

Page 1
Contents Page
Alert
Installation Guide
Introduction 2
Box Contents & Key Components 3
Specifications 3
Point
Alert Point Installation 4
Removal of the Front Cover 6
User Manual
Programmable Features 8
Other Features 9
Installing a 12-30V DC Power Supply 10
Installing External Sounders 11
Installing External Strobes / Beacons 12
Installing External Detectors 13
Networking the Alert Point 14
Networking Features 16
Troubleshooting 17
PCB Terminal Diagram 18
Using an Alert Point as a Manual Call Point (MCP) 18
DIL switch settings - Programmable Features 19
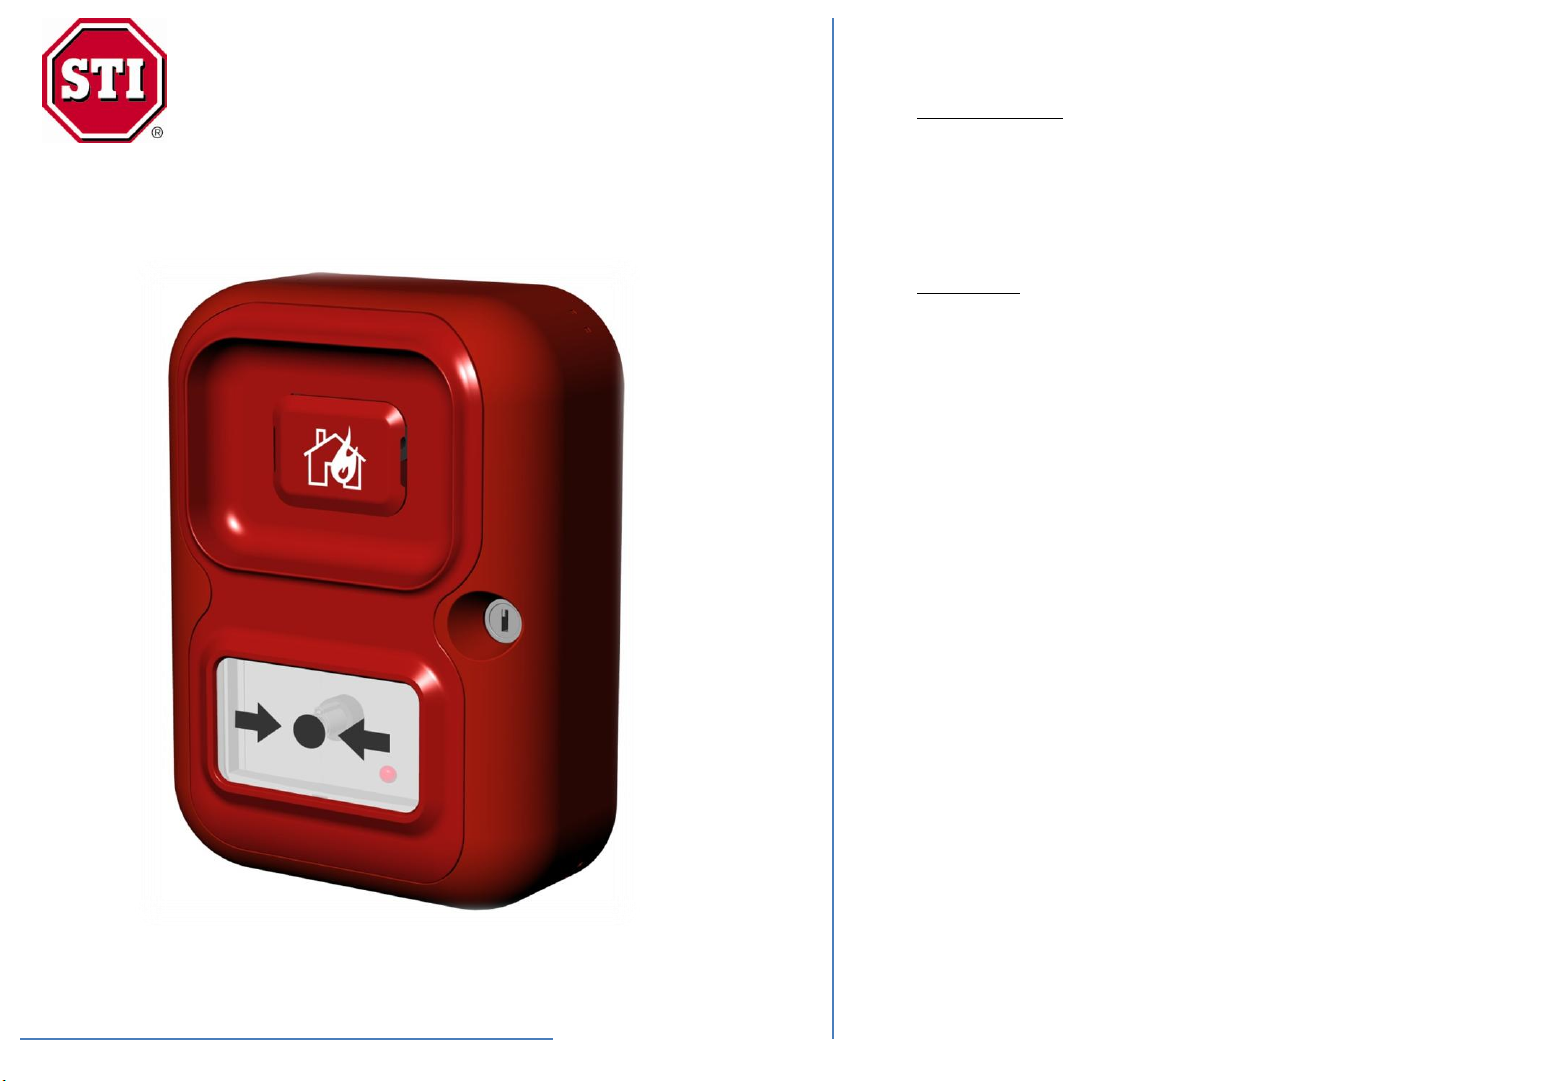
The Alert Point is an aesthetically pleasing, robust and fully featured stand alone alarm system.
Powered with a 9V DC alkaline battery, the Alert Point includes an integral sounder and
resettable call point.
Manufactured from tough polycarbonate, the Alert Point is designed for use in industrial as well
as commercial or retail applications.
Introduction
Alertpoint Installation rev 1_2 Sep10
Quick and easy to install and providing protection within minutes, the Alert Point is an ideal
solution for establishments that have a requirement for a simple but effective alarm system.
They may include: industrial/temporary buildings, warehouses, portacabins, churches, car parks,
small offices and holiday parks etc. Where an EN54 fire system is decommissioned on a
construction site, the Alert Point is ideal as a temporary system for raising an alarm in the event
of an emergency.
Available in a variety of colours, the Alert Point can be used for a wide range of applications such
as fire, intruder, panic, evacuation, assist or general alarm. It also incorporates a tamper switch
to prevent unauthorised removal or misuse.
Installation Guide
& User Manual
- 2 -
Page 2
Box Contents & Key Components
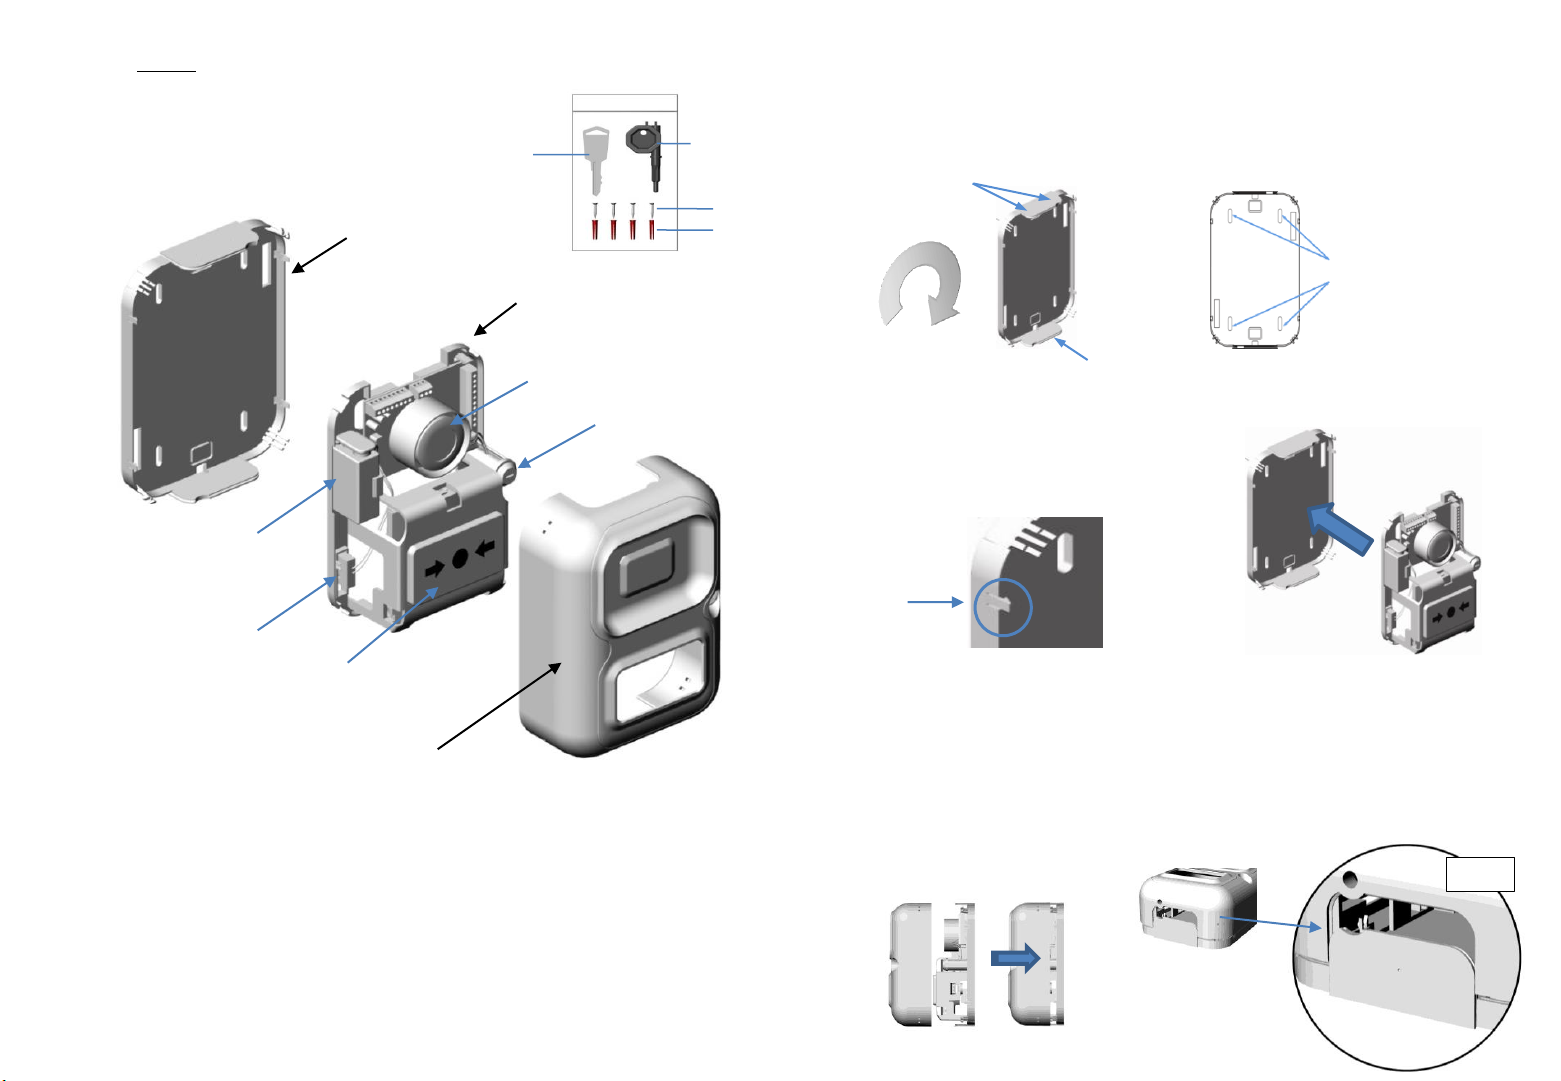
Alert Point Installation
Contents
1. Reversible Mounting Plate (x1)
2. Chassis (x1)
3. Front Cover (x1)
4. Installation Kit (x1)
1. Reversible Mounting Plate
9V DC Battery
Tamper Switch
Operating Element
Master Key
2. Chassis
Integral Sounder
4. Installation Kit
Master Key
Switch Cylinder
Reset Key
1” Screws (x4)
Rawlplugs (x4)
Step 1. Install the Reversible Mounting Plate
The reversible mounting plate can be installed in
any orientation; depending on the required conduit
entry and exit points.
Pilot point x2
Pilot point x1
Mark the 4 fixing points (as shown) and install using
the screws and Rawlplugs provided.
Step 2. Attaching the chassis
Attach by pushing the chassis over the 4 fixing clips on the
mounting plate (highlighted ).
Fixing clip
Fixing Points x4
3. Front Cover
Power source 9V DC battery (supplied) or 12-30V DC
Standby current 45µA
Alarm current 28mA low volume / 32mA high volume
Operating temperature 0ºC to 49ºC
Sounder output (at 1 metre) 95dB – 102dB
Sounder tones 7
Tamper tone 1
Network >2 Alert Points spaced less than 50m apart
- 3 -
Specifications
Step 3. Consult the User Manual for other programmable features
(Programmable Features page 8 & DIL switch settings page 19)
Step 4. Attach front cover
Line up each end using the channels located on the raised conduit sections (see detail). Push evenly
until the cover locks into place via 4 raised mounting clips situated on each corner.
Detail
- 4 -
Page 3

Alert Point Installation
Step 5. Turn the unit `ON’
Horizontal position - `0FF’.
Vertical position - `ON’.
Using the Master Key, turn the Key Switch Cylinder to the Vertical position. The LED
will flash green when turned `ON’ – unit in `standby condition.’
Step 6. Test
Depress the operating element.
A warning indicator drops into view,
the unit will alarm and the LED will
turn red when the Alert point is
activated.
Removal of the front cover
Using the 2 pips on the reset key provided, push firmly into each of the 4 corner clips individually, releasing
them, whilst at the same time gently pulling the cover away from the remainder of the unit.
Step 7. Reset the unit
Simply insert the
reset key into the
bottom of the Alert
Point.
- 5 -
A quick turn of the key
and the Alert Point is
reset, returning to
`standby condition’ and
is ready for use straight
away.
- 6 -
Page 4

User Manual
Programmable Features
Settings
PCB Layout
1. Integral Sounder Tones: DIL Switch No SW1 - SW3
The Alert Point has seven different
selectable alarm tones ranging from
95dB to 102dB, along with a prefixed
tamper tone.
2. External Power Provided (12-30V DC): DIL Switch No SW4
This setting allows the unit to be run from
an external power source.
3. Relay Setting: DIL Switch No SW5
When part of a network, this setting allows the option of sending a triggering signal
via the relay to an alarm panel, either:
• Relay is only triggered on the activated unit
• Relay sends triggering signal even when another unit is activated.
4. External Sounder/Strobe Trigger: DIL Switch No SW6
This setting allows the option of sending a triggering signal to externally fitted
sounders, along with strobes/beacons.
5. Internal & External Sounder Timer Options: DIL Switch No SW7 & SW8
4 alarm durations are available and can be selected by changing the DIL switch
settings. These are: continuous, 30 seconds, 3 minutes and 20 minutes.
If any duration period other than `continuous’ is used, the alarm will silence
after the selected time has elapsed. The LED will continue to flash red
until the unit is reset using the reset key.
6. External Strobe Timer Options: DIL Switch No SW9 & SW10
4 strobe durations are available and can be selected by changing the DIL switch
settings. These are: continuous, 30 seconds, 3 minutes and 20 minutes.
If any duration period other than ‘continuous’ is used, the strobe will cease
flashing. The Alert Point will still need to be reset, the LED will still flash red until
this has been done.
7. Key Switch – Manual or Auto Reset: DIL Switch No SW11
This allows the user greater control if misuse becomes a major factor.
Auto reset: The Alert Point will fully reset after activation when using the reset key.
Manual: Even if the Alert Point is reset after activation using the reset key, all
sounders and strobes will continue to run until the unit is reset using the master key
switch.
DIL Switch
8. Networking the Alert: DIL Switch No SW12
If this switch is `ON’ the Alert Point expects to be connected to another Alert Point
otherwise a fault is indicated.
If the switch is `OFF’ the Alert Point will not expect to be connected to another
Alert Point.
Note: DIL Switch settings are shown on page 19
- 8 -
Page 5

Other Features
Installing External 12-30V DC Power Supply
Integral sounder volume: The Alert Point has 2 volume settings – High and Low: this is
determined by the position of the jumper connector
configuration show below.
High: Jumper between centre pin and bottom pin (factory setting)
Low: Jumper between centre pin and top pin
PCB Layout
Top
To adjust the volume
setting, lift off the
jumper connector and
then place over and push
onto the selected pins
Bottom
Jumper connector
Bottom Pin
Note: Silencing the Alert Point is possible by not having the jumper fitted, but
no sound will be produced by the integral sounder during alarm, fault or tamper
conditions.
Low battery check: The Alert Point monitors the output power of the 9V DC
battery in 16 minute cycles. If the battery falls below the
recommended power level the unit will display a fault,
emitting a periodic single beep.
Battery life: The working life of the 9V DC battery under normal
`standby’ condition is a minimum of 15 months: it is
recommended that this battery is replaced at least every
15 months.
Battery back up: When the Alert Point is powered by a 12-30V DC power
supply, the 9V DC battery will become a backup if the
external power is lost.
The unit will display a fault until the external power has
been restored.
External detector checking: The Alert Point is fitted with a 5V6 Zener end-of-line
diode, enabling the unit to check for breaks in the
external wiring loop of all the linked detectors.
Even if external detectors are not fitted, the 5V6 Zener
diode must remain connected to the Alert Point,
otherwise a fault will be displayed.
Step 1. Ensure that the unit is switched `OFF’.
External Power +
External Power -
Step 2. Insert the external power wires into the correct terminals.
Step 3. Connect the 9V DC battery. The battery must be fitted as it
will become a backup if there is a power failure.
Step 4. DIL switch SW4 – should be `ON’ (external power required).
Step 5. Turn the unit `ON’ using the master key switch.
Step 6. The LED will illuminate to a constant green indicating that
the unit is functioning correctly.
Alarm Condition: If the unit is activated in the event of an emergency (depression of
the operating element) it will immediately emit an alarm tone for
the duration selected, an activation flag will drop into view and the LED will
flash red every 8 seconds until the unit is reset.
Resetting Unit: 1. DIL switch settings: changes will only take effect when the unit
has been powered back up using the master key switch.
2. Silencing Alarm : If the operating element has been depressed the
reset Key is to be used to reset the unit , returning it to Standby Mode.
Note: the master key switch can be used to silence the alarm but this will turn
the unit ‘OFF’ and the alarm will continue to sound when the unit is turned
back `ON’.
Power Loss: In the event of any loss of power, the LED will turn red and emit a short
beep every 90 seconds.
The unit will still run safely using the 9V DC battery as a back up. As soon
as power is restored the unit will automatically return to the `standby’
condition.
Low or No Battery: If the unit is reset but the battery is at low power or not attached a fault
will be indicated – the LED will turn red and the unit will emit a short single
beep every 90 seconds.
The unit automatically checks for low battery status every 16 minutes, during
this period if the battery falls into low battery condition (or is disconnected in
the presence of an external power source), the LED will turn red and emit a
short beep every 90 seconds upon detection at the end of any 16 minute cycle.
The battery will either need replacing or reconnecting and the unit reset
before it will return to a standby condition.
- 9 -
- 10 -
Page 6

Installing External Sounders
Step 1. Ensure that the unit is switched `OFF’.
Step 2. Insert the external sounder wires into the correct terminals.
Step 3. DIL switch SW6 – should be ‘OFF’ (external sounders/strobes to trigger during alarm
condition).
Important: Please ensure all sounders have their own power source and are wired correctly in
accordance with their own installation manuals.
Warning: Incorrectly installed external devices may cause irreversible damage to the Alert Point.
Installing External Strobes / Beacons
Step 1. Ensure that the unit is switched `OFF’.
Step 2. Insert the external strobe / beacon wires into the correct terminals.
Step 3. DIL switch SW6 – should be ‘OFF’ (external sounder(s)/strobes(s) to trigger during alarm
condition).
Important: Please ensure all external strobe(s)/beacon(s) have their own power source and are wired
correctly in accordance with their own installation manuals.
Warning: Incorrectly installed external devices may cause irreversible damage to the Alert Point.
Step4. Turn the unit `ON’ using the master key switch.
Step 5. The LED will now flash green every 8 seconds (or will remain constant if connected to an
external power supply), indicating that the unit is functioning correctly.
Step 6. Test:
When the operating element is depressed, the unit will go into alarm condition: the externally
installed sounders should now sound.
Step 7. Reset the Alert Point using the reset key, all sounders should now silence.
Please note: If the `Auto Reset’ is disabled (DIL switch SW11 `OFF’) the sounders will continue
to sound until the master Key switch is turned `OFF’. When turned back `ON’ the unit
should be in `standby’ condition.
IMPORTANT: Enabling/Disabling external sounders will also enable/disable any strobes or
beacons also wired to this unit.
External Sounder +
External Sounder -
Step 4. Turn the unit `ON’ using the master key switch.
Step 5. The LED will flash green every 8 seconds (or will remain constant if connected to an external
power supply), this indicates that the unit is functioning correctly.
Step 6. Test:
When the operating element is depressed, the unit will go into alarm condition: the externally
installed strobe(s)/beacon(s) should now flash.
Step 7. Reset the Alert Point using the reset key, all strobe(s)/beacon(s) should now cease flashing.
Please note: If the `Auto Reset’ is disabled (DIL switch SW11 ‘OFF’) the strobe(s)/beacon(s) will
continue to flash until the master key switch is turned `Off’. When turned back `On’ the unit
should be in `standby’ condition.
External Strobe / Beacon +
External Strobe / Beacon -
Note:
All external sounders must be hard-wired
using 2-core cable, and must have their
own power supply.
It is recommended that external wiring
does not exceed 50 metres.
Diagram of PCB terminal layout
- 11 -
Optional Internal Beacon
An optional extra (
not supplied as standard
) for the Alert Point is the capacity to incorporate an
internal beacon – this can provide for those who may be audibly impaired.
- 12 -
Page 7

Installing External Detectors
Networking the Alert Point
With the front cover removed
Step 1. Ensure that the unit is switched `OFF’.
Step 2. Disconnect the Zener diode.
5V6 Zener diode
External detector +
External Detector -
Important: Please ensure all detectors have their own power source and are wired correctly in
accordance with their own installation manuals.
Warning: Incorrectly installed external devices may cause irreversible damage to the Alert Point.
Step 3. Insert the external detector wires into the correct terminals, tighten down the
corresponding terminal screws ensuring wires are securely trapped.
Step 4. There is no DIL switch setting change to activate the external detectors, the Alert Point
is constantly monitoring for a loop connection.
The Zener diode creates the loop and must remain connected to the detector terminals at all
times even if no detectors are being used.
If the Zener diode is removed the Alert Point will trace a break in the loop and signal a fault.
The Zener diode must be installed at the end of line when linking detectors off the detector
terminals otherwise a fault will be signalled.
Any alarm condition to one of the Alert Points, will also trigger the linked units’ integral sounder and
the LED (flash red) to indicate the fault. Any external output devices that are installed to any of the
Alert points will also be activated if programmed to do so. Note: It is recommended that wire lengths
between individual units do not exceed 50m (including ‘return loop’ wire between last & first units).
Networking only 2 units - (ensure the front cover is removed)
Step 1. Ensure that both units are switched `OFF’.
Step 2. DIL switch SW12 should be `ON‘ on both units
(the Alert Point expects to be connected to a second unit).
Step 3. Alert Point 1: Insert wires into the network terminals
on the Alert Point (as shown opposite).
Step 4. Alert Point 2: When connecting into the network terminals
ensure the `Network In’ and the `Network Out’ wires
are switched over (as shown below).
Network IN .
Network OUT .
Network COM .
Network IN .
Network OUT .
Network COM .
Network IN
Network COM
Network OUT
AP1 AP2
Step 5. Turn both units `ON’ using the master key switch.
Step 6. Both LEDs will now flash green approximately every 8 seconds indicating that
both units are functioning correctly.
Step 5. Turn the unit `ON’ using the master key switch.
Step 6. The LED will now flash green every 8 seconds (or will remain constant if connected to an
external power supply), indicating that the unit is functioning correctly.
Step 7. To test the installation of the external detectors, firstly trigger one of the external detectors,
this should send the Alert Point into `alarm ‘condition.
Please note the Alert Point will only return to `standby’ condition, after the triggered detector
has been reset.
It is recommended that the maximum wiring length from the detector terminals on the
Alert Point to the final detector in the loop, should not exceed more than 50 metres.
- 13 -
Step 7. TEST: Alert Point 1
Depress the operating element, this will send the Alert Point into `full’ alarm condition, with
the activation flag dropping into view, the LED flashing red and integral alarm sounding.
Alert Point 2: Will immediately trigger into alarm, the LED will flash red and the integral
alarm will sound.
Resetting the networked Alert Points, can only be done by manually resetting the original
activated unit (e.g. Alert Point 1 from this test) using the reset key. This will return both units
back into `standby ‘condition.
Step 8. The above test should now be reversed.
- 14 -
Page 8

Networking the Alert Point
Networking Features
Networking 3 or more units - (ensure the front cover is removed)
Step 1. Ensure that all of the units are switched `OFF’.
Step 2. DIL switch SW12 should be `ON‘ on all of the units
(the Alert Point expects to be connected to another unit).
Step 3. Connect the ‘Network COM’ terminals by inserting a wire
into unit #1, and linking this to the same terminal on unit
#2. Now do the same by connecting an additional wire to
the ‘Network COM’ terminal on unit #2, and linking this to
the same terminal on unit #3. Repeat this for subsequent
units until all units are linked.
Step 4. Insert a wire into the ‘Network Out’ terminal on unit #1, and
link this to the ‘Network In’ terminal on unit #2. Now insert
a wire into the ‘Network Out’ terminal on unit #2 and link
this to the ‘Network In’ terminal on unit #3. Repeat this for
each subsequent unit.
Network IN .
Network OUT .
Network COM .
Network IN .
Network OUT .
Network COM .
AP1 AP2
Network IN .
AP3
Loss of connection between units:
Any loss of connection between the networks will be indicated as a fault (double beep every 90 seconds)
this will only be indicated on the unit expecting the input signal.
Network IN
Network COM
Network OUT
Network IN .
Network OUT .
Network COM .
Network IN .
Network OUT .
Network COM .
AP1 AP2
In the example above the `Network In’ connection is lost on Alert Point 2.
Resulting in
1. Alert Point 2 - The LED will flash red and a warning double beep will sound every
90 seconds.
2. Alert Point 1 - cannot trigger Alert Point 2 into alarm condition: the signal is lost
to the `Network In’ connection on Alert Point 2.
3. Alert Point 2 can still trigger Alert Point 1 into `alarm’ condition as the connection
remains intact between the `Network Out’ on Alert Point 2 and the `Network In’ on
Alert Point 1.
4. Both units will still continue to work independently.
Network OUT .
Network COM .
5. Alert Point 2 will instantly return to its `standby` condition when the connection is
re-made, without* having to reset the unit.
If both units lose their Network In or COMMON connections, they will both signal a
fault.
Step 5. Important! On the final unit (e.g. Unit #3) ensure that the ‘Network Out’ terminal is linked
back to the ‘Network In’ terminal on unit #1, creating a loop. (It is not necessary to do this
step for the COM wire).
Step 6. Turn all the units ‘ON’ using the master key switch.
Step 7. TEST
Alert Point 1, depress the operating element. This will send the unit into alarm condition,
causing the activation flag to drop into view, the LED to flash red and the integral alarm to
sound.
Alert Points 2 & 3 will also immediately trigger into alarm, with LEDs flashing red and their
integral alarms sounding.
Step 8. Resetting the networked units can only be done by manually resetting the originally
activated unit (showing the activation flag, in this case unit #1) using the reset key. This will
return the other units back into ‘standby’ condition.
- 15 -
* Note: to check that the network is functioning correctly whilst avoiding having to
wait 90 seconds for verification, turn the unit OFF then back ON using the master
key switch (a fault will emit a double beep immediately on startup).
Key Switch – Auto reset: DIL Switch No SW11 `ON’ – Auto reset.
If an activated Alert Point is reset back to `standby condition’, a linked Alert Point
will instantly return back to its own `standby’ condition.
Key Switch – Manual reset: DIL Switch No SW11 `OFF’ – Manual reset.
Only if an activated Alert Point is completely reset back to `standby condition’ using
the master key switch, will a linked Alert Point reset back to its own ‘standby’
condition (using the master key switch on a linked Alert Point will have no effect on
the network once it has been turned back ‘ON,’ until the initially activated unit has
been attended to.)
Please note: Tamper switch activation, low battery warning indication and no power source will
only be signalled on the affected unit.
- 16 -
Page 9

Problem Possible Cause Possible Solution
9V DC battery clip not connected
Connect correctly
12-30V DC power source installation fault
Check installation
Master key switch not turned `ON' Turn unit `ON' (vertical position)
Front cover fitted incorrectly Check installation
Reversible mounting plate incorrectly installed Check installation
Operating element depressed Reset using reset key
Networked - The linked Alert Point is in `alarm'
condition
Reset the `networked' Alert Point
Tamper alarm activating Check installation
Externally fitted detectors triggering Alert Point Check linked units are not alarming
Networking DIL switch SW12 `ON' - but no
network required
DIL switch SW12 should be `OFF'
Connection lost between the `networked' Alert
Points
Check all wiring connections (including
COMMON)
5V6 zener diode not connected Check detector terminals
Externally fitted detector connection broken Check all wiring connections
9V DC battery output power insufficient Low battery - change battery
DIL switch no. SW4 'ON' - the unit is expecting
external power, but not receiving any
Check ext power lead connections /
switch 'OFF' SW4 if no ext supply
Reset key not resetting Alert
Point when in `alarm' condition
Auto reset option turned `OFF' DIL switch SW11 should be `ON'
No sound in `alarm' condition
Volume jumper connection loose or missing
Ensure the jumper connection is fitted
correctly
External sounder DIL switch SW6 turned `ON' DIL switch SW6 should be `OFF'
External sounder connection fault Check all wiring connections
External strobe/beacon DIL switch SW6 turned
`ON'
DIL switch SW6 should be `OFF'
External sounder connection fault Check all wiring connections
No power
LED red & emitting a short beep
every 90 seconds
The Alert Point is constantly in
`alarm' condition
Tamper alarm sounding
External strobe / beacons not
flashing on activation
External sounders not alarming
on activation
LED red & emitting a short
double beep every 90 seconds
Troubleshooting
PCB Terminal Diagram
Network OUT
Network IN
Network COM
External Power +
External Power -
Relay N.O.
Relay COM
Relay N.C.
External Sounder +
External Sounder External Strobe/Beacon +
External Strobe/Beacon -
External Detector +
External Detector -
5V6 Zener diode
General Maintenance:
9V DC batteries should be replaced every 15 months or sooner.
Cleaning should be carried out using only mild, diluted detergents: concentrated solutions and those
including (but not limited to) alkalis, strong acids, ethers, amines, aromatic hydrocarbons and
alcohols can cause considerable harm to this product.
NEED TECHNICAL SUPPORT? FREEPHONE 0800 085 1678 (UK) TELEPHONE: +44 (0) 1527 520 999
- 17 -
DIL switch
Volume jumper connection ( 3 pins )
Terminal connections
External power terminals 12-30V DC
Relay terminals Max 30V DC, 1A
External sounder terminals All external sounders need to be hard wired using 2 core
cable and must have their own power supply.
External strobes / beacons terminals All external strobes & beacons need to be hard wired
and must have their own power supply.
Detector terminals All detectors need to be hard wired on a N.O. loop, have
their own power supply and an end of line 5V6 Zener
diode fitted (supplied with the unit).
Using the Alert Point as a Manual Call Point
Using the relay terminals, wire the positive loop connection into the N.O. terminal and the negative loop
connection into the COM terminal.
The unit will independently sound during `alarm condition’ as well as sending a trigger signal back the
alarm panel.
It is recommended that all external detector wiring does not exceed 50 metres.
- 18 -
Page 10

DIL Switch Settings – Programmable Features
Fe a tu res
SW1 SW2 SW3
Tone Sound Pattern
OFF OFF OFF 1 800Hz - 970Hz (Sweep)
ON OFF OFF 2 800Hz - 970Hz (Sweep)
OFF ON OFF 3 988Hz / 250ms - 645Hz / 250ms (Alternating)
ON ON OFF 4 670Hz / 250ms - 845Hz / 370ms (Alternating)
OFF OFF ON 5 800Hz - 970Hz in 330ms (Sweep)
ON OFF ON 6 2400Hz - 2850Hz in 110ms (Sweep)
OFF ON ON 7 2400Hz - 2850Hz in 330ms (Sweep)
ON ON ON 8 Not Implement ed
Act ion
External Power Provided -
(12-30V D C)
External power is to be supplied. NB: absence of power will indicate
fault (LED flashing red )
No external power is to be supplied. NB: absence of power will not
indic ate a fault
Relay is only triggered on the activated unit in a network
Integral Sounder Alarm
Tone
SW4 ON
SW4 OFF
SW5 ON
DI L Sw itch Se tt ing
Unit's Relay activates in a network even if this unit was not triggered
External Sounders/Beacons are NOT triggered dur ing `alarm'
condition
External Sounders/Beacons are triggered during `alarm' condition
Relay Mode
Disable External Sounders
& Strobes / Beacons
SW5 OFF
SW6 ON
SW6 OFF
Sounder Duration Timer
SW7 SW8
OFF OFF
ON OFF
OFF ON
ON ON
Sounder Duration
Sounders run continuously (unti l manually reset)
Sounders switch off automatically after 30 seconds
Sounders switch off automatically after 3 minutes
Sounders switch off automatically after 20 minutes
Strobe / Beacon Duration
Timer
SW9 SW10
Strobe / Beacon Duration
OFF OFF
Strobes / Beacons run continuously (until manually reset)
ON OFF
Strobes / Beacons switc h off automatically after 30 seconds
OFF ON
Strobes / Beacons switc h off automatically after 3 minutes
ON ON
Strobes / Beacons switc h off automatically after 20 minutes
Auto Reset
SW11 ON
SW11 OFF
Alert Point returns to `standby' condition after resetting with the
reset key
Alert Point latches in 'alarm' condition until it is manually reset using
the master key switch
The Alert Point expects to be connect ed to another Alert Point,
other wise a fault is indicated (LED flashing / constant r ed)
No fault will be indicated if an Alert Point is not c onnec ted to
another Alert Point, it is not looking for a connect ion
Networking the Aler t Point
SW12 ON
SW12 OFF
Important: Changes made to any DIL switch settings will only take effect after the Alert
Point has been reset using the master key switch.
Factory settings
- 19 -
Safety Technology International (Europe) Ltd.
Unit 49G • Pipers Road • Park Farm Industrial Estate
Redditch • Worcestershire • B98 0HU • England
Tel: +44 (0) 1527 520 999 Fax +44 (0) 1527 501 999
Email: info@sti-europe.com Web: www.sti-europe.com
Safety Technology International, Inc.
2306 Airport Road • Waterford • Michigan • 48327
Tel: 248 673 9898 Fax: 248 673 1246
Email: info@sti-usa.com Web: www.sti-usa.com
Alertpoint Installation rev 1_2 Sep10_webversion.
 Loading...