

Page 1
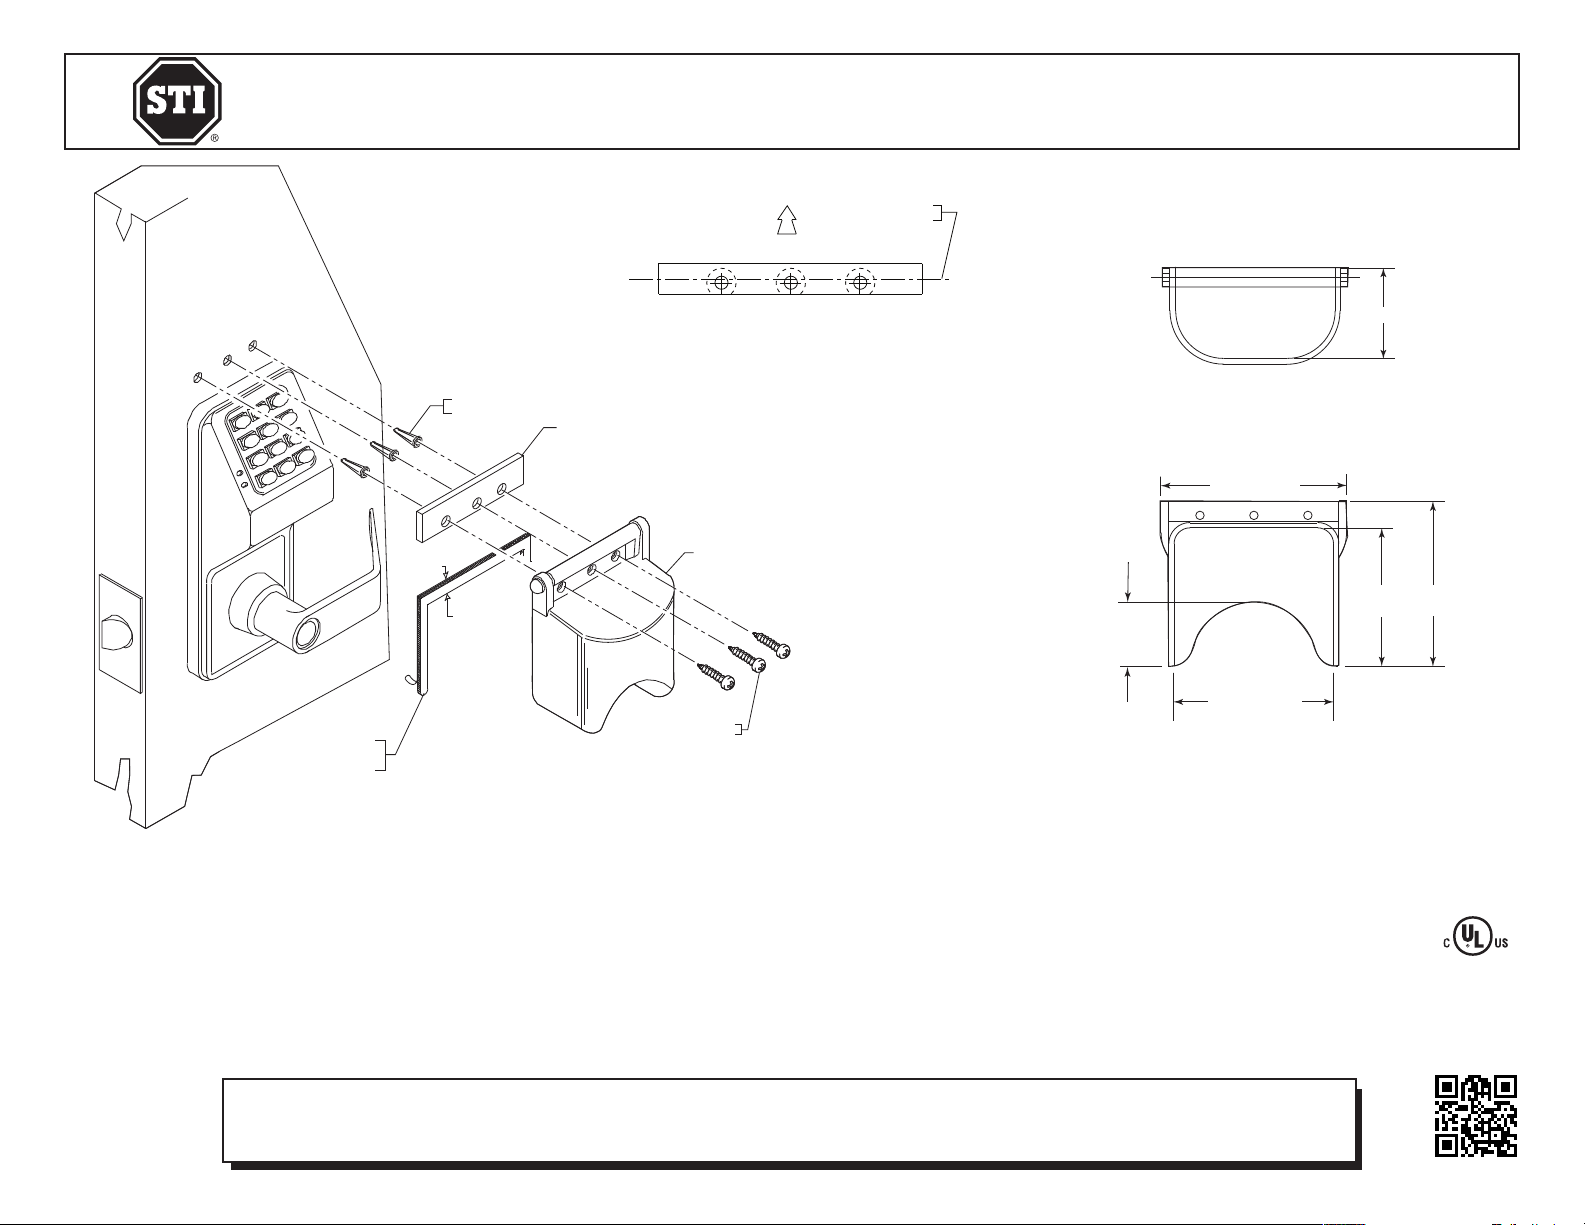
COVER ASSEMBLY
19018 ANCHOR
(3) PROVIDED
1015980 SPACER
82599 GASKET
(ADHESIVE BACKING
TOWARD DOOR)
SURFACE
“A”
SURFACE
“B”
19039 SCREWS #6 x 1 1/4 in.
(3) PROVIDED
COVER ASSY.
SPACER
ANCHOR
(3) PROVIDED
“A”
SURFACE
“B”
SCREWS #6 x 1 1/4 in.
(3) PROVIDED
SCHLAGE
3.25 in.
(82mm)
3.625 in.(92mm)
1.5 in.
(38mm)
3.75 in.(95mm)
GASKET
(ADHESIVE BACKING
TOWARD DOOR)
COVER ASSY.
SPACER
ANCHOR
(3) PROVIDED
SURFACE
“A”
SURFACE
“B”
SCREWS #6 x 1 1/4 in.
(3) PROVIDED
4 in.
(102mm)
SPACER ORIENTATION
Safety Technology International, Inc.
2306 Airport Road • Waterford, Michigan 48327-1209
Phone: 248-673-9898 • Fax: 248-673-1246
Toll Free: 800-888-4784 • E-mail: info@sti-usa.com
Web: www.sti-usa.com
Safety Technology International (Europe) Ltd.
Unit 49G Pipers Road • Park Farm Industrial Estate • Redditch
Worcestershire • B98 0HU • England • Tel: 44 (0) 1527 520 999
Fax: 44 (0) 1527 501 999 • Freephone: 0800 085 1678 (UK only)
E-mail: info@sti-europe.com • Web: www.sti-europe.com
82599 GASKET
(ADHESIVE BACKING
TOWARD DOOR)
SURFACE
“A”
19018 ANCHOR
(3) PROVIDED
SURFACE
“B”
1015980 SPACER
19039 SCREWS #6 x 1 1/4 in.
(3) PROVIDED
UP
MAKE SURE SPACER IS
INSTALLED AS SHOWN WITH
MOUNTING HOLES BELOW CENTER LINE.
SPACER ORIENTATION
COVER ASSEMBLY
CENTER LINE
OF SPACER
1.5 in.
(38mm)
TOP VIEW
3.75 in.(95mm)
3.625 in.(92mm)
FRONT VIEW
2 in.(51mm)
3.25 in.
(82mm)
4 in.
(102mm)
INSTALLATION NOTES
1. Remove backing paper and center gasket (# 82599) left to
right around lock with surface “B” against top of lock.
2. Next center spacer 1015980 with bottom of spacer lying on
surface “A” of gasket.
3. Using spacer as template, mark and drill three (3) 3/16 in. DIA.
holes. Complete assembly as shown.
Optional: if anchors are not required use spacer as template,
mark and drill (3) holes using a # 36 drill size.
INSTALLATION OF STI-6516 MINI BOPPER STOPPER
All specifications and information shown were current as of publication and are subject to change without notice.
CLEANING INSTRUCTIONS
Rinse cover with water to remove abrasive dust and dirt.
Wash with soap or mild detergent using a soft cloth. (DO NOT SCRUB.)
Rinse once more, then dry with a soft cloth or chamois.
To remove grease or wet paint, rub gently with a cloth wetted thoroughly
with naphtha, then wash and rinse. (DO NOT USE RAZOR BLADES.)
Electronic warranty form at www.sti-usa.com/wc14
ADA
Compliant
®
6516IS MAY2006
 Loading...