

Page 1
Installation and Operation Manual
STI Wireless Chime Series, 433 MHz
Thank you for purchasing an STI Wireless Chime. Your satisfaction is very important to us. Please read this manual carefully to
get the most from your new product.
Features
• Up to 500’ operating range (line of sight)
• Low and high volume setting on receiver
• Low battery alert
• UL/cUL Listed. FCC and IC Certied
• 433 MHz
• Jingle Bells
• Barking Dogs
• Bicycle Bell
• Buzzer
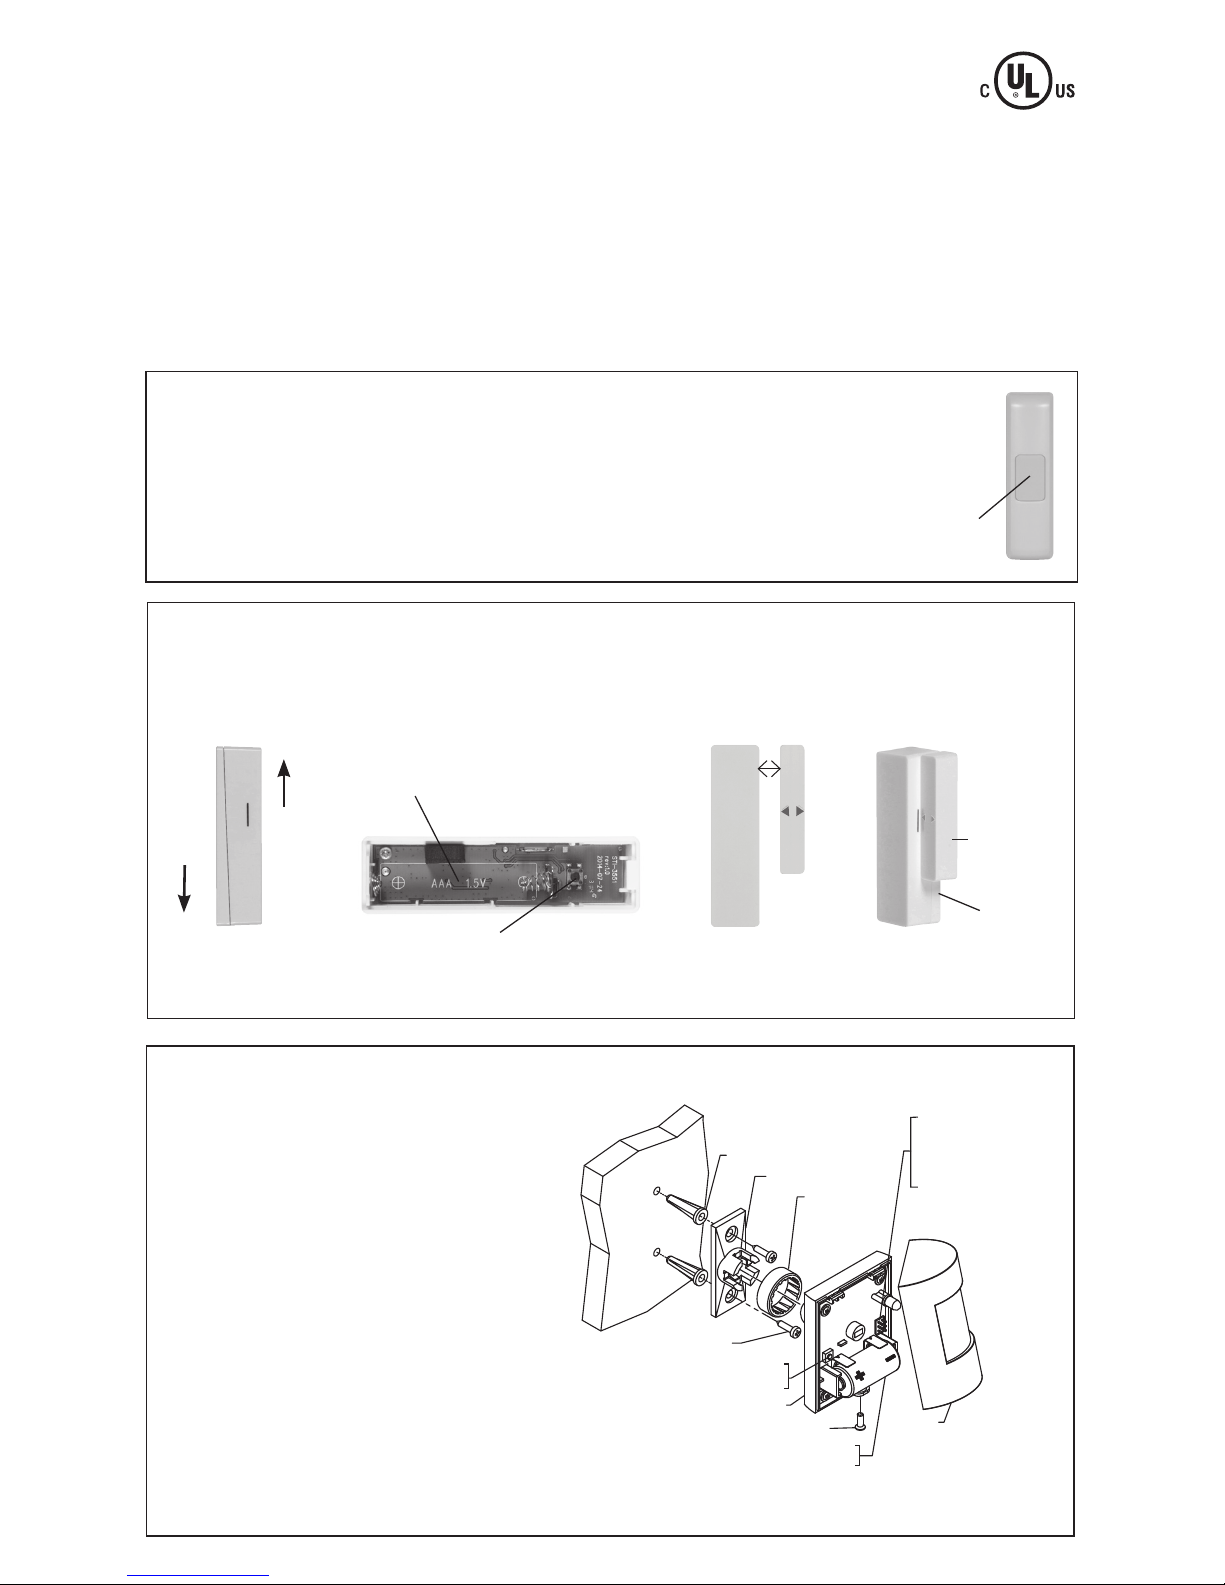
STI-3301 Wireless Doorbell Chime Sensor
Battery Installation and Replacement
1. For rst time installation, use thumb or athead screwdriver to hold down bottom tab and pull off cover.
2. Insert included CR2032 battery plus (+) side up.
3. Once mounted, to access battery, grab the bottom of cover, squeeze slightly and pull.
Program receiver with sensor and select sound, see STI-3353 section.
Mount with provided screws or tape. Keep cover off for mounting.
Program/sound
selection button
• Westminster – 4 note
• Westminster – 8 note
• Knock Knock
• 10 Sound Options
• Ding
• Dong
• Ding-Dong
STI-3551 Wireless Entry Alert® Sensor
Battery Installation – Open sensor and insert battery as shown below.
Program/sound selection button.
AAA battery
included.
Program receiver with sensor and select sound, see STI-3353 section.
Mount – Use provided double sided tape and see below.
Mount arrow on
magnet adjacent to
line on sensor.
To open sensor, slide
back and cover apart
as shown.
Back
Cover
Maximum gap 5/8” on non-
metallic surface. When mounting
on metallic surface distance
could be reduced.
Sensor
Magnet
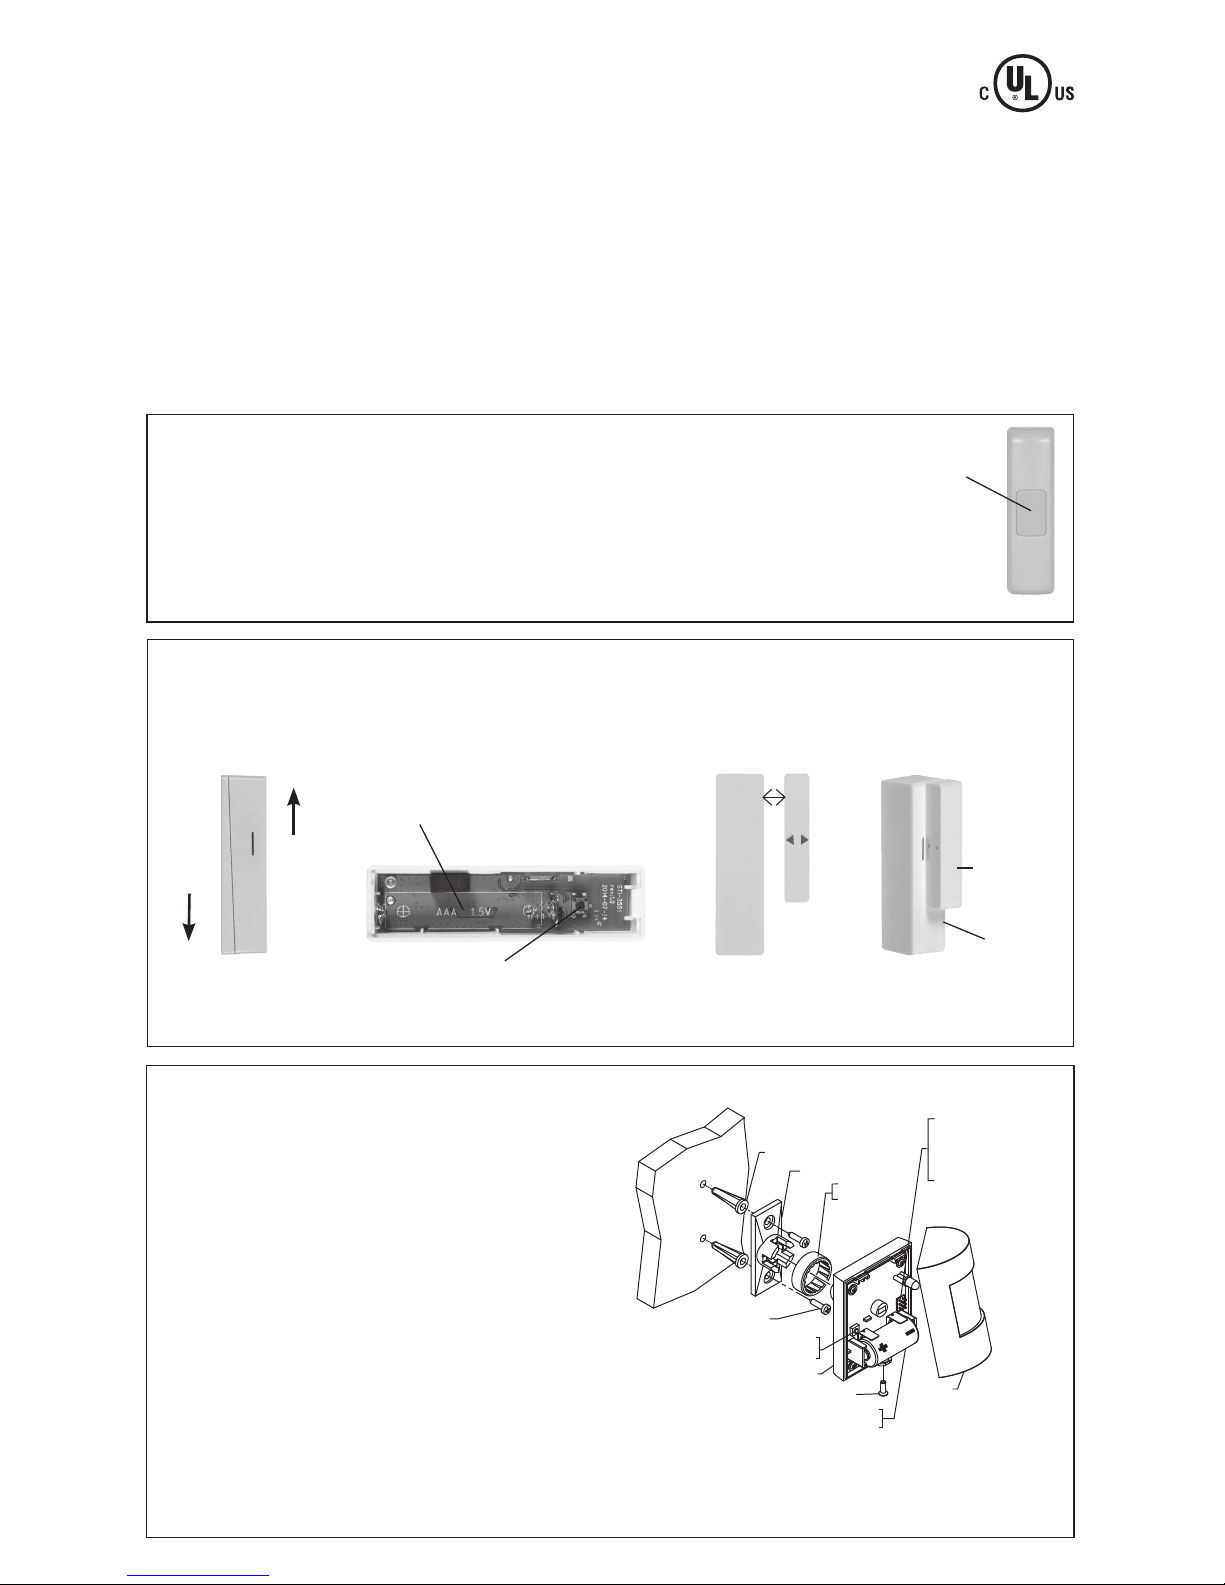
STI-3601 Wireless Motion-Activated Sensor
Mounting and Programming
1. Mount base at 7.5 feet (ideal height) with provided
wall anchors and mounting screws.
2. Program the PIR and select sound,
see STI-3353 section.
3. Adjust PIR detection range as necessary.
4. Align top of cover over tabs on PIR, then rotate down
and install cover screw.
5. Loosely place the lock ring on the post connected
to the PIR (do not snap). Press the PIR on to the base.
6. Adjust the PIR to desired detection angle then snap
the lock ring into position.
Testing and Operation Mode
Once PIR Sensor is mounted, test for optimal placement
for operation. Unit will detect motion every 10-15
seconds. After motion is detected, the sensor has a
10-15 second reset delay.
PIR DETECTION
RANGE ADJUSTMENT
H - 42’
M - 30’
L - 20’
LOCK RING
BASE
WALL ANCHOR
MOUNTING SCREW
PROGRAM/SOUND
SELECTION BUTTON
PIR
COVER SCREW
COVER
LITHIUM CR123
BATTERY INCLUDED
Page 2
Troubleshooting Tips
Problem Doorbell Entry Alert Motion Extender
Does not
sound
• Verify batteries are
installed correctly. Make
sure outlet is functioning.
• Check the receiver and
button are within 500’
operating range.
• Range may vary
depending on
environment.
• Verify minimum outlet
power to receiver is
110 VAC.
• Check to make sure the sensor and
magnet are in correct alignment and
not more than the 5/8” apart.
• Verify battery is installed correctly.
• Make sure outlet is functioning.
• Check the receiver and button are
within 500’ operating range. Range
may vary depending on environment.
Verify minimum outlet power to
receiver is 110 VAC.
• Replace batteries in motion
sensor.
• Check the receiver is within
500’ of the motion sensor.
• Check that metal objects do
not block the motion sensor
signal or move the receiver.
Range may vary depending
on environment. Verify
minimum outlet power to
receiver is 110 VAC.
• Check to make sure all wires to chime
terminal strip are tightly connected to
correct screws.
• Make sure outlet is functioning.
• Check that receiver and sensor are within
500’ operating range. Range may vary
depending on environment.
• Verify minimum outlet power to receiver
is 110 VAC.
• Extender may not be compatible with
all doorbells, especially digital, musical
doorbells.
• Verify power to existing doorbell is 16
VAC, 10VA.
Receiver
sounds
randomly
• Make sure silicone
button is aligned
properly.
• The magnet may be mounted
too far away from the sensor and
door vibration could trigger the
chime receiver. Move magnet
closer to the sensor.
• Check for moving objects,
such as: trees, animals and
insects on the surface.
• Be sure sensor is mounted
securely.
• Make sure original doorbell is not stuck.
All sensors
play the
same tune
• Use the program/sound
selection button to change
the sound options.
• Use the program/sound selection
button to change the sound options.
• Use the program/sound
selection button to change
the sound options.
• Sounds for front and back doors are
xed.
• Be sure black and brown wires are not
shorted together.
Important Notice
This device complies with part 15 of the FCC Rules. Operation is subject to the following two conditions: (1) This device may not cause harmful
interference, and (2) this device must accept any interference received, including interference that may cause undesired operation.
This device complies with Industry Canada license-exempt RSS standard(s). Operation is subject to the following two conditions: (1) this device may
not cause interference, and (2) this device must accept any interference, including interference that may cause undesired operation of the device.
STI-3301 FCC ID: TXL3301 IC: 6335A-3301
STI-3551 FCC ID: TXL3551 IC: 6335A-3551
STI-3601 FCC ID: TXL3601 IC: 6335A-3601
STI-3353 Tested to comply with FCC Standards
Changes or modications not expressly approved by Safety Technology International, Inc. could void the user’s authority to operate the equipment.
Warranty
Safety Technology International, Inc. warrants to the original consumer/purchaser that this product shall be free of defects in material an
workmanship under normal use and circumstances for a period of one (1) year from the original date of purchase.
Electronic warranty form at www.sti-usa.com/wc14.
Technical Support
Contact STI at 800-888-4784
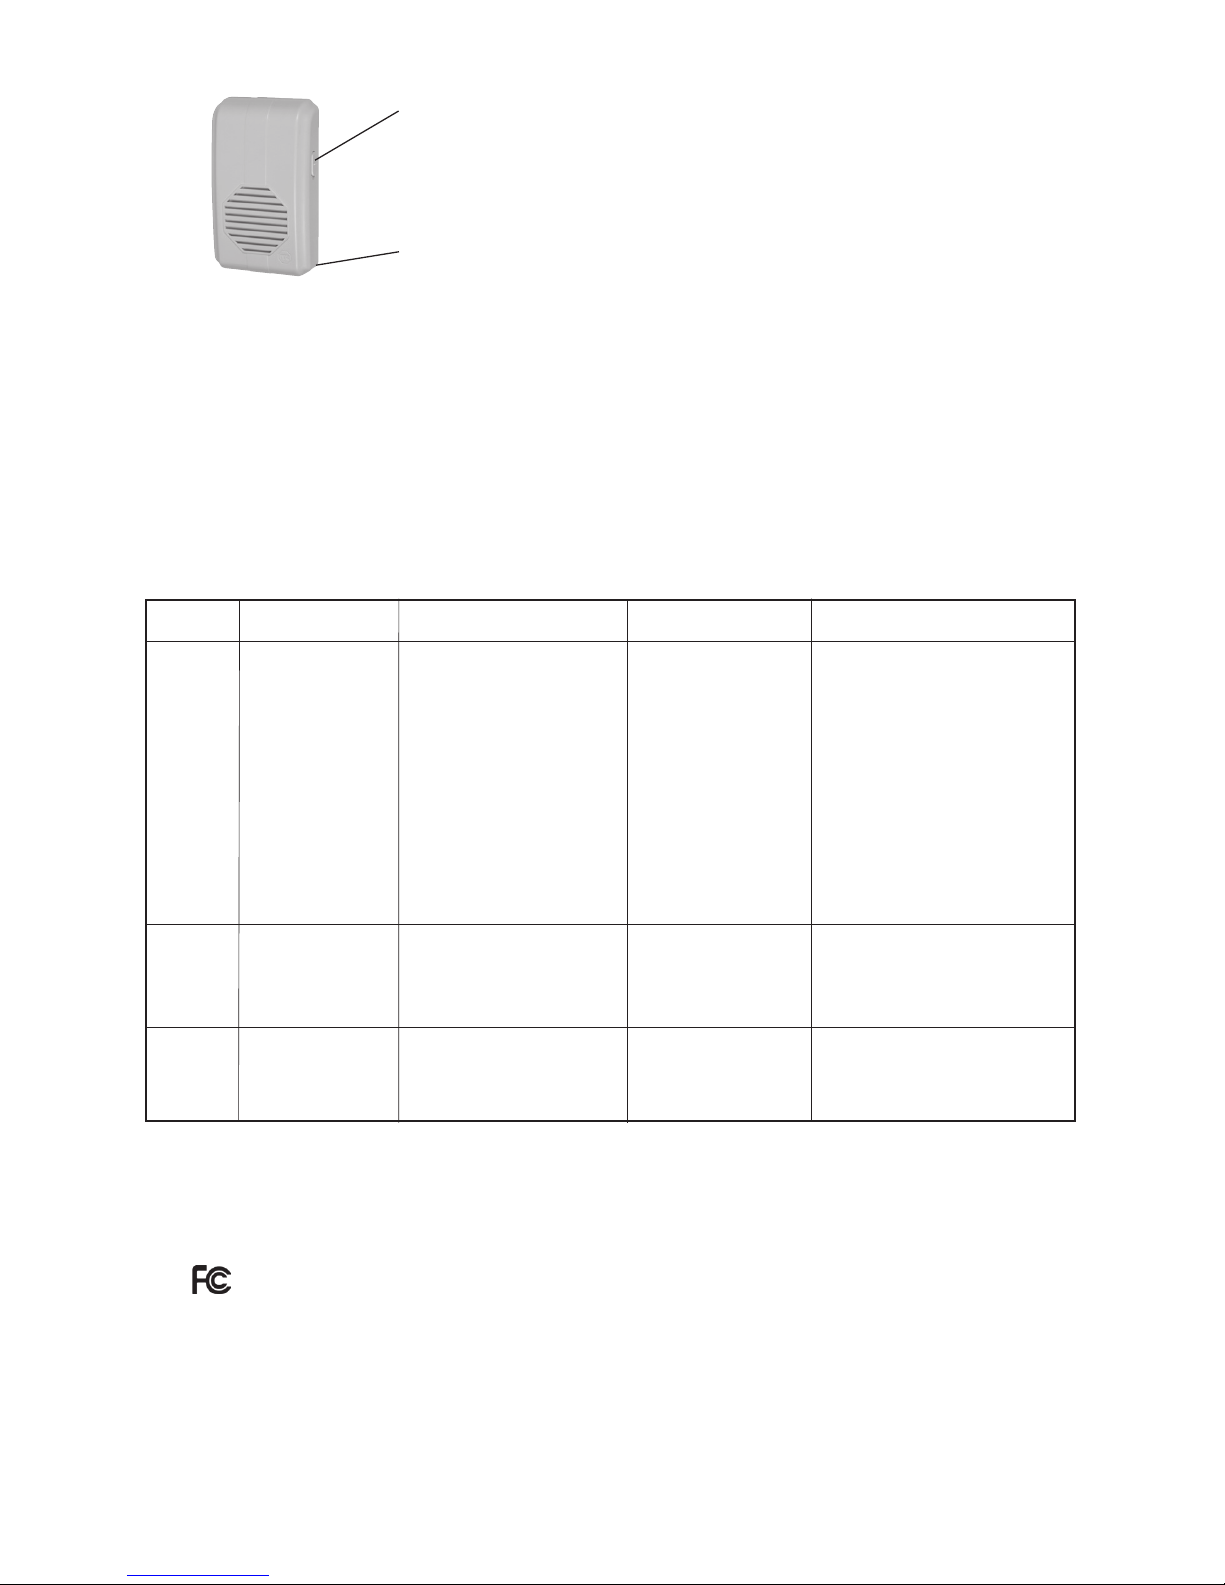
STI-3353 Wireless Chime Receiver
Volume Control
Up - High
Down - Low
Program Button
Sound Selection for all Sensors – After programming receiver with sensor, push and hold program/sound selection
button shown on the SENSOR diagrams until you hear a BEEP on the receiver (about 5 seconds). After receiver BEEPS, press
program/sound selection button on SENSOR to scroll through and select one of the available sounds. After desired sound nishes
HOLD program/sound selection button on sensor to save and exit (about 5 seconds until receiver BEEPS).
Programming Receiver with Sensors
1. Plug receiver into 120 VAC outlet.
2. Press and release program button on receiver. Receiver will make a tone.
3. Press and release program button on sensor(s). Receiver will make a tone to acknowledge programming success.
4. Press program button on receiver to exit program mode (receiver will automatically exit in 20 seconds).
Page 3
Manual de Instalación y Operación
Serie de Timbres Inalámbricos STI, 433 MHz
Gracias por su compra de un Timbre Inalámbrico STI. Su satisfacción es muy importante para nosotros. Por favor lea este manual
cuidadosamente para obtener la máxima prestación de su nuevo producto.
Características
• Rango de funcionamiento de hasta 500 pies (150 metros)
(línea visual)
• Regulación de volumen bajo y alto en el receptor.
• 10 Opciones de Sonido
• Cascabeles
• Ladrido de Perros
• Campanilla de bicicleta
• Zumbador
• Alerta de batería baja
• Listado en UL/cUL Certicado por la FCC y por IC
• 433 MHz
• Carillón de 4 Notas
• Carillón de 8 Notas
• Llamada a la puerta
STI-3301 Sensor de Timbre de Puerta
Botón de programación/
selección de sonido
Instalación y Reemplazo de la Batería
1. En la primera instalación, retenga la lengüeta inferior con el pulgar y quite la tapa.
2. Coloque la batería CR2032 con el lado positivo (+) hacia arriba.
3. Una vez montado, para acceder a la batería, se toma la parte inferior de la tapa, apriete ligeramente y tire.
Programar el receptor con el sensor y seleccione el sonio, consulte el sección STI-3353.
Montar con los tronillos suministrados o cinta adhesiva. Mantenga la cubierta retirada para el montaje.
STI-3551 Sensor Inalámbrico de Alerta de Entrada
®
Instalación de la batería – abra el sensor e inserte la batería como se muestra abajo.
El botón se usa para conectar
y para la selección sonidos
Se incluye pila AAA
Programar el receptor con el sensor y seleccione el sonido, consulte la sección de STI-3353.
Montaje – Use la cinta con adhesivo en ambas caras suministrada (vea abajo).
Monte la echa en el
imán adyacente a la
línea en el sensor.
Para abrir el sensor,
deslice la tapa
separándola de la tapa
tal como se muestra.
Parte
Trasera
Tapa
Una luz máxima de 5/8” sobre
supercies no metálicas Cuando se
monta en una supercie metálica la
distancia puede disminuir.
Sensor
Imán
STI-3601 Sensor de Inalámbrico de Movimiento
Instalación y Programación
1. Monte la base de 7,5 pies (altura ideal) con los anclajes y
tornillos de montaje suministrado.
2. Programar el PIR y seleccione el sonido, consulte STI-3353
sección.
3. Ajuste el rango de detección PIR si es necesario.
4. Alinee la parte superior de la tapa sobre las pestanas de
PIR, a continuación, gire hacia abajo e instale el tornillo de
la tapa.
5. Coloque el anillo de seguridad en el poste conectado al PIR
(no romper). Pulse el PIR en la base.
6. Ajuste el PIR al ángulo de detección deseada y enganchar
el anillo de seguridad en posición.
Modo de Ensayo y Operación
Una vez montado el Sensor PIR, verique cuál es su ubicación
óptima. La unidad detectará el movimiento cada 10 – 15 segundos. Una vez detectado el movimiento, el sensor tiene una
tiempo de demora de reposición de 10 a 15 segundos.
AJUSTE DEL RANDO
DE DETECCION DEL PIR
H - 42’
M - 30’
L - 20’
ANILLO DE
SEGURIDAD
BASE
ANCLAJE DE PARED
TORNILLO DE MONTAJE
BOTÓN DE PROGRAMACIÓN/
SELECCIÓN DE SONIDO
PIR
TORNILLO DE TAPA
TAPA
LITHIUM CR123
BATTERY INCLUDED
• Ding
• Dong
• Ding-Dong
Page 4

Problema Timbre de puerta Alerta de Ingreso Movimiento Prolongador
No suena
• Vericar que las
baterías estén instaladas
correctamente. Asegúrese
que el tomacorriente sea
funcional.
• Verique que el
receptor y el botón se
encuentren dentro de un
rango de funcionamiento
de 500 pies (150 m).
• El Rango puede
cambiar según el medio
ambiente.
• Vericar que la
alimentación de corriente
al receptor sea de 110
V de C.A.
• Verique que el sensor y el imán
estén alineados correctamente con una
separación no mayor de 5/8” (16 mm)
• Vericar que la batería esté instalada
correctamente.
• Asegúrese que el tomacorriente
funcione.
• Verique que el receptor y el botón
se encuentren dentro de un rango de
funcionamiento de 500 pies (150 m).
• El Rango puede cambiar según el
medio ambiente.
• Vericar que la alimentación de
corriente al receptor sea de 110 V
de C.A.
• Reemplace las baterías del
sensor de movimiento.
• Verique el receptor se
encuentre dentro de un radio
de 500 pies (150 m) del
sensor de movimiento.
• Verique que no haya
objetos metálicos que
bloqueen la señal del sensor
de movimiento o mueva el
receptor.
• El Rango puede cambiar
según el medio ambiente.
• Vericar que la mínima
alimentación de corriente al
receptor sea de 110 V de C.A.
• Verique que todos los cables a la bornera
del timbre estén bien conectados a los
tornillos correctos.
• Asegúrese que el tomacorriente funcione.
• Verique que el receptor y el sensor
se encuentren dentro de un rango de
funcionamiento de 500 pies (150 m).
• El Rango puede cambiar según el medio
ambiente.
• Vericar que la alimentación mínima de
corriente al receptor sea de 110 V de C.A.
• El prolongador puede no ser compatible
con todos los timbres, especialmente los
timbres digitales musicales.
• Verique que la alimentación eléctrica al
timbre existente sea de 16 V de C.A.
El receptor
suena
en forma
aleatoria
•Verique que el botón
de silicona esté alineado
correctamente.
• El imán puede estar montado
demasiado lejos del sensor y la
vibración de la puerta puede disparar
el receptor del timbre. Mueva el imán
más cerca del sensor.
• Verique los objetos
móviles, tales como: árboles,
animales e insectos en la
supercie.
• Verique que el sensor esté
montado rmemente.
• Asegúrese que el timbre original no
esté trabado.
Todos los sensores emiten
la misma
melodía
• Utilice el botón de
conexión/selección de
sonido para cambiar las
opciones de sonido.
• Utilice el botón de conexión/
selección de sonido para cambiar las
opciones de sonido.
• Utilice el botón de conexión/
selección de sonido para
cambiar las opciones de
sonido.
• Los sonidos para las puertas delantera y
trasera son jos.
• Asegúrese que los cables negro y marrón
no estén en corto entre sí.
Consejos sobre Corrección de Fallas
STI-3353 Receptor Inalámbrico de Timbre
Control de Volumen
Arriba - Alto
Abajo – Bajo
Botón de Conexión
Selección de Sonidos para todos los Sensores – Después de programar el receptor y el sensor, mantenga
oprimido el botón de programación/ selección de sonido mostrado en los diagramas del sensor hasta que se escuche un BIP
en el receptor (alrededor de 5 segundos). Una vez que el receptor emite un BIP, oprima el botón de programación / selección
de sonido en el sensor para desplazarse y seleccionar uno de los sonidos disponibles. Una vez nalizado el sonido deseado
continúe oprimiendo el botón de conexión/ selección de sonido en el sensor para salvar y salir (alrededor de 5 segundos hasta
que el receptor emite un BIP).
Conexión del Receptor con los Sensores
1. Enchufe el receptor en un tomacorriente de 120 V de C.A.
2. Oprima y suelte el botón de conexión en el receptor. Sonará un tono en el receptor.
3. Oprima y suelte el botón de conexión en el sensor(es). Sonará un tono en el receptor para indicar que la
conexión se efectuó correctamente.
4. Pulse el botón de programación en el receptor para salir del modo de (el receptor saldrá automáticamente en
20 segundos).
Page 5

Aviso Importante
Este dispositivo cumple con la sección 15 de las Reglas FCC. La operación está sujeta a las siguientes dos condiciones:
1) Este dispositivo no puede causar interferencias perjudiciales, y (2) este dispositivo debe aceptar cualquier interferencia
recibido, incluyendo interferencias que puedan causar un funcionamiento indeseado.
Este dispositivo cumple con las normas RSS de exención de licencia de Industry Canada. La operación está sujeta a las
siguientes dos condiciones: 1) Este dispositivo no puede causar interferencias perjudiciales, y (2) este dispositivo debe aceptar
cualquier interferencia , incluyendo interferencias que puedan causar un funcionamiento indeseado del dispositivo.
STI-3301 FCC ID: TXL3301 IC: 6335A-3301
STI-3551 FCC ID: TXL3551 IC: 6335A-3551
STI-3601 FCC ID: TXL3601 IC: 6335A-3601
STI-3353 Cumplimiento vericado con Normas de FCC.
Los cambios o modicaciones no aprobadas expresamente por Safety Technology International, Inc. puede anular la autoridad
del usuario para operar el equipo.
Garantía
Safety Technology International, Inc. garantiza al comprador/ consumidor original que el presente producto esté libre de
defectos materiales y de mano de obra en el uso y circunstancias normales por un período de un (1) año desde la fecha de la
compra original.
Formulario Electrónico de garantía en www.sti-usa.com/wc14.
Soporte Técnico
Contactar a STI en el 1-248-673-9898
Page 6

Manuel d’installation et d’utilisation
Série de carillons sans fil STI, 433 MHz
Merci d’avoir acheté un carillon sans l STI. Votre satisfaction nous est d’une grande importance. Veuillez lire ce manuel avec
attention pour tirer le meilleur prot de votre nouveau produit.
Caractéristiques
• Portée de service jusqu’à 500 pi (ligne de vue)
• Réglage bas et haut du volume au niveau du récepteur
• 10 options de son
• Ding
• Dong
•Ding-Dong
• Vive le vent
• Aboiement de chiens
• Cloche de vélo
• Vibreur
• Alerte de pile faible
• Homologué UL/cUL, certié FCC et IC
• 433 MHz
• Westminster à 4 notes
• Westminster à 8 notes
• Knock Knock
STI-3301 Capteur de carillon de porte sans fil
Bouton de programmation /
sélection de son
Installation et remplacement de la pile
1. Lors de la première installation, utilisez le pouce pour enfoncer l’onglet du bas an de tirer le couvercle.
2. Insérez la pile CR2032 fournie tout en ayant le pôle positif (+) vers le haut.
3. Une fois installée, il est possible d’accéder à la pile en tenant le bas du couvercle et en le tordant
légèrement pour pouvoir tirer.
Programmez le récepteur avec le capteur et sélectionnez le son, voir la section STI-3353.
Montez avec les vis fournies ou du ruban adhésif. Gardez le couvercle enlevé pour le montage.
STI-3551 Capteur sans fil Entry Alert
®
Installation de la batterie – Ouvrez le capteur et insérez la batterie tel que montré ci-dessous.
Bouton de programmation / sélection de son
Pile AAA fournie
Programmez le récepteur avec le capteur et sélectionnez le son, voir la section STI-3353.
Montage – Utilisez le ruban adhésif double-face fourni (et voir ci-dessous).
Placez la èche sur
l’aimant près de la
ligne sur le capteur.
Pour ouvrir le capteur,
faites glisser le
couvercle loin du fond
tel que montré.
Fond
Couvercle
Écart maximal de 5/8 po sur
une surface non métallique. Lors
d’un montages sur une surface
métallique, cet écart peut être réduit.
Capteur
Aimant
STI-3601 Capteur sans fil activé par le movement
Montage et Programmation
1. Monter la base à 7,5 pieds (hauteur idéale) avec chevilles et
vis de xation fournies.
2. Programmer le détecteur IRP et sélectionnez le son, voir la
section STI-3353.
3. Ajuster la plage de détection du détecteur IRP si nécessaire.
4. Aligner le haut du couvercle sur les onglets du détecteur
IRP, puis tournez vers le bas et installer la vis du couvercle.
5. Placer la bague de verrouillage sur le poste connecté
au détecteur IRP (ne pas casser). Appuyer à la base du
détecteur IRP.
6. Ajuster le détecteur IRP à l’angle de détection souhaitée
puis enclencher la bague de verrouillage en position.
Essai et mode de fonctionnement
Une fois le capteur PIR est monté, effectuez un essai pour
localiser son meilleur emplacement. L’unité détecte les mouvements toutes les 10 à 15 secondes. Dès qu’un mouvement
est détecté, le capteur nécessite un délai de réinitialisation de 10 à 15 secondes.
AJUSTEMENT DE LA DISTANCE
DE DÉTECTION IRP
H - 42’
M - 30’
L - 20’
BAGUE DE
VERROUILLAGE
BASE
CHEVILLE
VIS DE MONTAGE
BOUTON DE PROGRAMMATION/
SÉLECTION DE SON
IRP
VIS DU COUVERCLE
COUVERCLE
BATTERIE AU LITHIUM
CR123 INCLUSE
Page 7

Problème Sonnette de porte Entry Alert Mouvement Raccordeur
N’émet
aucun son
• Vériez que les piles
sont correctement
installées. Assurezvous que la prise est
alimentée.
• Vériez que le récepteur
et le bouton sont dans
la portée de service de
500 pi.
• La portée peut varier
selon l’environnement.
• Vériez que la
puissance de sortie
minimale au récepteur est
de 110 VCA.
• Assurez-vous que le capteur et
l’aimant sont correctement alignés
et ne sont pas à plus de 5/8 po l’un
de l’autre.
• Vériez que la pile est correctement
installée.
• Assurez-vous que la prise est
alimentée.
• Vériez que le récepteur et le
bouton sont dans la portée de service
de 500 pi. La portée peut varier
selon l’environnement. Vériez que
la puissance de sortie minimale au
récepteur est de 110 VCA.
• Remplacez les piles du
capteur de mouvement.
• Vériez que le récepteur
est dans la portée de service
de 500 pi du capteur de
mouvement.
• Conrmez qu’aucun objet
métallique ne bloque le signal
du capteur de mouvement;
sinon, déplacez le récepteur.
La portée peut varier selon
l’environnement. Vériez
que la puissance de sortie
minimale au récepteur est de
110 VCA.
• Assurez-vous que tous les ls reliés au
bornier du carillon soient étroitement xés
aux vis adéquates.
• Assurez-vous que la prise est alimentée.
• Vériez que le récepteur et le capteur
sont dans la portée de service de 500 pi. La
portée peut varier selon l’environnement.
• Vériez que la puissance de sortie
minimale au récepteur est de 110 VCA.
• Le raccordeur peut ne pas être compatible
avec toutes les sonnettes de porte,
en particulier, les sonnettes musicales
numériques.
• Vériez que la puissance de la sonnette
existante est de 110 VCA.
Les son du
récepteur
sont
aléatoires
• Assurez-vous que le
bouton en silicone est
correctement aligné.
• Il se peut que l’aimant soit installé
trop loin du capteur et la vibration
de la porte risque de déclencher
le récepteur du carillon. Déplacez
l’aimant plus près du capteur.
• Vériez la présence d’objets
en mouvement, tels que des
arbres, animaux et insectes à
la surface.
• Assurez-vous que le capteur
est installé en toute sécurité.
• Assurez-vous que la sonnette d’origine
n’est pas bloquée.
Tous les
capteurs
jouent la
même tonalité
• Utilisez le bouton de
sélection d’appariement/
de son pour modier les
options du son.
• Utilisez le bouton de sélection
d’appariement/de son pour modier
les options du son.
• Utilisez le bouton de
sélection d’appariement/de
son pour modier les options
du son.
• Les sons des portes avant et arrière
sont xes.
• Assurez-vous de ne pas court-circuiter les
ls noir et marron.
Conseils de dépannage
STI-3353 Récepteur de carillon sans fil
Contrôle du volume
Haut – Élevé
Bas – Faible
Bouton d’appariement
Sélection du son pour tous les capteurs – Après avoir programmé le récepteur et le capteur, appuyez sur le bouton
de programmation/sélection du son montré sur les schémas de certains capteurs et maintenez-le enfoncé jusqu’à entendre un
BIP du récepteur (environ 5 secondes). Dès que le récepteur émet un BIP sonore, appuyez sur le bouton de programmation /
sélection du son sur le capteur pour choisir un des sons disponibles. Une fois le son souhaité est choisi, MAINTENEZ le bouton
de programmation/sélection du son sur le capteur enfoncé pour sauvegarder et quitter (environ 5 secondes jusqu’à ce que le
récepteur émette un BIP).
Appariement du récepteur avec les capteurs
1. Branchez le récepteur sur une prise de 120 VCA.
2. Appuyez et relâchez le bouton d’appariement du récepteur. Ce dernier émettra une tonalité.
3. Appuyez et relâchez le bouton de programmation sur le(s) capteur(s). Le récepteur émettra une tonalité pour conrmer une
programmation réussie.
4. Appuyez sur le bouton de programmation sur le récepteur pour quitter le mode de programmation (le récepteur quitte le
mode automatiquement au bout de 20 secondes)
Page 8

Avis important
Cet appareil est conforme à la section 15 des règlements de la FCC. Son utilisation est autorisée seulement aux conditions
suivantes: (1) Cet appareil ne doit pas provoquer des interférences gênantes; et (2) cet appareil doit pouvoir accepter les interférences reçues, y compris les interférences risquant de déclencher des opérations non désirées.
Le présent appareil est conforme aux CNR d’Industrie Canada applicables aux appareils radio exempts de licence. L’exploitation
est autorisée aux deux conditions suivantes: (1) l’appareil ne doit pas produire de brouillage, et (2) l’utilisateur de l’appareil doit
accepter tout brouillage radioélectrique subi, même si le brouillage est susceptible d’en compromettre le fonctionnement.
STI-3301 FCC ID: TXL3301 IC: 6335A-3301
STI-3551 FCC ID: TXL3551 IC: 6335A-3551
STI-3601 FCC ID: TXL3601 IC: 6335A-3601
STI-3353 Testé pour conformité aux normes de la FCC
Les changements ou modications non expressément approuvé(e)s par Safety Technology International, Inc. risquent d’annuler
l’autorité de l’utilisateur à utiliser l’équipement.
Garantie
Safety Technology International, Inc. garantit au consommateur/acheteur original que ce produit est exempt de défauts de matériaux et de fabrication, en utilisation et circonstances normales pour une période d’un (1) an à compter de la date d’achat originale.
Formulaire de garantie électronique : www.sti-usa.com/wc14.
Soutien technique
Contactez STI au 800-888-4784
2306 Airport Rd • Waterford, MI 48327
Phone: 248-673-9898 • Fax: 248-673-1246
info@sti-usa.com • www.sti-usa.com
Safety Technology International (Europe) Ltd.
Unit 49G Pipers Road • Park Farm Industrial Estate • Redditch
Worcestershire • B98 0HU • England
Tel: 44 (0) 1527 520 999 • Fax: 44 (0) 1527 501 999
E-mail: info@sti-europe.com • Web: www.sti-europe.com
Inst. 3353 March 2015
Subject to change without notice.
Sujeto a cambio sin aviso.
Sous réserve de modication sans préavis.
Printed in China
 Loading...