

Page 1

“ALERT”
OPENED
APPROXIMATE GAP (1 INCH)
GAP MAY BE EFFECTED
IF MOUNTED ON METAL.
REED SWITCH CABLE
(18 INCHES)
APPROXIMATE GAP
(GREATER THAN 1 1/3 INCHES)
GAP MAY BE EFFECTED
IF MOUNTED ON METAL.
“ALERT”
OPENED
“RESTORE”
CLOSED
MAGNETIC SENSOR
Installation and Operation Manual
STI Universal Sensor
Model: STI-34401
Thank you for purchasing the STI Universal Sensor. Your satisfaction is very important to us. Please take
the time to read this manual carefully to get the most from your new product.
How The Product Works
The STI Universal Sensor is a wireless transmitter that can be configured to initiate a transmission to any
STI Receiver three different ways: internal magnetic sensor, internal tilt sensor or external switch.
Plan Your Installation
Universal Sensor Setup
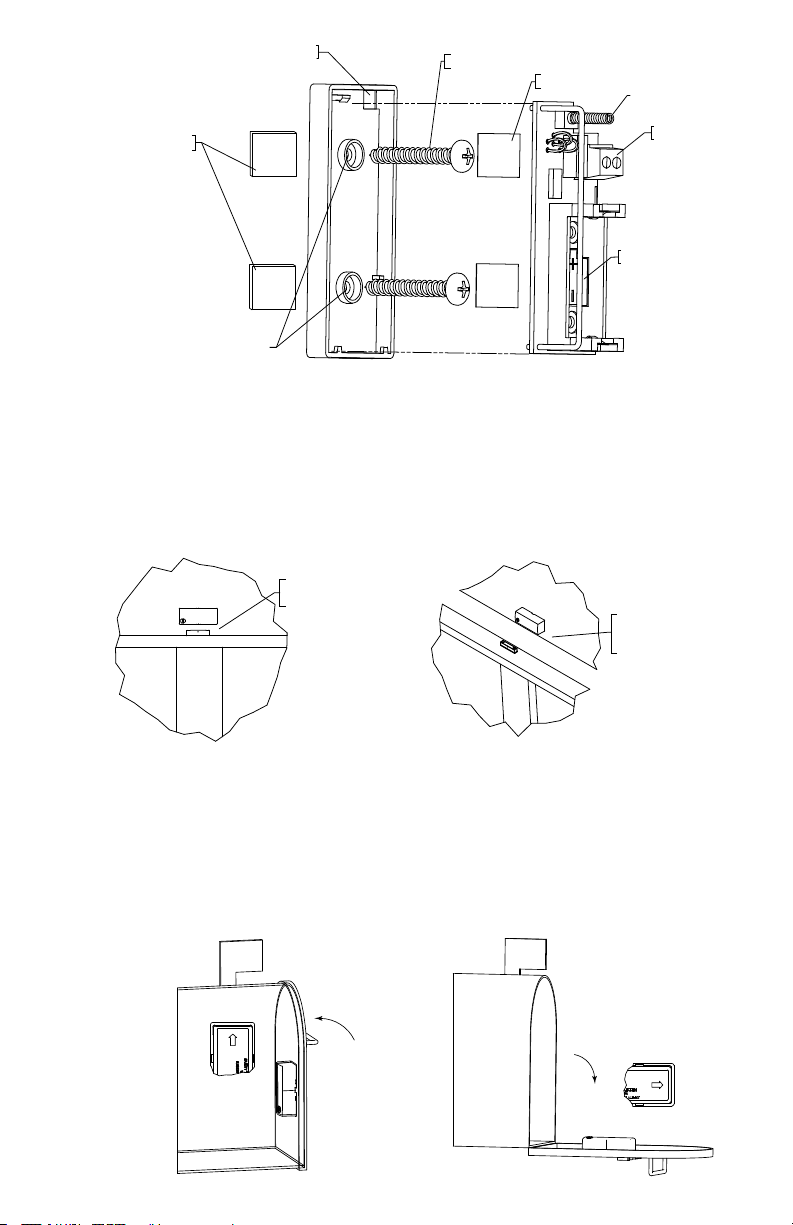
1. Open sensor case using a flat head screwdriver in side case slot.
2. Configure the jumpers for the desired application (see Jumper Configurations Fig. 1).
3. Activate battery by removing the red tape.
4. Program the STI Universal Sensor into the STI receiver. Refer to the STI receiver installation
5. Snap base into lid. Tamper switch spring automatically seats within the locator ring on the lid. Tamper
6. Test the sensor for proper operation before permanently mounting.
7. Select mounting option.
1) Refer to the Operation section on the following pages to determine which sensor configuration is
best for your application.
2) Refer to the Sensor Supervision section to understand the use of this feature. It is recommended
to leave the sensor in the supervised state (J2 uncut) until false trouble signals are displayed on the
receiver. If you need to disable sensor supervision, the sensor must be deleted from the receiver
and reprogrammed into the receiver. Refer to your receiver’s installation instructions.
instructions for programming instructions.
alert is triggered when the spring releases identifying when case is opened/broken/ajar.
OPTION 1: Mount with double sided foam tape provided to the back of the case (Fig. 2).
OPTION 2: Remove the circuit board from the case bottom. Drill 1/8 inch holes through the case
and use the screws (provided). For added protection, cover metal screw heads on the inside of
the case bottom with electrical tape (Fig. 2) to isolate the circuit board. Replace the circuit board
in the case bottom.
Jumper Congurations
J2
J3
J1
EXTERNAL SWITCH
CONNECTION BLOCK
ONBOARD REED SWITCH
LOCATION FOR
MAGNETIC SENSOR
Fig. 1
Cut jumpers with “X”, do not cut jumpers with “ “.
J1 J2 J3
Magnetic Sensor (supervised)
Tilt Sensor (supervised)
External Terminals (supervised)
Magnetic Sensor (not supervised)
Tilt Sensor (not supervised)
External Terminals (not supervised)
X
X X
X
X X
X X X
NOTE: After cutting jumpers, tape each of the cut ends with
electrical tape to prevent wires from shorting.
— 1 —
Page 2
“ALERT”
OPENED
APPROXIMATE GAP
(GREATER THAN 1 1/3 INCHES)
GAP MAY BE EFFECTED
IF MOUNTED ON METAL.
OPTION 1 MOUNTING
(DOUBLE SIDED FOAM TAPE)
OPTION 1 MOUNTING
(DOUBLE SIDED FOAM TAPE)
KNOCK OUT FOR WIRES
OF EXTERNAL SWITCH
19039 SCREW
(2) PROVIDED
VINYL ELECTRICAL
TAPE
TAMPER SWITCH
EXTERNAL SWITCH
CONNECTION BLOCK
ONBOARD
REED SWITCH
Fig. 2
OPTION 2 MOUNTING
Operation
Magnetic Sensor: (Fig. 3)
• Alert Signal – Magnet is over approximately 1 1/3 inches from the device.
• Restore Signal – Magnet is brought within approximately 1 inch from the device.
When using the Magnetic Sensor, the bottom case may be inserted into the top case in reverse
depending on which direction the Magnetic Sensor should face.
APPROXIMATE GAP (1 INCH)
GAP MAY BE EFFECTED
IF MOUNTED ON METAL.
Fig. 3
“RESTORE”
CLOSED
“ALERT”
OPENED
Tilt Sensor: (Fig. 4)
• Alert Signal – Sensor is tilted more than 45° from vertical.
• Restore Signal – Sensor is tilted less than 45° from vertical.
When using the Tilt Sensor, the arrow on the bottom should point straight up in the non-triggered state.
APPROXIMATE GAP
(GREATER THAN 1 1/3 INCHES)
GAP MAY BE EFFECTED
IF MOUNTED ON METAL.
Fig. 4
“RESTORE”
— 2 —
“ALERT”
Page 3

APPROXIMATE GAP (1 INCH)
GAP MAY BE EFFECTED
IF MOUNTED ON METAL.
“RESTORE”
CLOSED
“ALERT”
OPENED
APPROXIMATE GAP
(GREATER THAN 1 1/3 INCHES)
GAP MAY BE EFFECTED
IF MOUNTED ON METAL.
Sensor Supervision
The STI Universal Sensor has a supervision feature that monitors the battery condition, sensor
tampering and verifies that the sensor is within range of the STI Receiver. Sensor supervision can
be disabled for installations where the transmission signals may be locked when in the sensor’s
normal condition.
If the STI Universal Sensor has a Low Battery or triggered Tamper Switch, the sensor will send a
trouble signal to the receiver.
If the signal is out of range or there is a loss of communication, the receiver will indicate a trouble
condition between 12 and 24 hours from the time the signal was lost.
External Contacts: (Fig. 5)
• Alert Signal – Terminals must rst have a closed circuit then an open circuit any
time afterward will trigger an Alert signal.
• Restore Signal – Terminals have a closed circuit.
When using the External Switch Terminals, remove the case knock out (Fig. 2) in the corner of the case
bottom to insert sensor wires. Connect to external contact block.
NOTE: If mounted outdoors, use silicone sealant on the wire and screw hole knock outs.
REED SWITCH CABLE
(18 INCHES)
“ALERT”
CLOSED
APPROXIMATE GAP (1 INCH)
GAP MAY BE EFFECTED
IF MOUNTED ON METAL.
“ALERT”
OPENED
APPROXIMATE GAP
(GREATER THAN 1 1/3 INCHES)
GAP MAY BE EFFECTED
IF MOUNTED ON METAL.
Fig. 5
NOTE: In any configuration, an Alert or Restore signal must be triggered for any STI receiver to
acknowledge the device.
— 3 —
Page 4

Important Notice
This device complies with Part 15 of the FCC Rules. Operation is subject to the following two conditions.
1. This device may not cause harmful interference, and
2. This device must accept any interference received, including interference that may cause undesired
operation.
Changes or modifications not expressly approved by Safety Technology International, Inc. could void the
user’s authority to operate the equipment.
Le présent appareil est conforme aux CNR d’Industrie Canada applicables aux appareils radio exempts
de licence. L’exploitation est autorisée aux deux conditions suivantes:
1. L’Appareil ne doit pas produire de brouillage, et
2. L’utilisateur de l’appareil doit accepter tout brouillage radioélectrique subi, même si le brouillage est
susceptible d’en compromettre le fonctionnement.
Model: 34401 FCC ID: TXL34401 IC: 6335A-34401
This device is a transmitter intended for home and office use in all EU and EFTA member states.
Limited Warranty
STI, Inc. warrants to the original consumer/purchaser that this product shall be free of defects in material
and workmanship under normal use and circumstances for a period of one (1) year from the date of
original purchase for use.
Electronic warranty form at www.sti-usa.com/wc14.
Additional Wireless Alert Series Products
STI-34098 Single Channel Slave Receiver
STI-34104 4-Channel Receiver
STI-V34104 4-Channel Voice Receiver
STI-34108 8-Channel Receiver
STI-34188 8-Zone Relay Board
STI-34101 Solar Powered Driveway Monitor Sensor
STI-34151 Battery Powered Driveway Monitor Sensor
STI-34201 Wireless Mailbox Alert Sensor
STI-34301 Wireless Garage Sentry Sensor
STI-34401 Wireless Universal Alert Sensor
STI-34501 Wireless Entry Alert Sensor
STI-34601 Wireless Doorbell Button
STI-34701 Indoor Wireless PIR
STI-34751 Outdoor Wireless PIR
STI-6200WIR Wireless Fire Extinguisher Theft Stopper
STI-6200WIR4 Wireless Fire Extinguisher Theft Stopper w/Receiver
STI-6400WIR Wireless Exit Stopper Door Alarm
STI-6400WIR4 Wireless Exit Stopper Door Alarm with Receiver
STI-6517A Stopper Station Shield with Sound
STI-6517B Stopper Station Shield with Sound and Transmitter
STI-30104 Lamp Controller
STI-30105 Extended Antenna
STI-34105 Voltamax 12VDC (500mA) Power Supply
STI-34106 Keyfob
STI-34109 Repeater
2306 Airport Rd • Waterford, MI 48327
Phone: 248-673-9898 • Fax: 248-673-1246
info@sti-usa.com • www.sti-usa.com
Safety Technology International (Europe) Ltd.
Unit 49G Pipers Road • Park Farm Industrial Estate • Redditch
Worcestershire • B98 0HU • England • Tel: 44 (0) 1527 520 999
Fax: 44 (0) 1527 501 999 • Freephone: 0800 085 1678 (UK only)
E-mail: info@sti-europe.com • Web: www.sti-europe.com
We protect the things that protect you.
Inst. Sht. 34401 DEC2012
 Loading...