

Page 1

Installation and Operation Manual
for the
STI Solar Powered Lighted
House Number
Model STI-30325
Thank you for purchasing this quality product. We wish you to assure you that your
satisfaction is very important to us. Yet, it is important that you take the time to read
this manual very carefully to get the most from your new product.
HOW THE PRODUCT WORKS
Your Solar Powered Lighted House Number uses energy from sunlight to charge a
set of batteries inside. Then, when the sun goes down, these batteries power two
lights behind the display panel on the front of the device.
As explained herein, you remove sections of the display
digits to create your house number.
WORKING WITH THE SUN
For your Lighted House Number to function properly, it must be located in a place
where sunlight can reach it directly. The solar panel, which is located on top of the
product, must receive bright light for most of the day to fully charge the batteries.
Less sunlight translates into dimmer lights and shorter visible time during the night.
Caution: Do not mount the Lighted House Number in the shade, under trees,
or anywhere without direct exposure to sunlight.
Also, during winter the sun’s arc is lower in the sky and days are shorter. This
results in less power coming to the solar panel and less charging time. Depending
on your location, overall performance of your Lighted House Number may be
reduced during these months.
- 1-
Page 2
INSTALLATION INSTRUCTIONS
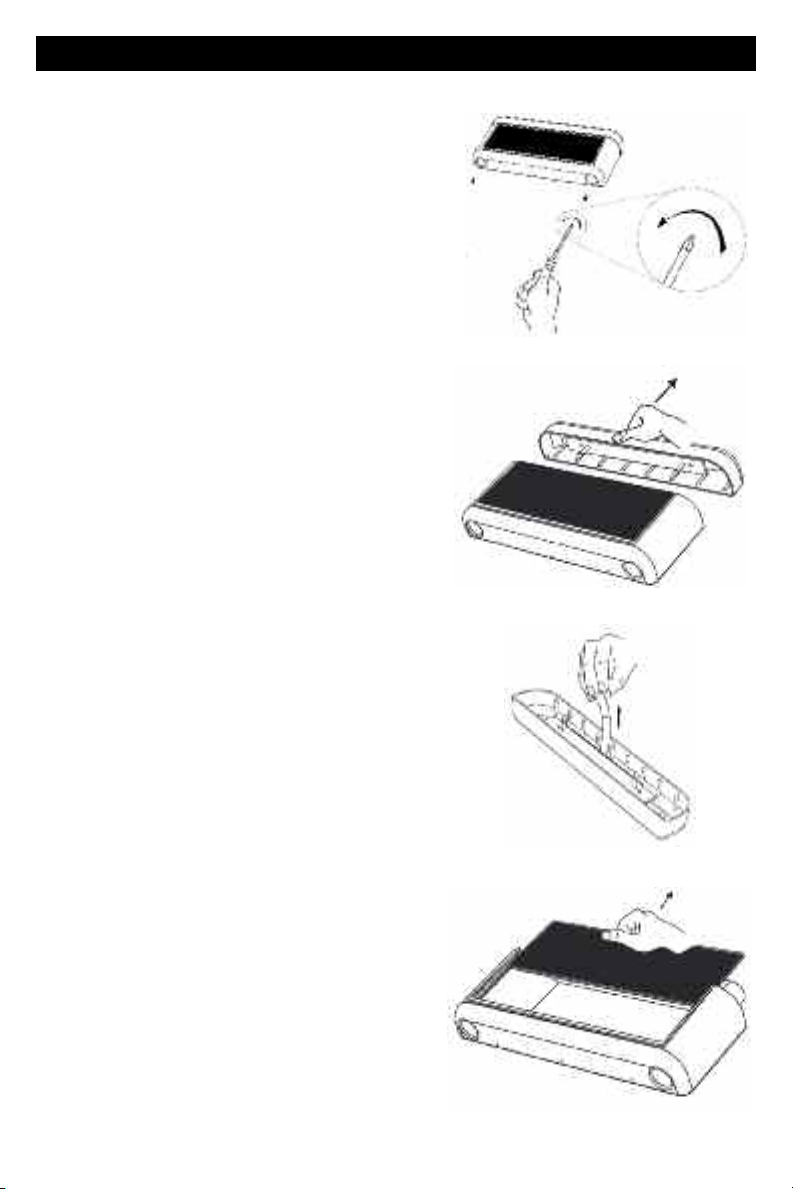
STEP 1
Unscrew the two small screws inside the deep
tube cavities underneath the product, using
the Phillips screwdriver provided or one similar
to it.
STEP 2
Remove the top section of your Lighted House
Number as shown.
STEP 3
Activate the batteries by pulling out the plastic
strip with the red tag completely. Discard the
plastic strip..
STEP 4
Remove the plastic number panel as shown
by sliding it out of the slots on each side.
- 2-
Page 3

STEP 5
Using a sharp implement such as that
enclosed, carefully peal away the number
segments where you want the light to show
through. You can create up to 5 digits for
your house number.
To the right is an example of how to create the
various numbers.
STEP 6
Replace the black number panel. Then replace the
top section of the unit and insert screws by turning
screwdriver clockwise.
STEP 7
If you are planning to mount your Solar
Power House Number in the ground, then
assemble the tubes as shown and insert
them into the two circular openings.
- 3-
Page 4

STEP 8
You have a choice of two types of
installation to maximize your amount of
sunlight — mounting in the ground (right)
or mounting on the side of a wall. Be
sure to do each correctly for best results.
STEP 9
If you prefer a wall mount, push out the
knockouts inside the mounting holes on
the back with a small screwdriver or
sharp implement — or by using both.
CHANGING THE BATTERIES
“But shouldn’t a solar powered product run
forever?” you might ask. The batteries in your
Lighted House Number can be automatically
recharged about 500 times. Since they will be
charged and discharged every day, they can be
expected to last about 18 months. At that time
they should be replaced. You can use either
Nickel Metal Hydrate (NI-MH) or Nickel
Cadmium (NiCd). The size is AA and any brand
will work. CAUTION: Do not use alkaline or
other non-rechargeable batteries. Doing so
could cause leakage and other damage.
WARRANTY
This product is backed by a one year limited warranty.
Electronic warranty form at www.sti-usa.com/wc14.
2306 Airport Road
Phone: 248-673-9898 • Toll Free: 800-888-4784 • Fax: 248-673-1246
© 2013 STI
Waterford, Michigan 48327-1209
www.
sti-usa.com
- 4-
STI-30325
01/14
 Loading...