

Page 1

PL
MŁOTOWIERTARKA
GB
ROTARY HAMMER
D
BOHRHAMMER
RUS
ПЕРФОРАТОР
UA
ПЕРФОРАТОР
LT
PERFORATORIUS
LV
URBJMAŠĪNA AR ĀMURU
CZ
VRTACÍ KLADIVO
SK
VŔTACIE KLADIVO
H
FÚRÓKALAPÁCS
RO
CIOCAN ROTOPERCUTOR
MARTILLO PERFORADOR
E
79054
Page 2
PL GB D RUS UA LT LV CZ SK H RO E
3
4
1
5
7
2
10
8
I
12
6
11
III IV
9
II
2019
2
V VI
VII
Rok produkcji:
Production year:
Produktionsjahr:
Год выпуска:
Рік випуску:
Pagaminimo metai:
TOYA S.A. ul. Sołtysowicka 13-15, 51-168 Wrocław, Polska
Ražošanas gads:
Rok výroby:
Rok výroby:
Gyártási év:
INSTRUKCJA ORYGINALNA
VIII
Anul producţiei utilajului:
Año de fabricación:
Page 3
PL
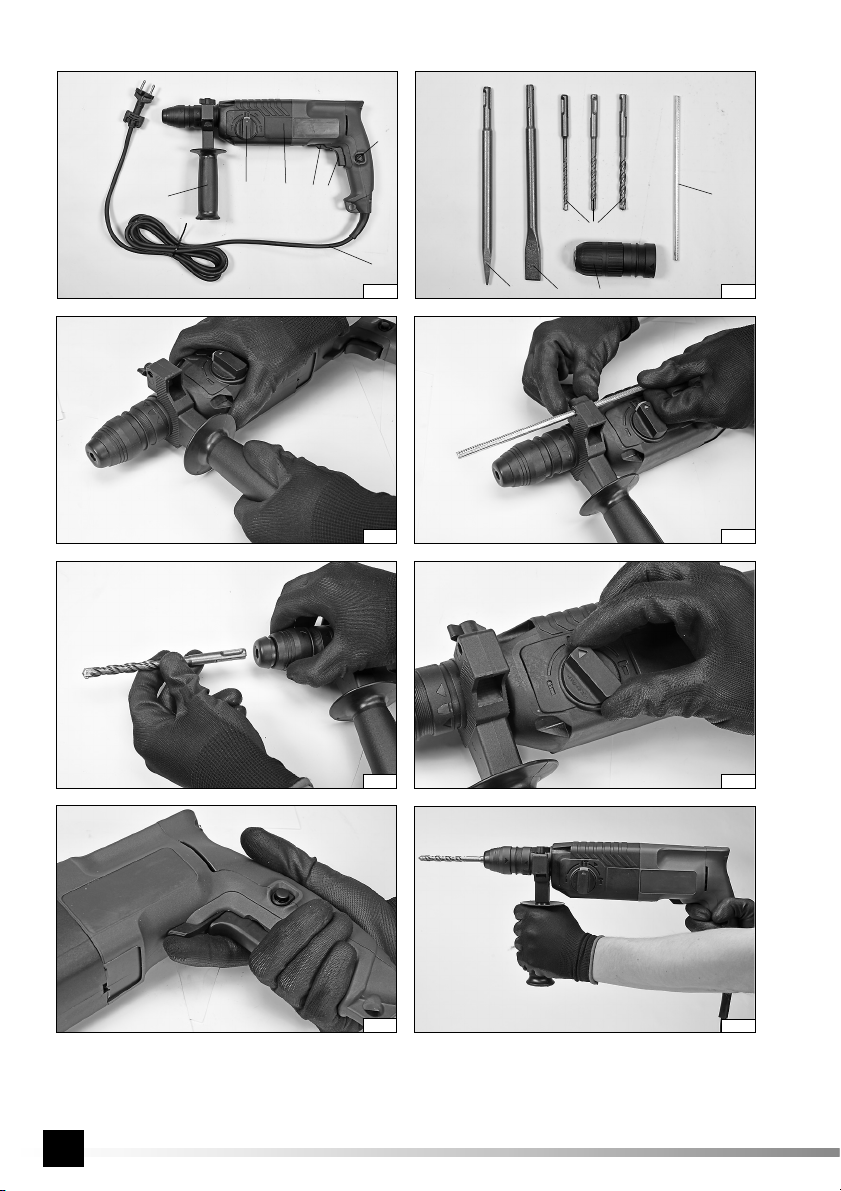
1. korpus z rękojeścią główną
2. włącznik elektryczny
3. blokada włącznika
4. przełącznik rodzaju pracy
5. przełącznik kierunku obrotów
6. uchwyt wiertarski
7. rękojeść dodatkowa
8. przewód sieciowy
9. ogranicznik głębokości wiercenia
10. wiertła
11. przecinak
12. przebijak
UA
1. корпус з основною рукояткою
2. кнопка ввімкнення
3. блокування кнопки ввімкнення
4. перемикач режиму роботи
5. перемикач напрямку обертання
6. патрон
7. допоміжна рукоятка
8. мережевий кабель
9. обмежувач глибини свердління
10. свердла
11. зубило
12. бур
SK
1. skriňa náradia s hlavnou rukoväťou
2. elektrický spínač
3. aretácia spínača
4. prepínač režimu práce
5. prepínač smeru otáčok
6. vŕtacie skľučovadlo
7. pomocná rukoväť
8. sieťový kábel
9. dorazová tyčka na nastavenie
hĺbky vŕtania
11. vrtáky
9. pretínak
10. priebojník
PL GB D RUS UA LT LV CZ SK H RO E
IX X
L
XI XII
GB
1. body with the main handle
2. electric switch
3. switch lock
4. operating mode selector
5. rotation selector
6. chuck
7. additional handle
8. power supply cord
9. drilling depth limiting device
10. drills
11. chisel
12. puncher
LT
1. корпус з основною рукояткою
2. кнопка ввімкнення
3. блокування кнопки ввімкнення
4. перемикач режиму роботи
5. перемикач напрямку обертання
6. патрон
7. допоміжна рукоятка
8. мережевий кабель
9. обмежувач глибини свердління
10. grąžtai
11. kirstukas
12. prakalas
H
1. test a fő fogantyúval
2. elektromos kapcsoló
3. a kapcsoló retesze
4. munkamód átkapcsoló
5. forgásirány váltó
6. fúrótokmány
7. kiegészítő nyél
8. hálózati kábel
9. furatmélység határoló
10. fúrófej
11. véső
12. lyukasztó véső
D
1. Gehäuse mit Hauptgriff
2. Elektroschalter
3. Blockade des Schalters
4. Schalter für die Betriebsart
5. Schalter für die Drehrichtung
6. Bohrfutter
7. Zusätzlicher Handgriff
8. Netzanschlussleitung
9. Begrenzer für die Bohrtiefe
10. Bohrer
11. Meißel
12. Dorn
LV
1. korpuss ar galveno rokturu
2. elektrisks ieslēdzējs
3. ieslēdzēja blokāde
4. darba režīma pārslēdzējs
5. rotāciju virziena pārslēdzējs
6. urbjmašīnas turētājs
7. papildu rokturis
8. barošanas vads
9. urbšanas dziļuma ierobežotājs
10. urbji
11. griešanas ierīce
12. caursišanas ierīce
RO
1. carcasă cu mâner principal
2. comutator electric
3. blocadă comutator
4. comutator tip de lucru
5. comutator direcţie turaţie
6. mandrină
7. mâner adiţional
8. cablu de alimentare
9. limitator de adâncime de găurire
10. burghie
11. daltă
12. daltă pentru perforare
RUS
1. корпус с основной рукояткой
2. кнопка включения
3. блокировка кнопки включения
4. переключатель режима работы
5. переключатель направления вращения
6. патрон
7. вспомогательная рукоятка
8. сетевой кабель
9. ограничитель глубины сверления
10. сверла
11. зубило
12. шлембур
CZ
1. skříň nářadí s hlavní rukojetí
2. elektrický spínač
3. aretace spínače
4. přepínač pracovního režimu
5. přepínač směru otáček
6. vrtací sklíčidlo
7. přídavná rukojeť
8. síťový kabel
9. dorazová tyč pro nastavení hloubky vrtání
10. vrtáky
11. upichovací nůž
12. průbojník
E
1. armazón con mango principal
2. interruptor
3. bloqueo del interruptor
4. selector del modo de trabajo
5. selector de la dirección de rotación
6. mandril
7. mango adicional
8. cable
9. limitador de la profundidad de perforación
10. taladros
11. cortador
12. perforador
INSTRUKCJA ORYGINALNA
3
Page 4
PL GB D RUS UA LT LV CZ SK H RO E
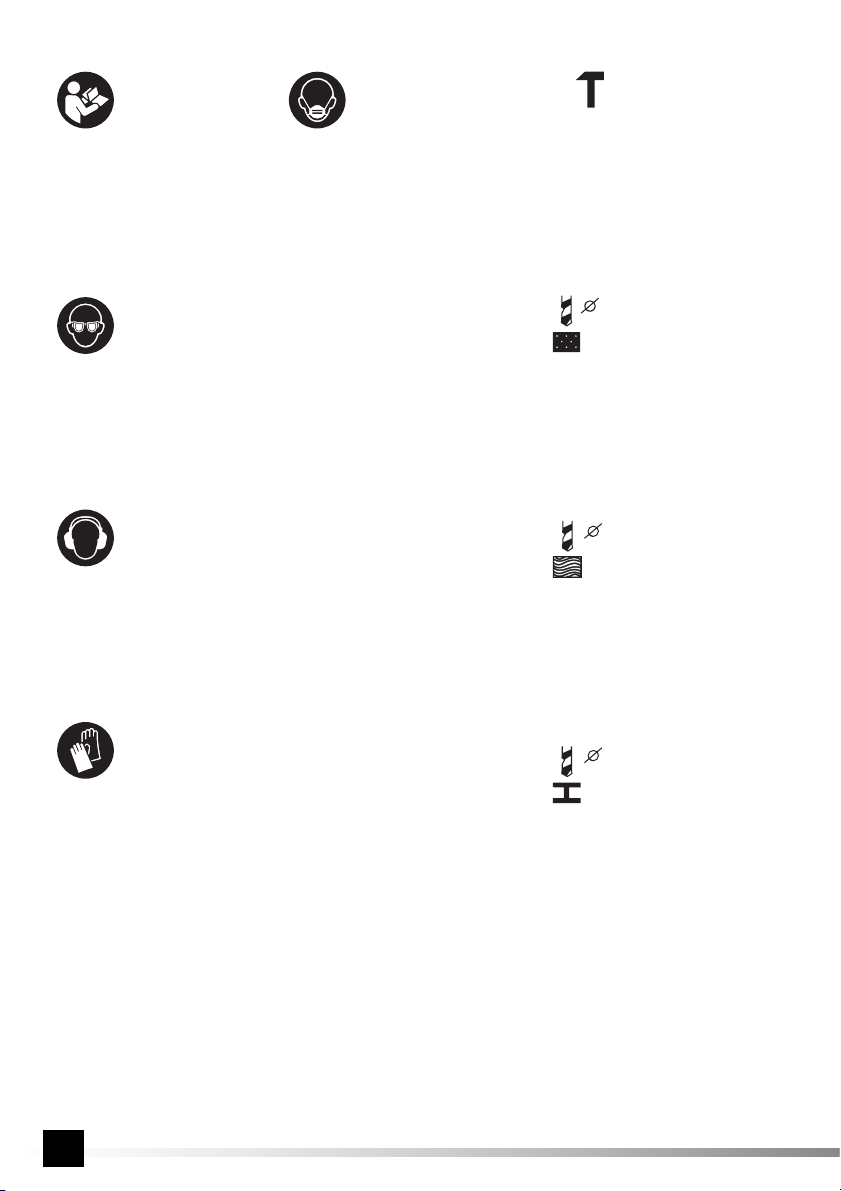
Przeczytać instrukcję
Read the operating instruction
Bedienungsanleitung durchgelesen
Прочитать инструкцию
Прочитать iнструкцiю
Perskaityti instrukciją
Jālasa instrukciju
Přečtet návod k použití
Prečítať návod k obsluhe
Olvasni utasítást
Citeşti instrucţunile
Lea la instrucción
Używać gogli ochronnych
Wear protective goggles
Пользоваться защитными очками
Користуйтесь захисними окулярами
Vartok apsauginius akinius
Jālieto drošības brilles
Používej ochranné brýle
Používaj ochranné okuliare
Használjon védőszemüveget!
Intrebuinţează ochelari de protejare
Use protectores del oído
Używać ochrony słuchu
Wear hearing protectors
Пользоваться средствами защиты слуха
Користуйтесь засобами захисту слуху
Vartoti ausines klausai apsaugoti
Jālieto dzirdes drošības līdzekļu
Používej chrániče sluchu
Používaj chrániče sluchu
Használjon fülvédőt!
Intrebuinţează antifoane
Use protectores de la vista
Stosować rękawice ochronne
Use protective gloves
Schutzhandschuhe verwenden
Необходимо пользоваться защитными
перчатками
Слід користуватися захисними рукавицями
Vartoti apsaugines pirštines
Lietot aizsardzības cimdus
Používejte ochranné rukavice
Používajte ochranné rukavice
Használjon védőkesztyűt
Utilizarea m
ănuşilor de protrcţie
Use guantes de protección
Stosować ochronę dróg oddechowych
Use the respiration protection
Atemwege schützen!
Применять защиту дыхательных путей
Користуйтеся захистом дихальних шляхів
Taikyti kvėpavimo takų apsaugą
Lietojiet elpošanas traktu aizsardzību
Používejte prostředky na ochranu dýchacích cest
Používajte prostriedky na ochranu dýchacích ciest
Használjon légzésvédő álarcot
Utilizaţi apărători ale căilor respiratorii
Proteja las vías respiratorias
230 V~ 50 Hz
Napięcie i częstotliwość znamionowa
Rating voltage and frequency
Spannung und Nennfrequenz
Номинальное напряжение и частота
Номінальна напруга та частота
Įtampa ir nominalus dažnis
Nomināls spriegums un nomināla frekvence
Jmenovité napětí a frekvence
Menovité napätie a frekvencia
Névleges feszültség és frekvencia
Tensiunea şi frecvenţa nominală
Tensión y frecuencia nominal
620 W
Moc znamionowa
Rating power
Nennleistung
Номинальная мощность
Номінальна потужність
Nominali galia
Nomināla spēja
Jmenovitý výkon
Menovitý výkon
Névleges teljesítmény
Consum de putere nominală
Potencia nominal
0 - 870 min
Znamionowa prędkość obrotowa
Nominal rotation
Nennumdrehungsgeschwindigkeit
Номинальные обороты
Номінальні оберти
Nominalus apsisukimų greitis
Nomināls griezes ātrums
Jmenovité otáčky
Menovité otáčky
Névleges fordulatszám
Viteza de rotire nominală
Velocidad de la rotación nominal
-1
0 - 4850 min
Częstotliwość udaru
Impact frequency
Stossfrequenz
Частота удара
Частота удару
Smūgių dažnis
Sitiena frekvence
Frekvence příklepu
Frekvencia príklepu
Ütési frekvencia
Frecvenţa bătăilor de percuţie
Frecuencia del impacto
-1
24mm
Maksymalna średnica wiercenia w betonie
Maximum drilling diameter in concrete
Maximaler Durchmesser zum Bohren in Beton
Максимальный диаметр отверстия - бетон
Максимальний діаметр
Maksimalus gręžimo betone skersmuo
Urbšanas maksimāls diametrs betonā
Maximální průměr vrtání do betonu
Maximálny priemer vŕtania do betónu
Maximális furatátmérő betonban
Dimensiune maximă de găurire în beton
Diámetro máximo de la perforación en concreto
отвору - бетон
30mm
Maksymalna średnica wiercenia w drewnie
Maximum drilling diameter in wood
Maximaler Durchmesser zum Bohren in Holz
Максимальный диаметр отверстия - дерево
Максимальний діаметр отвору - дерево
Maksimalus gręžimo medienoje skersmuo
Urbšanas maksimāls diametrs kokā
Maximální průměr vrtání do dřeva
Maximálny priemer vŕtania do dreva
Maximális furatátmérő fában
Dimensiune maximă de găurire în lemn
Diámetro máximo de la perforación en madera
13mm
Maksymalna średnica wiercenia w stali
Maximum drilling diameter in steel
Maximaler Durchmesser zum Bohren in Stahl
Максимальный диаметр отверстия - сталь
Максимальний діаметр отвору - сталь
Maksimalus gręžimo pliene skersmuo
Urbšanas maksimāls diametrs tēraudā
Maximální průměr vrtání do oceli
Maximálny priemer vŕtania do ocele
Maximális furatátmérő acélban
Dimensiune maximă de găurire în oţel
Diámetro máximo de la perforación en acero
4
INSTRUKCJA ORYGINALNA
Page 5

PL GB D RUS UA LT LV CZ SK H RO E
SDS+
System mocowania narzędzia roboczego
Working tool attaching system
Befestigungssystem für das Arbeitswerkzeug
Система крепления рабочего инструмента
Система кріплення робочого інструмента
Darbinio įrankio įtvirtinimo sistema
Darbarīka stiprināšanas sistēma
Systém upínání pracovního nástroje
Systém upínania pracovného nástroja
A munkaszerszám rögzítési rendszere
Sistem de fixarea sculei de lucru
Sistema de fijar la herramienta de trabajo
Druga klasa bezpieczeństwa elektrycznego
Second class of insulation
Zweite Klasse der elektrischen Sicherheit
Второй класс электрической безопасности
Другий клас електричної ізоляції
Antros klasės elektrinė apsauga
Elektrības drošības II. klase
Druhá třída elektrické bezpečnosti
Druhá trieda elektrickej bezpečnosti
Második osztályú elektromos védelem
Securitatea electrică de clasa a doua
Segunda clase de la seguridad eléctrica
INSTRUKCJA ORYGINALNA
5
Page 6

PL GB D RUS UA LT LV CZ SK H RO E
OCHRONA ŚRODOWISKA
Symbol wskazujący na selektywne zbieranie zużytego sprzętu elektrycznego i elektronicznego. Zużyte urządzenia elektryczne są surowcami wtórnymi - nie wolno wyrzucać
ich do pojemników na odpady domowe, ponieważ zawierają substancje niebezpieczne dla zdrowia ludzkiego i środowiska! Prosimy o aktywną pomoc w oszczędnym gospodarowaniu zasobami naturalnymi i ochronie środowiska naturalnego przez przekazanie zużytego urządzenia do punktu sk
ograniczyć ilość usuwanych odpadów konieczne jest ich ponowne użycie, recykling lub odzysk w innej formie.
ENVIRONMENTAL PROTECTION
Correct disposal of this product: This marking shown on the product and its literature indicates this kind of product mustn’t be disposed with household wastes at the end of
its working life in order to prevent possible harm to the environment or human health. Therefore the customers is invited to supply to the correct disposal, differentiating this
product from other types of refusals and recycle it in responsible way, in order to re - use this components. The customer therefore is invited to contact the local supplier office
for the relative information to the differentiated collection and the recycling of this type of product.
UMWELTSCHUTZ
Das Symbol verweist auf ein getrenntes Sammeln von verschlissenen elektrischen und elektronischen Ausrüstungen. Die verbrauchten elektrischen Geräte sind Sekundärrohstoffe – sie dürfen nicht in die Abfallbehälter für Haushalte geworfen werden, da sie gesundheits- und umweltschädigende Substanzen enthalten! Wir bitten um aktive
Hilfe beim sparsamen Umgang mit Naturressourcen und dem Umweltschutz, in dem die verbrauchten Geräte zu einer Annahmestelle für solche elektrischen Geräte gebracht
werden. Um die Menge der zu beseitigenden Abfälle zu begrenzen, ist ihr erneuter Gebrauch, Recycling oder Wiedergewinnung in anderer Form notwendig.
ОХРАНА ОКРУЖАЮЩЕЙ СРЕДЫ
Данный символ обозначает селективный сбор изношенной электрической и электронной аппаратуры. Изношенные электроустройства – вторичное сырье, в
связи с чем запрещается выбрасывать их в корзины с бытовыми отходами, поскольку они содержат вещества, опасные для здоровья и окружающей среды! Мы
обращаемся к Вам с просьбой об активной помощи в отрасли экономного
изношенного устройства в соответствующий пункт хранения аппаратуры такого типа. Чтобы ограничить количество уничтожаемых отходов, необходимо
обеспечить их вторичное употребление, рециклинг или другие формы возврата.
ОХОРОНА НАВКОЛИШНЬОГО СЕРЕДОВИЩА
Вказаний символ означає селективний збір спрацьованої електричної та електронної апаратури. Спрацьовані електропристрої є вторинною сировиною,
з чим заборонено викидати їх у смітники з побутовими відходами, оскільки вони містять речовини, що загрожують здоровю та навколишньому середовищу!
Звертаємося до Вас з просьбою стосовно активної допомоги у галузі охорони навколишнього середовища та економного використання природних ресурсів шляхом
передачі спрацьованих електропристроїв у відповідний пункт, що займається їх переховуванням
створити можливість для їх вторинного використання, рециклінгу або іншої форми повернення до промислового обігу.
APLINKOS APSAUGA
Simbolis nurodo, kad suvartoti elektroniniai ir elektriniai įrenginiai turi būti selektyviai surenkami. Suvartoti elektriniai įrankiai, – tai antrinės žaliavos – jų negalima išmesti į
namų ūkio atliekų konteinerį, kadangi savo sudėtyje turi medžiagų pavojingų žmgaus sveikatai ir aplinkai! Kviečiame aktyviai bendradarbiauti ekonomiškame natūralių išteklių
tvarkyme perduodant netinkamą vartoti įrankį į suvartotų elektros įrenginių surinkimo punktą. Šalinamų atliek
reciklingas arba medžiagų atgavimas kitoje perdirbtoje formoje.
VIDES AIZSARDZĪBA
Simbols rāda izlietoto elektrisko un elektronisko iekārtu selektīvu savākšanu, Izlietotas elektriskas iekārtas ir otrreizējas izejvielas – nevar būt izmestas ar mājsaimniecības
atkritumiem, jo satur substances, bīstamas cilvēku veselībai un videi! Lūdzam akt
elektriskas ierīces savākšanas punktā. Lai ierobežot atkritumu daudzumu, tiem jābūt vēlreiz izlietotiem, pārstrādātiem vai dabūtiem atpakaļ citā formā.
OCHRANA ŽIVOTNÍHO PROSTŘEDÍ
Symbol poukazuje na nutnost separovaného sběru opotřebovaných elektrických a elektronických zařízení. Opotřebovaná elektrická zařízení jsou zdrojem druhotných
surovin – je zakázáno vyhazovat je do nádob na komunální odpad, jelikož obsahují látky nebezpečné lidskému zdraví a životnímu prostředí! Prosíme o aktivní pomoc při
úsporném hospodaření s přírodními zdroji a ochraně životního prostředí tím, že odevzdáte použité zařízení do sběrného střediska použitých elektrických zařízení. Aby se
omezilo množství odpadů, je nevyhnutné jejich opětovné využití, recyklace nebo jiná forma regenerace.
OCHRANA ŽIVOTNÉHO PROSTREDIA
Symbol poukazuje na nutnosť separovaného zberu opotrebovaných elektrických a elektronických zariadení. Opotrebované elektrické zariadenia sú zdrojom druhotných
surovín – je zakázané vyhadzovať ich do kontejnerov na komunálny odpad, nakoľko obsahujú látky nebezpečné ľudskému zdraviu a životnému prostrediu! Prosíme o
aktívnu pomoc pri hospodárení s prírodnými zdrojmi a pri ochrane životného prostredia tým, že opotrebované zariadenia odovzdáte do zberného strediska opotrebovaných
elektrických zariadení. Aby sa obmedzilo množstvo odpadov, je nutné ich opätovné využitie, recyklácia alebo iné formy regenerácie.
KÖRNYEZETVÉDELEM
A használt elektromos és elektronikus eszközök szelektív gyűjtésére vonatkozó jelzés: A használt elektromos berendezések újrafelhasználható nyersanyagok – nem szabad
őket a háztartási hulladékokkal kidobni, mivel az emberi egészségre és a környezetre veszélyes anyagokat tartalmaznak! Kérjük, hogy aktívan segítse a természeti források-
kal való aktív gazdálkodást az elhasznált berendezéseknek a tönkrement elektromos berendezéseket gyűjtő pontra történő beszállításával. Ahhoz, hogy a megsemmisítendő
hulladékok mennyiségének csökkentése érdekében szükséges a berendezések ismételt vagy újra felhasználása, illetve azoknak más formában történő visszanyerése.
PROTEJAREA MEDIULUI
Simbolul adunării selective a utilajelor electrice şi electronice. Utilajele electrice uzate sunt materie primă repetată – este interzisă aruncarea lor la gunoi, deoarece conţin
substanţe dăunătoare sănătăţii omeneşti cât dăunătoare mediului! Vă rugăm deci să aveţi o atitudine activă în ceace priveşte gospodărirea economică a resurselor naturale
şi protejarea mediului natural prin predarea utilajului uzat la punctul care se ocupă de asemenea utilaje electrice uzate. Pentru a limita cantităţile deşeurilor eliminate este
necesară întrebuinţatrea lor din nou , prin recyklind sau recuperarea în altă formă.
PROTECCIÓN DEL MEDIO AMBIENTE
El símbolo que indica la recolección selectiva de los aparatos eléctricos y electrónicos usados. ¡Aparatos eléctricos y electrónicos usados son reciclados – se prohíbe tirarlos
en contenedores de desechos domésticos, ya que contienen sustancias peligrosas para la salud humana y para el medio ambiente! Les pedimos su participación en la tarea
de la protección y de los recursos naturales y del medio ambiente, llevando los aparatos usados a los puntos de almacenamiento de aparatos eléctricos usados. Con el fin
de reducir la cantidad de los desechos, es menester utilizarlos de nuevo, reciclarlos o recuperarlos de otra manera.
использования природных ресурсов и охраны окружающей среды путем передачи
. З метою обмеження обєму відходів, що знищуються, необхідно
īvi palīdzēt saglabāt dabisku bagātību un sargāt vīdi, pasniegšot izlietoto iekārtu izlietotas
ładowania zużytych urządzeń elektrycznych. Aby
у звязку
ų kiekiui apriboti yra būtinas jų pakartotinis panaudojimas,
6
INSTRUKCJA ORYGINALNA
Page 7

PL
CHARAKTERYSTYKA NARZĘDZIA
Ręczna młotowiertarka jest narzędziem zwykłym, II klasy izolacji, przeznaczonym do wykonywania otworów oraz kucia w betonie,
kamieniu naturalnym i sztucznym, marmurze itp. za pomocą narzędzi roboczych wyposażonych w chwyt SDS Plus. Młotowiertar-
ka posiada płynną regulację obrotów wrzeciona oraz dzięki odłączeniu funkcji udaru umożliwia wiercenie w materiałach takich jak:
drewno, metal czy tworzywa sztuczne. Prawidłowa, niezawodna i bezpieczna praca elektronarzędzia jest zależna od właściwej
eksploatacji, dlatego:
Przed przystąpieniem do pracy z narzędziem należy przeczytać całą instrukcję i zachować ją.
Za szkody powstałe w wyniku nie przestrzegania przepisów bezpieczeństwa i zaleceń niniejszej instrukcji dostawca nie ponosi
odpowiedzialności.
WYPOSAŻENIE
W opakowaniu fabrycznym powinny się znajdować:
- młotowiertarka
- rękojeść dodatkowa
- ogranicznik głębokości wiercenia
- wiertła i dł
uta
- samozaciskowy uchwyt wiertarski
PARAMETRY TECHNICZNE
Parametr Jednostka miary Wartość
Numer katalogowy 79054
Napięcie znamionowe [V] ~230
Częstotliwość znamionowa [Hz] 50
Moc znamionowa [W] 620
Obroty znamionowe [min
Maks. średnica otworu (beton) [mm] 24
Energia udaru [J] 2,4
Częstotliwość udaru [min
Masa [kg] 2,8
Poziom hałasu
- ciśnienie akustyczne L
- moc L
± K [dB(A)] 103 ± 3
wA
Poziom drgań (rękojeść główna/ rękojeść dodatkowa) [m/s
Klasa izolacji II
Stopień ochrony IP20
± K [dB(A)] 92 ± 3
pA
-1
] 0 - 870
-1
] 0 - 4850
2
] 14,377 ± 1,5 / 11,618 ± 1,5
OGÓLNE WARUNKI BEZPIECZEŃSTWA
UWAGA! Przeczytać wszystkie poniższe instrukcje. Nieprzestrzeganie ich może prowadzić do porażenia elektrycznego, pożaru
albo do uszkodzeń ciała. Pojęcie „narzędzie elektryczne” użyte w instrukcjach odnosi się do wszystkich narzędzi napędzanych
prądem elektrycznym zarówno przewodowych jak i bezprzewodowych.
PRZESTRZEGAĆ PONIŻSZYCH INSTRUKCJI
Miejsce pracy
Miejsce pracy należy utrzymywać dobrze oświetlone i w czystości. Nieporządek i słabe oświetlenie mogą być przyczynami
wypadków.
Nie należy pracować narzędziami elektrycznymi w środowisku o zwiększonym ryzyku wybuchu, zawierającym palne
ciecze, gazy lub opary. Narzędzia elektryczne generują iskry, które mogą spowodować pożar w kontakcie z palnymi gazami
lub oparami.
Nie należy dopuszczać dzieci i osób postronnych do miejsca pracy. Utrata koncentracji może spowodować utratę kontroli
nad narzędziem.
Bezpieczeństwo elektryczne
Wtyczka przewodu elektrycznego musi pasować do gniazdka sieciowego. Nie wolno modyfikować wtyczki. Nie wolno
stosować żadnych adapterów w celu przystosowania wtyczki do gniazdka. Niemodyfikowana wtyczka pasująca do gniazdka
INSTRUKCJA ORYGINALNA
7
Page 8

PL
zmniejsza ryzyko porażenia prądem elektrycznym.
Unikać kontaktu z uziemionymi powierzchniami takimi jak rury, grzejniki i chłodziarki. Uziemienie ciała zwiększa ryzyko
porażenia prądem elektrycznym.
Nie należy narażać narzędzi elektrycznych na kontakt z opadami atmosferycznymi lub wilgocią. Woda i wilgoć, która
dostanie się do wnętrza narzędzia elektrycznego zwiększa ryzyko porażenia prądem elektrycznym.
Nie przeciążać kabla zasilającego. Nie używać kabla zasilającego do noszenia, podłączania i odłączania wtyczki od
gniazdka sieciowego. Unikać kontaktu kabla zasilającego z ciepłem, olejami, ostrymi krawędziami i ruchomymi elementami. Uszkodzenie kabla zasilającego zwiększa ryzyko porażenia prądem elektrycznym.
W przypadku pracy poza pomieszczeniami zamkniętymi należy używać przedłużaczy przeznaczonych do pracy poza
pomieszczeniami zamkniętymi. Uż
W przypadku, gdy używanie elektronarzędzia w środowisku wilgotnym jest nieuniknione, jako ochronę przed napięciem
zasilania należy stosować urządzenie różnicowoprądowe (RCD). Zastosowanie RCD zmniejsza ryzyko porażania prądem
elektrycznym.
Bezpieczeństwo osobiste
Przystępuj do pracy w dobrej kondycji fizycznej i psychicznej. Zwracaj uwagę na to, co robisz. Nie pracuj będąc zmęczonym lub pod wpływem leków lub alkoholu. Nawet chwila nieuwagi podczas pracy może prowadzić do poważnych obrażeń
ciała.
Używaj środków ochrony osobistej. Zawsze zakładaj gogle ochronne. Stosowanie środków ochrony osobistej, takich jak
maski przeciwpyłowe, obuwie ochronne, kaski i ochronniki słuchu zmniejszają ryzyko poważnych obrażeń ciała.
Unikaj przypadkowego włączenia narzędzia. Upewnij się, że włącznik elektryczny jest w pozycji „wyłączony” przed pod-
łączeniem narzędzia do sieci elektroenergetycznej. Trzymanie narzędzia z palcem na włączniku lub podłączanie narzędzia
elektrycznego, gdy włącznik jest w pozycji „włączony” może prowadzić do poważnych obrażeń ciała.
Przed włączeniem narzędzia elektrycznego usuń wszelkie klucze i inne narzędzia, które zostały użyte do jego regulacji.
Klucz pozostawiony na obracających się elementach narzędzia może prowadzić do poważnych obrażeń ciała.
Utrzymuj równowagę. Przez cały czas utrzymuj odpowiednią postawę. Pozwoli to na łatwiejsze zapanowanie nad narzę-
dziem elektrycznym w przypadku niespodziewanych sytuacji podczas pracy.
Stosuj odzież ochronną. Nie zakładaj luźniej odzieży i biżuterii. Utrzymuj włosy, odzież i rękawice robocze z dala od
ruchomych części narzędzia elektrycznego. Luźna odzież, biżuteria lub długie włosy mogą zaczepić o ruchome części na-
rzędzia.
Stosuj odciągi pyłu lub pojemniki na pył, jeśli narzędzie jest w takie wyposażone. Zadbaj o to, aby je poprawnie podłą-
czyć. Użycie odciągu pyłu zmniejsza ryzyko poważnych obrażeń ciała.
Użytkowanie narzędzia elektrycznego
Nie przeciążaj narzędzia elektrycznego. Używaj narzędzia właściwego do danej pracy. Odpowiedni dobór narzędzia do
danej pracy, zapewni wydajniejszą i bezpieczniejszą pracę.
Nie używaj narzędzia elektrycznego, jeśli nie działa jego włącznik sieciowy. Narzędzie, które nie daje się kontrolować za
pomocą włącznika sieciowego jest niebezpieczne i należy je oddać do naprawy.
Odłącz wtyczkę od gniazdka zasilającego przed regulacją, wymianą akcesoriów lub przechowywaniem narzędzia. Pozwoli to na uniknięcie przypadkowego włączenia narzędzia elektrycznego.
Przechowuj narzędzie w miejscu niedostępnym dla dzieci. Nie pozwól pracować osobom nieprzeszkolonym w zakresie
obsługi narzędzia. Narzędzie elektryczne może być niebezpieczne w rękach nieprzeszkolonej obsługi.
Zapewnij właściwą konserwację narzędzia. Sprawdzaj narzędzie pod kątem niedopasowań i luzów ruchomych części.
Sprawdzaj czy jakikolwiek element narzędzia nie jest uszkodzony. W przypadku wykrycia usterek należy je naprawić
przed użyciem narzędzia elektrycznego. Wiele wypadków jest spowodowanych przez niewłaściwe konserwowane narzędzia.
Narzędzia tnące należy utrzymywać czyste i naostrzone. Właściwie konserwowane narzędzia tnące jest łatwiej kontrolować
podczas pracy.
Stosuj narzędzia elektryczne i akcesoria zgodnie z powyższymi instrukcjami. Stosuj narzędzia zgodnie z przeznaczeniem
biorąc pod uwagę rodzaj i warunki pracy. Stosowanie narzędzi do innej pracy niż zostały zaprojektowane może zwiększyć
ryzyko powstawania niebezpiecznych sytuacji.
Naprawy
Naprawiaj narzędzie tylko w uprawnionych do tego zakładach, używających tylko oryginalnych części zamiennych. Za-
pewni to właściwe bezpieczeństwo pracy narzędzia elektrycznego.
DODATKOWE INSTRUKCJE BEZPIECZEŃSTWA
Zakładać ochronniki słuchu podczas pracy wiertarką udarową. Narażanie na hałas może spowodować utratę słuchu.
Narzędzia używać z dodatkowymi rękojeściami dostarczonymi z narzędziem. Utrata kontroli może spowodować osobiste
obrażenia operatora.
Stosować maski przeciwpyłowe. Użycie masek przeciwpyłowych zmniejsza ryzyko poważnych obrażeń ciała.
ycie odpowiedniego przedłużacza zmniejsza ryzyko porażenia prądem elektrycznym.
8
INSTRUKCJA ORYGINALNA
Page 9

PL
Podczas wykonywania pracy, w której narzędzie wstawione może zetknąć się z ukrytym przewodem pod napięciem
trzymać narzędzie elektryczne za pomocą izolowanych uchwytów. Narzędzie wstawiane podczas kontaktu z przewodem
pod napięciem może spowodować, że metalowe elementy narzędzia mogą się znaleźć pod napięciem, co może spowodować
porażenie elektryczne operatora narzędzia.
MONTAŻ ELEMENTÓW WYPOSAŻENIA
UWAGA! Montaż wyposażenia może być dokonywany tylko przy odłączonym napięciu zasilającym. Wyciągnąć wtyczkę przewodu narzędzia z gniazda sieciowego!
Montaż rękojeści dodatkowej (III)
Założyć rękojeść dodatkową w żądanym po
Montaż ogranicznika głębokości wiercenia (IV)
Jeżeli na wyposażeniu młota znajduje się ogranicznik głębokości wiercenia można go zamocować do rękojeści dodatkowej.
W zależności od sposobu mocowania należy wsunąć ogranicznik w otwór w rękojeści dodatkowej, a po ustaleniu właściwego
położenia zamocować za pomocą, przycisku, pokrętła lub dokręcając rękojeść dodatkową.
PRZYGOTOWANIE DO PRACY
Przed rozpoczęciem pracy należy sprawdzić czy korpus obudowy oraz przewód przyłączeniowy z wtyczką nie są uszkodzone. W
przypadku stwierdzenia uszkodzeń zabrania się dalszej pracy!
Uwaga! Wszystkie czynności związane z wymianą narzędzi roboczych (wiertła i przecinaki z chwytem SDS Plus), montażem
osłon i prowadnic, regulacją itp. należy przeprowadzać przy wyłączonym napięciu zasilającym narzędzie, dlatego przed przystąpieniem do tych czynności: Wyciągnąć wtyczkę przewodu narzędzia z gniazda sieciowego!
Zakładanie narzędzi roboczych SDS Plus w uchwycie narzędziowym
Oczyścić wybrane narzędzie z brudu i rdzy oraz posmarować uchwyt SDS Plus cienką warstwą smaru.
Przyciągnąć ku sobie uchwyt narzędziowy i przytrzymać w tej pozycji (V).
Włożyć oczyszczone narzędzie do otworu. W razie potrzeby przekręcić narzędzie, aby bez oporu weszło do uchwytu.
Puścić uchwyt, narzędzie powinno się automatycznie zablokować w uchwycie.
Sprawdzić czy narzędzie jest pewnie osadzone. W tym celu wystarczy spróbować wyciągnąć narzędzie z uchwytu SDS-Plus.
Jeśli wiertło lub przecinak wysuwa się z uchwytu, ponowić czynności montażowe.
Ustawianie kierunku obrotów (VII)
Ustawić przełącznik kierunku obrotów zgodnie ze strzałkami obroty w prawo – strzałka skierowana ku przodowi narzędzia, obroty
w lewo – strzałka skierowana ku tyłowi narzędzia.
Uwaga! Zmiana kierunku obrotów może być dokonana jedynie przy odłączonym napięciu zasilającym!
Ustawianie rodzaju pracy (VI)
Do ustawiania trybu pracy młotowiertarki służy przełącznik wyposażony w blokadę. Naciskając i przytrzymując przycisk blokady
można zmienić położenie przełącznika.
Funkcja pracy z udarem ułatwia wiercenie przy wykonywaniu otworów w betonie, murze i twardych materiałach ceramicznych
(twarde cegły, kamienie, marmur). W tym celu przełącznik udaru ustawić na pracę z udarem, symbol wiertła i młotka.
W czasie wiercenia otworów w innych materiałach, funkcję wiercenia z udarem należy wyłączyć, ustawiając przełącznik na pracę
bez udaru, symbol wiertła.
Możliwe jest też ustawienie funkcji kucia, w tym trybie zostają odłączone obroty, nie zostaje natomiast wyłączony udar.
W tym celu należy nastawić przełącznik trybu pracy w pozycję kucia, symbol młotka.
Młotowiertarka została wyposażona w funkcję zmiany położenia dłuta. Funkcja jest przydatna w przypadku kucia za pomocą różnych narzędzi wstawianych, pozwala na ustawienie dłuta w dowolnej pozycji. Przełącznika w tej pozycji nie można zablokować.
Czynności przygotowawcze
Wybierać właściwe narzędzie robocze i zamontować je w uchwycie narzędziowym.
Ustawić przełącznik rodzaju pracy w odpowiednie położenie: symbol młotka – kucie; symbol młotka i wiertła – wiercenie z udarem;
symbol wiertła – wiercenie bez udaru; trójkąt – ustawienie położenia dłuta.
Założyć ochronniki słuchu, ochronę oczu, rękawice robocze.
Włożyć wtyczkę przewodu do gniazda sieci elektrycznej.
Przyjąć pozycję gwarantującą zachowanie równowagi, chwycić oburącz młotowiertarkę i uruchomić ją naciskając palcem włącznik
elektryczny (VIII).
Przytrzymać narzędzie w tym stanie kilka minut, aby smar dotarł do wszystkich elementów mechanizmu napędowego.
łożeniu i zacisnąć ją dokręcając rękojeść uchwytu.
INSTRUKCJA ORYGINALNA
9
Page 10

PL
Wyłączyć młotowiertarkę przez zwolnienie włącznika.
Uwaga! W razie wystąpienia podejrzanych zgrzytów, trzasków itp. Natychmiast wyłączyć młotowiertarkę z sieci elektrycznej i
przekazać ją do przeglądu uprawnionemu zakładowi serwisowemu.
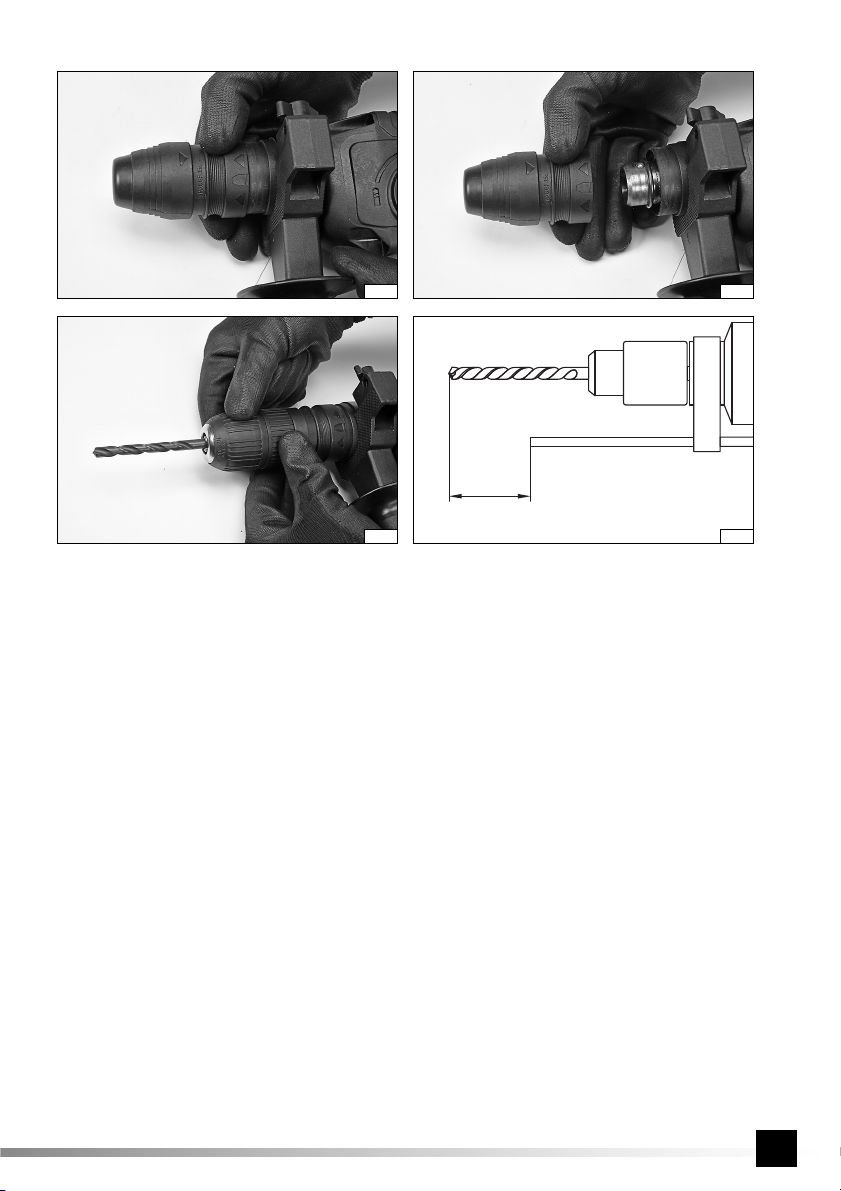
Wymiana uchwytu wiertarskiego
Młotowiertarka została wyposażona w możliwość zmiany chwytu wiertarskiego. Zamiast chwytu umożliwiającego montaż wiertła
w systemie SDS Plus można zamontować uchwyt umożliwiający montaż wierteł z chwytem walcowym.
W celu wymiany chwytu należy pierścień umieszczony z tyłu uchwytu pociągnąć w kierunku przodu uchwytu (IX). Umożliwi to
demontaż uchwytu. Uchwyt wiertarski należy zamontować naprowadzając go na tuleję wiertarki (X) i wciskając do zadziałania zatrzasku. Upewnić się, ż
Mocowanie wierteł w uchwycie wiertarskim samozaciskowym (XI)
Należy wybrać właściwe dla danej pracy wiertło z chwytem walcowym. Do uchwytu włożyć wiertło, chwycić tylna część uchwytu wiertarskiego, następnie kręcąc przednią częścią uchwytu zamocować wiertło, tak by było pewnie i mocno zamocowane w
uchwycie.
Uwaga! Nie zaleca się stosować uchwytu samozaciskowego do kucia. Obciążenia generowane przez mechanizm udarowy mogą
doprowadzić do zniszczenia uchwytu samozaciskowego.
UŻYTKOWANIE NARZĘDZIA
Uwaga! W czasie użytkowania młotowiertarki należy stosować ochronniki słuchu!
Stosowanie prawego lub lewego kierunku obrotów
Obroty prawe stosować w trakcie wiercenia powszechnie stosowanymi wiertłami prawoskrętnymi. Obroty lewe stosować w przypadku zakleszczenia się wiertła prawoskrętnego w materiale.
Stosowanie blokady włącznika
Blokadę włącznika zaleca się wykorzystywać w przypadku długotrwałego wiercenia, na przykład przy wierceniu w betonie, murze itp. W tym celu przy wciśniętym włączniku wcisnąć kciukiem przycisk blokady i puścić włącznik. W celu zwolnienia blokady
wystarczy przycisnąć włącznik elektryczny. Ze względów bezpieczeństwa nie jest możliwe stosowanie blokady przy obrotach w
lewą stronę.
Wiercenie w drewnie
Przed wykonaniem otworu zaleca się zamocować obrabiany materiał ściskami stolarskimi lub w imadle, a następnie punktakiem
lub gwoździem ustalić miejsce wiercenia. W uchwyt wiertarski zamocować właściwe wiertło, ustalić prędkość, podłączyć wiertarkę
do sieci elektrycznej i rozpocząć wiercenie. W przypadku wykonywania otworów przelotowych zaleca się pod materiał podłożyć
podkładkę drewnianą, dzięki czemu krawędź otworu u wylotu nie będzie poszarpana. W przypadku wykonywania otworów o
dużych średnicach wcześniej zaleca się wywiercić mniejszy otwór prowadzący.
Wiercenie w metalach
Zawsze należy pewnie zamocować obrabiany materiał. W przypadku cienkiej blachy zaleca się podłożyć pod nią kawałek drewna,
aby uniknąć niepożądanych zagięć itp. Następnie zaznaczyć miejsca wykonywania otworów punktakiem i rozpocząć wiercenie.
Używać wierteł do stali. W przypadku wiercenia w żeliwie białym zaleca się używanie wierteł z końcówkami z węglików spiekanych. Przy wierceniu większych otworów zaleca się wykonanie wcześniej mniejszego otworu prowadzącego. Przy wierceniu w
stali do chłodzenia wiertła używać oleju maszynowego. W przypadku aluminium stosować jako chłodziwo terpentynę lub parafinę.
W przypadku wierceniu w mosiądzu, miedzi lub żeliwie nie należy stosować środków chłodzących. W celu schłodzenia często
wyjmować wiertło z materiału aby pozwolić mu na ostygnięcie.
Wiercenie w materiałach ceramicznych
Wiercenie w twardych, zwartych materiałach: beton, twarda cegła, kamień, marmur itp.
Przy odłączonej od sieci elektrycznej młotowiertarce zamocować do uchwytu narzędziowego wiertło.
W razie potrzeby zamontować ogranicznik głębokości wiercenia.
Przełącznikiem trybu pracy wybrać wiercenie z udarem lub jeżeli jest dostępne, to wiercenie bez udaru.
Włożyć wtyczkę do gniazda sieci elektrycznej, włączyć włącznikiem młotowiertarkę i rozpocząć pracę.
W czasie pracy stosować regularne przerwy - nigdy nie dopuszczać do nadmiernego nagrzania młotowiertarki i narzędzia.
Wiercenie z udarem zaleca się stosować tylko w przypadku zwartych materiałów ceramicznych jak: beton, twarda cegła, kamień
itp. W przypadku wiercenia otworów o dużych średnicach zaleca się wykonanie otworu wstępnego o mniejszej średnicy, a następ-
nie użyć wiertła o docelowej średnicy. Należy stosować wiertła przeznaczone do wiercenia udarowego.
Nie zaleca się stosować wiercenia udarowego w przypadku materiałów ceramicznych o luźnej strukturze takich, jak: glazura,
miękka cegła, tynk itp. Wiercenie udarowe w takich materiałach może doprowadzić do zniszczenia materiału.
e zatrzask zadziałał i nie ma możliwości samoistnego odłączenia się uchwytu wiertarskiego w trakcie pracy.
10
INSTRUKCJA ORYGINALNA
Page 11

PL
Młotowiertarka jest wyposażona w sprzęgło zapobiegające przeciążeniu silnika elektrycznego w przypadku gdy narzędzie wstawiane zostanie zatrzymane w wyniku pracy. Na przykład w przypadku natrafienia w pręt zbrojeniowy. W takim wypadku wiertło
przestanie się obracać, mimo że silnik elektryczny nadal będzie pracował.
Ta kże wywieranie zbyt dużego nacisku w trakcie pracy może spowodować zadziałanie sprzęgła.
W takim wypadku należy wycofać narzędzie wstawiane z otworu, sprawdzić czy młotowiertarka pracuje poprawnie, a następnie
wznowić pracę przykładając tylko taki nacisk jaki jest konieczny do poprawnej pracy. W przypadku natrafienia na pręt zbrojeniowy
lub inne ukryte przeszkody metalowe, należy je przewiercić bez udaru za pomocą wiertła przeznaczonego do wiercenia w metalu
o tej samej średnicy co wiertło udarowe, a następnie kontynuować wiercenie w materiale ceramicznym.
Wiercenie w glazurze, miękkiej cegle, tynku itp.
Wiercić jak w przypadku materiałów twardych lecz bez udaru. Co pewien czas wyjmować wiert
usunięcia pyłu i odpadów. W trakcie wiercenia naciskać narzędzie ze stałą siłą.
Ustawianie położenia dłuta
Niektóre narzędzia wstawiane przeznaczone do kucia w celu bezpiecznej i ergonomicznej pracy wymagają ustawienia pod okre-
ślonym kątem, na przykład dłuta lub przecinaki. Można do tego celu użyć odpowiednego trybu pracy. Zamocować narzędzie wsta-
wiane w uchwycie zgodnie z zaleceniami podanymi w instrukcji. Ustawić przełącznik na symbol młotka ze strzałką, a następnie
nacisnąć włącznik. Narzędzie wstawiane zacznie się powoli obracać zgodnie z wybranym kierunkiem obrotów. Zwolnić nacisk
na włącznik po osiągnięciu przez narzędzie wstawiane pożądanej pozycji. Przestawić przełącznik trybu pracy w pozycję kucie
– symbol młotka, a następnie rozpocząć pracę.
Kucie
Przy odłączonej od sieci elektrycznej zamocować do uchwytu narzędziowego żądane narzędzie: przecinak lub przebijak.
Ustawić przełącznik rodzaju pracy w pozycję kucie. Włożyć wtyczkę do gniazda sieci elektrycznej, włączyć włącznikiem młotowiertarkę, poczekać do osiągnięcia pełnej prędkości i rozpocząć pracę.
Podczas kucia nie należy wbijać narzędzia wstawianego zbyt głęboko w obrabiany materiał. Należy skuwać materiał cienkimi
warstwami, nie wywierając zbyt dużego nacisku na młotowiertarkę.
Wycinanie otworów
Wiertarka może być wykorzystana do wykonywania większych otworów w drewnie za pomocą specjalnych wierteł o stałej śred-
nicy lub wymiennych końcówek z zestawu pił - wyrzynarek do otworów. W celu uniknięcia powstania zadziorów, poszarpanych
krawędzi wykonywanego otworu u wylotu otworu, pod materiał podłożyć kawałek drewna odpadowego.
Używanie przystawek
Wiertarki ze zmiennym kierunkiem obrotów nie powinny być używane do napędu przystawek roboczych.
Osłona uchwytu wiertarskiego
Jeżeli młotowiertarka została wyposażona w gumową osłonę uchwytu wiertarskiego, to zaleca się ją użyć w przypadku wiercenia
gdzie wiertło jest skierowane do góry, na przykład wierceniu w suficie. Po zamontowaniu wiertła w uchwycie należy nałożyć na
nie osłonę. Pył i odpady powstające podczas wiercenia będą gromadziły się w osłonie, co zapobiegnie zanieczyszczeniu uchwytu
wiertarskiego. Po skończonej pracy osłonę zdjąć z wiertła, oczyścić z pyłu i odpadków, a następnie opłukać pod strumieniem
letniej wody.
Wiercenie z użyciem ogranicznika głębokości (XII)
Ogranicznik można wykorzystać do ułatwienia wiercenia w powierzchniach, gdzie wykonywane są otwory nieprzelotowe, szczególnie w betonie i drewnie. Ustalić głębokość otworu. W uchwycie należy zainstalować wiertło, za pomocą flamastra zaznaczyć
na wiertle odległość od końca roboczego wiertła równą głębokości otworu. Ogranicznik głębokości ustawić tak, aby jego koniec
pokrywał się zaznaczoną odległością „L” na wiertle. Upewnić się, że ogranicznik nie przemieści się w trakcie pracy. Rozpocząć
wiercenie, przy ustalonej głębokości czoło ogranicznika oprze się o powierzchnię w pobliżu otworu. Należy wtedy wycofać wiertło
z otworu.
Uwagi dodatkowe
W czasie pracy nie należy wywierać zbyt dużego nacisku na obrabiany materiał i nie wykonywać gwałtownych ruchów, aby nie
spowodować uszkodzenia narzędzia roboczego i wiertarki. W czasie pracy stosować regularne przerwy. Nie wolno dopuścić do
przeciążenia narzędzia, temperatura powierzchni zewnętrznych nigdy nie może przekroczyć 60OC. Po zakończonej pracy wyłą-
czyć wiertarkę, wyjąć wtyczkę przewodu narzędzia z gniazda sieciowego i dokonać konserwacji i oględzin.
Deklarowana, całkowita wartość drgań została zmierzona za pomocą standardowej metody badań i może być użyta do porównania jednego narzędzia z drugim. Deklarowana, całkowita wartość drgań może zostać użyta we wstępnej ocenie ekspozycji.
Uwaga! Emisja drgań podczas pracy narzędziem może się różnić od zadeklarowanej wartości, w zależności od sposobu użycia
narzędzia.
Uwaga! Należy określić środki bezpieczeństwa mające chronić operatora, które są oparte na ocenie narażenia w rzeczywistych
ło z wierconego otworu w celu
INSTRUKCJA ORYGINALNA
11
Page 12

PL
warunkach użytkowania (wliczając w to wszystkie części cyklu pracy, jak na przykład czas kiedy narzędzie jest wyłączone lub
pracuje na biegu jałowym oraz czas aktywacji).
Smarowanie
Zawsze przed użyciem wierteł lub przecinaków należy je dokładnie oczyścić i posmarować chwyt SDS Plus cienką warstwą
smaru. Zaleca się stosowanie smaru przeznaczonego do uchwytów wiertarskich SDS Plus. W przypadku niewłaściwej pracy
mechanizmu udarowego, jedną z przyczyn może być niedostateczne smarowanie przekładni i zespołu korbowego tłoka udaru.
Zaleca się stosowanie smaru przeznaczonego do przekładni zębatych i korbowych. Uzupełnianie smaru zaleca się wykonać w
uprawnionym zakładzie serwisowym.
KONSERWACJA I PRZEGLĄDY
UWAGA! Przed przystąpieniem do regulacji, obsługi technicznej lub konserwacji wyciągnij wtyczkę narzędzia z gniazdka sieci
elektrycznej. Po zakończonej pracy należy sprawdzić stan techniczny elektronarzędzia poprzez oględziny zewnętrzne i ocenę:
korpusu i rękojeści, przewodu elektrycznego z wtyczką i odgiętką, działania włącznika elektrycznego, drożności szczelin wentylacyjnych, iskrzenia szczotek, głośności pracy łożysk i przekładni, rozruchu i równomierności pracy. W okresie gwarancji użytkownik
nie może domontować elektronarzędzi, ani wymieniać żadnych podzespołów lub części składowych, gdyż powoduje to utratę
praw gwarancyjnych. Wszelkie nieprawidłowości obserwowane przy przeglądzie, lub w czasie pracy, są sygnałem do przeprowadzenia naprawy w punkcie serwisowym. Po zakończeniu pracy, obudowę, szczeliny wentylacyjne, przełączniki, rękojeść dodatkową i osłony należy oczyścić np. strumieniem powietrza (o ciśnieniu nie większym niż 0,3 MPa), pędzlem lub suchą szmatką bez
użycia środków chemicznych i płynów czyszczących. Narzędzia i uchwyty oczyścić suchą czystą szmatą.
12
INSTRUKCJA ORYGINALNA
Page 13

GB
PROPERTIES OF THE TOOL
The manual hammer drill is an ordinary electric tool, insulation Class II, which has been designed for drilling and hammering in
concrete, natural and artificial stone, marble, etc., using working tools with an SDS Plus chuck system. The hammer drill permits
continuous adjustments of rotation of the spindle and by deactivation of the hammering action it permits drilling in such materials
as: wood, metal or plastics. A correct, reliable and safe operation of the tool depends on its correct use, so:
Read the operating manual thoroughly before work and keep it for future reference.
The supplier shall not be held responsible for any damage occurred as a result of failure to observe safety regulations and indications contained in this manual.
ACCESSORIES
There should be in the factory packaging:
- hammer drill
- additional shank
- drilling depth delimiter
- drills and chisels
- self locking drill shank
TECHNICAL PARAMETERS
Parameter Unit of measurements Value
Catalogue number 79054
Nominal voltage [V] ~230
Nominal frequency [Hz] 50
Nominal power [W] 620
Nominal rotation [min
Maximum hole diameter (concrete) [mm] 24
Hammering energy [J] 2,4
Hammering frequency [min
Mass [kg] 2,8
Level of noise
- acoustic pressure L
- power L
Level of vibration (main handle / additional handle) [m/s
Class of insulation II
Grade of protection IP20
± K [dB(A)] 92 ± 3
pA
± K [dB(A)] 103 ± 3
wA
-1
] 0 - 870
-1
] 0 - 4850
2
] 14,377 ± 1,5 / 11,618 ± 1,5
GENERAL SAFETY CONDITIONS
NOTE! Get acquainted with all the instructions below. Failure to observe them may lead to an electric shock, fire or injuries. The
notion of electric tool used in the instructions applies to all the tools which are powered with electric current, both wire tools and
wireless ones.
OBSERVE THE FOLLOWING INSTRUCTIONS
Place of work
The place of work must be properly illuminated and clean. Disorder and poor illumination may be a cause of accidents.
Do not work with electric tools in explosive environments, or those which contain inflammable liquids, gases or vapours.
Electric tools generate sparks, which may cause a fire in case of contact with inflammable gases or vapours.
Do not allow children and outsiders to the place of work. A lack of concentration may result in a loss of control over the tool.
Electric safety
The plug of the power supply cable must fit the mains socket. Do not modify the plug. Do not use any adapters whatsoever in order to adapt the plug to the socket. Unmodified plug which fits the socket reduces the risk of an electric shock.
Avoid contact with grounded surfaces, such as pipes, heaters and refrigerators. Grounding of the body increases the risk
of an electric shock.
Do not expose electric tools to precipitation or humidity. Water and humidity which gets into the electric tool increases the
risk of an electric shock.
ORIGINAL INSTRUCTIONS
13
Page 14

GB
Do not overload the power supply cable. Do not use the power supply cable in order to carry the tool or to connect and
disconnect the plug from the mains socket. Avoid contact of the power supply cable with heat, oils, sharp tools and
moving elements. Damage to the power supply cable increases the risk of an electric shock.
In case work is realised outside closed areas, it is necessary to use extension cords designed for applications outside
closed areas. Using a correct extension cord permits to reduce the risk of an electric shock.
If operating a power tool in a damp location is unavoidable, use a residual current device (RDC) protected supply. Use of
an RCD reduces the risk of electric shock.
Personal safety
Commence work in good physical and psychological conditions. Pay attention to what you do. Do not work if you are
tired or under effects of medicines or alcohol. Even a moment’s inattention during work may lead to serious injuries.
Always use individual means of protection. Always wear goggles. Using individual means of protection, such as dust-masks,
protective shoes, helmets and hearing protections permits to reduce the risk of serious injuries.
Avoid accidental activation of the tool. Make sure the switch is in the OFF position, before you connect the tool to the
mains. Holding the tool with a finger on the switch or connecting an electric tool when the switch is in the ON position may lead
to serious injuries.
Before you turn an electric tool on remove all the spanners and other tools, which have been used for adjustments. A
spanner left on rotating elements of the tool may lead to serious injuries.
Keep your balance. Maintain an appropriate position. It will permit to control the electric tool in case of unpredicted situations
during its operation.
Use protective clothes. Do not wear loose clothes or jewellery. Keep your hair, clothes and gloves away from moving
elements of the electric tool. Loose clothes, jewellery or long hair may get caught on moving elements of the tool.
Use dust extractors or dust containers, if the tool is equipped with any. Make sure they are properly connected. Using of
dust extractors permits to reduce the risk of serious injuries.
Operation of the electric tool
Do not overload the electric tool. Use a proper tool for the given purpose. A correct selection of the tool for the given work
will result in a more efficient and safer work.
Do not use the electric tool if the switch is not functioning properly. A tool which may not be controlled by means of a switch
is dangerous and must be repaired.
Disconnect the plug from the mains socket before any adjustment, replacement of accessories or storage of the tool. It
will permit to avoid accidental activation of the electric tool.
Store the tool away from children. Do not allow untrained persons to operate the tool. An electric tool may be dangerous
in hands of an untrained person.
Make sure the tool is properly maintained. Check the tool in order to detects any unfitting or loose moving elements.
Check whether the elements of the tool are not damaged. In case any damaged elements of the tool are detected, they
must be repaired before the electric tool is operated. Many accidents are caused by improper maintenance of tools.
Cutting tools must be sharp and clean. Properly maintained cutting tools are easier to control during work.
Use electric tools and accessories in accordance with the aforementioned instructions. Use the tool in accordance with
its purpose, taking into account the kind and conditions of work. Should the tool be used for other applications than the ones
it has been designed for, the risk of a dangerous situation increases.
Repairs
The tool may be repaired only by authorised service centres, which must use solely original spare parts. It will guarantee
a proper level of safety of operation of the electric tool.
ADDITIONAL SAFETY CONDITIONS
Wear ear protectors. Exposure to noise can cause hearing loss.
Use auxiliary handles supplied with the tool. Loss of control can cause personal injury.
Use anti-dust mask. Use of the anti-dust mask reduces the risk of the personal injury.
During the work, hold power tool by insulated gripping surface, because inserted tool may contact with hidden “live”
wire. Cutting a “live” wire may make exposed metal parts of the power tool “live” and could give the operator an electric shock.
INSTALLATION OF THE ACCESSORIES
ATTENTION! Installation of the accessories must be carried out when the power supply voltage is disconnected. Remove the plug
of the cord of the tool from the mains socket!
Installation of the additional handle (III)
Install the additional handle in the desired position and tighten it, turning the grip of the handle.
14
ORIGINAL INSTRUCTIONS
Page 15

GB
Installation of the drilling depth-limiting device (IV)
If the hammer drill is equipped with a drilling depth-limiting device, it may be installed on the additional handle.
Depending on the installation system the limiting device should be inserted into the hole in the additional handle, and once the
right position has been determined, it should be fastened with a button, handwheel or turning the additional handle.
PREPARATION FOR WORK
Before work may commence, it is necessary to make sure the enclosure and the cord with plug are not damaged. In case any
damage is detected, it is prohibited to continue working!
Attention! All actions consisting in replacement of the working tools (drill and cutter with the SDS Plus chuck system), installation
of guards and guides, adjustments etc. must be carried out when the power supply voltage is disconnected: Remove the plug of
the cord of the tool from the mains socket!
Installation of SDS Plus working tools in the tool chuck
Clean the selected tool of dirt and rust and lubricate The SDS Plus chuck with a thin layer of grease.
Tool the tool chuck towards you and maintain it in this position (V).
Insert a clean tool in the opening. If necessary, turn the tool, so that it enters the chuck without resistance.
Release the chuck; the tool should lock automatically in the chuck.
Make sure the tool is securely installed, trying to remove it from the SDS-Plus chuck. If the drill or the cutter can be removed from
the chuck, the installation procedure must be repeated.
Setting the direction of the rotation (VII)
Set the rotation switch in accordance with the arrows; right rotation – the arrow pointing to the front of the tool, left rotation – the
arrow pointing to the back of the tool.
Attention! The direction of the rotation of the tool may be changed only if the power supply voltage is off!
Setting for the type of work (VI)
The switch, equipped with a lock, is used for setting an operating mode of the hammer drill. By pressing and holding the lock
button you can change the position of the switch.
Impact mechanism facilitates drilling holes in concrete, masonry and hard ceramic materials (hard bricks, stones, marble). To do
this, set the impact switch for drilling with impact, marked by the symbol of the drill and a hammer.
When you are drilling holes in other materials, you should disable the function for drilling with impact by setting the impact switch
to work without a stroke, marked by the drill symbol.
It is also possible to set the function of hammering, in this mode the tool rotation is switched off, however the impact is not switched
off.
To do this, you should set the work mode switch to the position of hammering, marked by the hammer symbol.
Hammer drill is equipped with a function for changing the position of the chisel. The function is useful in the case of hammering by
using inserted various tools, this allows you to set the chisel in any position. The switch in this position cannot be blocked.
Preparatory steps
Choose the right tool and mount it in the tool holder.
Set the switch for type of work in its appropriate location: the symbol of the hammer - forging; the symbol of the hammer and drill
bit - impact drilling; the symbol of the drill - drilling without an impact; triangle - setting the chisel position.
Put on hearing protectors, eye protection, and work gloves.
Insert the cord plug to the mains socket.
Take the position to ensure the proper balance, grab the hammer drill with both hands and start it by pressing the electric switch
(VIII) with your finger.
Hold the tool in this state for a few minutes, so grease can reach all the elements of the drive mechanism.
Turn off the hammer drill by releasing the switch.
Attention! In the event of suspicious glitches, cracks, etc. you should immediately turn off the hammer drill from the mains and
take it for inspection to the authorized service workshop.
Replacement of the drill shank
Hammer drill is equipped with a function for changing the position of the drill shank. Instead of a shank to mount the drill of SDS
Plus system, you can mount the shank for mounting the drills with roll drill shank.
To replace the shank you should placed the the ring, which is located on shank back, and pull it toward the front of the shank (IX).
This will allow the removal of the shank. The drill shank must be mounted by guiding it on the drill sleeve (X) and pushing it until
the latch catches. Make sure, the latch caught and there is no possibility of spontaneous disconnection of the drill shunk during
operation.
ORIGINAL INSTRUCTIONS
15
Page 16

GB
Mounting the drill bits in the self-locking shank (XI)
You should select the drill which is appropriate for your work with roll drill bit shank. Insert the drill bit to the shank, grab the back
part of the drill shank, then, by turning the front part of the shank, mount the drill bit, so it is tightly and firmly fixed in the shank.
Attention! It is not recommended to use the self locking shank for forging. The tensions, which are generated by the hammer
mechanism can lead to the destruction of the self locking shank.
USING THE TOOL
Attention! While operating the hammer drill, it is required to use hearing protection!
Right or left rotation
Right rotation should be used while drilling with common right turn drill. Left rotation must be used if the right turn drill is jammed
in the material.
Using the switch lock
It is recommended to use the switch lock in case of long drilling, e.g. in case of drilling in concrete, walls, etc. While the switch
is pressed, press the lock button with your thumb and release the switch. In order to release the lock, it is sufficient to press the
electric switch.
Drilling in wood
Before drilling, it is recommended to fix the material to be processed with a clamp or in an anvil, and then using a punch or a nail
mark the place of drilling. Install the drill in the chuck, set the speed, connect the drill to the mains and start drilling. In case of
drilling through the material, it is recommended to place a wooden pad under the material, so that the edge of the hole at the outlet
will be smooth. In case of drilling large diameter holes, it is recommended to drill first a smaller guide hole.
Drilling in metals
It is always necessary to fix the material to be processed securely. In case of thin sheet metal, it is recommended to place a piece
of wood under it, so as to avoid any deformations. Then mark the places of drilling using a punch and start drilling. Use drills for
steel. In case of drilling in white cast iron, it is recommended to use drills with sintered carbide bits. While drilling larger holes, it is
recommended to drill first a smaller guide hole. While drilling steel, cool the drill with machine oil. In case of drilling in aluminium,
use turpentine oil or paraffin to cool the drill. In case of drilling in brass, copper or cast iron do not use any substances to cool the
drill. In order to cool it, is required to remove it frequently from the material.
Drilling in ceramic materials
Drilling in hard and compact materials: concrete, hard bricks, stone, marble etc.
While the hammer drill is disconnected from the mains, install a drill in the chuck.
If necessary, install the drilling depth-limiting device.
Set the operating mode selector to drilling with hammer action, or if it is available, to drilling without hammer action.
Plug the tool to the mains, turn the hammer drill on with the switch and start work.
During work make regular breaks – avoid overheating of the hammer drill and the tool.
Drilling with hammer action is recommended only in case of compact ceramic materials: concrete, hard bricks, stone etc. In case
of drilling holes of large diameter, it is recommended to drill first a smaller guide hole, and then use a drill of the final diameter. Use
drills designed for hammer action drilling.
It is not recommended to use the hammer action function in case of ceramic materials of loose structure, such as: glaze, soft
bricks, plaster, etc. Hammer action drilling in such materials may damage the material.
The hammer drill is equipped with a clutch that prevents overloading of the electric motor in case when the tool is jammed during
work, for example as a result of hitting a reinforcement wire. In such cases the drill will stop rotating, although the electric motor
is still working.
Also excessive pressure exerted on the tool during work may cause activation of the clutch.
In such cases remove the tool from the hole, make sure the hammer drill is functioning correctly and then resume work, applying
only the pressure which is necessary for proper operation. In case a reinforcement rod or another hidden metal obstacle is hit,
drill it using the hammer action function and a drill for metal of the same diameter as the hammer action drill, and then continue
drilling in the ceramic material.
Drilling in glaze, soft brick, plaster, etc.
Drill as in case of hard materials, but without hammer action. From time to time remove the drill from the hole, in order to remove
dust and debris. While drilling press the tool with constant strength.
Adjustments of the angle of the chisel
Certain hammering tools require adjustments to a certain angle, in order to guarantee a safe and ergonomic operation, for exam-
16
ORIGINAL INSTRUCTIONS
Page 17

GB
ple chisels and cutters. It is possible to use for this purpose an adequate operating mode selector. Install the tool in the chuck in
accordance with the recommendations indicated in the manual. Set the selector to the hammer symbol with an arrow, and then
press the switch. The tool will start to rotate in accordance with the selected direction of rotation. Release the switch, once the
tool has reached the required position. Set the operating mode selector to the hammering position – hammer symbol, and then
start work.
Hammering
While the tool is disconnected from the mains install the required tool in the chuck: cutter or punch.
Set the operating mode selector to the hammering position. Plug the drill to the mains, turn the hammer drill on with the switch,
wait until it has reached the full speed and start work.
During hammering, do not drive the tool too much into the material to be processed. Hack the material off in thin layers, not exerting excessive pressure on the hammer drill.
Carving holes
The drill may be used to carve larger holes in wood, using special drills of fixed diameter or interchangeable bits from the saw set
– jig-saws. In order to obtain smooth edges of the outlet of the hole, place a piece of wood under the material.
Using attachments
Drills with adjustable direction of rotation should not be used with attachments.
Protection of the drilling chuck
If the hammer drill is equipped with a rubber protection of the chuck, then it is recommended to use it in case of drilling with the
drill pointing up, e.g. for drilling in ceilings. Once the drill has been installed in the chuck, place the protection on it. Dust and debris
generated during drilling will accumulate in the protection, which permits to keep the chuck clean. Once work has ended, remove
the protection from the drill, remove dust and debris from the protection, and then rinse it under lukewarm water.
Drilling with the depth delimiter (XII)
The delimiter can be used to facilitate the drilling of surfaces, where there are performed blind holes, particularly in concrete and
wood. Determine the depth of the hole. Install the drill bit in the holder, by using a pen you should mark on the drill bit a distance,
from the working drill end which is equal to the depth of the hole. set the depth delimiter so its end would cover the marked the
distance „L” on the bit. Make sure, that the delimiter does not move during operation. Start drilling, at a fixed depth the delimiter
forehead will rest on the surface around the hole. You should withdraw the drill bit out of the hole.
Additional remarks
During work do not exert excessive pressure on the material to be processed and do not make abrupt movements, so as not to damage
the tool and the drill. Make regular breaks during work. Avoid overloading the tool. The temperature of the external surfaces must not
O
exceed 60
C. Once work has been finished, turn the drill off, unplug it from the mains and proceed to maintenance and inspection.
The declared total value of vibrations has been determined by means of a standard method and it may be used for comparative
purposes. The declared total value of vibrations may be applied in the preliminary assessment of exposure.
Attention! The emission of vibrations during work with the tool may differ from the declared value, depending on the use of the tool.
Attention! It is required to determine safety means to protect the operator, which are based on assessment of exposure under real operating conditions (including the whole working cycle, as for example the time when the tool is of or idling, and the time of activation).
Lubrication
Before each use of drills or cutters they must be thoroughly cleaned and the SDS Plus chuck must be lubricated with a thin layer
of grease. It is recommended to use grease designed for the SDS Plus chucks. In case of incorrect operation of the hammer
action mechanism, one of the reasons may be incorrect lubrication of the gear and the crank assembly of the hammer action
piston. It is recommended to use grease designed for toothed and crank gears. It is recommended to have grease refilled in an
authorised service point.
MAINTENANCE AND OVERHAUL
ATTENTION! Before any adjustment, technical service or maintenance operations unplug the tool. Once the operations have been
finished, the technical conditions of the tool must be assessed by means of external evaluation and inspection of the following
elements: body and handle, conductor with a plug and deflection, functioning of the electric switch, patency of ventilation slots,
sparking of brushes, noise level of functioning of bearings and gears, start-up and smoothness of operation. During the guarantee
period, the user cannot dismantle the electric tools or change any sub-assemblies or elements, since it will cancel any guarantee
rights. All irregularities detected at overhaul or during functioning of the tools are a signal to have the tool repaired at a service
shop. Once the functioning has been concluded, the casing, ventilation slots, switches, additional handle and protections must be
cleansed with a stream of air (at a pressure not exceeding 0.3 MPa), with a brush or a cloth without any chemical substances or
cleaning liquids. Tools and handles must be cleansed with a clean cloth.
ORIGINAL INSTRUCTIONS
17
Page 18

D
CHARAKTERISTIK DES WERKZEUGES
Der Hand-Bohrhammer ist ein gewöhnliches Werkzeug der II. Isolationsklasse, das für die Ausführung von Bohrungen und
Schmiedearbeiten im Beton, Natur- und Kunststein, Marmor usw. mit Hilfe von Arbeitswerkzeugen, die mit dem Schaft SDS
Plus ausgestattet sind, bestimmt ist. Der Bohrhammer besitzt eine fließende Drehzahlregelung der Spindel und auf Grund des
Abschaltens der Schlagfunktion wird das Bohren in solchen Materialien ermöglicht, wie Holz, Metall oder Kunststoff. Der richtige,
zuverlässige und sichere Funktionsbetrieb der Anlage ist von der korrekten Nutzung abhängig, deshalb:
Vor Beginn der Arbeiten mit dieser Anlage muss man die gesamte Anleitung durchlesen und sie einhalten.
Für sämtliche Schäden, die im Ergebnis der Nichteinhaltung von Sicherheitsvorschriften und Empfehlungen der vorliegenden
Anleitung entstanden, übernimmt der Lieferant keine Verantwortung.
AUSRÜSTUNG
In der fabrikmäßigen Verpackung sollten sich folgende Ausrüstungen befinden:
- Schlagbohrmaschine
- zusätzlicher Handgriff
- Tiefenbegrenzer beim Bohren
- Bohrer und Meißel
- selbstklemmendes Bohrfutter
TECHNISCHE PARAMETER
Parameter Maßeinheit Wert
Katalognummer 79054
Nennspannung [V] ~230
Nennfrequenz [Hz] 50
Nennleistung [W] 620
Nenndrehzahl [min
Max. Durchmesser der Bohrung (Beton) [mm] 24
Schlagenergie [J] 2,4
Schlagfrequenz [min
Gewicht [kg] 2,8
Lärmpegel
- Schalldruck L
- Leistung L
Schwingungspegel (Hauptgriff/Zusatzgriff) [m/s
Isolationsklasse II
Schutzgrad IP20
± K [dB(A)] 92 ± 3
pA
± K [dB(A)] 103 ± 3
wA
-1
] 0 - 870
-1
] 0 - 4850
2
] 14,377 ± 1,5 / 11,618 ± 1,5
ALLGEMEINE SICHERHEITSBEDINGUNGEN
ACHTUNG! Die nachstehenden Anweisungen durchlesen. Die Nichteinhaltung der nachstehenden Anweisungen kann einen
elektrischen Schlag, Brand oder Körperverletzungen führen. Der Begriff „Elektrowerkzeug” bezieht sich auf alle mit dem elektrischen Strom angetriebenen Werkzeuge sowohl mit der Netzleitung als auch ohne Netzleitung.
DIE NACHSTEHENDEN ANWEISUNGEN EINHALTEN!
Arbeitsplatz
Der Arbeitsplatz soll gut beleuchtet sein und In der Sauberkeit gehalten werden. Das Durcheinander und nicht ausreichende
Beleuchtung können Arbeitsunfälle verursachen.
Die Elektrowerkzeuge dürfen in der Umgebung mit erhöhter Explosionsgefahr, oder brennbaren Flüssigkeiten Gasen
oder Dunste nicht verwendet werden. Die Elektrowerkzeuge erzeugen Funken, die in Berührung mit brennbaren Gasen oder
Dunsten Brand verursachen können.
Kindern und unbefugte Personen fern von dem Arbeitsplatz halten. Die Konzentrationsschwäche kann zum Verlieren des
Beherrschens über dem Werkzeug führen.
Elektrische Sicherheit
Leitungsstecker muss an die Netzsteckdose passen. Der Stecker darf nicht modifiziert werden. Keine Adapter zur Anpassung des Leitungssteckers an die Netzsteckdose verwenden. Der nicht modifizierte Leitungsstecker, der genau an die
18
ORIGINALANLEITUNG
Page 19

D
Netzsteckdose passt vermindert die Gefahr des elektrischen Schlages.
Den Kontakt mit geerdeten Flächen wie Rohre, Heizkörper, Kühlschränke vermeiden. Die Körpererdung erhöht das Risiko des elektrischen Schlages. Die Elektrowerkzeuge dürfen dem Einfluss von atmosphärischen Niederschlägen oder
Der Feuchtigkeit nicht ausgesetzt werden. Wasser und Feuchtigkeit, die in das Innere des Elektrowerkzeuges eindringen,
erhöhen die Gefahr des elektrischen Schlages.
Den Netzkabel nicht überlasten. Die Netzkabel nicht zum Tragen, Abschalten und Einschalten des Leitungssteckers zum
Netzsteckdose verwenden. Den Kontakt des Leitungskabels mit der Wärme, Öl, scharfen Kanten und beweglichen Teilen
vermeiden. Beschädigung des Leitungskabels erhöht die Gefahr des elektrischen Schlages.
Be idem Einsatz außerhalb der geschlossener Räumen sollen für Außen geeignete Verlängerungsschnüre verwendet
werden. Die Verwendung der geeigneten Verlängerungsschnüre vermindert die Gefahr des elektrischen Schlages.
In dem Fall, wenn der Einsatz des Elektrowerkzeuges in einem feuchten Umfeld unvermeidlich ist, dann muss man als
Schutz vor der Spannung der Stromversorgung ein Differentialstromgerät (RCD) verwenden. Die Anwendung des RCD
verringert das Risiko eines elektrischen Stromschlags.
Personensicherheit
Dei Arbeit soll bei guter körperlicher und geistlicher Verfassung ausgeführt werden. Immer darauf achten was gemacht
wird. Die Arbeit darf nicht bei der Ermündung oder unter Einfluss von Alkohol oder Medikamenten ausgeführt werden.
Sogar eine momentane Unaufmerksamkeit während der Arbeit kann zu ernsthaften Körperverletzungen führen.
Die persönlichen Schutzmittel verwenden. Immer die Schutzbrille tragen. Die Verwendung von persönlichen Schutzmitteln
wie Staubmasken, Schutzschuhe, Helme und Gehörschutz vermindern die Gefahr der ernsthaften Körperverletzungen.
Das zufällige Einschalten des Elektrowerkzeuges vermeiden. Bitte prüfen ob der Schalter in der Stellung „AUS” steht
bevor das Elektrowerkzeug an das elektrische Netz angeschlossen wird. Das Halten der Finger auf dem Schalter oder
Anschluss des Elektrowerkzeuges bei dem eingeschalteten Schalter kann zu ernsthaften Körperverletzungen führen.
Vor Einschalten des Elektrowerkzeuges sollen alle Schlüssel und Werkzeuge entfernt werden, die zur Einstellung verwendet worden waren. Der an den beweglichen Teilen des Werkzeuges hintergelassene Schlüssel kann ernsthafte Körperver-
letzungen herbeiführen.
Gleichgewicht halten. Durch die ganze Zeit entsprechende Arbeitsstellung einnehmen. Dadurch lässt sich das Elektrowerkzeug in den unerwarteten Notfällen bei der Arbeit leichter beherrschen.
Schutzkleidung tragen. Keine lose Kleidung oder Schmuck tragen. Haare, Kleidung und Arbeitshandschuhe fern von
den beweglichen Teilen des Elektrowerkzeuges halten. Lose Kleidung, Schmuck oder lange Haare können an die bewegliche
Teile des Elektrowerkzeuges anhaken.
Staubabsaugung oder Staubbehälter verwenden falls das Werkzeug damit ausgestattet wird. Bitte sorgen Sie dafür
damit sie sachgemäß angeschlossen sind. Verwendung der Staubabsaugung vermindert die Gefahr der ernsthaften Körper-
verletzungen.
Verwendung des Elektrowerkzeuges
Das Elektrowerkzeug nicht überlasten. Das zur ausführende Aufgabe geeignete Werkzeug verwenden. Entsprechende
Auswahl des Werkzeuges gewährleistet eine leistungsfähige und sichere Arbeit.
Das Werkzeug darf nicht verwendet werden, falls der Netzschalter nicht funktioniert. Das Werkzug, welches sich mit dem
Schalter nicht kontrollieren lässt, ist gefährlich und soll zur Reparatur geliefert werden.
Den Leitungsstecker von der Netzsteckdose herausziehen wenn das Werkzeug eingestellt oder Zubehör ausgetauscht
bzw. das Werkzeug aufbewahrt wird. Dadurch wird das zufällige Einschalten des Elektrowerkzeuges vermieden.
Das Elektrowerkzeug vor den Zutritt von Kindern schützen. Die bei der Bedienung des Werkzeuges nicht eingeschulten
Personen dürfen das Werkzeug nicht verwenden. Das Elektrowerkzeug kann in den Händen der nicht geschulten Personen
gefährlich sein.
Entsprechende Instandhaltung des Werkzeuges gewährleisten. Das Werkzeug auf nicht eingepasste Teile und Spiele
der beweglichen Teile prüfen. Bitte überprüfen, ob irgendein Bestandteil des Werkzeuges nicht beschädigt ist. Die Störungen sollen vor dem Einsatz des Werkzeugen beseitigt werden. Viele Unfälle sind durch nicht sachgemäße Instandhaltung
des Werkzeuges verursacht.
Schneidewerkzeugen sollten sauber und geschärft sein. Sachgemäß geschärfte Schneidenwerkzeuge lassen sich besser
während der Arbeit kontrollieren.
Dei Elektrowerkzeuge und Zubehör gemäß der vorstehenden Anweisungen benutzen. Die Werkzeuge entsprechend der
Aufgabe und die Arbeitsbedingungen einsetzen. Die nicht bestimmungsgemäße Verwendung des Werkzeuges kann das
Risiko der Gefahren erhöhen.
Instandsetzungen
Die Werkzeuge sollen nur in den autorisierten Werkstätten bei der Verwendung der Originalersatzteile repariert werden.
Dadurch wird die entsprechende Arbeitssicherheit des Elektrowerkzeuges gewährleistet.
ORIGINALANLEITUNG
19
Page 20

D
ZUSÄTZLICHE SICHERHEITSHINWEISE
Während der Arbeit mit der Schlagbohrmaschine sind Ohrenschützer anzulegen. Die ständige Lärmbelastung kann zu
einem Gehörverlust führen.
Das Werkzeug ist mit einem zusätzlichen Haltegriff zu benutzen, der mit dem Werkzeug angeliefert wird. Der Verlust der
Kontrolle über das Werkzeug kann persönliche Verletzungen des Bedieners hervorrufen.
Ebenso sind Staubschutzmasken zu verwenden. Der Gebrauch von Staubschutzmasken verringert das Risiko von ernsthaften
Körperverletzungen.
Während der Ausführung der Arbeiten, bei denen das eingesetzte Werkzeug sich mit einer verdeckten Leitung unter
Spannung berühren kann, ist das Elektrowerkzeug an den isolierten Griffen zu halten. Das eingesetzte Werkzeug kann bei
Kontakt mit einer spannungführenden Leitung bewirken, dass im Ergebniss dessen die Metallelemente unter Spannung stehen,
was wiederum zu einem elektrischen Stromschlag des Werkzeugbedieners führen kann.
MONTAGE DER AUSRÜSTUNGSELEMENTE
HINWEIS! Die Montage der Ausrüstung darf nur bei abgetrennter Stromversorgungsspannung erfolgen. Der Stecker der Anschlussleitung des Werkzeuges ist aus der Netzsteckdose zu ziehen!
Montage des zusätzlichen Handgriffes (III)
Den zusätzlichen Handgriff in die gewünschte Lage bringen und ihn zusammendrücken, wobei der Handgriff des Futters angeschraubt wird.
Montage des Begrenzers der Bohrtiefe (IV)
Wenn sich bei der Ausrüstung des Bohrhammers ein Begrenzer der Bohrtiefe befindet, kann man ihn an den zusätzlichen Handgriff befestigen.
In Abhängigkeit von der Art der Befestigung muss man den Begrenzer in das Loch im Zusatzgriff schieben und nach Ermittlung
der richtigen Lage und mit Hilfe einer Taste, Stellrades oder durch Anschrauben des Zusatzgriffes befestigen.
BETRIEBSVORBEREITUNG
Vor Arbeitsbeginn muss man überprüfen, ob das Gehäuse und die Anschlussleitung mit Stecker nicht beschädigt sind. Beim
Feststellen von Beschädigungen ist der weitere Funktionsbetrieb verboten.
Hinweis! Alle Tätigkeiten im Zusammenhang mit dem Wechsel der Arbeitswerkzeuge (Bohrer und Bohrmeißel mit dem Schaft
SDS Plus), der Montage von Abdeckungen und Führungen, mit der Regelung usw. müssen bei ausgeschalteter Spannung der
Stromversorgung f+r das Werkzeug durchgeführt werden. Deshalb gilt vor Aufnahme dieser Tätigkeiten: Den Stecker der Lei-
tung des Werkzeuges aus der Netzsteckdose ziehen!
Einlegen der Arbeitswerkzeuge SDS Plus in das Werkzeugfutter
Das ausgewählte Werkzeug von Schmutz und Rost reinigen und das Futter SDS Plus mit einer dünnen Schmiermittelschicht
einreiben. Ziehen Sie das Werkzeugfutter zu Ihnen und halten Sie es in dieser Position (V).
Das gereinigte Werkzeug in die Öffnung legen. Bei Bedarf das Werkzeug verdrehen, bis es ohne Widerstand in das Futter geht.
Das Futter loslassen, das Werkzeug sollte sich automatisch im Futter blockieren.
Prüfen Sie jetzt, ob das Werkzeug im Futter fest sitzt. Zu diesem Zweck reicht es aus, wenn man probiert, das Werkzeug aus
dem Futter SDS Plus herauszuziehen. Sollte der Bohrer oder der Bohrmeißel sich aus dem Futter schieben, dann muss man die
Montagetätigkeiten wiederholen.
Einstellen der Drehrichtung (VII)
Den Drehrichtungsschalter entsprechend den Pfeilen einstellen, Drehungen nach rechts – der Pfeil ist zum vorderen Teil des
Werkzeuges gerichtet, Drehungen nach links – Pfeil ist nach hinten gerichtet.
Hinweis! Eine Drehrichtungsänderung darf nur bei abgetrennter Spannung der Stromversorgung erfolgen.
Einstellen der Betriebsart (VI)
Zum Einstellen der Betriebsart der Schlagbohrmaschine dient ein Schalter, der mit einer Blockade ausgerüstet ist. Durch Drücken
und Festhalten der Blockadetaste kann man die Stellung des Schalters verändern.
Die Betriebsfunktion mit Schlag erleichtert das Bohren in Betonwänden, Mauern und hartem Keramikmaterial (harte Ziegel, Steine,
Marmor). Zu diesem Zweck wird der Schalter auf das Schlagbohren eingestellt, das Symbol des Bohrers und des Hammers.
Beim Bohren der Löcher in anderen Materialien ist der Schlagmechanismus auszuschalten, in dem man den Schalter auf den
Betrieb ohne Schlag einstellt, das Symbol des Bohrers.
Die Einstellung der Funktion des Schmiedens ist auch möglich. In dieser Betriebsart werden die Umdrehungen abgeschaltet, aber
nicht die Schlagfunktion.
20
ORIGINALANLEITUNG
Page 21

D
Zu diesem Zweck muss man den Schalter auf die Betriebsart Schmieden verstellen, Symbol des Hammers.
Die Schlagbohrmaschine wurde mit einer Funktion zur Änderung der Meißelstellung ausgerüstet. Diese Funktion eignet sich für
das Schmieden mit verschieden eingesetzten Werkzeugen, ermöglicht die Einstellung des Meißels in einer beliebigen Position..
In dieser Position kann man den Schalter nicht blockieren.
Vorbereitende Tätigkeiten
Wählen Sie das richtige Arbeitswerkzeug aus und montieren Sie es in die Werkzeughalterung.
Der Schalter für die Betriebsart ist in die entsprechende Position zu bringen: Symbol des Hammers – Schmieden; Symbol des
Hammers und des Bohrers – Schlagbohren; Symbol des Bohrers – Bohren ohne Schlag; Symbol eines Dreiecks Einstellen der
Meißelstellung. .
Gehör- und Augenschutzmittel sowie Arbeitshandschuhe sind anzulegen.
Den Leitungsstecker in die Netzsteckdose stecken.
Nehmen Sie eine entsprechende Arbeitshaltung ein, die das Gleichgewicht garantiert. Die Schlagbohrmaschine ist mit beiden
Händen zu ergreifen und durch das Drücken des Elektroschalters mit dem Finger in Betrieb zu nehmen (VIII).
Halten Sie das Werkzeug in diesem Zustand für einige Minuten, damit das Schmiermittel zu allen Elementen des Antriebsmechanismus gelangt.
Durch die Freigabe des Schalters wird die Schlagbohrmaschine ausgeschaltet.
Hinweis! Wenn irgendwelche verdächtigen Geräusche, Knistern usw. auftreten, muss man sofort die Schlagbohrmaschine ausschalten und vom Netz trennen bzw. auch einem autorisierten Servicebetrieb zur Durchsicht übergeben.
Auswechseln des Bohrfutters
Die Schlagbohrmaschine wurde mit der Möglichkeit zum Wechseln des Bohrfutters ausgerüstet. Anstatt eines Futters, dass die
Montage eines Bohrers im System SDS Plus ermöglicht, kann man auch ein Bohrfutter anbringen, das die Montage von Bohrern
mit zylindrischer Halterung ermöglicht.
Zwecks Bohrfutterwechsel muss man den hinten am Futter angebrachten Ring in die Richtung nach vorn ziehen (IX). Dadurch
wird eine Demontage des Bohrfutters ermöglicht. Das Bohrfutter wird montiert in dem man es auf die Hülse der Bohrmaschine
bringt (X) und bis zum Ansprechen des Schnappverschlusses eindrückt. Überzeugen Sie sich, dass der Schnappverschluss
funktionierte und dass das Bohrfutter während des Betriebes keine Möglichkeit hat, sich abzutrennen.
Befestigung der Bohrer im Bohrfutter mit selbsttätigem Schnappverschluss (XI)
Für die gegebene Arbeit muss man den richtigen Bohrer mit zylindrischem Griff auswählen. Den Bohrer in das Futter einzulegenden hinteren Teil des Bohrfutters ergreifen, danach wird der vordere Teil des Bohrfutters gedreht und der Bohrer befestigt, und
zwar so, dass er sicher und fest im Bohrfutter steht. Hinweis! Es ist nicht empfehlenswert, zum Schmieden selbstklemmendes
Bohrfutter zu verwenden. Die durch den Schlagmechanismus erzeugten Belastungen können zur Zerstörung des selbstklemmenden Futters führen.
NUTZUNG DES WERKZEUGES
HINWEIS! Während der Nutzung des Bohrhammers müssen Gehörschutzmittel getragen werden!
Verwendungt der rechten oder linken Drehrichtung
Die Rechtsdrehungen verwendet man beim Bohren mit den allgemein üblichen rechtsdrehenden Bohrern. Die Linksdrehungen
dagegen in dem Fall, wenn der rechtsdrehende Bohrer sich im Material verklemmt hat.
Anwendung der Schalterblockade
Die Schalterblockade wird beim lange andauernden Bohren empfohlen, zum Beispiel beim Bohren im Beton, Mauer usw. Zu
diesem Zweck drückt man bei eingedrücktem Schalter mit dem Daumen die Taste für die Blockade und lässt den Schalter los. Zur
erneuten Freigabe der Blockade reicht es aus, den Elektroschalter zu betätigen.
Bohren in Holz
Vor dem Bohren wird empfohlen, das zu bearbeitende Material mit Schraubzwingen oder im Schraubstock zu befestigen und
anschließend mit einem Körner oder Nagel den Punkt der Bohrung zu kennzeichnen. Im Bohrfutter ist dann der entsprechende
Bohrer zu montieren, die Geschwindigkeit festzulegen, die Bohrmaschine an das Elektronetz anzuschließen und mit dem Bohren
zu beginnen. Beim Realisieren von Durchgangsbohrungen wird empfohlen, unter das Material eine Holzunterlage zu legen, wodurch die Kante der Bohrung beim Austritt nicht gerissen wird. Beim Ausführen von Bohrungen mit großem
Durchmesser ist es ratsam, vorher erst ein kleineres Führungsloch zu bohren.
Bohren im Metall
Das zu bohrende Material muss man immer sicher befestigen. Bei einem dünnen Blech ist es außerdem ratsam, einen Holzklotz
unterzulegen, um so unerwünschte Verbiegungen usw. zu vermeiden. Danach muss man die Stelle der Bohrung mit einem
ORIGINALANLEITUNG
21
Page 22

D
Körner kennzeichnen und mit dem Bohren beginnen, wobei Metallbohrer zu verwenden sind. Beim Bohren in Weißguss wird die
Verwendung von Bohrern mit Spitzen aus Karbidlegierung empfohlen. Beim Bohren von größeren Bohrungen ist immer ist immer
das Vorbohren eines Führungsloches mit kleinerem Durchmesser ratsam. Bohrt man in Stahl, muss zum Kühlen des Bohrers
Maschinenöl verwendet werden. Bei Aluminium verwendet man dagegen als Kühlmittel Terpentin oder Parafin. Bohrt man in
Messing, Kupfer oder Gusseisen sind keine Kühlmittel einzusetzen. Um hierbei zu kühlen nimmt man den Bohrer öfter aus dem
Material, um ihm das Abkühlen zu ermöglichen.
Bohren in Keramikmaterial
Bohren im harten, kompakten Material, wie: Beton, Hartziegel, Stein, Marmor usw.
Der Bohrer ist im Werkzeugfutter zu montieren, wenn der Bohrhammer vom Elektronetz abgetrennt ist.
Im Bedarfsfall kann man einen Begrenzer der Bohrtiefe montieren.
Mit dem Schalter für die Betriebsart wählt man das Schlagbohren oder, wenn es zugänglich ist, das Bohren ohne Schlag.
Den Stecker in die Netzsteckdose stecken, mit dem Schalter den Bohrhammer einschalten und mit der Arbeit beginnen. Während
der Arbeit sind regelmäßige Pausen einzuhalten – ein übermäßiges Erhitzen des Bohrhammers und des Werkzeuges darf nicht
zugelassen werden.
Das Schlagbohren wird nur bei kompakten keramischen Materialien empfohlen, wie z.B. Beton. Hartziegel, Stein usw. Bei den
Bohrung mit großem Durchmesser ist eine Vorbohrung mit kleinerem Durchmesser und danach mit einem Bohrer des zielgerichteten Durchmessers ratsam. Weiterhin muss man auch spezielle Bohrer zum Schlagbohren verwenden.
Das Schlagbohren wird bei Keramikmaterialien mit losen Strukturen, z.B. wie Glasur, Weichziegel, Putz usw., nicht empfohlen.
Das Schlagbohren kann bei solchen Materialien zur Zerstörung führen.
Der Bohrhammer ist mit einer Kupplung ausgerüstet, die einer Überlastung des Elektromotors vorbeugt, und zwar in dem Fall,
wenn das eingesetzte Werkzeug im Ergebnis der Arbeit angehalten wird, z.B. dann, wenn man auf einen Bewehrungsstab trifft. In
solch einem Fall dreht sich der Bohrer nicht weiter, obwohl der Elektromotor weiterhin in Funktion ist.
Auch wenn bei der Arbeit ein zu großer Druck ausgeübt wird, kann es zum Ansprechen der Kupplung kommen. In solch einem
Fall muss man das in die Bohrung eingesetzte Werkzeug wieder zurücknehmen, prüfen, ob der Bohrhammer korrekt funktioniert
und anschließend die Arbeit erneut aufnehmen, wobei aber nur der Druck angelegt wird, der für eine korrekte Ausführung der
Arbeit notwendig ist.
Trifft man auf einen Bewehrungsstab oder andere verdeckte Metallhindernisse, muss man sie ohne Schlag durchbohren mit
einem Bohrer von gleichem Durchmesser wie der Schlagbohrer und anschließend das Bohren im Keramikmaterial fortführen.
Bohren in Glasur, Weichziegel, Putz usw.
Bohren wie beim Hartmaterial, nur ohne Schlag. Zum Wegschieben des Staubes und der Abfallstoffe muss man den Bohrer zu
bestimmten Zeiten aus der Bohrung herausnehmen. Während des Bohrens darf man nur mit konstanter Kraft drücken.
Einstellen der Lage des Meißels
Einige der eingesetzten Werkzeuge, die zum Schmieden zwecks sicherer und ergonomischer Arbeit eingesetzt sind, erfordern die
Einstellung unter einem bestimmten Winkel, z.B. des Meißels oder des Locheisens. Man kann auch zu diesem Zweck auch eine
entsprechende Betriebsart verwenden. Das einzusetzende Werkzeug ist im Bohrfutter entsprechend der Anleitung zu befestigen.
Der Schalter ist auf das Symbol des Hammers mit Pfeil zu stellen und anschließend auf den Schalter zu drücken. Das eingesetzte
Werkzeug beginnt sich langsam entsprechend der gewählten Drehrichtung zu drehen. Der Druck auf den Schalter wird nach dem
Erreichen der gewünschten Position durch das eingesetzte Werkzeug freigegeben. Der Schalter für die Betriebsart wird auf die
Position Schmieden gestellt – Hammersymbol und dann mit der Arbeit begonnen.
Schmieden
Bei abgetrenntem Elektroenergienetz ist das gewünschte Werkzeug Bohrmeisel oder Locheisen im Werkzeugfutter zu befestigen.
Den Schalter für die Betriebsart auf die Position Schmieden stellen. Den Stecker in die Netzsteckdose stecken, mit dem Schalter
den Bohrhammer einschalten, abwarten bis zur vollen Geschwindigkeit und dann mit der Arbeit beginnen.
Während der Schmiedearbeiten darf man das eingesetzte Werkzeug nicht zu tief in das zu bearbeitende Masterial einschlagen.
Man muss das Materil mit dünnen Schichten zusammenschmieden, ohne dass ein zu großer Druck auf den Bohrhammer ausgeübt wird.
Ausschneiden von Öffnungen
Die Bohrmaschine kann auch mit Hilfe von Spezialbohrern mit konstantem Durchmesser oder austauschbaren Endstücken aus
dem Sägesatz – Schweifsäge für Öffnungen - für die Ausführung größerer Öffnungen im Holz genutzt werden. Zwecks Vermeidung der Entstehung von Grat, gerissenen Kanten am Austritt der Öffnung ist ein Stück Abfallholz unterzulegen.
Verwendung von Vorsatzgeräten
Bohrmaschinen mit varaibler Drehrichtung sollten nicht für den Antrieb von Vorsatzgeräten genutzt werden.
22
ORIGINALANLEITUNG
Page 23

D
Abdeckung des Bohrfutters
Wenn der Bohrhammer mit einer Gummiabdeckung für das Bohrfutter ausgerüstet ist, dann ist es empfehlenswert auch bei dem
Bohren zu nutzen, wo der Bohrer nach oben gerichtet ist, zum Beispiel beim Bohren an der Decke. Nach dem Montieren des
Bohrers im Werkzeugfutter ist darauf die Abdeckung zu legen. Staub und Abfallstoffe, die beim Bohren entstehen, werden sich in
der Abdeckung sammeln, was wiederum einer Verunreinigung des Bohrfutters vorbeugt. Nach Beendigung der Arbeit muss man
die Abdeckung vom Bohrer abnehmen, vom Staub und den Abfallstoffen reinigen und dann unter einem lauwarmen Wasserstrahl
abspülen.
Bohren mit der Verwedung eines Tiefenbegrenzers (XII)
Den Begrenzer kann man als Erleichterung beim Bohren in Flächen verwenden, wo keine Durchgangsbohrungen, besonders in
Beton und Holz, auszuführen sind. Dabei ist die Tiefe der Bohrung festzulegen. In das Futter ist der Bohrer zu installieren; mit Hilfe
eines Filzstiftes wird auf dem Bohrer der Abstand vom Arbeitsende, das gleich der Tiefe ist, gekennzeichnet. Der Tiefenbegrenzer ist so einzustellen, dass sein Ende sich mit dem auf dem Bohrer gekennzeichneten Abstand „L” überdeckt. Man muss sich
auch überzeugen, dass der Begrenzer sich während des Funktionsbetriebes nicht verlagert. Jetzt beginnt man mit dem Bohren.
Bei einer festgelegten Tiefe stützt sich dann der Begrenzer auf die Oberfläche in der Nähe der Bohrung. Dann muss man den
Bohrer aus der Bohrung nehmen.
Zusatzbemerkungen
Während des Funktionsbetriebes darf man keinen zu großen Druck auf das zu bearbeitende Material ausüben und keine ruckartigen Bewegungen ausführen, um keine Beschädigungen am Arbeitswerkzeug und an der Bohrmaschine hervorzurufen. Während
der Arbeit sind regelmäßig Pausen einzulegen. Eine Überlastung des Werkzeuges darf nicht zugelassen werden, die Temperatur
der Außenflächen darf niemals die 60°C nicht überschreiten. Nach Beendigung der Arbeit ist die Bohrmaschine auszuschalten,
den Stecker der Anschlussleitung aus der Netzsteckdose zu nehmen und Wartungsarbeiten bzw. Durchsichten vorzunehmen.
Der erklärte Gesamtwert der Schwingungen wurde entsprechend der Standardprüfmethode gemessen und kann zum Vergleich
eines Werkzeuges mit dem anderen benutzt werden. Weiterhin kann er bei der vorläufigen Bewertung der Exposition verwendet
werden.
Hinweis! Die Emmission der Schwingungen während der Arbeit mit dem Werkzeug kann sich vom erklärten Wert unterscheiden,
und zwar in Abhängigkeit von der Art der Verwendung des Werkzeuges.
Hinweis! Man muss die Sicherheitsmaßnahmen bestimmen, die den Bediener schützen und die sich auf die Bewertung unter
realen Nutzungsbedingungen stützen (unter Einbeziehung aller Teile des Betriebszyklusses, wie zum Beispiel die Zeit, wann das
Werkzeug ausgeschaltet ist oder im Leerlauf arbeitet sowie auch die Zeit der Aktivierung).
Schmierung
Vor jedem Gebrauch der Bohrer oder der Bohrmeißel muss man sie genau reinigen und das Heft SDS Plus mit einer dünnen
Schmiermittelschicht beschmieren. Die Anwendung eines speziellen Schmiermittels für die Bohrfutter SDS Plus wird empfohlen.
Bei nicht korrekter Arbeit des Schlagmechanismusses kann eine der Ursachen die ungenügende Schmierung des Getriebes und
der Kurbelwellenbaugruppe des Schlagkolbens sein. Man empfiehlt die Verwendung eines Schmiermittels, das für Zahnrad- und
Kurbelwellengetrieb geeignet ist. Das Nachschmieren wird in einem dazu berechtigten Servicebetrieb empfohlen.
KONSERVIERUNG UND ÜBERSICHTUNGEN
ACHTUNG! Vor dem Beitritt zur Regulierung, technischen Bedienung und Konservierung soll man die Einrichtung von der Elektronetz durch die Herausziehung des Steckers aus der Netzdose abschalten. Nach der Beendung der Arbeit soll man technischen
Stand durch äußere Besichtigungen und die Beurteilung von: Gestell und Handgriff, Elektroleitung mit Stecker und Abbiegungsstück, Tätigkeit des Elektroschalters, Durchgängigkeit von Lüftungsschlitzen, Funken von Bürsten, Arbeitslautstärke von Lager
und Getriebe, Anfahren und Arbeitsgleichmäßigkeit überprüfen. In der Garantiezeit kann der Benutzer keine Elektrowerkzeuge
demontieren oder keine Bauteile sowie Bestandteile austauschen, weil dies eine Verlierung der Garantierechte verursacht. Alle
beobachtete bei der Übersicht oder in der Arbeitszeit Unrichtigkeiten bestimmen das Signal zur Durchführung der Reparatur im
Service. Nach der Beendung der Arbeit soll man Gehäuse, Lüftungsschlitze, Schalter, Zusatzhandgriff und Bedeckungen z.B. mit
dem Druckluftstrahl (vom Druck nicht größer als von 0,3 MPa), Pinsel oder trockenen Lappen ohne Benutzung von Chemiemittel
und Reinigungsflüssigkeiten reinigen. Die Werkzeuge und Handgriffe soll man mit dem sauberen, trockenen Lappen reinigen.
ORIGINALANLEITUNG
23
Page 24

RUS
ХАРАКТЕРИСТИКА ИНСТРУМЕНТА
Ручной перфоратор является обычным инструментом II класса изоляции, предназначенным для бурения отверстий и
долбления в бетоне, природном и искусственном камне, мраморе и т.д. с использованием сменных рабочих инструментов
с хвостовиком SDS Plus. Перфоратор имеет плавную регулировку частоты вращения шпинделя и, благодаря возможности отключения ударной функции, ним можно сверлить отверстия в таких материалах как дерево, металл или пластик.
Правильная, надежная и безопасная работа электроинструмента зависит от соответствующей его эксплуатации, а для
этого:
Перед началом эксплуатации устройства необходимо полностью прочитать инструкцию и сохранить ее.
За ущерб, причиненный нарушением правил безопасности и рекомендаций данной инструкции, поставщик ответственности не несет.
ОСНАСТКА
В заводской упаковке должны
находиться:
- перфоратор
- дополнительная рукоятка
- ограничитель глубины сверления
- сверла и долота
- самозажимной патрон
ТЕХНИЧЕСКИЕ ХАРАКТЕРИСТИКИ
Параметр Единица измерения Значение
Каталожный номер 79054
Номинальное напряжение [В] ~230
Номинальная частота [Гц]50
Номинальная мощность [Вт] 620
Номинальные обороты [мин
Макс. диаметр отверстия (бетон)[мм]24
Энергия удара [Дж] 2,4
Частота ударов [мин
Масса [кг] 2,8
Уровень шума
- акустическое давление L
- акустическая мощность L
Уровень вибрации (основная рукоятка / вспомогательная рукоятка)[м/с
Класс электроизоляции II
Класс защиты IP20
± K [дБ (A)] 92 ± 3
pA
± K [дБ (A)] 103 ± 3
wA
-1
] 0 - 870
-1
] 0 - 4850
2
] 14,377 ± 1,5 / 11,618 ± 1,5
ОБЩИЕ ПРАВИЛА БЕЗОПАСНОСТИ
ВНИМАНИЕ! Детально ознакомиться с указанными инструкциями. Их несоблюдение может стать причиной удара элек-
трическим током, пожара или телесных повреждений. Понятие „электроустройство”, применяемое в инструкциях, касается всех устройств с электроприводом, как проводных, так и беспроводных.
СОБЛЮДАТЬ УКАЗАННЫЕ ИНСТРУКЦИИ
Рабочее место
Необходимо обеспечить надлежащее осветление рабочего места и содержать его в чистоте. Беспорядок и недо-
статочное осветление могут стать причиной несчастного случая.
Не рекомендуется работа с электроустройствами в местах с высоким риском взрыва, где обнаружены горючие
жидкости, газы или испарения. Во время работы электроустройств образуются искры, которые могут вызвать пожар в
результате реакции с горючими газами или испарениями.
Детям и посторонним лицам запрещается пребывать на рабочем месте. Недостаточная сосредоточенность может
вызвать потерю контроля над устройством.
Электрическая безопасность
Штепсель электрустройства должен совпадать с сетевым гнездом. Запрещается модифицировать штепсель. За-
24
ОРИГИНАЛЬНАЯ ИНСТРУКЦИЯ
Page 25

RUS
прещается пользоваться адаптерами с целью соединения штепселя с гнездом. Не модифицированный штепсель,
совпадающий с гнездом, уменьшает риск поражения электричсеким током.
Необходимо избегать контакта с заземленными поверхностями, такими, как трубы, батареи и холодильники. Заземление тела повышает риск удара электрическим током.
Не подвергать электроустройства влиянию атмосферных осадков или влаги. Вода
троустройства, повышают риск поломки устройства и телесных повреждений.
Не перегружать провода питания. Не пользоваться проводом питания с целью передвижения, подключения и отключения штепселя от гнезда сети питания. Избегать контакта провода питания с теплыми предметами, маслом,
острыми краями и подвижными элементами. Повреждение провода питания повышает
В случае работы вне закрытых помещений следует пользоваться удлинителями, предназначенными для работы вне
закрытых помещений. Пользование соответстсвенными удлинителями уменьшает риск поражения электрическим током.
Если использование электроинструмента во влажной среде является неизбежным, тогда в качестве защиты от
напряжения необходимо использовать устройство защитного отключения (УЗО). Применение УЗО снижает риск
поражения электрическим током.
Личная безопасность
Необходимо приступать к работе в хорошем физическом и психическом состоянии. Внимательно следить за
ходом проводимой операции. Не работать усталым, после приема медикаментов или упоребления спиртного. Не
забывать о том, что потеря концентрации на долю секунды может вызвать серьезные телесные повреждения.
Пользоваться средствами личной безопасности. Обязательно одеть защитные очки. Пользование средствами
личной защиты, такими, как противопыльные маски, каски и ушные вкладыши, уменьшает риск серьезных телесных повреждений.
Избегать случайного пуска устройства. Перед подключением устройства к электросети питания убедиться в том,
что выключатель находится в позиции «выкл.». Не держать палец на выключателе и не подключать электроустрой-
ство к сети питания, если выключатель находится в позиции «вкл.», поскольку это может вызвать серьезные телесные
повреждения.
Перед пуском электроустройства необходимо убрать все ключи и другие инструменты, которые использовались
во время его регулировки. Ключ, оставшийся на вращательных элементах устройства, может стать причиной серьезных
телесных повреждений.
Соблюдать равновесие. Постоянно работать в соответственной позе. Это облегчит контроль над пневматическим
устройством в случае непредвиденных происшествий во время работы.
Одеть защитную одежду. Не носить простроную одежду и украшения. Волосы, одежду и перчатки держать вдали
от подвижных частей устройства. Просторная одежда, украшения или длинные волосы могут зацепиться за подвижные
части устройства.
Пользоваться отсосом пыли или мешками для пыли, если устройство оснащено ними. Позаботиться о том, чтобы правильно подключить их. Использование отсоса пыли уменьшает риск серьезных телесных повреждений.
Пользование электроустройством
Не перегружать электроустройство. Пользоваться устройством, отвечающим данному виду работы. Выбор устрой-
ства, соответствующего данному виду работы, обеспечивает повышение производительности и трудовой безопасности.
Запрещается пользоваться электроустройством, если не работает сетевой выключатель. Устройство, которое невозможно контролировать с помощью сетевого выключателя, опасное; следует отдать его в ремонт.
Необходимо отключить штепсель от гнезда сети питания перед регулировкой, заменой аксессуаров или хранением устройства. Благодаря этому удастся избежать случайного пуска электроустройства.
Хранить устройства в месте, недоступном для детей. Не разрешать работать с устройством лицам, не обученным
обслуживать его. Электроустройство может быть опасным в руках необученного оператора.
Обеспечить соответственную консервацию устройства. Проверять, нет ли в нем несоответствий и зазоров в подвижных частях. Проверять, не повредились ли какие-то элементы устройства. Если обнаружены повреждения,
то следует устранить их перед пуском электроустройства. Много несчастных случаев вызывает неправильная кон-
сервация устройства.
Режущие инструменты должны быть чистыми и отточенными. Благодаря правильной консервации режущие инстру-
менты легче контролировать во время работы.
Пользоваться электроустройствами и аксессуарами согласно вышеуказанным инструкциям. Пользоваться инструментами в соответствии с их предназначением, учитывая вид работы и условия на рабочем месте. Поль-
зование инструментами для проведения других операций, чем те, для которых они были разработаны, повышает риск
опасных моментов во время работы.
Ремонты
Ремонтировать устройство исключительно в уполномоченных предприятиях, пользующихся только оригинальными запасными частями. Это обеспечивает требуемую трудовую безопасность во время работы с электроустрой-
ством.
и влага, проникая внутрь элек-
риск поражения электрическим.
ОРИГИНАЛЬНАЯ ИНСТРУКЦИЯ
25
Page 26

RUS
ДОПОЛНИТЕЛЬНЫЕ ИНСТРУКЦИИ ПО БЕЗОПАСНОСТИ
Во время работы с ударной дрелью необходимо использовать средства для защиты органов слуха. Шумовое воздей-
ствие может привести к потере слуха.
При работе с инструментом следует использовать дополнительные рукоятки, поставляемые с инструментом. Потеря
контроля может привести к травме оператора.
Использовать респираторы. Использование респираторов снижает риск серьезных травм.
Во время выполнения работ, при которых сверло или бур могут задеть скрытый провод под напряжением, электроинструмент необходимо держать за изолированные ручки. При контакте сверл или буров с проводом под напряжением
электрический ток может поступить на металлические элементы инструмента, что может привести к поражению
оператора инструмента электрическим током.
УСТАНОВКА ЭЛЕМЕНТОВ
ВНИМАНИЕ! Монтаж оборудования может выполняться только при отключенном питании. Отключить вилку провода питания инструмента от розетки.
Установка вспомогательной рукоятки (III)
Установить вспомогательную рукоятку в нужное положение и затянуть ее, завинчивая рукоятку.
Установка ограничителя глубины сверления (IV)
Если перфоратор оснащен ограничителем глубины сверления, его можно прикрепить к вспомогательной рукоятке.
В зависимости от способа крепления ограничитель необходимо вставить в отверстие во вспомогательной рукоятке и после настройки требуемой глубины, закрепить с помощью кнопки, воротка или завинтив вспомогательную рукоятку.
ПОДГОТОВКА К РАБОТЕ
Перед началом работы необходимо проверить, не поврежден ли корпус инструмента и сетевой кабель с вилкой. В случае
наличия повреждений, запрещается приступать к дальнейшей работе!
Внимание! Все операции, связанные с заменой сменных рабочих инструментов (буров и зубил с хвостовиком SDS Plus),
установкой пылезащитных колпаков и направляющих, регулировкой и т.д. необходимо выполнять при отключенном питании, поэтому, прежде чем притупить к выполнению данных операций, необходимо: Отключить вилку провода питания
инструмента от розетки!
Установка сменных рабочих инструментов SDS Plus в патрон
Очистить выбранные сменные инструменты от грязи и ржавчины, а также смазать патрон SDS Plus тонким слоем смазки.
Потянуть к себе патрон и удерживать его в этом положении (V).
Вставить очищенный сменный инструмент в отверстие. При необходимости повернуть сменный инструмент, чтобы он без
сопротивления вошел в патрон.
Отпустить патрон, сменный инструмент должен автоматически зафиксироваться в патроне.
Проверить надежность установки сменного инструмента. Для этого достаточно попытаться вытянуть его из патрона SDS
Plus. Если бур или зубило беспрепятственно выходит из патрона, необходимо повторить процедуру установки.
Установка направления вращения (VII)
Установить переключатель направления вращения согласно стрелкам: вращение вправо - стрелка, указывающая в сторону передней части инструмента, вращение влево - стрелка, указывающая в сторону задней части инструмента.
Внимание! Изменение направления вращения может выполняться только при отключенном питании!
Установка режима работы (VI)
Для выбора режима работы перфоратора служит переключатель с кнопкой блокировки. При нажатии и удержании кнопки
блокировки можно изменить положение переключателя.
Функция работы с ударом облегчает бурение отверстий в бетоне, каменной кладке и твердых керамических материалах
(твердый кирпич, камень, мрамор). Для этого переключатель ударов необходимо установить в режим работы с ударом
(символ сверла и молотка).
При сверлении в других материалах функцию бурения с ударом следует отключить, установив переключатель в режим
работы без удара (символ сверла).
Можно также установить функцию долбления, в этом режиме отключаются обороты, и остается удар.
Для этого переключатель режимов следует установить в положение долбления (символ молотка).
Перфоратор оснащен функцией изменения положения долота. Эта функция полезна в случае долбления с использованием различных инструментов, позволяет установить долото в любом положении. Переключатель в этом положении не
может быть заблокирован.
ОБОРУДОВАНИЯ
26
ОРИГИНАЛЬНАЯ ИНСТРУКЦИЯ
Page 27

RUS
Подготовительные операции
Выбрать соответствующий сменный рабочий инструмент и установить его в патроне.
Установить переключатель режима работы в требуемое положение: символ молотка - долбление; символ молотка и сверла - ударное бурение ; символ сверла - сверление без удара; треугольник - режим выбора положения зубила.
Надеть защитные наушники, защитные очки, перчатки.
Подключить кабель к электрической
Принять положение, гарантирующее равновесие, взять двумя руками перфоратор и запустить его, нажимая пальцем
кнопку включения (VIII).
Удерживать инструмент в этом состоянии несколько минут, чтобы смазка проникла во все части приводного механизма.
Выключить перфоратор, освободив кнопку включения.
Внимание! В случае подозрительного скрежета, треска и т.д., следует немедленно отключить перфоратор от сети
дать его на осмотр в авторизованный сервисный центр.
Замена патрона
Перфоратор оснащен функцией замены сверлильного патрона. Вместо патрона для сверл с хвостовиком SDS Plus можно
установить патрон для сверл с цилиндрическим хвостовиком.
Для замены патрона требуется зажимное кольцо, расположенное сзади патрона, потянуть к передней части патрона (IX).
Это позволит снять патрон. Для установки сверлильного патрона, его необходимо вставить во втулку дрели (X) и нажать
до щелчка. Убедиться, что защелка сработала, и нет возможности самопроизвольного отсоединения патрона в процессе
работы.
Установка сверл в самозажимном патроне (XI)
Необходимо выбрать соответствующее данной работе сверло с цилиндрическим хвостовиком. Вставить сверло в патрон,
зажать заднюю часть патрона, поворачивая переднюю его часть. Неподвижно и надежно зафиксировать сверло в патроне.
Внимание! Не рекомендуется использовать самозажимной патрон для долбления. Нагрузка, создаваемая ударным механизмом, может привести к разрушению самозажимного патрона.
ЭКСПЛУАТАЦИЯ ИНСТРУМЕНТА
Внимание! Во время эксплуатации перфоратора необходимо использовать средства для защиты органов слуха!
Использование право- и левостороннего вращения
Правостороннее вращение используются во время сверления обычными правосторонними бурами. Левостороннее вращение используются в случае заклинивания правостороннего бура в материале.
Применение блокировки кнопки включения.
Блокировку кнопки включения рекомендуется использовать при длительном бурении, напр., при бурении в бетоне, кладке
и т.д. Для этого при нажатой кнопке включения требуется нажать большим пальцем кнопку блокировки и отпустить кнопку
включения. Для освобождения блокировки достаточно нажать кнопку включения.
Сверление в дереве
Перед сверлением рекомендуется закрепить обрабатываемую деталь столярными струбцинами или в тисках, а затем
кернером или гвоздем обозначить место сверления. Закрепить в патроне соответствующее сверло, установить скорость,
подключить перфоратор к сети и начать сверление. В случае сквозных отверстий рекомендуется подложить под обрабатываемую деталь деревянную подкладку, благодаря чему край выходного отверстия будет ровным. При сверлении отверстий большого диаметра рекомендуется предварительно просверлить направляющее отверстие меньшего диаметра.
Сверление в металлах
Всегда необходимо надежно закрепить обрабатываемую деталь. В случае тонкого листового металла рекомендуется
подложить кусок дерева, чтобы избежать ненужных изгибов и т.п. Затем отметить кернером места отверстий и приступить
к сверлению. Использовать сверла для металла. При сверлении отверстий в чугуне рекомендуется использовать сверла
с твердосплавными наконечниками. При сверлении больших отверстий рекомендуется предварительно просверлить
направляющее отверстие меньшего диаметра. При сверлении в стали для охлаждения сверла следует использовать машинное масло. В случае сверления в алюминии, в качестве охлаждающей жидкости используется скипидар или парафин.
В случае сверления в латуни, меди или чугуне нет необходимости использовать хладагенты. А для охлаждения сверла,
его следует часто вынимать из материала, чтобы позволить ему остыть.
Бурение в керамических материалах
Бурение в твердых, плотных материалах: бетон, твердый кирпич, камень, мрамор и т.д.
Бур следует устанавливать в патрон перфоратора при отключенном питании.
розетке.
и пере-
ОРИГИНАЛЬНАЯ ИНСТРУКЦИЯ
27
Page 28

RUS
При необходимости установить ограничитель глубины бурения.
Установить переключатель режимов работы в режим бурения с ударом или, если имеется, в бурение без удара.
Вставить вилку в розетку, нажать кнопку включения перфоратора и начать работу.
В ходе работы необходимо регулярно делать перерывы - никогда не допускать чрезмерного нагрева перфоратора и
сменных рабочих инструментов.
Работать в режиме бурения с ударом рекомендуется только в случае плотных керамических материалов, таких как бетон,
твердый кирпич, камень и т.д. В случае бурения отверстий большого диаметра рекомендуется предварительно просверлить отверстие меньшего диаметра, а затем использовать бур требуемого диаметра. Необходимо использовать буры,
предназначенные для ударного бурения.
Не рекомендуется использовать
плитка, мягкий кирпич, штукатурки и т.д. Ударное бурение в таких материалах может его повредить.
Перфоратор снабжен муфтой, защищающей электродвигатель от перегрузок, при заклинивании сменного рабочего инструмента во время работы. Например, в случае попадания на стержень арматуры. В этом случае, бур перестанет вращаться, несмотря на то, что электродвигатель по прежнему будет работать.
Также, слишком сильное нажатие на перфоратор во время работы может вызвать срабатывание муфты.
В этом случае, необходимо вынуть рабочий инструмент из отверстия, убедиться, что перфоратор исправен и работает
должным образом, а затем возобновить работу, прикладывая усилие, необходимое для правильной работы. В случае
попадания бура на стержень арматуры или другое скрытое металлическое препятствие, его необходимо просверлить
без удара с помощью сверла, предназначенного для сверления в металле того же диаметра, что и ударный бур, а затем
продолжить бурение в керамическом материале.
Сверление в глазурной плитке, мягком кирпиче, штукатурке и т.д.
Сверлить, как и в случае твердых материалов, но без удара. Периодически вынимать бур из отверстия для удаления пыли
и отходов. Во время сверления следует нажимать на инструмент с постоянной силой.
Установка положения зубила
Некоторые сменные рабочие инструменты, предназначенные для долбления, с целью безопасности и для улучшения
эргономики необходимо установить под определенным углом, например, зубило или долото. Для этого можно использовать соответствующий режим работы. Закрепить сменный рабочий инструмент в патроне в соответствии с инструкциями,
приведенными в руководстве. Установить переключатель на символ молота со стрелкой, затем нажать кнопку включения.
Сменный рабочий инструмент начнет медленно поворачиваться в выбранном направлении вращения. Отпустить кнопку
включения после достижения сменным инструментом требуемого положения. Установить переключатель режимов в положение долбления (символ молотка), а затем приступить к работе.
Долбление
Отключить инструмент от сети и установить в патрон требуемый сменный инструмент: зубило или шлямбур.
Установить переключатель режимов в положение долбления. Вставить вилку в розетку, нажать кнопку включения перфоратора, подождать, пока он наберет полную скорость, и начать работу.
Во время долбления не следует проникать слишком глубоко в обрабатываемый материал. Материал необходимо снимать
тонкими слоями, не оказывая слишком сильного давления на перфоратор.
Вырезание отверстий
Перфоратор можно использовать для вырезания отверстий большого диаметра в древесине с помощью специальных
сверл с постоянным диаметром или сменных наконечников из набора пил для вырезания отверстий. Для предотвращения образования на выходных отверстиях заусенец или неровных краев, под обрабатываемый материал требуется
подложить кусок дерева (из отходов).
режим ударного бурения для керамических материалов с пористой структурой, таких как
Использование принадлежностей
Перфораторы со сменным направлением вращения не должна использоваться для привода рабочих принадлежностей.
Пылезащитный колпак патрона
Если в комплект перфоратора входит резиновый пылезащитный колпак патрона, его рекомендуется использовать при
бурении, когда сверло направлено вверх, например, бурение в потолке. После установки бура в патроне, на него необходимо надеть колпак. Пыль и отходы, образующиеся во время бурения, будут собираться в пылезащитном колпаке,
предотвращающем загрязнение патрона. После завершения работы необходимо снять колпак с патрона, очистить его от
пыли и отходов, а затем промыть струей теплой воды.
Сверление с использованием ограничителя глубины (XII)
Ограничитель может быть использован для облегчения сверления там, где требуется выполнить глухие (не сквозные) отверстия, в частности, в бетоне и дереве. Определить глубину отверстия. Установить в патроне сверло. Отметить фломастером на
28
сверле глубину отверстия (измерять от рабочего конца сверла). Ограничитель глубины установить так, чтобы
ОРИГИНАЛЬНАЯ ИНСТРУКЦИЯ
Page 29

RUS
его конец совпадал с отмеченным расстоянием „L” на сверле. Убедиться, что ограничитель не переместится во время
работы. Начать сверление. При достижении установленной глубины торец ограничителя коснется поверхности возле отверстия. После этого вынуть сверло из отверстия.
Дополнительные примечания
Во время работы нельзя слишком сильно нажимать на обрабатываемый материал, а также
не следует делать резких
движений, чтобы не повредить сменный рабочий инструмент и перфоратор. Во время работы следует регулярно делать
перерывы. Запрещено допускать к перегрузке инструмента, температура внешних поверхностей никогда не может превышать 60
o
C. После завершения работы выключить перфоратор, вынуть вилку из розетки и выполнить техническое
обслуживание и осмотр инструмента.
Заявленное общее значение вибрации измерялось с помощью стандартного метода испытания и может использоваться
для сравнения одного инструмента с другим. Заявленное общее значение вибрации может использоваться для предварительной оценки воздействия.
Внимание! Вибрация, создаваемая в процессе работы инструмента, может отличаться от заявленной. Это зависит от
способа использования данного инструмента.
Внимание! Необходимо определить меры безопасности для защиты оператора, основывающиеся на оценке рисков в реальных условиях эксплуатации (включая все рабочие циклы, напр., когда инструмент выключен или работает в холостом
режиме, а также время активации).
Смазывание
Перед каждым использованием буров или зубил, их необходимо тщательно очистить, а также смазать хвостовик SDS
Plus тонким слоем смазки. Рекомендуется использовать смазку для патронов SDS Plus. Одной из причин неправиль-
ного функционирования ударного механизма может быть недостаточная смазка редуктора и узла ударного коленчатого
поршня. Рекомендуется использовать смазку для зубчатых и коленчатых передач. Дополнять смазку рекомендуется в
авторизованном сервисном центре.
КОНСЕРВАЦИЯ И ОСМОТРЫ
ВНИМАНИЕ! Перед началом настройки, технического обслуживания или консервации следует вынуть штепсель устройства из гнезда электросети. После завершения работы следует проверить техническое состояние электроустройства путем внешнего осмотра и оценки: корпуса и рукоятки, электропровода со штепселем и отгибкой, работы электрического
включателя, проходимости вентиляционных щелей, искрения щеток, уровня шума при работе подшипников и передачи,
запуска и равномерности работы. В течение гарантийного периода потребитель не может проводить дополнительного
монтажа электроустройств и проводить замену любых частей и составных, поскольку это вызывает потерю гарантийных
прав. Все перебои, обнаруженные во время осмотра или работы, являются сигналом для проведения ремонта в сервисном пункте. После завершения работы корпус, вентиляционные щели, переключатели, дополнительную рукоятку и
щитки следует очистить, напр., струей воздуха (давление не более 0,3 MPa), кистью или сухой тряпочкой без применения
химических средств и моющих жидкостей. Устройство и зажимы очистить сухой чистой тряпкой.
ОРИГИНАЛЬНАЯ ИНСТРУКЦИЯ
29
Page 30

UA
ХАРАКТЕРИСТИКА ІНСТРУМЕНТА
Ручний перфоратор є простим інструментом II класу ізоляції, призначеним для буріння отворів та довбання в бетоні,
природному та штучному камені, мармурі тощо з використанням змінних робочих інструментів з хвостовиком SDS Plus.
Перфоратор має плавне регулювання частоти обертання шпинделя і, завдяки можливості відключення ударної функції,
ним можна свердлити отвори в таких матеріалах як дерево, метал або пластик. Правильна, надійна і безпечна робота
електроінструмента залежить від відповідної експлуатації, а для цього:
Перед початком експлуатації даного інструмента необхідно повністю прочитати інструкцію і зберегти її.
За шкоду, заподіяну внаслідок порушення правил безпеки і рекомендацій даної інструкції, постачальник відповідальності
не несе.
ОСНАСТКА
У заводській упаковці повинні знаходитися:
- перфоратор
додаткова бічна рукоятка
-
- обмежувач глибини свердління
- свердла і долота
- самозатискний свердлильний патрон
ТЕХНІЧНІ ХАРАКТЕРИСТИКИ
Параметр Одиниця вимірювання Значення
Номер за каталогом 79054
Номінальна напруга [В] ~230
Номінальна частота [Гц]50
Номінальна потужність [Вт] 620
Номінальні обороти [хв
Макс. діаметр отвору (бетон)[мм]24
Енергія удару [Дж] 2,4
Частота ударів [хв
Маса [кг] 2,8
Рівень шуму
- акустичний тиск L
- акустична потужність L
Рівень вібрації (основна рукоятка / допоміжна рукоятка)[м/с
Клас ізоляції II
Клас захисту IP20
± K [дВ (A)] 92 ± 3
pA
± K [дВ (A)] 103 ± 3
wA
-1
] 0 - 870
-1
] 0 - 4850
2
] 14,377 ± 1,5 / 11,618 ± 1,5
ЗАГАЛЬНІ ПРАВИЛА БЕЗПЕКИ
УВАГА! Необхідно детально ознайомитися з усіма інструкціями. Недотримання їх може стати причиною удару електрич-
ним струмом, пожежі або тілесних пошкоджень. Термін „електропристрій”, який вживається в інструкціях, стосується усіх
пристроїв з електроприводом, як провідних, так і безпровідних.
ДОТРИМУВАТИСЯ ВКАЗАНИХ ІНСТРУКЦІЙ
Робоче місце
Робоче місце повинно бути чистим та добре освітленим. Безладдя та недостатнє освітлення можуть стати причинами
нещасливих випадків.
Не слід працювати з електропристроями в середовищі з підвищеним ризиком вибуху, у якому викрито пальні
рідини, гази або випари. Під час роботи пристроїв утворюються іскри, які можуть викликати пожежу внаслідок реакції з
пальними газами або випарами.
Дітям та стороннім особам забороняється перебувати на робочому місці. Втрата зосередження може викликати
втрату контролю над пристроєм.
Електрична безпека
Штепсель електропровода повинен пасувати до гнізда мережі. Забороняється модифікувати штепсель. Забороняється використовувати будь-які адаптери з метою зєднання штепселя з гніздом. Не модифікований штепсель, що
30
ОРИГІНАЛЬНА ІНСТРУКЦІЯ
Page 31

UA
пасує до гнізда, зменшує ризик удару електричним струмом.
Слід уникати контакту з заземленими поверхнями, такими, як труби, батареї та холодильники. Заземлення тіла
підвищує ризик удару електричним струмом.
Не слід виставляти пневматичні пристрої на контакт з атмосферними опадами та вологою. Після проникнення
всередину електропристрою вода та волога підвищує ризик удару
Не перевантажувати провід живлення. Не користуватися проводом живлення з метою перенесення, підєднання та
відєднання штепселя від гнізда мережі. Уникати контакту провода живлення з теплими предметами, маслом, гострими краями та рухомими елементами. Пошкодження провода живлення підвищує ризик удару електричним струмом.
У випадку роботи поза закритими приміщеннями слід користуватися
поза закритими приміщеннями. Користування відповідними здовжувачами зменшує ризик удару електричним струмом.
Якщо використання електроінструменту у вологому середовищі є неминучим, тоді для захисту від напруги необхідно використовувати пристрій захисного відключення (ПЗВ). Застосування ПЗВ знижує ризик ураження електрич-
ним струмом.
Особиста безпека
Слід починати роботу, будучи у доброму фізичному та психічному стані. Необхідно уважно слідкувати за виконуваною операцією. Не слід працювати втомленим, після прийому медикаментів та вживання алкогольних напоїв.
Не забувайте про те, що навіть секундна неуважність може привести до поважних тілесних пошкоджень.
Слід користуватися засобами особистої безпеки. Обовязково одягти захисні окуляри. Користування засобами особистої безпеки, такими, як протипилові маски, захисне взуття, каски та вушні вклади зменшує ризик поважних тілесних
пошкоджень.
Слід уникати випадкового пуску пристрою. Необхідно переконатися у тому, що вимикач знаходиться у позиції
“викл.”, перед ввімкненням пристрою у електромережу. Не слід тримати палець на вимикачі або підєднувати електро-
пристрій, якщо вимикач знаходиться у позиції “вкл.”, оскільки це може викликати поважні тілесні пошкодження.
Перед пуском електропристрою необхідно усунути всі ключі та інструменти, які використовувалися під час його
регулювання. Ключ, що залишився на обертальних елементах пристрою, може стати причиною поважних тілесних по-
шкоджень.
Необхідно утримувати рівновагу. Постійно працювати у відповідній позі. Завдяки цьому полегшиться контроль над
електропристроєм у випадку несподіваних ситуацій під час роботи.
Слід користуватися захисним одягом. Не носити просторний одяг та прикраси. Волосся, одяг та рукавиці слід
тримати здаля від рухомих частин електропристрою. Просторний одяг, волосся або прикраси можуть зачепитися або
бути втягнутими рухомими частинами пристрою.
Слід користуватися відводом пилу або мішками для пилу, якщо пристрій оснащений ними. Подбайте про те, щоб
правильно підєднати їх. Користування відводом пилу зменшує ризик поважних тілесних пошкоджень.
Користування електропристроєм
Не перевантажуйте електропристрій. Слід користуватися інструментами, що відповідають даному виду роботи.
Відповідний добір інструменту до даної роботи гарантує підвищення продуктивності та трудової безпеки.
Забороняється користуватися електропристроєм, якщо не працює його вимикач мережі. Пристрій, який неможливо
контролювати за допомогою вимикача мережі, небезпечний; слід віддати його у ремонт.
Слід вийняти штепсель з гнізда мережі перед регулюванням, заміною аксесуарів та переховуванням пристрою.
Завдяки цьому Ви уникнете випадкового пуску електропристрою.
Пристрої слід переховувати у місці, недоступному для дітей. Забороняється працювати з пристроєм особам, які
не навчені обслуговувати його. Електропристрій в руках не навченого оператора може стати небезпечним.
Забезпечити відповідну консервацію пристрою. Перевіряти пристрій з точки зору невірних зєднань та зазорів у
рухомих частинах. Перевіряти, чи не пошкоджений будь-який елемент пристрою. Якщо викрито поломки, то слід
усунути їх перед початком роботи з електропристроєм. Багато нещасливих випадків викликано внаслідок неправиль-
ної консервації пристрою.
Ріжучі інструменти слід переховувати чистими та наточеними. Правильна консервація ріжучих інструментів полегшує
контроль над ними під час роботи.
Користуватися електропристроями та аксесуарами згідно з вказаними вище інструкціями. Користуватися пристроями та інструментами згідно з їх призначенням та враховувати умови на робочому місці. Використовування
пристроїв та інструментів всупереч їх призначенню підвищує ризик небезпечних ситуацій.
Ремонти
Слід проводити ремонти пристрою виключно в уповноважених закладах, що користуються лише оригінальними
запчастинами. Це гарантує відповідний рівень безпеки під час роботи з електропристроєм.
ДОДАТКОВІ ІНСТРУКЦІЇ З БЕЗПЕКИ
Під час роботи з ударним дрилем необхідно використовувати засоби для захисту органів слуху.
електричним струмом.
здовжувачами, пристосованими до роботи
Шум може призвести
ОРИГІНАЛЬНА ІНСТРУКЦІЯ
31
Page 32

UA
до втрати слуху.
Для роботи з інструментом слід використовувати додаткові ручки, що поставляються з інструментом. Втрата контролю
може призвести до травми оператора.
Необхідно використовувати респіратори. Використання респіраторів знижує ризик отримання серйозних травм.
Під час виконання робіт, при яких свердло або бур можуть зачепити прихований дріт під напругою, електроінструмент
необхідно тримати за ізольовані ручки. При контакті свердел або бурів з проводом під напругою електричний струм
може поступити на металеві елементи інструменту, що може призвести до ураження оператора інструменту електричним струмом.
МОНТАЖ ЕЛЕМЕНТІВ ОБЛАДНАННЯ
УВАГА! Монтаж змінного обладнання може виконуватися тільки при відключеному живленні. Витягнути вилку інструмента
з розетки!
Встановлення допоміжної рукоятки
Встановити допоміжну рукоятку в потрібне положення і затягнути її, закрутивши рукоятку.
Встановлення обмежувача глибини свердління (IV)
Якщо перфоратор оснащений обмежувачем глибини свердління, його можна прикріпити до допоміжної рукоятки.
Залежно від способу кріплення, обмежувач необхідно вставити в отвір в допоміжній рукоятці і після настройки необхідної
глибини, зафіксувати за допомогою кнопки, ручки або закрутивши допоміжну рукоятку.
ПІДГОТОВКА ДО РОБОТИ
Перед початком роботи необхідно перевірити, чи не пошкоджений корпус інструмента й електричний провід з вилкою. У
разі наявності пошкоджень забороняється приступати до подальшої роботи!
Увага! Всі операції, пов’язані з заміною робочих інструментів (бурів і зубил з хвостовиком SDS Plus), встановленням пилозахисних ковпаків і напрямних, регулюванням тощо, необхідно виконувати при відключеному живленні, тому, перш ніж
притупити до виконання даних операцій, необхідно: Вийняти вилку мережевого кабелю інструмента з розетки!
Встановлення змінних робочих інструментів SDS Plus в патрон
Очистити потрібні змінні інструменти від бруду та іржі, а також змастити патрон SDS Plus тонким шаром мастила.
Потягнути патрон на себе і утримувати його в цьому положенні (V).
Вставити очищений змінний інструмент в отвір. За необхідності повернути змінний інструмент так, щоб він без опору
ввійшов у патрон.
Відпустити патрон, змінний інструмент повинен автоматично зафіксуватися в патроні.
Перевірити надійність посадки змінного робочого інструмента. Для цього достатньо спробувати витягнути його з патрона
SDS Plus. Якщо бур або зубило виходить з патрона, дану процедуру необхідно повторити.
Встановлення напрямку обертання (VII)
Встановити перемикач напрямку обертання згідно зі стрілками: обертання вправо - стрілка направлена в сторону передньої частини інструмента, обертання вліво - стрілка, що вказує на задню частину інструмента.
Увага! Зміна напрямку обертання може виконуватися тільки при відімкненому живленні!
Установка режиму роботи (VI)
Для вибору режиму роботи перфоратора служить перемикач з кнопкою блокування. При натисканні та утриманні кнопки
блокування можна змінити положення перемикача.
Функція роботи з ударом полегшує буріння отворів у бетоні, цегляній кладці та твердих керамічних матеріалах (тверда
цегла, камінь, мармур). Для цього перемикач ударів необхідно встановити в режим роботи з ударом (символ свердла і
молотка).
При свердлінні в інших матеріалах функцію буріння з ударом слід відключити, встановивши перемикач у режим роботи
без удару (символ свердла).
Можна також встановити функцію довбання - в цьому режимі відключаються оберти, і залишається лише удар.
Для цього перемикач режимів слід встановити в положення довбання (символ молотка).
Перфоратор оснащений функцією зміни положення долота. Ця функція корисна в разі довбання з використанням різних
інструментів. Вона дозволяє встановити долото в будь-якому положенні. Перемикач в цьому положенні не може бути
заблокований.
Підготовчі операції
Вибрати відповідний змінний робочий інструмент і вставити його в патрон.
(III)
32
ОРИГІНАЛЬНА ІНСТРУКЦІЯ
Page 33

UA
Встановити перемикач режиму роботи в потрібне положення: символ молотка - довбання; символ молотка і свердла ударне буріння; символ свердла - свердління без удару; трикутник - режим вибору положення для зубила.
Одягнути захисні навушники, захисні окуляри, рукавиці.
Підключити кабель до електричної розетки.
Прийняти положення, що гарантує рівновагу, взяти обіруч перфоратор і запустити його
кнення (VIII).
Утримувати інструмент у цьому стані кілька хвилин, щоб мастило потрапило в усі частини привідного механізму.
Вимкнути перфоратор, відпустивши кнопку ввімкнення.
Увага! У разі підозрілого скреготу, тріску тощо, слід негайно відключити перфоратор від мережі і передати його на огляд
в авторизований сервісний центр.
Заміна патрона
Перфоратор оснащений
можна встановити патрон для свердел з циліндричним хвостовиком.
Для заміни патрона потрібно затискне кільце, розташоване ззаду патрона, потягнути в напрямку до передньої частини патрона (IX). Це дозволить зняти патрон. Для установки свердлильного патрона, його необхідно вставити у втулку дрилі (X)
і натиснути до характерного клацання. Переконатися, що блокування спрацювало, і патрон самовільно не від’єднається
під час роботи.
Установка свердла в самозатискному патроні (XI)
Необхідно вибрати свердло з циліндричним хвостовиком, що відповідатиме даній роботі. Вставити свердло в патрон, затиснути задню частину патрона, повертаючи його передню частину. Нерухомо і надійно зафіксувати свердло в патроні.
Увага! Не рекомендується використовувати самозатиский патрон для довбання. Навантаження, що створюється ударним
механізмом, може призвести до знищення самозатискного патрона.
ЕКСПЛУАТАЦІЯ ІНСТРУМЕНТА
Увага! Під час експлуатації перфоратора необхідно використовувати засоби для захисту органів слуху!
Використання право- і лівостороннього обертання
Правостороннє обертання використовуються під час свердління звичайними правосторонніми бурами. Лівостороннє обертання використовується у випадку заклинювання правостороннього бура в матеріалі.
Використання блокування кнопки ввімкнення.
Блокування кнопки ввімкнення рекомендується використовувати під час тривалого буріння, напр., при бурінні в бетоні,
кладці тощо. Для цього при натисненій кнопці ввімкнення потрібно великим пальцем натиснути кнопку блокування і відпустити кнопку ввімкнення. Для відміни блокування достатньо натиснути кнопку ввімкнення.
Свердління в дереві
Перед свердлінням рекомендується закріпити деталь, що обробляється, столярними струбцинами або в лещатах, а потім
кернером або цвяхом позначити місце свердління. Вставити в патрон відповідне свердло, встановити швидкість, підключити перфоратор до мережі і почати свердління. У разі наскрізних отворів рекомендується підкласти під деталь, що
обробляється, дерев’яну підкладку, завдяки цьому край вихідного отвору буде рівним. При свердлінні отворів великого
діаметра рекомендується попередньо просвердлити напрямний отвір меншого діаметру.
функцією заміни свердлильного патрона. Замість патрона для свердел з хвостовиком SDS Plus
, натискаючи пальцем кнопку ввім-
Свердління в металах
Завжди необхідно надійно закріпити деталь, що обробляється. У разі тонкого листового металу рекомендується підкласти
шматок деревини, щоб уникнути непотрібних згинів тощо. Потім відзначити кернером місця отворів і приступити до свердління. Використовувати свердла для металу. При свердлінні отворів у чавуні рекомендується використовувати свердла з
твердосплавними наконечниками. При свердлінні великих отворів рекомендується попередньо просвердлити напрямний
отвір меншого діаметру. При свердлінні отворів у сталі для охолодження свердла слід використовувати машинне мастило.
У разі свердління в алюмінії для охолодження використовується скипидар або парафін. У разі свердління в латуні, міді або
чавуні немає необхідності використовувати холодоагенти. Для охолодження свердла, його слід часто виймати з матеріалу,
щоб дозволити йому охолонути.
Буріння в керамічних матеріалах
Буріння в твердих, щільних матеріалах: бетон, тверда цегла, камінь, мармур тощо.
Бур слід встановлювати в патрон перфоратора при відключеному живленні.
За необхідності встановити обмежувач глибини буріння.
Встановити перемикач режиму роботи в режим буріння з ударом або, якщо такий є, в режим буріння без удару.
ОРИГІНАЛЬНА ІНСТРУКЦІЯ
33
Page 34

UA
Вставити вилку в розетку, натиснути кнопку ввімкнення перфоратора і розпочати роботу.
В ході роботи необхідно регулярно робити перерви - ніколи не допускати надмірного нагрівання перфоратора і змінних
робочих інструментів.
Працювати в режимі буріння з ударом рекомендується тільки у випадку щільних керамічних матеріалів, таких як бетон,
тверда цегла, камінь тощо. У разі буріння отворів великого діаметра рекомендується попередньо просвердлити отвір меншого діаметру, а вже після цього використовувати бур потрібного діаметра. Необхідно використовувати бури, призначені
для ударного буріння.
Не рекомендується використовувати режим ударного буріння для керамічних матеріалів з пористою структурою, таких як
плитка, м’яка цегла, штукатурка тощо. Ударне буріння в таких матеріалах
Перфоратор обладнаний муфтою, що захищає електродвигун від перевантажень, при заклинюванні змінного робочого
інструмента під час роботи. Наприклад, при попаданні на стрижень арматури. В цьому випадку бур перестане обертатися,
незважаючи на те, що електродвигун як і раніше буде працювати.
Занадто сильне натискання на перфоратор під час роботи також може викликати спрацьовування муфти.
В цьому випадку, потрібно вийняти робочий інструмент з отвору, переконатися, що перфоратор справний і працює належним чином, а потім відновити роботу, застосовуючи зусилля, необхідне для правильної роботи. У разі потрапляння бура на
стрижень арматури або іншу приховану металеву перешкоду, її необхідно просвердлити без удару свердлом для металу
того ж діаметру, що й ударний бур, а потім продовжити буріння в керамічному матеріалі.
Свердління в глазурованій плитці, м’якій цеглі, штукатурці тощо.
Свердлити аналогічно, як і у випадку твердих матеріалів, але без удару. Періодично виймати бур з отвору для видалення
пилу і відходів. Під час свердління слід натискати на інструмент з однаковою силою.
Встановлення положення зубила
Деякі призначені для довбання змінні робочі інструменти з метою безпеки і для поліпшення ергономіки необхідно встановлювати під певним кутом, наприклад, зубило або долото. Для цього можна використати відповідний режим роботи.
Закріпити змінний робочий інструмент у патроні відповідно до вказівок, поданих в інструкції з експлуатації. Встановити
перемикач на символ молотка зі стрілкою, потім натиснути кнопку ввімкнення. Змінний робочий інструмент почне повільно
повертатися в обраному напрямку. Відпустити кнопку ввімкнення після досягнення змінним інструментом необхідного положення. Встановити перемикач режимів у положення довбання (символ молотка) й приступити до роботи.
Довбання
Відключити інструмент від мережі і встановити в патрон необхідний змінний інструмент: зубило або шлямбур.
Встановити перемикач режимів у положення довбання. Вставити вилку в розетку, натиснути кнопку ввімкнення перфоратора, почекати, поки він набере повну швидкість і розпочати роботу.
Під час довбання не слід проникати занадто глибоко в оброблюваний матеріал. Матеріал необхідно знімати тонкими
шарами, не здійснюючи занадто сильного натиску на перфоратор.
Вирізання отворів
Перфоратор можна використовувати для вирізання отворів великого діаметру в деревині за допомогою спеціальних свердел з постійним діаметром або змінних наконечників з набору пил для вирізання отворів. Для запобігання утворенню
на вихідних отворах задирок чи нерівних країв під матеріал, що обробляється, потрібно підкласти шматок деревини (з
відходів).
Використання приладдя
Перфоратори зі змінним напрямком обертання не повинні використовуватися для приводу в дію робочого приладдя.
може їх пошкодити.
Пилозахисний ковпак патрона
Якщо в комплект перфоратора входить гумовий пилозахисний ковпак патрона, його рекомендується використовувати при
бурінні, коли свердло направлено вгору, наприклад, при бурінні в стелі. Після установки бура в патрон, на нього необхідно
надіти ковпак. Пил і відходи, що утворюються під час буріння, збиратимуться в пилозахисному ковпаку, запобігаючи забрудненню патрона. Після завершення роботи необхідно зняти ковпак з патрона, очистити його від пилу і відходів, а потім
промити струменем теплої води.
Свердління з використанням обмежувача глибини (XII)
Обмежувач може бути використаний для полегшення свердління там, де потрібно просвердлити глухі (не наскрізні) отвори, зокрема, в бетоні і дереві. Визначити глибину отвору. Встановити в патроні свердло. Відзначити фломастером на
свердлі глибину отвору (вимірювати від робочого кінця свердла). Обмежувач глибини встановити так, щоб його кінець
збігався із зазначеною на свердлі відстанню „L”. Переконатися, що обмежувач не пересунеться під час роботи. Розпочати
свердління. При досягненні встановленої глибини торець обмежувача торкнеться поверхні біля отвору. Після цього вийняти свердло з отвору.
34
ОРИГІНАЛЬНА ІНСТРУКЦІЯ
Page 35

UA
Додаткові примітки
Під час роботи не можна занадто сильно натискати на матеріал, що обробляється, а також не слід робити різких рухів,
щоб не пошкодити змінний робочий інструмент і перфоратор. Під час роботи слід регулярно робити перерви. Заборонено
допускати перевантаження інструмента, температура зовнішніх поверхонь ніколи не повинна перевищувати 60
o
C. Після
завершення роботи перфоратор слід вимкнути, вийняти вилку з розетки і виконати технічне обслуговування та огляд
інструмента.
Заявлене загальне значення вібрації вимірювалося за допомогою стандартного методу випробування і може використовуватися для порівняння одного інструмента з іншим. Заявлене загальне значення вібрації може використовуватися для
попередньої оцінки впливу.
Увага! Вібрація, що
створюється в процесі роботи інструмента, може відрізнятися від задекларованої. Це залежить від
способу використання даного інструмента.
Увага! Необхідно визначити заходи з безпеки для захисту оператора, що ґрунтуються на оцінці ризиків у реальних умовах
експлуатації (враховуючи усі робочі цикли, напр., коли інструмент вимкнений або працює в холостому режимі, а також час
активації).
Змащування
Перед кожним використанням бурів або зубил, їх необхідно ретельно очистити, а також змастити хвостовики SDS Plus
тонким шаром мастила. Рекомендується використовувати мастило для патронів SDS Plus. Однією з причин неправильного функціонування ударного механізму може бути недостатнє змащення редуктора і вузла ударного колінчастого поршня.
Рекомендується використовувати мастило для зубчастих і колінчастих передач. Доповнювати мастило рекомендується в
авторизованому сервісному центрі.
КОНСЕРВАЦІЯ ТА ОГЛЯД
УВАГА! Перед початком регулювання, технічного обслуговування або консервації слід вийняти штепсель приладу з гнізда
електромережі. Після завершення роботи слід перевірити технічний стан електроприладу шляхом зовнішнього огляду та
оцінки: корпуса та рукоятки, електропровода з штепселем і відгинкою, роботи електричного вимикача, прохідності вентиляційних щілин, іскрення щіток, рівня шуму при роботі підшипників та передачі, запуска та рівномірності роботи. Протягом
гарантійного періоду користувач не може проводити додатковий монтаж електроприладів або заміну будь-яких елементів
та частин, оскільки це викликає втрату гарантійних прав. Всілякі перебої, викриті під час огляду або роботи, є сигналом до
проведення ремонту у сервісному пункті. Після завершення роботи корпус, вентиляційні щілини, перемикачі, додаткову
рукоятку та щитки слід прочистити, напр., струменем повітря (тиск не більше 0,3 MPa), пензлем або сухою шматкою без
застосовування хімічних речовин та миючих рідин. Прилад та затиски прочистити сухою чистою шматою.
ОРИГІНАЛЬНА ІНСТРУКЦІЯ
35
Page 36

LT
ĮRANKIO CHARAKTERISTIKA
Rankinis smūginis gręžtuvas su kalimo funkcija, tai paprastas II klasės izoliacijos įrankis skirtas skylėms gręžti ir betonui, natūra-
liam bei dirbtinam akmeniui, marmurui ir kt. medžiagoms kalti pritaikytų dirbti su SDS Plus griebtuvu darbinių įrankių pagalba. Šio
tipo smūginis gręžtuvas turi tolygią veleno apsisukimų greičio reguliaciją, ko pasekmėje, smūgio funkciją atjungus, leidžia gręžti
tokias medžiagas kaip: mediena, metalas arba plastmasė. Taisyklingas, patikimas ir saugus elektros įrankio darbas priklauso nuo
jo tinkamo eksploatavimo, todėl:
Prieš pradedant dirbti su įrankiu, reikia atidžiai perskaityti visą instrukciją ir ją išsaugoti.
Už bet kokias žalas kilusias dėl įrankio naudojimo nesilaikant darbo saugos taisyklių ir šios instrukcijos rekomendacijų, tiekėjas
neneša atsakomybės.
ĮRANGA
Gamyklinėje pakuotėje turi būti:
- smūginis gręžtuvas
- papildomoji rankena
- gręžimo gylio ribotuvas
- grąžtai ir kaltai
- automatiškai užsispaudžiantis grąžto griebtuvas
TECHNINIAI PARAMETRAI
Parametras Matavimo vienetas Vertė
Katalogo numeris 79054
Nominali įtampa [V] ~230
Nominalus dažnis [Hz] 50
Nominali galia [W] 620
Nominalūs apsisukimai [min
Maksimalus skylės diametras (betonas) [mm] 24
Smūgio energija [J] 2,4
Smūgių dažnis [min
Masė [kg] 2,8
Triukšmingumo lygis
- akustinis slėgis L
- galia L
Virpesių lygis (pagrindinė rankena/ papildomoji rankena) [m/s
Izoliacijos klasė II
Apsaugos laipsnis IP20
± K [dB(A)] 92 ± 3
pA
± K [dB(A)] 103 ± 3
wA
-1
] 0 - 870
-1
] 0 - 4850
2
] 14,377 ± 1,5 / 11,618 ± 1,5
BENDROS SAUGOS SĄLYGOS
DĖMESIO! Būtina perskaityti visas žemiau aprašytas instrukcijas. Jų nesilaikymas gali būti elektros smūgio, gaisro arba kūno
sužalojimo priežastim. Vartojama instrukcijose „elektrinio įrankio” sąvoka yra taikoma visiems elektra varomiems įrenginiams,
maitinamiems elektros laidų pagalba, o taip pat bevieliniu būdu.
LAIKYKITĖS ŽEMIAU IŠDĖSTYTŲ INSTRUKCIJŲ
Darbo vieta
Darbo vieta turi būti gerai apšviesta ir laikoma švarioje būklėje. Netvarka ir silpnas apšvietimas gali būti nelaimingų įvykių
priežastim.
Nevartoti elektrinių įrankių padidintos sprogimo rizikos aplinkoje, kurioje yra liepsnieji skysčiai, dujos bei garai. Elektriniai įrankiai kibirkščiuoja, o tai, sąlytyje su liepsniaisiais skysčiais arba dujomis, gali sukelti gaisrą.
Į darbo aplinką negalima prileisti vaikų bei pašalinių asmenų. Išsiblaškymo pasekmėje galima prarasti įrankio kontrolę.
Elektrinė apsauga
Elektrinio įrankio kištukas turi tikti prie elektros tinklo rozetės. Kištuko negalima modifikuoti. Taip pat negalima vartoti jokių
adaptavimo elementų, kurių pagalba galima būtų kištuką sujungti su elektros tinklo rozete.
Nemodifikuotas kištukas, deramai sutaikytas su originalia rozete, sumažina elektros smūgio riziką. Reikia vengti kontakto su įžemintų įrenginių, tokių kaip vamzdžiai, šildytuvai bei šaldytuvai, paviršiais. Kūno įžeminimas didina elektros
36
ORIGINALI INSTRUKCIJA
Page 37

LT
smūgio riziką.
Elektrinius įrankius būtina saugoti nuo atmosferinių kritulių bei drėgmės poveikio. Vandens ir drėgmės įsiskverbimo į
elektros įrankio vidų atveju, didėja elektros smūgio rizika.
Maitinimo kabelio negalima perkrauti. Negalima nešti įrankio, laikant jį už maitinimo kabelio, o įjungiant ir išjungiant kištuką iš elektros tinklo rozetės, negalima traukti už laido. Vengti maitinimo kabelio kontakto su šilumos šaltiniais, tepalais,
aštriomis briaunomis ir judamais elementais. Maitinimo kabelio sužalojimas didina elektros smūgio riziką.
Atliekant darbą uždarų patalpų išorėje, būtina vartoti ilgintuvus atitinkamai pritaikytus darbui lauko sąlygomis. Tinkamo
ilgintuvo vartojimas sumažina elektros smūgio riziką.
Tuo atveju, kai elektros įrankio naudojimo drėgnoje aplinkoje negalima išvengti, apsaugai nuo maitinimo įtampos užtikrinti
reikia vartoti skirtuminės srovės apsaugos įtaisą (RCD). RCD įtaiso panaudojimas sumažina elektros smūgio patyrimo riziką.
Asmeniškas saugumas
Imkis darbo būdamas geroje fizin
arba vaistų arba alkoholio poveikio įtakoje. Net momentinis dėmesio išblaškymas darbo metu, gali būti rimtų kūno sužalojimų
priežastim.
Vartok asmeniškos apsaugos priemones. Visada užsidėk apsauginius akinius. Tok i ų asmeniškos apsaugos priemonių var-
tojimas, kaip dulkių kaukės, apsauginė avalynė, šalmai ir klausos apsaugos ausinės, sumažina rimtų kūno sužalojimų pavojų.
Venk atsitiktinio įrankio įjungimo. Prieš prijungdamas įrankį prie elektros energijos tinklo, įsitikink, ar jungiklis yra „išjungimo” pozicijoje. Įrankio laikymas su pirštu ant jungiklio arba pneumatinio įrankio jungimas, kai jungiklis yra „įjungtoje” po-
zicijoje gali sukelti rimtus kūno sužalojimus.
Prieš įjungiant pneumatinį įrankį pašalink visus veržliarakčius ir kitus įrankius vartotus jam sureguliuoti. Veržliaraktis
paliktas ant rotuojančių įrankio elementų, gali sukelti rimtus kūno sužalojimus.
Dirbdamas, visą laiką išlaikyk pusiausvyrą ir stabilią padėtį. Tai leis lengviau valdyti pneumatinį įrankį, visokių netikėtumų
darbo metu atvejais.
Dėvėk apsauginę aprangą. Nenešiok laisvų drabužių ir juvelyrinių dirbinių. Plaukai, drabužiai ir pirštinės turi būti pakankamai toli nuo judamų elektrinio įrankio dalių. Laisvi drabužiai, juvelyriniai dirbiniai arba ilgi plaukai gali įsivelti į judamas
įrankio dalis.
Vartok dulkių siurbimo priemones arba dulkių kaupimo rezervuarus, jeigu įrankis yra jais aprūpintas. Pasirūpink, kad jie
būtų taisyklingai prijungti. Vartojant dulkių siurbimo priemones, mažėja sunkių kūno sužalojimo pavojus.
Elektrinio įrankio vartojimas
Neperkrauk elektrinio įrankio. Ketinamą darbą atlik jam tinkamu įrankiu. Taisyklingas įrankio parinkimas atliekamam darbui
užtikrins produktyvesnį ir saugesnį jo atlikimą.
Nevartok elektrinio įrankio, jeigu jo tinklo jungiklis neveikia. Įrankis, kurio negalima valdyti tinklo jungikliu yra pavojingas
vartoti ir reikia jį atiduoti į taisyklą.
Prieš įrankį reguliuojant ar keičiant jo aksesuarus, o taip pat prieš jį sandėliuojant, ištrauk kištuką iš elektros tinklo
rozetės. Tai leis išvengti atsitiktinio elektrinio įrankio įjungimo.
Įrankį laikyk vaikams neprieinamoje vietoje. Neleisk įrankio vartoti asmenims neapmokytiems jo aptarnavime. Elektrinis
įrankis neapmokyto personalo rankose gali būti pavojingas.
Užtikrink tinkamą įrankio konservavimą. Tikrink judamųjų dalių tarpus bei paskirų elementų tarpusavį suderinimą. Tikrink visus įrankio elementus, ar kuris nors iš jų nėra sužalotas. Defektų atsiradimo atveju, prieš pneumatinį įrankį vartojant, reikia juos pašalinti. Daugelio nelaimingų įvykių priežastim yra netinkamai atliktas įrankio konservavimas.
Pjovimo įrankius reikia laikyti švarioje būklėje ir tinkamai išaštrintus. Tinkamai konservuotus pjovimo įrankius, darbo metu
yra lengviau kontroliuoti.
Elektrinius įrankius ir aksesuarus vartok vadovaudamasis aukščiau išdėstytomis instrukcijomis. Įrankius taikyk pagal
paskirtį, atsižvelgdamas į darbo pobūdį ir jo atlikimo sąlygas. Įrankių vartojimas kitokiam darbui negu jie yra suprojektuoti,
didina pavojingų situacijų kilimo riziką.
Taisymai
Taisyk įrankį vien tik įteisintose tokiems taisymams taisyklose, kuriose yra vartojamos tiktai originalios keičiamosios
dalys. Tai tinkamai užtikrins saugų elektrinio įrankio darbą.
PAPILDOMOS SAUGOS INSTRUKCIJOS
Dirbant su smūginiu gręžtuvu būtina dėvėti klausą apsaugančias ausines. Triukšmo poveikyje kyla klausos praradimo pavojus.
Įrankį vartoti pasinaudojant su įrankiu pristatytomis papildomomis rankenomis. Kontrolės praradimas gali sukelti opera-
toriaus kūno sužalojimus.
Dėvėti nuo dulkių apsaugan
Atliekant darbus, kurių metu yra pavojus, kad darbinis įrankio antgalis gali susiliesti su elektros įtampą turinčiu laidu,
įrankį reikia laikyti izoliuotų laikiklių pagalba. Įrankio griebtuve įtaisyto darbinio įrankio susilietimo su elektros įtampą turinčiu laidu
pasekmėje, metaliniai įrankio elementai gali įgauti tokią pat įtampą, ko rezultate įrankio operatorius gali patirti elektros smūgį.
ėje ir psichinėje būklėje. Sukaupk dėmesį į tai, ką darai. Nedirbk būdamas nuvargęs
čias kaukes. Dulkes sulaikančių kaukių naudojimas sumažina rimtų kūno pažeidimų riziką.
ORIGINALI INSTRUKCIJA
37
Page 38

LT
ĮRANGOS ELEMENTŲ MONTAVIMAS
Dėmesio! Įtaisomųjų įrankių montavimas gali būti atliekamas tik esant atjungtai maitinimo įtampai. Ištraukti įrankio laido kištuką
iš maitinimo tinklo rozetės!
Papildomos rankenos montavimas (III)
Uždėti papildomąją rankeną reikalaujamoje pozicijoje ir sukant laikiklį, rankeną užspausti.
Gręžimo gylio ribotuvo montavimas (IV)
Jeigu įrankio įrangos rinkinyje yra gręžimo gylio ribotuvas, galima jį pritvirtinti prie papildomosios rankenos.
Priklausomai nuo pritvirtinimo būdo ribotuvą reikia įkišti į papildomoje rankenoje esančią skylę ir nustačius atitinkamą ribotuvo
poziciją jį pritvirtinti spaustuko, suktuvo pagalba arba atitinkamai prisukant papildomąją rankeną
PARENGIMAS DARBUI
Prieš pradedant darbą reikia patikrinti ar įrankio korpusas, maitinimo kabelis su kištuku nėra pažeisti. Pažeidimų pastebėjimo
atveju tolesnis darbas yra draudžiamas!
Dėmesio! Bet kokie veiksmai susiję su darbinių
gaubtų ir kreipiamųjų montavimu bei reguliavimu ir pan. turi būti atliekami atjungus įrankio maitinimo įtampą, todėl prieš imantis
šių veiksmų reikia: Ištraukti įrankio maitinimo laido kištuką iš elektros tinklo rozetės!
Darbinių SDS Plus įrankių montavimas gręžtuvo griebtuve.
Išvalyti pasirinktą darbinį įrankį šalinant suteršimus bei rūdžių apnašas ir patepti SDS Plus griebtuvą plonu tepalo sluoksniu.
Patraukti į save įrankio griebtuvą ir prilaikyti šioje pozicijoje (V).
Įdėti švarų darbinį įrankį į griebtuvo angą. Jeigu reikia - pasukti įrankį, kad be pasipriešinimo įsikištų į griebtuvo angą.
Paleisti griebtuvą, darbinis įrankis turi automatiškai užsiblokuoti griebtuve.
Patikrinti ar darbinis įrankis yra patikimai įtvirtintas. Tuo tikslu užtenka pamėginti ištraukti įrankį iš SDS-Plus griebtuvo. Jeigu
grąžtą arba kirstuką pavyksta iš griebtuvo ištraukti – montavimo veiksmus reikia pakartoti.
Apsisukimų krypties nustatymas (VII)
Nustatyti apsisukimų krypties perjungiklį sutinkamai su rodyklėmis: apsisukimai į dešinę – rodyklė nukreipta įrankio priekine kryptimi, apsisukimai į kairę – rodyklė nukreipta įrankio užpakaline kryptimi.
Dėmesio! Apsisukimų krypties keitimas gali būti atliekamas tik esant atjungtai maitinimo įtampai!
Darbo režimo nustatymas (VI)
Smūginio gręžtuvo darbo režimas nustatomas perjungikliu su blokavimo įtaisu. Spaudžiant ir prilaikant blokuotės mygtuką galima
perjungiklio poziciją pakeisti.
Smūginis mechanizmas palengviną skylių gręžimą betone, mūre ir kietose keraminėse medžiagose (kietos plytos, akmenys,
marmuras). Tuo tikslu smūgio perjungiklį reikia perstatyti į smūginio gręžimo poziciją, pažymėtą grąžto ir plaktuko simboliu.
Gręžiant skyles kitose medžiagose, smūginio gręžimo funkciją reikia išjungti, perstatant perjungiklį į nesmūginio gręžimo poziciją
pažymėtą vien grąžto simboliu.
Galima taip pat nustatyti kalimo funkciją, šiame režime yra išjungiami apsisukimai, bet smūgis lieka įjungtas.
Tuo tikslu darbo režimo perjungiklį reikia perstatyti į kalimo poziciją, pažymėtą plaktuko simboliu.
Smūginis gręžtuvas turi kalto pozicijos keitimo funkciją. Ši funkcija yra paranki kalant įvairių įstatomų darbinių įrankių pagalba,
leidžia nustatyti kaltą bet kokioje norimoje pozicijoje. Perjungiklio šioje pozicijoje užblokuoti negalima.
įrankių (grąžtų ir kirstukų pritaikytų dirbti su SDS Plus griebtuvu) keitimu, su
Parengiamieji veiksmai
Parinkti tinkamą darbinį įrankį ir įtaisyti jį smūginio gręžtuvo griebtuve.
Nustatyti darbo režimo perjungiklį atitinkamoje pozicijoje: plaktuko simbolis – kalimas, plaktuko ir grąžto simbolis – gręžimas su
smūgiu, paties grąžto simbolis – nesmūginis gręžimas; trikampis – kalto pozicijos nustatymas.
Užsidėti klausos apsaugos ausines, akių apsaugą, darbines pirštines.
Maitinimo kabelio kištuką įsprausti į elektros tinklo rozetę.
Užimti pusiausvyros išlaikymą darbo metu garantuojančią poziciją, sugriebti smūginį griebtuvą abiem rankomis ir paleisti jį spaudžiant pirštu elektros jungiklį (VIII).
Prilaikyti įrankį toje būklėje per keletą minučių, kad tepalas pritekėtų į visus pavaros mechanizmo elementus.
Išjungti smūginį gręžtuvą atleidžiant jungiklį.
Dėmesio! Išgirdus įtartinus girgždėjimus, traškėjimus ir pan., smūginį gręžtuvą reikia tuojau pat išjungti, atjungiant jį nuo elektros
tinklo ir perduoti jį patikrinimui į įteisintą serviso punktą.
38
ORIGINALI INSTRUKCIJA
Page 39

LT
Griebtuvo pakeitimas
Smūginiame gręžtuve yra užtikrinta griebtuvo pakeitimo galimybė. Vietoj griebtuvo kuriame galima įtaisyti grąžtą SDS Plius sistemoje, galima įstatyti griebtuvą, kuris leidžia montuoti grąžtus su cilindriniais kotais.
Griebtuvui pakeisti, jo galinėje dalyje esantį žiedą reikia patraukti į griebtuvo priekį (IX). Tai leis išmontuoti griebtuvą. Grąžto griebtuvą reikia įmontuoti įvedant jį į gręžtuvo movą (X) ir įspaudžiant iki spragtuko spragtelėjimo. Įsitikinti, kad spragtukas suveikė ir
nėra pavojaus, kad griebtuvas darbo metu savarankiškai atsijungs.
Grąžtų montavimas automatiškai užsispaudžiančiame griebtuve (XI)
Reikia pasirinkti tinkamą duotajam darbui grąžtą su cilindriniu kotu. Į griebtuvą įstatyti grąžtą, sugriebti galinę griebtuvo dalį, po to,
sukant priekinę griebtuvo dalį įtvirtinti grąžtą
Dėmesio! Atliekant kalimą automatiškai užsispaudžiančiu griebtuvu naudotis nerekomenduojama. Smūginio mechanizmo generuojamos apkrovos gali sukelti automatiškai užsispaudžiančio griebtuvo sunaikinimą.
ĮRANKIO NAUDOJIMAS
Dėmesio! Smūginio gręžtuvo su kalimo funkcija naudojimo metu reikia dėvėti klausą apsaugančias ausines!
Dešiniosios arba kairiosios apsisukimų krypties taikymas
Apsisukimus į dešinę naudoti gręžiant visuotinai naudojamais dešiniojo posūkio grąžtais. Apsisukimus į kairę naudoti dešiniojo
posūkio grąžtui įstrigus gręžiamojoje medžiagoje.
Jungiklio blokuotės taikymas
Jungiklio blokuotę rekomenduojama taikyti ilgai trunkančio gręžimo atveju, pavyzdžiui gręžiant betoną, mūrą ir pan. Tuo tikslu,
turint nuspaustą jungiklį įspausti nykščiu blokuotės mygtuką ir atleisti jungiklį. Blokuotei pašalinti užtenka vien tik paspausti elektros jungiklį.
Medienos gręžimas
Prieš pradedant gręžti skylę rekomenduojama įtvirtinti apdirbamąjį ruošinį staliaus veržtuvuose arba spaustuvuose, o po to paženklinti gręžimo vietą vinies arba žymeklio pagalba. Gręžtuvo griebtuve įtaisyti atitinkamą grąžtą, nustatyti greitį, prijungti gręžtuvą
prie elektros tinklo ir pradėti gręžti. Gręžiant kiaurai per ruošinį, rekomenduojama po ruošiniu padėti plokščią medinę kaladėlę,
ko dėka išėjimo angos kraštai nebus sudraskyti. Norint padaryti didelio diametro skylę, rekomenduojama preliminariai išgręžti
mažesnio diametro skylę, kuri atliks kreipiamosios vaidmenį.
Metalų gręžimas
Apdirbamąjį ruošinį reikia visada patikimai įtvirtinti. Plonos skardos gręžimo atveju rekomenduojama padėti po ja medinę plokščią
medienos kaladėlę, kad išvengti nepageidaujamų skylės briaunos sulankstymų ir pan. Po to paženklinti ketinamos gręžti skylės
centrą žymekliu ir pradėti gręžti. Naudoti grąžtus skirtus plienui gręžti. Baltojo ketaus gręžimui rekomenduojama naudoti grąžtus
su karbido galūnėmis. Ketinant išgręžti didesnio diametro skylę, rekomenduojama prieš tai išgręžti toje vietoje mažesnio skersmens skylę. Gręžiant plieną, grąžto aušinimui naudoti mašininę alyvą. Gręžiant aliuminį, grąžtą aušinti terpentinu arba parafinu.
Gręžiant žalvarį, varį arba ketų nenaudoti jokių aušinimo skysčių. Aušinimo tikslu grąžtą dažnai ištraukti iš ruošinio ir leisti jam
savaime ataušti.
Gręžimas keraminėse medžiagose
Kietų, monolitinių medžiagų gręžimas: betono, kietų plytų, akmens, marmuro ir pan.
Grąžtas įstatomas į įrankio griebtuvą tik smūginį gręžtuvą atjungus nuo elektros tinklo.
Jeigu reikia – įtaisomas taip pat gręžimo gylio ribotuvas.
Darbo rėžimo perjungikliu pasirinkti smūginį gręžimą arba jeigu yra tokia galimybė, - gręžimą be smūginės funkcijos.
Įkišti kištuką į elektros tinklo rozetę, įjungti jungikliu smūginį gręžtuvą ir pradėti darbą.
Darbo metu daryti reguliarias pertraukas – niekada neleisti, kad smūginis gręžtuvas ir darbinis antgalis pernelyg įšiltų.
Smūginį gręžimą rekomenduojama taikyti tik monolitinių keraminių medžiagų atveju, tokių kaip: betonas, kietos plytos, akmuo,
marmuras ir pan. Gręžiant didelių diametrų skyles rekomenduojama pirmiau padaryti mažesnio skersmens skylę, o po to panaudoti norimo diametro grąžtą. Reikia naudoti grąžtus skirtus smūginiam gręžimui.
Nerekomenduojama gręžti smūginiu metodu keraminių nekompaktiškos struktūros medžiagų, tokių kaip: glazūra, minkštos plytos, tinkas ir pan. Smūginis gręžimas tokių medžiagų atveju gali sukelti medžiagos sunaikinimą.
Smūginis gręžtuvas su kalimo funkcija yra aprūpintas sankaba, kuri užkerta kelią elektros variklio perkrovai pasireikšti tuo atveju,
kai įtaisomas darbinis įrankis darbo metu įstringa. Pavyzdžiui jeigu grąžtas savo kelyje aptiks armavimo strypą. Tokiu atveju
grąžtas nustos suktis, nežiūrint to, kad elektros variklis toliau dirba.
Taip pat pernelyg didelis įrankio spaudimas darbo metu gali sukelti sankabos suveikimą.
Tokiu atveju įstatomąjį įrankį reikia ištraukti iš skylės, patikrinti ar smūginis gręžtuvas funkcionuoja taisyklingai, o po to vėl pradėti
gręžimą spaudžiant tik tiek, kiek tai yra reikalinga taisyklingam gręžimui atlikti. Gręžimo kelyje aptikus armavimo strypą arba
taip, kad jis būtų patikimai ir tvirtai įtvirtintas griebtuve.
ORIGINALI INSTRUKCIJA
39
Page 40

LT
kitokias metalines kliūtis, reikia jas pergręžti be smūginės funkcijos naudojant tokio pat diametro kaip smūginis grąžtas - grąžtą
skirtą metalui gręžti, o po to tęsti keraminės medžiagos gręžimą vėl taikant smūginį grąžtą.
Glazūros, minkštų plytų, tinko ir pan. medžiagų gręžimas
Gręžti kaip kietų medžiagų atveju, bet be smūginės funkcijos. Kas kurį laiką ištraukti grąžtą iš gręžiamos skylės dulkių ir atliekų
pašalinimo tikslu. Gręžimo metu spausti įrankį pastovia jėga.
Kalto pozicijos nustatymas
Kai kurie įstatomieji darbiniai kalimui skirti įrankiai, tokie kaip kaltai ir kirstukai, saugiam ir ergonominiam darbui užtikrinti turi būti
nustatomi atitinkamu kampu. Tuo tikslu galima panaudoti atitinkamą darbo rėžimą
gal instrukcijoje pateiktus nurodymus. Perjungiklį nustatyti į poziciją paženklintą plaktuko su rodykle simboliu ir nuspausti įjungiklį.
Įstatomasis darbinis įrankis pradės pamažu suktis atitinkamai su pasirinkta apsisukimų kryptimi. Atleisti įjungiklį kai įstatomasis
įrankis pasieks norimą poziciją. Darbo rėžimo perjungiklį perjungti į kalimo funkciją – plaktuko simbolis, o po to pradėti darbą.
Kalimas
Reikiamas darbinis įrankis (kirstukas arba prakalas) įstatomas į įrankio griebtuvą tik gręžtuvą atjungus nuo elektros tinklo.
Darbo rėžimo perjungiklį perjungti į kalimo poziciją. Įkišti kištuką į elektros tinklo rozetę, įjungti jungikliu smūginį gręžtuvą, palaukti
kol apsisukimai pasieks pilną greitį ir pradėti darbą.
Kalimo metu įstatomojo darbinio įrankio neįkalti pernelyg giliai į apdirbamąją medžiagą. Medžiagą reikia atskelti plonais sluoksniais, pernelyg stipriai gręžtuvo nespaudžiant.
Angų išpjovimas
Gręžtuvas gali būti naudojamas didesnių angų medienoje išpjovimui, taikant specialius pastovaus diametro grąžtus arba kei-
čiamuosius antgalius iš siaurapjūklio geležčių rinkinio taikomo angoms išpjauti. Tam, kad išvengti šerpetų, atplaišų susidarymo
angos išėjime, jos briaunų apdraskymų – rekomenduojama po ruošiniu, gręžimo vietoje padėti plokščią atliekamos medienos
kaladėlę.
Adapterių naudojimas
Gręžtuvas su keičiamąją apsisukimų kryptimi neturi būti naudojamas kaip darbinių adapterių pavara.
Gręžtuvo griebtuvo gaubtas
Jeigu gręžtuvas yra aprūpintas guminiu griebtuvo apsaugos gaubtu, rekomenduojama juo naudotis, kai gręžimo metu grąžtas yra
nukreiptas į viršų, pavyzdžiui gręžiant lubose. Gaubtą reikia uždėti ant grąžto, kai grąžtas jau yra užspaustas griebtuve. Dulkės ir
gręžimo metu susidarančios atliekos kaupsis apsauginiame gaubte, ko dėka gręžtuvo griebtuvas bus apsaugotas nuo užteršimo.
Užbaigus darbą gaubtą reikia nuimti nuo grąžto, išberti iš jo dulkes ir atliekas, o po to išplauti drungno vandens srautu.
Gręžimas su gręžimo gylio ribotuvu (XII)
Ribotuvą galima panaudoti pageidaujamo gylio skylių gręžimui paviršiuose, kur gręžimas nėra daromas skradžiai, o iki apibrėžto
gylio, ypač betone ir medienoje. Nustatyti pageidaujamą skylės gylį. Įrankio griebtuve įtaisyti grąžtą, flomasteriu ant darbinio
grąžto pažymėti atitinkantį ketinamo gręžimo gylį atstumą nuo jo galo. Gręžimo gylio ribotuvą nustatyti taip, kad jo galas sutaptų su
pažymėtu ant grąžto atstumu „L“. Įsitikinti, kad ribotuvas darbo metu nepakeis savo pozicijos. Pradėti gręžimą, jo metu, pasiekus
nustatytą gylį, ribotuvo galas atsirems į ruošinio paviršių skylės artumoje. Tokiu atveju grąžtą reikia ištraukti iš skylės.
Papildomos pastabos
Darbo metu pernelyg stipriai apdirbamosios medžiagos nespausti ir nedaryti staigių judesių – tai leis išvengti gręžtuvo ir darbinio
įrankio pažeidimų. Darbo metu daryti reguliarias pertraukas. Neleisti, kad įrankis dirbtų perkrovos sąlygomis, išorinio paviršiaus
temperatūra niekada negali viršyti 60OC. Užbaigus darbą gręžtuvą reikia išjungti, ištraukti maitinimo laido kištuką iš elektros tinklo
rozetės, įrankį apžiūrėti ir atlikti konservavimą.
Deklaruota bendroji virpėjimų vertė buvo išmatuota standartiniu tyrimo metodu ir gali būti naudojama vieną įrankį palyginant su
kitu. Deklaruota bendroji virpėjimų vertė gali būti panaudota preliminariame ekspozicijos vertinime.
Dėmesio! Virpėjimų emisija dirbant įrankiu gali skirtis nuo deklaruotos vertės priklausomai nuo įrankio naudojimo būdo.
Dėmesio! Reikia apibrėžti saugos priemones būtinas operatoriui apsaugoti, atitinkančias faktiškų darbo sąlygų įvertinimą (atsižvelgiant į visus darbo ciklo etapus, pavyzdžiui kai įrankis yra išjungtas arba veikia tuščios eigos rėžime, o taip pat įrankio
aktyvacijos metu).
Tepimas
Visada prieš grąžtų arba kirstukų panaudojimą reikia juos tiksliai išvalyti ir SDS Plus griebtuvą patepti plonu tepalo sluoksniu.
Rekomenduojama naudoti tepalą skirtą gręžtuvų SDS Plus tipo griebtuvų tepimui. Netaisyklingo smūginio mechanizmo veikimo
atveju, viena iš galimų priežasčių gali būti nepakankamas smūginio stūmoklio pavaros ir alkūninio veleno mazgo tepimas. Rekomenduojama taikyti tepalą skirtą dantytoms ir alkūninėms pavaroms tepti. Tepalo papildymą rekomenduojama atlikti specializuotoje serviso dirbtuvėje.
. Įtvirtinti įstatomąjį darbinį įrankį griebtuve pa-
40
ORIGINALI INSTRUKCIJA
Page 41

LT
KONSERVACIJA IR PERŽIŪRA
DĖMESIO! Prieš pradedant siaurapjūklio reguliavimą, techninį aptarnavimą ar konservaciją ištrauk įrankio laido kištuką iš elektros
tinklo rozetės. Užbaigus darbą reikia patikrinti elektros įrankio techninį stovį apžiūrint jį iš išorės ir tikrinant: korpusą ir rankeną,
elektros laidą su kištuku ir atlenkimu, elektros jungiklio veikimą, ventiliacijos angų praeinamumą, šepetėlių kibirkščiavimą, guolių
ir pavarų darbo garsumą, paleidimą ir darbo tolygumą. Garantijos metu vartotojas negali demontuoti elektros įrenginių nei keisti
bet kokius mazginius surinkimus arba sudedamąsias dalis, kadangi to pasekmėje būtų prarastos garantijos teisės. Visokie pastebėti peržiūros metu, arba darbo metu netaisyklingumai – tai signalas, kad reikia įrankį atiduoti pataisymui į serviso dirbtuvę.
Užbaigus darbą reikia išvalyti korpus
nedidesniu negu 0,3 MPa), teptuku arba sausa šluoste, be jokių chemiškų priemonių bei ploviklių. Įrankius ir rankenas išvalyti
sausa švaria šluoste.
ą, ventiliacijos angas, jungiklius, papildomą rankenėlę ir gaubtus, pvz. oro srautu (su slėgiu
ORIGINALI INSTRUKCIJA
41
Page 42

LV
IERĪCES RAKSTUROJUMS
Rokas urbjmašīna ar āmuru ir parastā, II izolācijas klases ierīce, paredzēta caurumu urbšanai un kalšanai betonā, dabiskā un
mākslīgā akmenī, marmorā utt. ar darba piederumiem ar SDS Plus turētāju. Ierīce ir apgādāta ar apgriezienu laidenu regulāciju
un - pateicoties āmura funkcijas atslēgšanai - atļauj urbt caurumus sekojošos materiālos: koksne, metāls vai plastika. Pareiza,
uzticama un droša elektroierīces darbība ir atkarīga no pareizas ekspluatācijas, tāpēc:
Pirms darbības ar ierīci uzsākšanas salasiet un saglabājiet visu šo instrukciju.
Piegādātājs nenes atbildību par zaudējumiem, ierosinātiem drošības noteikumu un instrukcijas rekomendāciju neievērošanas dēļ.
ŠANA
APGĀDĀ
Oriģinālā iepakojumā jābūt novietoti:
- urbjmašīna ar āmuru
- papildus rokturis
- urbšanas dziļuma ierobežotājs
- urbji un drupinātāji
- paši saspīlēšanas urbjmašīnas turētājs
TEHNISKI PARAMETRI
Parametrs Mērvienība Vērtība
Kataloga numurs 79054
Nomināls spriegums [V] ~230
Nominālā frekvence [Hz] 50
Nomināla jauda [W] 620
Nomināli apgriezieni [min
Maks. cauruma diametrs (betons) [mm] 24
Sitiena enerģija [J] 2,4
Sitiena frekvence [min
Svars [kg] 2,8
Trokšņa līmenis
- akustisks spiediens L
- jauda L
wA
Vibrācijas līmenis (galvenais rokturis / papildu rokturis) [m/s
Izolācijas klase II
Korpusa drošības IP20
± K [dB(A)] 92 ± 3
pA
± K [dB(A)] 103 ± 3
-1
] 0 - 870
-1
] 0 - 4850
2
] 14,377 ± 1,5 / 11,618 ± 1,5
VISPĀRĪGI DROŠĪBAS NOTEIKUMI
UZMANĪBU! Jālasa šo instrukciju. Šo noteikumu neievērošana var būt par elektrošoka, ugunsgrēka un ievainojuma iemeslu. Par
„elektriskām ierīcēm” ir saprastas visas ierīces, kuras strādā ar elektrību - ar vadiem, vai bez vadiem.
JĀIEVĒRO APAKŠĀ MINĒTO INSTRUKCIJU
Darba vieta
Darba vieta jābūt labi apgaismota un tīra. Nekārtība un tumšs apgaismojums var būt par nelaimes notikuma iemeslu.
Nedrīkst lietot elektroierīci tur, kur ir paaugstināta eksplozijas bīstamība, kur ir degoši šķidrumi, gāzes un tvaiki. Elek-
troierīces ģenerē dzirksteles, kuras var būt par ugunsgrēka iemeslu pēc kontakta ar uzliesmojošiem gāzēm vai tvaikiem.
Nedrīkst pieļaut bērniem un citām personām atrasties darba vietā. Koncentrācijas zaudēšana var būt par kontroles zaudēšanas iemeslu.
Elektriska drošība
Elektrības vada kontaktdakša jābūt pielāgota pie ligzdas. Nedrīkst modificēt kontaktdakšu. Nedrīkst lietot kaut kādu
adapteru lai pielāgot kontaktdakšu. Nemodificēta kontaktdakša samazina elektrošoka risku.
Nedrīkst kontaktēties ar iezemētām virsmām, piem. caurules, radiatori un dzesētāji. Ķermeņa iezemējums var būt par
elektrošoka iemeslu.
Nedrīkst apdraudēt elektrisko ierīci ar kontaktu ar atmosfēriskiem nokrišņiem vai mitrumu. Ūdens un mitrums, kuri nāks
ierīces iekšā, var būt par elektrošoka iemeslu.
Nedrīkst pārslogot apgādāšanas vadu. Nedrīkst nēsāt ierīci vai ieslēgt/izslēgt ierīci, turēšot to ar vadu. Izvairoties, lai
42
ORIĢ INĀ L Ā INSTRUKCIJA
Page 43

LV
vads nekontaktētu ar siltumu, eļļām, asām malām un kustīgiem elementiem. Bojāts vads var būt par elektrošoka iemeslu.
Gadījumā, kad darbs ir veidots ārpus telpas, jābūt lietoti pagarināšanas vadi, paredzēti darbībai ārā. Pareiza pagarināša-
nas vada lietošana samazina elektrošoka risku.
Gadījumā, kad elektroierīce ir lietota mitrā apkārtnē, par sprieguma barošanas aizsardzību jālieto uz diferenciālo strāvu reaģējošu
automātslēdžu (RCD). RCD lietošana samazina elektriskās strāvas trieciena risku.
Personāla drošība
Strādāt var tikai labā fiziskā un psihiskā kondīcijā. Jābūt uzmanīgi darbā
kamentu vai alkohola pieņemšanas. Pietiek neuzmanības moments, lai ievainot ķermeņu.
Jālieto personālas aizsardzības līdzekļus. Vienmēr jālieto drošības brilles. Personālas aizsardzības līdzekli, piem. pretputek-
ļu maskas, drošības apavi, ķiveres un prettrokšņa austiņas, samazina ievainojuma risku.
Jābūt uzmanīgi, lai nejauši neieslēgt ierīci. Jākontrolē, vai ieslēdzis būtu „izslēgtā” pozīcijā pirms ierīces pievienošanu pie
elektrotīkla. Ierīces turēšana ar pirkstu uz ieslēdzi vai kad ieslēdzis ir „ieslēgtā” pozīcijā var būt par ķermeņa ievainošanas iemeslu.
Pirms elektriskas ierīces ieslēgšanas jānoņem visas atslēgas un citu ierīci, kuri bija lietoti regulācijā. Atslēga, kura ir at-
stāta uz ierīces rotējošiem elementiem, var nopietni ievainot ķermeņu.
Jāsaglabā līdzsvaru. Visu laiku jāsaglabā pareizu pozīciju. Tas a t ļaus vieglāk strādāt ar elektrisko ierīci negaidītās situācijās.
Jāapģērbj drošības apģērbu. Nedrīkst apģērbt brīvo apģērbu un juvelierizstrādājumu. Mati, apģērbs un darba dūraiņi
jābūt turēti tālu no ierīces kustīgām daļām, jo var aizkabināties uz ierīces kustīgiem elementiem.
Jālieto putekļu izsūkšanas ierīci vai putekļu tvertnes, kad ierīce ir ar tām apgādāta. Jākontrolē, vai tādas ierīces ir pareizi
pievienotas. Putekļu izsūkšanas ierīce atļauj samazināt bīstamību veselībai.
Elektriskas ierīces lietošana
Nedrīkst pārslogot elektrisko ierīci. Jālieto ierīci, kura ir pareiza noteiktai darbībai. Pareiza ierīces izvēlēšana atļauj strādāt
efektīvāk un drošāk.
Nedrīkst lietot elektrisko ierīci, kad ir bojāts elektrisks slēdzējs. Ierīce, kuru nevar kontrolēt ar elektrisko slēdzēju, ir bīstama
un jābūt atdota remontam.
Atslēgt kontaktdakšu no ligzdas pirms regulēšanas, aksesuāru mainīšanas un ierīces glabāšanas. Tas var sargāt no ie-
rīces gadījuma ieslēgšanas.
Glabāt ierīci bērniem nepieejamā vietā. Neatļaut strādāt ar ierīci neapmācītiem cilvēkiem. Elektriska ierīce var būt bīstama
neapmācīta personāla rokās.
Nodrošināt pareizu ierīces konservāciju. Kontrolēt ierīces neatbilstību un atstarpes. Kontrolēt, vai ierīces elementi nav
bojāti. Bojājumu konstatēšanas gadījumā to jāsaremontē pirms elektriskas ierīces lietošanas. Daudz nejaušību var notikt
pēc nepareizas ierīces konservācijas.
Griezīgo ierīci jātur tīrībā un uzasinātā stāvoklī. Pareiza griezīgas ierīces konservācija atļauj vieglāk kontrolēt ierīci darba laikā.
Lietot elektrisko ierīci un aksesuāru saskaņā ar šo instrukciju. Lietot paredzēto ierīci, ievērošot darba veidu un apstākļu.
Ierīce lietota citā darbībā, nekā bija paredzēta, var būt par bīstamas situācijas iemeslu.
Remonti
Ierīci var remontēt tikai autorizētos servisos, kuri lieto oriģinālo rezerves daļu. Tas var nodrošināt pareizu lietošanas drošību.
PAPILDUS DROŠĪBAS INSTRUKCIJAS
Lietot dzirdes aizsardzību, ja ir izmantots veserurbis. Trokšņi var ierosināt dzirdes pazaudēšanu.
Ierīci izmantot ar papildu rokturiem, piegādātiem ar ierīci. Kontroles pazaudēšana var ierosināt operatora ievainojumu.
Izmantot pretputekļu masku. Pretputekļu maskas izmantošana atļauj samazināt ķermeņa ievainojuma risku.
Veicot darbu, kad ierīce var kontaktēties ar slēptu elektrības vadu, elektroierīci turēt ar izolētiem rokturiem. Ierīce, kontaktējoties
ar elektrības vadiem, var ierosināt situāciju, kad ierīces metāla elementi būs zem sprieguma, kas var ierosināt ierīces
operatora elektrošoku.
APRĪKOJUMA ELEMENTU MONTĀŽA
UZMANĪBU! Aprīkojuma elementu montāžu var veikt tikai ar atslēgto elektroapgādi. Noņemt ierīces vada kontaktdakšu no elektrības ligzdas!
Papildu roktura montāža (III)
Uzstādīt papildu rokturu prasītā pozīcijā un to piespiest, pieskrūvējot turētāja rokturu.
Urbšanas dziļuma ierobežotāja montāža (IV)
Ja ierīces komplektā atrodas urbšanas dziļuma ierobežotājs, var būt uzstādīts uz papildu roktura.
Atkarīgi no stiprināšanas veida, ierobežotāju iebāzt papildu roktura caurumā, un pēc attiecīgas pozīcijas noteikšanas piestiprināt
ar pogu, kloķi vai pieskrū
vēt ar papildu rokturu.
. Nedrīkst strādāt nogura stāvoklī, vai pēc medi-
ORIĢ INĀ L Ā INSTRUKCIJA
43
Page 44

LV
DARBA SAGATAVOŠANA
Pirms darba sākuma kontrolēt, vai apvalka korpuss un pievienošanas vads ar kontaktdakšu nav bojāti. Gadījumā, kad bojājumi
ir konstatēti, nedrīkst uzsākt darbu!
Uzmanību! Visas darbības savienotas ar darba instrumentu (urbji un griezēji ar SDS Plus turētāju) mainīšanu, apvalka un vadīkla
montēšanu, regulēšanu utt., jāveido pēc ierīces izslēgšanas no elektrības tīkla, tāpēc pirms tām darbībām: Noņemt ierīces vada
kontaktdakšu no elektrības ligzdas!
SDS Plus darba instrumentu uzstādīšana instrumentu turētājā
Notīrīt izvēlētu instrumentu no piesārņojumiem un rūsas, noeļļot SDS Plus turēt
Pievilkt instrumentu turētāju un paturēt tajā pozīcijā (V).
Novietot notīrītu instrumentu caurumā. Ja nepieciešami, pagriezt instrumentu, lai bez pretestības uzstādīt turētājā.
Atbrīvot turētāju, instruments jābūt automātiski nobloķēts turētājā.
Pārbaudīt, vai instruments ir pareizi novietots. Lai to darīt - pamēģināt noņemt instrumentu no SDS-Plus turētāja. Ja urbis vai
griezējs var izstiepties no turētāja, atkārtoti veikt montāžas procedūru.
Rotāciju virziena regulēšana (VII)
Uzstādīt rotāciju virzienu pārslēdzēju saskaņā ar bultām, rotācija uz labu - bulta novirzīta uz ierīces priekšu, rotācija uz kreisu
- bulta novirzīta ierīces mugurpusē.
Uzmanību! Virzienu mainīšana ir iespējama tikai ar atslēgto elektroapgādi!
Darba veida uzstādīšana (VI)
Āmura-urbjmašīnas darba režīma uzstādīšanai ir paredzēts pārslēdzējs ar blokādi. Spiežot un turēšot blokādes pogu, mainiet
pārslēdzēja pozīciju.
Darba ar āmuru funkcija atvieglo urbšanu betonā, sienā un cietos keramikas materiālos (ķieģelis, akmens, marmorējums). Lai
ieslēgtu āmuru, āmura pārslēdzēju pārslēgt uz urbja un āmura simbolu.
Citos materiālos urbšanas laikā āmura funkciju izslēgt, pārslēdzot pārslēdzēju uz urbja simbolu.
Ierīce var būt pārslēgta arī uz kalšanas funkciju, tajā režīmā apgriezieni tiek izslēgti un funkcionē tikai āmurs.
Lai ieslēgtu to režīmu, darba režīma pārslēdzēju pārslēgt uz āmura simbolu.
Āmurs-urbjmašīna ir apgādāta ar drupinātāja pozīcijas mainīšanas funkciju. Funkcija ir nepieciešama, ja ir lietoti dažādi iespraužami darbarīki, ļauj uzstādīt drupinātāju jebkurā pozīcijā. Pārslēdzējs šajā pozīcijā nevar būt nobloķēts.
Sagatavošanas darbība
Izvēlēt attiecīgu darba instrumentu un to uzstādīt instrumentu turētājā.
Darba veida pārslēdzēju pārslēgt uz attiecīgu pozīciju: āmura simbols - kalšana; āmura un urbja simbols - urbšana ar āmuru; urbja
simbols - urbšana bez āmura; trīsstūris - drupinātāja pozīcijas uzstādīšana.
Uzvilkt dzirdes aizsardzību, acu aizsardzību, darba cimdus.
Uzstādīt vada kontaktdakšu elektrības ligzdā.
Pieņemt pozīciju, kas garantē balansa saglabāšanu, ar abām rokā pakampt ierīci un iedarbināt, spiežot ar pirkstu uz ieslēdzēju
(VIII).
Ierīci turēt tajā pozīcijā dažādu minūšu laikā, lai smērviela noeļļotu visu piedziņas mehānisma elementu.
Izslēgt ierīci, atbrīvojot ieslēdzēju.
Uzmanību! Ja būs dzirdama savāda šņirkstoņa, brikšķēšana utt., ierīci nekavējoties atslēgt no elektrības un nodot apskatei
pilnvarotam servisa punktam.
Urbjmašīnas turētāja mainīšana
Āmurs-urbjmašīna ir apgādāta ar urbjmašīnas turētāja pozīcijas mainīšanas iespēju. Turētāja, kas ļauj uzstādīt urbjus SDS Plus
sistēmā, vietā var būt uzstādīts turētājs, kas ļauj montēt urbjus ar cilindrisku rokturu.
Lai mainītu urbjmašīnas turētāju, gredzenu turētāja aizmugurējā daļā pastiept turētāja priekšpuses virzienā (IX). Tas ļaus demontēt turētāju. Urbjmašīnas turētājs jābūt uzstādīts pēc novietošanas uz urbjmašīnas uzmavas (X) un piespiešanas līdz sprosta
slēgšanai. Pārbaudīt, vai sprosts tika noslēgts un vai nav iespējama urbjmašīnas turētāja atslēgšana darba laikā.
Urbja stiprināšana paši saspīlēšanas urbjmašīnas turētājā (XI)
Izvēlēt attiecīgam darbam derīgo urbi ar cilindrisku turētāju. Turētājā novietot urbi, pakampt urbjmašīnas turētāja aizmugurēju daļu
un rotējot priekšēju - iestiprināt urbi, lai būtu droši un stipri uzstādīta turētājā.
Uzmanību! Nerekomendējam lietot paši saspīlēšanas urbjmašīnas turētāju kalšanai. Noslogojumi, ģenerēti ar āmura mehānismu,
var izraisīt paši saspīlēšanas turētāja bojāšanu.
āju ar plānu smērvielas slāni.
44
ORIĢ INĀ L Ā INSTRUKCIJA
Page 45

LV
IERĪCES LIETOŠANA
Uzmanību! Darba laikā ar ierīci lietot dzirdes aizsardzību!
Laba un kreisa rotāciju virziena izmantošana
Labu rotāciju izmantot, urbjot ar parasti lietotiem urbjiem ar labēju rotāciju virzienu. Kreisu rotāciju izmantot pēc urbja ar labēju
rotāciju virzienu nobloķēšanas.
Ieslēdzēja blokādes izmantošana
Ieslēdzēja blokādes izmantošana ir rekomendēta ilgstošas urbšanas gadījumā, piem. urbjot betonā, sienā utt. Lai ieslēgt blokādi,
ar piespiestu ieslēdzēju piespiest blokādes pogu un atbrīvot ieslēdzēju. Lai atslēgt blokādi, piespiest ieslēdzēju.
Urbšana koksnē
Pirms cauruma izurbšanas rekomendējam uzstādīt apstrādātu materiālu galdnieka spailēs, un pē
noteikt urbšanas vietu. Ierīces turētājā uzstādīt attiecīgu urbju, noteikt ātrumu, pieslēgt urbjmašīnu pie elektrības tīkla un uzsākt
urbšanu. Caurplūdes cauruma urbšanas gadījumā rekomendējam zem materiāla novietot koksnes paliktni, tas atļaus pasargāties
no cauruma izejas saraušanas. Caurumu ar lielu diametru urbšanas gadījumā rekomendējam agrāk izurbt mazāku vadīšanas
caurumu.
Urbšana metālā
Vienmēr droši piestiprināt apstrādātu materiālu. Tieva skārda gadījumā rekomendējam zem tā novietot koksnes elementu, lai
izvairīties no liekšanas utt. Pēc tam noteikt urbšanas vietu ar punktsiti un uzsākt urbšanu. Izmantot urbjus urbšanai tēraudā. Balta
čugunā urbšanas gadījumā rekomendējam izmantot urbjus ar karbīda uzgaļiem. Urbjot lielākus caurumus, rekomendējam agrāk
izurbt mazāku vadīšanas caurumu. Urbjot tēraudā, urbja atdzesēšanai rekomendējam izmantot mašīnas eļļu. Alumīnija gadīju-
mā atdzesēšanai rekomendējam izmantot terpentīnu vai parafīnu. Misiņa, vara vai čuguna gadījumā neizmantot atdzesēšanas
līdzekļu. Atdzesēšanai bieži noņemt urbju no materiāla un atļaut atdzist.
Urbšana keramikas materiālos
Urbšana cietos, blīvos materiālos: betons, ciets ķieģelis, akmens, marmorējums utt.
Urbi instrumenta turētājā piestiprināt, kad veserurbis ir atslēgts no elektroapgādes.
Ja nepieciešami, uzstādīt urbšanas dziļuma ierobežotāju.
Ar darba režīma pārslēdzēju izvēlēt urbšanu ar āmuru vai - ja iespējami - urbšanu bez āmura.
Pieslēgt kontaktdakšu pie elektroapgādes, ieslēgt veserurbi un uzsākt darbu.
Regulāri pārtraukt darbu - neatļaut, lai veserurbis un instruments pārāk stipri sakarstu.
Urbšana ar āmuru ir rekomendēta tikai blīvu keramikas materiālu gadījumā: betons, ciets ķieģelis, akmens utt. Lielu diametru
caurumu urbšanas gadījumā rekomendējam izurbt vadīšanas caurumu ar zemāku diametru, un pēc tam izmantot attiecīgu urbja
diametru. Lietot tikai urbjus, paredzētus āmura urbšanai.
Nerekomendējam izmantot āmura urbšanas režīmu keramikas materiāliem ar blīvu struktūru, piem.: glazūra, mīkstais ķieģelis,
apmetums utt. Āmura urbšana tādos materiālos var sabojāt materiālu.
Ierīce ir apgādāta ar uzmavu, kas sargā no elektrodzinēja pārslogošanas gadījumā, kad ierīce tiks nobloķēta darba laikā. Piem.,
pēc urbšanas stiegrojumā. Tādā gadījumā urbis beigs rotēties, bet dzinējs nepārtrauks darbību.
Pārāk stipra ierīces piespiešana var ierosināt uzmavas iedarbināšanu.
Tādā gadījumā instrumentu noņemt no cauruma, pārbaudīt ierīces darbības pareizību, un pēc tam atjaunot darbu, ar noslogojumu
nepieciešamu pareizai darbībai. Urbšanas stiegrojumā vai cita slēpta metāla priekšmetā gadījumā izurbt caurumu bez āmura,
lietojot urbi urbšanai metālā, ar vienādu diametru, nekā āmura urbis, un pēc tam turpināt urbšanu keramikas materiālā.
Urbšana glazūrā, mīkstā ķieģelī, apmetumā utt.
Urbt kā cietos materiālos, bet bez āmura. Periodiski noņemt urbi no urbta cauruma, lai izraidīt putekļus un atkritumus. Urbšanas
laikā piespiest uz ierīci ar pastāvīgu spēku.
Kalta pozīcijas uzstādīšana
Dažādi instrumenti, paredzēti kalšanai, drošam un ergonomiskam darbam prasa attiecīga leņķa uzstādīšanu, piem. kalti vai
griezēji. Var būt izmantots attiecīgs darba režīms. Uzstādīt instrumentu turētājā saskaņā ar instrukcijā noteiktiem noradījumiem.
Uzstādīt pārslēdzēju uz āmura ar bultu simbolu, pēc tam piespiest ieslēdzēju. Instruments sāks lēni rotēt saskaņā ar rotācijas
virzienu. Atslābināt ieslēdzēju pēc instrumenta attiecīgas pozīcijas sasniegšanas. Pārslēgt pārslēdzēju uz kalšanas darba režīmu
- āmura simbols, un pēc tam uzsākt darbu.
Kalšana
Griezēju vai caurumsiti instrumenta turētājā piestiprināt, kad veserurbis ir atslēgts no elektroapgādes.
Uzstādīt ierīces režīmu uz kalšanas pozīciju. Pieslēgt kontaktdakšu pie elektroapgādes, ieslēgt ierīci, pagaidīt līdz pilna ātruma
c tam ar punktsiti vai naglu
ORIĢ INĀ L Ā INSTRUKCIJA
45
Page 46

LV
sasniegšanai un uzsākt darbu.
Kalšanas laikā nedrīkst sist instrumentu pārāk dziļi apstrādātā materiālā. Materiālu kalt ar plāniem slāņiem, nepiespiest pārāk
stipri ierīci.
Caurumu izgriešana
Urbjmašīna var būt izmantota lielāku caurumu urbšanai koksnē, izmantojot speciālu urbju ar pastāvīgu diametru vai apmaināmu
režģa uzgaļu - caurumu izgriešanai. Lai izvairīties no ierobiem, apstrādāta materiāla norautām malām, zem materiāla uzstādīt
koksnes elementu.
Papildierīču izmantošana
Urbjmašīnas ar maināmu rotācijas virzienu nevar būt izmantotas ar darba papildierīcēm.
Urbjmašīnas turētā
Ja ierīce tika apgādāta ar urbjmašīnas turētāja gumijas aizsegu, rekomendējam to darba laikā, kad urbis ir novirzīts uz augšu,
piem. griestos. Pēc urbja novietošanas uzstādīt uz tā gumija aizsegu. Putekļi un urbšanas atkritumi tiks savākti aizsegā, kas
pasargās no turētāja piesārņošanas. Pēc darba pabeigšanas aizsegu noņemt no urbja, notīrīt no putekļiem un atkritumiem, pēc
tam noskalot ar silts ūdens.
Urbšana ar dziļuma ierobežotāju (XII)
Ierobežotājs var būt izmantots, lai atvieglotu urbšanu virsmās, kur ir urbti nepārejami caurumi, sevišķi betonā un koksnē. Noteikt
cauruma dziļumu. Turētājā uzstādīt urbi, ar flomāsteru atzīmēt, skatot no urbja darba gala, attālumu, līdzīgu cauruma dziļumam.
Dziļuma ierobežotāju uzstādīt, lai tā gals būtu saskaņots ar “L” attālumu, atzīmētu uz urbja. Pārbaudīt, vai ierobežotājs nevar
pārvietoties darba laikā. Uzsākt urbšanu, pēc attiecīga dziļuma sasniegšanas ierobežotājs kontaktēs ar virsmu pie cauruma.
Pārtraukt urbšanu un noņemt urbi no cauruma.
Papildu piezīmes
Darba laikā nedrīkst pārāk stipri spiest apstrādātu materiālu un nedrīkst veikt pārāk strauju kustību, lai neierosināt ripzāģa un
ierīces bojāšanu. Regulāri pārtraukt darbu. Nedrīkst pārslogot ierīci, ārējas virsmas temperatūra nevar pārsniegt 60 oC. Pēc darba
pabeigšanas izslēgt ierīci, atslēgt elektrības vada kontaktdakšu no ligzdas, veikt konservāciju un apskati.
Deklarēta, pilnīga vibrācijas vērtība tika mērīta ar standartu pētniecības metodi un var būt lietota, lai salīdzināt vienu instrumentu
ar otru. Deklarēta, pilnīga vibrācijas vērtība var būt lietota iepriekšējā ekspozīcijas novērtēšanā.
Uzmanību! Vibrācijas emisija ierīces darba laikā var atšķirties no deklarētas vērtības, atkarīgi no ierīces lietošanas veida.
Uzmanību! Jānoteic drošības līdzekļus operatora aizsardzība, pamatotus uz riska novērtēšanas reālos lietošanas apstākļos (ieskaitot visus darba cikla elementus, piem. laiku, kad ierīce ir izslēgta vai strādā ar brīvu ātrumu, kā arī aktivācijas laiku).
Eļļošanas
Pirms urbja vai griezēja lietošanas notīrīti instrumentus un noeļļot SDS Plus turētāju ar smērvielas plāno slāni. Rekomendējam izmantot smērvielu, paredzētu SDS Plus turētājiem. Āmura mehānisma nepareizas darbības gadījumā - viens no iemesliem var būt
āmura virzuļa pārnesuma un kloķvārpstas neattiecīga eļļošana. Rekomendējam izmantot smērvielu, paredzētu zobu un kloķveida
pārnesumiem. Smērvielu papildināt autorizētā servisā.
KONSERVĀCIJA UN APSKATĪŠANA
UZMANĪBU! Pirms regulēšanai, tehniskai apskatīšanai un uzturēšanai jānoņem ierīces elektrības vadu no ligzdas. Pēc darbības
jākontrolē elektroierīces tehnisko stāvokli, apskatīšot un vērtēšot: apvalku un rokturi, elektrības vadu ar kontaktdakšu un iztaisnotāju, kā arī - paplašināšanas vadus, aproču pogas darbību, ventilēšanas spraugas pārgājību, ogles sukas spīguļošanu, gultņu un
transmisijas darbības skaņu, ierīces darba startu un darbības vienmērīgumu. Garantijas laikā lietotājs nevar demontēt elektroierīci
un nevar mainīt nevienu daļu, jo tas veido garantijas zaudējumu. Visi nepareizumi piezīmēti ierīces darbā vai apskatīšanas laikā
ir par signālu, lai veidot remontu servisā. Pēc darba beigšanu apvalku, ventilēšanas spraugas, pārslēdzi, papildu rokturi un ekrāni
jātīra, piemēram, ar saspiestu gaisu (ar spiedienu ne vairāk nekā 0,3 MPa), otu vai sauso drānu, bez ķīmiskiem līdzekļiem un
tīrīšanas šķidrumiem. Instrumentus un rokturus tīrīt ar sauso tīro drānu.
ja aizsegs
46
ORIĢ INĀ L Ā INSTRUKCIJA
Page 47

CZ
CHARAKTERISTIKA NÁŘADÍ
Ruční vrtací kladivo je obyčejné nářadí s třídou izolace II. Je určeno ke zhotovování otvorů a sekání betonu, přírodního a umělého
kamene, mramoru a pod. pomocí pracovních nástrojů přizpůsobených k upnutí do sklíčidla SDS-Plus. Vrtací kladivo je vybaveno
plynulou regulací otáček vřetena a díky možnosti vypnutí funkce příklepu lze vrtat do takových materiálů, jako je dřevo, kov nebo
plasty. Správná, spolehlivá a bezpečná práce elektrického nářadí je závislá na náležitém provozování, proto:
Před zahájením práce s nářadím je nutné si přečíst celý návod na obsluhu, řídit se ním a uschovat ho pro případné
pozdější použití.
Dodavatel nenese odpovědnost za škody vzniklé v důsledku nedodržování bezpečnostních předpisů a doporučení tohoto návodu.
OBSAH BALENÍ
V továrenském balení se musí nacházet:
- vrtací kladivo
- přídavná rukojeť
- hloubkový doraz
- vrtáky a sekáče
- rychloupínací vrtací sklíčidlo
TECHNICKÉ PARAMETRY
Parametr Rozměrová jednotka Hodnota
Katalogové číslo 79054
Jmenovité napětí [V] ~230
Jmenovitá frekvence [Hz] 50
Jmenovitý příkon [W] 620
Jmenovité otáčky [min
Max. průměr otvoru (beton) [mm] 24
Energie příklepu [J] 2,4
Frekvence příklepů [min
Hmotnost [kg] 2,8
Úroveň hluku
- akustický tlak L
- výkon L
Hladina vibrací (hlavní rukojeť/přídavná rukojeť) [m/s
Třída izolace II
Stupeň ochrany IP20
± K [dB(A)] 92 ± 3
pA
± K [dB(A)] 103 ± 3
wA
-1
] 0 - 870
-1
] 0 - 4850
2
] 14,377 ± 1,5 / 11,618 ± 1,5
VŠEOBECNÉ BEZPEČNOSTNÍ PODMÍNKY
POZOR! Přečíst všechny níže uvedené instrukce. Jejich nedodržování může vést k zasažení elektrickým proudem, požáru nebo
úrazu. Pojem „elektrické nářadí” použitý v instrukcích se vztahuje na všechna nářadí poháněná elektrickým proudem bez ohledu
na to, jestli jsou s přívodem nebo bez něho.
DODRŽOVAT NÍŽE UVEDENÉ INSTRUKCE
Pracoviště
Pracoviště je třeba udržovat dobře osvětlené a čisté. Nepořádek a špatné osvětlení mohou být příčinou nehod.
Není dovoleno pracovat s elektrickým nářadím v prostředí se zvýšeným rizikem výbuchu, kde se nacházejí hořlavé kapaliny, plyny nebo výpary. Elektrická nářadí vytvářejí jiskry, které při styku s hořlavými plyny nebo výpary mohou způsobit požár.
Dětem a nepovolaným osobám není dovolen přístup na pracoviště. Snížená pozornost může být příčinou ztráty kontroly
nad nářadím.
Elektrická bezpečnost
Zástrčka elektrického přívodu musí lícovat se síťovou zásuvkou. Není dovoleno zástrčku přizpůsobovat. Není dovoleno
používat žádné adaptéry pro přizpů
sobení zástrčky do zásuvky. Nepřizpůsobovaná zástrčka lícující se zásuvkou snižuje
riziko zasažení elektrickým proudem.
Vyhýbat se kontaktu s uzemněnými plochami jako potrubí, ohřívače a ledničky. Uzemnění těla zvyšuje riziko zasažení
elektrickým proudem.
ORIGINÁL NÁVODU
47
Page 48

CZ
Není dovoleno vystavovat elektrické nářadí kontaktu s atmosférickými srážkami nebo vlhkostí. Voda a vlhkost, které se
dostanou dovnitř elektrického nářadí, zvyšují riziko zasažení elektrickým proudem.
Nepřetěžovat napájecí kabel. Nepoužívat napájecí kabel k přenášení, připojování nebo odpojování zástrčky ze síťové zásuvky. Zamezit dotyku napájecího kabelu s teplem, oleji, ostrými hranami a pohyblivými předměty. Poškození napájecího
kabelu zvyšuje riziko úrazu elektrickým proudem.
V případě práce mimo uzavřeného prostoru nutno používat prodlužovací kabel určený pro použití mimo uzavřeného
prostoru. Použití náležitého prodlužovacího kabelu snižuje riziko zasažení elektrickým proudem.
V případě, že je použití nářadí ve vlhkém prostředí nevyhnutné, je třeba v napájecím obvodu použít jako ochranu rozdílový proudový chránič (RCD). Použití RCD snižuje riziko úrazu zaviněného elektřinou.
Osobní bezpečnost
Pracuj, jen když jsi v dobré fyzické a psychické kondici. Soustřeď se na to, co děláš. Nepracuj, když jsi unavený nebo
pod vlivem léků nebo alkoholu. Chvíle nepozornosti během práce může vést k vážným zraněním těla.
Používej prostředky osobní ochrany. Vždy si nasaď ochranné brýle. Používání prostředků osobní ochrany jako protiprachový
respirátor, ochranná obuv, přilba a chrániče sluchu snižují riziko vážných úrazů.
náhodnému zapnutí nářadí. Před připojením nářadí k elektrické síti se ubezpeč, že elektrický spínač je v poloze
Zabraň
„vypnuto”. Držení nářadí s prstem na spínači nebo připojování elektrického nářadí, když je spínač v poloze „zapnuto”, může
vést k vážným úrazům.
Před zapnutím elektrického nářadí odstraň všechny klíče a jiné nástroje, kterých bylo použito na jeho seřizování. Klíč
ponechaný v rotujících elementech nářadí může způsobït vážné úrazy těla.
Udržuj rovnováhu. Po celou dobu udržuj náležité postavení. Umožní to jednodušší ovládnutí elektrického nářadí v případě
neočekávaných situací během práce.
Používej ochranný oděv. Nepoužívej příliš volný oděv a bižutérii. Udržuj vlasy, oděv a pracovní rukavice mimo dosahu
pohyblivých částí elektrického nářadí. Volný oděv, bižutérie nebo dlouhé vlasy se mohou zachytit do pohyblivých částí nářadí.
Používej odsávače prachu nebo zásobníky na prach, jestliže je nářadí tímto způsobem vybaveno. Postarej se o to, aby
byly správně připojeny. Používání odsávače prachu snižuje riziko vážného poškození zdraví.
Používání elektrického nářadí
Elektrické nářadí nepřetěžuj. K dané práci používej jen nářadí k tomu určené. Správný výběr nářadí pro daný druh práce
zabezpečí, že práce bude efektivnější a bezpečnější.
Nepoužívej elektrické nářadí, když nefunguje jeho síťový spínač. Nářadí, které nelze ovládat pomocí síťového spínače, je
nebezpečné a je třeba ho odevzdat do opravy.
Vytáhni zástrčku z napájecí zásuvky před seřizováním, výměnou příslušenství nebo uložením nářadí. Tím se zabrání
náhodnému zapnutí elektrického nářadí.
Nářadí přechovávej v místě, které je nepřístupné dětem. Nedovol, aby nářadí obsluhovaly osoby nevyškolené k jeho
obsluze. Elektrické nářadí v rukou nevyškolené obsluhy může být nebezpečné.
Zabezpeč náležitou údržbu nářadí. Kontroluj nářadí z pohledu nepřizpůsobení a vůlí pohyblivých částí. Kontroluj, jestli
není nějaký element nářadí poškozen. V případě zjištění nějakých závad je potřebné je před použitím elektrického nářadí
opravit. Mnoho nehod je způsobených nesprávně udržovaným nářadí.
Řezné nástroje je potřebné udržovat čisté a nabroušené. Správně udržované řezné nástroje jsou během práce snadněji
ovladatelné.
Používej elektrické nářadí a příslušenství v souladu s výše uvedenými instrukcemi. Používej nářadí v souladu s jeho
určením a ber do úvahy druh a podmínky práce. Použití nářadí k jiné práci, než bylo projektováno, může zvýšit riziko vzniku
nebezpečných situací.
Opravy
Nářadí dávej do opravy jen podnikům k tomu oprávněným, které používají výhradně originální náhradní díly. Tím bude
zajištěna náležitá bezpečnost práce elektrického nářadí.
DOPLŇUJÍCÍ BEZPEČNOSTNÍ PŘEDPISY
Při práci s příklepovou vrtačkou si nasaďte chrániče sluchu. Účinky hluku mohou vést až ke ztrátě sluchu.
Nářadí používejte s přídavnými rukojetěmi dodanými s nářadím. Ztráta kontroly nad nářadím může způsobit obsluze úraz.
Používejte respirátory proti prachu. Používání respirátorů proti prachu snižuje riziko vážného poškození zdraví.
Během práce, při které hrozí riziko kontaktu nástroje upnutého v nářadí se skrytým vodičem pod napětím, drže nářadí
pomocí izolovaných rukojetí. Při kontaktu nástroje upnutého do nářadí s vodičem pod napětím se na kovové prvky nářadí může
dostat napětí, což může způsobit obsluze úraz elektrickým proudem.
48
ORIGINÁL NÁVODU
Page 49

CZ
MONTÁŽ PRVKŮ PŘÍSLUŠENSTVÍ
UPOZORNĚNÍ! Montáž příslušenství lze provádět pouze při odpojeném napájecím napětí. Vytáhněte zástrčku přívodního kabelu
nářadí ze síťové zásuvky!
Montáž přídavné rukojeti (III)
Přídavnou rukojeť nasaďte do požadované polohy a zajistěte ji dotažením rukojeti.
Montáž dorazové tyče pro nastavení hloubky vrtání (IV)
Jestliže se v příslušenství vrtacího kladiva nachází dorazová tyč pro nastavení hloubky vrtání, je možné ji namontovat do přídavné
rukojeti. Podle způsobu upevnění je třeba dorazovou tyč zasunout do otvoru v přídavné rukojeti a po nastavení požadované
polohy ji zajistit pomocí tlačítka, otočného knoflíku nebo dotažením přídavné rukojeti.
PŘÍPRAVA K PRÁCI
Před zahájením práce je třeba zkontrolovat, zda není poškozená skříň nářadí a přívodní kabel se zástrčkou. Jestliže budou
zjištěna nějaká poškození, je další práce zakázána!
Upozornění! Veškeré činnosti spojené s výměnou pracovních nástrojů (vrtáky a sekáč
krytů a vedení, se seřizováním a pod. je třeba provádět při odpojeném napájecím napětí nářadí. Proto před zahájením těchto
činností: Vytáhněte zástrčku přívodního kabelu nářadí ze síťové zásuvky!
Upínání pracovních nástrojů SDS-Plus do sklíčidla
Zvolený nástroj očistěte od nečistot a rzi a upínací stopku SDS-Plus potřete tenkou vrstvou mazacího tuku.
Sklíčidlo stáhněte směrem k sobě a podržte ho v této poloze (V).
Očištěný nástroj zasuňte do otvoru sklíčidla. V případě potřeby nástrojem pootočte, aby se bez odporu do sklíčidla zasunul.
Sklíčidlo uvolněte, nástroj by se měl automaticky ve sklíčidle zajistit.
Zkontrolujte, zda je nástroj spolehlivě upnutý. Kontrolu stačí provést tak, že se pokusíte nástroj ze sklíčidla SDS-Plus vytáhnout.
Pokud bude možné vrták nebo sekáč ze sklíčidla vytáhnout, opakujte montážní postup znova.
Nastavení směru otáček (VII)
Přepínač směru otáček přepněte podle šipek; otáčky vpravo – šipka směřující k přední části nářadí, otáčky vlevo – šipka směřující
k zadní části nářadí.
Upozornění! Směr otáček lze přepínat pouze při vypnutém nářadí!
Nastavování pracovního režimu (VI)
Na nastavování pracovního režimu vrtacího kladiva slouží přepínač vybavený aretací. Polohu přepínače je možné změnit po
stisknutí tlačítka aretace a jeho podržení ve stisknuté poloze.
Pracovní režim s příklepem usnadňuje vrtání otvorů do betonu, zdiva a tvrdých keramických materiálů (tvrdé cihly, kámen, mramor). K tomuto účelu přepněte přepínač do pracovního režimu s příklepem (symbol vrtáku a kladiva).
Při vrtání otvorů do jiných materiálů je třeba funkci vrtání s příklepem vypnout přepnutím přepínače do polohy pracovního režimu
bez příklepu (symbol vrtáku).
Lze rovněž nastavit funkci sekání. V tomto režimu jsou otáčky vypnuté, ale příklep zůstane zapnutý.
K tomuto účelu je třeba přepnout přepínač pracovního režimu do polohy sekání (symbol kladiva).
Vrtací kladivo je vybaveno funkcí změny polohy plochého sekáče. Tato funkce je užitečná při sekání pomocí různých upínaných
nástrojů. Umožňuje nastavit sekáč do libovolné polohy. Přepínač není možné v této poloze zaaretovat.
Přípravné práce
Zvolte vhodný pracovní nástroj a upněte ho do vrtacího sklíčidla.
Přepněte přepínač pracovního režimu do požadované polohy: symbol kladiva – sekání; symbol kladiva a vrtáku – vrtání s příklepem; symbol vrtáku – vrtání bez příklepu; trojúhelník – nastavení polohy plochého sekáče.
Nasaďte si chrániče sluchu, ochranu očí a pracovní rukavice.
Zasuňte zástrčku napájecího kabelu do zásuvky elektrické sítě.
Zaujměte polohu, při které bude zajištěno udržení rovnováhy, uchopte vrtací kladivo oběma rukama a uveďte ho do chodu stisknutím elektrického vypínače prstem (VIII).
Nechte nářadí několik minut běžet, aby se mazadlo dostalo do všech prvků pohonného mechanizmu.
Vrtací kladivo vypněte uvolněním vypínače.
Upozornění! V případě výskytu podezřelého skřípání, praskání a pod. je třeba vrtací kladivo okamžitě vypnout, odpojit od elek-
trické sítě a odevzdat k prohlídce do autorizovaného servisního podniku.
e s upínací stopkou SDS-Plus), montáží
ORIGINÁL NÁVODU
49
Page 50

CZ
Výměna vrtacího sklíčidla
Vrtací kladivo je vybaveno možností výměny vrtacího sklíčidla. Místo sklíčidla pro upínání vrtáků v systému SDS Plus je možné
na nářadí namontovat sklíčidlo pro upínání vrtáků s válcovou stopkou.
Výměna se provádí tak, že se kroužek umístěný v zadní části sklíčidla potáhne směrem k přední části sklíčidla (IX). Tím se umožní
demontáž sklíčidla. Vrtací sklíčidlo se montuje tak, že se zasune do pouzdra vrtačky (X) a zatlačí se, až se aktivuje západka.
Zkontrolujte, zda se západka skutečně aktivovala a zda nemůže dojít k samovolnému odpojení vrtacího sklíčidla během práce.
Upínání vrtáků do rychloupínacího vrtacího sklíčidla (XI)
Zvolte vrták s válcovou stopkou vhodný pro danou práci. Vrták zasuňte do sklíčidla, uchopte zadní část sklíčidla a potom otáčením
přední části sklíčidla vrták upněte tak, aby byl ve sklíčidle pevně a spolehlivě uchycen.
Upozornění! Rychloupínací sklíčidlo se nedoporučuje používat na sekání. Zatížení generované příklepovým mechanizmem by
mohlo způsobit zni
POUŽÍVÁNÍ NÁŘADÍ
Upozornění! Během práce s vrtacím kladivem je třeba používat chrániče sluchu!
Používání pravého nebo levého směru otáček
Otáčky doprava používejte při vrtání s běžnými pravotočivými vrtáky. Otáčky doleva používejte k uvolnění sevřeného pravotočivého vrtáku z materiálu.
Používání aretace spínače
Aretaci spínače je žádoucí používat při dlouho trvajícím vrtání, například do betonu, zdiva a pod. K tomuto účelu stiskněte spínač,
následně stiskněte palcem tlačítko aretace a posléze spínač uvolněte. Ke zrušení aretace stačí stisknou elektrický spínač.
Vrtání do dřeva
Před zhotovením otvoru se doporučuje upevnit obráběný předmět stolařskými svěrkami nebo ve svěráku a potom důlčíkem nebo
hřebíkem označit místo vrtání. Do sklíčidla upněte příslušný vrták, nastavte otáčky, připojte vrtačku k elektrické síti a začněte
vrtat. Při zhotovování průběžných otvorů se doporučuje podložit pod materiál dřevěnou podložku, díky čemu nedojde k roztřepení
materiálu na hraně výstupního otvoru. Při zhotovování otvorů velkých průměrů se doporučuje napřed vyvrtat menší vodící otvor.
Vrtání do kovů
Obráběný materiál se musí vždy spolehlivě upevnit. Tenký plech je vhodné podložit kouskem dřeva, aby se zamezilo vzniku nechtěných deformací a pod. Potom důlčíkem označte místa zhotovení otvorů a začněte vrtat. Používejte vrtáky do oceli. Při vrtání do
bíle litiny se doporučuje používat vrtáky opatřené břity ze slinutých karbidů. Při vrtání větších otvorů se doporučuje vyvrtat napřed
menší vodící otvor. Při vrtání do oceli používejte ke chlazení vrtáku strojní olej. U hliníku používejte jako chladící prostředek
terpentýn nebo parafín. Při vrtání do mosazi, mědi nebo litiny se chladící prostředky používat nemají. Za účelem chlazení vrták
často z materiálu vytahujte a počkejte, dokud nevychladne.
Vrtání do keramických materiálů
Vrtání do tvrdých kompaktních materiálů – beton, tvrdé cihly, kámen, mramor a pod.
Při odpojeném vrtacím kladivu od elektrické sítě upněte do sklíčidla vrták.
V případě potřeby namontujte dorazovou tyč pro nastavení hloubky vrtání.
Přepínač pracovního režimu přepněte do polohy vrtání s příklepem a pokud to bude s ohledem na charakter obráběného materiálu žádoucí, tak přepněte do režimu bez příklepu (pokud je ním nářadí vybaveno).
Zasuňte zástrčku do zásuvky elektrické sítě, vrtací kladivo uveďte spínačem do chodu a začněte pracovat.
Během práce dodržujte pravidelné přestávky – nikdy nedovolte, aby se vrtací kladivo a nástroj nadměrně zahřály.
Vrtání s příklepem se doporučuje používat pouze u kompaktních keramických materiálů jako beton, tvrdé cihly, kámen a pod. Při
vrtání otvorů velkých průměrů se doporučuje nejprve předvrtat otvor menšího průměru a potom použit vrták konečného průměru.
Je třeba používat vrtáky určené pro vrtání s příklepem.
Vrtání s příklepem se nedoporučuje používat u keramických materiálů s měkkou strukturou jako obkladačky, měkké cihly, omítky
a pod. Vrtání s příklepem do takových materiálů může vést k jejich poškození.
Vrtací kladivo je vybaveno spojkou, která chrání elektromotor proti přetížení v případě, že během práce dojde k náhlému zaseknutí upnutého nástroje v materiálu (například když vrták narazí na tyč výztuže). V takovém případě se vrták přestane otáčet, ale
elektromotor bude přesto běžet dál.
Také příliš velký tlak na nářadí během práce může vyvolat aktivaci spojky.
V takovém případě je třeba vytáhnout upnutý nástroj z otvoru, zkontrolovat, zda vrtací kladivo pracuje správně a potom pokračo-
vat v práci a vyvíjet na nářadí pouze takový tlak, jaký je nutný ke správnému provedení práce. V případě, že vrták narazí na tyč
výztuže nebo jinou skrytou kovovou překážku, je třeba ji provrtat bez příklepu pomocí klasického vrtáku do oceli stejného průměru
jako příklepový vrták a potom pokračovat ve vrtání do daného materiálu.
čení rychloupínacího sklíčidla.
50
ORIGINÁL NÁVODU
Page 51

CZ
Vrtání do obkladaček, měkkých cihel, omítky a pod.
Vrtejte stejným způsobem jako v případě tvrdých materiálů, avšak bez příklepu. V pravidelných intervalech vrták z vrtaného otvoru
vytahujte, aby se odstranily úlomky a prach. Při vrtání tlačte na nářadí rovnoměrně.
Nastavení polohy sekáče
Některé upínané nástroje určené k sekání musí být z bezpečnostních a ergonomických důvodů nastaveny pod předepsaným
úhlem, například ploché nebo drážkovací sekáče. K nastavení lze využít příslušný pracovní režim. Nástroj upněte do sklíčidla
podle pokynů uvedených v návodu. Přepínač režimu přepněte na symbol kladiva se šipkou a potom stlačte spínač. Upnutý nástroj
se začne pomalu otáčet zvoleným směrem otáček. Když dosáhne požadovanou polohu, spínač uvolněte. Přepínač pracovního
režimu přepněte do polohy sekání (symbol kladiva) a začněte pracovat.
Sekání
Při odpojeném nář
Přepínač pracovního režimu přepněte do polohy sekání. Zasuňte zástrčku do zásuvky elektrické sítě, spínačem uveďte vrtací
kladivo do chodu, počkejte, až dosáhne plné otáčky a začněte pracovat.
Při sekání se upnutý nástroj nesmí dostat příliš hluboko do obráběného materiálu. Materiál se musí osekávat v tenkých vrstvách
a na vrtací kladivo se nesmí příliš silně tlačit.
Vyřezávání otvorů
Vrtačku lze použít ke zhotovování větších otvorů do dřeva pomocí speciálních vrtáků s konstantním průměrem nebo s vyměnitelnými koncovkami ze sady vykružovacích vrtáků. Aby se zabránilo poškození okraje zhotovovaného otvoru, zejména na opačné
straně materiálu, podložte pod materiál kousek odpadového dřeva.
Použití přídavných zařízení
Vrtačky s volitelným směrem otáček se nemají používat k pohonu přídavných zařízení.
Protiprachový kryt na sklíčidlo
Je-li vrtací kladivo vybaveno gumovým protiprachovým krytem na sklíčidlo, doporučuje se ho používat při vrtání, kdy je vrták
orientován směrem vzhůru, například do stropu. Kryt se nasazuje na vrták po jeho upnutí do sklíčidla. Prach a úlomky vznikající
při vrtání se budou hromadit v krytu, co zabrání znečištění sklíčidla. Po ukončení práce kryt sejměte z vrtáku, očistěte od prachu
a úlomků a potom ho opláchněte proudem vlažné vody.
Vrtání s použitím hloubkového dorazu (XII)
Hloubkový doraz je možné používat pro usnadnění vrtání do materiálů, do kterých se mají zhotovovat slepé díry, zejména do
betonu nebo dřeva. Zjistěte, jaká má být hloubka otvorů. Do vrtacího sklíčidla upněte vrták a pomocí značkovače označte na
vrtáku vzdálenost od špičky vrtáku rovnající se hloubce otvoru. Hloubkový doraz nastavte tak, aby jeho konec byl v úrovni značky
na vrtáku označující hloubku vrtání „L”. Zkontrolujte, zda je hloubkový doraz zajištěný, aby se nemohl během práce pohybovat.
Začněte vrtat. Po dosažení nastavené hloubky čelo hloubkového dorazu narazí na povrch vrtaného materiálu v blízkosti otvoru.
Tehdy je třeba vrták z otvoru vytáhnout.
Doplňující poznámky
Během práce se nesmí na obráběný materiál příliš silně tlačit a nesmí se provádět prudké pohyby, aby nedošlo k poškození
pracovního nástroje a vrtačky. Během práce využívejte pravidelné přestávky. Přetěžování nářadí je nepřípustné. Teplota vnějšího
povrchu nesmí nikdy překročit 60 °C. Po ukončení práce vrtačku vypněte, vytáhněte zástrčku napájecího kabelu ze síťové zásuvky a proveďte prohlídku a údržbu.
Deklarovaná celková hodnota vibrací byla změřena pomocí standardní měřící metody a lze ji použít k porovnání jednoho nářadí
s druhým. Deklarovanou celkovou hodnotu vibrací lze použít k výchozímu posouzení expozice.
Upozornění! Emise vibrací během práce s nářadím se může lišit od deklarované hodnoty v závislosti na způsobu použití nářadí.
Upozornění! Je třeba stanovit bezpečnostní opatření, která mají chránit obsluhu a která vychází z posouzení rizika za reálných
podmínek používání (při tom je třeba uvažovat se všemi etapami pracovního cyklu, jako například s časem, kdy je nářadí vypnuté
nebo pracuje na volnoběh, tak i s časem aktivace).
Mazání
Vrtáky nebo sekáče se vždy musí před použitím důkladně očistit a stopky SDS-Plus namazat tenkou vrstvou mazacího tuku. Doporučuje se používat tuk určený pro sklíčidla SDS-Plus. V případě nesprávném chodu příklepového mechanizmu jednou z příčin
může být nedostatečné mazání převodovky a kloubového mechanizmu pístu příklepu. Doporučuje se používat mazadlo určené
pro zubové a kloubové převody. Doplňování mazadla se doporučuje svěřit autorizovanému servisu.
adí od elektrické sítě upněte do sklíčidla požadovaný nástroj – plochý, drážkovací nebo špičatý sekáč.
ORIGINÁL NÁVODU
51
Page 52

CZ
ÚDRŽBA A PROHLÍDKY
POZOR! Veškeré činnosti zvazané z; výměnou příslušenství, seřízovaním apod, je potřeba realizovat při vypnutým napětí napájení nářadí, proto před zahajením těchto činnosti je potřeba odpojit zástrčku od elektrické sítě. Po ukončení práce je třeba
skontrolovat technický stav elektonářadí prohlídkou a hodnocením: stojanu a rukojeti, elektrického vodiče včetně zastrčky a
ohybání, působení elektrického spínače, průchodnosti ventilačních mezer, jiskření kartáčů, hlasitosti práce ložisek a převodovek,
spouštění a rovnoměrnosti práce. Během záruční doby použivatel nesmi demontovat elektronářadí, ani měnit veškere provozní
jednotky nebo součásti, protože může stratit narok na záruku. Veškere nespravnosti zjištěne během prohlídky, nebo provozování,
jsou signalem pro provedení opravy v záručním servisu. Po ukončení práce, stojan, ventilační mezery, přepínače, dodatečnou
rukojeť a ochrany je třeba o
použití chemických prostředků a čisticích kapalin. Nářadí a rukojeť očistit suchým čistým hadříkem.
čistit, například proudem vzduchu (o tlaku maximum 0,3 MPa), štětcem nebo suchým hadříkem bez
52
ORIGINÁL NÁVODU
Page 53

SK
CHARAKTERISTIKA NÁRADIA
Ručné vŕtacie kladivo je obyčajné náradie s triedou izolácie II. Je určené na zhotovovanie otvorov a na sekanie betónu, prírodného a umelého kameňa, mramoru a pod. pomocou pracovných nástrojov prispôsobených na upnutie do skľučovadla SDS-Plus.
Vŕtacie kladivo je vybavené plynulou reguláciou otáčok vretena a vďaka možnosti vypnúť funkciu príklepu je možné vŕtať aj do
takých materiálov, ako je drevo, kov alebo plasty. Správna, spoľahlivá a bezpečná práca elektrického náradia je závislá na náležitom prevádzkovaní, preto:
Pred zahájením práce s náradím je potrebné si prečítať celý návod na obsluhu, riadiť sa ním a uschovať ho pre prípadné
neskoršie použitie.
Dodávateľ nenesie zodpovednosť za škody vzniknuté v dôsledku nedodržiavania bezpečnostných predpisov a pokynov tohto
návodu na obsluhu.
OBSAH BALENIA
V továrenskom balení sa musia nachádzať:
- vŕtacie kladivo
- pomocná rukoväť
- hĺbkový doraz
- vrtáky a sekáče
- rýchloupínacie vŕtacie skľučovadlo
TECHNICKÉ PARAMETRE
Parameter Rozmerová jednotka Hodnota
Katalógové číslo 79054
Menovité napätie [V] ~230
Menovitá frekvencia [Hz] 50
Menovitý príkon [W] 620
Menovité otáčky [min
Max. priemer otvoru (betón) [mm] 24
Energia príklepu [J] 2,4
Frekvencia príklepov [min
Hmotnosť [kg] 2,8
Úroveň hluku
- akustický tlak L
- výkon L
Hladina vibrácií (hlavná rukoväť/pomocná rukoväť) [m/s
Trieda izolácie II
Stupeň ochrany IP20
± K [dB(A)] 92 ± 3
pA
± K [dB(A)] 103 ± 3
wA
-1
] 0 - 870
-1
] 0 - 4850
2
] 14,377 ± 1,5 / 11,618 ± 1,5
VŠEOBECNÉ BEZPEČNOSTNÉ PODMIENKY
POZOR! Prečítať všetky nižšie uvedené inštrukcie. Ich nedodržiavanie môže byť príčinou úrazu elektrickým prúdom, požiaru
alebo poškodenia zdravia. Pojem „elektrické náradie” použitý v inštrukciach sa týka všetkých zariadení poháňaných elektrickým
prúdom, a to súčasne buď s prívodom alebo bez prívodu elektrickej energie.
DODRŽIAVAŤ NIŽŠIE UVEDENÉ INŠTRUKCIE
Pracovisko
Pracovisko je potrebné udržiavať dobre osvetlené a v čistote. Neporiadok a slabé osvetlenie môžu byť príčinou nehôd.
S elektrickým náradím nie je dovolené pracovať v prostredí so zvýšeným rizikom výbuchu, s výskytom horľavých kvapalín, plynov alebo pár. Elektrické zariadenia vytvárajú iskry, ktoré v styku s horľavými plynmi alebo parami môžu spôsobiť požiar.
Nepovolaným osobám a deťom nie je dovolený prístup na pracovisko. Zníženie pozornosti môže mať za následok stratu
kontroly nad náradím.
Elektrická bezpečnosť
Zástrčka elektrického prívodu musí pasovať do sieťovej zásuvky. Nie je dovolené zástrčku upravovať. Nie je dovolené
používať žiadne adaptéry za účelom prispôsobenia zástrčky do zásuvky. Neupravovaná zástrčka, ktorá pasuje do zásuvky,
znižuje riziko zasiahnutia elektrickým prúdom.
ORIGINÁL NÁVODU
53
Page 54

SK
Vyhýbať sa kontaktu s uzemnenými plochami ako rúry, ohrievače a chladničky. Uzemnenie tela zvyšuje riziko zasiahnutia
elektrickým prúdom.
Nie je dovolené vystavovať elektrické náradie kontaktu s atmosférickými zrážkami alebo s vlhkosťou. Voda a vlhkosť,
ktoré sa dostanú do vnútra elektrického náradia, zvyšujú riziko zasiahnutia elektrickým prúdom.
Nepreťažovať napájací kábel. Nepoužívať napájací kábel na nosenie, pripojovanie a odpojovanie zástrčky zo sieťovej
zásuvky. Zabrániť kontaktu napájacieho kábla s teplom, olejmi, ostrými hranami a pohyblivými predmetmi. Poškodenie
napájacieho kábla zvyšuje riziko zasiahnutia elektrickým prúdom.
V prípade práce mimo uzavretých priestorov je potrebné používať predĺžovacie káble určené pre prácu mimo uzavretých
priestorov. Použitie náležitého predĺžovacieho kábla znižuje riziko zasiahnutia elektrickým prúdom.
V prípade, že je použitie elektronáradia vo vlhkom prostredí nevyhnutné, je potrebné v napájacom obvode použiť ako
ochranu rozdielový prúdový chránič (RCD). Použitie RCD znižuje riziko úrazu zavineného elektrinou.
Osobná bezpečnosť
Pracuj, len ak si v dobrej fyzickej a psychickej kondícii. Sústreď sa na to, čo robíš. Nepracuj, ak si unavený alebo pod
vplyvom liekov alebo alkoholu. Iba chvíľa nepozornosti počas práce môže zapríčiniť vážne úrazy.
Používaj prostriedky osobnej ochrany. Vždy si nasaď ochranné okuliare (určené pre daný druh práce). Používanie
prostriedkov osobnej ochrany ako prachové respirátory, ochranná obuv, prilby a chrániče sluchu znižujú riziko vážnych úrazov.
Zabraň náhodnému zapnutiu náradia. Pred pripojením náradia k elektrickej sieti sa uisti, že elektrický spínač je v polohe
„vypnuté”. Držanie náradia s prstom na spínači alebo pripájanie elektrického náradia, keď je spínač v polohe „zapnuté”, môže
zapríčiniť vážne úrazy.
Pred zapnutím elektrického náradia odstráň všetky kľúč
ponechaný na rotujúcich častiach zariadenia môže zapríčiniť vážne úrazy.
Udržuj rovnováhu. Po celý čas udržuj náležité postavenie. To umožní jednoduchšie ovládanie elektrického náradia v prípade
neočakávaných situácií počas práce.
Používaj ochranný odev. Neobliekaj si voľný odev, nenos bižutériu. Udržuj vlasy, odev a pracovné rukavice v dostatočnej
vzdialenosti od pohyblivých častí elektrického náradia. Voľný odev, bižutéria alebo dlhé vlasy sa môžu zachytiť do pohybli-
vých častí náradia.
Používaj odsávače prachu alebo zásobníky na prach, pokiaľ je nimi náradie vybavené. Postaraj sa, aby boli správne
pripojené. Použitie odsávania prachu znižuje riziko vážneho ohrozenia zdravia.
Prevádzkovanie elektrického náradia
Elektrické náradie nepreťažuj. Pre danú prácu používaj správne náradie. Správny výber náradia pre danú prácu zabezpečí,
že práca bude produktívnejšia a bezpečnejšia.
Nepoužívaj elektrické náradie, ak nefunguje jeho sieťový spínač. Náradie, ktoré sa nedá ovládať pomocou sieťového spína-
ča, je nebezpečné a je potrebné odovzdať ho do opravy.
Pred nastavovaním, výmenou príslušenstva alebo uskladnením náradia odpoj zástrčku z napájacej zásuvky. Zabráni sa
tak náhodnému zapnutiu elektrického náradia.
Náradie uskladňuj na mieste neprístupnom pre deti. Nedovol, aby s náradím pracovali osoby nezaškolené pre jeho
obsluhu. Elektrické náradie v rukách nezaškolenej obsluhy môže byť nebezpečné.
Zabezpeč náležitú údržbu náradia. Kontroluj náradie po stránke neprispôsobení a vôľe pohyblivých častí. Kontroluj,
či niektorá časť náradia nie je poškodená. V prípade zistenia závad je potrebné ich pred použitím elektrického náradia
odstrániť. Veľa nehôd býva spôsobených nesprávne udržovaným náradím.
Rezné nástroje je potrebné udržiavať v čistote a naostrené. Správne udržované rezné nástroje sa počas práce jednoduchšie
ovládajú.
Používaj elektrické náradie a príslušenstvo v súlade s vyššie uvedenými inštrukciami. Náradie používaj na účely, na
ktoré je určené a vždy zohľadni druh a podmienky práce. Používanie náradia na iné práce, než na ktoré bolo projektované,
môže zvyšiť riziko vzniku nebezpečných situácií.
Opravy
Opravy náradia zver len k tomu oprávneným firmám, ktoré používajú výhradne originálne náhradné diely. Tak bude
zabezpečená náležitá bezpečnosť práce elektrického náradia.
DOPLŇUJÚCE BEZPEČNOSTNÉ PREDPISY
Pri práci s príklepovou vŕtačkou si nasaďte chrániče sluchu. Účinky hluku môžu spôsobiť stratu sluchu.
Náradie používajte s prídavnými rukoväťami dodanými spolu s náradím. Strata kontroly nad náradím môže spôsobiť obsluhe
úraz.
Používajte masky proti prachu. Používanie masiek proti prachu znižuje riziko vážneho poškodenia zdravia.
Počas vykonávania práce, pri ktorej hrozí riziko kontaktu nástroja upnutého do náradia so skrytým vodičom pod napätím, držte elektrické náradie pomocou izolovaných rukovätí. Ak by došlo ku kontaktu nástroja upnutého do náradia s vodičom
pod napätím, na kovové prvky náradia by sa dostalo napätie, čo by mohlo obsluhe spôsobiť úraz elektrickým prúdom.
e a iné nástroje, ktoré sa používali na jeho nastavenie. Kľúč
54
ORIGINÁL NÁVODU
Page 55

SK
MONTÁŽ PRVKOV PRÍSLUŠENSTVA
UPOZORNENIE! Montáž príslušenstva je možné uskutočňovať iba pri odpojenom napájacom napätí. Vytiahnite zástrčku prívodného kábla náradia zo sieťovej zásuvky!
Montáž pomocnej rukoväte (III)
Pomocnú rukoväť nasaďte do požadovanej polohy a zaistite ju dotiahnutím rukoväte.
Montáž dorazovej tyčky pre nastavenie hĺbky vŕtania (IV)
Ak sa v príslušenstve vŕtacieho kladiva nachádza dorazová tyčka na nastavenie hĺbky vŕtania, je možné ju namontovať do pomocnej rukoväte.
Podľa spôsobu upevnenia je treba dorazovú tyčku zasunúť do otvoru v pomocnej rukoväti a po nastavení požadovanej polohy ju
zaistiť pomocou tlačidla, otočného gombíka alebo dotiahnutím pomocnej rukoväte.
PRÍPRAVA K PRÁCI
Pred zahájením práce je potrebné skontrolovať, či skriňa náradia a kábel napájania so zástrčkou nie sú poškodené. V prípade
zistenia poškodenia je ďalšia práca zakázaná!
Upozornenie! Všetky činnosti spojené s výmenou pracovných nástrojov (vrtáky a sekáče s upínacou stopkou SDS-Plus), montážou krytov a vedení, so zoraďovaním a pod. je potrebné uskutočňovať pri odpojenom napájacom napätí náradia. Preto pred
zahájením týchto činností: Vytiahnite zástrčku prívodného kábla náradia zo sieťovej zásuvky!
Upínanie pracovných nástrojov SDS-Plus do skľučovadla
Zvolený nástroj očistite od nečistôt a hrdze a upínaciu stopku SDS-Plus potrite tenkou vrstvou mazacieho tuku.
Skľučovadlo stiahnite smerom ku sebe a podržte ho v tejto polohe (V).
Očistený nástroj zasuň
sunul.
Skľučovadlo uvoľnite, nástroj by sa mal v skľučovadle automaticky zaistiť.
Skontrolujte, či je nástroj spoľahlivo upnutý. Kontrolu stačí urobiť tak, že sa pokúsite nástroj zo skľučovadla SDS-Plus vytiahnuť.
Ak bude možné vrták alebo sekáč zo skľučovadla vytiahnuť, zopakujte montážny postup odznova.
Nastavenie smeru otáčok (VII)
Prepínač smeru otáčok prepnite podľa šípok; otáčky vpravo – šípka smerujúca ku prednej časti náradia, otáčky vľavo – šípka
smerujúca k zadnej časti náradia.
Upozornenie! Smer otáčok je možné prepínať iba pri vypnutom náradí!
Nastavovanie režimu práce (VI)
Na nastavovanie režimu práce vŕtacieho kladiva slúži prepínač vybavený aretáciou. Polohu prepínača je možné zmeniť po stla-
čení tlačidla aretácie a jeho podržaní v stlačenej polohe.
Režim práce s príklepom uľahčuje vŕtanie otvorov do betónu, muriva a tvrdých keramických materiálov (tvrdé tehly, kameň, mramor). K tomuto účelu prepnite prepínač do režimu práce s príklepom (symbol vrtáka a kladiva).
Pri vŕtaní otvorov do iných materiálov je potrebné funkciu vŕtania s príklepom vypnúť prepnutím prepínača do polohy režimu práce
bez príklepu (symbol vrtáka).
Taktiež je možné nastaviť funkciu sekania. V tomto režime sú otáčky vypnuté, ale príklep zostane zapnutý.
K tomuto účelu je potrebné prepnúť prepínač režimu práce do polohy sekania (symbol kladiva).
Vŕtacie kladivo je vybavené funkciou zmeny polohy plochého sekáča. Táto funkcia je užitočná pri sekaní pomocou rôznych upínaných nástrojov. Umožňuje nastaviť sekáč do ľubovoľnej polohy. Prepínač nie je možné v tejto polohe zaaretovať.
Prípravné práce
Zvoľte si vhodný pracovný nástroj a upnite ho do vŕtacieho skľučovadla.
Prepnite prepínač režimu práce do požadovanej polohy: symbol kladiva – sekanie; symbol kladiva a vrtáka – vŕtanie s príklepom;
symbol vrtáka – vŕtanie bez príklepu; trojuholník – nastavenie polohy plochého sekáča.
Nasaďte si chrániče sluchu, ochranu očí a pracovné rukavice.
Zasuňte zástrčku prívodného kábla do zásuvky elektrickej siete.
Zaujmite také postavenie, aby bolo zaručené udržanie rovnováhy, uchopte vŕtacie kladivo oboma rukami a uveďte ho do chodu
stlačením elektrického vypínača prstom (VIII).
Nechajte náradie bežať v tomto stave niekoľko minút, aby sa mazadlo dostalo od všetkých prvkov hnacieho mechanizmu.
Vŕtacie kladivo vypnite uvoľnením vypínača.
te do otvoru skľučovadla. V prípade potreby nástrojom pootočte, aby sa do skľučovadla bez odporu za-
ORIGINÁL NÁVODU
55
Page 56

SK
Upozornenie! V prípade výskytu podozrivého škripotu, praskania a pod. je potrebné vŕtacie kladivo okamžite vypnúť, odpojiť od
elektrickej siete a odovzdať na prehliadku do autorizovaného servisu.
Výmena vŕtacieho skľučovadla
Vŕtacie kladivo je vybavené možnosťou výmeny vŕtacieho skľučovadla. Namiesto skľučovadla pre upínanie vrtákov v systéme
SDS Plus je možné na náradie namontovať skľučovadlo pre upínanie vrtákov s valcovou stopkou.
Výmena sa vykonáva tak, že sa krúžok umiestnený v zadnej časti skľučovadla potiahne smerom k prednej časti skľučovadla (IX).
Tým sa umožní demontáž skľučovadla. Vŕtacie skľučovadlo sa montuje tak, že sa zasunie do puzdra vŕtačky (X) a zatlačí sa, až
sa aktivuje západka. Skontrolujte, či sa západka skutočne aktivovala a či nemôže dôjsť ku samovoľnému odpojeniu vŕtacieho
skľučovadla počas práce.
Upínanie vrtákov do rýchloupínacieho vŕtacieho skľučovadla (XI)
Zvoľte vrták s valcovou stopkou vhodný pre danú prácu. Vrták zasuň
otáčaním prednej časti skľučovadla vrták upnite tak, aby bol v skľučovadle pevne a spoľahlivo uchytený.
Upozornenie! Rýchloupínacie skľučovadlo sa neodporúča používať na sekanie. Zaťaženie generované príklepovým mechanizmom by mohlo spôsobiť zničenie rýchloupínacieho skľučovadla.
POUŽÍVANIE NÁRADIA
Upozornenie! Počas práce s vŕtacím kladivom je potrebné používať chrániče sluchu!
Používanie pravého a ľavého smeru otáčok
Pravé otáčky používajte pri vŕtaní s bežnými pravotočivými vrtákmi. Ľavé otáčky používajte na uvoľnenie zovretého pravotočivého
vrtáka z materiálu.
Používanie aretácie spínača
Aretáciu spínača je žiaduce využívať pri dlho trvajúcom vŕtaní, napríklad do betónu, muriva a pod. Aretáciu spínača uskutočníte tak,
že pri stlačenou spínači stlačíte palcom aretačné tlačidlo a spínač pustíte. Na zrušenie aretácie stačí stlačiť elektrický spínač.
Vŕtanie do dreva
Pred zhotovením otvoru sa odporúča upevniť obrábaný materiál stolárskymi zvierkami alebo v zveráku a následne jamkárom
alebo klincom označiť miesto vŕtania. Do skľučovadla upnite vhodný vrták, nastavte otáčky, pripojte vŕtačku ku elektrickej sieti
a začnite vŕtať. Pri zhotovovaní priebežných otvorov sa odporúča podložiť pod vŕtaný materiál drevenú podložku, vďaka čomu
nedôjde k rozstrapkaniu materiálu na hrane výstupného otvoru. Pri zhotovovaní otvorov s veľkými priemermi sa odporúča najprv
vyvŕtať menší vodiaci otvor.
Vŕtanie do kovov
Obrábaný materiál sa musí vždy spoľahlivo upevniť. Tenký plech je vhodné podložiť kúskom dreva, aby sa zamedzilo vzniku
neželaných deformácií a pod. Potom jamkárom označte miesta pre zhotovenie otvorov a začnite vŕtať. Používajte vrtáky do ocele.
Pri vŕtaní do bielej liatiny sa odporúča používať vrtáky opatrené čepeľami so spekaných karbidov. Pri vŕtaní väčších otvorov sa
odporúča vyvŕtať najprv menší vodiaci otvor. Pri vŕtania do ocele používajte na chladenie vrtáka strojový olej. V prípade hliníka
používajte ako chladivo terpentín alebo parafín. Pri vŕtaní do mosadze, medi alebo liatiny sa chladiace prostriedky používať
nemajú. Za účelom chladenia vrták často z materiálu vyťahujte a počkajte, kým nevychladne.
Vŕtanie do keramických materiálov
Vŕtanie do tvrdých kompaktných materiálov – betón, tvrdé tehly, kameň, mramor a pod.
Pri odpojenom vŕtacom kladive od elektrickej siete upnite do nástrojového skľučovadla vrták.
V prípade potreby namontujte dorazovú tyčku pre nastavenie hĺbky vŕtania.
Prepínač režimu práce prepnite do polohy vŕtania s príklepom a pokiaľ to bude s ohľadom na charakter obrábaného materiálu
žiaduce, tak prepnite do režimu bez príklepu (pokiaľ je ním náradie vybavené).
Zasuňte zástrčku do zásuvky elektrickej siete, vŕtacie kladivo spínačom zapnite a začnite pracovať.
Počas práce dodržujte pravidelné prestávky – nikdy nedovoľte, aby sa vŕtacie kladivo a nástroj neprimerane zohriali.
Vŕtanie s príklepom sa odporúča používať iba u kompaktných keramických materiálov ako betón, tvrdé tehly, kameň a pod. Pri vŕtaní otvorov veľkých priemerov sa odporúča najprv predvŕtať otvor menšieho priemeru a potom použiť vrták konečného priemeru.
Je treba používať vrtáky určené pre vŕtanie s príklepom.
Vŕtanie s príklepom sa neodporúča u keramických materiálov s mäkkou štruktúrou ako obkladačky, mäkké tehly, omietky a pod.
Vŕtanie s príklepom do takýchto materiálov môže spôsobiť ich poškodenie.
Vŕtacie kladivo je vybavené spojkou, ktorá chráni elektromotor v prípade, že počas práce dôjde k náhlemu zaseknutiu nástroja v
materiáli (napríklad keď vrták narazí na tyč výstuže). V takom prípade sa vrták prestane otáčať, ale motor bude bežať ďalej.
Tiež príliš silný tlak na náradie počas práce môže vyvolať aktiváciu spojky.
te do skľučovadla, uchopte zadnú časť skľučovadla a potom
56
ORIGINÁL NÁVODU
Page 57

SK
V takom prípade je nutné vytiahnuť upnutý nástroj z otvoru, skontrolovať, či vŕtacie kladivo pracuje správne a potom pokračovať
v práci a vyvíjať na náradie iba taký tlak, aký je potrebný pre správne vykonanie práce. V prípade, že vrták narazí na tyč výstuže
alebo inú skrytú kovovú prekážku, je potrebné ju prevŕtať pomocou klasického vrtáka do ocele rovnakého priemeru ako príklepový
vrták a potom pokračovať vo vŕtaní do daného materiálu.
Vŕtanie do obkladačiek, mäkkých tehál, omietky a pod.
Vŕtajte rovnakým spôsobom ako v prípade tvrdých materiálov, avšak bez príklepu. V pravidelných intervaloch vyťahujte vrták z
vŕtaného otvoru, aby sa odstránil prach a úlomky. Pri vŕtaní tlačte na náradie rovnomerne.
Nastavenie polohy sekáča
Niektoré upínané nástroje určené na sekanie musia byť z bezpečnostných a ergonomických dôvodov nastavené pod predpísaným uhlom, napríklad ploché alebo drážkovacie sekáče. Na nastavenie je možné využiť príslušný režim práce. Nástroj upnite do
skľučovadla podľa pokynov uvedených v návode. Prepínač režimu prepnite na symbol kladiva so šípkou a potom stlačte spínač.
Upnutý nástroj sa začne pomaly otáčať zvoleným smerom otáčok. Kaď dosiahne požadovanú polohu, spínač uvoľnite. Prepínač
režimu práce prepnite do polohy sekania (symbol kladiva) a začnite pracovať.
Sekanie
Pri odpojenom náradí od elektrickej siete upevnite do skľ
Prepínač režimu práce prepnite do polohy sekania. Zasuňte zástrčku do zásuvky elektrickej siete, zapnite spínačom vŕtacie
kladivo, počkajte, až dosiahne plné otáčky a začnite pracovať.
Pri sekaní sa upnutý nástroj nesmie dostať príliš hlboko do obrábaného materiálu. Materiál sa musí osekávať v tenkých vrstvách
a na vŕtacie kladivo sa nesmie príliš silno tlačiť.
Vyrezávanie otvorov
Vŕtačku je možné používať aj na zhotovovanie väčších otvorov do dreva pomocou špeciálnych vrtákov s konštantným priemerom
alebo s vymeniteľnými koncovkami zo sady vykružovacích vrtákov. Aby sa zabránilo poškodeniu okraja zhotovovaného otvoru,
najmä na opačnej strane, podložte pod materiál kúsok odpadového dreva.
Používanie prídavných zariadení
Vŕtačky s voliteľným smerom otáčania sa nesmú používať na pohon prídavných zariadení.
Kryt proti prachu na skľučovadlo
Ak je vŕtacie kladivo vybavené gumovým krytom proti prachu na skľučovadlo, odporúča sa ho používať pri vŕtaní, kedy je vrták
orientovaný smerom nahor, napríklad do stropu. Kryt sa nasadzuje na vrták po jeho upnutí do skľučovadla. Prach a úlomky vznikajúce pri vŕtaní sa budú hromadiť v kryte, čo zabráni znečisteniu skľučovadla. Po ukončení práce kryt snímte z vrtáka, očistite ho
od prachu a úlomkov a potom ho opláchnite prúdom vlažnej vody.
Vŕtanie s použitím hĺbkového dorazu (XII)
Hĺbkový doraz je možné použiť pre uľahčenie vŕtania do materiálov, do ktorých sa majú zhotovovať slepé diery, najmä do betónu
alebo dreva. Zistite, aká má byť hĺbka otvorov. Do vŕtacieho skľučovadla upnite vrták a pomocou značkovača označte na vrtáku
vzdialenosť od špičky vrtáka rovnajúcu sa hĺbke otvoru. Hĺbkový doraz nastavte tak, aby jeho koniec bol v úrovni značky na vrtáku
označujúcej hĺbku vŕtania „L”. Skontrolujte, či je hĺbkový doraz zaistený, aby sa nemohol počas práce pohybovať. Začnite vŕtať.
Po dosiahnutí nastavenej hĺbky čelo hĺbkového dorazu narazí na povrch vŕtaného materiálu v blízkosti otvoru. Vtedy je treba vrták
z otvoru vytiahnuť.
Doplňujúce poznámky
Počas práce sa nesmie na obrábaný materiál príliš silno tlačiť a nesmú sa vykonávať prudké pohyb, aby nedošlo ku poškodeniu pracovného nástroja a vŕtačky. Počas práce využívajte pravidelné prestávky. Preťažovanie náradia je neprípustné. Teplota
vonkajších plôch nesmie nikdy prekročiť 60 °C. Po ukončení práce vŕtačku vypnite, vytiahnite zástrčku kábla náradia zo sieťovej
zásuvky a vykonajte prehliadku a údržbu.
Deklarovaná celková hodnota vibrácií bola zmeraná pomocou štandardnej meracej metódy a môže sa použiť na porovnanie
jedného náradia s druhým. Deklarovaná celková hodnota vibrácií sa môže použiť pre východiskové posúdenie expozície.
Upozornenie! Emisia vibrácií počas práce s náradím sa môže líšiť od deklarovanej hodnoty v závislosti od spôsobu použitia
náradia.
Upozornenie! Je potrebné stanoviť bezpečnostné opatrenia, ktoré majú chrániť obsluhu a ktoré vychádzajú z posúdenia rizika v
reálnych podmienkach používania (pri tom je potrebné uvažovať so všetkými pracovnými cyklami, ako napríklad s časom, kedy
je náradie vypnuté alebo pracuje na voľnobeh, ako aj s časom aktivácie).
Mazanie
Vrtáky a sekáče sa vždy musia pred použitím dôkladne očistiť a stopky SDS-Plus namazať tenkou vrstvou mazacieho tuku.
Odporúča sa používať tuk určený pre skľučovadla SDS-Plus. V prípade, že príklepový mechanizmus nepracuje správne, jednou
učovadla požadovaný nástroj – plochý, drážkovací alebo špicatý sekáč.
ORIGINÁL NÁVODU
57
Page 58

SK
z príčin môže byť nedostatočné mazanie prevodovky a kĺbového mechanizmu piesta príklepu. Odporúča sa používať mazadlo
určené pre zubové a kĺbové prevody. Doplňovanie mazadla sa odporúča zveriť autorizovanému servisu.
ÚDRŽBA I PREHLIADKY
POZOR! Všetké činnosti svazané z; výmenou príslušenstva, regulaciu apod, je potreba realizovať pri vypnutým napätiu napájenia
náradí, preto pred zahajeniem techto činnosti je potreba odpojiť zástrčku od elektrické sietí. Po ukončení prace je treba skontrolovať technický stav elektonáradí prehlídkou i hodnocením: stojanu i rukojeti, elektrického vodiče vrátane zastrčky a ohybání,
pôsobení elektrického spínača, prôchodnosti ventilačních štrbin, iskrenie kartáčov, hlasitosti ložisek a převodovek, uvádzania
do pohybu a rovnomernosti prace. Počas záručného obdobia použivateľ nesmi demontovať elektronáradí, ani meniť provozné
jednotky alebo súčiasti, pretože môže stratiť narok na záruku. Všetké nespravnosti zjištené počas prehliadky, alebo provozovánia,
su signalem pre provedení opravy v záručném servisu. Po ukončení prace, stojan, ventilačné šterbiny, prepínače, dodatečnou
rukoväť a ochrany je treba očistiť, napríklad prúdem vzduchu (o tlaku maximum 0,3 MPa), štetcem alebo suchou handrou bez
použití chemických prostredkov a čisticích tekutin. Náradí a rukoväť očistiť suchou čistou handrou.
58
ORIGINÁL NÁVODU
Page 59

H
AZ ESZKÖZ JELLEMZŐI
A kézi fúrókalapács egy közönséges, II. szigetelési osztályú szerszám, amelynek feladata betonban, természetes és műkőben,
márványban stb. furatok készítése és vésés SDS Plus befogású munkaszerszámok segítségével. A fúrókalapács forgófejének
fordulatszámát folyamatos módon lehet szabályozni, és ha kikapcsolják az ütés funkciót, akkor lehet furatot készíteni olyan anyagokban, mint a fa, fém vagy a műanyag. Az elektromos szerszám helyes, meghibásodástól mentes és biztonságos működése a
megfelelő üzemeltetéstől függ, ezért:
Az eszközzel történő munkavégzés megkezdése előtt el kell olvasni, és meg kell őrizni a teljes kezelési utasítást.
A biztonsági előírások és a jelen utasítások be nem tartása miatt keletkező károkért a szállító nem vállal felelősséget.
TARTOZÉKOK
A gyári csomagolásban a következőknek kell lenniük:
- fúrókalapács
- kiegészítő fogantyú
- furatmélység határoló
- fúró és véső
MŰSZAKI PARAMÉTEREK
Paraméter Mértékegység Érték
Katalógusszám 79054
Névleges feszültség [V] ~230
Névleges frekvencia [Hz] 50
Névleges teljesítmény [W] 620
Névleges fordulatszám [perc
Max. furatátmérő (beton) [mm] 24
Egy ütés energiája [J] 2,4
Ütésfrekvencia [perc
Tömeg [kg] 2,8
Zajszint
- akusztikus nyomás L
- teljesítmény L
Rezgésszint (fő fogantyú / kiegészítő fogantyú) [m/s
Szigetelési osztály II
Védelmi fokozat IP20
± K [dB(A)] 92 ± 3
pA
wA
-1
] 0 - 870
-1
] 0 - 4850
[dB(A)] 103 ± 3
2
] 14,377 ± 1,5 / 11,618 ± 1,5
ÁLTALÁNOS BIZTONSÁGI ELŐÍRÁSOK
FIGYELEM! Olvassa el az összes alábbi előírást. Az alábbiak be nem tartása áramütéshez, tűzvészhez illetve testi sérüléshez
vezethet. A használati utasításokban használt „elektromos feszültség” fogalom minden árammal hajtott vezetékes, illetve vezeték
nélküli berendezésekre vonatkozik.
MINDIG TARTSA BE AZ ALÁBBI UTASÍTÁSOKAT
Munkahely
A munkahely legyen mindig jól kivilágított és tiszta. A rendetlenség és a nem megfelelő világítás balesetek kiváltó okai lehetnek.
Az elektromos készülékekkel soha ne dolgozzon gyúlékony folyadék, illetve gáz közelében, robbanásveszélyes környezetben. Az elektromos berendezések szikrákat szórhatnak, melyek gyúlékony gázokkal együtt tűzvészt okozhatnak.
Soha ne engedjen gyerekeket, illetve más hozzá nem értőket a munkahelyhez. Az összpontosítás elveszítésével elveszítheti
a munkaeszköz feletti uralmát is.
Elektromos biztonság
Az elektromos tápvezeték csatlakozójának illeszkednie kell az elektromos aljzatba. Soha ne alakítsa át a csatlakozót.
Soha ne használjon semmilyen adaptert a csatlakozónak az aljzatba való beillesztése érdekében. Nem módosított, az
aljzatba illő csatlakozó csökkenti az áramütés kockázatát.
Mindig kerülje el a földelt felületekkel pl. csövek, fűtőtestek, hűtőszekrények stb. való érintkezést. A test földelése növeli
az áramütés kockázatát.
EREDETI UTASÍTÁS
59
Page 60

H
Soha ne tegye ki az elektromos berendezést csapadék, illetve nedvesség hatásának. Az elektromos berendezésbe belekerülő víz és nedvesség növelik az áramütés kockázatát.
Soha ne terhelje túl az elektromos tápvezetéket. Soha ne használja az elektromos tápvezetéket berendezés hordozására,
a csatlakozónak az elektromos aljzatba/ból be/kihúzására. Kerülje el az elektromos vezetéknek meleggel, olajjal, éles
peremekkel illetve mozgó elemekkel való érintkezését. Az elektromos tápvezeték sérülései növelik az áramütés kockázatát.
A zárt helyiségen kívül zajló munka esetében kizárólagosan kültéri hosszabbítót használjon. A megfelelő hosszabbító
használatával csökken az áramütés kockázata.
Abban az esetben, ha az elektromos eszköz nedves környezetben történő használatát nem lehet elkerülni, a tápfeszültség
elleni védelemként áram-védőkapcsolót (RCD) kell használni. Az RCD használata csökkenti az elektromos áramütés veszélyét.
Személyvédelem
Csak jó lelki és fizikai állapotban álljon munkába. Mindig figyeljen arra, mit csinál. Soha ne dolgozzon, amikor túl fáradt,
illetve gyógyszer vagy alkohol hatása alatt áll. Pillanatnyi figyelmetlenség komoly sérülésekhez vezethet.
Mindig alkalmazza a személyi védelem eszközeit. Mindig vegye fel a védőszemüveget. A személyvédelem eszközeinek:
védőmaszkok, védőlábbeli, sisakok, illetve fülvédők használata jelentősen csökkenti a testi sérülések kockázatát.
Kerülje el a berendezés véletlen bekapcsolását. A berendezés az elektromos hálózatába való csatlakozása előtt mindig
bizonyosodjon meg arról, hogy a kapcsológomb a „kikapcsolt” pozícióban van. Elektromos hálózatba való csatoláskor
benyomott kapcsolási gomb illetve „bekapcsolt” pozícióba tartott kapcsológomb komoly testi sérülésekhez vezethet.
A pneumatikus rendszer bekapcsolása előtt tüntesse el az összes, a beállításához használt csavarhúzót és egyéb tárgyat. A mozgó elemeken felejtett kulcs komoly testi sérülésekhez vezethet.
Ügyeljen az egyensúlyra. Egész idő alatt tartsa fenn a megfelelő testhelyzetet. Munka közben kialakuló váratlan helyzetek-
ben ez megkönnyíti a elektromos berendezés irányítását.
Használjon védőruhát. Ne hordjon laza ruházatot, illetve ékszert. Haját, ruházatát illetve munkakesztyűjét tartsa távol az
elektromos berendezésétől. Laza ruházat, ékszer illetve hosszú haj beleakadhat a berendezés mozgó alkatrészeibe.
Amennyiben lehetséges használjon porelszívókat, illetve portárolókat. Ügyeljen a megfelelő, szabályos felszerelésére.
Porelszívó használata csökkenti a komoly testsérülések előfordulási kockázatát.
Elektromos berendezés használata
Soha ne terhelje túl az elektromos berendezést. Mindig az adott munkához megfelelő eszközt használjon. A megfelelő
munkaeszköz kiválasztása eredményesebb és biztonságosabb munkavégzéshez vezet.
Soha ne használja az elektromos berendezést, amennyibe nem működik a kapcsológombja. A berendezés, melyet nem tud
szabályozni kapcsológombbal veszélyes, illetve javítandó.
A tartozékok cserélése és beállítása előtt illetve a berendezés eltárolása előtt húzza ki a csatlakozót az elektromos aljzatból. Ez lehetővé teszi az elektromos berendezés véletlenszerű bekapcsolásának elkerülését.
Az eszközt mindig a gyerekek elöl elzárt helyen tárolja. Soha ne hagyja, hogy a berendezést a használatában nem kiképzett emberek használják. A nem kiképzett személyzet kezében az elektromos eszköz veszélyes lehet.
Biztosítsa a berendezés megfelelő karbantartását. Ellenőrizze a nem tökéletesen illeszkedő, illetve túl laza mozgó részeket. Ellenőrizze, hogy a berendezés valamelyik alkatrésze nem sérült-e. Meghibásodás észlelése esetében még az
elektromos berendezés használata megkezdése el
balesetnek okozója.
A vágó elemeket mindig tartsa élesen és tisztán. A megfelelően karbantartott vágóeszközöket munka közben könnyebben
lehet irányítani.
Az elektromos berendezéseket és tartozékait csak a jelen használati utasításban foglaltak szerint használja. A berendezéseket mindig rendeltetésszerűen, munka körülményeit és fajtáját figyelembe véve használja. A berendezések nem
rendeltetésszerű használata növelheti a veszélyes helyzetek kialakulásának kockázatát.
Javítások
Az eszköz javításait kizárólagosan az erre jogosult, eredeti alkatrészeket használó szervizekben végeztesse. Ez garantálja
az elektromos berendezés biztonságos munkáját.
TOVÁBBI BIZTONSÁGI UTASÍTÁSOK
Vegyen fel hallásvédőt az ütvefúró használatakor. A zaj hallásvesztést okozhat.
A gépet a berendezéssel együtt szállított plusz fogantyúval használja. Az a gép feletti uralom elvesztése a gép kezelőjének
sérüléséhez vezethet.
Porvédő álarcot kell viselni. A porelszívó használata csökkenti a súlyos testi sérülések bekövetkeztének lehetőségét.
Olyan munka kivitelezése közben, amikor az eszköz feszültség alatt lévő, rejtett elektromos kábellel találkozhat, a szerszámot a szigetelt nyelénél fogva kell tartani. A feszültség alatt lévő vezetékhez érő eszköz fém részei is feszültség alá
kerülhetnek, ami miatt a szerszám kezelőjét áramütés érheti.
őtt javítsa ezt ki. A berendezés nem megfelelő karbantartása nagyon sok
60
EREDETI UTASÍTÁS
Page 61

H
A TARTOZÉK ELEMEK SZERELÉSE
FIGYELEM! A tartozékelemek felszerelését csak feszültségmentesítés után szabad elvégezni. Húzza ki a hálózati kábel dugaszát
a hálózati dugaszolóaljzatból!
A kiegészítő fogantyú felszerelése (II)
Helyezze fel a plusz fogantyút a kívánt helyzetben, és megnyomva, csavarozza fel a fogantyút a tartóra.
A furatmélység határoló felszerelése (IV)
Ha a kalapács tartozékai között van furatmélység határoló, azt fel lehet szerelni a plusz fogantyúra.
A rögzítés módjától függően be kell dugni a furatmélység határolót a plusz fogantyúba, a megfelelő helyzet beállítása után pedig
rögzíteni kell nyomógombbal, forgatógombbal vagy fel kell csavarozni a plusz fogantyúra.
FELKÉSZÜLÉS A MUNKAVÉGZÉSRE
A munka megkezdése előtt ellenőrizni kell, hogy gép teste vagy a hálózati kábel a dugasszal nem sérült-e. Amennyiben valamilyen sérülés tapasztalható, tilos a további munkavégzés!
Figyelem! Minden, a munkát végző szerszámok (SDS Plus befogású fúrószárak és vésők) cseréjével, a védőburkolatok és megvezetők felszerelésével és beállításával, stb. kapcsolatos műveletet csak az eszköz áramtalanítása után szabad elvégezni, ezért
ezen műveletek megkezdése előtt: Húzza ki a hálózati kábel dugaszát a hálózati dugaszolóaljzatból!
Az SDS-Plus befogású munkaszerszámok behelyezése a tokmányba
Tisztítsa meg a kiválasztott szerszámot a kosztól és rozsdától, és kenje meg az SDS-Plus befogást egy vékony réteg kenőanyaggal.
Húzza maga felé a tokmány, és tartsa meg ebben a helyzetben (V).
Helyezze be a megtisztított szerszámot a nyílásba. Szükség esetén fordítsa el a szerszámot, hogy ellenállás nélkül menjen be
a tokmányba. Engedje el a tokmányt, a szerszámnak automatikusan rögzülnie kell a tokmányban.
Győződjön meg róla, hogy a szerszám biztosan be van fogva. Ehhez elég, ha megpróbálja kihúzni a szerszámot az SDS-Plus
tokmányból. Ha a fúró vagy a véső kijön a tokmányból, ismételje meg a behelyezés műveletét.
A forgásirány beállítása (VII)
Állítsa a forgásirány váltót a jobbra forgás irányába, azaz a szerszám eleje felé mutató nyílnak megfelelően, vagy a balra forgás,
azaz a szerszám vége felé mutató nyíl irányába.
Figyelem! A forgásirányt csak lekapcsolt feszültségnél lehet megváltoztatni!
Az üzemmód beállítása (VI)
A fúrókalapács üzemmódjának beállítására a retesszel ellátott kapcsoló szolgál. Megnyomva és benyomva tartva a retesz gombját, lehet megváltoztatni a kapcsoló állását.
Az ütve fúró funkció megkönnyíti a furatok elkészítését betonban, falban és kemény kerámia anyagokban (kemény téglák, kövek,
márvány). Ehhez az ütés üzemmód kapcsolóját ütéssel történő munkavégzésre, a fúró és kalapács jelre kell állítani.
Amikor másfajta anyagokban készít furatot, az ütve fúró funkciót ki kell kapcsolni, a kapcsolót ütés nélküli üzemmódra, a fúró
jelre állítva.
Be lehet állítani vésés funkciót is, ebben az üzemmódban a forgás ki lesz kapcsolva, viszont nem lesz kikapcsolva az ütés.
Ehhez az üzemmód kapcsolóját vésés üzemmódja, a kalapács jelre kell állítani.
A fúrókapcsoló rendelkezik egy olyan funkcióval, aminél állítani lehet a véső helyzetét. Ez a funkció különféle befogott szerszámokkal történő vésésnél tesz hasznos szolgálatot, lehetővé téve a véső tetszőleges helyzetbe történő beállítását. Az átkapcsolót
ebben a helyzetben nem lehet reteszelni.
Előkészítő műveletek
Válassza ki a megfelelő munkaszerszámot, és szerelje be a szerszám tokmányába.
Állítsa az üzemmód váltót a megfelelő helyzetbe: kalapács jel - vésés; kalapács és fúró jele - ütve fúrás; fúró jele - fúrás ütés
nélkül; háromszög - a véső helyzetének beállítása.
Vegyen fel védőszemüveget, hallásvédőt és védőkeszty
Dugja be a hálózati kábel dugaszát az elektromos hálózat dugaszolóaljzatába.
Vegyen fel olyan testhelyzetet, ami garantálja az egyensúlyt, ragadja meg két kézzel a fúrókalapácsot, és az elektromos kapcsoló
újjal történő benyomásával indítsa be (VIII).
Tartsa a szerszámot ebben az állapotba néhány percig, hogy a kenőanyag eljusson a meghajtás minden alkatrészéhez.
A kapcsoló elengedésével kapcsolja ki a fúrókalapácsot.
Figyelem! Ha gyanús csikorgások, zörejek stb. hallhatók, azonnal ki le kell választani a fúrókalapácsot az elektromos hálózatról,
és átvizsgálásra szakszervizbe kell adni.
űt.
EREDETI UTASÍTÁS
61
Page 62

H
A fúrótokmány cseréje
A fúrókalapács rendelkezik a fúrótokmány cseréjének lehetőségével. Az SDS Plus rendszerű fúrók befogását lehetővé tevő
tokmány helyett fel lehet szerelni hengeres szárú fúrók befogását lehetővé tevő tokmányt.
A tokmány cseréjéhez a tokmány hátulján elhelyezett gyűrűt a tokmány eleje irányában kell húzni (IX). Így le lehet szerelni a tokmányt. A fúrótokmányt úgy kell felszerelni, hogy rá kell húzni a fúró perselyére (X), amíg a retesz be nem kattan. Meg kell győződni
róla, hogy a retesz bekattant, és nincs lehetőség arra, hogy a fúrótokmány a gép üzemelése közben leváljon.
A fúrószár rögzítése az önszorító fúrótokmányban (XI)
Ki kell választani az adott munkának megfelelő, hengeres szárú csigafúrót. A tokmányba helyezze be a fúrószárat, fogja meg a
tokmány hátsó részét, majd a tokmány első részét forgatva rögzítse a fúrószárat, úgy, hogy az biztosan és erősen rögzítve legyen
a tokmányban.
Figyelem! Tilos az önszorító tokmányt vésésnél alkalmazni. Az ütő mechanika által kiváltott terhelés az önszorító tokmány tönkremenetelét okozhatja.
AZ ESZKÖZ HASZNÁLATA
Figyelem! A fúrókalapács használata közben fülvédőt kell viselni!
Jobbos vagy balos forgásirány használata.
Jobbos forgásirányt akkor használjon, ha általánosan használt, jobbos forgásirányú fúrókkal készít furatot. A balos forgásirányt
akkor használja, ha a jobbos forgásirányú fúrószár beékelődik az anyagba.
A kapcsoló reteszelésének használata
A kapcsoló reteszelését hosszantartó fúrás esetén ajánljuk használni, pl. betonban, falban történő furatkészítéskor. Ehhez, amikor a kapcsoló be van nyomva, hüvelykujjal meg kell nyomni a reteszelő nyomógombot, és el kell engedni a kapcsolót. A retesz
kioldásához elég a kapcsolót megnyomni.
Furatkészítés fában
A furat elkészítése előtt a megmunkálandó anyagot asztalos szorítókkal vagy satuban rögzíteni kell, majd pontozóval vagy szöggel meg kell jelölni a furat helyét. A tokmányba helyezze be a megfelelő fúrószárat, állítsa be a sebességet, csatlakoztassa a
fúrógépet az elektromos hálózathoz, és kezdje meg a fúrást. Átmenő furatok készítésekor ajánlatos a munkadarab alá fa alátétet
tenni, ennek köszönhetően a furat pereme nem lesz sorjás. Nagy átmérőjű furatok készítése esetén előbb ajánlatos egy kisebb
átmérőjű, megvezető furatot fúrni.
Furatkészítés fémben
Mindig biztosan rögzíteni kell a munkadarabot. Vékony lemez esetén ajánlatos alátenni egy darab fát, hogy elkerüljük a nem
kívánt elgörbülést stb. Ezután pontozóval meg kell jelölni a készítendő furat helyét, és meg kell kezdeni a furat elkészítését.
Használjon acélhoz való fúrószárat. Fehér öntvényben történő furatkészítéskor ajánlatos égetett karbamid hegyű fúrószárat
használni. Nagyon furatok készítésekor ajánlatos előbb kisebb átmérőjű vezető
hűtéséhez gépolajat kell használni. Alumínium esetén a hűtéshez terpentint vagy parafint kell használni. Bronzban, rézben vagy
öntöttvasban történő furáskor nem szabad hűtőközeget használni. Hűtés céljából a fúrószárat gyakran ki kell venni az anyagból,
hogy le tudjon hűlni.
Furatkészítés kerámia anyagokban
Furatkészítés kemény, tömör anyagokban: betonban, kemény téglában, kőben, márványban stb.
Miután a hálózati kábelt kihúzta a hálózati dugaszolóaljzatból, a fúrókalapács tokmányába tegyen egy fúrószárat.
Szükség esetén szerelje fel a furat mélységét határoló pálcát.
Az üzemmód kapcsolóval válassza ki az ütve furást, vagy ha rendelkezésre áll, a az ütés nélküli fúrást.
Dugja be a dugaszt a hálózati dugaszolóaljzatba, kapcsolja be a fúrókalapácsot a kapcsolóval, és kezdje meg a munkát.
Munka közben rendszeresen szünetet kell tartani - soha ne engedje, hogy a fúrókalapács és a szerszám túlzottan felmelegedjen.
Az ütve fúrást csak tömör, kerámia anyagokban ajánlott használni, mint a beton, kemény tégla, kő stb. Nagy átmérőjű furatok
készítése esetén ajánlott előbb egy kisebb átmérőjű furatot készíteni, majd ezután használni a szándékolt átmérőjű fúrót. Ütve
fúráshoz készült fúrószárat kell használni.
Nem szabad ütve fúrást használni laza szerkezetű, kerámia jellegű anyagokhoz, mint a csempe, puha tégla, vakolat stb. Az ütve
fúrás ilyen anyagokban az anyag tönkremeneteléhez vezethet.
A fúrókalapács el van látva egy tengelykapcsolóval, ami megakadályozza az elektromotor túlterhelését abban az esetben, ha a
betett szerszám beszorul az anyagba. Például ha egy betonvasba ütközik. Ilyen esetben a fúrószár megáll, annak ellenére, hogy
az elektromos motor tovább működik.
A túl erősen nyomja a fúrógépet fúrás közben, akkor is működésbe léphet a tengelykapcsoló.
Ilyen esetben vissza kell húzni a szerszámot a furatból, ellenőrizni kell, hogy a fúrókalapács jól működik-e, majd folytatni kell a
furatot fúrni. Acélban történő fúrás esetén a fúró
62
EREDETI UTASÍTÁS
Page 63

H
munkát, csak akkora nyomást fejtve ki, amennyi kell a helyes munkához. Ha betonvasba vagy más eltakart fémpálcába ütközik,
azt ütés nélkül átkell fúrni egy fémhez készült, ugyanolyan átmérőjű fúróval, mint az ütve fúró, majd folytatni kell a fúrást a kerámia
anyagban.
Furatkészítés csempében, puha téglában, vakolatban stb.
Ugyanúgy kell fúrni, mint kemény anyagok esetében, vagy ütés nélkül. Időközönként vegye ki a fúrószárat a furatból a por és
hulladék eltávolítása céljából. Fúrás közben a szerszámra fejtsen ki egyenletes nyomást.
A véső helyzetének beállítása
Némelyik behelyezhető vésőszerszámot, pl. a véső vagy a lyukasztót, a biztonságosabb és ergonomikusabb munkavégzéshez
be kell állítani bizonyos szögben. Ehhez a megfelelő üzemmódot kell használni. Rögzítse az útmutatóban megadott utasítások
szerint a tokmányba beállított szerszámot. Állítsa át az üzemmód váltót a kalapács jelre, majd nyomja meg a kapcsolót. A betett
szerszám lassan elkezd forogni a kiválasztott forgásiránynak megfelelően. Ha a betett szerszám eléri a kíván helyzetet, engedje
el a kapcsolót Állítsa át az üzemmód kapcsolót a vésés pozícióra – kalapács szimbólum, majd kezdje meg a munkát.
Vésés
Miután a hálózati kábelt kihúzta a hálózati dugaszolóaljzatból, a tokmányba tegye bele a kívánt szerszámot: hidegvágó vagy fúró.
Állítsa az üzemmód kapcsolóját a „vésés” pozícióra. Dugja be a dugaszt a hálózati dugaszolóaljzatba, kapcsolja be a fúrókalapácsot a kapcsolóval, várja meg, míg eléri a teljes fordulatszámot, és kezdje meg a munkát.
Vésés közben nem szabad a betett szerszámot nagyon mélyen beütni a megmunkálandó anyagba. Az anyagot vékony rétegbe
kell lefejteni, munka közben nem fejtve ki túl nagy nyomást a fúrókalapácsra.
Lyukak vágása
A fúróval, speciális, állandó átmérőjű fúrószárakkal vagy szúrófűrészek cserélhető, furatkészítéshez való hegyeivel fában nagyobb átmérőjű furatokat lehet készíteni. A szálkásódás elkerülése érdekében, valamint hogy az elkészült furat pereme ne töredezzen ki, a megművelendő munkadarab alá egy hulladék fadarabot kell tenni.
Előtétek használata.
A változó forgásirányú fúrógépet nem szabad munkaeszközök meghajtására használni.
Furatkészítés a furatmélység határoló használatával (XII)
A határoló olyan felületekben történő fúratok készítésénél könnyíti meg a munkát, ahol nem átmenő furatok készülnek, különösen betonnál és fánál. Állapítsa meg a furat mélységét. A tokmányba be kell fogni a fúrószárat, egy filctollal be kell jelölni a fúró
hegyétől a furat mélységének megfelelő távolságot. A furatmélység határolót be kell állítani úgy, hogy annak vége egybeessen
a furat mélységének a fúrószáron bejelölt „L” távolságával. Meg kell győződni róla, hogy a furatmélység határoló nem mozdul el
munka közben. Meg kell kezdeni a furást, a beállított mélységnél a furatmélység határoló hegye beleütközik a felületbe a furat
közelében. Ekkor húzza ki a fúrószárat a furatból.
A fúrótokmány védőburkolata
Ha a fúrókalapács tokmánya el lett látva egy gumi védőburkolattal, akkor ajánlott ezt használni fúrás közben, amikor a fúró felfelé
van irányozva, pl. födémbe történő fúráskor. Miután behelyezte a fúrót a tokmányba, fel kell tenni a védőburkolatot. A fúrás közben
keletkező por és hulladék a védőburkolatban gyűlik össze, ami megelőzi a fúrótokmány elszennyeződését. A munka befejezése
után vegye le a burkolatot a fúróról, tisztítsa meg a portól és a hulladékoktól, majd langyos vízsugárral öblítse ki.
További megjegyzések
Munka közben nem szabad túl nagy nyomást kifejteni a megmunkálandó anyagra, és nem szabad hirtelen mozdulatokat tenni,
hogy ne okozza a munkaszerszám és a fúrószár sérülését. Munka közben rendszeresen szünetet kell tartani. Nem szabad a gépet túlterhelni, a gép külső felületének hőmérséklete soha nem haladhatja meg a 60 °C-ot. A munka befejezése után kapcsolja ki a
fúrógépet, húzza ki a hálózati kábel dugaszát a hálózati dugaszolóaljzatból, és végezze el a karbantartást és a felülvizsgálatot.
A deklarált, teljes rezgés értékét hagyományos mérési módszerrel mérték, és felhasználható két eszköz egymással történő öszszehasonlításához. A deklarált, teljes rezgés értéke felhasználható az expozíció előzetes megítéléséhez.
Figyelem! A szerszámmal végzett munka közben a tényleges rezgésérték, a szerszám használatának módjától függően, különbözhet a deklarált értéktől.
Figyelem! A tényleges használat körülményeinek alapján kell megadni a kezelő védelmére szolgáló biztonsági eszközöket (figyelembe véve a munkavégzés összes ciklusát, például azt az időt, amikor az eszköz be van kapcsolva, vagy üresjáratban üzemel,
valamint az aktiválás idejét).
Kenés
Mindig, mielőtt elkezdi használni a fúrót vagy hidegvágót, azt alaposan le kell tisztítani és egy vékony kenőanyag réteggel meg
kell kenni az SDS Plus fogantyút. Ajánlott SDS Plus fúróbefogáshoz készült kenőanyagot használni. Az ütő mechanizmus nem
megfelelő működése esetén, az okok egyike az áttétel és ütő dugattyú forgattyú-csap egységének nem megfelelő kenése lehet.
EREDETI UTASÍTÁS
63
Page 64

H
Ajánlott SDS Plus fogaskerekes és forgattyú-csapos áttételhez készült kenőanyagot használni. A kenőanyag kiegészítését erre
jogosult szervizben kell elvégeztetni.
KARBANTARTÁS ÉS KONZERVÁLÁS
FIGYELEM! A beállítás, műszaki kezelés vagy karbantartás előtt a berendezés dugvilláját ki kell húzni az elektromos hálózat
dugaljából. A munka befejezése után külső szemlevételezéssel ellenőrizni kell az elektromos berendezés műszaki állapotát, és
meg kell ítélni: a testet és a fogantyút, a hálózati vezetéket a dugvillával és a megtörésgátlóval, az elektromos kapcsoló műkö-
dését, a szellőző járatok átjárhatóságát, a szénkefék szikrázását, a csapágyak és áttételek hangosságát, gép beindulását és
egyenletes működését. A garanciális időszakban a felhasználó nem szerelhet az elektromos berendezéshez, és nem is cserélhet
ki semmiféle részegységet vagy tartozékot, mivel ez a garanciális jog elvesztésével jár. A szemrevételezésnél vagy a működés
közben tapasztalt bármiféle rendellenesség jelzés arra, hogy a gépet szervizben meg kell javítani. A munka befejezése után a
testet, a szellőző réseket, a kapcsolókat, a kiegészítő fogantyút és a védőburkolatot meg kell tisztítani légsugárral (max. 0,3 MPa
nyomásúval), ecsettel vagy száraz ronggyal, vegyi anyagok és tisztítószerek használata nélkül. A berendezést és a fogantyúkat
száraz ronggyal kell megtisztítani.
64
EREDETI UTASÍTÁS
Page 65

RO
DESCRIERE UNEALTĂ
Ciocanul rotopercutor manual este o unealtă obişnuită, cu clasa II de izolaţie, destinată pentru găurire şi dăltuire în beton, piatră
naturală şi artificială, marmură etc. cu unelte de lucru dotate cu suport SDS Plus. Ciocanul rotopercutor posedă ajustare a turaţiei
arborelui şi datorită posibilităţii de decuplare a funcţiei percutoare permite efectuarea de găuri în materiale precum: lemn, metal
sau materiale artificiale. Funcţionarea corectă, fiabilă şi în condiţii de siguranţă a uneltei electrice depinde de exploatarea corectă,
de aceea:
Înainte de a începe lucrul cu unealta trebuie să citiţi toate instrucţiunile şi să le păstraţi.
Furnizorul nu va fi responsabil pentru pagubele apărute datorită nerespectării normelor de siguranţă şi a recomandărilor din
aceste instrucţiuni de siguranţă.
DOTARE
În ambalajul original trebuie să se afle:
- maşina de g
ăurit cu percuţie
- mâner adiţional
- limitatorul adâncimii de găurire
- burghiuri şi dălţi
- mandrină cu autoprindere
PARAMETRI TEHNICI
Parametru Unitate de măsură Valoare
Număr de catalog 79054
Tensiune nominală [V] ~230
Frecvenţă nominală [Hz] 50
Putere nominală [W] 620
Turaţie nominală [min
Diametru max. gaură (beton) [mm] 24
Energie percuţie [J] 2,4
Frecvenţă percuţie [min
Masa [kg] 2,8
Nivel de zgomot
- presiune acustică L
- putere L
Nivel de vibraţii (mâner principal / mâner adiţional) [m/s
Clasa de izolaţie II
Nivel de protecţie IP20
± K [dB(A)] 92 ± 3
pA
± K [dB(A)] 103 ± 3
wA
-1
] 0 - 870
-1
] 0 - 4850
2
] 14,377 ± 1,5 / 11,618 ± 1,5
CONDITII GENERALE DE SECURITATE
ATENTIE! Trebuie citite toate instrucţiunile de mai jos. Nerespectarea lor poate duce la electrocutae, la incendiu sau la leziuni.
Noţiunea “sculă electrică” folosită în instrucţiuni se referă la toate sculele acţionate cu curent electric, atât cele alimentate cu
energie prin cablu cât şi cele fără cablu.
TREBUIE RESPECTATE INSTRUCŢIUNILE DE MAI JOS
Locul de lucru
Locul de lucru trebuie întreţinut curat şi să fie bine iluminat. Dezordinea cât şi iluminarea insuficientă pot fi pricina accidentelor.
Nu se recomandă utilizarea sculelor electrice în mediu în care este mărit riscul exploziei, sau în mediu care conţine fluide inflamabile, gaze sau vapori. Sculele electrice generează scântei care, în contact cu gaze sau vapori inflamabili pot pricinui incendiu.
Evitaţi aproprierea la locul de muncă a copiilor sau a altor persoane străine. In afară acest avertisiment fiţi foarte atenţi,
deoarece pierderea concentraţiei poate pricinui pierdera controluluii asupra sculei.
Securitatea electrică
Sztecărul conductorului electric trbuie să corespundă cu priza electrică. Este interzisă modificarea ştecărului. Este interzisă modificarea ştecărului cu scopul de a fi adaptabil la priza electrică. Sztecărul ne modificat micş
orează riscul elec-
trocutării.
INSTRUCŢ IUNI ORIGINALE
65
Page 66

RO
Evitaţi posibilitatea contactului cu cu obiecte cu împământare ca ţevi, radiatoare şi instalaţii frigorifere. Corpul omenesc
împământat măreşte riscul electrocutării.
Se recomandă evitarea expunerii sculei electrice în contact cu percipitaţii atmosferice sau cu umezeala. Apa şi umezeala,
care intră în interiorul sculei electrice măreşte riscul electrocutării.
Nu supraîncărcaţi conducta de alimentare electrică. Nu purtaţi scula ţinând-o de conducta de alimentare electrică, nu
trageţi de conductă vrând să scoateţi ştecărul din priza de alimentare electrică. Evitaţi contactul conductei cu căldură, cu
uleiuri, sau cu obiecte ascuţite şi elemente în mişcare. Defectarea conductei de alimentare măreşte riscul electrocutării.
In cazul efectuării lucrului în afara încăperilor trebuie să întrebuinţaţi conductori prelungitori destinaţi pentru întrebuinţarea lor afar
În cazul în care nu puteţi evita să utilizaţi unealta electrică într-un mediu umed, drept protecţie împotriva tensiunii electrice trebuie să utilizaţi un dispozitiv cu curent diferenţial (RCD). Utilizarea RCD scade riscul de electrocutare.
Securitatea personală
Apucă-te de lucru numai în bună condiţie fizică şi psihică. Fii precaut la ceace faci. Nu lucra atunci când eşti obosit sau sub
influenţa medicamentelor sau a alcoolului. Cea mai mică neatenţie, în timpul lucrului, poate provoca leziuni serioase a corpului.
Intrebuinţează mijloace de protejare personală. Totdeauna puneţi ochelari de protecţie. Intrebuinţarea mijloacelor de pro-
tejare personală, adică măşti respiratorii de protecţie, încălţăminte de protecţie, căşti şi antifoane pe urechi micşorează riscul
leziunilor serioase ale corpului tău.
Evită întâmplătoarea punere în funcţiune a sculei. Inainte de a alimenta scula cu energie electrică verifică totdeauna dacă
întrerupătorul este pe poziţia „deconectat“. Tinând degetul pe întrerupătorul sculei sau punerea în funcţiune a sculei electrice
atunci când întrerupătorul este pe poziţia „ conectat“ poate duce la leziuni serioase ale corpului tău.
Inainte de a pune în funcţiune scula electrică dă la o parte toate cheile şi alte scule care au fost întrebuinţate la reglarea
ei. Cheia lăsată pe elementele rotitoare ale sculei poate duce la leziuni serioase ale corpului tău.
Păstrează-ţi echilibrul. Tot timpul păstrează statura corespunzătoare. Această poziţie îţi va permite să stăpâneşti scula
electrică în cazuri de situaţii de lucru neaşteptate.
Impbracă-te în haine de protejare. Nu te îmbrăca în haine largi şi cu bijuterii. Părul, îmbrăcămintea şi mănuşile să nu
le apropii de piesele în mişcare ale sculei electrice. Imbrăcămintea largă, bijuteria sau părul lung se pot agăţa de piesele în
mişcare ale sculei.
Intrebuinţează extractor de praf sau recipient pentru praf, dacă scula este înzestrată cu recipient. Imbină le corect. Utilizarea extractorului de praf micşorează riscul leziunilor serioase ale corpului tău.
Utlizarea sculei electrice
Nu supra încărca scula electrică. Utilizează scula corespunzătoare lucrului care trebuie să-l faci. Alegerea sculei corespun-
zătoare lucrului respectiv, asigură eficienţă şi siguranţă în timpul lucrului.
Nu întrebuinţa scula electrică, dacă întrerupătorul ei nu funcţionează corect. Scula, pe care nu o poţi verifica utilizând în-
trerupătorul alimentării electrice este foarte periculoasă deci trebuie dată la reparat.
Inainte de reglarea sculei, schimbarea accesoriilor sau la terminrea lucrului, deconectează conducta de alimentare. Scula
electrică deconectată dela alimentare evită o neaşteptată, întâmplătoare punere în funcţiune.
Păstrează scula la loc neaccesil copiilor. Nu permite nimănui să lucreze cu scula electrică dacă nu este şcolarizat în
ceace priveşte deservirea ei. Scula electrică poate fi foarte periculoasă în mâna cuiva ne şcolarizat.
Scula trebuie să fie întreţinută corespunzător. Verifică dacă scula este bine păsuită, nu are jocuri la piesele în mişcare.
Verifică desemeni, dacă vreun element la scula electrică nu este defectat. In caz că vei constata vreun deranjament, el
trebuie eliminat înainte de a utiliza scula. Multe accidente au avut loc din cauza întreţinerii ne corespunzătoare.
Sculele tăietoare trebuie întreţinute curate şi scuţite. Intreţinerea corespunzătoare a sculei tăietoare poate fi cu uşurinţă
controlată în timpul lucrului.
Utilizează scula electrică şi accesoriile conform instrucţiunilor de mai sus. Utilizează sculele în conformitate cu destnaţia
lor, având în vedere felul lucrului şi condiţiile de lucru. Intrebuinţarea sculelor la alt fel de lucrări decât la cele pentru care au
fost proiectate, măreşte riscul naşterii situaţiilor periculoase.
Reparaţiile
Repararea sculei trebuie executată numai de către ateliere autorizate, care au numai piese de schimb originale. In acest
fel, este asigurată securitatea utilizării sculei electrice.
INSTRUCŢIUNI ADIŢIONALE DE SIGURANŢĂ
Purtaţi mijloacele de protecţie auditivă atunci când lucraţi cu maşina de găurit cu percuţie. Expunerea la zgomot poate
duce la pierderea auzului.
Utilizaţi unealta cu mânerele adiţionale furnizate împreună cu unealta. Pierderea controluilui poate duce la rănirea opera-
torului.
Purtaţi măşti antipraf. Utilizarea măştilor antipraf reduce riscul de rănire gravă.
Atunci când efectuaţi o lucrare în timpul căreia unealta introdusă poate atinge un cablu sub tensiune ascuns prindeţi
ă. Intrebuinţarea conductorilor corespunzători micşorează riscul elctrocutării.
66
INSTRUCŢ IUNI ORIGINALE
Page 67

RO
unealta electrică de mânerele izolate. Atunci când atinge cablul sub tensiune unealta introdusă poate face ca piesele de metal
din unealtă să se afle sub tensiune, iar acest lucru poate duce la electrocutarea operatorului.
MONTAJ ELEMENTE DIN DOTARE
ATENŢIE! Montajul echipamentelor poate fi efectuat doar atunci când cablul de alimentare este decuplat. Scoateţi ştecherul de
pe cablul uneltei din priză!
Montaj mâner adiţional (III)
Aşezaţi mânerul adiţional la poziţia dorită şi apăsaţi înfiletând mânerul suportului.
Montaj limitator de adâncime de găurire (IV)
În cazul în care ciocanul este dotat cu limitator de adâncime de găurire puteţi să-l montaţi pe mânerul adiţional.
În funcţie de modul de prindere trebuie să introduceţi limitatorul în orificiul din mânerul adiţional, iar după ce aţi stabilit poziţia
corectă fixaţi cu butonul, rozeta sau înfiletaţi mânerul adiţional.
PREGĂTIRE PENTRU MUNCĂ
Înainte de a începe munca trebuie să verificaţi dacă carcasa şi cablul de alimentare nu sunt deteriorate. În cazul în care constataţi
defecţiuni se interzice să continuaţ
Atenţie! Toate activităţile legate de schimbarea uneltelor de lucru (burghie şi dalte cu suport SDS Plus), montajul protecţiilor şi al
ghidajelor, ajustarea etc. trebuie efectuate atunci când tensiunea de alimentare este oprită, de aceea înainte de a efectua aceste
activităţi: Scoateţi ştecherul cablului de alimentare din priză!
Montarea uneltelor de lucru SDS Plus în mandrină
Curăţaţi unealta aleasă de impurităţi şi rugină şi gresaţi suportul SDS Plus cu un strat subţire de lubrifiant.
Trageţi către dumneavoastră suportul uneltei şi ţineţi-l în această poziţie (V).
Introduceţi unealta curăţată în orificiu. În cazul în care este necesar rotiţi unealta astfel încât să intre fără rezistenţă în suport.
Daţi drumul la suport, unealta trebuie să se blocheze automat în mandrină.
Verificaţi dacă unealta este prinsă ferm. Pentru a face acest lucru încercaţi să scoateţi unealta din suportul SDS-Plus. În cazul în
care burghiul sau dalta se mişcă în faţă trebuie să montaţi din nou.
Setarea direcţiei de rotire (VII)
Setaţi comutatorul direcţiei de rotire conform săgeţii de rotire în dreapta – săgeata îndreptată spre partea din faţă a uneltei, rotaţie
în stânga – săgeata direcţionată către partea din spate a uneltei.
Atenţie! Schimbarea direcţiei de rotire poate fi efectuată doar atunci când tensiunea de alimentare este decuplată!
Setarea tipului de lucru (VI)
Folosiţi comutatorul cu blocadă pentru a seta modul de lucru. Apăsaţi şi ţineţi apăsat butonul de blocare pentru a schimba poziţia
comutatorului.
Funcţia de lucru cu percuţie facilitează găurirea în beton, ziduri şi materiale ceramice dure (cărămidă dură, piatră, marmură). În
acest scop setaţi comutatorul la poziţia de lucru cu percuţie, simbolul burghiu şi ciocan.
Atunci când efectuaţi găuri în alte materiale, funcţia de găurire cu percuţie trebuie oprită, setând comutatorul la funcţionare fără
percuţie, simbolul burghiului.
Puteţi seta, de asemenea, funcţia de percuţie, în acest mod se opreşte rotaţia, însă nu se opreşte percuţia.
Pentru a face acest lucru trebuie să setaţi comutatorul modului de lucru la poziţia de percuţie, simbolul ciocanului.
Maşina de găurit cu percuţie este dotată cu funcţia de schimbare a poziţiei dălţii. Funcţia este utilă în caz de batere cu diferite tipuri
de unelte de lucru, aceasta permite setarea dălţii la orice poziţie. Comutatorul nu poate fi blocat în această poziţie.
Activităţi de pregătire
Selectaţi unealta de lucru corespunzătoare şi montaţi-o în mandrină.
Setaţi comutatorul tipului de lucru la poziţia corespunzătoare: simbolul ciocan – batere; simbol ciocan şi burghiu – găurire cu
percuţie; simbol burghiu - găurire fără percuţie; triunghi - setarea poziţiei dălţii.
Purtaţi protecţie auditivă, protecţie oculară şi mănuşi de protecţie.
Introduceţi ştecherul cablului în priza de reţea electrică.
Luaţi o poziţie care garantează păstrarea echilibrului, prindeţi maşina de găurit cu ambele mâini şi porniţi apăsând comutatorul
electric (VIII).
Ţineţi unealta în această stare câteva minute astfel încât lubrifiantul să ajungă la toate elementele sistemului de angrenaj.
Încetaţi să apăsaţi comutatorul pentru a opri maşina de găurit cu percuţie.
i lucrul!
INSTRUCŢ IUNI ORIGINALE
67
Page 68

RO
Atenţie! În cazul în care apar sunete şi zgomote suspecte etc. Trebuie să opriţi maşina de găurit cu percuţie de la reţeaua elec-
trică şi trimiteţi-o la un service autorizat.
Schimbarea mandrinei
Maşina de găurit cu percuţie este prevăzută cu posibilitatea de schimbare a mandrinei. În locul mandrinei care permite montajul
burghiului în sistemul SDS Plus puteţi monta suportul care permite montajul burghiurilor cu suport cilindric.
Pentru a schimba mandrina trebuie să trageţi inelul amplasat în spatele mandrinei în faţa mandrinei (IX). Acest lucru permite
demontarea mandrinei. Montaţi mandrina pe bucşa maşinii de găurit (X) şi apăsaţi până la acţionarea blocadei. Asiguraţi-vă că
blocada s-a activat şi că mandrina nu se poate decupla în timpul lucrului.
Fixarea burghiurilor în mandrina cu autostrângere (XI)
Selectaţi burghiul cu suport cilindric corespunzător pentru tipul respectiv de lucru. Introduceţi burghiul în mandrină, prindeţi partea posterioară a mandrinei, iar apoi rotind partea frontală a mandrinei fixaţi burghiul astfel încât să fie fixat ferm şi puternic în
ă.
mandrin
Atenţie! Nu se recomandă utilizarea mandrinei cu autostrângere pentru batere. Sarcinile generate de mecanismul cu percuţie pot
duce la distrugerea mandrinei cu autostrângere.
UTILIZAREA UNELTEI
Atenţie! Atunci când utilizaţi ciocanul rotopercutor trebuie să purtaţi protecţie auditivă!
Utilizarea turaţiei pe dreapta sau pe stânga
Turaţia în dreapta trebuie utilizată atunci când faceţi găuri cu burghiuri general folosite cu rotire de dreapta. Turaţia pe stânga
trebuie folosită în cazul în care burghiul cu turaţie pe dreapta se blochează în material.
Utilizarea blocadei pentru comutator
Blocada comutatorului este recomandată în cazul în care faceţi găuri pe o durată mai lungă de timp, de exemplu când faceţi găuri
în beton, perete etc. În acest scop atunci când comutatorul este apăsat ţineţi cu degetul mare butonul blocadei şi ridicaţi degetul
de pe comutator. Pentru a da drumul la blocadă este suficient să apăsaţi comutatorul electric.
Efectuarea de găuri în lemn
Înainte de a face găuri se recomandă fixarea materialului prelucrat cu cleme sau menghine de dulgherie, iar apoi cu punctatorul
sau cu un cui marcaţi locul de găurire. Introduceţi burghiul adecvat în mandrină, stabiliţi viteza, cuplaţi ciocanul rotopercutor la
curent şi începeţi să efectuaţi găuri. În cazul în care efectuaţi găuri care trec prin tot materialul se recomandă să aşezaţi sub materialul prelucrat un suport de lemn, datorită acestuia marginea orificiului nu va fi ruptă. În cazul în care efectuaţi găuri cu diametru
mare se recomandă să efectuaţi mai întâi o gaură mai mică de ghidaj.
Efectuarea de găuri în metale
Trebuie să prindeţi mereu ferm materialul prelucrat. În cazul tablei subţiri se recomandă să aşezaţi sub aceasta o bucată de lemn
pentru a evita îndoiturile nedorite, etc. Apoi marcaţi locurile în care efectuaţi găuri cu punctatorul şi începeţi să găuriţi. Folosiţi
burghiuri pentru oţel. În cazul în care efectuaţi găuri în fontă albă se recomandă să folosiţi burghiuri cu capete din aliaje dure.
Atunci când efectuaţi găuri mai mari se recomandă să efectuaţi mai întâi o gaură mai mică de ghidaj. Atunci când efectuaţi găuri
în oţel trebuie să folosiţi ulei de maşină pentru a răci burghiul. În cazul aluminiului drept agent de răcire folosiţi terbentină sau
parafină. În cazul găurilor făcute în alamă, cupru sau fontă nu folosiţi agenţi de răcire. Pentru a răci scoateţi des burghiul din
material pentru a-l lăsa să se răcească.
Efectuarea de găuri în materiale ceramice
Efectuarea de găuri în materiale dure, compacte: beton, cărămidă tare, piatră, marmură etc.
Atunci când ciocanul rotopercutor este decuplat de la reţeaua electrică montaţi burghiul pe mandrină.
În cazul în care este necesar montaţi limitatorul de adâncime de găurire.
Folosiţi comutatorul modului de lucru pentru a selecta găurire cu percuţie sau, dacă este disponibilă, găurire fără percuţie.
Introduceţi ştecherul în priză, porniţi cu comutatorul ciocanul rotopercutor şi începeţi să lucraţi.
În timpul lucrului trebuie să faceţi pauze regulate – nu permiteţi niciodată să se supraîncălzească ciocanul rotopercutor şi unealta.
Găurirea cu percuţie se recomandă doar în cazul materialelor ceramice compacte precum: beton, cărămidă tare, piatră etc. În
cazul în care faceţi găuri cu diametru mare se recomandă efectuarea unei găuri iniţiale cu dimensiune mai mică, iar apoi folosiţi
burghiul cu diametrul final. Trebuie să folosiţi burghiuri destinate pentru efectuare de găuri cu percuţie.
Nu se recomandă efectuarea de găuri cu percuţie în cazul materialelor ceramice cu o structură mai puţin compactă, precum:
gresie, cărămidă moale, tencuială etc. Găuritul cu percuţie în aceste materiale poate duce la stricarea materialului.
Ciocanul rotopercutor este dotat cu ambreiaj care previne suprasolicitarea motorului electric în cazul în care unealta introdusă se
opreşte în urma lucrului efectuat. De exemplu în cazul în care daţi de o bară din armatura zidului. În acest caz burghiul nu se mai
68
INSTRUCŢ IUNI ORIGINALE
Page 69

RO
roteşte, cu toate că motorul electric va lucra în continuare.
De asemenea aplicarea unei presiuni prea mari în timpul lucrului poate duce la declanşarea ambreiajului.
În acest caz trebuie să scoateţi unealta din orificiu, verificaţi dacă ciocanul rotopercutor funcţionează corect, iar apoi reîncepeţi
lucrul apăsând doar atât cât este necesar pentru funcţionarea corectă. În cazul în care daţi de o bară din armatura zidului sau de
alte piedici ascunse din metal trebuie să le găuriţi fără percuţie cu un burghiu destinat pentru găurire în metal cu acelaşi diametru
ca şi burghiul cu percuţie, iar apoi continuaţi să faceţi găuri în materialul ceramic.
Efectuarea de găuri în gresie, cărămidă moale, tencuială etc.
Efectuaţi găuri la fel ca în cazul materialelor tari dar fără percuţie. Din când în când scoateţi burghiul din orificiul efectuat pentru a
scoate praful şi materialul înlăturat. Apăsaţi cu forţă constantă
Setarea poziţiei daltei
Unele unelte introduse destinate pentru dăltuire trebuie aşezate la un anumit unghi pentru a asigura lucrul în condiţii de siguranţă şi
ergonomic, de exemplu dalta sau dornele. În acest scop puteţi folosi modul de lucru corespunzător. Fixaţi unealta introdusă în mandrină conform recomandărilor din instrucţiuni. Setaţi comutatorul la simbolul ciocanului cu săgeata, iar apoi apăsaţi comutatorul.
Unealta introdusă începe să se rotească încet conform direcţiei selectate de rotire. Ridicaţi degetul de pe comutator după ce unealta ajunge la poziţia dorită. Mutaţi comutatorul modului de lucru la poziţia de dăltuire – simbol ciocan, iar apoi începeţi să lucraţi.
Dăltuire
Atunci când aparatul este decuplat de la reţeaua electrică montaţi în mandrină unealta dorită: dalta sau dornul.
Setaţi comutatorul tipului de lucru la poziţia dăltuire. Introduceţi ştecherul în priză, porniţi cu comutatorul ciocanul rotopercutor,
aşteptaţi până ce atinge turaţia maximă şi începeţi să lucraţi.
În timp ce dăltuiţi nu înfingeţi prea tare unealta introdusă în materialul prelucrat. Trebuie să dăltuiţi materialul în straturi subţiri, fără
a apăsa prea tare pe ciocanul rotopercutor.
Tăiere de orificii
Aparatul poate fi utilizat pentru a efectua găuri mai mari în lemn cu burghiuri speciale cu diametru fix sau cu capuri schimbabile
din setul de ferăstrău pentru orificii. Pentru a evita apariţia de aşchii, margini desprinse la ieşirea orificiului efectuat, sub material
trebuie să aşezaţi o bucată de lemn.
Folosire ajutaje
Burghiurile cu turaţie schimbabilă nu trebuie folosite pentru motorul angrenarea ajutajelor de lucru.
Carcasă mandrină
În cazul în care ciocanul rotopercutor este dotat cu carcasă de cauciuc pentru mandrină, se recomandă utilizarea acesteia în cazul
în care se efectuează găuri în timpul cărora burghiul este direcţionat în sus, în special spre tavan. După ce aţi montat burghiul
în mandrină trebuie să fixaţi carcasa pe acesta. Praful generat în timp ce efectuaţi găuri se adună în carcasă, ceea ce previne
murdărirea mandrinei. După ce aţi terminat lucrul daţi jos carcasa de pe burghiu, curăţaţi de praf, iar apoi curăţaţi sub un jet de
apă călduţă.
Găurire folosind limitatorul de adâncime (XII)
Limitatorul poate fi folosit pentru a facilita găurirea în suprafeţele în care nu se efectuează găuri pe toată grosimea materialului,
în special în beton şi lemn. Stabiliţi adâncimea orificiului. Introduceţi burghiul în mandrină, marcaţi cu un marker pe burghiu distanţa de la capătul de lucru al burghiului egală cu adâncimea orificiului. Setaţi limitatorul adâncimii de găurire astfel încât capătul
acestuia să se potrivească cu distanţa „L” marcată pe burghiu. Asiguraţi-vă că limitatorul nu se deplasează în timpul lucrului.
Începeţi să găuriţi, vârful limitatorului va atinge suprafaţa în care lucraţi la adâncimea setată de găurire. Atunci trebuie să retrageţi
burghiul din orificiu.
Observaţii adiţionale
În timpul lucrului nu apăsaţi prea tare pe materialul prelucrat şi nu efectuaţi mişcări bruşte pentru a nu duce la defectarea uneltei
de lucru şi a ciocanului rotopercutor. În timpul lucrului trebuie să faceţi pauze regulate Nu permiteţi suprasolicitarea uneltei, temperatura suprafeţelor externe nu poate depăşi 60OC. După ce aţi terminat lucrul trebuie să opriţi unealta, scoateţi ştecherul cablului
uneltei din priză şi efectuaţi operaţiunile de mentenanţă şi inspectare.
Valoarea declarată, totală a vibraţiilor a fost măsurată prin metoda standard de analiză şi poate fi folosită pentru a compara o
unealtă cu alta. Valoarea totală, declarată a vibraţiilor poate fi utilizată la evaluarea iniţială a expunerii.
Atenţie! Emisia de vibraţii în timpul lucrului cu unealta poate fi diferită de valoarea declarată, în funcţie de modul de utilizare a
uneltei.
Atenţie! Trebuie să stabiliţi mijloacele de protecţie care trebuie să protejeze operatorul şi care sunt bazate pe evaluarea expunerii
în condiţii reale de utilizare (inclusiv toate piesele din ciclul de lucru, precum durata când unealta este oprită sau lucrează în gol
şi durata de activare).
în timp ce efectuaţi gaura.
INSTRUCŢ IUNI ORIGINALE
69
Page 70

RO
Gresare
Mereu înainte de utilizarea burghiurilor sau dornelor trebuie să le curăţaţi şi să gresaţi suportul SDS Plus cu un strat subţire de
gresare. Se recomandă utilizarea unui agent de gresare destinat pentru mandrine SDS Plus. În caz de funcţionare necorespunzătoare a mecanismului de percuţie, una dintre cauze poate fi gresarea insuficientă a transmisiei şi a ansamblului de manivelă
petru pistonul de percuţie. Se recomandă utilizarea unui agent de gresare destinat pentru transmisii dinţate şi cu manivelă. Se
recomandă umplerea cu agent de gresare într-un service autorizat.
CONSERVAREA SI REVIZIILE
Atenţie! Inainte de a începe reglarea, deservirea tehnică sau conservarea scote fişa conductei de alimentare din priza cu tensiune
electrică. După terminarea lucrului trebuie verificată starea tehnică a sculei electrice, aspectul ei exterior adică: carcasa şi mînierul, conductorul electric şi fişa lui, funcţionarea întrerupătorului electric, rosturile de trecerea aerului (ventilaţia), scâterierea periilor
(cărbunilor), sonoritatea lagărelor şi angrenajului, pornirea şi corectitudinea funcţionării, In timpul garanţiei uzufructuarul nu poate
anexa nimic la scula respectivă şi nici nu poate să schimbe nici un subansamblu, deoarece se pierde dreptul la garanţie. Dac
în timpul funcţionării vor fi constate necorectitudeni sau alte simptome neaşteptate, înseamnă că trebuie făcută revizia periodică
la servis. După terminarea lucrului trebuie curăţată toată scula, rosturile de trecerea aerului, întreruptorii, mânierul şi scuturile de
exemplu cu are comprimat cu o presiune nu mai mare de 0,3 Mpa, sau cu penson sau cu o cârpă uscată neântrebuinţând mijloace
chimice şi lichide curăţătoare.
ă
70
INSTRUCŢ IUNI ORIGINALE
Page 71

E
PROPIEDADES DE LA HERRAMIENTA
El martillo perforador de mano es una herramienta ordinaria de la II clase de aislamiento, diseñado para perforar orificios y para
martillar en concreto, piedra natural y artificial, mármol, etc., usando herramientas de trabajo con mandril SDS Plus. El martillo
perforador permite ajustes continuos de la rotación del huso y gracias a la posibilidad de desactivar la función de percusión permite taladrar en tales materiales como: madera, metal o plásticos. El funcionamiento correcto, infalible y seguro de la herramienta
depende de su adecuada operación, y por lo tanto:
Antes de comenzar cualquier trabajo con la herramienta es menester leer todo el manual y guardarlo.
El proveedor no será responsable por los daños y lesiones ocasionados en el caso de no seguir las reglas de seguridad y las
recomendaciones del presente manual.
EQUIPO
El envase original del fabricante debe contener::
- martillo perforador
- empuñadura auxiliar
- limitador de profundidad de perforación
- taladros y cinceles
- portabrocas sin llave
PARAMETROS TECNICOS
Parámetro Unidad de medición Valor
Numero de catalogo 79054
Tensión nominal [V] ~230
Frecuencia nominal [Hz] 50
Potencia nominal [W] 620
Rotación nominal [min
Diámetro máximo del orificio (concreto) [mm] 24
Energía de percusión [J] 2,4
Frecuencia de percusión [min
Masa [kg] 2,8
Nivel de ruido
- presión acústica L
- potencia L
Nivel de vibración (mango principal/ mango adicional) [m/s
Clase de aislamiento II
Grado de protección IP20
± K [dB(A)] 92 ± 3
pA
± K [dB(A)] 103 ± 3
wA
-1
] 0 - 870
-1
] 0 - 4850
2
] 14,377 ± 1,5 / 11,618 ± 1,5
CONDITII GENERALE DE SECURITATE
ATENTIE! Trebuie citite toate instrucţiunile de mai jos. Nerespectarea lor poate duce la electrocutae, la incendiu sau la leziuni.
Noţiunea “sculă electrică” folosită în instrucţiuni se referă la toate sculele acţionate cu curent electric, atât cele alimentate cu
energie prin cablu cât şi cele fără cablu.
TREBUIE RESPECTATE INSTRUCŢIUNILE DE MAI JOS
Locul de lucru
Locul de lucru trebuie întreţinut curat şi să fie bine iluminat. Dezordinea cât şi iluminarea insuficientă pot fi pricina accidentelor.
Nu se recomandă utilizarea sculelor electrice în mediu în care este mărit riscul exploziei, sau în mediu care conţine fluide
inflamabile, gaze sau vapori. Sculele electrice generează scântei care, în contact cu gaze sau vapori inflamabili pot pricinui
incendiu.
Evitaţi aproprierea la locul de muncă a copiilor sau a altor persoane străine. In afară acest avertisiment fiţi foarte atenţi,
deoarece pierderea concentraţiei poate pricinui pierdera controluluii asupra sculei.
Securitatea electrică
Sztecărul conductorului electric trbuie să corespundă cu priza electrică. Este interzisă modificarea ştecărului. Este
interzisă modificarea ştecărului cu scopul de a fi adaptabil la priza electrică. Sztecărul ne modificat micşorează riscul
electrocutării.
MANUAL ORIGINAL
71
Page 72

E
Evitaţi posibilitatea contactului cu cu obiecte cu împământare ca ţevi, radiatoare şi instalaţii frigorifere. Corpul omenesc
împământat măreşte riscul electrocutării.
Se recomandă evitarea expunerii sculei electrice în contact cu percipitaţii atmosferice sau cu umezeala. Apa şi umezeala,
care intră în interiorul sculei electrice măreşte riscul electrocutării.
Nu supraîncărcaţi conducta de alimentare electrică. Nu purtaţi scula ţinând-o de conducta de alimentare electrică, nu
trageţi de conductă vrând să scoateţi ştecărul din priza de alimentare electrică. Evitaţi contactul conductei cu căldură, cu
uleiuri, sau cu obiecte ascuţite şi elemente în mişcare. Defectarea conductei de alimentare măreşte riscul electrocutării.
In cazul efectuării lucrului în afara încăperilor trebuie să întrebuinţaţi conductori prelungitori destinaţi pentru
area lor afară. Intrebuinţarea conductorilor corespunzători micşorează riscul elctrocutării.
întrebuinţ
În cazul în care nu puteţi evita să utilizaţi unealta electrică într-un mediu umed, drept protecţie împotriva tensiunii electrice trebuie să utilizaţi un dispozitiv cu curent diferenţial (RCD). Utilizarea RCD scade riscul de electrocutare.
Securitatea personală
Apucă-te de lucru numai în bună condiţie fizică şi psihică. Fii precaut la ceace faci. Nu lucra atunci când eşti obosit sau sub
influenţa medicamentelor sau a alcoolului. Cea mai mică neatenţie, în timpul lucrului, poate provoca leziuni serioase a corpului.
Intrebuinţează mijloace de protejare personală. Totdeauna puneţi ochelari de protecţie. Intrebuinţarea mijloacelor de pro-
tejare personală, adică măşti respiratorii de protecţie, încălţăminte de protecţie, căşti şi antifoane pe urechi micşorează riscul
leziunilor serioase ale corpului tău.
Evită întâmplătoarea punere în funcţiune a sculei. Inainte de a alimenta scula cu energie electrică verifică totdeauna dacă
întrerupătorul este pe poziţia „deconectat“. Tinând degetul pe întrerupătorul sculei sau punerea în funcţiune a sculei electrice
atunci când întrerupătorul este pe poziţia „ conectat“ poate duce la leziuni serioase ale corpului tău.
Inainte de a pune în funcţiune scula electrică dă la o parte toate cheile şi alte scule care au fost întrebuinţate la reglarea
ei. Cheia lăsată pe elementele rotitoare ale sculei poate duce la leziuni serioase ale corpului tău.
Păstrează-ţi echilibrul. Tot timpul păstrează statura corespunzătoare. Această poziţie îţi va permite să stăpâneşti scula
electrică în cazuri de situaţii de lucru neaşteptate.
Impbracă-te în haine de protejare. Nu te îmbrăca în haine largi şi cu bijuterii. Părul, îmbrăcămintea şi mănuşile să nu
le apropii de piesele în mişcare ale sculei electrice. Imbrăcămintea largă, bijuteria sau părul lung se pot agăţa de piesele în
mişcare ale sculei.
Intrebuinţează extractor de praf sau recipient pentru praf, dacă scula este înzestrată cu recipient. Imbină le corect. Utilizarea extractorului de praf micşorează riscul leziunilor serioase ale corpului tău.
Utlizarea sculei electrice
Nu supra încărca scula electrică. Utilizează scula corespunzătoare lucrului care trebuie să-l faci. Alegerea sculei
corespunzătoare lucrului respectiv, asigură eficienţă şi siguranţă în timpul lucrului.
Nu întrebuinţa scula electrică, dacă întrerupătorul ei nu funcţionează corect. Scula, pe care nu o poţi verifica utilizând
întrerupătorul alimentării electrice este foarte periculoasă deci trebuie dată la reparat.
Inainte de reglarea sculei, schimbarea accesoriilor sau la terminrea lucrului, deconectează conducta de alimentare. Scula
electrică deconectată dela alimentare evită o neaşteptată, întâmplătoare punere în funcţiune.
Păstrează scula la loc neaccesil copiilor. Nu permite nimănui să lucreze cu scula electrică dacă nu este şcolarizat în
ceace priveşte deservirea ei. Scula electrică poate fi foarte periculoasă în mâna cuiva ne şcolarizat.
Scula trebuie să fie întreţinută corespunzător. Verifică dacă scula este bine păsuită, nu are jocuri la piesele în mişcare.
Verifică desemeni, dacă vreun element la scula electrică nu este defectat. In caz că vei constata vreun deranjament, el
trebuie eliminat înainte de a utiliza scula. Multe accidente au avut loc din cauza întreţinerii ne corespunzătoare.
Sculele tăietoare trebuie întreţinute curate şi scuţite. Intreţinerea corespunzătoare a sculei tăietoare poate fi cu uşurinţă
controlată în timpul lucrului.
Utilizează scula electrică şi accesoriile conform instrucţiunilor de mai sus. Utilizează sculele în conformitate cu destnaţia
lor, având în vedere felul lucrului şi condiţiile de lucru. Intrebuinţarea sculelor la alt fel de lucrări decât la cele pentru care au
fost proiectate, măreşte riscul naşterii situaţiilor periculoase.
Reparaţiile
Repararea sculei trebuie executată numai de către ateliere autorizate, care au numai piese de schimb originale. In acest
fel, este asigurată securitatea utilizării sculei electrice.
ADICIONALES INDICACIONES DE SEGURIDAD
Durante el trabajo con la perforadora de percusión use protectores del oído. Exposición al ruido puede causar perdida de oído.
Use la herramienta con mangos adicionales que se suministran junto con ella. Pérdida de control sobre la herramienta
puede ser causa de lesiones del operador.
Use máscaras antipolvo. El uso de máscaras antipolvo reduce el riesgo de daños serios.
Durante el trabajo en el cual la pieza instalada puede entrar en contacto con cables bajo tensión agarre la herramienta
eléctrica por medio de agarraderos aislados.
72
MANUAL ORIGINAL
Page 73

E
La pieza instalada que entre en contacto con cables bajo tensión puede causar que los elementos de metal de la herramienta se
encuentren bajo tensión, lo cual puede a su vez causar un electrochoque al operador de la herramienta.
INSTALACIÓN DE LOS ELEMENTOS
¡ATENCIÓN! Los elementos de la herramienta deben instalarse con la tensión de alimentación desconectada. ¡Saque la clavija
del cable de la herramienta del contacto!
Instalación del mango adicional (III)
Coloque el mango adicional en la posición requerida y apriétela girando el mango.
Instalación del limitador de la profundidad de perforación (IV)
Si el martillo viene con el limitador de la profundidad de perforación, éste se puede instalar en el mango adicional.
Dependiendo de la manera de instalación, ponga el limitador en el orificio del mango adicional, y habiendo determinado la posición adecuada fíjelo con el botón, la perilla o apretando el mango adicional.
PREPARATIVOS PARA EL TRABAJO
Antes de comenzar el trabajo, es menester asegurarse que el armazón y el cable con la clavija no están estropeados. ¡En el caso
de que se detecten daños, se prohíbe continuar el trabajo!
¡ATENCIÓN! Todas las actividades de reemplazo de la herramienta de trabajo (la broca y los cortadores con el mandril SDS Plus),
instalación de las protecciones y guías, ajustes, etc. es menester realizar con la tensión de alimentación herramienta desconectada, entonces antes de empezarlas: ¡saque la clavija del cable de la herramienta del contacto!
Instalación de la herramienta de trabajo SDS Plus en el mandril
Limpie la herramienta de suciedad y oxidación y lubrique el mandril SDS Plus con una capa fina de lubricante.
Jale hacia si el mandril de la herramienta y manténgalo en ésta posición (V).
Inserte herramienta limpia en el orificio. En el caso de que sea necesario gire la herramienta, para que entre en el mandril sin
resistencia.
Suelte el mandril, la herramienta debe fijarse automáticamente en el mandril.
Asegúrese que la herramienta está instalada de una manera segura, intentando sacar la herramienta del mandril SDS-Plus. Si la
broca o el cortador sale del mandril, es menester realizar la instalación de nuevo.
Cambios de la dirección de rotación (VII)
Coloque el selector de la dirección de rotación de acuerdo con flechas de rotación: hacia la derecha – la flecha que apunta hacia
la parte delantera de herramienta, rotación hacia la izquierda – la flecha que apunta hacia la parte trasera de la herramienta.
¡ATENCIÓN! El cambio de la dirección de rotación puede realizarse únicamente con la tensión de alimentación apagada!
Ajuste del modo de funcionamiento (VI)
Se ajusta el modo de funcionamiento del martillo perforador con un interruptor de bloqueo. Pulsando y manteniendo pulsado el
botón de bloqueo se puede cambiar la posición del interruptor. La función de operación con el percutor facilita el taladrado al
realizar orificios en el hormigón, mampostería y materiales duros cerámicos (ladrillos duros, piedras, mármol). Para ello colocar
el interruptor de percusión en el modo de percusión, símbolo de broca y el martillo.
Durante la perforación de otros materiales, la función de perforación percusiva debe ser desactivada por ajustando el interruptor
de trabajo sin percusión, o sea - el símbolo de broca.
También es posible ajustar la función de forja, en este modo son facturación desconectado no se apaga mientras que la carrera.
Es posible también el ajuste de la función de forja, en este modo se desactivan las rotaciones, pero no se apaga la función percusiva.
Para ello, colocar en interruptor de modo de trabajo en la posición de forja, o sea el símbolo de martillo.
Este martillo perforador ha sido equipado en la función de cambio de cincel. Esta función es útil para forjar el uso de diferentes
herramientas insertadas, le permite establecer el cincel en cualquier posición. El interruptor en esta posición no se puede bloquear.
Actividades preparatorias
Seleccione el herramienta correcta de trabajo y montarlos en el portaherramientas.
Poner el interruptor de modo de trabajo en la posición deseada: símbolo de martillo – la forja; símbolo de martillo y de broca
– perforación percusiva; símbolo de broca – sólo perforación sin percusión; triángulo - ajustar la posición del cincel.
Llevar puestas protecciones: auditiva, ocular, guantes de trabajo.
Enchufar el cable a una toma de corriente eléctrica.
Adoptar una postura que garantiza el equilibrio, agarrar con las dos manos el martillo perforador y ponerlo en marcha pulsando
con el dedo el interruptor eléctrico.(VIII).
MANUAL ORIGINAL
73
Page 74

E
Mantenga la herramienta en esa condición durante pocos minutos dejando llegar la grasa a todas las partes del mecanismo de
accionamiento.
Apagar el martillo perforador liberando el interruptor.
¡Precaución! Al oír chirridos, chasquidos sospechosos y problemas técnicos similares, apagar inmediatamente el martillo perforados de la red y pasarlo a revisar la instalación de servicio establecimiento autorizado.
Sustituir portabrocas
El martillo perforador ha sido equipado en la posibilidad de sustituir el mango de broca. En lugar del portabrocas que posibilita
el montaje de broca en el sistema SDS Plus, se puede instalar el portabrocas que posibilita el montaje de brocas con mango
recto. Para sustituir el portabrocas, el anillo ubicado en la parte posterior del soporte debe tirarse hacia la parte frontal del
portabrocas.(IX). Por ello se dejará desmontar el portabrocas. Este portabrocas debe montarse guiándole en el casquillo de la
perforadora (X) y presionar hasta que se oiga el bloqueo por el pestillo. Asegurarse de que el pestillo ha funcionado y no hay
posibilidad de separación espontánea de portabrocas durante el funcionamiento..
Montar brocas en portabrocas sin llave (XI)
Se debe seleccionar una broca adecuada al tipo de trabajo ejecutado, con el mango recto. Poner la broca en el portabrocas,
agarrar la parte posterior del portabrocas, a continuación, girando la parte frontal del dispositivo fijar la broca, de modo que sea
segura y firmemente fijada en el portabrocas.
¡Precaución! No se recomienda el uso del portabrocas sin llave para el modo de forja. La carga generada por el mecanismo
percusivo puede conducir a la destrucción del portabrocas sin llave.
USO DE LA HERRAMIENTA
¡ATENCIÓN! Durante el uso del martillo perforador es menester usar protecciones del oído!
Uso de la dirección de rotación hacia la derecha o la izquierda
La rotación hacia la derecha debe usarse durante la perforación con las brocas comunes de paso derecho. La rotación hacia la
izquierda debe usarse en el caso de que la broca de paso derecho quede atrapada en el material.
Uso del bloqueo del interruptor
Se recomienda usar el bloqueo del interruptor en el caso de una perforación prolongada, por ejemplo en concreto, paredes etc.
Para este fin, con el interruptor oprimido, oprima con el pulgar el botón de bloqueo y suelte el interruptor. Para desactivar el
bloqueo, es suficiente oprimir el interruptor.
Perforación en madera
Antes de hacer el orificio, se recomienda fijar el material en una prensa de carpintero o un yunque, y luego usando un punzón
u clavo marcar el lugar de perforación. Instale en el mandril una broca adecuada, ajuste la velocidad, conecte el taladro a la red
eléctrica y empiece la perforación. En el caso de hacer orificios abiertos, se recomienda colocar debajo del material un pedazo
de madera, para que el borde del orificio en la salida no quede quebrado. En el caso de hacer orificios de un gran diámetro, se
recomienda hacer antes un orificio más pequeño que sirva de guía.
Perforación en metal
Ss menester fijar el material de una manera segura. En el caso de hojalata se recomienda colocar debajo un pedazo de madera,
para evitar deformaciones innecesarias, etc. Luego marque el punto de perforación de orificio con un punzón y empiece la perforación. Use brocas para acero. En el caso de realizar la perforación en fundición blanca, se recomienda usar brocas con punta
de carburos sinterizados. En el caso de taladrar orificios grandes, se recomienda hacer antes un pequeño orificio de guía. En
el caso de taladrar en acero, para enfriar la broca debe usarse aceite de máquina. En el caso de taladrar en aluminio, se debe
usar trementina o parafina para enfriar la broca. En el caso de perforaciones en latón, cobre o fundición no se usan ningunas
sustancias para enfriar la broca. Para enfriarla se debe sacar la broca del material con mucha frecuencia.
Perforación en materiales cerámicos
Perforación en materiales duros y compactos: concreto, ladrillo duro, piedra, mármol etc.
Con el taladro desconectado de la red eléctrica, instale en el mandril la broca.
En el caso de que sea necesario instale el limitador de la profundidad de perforación.
Use ll selector del modo de trabajo para escoger la perforación con percusión, o si es posible la perforación sin percusión.
Conecte la clavija al. contacto, active con el interruptor el martillo perforador y empiece el trabajo.
Durante el trabajo haga descansos regulares – nunca permita que el martillo perforador y la herramienta se sobrecalienten.
La perforación con percusión se recomienda sólo en el caso de compactos materiales cerámicos como: concreto, ladrillo duro,
piedra, etc. En el caso de perforar orificios de un gran diámetro se recomienda hacer un orificio inicial de un diámetro más pequeño, y luego usar broca del diámetro final. Es menester usar brocas para la perforación con percusión.
74
MANUAL ORIGINAL
Page 75

E
No se recomienda usar la perforación con percusión en el caso de materiales cerámicos suaves como: azulejos, ladrillo suave,
revoque, etc. La perforación con percusión en tales materiales puede destruirlos.
El martillo perforador tiene un embrague que permite evitar sobrecargas del motor eléctrico en el caso de que la herramienta de
trabajo se detenga durante el trabajo. Por ejemplo en el caso de encontrar una barra de armadura. En tales situaciones la broca
dejará de girar, aunque del motor eléctrico siga funcionando.
También demasiada presión durante el trabajo puede causar que se active el embrague.
En tales casos es menester sacar la herramienta del orificio y asegurarse que el martillo perforador funciona correctamente, y
luego continuar el trabajo ejerciendo sólo la presión necesaria para el trabajo. En el caso de encontrar una barra de armadura
u otros objetos de metal escondidos en el material es menester perforarlos sin percusión con una broca para metal del mismo
diámetro que la broca de percusión, y luego continuar la perforación en el material cerámico.
Perforación azulejos, ladrillo suave, revoque, etc.
Taladre como en el caso de materiales duros, pero sin percusión. De vez en cuando saque la broca del orificio para quitar el polvo
y restos del material. Durante la perforación presione la herramienta con una fuerza constante.
La posición del cincel
Ciertas herramientas para martillar deben colocarse con cierto ángulo, para garantizar un trabajo seguro y ergonómico, por ejemplo cinceles o cortadores. Para este fin se puede usar el modo adecuado de trabajo. Fije la herramienta de trabajo en el mandril
de acuerdo con las recomendaciones indicadas en el manual. Ponga el selector en el símbolo de martillo con flecha, y luego
oprima el interruptor. La herramienta de trabajo comenzará a girar lentamente de acuerdo con la dirección de rotación elegida.
Suelte el interruptor una vez que la herramienta de trabajo haya alcanzado la posición deseada. Ponga el selector del modo de
trabajo en la posición de martillar – el símbolo de martillo, y luego empiece el trabajo.
Martillar
Con la herramienta desconectada de la corriente fije en el mandril la herramienta deseada: cortador o perforador.
Coloque el selector del modo de trabajo en la posición de martillar. Conecte la clavija al contacto de la red eléctrica, active con el
interruptor el martillo perforador, espere hasta que haya alcanzado la velocidad completa y empiece el trabajo.
Durante los trabajos de martillar no se debe introducir la herramienta demasiado en el material. El material debe quitarse en
capas finas, sin demasiada presión sobre el martillo perforador.
Cortar orificios
El taladro puede usarse para hacer orificios más grandes en madera, con unas brocas especiales de diámetro fijo, o puntas
intercambiables del juego de serruchos – cortadores de orificios. Para evitar rebaba en la salida de orificios, debajo del material
debe colocarse un pedazo de madera.
Uso de otras herramientas instaladas en el taladro
El taladro con la rotación de dirección variable no debe usarse para propulsión de otras herramientas de trabajo.
Protección del mandril
Si el martillo perforador tiene una protección de caucho del mandril, se recomienda usarla en el caso de perforación con la broca
dirigida hacia arriba, por ejemplo perforación en los techos. Habiendo instalado la broca en el mandril, coloque la protección.
Polvo y restos del material generados durante la perforación se acumularán en la protección, lo cual permitirá evitar que el
mandril se ensucie. Habiendo terminado el trabajo, quite la protección de la broca, límpiela de polvo y restos del material, y luego
enjuague bajo la corriente de agua tibia.
Perforar usando el limitador de profundidad de perforación (XII)
Se usa el limitador para facilitar la perforación en las zonas y superficies donde se realizan los agujeros ciegos, en particular en
hormigón y en madera. Determinar la profundidad del agujero. Instalar la broca en el soporte (portaherramientas), marcar con
un rotulador la distancia del taladro del extremo de la broca de trabajo igual a la profundidad del agujero. Ajustar el limitador de
profundidad de manera que su extremo coincida con la distancia marcada „L” en la broca. Asegurarse de que el tapón no se
mueva durante la operación. Iniciar el taladro, en la profundidad determinada, la parte frontal del limitador fijará apoyada en la
superficie del agujero. A continuación, se debe retirar la broca del agujero.
Comentarios adicionales
Durante el trabajo no se debe ejercer una presión excesiva sobre el material o hacer movimientos bruscos, para no dañar la herramienta de trabajo o el taladro. Durante el trabajo se debe hacer descansos regulares. No permita sobrecargas de la herramienta, la temperatura de las superficies externas no debe nunca exceder 60
O
C. Habiendo terminado el trabajo, apague el taladro,
saque la clavija del cable de la herramienta del contacto, revise la herramienta y realice los procedimientos de mantenimiento.
El valor total declarado de vibración fue medido con un método estándar y puede usarse para comparar herramientas. El valor
total declarado de vibración puede usarse en una evaluación inicial de la exposición.
MANUAL ORIGINAL
75
Page 76

E
¡ATENCIÓN! La vibración durante el trabajo con la herramienta puede ser distinta que el valor declarado, dependiendo del uso
de la herramienta.
¡ATENCIÓN! Es menester determinar medios de seguridad que protejan al operador, que se basen en la evaluación de los
riesgos dentro de un contexto real del uso (incluidas todas las partes del ciclo de trabajo, como por ejemplo el tiempo cuando la
herramienta está apagada o está trabajando al ralentí, y el tiempo de activación).
Lubricación
Siempre antes de usar brocas o cortadores, es menester limpiarlos cuidadosamente y lubricar el mandril SDS Plus con una
capa fina de lubricante. Se recomienda usar lubricantes para mandriles SDS Plus. En el caso de un funcionamiento incorrecto
del mecanismo de percusión, una de las causas puede ser lubricación insuficiente de engranaje y el mecanismo de manivela del
pistón de percusión. Se recomienda usar lubricantes para transmisiones dentadas y de manivela. El lubricante se debe añadir
en un taller autorizado.
MANTENIMIENTO E INSPECCIONES
¡ATENCIÓN! Antes de empezar el ajuste, servicio técnico o mantenimiento, saque el enchufe de la herramienta del contacto de
la red eléctrica. Habiendo terminado el trabajo, es menester revisar el estado técnico de la herramienta eléctrica por medio de un
control externo y la evaluación de: el armazón y el mango, el cable eléctrico con el enchufe, el funcionamiento del interruptor eléctrico, los intersticios de ventilación, el chispear de los cepillos, el nivel de ruido de los cojinetes y las transmisiones, el arranque y
la uniformidad del funcionamiento. Dentro del periodo de garantía, el usuario no puede desmantelar las herramientas eléctricas
o cambiar sus partes ya que pierde de esta manera los derechos de garantía. Todas las irregularidades que se detecten durante
una inspección o el trabajo implican la necesidad de reparar la herramienta en un taller especializado. Habiendo terminado el
trabajo, es menester limpiar el armazón, los intersticios de ventilación, interruptores, el mango adicional y los protectores con aire
comprimido (cuya presión de debe exceder 0,3 MPa) con una brocha o con un trapo seco sin usar sustancias químicas y líquidos
limpiadores. Limpie las herramientas y los mangos con un trapo seco y limpio.
76
MANUAL ORIGINAL
Page 77

TOYA S.A.
ul. Sołtysowicka 13 - 15
51 - 168 Wrocław
tel.: 071 32 46 200
fax: 071 32 46 373
e-mail: biuro@yato.pl
ODDZIAŁ WARSZAWSKI
Teren ProLogis Park Nadarzyn
al. Kasztanowa 160
05 - 831 Młochów k. Nadarzyna
tel.: 022 73 82 800
fax: 022 73 82 828
TOYA ROMANIA SA
Soseaua Odai 109-123
Sector 1, Bucuresti
www.yato.ro
office@yato.ro
tel: 031 710 8692
fax 0317104008
DEKLARACJA ZGODNOŚCI
0118/79054/EC/2018
Deklarujemy z pełną odpowiedzialnością, że niżej wymienione wyroby:
Młot udarowy, elektryczny; ~230 V; 50 Hz; 620 W, 24 mm; nr kat. 79054
do których odnosi się niniejsza deklaracja, są zgodne z poniższymi normami:
EN 60745-1:2009 + A11:2010
EN 60745-2-6:2010
EN 55014-1:2006 + A1:2009 + A2:2011
EN 55014-2:2015
EN 61000-3-2:2014
EN 61000-3-3:2013
i spełniają wymagania dyrektyw:
2006/42/WE Maszyny i urządzenia bezpieczeństwa
2014/30/UE Kompatybilność elektromagnetyczna
2011/65/UE Substancje niebezpieczne w sprzęcie elektrycznym
Numer seryjny: dotyczy wszystkich numerów seryjnych urządzeń wymienionych w deklaracji
Dwie ostatnie cyfry roku, w którym wprowadzono oznaczenie CE: 17
Rok budowy / produkcji: 2018
Nazwisko i adres osoby upoważnionej do przygotowania dokumentacji technicznej:
Tomasz Zych
TOYA S.A., ul. Sołtysowicka 13 - 15, 51-168 Wrocław, Polska
Wrocław, 2018.01.02
(miejsce i data wystawienia)
INSTRUKCJA ORYGINALNA
(nazwisko i podpis osoby upoważnionej)
77
Page 78

TOYA S.A.
ul. Sołtysowicka 13 - 15
51 - 168 Wrocław
tel.: 071 32 46 200
fax: 071 32 46 373
e-mail: biuro@yato.pl
ODDZIAŁ WARSZAWSKI
Teren ProLogis Park Nadarzyn
al. Kasztanowa 160
05 - 831 Młochów k. Nadarzyna
tel.: 022 73 82 800
fax: 022 73 82 828
TOYA ROMANIA SA
Soseaua Odai 109-123
Sector 1, Bucuresti
www.yato.ro
office@yato.ro
tel: 031 710 8692
fax 0317104008
DECLARATION OF CONFORMITY
0118/79054/EC/2018
We declare and guarantee with full responsibility that the following products:
Rotary hammer ~230 V; 50 Hz; 620 W, 24 mm; item no. 79054
meet requirements of the following European Standards / Technical Specifications:
EN 60745-1:2009 + A11:2010
EN 60745-2-6:2010
EN 55014-1:2006 + A1:2009 + A2:2011
EN 55014-2:2015
EN 61000-3-2:2014
EN 61000-3-3:2013
and fulfill requirements of the following European Directives:
2006/42/EC Machinery and safety elements
2014/30/EU Electromagnetic compatibility (EMC) Directive
2011/65/EU Restriction of the Use of Certain Hazardous Substances
Serial number: concern all serials numbers of item(s) mentioned in this declaration
The last two digits of the year in which the CE marking was affixed: 17
Year of production: 2018
The person authorized to compile the technical file:
Tomasz Zych
TOYA S.A., ul. Sołtysowicka 13 - 15, 51-168 Wrocław, Polska
Wrocław, 2018.01.02
(Place and date of issue)
78
INSTRUKCJA ORYGINALNA
(Name and signature of authorized person)
Page 79

TOYA S.A.
ul. Sołtysowicka 13 - 15
51 - 168 Wrocław
tel.: 071 32 46 200
fax: 071 32 46 373
e-mail: biuro@yato.pl
ODDZIAŁ WARSZAWSKI
Teren ProLogis Park Nadarzyn
al. Kasztanowa 160
05 - 831 Młochów k. Nadarzyna
tel.: 022 73 82 800
fax: 022 73 82 828
TOYA ROMANIA SA
Soseaua Odai 109-123
Sector 1, Bucuresti
www.yato.ro
office@yato.ro
tel: 031 710 8692
fax 0317104008
DECLARAȚIE DE CONFORMITATE
0118/79054/EC/2018
Declarăm și garantăm pe proprie răspundere că produsele următoare:
Ciocan rotopercutor ~230 V; 50 Hz; 620 W, 24 mm; cod articol. 79054
satisfac cerințele Standardelor europene / Specificațiilor tehnice următoare:
EN 60745-1:2009 + A11:2010
EN 60745-2-6:2010
EN 55014-1:2006 + A1:2009 + A2:2011
EN 55014-2:2015
EN 61000-3-2:2014
EN 61000-3-3:2013
și satisfac cerințele Directivelor europene următoare:
2006/42/WE Directiva pentru utilaje și dispozitive de siguranță
2014/30/UE Directiva privind compatibilitatea electromagnetică (EMC)
2011/65/UE Restricția utilizării unor substanțe periculoase
Număr de serie: se referă la toate numere de serie ale articolelor specificate în această declarație
Ultimele două cifre ale anului în care s-a aplicat marcarea: 17
Anul de fabricație: 2018
Persoana autorizată să întocmească dosarul tehnic:
Tomasz Zych
TOYA S.A., ul. Sołtysowicka 13 - 15, 51-168 Wrocław, Polonia
Wrocław, 2018.01.02
(locul și data emiterii)
INSTRUKCJA ORYGINALNA
(nume și semnătura persoanei autorizate)
79
Page 80

80
INSTRUKCJA ORYGINALNA
 Loading...