

Page 1
Sheet #i-5371 Updated 11/18
StewMac
PREMIUM SOLID-WOOD
UKULELE
KIT
Assembly
Instructions
Page 2

Table of contents
Tools and supplies..................................... 2
Parts list .............................................. 3
Installing the rosette .................................. 4
Brace the top and back ................................ 5
Make the body mold .................................. 7
Assemble the body ................................... 8
Prepare the neck ...................................... 15
Level the frets ......................................... 21
Tools and supplies
These are the tools and supplies we recommend for assembling this kit. StewMac item numbers are included where
applicable.
Tool you will need (required)
Clamps (few are needed, but more are handy)
4-6 Small cam clamps (#3721)
2 Small sound hole clamps (#2010)
20 Mini clamps (2 packs of #3712)
Flat mill le or pillar le (#4175)
Razor knife (#4878)
Small chisel (#1619)
Fine-cut saw (#3617)
Side cutter or fret cutter (#0619)
Hammer for fret installation (#4895)
Micro-Mesh Soft Touch Pads (#3730)
Electric hand drill
1/4" and 1/16" drill bits (#4850, #1710)
Scissors
Straightedge to reach from string nut to bridge (#3850)
Good quality rule accurate to 1/64" (#4905)
18" Rule
Optional tools
Go-bar Deck (#4731)
Laminate Trimmer (#0488)
Flush Trim Bearing + Router Bit (#1298-B, #1298-000)
Fret Beveling File (#3760)
Sand the body and neck .............................. 22
Locate the bridge ..................................... 23
Apply the stain (optional) ............................. 25
Attach the neck ....................................... 26
Apply the nish ....................................... 27
Glue the bridge ....................................... 28
Install the tuners ...................................... 28
Fit the nut and saddle ................................. 29
Supplies
Titebond Original Wood Glue (#0620)
or StewMac Fish Glue (#0702)
StewMac #20 Medium Super Glue (#0020)
Masking tape or low-tack protective tape (#1683)
Double -stick tape (#1689)
Scraps of wood for various clamping cauls and supports
Waxed paper
For body mold:
3/4" plywood, 19"x12"
Four 2-1/2" steel corner braces with mounting screws
Eight large screw eyes or screw hooks
Sandpaper (#5562 or #5096)
60-grit, 80-grit, 120-grit, 220-grit, 320-grit, 400-grit
Sanding blocks (scrap wood or #3701, #3699)
ColorTone Wipe-On Poly Finish (#3622)
ColorTone Liquid Stain (optional)
Steel wool, 0000-gauge
Fretboard oil or lemon oil (#3863 or #3864)
Paste wax, such as car wax
Cotton balls
Scraps of t-shirt material
2
stewmac.com
Page 3
Welcome to instrument making!
Whether you’re a rst time builder or an experienced
luthier, this kit is a great way to have fun and learn a lot.
This solid-wood ukulele kit will produce a professional
quality instrument you will be proud of for decades
to come. The design and construction is similar to an
acoustic guitar, but faster and easier to build.
Parts list
This kit can be assembled with basic tools, but we've
also shown how to use more specialized lutherie tools
in the construction of this ukulele.
When you’re done, you’ll have an excellent sounding
ukulele, and you'll have the necessary skills to start
building guitars!
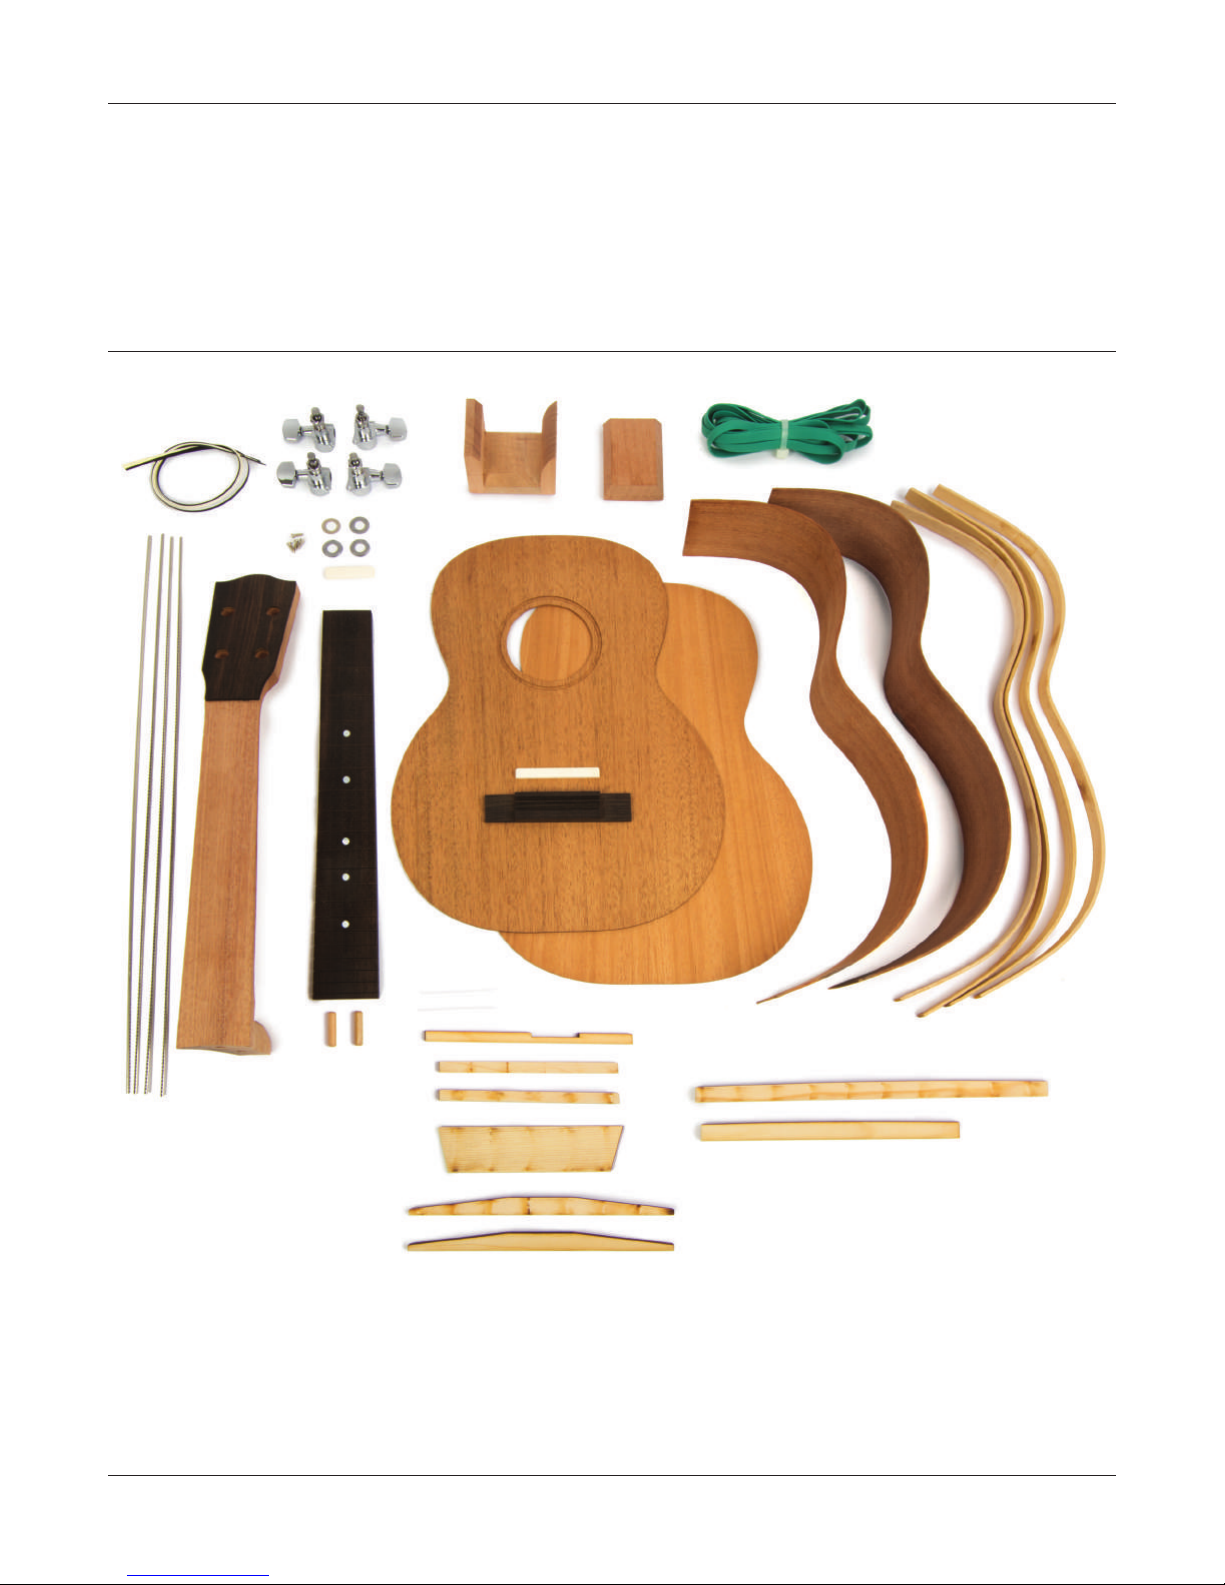
Kit contents
Top
Back
Sides
Fully shaped neck
Slotted ebony fretboard
Tuners with mounting hardware
stewmac.com
Carved, drilled bridge
Shaped saddle
Rosette puring
Fretwire
Two back braces
Six top braces
Shaped bridge plate
Lining
Neck block
Tail block
Rubber binding bands
Full-size bracing plan
3
Page 4
Installing the rosette
Before we dive into bracing the top of your ukulele we need
to install the rosette. Your top has come with a pre-routed
channel that the rosette will t perfectly into.
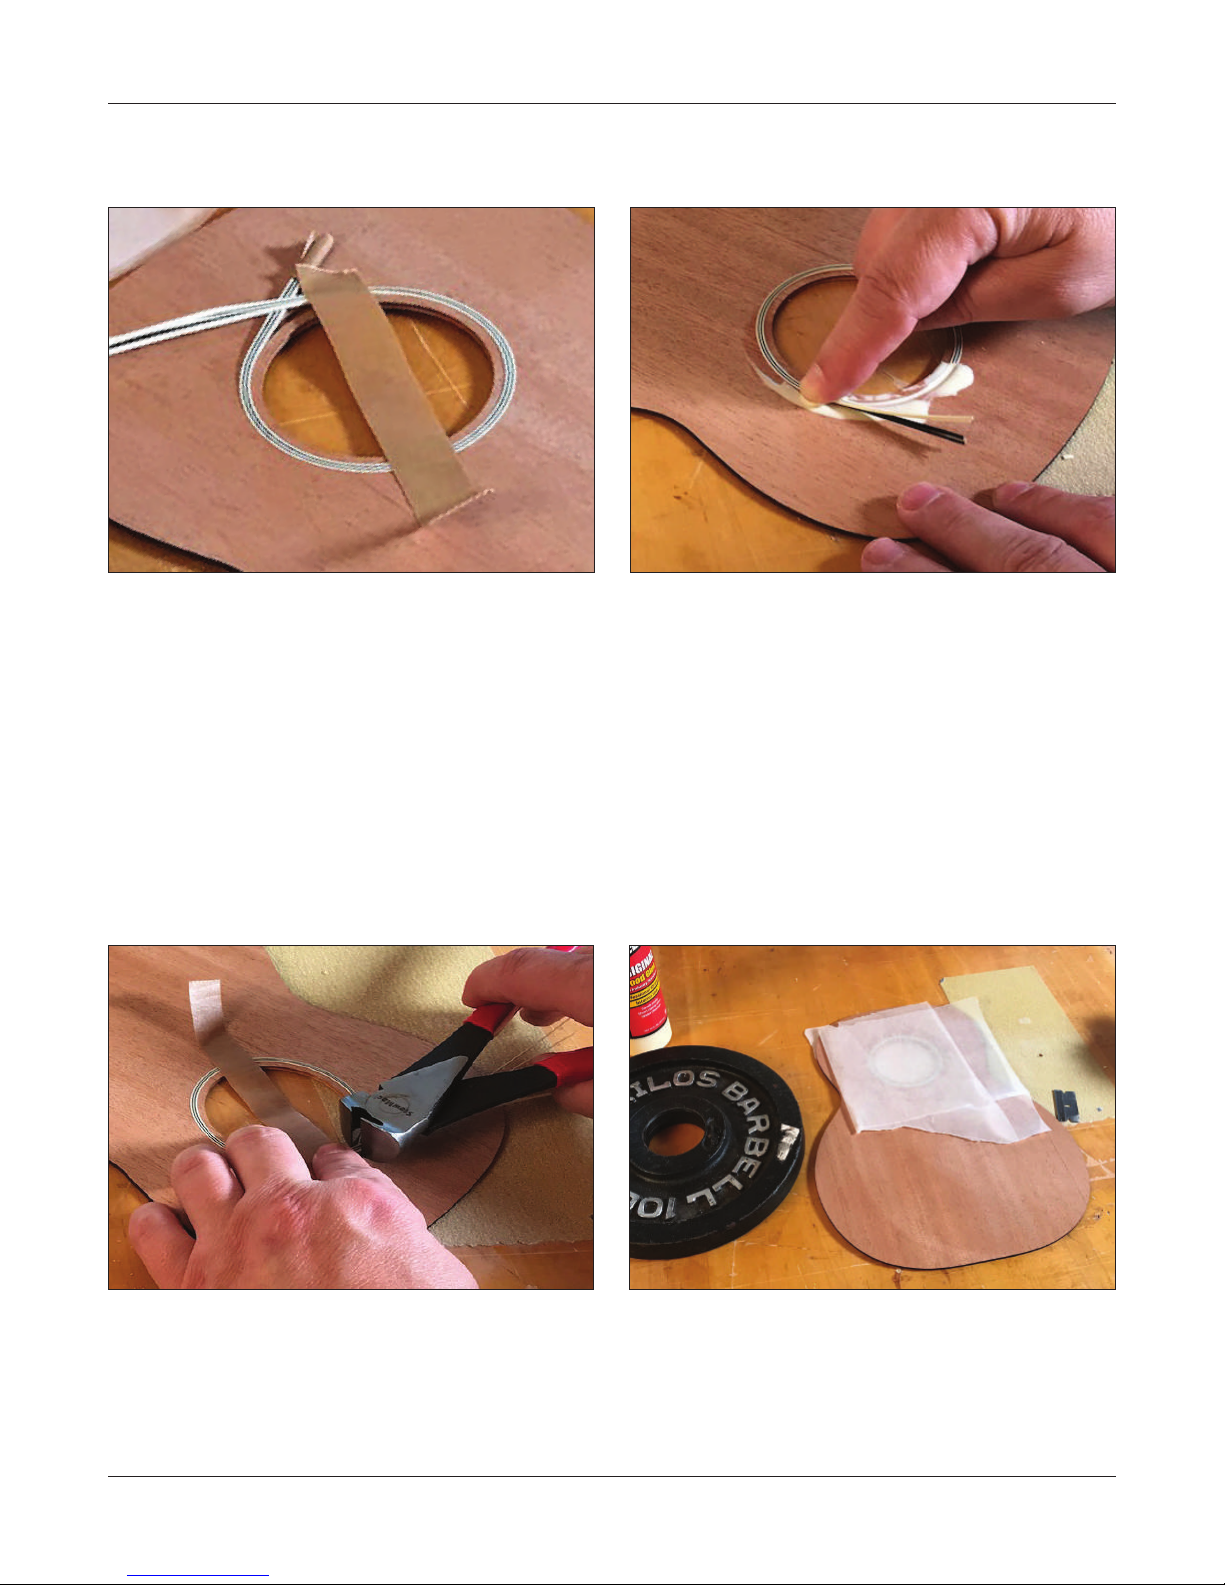
To get started locate the cream and black puring pieces.
Neatly arrange them in the following conguration: cream /
black / cream / black / cream. As you can see it’s challenging
to align them all neatly, they have a tendency to slide around.
To help hold them It is helpful to use a tight piece of masking
tape on the end to help keep everything in place.
Once you have them arranged place them in the rosette
channel.
Using a razor blade or your fret cutters trim the ends of the
rosette. It’s not absolutely necessary that the puring pieces
make a perfect join. The upper ring of the rosette will be
hidden under the ngerboard extension.
glue lled channel. The glue acts as a lubricant and everything should slide back in place very easily. (Don’t worry
about the mess, we will clean that up in a second.)
Now remove the purings from the unglued side and repeat
the process. Be sure you remove enough of the puring so
the entire rosette is glued into the channel.
Now we will clean up all the excess glue from the top of the
instrument and any that may have got through the soundhole on the inside of the top. (It’s a good idea to wipe up any
glue that may have got on your workbench as well.)
Now place a sheet of wax paper on your workbench under
the top, and one over top the wet glue on your rosette and
weight it down with something heavy to dry – a spare 10lb
plate does the job nicely, but a heavy book would work
equally well.
Next remove half the rosette.
Flood the channel with glue (Titebond Original Wood Glue
works very well for this application).
Now take your nger and guide the purings back into the
4
Let this dry for 2 hours.
After 2 hours, remove the weight and use a sanding block
with 120-grit adhesive sandpaper to sand the rosette ush
with the top. Be sure to sand in a wide area so you don’t
accidentally make the top thinner in this area.
stewmac.com
Page 5
Brace the top and back
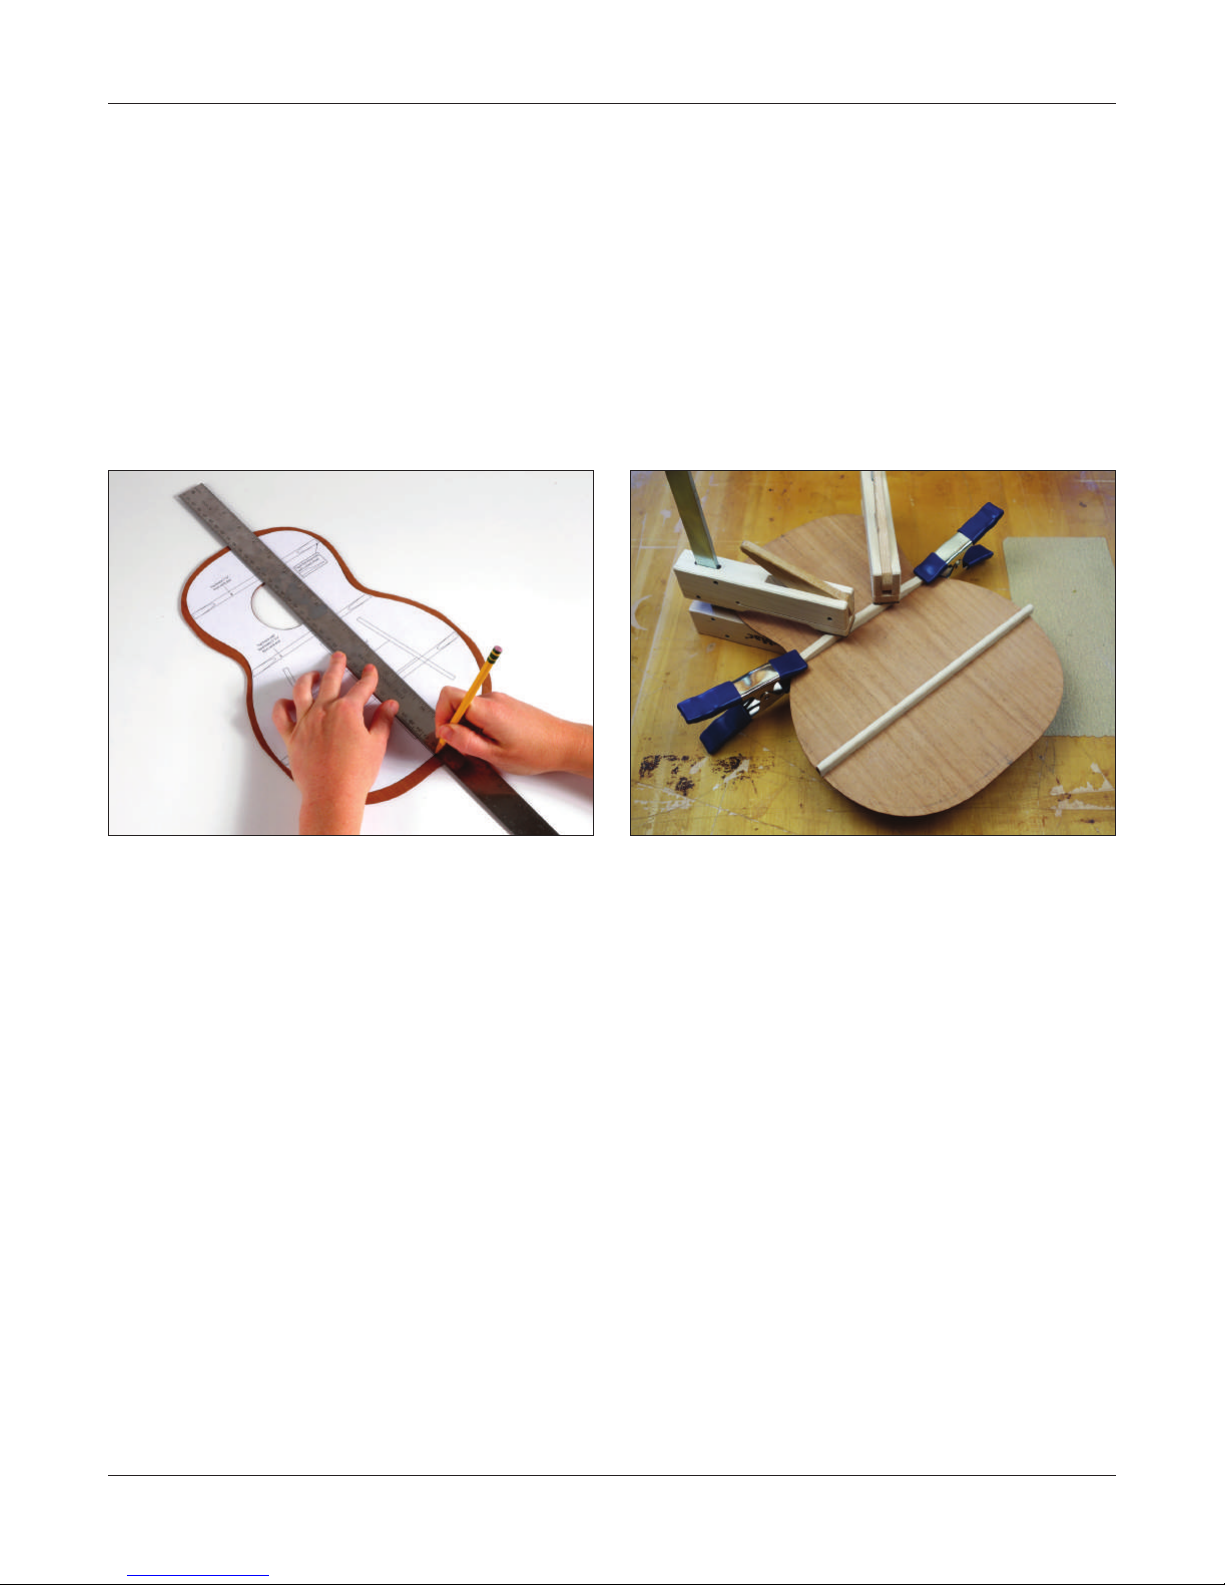
Begin by carefully cutting out the plan on or just outside
the solid black line that denotes the sides. This can be done
with scissors or a razor knife.
Transfer the brace plan to the wood
Mark a centerline precisely on your back plate along the
center seam.
Tape your plan carefully to your back plate taking care to
ensure the centerlines match perfectly at both ends.
Locate the back braces by using a pushpin, awl or scribe
to poke small holes into the wood at the brace ends. The
back braces are the two horizontal braces at the waist and
lower bout.
Apply the glue
For this application we recommend using Titebond Original
Wood Glue or StewMac Fish Glue.
Apply a thin bead of glue to the brace and use your pinky
nger to spread an even, thin, lm of glue across the entire
brace. Quickly wipe your hands with a dry cloth and seat the
brace in the proper location.
Start by placing a clamp (or Go-bar) in the center of the
brace. Parts tend to skate around during clamp up, so it is
always a good idea to ensure your brace hasn’t moved from
its intended location. If you are using clamps, lightly snug it
up once your brace is in place.
Connect these holes with a pencil and straightedge, which
will be your marks for where to glue the braces.
Save the plan drawing for use later throughout the build
process.
Gluing the back braces
Notice that the bottom of your back braces have a radius.
This adds structural integrity to your instrument as well as
improves the sound quality.
You can glue each brace separately, or use a Go-bar Deck
and a radius dish to clamp more than one brace at a time.
Do a dry run before gluing
It is always a good idea to test your clamping setup before
you apply glue. Decide where to place clamps and cauls on
your bench, and frequently check to see that the braces are
located in the proper location and held down tightly from
end to end.
You don’t want to gure this out while the glue is drying!
The important thing is that you’re comfortable with your
clamping plan, and have seen that it works before you’re
under the time pressure created by wet glue.
Now place a Go-bar or clamp at each end of the brace. (Again,
frequently check to ensure your brace hasn’t moved during
clamp up.)
If you’re using clamps, 3 will usually suce for a ukulele, but
if you like feel free to add a couple more for added assurance.
Snug them all up. It doesn’t take a lot of clamping pressure
so there is no need to over tighten your clamps.
If you’re using Go-bars feel free to place 2 more bars on the
brace for added clamping pressure.
Wait 5 minutes and clean up the squeeze out. (Waiting a
few minutes gives the glue a bit of time to gel which makes
clean up easier.)
One extremely eective way to clean up squeeze out is
to use a scrap piece of spruce that has been sanded into a
crude “chisel” blade. The soft wood doesn’t dent your brace
or leave marks yet cleans up the glue quite nicely. Any remaining glue residue can be wiped away with a damp (NOT
wet) cloth rag.
Ensure your brace is seated tightly to the back across the
entire length.
Let it dry for 2 hours.
stewmac.com
5
Page 6
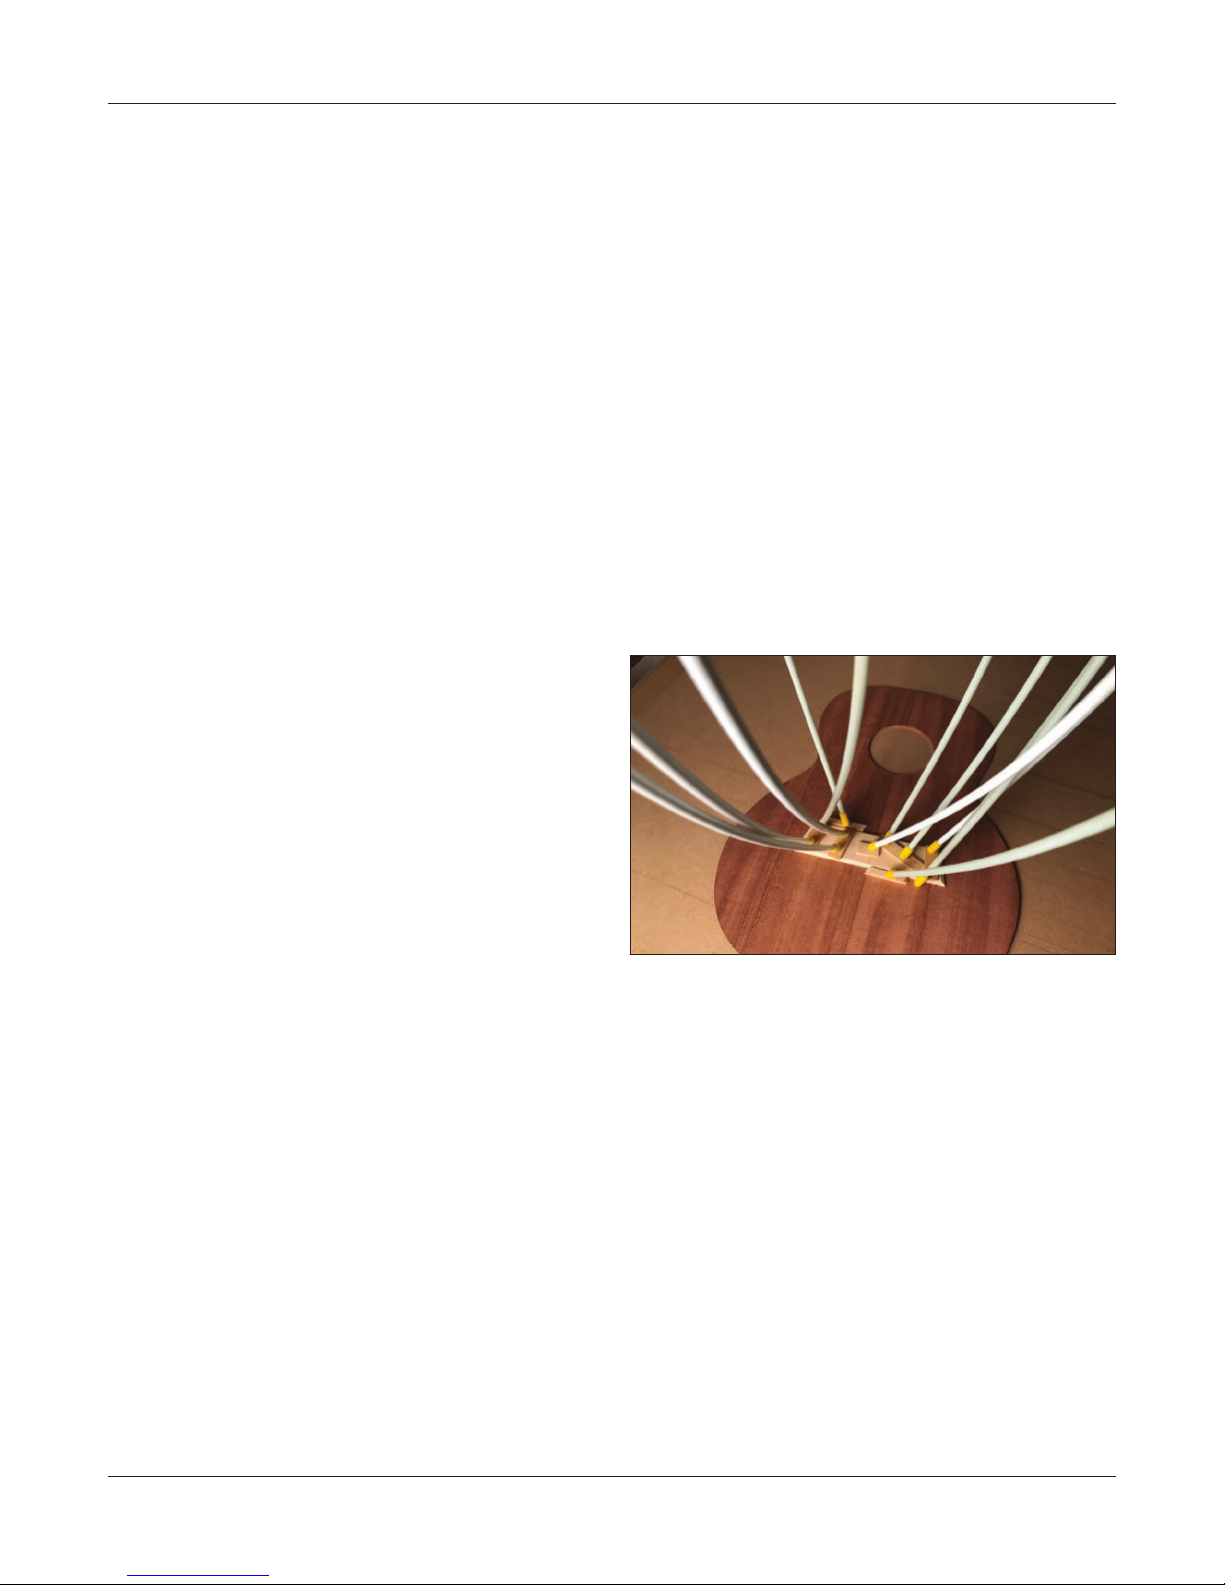
If you are using a Go-bar Deck feel free to go ahead and glue
up the other brace in the same manner now. If you’re using
clamps it’s best to wait and install the braces one at a time.
Bracing the top
We are going to begin by locating the position of the top
braces similar to the approach we used on the back.
Mark a centerline precisely on the center seam inside your
top. (While you had a choice of which side was the exterior
on the back of your ukulele, the top has been predetermined
since the rosette will be on the face of the instrument.)
Tape your plan carefully to the interior of your top plate
taking care to ensure the centerlines match perfectly at both
ends, and the soundhole aligns with the drawing.
Locate the upper and mid transverse braces with a pushpin,
awl or scribe. These are the long horizontal braces just above
and below the sound hole.
Note: The mid transverse brace resides in the same
location as one of your back braces, so don't let this
confuse you.
Connect these holes with a pencil and straightedge, and you
have the brace locations marked for gluing.
We recommend starting with the bridge plate rst, followed
by the fan braces.
If you are using a Go-bar Deck you can probably glue all 3 of
the fan braces in place in one session, if you are using clamps
it may be better to take them one at a time.
Take your time. There is no rush.
Apply the glue
Let’s start with the bridge plate. Put a small dab of glue in
the center and use your pinky to spread an even, thin lm all
the way to the edge. Wipe up any excess glue on your hands
and glue that may have run over the edges of your plate.
Precisely locate the bridge plate and apply a clamp or Go-bar
to the center. After the clamp is applied carefully recheck
the position of the plate and apply additional clamps (or
Go-bars).
Ensure the bridge plate is seated tightly to the top all the
way around. After 5 minutes clean up the squeeze out. Wait
2 hours and remove the clamps.
Now carefully mark the locations of the bridge plate and 3
vertical fan braces. Once this is done lightly draw the locations of all the braces for your top.
Remove the plan. We will be using it again shortly.
Gluing the top braces
As with the back braces you can glue each brace separately
with clamps, or use a Go-bar Deck and a radius dish to clamp
more than one brace at a time.
However, unlike your back braces which had a slight radius,
you’ll notice the top braces are at. This means that if you’re
using a Go-bar Deck you’ll want to make sure to remove the
radius dish and replace it with a at surface (or ip the radius
over and use its at back.)
Do a dry run before gluing
Getting the brace locations exactly right on the top is critically important to the structural integrity and tone of your
instrument. So like you did when gluing the back braces,
take a few minutes and do a dry run of your clamping setup
before you apply glue.
Now it’s time glue in the fan braces. The center fan brace
has a notch for the bridge plate. Locate this brace directly
on the centerline. Apply glue and lightly clamp it in place.
The two outer fan braces should bump up to the right and
left side of the bridge plate. To get the best tone from your
instrument is important that the fan braces are all making
contact with the bridge plate.
Glue them all in place using the same method we have been
using and clean up any squeeze out.
Let them dry for 2 hours and then remove the clamps.
6
stewmac.com
Page 7
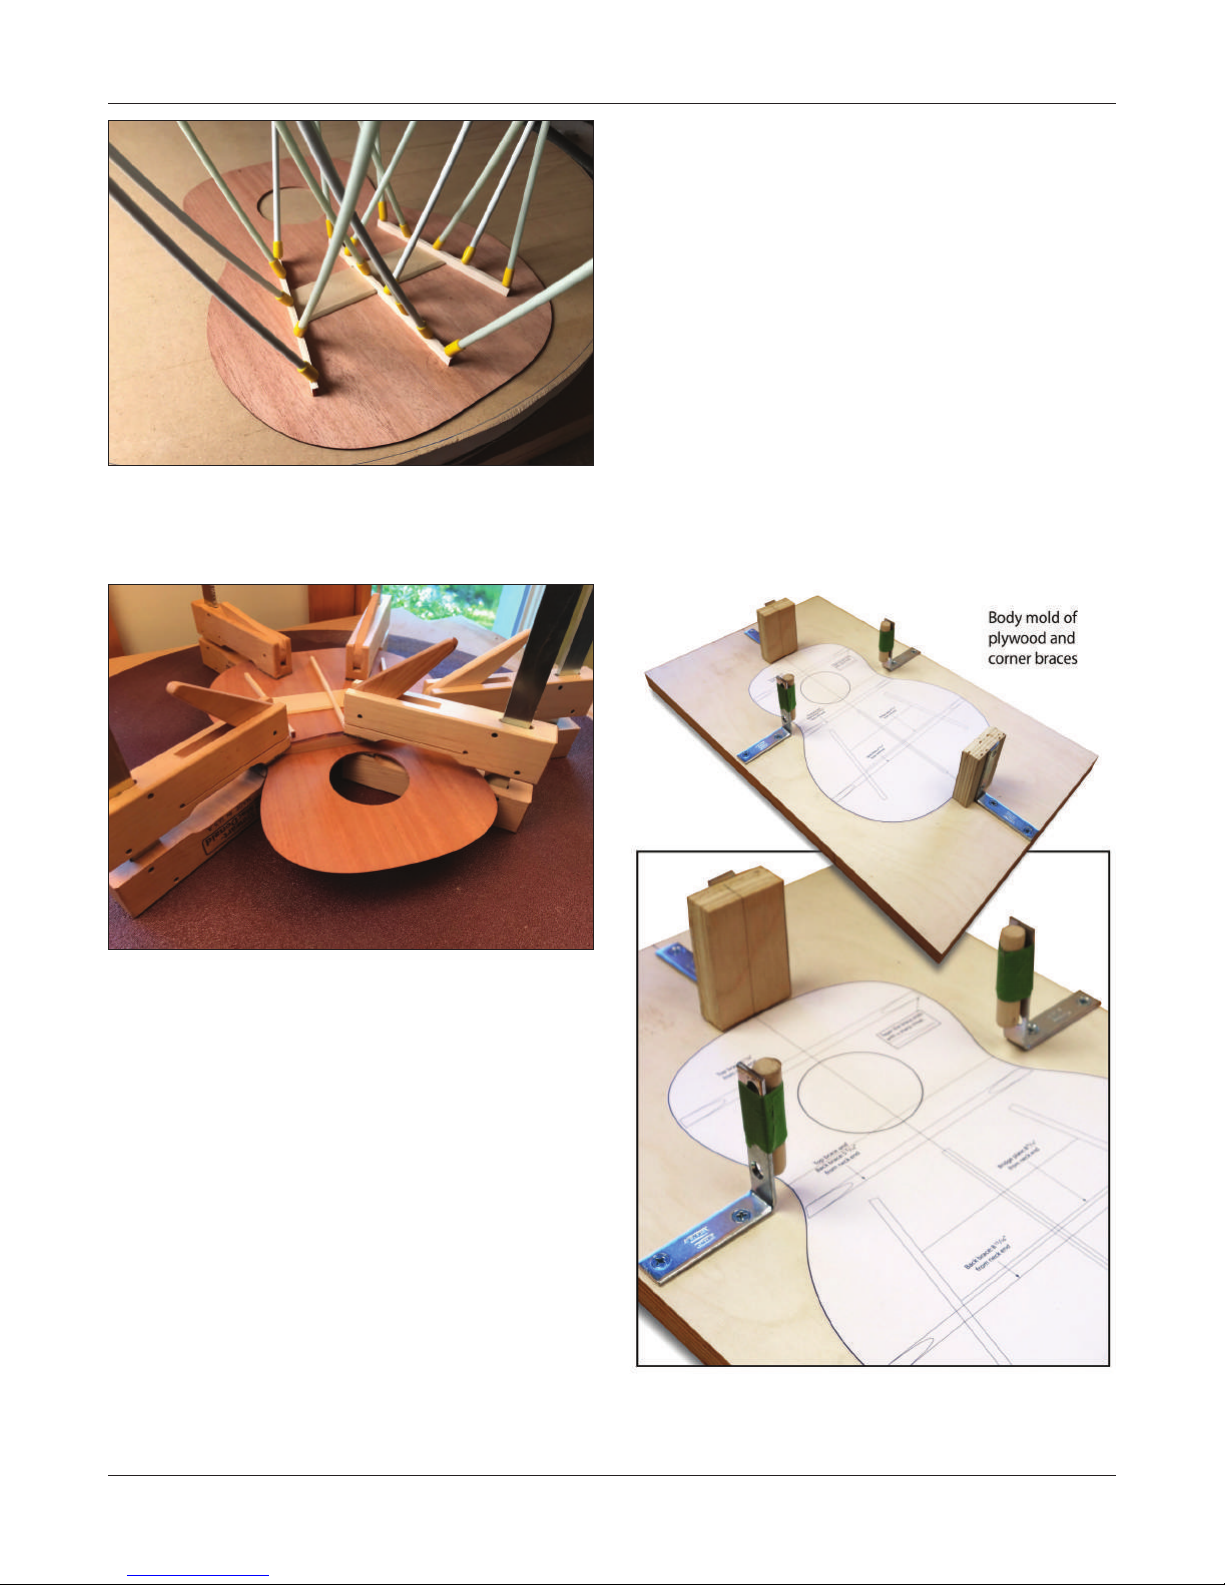
upper transverse brace.
Let the braces dry for 2 hours before removing the clamps.
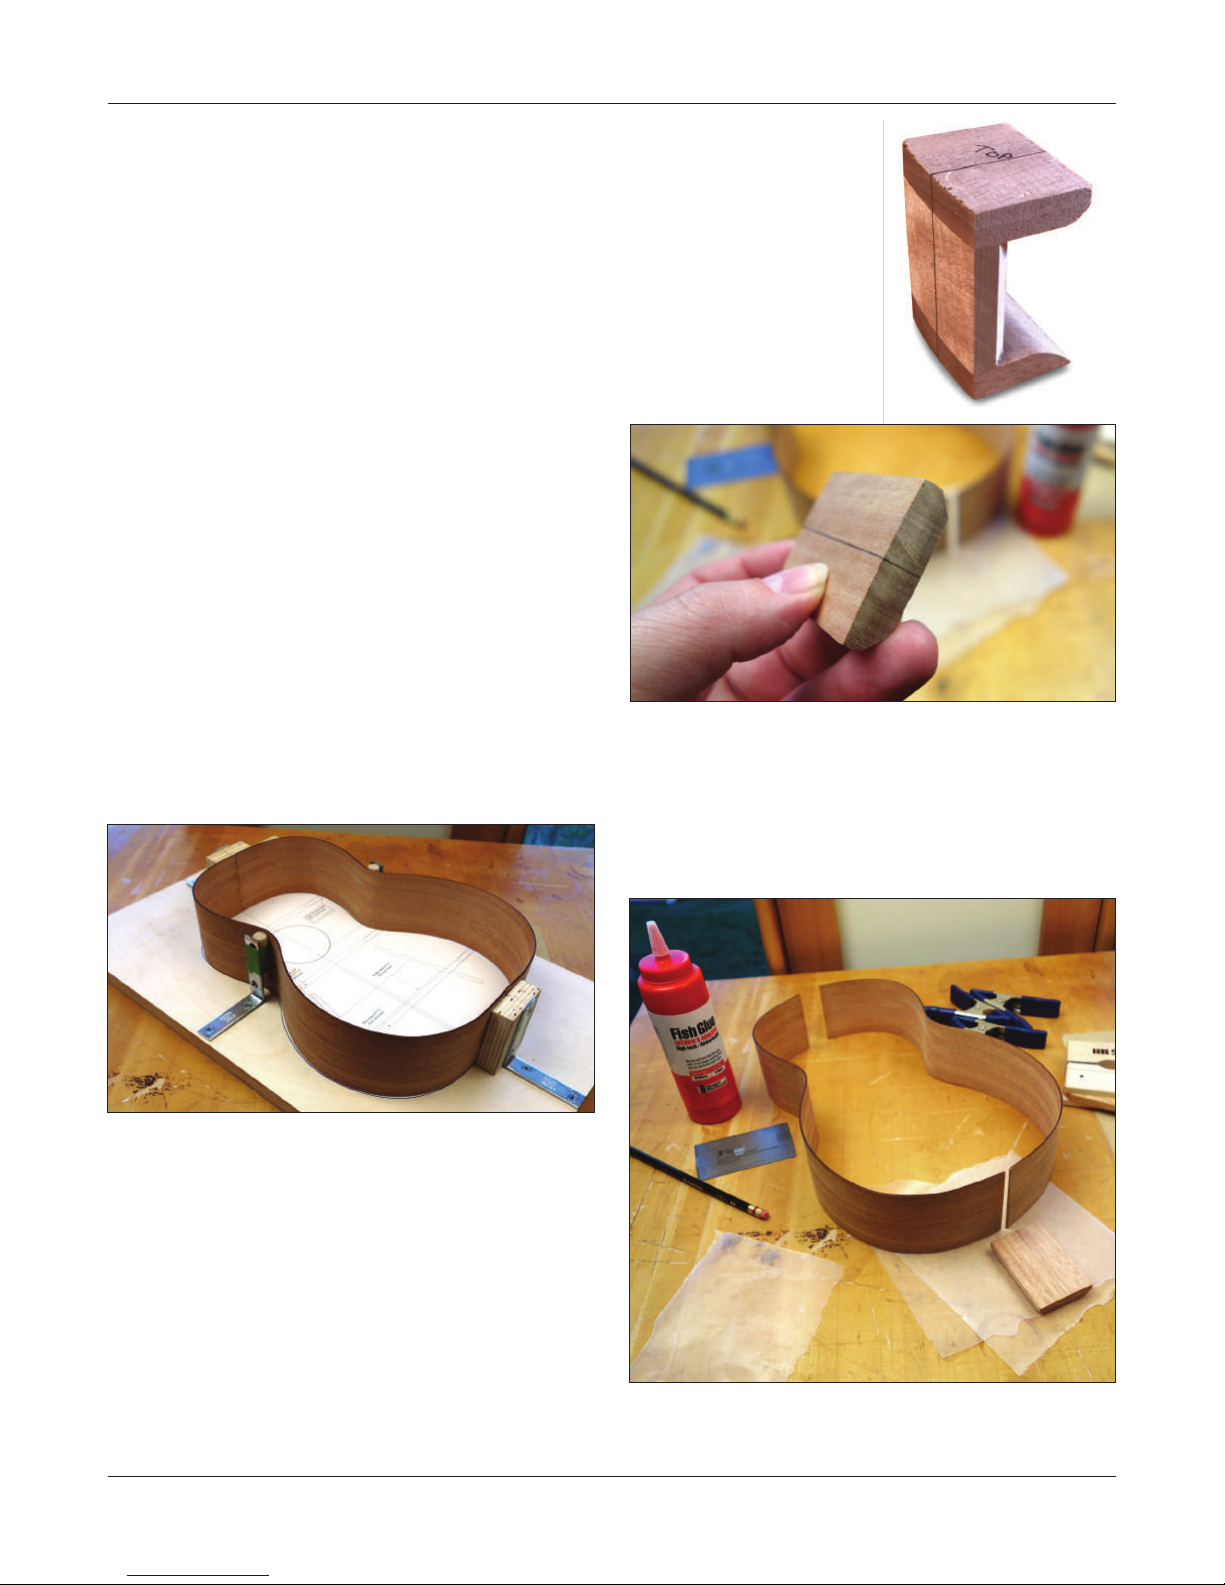
in the photo (below). Screw these two braces to the plywood,
on the centerline. Position them so they are against the bold
line of the uke shape. These are clamp supports for gluing
the neck block and tail block to the sides.
These clamping blocks should be no taller than the sides
of the ukulele.
The other two corner braces support the sides at the uke’s
waist. To avoid metal scarring the mahogany sides, give
these brackets some padding. A piece of dowel wrapped
in masking tape works well.
Screw these braces to the plywood, positioning them against
the uke outline at the waist.
Now we’re ready to begin working on the body.Next glue in the lower transverse brace followed by the
Optional: showing the gluing setup with clamps.
Make the body mold
Now we are going to turn our attention to the ukulele body,
and this begins with creating an outside mold.
This is a very simple xture: a piece of plywood (or MDF) and
four 2-1/2" corner braces (angle brackets). It holds the body
pieces in shape while you build.
Start with a high quality piece of 3/4" plywood (or MDF),
19"x12". Draw a centerline down the middle of the board.
Tape or spray mount the plan drawing to the plywood,
aligning it on the centerline. The bold black line on the plan
drawing is the nal shape of your uke.
Attach blocks of wood to two of the corner braces, as shown
stewmac.com
7
Page 8
Assemble the body
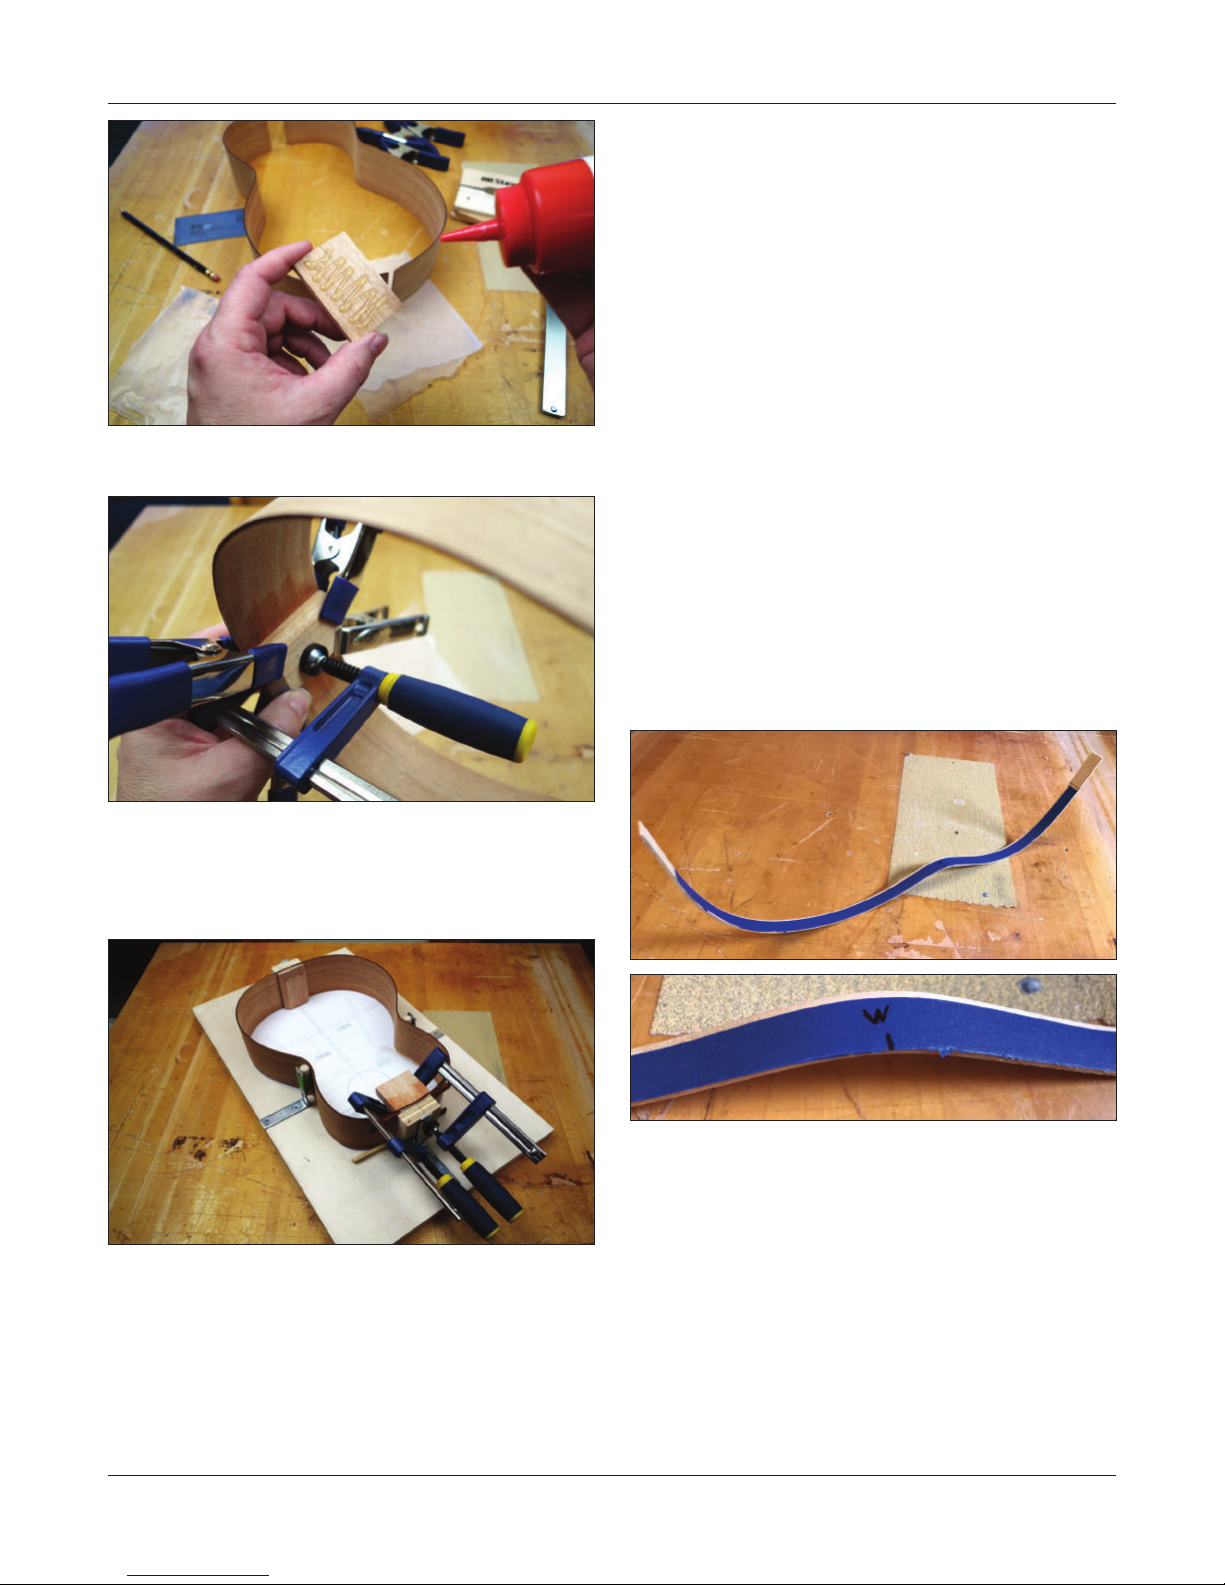
Place the bent sides into the body mold, with their ends
butted together at the center. Now you can see the body
of your ukulele taking shape!
If the sides are oversized and extend more than 1/8" past
the centerline when you insert them in the mold they will
need to be trimmed.
To do this, while holding the sides down rmly in the mold,
and ensuring they line up nicely with picture of the sides
axed to your work board, carefully mark the centerline
on your side near the headblock. Remove the side, mark a
square line and carefully cut this with a saw. (A little double
stick tape and a wood block provide a good fence to ensure
your cut is square and straight.)
Reinstall the side in the mold. Align the newly trimmed side
to the centerline at the neck block, hold the sides down to
the work board to ensure they line up with the prole on
your plan and mark the centerline at the tail block. Mark
and cut the side the same way you made the previous cut.
Repeat the process for the other side.
Now we are going to glue in the neck and end blocks.
extension toward the back of
the instrument.
Carefully measure and mark
a centerline on both blocks.
The neck and tail blocks need
to be the same height as the
sides. If yours are taller than
the sides, trim them with a
saw or chisel. This is easier to
do now than later.
Snap the sides into the mold so the neck and tail ends t
end-to-end perfectly. Align the seams to the centerlines
marked on your plan.
If the sides don’t precisely match the body shape on the
plan drawing, don’t worry. A little variation between ukes
is ne. As long as the side curves match each other nicely,
you’ll have a great looking instrument.
The corner braces will hold your sides nicely square to the
baseboard, so the body doesn’t “lean” in one direction. If
you like, use a square to double-check this.
Glue the sides and blocks
You can glue the blocks in using the mold as support, or
out of the mold. Each method has pros and cons. Using the
mold provides rigidity, however, clamping up outside the
mold allows the visibility to ensure everything is aligned
perfectly during glue up.
The tail block is the smaller of the two blocks, and the neck
block has horizontal extensions on both ends.
When gluing in the neck block, place the “square” horizontal
extension toward the top of the ukulele and the “rounded”
8
For these instructions, we are going to glue up the tail block
outside the mold, and the neck block inside the mold.
stewmac.com
Page 9
When you’re comfortable with your clamping setup, put
glue on the neck and tail blocks.
Install the linings
The exible wooden linings will be glued to the edges of the
sides, ush with the top and back. These strengthen the body
and provide a wider surface for gluing the top and back.
For rm gap-free pressure all along the linings, you’ll need at
least 12 Mini Clamps for Linings to glue one lining strip. Using
even more, closely spaced together, ensures that the linings
are pressed to the sides at every point along the curves.
The linings are oversized and will need to be trimmed before
glue up.
The easiest way to do this is to carefully install a piece of blue
painters tape ush with the top edge of the ukulele’s side.
Take your time to ensure the tape aligns perfectly with the
top edge of the side. Carefully trim the tape exactly where
it meets the neck block and the tail block. Before removing
the tape, place a visible mark at the apex of the waist.
Remove the tape and align the mark on the tape to the apex
of the waist on your pre-bent lining. Carefully align the tape
to the top edge of your lining.
Put a little glue on the narrow edges of the sides that butt
together, too. If the neck and tail blocks quickly absorb the
glue, add more to make sure you have a slightly wet gluing
surface. You don’t want a glue-starved joint.
Clamp the blocks and sides, and let them dry for 1-2 hours.
Use warm water to clean up any glue squeeze out. Titebond
and Fish Glue cleans up nicely after 10 - 15 minutes. It is still
wet enough to remove, but rubbery enough to make clean
up less messy.
At the end of the tape make a pencil line.
Technically, the pencil line at the ends of the tape should give
you a perfect t. However, due to small errors in alignment of
the tape when measuring the sides, and when tting them
to the linings if you cut to the pencil lines the linings will be
a smidge too short.
To account for this make a mark 1/16" past the trim line at
the ends of the tape, draw a square line and cut the lining
at these locations.
stewmac.com
9
Page 10
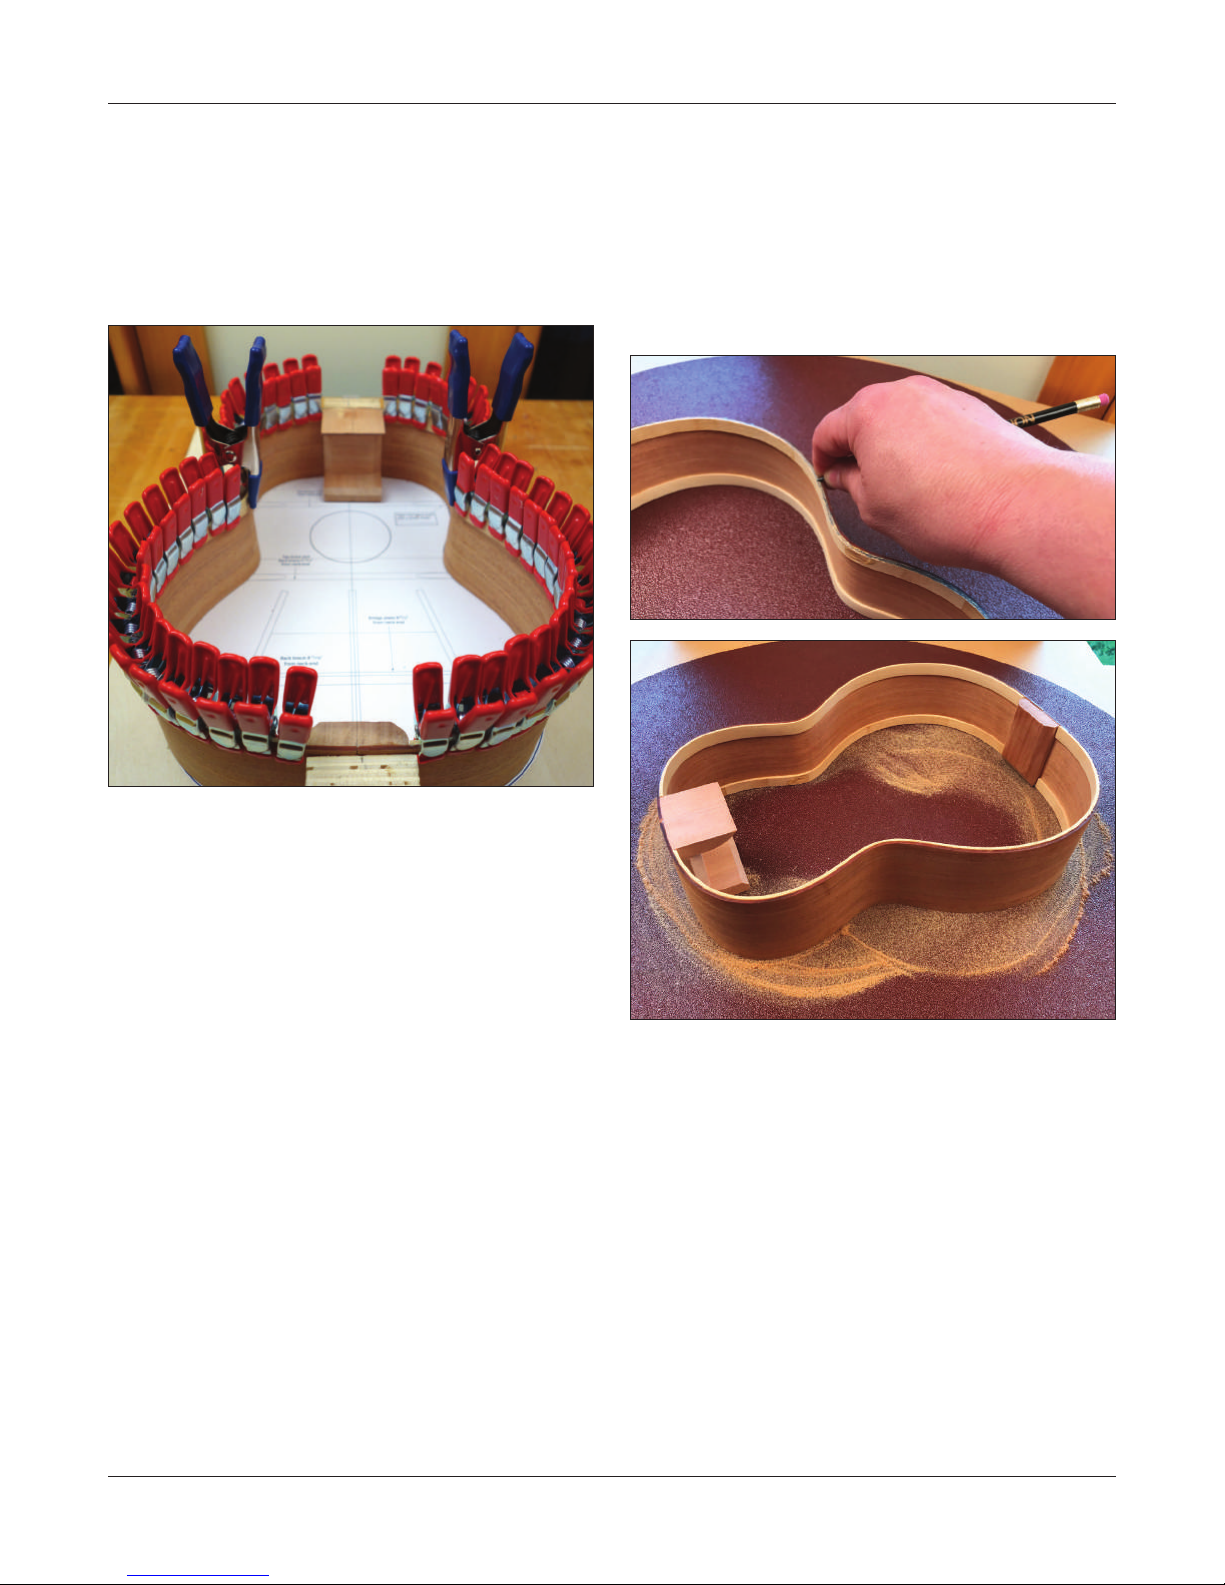
Do a dry run of the clamp up before applying glue. Fit the
ends of the linings against the neck and tail blocks. Starting
at the neck block apply clamps closely working toward the
tail block.
Once all the clamps are in inspect the rim carefully to ensure
the linings are tight to the sides. If there are no gaps you’re
ready to glue!
Sand the linings ush
The edges of the sides need to be smooth and uniform for
gluing the top and back. The easiest way to do this is with
adhesive sandpaper taped down to a at surface (such as
a piece of MDF).
Remove the rim from the mold and draw a pencil mark across
the face of the blocks and linings. Lightly rotate the rim on
the sandpaper until the lines disappear.
Apply glue to the linings and clamp them. Wait 10 minutes
and clean up any squeeze out by gently scraping it away
with a razor blade. Any remaining glue marks can be gently
scrubbed o with a damp (not wet) cotton rag.
If you have enough clamps you can glue up both halves
of the rim at once. Allow them to dry for 1-2 hours before
removing the clamps, then turn the sides over in the body
mold and glue the linings to the other edge.
10
stewmac.com
Page 11
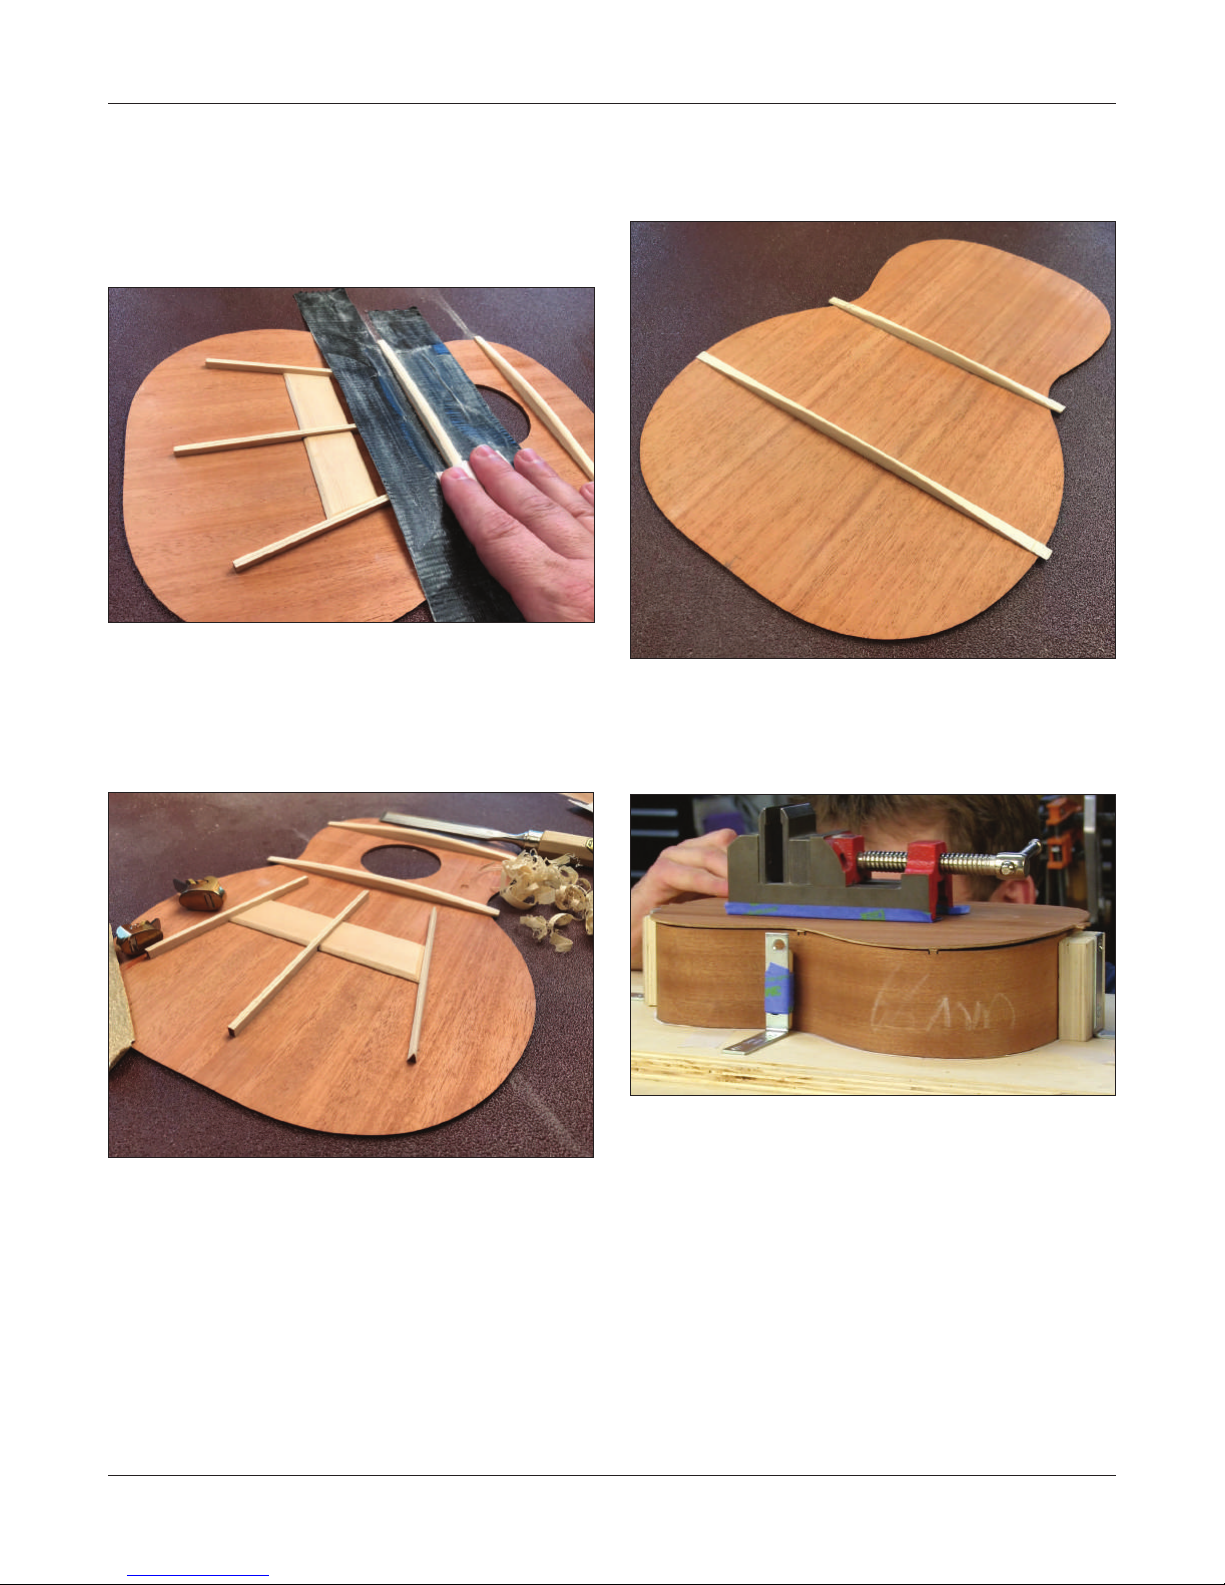
Shaping the Braces
After the glue has dried at least 2 hours, and all the clamps
have been removed lightly shape the top and back braces.
Using a small block of wood with adhesive sandpaper attached lightly round over the top of each brace.
(To keep your work clean and neat, and to protect the top
and back plates of your instrument it is helpful to put down
protective layers of tape. Simply take regular duct tape or
masking tape and stick it to your shirt a few times to remove
some of the stickiness and apply it right next to your brace.)
Sand each brace with 80-grit, 120-grit, and 220-grit and try
to create an even, uniform, attractive looking brace.
Fit the back to the sides
The braces on the back are intentionally longer than the
width of the body. When you place the back on, these braces
will overhang the sides.
Once the top of your brace has been roughly shaped with
the sanding block use a piece of sandpaper between your
ngers to round over the top of the brace.
stewmac.com
The next step is trimming braces to length, and creating
notches in the side linings so the back drops in place.
Place the back in position, aligning it on center. Use a weight
to hold it in place. Make small pencil marks on the sides to
show where the braces touch. Extend these marks over the
edge of the sides and linings.
11
Page 12
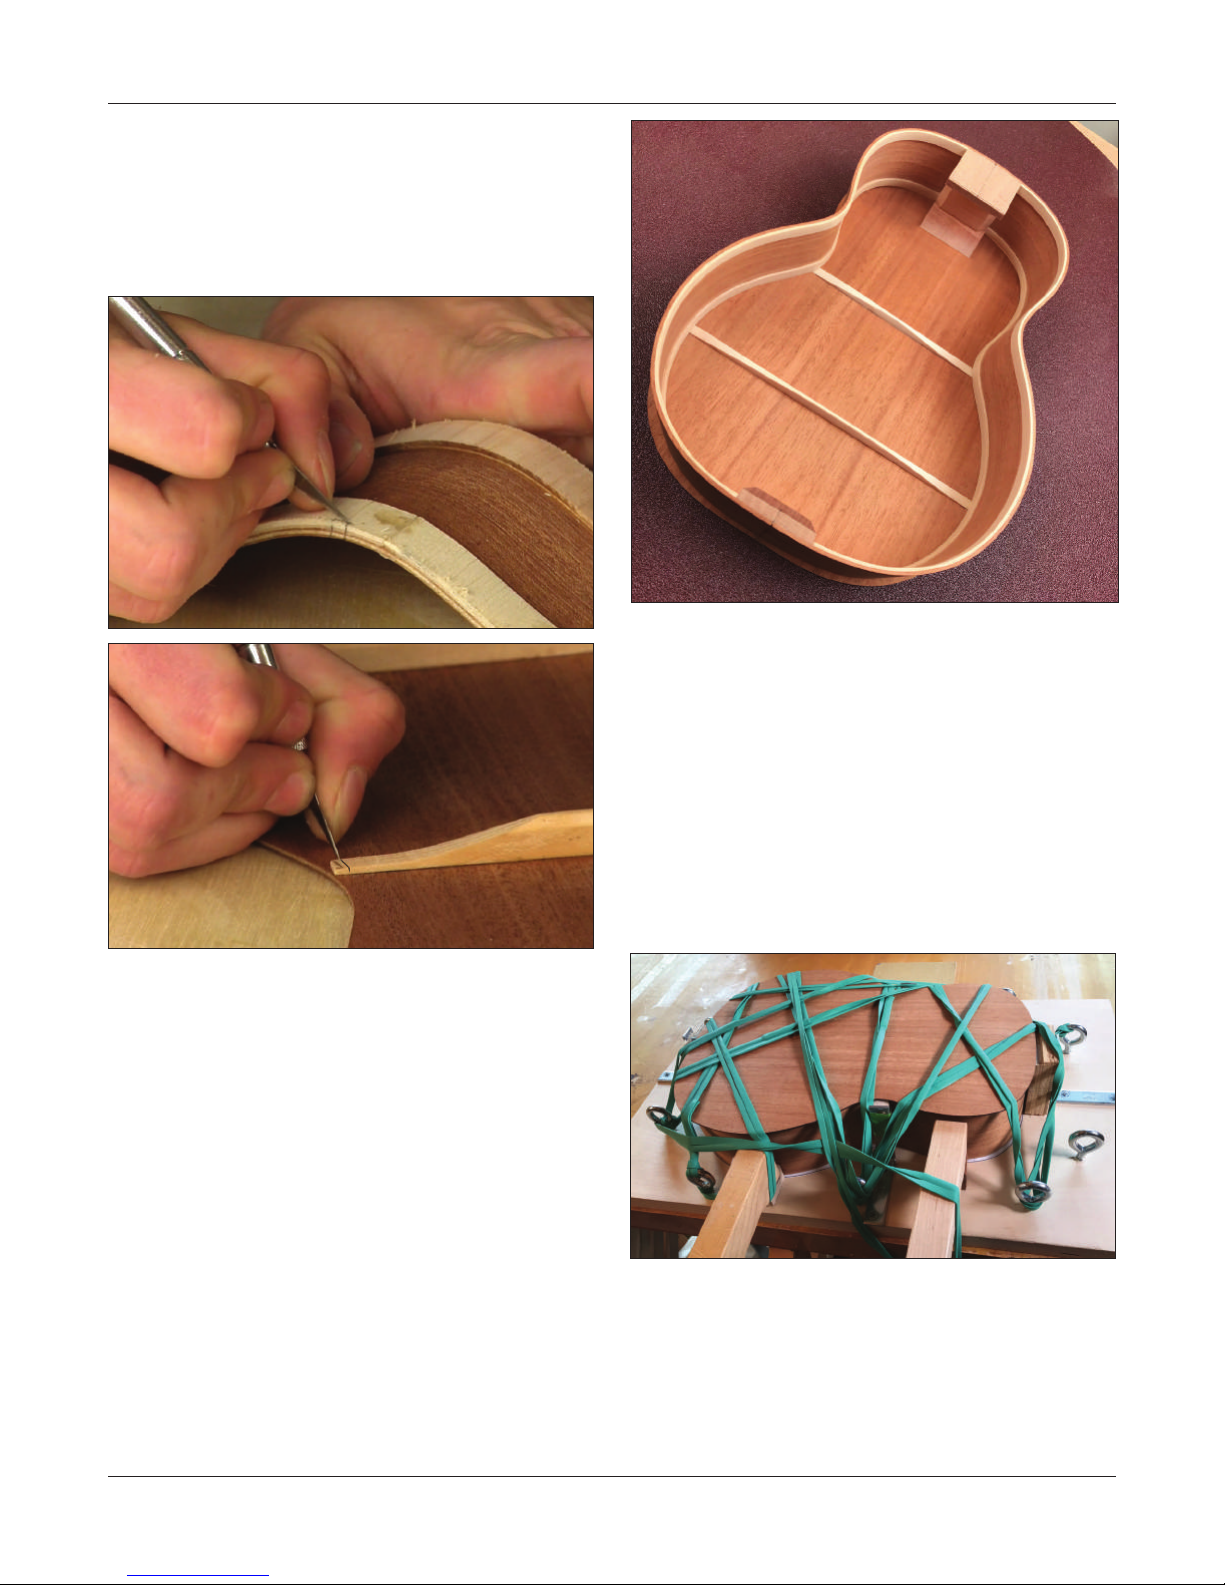
With a sharp razor knife, cut notches in the linings for the
braces. A small chisel is helpful for chipping out the notch.
Trim the ends of the braces so they t within the sides,
dropping into the notches. Scrape the trimmed brace ends
o the back. When you’re done, the back ts at onto the
sides, with the braces keyed into the notches.
Glue the back on the rim
To get good clamping pressure all around the back, the
body mold is now put to use again. By adding screw eyes
or hooks around the edges of the of the plywood, you can
ax the rubber clamping bands included with your kit. If
your clamping band is an unbroken loop, cut it to make it
one long strip.
The top and back are slightly oversize, with edges that hang
over the sides. This overhang will be removed after gluing.
Tie the end of the clamping band and stretch it tightly over
the body to the opposite corner. Continue strapping from
corner to corner until the back is clamped under a web of
rubber bands. Tie o the end to one of the screw eyes. Try
this as a dry run.
When you’re ready for glue, apply it to the edge of the side
and lining, and to the end of the neck and tail blocks. Put the
back in position and wrap with the rubber clamping band.
Let the glue dry for 2 hours, then remove the body from
the mold. Clean away any dripped glue, especially where it
can be seen through the soundhole of the assembled body.
12
stewmac.com
Page 13
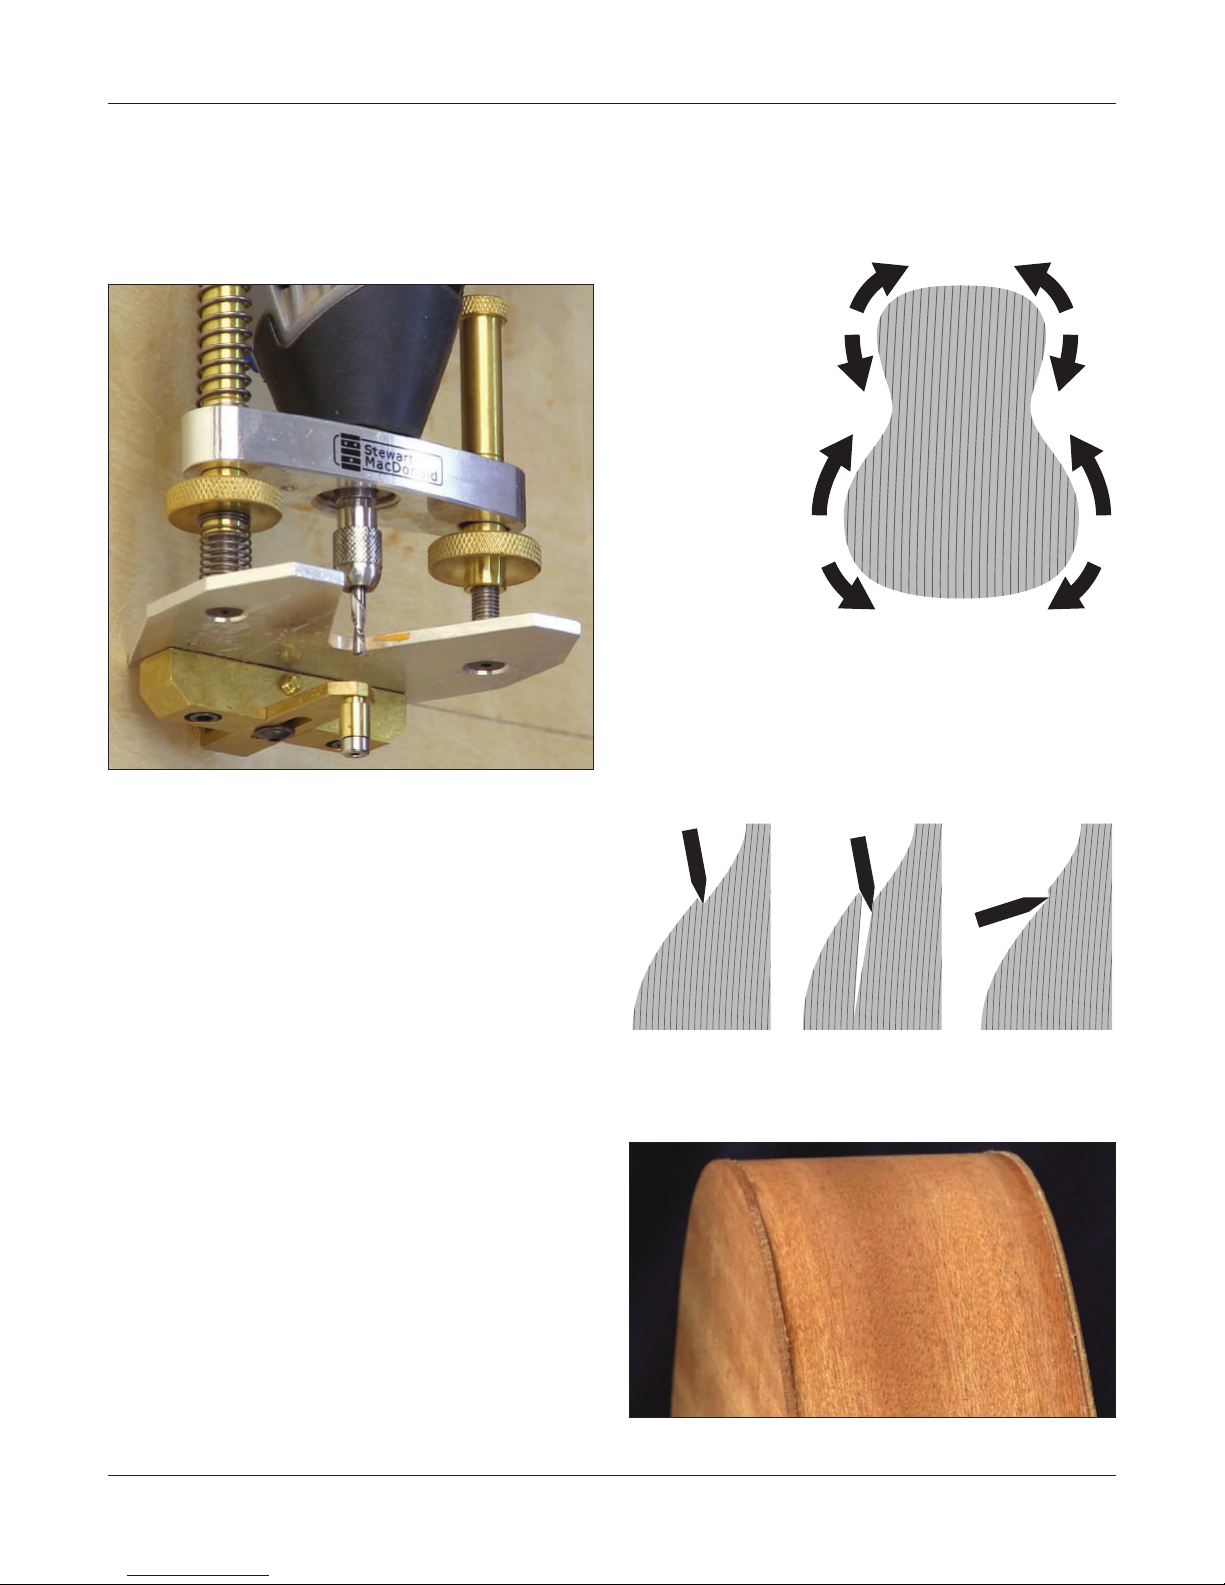
Trim the overhang
Before you glue the top on, you will need to trim the overhang on the back of your ukulele. This involves cutting the
overhang slightly proud of the sides, then sanding away
the remainder to make the edges smooth and ush with
the sides.
To avoid tearout,
make your cuts
on the downward
slope of the curve,
with the grain.
Don’t cut upward
against the grain.
A Dremel rotary tool with StewMac’s Precision Router Base
and Edge Guide is ideal for trimming the overhang. Use a
down-cut router bit to make a clean cut. Rout away most
of the overhang, leaving it small enough to remove with
sandpaper.
You can also trim the overhang with a sharp razor knife and
a at le. Using the knife, carve away a small bit of wood
with each cut, reducing the overhang until it is close to the
sides. Follow with the le to bring it close enough to remove
with sandpaper.
Beware of tear out. Whether you use a router or a knife, you
must pay attention to the grain of the wood on the body
curves.
At the curves, a cutting tool working against the grain wants
to dig into the wood. This action makes it easy to tear out
a chunk of wood.
Tearout: accidentally breaking at the grain line
Cutting tool
approaching
a curve from
this direction
invites tearout.
Tearout: the
wood breaks
at the grain.
Cutting from
the opposite
direction makes
tearout much
less likely.
To avoid tear out, plan your cuts so that the router or knife
approaches each curve on its downward slope, rather than
climbing upward. The eight arrows on the illustration show
the direction to make each cut around the body.
After trimming, the remaining back and top overhang should
be very small. You’ll remove this with a le and sandpaper.
stewmac.com
13
Page 14
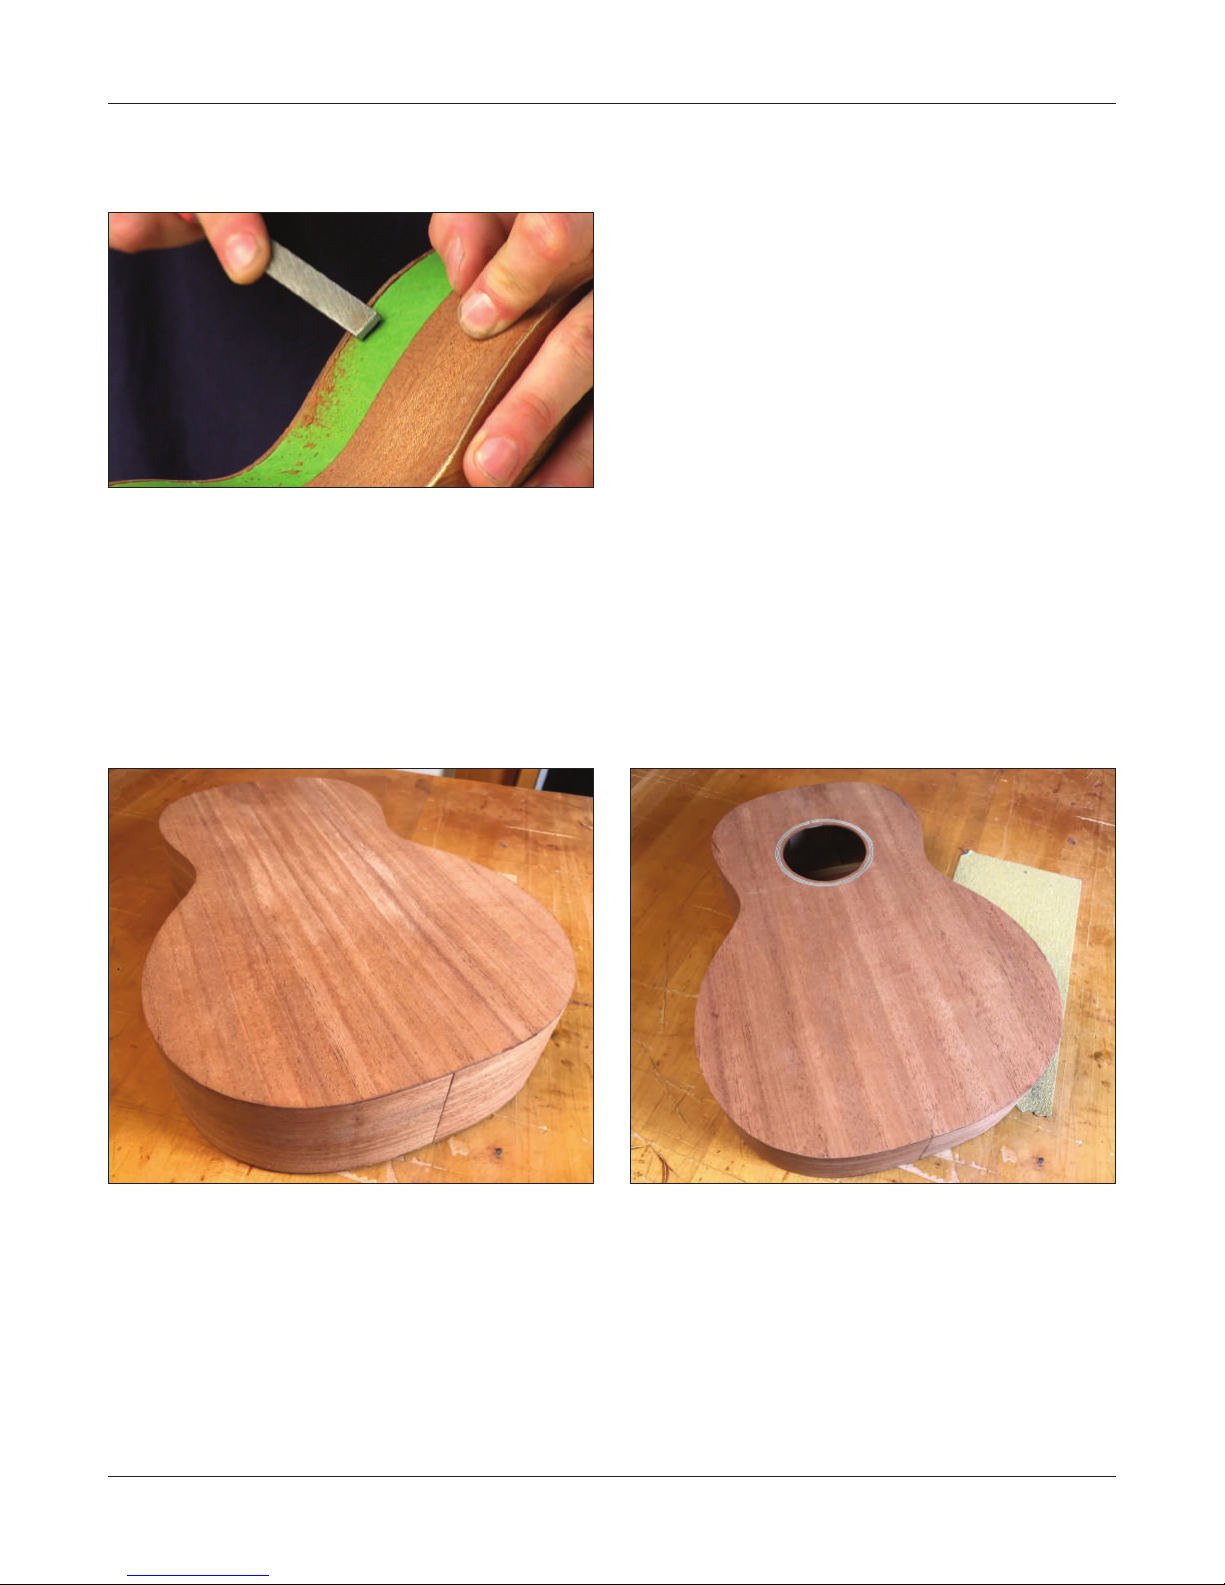
Sand the top and back ush with the sides
A at le will remove the remaining bit of overhang, followed
by sandpaper to make a smooth, ush edge.
Put masking tape on the sides to protect them from le
marks. Carefully file away the overhang until it’s small
enough that you feel ready to switch to sandpaper. You
might not need the le at all: 120-grit sandpaper may be
all you need.
With a at sanding block, follow the outer curves of the body
to ush the edges with the sides. A curved sanding block or
a stout wooden dowel makes a good sanding block for the
inside curves at the waist.
Don’t sand the sides at this point. That comes later. Just make
the top and back edges ush with the sides.
Sand until you have a smooth edge all around the uke.
Glue the top on the rim
Now we will t the top and glue it on.
Reinsert your body back in the mold with the freshly glued
on back facing down. Align the centerline with the marks
you placed on your end blocks.
Just like with the back braces, we will need to trim and t
the horizontal transverse braces. Perform the same steps
you did for the back braces - trim them to length, and create
notches in the linings so the top drops in place.
It’s very important during this step that the centerline of the
top remains on center with the rim. Take your time while
notching the braces and gluing up to make sure everything
is in the proper location.
Use the same clamping procedure to install the top. Wait
at least 2 hours and remove it from the mold and trim the
overhang like you did on the back.
14
stewmac.com
Page 15
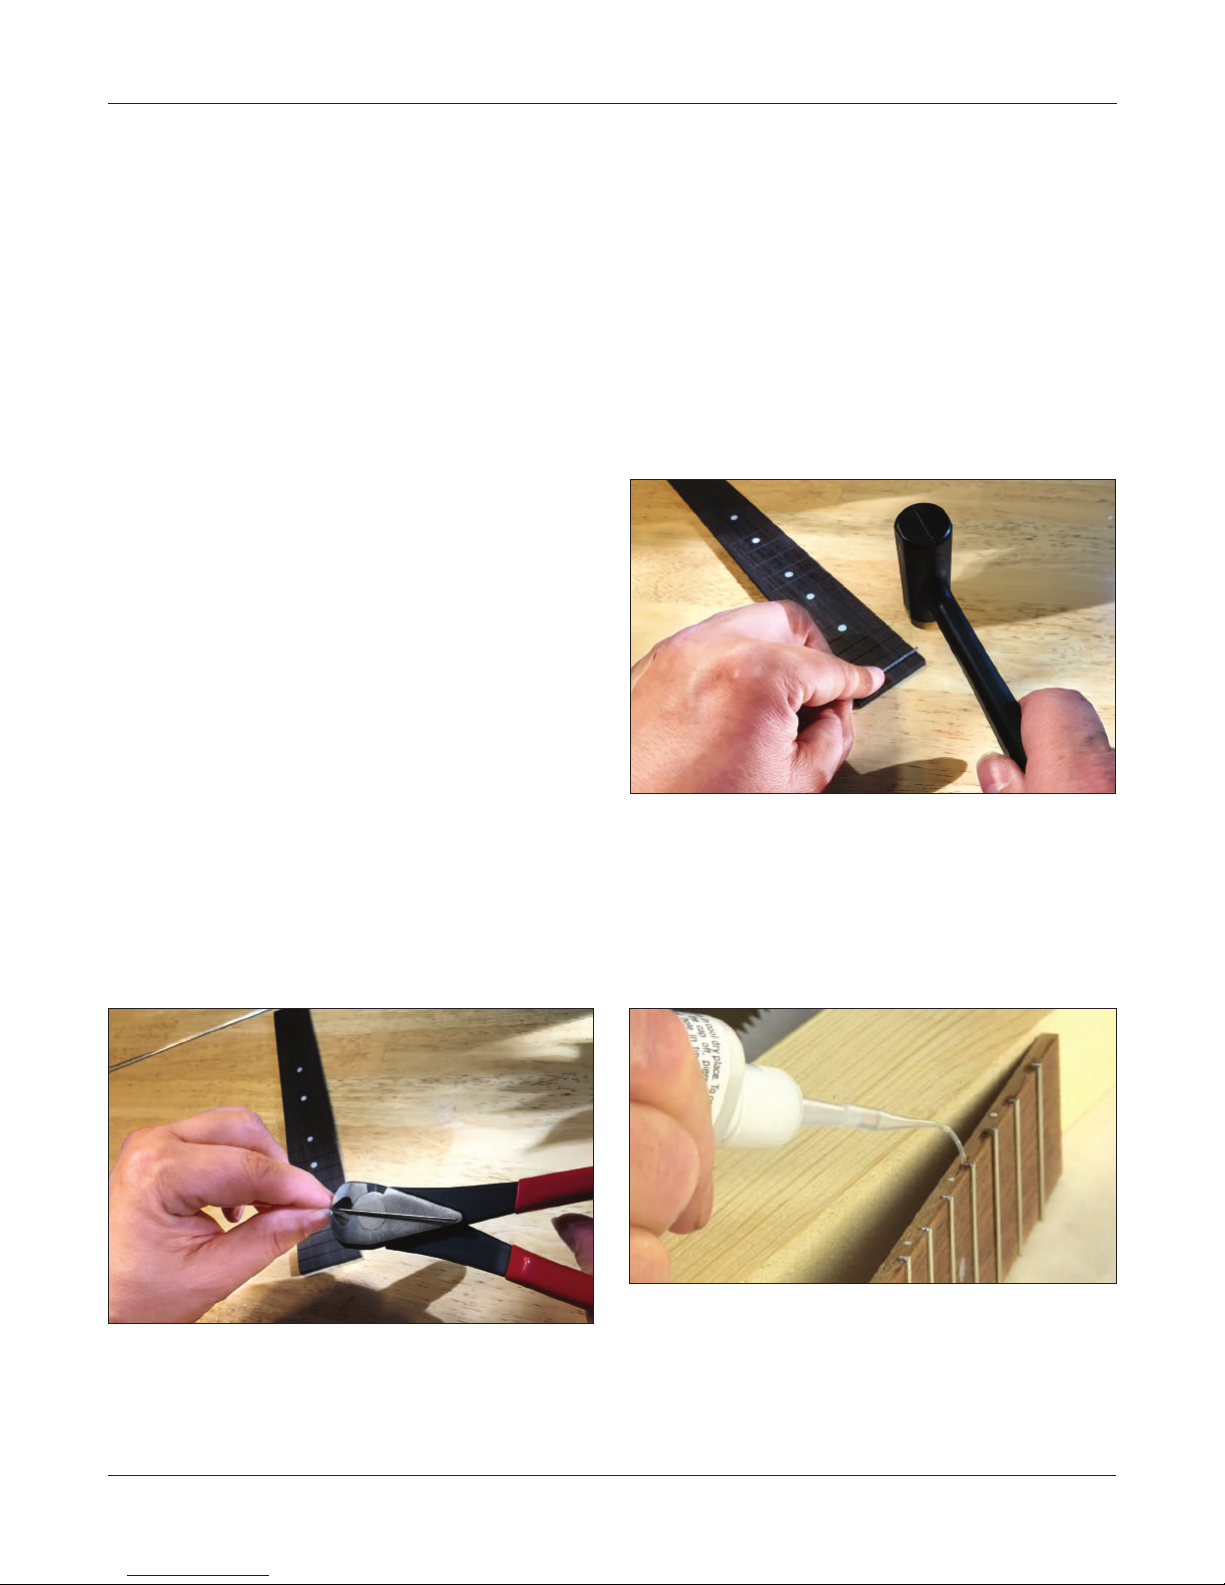
Prepare the neck
Install the side dots
The position markers on the side of the ngerboard are
made from a small plastic dowel, 1/16" in diameter. The dots
are centered between the same frets that have inlaid dots
on the board.
Use your scribe, awl or pushpin to mark holes for drilling.
Make sure all the holes are centered equally down the side
of the board. You might want to put two dots at the 12th fret
to indicate the octave; this is optional on a ukulele.
Using a drill with a 1/16" bit, start each hole by briey running the drill in reverse. This will create an indentation in the
wood to center the bit so it doesn’t wander when drilling.
Hold the drill square to the surface, and drill each hole about
1/8" deep.
Turn the end of the side dot dowel against a piece of sandpaper to clean up the end so it will slide into the hole. Then
dip it in Titebond glue and insert it in the hole.
Wipe away any excess glue, then cut the dowel o at the
surface of the wood using fret cutters or side cutters. After
installing all the dots, use a le to level them ush with
the surface of the wood. The result is a line of small round
position markers.
Install the frets
The top of the fret is called the crown. The strip that ts into
the fret slot is called the tang. Position the rst fret so the
tang sits on the fret slot. Hold the fret in position by pressing
it down at the center with one nger. With a hammer in your
other hand, tap the two ends of the fret into the slot.
When the ends are seated in the slot, you can remove your
nger and tap down the center of the fret. Do this for each
fret down the board.
Any hammer can be used, but a small one, like a fretting
hammer, works best. Don’t hit the fret or the board hard
enough to cause dents.
Preparing for fretting
Use a smooth flat work surface. You want a solid table
that won’t bounce or shake when you tap the frets with a
hammer.
Lay the end of the wire over the rst fret slot, so it protrudes
only very slightly over the edge of the board. Holding the
wire down with one hand, cut the fret at the other side of
the board. This creates a fret that’s cut to length for this slot,
with very little extra metal to le away from the ends later.
Use a fret cutter or side cutter to cut the fretwire.
Glue the frets
Adding medium viscosity superglue under the frets, such as
StewMac #20, keeps the frets seated.
Turn the board on its side and run the glue under the fret
slots. A small whip tip on the glue bottle will help direct the
glue into the fret slot.
After adding glue to each slot, turn the board over and do
the same to the other side.
Set the cut fret aside and move on to the next. Fasten a piece
of masking tape to your table, sticky side up, to keep your
cut frets in order while you work.
stewmac.com
15
Page 16
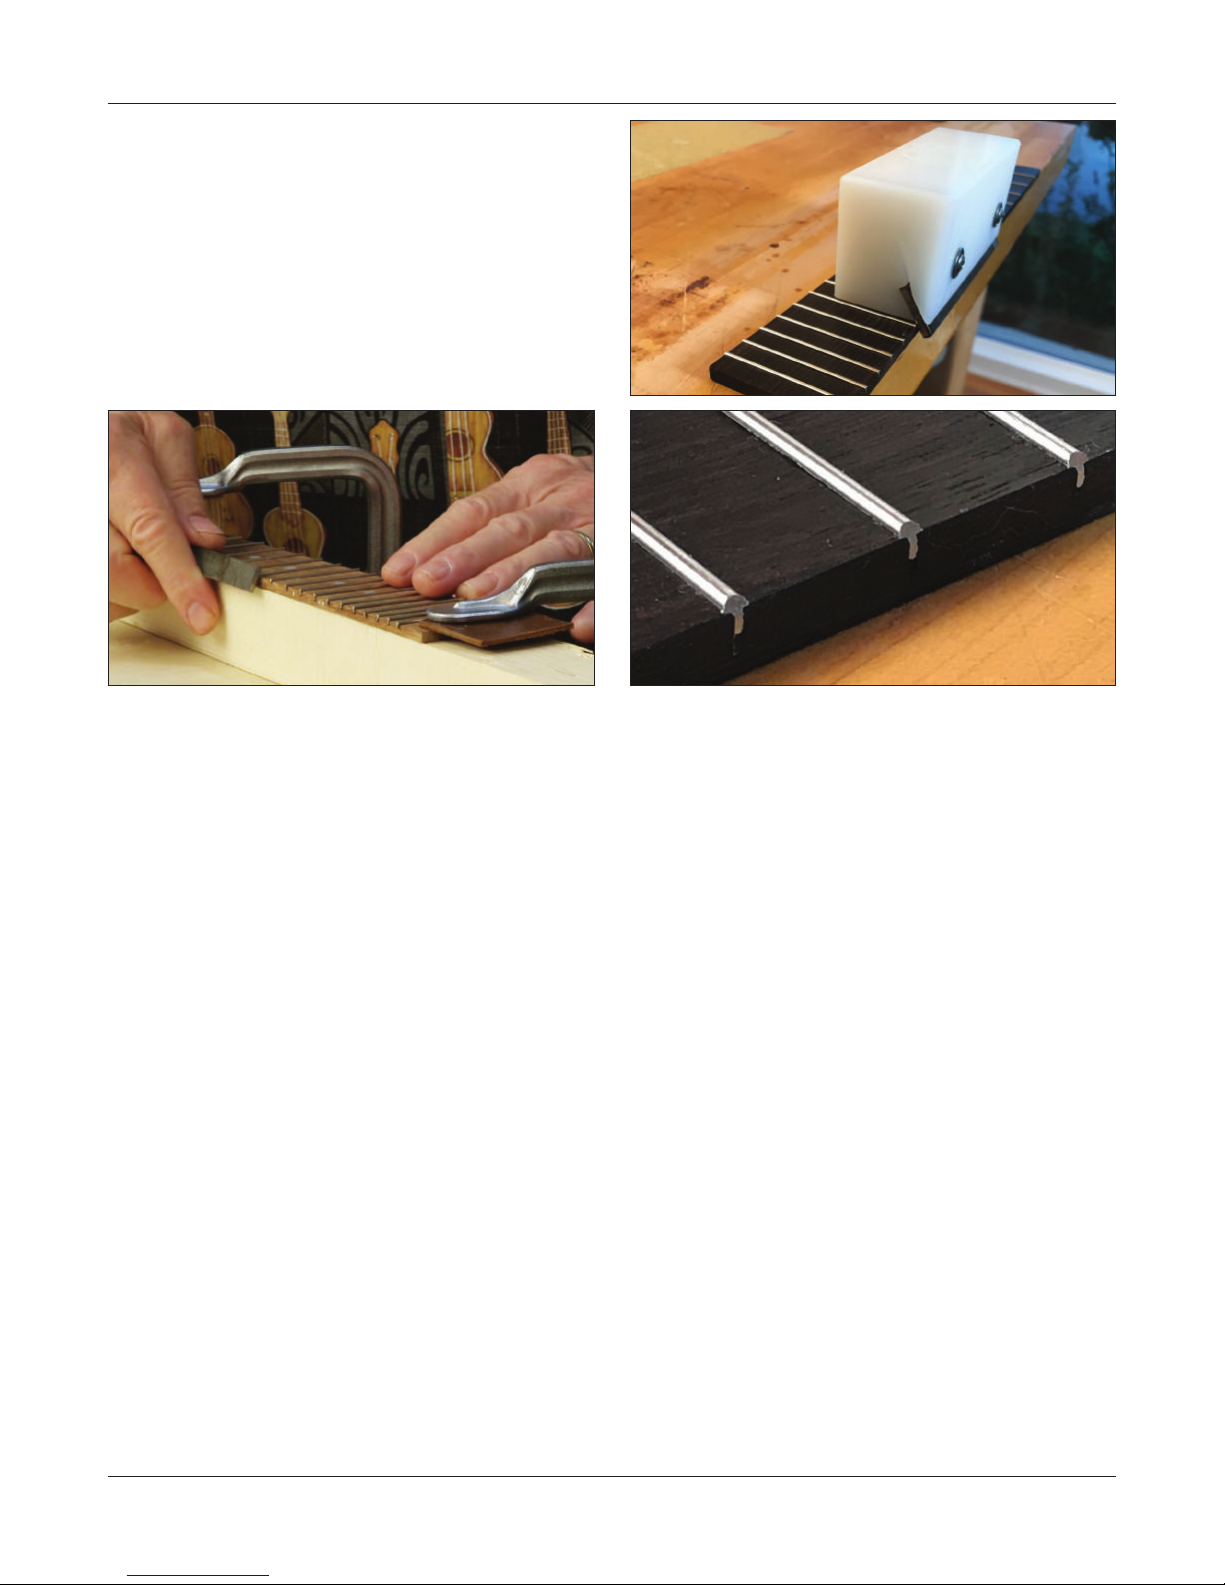
File the fret ends
Clamp the fretted ngerboard onto a piece of wood with
one edge overhanging. This is a convenient way to le the
fret ends. Use cauls to prevent the clamps from damaging
the ngerboard.
Using long strokes with a at le, remove the ends of the
frets so they are ush with the ngerboard edge.
A two-handed grip is recommended: it takes rm pressure
to le down the fret ends—especially at rst, while their cut
ends are sharp and uneven.
When you’ve made the fret ends ush, tip your le and give
a slight bevel to the fret crowns. This makes the frets more
comfortable to play. When the fret ends on one side are
smooth, rotate the board and perform the same procedure
to the other side. (Optionally you can use a Fret Beveling
le – #3760 – to get a perfectly uniform bevel on both sides
of your ngerboard.)
16
stewmac.com
Page 17
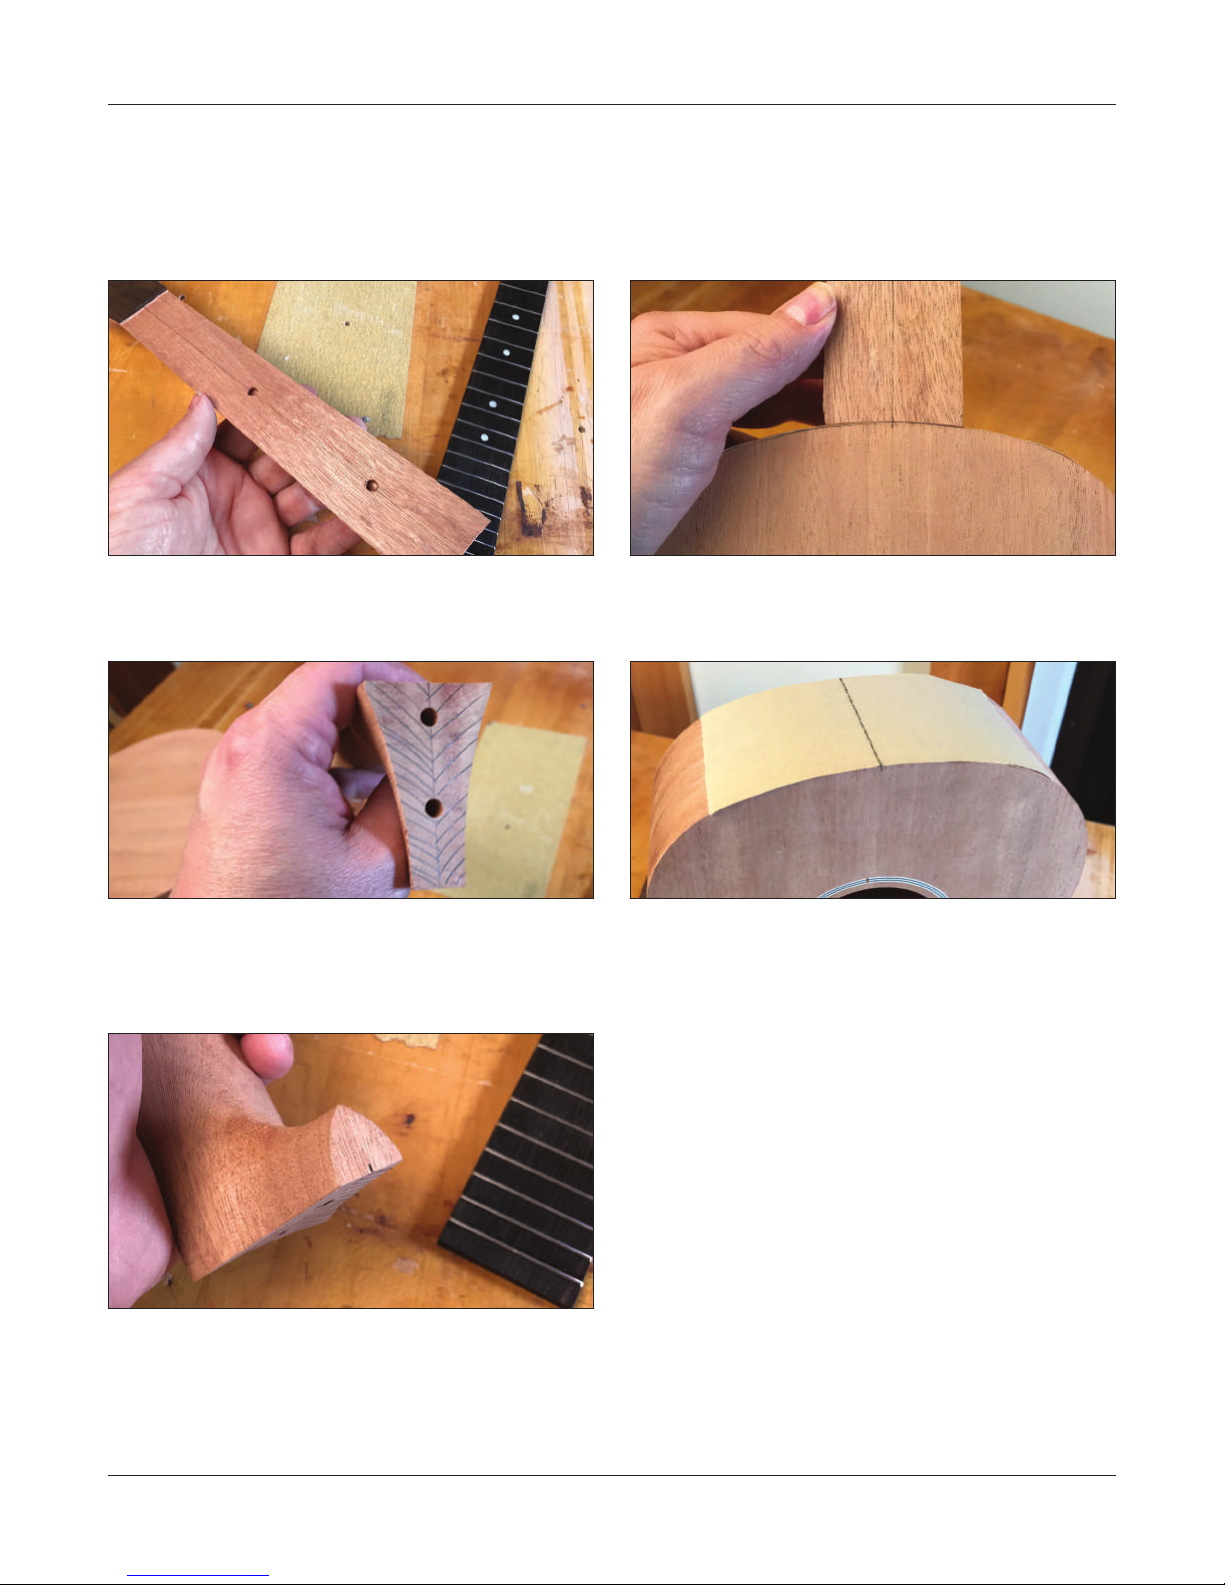
Pre-t the neck
Now is a good time to pre-t the neck. Let ’s start by carefully
drawing a centerline down the face of the neck (where the
ngerboard will be placed), and extend this line through
the underside of the heel (the part of the neck that makes
contact with the body).
sides are perfectly at along the lines you just drew. If they
aren’t at use a sanding block axed with 120-grit sand
paper and lightly sand the entire surface of the side (with
the grain) until the area where the neck meets the body is
dead at.
Carefully extend a pencil mark on the heel so you can redraw a centerline to the underside of the heel as necessary.
Gently set the neck in position so the centerline on the neck
closely aligns with the centerlines on the front and back of
the body. Lightly mark the shape of the heel on the body
of the instrument.
Now, ax 80-grit adhesive sandpaper to the body of the
instrument and trim o any overhang with an exacto knife
or razor blade.
Gently sand the underside of the neck prole on the body
taking care to keep the centerlines on the body and neck
aligned. (This isn’t as hard as it sounds.)
When the bottom of the neck is fully sanded and the cheeks
of your neck set ush against the sandpaper your neck has
been roughed in and this will allow it to quickly be ne-tuned
later just before gluing.
Now take a rule or straightedge and check to make sure the
stewmac.com
17
Page 18
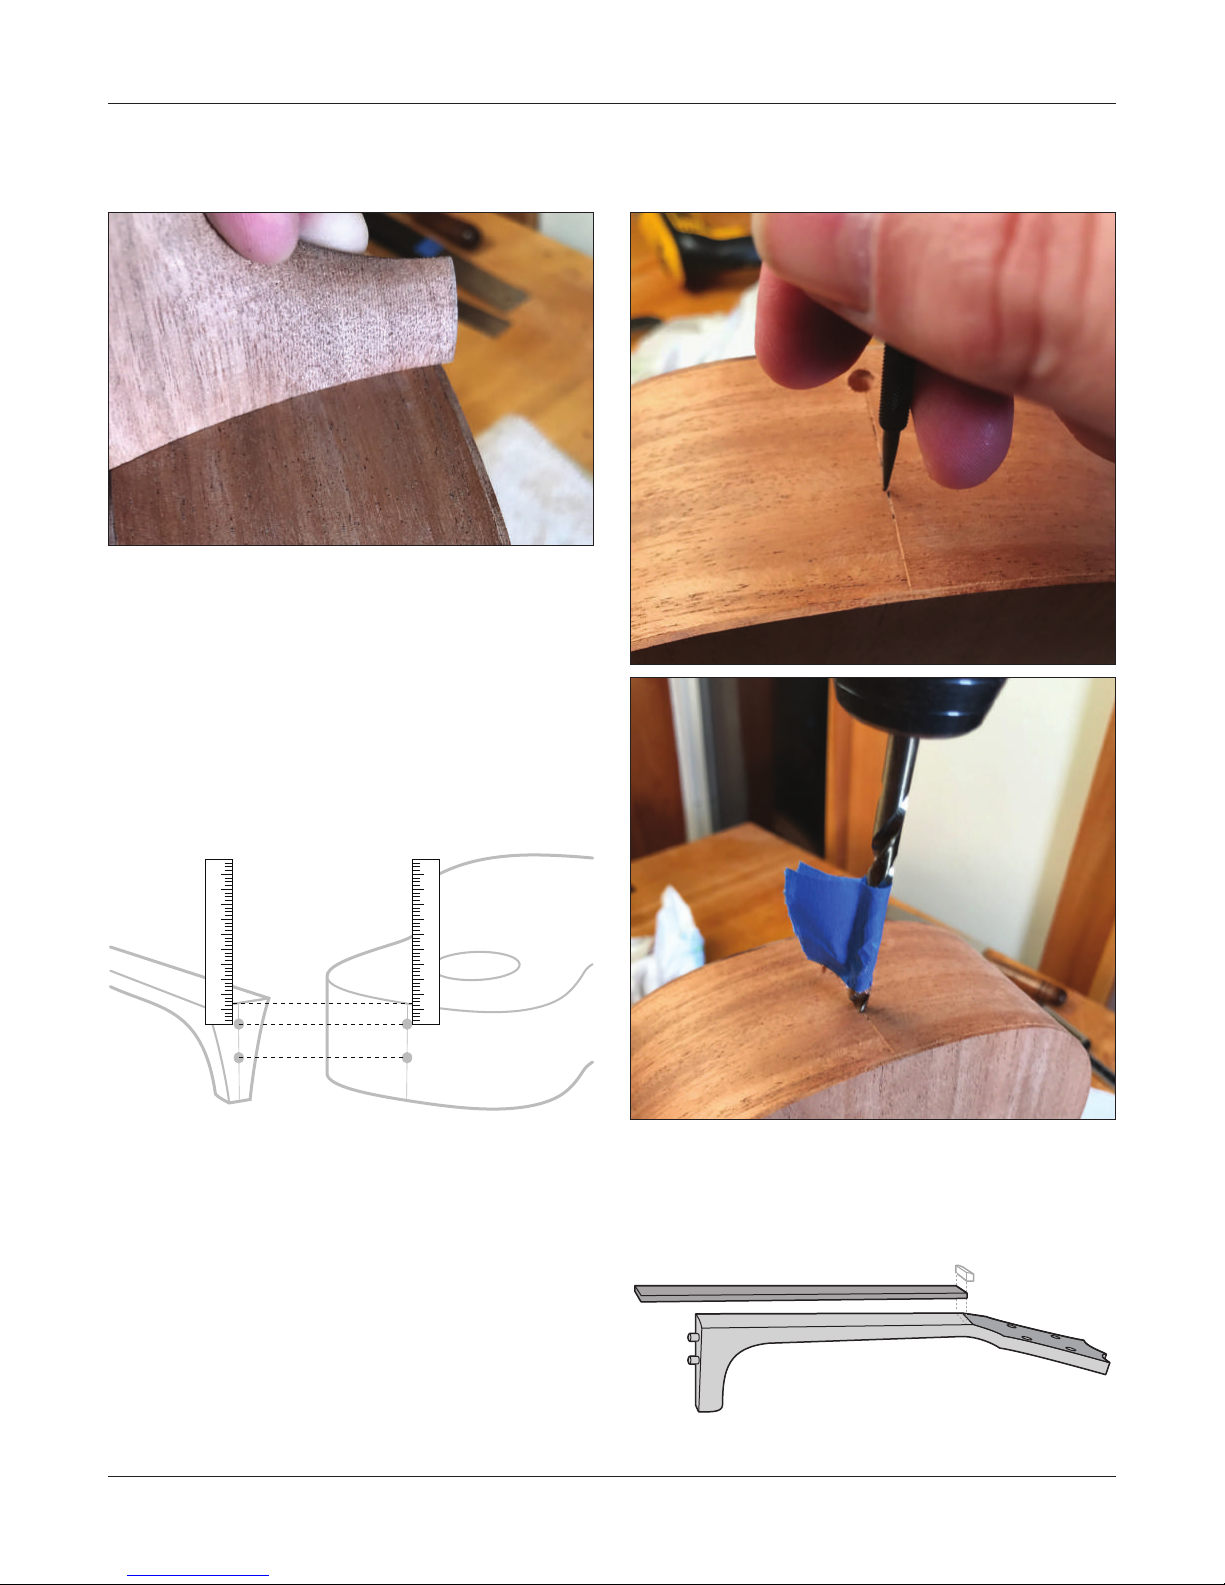
Drill the neck joint
Now let’s drill the holes for the neck location.
The neck has two 1/4" diameter holes for the dowels that
support the neck joint. You need to drill matching holes in
the body to t these dowels.
Measure from the top of the neck to nd the center of the
two dowel holes. Use these measurements to mark and drill
matching holes on the body.
After measuring the locations the pins carefully mark them
with a pencil and make a deep indentation with a scribe, awl
or push pin. This will help keep the drill bit aligned when
you drill the hole.
Measure the hole
locations on the
neck and duplicate
them on the body
Note: It is possible that the locating holes may not align
with the centerline on the body due to small dierences
in where the holes are drilled on the neck.
Drill the two holes using a 1/4" drill bit. To keep the drill from
skating around as you begin drilling the hole, start the drill
in reverse until it makes an indentation that will help keep
the drill positioned.
Attach the ngerboard
The nut should seat rmly between the pre-attached headplate and the ngerboard.
Drill them 3/8" deep. (Mark your drill bit with a piece of masking tape to keep from drilling the holes too deep.)
18
stewmac.com
Page 19
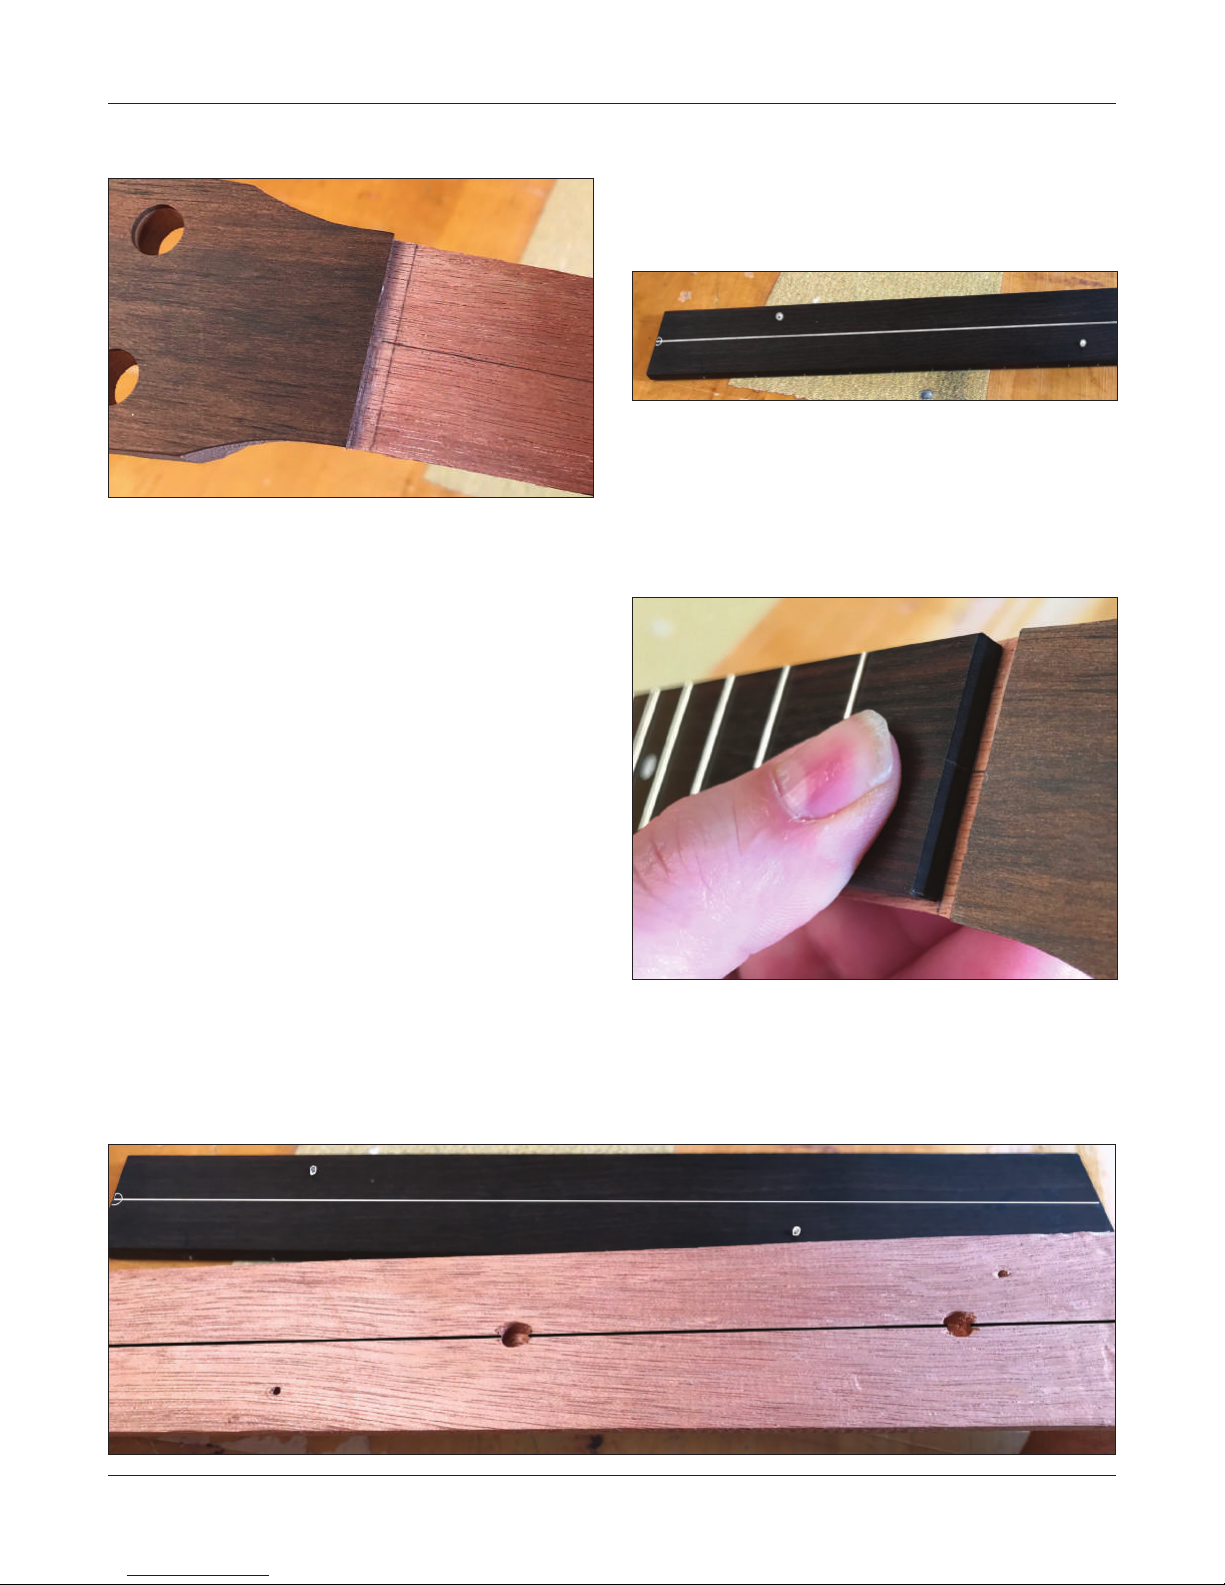
Align the nut against the headplate and trace a pencil along
the face of the neck to determine the ngerboard location.
Carefully measure and mark a centerline on each end of
the ngerboard, and draw a centerline down the back of
the ngerboard.
You should already have a centerline drawn on the face of
the neck. Carefully mark the underside of the heel with a
pencil at the centerline location. This will help you ensure
the ngerboard is perfectly aligned on the neck.
Insert the fret board position marker material in the hole you
just drilled and snip it o with 1/8"–3/32" protruding above
the ngerboard. (It’s not necessary to glue the material in if
it ts snugly in the hole.)
Now repeat the process between the 10th and 11th fret.
When this is completed carefully align centerlines you made
on the ngerboard with the centerlines drawn on the neck
and rmly squeeze the ngerboard onto the neck. (Remember to align it with the pencil mark you made for the nut. It’s
a good idea to cover the pencil line with nger board. This
will ensure the nut ts nice and snug.)
Registration pins
It’s very important that the ngerboard is perfectly aligned
on center to the neck. As you may have experienced parts
tend to skate around during glue up.
To help with this we can optionally add 2 locating pins in
the ngerboard that will hold the ngerboard securely in
place during glue up.
You should have excess side dot material left over from an
earlier step where we added side position markers to the
ngerboard.
Using a 1/16" drill bit carefully drill a hole 1/16" deep in the
reverse side of the ngerboard between the 1st and 2nd
fret. You want to drill this hole about half way between the
centerline and the edge of the ngerboard.
The plastic ngerboard marker material will easily embed
into the softer mahogany. These will serve as registration
pins to help hold the neck in place during glue up.
It’s important that the ngerboard seats tightly on the neck.
stewmac.com
19
Page 20
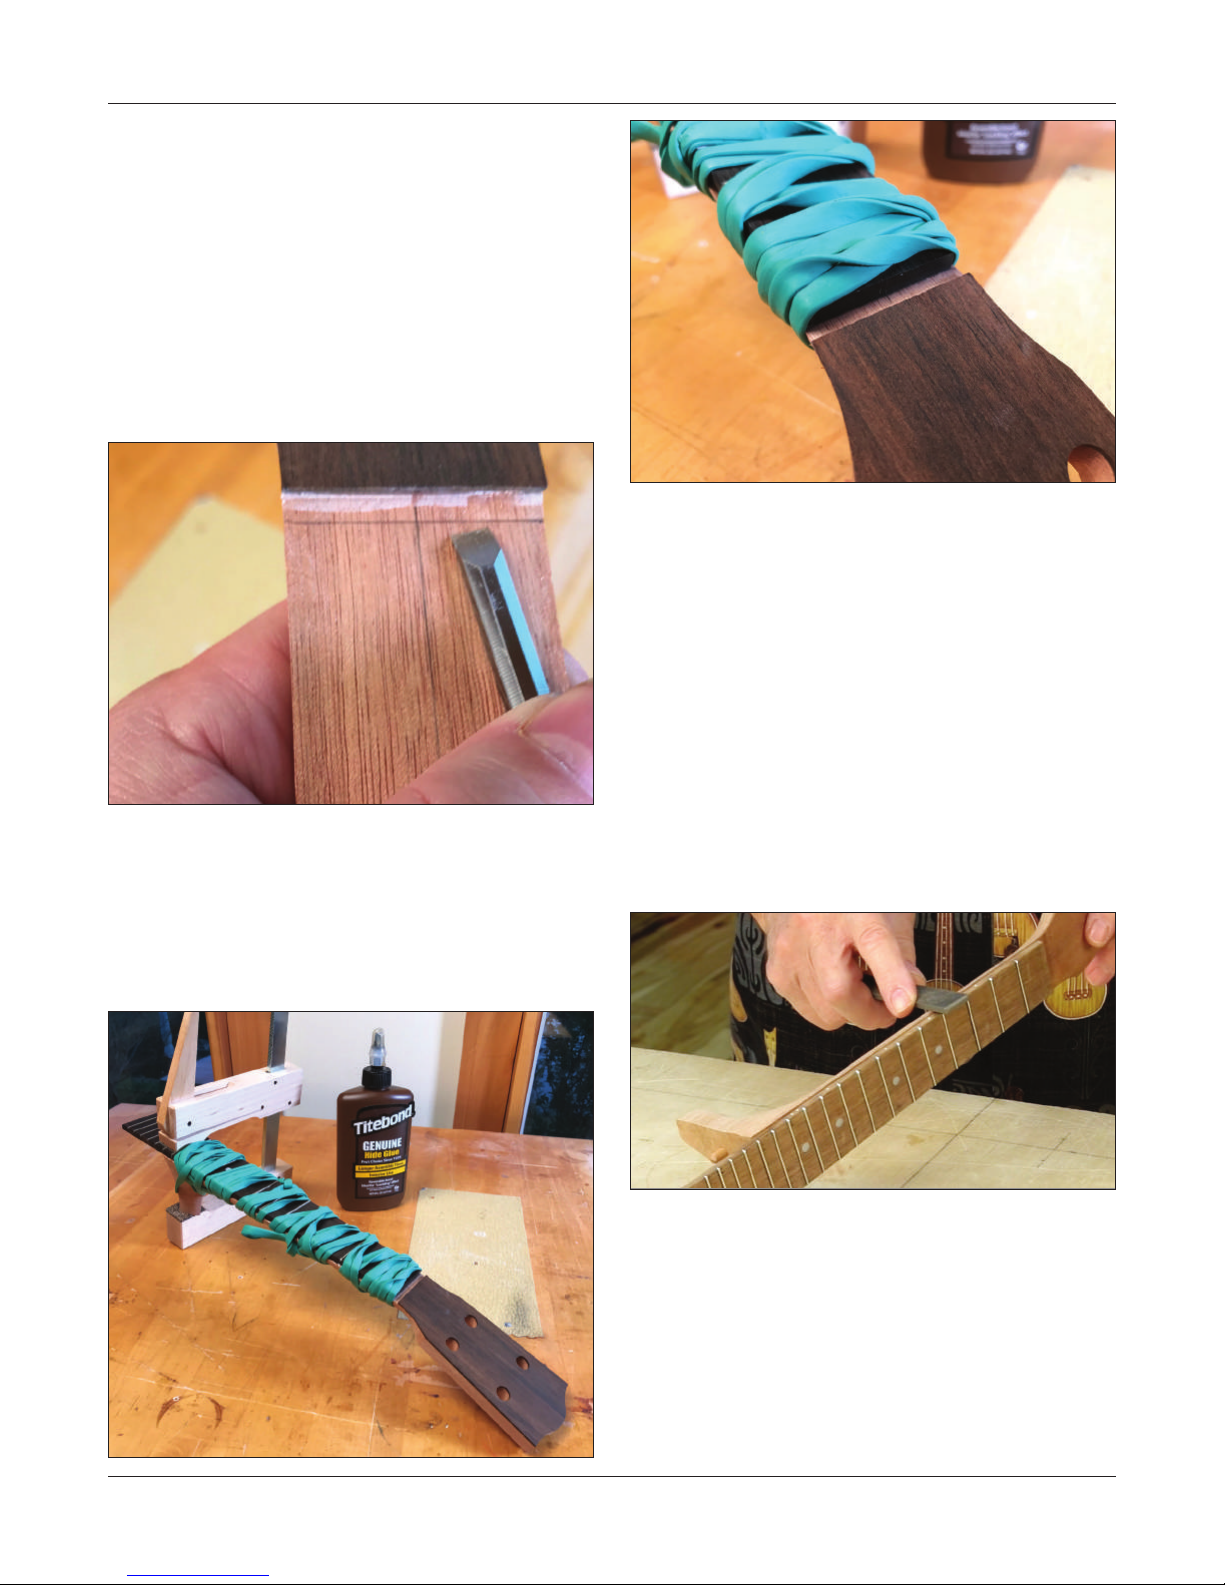
If the registration pins hold the neck up (even the slightest
amount) use a le to lightly remove some material from the
registration pins until the ngerboard sits dead at against
the neck.
Preparing the nut area
If there is any dried glue squeeze out from where the headplate was applied it is easiest to remove it now before the
ngerboard is glued on.
It is easiest to remove this with a very sharp chisel. Simply
lay the back of the chisel along the face of the ngerboard
and gently remove any dried glue.
If there is any glue squeeze out in the nut slot or under the
ngerboard near the heel wait 5 minutes and clean it up
as you did with the braces. (Don’t worry about squeeze
out along the edges of the ngerboard. We’ll clean that up
after it is dry.)
Allow the glue to dry overnight.
Gluing the ngerboard on the neck
Brush glue onto the surface of the neck, and press the ngerboard in place.
Wrap the board tightly with rubber binding bands. Even with
the registration pins it is important to check to be sure the
board is centered on the neck.
Smooth the ngerboard/neck transition
The glue joint between the ngerboard and neck needs to
be smoothed to get a comfortable transition between the
rounded neck and the at edge of the ngerboard.
Use a at le and sandpaper to slightly round the ngerboard
edge, blending it into the neck. At this stage, you’re shaping,
not nal sanding. Final sanding comes later, as you prepare
for nishing.
While ling along the length of the neck, this is a good time
to double-check the bevel of your fret ends. When playing
the uke, you’ll appreciate the feel of the rounded neck
blending smoothly into the ngerboard, with comfortably
beveled fret ends.
20
Trim the heel
If the heel of your neck extends past the sides of the ukulele
we will need to trim the neck so the heel transitions nicely
from the back of the instrument.
stewmac.com
Page 21
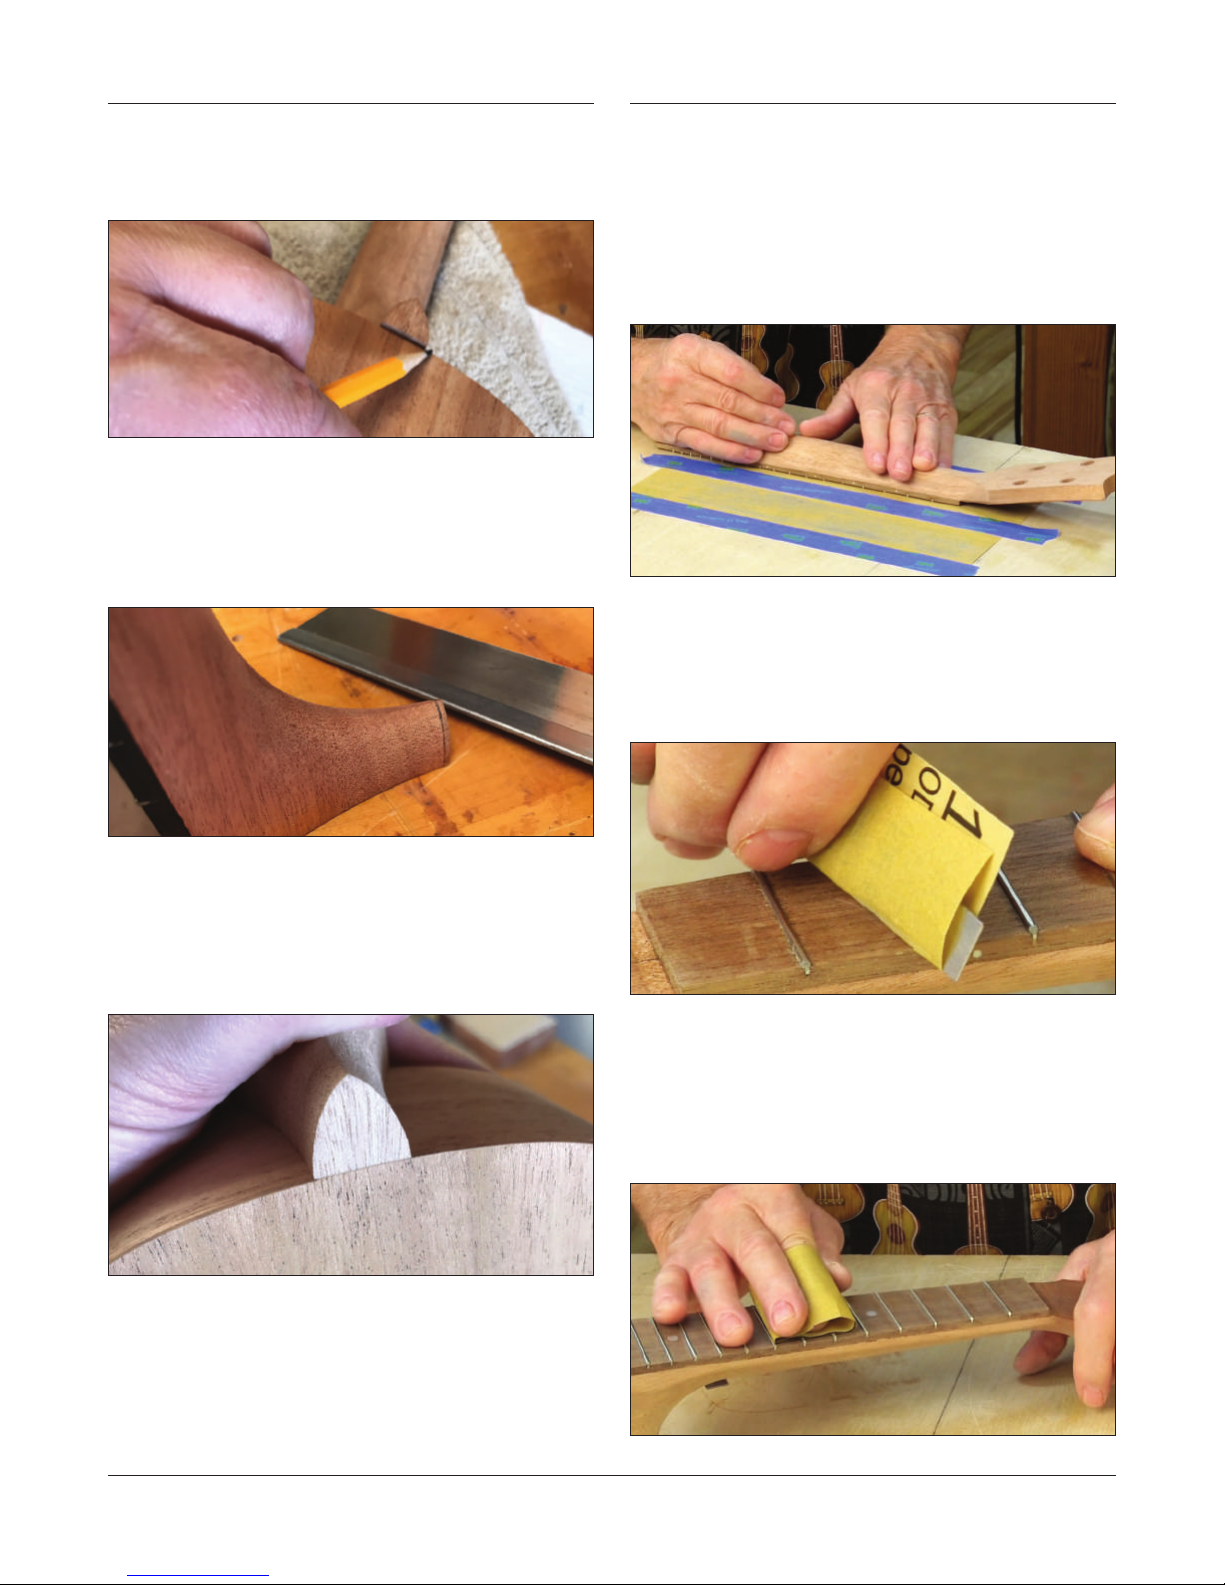
Level the frets
Seat the neck into the body using the dowel pins and ensure
it is aligned on center.
Mark a line where the heel cap extends past the body.
Extend this pencil line up both sides of the heel so the entire
amount to be removed is marked.
Carefully trim o the excess with a saw. You should NOT take
the line. We want the heel to remain just a tiny bit proud of
the back of the ukulele body after trimming.
No matter how carefully you’ve installed the frets, some fret
tops will be higher than others.
To level the frets, tape 320- and 400-grit sandpaper to a at
table top. Lay the frets face-down on the 320-grit and slide
back and forth to sand them. When all the fret tops have
been scued by the paper, the frets are level. Follow this
with 400-grit paper, sanding gently to remove scratches.
Round the fret ends
The beveled fret ends will have some roughness from ling.
400-grit sandpaper wrapped around a metal ruler makes a
good tool for rounding them. Stroke the ends where they
meet the ngerboard, rounding them until they feel smooth.
Now, take a at sanding block with 120-grit adhesive sandpaper and sand the transition between the back of the
instrument and the heel smooth.
When you’re done you should have a owing surface that
extends directly from the back of the body and the neck.
Round the fret tops
Leveling the frets leaves at surfaces on the fret tops. Round
o these ats using 400-grit sandpaper wrapped around
your ngers. Run the sandpaper up and down the ngerboard to smooth the frets. Follow this with 600-grit paper
for a nice satin surface.
stewmac.com
21
Page 22
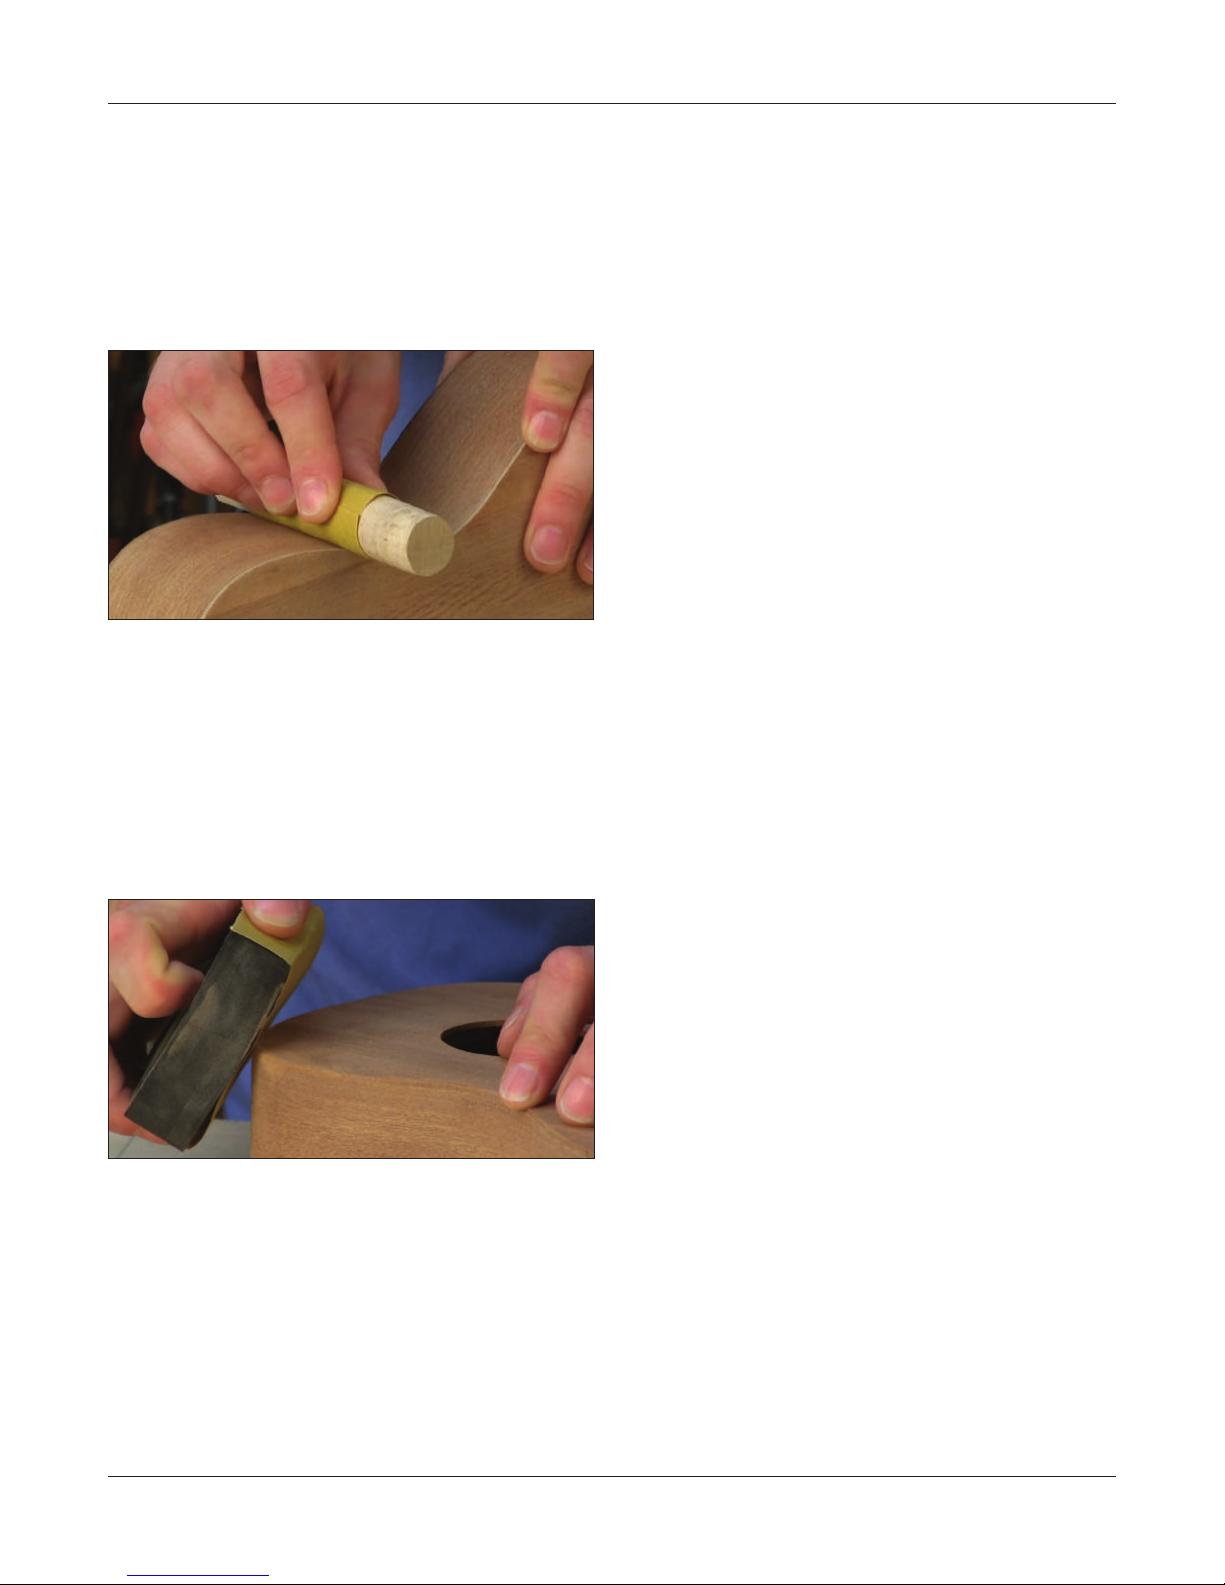
Sand the body and neck
Sand with 180-grit
Sand the body using 180-grit sandpaper and a at sanding
block. Make your sanding strokes with the grain direction,
not sideways across it. You’re looking for and removing any
scratches deeper than the grain itself, and a sideways or
circular motion will create small new scratches.
A stout wooden dowel makes a good sanding block for the
inner curves at the waist.
Other than the top edge directly under the ngerboard,
smooth all sharp edges to make them slightly rounded.
When edges are too sharp, it’s easy to accidentally sand the
nish away at those points when you sand between coats.
Knock o all sharp edges so they receive and hold a good
coat of nish.
Raise the grain by damp sanding
Sandpaper cuts away the fuzzy bers of wood grain. Sanding
causes some of these bers to lay down at, even though
they haven’t been removed. When wet nish touches them,
the bers lift up and make your nish feel rough.
Solve this problem by raising the grain with a damp rag.
When you’re done with the 180 -grit sanding, wipe the wood
with damp rag (not wet. After the wood dries, you’ll feel the
roughness of the raised grain.
Sand with 220-grit
Now move on to sanding with 220-grit, which cuts away
the bers raised by the damp rag. Completely sand the
body and neck.
Examine your work thoroughly for any scratches that may
have been left by the 180-grit sand paper.
Once you’re satised you’ve removed all the scratches and
everything is smooth, the wood is ready for nish.
However, before nishing, you will need to establish the
bridge location in order to tape o the area where it will
be glued later.
Carefully examine your work using glancing light to nd
any scratches you missed. Continue with the process until
all deep scratches are removed.
22
stewmac.com
Page 23
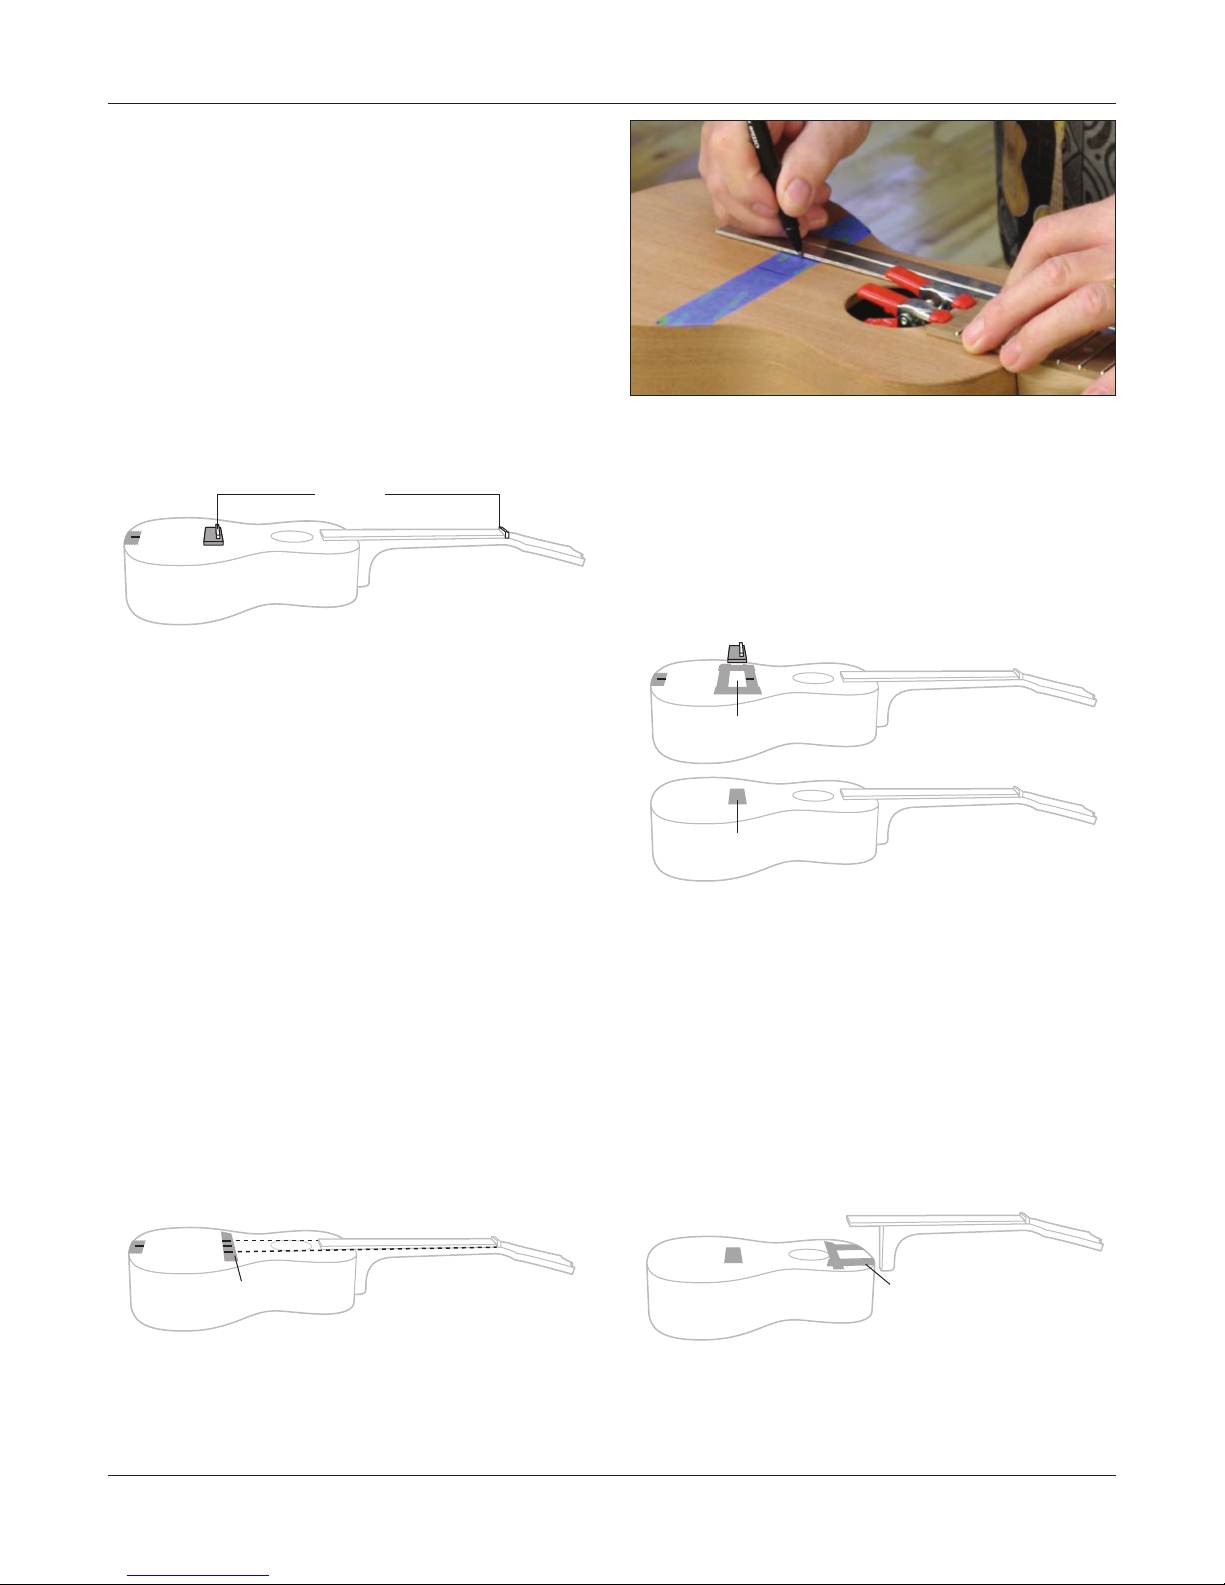
Locate the bridge
The bridge needs to be at the correct distance from the nut
for your uke to play in tune. We’ve made locating the bridge
very simple: you just need one measurement.
Dry-t the neck onto the body using one of the neck joint
dowels. With a straightedge down the middle of the ngerboard, nd the center point on the tail of the uke. Mark this
on a piece of tape.
Measure carefully along this centerline to locate the bridge.
Start from the end of the ngerboard where it will contact
the nut, and measure 16-31/32".
Measure from the front of the nut
to the center of the saddle.
31
/
16
Tape Saddle
32"
This is the distance from the nut to the center of the saddle.
This is a critical measurement so take your time and double
and triple check your work. Use a piece of tape to mark this
location on the uke. The tape should be longer than the
width of the bridge. Line up the edge of this tape with the
center of the saddle slot to ensure proper bridge placement.
Draw a pencil line from the center of the saddle slot to the
edge of the bridge on each side to aid in lining up the bridge.
It can be erased later.
Nut
Small spring clamps through the soundhole can grip the
ngerboard to keep the neck in its corrected position while
you center the neck.
Tape o the bridge area
Pencil a centerline on the front edge of the uke bridge, and
line the bridge up against the tape that marks your measurement. With the bridge centered and square to the centerline,
place masking tape around all four edges.
Bridge surrounded with tape
Bridge area taped off
Taping off the bridge area
to prepare for finishing
Place a piece of tape along the front edge of the bridge while
holding it in the proper location. This will mark the location
of the bridge, the rst piece of tape can be removed. With
your straightedge, mark the centerline on this tape.
Center the neck
Check to see if the neck is centered. Place the straightedge
along both sides of the fretboard and mark the tape at the
bridge location. These two mark s should equally straddle the
centerline that you’ve already marked. If they’re o-center,
shift the neck until it’s centered.
Mark fretboard edge lines See if the neck is centered
stewmac.com
Remove the bridge, and you’ve a framed the bridge’s “footprint” with masking tape. Cut more tape to exactly ll the
inside of this frame. Remove the outer tape. After you’ve
applied the nish, this taped-o bridge area will be left
unnished for good adhesion when you glue the bridge.
Tape o the ngerboard area
Put tape around the fingerboard extension to create a
“frame” around this area also. Before you place tape inside
the frame, consider whether your neck joint needs to be
adjusted.
Fretboard taped
23
Page 24
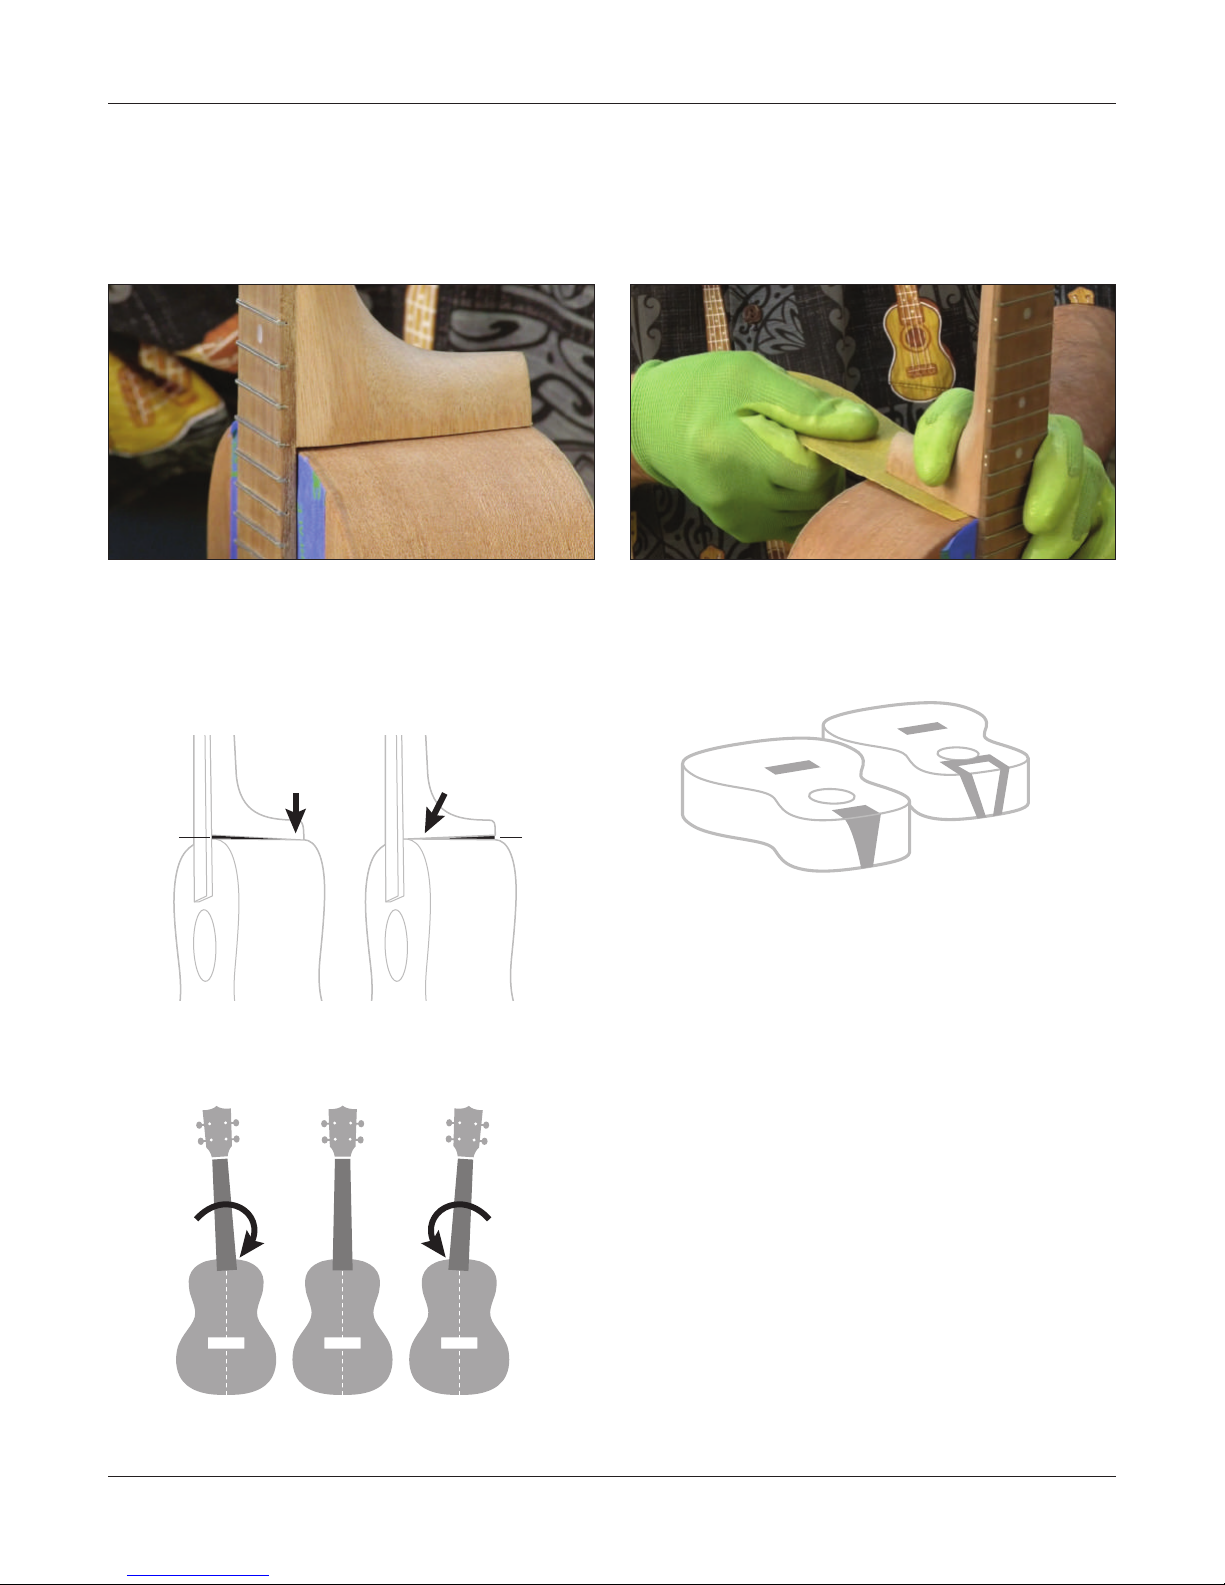
Fitting the neck joint
When you dry-tted the neck, if it needed to be shifted left
or right for centering, the neck joint needs to be adjusted.
Or, you may nd a gap between the neck and the body.
This can be caused by any number of things, and it’s not
hard to correct.
The gap in the photo above can be xed by removing wood
from the heel of the neck. Because the gap is toward the
ngerboard, wood needs to be removed from the bottom of
the heel. If the gap were ran the opposite way, wood would
be removed from the top of the heel.
Remove wood by strip-sanding with 80- Grit sandpaper. Cut
a strip of paper to t under the area you’re sanding, and slide
it between the neck and body. Hold the neck rmly down
onto the body, and pull the sandpaper out. Repeat this until
enough wood has been sanded away. Wear gloves to avoid
paper cuts from the edge of the sandpaper.
Tape o the neck heel area
Frame the neck heel with masking tape, as you did for the
bridge and ngerboard.
Remove
wood here
Gap
Remove
wood here
Gap
If the neck leans to the left or right, wood needs to be removed from the opposite side of the neck heel.
If the
neck leans
this way,
remove
wood here
If the
neck leans
this way,
remove
wood here
Taped-off for gluing
Taped-off for staining
The next step depends on whether you’re going to stain your
ukulele or give it a clear natural nish. If you’re staining, tape
inside the neck heel and ngerboard extension, then remove
the frame of tape. Like the bridge, the neck joint area is now
masked to keep it free of stain and nish, for gluing later.
If you’re not staining, the frame of tape around the neck joint
is ready for gluing the neck.
24
stewmac.com
Page 25
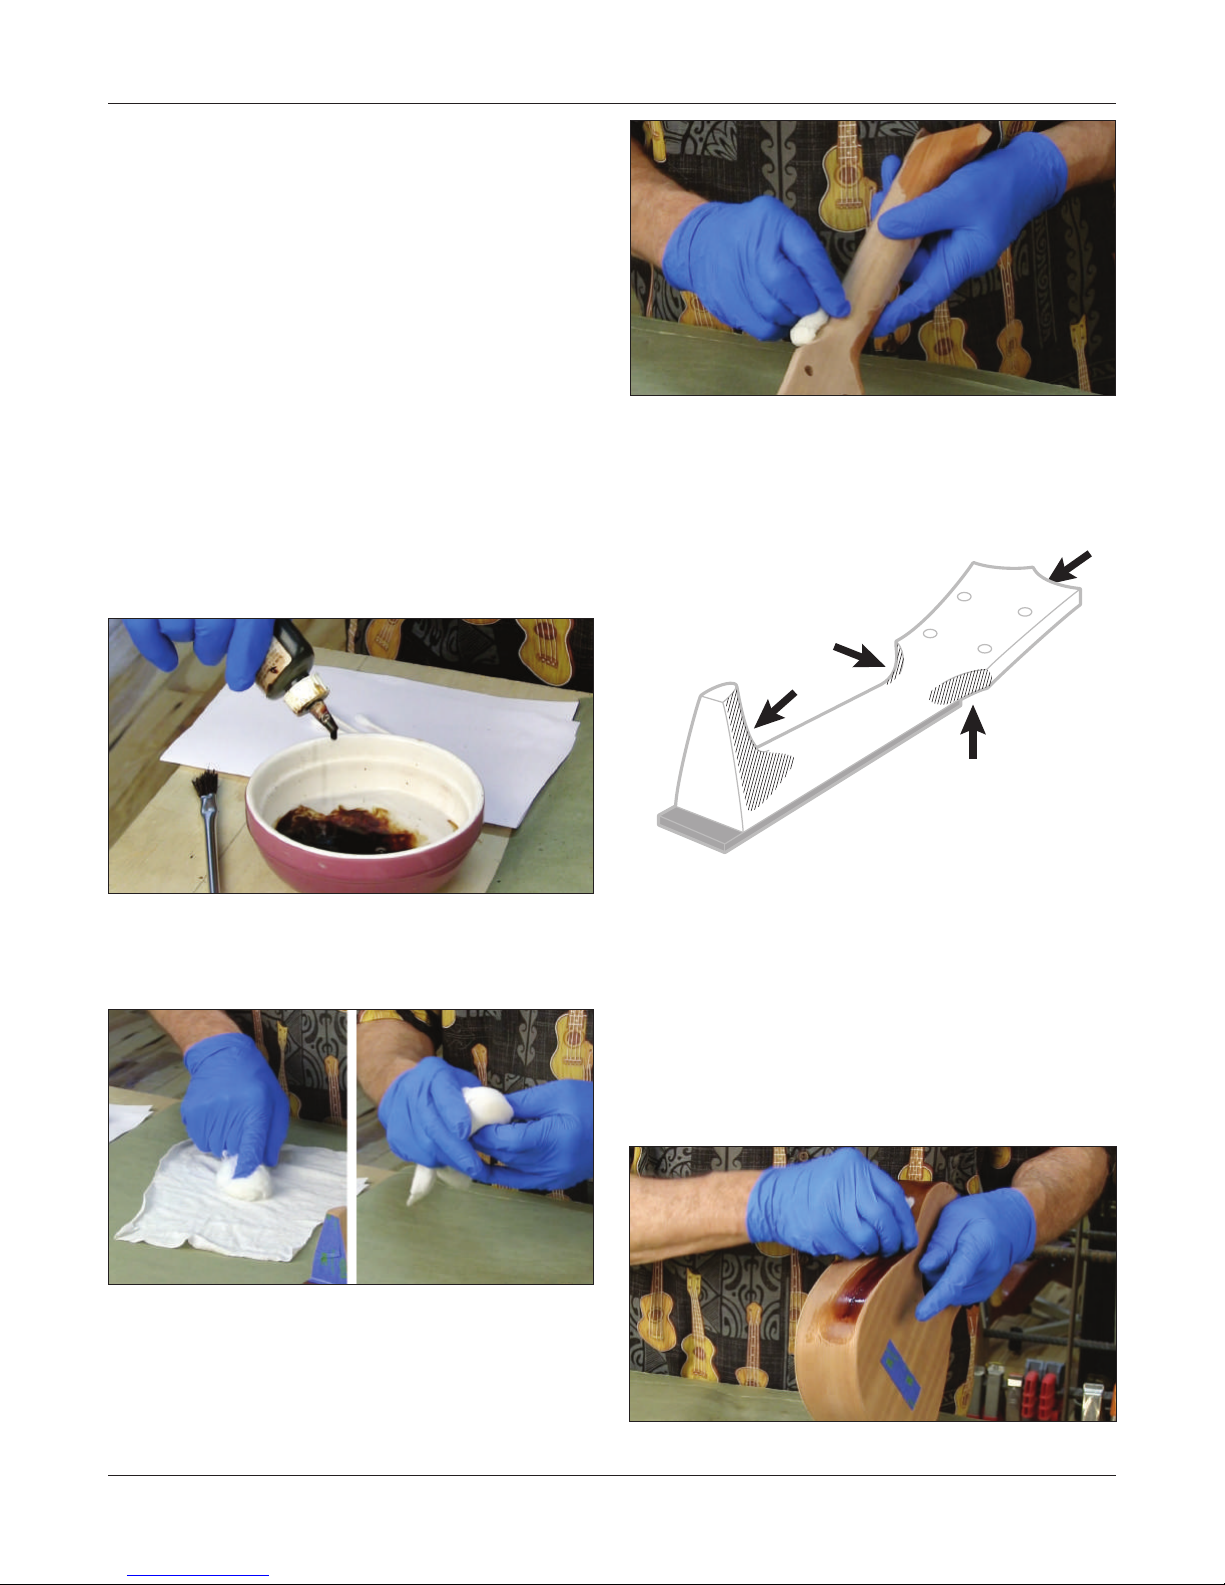
Apply the stain (optional)
Wet the endgrain
before staining
If you’re going to stain the wood, do it before attaching the
neck. When the neck is on, stain accumulates along the seam
where the neck meets the body. To avoid having to remove
stain from this crevice, stain the neck and body separately.
If you’re choosing an unstained natural nish, you can skip
this section on staining and attach the neck.
It’s not impossible to have diculty with stain. Dark spots,
light spots or otherwise uneven coverage are possibilities.
If you want to follow the easiest, most foolproof path to a
nished uke, go with the clear natural nish.
Use ColorTone Liquid Stains to create rich dark browns or
vibrant colors. The color in the bottle may be exactly what
you want, but don’t hesitate to mix colors.
Mix the stain with water
ColorTone Stains are concentrated, so mix them with water.
The amount of water and stain depends on the color you’re
after and the wood you’re staining.
Compensate for this by wetting these areas with a damp
cloth before you begin staining. The damp endgrain will
suck up less stain than if it were dry, giving better balance
to your stain overall.
Wipe on with cloth-wrapped cotton
Wrap a ball of cotton in a scrap of t-shirt material to make a
pad for staining.
Wet the endgrain with water
Down the length of the neck, the wood grain runs straight.
The carved heel and peghead have exposed endgrain, indicated by dark areas in the illustration below. The end of
the peghead is endgrain also. These areas will absorb more
stain than the straight grain, making them darker.
stewmac.com
Wait until your color is mixed and you’re ready to begin
staining before you wet the endgrain, so it doesn’t have
time to dry out.
Wipe on the stain
Wear gloves! Work quickly with the cloth/cotton pad, building the color evenly all over the body and neck. You can go
back and apply more stain, and can even darken the edges
around the body using a semi-dry staining pad.
25
Page 26
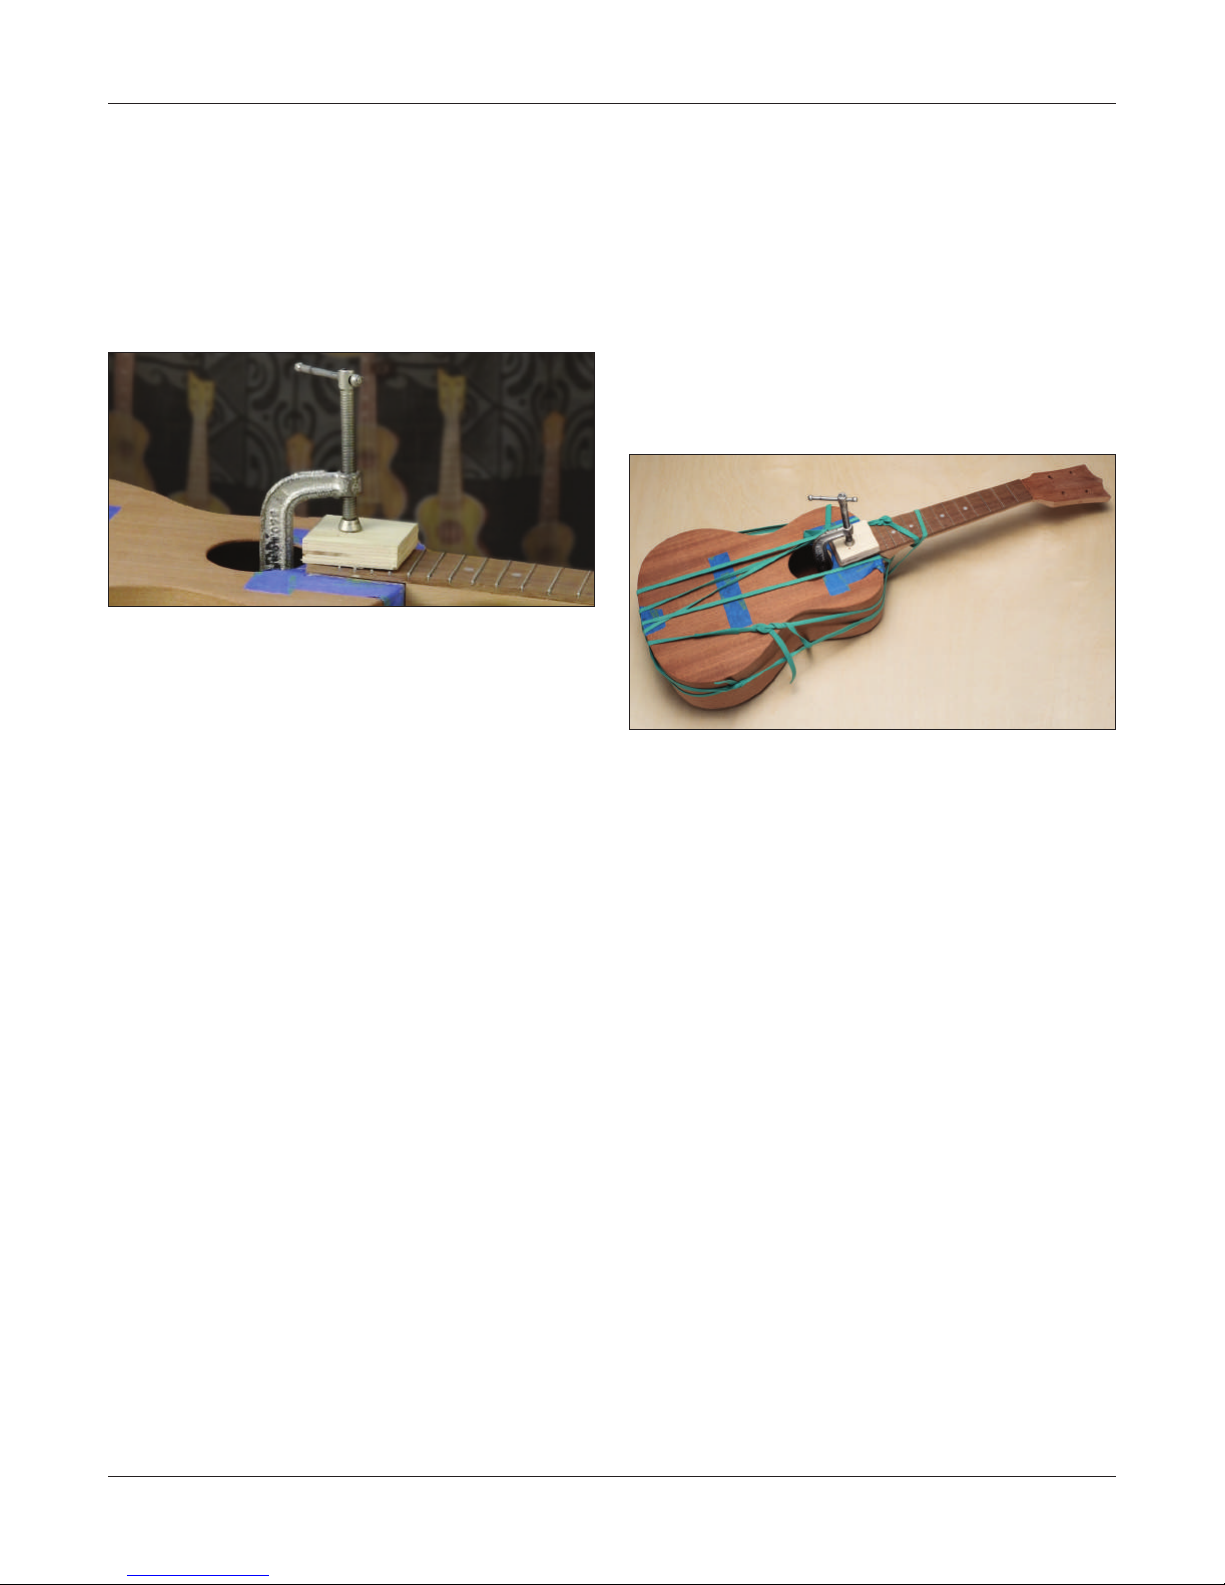
Attach the neck
At last, it’s time to put the neck on the body! The neck will
be held in place during gluing with a rubber binding band.
A small clamp will hold the ngerboard extension to the
top. This might be the spring clamp used when test-tting
the neck.
If more pressure is needed on the ngerboard extension, a
C-clamp can be used. Use a piece of scrap wood as a caul to
protect the frets from the clamp.
Inside the body, the clamp foot will land on the top brace.
To best protect the brace from damage, make a caul from a
small piece of scrap wood. This caul elevates the clamping
surface above the brace allowing the clamp to be applied
without interference.
If you stained your uke, apply masking tape again around
the neck joint surfaces. Apply glue to the neck heel and ngerboard extension, and to the matching areas on the body.
Put glue on the dowels and the holes they t into.
Clamp the neck in place, checking to make sure it’s aligned
and centered. Tie the rubber binding band to the neck.
Stretch it down over the tail of the uke and back up around
the heel of the neck, wrapping tightly.
When the neck is bound with rubber bands, clean away any
squeeze out you can reach. Allow to dry overnight (there’s
a lot of glue in that neck joint).
26
stewmac.com
Page 27
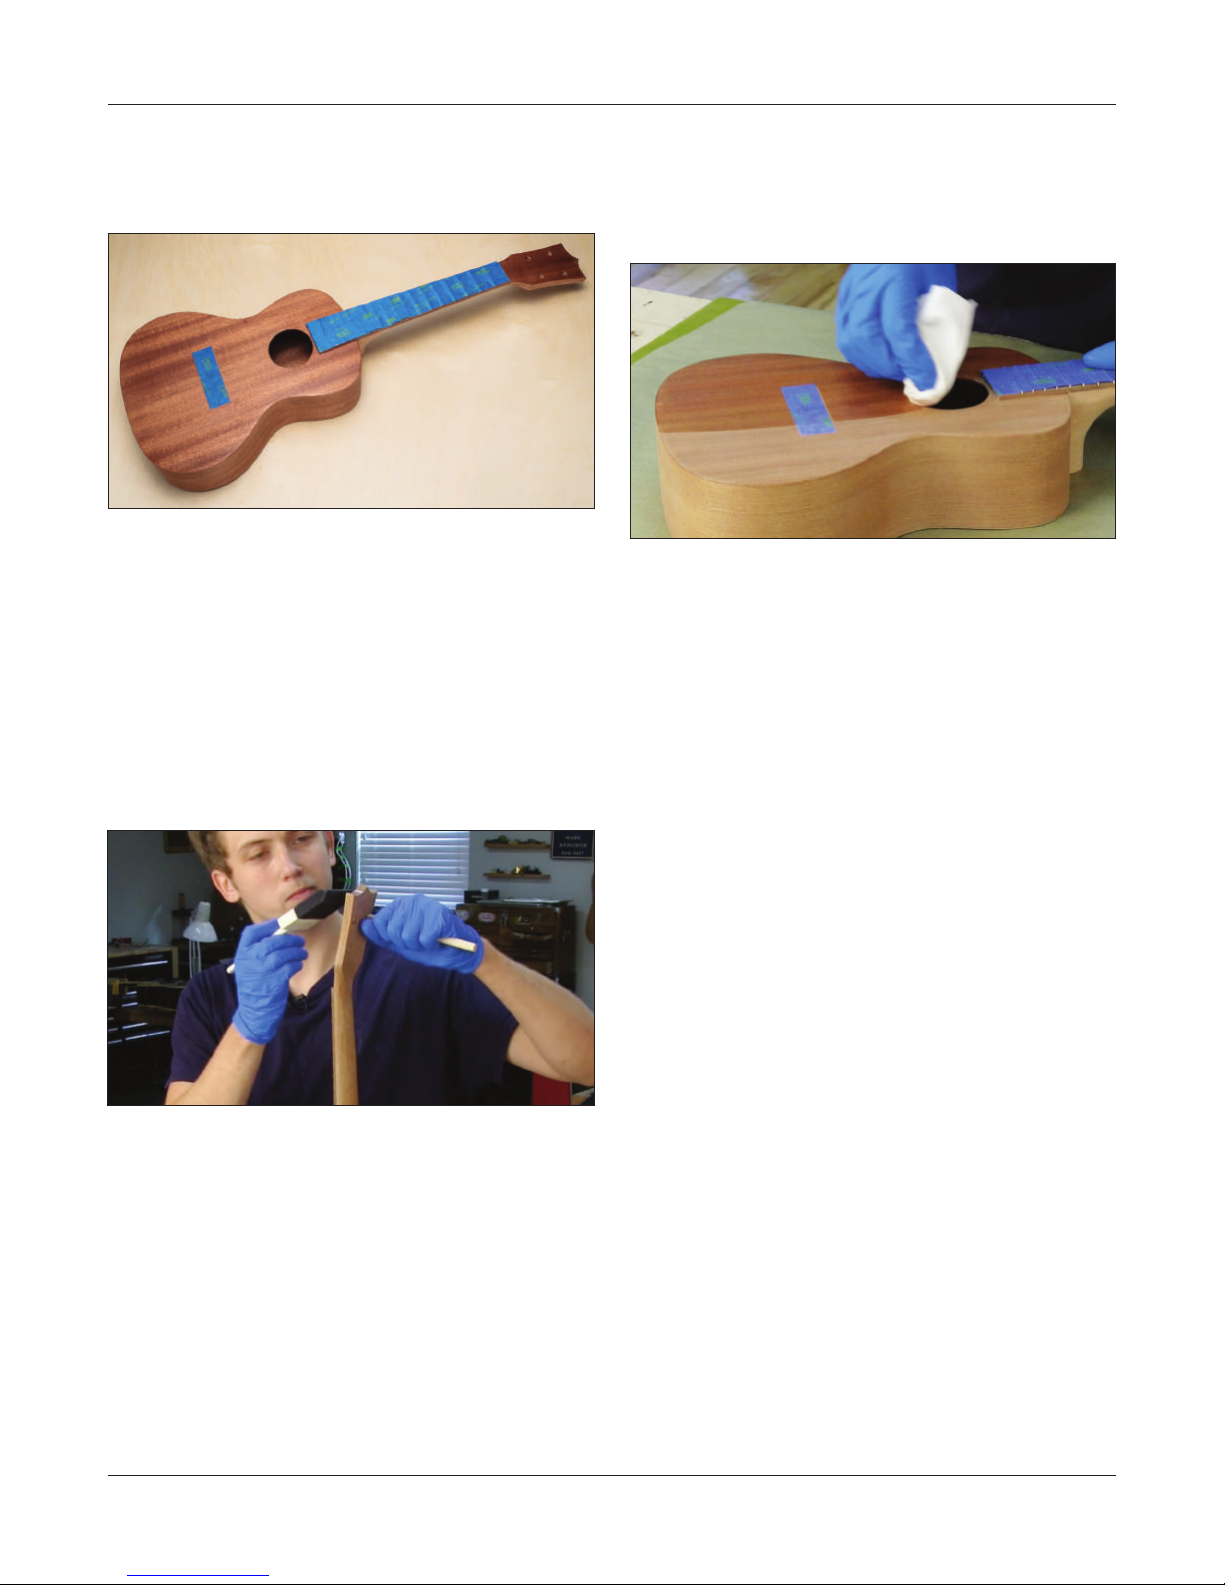
Apply the nish
Tape o the ngerboard to avoid getting nish on it. If there
is a gap between the neck and body, ll it with ColorTone
Grain Filler. A mix of our Mahogany and Ash colors made a
good match for the light mahogany of this unstained kit.
Tape o both sides of the gap, then use a knife to press the
ller into it. Wipe o the excess with a damp paper towel and
peel away the tape. Clean up with paper towel if needed.
Allow to dry, then sand with 400-grit paper.
Wear nitrile or other protective gloves when handling the
uke now, to keep the surface dry and clean for nishing.
Make a holder peg
You can hold the uke by the neck while nishing the body,
but by the time you’re nishing the peghead you’ll need a
hand grip.
Wipe on the rst coat
Using ColorTone Wipe-On Poly nish, apply the rst coat
using the pad made of cotton wrapped in a piece of t-shirt
cloth. The wood will soak up this rst coat very quickly; it’s
basically a sealer coat. Allow to dry.
Scu-sand with 400-grit
When the coat is dry, lightly sand it with 400-grit paper, to
remove surface imperfections.
Brush on the second coat
A foam brush lays down more nish than a cloth pad, so
brushing builds the nish more quickly while still being
very easy to do.
Scu-sand again with 400-grit
When dry, lightly sand again with 400-grit paper.
Sand a taper onto the end of a dowel, so it will press-t into
one of the tuner holes, like a violin peg. This gives you a
handle while adding the last stroke of nish. You can also
clamp this peg to your table when leaving the uke to dry.
Apply the nal coat
Add a third coat for a complete nish. Allow to dry for a day.
Shiny or satin?
The nish will have a nice sheen. If you’d rather have a satin
look, you can dull the nish by rubbing it with 0000-grade
steel wool.
stewmac.com
27
Page 28
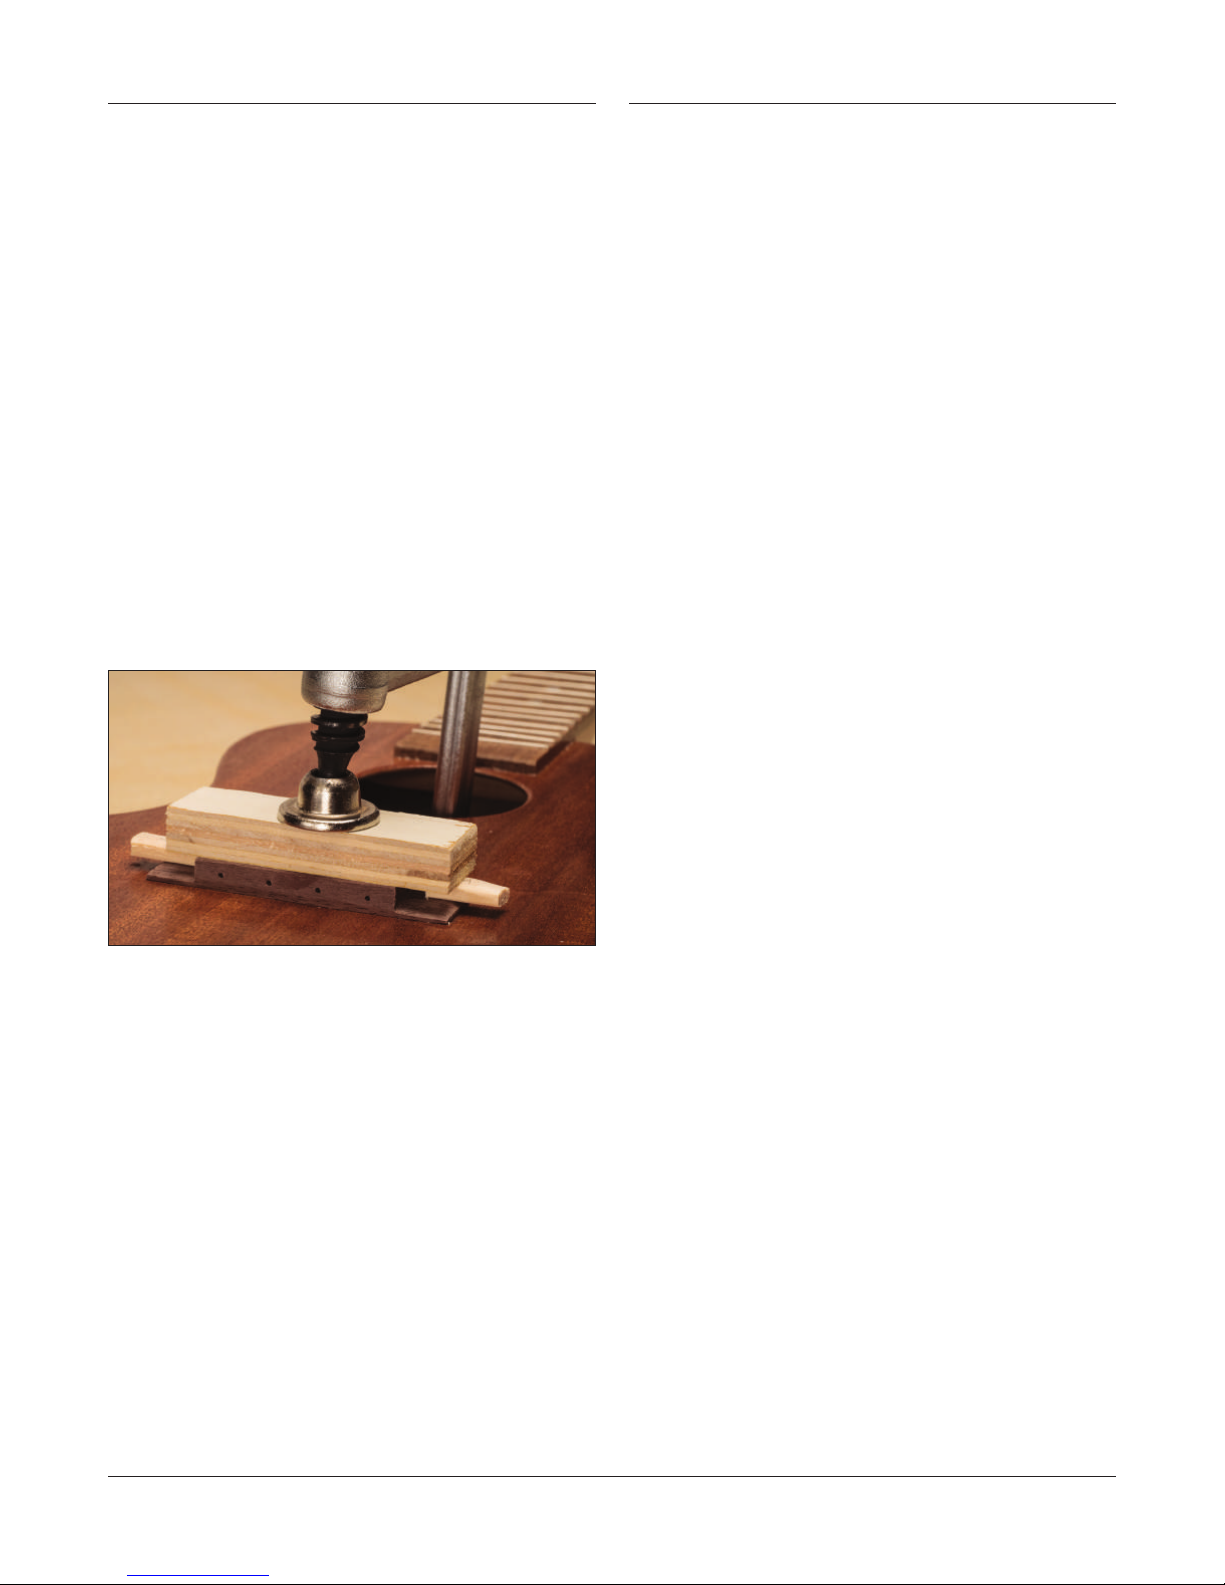
Glue the bridge Install the tuners
Be careful not to install the bridge backwards! The saddle
goes toward the neck, and the string tie block goes toward
the tail.
Remove the tape from the bridge area and ngerboard. Place
the bridge onto its “footprint” and tape around it to catch
any glue squeeze out.
Reduce the tackiness of masking tape
Masking tape’s adhesive is strong, and contains chemicals
that could react with your new nish—so don’t leave tape on
the nish any longer than you have to. Also, make the tape
less tacky by pressing it onto your clothing before applying it.
Dry-run your clamping setup
You can glue the bridge with a single clamp. Protect the top
of the bridge with a wooden caul. Apply pressure to the ends
of the bridge with small wooden wedges.
Be sure to NOT place the clamp on top of the center fan
brace over the bridge patch – this could damage the soft
spruce. Instead place the camp just to the right or left of
the fan brace.
Put the tuners in the peghead, and place the washers
over the string posts. Add the hex nuts and make them
nger-tight. Line the tuners up so they stick out at right
angles, not crooked. Use a sharp awl to mark the tuner
mounting holes. Drill the pilot holes and install the screws.
Use a wrench to tighten the hex nuts on the peghead face.
Glue and clamp up
Apply the glue and clamp the bridge. Clean away squeezeout, and allow it to dry for 45 minutes.
28
stewmac.com
Page 29
Fit the nut and saddle
Place a straightedge on the frets, and see where it meets the
bridge. It should be roughly at the height of the bridge top.
Press the saddle into its slot and rest the straightedge on it.
Pretend the straightedge is a string and imagine that string
passing over the rst fret. Lift the straightedge so it’s a little
less than 1/16" above the rst fret (about .050"). This is a good
height for your strings. When the nut is installed, we’ll want
it to hold the strings at about this height.
Clean up the nut ledge
Use sandpaper to be sure the at area for the nut is level and
free of nish. An easy way to do this is to double-stick tape
a piece of 220-grit sandpaper to the bottom of the nut and
slide it back and forth. Remove the sandpaper and place the
nut in position, holding it with a bit of double-stick tape.
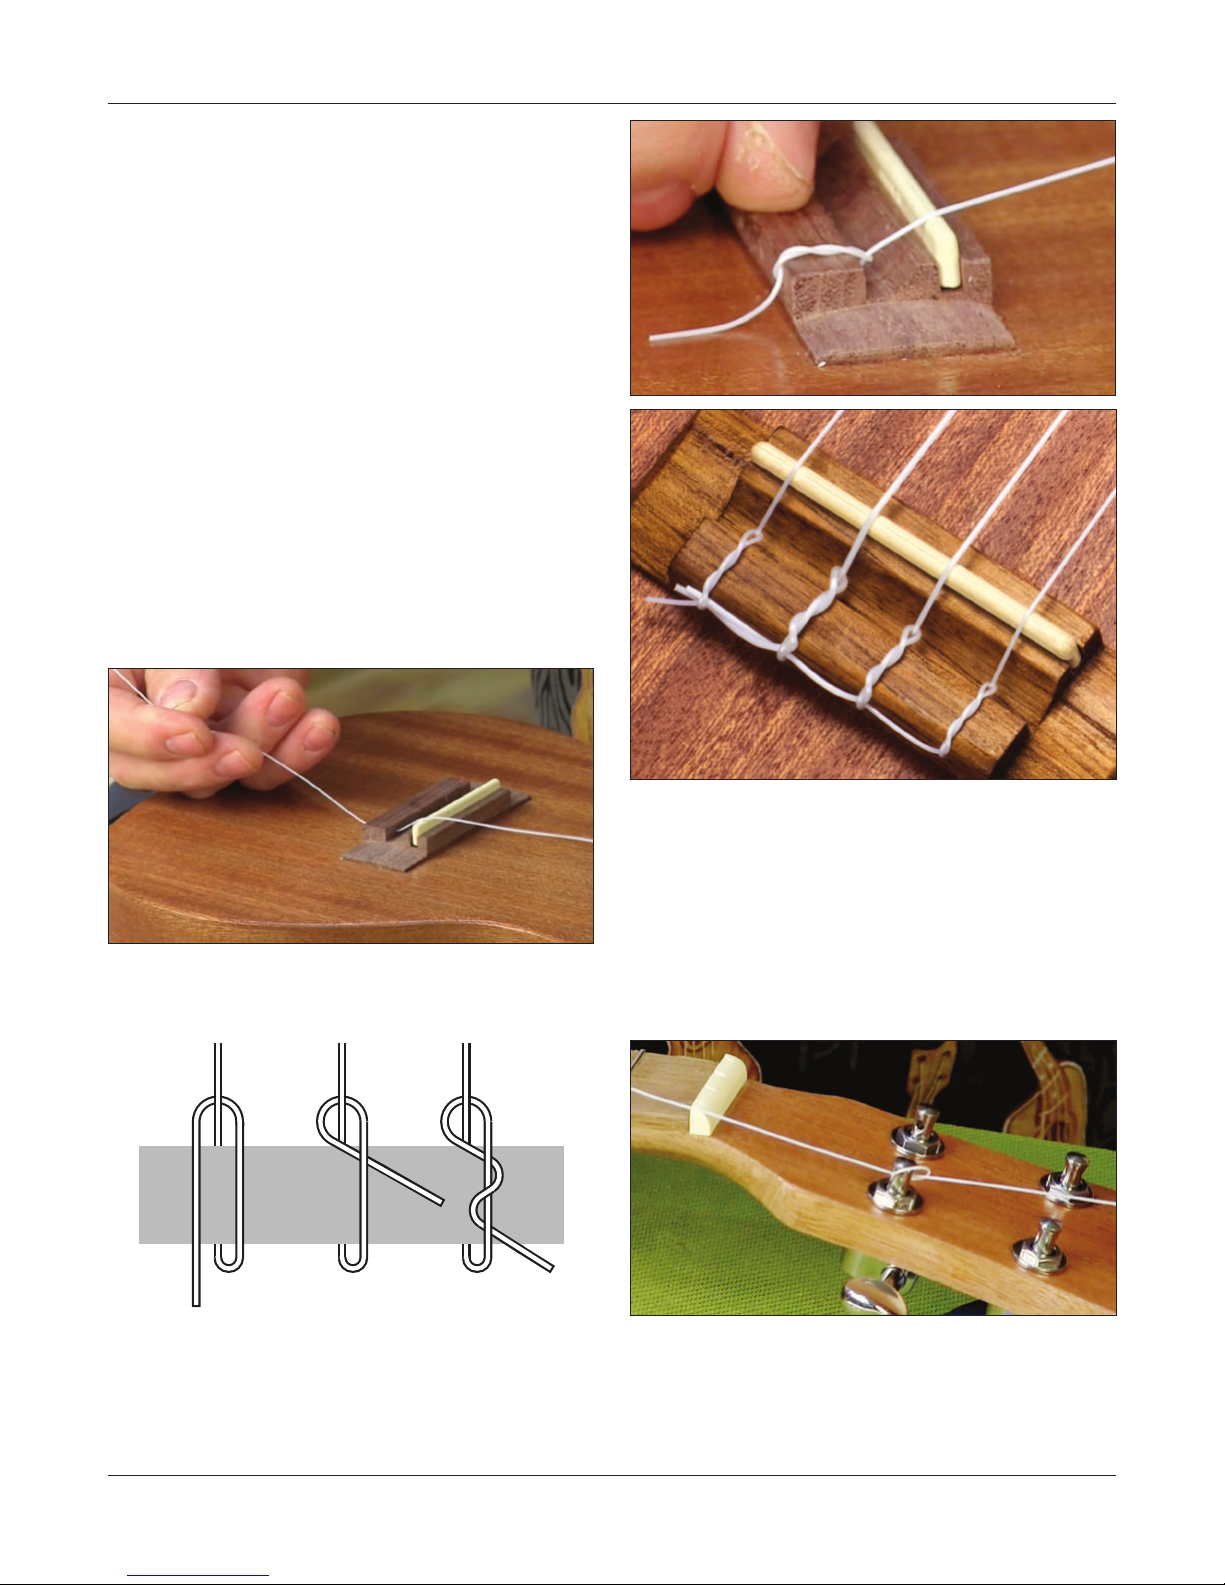
Install the two outside strings
There are four strings on a uke—two thin ones and two
thicker ones. The thin ones are the outermost strings. Install
these two outer strings so you can check the height of the
nut and saddle.
Thread the string through the back of the bridge. Tie it as
shown in the three-step drawing below. Draw it tight.
Pull it tight, and the knot holds securely.
When installing all four strings, tuck the tail end of the rst
string into the wrap of the second string. Continue this pattern for a clean job of stringing the uke.
Uke strings are stretchy. To get them to hold tight to the
string post, pass them through the hole, around and through
again to create a knot. This is quicker than slowly wrapping
many times to get a good grip on the post.
stewmac.com
29
Page 30
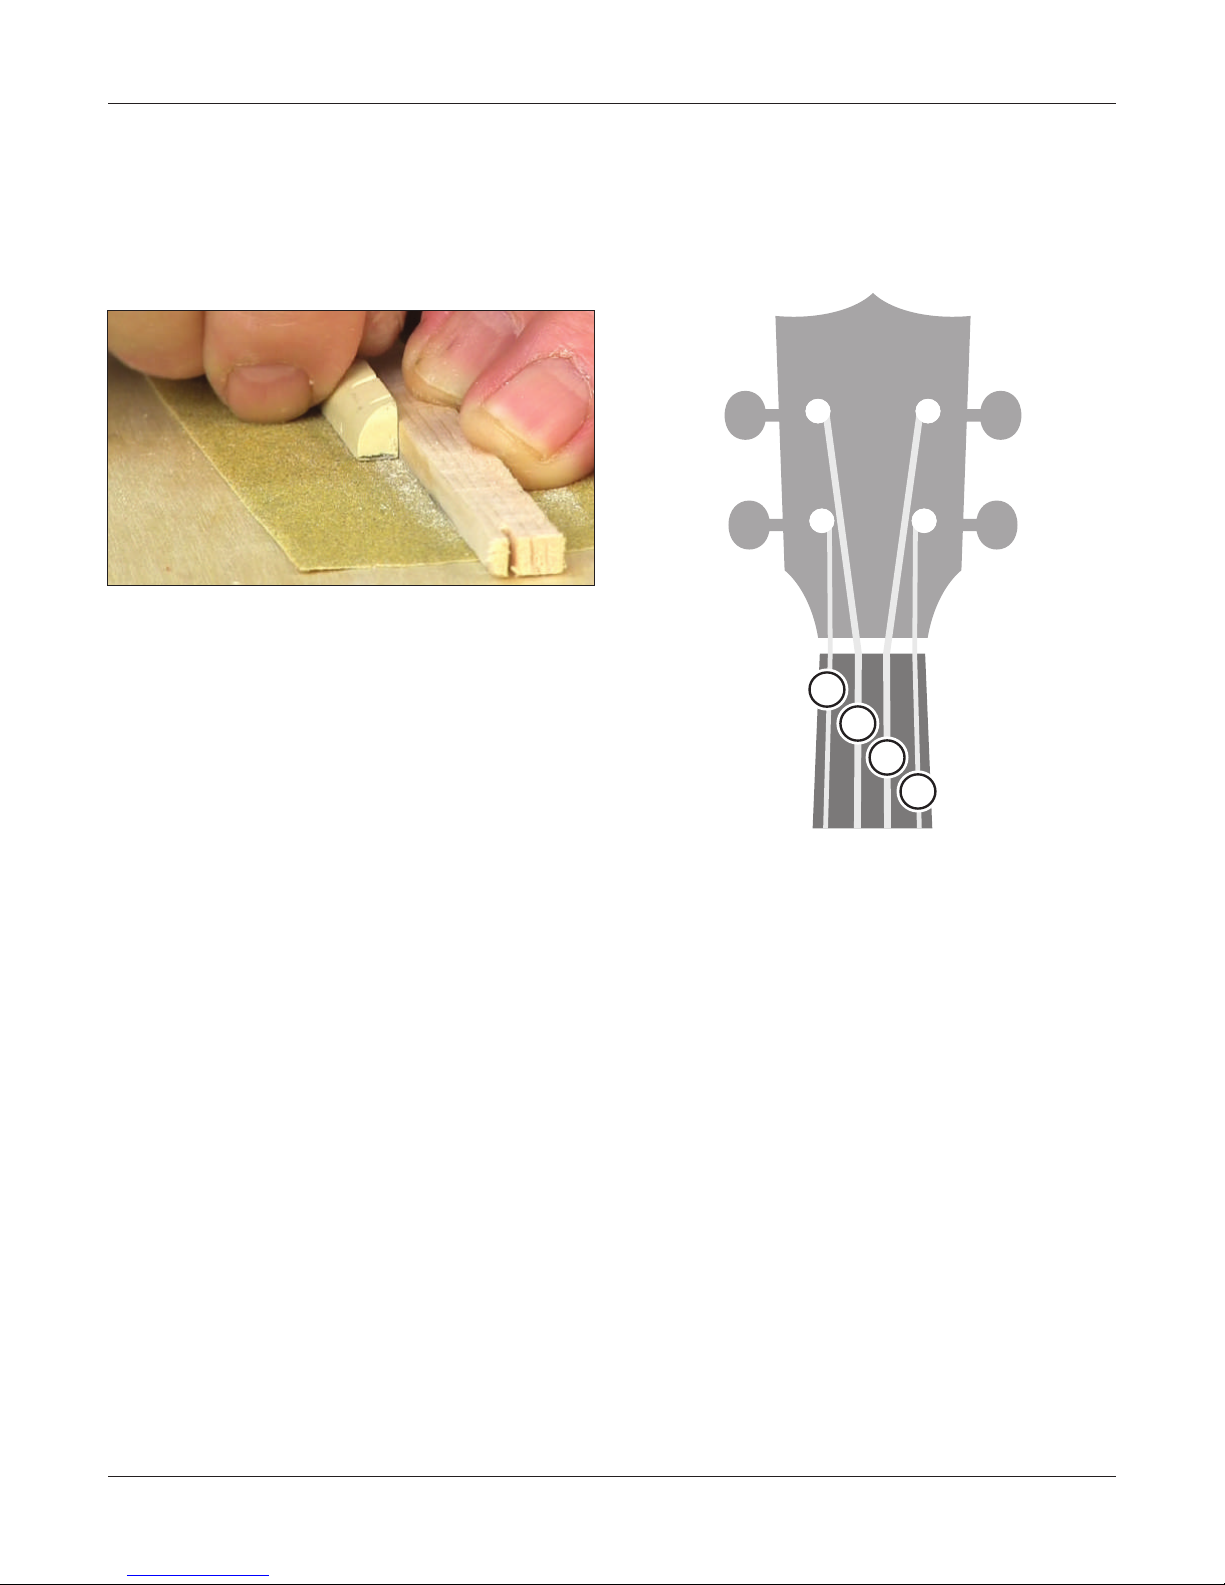
G
C
E
A
Adjust the nut height
If the string heights are comfortable, you’re almost done. If
the nut is too high, you can lower it by sanding material o
the bottom. Tape sandpaper to your table and slide the nut
on it until you’ve removed enough material. Hold the nut
against a piece of wood to keep square. Also smooth and
round the ends of the nut on the sandpaper.
If the nut is too low (unlikely), place a thin shim cut from
wood or a business card under it to raise it.
Oil the ngerboard and bridge
Before stringing up, wipe the ngerboard with ngerboard
oil or lemon oil. Use a Q-tip to do the same for the bridge.
Install the strings
String up and you’re done! Your uke is ready to play.
Tune your uke
The four open strings are G C E A. Have fun with your new
custom-built uke!
Install the nut
Put a small drop of glue under the nut, and place it in position. The strings will hold it securely.
30
stewmac.com
Page 31

stewmac.com
31
Page 32

21 N. Shafer St • Athens, Ohio 45701 • USA
USA & Canada call toll-free: 800-848-2273
9am-6pm weekdays Eastern time
stewmac.com
 Loading...