

Page 1
StewMac
Sheet #i-5282 Updated 10/17
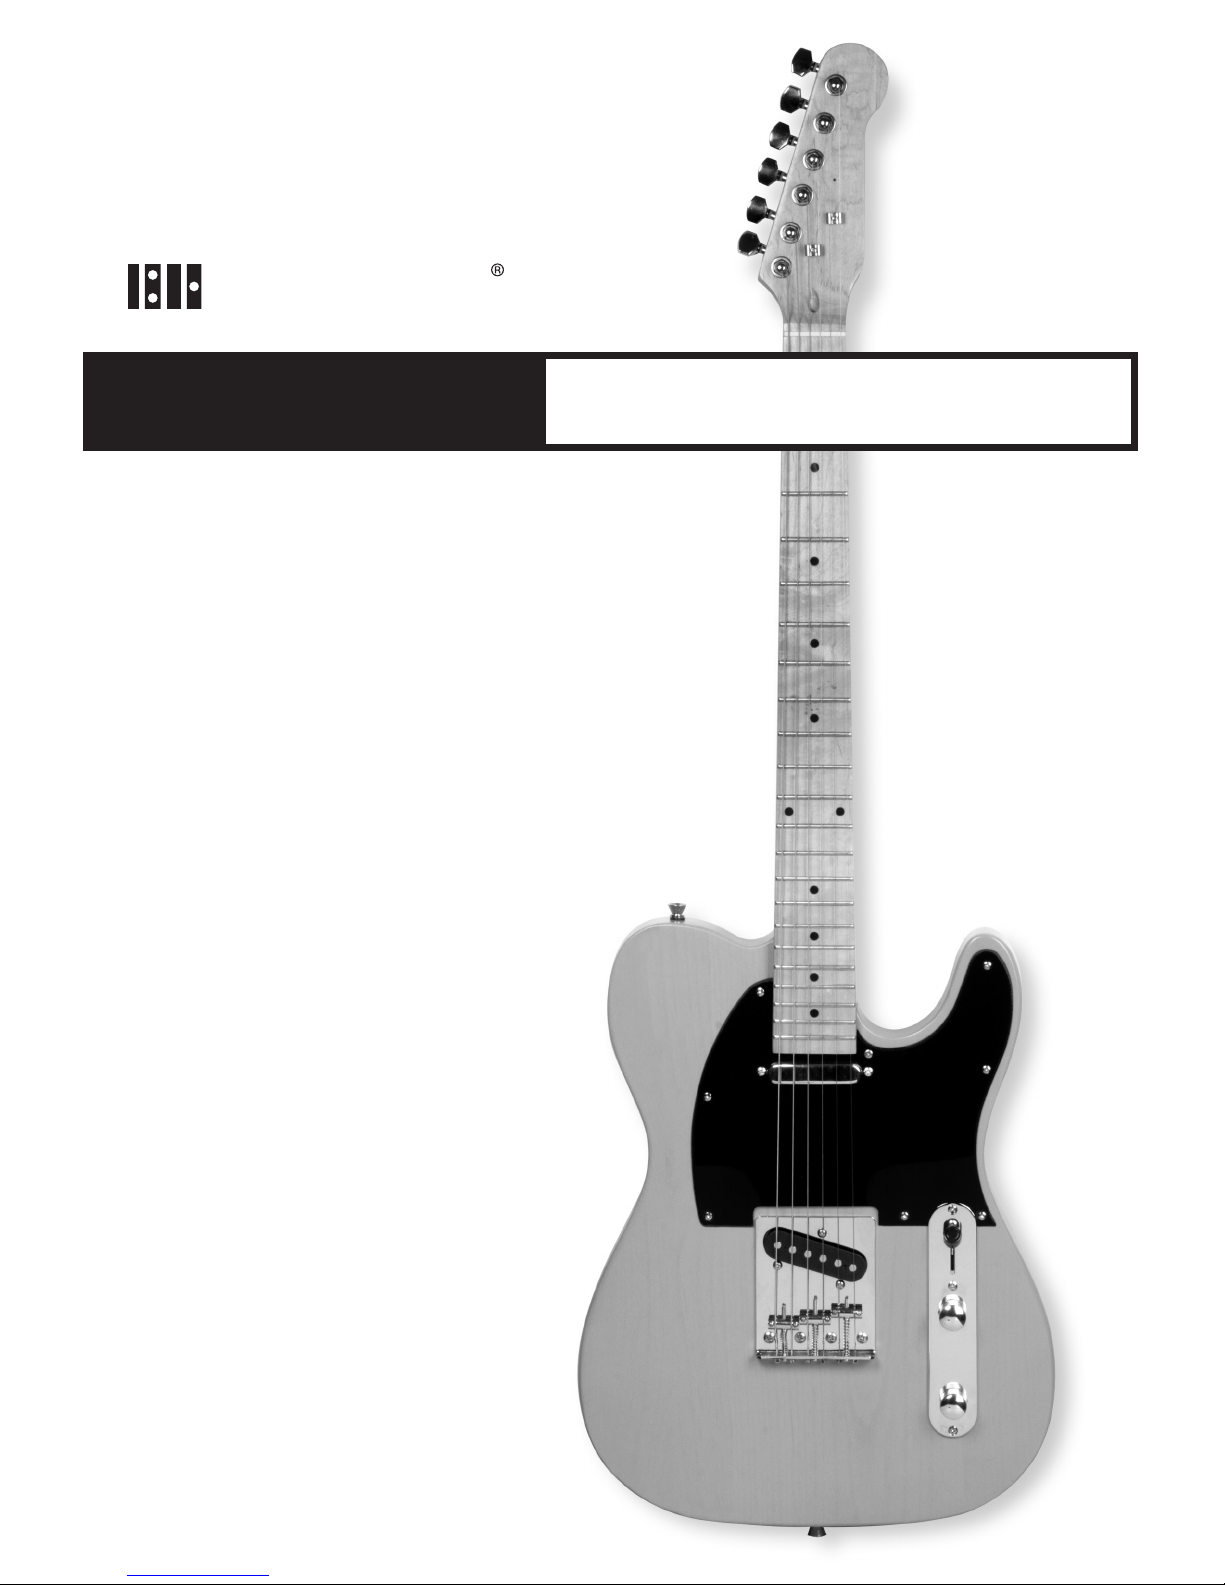
T-STYLE
Assembly Instructions
Welcome to guitar building! If you’re a first-time builder,
this kit is a great way to start. You’ll have fun and learn a lot.
This simple kit is an excellent entry into electric guitar
assembly. It can be built with basic tools. You’ll learn to
cut the peghead shape, attach the neck, and apply a
finish. After you build it, we’ll show you how to set it up
to play tip-top.
GUITAR KIT
Page 2

Table of contents
Tools and supplies..................................... 2
Parts list .............................................. 3
Create your peghead shape ........................... 4
Prep for finishing ...................................... 4
Spray the finish ....................................... 6
Level and dress the frets ............................... 7
Assemble your guitar ................................. 9
Wire the electronics ................................... 11
Final setup ............................................ 13
Tools and supplies
These are the tools and supplies we recommend for assembling this kit. StewMac item numbers are included where
applicable.
Tools
Electric hand drill
Foam sanding block (#3701 or 3699)
Fretting hammer (#4895)
Phillips screwdrivers, size #1 & #2 (#3000)
Center punch or awl (#3000)
Drill bits:
1/16" (#1710)
5/6 4" (#1712)
3/32" (#1714)
1/8" aircraft extension bit (#4840)
10mm nut driver (#5890) or wrench (#3691)
Nut-slotting files:
0.013" width (#0823)
0.020" width (#0828)
0.035" width (#0832)
Saw for peghead: bandsaw, jigsaw or coping saw
16" radius sanding block (#0418)
Fret crowning file (#1602)
Razor knife (#4878)
Ruler (#4905)
Straightedge (#3849)
Cam clamp (#3721)
Soldering iron (#0502 or 0515)
Supplies
Sandpaper: 150, 220, 320, 400 grits (#5562 or 5096)
Light Duty 3M Scotch-Brite Pad (#7445)
or 0000 steel wool
Naphtha solvent (#0775)
Gloves
Blue permanent marker
Masking tap e (#1683)
Double -stick tape (#16 89)
Finishing supplies
There are many finishes and application methods to choose
from. We use ColorTone Aerosol Guitar Lacquers because
they’re easy to use and you can get a beautiful nitrocellulose
finish without investing in spray equipment.
ColorTone Waterbase Grain Filler, Neutral (#0220-N)
ColorTone Aerosol Guitar Lacquers:
1 can Vinyl Sealer (#3884)
1 can Aged Clear (#5887)
1 can TV Yellow (#5885)
2-3 cans of Clear Satin (#3882)
2
stewmac.com
Page 3
Parts list
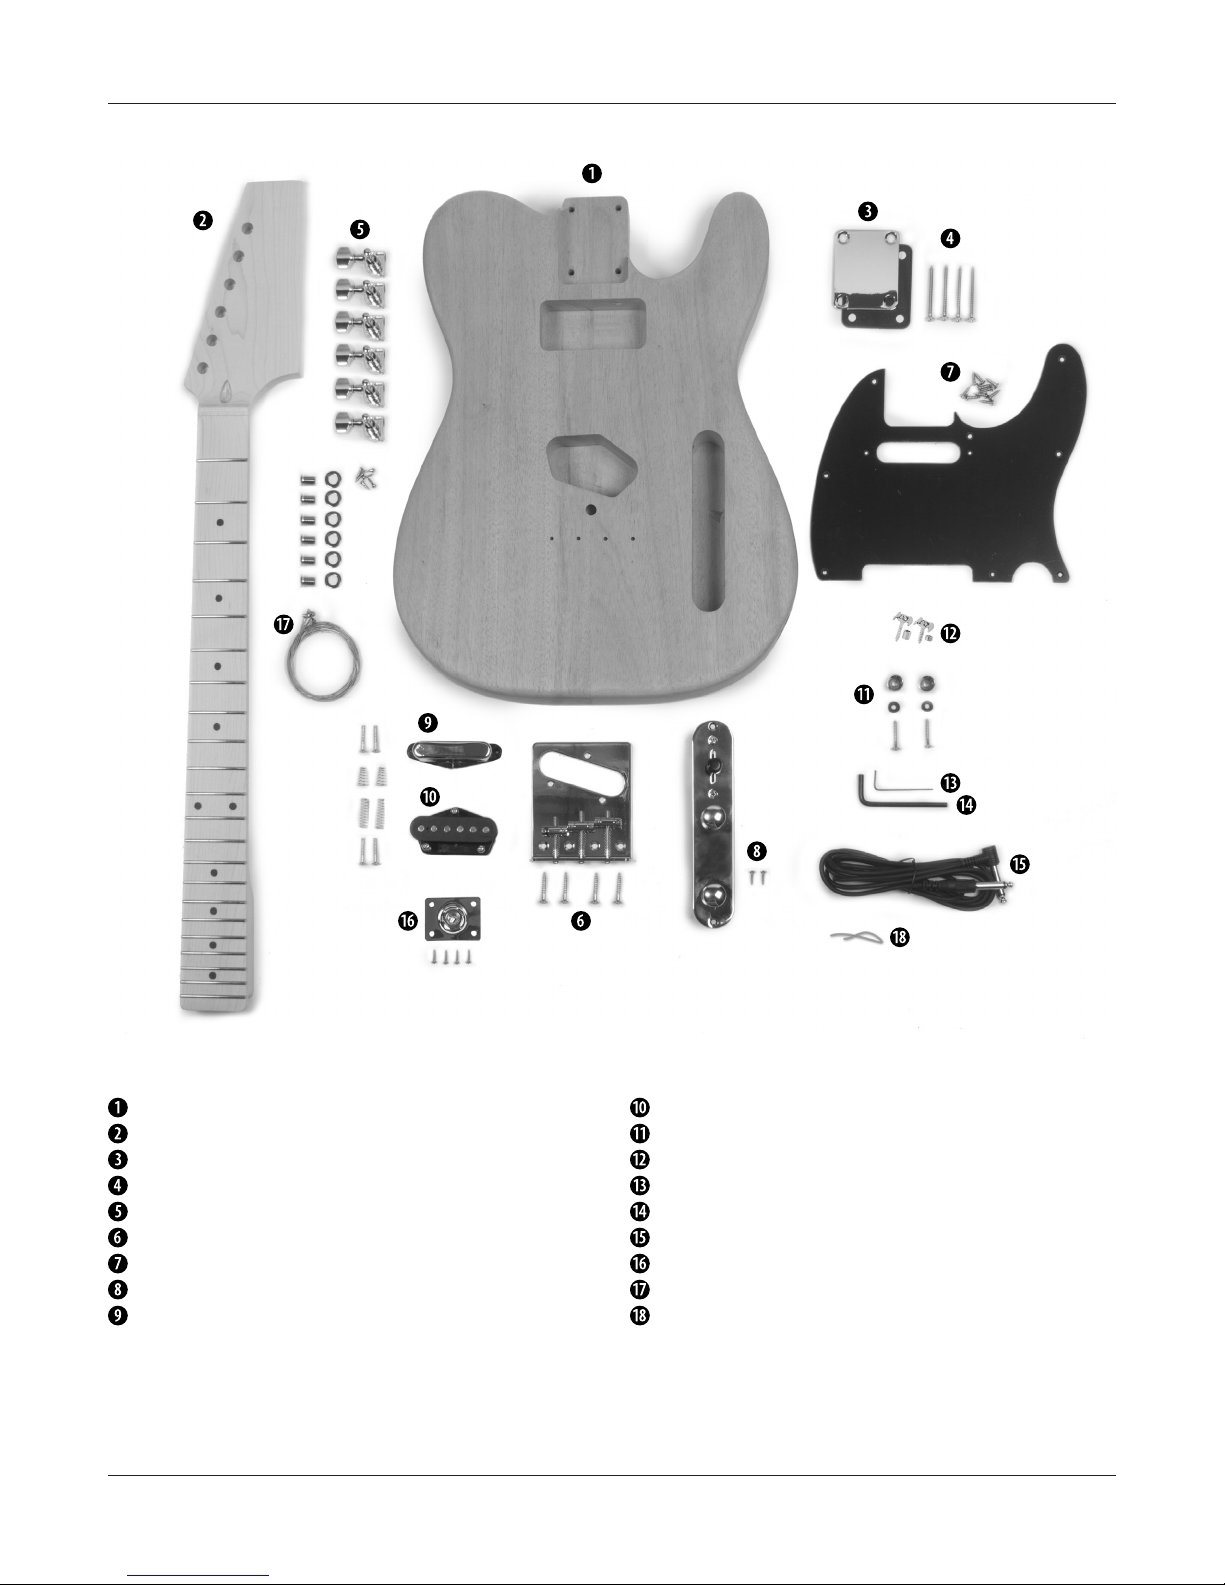
Mahogany body
Maple neck
Neck plate with plastic backer
Neck attachment screws (4)
Tuners with bushings, washers, and screws (set of 6)
Bridge with mounting screws
Pickguard with mounting screws
Prewired control plate with mounting screws
Neck pickup with mounting screws and springs
stewmac.com
Bridge pickup with mounting screws and springs
Strap buttons with screws and protective washers (2)
String trees with screws (2)
1.5mm hex wrench for adjusting bridge saddles
4mm hex wrench for adjusting truss rod
Output cord
Output jack with mounting screws
Strings (2 sets)
Solder
3
Page 4
Create your peghead shape
You can trace a favorite peghead or come up with a look
all your own. You’ll be cutting your design from the blank
peghead on the kit’s neck.
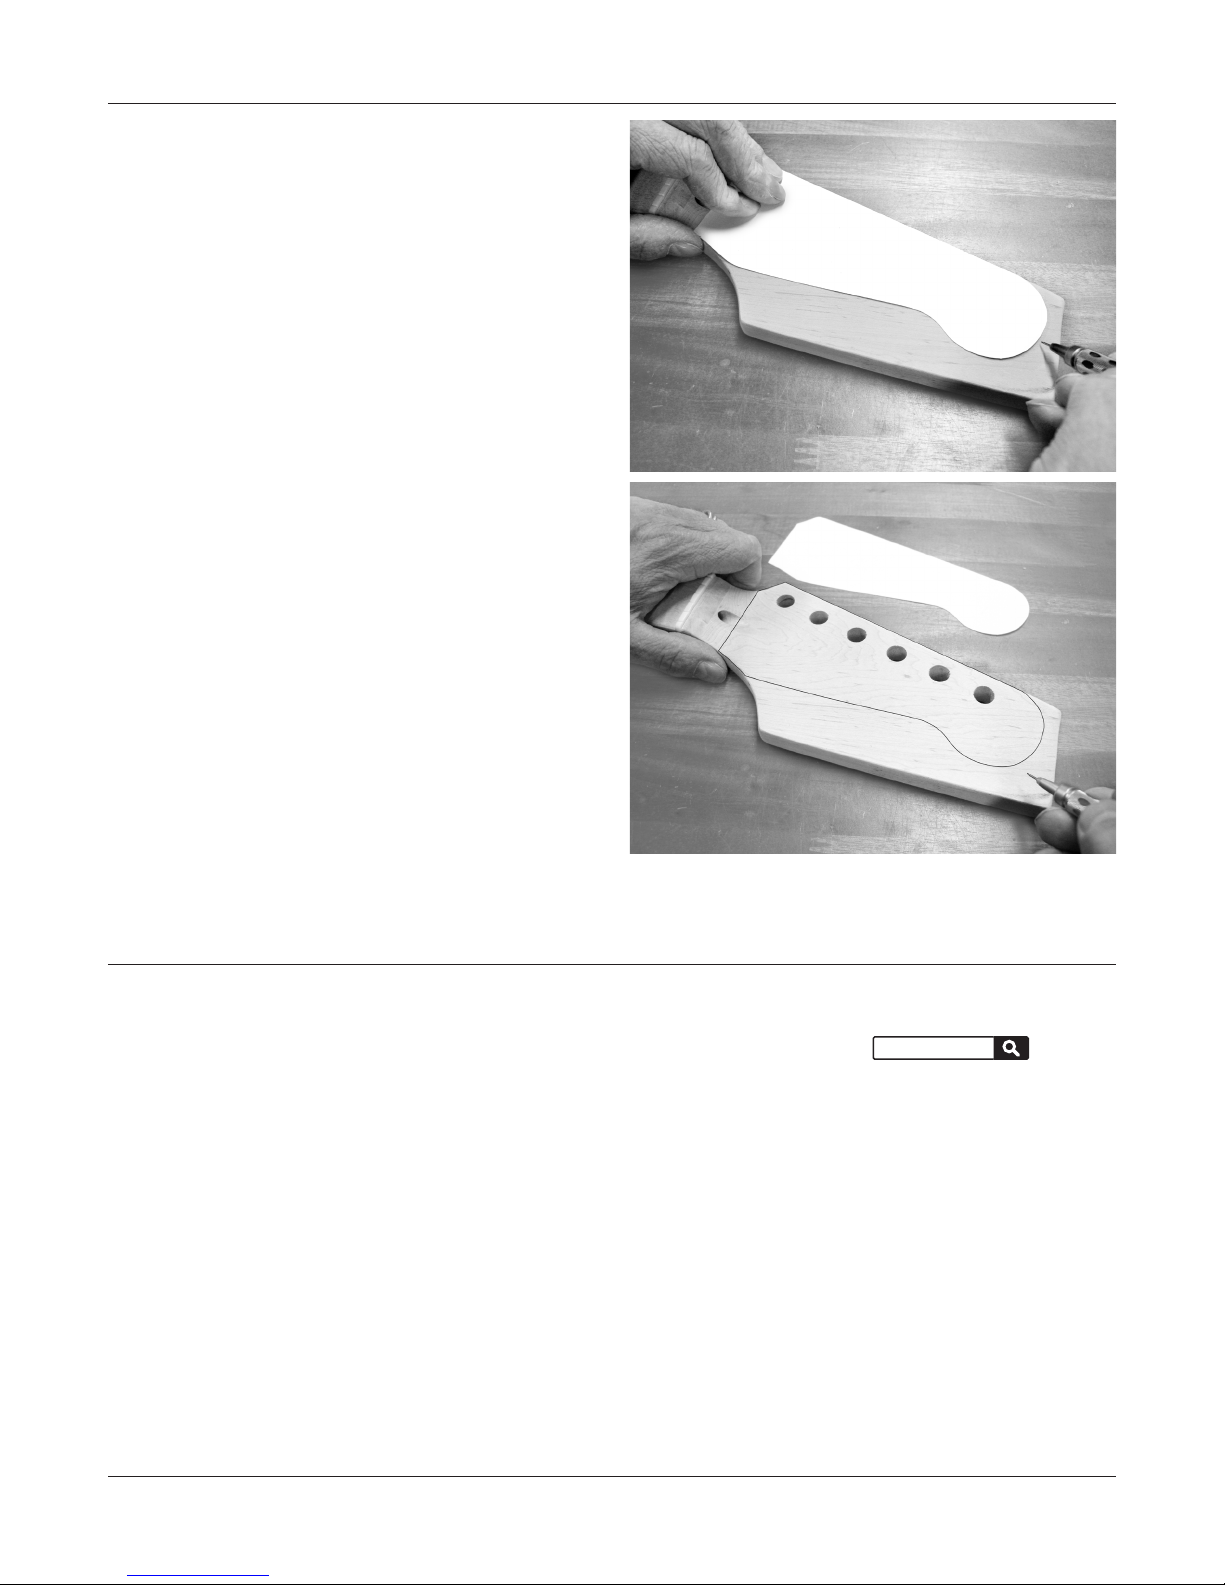
Make a paper template
Sketch out your peghead design on a piece of heavy paper
and cut it to shape with scissors. Using a pencil, trace the
shape onto the peghead. Use a light touch that doesn’t
dent or compress the wood which could make sanding
out any unwanted lines difficult. Don’t use ink, because it
leaves permanent stains that can even bleed up through
an opaque guitar finish.
Cut the peghead to shape
It’s important that your saw stays square to the face of the
peghead while you cut. If it tilts to an angle, you’ll get a
sloppy result that takes a lot of sanding to correct. Use a
bandsaw if you have one; a jigsaw is also good. A hand-held
coping saw can also be used, but it’s tough to hand-saw
smooth clean curves.
Never cut on the line
Always cut just outside the line, so you can sand to the line
afterward.
Smooth your saw cuts to create your peghead shape using
rasps, files and sandpaper. Don’t rush: rough patches will
disappear into a good final shape if you take your time.
When you’re happy with your peghead shape, sand it
smooth using 150-grit sandpaper followed by 220-grit,
then 320-grit.
Prep for nishing
Preparing the the neck and body for finish is just as important if not more important than the final spray. The key to a
great looking finish is patience and lots of it. Be thorough
with your sanding and follow the finishing schedule on page
6 for best results.
Inspect the body and neck for any dents, chips, or other
imperfections and repair them. Small dents can be steamed
out by placing a damp cloth over the dent and applying
heat with a soldering iron. Chips and knotholes will need
to be filled.
Fill the grain
The body of your guitar kit is made of mahogany, which is an
open grained wood. The grain will need to be filled before
finishing in order to achieve a flat surface. We suggest using
our Neutral ColorTone grain filler following the instructions
on the label. Three applications are recommended to get a
nice flat surface to build finish coats over.
For more information on grain filling, see our article #i-5035
“Using ColorTone Grain Filler” at stewmac.com.
stewmac.com search:
Sand the body
Using 150-grit sandpaper on a flat sanding block, sand the
entire body working only in the direction of the grain.
After a complete sanding, wipe the body with a damp cloth
to raise the grain, to reveal fibers that need more sanding.
Let the dampness dry, then sand the raised grain with 220grit sandpaper. After sanding, raise the grain again and sand
a third time, using 320-grit sandpaper.
i-5035
4
stewmac.com
Page 5
Seat the frets
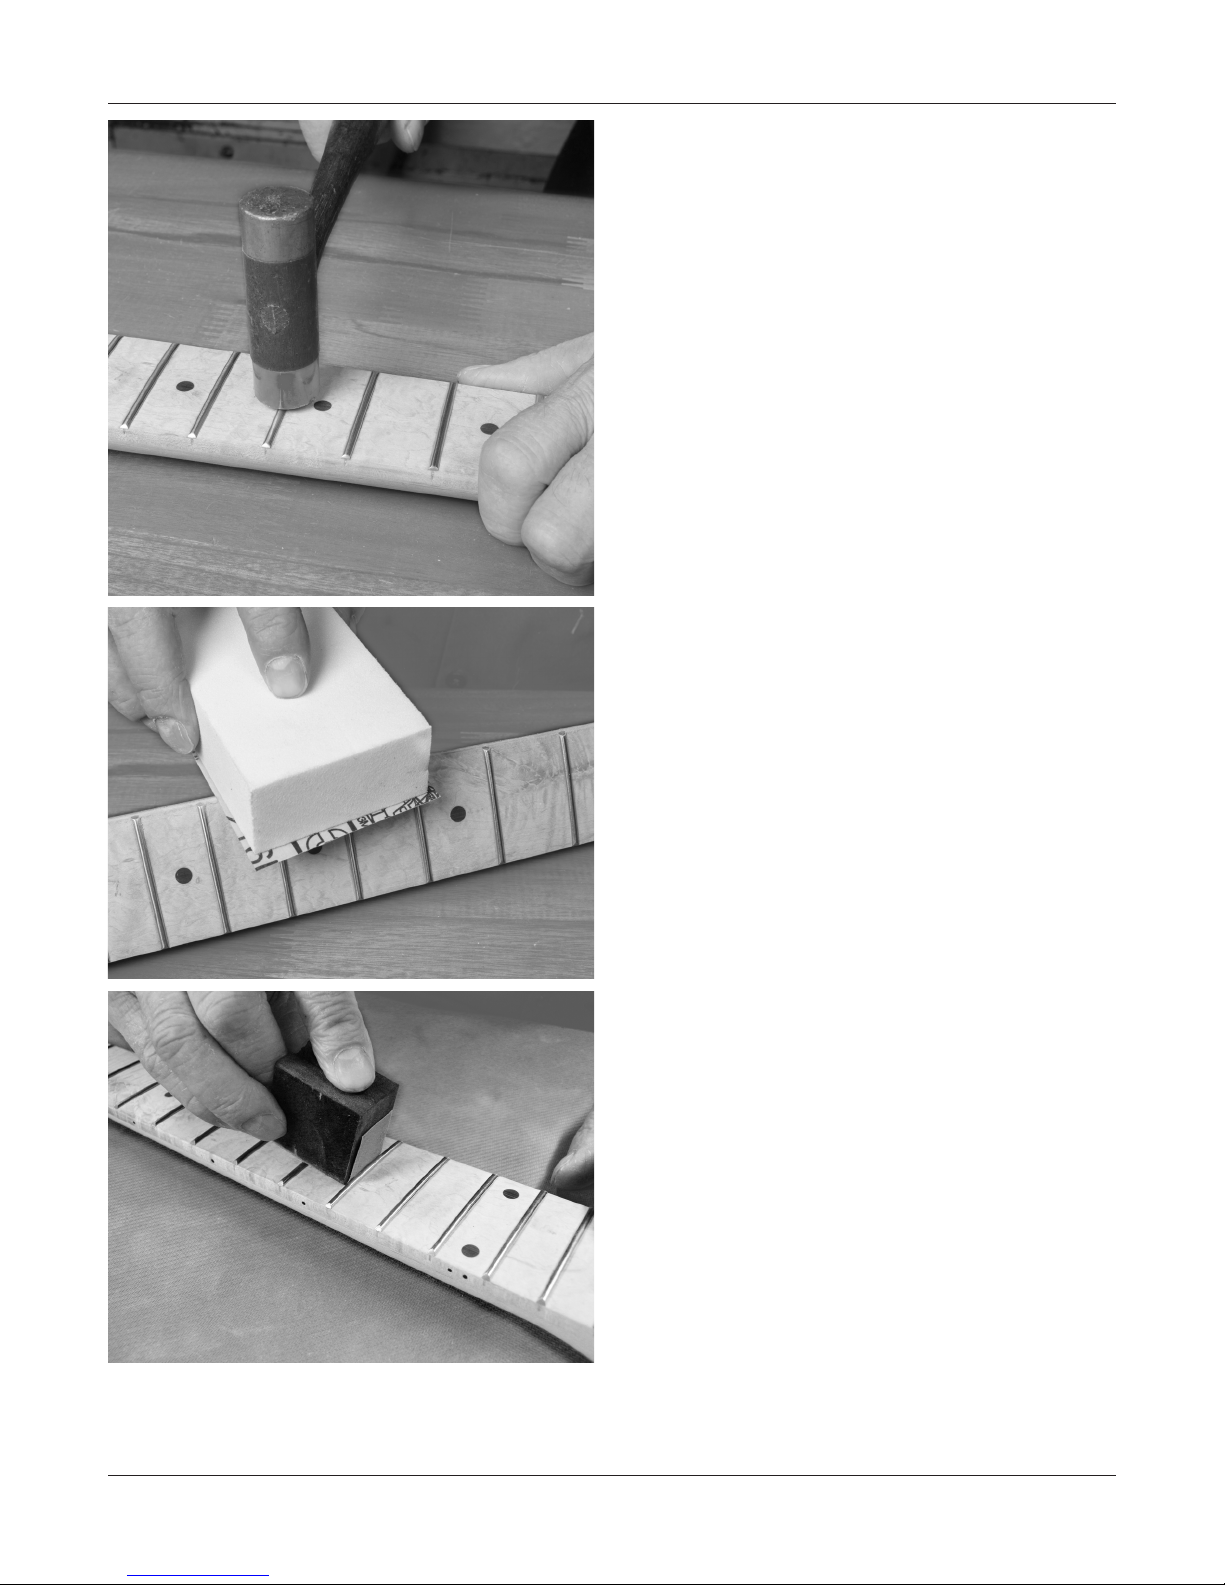
Before sanding the neck use a fretting hammer to make
sure the frets are all seated properly. The more evenly your
frets have been hammered in, the less leveling work there
is to do later.
After finishing, the frets will be leveled and dressed for the
best playability.
Sand the neck
Sand the neck with 220-grit followed by 320-grit. Try to avoid
sanding the fret tops. A foam pad wrapped in sandpaper
works well for sanding between the frets. Slightly break any
sharp edges on the fretboard and peghead. Softening hard
edges promotes even finish coverage. Later, when you’re
lightly sanding between coats of finish, these edges are less
likely to sand through to bare finish.
Run your fingers lightly along the edge of the fretboard and
feel for sharp fret ends. If the frets feel sharp where they
meet the edge of the neck, gently sand them back with long
strokes down the length of the neck. Use care not to change
the bevel of the frets in the process.
Wipe the neck with a damp cloth to raise the grain. After it’s
dry, sand it again with 320-grit.
Degrease with naphtha
When you’ve finished sanding, wipe the body and neck with
a naphtha-dampened rag to remove any oils or grease. From
this point on, wear clean gloves when handling so you won’t
contaminate the wood.
Tape off the string nut before spraying, so it remains free
of finish.
stewmac.com
5
Page 6
Spray the nish
There are many finishes and application methods to choose
from. In creating these instructions, we’re using ColorTone
Aerosol Guitar Lacquers. These aerosols are a fast way to
build a quality finish.
Using a clear satin topcoat is recommended, because satin
doesn’t require much sanding or buffing the way gloss does.
If you choose to spray a glossy finish, it will involve more steps.
For help with that or any kind of finish, see our book, Guitar
Finishing Step-By-Step (#5095).
Use scrap wood to make a spray handle. Put a hole in this
handle and bend a thin metal rod into an S-shape to hang
the body and neck during spraying and while drying.
A brushed-on finish like tung oil, waterbase lacquer, or
shellac works great too. Any of these finishes will seal and
protect the wood from dirt and moisture.
The best advice for nishing: practice on scrap!
Test your finish of choice on scrap wood first, so you can see
what you’ll get before applying it to your guitar.
Use warm lacquer, not cold. Professional finishers spray
heated lacquer because cold lacquer spatters, requiring
extra sanding. Warm up your aerosols before spraying by
placing the cans in a sink of warm tap water.
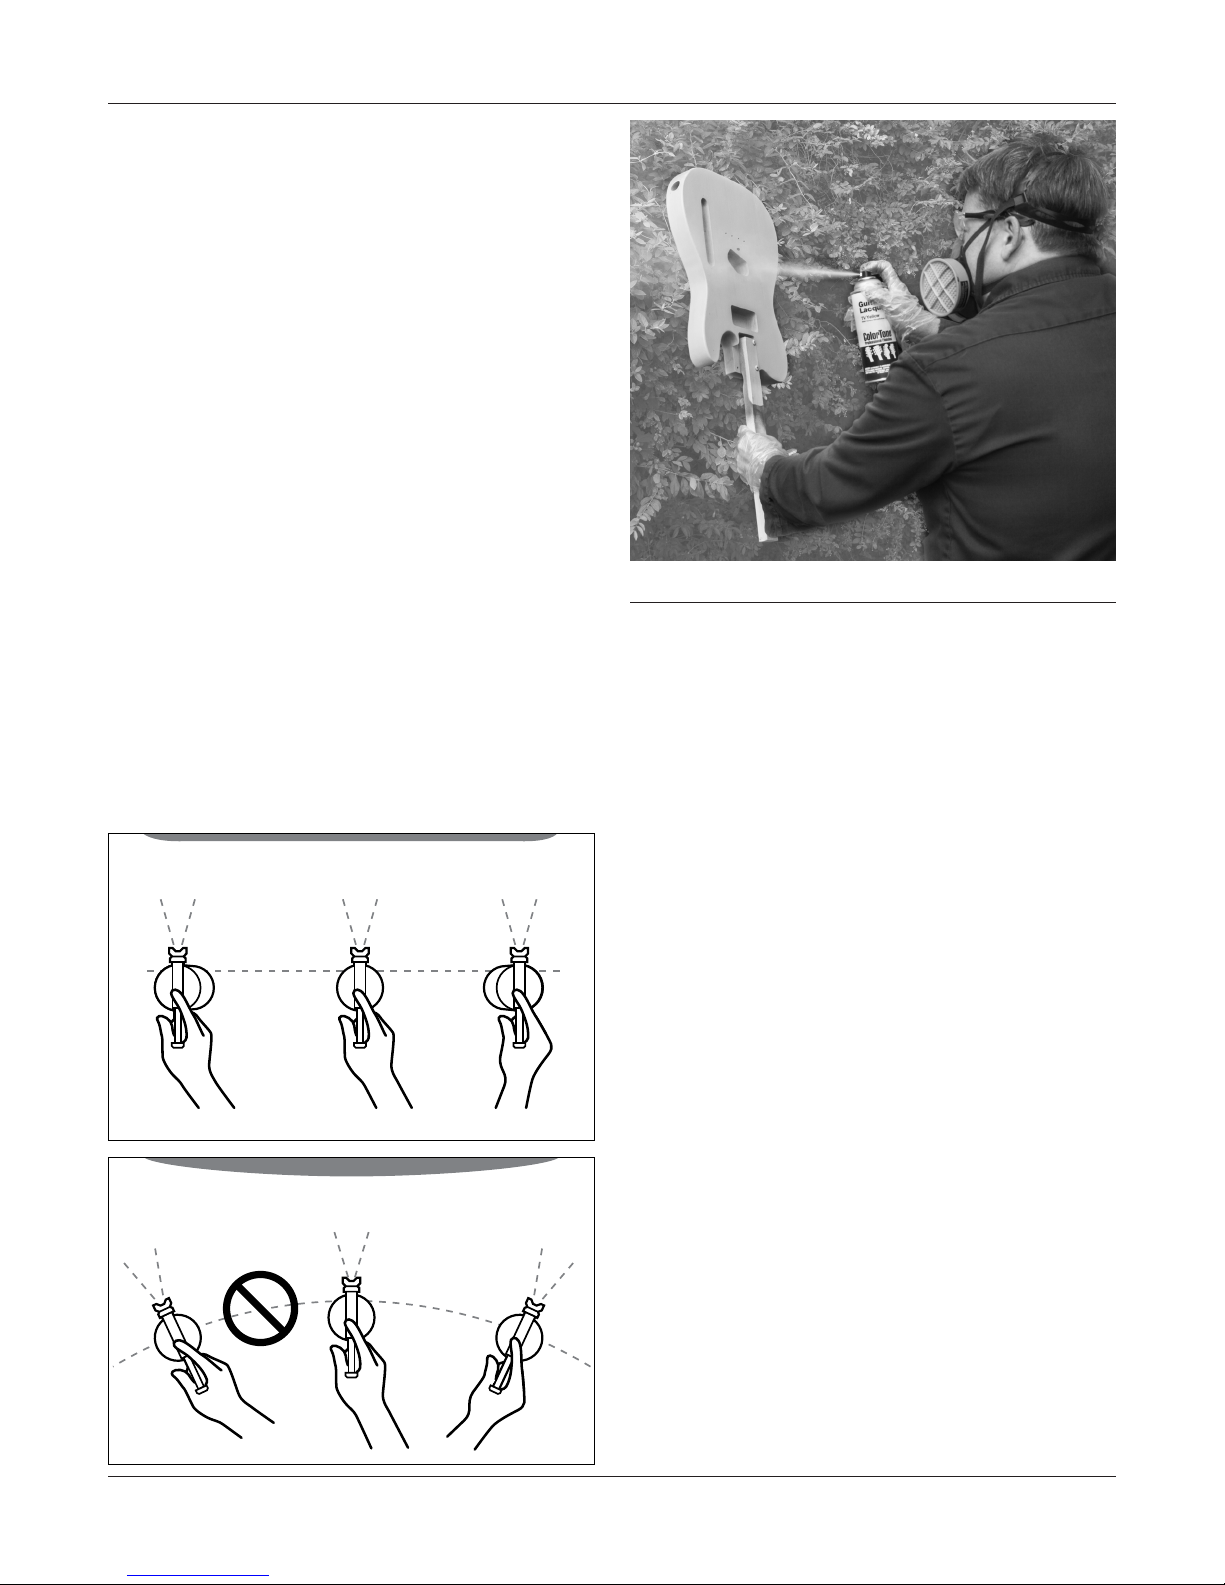
When spraying, keep the spray parallel to the surface of the
guitar for even coverage as shown below.
The right way to spray: Move in a straight line, so the distance
from the work stays the same. This gives you even coverage.
Keep your
wrist flexible
Spray schedule with ColorTone Aerosol Lacquer
This finishing process can be completed in as little as three
days, followed by a week of curing. Remember that patience
is the key to a successful finish job. Don’t rush it! Spray the
lacquer using light passes to prevent runs.
Day 1
Body: Spray 1-2 coats of aerosol Vinyl Sealer on the body,
waiting 1-2 hours between coats. Next, spray 1-3 coats of
TV Yellow, waiting 1 hour between coats.
Neck: Spray 1-2 coats of Clear Satin lacquer, allowing 1 hour
between coats. Follow this with 1-2 coats of our Aged Clear
lacquer for a warm maple color. Wait 1 hour between coats.
You will be spraying over the entire neck, including the frets.
Finish will be removed from the frets during the leveling and
dressing process after it has cured. The nut has been taped
off to keep it unfinished.
Allow the body and neck to dry overnight.
Day 2
Body and Neck: Spray 3-4 additional coats of Clear Satin, 1
hour apart.
The wrong way: Swinging in an arc moves the spray closer and
farther from the work. Center coverage is heavy, edges are light.
Stiff wrist
6
Allow to dry overnight.
Day 3
Body and Neck: Lightly sand the body and neck with 400-grit
paper to remove any finish spatter or dust.
Spray 3-4 additional coats of satin clear, 1-2 hours apart.
Allow the finish to cure for a week in a cool, dry room. Around
70° at 50% humidity is recommended.
After the finish has dried for 1 week, go over the entire
instrument lightly with Light Duty 3M Scotch-Brite Pads or
0000 steel wool for a nice satin appearance.
stewmac.com
Page 7
Level and dress the frets
After the finish has cured, it’s time to level and dress the frets.
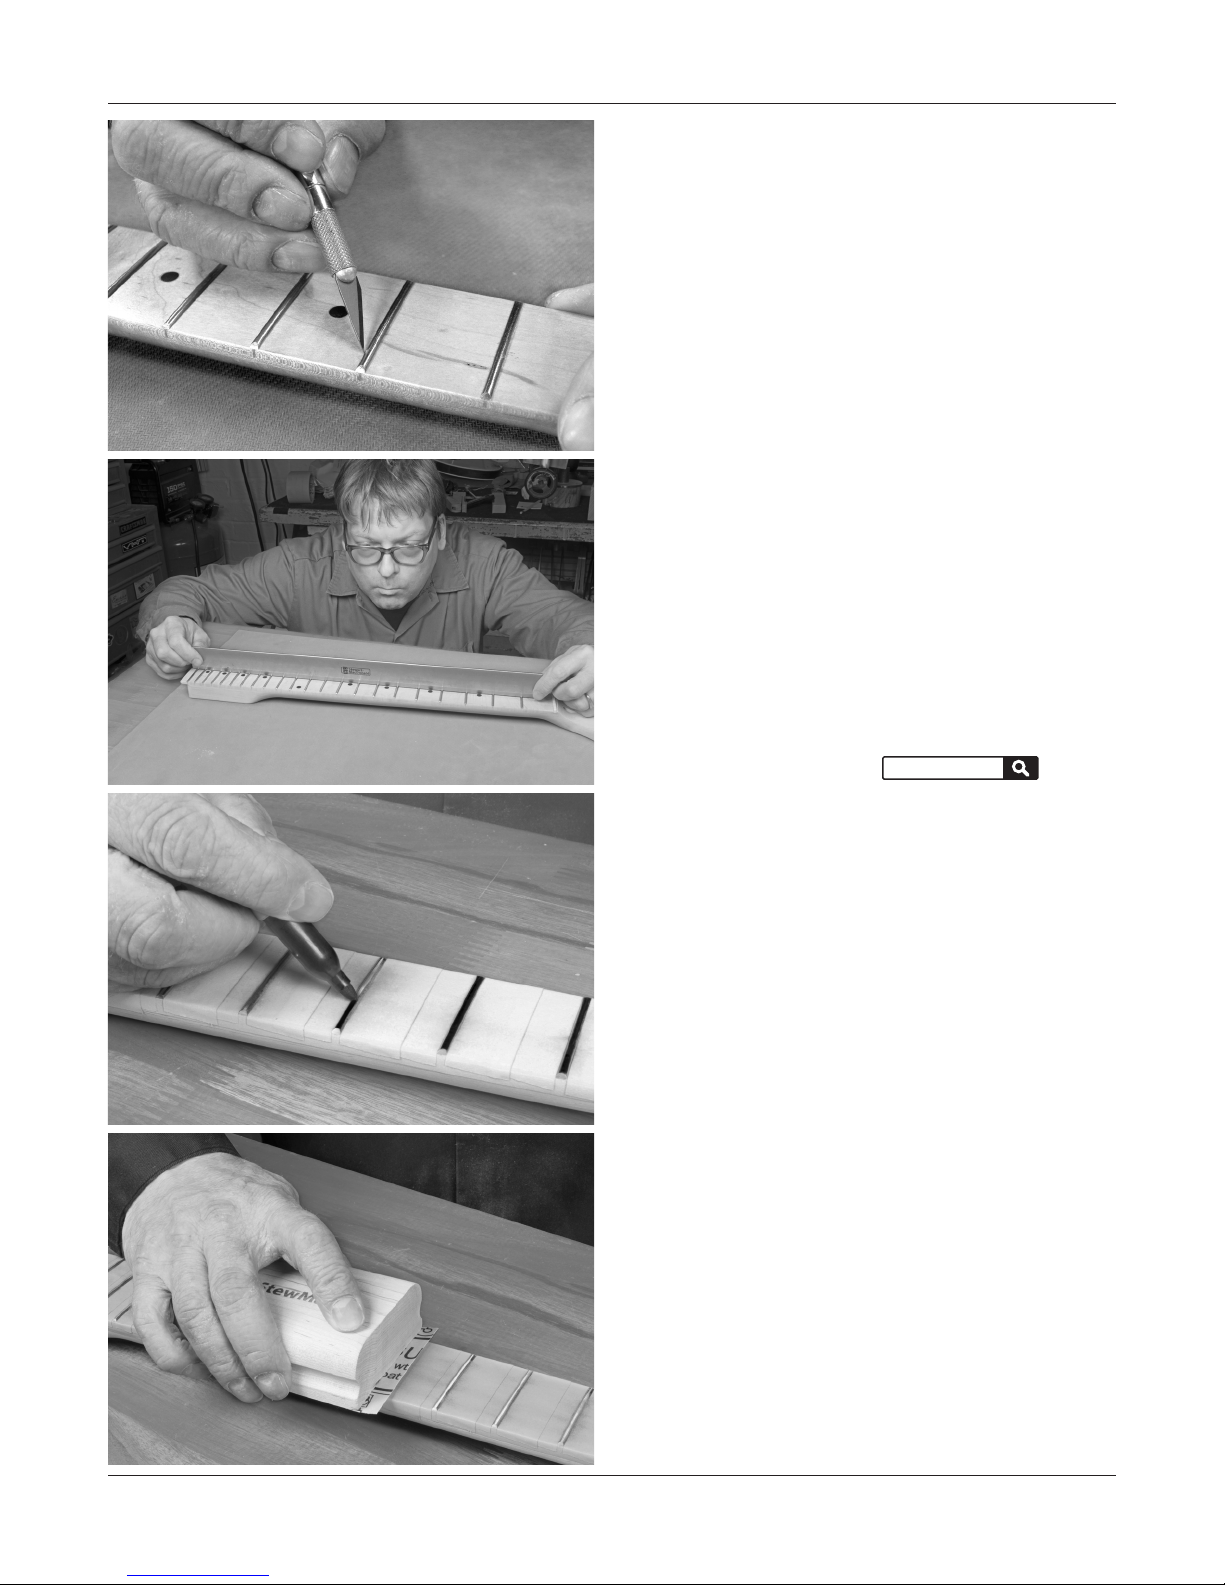
Before doing so, lightly score the lacquer along the length
of the frets with a sharp knife, using care not to cut into the
wood or scratch the frets. This step helps in removing the
lacquer that was sprayed over the frets.
Then tape off the entire board between the frets to protect it
from damage during the leveling and dressing process. Use
low tack tape to prevent pulling any finish up.
Straighten the neck
Use the 4mm hex wrench to adjust the truss rod. With a
straightedge on the frets, adjust the truss rod until the
straightedge touches all of the fret tops without rocking.
Turn the truss rod nut counterclockwise (viewed from the
peghead end) to loosen the truss rod, allowing the neck to
bow upward. Turning it right tightens the rod, pulling the
neck back.
For more information, see our Trade Secrets article #33 “Don’t
be nervous about adjusting that truss rod!” at stewmac.com.
stewmac.com search:
ts33
Color the fret tops with a blue permanent marker to prepare
them for leveling. The blue ink will show your progress: the
frets are level when sanding has removed some of the blue
across all of the fret tops.
Level the frets
Use double-stick tape to attach 320-grit sandpaper to the
16" radius sanding block. With this, level the frets using full
length strokes down the fretboard.
stewmac.com
7
Page 8
Recrown the frets
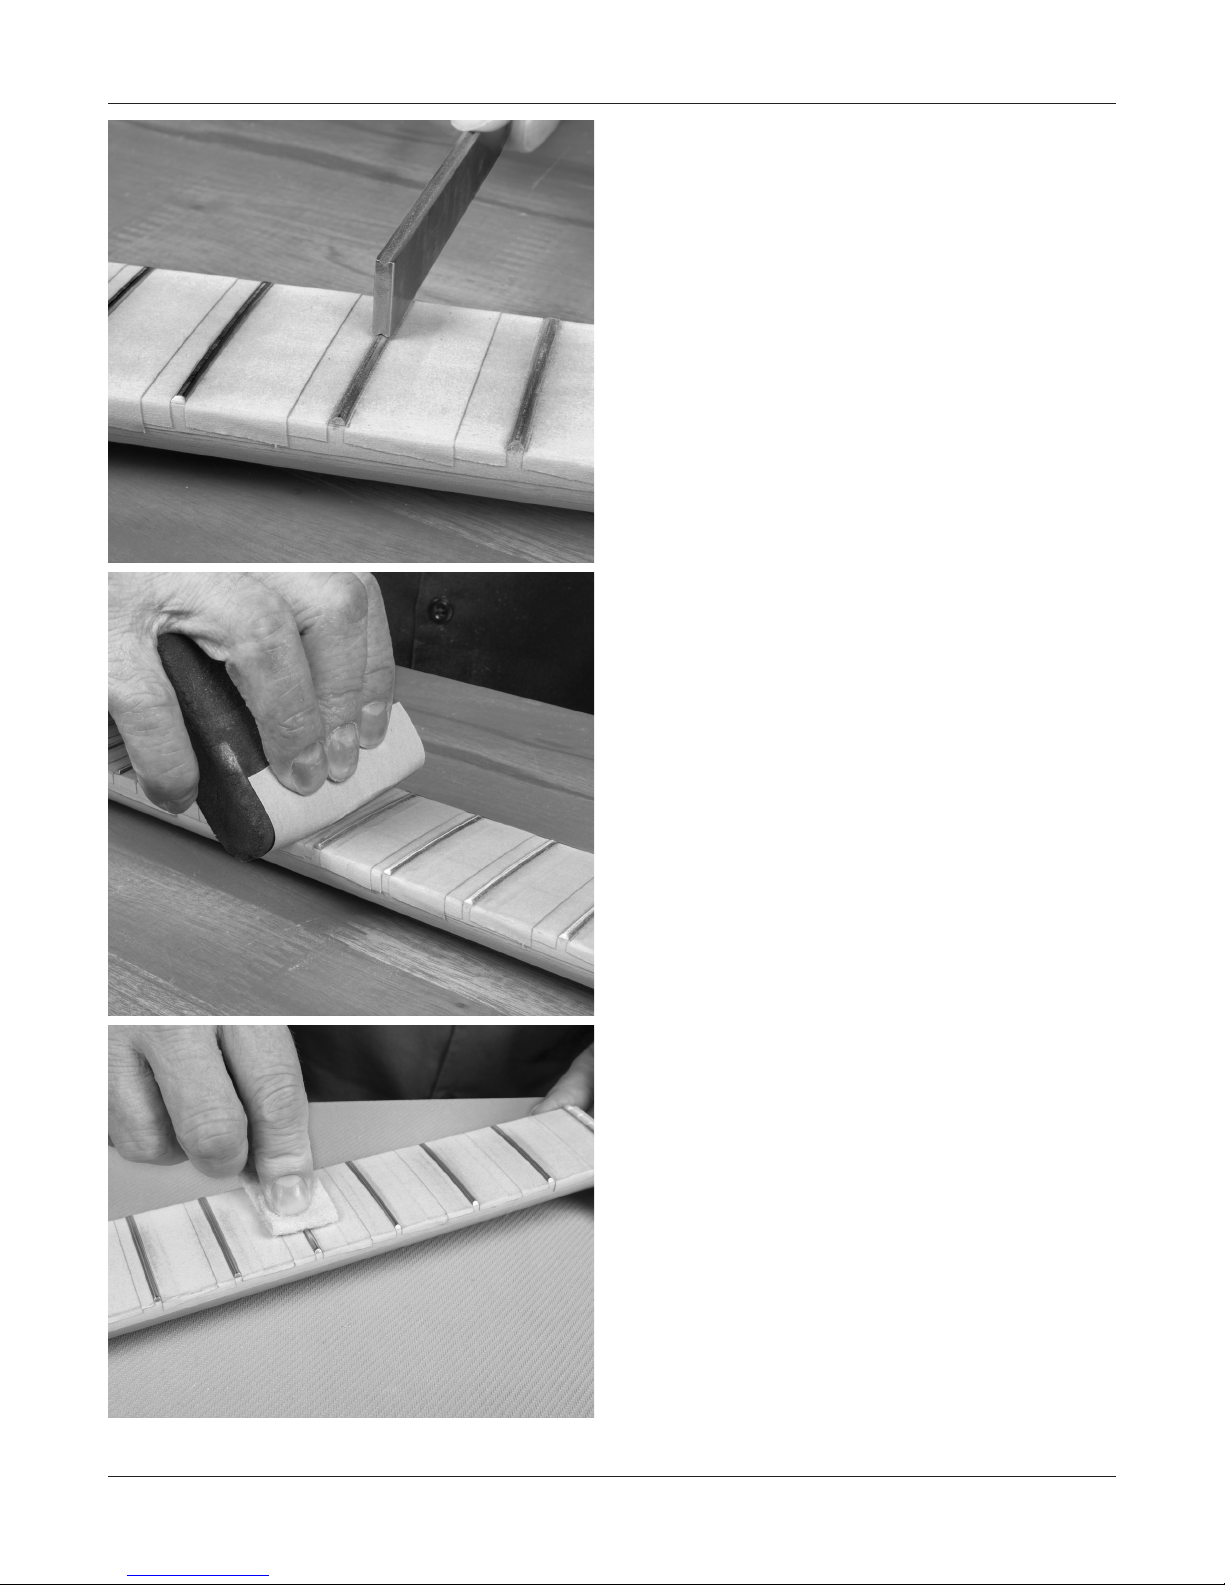
Leveling will leave flat tops on the frets. Use a fret crowning
file to restore their rounded shape.
Reapply blue marker to the fret tops. By filing the sides of the
frets, bring in the edges of the flats left over from leveling.
With a rounding motion, keep bringing in these edges until
the remaining flatted top is a very thin line. Don’t remove
this line entirely; filing the fret tops would undo your leveling.
Sand the frets with 400-grit, then 600-grit sandpaper
wrapped around a foam block, running up and down the
entire length of the fretboard.
8
Follow up with Light Duty Scotch-Brite Pads or 0000 steel
wool for a final finish. This will remove any of the remaining
lacquer from the frets, and polish them to a smooth finish.
stewmac.com
Page 9
Assemble your guitar
During assembly, use a padded surface to protect the finish
from scratches and dents.
Install the tuners
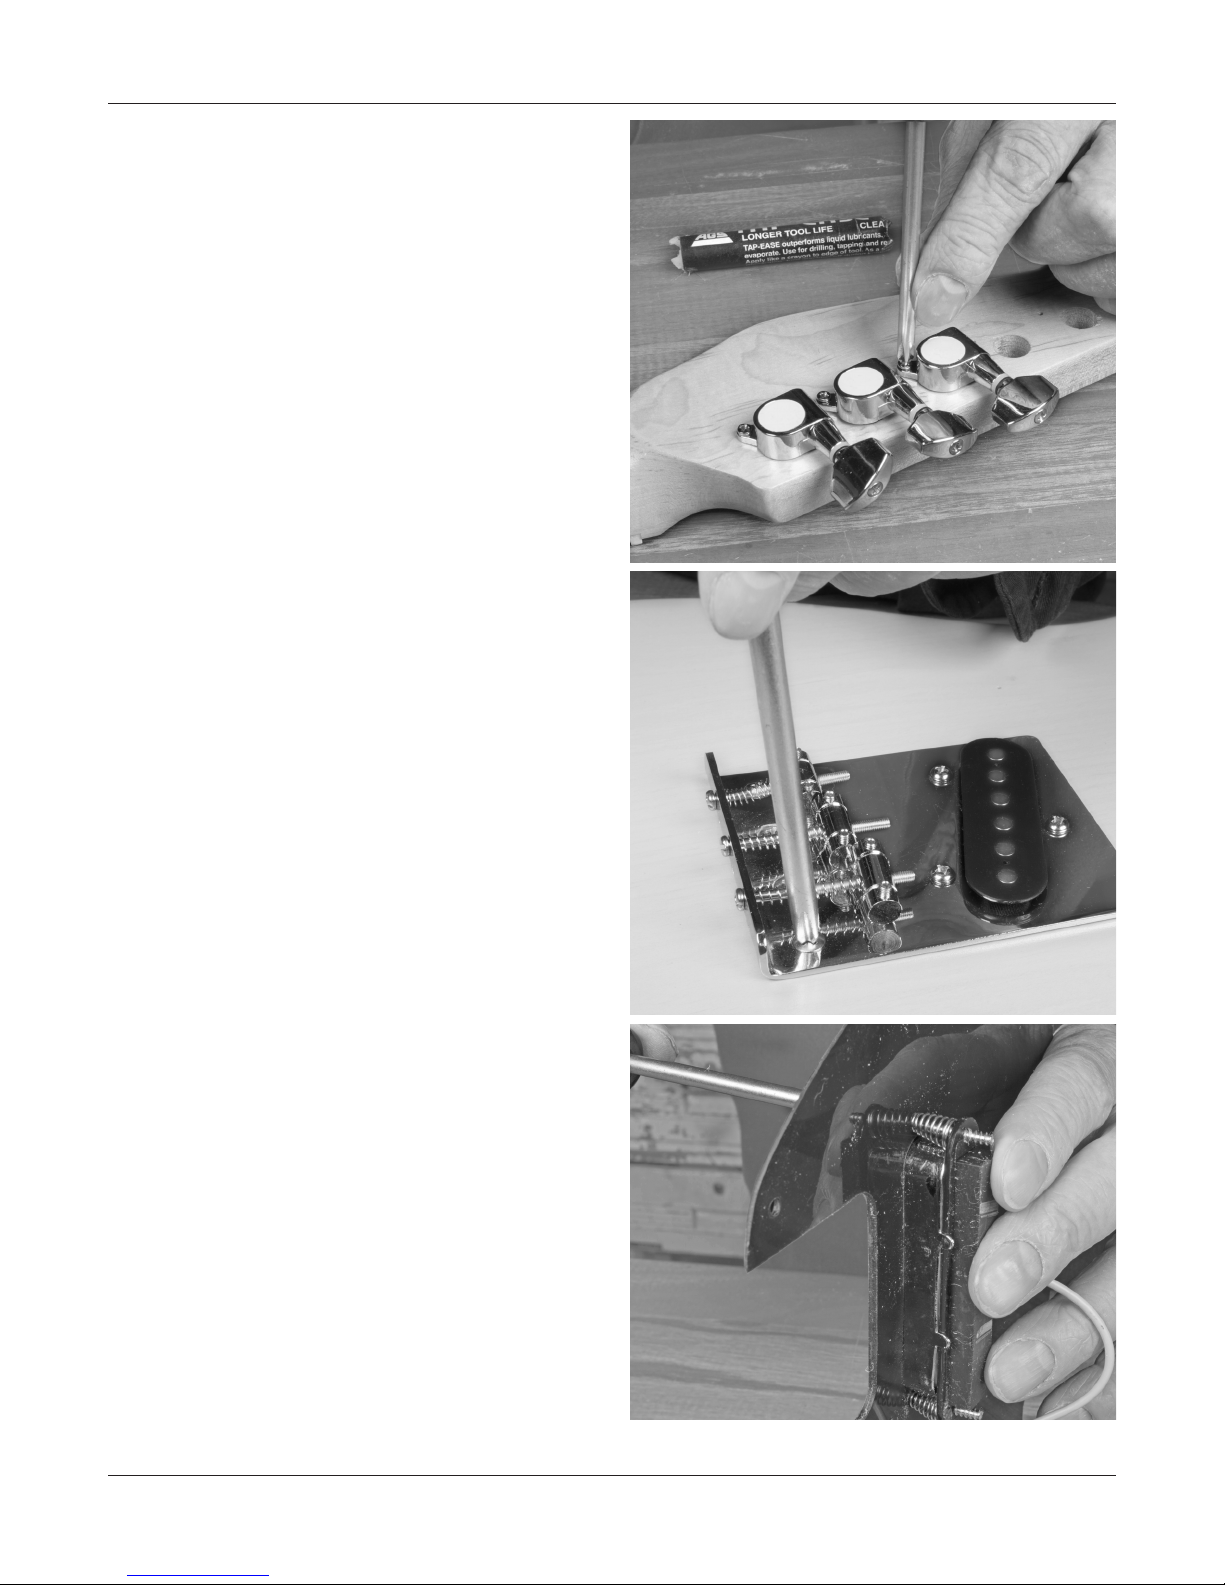
Lay out the tuners, using a ruler to make sure they’re in line
with one another and square to the edge of the peghead.
Mark out your mounting holes with a scribe or punch.
Tuner mounting screws are very delicate, and will break off
if forced into hard maple. Use a 5/64" drill bit to make pilot
holes for the screws; if these holes are any smaller you risk
shearing off the screw heads. Lubricate the screw threads by
dragging them across soap or wax for smooth installation.
With the tuners in place, install the screws in the pilot holes
with a #1 Phillips screwdriver. On the tuner string post, add
a washer then the threaded bushing. Tighten with a 10mm
nut driver or wrench.
Install the bridge
Using a #2 Phillips screwdriver, install the bridge pickup
into the bridge. The mounting screws insert through the
top of the bridge. Place the height springs on the screws on
the underside of the bridge and thread the screws into the
baseplate of the pickup. Feed the lead wire of the pickup
through the hole in the body running from the pickup cavity
to the control cavity. Attach the bridge to the body using
the screws provided.
Install the neck pickup
Run the mounting screws through the holes on the face
of the pickguard. From the underside of the guard, place
the springs over the screws and thread them into the holes
on the pickup. Adjust each side evenly until the pickup fits
through the guard. Feed the lead wire from the pickup
through the hole in the body running from the bottom of
the pickup rout, and feed it through to the control cavity.
stewmac.com
9
Page 10
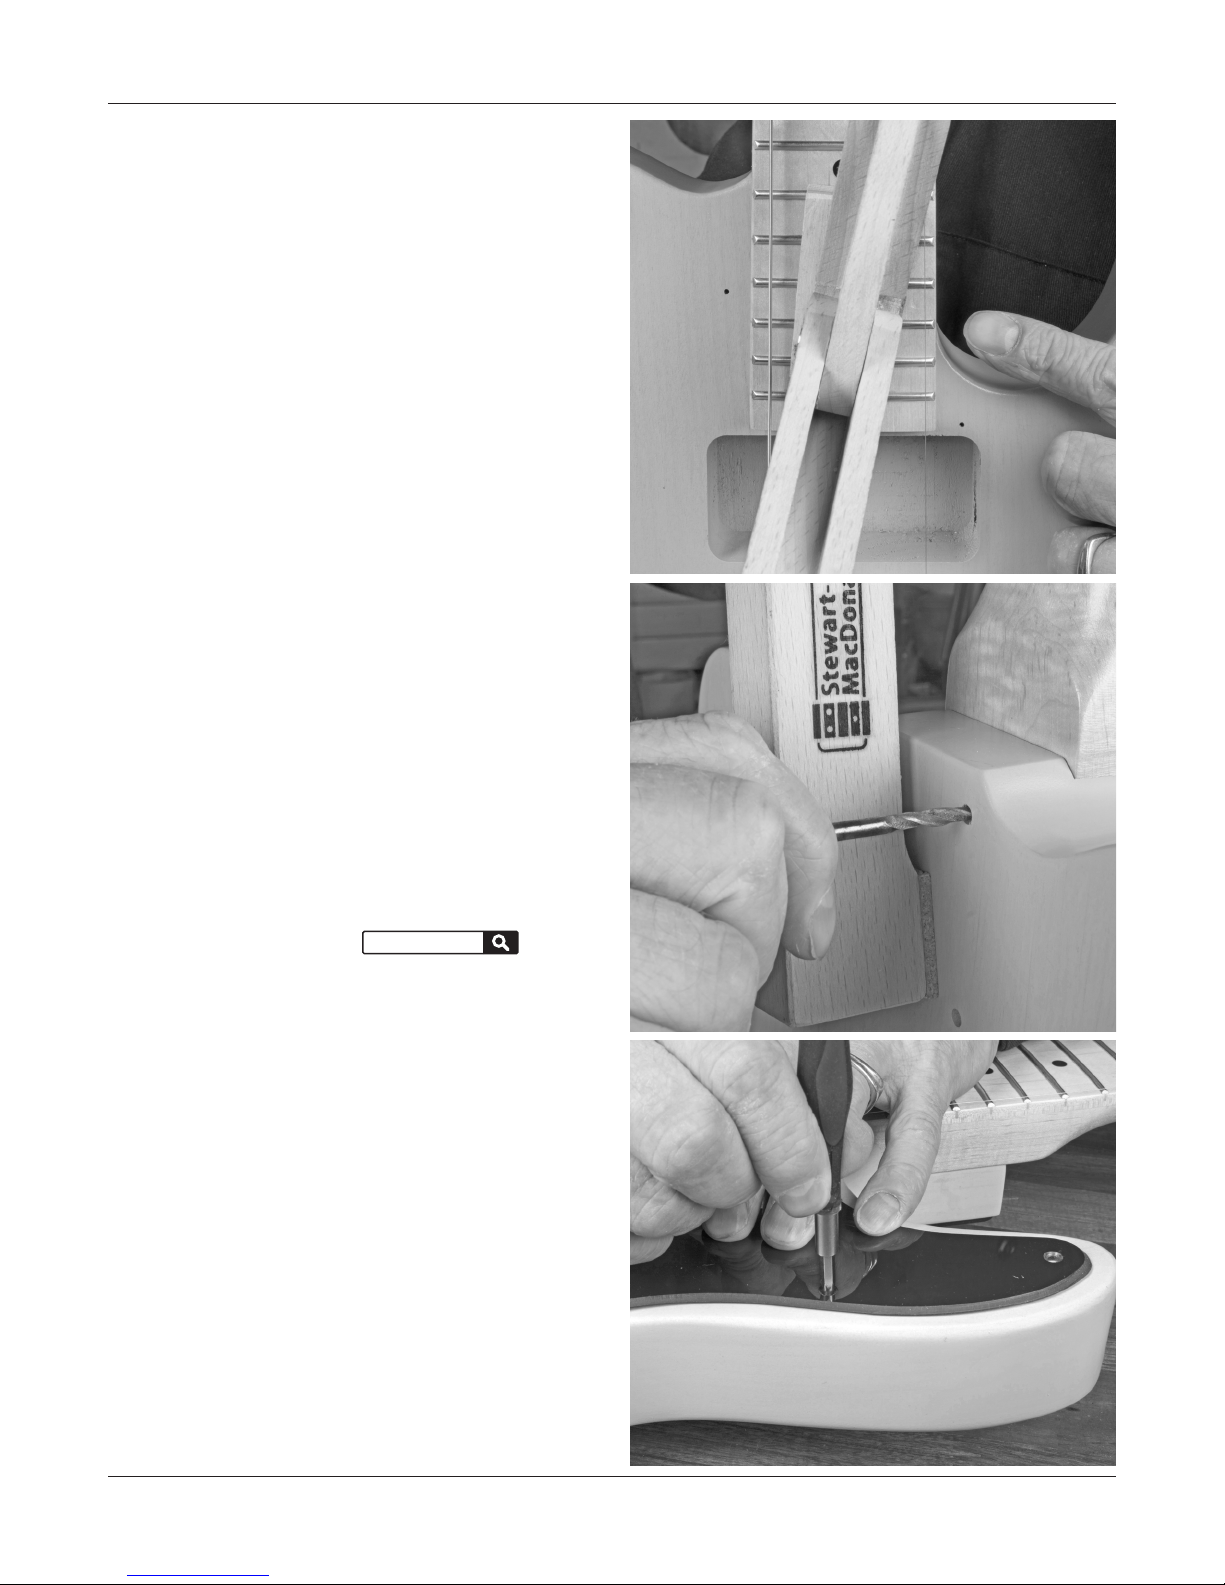
Install the neck
Use a clamp to lightly hold the neck in place. Place a scrap
of wood over the frets so the clamp doesn’t mar them.
The kit comes with two sets of strings; the generic set is for
checking the alignment of the neck and positioning the
string trees. The higher quality strings are for the final setup.
Install the high and low E strings from the generic set to
check alignment and make side-to-side adjustments as
needed to make sure the strings ride even along both edges
of the fretboard.
Use the holes in the body to mark the neck. A scribe, nail, or
transfer punch will make clean marks in the neck to show
you where to drill. A 4mm brad point drill bit turned by hand
also works well for making these marks.
Drill the neck mounting holes
It’s important that these holes are drilled square to the neck,
so a drill press works best for this job. Use a 1/8" bit and drill
the holes 11/16" deep.
If you don’t have access to a drill press, use a drill guide to
keep your hand drill squared up.
Use a #2 Phillips screwdriver to install the neck mounting
screws through the neck mounting plate. The mounting
plate sits on a plastic backer.
For more information, see our Trade Secrets video #245 “How
to install a bolt-on neck” at stewmac.com.
stewmac.com search:
ts245
Install the pickguard and control plate
Lay out the pickguard and control plate using the neck and
bridge for reference. Once positioned, mark out the mounting screw holes with a scribe or punch. Drill pilot holes for
the screws using a 1/16" drill bit.
Choose the location of your strap buttons, and drill holes for
them with a 3/32" bit. Drill these holes 1/2" deep.
10
stewmac.com
Page 11
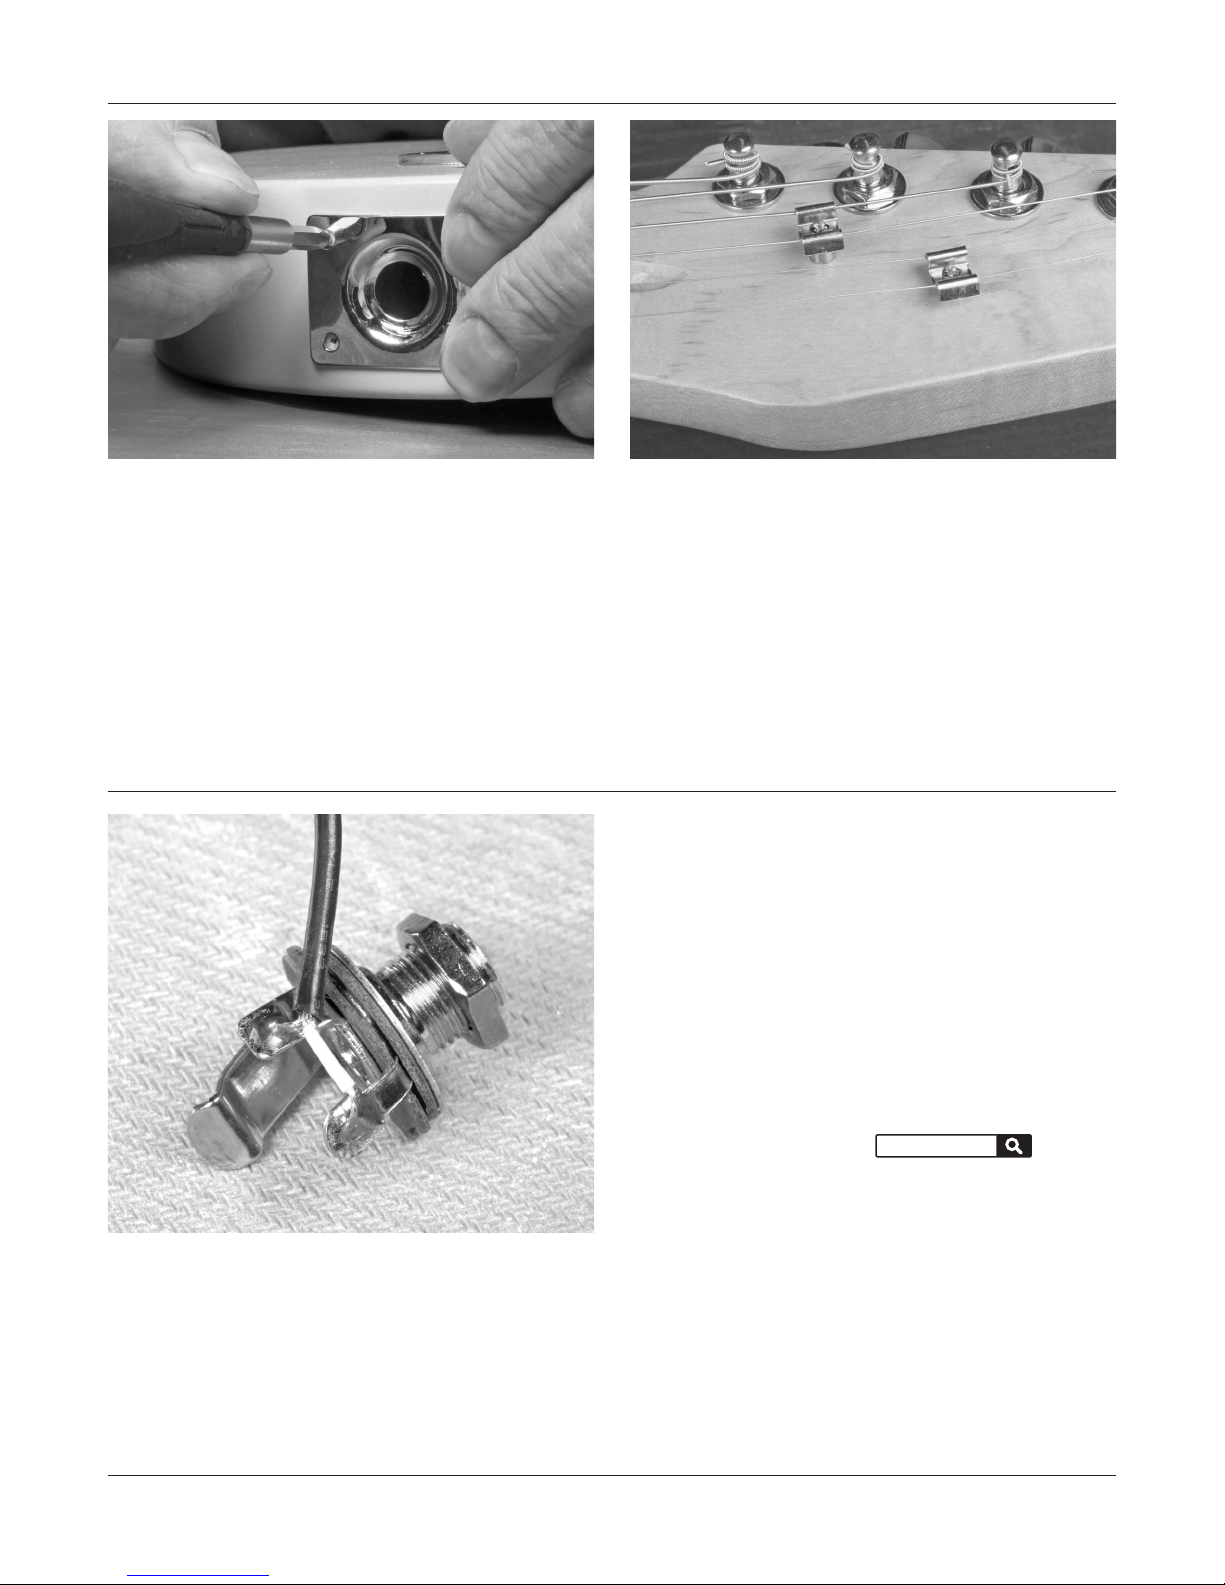
Mark the mounting holes for your jack plate, then drill pilot
holes for the screws using a 1/16" drill bit.
Wire the electronics
Install the string retainers
Install the rest of the strings and mark the locations for the
string retainers on the peghead. These retainers maintain the
proper string angle over the nut for the D, G, B, and E strings.
Locate the D/G string retainer between the E and A string
posts (approximately 2" from the nut).
Locate the B/E string retainer between the A and D string
posts (approximately 3" from the nut).
Solder the output jack
The two-strand hookup wire from the volume pot goes
to the output jack. Thread the wire through the hole from
pickup cavity into the jack cavity.
Solder the white insulated wire to the jack’s tip lug (the
rounded lug).
Solder the bare ground wire to the jack’s sleeve lug (the
square lug).
stewmac.com
For more information, see our Trade Secrets video #186 “How
to get a good clean solder joint!” at stewmac.com.
stewmac.com search:
ts186
11
Page 12
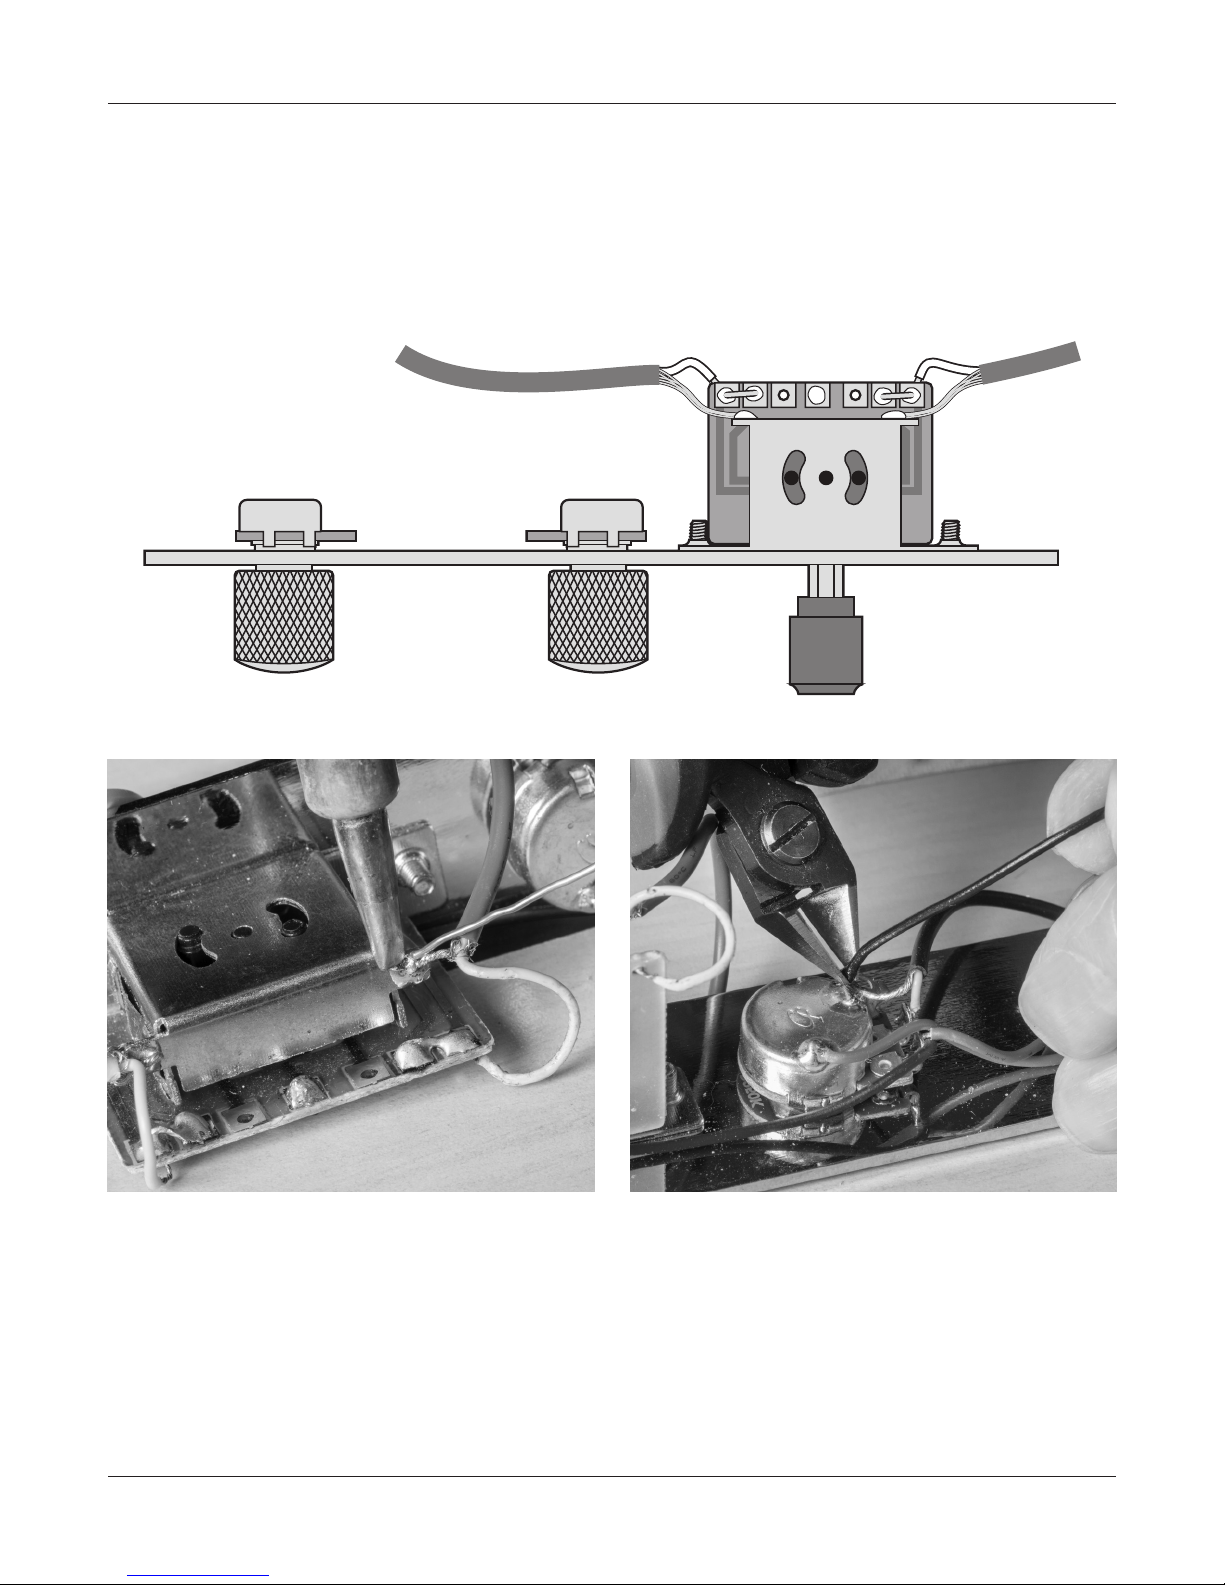
Solder the pickup leads to the switch
With the mechanism of the switch facing you, refer to the
drawing below. Lugs #3 and #5 are not used. The center lug,
#4, is already soldered to the volume pot.
Strip the white leads of the neck and bridge pickups to
expose 3/16" of bare wire. These are the hot leads. The bare
wires are the ground leads.
Feed the hot lead from the neck pickup through the back
of lug #1 and jump it to lug #2.
Feed the hot lead through the back of lug #7 and jump it
to lug #6.
Solder these connections.
1 2 3 54 6 7
Solder the bare ground leads of each pickup to the lugs on
the switch housing.
12
Note that there is one lead that is not necessary for this
circuit. Cut this wire off at the volume pot.
stewmac.com
Page 13
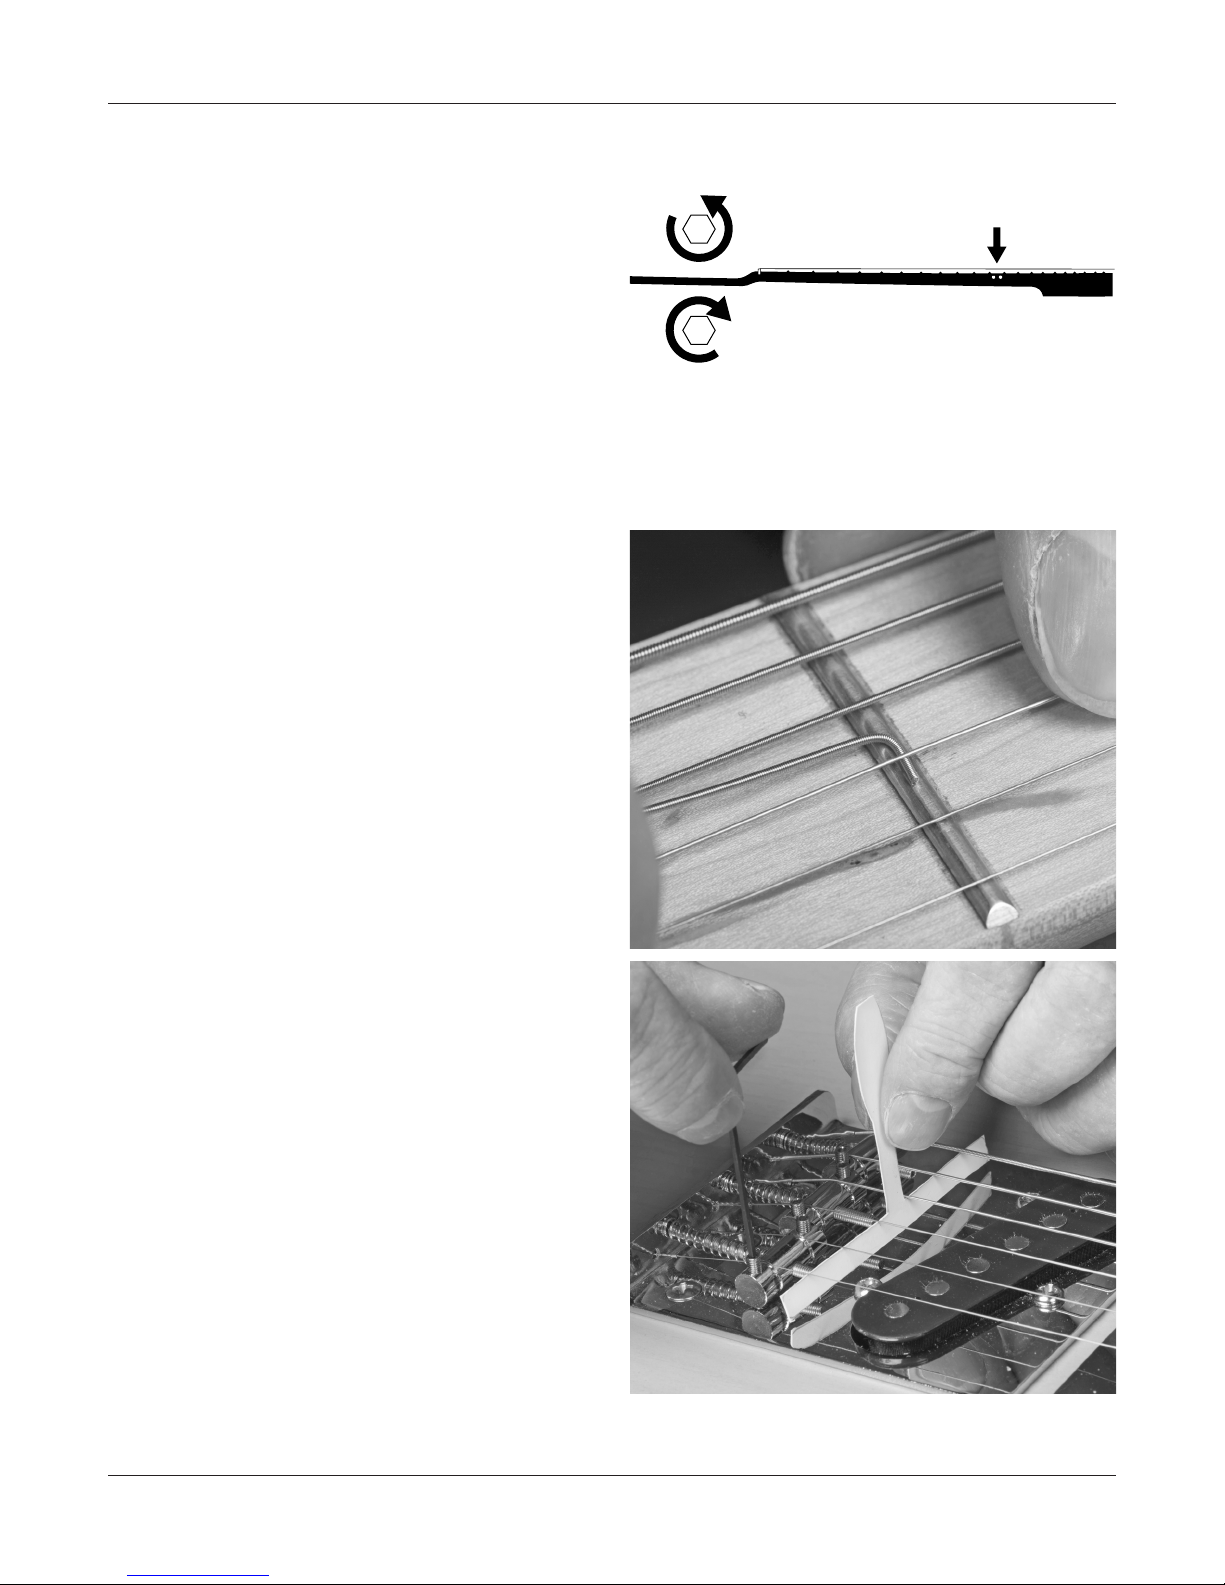
Final setup
Remove the generic strings and install the included higher
quality strings (or your own preferred brand/gauge). Tune
the guitar to pitch and adjust the neck using the included
4mm hex wrench.
Straight neck, or a little relief?
Neck relief refers to adjusting a neck so that it has a very slight
upbow, rather than being perfectly straight. This relief allows
a little more room for string vibration, reducing the chance
of hitting the lower frets and causing fret buzz.
Depending on your playing style, and how perfectly level
your fret tops are, a neck should be anywhere from perfectly
straight to having 0.012" of relief. This measurement refers
additional string height over the 12th fret, compared to a
perfectly straight neck.
A straight neck tends to play and sound better, but very few
guitars end up with no relief at all, and several thousandths
of an inch or more is perfectly normal.
Set the action at the nut
Lower your string nut slots for better playability, using
gauged nut files. Measure string height over the 1st fret,
between the bottom of the string and the top of the fret.
Turn the truss rod nut
counterclockwise to bring
the neck up, adding relief.
Measure string relief
at the 12th fret.
Turn clockwise to pull the
neck back, reducing relief.
Go slow: a little does a lot!
A comfortable medium action is:
Unwound strings (G, B, E): 0.012" at the 1st fret
Wound strings (E,A,D): 0.020" at the 1st fret
Use feeler gauges to measure the gap, or use guitar strings
whose gauges match the measurement you’re after. Stop
when the string sits on your feeler gauge. Go slow and check
your work frequently—it’s easy to go too far in this step and
ruin the nut.
Set the action at the bridge
Adjust the action at the bridge by raising or lowering the
string saddles. Measure string height over the 12th fret,
between the bottom of the string and the top of the fret.
A good starting point is:
High (unwound) E string: 1/16" at the 12th fret
Low (wound) E string: 5/64" at the 12th fret
You can always go lower or higher depending on your playing style. After setting the two E strings, dial in the remaining
strings to match the curve of the fretboard’s 16" radius using
the cut out gauge included on page 15.
stewmac.com
13
Page 14
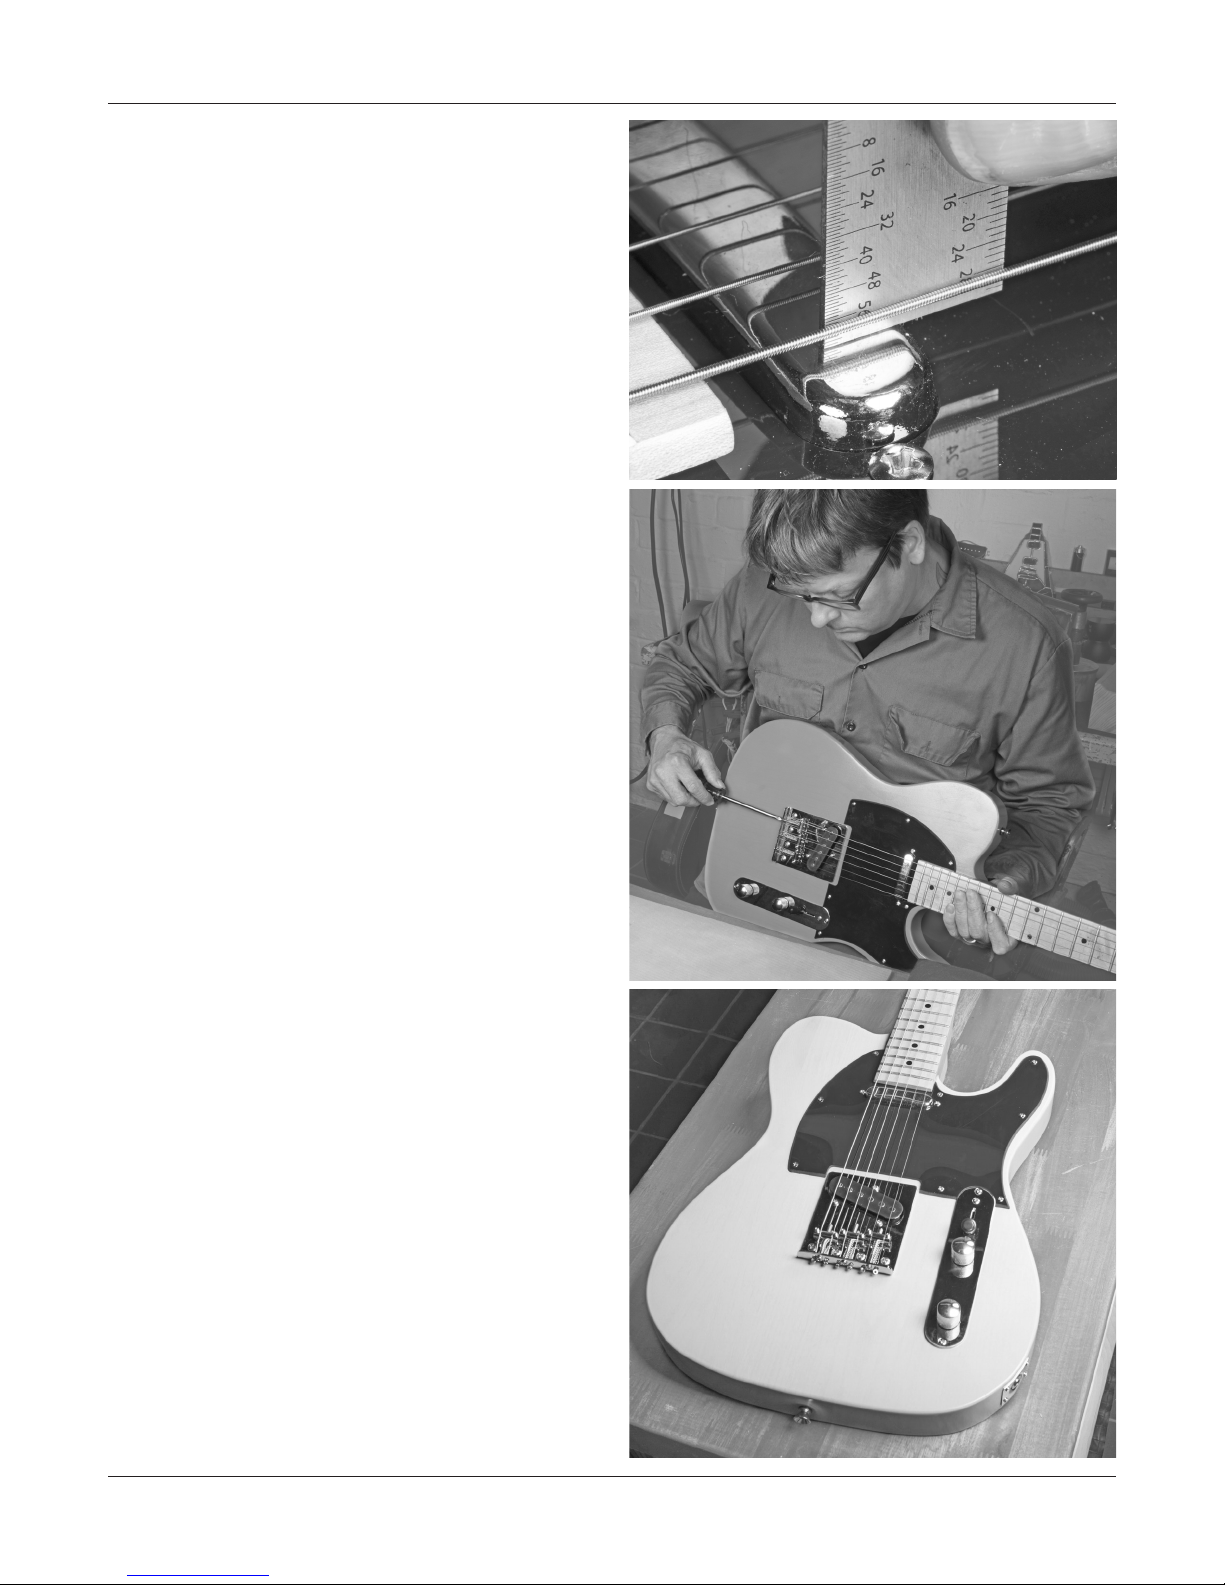
Adjust the pickup height
Holding down the low E and high E strings at the 22nd fret,
adjust the bass side of the pickups to 5/64" from the top of
the pickup pole to the bottom of the low E string. Adjust the
treble side to 1/16".
Set the intonation
The last step is intonating the guitar by adjusting the string
lengths at the bridge saddles so the guitar plays in tune all
the way up the neck.
The bridge on this kit features the same 3-saddle design as
the original Telecaster guitars of the 50s and 60s. While this
is a traditional feature, it does have a drawback. Because the
bridge only has 3 adjustable saddles you will not be able to
perfectly set the intonation on all strings.
By intonating the high E, D, and A strings as described below, the B, G, low E strings will be intonated close enough
for rock and roll.
Using a strobe or other accurate tuner, first tune the strings
to pitch. Then, press the high E string lightly at the 12th fret
using just enough pressure to sound the note. Check it with
your tuner.
If the note reads flat, the saddle needs to be adjusted forward
towards the nut, shortening the length of the string.
If the note reads sharp, the saddle needs to be adjusted back
away from the nut, increasing the string length.
Moving to the D/G saddle, check and adjust the intonation
of the D string at the 12th fret. Lastly, check and adjust the
A string at the 12th.
You’re done!
Congratulations! Your guitar is ready to play. We hope this
guitar will be the first of many that you have fun assembling
and customizing.
Be sure to get a gig bag or case, so it doesn’t get banged
around!
14
stewmac.com
Page 15
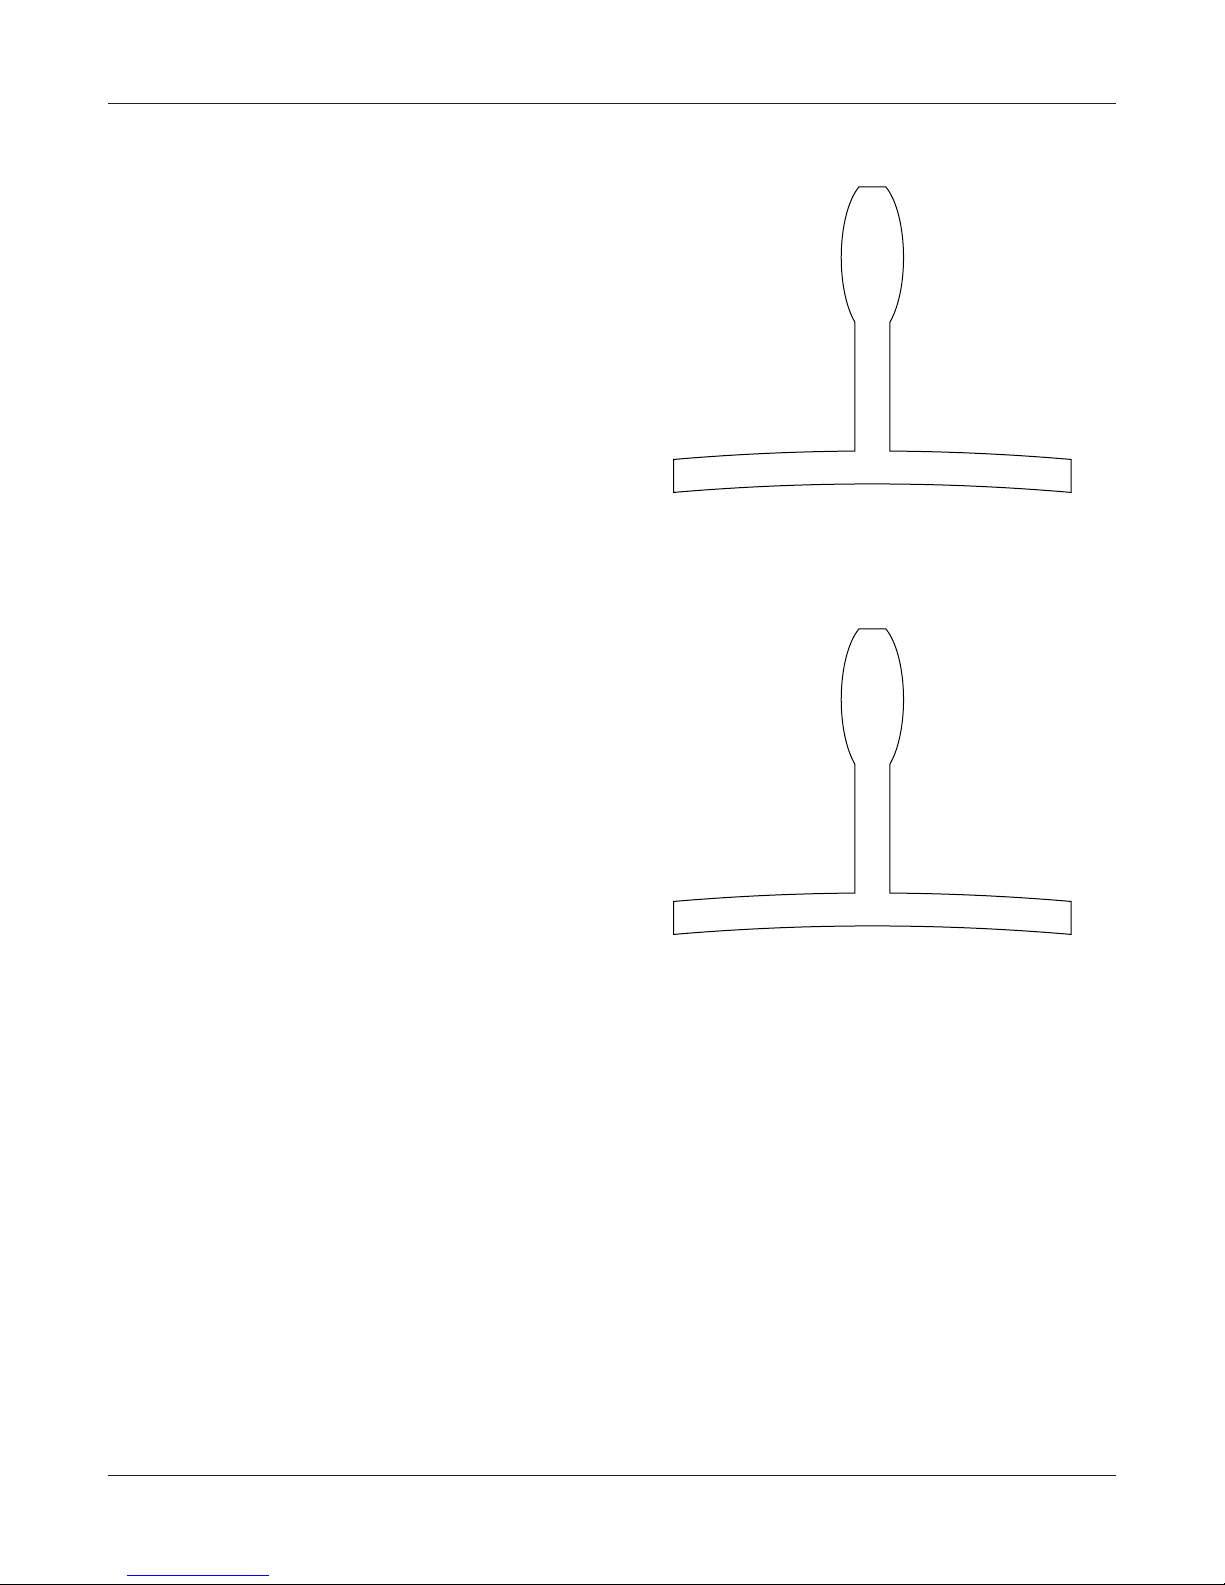
Cut-out radius gauge
Carefully cut out this radius gauge to check your saddle
heights as shown on page 13. We’ve printed two, so you
have a backup.
16" RADIUS16" RADIUS
stewmac.com
15
Page 16

StewMac
tools + ideas for guitarmaking
21 N. Shafer St • Athens, Ohio 45701 • USA
USA & Canada call toll-free: 800-848-2273
9am-6pm weekdays Eastern time
stewmac.com
 Loading...