

Page 1
Sterling Power Products
Copyright
Legal and Safety | Warranty
3A - 7A portable charger
USER MANUAL
Manual for:
Code
B127 230VAC | 50Hz
E127 230VAC | 50Hz
A127 110VAC | 60Hz
STERLING POWER 6V / 12V LCD BATTERY CHARGER
INPUT: 230VAC 50Hz | 110VAC 60Hz
OUTPUT: 6V / 12VDC 3A / 5A / 7A
WARNING:
Read the SAFETY section at the beginning of this manual ENTIRE
before setup or use of this product.
- This charger is designed for indoor use only. Never expose this product
to rain or wet conditions.
- Make sure you are using the correct AC line voltage and all plugs and
sockets are in good order.
- Do not attempt to use the charger if it has been dropped or damaged.
- Never attempt to charge a damaged battery, frozen battery or nonrechargeable battery.
- Do not use the charger in a closed area or poorly-ventilated area.
The battery charger should be away from any heat source or ignitable air,
which could possibly cause explosion.
- Do NOT replace the cord and plug.
If the battery charger does not work properly, do NOT attempt to repair it,
or open the case, as there is high (230V) internal voltages and this may
kill.
- Keep the battery charger away from children and animals.
- Disconnect the battery charger after turning off.
Before charging, check the battery type and maximum charging voltage
allowed. Or, get this information from battery supplier.
- Use goggles while connecting or disconnecting the charger.
- Do not operate this product in explosive atmospheres, such as in the
presence of flammable liquids, gases or dust. This could result in serious
injury.
- Don't insert any metal items into the ventilator of the battery charger.
To reduce risk of damaging the battery, avoid dropping any metal tools
onto the battery.
- Don't put the battery charger too close to the battery during charging.
Warning do not attempt to charge non rechargeable batteries
SPECIFICATIONS PARAMETERS
Simple specification:
Input voltage: 220-240VAC 50Hz | 110-120VAC 60Hz (N.A model)
Input current: 0.4A RMS max.
Back drain current: <5 mA (No AC input)
Cut off voltage: 17V (+/-0.25V) @ 12V | 8.5V (+/-0.25V) @ 6V
Charging current: 3A / 5A / 7A (+/-10%)
Ripple: 150mV max.
Battery type: 6 Preset values
Audible noise: < 50dB (test from 500mm distance)
Your 100% satisfaction is our goal:
We know that every customer is unique. If you have a problem, a question
or comment please do not hesitate to contact us, even if the warranty
period is over.
Product warranties:
Each product manufactured by Sterling comes with a warranty of at least 2
years. This is counted from the date of purchase. Each product is
guaranteed against defects in materials or workmanship. We shall choose
to replace or repair the defective product duringthe warranty period.
The following provisions apply:
- Proof of purchase must be provided, otherwise the warranty period
begins on the date of manufacture of the object.
- Our warranty covers defects in materials and manufacturing. Damage
caused by neglect, abuse, accident, alteration, misuse, are not covered by
our warranty.
- The guarantee does not apply if the damage resulted from improper
repairs.
- The consumer is liable for shipping the product.
- Sterling Power shall return the product at the customer’s own expense.
- If your product was damaged in transit, contact us quickly, we can solve
the problem.
- This only applies for the transport organized by our company. It is best not
to throw away the original packaging.
All returns must be accompanied by a proof of purchase. If you don 't have
the evidence ask the seller from whom you purchased the equipment to
provide you with a new one.
To make a claim under warranty, check the phone number on the internet.
We will make best efforts to repair or replace the product, if defective,
according to the criteria of guarantee.
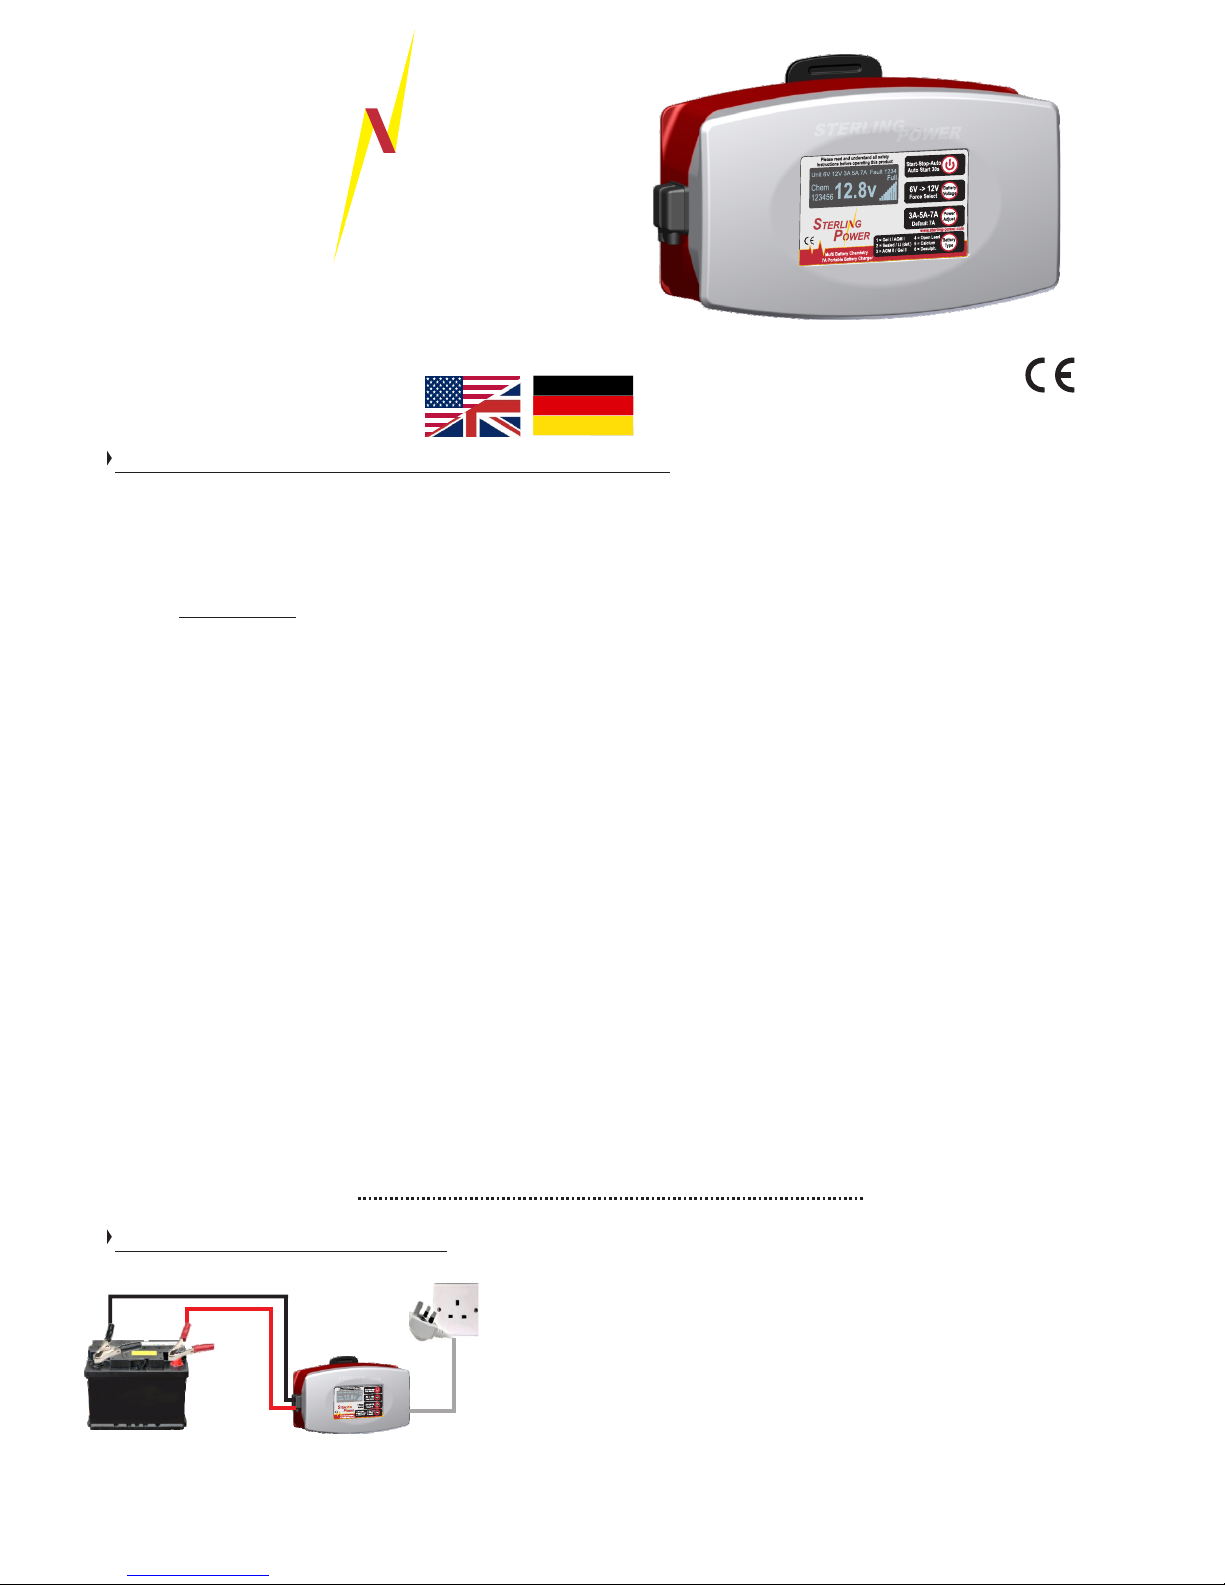
6V or 12V
Battery
Euro / UK
230VAC | 50Hz
N. America
110VAC | 60Hz
Portable Charger
Firstly check that both DC and AC cables are not damaged / split / worn / spliced
etc.
Connect the AC plug to nominal 230V / 50Hz mains for the UK / Euro models or
110V / 60Hz mains for the North American models. The charger’s screen should
then light up.
Connect the DC output clips to the and negative (black) of the positive (red)
battery. Parameters on the charger can only be modified once the DC cables are
connected.
The charger shall detect and auto select whether the charger has been
connected to a 6V or 12V battery and begin charging after approximately 30
seconds - at 14.4V absorption / 13.8V float (7.2V / 6.9V for 6V) at a 7A charge
rate. If you do not wish to wait 30 seconds for the charger to start, press the StartStop-Auto button - the charger shall then start.
This level of installation should be sufficient for most users. Please continue to
read below if you wish to modify the charger’s parameters.
After completing the charge, simply remove the AC, then remove the DC cables.
Basic Operation
RoHS
compliant
Sterling Power Products Ltd.
www.sterling-power.com
www.sterling-power-usa.com
STERLI
G
POWER
Page 2
Sterling Power Products
Copyright
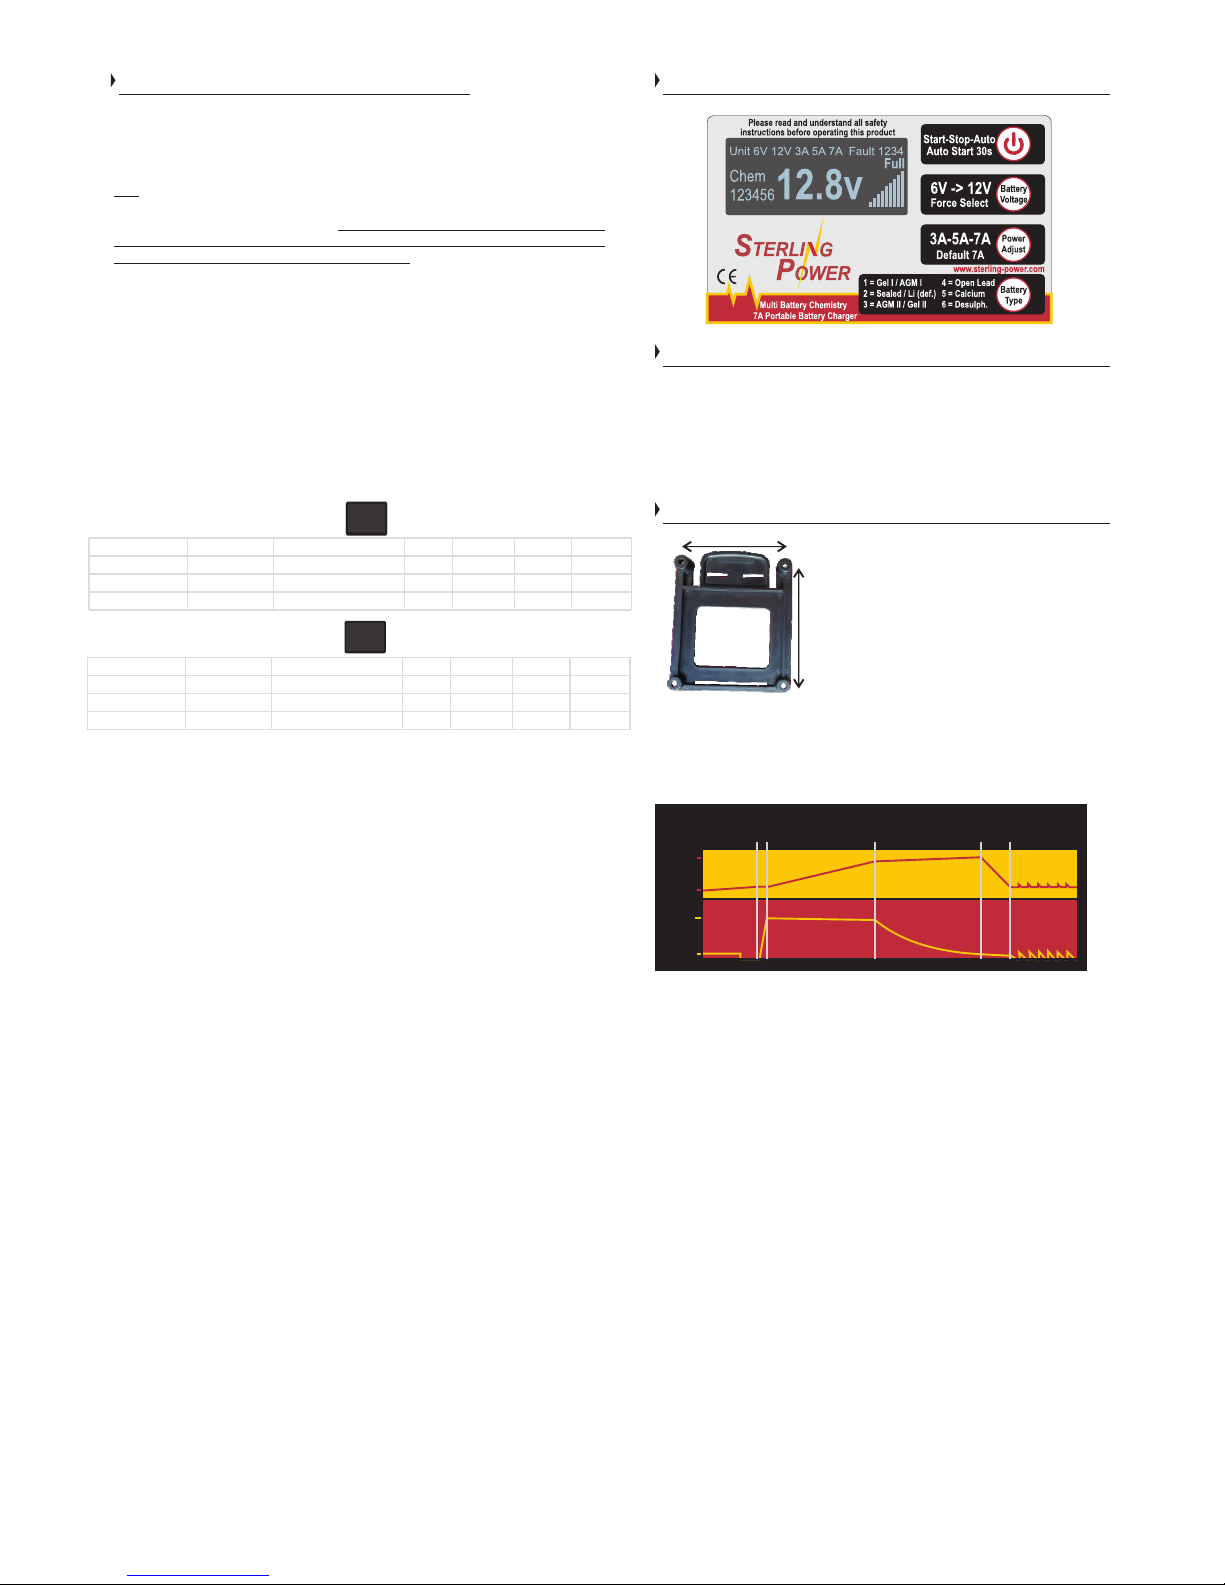
Front Label
12V12V
6V
6 Stage Charging Curve - Charger set to Number 2 (14.4V bulk and 13.8V float)
110Ah Battery Discharged at 50A to 10.5V, then charged for 1000 minutes
Number 1 2 (default) 3 4 5 6*
Profile Gel I / AGM I Se aled LA / Lithium AGM II Open LA Calcium De sulph
Absorption (V) 14.1 14.4 14.6 14.8 15.1 15.5
Float (V) 13.4 13.8 13.7 13.3 13.6 N/A
Number 1 2 (default) 3 4 5 6*
Profile Gel I / AGM I Se aled LA / Lithium AGM II Open LA Calcium De sulph
Absorption (V) 7.1 7.2 7.3 7.4 7.6 7.8
Float (V) 6.7 6.9 6.9 6.7 6.8 N/A
Advanced operational manual
14.5
13.7
6.0A
0.5A
VOLTS
AMPS
1 2 3 4 5 6
6 Step intelligent battery charging and conditioning
4 Faults
Fault 1 = High output voltage (exceeded 17V)
Fault 2 = High unit temp alarm (80C+)
Fault 3 = Reverse Polarity
Fault 4 = Open circuit / Batt. disconnected
Faults
This bracket is designed to be installed
in a place of your convenience so the
charger can be stored safely. To
operate, simply clip the charger into the
bracket. To release, push back the top
of the bracket to remove the unit.
95mm
83mm
Modifications -
To make changes from default / auto select described above, please read
on. Changes can only be made if the DC cables are connected to a battery
and the charger is NOT charging. If the charger has already started
charging, press the Start-Stop button. This stops the charger from charging.
You can now modify the settings. Once these changes have been and the
Start-Stop button has been pressed, the charger stores this information
(exception is the 6V-12V Force Select option).
Charging a very low voltage 12V battery - Force Select.
If you have a nominally 12V battery that is down at a much lower voltage
(e.g.~6V), you can force the charger to charge at a 12V profile. The charger
shall automatically detect 6V, thus, it assumes that the battery is a 6V
(nominal) battery and shall assume a 6V profile. However, you can override
this by pressing the Force Select button once - the 6V light on the display
shall now read 12V. Once the display reads 12V, press the Start - Stop
button and the charger shall begin charging.
Changing battery chemistry - Battery Type.
You can select the battery type by pressing the battery selector switch.
Simply toggle between 1-6 and select which profile best suits you (table
below):
The voltage requirements of the battery company will override our
recommendations as it is them who are supporting the battery warranty. Get
as close to the recommended voltage that is set by the battery manufacturer
and select the relevant number.
Profile 6* - Desulphation mode
This mode comes with a warning of high voltage. Should not be used unless
you need to desulphate your battery. If you are not familiar with this term
please refrain from using profile 6.
Changing current level - Power Adjust.
Select which current level you want, either 3A, 5A or 7A (default). Use the
Power Adjust button to toggle between these three settings.
When all has been done, press the Start-Stop button at the top. The charger
screen should then briefly display the absorption and float voltages and then
start charging.
During charging, if any parameter needs modifying (nominal voltage /
battery profile / current) the Start-Stop button shall need to be pressed to
turn the charger off, first. Then make the modification, then press the StartStop button to resume charging.
Any parameter changes (except FORCE SELECT) shall be saved for future
use. Therefore, when the charger is disconnected and reconnected the
charger shall fire up with the previously saved settings.
Rescue dead battery
When being connected to a battery and starting the charging course, the
charger detects the voltage of the battery automatically and then changes to
pulse charging mode if the voltage is within the range of 7.5V+/-0.5 to
10.5V+/-0.5. This pulse charging course won’t stop until the battery voltage
rises to 10.5V+/-0.5. Once this point is arrived, the charger changes to the
normal charging mode selected by the user at the beginning and now the
battery can be charged up fast and safely. Through this method, most ‘dead’
batteries can be rescued.
Abnormality protection
Whenever a fault appears (1-4), one of the following abnormal occasions,
such as: Short circuit, high or low battery voltage, open circuit or reverse
connection of the output terminals, the charger will stop charging to avoid
damage. If there is no further order received, the system will remains in the
standby state.
Temperature protection
During the charging course, if the charger is too hot for some reason, it will
reduce the output power automatically to protect itself from damaging.
Phase 1: INITIALIZATION: Test feature evaluates the battery on its size,
condition and state of charge. This step incorporates a FAULT indication in
the event that it deems this battery in such a state or condition that it cannot
be charged.
Phase 2: SOFT START: In order to reduce shock on the power supply and
battery the current is ramped up over a short period of time.
Phase 3: BULK CHARGE: The charge voltage starts to rise to its maximum
charge voltage of about 14.5V. The current runs at max during this phase
delivering as much power as possible to the battery.
Phase 4: SATURATION CHARGE: The voltage has reached its target
voltage and now the current starts to drop back as the battery fills up. It shall
then be unable to take any more charge.
Phase 5: BATTERY TEST and REVALUATION: At this stage the battery
should be almost full and the charge current should be dropping away.
However, the charger shall perform a quick test if: There is a miscalculation,
the battery state was due to a draw being taken off the battery while charging
or the battery is not at the state it should be. Also, if required, add more time
onto the saturation time to ensure the task is completed and the battery is full
charged.
Phase 6: FLOAT CHARGE: Float charge for a portable charger means that
enough voltage and current is supplied to the battery in order to replace an
internal discharge of the battery to maintain the battery at its full state and
readiness for when you require it.
Quick Release Storage Bracket
Page 3
Sterling Power Products
Copyright
3A - 7A mobiles Ladegerät
ANLEITUNG
Anleitung für folgende Artikel:
Ÿ B127 230VAC | 50Hz
Ÿ E127 230VAC | 50Hz
Ÿ A127 110VAC | 60Hz
INSTALLATIONS- UND BEDIENUNGSANLEITUNG
STERLING POWER 12V LCD LADEGERÄT
EINGANGSSPANNUNG: 230VAC 50Hz
110VAC 60Hz (A127)
AUSGANGSSPANNUNG: 12VDC 3A / 5A / 7A
ACHTUNG:
- Dieses Ladegerät ist nur für den Betrieb im Innenraum geeignet. Es
ist nicht gegen Feuchtigkeit, Wasser, Regen, etc. geschützt.
- Stellen Sie sicher, dass die 230V Stecker und Steckdosen nicht
defekt oder beschädigt sind.
- Verwenden Sie das Ladegerät nicht, wenn es beschädigt oder fallen
gelassen wurde.
- Verwenden Sie das Gerät nicht in geschlossenen Boxen/Kästen
oder schlecht belüfteten Orten.
- Das Ladegerät darf nicht neben wärmeausstrahlenden Geräten
oder in explosiver Luft verwendet werden. (z.B. auch nicht in
Maschinenräumen von Benzin- oder Gasmotoren).
- Laden Sie niemals eine beschädigte, gefrorene oder nichtwiederaufladbare Batterien.
- Ersetzen Sie niemals die 230V Leitung und den Stecker.
- Sollte das Ladegerät nicht funktionieren, öffnen Sie niemals das
Gerät und versuchen Sie auch nicht, dieses selbst zu reparieren.
- Hohe Spannungen können tödlich sein!
- Stellen Sie sicher, dass Kinder und Tiere nicht in die Nähe des
Gerätes kommen.
- Nach dem Laden entfernen Sie bitte die Kabel von der Batterie.
- Vor dem Laden überprüfen Sie bitte den Batterietyp und die
maximal erlaubte Ladeschlussspannung. Falls diese Informationen
nicht vorhanden sind, fragen Sie den Hersteller Ihrer Batterie oder
Ihren Lieferanten der Batterie.
- Benutzen Sie eine Schutzbrille, wenn Sie das Ladegerät
anschließen oder den Anschluss wieder entfernen.
- Der Lüfter muss frei laufen können.
- Um das Risiko von defekten Batterien zu minimieren, hantieren Sie
nicht mit metallischen Werkzeugen oder ähnlichem in der Nähe der
Batterien.
- Beim Laden stellen Sie das Ladegerät NICHT direkt neben oder auf
die Batterie.
- Lesen Sie die gesamte Anleitung, bevor Sie mit dem Betrieb des
Ladegerätes beginnen.
- Das Gerät ist nur zum Laden von wiederaufladbaren Blei-Batterien
geeignet.
Spezifikationen:
Eingangsspannung: 220---240VAC 50/60HZ / 110 - 120VAC 60Hz
Eingangsstrom: 0.6A RMS max.
Rückstrom: <5 mA (No AC input)
Ladeschlussspannung: 14,1V - 14.8V (+/-0,25V)
je nach eingestelltem Batterietyp
Ladestrom: 3A / 5A / 7A (+/-10%)
Restwelligkeit: 0,15V max.
Batterietyp: 12V Blei, GEL, AGM 5Ah----100Ah
Geräuschentwicklung: < 50dB (Entfernung: 50cm)
Garantie
Ihre 100% Zufriedenheit ist unser Ziel:
Wenn Sie ein Problem, eine Frage oder einen Hinweis für uns haben,
bitte kontaktieren Sie uns, auch wenn die Garantiezeit abgelaufen ist.
Produktgarantie:
Jedes Sterling Produkt erhalten Sie mit einer 2 Jahres-Garantie. Diese
startet mit dem Kauf eines neuen Produktes. Dabei überlassen Sie
uns, ob wir das Produkt reparieren oder austauschen.
Bedingungen:
- Der Kauf muss durch eine Kopie der Rechnung / Quittung
nachgewiesen werden, ansonsten beginnt die Garantiezeit mit dem
Herstellungsdatum.
- Unsere Garantie deckt alle Schäden des Gerätes selbst ab, welche
durch Material- oder Fabrikationsfehler entstanden sind. Schäden
durch Veränderung des Gerätes, nicht authorisierte Reparaturen,
Zweckentfremdung, falsche Handhabung, falschen Anschluss und
Unfall sind nicht abgedeckt.
- Der Kunde sendet das Gerät kostenfrei an uns zurück.
- Sterling Power sendet das reparierte / ausgetauschte Gerät auf
Kosten des Kunden zurück.
- Hat das zurückgeschickte Gerät einen Transportschaden, bitte
informieren Sie uns innerhalb von 24Std. nach Erhalt der Ware. Ist der
Transport von Ihnen organisiert, kontaktieren Sie bitte Ihren Spediteur.
Bewahren Sie die Verpackung auf.
-Wenn Sie diese Garantie in Anspruch nehmen möchten, überprüfen
Sie bitte unsere aktuelle Adresse und Telefonnummer auf unsere
Webseite.
-Diese Garantie ist unabhängig von der Ihnen gesetzlich zustehenden
Gewährleistung.
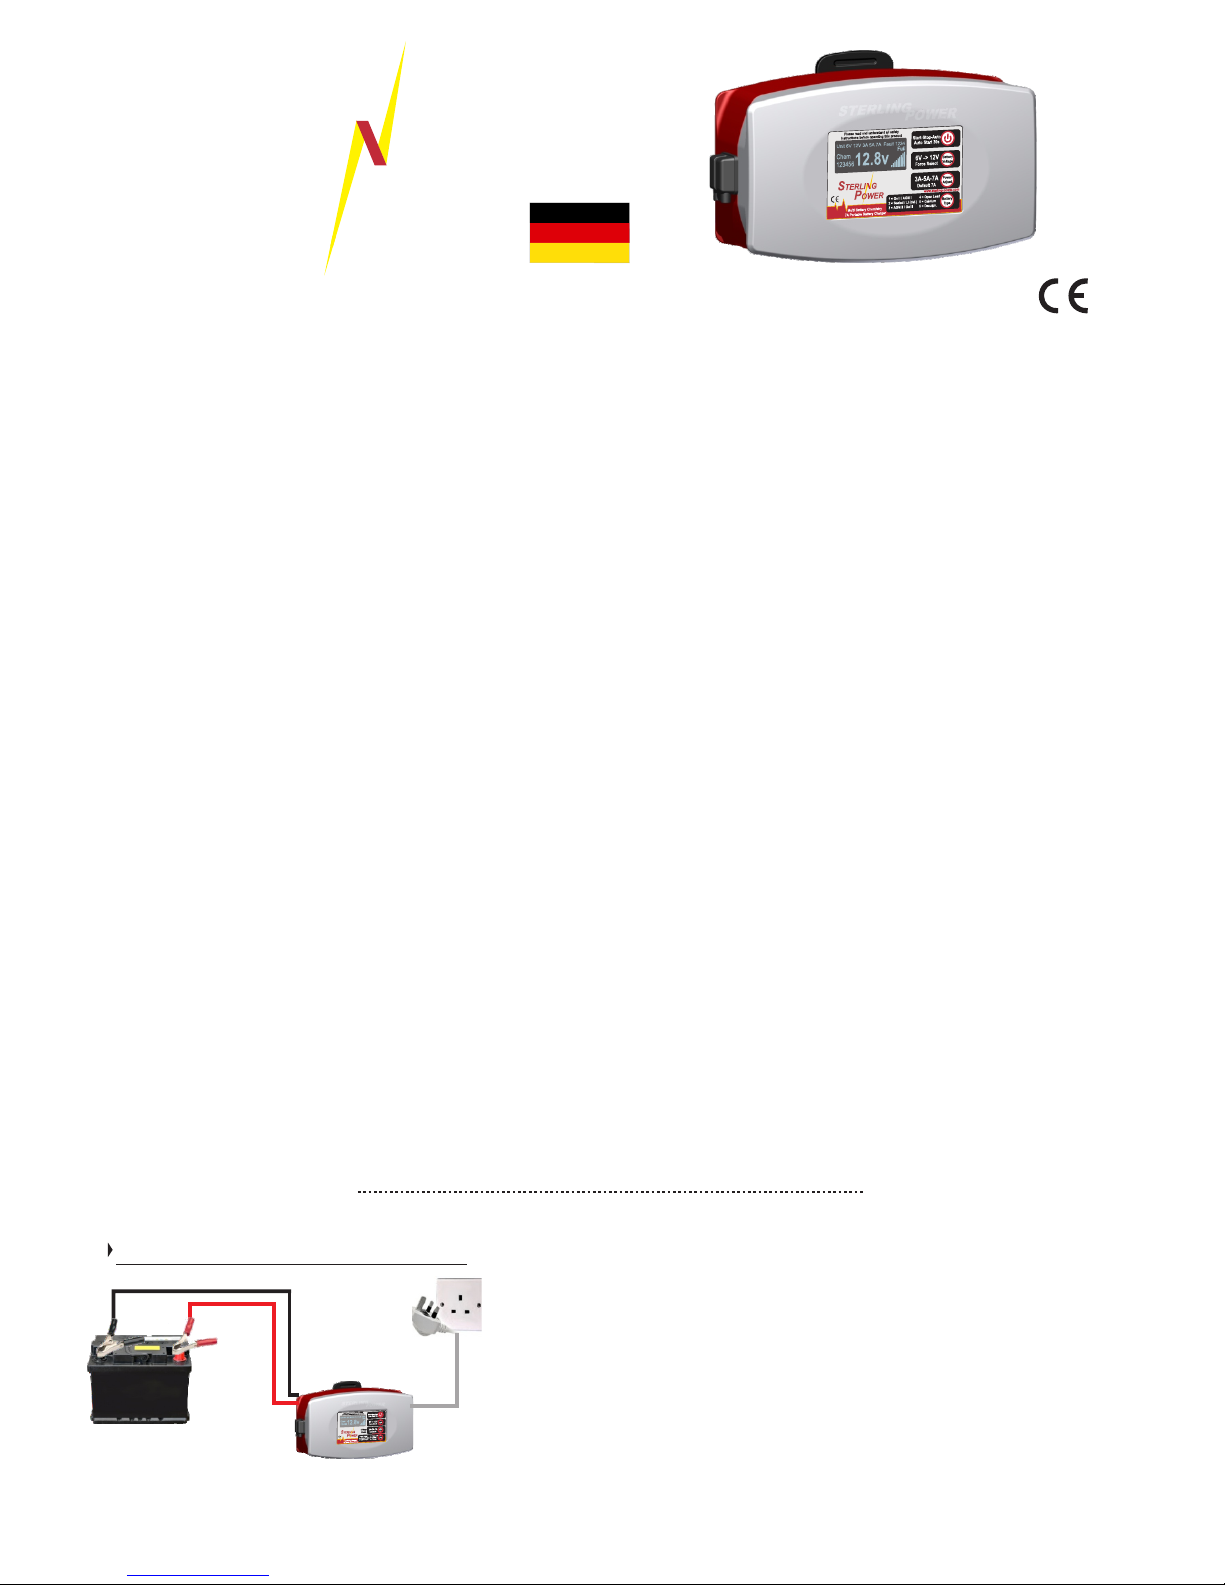
Grundbetrieb
6V oder 12V
Batterie
Euro / UK
230VAC | 50Hz
N. America
110VAC | 60Hz
mobiles Ladegerät
Vor jeglichem Betrieb überprüfen Sie bitte, dass alle Kabel nicht beschädigt
und in einwandfreiem Zustand sind.
Verbinden Sie den 230V Stecker mit einer Steckdose. Das Display des
Gerätes sollte sich einschalten.
Anschließend verbinden Sie die 6V/12V Kabel (rot/schwarz) mit der
Batterie. Das schwarze Kabel wird mit dem MINUS-Pol und das Kabel rote
mit dem der Batterie verbunden.PLUS-Pol
Die Einstellungen des Ladegerätes können nur geändert werden, wenn eine
Batterie angeschlossen ist.
Das Ladegerät erkennt nun automatisch, ob es sich um eine 6V oder 12V
Batterie handelt. Nach ca. 30 Sekunden fängt es mit dem Laden
automatisch an. Ist kein individueller Batterietyp eingestellt, lädt es mit
14,4V (7,2V bei 6V) in der Ladephase und mit 13,8V (6,9V bei 6V) in der
Erhaltungsphase (Profil 2).
Wenn Sie nicht warten möchten, Drücken Sie die Start-Stop-Auto Taste.
Möchten Sie den Batterietyp ändern und das Ladegerät hat bereits
angefangen zu laden, drücken Sie die Start-Stop-Auto Taste um den
Ladevorgang anzuhalten.
RoHS
compliant
STERLI
G
POWER
Page 4
Sterling Power Products
Copyright
Einstellungen ändern
Wenn Sie andere Einstellungen, als die Standard-Einstellung vornehmen
möchten, dann muss eine Batterie angeschlossen sein und das Ladegerät darf
NICHT laden. Wenn das Ladegerät schon in der Ladephase ist, dann müssen
Sie die Start-Sto p-Auto Taste drücken. Das Ladegerät stoppt den
Ladevorgang. Nun können Änderungen vorgenommen werden.
Tiefentladene 12V Batterie laden - Taste „Force Select“
Wenn Sie eine tiefentladene 12V Batterie laden möchten, ist meistens die
Spannung nicht hoch genug, dass diese als 12V Batterie erkannt wird. In
diesem Fall müssen Sie die 12V Spannung manuell auswählen. Dazu drücken
Sie die Taste „Battery Voltage“ bis die Anzeige „Unit 12V“ anzeigt.
Anschließend drücken Sie die Taste „Start-Stop-Auto“. Das Ladegerät fängt an
zu laden.
Batterieladeprofil ändern
Sie können zwischen 6 verschiedenen Ladeprofilen auswählen. Hierzu
drücken Sie die Taste „Battery Type“, bis der von Ihnen gewünschte Batterietyp
im Display angezeigt wird.. Wählen Sie das Profil, welches den empfohlenen
Einstellungen des Herstellers der Batterie am nächsten liegt. Im Zweifelsfall
fragen Sie den Hersteller der Batterien nach den empfohlenen Spannung. Die
hier genannten Batterietypen sind unverbindliche Empfehlungen. Im
Zweifelsfall gilt immer die Empfehlung des Herstellers!
Profil 6* - Desulfatierungs Modus
Dieses Profil ist mit Vorsicht zu benutzen. Die Spannung geht über die
Gasungsspannung der Batterie hinaus und ist nur bei Batterien zu empfehlen,
bei denen der Elektrolyt nachzufüllen ist. Lassen Sie die Batterie in diesem
Modus niemals unbeaufsichtigt!
Auswahl der Stromstärke
Sie können zwischen den Stromstärken 3A, 5A und 7A wählen. Dazu drücken
Sie die Taste „Power Adjust“, bis die von Ihnen gewünschte Stromstärke im
Display angezeigt wird.
Abschluss der Einstellungen
Haben Sie alle Einstellungen vorgenommen, drücken Sie die Taste „StartStop-Auto“. Das Ladegerät wird mit den gewünschten Einstellungen laden.
Sie können den Ladevorgang jederzeit durch das Drücken der „Start-StopAuto“ Taste unterbrechen.
Sicherung der Einstellungen
Alle von Ihnen vorgenommen Einstellungen, bis auf die Einstellung „6V/12V“
werden gespeichert und beim nächsten Einschalten wieder geladen.
Schließen Sie das Ladegerät an eine Batterie an und verbinden es mit 230V,
dann fängt es nach 30 Sekunden automatisch mit den gespeicherten
Einstellungen an zu laden.
Fehlererkennung
Kommt es zu einem Fehler (siehe Fehlerbeschreibung oben), schaltet das
Gerät in den Standby-Modus und zeigt den Fehler im Display an.
Temperaturschutz
Wird das Gerät eventuell zu heiß, weil die Umgebungstemperatur zu hoch ist
oder es in einem kleinen Raum ohne Belüftung betrieben wird, reduziert das
Gerät die Ausgangsleistung in Stufen, um es zu schützen.
Rettungsmodus bei tiefentladener Batterie
Schließen Sie eine Batterie an, bei der die Spannung zwischen ca. 7,5V und
10,5V liegt (1/2 bei 6V), dann fängt das Ladegerät mit einer Pulsladung an, bis
die Spannung ca. 10,5V ankommt. Anschließend wechselt das Ladegerät in
den normalen Lademodus. Durch diese Methode können auch tiefentladene
Batterien eventuell wieder reaktiviert werden.
Ladestufen:
1. Initialisierung:
Während dieser kurzen Testphase testet das Ladegerät die Kondition
und den Ladezustand. Bei einer defekten Batterie schaltet das Gerät in
den Fehlermodus.
2. Soft Start:
Die Stromstärke wird langsam bis zur maximalen Stromstärke erhöht.
3. Maximalladung:
Bis zur eingestellten Ladespannung wird mit dem maximal möglichen
Strom geladen. Bei Erreichen der Ladeschlussspannung wird in die
nächste Stufe geschaltet.
4. Ausgleichsladung:
Bei konstanter Ladeschlussspannung sinkt langsam der Strom.
Während dieser Phase wird die Batterie bis zur Vollladung geladen.
5. Batterie-Test und Überprüfung:
In dieser Phase überprüft das Gerät, ob wirklich keine weitere Ladung
mehr akzeptiert wird. Entweder wird weiter geladen oder das Gerät
schaltet in die nächste Stufe und die Spannung wird bis zur
Erhaltungsladespannung reduziert..
6. Erhaltungsladung:
In dieser Spannung verbleibt das Gerät, um die Batterie in einem
vollgeladenen Zustand zu halten.
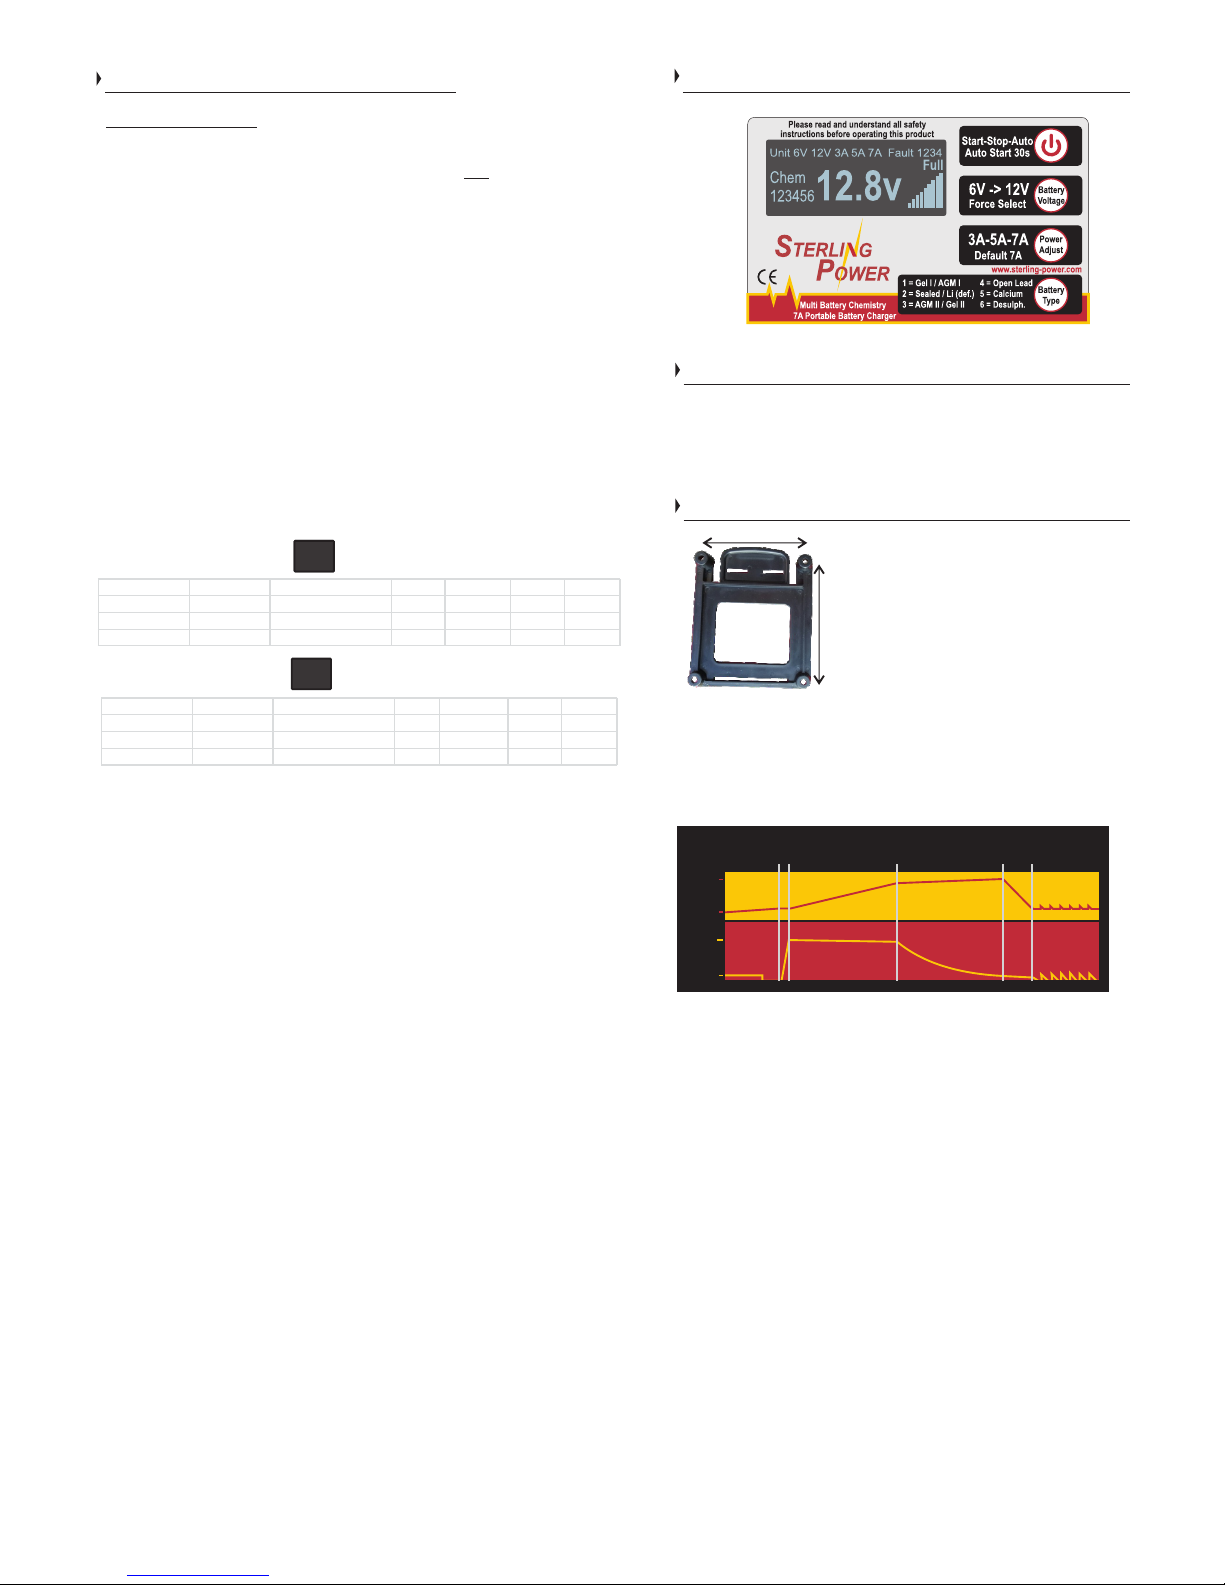
Vorderseite
Erweiterte Einstellung
14.5
13.7
6.0A
0.5A
VOLTS
AMPS
1 2 3 4 5 6
Intelligente 6-Stufen Ladung und Konditionierung
Fehler 1 = Hohe Ausgangsspannung (>17V)
Fehler 2 = Übertemperatur (>80°C)
Fehler 3 = Verpolungsschutz
Fehler 4 = Keine Batterie angeschlossen
Fehleranzeige (Fault)
12V12V
6V
Nummer 1 2 (Standard) 3 4 5 6*
Profil Gel I / AGM I geschl. BS / Lithium AGM II offene BS Kalzium Desulf.
Ladung (V) 14,1 14,4 14,6 14,8 15,1 15,5
Erhaltung (V) 13,4 13,8 13,7 13,3 13,6 N/A
Nummer 1 2 (Standard) 3 4 5 6*
Profil Gel I / AGM I geschl BS / Lithium AGM II offene BS Kalzium Desulf.
Ladung (V) 7,1 7,2 7,3 7,4 7,6 7,8
Erhaltung (V) 6,7 6,9 6,9 6,7 6,8 N/A
Quick Release Storage Bracket
Diese Halterung ist so konzipiert, dass
sie in einem Ort Ihrer Bequemlichkeit
installiert werden, und das Ladegerät
somit sicher gelagert werden kann. Für
den Betrieb clippen Sie das Ladegerät
einfach in die Halterung. Zum Lösen
drücken Sie die O be rs ei te de r
Halterung zurück, um das Gerät zu
entfernen.
95mm
83mm
6-Stufen Ladekurve - Batterieladeprofil 2 (14,4V
Ladung & 13,8V Erhaltung) 110Ah Batterie,
entladen auf 50Ah bei 10,5V, anschließend 1000
Min. geladen.
 Loading...