

Page 1
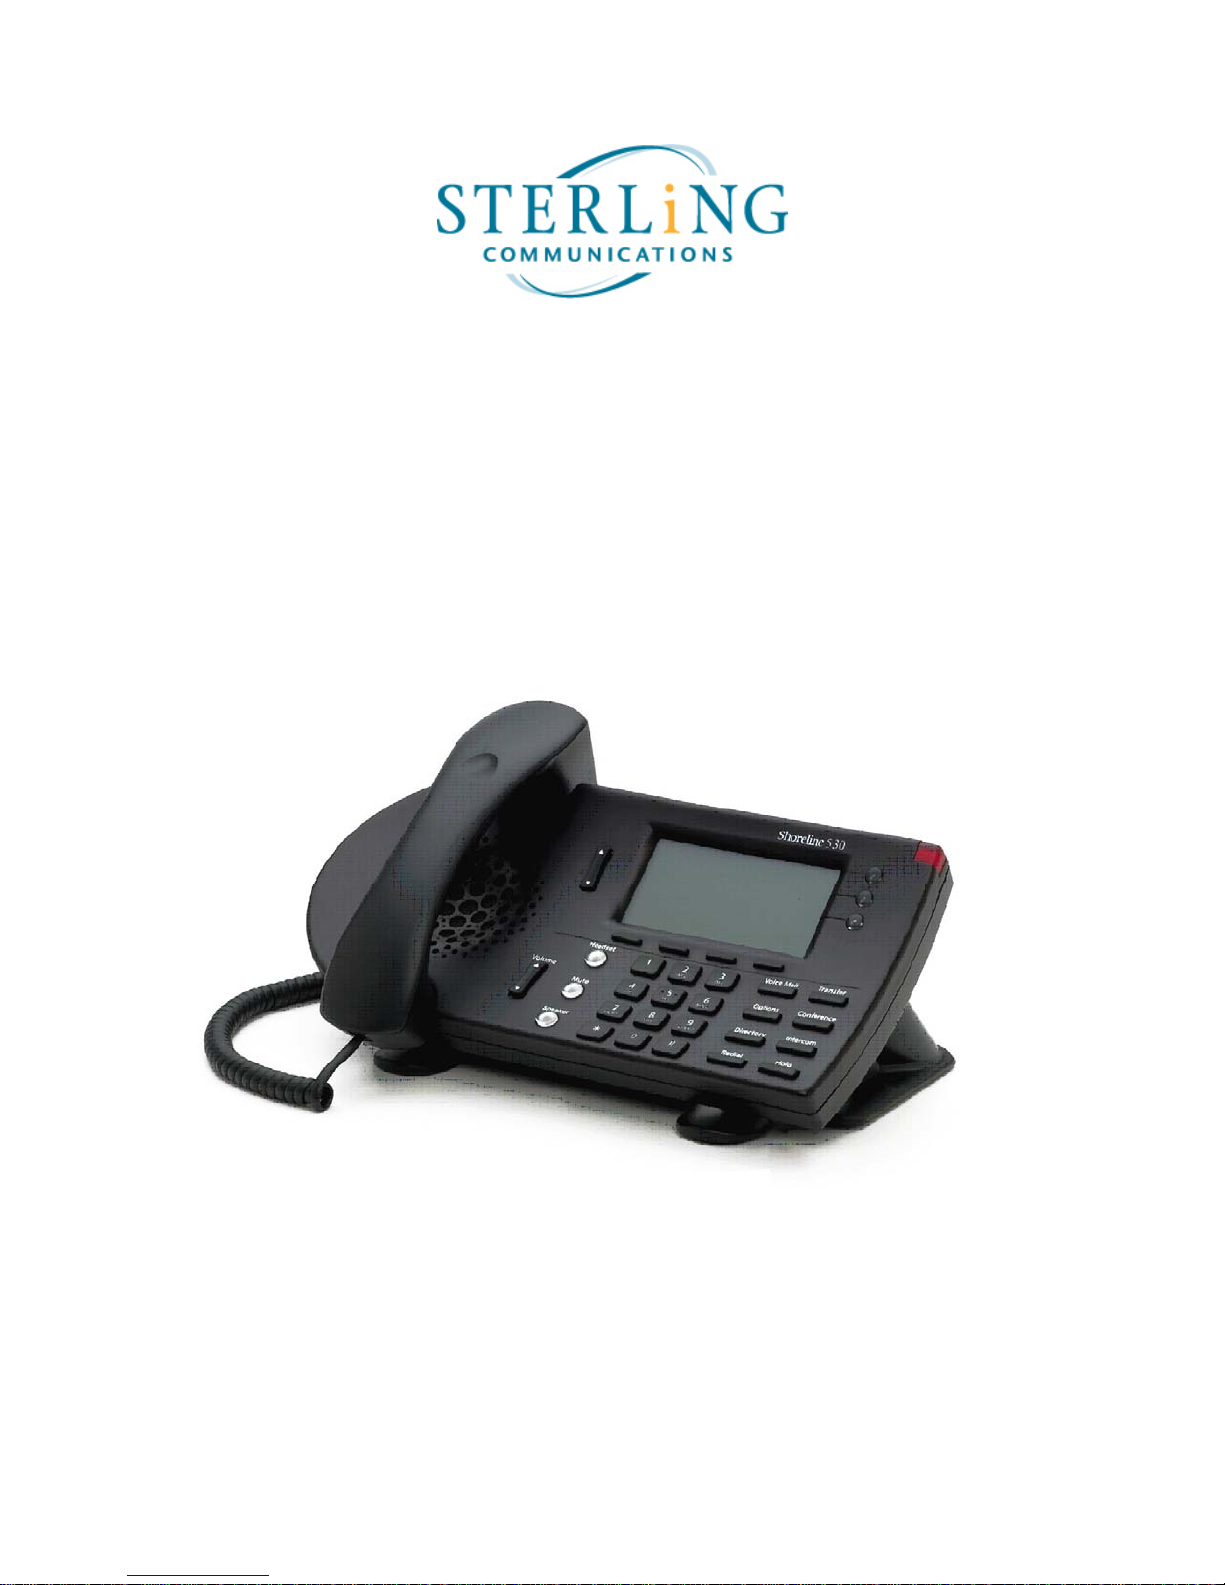
IP530 Phone User Training Guide
Sterling Voice
™
Managed VoIP Services
Sterling Communications, Inc.
14945 SW Sequoia Parkway, Suite 110
Portland, OR 97224
p: 503.968.8908 | f: 503.603.1879
Page 2
rëáåÖ=íÜÉ=fm=RPM=mÜçåÉ=
Property of Sterling Communications © 2007
Last Updated: 03/14/2007 @ 2:13 PM
Page 2 of 8
=
NK mЬулбЕ~д=mЬзеЙW=
~K mÜçåÉ=mçêíëW==
i. Handset
ii. Headset
iii. PC Port
iv. LAN Port
has a power adapter that plugs into the network drop and the power supply.
ДK aЙлЕкбйнбзе=зС=hЙулW==
i. Message Indicator Light
flashes red when user has unheard voicemail, or an incoming call.
ii. Microphone
phone on hard surface and free of paper, to ensure good voice quality.
iii. Speaker button
to be carried over the speaker beneath handset; the button will be lit green
when it is in use.
iv. Mute button
user’s side of the conversation; allows user to hear the caller, but caller can not
hear the user; the button will be lit green when it is in use.
v. Headset button
the headset; note: if this button is depressed without the headset installed, the
call will sit on the line, until it is reclaimed; the button will be lit green when it
is in use.
: plugs into the left side of the phone.
: plugs into the left side of the phone of the phone.
: This port is used to connect a PC to the network, on back of phone.
: This port is used to connect the IP phone to the network. The IP 530
: located below hold button – on bottom of phone base; keep the
: located on the upper right hand corner of the phone,
: bottom button next to * on the key pad; allows the phone call
: button directly above the speaker button, mutes all noise on the
: button above mute and speaker buttons; transfers the call to
vi. Volume
ringing volume and listening volume for the handset, headset, and speaker
phone, depending on which item is off the hook.
vii. Call Stack Keys
screen.
viii. LCD Panel
stack, date and time; is the information center; gives the user status of phone
and step by step instructions.
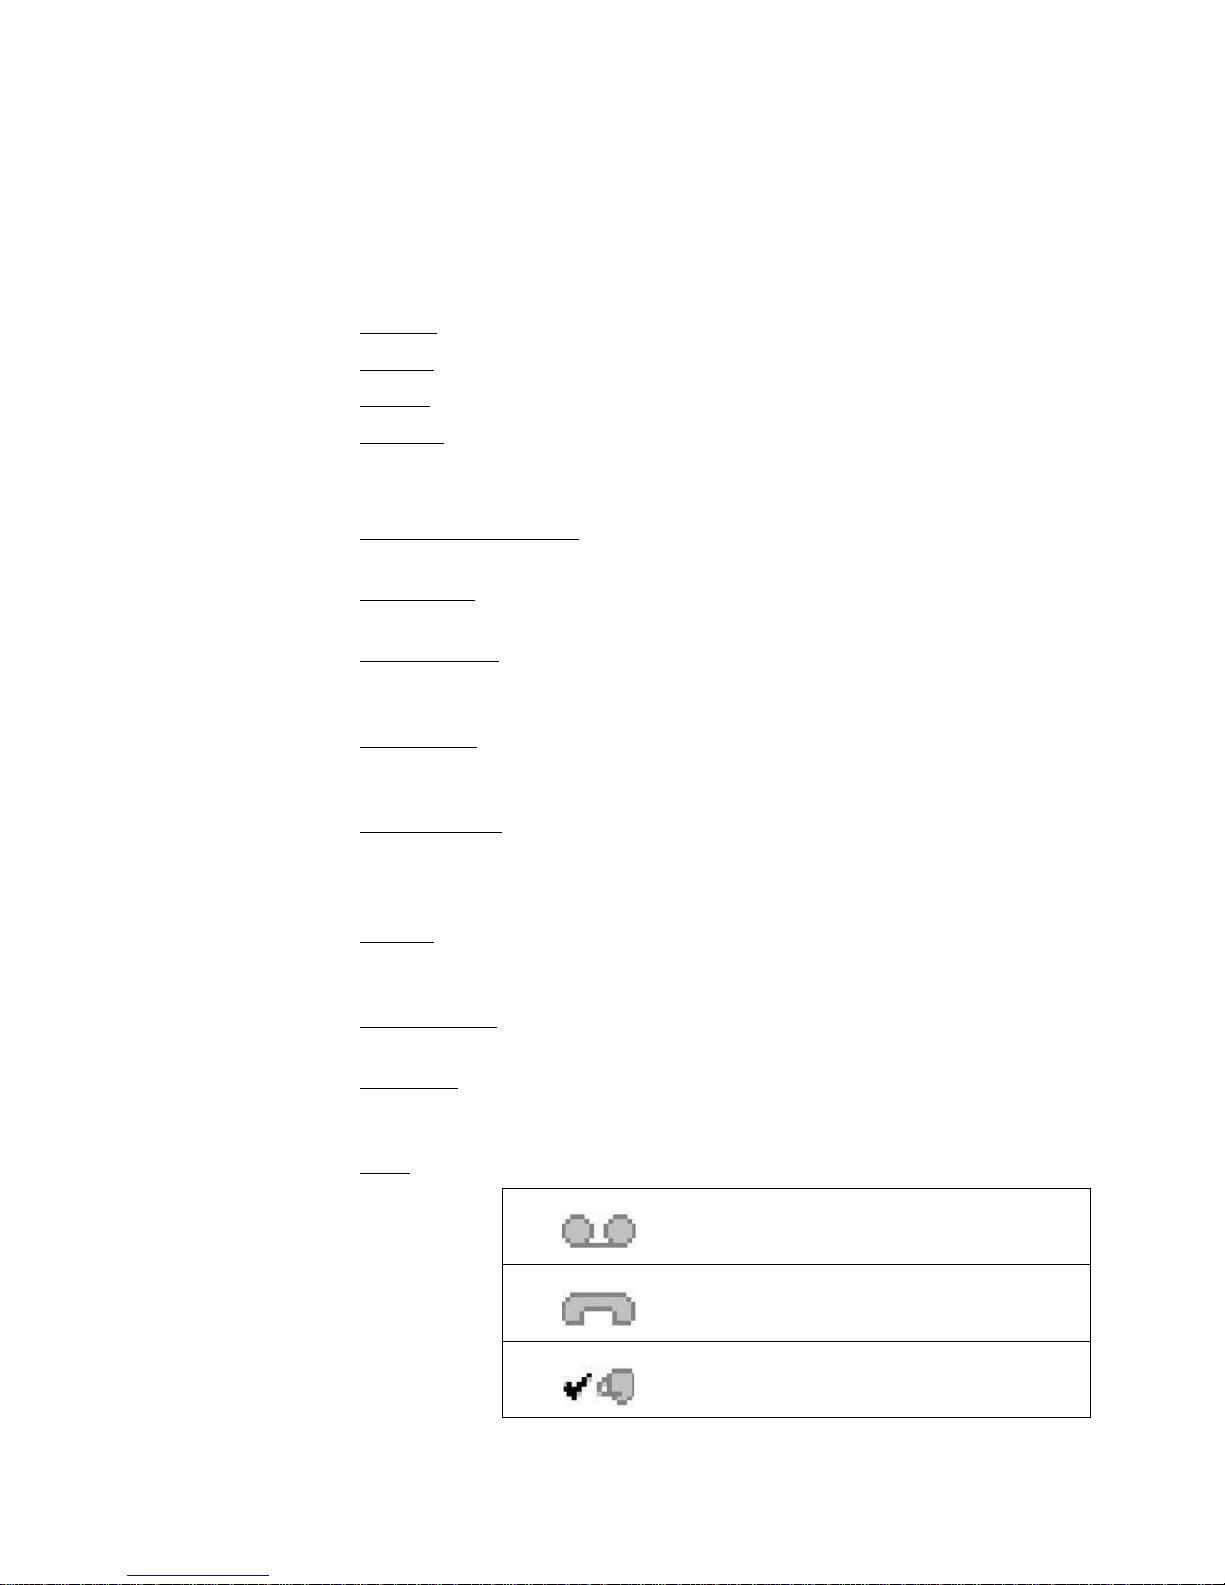
ix. Icons
: located to the left of the headset, mute and speaker buttons; adjusts
: 3 viewable call lines, located on the right side of the LCD
: should show user’s name, extension, call handling modes, call
: these icons appear on the LCD display on the phone.
Unheard voice message
Missed call
Logged into workgroup
Page 3
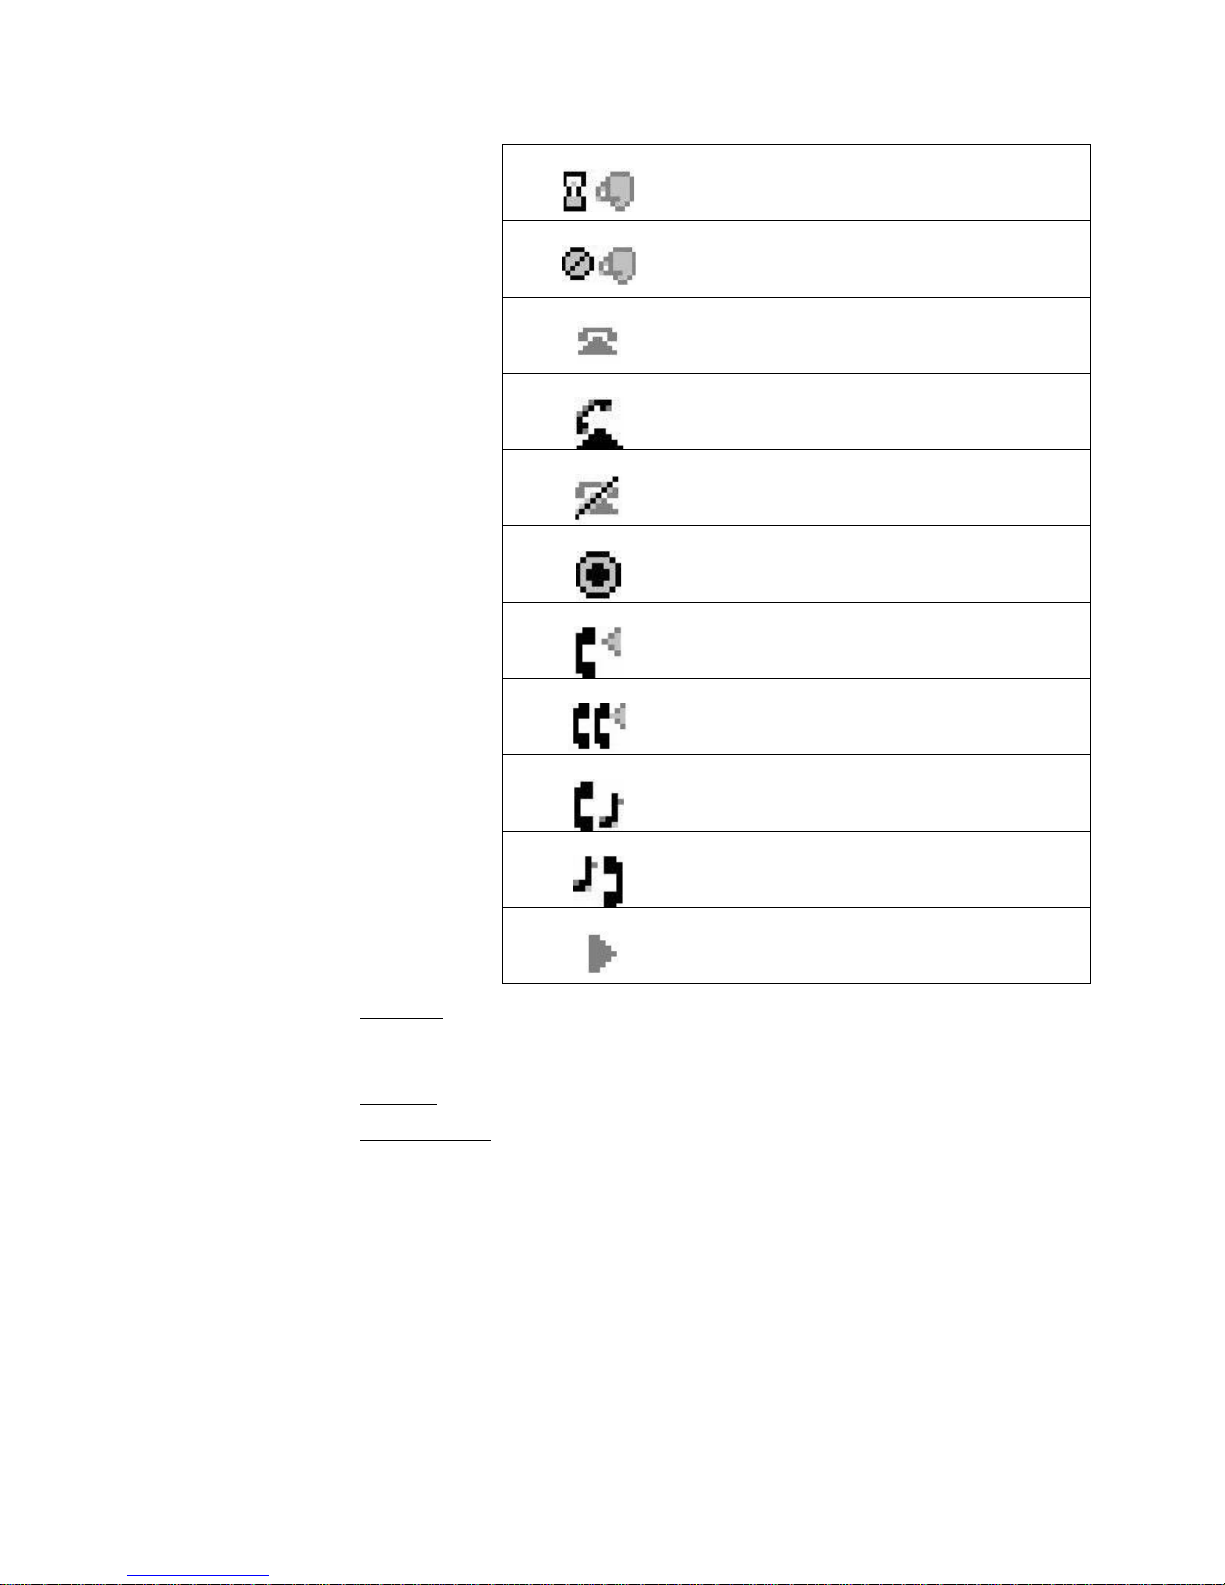
Logged into workgroup, In Wrap-Up
Property of Sterling Communications © 2007
Last Updated: 03/14/2007 @ 2:13 PM
Page 3 of 8
Logged out of workgroup
On Hook
Off Hook
Inactive / Do Not Disturb
Incoming Call (Animated)
On a call
On a conference call
Call on Hold / Parked
x. Soft Keys: these are the four unlabeled buttons underneath the LCD panel;
xi. Dial Pad
xii. Function Keys
OK _~лбЕ=cмеЕнбзелW=
~K eзп=нз=г~вЙ=L=~елпЙк=Е~ддлW=
i. To dial another extension, simply key in the direct extension. No prefix is
ii. To dial outside the phone system, the user must dial “9” first. For long
Remote Hold
Speed dial extension.
function of keys change according to system functions (transfers, conference,
calls, etc.)
: 10 number keys, including * and #.
: contains voice mail, transfer, options, conference, directory,
intercom, redial, hold; follow instructions on LCD screen.
required.
distance calls user will need to dial “9” + “1” + the area code and phone
number.
Page 4

iii. If dialing a number with the receiver on the hook, the Soft Keys allow the user
Property of Sterling Communications © 2007
Last Updated: 03/14/2007 @ 2:13 PM
Page 4 of 8
to change the number or cancel the call. User must depress the Soft Key
labeled “Dial” in order to make the call active.
ÄK sçáÅÉ=j~áäW=
i. Accessing the Voice Mail system for the first time:
1. From the user’s IP phone, press the “Voice Mail” function key.
2. Enter the default password of “1234” + “#”.
3. User will be prompted to record his or her name, and please do so.
4. Please change the password from the default of “1234”.
5. To record a greeting, press 7, then press option 1, and follow prompts.
ii. Accessing the Voice Mail system:
1. From an IP phone: press the “Voice Mail” function key or take phone
off hook and press “#” twice. Follow prompts for entering the user’s
extension (if required) and password.
2. From a non-IP phone: To access the voice mail system, the user may
dial the company’s main auto attendant. (Please see the company IP
phone administrator for the access phone number.) Press “#”, enter
user’s extension, and then enter the password, followed by “#”.
ЕK `~дд=j~е~ЦЙгЙенW=
i. Hang Up
ii. Voice Mail
: terminates current active call; will appear as a soft key.
: automatically dials the voice mail system; prompt requests the
password. See above for specific directions.
iii. Transfer
: capability to transfer a call to another extension or externally. To
transfer externally, must dial “9”.
1. While on an active call, press the transfer button.
2. Enter number to transfer caller to. To transfer to an external number,
dial 9.
3. Pick from the soft key buttons what the call needs to do: Transfer
straight to the third party, consult before completing the transfer,
send the caller to voice mail, or park the call on another extension.
4. If consulting the third party, user must press yes under the soft key to
complete the transfer.
iv. Conference
: capable of talking to two additional callers simultaneously.
1. While on an active call, press the conference button to call the second
person. (This puts the first caller on hold while the second caller is
reached.)
2. The soft keys will give the user an option to directly conference or to
consult the second caller before joining the two callers.
3. If the second caller is consulted, the user must press join on the soft
key to join the two callers.
Page 5

v. Join: this is a one-touch conferencing button; available when user has one call
Property of Sterling Communications © 2007
Last Updated: 03/14/2007 @ 2:13 PM
Page 5 of 8
on hold and is on another call; allows the user to join two calls.
vi. Speed Dial
: allows user to pick from a list of labeled numbers, preset by user;
must be set up in Call Manager or Web Call Manager.
1. To initiate a call from the speed dial list, press speed dial.
2. Select from the list on the LCD screen. These names and numbers
have been set up by the user in the Call Manager or Web Call Manager.
3. Use the LCD Navigation keys or the soft keys to scroll up and down the
list to select a number.
4. Press the soft key labeled as dial to call the selected number.
vii. Redial
: allows the user to see the list of the previous calls made and received;
the user can choose one of the previous call and dial them directly.
1. To initiate, press the redial button on the phone.
2. Use the scroll keys to the left of the display to select the call
destination.
3. Press the soft key labeled dial to complete the call.
viii. Intercom
: allows the user to call another extension and talk with them
without the end user picking up the phone; whisper page allows the end user
to hear the intercom during an active phone call without disrupting their
phone call; (an intercom would usually go to voice mail if end user is on an
active call).
1. Press intercom button.
2. Dial the desired extension.
3. Finish the action by pressing the “Intcom” soft key.
4. Press the soft key labeled “Whspr” to initiate a whisper page. This
allows the user to talk to the end user during a call without their caller
hearing the one-way conversation.
ix. Hold
: puts current caller on hold. First caller automatically put on hold when
depressing line 2 (without pressing the “hold” button) and the same for the
following calls. When placing a caller on hold indefinitely (without a second
caller on line 2), to return to the caller, depress call line once. Do not hit call
line twice because it will hang up on the caller.
x. Pickup
: capable of picking up a call ringing in on another phone.
1. Press the soft key labeled “Pickup”.
2. Dial the ringing extension that the user desires to pick up.
3. Complete the action by pressing the soft key labeled “Pickup”.
xi. Park
: places caller on hold for 90 seconds on a specified extension. Call
returns to original phone after the 90 seconds.
1. During an active call, press the soft key labeled “park”.
2. Dial the extension the user would like to park the active call on.
3. Complete the action by pressing the soft key labeled “park”.
Page 6

4. If the call is not picked up by the end user, the call returns to the user
Property of Sterling Communications © 2007
Last Updated: 03/14/2007 @ 2:13 PM
Page 6 of 8
who parked the call in 90 seconds.
xii. Unpark
: allows the user to ‘unpark’ a call on another extension.
1. Press the soft key labeled “unpark”.
2. Dial the extension that the user would like to unpark the active call.
3. Complete the action by pressing the soft key labeled “unpark”.
xiii. Wrap Up
: allows the user to make notes about the call after the call has been
completed and not receive another workgroup call until they are done
“wrapping up”.
xiv. Mode
: allows the user to change their Call Handling Mode.
1. Press mode.
2. Select the Call Handling Mode.
3. Press the soft key labeled okay.
4. The Call Handling Mode has been changed.
xv. Options
: allows the user to change their Call Handling Mode, Handsfree
Mode, Ring Tone, Custom Keys and Agent State. Handsfree Mode allows the
user to answer calls without pushing any buttons by ringing in the headset
and then the call goes live.
xvi. Directory
: allows the user to see a list of everyone in the system; soon to
change to just the people in the specific company. Directory allows the user to
manually access and call their speed dial list.
PK ^Зо~еЕЙЗ=`~дд=j~е~ЦЙгЙенW=
a. Call Handling Modes: 5 different ways the system deals with incoming calls. The
system allows the user to modify each mode and specify how incoming calls are
handled. Each mode contains a separate voicemail recording, allowing different
messages to be played in each mode.
i. Standard
ii. In a Meeting
mail.
iii. Out of Office
mail or forward them to the Find Me feature, if enabled.
iv. Extended Absence
voice mail.
v. Custom
b. cáåÇ=jÉ=ÑÉ~íìêÉW a function that allows the system to dial a second number to find
the user and transfer the caller to the user. This function is activated if callers know
that they must press 1 when they get to the voicemail message, either by recording it
in the message or if user tells callers.
i. From an IP phone, the user can only enable or disable Find Me feature.
: To use while available; incoming calls will ring on the phone.
: default will automatically send the caller to the user’s voice
: a setting where user can choose the purpose.
: default will automatically send the caller to the user’s voice
: default will automatically send the caller to the user’s
ii. Setup this feature via Web Call manager or Call Manager Software.
Page 7

c. ^еу=fm=mЬзеЙ=cмеЕнбзеW ability to assign the user’s extension to any IP Phone within
Property of Sterling Communications © 2007
Last Updated: 03/14/2007 @ 2:13 PM
Page 7 of 8
the company. This is only to be used for a temporary move. If moving permanently,
please move the phone with the user. The phone will remain the user’s phone with
extension, as long as it is moved within the company.
i. Press the voice mail function key followed by #.
ii. Dial the extension to be moved and password.
iii. At the Main Menu prompt, press 7.
iv. Press 3 to reassign user’s extension to the phone being used.
v. Press 1 to confirm the extension being assigned to that phone.
vi. To un-assign extension, follow first two steps (i, & ii) and then press 2 to un-
assign extension. The extension will automatically return to the phone it was
originally assigned to.
QK pмййзкн=fеСзкг~нбзеW=
~K fЗЙенбСу=йЙклзеEлF=Сзк=Езгй~еу=г~бе=Езен~ЕнW=
i. System Administrator: _________________________
ii. Phone Number: ______________________
iii. Alternate Phone Number (cell): _____________________
iv. Email Address: _______________________________
ÄK oЙйзкнбеЦ=qкзмДдЙW=
i. When reporting trouble, please include the following information:
1. Company
2. Contact Name & Number
3. Time & Date of Problem
4. Extension of phone with problem
5. Mac address of problem phone (sticker on back of phone opposite end
from handset).
6. Number dialed when having problem
ii. Places to report problems:
1. To the System Administrator
2. Phone:
3. Email: [email protected]
ЕK pмййзкн=tЙДлбнЙW=
i. http://www.sterling.net/sterlingvoice/support
(503) 968-8908
Page 8

RK _~лбЕ=qкзмДдЙ=pЬззнбеЦW=
Property of Sterling Communications © 2007
Last Updated: 03/14/2007 @ 2:13 PM
Page 8 of 8
~K fС=нЬЙ=З~нЙ=зк=нбгЙ=~кЙ=беЕзккЙЕн=зк=нЬЙ=i`a=лЕкЙЙе=бл=Дд~евI=ЕЬЙЕв=нЬЙ=СзддзпбеЦW=
i. Check all cord connections to the phone and the wall, and make sure they are
plugged in correctly.
ii. If all cords are fine, please reboot the phone.
1. How to reboot the phone:
a. Hold the mute button down for 5 seconds.
b. On the key pad, press R-E-S-E-T (7-3-7-3-8) followed by #.
c. Follow the prompt on the screen.
ДK fС=млЙк=ЬЙ~кл=~=йЙкбзЗбЕ=~дЙкн=кбеЦI=Дмн=Е~еЫн=СбеЗ=~еу=Е~ддл=зе=нЬЙ=Зблйд~уK=
i. The call stack on the phone is overflowing. If the user answers the ring, the
first call will appear normally on the phone. The user can also use the Call
Manager software to manage the call stack overflow by sending callers to the
user’s voicemail.
ЕK qЬЙ=лулнЙг=бл=езнбСубеЦ=Е~ддЙкл=нЬ~н=нЬЙ=млЙкЫл=г~бдДзс=Ь~л=ЙсЕЙЙЗЙЗ=бнл=дбгбн=~еЗ=бл=
ме~ДдЙ=нз=~ЕЕЙйн=еЙп=гЙлл~ЦЙлK=
i. The voice mail system keeps recently deleted messages in the mailbox, which
are part of the total count. If user’s mailbox is full, first purge any backlog of
deleted messages.
1. Log into voice mail.
2. At the Main Menu prompt, press 7.
3. Press 8 to remove deleted messages.
4. Press 1 to confirm deletion.
ЗK kз=зеЙ=Е~е=ЬЙ~к=нЬЙ=млЙк=пЬЙе=ЬЙ=зк=лЬЙ=н~двл=зе=нЬЙ=лйЙ~вЙкйЬзеЙK=
i. Check for debris in front of the microphone.
ii. Check the mute button status. If muted, the caller will not be able to hear the
user.
ЙK qЬЙ=Зблйд~у=зе=нЬЙ=йЬзеЙ=бл=Дд~евK=
i. The phone does not have power. Check the connections between the phone
and the electrical outlet.
СK qЬЙ=Зблйд~у=зе=нЬЙ=йЬзеЙ=кЙ~Зл=“kз=pЙкобЕЙТK=
i. The phone, most likely, has been disconnected from the network. Check the
connection between the phone and the network drop. If this doesn’t fix the
phone, reboot the phone by following the above directions.
=
 Loading...