

OWNER’S MANUAL

INTRODUCTION:
Congratulations on your Sterling MX Series studio monitor
purchase. We are proud to bring our wealth of experience
and sound innovation to this new product line. The MX Series
combines years of our transducer technology R&D with sleek
and purposeful industrial design. The carefully balanced voicing
of each monitor allows for critical mixing and monitoring as well
as playback. To get the most of your purchase, read this manual
carefully and store it for future reference.
FEATURES:
• Unique vertical-and-horizontal waveguide design for wide
frequency dispersion and superior stereo imaging
• Low frequency drivers with multi-fiber paper cone design for
improved damping and frequency response
• 1” silk dome tweeter for clear transients and superior
audio definition
• High-efficiency, low-distortion, bi-amped class A/B amplifier
for accurate sound reproduction
• Studio grade internal components with protective
electrical design
• Rear panel porting offers superior bass response
and accuracy
• Elegant, polished ebony front baffle and Sterling LED
for outstanding looks
IMPORTANT SAFETY INSTRUCTIONS
1. Read these instructions.
2. Keep these instructions.
3. Heed all warnings.
4. Follow all instructions.
5. Do not use this apparatus near water.
6. Clean only with dry cloth.
7. Do not block any ventilation openings. Install in accordance
with the manufacturer’s instructions.
8. Do not install near any heat sources such as radiators, heat
registers, stoves, or other apparatus (including amplifiers)
that produce heat.
9. Do not defeat the safety purpose of the polarized or groundingtype plug. A polarized plug has two blades with one wider
than the other. A grounding-type plug has two blades and
a third grounding prong. The wide blade or the third prong
are provided for your safety. If the provided plug does not fit
into your outlet, consult an electrician for replacement of the
obsolete outlet.
10. Protect the power cord from being walked on or pinched
particularly at plugs, convenience receptacles, and the point
where they exit from the apparatus.
11. Only use the attachments/accessories specified by the
manufacturer.
12. Use only with the cart, stand, tripod, bracket, or table
specified by the manufacturer, or sold with the apparatus.
When a cart is used, use caution when moving the cart/
apparatus combination to avoid injury from tip-over.
13. Unplug this apparatus during lightning storms or when
unused for long periods of time.
14. Refer all servicing to qualified service personnel. Servicing
is required when the apparatus has been damaged in any
way, such as power-supply cord or plug is damaged, liquid
has been spilled or objects have fallen into the apparatus,
the apparatus has been exposed to rain or moisture, does
not operate normally, or has been dropped.
15. WARNING: To reduce the risk of fire or electric shock, do not
expose this apparatus to rain or moisture.
16. When the MAINS plug, or an appliance coupler is used as
the disconnect device, the disconnect device shall remain
readily operable.
17. Protective Ground Terminal: The apparatus shall be
connected to an AC main socket with a protective earth
ground connection.
HANDLING AND MAINTENANCE
• Using a cell phone near the speaker system can induce
noise. If this occurs, move the cell phone further away from
the speaker system.
• Air blowing out of the rear bass reflex ports is normal, and
often occurs when the speaker is handling program material
with heavy bass content.
• Always turn the power off when the device is not in use.
• Avoid touching or allowing objects to come in contact with the
speaker diaphragms.
• These speakers should be used vertically, not laid on their side.
• Keep these speakers away from magnets other electronic
devices containing magnets, such as Cathode Ray Tube
(CRT) monitors.
MX5 | MX8
POWERED STUDIO MONITOR
2
CONNECTIONS
1. Turn off power on all devices. Set all volumes to minimum.
Now it is safe to connect all devices and power up.
2. Turn on the power to all connected devices such as
computers, outboard gear and audio interfaces.
3. Turn on the power to your MX studio monitors.
4. Play music or sound through your audio system and then
slowly increase the volume of the monitors to the desired level.
5. When turning off your audio system, make sure to follow
these steps in reverse. You can choose to leave your volume
levels where you set them originally, so long as the output on
your mixer, audio interface or sound system outputs remains
the same as well.
REAR PANEL
The MX switches and connectors are located on the rear panel,
as described below.
1
2
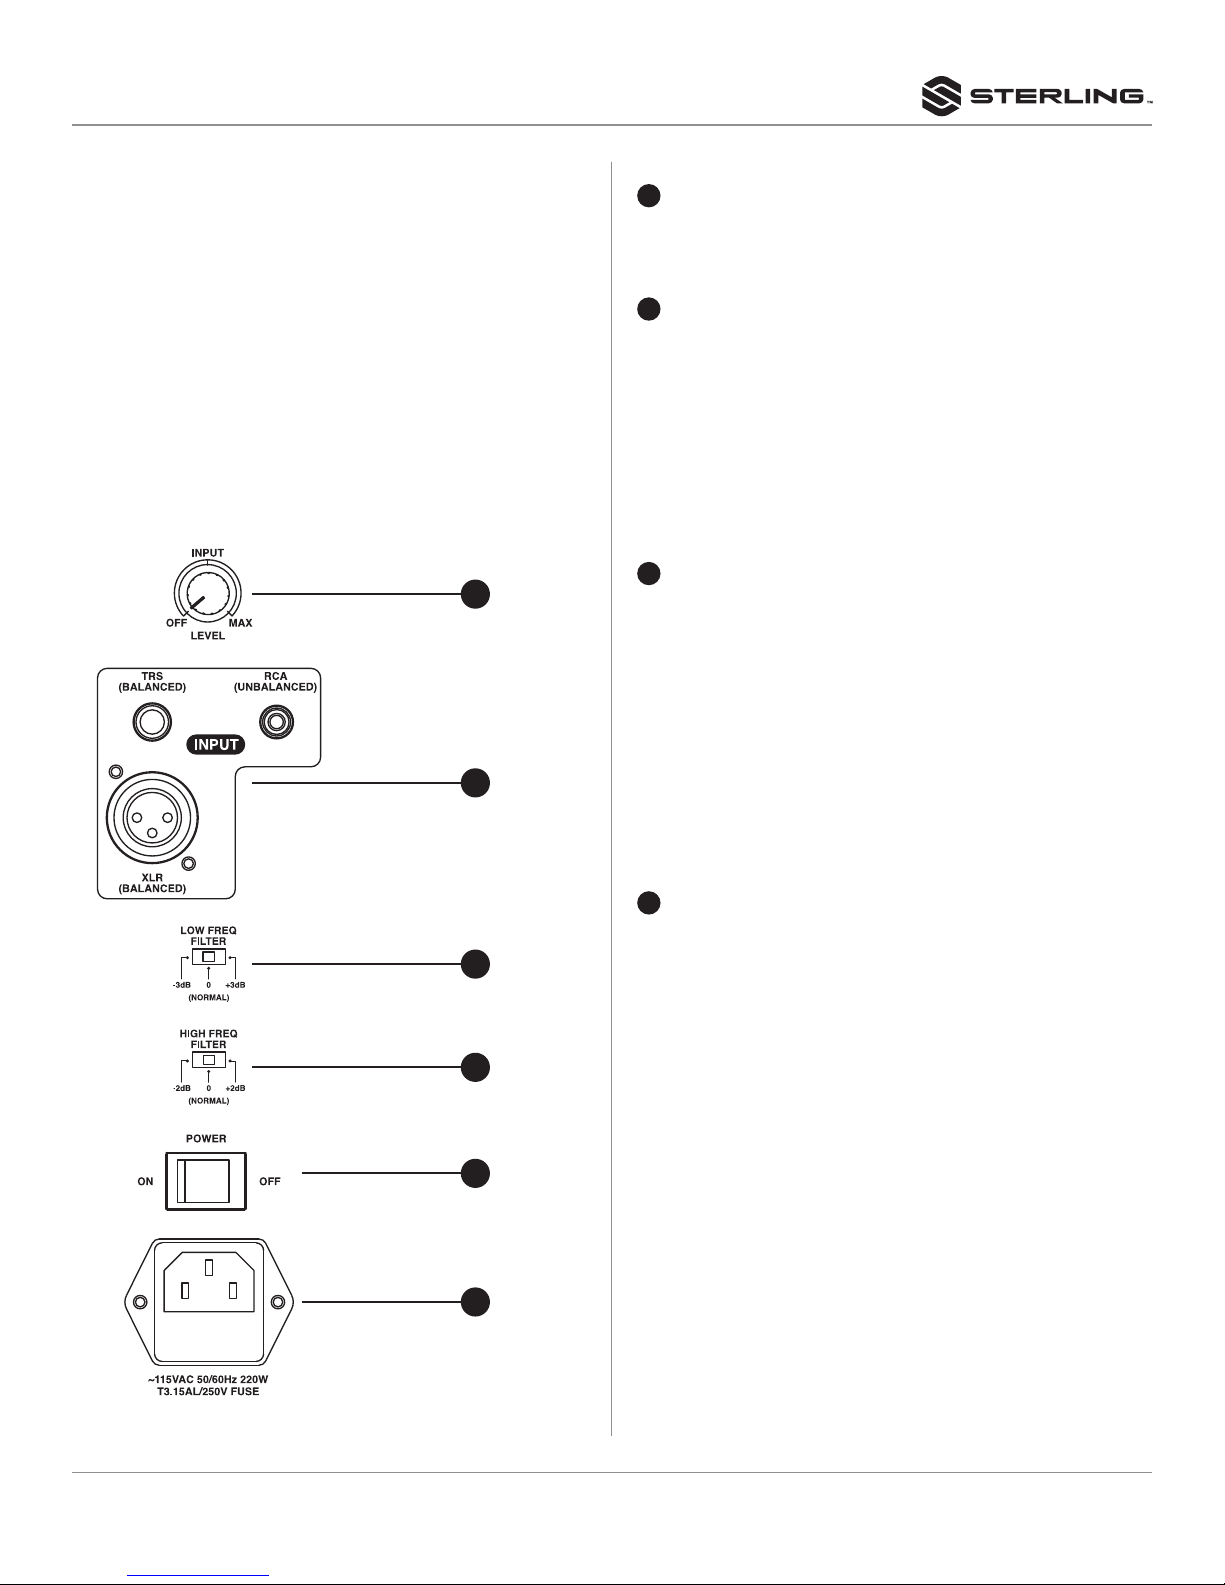
SPEAKER INPUT AND RESPONSE CONTROL
1
LEVEL CONTROL
Adjusts the output level of the speaker. When fully
counterclockwise, the speakers will be off. When turned to
the right, the speakers will be on and the backlit LED will light.
2
INPUT CONNECTORS
These connectors receive the input signal to the speaker.
Three input connectors are provided: one balanced
XLR connector, one balanced (TRS) phone jack, and an
unbalanced RCA connector.
NOTE: The XLR and phone jack input connectors can not be
used simultaneously. Use only one input connector at a time.
NOTE: Refer to “Connection and Cable Types” on page 4 and 5
for more connector details.
3
LOW FREQUENCY FILTER
This switch adjusts the low frequency performance of
the speaker by -3db or +3dB at 75Hz. The switch is in the
neutral position in the center at 0dB. The -3dB setting can be
used to compensate for increased bass response resulting
from the speaker being close to reflective surfaces in your
listening environment. With each adjacent reflective surface,
there is +3dB increase in low frequency response. So if the
speaker must be placed next to a wall, for example, there
will be a +3dB boost in low frequency performance which
can be accounted for by using the -3dB switch. You can also
choose to use the +3dB setting if you are using the speakers
primarily for listening rather than as reference monitors or if
you prefer more bass as part of your listening experience.
4
HIGH FREQUENCY FILTER
This switch adjusts the high frequency performance of the
3
4
5
speaker by -2dB or +2dB at 10kHz and above. This filter
can be used when compensating for listening environments
based on their reflective properties. Listening environments
with a large proportion of hard, reflective surfaces such as
concrete, brick or drywall tend to sound abnormally bright
or harsh in the high frequencies. The -2dB setting may be
helpful here. Rooms with a high proportion of absorptive
materials such as carpet or foam tend to sound duller. The
+2dB setting may be more appropriate. Try the low and high
frequency filters to determine which settings are correct for
your listening environment and personal preference.
6
MX5 | MX8
POWERED STUDIO MONITOR
3
 Loading...