

Page 1

M2B+ Controller
M2B+ Controller
Part Number: 682.92011.00
Bulletin Number: SC1-630.8
Effective: 12/10/07
Write Down Your Serial Numbers Here For Future Reference:
_________________________ _________________________
_________________________ _________________________
_________________________ _________________________
We are committed to a continuing program of product improvement.
Specifications, appearance, and dimensions described in this manual are subject to change without notice.
DCN No. ____________
© Copyright 2007
All rights reserved.
Chapter 1: Safety 1 of 65
Page 2

M2B+ Controller
Shipping Information
Unpacking and Inspection
You should inspect your equipment for possible shipping damage. Thoroughly check the
equipment for any damage that might have occurred in transit, such as broken or loose wiring
and components, loose hardware and mounting screws, etc.
In the Event of Shipping Damage
According to the contract terms and conditions of the Carrier, the responsibility of the
Shipper ends at the time and place of shipment.
Notify the transportation company’s local agent if you discover damage
Hold the damaged goods and packing material for the examining agent’s inspection.
return any goods before the transportation company’s inspection and authorization.
File a claim with the transportation company. Substantiate the claim by referring to the
agent’s report. A certified copy of our invoice is available upon request. The original Bill of
Lading is attached to our original invoice. If the shipment was prepaid, write us for a
receipted transportation bill.
Advise customer service regarding your wish for assistance and to obtain an RMA (return
material authorization) number.
If the Shipment is Not Complete
Check the packing list as back-ordered items are noted on the packing list. In addition to the
equipment itself, you should have:
; Bill of lading
; Packing list
; Operating and Installation packet
; Electrical schematic and panel layout drawings
; Component instruction manuals (if applicable)
Re-inspect the container and packing material to see if you missed any smaller items during
unpacking.
Do not
If the Shipment is Not Correct
If the shipment is not what you ordered, contact the parts and service department
immediately at (262) 641-8610. Have the order number and item number available.
Hold the items until you receive shipping instructions.
Returns
Do not return any damaged or incorrect items until you receive shipping instructions from the
shipping department.
2 of 65 Chapter 1: Safety
Page 3

M2B+ Controller
Table of Contents
CHAPTER 1: SAFETY................................................................6
1-1 How to Use This Manual.............................................................................................6
Safety Symbols Used in this Manual.....................................................................6
1-2 Warnings and Precautions..........................................................................................7
1-3 Responsibility..............................................................................................................7
CHAPTER 2: FUNCTIONAL DESCRIPTION.............................9
2-1 Models Covered in This Manual..................................................................................9
2-2 General Description...................................................................................................10
2-3 Standard Features.....................................................................................................11
2-4 Optional Features......................................................................................................11
2-5 Panel Layout and Keypad.........................................................................................12
LED Indicator Lights............................................................................................12
LCD Display ........................................................................................................12
LCD Messages....................................................................................................13
Keypad................................................................................................................14
2-6 Menu Structure..........................................................................................................16
Primary Menu......................................................................................................16
Secondary Menu .................................................................................................16
Secure Menu.......................................................................................................16
2-7 Passwords and Security............................................................................................17
CHAPTER 3: INSTALLATION..................................................19
3-1 Location.....................................................................................................................19
3-2 Electrical Connections...............................................................................................19
CHAPTER 4: BASIC OPERATION ..........................................21
4-1 Turning the Power On...............................................................................................21
4-2 Starting and Stopping Water TCUs...........................................................................22
Starting the Unit (Local).......................................................................................22
Stopping the Unit.................................................................................................22
Starting the Unit (Remote)...................................................................................22
4-3 Starting and Stopping Hot Oil TCUs..........................................................................23
Starting the Unit (Local).......................................................................................23
Stopping the Unit.................................................................................................23
Starting the Unit (Remote)...................................................................................24
4-4 Tuning .......................................................................................................................24
Autotuning...........................................................................................................24
Manual Tuning (Zeigler-Nichols PID Method) .....................................................25
4-5 Selecting a Local Probe ............................................................................................26
Using a Remote Input Probe for Monitoring........................................................26
4-6 Setting Up Cascade Control......................................................................................27
4-7 Adjusting the Automatic Venting Timer.....................................................................28
4-8 Using Crash Cool......................................................................................................28
Chapter 1: Safety 3 of 65
Page 4

M2B+ Controller
CHAPTER 5: ADVANCED OPERATION.................................29
5-1 Using the Analog Remote Input ................................................................................29
5-2 Retransmission Analog Signal ..................................................................................30
Setting the Analog Signal Source to FLOW ........................................................31
Using Analog Output for Heating and Cooling.....................................................31
5-3 Using the Flow Monitor..............................................................................................32
5-4 Programming the Alarms...........................................................................................33
Temperature........................................................................................................33
Flow Alarm ..........................................................................................................34
Open Sensor .......................................................................................................34
Low Pressure ......................................................................................................34
Low Fluid Level Alarm.........................................................................................35
High Fluid Level Alarm........................................................................................35
Pump Failure Alarm.............................................................................................35
Safety Thermostat Alarm.....................................................................................35
Welded Contactor Alarm .....................................................................................35
5-5 Using the Second Setpoint Function.........................................................................36
5-6 Using the Remote Start Function..............................................................................36
5-7 Changing the Temperature Display Units .................................................................37
5-8 Setting the Temperature Display Precision...............................................................37
5-9 Using the Elapsed Time Meter..................................................................................38
5-10 Programming Ramp/Soak.........................................................................................39
Controlling Ramp/Soak .......................................................................................41
Monitoring Ramp/Soak........................................................................................41
5-11 Setting the Approach Rate........................................................................................42
5-12 Level Input Operation (Water Units)..........................................................................42
5-13 Adjusting the LCD Display Contrast..........................................................................42
5-14 Adjusting the Auto Shutdown Temperature Setpoint ................................................42
5-15 Calibrating the T/C, RTD, and V Inputs.....................................................................43
5-16 Accessing the Debug Menu ......................................................................................45
5-17 Reloading Factory Defaults.......................................................................................46
5-18 Serial Communications Operation.............................................................................47
Port Address........................................................................................................47
Baud Rate and Data Format ...............................................................................47
Protocols .............................................................................................................47
MODBUS Protocol ..............................................................................................48
SPI Protocol ........................................................................................................51
CHAPTER 6: TROUBLESHOOTING .......................................53
6-1 Operating Mode and Error Display Messages ..........................................................55
CHAPTER 7: APPENDIX..........................................................56
7-1 Electrical Specifications.............................................................................................56
General................................................................................................................56
Normal Operating Environment...........................................................................56
Storage Environment...........................................................................................56
Primary, Power Supply (Line Power)...................................................................56
Alarm Outputs .....................................................................................................56
External System Outputs.....................................................................................56
4 of 65 Chapter 1: Safety
Page 5

M2B+ Controller
User Interface......................................................................................................56
Temperature Sensor Inputs.................................................................................57
Flow Sensor Inputs..............................................................................................57
System Inputs......................................................................................................57
Optional Analog Output Modules ........................................................................57
7-2 Menu Structure* ........................................................................................................58
7-3 Control Board Layout ................................................................................................64
7-4 DAC Board Layout (Optional)....................................................................................64
7-5 Technical Assistance.................................................................................................65
Parts Department ................................................................................................65
Service Department.............................................................................................65
Sales Department................................................................................................65
Contract Department...........................................................................................65
Chapter 1: Safety 5 of 65
Page 6

M2B+ Controller
Chapter 1: Safety
1-1 How to Use This Manual
Use this manual as a guide and reference for installing, operating, and maintaining your
equipment. The purpose is to assist you in applying efficient, proven techniques that enhance
equipment productivity.
This manual covers only light corrective maintenance. No other maintenance should be
undertaken without first contacting a service engineer.
The Functional Description section outlines models covered, standard features, and optional
features. Additional sections within the manual provide instructions for installation, preoperational procedures, operation, preventive maintenance, and corrective maintenance.
The Installation chapter includes required data for receiving, unpacking, inspecting, and setup
of the equipment. We can also provide the assistance of a factory-trained technician to help
train your operator(s) for a nominal charge. This section includes instructions, checks, and
adjustments that should be followed before commencing with operation of the equipment.
These instructions are intended to supplement standard shop procedures performed at shift,
daily, and weekly intervals.
The Operation chapter includes a description of electrical and mechanical controls, in
addition to information for operating the equipment safely and efficiently.
The Maintenance chapter is intended to serve as a source of detailed assembly and
disassembly instructions for those areas of the equipment requiring service. Preventive
maintenance sections are included to ensure that your equipment provides excellent, long
service.
The Troubleshooting chapter serves as a guide for identification of most common problems.
Potential problems are listed, along with possible causes and related solutions.
The Appendix contains technical specifications, drawings, schematics, and parts lists. A
spare parts list with part numbers specific to your machine is provided with your shipping
paperwork package. Refer to this section for a listing of spare parts for purchase. Have your
serial number and model number ready when ordering.
Safety Symbols Used in this Manual
The following safety alert symbols are used to alert you to potential personal injury hazards.
Obey all safety messages that follow these symbols to avoid possible injury or death.
Danger! DANGER indicates an imminently hazardous situation which, if not avoided,
will result in death or serious injury.
Warning! WARNING indicates a potentially hazardous situation or practice which, if not
avoided, could result in death or serious injury.
Caution! CAUTION indicates a potentially hazardous situation or practice which, if not
avoided, may result in minor or moderate injury or in property damage.
6 of 65 Chapter 1: Safety
Page 7

M2B+ Controller
1-2 Warnings and Precautions
Our equipment is designed to provide safe and reliable operation when installed and operated
within design specifications, following national and local safety codes.
To avoid possible personal injury or equipment damage when installing, operating, or
maintaining this equipment, use good judgment and follow these safe practices:
; Follow all SAFETY CODES.
; Wear SAFETY GLASSES and WORK GLOVES.
; Disconnect and/or lock out power before servicing or maintaining the equipment.
; Use care when LOADING, UNLOADING, RIGGING, or MOVING this
equipment.
; Operate this equipment within design specifications.
; OPEN, TAG, and LOCK ALL DISCONNECTS before working on equipment.
You should remove the fuses and carry them with you.
; Make sure the equipment and components are properly GROUNDED before you
switch on power.
; When welding or brazing in or around this equipment, make sure VENTILATION is
ADEQUATE. PROTECT adjacent materials from flame or sparks by shielding with
sheet metal. An approved FIRE EXTINGUISHER should be close at hand and
ready for use if needed.
; Refrigeration systems can develop refrigerant pressures in excess of 500 psi (3,447.5
kPa/ 34.47 bars). DO NOT CUT INTO THE REFRIGERATION SYSTEM. This
must be performed by a qualified service technician only.
; Do not restore power until you remove all tools, test equipment, etc., and the
equipment and related components are fully reassembled.
; Only PROPERLY TRAINED personnel familiar with the information in this
manual should work on this equipment.
We have long recognized the importance of safety and have designed and manufactured our
equipment with operator safety as a prime consideration. We expect you, as a user, to abide
by the foregoing recommendations in order to make operator safety a reality.
1-3 Responsibility
These machines are constructed for maximum operator safety when used under standard
operating conditions and when recommended instructions are followed in the maintenance
and operation of the machine.
All personnel engaged in the use of the machine should become familiar with its operation as
described in this manual.
Proper operation of the machine promotes safety for the operator and all workers in its
vicinity.
Each individual must take responsibility for observing the prescribed safety rules as outlined.
All warning and danger signs must be observed and obeyed. All actual or potential danger
areas must be reported to your immediate supervisor.
Chapter 1: Safety 7 of 65
Page 8

Page 9

M2B+ Controller
Chapter 2: Functional Description
2-1 Models Covered in This Manual
This manual provides operation, installation, and maintenance instructions for the M2B+
Controller. The M2B+ Controller is available for use with several models of temperature
control units (TCUs). A separate manual describes operation, installation, and maintenance
instructions for the TCU itself.
Chapter 2: Functional Description 9 of 65
Page 10

M2B+ Controller
2-2 General Description
The M2B+ is a microprocessor-based process controller designed for use with temperature
control units. The M2B+ monitors and maintains the temperature of the fluid in any given
process to a selected setpoint using a unique proportional integral derivative (PID) autotuning program. The controller employs PID algorithms to automatically tune the system to
heat or cool the fluid as required by the process.
The M2B+ has a Liquid Crystal Display (LCD) that provides all operational status and
programming menus. The controller includes self-diagnostics to check hardware functions.
All diagnostic information is displayed in the second line of the Liquid Crystal Display.
The M2B+ is panel-mounted and has a membrane keypad with tactile feedback. When
properly installed with a sealing gasket, the M2B+ meets NEMA 4 or IP66 integrity.
10 of 65 Chapter 2: Functional Description
Page 11

M2B+ Controller
2-3 Standard Features
• PID Control for both heating and cooling
• 4 line x 20 character LCD Display Screen
• Setpoint, To Process, From Process, and DT displays
• System status
• Password protection
• Selectable sensor types (Type K, J, & T thermocouples; 100 ohm and 1000 ohm RTDs)
• Autovent sequence (adjustable from 1 to 10 minutes)
• Sixteen segment Ramp/Soak program
• Start, stop, vent, and alarm silence switches
• D.C. dry contact inputs for pressure switch, pump rotation/phase loss, safety thermostat,
second setpoint/remote start, weld contact, and for pump tank applications high and low
water level
• Cascade control with remote input sensor
• Triac outputs for heating and cooling
• Crash (Quick) cool feature
• Alarm outputs for temperature (absolute and deviation), low or high flow (with optional
flow meter), open temperature sensor, low water pressure, pump failure, over
temperature, contactor weld, high and low water level (for pump tank units)
• Analog setpoint temperature input (current or voltage)
2-4 Optional Features
• Analog output for heating (SCRs) and cooling (modulating valves)
• Analog retransmission of Setpoint or To Process temperature
• Analog retransmission of flow (with optional flow meter)
• Flow sensor input, pulse or analog, with voltage excitation
• RS-232 or RS-485 Modbus communications
• RS-485 SPI communications
Chapter 2: Functional Description 11 of 65
Page 12

M2B+ Controller
2-5 Panel Layout and Keypad
See
Figure 1 on page 15 for an illustration of the control panel and its buttons. The LCD backlight
lights up whenever any key is pressed. The backlight turns off after five minutes if no other
key activity occurs.
LED Indicator Lights
The M2B+ has one LED that will light up to indicate the control process has been started.
This LED is located inside the Start button of the controller’s front panel. When power is
applied, the LED will remain off until the Start button is pushed. The LED will then
illuminate green.
LCD Display
A 4-line by 20-character liquid crystal display (LCD) will show operational status, alarms
and programming menus.
1st Line. The first line of the LCD continuously displays the ‘To Process’ temperature.
2nd Line. The second line of the LCD continuously displays the ‘Setpoint’ temperature.
3rd Line. The third line of the LCD continuously displays the ‘From Process’ temperature;
the delta temperature of the ‘To Process’ and the ‘From Process’; and the flow in GPM or
LPM, if applicable.
4th Line. The fourth line of the LCD will display all menu items used in the controller setup.
Also displayed are the status of the pump, outputs for the heater, as well as cooling and
elapsed time for the vent cycle. The fourth line will also explain all alarm conditions and
operating status.
12 of 65 Chapter 2: Functional Description
Page 13

M2B+ Controller
LCD Messages
Autotuning. Appears while tuning is in process.
High Water Alarm. Appears if the option is selected and the switch is closed
Water Pressure/Low Level Alarm. Appears when the Low Water Pressure switch is open
or the optional Low Water switch is closed.
Auto Vent Indicator. Appears in the LCD display when the unit is in Auto Vent mode. The
vent time remaining will also be displayed.
Pump Rotation/Loss Indicator. Appears in the LCD display when the Pump Rotation
switch is open.
Safety Thermostat Indicator. Appears in the LCD display when the Safety Thermostat
switch is open.
‘To Process’ Sensor Open Indicator. “999” appears in the process LED displays when the
‘To Process’ probe is open.
‘From Process’ Sensor Open Indicator. “999” appears in the LCD display for return
temperature (RT) when the ‘From Process’ probe is open.
Remote Probe Sensor Open Indicator. “999” appears in the LCD display for mold
temperature (MT) when the Remote probe is open.
High Alarm Indicator. Appears in the LCD display when a High Alarm condition occurs.
Low Alarm Indicator. Appears in the LCD display when a Low Alarm condition occurs.
‘From Process’ Temp Indicator. Appears in the LCD display when the temperature display
is showing the ‘To Process’ temperature.
Delta Temp Indicator. Appears in the LCD display when the temperature display is showing
temperature differential.
High Heat Output Indicator. Displays status in the LCD display when full power heat
output is applied.
Low Heat Output Indicator. Displays status in the LCD display when half power heat
output is applied. When the optional proportional output is installed, the display will show the
percentage of output.
Cool Output Indicator. Displays status in the LCD display when the cool output is applied.
When the optional proportional output is installed, the display will show the percentage of
output.
Ramp/Soak Indicator. Displays the ramp/soak segment status and remaining time in the
LCD display.
Second Setpoint/Remote Start. Displays status in the LCD display when either function is
selected.
Communications Local/Remote.
Weld Contact. Appears in the LCD Display when a Weld Contact Alarm condition occurs.
Chapter 2: Functional Description 13 of 65
Page 14
M2B+ Controller
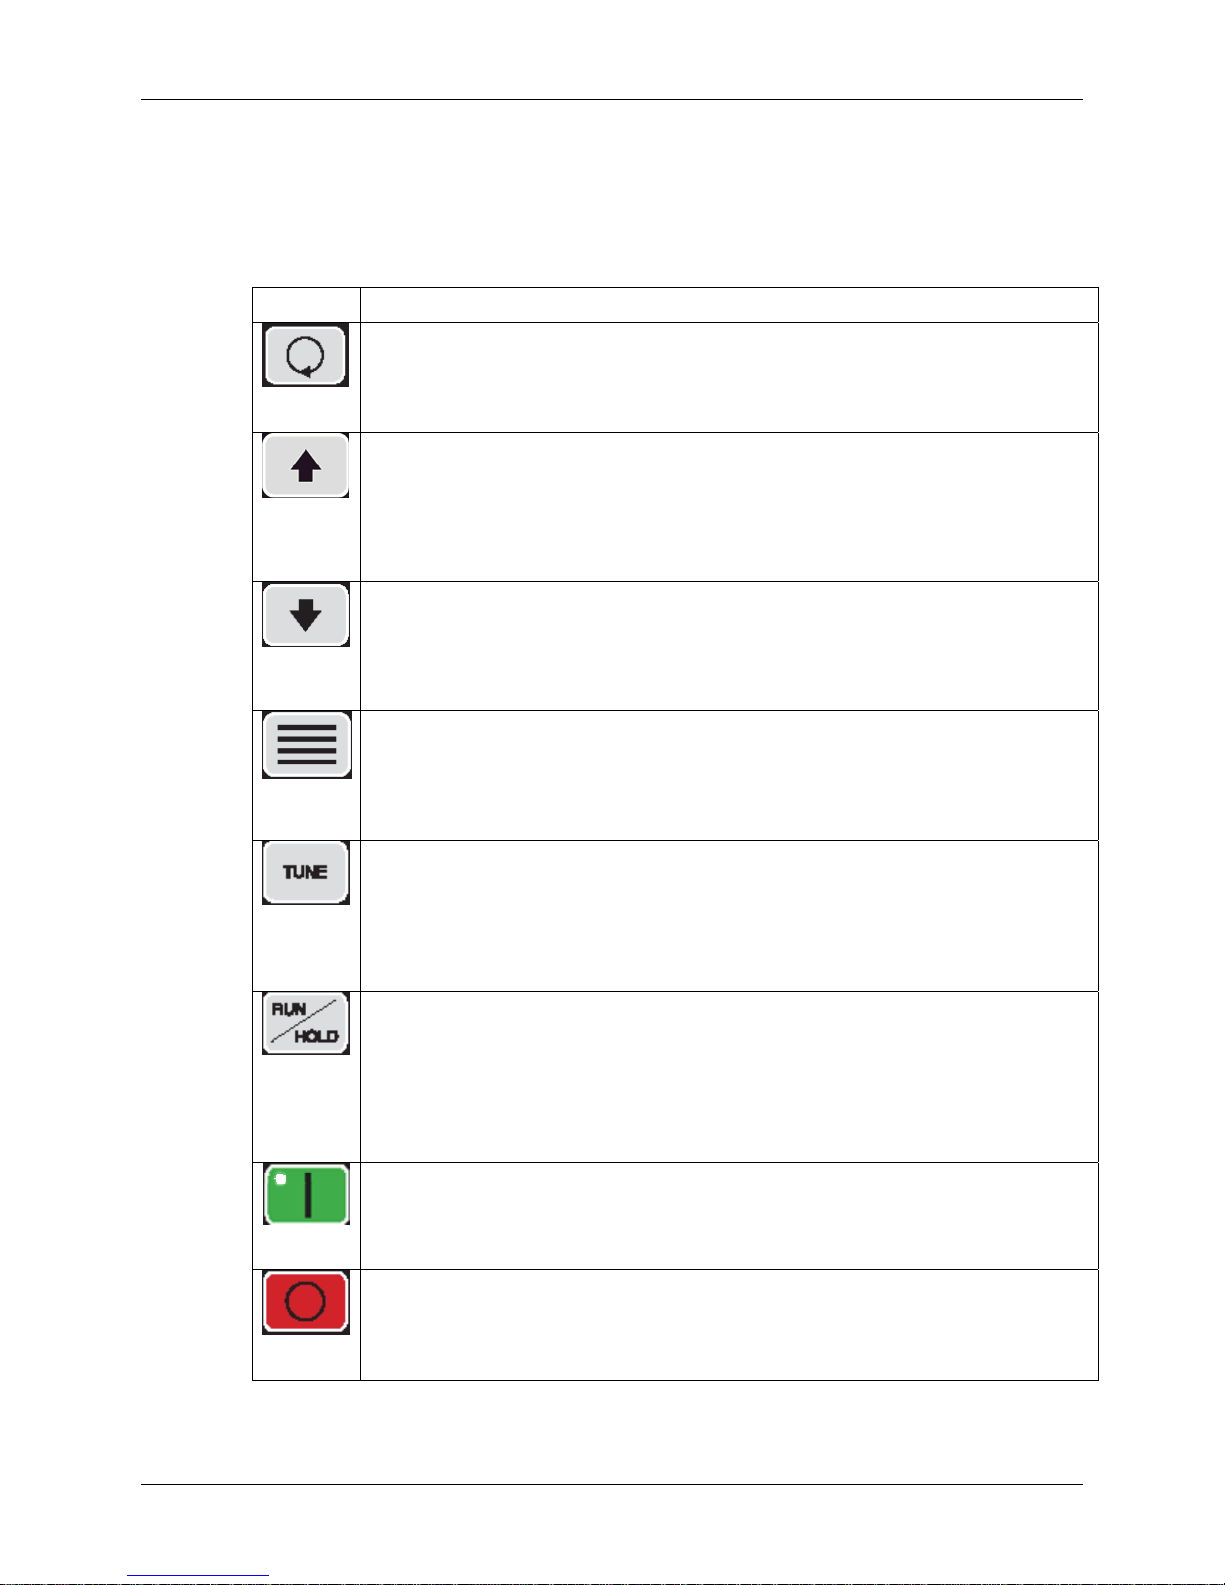
Keypad
Four keys, ‘Index’, ‘Up’, ‘Down’, and ‘Enter’ are used primarily to gain access to the menu
structure and modify the controller’s parameters and features. The remaining six keys are
used to direct the controller to start or stop a process.
Button Function
• Used to advance to one of the three setup menus.
• Used to advance to the next menu item when in a setup mode.
• Used in conjunction with the Down button to go back to a previous menu item when
Index
Up
Down
Enter
Tune
Run/Hold
Start
Stop
in a setup mode.
• Used in conjunction with the Enter button at power-on to break into Factory mode.
• Used to increment the current setpoint value while system is in the normal running
mode. Note that the rate speeds up when the key is held down.
• Used to increment the current parameter value when in a setup mode. Note that
the rate speeds up when the key is held down.
• If pressed when the oil unit is in the “PmpRev” Shutdown mode, the Vent Output
and the Alarm2 Output will be energized while the key is pressed. Use this function
to reverse the pump in order to purge the mold of hot oil.
• Used to decrease the current setpoint value while the system is in the normal
running mode. Note that the rate speeds up when the key is held down.
• Used to decrease the current parameter value when in a set up mode. Note that the
rate speeds up when the key is held down.
• If pressed when the Index button is being held down, returns to the previous menu
item when in a setup mode.
• Used to select one of the three setup modes.
• Used to accept (save/write to EEPROM) the current indicated parameter value.
• Note: No save/write occurs unless the Enter key is pressed before going to the
next/previous item or Setup mode is terminated.
• Used in conjunction with the INDEX key at power-on to enter into the Factory
mode.
• If no Autotune operation is in progress, this button starts an Autotune operation. If
an Autotune operation is in progress, pressing this button will immediately stop the
Autotune operation. While the Autotune is running, the “Autotune” message is
displayed on the LCD in place of the normal “Running” message.
• This key will not function if the Security Level is less than 3.
• This key will not function if the Ramp/Soak operation is in progress.
• This key will not function while in the Factory mode.
• This key controls the Ramp/Soak process. If no Ramp/Soak operation is in
progress, it starts the Ramp/Soak operation. When Ramp/ Soak is running, this key
puts the Ramp/Soak operation into a hold condition. While the Ramp/Soak is
running, the “Ramp/Soak” message is displayed on the LCD in place of the normal
“Running” message.
• This key will not function if the Security Level is less than 3.
• This key will not function if the Ramp/Soak operation is in progress.
• This key will not function while in the Factory mode.
• When system is powered-on, the controller initializes and then displays the
“[SYSTEM OFF]” message on the LCD. The controller is not functioning at this
point. Pressing this START key enables all controller functions and lights the green
power-on LED. After the system has been started, the “[Running]” message is
displayed on the LCD.
• Stops all controller functions and turns off the green power-on LED (ov errides
Remote Start input). After the system has been stopped, the “Stopped” message is
displayed on the LCD.
• This key will override an existing Remote Start input switch closure.
14 of 65 Chapter 2: Functional Description
Page 15

M2B+ Controller
Button Function
Vent
Alarm
Silence
Figure 1: Panel Layout
2-6
• When the system is first powered-on and the “Power Available - System Off”
message is displayed, pressing the VENT key will turn on the Vent Output for a
period of 8 seconds. The message “VENT” will be displayed during this period.
• When the system is running, pressing the VENT key shall manually turn on the
Vent Output for as long as the key is held down, provided the ‘To Process’
temperature is below 150
unit. The message “Vent Time = MANUAL” will be displayed while the key is held
down.
• Turns off the Alarm 1 Output. The cause of the alarm will continue to appear in LCD
until the fault is cleared.
• Used to immediately terminate any of the three Setup modes without having to
cycle through to the end of the menu items. Note that the current displayed
parameter value is not saved to EEPROM when this key is pressed.
• Can be used as a means of turning on the LCD backlight without affecting any
operation.
o
F (65.5oC) for a water unit and 250oF (121oC) for an Oil
Chapter 2: Functional Description 15 of 65
Page 16

M2B+ Controller
Menu Structure
The parameter menu structure is organized into three basic menus: Primary, Secondary, and
Secure. To access the menus, press the Index button until the menu label appears in the
second line of the LCD display. Additional menus display when an option is selected;
however, the options are non-functional unless the appropriate menu option or option board
has been installed. See the Menu Parameter Tables in the Appendix of this manual for more
information.
Continuing to press the Index button scrolls from menu to menu. Press the Enter button to
enter the menu, and use the Index button to scroll through the parameters of the menu. Once
you find the parameter that needs to be changed, use the Up and Down buttons to change the
parameter. Press the Enter button to accept the new value.
You can exit the setup menus by scrolling through the menu to its end or by pressing the
Alarm Silence button. The controller will automatically exit the setup menu if no buttons
have been pressed for more than one minute.
Primary Menu
The Primary menu includes all non-critical parameters for standard operation including but
not limited to standby mode, mold temperature, alarm trip points, ramp/soak settings, and
high heat.
Secondary Menu
The Secondary menu includes all non-critical parameters for optional equipment including
but not limited to degrees F/C, Alarm parameters, ramp/soak segments, remote setpoint
scaling, communication setup, and retransmission scaling.
Secure Menu
The Secure menu includes all critical parameters for setting up the controller including but
not limited to controller function, select either Water TCU or Oil TCU default values, flow
meter on/off, remote control probe on/off, pressure switch, high and low level, safety
thermostat on/off, output parameters, and scale limits.
16 of 65 Chapter 2: Functional Description
Page 17

M2B+ Controller
2-7 Passwords and Security
The controller provides four levels of security. Depending on the security level, some or all of
the setup menus may be locked. The security level must be changed in order to unlock these
menus. The current security level is displayed in the lower right corner of the menu display.
The default security level is 3.
Security levels are changed by changing the password value using the Up and Down buttons
and pressing the Enter button. Values in the setup menus can be changed only when the
correct security level is set. Note that the security level value itself can be changed in any
security level.
Use the following procedure to change the security level:
1. Press the Index button three times to access the Secure menu.
2. Press the Enter button. The LCD screen will display the current security level.
3. Use the Up or Down buttons to change the value in the display line to the password
of the new desired security level.
4. Press the Enter button to select this new security level and retain the value in
EEPROM. The display will change from the password value to the selected security
level for that password.
Level Password Menu Status Description
1 110
2 101
3 011
4 111
Primary Locked
Secondary Locked
Secure Locked
Primary
Secondary Locked
Secure Locked
Primary
Secondary
Secure Locked
Primary
Secondary
Secure
Unlocked
Unlocked
nlocked
U
nlocked
U
nlocked
U
nlocked
U
No parameter values can be
changed.
Setpoint cannot be changed.
Only the primary menu values
can be changed.
Setpoint can be changed.
Only the primary and secondary
menu values can be changed.
Setpoint can be changed.
All parameter values can be
changed.
Setpoint can be changed.
Chapter 2: Functional Description 17 of 65
Page 18

Page 19

M2B+ Controller
Chapter 3: Installation
3-1 Location
Mount the instrument in a location that will not be subject to excessive temperature, shock or
vibration. All models are designed for mounting in an enclosed panel.
When properly mounted in an enclosed panel using a gasket at the panel/controller interface,
the keypad can be washed down with water. Do not use high-pressure fluids.
3-2 Electrical Connections
Microprocessor-based instruments require a “clean” source of power that is steady and free of
noise. Electrical noise may be caused by line faults, power switching, motors, motor
controllers, or power controllers containing SCR devices. Without a clean source, any
microprocessor is prone to failure. If your power source is not from a clean line, your system
can be protected by installing a line filter.
Where external contactors or solenoids are used with relay output instruments, an R/C
Snubber Network should be used. The snubber installs easily directly across the field coil
terminals of the relay or solenoid.
Do not run thermocouples, RTD’s or other class 2 wiring in the same conduit or area as the
power leads. Maintain separation between wiring of sensors, process signals and other power
and control wiring.
Chapter 3: Installation 19 of 65
Page 20

Page 21

M2B+ Controller
Chapter 4: Basic Operation
4-1 Turning the Power On
When AC power is first applied to the unit, the following sequence of events will occur:
1. The LCD backlight lights up.
2. The LCD displays dashes: LEDs have all segments on.
3. The LCD displays the PROM Rev/Date.
4. The LCD displays “SelfTest in Progress.”
5. If the ‘Debug’ parameter is enabled, the following messages about Option Cards can
be displayed:
• Re-Transmit Detected
• Cool Analog Detected
• Heat Analog Detected
• Serial Comm Detected
• None Installed
6. The LED segments turn off.
7. The LCD backlight turns off.
8. The LCD displays “Power Available/System OFF.”
At this point, a Manual Vent Operation can be initializeed for 8 seconds by pressing the Vent
button.
The unit is now in a standby mode of operation. No system process control will occur until
the Start button is pressed.
Chapter 4: Basic Operation 21 of 65
Page 22

M2B+ Controller
4-2 Starting and Stopping Water TCUs
Starting the Unit (Local)
Press the Start button to begin the following sequence of events:
1. The green LED inside the Start button lights up.
2. The LCD backlight lights up.
3. The Pump Output turns on.
4. The LCD displays the setpoint value, process temperature, return temperature, and
delta temperature.
5. If the Auto Vent Cycle parameter is enabled, the Vent Output turns on, and the LCD
displays “Vent Time = mm:ss.”
6. When the Auto Vent timer expires or if the Auto Vent Cycle parameter is disabled,
the LCD displays “RUNNING,” and system control begins.
Stopping the Unit
While the system is running, press the Stop button to shut down the system. If the process
temperature is below 150ºF, the system will immediately shut down. If the current process
temperature is above 150ºF, pressing the Stop button will begin the following sequence of
events:
7. The LCD displays “SHUTDOWN [Cool Down].”
8. The setpoint changes to 150
º
F.
9. The Heat Outputs will turn off.
10. The Cool Output will turn on.
11. The system waits for the process temperature to drop down to 150
Note: Shutdown temperature is adjustable from 90
º
F.
°
F to 180°F. See
Section 5-14 for procedure.
12. At 150
º
F, the LCD displays “SHUTTING DOWN.”
13. All outputs immediately turn off.
14. The system re-cycles to the “Power Available/System OFF” state.
Note: Pressing the Stop button a second time while the controller is
in the “SHUTDOWN [Cool Down]” mode will abort this cool
down operation and the system will immediately go into the
“SHUTTING DOWN” phase of the operation.
Starting the Unit (Remote)
REMOTE START option, the controller start sequence will be initiated by a maintained dry
contact closure on pins 5 & 6 of header J6. The controller may be turned off by two means;
open the maintained contact input or depress the controller stop button.
The controller may also be started or stopped locally by depressing the controller start button
or stop buttons.
22 of 65 Chapter 4: Basic Operation
Page 23

M2B+ Controller
4-3 Starting and Stopping Hot Oil TCUs
Starting the Unit (Local)
Press the Start button to begin the following sequence of events:
1. The green LED inside the Start button lights up.
2. The LCD backlight lights up.
3. The Pump Output turns on.
4. The LCD displays the setpoint value, process temperature, return temperature, and
delta temperature.
5. If the Auto Vent Cycle parameter is enabled, the Vent Output turns on, the green
LED blinks, and the LCD alternates between “Mode is OFF,” “Press START to
Run,” and “Vent Time = mm:ss.”
6. When the Auto Vent timer expires or if the Auto Vent Cycle parameter is disabled,
the LCD alternates between “Mode is Off” and “Press START to Run.”
7. Press the Start button. The display reads “Vent Time = mm:ss.”
8. When the vent time expires, the LCD displays “RUNNING,” and system control
begins.
Stopping the Unit
While the system is running, press the Stop button to shut down the system. If the current
process temperature is above 150ºF, pressing the Stop button will begin the following
sequence of events:
9. The LCD displays “SHUTDOWN [Cool Down].”
10. The setpoint changes to 150ºF.
11. The Heat Outputs will turn off.
12. The Cool Output will turn on.
13. The system waits for the process temperature to drop down to 150ºF.
Note: Shutdown temperature is adjustable from 90
5-14 for procedure.
14. At 150ºF, the LCD displays “SHUTTING DOWN.”
15. All outputs immediately turn off.
16. The system re-cycles to the “Power Available/System OFF” state.
Note: Pressing the Stop button a second time while the controller is in the
“SHUTDOWN [Cool Down]” mode will abort this cool down operation
and the system will immediately go into the “SHUTTING DOWN” phase
of the operation.
If the process temperature is below 150ºF, all outputs will turn off, and the controller will
enable Pump Reverse mode. The LCD will display “Shutdown [PmpRevOff]” for 30 seconds
before the system re-cycles to the “Power Available/System OFF” state.
8
F to 1808F. See Section
During the 30-second “Shutdown[PumpRevOff] mode, press the Up button to reverse the
pump and purge oil from the mold. During pump reverse, the Vent Output and Pump
Reverse outputs will turn on. The LCD will display “Shutdown[PmpRevON] until the Up
Chapter 4: Basic Operation 23 of 65
Page 24

M2B+ Controller
button is released, at which time the 30-second time-out will restart. After 30-seconds, the
system will recycle to the “Power Available/System OFF” state.
Starting the Unit (Remote)
REMOTE START option is similar to the water process sequence. Closure of pins 5 and 6 of
header J6 initiates the start sequence. The display flashes MODE IS OFF, PRESS START
TO RUN. THE VENT/FILL timer counts down from 10 minutes. After the VENT/FILL
timer has elapsed, the controller will automatically go to the second vent operation for 10
minutes. Upon completing the second vent operation the controller will automatically go to
the run mode.
The controller may also be started or stopped locally by depressing the controller start button
or stop buttons.
4-4 Tuning
Autotuning
Caution! The factory default for the controller is automatic half/full heat for water units,
and full heat for oil units. If an autotune cycle is completed, do not switch to
low heat without performing a new autotune cycle. Failure to autotune will
result in poor control of the process. Subsequent changes from one heat setting
to another require autotune to be run.
The Tune button is used to toggle the autotune process. If no autotune operation is in
progress, pressing the Tune button starts the autotune operation. The “AutoTune” message is
displayed on the LCD. If an autotune operation is already in progress, pressing this button
again will immediately stop the autotune operation. The display will return to the “Running”
message.
During the autotune process, the control point is the ‘To Process’ probe or the ‘Remote
Selected’ probe. The tuning constants (i.e. rate, reset and gain) can be altered in setup mode.
The unit’s cycle time is selectable in one-second increments. The heat and cool cycles have a
minimum pulse of one second.
24 of 65 Chapter 4: Basic Operation
Page 25

M2B+ Controller
Manual Tuning (Zeigler-Nichols PID Method)
This tuning method may be used if the spread between ambient temperature and process
operating temperature is small. For best results, use a recording device when tuning with this
method.
1. Disable the cooling valve by removing the output signal to the device. For solenoid
valves, remove plug from the solenoid. For modulating valves, remove the J7 plug
located on the back of the controller.
2. Press the Index button one time to access the Primary Menu.
3. Press the Enter button.
4. In the Primary Menu, change the Reset Time and Rate Time OFF, and change the
Prop Band Heat to 100.
5. Adjust setpoint to the desired value.
6. While monitoring the process temperature or recording device, decease the
proportional value by repeatedly halving the value until a small, sustained
temperature oscillation is observed. Measure the period of one cycle of oscillation
“T”.
7. Divide the period of oscillation “T” by eight; the resulting number is the correct Rate
Time in seconds.
8. Multiply the Rate Time by four. This is the correct Reset Time in seconds.
9. Multiple the bandwidth value “T” by 1.66, and enter this as the new Prop Band Heat
value.
10. Re-enable the cooling valve by reversing step 1.
Chapter 4: Basic Operation 25 of 65
Page 26

M2B+ Controller
4-5 Selecting a Local Probe
The controller has two standard temperature probe inputs for delivery (to process) and return
(from process). The probes are typically set up at the factory, but they can be re-configured in
the field. To set up this feature you must have access to the Secure Menu. See Section 2-6 on
page 16 to review accessing the Secure Menu.
Use the following procedure to select a local probe:
1. Press the Index button three times to access the Secure menu.
2. Press the Enter button.
3. Press the Index button until the display reads “Sensor type = RTDIK.”
4. Use the Up and Down buttons to select the sensor type.
5. Press the Enter button to accept the value.
When changing the sensors from RTDs to thermocouples, you must also change the
jumpers JMP1 and JMP3 to pins 2 and 3.
6. Press the Alarm Silence button to return to Running mode.
Using a Remote Input Probe for Monitoring
The Remote Probe Input can be used for two different functions: To control or monitor the
temperature of a process outside of the temperature control loop. To set up this feature you
must have access to the Secure Menu. See Section 2-6 on page 16 to review accessing the
Secure Menu.
This option can be purchased with or without the manufacturer supplying the actual
temperature-sensing device. If the manufacturer supplies the probe, the controller is
preconfigured, and the user needs to set up the controller as local or remote input.
Use the following procedure to monitor the process from the remote probe:
1. Press the Index button three times to access the Secure menu.
2. Press the Enter button.
3. Press the Index button until the display reads “Sensor Monitor.”
4. Press the Enter button.
5. Use the Up and Down buttons to select the type of input desired. Select “MON” for
monitor. The LCD display will change to have MT display the monitored
temperature from the probe.
If the display reads “999,” the probe is not plugged into the back of the controller at
pins 3 and 4 of the 8-pin connector.
6. Press the Enter button to save the sensor monitor parameter.
7. Press the Index button until the display reads “Mold Sensor Type.”
8. Press the Enter button.
9. Use the Up and Down buttons to select the type of mold sensor (Type J, K, or T
thermocouples or 100 or 1000 ohm RTD).
10. Press the Enter button to save the mold sensor type.
11. Press the Alarm Silence button to return to Running mode.
26 of 65 Chapter 4: Basic Operation
Page 27

M2B+ Controller
4-6 Setting Up Cascade Control
The controller is provided with an internal cascade control feature. Cascade control is used to
enable a process having multiple lags to be controlled with the fastest possible response to
process disturbances. The system uses a remote control probe in the downstream process and
a local delivery and return probe in the TCU. The controller uses the remote probe to drive
the heating and cooling outputs, while the local delivery probe is the process fluid
temperature limit control. To set up this feature you must have access to the Secure Menu.
See Section 2-6 on page 16 to review accessing the Secure Menu.
V1.09C-V2.01 Cascade Set-up
• Turn Power on. The controller will go through an initialization sequence.
• After the sequence is complete, turn the controller on with the start button. The
controller will be defaulted to SECURE 3; To access parameters in the secure
menu the controller must be in SECURE 4.
• Index to secure menu, press enter, Use the up arrow to scroll to “111”, press
enter. The controller secure menu is unlocked.
• Scroll down to the SENSOR MONITOR menu, default is OFF. Depress the up
arrow to display=CNTL depress enter. The controller is now set for cascade
control.
• Scroll to the menu MOLD SENSOR type. Press the up arrow to display = RTD.
This is the setting for a 100 ohm RTD for the remote probe. For 1K ohm, select
RTD1K.
• Continue to scroll through the menu until the control goes back to the run menu.
Or wait one minute without touching a key. The controller will return to the run
mode automatically.
• The remote probe input is wired to Header J5, pins 3 and 4 on the back of the
controller. The remote probe is factory defaulted for a Type J T/C input. Move
the jumper “JMP2” to pins 1 and 2 for a RTD input.
• The controller process display will reflect the customer’s remote temperature. DT
(local to process temperature) will appear to the right of the Delta T temperature.
• If the local PID parameters are known, enter them for the inner loop parameters.
If they are unknown, take the controller out of the cascade mode by setting the
SENSOR monitor selection to OFF. Press the TUNE button. The parameters will
be written into the primary menu.
• Return the controller to the cascade mode.
• Press the TUNE button again to tune the controller to the customer’s process.
When the tune is completed, the PID parameters will be written into the
PRIMARY menu.
• Both the inner and outer loops can be viewed or adjusted in the PRIMARY
menu.
Chapter 4: Basic Operation 27 of 65
Page 28

M2B+ Controller
4-7 Adjusting the Automatic Venting Timer
When the Auto Vent Cycle Timer is set, the controller will open the venting valve for the set
time at the startup of the unit. The Auto Venting Timer can be turned off, or it can be set to a
specified time period. For water TCUs, Auto Vent can be set between 1 and 10 minutes. For
hot oil TCUs, the vent time can be set between 1 and 60 minutes. TCUs are programmed at
the factory to Auto Vent for 1 minute for water units and 10 minutes for oil units.
Use the following procedure to adjust the Auto Vent Cycle parameter:
1. Press the Index button one time to access the Primary menu.
2. Press the Enter button.
3. Press the Index button until the display reads “Auto Vent Cycle.”
4. Press the Enter button.
5. Use the Up and Down buttons to set the cycle time to the desired time.
6. Press the Enter button to save the cycle time.
7. Press the Alarm Silence button to return to Running mode.
4-8 Using Crash Cool
The Crash Cool feature allows the user to quickly cool the process down. Once Crash Cool is
turned on, the setpoint is automatically adjusted to 0ºF, and the cooling valve is opened. Oil
TCUs not equipped with the optional heat exchanger will cool only through convection and
radiation.
Use the following procedure to being “Crash Cool”:
1. Press the Index button one time to access the Primary menu.
2. Press the Enter button
3. Press the Index button until the display reads “Crash Cool.”
4. Press the Enter button.
5. Use the Up and Down buttons to set the “Crash Cool” parameter to “ON.”
6. Press the Enter button to begin crash cooling. The setpoint will change to 0, and the
cool output will turn on.
7. Press the Alarm Silence button to return to Running mode.
28 of 65 Chapter 4: Basic Operation
Page 29

M2B+ Controller
Chapter 5: Advanced Operation
5-1 Using the Analog Remote Input
This feature is typically setup at the factory, but can be installed as a retrofit in the field. It is
used to accept a remote analog setpoint value or flow value. If the analog signal is set up for
remote setpoint input, the Up and Down arrow keys are locked out for changing the setpoint
at the controller. The analog signal can be configured to be 0-20 mA, 4-20 mA, 0-5 VDC, 15 VDC, 0-10 VDC, or 2-10 VDC via jumper 4 and menu selection.
Use the following procedure to set up the Analog Remote Input:
1. Press the Index button two times to access the Secondary menu.
2. Press the Enter button.
3. Press the Index button until the display reads “Remote Input.”
4. Press the Enter button.
5. Use the Up and Down buttons to change value to either SETP for setpoint or FLOW
for flow.
6. Press the Enter button.
7. Press the Index button one time to access the “Remote Signal” parameter.
8. Press the Enter button.
9. Use the Up and Down buttons to change the range of the analog input.
10. Press the Enter button.
11. Press the Alarm Silence button to return to Running mode.
From the factory, the remote setpoint temperature range is set up to be the same as the range
of the controller (Water: 0°F to 250°F; Oil: 0°F to 550 °F). These parameters can be changed
through the Secondary Menu.
Use the following procedure to adjust the remote setpoint temperature range:
1. Press the Index button two times to access the Secondary menu.
2. Press the Enter button.
3. Press the Index button until the display reads “Remote SetPtLo” for the low limit, or
“Remote SetPtHi” for the high limit.
4. Press the Enter button.
5. Use the Up and Down buttons to change the value.
6. Press Enter to accept the value change.
7. Press the Alarm Silence button to return to Running mode.
Note: If there is no signal present, the controller’s setpoint will automatically
default to 0 °F.
Chapter 5: Advanced Operation 29 of 65
Page 30

M2B+ Controller
5-2 Retransmission Analog Signal
This feature is typically set up at the factory, but it can also be installed as a retrofit in the
field. It is used to transmit an analog signal for process temperature, setpoint temperature, and
flow. The analog signal can be configured to be 0-20mA, 4-20mA, 0-5VDC, 1-5VDC, 010VDC, and 2-10VDC.
Note: The Process Output Low and High values must match the high and low
limits of the controller setup in the Secure menu.
Use the following procedure to set up the analog retransmission output:
1. Insert the analog retransmission card (P/N 691-00537-00) into header “J9.” The card
must be inserted into the header to activate the analog output setpoint menus.
2. Press the Index button two times to access the Secondary menu.
3. Press the Enter button.
4. Press the Index button until the display reads “Analog Out=Process Signal Type.”
5. Use the Up and Down buttons to change the value.
6. Press the Enter button to accept the value.
7. Press the Index button until the display reads “Process Outlow.”
8. Use the Up and Down buttons to change the low limit value.
9. Press the Enter button to accept the value.
10. Press the Index button until the display reads “Process OutHig.”
11. Use the Up and Down buttons to change the high limit value.
12. Press the Enter button to accept the value.
13. Press the Index button until the display reads “Process Out SrC.”
14. Use the Up and Down buttons to change the analog signal source to PROC, SETP, or
FLOW.
Note: Selecting “FLOW” requires additional setup. See the next procedure.
15. Press the Enter button to accept the value.
16. Press the Alarm Silence button to return to Running mode.
30 of 65 Chapter 5: Advanced Operation
Page 31

M2B+ Controller
Setting the Analog Signal Source to FLOW
If the analog signal source is set to “FLOW,” follow steps 1 through 15 on page 30, and then
complete the following procedure:
1. Press the Index button until the display reads “Remote Input.”
2. Use the Up and Down buttons to change the value to “FLOW.”
3. Press the Enter button to accept the value.
4. Press the Index button until the display reads “Remote Signal.” Do not alter this
value; use the default setting.
5. Press the Enter button to accept the default setting.
6. Press the Index button until the display reads “Remote Flowslo=Minimum Flow
Value.”
7. Use the Up and Down buttons to change the value to 0.
8. Press the Enter button to accept the value.
9. Press the Index button until the display reads “Remote Flowshi=Maximum Flow
Value.”
10. Press the Enter button to accept the default value.
11. Press the Alarm Silence button to return to Running mode.
12. Press the Index button two times to access the Secondary menu.
13. Press the Enter button.
14. Press the Index button until the display reads “Remote Input.”
15. Use the Up and Down buttons to select “OFF.”
16. Press the Enter button to accept the value.
17. Press the Alarm Silence button to return to Running mode.
Using Analog Output for Heating and Cooling
This feature is typically set up at the factory, but it can also be installed as a retrofit in the
field. It is used to control a modulating valve or heating SCR proportionally. The analog
signal can be configured to be 0-20mA, 4-20Ma, 0-5VDC, 1-5VDC, 0-10VDC, and 210VDC. Inserting the card into header “J5” for cooling or “J6” for heating automatically
configures the controller to direct its outputs through these boards.
Use the following procedure to set up the analog outputs:
1. Insert the analog card (P/N 691-00537-00) into the appropriate header.
2. Press the Index button two times to access the Secondary menu.
3. Press the Enter button.
4. Press the Index button until the display reads “Cool Output” or “Heat Output.”
5. Use the Up and Down buttons to select the analog signal type.
6. Press the Enter button to accept the value.
7. Press the Alarm Silence button to return to Running mode.
Chapter 5: Advanced Operation 31 of 65
Page 32

M2B+ Controller
5-3 Using the Flow Monitor
The controller is set up to accept a pulsed or current input from a flow sensor. The controller
translates the pulse or current into either gpm (gallons per minute) or lpm (liters per minute).
If the flow sensor is of the pulsed variety, it is connected to block J1 on the main controller
board. For analog signal sensors, see Section Chapter 5: on page 29.
Use the following procedure to set up a pulsed flow sensor:
1. Press the Index button three times to access the Secure menu.
2. Press the Enter button.
3. Press the Index button until the display reads “Flow Monitor.”
4. Press the Enter button.
5. Use the Up or Down buttons to change the value to PUL for pulsed input.
6. Press the Enter button to accept the value.
7. Press the Index button one time to access the “Flow Constant B” parameter.
8. Press the Enter button.
9. Use the Up and Down buttons to change the offset of the displayed flow reading.
This value should be determined by using a certified sensor to determine the offset.
10. Press Enter to accept the value.
11. Press the Index button one time to access the “Flow Constant K” parameter.
12. Press the Enter button.
13. Use the Up and Down buttons to change the scaling factor to the K factor (pulses per
gallon) provided by the sensor manufacturer. If the K factor isn’t known, use the
GPM flow rate and frequency. (A factor = GPM/Hz, K factor = 60 sec./A factor)
14. Press the Enter button to accept the value.
15. Press the Alarm Silence button to return to Running mode.
At this point, the controller should display the flow as “FL=X.X.” The user can now set up as
many as two alarms that will annunciate when the flow drops below or rises above a set value.
Use the following procedure to set up the flow alarm:
1. Press the Index button one time to access the Primary menu.
2. Press the Enter button.
3. Press the Index button until the display reads “Flow Alarm Low” for a low flow
alarm or “Flow Alarm High” for a high flow alarm.
4. Press the Enter button.
5. Use the Up and Down buttons to change the value.
6. Press the Enter button to accept the value.
7. Press the Alarm Silence button to return to running mode.
Use the following procedure to change the units of the displayed flow:
1. Press the Index button two times to access the Secondary menu.
2. Press the Enter button.
3. Press the Index button until the display reads “Flow Display.”
4. Press the Enter button.
5. Use the Up and Down buttons to change the value between GPM and LPM.
6. Press the Enter button to accept the change.
7. Press the Alarm Silence button to return to Running mode.
32 of 65 Chapter 5: Advanced Operation
Page 33

M2B+ Controller
5-4 Programming the Alarms
The controller is set up to monitor both critical and non-critical operations within the process.
Based on the severity of the condition, the controller will alarm and perform a specific
function based on the type of unit being controlled. If an alarm is tripped, the LCD display
will flash the backlight and if an audible alarm is present, turn it on. Below is a brief
explanation of each of the eight areas that the controller monitors and how to set them up.
Temperature
This alarm is used to monitor the difference between the setpoint and the “to process”
temperatures. The alarm can be configured as an absolute or deviation alarm. When setting
the alarm value for an absolute alarm (Alarm1 Mode = ABS), simply set the value at which
the alarm is to occur.
When setting the value for the deviation alarm (Alarm1 Mode = DEV), set the difference in
value from the Setpoint desired. For example if you want to configure Alarm 1 as a high and
low deviation alarm (Alarm1 Cfg = HILO and Alarm1 Mode = DEV), and you want the low
alarm to be 5 degrees below the setpoint, then set Alarm 1 Low = 5. If a high alarm is to be
20 degrees above the setpoint, then set Alarm 1 High = 20. If the setpoint is changed, the
alarm will continue to maintain that deviation.
Use the following procedure to set up the temperature alarm to be either an absolute alarm or
a deviation alarm:
1. Press the Index button two times to access the Secondary menu.
2. Press the Enter button.
3. Press the Index button until the display reads “Alarm1 Cfg.”.
4. Press the Enter button.
5. Press the Up and Down buttons to select the alarm type: low, high, hilo, or evnt.
6. Press the Enter button.
7. Press the Index button one time to see “Alarm1 Mode.”
8. Use the Up and Down buttons to select ABSL for absolute or DEV for deviation.
9. Press the Enter button.
10. Press the Alarm Silence button to return to the Running mode.
11. Press the Index button one time to access the Primary menu.
12. Press the Enter button.
13. Press the Index button until the alarm type you selected in Step 5 appears (example
Alarm 1 Low).
14. Press the Enter button.
15. Use the Up and Down buttons to select the temperature for the configured alarm.
16. Press the Enter button.
17. Repeat Steps 15 and 16 until all of the alarm configurations are set up.
18. When finished, press the Alarm Silence button to return to Running mode.
Note: The factory setup of the alarms is to be in an On/Off reset mode (Alarm1 Reset =
ONOF). The reset declares how the controller is supposed to function when the
alarm is tripped. The On/Off mode allows the controller to reset the alarm when
the offending parameter is cleared. The HOLD mode makes the alarm a critical
one in which the user has to turn the controller off and then on to clear the alarm.
Chapter 5: Advanced Operation 33 of 65
Page 34

M2B+ Controller
Flow Alarm
This alarm is used to monitor the flow rate input from either a pulse or analog style flow
meter. Once the Flow Monitor is turned on (in the Secure Menu; Flow Monitor = PUL or
CUR) either a low flow alarm or high flow alarm or both can be set up.
Use the following procedure to set up the Flow Alarm:
1. Press the Index button one time to access the Primary menu.
2. Press the Enter button.
3. Press the Index button until the display reads “Flow Alarm Low.”
4. Press the Enter button.
5. Use the Up and Down buttons to adjust the value of the alarm.
6. Press the Enter button to accept the value.
7. Press the Index button until the display reads “Flow Alarm High.”
8. Press the Enter button.
9. Use the Up and Down buttons to adjust the value of the alarm.
10. Press the Enter button to accept the value.
11. Press the Alarm Silence button to return to Running mode.
Open Sensor
This alarm occurs when the controller loses the signal from the To Process (process display
999), From Process (return display 999), or Remote probes (mold display 999). This alarm is
critical. The pump will remain operating and cooling is enabled. Turn the controller off,
correct the condition and start the controller to clear the fault. There are no menu items that
affect this function.
Low Pressure
This alarm occurs when the controller loses the signal from the pressure switch. In water
units, this alarm immediately disables the pump motor, heat, and cool outputs. In the water
unit, this alarm is not critical and will automatically reset the controller once the pressure
signal is regained.
In water units with manual fill reservoir tanks, the pressure switch input can be bypassed
during initial start-up with an adjustable timer located in the Secure menu. This time period
should be kept as short as possible to prevent damage to the pump seal.
In oil units, during the Auto Mode, the loss of the pressure switch disables the heater output
and the pump motor output will remain on for a preset time period (Pressure Timer = OFF,
2sec, 5sec, 30sec, or 1 to 10 minutes).
Use the following procedure to change the Pressure Timer for oil TCUs:
1. Press the Index button three times to access the Secure menu.
2. Press the Enter button.
3. Press the Index button until the display reads “Pressure Timer.”
4. Press the Enter button.
5. Use the Up and Down buttons to adjust the value of the timer.
6. Press the Enter button to accept the change.
7. Press the Alarm Silence button to return to Running mode.
34 of 65 Chapter 5: Advanced Operation
Page 35

M2B+ Controller
Low Fluid Level Alarm
This factory-set alarm occurs when the low level switch is in a closed condition. This is not a
critical alarm and will reset once the condition is cleared. For water TCUs the Low Level
alarm disables the heater and the pump motor outputs. For oil TCUs it disables the heater
output. There are no menus that affect this alarm.
High Fluid Level Alarm
This factory-set alarm occurs when the high level switch is in a closed condition. This alarm
is only applicable for water TCUs. This is not a critical alarm and will reset once the
condition is cleared. It is an alarm only and no outputs are disabled.
Pump Failure Alarm
This critical, factory-set alarm occurs when one of three conditions occurs: phase loss, phase
reversal, or motor overload trip. If any of these occur, the heat, cool, and pump motor
outputs are disabled. Turn the unit off and then on again to reset the fault.
Safety Thermostat Alarm
This critical, factory-set alarm occurs when the thermostat sensor opens on a high
temperature condition. For both water and oil TCUs, the heater output is disabled, but the
pump and cooling outputs are still active. For water TCUs, the cooling output will latch on.
Turn the unit off and then on again to reset the fault.
Welded Contactor Alarm
This critical factory-set alarm occurs when the controller senses that an auxiliary contact has
remained closed after a preset time period after the heater output has been turned off. The
heater output is disabled, and the cool and pump motor outputs are enabled to prevent
temperature runaway. This alarm is an option for water TCUs and is standard for oil units.
Turn the unit off and then on again to reset the fault.
Chapter 5: Advanced Operation 35 of 65
Page 36

M2B+ Controller
5-5 Using the Second Setpoint Function
With this function, the user can send the controller a dry contact closed signal to activate the
second setpoint. Opening the dry contact causes the controller to revert to the primary
setpoint. To reinitiate the second setpoint, the switch must be closed again.
Use the following procedure to enable the second setpoint function:
1. Press the Index button three times to access the Secure menu.
2. Press the Enter button.
3. Press the Index button until the display reads “SP2/RmtStart.”
4. Press the Enter button.
5. Use the Up and Down buttons to change the value to “SP2.”
6. Press the Enter button to accept the change.
7. Press the Alarm Silence button to return to Running mode.
8. Press the Index button to access the Primary menu.
9. Press the Enter button.
10. Press the Index button until the display reads “Aux Set Point.”
11. Press the Enter button.
12. Use the Up and Down buttons to change the value. The range is between the
SetPtLoLimit and the SetPtHiLimit in the Secure menu.
13. Press the Enter button to accept the change.
14. Press the Alarm Silence button to return to Running mode.
5-6 Using the Remote Start Function
With this function, the user can send the controller a dry contact closed signal to activate the
controller. Stopping the unit can be done one of two ways: removing the signal or pressing
the Stop button on the face of the controller. Either method will initiate the Automatic
Shutdown routine within the controller. The remote contact must be opened to reset the
controller.
36 of 65 Chapter 5: Advanced Operation
Page 37

M2B+ Controller
5-7 Changing the Temperature Display Units
The controller is set up to display the temperature, and all related temperature settings, in
either degrees Fahrenheit or degrees Celsius. Use the following procedure to change the
display units:
1. Press the Index button two times to access the Secondary menu.
2. Press the Enter button.
3. Press the Index button one time to access the “Degrees (F/C)” parameter.
4. Use the Up and Down buttons to change the value.
5. Press the Enter button to accept the change.
6. Press the Alarm Silence button to return to Running mode.
5-8 Setting the Temperature Display Precision
The controller is factory-set to display the temperature, and all related settings, as an integer.
The user has the ability to change the display precision to tenths of a degree. Use the
following procedure to change the display precision:
1. Press the Index button two times to access the Secondary menu.
2. Press the Enter button.
3. Press the Index button until the display reads “Precision.”
4. Use the Up and Down buttons to change the value.
5. Press the Enter button to accept the change.
6. Press the Alarm Silence button to return to Running mode.
Chapter 5: Advanced Operation 37 of 65
Page 38

M2B+ Controller
5-9 Using the Elapsed Time Meter
The controller is equipped with an elapsed time meter that keeps track of the time that the
pump motor has run in hours. The meter is enabled or reset in the Secure menu and viewed
in the Primary menu.
Use the following procedure to enable the elapsed time meter:
1. Press the Index button three times to access the Secure menu.
2. Press the Enter button.
3. Press the Index button until the display reads “ElapsedTimeMode.”
4. Use the Up and Down buttons to change the value to “ON.”
5. Press the Enter button to accept the value.
6. Press the Alarm Silence button to return to Running mode.
Use the following procedure to view the elapsed time meter:
1. Press the Index button one time to access the Primary menu.
2. Press the Enter button.
3. Press the Index button until the display reads “ElapsedTime.”
4. Press the Alarm Silence button to return to Running mode.
Use the following procedure to reset the elapsed time meter:
1. Press the Index button three times to access the Secure menu.
2. Press the Enter button.
3. Press the Index button until the display reads “ElapsedTimeMode.”
4. Use the Up and Down buttons to change the value to “RST.”
5. Press the Enter button to accept the value.
6. Press the Alarm Silence button to return to Running mode. At this point the meter has
been reset to zero hours.
38 of 65 Chapter 5: Advanced Operation
Page 39

M2B+ Controller
5-10 Programming Ramp/Soak
The controller has a 16-segment, front-face programmable Ramp/Soak feature. Unused
alarms can be programmed as a segment.
Caution! Do not attempt to auto-tune the controller during a ramp/soak program. The
Tune button will not function during this process.
Instead of requiring the operator to calculate an approach rate, the controller does the
calculation automatically. The operator needs to program the target setpoint and the time
desired to reach that setpoint. When the controller executes the ramp segment, it calculates
the ramp required to reach the process temperature from starting setpoint to the programmed
setpoint in the time allowed. (See Figure 2 for sample ramp/soak program.)
Dwells (or soaks) are ramp segments with target setpoint equal to starting process
temperature. This allows for multistage ramps without wasting intermediate soak steps.
Note: Before programming Ramp/Soak, evaluate your program on paper.
Test any program for best results before running production material.
Caution! Make sure to run auto-tune before operating Ramp/soak because Ramp
functions will interfere with the operation of the auto-tune
Segment Prompt Function Time (min.) Setpoint, ºF
1TI 1st Event 1
1SP 50
2TI 2nd Event 2
2SP 150
3TI 3rd Event 2
3SP 150
4TI 4th Event 2
4SP 100
5TI 5th Event 1
5SP 100
6TI 6th Event 2
5SP 50
7TI Un-Used 0
7SP Hold Last Setpoint 50
↓
GTI Un-Used 0
GSP 50
END Stay at present setpoint (GSP) HOLD
END Revert to SP1 value SETP
END Repeat program at 1TI LOOP
Un-Used
Figure 2: Sample Ramp Soak Program
Chapter 5: Advanced Operation 39 of 65
Page 40

M2B+ Controller
Use the following procedure to program the Ramp/Soak functions:
Starting Ramp/Soak Programming:
1. Press the Index button two times to access the Secondary menu.
2. Press the Enter button.
3. Press the Index button until the display reads “Prog Ramp/Soak.”
4. Use the Up and Down buttons to change the parameter to “On.”
5. Press the Enter button to accept the change.
6. Press the Index button one time to access the “Prog Values” parameter.
7. Press the Enter button.
8. Use the Up and Down buttons to change the parameter to “On.”
9. Press the Enter button to accept the change.
10. Press the Index button until the display reads “Prog Time Base.”
11. Press the Enter button.
12. Use the Up and Down buttons to change the time base for each segment. Choose
seconds or minutes. (1s=seconds, 60s=minutes.)
13. Press the Enter button to accept the change.
Programming the Ramp/Soak Segments:
1. Press the Index button one time to access the “Seg 1 Time” parameter.
2. Press the Enter button.
3. Use the Up and Down buttons to change the length of time for Segment 1.
4. Press the Enter button to save the segment time for Segment 1.
5. Press the Index button one time to access the “Seg 1 SetPoint” parameter.
6. Press the Enter button.
7. Use the Up and Down arrows to set the desired setpoint at the end of Segment 1.
8. Press the Enter button to save the setpoint for Segment1.
9. Repeat steps 1-8 for each of the 16 segments. Segment time should be set to 0 for
unused segments.
Finishing the Ramp/Soak Programming:
1. Press the Index button until the display reads “Prog End.”
2. Press the Enter button.
3. Use the Up and Down buttons to change the value for the desired reaction at the end
of the program. “OFF” will power down the TCU after the program; “HOLD” will
control the setpoint from the last segment after the program; “LOOP” will
continuously loop through the program; “SETP” will control at the setpoint prior to
the program.
4. Press the Enter button to accept the value.
5. Press the Alarm Silence button to return to Running mode.
6. Press the Run/Hold button to activate the program.
40 of 65 Chapter 5: Advanced Operation
Page 41

M2B+ Controller
Controlling Ramp/Soak
The Secondary Menu parameter “Prog Ramp/Soak = “ must be set to ‘ON’ in order to control
the ramp/soak operation.
Press the ‘RUN/HOLD’ button on the panel to put the ramp/soak operation into the Run state.
The LCD display will change from “Running” to “RAMPSOAK”. The setpoint will step to
the programmed value over the programmed time period and the process will be changed
accordingly.
Press the ‘RUN/HOLD” button again to toggle the ramp/soak operation into the Hold state.
The LCD display will change from “RAMP/SOAK” to “R/S HOLD”. The setpoint will be
held at its current value and the process will control at that value for as long as the Hold state
continues.
Press the ‘RUN/HOLD” button again to toggle the ramp/soak operation back into the
ramp/soak Run state.
While the Ramp/Soak operation is running, there are two ways to abort the operation:
• Hold down the RUN/HOLD key for 3 seconds.
• In the Secondary Menu, set the “Prog Ramp/Soak = “ parameter to ‘OFF’.
Monitoring Ramp/Soak
If the “Status of Prog” parameter in the Secondary menu is set to “ON”, the Primary menu
will display the following items:
• “PrgSeg# Remain = ###” displays the remaining time in the current segment.
• “PrgSeg# Time = ###” displays total time of the current segment.
• “PrgSeg# StPt = ###” displays the setpoint of the current segment.
If the “Status of Prog” parameter is set to “OFF”, the additional menu items will not appear in
the Primary menu.
Chapter 5: Advanced Operation 41 of 65
Page 42

M2B+ Controller
5-11 Setting the Approach Rate
The controller is provided with a selectable up and down ramp to setpoint feature, located in
the secure menu. The time base is in minutes and is adjustable from off to 99 minutes in 1
minute increments.
Use the following procedure to enable the approach rate feature:
1. Press the Index button three times to access the Secure menu.
2. Press the Enter button.
3. Press the Index button until the display reads “Approach Rate.”
4. Use the Up and Down buttons to select the time period in minutes.
5. Press the Enter button to accept the value.
6. Press the Alarm Silence button to return to Running mode.
5-12 Level Input Operation (Water Units)
All level inputs have a three-second input suppression timer to prevent false input signals
caused by turbulent fluid. The level input has a menu selection for CONTROL or ALARM in
the Secure menu.
When the machine is started, the controller will determine if a high- or low-level condition is
present. If the water level is below the low-level mark, the fill solenoid is enabled, filling the
tank. Once the water level is above the high-level mark, filling stops, and the pump, cooling,
and heating outputs are enabled.
As the process fluid is circulated through the system, the fluid level may fall. The control
system will continue to function without interruption. If a low-level condition exists for more
than three seconds, the pump, cooling, and heating outputs are disabled while the fill solenoid
re-fills the tank.
The controller has a Water Fill Timer, which can be set in the Secondary menu. The timer
can be set to “OFF” or from 1 to 180 minutes. When it is set to off, there is no time limit for
the fill solenoid. When it is set to on, and the low level does not clear in the preset time, the
fill solenoid valve will turn off.
5-13 Adjusting the LCD Display Contrast
Potentiometer R82, on the controller main PC board, is used to adjust the contrast of the
LCD. The range of adjustment varies from completely off, where nothing is displayed on the
LCD, to fully on, where the display “blooms” and may not be readable. Adjust the
potentiometer to achieve an acceptable viewing condition somewhere between the two
extremes.
5-14 Adjusting the Auto Shutdown Temperature Setpoint
The controller is provided with an adjustable shutdown setpoint. The range is 90°F to 180°F
(32°C to 82°C). Use the following procedure to change the shutdown temperature:
1. Press the Index button three times to access the Secure menu.
2. Press the Enter button
3. Press the Index button until the display reads shut down temp.
4. Press the Up or Down buttons to select the new temperature.
5. Press the Enter button to accept the value
6. Press the Alarm silence button to return to the Running mode.
42 of 65 Chapter 5: Advanced Operation
Page 43

M2B+ Controller
5-15 Calibrating the T/C, RTD, and V Inputs
This calibration procedure describes the operator procedures for calibrating the Controller
Sensor Input (T/C and RTD) and the Analog input (V).
Use the following procedure to calibrate all three sensor inputs:
1. While the controller is powering on, hold the Index button and the Enter button when
the “Selftest in Progress” message is displayed. This will put the controller into
Factory mode.
2. Press the Index button two times so that the display reads “Calibrate?<ENT=YES>”.
3. Press the Enter button to begin calibration.
4. Use the Index button to cycle through the six calibration parameter menu selections:
LOCalJTC(25C) = nn.n
HICalJTC(345C) = nn.n
LOCalR1K(10R) = nn.n
HICalR1K(2K1) = nn.n
LOCalRSp(0.1V) = nn.n
HICalRSp(9.9V) = nn.n
5. Use the Up and Down buttons to select the calibration value for each parameter.
6. Press the Enter button to save the value.
Calibrating the Thermocouple Input (T/C)
Note: This thermocouple calibration procedure requires a “J” T/C reference
source to calibrate this analog input circuit. Once the circuit is calibrated,
either a Type “J” or a Type “K” thermocouple can be selected for
operation.
1. Put a jumper on pins 2 and 3 of JMP2 on the main PC board to select the T/C input
type.
2. Connect the “J” thermocouple calibration source to pins 3 (+) and 4 (-) on the J5
connector on the main PC board.
3. Select the “LOCalJTC(25C)” parameter.
4. Set the “J” thermocouple low calibration source to 25ºC. Use the Up and Down
buttons to change the value on the display to 25.0.
5. Press the Enter button to save the value.
6. Select the “HICalJTC(345C)” parameter.
7. Set the “J” thermocouple high calibration source to 345ºC. Use the Up and Down
buttons to change the value on the display to 345.0.
8. Press the Enter button to save the value.
9. Cycle between the Low and High parameters and readjust the values if needed to
compensate for any interaction that may occur between the two parameters.
Chapter 5: Advanced Operation 43 of 65
Page 44

M2B+ Controller
Calibrating the RTD Input
Note: This RTD calibration procedure requires a 0 to 1000 ohm Decade
Resistance box to calibrate this analog input circuit. Once the circuit is
calibrated, either a 100 ohm RTD or a 1000 ohm RTD can be selected for
operation.
1. Put a jumper on pins 1 and 2 of JMP1 on the main PC board to select the RTD input
type.
2. Connect the Decade Resistance Box to pins 1 and 2 on the J5 connector on the main
PC board.
3. Select the “LOCalJR1k(10R)” parameter.
4. Set the decade resistance box low calibration value to 10 Ohm. Use the Up and Down
buttons to change the value on the display to 10.0.
5. Press the Enter button to save the value.
6. Select the “HICalR1K(2K1)” parameter.
7. Set the decade resistance box high calibration value to 2100 Ohm. Use the Up and
Down buttons to change the value on the display to 2100.0.
8. Press the Enter button to save the value.
9. Cycle between the Low and High parameters and readjust the values if needed to
compensate for any interaction that may occur between the two parameters.
Calibrating the Analog Input (V)
Note: This analog input calibration procedure uses a Voltage source for this
analog input circuit. Once the circuit is calibrated, the JMP4 jumper can
be changed for a Milliamp or Voltage input source for operation.
1. Put a jumper on pins 2 and 3 of JMP4 on the main PC board to select a Voltage input
source.
2. Connect the voltage calibration source to pins 7 (+) and 8 (-) on the J5 connector on
the main PC board.
3. Select the “LOCalRSp(0.1V)” parameter.
4. Set the voltage low calibration source to 0.1V. Use the Up and Down buttons to
change the value on the display to 0.100.
5. Press the Enter button to save the value.
6. Select the “HICalRSp(9.9)” parameter.
7. Set the voltage high calibration source to 9.9V. Use the Up and Down buttons to
change the value on the display to 9.900.
8. Press the Enter button to save the value.
9. Cycle between the Low and High parameters and readjust the values if needed to
compensate for any interaction that may occur between the two parameters.
44 of 65 Chapter 5: Advanced Operation
Page 45

M2B+ Controller
5-16 Accessing the Debug Menu
The controller has a troubleshooting tool in the secure menu. Use this menu to assist in
debugging communications errors and flow sensor input errors.
Use the following procedure to troubleshoot communications errors:
1. Press the Index button three times to access the Secure menu.
2. Press the Enter button.
3. Press the Index button until the display reads “Debug”.
4. Press the Enter button.
5. Press the Up button until the top display reads “Comm. Activity [TX and RX]” and
the bottom display reads “Debug 1.”
6. Press the Enter button.
7. Press the Alarm Silence button to return to Running mode. The top line of the LCD
display will indicate by flashing “TX” and “RX”, the transfer of commands between
the host and the slave controllers. If one of the characters isn’t flashing, it is not
communicating.
8. Return to the Debug program and turn it off after the troubleshooting task is
complete.
Use the following procedure to troubleshoot flow sensor input errors:
1. Press the Index button three times to access the Secure menu.
2. Press the Enter button.
3. Press the Index button until the display reads “Debug”.
4. Press the Enter button.
5. Press the Up button until the top display reads “Flow Freq # # # HZ” and the bottom
display reads “Debug 2.”
6. Press the Enter button.
7. Press the Alarm Silence button to return to Running mode. The top line of the display
will read “Flow Freq” with a value in Hertz. Use this value to verify calibration or
verify the presence of an input signal.
8. Return to the Debug program and turn it off after the troubleshooting task is
complete.
Chapter 5: Advanced Operation 45 of 65
Page 46

M2B+ Controller
5-17 Reloading Factory Defaults
When factory default settings are reloaded, all special configurations (i.e., 4-20 ma scaling)
will be lost. Please record menu variables before restoring the factory defaults.
Restoring factory defaults for low-heat water TCUs can be accomplished by entering
“Factory mode.” Use the following procedure to restore factory defaults:
Note: TCUs will default to a 250ºF (121.1ºC) set-stop limit. For 550ºF (287.7ºC)
applications, the controller must be reset for a high-heat configuration (see
below).
1. Cycle control power to system Off and On.
2. While the controller is performing the self test, simultaneously press the Index and
Enter button together to enter Factory mode.
3. Press the Index button until the display reads “Default<ENT=YES>.”
4. Press the Enter button to accept the factory defaults. Both displays will flash the
words “OFF” and “ON” indicating reboot is complete.
5. Restart the controller to automatically return to Running mode.
TCUs will default to a 250ºF (121.1ºC) set-stop limit.
For 550ºF (287.7ºC) applications, the controller must be reset for a high-heat configuration.
Use the following procedure to configure the TCU for high-heat applications:
1. Press the Index button until the “Secure Menu” prompt is in the display.
2. Press the Enter button.
3. Security level “SEC = 4” should be displayed. If not, use the Up arrow to scroll to
“111.” Press the Enter button.
4. Press the Index button to display “Unit Function = HEATLO.”
5. Use the Up/Down arrows to change the display to “Unit Function = HEATHI.”
6. Press the Enter button and the Down button simultaneously to accept the factory
default settings. The LCD will flash off and then on to indicate that the default
settings have been restored. The controller will automatically reboot and turn off the
controller.
7. Press the Start button to enable the TCU.
46 of 65 Chapter 5: Advanced Operation
Page 47

M2B+ Controller
5-18 Serial Communications Operation
The controller communicates with a host machine via an RS232 or RS485 communication
link when the communication option card is installed in the J8 slot on the motherboard. There
are two versions of this option card; one is populated with the ICs to support RS232, and the
other is populated with the ICs to support RS485. All data is sent and received in the bit data
format, using 10 bits: 1 start bit, 8 data bits, no parity bits, and 1 stop bit. This
communications options card uses the J12 connector.
The software supports two protocols, SPI and MODBUS, which are user selectable in the
menus. All communication parameters can be accessed through the setup menus only when a
communication option card is installed:
Primary Menu: “Comm Addr(Hex)=xxxx” specifies the operating address in hex from 0001H
to 03E7H. (This parameter is duplicated in Menu 3.)
Secure Menu: “Comm Protocol = xxx” select either SPI or MODBUS.
Secure Menu: “Comm Addr(Hex)=xxxx” specifies the operating address in hex from 0001H
to 03E7H.
Secure Menu: “Comm Baud Rate=xxxx” select 300, 1200, 2400, 4800, 9600, or 19.2KB.
Secondary Menu: “Comm Local/RMT” [RMT enables serial communication]
Port Address
Operator selection of the address to use is from a menu parameter selection of 1H to 3E7H.
Note: For MODBUS configuration, this address setting must be set between 1
and 247 (0x00Hex to 0xF7Hex).
The default value for this parameter is 1H. The SPI DEVID specified in the SPI Protocol
Specification field is set by this PORT address setting.
Note: For SPI configuration, the address setting must be set between 32 and 255
(x20Hex to 0x0xFFHex).
Baud Rate and Data Format
Operator selection of the baud rate to use is from a menu parameter selection of 300, 1200,
2400, 4800, 9600, or 19.2KB. The default value for this parameter is 9600 Baud. The data
format is 1 start bit, 8 data bits, no parity, and 1 stop bit for all protocols.
Protocols
Onboard protocols are Modicon Modbus RTU and SPI. SPI is only available in RS485. These
follow the standard rules for these protocols. All other desired protocols will require an
external gateway to be supplied by the manufacturer. Operator selection of the protocol to
uses is from a menu parameter selection. The default protocol is MODBUS.
Note: When the protocol is changed, the port address must be set correctly in the
range appropriate for the protocol.
Chapter 5: Advanced Operation 47 of 65
Page 48

M2B+ Controller
MODBUS Protocol
Every message sent from a MODBUS master to a slave on to the network contains a function
code that represents the action the slave device should take in response to the message. So
that a MODBUS master can read and write the controller parameters, setpoints, and status
values in an Athena Temperature controller, the Athena implementation of the MODBUS
protocol supports the following function codes:
function 03 ($03) This function is used to read to one or more contiguous “holding registers”
(database locations that are next to one another in the register map).
function 06 ($06) This function is used to write to a single holding register. A message
containing function 06 can be broadcast to all controllers on the network simultaneously by
sending the message to the controller ID of 0 (zero), instead of to the controller ID of a
specific device.
function 16 ($010) This function is used to write to a single register or to multiple contiguous
holding registers, that is, to two or more registers that are next to one another in the register
map. A message containing function 16 ($10) can be broadcast to all controllers on the
network simultaneously by sending the message to the controller ID of 0 (zero), instead of to
the controller ID of a specific device.
So that you can test communication over the MODBUS network, Athena also supports the
diagnostic function 08 ($08), subfunction 00 ($00) to perform a loopback test. When a
loopback test is performed, the MODBUS master sends a message to a controller and the
controller sends the same message back to the master. (No changes are made to the controller
database as a result of processing the command.) If the master does not receive a reply, it is
time to troubleshoot the network or the controller’s communication setup.
The controllers will not take any action, nor will they reply in response to any messages they
cannot interpret. This includes any messages that contain a function code other than 03, 06,
16 ($10), or 08 subfunction 00.
Modbus Register Addressing Regions. The regions (ranges) of register relative addresses
used for the various types of representations of controller values are shown in the table
below. Each register type used to transmit controller values was described in more detail
earlier in this section (see the cross-references in the table).
Figure 3: Modbus Address Regions
Register Address
Region Type of Value Used
Range
0000 to 0999 Integer Integer 16-bit Integer
1000 to 1999 10X mirror of 0000
to 0999 base region
4000 to 4999 32-bit IEEE mirror
of 0000 to 0999 base
region
All others Reserved Reserved Reserved
Note: The Register Address field in the Message protocol should be offset (-1),
from the point number shown in Table 13
by the Controller
Can include
fractional values
Can include
fractional values
How Data is
Transmitted in the
Register
16-bit Integer
32-bit IEEE floating
point
48 of 65 Chapter 5: Advanced Operation
Page 49

M2B+ Controller
Modbus Accessible Parameter Mapping. The customized controller allows access to (29)
controller parameters and settings, which can be accessed in Integer Mode or Floating point
mode. This is accomplished with (2) Point Address ranges, allowing data exchange in either
integer or floating point format, for all controller parameters and settings. All data conversion
such as rounding, integer float, Etc, is transparent and handled by the controllers, since
internal variables data type can be different for the MODBUS data exchange types.
The M2B+ customized controller software supports the following Modbus Parameters and
Settings:
Figure 4: Modbus Parameters List
Parameter
/ Item
Index
R/W Integer
Data
Region
Point
Address
Float
Data
Region
Point
Address
Min
Value
Max
Value
Description
0 R 0000 4000 0 0 Version ID (4369)
1 R 0001 4002 -34 343 Delivery Temp (ºC)
2 R 0002 4004 -34 343 Mold Temp (ºC)
3 R 0003 4006 -34 343 Return Temp (ºC)
4 R 0004 4008 0 999 Flow Value
5 R/W 0005 4010 0 1 System Standby Heat/cool
6 R/W 0006 4012 0 1 Temp Units
7 R/W 0007 4014 -34 343 Setpoint 1 (ºC)
8 R/W 0008 4016 -34 343 Setpoint 2 (ºC)
9 R/W 0009 4018 -34 343 Alarm 1 Low (ºC)
10 R/W 0010 4020 -34 343 Alarm 1 High (ºC)
11 R/W 0011 4022 1 343 Prop. Band Heat (ºC)
12 R/W 0012 4024 1 343 Prop. Band Cool (ºC)
13 R/W 0013 4026 0 999 Reset (seconds)
14 R/W 0014 4028 0 999 Rate (seconds)
15 R/W 0015 4030 0 999 Autotune.State
16 R/W 0016 4032 0 999 Autotune.TuneDutyPercent
17 R/W 0017 4034 0 999 Autotune.PeakOverShoot
18 R/W 0018 4036 0 999 Autotune.PeakUnderShoot
19 R/W 0019 4038 0 999 Autotune.InitialTempDeviation
20 R/W 0020 4040 0 999 Autotune.ProcessTripTemp
21 R 0021 4042 -34 343 Delivery Temp (ºC)
22 R/W 0022 4044 -34 343 Setpoint 1 (ºC)
23 R/W 0023 4046 0 999 Proportional Percent (%)
24 R/W 0024 4048 0 999 Integral Percent (%)
25 R/W 0025 4050 0 999 Direvative Percent (%)
26 R/W 0026 4052 0 999 PID Output Percent (%)
27 R/W 0027 4054 0 999 Heater Output Percent (%)
28 R/W 0028 4056 0 999 Cooling Output Percent (%)
Chapter 5: Advanced Operation 49 of 65
Page 50

M2B+ Controller
MODBUS Function 03 Request. The format for a function 03 request is shown below.
Device
Address
1 byte 1 byte
Function Code
03
Register Address Number Of Words
CRC
To Read
MSB LSB MSB LSB MSB LSB
containing $03
MODBUS Function 03 Request Example. Suppose you want to Read Delivery
Temperature in Float 32 Bit IEEE Format, which has registers address of "4002" and if the
controller ID is "01".
Device
Address
Function Code
03
Register Address Number Of
Words To Read
CRC
$01 $03 $0F $A2 $00 $02 $66 $FD
Function 03 Normal Reply. The controller reply will consist of the following data:
01= MODBUS unit ID
03= MODBUS command: read holding registers
0F = high byte of first register to read
A2 = low byte of first register to read
0FA2 = 4002 decimal
00 = high byte of number registers to read
02 = low byte of number of registers to read
2 = 16-bit registers are read in a single command, to get all of a 32-bit floating
point register
66 = low byte of CRC of command packet
FD = high byte of CRC of command packet
Following is an example of normal reply response showing Process Temperature = 37.6° C
Device
Address
Function
Code 03
Number Bytes
of Data
IEEE32 BitFloat Data Field See
Modbus Spec.
CRC
$01 $03 $04 $C0 $93 $42 $16 $87 $70
50 of 65 Chapter 5: Advanced Operation
Page 51

M2B+ Controller
SPI Protocol
The Society of the Plastics Industry (SPI) communication protocol specifies a connection
management Protocol, a packetized communication format, and communication error
mechanisms passing commands and data between a host computer and a slave. A host
computer initiates all communications. The protocol used corresponds to the 3.01 version of
the SPI communication protocol specification dated October 1990. The data is transmitted via
a multi-drop EIA485 (half-duplex) hookup. The controller will support a number of
commands that will allow the host computer to retrieve status and assign setpoints. The
commands correspond to a mold temperature controller device.
Commands Descriptions
(20H) Echo poll-Controller integrity command. Return the 4 bytes of ASCII assigned
(21H) Echo Select -Controller integrity command. Supplies 4 bytes of ASCII in an open
(22H) Version poll-Returns a version number (MBB =0101) as 4 bytes of ASCII in an
by the Echo Select command in an open format.
format that is to be returned when an Echo Poll command is received.
open format where: AA = SPI assigned version level, BB = Vendor assigned
version level
(30H) Setpoint poll - Returns the current process setpoint value in numeric format.
(31H) Setpoint select -Assigns a value to the process setpoint in numeric format.
(32H) Alarm, high temperature deviation poll -Return the high temperature deviation
setpoint value in numeric format. This value when added to the process setpoint
gives the temperature at which a high alarm will occur.
(33H) Alarm, high temperature deviation select -Assigns a value to the high
temperature deviation setpoint in numeric format.
(34H) Alarm, low temperature deviation poll -Returns the low temperature deviation
setpoint value in numeric format. This value when subtracted from the process
setpoint gives the temperature at which a low alarm will occur.
(40H) Status process poll -Returns the status of the process as 16 flag bits in open
format. The following bits are supported. The rest are set to 0.
Bit 0 - Processing
Bit 1 -Alarm, System
Bit 2 -Alarm, Process
Bit 3 -Alarm, Machine
Bit 4 -Alarm, High Temperature
Bit 5 -Alarm, Low Temperature
Bit 7 -Alarm, Low Pressure
Bit 9- Alarm, Low Flow
(42H) Status, machine 1 poll - Returns the status of the machine as 16 flag bits in open
format. The following bits are supported. The rest are set to 0.
Bit 0 - Processing
Bit 1 -Alarm, System
Bit 2 -Alarm, Process
Bit 3 -Alarm, Machine
Bit 4 -Alarm, High Temperature
Chapter 5: Advanced Operation 51 of 65
Page 52

M2B+ Controller
Bit 5 -Alarm, Low Temperature
Bit 7 -Alarm, Low Pressure
Bit 14 -Alarm, Phase Reversed or Lost
(44H) Status, machine 2 poll-Returns the status of the machine as 16 flag bits in open
format. The following bits are supported. The rest are set to 0.
Bit 0 -Processing
Bit 1 -Alarm, System
Bit 2 -Alarm, Process
Bit 3 -Alarm, Machine
Bit 4 -Fault, Sensor, Delivery
Bit 5 -Fault, Sensor, Return
(48H) Mode, Machine Poll-Returns the current status of temperature control unit if the
machine is On (1) or Off{O).
(49H) Mode, Machine Select-Commands the temperature control unit to turn On(1) or
Off(D)
Bit 0- Machine On/Off, Bit 1 -Alarm Acknowledge
(70H) Temperature, to process poll-Returns the delivery temperature in numeric format.
(72H) Temperature, from process poll -Returns the return temperature in numeric
format.
52 of 65 Chapter 5: Advanced Operation
Page 53

M2B+ Controller
Chapter 6: Troubleshooting
This Troubleshooting section should be used in conjunction with the Troubleshooting section
of the unit that the controller was supplied with. The problems listed below are displayed on
the LCD and the action the user takes will depend on whether the alarm is critical or noncritical.
Problem Possible Cause Solution
Alarm configuration is set up
incorrectly.
Process Temperature Alarm
does not acknowledge when
Process Temperature is lower
than Setpoint
Process Temperature Alarm
does not acknowledge when
Process Temperature is higher
than Setpoint
Setpoint will not change with
a change of Remote Analog
Setpoint value, or setpoint
displays 0.
Ramp/Soak program does not
transition to desired setpoint.
Last setpoint in Ramp/Soak
program reverts back to first
setpoint
Ramp/Soak program never
stops cycling through steps
Alarm Mode is configured
incorrectly
Alarm trip point incorrect set. Change the value of the high
Alarm configuration is set up
incorrectly.
Alarm Mode is configured
incorrectly
Alarm trip point incorrect set. Change the value of the high
Remote input is not enabled.
Remote input is incorrectly
configured.
Remote Signal value is
incorrect.
The status of the program has
been stopped.
The segment setpoint is
incorrect.
The program time is too short
for the heating/cooling
capacity of the unit.
The Program End function is
incorrectly configured.
The Program End function is
incorrectly configured.
Change the configuration to
Low, High, High/Low, or
Event. See 5-4 on page 33.
Change the Mode to either
Absolute or Deviation. See 5-4
on page 33.
or low tripping point for the
alarm. See 5-4 on page 33.
Change the configuration to
Low, High, High/Low, or
Event. See 5-4 on page 33.
Change the Mode to either
Absolute or Deviation. See 5-4
on page 33.
or low tripping point for the
alarm. See 5-4 on page 33.
Change the value for “Remote
Input” in the Secondary Menu
to SETP.
Change the range for “Remote
Signal” to desired setting.
Either Press the Run/Hold
button on the face of the
controller or change the value
of “Prog Ramp/Soak” in the
Secondary Menu to ON.
Change the value of “Seg #
SetPoint” to desired
temperature.
Change the value of “Seg #
Time” to a longer timer
period.
Change the value of “Prog
End” to HOLD.
Change the value of “Prog
End” from LOOP to desired
action at the end of program.
Chapter 6: Troubleshooting 53 of 65
Page 54

M2B+ Controller
Problem Possible Cause Solution
Unit shuts down after running
through Ramp/Soak program
The Program End function is
incorrectly configured.
Change the value of “Prog
End” from OFF to desired
action at the end of the
program.
Setpoint temperature does not
change when using the Up or
Down Arrow keys
Security password set to
lockout status
Controller setup in remote
analog input.
Change security setting to gain
access to parameters.
Change “Remote Input”
parameter in Secondary Menu
to “OFF.”
Buttons on the face of the
controller do not function
when pressed
Security password set to
lockout status
Controller parameters setup to
in remote function.
Change security setting to gain
access to parameters.
Change parameters to be in
local function.
Excessive environment noise Consult factory.
Controller does communicate
with remote host computer
Communications board
improperly installed.
Check slot J8 on the secondary
controller board to ensure
proper board installation
Incorrect protocol selected Change parameter “Comm
Protocol” in the Secure Menu
to proper protocol (MOD for
MODBUS® RTU or SPI)
Incorrect address selected Change the parameter “Comm
Addr (Hex)” in the Secure
Menu to a unique address in
hexadecimal. This parameter
will depend on the type of
protocol being used. (See
debug menu on page Error!
Bookmark not defined.)
Incorrect communications
speed.
The parameter “Comm Baud
Rate” in the Secure menu must
equal the speed of the host
computer to communicate
properly.
No Flow display Check flow amp. JMR 5’
Change jumper location
Lo for low signal level <IVPP
Hi for high signal level >IVPP
Check for pull up or pull down
resistor on sensor input
Replace IK Resistor per
elementary diagram. (See
debug menu on page Error!
Bookmark not defined.)
LCD Display is dark Contrast needs to be adjusted Adjust POT, R82 to left or
right until display illuminates.
Backlight is on, display reads
“Power Available” [System
off], Setpoint and process
display has all 8’s.
“J6” DC input connector isn’t
inserted into socket or all DC
inputs are open at the same
time
Sensor Low Display Process temperature is outside
Insert 12 pin plug into the ”J6”
socket and recycle power to
the controller.
Consult factory.
of the sensor ref. Table range.
54 of 65 Chapter 6: Troubleshooting
Page 55

M2B+ Controller
6-1 Operating Mode and Error Display Messages
Figure 5: Display Messages, Operational and Errors
Message Type Display Presentation Description
Normal Autotune Autotuning [ ]
Normal Running Running [ ] Running. (High Heat and Cool shown is Normal)
Normal RampSoak Rampsoak [ ]
Alarm Alarm1/2 [LoFluid LVL] This Indicates Alarm Low Fluid Level
Alarm Alarm1/2 [Lo Pressure] This Indicates Alarm Low Pressure
Alarm Alarm1/2 [High LEVEL] This Indicates Alarm High Fluid Level
Alarm Alarm1/2 [Process] This Indicates Alarm Temperature Process
Exceeded
Alarm Alarm1/2 [Deviation] This Indicates Alarm Temperature Deviation
Exceeded
Alarm (Major Fault) Alarm1/2 [SafetyTherm] This Indicates Alarm Safety Thermostat Alarm
Input Detected
Alarm [Major Fault) Alarm1/2 [SensorRange] This Indicates Sensor Over-range or beyond range
of the unit.
Alarm [Major Fault) Alarm1/2 [Sensor Open] This Indicates Delivery, Return or Remote Sensor
Open or Not Connected to the input connector
Alarm (Major Fault) Alarm1/2 [WeldContact] This Indicates Heater Weld Contact Input
Detected
Alarm (Major Fault) Alarm1/2 [Pump Fail] This Indicates Pump Phase Error Input Detected
Alarm Alarm1/2 [Event] This Indicates Ramp Soak Segment Event Alarm
Alarm Alarm1/2 [Lo Flow] This Indicates Flow Sensor Alarm Low Flow
Alarm Alarm1/2 [Hi Flow] This Indicates Flow Sensor Alarm High Flow
Tank Fill Running [TankFill] Automatic Tank Fill Mode Active
Prom/Signature
Error Alternating with
Loading Factory defaults
Temp= -44
° F Sensor set to RTD in Secure Menu, JMR 1 or 2 set
RS Comm Card Installed in DAC Card Slot
for T/C Input
Chapter 6: Troubleshooting 55 of 65
Page 56

M2B+ Controller
Chapter 7: Appendix
7-1 Electrical Specifications
General
Dimensions 5.5” X 9” X 4”
Range of the Unit -30°F to 650°F
Normal Operating Environment
Operating Temperature Range 0° C to 60° C (LCD Display up-to 50° C)
Humidity 0 to 95% RH (Non condensing)
Storage Environment
Storage Temperature Range -10° C to 95° C
Primary, Power Supply (Line Power)
Typical Supply Voltages 120VAC, 60Hz
Operating Range 85 to 150Vac 50/60 Hz, Single Phase
Consumption (Max/Typical) 15 Max/ 12 Watts Typ.
Connector Type/Model 5.8 mm Terminal Connector
Alarm Outputs
Mechanical relay Type (2 Outputs) 1A @120VAC INDUCTIVE (Alarm 1 tied to incoming
AC, Alarm 2 contacts only/no applied power).
External System Outputs
SCR/Triac Type 120Vac, 1A continuously @ 60° C for all output loads.
Snubbers to be applied externally by customer; there will
be no board mounted snubbers
System Output Variables Pump, Vent, Heater High/Low
Cool, Aux (Purge), Alarm 1, Alarm 2
User Interface
Keyboard Membrane Type, with Snap Dome Contacts
LCD Backlight LCD Brightness fixed/preset with Adjustable Pot.
Backlight will automatically turn off when there is 5
minutes of inactivity on the Keyboard
Display LCD Alphanumeric Display with Backlight
56 of 65 Chapter 7: Appendix
Page 57

M2B+ Controller
Temperature Sensor Inputs
Thermocouple Type J, K, and T ungrounded Thermocouple Types (Class 2)
RTD Type 100Ω, 1000Ω RTD Type, 00385 COEF. 2 Wire (Class
Measurement (Full Scale) Range -30 °F to 650°F
Process/Setpoint Display Resolution 1° C, 1° F, 0.1° C, 0.1° F
Measurement Accuracy ± 0.25% OF SPAN, ±LEAST SIGNIFICANT DIGIT
Number of Sensors Measured Up-to, Three (3)
Common Mode Noise Rejection 100db MINIMUM AT 60 Hz.
Temperature Stability 4 uV/° C TYPICAL,5 uV/° C MAX
Flow Sensor Inputs
Ranges 15-250Hz@80mV-1.6Vpp (sine) JMP5, pins 1-2
2)
8-125Hz, 0-5Vdc pulsed JMP5, pins 2-3 (HI)
Resolution 15-250Hz@80mV-1.6Vpp (sine) JMP5, pins 1-2
8-125Hz, 0-5Vdc pulsed JMP5, pins 2-3 (HI)
System Inputs
Type Dry Contact (0.5mA @ 5 Vdc Sense) CLASS 2
System Input Variables Pressure / Low Level
Phase Detection (2 Switches In Series)
2nd Setpoint / Remote Start
Safety Thermostat
Weld Contact Detect
High Level
System / Dry Contact Input Ground Common Grounding
Analog Input 0-10 V = 20K
4-20 mA = 50 OHM
Optional Analog Output Modules
Range 4-20mA @ 500 OHMS or 0-10Vdc, Jumper Selectable
Variables Process Temperature, Setpoint Temperature, Heat, Cool
DAC Resolution 12 Bits
Agency Approval cULus and CE per EC Directive; 73/23/EEC, 93/68/EEC,
Chapter 7: Appendix 57 of 65
Harmonized Standards; EN61010-1, 50081, 50082
Page 58

M2B+ Controller
Menu Structure*
Primary Menu Secondary Menu Secure Menu
System Degrees (F/C) Security Level
Monitor Temp
Alarm 1 Low
Alarm 1 High Alarm1 Mode
PrgSeg#Remain Alarm1 Reset
PrgSeg# Time Alarm PwrIntr
PrgSeg# SetPt Alarm1 PwrInhb
Tune Choice Contact@Alarm1 Sensor Filter
DelivProp Band Heat Alarm/Loop Break Display Filter
DelivProp Band Cool Prog Ramp/Soak Setpoint Source
DelivReset Time Prog Values Link Terms
DelivRate Time
Cool Ratio
Mold Prop. Band Seg # Time
Mold Reset Time Seg # SetPoint Flow Constant B
Mold Rate Time Seg # A1 Event Flow Constant K
Aux Set Point
Flow Alarm Low Prog End
Flow Alarm High Alarm 2 Low
Auto Vent Cycle
Crash Cool
High Heat AntiRst Windup SP2/RmtStart
ElapsedTime PerCent Output HighLevel Inp
Comm Add(Hex)
Cool Output SetPtLoLimit
Remote Input SetPtHiLimit
WaterFill Timer Output 2 High Limit
Peak PV Alarm2 Cfg
Valley PV
Contact@Alarm2
Alarm2LoopBrk
ElapsedTimeMode
Debug
*Menu items in Italics are only present when appropriate options or option boards have been installed.
58 of 65 Chapter 7: Appendix
Precision Unit Function
Alarm1 Cfg Tune% Reduction
Mold Offset
Return Offset
Delivery Offset
Shutdown Temp
Status of Prog
Prog Time Base
Seg # A2 Event Flow Filter
Alarm 2 High
Alarm 2 DeadBnd Pressure Timer
Loop Break Time Weld Cont. Inp
Analog Output
Process OutLow
Process OutHigh
Process Out Src
Heat Output
Remote Signal
Remote SetPtLo
Remote SetPtHi
Remote FlowSLo
Remote FlowSHi
Flow Display
Comm. Local/Remote Alarm2 Reset
Approach Rate
Sensor Monitor
Flow Monitor
Safety Thermo
PressLevel Inp
PressLevel
Sensor Type
MoldSensorType
Input Fault Timer
Out1 Type
Out2 Type
Output 1 Dir/REV
Output 1 Low Limit
Output 1 High Limit
Absolute/Deviate
Output 2 Dir/REV
Output 2 Low Limit
Alarm2 Mode
Alarm2 PwrIntr
Alarm2 PwrInhb
Comm Protocol
Comm Addr(Hex)
Comm Baud Rate
Page 59

M2B+ Controller
Chapter 7: Appendix 59 of 65
Page 60

M2B+ Controller
60 of 65 Chapter 7: Appendix
Page 61

M2B+ Controller
Chapter 7: Appendix 61 of 65
Page 62

M2B+ Controller
62 of 65 Chapter 7: Appendix
Page 63

M2B+ Controller
Chapter 7: Appendix 63 of 65
Page 64

M2B+ Controller
7-2 Control Board Layout
7-3 DAC Board Layout (Optional)
64 of 65 Chapter 7: Appendix
Page 65

M2B+ Controller
7-4 Technical Assistance
Parts Department
Call toll-free 7am–5pm CST [800] 423-3183 or call
The ACS Customer Service Group will provide your company with genuine OEM quality parts
manufactured to engineering design specific ations, which will maximize your equipment’s performa nce
and efficiency. To assist in expediting your phone or fax order, please have the model and serial
number of your unit when you contact us. A customer replacement parts list is included in this manual
for your convenience. ACS welcomes inquiries on all your parts needs and is d edicated to providing
excellent customer service.
Service Department
Call toll-free 8am–5pm CST [800] 423-3183 or call
Emergencies after 5pm CST, call [847] 439-5655
We have a qualified service department ready to help. Service contracts are available for most of our
products.
www.acscustomerservice.com
Sales Department
[262]
Call
Our products are sold by a world-wide network of independent sales representatives. Co ntact our Sales
Department for the name of the sales representative nearest you.
641-8610 Monday–Friday, 8am–5pm CST, Fax [262]641-8653
[262]
641-8610, Fax [262] 641-8653
[262]
641-8610
Contract Department
[262]
Call
Let us install your system. The Contract Department offers any or all of these services: project planning;
system packages including drawings; equipment, labor, and construction materials; and union or nonunion installations.
641-8610 Monday–Friday, 8am–5pm CST
Chapter 7: Appendix 65 of 65
 Loading...