

Page 1

Page 2

Page 3

Page 4

Page 5

Page 6

5 Start Up and Operation 29
5-1 Pre-Operational Checklist 29
5-2 Operation 30
6 Maintenance 31
6-1 General Recommendations 31
6-2 Monthly Maintenance Operations 32
6-2-1 Drive Belt Tension 32
6-2-2 Proper Belt Tension 32
6-2-3 Belt Replacement 33
6-3 Removal and Replacement of the Screen 33
6-4 Inspection and Adjustment of Knives 34
6-5 Removing and Replacing Bed Knives 36
6-6 Removal and Replacement of Rotating Blades 38
6-7 Specifications for Resharpening Bed Knives 39
6-8 Specifications for Resharpening Rotor Knives 40
7 Troubleshooting 41
7-1 General Problems 41
7-2 Electrical Problems 43
8 Spare Parts 44
8-1 Table 1: Recommended Spare Parts List 44
9 Typical Wiring Diagram 49
10 Contact Information 50
Page vi of 54
Page 7

Page 8

15. Removing The Screen 35
16. Inspection of Knives 37
17. Bed Knife Specifications 40
18. Rotor Knife Specifications 40
19. Cutting Chamber - Vertical Cross Section 45
20. Cutting Chamber - Longitudal Cross Section 46
21. Cutting Chamber - Front View 47
22. Cutting Chamber - Rear View 48
Page viii of 54
Page 9

1 Safety Considerations
1-1 Safety Guidelines
Our granulators are designed to provide safe and reliable operation
when installed and operated within design specifications, following
national and local safety codes.
To avoid possible personal injury or equipment damage when
installing, operating, or maintaining this granulator, use good
judgment and follow these safe practices:
; LEARN AND OBEY your company’s safety policy regarding
granulating equipment.
; MOVING OR LIFTING THE GRANULATOR: Although
our equipment is built and engineered for great ruggedness in
operation, care must be taken when moving the machine along
the floor or lifting it. Damage may occur to sheet metal covers,
electrical cabinets, or small brackets if pressure is applied to
them when moving the granulator. When lifting the granulator,
be certain of total machine weight and the capability of the
lifting equipment. (See the Granulator Specification Sheets for
machine weights and dimensions.)
; GRANULATOR LOCATION: Adequate area for routine
maintenance should be provided in order to open the machine
for knife, screen, or cleanout service. Proper service area
clearances also should allow people who are working on the
machine to be clearly visible to others, thereby reducing the
potential safety hazards.
; SAFE HOUSEKEEPING: The work area must be kept clean
and uncluttered during periods of operation or maintenance. No
hand tools or other metal objects should be left on or around
the machine. Any tools or other metal objects which
mistakenly fall into the hopper feed opening can cause severe
damage to internal cutting chamber and screen chamber
components.
; SAFETY GLASSES OR A FACE SHIELD MUST
ALWAYS BE WORN when servicing or operating the
machine. Although our machines are designed for the
maximum in flyback control, caution must be used when
operating near the hopper feed opening in order to guard
against unexpected material flyback.
Page 9 of 54
Page 10

; EAR PROTECTION may be required when operating the
machine during granulation of very hard or noisy materials.
The Occupational Safety and Health Act of 1970 has
established guidelines for Permissible Noise Exposures (OSHA
1910.95) that should be followed.
; NEVER attempt to operate the granulator unless it is fully
assembled with all guards and interlocks in place and
functional.
; OBSERVE all danger, warning, caution and safety labels on
the equipment.
; Upon completion of any machine maintenance, be certain ALL
SAFETY GUARDS AND COVERS are securely and
properly fastened prior to resuming machine operation. All
fasteners must be in place and properly tightened. ANY
SHORTCUTS MAY RESULT IN INJURY TO
PERSONNEL OR DAMAGE TO EQUIPMENT.
; NEVER wear any loose fitting clothes, neckties, or dangling
items such as earrings, belts, or shoestrings. Jewelry, such as
wristwatches, bracelets, or rings should NEVER be worn. Long
hair must be tied back or placed in a tight fitting hairnet.
NEVER lean against or rest hands or feet on the granulator
when it is in operation or open for maintenance. NEVER stand
on the granulator when it is in operation.
; ROTATION OF MOTORS: All rotating items in the
granulator are clearly marked on the machine. Always check
for proper rotation of motors.
; ELECTRICAL GROUNDING: All electrical equipment on
the granulator must be grounded in accordance to all local
codes and Article 250 of the National Electric Code.
; ALWAYS DISCONNECT AND LOCKOUT the main
electrical power to the granulator before performing any
service.
; SAFETY INTERLOCKS MUST NOT BE BYPASSED.
The mechanical and electrical safety interlocks ensure the
safety of personnel. They should never be tampered with or
removed for ANY reason. They should be checked frequently
by a qualified mechanic for proper operation.
; NEVER modify the machine configuration or any individual
component without written consent from Cumberland
Engineering Corp.
Page 10 of 54
Page 11

For further information on granulator safety, installation, and
operation, see the American National Standard for Plastics
Machinery
Reduction of Plastics⎯Construction, Care, and Use. ANSI
B151.11-1982.
Cumberland has long recognized the importance of safety and has
designed and manufactured its equipment with operator safety as a
prime consideration. We expect you, as a user, to abide by the
foregoing recommendations in order to make operator safety a
reality.
⎯
Granulators, Pelletizers, and Dicers Used for Size
SAFETY IS NO ACCIDENT
1-2 Safety Procedures
1-2-1 Guidelines for Moving the Granulator
To lift and move the granulator safely and correctly, cover any
sharp corners or edges, and use the type of equipment that has the
most appropriate features and capacity.
Before lifting, check that there are no items that could fall during
lifting.
Before positioning the granulator, check that the floor is level and
is strong enough to support the load, that there is adequate space in
the installation area to allow the movement of equipment necessary
to the task and to enable any necessary maintenance work to be
carried out unhindered.
1-2-2 Clearing a Jammed Cutting Chamber
1. Disconnect and lockout power.
2. Be certain that the rotor is motionless.
3. Open the front panel and remove the bin.
4. Unscrew the screw knob, which keeps the hopper and screen
cradle in place.
5. Remove the screen.
Page 11 of 54
Page 12

!! CAUTION !!
NEVER ATTEMPT TO FREE A JAMMED MACHINE BY PLACING HANDS ON
ROTOR, ROTOR KNIVES, OR WITHIN THE CUTTING CHAMBER.
HANDS MUST BE KEPT CLEAR OF THE ROTATIONAL PATH OF THE ROTOR
KNIVES.
A block of wood should be used to exert force on the rotor, usually
in the direction opposite normal rotation.
Good footing on a clean floor is essential and the body should be
well braced when performing this act. Guard against loss of
balance should the jammed conditions suddenly come free.
A leather mallet and block of wood of sufficient length to keep
hands away from the path of knives can be used if required.
Use pliers in removing material from the cutting chamber, keeping
in mind that the removal of material may cause rotation of the rotor
and rotor knives.
After clearing the jam, be certain that the hopper screen, and all
guards and covers are secured in place before connecting power
and starting the machine.
1-3 Safety Features
The granulators are equipped with safety features intended to
protect personnel and the granulator. Do NOT remove or tamper
with such equipment.
1-3-1 Safety Features Fitted On the Granulator
All moving drive parts, including the two pulleys and the belt, are
contained in a guard, which may only be removed using specific
tools and moreover cannot be fixed in the correct position without
special fastenings.
Warning!
Always make sure that the guard is in position before starting the granulator.
Page 12 of 54
Page 13
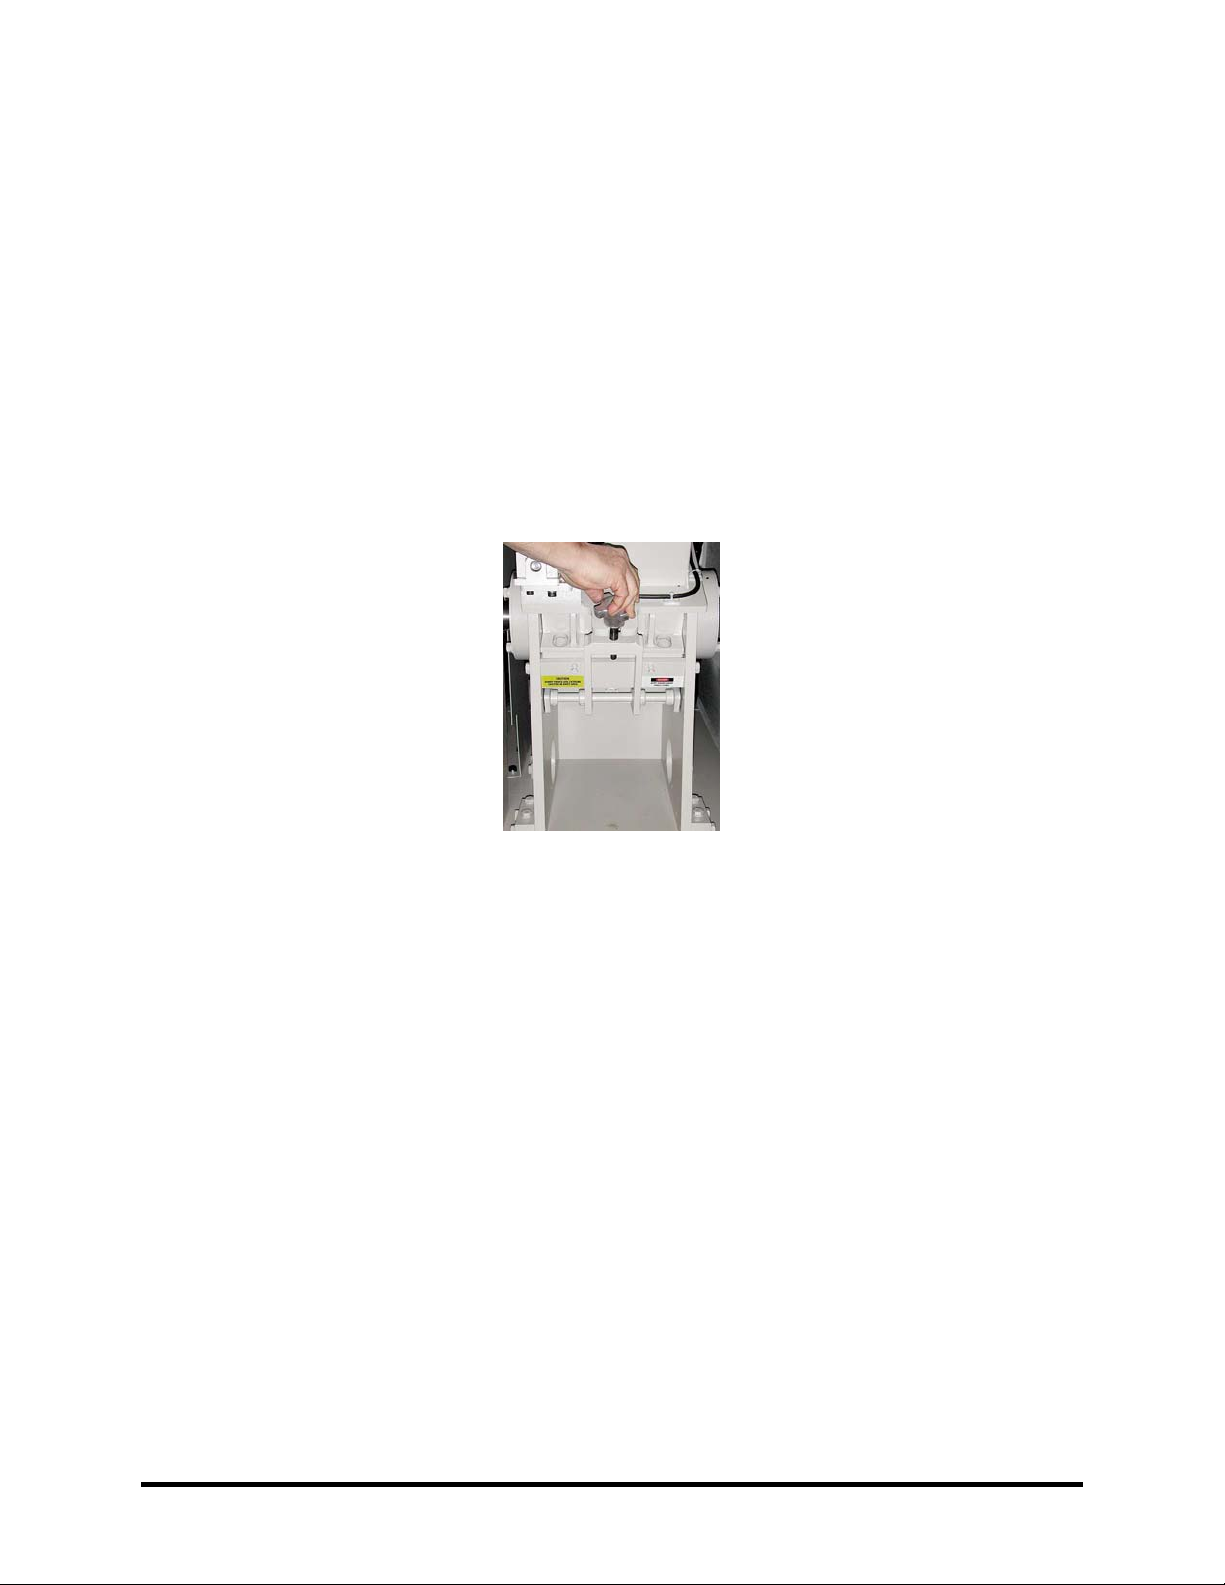
Figure 1: Safety Switch
The upper part of the cutting chamber is protected by the feed
hopper, used to insert material to be granulated while the lower
part is protected by the screen, and screen support. These
components are fixed by a screw knob, unscrewing releases a
safety switch key (Figure 1), which cuts off the electric supply to
the motor, causing the rotor to stop.
The method of opening the granulator has been designed to restrict
operator access, allowing the rotor and all moving knives to stop
completely. To allow operator access more quickly could be
dangerous as it might be possible to make contact with the
granulator knives while they are still rotating.
1-3-2 Opening the Granulator
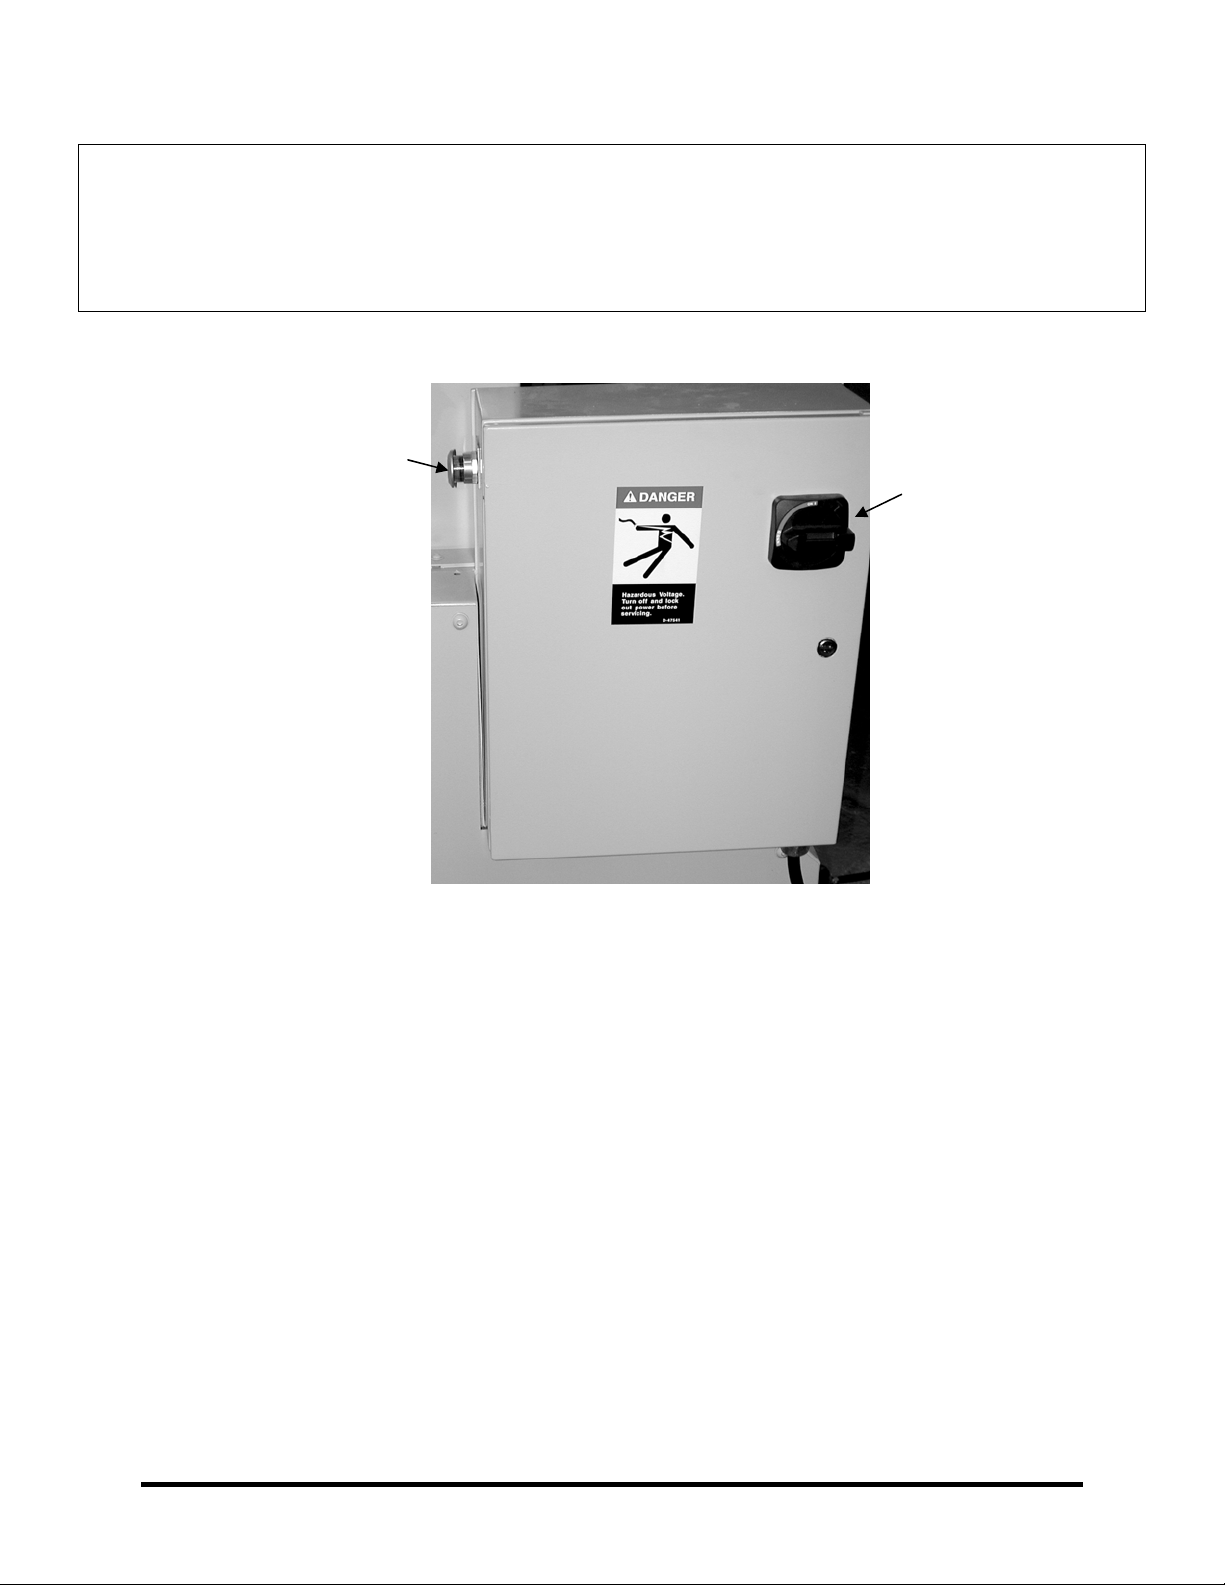
The Start/Stop lighted pushbutton provided on the control panel
(Figure 2) is used to operate the granulator. The button must be
pressed to stop the granulator and pulled out to start.
Before performing any maintenance or opening the granulator,
perform the following procedure:
1. Turn off the granulator using the pushbutton provided.
2. Turn the disconnect switch to OFF and lockout power. (If you
cannot lock out power, remove the power fuses in the control
panel.)
3. Tag the machine as Out of Service.
4. Make sure the rotor has come to a complete stop.
Page 13 of 54
Page 14
Wear protective gloves when exposed to knives.
Figure 2: Control Panel
Start/Stop Push Button
Warning!
Disconnect Switch
Page 14 of 54
Page 15

2 General Information
2-1 Introduction
This family of granulators has been designed to granulate plastic
material such as sprues, runners, and small reject parts.
The granulator is comprised of an infeed hopper into which the
material to be granulated is fed, mounted on a cutting chamber in
which a series of rotary and bed knives reduce the material to
granules, the size of which is determined by the screen holes. The
granules fall and collect in the bin below. The operation of the
granulator is controlled by a control panel and powered by an
electric motor.
2-2 Using This Manual
Use this manual as a guide and reference for installing, operating,
and maintaining your granulator. The purpose is to assist you in
applying efficient, proven techniques that enhance equipment
productivity.
The General Information section outlines models covered, standard
features, and available options. Additional sections within the
manual provide instructions for installation, pre-operational
procedures, operation, preventive maintenance, and corrective
maintenance.
Installation instructions include all required data for receiving,
unpacking, inspecting, and setup of the granulator. Whenever
possible, illustrations have been included to help you complete
these tasks more efficiently. We can also provide the assistance of
a factory-trained technician to help train your operator(s) for a
nominal charge.
Pre-operational procedures include instructions, checks, and
adjustments that should be followed before commencing with
operation of the granulator. These instructions are intended to
supplement standard shop procedures performed at shift, daily, and
weekly intervals.
The Operation chapter includes a description of electrical and
mechanical controls, in addition to information for operating the
granulator safely and efficiently.
Page 15 of 54
Page 16

The Maintenance chapter is intended to serve as a source of
detailed assembly and disassembly instructions for those areas of
the equipment requiring service. Preventive maintenance sections
are included to ensure that your granulator provides excellent, long
service.
The Troubleshooting chapter serves as a guide for identification of
most common problems. Potential problems are listed, along with
possible causes and related solutions.
The Spare Parts section contains a list of parts that may require
replacement. A spare parts list with part numbers specific to your
machine is provided with your shipping paperwork package. Refer
to this section for a listing of spare parts for purchase. Have your
serial number and model number ready when ordering.
2-3 Safety Symbols Used in This Manual
The following safety alert symbols are used to alert you to
potential personal injury hazards. Obey all safety messages that
follow these symbols to avoid possible injury or death.
DANGER indicates an imminently hazardous situation, which, if
not avoided, will result in death or serious injury.
WARNING indicates a potentially hazardous situation or practice
which, if not avoided, could result in death or serious injury.
CAUTION indicates a potentially hazardous situation or practice
which, if not avoided, may result in minor or moderate injury, or in
property damage.
2-4 Description
2-4-1 Technical Data
Infeed: Front or top entry
Infeed hopper: For manual feeding
Cutting Chamber: Upright bolted type
Rotor: 3 knife rotor w/lateral disks
Cutting System: Scissor action with double angle cutting
Knives: Tool steel
Page 16 of 54
Page 17
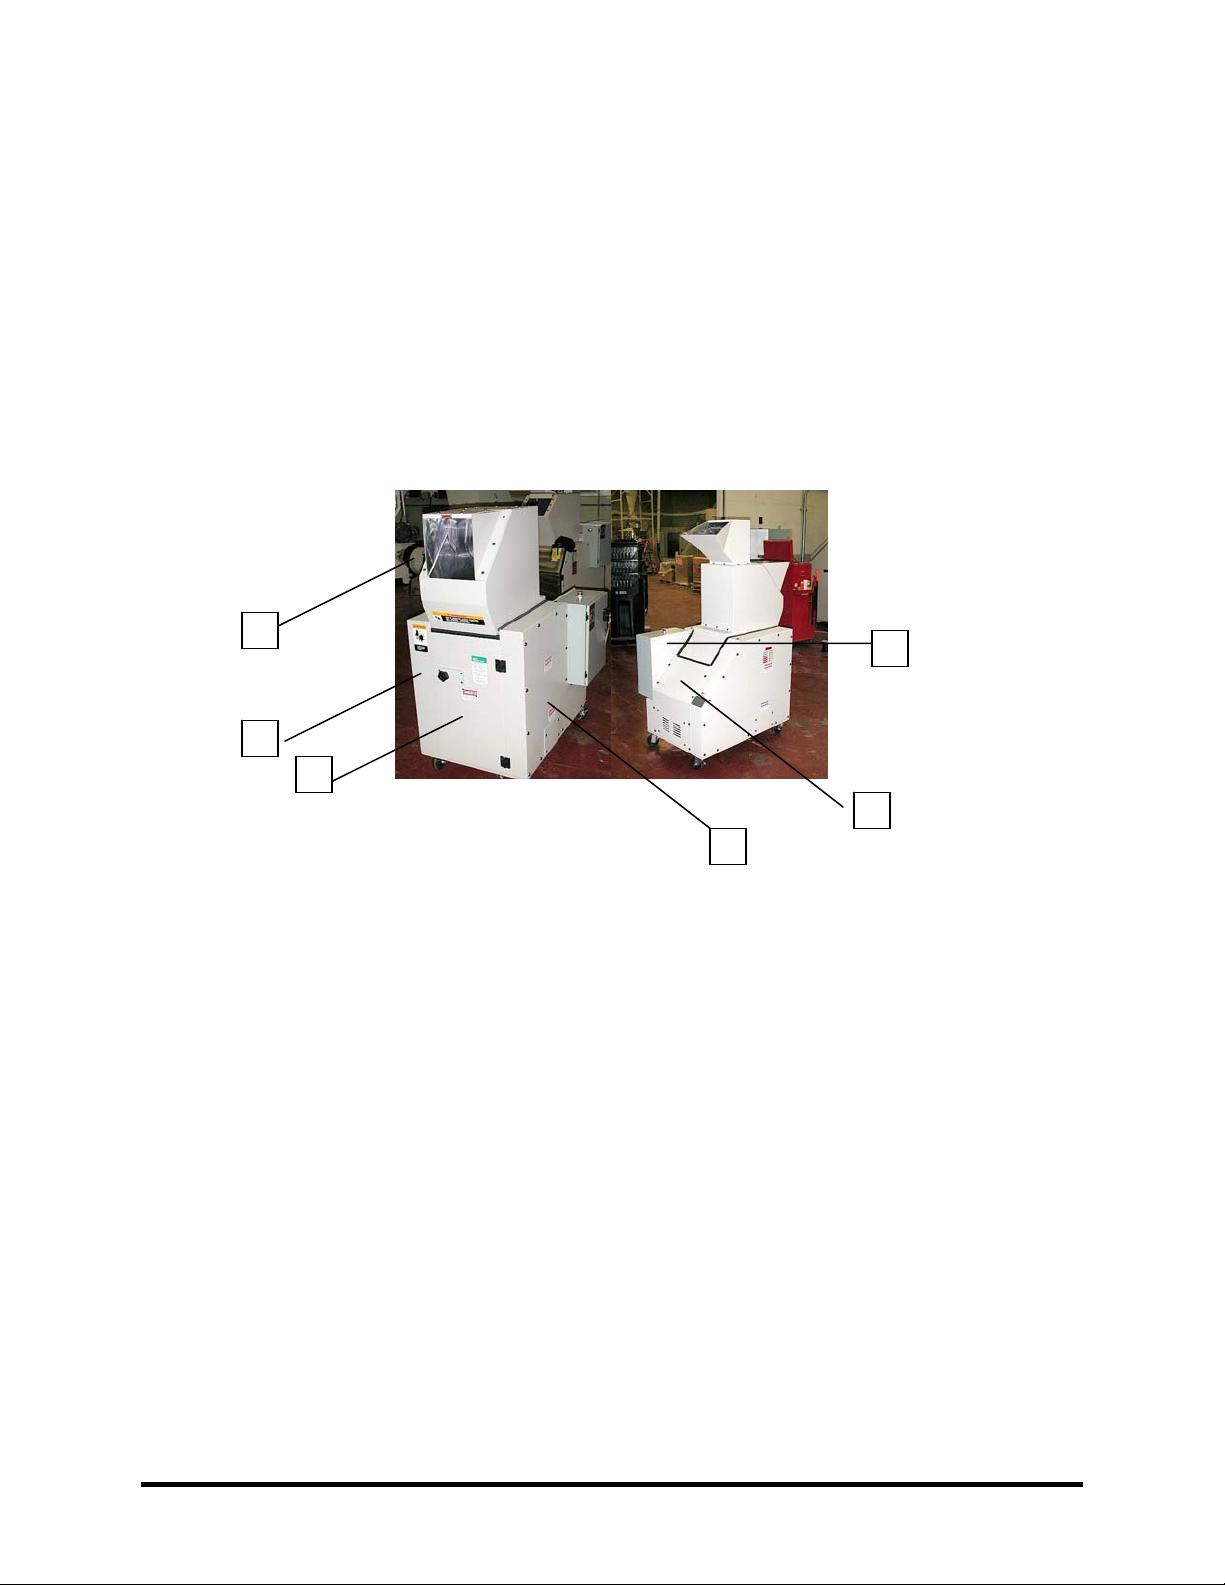
2-4-2 Main Components of Standard Granulators
(See Figure 3)
1. Infeed hopper
2. Cutting chamber
3. Bin for granulated material
4. Belt drive
5. Control panel
6. Electric Motor
1
2
3
Figure 3: Main Components of Standard Granulators
2-4-3 Optional Equipment
• Conveyor
• Other screen hole sizes
• Blower/airveying system
• Vacuum bin
• Special operating voltages
5
6
4
Page 17 of 54
Page 18

Page 19

3 Shipping Information
3-1 Unpacking and Inspection
You should inspect your granulator for possible shipping damage.
Thoroughly check the equipment for any damage that might have
occurred in transit, such as broken or loose wiring and
components, loose hardware and mounting screws, etc.
3-2 In the Event of Shipping Damage
Important!
According to the contract terms and conditions of the Carrier, the responsibility
of the Shipper ends at the time and place of shipment.
Notify the transportation company’s local agent if you discover
damage
Hold the damaged goods and packing material for the examining
agent’s inspection.
transportation company’s inspection and authorization.
File a claim with the transportation company. Substantiate the
claim by referring to the agent’s report. A certified copy of our
invoice is available upon request. The original Bill of Lading is
attached to our original invoice. If the shipment was prepaid, write
us for a receipted transportation bill.
Advise the shipping department regarding your wish for assistance
and to obtain an RMA (return material authorization) number.
Do not return any goods before the
3-3 If the Shipment is Not Complete
Check the packing list as back-ordered items are noted on the
packing list. You should have:
; Granulator
; Bill of lading
; Packing list
Page 19 of 54
Page 20

Page 21

Figure 5: Lifting the Granulator
drawings, electrical schematics, and manual from the base
evacuation area.
You can now have the machine lifted from the skid. A forklift is
ideal for the purpose, but take care to properly position the forks
between the casters and the centrally mounted evacuation pipe
from the side of the machine. (See Figure 5)
! CAUTION !
Do not attempt to lift the granulator by means of any shaft or protruding member,
ESPECIALLY THE HOPPER
Page 21 of 54
Page 22

4 Installation
4-1 Lifting
Important!
Before lifting or moving the granulator, check the relative weight shown on the
shipping papers and in Figure 4.
To facilitate the lifting operation using forklift trucks, the drop box
has been removed from the granulator and is packed with any
spare parts.
When using a forklift to move the granulator, make sure it is
suitable for the weight and dimensions of the granulator. When
moving, take care not to damage delicate parts. To lift the machine
with a forklift, place the carriage forks under its base (See Figure
5). Where a forklift truck is not available, it is possible to use
cables or belts, provided that they are strong enough to support the
weight of the granulator, then carry out the lifting procedure.
Important!
During the movement, the load must remain in a horizontal position, regardless of
the type of equipment used.
4-2 Positioning the Granulator
Important!
Make sure that the base on which the granulator is supported is solid and
completely level, in order to rigidly support the granulator without its being
subjected to vibration. It is recommended that the floor be reinforced concrete
with a very smooth support surface.
Place the granulator in an area large enough to allow sufficient
space on all sides for the operator to carry out maintenance.
Although the granulator controls and electrical components
comply with CEE & NEMA codes and regulations, the machine
must be placed in an area free from humidity, dampness, and
Page 22 of 54
Page 23

water. The granulator should be installed in an inside covered,
weather-proof environment and away from any areas where water
collects on the floor.
Once the granulator is in position, the front panel must be opened in order to insert the bin as
illustrated in
Figure 6.
Figure 6: Inserting the Bin
4-3 Electrical Connection
It is extremely important that the machine is correctly wired into
the plant power source by a licensed electrician. See Section 9 for
a wiring diagram.
All electrical equipment must be properly grounded in accordance
with local and national codes to protect personnel from electrical
shock. A fusible, lockable disconnect between the plant power
source and the machine electrical cabinet is highly recommended.
Page 23 of 54
Page 24

!!Caution!!
Before connecting the power, check that the power cable size and capacity
corresponds to the horsepower and amp load indicated on the granulator label
and that the disconnect switch is in the OFF position. (See Figure 2.)
Unless otherwise specified, the granulator has been wired for 480
volts, 60 Hz, 3 ph.
The power cable from the plant source can be run directly to the
control panel or through the base of the machinery. To run the
power cable through the base of the granulator, perform the
following steps:
1. Open the back cover, and insert the power cable from
underneath the granulator.
2. Pass the power cable through the appropriate hole, and insert it
into the control panel through a connector placed at the base.
3. Connect the three phase wires to the appropriate terminals of
the main switch, and connect the ground wire to the terminal
provided near the main disconnect switch. (See Figure 7.)
Figure 7: Electrical Connections
4-4 Start-Up Checks
4-4-1 Checking the Cutting Chamber
Before starting the granulator, open the cutting chamber to ensure
that during transportation or installation, no foreign objects have
Phase Wire
Terminals
Page 24 of 54
Page 25

fallen in. The use of heavy gloves is recommended to avoid injury
when exposed to the knives in the cutting chamber.
NOTE: This operation must be carried out by an operator /
mechanical maintenance engineer.
Check that the cutting chamber is free from foreign objects as
follows:
1. Turn off and lockout the machine power to the granulator or
remove the fuses from the main control panel.
2. Open the front panel, and remove the bin.
Unscrew the screw knob, and carefully lower the screen. (See
3. Figure 8.)
4. Pivot back the feed hopper to gain free access to the cutting
chamber.
5. Check that there are no foreign objects in the cutting chamber.
6. Check to be sure the bed knife and rotor knife bolts are at the
proper torque and the knife gap is set according to
specifications. See Sections 4-4-4 and 6-4.
7. After completing the checks, close the hopper and screen, and
fasten them with the corresponding knob; reinsert the bin. Then
close both the rear cover and the front panel.
8. Remove the drive belt guard by unscrewing the ten fastening
screws.
9. Manually give the rotor at leas t one complete turn using the
rotor pulley.
10. If there are no warning noises or signs of friction, this means
the cutting chamber is completely clear. Replace the belt guard,
remove lockout devices, and turn power on.
Page 25 of 54
Page 26

Figure 8: Removing the Screw Knob
4-4-2 Checking Rotation Direction
Check the correct direction of the rotor as follows:
1. Turn the main disconnect switch to “ON”.
2. Pull the Start button until the motor comes up to speed; then
push the button to stop the granulator motor.
3. Check via the appropriate window that the rotor direction
corresponds to that shown on the arrow label that is located
above the guard.
If the rotation direction is correct, the granulator is ready to use. If
the rotation direction is incorrect, reverse the rotor direction as
follows:
!!Warning!!
A LICENSED ELECTRICIAN must carry out this operation.
1. Disconnect and lockout the power to the machine at the
incoming power source. If the disconnect is not lockable,
remove the fuses.
2. Reverse any two of the three power line conductors to the
machine. If there is more than one motor on the machine and
only one is turning in the wrong direction, reverse any two of
the three line conductors at the overload relay for that motor.
3. Unlock the power and switch the electrical disconnect switch
to “ON”. (Replace the fuses if necessary.)
4. Re-check the rotation direction of the motors.
Page 26 of 54
Page 27

4-4-3 Test the Interlock Switch
With the cutting chamber and screen cradle closed and power On,
perform the following tests:
1. Push the start button to start the granulator.
2. With the granulator running, loosen the handknob on the front
access door to verify the safety interlock switch shuts the
machine off. If the hand knob is completely loose and the
power does not disconnect, the interlock switch is not working
and the cause of the malfunction must be determined.
3. Turn off the power and lockout the power.
4. Have the electrician check the interlock switch on the hopper to
correct the malfunction.
5. If necessary, engage the screen cradle interlock actuator screw.
Having completed the above procedures, close the control panel.
Unlock power or return the fuses in the supply panel, turning the
disconnect switch to “ON”. Pull the start button and release only
when the motor has started, then check again that the rotor is
turning in the correct direction.
4-4-4 Checking Knife Position
NOTE: This operation must be carried out by an operator /
mechanical maintenance engineer.
Before undertaking any type of work on the machine, use a feeler
gauge to check the distance between the bed knives and the rotor
knives (the knife gap).
To access the cutting chamber, follow the same procedure and
observe the precautionary steps given in Section 4-4-1. Before
proceeding to the checks, it is advisable to block the rotor to avoid
any inadvertent rotation.
Page 27 of 54
Page 28

Once you have safely accessed the cutting chamber, check the curre nt distance between the bed
knives and the rotor knives using a feeler gauge. (See
Figure 9.)
NOTE: The distance set by the manufacturer for normal
application is 0.006”-0.008” (0.15-0.20 mm). If the gap between
the bed knives and the rotor knives is found to be greater than that,
an adjustment must be made. (See Section 6-4: Inspection and
Adjustment of Knives.)
Once you have checked the knife gap, close the hopper, secure it
with the appropriate swing bolt, reinsert the bin, and close the front
panel.
Figure 9: Checking the Knife Gap
Page 28 of 54
Page 29

5 Start Up and Operation
5-1 Pre-Operational Checklist
To ensure the granulator is ready for operation, perform the tasks
listed on the following pre-operational checklist. Make sure that
all electrical and mechanical machine elements are inspected and
any defects corrected first.
; Have all installation and preparation instructions been read and
followed?
; Have the granulator operators and all other necessary
personnel, such as the cleanout, maintenance and service
persons, been fully trained on machine operation and all
machine safety mechanisms?
; Have the granulator operator and all other necessary personnel,
such as the cleanout, maintenance and service persons, read the
Operation and Installation Manual?
; Have sufficient location clearances been allowed?
; Has the equipment been grounded as required by local codes
and/or Article 250 of the National Electric Code?
; Have all motors been checked for proper rotation?
; Have all machine controls, pushbuttons, and limit switch
interlocks been checked for proper functioning?
; Has the cutting chamber been checked for foreign matter?
; Have the drive components been checked for alignment and
tension?
; Is the machine properly closed with all visible fasteners tight?
; Are all accessory components electrically and mechanically
connected with proper support and with all fasteners tight?
; Are all electrical enclosure boxes tightly closed and clamped
shut?
; Are all personnel clear of the machine?
Page 29 of 54
Page 30

5-2 Operation
The granulator can be operated in a vertical top feed position or in
a horizontal front feed position.
Before starting the granulator, always check for and remove tools
or any other objects placed on the granulator. Turn the Power
disconnect switch to “ON”, pull the Start button, and release it
when the motor has started.
It is quite normal for the motor not to start immediately, as the
electronic system must check all the micro switches before
enabling start up procedures. Wait for the electric motor to reach
normal rotating speed before feeding the granulator.
Never push material into the hopper with hands.
If the hopper becomes blocked, the granulator must be turned off,
and the power must be locked out or the fuses removed.
!!Warning!!
Before stopping the granulator for the end of a working shift or for
any other reason, stop feeding in the material to be granulated, and
leave the granulator running for several minutes to allow the
cutting chamber to completely granulate and empty the material
inside. Press the lighted Start/Stop button, which will immediately
turn off the granulator.
Important!
If the granulator stalls frequently during use, it may be necessary to adjust the
calibration of the “overload.” (Refer to the values shown in the electrical
diagram.)
Page 30 of 54
Page 31

6 Maintenance
6-1 General Recommendations
Before carrying out any work on the granulator, carefully read the
instructions contained in this manual.
NOTE: Only specialist and competent personnel should carry
out this operation.
All maintenance work must be carried out with the granulator
switched off and with the power supply disconnected and locked
out.
Conduct that is not in accordance with the safety instructions in
Section 1 may pose a threat to both personnel and equipment.
Instructions given in the maintenance procedures should be strictly
followed.
Once the maintenance work is completed, before returning the
granulator to service, check the following:
• Any parts that may have been replaced and/or tools that have
been used are removed from the granulator.
• All safety equipment is in proper working condition.
Figure 10: Periodic Maintenance Table
Mechanical Check Frequency
Knife clearance and wear Weekly
Rotor knife retaining screws for tightness Weekly
Downstroke bed knife and shield retaining screws for tightness Weekly
Upstroke bed knife retaining screws for tightness Weekly
Screen cradle arm screws for tightness Weekly
Infeed chute & cutting chamber screws for tightness Monthly
Important!
After the granulator has been used for the first day, adjust the drive belt tension.
Correct tension for use should be the minimum at which the belt does not slip.
Check that the pulleys are correctly aligned.
Page 31 of 54
Page 32

6-2 Monthly Maintenance Operations
6-2-1 Drive Belt Tension
NOTE: This operation should be carried out by an operator /
mechanical maintenance engineer.
For the granulator to function correctly, it is extremely important
that the drive belt is always tight. Correct tension reduces the load
of the rotor bearings and minimizes wear and stretching of the belt.
To check and adjust belt tension, carry out the following
procedure:
1. Turn off the machine and lockout power by using the
disconnect switch, or remove the fuses from the electrical
control panel.
2. Remove the belt guard by unscrewing the ten screws that hold
it in place.
3. Open the front panel.
4. Remove the bin.
5. Open the rear panel.
6. Loosen the nuts that lock the motor base slide.
7. Loosen the tie rod
8. Adjust the belt tension, turning the tie rods forward.
9. Turn the tie rod to bring the motor square to the belt axis.
10. After the adjustment, lock the nuts again, and close the rear
panel, refitting the proper locking latch.
11. Reinsert the bin, close the front panel, refit the belt guard and
unlock the power or replace the fuses in the control panel.
6-2-2 Proper Belt Tension
Measure the belt span and divide by 64 to get the allowable belt
deflection. With a belt gauge, measure the force it takes to deflect
the belt the amount calculated.
NOTE: Check your belt gauge’s instructions for proper scale
settings. Belt tension gauges are available from customer service or
your belt manufacturer.
Compare the gauge reading with the chart value for the belt crosssection used. (See
Page 32 of 54
Page 33

Figure 11: Belt Tension Chart
Belt Cross Section Small O.D. Range
3VX 3.65-4.12
4.50-5.60
Deflection = Beltspan
64
Belt Span
6-2-3 Belt Replacement
∗Deflection Force Lbs/V-belt
Run-In Normal Running
6.4
7.5
Belt Deflection Guage
5.7-4.4
6.6-5.1
Important!
It is very important to replace all belts at the same time.
If the drive belts have to be replaced, follow the procedure in
Section 6-2-1 up to Step 6. Then release the belt from tension by
fully unscrewing the tie rods. Slip off the belts, and replace them
with new ones. Continue with the procedure for adjusting the belt
tension.
6-3 Removal and Replacement of the Screen
NOTE: A qualified operator/maintenance mechanic should
carry out this procedure.
1. Switch the machine off and lockout power by turning the
disconnect switch to “OFF”, or remove the fuses from the main
control pane.
2. Open the front panel.
∗ The Deflection Force Value shown is for each belt and must be multiplied by the number of V-belt
elements if all are deflected.
Page 33 of 54
Page 34

3. Remove the bin.
4. Remove the screw knob that holds the hopper on top of the
cutting chamber. Carefully lower the screen cradle assembly,
resting it on the base.
Remove the screen, keeping it in a horizontal position. (See
5. Figure 12.)
6. Replace the screen with a new one, tighten the screw knob,
reposition the bin, and close the front panel. Unlock the power
and turn the machine back on.
Figure 12: Removing the Screen
6-4 Inspection and Adjustment of Knives
NOTE: This operation must be performed by a qualified
operator / mechanical maintenance technician.
Page 34 of 54
Page 35

Important!
Before carrying out any maintenance on the cutting chamber, the operator must
wear work gloves thick enough to avoid injury to the hands while touching sharp
parts or the cutting edges of the blades.
To inspect blades, remove the screen by following steps 1-0 in
Section 6-3. Then, proceed as follows:
1. Open the rear-closing panel by releasing the locking latch.
2. Pivot the in-feed hopper completely back to gain clear access
to the cutting chamber, and clear any process material or
foreign objects between the knives.
3. Turn the rotor slowly until the first row of rotor knives are in
close proximity to the bed knife cutting edge. Turn the rotor
backwards, keeping hands and fingers from directly contacting
sharp knife-edges.
4. Using a feeler gauge, measure the gap between the rotor and
knife cutting edges. Check each rotor knife to find the “high
knife” or the knife that measures the smallest gap. If the gap is
substantially greater than the specified 0.006” - 0.008” (0.15
mm – 0.2 mm), the knives need readjustment.
5. Loosen the bed knife shield hold down screws and remove the
shield. (See Error! Reference source not found..)
6. Leave the screws that hold the bed knife just tight enough to
allow the bed knife to move.
7. Loosen the adjustment screws and lock nuts. (See Error!
Reference source not found..)
8. Insert a 0.006” – 0.008” (0.15 mm – 0.2 mm) thickness gauge
between the cutting edge of the bed knife and that of the high
rotor knife.
9. Adjust the bed knife into the rotor knife using the adjustment
screws, so as to leave enough space for the thickness gauge to
move.
NOTE: Check that the distance between the fixed and rotating
knife is the same at both ends of each knife. Move the bed
knife using the push adjusting screws a little at a time on each
end.
Page 35 of 54
Page 36

10. When adjustment is complete, tighten the lock nuts on the
adjustment screws.
11. Torque the bed knife and bed knife shield bolts to 95 lbs./ft.
(13 Kgm., 128 Nm) using a torque wrench.
12. Repeat the steps 4-11 to adjust the rear (or down stroke) bed
knife. Turn the rotor slowly for one complete revolution,
checking the exact distance between all the rotary knives and
the bed knives.
13. Close the hopper and replace the screen and screen cradle,
securing them in place using the swing bolt provided.
14. Close the front and rear doors, and unlock the power or replace
the fuses in the control panel. Turn the disconnect switch to
“ON”.
Figure 13: Inspection of Knives
Rotor Knife Locking Bolts
6-5 Removing and Replacing Bed Knives
NOTE: This procedure should be performed by a qualified
operator / maintenance mechanic. Protective gloves must be
worn to avoid injury when handling the cutting knives.
To remove and replace bed knives, complete the following
procedure:
Bed Knife Locking Bolts
Bed knife Adjusting Screws
1. Open the granulator by following Steps 1-0 in Section 6-3.
2. Open the rear-closing panel by releasing the locking latch.
Page 36 of 54
Page 37

3. Pivot the in-feed hopper completely back to gain clear access
to the cutting chamber, and clear any process material or
foreign objects from between the knives.
4. Rotate the rotor so that the rotor knives will not interfere with
the removal of the bed knife. Using a wooden block, block the
rotor to prevent it from rotating while removing the knives.
5. Loosen the lock nuts and back off the adjustment screws. (See
Error! Reference source not found..)
6. Loosen and remove the bed knife shield bolts and remove the
shield, positioned above the knife. The remaining bed knife
bolts and bed knife may now be removed.
7. Perform the above steps to remove the rear (upstroke) bed
knife as well.
NOTE: Before replacing the bed knife with new or sharpened
knives, wipe the knife seats on the knife block, being sure to
clean off all process material. The tapped holes in the knife
block (used for holding the knives in place) should be clear of
any dirt, oil, or process material.
8. Install new or sharpened bed knives on each knife seat, making
sure that the rotor is blocked to prevent it from rotating while
installing each knife. Be sure to place the bed knives in the
correct positions⎯the rear (up stroke) bed knife must be
placed with the extended cutting edge on the bottom, and the
front (down stroke) bed knife should be placed with the cutting
edge on the top.
9. Before re-installing the knife bolts, wipe them clean with a
lightly oil-damped cloth. Do not leave an oil film on the bolt
since lubrication can adversely affect the stress on the bolt
when torqued to the specified values. It is recommended that
the knife bolts be replaced with each new set of knives. This
will reduce the risk of bolt failure due to overstretching.
Always use the specified replacement bolts.
10. Tighten the bolts that hold just the bed knife, enough to keep
the knife in place, while still allowing the adjusting screws to
move the knife forward.
11. Adjust the knife gaps with the rotor knives, following Steps 8-
12 in Section 6-4.
12. Replace the shields in position above the bed knives. The
shield on the front (down stroke) bed knife should be
positioned so that the inside edge is set back approximately
1/32” from the cutting edge below it. Replace the remaining
bolts and torque.
Page 37 of 54
Page 38

13. Close the machine, following Steps 12-14 in Section 6-4.
6-6 Removal and Replacement of Rotating Blades
NOTE: A qualified operator / maintenance mechanic should
perform this operation. Protective gloves must be worn to
avoid injury when handling the cutting knives.
To remove and replace rotor knives, complete the following
procedure:
1. Open the granulator by following Steps 1-0 in Section 6-3.
2. Open the rear-closing panel by releasing the locking latch.
3. Pivot the in-feed hopper completely back to gain clear access
to the cutting chamber, and clear any process material or
foreign objects from between the knives.
4. Rotate the rotor so that the knife bolts are in a convenient
position to remove the bolts with the appropriate wrench.
Using a wooden block, block the rotor to prevent it from
rotating while removing knives or after a knife has been
removed.
5. Loosen and remove the knife bolts and lift the knife off the
knife seat removing it from the cutting chamber.
6. Perform the above steps until all the rotor knives are removed.
NOTE: Before replacing the rotor knife with new or sharpened
knives, wipe the knife seats on the rotor, being sure to clean off
all process material. The tapped holes in the rotor (used for
holding the knives in place) should be clear of any dirt, oil, or
process material.
7. Loosen the bed knife bolts and adjusting screws, and pull back
the bed knife so that the rotor knives will collide as they are
installed and rotated.
8. Install new or sharpened knives on each knife seat, making
sure that the rotor is still blocked to prevent it from rotating
while installing each knife.
9. Before re-installing the knife bolts, wipe them clean with a
lightly oil-damped cloth. Do not leave an oil film on the bolt
since lubrication can adversely affect the stress on the bolt
when torqued to the specified values. It is recommended that
the knife bolts be replaced with each new set of knives. This
will reduce the risk of bolt failure due to overstretching.
Always use the specified replacement bolts.
Page 38 of 54
Page 39

10. Tighten each set of the knife bolts; making sure that the knif e is
seated against the back heel in the rotor seat. Before torquing
the bolts, check that a 0.001” feeler gage cannot fit between the
heel and the back of the knife.
11. Torque the rotor knife bolts to 100 Lbs./ft. (14 Kgm, 135 Nm).
12. Adjust the knife gap with the bed knives and close the
machine, following Steps 8-14 in Section 6-4.
6-7 Specifications for Re-sharpening Bed Knives
Every bed knife has two cutting edges, one on each side. When a
blade becomes worn, the knives can be rotated. To regrind these
knives, refer to the data shown in Figure 14. Replacement of these
knives is necessary when their length falls below the recommended
tolerance.
Page 39 of 54
Page 40

Page 41

7 Troubleshooting
The following tables list problems that could occur when using the
granulator. This general information may help to locate the cause
of the problem and allow it to be resolved promptly. When a
problem arises, it is advisable to perform the simplest checks
before proceeding to more complicated ones, which may
subsequently prove unnecessary.
7-1 General Problems
Problem Possible Causes Possible Remedies
Overheating of bearings Dirt or contamination in the bearing
Excessive belt tension
No lubrication
Knives moving in their
seats
Broken knife Improper resharpening
Excessive knife wear Incorrect knife position
Abnormal screen wear Incorrect fitting of screen
There may be foreign matter on the
knives
Knife screws loose
Knife screws weakened
Extremely hard material
Incorrect rotor direction
Foreign body in the cutting chamber
Faulty fitting of screen
Improper knife re-sharpening
Abrasive material
Correct source of contamination
Adjust belt tension
Check bearing seals
Carefully clean seat
Tighten screws with torque wrench
at values specified
Screws must not be used more than
6 times
Check knife grinding method used
Contact supplier
Check rotor direction
Look for cause with operator
Check assembly procedure
Correct the gap or distance
between bed knives and rotor
knives
Check dimensions with Figure 14
and Figure 15.
Contact the supplier for special
knives
Check that the screen is correctly
seated in its rear position and that it
fits perfectly at the front.
Page 41 of 54
Page 42

Problem Possible Causes Possible Remedies
Abrasive material
Rotor Jamming Excessive infeed material
Total or partial obstruction of the
screen holes
Insufficient belt tension
Knives worn
Distance between the knives too
small or too large
Screen holes too small
Failure of air conveying system or
discharge system
Contact the supplier for special
knives
Reduce amount of material being
fed to the machine
Remove the screen and clear the
holes
Check and/or adjust belt tension
Replace with new knives
Check distance between knives
Increase screen hole diameter
Check fan rotation and that pipes
are not obstructed
Page 42 of 54
Page 43

7-2 Electrical Problems
Problem Possible Causes Possible Remedies
Machine stops for no
apparent reason
Electric motor does not
start
Motor starts but does not
speed up or take a load
Safety switch has stopped power Check that the knobs that operate
No power
Overload failure
Safety switch not working
Cutting chamber too full
Excessive drive belt tension
Motor connected to power source
incorrectly
Defective starter winding
the safety switch are tightened
Check fuses
Check amperage of electric motor
Check and replace
Empty cutting chamber
Check belt tension and adjust
Reconnect correctly
Check current in each phase. If
substantial difference between
phases, contact motor manufacturer
Motor starts, but does not
gain speed
Bearing excessively worn
Cutting chamber full
Replace bearings
Empty cutting chamber
Page 43 of 54
Page 44

Page 45

Figure 16: Cutting Chamber – Vertical Cross Section
DRAWING CA039060S2
Page 45 of 54
Page 46

Figure 17: Cutting Chamber – Longitudal Cross Section
DRAWING CA039060S1
Page 46 of 54
Page 47

Figure 18: Cutting Chamber – Front View
DRAWING CA039060S3
Page 47 of 54
Page 48

Figure 19: Cutting Chamber – Rear View
DRAWING CA039060S4
Page 48 of 54
Page 49

9 Typical Wiring Diagram
Page 49 of 54
Page 50

DRAWING
D05991100000
Page 50 of 54
Page 51

Page 52

Service Notes
______________________________________________________________________________
______________________________________________________________________________
______________________________________________________________________________
______________________________________________________________________________
______________________________________________________________________________
______________________________________________________________________________
______________________________________________________________________________
______________________________________________________________________________
______________________________________________________________________________
______________________________________________________________________________
______________________________________________________________________________
______________________________________________________________________________
______________________________________________________________________________
______________________________________________________________________________
______________________________________________________________________________
______________________________________________________________________________
______________________________________________________________________________
______________________________________________________________________________
______________________________________________________________________________
______________________________________________________________________________
Page 52 of 54
Page 53

Page 54

 Loading...