

Page 1
BEDIENUNGSANLEITUNG
OPERATING MANUAL
STERIPOWER
stainless steel edition /
white edition
Page 2
1
3
8
6
9
10
7
11
12
4
5
13
14
15
16
2
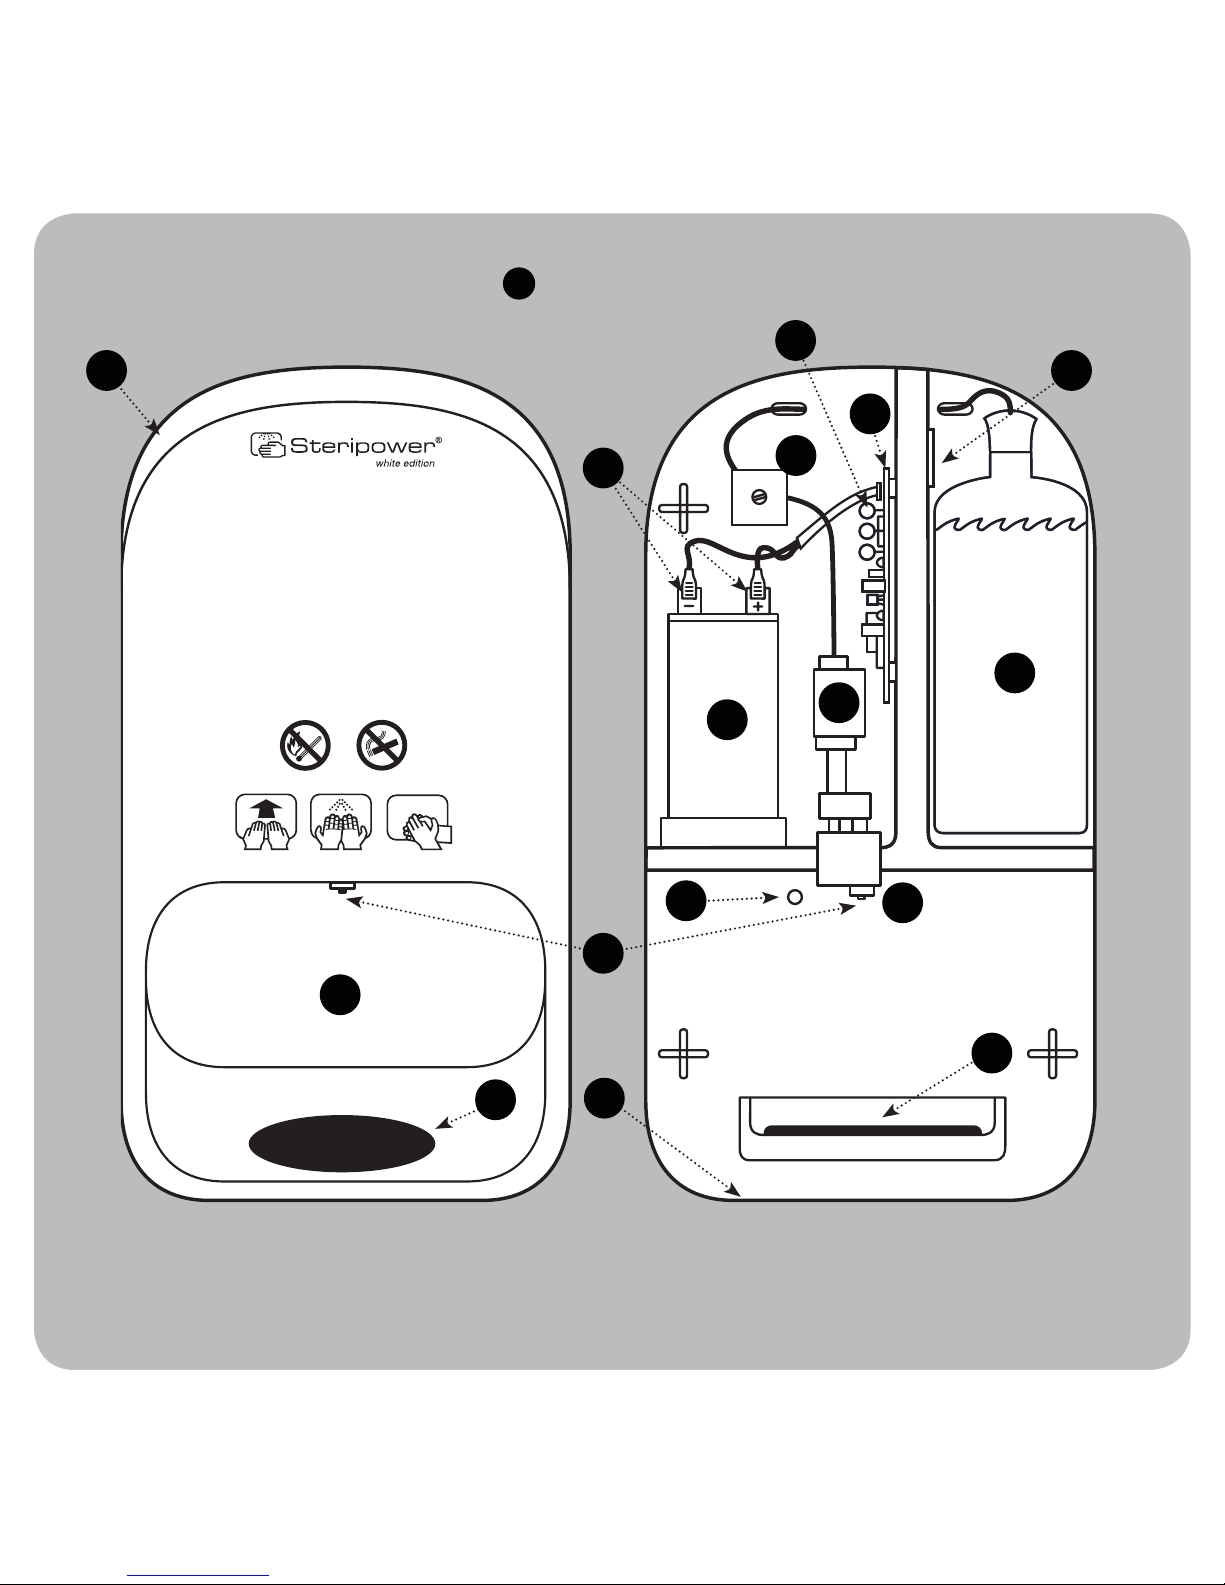
Internal view of Steripower 10041 / 10046
10046 without socket > operation only possible with rechargeable battery!
Available versions
10041 (with rechargeable battery)
10046 (high-frequency device)
10047 (with internal power supply unit)
10048 (with internal power supply unit + signalling)
10127 secure light
5
Page 3

Description of the components*:
1 External housing
2 Strap for housing opening
3 Disinfection area
4 Spray nozzle
5 Female plug for charging device
6 Rechargeable battery
7 Plug for rechargeable battery (+/-)
8 Printed circuit board
9 Space for disinfectant container
10 Collecting tray with Medical Pad
11 Control lamps LED
12 Service label
13 Solenoid valve
14 Pump unit
15 Sensor
16 Lid switch
17 Integrated power supply unit
OVERVIEW & DESCRIPTION
01 | DESCRIPTION
17
*The technical drawing for illustration purposes is located on the inside of the cover!
Internal view of Steripower art. 10047
(Steripower with power supply unit)
Page 4
EN
This manual provides to the owner and user
designated instructions regarding installation, usage and maintenance of the disinfection
device. Please carefully read the following instructions before unpacking the device, which
shall contribute to the reliability of the device.
The selection of the installation site, placement and installation of the device(s) shall be
performed by technical personnel.
Overview and description................................................................................................................01
Transport, dimensions and storage ............................................................................................... 03
Safety rules ..................................................................................................................................... 04
Description and technical data ....................................................................................................... 05
Removal and installation ................................................................................................................ 06
Operation and operating principle ..................................................................................................08
Maintenance and care ..................................................................................................................... 12
Electronic system ........................................................................................................................... 13
Troubleshooting .............................................................................................................................. 14
Operation manual for the lead charging device ............................................................................. 16
INTRODUCTION
INDEX
TABLE OF CONTENTS
TABLE OF CONTENTS | 02
Page 5

Use the original packaging when transporting the device and observe
the international information and protection symbols on the packaging
during transport and storage!
Set the cardboard box and/or device in this direction only!
Risk of breakage, protect against damage!
Protect against wet conditions!
Do not stack more cardboard boxes than indicated!
Open the packaging on the indicated side; do not use pointed
or sharp objects!
TRANSPORT
Packaging sizes:
Height 220 mm x width 420 mm x length 530 mm
Device dimensions (approx.):
Height 505 mm x width 290 mm x depth 200 mm
DIMENSIONS
Temperature: -15°C bis +40°C
STORAGE
530 mm
420 mm
220 mm
505 mm
200 mm
290 mm
EN
TRANSPORT & STORAGE
03 | TRANSPORT & STORAGE
Page 6
Steripower® is a very easy-to-operate device which does not require
special safety rules.
SAFETY RULES
Before commissioning the device, the following must be observed:
> Please carefully read the manual before operating the device.
> The device must either be installed by the building services department, technical
personnel or independently; sufficient technical knowledge is necessary.
> Knowledge relating to the performance and characteristics of the device must be
present.
> Only permitted disinfection liquids may be used.
> The general hygiene provisions must be observed.
> The device may under no circumstances be modified (except for genuine spare
parts); otherwise, the guarantee will be void.
> Information labels attached to the device which were made illegible must be
requested and replaced immediately..
> Use the Steripower and its accessories according to the intended and proper use
and as specified by the manufacturer.
EN
SAFETY RULES
SAFETY RULES | 04
Page 7
Steripower®, the automatic, touch-less hand disinfection device is
composed of two main parts.
DESCRIPTION
• Operating voltage: 12 V
• Motor spray pump: 12 V
• Max. output: 18 Watt
• Spray performance: 0,5 - 5,0 ml
• Liquid containers: up to 1000 ml
• Dimensions: 505 x 290 x 200 mm
• Weight: 5 kg
TECHNICAL DATA
1 pc. Steripower
®
1 pc. Charging device (only for 10041)
1 pc. Collecting tray
1 pc. Operation manual
1 pc. Drilling template
1 pc. Protective caps rechargeable battery
1 pack of screws & dowels
1 pc. Medical Pad
Optional accessories:
Counter (art. 13010) S.07
Signalling (art. 01704)
LED tunnel illumination (art. 01705)
Wall panels
Wall displays
Stand-up displays
SCOPE OF DELIVERY & ACCESSORIES
• Front cover:
with inspection windows
• Rear wall:
with integrated technology and space for
the liquid container
EN
DESCRIPTION & DATA
05 | DESCRIPTION & DATAs
Page 8
REMOVAL
INSTALLATION
Check the packaging for transport damage before removing the device. Do not use pointed or
sharp objects to open the packaging. Remove
the device, drilling template, screws and dowels
as well as the charging device from the cardboard box.
Attention: The rechargeable battery is not
fully charged and must be fully charged before commissioning.
1. Removing the front cover: By verticallypulling
the strap on the bottom of the device (refer to pg.
01 / item 2)
2. Removing the internal cover: By slightly
pulling with the index finger in the inspection win
-
dow and simultaneously pulling forward.
3. Assembling the rear wall: Check the instal
lation site for levelness. By means of the drilling
template, fix the rear wall to the wall using the
dowels and screws. Attach the device at a height
of approx. 90 cm above the ground (or 70 cm if
predominantly used by children; distance between
the bottom of the Steripower and the ground).
4. Rechargeable battery connection: charging is
only possible with the cable correctly connected to
the rechargeable battery (refer to pg. 01 / item 7).
5. Charging procedure: Plug the charging device
into the socket (at the bottom of the device on the
left; refer to pg. 01 / item 5). The charging proce
dure is continued as long as the LED of the charging device is green. Charging duration approx.
24 hrs.
6. Setting the quantity: The liquid quantity is
controlled via a pressure switch. A value of 1.5 ml
is pre-set ex works. When pressing the switch,
the LED flashes red. The switch is located on the
printed circuit board (refer to pg. 13 / item C).
Adjustment steps:
The red LED flashes:
1x = 0,5 ml 6x = 3,0 ml
2x = 1,0 ml 7x = 3,5 ml
3x = 1,5 ml 8x = 4,0 ml
4x = 2,0 ml 9x = 4,5 ml
5x = 2,5 ml 10x = 5,0 ml
Should the liquid quantity be to low or too high,
fine tuning can be performed by turning a
watchmaker‘s screwdriver to the right or left.
(refer to pg. 13 / item L)
Attention: Risk of electrocution!
The Steripower with integrated power supply unit (art. 10047) must only be installed
by technical personnel. Before assembly,
disconnect the wall cable from the power
supply (e.g. by switching off the fuse).
EN
REMOVAL & INSTALLATION
REMOVAL & INSTALLATION | 06
Page 9
EN
INSTALLATION
7.
Medical Pad (consumable no. 12020): For
sucking away residual liquids and absorbing the
steams of disinfectant liquids of any kind.
8. Checking the LED display:
(refer to pg. 01 / item 11)
• flashing green, 2 seconds intervals:
Rechargeable battery is ready for operation!
• red-green simultaneously:
Recharge battery! Only for Steripower with
rechargeable battery (art. 10040)
• flashing red:
Recharge battery immediately! Only for Steripower with rechargeable battery (art. 10040)
9. Replacing the rechargeable battery: Please
contact the technical personnel or observe the
instructions when recharging or replacing the
device. Attention: the protective caps of the rechargeable battery serve against short-circuit
protection! Only for Steripower with rechargeable battery (art. 10040)
10. Closing the device: Put the front cover onto
the device at an angle of 90° (straight towards
device). Lift above the interlocking at the upper
edge, press at the lower part until latched. Check
the device for functionality.
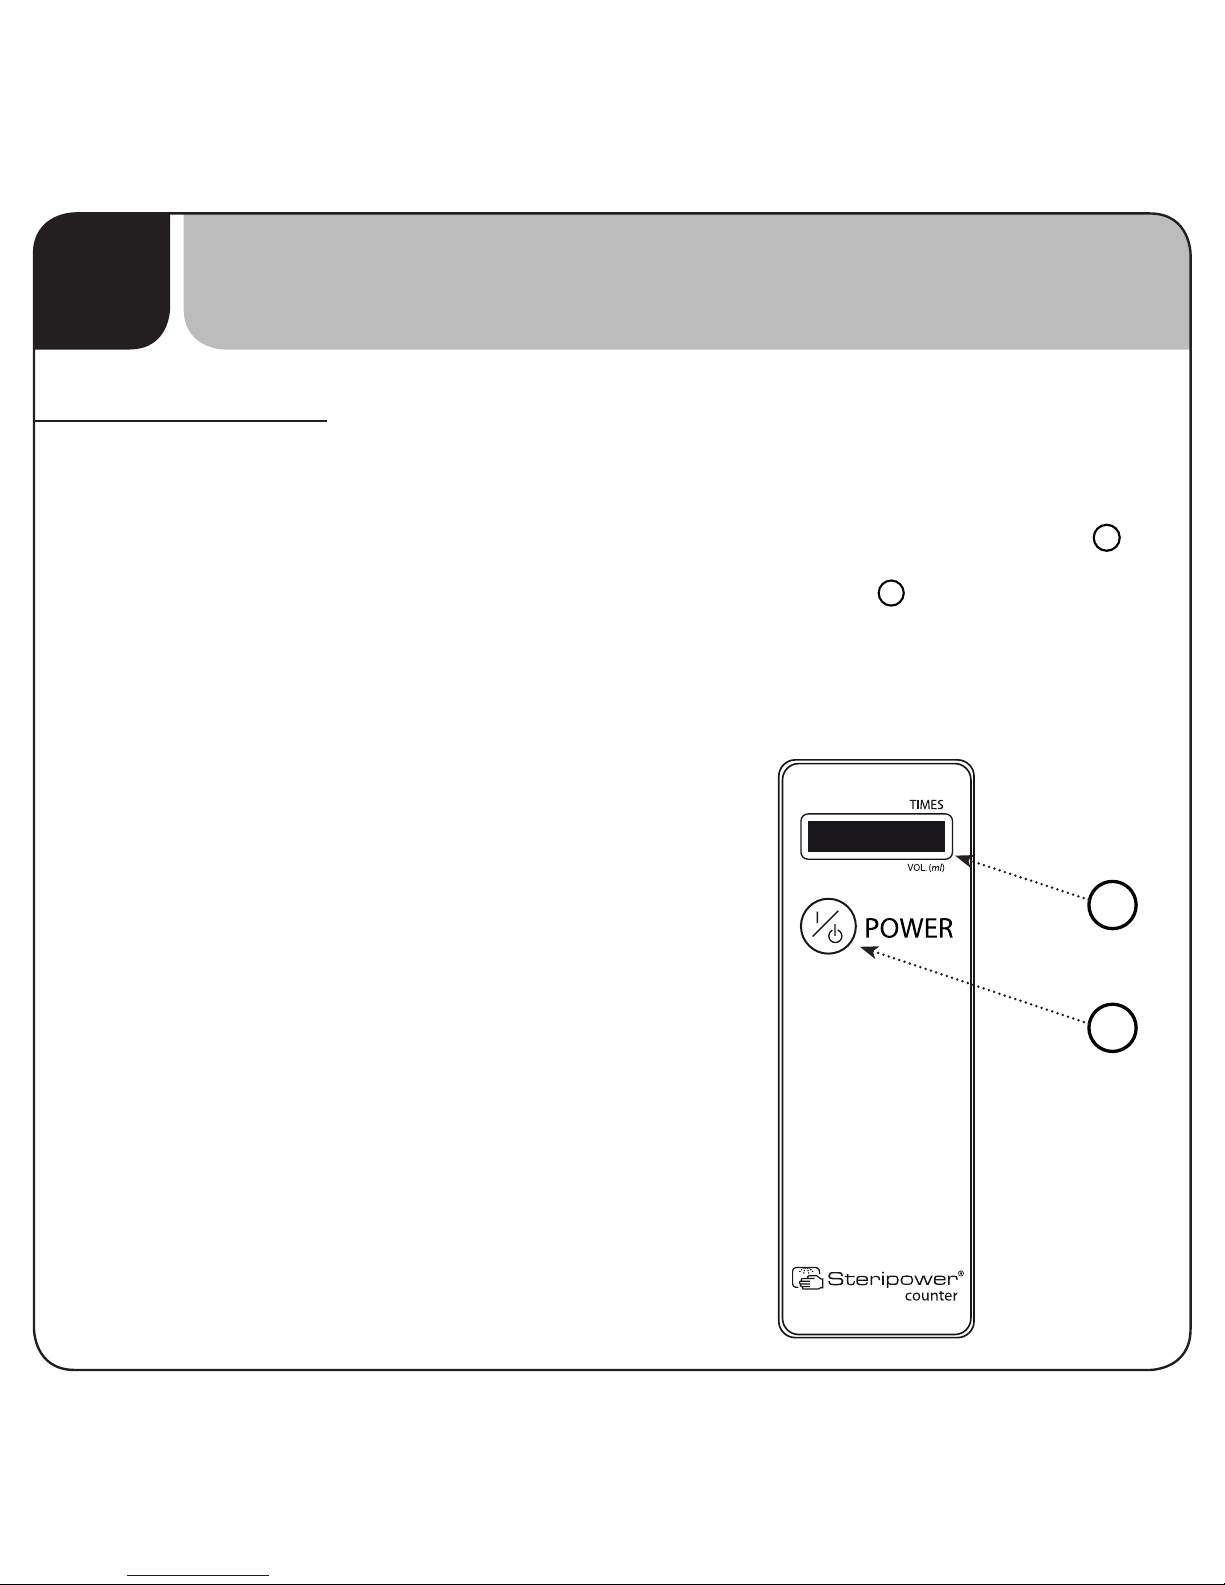
11. Counter: (optional art. no. 13010)
Using the counter, the number of sprays already
performed as well as the set liquid quantity per
spray interval is indicated on a digital display
in ml. Point the counter towards the (LEDs) and
keep the power button pressed. The digital
display changes automatically between the indication of ml and the indication of sprays performed.
INSTALLATION
07 | INSTALLATION
1
2
2
1
Page 10
white
ed
i
t
i
on
OPERATING THE DEVICE
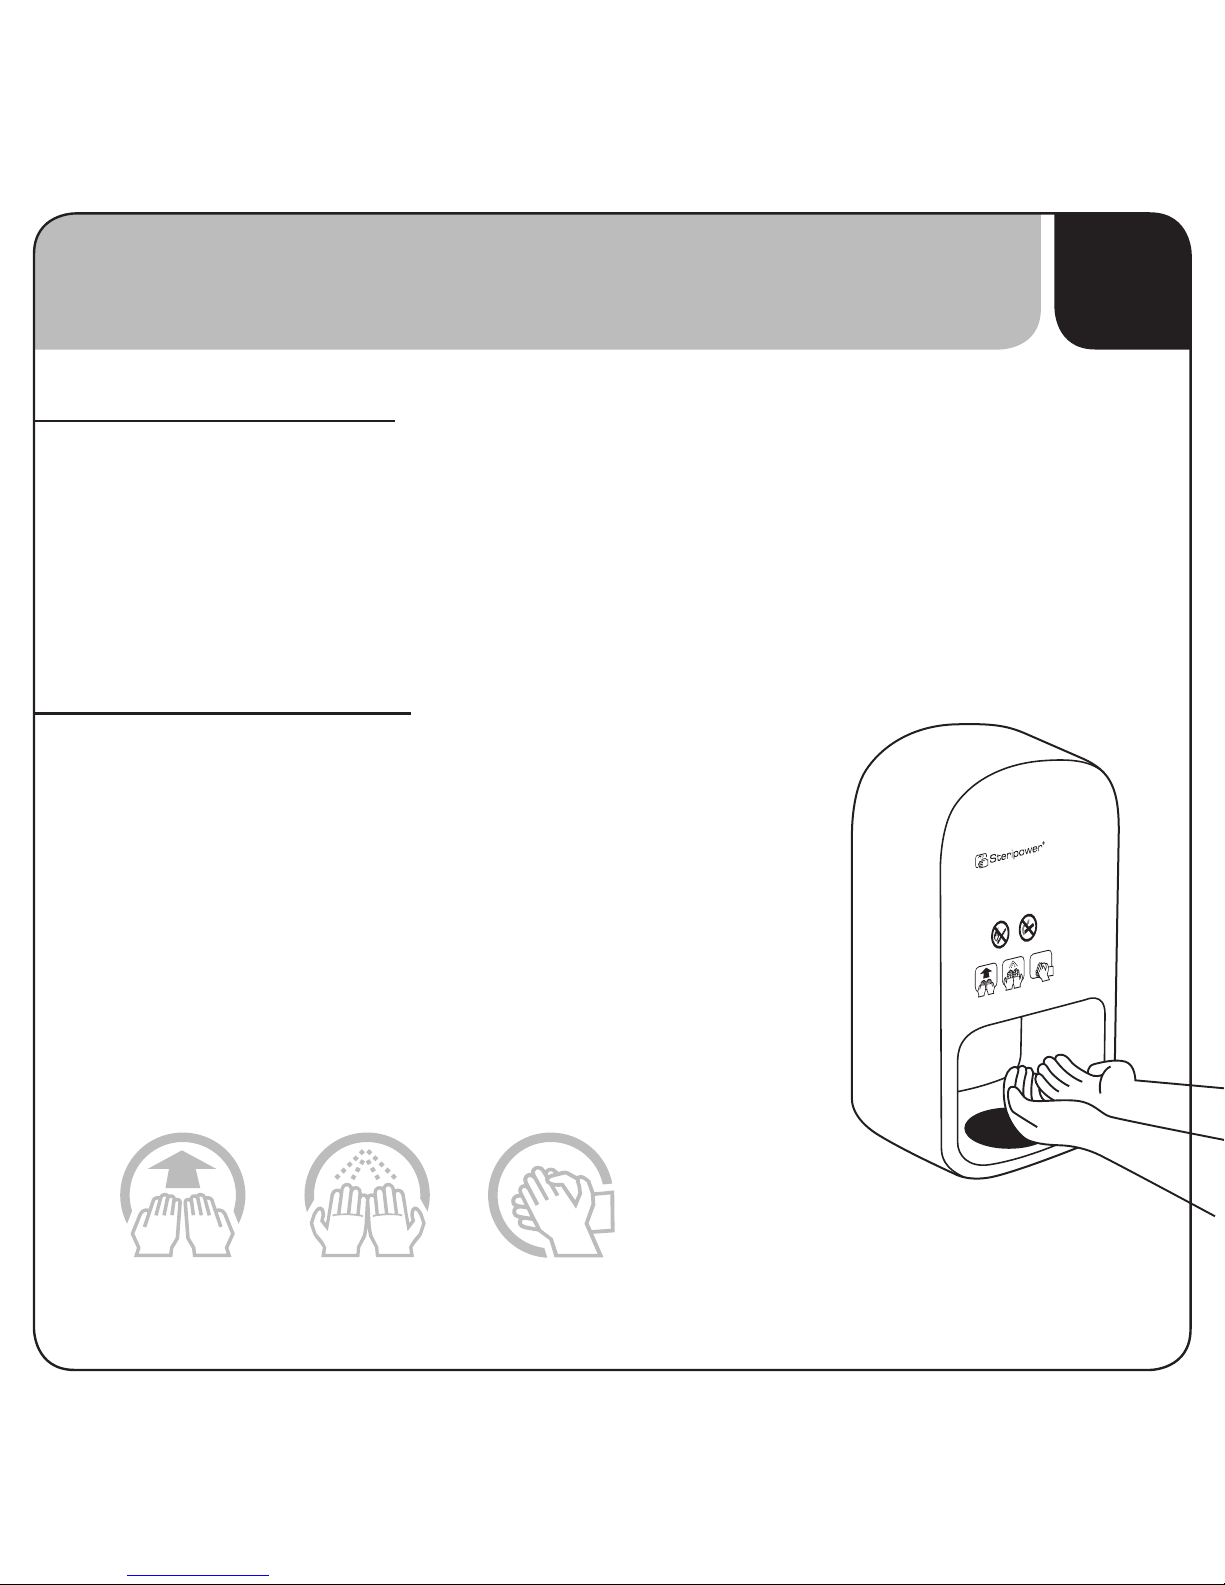
> Touch-less insertion of the hands into the spray channel, both
palms of the hands open and facing up.
> Finger tips bent upwards.
> Once recognised by the sensor, the palms of the hands are
automatically sprayed with disinfectant.
> Spray quantity can be set if required (refer to pg. 06 / item 6).
> Remove the hands from the device and rub the liquid for
optimal germ elimination.
The automatic spraying device Steripower® was specifically designed
for hand hygiene purposes in order to ensure quick, simple and effective
disinfection of the hands.
Fields of application are, for example: hospitals, medical practices, retirement and special-care homes, laboratories, food and pharmaceutical
industry, hotel/gastronomy industry as well as public facilities with high
foot traffic.
FIELDS OF APPLICATION
EN
OPERATION & OPERATING PRINCIPLE
OPERATION & OPERATING PRINCIPLE | 08
Page 11
SPRAY & APPLICATION TIMES
Recommended spray quantity in ml and application time in min:
• hygienic hand disinfection: at least.: 3 ml (quantity)
• surgical hand disinfection: at least.: 5 ml (quantity)
The hands must be sprayed and/or kept humid according to the
specified application time of the alcoholic hand disinfectant.
Observe the manufacturer‘s requirements!
The spray quantity can be set in steps of
0.5 ml from 0.5 ml to 5 ml (refer to pg. 6 / item 6).
DISINFECTION OF HANDS WHEN HANDLING FOOD
Disinfecting the hands is required to avoid contamination of food
with germs of any kind.
Disinfection must be performed, for example, following:
Eating, visits to the toilet, smoking, raw material change - chicken,
vegetables, egg, etc. in order to avoid transfer of germs.
Touching the food with disinfected hands does not affect the food.
Hands that are not disinfected, however, can contaminate the goods by
applying the germs.
Germs do proliferate very quickly.
(e.g. salmonella - cell division every 20 min.)!
EN
OPERATION & OPERATING PRINCIPLE
09 | OPERATION & OPERATING PRINCIPLE
Page 12
> Pull down the strap at the bottom of the cover.
> Remove the front cover by slightly lifting and then pulling it off towards the front.
> Remove the plug and pull the suction pipe out of the empty container.
> Insert the suction pipe with the plug into a full container (up to a maximum
of 1000 ml) and slightly press the plug.
> If the package size is changed, slide the plug up or down the suction pipe.
> Always cover the liquid container with the plug in order to avoid evaporation
of the liquid.
> Move the front cover horizontally towards the device, put it on at the top,
and press the lower part until latched.
> Have the liquid sucked into the device by triggering the sensor several times.
REPLACING THE LIQUID CONTAINER
If the device was not used for a longer period, first rinse with pure alcohol several
times in order to remove clogs or, if required, replace the hoses.
SPECIAL NOTE
EN
OPERATION & OPERATING PRINCIPLE
OPERATION & OPERATING PRINCIPLE | 10
Page 13
Before opening the hood, disconnect the Steripower from the power supply if the
device is directly connected to the mains (art. no. 10047), e.g. by switching off the fuse!
• Before performing maintenance works or in order to disconnect the device from mains operation, the power supply must be disconnected by pulling the mains plug and/or switching off the
fuse. In order to avoid damage to the power cable, make sure to pull on the mains adapter and
not on the cord. The mains plug should be easily accessible.
• Only use the genuine charging device and power supply unit supplied with this disinfection
device. Do not under any circumstances use a damaged charging device or power supply unit. If
the charging device or power supply unit are defective or damaged, they may only be replaced by
a genuine spare part.
• The rechargeable battery must be disposed of in a proper manner and not via household waste.
Rechargeable batteries can be disposed of in collection centres of the public waste management
organisations.
• If used frequently, it is recommended to replace the Medical Pad in the collecting tray. This ensures that overfilling and frequent use don’t require the removal of liquid residues or ventilation
of the room and the risk of ignition due to ignition sources is lowered.
• Do not smoke when the device is in use!
GENERAL NOTES
EN
OPERATION & OPERATING PRINCIPLE
11 | OPERATION & OPERATING PRINCIPLE
Page 14

Only have maintenance works performed on technical or electronic
parts of the device by technical personnel or the building services
department. Only use genuine spare parts. Do not modify the device
without talking to the manufacturer.
• Keep the device clean. Clean the device with a soft cloth and a commercially available detergent, and the stainless steel device with stainless steel detergent.
• Do not wash with water; do not use pressurised air and solvents in
order to remove dirt or residues.
• If the device is to be reused after a long period not in use, rinse the
system several times with pure alcohol. This is done in order to remove
possible clogging.
Charge the rechargeable battery for 24 hrs and then loosen the positive
pole and secure it with a protective cap (yellow)!
MAINTENANCE & CARE
Alcohol (ethanol, isopropanol, N propanol) with +/- 70% alcohol
content has the best proven effect in disinfectants, i.e. all common
alcoholic hand disinfectants with approval.
DISINFECTANTS
EN
MAINTENANCE & CARE
MAINTENANCE & CARE | 12
Page 15

Listing of the components:
A Printed circuit board (electronics)
B Plug for LED ready lamp
C Pushbutton for liquid quantity
regulation (0.5 - 5 ml)
D Plug for motor pump
E Plug for non-return valve
F Plug for rechargeable battery 12 V - 7 Ah
G Fuse 1.6 A (delayed-action fuse)
H LED green (for operation)
I LED red (signal)
J LED blue (counter)
K Sensor
L Fine tuning
M Plug for cover contact
N Plug for LED activity lamp
ELECTRONIC SYSTEM
D
B
E
F G
H
I
J
A
M
K
CL
N
EN
ELECTRONIC SYSTEM
13 | ELECTRONIC SYSTEM
Page 16
Red LED display flashing. Device no longer functions!
• Charge or replace rechargeable battery.
No LED display!
•The rechargeable battery is fully discharged, replace or recharge if required.
• Fuse (refer to pg. 13 / item G) on the printed circuit board is defective, replace with 1.6 ampere T
fuse (delayed-action fuse) if required.
There is no or only irregular spraying activity!
• Check liquid level, refill if required.
• Check if the motor is working (motor-pump unit).
• Check all liquid hoses for air bubbles / correct connection.
• Red nozzle at the pump is clogged. Loosen the pump latching and press from bottom to top.
Screw off the red nozzle and clean the tiny hole of the jet opening with a thin needle. Screw on the
red nozzle and adjust the correct spray jet (cone-shaped) by screwing down or unscrewing. Then,
insert the pump in the support and lock it in position.
• If the measures taken are unsuccessful, inform the service.
(refer to service label pg. 01 / item 12)
The liquid quantity is too high or to low!
• Regulate the spray quantity with pushbutton C.
(refer to pg. 13 / item C and pg. 06 / item 6 - Setting the quantity)
QUESTIONS & ANSWERS
In the case of a malfunction of the device, do not send it to us for repairs if you have not
contacted your authorised dealer or the service hotline. Troubleshooting is usually possible by service telephone under +49 (0) 8151 / 555 15 27.
EN
TROUBLESHOOTING
TROUBLESHOOTING | 14
Page 17
QUESTIONS & ANSWERS
How is the device operated?
• The device is operated with the rechargeable battery (art. 10041).
• The device can be operated with the rechargeable battery (art. 10041) and the charging device
plugged into a socket. The rechargeable battery continues to operate the device even in the case
of a power failure.
• The device can be operated with an internal power supply unit (art. 10047) without the rechargeable battery.
• The customer can purchase an additional spare battery incl. charging cable (art. 11190) allowing the rechargeable battery to be charged in an office or technical room, for example.
Recommendation: if you charge the rechargeable battery of the device for 24 hrs every 4 weeks
(with approx. 100 usages per day), you can avoid malfunctions!
The device is constantly dripping!
• The valve must be replaced. Request valve (art. 11150) or contact service hotline (refer to service label pg. 01 / item 12)
Liquid is leaking out of the device!
• Medical Pad (art. 12020) in the collecting tray is no longer absorbent and must be replaced. It
must be ensured that the black panel is attached with the flat side to the device wall.
Recommendation: Replace the Pad after 3-4 bottles (or after 2 months at the latest).
The device cannot be charged!
The device itself triggers sprays without hand insertion!
EN
TROUBLESHOOTING
15 | TROUBLESHOOTING
Page 18
The LED signals the following conditions:
LED lights red: in the case of reverse connection
LED lights green: during charging procedure, goes out when finished
CAUTION
Only charge rechargeable batteries, there is a „risk of explosion“ when using batteries of another
type! Apply electrical contact to the 12 V rechargeable lead battery, observing the positive and
negative pole.
Apply electrical contact between the adapter cable and the charging plug of the device. Connect the
terminals to the rechargeable lead battery observing the positive and negative pole. Connect the black
terminal with the negative pole (-) and the red terminal with the positive pole (+).
Plug the charging device into the wall socket. Once the electrical contact is applied, the charging
procedure starts automatically. The LED flashes green and indicates the charging procedure.
Once the charging procedure is completed, the LED turns off. The rechargeable battery continues
to be buffered with a float charging current following the charging procedure. Once the charging
device is disconnected from the mains, the rechargeable battery can be disconnected from the
charging device.
LED
TERMINAL ADAPTER
TECHNICAL DATA
• For 12 V rechargeable lead (Pb) batteries
• Electronic protection against reverse polarity
• Electronic protection against overloading
• Electronic protection against short circuit
• Charging according to IUoU characteristic
• Automatic additional charge - floating charge
• Charging device can be used worldwide (100-240 V AC)
EN
Operation manual lead charging device
OPERATION MANUAL LEAD CHARGING DEVICE | 16
Page 19
Explosive gases could be generated when charging rechargeable lead batteries.
Please ensure sufficient ventilation and avoid fire and/or naked lights.
Cleaning works may only be performed when the device is disconnected from the power supply.
The device must only be cleaned with a dry cloth. Do not put the device into operation when the
housing or the mains plug is damaged. In case of defects, please contact an authorised dealer or
The charging device may only be operated in closed and dry rooms. In order to exclude the risk of
fire or the risk of an electric shock, the device must be protected against humidity.
READINESS AND PARALLEL OPERATIONAL WARNING
SAFETY NOTE
CARE
SERVICE
eMail: [email protected]
Telefon: +49 (0)8151 555 15 27
or contact your authorised dealer
EN
Operation manual lead charging device
17 | OPERATION MANUAL LEAD CHARGING DEVICE
Page 20
EG-Komformitätserklärung nach Artikel 10.1 der Richtlinie 89/336/EWG (EWG-Richtlinie)
EC-Declaration of Conformity acc. to Article 10.1 of the Directive 89/336/EEC (EMC-Directive)
Déclaration de conformité CEE selon l’article 10.1 de la directive 89/336/CEE (Directive EMC)
Steripower GmbH & Co. KG
Schiffbauerweg 1
D-82319 Starnberg (Germany)
Name und Anschrift des Herstellers oder des in der EU niedergelassenen Inverkehrbringers
Name and address of the manufactor or of the introducer of the product who is established in the EU
Nom et adresse du fabricant ou le la personne résidant dans la CEE qui introduit le sous-dit produit de la CEE
erklären in alleiniger Verantwortung, dass das Produkt
herewith take the sole responsibility to confirm that the product
soussignés déclarons de notre seule responsabilité que ce produit
Touchless Hand-Disinfection unit
Steripower® / white edition / stainless steel edition
Typenbezeichnung und ggf. Artikelnummer
Type designation and, if applicable, article no.
Type, nom et - si nécessaire - no d’article du produit
mit den folgenden Normen bzw. normativen Dokumenten übereinstimmt
is in accordance with the following standards or standardized documents
est conforme aux normes ou spécifications Européennes suivantes
1. EN 61 000-6-3:2001 Störaussendungen EMA (RF emission)
EN 61 000-3-2:2000 Oberschwingungen (harmonics)
EN 61 000-3-3:1995+A1:2001 Spannungsschwankungen (flicker)
2. EN 61 000-6-1:2001 Störfestigkeit (immunity)
Folgende Betriebsbedingungen und Einsatzvolumen sind vorauszusetzen
The following operating conditions and installation arrangements have to be presumed
Les conditions d’opération et d’installation suivantes sont á respecter
In normal operation mode, no battery charger is connected
Dieser Erklärung liegt zugrunde der Prüfbericht
This confirmation is based on testreport
Cette confirmation est besée sur report de test
21108246_001 TÜV Rheinland Product Safety GmbH, 51101 Köln, Allemange
Name, Anschrift, Datum und Unterschrift des rechtsverbindlichen Verantwortlichen
name, address, date and legally binding signature of the person being responsible
Nom, adresse, date et signature de la personne responsable
Mr. Jan Rombach • 01.12.2003
Steripower GmbH & Co. KG • Schiffbauerweg 1
D-82319 Starnberg (Germany)
>
Page 21

STERIPOWER GmbH & Co. KG
Schiffbauerweg 1 • D-82319 Starnberg
www.steripower.de • [email protected]
made by spleen.de
 Loading...