

Page 1
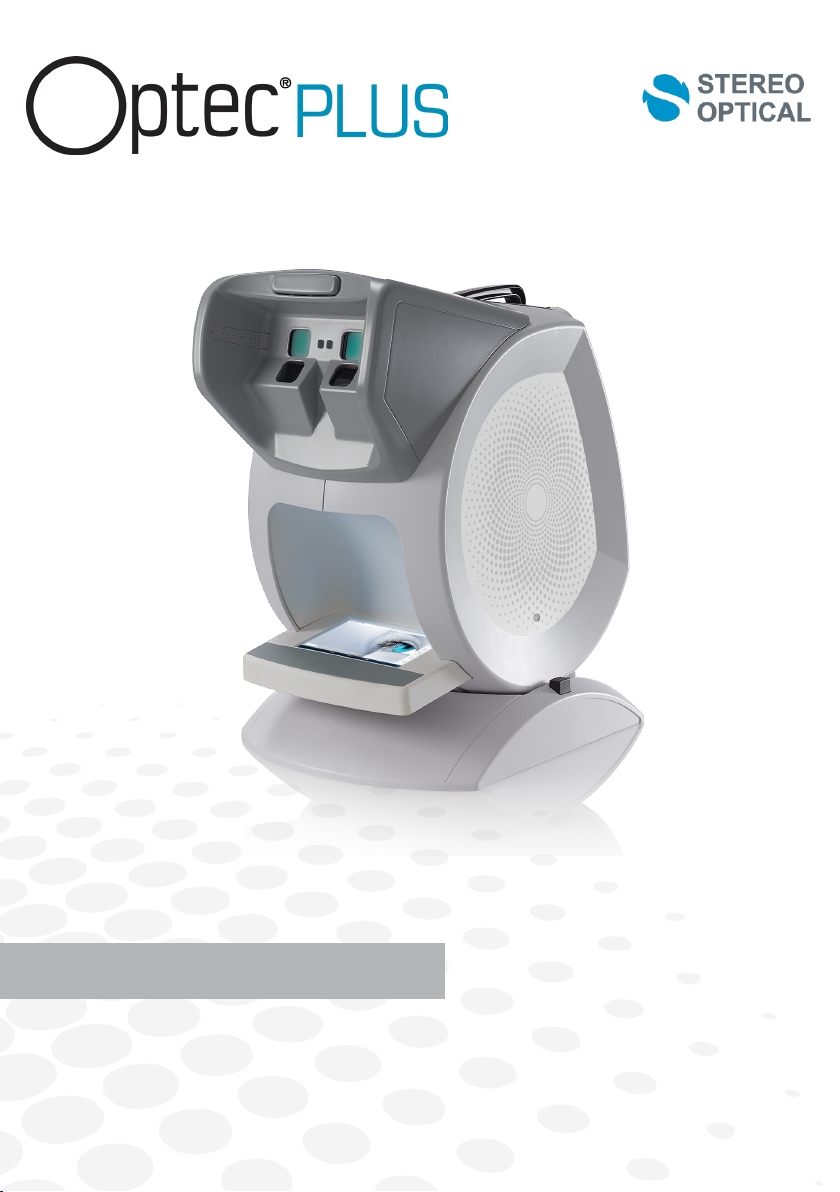
Quickstart guide
Page 2

Copyright 2017 StereoOptical
Page 3
introduction
The quick start guide provides an overview of the machine C86 (Optec Plus) it contains:
● basic information on the device,
● its main features,
● its maintenance.
However, the quick start guide is not intended to provide exhaustive information. It does not
cover the details of the functionalities of the device.
For more information on how to use all the features, please refer to the assistance on the
device, which is accessible via the icon on the software’s status bar.
table of contents
description ............................................. 4
1. Packaging and Accessories 4
2. Overview 5
a. Front view 5
b. Back view
first steps ............................................... 6
1. Unpack the device 6
2. Turn on and off the device 7
Install the Bluetooth key
3.
4. Install PC Interface software 8
5. Connect the device and the remote control 9
6. Change the language 10
7. Use the “remoteless” mode 11
8. Use the assistance on the device 11
9. Manage the device options 12
recommendations .................................... 13
1. General guidelines 13
2. Handling 13
3. Connectors and charging 14
4. Position of the person 14
a. Recommendations 14
b. Adjust the height of the device
5
15
main features ......................................... 16
1. Protocol menu 16
2. Tests menu 16
3. Settings menu 16
4. About Menu 16
5. Assistance for carrying out tests or protocols 16
maintenance & servicing ............................ 17
1. Cleaning the device 17
2. Cleaning the ancillary lenses 18
7
3. Cleaning the face rest 18
4. More information and contact 18
technical data ....................................... 19
general information ................................ 20
3
Page 4
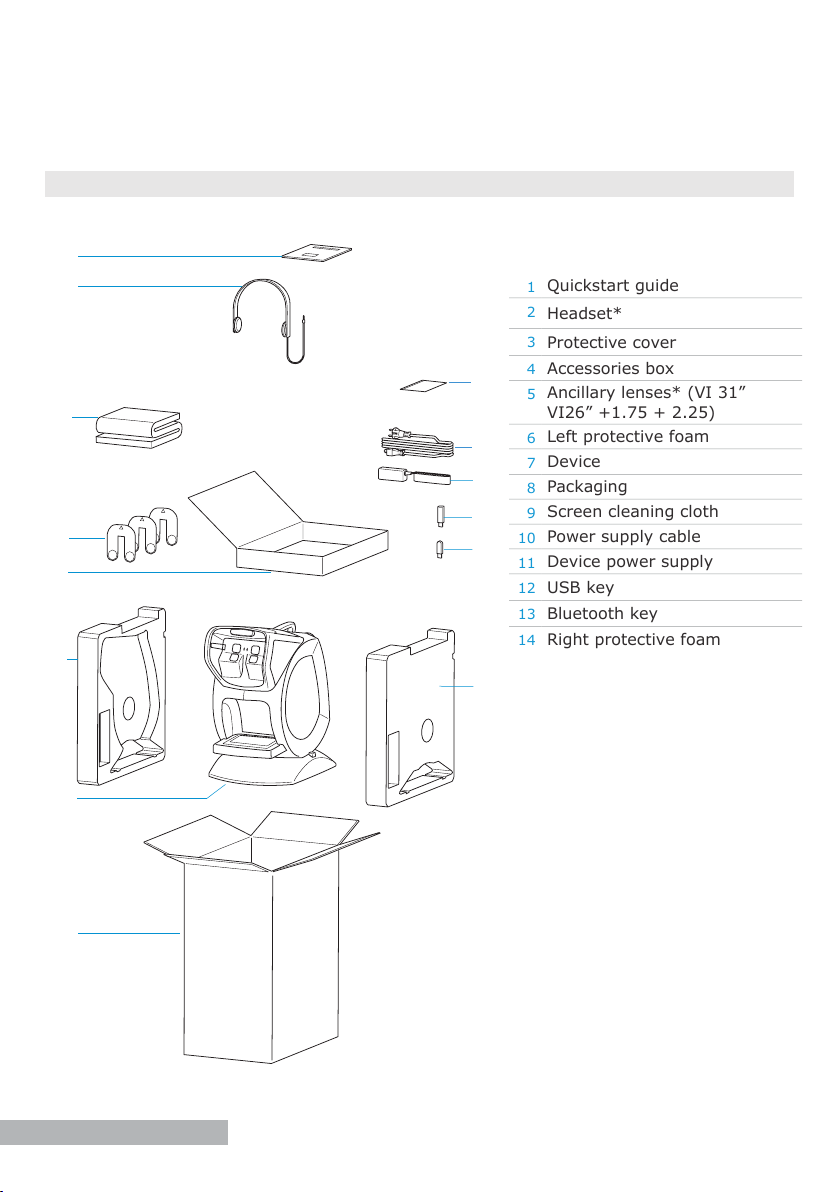
description
1
Quickstart guide
2
Headset*
3
Protective cover
4
Accessories box
5
Ancillary lenses* (VI 31”
VI26” +1.75 + 2.25)
6
Left protective foam
7
Device
8
Packaging
9
Screen cleaning cloth
10
Power supply cable
11
Device power supply
12
USB key
13
Bluetooth key
14
Right protective foam
1. packaging and accessories
1
2
3
5
4
6
9
10
11
12
13
14
7
8
4
o
(*) Options included or at extra cost.
Page 5
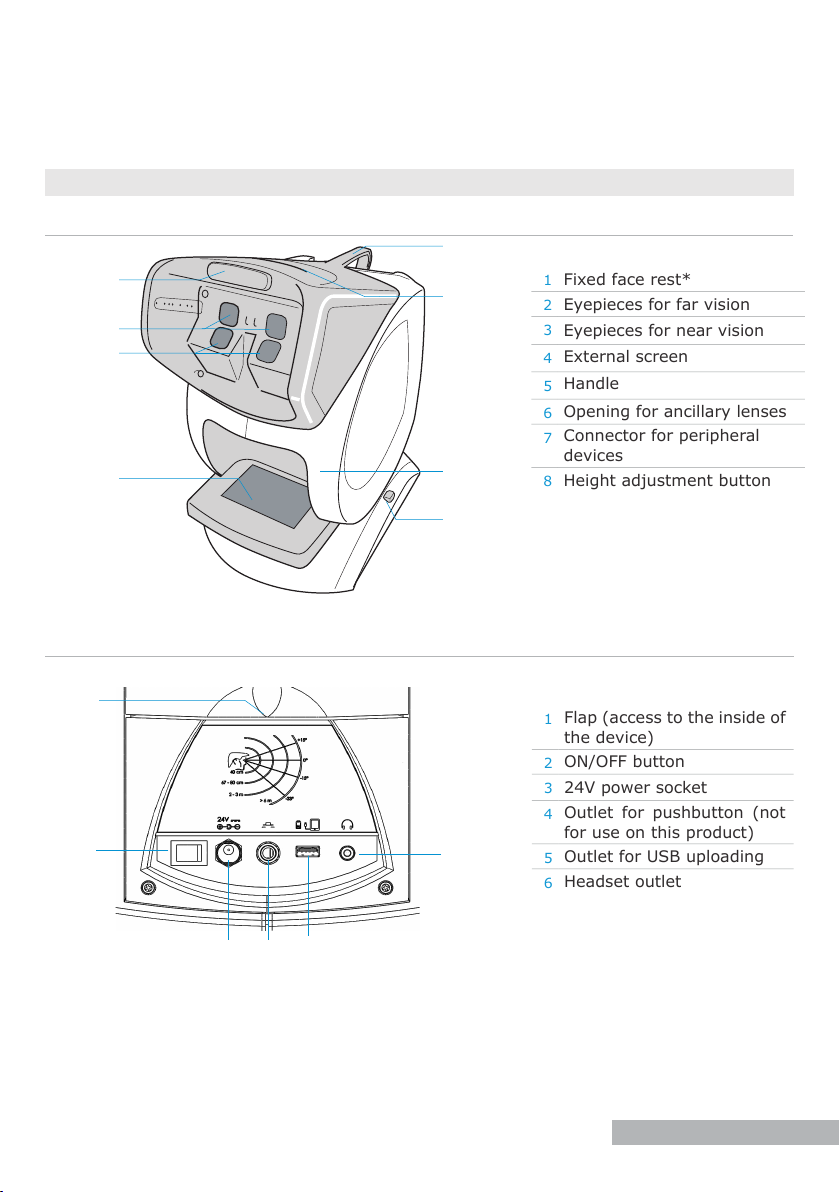
1
Fixed face rest*
2
Eyepieces for far vision
3
Eyepieces for near vision
4
External screen
5
Handle
6
Opening for ancillary lenses
7
Connector for peripheral
devices
8
Height adjustment button
1
Flap (access to the inside of
the device)
2
ON/OFF button
3
24V power socket
4
Outlet for pushbutton (not
for use on this product)
5
Outlet for USB uploading
6
Headset outlet
description
2. overview
a. Front view
1
2
3
4
b. Back view
1
5
6
o
7
8
2
6
3
5
4
(*) Applied part
5
Page 6
first steps
1. unpack the device
1
Take out the boxes on top and put them on the table.
2
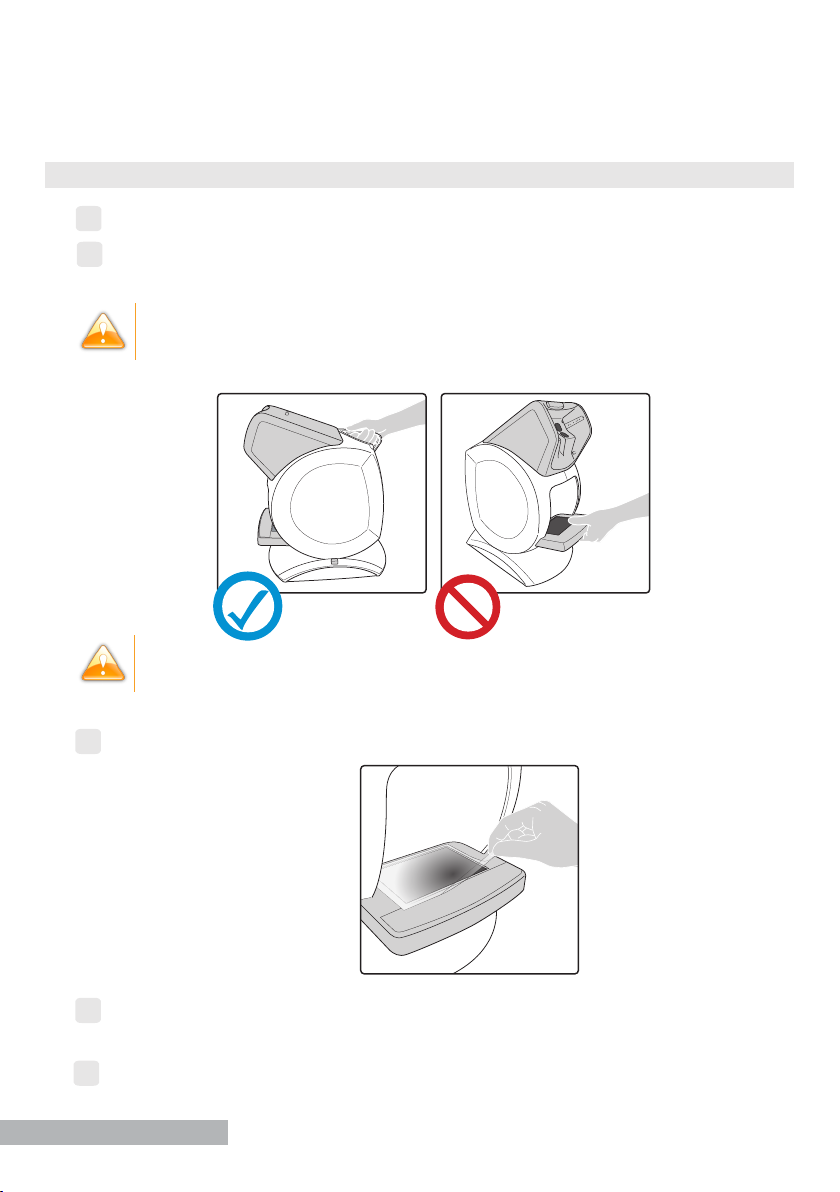
Take the device out of its protective foam by holding it by the handle and remove the
protective plastic covering it.
Never hold the device by the external screen, to prevent it from damage.
The device must be installed on a stable table, the part in front of the device
approximately 10 centimeters from the edge of the table.
3
Remove the protective lm on the external screen.
According to the selected options, remove the additional accessories and put them
4
awa y.
5
Open the box(es) of accessories.
6
Page 7
first steps
6
Remove the protective cover and put it away for later use.
7
Remove the charger (cable and power supply), plug it into the power socket then into
the main power supply.
Before plugging in the device, ensure that your power supply voltage
complies with the external power indicated.
8
Remove the cleaning cloth and put it away for later use.
The cleaning cloth must be used dry on the screen, eyepieces and remote
control.
9
Remove the ancillary lenses and put them away for later use.
According to the selected options, remove the additional accessories and put them
10
away.
Keep the packaging (boxes, protective foam and plastic).
2. turn on and off the device
1
Press on the button located on the back device to turn it on.
2
Wait several seconds for the software to open up on front of the device.
› the device is turned on.
Perform these steps in reverse to turn off the device.
3. install the bluetooth key
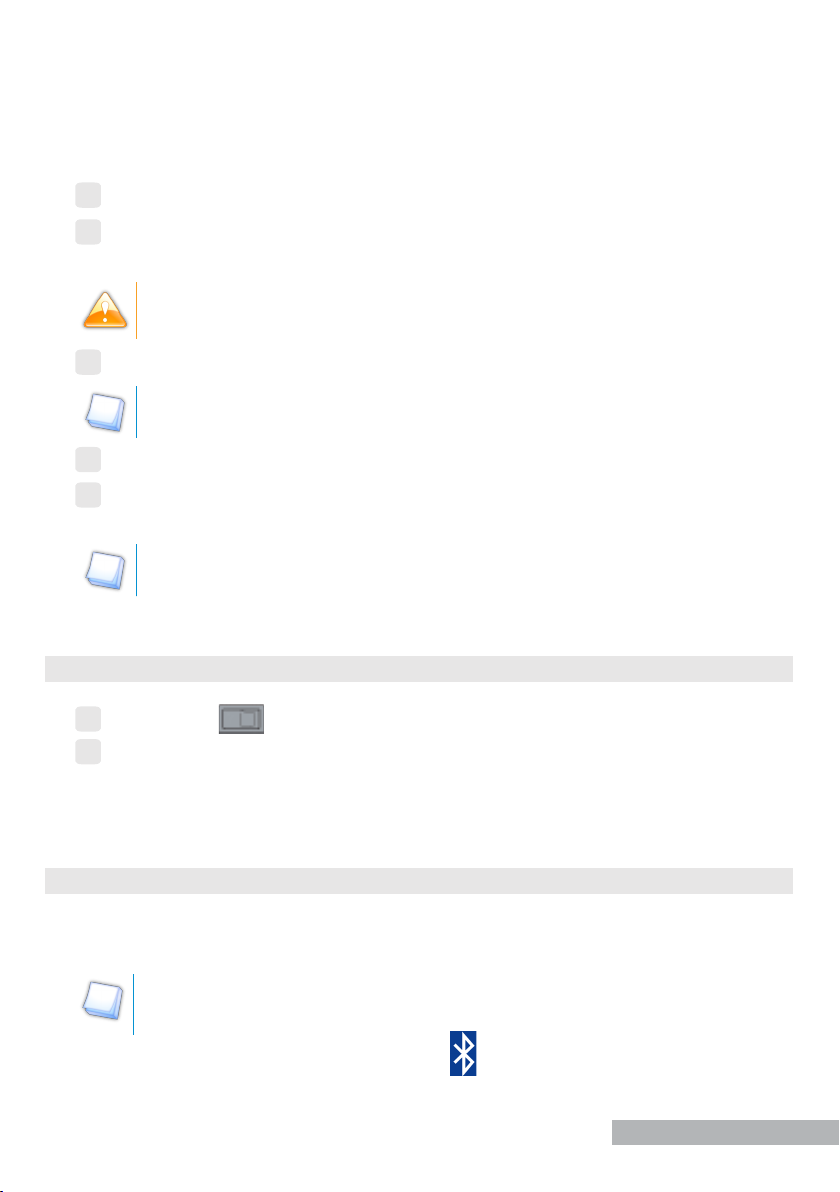
Insert the Bluetooth dongle into one of the USB ports on your computer.
› The Bluetooth dongle installs itself automatically.
If the key does not install automatically, install the USB driver provided or
contact your support technician.
› Once installation has nished , the icon will appear at bottom of your screen.
7
Page 8
first steps
4. install pc interface software
The bluetooth key must be installed beforehand (cf preceding chapter).
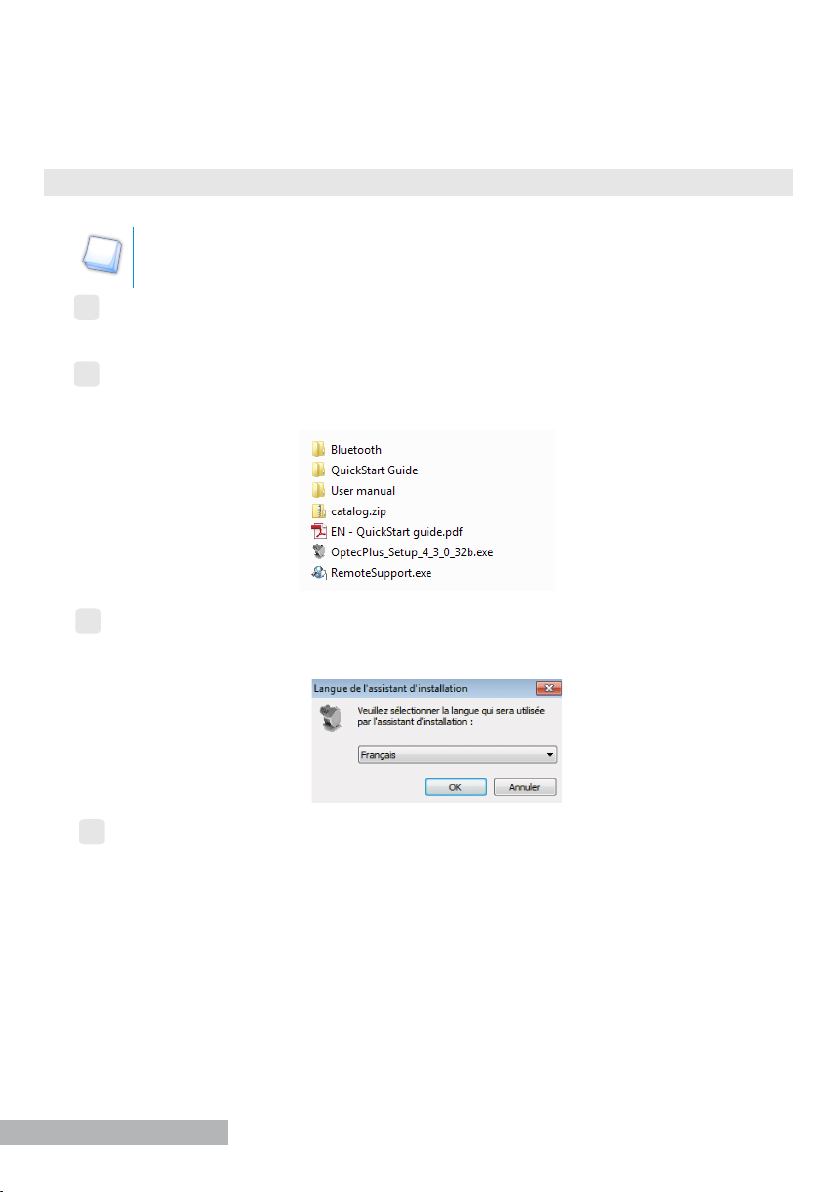
Insert the stick containing the software into one of the USB ports on your computer.
1
› A new folder will appear in the browser list.
2
Open the folder.
› The following tree structure is displayed:
3
Double-click on OptecPlus_Setup_X_X_X_X32b.exe.
› The installation window opens.
4
Follow the installation instructions.
› The software is installed on your computer.
8
Page 9
first steps
5. connect the device and the remote control
Before you can start your rst tests, it is necessary to connect the remote control and
the device.
1
Turning on the device and its screen.
2
Turn on the remote control.
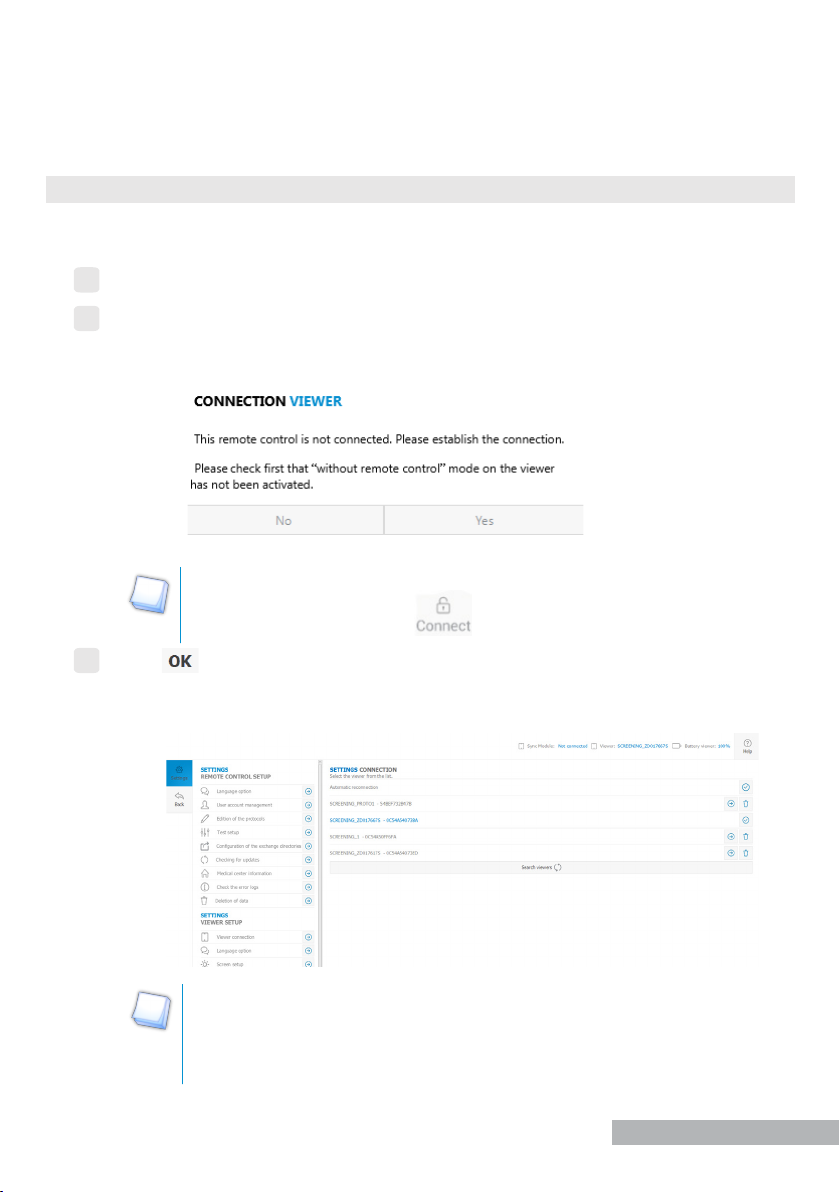
› The following message appears:
To check that the “without remote control” mode is not activated, no menu
can be open and the button in top on the right of the viewer must
be visible.
3
Press
.
› The remote control connection settings is displayed with the list of the available
supported devices.
The name of the device always starts with “Screening_”. If you tick the
Automatic Reconnection box, each time the remote control is started,
it will automatically try to reconnect with the last connected device
(viewer).
9
Page 10
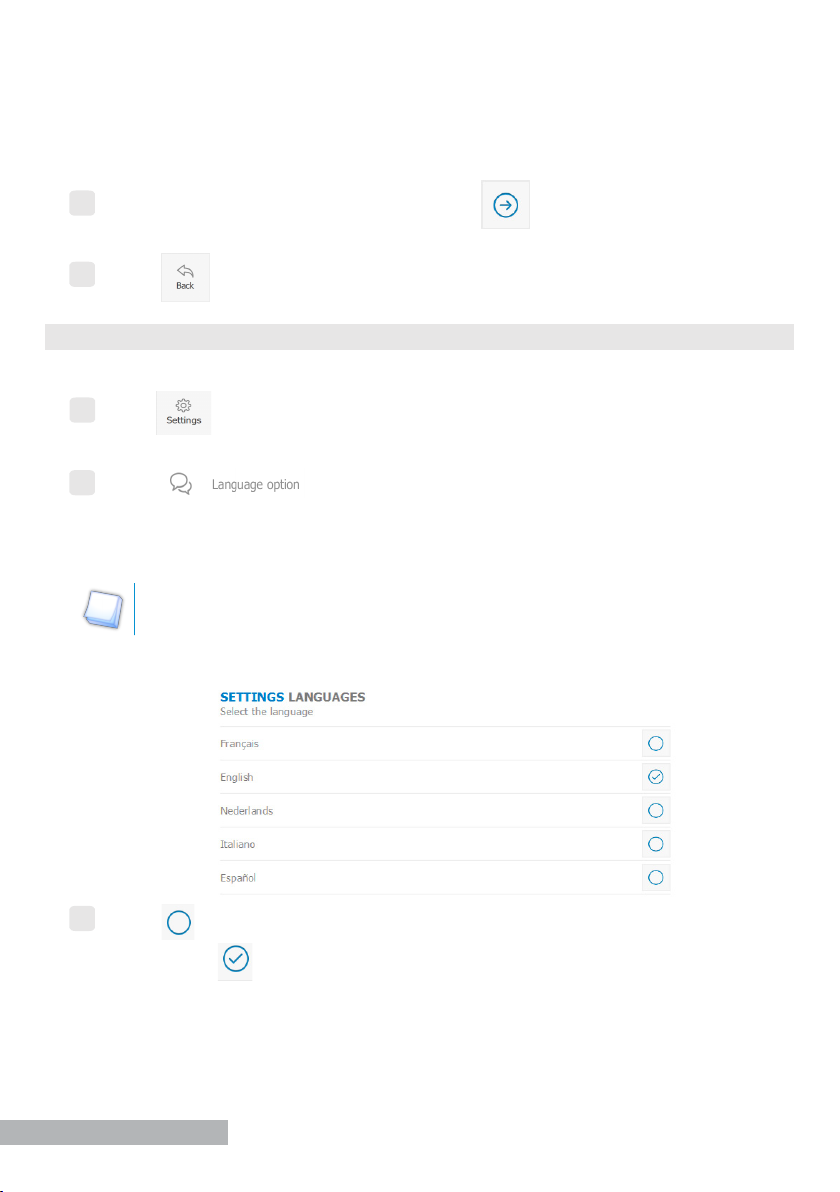
first steps
4
Select the peripheral you require by pressing .
› The device and remote control are synchronizing.
5
Press
6. change the language
You can change the language of remote control and the viewer.
1
Press in menu bar.
› Menu Settings appears.
to go back to the main screen.
2
Press
• the Remote control Settings Conguration menu for the remote control,
• the Viewer Settings Conguration menu for the viewer.
The viewer and remote control can be congured in two different languages if
necessary.
› The languages Settings menu appears.
3
Press to select your language choice.
› The icon is displayed and the interface application language changes
immediately.
in:
10
Page 11
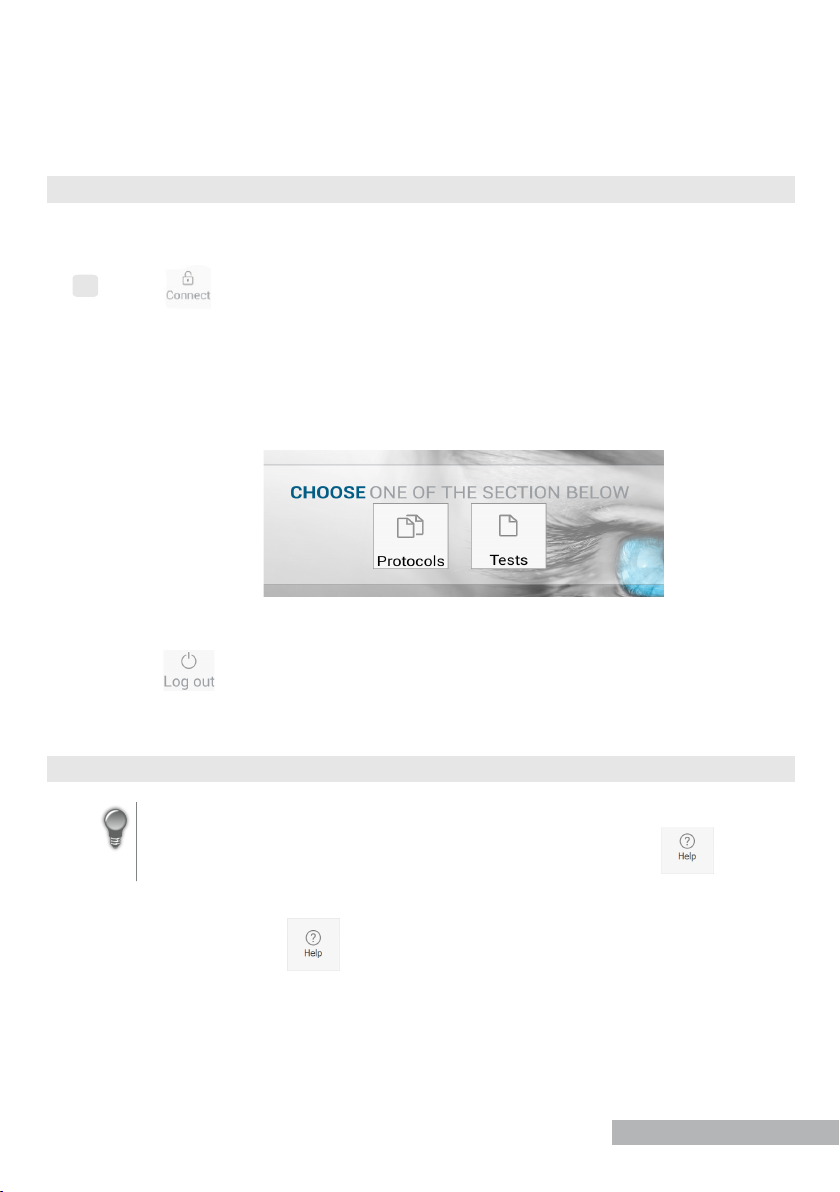
first steps
7. use the “remoteless” mode
If you do not have the remote control, this mode allows you to control the device.
1
Press on the top right of the viewer.
› The following message appears: “Do you want to start in the mode without remote
control?”
Press yes.
› The “remoteless”mode starts, you can use the external screen to control the device.
Press on the top right of the viewer to exit remoteless mode.
8. use the assistance on the device
For your convenience, additional documentation is available via the assistance
icon on the status bar of your remote control/software interface .
The Help button enables you to directly access online assistance for the device.
To leave online help press again.
11
Page 12
first steps
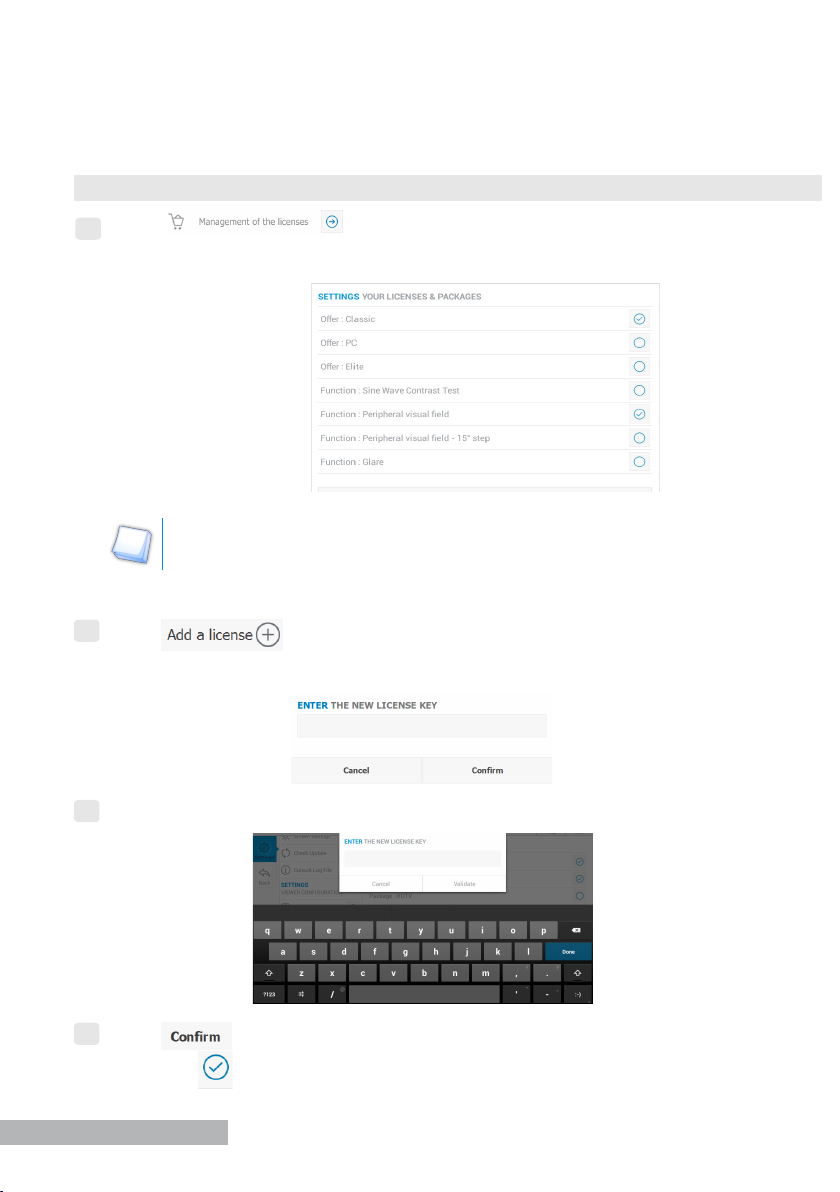
9. manage the device options
Press in the viewer Settings/Conguration menu.
1
› The Settings Licences and Package screen appears:
The packages and licenses may change over time. They also differ between
the versions.
2
Press .
12
› The license key window appears:
3
Press the eld, then enter the number using the keyboard.
4
Press to conrm.
› The icon is displayed to indicate that the option has been activated.
Page 13
recommendations
1. general guidelines
● Place the device and remote control in a room where the temperature is
neither too high (<40°C) nor too low (>10°C).
● Protect the device from vibrations and impact.
● Keep the device and the remote control/tablet away from chemicals and gas.
Never try to dismantle the device or remote control.
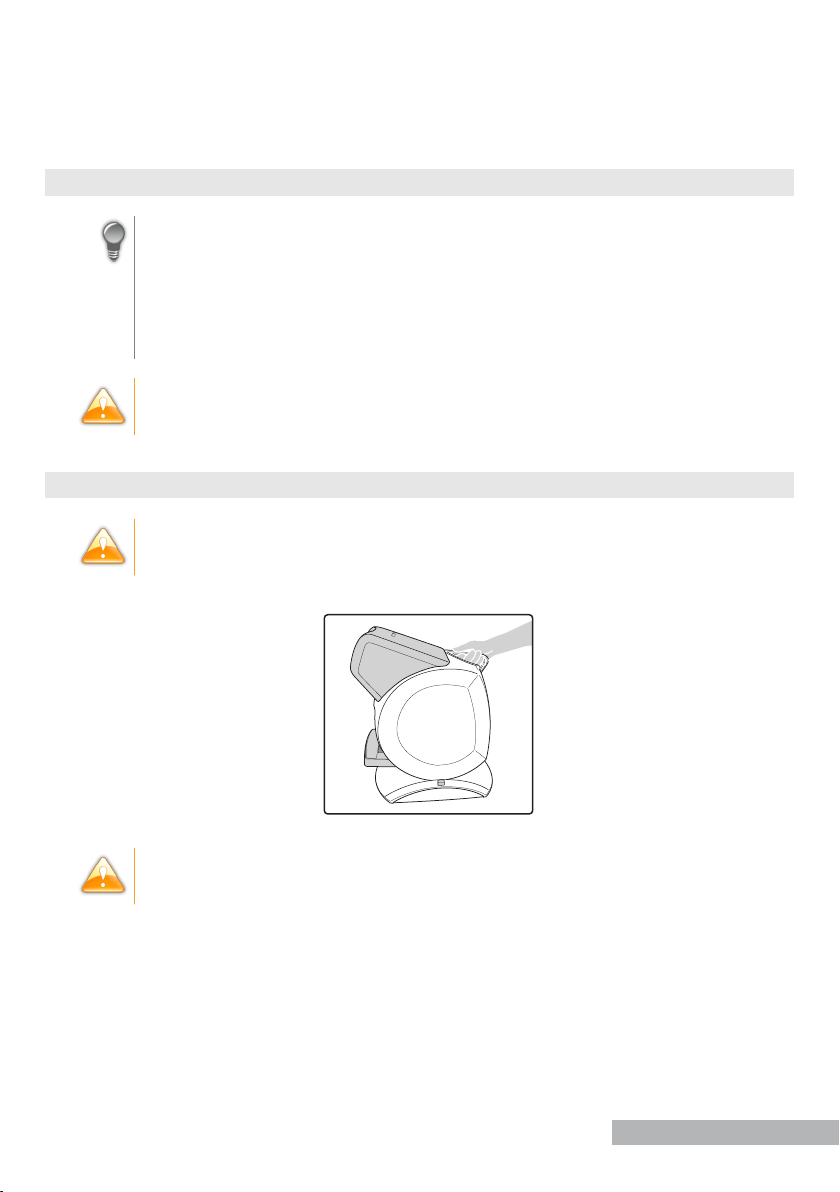
2. handling
Never hold the device by the external screen, to prevent it from coming off.
Never pull the device over the table, so as not to scratch the table surface.
13
Page 14
recommendations
3. connectors and charging
● Ensure that the equipment is connected to the main supply and to a power
socket which comply with local regulations.
● Your device must be plugged into a ma main power supply with a
ground connection. Avoid extending leads or adapters, which do not guarantee a
reliable connection.
● If the screen turns on directly after it is plugged in, you can continue using the device
while it’s charging.
4. position of the person
a. Recommendations
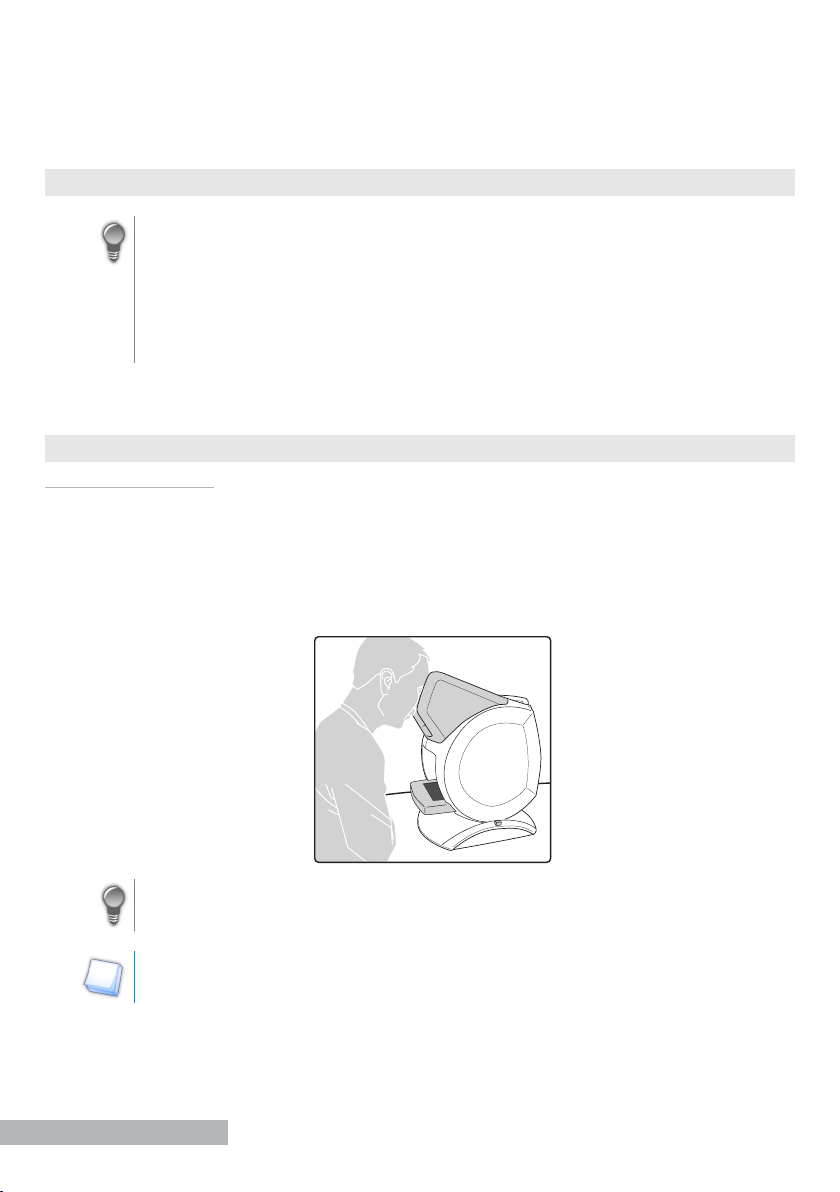
The person must be tested in his/her work conditions. Before starting the tests, ensure
that the person to be examined is sat in front of the device correctly.
If the person has to strain his/her neck, sit on the edge of the seat or hunch down to see
the eyepieces, the device is not set to the correct height.
14
If the subject has corrective lenses or contact lenses, they must keep them in/
on for the examination.
Ensure that the person’s face is pressed against the forehead rest before starting
the tests.
Page 15
recommendations
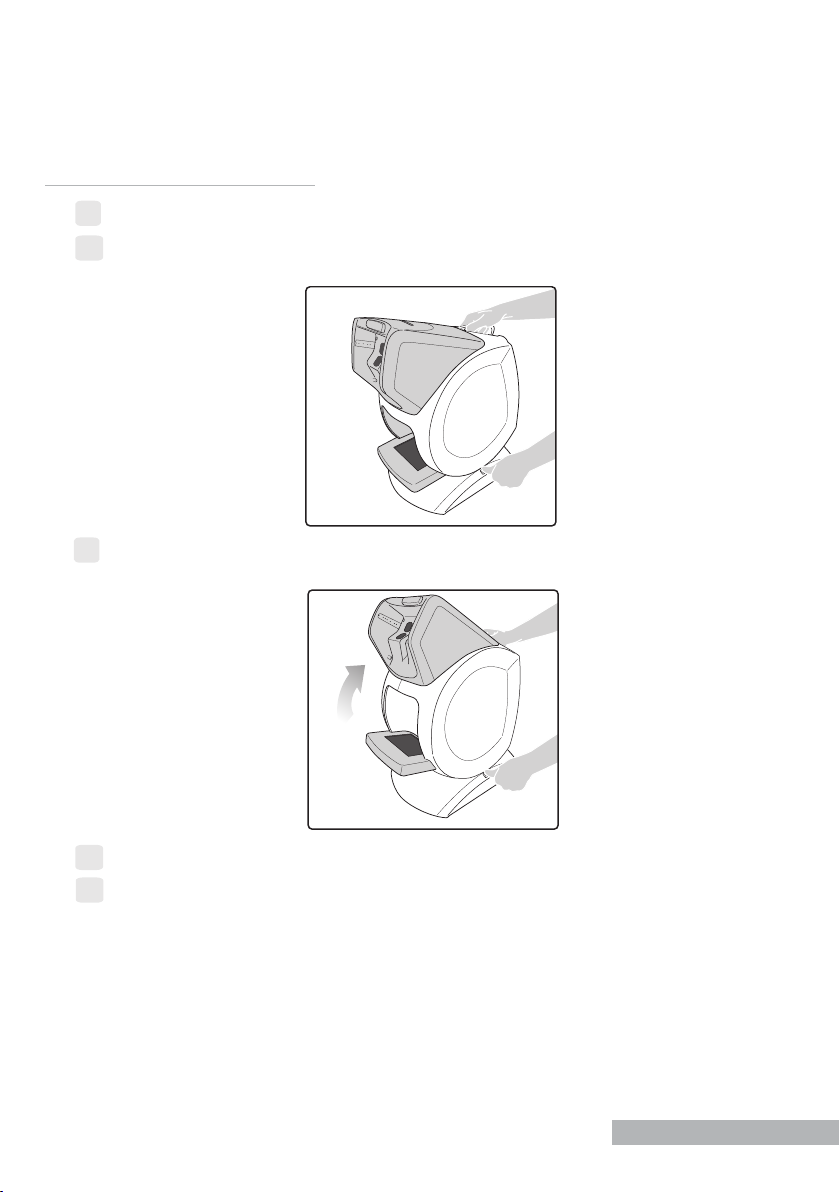
b. Adjust the height of the device
1
Use the handle to hold the device.
2
Press on height adjustment button and keep pressed down.
3
Incline the device until the required height has been reached.
Let go of the button and wait for a click sound.
4
5
Let go of the handle.
› The height of the device has been adjusted.
15
Page 16
main features
You can access the remote control menus via the menu bar. Following is a brief description
of the main features that are available to you.
For more information on one or more of these features, please refer to the menu on
remote control.
To access the menus, select “To start with a person” before hand.
1. protocol menu
The menu Protocols allows you to start a series of tests. There are various basic
protocols which make it possible to concentrate on a kind of work station.
Depending on the selected options, you can create your own protocols by
choosing the tests which you wish to carry out.
Assistance, available via the button , describes the use of all the protocols,
as well as in automatic mode. See part “8. Use the assistance on the device”.
2. tests menu
The menu Tests allows you to choose, from the list, each test that you wish to carry out.
If you choose to carry out each test one after the other, you will need to stay in
the room to progressively start them.
3. settings menu
The Settings menu allows you to congure the remote control and the device: language,
protocols or add new options, depending on the product version.
4. menu about
The menu About gives you technical and legal information about the product.
5. assistance for carrying out tests or protocols
Assistance is available to help you to carry out tests or protocols. For that, go to the part
“8. Use the assistance on the device”.
16
Page 17
maintenance & servicing
1. cleaning the device
To avoid any incidents, unplug the device before cleaning.
Clean the interior and exterior screen and the remote control with a soft dry cloth. The
screens must never come into contact with liquid (e.g. water, alcohol, window cleaner).
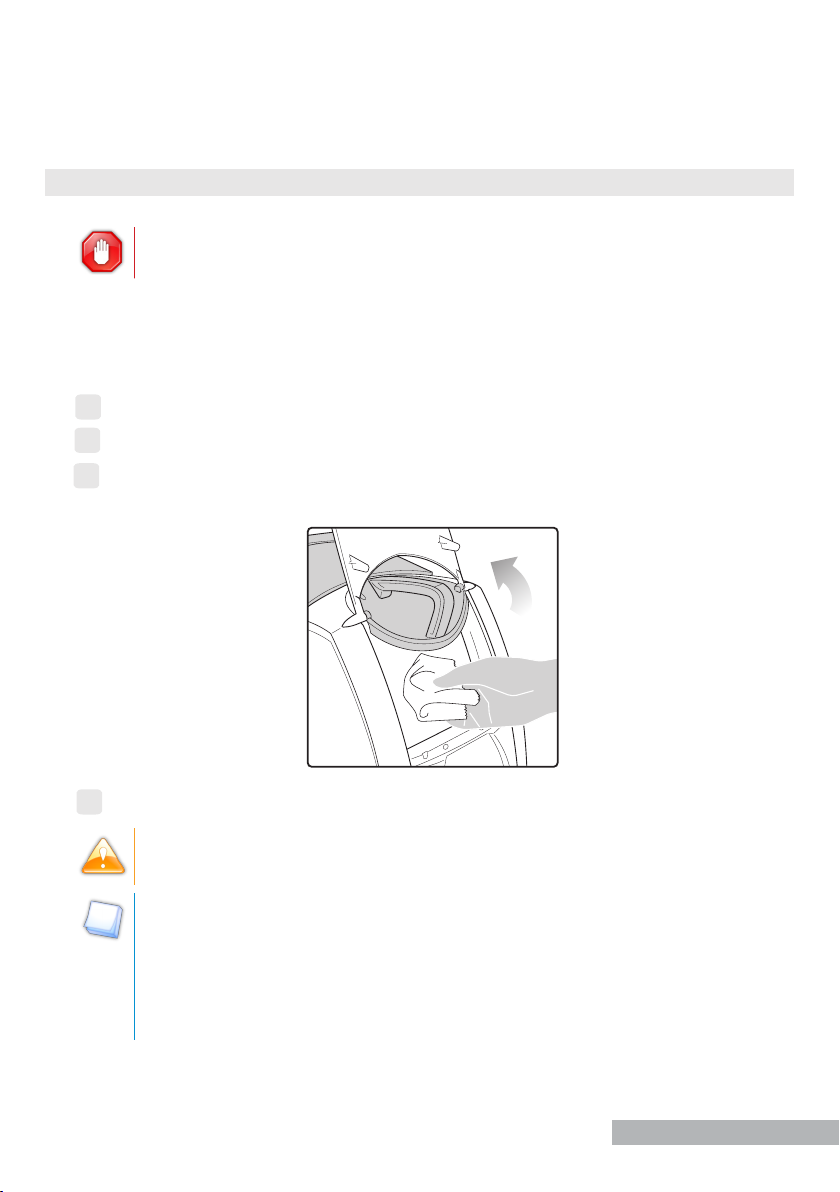
To clean the interior screen:
1
Unplug the device.
2
Open the access ap located at the back of the device.
3
Clean the interior screen with a soft and dry rag, take care not to leave nger marks.
Close the access ap.
4
Be careful of the connections inside the device. Too abrupt movements may
unplug certain wires.
● You can use the cleaning cloth provided in the package.
● If the device is transported outside or not used over a long period of time,
use the protection cover provided with the device.
● The cloth may be washed in washing machine at 40°C at most (without fabric
softeners).
17
Page 18
maintenance & servicing
2. cleaning the ancillary lenses
Clean the ancillary lens with a dry soft cloth.
● Badly cleaned ancillary lenses can distort the test results.
● Clean the intermediate vision ancillary lenses without putting too much
pressure on them. You are likely to damage the lens surface, which may also
distort the test results.
3. cleaning the face rest
Cleaning face rest is recommended between each person. Carry out cleaning with a soft
cloth or a handkerchief soaked in soapy water.
Avoid using any alcohol or aggressive lotions.
4. more information and contact
For your convenience, documentation about the device is available via the help icon
on the status bar.
Please note your contact’s details: ............................................................
18
Page 19

technical data
This device is a class I medical device without measurement function.
1. the device
● Dimensions : 483 x 283 x 456 (mm) or 19.0 x 11.2 x 18.0 (in)
● Weight: 6.700 Kg or 15 lb
● Power supply:
AC Input : 100-240 VAC, 1.9A max, 47-63 Hz
DC Input : 24.0 V, 2.70A
Maximum output power: 65W
● Product: Input: 24V, 50VA
2. accessory list
● Microfiber cloth
● Supply ref. MVC65NR24E and cord
● Protective cover
● Ancillary lenses*: “VI 31” VI26” +1.75 +2.25
● USB key
● Bluetooth key
● Headset*
● Transportation case*
(*) These options are included or at extra cost.
3. environment
The temperature and relative humidity of the room where you use your digital system must lie within the following limits:
Operation:
● temperature of +10°C (+50°F) to +40°C (+104°F)
● humidity: 30% to 75%
Storage:
● temperature of -5°C (+23°F) to 50°C (+122°F)
● humidity: 25% to 95%
Altitude: < 2,000 m (6,562 ft)
Degree of pollution: 2
Avoid sudden changes in temperature and relative humidity and install your system:
● away from direct sunlight;
away from all heat sources;
● away from any strong magnetic field; and
● away from all chemicals, corrosive vapors and liquids.
Never put anything on top of the device. Avoid exposing the equipment to vibration or impact.
19
Page 20
general information
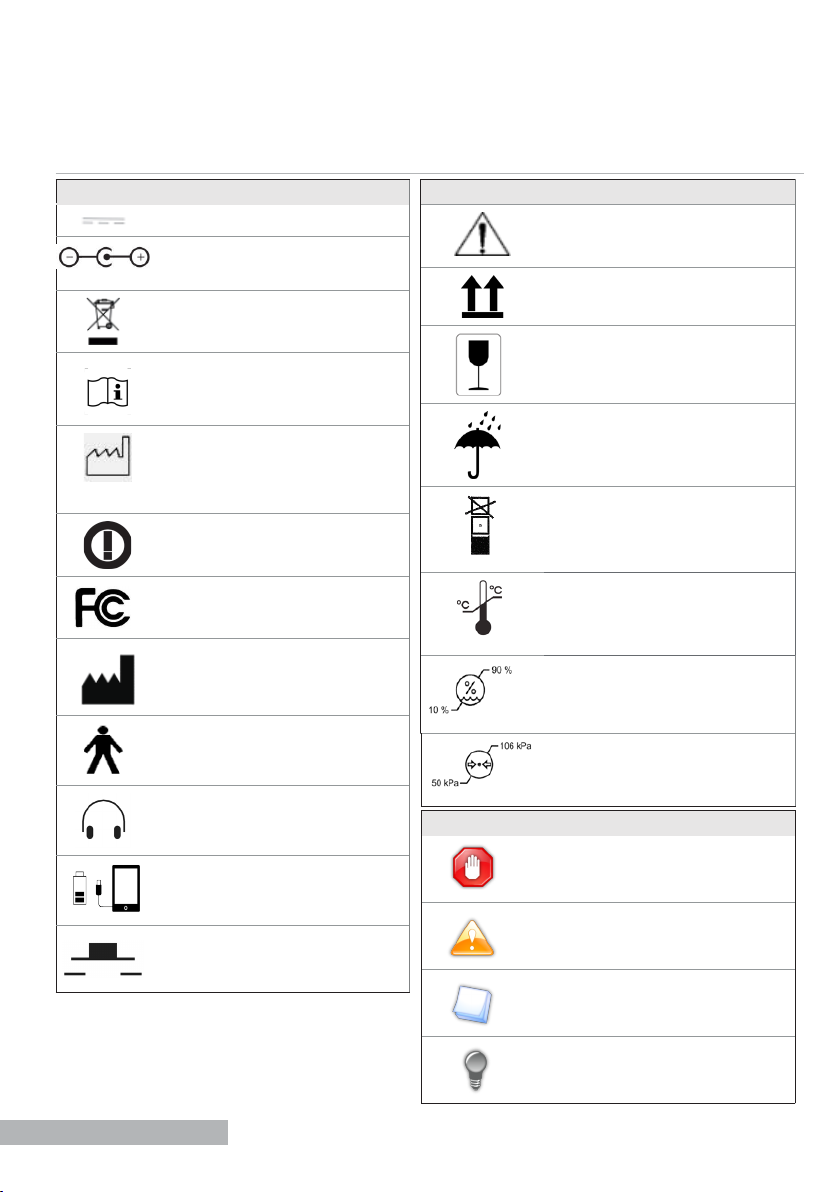
1. Symbols
symbols on the device
D.C. current
Polarity
Disposal of this electrical and electronic
equipment
Careful, read and assimilate the
accompanying documents (user manual,
etc…).
Manufacturing date.
symbols on the device
NB: read and understand accompanying
documents (user manual, etc.).
This side up
Fragil
Keep dry
Complies with R&TTE standards;
Compliant to FCC standards
Manufacturer
This instrument is a class I type B
product
Headset
Tablet connector
Tweezers/Pushbutton (not for use on
this product)
Do not put in a pile
Limited temperature for transportation
and storag
Limited humidity for transportation and
storage
Limited pressure for transportation and
storage
symbols present in the document
Danger: risk of injury
Caution: risk of damage to the product
Note: Additional information
Tip: practical advice
20
Page 21
general information
2. Modications
The information contained in this document is non-contractual and provided as a guide. They may be changed without prior
notice. Errors or omissions may occur in this type of document, although the greatest care has been taken to ensure the
accuracy of the information provided. StereoOptical cannot be held responsible for any malfunction or loss of data resulting
from such errors or omissions.
3. Condentiality of customer’s data
The device is a system, which can save/store/share relative information with the customer such as measurements, the
name or the photograph. It is the device user’s responsibility to comply with patient data confidentiality regulations that
are applicable to their site.
4. Declaration of conformity
Complies with marking .
Life of the product: 7 years.
Date of rst marking: September 2016
This equipment complies with the limits imposed by Part 15 of the FCC rule. Its use meets the following conditions: (1) this
device should not cause interferences and (2) must be able to deal with interferences from external sources, in particular
those likely to cause malfunctions.
In accordance with the requirements of FCC rules, any modication made to this equipment which is not expressly approved
by StereoOptical would nullify the user’s right to use this device.
This equipment has been tested and is deemed compliant with the limits imposed for Class-B digital devices according
to Part 15 of the FCC rule. Those limits are set so as to ensure reasonable protection against interference in a residential
environment. This equipment generates, uses and can emit radio frequency energy likely to cause radio communication
interferences if the device is not installed and used in strict compliance with the manufacturer’s instructions. However,
nothing guarantees the absence of interference under particular conditions. If this equipment is the source of interference
with radio or television reception (this can be conrmed by switching off the device then turning it back on), the user may be
able to eliminate this interference through one or more of the following measures:
● Swivel or move the affected receiver or its receiving antenna;
● Move the device away from the affected receiver;
● Connect the device to a different circuit from the one, which powers the receiver in question;
● Request help from the retailer or a qualified radio/television technician.
Interference and micro-outages
The products have been designed to withstand interference and operate despite its presence and the possibility of micro-
outages on the network. However, if these malfunctions are too serious and abnormal, the machine cannot be guaranteed
to operate normally.
5.
Copyright
Copyright © 2018 Stereo Optical - Translation of the original handbook
All rights reserved. All reproduction of the content of this document, whether in part or as a whole, for the purpose of its
publication or dissemination by any means and in any format whatsoever, even free of charge, is strictly prohibited
without Stereo Optical’s prior written consent.
21
Page 22

general information
6. Materials and products
Do not place this device in a dusty environment, in a room where the temperature is too high or too low, or in a damp place.
Perchlorate material warning applies to the primary Manganese Dioxide Lithium coin cells present in the device. Special
handling precautions may apply.
7. Safety instructions
All mechanical or electronic adjustments and electrical maintenance must be carried out by an after-sales technician
approved by Stereo Optical.
The use and operation of any accessory or cable other than those recommended in this manual could create a risk for the
operators using the product.
Check the power cable regularly; if damaged, have it replaced by an approved repairer.
Never pull on the cables to unplug them from the power socket.
Your system is a professional tool
else apart from these operators.
Do not use our system for other uses than those described in this document. Otherwise, the protection ensured by the device
may be compromised.
Never try to modify or dismantle this product yourself. Apart from the risk of damaging the instrument, there is a risk of
personal injury.
Your device must be carefully maintained, in accordance with the instructions detailed in this document.
Your system is an electrical device which complies with the relevant safety standards. In the event of malfunction, the
repair operations must be performed by qualified personnel approved by Stereo Optical. Otherwise, the user’s safety would
be at risk.
During extended periods of non-use and before the servicing and/or replacement of certain accessories, you must disconnect
your system from the electricity supply. Removing power from the device should be done by unplugging the power cord.
The equipment must be connected to an electrical supply with a ground connection. The ground connection must comply
with public standards and be checked by a technician. Avoid using extension cords or intermediary multiple-socket
connectors which might result in poor contact. Make sure the wall outlet is easily accessible.
Use the product as specified in this guide.
The main plug allows you to turn the device off, it must always be accessible, ensure that your product is installed so you
can do this.
The USB port is only intended for the connection of smartphones and mini-tablets using micro-USB ports to have them
recharged. This is especially intended for mini-tablets that would be used as a remote control of the device.
Do not plug in any other device, such as a PC. At the end of the product use, please press on the power switch.
Removing power from the device should be done by unplugging the power cord.
There are no known contraindications to the use of the device.
Screening time varies from 2 to 5 minutes depending on the subjects examined.
which must only be used by specialized, responsible operators. It should be used by nobody
8. Electromagnetic waves
Electromagnetic waves emitted by radio and television sets, mobile phones, radio transmitters, etc. are liable to cause
malfunctions in the instrument. This instrument is also likely to cause interference with radios or television, mobile
phones, radio transmitters, etc. Avoid installing or placing devices likely to create interference close to the instrument.
Likewise, never place the instrument on or near this type of device. This may cause malfunctions or faults in the
instrument.
22
Page 23

Page 24

8600 W. Catalp
a Avenue, Suite 703. Chicago, IL 60656
Phone: 733.867.0380 Toll-Free (US): 800.344.9500
email: [email protected]
www.stereooptical.com
© Stereo Optical Co., Inc. 03/2018. All rights reserved. Unless indicated otherwise, all
trademarks are the property of Stereo Optical Co., Inc. in the United States and other countries.
24
 Loading...