

Page 1
Installation &
Operation Manual
© 2014 Electro Plastics, Inc.
Do not use this equipment before reading this manual!
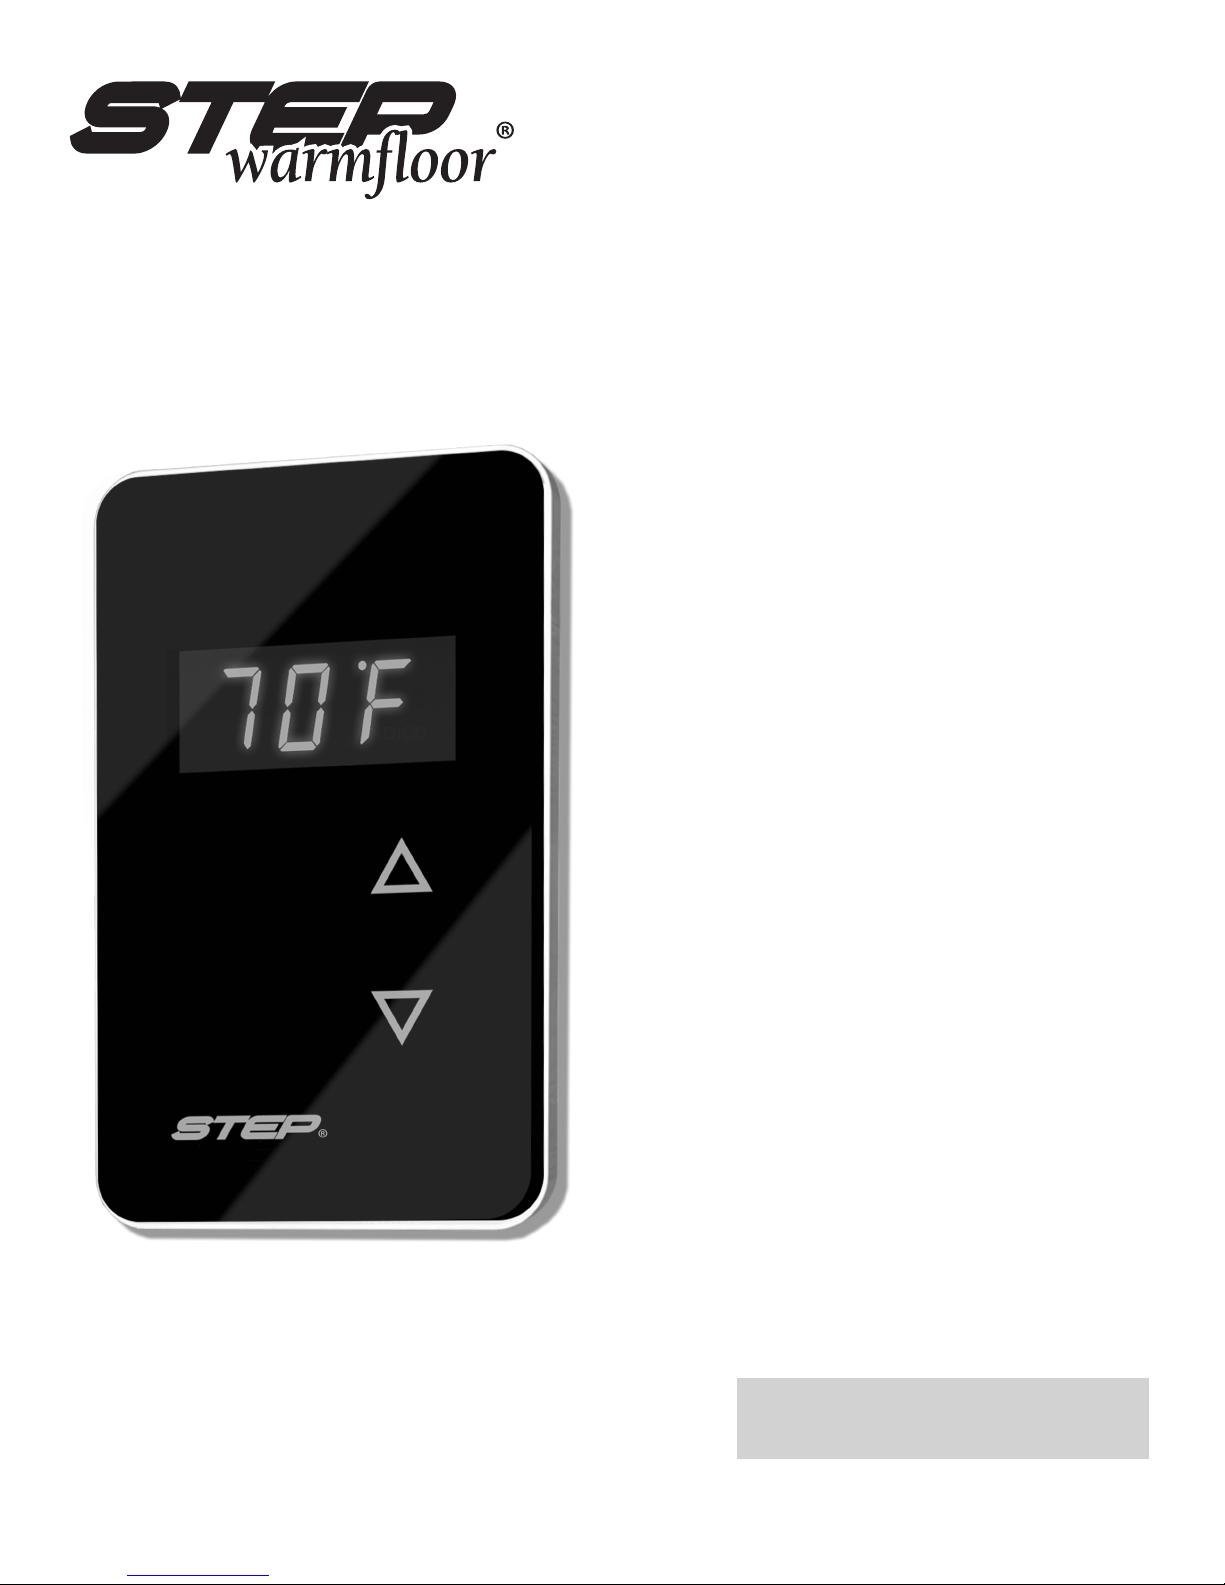
The New Step® Touch Thermostat
The Ideal Way to Control Your Warmfloor
The new Step Touch thermostat from Electro Plastics is
the elegant way to control your Step Warmoor system.
Perfectly suited and designed from the ground up
to work seamlessly with all Step Systems.
Features:
• Clean, simple two control design for ease of operation
• Three digit auto-dimmable LED Display
• Touch sensor controls that are maintenance free
• Clear, totally at acrylic surface for a clean contemporary look that works
well with any decor
• Elegant stainless steel perimeter housing
• Displays in Fahrenheit or Celsius
• Interfaces to an external temperature sensor
• Works with Step Warmoor, Step Snowmelt and Step Deicing systems
• Standard colors: black and white. Custom colors available at additional cost
• Capable of interfacing with smart home systems
• No batteries needed. All settings are stored in permanent memory for
instant recovery in the event of a power failure
• Step Warmoor logo is lit when system is heating
• Green friendly low power design
Model Number: EPI-LX-TC
Printed in the U.S.A.
Specications:
Set Range: 40º to 90ºF • 4º to 32ºC
Internal Ambient Temp Range: 0º to 99ºF, +/-1ºF • -9º to 37ºC, +/-0.5ºC
External Sensor Temp Range: 0º to 99ºF / -9º to 37ºC
Power: 9-24 VAC/VDC @ <10mA (without external temperature sensor)
Note: This manual contains important warnings
and instructions. Please read and retain
for reference.
© 01/2014 Step Warmfloor, Inc. All rights reserved.
Page 2
Physical Description
The New Step® Touch Electronic Thermostat is a zone control device specially designed for use with the STEP Warmoor™ radiant heat system.
The Step® Touch provides a pulsed output that complements the self-regulating nature of the STEP Warmoor™ heating elements to oer the
homeowner the highest energy eciency while providing better zoned control over personal comfort.
Thermostat
The thermostat is the operator interface for the Step Warmoor System.
It is designed to be ush wall mounted in a place that will be most
representative of the zone it controls.
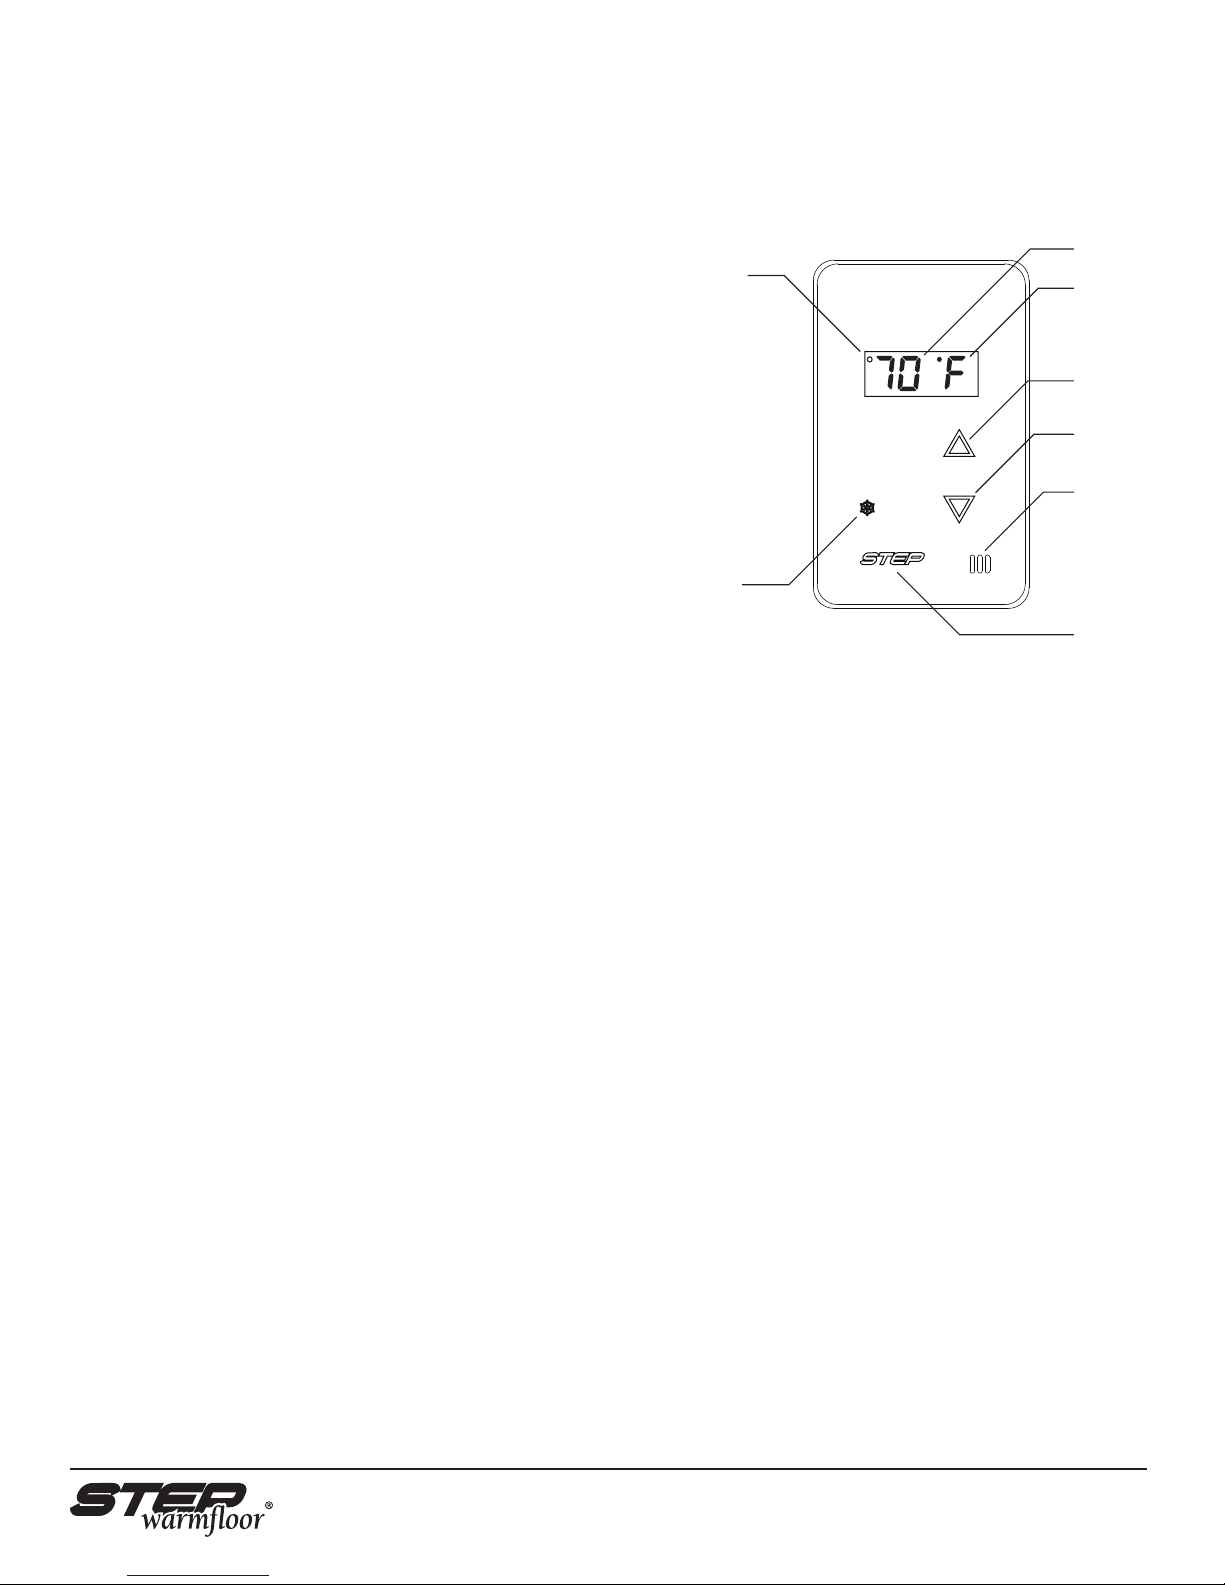
The thermostat consists of a digital display that indicates the measured
air temperature or set temperature, touch sensitive switches for control
of the set point, the air temperature sensor and indicators for the
external sensor mode, snowmelt mode and logo illumination.
Regulator
The regulator is an intelligent switch that enables/disables the line
voltage in such a way that does not harm the transformer(s) and gently
applies the load to the power system. It is designed to be surface
mounted adjacent to the transformer(s) that it controls. The regulator
consists of a printed circuit board mounted inside the power supply
housing or in a junction box w/ heat sink. Each regulator is designed to
handle up to 1,500W of load.
The thermostat and power supply are connected together using a 20 foot length of
3 conductor shielded cable. For control of a zone with a load larger than 1,500W, up
to 20 power supplies can be connected to one thermostat for a total controlled load
of 30,000W.
External
Sensor
Indicator
SnowMelt
Mode
Engaged
Illustration 1 - Thermostat Features
Temperature
Display
Temperature
Units
Up
Down
Ambient
Temperature
Sensor
Illuminated Logo
Functional Features
Interface:
UP/DOWN capacitive sensing proximity switches (no membrane
switches)
These switches are used to modify the “Set Temperature”.
Normally the display will show the ambient temperature, however
when any switch is pressed, the Set Temperature is displayed for 3
seconds and the units (F or C) digit is ashed. If a switch is pressed
again, while the Set Temperature is displayed the Set Temperature is
modied.
If both the UP/DOWN switches are held for more than 4 seconds,
the unit will go into shutdown mode and completely turn the system
o. While these switches are held the display will count down, ie: “3”,
“2”, “1”, “OFF”. During this time all setting information is saved in
memory and recovered on power-up. To re-activate, the switches
must be held down again for 4 seconds.
All settings are permanently stored in ash memory (no batteries)
so that in the case of a power failure, there will be no need to modify
any settings. This also includes shutdown mode, ie: if you are out of
town and the unit is in shutdown mode a power uctuation will not
cause the unit to re-enable.
Output:
When the temperature measurement from either the ambient
sensor or the oor sensor (depending on the mode of operation) is
below the Set Temperature, the unit will trigger the system to
activate and the Step logo will illuminate indicating heat is being
called for.
Internal Temp Sense:
Ambient temperature is sensed via the three vent slots on the
front panel.
External Temp Sense:
The unit also provides for the sensing of temperature externally
via the EPI-LX-TS sensor supplied. This could be necessary, if the
thermostat is located in an area that has a falsely high temperature
(ie: near a large piece of machinery on a factory oor) or can be used
as a oor temperature sensor. It would also be used in the case of
SnowMelt mode where the sensor would need to be installed in the
concrete that is being sensed.
This connection is made via a very common 6 position 4 contact
modular connector and allows the sensor to be extended to a
maximum distance of 50 feet. Try doing that with a platinum RTD?
The external sensor has a small micro-controller built in and digitally
transmits the temperature data so there is no loss in accuracy with
distance.
Home Control Shutdown:
It is also possible, via the modular jack on the rear of the unit, that
the unit can be shut down via a relay closure from an external Home
Control system. If Pins 1 and 6 are shorted together the unit will
shutdown.
© 2014 Electro Plastics, Inc.
© 01/2014 Step Warmfloor, Inc. All rights reserved.
Page 3
Dip Switches:
Dip Switches:
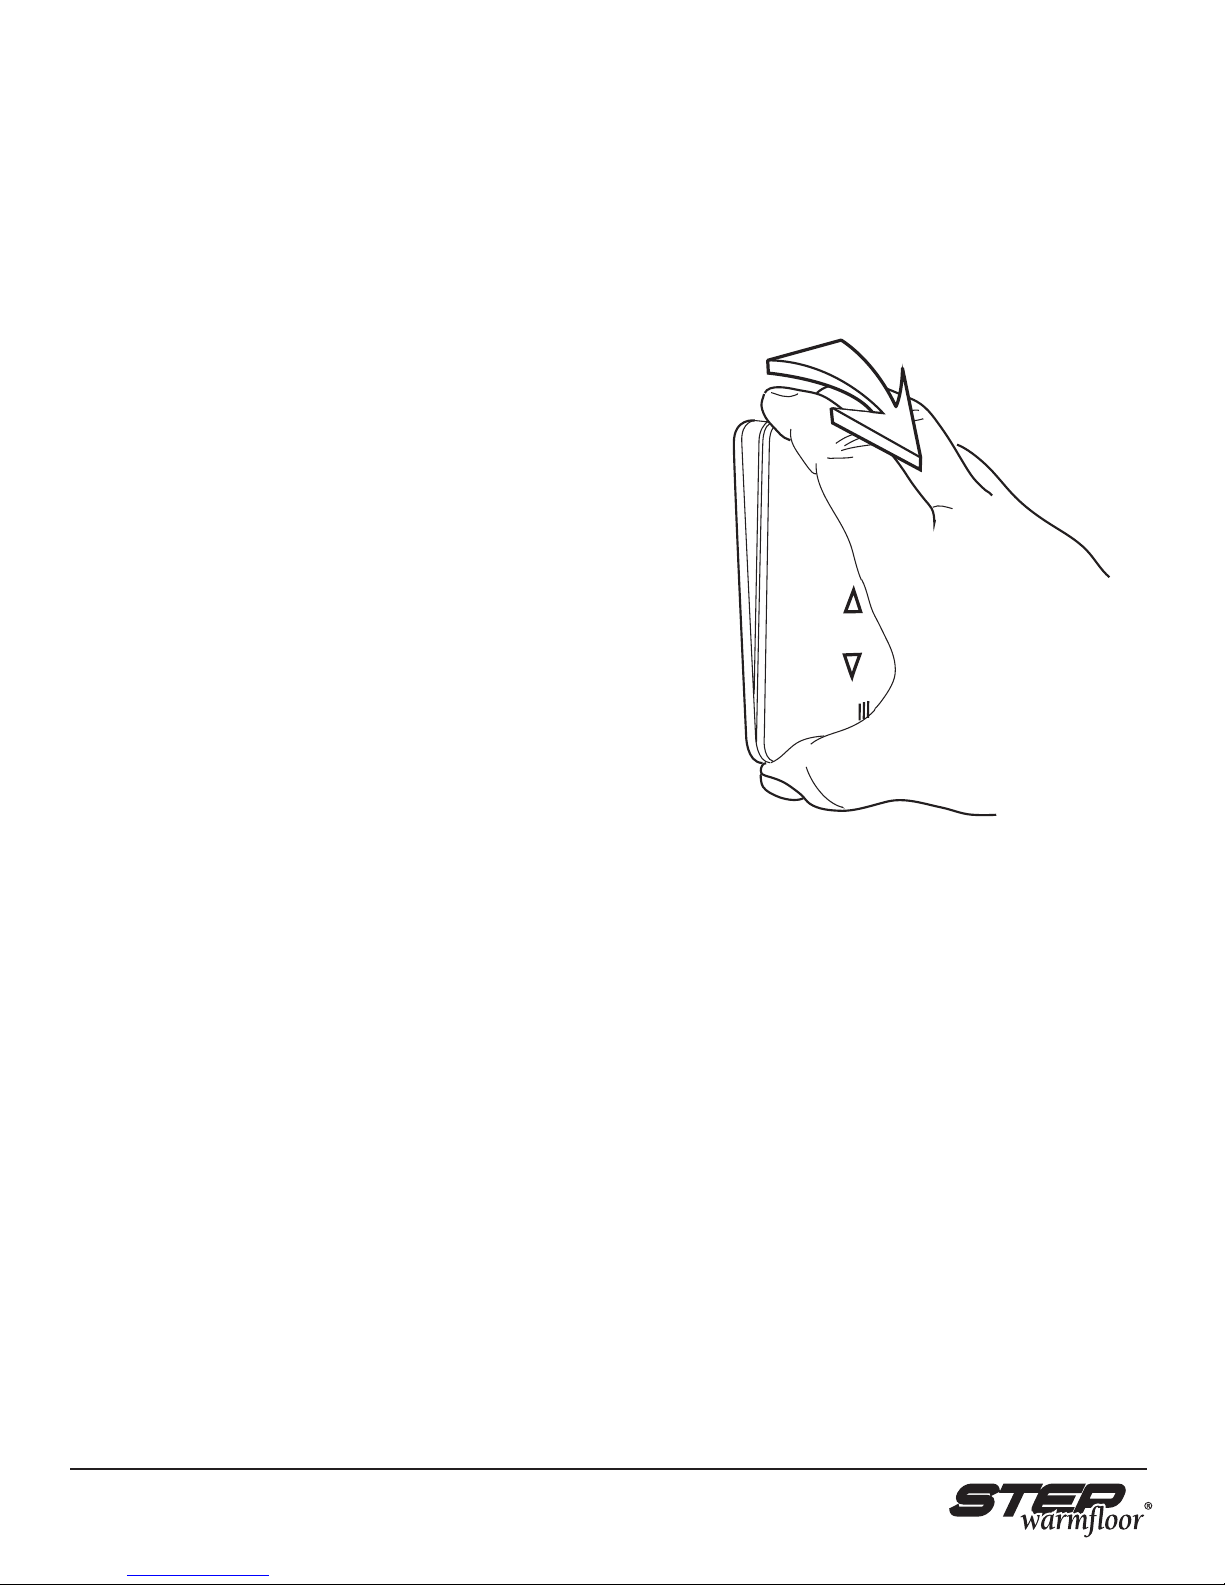
FACEPLATE REMOVAL: The faceplate is retained via high power
FACEPLATE REMOVAL: The faceplate is retained via high power
magnets. Illustration 2 shows proper technique to remove the
magnets. Illustration 2 shows proper technique to remove the
faceplate and gain access to the dip switches and connections. In
faceplate and gain access to the dip switches and connections. In
order to remove, rst grasp the top edge of the acrylic faceplate with
order to remove, rst grasp the top edge of the acrylic faceplate with
your rst three ngers, with your thumb on the bottom edge of the
your rst three ngers, with your thumb on the bottom edge of the
faceplate, rotate the display away from the housing until it is free.
faceplate, rotate the display away from the housing until it is free.
Dip switches are extremely easy to access via the magnetically
Dip switches are extremely easy to access via the magnetically
attached front panel. No fasteners or annoying plastic clips. Electrical
attached front panel. No fasteners or annoying plastic clips. Electrical
connection between the front panel and the base are made via
connection between the front panel and the base are made via
gold-plated, spring-loaded contacts ensuring extremely long life. The
gold-plated, spring-loaded contacts ensuring extremely long life. The
4 position dip switch is located on the inside of the front panel PCB.
4 position dip switch is located on the inside of the front panel PCB.
1. C/F:
1. C/F:
Simply changes the units of measurement between Fahrenheit
Simply changes the units of measurement between Fahrenheit
and Celsius.
and Celsius.
2: AUTODIM MODE:
2: AUTODIM MODE:
Many people do not like a bright LED display to be on all the time,
Many people do not like a bright LED display to be on all the time,
especially at night. The AutoDim feature simply dims the display
especially at night. The AutoDim feature simply dims the display
when the unit is not being modied. If a switch is pressed, the display
when the unit is not being modied. If a switch is pressed, the display
is brightened and stays bright for several seconds after modications
is brightened and stays bright for several seconds after modications
have been completed. When AutoDim mode is not enabled, the
have been completed. When AutoDim mode is not enabled, the
display is bright all the time.
display is bright all the time.
3. EXTERNAL TEMPERATURE SENSOR:
3. EXTERNAL TEMPERATURE SENSOR:
When this switch is enabled the unit will make decisions based on the
When this switch is enabled the unit will make decisions based on the
temperature reading from the external sensor. The display will always
temperature reading from the external sensor. The display will always
show the temperature of the external temp sensor, however if the
show the temperature of the external temp sensor, however if the
user wishes to check the ambient temperature, they can simply press
user wishes to check the ambient temperature, they can simply press
and release both the UP/DOWN switches within 1 second and the
and release both the UP/DOWN switches within 1 second and the
ambient temperature will be displayed for several seconds after
ambient temperature will be displayed for several seconds after
which it will revert to the temperature of the external sensor. If, by
which it will revert to the temperature of the external sensor. If, by
mistake, both the External Temperature Switch and the SnowMelt
mistake, both the External Temperature Switch and the SnowMelt
switch are activated, the SnowMelt switch is dominant and this mode
switch are activated, the SnowMelt switch is dominant and this mode
will be enabled. Whenever the external sensor is active the dot in the
will be enabled. Whenever the external sensor is active the dot in the
upper left-hand corner of the display will be illuminated.
upper left-hand corner of the display will be illuminated.
4. SNOWMELT MODE:
4. SNOWMELT MODE:
This mode is enabled when the thermostat is being used with the
This mode is enabled when the thermostat is being used with the
snowmelt elements. The external temp sensor is installed in the
snowmelt elements. The external temp sensor is installed in the
concrete and the Set Temperature is adjustable between 32-41F/0-5C.
concrete and the Set Temperature is adjustable between 32-41F/0-5C.
This value is maintained in ash memory. The display will show this
This value is maintained in ash memory. The display will show this
measurement and, as with external mode, when both the UP/DOWN
measurement and, as with external mode, when both the UP/DOWN
switches are pressed and released within 1 second, the display will
switches are pressed and released within 1 second, the display will
show the ambient temperature for a short period after which it will
show the ambient temperature for a short period after which it will
revert to the external temperature sensor. When in SnowMelt Mode,
revert to the external temperature sensor. When in SnowMelt Mode,
the snowake logo on the front panel will glow blue.
the snowake logo on the front panel will glow blue.
Illustration 2 - Faceplate Removal
Installation
The Step® Touch thermostat can be used in conjunction with all
the EPI-LX-R power supply series and the STEP DC Controllers. Be sure
to install the thermostat on an interior wall away from direct sun and
drafts. Measure the distance from the power supply to the thermostat
to identify the length of the thermostat wire. The low-voltage (24)
thermostat is connected to the power supply using a 3-conductor
shielded cable and can control up to 20 power supplies or 20 DC
Controllers.
The process of installing the EPI-LX-TC involves preplanning of
mounting locations and roughing in of the necessary hardware. The
installation of the EPI-LX-TC typically occurs during new construction
or a remodel project where access to the walls is possible for the
rough in work. If access to the walls is not possible, as during some
remodel projects, the EPI-LX-TC installation may require the use of
surface mounted raceway products such as those manufactured by
Wiremold® (www.wiremold.com).
Plan mounting Locations
Thermostat – Locate the thermostat approximately 60” o the
oor in a location that is most representative of the zone that it
controls. Do not install where exposed to direct sunlight or drafts.
© 01/2014 Step Warmfloor, Inc. All rights reserved.
Rough In
The thermostat is designed to be ush mounted on a single gang
junction box. Install such a box at the desired mounting location.
Install the supplied 3-conductor shielded cable between the
housing and the power supply. The cable can be installed in the wall
without the use of conduit as it only carries a low voltage signal. If the
cable is not long enough, acquire a suitable length of an equivalent
cable sucient to run the full length between the boxes. Do not
splice the cable – only use a full new length. If an additional power
supply will be connected, install the supplied 3-conductor shielded
cable between the supplies.
Thermostat
Terminate the 3-conductor shielded cable to the thermostat. Trim
back the shield ush with the outer cable jacket and do not ground
the drain wire at the thermostat. Only ground the drain wire at the
regulator. Remove the face plate from the housing to expose the
mounting holes. Push the excess cable into the box and install the
Thermostat using the screws provided. Reinstall the face plate on to
the housing.
© 2014 Electro Plastics, Inc.
Page 4
Operation
Normal Operation
Normal Operation
The Step Touch digital display indicates the measured room temperature during normal operation.
The Step Touch digital display indicates the measured room temperature during normal operation.
Set-point change
Set-point change
The set-point is modied by using the “Up” and “Down” switches located on the thermostat faceplate. The rst press of
The set-point is modied by using the “Up” and “Down” switches located on the thermostat faceplate. The rst press of
the switches will cause the digital display intensity to increase and to display the present set-point. Subsequent press-
the switches will cause the digital display intensity to increase and to display the present set-point. Subsequent press-
ing of the switches will allow you to change the set temperature to the desired setting. After a few seconds of inactivity,
ing of the switches will allow you to change the set temperature to the desired setting. After a few seconds of inactivity,
the digital display will dim back to its original intensity and will return to displaying the measured room temperature.
the digital display will dim back to its original intensity and will return to displaying the measured room temperature.
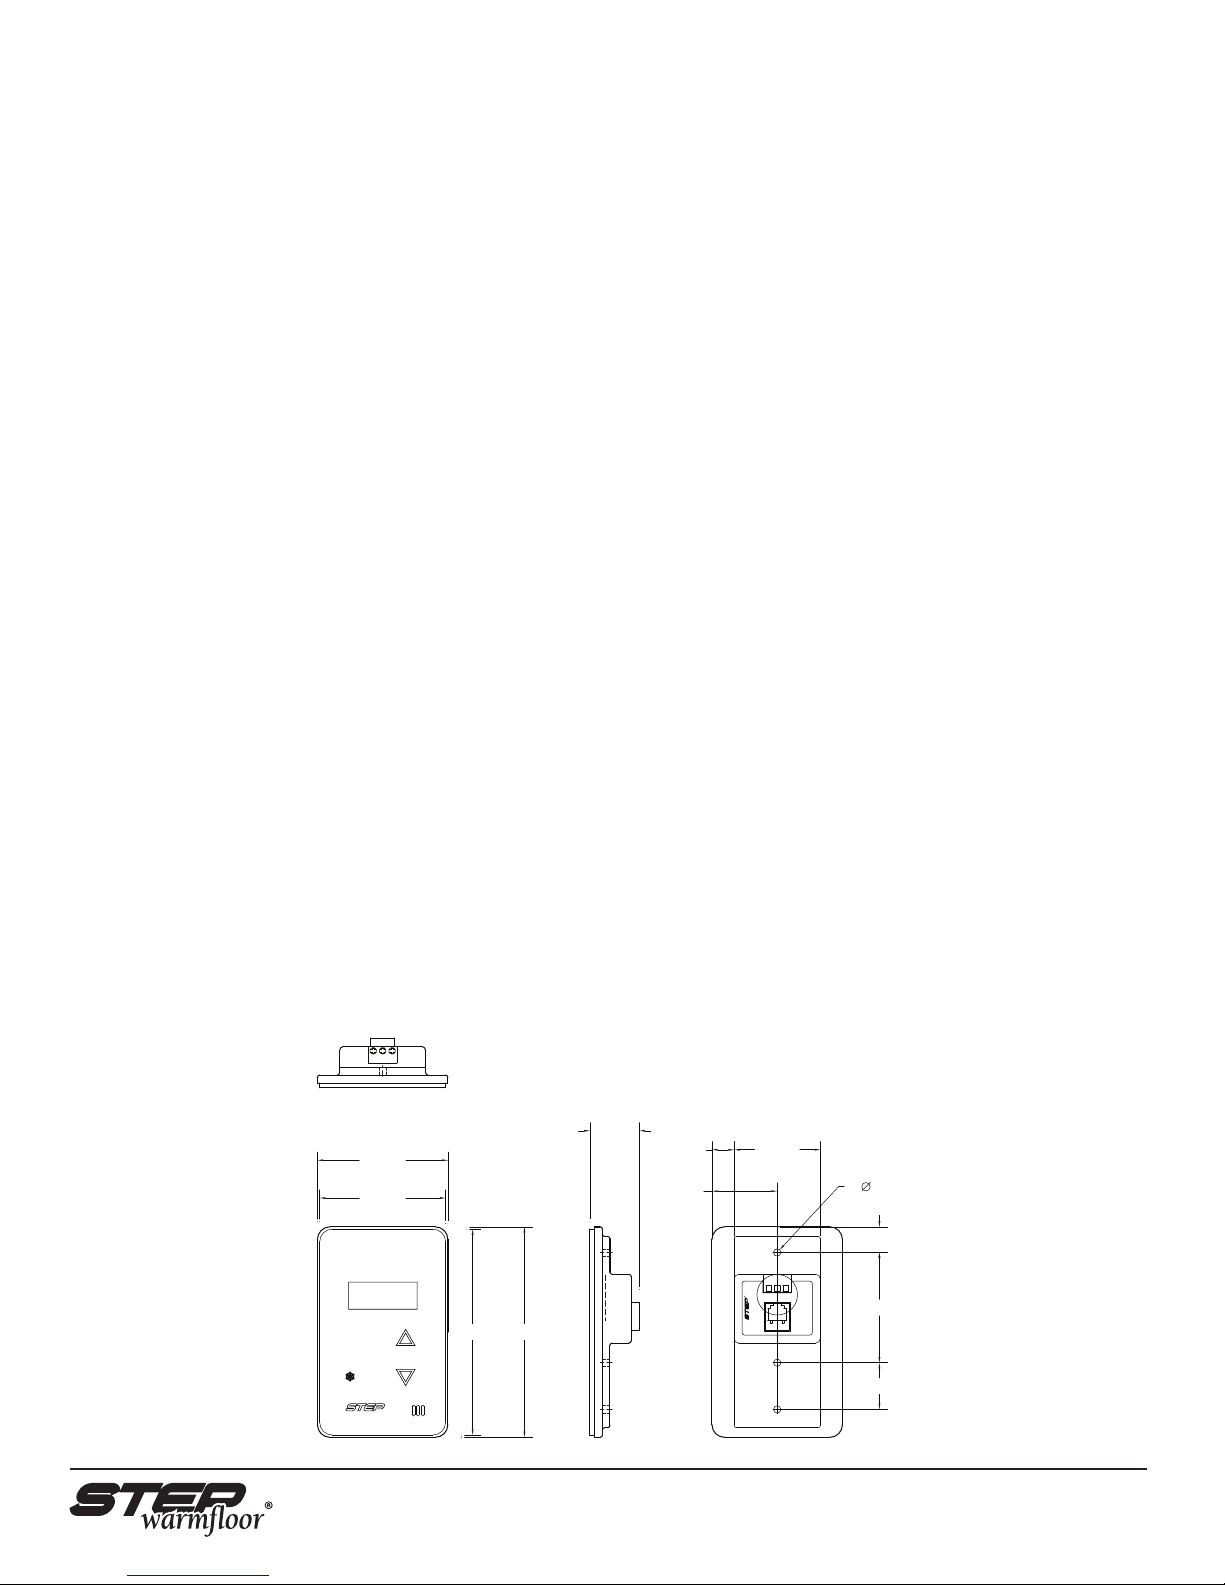
Mechanical Features
External 3 digit auto-dimmable LED display (ie: 70 ‘F)
(Front) UP touch switch (not membrane switch)
DOWN touch switch (not membrane switch)
External 3 position terminal block (AC/DC, TRG, COM)
(Rear) 6 position 6 contact modular jack
Internal Fahrenheit/Celsius switch
(dip switch) AutoDim switch
External Temperature Sensor Mode switch
Snowmelt Mode Switch
Specifications:
Internal Ambient temp Range: 0-99˚F/-9-37˚C
External Sensor temp Range: 0-99˚F/-9-37˚C
Internal Sensor Mode Set Temp Range: 40-90˚F, 4-32˚C
External Sensor Mode Set Temp Range: 40-90˚F, 4-32˚C
Snow Melt Mode Set Temp Range: 32-41˚F, 0-5˚C
Power: 9-24 VAC/VDC @ 12mA max
Physical Dimensions
2.85”
2.75”
© 2014 Electro Plastics, Inc.
4.50” 4.60”
1.08”
0.49”
1.43”
STEP TOUCH THERMOSTAT
MADE IN USA
1.89”
3X 0.187”
0.56”
AC TRG COM
(DC) (GND)
EXTERNAL TEMP SENSE
2.41”
1.02”
© 01/2014 Step Warmfloor, Inc. All rights reserved.
 Loading...