

Page 1

Yagi Dipole
Vertical
(Patent #6,677,914)
40m - 30m Dipole Kit
nstruction Manual for the 2-3-4 Element Yagi
I
teppIR Antennas
S
112 -116th Ave NE, Suite 2-5 , Bellevue, WA 98004
2
Tel: 425-453-1910 Fax: 425-462-4415
Tech Support: 425-891-6134
www.steppir.com
Rev: Q 01/16/08
Page 2

SteppIR Antennas 40m - 30m Dipole Kit
2
EST
A
bbreviations
EST Element Support Tube
EHU Element Housing Unit
FTP Fiberglass Telescoping Pole
QDB Quick Disconnect Boots (rubber)
ERT Element Return Tube
QDB
EHU
FTP
ERT
SteppIR Antenna Information Web Sites (as of 8/03/06)
http://steppir.com/
http://groups.yahoo.com/group/steppir/
Page 3

SteppIR Antennas 40m - 30m Dipole Kit
3
40m - 30m Dipole Overview
T
he 40m - 30m dipole is simply a driven element that functions as a dipole from 6.8 MHz to
13.8 MHz and as the driven element for the yagi array from 13.8 MHz to 54 MHz. It has no
effect on the performance of the yagi. The yagi works the same with or without this option.
A dipole for 40m would normally be about 64 feet long but we have shortened it to 39 feet
by looping the element tip back towards the boom. This is a form of linear loading and is
very efficient, however, nothing comes for free and with this dipole you lose about .37 db on
40m over a full size dipole. This is hardly measurable at the receiving station end so it is a
very reasonable trade off. On 30m since the copper tape barely turns the corner back toward
the boom it essentially performs like a full sized dipole.
On 40m folding the element back nearly double (the tape comes within about 3.5 feet of the
boom on each side) very conveniently makes the impedance 25 ohms, a 1.0:1 match for our
yagi Balun/Unun. On the 30m, however, we have a full sized dipole whose impedance is
very much dependant on the height above ground so there is a varying degree of mismatch.
Below 40 feet or so you will find the SWR as high as 2.6:1 but at greater heights it can drop
to as low as 1.6:1 SWR.
This small amount of mismatch can easily be handled by the internal tuners on most trans-
ceivers. At 10 MHz SWR values in this range result in insignificant loss, so the antenna will
perform very well on 30m. You will find that on 40m even at heights below 40 feet you will
get a very good match with this type of shortened dipole. If the SWR seems to be too high
try adjusting the driven element length using the “Create Modify” function.
Note: By using the “Create Modify” function to fully extend either the reflector or director 1
on 30m you can create a very short director for the dipole resulting in .5 db gain and
lowering the SWR by about .2. You can then save it and it will be permanent. You
could also save it in both directions (180
180° and the director 1 in the normal direction and now have it reversible. If SWR is
the biggest concern try
lengthening both the reflector and director 1 to
get the lowest SWR.
Warm Regards,
First Prototype Sweep
°
and normal), lengthen the reflector in the
Mike Mertel
Mi
chael (Mike) Mertel - K7IR
President
Page 4

SteppIR Antennas 40m - 30m Dipole Kit
Boom
Element Support Tube
4
Stepper Drive Motor
Copper Beryllium Tape
Element Housing Unit
Element Return Tube
Page 5

SteppIR Antennas 40m - 30m Dipole Kit
5
Topic Page
Abbreviations 2
40m - 30m Dipole Overview 3
Table of Contents 5
Parts List 6
For Upgrade of Existing Antenna
Remove Existing Driven Element - 2 Element 7
- 3 Element 8
- 4 Element 9
Install 40m - 30m Return Loop
Install the Element Return Mounting Bracket 10
Assemble the Return Mounting Kit 11
Install Boom Counter-weights (4 Element Retrofit ONLY) 12
Install the Element Housing Unit 14
Install CPVC Liner Tubes 14
Prepare the Fiberglass Telescoping Poles (FTP) 16
Assemble the Sweeps to the Poles 18
Attach the 40 - 30 EST’s to the EST & ERT 21
Antenna Layout Drawing - 2 Element 22
- 3 Element 23
- 4 Element 23
New Antenna Specifications 24
Appendix A - 6m Passive (Early 3 Element Reconfiguration) 25
Appendix B - Controller (Upgrade) 26
Appendix C - CPU (Firmware chip) Replacement Procedures 27
Appendix D - Controller Firmware Version 6.7 or Later 30
Appendix E - Troubleshooting Guide 33
Appendix F - Replacing the Driven Element Bracket 39
SteppIR Warranty 41
Page 6

SteppIR Antennas 40m - 30m Dipole Kit
40m - 30m Dipole Kit
(
RETROFIT 3E)
ITEM QTY PART # DESCRIPTION
PARTS LIST
6
1
BOX 1 1 72-0027-01 ELEMENT HOUSING UNIT (DRIVEN)
1 72-0009-03 PVC GLUE PACK
2 72-0027-02 SWEEP ASSEMBLY (RETURN LOOP)
2 72-xxxx-01 COUNTER-WEIGHT BAR 2-1/2” x 12” x 1/2” (4 Element Retrofit Only)
1 72-0027-03 FIBERGLASS TUBE, 1.75" OD x 12"
BOX 2 4 70-2025-02 3/4” CPVC LINER TUBE WITH COUPLING (2-43.5” & 2- 49” LONG)
BAG 1 16 60-0014-01 6-32 X 7/8 PANHEAD SCREWS
1 10-1505-01 ELEMENT RETURN BRACKET
4 72-0023-06 FIBERGLASS TELESCOPING POLE (FTP), 18 FOOT
72-0009-02
40M - 30M DIPOLE KIT
DRIVEN ELEMENT KIT
ELEMENT RETURN TUBE KIT
HARDWARE
16 60-0014 6/32 NYLOK NUT
4 60-0014 4-40 X 3/4 PANHEAD SCREW
2 60-0003 1-3/4 U-BOLT W/SADDLES
2 60-0093 5/16 X 2-3/4 BOLTS
6 60-0046 5/16 NYLOK NUTS
BAG 2 4 60-1006-01 QUICK DISCONNECT (RUBBER BOOT) 1.5” TO 1.25” - W/CLAMPS
8 60-0021-01 4-40 X 5/8 PANHEAD SCREW
12 60-0022 4-40 NYLOK NUT
7 60-0019 10-32 NYLOK NUTS
2 60-0091 1/4-20 X 3-3/4 BOLT (4 Element Retrofit Only)
2 60-0030 1/4 NYLOK NUT (4 Element Retrofit Only)
8 60-0041 1/4 FLAT WASHER (4 Element Retrofit Only)
1 09-0002 CW 85 ELECTRICAL TAPE (66 ft)
1 20-4003-01 CPU CHIP W/LATEST FIRMWARE & 40 - 30 BUTTON LABEL
Page 7

SteppIR Antennas 40m - 30m Dipole Kit
7
Remove Existing Driven Element: (F
• Retract all elements:
sing the controller:
• U
• Go to “Setup” mode and press ‘Select’
• Using the ‘Up’ - ‘Dn’ buttons find “Retract Elements” and press ‘Select’
• Using the ‘Up’ - ‘Dn’ buttons find “Yes” and press ‘Select’
• Wait for the “ * ” to stop flashing
• The elements are now retracted
• Disconnect the coax and control cable for the driven
• Loosen the clamps holding the two rubber boots securing the fiberglass poles
• Remove the two fiberglass telescoping poles (FTPs) from the driven element
housing (Drawing 1 - 3 or 5)
• Remove the driven element housing (EHU) unit from its mounting plate
(Drawing 1 - 3 or 5)
Note: For customers who purchased a 3 element anten
housing brackets may have been of a different design. If you have the original style
element housing bracket (approximately 4-1/4” across the top) you will need to install a new style element housing bracket on your boom before you can mount the
new 40m - 30m dipole driven element housing unit (see Appendix F).
or Retrofit Installation ONLY)
element
na before March 2003 your element
REMOVE
iven FTPs & EHU
Dr
2 Element 20m - 6m
New 40m - 30m Dipole Loop
2 Element 40m - 6m
Driven
Director
Driven
Director
Drawing 1
rawing 2
D
Page 8

SteppIR Antennas 40m - 30m Dipole Kit
Director
EMOVE
R
iven FTPs & EHU
Dr
3 Element 20m - 6m
Driven
8
Drawing 3
New 40m - 30m Dipole Loop
Reflector
Director
Drawing 4
Driven
3 Element 40m - 6m
Reflector
Page 9

SteppIR Antennas 40m - 30m Dipole Kit
Reflector
R
D
EMOVE
riven FTPs & EHU
Drawing 5
Driven
Director 1
9
4 Element 20m - 6m
New 40m - 30m Dipole Loop
Director 2
Reflector
Driven
Drawing 6
Director 1
4 Element 40m - 6m
Director 2
Page 10

SteppIR Antennas 40m - 30m Dipole Kit
Install 40m - 30m Return Loop:
In
stall the Element Return Mounting Bracket: (For Retrofit Kit ONLY)
10
Note
• Drilling instructions
Warning:
Keep the drill straight while drilling to produce a clean round hole.
he element return bracket comes installed when ordered with a new antenna.
: T
• M
easure
• Secure
• Make sure to level
ither a level or actually mounting the element and eyeballing it.
e
• Drill
sing the pre-drilled pilot holes in the bracket as a guide (Picture 1).
u
& mark the boom to install the return bracket per D
the return bracket firmly in place with some type of clamp (P
the bracket with respect to the driven element bracket using
four 5/16” holes, two in from each side, through the bracket and the boom
rawing 7, 8 or 9.
icture 1).
Make sure that the bracket does not slip or twist while drilling.
It may be helpful to drill both holes for one bolt and then install
that bolt providing more positive alignment for the second hole.
• Install the two 5/16” bolts with Nylok nuts & tighten
snug as possible in the holes.
Note: For the 2 element boom only you will need to move the mast plate from its original
position in the center of the boom to make room for the return bracket. It can be located in any of the four (4) positions indicated in Drawing 7. It only needs to be
moved enough to clear the return bracket. If you will be installing the optional 6m
passive element - only positions #2 or #3 can be used.
. These bolts should fit as
irector
D
.75 12.00
4 8.0 0
2 .2 5
Director
Drawing 8
9 4.0
2
3
8" splice
Drawing 7
19 6 .5 0
4 8.0 0
Driven
Return
4 .2 5
4
48.00
2 0.7 5
2 5.0 0
18.60
Driven
1
18.60
2 Element
.75
3 Element
Reflector
4 8.0 0
Return
10 2 .5 0
4 8.0 0
5 0.2 5
Page 11

SteppIR Antennas 40m - 30m Dipole Kit
11
R
eflector
Return
84.00 114.00 186.50
25.00
Driven
Drawing 9
42.5067.5046.25
72.00
Director 1
42.50 67.50
* Not Actual Spacing *
Return
racket
B
Level
Pre-Drilled
ilot Holes (4)
P
(2 Per Side)
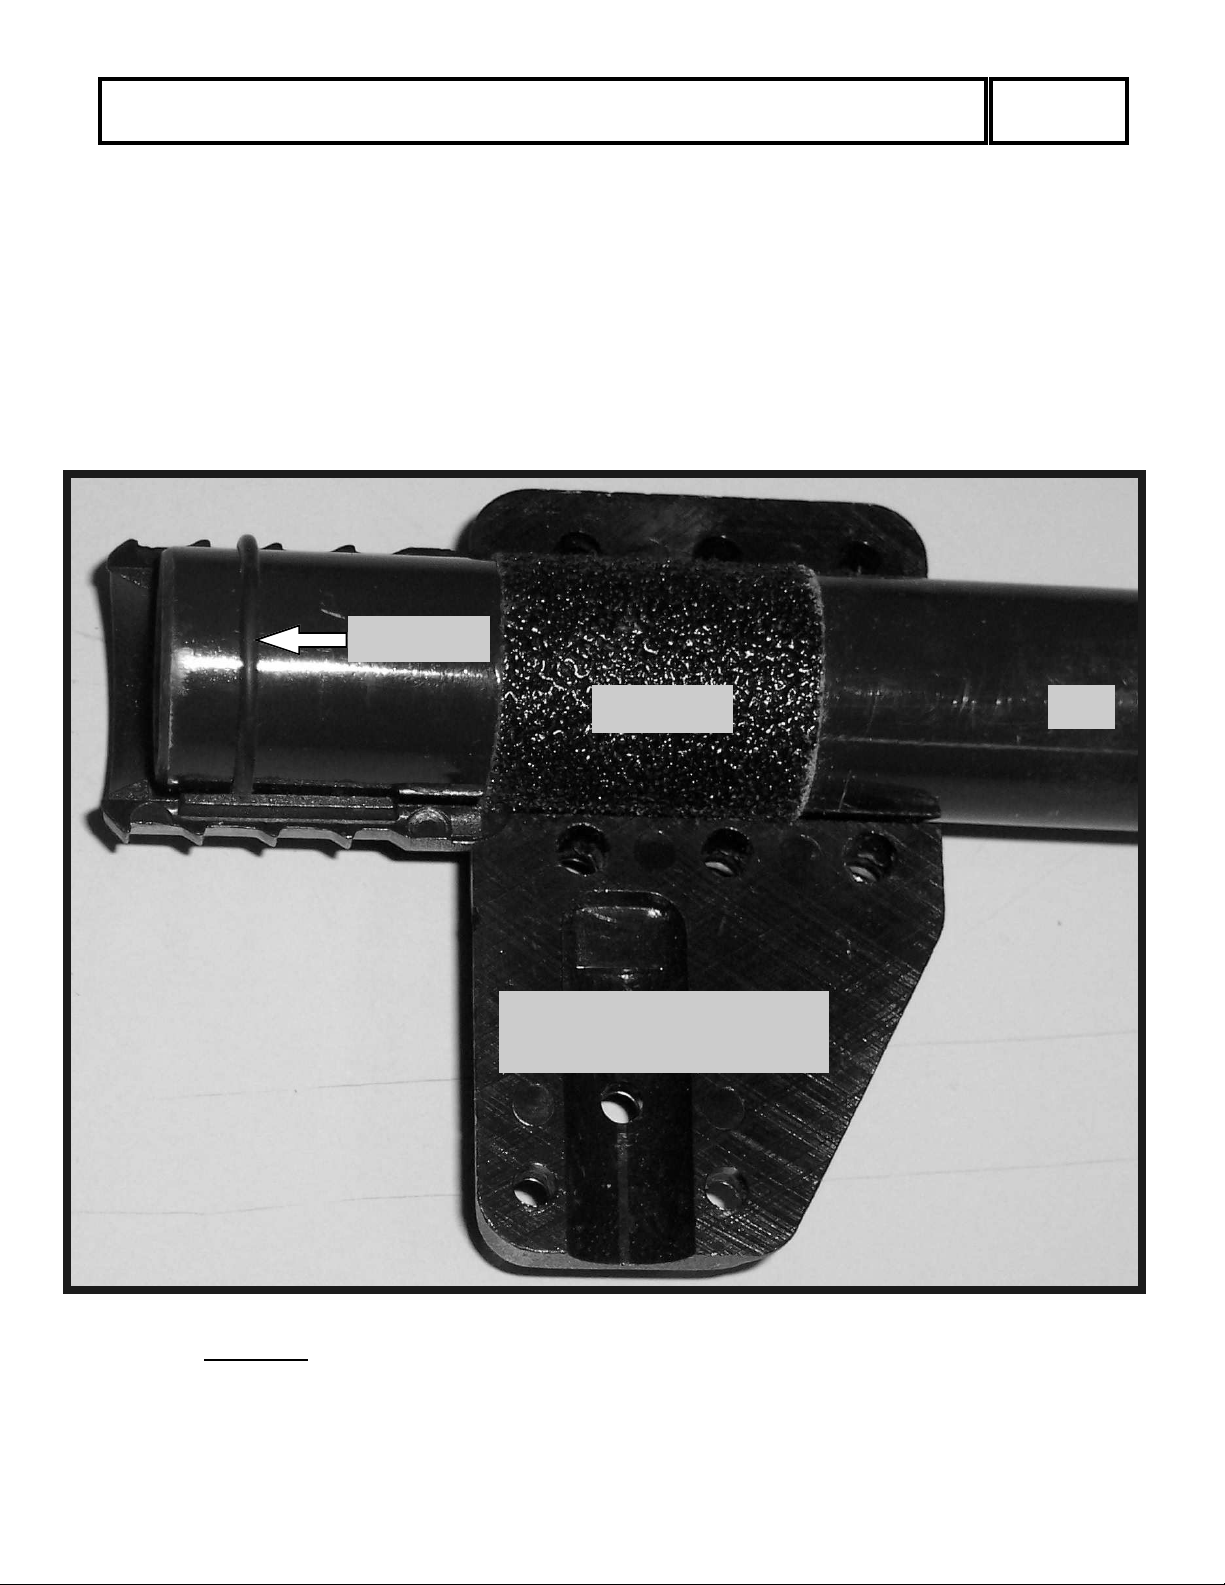
• A
ssemble the Return Mounting Kit
nstall return element cross tube and U-bolts as seen in Picture 3 (center an
• I
aluminum sleeve under each U-bolt but do not tighten yet).
Note: Some of the U-bolt saddles have come from the supplier with the ears bent out-
ward (Picture 2-A). It is recommended that you bend then straight so that they
center on the reinforcing ring more securely and safer (Picture 2-B). The sad-
dles will need to be pressed on securely (or tapped on with a hammer) until
they bottom out.
• Measure the return tube offset to
ma
tch the offset of the driven ele-
ment housing tube (Drawing 10).
• Tighten the U-bolts securely.
Drill Bit
A B
4 Element
Picture 1
Driven Bracket
Return Kit
Picture 2
Director 2
46.25
Page 12

SteppIR Antennas 40m - 30m Dipole Kit
12
Picture 3
Drawing 10
6
7
5
4
3
1
2
nstall Boom Counter-weights (4 Element ONLY):
I
On the 4 element antenna ONLY you will need to install a pair of counter-weights to the side
of the Director 2 element mounting bracket (Picture 3B) to balance the boom after the in-
stallation of the 40m - 30m dipole kit. These are powder coated steel bars weighing approxi-
mately a total of 8.2 pounds.
Locate: (Picture 3A)
• Two steel bars 2-1/2” x 12” x 1/2” (counter-weigh
• Two 1/4-20 x 3-3/4” bolts
• Two 1/4-20 Nylok nuts
• Eight 1/4” flat washers
Suggested Installation Steps (retrofit only):
• On a retrofit installation you should not need to remove the element housing unit
(EHU) from the element mounting bracket but do be careful with the weight of
the EHU and the FTP’s attached when you remove the existing bolts.
• Remove the first 1/4” bolt from the Di
stall it back into its hole from the other side of the bracket. This will support the
bracket while you remove the second bolt.
• Remove the second 1/4” bolts from the Director 2 element mounting bracket.
• Put two 1\4” flat washers on each of the new 1/4-20 x 3-3/4” bolts.
• Position the first counter-weight by lining up the holes so that the end of the
weight is even with the end of the element mounting bracket (Picture 3B) and in-
stall a new 1/4-20 x 3-3/4” bolts with the two flat washers through the empty
hole.
• Now install the second new 1/4-20 x 3-3/4” bolts with
through the second hole pushing out the old bolt that you temporarily installed
from the other side.
• Put the second counter-weight over the two new bolts sticking out.
• Install two flat washers on each bolt and then the new Nylok nuts and tighten.
• The end results should look like Pi
• This completes the installation of the counter-weights.
rector 2 element mounting bracket and in-
cture 3B.
ts)
the two flat washers
Page 13

SteppIR Antennas 40m - 30m Dipole Kit
Director 2 - Element Mounting Bracket
13
Picture 3A
Director 2 - Element
ounting Bracket
M
ounter-Weight Bar (2)
C
4 Element Counter-Weight Assembled
or the 40m - 30m Dipole Option
f
Counter-Weight
ars Installed
B
Picture 3B
Page 14

SteppIR Antennas 40m - 30m Dipole Kit
Install the Element Housing Unit (EHU):
Wa
rning: (For a retrofit installation only) Mount the new 40m - 30m driven element hous-
ing unit (EHU) in the SAME
r
efer to Drawing 2 - 4 or 6.
• Install the driven element housing unit onto the element bracket with bolts in
holes 1 through 7 (Drawing 10) and tighten. Use the seven (7) new 10-32
Nylok nuts and the existing screws. (For a retrofit installation only) hole # 7 will
need to be drilled through the aluminum element bracket (with a # 6 or a 13/64”
bit) before the bolt can be installed and tightened.
• If the mounting holes in the new EHU do not line up w
mounting bracket you may need to loosen the two horizontal bolts [Picture 1
(Driven Bracket)] that secure the element mounting bracket to the boom and
then insert the screws in the EHU and tighten. Be sure to retighten the two horizontal bolts when you are finished mounting the EHU.
• The remaining three bolts do not pass through the aluminum element plate but be
sure they are tight also.
Note: With a retrofit installation
he control cable and run the “Test Motors
t
ain antenna installation manual to verify the wiring is correct and eve-
m
rything is functioning before final assembly.
Installing CPVC Liner Tubes:
Locate:
• Four pieces of 3/4” CPVC liner extension tubing
(pi
cture 4 & 5 only has 2 shown in picture) with
CPVC coupling installed, two poles for each side.
• One CPVC glue kit
• One or more good assistants
• Using the supplied glue and cotton tips, apply the
glue onto any area where there is a CPVC connection. Be sure and place the glue
onto the outside of the CPVC tubing and NOT ON THE INSIDE OF THE COU-
PLER. Then slide the coupler onto the CPVC so that none of the glue goes onto the
inside of the CPVC, this would cause a potential blockage inside the tube.
• Glue the two CPVC sections together so that the 43.5”
element housing and the 49” will slide into the Fiberglas Telescoping Pole first. Let
it dry for ten minutes.
• Repeat this process for the other side.
orientation as the old unit that you removed. Also
ith the holes in the element
this is the point where you want to reconnect
” procedure outlined in the
section can be glued to the
14
Picture 4
43.5” CPVC
49”
CPVC
Page 15

SteppIR Antennas 40m - 30m Dipole Kit
Note: You may need to prop up the CPVC until the glue sets.
W
arning: This will leave you with the two liner ext
not to hit or catch anything on these liners as this could damage the CPVC.
These liners will be covered with the installation of the Fiberglass Telescoping
Poles in the next operation. Be equally careful when sliding them into place.
• Prepare the special EST’s marked 30 - 40 as described in the “Prepare the Fi-
berglass Telescoping Poles (FTP)” section and “Assemble the Sweeps to the
Poles:” sections.
• Read the “Attach the 40 - 30 FTP’s to the EST & ERT”
ing.
• Slide the entire CPVC extension into the Fiberglass Telescoping Pole, except for
6” to allow for gluing to the CPVC in the element housing, as shown in Drawing
11.
Note: It may take a number of attempts to get the CPVC liner tube to go past the second
section of the Fiberglass Telescoping Pole, allowing it to go in all the way (Drawing
11). Gently shaking the CPVC can be helpful. Take your time and be careful with it.
• Then you will glue the CPVC extension tube to the int
housing (Picture 6)
ensions sticking out. Be very careful
section before continu-
ernal CPVC of the driven
15
EST Ho usin g
Drawing 11
ib erg la ss Telescoping Pole with Inte rna l C PV C for 40/30m Diag ram
F
Rubbe r boot sh o u ld b e place onto th e Fiberg las s
Tele scoping Pole s o that it slid e s o n to the ES T
CP VC Co up ler
43 .5 Inn er C PV C
• After the glue has been dried, then finish
th
e assembly as described in the “Attach
the 40 - 30 FTP’s to the EST & ERT”
section.
• Repeat these instructions for the other
si
de to finish the installation of the 40m -
30m loop assembly.
CPVC Liner
49 Inn er C PVC
Picture 6
EHT
Bullet
EHU
Page 16

S
teppIR Antennas 40m - 30m Dipole Kit
Prepare the Fiberglass Telescoping Poles
L
ocate:
• Four dark green fiberglass telescoping poles (Pi
• Four quick disconnect boots with clamps (Picture 5)
• One roll of black vinyl electrical tape (Picture 11)
• Your tape measure
Note: The steel reinforcing rings on the first two pole sections provide extra strength in
potential high stress conditions.
The green fiberglass telescoping poles are all assembled in the same manner and, when
extended, keep the copper -beryllium tape safe from the weather. The copper-beryllium tape
is shipped retracted inside their respective element housing units (EHUs).
Repeat the following procedure for each telescoping pole
elescope a pole to full length by jerking each section out very
T
aggressively with a twisting motion until it is extended as far as
possible. Each segment is tapered and should lock (jam) se-
curely in place when fully extended. It is especially important
on the 40 - 30 driven element that the poles are very firmly telescoped. You don’t want them potentially twisting out of level
in the wind - that would not look good. Each poles length, when
fully extended, must be 17’ 8” +/- 1”
from the butt (large) end of the pole to the tip. (Picture 13)
Caution: Verify the length for each pole before
f a pole comes up a little short try collapsing the pole and start-
I
Picture 5
n length as measured
i
cture 13)
Picture 11
Picture 13
proceeding.
16
ing over, this time aggressively
stead of twisting. The pole cannot be damaged and you may
gain a minimum of 1/2” or more.
jerk” each section out in-
“
17’8” +/- 1”
Page 17

SteppIR Antennas 40m - 30m Dipole Kit
If you have trouble collapsing a pole try carefully striking one end on a piece of wood or
o
ther similar surface placed on the ground. If necessary you can use a hard plastic faced
mallet to drive the sections in.
At the factory when we quality check the poles to verify that they meet minimum
ength we hold the butt (large) end and whip it like we were casting a fishing pole
l
with considerable force. This procedure can produce a significant difference in the
extended length of some poles as a last resort if nothing else works.
DO BE CAREFUL !!!
17
Warning:
Next wrap each joint on the fiberglass poles (Picture 15) with the vinyl electrical tape
(Picture 11). Use approximately: 40 in. On the first (large) joint
31 in. On the second (middle) joint
22 in. On the third (small) joint.
For each joint, stretch the tape tight (up to 50 %) as you wrap it. This should make at least
two passes. This new tape replaces the old electrical tape and silicone tape process we
used before. E
joint.
Exception: On joints with reinforcing rings, the tape must continue further so it extends a
heck all four sections of each pole for packing popcorn or any other
C
foreign object that could interfere with the copper tape movement.
There are NO
reen telescoping poles as there are in a regular pole. This is the correct
g
configuration for the four 40 - 30 poles.
ach joint should have at least the full width of the tape on both sides of the
minimum of one full tape width beyond the metal ring and onto the fiberglass
pole.
foam plugs glued in the small end of these four special dark
Picture 15
Start the tape with one complete wrap of electrical tape around the fiberglass telescoping
pole. The tape should be applied in half-lapped layers with sufficient tension to produce a
uniform wind (for most applications this tension will reduce the tape’s width to approximately 5/8 of its original width). In the beginning wrap the tape up-hill, taping from a
smaller diameter surface to a larger diameter surface then back down smoothing the tape
with your fingers as you go. Apply the tape with no tension on the last full wrap to prevent
flagging. At the end of the run, cut the tape with a knife or scissors and press it down flat.
Then run your hand over the tape again a couple of times to smooth it and firm up the bond-
Page 18

SteppIR Antennas 40m - 30m Dipole Kit
Picture 19
18
Assemble the Sweeps to the Poles:
ocate: 2 Sweep Assemblies (Picture 19)
L
2 3/8 x 28” White Fiberglass Rods
4 #4 x 3/4” Screws w/Nylok nuts
8 #4 x 5/8” Screws w/Nylok nuts
16 #6 x 7/8” Screws w/Nylok nuts
4 Telescoping Fiberglass Poles
1 Small container of silicone grease (Picture 25.5)
Layout two poles (fully extended and taped) parallel about 30” apart. The tip of each pole
will have an “O” ring seal (glued on) and a piece of adhesive non-skid attached to it (Picture
21). Their will also be one extra strip (spare) of non-skid tape in the hardware kit in case a
repair is needed. This material is to provide a very secure grip for the return loop fitting to
grab on to.
Get one of the sweep assemblies, making sure the label [THIS WAY UP] is on top (Picture
19) and the drain holes in the tip of the loop are to the bottom. Insert one of the pole tips into
each of the sweep fittings (Picture 25) making sure that they go in until they bottom out
(approximately 2-3/8”). The non-skid tape should go completely inside the fitting (Picture
27). It may be a good idea to mark the poles so you can see when they are fully seated.
WARNING: Petroleum base lubricants WI
25). We recommend that you apply a thin film of the NON PETROLEUM
ased silicone grease - (provided
b
serted in the fitting.
LL
damage the polycarbonate fittings (P
- Picture 25.5)
to the “O” ring as it is in-
Picture 21
icture
Picture 25
Picture 25.5
inished Assembly
F
Picture 26
Page 19
SteppIR Antennas 40m - 30m Dipole Kit
Caution: Inserting the pole tip into the sweep fitting may be very tight. You may need to
i
nsert a screwdriver into the gap on the edge of the fitting (Picture 25) and pry it
apart enough to push the pole home. Be careful not to damage the “O” ring seal or
the non-skid tape when inserting the poles.
Now insert one of the white fiberglass rods, one end into each fitting (Picture 26 & 29), into
the assembly and line up the holes.
Repeat this procedure for the other side.
19
“O” Ring
Grip Tape
Cut-Away View of Return
acket Fitting
Br
Pole
Picture 27
is a cut-away to show the position of the pole tip and its components
s they fit together inside the sweep fitting.
a
Page 20

SteppIR Antennas 40m - 30m Dipole Kit
20
Now, as seen in P
and tighten to secure the fitting to the green poles. Be sure to place the nut into the side of
the fitting that is molded to capture the nut (Picture 28), Do not tighten yet.
Next insert the #4 screws and Nylok nuts used to properly secure the 3/8” white fiberglass
rod that stiffens the return loop assembly. The center screw is #4 x 3/4 and the other two
screws are #4 x 5/8 (Picture 29). When inserting the middle screw through the fiberglass
rod you may need to screw it in with a screw driver to get it to go through. Again observe
the correct side of the fitting to place the nuts. Now tighten all the screws.
Note: You may need to hold the nut down in the pocket with your finger when you first be-
gin tightening each screw.
When both return loop assemblies are properly mounted to the ends of the fiberglass telescoping poles the two resultant assemblies are ready for final preparation and installation to
the element housing tube and the return bracket tube (Drawing 13).
icture 29, insert the four #6 screws and Nylok nuts in each of the fittings
Picture 28
Picture 29
(4) # 6 Screws
# 4 x 3/4 Screws
This Side Molded
o Hold a Nut
t
# 4 x 5/8 Screws
EHU
Not Used
Drawing 13
EHT
Reinforcing Rings
ERT
Page 21

teppIR Antennas 40m - 30m Dipole Kit
S
21
Attach the 40 - 30 FTPs to the EST & ERT:
T
he butt (large) ends of the green fiberglass telesco
ameter. Some of them may have been sanded, while others were not. The colors at the ends will be either natural, or black. The difference in colors has no affect on performance. Do not be concerned if
they vary slightly in tightness when being installed in the EST’s. This is normal. All poles are tested at
the factory prior to shipping, however in the event that a specific pole just won’t fit sanding it is okay.
The EST’s on the EHU’s have aluminum reinforcing rings (Drawing 13) attached to provide extra
strength in high wind conditions.
Locate the four quick disconnect boots (rubber) and repeat the following procedure for each of the four
fiberglass telescoping poles.
ping poles (FTPs) may vary slightly in outside di-
Picture 35
Picture 31
• Place the narrow end of a rubber boot onto the butt (
assembly and slide them about 6” up each pole (Figure 31).
• Insert the butt ends of each of the two pole assemblies into one side of the EST and the ERT
(Drawing 9).
Caution: It is very important to ensure that the butt (large)
pole firmly bottoms out (is seated) inside the driven element EST.
n the element return tube (ERT) the pole (FTP) may be adjusted in or out a small
O
amount to get the tips of the two poles even (where the sweep is attached - Picture 27),
just make sure the black raised ring on the FTP is covered by the rubber boot.
ush each rubber boot firmly onto its EST until the h
• P
and will clamp down onto the fiberglass telescoping pole (Picture 35). It is imperative that
the stainless steel hose clamp be located so that the clamp on the outside of the rubber boot on
the EHU side of the connection is completely PAST
ures that the hose clamp can grip onto the fiberglass and the ring will prevent the rubber
s
boot from ever coming off.
Note: Before tightening the rubber boots ensure the 40m - 30m driven element loop tip is level by ro-
tating the butts of each EST until the element tip is level.
• Firmly tighten both stainless steel hose clamps, one
test the connection by pulling and twisting it. There should be no slippage at the joints.
Picture 33
large) end of each of the two poles of the first
end of each fiberglass telescoping
ose clamp is past the aluminum ring
the aluminum reinforcing ring. This en-
over the EST and the other over the FTP. Then
Page 22

SteppIR Antennas 40m - 30m Dipole Kit
• F
inally wrap each of the quick disconnect boots (rubber) between the clamps with two
layers of the premium all weather electrical tape the same way as you wrap the joints on
the FTP’s (Picture 15). Remember to stretch the tape tight and smooth it down while
wrapping. This tape will help protect the rubber from UV radiation.
After installing both return loop assemblies and double checking that all connections are
made and fittings are properly tightened the assembly of the 40m - 30m dipole section is
complete.
If this is a retrofit kit
he antenna otherwise return to the main
t
assembly manual.
it is time to mount
Electrical Tape
22
30 in. From center of
riven element to center
d
of return element
Boom / Mast Plate
Mast
Splice
40m - 30m Return
ounting Plate
M
22 in. From center of driven
lement to center of 6m
e
passive element
57in.
Drawing 15
Optional 6m Passive
114 in. Long
Picture 19
Director
D
riven
2 Element Yagi Spacing and Installation Layout
(not to scale)
Page 23
SteppIR Antennas 40m - 30m Dipole Kit
23
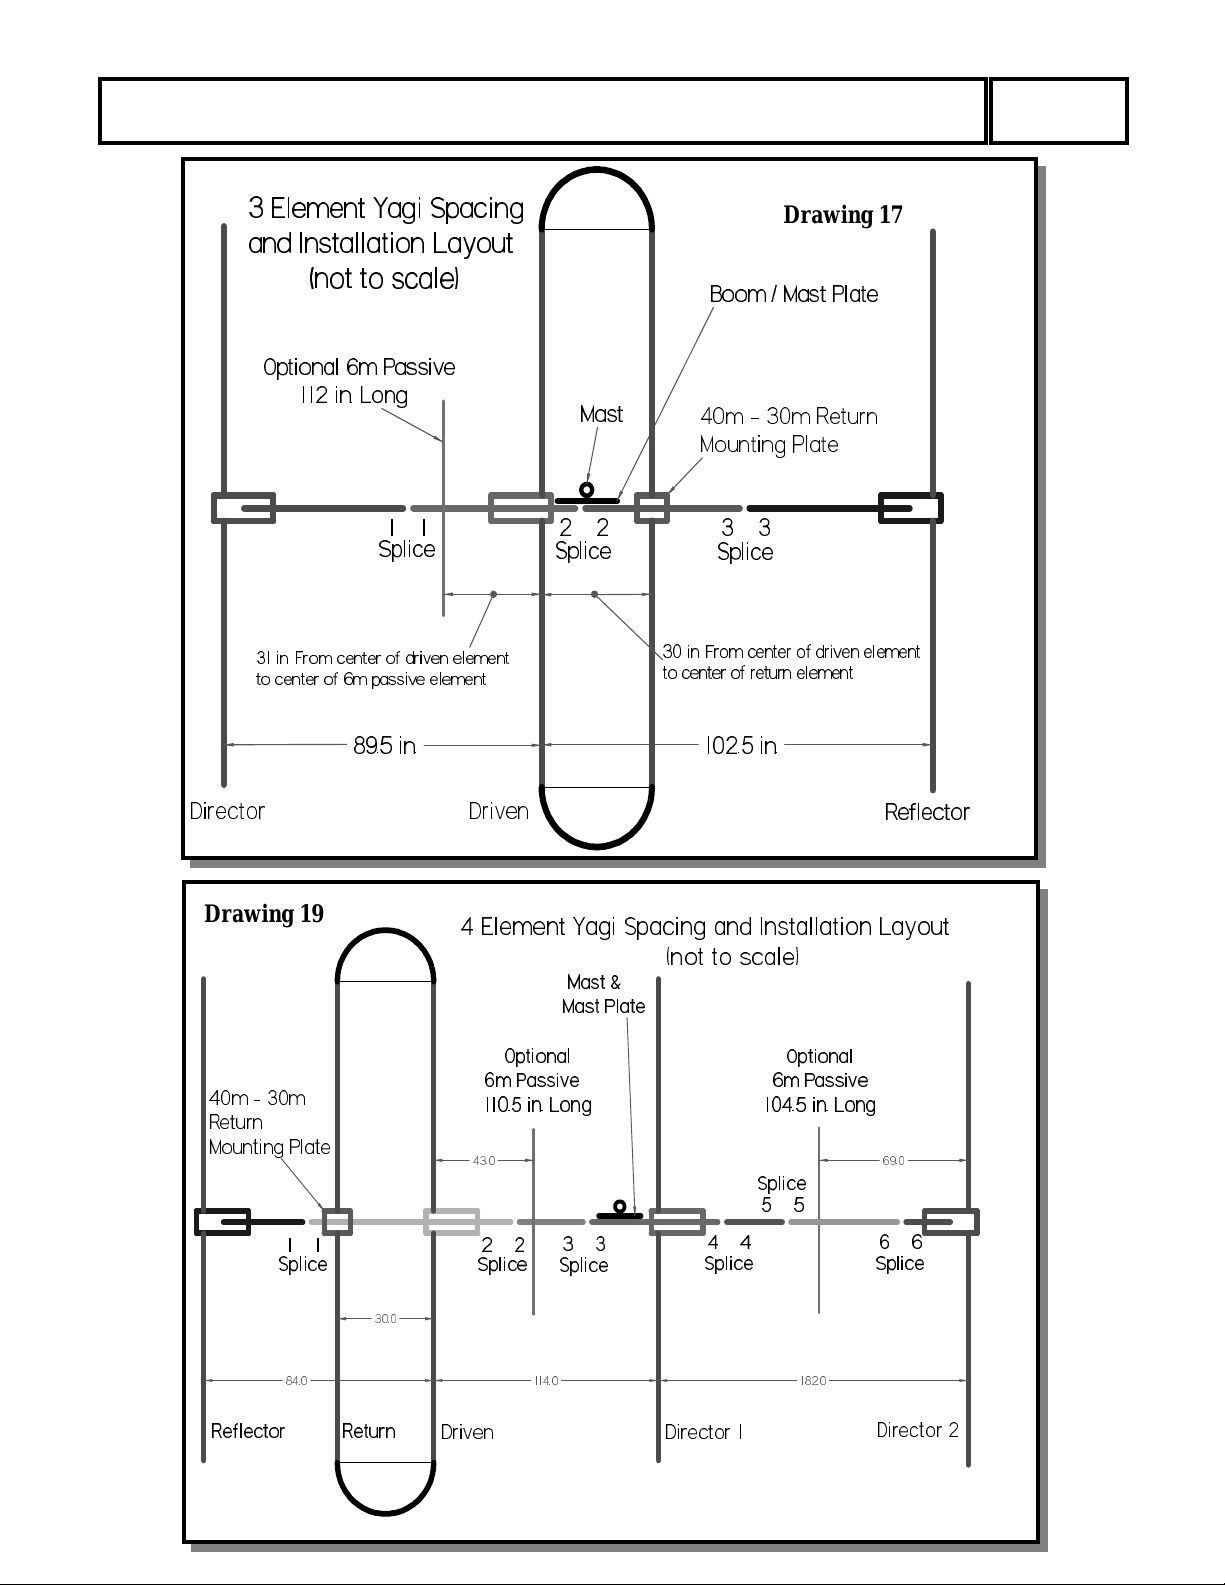
3 Element Yagi Spacing
nd Installation Layout
a
(not to scale)
Optional 6m Passive
112 in. Long
Splice
31 in. From center of driven element
o center of 6m passive element
t
89.5 in. 102.5 in.
Mast
2 2
Splice
Drawing 17
Boom / Mast Plate
40m - 30m Return
ounting Plate
M
31 1
3
Splice
30 in. From center of driven element
o center of return element
t
Director D
Drawing 19
40m - 30m
eturn
R
Mounting Plate
1 1
Splice
84.0 114.0 182.0
30.0
4 Element Yagi Spacing and Installation Layout
riven
(not to scale)
Mast &
Ma
st Plate
Optional
6m Passive
110.5 in. Long
43.0 69.0
4
2 2
Splice
3 3
Splice
4
Splice
Optional
6m Passive
104.5 in. Long
Sp
lice
5
5
Reflector
6 6
Splice
Reflector
Return
Driven
Director 1
Director 2
Page 24

SteppIR Antennas 40m - 30m Dipole Kit
New Antenna Specifications With
24
Specifications
/ 40m - 30m
W
eight
W
Max. Wind
urface Area
S
ind Rating
W
Longest
lement
E
ower Rating
P
T
he 40m - 30m Dipole Installed
→
2 Element Yagi 3 Element Yagi 4 Element Yagi
→
37 lb / 16.8 kg 58 lb / 23.1 kg 108 lb / 49.0 kg
→
6.0 ft2 /
→
100 MPH EIA-
→
39 ft / 11.88 m 39 ft / 11.88 m 39 ft / 11.88 m
→
3000 Watts
Ke
.56m2
222-C
y Down
8.1 ft² / 0.75 m² 11.7 ft² / 1.09 m²
100 MPH EIA-
222-C
3000 Watts
Key Down
100 MPH EIA-
222-C
3000 Watts
Key Down
Boom Length
oom Diameter → 1.75 in
B
Mast Diameter
requency
F
Coverage
Turning Radius
able
C
Requirements
Tuning Rate
→
57 in / 1.44 m 16 ft / 4.87 m 32 ft / 9.75 m
4.5 cm
→
2.0 in / 5.08 cm 2.0 in / 5.08 cm 2.0 in / 5.08 cm
→
40m - 6m
Continuous
18.15 ft / 5.53 m 19.7 ft / 6 m 24.1 ft / 7.35 m
→
→
12 conductor
22
AWG
(shielded)
→
1.33 ft/ sec
1.75 in
4.5 cm
40m - 6m
Continuous
12 conductor
22 AWG
(shielded)
1.33 ft/ sec
2.50 - 1.75 in
6.35 - 4.5 cm
40m - 6m
Continuous
16 conductor
22 AWG
(shielded)
1.33 ft/ sec
Balun Included
40 m/sec
.
→
Yes Yes Yes
40 m/sec
.
40 m/sec
.
Page 25

SteppIR Antennas 40m - 30m Dipole Kit
Appendix A:
25
6 M
eter Passive Installation (3 Element)
e use of the optional 6m passive element on 3 element antennas configured at the end of
Th
2003 and later (Drawings 17) or earlier antennas modified to the new configuration do not
present any problems working with the new 40m - 30m dipole kit.
Antennas configured earlier (Drawings 21) that have not been modified to the new configuration will need to be modified before the new 40m - 30m dipole kit can be installed.
With the early 3 element antennas the direction on 6m was 180 degrees different from the
other bands (what were we thinking? - actually, you get very slightly better gain the other
way, about .2 dB - not worth the confusion).
The six meter aluminum element now mounts between the driven element and the director
(the elements that are approximately 89” apart). The center of the 6m element should be 31”
from the center of the driven element. (Drawings 17)
This change also necessitated adding 2” to each side of the aluminum element, for a total of
112” from tip to tip. The beam still works very well and without the mental gymnastics of
keeping track of your real direction on 6 meters!
The 6m element has enough 3/8 tubing inside to extend it to the new length of 112 inches.
All you will have to do is drill new holes.
The controller is all ready to go with the new firmware. All you need to do is enable the option using the “Options” menu.
This should be all you need to swap the 6m element position to the Normal direction.
3 Element Yagi Spacing
nd Installation Layout
a
(not to scale)
Boom / Mast Plate
Splice
30 in. From center of driven element
o center of return element
t
89.5 in. 102.5 in.
Director
Drawings 21
1
D
riven
Mast
2 2 3 31
Splice
OLD 6 meter
Passive Instalation
late 2003 & earlier
Optional 6m Passive
108
in. Long Must be
modified and relocated
to work with the 40 - 30
dipole loop system.
Splice
40m - 30m Return
ounting Plate
M
Reflector
Page 26
SteppIR Antennas 40m - 30m Dipole Kit
26
Appendix B:
C
ontroller (Upgrade)
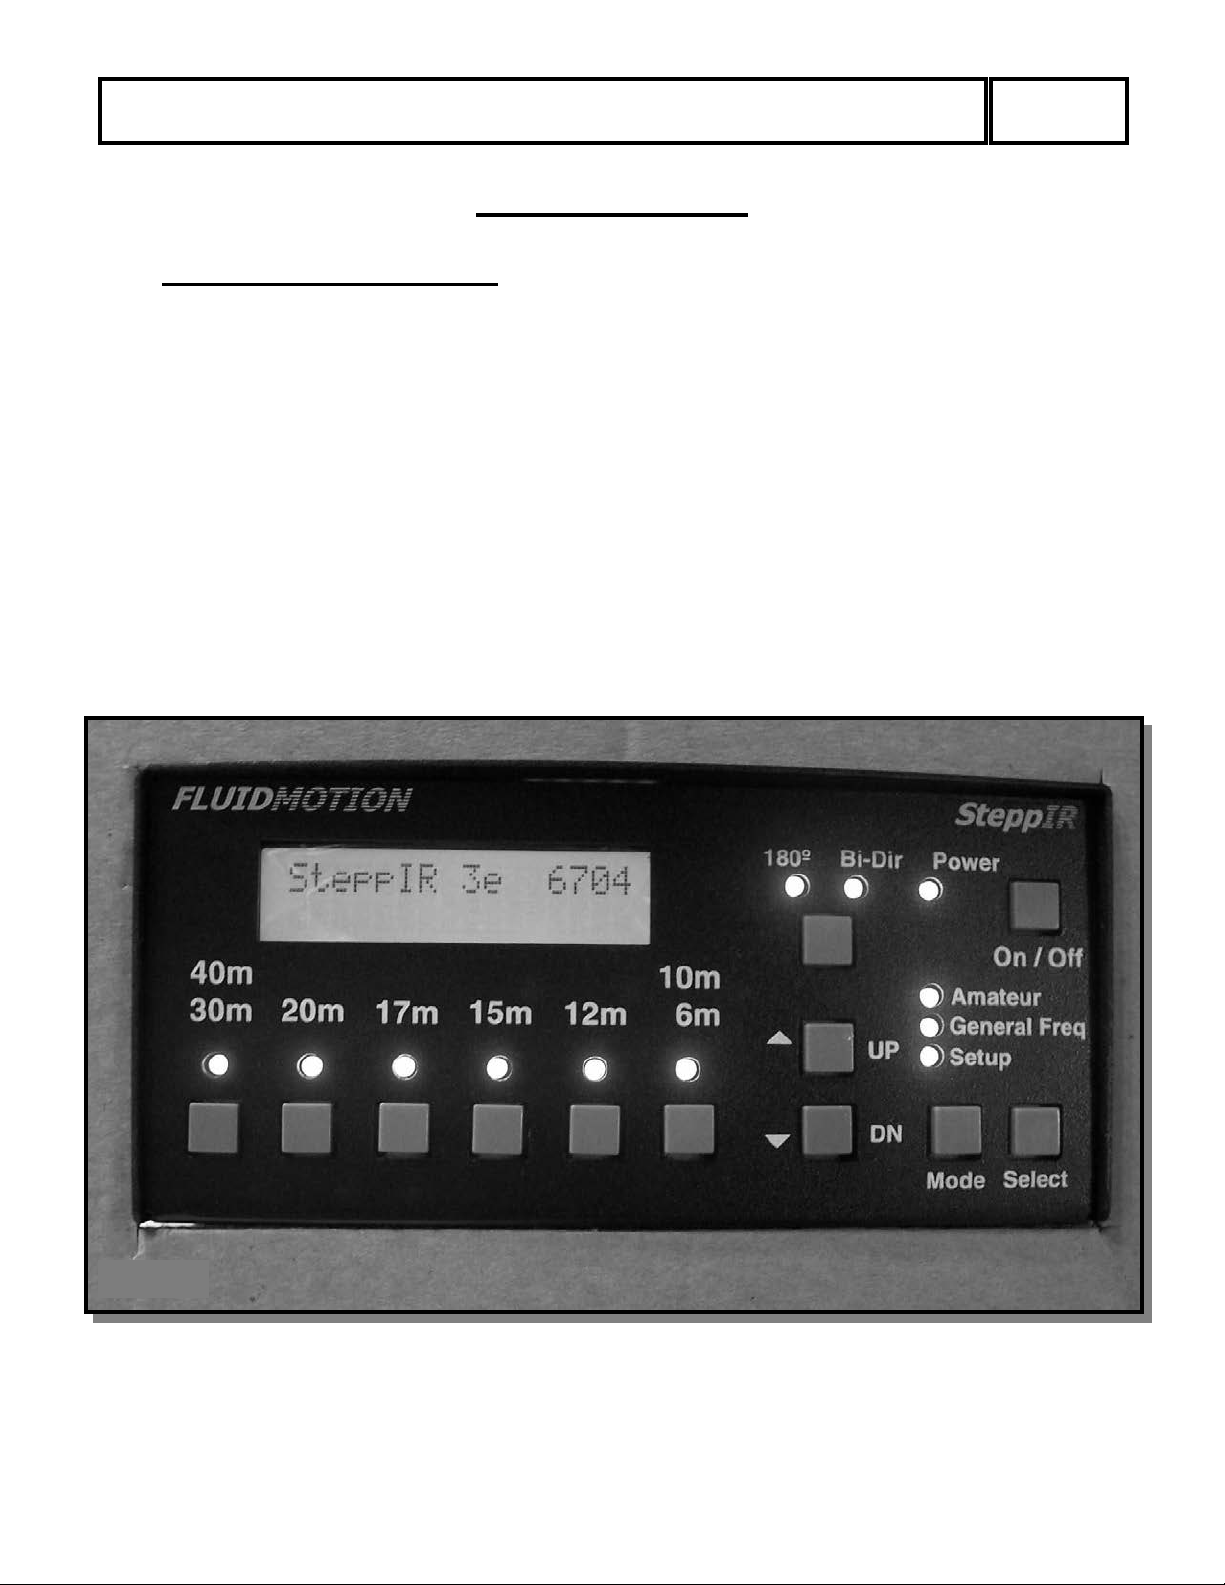
less your firmware is version 6.704 or later you will need to update your controller firm-
Un
ware with the provided chip. If you do not know what version of firmware you have on your
controller the version number will appear in the upper right hand corner of the controller display (Picture A) when you first turn it on. If your controller does not have a 40m band button you will need to install the provided label to properly identify the band buttons for the
new firmware. Look over the software options carefully, the frequency offset will need to be
adjusted in most cases to center your antenna with the new firmware. Remember to enable
the 40/30 option in the menu.
Instructions for controller firmware version 6704 or later will be in with your new chip, in the
back of your antenna manual or both.
Picture A
Page 27

CPU (chip) Replacement Procedures
Appendix C:
●
Retract elements
○
Press 'Mode' button until you see 'Setup Mode' (Setup light will also come on)
○
Press 'Select' button (within 4 seconds)
○
Press 'Up' or 'Dn' button to scroll to 'Retract Elements'
○
Press 'Select' button and 'Home Now ?' will display
○
Press 'Up' or 'Dn' button to select 'Yes' (flashing)
○
Press 'Select' button and the elements will retract (wait until the '*' stops flashing)
●
Power off and unplug the controller
●
Remove the controller top cover (Picture 1)
○
Remove four Phillips head screws (two on each side)
○
Remove the 2 jack screws from the 25 pin D sub connector (and 4 jack screws from
27
the (2) 9 pin D sub connectors if you have the interface option on your controller)
○
Remove the nut and lock washer from the ground stud on the back of the controller
○
Lift the top cover off
Display Board
Driver Board
• Unplug the driver board from the display board (Pi
Picture 1
cture 1)
Page 28

CPU (chip) Replacement Procedures
28
Chip Extractor
Picture 2
●
Use a chip extractor (P
tiny “claws” on the extractor fit at the chip corners, and hook under the chip. Gently
pull the chip upwards, rocking slightly as necessary until it is free.
icture 2 & 3) to carefully pull the chip out of its socket. The
Picture 3
Chip Extractor
Picture 4
Driver Board
Display Board
Firmware chip shown properly aligned but out of its socket
●
Caution: U
●
Align the arrow on the replacement chip to the arrow in the chip socket (P
sing any other tool to remove the chip may damage the pins on the chip
icture 4)
Page 29

C
PU (chip) Replacement Procedures
29
Picture 5
Firmware chip in its socket
●
Center the chip in the socket and press the chip down vertically with your thumb
icture 5). Press evenly until the chip is firmly seated on all sides.
(P
●
Reinstall the driver board to the display board (Picture 1)
●
Reassemble the controller cover
Page 30

New SteppIR Controller Firmware
Appendix D:
30
N
ew SteppIR Controller Firmware
V
ersion 6.7 or later
n a effort to improve the operation of the Steppir antenna and to address the problems that
I
can come up in the myriad of installations we have a new version of firmware for all of our
Yagis.
Feature list:
●
Moved Band defaults to more common frequencies in the
●
Moved the center frequency to better center the best SWR.
●
Cleaned up messages so they are clearer.
●
Frequency is common between Amateur and General Freq Modes.
●
Changed Band segments so there is one segment per band.
●
Applied changes done in Create Modify to entire band.
●
Added New Options menu.
●
Added 6M passive selection.
●
Added Transceiver Frequency tracking Disable Key.
HAM mode.
●
Added Global Frequency Offset adjustment.
●
Added Global SWR correction.
●
Made it possible to program a single button for the H
●
Added 40/30 Dipole selection.
Am
ateur Mode
ome position.
When the controller is in the Amateur Mode the band buttons 20M-6M (1 through 6) are
pre-programmed to get the antenna close to the desired frequency. On the larger bands the
buttons have several presets in the band which the controller will cycle through each time
the band button is pressed. If the the controller is switched between bands using the band
buttons it will return to the last preset frequency the button was at.
The Bandwidth will depend on which model antenna you have but it will be at least 100Khz,
if you want to fine tune the antenna the UP/DN Keys will shift the antenna frequency in
50Khz steps.
The button below the 180 and Bi-dir LEDs cycles the Steppir through the 3 directions. When
both the 180 and Bi-dir LEDs are OUT the antenna is in the Forward or Normal direction.
The transceiver interface does not change the frequency in this Mode.
Page 31

New SteppIR Controller Firmware
General Freq Mode
W
hen the controller is in this mode there are several options:
●
The Transceiver Interface sets the operating frequency.
●
The Options menu is selectable in this mode.
●
The Band buttons are programmable in this Mode.
If the transceiver interface is disabled or disconnected the band buttons can be used as
presets to your favorite frequencies or to Retract (Home) the elements. To save a preset first
use the band buttons and UP/DN keys to select the desired frequency. Next Hold the band
button in until the LED over it starts to blink. Release the button and press it once more
before the LED stops blinking.
In the Case of saving the Home position first use the setup Menu retract elements command.
After the elements are Home Press and hold the Band button as before. When you press it the
second time the Controller will display 0000Mhz.
The transceiver interface will update the frequency if it is enabled with the radio or computer
on overriding the band buttons almost immediately. If using a Band button to home the
antenna turn off the Radio first.
31
Options Menu- This menu is entered by holding the Select Key Down for 3 seconds while
the controller is in the General Freq Mode. Due to limited program space the the only sure
indication this mode is active will be some of the band LEDs lighting (LED 5 will always
light). Also since we have 2 different boxes we will refer to the Band buttons as 1 through 6
with 1 being the 20M or 40/30M button on the far left.
1) Driven Element Offset- Band button #1 works with the #2 band button Ad-
just the Driven element to Correct for feed point interactions. Each time the
#1 button is pressed the driven element is moved .2” longer. The opposite
happens when the #2 button is pressed. The band LED’s for these buttons indicate which way the driver has been adjusted (Both Off indicates the default
position). This adjustment can correct for higher than normal SWRs when
other antennas are interacting and changing the feed point impedance. It will
have little to no effect if the antenna is in the clear.
2) 6M passive selection- Button #3 will toggle between having the 6M passive
installed or not. The band LED will be lit when the passive element is selected. The lengths for the 6M passive element will be active for the Normal
and 180 positions in the frequency range of 50 MHz through 51 MHz. There
will be a small “p” in the same location as the saved segment indicator on the
LCD display when the 6M passive element lengths are being used. The 6M
passive antenna always faces forward even in the 180 mode, Bi-Dir mode will
reduce the front to back but the antenna will still have forward gain. This does
not effect any other band.
Page 32

New SteppIR Controller Firmware
3
) 40/30 Dipole selection- Button #4 toggles between having the 40/30 Dipole
option installed or not. The band LED needs to be lit when the Dipole option
is present to use it. CAUTION do not enable this option if the Dipole is not
installed, it may be possible to damage your driven element if you do.
4) Frequency Tracking disable- Band Button #6 is the Transceiver Interface
Frequency tracking control toggle. When its band LED is lit the antenna will
follow the radio frequency. This only effects frequency tracking, the computer
Port (Data Out) can still send commands to the controller.
5) Frequency Offset ADJ- Using the UP and DN keys the antenna display fre-
quency can be offset from the antenna frequency. There will be a number in
the range of +/- 15 displayed in the upper right of the LCD display indicating
the offset value. This is a global adjustment to all bands and is based on a percent of frequency. The number is for reference only and does not scale directly. When making this adjustment it is possible to move off the best performance point so some experimentation may be necessary to find the best
value.
The changes made in this menu will be saved when the controller power is switched
off or after about 3 minutes.
Some notes about adjusting the antenna:
●
The firmware frequency is set to what we have determined to be proper for each band,
t
he lowest SWR point may still be at a higher frequency.
●
The SWR should be less than 1.5:1 if the antenna is working correctly.
●
If the antenna is working properly the SWR in the Normal Mode (Direction) and the 180
Mode should be very close to being the same. Bi-dir Mode SWR varies a lot, do not expect it to be the same or close to the SWRs in the other modes, as it is difficult to create
this type of antenna.
●
If you are upgrading from older firmware (3x04) you will need to adjust the frequency
o
ffset to get the proper frequency display
32
Page 33

Yagi Troubleshooting Guide
●
Miss
-
wir
e causing the stepper motor on one or more elements to run backwards
Appendix E:
Th
e Most Common Problems
ead this First!
(R
The antenna is out of calibration, perform the calibration as described in the manual.
●
●
The factory defaults have been inadvertently changed, reset factory defaults “all”. There
are two default modes, “all” and “current”. “Current” only resets the band segment you
are currently on.
●
The control cable is miss-wired.
●
Interaction between power lines, other antennas, metal roofs, house wiring, gutters, etc,
and the antenna.
●
The automatic tuner is enabled on your rig, your linear or your external tuner that is in-
line.
●
Your antenna selector is on the wrong antenna, check the coax cable at the shack end with
an ohm meter, it should read very close to a dead short.
)
33
●
Your rig is in the split mode and worse case, to a different band!
●
A low pass filter is in-line and 6 meters has very high SWR.
●
Your in-line linear has a transmit / receive switch some of which may be poorly designed
or faulty. This can make the SWR give incorrect higher readings. Remove as many things
in-line on the coax as possible so you get a more accurate SWR reading.
●
Low cost SWR meters, especially those built into transceivers, can give incorrect readings,
both higher and lower than reality. They also can be drastically affected by the length of
the coax line. Removing a few feet of line can cause drastic differences in the reading
ranging from 10% to as much as 100%! Directional couplers such as the Bird watt meter
or antenna analyzers are much more reliable. Make sure you really have a problem before
you hit the panic button.
●
Blown driver board from shorting any of the wires in the control cable with power plugged
i
nto the controller. Even with the power button pushed “off” the cable is energized.
●
Broken or damaged control cable or connector. See Cable Problems section.
●
Bad coax or coax connector. We have seen bad coax that an analyzer said was good. Sub-
stitution is the sure way.
●
Damaged driver board is pulling power supply voltage down causing the microprocessor
t
o malfunction. Check to see if the green LED is lit on power supply
●
Ground the controller, this prevents crashes of the microprocessor and provides a path
for static discharge.
●
The rubber plugs that were installed in the telescoping poles for shipping and handling
urposes were not removed.
p
●
PL-259 was not tightened with PLIERS
roblem
p
– Do NOT trust your fingers – This is a common
Page 34

Yagi Troubleshooting Guide
34
GENERAL:
B
e aware that just because the controller display say
no guarantee that it is, the motor could be running backwards due to a miss-wire, the element
could have mechanical problems, or a broken wire in the control cable (the motor will run
with only one winding driven in some cases) or a faulty driver board. The controller runs
open loop and has no way of knowing if the element is really moving. The motors in the
elements make three
A ratcheting sound lasting 1 – 2 seconds at the start and finish of the motor running. This
1.
is the rpm ramp-up the stepper motors require and is normal.
2. A smooth whirring sound indicating normal operation.
3.
A loud rattling sound that sounds like gears slipping indicates the stepper is stalling.
This occurs during the middle portion of a “calibrate” with the smooth running sound before and after it and is normal. Any other time (even for brief durations) this noise indicates unwanted stalling of the motor and should be investigated.
Check the resistance with an ohmmeter between the center conductor and ground of the coax
connected to the antenna, it should read zero
distinct noises:
ohms.
s an element is a certain length there is
IGH SWR:
H
Wh
enever the antenna has a problem you will most likely observe higher than expected
SWR. However, this is not always the case, as there are many situations where the SWR
looks good but one element on the antenna may not be working at all. This is what makes it
so difficult to diagnose problems and why we emphasis building and wiring the antenna
carefully.
SWR will not be at the same frequency as the best performance. This is because we have
optimized the antenna for performance first, SWR second.
If the problem is with the driven element the SWR can be very high (over 3:1 and as high as
10:1). If the problem is with a passive element the SWR will not be over about 3:1 no matter
how far off the passive element is.
In our experience an SWR of 1.4:1 or less is normal. In most cases the lowest
INTERACTION PROBLEMS:
The most common reason for higher than expected or shifted SWR is unexpected interactions. Usually only one or two bands are affected but not always and the antenna will probably have reasonable gain and front to back. It is important to take good notes so if you need
to call us we can do a better job of helping you. Record the SWR on each band and each direction mode at least one place in the band, this is a good idea anyway so you can assess the
health of your antenna over time. Rotate the antenna and look for changes in SWR greater
than .2 or so, this indicates interaction if it changes very much. The usual culprits are wire
antennas, other nearby antennas, gutters, power lines, house wiring, metallic guy wires, etc.
If the SWR is not too high you can “tune” it out by using the “Create, Modify” mode to adjust only the driven element
djust the passive elements to improve SWR it will degrade the performance. Adjusting the
a
driven element won’t. Otherwise you will need to change your installation to reduce the interaction to an acceptable level.
for best SWR and save it as described in the manual. Don’t
Page 35

Yagi Troubleshooting Guide
35
CABLE PROBLEMS:
T
he control cable uses 4 wires per motor (one motor in each element housing). Each motor
has two wires for each of its two motor windings. This test assumes the antenna is connected
to one end of the control cable and the measurements are taken at the 25-pin connector that
mates to the controller. You need a ohmmeter capable of measuring 15 – 35 ohms with reasonable resolution or at least one that you can tell the difference between a dead short and 15
ohms. Remove the 25-pin D sub control cable connector from the controller. Hold it so you
are looking at the pins with them pointing at you. Orient the connector so the row with 13
pins is on top, now the upper left-hand pin is pin 1. You should read between about 18 ohms
to 30 ohms depending on cable length between the pins listed below. (100’ is about 23 ohms)
=====================================================
=========================
The Dipole: (has a driven only)
Pin Numbers
Driven 1 – 2 20 ohms (approximately)
3 – 4 20 ohms
===============================================================================
The 2 Element: (has a driven & director)
Pin Numbers
Driven 1 – 2 20 ohms (approximately)
3 – 4 20 ohms
Director 5 – 6 20 ohms
7 – 8 20 ohms
===============================================================================
The 3 Element: (has a driven, director & reflector)
Pin Numbers
Driven 1 – 2 20 ohms (approximately)
3 – 4 20 ohms
Director 5 – 6 20 ohms
7 – 8 20 ohms
Reflector 9 – 10 20 ohms
11 – 12 20 ohms
=====================================================
==========================
Page 36

Yagi Troubleshooting Guide
36
The 4 Element & MonstIR:
tor)
Pin Numbers
Driven 1 – 2 20 ohms (approximately)
3 – 4 20 ohms
Director 1 5 – 6 20 ohms
7 – 8 20 ohms
Reflector 9 – 10 20 ohms
11 – 12 20 ohms
Director 2 14 – 15 20 ohms
16 – 17 20 ohms
=====================================================
Next make sure there is an open
ohms is bad)
K
●
Connector case to
circuit between the following pins. (Any reading less than 100
(each have a driven, director 1, director 2 & reflec-
==========================
any pin
pin 1 to
●
pin 3 to
●
pin 5 to
●
pin 7 to
●
pin 9 to
●
pin 11 to
●
pin 14 to
●
pin 16 to
●
pin 13 is NOT used
●
If your antenna passes this test it does not mean it is wired correctly. You could still have
swapped two elements or even wired the whole thing backwards (started at the wrong end of
the terminal strip) and it will still measure correctly because each connector pair has a motor
winding connected to it but it is the wrong one. This test just takes you to the next step of trying to determine if the antenna is wired correctly and then finally determining if the elements
are physically moving. This is an open loop system and the controller has no way of knowing if
the elements are really moving when commanded to.
any pin except pin 2
any pin except pin 4
any pin except pin 6
any pin except pin 8
any pin except pin 10
any pin except pin 12
any pin except pin 15
any pin except pin 17
MISS-WIRED CABLE:
It can be a difficult to figure out what exactly has
it is likely you have a miss-wire, it is advisable to go up on the tower and check the terminal
wiring. Since there are many combinations of incorrect wiring we will give just a few examples
of common miss-wires and the symptoms they cause.
been miss-wired. Once you have determined
Page 37

Yagi Troubleshooting Guide
●
T
wo or More Elements are Swapped:
37
This is easy to do if you don’t mark the 4 conductor cables before you tape them along the
boom. The SWR will usually be high on every band. Often by changing the controller
frequency, while keeping the transmit frequency fixed, the SWR may go quite low at a
higher or lower controller frequency. In any case of SWR problems don’t be surprised if the
SWR is okay when you switch to the 180 degree mode. If it isn’t good in the forward mode
you have a problem.
●
If you Suspect Elements are Swapped:
Fi
rst try to identify which one is the driven element. You can identify the driven element
easily because it has a much greater effect on SWR than the passives do. The driven element
is also very easy to identify by retracting all of the elements and then use “Create, Modify”
to extend each element individually until signals are heard in the receiver. Obviously you
will only hear signals when the driven element is extended. The best way to determine if the
passives are switched is to point the antenna in the normal mode at a station you know the
location of and then switch the antenna to 180-degree mode, if he gets stronger you probably
have switched the passives. If it seems like they are switched you can use “Create, Modify”
mode to “swap” the elements back by first recording what the controller says each one
should be and then go put the reflector length into the director and vice-versa for the director.
If the antenna now works normally you have swapped the cables of the two passives and will
need to correct the wiring.
●
One or More Elements are not Moving:
If
the driven is not moving you will have very high SWR at all frequencies. However, it may
have stopped at some length and you might have good SWR only at one particular
frequency. Set the controller to 14.200 Mhz and monitor the SWR at that frequency. Next
go into the “Create, Modify ” mode and vary each element length and monitor the SWR
while you do it (100 watts or less is okay) and watch for dramatic changes (.5 SWR change,
minimum). When you adjust the driven element driven you should be able to get an SWR of
5:1 or greater. Always return the element you have just tested to its original length before
testing the next one. The passive elements can only cause an SWR of 3.5:1 maximum no
matter what length you make them. Adjust the passive elements from minimum length to
maximum length and you should see at least a .5 change at some point. When the passive
element is near the length of the driven element interaction is the greatest and you should see
very noticeable change in SWR. You will find that Director 2 (on 4 element models) has
much less of an affect on the SWR because it is so far away from the driven element, but you
should still see at least a .4 change in the SWR reading. A classic symptom of one passive
element not moving is a high SWR in the normal direction and a markedly better SWR in the
180 direction.
If any element does not affect the SWR the cause is one of the following:
●
Bad or intermittent cable, check it again.
●
Damaged driver board in the controller
●
Mechanical problem with the element
aware that lightning or shorting the cable can partially disable a driver chip and it will
Be
still limp along moving the tape but you will see inconsistent SWR when changing from
band to band.
Page 38

Yagi Troubleshooting Guide
Mechanical problems can range from an obstruction in the element, usually in the tip, such as packing
m
aterial or in rare cases fiberglass bumps or imperfections. We check this by running a gauge in the tip
but once in a great while that doesn’t catch it. DO NOT ever tape or block the end of the element tip,
water can collect and freezing can cause a blockage or trap the element. The foam plug must be left
in the tip so wind driven rain and bugs are kept out but the element can breathe.
●
Stepper Motor Running Backwards:
A
simple miss-wire can cause one or more element stepper motors to run backwards. Simply swapping
the Black and Red
ackwards. If both pairs get swapped the motor will run normally.
b
wires or the Green and White in the 4 conductor cable will cause the motor to run
38
Motor Runs:
o-------- Black o-------- Black
o-------- Red o-------- Green
o-------- Green Normal
o-------- White o-------- White
o-------- Red
o-------- Black
o-------- Green Backwards
o-------- White
o-------- White
o-------- Green
o-------- Red Backwards
o-------- Black
M
o
-------- Red Driver Board Damaged
otor Doesn't Runs:
o-------- Red
o-------- Black
o-------- White Normal
o-------- Green
If the driven is wired backwards when you first command the antenna to go to a specific band the driven
tries to go in (retract) and it can't so you hear no signal (unless it is an S9 + ++ signal) and the SWR will
be very
als and band noise. The SWR will probably be terrible but with a little imagination you can see that you
n
might hit some combination where the SWR looks good, so this type of miss-wire can be very confusing.
The driven is the easiest to diagnose in this case. Passives are a little tougher. Run the element you want
to test all the way out then all the way in using the “Create Modify” function and carefully look for a
good SWR. If a director starts working at 4.5” or at very short lengths you can be sure that motor is running backwards
high. If you retract or go to a higher band the driven will start going out and you will hear sig-
Page 39

SteppIR Antennas - 3 Element
39
Appendix F:
R
eplacing the Driven Element Bracket (Original 3 element only)
Fo
r customers who purchased a 3 element antenna before March 2003 your element housing brackets
may have been of a different design (Figure 3-C). If you have the original style element housing bracket
you will need to install a new style element housing bracket on your boom (Figure 3) before you can
mount the new 40m - 30m driven element housing unit.
A 3 element boom layout drawing (Figure 1) is provided to give you the necessary dimensions to install
the new element housing bracket as well as the new element return bracket.
Remove Existing Driven Element & its Bracket:
• Retract all elements:
sing the controller:
• U
• Go to “Setup” mode and press ‘Select’
• Using the ‘UP’ - ‘DN’ buttons find “Retract Elements” and press ‘Select’
• Using the ‘UP’ - ‘DN’ buttons find “Yes” and press ‘S
• Wait for the “ * ” to stop flashing
• The elements are now retracted
• Disconnect the coax and control cable for the driven element
• Loosen the clamps holding the two quick disconnect rubber boots securing the fiberglass tele-
scoping poles
• Remove the two fiberglass telescoping poles (FTPs) from the driven element housing
• Remove the driven element housing unit from its mount
• Remove the driven element housing mounting bracket from the boom
elect’
ing bracket
Install the New Element Mounting Bracket:
• Drilling instructions
easure
• M
• Secure
ake sure to level
• M
evel or actually mounting the element and eyeballing it.
l
• Drill
NOT be using the original holes in the boom.
arning:
W
Keep the drill straight while drilling to produce a clean round hole. It may be helpful to
Make sure that the bracket does not slip or twist while drilling.
drill both holes for one bolt and then install that bolt providing more positive alignment
for the second pair of holes.
• Install the two 5/16” bolts with Nylok nuts & tighten
possible in the holes.
& mark the boom to install the new bracket per F
the return bracket firmly in place with some type of clamp
four 5/16” holes, two in from each side, through the bracket and the boom. You will
igure 1.
the bracket with respect to the other element brackets using either a
. These bolts should fit as snug as
Page 40

2.25
48.00
teppIR Antennas - 3 Element
S
48.00
4.25
48.00
40
48.00
Figure 1
Figure 2
94.0
Make Section with return bracket like this
Make both (2) end sections like this
10-1018-01
1/4-20 x 2-1/4 Bolt
10-1020-01
" splice
8
30.00
25.00
102.5
Make Center section like this
Note: In this drawing you are looking down on the
so that the element housings would be up
boom
A - Return bracket for the 40/30 loop
- Current element housing bracket
B
C - Original element housing bracket
50.25
Figure 3
C
Original Bracket
A
Return Bracket
B
Current Production Bracket
Page 41

teppIR Antennas 40m - 30m Dipole Kit
S
www.steppir.com
41
i m i t e d W a r r a n t y
L
hese products have a limited warranty against manufacturer's
T
defects in materials or construction for two (2) years from date of
sale. Do not modify this product or change physical construction
without the written permission of SteppIR Antennas Inc. This
limited warranty is automatically void if the following occurs:
improper installation, unauthorized modifications, physical abuse or
damage from severe weather, beyond the manufacturer's control.
Manufacturer's responsibility is strictly limited to repair, or
replacement of defective components. The shipping instructions
will be issued to the buyer for defective components, and shipping
charges will be paid for by the buyer to the manufacturer. The
manufacturer assumes no further liability.
Page 42

40m - 30m Dipole Option
Yagi
Dipole
Vertical
www.steppir.com
 Loading...