

Page 1
1
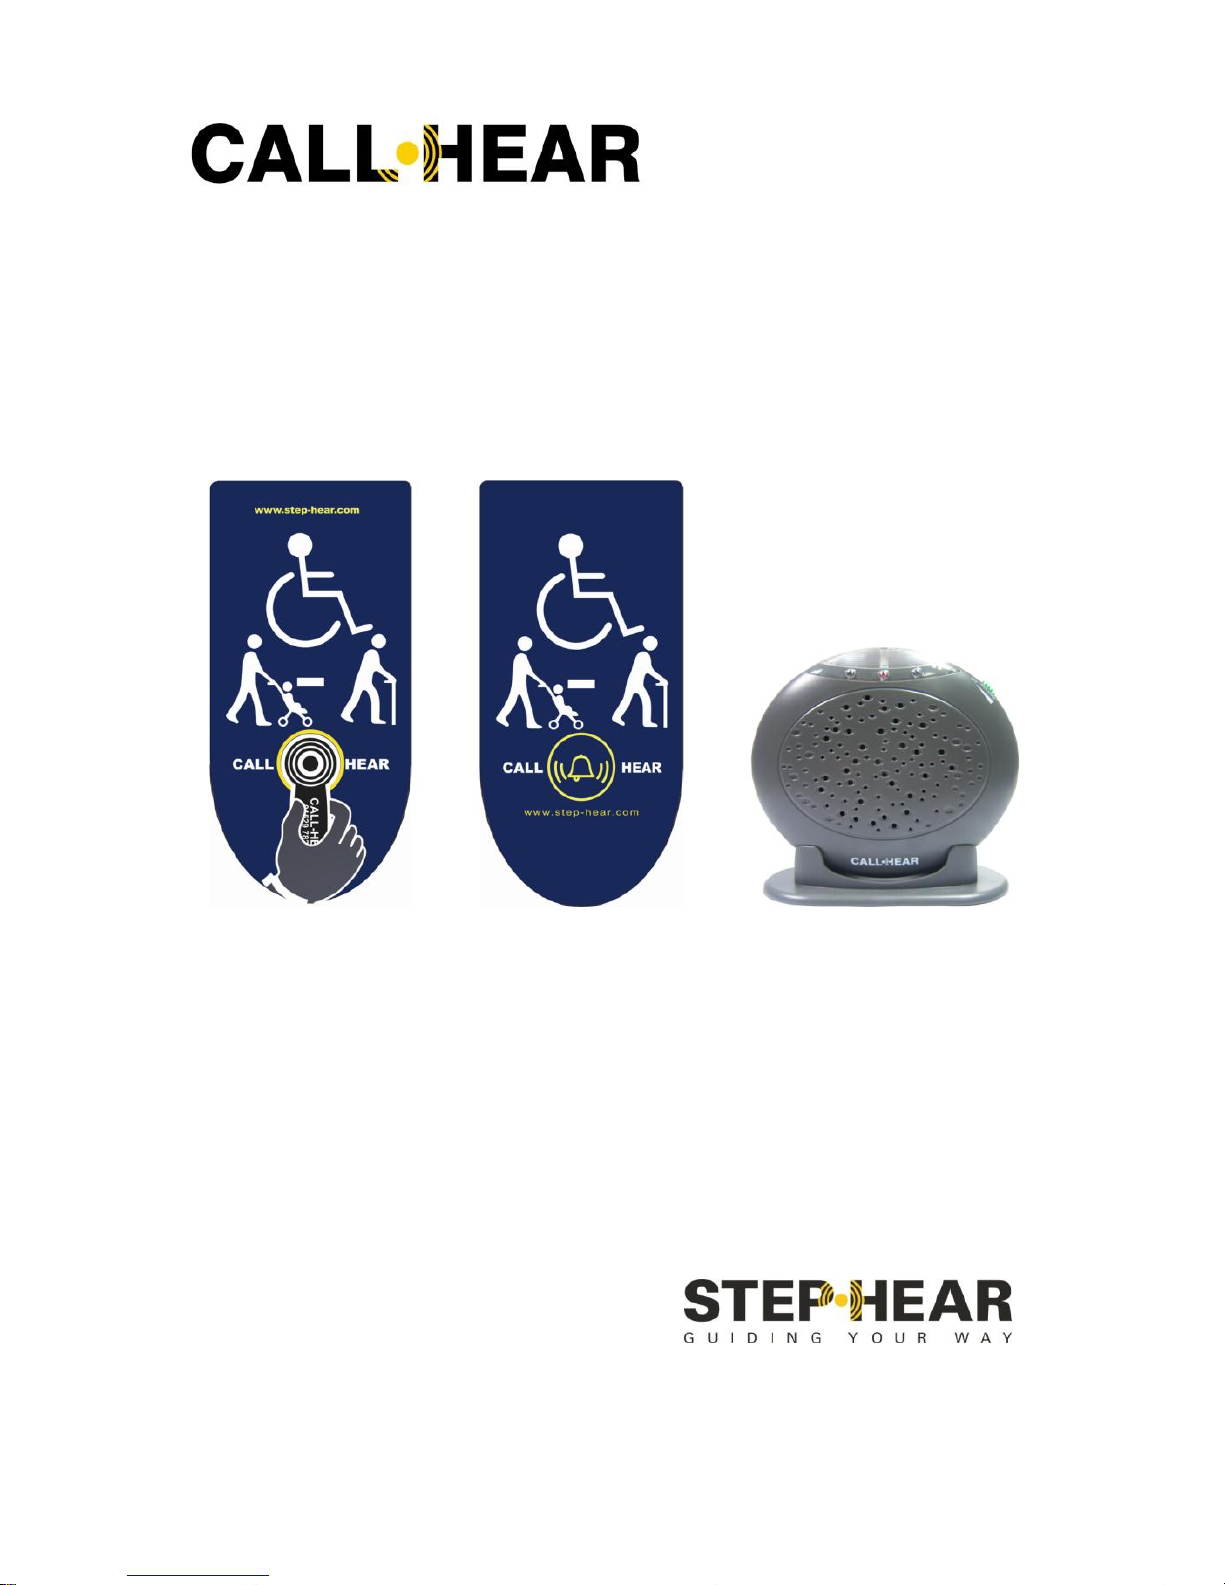
CALL HEAR ODU (CH-100/101/104)
CALL HEAR IDU (CH-105-IDU)
CH-215, CH-315, CH-415
User Guide
ALERT AND ASSISTANCE SYSTEM
Another quality product from
E n g l i s h
Page 2

2
CONTENTS
CONTENTS 1
INTRODUCTION 2
Unpacking the Call Unit ODU and Indoor
Unit (IDU) 3
DESCRIPTION 4
Call-Hear ODU (CH-100/101/104) 4
Call-Hear IDU (CH-105-IDU) 5
Standard Key (CH-102) 6
Telescopic Key (CH-103) 6
USING CALL-HEAR 7
INSTALLATION 8
Setting up the Call Unit (ODU) 8
Setting up the Indoor Unit (IDU) 9
Pairing the Call Unit (ODU) and the
Indoor Unit (IDU) 10
USING CALL-HEAR 11
Testing the Indoor Unit (IDU) 11
Using Call-Hear 11
SYSTEM CONFIGURATION 13
TROUBLESHOOTING & SAFETY 14
GUARANTEE (EU) 15
GUARANTEE (USA) 16
RECYCLING DIRECTIVES 17
INFORMATION 18
Page 3

3
INTRODUCTION
Congratulations on purchasing your CALL-HEAR
system. This consists of an Outdoor Unit(s) (ODU) and
an Indoor Unit(s) (IDU). The ODU is a large, clear,
weather resistant outdoor transmitter which can be
stuck onto an entrance door/glass/window not suitable
for iron doors. It is activated and will transmit a signal
via a bell push, a key or a combination of the two. The
person using this will be someone who requires
assistance and needs to alert someone of this. The IDU
receives the transmitted signal. The IDU will flash and
emit an alarm sound in order to alert someone to help
the person in need.
It is important that you read the instructions below in
order to use your CALL-HEAR system to its full
potential. Keep this user guide in a safe place for future
reference.
This guide explains how to use the following:
CALL-HEAR ODU with Bell Push and Key –
CH-100
CALL-HEAR ODU with Key – CH-101
CALL-HEAR ODU with Bell Push – CH-104
CALL-HEAR IDU – CH-105-IDU
CH215 – CH-100 combined with CH-105-IDU
Page 4

4
INTRODUCTION
CH315 – CH-101 combined with CH-105-IDU
CH415 – CH-104 combined with CH-105-IDU
Unpacking the Call Unit (ODU) & Indoor Unit
(IDU)
On unpacking the Call Unit (ODU) you will find the
following contents in the box:
1 Call Unit with adhesive tape
1 A23 Battery
2 Fixing Templates
1 Pack of Screws
1 Rear Label
1 User Guide
On unpacking the Indoor Unit (IDU) * you will find the
following contents in the box:
1 Indoor Unit
4 AA Batteries
1 Stand
Please Note: A Mains adapter can be bought as an
accessory for the Indoor Unit (IDU).
The standard Key (CH-102) or telescopic Key (CH-103)
can be bought as an accessory for the Outdoor Unit
(ODU).
*This guide refers to the Indoor Unit CH-105-IDU, if you
have purchased the CH-120, please refer to the User
Guide packed in that box.
Page 5
5
DESCRIPTION
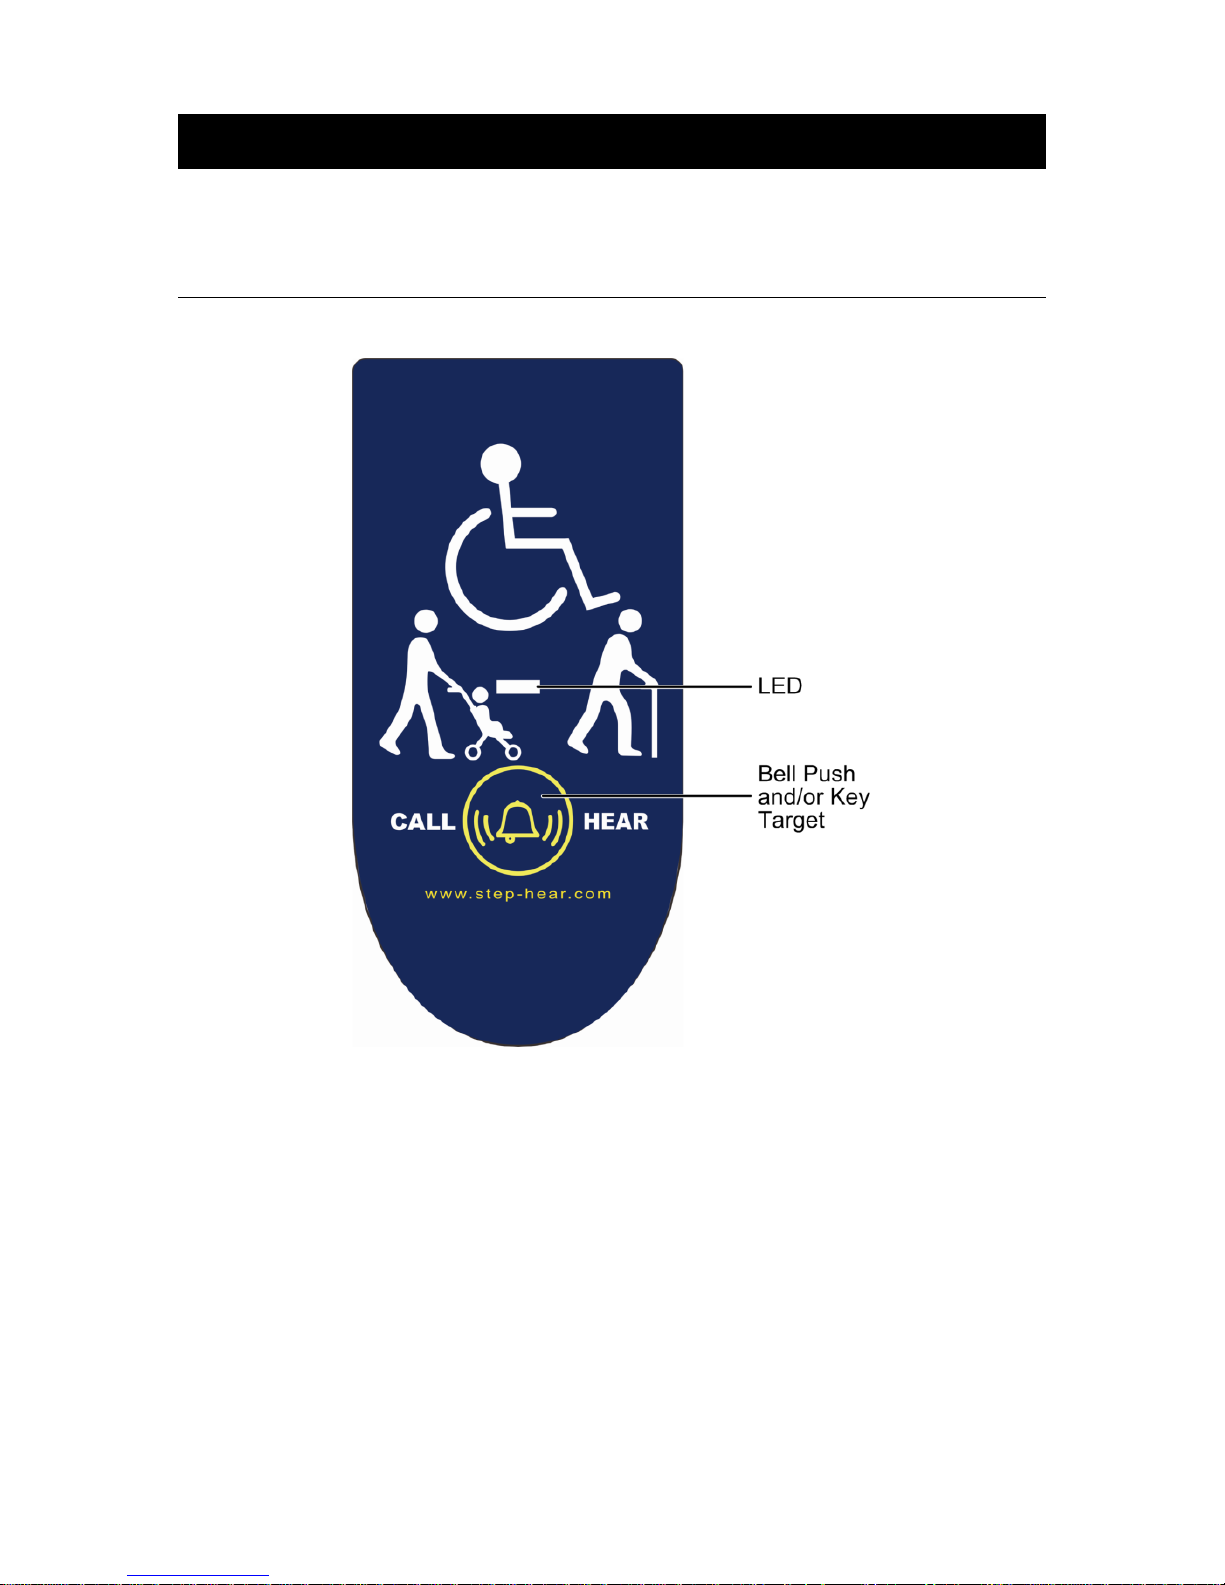
Call–Hear ODU (CH–100/101/104)
Page 6
6
DESCRIPTION
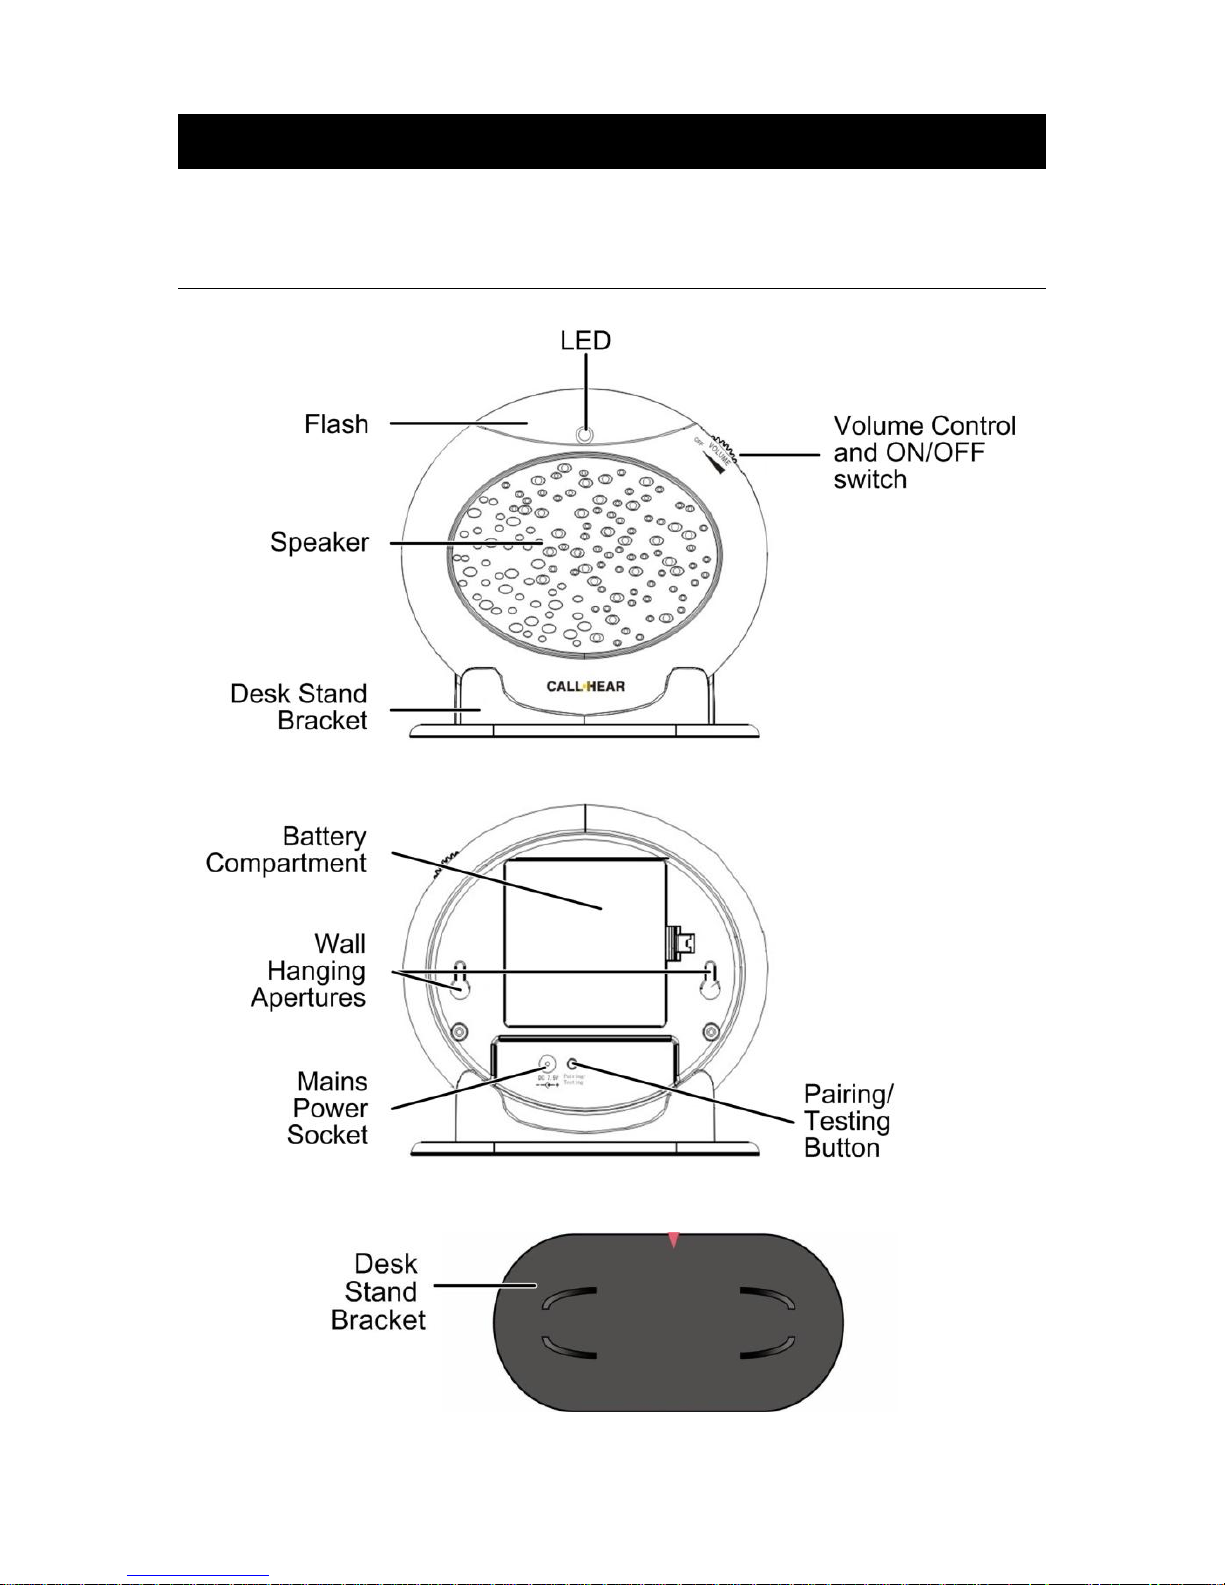
Call-Hear IDU
6
Page 7
7
DESCRIPTION
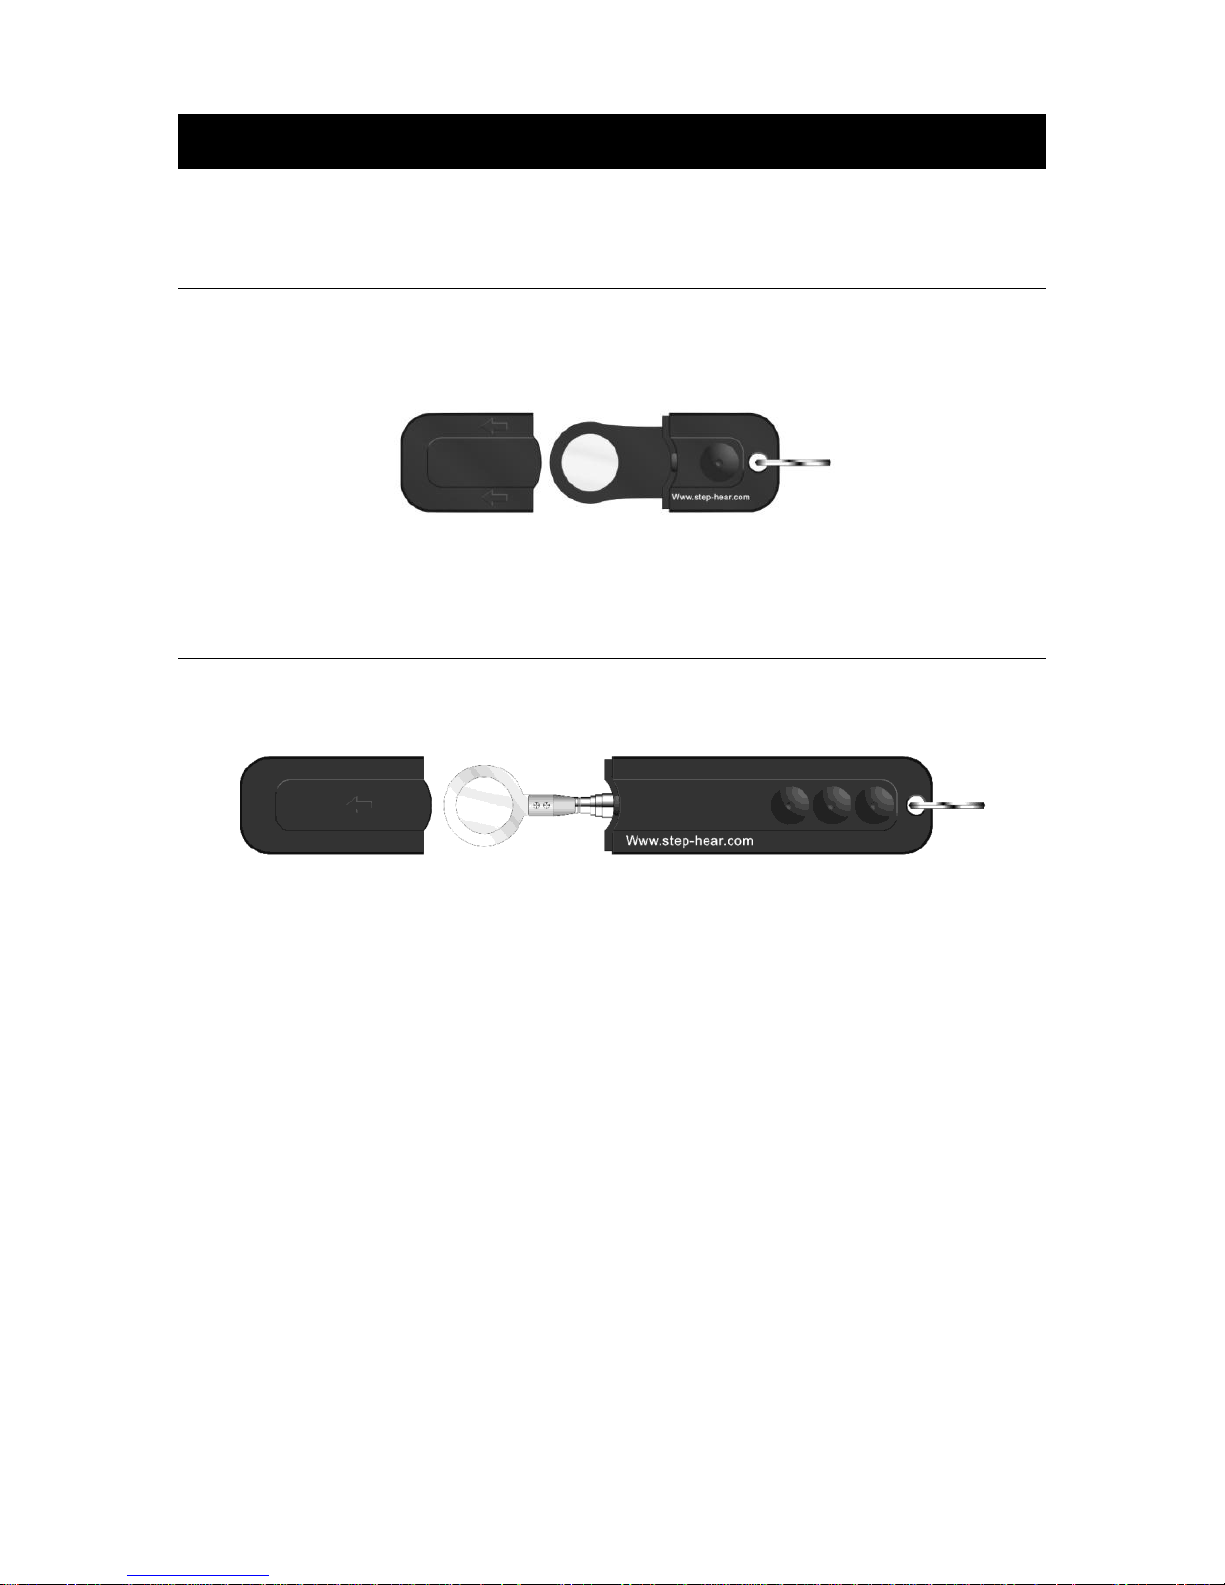
Standard Key (CH-102)
Telescopic Key (CH-103)
Page 8
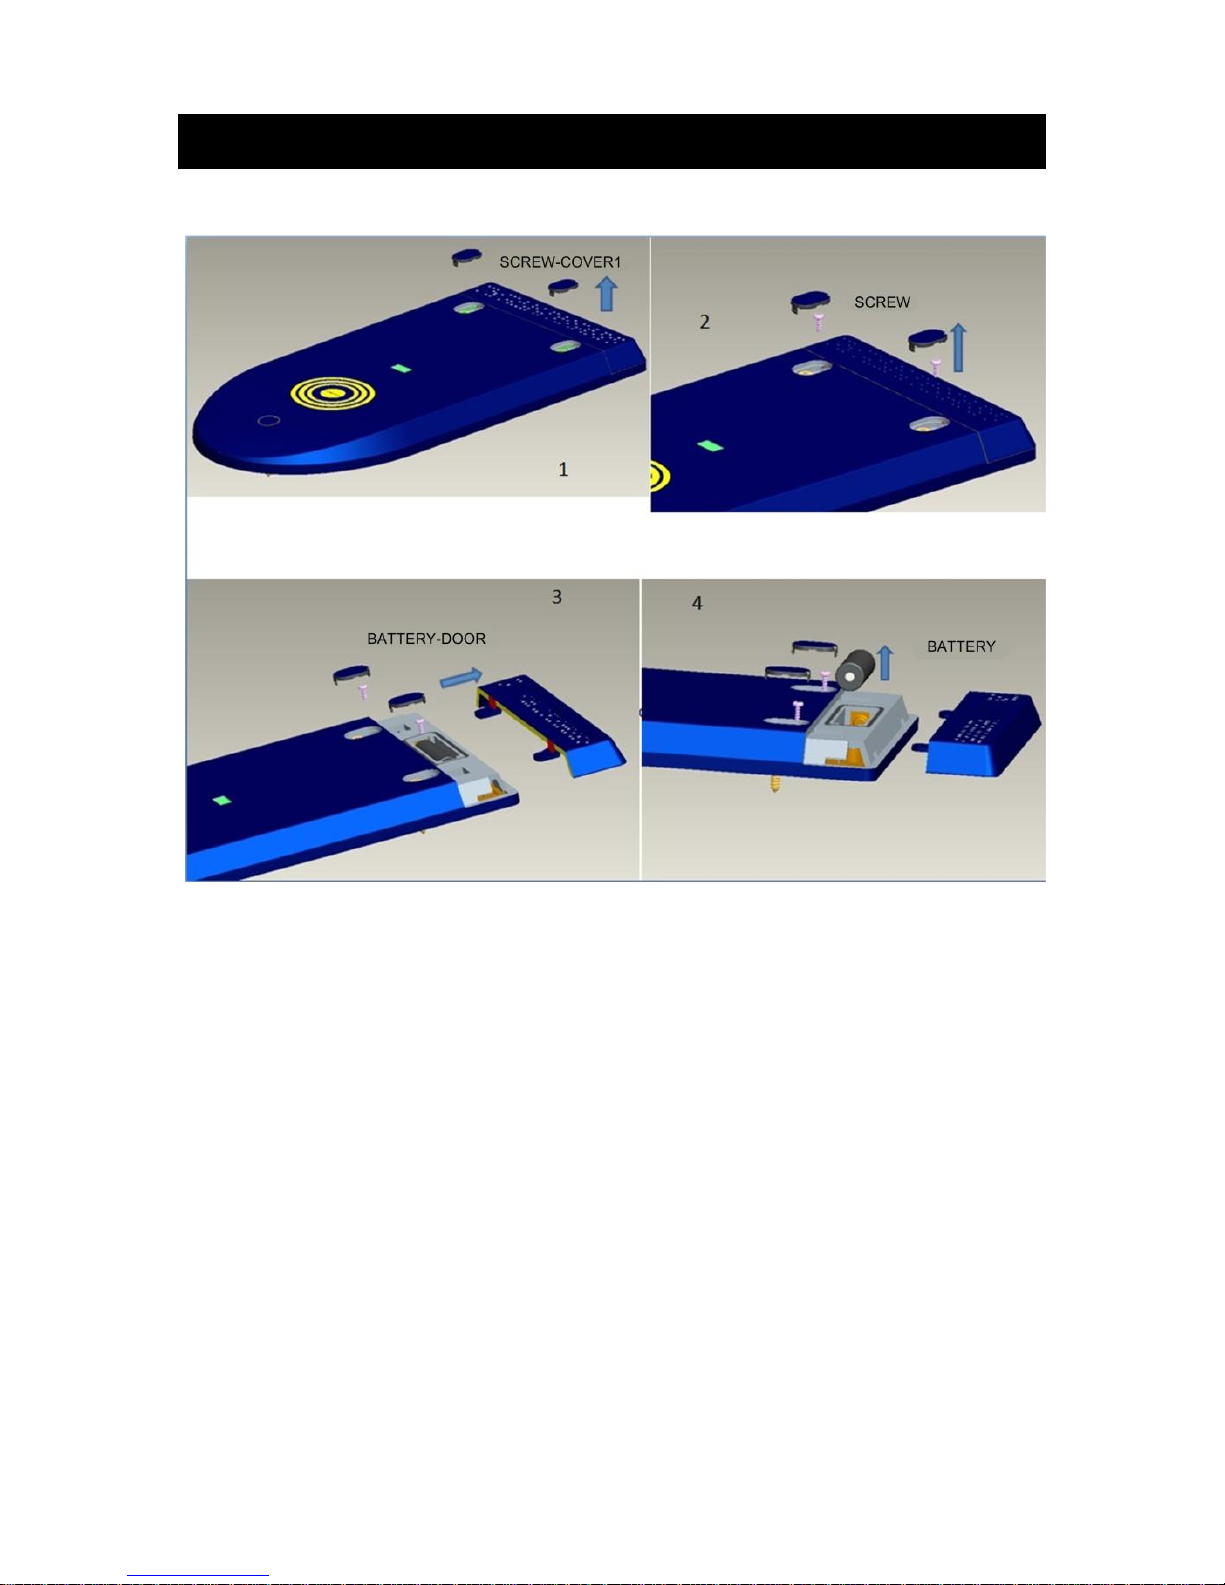
open and insert the A23 battery. Ensure correct polarity
8
USING CALL-HEAR
Open the two screw covers and undo the two screws
(the screw covers must be replaced after the battery
has been inserted to ensure that the unit is correctly
water resistant.). Slide the battery compartment cover
is observed. Slide the battery compartment cover back
into position.
Page 9

9
INSTALLATION
Setting up the Call Unit (ODU)
Stick the Call Unit onto a door, window, counter, desk
etc (not suitable for iron doors) using the supplied
strong adhesive tape. Remove the protective paper
from the adhesive tape on the back of the Call unit and
stick to the required window. Please use the fixing
templates provided and line them up precisely –
WARNING – THE ADHESIVE USED IS EXTREMELY
STRONG. MISTAKES WILL BE DIFFICULT TO
RECTIFY.
When placing the Call unit on glass (window/door), stick
the rear static label in exactly the same position as the
front of the Call Unit. The Call Unit can now be used
from the other side of the window/door (except CH104).
In such case thickness of glass/door should be less
then 2 cm.
The Call Unit is also ideal for use on counters, desks,
reception areas or on wooden posts. For these uses,
the Call unit can be fitted with the supplied adhesive
tape. If additional security is required there is provision
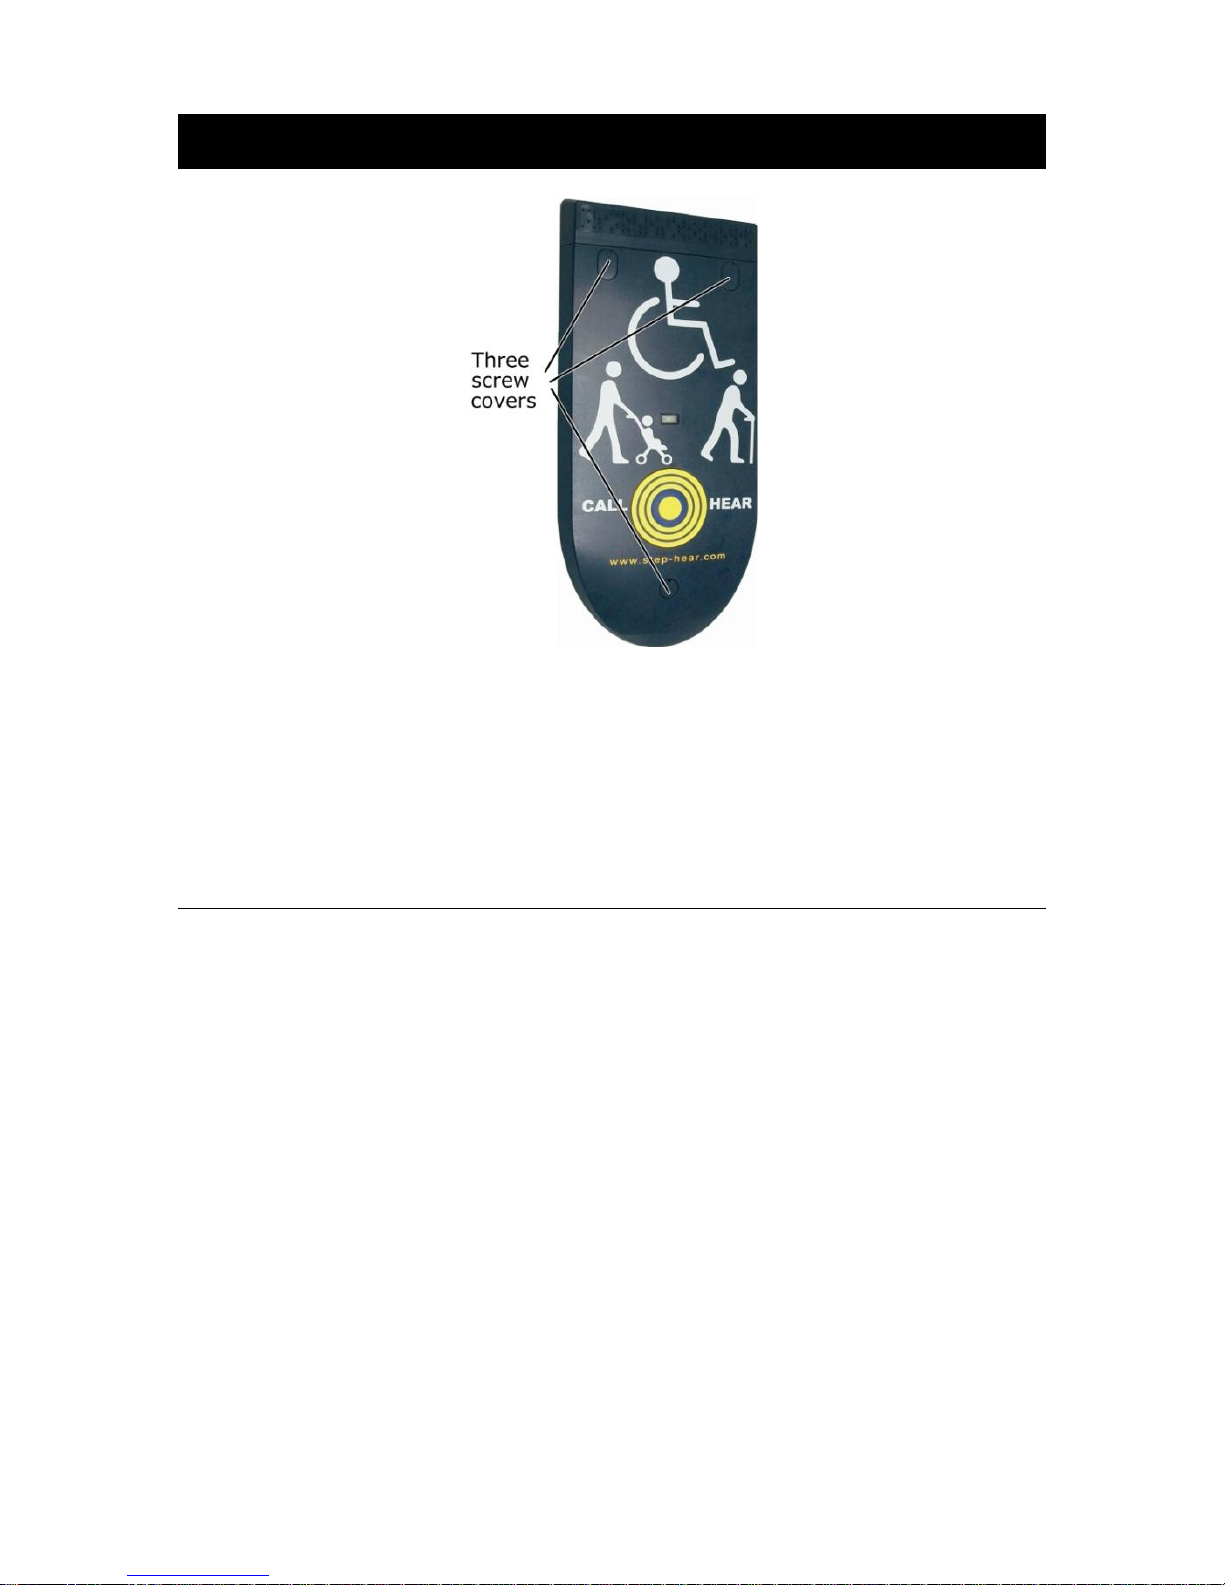
for three screws which can be fitted by opening the
three screw covers and insert screws and screw to
desired location.
10
Page 10
10
INSTALLATION
Ensure the Call Unit is placed in a location which is
easily accessible and useful for a person in need of
assistance. For wheelchair users, the ideal height for
the Call Unit is 90cm to 100cm from the ground.
Setting up the Indoor Unit (IDU)
Open the battery compartment and insert the 4 AA
batteries supplied. Ensure correct polarity is observed.
Close the battery compartment. Alternatively, connect
the mains adaptor (not supplied) into the mains power
socket then plug the other end into a suitable wall
socket.
Ensure the Indoor Unit (IDU) is placed in a location
where someone will notice the flashing light and hear
the alarm in order to go and assist the person in need.
The Call-Hear range is approximately 60-80m in free
space and approximately 30m where there are walls or
other obstructions.
Page 11

11
INSTALLATION
The Indoor Unit (IDU) can either be placed on the
supplied stand or wall mounted.
To wall mount the Indoor Unit (IDU), drill two holes and
insert two screws 96mm apart. Leave about 5 mm of
the screw projecting from the wall. Guide the wall
mounting apertures at the back of the unit over the
screws and slide the Indoor Unit (IDU) downwards.
Caution: Ensure there are no electrical lines, water
pipes etc. in the wall where the holes are drilled.
Turn the Indoor Unit (IDU) on by turning the On/Off
Volume Control switch to the On position.
Pairing the Call Unit (ODU) and the Indoor Unit
(IDU)
The Indoor Unit (IDU) should be paired with the Call
Unit (ODU).
The pairing procedure is as Follows:
1. Press and hold the pairing/testing key of the Indoor
Unit (IDU) and the bell push sign of the Call-Unit
(CH-1000/CH-104) at the same time. When pairing
is complete, the camera flash led will flash twice and
a long beep will be heard.
12 14
Page 12

12
INSTALLATION
2. Press and hold the pairing/testing key of the Indoor
Unit (IDU) and place the standard/telescopic key
(CH-102/CH-103) on the key sign of the Call-Unit
(CH101) at the same time. When pairing is
complete, the camera flash led will flash twice and a
long beep will be heard.
3. If you want to pair another Call unit with another Call
unit, the currect Call unit will be replaced by the new
paired unit.
USING CALL-HEAR
Testing the Indoor Unit (IDU)
To check whether the Indoor Unit (IDU) is working
properly and has been paired correctly, press the
pairing/testing button once. The Indoor Unit (IDU)
should sound the alarm and flash.
Using Call-Hear
Once the Call Unit (ODU) and the Indoor Unit (IDU)
have been placed in the required locations and all
required batteries have been inserted, you are ready to
use the Call-Hear system.
To use the Call Unit (ODU), the person who needs
assistance must touch the target with the Standard or
telescopic key (CH-100/CH-101).
Page 13

battery. Ensure correct polarity open and insert the A23
LED will flash; replace the A23
13
USING CALL-HEAR
Or, for the bell push version Call Unit (CH-100/CH-104)
simply push the bell push.
This will trigger the Call Unit (ODU) to send a signal to
the Indoor Unit (IDU). While the Call Unit (ODU) is
transmitting a signal, the LED will light up (amber).
When the Indoor Unit (IDU) receives the signal from the
Call Unit (ODU), an alarm will be heard and the light at
the top of the unit will flash brightly. This alerts you to
the fact that someone needs assistance. The alarm and
flash will stop after 4 seconds.
The volume of the Indoor Unit’s (IDU) alarm sound can
be controlled by the volume control switch. The alarm
can be switched off using this switch.
If the batteries run low in the Indoor Unit (IDU), the red
LED will flash.
If the batteries run low in the Outdoor Unit (ODU) – the
battery as follows:
Open the two screw covers and undo the two screws
(the screw covers must be replaced after the battery
has been inserted to ensure that the unit is correctly
water resistant.). Slide the battery compartment cover
is observed. Slide the battery compartment cover back
into position.
Page 14
14
SYSTEM CONFIGURATION
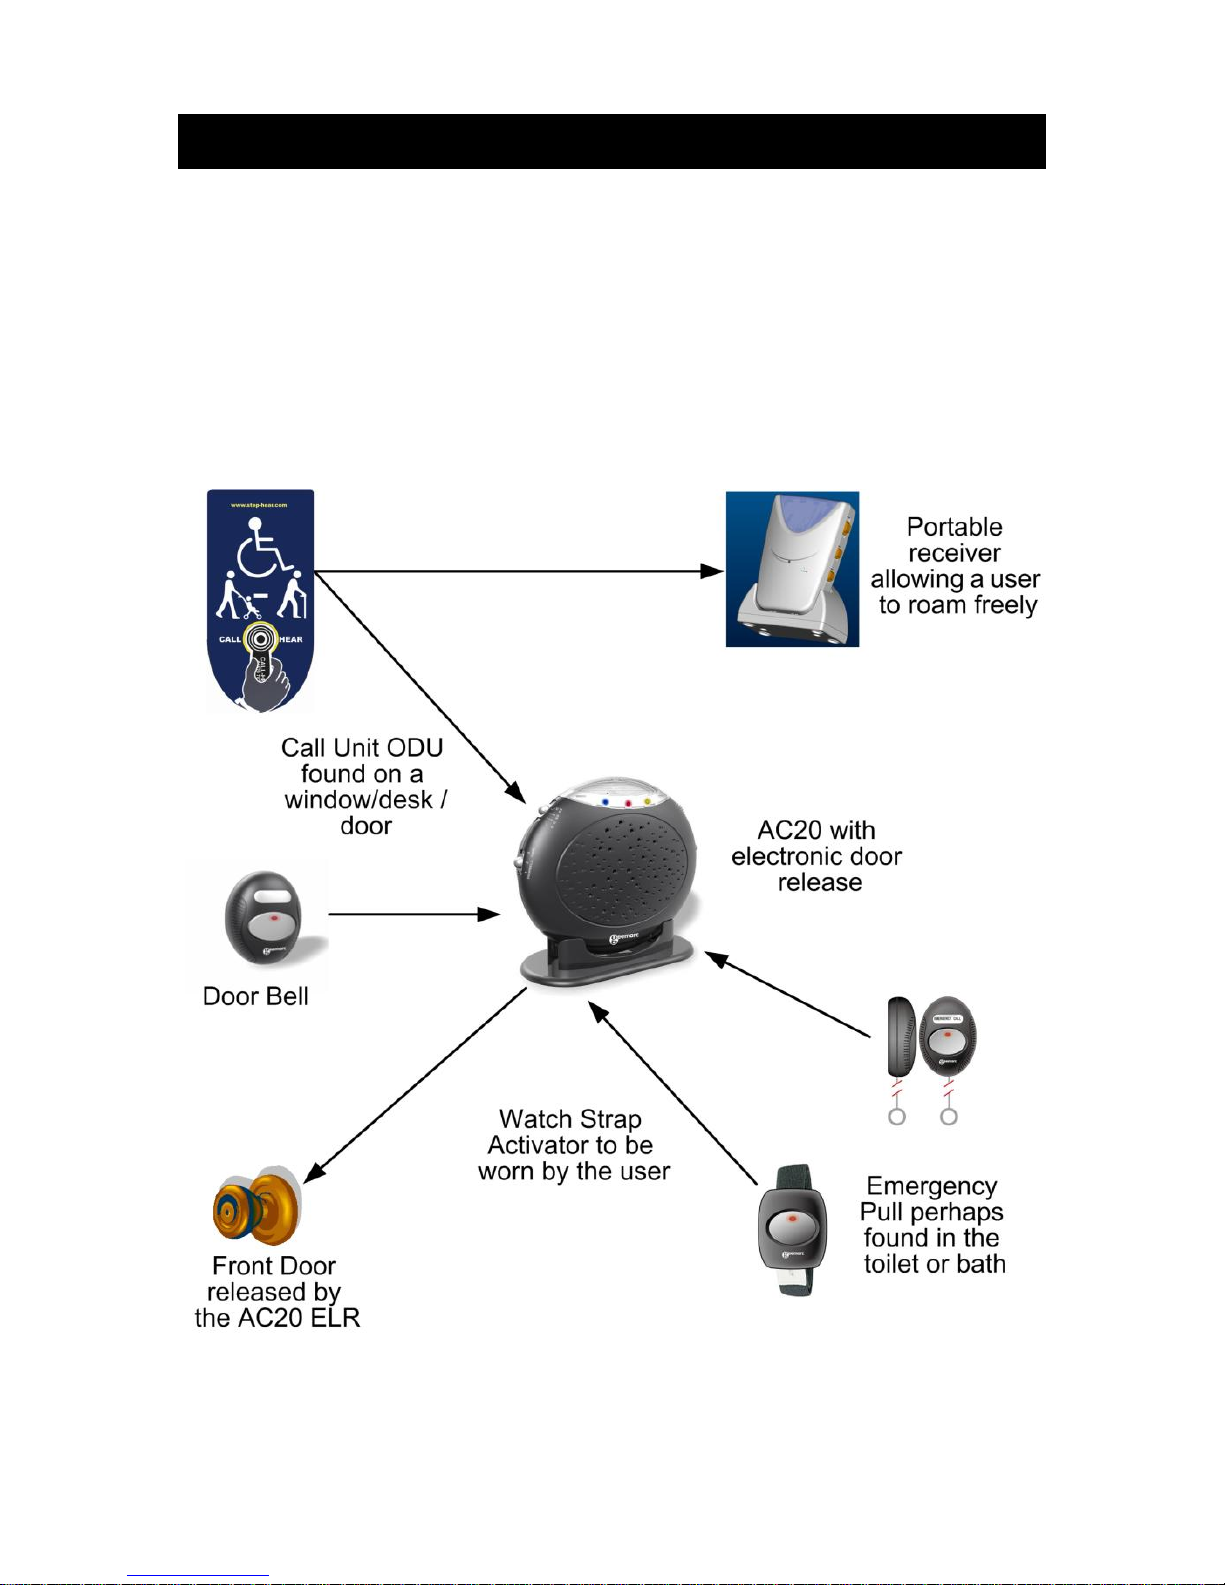
The Call-Hear system is extremely flexible and can be
used in up to four locations i.e. one transmitter can link
with up to 4 of the same/or combinations of receivers. –
see the example below.
Only models CH-120 or AC 50 will identify which
transmitter is calling.
18
Page 15

15
TROUBLESHOOTING & SAFETY
The Indoor Unit (IDU) will not flash or make a
sound
Ensure the batteries are not flat
Ensure the batteries are inserted correctly
Ensure the Call Unit (ODU) and Indoor Unit (IDU)
have been paired correctly
Ensure the Indoor Unit (IDU) is not out of range
Ensure the Indoor Unit (IDU) is switched on
The Indoor Unit (IDU) will flash but does not
make a sound
Increase the volume using the volume control
switch
General Safety
Use the correct size batteries
Do not open the unit. Contact the helpline for all repairs.
Cleaning Safety
Clean the units with a soft cloth. Never use polishes or
cleaning agents - they could damage the finish or the
electrics inside.
Environmental Safety
Always ensure there is a free flow of air over the
surfaces of the IDU.
Do not expose your product to fire or other hazardous
conditions.
18
Page 16
240V 50/60Hz supply only. (Classified as
16
GUARANTEE (EU)
From the moment your CALL-HEAR product is purchased, STEPHEAR™ guarantee it for the period of one year. During this time,
all repairs or replacements (at our discretion) are free of charge.
Should you experience a problem then contact our help line or
visit our website at www.step-hear.com. The guarantee does not
cover accidents, negligence or breakages to any parts. The
product must not be tampered with or taken apart by anyone who
is not an authorized STEP-HEAR™ representative. The STEP-
HEAR™ guarantee in no way limits your legal rights.
IMPORTANT: YOUR RECEIPT IS PART OF YOUR
GUARANTEE AND MUST BE RETAINED AND PRODUCED IN
THE EVENT OF A WARRANTY CLAIM.
Please note: The guarantee applies to the EU only
Electrical connection: The apparatus (IDU) is designed to
operate from a 100‘hazardous voltage’ according to EN60950 standard).
The apparatus does not incorporate an integral power on/off
switch. To disconnect the power, switch off supply at the mains
power socket and pull the plug out. When installing the apparatus,
ensure that the mains power socket is readily accessible.
Declaration: Step-Hear hereby declare that this CH-100, CH-101,
CH104, CH-105-IDU are in compliance with the essential
requirements and other relevant provisions of Directive
1999/5/EC.
A copy of the Declaration of Conformity to the essential
requirements of 1999/5/EC can be found at www.step-hear.com
Page 17

17
GUARANTEE (USA)
STEP-HEAR Ltd warrants the STEP-HEAR product against any defect in
materials or workmanship for the period of one year from the date of
purchase.
Should you experience a problem, contact our customer service
department.
Be sure to save your sales receipt as proof of purchase date should you
need warranty service.
Within a period of one year from purchase date, STEP-HEAR Ltd will
repair or replace (at our discretion) your STEP-HEAR product at no cost,
if a defect in materials or workmanship is found. If we elect to replace
your STEP-HEAR product, we may replace it with a new or
reconditioned product of the same or similar design.
Repair or replacement will be warranted for a period of 90 days or the
remaining time on the original warranty, whichever is longer.
The warranty does not cover damage caused by vandalism, accident
negligence, shipping damage, failure to follow instructions, misuse, fire,
floods, use of incompatible accessories or Acts of God.
The product must not be tampered with or taken apart by anyone who is
not an authorized STEP-HEAR representative. The STEP-HEAR
guarantee in no way limits your legal rights
STEP-HEAR Ltd shall not be responsible for loss of time, inconvenience,
property damage or any other accidental or consequential damages
caused by your STEP-HEAR product
Warranty service is available only with proof of purchase.
IMPORTANT: YOUR RECEIPT IS PART OF YOUR WARRANTY AND
MUST BE RETAINED AND PRODUCED IN THE EVENT OF A
WARRANTY CLAIM.
For product support and help visit our website: www.step-hear.com
Or contact our representative in North America:
2288A Queen Street East
Toronto, ON M4E1G6,
Canada
T: 347.482.1557
F: 801.760.9791
Page 18

18
4. Consult the dealer or an experienced radio/TV technician for
3. Connect the equipment into an outlet on a circuit different
2. Increase the separation between the equipment and receiver
1. Reorient or relocate the receiving antenna.
GUARANTEE (USA)
Warning: Changes or modifications to this equipment not
expressly approved by the party responsible for compliance
could void the user’s authority to operate the equipment.
NOTE: This equipment has been tested and found to comply
with the limits for a Class B digital device, pursuant to
Part 15 of the FCC Rules. These limits are designed to
provide reasonable protection against harmful interference
in a residential installation. This equipment generates,
uses and can radiate radio frequency energy and, if not
installed and used in accordance with the instructions,may
cause harmful interference to radio communications.However,
there is no guarantee that interference will not occur in a
particular installation. If this equipment does cause harmful
interference to radio or television reception, which can be
determined by turning the equipment off and on, the user is
encouraged to try to correct the interference by one or more
of the following measures:
from that to which the receiver is connected.
help
This device complies with part 15 of the FCC Rules. Operation is
subject to the following two conditions: (1) This device may not
cause harmful interference, and (2) this device must accept any
interference received, including interference that may cause
undesired operation.
Page 19

19
RECYCLING DIRECTIVES
The WEEE (Waste Electrical and Electronic Equipment)
has been put in place for the products at the end of their
useful life are recycled in the best way.
When this product is finished with, please do not put it
in your domestic waste bin.
Please use one of the following disposal options:
- Remove the batteries and deposit them in an
appropriate WEEE skip. Deposit the product in an
appropriate WEEE skip.
- Or, hand the old product to the retailer. If you
purchase a new one, they should accept it.
Thus if you respect these instructions you ensure
human health and environmental protection.
 Loading...