

Page 1
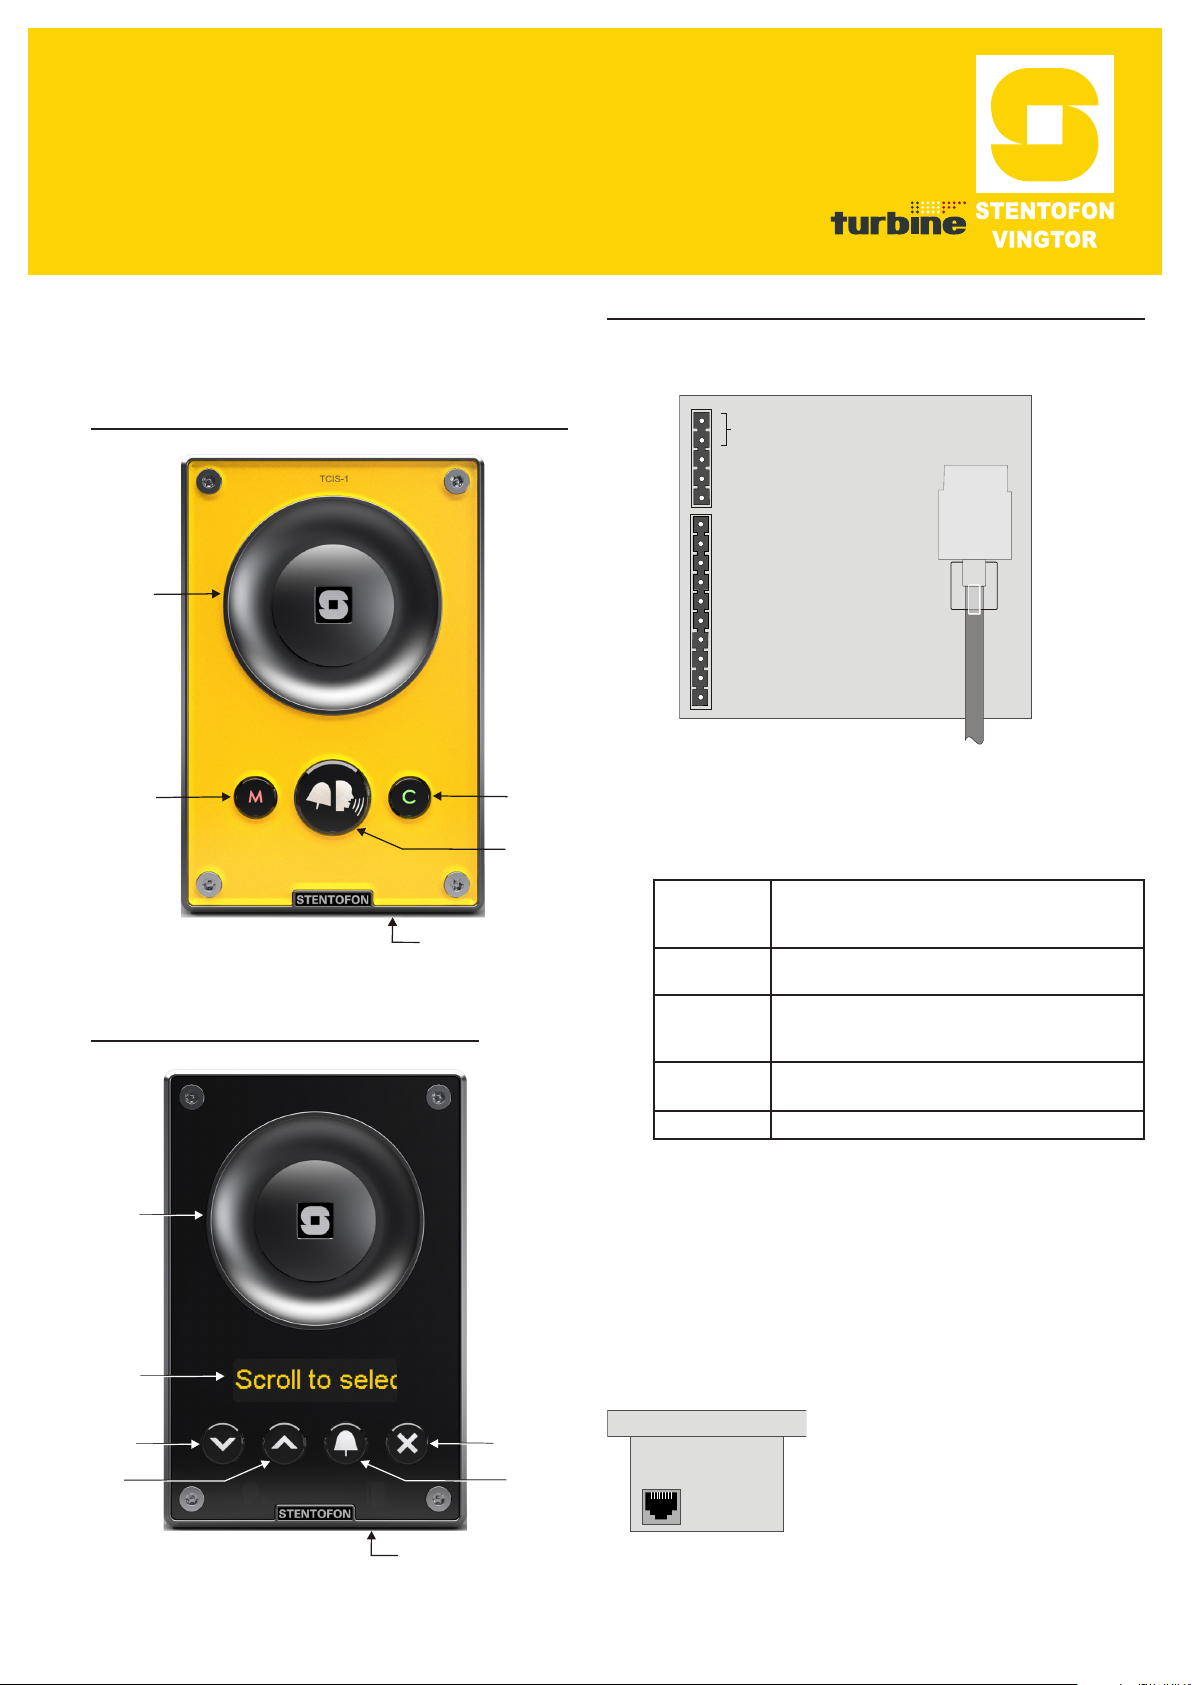
Loudspeaker
Cancel
Microphone
Manual Speech
Direction Control
Call Button
Loudspeaker
Cancel
Microphone
Call Button
Scroll Up
Scroll Down
PMOLED
Display
Turbine Compact IP Stations
Getting Started for AlphaCom
The information in this document pertains to the
Turbine Compact IP Stations TCIS-1/TCIS-1-V, TCIS-2,
TCIS-3, TCIS-4, TCIS-5, TCIS-6, TKIS-1.
Turbine TCIS-1/TCIS-1-V Station Keys & Functions
1 Station Connections
1.1 External Connectors
1
24 VDC for external secondary power
if PoE is not used. Pin 1 is positive.
2
3
- COM relay
- NO relay
4
- NC relay
5
- 5.3V (LED driver)
1
2
- GND
- Input/Output 1
3
4
- Input/Output 2
5
- Input/Output 3
6
- Input/Output 4
7
- Input/Output 5
- Input/Output 6
8
- 600 ohm balanced line out +
9
- 600 ohm balanced line out -
10
The following table is an overview of the main
connectors involved when installing the Turbine IP
Stations.
RJ-45
PoE
port
Ethernet Connection
Turbine TCIS-6 Station Keys & Functions
Ethernet/Power 10/100 Mbps Ethernet RJ-45 port for LAN (uplink)
connection. Supports PoE (802.3af). Draws power from
either spare line or signal line.
Secondary
Power
24 VDC (16 – 48 V) secondary power is provided from an
external adapter.
Relays There is one Double Throw relay contact with 60W
switching power. COM, NO, NC contacts are provided. Max:
250VAC/220VDC, 2A, 60W.
Input/Output 6 general purpose I/Os are available. Each I/O can be
congured as either button input or LED driver.
Audio Line Out A balanced 600 ohm audio line out with induction loop signal
1.2 Power Supply
The Turbine Station supports Power over Ethernet
(PoE, IEEE 802.3 a-f) where power can be drawn from
either the spare line or signal line.
If PoE is not available, the Turbine Station can be
connected to a 24 VDC local power supply.
1.3 Network Connection
There is one RJ-45 port located on
the Turbine station that is used as
the PoE/LAN port.
PoE port
Page 2
1.4 Input/Output Connections
There are 6 I/O connection options for the Turbine
Station. These connections are used as relay contacts
for door lock control and external I/O devices.
2 Station Conguration
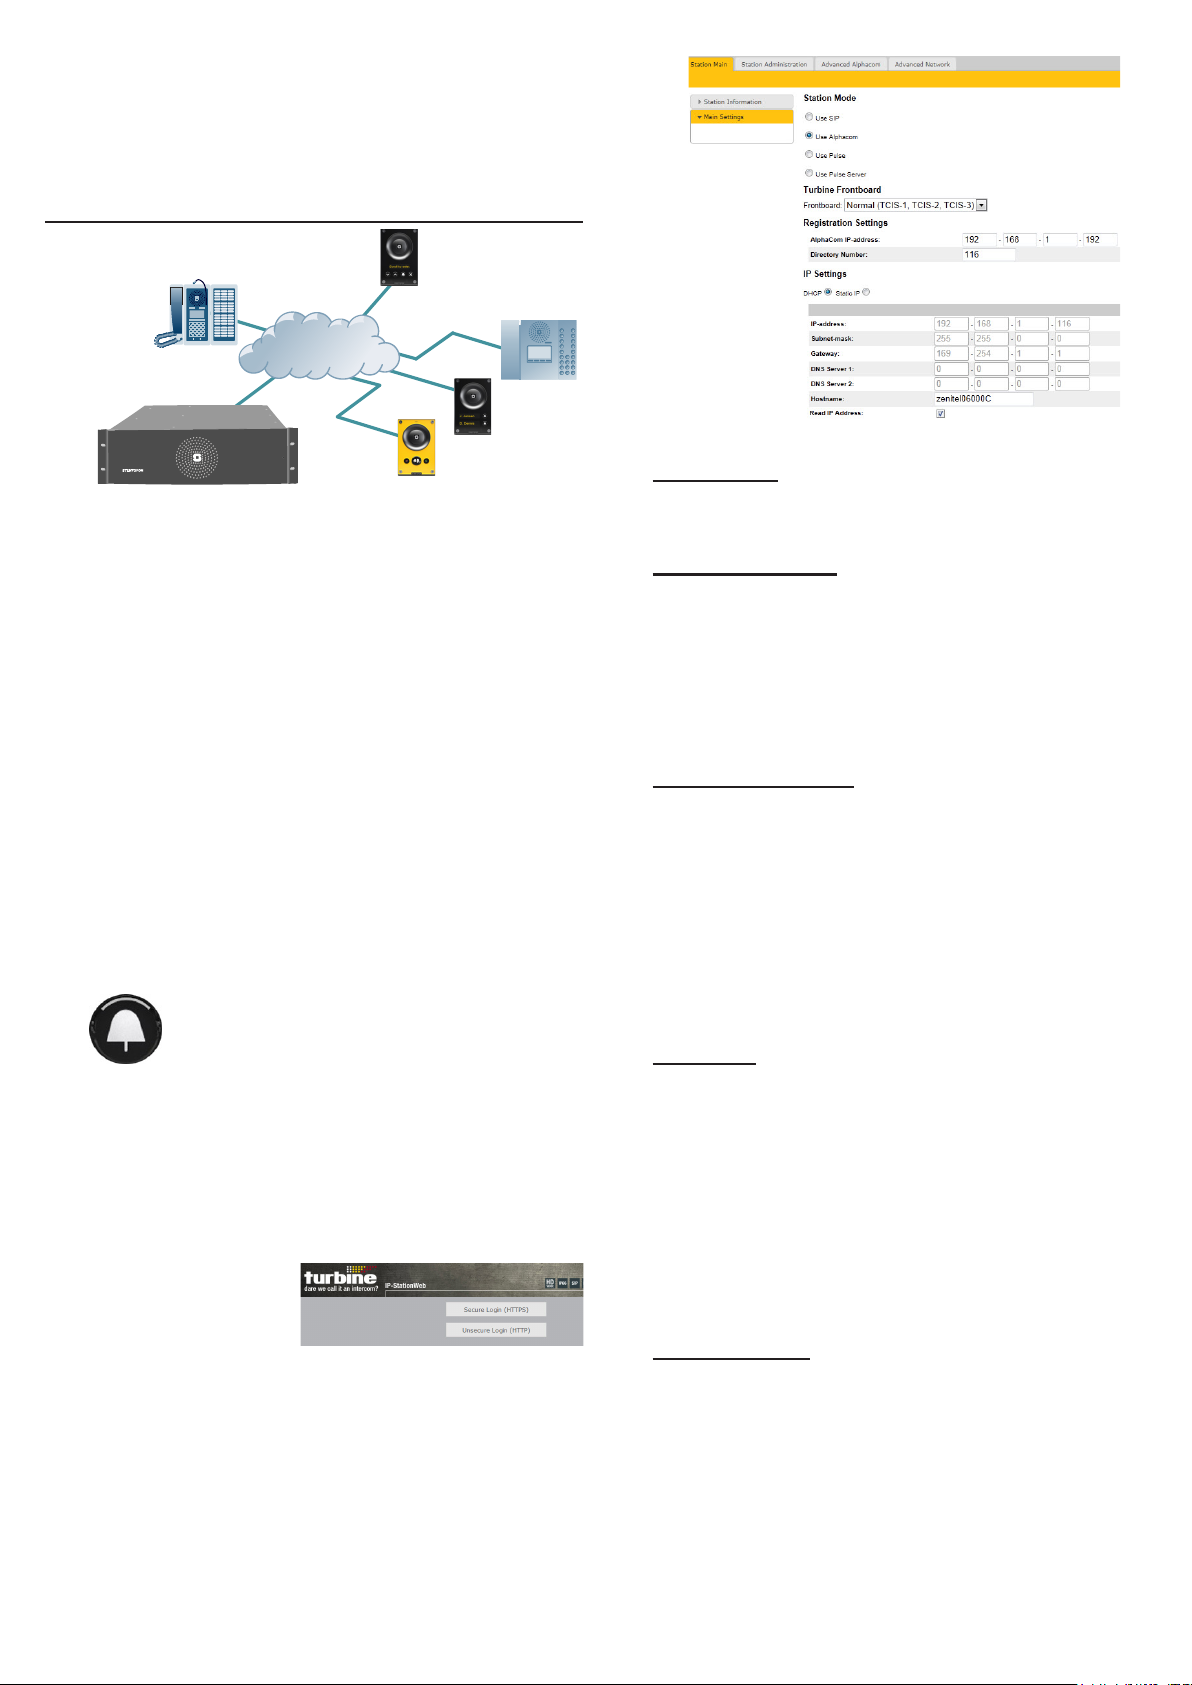
Turbine TICS-6
Control Room
Master Station
IP Network
Turbine TICS-5
AlphaCom XE7
AlphaCom XE Server/Exchange
2.1 Logging into the Turbine Station
The Turbine Station features an embedded web
interface which allows users to log in via a standard
web browser.
To do this, your PC and the Turbine IP station have to
be connected together via a PoE switch using network
cables:
1. Connect the PC to the PoE switch
2. Connect the PoE port on the station to the PoE
switch
When the Turbine Station is connected to the network,
the IP address of the station is automatically obtained
in one of two ways:
1. IP address obtained from a DHCP server
2. If there is no DHCP server, an IP address in the
range 169.254.x.x will be assigned.
To make the station speak its IP address:
● Press the call button on the station
- when the station is not yet registered
Turbine TCIS-1
IP Desk Master
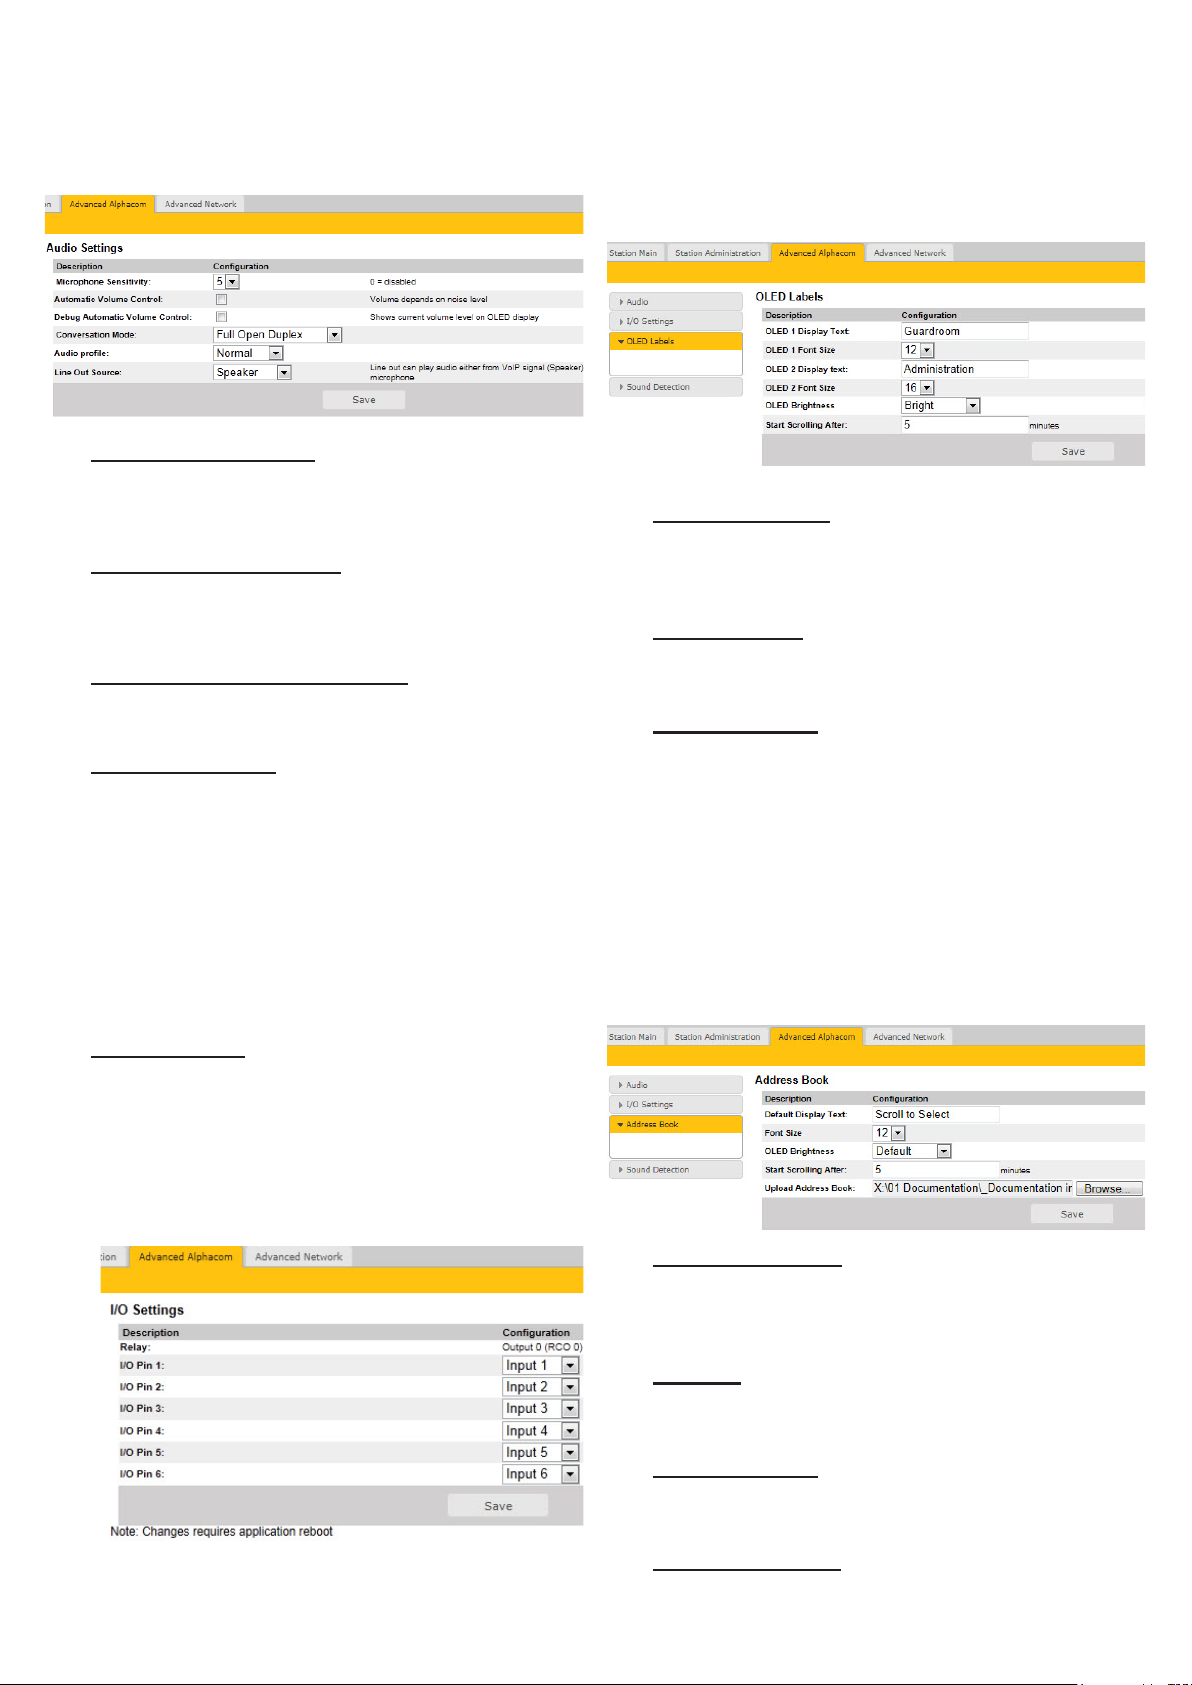
Station Mode
● Select the Use Alphacom radio-button
Turbine Frontboard
Depending on the type of Turbine Compact station,
select one of the options from the drop-down box:
- Kit
- Normal (TCIS-1, TCIS-2, TCIS-3)
- OLED Labels (TCIS-4, TCIS-5)
- Scrolling Station (TCIS-6)
Registration Settings
● Enter the IP address of the AlphaCom server/
exchange in which the IP station is to be a
subscriber in the AlphaCom IP-address eld.
● Enter the directory no. of the station in the
Directory Number eld.
- If a directory number is not entered, the station will
register with its MAC address. The MAC address is
found on the Station Information page and needs to be
entered into AlphaPro.
IP Settings
Access the station by logging into the web interface
using a standard web browser:
1. Open a web browser
2. In the browser’s address bar, type the station IP
address and press the ENTER key
- The station login page will be displayed.
To log into the station:
1. Click Login
2. Enter the default User name: admin
3. Enter the default password: alphaadmin
2.2 Station Main Settings
● Click Station Main > Main Settings to access
the page for conguring station mode and IP
parameters.
● DHCP – Select this option if the IP station shall
receive IP Settings from a DHCP server.
● Static IP – Select this option if the IP station shall
use a static IP address. Enter values for:
- IP-address
- Subnet-mask
- Gateway
- DNS Server 1 (optional - for network administration)
- DNS Server 2 (optional - for network administration)
- Hostname (optional - for network administration)
Read IP Address
● Check the Read IP Address box to enable an
unregistered station to speak the IP address when
the call button is pressed.
Click Save followed by Apply to apply the new
conguration settings.
Page 3
2.3 Audio Settings
To congure audio settings:
● Select Advanced Alphacom > Audio from the
menu
Microphone Sensitivity
- Select the sensitivity level in the range 0 to 7 from the
drop-down box. The default setting is 5.
2.5 OLED Labels
L Note that only Turbine stations congured with OLED Labels
(TCIS-4, TCIS-5) under Main Settings will have this menu
option.
● Select Advanced AlphaCom > OLED Labels
from the menu
OLED Display Text
Automatic Volume Control
- Check box to enable automatic volume control that is
adjusted according to the noise level
Debug Automatic Volume Control
- Check box to show current volume level on OLED display
Conversation Mode
- Full Open Duplex: Normal mode with echo cancellation
- Robust Duplex: Option used when open duplex fails due
to excessive speaker loudness, microphone overload or
very high nonlinear distortions.
- Half Duplex Switching: Switches speech direction
depending on who speaks the loudest
- Push-To-Talk: Half-duplex communication. Initially the
microphone is shut off. Push the M-button to open the
microphone, and release to listen. (TCIS-1 station only)
- Open: Full Open Duplex without echo cancellation
Line Out Source
Plays audio either from VoIP signal (Speaker) or direct
from Microphone.
● Enter display text in the relevant elds for OLED 1
and OLED 2.
OLED Font Size
● The font size can be either 12 or 16
OLED Brightness
● Brightness: Default, Bright, Extra Bright
2.6 Address Book
L Note that only the Turbine station congured as a Scrolling
Station (TCIS-6) under Main Settings will have this menu
option.
● Select Advanced AlphaCom > Address Book
from the menu
2.4 I/O Settings
● Select Advanced AlphaCom > I/O Settings from
the menu
● Select either Input or Output options from the
drop-down box for I/O Pins 1 to 6.
Default Display Text
● The idle text shown in the display may be changed.
The default text is: Scroll to Select
Font Size
● The font size can be either 12 or 16
OLED Brightness
● Brightness: Default, Bright, Extra Bright
Start Scrolling After
● Set the time in minutes after which scrolling should
start
Page 4
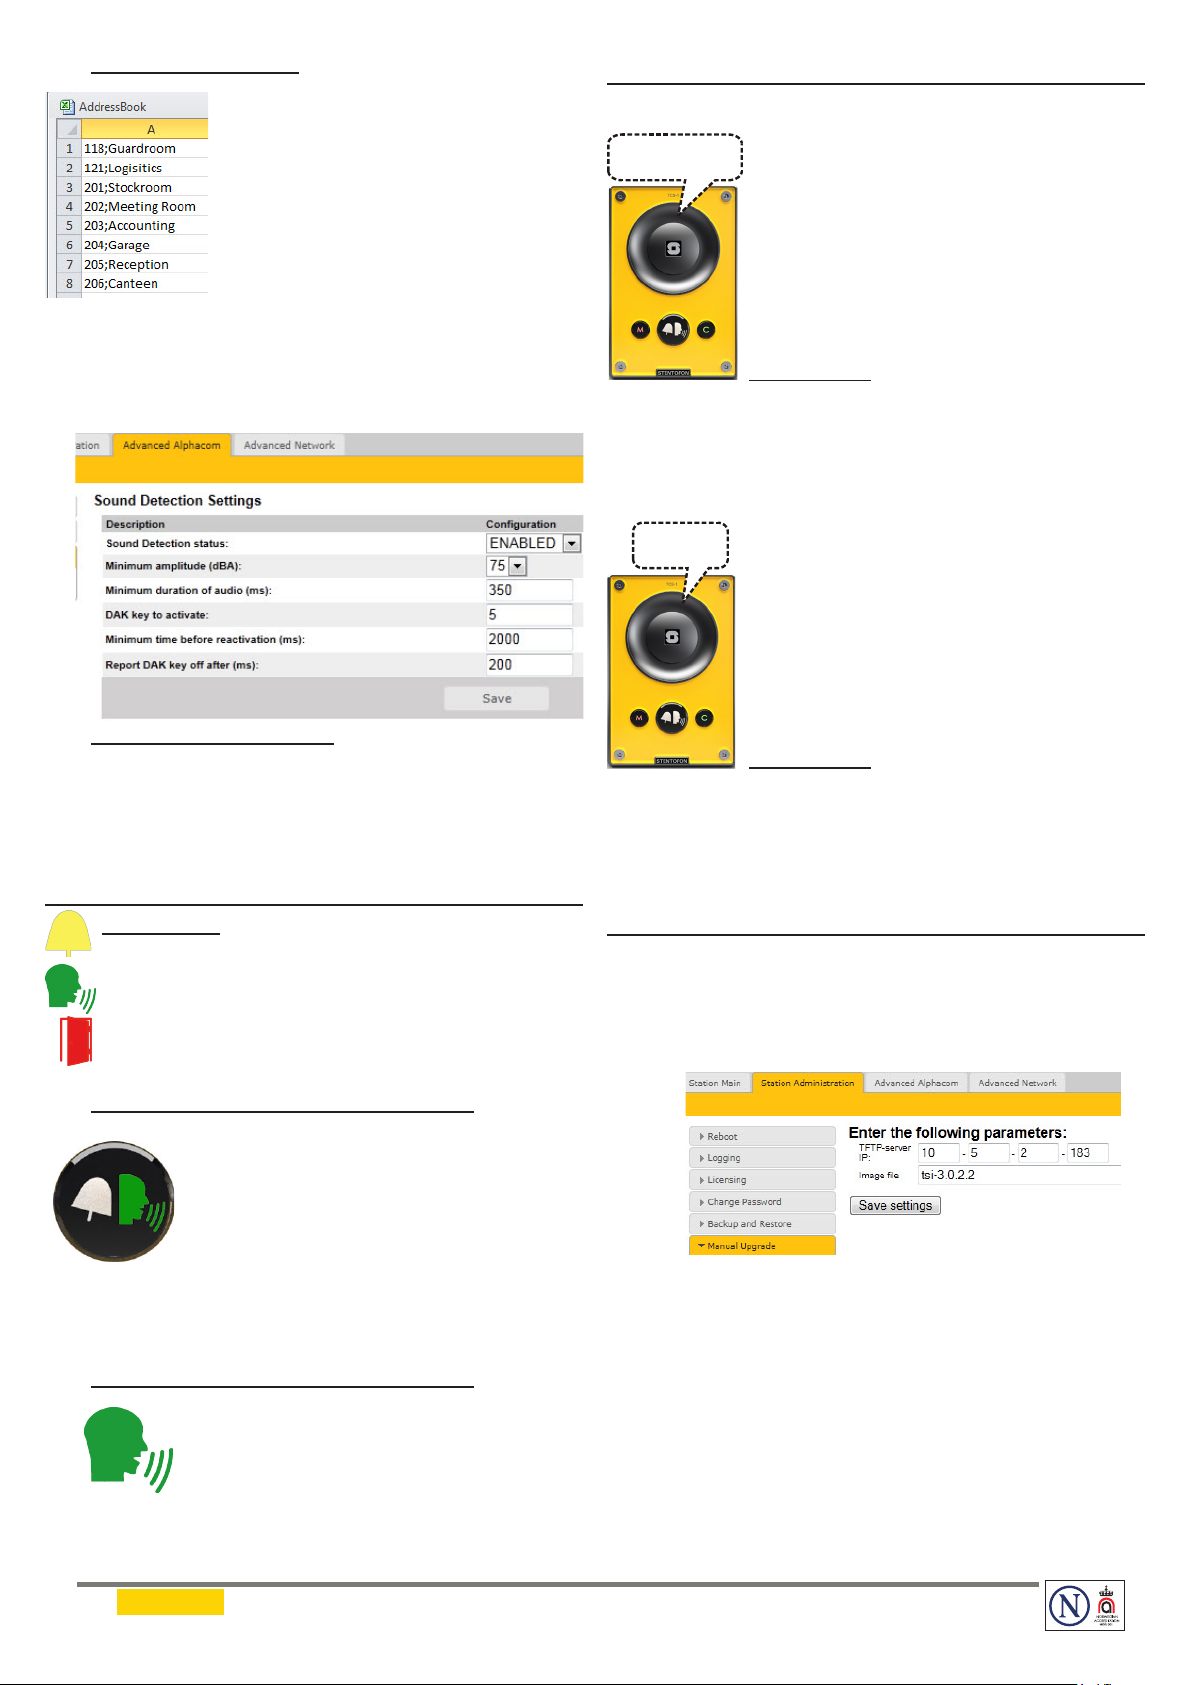
Upload Address Book
1, 2, 3, 4, 5
A CSV le consisting of directory
numbers and display text with
the semi-colon character (;) as
delimiter may be uploaded.
● Click Browse to upload a CSV
le
2.7 Sound Detection
● Select Advanced Alphacom > Sound Detection
from the menu
Sound Detection Settings
Here you can set the minimum amplitude and duration
of the audio, the DAK to activate, etc.
4 Restoring Default Settings
4.1 Reset to Default with Activated DHCP
To reset:
1. While pressing any button, power up the
station by connecting to a PoE switch.
2. Hold the button until the station audio starts
counting, and release the button on count 1.
3. Press and hold the button on count 5 and
release on count 0.
4. Press the call button to make the station
speak its IP address.
Default values
- Station IP address: (determined by DHCP server)
- Username: admin
- Password: alphaadmin
4.2 Reset to Default with Static IP
1, 2, 3
To reset:
1. While pressing any button, power up the
station by connecting to a PoE switch.
2. Hold the button until the station audio starts
counting, and release the button on count 1.
3. Press and hold the button on count 3 and
release on count 0.
4. Press the call button to make the station
speak its IP address.
Default values
- Station IP address: 169.254.1.100
- Username: admin
- Password: alphaadmin
3 LEDs on Station Front Plate
Status LEDs
- Bell icon lights yellow when a call is placed and ringing
- Talk icon lights green when a call is active and in
conversation
- Door icon lights red when the door is unlocked or relay is
active
Talk Icon: Flashing at 1 second intervals
- Station has no connection to the AlphaCom
server/exchange.
Possible reasons:
- No connection to Ethernet
- Wrong AlphaCom XE IP address congured
- Invalid IP address
- No gateway or wrong gateway to the
AlphaCom server/exchange
Talk Icon: Flashing at 5 second intervals
- Station connected but NOT registered in the
AlphaCom server/exchange.
Reason:
- Station has not been programmed in
AlphaPro
5 Station Software Upgrade
1. Start the TFTP server program and click Browse to
select the folder containing the software image les
2. Log on to the IP station web interface
3. Select Station Administration > Manual Upgrade
4. Enter the IP address of the TFTP server (your PC’s
IP address)
5. Enter the prex (e.g. tsi-3.x.x.x) to the software
image les in the Image le eld
6. Click Save settings to store the data
- The station will now try to contact the TFTP server. If the
response is TFTP_CONN_OK the settings are saved, and
the Upgrade button will appear.
7. Click the Upgrade button to upgrade the software
on the IP station.
- The upgrade procedure takes about 3 minutes.
DOC NO..
A100K11293
Zenitel and its subsidiaries assume no responsibility for any errors that may appear in this publication, or for damages arising from the information therein. STENTOFON and VINGTOR products are developed and marketed
by Zenitel. The company’s Quality Assurance System is certified to meet the requirements in NS-EN ISO 9001. Zenitel reserves the right to modify designs and alter specifications without notice.
ZENITEL PROPRIETARY. This document and its supplementing elements, contain Zenitel or third party information which is proprietary and confidential. Any disclosure, copying, distribution or use is prohibited, if not
otherwise explicitly agreed in writing with Zenitel. Any authorized reproduction, in part or in whole, must include this legend. Zenitel – All rights reserved.
16.1.2013
 Loading...