


Release: April 2017, September 2016, April 2016, January 2016, November 2015, August 2015.
Copyright 2017, Stenograph, LLC. All Rights Reserved.
Stenograph. Adjustable LCD Screen Assembly for Writing Machine. U.S. patent 7,403,375, filed May 27,
2005, and issued July 22, 2008.
This material is protected by law, including the Copyright Act of 1976 and is not to be copied, reproduced,
modified, sold, stored or transmitted in any form or by any means (electronic, mechanical, photocopy,
recording or otherwise), or used in any other manner, without the prior written permission of Stenograph.
STENOGRAPH PROPRIETARY: This material constitutes proprietary and trade secret information of
Stenograph and shall not be disclosed to any third party, nor used by the recipient, except under the terms
and conditions of the purchase agreement between the customer and Stenograph.
This device complies with Part 15 of the FCC Rules. Operation is subject to the following two conditions:
(1) this device may not cause harmful interference, and (2) this device must accept any interference
received, including interference that may cause undesired operation.
Changes may be made periodically to the information in this publication. Such changes will be incorporated
in any new edition of this manual.
Stenograph is a Pettibone Company.
Luminex, Case CATalyst, CATalyst, EasyLock, Diamante, TrueStroke Technology, élan Mira, Stentura
Fusion, SmartWriter, Stentura, Stenograph logo and Stenograph are trademarks and registered trademarks
of Stenograph.
Windows is a registered trademark of Microsoft Corporation in the United States and other countries.
Windows Vista is either a registered trademark or trademark of Microsoft Corporation in the United States
and/or other countries.
SanDisk is a registered trademark of SanDisk Corporation.
The SD logo is a trademark of Toshiba Corporation.
All other trademarks are the property of their respective owners.

Table of Contents
Chapter 1: Introduction............................................................................................... 7
Luminex Feature Details.................................................................................................................. 9
User Guide Overview.......................................................................................................................10
Chapter 2: Hardware ...................................................................................................11
Battery .............................................................................................................................................12
Charging the Battery..................................................................................................................12
Low Battery Warnings................................................................................................................14
Communication Ports ......................................................................................................................16
Install the Luminex USB Drivers ................................................................................................16
Powering With the USB Cable ...................................................................................................17
Updating With the USB Cable....................................................................................................17
Connect for Realtime Writing.....................................................................................................17
Function Sensors.............................................................................................................................21
Touch Screen.............................................................................................................................21
Keyboard Depth and Tension Controls............................................................................................22
Adjust Depth of Stroke...............................................................................................................22
Adjust Keyboard Tension...........................................................................................................22
Reset ...............................................................................................................................................23
Secure Digital (SD) Cards ...............................................................................................................24
Enable Writing on a SD Card.....................................................................................................25
Remove and Insert a SD Card...................................................................................................25
USB SD Flash Drive Reader......................................................................................................26
Status LCD ......................................................................................................................................27
Tilting Color Touch Screen ..............................................................................................................28
Cleaning the Tilting Screen........................................................................................................28
Tripod...............................................................................................................................................29
Attaching the Tripod...................................................................................................................29
Adjusting the Tripod Height........................................................................................................30
Tilting the Luminex.....................................................................................................................30
Removing the Tripod..................................................................................................................30
Routine Maintenance.......................................................................................................................31
Daily/Monthly .............................................................................................................................31
Two to three years .....................................................................................................................31
Additional Accessories for your Luminex.........................................................................................32
Chapter 3: Writing on the Luminex............................................................................35
Accessing Luminex Features...........................................................................................................36
Writing Menus............................................................................................................................37
Writing Jobs .....................................................................................................................................39
A/An Resolution ...............................................................................................................................41
About ...............................................................................................................................................42
Audio................................................................................................................................................43
Audio Hardware Setup...............................................................................................................43
Audio Options ............................................................................................................................43
Audio Playback ..........................................................................................................................45
Auto-Conflict Resolution ..................................................................................................................46
Backup SD Card ..............................................................................................................................47
Format the Backup SD Card......................................................................................................47
View Files on the Backup SD Card............................................................................................48
Beeper Volume ................................................................................................................................49
Brief It ..............................................................................................................................................50
Managing Briefs.........................................................................................................................51
© 2017 Stenograph
1

Luminex User Guide
Use Brief It .................................................................................................................................52
Copy Log .........................................................................................................................................54
Data SD Card ..................................................................................................................................55
Format a Data SD Card .............................................................................................................55
Manage Data SD Card Space ...................................................................................................55
View and Copy Data SD Card Files...........................................................................................56
Dictionaries ......................................................................................................................................58
Load Dictionaries onto the Luminex...........................................................................................58
Using Job Dictionaries ...............................................................................................................59
Display Set Strokes Per Minute (SPM)............................................................................................61
Electronic Marks ..............................................................................................................................62
J-Defines..........................................................................................................................................63
Create J-Defines........................................................................................................................63
Write All J-Defines to a Data SD Card.......................................................................................66
Clear All J-Defines .....................................................................................................................66
Spell Mode .................................................................................................................................67
Job Statistics....................................................................................................................................71
View Job Statistics.....................................................................................................................71
Keyboard Layout..............................................................................................................................72
Keyboard Settings ...........................................................................................................................73
Keyboard Adjustments...............................................................................................................73
Individual Key Adjustments........................................................................................................75
Keyboard Profiles.......................................................................................................................76
Memory............................................................................................................................................77
View and Copy Memory Files ....................................................................................................77
New View.........................................................................................................................................79
Options ............................................................................................................................................80
Only use touch screen for function keys during a job ......................................................................81
Prompt to End a Job Option ............................................................................................................82
Clear J-defines when turning on/ending job ....................................................................................83
Reopen ............................................................................................................................................84
Scroll................................................................................................................................................85
Search .............................................................................................................................................86
Search for the Last Question .....................................................................................................86
Search for the Last Answer........................................................................................................86
Search for the Last Mark............................................................................................................87
Search for Steno Strokes...........................................................................................................87
Search for the Last Untranslate .................................................................................................88
Serial Protocol .................................................................................................................................89
Status...............................................................................................................................................90
Check Status Information...........................................................................................................90
Steno Test .......................................................................................................................................91
Suffix Handling.................................................................................................................................92
Test Mode........................................................................................................................................93
Thumb Drive ....................................................................................................................................94
Tilting Screen Appearance ..............................................................................................................95
Set Tilting Screen Text Colors ...................................................................................................95
Select Tilting Screen Font Size..................................................................................................95
Set the Tilting Screen Backlight Level .......................................................................................96
Time and Date .................................................................................................................................97
Translate Options ............................................................................................................................98
TrueStroke .......................................................................................................................................99
2
© 2017 Stenograph

Table of Contents
USB Communication .......................................................................................................................100
Chapter 4: Troubleshooting .......................................................................................101
Troubleshooting Tips........................................................................................................................101
Luminex Technical Support .............................................................................................................105
Appendix A: Updating Luminex Software................................................................ 107
Appendix B: Luminex Utilities................................................................................... 109
Personalize the Luminex Splash Screen .........................................................................................110
Convert Date/Time to Stentura Format............................................................................................112
Convert RTF/CRE Dictionaries........................................................................................................114
Backup SD Card Reader .................................................................................................................116
TrueView..........................................................................................................................................118
Copy the TrueView Utility...........................................................................................................118
Access TrueStroke Data............................................................................................................119
Understanding the TrueStroke Data ..........................................................................................121
TrueView Menu Features...........................................................................................................123
Perform Luminex Key Adjustments............................................................................................125
Troubleshooting TrueView.........................................................................................................125
© 2017 Stenograph
3

Luminex User Guide
4
© 2017 Stenograph

Congratulations on the purchase of your Luminex Writer!
We strongly encourage you to read this User Guide and practice using your writing machine according to the
instructions contained therein. This will allow you to become comfortable and familiar with it before taking it
on a job or into class.
The Luminex is equipped with a full-color high resolution LCD touch screen for viewing steno or text and to
interact with what is displayed.
The Luminex comes with a built-in rechargeable battery. Advanced battery technology prevents the battery
from overcharging so you don’t have to worry about leaving the writer plugged into an electrical outlet for
extended periods of time.
TM
EasyLock
Simply open and set the tripod on the floor and place your machine on it according to the instructions in this
guide. The design of the tripod assures a smooth, even writing platform for you to enjoy. A tilt-mechanism
enables the writer to be tilted 70
Weighing in at only 3.5 pounds, the Luminex lightens your load when carrying it from place to place.
Remember to check the Stenograph
The Luminex was designed with you in mind. We are confident you’ll enjoy using it!
LMX V2 tripod positioning with a positive-locking mechanism provides smooth and easy setup.
o
forward and backwards to suit your personal preference.
®
web site, www.stenograph.com, for updates to the Luminex.
STENOGRAPH
© 2017 Stenograph
5

The Importance of Working Comfortably and Effectively
Stenograph believes that the Luminex shorthand machine, when used in compliance with the enclosed
instructions and information, is safe. Certain sources, though controverted, suggest a relationship between
injuries of the hands and forearms with prolonged use of any type of keyboard or other equipment involving
repetitive movements of the hands. At the same time, other sources indicate that there is no such cause and
effect.
The safety and well-being of persons using Stenograph equipment is of paramount concern and because we
recognize that these medical and scientific questions are not definitively resolved, Stenograph encourages all
users of our writers to carefully review the following Work Area Checklist and to use appropriate work habits.
Remember, personalizing your environment so that it is comfortable for you, promotes a healthy physical and
mental work lifestyle.
The following Work Area Checklist is not intended to be all inclusive but a guideline for you to use. Only you can
determine what is best for you. Use the checklist to assess and adjust your work area to suit your own needs.
Personalizing your environment so that it is comfortable for you promotes a healthy physical and mental work
lifestyle.
Work Area Checklist
At Your Luminex
Use a comfortable chair conducive to correct posture.
Adjust the height of the shorthand machine
appropriately for your body.
Position the shorthand machine comfortably close to
you.
Place the tripod between your knees. Do not sit
“sidesaddle”.
Minimize the use of the shorthand machine on surfaces
other than the tripod stand.
At Your Computer
Place the monitor screen perpendicular to the window to
help avoid glare.
Adjust or close window coverings.
Arrange materials such as reference books or a
telephone close to you to help avoid excessive reaching
or twisting.
Clear the area under and around the desk to leave room
for your feet and legs.
Remove sources of distraction around the monitor.
Keep noise to a minimum.
Your Body
Take frequent breaks to stretch or exercise.
Maintain a straight wrist position.
Avoid resting your wrists while writing.
Keep your hands level with your forearms.
Let your fingers curve naturally.
Let your forearm go up and down a little when you write,
pivoting at the elbow, not at the wrists.
Pull your steno machine comfortably close to you.
Keep your feet on the floor or supported by a footrest.
Support your lower back.
Assure that your knees are bent at an angle of 90° or
more and your thighs at an angle of 90° or greater in
relation to your torso.
Adjust the chair position and your posture throughout
the day.
If you experience any aching, numbing, or tingling in
your arms, wrists, or hand, consult a qualified health
care professional.
See accompanying materials provided by the computer
keyboard manufacturer.
© 2017 Stenograph
6

Chapter 1
Introduction
Congratulations on the purchase of your Luminex writer. Read this User Guide to familiarize yourself
with the Luminex components.
Chapter 1, Introduction, highlights the features of your Luminex, describes typographical conventions
used in this guide and outlines the organization of this guide.
Package Contents
Your new Luminex comes with the following items:
• Carrying case
•EasyLock
• 110/220 AC adapter/charger
• 1 Data SDHC card, (4 GB)
• 1 Backup Micro SDHC card, (4 GB)
• USB SD Flash Drive reader
• Micro USB cable (6 ft.)
• Optical-quality spray cleaner and cleaning cloth
• Stenograph One-Year Commercial Warranty document
TM
LMX V2 tripod
© 2017 Stenograph
7

Luminex User Guide
8
© 2017 Stenograph

Luminex Feature Details
The Luminex provides you with the following features:
Chapter 1: Introduction
• Full-Color, High Resolution LCD Touch Screen which pivots a full 180
o
.
• Six capacitive touch sensors. The first one on the left turns the Luminex on and off.
• View text, steno notes or text and steno notes simultaneously.
• Realtime ready through USB, virtual serial port, Bluetooth and WiFi.
• Backup SD card saves steno notes, timestamps and audio.
• Data SD card saves steno notes, timestamps, job dictionary and audio.
• Record and playback audio with optional microphone and headset.
• Adjustable digital clock with month, date, and time.
• Adjust beeper volume.
• Adjust screen brightness and text color and font size.
• Update Luminex software from Internet download via USB.
• Date and timestamp note files.
• Automatically load main and job dictionaries.
• J-Define entries into a job dictionary.
• A/An resolution, Auto-Conflict, Brief It and suffix handling options.
• Search for and display the previous or last Question, Answer, untranslate, StenoMark, or steno
string.
• Scroll forward and backward in a file.
• Keyboard and individual key sensitivity adjustments.
• Reopen an existing file for readback and play audio.
© 2017 Stenograph
9

Luminex User Guide
User Guide Overview
This Luminex User Guide contains the following chapters with related topics.
Chapter 1: Introduction
Introduction acquaints you to the Luminex features and explains this User Guide.
Chapter 2: Hardware
Hardware explains the various components of the Luminex and how to use them.
Chapter 3: Writing on the Luminex
Writing on the Luminex explains all the software features of the Luminex used for setup before you begin
writing and while writing a job. These includes features such as loading dictionaries, setting audio
options, customizing the tilting screen, searching steno and text and changing the tilting screen view.
Chapter 4: Troubleshooting
Troubleshooting suggests possible solutions to some common situations that you may encounter when
using the Luminex.
Appendix A: Updating Luminex Software
Updating Luminex Software instructs you how to download available updates for your Luminex from the
Stenograph web site.
Appendix B: Luminex Utilities
Luminex Utilities provides instruction on how to load an RTF/CRE dictionary on the Luminex, convert
Luminex files from Date and Time format to Stentura compatible format, personalize the Luminex splash
screen, retrieve jobs from a Backup SD card and view TrueStroke
®
data.
10
© 2017 Stenograph

Chapter 2
Hardware
Chapter 2, Hardware, provides information about the hardware components of your Luminex. This
includes details on battery charging and use; communication ports and setup; function touch sensors for
accessing menus; touch screen, status LCD icons; adjusting the Tilting screen; resetting the writing
machine; and assembling and attaching the tripod.
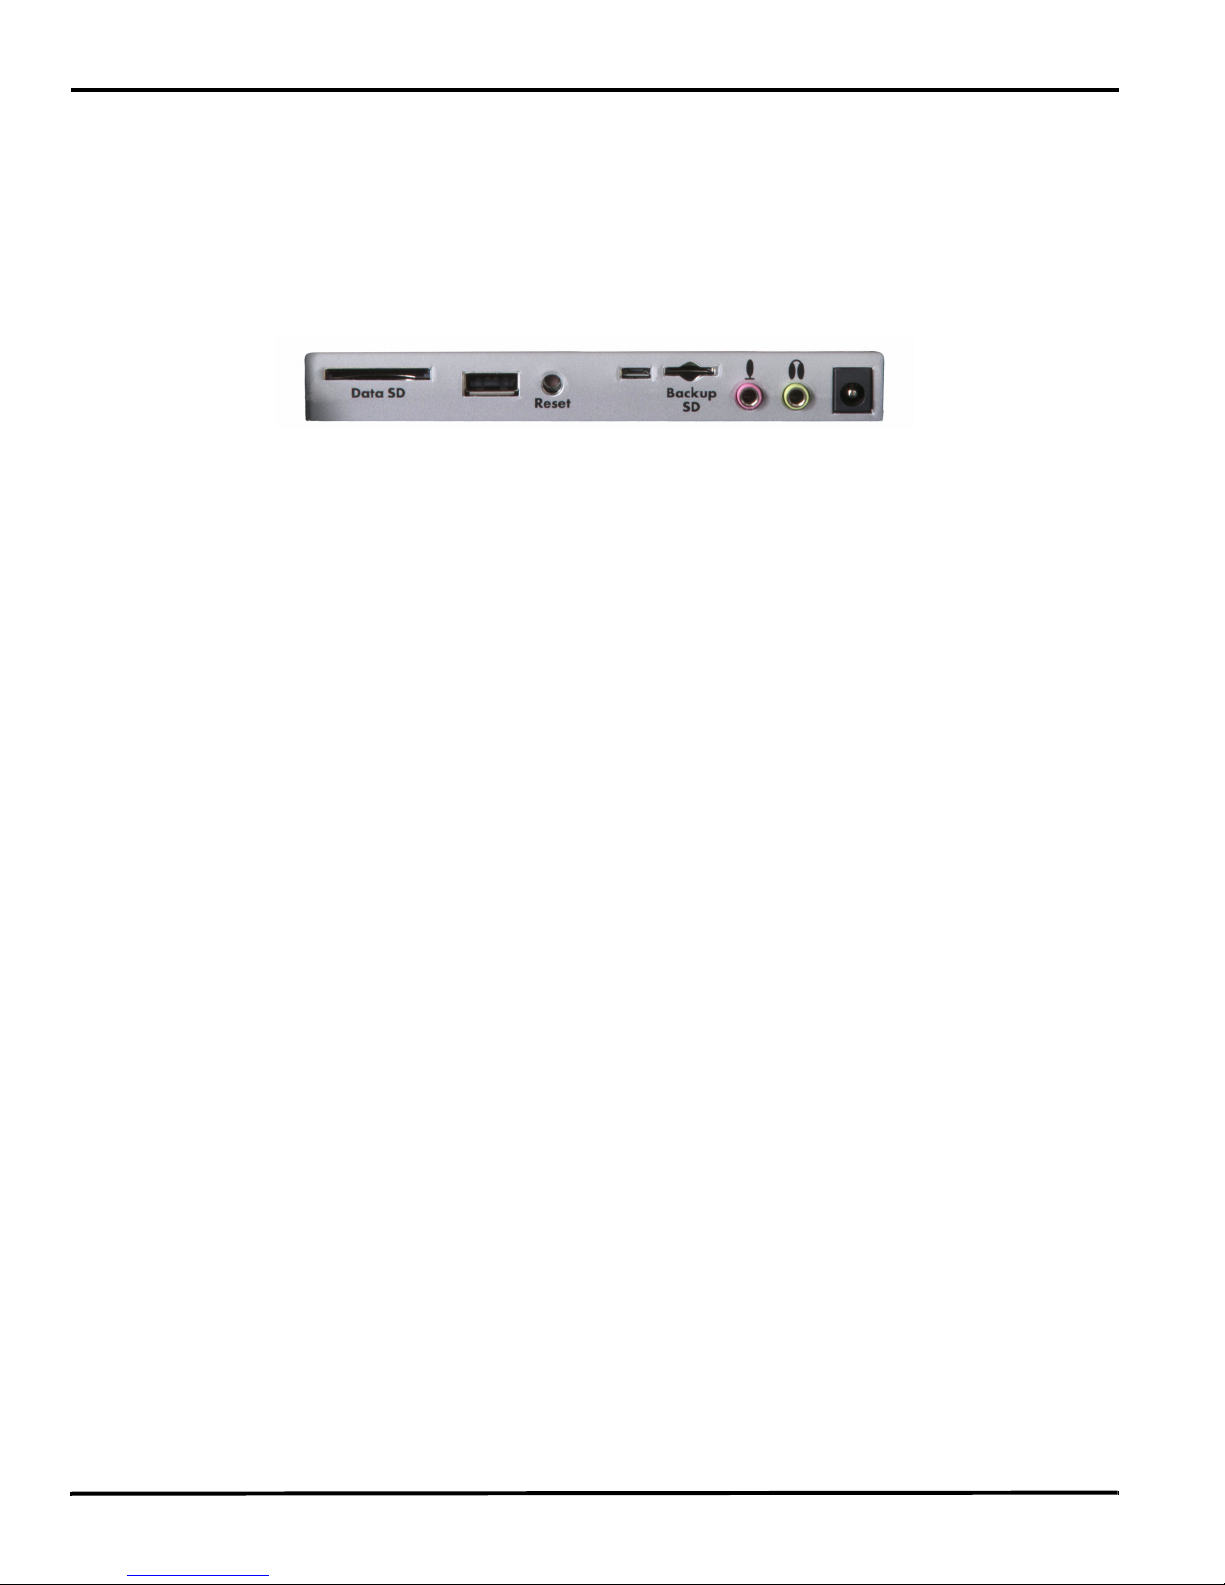
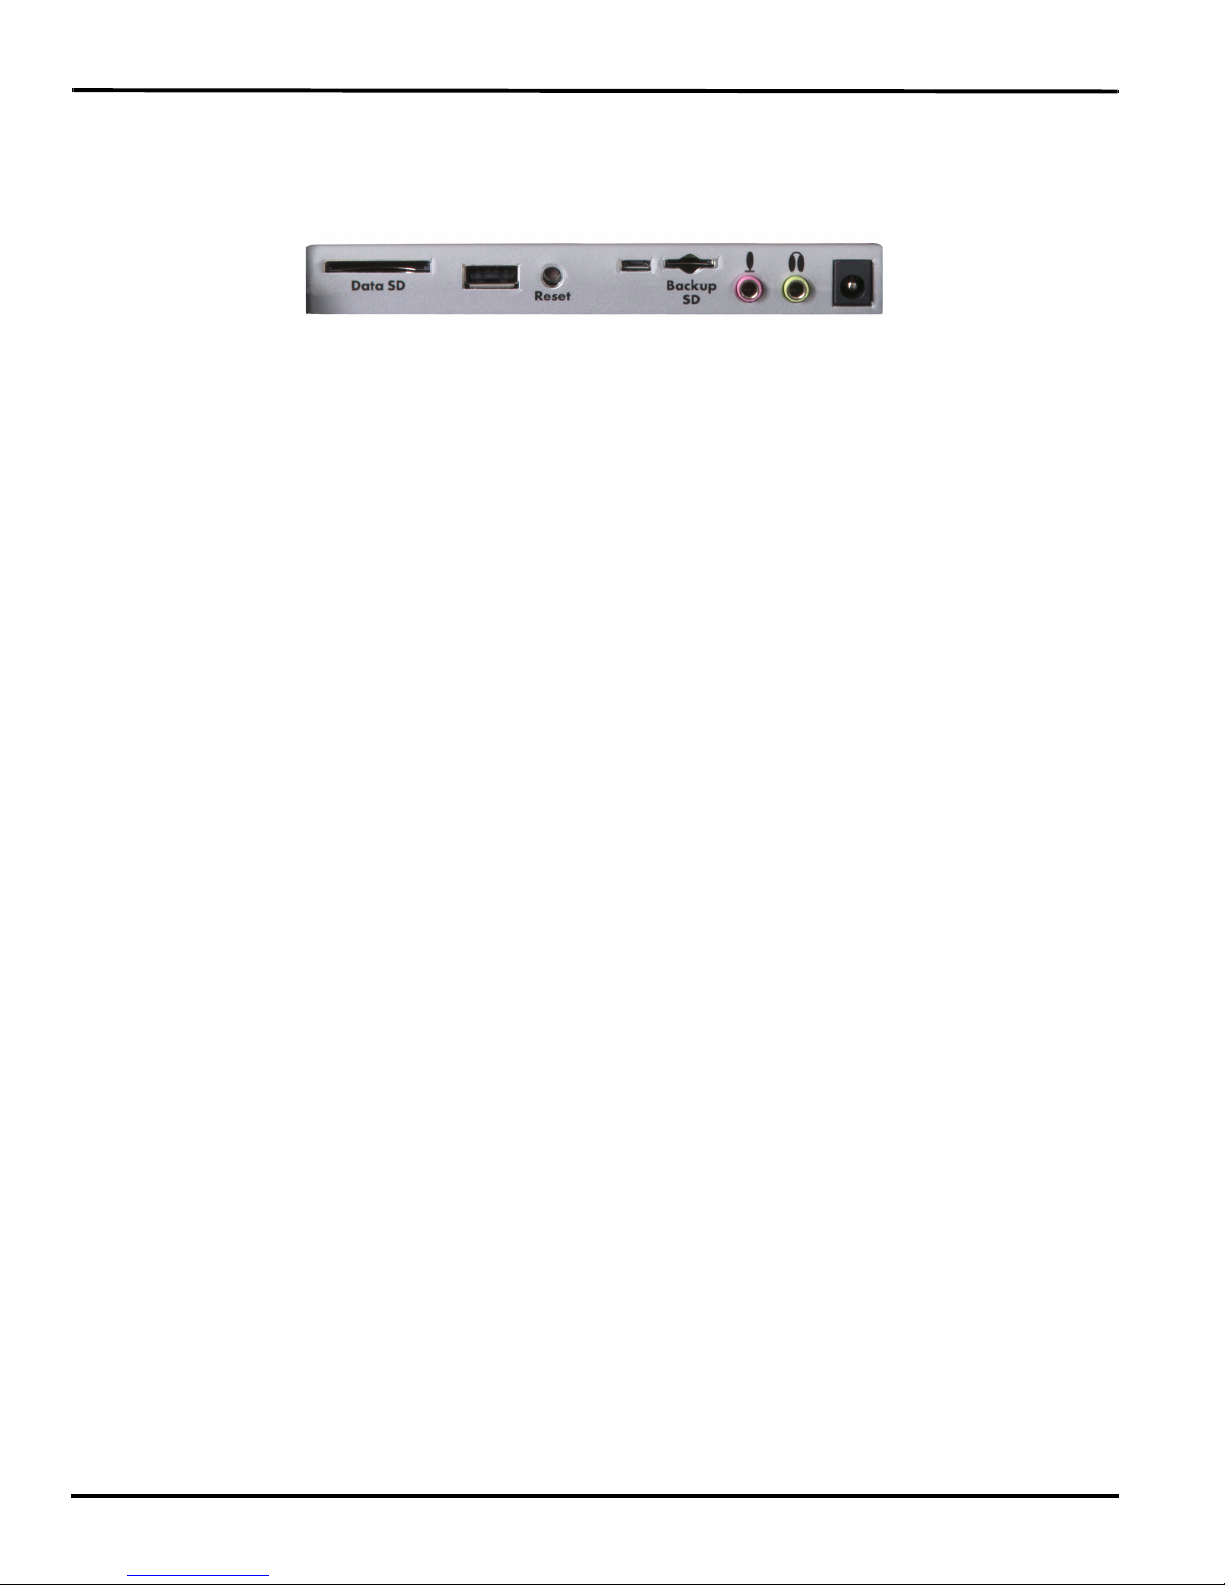
Back of Luminex with SD cards
Luminex Ports
• Data SD port holds your SD Data Card.
• Standard USB port is designed for a thumb drive for copying files.
• Reset button reboots your Luminex.
• Micro USB port holds the micro end of your USB cable for USB communication between writer
and computer and/or as a virtual serial connection to CAT systems that do not support
Stenograph’s USB communications protocol.
• Micro Backup SD port holds your micro Backup SD card.
• Microphone jack when recording audio.
• Headphone jack for monitoring live audio and/or audio playback.
• Power receptacle for charging the Luminex.
© 2017 Stenograph
11

Luminex User Guide
Battery
The Luminex comes with one main rechargeable battery and an AC adapter/charger. You can operate
your writing machine on battery power or using the AC adapter/charger with the main battery charging.
Although you can use the Luminex with the AC adapter/charger, Stenograph recommends that you fully
charge the battery before first time use. See Battery Charging Procedure on page 12.
The main battery, fully charged, operates all the features on the Luminex for approximately 18-19 hours.
Charging time for the main battery is approximately 5 - 6 hours.
The main battery provides a FailSafe mode if the charged level of the main battery becomes too low and
you are not using the AC adapter/charger or have your micro USB cable plugged into a powered
computer. In FailSafe mode, the tilting screen, Bluetooth communication and WiFi communication turn
Off. Your steno notes and audio continue to be written to the Data and Backup SD cards and, if you are
writing realtime via a USB connection, steno notes are sent to the realtime screen. Steno notes also
continue to be stored in memory. FailSafe mode may last up to 3 hours. The Luminex retains the date,
time and user settings during FailSafe mode.
Charging the Battery
When the Luminex is powered by the AC adapter/charger, the main battery level is maintained. The
batteries fully charge in 5 - 6 hours. You can use your writing machine while the AC adapter/charger
charges the battery. The Luminex battery fully charged operates all features for approximately 15 hours
and then will go into Failsafe mode which may last up to 3 hours.
The Luminex battery only charges when needed. Once the batteries are charged, it is not necessary to
keep the writing machine plugged into the AC adapter/charger, however, keeping the writing machine
plugged in does not damage the battery. If you are connected via the micro USB cable to a computer
that is powered On, the Luminex battery can be charged. If you are not going to use your Luminex for an
extended period of time, Stenograph recommends keeping the Luminex plugged into the AC adapter/
charger. If the Luminex is not in use for a long period of time while disconnected from the AC adapter/
charger, it is important to fully charge the battery before use and to check the date and time setting on
the writer.
®
Use only the AC adapter/charger supplied with your Luminex. The Diamante
charge the Luminex if your Luminex AC adapter/charger is not available. All other chargers designed for
other Stenograph writing machines do not power the Luminex. Although previous Stenograph writing
machine AC adapter/charger may fit the Luminex, they will not
charge the Luminex battery.
AC adapter/charger will
Turning the Luminex On and Off
On either side of the Status LCD are three touch sensitive sensors. The far left sensor turns the Luminex
On and Off. If there is no power source to the writer (AC adapter is not plugged in or your Luminex is not
connected to your computer via the USB cable) you need to touch the On/Off sensor for a 1/2 second in
order to turn the Luminex On. To turn the Luminex off, touch the On/Off sensor until you hear the beep.
Battery Charging Procedure
To charge your Luminex battery:
1. Plug the AC charger/adapter into a wall outlet.
2. Insert the small plug on the AC adapter/charger cord into the AC adapter/charger socket on the back
12
© 2017 Stenograph

Chapter 2: Hardware
of the Luminex.
3. The Luminex turns On. A black dot in the lower right corner of the Status LCD indicates the Luminex
is On. A row of running blocks indicates the battery is charging. If you plug your Luminex in to charge
and only the black dot displays, the batteries are charged. Charging is not necessary and no
charging occurs.
You can use the Luminex while the battery charges. The running blocks do not
but the Luminex continues to charge. Status LCD on page 27 for more information.
Press the On/Off sensor to turn the Luminex Off during charging. The tilting screen turns off but the
Luminex remains On while charging as indicated by the black dot on the Status LCD.
display while writing
Viewing Battery Charging Status
The Tilting screen and the Status LCD display graphic indicators that reflect the charging status of
battery. View Battery Voltage Level on page 13 to view specific
battery voltage levels, current charging status and the most
recent charging history.
When the AC adapter/charger is connected to the Luminex charging the battery, the title bar on the tilting
screen displays a battery icon with the battery gauge showing running black and yellow stripes. When
the batteries are fully charged, a plug icon replaces the battery icon until you disconnect the AC adapter/
charger.
Battery Charging Battery Fully Charged
When the battery is charging, the Status LCD displays black bars in running sequence from left to right.
The black bars are not visible when you are writing, but re-display when you close the job. When the
Luminex is finished charging, the bars move from each side of the screen to the middle of the screen in
a “clapping” motion.
View Battery Voltage Level
The Battery diagnostic screen displays the voltage level and charging status.
To view battery voltage and charging status:
1. Make sure the charger/adapter is not plugged into the Luminex. If you just disconnected the charger/
adapter from the Luminex, turn the Luminex On and wait 10 – 15 minutes to get an accurate battery
voltage reading.
2. From the Opening menu, press More.
© 2017 Stenograph
13

Luminex User Guide
3. Press Diag and then press Battery. The battery status screen displays.
Luminex Battery Status Screen
4. Review the following battery information:
• Indicator bar - provides an approximate indication of the battery voltage level. Green indicates
the battery is fully charged; yellow indicates it is charged and red indicates it is low.
• Voltage - the actual voltage amount. A main battery reading of 4.07 volts or higher indicates
normal operating voltage. 3.6 volts or below indicates the battery is very low and the titling screen
will turn off and Failsafe mode will occur if battery is not charged.
• State - displays whether the battery is charging or not charging.
5. When finished, press OK, Quit.
6. To display the Opening menu, press More.
Low Battery Warnings
As the main battery becomes progressively low, the battery indicator on the title bar will change from
green to yellow to red indicating a drop in battery voltage. The Luminex displays warnings messages on
the tilting screen and will beep to indicate the battery voltage is getting low. Once the Luminex switches
to FailSafe mode, the battery icon on the Status LCD blinks. When the main battery becomes low while
the Luminex is connected to a computer with the micro USB cable during realtime, low battery messages
continue to display until the battery is depleted but the writer will not beep. The micro USB cable plugged
into a powered computer may be able to charge the battery but may not begin charging immediately if
the battery is in a very low voltage state. The battery indicator on the title bar may reflect that it is
charging, but it may not actually be charging if the battery voltage is extremely low.
Use the Luminex Diagnostic feature to check the specific voltage level of the battery. View Battery
Voltage Level on page 13.
14
© 2017 Stenograph

Chapter 2: Hardware
Battery Gauge
The battery gauge on the title bar of the Tilting screen provides a general indicator of the battery voltage
level. It changes appearance as the voltage level of the battery changes:
• - an electrical plug with a full green gauge indicates the Luminex is plugged into the AC
adapter/charger and the main battery is fully charged.
• - a battery with a full green gauge indicates the main battery is fully charged. As the charge of
the battery level drops, the green bar becomes smaller.
• - a battery with a partial yellow gauge indicates the battery is low.
• - a battery with a short red gauge indicates the battery is almost completely drained. The
battery icon flashes on and off.
• - a battery with black and yellow running stripes indicates the Luminex is plugged into the AC
adapter/charger and the batteries are charging.
Tilting Screen Battery Messages
The Tilting screen displays four progressive warning messages as the main battery level becomes low:
• Battery, Danger -- Battery Low.
• Battery, Danger -- Recharge Battery Now.
• Battery, Battery Dead -- Switching To FailSafe...
© 2017 Stenograph
15
Luminex User Guide
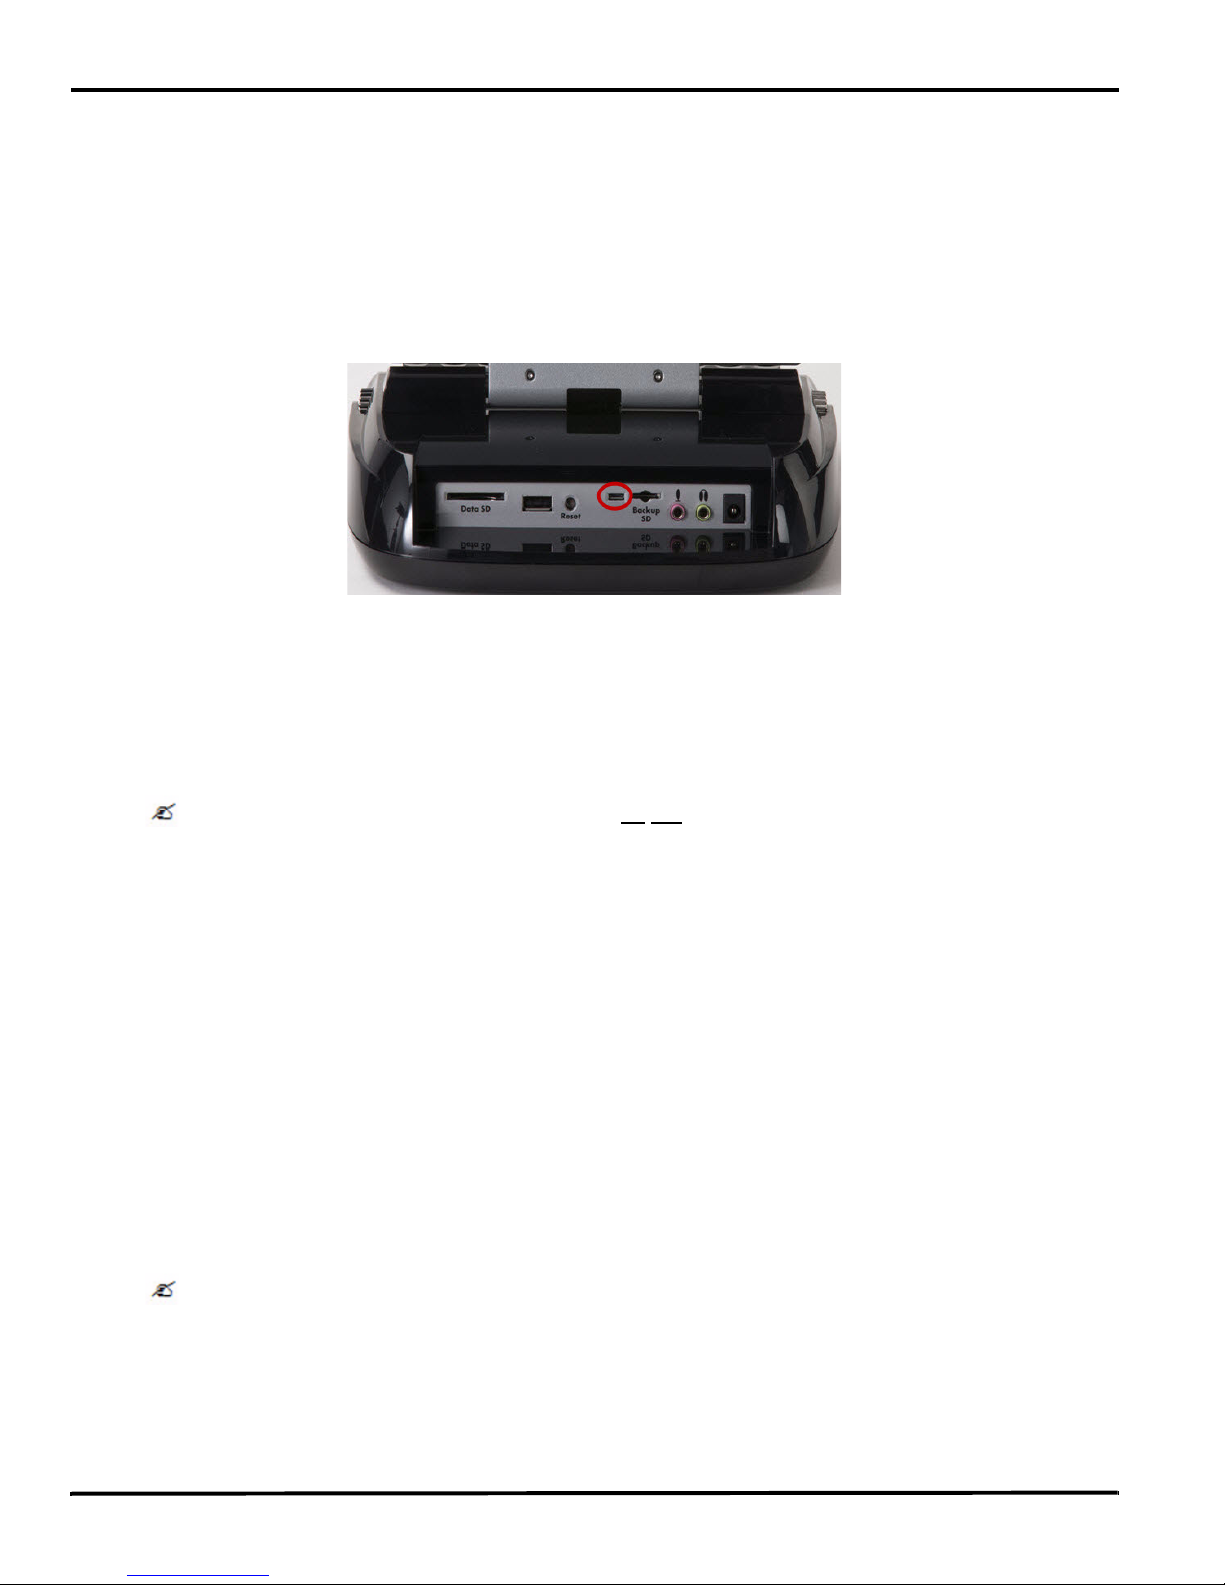
Communication Ports
There are two types of USB ports on your Luminex. The standard USB A (host) port allows you to insert
a thumb drive to copy files from the memory or from the Data SD card. The micro USB-B (client) port
provides connection access for the USB realtime cable between the writing machine and Case CATalyst
and any other CAT system that supports the Stenograph USB protocol. The micro USB port also allows
for a virtual serial connection for other CAT systems. To use the USB cable connection, it is necessary to
install the Luminex USB drivers.
Install the Luminex USB Drivers
The Luminex USB driver must be installed on your computer in order to write realtime with the micro
USB cable, load dictionaries and install updates. The USB driver installation also installs the USB driver
that creates a virtual serial port. If your CAT vendor does not support a USB realtime connection, the
driver allows for serial communication between the Luminex and other CAT software. USB Virtual Serial
Port Communication on page 19 for details.
You can use the USB Realtime and Read communications with USB compatible CAT software such as
Case CATalyst version 4.096 or higher.
The Luminex USB device drivers are available for download from the Stenograph website at
www.stenograph.com. At the Stenograph website: click Support, Download Center and Utilities & links.
Right click the on the Stenograph Writer USB Drivers and select Save Target As or Save Links As and
save the file to a location on computer desktop or your hard drive. Navigate to the location where you
saved the file, highlight the file, right click and select Extract All. Then double click the
StenographDriverInstall.exe to install the drivers.
1. Turn your computer On and make sure it is fully booted.
2. Once you download (save) the USB_Writer_Drivers.zip file to your computer, Navigate to the
location where you saved the file, highlight the file, right click and select Extract All.
3. Double click the StenographDriverInstall.exe, the Stenograph Writer Drivers Setup dialog box
displays.
4. Once the drivers install, the Stenograph Writer Drivers Setup Complete dialog box displays. Press
Enter (Finish) to close the wizard.
16
© 2017 Stenograph

Chapter 2: Hardware
Powering With the USB Cable
When the Luminex is connected to your computer for realtime via the micro USB cable, the main battery
continues to power the writing machine. In most situations, the USB port can power the Luminex and
may charge the battery when the main battery is not fully charged.
When the main battery becomes low while using the micro USB connection, low battery messages
display on the Luminex, but all features continue to operate. The USB port provides power to run all the
Luminex components except WiFi and Bluetooth communications. When powered by the micro USB
port, the Luminex tilting screen displays at about half of the Backlight brightness setting.
To use the micro USB cable, you must install the Luminex USB driver on your computer. Install the
Luminex USB Drivers on page 16 for instructions on loading the driver.
Updating With the USB Cable
Software updates for your Luminex, when available, can be easily downloaded from the Stenograph web
site. Once downloaded onto your computer, you can load the software update onto your Luminex over a
USB cable. To update Luminex software: on page 107 for more information about updating the Luminex.
Connect for Realtime Writing
To connect your Luminex to your computer for realtime writing, you must have one of the following:
• a USB cable connection which requires using a micro USB compatible CAT software, such as Case
CATalyst V4.096 or higher. A micro USB cable is included with your Luminex. Check with your CAT
software vendor for compatibility information.
• a virtual serial port connection via the micro USB cable. The virtual serial port connection is
compatible with any CAT software that accepts a serial connection and Stentura protocol. USB
Virtual Serial Port Communication on page 19.
• a wireless kit. Stenograph provides technical support for Luminex wireless communication when the
Luminex Wireless Communication kit is used. Technical support for other wireless adapters are not
supported.
© 2017 Stenograph
17
Luminex User Guide
Micro USB Cable Communications
You must be using a USB compatible CAT software and have installed the Luminex USB driver on your
computer. Install the Luminex USB Drivers on page 16 for instructions on loading the driver.
1. Ensure your Luminex and computer are turned On and are fully booted.
2. Each end of the USB cable has a different connection plug. Insert the micro end of the USB cable
into the USB B (client) micro port on the back of the Luminex and the other end into a USB port on
the computer.
3. Start your CAT software.
4. Set your realtime options. In Case CATalyst V16.04 and higher, select Stenograph Writer USB on
the Translate Realtime tab. In Case CATalyst V10 - V16.03, select Diamante - USB or élan - USB,
V4.096 - V9, select élan - USB. Please check with your CAT software vendor if you are not using
Case CATalyst.
This is a USB connection. COM port settings do
not apply.
5. Write a few strokes on the Luminex before starting realtime. If you loaded a dictionary onto your
Luminex, the translated steno displays on the tilting screen.
The USB realtime connection allows you to disconnect and reconnect the USB cable and maintain
the realtime connection. For example, if you disconnect from the USB port to report a bench
conference and then reconnect when finished, the USB realtime connection will feed the strokes
written during the bench conference. Please check with your CAT vendor to see if this capability is
available with your CAT software if you are not using Case CATalyst.
6. When you are finished writing realtime using a USB cable, it is important that you complete the
following steps in order. This ensures your computer shuts down properly.
a. Press End on the Luminex to close the file.
b. Close and save the realtime file.
c. Unplug the Luminex USB cable from your computer and the Luminex.
If the USB realtime connection is active when you take a break, the realtime screen may not
display new steno strokes when you resume writing. This may happen when the USB port becomes
inactive after remaining idle for a period of time. If this occurs, disconnect the USB cable from the
back of the Luminex and reconnect it. The realtime file is not affected. Reconnect the cable to display
the new steno strokes on the realtime screen. Troubleshooting Tips on page 101 for details on
disabling USB port power saving features to avoid an inactive connection.
18
© 2017 Stenograph
Chapter 2: Hardware
USB Virtual Serial Port Communication
You must have installed the Luminex virtual serial port driver on your computer. The virtual serial port
driver installs when you install the USB driver. The virtual serial port uses Stentura protocol for realtime
communications and reading notes. Install the Luminex USB Drivers on page 16 for instructions on
loading the driver.
If you leave the USB realtime connection active when you take a break, the realtime screen may not
display the new steno strokes when you resume writing. This is a function of the computer USB port
becoming inactive when it remains idle for a period of time. To avoid an inactive connection when using
the virtual serial port communications via a USB cable, it is important to check the power management
settings to ensure the USB port does not turn off when idle. Troubleshooting Tips on page 101.
Virtual serial port communications via micro USB cable does not allow you to disconnect and
reconnect the USB cable and maintain the realtime connection. For example, if you disconnect
from the virtual serial port connection to report a bench conference and then reconnect when finished,
strokes written during the bench conference will not be sent to CAT software. Also see USB
Communication on page 100 for information on the Mira Emulation option.
To establish USB virtual serial port communication:
1. Ensure your Luminex and computer are turned On and are fully booted.
2. Each end of the USB cable is different. Insert the micro end of the USB cable into the USB B (client)
port on the back of the Luminex and the other end into a USB port on the computer.
3. Start your CAT software.
4. Set your realtime options. This is a virtual serial port communication via the micro USB cable. Ensure
the appropriate COM port is selected. Depending on your CAT software, it may be necessary to
select Stentura as the realtime writing machine.
5. Write a few strokes on the Luminex before starting realtime. If you loaded a dictionary onto your
Luminex, the translated steno displays on the Tilting screen.
6. When you are finished writing realtime using the virtual serial port connection, it is important that you
complete the following steps in order. This ensures your computer shuts down properly.
a. Press End on the Luminex to close the file. If the option, Prompt to confirm ending job is active,
press End again at the prompt.
b. Close and save the realtime file.
c. Unplug the Luminex USB cable from your computer and the Luminex.
© 2017 Stenograph
19

Luminex User Guide
Wireless Communication
Stenograph provides Bluetooth communication for wireless realtime writing.
Bluetooth Wireless Communication
Bluetooth wireless communication is available for the Luminex. The Stenograph Bluetooth Wireless
Realtime kit allows wireless communication between the Luminex and Case CATalyst or a Windows
based 32-bit or 64-bit CAT system on your Windows
notebook computer. The kit includes the Bluetooth software, drivers and adapter for your computer. See
the Stenograph Bluetooth Wireless Communication guide included in the kit for information on Bluetooth
wireless communication set up, configuration and use.
Stenograph provides Luminex wireless support when the Luminex Bluetooth Wireless Communication
kit is used. Other wireless adapters and software may work but are not supported by Stenograph.
If you are not going to use Bluetooth communications, you may want to turn it off. To access the
Bluetooth communication settings, do the following:
1. From the Opening menu, touch Setup and then touch Wireless.
2. At the Wireless menu, touch Bluetooth. The Bluetooth Information screen displays.
®
10, Windows 8, Windows 7 or Windows Vista®
3. If Bluetooth is on and configured, Bluetooth information displays. If Bluetooth is off, then Bluetooth
powered off displays. If Bluetooth is on and you want to turn it off, touch On/Off.
4. To exit the Bluetooth screen, touch Quit. To return to the Opening menu, touch Quit, More and then
Quit.
20
© 2017 Stenograph
Chapter 2: Hardware
Function Sensors
On either side of the Status LCD are three touch sensitive sensors. The far left sensor turns the Luminex
On and Off.
Each sensor serves a specific purpose, or function, on the different menus. The menu bar is located at
the bottom of the tilting screen. Press the associated sensor, just below a function on the menu bar, to
perform the action. For example, on the Opening menu, the word Off displays above the left most
sensor. Touching the sensor for more than one second and then lifting your finger off the sensor turns
the Luminex Off. Simply touching the Off sensor, does not turn the Luminex off to prevent accidentally
turning of the writer. Another example on the Opening Menu is the sensor associated with Dict. Touch
the Dict sensor to select a job dictionary. When you touch Dict, another menu displays, listing more
menu choices related to using dictionaries. From this menu, touch the sensor below Select to display a
list of job dictionaries from which you can choose.
Touch Screen
In addition to the Function sensors, you can also navigate through menus by touching the menu item at
the bottom of the tilting screen. As in the example above, on the Opening menu, if you touch the Off
menu item on the tilting screen for more than a second and then release your finger, the Luminex turns
off. If you simply touch the Off menu item, does not turn the Luminex off.
The Off sensor and Off menu item work the same. You must touch the sensor or screen menu for more
than a second and then release to turn the Luminex off.
© 2017 Stenograph
21

Luminex User Guide
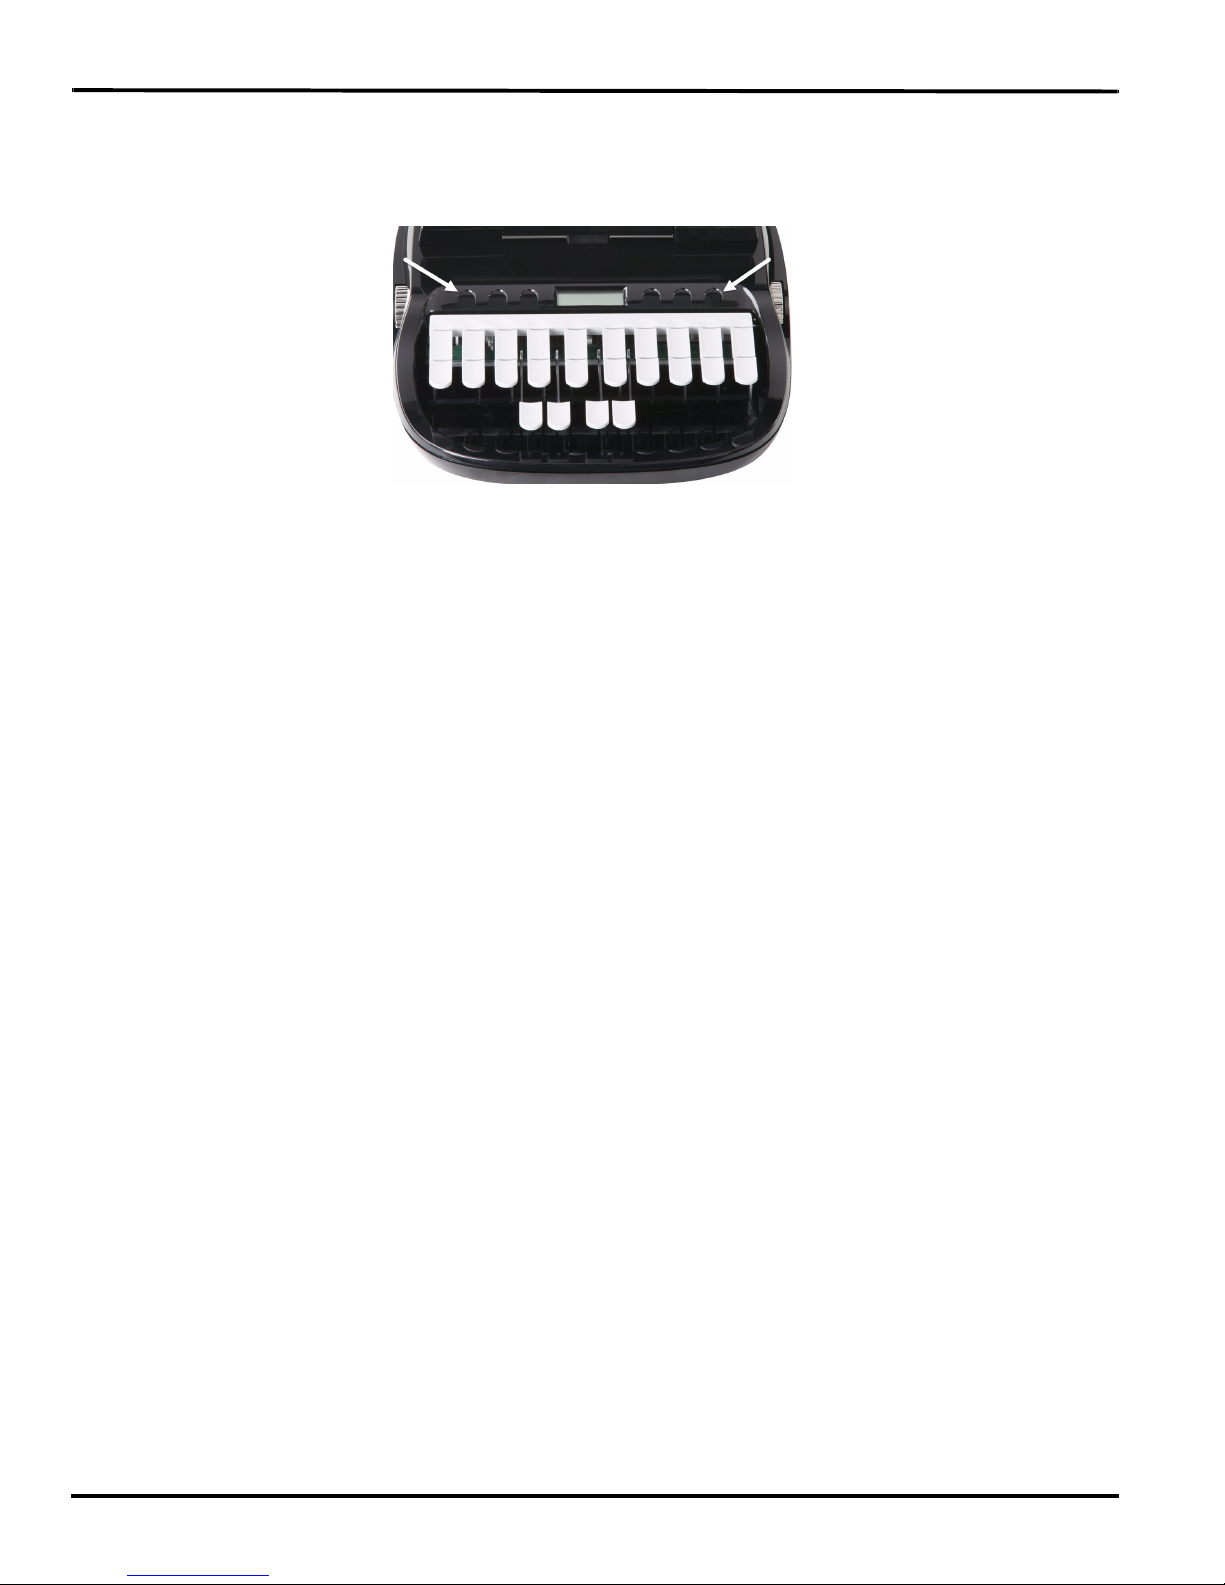
Keyboard Depth and Tension Controls
There are two thumbwheels on the Luminex, one on each side of the keyboard, that control the keyboard
depth and keyboard tension.
The depth of stroke adjustment wheel, on the left, determines the height of the number bar and all the
steno keys. This affects how far the keys go down when you press them. There are 10 available settings
to meet your needs.
The keyboard tension adjustment wheel, on the right, controls how soft or firm the keys feel. The
extensive range, between the top and bottom stopping positions on the wheel, allows you to customize
the tension to your particular writing touch. Do not force the wheel past either stopping position.
Adjust Depth of Stroke
To adjust the depth of stroke:
1. Face the front of the Luminex.
2. Do one of the following:
• To shorten the stroke depth, roll the left thumbwheel toward the front of the Luminex.
• To lengthen the stroke depth, roll the left thumbwheel toward the back of the Luminex.
Adjust Keyboard Tension
To adjust the keyboard tension:
1. Face the front of the Luminex.
2. Do one of the following:
• To decrease keyboard tension for a softer touch, roll the right thumbwheel toward the front of the
Luminex.
• To increase keyboard tension for a firmer touch, roll the right thumbwheel toward the back of the
Luminex.
22
© 2017 Stenograph
Chapter 2: Hardware
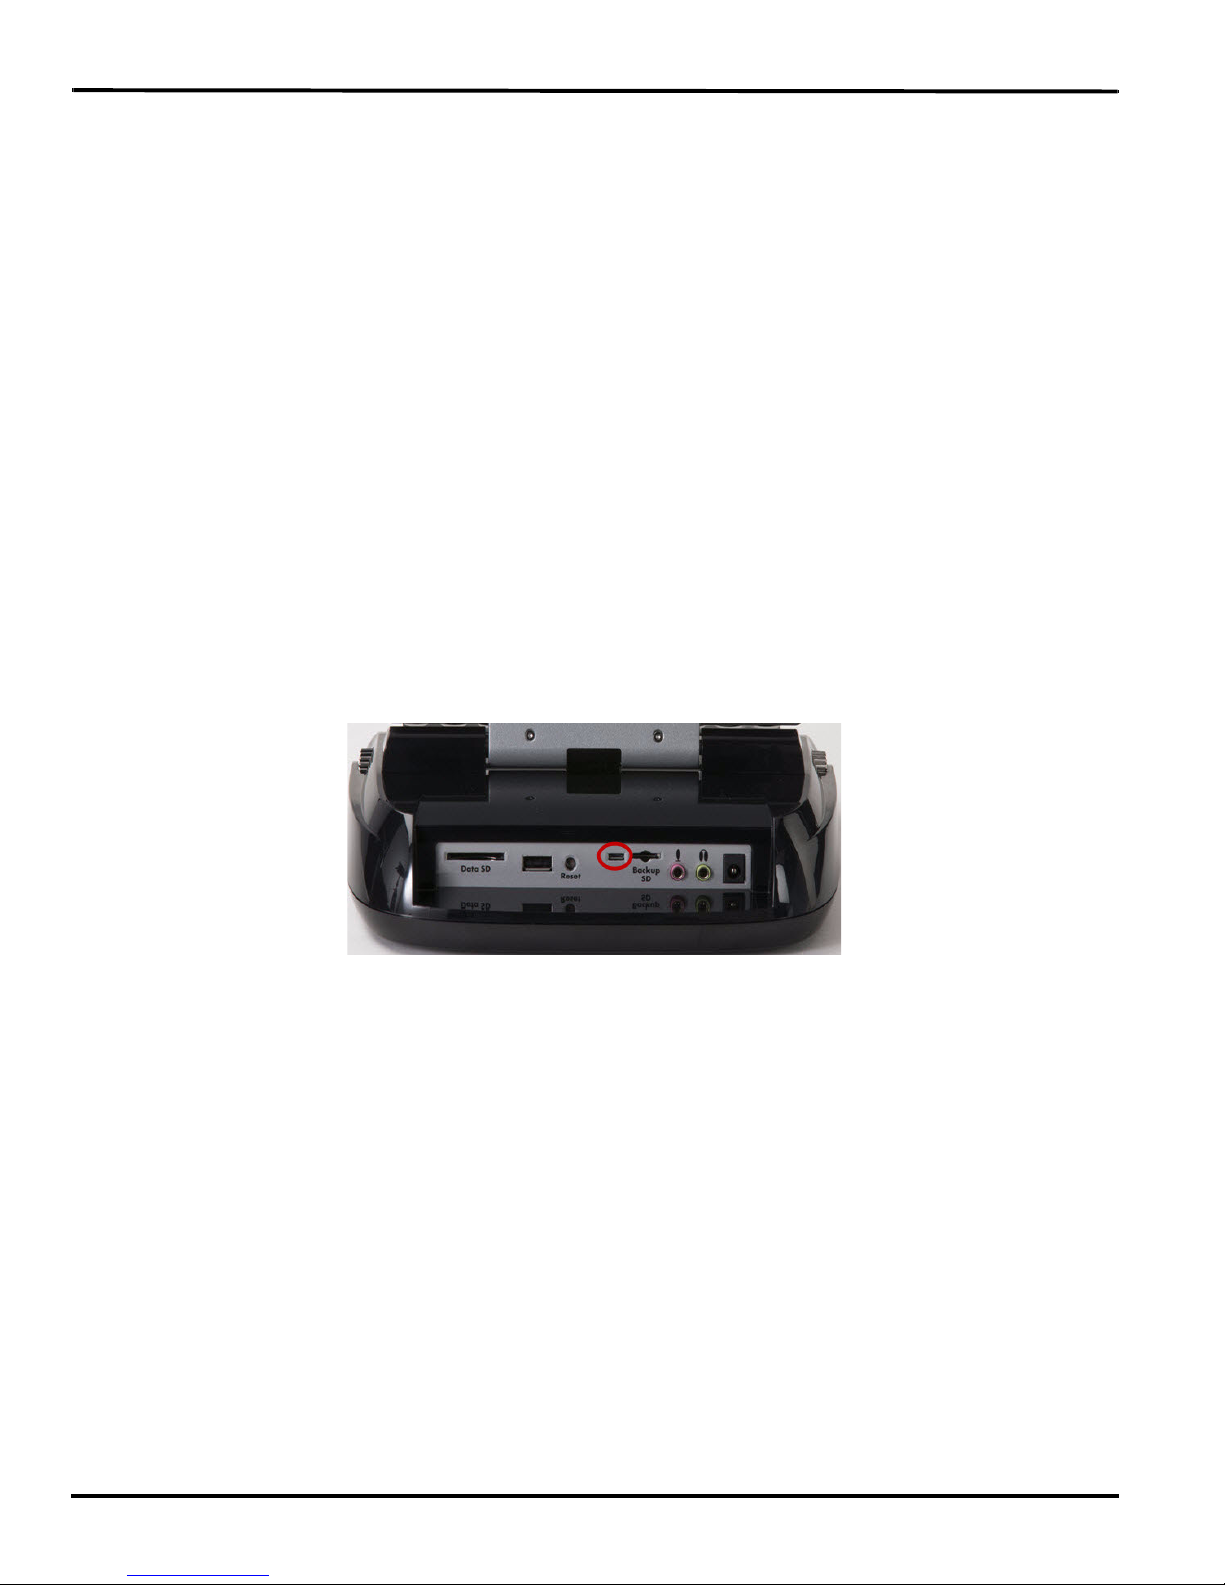
Reset
The Reset button is a small, recessed button located close to the middle of the back of the Luminex and
a little to the right of the standard size USB port.
Like other computer equipment, the Luminex can seem unresponsive when it receives a series of
commands it does not recognize. If the Luminex appears unresponsive, press the Reset button on
the back of the Luminex. When you press the Reset button, the Luminex reboots and is then ready to
use.
If you had a file open before pressing Reset, the Luminex ends the job and the file closes. A message
displays about the recovering the file. Once the file is open, you can start writing to append to the
previous job.
© 2017 Stenograph
23

Luminex User Guide
Secure Digital (SD) Cards
A Secure Digital (SD) card is a memory card that can hold large amounts of data. The Luminex uses two
SD cards, a Data SD card and a Backup SD card. The Data and Backup SD cards are located on the
back of the Luminex. The Backup SD card is a micro sized SD card and is recessed and must be in the
Backup SD card slot in order to use the Luminex.
The Luminex requires a minimum 1GB Data SD card, supporting SD cards from1 to 2 GB and Secure
Data High Density (SDHC) cards from 4 to 32 GB. The Data SD card stores steno notes, timestamps,
job dictionaries and audio files.
The Luminex requires a minimum 1 GB Backup SD card, supporting SD cards from 1 to 2 GB and
SDHC cards from 4 to 32 GB. The Backup SD card must
seated in the Backup SD card slot to operate the Luminex. When you insert an SD card into the Backup
SD slot on the Luminex, you are prompted to format the card if it has not previously been formatted in
the writing machine.
be formatted in the Luminex and properly
The Backup SD card serves as a backup storage for steno notes, timestamps and audio files. It is
necessary to insert a Backup SD card into the Luminex in order to operate the writing machine. If the
Backup SD card in the Luminex Backup SD card slot is write protected, a message displays. Writing is
not possible until you unlock the card. The Backup SD card is designed as a backup and is not
intended for archiving steno notes.
Stenograph recommends you carry at least one additional SD card in the event the Data SD card
becomes full or in a rare instance that an SD card in the Luminex becomes unusable. The Luminex is
inoperable without a Backup SD card. Writing on the Luminex on page 35 for more information about
using Data SD and Backup SD cards.
SD Card Care
®
Stenograph recommends SimpleTech
, Kingston® or SanDisk® SD cards, although any high quality SD
card is acceptable. SD cards are fast and durable yet still require basic handing care:
• Avoid excessive heat, cold, and moisture. Although the SD card is vulnerable to static, airport
security should not damage a card.
• Always insert your card properly. SD cards are “keyed” so that they can only be inserted in one
direction. If you cannot easily insert the card into the slot, reposition the card and try again.
• Do not attempt to remove a card while it is in use. SD cards are fast but still require a second or two
to complete operations. Using or removing a card while the Luminex is On may corrupt the data
on the card. Stenograph strongly recommends turning Off the Luminex before removing
either a Data SD or Backup SD card.
24
© 2017 Stenograph

Chapter 2: Hardware
Enable Writing on a SD Card
SD cards have a write protect slide on the side of the card. If the write protect slide is moved to the
protected position, no data is written on the SD card. If you insert a write protected SD card, a message
displays on the Luminex indicating the SD card is write protected.
To allow data to be written to the SD card:
1. Hold the SD card with the notched side up.
2. Move the write protect slide to the Up position.
Remove and Insert a SD Card
SD cards are “keyed” so that they can only be inserted in one direction. When inserted properly, the SD
card easily moves in and out of the slot although the locking mechanism is tight to prevent accidental
removal of the card. Attempting to force a SD card into the slot on your Luminex or USB SD Flash Drive
reader could damage the card.
Remove a Data or Backup SD card
1. Use your index finger to gently push the SD card to its unlocked state and then release your finger.
You should feel the SD card release from the slot.
2. Remove the card from the slot. You should be able to easily remove the card from the slot. If you
cannot easily remove the card, it is not released. The SD lock mechanism is tight to prevent
accidental removal of the card. Repeat Step 1.
Insert a Data or Backup SD card
1. Hold the card with the notched edge facing the Luminex and the metal strip facing down. Position the
card in front of the SD slot without any angling.
2. Gently push the card into the SD slot on the Luminex or a USB SD Flash Drive reader on your
computer. You may hear a soft click as you insert the card, indicating correct placement. If the card
does not easily insert into the slot, do not force it. Remove the card and reinsert it.
If the Backup SD card in the Luminex Backup SD card slot is write protected, a message displays.
Writing is not possible until you unlock the card.
© 2017 Stenograph
25

Luminex User Guide
USB SD Flash Drive Reader
A USB SD Flash Drive reader comes with your Luminex. The USB SD Flash Drive reader plugs into a
USB port on your computer and holds the Data SD and Backup SD cards. This allows you to read steno
notes, job dictionaries and audio files.
If you have an SD slot built into your computer, insert the Data SD card directly into the slot. You may not
need the USB SD Flash Drive reader for all read functions.
It is necessary to read the Backup SD card using the USB SD Flash Drive reader that came with your
Luminex or another reliable USB based external SD card reader. A built-in SD card slot reader on your
computer cannot
The USB SD Flash Drive Reader that comes with the Luminex has a standard sized SD card slot and a
micro sized SD card slot to accommodate both the Data SD card and Backup SD card.
read the Backup SD card.
Sample USB SD Flash Drive Reader
26
© 2017 Stenograph

Chapter 2: Hardware
Status LCD
Located between the touch sensors is a small rectangular LCD screen. The Status LCD displays icons
that indicate specific operations of the Luminex. When battery power is low enough to turn off the tilting
screen, the Status LCD continues to show information, indicating the writing machine is still working.
The Status LCD provides the following information:
• A black dot ( ) displays in the lower right corner of the screen indicating the Luminex is On.
• The file open ( ) icon displays when you begin writing on the Luminex, indicating a file is open.
• The wireless communication icon ( ) displays when the Luminex is connected to a CAT system
using wireless connection. The icon only displays when there is an active realtime connection. When
you end realtime, the icon does not display.
• The realtime indicator ( ) displays when the Luminex is connected to a CAT system with a USB
connection or virtual serial port connection using the micro USB cable for writing. The icon only
displays when there is an active realtime connection. When you end realtime or disconnect the
cable, the icon does not display.
• The battery ( ) icon displays when battery voltage is low and blinks when battery voltage is
extremely low.
A row of rectangular black blocks ( ) display in running sequence from left to right when the main
battery is charging. When the Luminex is finished charging, the bars move from each side to the
middle of the screen in a “clapping” motion.
• A single black rectangular block ( ) displays when you press a key. There is a corresponding block
for each letter on the keyboard. Which block displays depends on the key stroked. A block displays
for each key in the following order:
# S T K P W H R A O * E U F R P B L G T S D Z
Stroking the number bar along with a key displays the # sign on the left-most side of the Status LCD
and the single black rectangular block for the key pressed.
© 2017 Stenograph
27

Luminex User Guide
Tilting Color Touch Screen
The Luminex tilting color screen is a high resolution, WVGA display. The “non-glare finish” reduces glare
from overhead lights. The display folds flat for storage or transport and opens to lay flat to fit under a
conference table.
To use the Tilting screen, gently pull up on the display and adjust the tilt as necessary. Gently pull
forward on the display to fold it flat to cover the keys. Gently push the display back to lay flat to fit under
a table. When the Luminex is On and the display is folded flat, the display remains On.
You can adjust the brightness, text color and font size on the Tilting screen. Adjusting the screens
backlight brightness can reduce battery usage. Writing on the Luminex on page 35 for more information
about brightness, text color and font size settings.
Depending on the selected function, the tilting touch screen shows:
• the title bar with a battery icon, battery gauge reflecting the approximate main battery level, audio
recording status when audio is active, the number of steno strokes for the open file and the
estimated number of pages for the open file.
• the transcript text, steno, brief suggestions or file number messages.
• menu bar from which you select options or perform an action.
• warning messages, such as “Low Battery.”
Cleaning the Tilting Screen
1. Turn the Luminex Off. It is easier to see the areas that are dirty when the screen is dark.
2. Very gently wipe the screen using the cleaning cloth that came with your Luminex or a microfiber
cloth available in computer, camera and eyeglass stores.
not use materials such as paper towels, tissue paper or your shirt sleeve. These non-ultrasoft
Do
materials can easily scratch the screen.
not press hard on the screen. Pushing directly on the Tilting screen can cause pixels to burn out.
Do
3. If the cloth does not completely remove the dirty areas, dampen the cloth with the optical-quality
spray cleaner that came with your Luminex or a cleaner designed for flat screen monitors or
eyeglasses, and very gently wipe the screen.
not spray the display screen directly. Liquid can run along the inside the edge of the screen and
Do
cause damage.
use cleaning products that contain ammonia, ethyl alcohol, acetone (fingernail polish
Never
remover), toluene, ethyl acid, or methyl chloride. These chemicals can react with the materials in the
display screen and cause damage.
4. Clean the plastic edge that surrounds the screen with any multipurpose cleaner using a soft cloth.
Avoid contacting the screen itself with the cleaner.
28
© 2017 Stenograph

Chapter 2: Hardware
Tripod
The Luminex uses only the EasyLock LMX V2 tripod designed with three straight legs, tilting mechanism
and constructed of high gauge aluminum to provide a lightweight but strong and stable stand for your
Luminex. The EasyLock LMX V2 tripod fully extends to 27.5 inches. When folded, the tripod is 12.5
inches long.
Attaching the Tripod
On the bottom of the Luminex is a positive locking mechanism that looks like a large, round keyhole. The
top of the EasyLock LMX V2 tripod fits like a key into the recessed mechanism.
To attach the tripod, follow these steps:
1. Fully extend each leg of the tripod, making sure the braces lock.
2. Set the tripod on the floor.
3. Loosen the thumb-lock knob on the tripod base.
4. Extend the inner tripod tube to a comfortable height.
Turn the tripod head so that one of the flat sides of the tripod head is facing you and tighten the thumb-
lock knob.
Top of EasyLock LMX V2 Tripod
On the bottom of the Luminex, locate the positive locking mechanism that looks like a large, round
keyhole. The top of the EasyLock LMX V2 tripod fits like a key into the recessed mechanism.
5. Lift the Luminex on two sides of the machine and lower it evenly onto the top of the tripod with one of
the flat sides of the writing machine facing you.
6. Grasp the inner tripod tube with one hand and with the other hand, rotate the machine clockwise until
you hear a solid click. Ensure the Luminex is firmly attached to the tripod tube.
© 2017 Stenograph
29

Luminex User Guide
Adjusting the Tripod Height
1. Grasp the tripod tube firmly, directly beneath the Luminex with one hand.
2. Using your other hand, loosen the thumb-lock knob on the tripod. As you loosen the thumb-lock,
support the weight of the Luminex with your hand.
3. Adjust the Luminex to the desired height.
4. Tighten the thumb-lock knob.
Tilting the Luminex
The EasyLock LMX V2 tripod has a built-in tilting mechanism. Once the Luminex is secured on the
tripod, tilt the writing machine forward or backward within 70 degrees to a position comfortable for your
writing style.
To tilt the Luminex:
1. Open the Tilting screen before adjusting the tilt position of the Luminex.
2. Position one hand on the back of the Luminex behind the Tilting screen and the other hand on the
front of the machine under the vowel keys.
3. Gently lift up or push down to the desired position. The movement of the Tilting mechanism is stiff to
ensure the position of the desired tilt is secure while writing.
Removing the Tripod
To remove the tripod, follow these steps:
1. Position the tripod firmly on the floor.
2. Locate the quick release lever on the left underside of the Luminex.
3. Push the quick release lever towards the back of the Luminex and then rotate the Luminex
counterclockwise one quarter of a turn.
4. Lift the Luminex from the tripod.
30
© 2017 Stenograph

Chapter 2: Hardware
Routine Maintenance
Although little maintenance is required for your Luminex, covering it when not in use is suggested.
Daily/Monthly
• Cover the Luminex when it is not in use.
• Clean the tilting screen (when needed).
Always protect the tilting screen of your Luminex by removing all grit before cleaning. To remove grit,
use a soft brush to light brush the grit away before using the cleaner and micro-fiber cloth.
1. Turn the Luminex Off. It is easier to see the areas that are dirty when the screen is dark.
2. Very gently wipe the screen using the cleaning cloth that came with your Luminex or a
microfiber cloth available in computer, camera and eyeglass stores. Do
as paper towels, tissue paper or your shirt sleeve. These non-ultrasoft materials can easily
scratch the screen. Do
cause pixels to burn out.
3. If the cloth does not completely remove the dirty areas, dampen the cloth with the optical-quality
spray cleaner that came with your Luminex or a cleaner designed for flat screen monitors or
eyeglasses, and very gently wipe the screen. Do
can run along the inside the edge of the screen and cause damage. Never
that contain ammonia, ethyl alcohol, acetone, toluene, ethyl acid, or methyl chloride. These
chemicals can react with the materials in the display screen and cause damage.
not press hard on the screen. Pushing directly on the Tilting screen can
not spray the display screen directly. Liquid
not use materials such
use cleaning products
• Clean the shell (when needed).
Always protect the shell of your Luminex by removing all grit before cleaning. To remove grit, use a
soft brush to lightly brush the grit away before using the cleaner and soft cloth.
1. Use mild soap and water or multipurpose cleaner using a soft cloth.
2. Apply sparingly and avoid contact with the tilting screen and the cleaner.
3. If using a spray bottle, spray the mild soap and water on a soft cloth and wipe the body of the
writer. Never
polish remover), toluene, ethyl acid, or methyl chloride.
• Clean the keyboard with any good clear furniture polish.
use cleaning products that contain ammonia, ethyl alcohol, acetone (fingernail
Two to three years
• Have your writer cleaned, lubricated and a routine inspection by a trained service technician every
two to three years depending on your machine’s usage.
© 2017 Stenograph
31
Luminex User Guide
Additional Accessories for your Luminex
The following are popular customer requested accessories for your Luminex. Please visit
www.stenograph.com for pricing and to place your order.
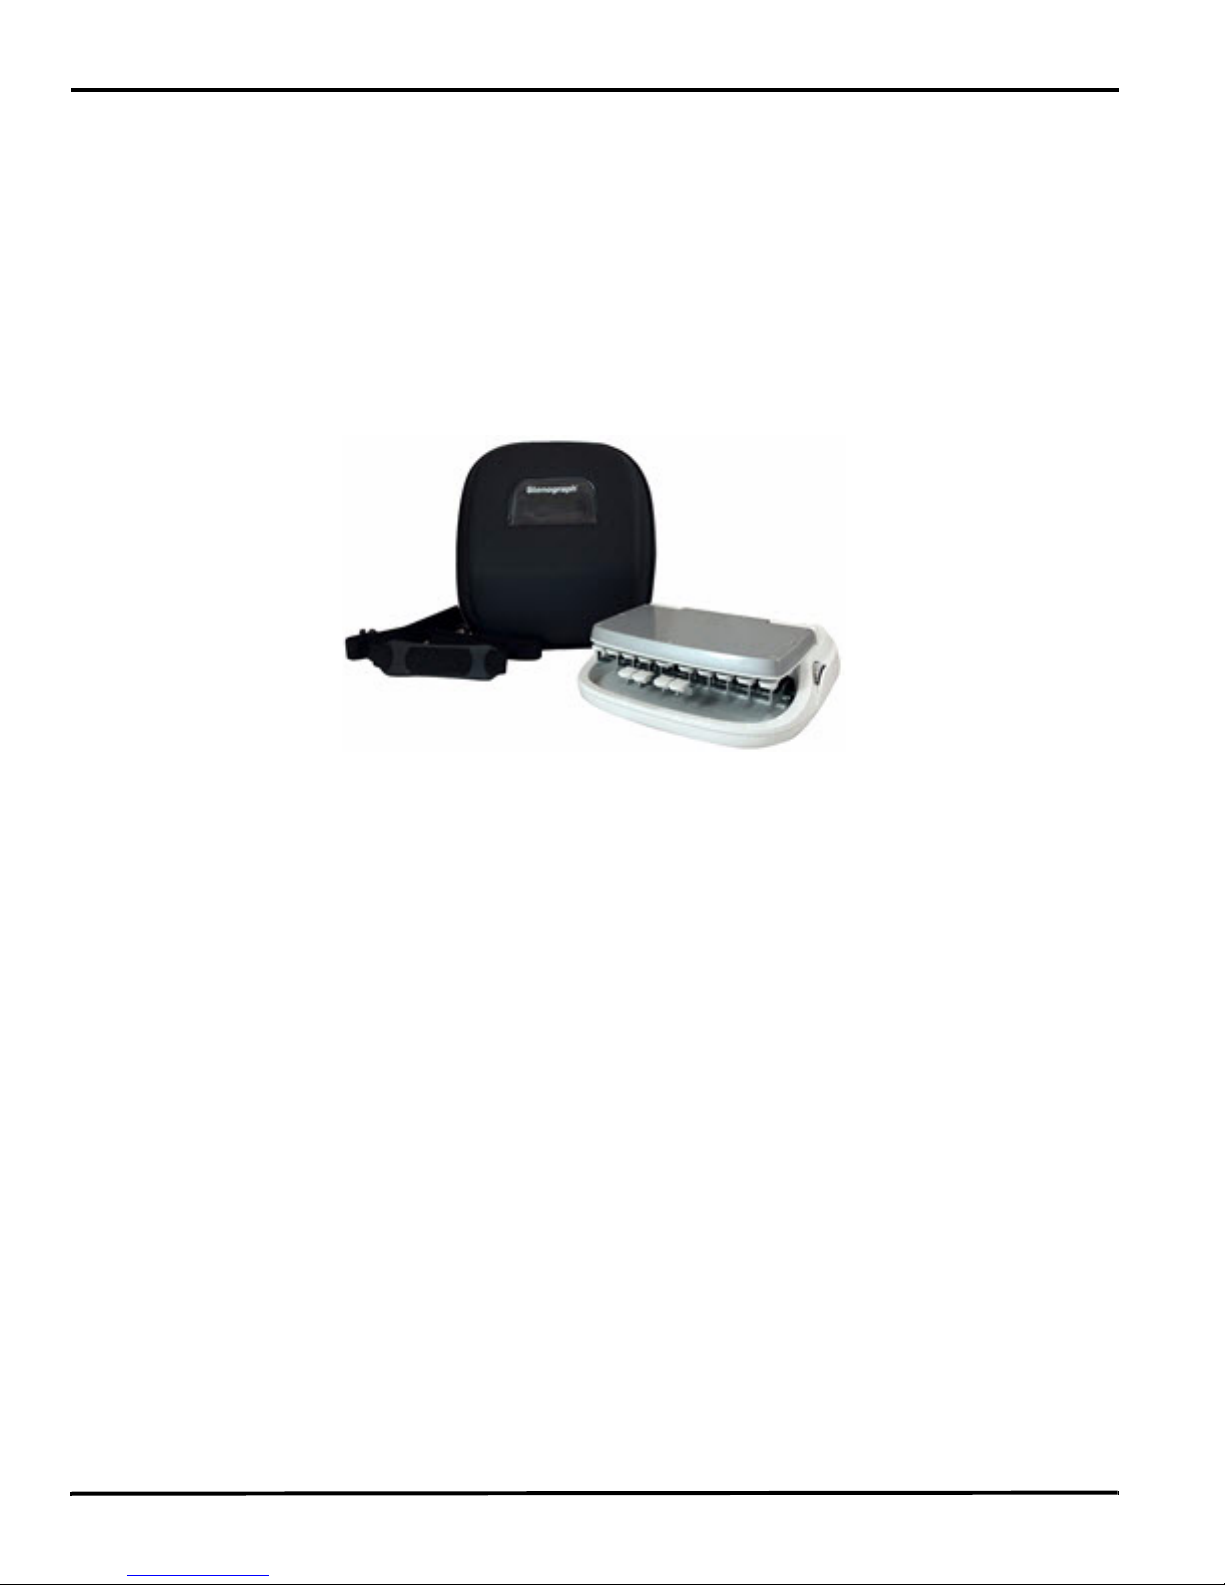
LMX Mini
This sleek Luminex bag is a perfect fit, securely hugging the exquisite curves of your Luminex. It’s so
versatile! Carry the LMX Mini on your shoulder, slip it inside another bag or attach it to the pull-up handle
of your wheeled case. The 48-inch adjustable shoulder strap is long enough to be worn over the
shoulder or as a cross-body bag.
If you already have a shoulder bag or wheeled case that you love, now you can put your Luminex in it
safely and securely. It’s also a great jet bag to use when flying with your Luminex. Off you go with one
less thing to worry about.
A quality zippered closure ensures that your Luminex stays securely inside, while unwanted items, such
as meandering paper clips, stay out!
Item # 46062
Luminex Tall Tripod LMX-T
Just what you need for bench conferences! Leave your chair behind and comfortably stand with counsel
so you can better hear the dialogue.
Designed specifically for the Luminex writer, the LMX-T Tripod:
• Stands 36 inches tall when full extended.
• Keyboard height range is 37.5 to 38.25 inches from the floor depending on your depth of stroke
setting.
• The no-spring latching mechanism creates a firm lock and provides a steady platform for writing.
• The re-imagined design produces silky smooth mounting and dismounting.
Item # 46141
32
© 2017 Stenograph
Chapter 2: Hardware
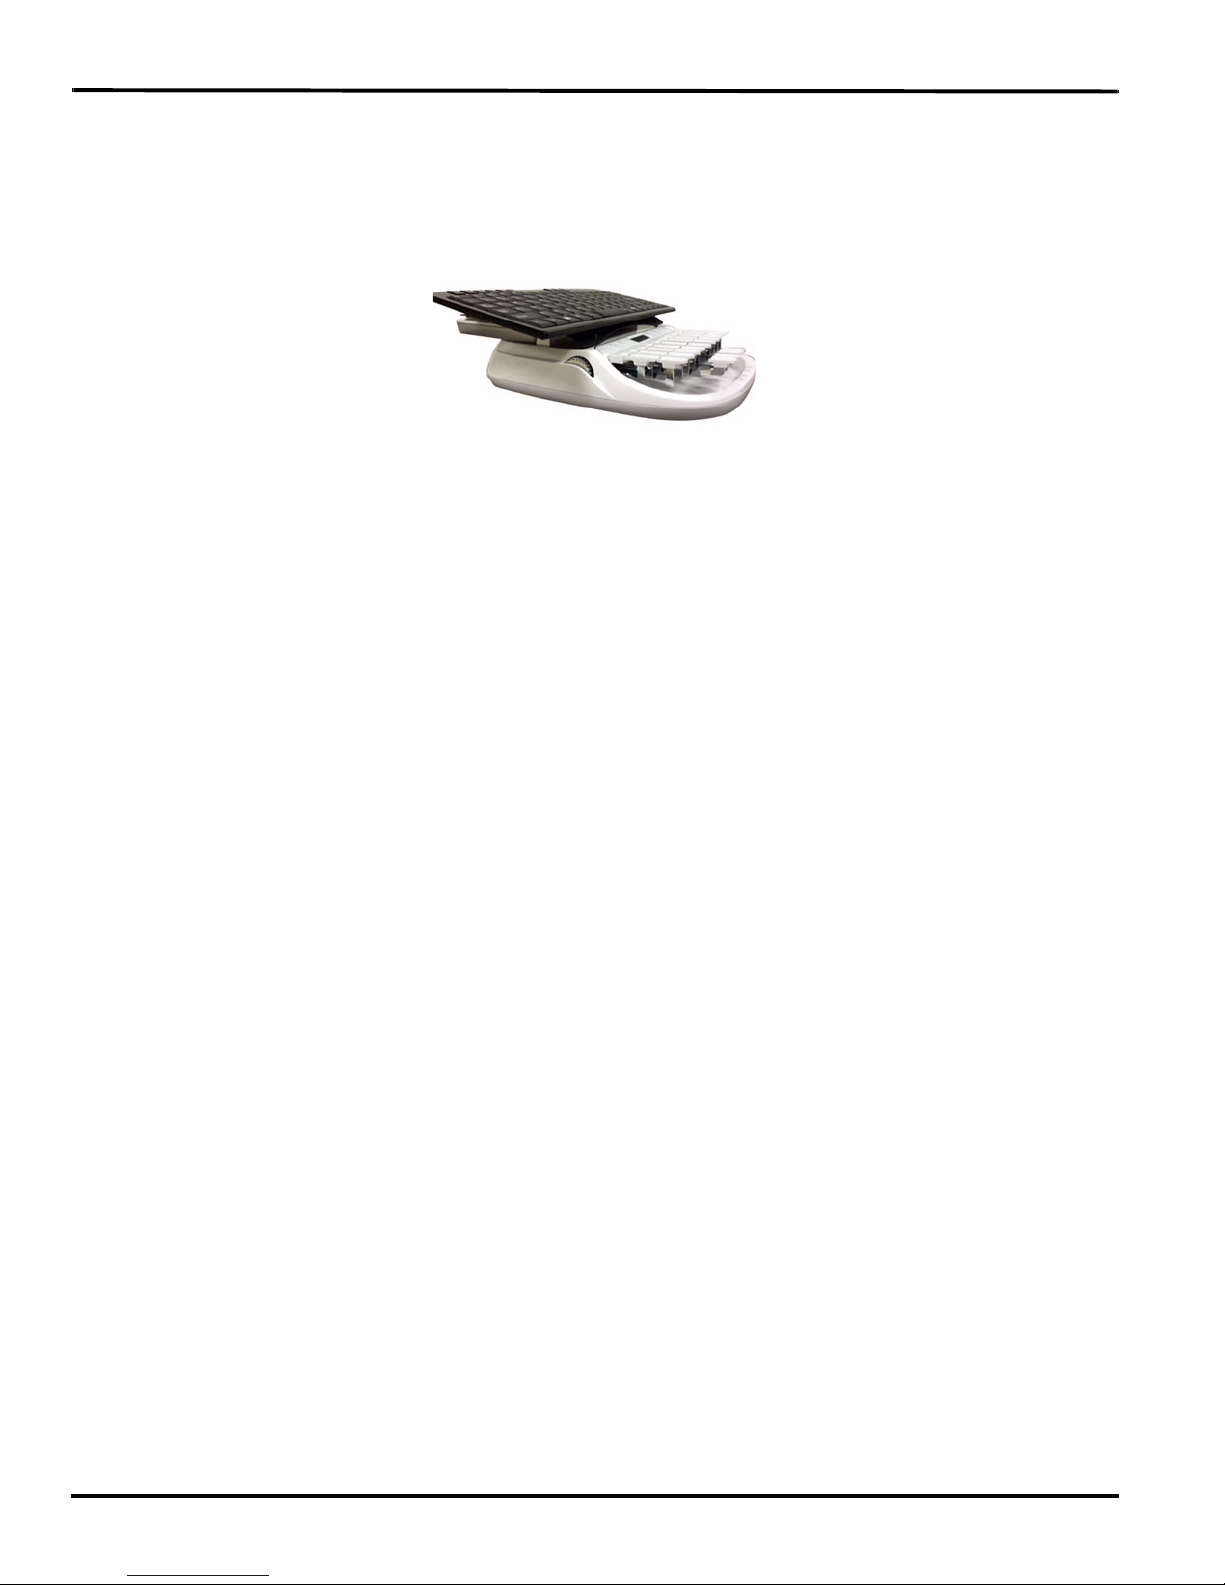
LMX Mini Keyboard Tray
The LMX Keyboard Tray for the Luminex has been custom designed by Stenograph to fit onto your
Luminex. The lightweight and strong aluminum construction creates portability without compromising
durability.
The tray uses a Dual Lock™ adhesive mounting system to keep both the tray and the keyboard secure
without damaging your Luminex.
The LMX Keyboard Tray works great with the SIIG® Mini Keyboard, sold separately by Stenograph and
will work with most other mini Keyboards.
Item # 46194
© 2017 Stenograph
33

Luminex User Guide
34
© 2017 Stenograph

Chapter 3
Writing on the Luminex
Chapter 3, Writing on the Luminex, provides an overview of the Luminex menus and details Luminex
features. Some of the detailed features include loading dictionaries, setting audio options, viewing SD
card directories, creating J-Defines and searching steno and text on the tilting screen.
Luminex Setup
Installing the Luminex USB drivers on your computer is necessary in order to write realtime with the
micro USB cable, load dictionaries and install updates. The Luminex USB drivers are available for
download from the Stenograph website at www.stenograph.com. Download instructions are included on
the website: Support, Download Center, Utilities and Links, Stenograph Writer USB Drivers. See Install
the Luminex USB Drivers on page 16.
Before writing on your Luminex, ensure there is a Data SD and Backup SD in the appropriate SD slots
and charge the battery. The Luminex uses a Data SD card to store steno notes, timestamps, audio files
when the audio option is selected and the associated job dictionary when J-Defines are created for the
job.
The Backup Secure Data (SD) card that comes with your Luminex is used as a backup for your steno
notes, timestamps and audio. This card is formatted at the Stenograph factory. If you insert a different
SD card in the Backup SD slot, it must be formatted in the Luminex before you can begin writing. The
Luminex requires a Backup SD card in order to operate.
Although you can use the Luminex with the AC adapter/charger, Stenograph recommends that you
charge the battery in your Luminex before using it for the first time. Battery on page 12 for detailed
information about charging your battery.
© 2017 Stenograph
35

Luminex User Guide
Accessing Luminex Features
When you turn the Luminex On, the Opening menu displays. The Opening menu is the first of two main
menus accessible when not writing on the Luminex.
Opening Menu
The Opening menu provides access to features that allow you to:
• view Data and Backup SD card, memory and thumb drive directories.
• format Data and Backup SD cards.
• copy files from memory.
• reopen a file to append further testimony and playback audio.
• set audio, display, translate and general Luminex options.
• manage wireless settings.
• make adjustments to Keyboard Settings and load keyboard profiles.
• start test mode.
• create j-defines.
• open the second menu.
Second Menu
Pressing More on the Opening menu displays the second menu.
Second Menu
The second menu provides access to features that allow you to:
• display Luminex software version, free space on the Data SD card and wireless information.
• display job data such job size, number of pages and the use of audio and a job dictionary.
• display the approximate minimum, maximum and average strokes per minute for the job along with a
graphical representation of the varying number of strokes per minute throughout the job.
• display the total number of strokes for all jobs taken.
• perform diagnostics.
• display battery status information.
• return to the Opening menu.
36
© 2017 Stenograph
Chapter 3: Writing on the Luminex
Writing Menus
Once you begin writing on the steno keyboard, the first of two Writing menus replace the Opening menu.
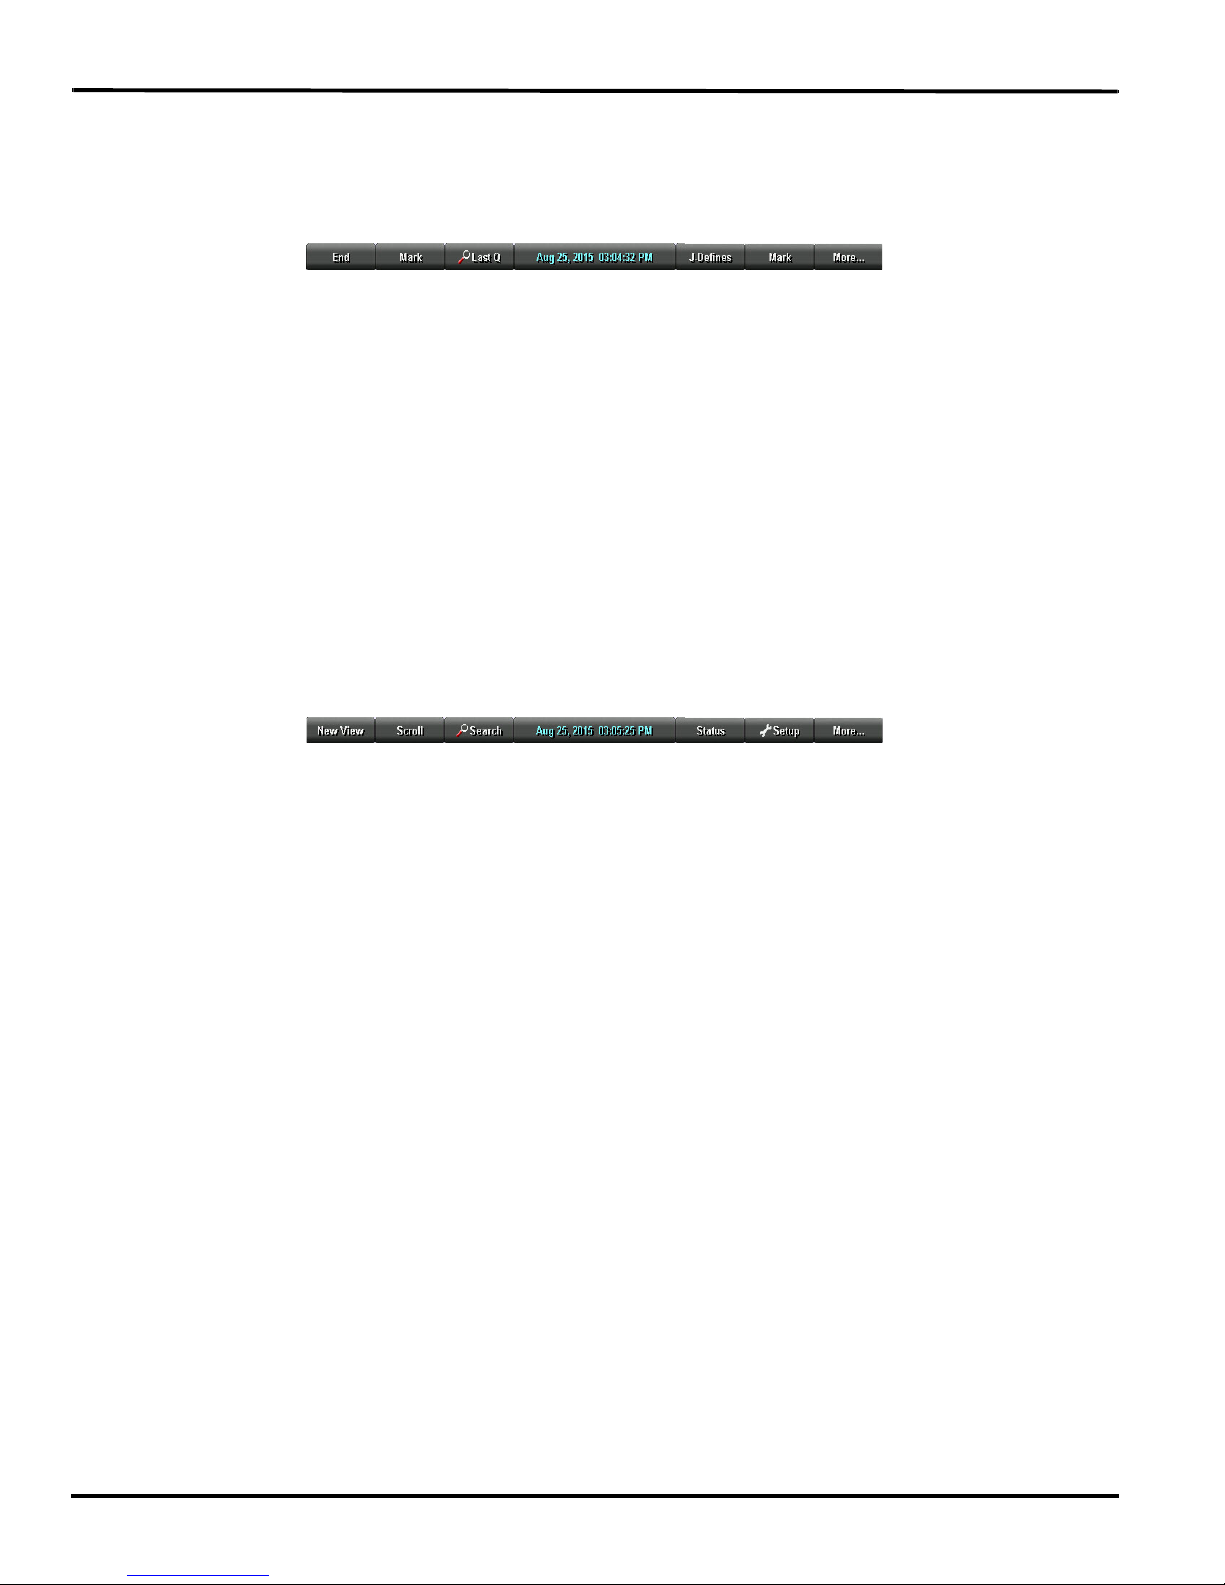
First Writing Menu
The First Writing menu includes features that allow you to:
• close the file.
• insert electronic marks.
• search for the last question.
• create J-Defines.
• access the second Writing menu.
Second Writing Menu
Pressing More on the First Writing menu displays the second Writing menu.
Second Writing Menu
The second Writing menu includes features that allow you to:
• toggle the tilting touch screen display between steno only, text only, text with vertical notes or text
and Brief It when Brief It is active.
• scroll through the steno or text on the tilting screen.
• search for the last Q, A, untranslate, StenoMark, and steno on the tilting touch screen.
• display status information about the Luminex.
• set audio options.
• change tilting screen text color, font size and backlight level.
• perform keyboard adjustments, save profiles and load profiles.
• playback audio.
• access a third menu to display the Brief It pane and create briefs, when Brief It is active.
• access the First Writing menu.
Third Writing Menu
If the Use Brief It option in Trans. Opt. is set to Yes, pressing More on the Second Writing menu displays
the third Writing menu which includes Brief It. The Brief It option allows you to manually accept or reject
briefs and suggest new briefs. You can scroll up or down in the Brief It pane.
© 2017 Stenograph
37

Luminex User Guide
Return to First Writing Menu
Continue writing, pressing More on the second Writing menu or pressing Quit on the Brief It menu
returns you to the First Writing menu.
Return to Opening Menu
Pressing End on the First Writing menu automatically closes the current job and returns you to the
Opening menu. If the Prompt to End Job option is active, you are prompted with a confirmation message
to close the job each time you press the End sensor or touch screen End.
38
© 2017 Stenograph

Chapter 3: Writing on the Luminex
Writing Jobs
The Luminex stores steno notes, timestamps, job dictionaries, audio files and J-Defines on the Data SD
card. The Luminex also saves steno notes, timestamps and audio files to the Backup SD card; and
saves steno notes and timestamps to memory.
The Backup SD card is not designed to be removed from the Luminex unless, in a rare occurrence, it is
necessary to locate a job that cannot be found in memory or on the Data SD card. The Backup SD card
must
be in the Luminex in order for the steno machine to operate. Never remove the Backup SD card
while the Luminex is On.
To begin writing:
1. Turn the Luminex On. Press the first function sensor on the left.
2. The Luminex logo displays briefly on the Tilting screen followed by the title bar across the top of the
screen and the Opening menu at the bottom.
3. The Title Bar shows the following information:
• —the approximate amount of charge remaining for the main battery. When the gauge is
completely green, the battery is fully charged. As the battery level changes or the Luminex is
charging, the gauge changes. Battery on page 12 for more information about Luminex batteries.
• —the approximate amount of space remaining on the Data SD card. Data SD Card
on page 55.
• —the microphone gauge displays when you begin writing and indicates the
audio is recording. The gauge shows the sound level for the recording input. The default for
audio recording is set to Off. Audio on page 43 to turn audio recording On.
• —the double bars display when writing and the audio is paused by the
Luminex Auto Pause Resume feature or by a realtime Pause Audio dictionary definition. Audio
on page 43 for more information about audio recording.
• —the no microphone icon displays when no audio is recording while writing. Audio Hardware
Setup on page 43 for more information about audio setup.
• Strokes—the number of steno strokes written for the open file.
• SPM—the average number of strokes written per minute.
• Pages—the estimated number of text pages in the open file.
4. Luminex menus allow you to perform a function or select to display another menu.
The Opening menu is the first of two setup menus used to select options prior to writing.
© 2017 Stenograph
39

Luminex User Guide
5. When you write a steno stroke, the Luminex opens a new file and replaces the Opening menu with
the first of two writing menus.
6. To close the job when finished writing, press End. The Luminex finishes writing the steno and audio
to the Data SD card and closes the current file.
If the option, Prompt to confirm ending job is active, a confirmation prompt displays. Press End to
close the job or continue writing to cancel the message. Prompt to End a Job Option on page 82 for
information about the Prompt to confirm ending job option.
The Luminex names files using a year, month, date and time format. For example:
20150816-142341 (August 16, 2015 at 2:23:41 p.m.). Job files are stored in folders identified by year
and month. For example, 201508. By default, the newest file is listed first.
7. To turn the Luminex Off, on the Opening menu touch the Off sensor or Off menu item for one
second or more and then. If you simply touch the Off sensor or Off menu item, the Luminex will
remain On.
Use the Reopen feature to reopen an existing file and append same day testimony. You can search,
readback and play audio in reopened files. Reopen on page 84 for details on reopening a job.
40
© 2017 Stenograph

Chapter 3: Writing on the Luminex
A/An Resolution
A/An resolution automatically selects the correct word, “a” or “an” based on the word that follows. The
steno translates as “a” before consonants and as “an” before vowels and the numeral 8.
The steno, A, must be defined as "a" (no quotes) in your dictionary in order for the A/An Resolution
feature to work. If the dictionary entry is defined as a conflict, this feature does not work as described.
To turn A/An resolution Off or On:
1. From the Opening Menu, press Setup, Trans. Opt. The current status of the A/An option displays on
the screen.
2. Press the Down/up sensors or menu items as necessary to highlight the A/An option.
3. Press the On/Off sensor to toggle the A/An option On or Off.
4. To display the Opening menu, press OK, More, Quit.
© 2017 Stenograph
41

Luminex User Guide
About
The About screen displays copyright information about the Luminex and FCC information. You can
access the About screen from the Opening menu by touching More and then About. The same FCC
information in the About screen is available on the Copyright page of this User Guide.
42
© 2017 Stenograph

Chapter 3: Writing on the Luminex
Audio
The Luminex allows you to record an audio file that is automatically synchronized to your written steno
notes. To record, you must enable the Luminex audio option, Record Audio During Job and connect a
microphone to the Luminex. Stenograph recommends using either a microphone that is battery powered
or a high gain microphone that receives power from the connected device.
The Luminex saves the audio files to the Backup SD and Data SD cards. Audio files take up additional
space on the SD cards. When the Record Audio During Job option is enabled, the additional space is
always used regardless of whether or not you have a microphone connected to the Luminex and are
recording. The amount of additional space is determined by the audio option, Audio Format.
When there is less than 75MB available on the Data SD card, you can begin writing a job but no audio
records regardless of the audio options selected. The following message displays when there is
insufficient space to record: Space is TOO Low. Audio Will Not Be Recorded To Data SD Card.
While writing a job and there is only 12MB available on the Data SD card, the audio stops recording. The
following message displays: Space is Low. Audio Has Stopped Recording To Data SD Card. Data SD
Card on page 55 to change the Data SD card while writing.
Luminex audio options enable you to listen to the recording live. You can connect a headset or speakers
to the Luminex for audio playback. Audio Playback on page 45 for more information about audio
playback.
Audio Hardware Setup
To prepare for audio recording:
1. Plug the microphone into the microphone jack on the back of the Luminex.
Using a direct feed from a videographer to the microphone jack is not recommended
since most of those feeds are line level (much higher) and not microphone level.
2. Confirm the Data SD card is properly inserted in the Luminex.
3. If you are using headphones or speakers to listen to the live recording or for playback,
plug the headphones into the headphone jack on the back of the Luminex.
4. The placement of the microphone directly affects the quality of the audio file. Position the
microphone away from audio playback devices, such as speakers.
5. Set necessary Audio options. Ensure the option, Record Audio During Job is set to On. Audio
Options on page 43 for audio option details.
Audio Options
The options Record Audio During Job and Audio Format must be set before opening a job on the
Luminex. All other audio options are accessible while writing.
To set audio options:
1. From the Opening or First Writing menu, press Setup, Audio.
© 2017 Stenograph
43

Luminex User Guide
2. Use the Up and Down sensors to move the pointer (>>) to identify a feature for selection.
• Microphone Gain—indicates the current gain setting for the microphone, 0 - 100%. If your
microphone is battery powered, set the gain lower. A suggested starting point is 75 - 80%. If the
microphone is not battery powered, set the gain higher. A suggested starting point is
95-100%. Setting this gain too high, may cause audio feedback.
Press the - and + sensors as necessary to set the percent. A graphic bar indicates the selected
level. Test the quality and adjust the gain as necessary. You can adjust the gain during a job.
• HeadPhone Volume—indicates the current volume level for the audio playback through
headphones, 0 - 100%. A suggested setting is 65%. The audio is amplified when monitoring live
audio and may require a lower setting when the Monitor Live Audio option is active.
Use the Quieter and Louder sensors to adjust the volume. A graphic bar indicates the selected
level. During a job, you can playback the audio and adjust this option as necessary.
• Record Audio During Job—indicates the audio recording status. Press the On/Off sensor to
toggle your selection. The default is set to Off. This option cannot be changed once you open a
job.
• Monitor Live Audio—allows you to listen to the recording live with some amplification through
headphones or a headset attached to the Luminex. Press the On/Off sensor to toggle your
selection. During a job, you can playback the audio.
When monitoring live audio during the job the audio is amplified. Check the HeadPhone Volume
setting for an appropriate level.
• Auto Pause Resume—allows you to automatically pause the recording after a specific period of
time, when no new steno is being input from the steno machine. Audio recording automatically
resumes when you begin writing. Using this feature can help conserve SD card space when
recording audio on jobs where long or frequent pauses occur. Use the - and + sensors to set the
wait time before pausing the audio. The range is between 5 seconds and 15 minutes. Settings
from 5 seconds to 2 minutes are made in increments of one second; 2 - 5 minutes in 15 second
increments; and 5 - 15 minutes in one minute increments. You can adjust this option during a job.
When using Case CATalyst, you can use existing Case CATalyst dictionary definitions {Pause
Audio} and {Resume Audio} to manually pause and resume the audio. It is necessary to place
these definitions into your dictionary before loading the dictionary onto the Luminex. When you
manually pause the audio using a steno stroke on the Luminex, you must resume the audio with
a steno stroke, regardless of the setting for the Auto Pause Resume option.
If you are not using Case CATalyst, check with your CAT vendor to verify that your software
recognizes pause and resume commands, if not, do not use the Auto Pause Resume option.
• Audio Format—allows you to set the audio compression format for recording. A higher
compression rate, ADPCM (14.7 MB/hour), produces a better audio quality and requires more
space on the Data SD card.
A lower compression rate, GSM (5.8 MB/hour), produces a slightly lower audio recording quality
and requires less space. Press the Change sensor to toggle your selection. Audio recorded to
the Backup SD card is recorded at the GSM format regardless of this option setting.
This option cannot be changed once you open a file.
3. To display the Opening or First Writing menu, press OK
44
, More, Quit.
© 2017 Stenograph

Chapter 3: Writing on the Luminex
Audio Playback
The Play feature becomes available when you use a Search feature while writing a job. Play allows you
to playback the audio portion of the file from the point of the highlighted text forward in the file. The
Luminex highlights the corresponding steno and text on the tilting screen during the audio playback. You
can stop the playback at any time. A set of external speakers or headset is required for audio playback.
To play audio while writing a job:
1. Using a Search feature, look for any of the following: Last Q, Last A, Last Mark, Steno or Untranslate.
Search on page 86 for information about searching.
2. When you identify the position in the file from which you want to playback the audio, touch the Play
sensor or menu item. The Luminex begins the playback and simultaneously highlights the
corresponding text and steno.
3. Use the Quieter and Louder sensors to adjust the playback volume. If applicable, you may also
need to adjust the volume control on your headset or speakers.
4. Touch the Stop sensor or menu item when finished.
© 2017 Stenograph
45

Luminex User Guide
Auto-Conflict Resolution
Auto-Conflict Resolution, when turned On, automatically selects the first choice of the conflict. This
prevents the display of conflicts on the Luminex screen for easier readback. This option does not affect
the realtime output when writing realtime to a computer.
To turn Auto-Conflict On or Off:
1. From the Opening Menu, press Setup, Trans. Opt. The current status of the Auto-Conflict
Resolution option displays on the screen.
2. Press the Down and Up sensors or menu items as necessary to highlight the Auto-Conflict
Resolution option.
3. Press the On/Off sensor to toggle the Auto-Conflict Resolution option On or Off.
4. To display the Opening menu, press OK, More, Quit.
46
© 2017 Stenograph

Chapter 3: Writing on the Luminex
Backup SD Card
The Backup SD card stores steno notes, timestamps and audio files as a backup to the Data SD card. In
a situation where there is no main battery, not enough charge in the main battery or no AC adapter/
charger power, the Luminex uses FailSafe Mode to save the steno notes, timestamps and audio files to
the Backup SD card.
It is necessary to insert a Backup SD card into the Luminex in order to operate the writing machine. If
you remove the Backup SD card while the writing machine is On, the Luminex beeps and displays the
message: Backup SD Card Missing!!! Insert Card or Turn Off. You must reinsert the card to use the
Luminex.
The Luminex requires a minimum 4GB SDHC card. Luminex supports SDHC cards 4GB to 32 GB. The
Backup SD card must
on the Luminex, you are prompted to format the card if it has not previously been formatted in the writing
machine. Format the Backup SD Card on page 47
You can view files on the Backup SD card when working on the Luminex. The Backup SD card is
designed as a backup and is not intended for archiving steno notes. Once the Backup SD card is
full, the new files overwrite the oldest file or files. Stenograph recommends carrying an extra SD card.
In the rare event it is necessary to retrieve a file from the Backup SD card, you can use the Backup Card
Reader utility. The Backup SD card must be removed from the Luminex and inserted into a SD Flash
Card Reader that connects to your computer. A built-in SD card slot reader on your computer cannot
read the Backup SD card. Ensure you reinsert the Backup SD card into the Luminex when finished. The
Luminex requires that a Backup SD card is in the steno machine in order to operate. See Backup
SD Card Reader on page 115 for more information on the Backup Card Reader.
be formatted in the Luminex. When you insert an SD card into the Backup SD slot
Format the Backup SD Card
The Backup SD card must be formatted in the Luminex. The card is verified when inserted into the
Backup SD slot on the Luminex. You are prompted to format the card if it has not been formatted in the
writing machine.
Formatting a Backup SD card erases all the files and data stored on the Backup SD card. Confirm that
all the files on the card are no longer necessary. See Format a Data SD Card on page 55 for instructions
on formatting a Data SD card.
To format the Backup SD card:
1. Hold the Backup SD card straight without angling and gently insert it into the Backup SD slot on the
Luminex until you hear a soft click. If the card does not easily insert, do not force it. Remove the card
and reinsert it.
2. Turn the Luminex On.
3. From the Opening menu, touch Storage, Backup, SG Format. A message prompts you to continue.
4. Press Yes to format the Backup SD card. A preparation message, along with a status bar displays as
the Luminex formats the Backup Card. Press No to cancel the format.
© 2017 Stenograph
47

Luminex User Guide
5. When the Backup cards finishes formatting, the Luminex displays a completion message.
6. To display the Opening menu, press OK twice.
View Files on the Backup SD Card
The Luminex names job files using a year, month, date format followed by the time. For example:
200150816-142341 (August 16, 2015 2:23:41 p.m.) The newest file is listed first. File size accompanies
each file name.
To view the Backup SD card directory:
1. From the Opening menu, touch Storage, Backup, Files.
2. Press the Down and Up sensors to scroll through the list of files.
3. To display the Opening menu, press Quit, OK.
48
© 2017 Stenograph

Chapter 3: Writing on the Luminex
Beeper Volume
The Luminex has a beeper to alert you to specific messages on the tilting screen, such as Low Battery.
To adjust the beeper volume:
1. From the Opening menu, press Setup, More, Options.
2. Touch the Down and Up sensors as necessary to highlight the Beeper Volume option.
3. Touch the Change sensor to toggle the Beeper volume between Soft and Loud. The Luminex emits
a softer or louder tone indicating the volume level selected.
4. To display the Opening menu, press OK, More, Quit.
© 2017 Stenograph
49

Luminex User Guide
Brief It
Brief It is a translation feature, on the Luminex that suggests conflict free brief forms for words and
phrases that you write during a realtime job. When you write the same three or more steno strokes more
than once, the Luminex generates a brief form and displays it in the Brief It pane.
The Luminex Brief It feature is designed for use when not in a realtime situation writing to CAT software.
If you use Brief It on the Luminex and on your CAT system, the Suggested briefs may not match.
Stenograph recommends against using the Luminex Brief It feature during realtime.
There are two types of briefs, Suggested and Reminder. Suggested briefs are generated during realtime
when three or more steno strokes are written for the same text more than once and no brief exists in a
dictionary currently used for translation. To use the Suggested brief, write steno for the brief twice, the
default, to accept it. Accepted briefs are stored in the dictionary within memory and the current job
dictionary. When you write the same steno of a used brief in a subsequent job, the Luminex provides a
Reminder brief. You can also suggest a new brief or reject a brief. See Managing Briefs on page 51.
The Luminex Translate Option, Use Brief It, must be set to Yes before beginning a job for the Brief It
feature to be active and available during a realtime. When Brief It is active, the Luminex defaults to the
Brief It view when you begin writing. Text shows on the left side of the screen and the Brief It pane on the
right. The most recent brief always displays at the bottom of the Brief It list.
Brief It automatically creates a J-Define the first time you use a Suggested brief. J-Defines made for the
current job are placed into a job dictionary on the Luminex that uses the same date/time name as the
job. The job dictionary is stored on the Data SD card as a subfile of the job. If you are writing realtime
using Case CATalyst V13 or higher, the definition is also sent to the global table of the Case CATalyst
realtime file. All J-defines stored in the dictionary within memory are automatically used on subsequent
jobs. If you do not want to use the J-Defines in another job, it is necessary to clear them from the
dictionary within memory. See J-Defines on page 63 for more information.
Luminex Suggested and Reminder briefs along with used briefs display in the Brief It pane on the right
side of the screen, in a color coded background. The newest Suggested or last used brief display at the
bottom of the list. Suggested briefs have a yellow background, Reminder briefs a green background and
used briefs a gray background. When you write a Suggested brief, the background color for the brief
turns gray, moves to the bottom of the list and the J-Define is created. You can reject a Suggested brief
or request a new one. See Managing Briefs on page 51 for more information.
Briefs are not Suggested when an entry exists in a dictionary currently used for translation. For example,
during the job you write AB/OT/HRAB/TOERS for the name "Abbott Laboratories." A job dictionary
currently used for translation contains the entry A*L defined as "Mr. Allen." Brief It does not suggest A*L
for the Abbott Laboratories brief but creates and suggests a brief that does not conflict, such as A*LT.
If you write a steno outline that matches the steno stroke for a Suggested brief or do not want to use the
brief, you can write the {Delete} command to remove the steno and text from the transcript. Using the
Delete command does not remove the define from the dictionary. You may want to use the Brief It
option, Write Twice to Define. See Brief It Options on page 53 for more information.
Case CATalyst V13 or Higher
The Luminex Brief It feature is designed for situations in which you are not writing realtime to your CAT
system. If you are using Case CATalyst V13 or higher, defines are exchanged between Case CATalyst
and the Luminex while writing realtime. It is strongly
your Luminex or Case CATalyst but not both locations.
50
recommended to only use the Brief It feature on
© 2017 Stenograph

Chapter 3: Writing on the Luminex
If you are using the Brief It feature on your Luminex with Case CATalyst V13 or higher, selecting to Undo
a global, Undo Last Global or delete a global in Case CATalyst does not remove the definition from
dictionary in the Luminex memory or the job dictionary for the file on the Luminex. To remove J-Defines
from the Luminex, it is necessary to clear them from the dictionary stored in memory. See J-Defines on
page 63 for more information.
Managing Briefs
Luminex Suggested and Reminder briefs along with used briefs display in the Brief It pane in a color
coded background. The newest and last used briefs display at the bottom of the list. Suggested briefs
have a yellow background, used briefs a gray background and Reminder briefs a green background.
To manage briefs during a job, touch More, More, Brief It. The title bar of the Brief It pane turns blue,
indicating it has cursor focus. Use the Scroll Dwn and Scroll Up sensors to position the cursor on the
desired brief. The cursor location is indicated with a dark grey color on the edge of the Brief It pane.
© 2017 Stenograph
51

Luminex User Guide
Use the following options as necessary:
Accept
Add the Suggested brief to the job dictionary and turns the background of the Suggested brief gray.
During a job, a Suggested brief is automatically accepted and added to the job dictionary when you write
it. If writing realtime to CATalyst V13 or higher, the accepted brief is sent to the global table of the
Case CATalyst realtime file.
Suggest New
Strike out the current suggestion and suggest a new brief at the bottom of the list.
Reject
Strike out the current suggestion.
Quit
Save the changes and closes the Brief It management screen.
Use Brief It
The Luminex Translate Option, Use Brief It, must be set to Yes before beginning a job for Brief It to be
available on the Luminex. By default, this option is set to No. When Brief It is active, the Luminex
defaults to the Brief It view when you begin writing. Text shows on the left side of the screen and the
Brief It pane on the right. Changing the font size for the screen also changes the size of the Brief It pane
and the text within it. You can change the View to not show the Brief It pane, but unless you turn Brief It
Off, Suggested briefs continue to be provided. If you turn Brief It off during a job, when you return to
writing the job, the View shows text on the left and vertical notes on the right.
When Use Brief It is set to Yes, two Brief It Options are available. The options, Write Twice to Define and
Only Suggest One Stroke Briefs, allow you to customize how you use Brief It.
Turn Brief It On or Off Before a Job
1. From the Opening Menu, touch Setup, Trans. Opt.
2. Touch the Down/Up sensors as necessary to highlight the Use Brief It option.
3. Touch the On/Off sensor to toggle the Brief It option On or Off.
4. To display the Opening menu, press OK, More, Quit.
Turn Brief It Off During a Job
Once a file is open, you can turn the Use Brief It option Off but you cannot turn it On. Once the option is
turned off while a file is open, you cannot turn it back on until you close the current job.
To turn Brief It Off while writing a job:
1. From the first Writing menu, touch More, Setup, Trans. Opt.
2. The cursor points to the Use Brief It option. touch the Off sensor. If you touch OK without changing
the option, the status of the option does not change.
52
© 2017 Stenograph

Chapter 3: Writing on the Luminex
Brief It Options
Write Twice to Define
Brief It, by default, automatically creates a J-Define the first time you use a Suggested brief. When this
option is active, you must consecutively write a brief twice before Brief It creates a J-Define. All
subsequent uses of the brief only need to be written once. For example, Brief It suggests, P*F, for
“Piogenic Ventriculitis.” You want to use the brief so you write, P*F/P8F the first time, which places the
words “Piogenic Ventriculitis” in your transcript and puts the definition, P*F = Piogenic Ventriculitis, in
your job dictionary. To use the brief again, write, P*F.
You may want to use this option to try a Suggested brief before making it a definition or to prevent a
possible misstroke in accepting a brief. The default is Yes.
Only Suggest One Stroke Briefs
Brief It, by default, always suggests a one stroke brief with the asterisk before suggesting a two stroke
brief. When this option is active, Brief It suggests only one stroke briefs.
© 2017 Stenograph
53

Luminex User Guide
Copy Log
In the rare instance your Luminex experiences an error or an exception, Copy Log automatically saves
the information to a log file. Technical Support may ask you to send the information to Stenograph for
analysis.
To copy the error information:
1. From the Opening Menu, touch More, Diag, Copy Log. The Luminex copies all the appropriate log
information to the Data SD card, placing it in the Support Info Files folder.
2. To return to the Opening menu, press Quit, More.
3. Insert the Data SD card into the USB SD Flash Drive reader or into a built-in SD slot on your
computer.
4. Send the files in the Support Info Files folder on the Data SD card to Stenograph as an e-mail
attachment.
54
© 2017 Stenograph

Chapter 3: Writing on the Luminex
Data SD Card
The Luminex uses a Data SD card to store steno notes, timestamps, audio files when the audio option is
selected and the associated job dictionary when J-Defines are created for the job. The Luminex comes
with a 4 GB Data SD card.
The actual number of files a Data SD card holds varies according to the size of the SD card and the size
of each steno note, timestamp and audio files. For example, a 1 GB Data SD card holds approximate
600,000 pages without audio files. Depending on the audio compression option selected, a 1 GB Data
SD card holds approximately 170 hours of audio at the lower GMS compression rate and 70 hours at the
higher ADPCM compression rate.
The SD card icon on the title bar of the tilting touch screen provides a general indication of the remaining
space on the Data SD card. When the gauge is completely blue, the entire card is available. If no SD
card icon displays, there is no SD card in the Data SD slot or the Luminex does not recognize the Data
SD card.
If the Data SD card is corrupt, full or missing from the Data SD slot, the Luminex displays warning
messages but allows you to continue writing. Steno notes continue to be saved to memory and the
steno, timestamps and audio continue to be saved to the Backup SD card. Stenograph recommends
carrying an extra SD card.
Format a Data SD Card
You may want to format a previously used Data SD card for use in the Luminex. For example, you have
archived all the files on the Data SD card and want to start with a clean Data SD card.
To format a Data SD card:
1. Gently insert a Data SD card into the Data SD slot on the Luminex until you hear a soft click. If the
card does not insert easily, do not force it. Remove the card and reinsert it, ensuring it is straight
without angling.
2. From the Opening menu, touch Storage, SD Card, Format. A message prompts you to continue.
3. Touch Yes to format the Data SD card. A message box displays, indicating the progress of the
format. To abort the format, press No.
4. A message displays confirming format completion.
5. To display the Opening menu, press OK, Quit, OK.
Manage Data SD Card Space
You can check the amount of free space left on a Data SD card. As the Data SD card reaches capacity
while writing a job, the Luminex beeps and a series of prompts warn that the Data SD card is almost full.
If you are recording audio while writing, a series of prompts warn that recording will stop soon. When the
Data SD card reaches only 12 MB, a message displays indicating that audio is no longer recorded to the
Data SD card. If you start a job and there is 75MB or less available on the Data SD card, audio is not
recorded to the Data SD card.
Once a Data SD card is full, steno, timestamps and audio are no longer saved to the Data SD card but
continue to be saved to the Backup SD card. Steno and timestamps also continue to be saved to
memory.
© 2017 Stenograph
55

Luminex User Guide
You can change the Data SD card any time during the writing process by first closing the open file and
turning Off the Luminex. When you insert a new Data SD card and turn the Luminex On, a new file is
created as you begin writing. Files cannot span Data SD cards. You can merge the files together later on
your CAT system.
Check the Data SD Space
1. From the Opening menu, touch Storage, SD Card, Information.
2. To display the Opening menu, touch OK, Quit, OK.
Change the Data SD Card
To change the Data SD card while writing:
1. On the First Writing menu, press End to close the open file.
2. Turn the Luminex Off and remove the current Data SD card from the Data SD card slot.
The message, Disk in use -- Put it Back! displays when you attempt to remove the Data SD card
without closing the file by pressing End; or you attempt to remove the Data SD card before the
Luminex has finished writing information to it.
3. Gently insert a new formatted Data SD card until you hear a soft click. If the card does not easily
insert, do not force it. Remove the card and reinsert it, ensuring it is straight without angling.
4. Turn the Luminex On and continue writing.
View and Copy Data SD Card Files
The Luminex names job file using a year, month, date and time format. For example: 20150816-142341
(August 16, 2015 2:23:41 p.m.) Job files are stored in folders identified by year and month. For example,
201508. By default, the newest file is listed first.
Each job file contains subfiles that include: steno notes with timestamps, an associated audio file when
audio is recorded, audio pause and resume information and an associated job dictionary when a job
dictionary is used.
Only the file name for your job displays on the Data SD card. The individual subfiles display on the
destination drive when you read the job into your CAT system or use the DateTimeToStentura program.
When copying, the Luminex automatically copies your selected files from the Data SD card to a USB
storage device inserted into the Luminex USB A (host) port. Be sure to insert your thumb drive before
copying files.
To view and copy files on the Data SD card:
1. From the Opening menu, touch Storage, SD Card, Files.
56
© 2017 Stenograph

Chapter 3: Writing on the Luminex
2. Job files are organized in folders by year and month, with the newest folder first. Press the Down
and Up sensors to highlight a folder. Use Date Sort to toggle folders between ascending and
descending order.
An additional folder, Support Info Files, may be visible along with the job folders. If an error occurs,
the Luminex writes error information to this folder. Stenograph uses the information to research and
improve the software. See Copy Log on page 54 for more information.
Steno notes copied from memory to the Data SD card display at the root of the card in date order and
are identified with the .sgstn file name extension. Although memory stores other file information in
addition to the steno note file, only the steno note file is available for copy. See Memory on page 77
for more information.
3. Touch Folder to display the job files for the selected folder. Job files display in date order, newest
files first, with the following subfile information: the file size in megabytes, the estimated number of
transcript pages, an indicator when there is an associated Audio file and an indicator when there is
an associated job dictionary.
Use Date Sort to toggle the display of files in ascending and descending order.
4. To copy files, touch the Down or Up sensors to highlight the desired files. When finished, touch
Select to highlight the files.
5. Ensure there is a thumb drive in the Luminex USB A (host) port and press Copy. The Luminex
automatically copies the selected files to the thumb drive. The Opening menu displays when the
copy is complete.
© 2017 Stenograph
57

Luminex User Guide
Dictionaries
The Luminex uses Case CATalyst converted dictionaries or an RTF/CRE dictionary converted by the
RTF2Writer Dictionary Conversion program. Valid dictionaries include your personal dictionary, any job
dictionary and the Case CATalyst Power Define dictionary. You can also export the Case CATalyst Spell
Check Wordlist and Prefixsuffixrules.ini file when using Case CATalyst 8.05 or higher. Convert RTF/CRE
Dictionaries on page 114 for more information about the RTF2Writer Dictionary Conversion.
The Luminex can hold approximately 900,000 dictionary entries, depending on the size of the entries. The
total number of combined personal and job dictionary entries cannot exceed 900,000.
Load Dictionaries onto the Luminex
The Luminex loads Case CATalyst dictionaries from your computer via the micro USB cable. In order to
export your Case CATalyst dictionaries via USB cable you must have installed the Luminex USB driver
on your computer. Install the Luminex USB Drivers on page 16 for instructions on loading the driver.
Each time you load dictionaries, the newly loaded dictionaries overwrite all other dictionaries on the
Luminex. Dictionaries remain on your Luminex until you load dictionaries again. When loading
dictionaries, J-Defines held in the dictionary within the Luminex memory are not
previous J-Defines made on the Luminex from applying to future jobs, you must manually clear them.
Clear All J-Defines on page 66.
cleared. To prevent
To export Case CATalyst dictionaries to the Luminex:
1. Ensure your Luminex and computer are turned On and fully booted.
2. Start Case CATalyst.
3. Do the following:
USB Connection
Each end of the USB cable has a different connection plug. Connect the appropriate end of the USB
cable to the USB B (client) port on back of the Luminex and the other end to the USB port on the
computer.
4. In Case CATalyst, open the Export function and select the Stenograph Writer tab. If using Case
CATalyst V16.03 or lower, select the élan/Fusion/Luminex tab. In Case CATalyst V10.04 or earlier,
select the élan/Fusion tab.
58
© 2017 Stenograph

Chapter 3: Writing on the Luminex
5. Select the dictionaries you want to load onto your Luminex. The Personal Dictionary is selected by
default to ensure the most recent version on your Luminex.
You can also select the Case CATalyst Power Define dictionary. J-Defines on page 63 for additional
information about using Case CATalyst Power Define dictionary.
To load the Spell Check Wordlist and the Prefixsuffixrules.ini file, if applicable, check the appropriate
box for each option. You must be using Case CATalyst V8.05 or higher. Suffix Handling on page 92
for more information.
6. Do the following:
USB Connection
Click the radio button USB (All)
7. Click Export. The Luminex beeps and briefly displays a progress bar along with a series of
messages as the dictionaries load.
8. When the Luminex finishes loading the dictionaries, it reboots, displaying the Opening menu. A
verifying dictionary message may display. Depending on your Case CATalyst setting, the message,
Export Complete, may display.
Using Job Dictionaries
In addition to your main (personal) dictionary, you can use Case CATalyst exported job dictionaries for
translation when writing on the Luminex. You must load Case CATalyst job dictionaries onto the
Luminex in order to select them for translation.
When using the RTF2Writer program, you can load up to seven job dictionaries on the Luminex. Convert
RTF/CRE Dictionaries on page 114 for more information.
You can set job dictionary priority on the Luminex. When a stroke appears in more than one dictionary
with a different definition, the job dictionary with the highest priority is used to translate the stroke. All
selected job dictionaries have a higher priority than the main dictionary and the J-Defines in the
dictionary within the Luminex memory.
To set dictionary priorities:
1. From the Opening menu, touch Dict.
2. From the Dictionary menu, touch Select. The Job dictionaries display in the order they were loaded
onto the Luminex.
The following information displays for each dictionary:
• Priority—the translation priority for the dictionary. One is the highest and ten is the lowest when
dictionaries are selected.
• Job Dictionary Name—the file name of the job dictionary.
• Date/Time—the date and time the job dictionary was loaded on the Luminex.
• Size—the size of the job dictionary.
© 2017 Stenograph
59

Luminex User Guide
3. Select job dictionaries to use for translation and set the priority. Use the Down and Up sensors to
move the pointer (>>) to the desired job dictionary and press Select. The dictionary priority is set in
the order you select the dictionaries. To reorder the priority, press Clear to deselect all the
dictionaries so that you can reselect the dictionaries in the desired priority order.
When the Case CATalyst Power Define dictionary is loaded, the Luminex automatically selects it for
use when making a J-Define. The Power Define dictionary takes priority over all other dictionaries
when creating a J-Define. It does not display in the dictionary list.
4. Do one of the following:
•Touch Accept to save the selections. The Dictionary menu displays.
•Touch Quit to exit without making changes to the existing job dictionary priorities. The Dictionary
menu displays.
5. To display the Opening menu, touch Quit.
60
© 2017 Stenograph

Chapter 3: Writing on the Luminex
Display Set Strokes Per Minute (SPM)
This option allows the average number of strokes per minute to display on the Title bar and Status
screen. The Title bar shows the approximate number of strokes per minute, SPM, while writing. The
Status screen shows strokes per minute data for the most recent job. While writing, the Status screen
shows strokes per minute data for the current job.
1. From the Opening menu, touch Setup, More, Options.
2. Touch the Down and Up sensors as necessary to highlight the Display Strokes per minute (SPM)
option.
3. Touch the Change sensor to toggle the option between Yes and No. Yes is the default.
4. To display the Opening menu, press OK, More, Quit.
© 2017 Stenograph
61

Luminex User Guide
Electronic Marks
Use the Mark function to electronically mark locations in your steno notes. You can use the Search
feature to locate the Marks in the file.
To mark your steno notes:
1. From the First Writing menu, touch either Mark sensor or the menu item.
When no dictionary definition exists for the Mark, the untranslate displays as /! in the Text and in the
Vertical Notes on the tilting screen. If you have defined the Mark in your dictionary, the exclamation
mark (!) displays in the Vertical Notes and the text definition displays in the text.
2. Continue writing.
62
© 2017 Stenograph

Chapter 3: Writing on the Luminex
J-Defines
J-Defines are steno-based words or phrases that are specific to a job, such as names and technical
terms. You can create J-Defines on the Luminex before beginning or during a job. The Luminex
automatically uses the J-Defines in the writer’s memory, along with any other selected job dictionaries,
when you write a job. J-Defines created during a job apply from the point you define them and do not
apply to text you have already written.
If you are using Case CATalyst V13 or higher, J-Defines made on the Luminex, including used briefs,
are automatically sent to Case CATalyst when writing realtime via the micro USB connection. The
defines are sent to the global table of the Case CATalyst realtime file. Any dictionary definitions made in
the Case CATalyst file, including D-Defines, J-Defines, K-Defines and Other Defines, are automatically
sent to the Luminex and stored in the memory of the writer as J-defines. The exchanged definitions
apply from the point of creation forward to all new realtime steno written.
J-Defines made for the current job are stored in the writer’s memory and placed into a job dictionary on
the Luminex that uses the same date/time name as the job. The job dictionary is stored on the Data SD
card as a subfile of the job. Case CATalyst automatically transfers the associated job dictionary to the
computer when reading the steno notes from the Data SD card.
All J-Defines created on the Luminex are stored in the Luminex’s memory and remain in there until you
clear them. The J-define’s memory can hold approximately 100,000 J-Defines. J-defines in memory are
automatically used on subsequent jobs. If you do not want to use the J-Defines in another job, you can
manually clear them (see Clear All J-Defines on page 66) or set the Clear J-defines when turning
on/ending job option (see Clear J-defines when turning on/ending job on page 83).
You can save all the J-Defines from the dictionary within the Luminex memory to a dictionary file,
jdefines.sgdct, on the Data SD and use the file in Case CATalyst as you would any job dictionary. For
example, you can use the file in translations or merge the file into your personal dictionary.
See Write All J-Defines to a Data SD Card on page 66 for information about copying the J-Defines.
You can export J-Defines from Case CATalyst to your Luminex. You can also export the Case CATalyst
Power Define dictionary and use Power Defines commands when creating J-Defines on the Luminex.
See Dictionaries on page 58 for more information about loading job dictionaries.
Create J-Defines
When creating J-Defines on the Luminex, you can fingerspell the text or you can stroke defined steno
outlines to enter the text portion of a J-Define. The Luminex’s Spell Mode allows you to use steno stroke
equivalents for each letter to enter the text portion of a J-Define. When stroking defined steno outlines in
the J-Define Text field, the Luminex automatically enters the text portion of an existing definition from
your dictionary. For example, you have STKPWHR defined in your dictionary as<Question>. To define a
misstroke for a question bank, you write STKPW R in the J-Define Steno field and press OK. In the JDefine Text field you write STKPWHR. The Luminex automatically inserts <Question>. If you are using
Case CATalyst V13 or higher when writing realtime via a micro USB connection, the definition is sent to
the global table of the Case CATalyst realtime file.
© 2017 Stenograph
63

Luminex User Guide
When an entry in your dictionary conflicts with a steno outline used by the Spell Mode feature, the steno
outline in the Spell Mode feature takes priority. It is necessary to fingerspell the definition for any entry
that conflicts with the Spell Mode feature. For example, you want to J-Define the misstroke for TKELG as
“Dell.” You write the steno stroke TKELG in the J-Define Steno field and TKEL in the J-Define Text field.
Since the Spell Mode feature uses TKEL for <Delete Space>, the Luminex automatically enters <Delete
Space> in the J-Define Text field. It is necessary to fingerspell Dell in order to define TKELG as “Dell.”
The exception to Spell Mode priority is for the #*. The #* is internally defined in the Luminex as Delete. If
a dictionary used for translation contains another definition, the definition in dictionary takes priority.
When you use Power Define commands from a Case CATalyst Power Define dictionary loaded onto the
Luminex to create J-Defines, the Spell Mode feature is disabled and the Power Define dictionary takes
the highest priority over other dictionaries in the J-Define feature.
Create J-Defines Using Power Defines
You can use Power Define commands from a Case CATalyst Power Define dictionary loaded onto the
Luminex, in lieu of Spell Mode, to create J-Defines. The Power Define dictionary allows the use of your
customized entries to fingerspell, write format commands and navigate within the J-Define feature.
When you load your Case CATalyst Power Define dictionary onto your Luminex, the Spell Mode feature
is disabled and the Power Define dictionary takes the highest priority over other dictionaries in the
J-Define feature. If you are using Case CATalyst V13 or higher when writing realtime via micro USB
connection, the definition is sent to the global table of the Case CATalyst realtime file.
When creating a J-Define, the Power Define dictionary loads into the dictionary priority list but does not
display in the list of Job Dictionaries. A Power Define entry takes priority if it conflicts with another
dictionary entry. When finished creating J-Defines, the Power Define dictionary is removed from the
dictionary priority list.
Since the Spell Mode feature is disabled, you may want to put specific format symbols definitions in your
Case CATalyst Power Define dictionary to use with the J-Define feature. For example, you use the
Colloquy format symbol in your J-defines for speaker identifications. In your Power Define dictionary,
you insert an entry using the steno, KOL, with the <Colloquy> format symbol entered in the Text of the
definition. You export the Power Define dictionary along with any other dictionaries to the Luminex.
When writing a job, you stroke “KOL” in the Text field of the J-Define feature to insert the <Colloquy>
format symbol followed by a speaker name. Format Symbols on page 69 for Spell Mode format symbol
definitions. See the Case CATalyst Help for information on creating Power Define dictionary entries in
Case CATalyst.
You may want to review the Spell Mode entries for Punctuation on page 69 and Format Symbols on
page 69 before exporting your Power Define dictionary. To remove the Power Define dictionary from
your Luminex and use the Luminex default Spell Mode entries for J-Defines, export your dictionaries into
the Luminex without selecting the Power Define dictionary. Dictionaries on page 58 for information about
loading dictionaries.
64
© 2017 Stenograph

Chapter 3: Writing on the Luminex
Create J-Defines Using Spell Mode
1. Do one of the following:
• From the Opening Menu, press Dict, J-Defines, Add.
The Add to J-Define screen displays. The total number of J-Defines entries and the amount of
remaining space for J-Defines shows on the right side of the screen.
• From the First Writing Menu, press J-Defines.
2. In the J-Define Steno field, write the steno strokes for the J-Define. If you make a mistake, press the
* (asterisk) to delete the previous stroke or press Clear to delete all the strokes.
3. When finished entering steno outlines, do one of the following:
•Touch OK.
• If using the Power Define dictionary, write the stroke defined as Tab or Enter.
4. In the J-Define Text field, write text for the J-Define. Use uppercase and lowercase letter letters,
punctuation and format symbols as defined in Spell Mode on page 67; or write steno defined in your
dictionary as the word or format symbol you are defining. Do any of the following:
• Write a stroke that is defined in a dictionary, such as <Question>.
• Write a stroke that is defined in a dictionary and use the Spell Mode letters to complete the word.
For example, write the stroke for Peter and fingerspell "s" "e" "n" to make Petersen.
• Use the Spell Mode letters to create a word that is not in the dictionary, such as “Kurkowski.”
• If you make a mistake, press the * (asterisk) to delete the previous character or press Clear to
delete the entire entry.
5. When finished, do one of the following:
•Touch OK to complete the definition.
• If using the Power Define dictionary, write the stroke defined as Enter.
6. Repeat the previous steps to create additional J-Defines. When finished creating J-Defines, do one
of the following:
• When creating J-Defines before beginning a job, touch Quit twice to return to the Opening menu.
• When creating J-Defines while writing, Touch Quit. Continue writing.
© 2017 Stenograph
65

Luminex User Guide
Write All J-Defines to a Data SD Card
You can copy all the J-Defines from dictionary in the Luminex memory to a dictionary file, jdefines.sgdct,
on the Data SD card for use in Case CATalyst. You can then use Windows My Computer, to copy the file
from the Data SD card to your Case CATalyst user name. Copying all J-defines to the Data SD Card
does not clear (delete) them from the Luminex’s memory.
To copy the J-Defines to the Data SD card:
1. From the Opening Menu, touch Dict, J-Defines.
2. From the J-Define menu, touch Write. The following message displays prompting you to confirm the
copy: Ready to Write All J-Defines to Data SD card. Are You Sure?
a. Touch Yes to write all J-defines in memory to the Data SD card to a file named jdefines.sgdct.
The following message displays:
“Writing J-Defines to Data SD Card.”
b. Touch No to cancel the J-defines being written to the Data SD card.
3. To display the Opening Menu, touch Quit twice.
Clear All J-Defines
To delete all the J-Defines from dictionary in the Luminex memory:
1. From the Opening Menu, touch Dict, J-Defines, Clear.
2. The following message displays prompting you to confirm the deletion: Ready to Delete All
J-Defines. Are You Sure?
a. Touch Yes to clear all J-Defines from the Luminex. The following message displays:
“All J-defines deleted from this writer’s memory.”
b. Touch No to retain the J-defines in memory.
3. To display the Opening Menu, touch Quit twice.
66
© 2017 Stenograph

Chapter 3: Writing on the Luminex
Spell Mode
Use Spell Mode to create J-defines on the Luminex or type a keyboard profile name using the following
steno stroke equivalents. Case CATalyst Power Define dictionary entries on the Luminex take priority.
Lower Case Letters
a /ARBGS or /AEURBGS or /A or /AEU
b /PW-RBGS or /PW or /-B
c /KR-RBGS or /KR or /-BG
d /TK-RBGS or /TK or /-D
e /ERBGS or /AOERBGS or /E
f /TP-RBGS or /TP or /-F
g /TKPW-RGBS or /TKPW or /-G
h /H-RBGS or /H
i /EURBGS or /AOEURBGS or /EU or /AOEU
j /SKWR-RBGS or /SKWR or /-PBLG
k /K-RBGS or /K
l /HR-RBGS or /HR or /-L
m /PH-RBGS or /PH or/-PL
n /TPH-RBGS or /TPH or /-PB
o /ORBGS or /OERBGS or /O or /OE
p /P-RBGS or /P or /-P
q /KW-RBGS or /KW
r /R-RBGS or /R or /-R
s /S-RBGS or /S or /-S
t /T-RBGS or /T or /-T
u /URBGS or /AOURBGS or /U or /AOU
v /SR-RBGS or /SR
w/W-RBGS
x /KP-RBGS or /KP or /-BGS
y /KWR-RBGS or /KWR
z /STKPWHR or /SAOE-RBGS or /SE-RBGS or /SAOE or
/SOE or /SE or /-Z
© 2017 Stenograph
67

Luminex User Guide
Upper Case Letters
A /AFPLT or /AEUFPLT
B /PW-FPLT
C /KR-FPLT
D/TK-FPLT
E /EFPLT or /AOEFPLT
F/TP-FLPT
G /TKPW-FPLT
H /H-FPLT
I /EUFPLT or /AOEUFPLT
J /SKWR-FPLT
K /K-FPLT
L /HR-FPLT
M /PH-FPLT
N /TPH-FPLT
O /OFPLT or /OEFPLT
P /P-FPLT
Q /KW-FPLT
R /R-FPLT
S /S-FPLT
T/T-FPLT
U /UFPLT or /AOUFPLT
V /SR-FPLT
W/W-FPLT
X /KP-FPLT
Y /KWR-FPLT
Z /STKPWHR-FPLT or /SAOE-FPLT or /SOE-FPLT
or /SE-FPLT
68
© 2017 Stenograph

Punctuation
? (interrog) /STPH
. (period) /-FPLT
: (colon) /-FPLT/-FPLT
; (semicolon) /-FPLT/-RBGS
... (ellipses) /-FPLT/-FPLT/-FPLT
,(comma) /RBGS
- (dash) /TK-RB
‘ (apostrophe) /AE or /AOE
“ (double quote) /KW-T or /KWOET
( (left parenthesis) /STPH-FPLT
) (right parenthesis) /STPH-FPLT/STPH-FPLT
$ (dollar sign) /-D or /-D#
^ (caret) /KA or /KAR
Chapter 3: Writing on the Luminex
& (ampersand) /APBD or /AFRP or /APL
* (asterisk) /AS
+ (plus sign) /P-LS
/ (slash) /SHR-RB or /SHRARB
Space /SPAEUS
Format Symbols
Question /STKPWHR or /KWE or /KWEU
Answer /-FRPBLGTS or /APB or /APBS
Colloquy /KOL
Paragraph /*P or /PAR or /PRAF or /PAEUR
Delete Space /TKEL or /TKHRET
Sticky Space /KEP or /KAOEP
Tab /TAB
New Line /HRAOEUPB
Glue /TKPWHRAOU or /TKPWHRU
Cap Next /KAP
Cap Previous /PRE or /PRAOE
Uncap Next /KA*P or KAUP
© 2017 Stenograph
69

Luminex User Guide
Numbers
1/S-#
2/T-#
3/P-#
4/H-#
5/A-#
6/-F#
7/-P#
8/-L#
9/-T#
0/O-#
70
© 2017 Stenograph

Chapter 3: Writing on the Luminex
Job Statistics
Job statistics displays data for each job that includes the job size in bytes, the number of estimated
pages, audio use, whether or not there is a job dictionary associated with the file and strokes per minute
information. Strokes per minute, SPM, information displays on a separate screen in numeric and graphic
format. The numeric information includes the minimum, maximum and average strokes per minute for
the selected job. The graph shows the varying speed of strokes throughout the job. The strokes per
minute graph is only visible in Job Statistics when the job is closed.
When the Display Strokes Per Minute option is active, the Title bar and Status screen display strokes per
minute (SPM) data. While writing, the Title bar shows the approximate number of SPM and the Status
screen shows SPM data for the current job. When no job is active, the Status screen shows strokes per
minute data for the most recent job. Display Set Strokes Per Minute (SPM) on page 61
View Job Statistics
1. From the Opening menu, touch More, Job Stats.
2. Steno note folders display by year and month with the newest folder first. Use Date Sort to toggle
folders between ascending and descending order.
3. Touch the Down and Up sensors to move to the desired folder and touch Folder to view job file data
contained in the folder.
4. To view strokes per minute and the graph for a specific job, press the Down and Up sensors to move
to the desired file and touch Select. The Job Statistics graph displays.
5. Use the options as necessary:
• Scroll—Use the Scroll sensors to move graph detail horizontally on the screen.
• Zoom—Use the Zoom sensors to examine details of the graph in closer context or in a more
distant overview.
6. Touch Quit to return to the Second Setup screen.
7. Do one of the following:
• View job statistics for another file, touch Job Stats.
• Return to the Opening menu, touch More.
© 2017 Stenograph
71

Luminex User Guide
Keyboard Layout
Keyboard Layout is designed for international use of the Luminex. Changes to the Keyboard Layout
should only be made when your steno keyboard layout uses a specific language steno theory.
1. From the Opening menu, touch Setup, More, Options.
2. Touch the Down and Up sensors as necessary to highlight the Keyboard Layout option.
3. Touch the Change sensor to cycle through the available keyboard.
4. To display the Opening menu, touch OK, More, Quit.
72
© 2017 Stenograph

Chapter 3: Writing on the Luminex
Keyboard Settings
The majority of Luminex users successfully adjust their keyboard accuracy using the depth of stroke and
the tension control adjustment wheels. Keyboard Depth and Tension Controls on page 22. Occasionally,
when a very short depth of stroke is used or after adjusting the tension control and depth of stroke, you
may continue to experience stacking or splitting. The Keyboard Settings allow you to further customize
the keystroke interaction to your writing style.
You can save changed Keyboard Settings to a keyboard profile. You can load the saved profile at
another time to quickly apply the settings. You may want to create different profiles for situations when
your writing varies. For example, you are in a situation where several people are using the Luminex or
you write differently first thing in the morning and late in the afternoon. You make adjustments to the
Keyboard Settings and save them to a profile. The next time you write, you load the desired profile to
have the Luminex automatically apply the saved Keyboard Settings with your personalized adjustments.
Keyboard Adjustments
1. Make adjustments to the keyboard depth of stroke and tension control settings. Keyboard Depth and
Tension Controls on page 22 for details.
2. Turn on CNN or the equivalent and write against the broadcast for 20 - 30 minutes.
3. If you continue to experience keystroke issues, make further adjustments using the Keyboard
Options. From the Opening Menu, touch Setup, More, Keyboard, Adjust. If you need to make
adjustments during a job, press More, Setup, Keyboard, Adjust.
4. Perform the adjustments according to the following priority list to ensure optimal keystroke
performance. Use the Down and Up sensors to highlight an option.
a. Keyboard Sensitivity—Adjust the overall keyboard sensitivity. This may be particularly
necessary when your depth of stroke is very shallow. It is strongly
the first available setting and assess the change. Turn on CNN or the equivalent and write
against the broadcast for 20 - 30 minutes.
The default setting is Balanced. Use the + and - sensors to select one of the following:
• Less Sensitive—A key or keys show that you do not want in your steno outlines
(shadowing).
• More Sensitive—A key or keys you want are not in your steno outlines (missed or dropped).
b. Split/Stack Adjustment - When you experience splitting steno outlines or multiple steno outlines
becoming one, adjust the Split/Stack Adjustment setting. It is strongly
select the first available setting and assess the change. Turn on CNN or the equivalent and write
against the broadcast for 20 - 30 minutes.
The default setting is Balanced. Use the + and - sensors to select one of the following:
recommended that you select
recommended that you
• Less Splitting 1—Multiple steno outlines show in your steno notes that are intended to be
one stroke.
• Less Stacking 1—Single steno outlines show in your steno notes that are intended to be two
strokes.
© 2017 Stenograph
73

Luminex User Guide
c. Transition Time—Transition time is the number of milliseconds that pass between the release of
a key stroke and when the Luminex recognizes the next key stroke. This can affect the stacking
or splitting of steno outlines. If you experience stacking or splitting steno outlines, adjust the
Split/Stack Adjustment option first
If the Split/Stack Adjustment settings do not resolve the splitting or stacking of steno outlines, set
the Split/Stack Adjustment option to “Balanced” before
strongly
recommended that you adjust the transition time in a small increment and assess the
change. Turn on CNN or the equivalent and write against the broadcast for 20 - 30 minutes.
The default setting is 8 milliseconds. Use the + and - sensors to choose a number between 2 and
66.
• Lengthen transition time setting - If split steno outlines continue to show in your steno
notes, lengthening the transition time should help. Split steno outlines indicate that the
transition time is too short. Increase the transition time setting in small increments. To
increase the transition time (lengthen the time allowed for strokes to be combined into one)
press + (plus). For example, if the Transition Time setting is 8 ms (default), pressing +
increases the transition time to 10 ms.
• Shorten the transition time setting—if stacked steno outlines continue to show in your
steno notes, shortening the transition time should help. Stacked steno outlines indicates that
the transition time is too long. Decrease the transition time setting in small increments. To
decrease the transition time (shorten the time allowed for strokes to be combined into one),
press - (minus). For example, if the Transition Time setting is 8 ms (default),
pressing - decreases the transition time to 6 ms.
.
changing the Transition Time setting. It is
d. Return to Factory Default Settings—Return all the keyboard options to the default factory
settings. Use the - (No) or + (Yes) sensor to make your selection. If you only made changes in
Adjust Keys feature, you will not prompted to save the settings as indicated in the next step.
5. Touch OK. You are prompted to save the settings to a profile. While writing, you are prompted after
you End the job. No prompting occurs if you selected to Reset all the key settings to the factory
default.
6. Select one of the following:
Yes
Apply the settings and display the Keyboard Profiles screen. Do the following:
a. Use the Down and Up sensors to highlight an empty profile or profile name and touch Save.
b. Type a profile name using uppercase and lowercase letter letters, punctuation and format
symbols as defined in Spell Mode on page 67; or write steno defined in your dictionary as the
word. The maximum number of characters is 32.
c. Touch Accept. Load a Profile on page 76 to apply a saved Keyboard Profile. Touch Cancel to
return to the Keyboard Profiles screen without saving the profile.
No
Apply the settings, which are remembered until changed. They are not
the Opening menu, touch Quit twice.
74
saved to a profile. To return to
© 2017 Stenograph

Chapter 3: Writing on the Luminex
Individual Key Adjustments
Adjust an individual key when it consistently drags or drops. If you are experiencing multiple keys that
drag or drop, first carefully follow all the steps in Keyboard Adjustments on page 73 before making
individual key adjustments.
If you press three or more keys five consecutive times while making individual key adjustments, the
Luminex automatically exits the screen. When you are in a job, you are returned to the realtime screen.
Any adjustments made prior to the five consecutive strokes are remembered but you are not prompted
at any time to save the changes to a profile.
To adjust an individual key:
1. Ensure the depth of stroke is customized to your writing style. Keyboard Depth and Tension Controls
on page 22 for details.
2. Access the Adjust Keys option. Do one of the following:
• Before writing, touch Setup, More, Keyboard, Adjust, Adjust Keys.
• During a job, touch More, Setup, Keyboard, Adjust, Adjust Keys.
3. The Keyboard Hardware Type screen displays.
Keyboard at rest with the deepest depth of stroke setting.
The line of white bars at the top of the screen represents the bottom of the keyboard. The horizontal
position of the line varies depending on the depth of stroke setting. For example, a deeper depth of
stroke places the line closer to the top of the screen. Each individual bar indicates the point the key
must reach or move slightly past in order to register as a stroke. The number below each key is the
current setting. Zero is the factory default.
4. Press the key you want to adjust with enough pressure to move it past the white bar and then release
it. The gray vertical bar highlights the key selected for adjustment.
© 2017 Stenograph
75

Luminex User Guide
5. Perform one of the following adjustments:
• More—Increase the key sensitivity when the key is not showing in the steno notes and you want
it to register. Increase the sensitivity using increments of 5. It is strongly
make the first incremental setting and assess the change. Turn on CNN or the equivalent and
write against the broadcast for 20 - 30 minutes.
• Less—Decrease the key sensitivity when the key is showing in the steno notes and is not
wanted. Decrease the sensitivity using increments of 5. It is strongly
make the first incremental setting and assess the change. Turn on CNN or the equivalent and
write against the broadcast for 20 - 30 minutes.
• Reset—Return all the key settings to the factory default.
6. When finished, touch Done. You are prompted to save the settings to a profile. While writing, you are
prompted after you End the job. No prompting occurs if you selected to Reset all the key settings to
the factory default.
recommended that you
recommended that you
Keyboard Profiles
A keyboard profile is a group of Keyboard Settings saved to a file. When you load a saved Keyboard
profile, the Luminex automatically applies the saved Keyboard Settings. You can have up to ten different
profiles. Keyboard Adjustments on page 73 and follow the steps to make changes to your Keyboard
Settings and save them to a profile.
Load a Profile
1. Do one of the following:
• Before writing, touch Setup, More, Keyboard, Profiles.
• During a job, touch More, Setup, Keyboard, Profiles.
2. Use the Down and Up sensors to select a profile.
3. Touch Load.
4. Do one of the following:
• Before writing, touch Quit twice.
• During a job, continue writing.
76
© 2017 Stenograph

Chapter 3: Writing on the Luminex
Memory
The Luminex uses memory to store steno notes and timestamp files as additional backup to the Data SD
and Backup SD cards. Steno note files stored in memory remain even when you turn the Luminex Off.
You can save individual or multiple steno note files that are stored in memory to a Data SD card or
thumb drive in the rare instance you need to retrieve a file.
In addition to steno files and timestamp information, the Luminex memory also stores dictionaries, jdefines made on the Luminex, user settings and log files. The Luminex memory has approximately 8 GB
of space. You can view the available space in memory, copy files from memory or clear the memory. If
you decide to clear the memory, you are only removing access to the steno notes and timestamps from
memory, you are not removing your dictionaries, j-defines, log files or user setting information.
View and Copy Memory Files
The memory screen displays the list of files in a year, month, date and time format: 20150816-142341
(August 16, 2009 2:23:41 p.m.). By default, the newest file is listed first. The file size and the estimated
number of transcript pages shows for each file. Timestamp files are part of the steno note file. They are
not visible in the list.
Files in memory can be copied to the Data SD card or to a thumb drive. Files are automatically copied to
the root directory of the destination drive. When copying to a thumb drive, be sure to insert your device
before copying files.
To view and copy memory files:
1. From the Opening menu, touch Storage, Memory.
2. Steno note files display with the newest folder first. Use Date Sort to toggle files between ascending
and descending order.
3. Press the Down and Up sensors to move to the desired file and touch Select. You can select to
copy any or all of the files in memory.
4. When finished selecting files, touch Copy. The Luminex prompts you to copy to the Data SD card or
a thumb drive. When copying to a thumb drive, ensure you insert the thumb drive into USB A (host)
port before copying.
5. Touch one of the following:
• Data Card
• Thumb Drv
6. Files are copied to the root of the storage destination.
7. The Opening menu displays.
Clear Memory
1. From the Opening menu, touch Storage, Memory.
2. To clear all files from Memory, touch Clear. At the Ready to Clear All Files in Memory. Are you Sure?
confirmation prompt, do one of the following:
• To remove all the files from memory, touch Yes.
© 2017 Stenograph
77

Luminex User Guide
• To cancel the removal of files from memory, touch No.
3. To return to the Opening menu, touch Quit.
Information
After selecting Memory from the Storage menu and then selecting Information, the Memory dialog box
displays the Volume Label, free space and percentage of free space available in memory. The Luminex
memory is approximately 8 GB. Although there is a lot of free space available, the Memory feature
should not be used as an archive, you should perform your regular backups of steno files and archival.
The extra memory space may also be used for future features and enhancements. Touch OK to dismiss
the Memory dialog box.
78
© 2017 Stenograph

Chapter 3: Writing on the Luminex
New View
The New View feature allows you to change the touch screen view. The display cycles between steno
only, text only, text with vertical notes and text with the Brief It pane. The message Brief It (Disabled)
displays in the cycling view when Brief It is Off. You can change the touch screen view any time while
writing a job.
To change the tilting screen view:
1. From the First Writing menu, touch More, New View.
2. Touch New View until the desired selection displays.
3. Continue writing.
© 2017 Stenograph
79

Luminex User Guide
Options
Options allow you to switch the USB communication between Standard and élan Mira® emulation, select
keyboard layout language, adjust Beeper Volume, view strokes per minute job statistics, delete J-defines
from the writer’s memory, select a prompt when ending a job and change the save setting for TrueStroke
files.
To access Options:
1. From the Opening Menu, touch Setup, More, Options.
2. For details about each option, see the appropriate topic in this chapter:
• “Beeper Volume”
• “Clear J-defines when turning on/ending job”
• “Display Strokes Per Minute (SPM)”
• “Keyboard Layout”
• “Prompt to End a Job”
• “Only use touch screen for function keys during job”
• “Serial Protocol”
•“TrueStroke”
• “USB Communication”
80
© 2017 Stenograph

Chapter 3: Writing on the Luminex
Only use touch screen for function keys during a job
The Only use touch screen for function keys during job option when set to Yes, disables the touch
sensors (except for the Mark sensors) while you are writing.If this option is set to Yes, the function
sensors are disabled while in a job and you need to use the touch screen to navigate and to end a file.
This option may be useful for those users who want to avoid the accidental touching of a function sensor
while writing a job. Once you end a job the function sensors are available.
The Mark function sensors work (insert a mark into the file) even when this option is set to Yes. Other
function sensors will work once you are in an action. For example, if you touch the screen to make a
J-define you can use the function sensors to indicate OK, Clear or Quit in the J-define screen.
To select or deselect the Only use touch screen for function keys during job option:
1. From the Opening menu, touch Setup, More, Options.
2. Touch the Down and Up sensors as necessary to highlight the Only use touch screen for function
keys during job option.
3. Touch the Change sensor to toggle the option between Yes and No. No is the default.
4. To save the setting and display the Opening menu, touch OK, More, Quit.
© 2017 Stenograph
81

Luminex User Guide
Prompt to End a Job Option
The Luminex can optionally prompt you with a confirmation message each time you touch the End
sensor to close a job. When the message displays, you can continue to close the job by selecting End
again. Pressing Cancel or continuing to write cancels the message and the job remains open.
To set the end job confirmation prompt option:
1. From the Opening menu, touch Setup, More, Options.
2. Touch the Down and Up sensors as necessary to highlight the Prompt to end job option.
3. Touch the Change sensor to toggle the option between Yes and No. Yes is the default.
a. Yes - means you will be prompted to confirm that you want to end the file. The following prompt
displays:
“To Confirm End of Job, press End.”
b. No - means that when you press End in a job, the file will close.
3. To save the setting and display the Opening menu, touch OK, More, Quit.
82
© 2017 Stenograph

Chapter 3: Writing on the Luminex
Clear J-defines when turning on/ending job
J-defines made on the Luminex are sent to a J-defines file in the Luminex’s memory. All dictionary
defines made when writing realtime via the USB cable to Case CATalyst V13 or higher are also sent to
the Luminex and are saved in the writer’s memory. J-defines held in memory are automatically used for
translation in subsequent files on the Luminex unless cleared. The J-defines can be cleared (deleted)
manually (see Clear All J-Defines on page 66) or automatically by selecting an action for this option. If
you do not want the J-defines to apply to future jobs, you may want to select the setting that best fits your
needs. The default setting is Never.
To set the Clear J-defines when turning on/ending job option:
1. From the Opening menu, touch Setup, More, Options.
2. Touch the Down and Up sensors as necessary to highlight the Clear J-defines when turning on/
ending job option.
3. Touch the Change sensor to toggle the option between the following settings. The default setting is
Never.
a. Never - means the J-defines will never automatically be deleted from the writer's memory. You
can manually clear J-defines in memory from the Opening menu by selecting Dict., J-Defines and
then Clear.
b. Ask - means you will be prompted at the end of each job and/or when turning the Luminex On
when J-defines exist. The following message displays:
"Ready to delete all J-defines from this writer's memory. Are you sure?"
Select Yes to clear (delete) the J-defines from memory. The following message displays:
"All J-defines deleted from this writer's memory."
Select No to retain the J-defines in the writer’s memory. You will be prompted to delete all jdefines each time you turn the machine on and/or ending a file.
c. Always - means the J-defines will automatically be deleted when closing a file or when turning
the Luminex On. The following message displays:
"All J-defines deleted from this writer's memory."
4. To save the setting and display the Opening menu, touch OK, More, Quit.
© 2017 Stenograph
83

Luminex User Guide
Reopen
Using the Reopen feature, you can open an existing file for searching and readback purposes. You can
search, scroll and playback audio in a reopened file.
The Luminex stores files for reopen on the Data SD card. It is necessary to have the Data SD card in the
Luminex in order to reopen files. When you resume writing, the new text is appended to the reopened file
and is a single file on the Date SD card. New text shows on the screen following the heading, Reopened
Section. The Luminex creates a new Reopened Section each time you reopen a file. J-Defines created
in the reopened file apply only to the appended portion and are the only J-Defines stored with the file.
J-Define created during previously reopened sections are available by saving all J-Defines to the
J-Defines.job dictionary.
You can only reopen a job with audio when you reopen it on the same day it was created. For example,
you write a job in the morning and record audio. When you break for lunch, you end the file. You can only
reopen and append to the job later the same day. If a job selected for reopen has audio and your options
are currently set to not record audio, you can only open and append to the job by changing your audio
settings to record audio. If the job selected for reopen does not have audio and your options are
currently set to record audio, you can only open and append to the job by changing your audio setting to
not record audio.
The original and appended steno notes, timestamps, audio and all new J-Defines are stored in the same
file on the Data SD card. The original and appended files are saved in separate files in memory and on
the Backup SD card.
To reopen and append a file:
1. From the Opening menu, touch Reopen.
2. Job files are organized into folders by year and month, with the newest folder first. Press the Down
and Up sensors to highlight to the desired folder. Use Date Sort to toggle folders between ascending
and descending order.
3. Touch Folder to display the job files for the selected folder.
Job files display in date order, newest files first, with the following subfile information: the file size in
megabytes, the estimated number of transcript pages, an indicator when there is an associated
Audio file and an indicator when there is an associated job dictionary.
4. Touch the Down and Up sensors to highlight the desired file for reopen.
5. Touch Open. The Luminex loads the file. The new translation displays on the Tilting screen under
the Reopened Section.
6. Write a stroke on the writer. Once you write a steno outline, you can play back any audio from the
current or reopened file.
84
© 2017 Stenograph

Chapter 3: Writing on the Luminex
Scroll
Using the Scroll function, you can review testimony by moving up or down the tilting screen one line at a
time. When you resume writing, the Luminex returns to the current spot in the testimony.
1. From the First Writing menu, touch More, Scroll.
2. Use any of the following menu options:
• New View—change the view on the Tilting screen.
• Play—playback the audio.
• Up—move to a previous line.
• Down—move to the following line.
3. To exit the Scroll menu, continue writing or touch Quit.
© 2017 Stenograph
85

Luminex User Guide
Search
The Luminex allows you to search and scroll through a job using information from the Data SD card.
Ensure the Data SD card is inserted into the Data SD slot on the Luminex to effectively use search.
When you select to search for an item, the Luminex highlights the located item on the screen. You can
search for the last question, answer, untranslate or electronic Mark. You can also search for one or more
specific steno strokes.
Search for the Last Question
1. From the First Writing menu, touch Last Q. The Luminex highlights the last Q. If a question is not
found or you reach the beginning of the file, the search stops with the cursor positioned at the top of
the file.
Use any of the following menu options:
• New View—change the view on the tilting screen.
• Play—playback the audio.
• Prev. Q—search backward in the file for previous question.
• Down—scroll forward in the file.
• Up—scroll backward in the file.
2. Continue writing or touch Quit. The First Writing menu and your current writing position display.
Search for the Last Answer
1. From the First Writing menu, touch More, Search, Last A. The Luminex highlights the last A. If an
answer is not found or you reach the beginning of the file, the search stops with the cursor positioned
at the top of the file.
Use any of the following menu options:
• New View—change the view on the Tilting screen.
• Play—playback the audio.
• Prev. A—search backward in the file for the previous answer.
• Down—scroll forward in the file.
• Up—scroll backward in the file.
2. Continue writing or touch Quit. The First Writing menu and your current writing position displays.
86
© 2017 Stenograph

Chapter 3: Writing on the Luminex
Search for the Last Mark
An undefined electronic Mark displays as an exclamation mark (!) in the Vertical Notes on the tilting
screen.
1. From the First Writing menu, touch More, Search, Last Mark. If the Mark is not found or you reach
the beginning of the file, the search stops with the cursor positioned at the beginning of the file.
Use any of the following menu options:
• New View—change the view on the Tilting screen.
• Play—playback the audio.
• Previous—search backward in the file for the previous electronic Mark.
• Down—scroll forward in the file.
• Up—scroll backward in the file.
2. Continue writing or touch Quit. The First Writing menu and your current writing position display.
Search for Steno Strokes
1. From the First Writing menu, touch More, Search, Steno. The Enter Steno To Search For field
displays.
2. Write the steno strokes on which to search. If you make a mistake, touch Clear and write the new
strokes.
3. Touch OK. The Luminex highlights the text for the steno outlines. If the steno outlines are not found
or you reach the beginning of the file, the search stops with the cursor positioned at the top of the file.
Use any of the following menu options:
• New View—change the view on the Tilting screen.
• Play—playback the audio.
• Previous—search backward in the file for the previous occurrence of the steno outlines.
• Down—scroll forward in the file.
• Up—scroll backward in the file.
4. Continue writing or touch Quit. The First Writing menu and your current writing position displays.
© 2017 Stenograph
87

Luminex User Guide
Search for the Last Untranslate
Searching for the last untranslate can be an easy way to identify the steno for a J-Define.
1. From the First Writing menu, touch More, Search, Untranslate. The Luminex highlights the last
untranslate. If an untranslate is not found or you reach the beginning of the file, the search stops with
the cursor positioned at the top of the file.
Use any of the following menu options:
• New View—change the view on the Tilting screen.
• Play—playback the audio.
• Previous—search backward in the file for the previous untranslate.
• Down—scroll forward in the file.
• Up—scroll backward in the file.
2. Continue writing or touch Quit. The First Writing menu and your current writing position displays.
88
© 2017 Stenograph

Chapter 3: Writing on the Luminex
Serial Protocol
The Serial Protocol option is a fixed option that displays the Luminex communication protocol when
using the Virtual Serial Port driver provided by Stenograph. Select Stentura as the writer in your CAT
system when using the serial protocol with a CAT system not compatible with the Luminex USB protocol.
© 2017 Stenograph
89

Luminex User Guide
Status
Status displays information about the Luminex. The status screen indicates:
• Software version.
• When a job is opened, the name of the job.
• The approximate number of strokes per minute including the minimum, maximum and average for
the job along with a graphical representation of the varying number of strokes per minute throughout
the job.
• The total number of strokes to date for all jobs taken.
• Keyboard type and Serial Protocol.
• The amount of space left on the Data SD card and whether or not the card is write enabled.
• When the AC adapter/charger is charging.
• If Bluetooth is turned on, the status indicates target computer numeric ID, computer name and the
Passkey, when applicable. If Bluetooth is turned off, status indicates Bluetooth powered off. For
more information please see the Stenograph Bluetooth Wireless Communication guide included in
the Stenograph Bluetooth Wireless Realtime kit for information on Bluetooth wireless communication
set up, configuration and use.
• Main Battery status. Battery on page 12 for more information.
Check Status Information
To check status information:
1. From the Opening or First Writing menu, touch More, Status.
2. To return to the initial menu, Opening or First Writing menu, touch OK, More.
90
© 2017 Stenograph

Chapter 3: Writing on the Luminex
Steno Test
The Steno Test feature puts the Luminex in writing mode and simulates steno strokes for diagnostic
purposes. This feature is generally used at the request of a Stenograph Technical Support
Representative to test the Read and Writing features of the Luminex.
To activate Steno Test:
1. From the Opening menu, touch More, Diag, Steno Test.
2. Touching menu action sensors or menu items exits the Steno Test mode but keeps the file open. To
close the file, touch End.
If the option, Prompt to confirm ending job is active, a confirmation prompt displays. touch End to
close the job or continue writing to cancel the message.
© 2017 Stenograph
91

Luminex User Guide
Suffix Handling
The Suffix Handling feature attaches properly defined suffixes to the previous word. This provides for
easier readback on the Luminex screen when using suffixes.
If you have exported your Case CATalyst Spell Check Wordlist and Prefixsuffixrules.ini file, the suffix
handling feature attaches the suffix to the previous word and spell checks it against the wordlist and
prefixsuffixrules file. You need Case CATalyst v8.05 or higher to export the wordlist and prefixsuffixrules
file.
To export the Case CATalyst Spell Check Wordlist and the Prefixsuffixrules.ini files, you must have
installed the Luminex USB driver on your computer. Install the Luminex USB Drivers on page 16 for
instructions on loading the driver.
To export the files:
1. Ensure your Luminex and computer are turned On and fully booted.
2. Start Case CATalyst.
3. Connect your Luminex to your computer via micro USB cable. Each end of the USB cable has a
different connection plug. Connect the appropriate end of the USB cable to the USB B (client) port on
back of the Luminex and the other end to the USB port on the computer.
Luminex Back Port Panel
4. In Case CATalyst, select Export.
5. From the Export dialog box, select the Stenograph Writer tab. If using Case CATalyst 16.03 or lower,
select élan/Fusion/Diamante tab. In Case CATalyst V10.04 or earlier, select the élan/Fusion tab.
6. Check the box, Export Spell Check Wordlist.
If applicable, check the box Export Prefixsuffixrules.ini File. When the Export to
Prefixsuffixrules.ini File option is grayed out, there is no Prefixsuffixrules.ini file in your System Files
Case indicating you do not use it. A Prefixsuffixrules.ini file is not necessary to use the Suffix
Handling feature.
Case CATalyst remembers the status of these checkboxes.
7. Select any dictionaries to export. The Personal Dictionary is automatically selected.
8. Select Export. The Luminex beeps and briefly displays a progress bar.
9. When the Luminex finishes loading the selected files, it reboots, displaying the Opening menu.
Depending on your Case CATalyst settings, the message, Export Complete displays.
10. Remove the USB cable.
92
© 2017 Stenograph

Chapter 3: Writing on the Luminex
Test Mode
Test Mode is designed for situations where you are taking a test or writing in a secure location that
restricts you from leaving the environment with any copy of the proceedings. In Test Mode, the Luminex
writes only to the Data SD card, regardless of your settings. In Test Mode, no files are written to memory
or the Backup SD card and all audio recording features are disabled.
To turn Test Mode On or Off:
1. From the Opening Menu, touch Setup, More, Test Mode. The current status of Test Mode displays
on the screen.
2. Do one of the following:
•Touch Off to disable Test Mode. The Status and Menu bars return to the normal blue display
color.
•Touch On to use Test Mode. The Status and Menu bars display in red. The Luminex remains in
Test Mode until you turn the feature Off or turn the Luminex Off.
3. To display the Opening menu, touch OK, More, Quit.
© 2017 Stenograph
93
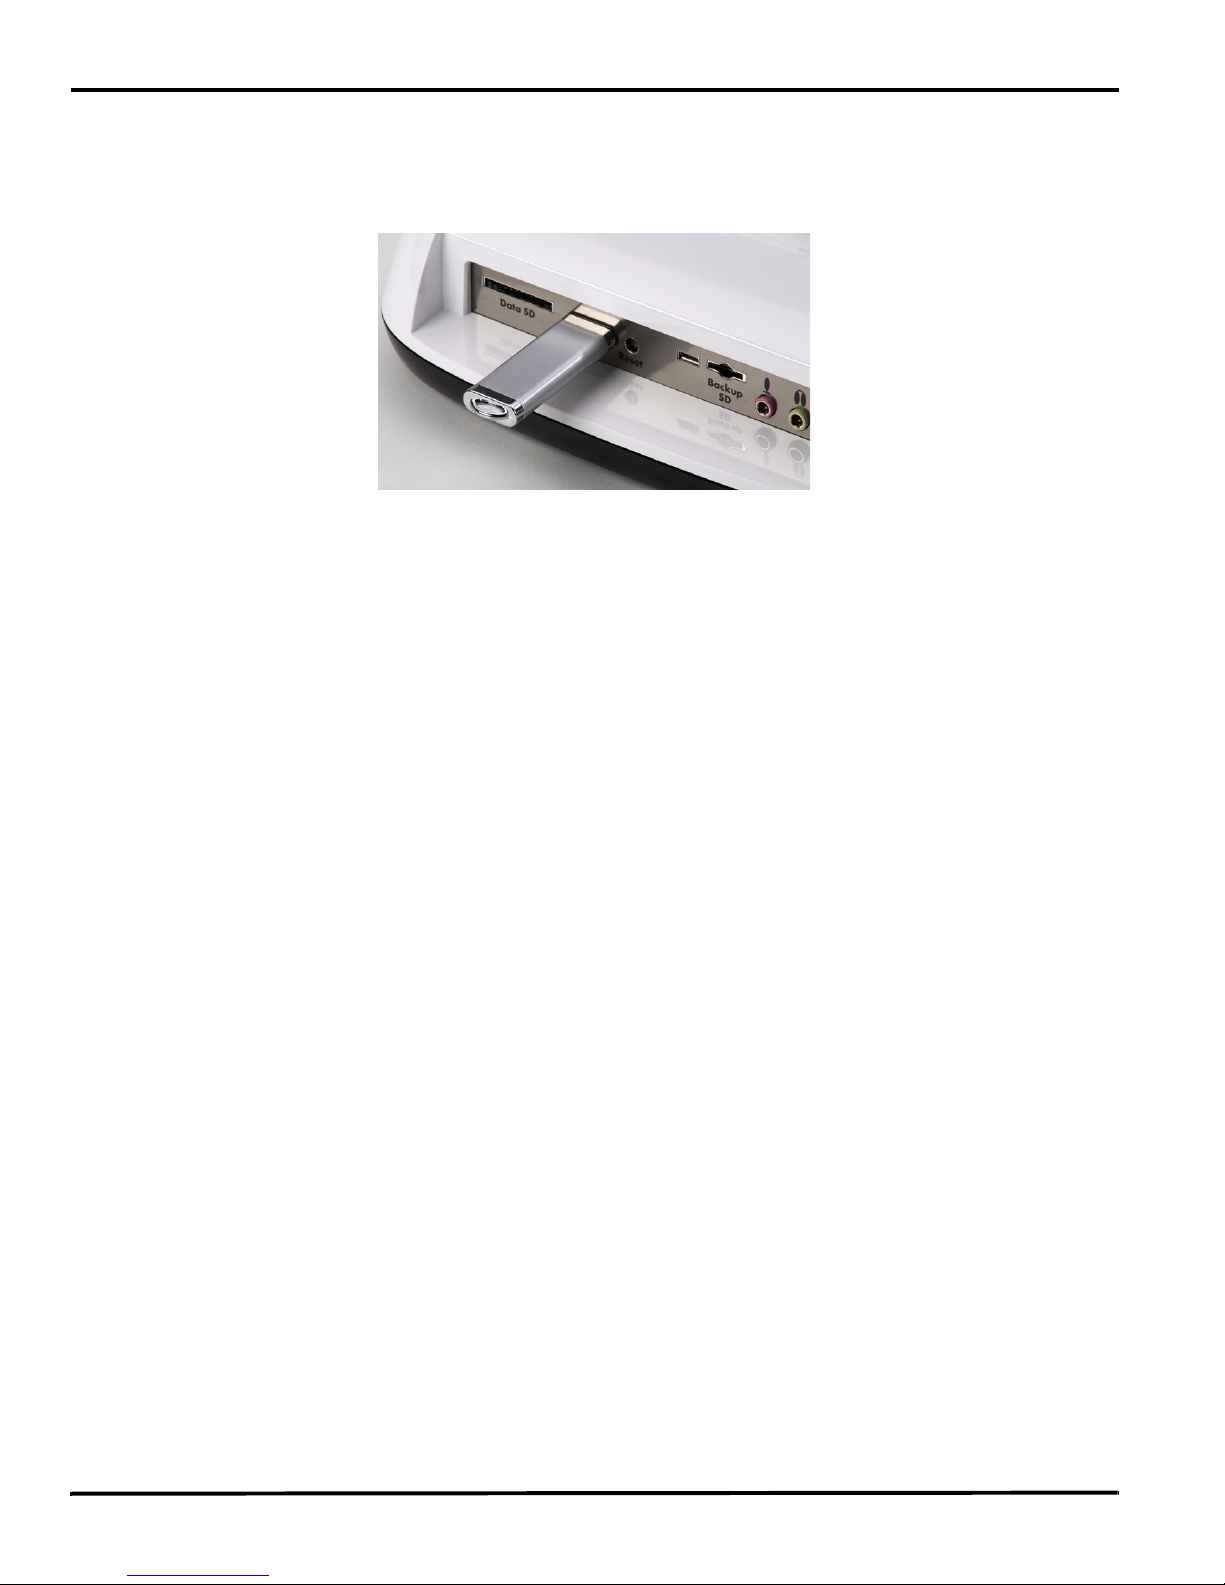
Luminex User Guide
Thumb Drive
If you have a thumb drive plugged into the USB A (host) port on the back of the Luminex, you can view
files on the thumb drive.
You can copy files from the Data SD card and the Luminex memory to a thumb drive. View and Copy
Data SD Card Files on page 56 and View and Copy Memory Files on page 77 to copy files.
To view the contents of a thumb drive:
1. Insert the thumb drive into the USB A (host) port on the back of the Luminex.
2. From the Opening Menu, touch Storage, Thumb.
3. Do either of the following:
• To view information about the Thumb drive, touch Information.
• To view the contents of the Thumb drive, touch Files.
94
© 2017 Stenograph

Chapter 3: Writing on the Luminex
Tilting Screen Appearance
You can adjust the text color, font size and backlight level from the Opening Menu or while writing a job.
Set Tilting Screen Text Colors
The Luminex tilting screen can display text in several different colors. You can set separate colors for
untranslates, question symbol, answer symbol, text, and conflicts.
To change the Tilting screen text colors:
1. Do one of the following:
• From the Opening menu, touch Setup, Display.
• From the First Writing menu, touch More, Setup, Display.
2. From the Display menu, touch Color. The Color menu displays sample text showing the current
color assignment for each text type.
3. Move the pointer (>>) using the Down and Up sensors to the item you want to change.
4. Cycle through the available colors using the Color and Color sensors. The item displays in the
selected color under the New Color Assignment column. Some colors are less noticeable due to their
subtle differences.
5. Repeat steps 3 and 4 to change the color for other items.
6. When finished selecting colors, touch Accept. To exit the Color screen without changing the color,
touch Quit.
7. The Display menu reappears. The color selection remains until you change them.
8. Do one of the following:
• When changing colors before beginning a job, return to the Opening Menu by touching OK,
More, Quit.
• When changing colors while writing, continue writing. The First Writing menu redisplays.
Select Tilting Screen Font Size
The Luminex can display text in five different font sizes. Using a smaller font allows you to display more
text on the Tilting screen and using a larger font allows for easier viewing. The default font size setting is
#3.
To change the Tilting screen font size:
1. Do one of the following:
• From the Opening menu, touch Setup, Display.
• From the First Writing menu, touch More, Setup, Display.
2. On the Display menu, touch Font.
3. Move the pointer (>>) using the Font and Font sensors to select one of the font sizes.
© 2017 Stenograph
95

Luminex User Guide
4. When finished with your selection, touch Quit. The Display menu reappears. The selected font size
remains until changed.
5. Do one of the following:
• When changing font size before writing a job, return to the Opening Menu by touching OK, More,
Quit.
• When changing font size while writing, continue writing. The First Writing menu redisplays.
Set the Tilting Screen Backlight Level
Adjust the brightness of the Backlight on the Tilting screen to accommodate your viewing preference.
Decreasing the brightness reduces the amount of the power required to display the screen which can
reduce battery consumption. Optionally, setting the Backlight to automatically dim after a period of
inactivity also reduces battery consumption. Dimming options allow you to customize automatic dimming
when selected.
To customize the Tilting screen Backlight levels:
1. Do one of the following:
• From the Opening menu, touch Setup, Display, Backlight.
• From the First Writing menu, touch More, Setup, Display, Backlight.
2. Press the Down and Up sensors to highlight an option. Use the - and + sensors to make changes.
• Backlight Bright Level—Increase or decrease the Backlight level. The brightness is based on a
percentage. 100% is the default. The screen reflects your selection.
• Backlight Dim Level—Set the Backlight dimming level when the Auto Dim After option is active.
The brightness level is based on a percentage. The screen reflects your selection.
• Auto Dim After—Select the period of inactivity that must pass on the Luminex before Backlight
dimming occurs. Choose a number between 1-90 seconds or Never.
• Auto Bright When—select the action that must be taken to resume regular Backlight brightness
after dimming. Choose Steno or Function Key.
3. When finished with your selections, touch OK. The Display menu reappears.
4. Do one of the following:
• With no open job, return to the Opening Menu by touching OK, More, Quit.
• During a job, continue writing. The First Writing menu redisplays.
96
© 2017 Stenograph

Chapter 3: Writing on the Luminex
Time and Date
The Time function allows you to change the time and date on your Luminex. It is important to maintain
date and time accuracy in the event you need to locate a file in memory, on the Data SD card or on the
Backup SD card.
1. From the Opening menu, touch Setup, Time. The Time and Date screen displays.
2. Press the Next sensor to select the unit of time or date you want to change.
• Month
•Day
• Year
• Hour
• Minutes
•AM/PM
3. Do one of the following:
• To decrease the unit of time or date, press -.
• To increase the unit of time or date, press +.
4. Repeat the previous steps for each unit of time or date you want to change.
5. To apply your selection, touch Accept.
6. To display the Opening menu, touch Quit, More, Quit.
© 2017 Stenograph
97

Luminex User Guide
Translate Options
The Luminex has five translate options, A/An, Auto-Conflict and three Brief It. Using the Trans. Opt.
menu, you can turn these options On and Off. A/An Resolution on page 41, Auto-Conflict Resolution on
page 46 and Brief It on page 50 for details about each option.
To access Translate Options:
1. From the Opening Menu, touch Setup, Trans. Opt.
98
© 2017 Stenograph
 Loading...