

Page 1

INSSTE302P0514
For further information or to consult this guide online, please visit our website at www.stelpro.com
USER’S GUIDE
STE302P
MULTIPLE PROGRAMMING ELECTRONIC THERMOSTAT
Energy Veried
S
Y
S
T
È
M
E
Q
U
A
L
I
T
É
C
E
R
T
I
F
I
É
-
R
E
G
I
S
T
E
R
E
D
Q
U
A
L
I
T
Y
S
Y
S
T
E
M
Page 2
INSSTE302P0514
2
WARNING
Before installing and operating this product, the owner and/or installer must read, understand
and follow these instructions and keep them handy for future reference. If these instructions are
not followed, the warranty will be considered null and void and the manufacturer deems no further
responsibility for this product. Moreover, the following instructions must be adhered
to in order to avoid personal injuries or property damages, serious injuries
and potentially fatal electric shocks.
All electric connections must be made by a qualied
electrician, according to the electric and building codes effective in your region. Do NOT
connect this product to a supply source other than 120 VAC or 240 VAC, and do not exceed the load
limits specied. Protect the heating system with the appropriate circuit breaker or fuse. You must
regularly clean dirt accumulations on the thermostat. Do NOT use uid to clean thermostat air vent. Do
not install thermostat in a wet place. However, installing it in isolated walls is allowed.
Note:
When a part of the product specification must be changed to improve operability or other functions,
priority is given to the product specification itself. In such instances, the instruction manual may not
entirely match all the functions of the actual product.
Therefore, the actual product and packaging, as well as the name and illustration, may differ from the
manual.
The screen/LCD display shown as an example in this manual may be different from the actual screen/
LCD display.
Page 3

INSSTE302P0514
3
The multiple programming electronic thermostat STE302P can be used to control electric heating units
such as electric baseboards, convectors, or aeroconvectors. It keeps the temperature of a room at
the requested set point with a high degree of accuracy. This product is designed for installations with
electrical current – with a resistive load – ranging from 1.25 A to 12.5 A (120/240 VAC). It possesses a
user-friendly interface. Furthermore, it gives you the possibility to control the temperature of a room with
great precision.
This thermostat is not compatible with the following installations:
• electrical current higher than 12.5 A with a resistive load
(3000 W @ 240 VAC and 1500 W @ 120 VAC);
• electrical current lower than 1.25 A with a resistive load
(300 W @ 240 VAC and 150 W @ 120 VAC); and
• central heating system.
Parts supplied:
• one (1) thermostat;
• wall mounting plate located at the back of the thermostat;
• two (2) mounting screws;
• two (2) solderless connectors suitable for copper wires.
DESCRIPTION
INSTALLATION
Selection of the thermostat location
The thermostat must be mounted to a connection box on a wall facing the heating unit, at around 1.5 m
(5 feet) above the oor level, on a section of the wall exempt from pipes or air ducts.
Do not install the thermostat in a location where temperature measurements could be altered. For
example:
• close to a window, on an external wall, or close to a door leading outside;
• exposed directly to the light or heat of the sun, a lamp, a replace or any other heat source;
• close or in front of an air outlet;
• close to concealed ducts or a chimney; and
• in a location with poor air ow (e.g. behind a door), or with frequent air drafts (e.g. head of stairs).
Page 4
INSSTE302P0514
4
Thermostat mounting and connection
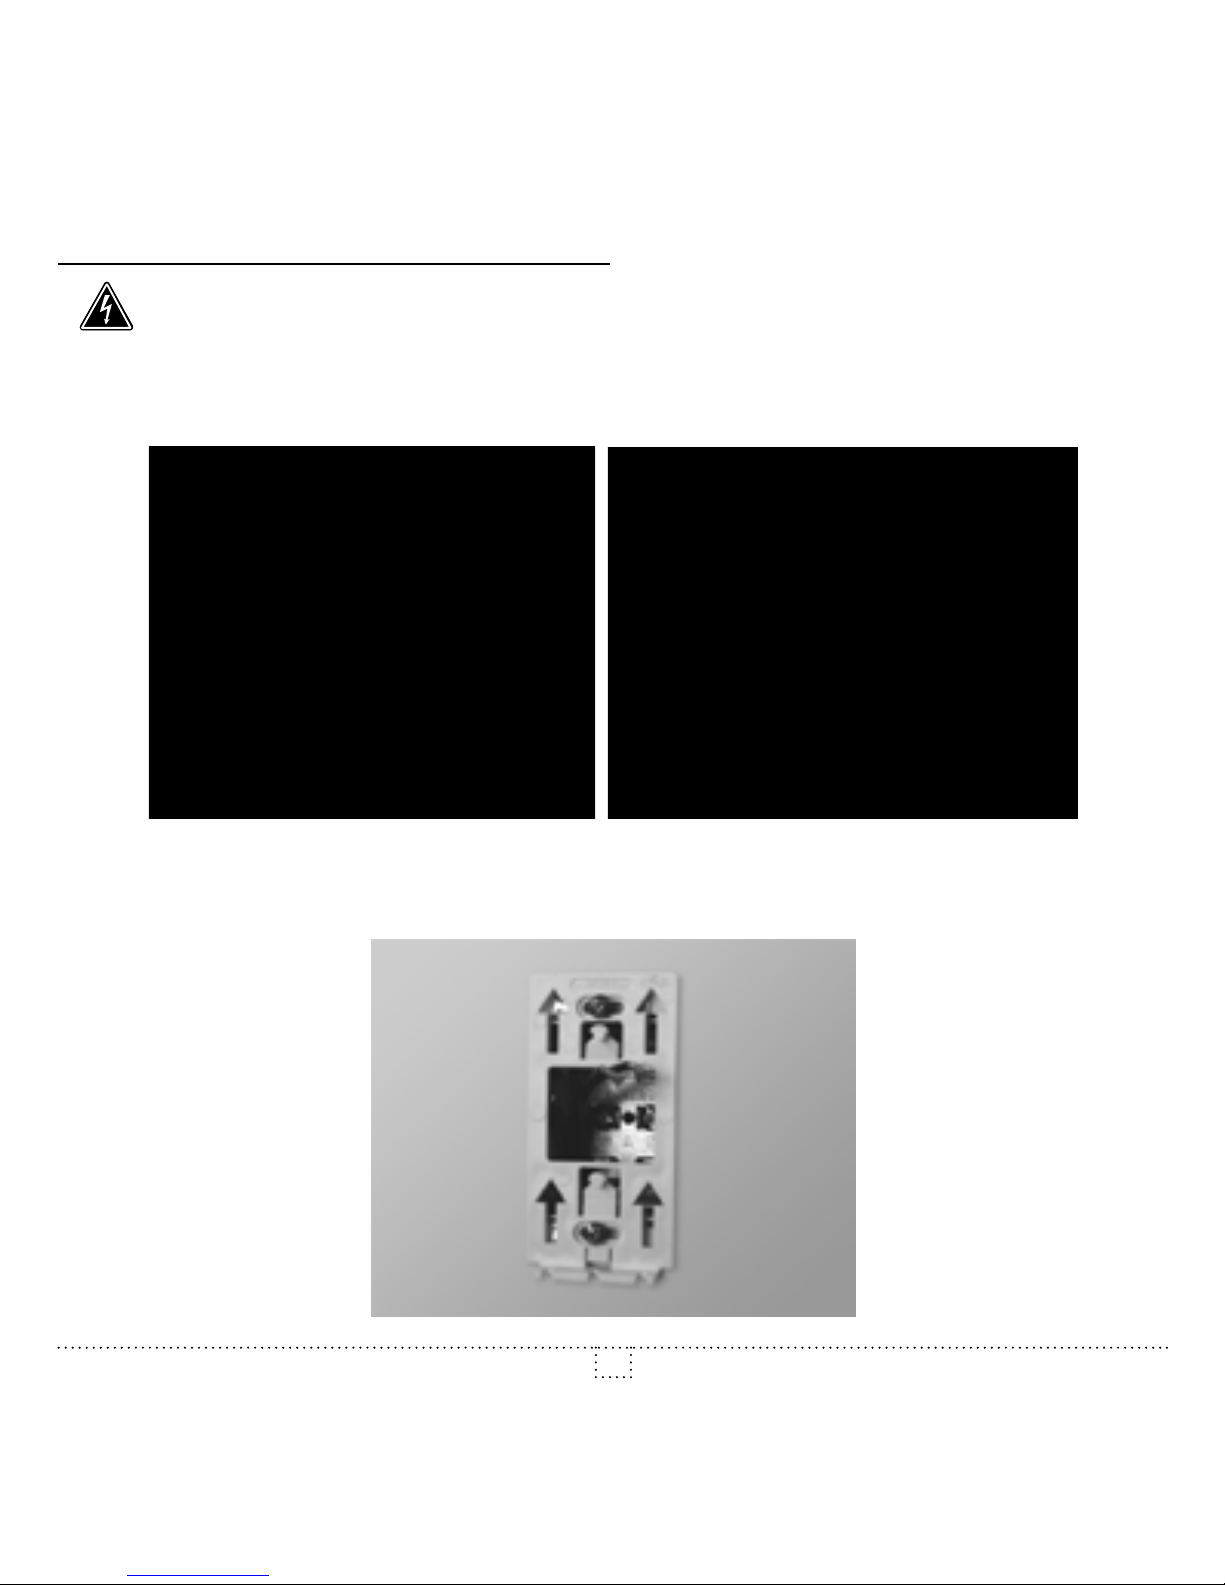
1. Cut off power supply on lead wires at the electrical panel in order to avoid any risk of electric
shock.
2. Ensure that the air vents of the thermostat are clean and clear of any obstruction.
3. Using a screwdriver, loosen the screw retaining the mounting base of the thermostat until it is loose
(do not completely remove the screw).
Then, remove the mounting base at the back of the thermostat by pushing it downwards and then
towards you.
4. Align and secure the mounting base to the connection box using the two screws supplied.
Page 5
INSSTE302P0514
5
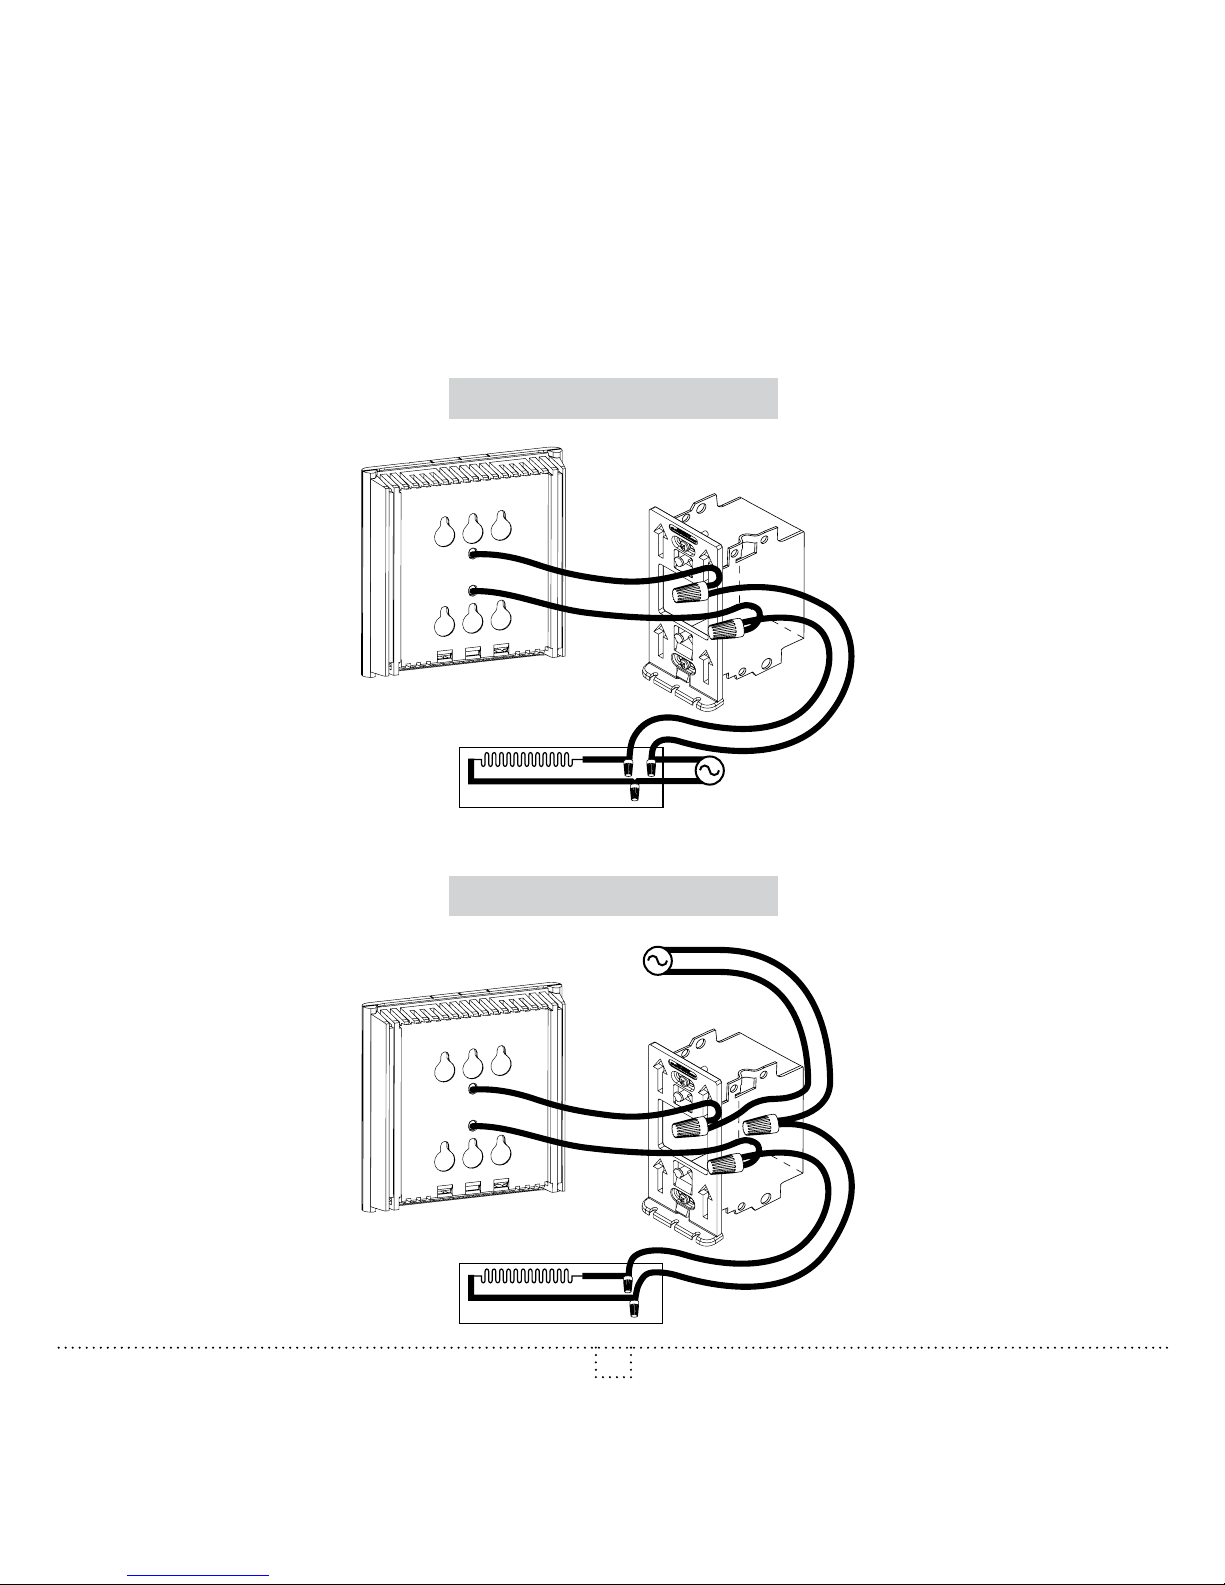
5. Pass the wires from the wall through the opening on the mounting base and connect them using the
supplied solderless connectors. When making the connection with aluminum wire, make sure that you
are using connectors identied CO/AL. Please note that the thermostat wires do not have polarity.
Therefore, the way they are connected is not important.
2-WIRE INSTALLATION
4-WIRE INSTALLATION
Page 6

INSSTE302P0514
6
6. Place all the wires into the connection box.
7. Align the little slots located on the top of the thermostat with those on the mounting base and secure
the thermostat to the mounting base. Note that you can also position the thermostat on the left or the
right side of the junction box. Then, tighten the screw at the bottom of the unit.
8. Turn on the power.
9. Set the thermostat to the desired setting (see the following section).
Alignment
Page 7
INSSTE302P0514
7
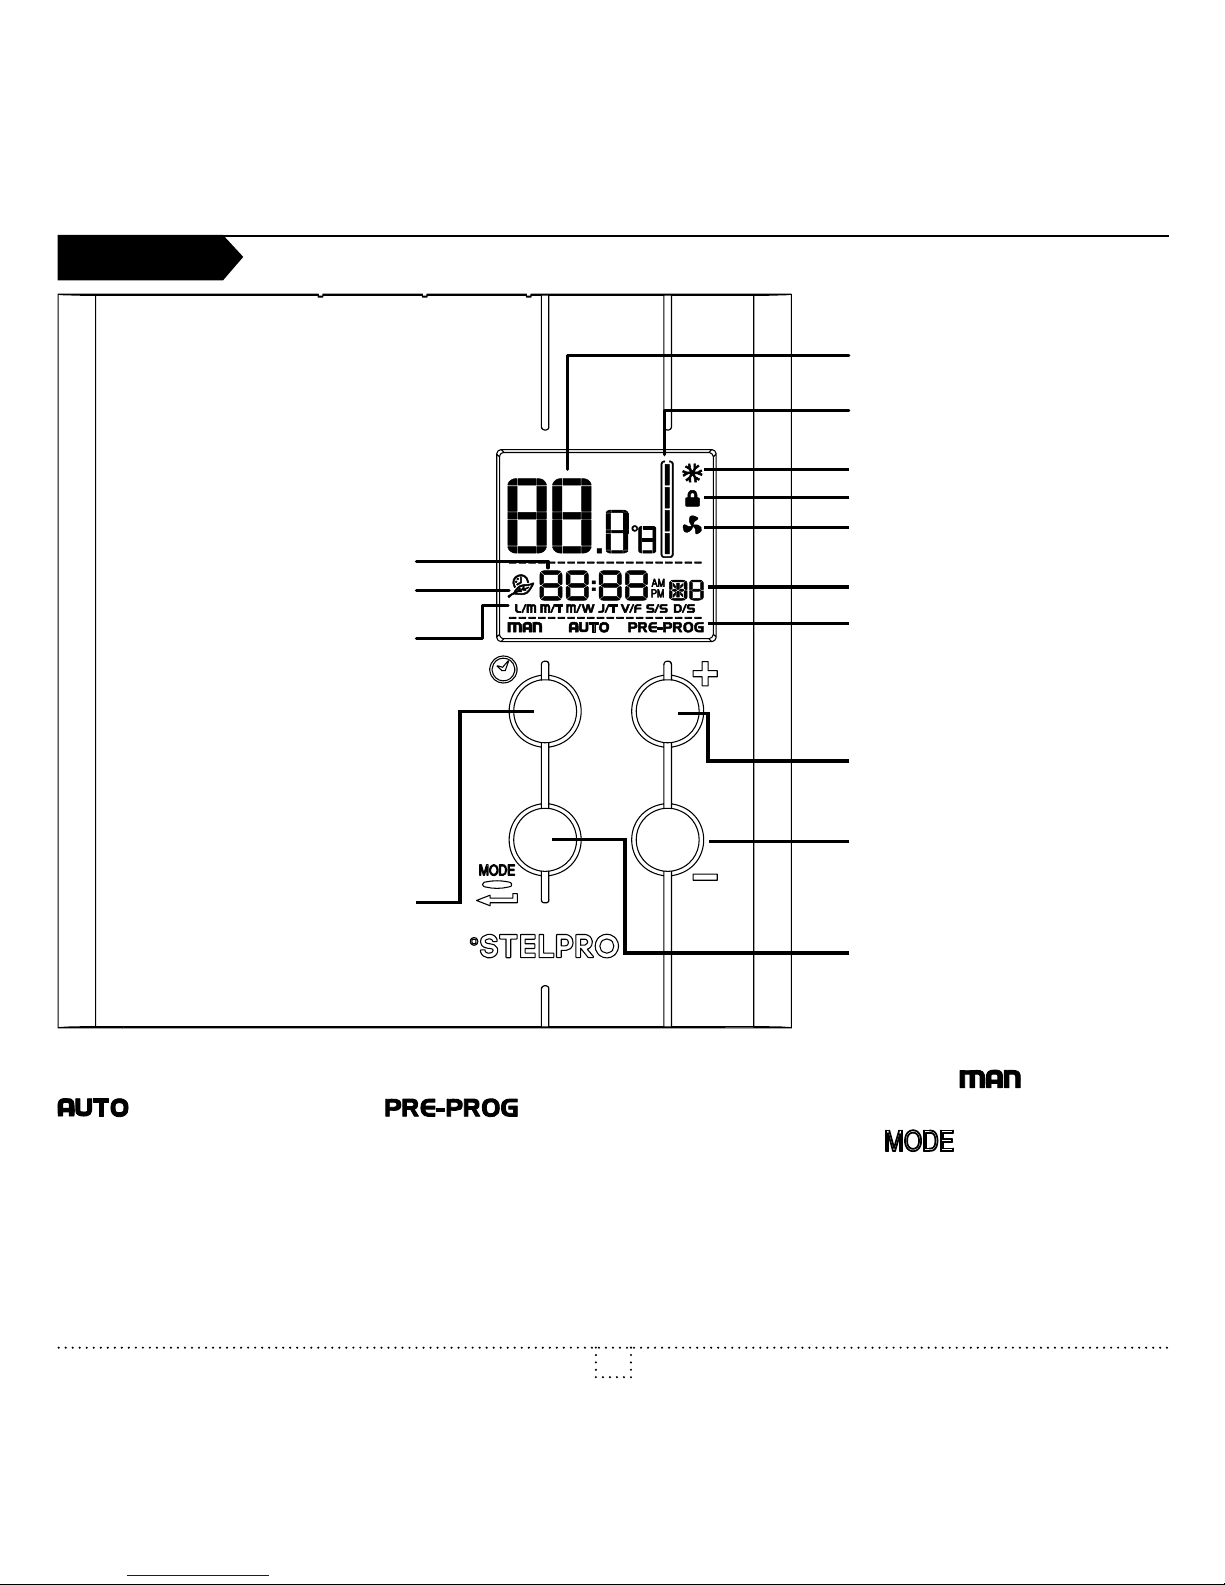
The multiple programming thermostat has three main operating modes: Manual ( ), Automatic (
) and Preprogrammed ( ). The active mode is displayed at the bottom of the screen.
The transition from one mode to another is done by pressing down the
button, out of any
adjustment mode.
Note: it is impossible to change the operation mode when the Security mode is activated.
When rst powered up, the thermostat is initially in degrees Celsius, in Preprogrammed mode
(preprogramming 5), and the Anticipated start mode is activated. The clock is adjusted to Saturday (12:00)
and ashes to indicate that an adjustment is necessary. The preprogramming is effective immediately.
OPERATION
Ambient temperature
Heating power
indicator
Security mode
Fan mode
+ button (to increase)
Mode (Manual;
Automatic;
Preprogrammed
Programming period
Anticipated start
Hour
Frost-free warning
- button (to decrease)
Mode button
Clock button
Days (L/M : Monday,
M/T : Tuesday,
M/W : Wednesday,
J/T : Thursday,
V/F : Friday,
S/S : Saturday and
D/S : Sunday)
Page 8
INSSTE302P0514
8
Adjustment of the hour and the day
To adjust the hour and the day:
1. In any mode (Manual, Automatic or Prepro grammed), out of any adjustment mode, press down the
button and release it.
2. The current time mode (24H/12H) is displayed. Press down the or button to select the desired
format. Press down the
button to conrm your choice.
3. The two hour digits ash. Adjust the hours using the
and buttons. Press down the button
to conrm your choice.
4. The two minute digits ash. Adjust the minutes using the
and buttons. Press down the
button to conrm your choice.
5. The day of the week ashes. Adjust using the
and buttons. Press down the button to
conrm your choice.
The adjustment is thus completed and the thermostat returns to normal operation.
It is possible to exit the hour and day adjustment mode at any time:
• By pressing down the
button.
• By not pressing down any buttons during 1 minute.
In case of a power failure lasting less than 2 hours, the thermostat saves the adjustment of the hour and
the day of the week. When the power is restored after an extensive failure, the hour will blink, indicating
that it must be readjusted.
Ambient temperature
The gures displayed above the hour indicate the ambient temperature. It can be displayed in degrees
Celsius or Fahrenheit (see “Display in degrees Celsius/Fahrenheit”).
To adjust the set point, out of any adjustment mode, press down the button to increase the set point (it
will blink), or the button to decrease it. Set points can only be adjusted by increments of 0.5°C (1°F).
To quickly scroll through the set point values, press and hold down the button. The minimum set point is
3°C (37°F), and the maximum set point is 30°C (86°F).
To return to the ambient temperature, do not press down any buttons for 3 seconds or press down both
and buttons simultaneously. You can turn off the thermostat by lowering the set point below 3°C
(37°F). The set point value displayed will be --.-, and heating system start up will be impossible.
Page 9
INSSTE302P0514
9
Display in either degrees Celsius/Fahrenheit
The thermostat can display the ambient temperature and the set point in degrees Celsius (standard
factory setting) or Fahrenheit.
1. In any mode (Manual, Automatic or Preprogrammed), out of any adjustment mode, press down the
button for 3 seconds and release it. The various icons and options appear and °C or °F icon
ashes.
2. Press down the
button to conrm your choice.
3. Press down the
or button to switch from degrees Celsius to Fahrenheit. Press down the
button to conrm your choice.
The adjustment is thus completed and the thermostat returns to normal operation.
It is possible to exit the degrees Celsius/Fahrenheit adjustment mode at any time:
• By pressing down the
button.
• By not pressing down any buttons during 1 minute.
In any case, the adjustment is saved.
Manual mode ( )
From the Manual mode, you can manually adjust the thermostat set point by pressing down the or
button to increase the value, or to decrease it. To quickly scroll through the set point values, press and
hold down the button. The standard factory set point adjustment is 21°C. From this mode, the screen
displays the temperature, the heating power used, the hour and the day of the week.
Automatic mode ( )
From the Automatic mode, the thermostat adjusts the set points according to the programmed periods.
If no data was entered, the thermostat acts the same way as from the Manual mode and the standard
factory set point adjustment is 21°C. It is always possible to manually adjust the set point using the
or button. The selected set point will be effective until one period is programmed, which represents
an hour and a day of the week. Note that if the set point is lowered to off (--.-), the programming will
not be effective. It is possible to program 4 periods a day during the week and 4 periods a day during
the weekend, which means that the set point can change automatically up to 4 times a day. The period
order is not important.
From this mode, the screen displays the temperature, the heating power used, the hour, the day of the
week and the current programmed period number (
to ; displayed on the right-hand side of the
hour).
Page 10
INSSTE302P0514
10
Programming procedure of the Automatic mode
Programming the Automatic mode can be done in the Automatic mode or the Manual mode.
1. Out of any adjustment mode, press down the button during 3 seconds and release it. It then enters
into the programming of period 1 of the 5 days of the week. The 5 days of the week (L/M, M/T, M/W,
J/T, V/F), the period 1 ( ) and the associated programming (hours and set point) are displayed.
Note that the time displays --:-- and the set point displays --.-- if there is no programming for the period.
Note: if no programming is required for the period, simply press down the
button. It then
automatically switches to the next adjustment period.
2. The two hour digits of the period ash and can then be adjusted with the
and buttons. Conrm
the adjustment using the
button.
3. The two minute digits of the period ash. Use the and buttons to adjust by intervals of 15
minutes. Conrm the adjustment by pressing down the
button.
4. The set point temperature of the period is ashing. Adjust the set point using the and buttons.
Conrm your selection by pressing down the
button.
5. The programming of this period is over. The programming of the next period is displayed and you
return to step 2.
6. At the end of the programming of the 4 periods of the week days, you enter into the programming
period 1 of the two days of the weekend. The two days of the weekend (S/S, D/S), the period 1 and
the associated programming (hours and set point) are displayed. The programming of the weekend
periods is made in the same manner as for the periods of the week days (steps 2 to 5).
At the end of the programming period 4 of the weekend, the programming is completed and the
thermostat returns to normal operation.
It is possible to exit the Automatic mode’s programming at any time:
• By pressing down the
button.
• By not pressing down any buttons during 1 minute.
In any case, all programming is saved.
Erasing of the programming
When programming the Automatic mode, it is possible to delete a programming period.
1. Enter into the programming of the Automatic mode and reach the period, as described in the previous
section.
Page 11
INSSTE302P0514
11
2. When the period is displayed, simultaneously press down the and buttons to erase the
programming. The time of the period displays --:-- and the set point displays --.- to indicate that the
programming is erased.
3. Then, exit the programming mode as described in the previous section.
Preprogrammed mode ( )
The Preprogrammed mode allows a quick and easy programming of the thermostat. 18 preprogrammings
(01 to 18) are dened in factory and easily accessible. This mode gives you the possibility to quickly
program the thermostat using commonly used preprogrammings.
As from the Automatic mode, it is possible at any time to manually adjust the set point. This set point will
be effective until the next set point change anticipated by the preprogramming. Note that if the set point
is lowered to off (--.-), the programming will not be effective.
From this mode, the screen displays the temperature, the heating power used, the hour, the day of the
week and the number of the preprogramming period (
to ; displayed on the right-hand side of
the hour).
This mode is initially activated when the power is turned on for the rst time, with the programming #5.
Selection of the preprogramming
See section 5 (Preprogrammings) to choose one of the 18 preprogrammings. The Quick selection
section allows a choice based on 3 criteria: the number of hours you sleep, the time you wake up
and the time you come home. The Detailed preprogrammings section gives a detailed schedule of all
preprogrammings.
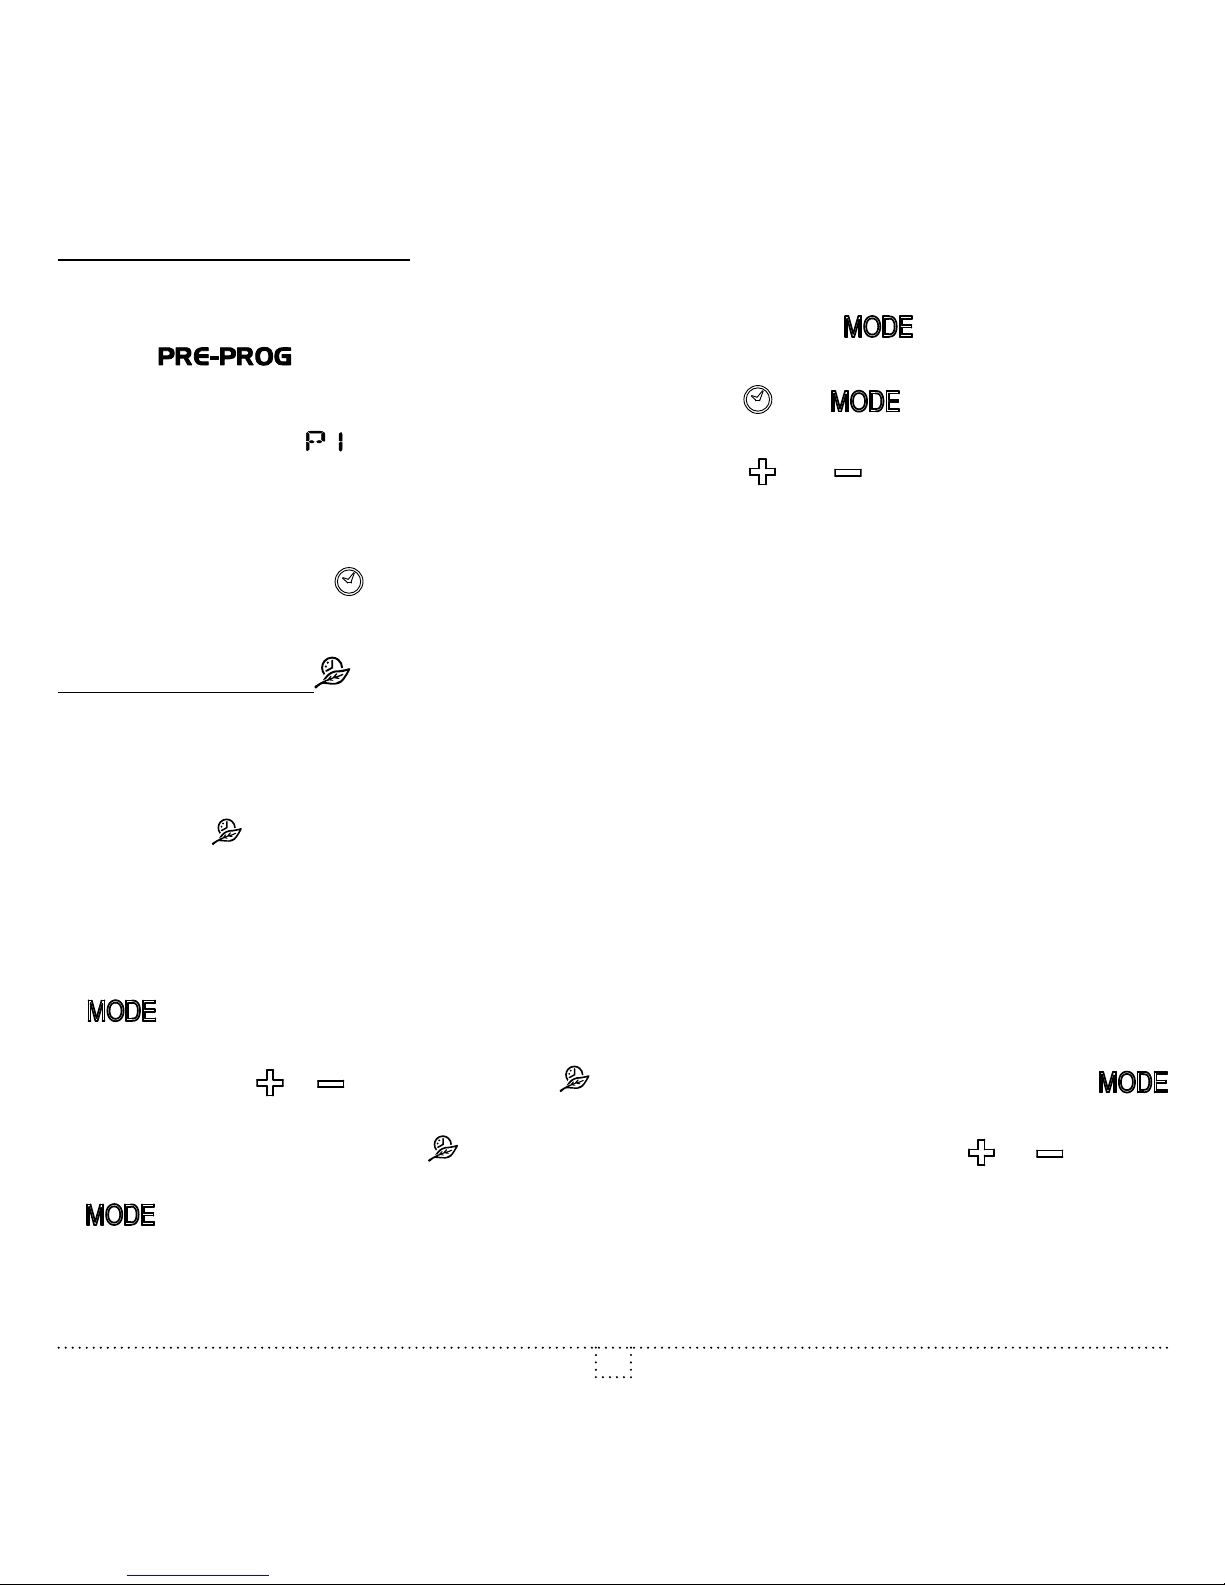
To select the preprogramming :
1. Access the Preprogrammed mode (if required) by pressing down the
button until the display
shows .
2. Out of any adjustment mode, press down the
button during 3 seconds until the preprogramming
number (01 to 18) blinks at the right-hand side of the hour.
3. Choose the preprogramming number by pressing down the and buttons. Conrm by pressing
down the
button.
It is possible to exit the selection of the preprogramming at any time:
• By pressing down the
button.
• By not pressing down any buttons during 1 minute.
In any case, the selection is saved.
Page 12
INSSTE302P0514
12
View of the preprogramming
It is possible to view the current preprogramming. However, it is impossible to modify a preprogramming.
1. Access the Preprogrammed mode (if required) by pressing down the
button until the display
shows .
2. Out of any adjustment mode, simultaneously press down the and button and release.
3. The period 1 icon (
) ashes and the days of the week are displayed to indicate that you are
visualizing the days of the week’s period 1. Press down the
and buttons to select the period
to view.
It is possible to exit the view of the preprogramming at any time:
• By pressing down the
button.
• By not pressing down any buttons during 1 minute.
Anticipated start
This mode enables the room to reach the selected temperature at the programmed hour. In fact, the
thermostat estimates the delay required to reach the set point of the next period at the programmed
hour. This delay is obtained by the observation of the temperature variations in the room and the results
obtained during the preceding anticipated starts. That way, the results should be increasingly precise day
after day. The icon will blink when the anticipated start of the next period will begin.
If the set point is changed manually when this mode is in progress, the anticipated start of the next period
is canceled.
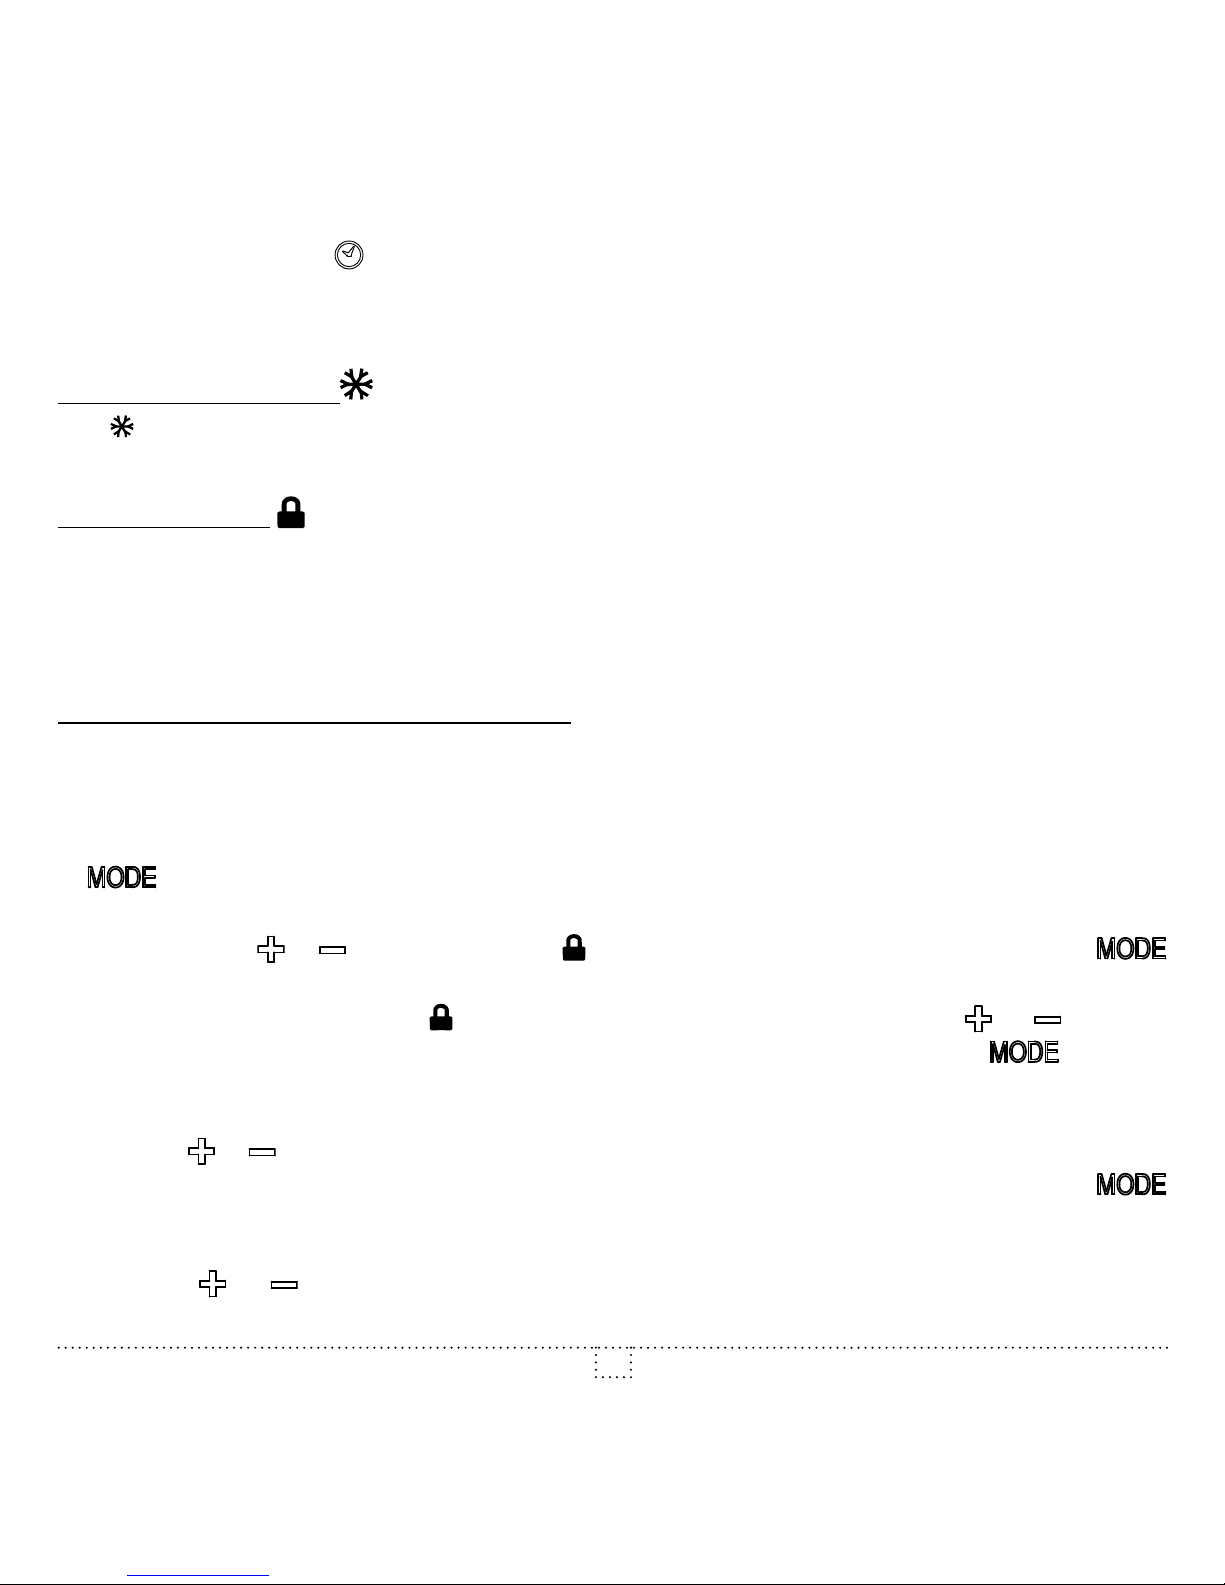
To activate or deactivate the anticipated start:
1. In any mode (Manual, Automatic or Preprogrammed), out of any adjustment mode, press down the
button for 3 seconds and release it. The various icons and options appear and °C or °F icon
ashes.
2. Press down the
or button to select the icon (indicated by its ashing). Press down the
button to conrm your choice.
3. All icons disappear except the icon that continues to ash. Press down the or button to
activate or deactivate the Anticipated start (indicated by the icon that turns on or off). Press down the
button to conrm your choice.
The adjustment is thus completed and the thermostat returns to normal operation.
It is possible to exit the Anticipated start adjustment mode at any time:
Page 13
INSSTE302P0514
13
• By pressing down the button.
• By not pressing down any buttons during 1 minute.
In any case, the adjustment is saved.
Frost-free warning
The icon is displayed when the temperature set point is between 3°C (37°F) and 5°C (41°F). A
minimum temperature will be maintained to ensure frost control.
Security mode
It is possible to impose minimum and maximum temperature set points by activating this mode. Then, it
becomes impossible to exceed the maximum set point and go below the minimum set point, regardless
of the current mode. When the Security mode is activated, any change in operation mode (Manual,
Automatic or Preprogrammed) or any change in programming (Automatic mode) or preprogramming
(Preprogrammed mode) is impossible.
Procedures to activate the Security mode
To activate the Security mode, you must be in the desired mode (Manual, Automatic or Preprogrammed),
and you must have completed the programming (Automatic mode) or selected the desired
preprogramming (Preprogrammed more).
1. In any mode (Manual, Automatic or Preprogrammed), out of any adjustment mode, press down the
button for 3 seconds and release it. The various icons and options appear and °C or °F icon
ashes.
2. Press down the
or button to select the icon (indicated by its ashing). Press down the
button to conrm your choice.
3. All icons disappear except the
icon that continues to ash. Press down the or button to
activate the Security mode (indicated by the icon that turns on). Press down the
button to
conrm your choice.
4. L_ _ _ is displayed instead of the hours and the adjustment of the minimum set point ashes. Press
down the
or button to adjust the minimum set point temperature. The adjustment can range from
--.- (Heating off) to 30°C by intervals of 0.5°C (or 86°F by intervals of 1°F). Press down the
button to conrm your selection.
5. H
_ _ _
is displayed instead of the hours and the adjustment of the maximum set point ashes. Press
down the or button to adjust the maximum set point temperature. The adjustment will be
between the minimum set point previously selected and 30°C by intervals of 0.5°C (or 86°F by intervals
Page 14
INSSTE302P0514
14
of 1°F). Press down the button to conrm your selection.
The activation of the Security mode is thus completed and the thermostat returns to normal operation.
It is possible to exit the Security mode adjustment at any time:
• By pressing down the
button.
• By not pressing down any buttons during 1 minute.
Note: if the adjustment of minimum and maximum set points is not completed, Security mode will not
be activated.
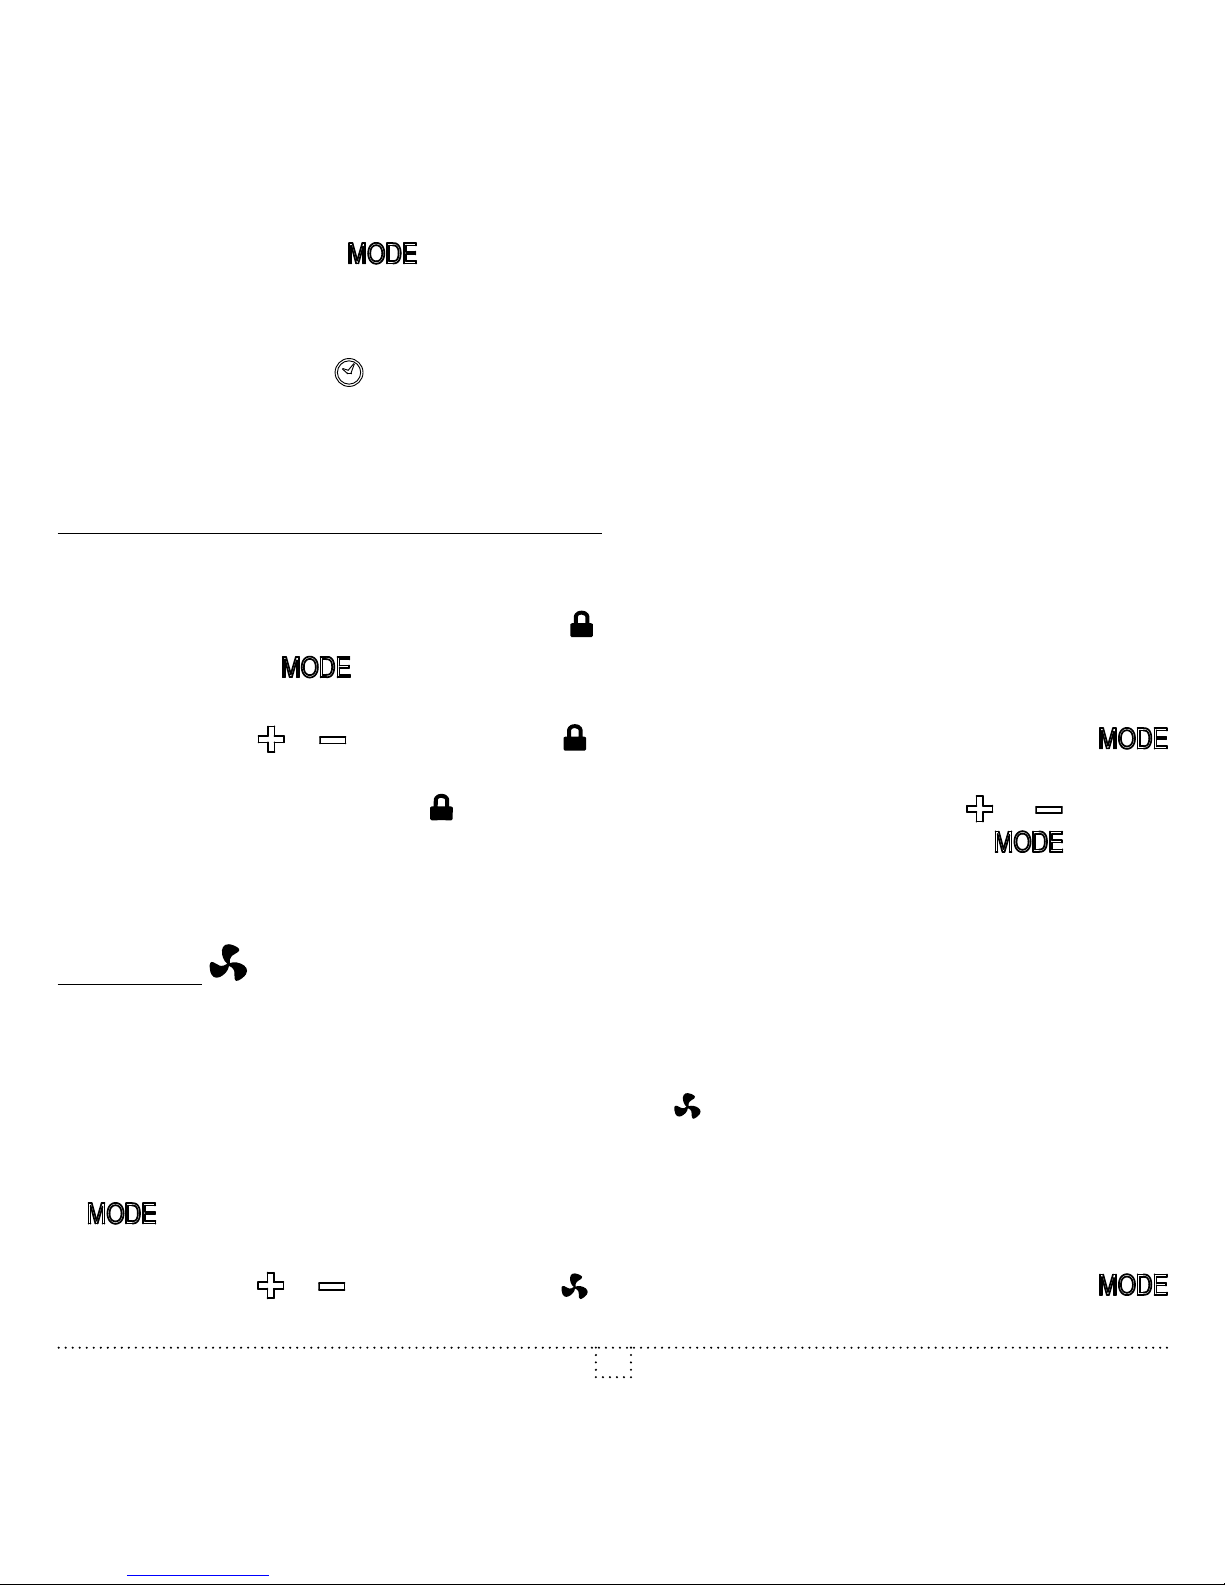
Procedures to deactivate the Security mode
1. To deactivate the Security mode, start by cutting off the thermostat power at circuit breaker and wait
at least 30 seconds.
2. Turn the thermostat power back on and the
icon will blink for a maximum of 5 minutes.
3. Press down the
button for 3 seconds and release it. The various icons and options appear
and °C or °F icon ashes.
4. Press down the
or button to select the icon (indicated by its ashing). Press down the
button to conrm your choice.
5. All icons disappear except the icon that continues to ash. Press down the or button to
deactivate the Security mode (indicated by the icon that turns off). Press down the
button to
conrm your choice.
The deactivation of the Security mode is thus completed and the thermostat returns to normal operation.
Fan mode
When the thermostat is used to control a heating system equipped with a fan, the Fan mode must be
activated. This mode prevents the system to continuously start and stop, which could cause fan failure.
The Fan mode is not activated by default.
The status of this mode is indicated on the display by the
icon.
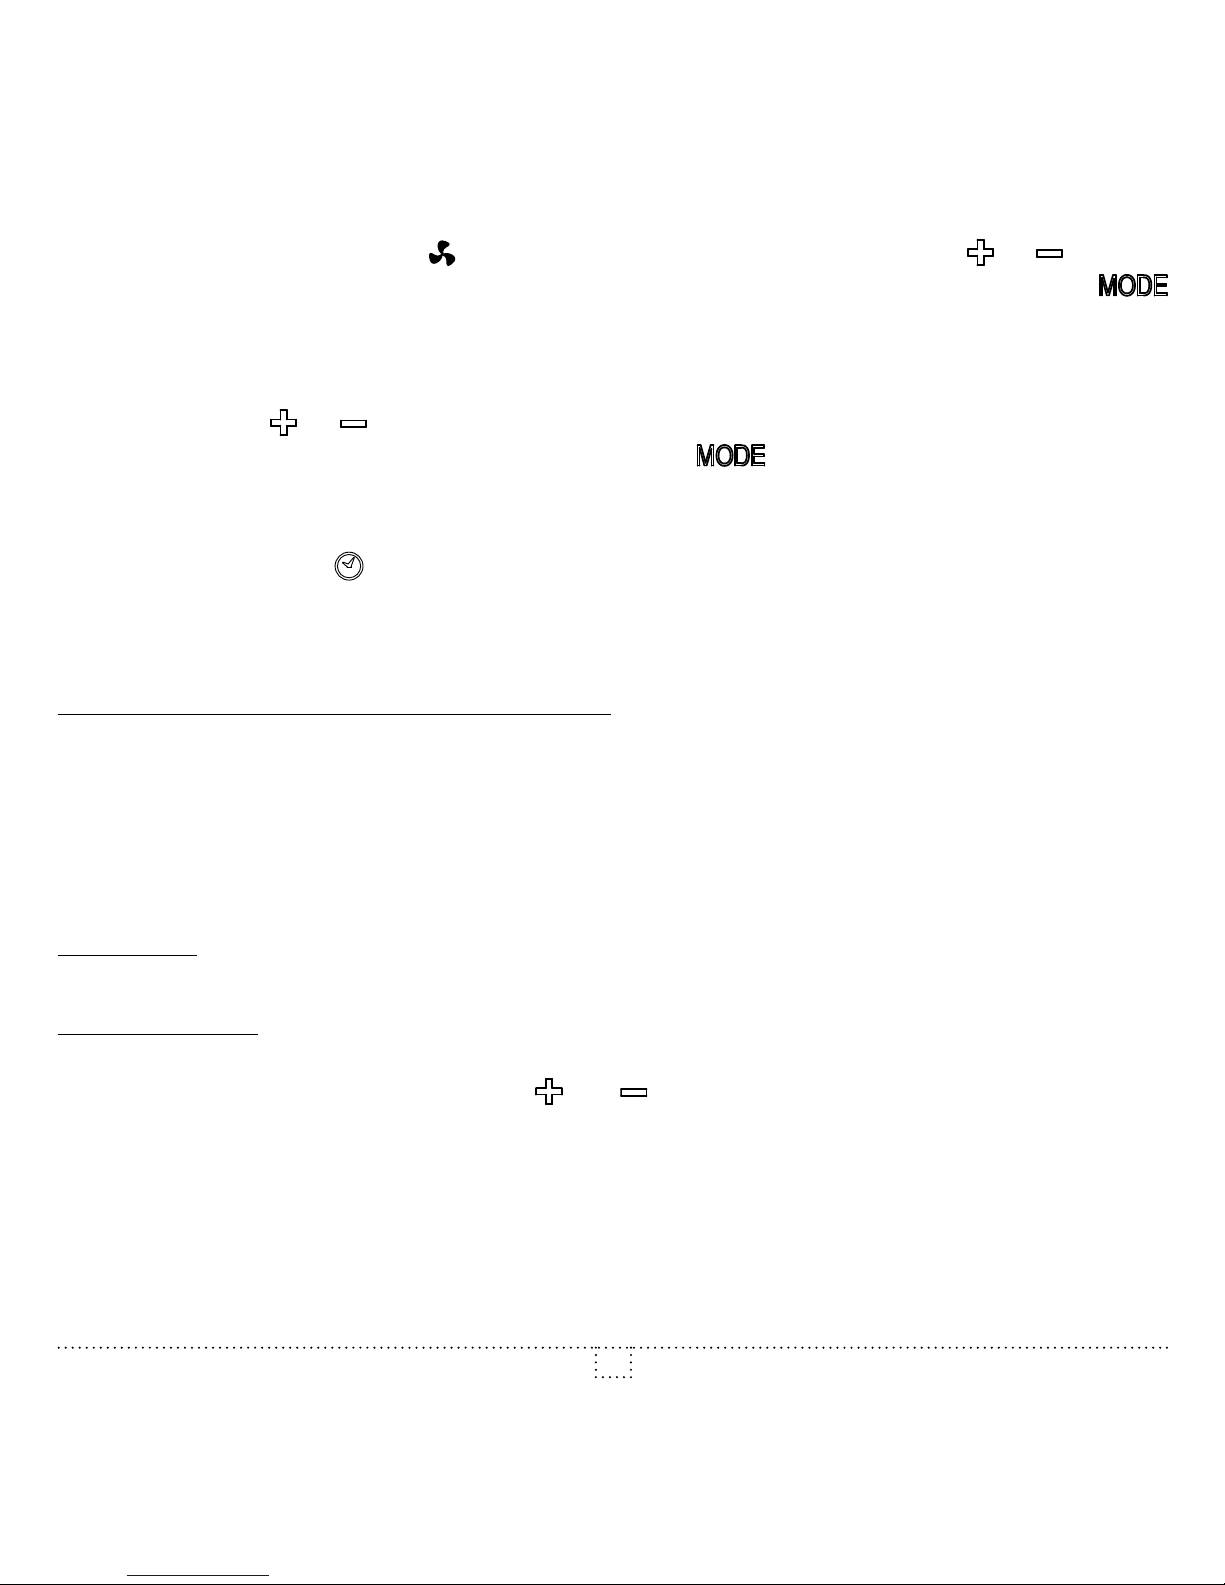
To activate or deactivate the Fan mode and / or adjust the minimum operating time:
1. In any mode (Manual, Automatic or Preprogrammed), out of any adjustment mode, press down the
button for 3 seconds and release it. The various icons and options appear and °C or °F icon
ashes.
2. Press down the
or button to select the icon (indicated by its ashing). Press down the
button to conrm your choice.
Page 15
INSSTE302P0514
15
3. All icons disappear except the icon that continues to ash. Press down the or button to
activate or deactivate the Fan mode (indicated by the icon that turns on or off). Press down the
button to conrm your choice.
4. If the Fan mode is deactivated, the thermostat returns to normal operation. If it is activated, the
minimum operating time in seconds blinks (90 seconds by default).
5. Press down the
or button to adjust the minimum operating time if desired, from 90 to 300
seconds, in intervals of 30 seconds. Press down the
button to conrm your choice. The
thermostat will return to its normal operation.
It is possible to exit the Fan mode adjustment at any time:
• By pressing down the
button.
• By not pressing down any buttons during 1 minute.
In any case, the adjustment is saved.
Parameters saving and power failures
The thermostat saves some parameters in a non-volatile memory to be able to recover them after being
shut off (a power failure, for example). These parameters are the operation modes (Manual, Automatic
or Preprogrammed), the programming of the Automatic mode, the preprogramming selection, the current
set point, the Celsius/Fahrenheit display, the Fan mode, the minimum operating time in Fan mode, the
Security mode, the minimum and maximum set points in Security mode, the Anticipated start, the time
mode (24h/12h), the day, the hour and the Nightlight mode.
Backlight
By default, the backlight turns on when pressing down a button and turns off after 15 seconds of inactivity.
Nightlight mode
You can activate the Nightlight mode to permanently turn on the backlight. To activate or deactivate this
mode, you must simultaneously press both
and buttons for 3 seconds until the backlight blinks.
Release the buttons. The Nightlight mode will be activated (or deactivated if it was previously activated).
Page 16

INSSTE302P0514
16
Heating Power Indicator
The level of power used to maintain the temperature at the set point is expressed as a percentage
indicated by the number of bars in the thermometer displayed. The heating power used is displayed
as follows:
4 bars = 76% to 100%
3 bars = 51% to 75%
2 bars = 26% to 50%
1 bar = 1% to 25%
0 bar = no heat
Page 17
INSSTE302P0514
17
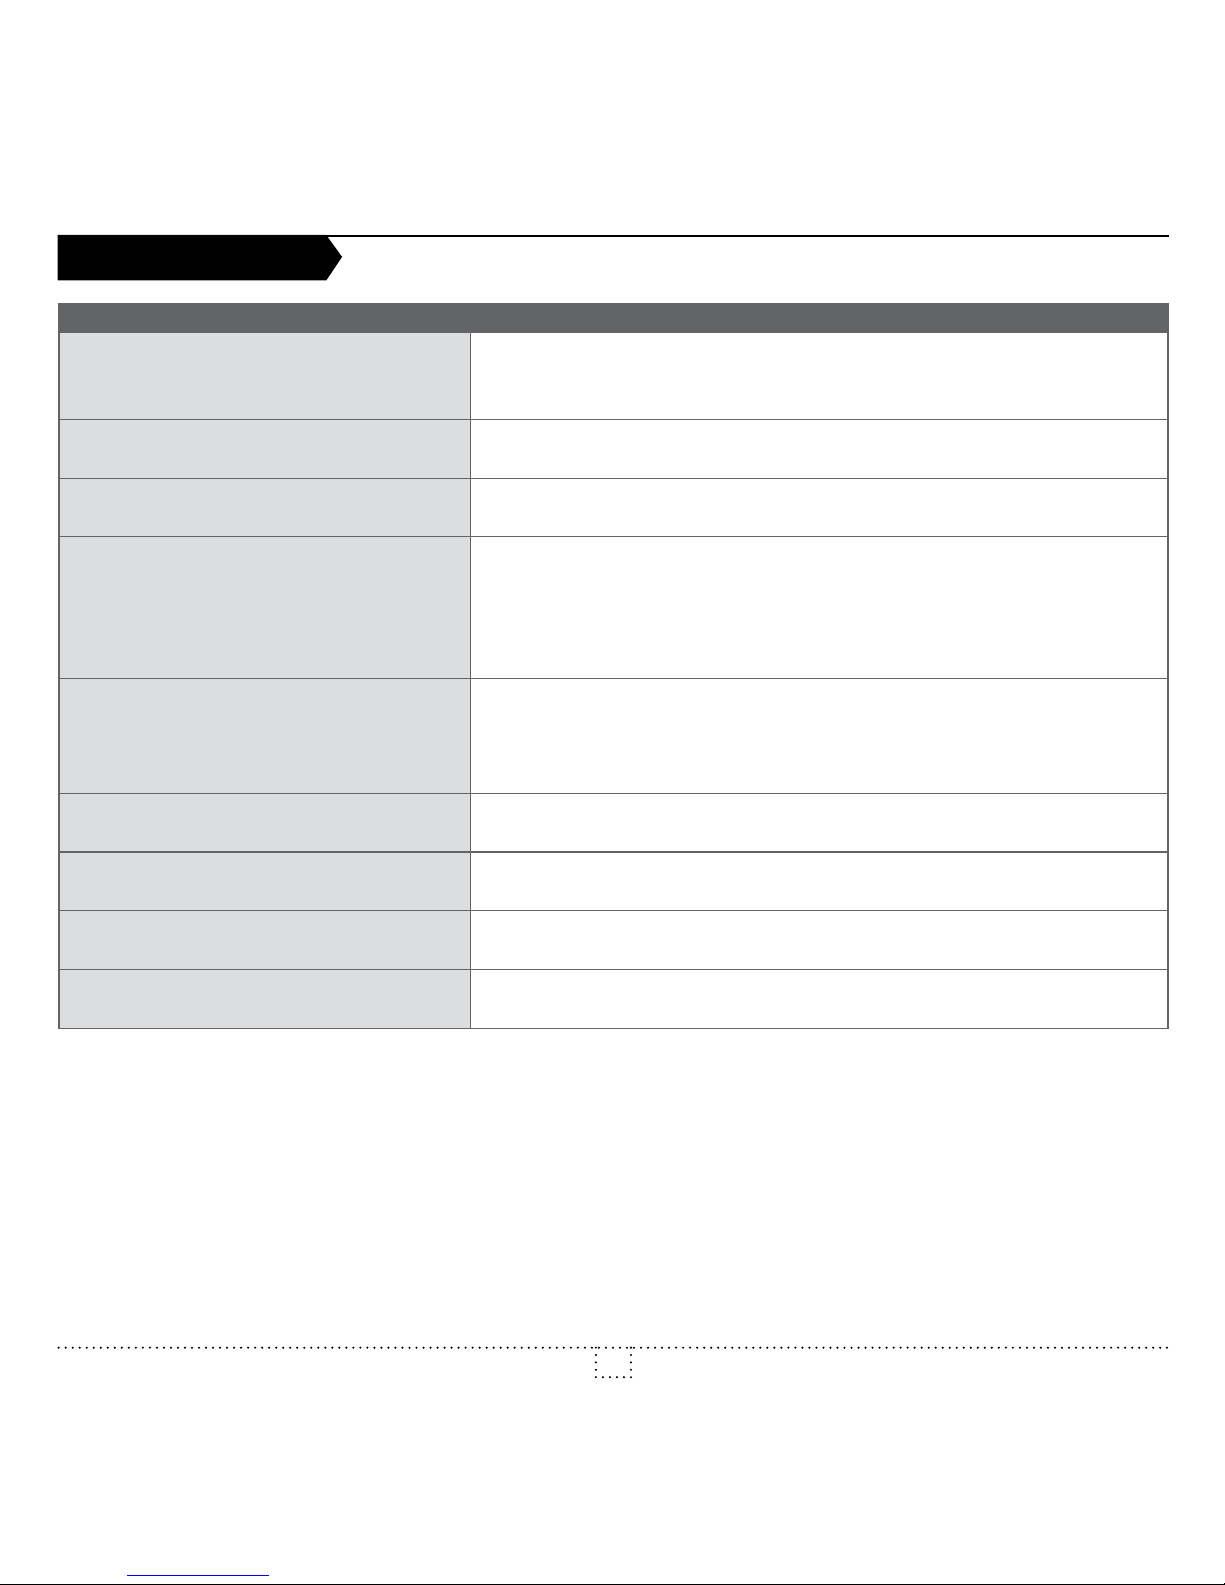
TROUBLESHOOTING
PROBLEM DEFECTIVE PART OR PART TO CHECK
The thermostat is hot.
• In normal operating conditions, the thermostat housing can
reach nearly 40°C at maximum load. That is normal and will
not affect the effective operation of the thermostat.
Heating is always on.
• Check if the thermostat is properly connected. Refer to the
installation section.
Heating does not run even if the
thermostat indicates it is on.
• Check if the thermostat is properly connected. Refer to the
installation section.
The display does not turn on.
• Check if the thermostat is properly connected. Refer to the
installation section.
• Check the power supply at the electrical panel.
• Check if the heating unit has a switch. If so, ensure that this
switch is turned on.
The display turns off a few
minutes and then turns on again.
• The thermal protection of the heating unit has opened due
to overheating. Check if the heating unit is in good condition
of operation and that clearance around the appliance is
according to the manufacturer’s specifications.
The display has low contrast
when heating is on.
• The load is lower than the minimum load. Install a heating
unit that is within the load limits of the thermostat.
The displayed ambient
temperature is incorrect.
• Check the presence of an air stream or a heat source near
the thermostat, and correct the situation.
The display indicates E1, E2,
E3 or E4.
• Faulty thermostat. Contact the customer service.
Weak luminosity of the display.
• Possibility of a bad contact. Check thermostat wirings. Refer
to the installation section.
N.B. If you are unable to solve the problem after having veried these points, please communicate
with our customer service. Consult our website for the phone numbers.
Page 18
INSSTE302P0514
18
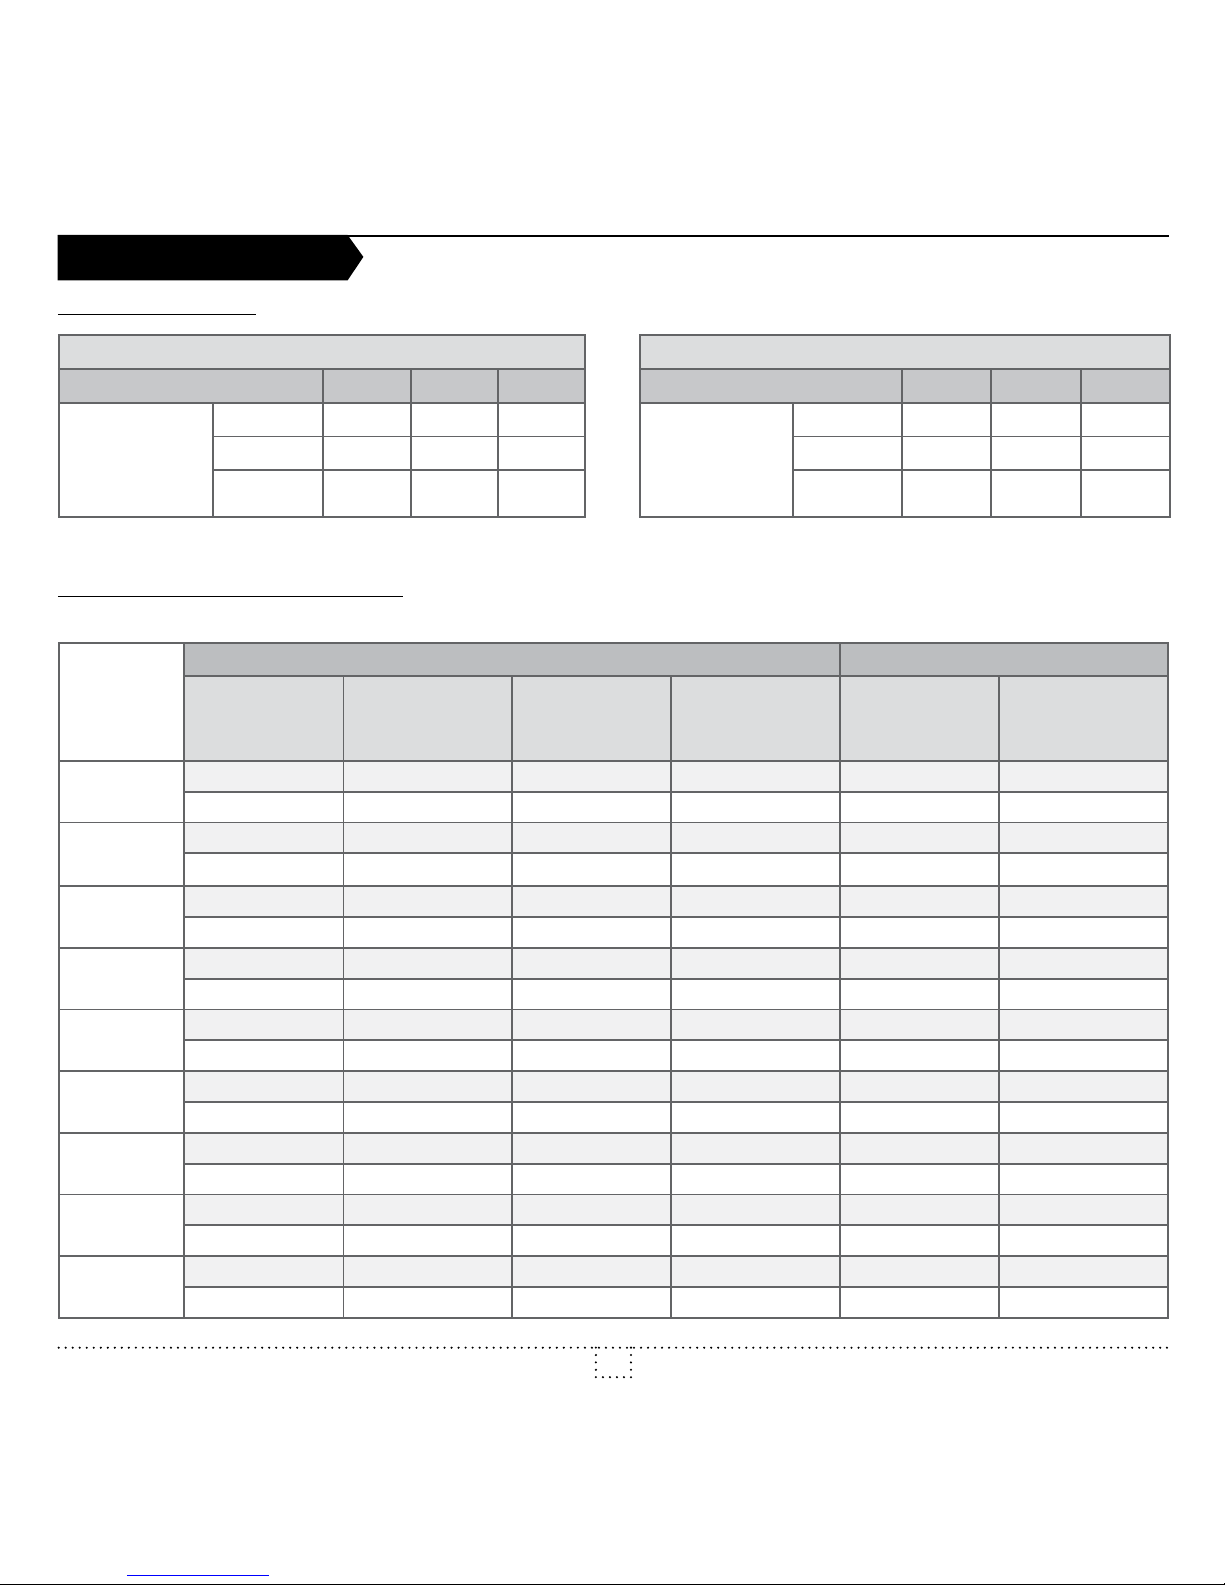
Quick selection
8 hours of sleep 9 hours of sleep
Wake up time: 6am 7am 8am Wake up time: 6am 7am 8am
Hour at
which you
come back
from work:
4pm 1 4 7
Hour at
which you
come back
from work:
4pm 10 13 16
5pm 2 5* 8 5pm 11 14 17
6pm 3 6 9 6pm 12 15 18
* preprogramming by default
Detailed preprogrammings
8 hours of sleep
N°
pre-prog
Monday-Friday Saturday-Sunday
P1
(Wake up)
P2
(Leaving
time)
P3
(Come
back time)
P4
(Sleep)
P1
(Wake up)
P2
(Sleep)
1
6am 8am 4pm 10pm 6am 10pm
21°C (70°F) 16.5°C (62°F) 21°C (70°F) 16.5°C (62°F) 21°C (70°F) 16.5°C (62°F)
2
6am 8am 5pm 10pm 6am 10pm
21°C (70°F) 16.5°C (62°F) 21°C (70°F) 16.5°C (62°F) 21°C (70°F) 16.5°C (62°F)
3
6am 8am 6pm 10pm 6am 10pm
21°C (70°F) 16.5°C (62°F) 21°C (70°F) 16.5°C (62°F) 21°C (70°F) 16.5°C (62°F)
4
7am 9am 4pm 11pm 7am 11pm
21°C (70°F) 16.5°C (62°F) 21°C (70°F) 16.5°C (62°F) 21°C (70°F) 16.5°C (62°F)
5
7am 9am 5pm 11pm 7am 11pm
21°C (70°F) 16.5°C (62°F) 21°C (70°F) 16.5°C (62°F) 21°C (70°F) 16.5°C (62°F)
6
7am 9am 6pm 11pm 7am 11pm
21°C (70°F) 16.5°C (62°F) 21°C (70°F) 16.5°C (62°F) 21°C (70°F) 16.5°C (62°F)
7
8am 10am 4pm 0am 8am 0am
21°C (70°F) 16.5°C (62°F) 21°C (70°F) 16.5°C (62°F) 21°C (70°F) 16.5°C (62°F)
8
8am 10am 5pm 0am 8am 0am
21°C (70°F) 16.5°C (62°F) 21°C (70°F) 16.5°C (62°F) 21°C (70°F) 16.5°C (62°F)
9
8am 10am 6pm 0am 8am 0am
21°C (70°F) 16.5°C (62°F) 21°C (70°F) 16.5°C (62°F) 21°C (70°F) 16.5°C (62°F)
PREPROGRAMMINGS
Page 19
INSSTE302P0514
19
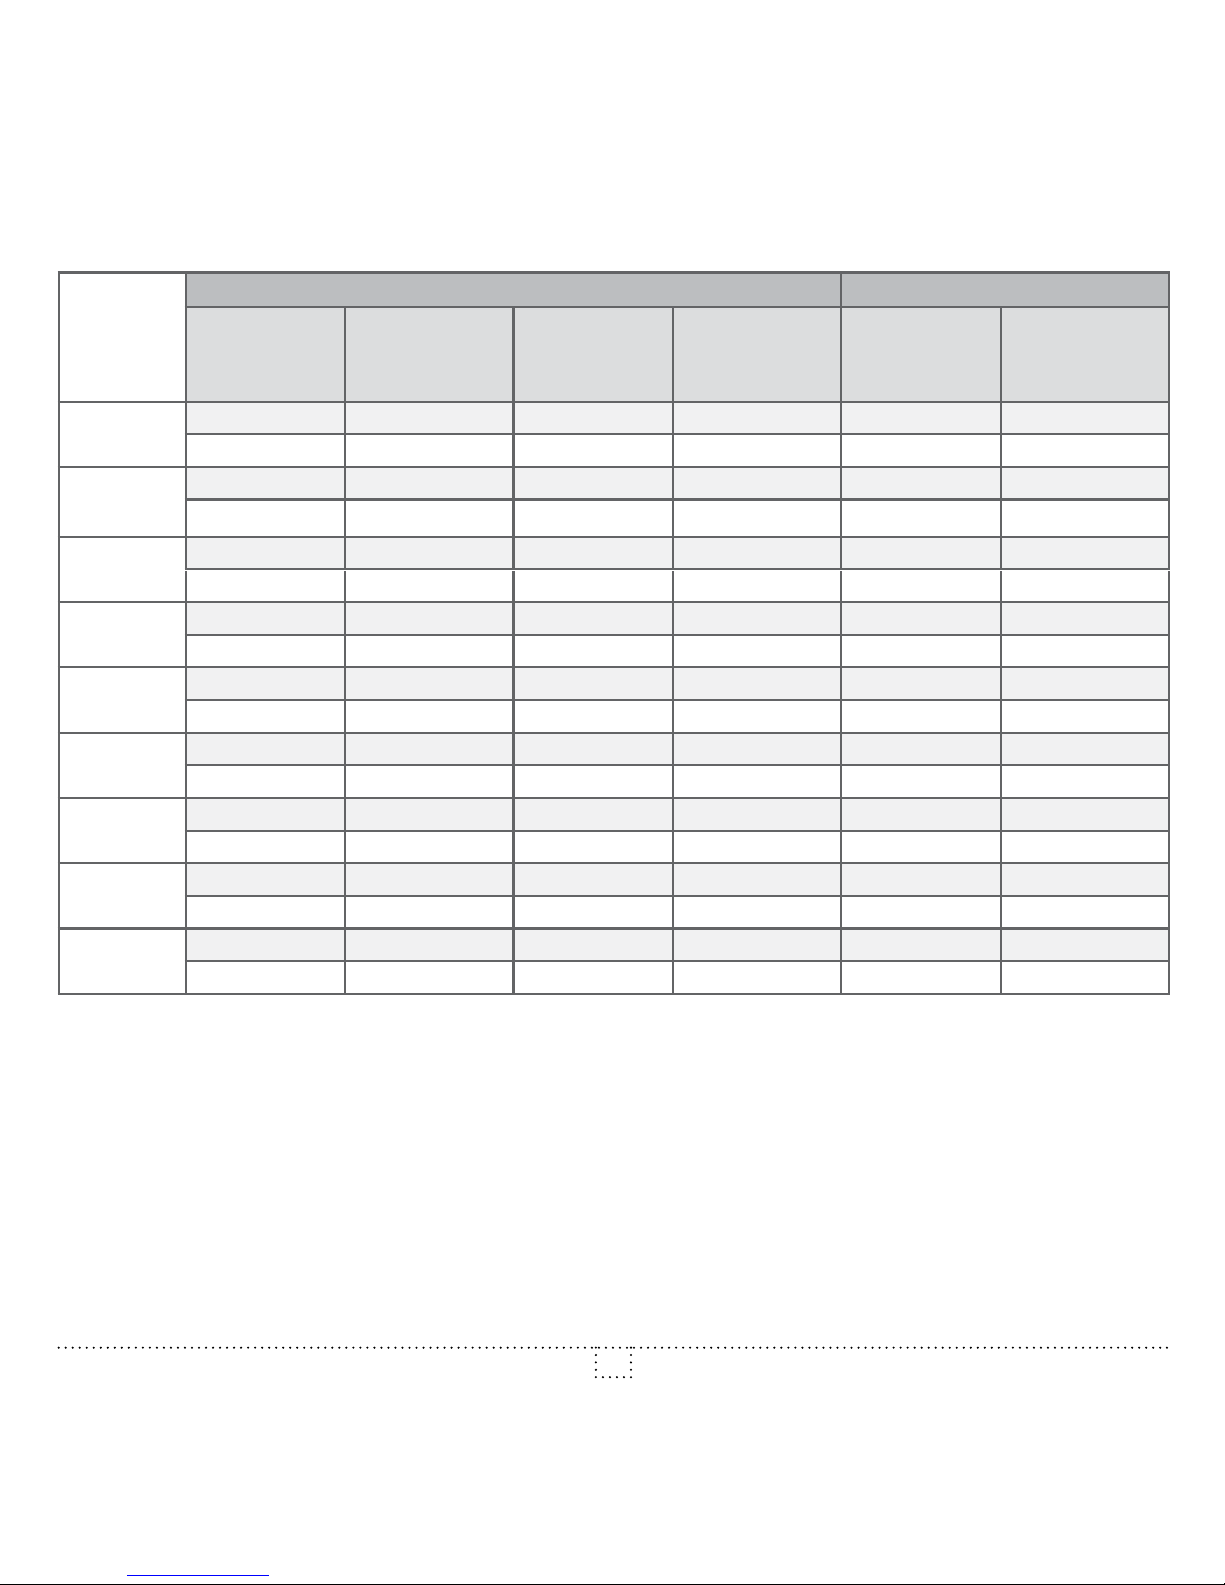
9 hours of sleep
N°
pre-prog
Monday-Friday Saturday-Sunday
P1
(Wake up)
P2
(Leaving
time)
P3
(Come
back time)
P4
(Sleep)
P1
(Wake up)
P2
(Sleep)
10
6am 8am 4pm 9pm 6am 9pm
21°C (70°F) 16.5°C (62°F) 21°C (70°F) 16.5°C (62°F) 21°C (70°F) 16.5°C (62°F)
11
6am 8am 5pm 9pm 6am 9pm
21°C (70°F) 16.5°C (62°F) 21°C (70°F) 16.5°C (62°F) 21°C (70°F) 16.5°C (62°F)
12
6am 8am 6pm 9pm 6am 9pm
21°C (70°F) 16.5°C (62°F) 21°C (70°F) 16.5°C (62°F) 21°C (70°F) 16.5°C (62°F)
13
7am 9am 4pm 10pm 7am 10pm
21°C (70°F) 16.5°C (62°F) 21°C (70°F) 16.5°C (62°F) 21°C (70°F) 16.5°C (62°F)
14
7am 9am 5pm 10pm 7am 10pm
21°C (70°F) 16.5°C (62°F) 21°C (70°F) 16.5°C (62°F) 21°C (70°F) 16.5°C (62°F)
15
7am 9am 6pm 10pm 7am 10pm
21°C (70°F) 16.5°C (62°F) 21°C (70°F) 16.5°C (62°F) 21°C (70°F) 16.5°C (62°F)
16
8am 10am 4pm 11pm 8am 11pm
21°C (70°F) 16.5°C (62°F) 21°C (70°F) 16.5°C (62°F) 21°C (70°F) 16.5°C (62°F)
17
8am 10am 5pm 11pm 8am 11pm
21°C (70°F) 16.5°C (62°F) 21°C (70°F) 16.5°C (62°F) 21°C (70°F) 16.5°C (62°F)
18
8am 10am 6pm 11pm 8am 11pm
21°C (70°F) 16.5°C (62°F) 21°C (70°F) 16.5°C (62°F) 21°C (70°F) 16.5°C (62°F)
Page 20
INSSTE302P0514
20
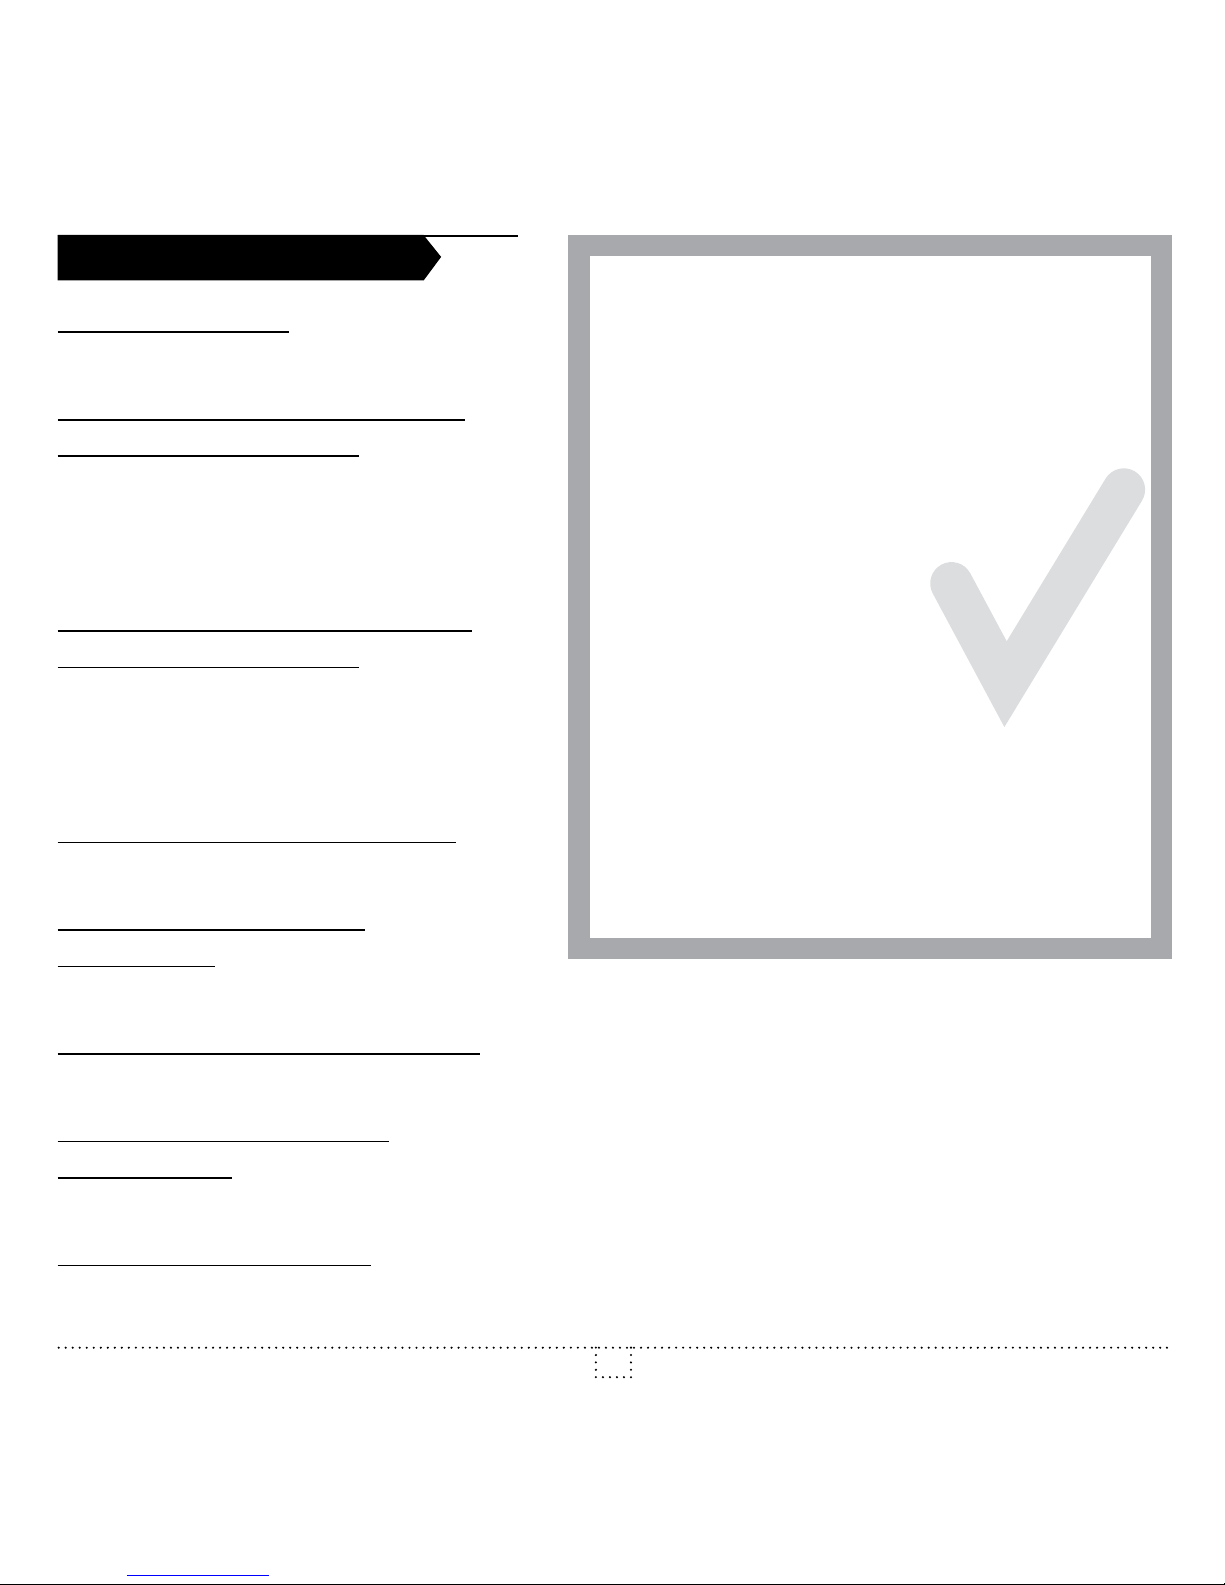
Supply voltage:
120/208/240 VAC, 50/60 Hz
Minimum electrical current
with a resistive load:
1.25 A
150 W @ 120 VAC
260 W @ 208 VAC
300 W @ 240 VAC
Maximum electrical current
with a resistive load:
12.5 A
1500 W @ 120 VAC
2600 W @ 208 VAC
3000 W @ 240 VAC
Temperature display range:
3°C to 40°C (37°F to 99.5°F)
Temperature display
resolution:
0.5°C (0.5°F)
Temperature set point range:
3°C to 30°C (37°F to 86°F)
Temperature set point
increments:
0.5°C (1°F)
Storage temperature:
-40°C to 50°C (-104°F to 122°F)
LIMITED WARRANTY LIMITED WARRANTY LIMITED WARRANTY
LIMITED WARRANTY LIMITED WARRANTY LIMITED WARRANTY
LIMITED WARRANTY
This unit has a 3-year warranty. If at any time
during this period the unit becomes defective,
it must be returned to its place of purchase
with the invoice copy, or simply contact our
customer service department (with an invoice
copy in hand). In order for the warranty to
be valid, the unit must have been installed and used according to instructions.
If the installer or the user modies the unit,
he will be held responsible for any damage
resulting from this modication. The warranty
is limited to the factory repair or the replacement of the unit, and does not cover the cost
of disconnection, transport, and installation.
E-mail: [email protected]
Web site: www.stelpro.com
LIMITED WARRANTY LIMITED WARRANTY LIMITED
LIMITED WARRANTY LIMITED WARRANTY LIMITED
TECHNICAL SPECIFICATIONS
STELPRO DESIGN INC. | Saint-Bruno-de-Montarville | Québec | J3V 6L7
 Loading...