

Page 1
ORCHESTRATING COMFORT
MAÎTRE DE VOTRE CONFORT
QUICKSTART GUIDE | GUIDE DE DÉMARRAGE RAPIDE
MAESTRO SMART THERMOSTAT
THERMOSTAT INTELLIGENT MAESTRO
1
Page 2

THE 360° COMFORT EXPERIENCE
BIENVENUE DANS L’EXPÉRIENCE DU CONFORT 360°
CONGRATULATIONS!
You’ve chosen to entrust the heating of your home to the Maestro smart thermostat. The comfort of your
family is now in your hands. Elegant, accurate and highly efcient, your new Maestro smart thermostat will
help you reduce your energy bill and ecological footprint, so you can do your part for the environment.
Create your own ecosystem in your home and take full control of your comfort with the Maestro mobile app.
MADE AND DESIGNED FOR CANADA
Established in Quebec for more than 35 years, the Stelpro family business understands the specic needs
our climate imposes on us and Canadians' concerns regarding safety and environmental protection.
By choosing Maestro by Stelpro, you’re encouraging local innovation and the development of energy
efcient products for a better future.
FÉLICITATIONS !
Vous avez choisi de coner le chauffage de votre foyer au thermostat intelligent Maestro. Désormais,
le confort de votre famille est entre vos mains. Élégant, précis et performant, votre nouveau thermostat
intelligent Maestro vous aidera à réduire votre facture d’électricité et votre empreinte écologique
tout en contribuant à la préservation de l’environnement.
Créez votre propre écosystème dans votre demeure et prenez le plein contrôle de votre confort
avec l'application mobile Maestro.
FAIT ET PENSÉ POUR LE CANADA
Établie au Québec depuis plus de 35 ans, l’entreprise familiale Stelpro comprend les besoins particuliers
que nous impose notre climat, mais aussi les préoccupations des Canadiens en matière de sécurité
et de protection de l’environnement.
En choisissant Maestro de Stelpro, vous encouragez l’innovation d’ici et le développement de produits
écoénergétiques pour un avenir meilleur.
2
Page 3

FOUR EASY STEPS TO CONTROL THE COMFORT OF YOUR HOME
1 - Install your Maestro controller • thermostat
2 - Install your Maestro thermostats
3 - Install the Maestro application and create your Maestro account
4 - Build your Maestro network
For further information or to consult the complete User Guide, please visit our website.
www.stelpro.com/en-CA/support-maestro
QUATRE ÉTAPES FACILE VERS LE CONTRÔLE DE VOTRE CONFORT
1 - Installez votre contrôleur • thermostat Maestro
2 - Installez vos thermostats Maestro
3 - Installez l’application Maestro et créez votre compte Maestro
4 - Construisez votre réseau Maestro
Pour obtenir de plus amples renseignements ou pour consulter le guide d'utilisation complet,
visitez notre site web.
www.stelpro.com/fr-CA/soutien-maestro
3
Page 4
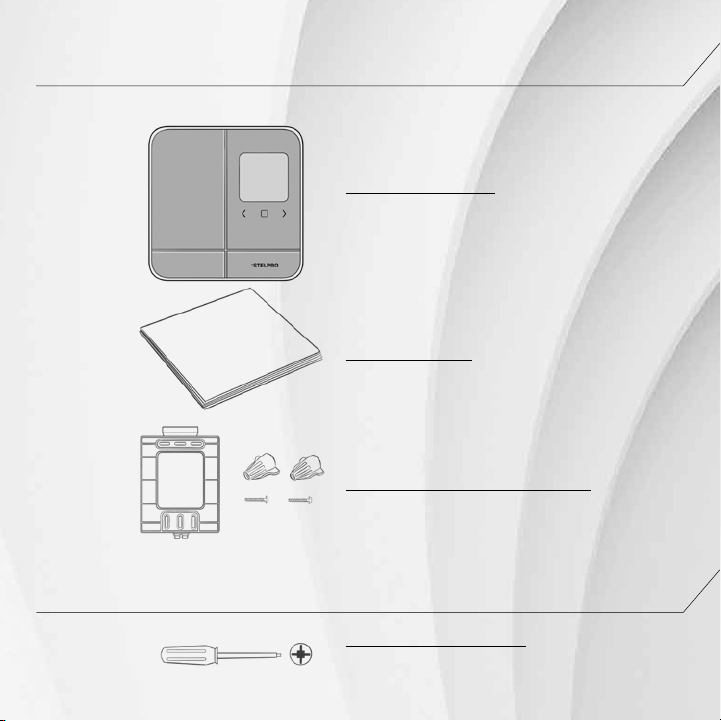
WHAT’S IN THE BOX • CONTENU DE LA BOÎTE
SMART THERMOSTAT
THERMOSTAT INTELLIGENT
QUICKSTART GUIDE
GUIDE DE DÉMARRAGE
MOUNTING PLATE | SCREWS (2) | CAPS (2)
PLAQUE DE MONTAGE | VIS DE MONTAGE (2)
CAPUCHON DE CONNEXION (2)
TOOLS REQUIRED • OUTILS REQUIS
NO. 2 PHILLIPS SCREWDRIVER
TOURNEVIS À TÊTE CRUCIFORME
4
Page 5

BEFORE YOU START
WHERE TO INSTALL YOUR MAESTRO THERMOSTAT
Install the thermostat at approximately 1.5 m (5 ft.) from the oor, on an indoor wall that faces
the heating system.
IMPORTANT: Leave a clearance of at least 30 cm (12 in.) around the thermostat to ensure
it is properly ventilated.
AVANT DE COMMENCER
OÙ INSTALLER VOTRE THERMOSTAT MAESTRO
Installez le thermostat à environ 1,5 m (5 pi) du sol, sur un mur intérieur faisant face au système
de chauffage.
ATTENTION : Laissez un dégagement d’au moins 30 cm (12 po) autour du thermostat
pour qu’il soit adéquatement ventilé.
5
Page 6

INSTALLING THE MAESTRO THERMOSTAT
Before you begin, take a few minutes to watch the step-by-step video on installing
the Maestro thermostat.
www.stelpro.com/en-CA/maestro
IMPORTANT: The thermostat must be installed by a qualied electrician.
NOTE: A Maestro thermostat cannot control more than 4000 Watts in total.
INSTALLER LE THERMOSTAT MAESTRO
Avant de vous lancer, prenez quelques minutes pour regarder la vidéo d’installation
étape par étape du thermostat Maestro.
www.stelpro.com/fr-CA/maestro
ATTENTION : L’installation du thermostat doit être effectuée par un électricien certié.
NOTE : Un thermostat Maestro ne peut pas contrôler plus de 4 000 Watts au total.
6
Page 7
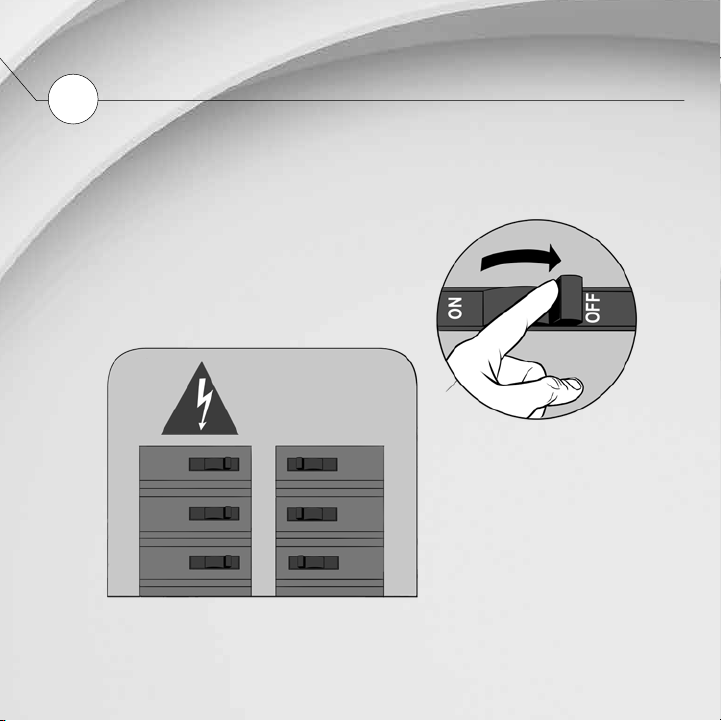
TURN OFF THE HEATING SYSTEM’S ELECTRICAL CURRENT
1
COUPER L’ALIMENTATION ÉLECTRIQUE
DU SYSTÈME DE CHAUFFAGE
7
Page 8
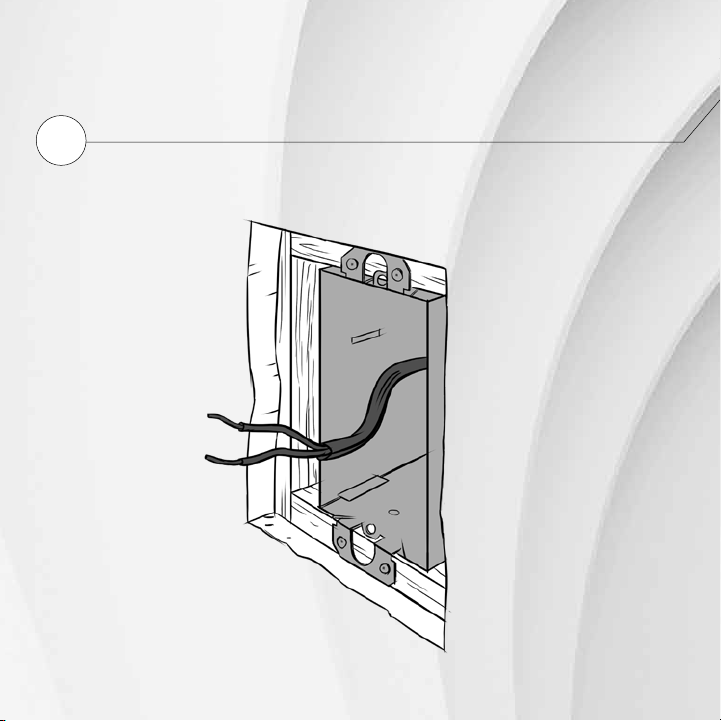
REMOVE PREVIOUS THERMOSTAT
2
RETIRER L’ANCIEN THERMOSTAT
8
Page 9
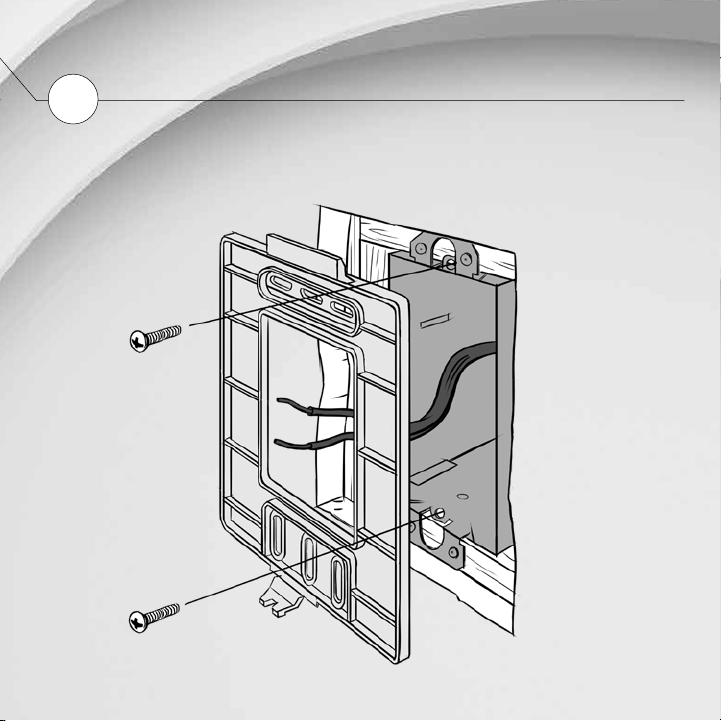
SECURE THE MAESTRO THERMOSTAT
MOUNTING PLATE TO THE ELECTRICAL BOX
3
FIXER LA PLAQUE DE MONTAGE DU THERMOSTAT
MAESTRO À LA BOÎTE ÉLECTRIQUE
9
Page 10
10
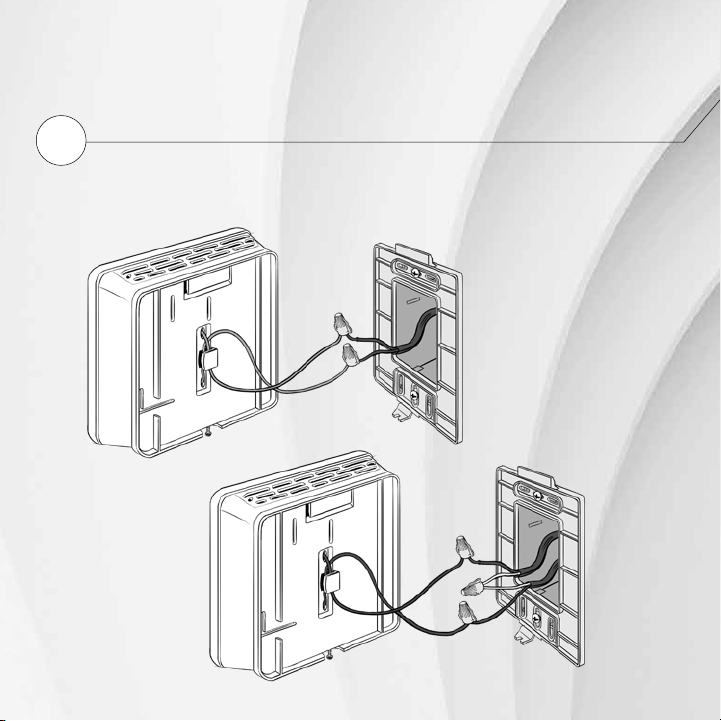
CONNECT THE WIRES INSIDE THE CAPS PROVIDED
4
RACCORDER LES FILS ÉLECTRIQUES AVEC LES CAPUCHONS
DE CONNEXION FOURNIS
2 WIRES
2 FILS
4 WIRES
4 FILS
Page 11
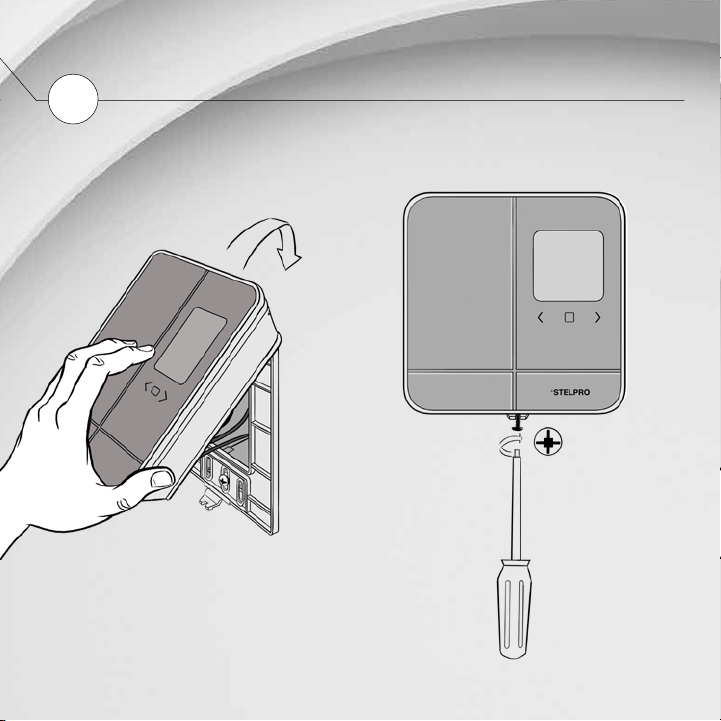
SECURE THE THERMOSTAT ON THE MOUNTING PLATE
5
FIXER LE THERMOSTAT SUR LA PLAQUE DE MONTAGE
11
Page 12
12
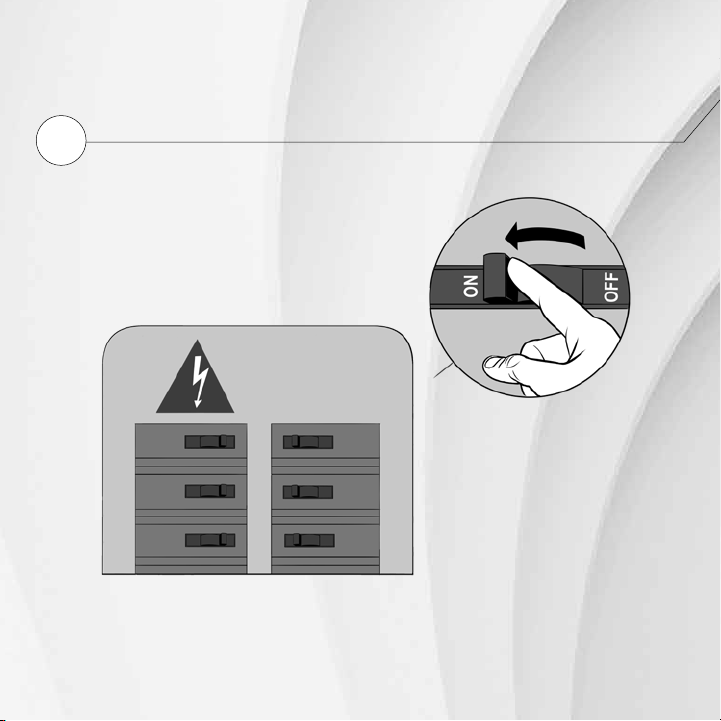
TURN ON THE ELECTRICAL CURRENT
6
RÉTABLIR L’ALIMENTATION ÉLECTRIQUE
Page 13
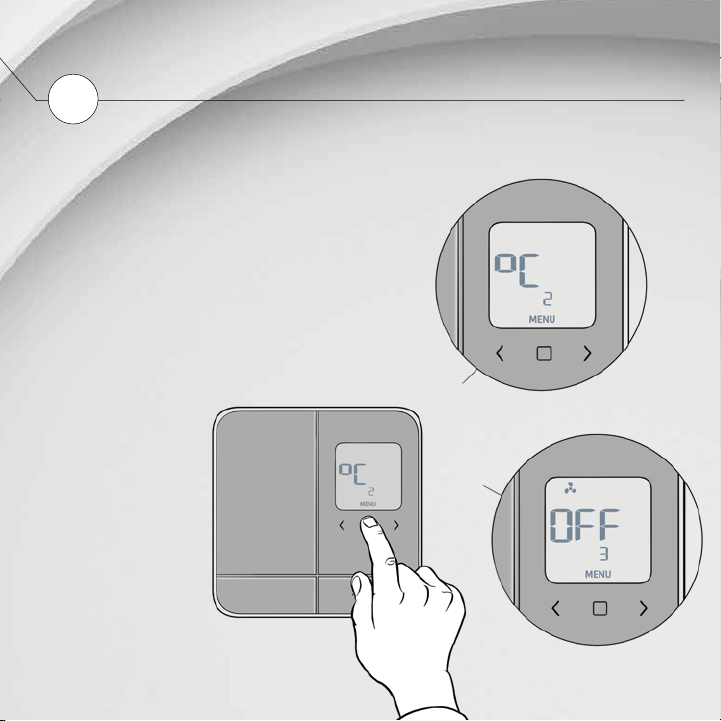
SET-UP BASIC OPTIONS ON FIRST START
7
EFFECTUER LES RÉGLAGES DE BASE AU PREMIER DÉMARRAGE
2 SETTINGS TO BE SET:
> TEMPERATURE FORMAT (°Celsius / °Fahrenheit)
> HEATING MODE (Baseboard / Fan-forced heater)
Use the LEFT/RIGHT arrows to change the selection
and used CENTER button to conrm.
2 PRÉFÉRENCES À RÉGLER :
> FORMAT DE TEMPÉRATURE (°Celsius / °Fahrenheit)
> MODE DE CHAUFFAGE (Plinthe / Aéroconvecteur)
Utilisez les èches GAUCHE/DROITE pour modier la
sélection et le bouton CENTRE pour conrmer.
TEMPERATURE FORMAT
FORMAT DE TEMPÉRATURE
HEATING MODE
MODE DE CHAUFFAGE
13
Page 14
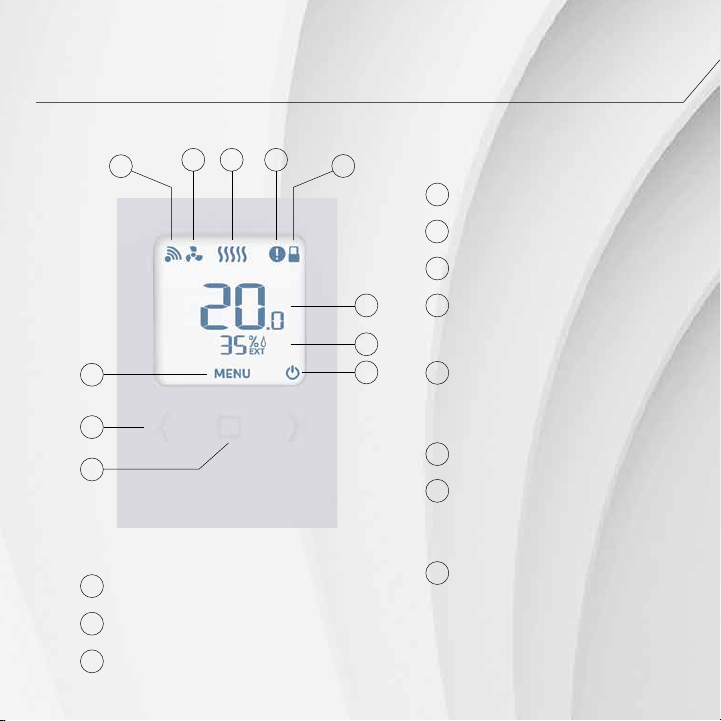
THERMOSTAT INTERFACE
INTERFACE DU THERMOSTAT
14
1
9
10
11
ZIGBEE CONNECTED
1
CONNEXION ZIGBEE ÉTABLIE
HEATING MODE
2
MODE DE CHAUFFAGE
HEATING POWER
3
PUISSANCE DE CHAUFFAGE
2 3 4
5
OVERHEATING APPLIANCE
4
APPAREIL EN SURCHAUFFE
KEYBOARD LOCKED
5
CLAVIER VERROUILLÉ
ROOM TEMPERATURE
6
TEMPÉRATURE AMBIANTE
RELATIVE AMBIENT HUMIDITY/
6
7
8
7
OUTDOOR TEMPERATURE
HUMIDITÉ RELATIVE AMBIANTE OU
TEMPÉRATURE EXTÉRIEURE
SETPOINT IS LOW OR OPEN WINDOW
8
DETECTED (BLINKING ICON)
TEMPÉRATURE DE CONSIGNE BASSE OU
DÉTECTION DE FENÊTRE OUVERTE
(ICÔNE CLIGNOTANTE)
ADVANCED MENUS INDICATOR
9
INDICATEUR DES MENUS AVANCÉS
ADJUST THE ROOM TEMPERATURE /
10
MODIFY THE MENU SELECTION
RÉGLER LA TEMPÉRATURE DE CONSIGNE
/ MODIFICATION DE LA SÉLECTION DANS
LES MENUS AVANCÉS
TOGGLE BETWEEN RELATIVE AMBIENT
11
HUMIDITY AND OUTDOOR TEMPERATURE / ACCESS TO ADVANCED MENUS /
CONFIRM IN ADVANCED MENUS
ALTERNER ENTRE HUMIDITÉ RELATIVE
AMBIANTE ET TEMPÉRATURE EXTÉRIEURE /
ACCÉDER AUX MENUS AVANCÉS / CONFIR
MATION DANS LES MENUS AVANCÉS
-
Page 15
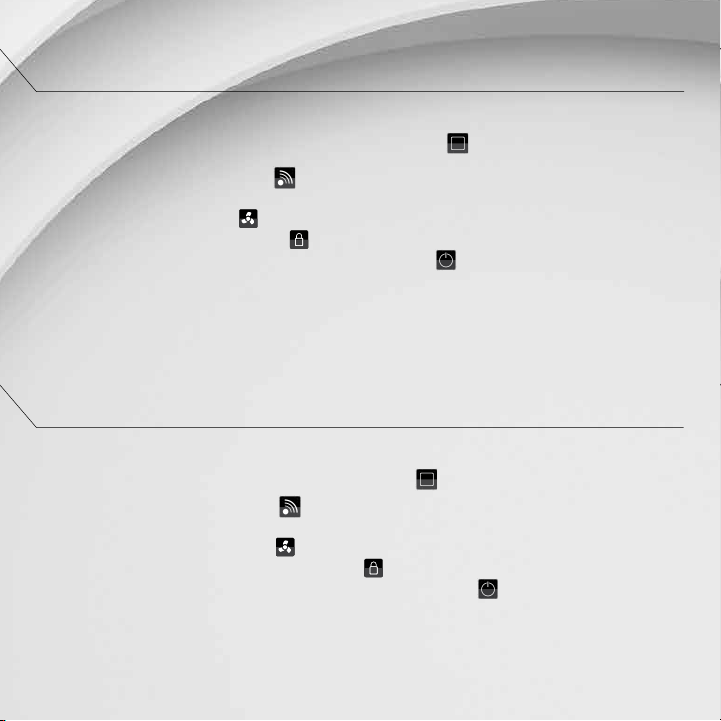
THERMOSTAT ADVANCED MENUS
MODIFY THE SETTINGS
To access the advanced menus, hold the CENTER button for 3 seconds.
• Menu 1: Zigbee connectivity ( )
• Menu 2: Temperature format (°C or °F)
• Menu 3: Heating mode ( )
• Menu 4: Lock/unlock keyboard ( )
• Menu 5: Activate/deactivate open window detection ( )
• Menu 6: Activate/deactivate proximity detection
• Menu Reset to Default (dEF)
MENUS AVANCÉS DU THERMOSTAT
MODIFIER LES RÉGLAGES
Pour accéder aux menus avancés, touchez le bouton 3 secondes.
• Menu 1 : Connectivité Zigbee ( )
• Menu 2 : Format de température (°C ou °F)
• Menu 3 : Mode de chauffage ( )
• Menu 4 : Verrouiller/déverrouiller le clavier ( )
• Menu 5 : Activer/désactiver la détection de fenêtre ouverte ( )
• Menu 6 : Activer/désactiver la détection de proximité
• Menu Réinitialisation par défaut (dEF)
15
Page 16

For further information or to consult the complete User Guide,
please visit our website.
stelpro.com/en-CA/maestro
Pour obtenir de plus amples renseignements ou pour consulter
le guide d'utilisation complet, visitez notre site web.
16
stelpro.com/fr-CA/maestro
QS-SMT-0518
 Loading...