

Page 1
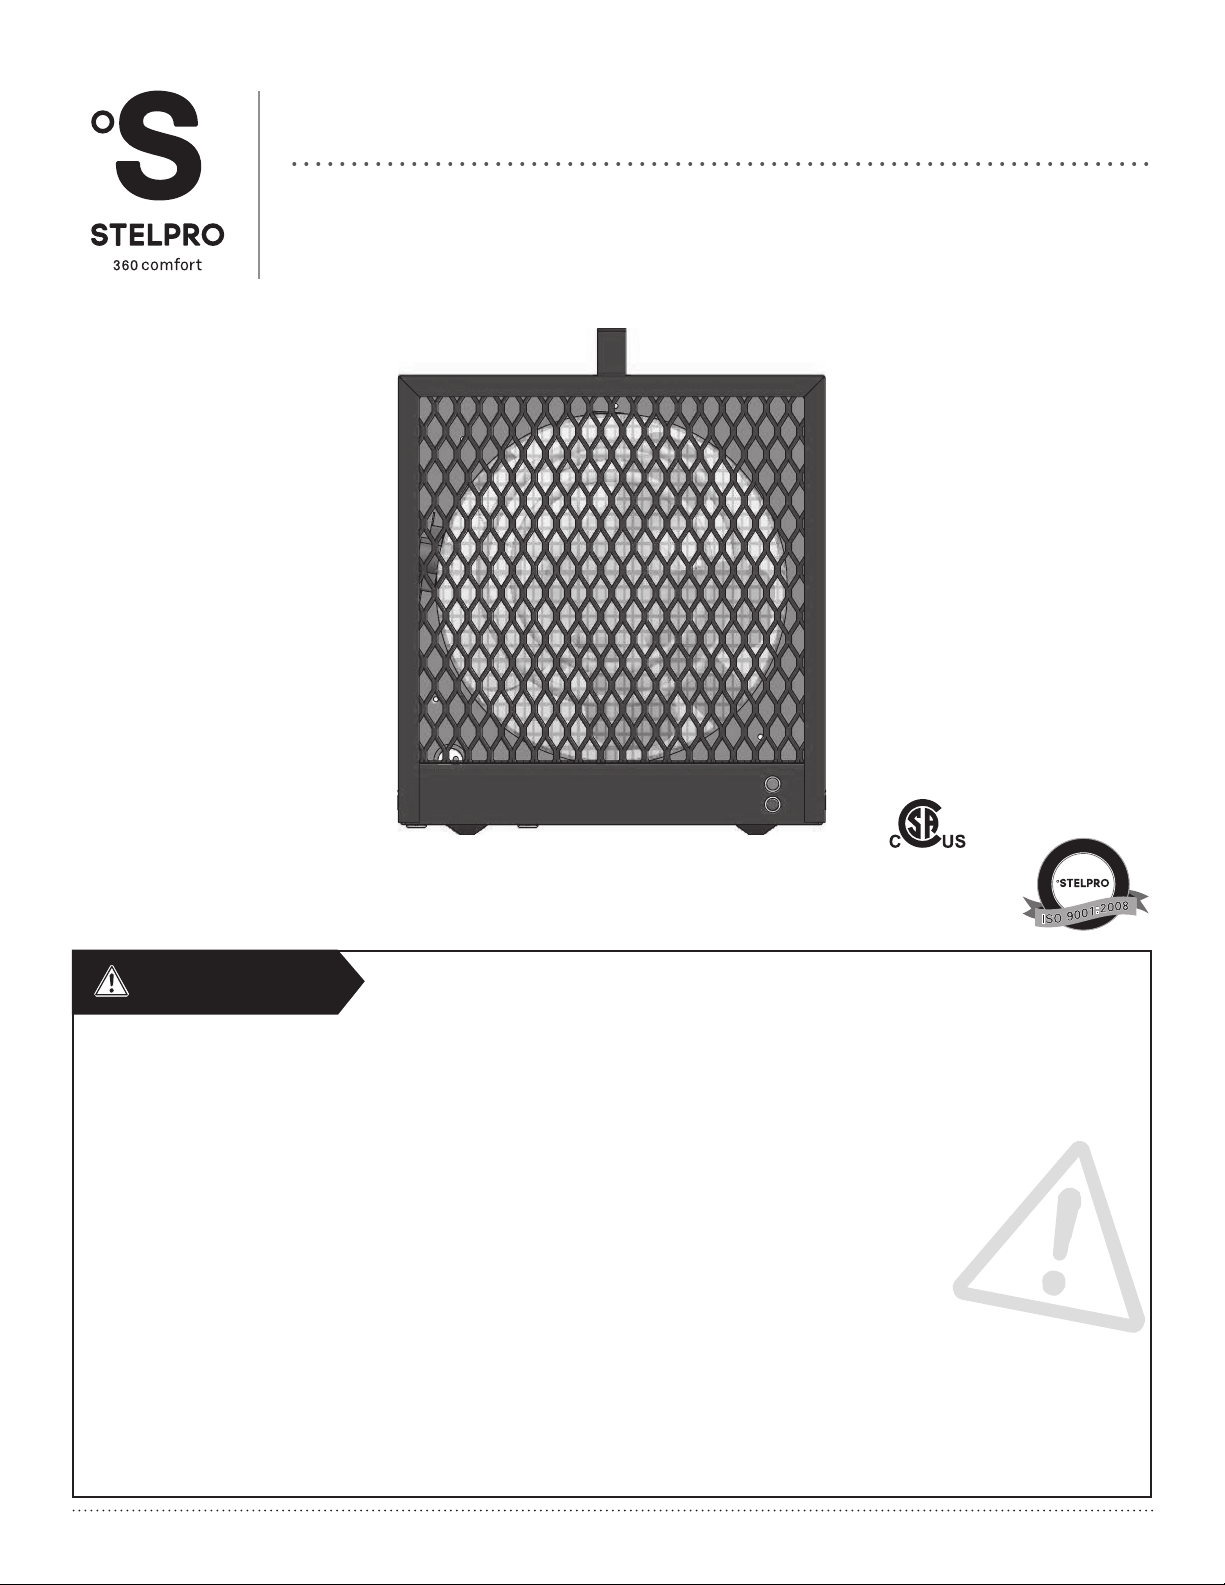
USER’S GUIDE
ASCH SERIES
PORTABLE HEATER
REPLACEMENT COMPONENT LIST INCLUDED
G
E
I
R
S
-
T
E
É
I
R
F
E
I
D
T
R
Q
E
U
C
A
This unit
complies with
the CSA
É
T
I
L
A
U
Q
E
M
È
T
S
Y
S
L
I
T
standards
WARNING
This product is designed and approved for use under normal, dry conditions. It is not intended for use or storage within damp and/or dusty conditions. It
gasoline, chlorine, cleaning products, sawdust, etc.
When choosing a heater, assure that it is suitable to the application. Should your application possess any of the above-mentioned conditions, then your
Stelpro Design inc. does not warrant their products should they be used under any condition to which their design is not intended, nor shall they be held
responsible for any incident arising as a result of improper use.
Please ensure that the plug of the unit is not impaired (color changes, rust, distorsion, etc.). It is important to inspect the plug and the electrical outlet at least
It is the user’s responsibility to evaluate if the unit must be cleaned based on the amount of dirt accumulated on and inside air vents. Accumulated dirt can
shock, and injury to persons, including the following. If these instructions are not followed, the warranty will be considered null and void and the manufacturer
deems no further responsibility for this product.
This unit must be used in accordance with the electrical and building codes effective in your region.
Protect the heating unit with the appropriate circuit breaker or fuse, in accordance with the nameplate.
Make sure the line voltage (volt) is consistent with that indicated on the unit’s nameplate.
Connect to properly grounded outlets only. (This item may be omitted if the heater is not provided with a grounding type attachment plug.)
Switch off the power at the circuit breaker/fuse before installing, repairing and cleaning the unit. To disconnect heater, turn controls to off, then remove plug
from outlet.
IMPORTANT INSTRUCTIONS
Y
S
Y
S
T
E
M
For further information or to consult this guide online, please visit our website at www.stelpro.com
INSASCH0415
Page 2
WARNING
Make sure the unit is appropriate for the intended use (if needed, refer to the product catalog or a representative).
Recommended heating capacity:
1.25 W/cubic foot (0.03 m³).
It corresponds to 10 watts / square foot (0.09 m²)
and to increase your comfort, it is recommended to install several units instead of one. For example, 2 X 1000 W rather than 1 X 2000 W.
Respect distances and positions indicated in the installation section. Make sure the unit does not fall on its side.
Extreme caution is necessary when any heater is used by or near children or invalids and whenever the heater is left operating and unattended.
This heater is not intended for use in bathrooms, laundry areas and similar indoor locations. Never locate heater where it may fall into a bathtub or other water
container. Do not use it if any part has been immersed. Moreover, do not turn it on or off when standing in water or if your hands are wet.
Do not run cord under carpeting. Do not cover cord with throw rugs, runners, or similar coverings. Do not route cord under furniture or appliances. Arrange
with a clock-operated switch).
outlet using a proper clamp system.
Always plug heaters directly into a wall outlet/receptacle. Never use with an extension cord or re locatable power tap (outlet/power strip).
This heater is hot when in use. To avoid burns, do not let bare skin touch hot surfaces. If provided, use handles when moving this heater. Be careful and
responsible when using it. The unit must cool down for few minutes since it will stay warm for some time after shut-down.
Keep combustible materials, such as furniture, pillows, bedding, papers, clothes and curtains at least 3 feet (0,9 m) from the front of the heater and keep them
away from the sides and rear (sides and rear restrictions apply to location dedicated heaters only).
You must leave at least 6 in. (152 mm) of clearance between the air inlet of the heater and the walls of the room where the heater will be installed.
Do not install on a wall behind a door.
are used or stored. Store it in a dry place when not using it.
Some areas are dustier than others. Thus, it is the user’s responsibility to evaluate if the unit must be cleaned based on the amount of dirt accumulated on
these instructions.
The thermal protection activation indicates that the unit has been subjected to abnormal operating conditions. If the thermal protection remains activated or
Do not operate any heater with a damaged cord or plug or after the heater malfunctions, has been dropped or damaged in any manner. Discard heater, or
return to authorized service facility for examination and/or repair.
This heater includes a visual alarm (red light) to warn that parts of the heater are overheating. If the red light turns on, immediately turn heater off and inspect
Always unplug the heater when not in use.
minimum size and rated no less than 6 kW.
When transporting or storing the heater and cord, keep in a dry place, free from excessive vibration and store so as to avoid damage.
SAVE THESE INSTRUCTIONS
Note:
instances, the instruction manual may not entirely match all the functions of the actual product. Therefore, the actual product and packaging, as well as the name
and illustration, may differ from the manual.
2
INSASCH0415
Page 3
SPECIFICATIONS, TECHNICAL DRAWINGS AND INSTALLATION
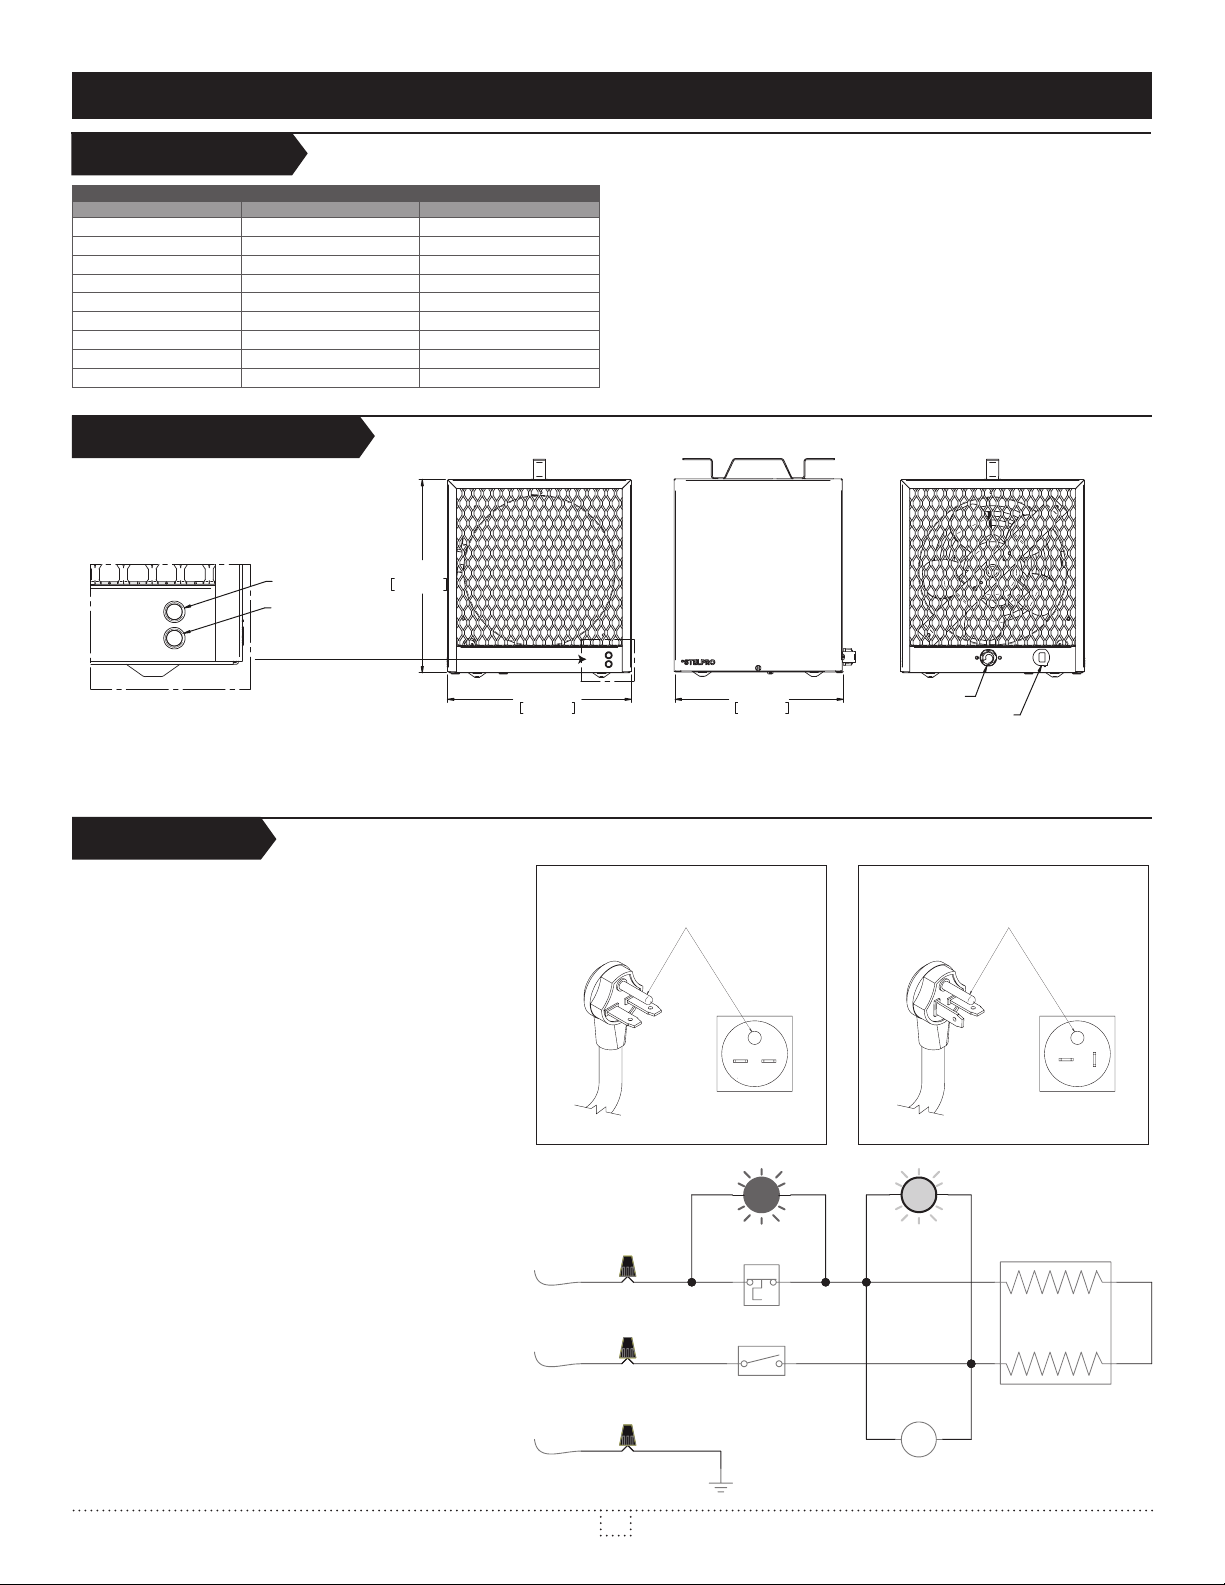
SPECIFICATIONS
MODELS ASCH48T, ASCH4800T ASCH40T
VOLTS 208/240 V 240 V
WATTS 3600/4800 W 4000 W
AMPS 17.3/20 A 16.67 A
FREQUENCY 60 HZ 60 HZ
BTU/H 12286/16382 13648
WEIGHT
LENGTH 9 5/8" / 245 MM 9 5/8" / 245 MM
WIDTH 10 1/2" / 267 MM 10 1/2" / 267 MM
HEIGHT 11" / 279 MM 11 " / 279 MM
PORTABLE HEATER
TECHNICAL DRAWINGS
11 1/16
281mm
POWER ON
OVER TEMP
GREEN LIGHT
RED LIGHT
DETAIL A
10 17/32
267mm
A
9 5/8
245mm
THERMOSTAT
CABLE EXIT 30A 250V
(3600/4800 W models)
CABLE EXIT 20A 250V
(4000 W models)
INSTALLATION
N.B. Cut off power supply at circuit breaker/fuse
before proceeding to the installation and wiring
connections. This product must be connected by a
building codes effective in your region.
vicinity of the heater. Do not mount in contact with
combustible material. Do not mount in close proximity
to another unit.
abnormal conditions. Do not partially or fully cover or obstruct
the front of this heater.
drapery, furnishings, and other combustibles at least 3 feet (0.9
m) from the front of the heater and away from the side and rear.
product.
2. Plug the unit into a properly grounded outlet only.
3. Check the heater’s voltage and amperage indicated on
the back of the unit to make sure it is compatible with the
electrical supply. Follow all other indications written on the
nameplate.
4. This heater is not suitable for use in wet or very humid
locations.
5. Before starting the unit, make sure the power cord is fully
inserted into the wall outlet. If it is a ceiling outlet, it is
clamp system.
FIGURE 1: PLUG AND OUTLET CONFIGURATION
FOR 240 VOLT, 30 AMP. CIRCUIT.
GROUND
OUTLET
PLUG
R
Prot1
Auto
TH1
12
FIGURE 1: PLUG AND OUTLET CONFIGURATION
FOR 240 VOLT, 20 AMP. CIRCUIT.
GROUND
OUTLET
PLUG
G
E1
M1
M
3
INSASCH0415
Page 4
INSTALLATION, OPERATION AND MAINTENANCE
11 3/4"
OPTION
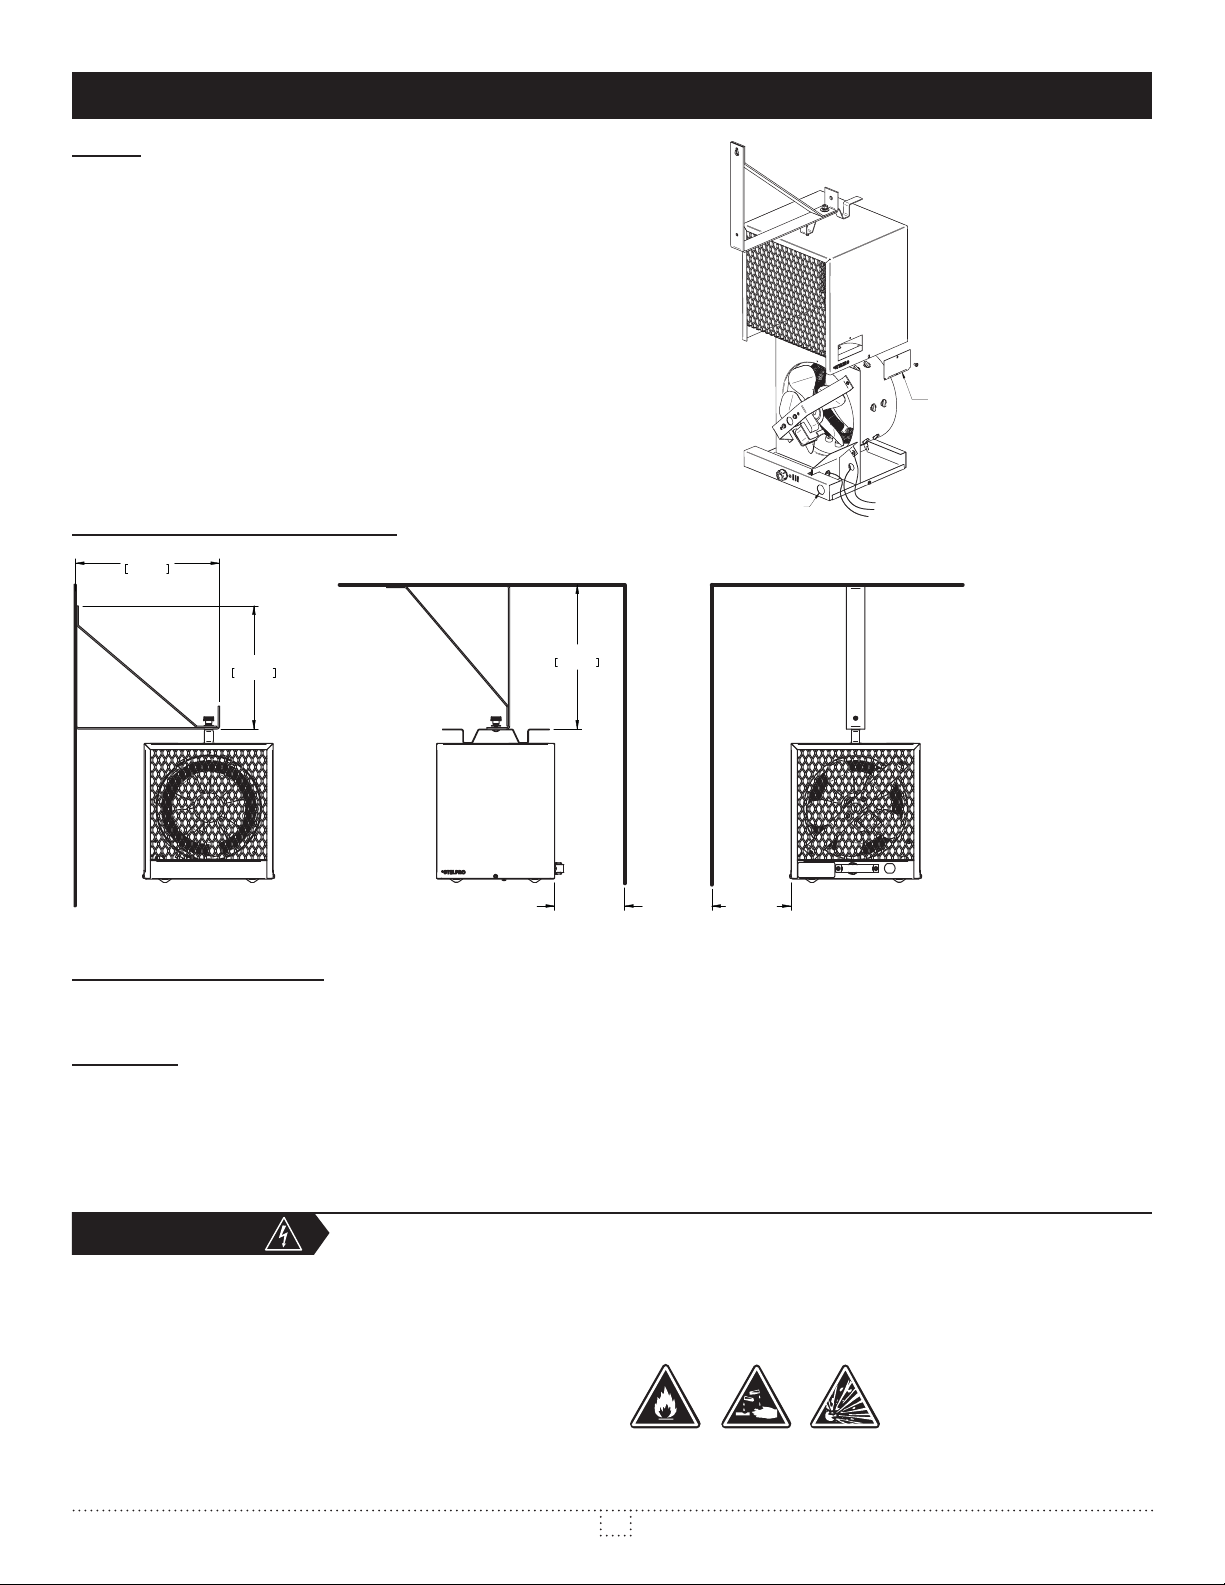
Wall or ceiling installation.
Do not install the unit at less than 6 in (152 mm) from the wall and/or the ceiling.
to, painting, gasoline, chlorine, sawdust and cleaning products.
The unit must be mounted for a horizontal exhaust air only.
Maximum installation height: 8 feet (2.44 m).
The wall or ceiling must be solid enough to support the combined weight of the unit
and the mounting bracket: 13 lbs (5.9 kg)
Secure the bracket to the framing of the wall or ceiling.
The electrical wiring must be done in the appropriate location inside the unit for the
POWER SUPPLY
ACCESS PANEL
MOUNTING BRACkET INSTALLATION
299mm
10 1/16"
255mm
FRONT
SIDE
11 3/4"
299mm
6"
[152mm]
MINIMUM
CABLE ENTRY
30A / 250V or 20A / 250V
6"
[152mm]
MINIMUM
L1
REAR
GND
L2
GROUNDING INSTRUCTIONS
This heater is for use on 240 or 208 Volts. The cord has a plug as shown on Figure 1. No adapter should be used with this unit. The type outlet is a 240 or 208
Volt grounding outlet. When properly installed, it provides a ground connection through the cord to the heater to protect the operation from electric shock.
OPERATION
Warning: the heater must be properly installed before it is used.
Set the thermostat to its full counter-clockwise position. Plug the unit into a properly grounded 240 V outlet in accordance with all the guidelines indicated in
this guide. Set the thermostat to its furthest clockwise position. The fan should turn on and the unit will start heating the room (the green pilot light will turn on).
temperature, turn the thermostat clockwise. To lower the temperature, turn the thermostat counter-clockwise. To turn off the heater, turn the thermostat to its
MAINTENANCE
All other repairs and maintenance other than those described in
regularly. Cut off power supply at circuit breaker/fuse and wait for
the unit to cool down before cleaning.
Turn off the thermostat and remove the plug from the electrical outlet before
a damp rag and non-abrasive dish soap. Do not use abrasive or chemical
dusty location, use a vacuum brush to remove dust and other foreign objects
from the grilles. Wrap the power cord of the unit around the handle when it is
disconnected and has cooled.
N.B. Note that there is electrical current linked to the unit even if
the thermostat is set off. This means that there is a risk of electric
shock as long as the unit is connected.
4
INSASCH0415
Page 5
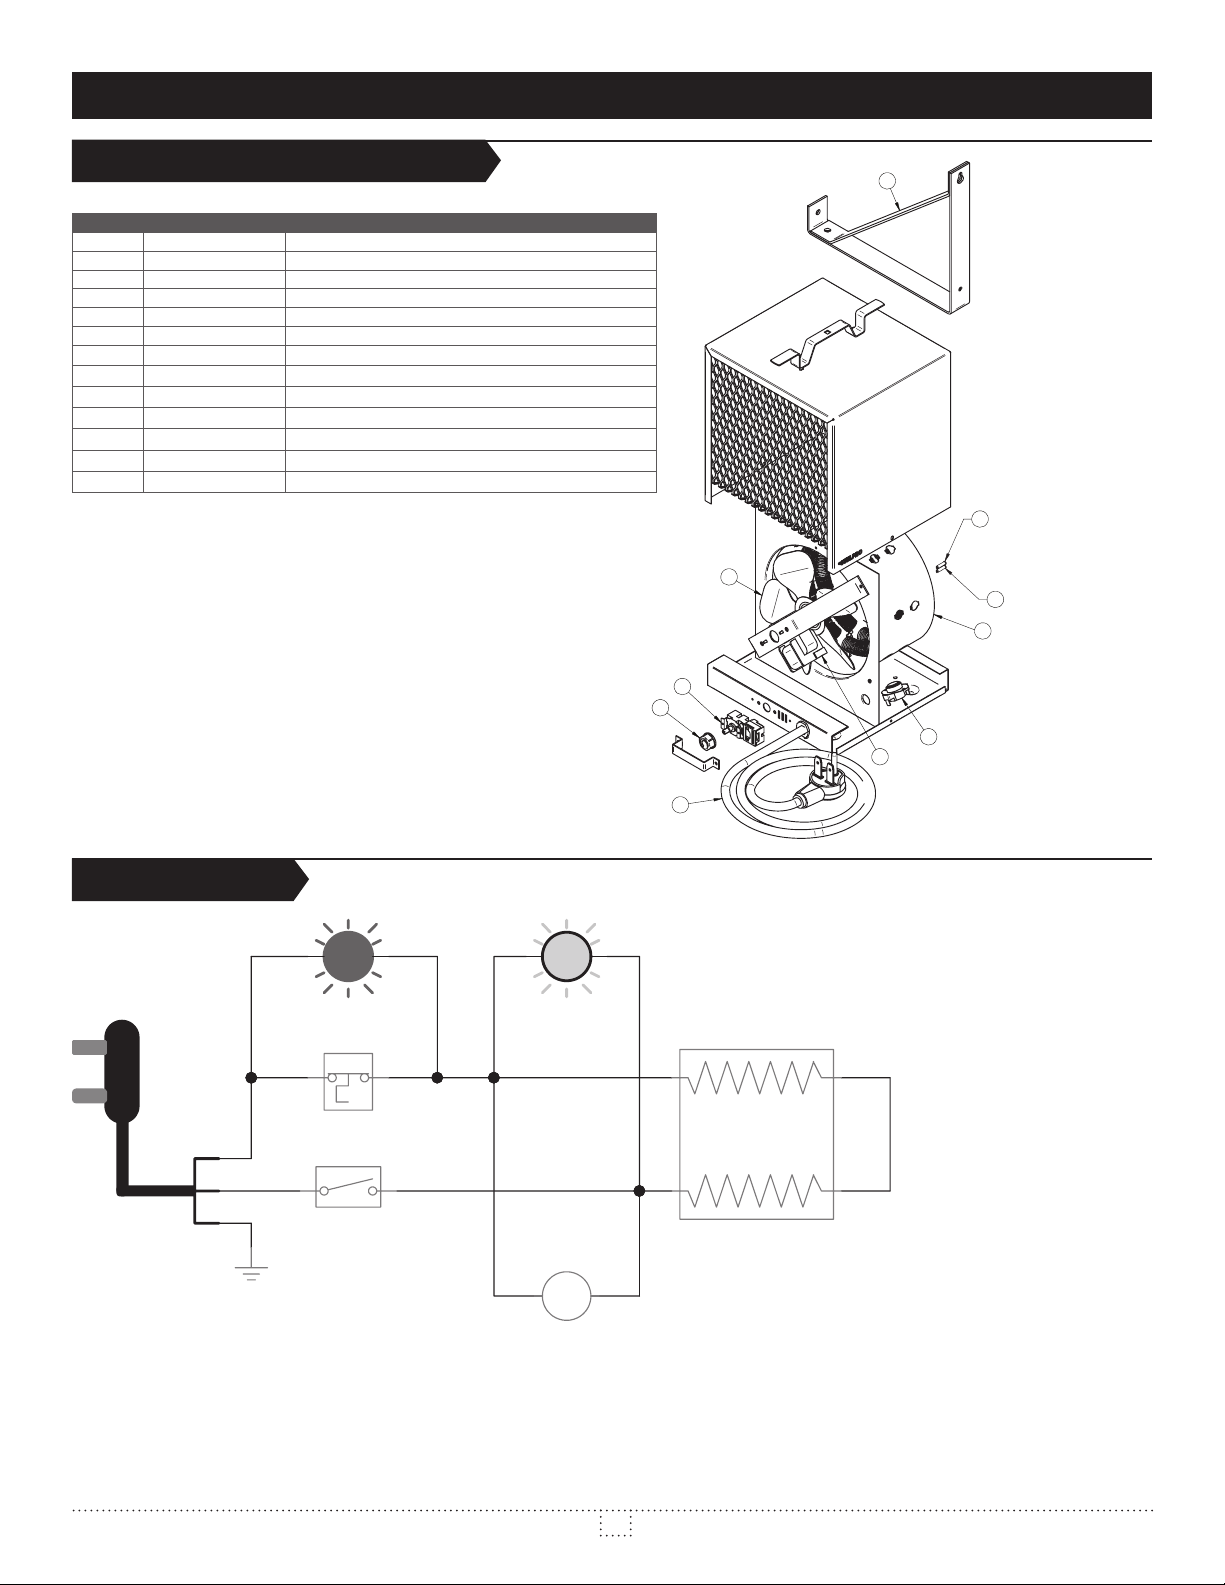
REPLACEMENT COMPONENT LIST AND WIRING DIAGRAM
REPLACEMENT COMPONENT LIST
MODELS ASCH48T AND ASCH4800T
REF. # PART # DESCRIPTION
1
2
2
3
4
4
5
6 ST-007
7 SCH-WBB
8 CD-001
8 CD-012
9
10
7
9
3
10
2
6
1
5
4
WIRING DIAGRAM
R
Prot1
Auto
TH1
12
8
G
E1
M1
M
5
INSASCH0415
Page 6
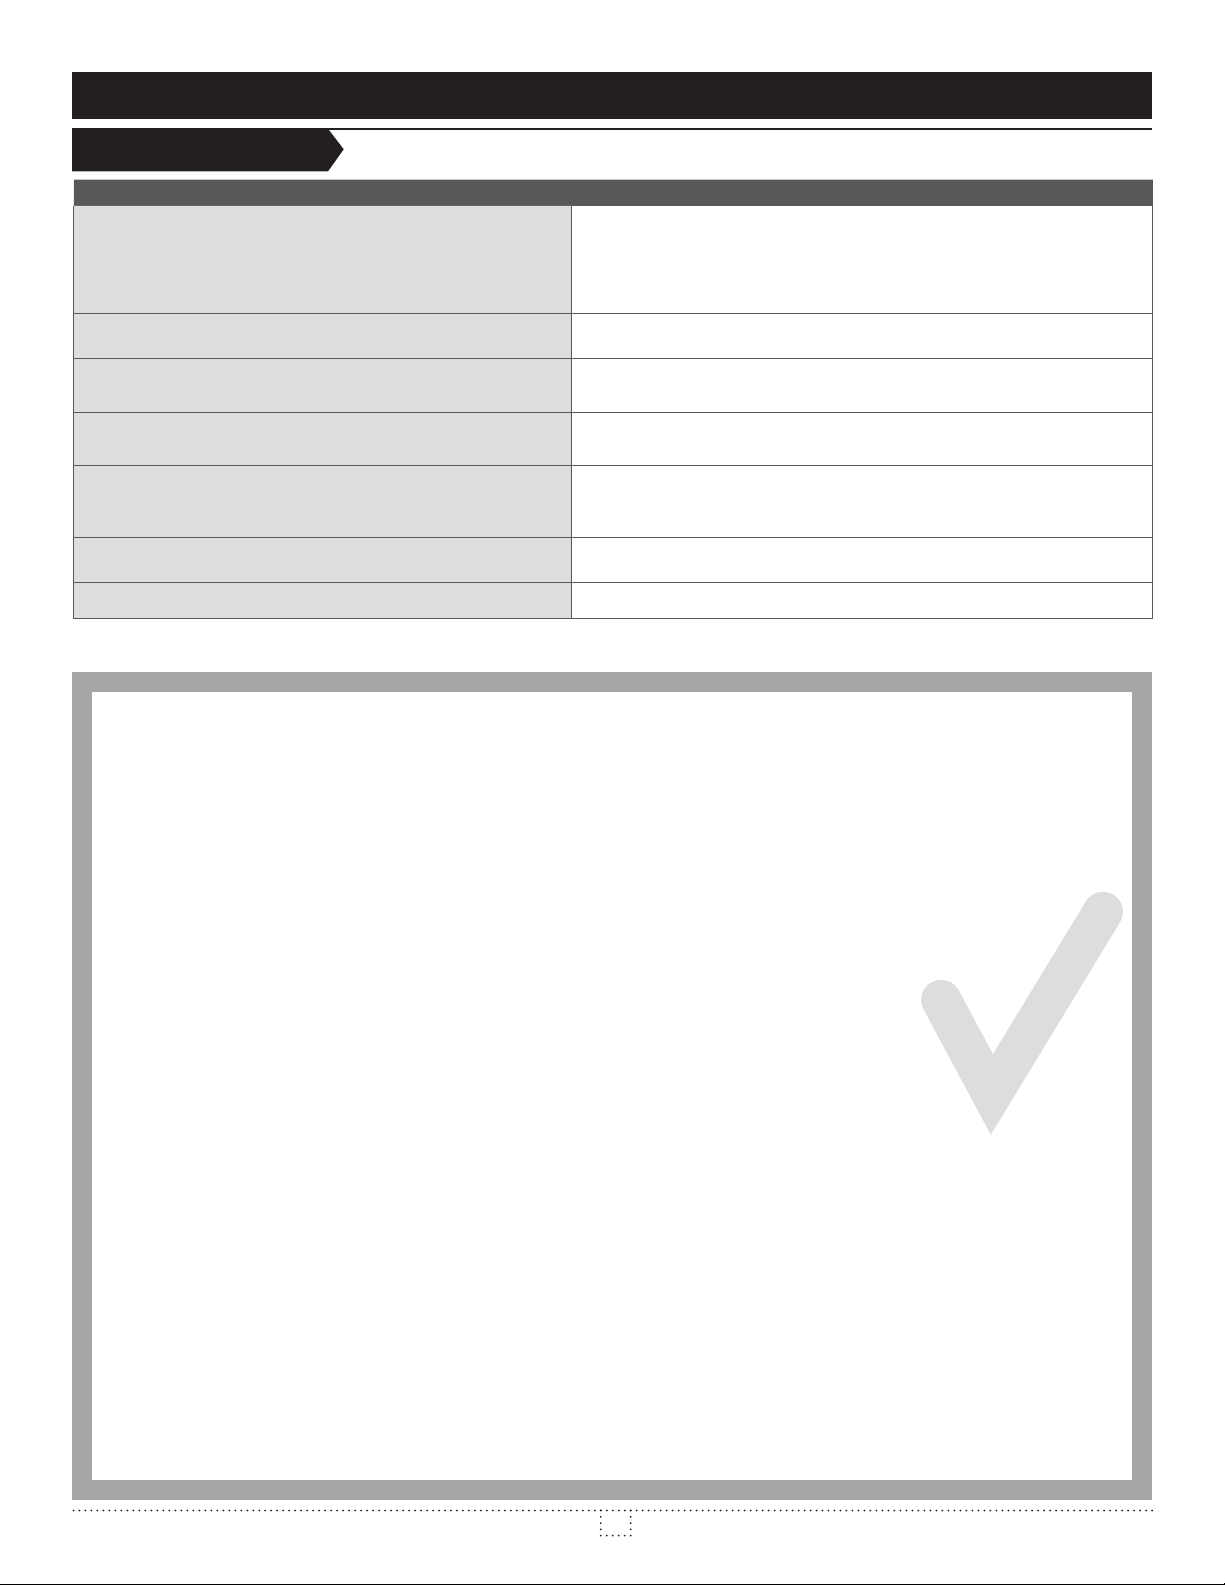
TROUBLESHOOTING
TROUBLESHOOTING
PROBLEM DEFECTIVE PART OR PART TO CHECK
Defective thermostat or wrong thermostat setting
The unit does not work
The unit runs continuously
Elements are on but the motor does not work
The enclosure is extremely hot
The desired room temperature cannot be reached
The unit cycles under control of the thermal protection
(overheat indicator)
N.B. If you do not solve the problem after checking these points, cut off the power supply at the main electrical panel and contact our customer service (see the
The thermal protection has been activated
Faulty connections
Damaged or defective plug or outlet
Protection device. See warning.
Defective thermostat or wrong thermostat setting
Heat losses higher than the unit capacity
Defective motor
The thermal protection has been activated
Blocked fan blades
Defective thermal protection
Blocked air vents
Defective motor
Defective thermostat or wrong thermostat setting
Voltage lower than that written on the nameplate
Heat losses higher than the unit capacity
Defective thermostat or wrong thermostat setting
Defective motor
Blocked air vents
Defective motor
LIMITED WARRANTY LIMITED WARRANTY LIMITED WARRANTY LIMITED WARRANTY LIMITED WARRANTY
LIMITED WARRANTY
Please read this limited warranty carefully. Subject to the terms of this warranty, Stelpro warrants its products and their components
against defects in workmanship and/or materials for the following periods from the date of purchase: 3 years (ASCH4800T) and 2 years
(ASCH48T and ASCH40T). This warranty applies only to the original purchaser; it is non-transferable and cannot be extended.
CLAIM PROCEDURE
If at any time during the warranty period the unit becomes defective, you must cut off the power supply at the main electrical panel and contact 1)
your installer or distributor, 2) your service center or 3) Stelpro’s customer service department. In all cases, you must have a copy of the invoice
and provide the information written on the product nameplate. Stelpro reserves the right to examine or to ask one of its representatives to
examine the product itself or any part of it before honoring the warranty. Stelpro reserves the right to replace the entire unit, refund its purchase price
or repair a defective part. Please note that repairs made within the warranty period must be authorized in advance in writing by Stelpro and carried out
by persons authorized by Stelpro.
1-800-363-3414 (electricians and distributors - French), 1-800-343-1022 (electricians and distributors - English), or 1-866-766-6020 (consumers).
The authorization number must be clearly written on the parcel or it will be refused.
This warranty is exclusive and in lieu of all other representations and warranties (except of title), expressed or implied, and Stelpro expressly disclaims
Stelpro’s liability with respect to products is limited as provided above. Stelpro shall not be subject to any other obligations or liabilities whatsoever,
whether based on contract, tort or other theories of law, with respect to goods or services furnished by it, or any undertakings, acts or omissions
relating thereto. Without limiting the generality of the foregoing, Stelpro expressly disclaims any liability for property or personal injury damages,
services, shutdowns, slowdowns, or for other types of economic loss or for claims of a dealer’s customers or any third party for such damages. Stelpro
This warranty does not cover any damages or failures resulting from: 1) a faulty installation or improper storage; 2) an abusive or abnormal use, lack
of maintenance, improper maintenance (other than that prescribed by Stelpro) or a use other than that for which the unit was designed; 3) a natural
negligence of the user or owner of the product. Moreover, it does not cover the cost of disconnection, transport, and installation.
The warranty is limited to the repair or the replacement of the unit or the refund of its purchase price, at the discretion of Stelpro. Any parts
replaced or repaired within the warranty period with the written authorization of Stelpro will be warranted for the remainder of the original warranty
period. This warranty will be considered null and void and Stelpro will have the right to refuse any claims if products have been altered without
corrosion or discoloration caused by excessive heat, chemical cleaning products and abrasive agents. It does not cover any damage that occurred
during the shipping.
may have other rights which vary from state to state or from province to province.
LIMITED WARRANTY LIMITED WARRANTY LIMITED WARRANTY LIMITED WARRANTY
LIMITED WARRANTY LIMITED WARRANTY LIMITED WARRANTY LIMITED WARRANTY
LIMITED WARRANTY LIMITED WARRANTY LIMITED WARRANTY LIMITED WARRANTY LIMITED WARRANTY
STELPRO DESIGN INC. | Saint-Bruno-de-Montarville | Quebec | J3V 6L7
6
INSASCH0415
 Loading...