

Page 1
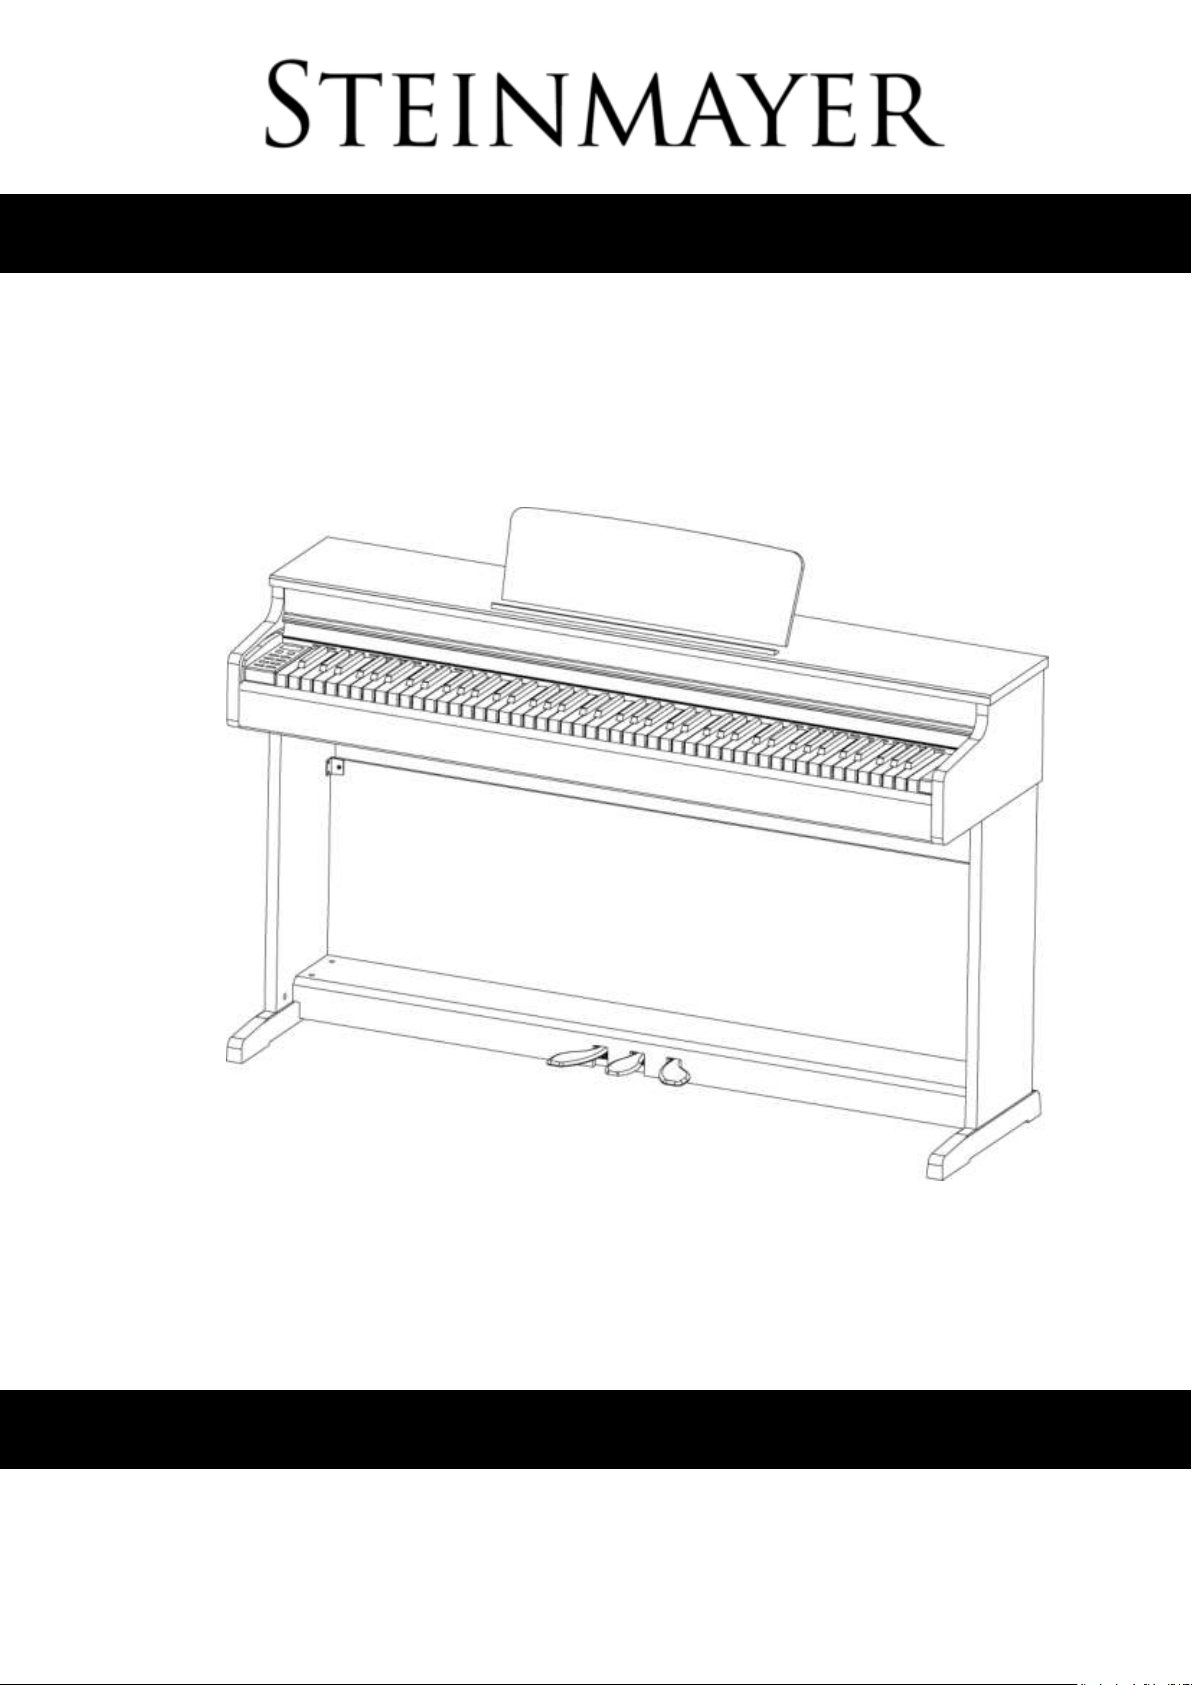
DP 321
Owner’s Manual
Version: 11/2019
Page 2

© 2019
This manual is protected by copyright. Any copying or reprint, even in excerpts, is
only allowed with consent of Musikhaus Kirstein GmbH. The same applies to
reproduction or copying of images, even in altered form.
Contents
Zusammenbau ....................................................................................................... 1
Assembly of the pedal bar and side panels .......................................................... 2
Attach the Back .................................................................................................... 2
Fitting the piano console ...................................................................................... 3
Connect the pedal cable and power cord ............................................................. 3
Basic operation ...................................................................................................... 4
Power switch ........................................................................................................ 4
Auto Power Off (APO) .......................................................................................... 4
Headphone jacks ................................................................................................... 4
Connections ........................................................................................................... 5
Pedals ..................................................................................................................... 6
Connecting the pedal cable .................................................................................. 6
How to operate the pedals ................................................................................... 6
Operating unit ........................................................................................................ 7
Bedienung Operation ............................................................................................ 8
Adjusting the volume ............................................................................................ 8
Choosing a Tone (Voice) ...................................................................................... 8
Voice-List ............................................................................................................. 8
Piano Mode .......................................................................................................... 9
Dual ..................................................................................................................... 9
Layer .................................................................................................................... 9
Split ...................................................................................................................... 9
Move the split point .............................................................................................10
Page 3

Twin Piano ..........................................................................................................10
Metronome ........................................................................................................... 10
Start / Stop ..........................................................................................................10
Metronome Tempo ..............................................................................................11
Further Metronome Parameters ..........................................................................11
“Piano Assist” Function ...................................................................................... 11
To start Piano Assist ...........................................................................................11
Selection of the accompaniment rhythm ..............................................................11
List of available drum rhythms .............................................................................12
Piano Assist Tempo ............................................................................................12
Piano Player ........................................................................................................12
Select Accompanying Pattern .............................................................................12
To start the Piano Player Playing Help ................................................................13
Chord specification for the Piano Player ..............................................................13
Select the Method ...............................................................................................14
To Move the Split Point for the Chord Input .........................................................15
“Record” Function ............................................................................................... 15
Recording ............................................................................................................15
Playback .............................................................................................................16
To Delete Recordings..........................................................................................16
Selection of a Memory Bank................................................................................17
Music Database.................................................................................................... 17
Selection of a Music Folder .................................................................................17
To Select the Track for Playback .........................................................................17
Adjusting the Tempo ...........................................................................................18
Further settings ...................................................................................................18
Bluetooth .............................................................................................................. 18
Bluetooth Audio ...................................................................................................18
Bluetooth-MIDI ....................................................................................................19
Page 4

BrainCare ............................................................................................................. 19
BrainCare Liste ...................................................................................................21
Function-menu ..................................................................................................... 21
F01 Tune .............................................................................................................22
F02 Transpose ....................................................................................................22
F03 Touch ...........................................................................................................22
F04 Touch fixed Volume .....................................................................................23
F05 Metronome Time-Signature ..........................................................................23
F06 Metronome Volume ......................................................................................23
F07 Main Voice Volume ......................................................................................23
F08 Layer Voice Volume .....................................................................................23
F09 Split Voice Volume .......................................................................................23
F10 Split point .....................................................................................................23
F11 Reverb Type ................................................................................................24
F12 Reverb Volume ............................................................................................24
F13 Effect Type ...................................................................................................24
F14 Effect Volume ...............................................................................................24
F15 String Resonance .........................................................................................24
F16 Damper Resonance .....................................................................................24
F17 Corpus Resonance ......................................................................................25
F18 Half-pedal.....................................................................................................25
F19 Piano Assist Mode .......................................................................................25
F20 Piano Assist Multi-finger ...............................................................................25
F21 Piano Assist Volume ....................................................................................25
F22 Music Playback Mode ..................................................................................25
F23 Music Playback ............................................................................................26
F24 Transpose Music Playback ..........................................................................26
F25 Bluetooth ......................................................................................................26
F26 Bluetooth Volume .........................................................................................26
Page 5

F27 AUX-In Volume ............................................................................................26
F28 MIDI Local ....................................................................................................26
F29 Auto Power Off .............................................................................................26
rSt Reset .............................................................................................................26
MIDI Chart ............................................................................................................. 27
GM-Voice .............................................................................................................. 28
Percussion ........................................................................................................... 29
Trouble Shooting ................................................................................................. 30
Product Specifications ........................................................................................ 31
WEEE Declaration ................................................................................................ 32
Page 6
Observe operating instructions!
The WARNING signal word identifies hazards that, without
precautions, could result in serious injury.
The signal word NOTE indicates general precautions that should be
observed when handling the product.
Images and screen images in this manual may differ slightly from
the actual product's appearance, as long as it does not adversely
affect the technical characteristics and safety of the product.
All personal phrasing in this manual should be considered gender
neutral.
Children should be supervised to ensure that they do not use this
device as a toy.
Never allow children to play unattended with the packaging
material.
Danger of property damage! We are not liable for accidents that
occur as a result of non-observance of the safety instructions or
due to incorrect handling.
Thank you for choosing this product.
To ensure that you are fully satisfied with this product, carefully read and understand
this manual before using this instrument. Keep this manual in a safe place. The
operating instructions must be passed on to all subsequent users.
These operating instructions apply to responsible persons and users who have been
supervised by a person responsible for their safety or instructed in the operation of
the device and who have proven to be able to handle the device.
All information in this manual has been checked to the best of our knowledge and belief.
However, neither author nor publisher can be held liable for any damage related to the
use of this manual.
Other product, brand and company names mentioned herein may be the trademarks
of their respective owners. Compliance with all applicable copyright laws is the
responsibility of the user of this document.
Page 7
Caution
Please observe the following basic information in order not to endanger yourself or
others and to avoid damage to external devices.
Warning
Do not disassemble the instrument and do not modify it. This could result in electric
shock. Entrust a specialist workshop with any necessary service and maintenance
or contact your dealer.
If you notice that the power cord is showing signs of wear, the unit shows
malfunctions, burns, smells or smokes, unplug the power cord immediately and
have a technician repair it.
Before you clean the instrument, you should disconnect it from the mains power.
Always place the instrument on a level, stable surface to ensure a secure footing.
Do not use the instrument in a damp or wet environment.
Do not place vessels that are filled with liquids on the instrument, such as vases,
glasses or bottles.
Do not place small objects on it that could slip in, such as Hairpins, sewing needles
or coins.
Do not place burning candles on the instrument.
Precautions
To avoid damage to the instrument, do not place it in places with high temperatures
or dust, do not place it next to an air conditioner and avoid direct sunlight.
Do not place the instrument near other electrical equipment to avoid interference.
Do not use force when handling the instrument or place heavy objects on it.
Disconnect the instrument from the power if you are not going to use it for a long
time. To disconnect the device from the mains, pull the plug, not the cable. Please
handle the power cable with care. It should not be near radiators, you should not
place heavy objects on it and move it so that people can not step on it or fall over it.
Please note that continuous high volume can permanently damage your hearing.
Adjust the volume carefully.
Power adapter
Please connect the supplied power adapter to a power outlet with the correct
voltage. Do not connect it to mains voltages other than those for which the
instrument is intended. Unplug the power cord if you are not going to use the
product for a long time or if there is upcoming a thunderstorm.
Page 8
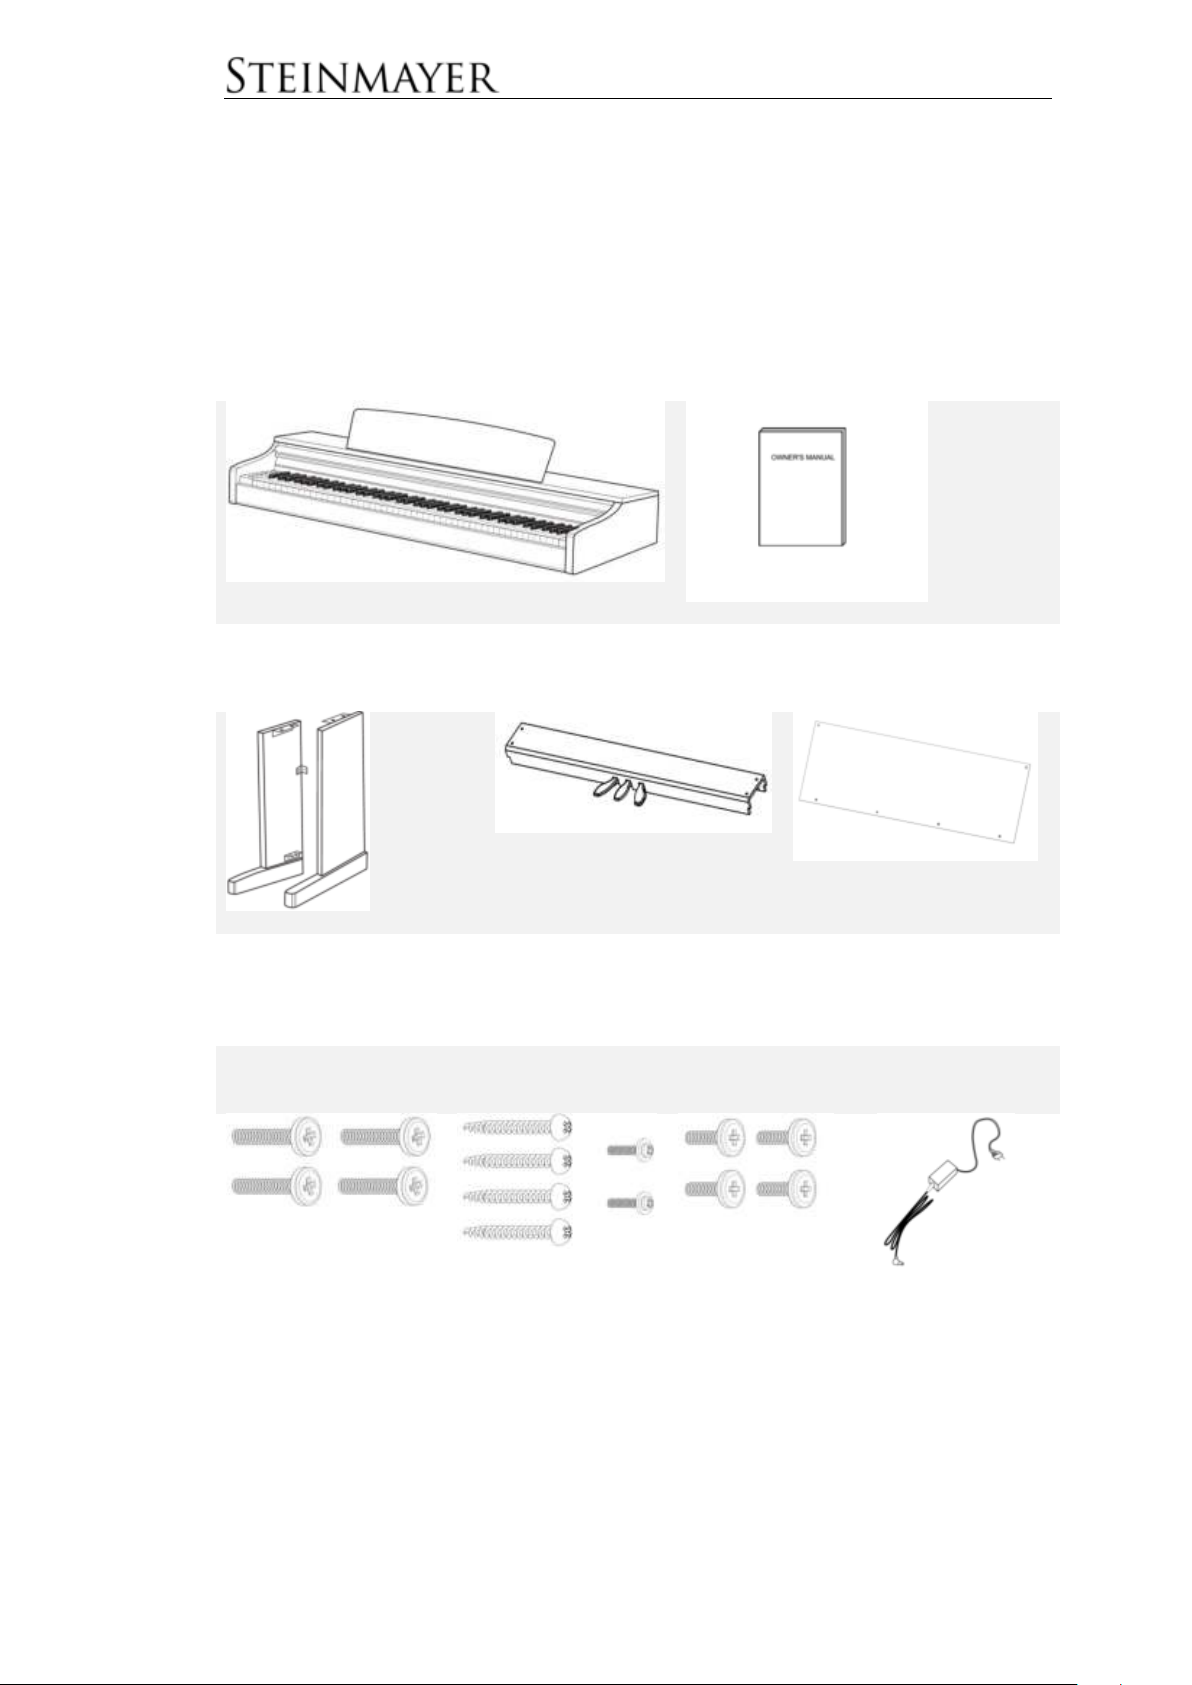
Piano console
Operating manual (possibly as download)
Left / Right foot (a, b)
Pedal unit (c)
Back (d)
Screws pedal box
Screws for the Back
Screws for the
console
Power adapter
(e) 4 pieces M6 x 25
(f) 4 pieces M3,5 x 25
(g) pieces M4 x 13
(h) 4 pieces M6 x 15
Zusammenbau
Please unpack the instrument carefully and make sure all components listed below
are in perfect condition.
If any items are missing or damaged, please contact the manufacturer.
► It may be useful to keep the packaging materials in case the instrument needs to be transported to a
faraway place.
1
Page 9
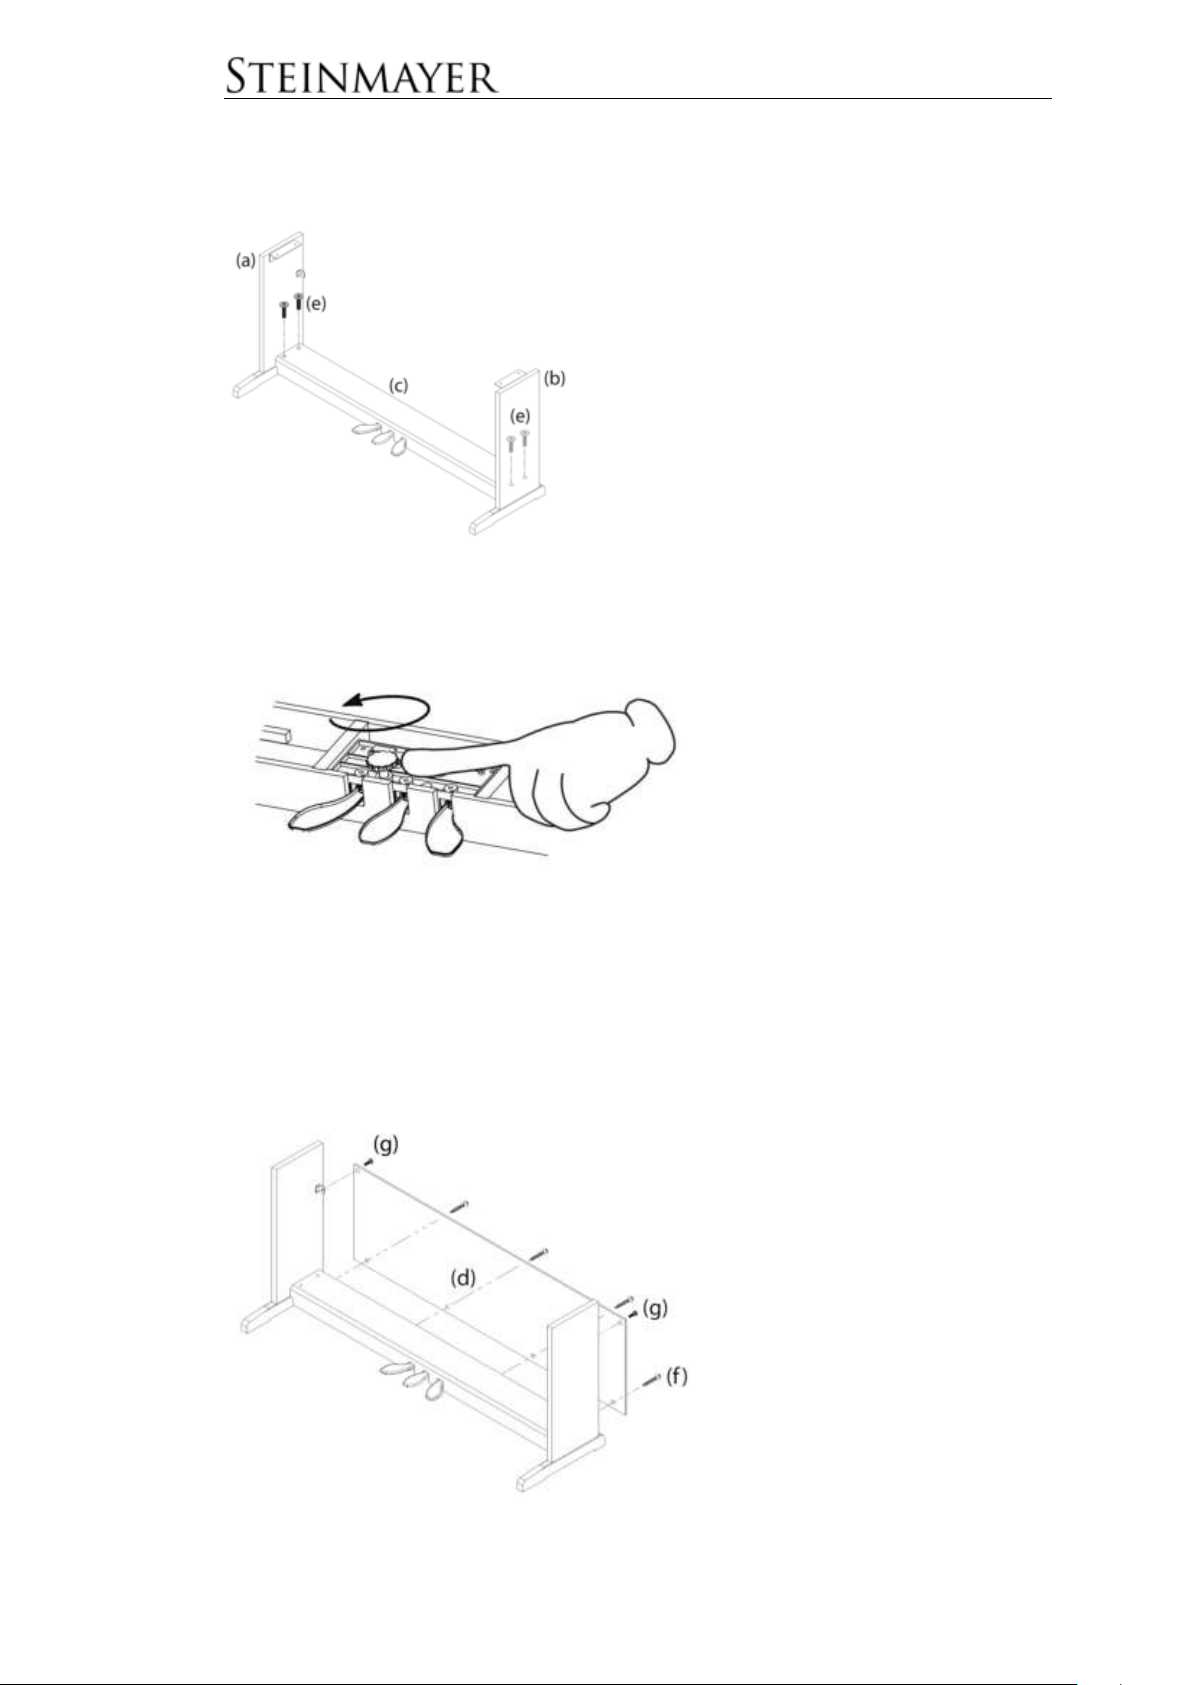
Attach the pedal bar (c) between the two
side panels (a, b) using the screws (e)
Assembly of the pedal bar and side panels
Unscrew the spacer screw under the pedal unit until it makes contact with the
ground and the pedal unit can be supported against the pedal pressure towards the
ground.
Attach the Back
Attach the Back to the base from the rear and attach it to the side panels using the
screws (g).
Make sure the base is properly aligned and secure the Back to the pedal bar using
the screws (f).
2
Page 10
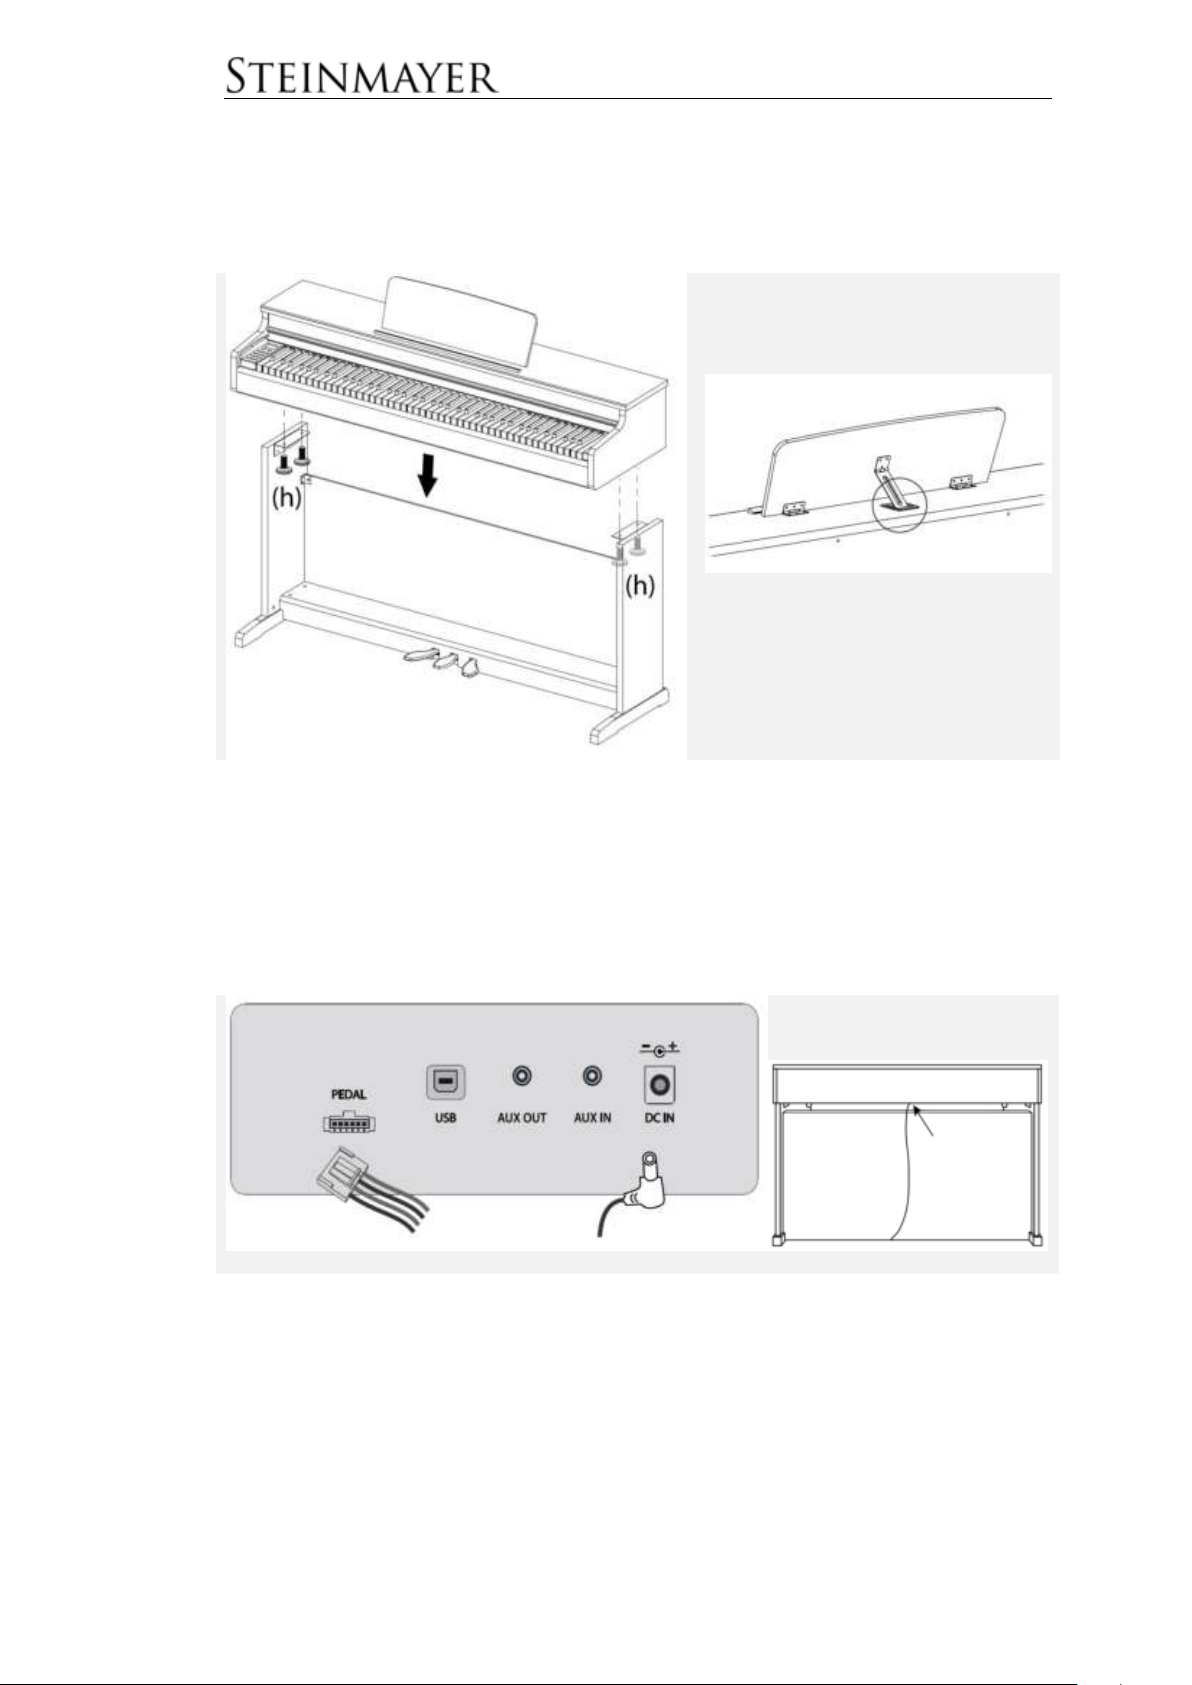
Carefully place the piano console on the base.
Pay attention to your fingers. Connect the two
components using the screws (h)
Set up the music stand and hold it
at the desired angle with the metal
base
Connect the pedal cable (this is already placed on the underside of the pedal bar)
with the matching connection on the underside of the piano console.
Fitting the piano console
Connect the pedal cable and power cord
3
Page 11
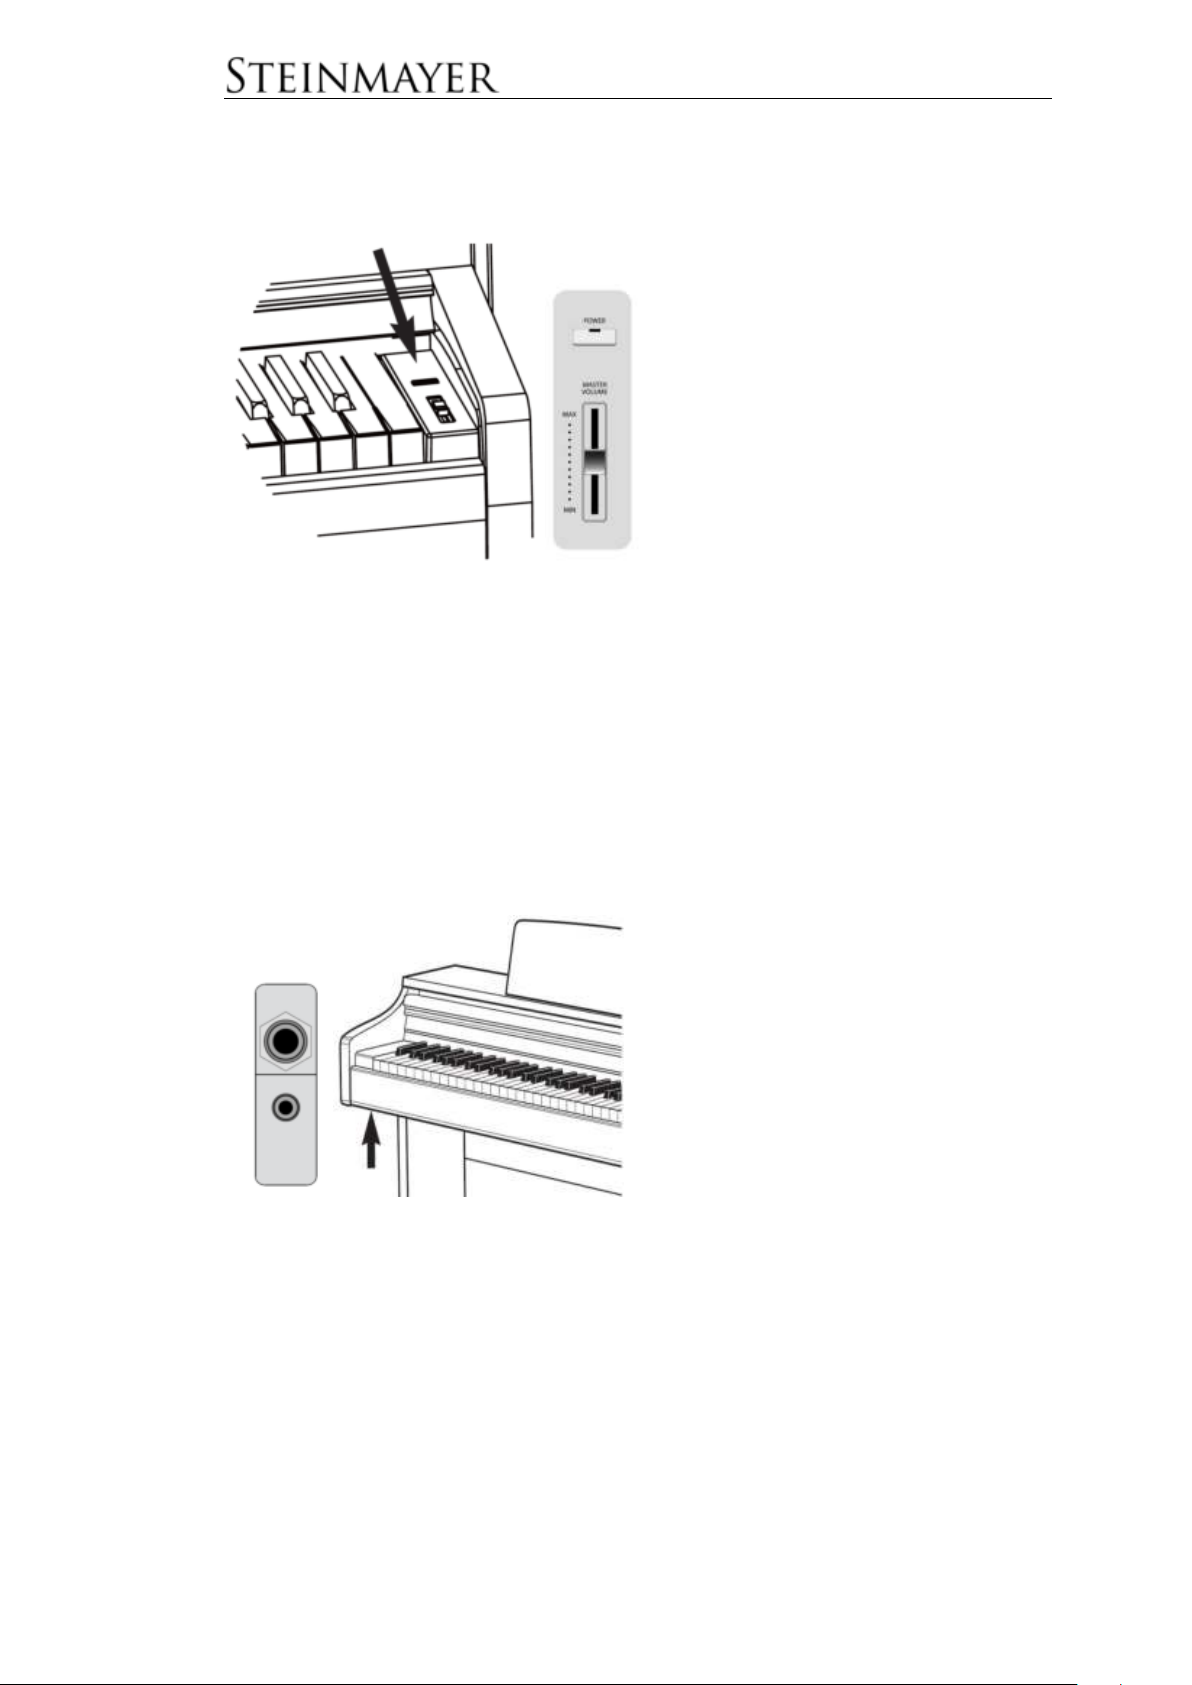
Insert the jack plug of the power supply
unit into the socket at the bottom of the
console and then plug the power plug
into the socket.
Now press the power button to turn on
the instrument.
► When switching on for the first time,
"German G.Piano” is selected as
“Voice".
► Adjust the desired volume with the
MASTER VOLUME control.
There are two headphone jacks in the
connection panel at the bottom left of
the piano console
► The loudspeakers of the instrument
are automatically deactivated when a
headphone is connected
► To allow the connection of both
commercially available headphone plug,
the instrument has a 6.35 mm and a 3.5
mm headphone jack.
Basic operation
Power switch
To turn off the instrument, press and hold the power button. All settings made will be
reset to the default value when restarting. Recordings are saved in the memory.
Auto Power Off (APO)
This instrument automatically shuts off, if it is not used for 30 minutes. This setting
can be changed via function-menu.
Headphone jacks
► Both headset connections can be used simultaneously. Thus, two players can
practice together through headphones.
4
Page 12
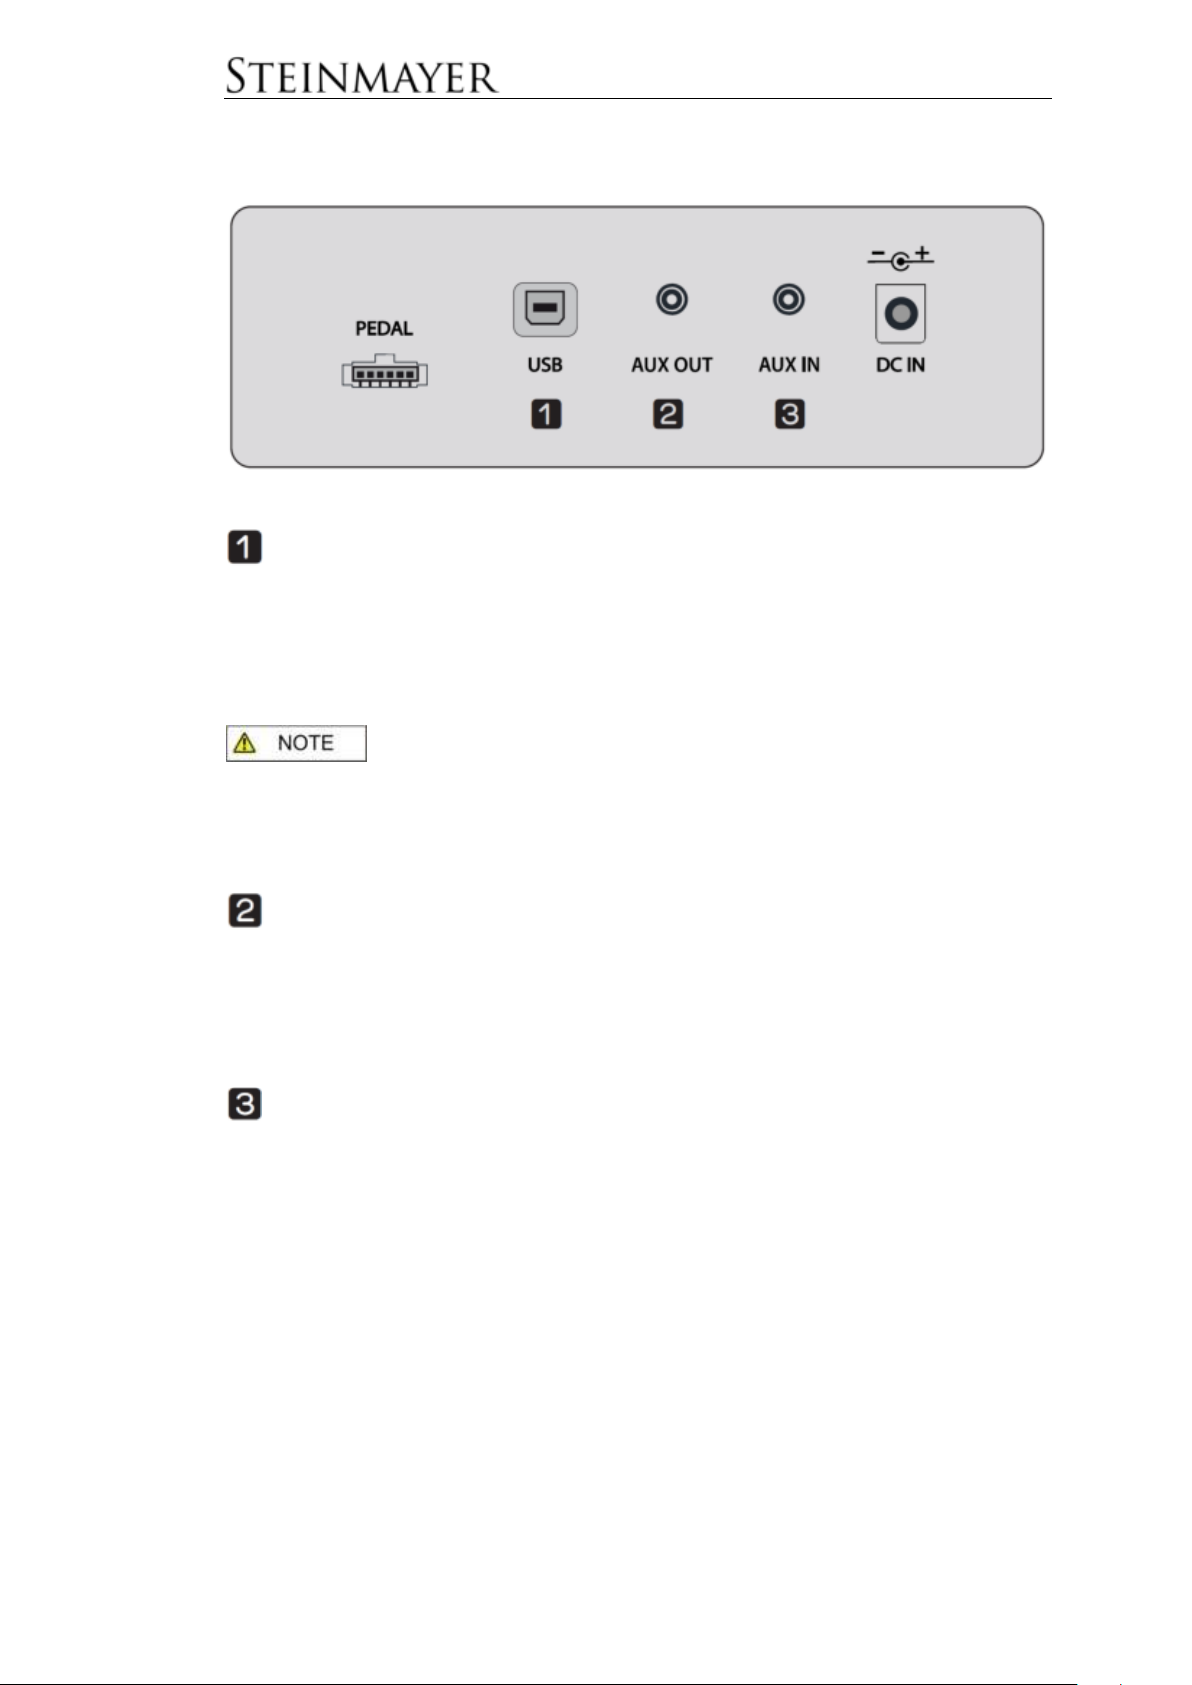
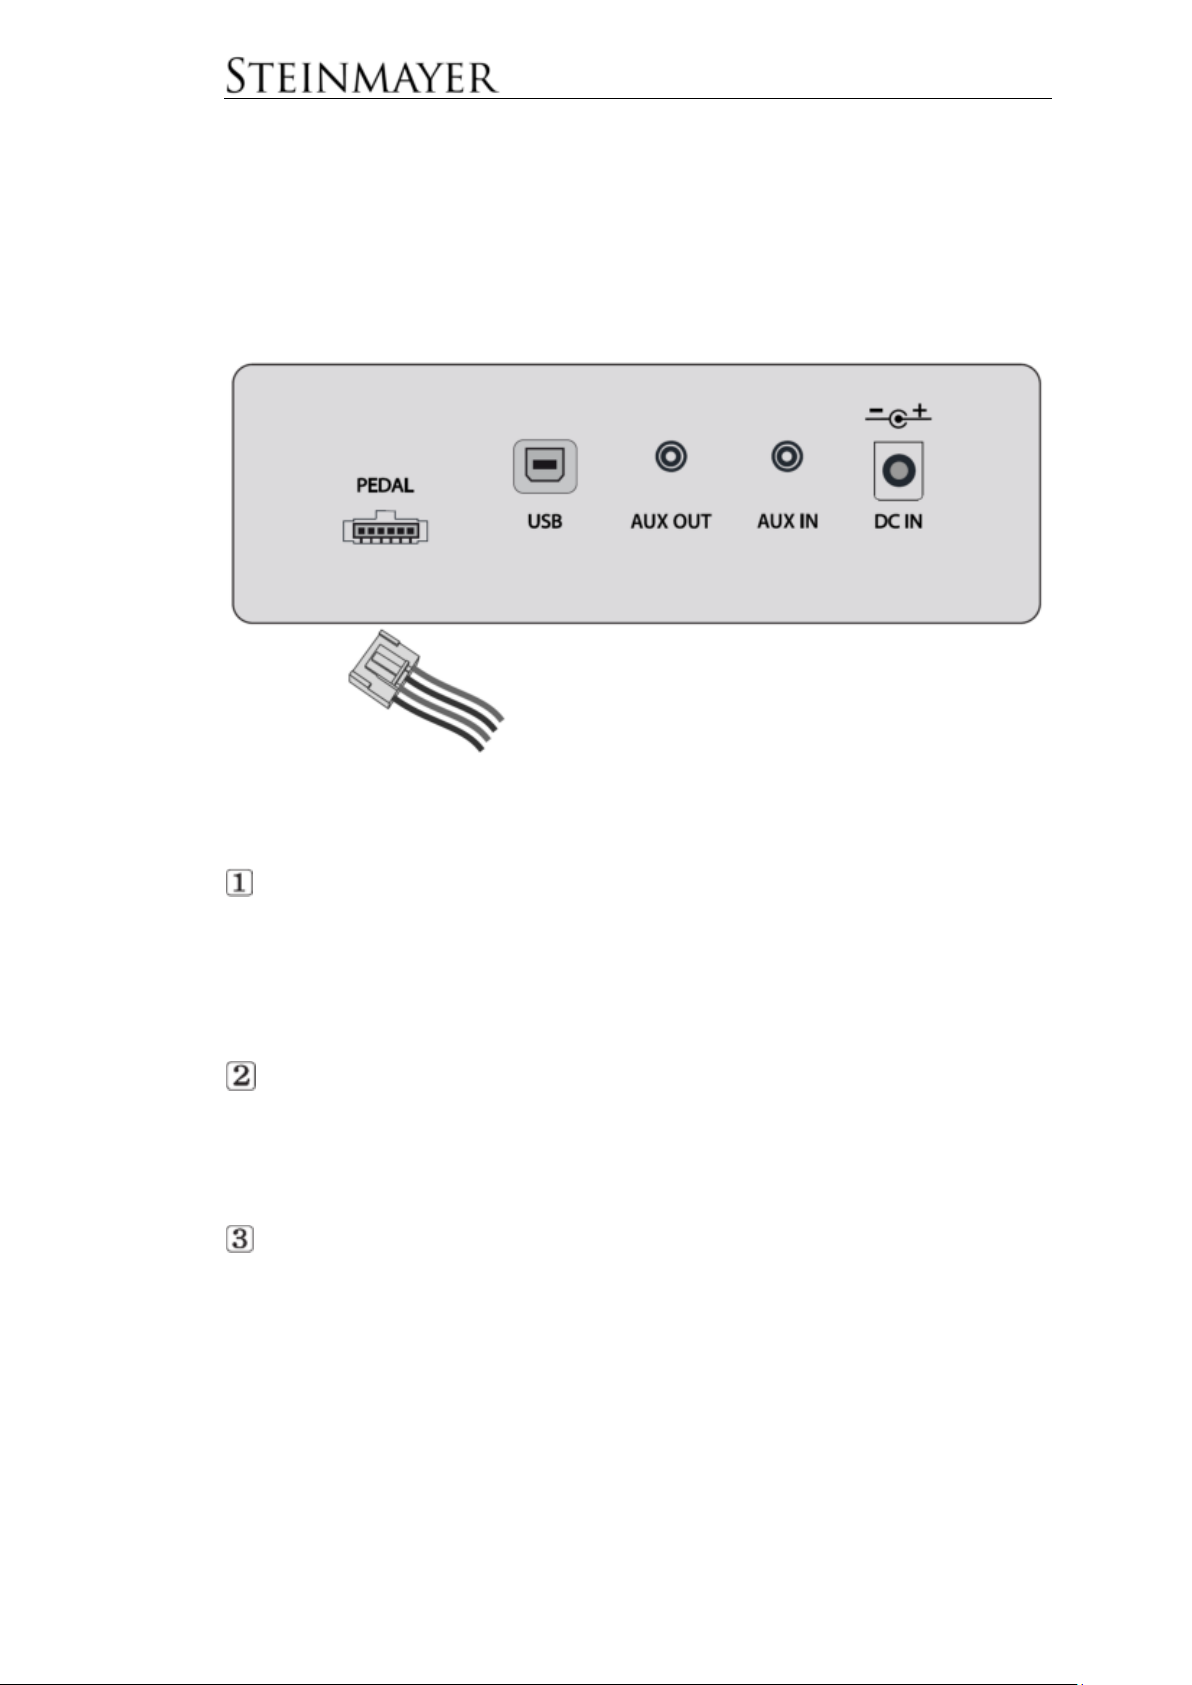
Connections
Connection panel at the bottom of the piano console
USB to HOST - (USB – B)
The USB-to-HOST jack connects to the computer to transmit MIDI or audio data.
The connection is made via a USB A to B cable (not included).
To use the piano as a MIDI input device, start MIDI-capable software (not included)
on your computer and select the piano as a MIDI device within the application.
To use the piano as an audio source, select the instrument in the audio settings of
the computer as the audio device.
: The instrument uses USB 2.0. It is recommended not to exceed a
cable length of 1.2m. The instrument supports Windows XP or higher, Mac OS X
and iOS 4.0 and higher. Compatibility with Android Devices may be limited
depending on the manufacturer and version. No further drivers are needed. After
connecting, to avoid malfunction, wait a few seconds before using the instrument.
Aux Out – Stereo 3.5mm
The Aux-Out jack can be used to connect external amplifiers or recorders. The
music signals sent out via this jack can be played back via an external amplifier or
recorded by a recording device. It is recommended to turn off both devices before
making a cable connection. Initially, to avoid damage, set the volume / sensitivity of
both devices to a low level.
Aux In – Stereo 3.5mm
The Aux-in jack can be used to connect external audio devices such as Mp3
players. The incoming music signals through this jack are played through the
loudspeakers of the piano. It is recommended to turn off both devices before making
a cable connection. Initially, to avoid damage, set the volume of both devices to a
low level.
5
Page 13
Pedals
The instrument has three pedals. These simulate the pedals of a real concert piano.
Connecting the pedal cable
Disconnect the pedal cable which is fixed under the pedal box and connect it to the
corresponding socket on the underside of the piano console.
How to operate the pedals
Sustain Pedal (right pedal)
This pedal has the same function as the sustain pedal of an acoustic piano. Notes
played while the pedal is pressed continue to sound when the key on the keyboard
is released. This pedal also supports the half-pedal-function, which simulates the sound of
a piano string slightly touched by the damper while the pedal is lightly pressed.
Sostenuto Pedal (middle pedal)
This pedal has the same function as the Sostenuto-Pedal of a concert piano.
It behaves similar to the sustain pedal, but only the sounds are retained which are
triggered simultaneously with the pedal.
Soft Pedal (left pedal)
This pedal has the same function as the Soft Pedal of an acoustic piano. Pressing
this pedal softens and thins the sound a bit.
6
Page 14
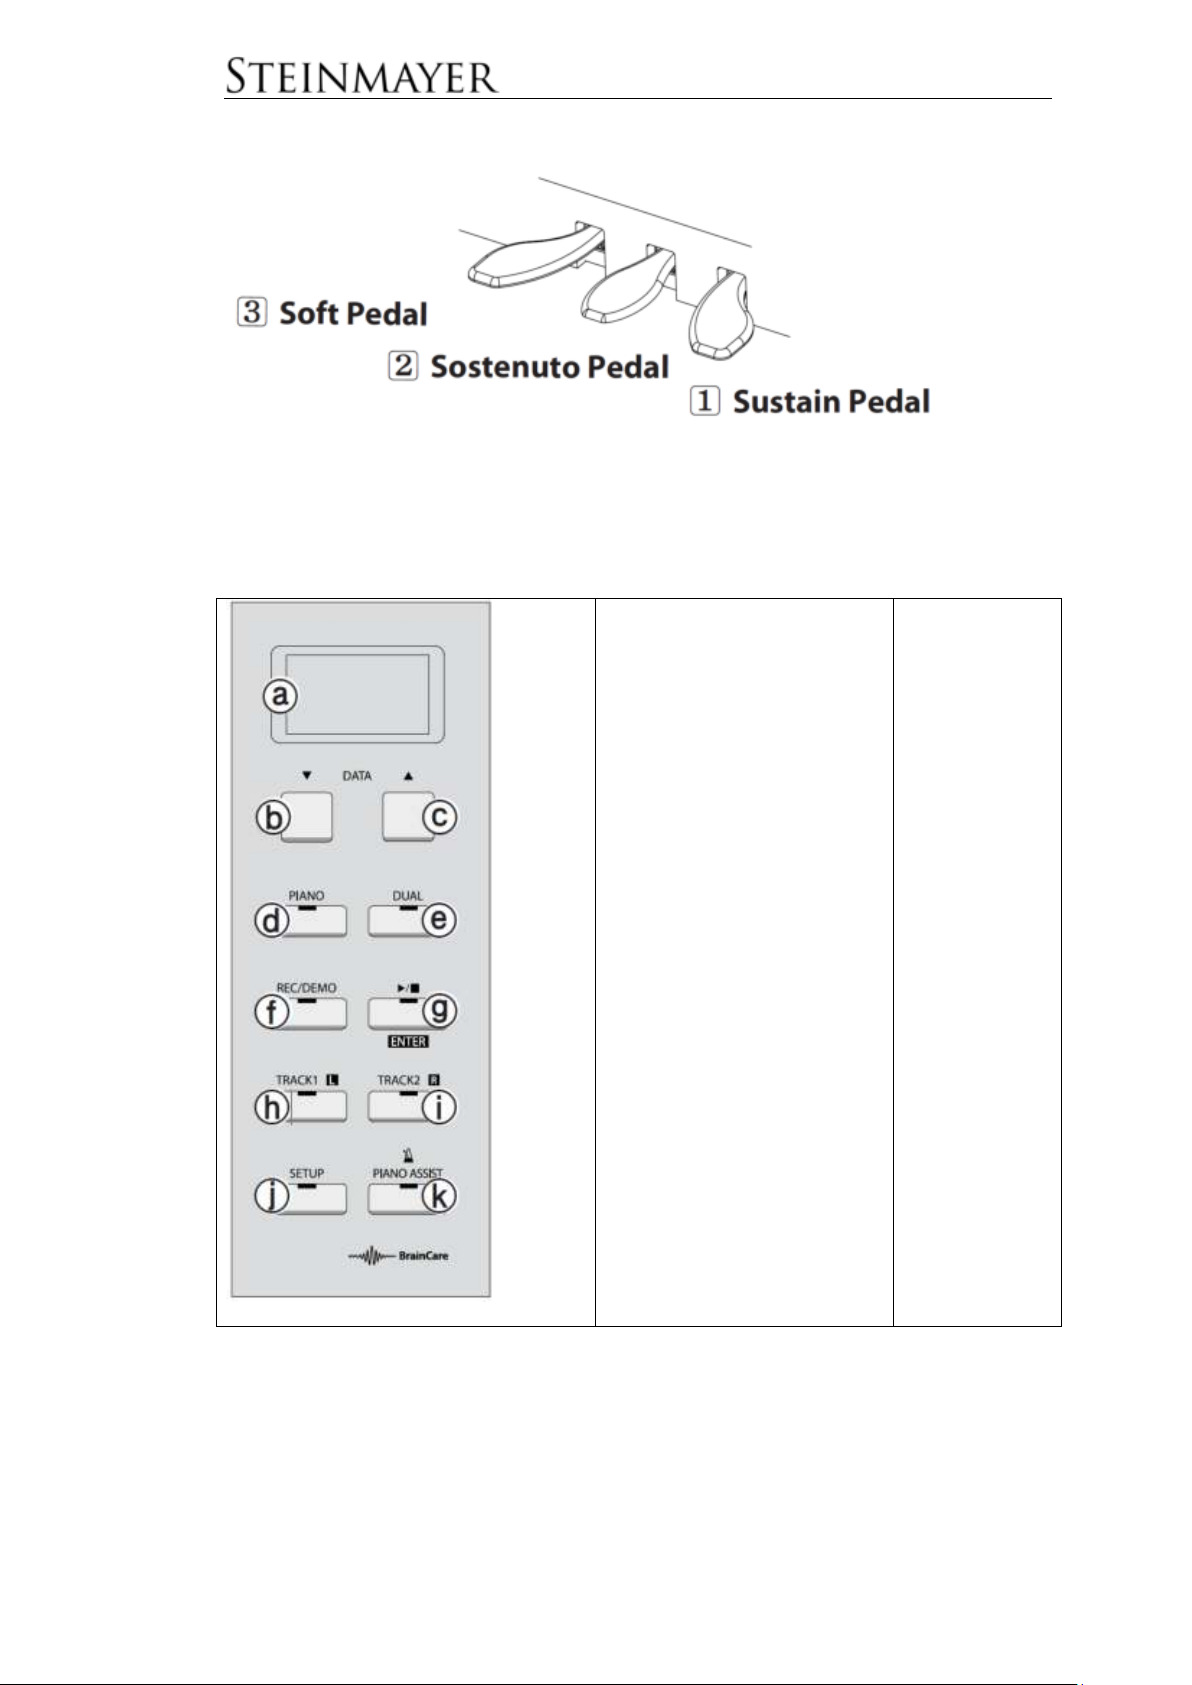
a LCD screen
b DATA move down
c DATA move up
d PIANO
e DUAL
f REC / DEMO
g Play-Stop / ENTER
h TRACK 1
i TRACK 2
j SETUP
k PIANO / ASSIST
page 9
page 9
page15, 17
page 15
page15
page 21
page 10, 11
Operating unit
7
Page 15
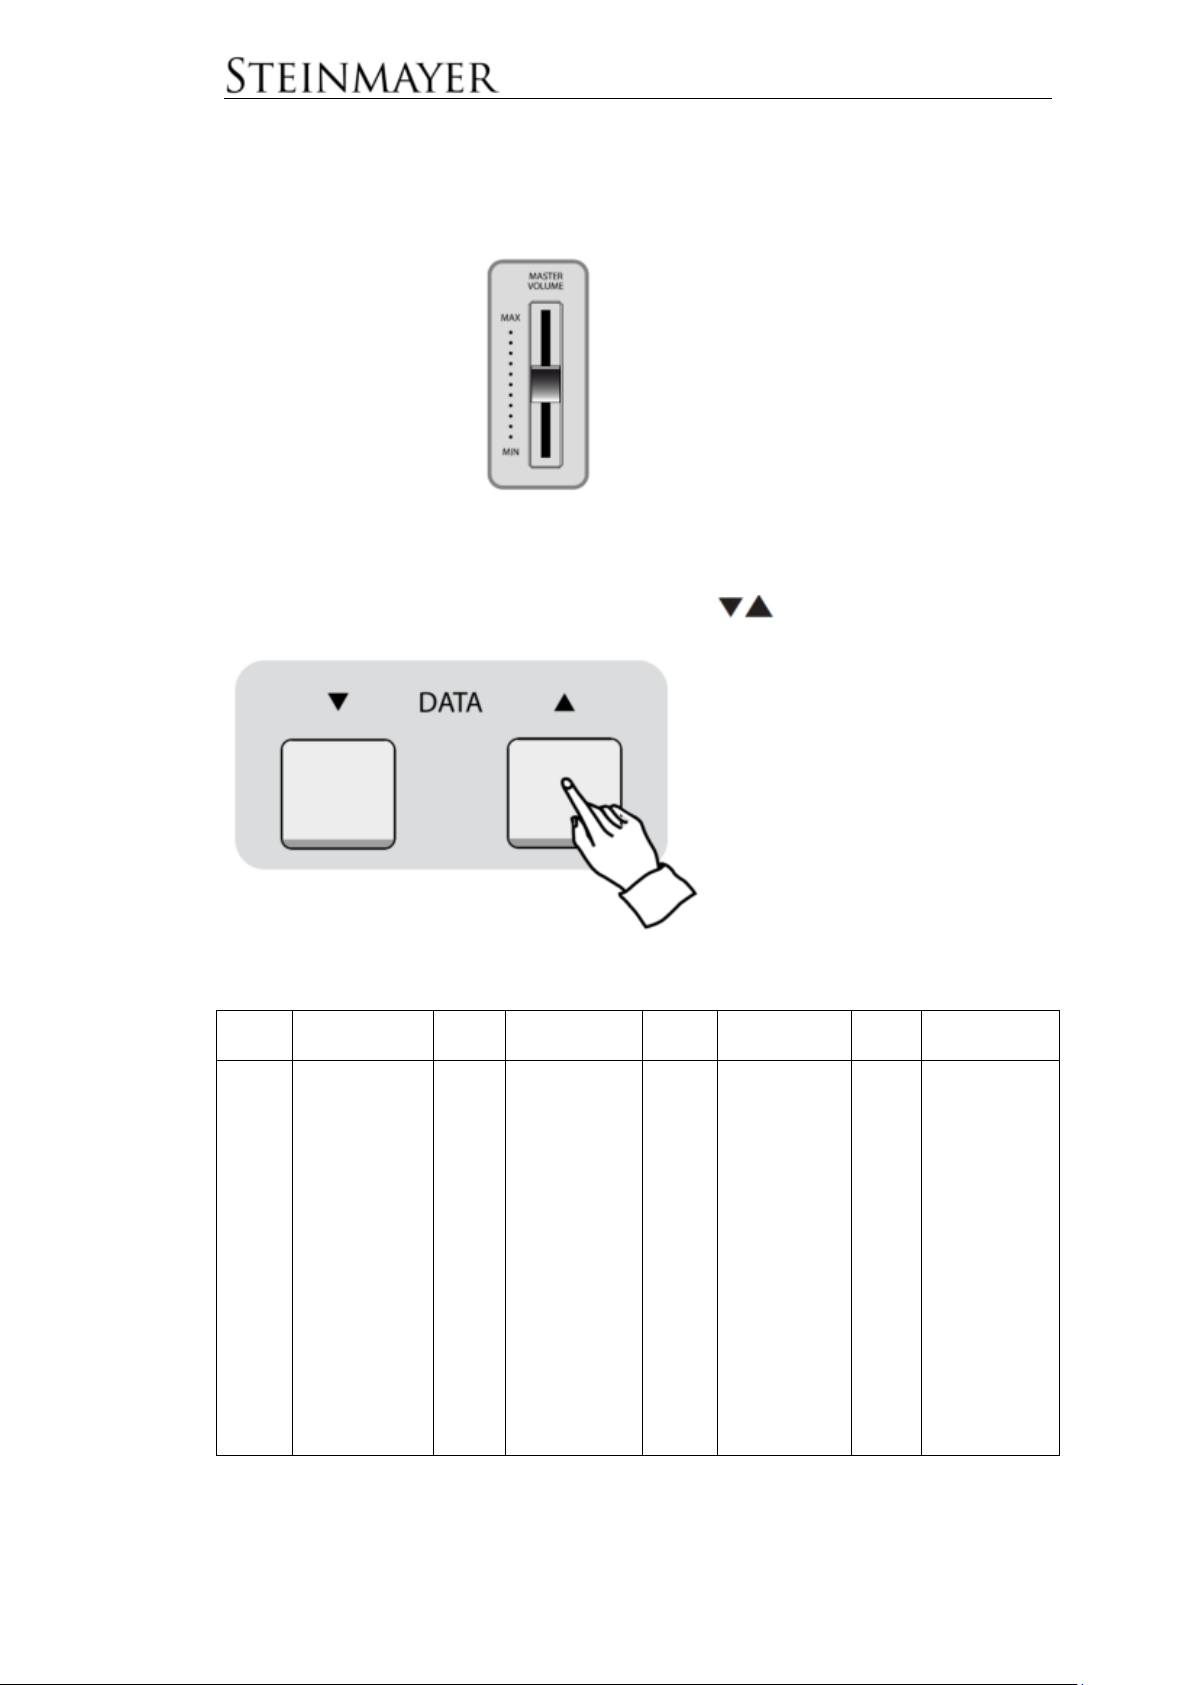
To adjust the
overall volume,
use the volume
slider
LED
Voice
LED
Voice
LED
Voice
LED
Voice
G.P1
G,P2
G.P3
G.P4
Ht.P
E.P1
E.P2
HSC
Vbr
Grand Piano1
Grand Piano2
Grand Piano3
Grand Piano4
Honky Tonk
Electr. Piano1
Electr. Piano2
Harpsicord
Vibraphone
P.Or
E.O1
E.O2
Acd
St1
St2
St3
P.St
Chr
Pipe Organ
Electr Organ1
Electr Organ2
Accordion
Sym. Strings
Synth Strings
Slow Strings
Pizz Strings
Choir Aahs
vcL
vln
HAP
Gt1
Gt2
A.bS
E.bS
FLt
Obo
Vocal
Violin
Harp
Nylon Guitar
Drive Guitar
Acoustic Git
E-Bass
Flute
Oboe
CLA
br1
br2
S.br
A.SP
t.SP
Sqr
dru
S.EF
Clarinet
Brass Sect1
Brass Sect2
Synth Brass
Alto Sax
Tenor Sax
Square
Drum
Sound Effects
Bedienung Operation
Adjusting the volume
Choosing a Tone (Voice)
Select the desired tone with the arrow keys DATA
Voice-List
8
Page 16
Piano Mode
Press the PIANO button to enter Piano mode.
The instrument changes to the tone Grand Piano1 (G.P1).
Press DATA
again to exit this mode.
The dual function is not available in Piano mode.
Dual
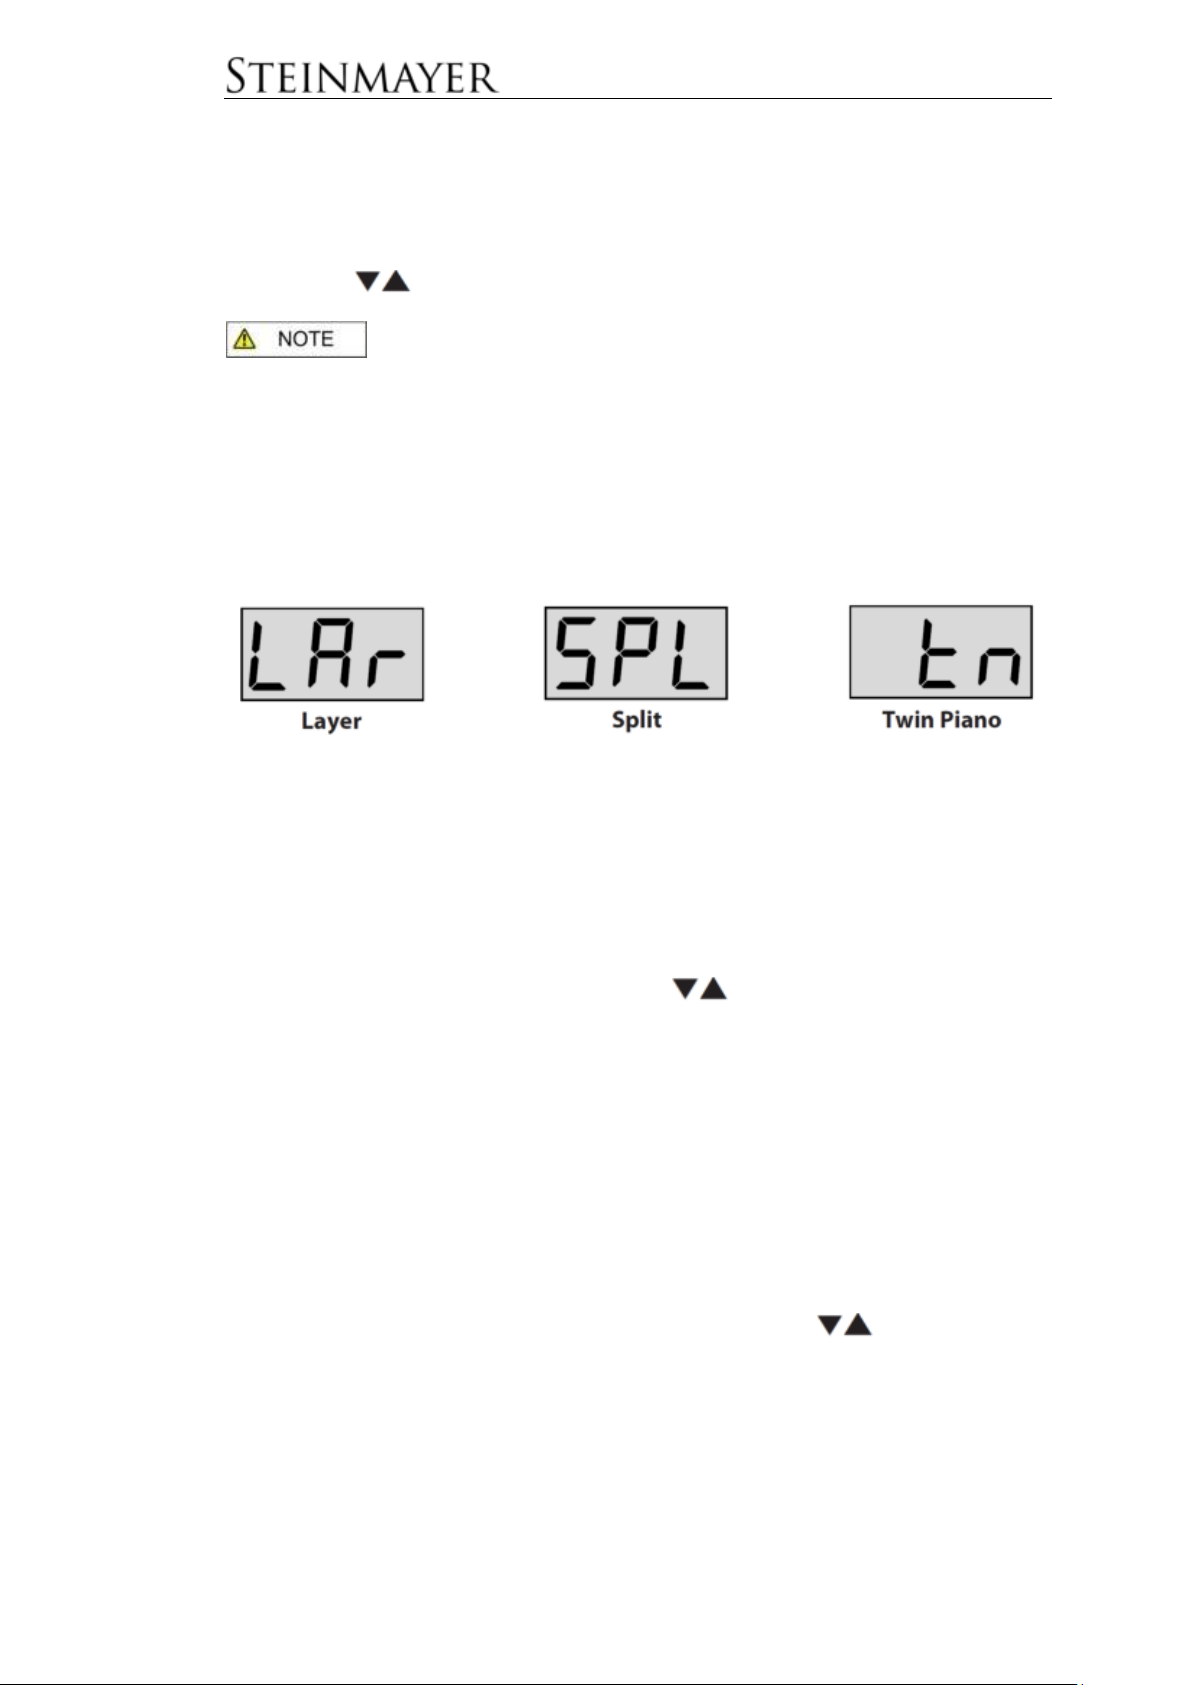
Press the DUAL button to enter the Dual Mode. In this mode, you can combine
multiple timbres in different ways. Pressing the DUAL button repeatedly will enter
the different operating modes: Layer, Split and TwinPiano. To exit this function,
press the DUAL button again.
Layer
Here two tones per key are played simultaneously.
First select the desired main voice (Main Voice).
Now press the DUAL button. The display shows LAr. Now select the desired second
tone (Layer Voice) with the arrow keys DATA
The volume levels of both voices can be adjusted individually. See function-menu.
Press the DUAL button three times to deactivate the mode.
.
Split
Here, the keyboard divides into two areas with different timbres. First, select the
desired main voice for the right keyboard half.
Now press the DUAL button two times. The display shows SPL. Now select the
desired second tone (Split-Voice) with the arrow keys DATA .
The volume levels of both voices can be adjusted individually. See function-menu.
Press the DUAL button two times to deactivate the mode.
9
Page 17
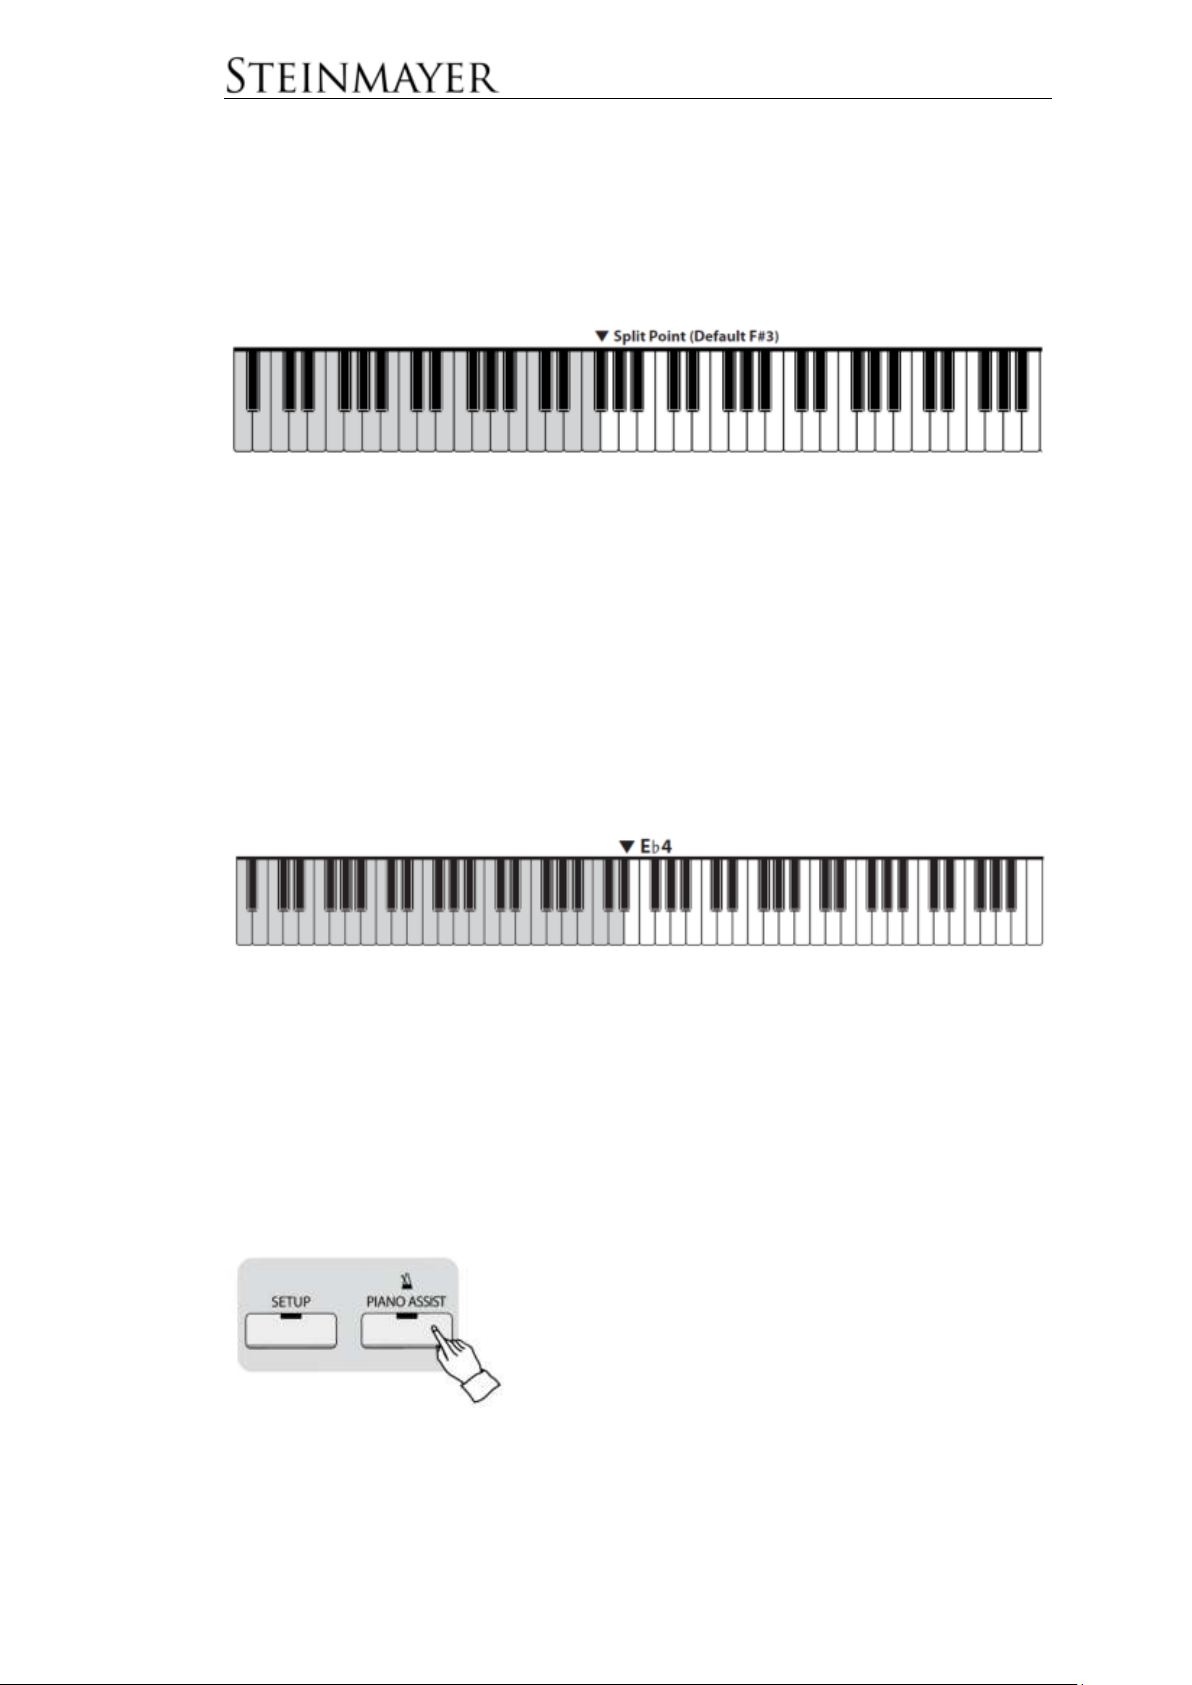
Move the split point
The split point defines the boundary between the left and right half of the keyboard.
The split point can be chosen individually. See function-menu. The default value for
the split point is F # 3 (the third Fis from the left).
Twin Piano
This function divides the keyboard into two equal parts. Now two players can play in
the same pitch at the same time.
The operation of the pedals is adapted to the split keyboard. The left pedal controls
the sustain effect of the left keyboard half and the right pedal controls the sustain
effect of the right keyboard half.
First, select the desired main voice for the right keyboard half. Now press the DUAL
button several times. The display shows tn. The keyboard is now shared at Eb4.
Press the DUAL button again to deactivate the TWIN Piano mode.
Metronome
Start / Stop
Press the PIANO ASSIST button to start the metronome.
Press the PIANO ASSIST button again to stop the metronome.
10
Page 18
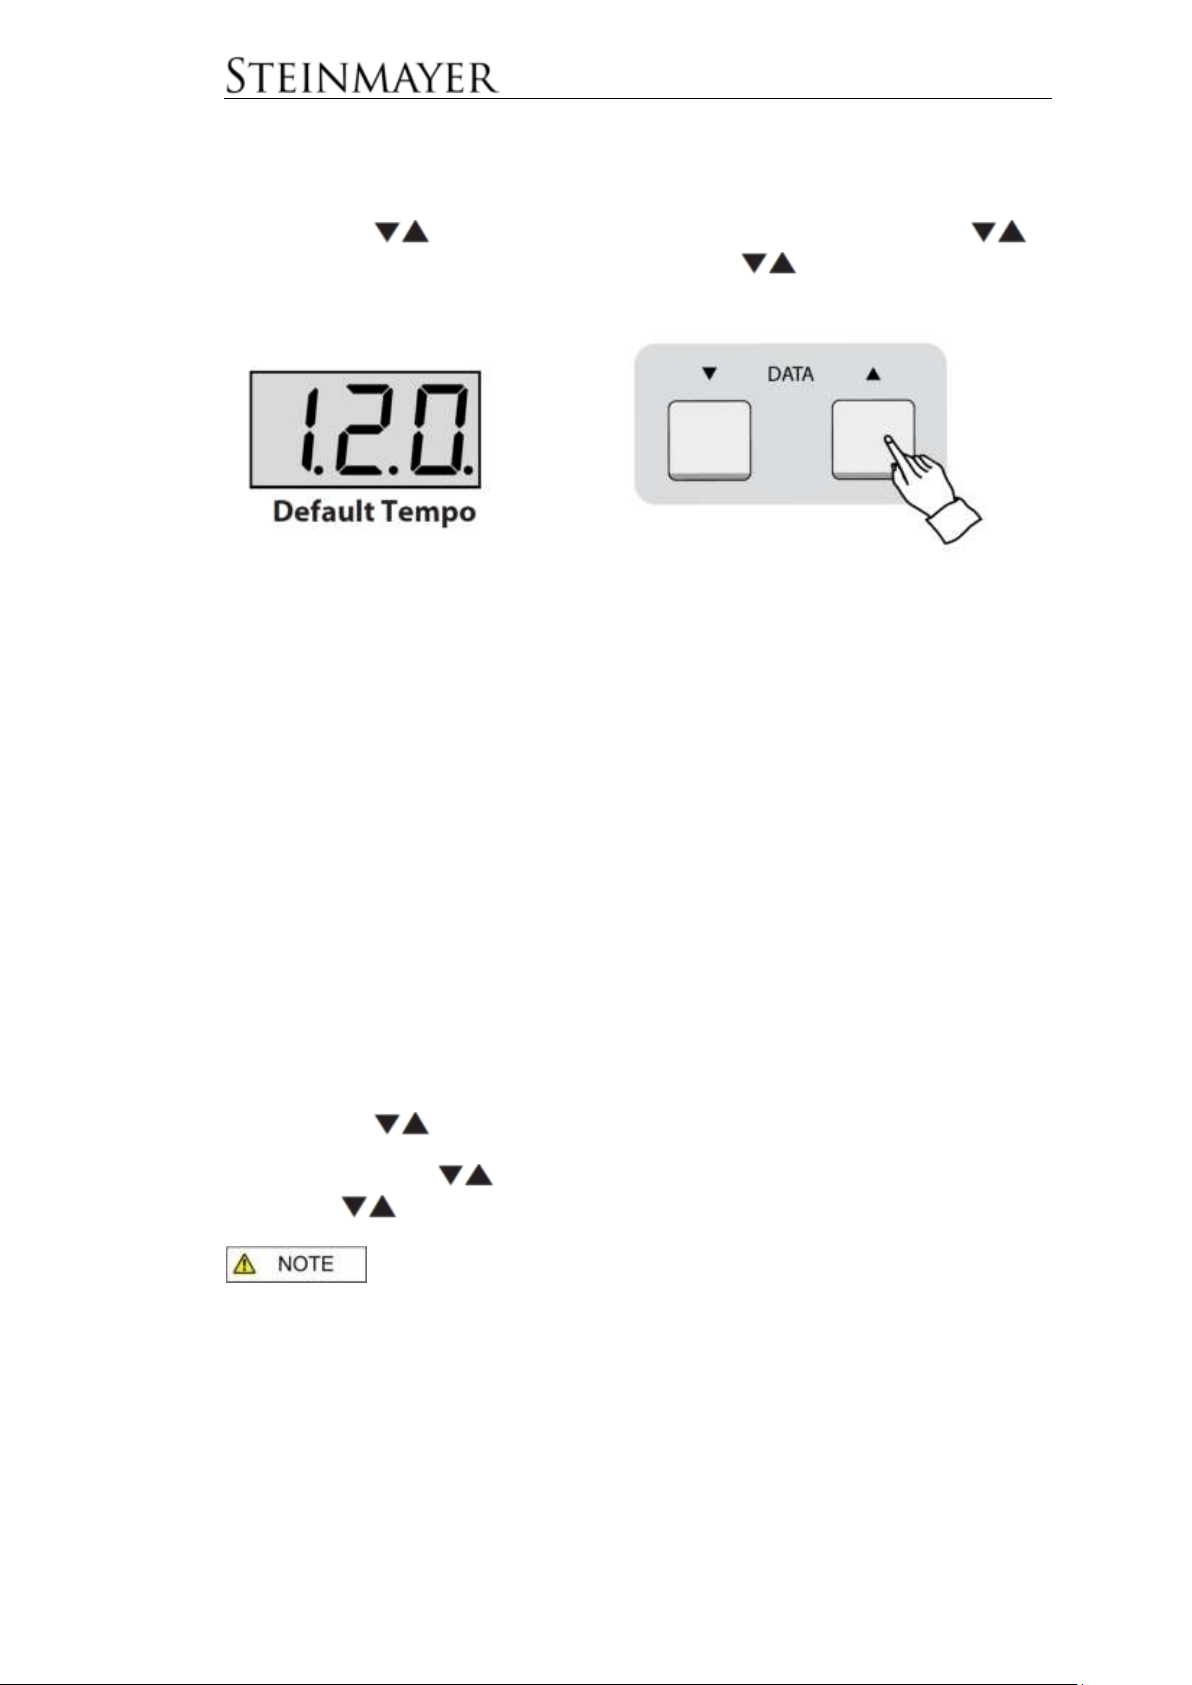
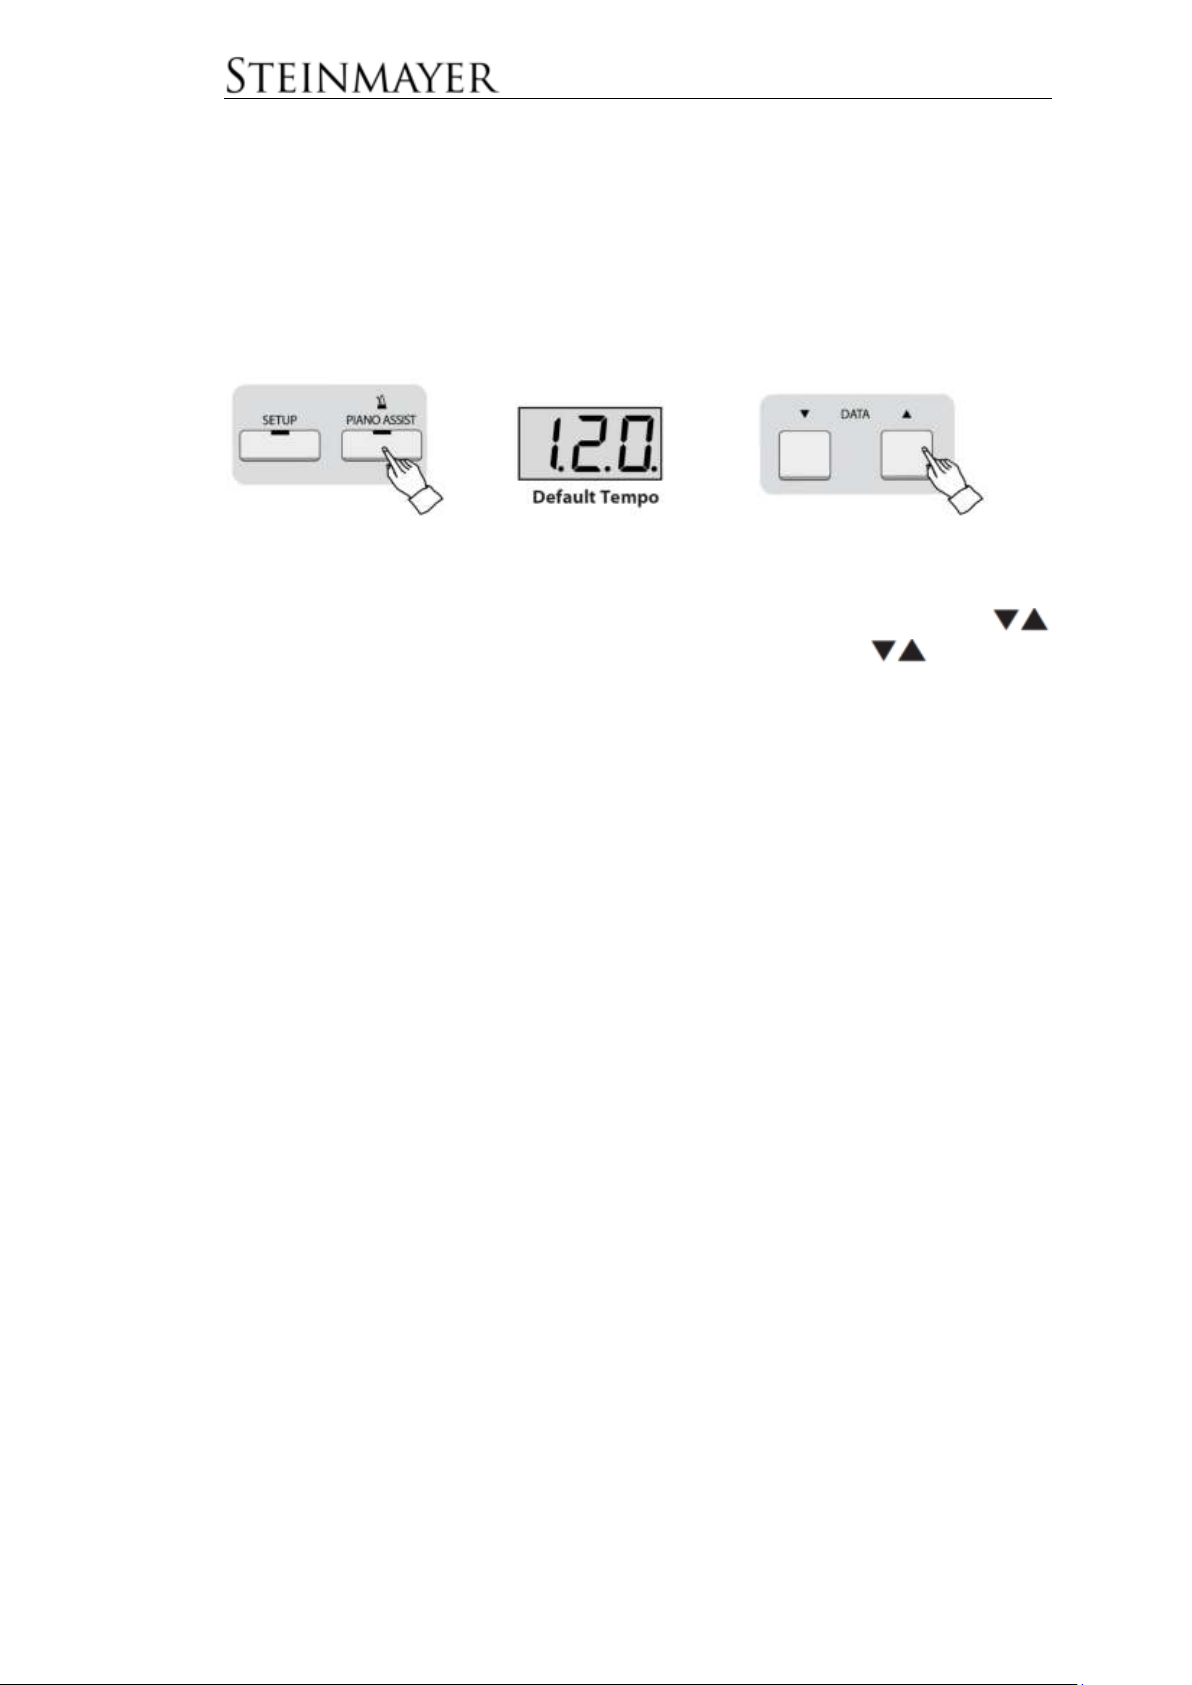
Metronome Tempo
Use the DATA
keys to quickly change the tempo. Press both DATA keys simultaneously to
get to the default value (120).
keys to change the metronome tempo. Hold the DATA
Further Metronome Parameters
The metronome volume and the tempo (3/4, 4/4, etc.) can be adjusted as further
parameters. See function-menu.
“Piano Assist” Function
In the Piano Assist function two different assistants can be selected. In Drum Player
mode, you can be accompanied by a drum rhythm. In Piano Player mode, the
instrument plays complicated left-hand chord patterns on its own, making it easier to
play challenging piano pieces.
To start Piano Assist
To start Piano Assist, press and hold the PIANO ASSIST button for about 2-3 seconds.
The display shows r01 and the piano is in the mode for the selection of the
accompaniment rhythm.
Selection of the accompaniment rhythm
Use the DATA
By holding the DATA
both DATA
The sounds of the Piano Assist function cannot be recorded in the
recording function.
keys to select the desired pattern of drum accompaniment.
keys you can scroll faster in the selection list. Press
keys simultaneously to get to the standard rhythm (r01).
11
Page 19
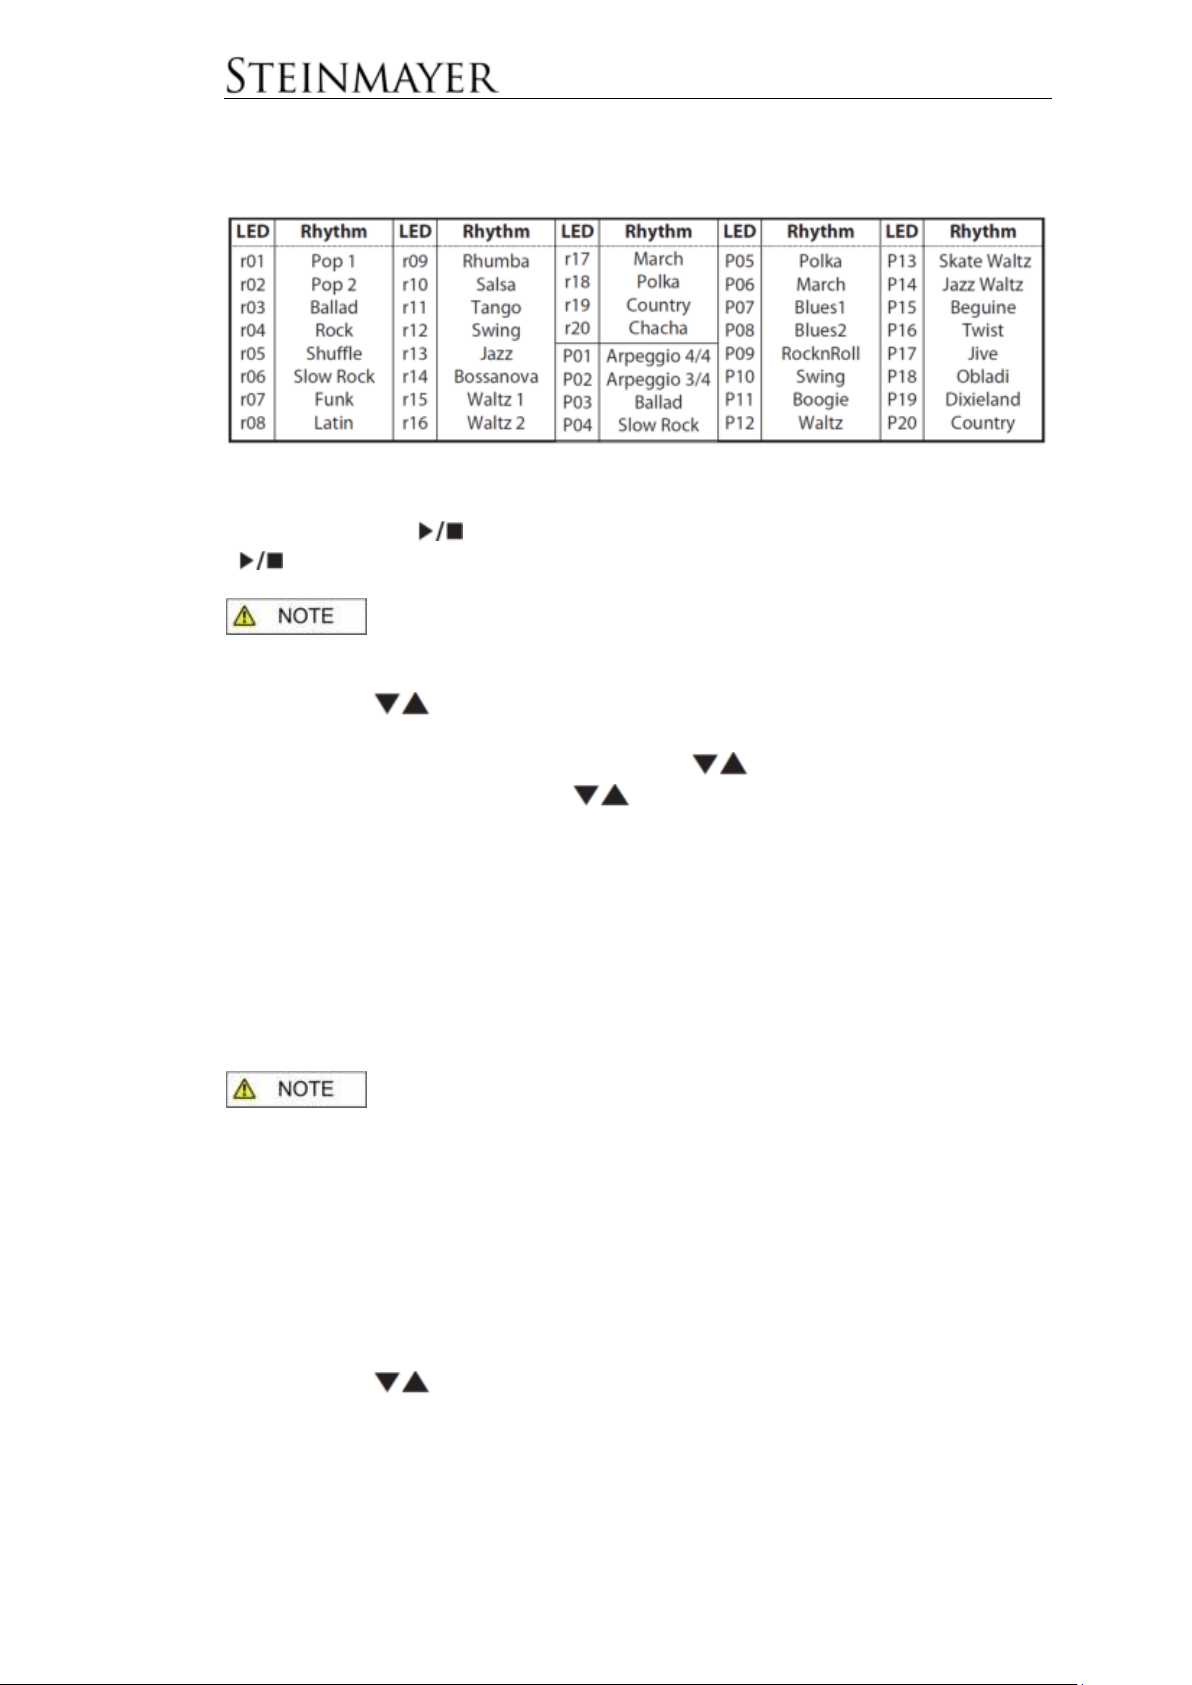
List of available drum rhythms
Press the ENTER / button to start the drum accompaniment. Press the ENTER
button again to stop the drum accompaniment.
/
The volume of the Piano Assist can be adjusted in the function-menu.
Piano Assist Tempo
Use the DATA keys to change the metronome tempo. The metronome tempo
will change when the display has switched from the rhythm display back to the
tempo display (e.g., 120). By holding the DATA
changed quickly. Press both DATA keys simultaneously to get to the default
value of the respective rhythm.
keys, the tempo value can be
Piano Player
In the Piano Player mode, you can choose between numerous accompanying
characters, which facilitate the play of the left hand.
The operation of the Piano Player mode is analogous to the drum player.
The piano player mode must be activated in the function-menu. See
function-menu.
To start Piano Assist, press and hold the PIANO ASSIST button for about 2-3
seconds.
The display shows p01 and the piano is in the selection mode for the Piano Player.
Select Accompanying Pattern
Use the DATA
help.
keys to select the desired pattern of the Piano Player playing
12
Page 20
To start the Piano Player Playing Help
The piano player starts as soon as you specify a chord in the left part of the
keyboard. The instrument now plays independently the associated chord break of
the selected accompanying figure. Press the ENTER /
Player. Press the PIANO ASSIST button to exit this mode.
button to stop the Piano
Chord specification for the Piano Player
In Piano Player mode, it is necessary to specify the chord of the desired
accompaniment character.
For this purpose, two methods can be used with this instrument:
Single Finger method
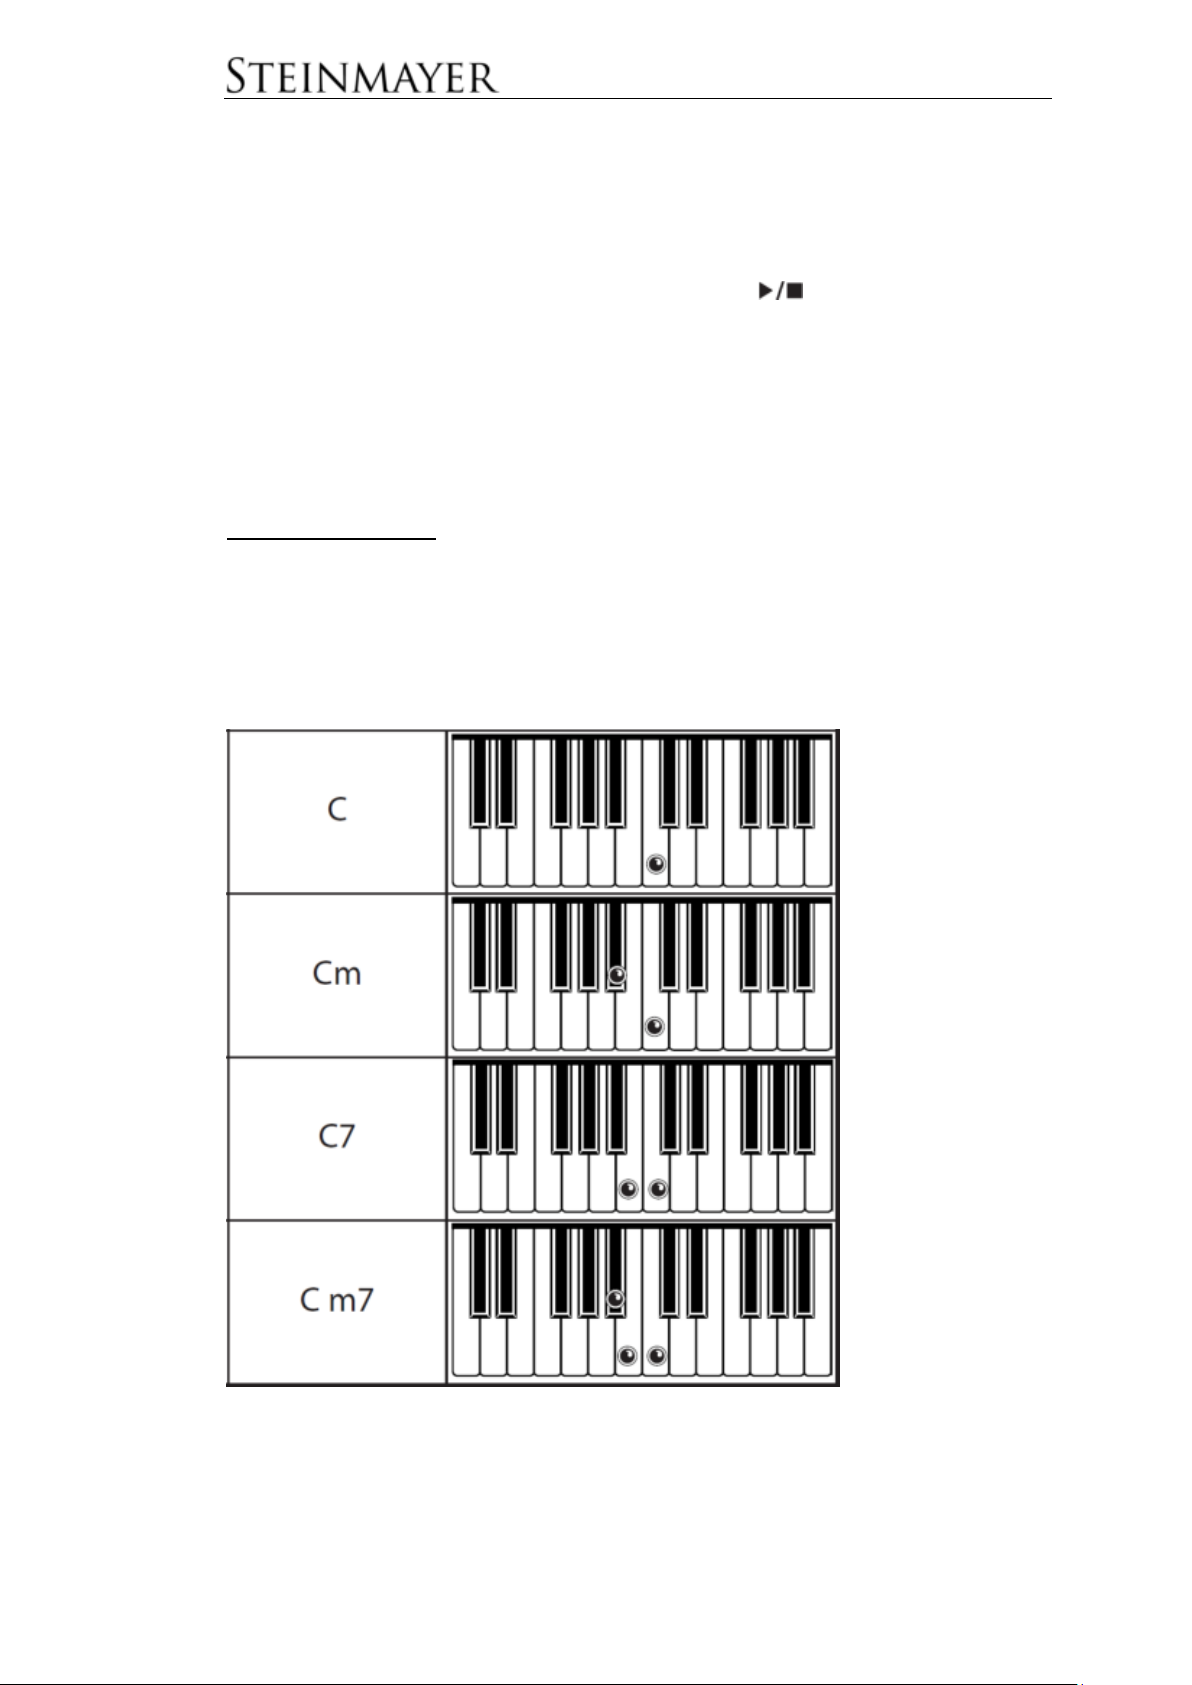
With the Single Finger method, chords can be specified with 1-3 fingers. Here, the
root of a chord is enough to define a major triad. The keynote and the nearest left
black key lead to a minor triad. The root note and the nearest left white key give a
dominant seventh chord and the root note and the nearest left white and black keys
a minor seventh chord.
13
Page 21
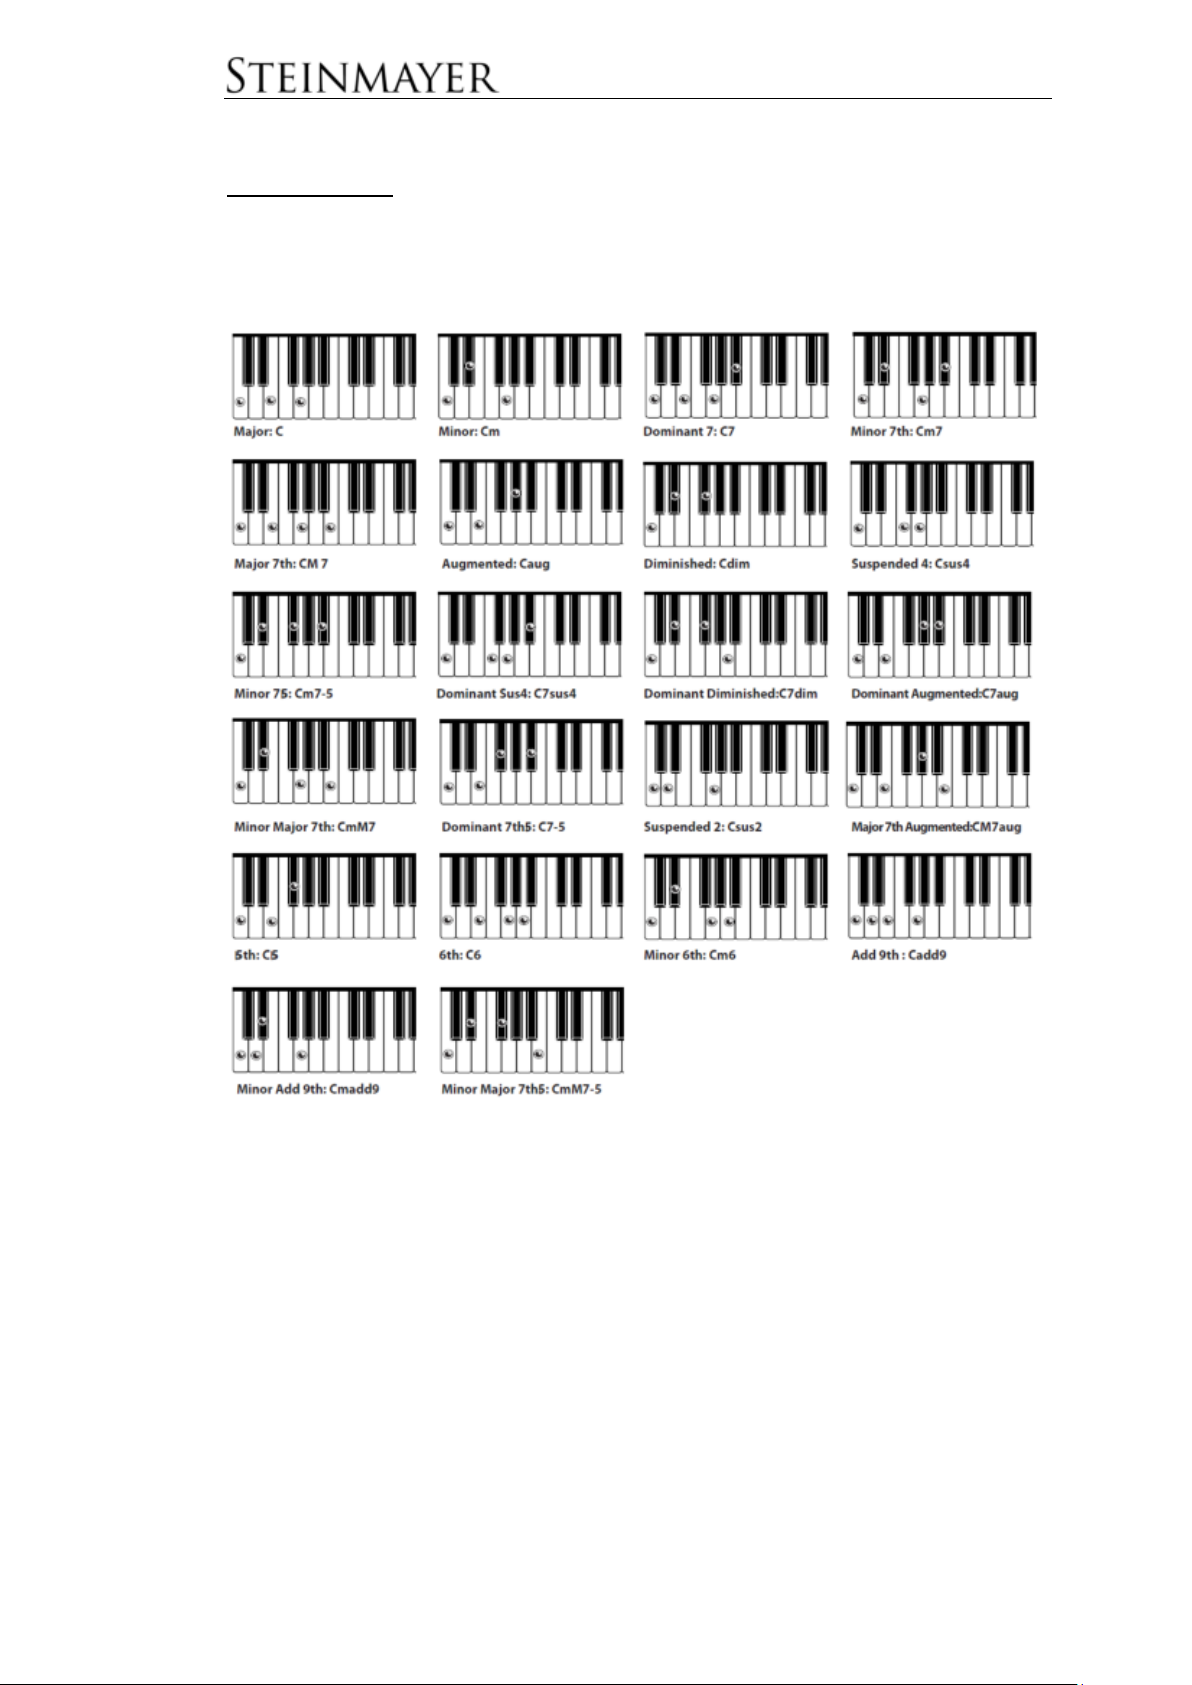
Fingered method
With the fingered method, it is possible to specify a chord by all chord tones
involved. The advanced player can use this method to reproduce more complicated
chords.
Select the Method
By default, the piano recognizes both input methods. If you only want to use the
Fingered method, you can set this in the function-menu. See function-menu.
14
Page 22
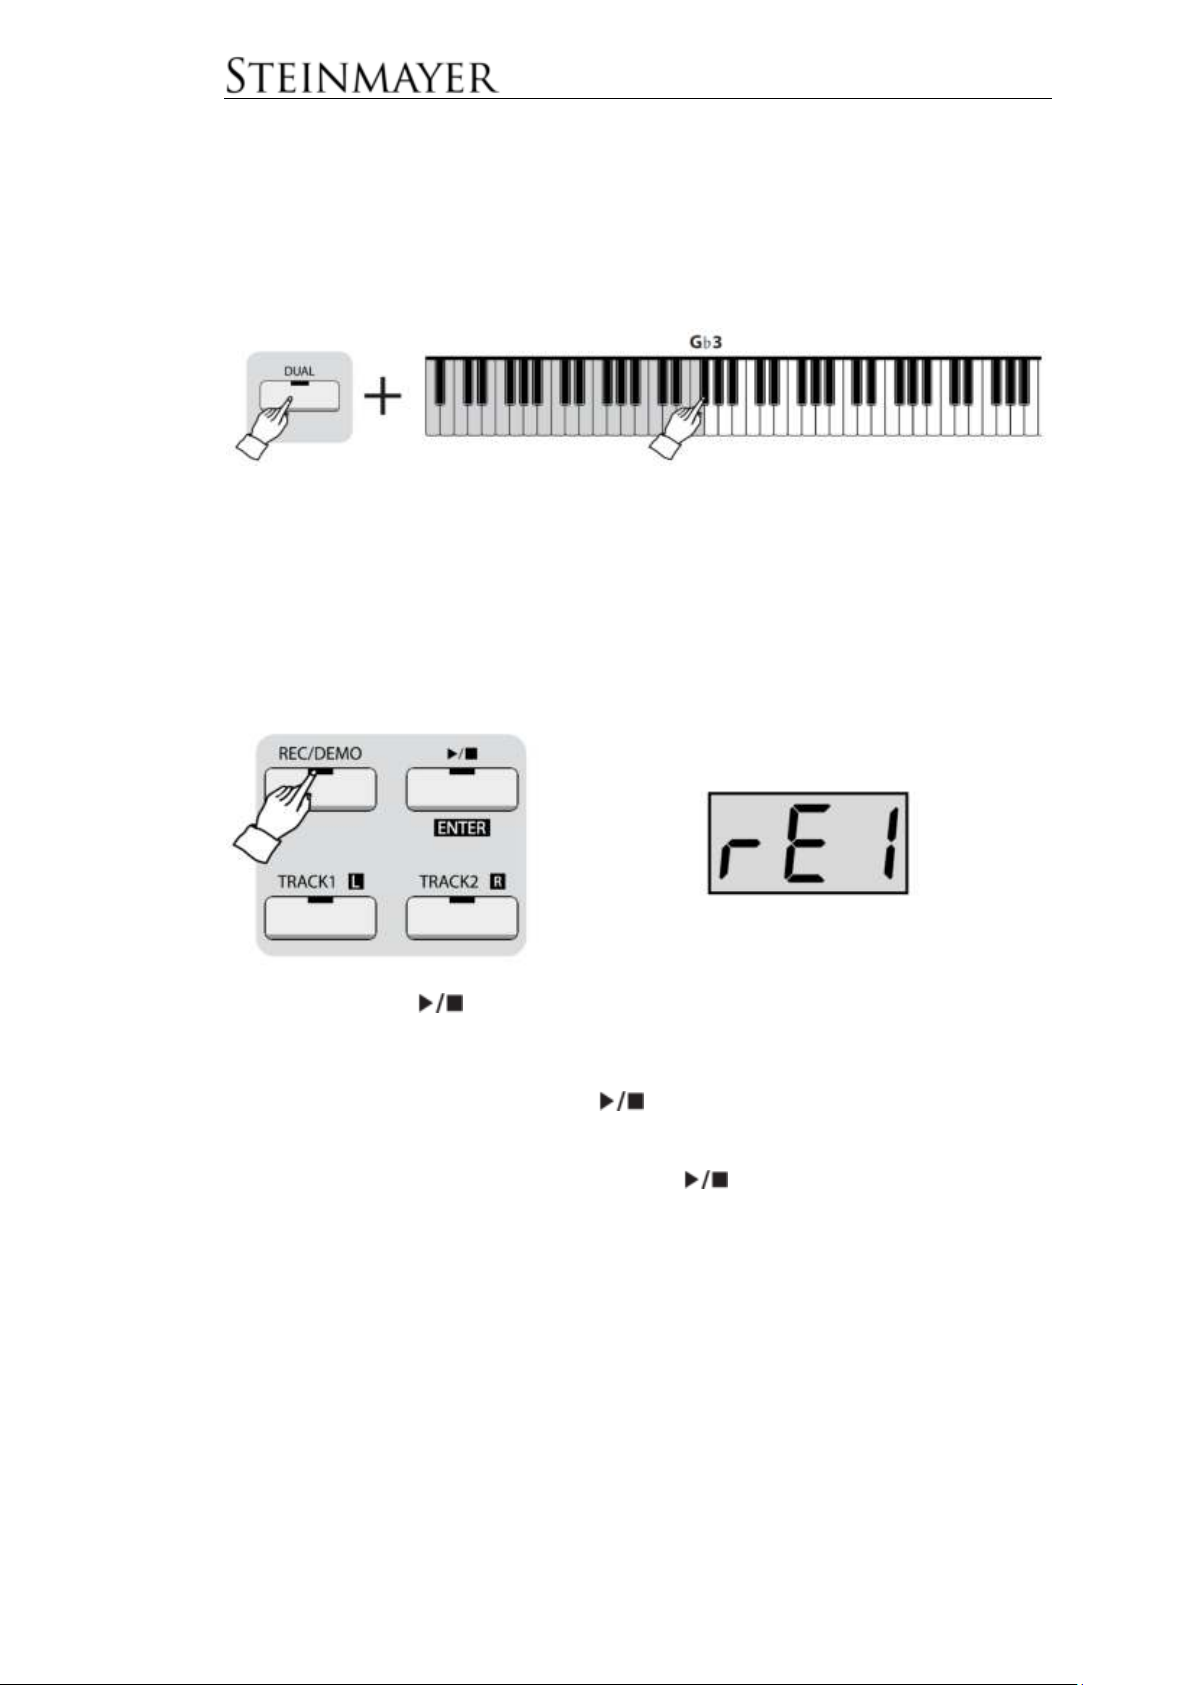
To Move the Split Point for the Chord Input
The split point defines the limit up to which tone of the left hand chords for the piano
player can be specified. The split point can be chosen individually. See functionmenu. The default value for the split point in Piano Assist mode is Gb3.
“Record” Function
Recording
Press the REC / DEMO button to enter the recording mode.
The TRACK1 button flashes and indicates that your piano is ready for recording.
Press the ENTER /
During recording, the REC / DEMO button flashes.
To stop recording, press the ENTER /
permanently to signal stored music data.
To play the recorded track, press the ENTER /
To start another recording on TRACk2, press TRACK2 in the recording mode.
The TRACK2 button flashes and indicates that your piano is ready for recording.
button or play the keyboard to start recording.
button. The TRACK1 button now lights
button again.
15
Page 23
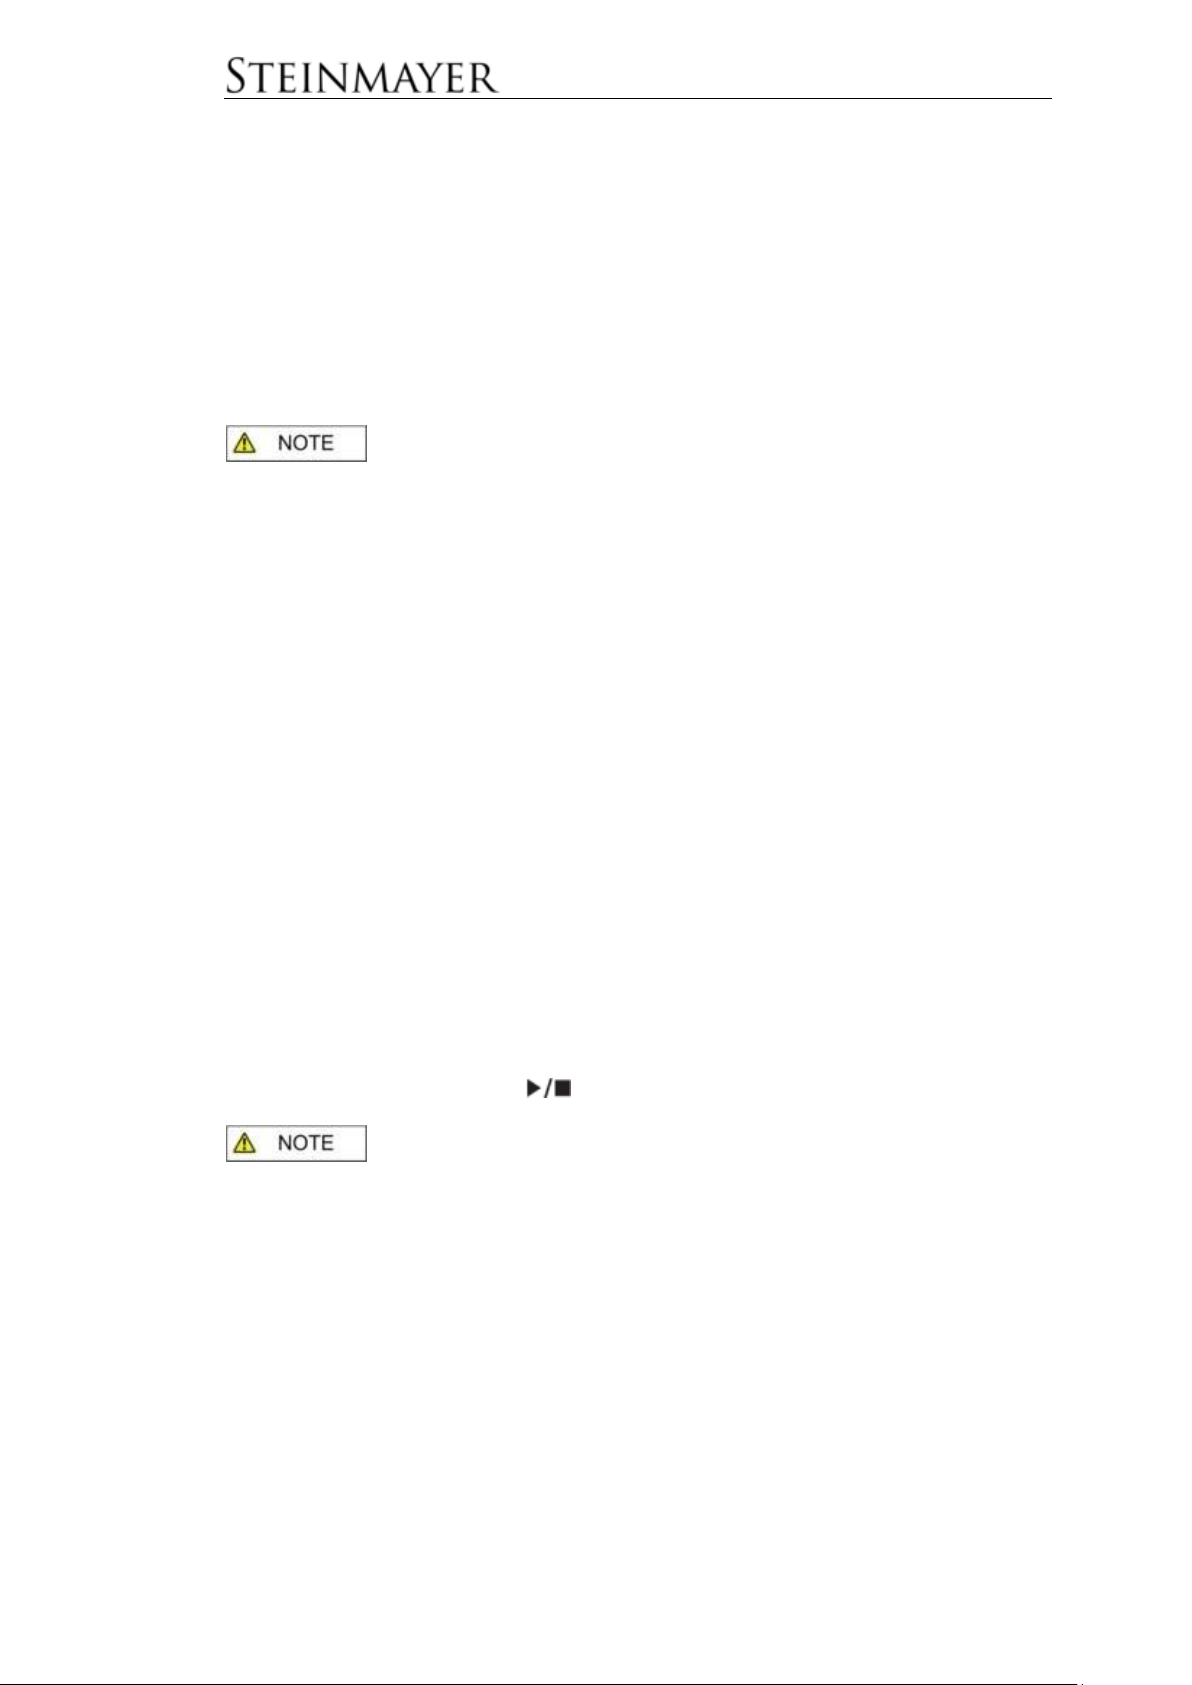
If a recording is already stored on the TRACK1 storage location, it will be played
back simultaneously when recording to TRACK2. If you do not want to hear
TRACK1, you can mute it by pressing TRACK1 before recording (TRACK1 backlight
goes off).
Press REC / DEMO again to exit the recording mode.
If no key is pressed for a long time during recording, recording will
stop automatically.
The recording capacity per track is 4500 notes. If this number is exceeded, the
recording stops automatically.
If you want to use the metronome while recording, start the metronome before
recording. The metronome will not be recorded.
A track occupied by a recording cannot be dubbed. If you want to replace this track,
first delete the current recording.
The piano has an internal memory. The recorded tracks are not lost when switching off.
Playback
To play saved music data, select the desired track (Track1, Track2 or Track1 +
Track2). To select a track, press the respective TRACK button. If music data is
stored in this memory location, the button lights up and indicate that the piano is
ready to play. To mute a track for playback, press the desired TRACK button again.
The button stops lighting and indicates that this memory do not have recording or is
muted for playback.
During playback, the ENTER /
button flashes.
Track selection cannot be changed while playback is in progress.
To Delete Recordings
To delete recordings, press and hold the desired TRACK button.
16
Page 24
Selection of a Memory Bank
The piano has 3 memory banks (rE1-rE3) for 2 tracks each. To select a memory
bank, in the recording mode, while the display is showing rE1, use the DATA
buttons to switch to rE2 or rE3.
Music Database
The instrument contains various music data which can be used for practicing or
simply for listening.
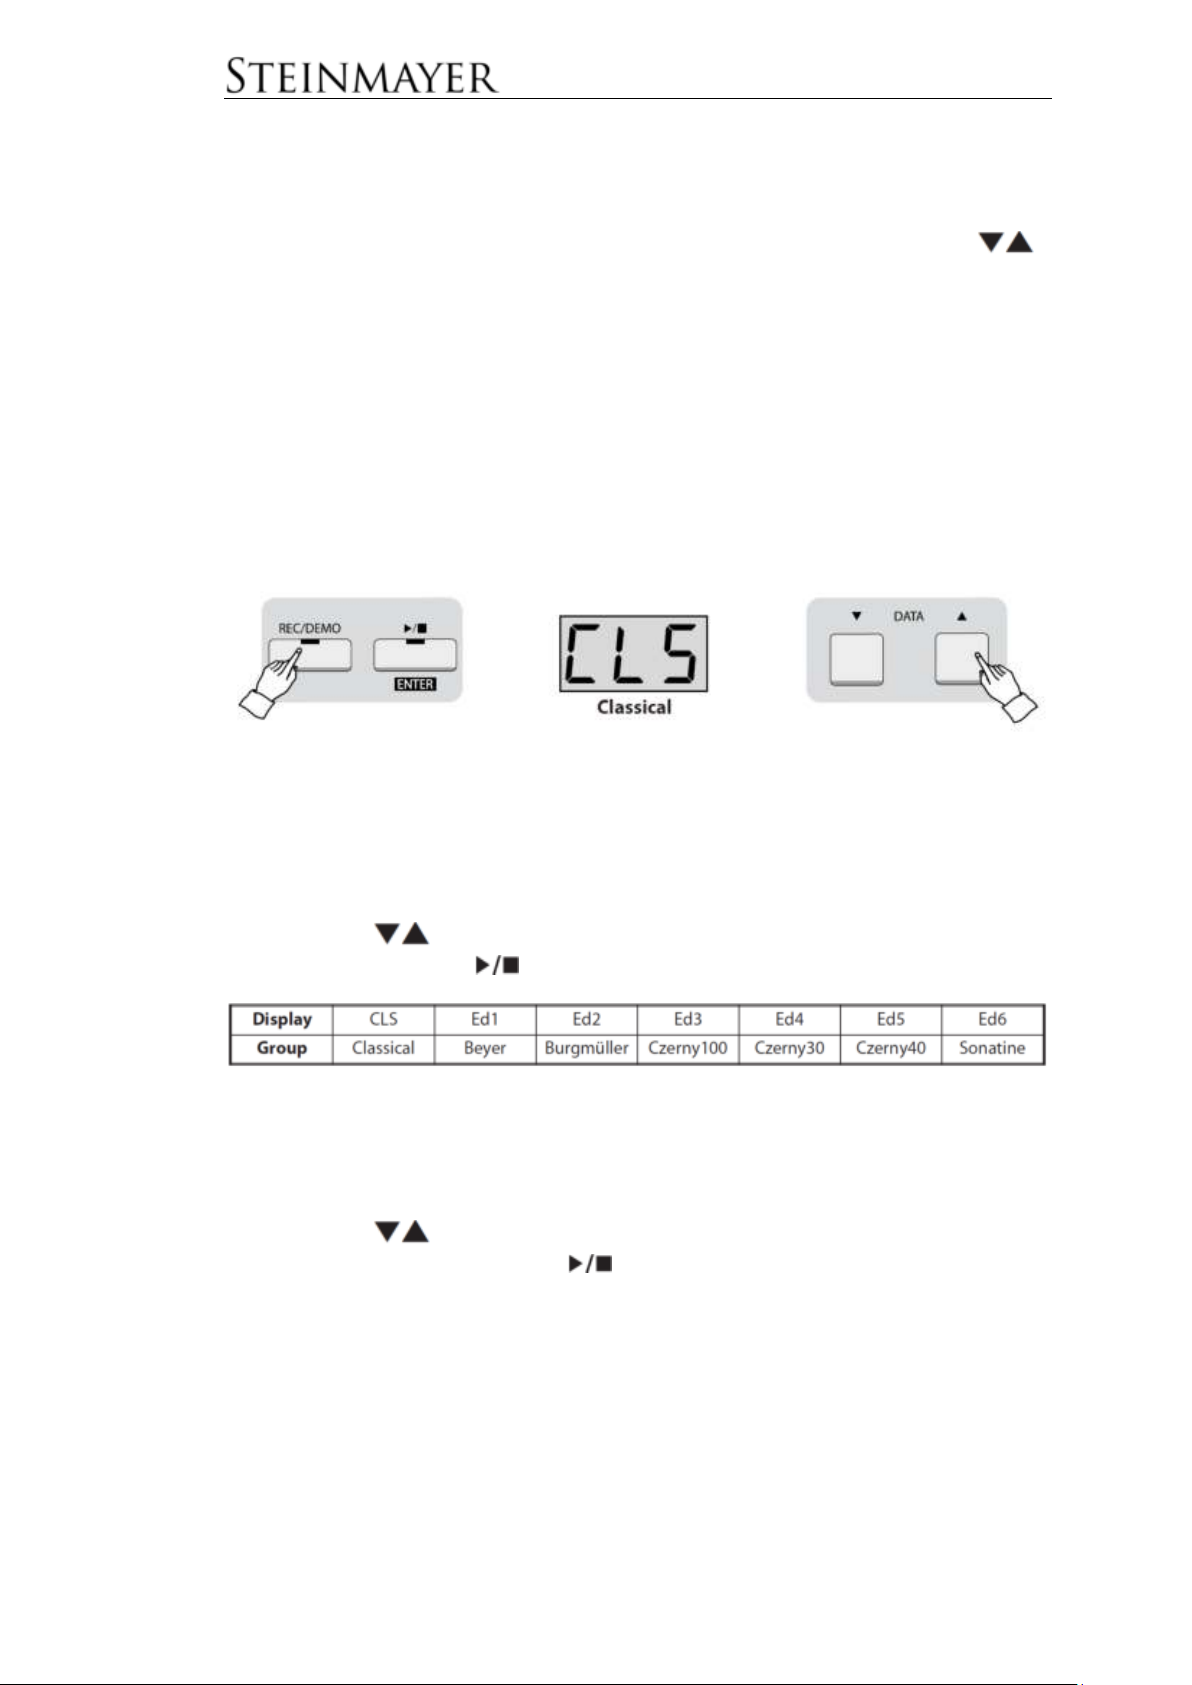
Press and hold the REC / DEMO button to enter the corresponding selection-menu.
The REC / DEMO button will light up and the display will show CLS.
Selection of a Music Folder
The instrument offers 7 music folders. These are a folder for DEMO songs and 6
more folders for piano etudes.
Use the DATA
by pressing the ENTER /
If you want to leave the folder again, select "-" as the play title (first track of the list).
buttons to select between the different folders and open them
button.
To Select the Track for Playback
Use the DATA
playback by pressing the ENTER /
buttons to select between the different songs and start their
button.
All songs from Ed1-6 are divided into left (possibly with accompaniment) and right
hand. By pressing the TRACK1 or TRACK2 button, left and right hands can be
practiced separately.
17
Page 25
If the respective TRACK button lights up, it is activated for playback. If the TRACK
button does not light, it is muted. By repeatedly pressing the TRACK buttons their
status (active / inactive) can be changed.
Adjusting the Tempo
Each piece is stored at an individual tempo. You can change the tempo by pressing
the PIANO ASSIST button during playback. Now you will hear the metronome in the
respective speed of the song. The display also shows the tempo. Now use the
buttons to adjust the tempo. Simultaneously press the both DATA buttons to
reset the tempo to the default value. Press the PIANO ASSIST button again to
deactivate the metronome.
Further settings
In Playback mode, you can change the volume of the song, the playback option
(only one song, all the songs in a row) and the key of the played song. See functionmenu.
Bluetooth
This instrument supports Bluetooth audio and Bluetooth MIDI connections.
Bluetooth Audio
The default is PAIRING ON. Thus, immediate pairing is possible. Activate Bluetooth
on the smart device (smartphone, tablet or similar) which you want to connect to the
piano. Select the piano from the list of available Bluetooth devices displayed on your
smart device. Once pairing is complete, you can hear the music you play on your
smart device through the speakers of the piano.
18
Page 26
Bluetooth-MIDI
With the PAIRING-ON status selected, you can also pair your piano with MIDIenabled applications on your smart device. To do this, select "BLE" as the MIDI
device in the MIDI-enabled application.
If there are connection problems, check in the function-menu whether
the pairing status is ON.
Switch off the Bluetooth function of your Smart Device and start it again.
Check if there is already an automatic pairing with another device.
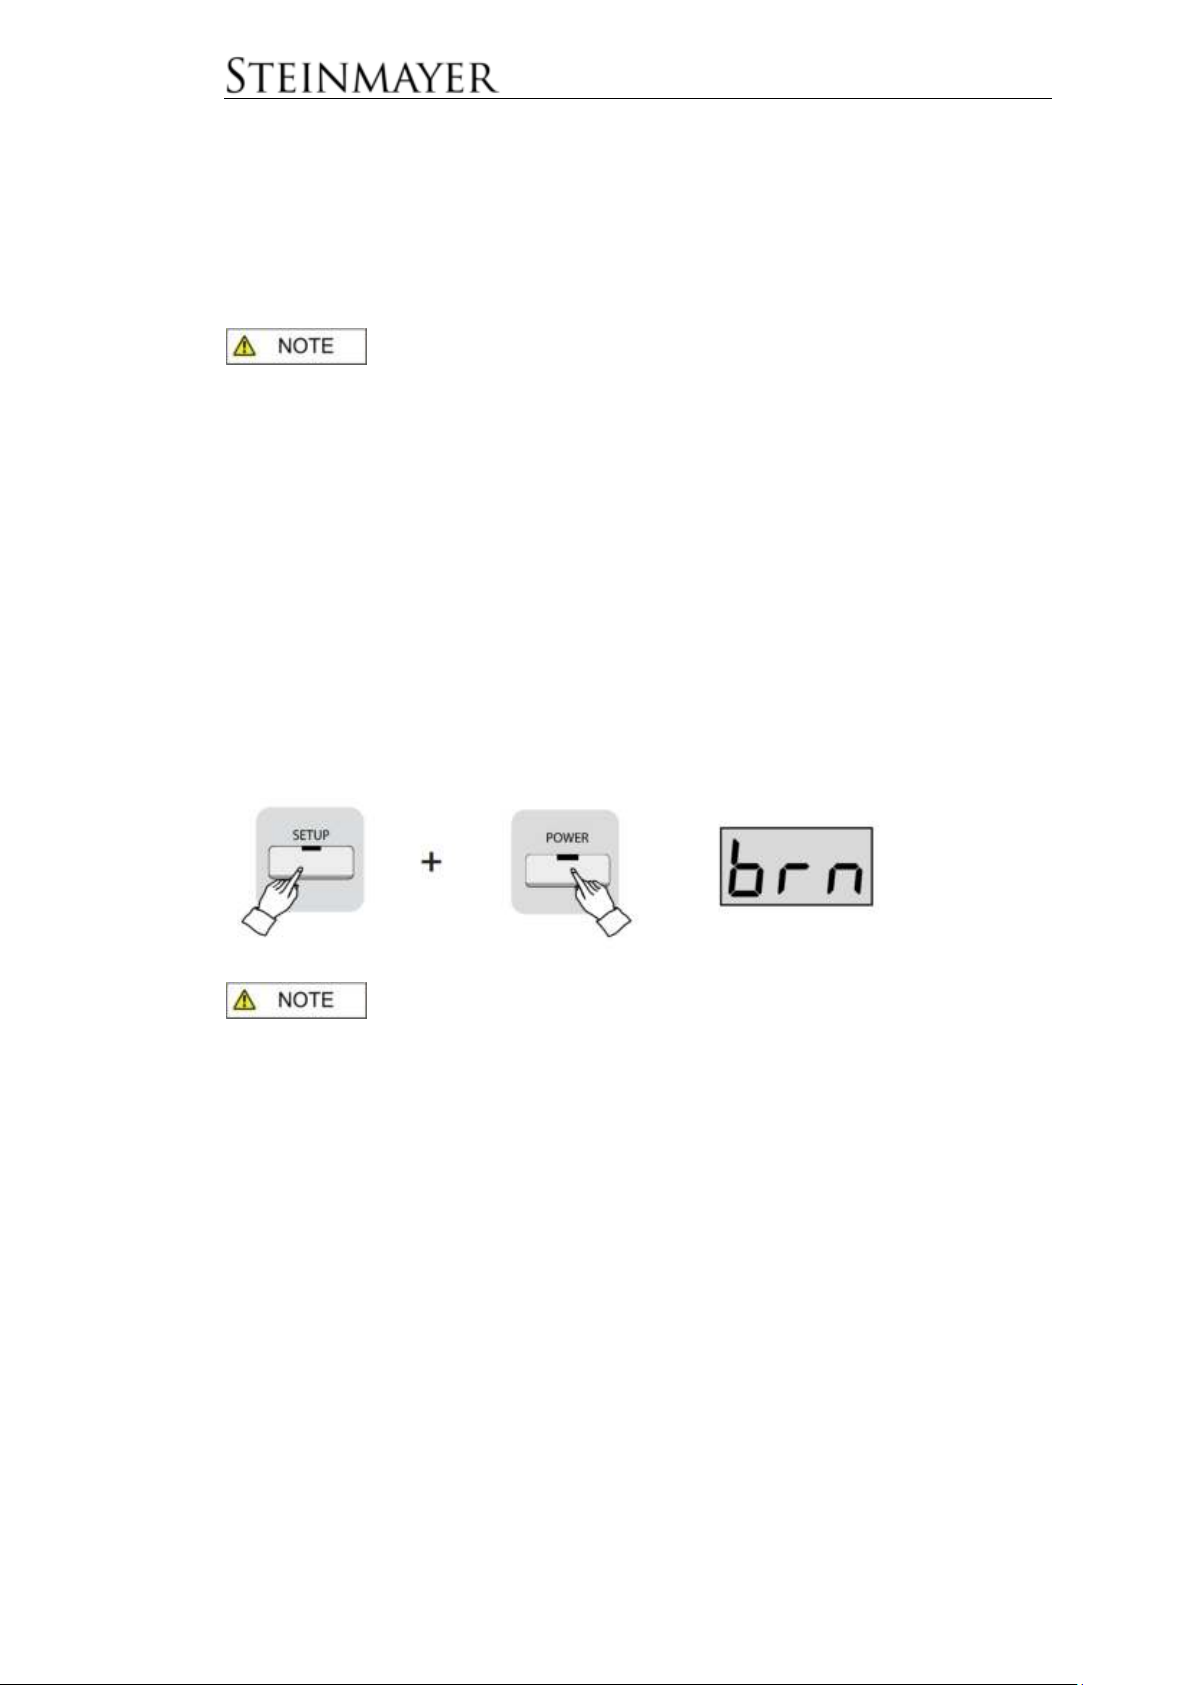
BrainCare
The instrument has a separate BrainCare mode. To get into this operating state,
turn off the instrument. Now press and hold the SETUP button and switch on the
instrument. Hold down the SETUP button until the instrument is started in secured
BrainCare mode. The display shows brn.
There are no piano functions available in BrainCare mode.
In this operating mode, you can choose from different categories of background
noise atmosphere with timer function. After expiry of the timer, the instrument
switches off automatically.
These categories can be combined with each other. For example, as a sleeping aid
you can underlay a relaxing piano piece with the sound of the sea.
19
Page 27
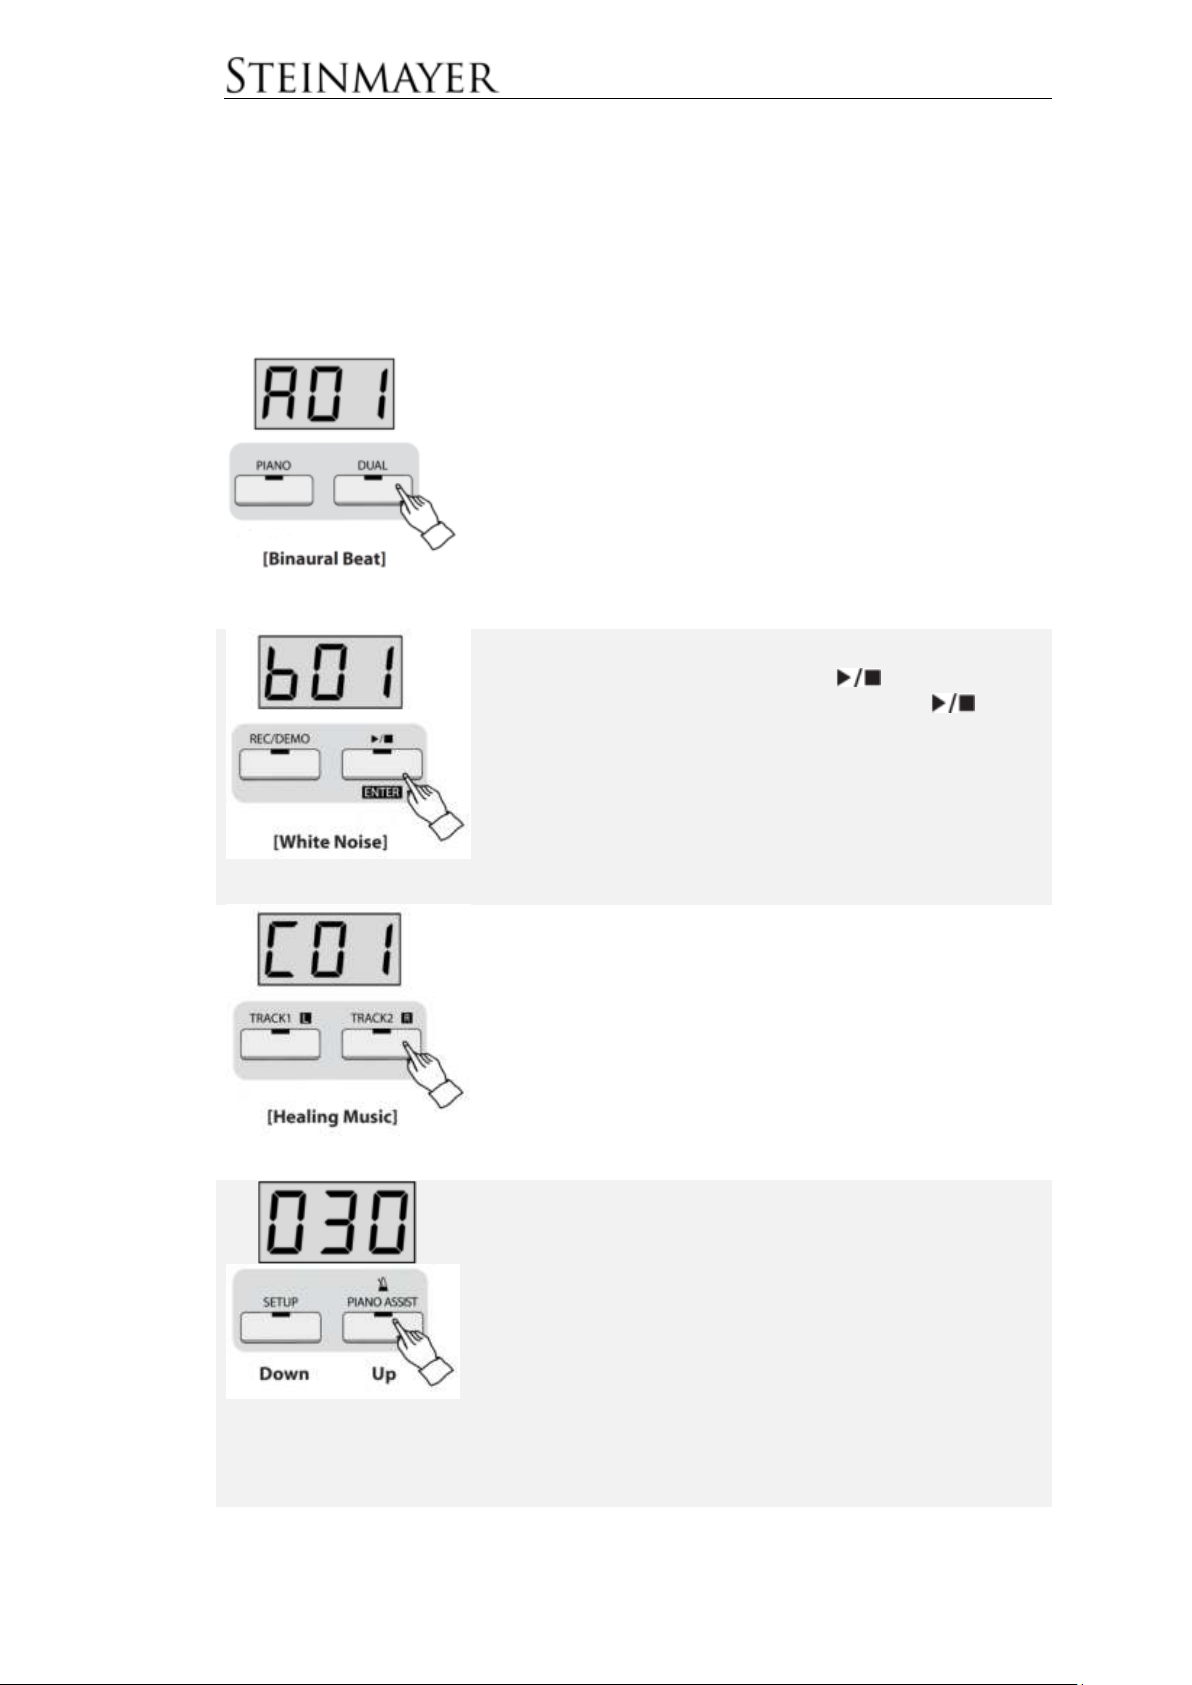
Binaural Beat
Press the DUAL button to start
Binaural Beat. By repeatedly pressing
DUAL, you can scroll through the
different sounds of Binaural Beats.
Press the PIANO button to scroll
backwards to the OFF status.
White Noise
Press the ENTER / button to start
White Noise. Press ENTER /
several times to scroll through the
different sounds of White Noise. Press
the REC / DEMO button to scroll
backwards to the OFF state.
Healing Music
Press the TRACK2 button to start
Healing Music. Press TRACK2 several
times to scroll through the different
sounds of Healing Music. Press the
TRACK1 button to scroll backwards to
the OFF status.
Timer control
Press the PIANO ASSIST button to set
the value for the timer. For example, at
the value 30 the playback is stopped
after 30min. Pressing the PIANO
ASSIST button several times increases
the value. Press the SETUP button to
decrease the value. You can decrease
the value till inactive status (000).
Each row of the panel controls one level of the BrainCare categories. All three
categories can be controlled independently. Only the timer function refers to the
entire playback of BrainCare.
20
Page 28
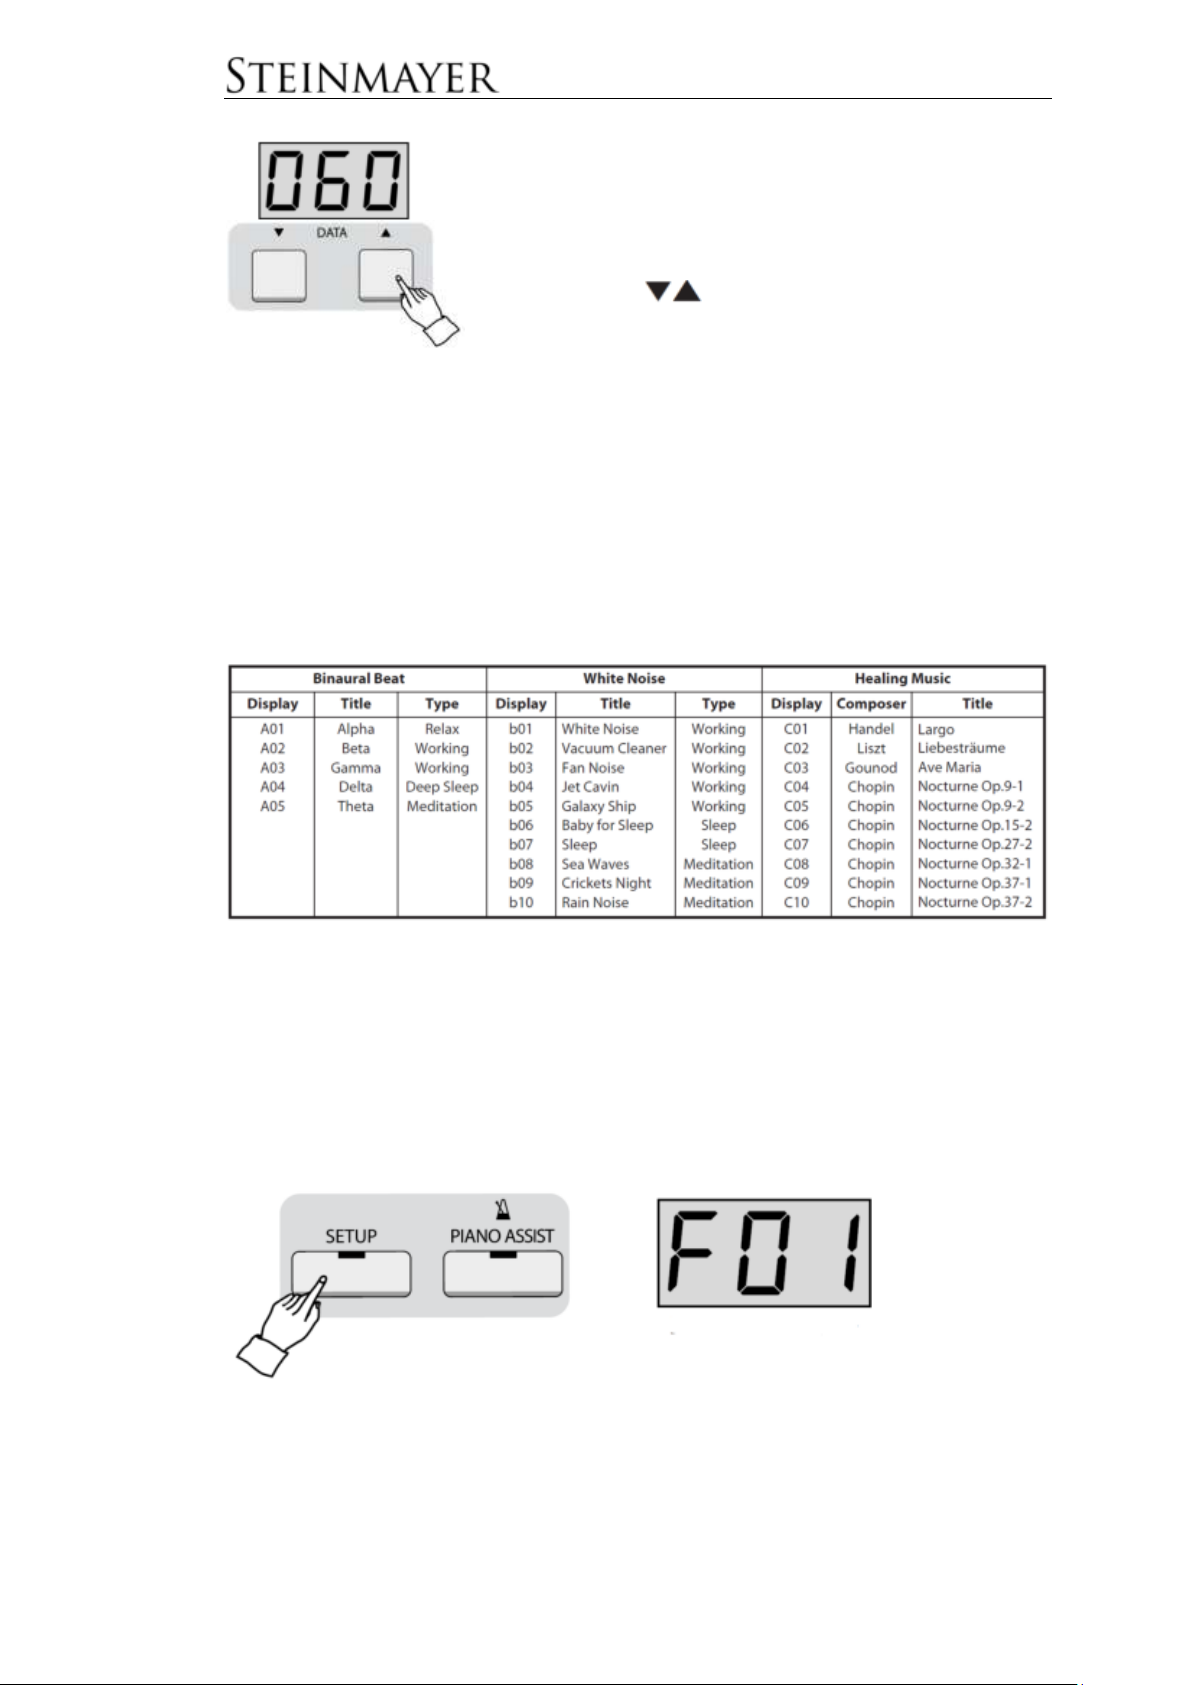
Volume adjustment
It is possible to adjust the volume of each
category of BrainCare individually. The
individual categories can be mixed with
simultaneous playback. To do this, use the
buttons in the respective category to
adjust the volume up or down.
To return to standard mode and exit BrainCare mode, turn the instrument off and
start it again by pressing the POWER button.
BrainCare Liste
Function-menu
Numerous settings can be made on the instrument with the function-menu.
Press the SETUP key to enter the function-menu.
21
Page 29
Display
Name of the
setting
Description
1
2
3
Soft 1
Soft 2
Soft 3
Recommended for players with a weak touch. Even
with a light touch relatively loud sounds are played.
4
5
6
Normal 1
Normal 2
Normal 3
Simulates the touch sensitivity of an acoustic grand
piano.
7
8
9
Hard 1
Hard 2
Hard 3
Recommended for players with a strong touch. This
setting provides another dynamic range.
OFF
Fixed
All notes are played equally loud regardless of the
touch
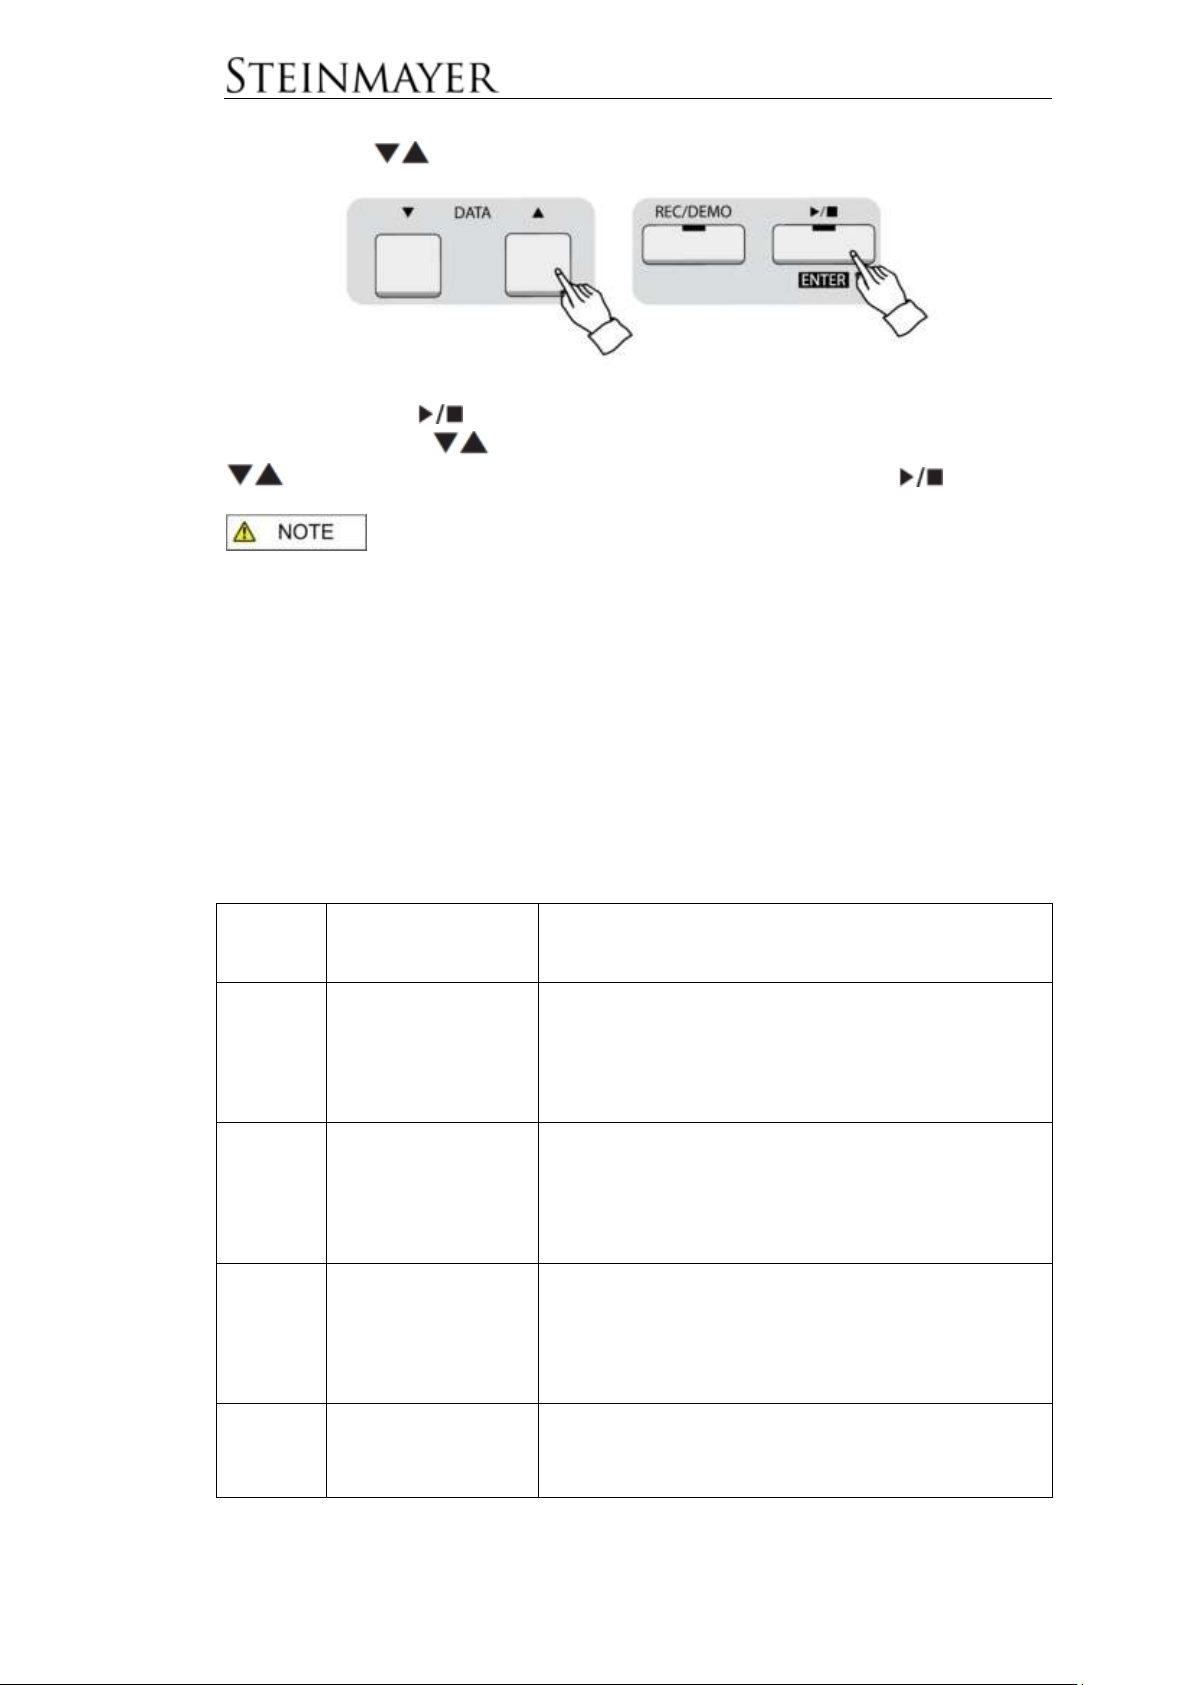
Use the DATA
buttons to navigate to the desired function-menu dialog.
Press the ENTER /
value with the DATA
button to enter the function-menu dialog and change the
buttons. By simultaneously pressing the two DATA
buttons return to their default value. Confirm with the ENTER / button.
If no entry is made for 10 seconds, the function-menu closes automatically.
F01 Tune
Here you can adjust the tuning of your instrument to other instruments in Hertz steps
up and down. The default is 440Hz.
F02 Transpose
Here you can transpose the instrument up or down (adjust the pitch in semitones) to
make it easier to playback pieces in hard-to-play keys.
F03 Touch
Here you can adjust the touch sensitivity of the keyboard to your playing style. The
following touch sensitivities are available.
22
Page 30
0
no sound
2
2/4 3 3/4
4
4/4
5
5/4 6 6/8
7
7/8 8 8/8
9
9/8
10
10/8
11
11/8
12
12/8
F04 Touch fixed Volume
If F03 Touch Fixed is selected in the menu, the volume of the playback when the
touch sensitivity is switched off can be set here.
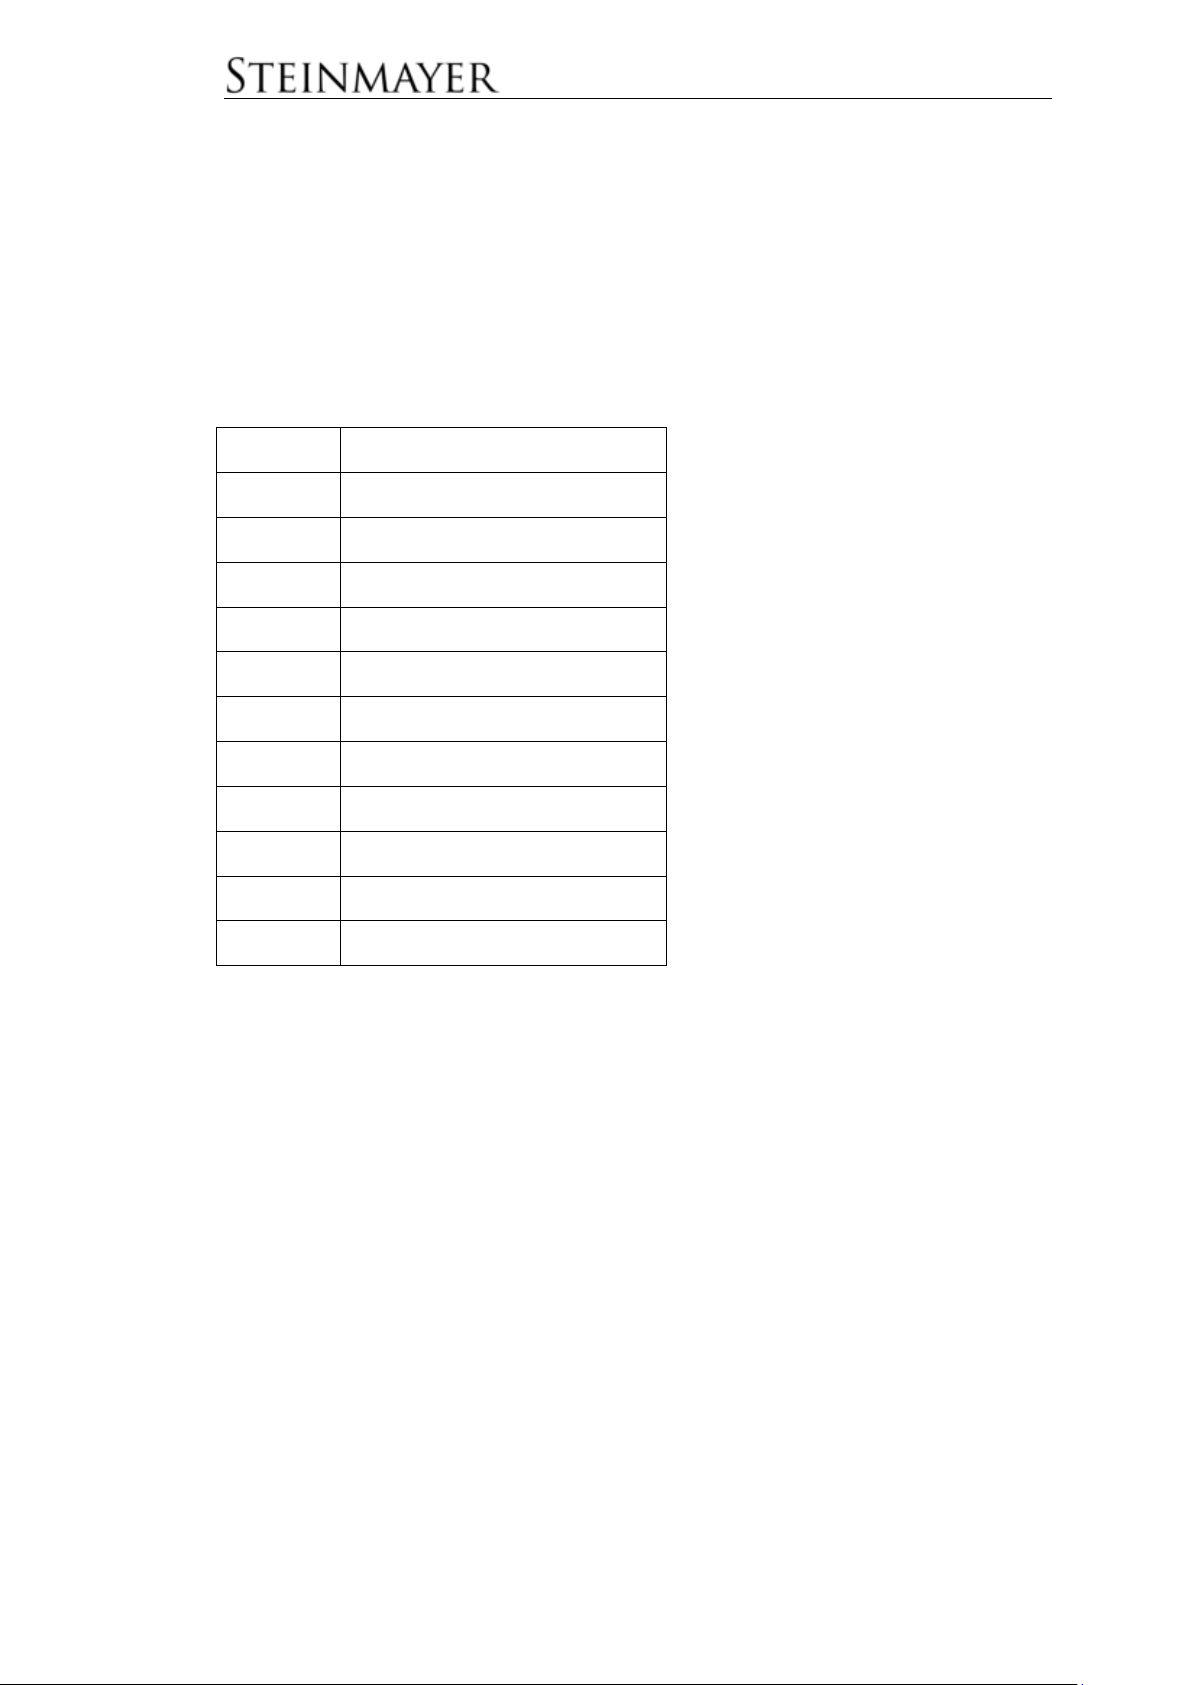
F05 Metronome Time-Signature
Here the time-signature of the metronome can be set.
The following possibilities are available:
F06 Metronome Volume
Here, the volume of the metronome can be adjusted up or down.
The default is 80.
F07 Main Voice Volume
Here you can adjust the volume of the Main Voice up or down.
F08 Layer Voice Volume
Here you can adjust the volume of the Layer Voice up or down.
F09 Split Voice Volume
Here you can adjust the volume of the Split Voice up or down.
F10 Split point
Here the position of the split point can be moved. The display shows the note name
and the octave (for example, Gb3 for the third Ges from the left).
23
Page 31
Display
Off
r-1
r-2
r-3
r-4
r-5
r-6
r-7
r-8
r-9
Name
No
Reverb
Room
1
Room
2
Room
3
Hall
1
Hall
2
Hall 3
Stage
1
Stage
2
Stage
3
Display
OFF
Chr
PhS
trE
rot
Name
No Effect
Chorus
Phase
Tremolo
Rotary
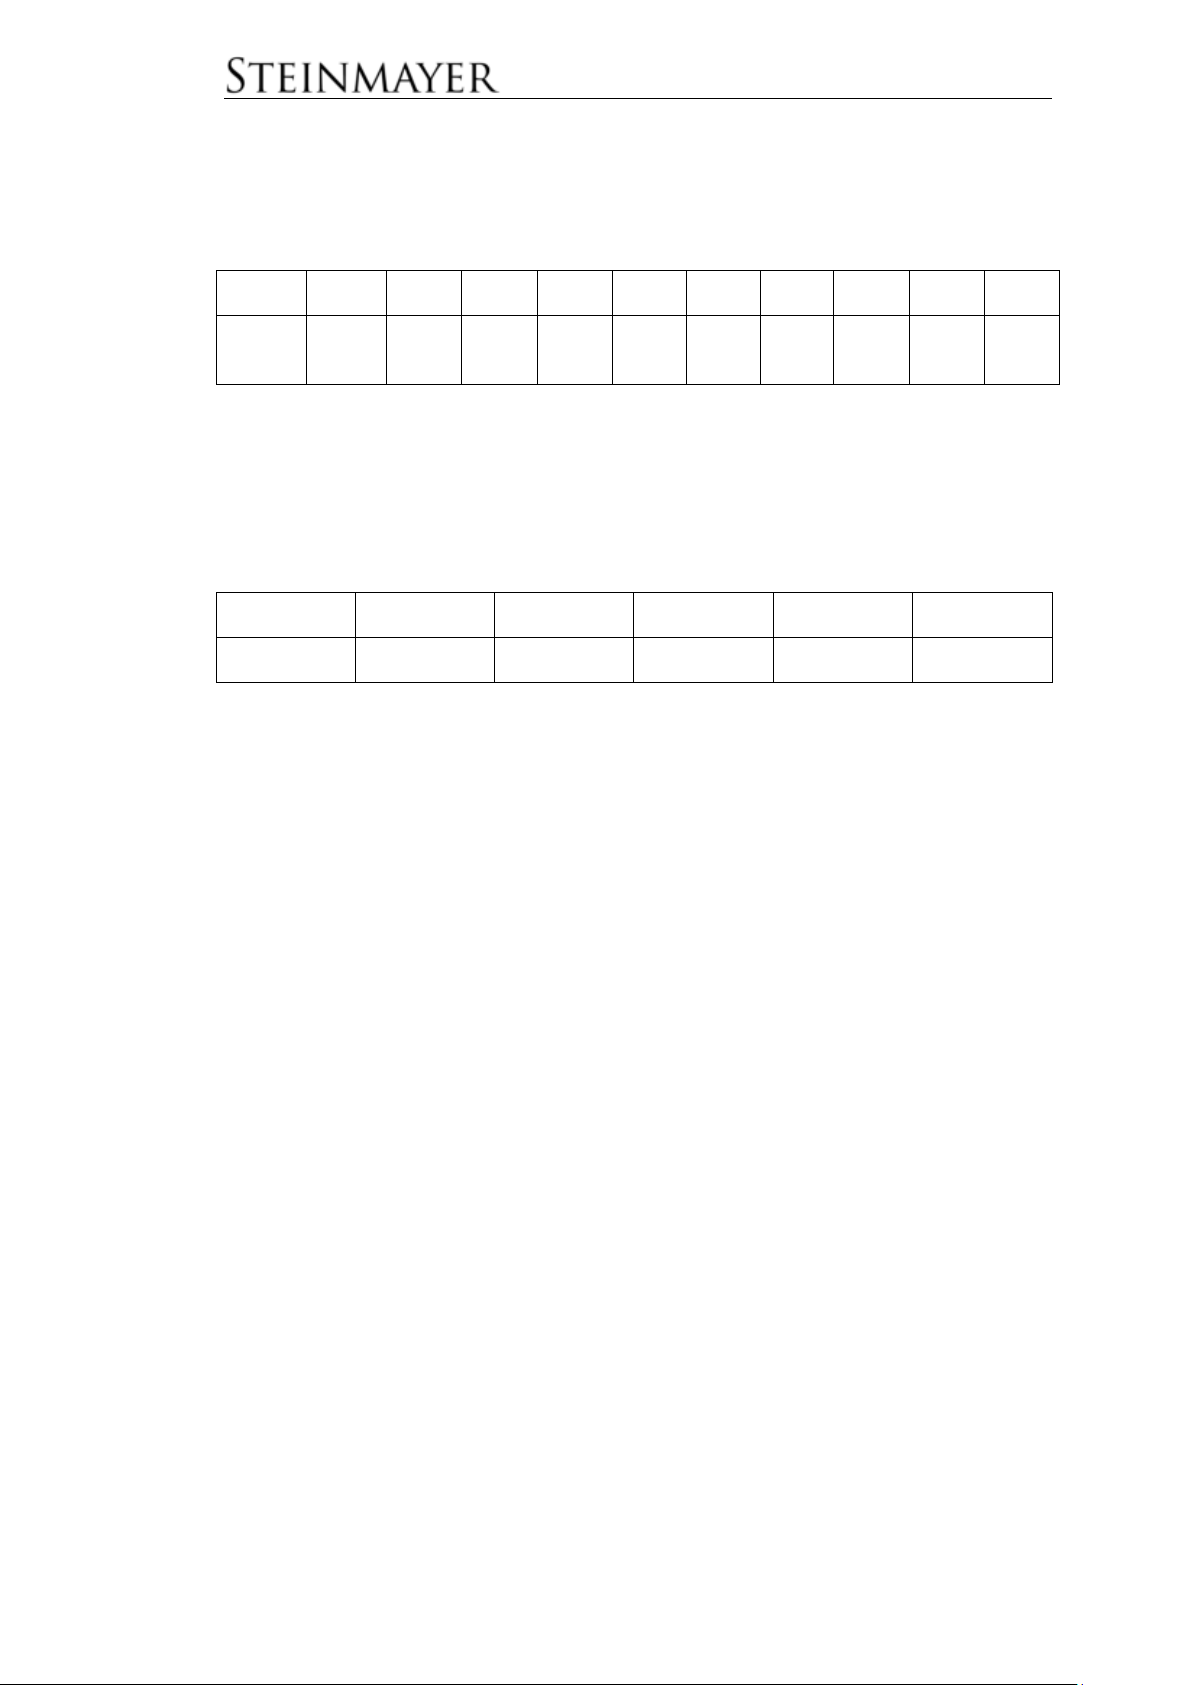
F11 Reverb Type
Here you can choose from 9 reverb types.
The default is r-3
F12 Reverb Volume
Here you can adjust the volume of the Reverb up or down.
F13 Effect Type
Here you can choose from 4 effect types.
The default is OFF
F14 Effect Volume
Here you can adjust the volume of the effect up or down.
The default is 80.
F15 String Resonance
In addition to the sound of each played string, the acoustic piano has a unique string
resonance phenomenon caused by sound interference between the piano strings.
This function allows you to adjust the strength of the string resonance volume.
The default is 60. This function is only available on Main Voice G.P1-G.P4.
F16 Damper Resonance
When you play the damper pedal on an acoustic piano, in addition to playing the
notes you will hear certain strings of the piano reverberate. This is called damper
resonance and is a natural reverberation that occurs in the piano corpus. This
function allows you to set the damper resonance volume.
The default is 80. This function is only available with Main Voice G.P1-G.P4.
24
Page 32
Display
rhy
Pno
Mode
Rhythm (Drumbeat)
Piano Player performing aid
Display
ON
OFF
Chord recognition
Multi-finger is activated: The
instrument allows chord
indication through the
fingered and single finger
methods
Multi-finger is disabled: The
instrument allows Fingered
method only
Display
ALL
rEP
OFF
Mode
All songs will be played
automatically one after
the other
The selected song will
be repeated
continuously
The selected song will
be played once and
then stopped.
F17 Corpus Resonance
In addition to damper and string resonance, an acoustic piano has a corpus
resonance. With this function you can activate / deactivate the corpus resonance.
Speaker resonances represent the resonances of the strings without damper (G6
C8) and the resonances delivered by the piano frame. When using REVERB, the
corpus sound effect is not applied, so REVERB should be off.
This function is only available on Main Voice G.P1-G.P4.
F18 Half-pedal
Here, the half-pedal function can be activated or deactivated.
The default is ON.
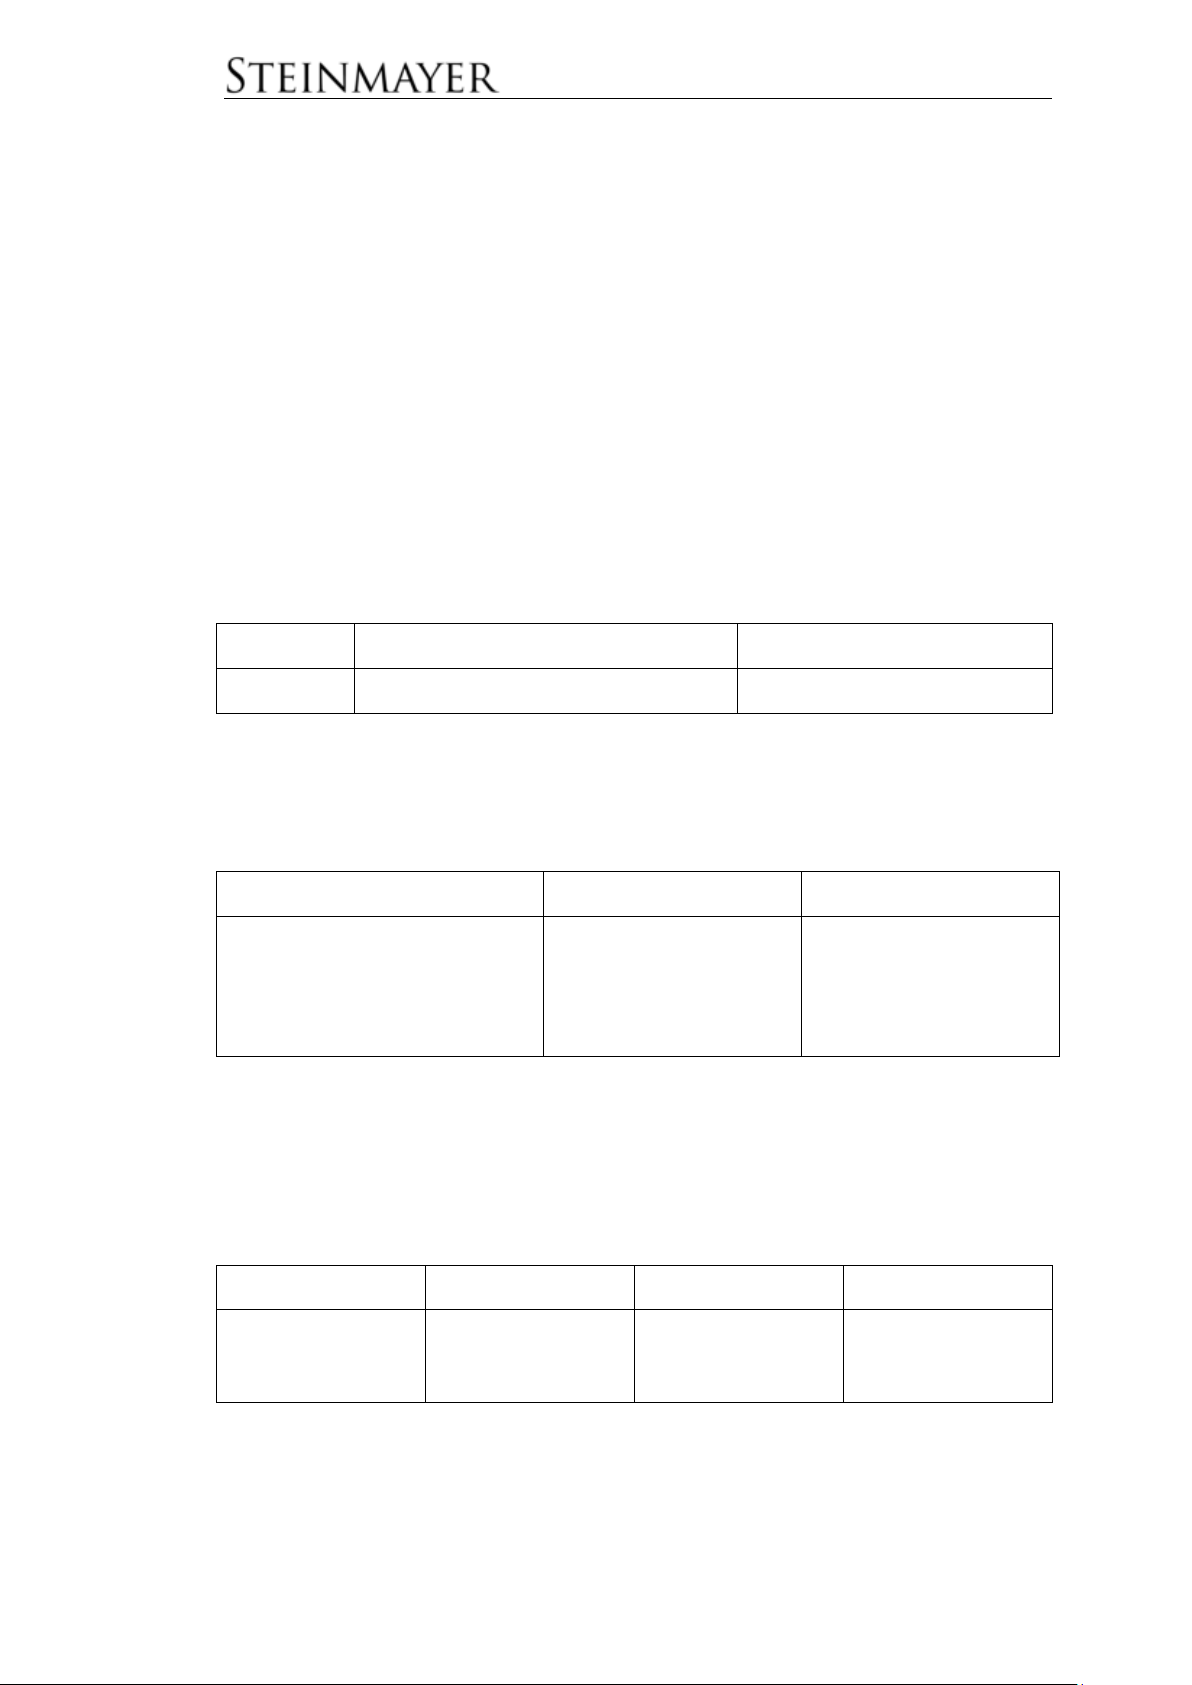
F19 Piano Assist Mode
Here the mode of the Piano Assist function can be selected. There are two modes
available:
F20 Piano Assist Multi-finger
Here you can select the mode of the chord recognition for the Piano Player
performing aid of the Piano Assist function.
The default is ON
F21 Piano Assist Volume
Here the volume of the Piano Assist function can be adjusted up or down.
F22 Music Playback Mode
Here you can select the mode for playing the demo songs and etudes.
The default is ALL
25
Page 33
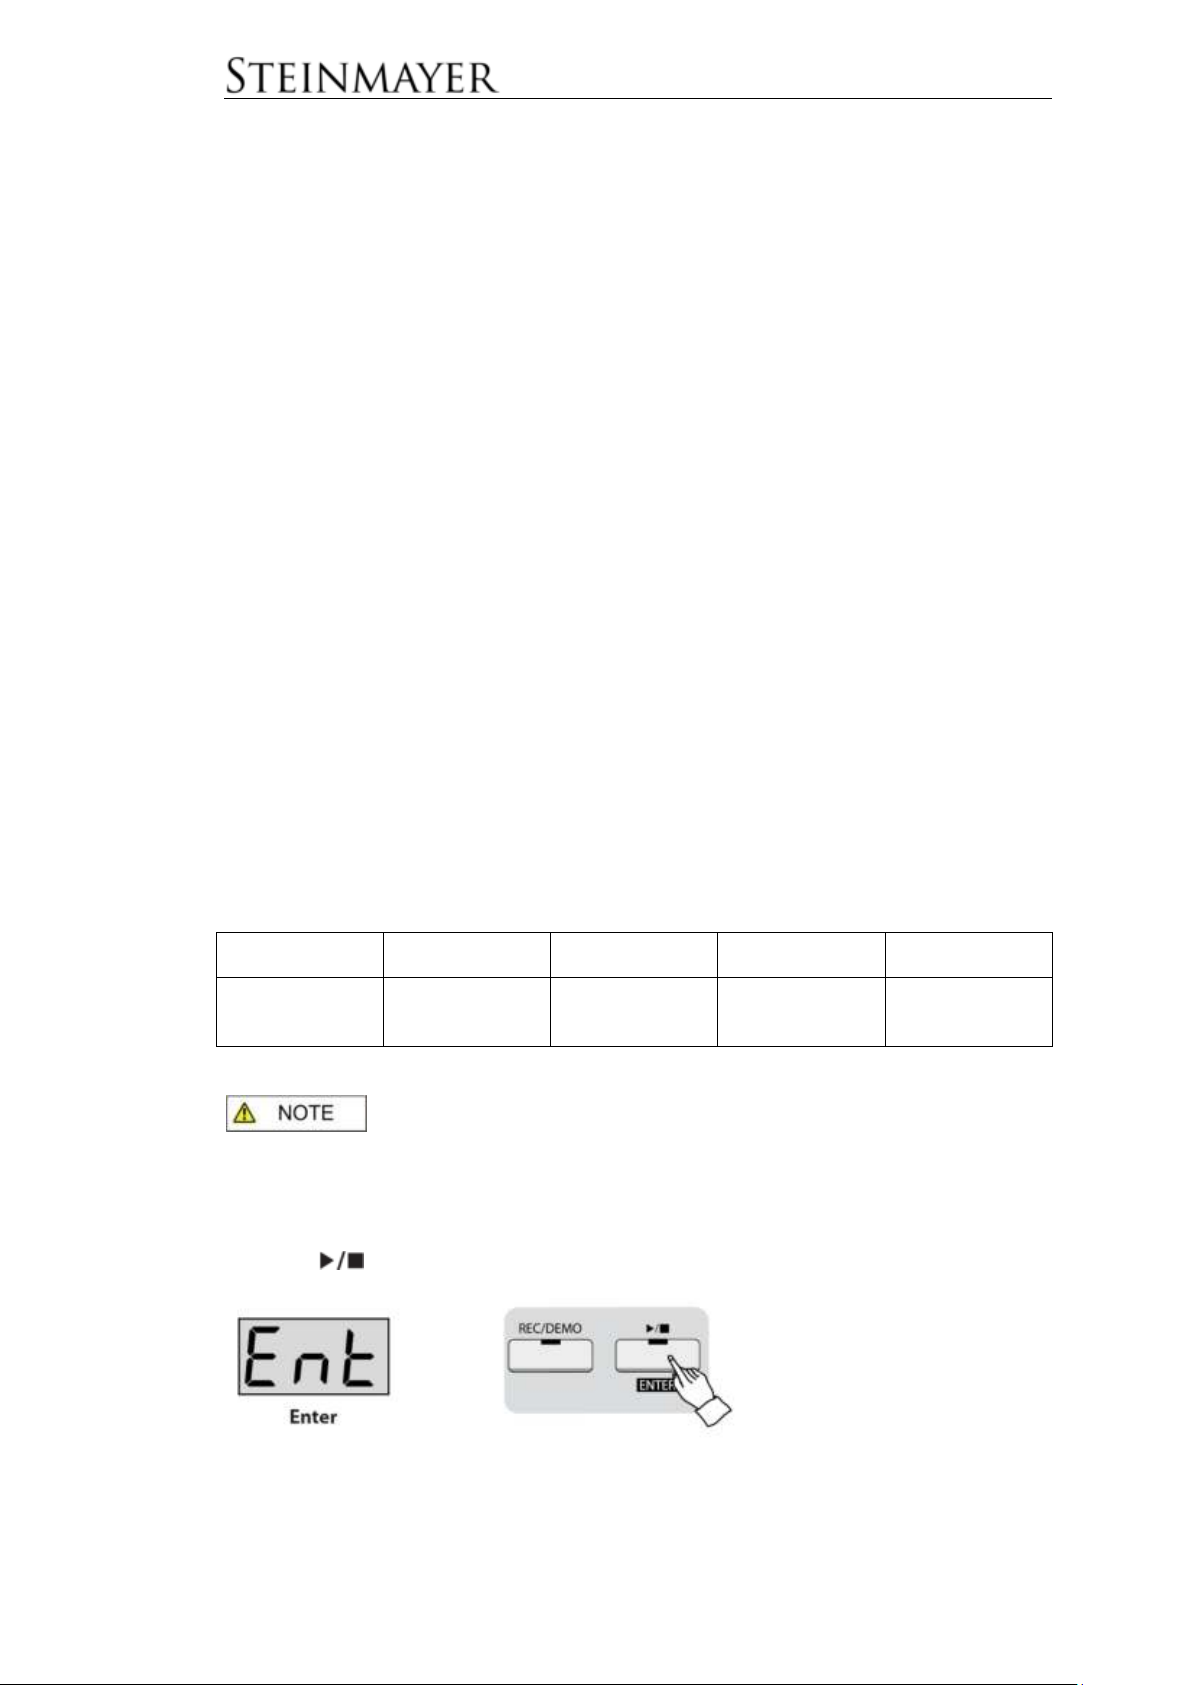
Display
OFF
030
120
240
Shut off time
APO is
deactivated
30 Minutes
2 Hours
4 Hours
F23 Music Playback
Here you can adjust the volume of the played demo music / etudes up or down.
F24 Transpose Music Playback
Here you can change the tuning of demo music and etudes in semitones up or
down. This makes it easier to replay tracks in hard-to-play keys.
F25 Bluetooth
Here you can enable or disable the piano's Bluetooth features.
The default is ON.
F26 Bluetooth Volume
Here, the volume of music played using Bluetooth audio can be adjusted up or
down.
F27 AUX-In Volume
Here you can adjust the volume of the music played via AUX-In connection up or
down.
F28 MIDI Local
Here you can find Local-OFF setting for using the piano as a MIDI controller.
F29 Auto Power Off
If the instrument is not used for a long time, it automatically shuts off to save energy.
Here you can set the value of the Auto Power Off function.
The default is 030
This value will be stored when the instrument is switched off and is
also valid when switched on again.
rSt Reset
Resets the instrument to factory settings. Confirm this selection by pressing the
ENTER /
button. Cancel by pressing the SETUP button.
26
Page 34
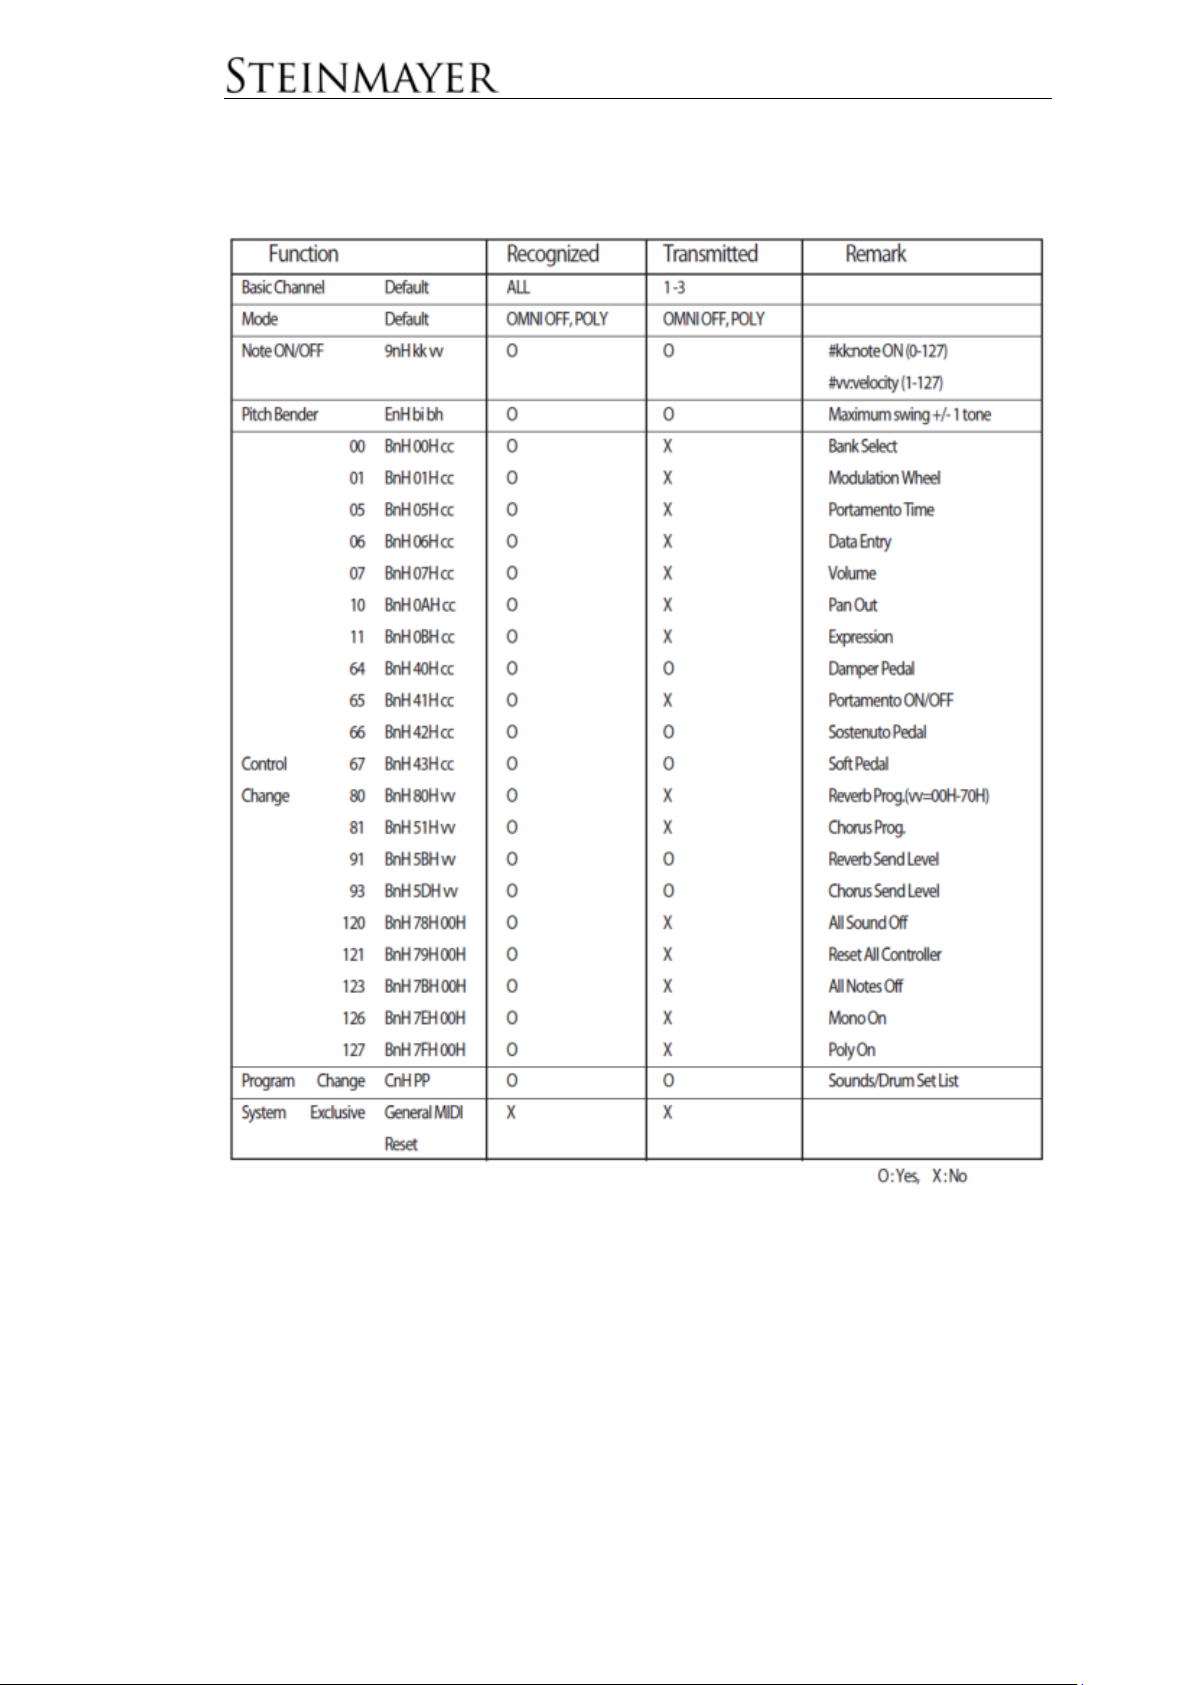
MIDI Chart
27
Page 35
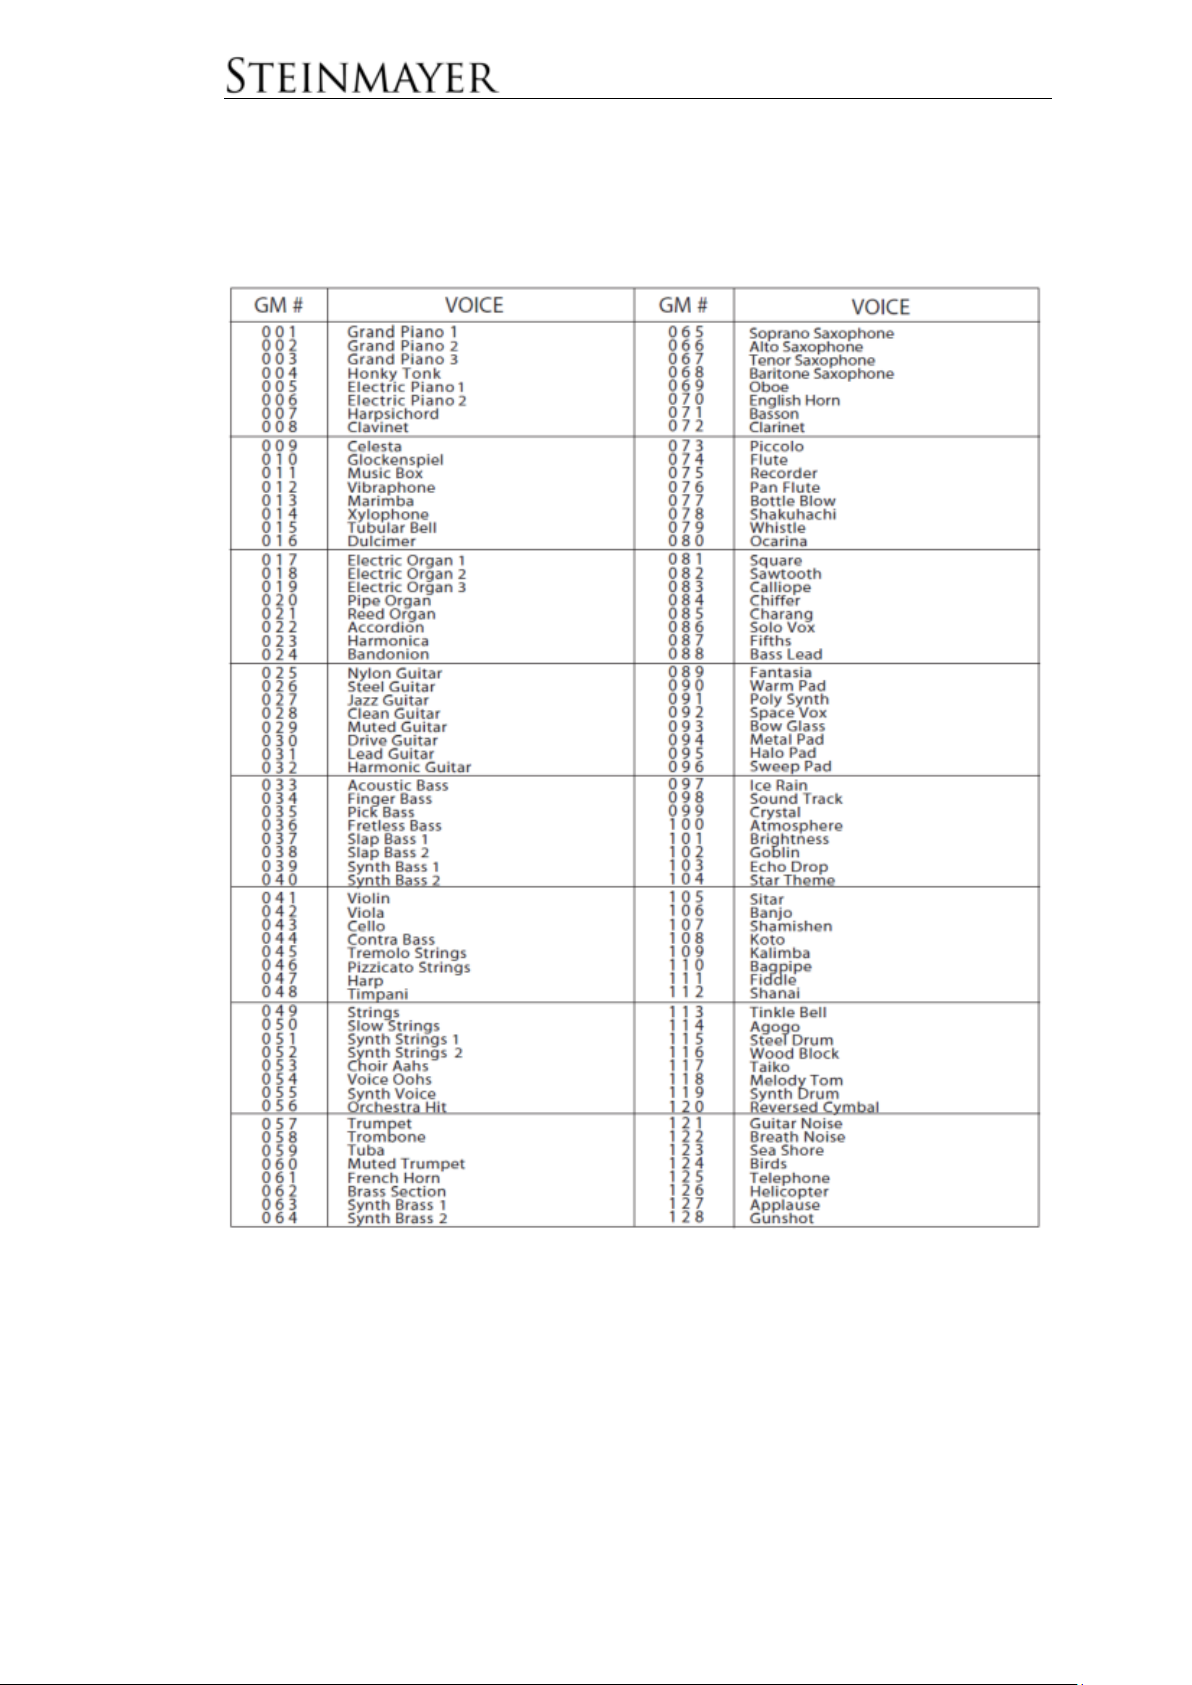
GM-Voice
(only with MIDI connection)
28
Page 36
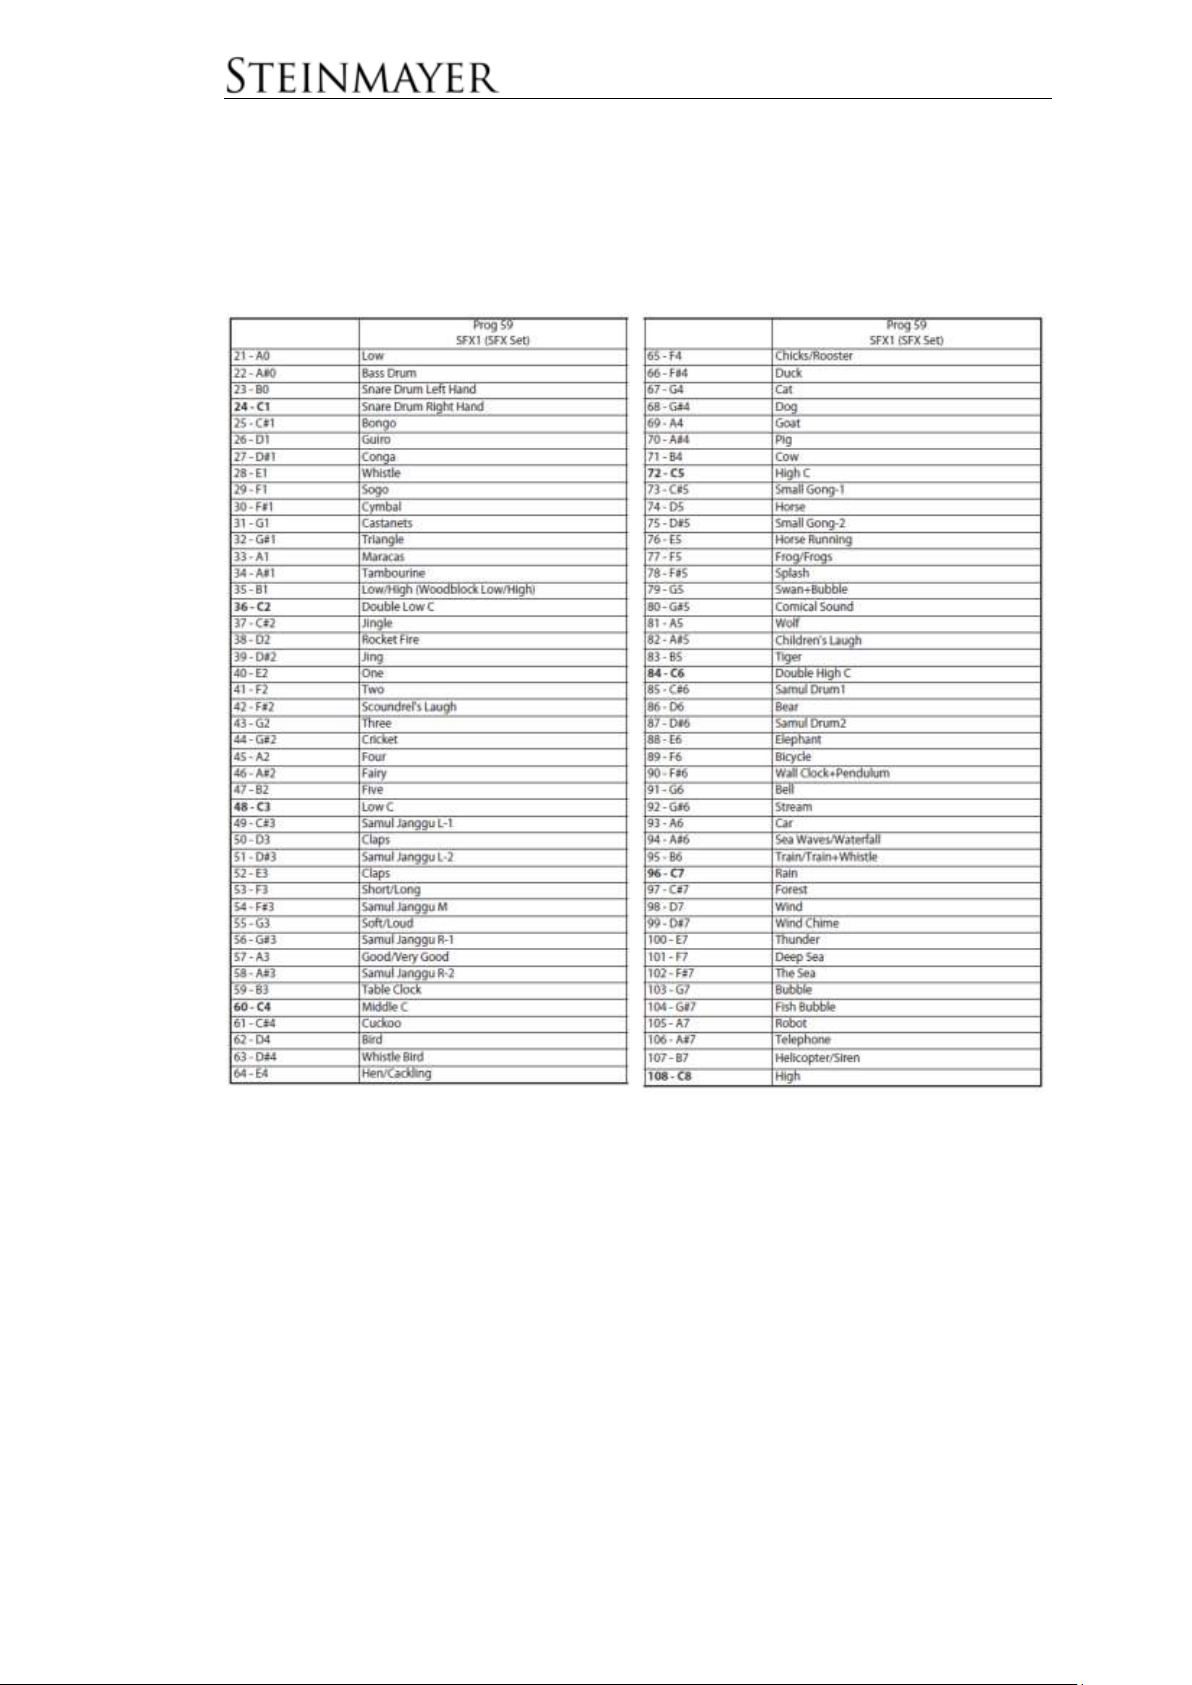
Percussion
(If two different effects are specified, they will react depending on the strength of the
touch)
29
Page 37
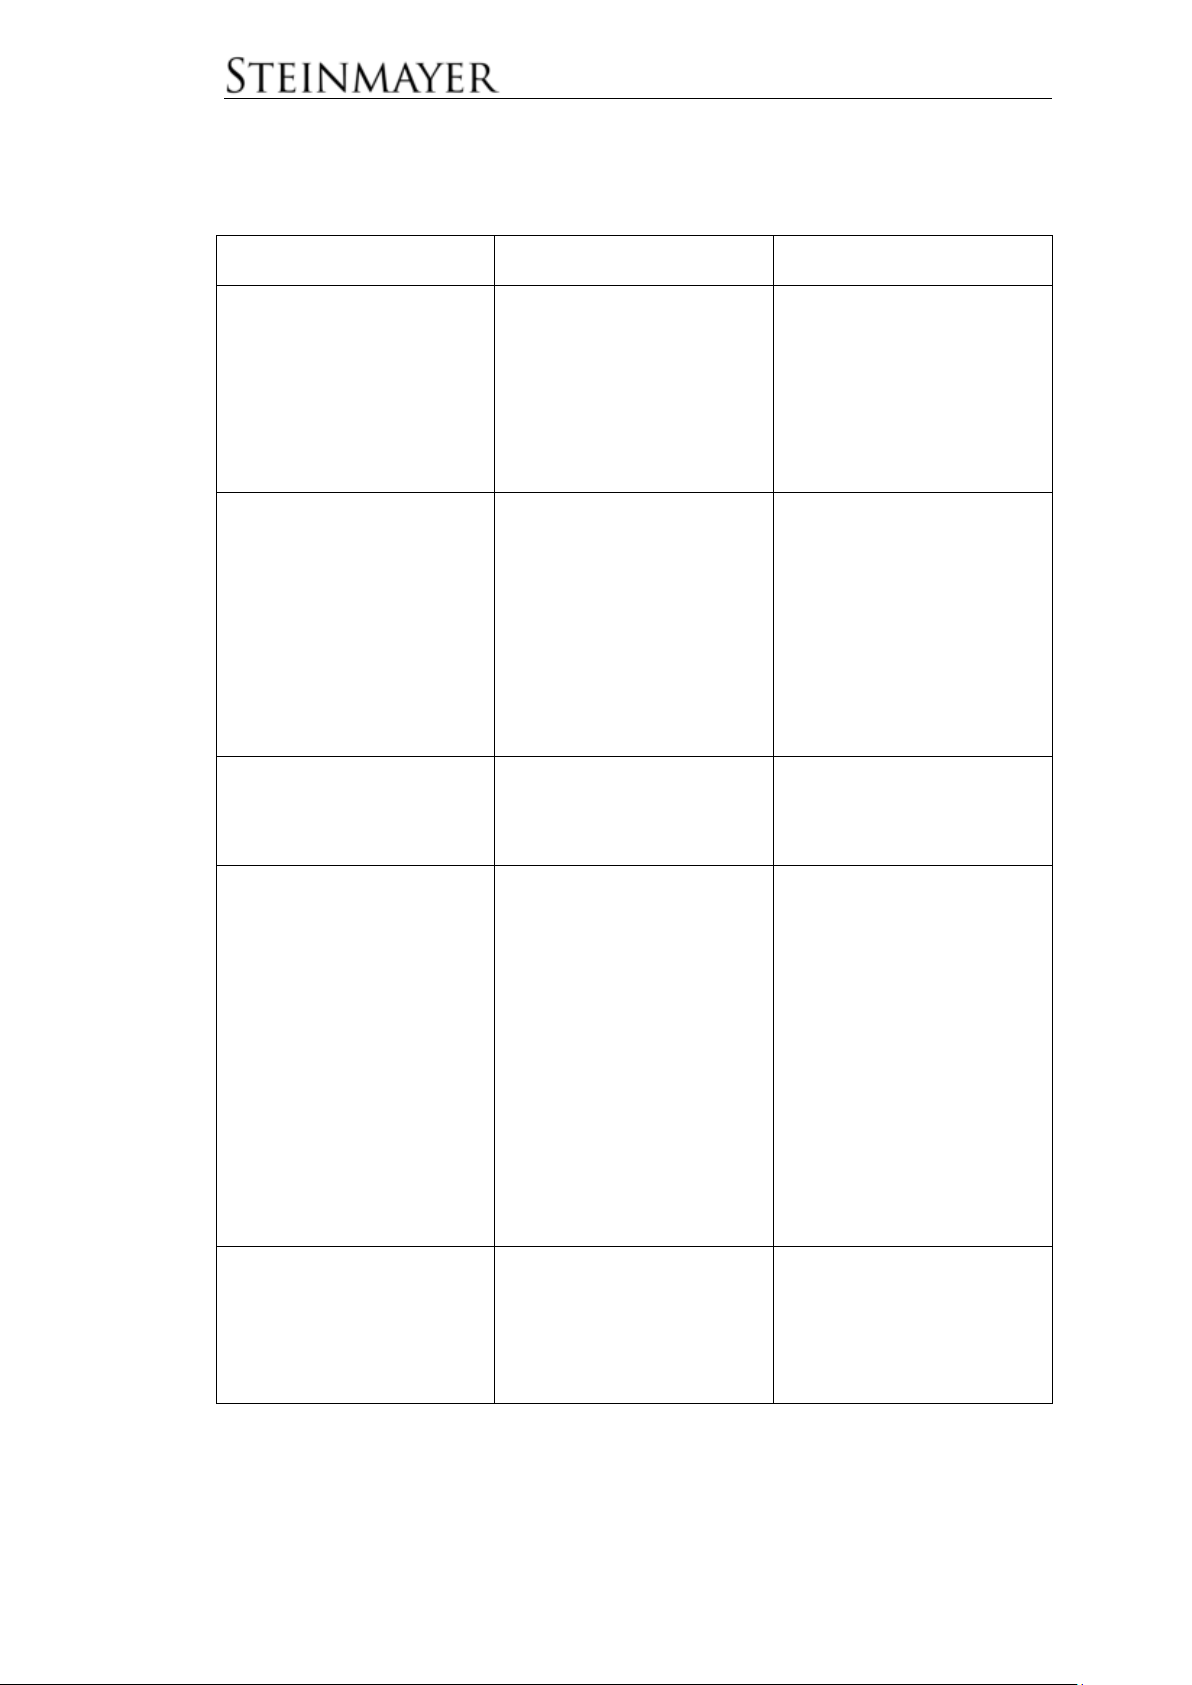
Error
Cause
Solution
The piano does not turn
on
1.The power cord is not
plugged in
2.The instrument is not
turned on
3.The outlet has no power
1.Plug in the power cord
properly
2.Turn on the instrument
3.Use another outlet
The piano does not emit
sound from the speakers
1.The volume is set to the
lowest value
2.A headphone (adapter)
is in the headphone jack
3.The power cord is not
plugged in
1. Increase the volume
setting
2.Remove the headphone
(adapter) from the
headphone jack
3.Plug the instrument into
an electrical outlet
The volumes of the
different voices are very
different
The volume adjustment in
the function-menu is
changed
Reset the volume levels in
the function-menu to the
default values
The instrument emits
noises
1.There are devices with
disturbing features
(freezer, washing
machine or similar) in the
immediate vicinity
2.Objects on or near the
instrument resonate with
3.The noise occurs only
when using a headphone
1.Remove the piano from
the vicinity of other
electrical appliances
(especially those with
motors)
2.Remove resonant
objects from the
surroundings of the piano
3.Clean the headphone
plug or replace the
headphone
The instrument does not
pass any sound through
the AUX-OUT connector
1.The volume is set to the
minimum value
2.The connection cable is
damaged
1. Increase the volume
2.Replace the connection
cable
Trouble Shooting
If a malfunction occurs, please check the following causes of error:
30
Page 38
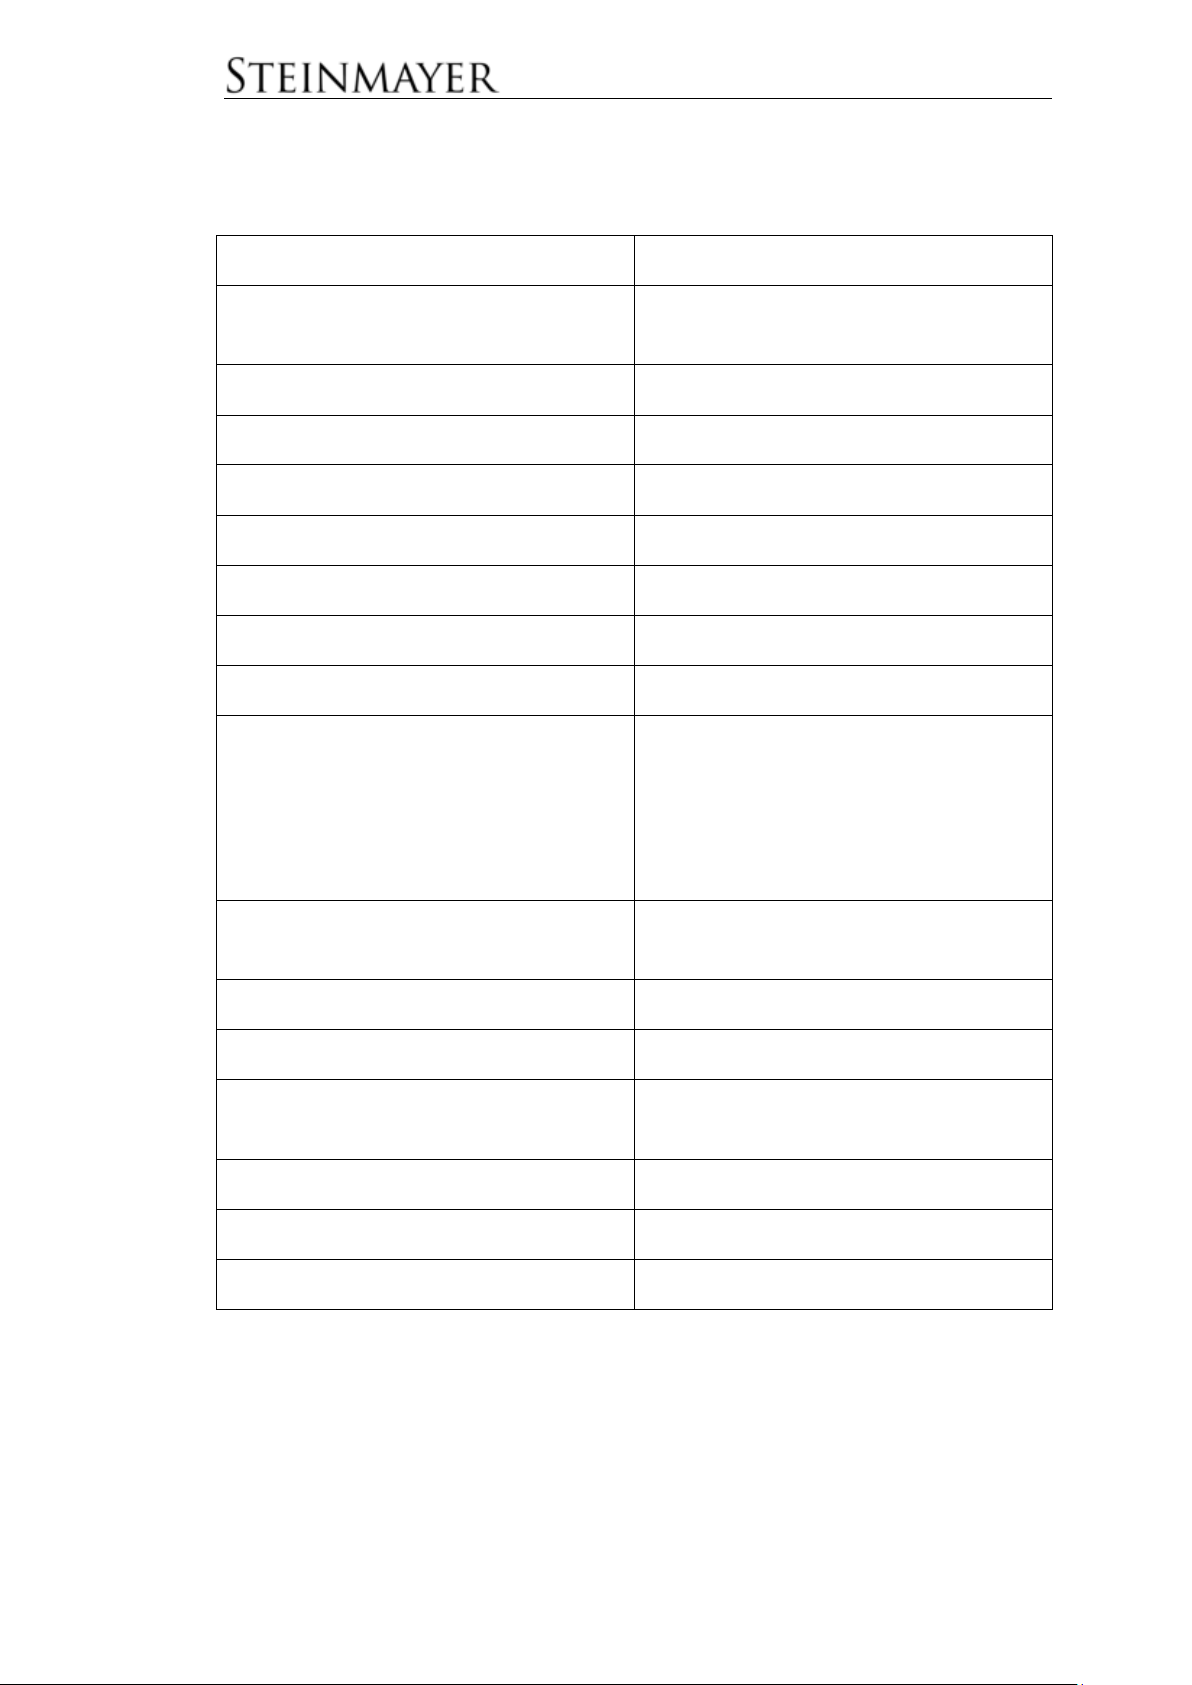
Keyboard
88 touch-sensitive hammer keys
Touch-sensitivity
10 levels (Soft 1/2/3, Normal 1/2/3, Hard
1/2/3, Fixed)
Max. Polyphony
256
Voices
34 + 1 Drum-Set + 1 SFX-Set
Dual
Layer, Split, TwinPiano
DSP
9 Reverb, 4 Effect
Demo
50
Piano Assist
PianoPlayer 20, DrumPlayer 20
Record function
2 tracks in 3 banks (4500 Note/Track)
Bluetooth
Bluetooth-Audio, Bluetooth-MIDI
Bluetooth 5.0 Dual Mode, Class2
Frequency spectrum: 2.402 GHz to 2.480 GHz
• Receive sensitivity: -90 dBm (2 Mbps EDR)
• Output Power
- BM62/64 Class 2: +2 dBm typical
BrainCare
5 Binaural Beats, 10 White Noise, 10
Healing Music
Pedals
3 (Soft, Sostenuto, Sustain)
Half-pedal
Yes (right pedal)
Connections
AUX In/Out, USB to Host, 2x headphone
(3,5mm+6,35mm), pedal, power supply
Speaker
(16cm x 8cm)x2
Power consumption max.
36W
Supplied accessories
Power supply 18V,2A, + inside
Product Specifications
31
Page 39
WEEE Declaration
(Waste of Electrical and Electronic Equipment)
Your product has been designed and manufactured using high quality materials and
components that are recyclable and reusable. This symbol means that electrical and
electronic equipment must be disposed of separately from household waste at the
end of their service life.
Please dispose of this device at your local municipal collection point or at the
recycling center.
Please help protect the environment in which we all live.
All specifications and appearance are subject to change without notice. All
information was correct at the time of printing. Musikhaus Kirstein GmbH assumes
no responsibility for the accuracy or completeness of the descriptions, photos or
statements contained in this manual. Printed colors and specifications may vary
slightly from the product. Products of Musikhaus Kirstein GmbH are distributed only
through authorized dealers. Distributors and dealers are not representatives of
Musikhaus Kirstein GmbH and are not authorized to legally bind Musikhaus Kirstein
GmbH in any way, whether expressly or through conclusive action. This manual is
protected by copyright. Any duplication, or any reprint, even in extracts, and any
reproduction of the illustrations, even in altered condition, is only permitted with the
written consent of the company Musikhaus Kirstein GmbH.
SIMPLIFIED EU DECLARATION OF CONFORMITY
Herewith Musikhaus Kirstein GmbH declares that the radio unit of Model is in compliance with the EU
directive 2014/53/EU.
You can download the full EU declaration of conformity for this item under download link:
http://www.kirstein.de/docs/Konformitaetserklaerung/CE_Konformitaetserklaerung_00063251.pdf
Musikhaus Kirstein GmbH
Bernbeurener Str. 11
86956 Schongau – Germany
Telefon/Phone: 0049-8861-909494-0
Telefax/Fax: 0049-8861-
32
 Loading...