

Page 1
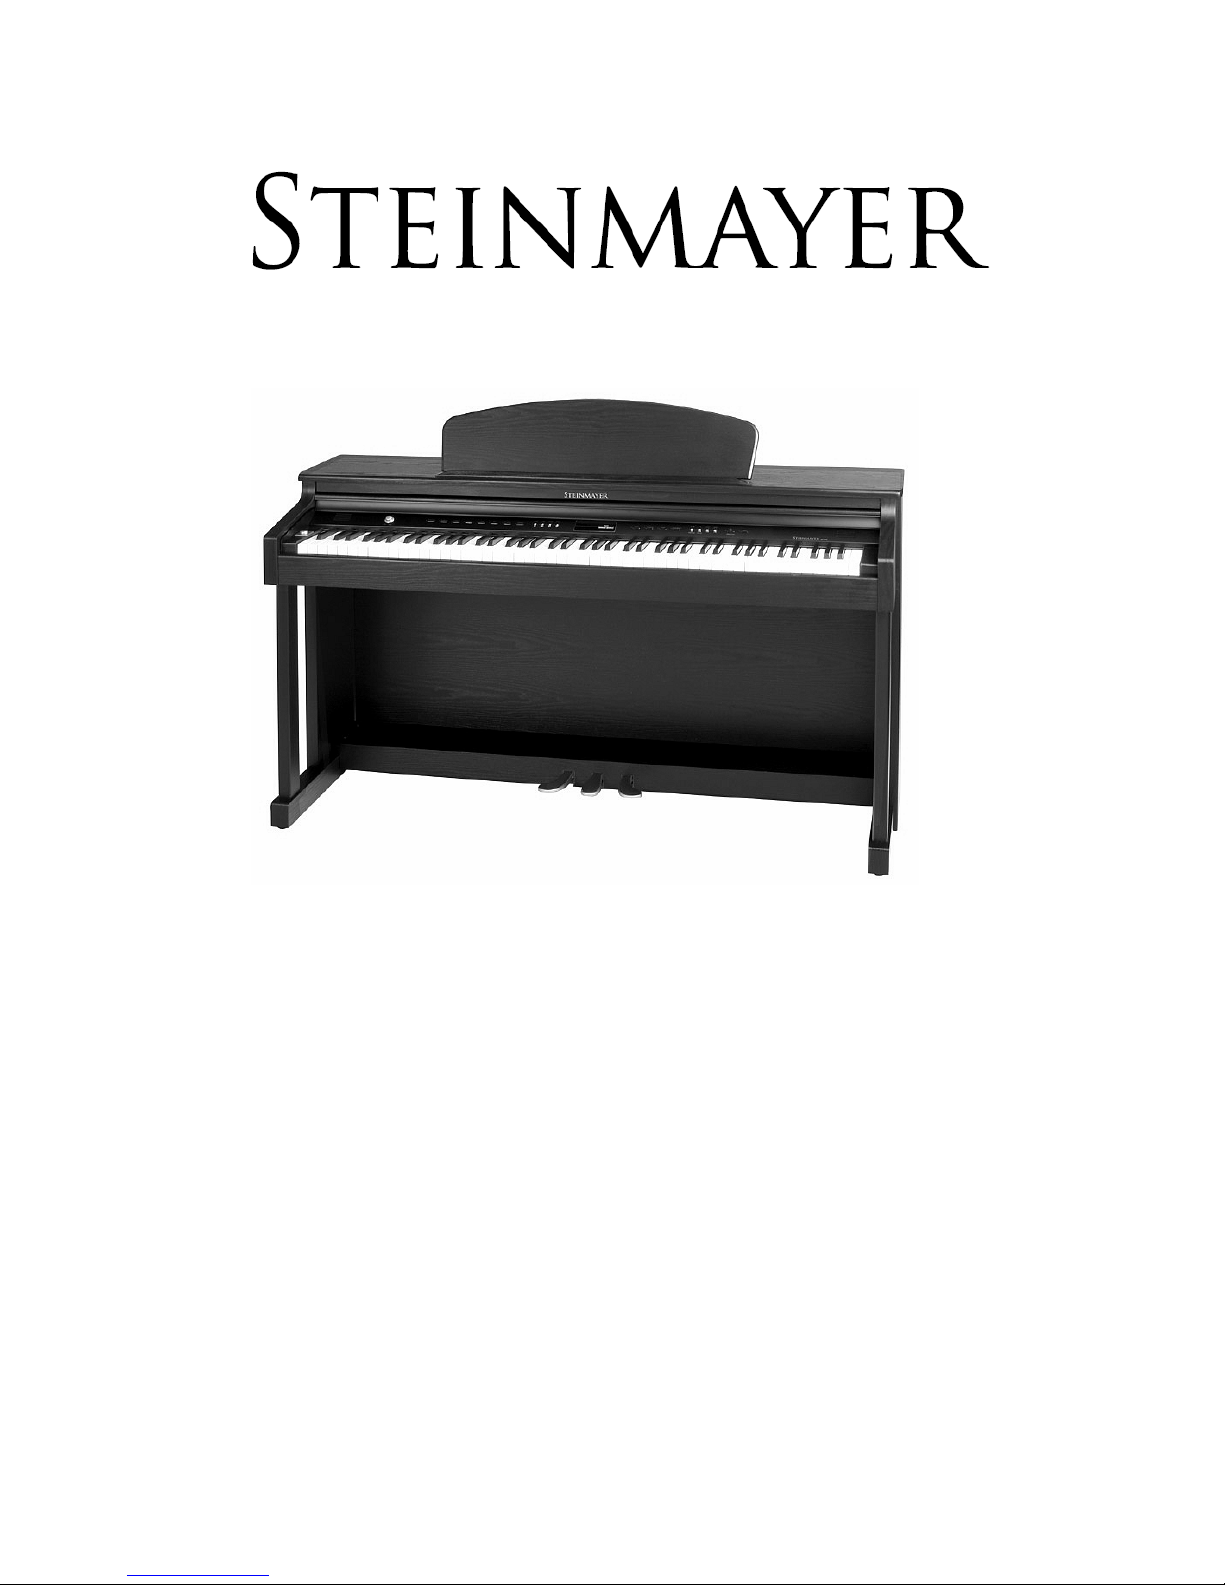
Users manual
DP-260
Digital Piano
00027529
Version 10/2012
Page 2
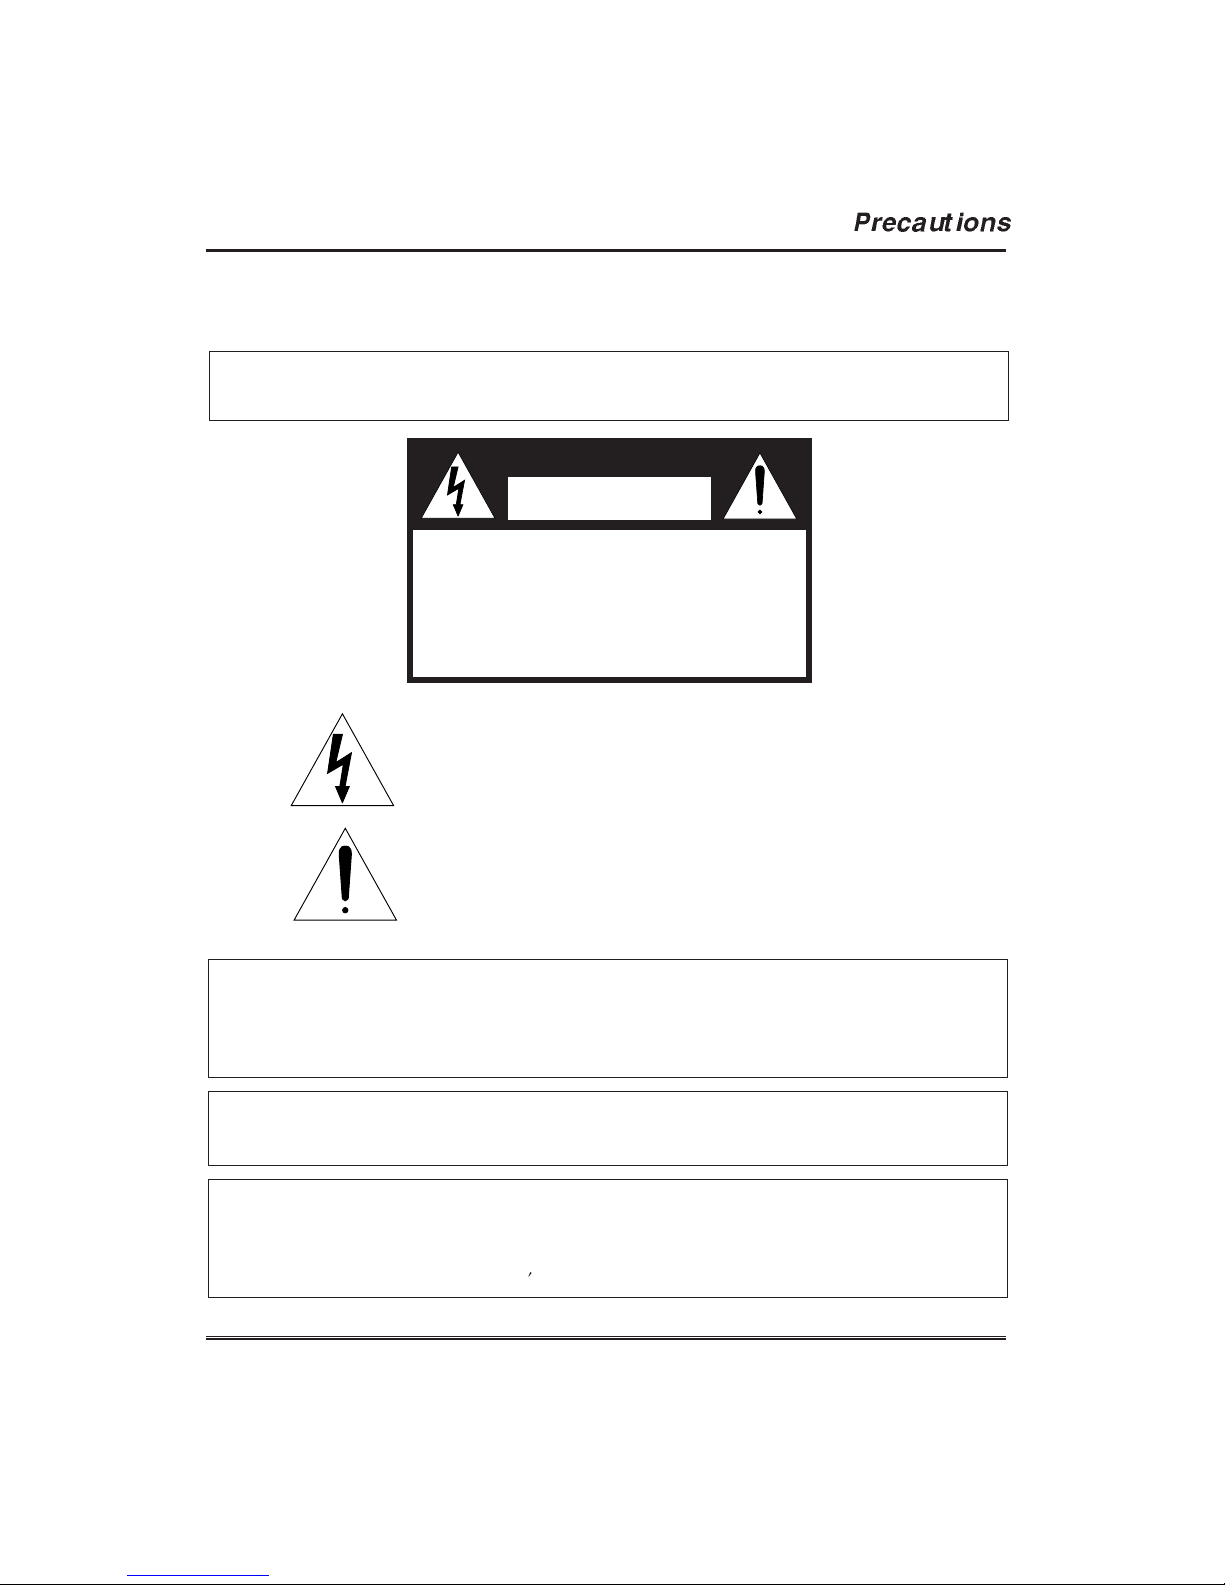
CAUTION
1
INSTRUCTIONS PERTAINING TO A RISK OF FIRE,
ELECTRIC SHOCK, OR INJURY TO PERSONS.
WARNING : TO REDUCE THE RISK OF FIRE OR ELECTRIC SHOCK, DO NOT
EXPOSE THIS APPLIANCE TO RAIN OR MOISTURE.
RISK OF ELECTRIC
SHOCK
CAUTION TO REDUCE THE RISK OF
ELECTRIC SHOCK
DO NOT REMOVE COVER (OR BACK)
NO USER SERVICEABLE PARTS INSIDE
REFER SERVICING TO QUALIFIED SERVICE
PERSONNEL
This Symbol is intended to alert the user to the presence of
uninsulated dangerous voltage within the product’s enclosure
that may be of sufficient magnitude to constitute a risk of fire
or electric shock.
This Symbol is intended to alert the user to the presence of
important in the literature accompanying this appliance.
All information should be read carefully to avoid misuse of
product.
WARNING :
DO NOT OPEN THE CABINET.
DANGEROUS HIGH VOLTAGE IS PRESENT, SERVICING SHOULD ONLY
BE PERFORMED BY QUALIFIED PERSONNEL.
CAUTION : TO PREVENT ELECTRIC SHOCK. MATCH WIDE BLADE OF PLUG
TO WIDE SLOT, FULLY INSERT.
ATTENTION :
POUR ÉVITER LES CHOC ÉLECTRIQUES, INTRODUIRE LA LAME LA PLUS
LARGE DE LA FICHE DANS LA BORNE CORRESPONDANTE DE LA PRISE
ET POUSSER JUSQU AU FOND.
Page 3
2
IMPORTANT SAFETY INSTRUCTIONS
When using electric products, basic precautions should always be followed, including the
following:
1. Read all the instructions before using the product.
2. To reduce the risk of injury, close supervision in necessary when a product is used near children.
3. Do not use this product near water - for example, near a bathtub, washbowl, kitchen sink, in a
wet basement, or near a swimming pool.
4. This product should be used only with a cart or stand that is recommended by the manufacturer.
5. This product, either alone or in combination with an amplifier and headphones or speakers,
may be capable of producing hearing loss. Do not operate for a long period of time at a high
volume level or at a level that is uncomfortable. If you experience any hearing loss or ringing
in the ears, you should consult an audiologist.
6. The product should be positioned so that its location does not interfere with its proper
ventilation.
7. The product should be positioned away from heat sources such as radiators, heat registers,
or other products that produce heat.
8. The product should only be connected to the type of power supply described in the operating
instructions or as marked on the product.
9. This product may be equipped with a polarized line plug (one blade wider than the other). This
is a safety feature. If you are unable to insert the plug into the outlet, contact an electrician to
replace your obsolete outlet. Do not defeat the safety purpose of the plug.
10. The power-supply cord of the product should be unplugged from the outlet when left unused
for a long period of time.
11. Care should be taken so that objects do not fall and liquids are not spilled into the openings of
the enclosure.
12. The product should be serviced by qualified service personnel when:
A. The power-supply cord or the plug has been damaged;
B. Objects have fallen, or liquid has been spilled into the product;
C. The product has been exposed to rain;
D. The product does not appear to operate normally or exhibits a marked change in performance;
Page 4
3
13. Do not attempt to service the product beyond described in the user maintenance
instruction. All other servicing should be done by qualified service personnel.
14. To clean the exterior surfaces, wipe lightly with a clean, dry cloth. Never use solvents such
as benzine or paint thinners.
15. The product should be positioned away from a television, radio, or any heavy equipment that
can generate electromagnetic fields.
16. The product should be located on a flat, stable surface that is free of vibration.
17. Be careful to protect the product from knocks, particularly when carrying it.
18. During thunderstorms, turn the product off and disconnect the plug from the power outlet.
INFORMATION TO THE USER
This equipment has been tested and is found to comply with the limits for a class B digital device,
pursuant to part 15 of the FCC Rules. These limits are designed to provide reasonable protection
against harmful interference in a residential installation. This equipment generates, uses and can
radiate radio frequency energy and, if not installed and used in accordance with the instructions,
may cause harmful interference. If this equipment does cause harmful interference to radio or
television reception, which can be determined by turning the equipment off and on, the user is
encouraged to try to correct the interference by one more of the following measures :
- Reorient or relocate the receiving antenna.
- Increase the separation between the equipment and receiver.
- Connect the equipment into an outlet on a circuit different from that to which the receiver is connected.
- Consult the dealer or an experienced radio/TV technician for help.
W ARNING
Changes or modifications not expressly approved by the manufacturer could void the user’s
authority to operate the equipment.
Page 5

4
Thank you and congratulations on your purchase of the DIGITAL PIANO.
Your new DIGITAL PIANO is a state-of-the-art musical instrument which
incorporates the latest electronics technology to make its operation as easy as
possible.
Your versatile DIGITAL PIANO is ideal for beginners or experienced musicians. In
order to enjoy the features and functions of this unit to their fullest, be sure to
carefully read this manual and follow the instructions contained herein.
Page 6
Precautions
Welcome/Contents
Care of Your Digital Piano
Unpacking (Upright Type/Grand Type)
Setting Up Your Piano (Upright Type/Grand Type)
External Appearance (Upright Type/Grand Type)
Panel Controls and Terminals
Adjusting the Volume
Demo play
Selecting Voices
Keyboard Percussion
GM Voice
Layer
Split
Using Pedals
Reverb
Chorus
Functions(Touch, Transpose, Tune)
Using Metronome
Recording
MIDI
The Connectors
GM Voice Table
Drum/SFX Table
MIDI Implementation Chart
Troubleshooting
Specifications
5
1
4
6
7,11
8,12
14,15
12
14
15
16
17
18
19
20
21
22
23
24
26
27
29
30
31
32
34
35
36
Page 7
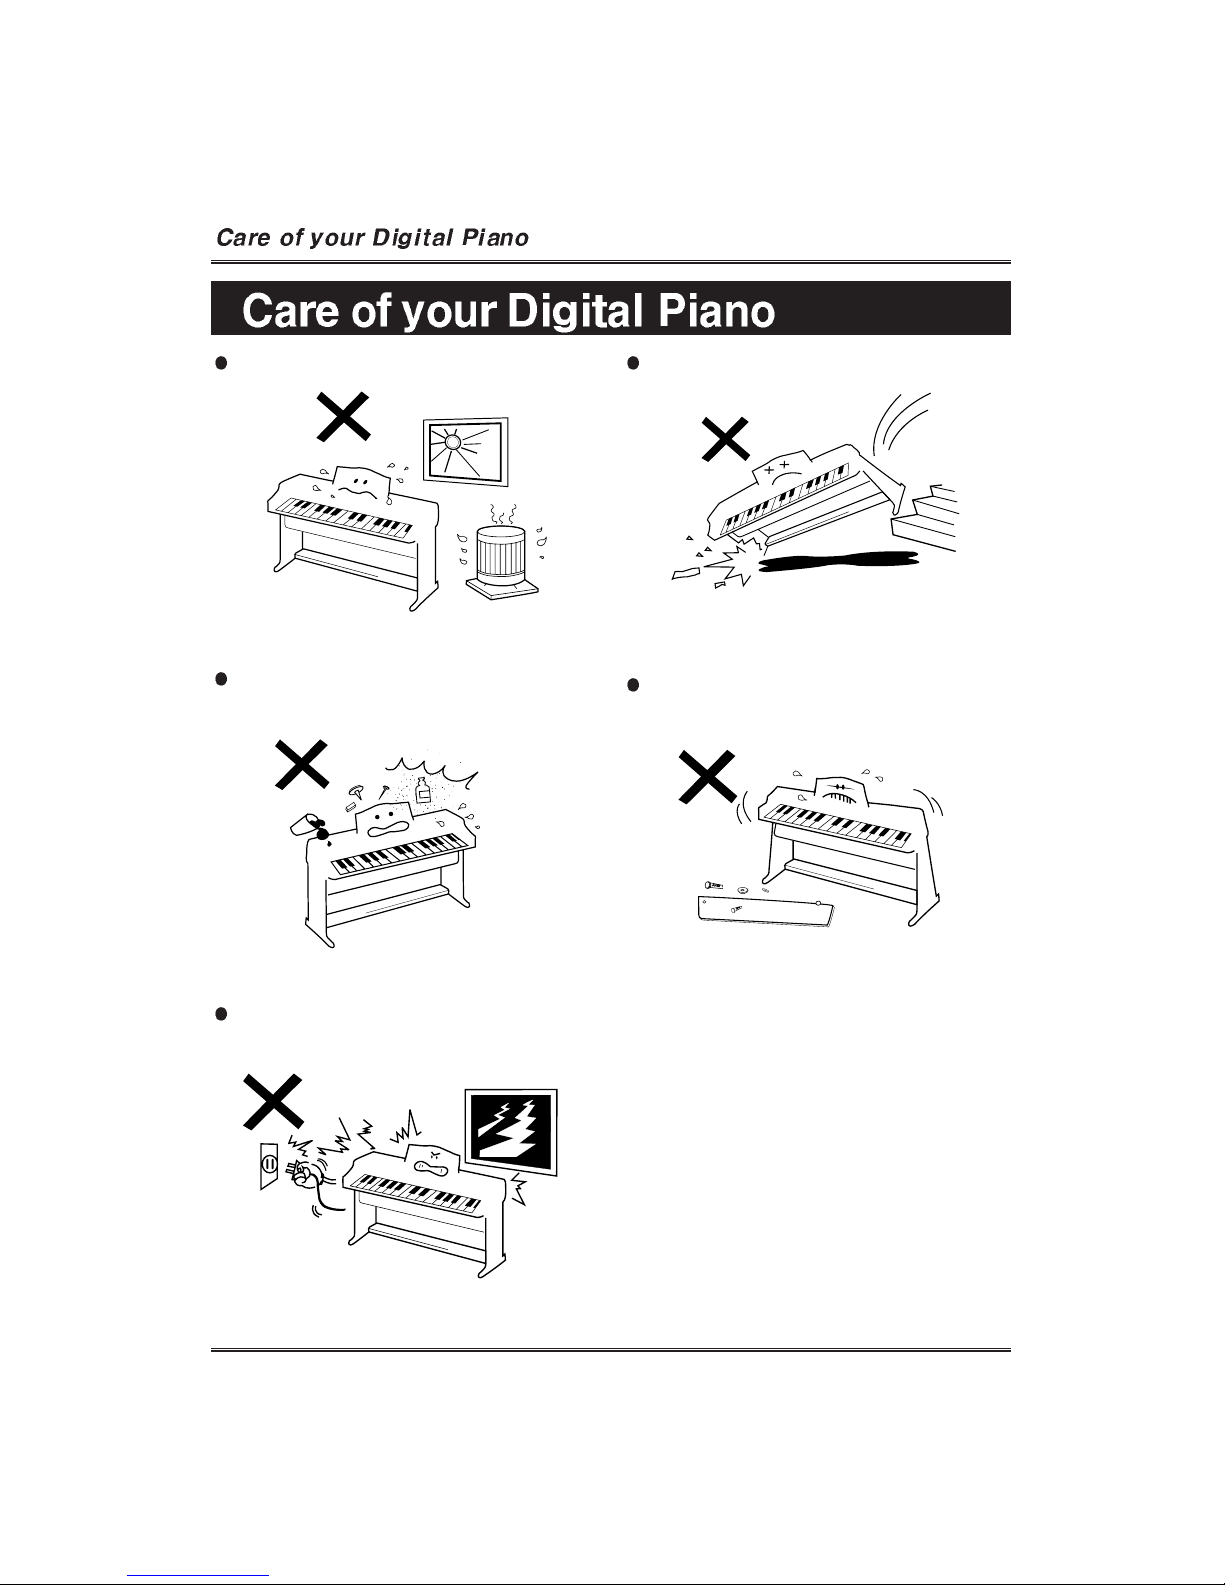
Avoid heat, humidity or direct sunlight.
Keep the unit free from liquids, dust, etc...
During thunderstorms, turn the product off and
disconnect the plug from the power.
Take care not to drop the unit and avoid
strong impact.
Never attempt to modify any parts of the
unit.
6
Page 8
7
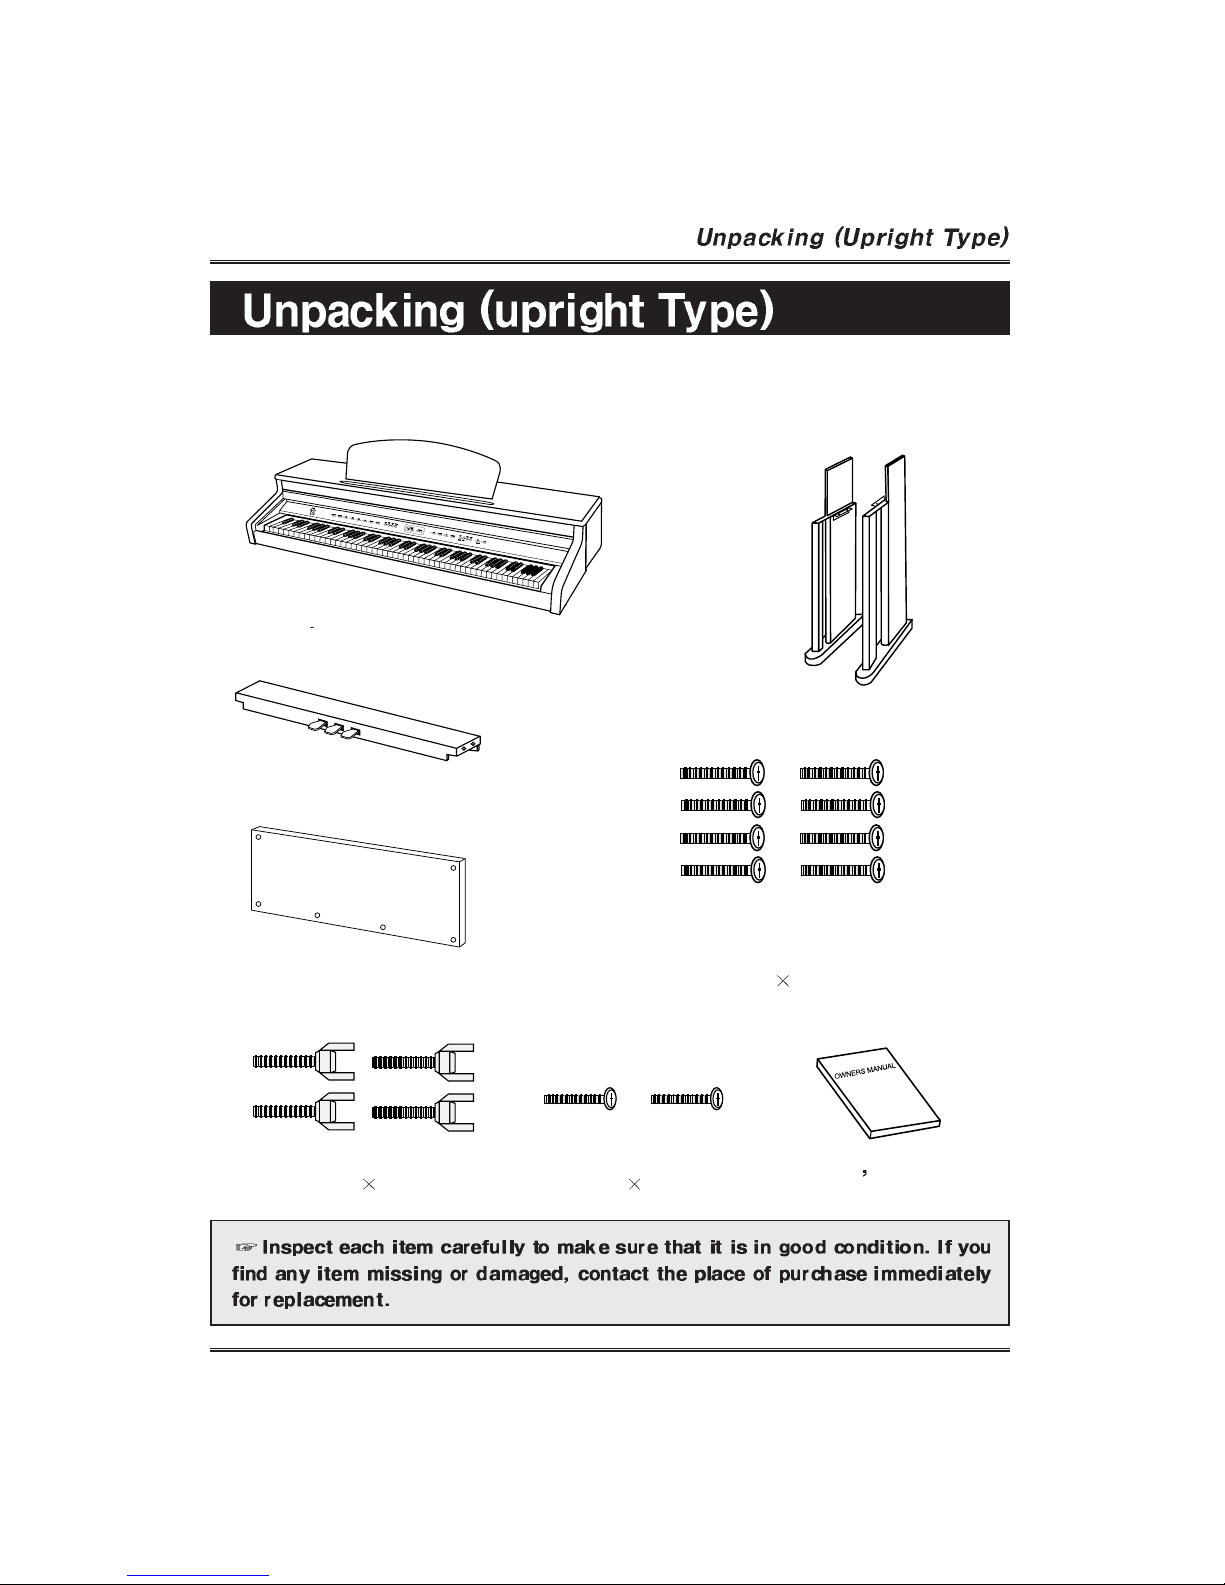
Carefully remove the Digital Piano and its accessories from the packing box. The
Digital Piano set consists of the following items.
Main Unit
Right, Left Legs (a, b)
Pedal Box (c)
Rear Plate (d)
Four Bolts for Main Unit
(g) (M6
15)mm
Eight Bolts
for Pedal Box and Rear Panel
(f) (6
24)mm
Owner
s Manual
Tow Bolts for Rear Plate
(h) (4
22)mm
Page 9
8
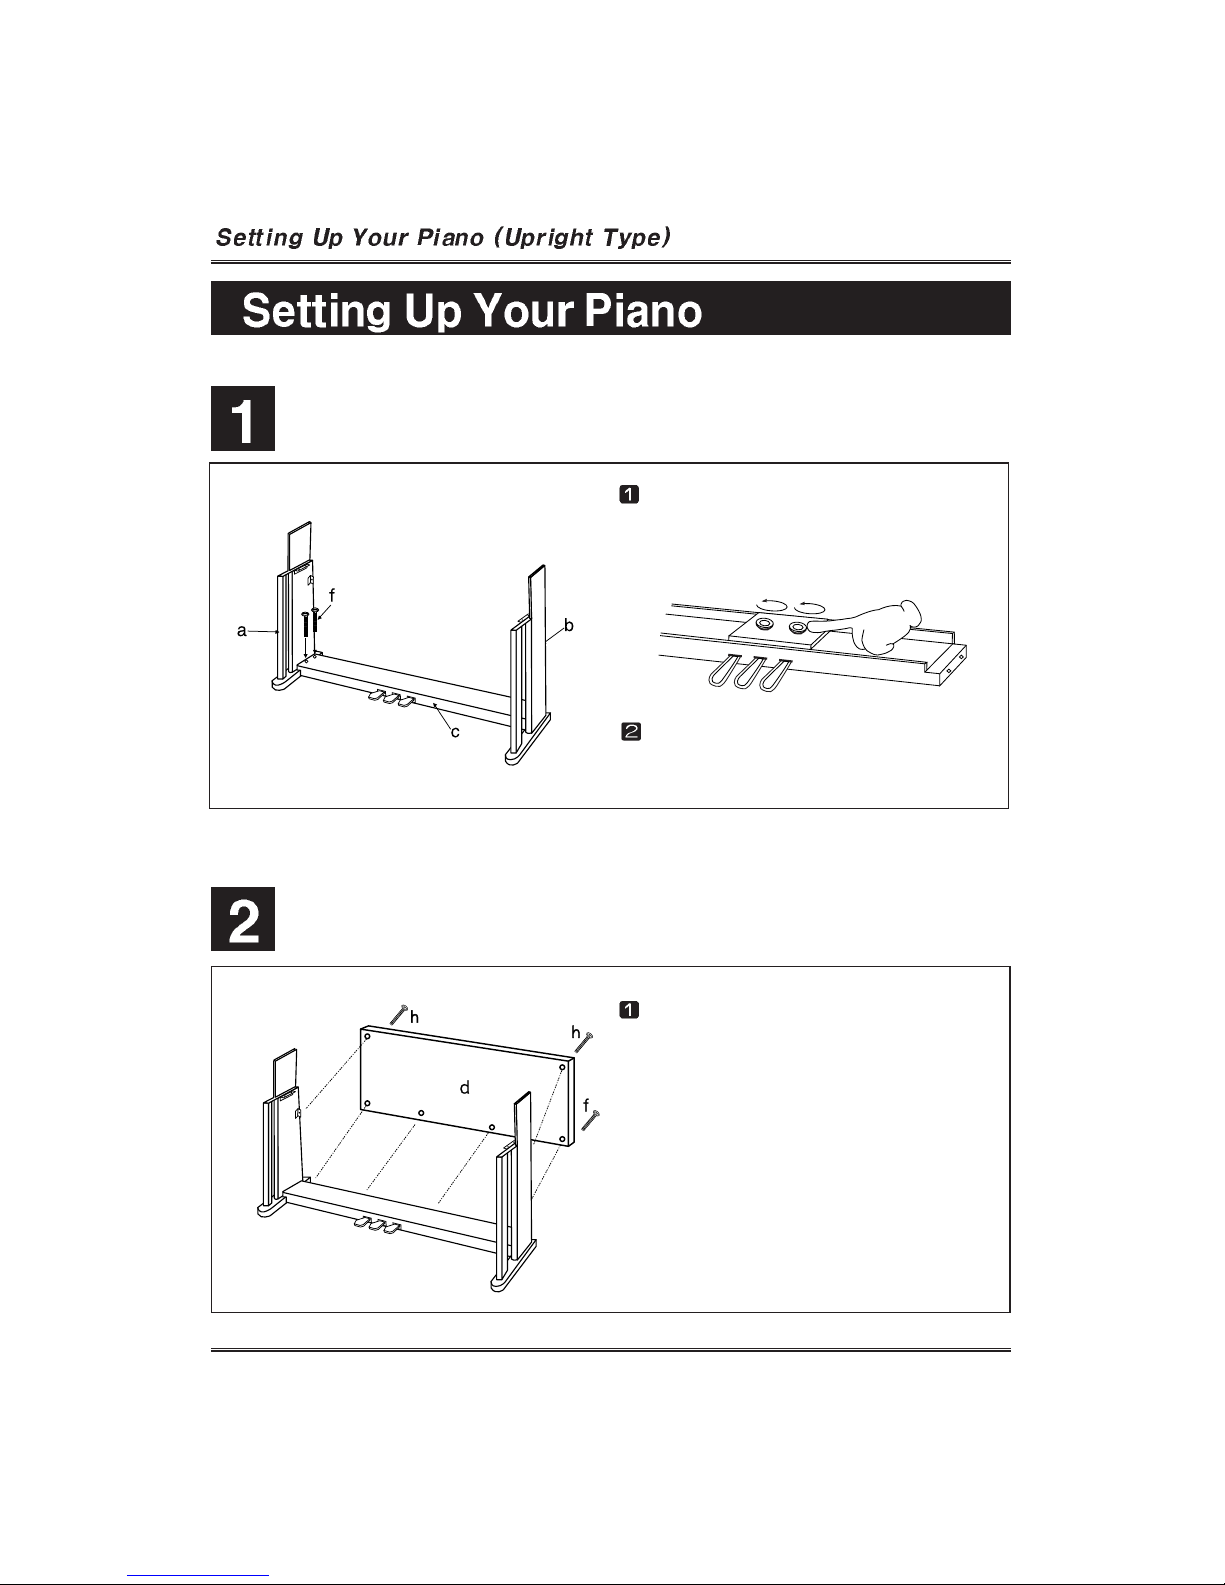
Attaching the both legs and pedal box assembly
Assembling the stand
Securely combine both legs(a,b) and pedal
box(c) by using four bolts(f) for pedal box.
For pedal stability, rotate the adjusters on
the bottom of the pedal assembly until they
come in firm contact with the floor surface.
Attach the rear plate(d) to the legs and
pedal box using two bolts(h) and four
bolts(f) for rear plate.
Page 10
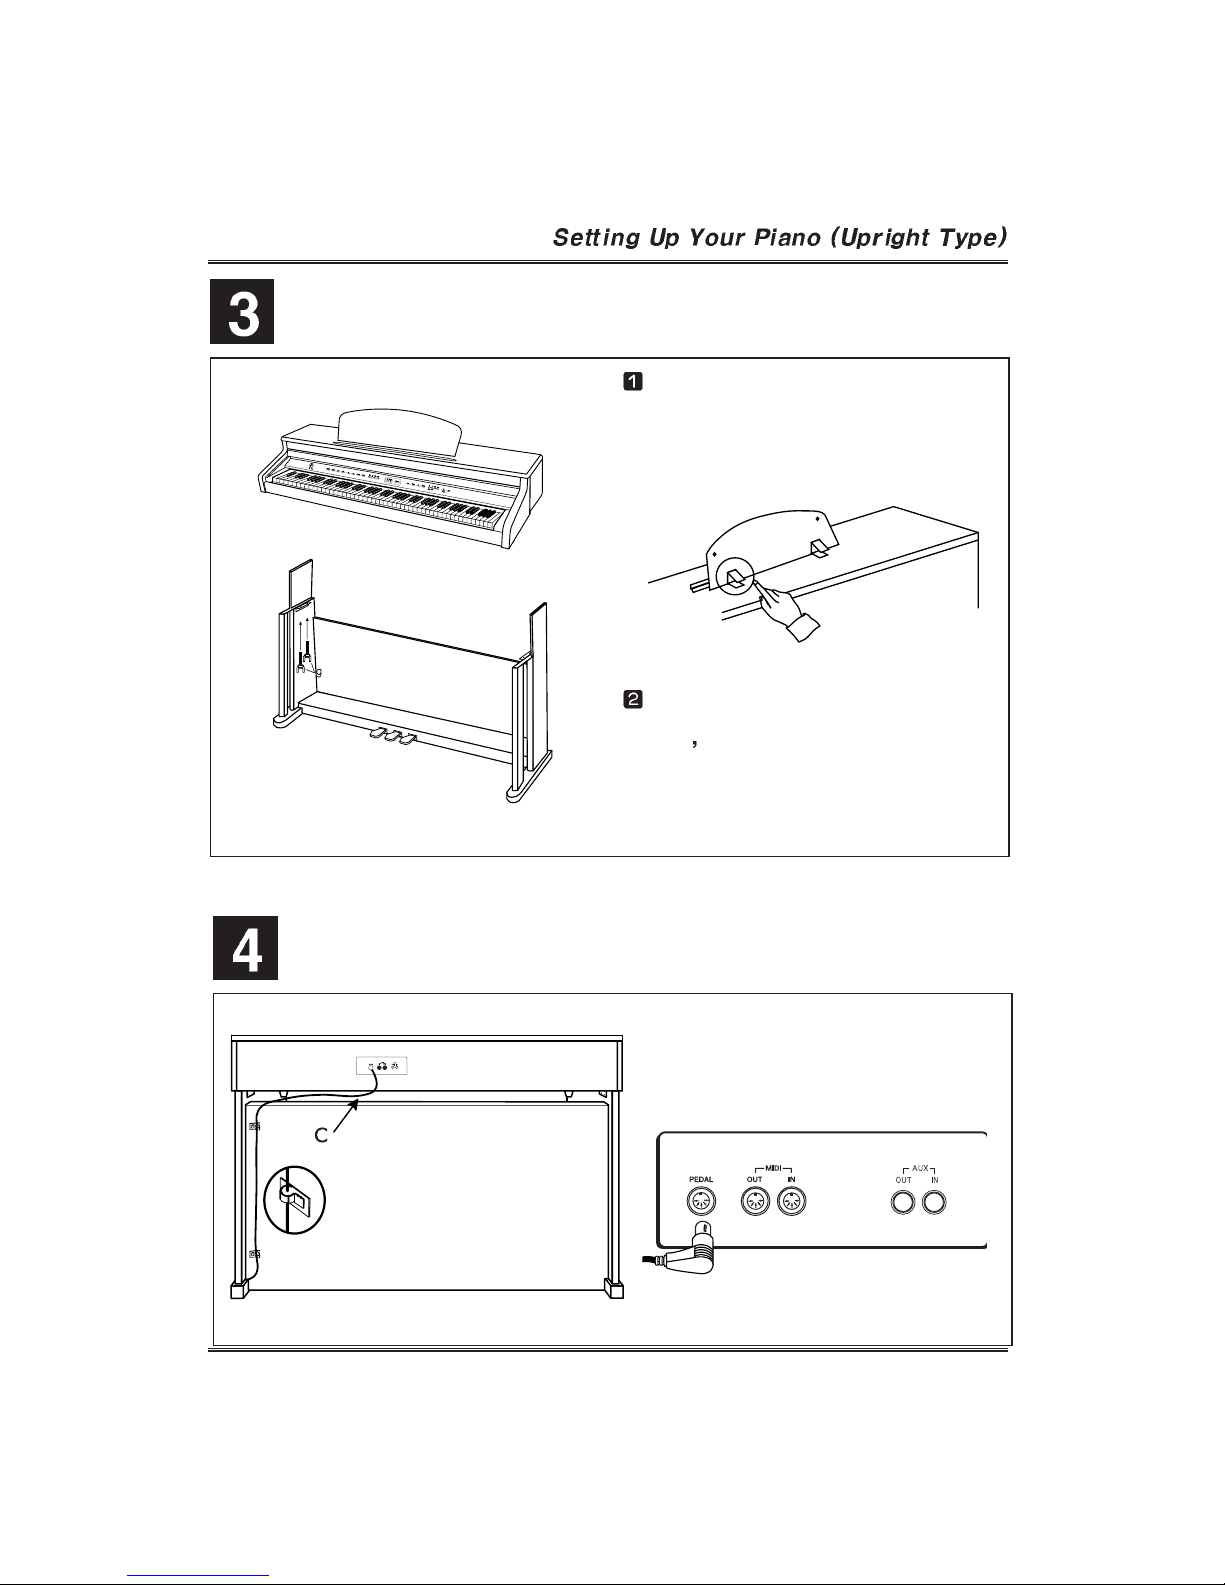
Connecting the pedal cord.
Plug pedal cord(c), which is protruding
from the top of the pedal assembly, into
the corresponding port in the back of the
main unit.
Attaching the main unit and stand
9
Set the stand upright and gently lower
the main unit on the stand, then tighten
the main unit with four bolts (g) for main
unit as shown in illustration.
Music Stand
Raise the music stand on the
piano
s top panel by lifting two brackets
on the back of the music stand.
Page 11
10
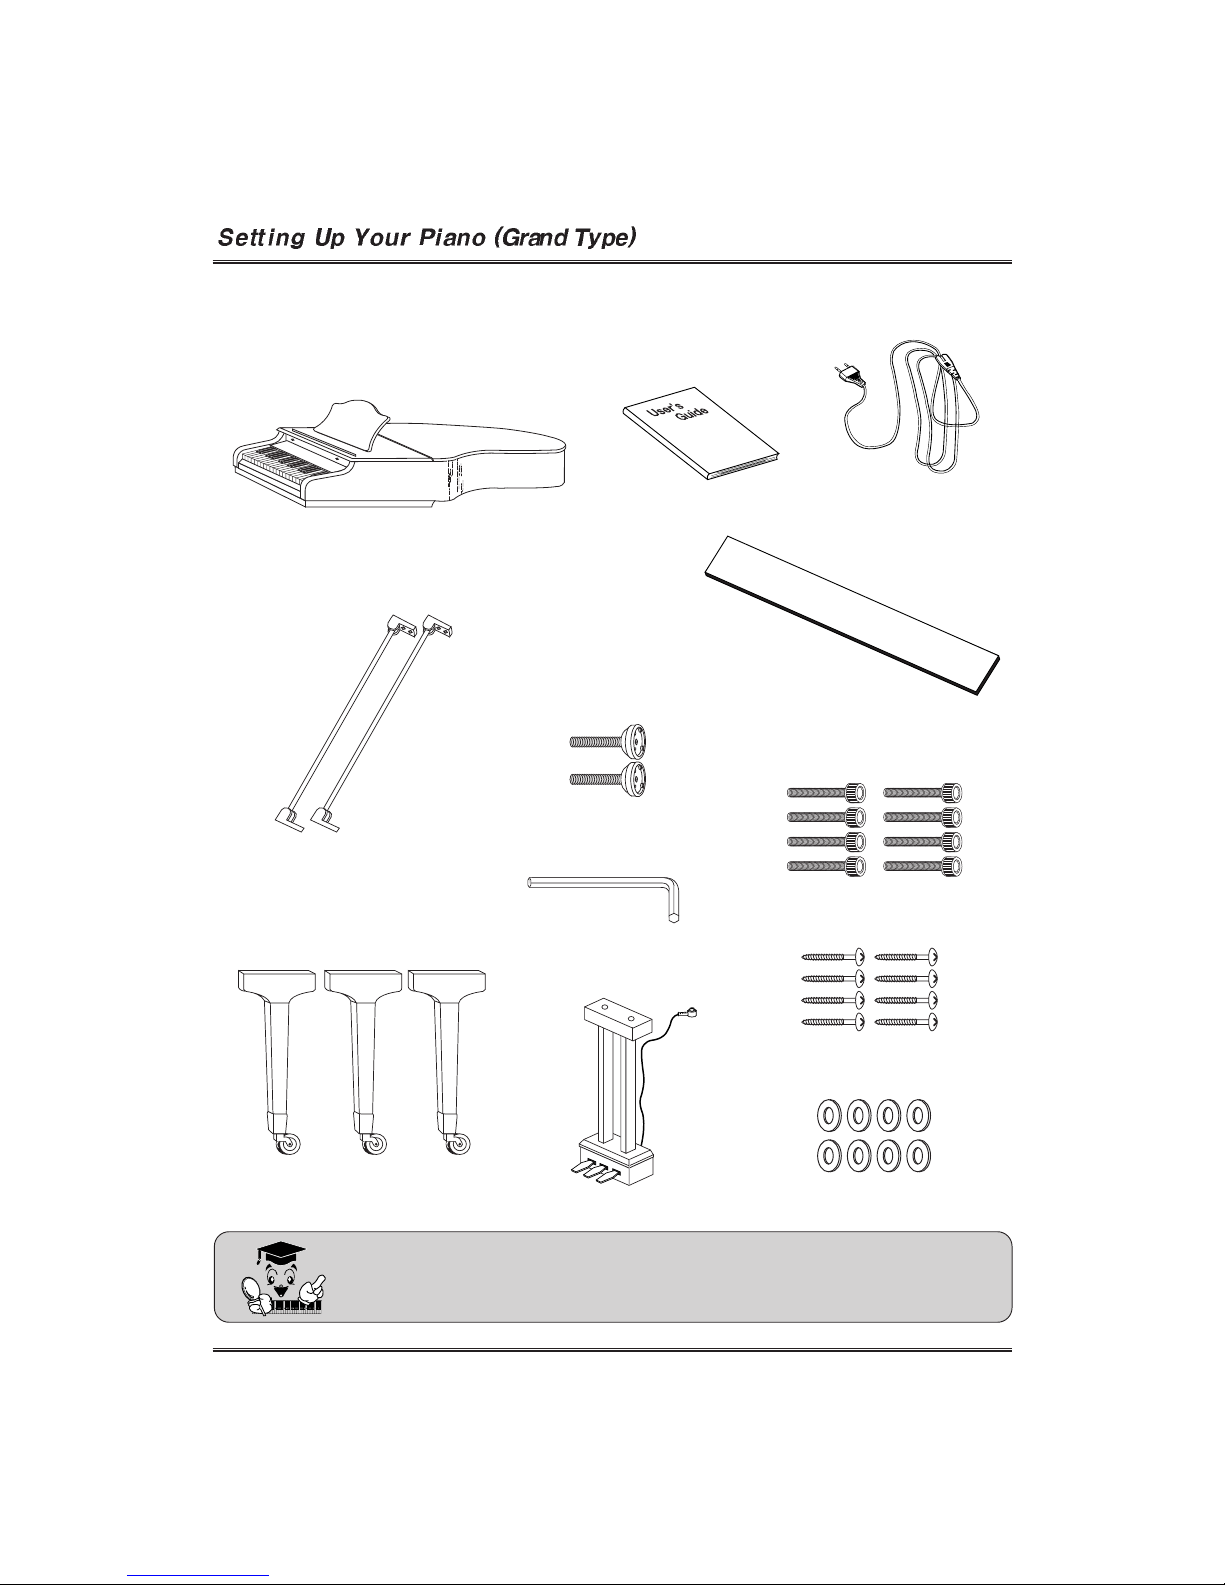
Carefully remove the Digital Piano and its accessories from the packing box. The
Digital Piano set consists of the following items.
Inspect each item carefully to make sure that it is in good condition. If
you find any item missing or damaged, contact the place of purchase
immediately for replacement.
Main Unit
Manual
Keyboard Protection Cover
(Option)
Power Cord
Legs(3EA)
Pedal Nuts (2EA)
Bolt M10 X 60 (8EA)
Pedal Ass’y
Pedal Stand Brace(2EA)
Wrench (1EA)
Screw 3.5 X 25 (8EA)
Washer 20 X1T (8EA)
Page 12
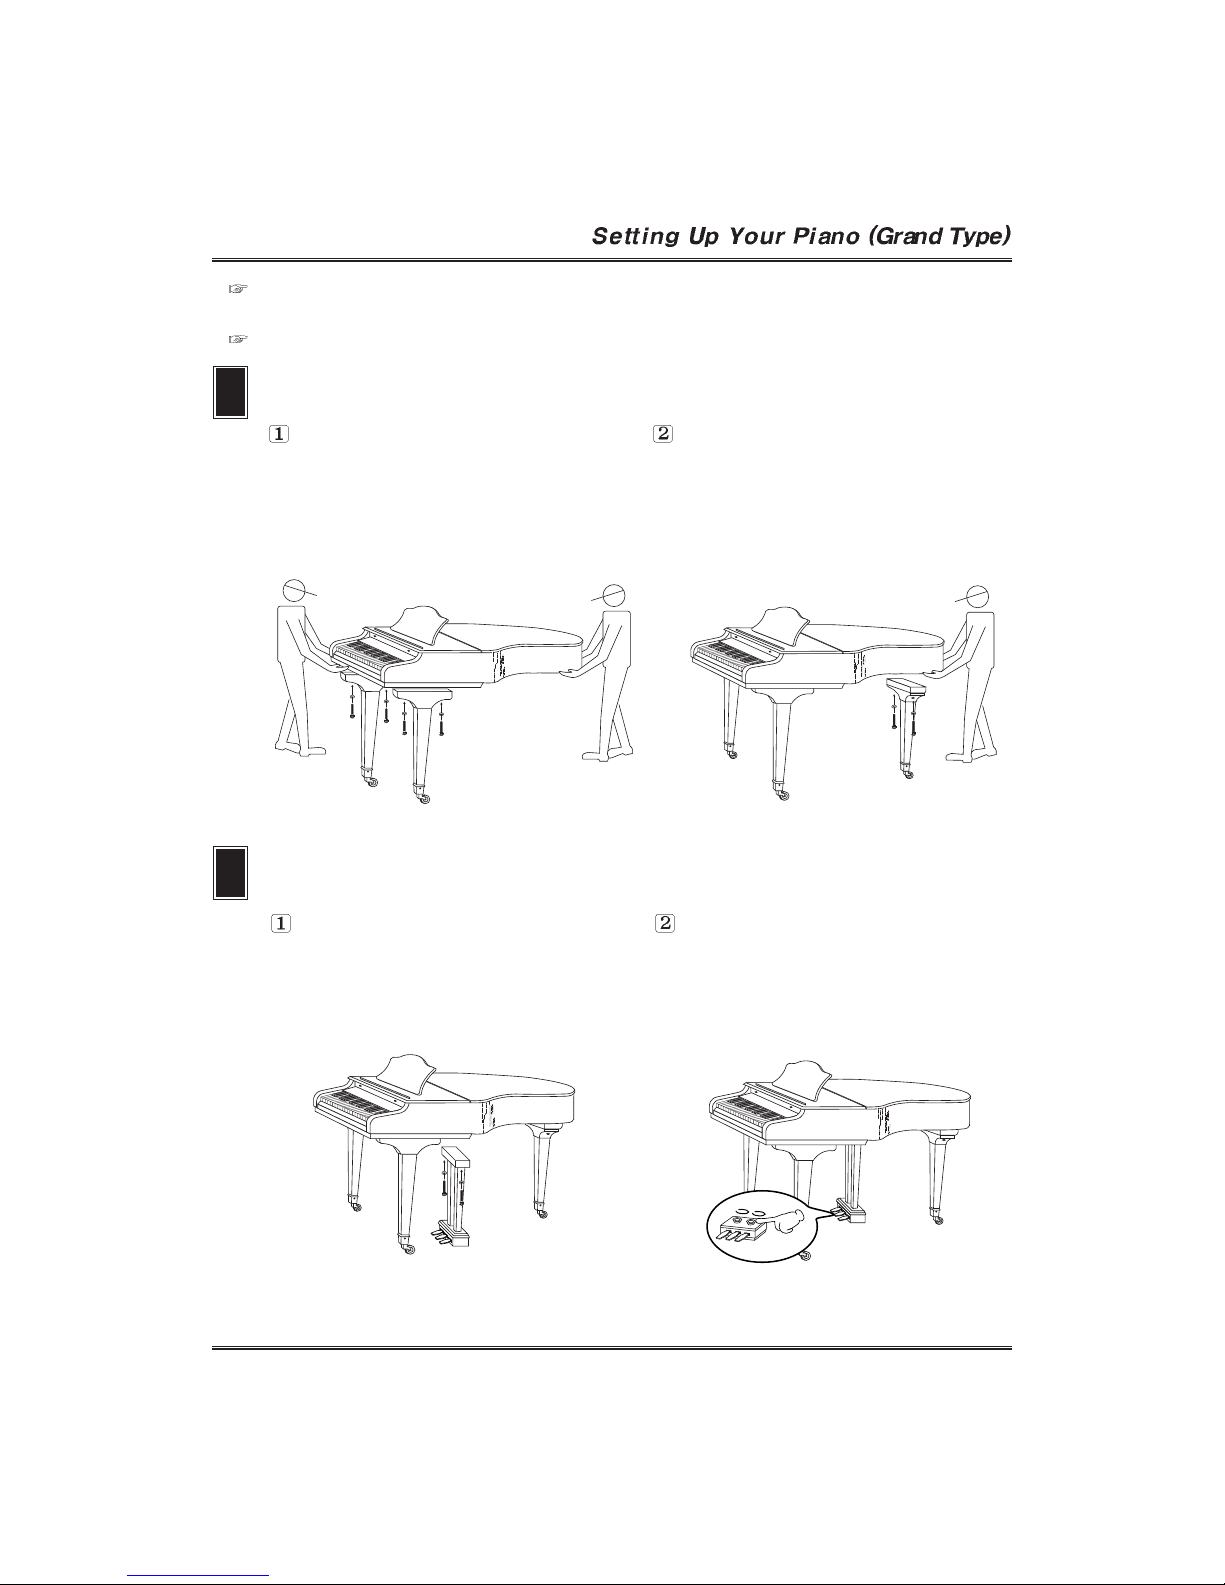
Attaching the main unit and three legs.
1
The first, Set the both legs upright
and hang the both legs at the main
unit, then tighten the main unit with
four bolts for main unit as shown in
the illustration.
After fixing the both legs to the
main unit, the remainder leg
upright and hang the leg at the
main unit, then tighten the main
unit with two bolts for main unit.
2
Set the pedal stand assembly
upright and securely attach the
pedal stand assembly and the main
unit assembly by using two bolts.
For pedal stability, rotate the
adjuster on the bottom of the pedal
stand assembly until it comes in
firm, contact with the floor surface.
Attaching the main unit and pedal stand assembly
To reduce the risk of injury, The Digital Piano should be assembled by qualified
service personnel.
Take care not to drop the unit and avoid strong impact.
11
Page 13
12
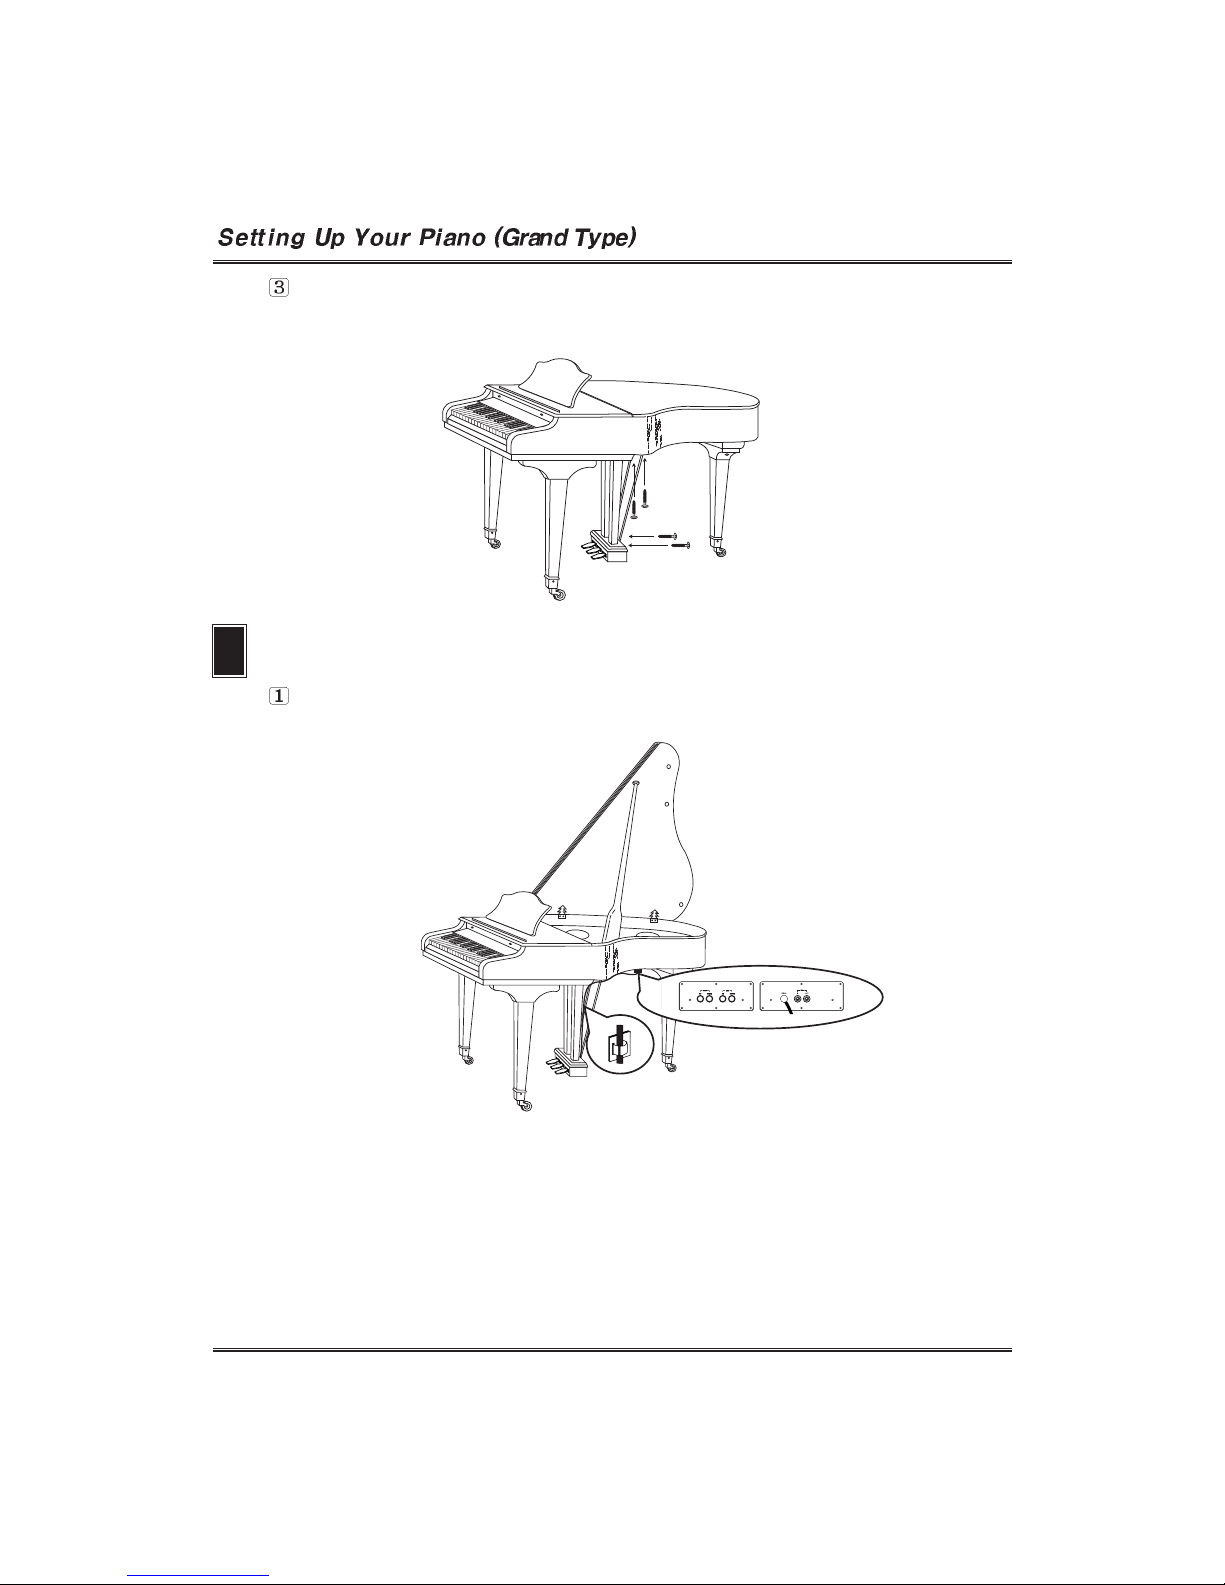
Attach the pedal stand brace to the main unit and pedal stand assembly using four
screws. Make sure the screws are securely tightened.
3
Plug the Pedal Cord which is protruding from the top of the pedal assembly into
the corresponding port in the bottom of the main unit.
Connecting the Pedal Cord
Page 14
13
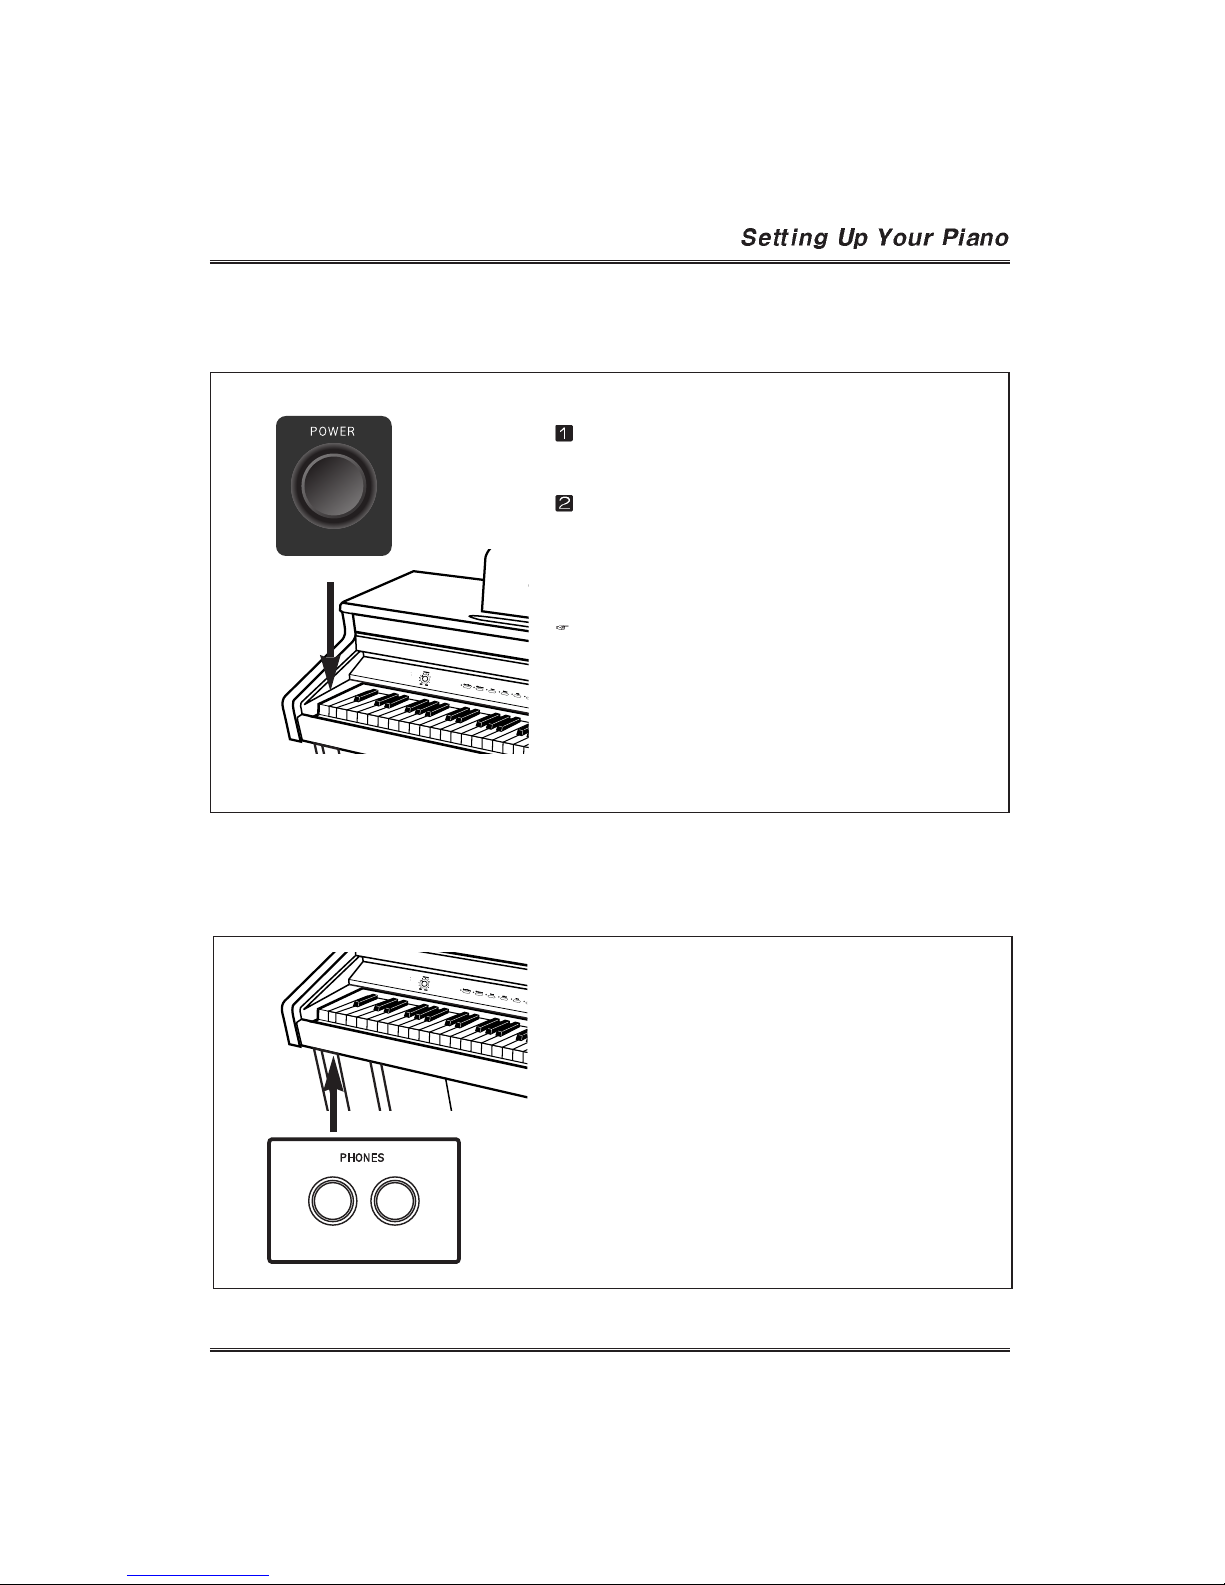
Turning on the Power
Connect the power cord. Insert the plug at the end
of the cord into a standard AC outlet.
Press POWER switch. The power is turned on
and the initial display appears in the Multi
Function Display. The voice of Grand Piano is
selected automatically at first.
Adjust the volume by using MASTER VOLUME.
Press POWER switch again when turning off the
power. All lamps and LED display will turn off.
Headphones
Connect a set of stereo headphones(optional) to
PHONES jack.
Insert plug of the headphone into the PHONES
jack on the bottom panel of the piano.
When headphones are connected, the internal
speaker system is automatically shut off.
Since the piano has two PHONES jacks, two sets
of headphones can be used simultaneously,
allowing two people to enjoy the performance.
Page 15
14
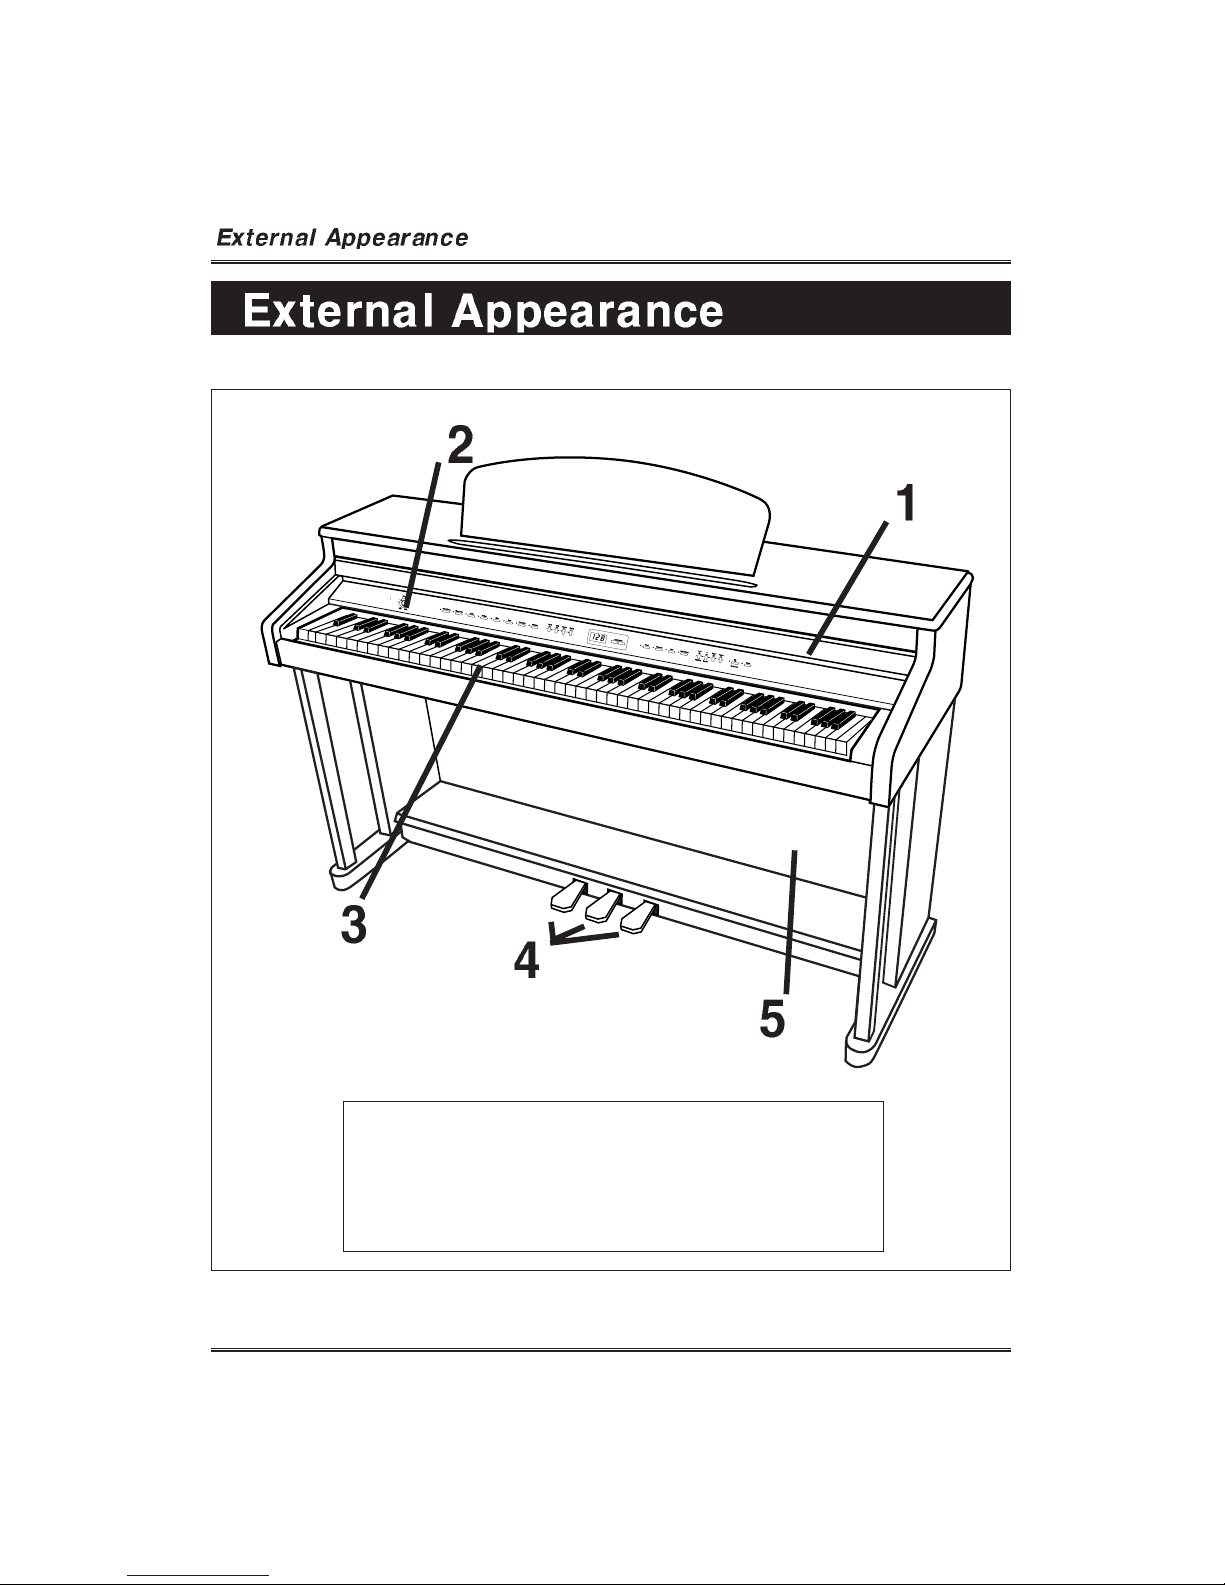
1. Keyboard Cover
2. Control Panel
3. Keyboard
4. Pedal
5. Stand
Page 16
15
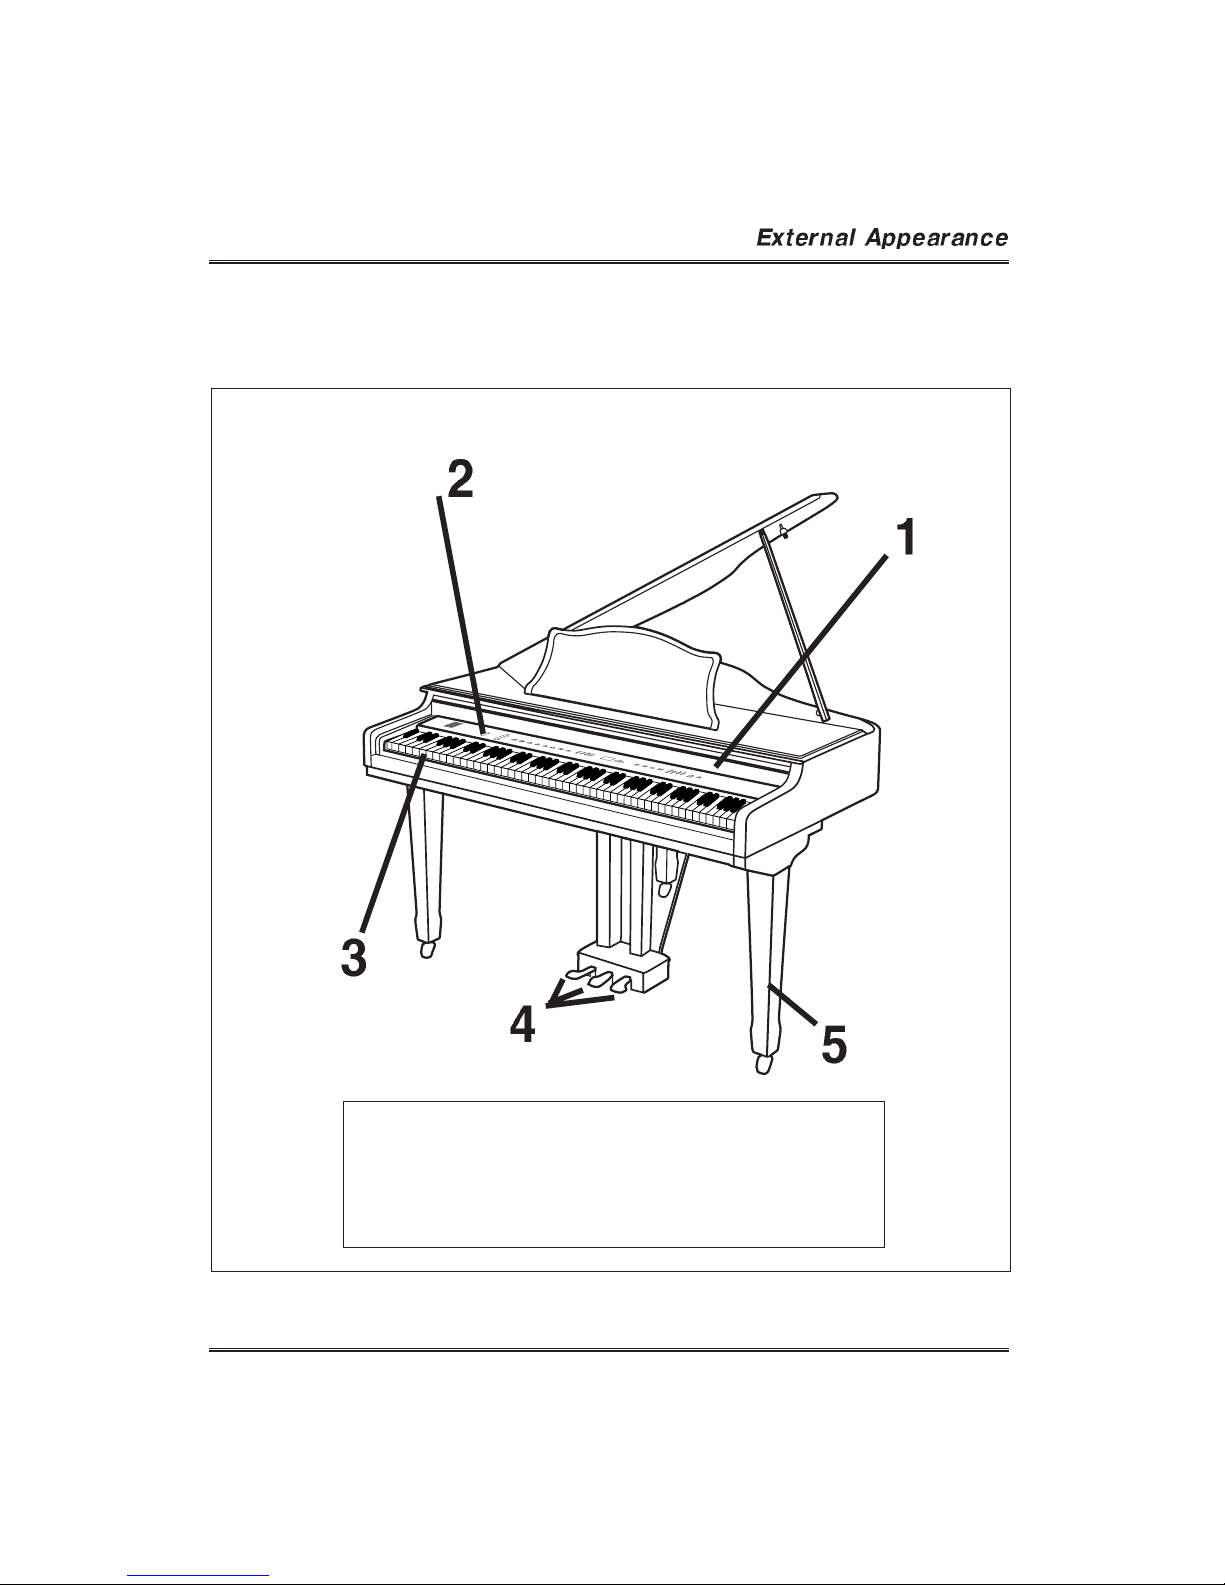
1. Keyboard Cover
2. Control Panel
3. Keyboard
4. Pedal
5. Stand
Page 17
16
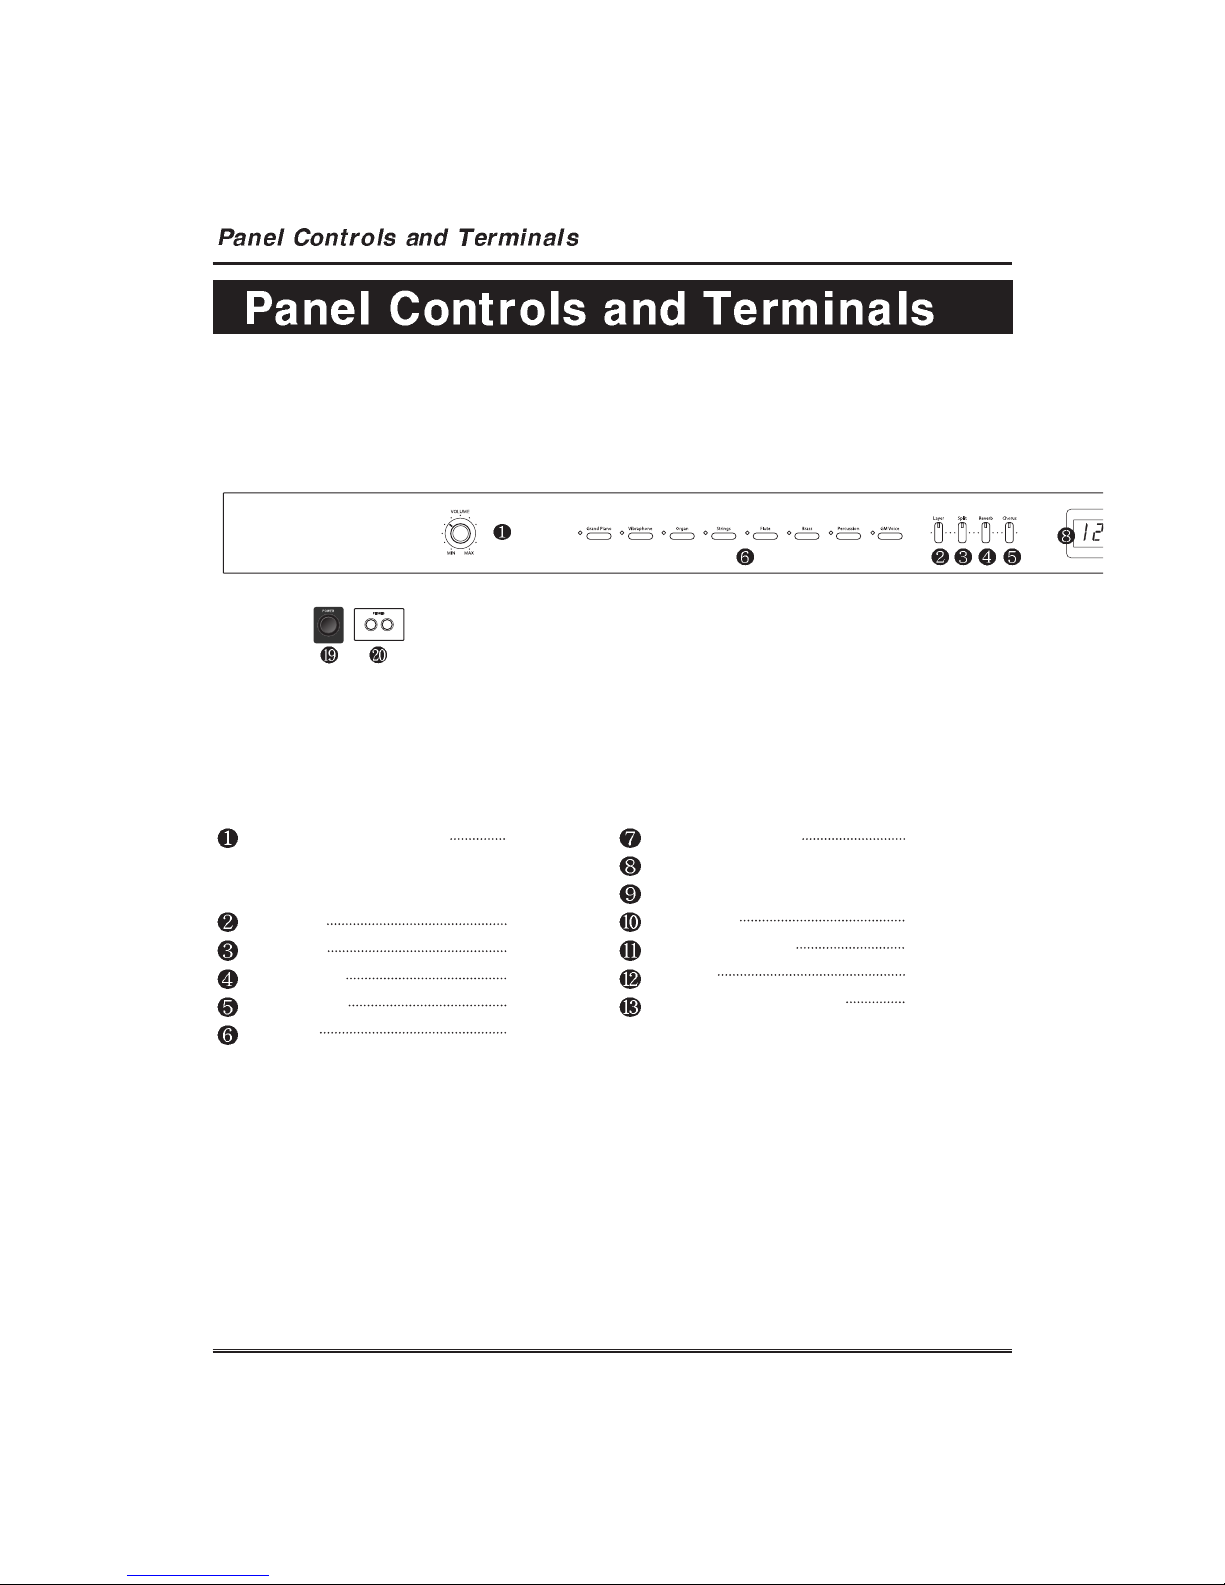
VOLUME SECTION
MASTER VOLUME
VOICE SECTION
LAYER
SPLIT
REVERB
CHORUS
VOICE
FUNCTION SECTION
METRONOME
Multi Function Display
DATA/TEMPO
TOUCH
TRANSPOSE
TUNE
SOUND BALANCE
Page 18
Page 21
Page 24
Page 26
Page 27
Page 20
Page 30
Page 28
Page 29
Page 29
Page 23
Page 18
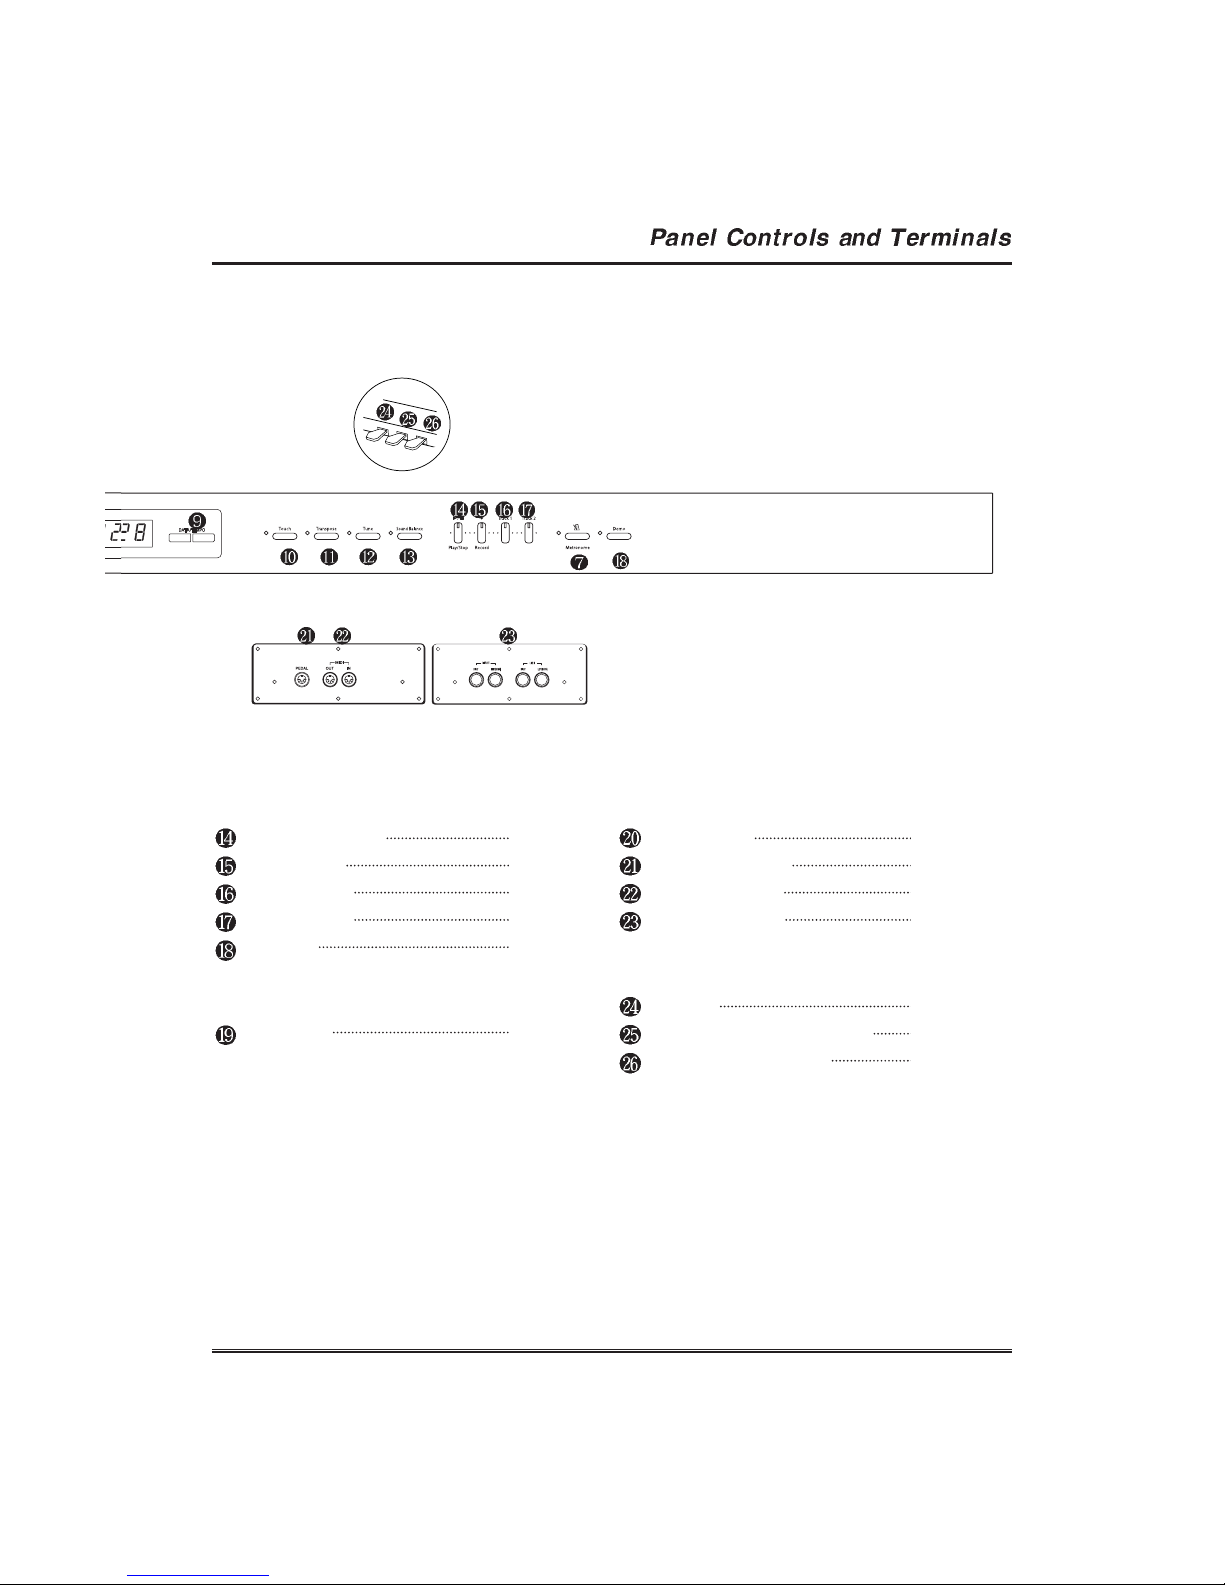
17
SONG CONTROL SECTION
PLAY/STOP
RECORD
TRACK 1
TRACK 2
DEMO
POWER
POWER
TERMINAL SECTION
PHONES
PEDAL JACK
MIDI IN/OUT
LINE IN/OUT
PEDAL SECTION
SOFT
SOSTENUTO PEDAL
DAMPER PEDAL
Page 31
Page 31
Page 31
Page 31
Page 19
Page 13
Page 34
Page 34
Page 34
Page 34
Page 25
Page 25
Page 25
Page 19
18
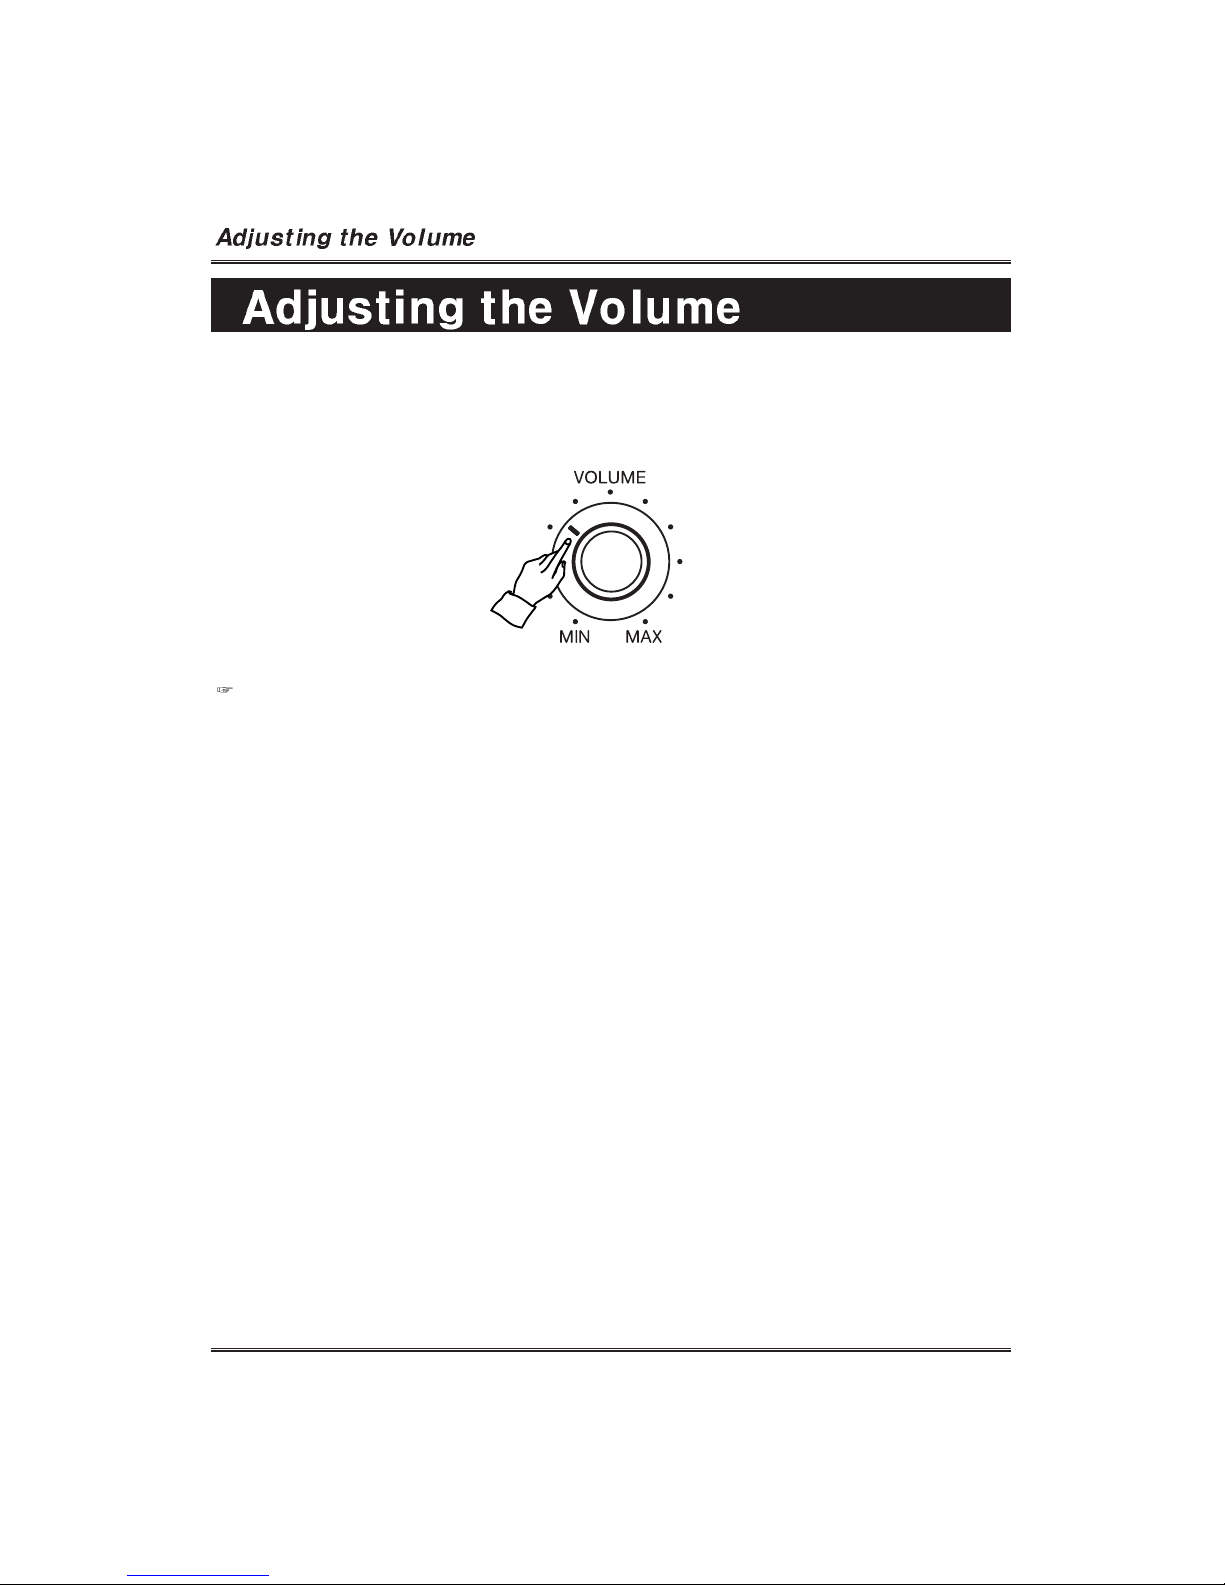
The piano has one knob on the panel for adjusting the volume.
MASTER VOLUME
This determines the entire volume of the piano.
This also determines the output level of the signal at the PHONES.
Page 20
19
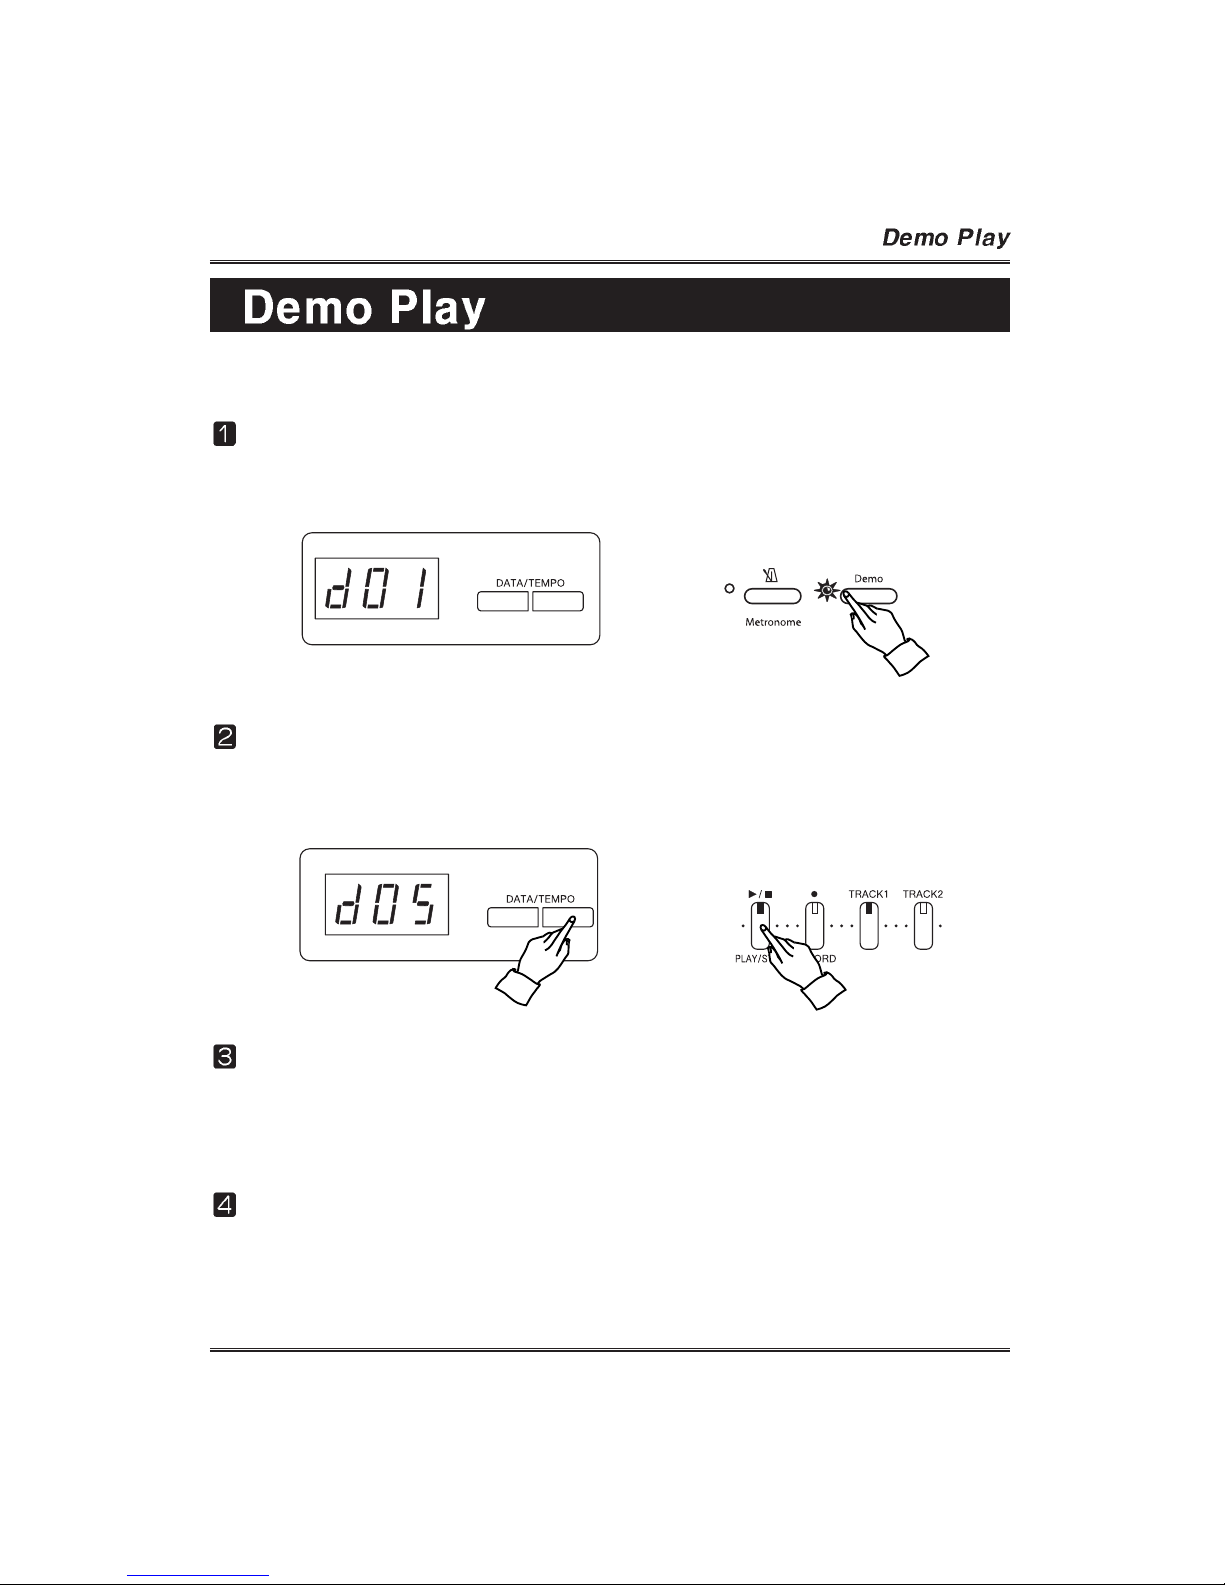
The piano features a total of 12 demo pieces. Listen to them all and hear what the piano
can do.
Call up the Demo Play mode.
Press DEMO. The DEMO display appears.
Select the song and start playback.
Choose the desired song by using the DATA buttons and press the PLAY/STOP
button. The selected demo plays.
Adjust the volume.
Adjust the volume of the Demo by using MASTER VOLUME.
Stop playback of the Demo.
To stop playback, press PLAY/STOP.
Page 21
20
The piano features a wealth of rich, authentic voices, including piano, strings and brass
instruments. It also features a keyboard percussion function that lets you play realistic
drum and percussion sounds, as well as various sound effects directly from the
keyboard.
Voice Types
128 GM sounds with 10MB Grand piano sound.
6 Drum kits.
2 SFX sets
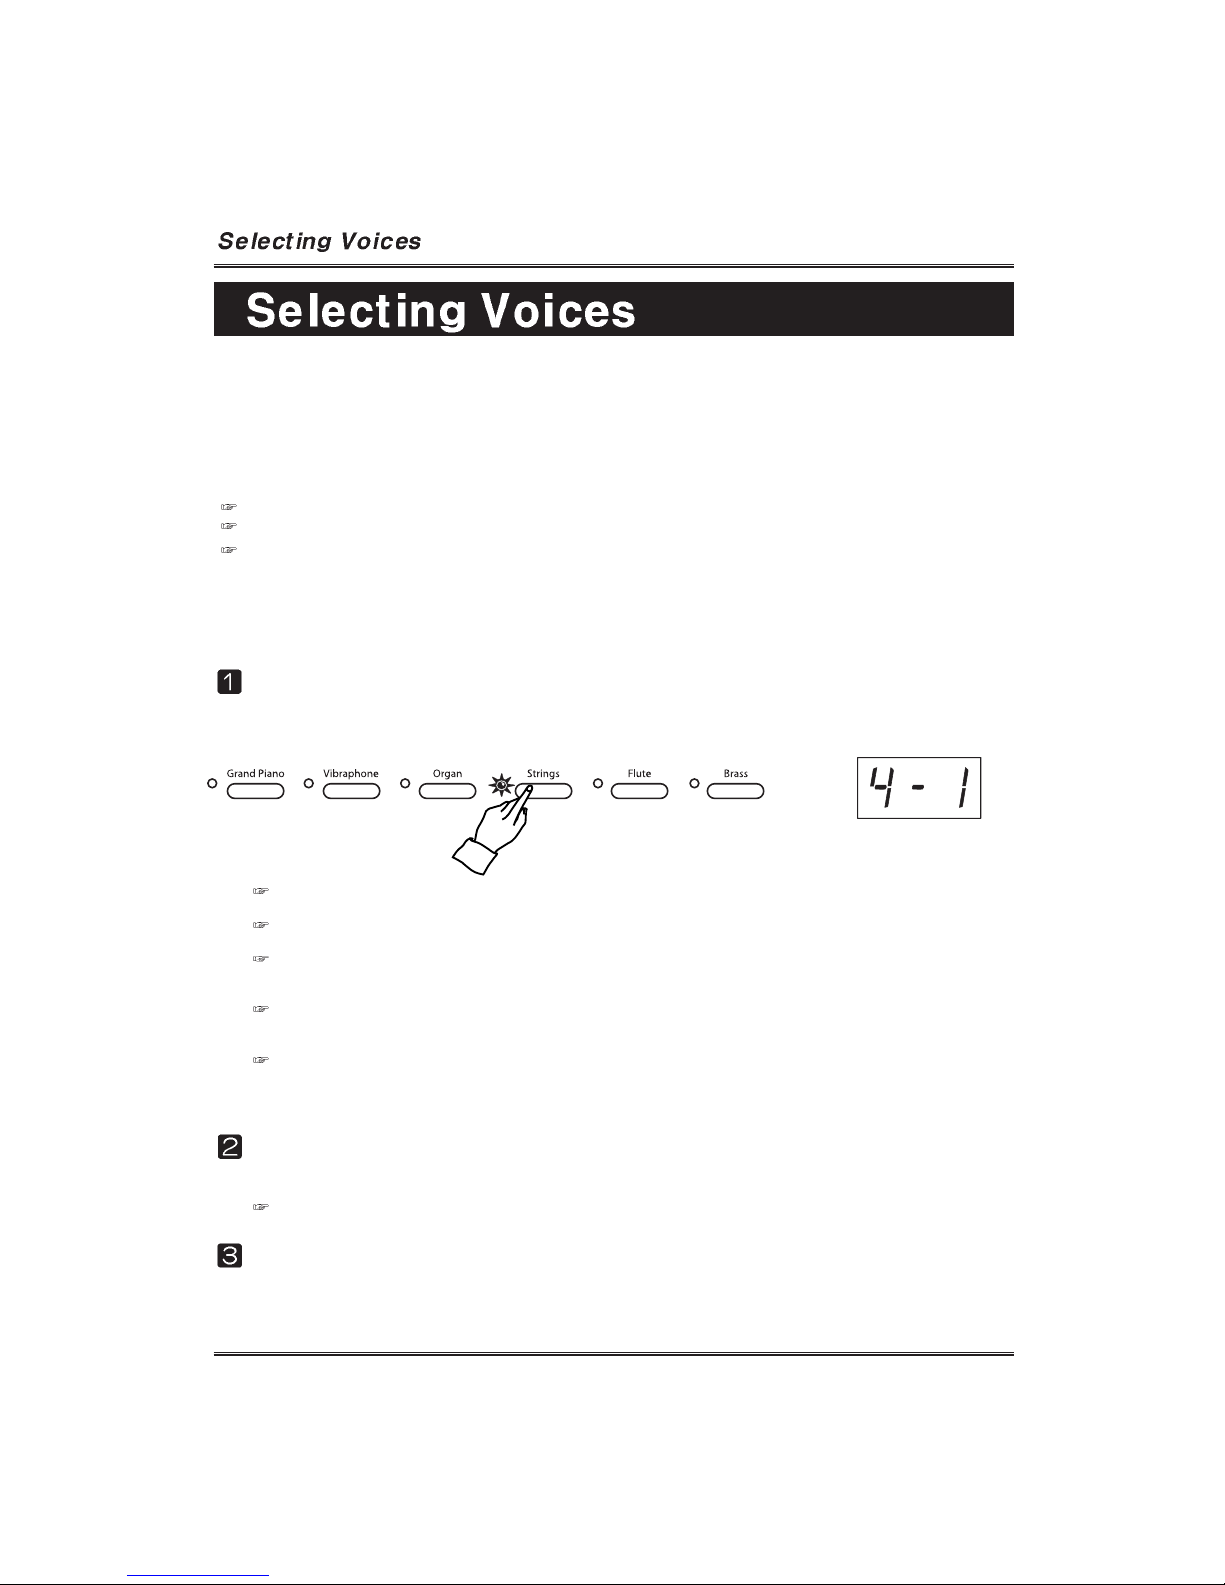
The voices of the piano are divided into eight groups, and each voice group is
assigned to the corresponding VOICE button on the panel.
Select the voice group.
Select the desired voice group by pressing the appropriate VOICE button.
When the voice group is selected, its default voice or its last selected voice is automatically selected.
The pop-up display of the VOICE SELECT appears.
POP-UP Display.
The pop-up display returns to the previous display after around five(5) seconds.
Backing Up Selected Voice.
The last selected voice in each group can be retained in memory.
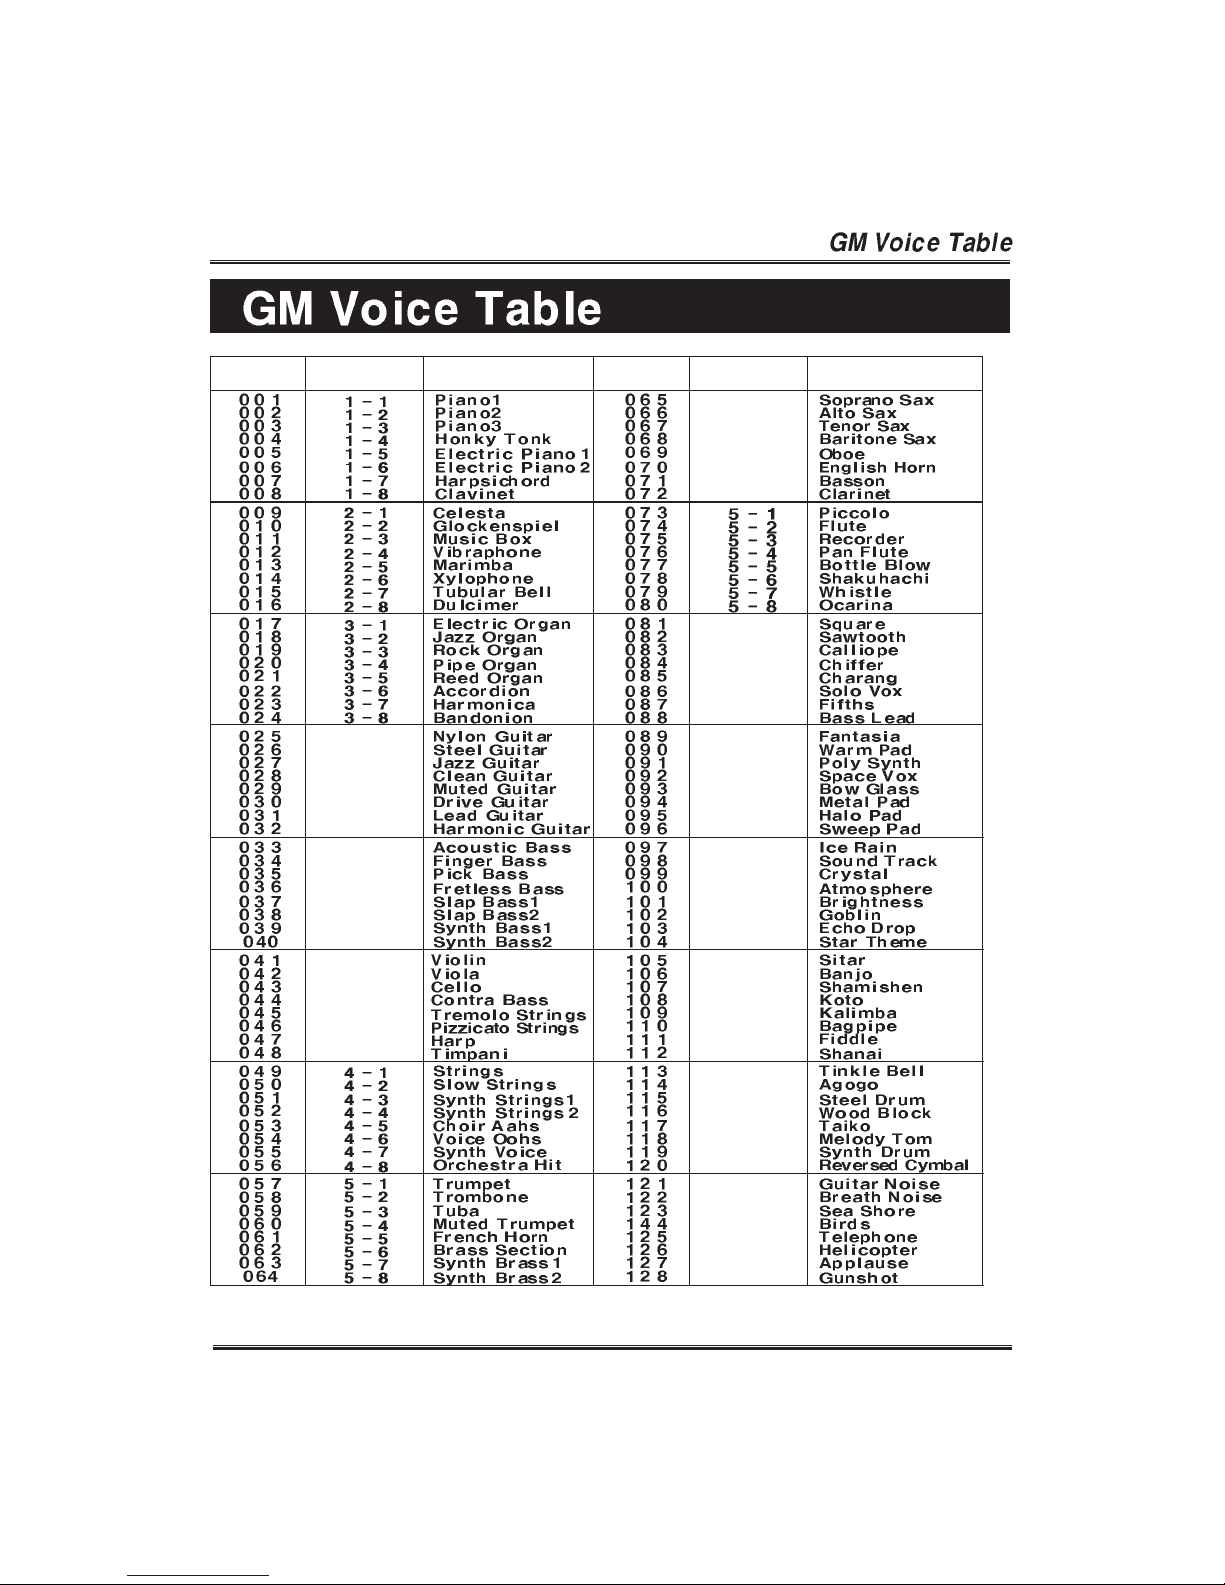
See the GM Voice Table on Page 31 in this manual.
Select the voice.
Select the desired voice by pressing the DATA/TEMPO buttons.
If you don’t change the voice of the selected voice group, the last selected voice or the default voice remains.
Play the selected voice.
Adjust the volume by using MASTER VOLUME.
Page 22
21
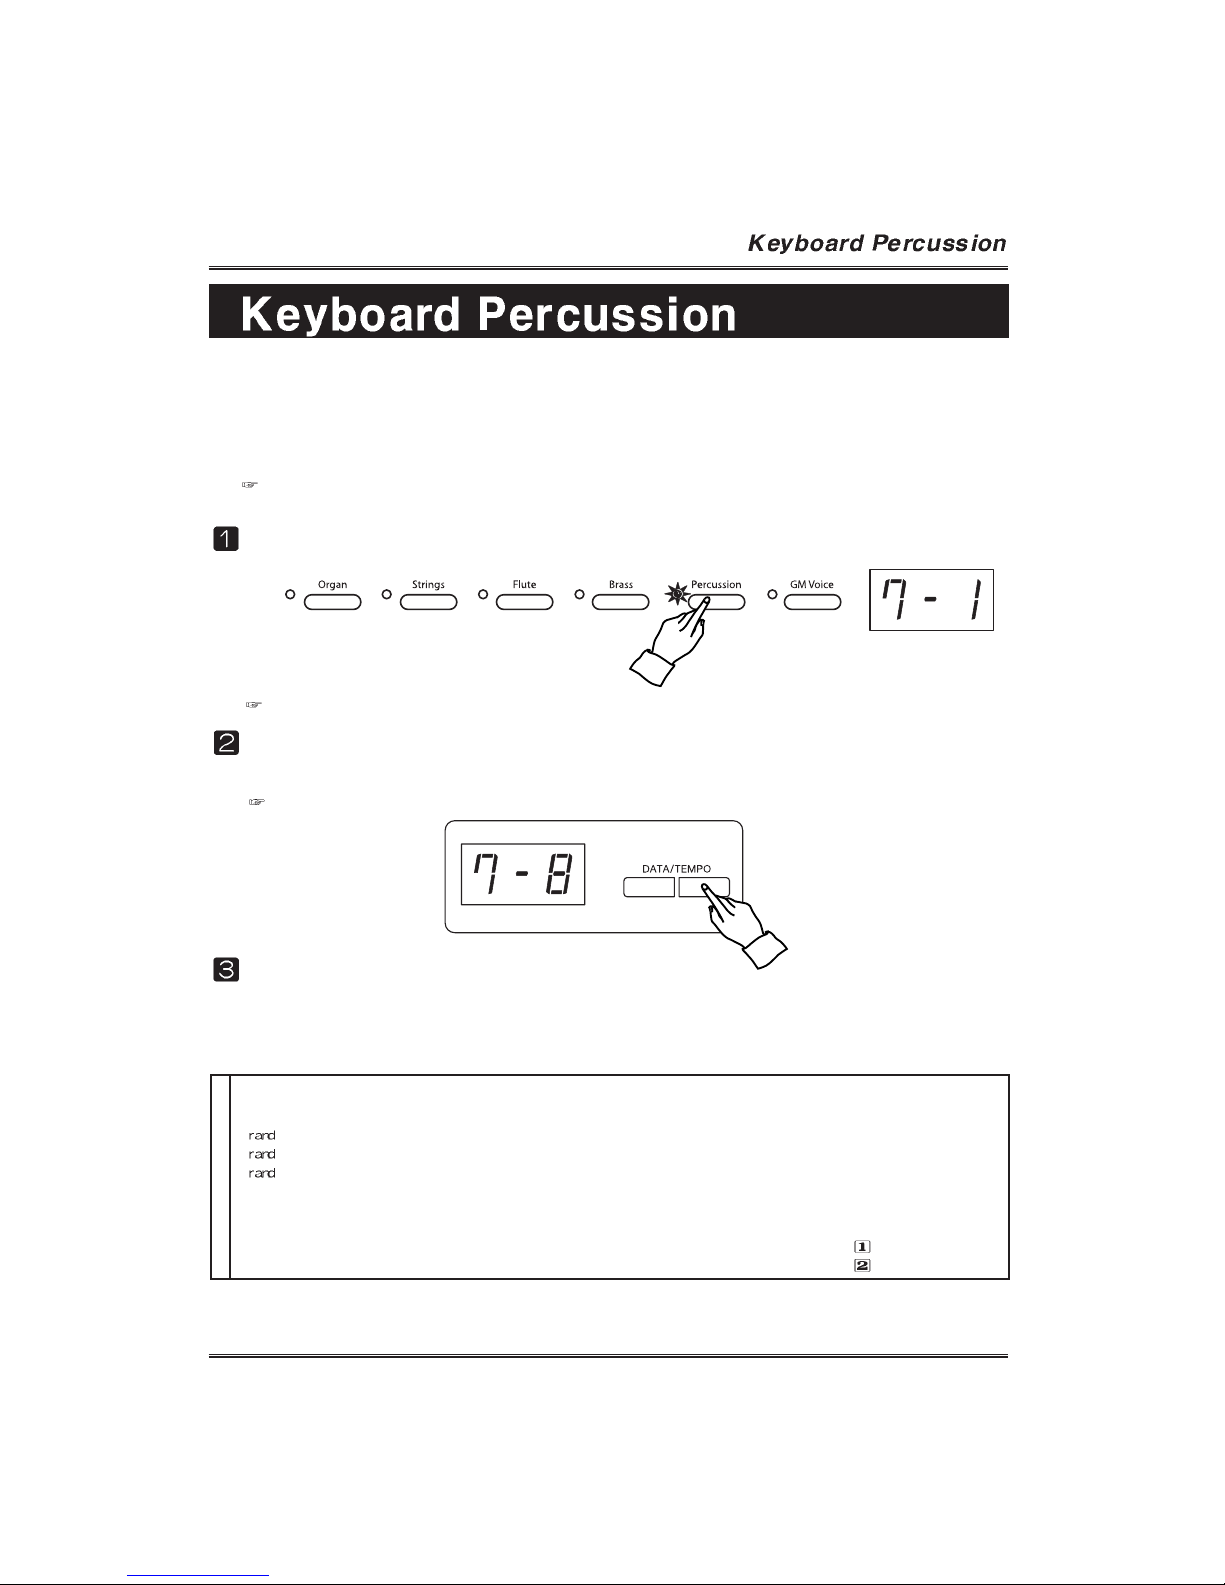
The piano has six Drum kits and two SFX sets in the Percussion voice group.
When a drum kit is selected, a different percussion sound is assigned to each key,
allowing you to play the sounds from the keyboard. Also, when one of the SFX sets is
selected, a different sound effect is assigned to each key, allowing yo to play the
sounds from the keyboard.
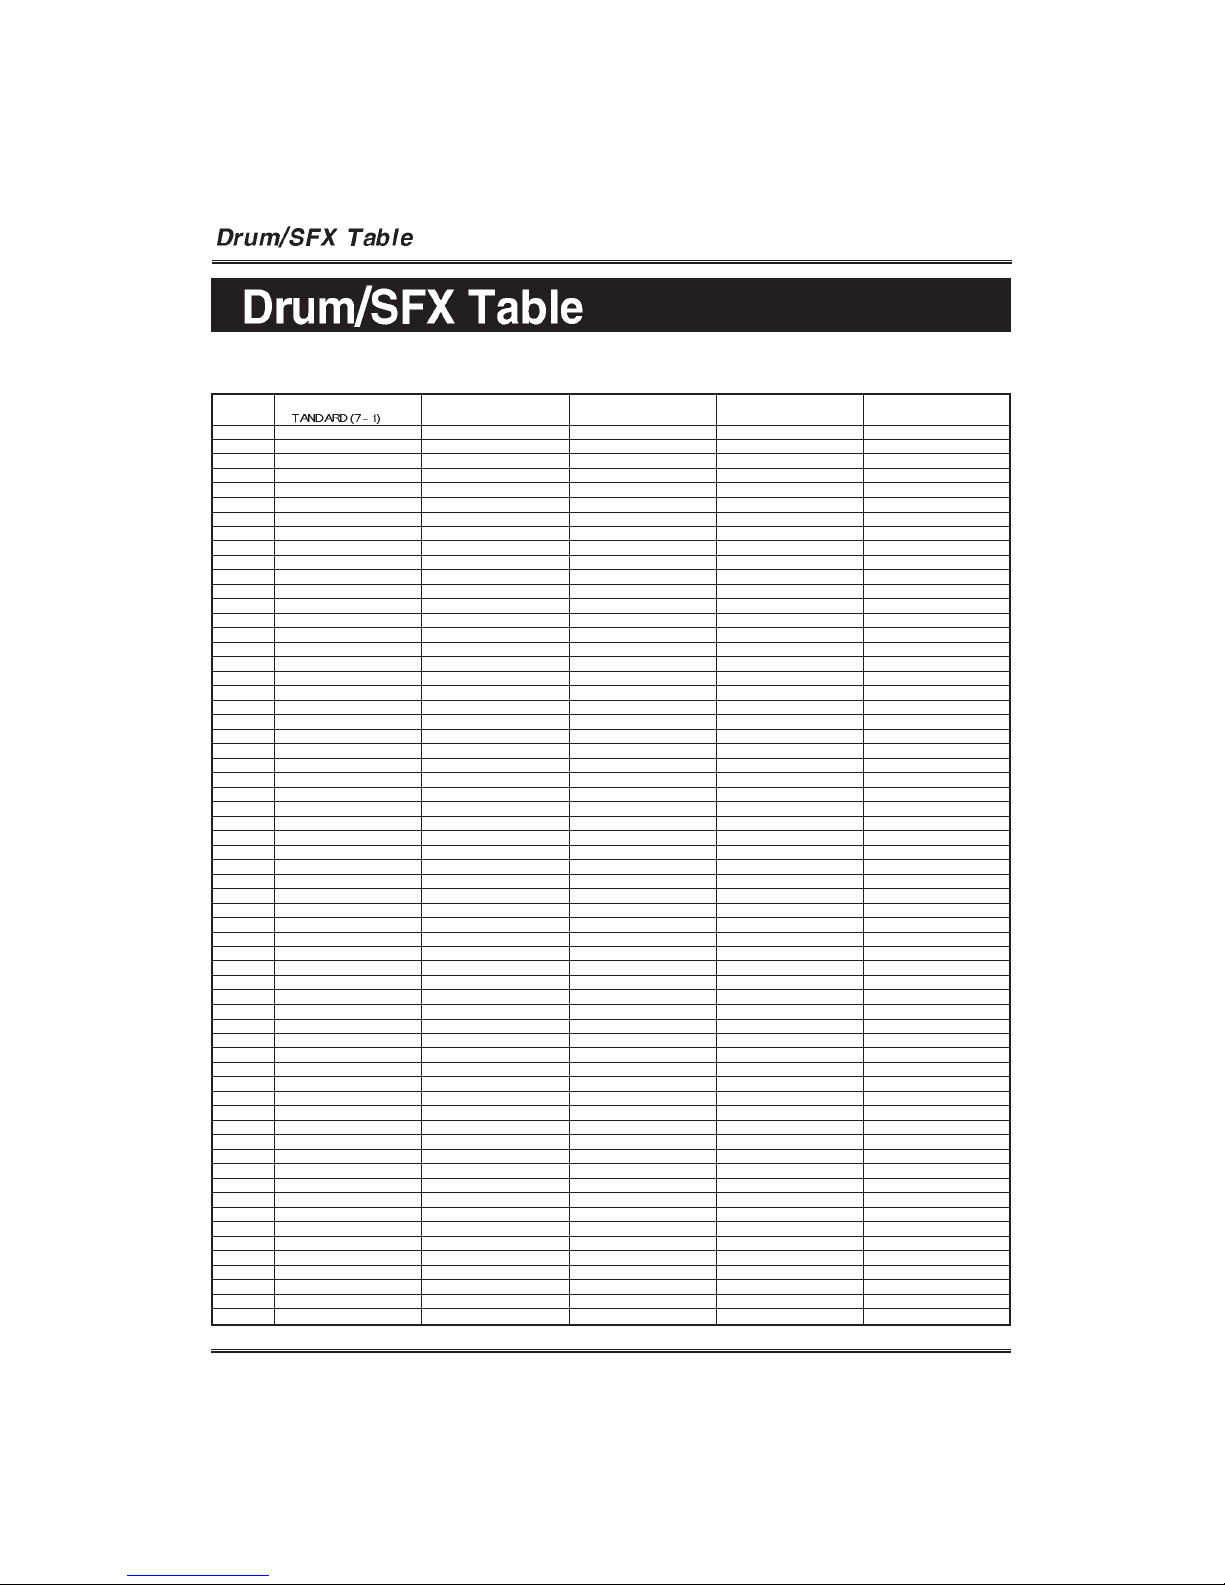
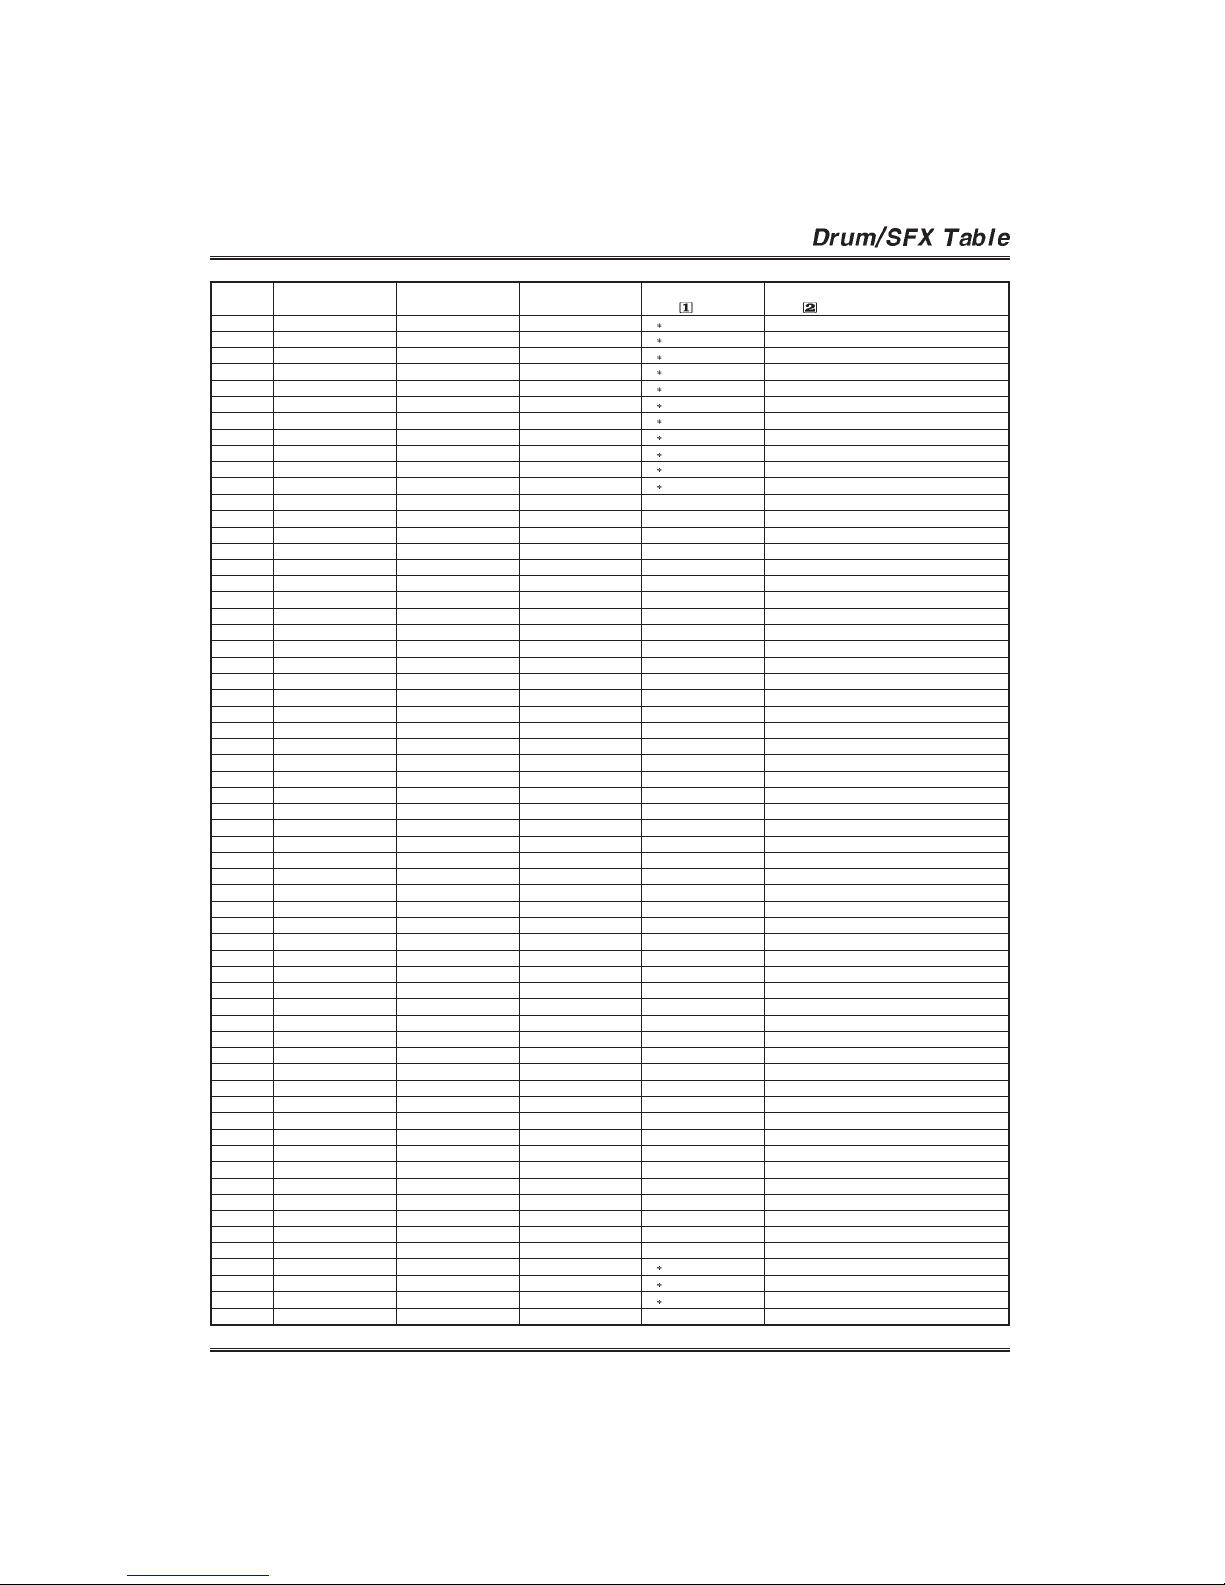
See the Drum/SFX Table on Page 36 ~ 37 in this manual for the types of drum/effect sounds in each Drum
kit/SFX set.
Select the Percussion group.
The default voice of the percussion group is the Standard drum kit.
Select the voice.
Select the desired voice by pressing the DATA/TEMPO buttons.
If you don’t change the voice of the selected voice group, the last selected voice or the default voice remains.
Play the selected voice.
Adjust the volume by using MASTER VOLUME.
VOICE GROUP TABLE
Flute
Piccolo
Flute
Recorder
Pan Flute
Bottle Blow
Shakuhachi
Whistle
Ocarina
GrandPiano
G
Piano1
G
Piano2
G
Piano3
Honky Tonk
Electric Piano1
Electric Piano2
Harpsichord
Clavinet
Vibraphone
Celesta
Glockenspiel
Music Box
Vibraphone
Marimba
Xylophone
Tubular Bell
Dulcimer
Organ
Electric Organ
Jazz Organ
Rock Organ
Pipe Organ
Reed Organ
Accordion
Harmonica
Bandonion
Strings
Strings
Slow Strings
Synth Strings1
Synth Strings2
Choir Aahs
Voice Oohs
Synth Voice
Orchestra Hit
Brass
Trumpet
Trombone
Tuba
Muted Trumpet
French Horn
Brass Section
Synth Brass1
Synth Brass2
GM voice
See
the GM
Voice Table
on Page 31.
Percussion
Standard Drum
Room Drum
Power Drum
Elec Drum
TR808 Drum
Jazz Drum
SFX
SFX
#
1
2
3
4
5
6
7
8
Page 23
22
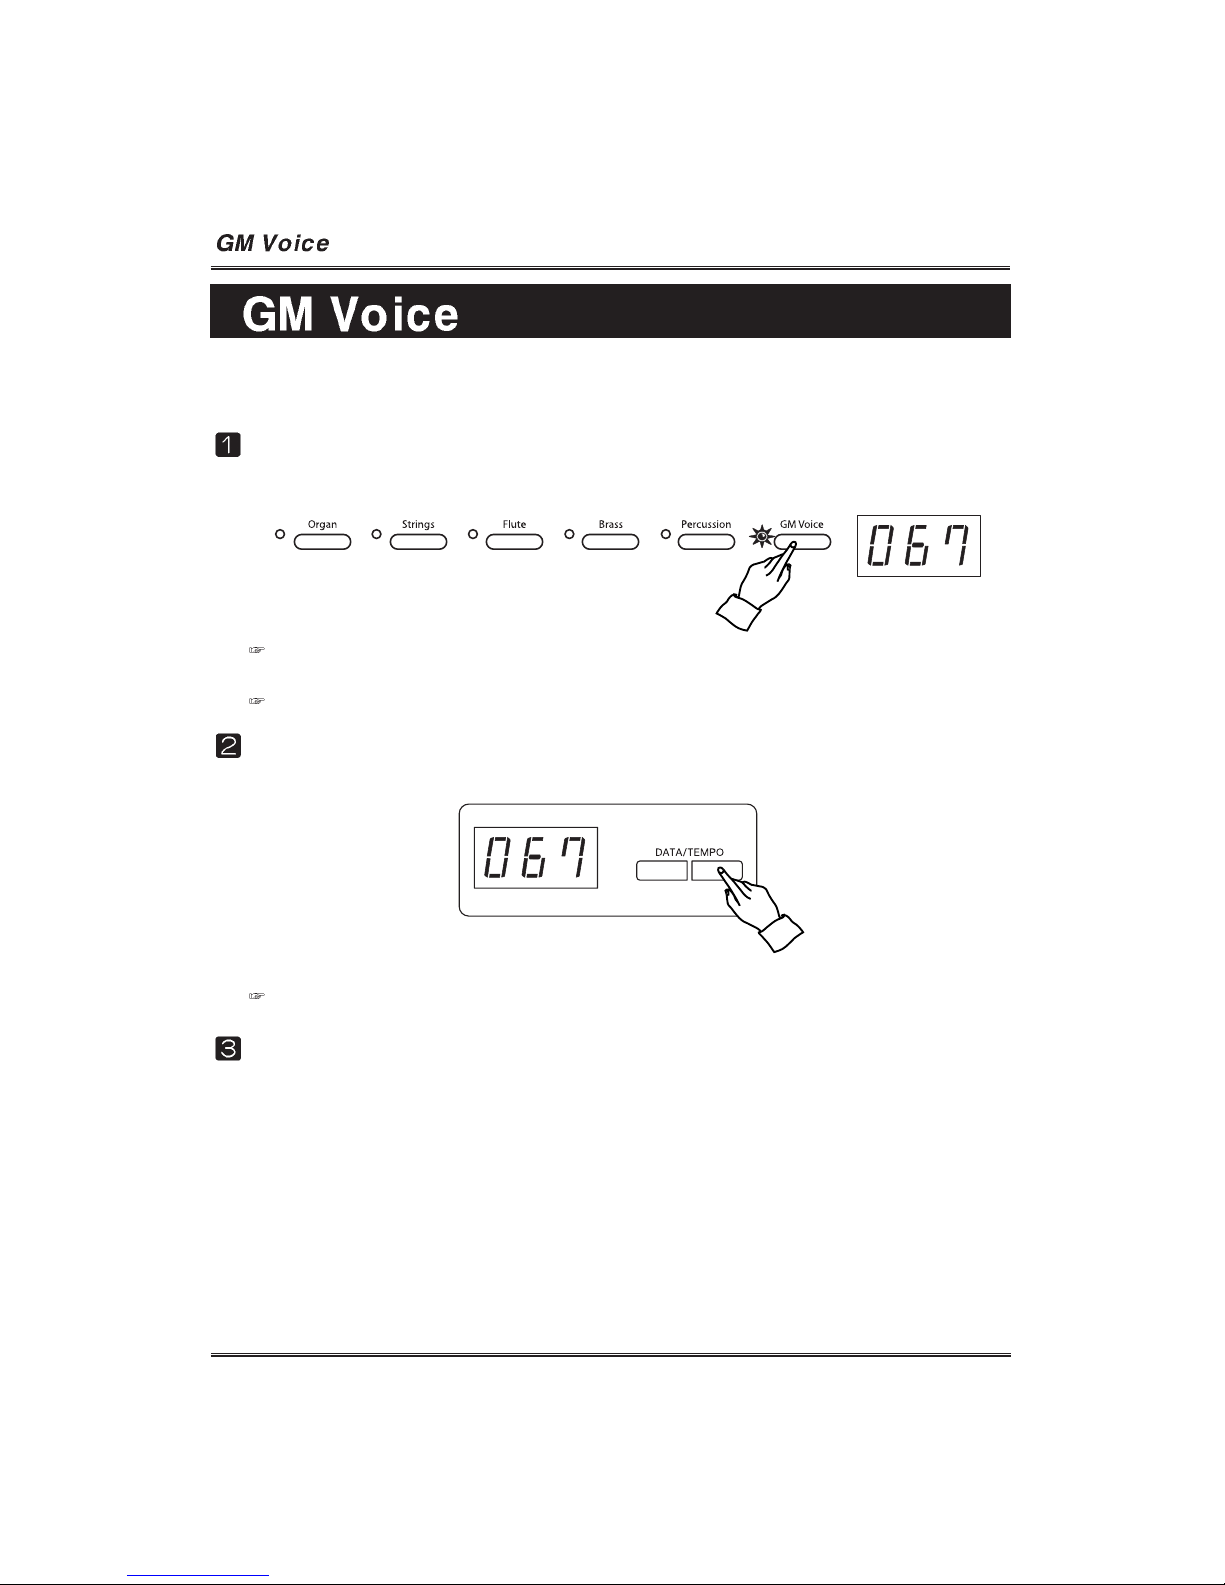
There are 128 different voices in the piano. When the GM VOICE group is selected,
one of 128 GM voices can be assigned.
Select the GM VOICE group.
The assigned GM voice number is displayed on the Multi Function Display.
The default voice of the GM voice group is 067 Tenor Saxophone in the normal and layer mode and the
default voice is 033 Fingered Bass in the Split mode.
See the GM Voice Table on Page 31 in this manual.
Select the voice.
Select the desired voice by pressing the DATA/TEMPO buttons.
If you don’t change the voice of the selected voice group, the last selected voice or the default voice remains.
Play the selected voice.
Adjust the volume by using the MASTER VOLUME.
Page 24
23
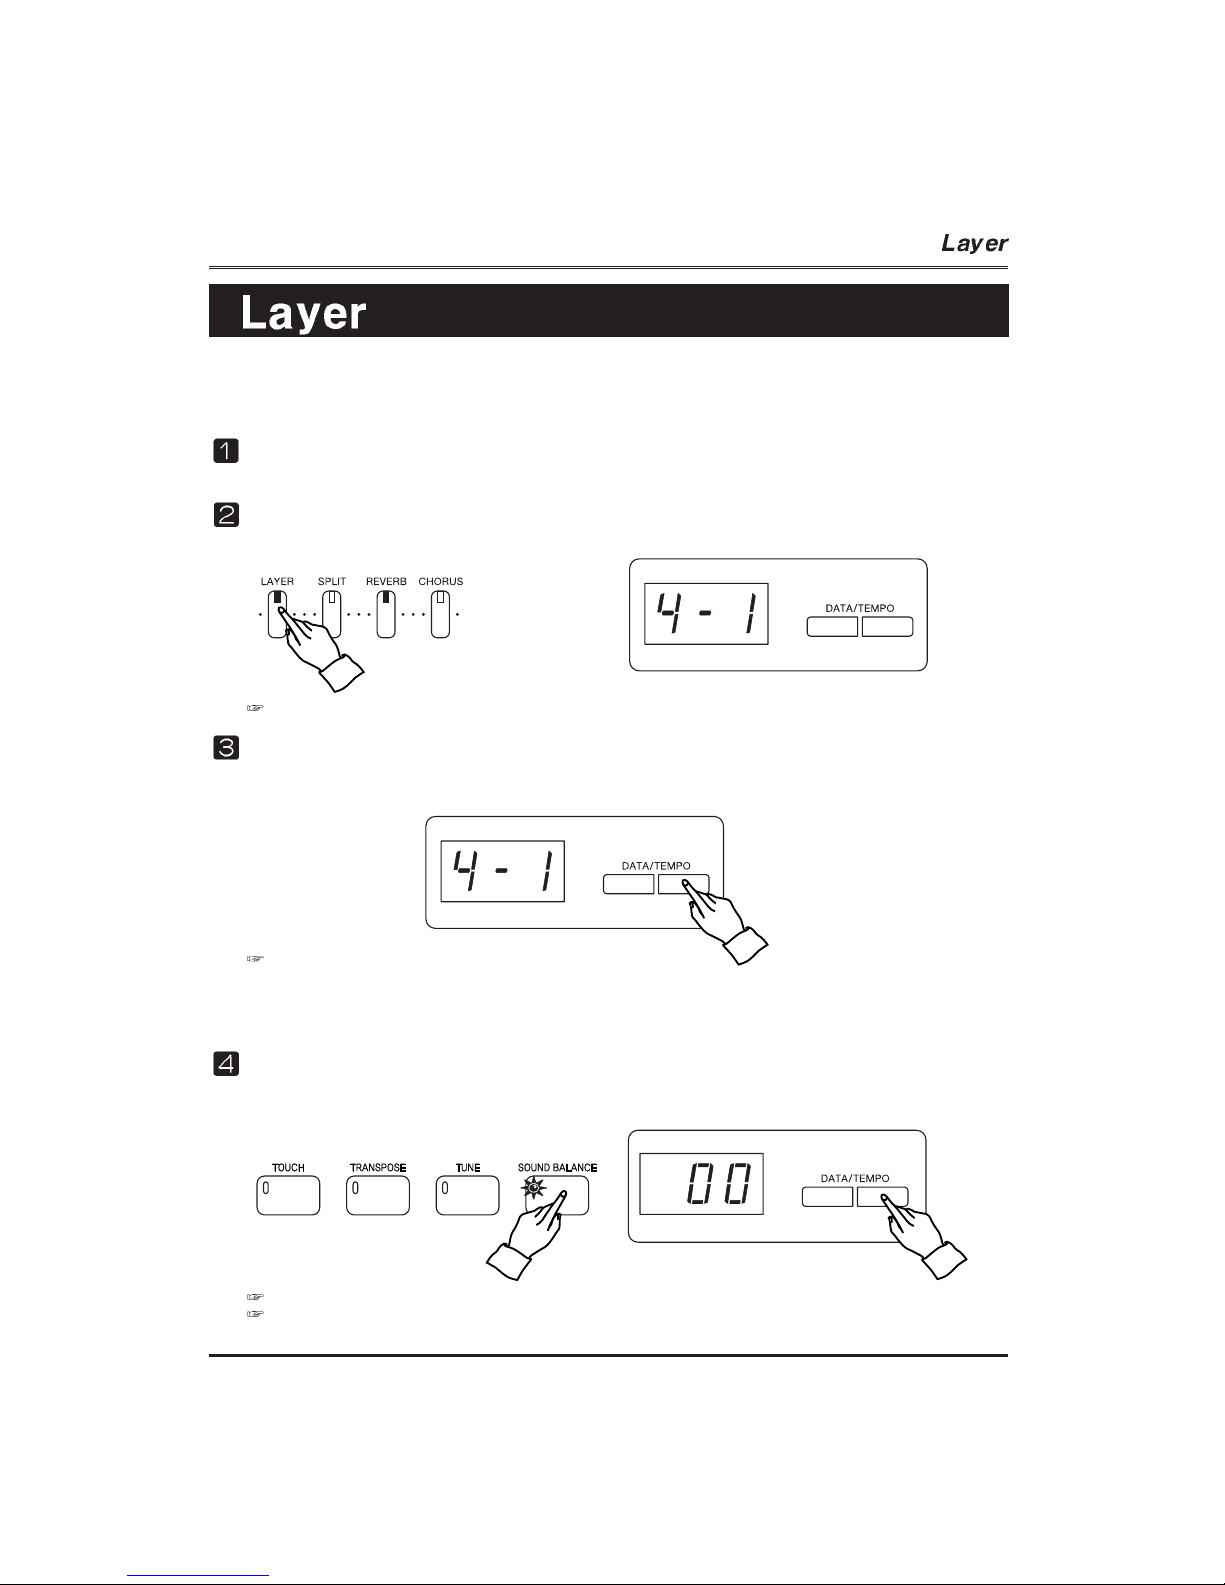
The Layer mode of the piano allows you to select and play two different voices
simultaneously in a layer. This makes it easy to create exceptionally rich and thick
tonal textures. The volume balance can be set for the two voices.
Select the first voice.
Select a voice in the normal way. (See Page 20)
The default voice is the 4-1 Strings in the Layer mode.
Call up the Layer mode.
To call up the layer mode, press the LAYER button.
Select the second voice.
The second voice can also be selected from the pop-up display of the Voice select
by using the DATA/TEMPO button.
The layered voice is selected in the normal way.
Setting the Volume Balance of the Two Voices.
Press SOUND BALANCE button on the panel
Adjust the volume balance of two voices by using the DATA/TEMPO buttons.
The sound balance range is -10 ~ 00 ~ 10.
If the balance is over 0, the first voice volume is higher than the second voice. If the balance is less than 0, the
second voice volume is higher than the first voice volume.
Page 25
24
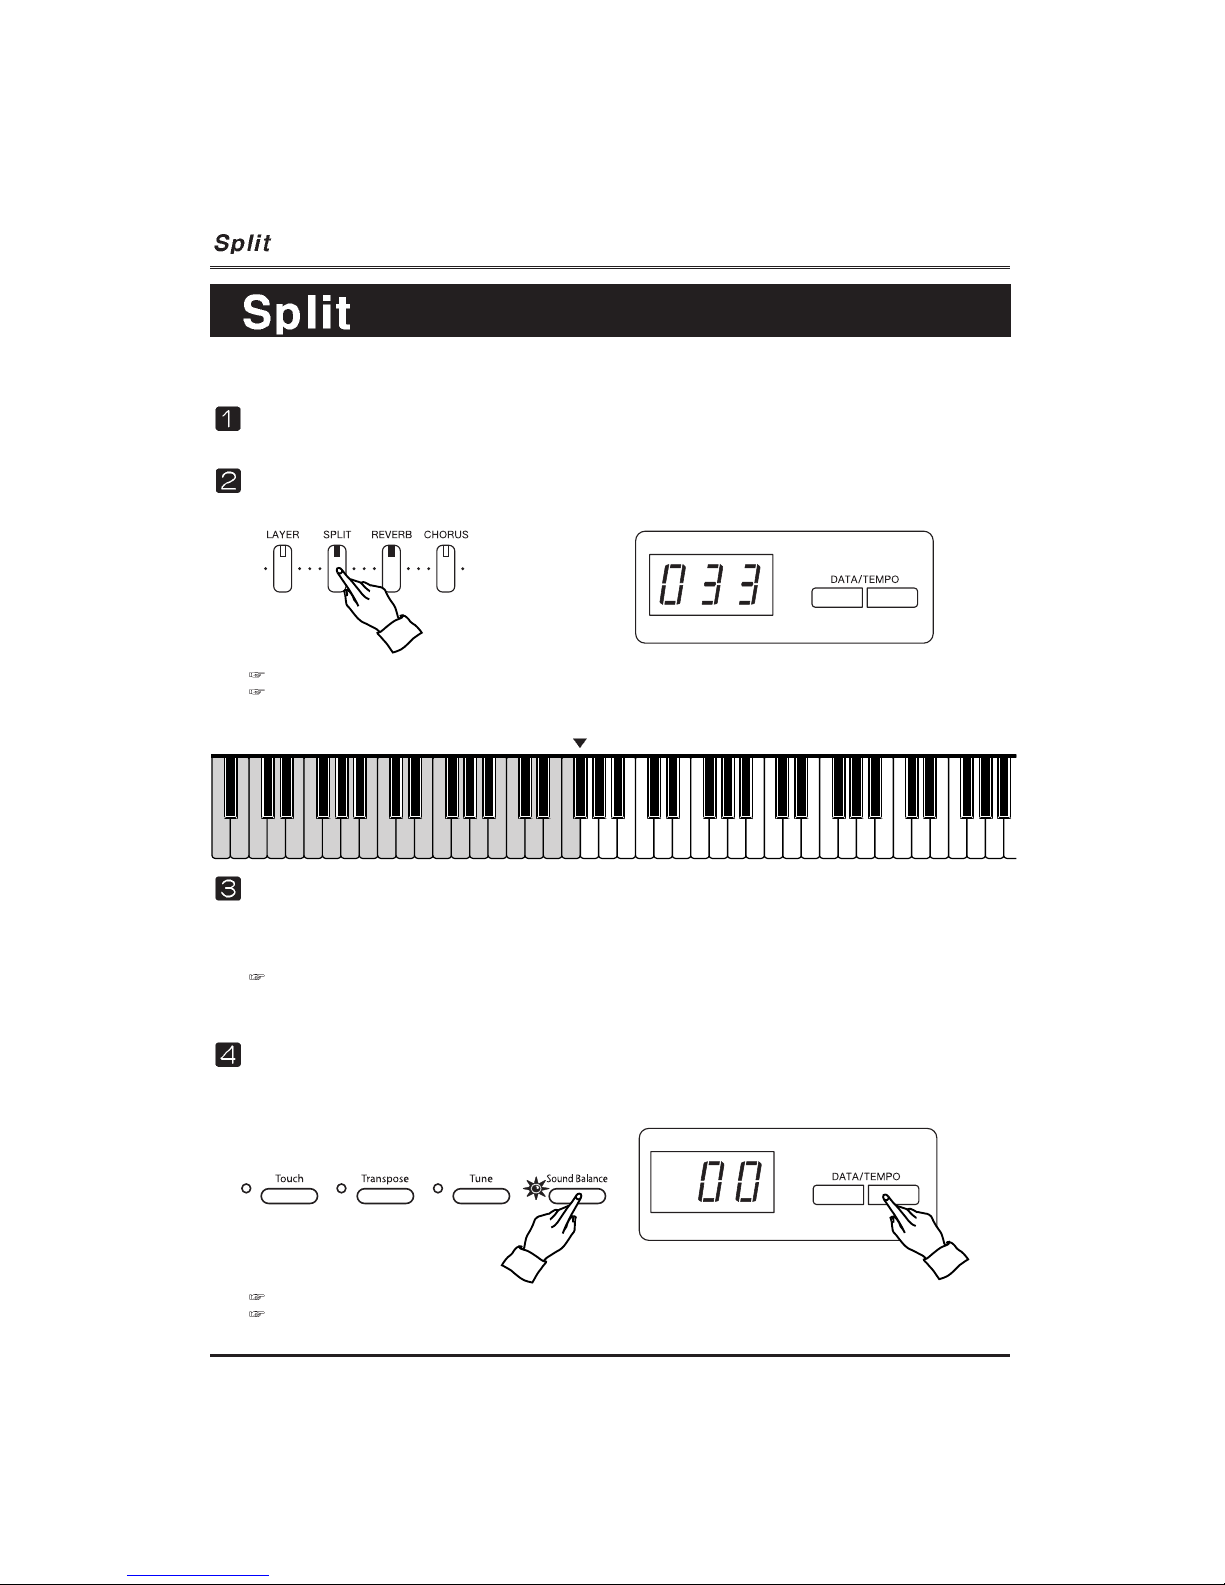
The Split mode of the piano allows you to select and play two different voices with your
left and right hands. For example, play bass with the left and piano with the right .
Select the first voice.
Select a voice in the normal way. (See Page 20)
The default voice is the 033 FINGERED BASS in the Split mode.
Hold down the SPLIT button during around 2 seconds, SPL appears on the Multi Function Display. During
displaying the SPL, new split point can be assigned by pressing a key.
Split point (F3#)
Call up the Split mode.
To call up the split mode, press the SPLIT button.
Select the second voice.
The second voice also can be selected from the pop-up display of the Voice select
by using the DATA/TEMPO.
The split(second) voice is selected in the normal way.
Setting the Volume Balance of the Two Voices.
Press SOUND BALANCE button on the panel
Adjust the volume balance of two voices by using the DATA/TEMPO buttons.
The sound balance range is -10 ~ 00 ~ 10.
If the balance is over 0, the first voice volume is higher than the second voice. If the balance is less than 0, the
second voice volume is higher than the first voice volume.
Page 26
25
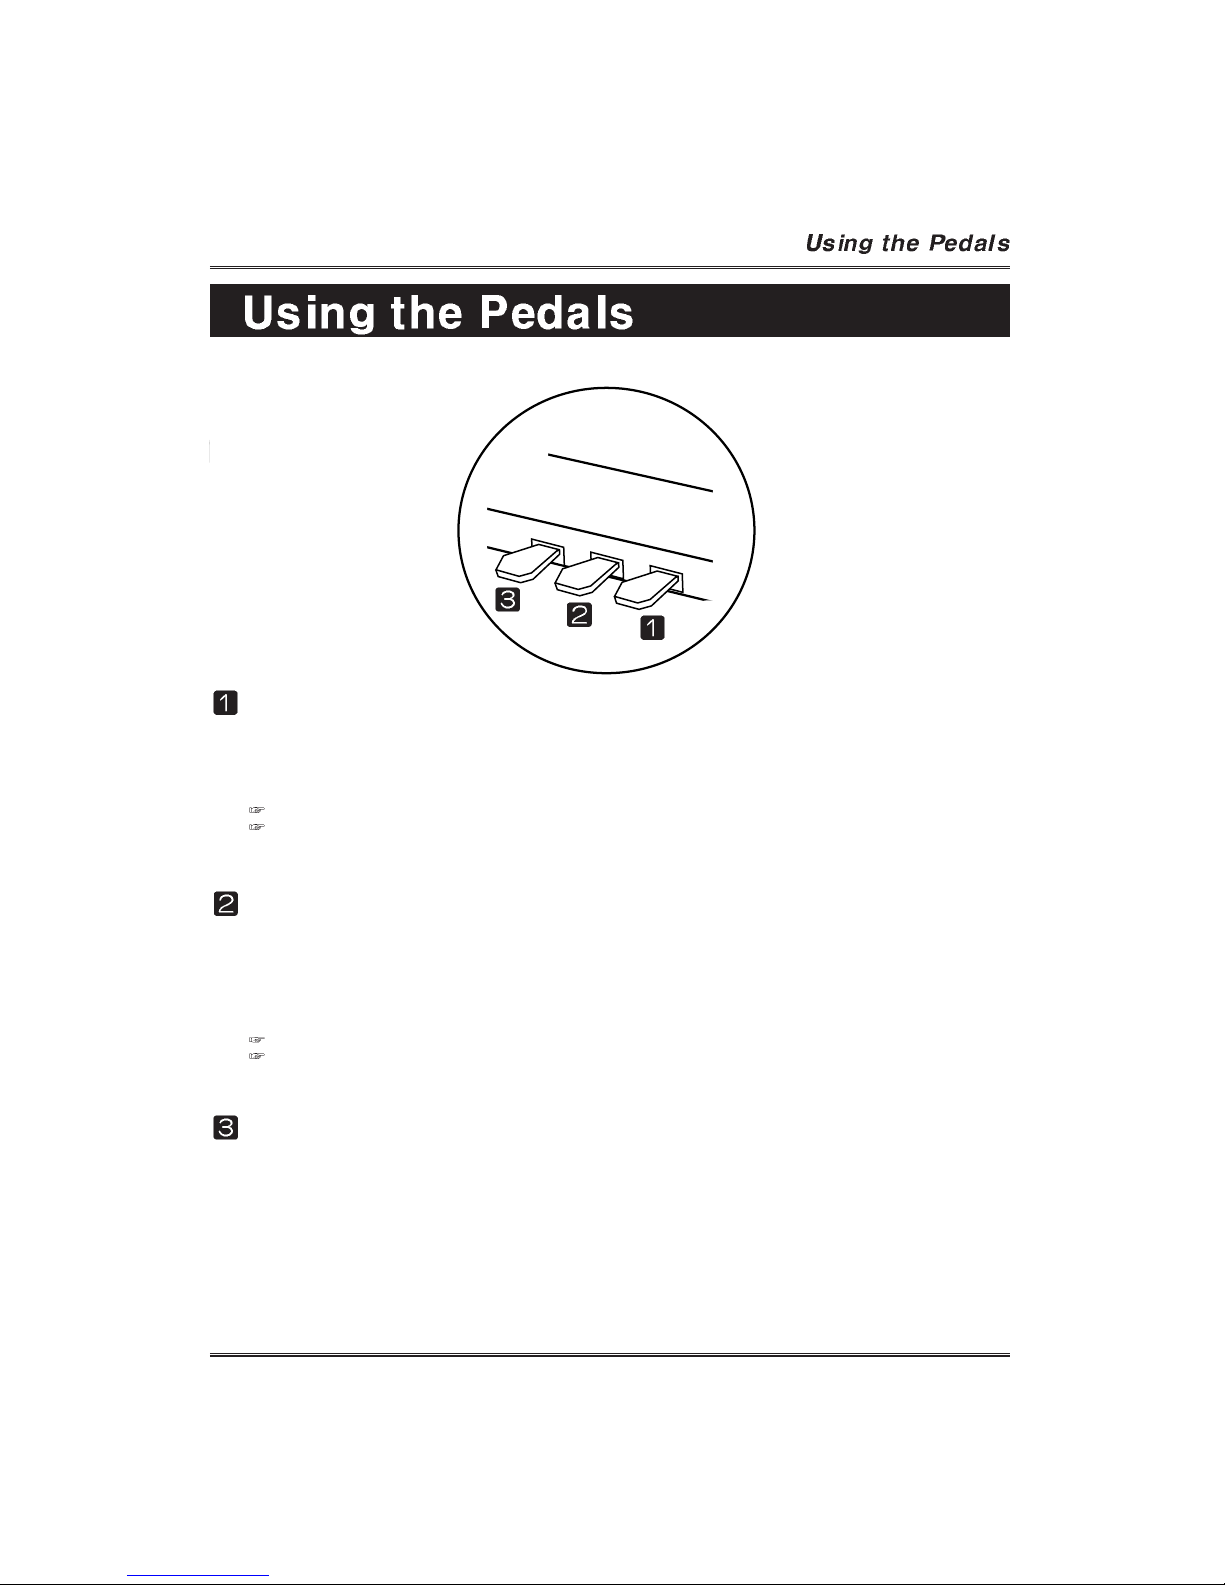
The piano has three pedals.
Damper Pedal (Right)
The damper pedal performs the same function as the damper pedal on an actual
acoustic piano, letting you sustain the sound of the voices even after releasing your
fingers from the keys.
Certain voices in the PERCUSSION group may not be affected by use of the damper pedal.
Some voices may sound continuously or have a long decay after the notes have been released while the
damper pedal is held.
Sostenuto Pedal (Center)
If you play a note or chord on the keyboard and press the sostenuto pedal while
the note(s) are held, those notes will be sustained as long as the pedal is held, but all
subsequently played notes will not be sustained. This makes it possible to sustain a
chord, for example, while other notes are played staccato.
Soft Pedal (Left)
Pressing this pedal reduces the volume and slightly changes the timbre of the
notes you play.
Certain voices in the PERCUSSION group may not be affected by use of the sostenuto pedal.
Certain voices such as STRINGS or BRASS sustain continuously when the sostenuto pedal is pressed.
Page 27
26
Reverb is an effect that recreates the decaying reflections of a sound in a performance
space, and reproduces the special ambience of a concert hall.
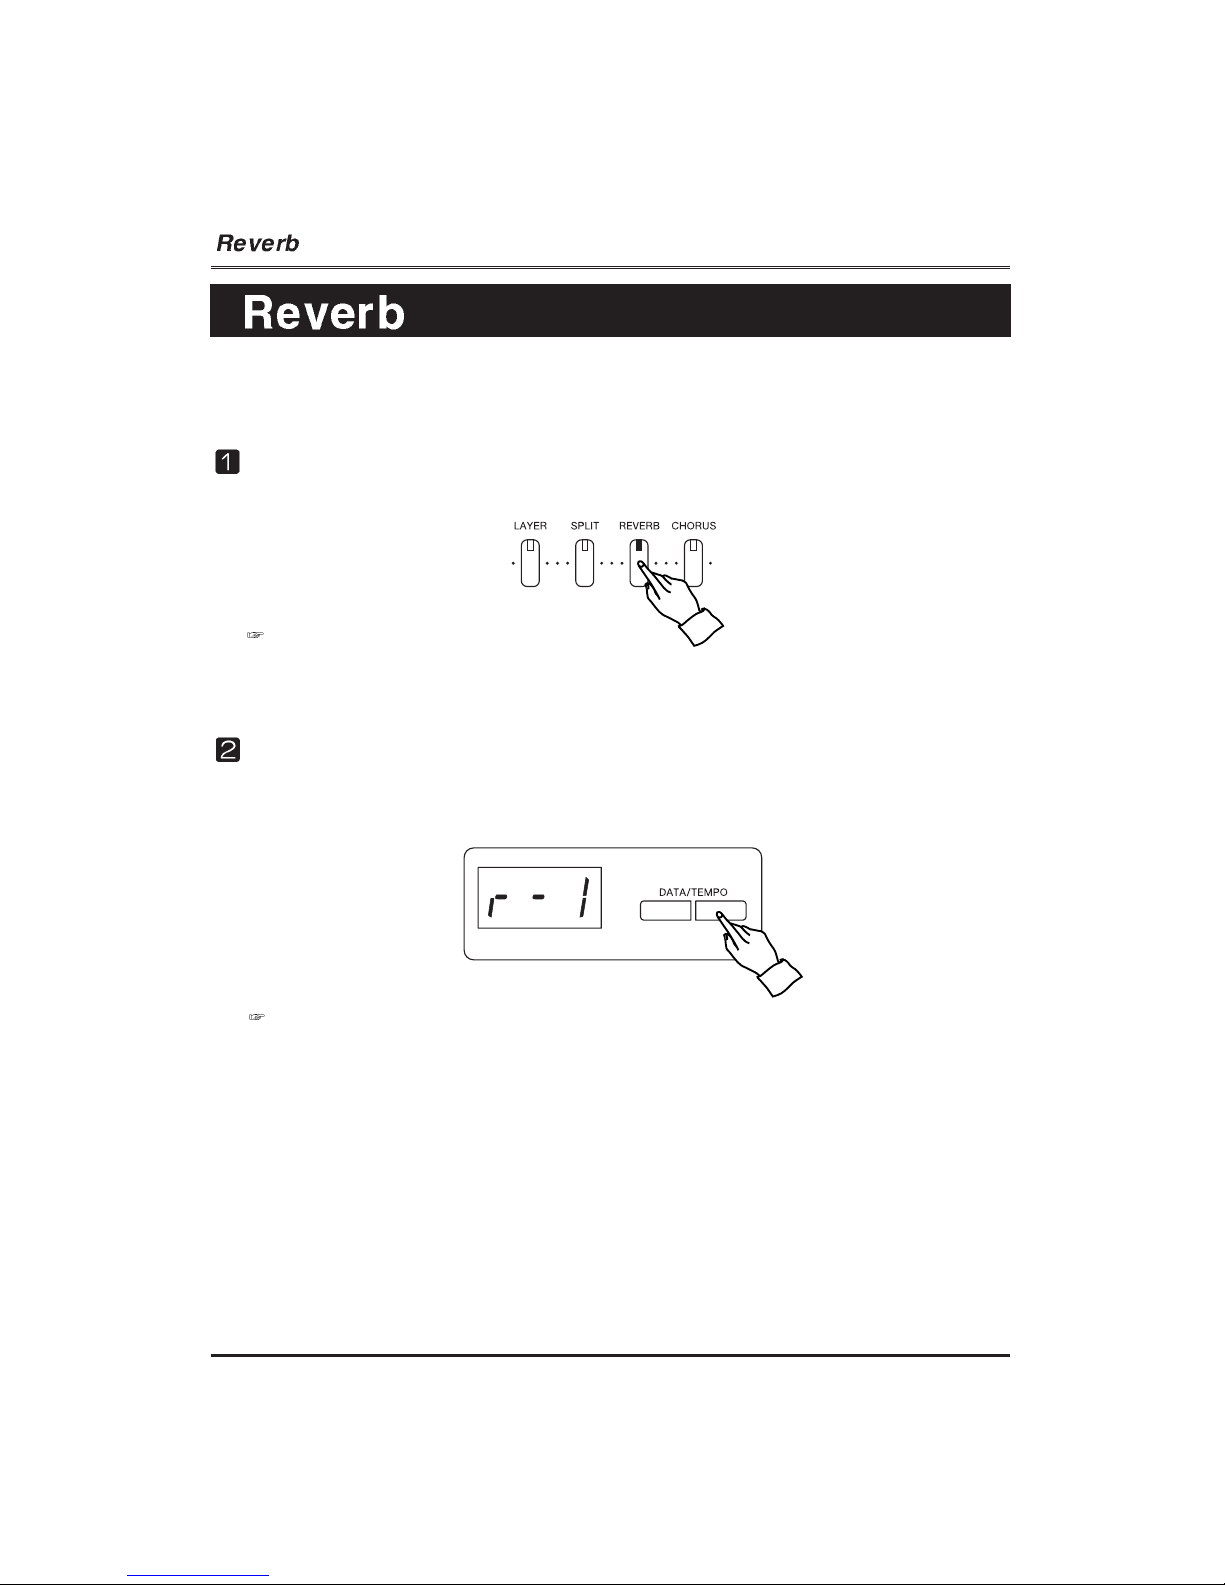
The REVERB pop-up display appears.
Reverb ON/OFF
To turn on reverb, press the REVERB button. The lamp lights and reverb is set ON.
There are 4 Reverb types in the piano.
To turn off reverb, press the REVERB button again. The lamp turns off and reverb
is no longer active.
Selecting Reverb type
Select the Reverb type by pressing the DATA/TEMPO buttons while displaying the
REVERB pop-up display on the Multi Function Display.
Page 28
27
There are four different effects: Chorus 1, 2, 3, 4.
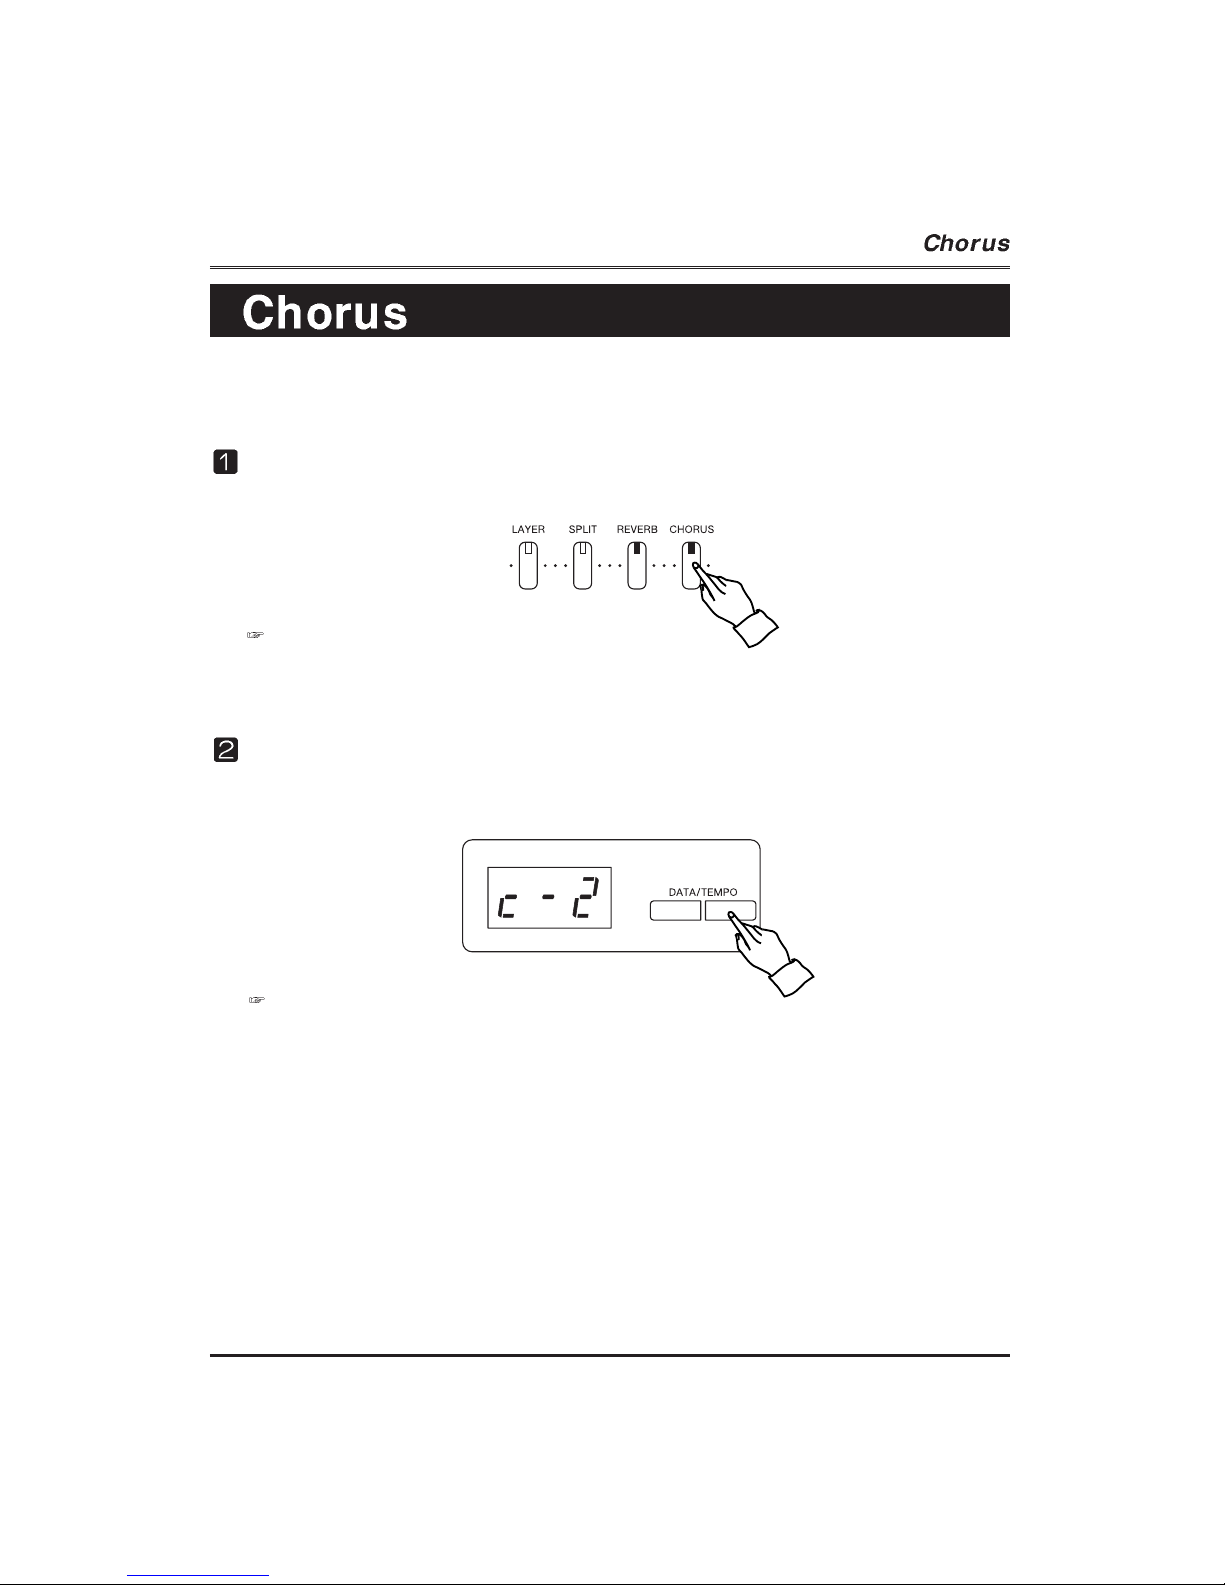
The CHORUS pop-up display appears.
Chorus ON/OFF
To turn on Chorus, press the CHORUS button. The lamp lights and chorus is set ON.
There are 4 Chorus types in the piano.
To turn off chorus, press the CHORUS button again. The lamp turns off and chorus
is no longer active.
Selecting Chorus type
Select the Chorus type by pressing the DATA/TEMPO buttons while displaying the
CHORUS pop-up display on the Multi Function Display.
Page 29
28
TOUCH
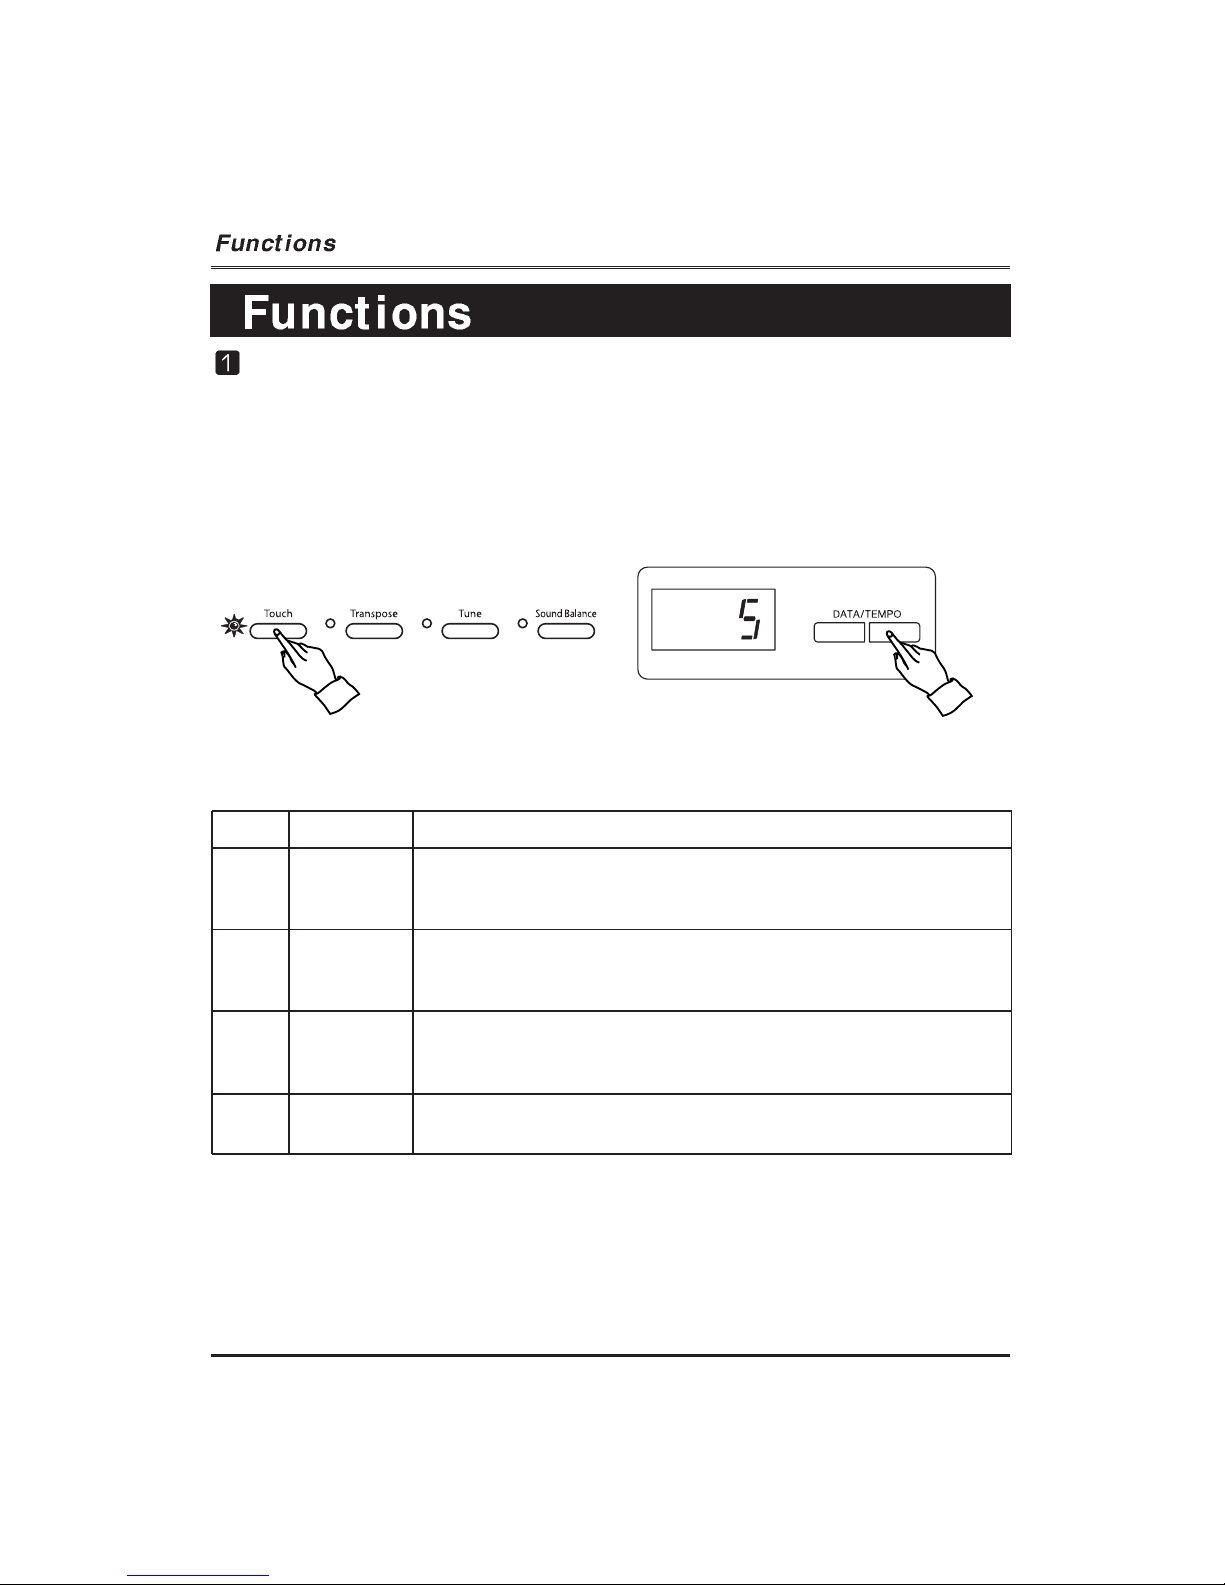
Touch determines how your playing strength affects the volume of the voices.
Ten(10) types are available for tailoring the keyboard response to the selected voice,
type of song, or your own playing preference. Press the TOUCH button and select the
desired touch type by pressing the DATA/TEMPO buttons while the TOUCH pop-up
display appears.
SOFT 1
SOFT 2
SOFT 3
1
2
3
These settings let you produce a relatively loud sound even
when playing the key softly.
DSP
TYPE
4
5
6
NORMAL 1
NORMAL 2
NORMAL 3
These settings are standard keyboard response and the
NORMAL 2 is used as the basic setting.
7
8
9
HARD 1
HARD 2
HARD 3
These settings require you to play the keys quite strongly to
produce maximum loudness.
OFF FIXED
This setting produces the same degree of loudness, no matter
how strongly of softly you play the keys.
Page 30
29
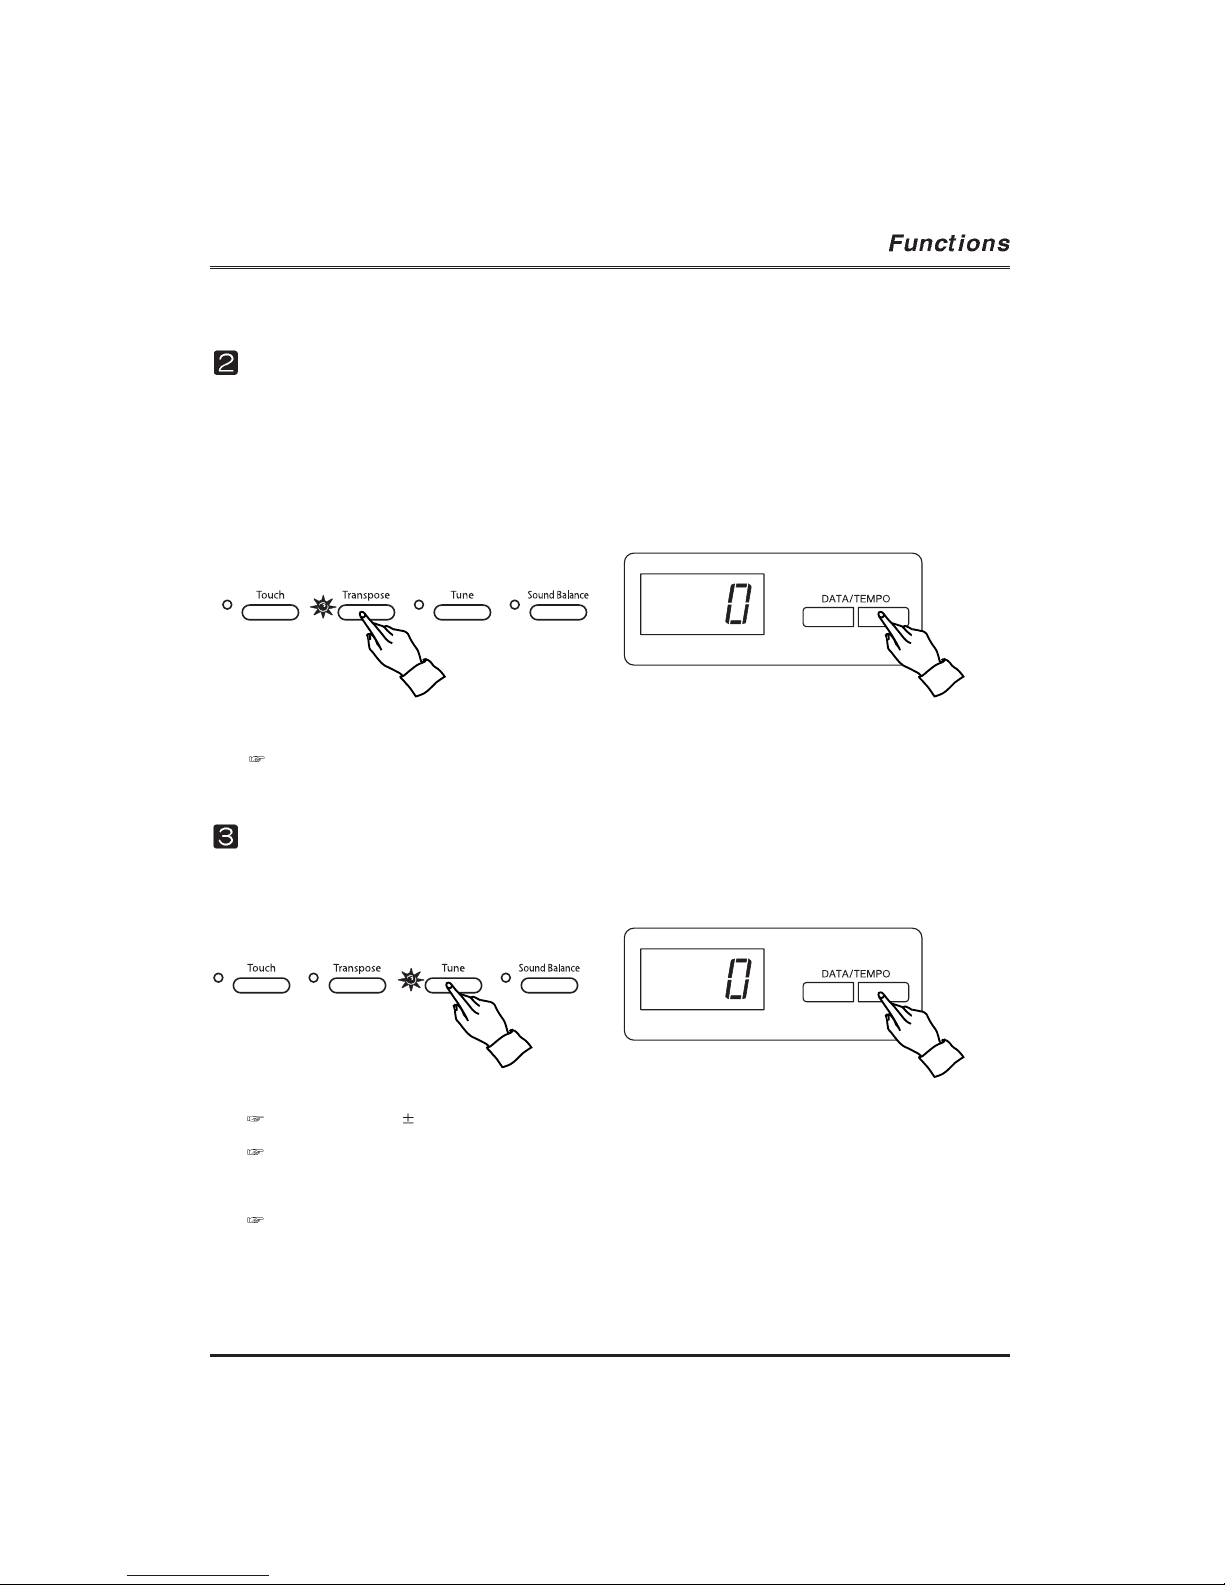
TRANSPOSE
The Transpose function makes it possible to shift the pitch of the keyboard in
semitone units, allowing you to match the pitch of the keyboard to the range of other
instruments or singers, or letting you easily play in a different key without having to
change your fingering. For example, if the Transpose is set ‘+5’ semitones, playing C
results in a pitch of F, or in other words, you can play in the key of C major on the
keyboard and automatically have the pitch transposed to F major.
Range: -12 semitones (5 ~ 0 ~ -6), initial value: 0 (C key)
TUNE
The Tune function lets you make fine adjustments to the pitch, allowing you to
accurately match the tuning with that of other instruments.
Range: A3 440Hz 50cents
Hz(Hertz)
The pitch is measured in units of Hertz (abbreviated Hz), which represents the number of times the sound wave
vibrates in a second.
Cent
Cent is unit of pitch, equal to 1/100 of a semitone.
Page 31
30
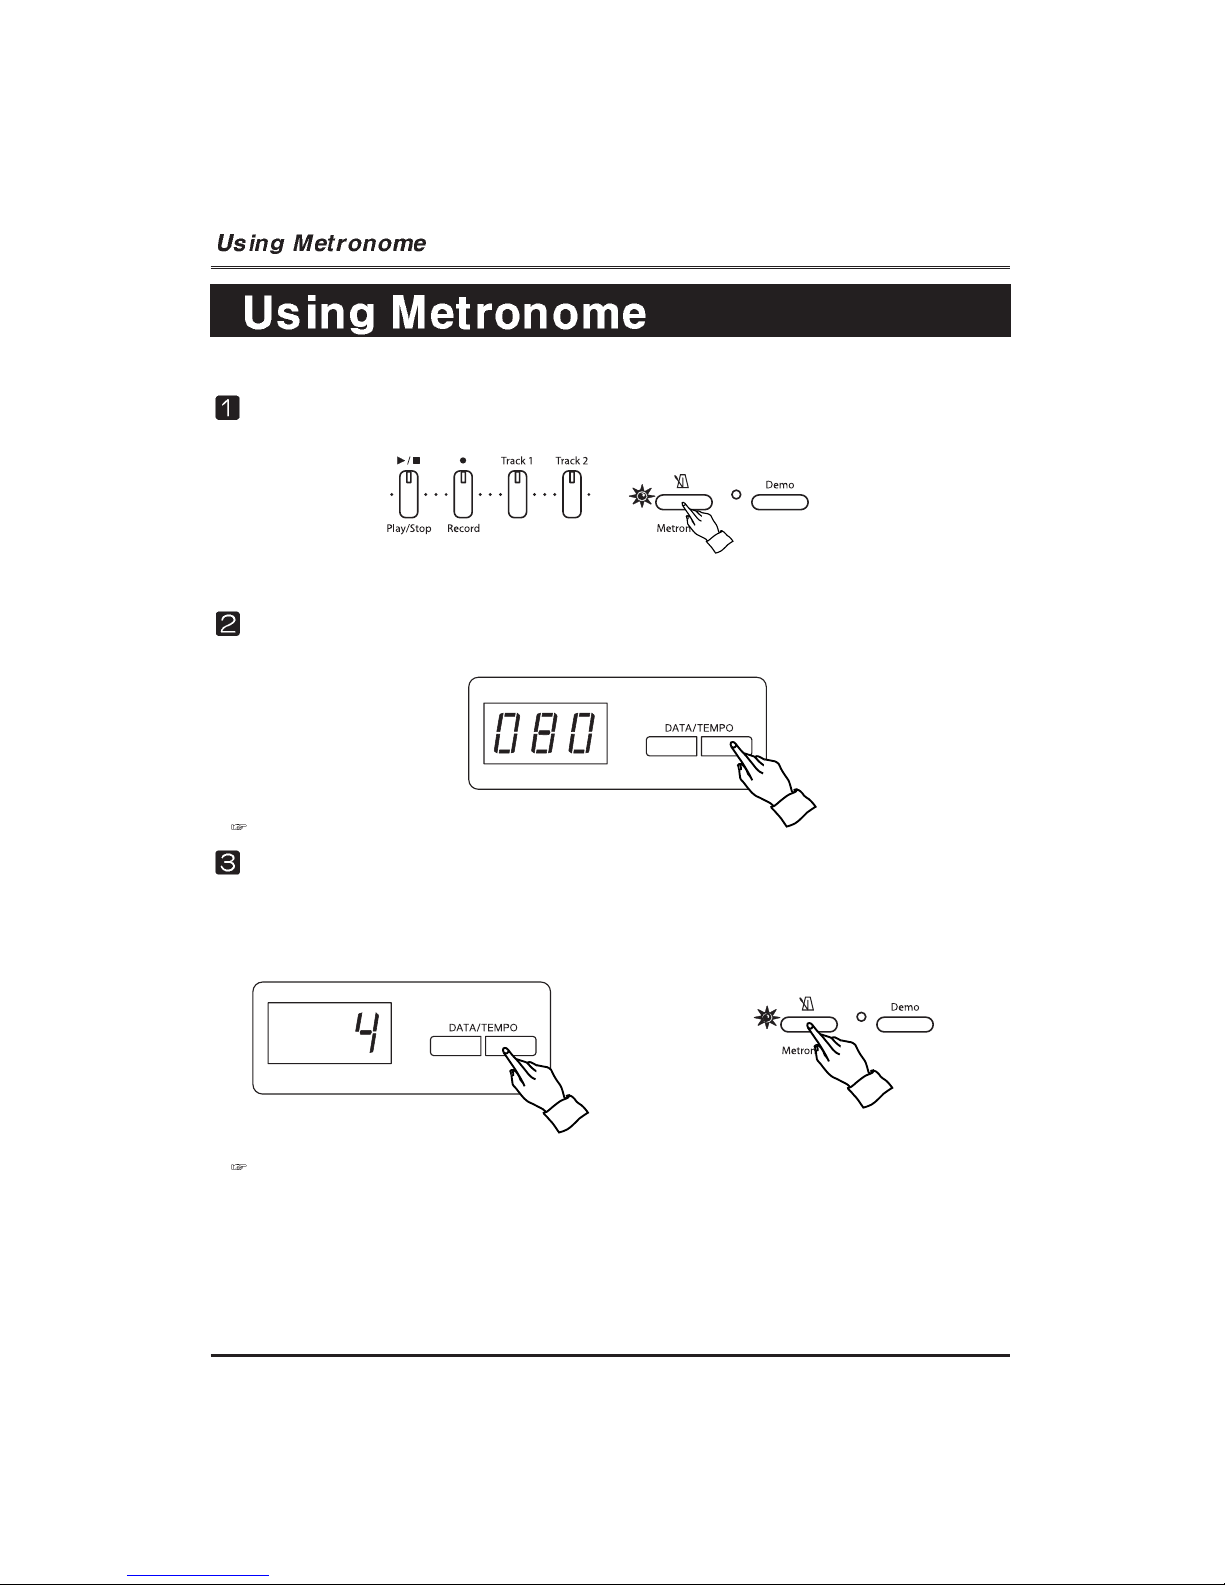
START/STOP of Metronome
To start the metronome, simply press the METRONOME button.
The piano features a convenient metronome that is ideal for practicing.
Press the METRONOME button again to stop the metronome sound.
Adjusting Tempo of Metronome
You can set the tempo over range 40 ~ 250 by using the DATA/TEMPO buttons.
Hold the button for continuously decrement or increment the tempo.
Selecting the Beat
To select the beat, hold down the METRONOME button for 2~3 seconds.
The METRONOME BEAT pop-up will appear, and you can select the beat by using the
DATA/TEMPO buttons.
Beat Range: 0, 2/4, 3/4, 4/4, 5/4, 6/4, 7/4, 8/4.
Page 32
31
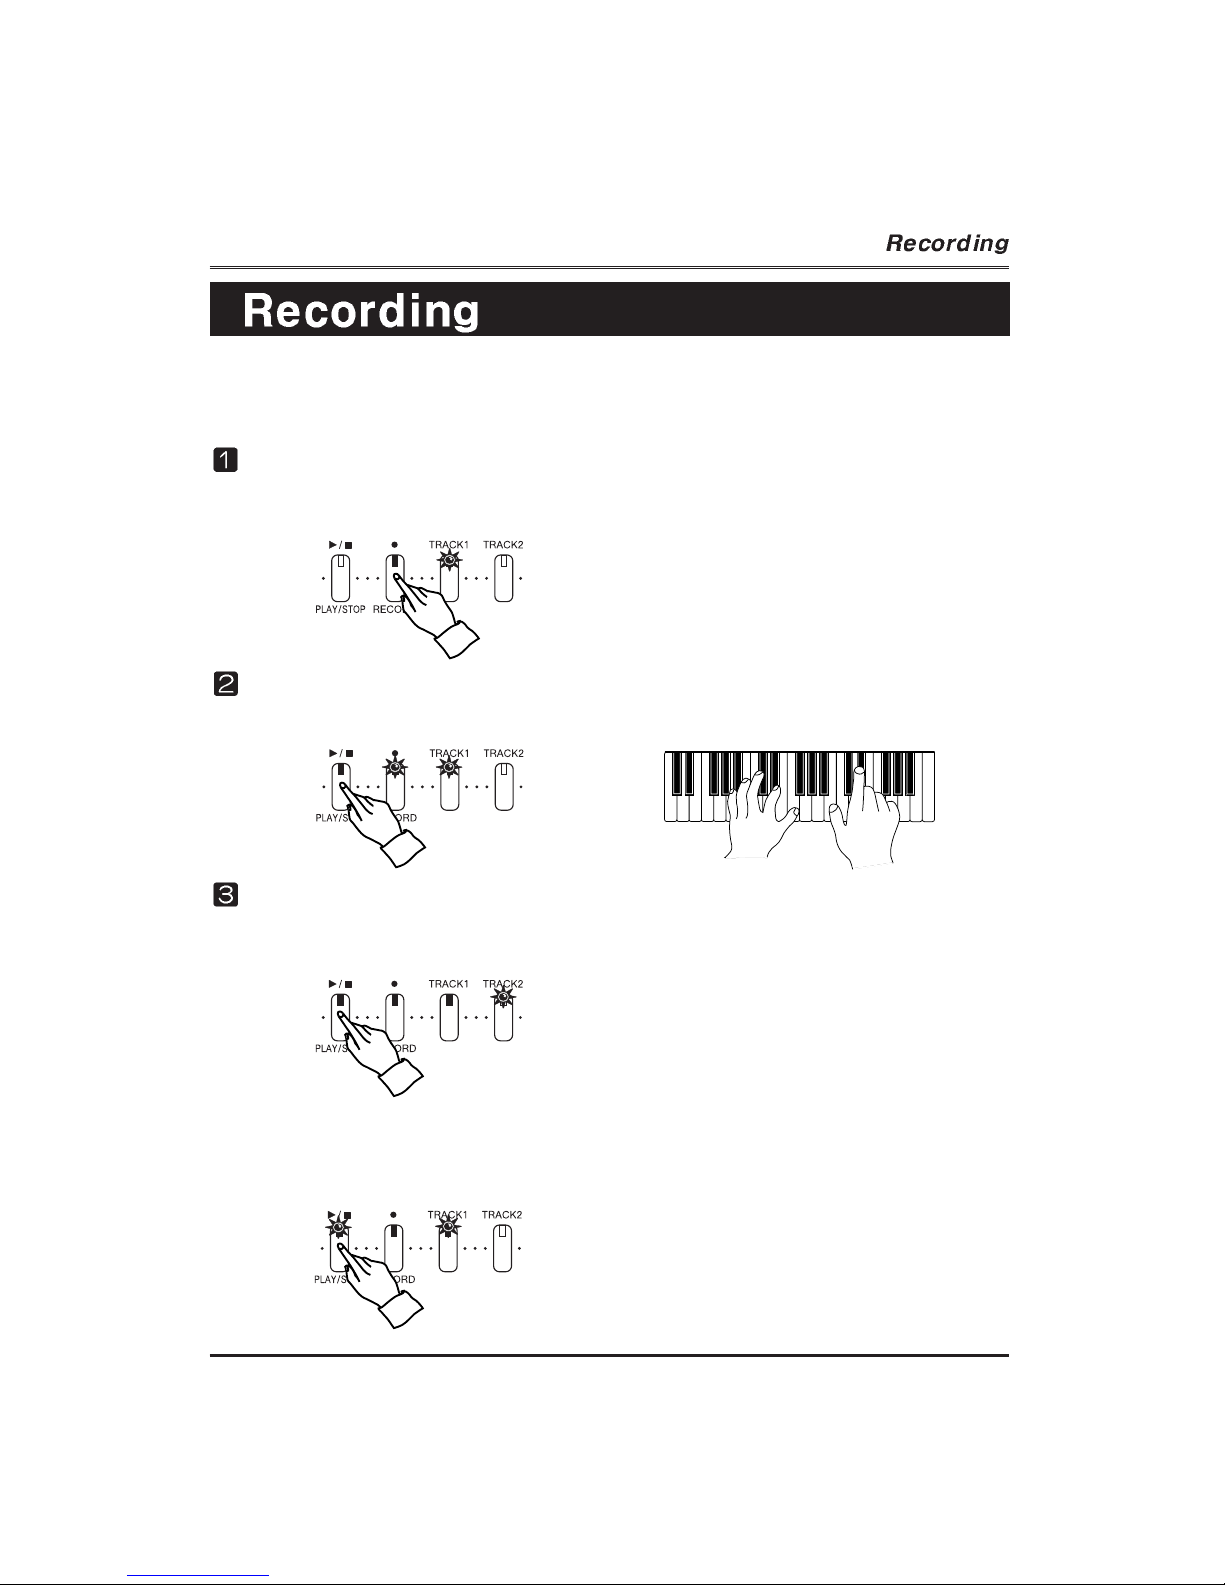
Select Record mode.
Select the desired voice by using the VOICE group and the DATA/TEMPO buttons.
Press the RECORD button, the RECORD lamp lights and the TRACK 1 lamp flashes.
The piano features comprehensive song recording functions that allow you to record
your own performance.
Start recording to the Track1.
Start playing the keyboard or press the PLAY/STOP button.
Stop recording to the Track1.
Stop playing the keyboard and press the PLAY/STOP button. The Track2 lamp
automatically flashes. You can record the second part of the song to the Track2.
If you want to hear the recorded song in the Track1, press the TRACK2 button.
Flashing the lamp of the Track2 stops.
Press the PLAY/STOP button. The recorded song of the Track1 is played.
Page 33
32
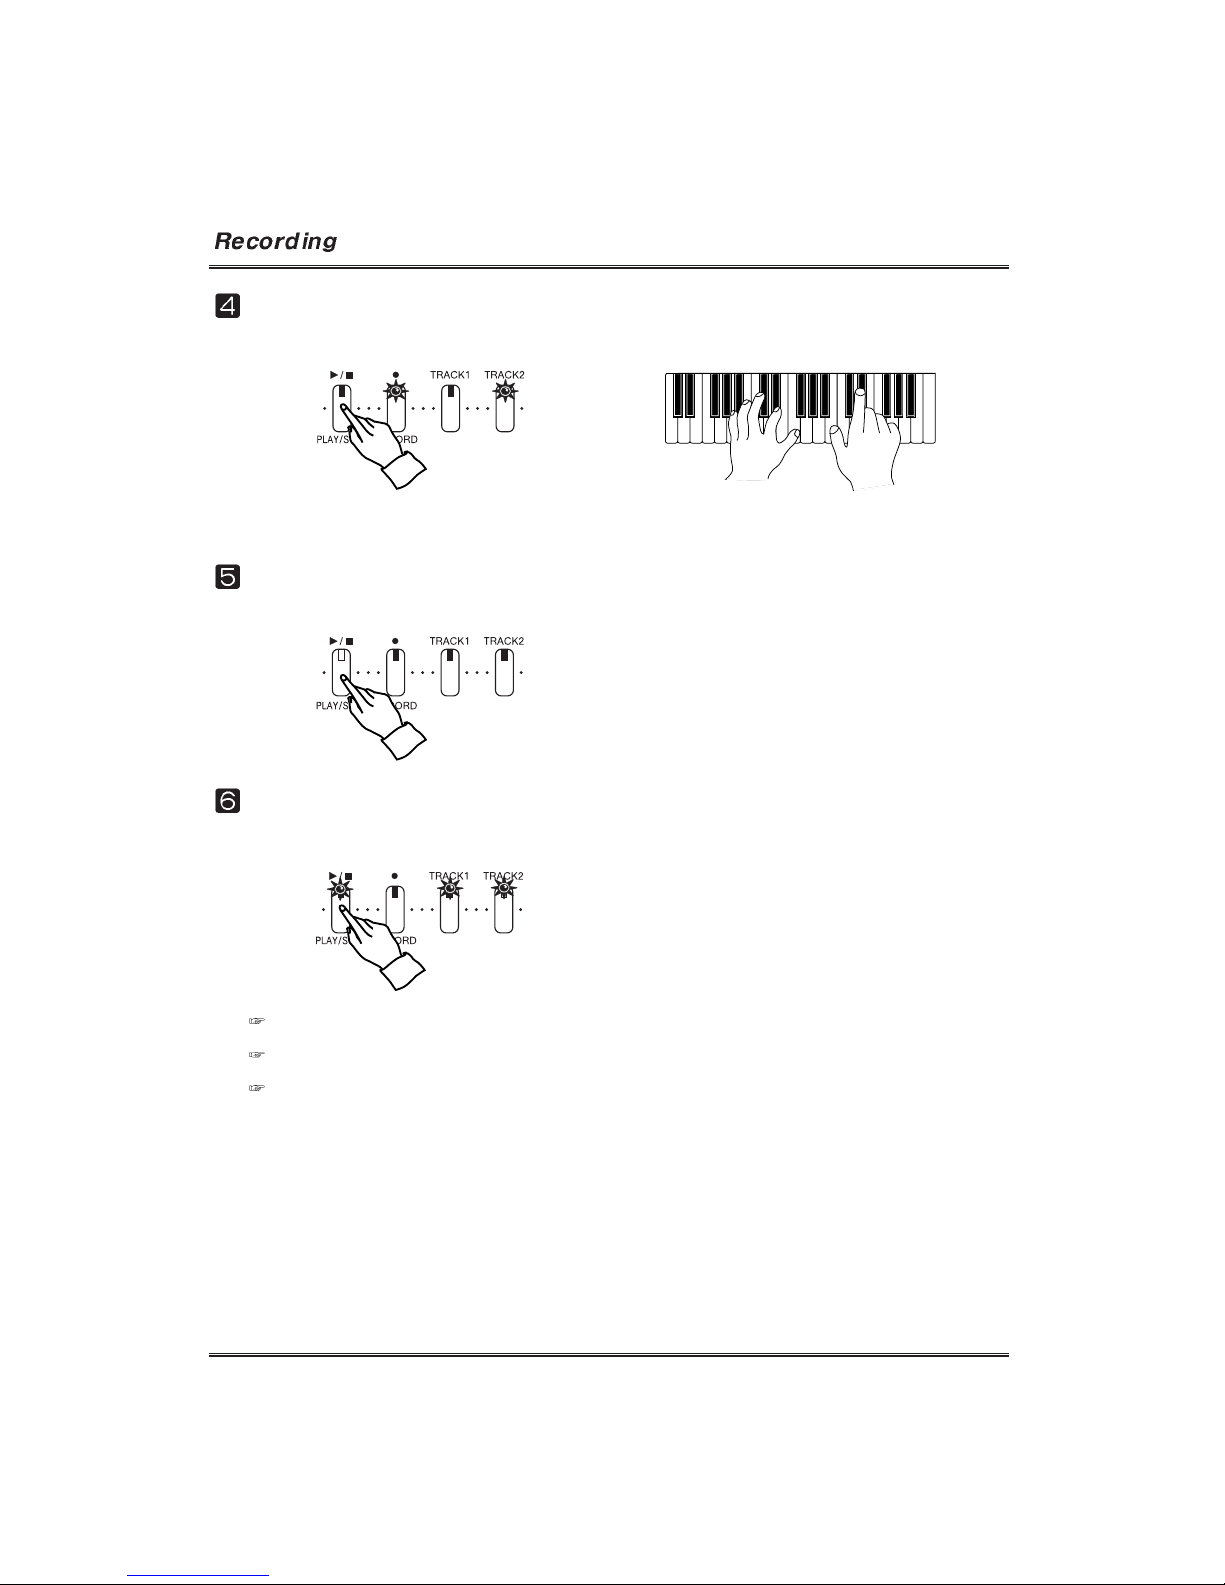
Start recording to Track2.
Start playing the keyboard or press the PLAY/STOP button.
Stop recording.
Stop playing the keyboard and press the PLAY/STOP button.
Playback the recorded song.
Press the PLAY/STOP button again. The recorded song is played.
During recording to the Track2 you can listen the recorded song of the Track1.
To delete the recorded track, press and hold the TRACK button for 2~3 seconds.
To delete the recorded song, press and hold the RECORD button for 2~3 seconds.
The song memory is cleared when the power is turned off.
Page 34
MIDI?
MIDI(Musical Instrument Digital Interface) is the international standard for digital communication
of electronic musical instrument data. This means that any equipment which has a MIDI
terminal, such as electronic musical instrument or personal computers, can easily exchange the
digital data with other MIDI equipment without complicated conversions or connections.
How to connect MIDI cable
The MIDI feature makes it possible for you to send and receive a variety of digital data.
MIDI IN terminal
This is an input terminal that connects with the MIDI out terminal of other MIDI devices.
MIDI OUT terminal
The terminal that transmits data from this instrument to other equipment.
Local Control ON/OFF
“Local Control “ refers to the fact that, normally, the piano keyboard controls its internal tone
generator, allowing the internal voices to be played directly from the keyboard. This situation is
called “Local Control ON.” When the local control is set to off, the “keyboard” and “sound
source” are separated, and no sound comes out of the piano when playing the keyboard.
However, the data of the keyboard performance is output through MIDI. By setting the local
control to off, you can play an external MIDI tone generator from the keyboard of the piano
without sounding the internal voices.
The LOCAL CONTROL pop-up display
Press both the SOUND BALANCE button and the PLAY/STOP button. The LOCAL CONTROL
pop-up display appears.
The LOCAL CONTROL ON/OFF
To set the Local control ON/OFF, select the LOCAL CONTROL by using the DATA/TEMPO
buttons, while the LOCAL CONTROL pop-up display appears.
33
Page 35
34
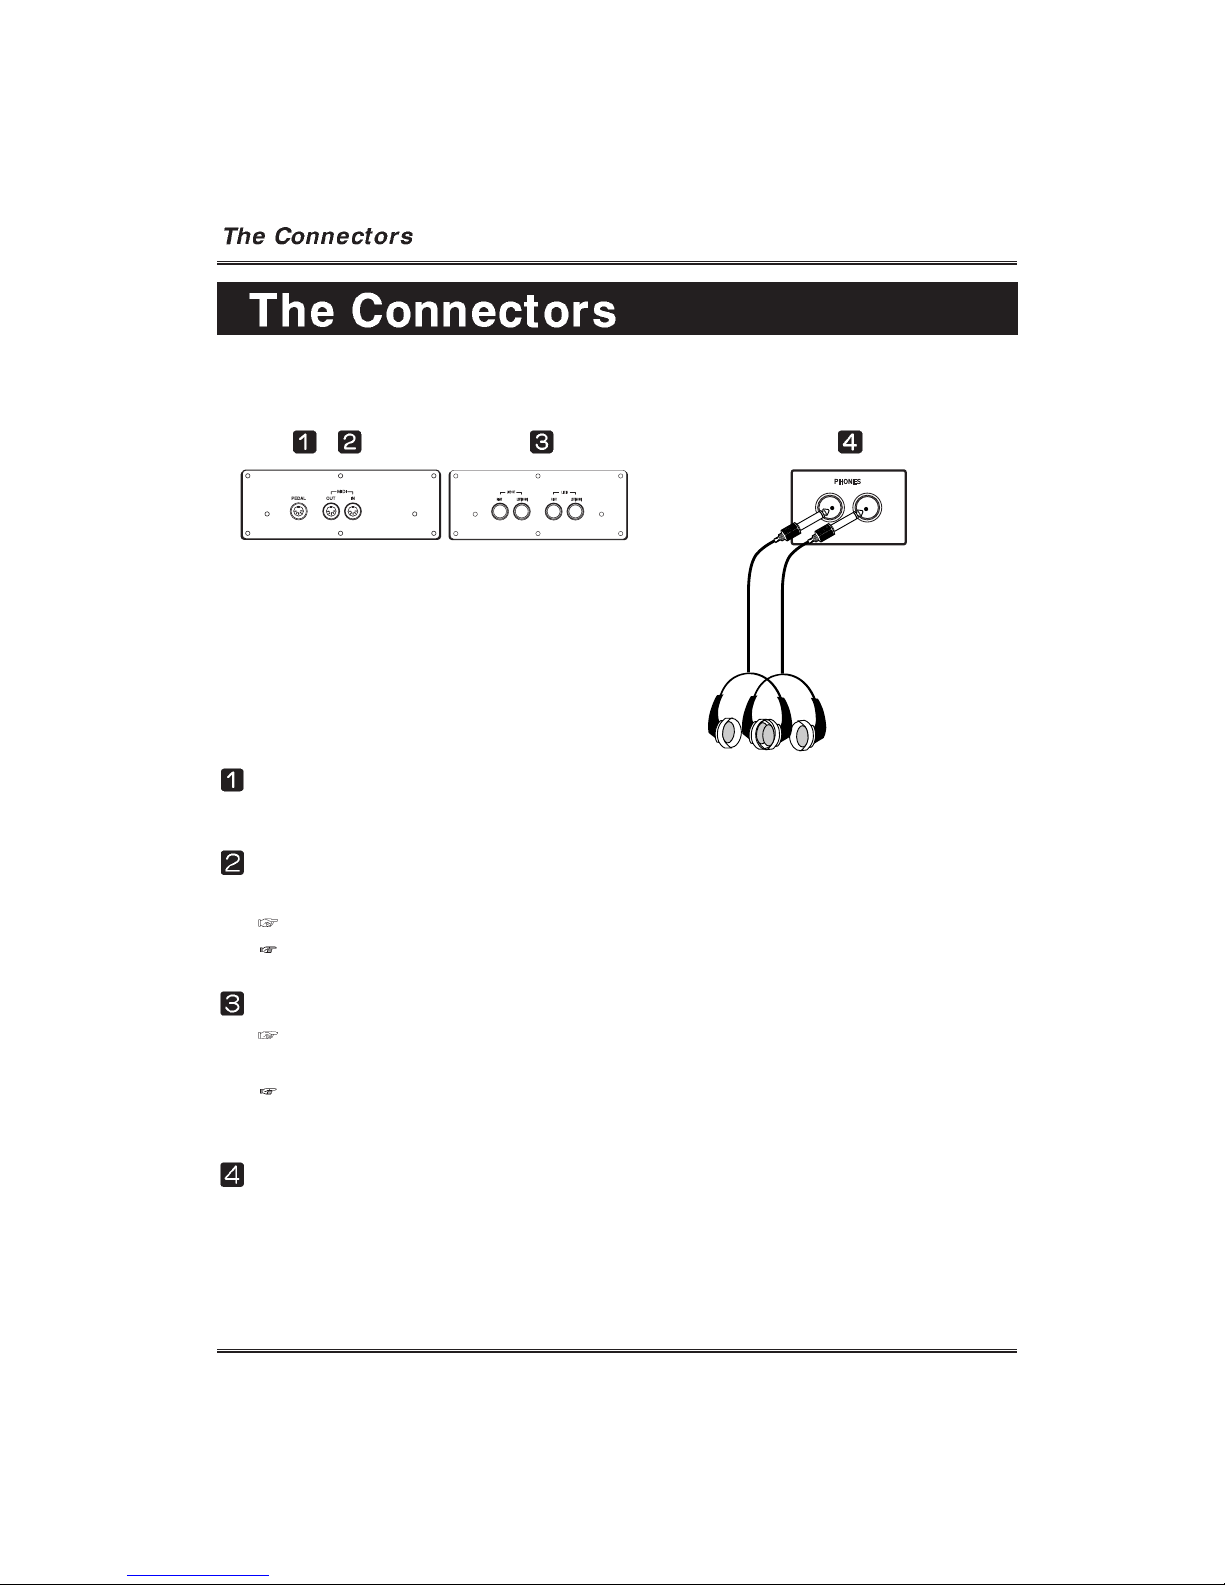
PEDAL Jack
MIDI Terminals
Used to connect other MIDI instruments
MIDI OUT Terminal: Used to transmit data from this instrument to other equipment.
MIDI IN Terminal: Used to receive data from other equipment.
LINE IN/OUT Terminals
LINE OUT Terminal: By connecting audio cable to the jack, output the sound of
the piano to a stereo system, amplifier, mixing console, or recording equipment.
LINE IN Terminal: the sound of other instruments or tone generator modules can be
output through the speaker system of the piano by connecting audio cable to the jack.
PHONES Jacks
To use headphones, connect them to one of the PHONE Jacks (Standard 1/4” Phone
Jack). Internal speaker system of the piano is automatically shut off when a pair of
headphones are connected. Two people can enjoy the sound together by connecting two
pairs of headphones to the two available terminals.
Page 36
35
GM # DISPLAY VOICE GM # DISPLAY
VOICE
Page 37
36
Prog 1: Prog 9: Prog 17: Prog 25: Prog 26
S ROOM SET(7 - 2) POWER SET (7 - 3) ELEC SET (7- 4) TR808 (7 - 5)
27 - D#1 High Q
28 - E1 Slap
29 - F1 Scratch Push
30 - F#1 Scratch Pull
31 - G1 Sticks
32 - G#1 Square Click
33 - A1 Metronome Click
34 - A#1 Metronome Bell
35 - B1 HQ STD1 Kick2 Power Kick2 Elec Kick2
36 - C2 HQ STD1 Kick1 Power Kick1 Elec Kick1 808 Base Drum
37 - C#2 Side Stick 808 Rim Shot
38 - D2 HQ Low Floor Tom Gated Snare Elec SD 808 Snare Drum
39 - D#2 Hand Clap
40 - E2 Snare Drum 2 Power Snare1 Elec Snare1
41 - F2 HQ Low Floor Tom Room Low Tom2 Power Low Tom2 Elec Low Tom2 808 Low Tom 2
42 - F#2 Closed Hi Hat [EXC1] 808 CHH[EXC1]
43 - G2 HQ High Floor Tom Room Low Tom1 Power Low Tom1 Elec Low Tom1 808 Low Tom 1
44 - G#2 Pedal Hi-Hat [EXC1] 808 CHH[EXC1]
45 - A2 HQ Low Tom Room Mid Tom2 Power Mid Tom2 Elec Mid Tom2 808 Mid Tom 2
46 - A#2 Open Hi-Hat [EXC1] 808 OHH[EXC1]
47 - B2 HQ Low-Mid Tom Room Mid Tom1 Power Mid Tom1 Elec Mid Tom1 808 Mid Tom 1
48 - C3 HQ Hi Mid Tom Room Hi Tom2 Power Hi Tom2 Elec Hi Tom2 808 Hi Tom 2
49 - C#3 Crash Cymbal 1 808 Cymbal
50 - D3 HQ High Tom Room Hi Tom1 Power Hi Tom1 Elec Hi Tom1 808 Hi Tom 1
51 - D#3 Ride Cymbal 1
52 - E3 Chinese Cymbal Reverse Cymbal
53 - F3 Ride Bell
54 - F#3 Tambourine
55 - G3 Splash Cymbal
56 - G#3 Cowbell 808 Cowbell
57 - A3 Crash Cymbal2
58 - A#3 Vibraslap
59 - B3 Ride Cymbal2
60 - C4 Hi Bongo
61 - C#4 Low Bongo
62 - D4 Mute Hi Conga 808 High Conga
63 - D#4 Open Hi Conga 808 Mid Conga
64 - E4 Low Conga 808 Low Conga
65 - F4 High Timbale
66 - F#4 Low Timbale
67 - G4 High Agogo
68 - G#4 Low Agogo
69 - A4 Cabasa
70 - A#4 Maracas
71 - B4 Short Whistle[EXC2]
72 - C5 Long Whistle[EXC2]
73 - C#5 Short Guiro[EXC3]
74 - D5 Long Guiro[EXC3]
75 - D#5 Claves
76 - E5 Hi Wood Block
77 - F5 Low Wood Block
78 - F#5 Mute Cuica[EXC4]
79 - G5 Open Cuica[EXC4]
80 - G#5 Mute Triangle[EXC5]
81 - A5 Open Triangle[EXC5]
82 - A#5 Shaker
83 - B5 Jingle Bell
84 - C6 Belltree
85 - C#6 Castanets
86 - D6 Mute Surdo[EXC6]
87 - D#6 Open Surdo[EXC6]
88 - E6
Page 38
37
Prog 33: Prog 41: Prog 49: Prog 58: Prog 59:
JAZZ SET (7 - 6) BRUSH ORCHESTRA SFX (7 - 7) SFX (7 - 8)
27 - D#1 Closed Hi Hat Slap
28 - E1 Pedal Hi-Hat Conga
29 - F1 Open Hi Hat Short Whistle
30 - F#1 Ride Cymbal Long Whistle
31 - G1 Cymbal
32 - G#1 Short Guiro
33 - A1 Triangle
34 - A#1 Long Guiro
35 - B1 Jazz BD2 Jazz BD2 Concert BD 2 Shaker
36 - C2 Jazz BD1 Jazz BD1 Concert BD1 Open Cuica
37 - C#2 Cuica
38 - D2 Brush Tap Concert SD * Jingle
39 - D#2 Brush Slap High Q Bell Belltree
40 - E2 Brush Swirl Concert SD Slap Korean Cymbal 1
41 - F2 Timpani F Scratch Push ONE
42 - F#2 Timpani F# Scratch Pull TWO
43 - G2 Timpani G Sticks Bad Sound 1
44 - G#2 Timpani G# Square Click THREE
45 - A2 Timpani A Metronome Click Bad Sound 2
46 - A#2 Timpani A# Metronome Bell FOUR
47 - B2 Timpani B Guitar Slide Gun Shot
48 - C3 Timpani c Gt Cut Noise (down) FIVE
49 - C#3 Timpani c# Gt Cut Noise (up) SIX
50 - D3 Timpani d Double Bass Slap Korean Drum 1
51 - D#3 Timpani d# Key Click SEVEN
52 - E3 Timpani e Laughing Korean Drum 2
53 - F3 Timpani f Screaming EIGHT
54 - F#3 Punch NINE
55 - G3 Heart Beat Korean Drum 3
56 - G#3 Footsteps1 TEN
57 - A3 Concert Cymbal2 Footsteps2 Korean Drum 4
58 - A#3 Applause Rocket
59 - B3 Concert Cymbal1 Door Creaking Korean Drum 5
60 - C4 Door Closing Chirping
61 - C#4 Scratch Birds 1
62 - D4 Wind Chime Cuckoo
63 - D#4 Car Engine Start Cock
64 - E4 Car Breaking Birds 2
65 - F4 Car Pass Duck
66 - F#4 Car Crash Dog
67 - G4 Police Siren Splashing
68 - G#4 Train Pig
69 - A4 Jet Take-off Comic Sound
70 - A#4 Helicopter Cat
71 - B4 Starship Children
72 - C5 Gun Shot Goat
73 - C#5 Machinegun Cow
74 - D5 Lasergun Korean Cymbal 2
75 - D#5 Explosion wolf
76 - E5 Dog Korean Cymbal 3
77 - F5 Horse Gallop Horse
78 - F#5 Birds Frog
79 - G5 Rain Sprite
80 - G#5 Thunder Bear
81 - A5 Wind Knocking
82 - A#5 Sea Shore Tiger
83 - B5 Stream Space Sound
84 - C6 Bubble Elephant
85 - C#6 Car
86 - D6 Korean Drum 6
87 - D#6 Telephone
88 - E6 Applauses Korean Drum 7
Page 39
38
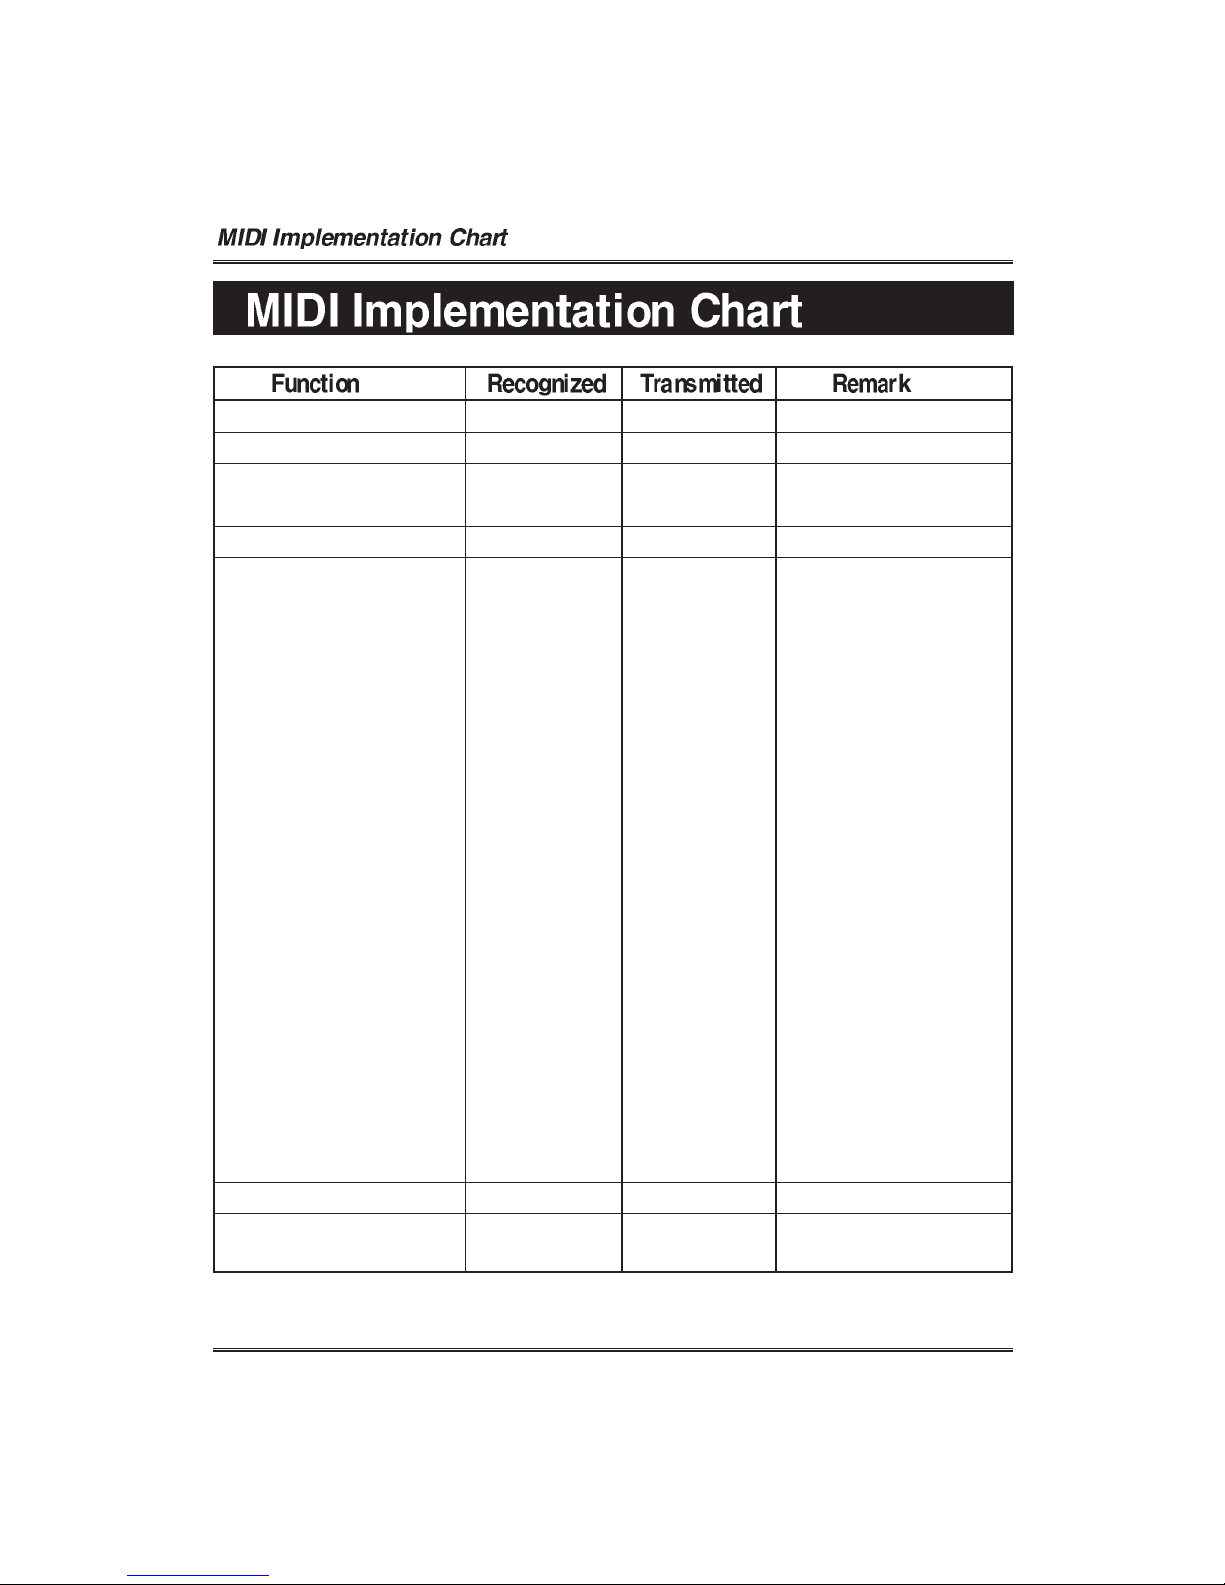
Basic Channel Default ALL 1 - 3
Mode Default OMNI OFF, POLY OMNI OFF, POLY
Note ON/OFF 9nH kk vv O O #kk:note ON (0-127)
#vv:velocity (1-127)
Pitch Bender EnH bi bh O X Maximum swing +/- 1 tone
00 BnH 00H cc O X Bank Select
01 BnH 01H cc O X Modulation Wheel
05 BnH 05H cc O X Portamento Time
06 BnH 06H cc O X Data Entry
07 BnH 07H cc O X Volume
10 BnH 0AH cc O X Pan Out
11 BnH 0BH cc O X Expression
64 BnH 40H cc O O Sustain (Damper) Pedal
65 BnH 41H cc O X Portamento ON/OFF
66 BnH 42H cc O O Sostenuto Pedal
Control 67 BnH 43H cc O O Soft Pedal
Change 80 BnH 80H vv O X Reverb Prog.(vv=00H-70H)
81 BnH 51H vv O X Chorus Prog.
91 BnH 5BH vv O X Reverb Send Level
93 BnH 5DH vv O X Chorus Send Level
120 BnH 78H 00H O X All Sound Off
121 BnH 79H 00H O X Reset All Controller
123 BnH 7BH 00H O X All Notes Off
126 BnH 7EH 00H O X Mono On
127 BnH 7FH 00H O X Poly On
Program Change CnH PP O O Sounds/Drum Set List
System Exclusive General MIDI O X
Reset
O : Yes, X : No
Page 40
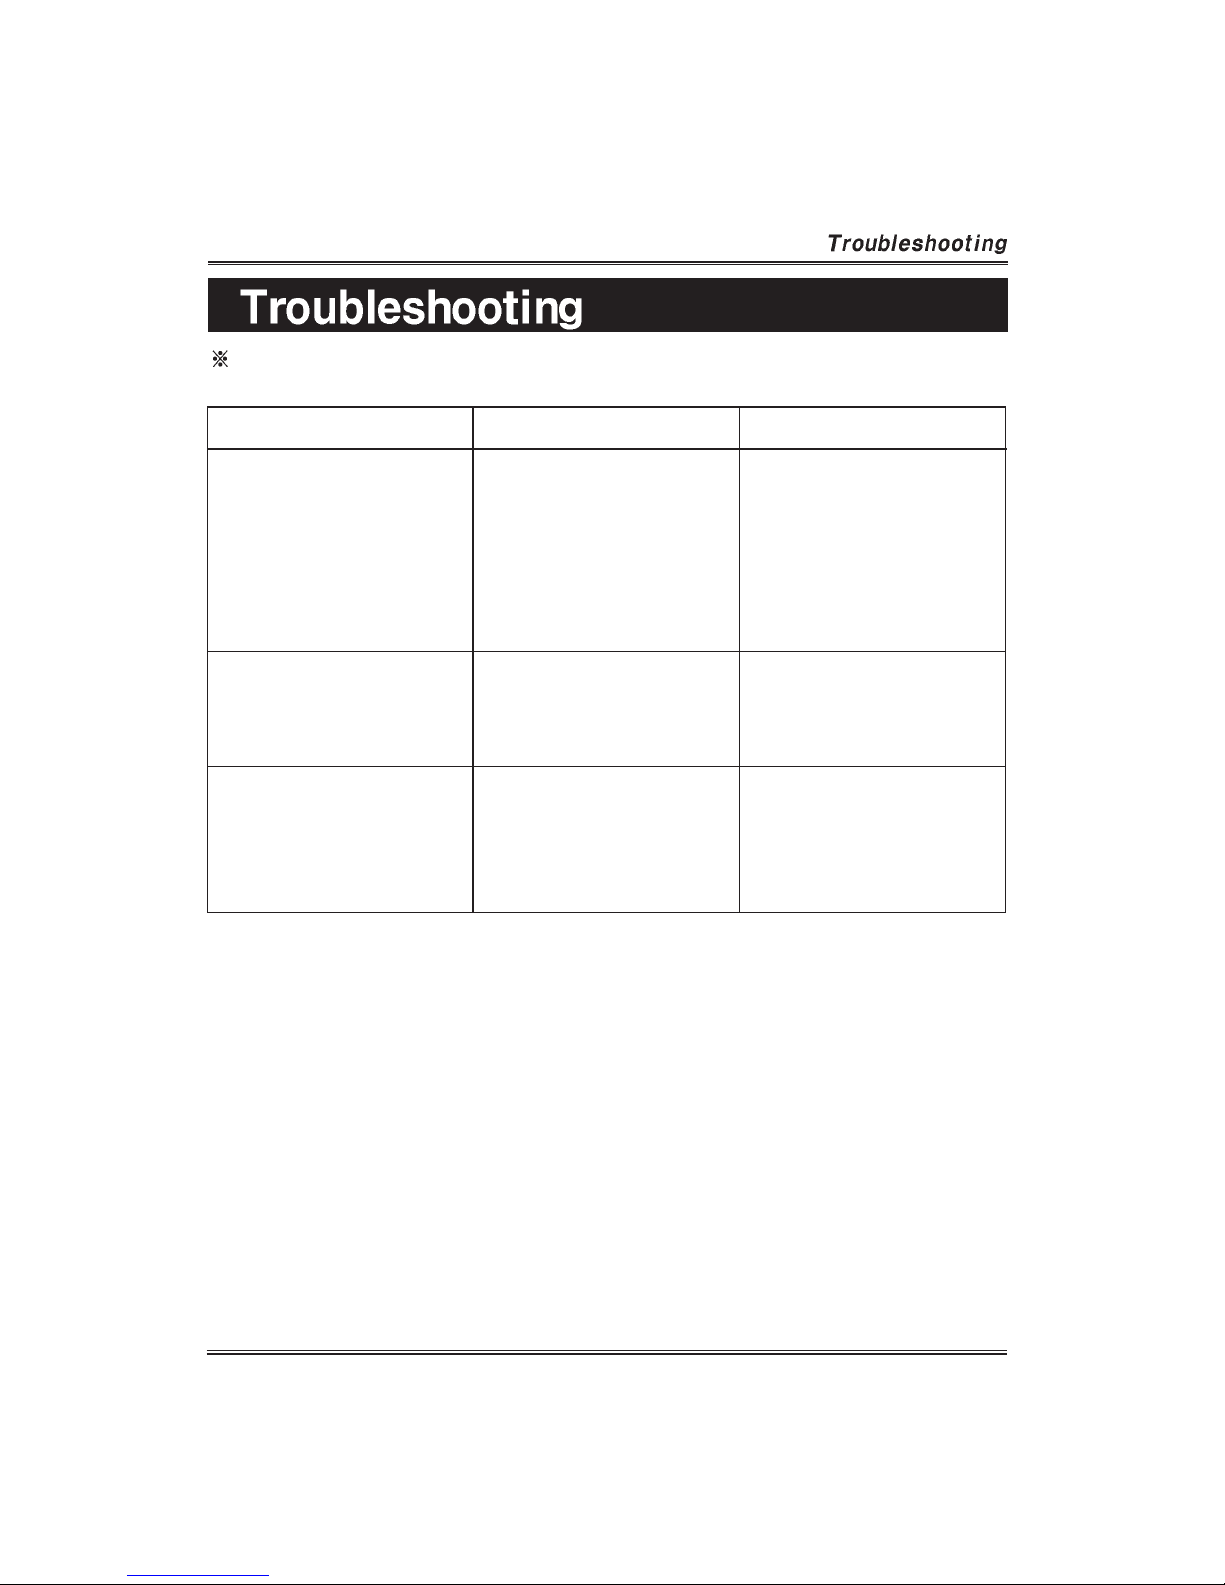
Be sure to check to following table whenever you encounter problems with the DIGITAL
PIANO operation.
PROBLEM CAUSE SOLUTION
No sound
Occasional interference
No sound when connected
to external amplifier.
1. Power supply problem.
2. Volume setting is too low.
3. Headphones are plugged in.
1. Refrigerators, washing
machines and similar
electric appliances are
interfering.
1. Volume setting is too low.
2. Defective connection cord.
1. Check the power cord
whether it’s properly in AC
outlet.
2. Adjust the volume.
3. Unplug the headphones.
1. Use outlet as far away as
possible from appliance
thought to be the cause.
1. Adjust the volume.
2. Replace connection cord.
39
Page 41
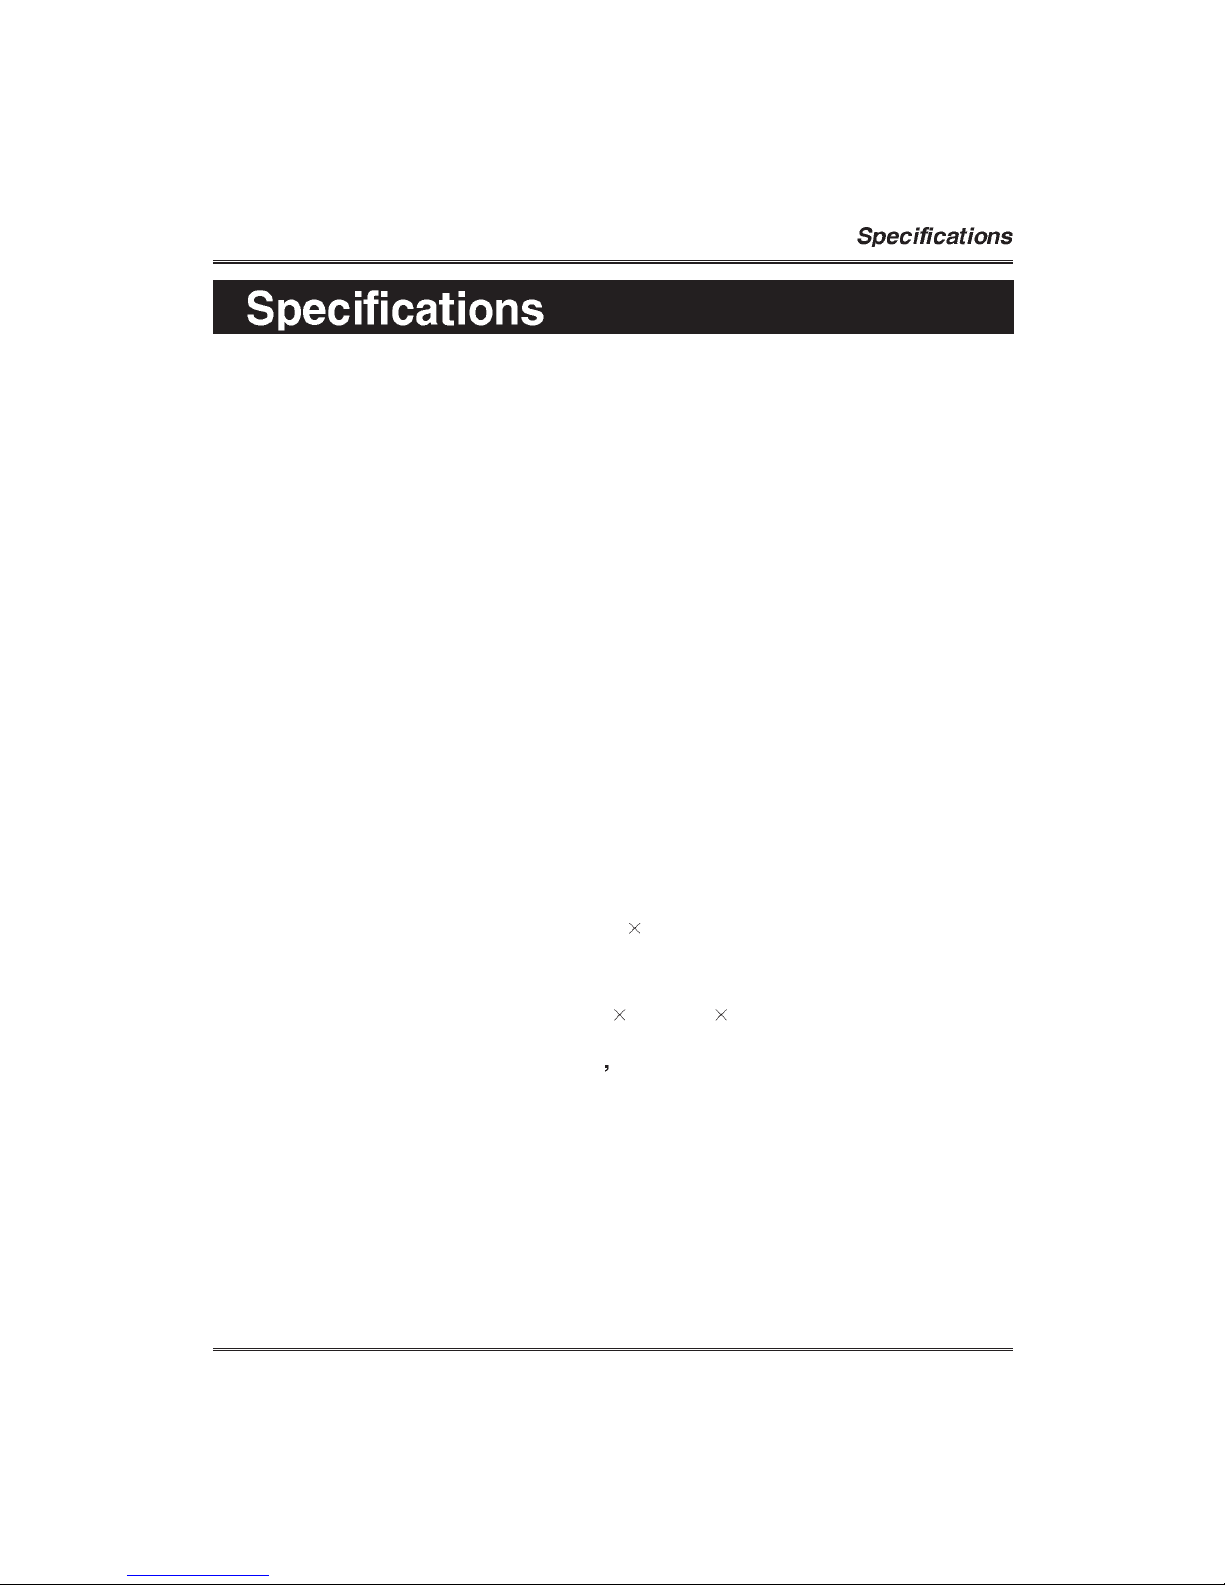
Section Contents
PRODUCT DIGITAL PIANO
KEYBOARD 88 KEYS (STANDARD) - 7 1/4 OCTAVES
TOUCH RESPONSE Off, Hard 1/2/3, Soft 1/2/3, Normal1/2/3
MAX. POLYPHONY 128NOTES
SOUND GM 128 VOICES
6 DRUM KITS, 2 SFX SETS
FUNCTIONS LAYER, SPLIT, TUNE, TRANSPOSE
DSP CHORUS(4), REVERB(4)
METRONOME YES
DISPLAY LED MULTI FUNCTION DISPLAY
DEMO TUNES 12
RECORD REAL-TIME-RECORDING
2 TRACKS
MAX. 4,000NOTES
PEDAL 3PEDALS(DAMPER, SOSTENUTO, SOFT)
VOLUME CONTROLS MAIN
I/O TERMINALS MIDI IN/OUT, STEREO LINE IN/OUT
2 HEADPHONE JACKS
SPEAKER 6 INCHES 2
POWER AC IN
POWER CONSUMPTION 30W
DIMENSIONS (W x D X H) 1385mm 480mm 845 (UPRIGHT TYPE)
WEIGHT 70Kg (UPRIGHT TYPE)
ACCESSORY OWNER S MANUAL
40
 Loading...