

Page 1
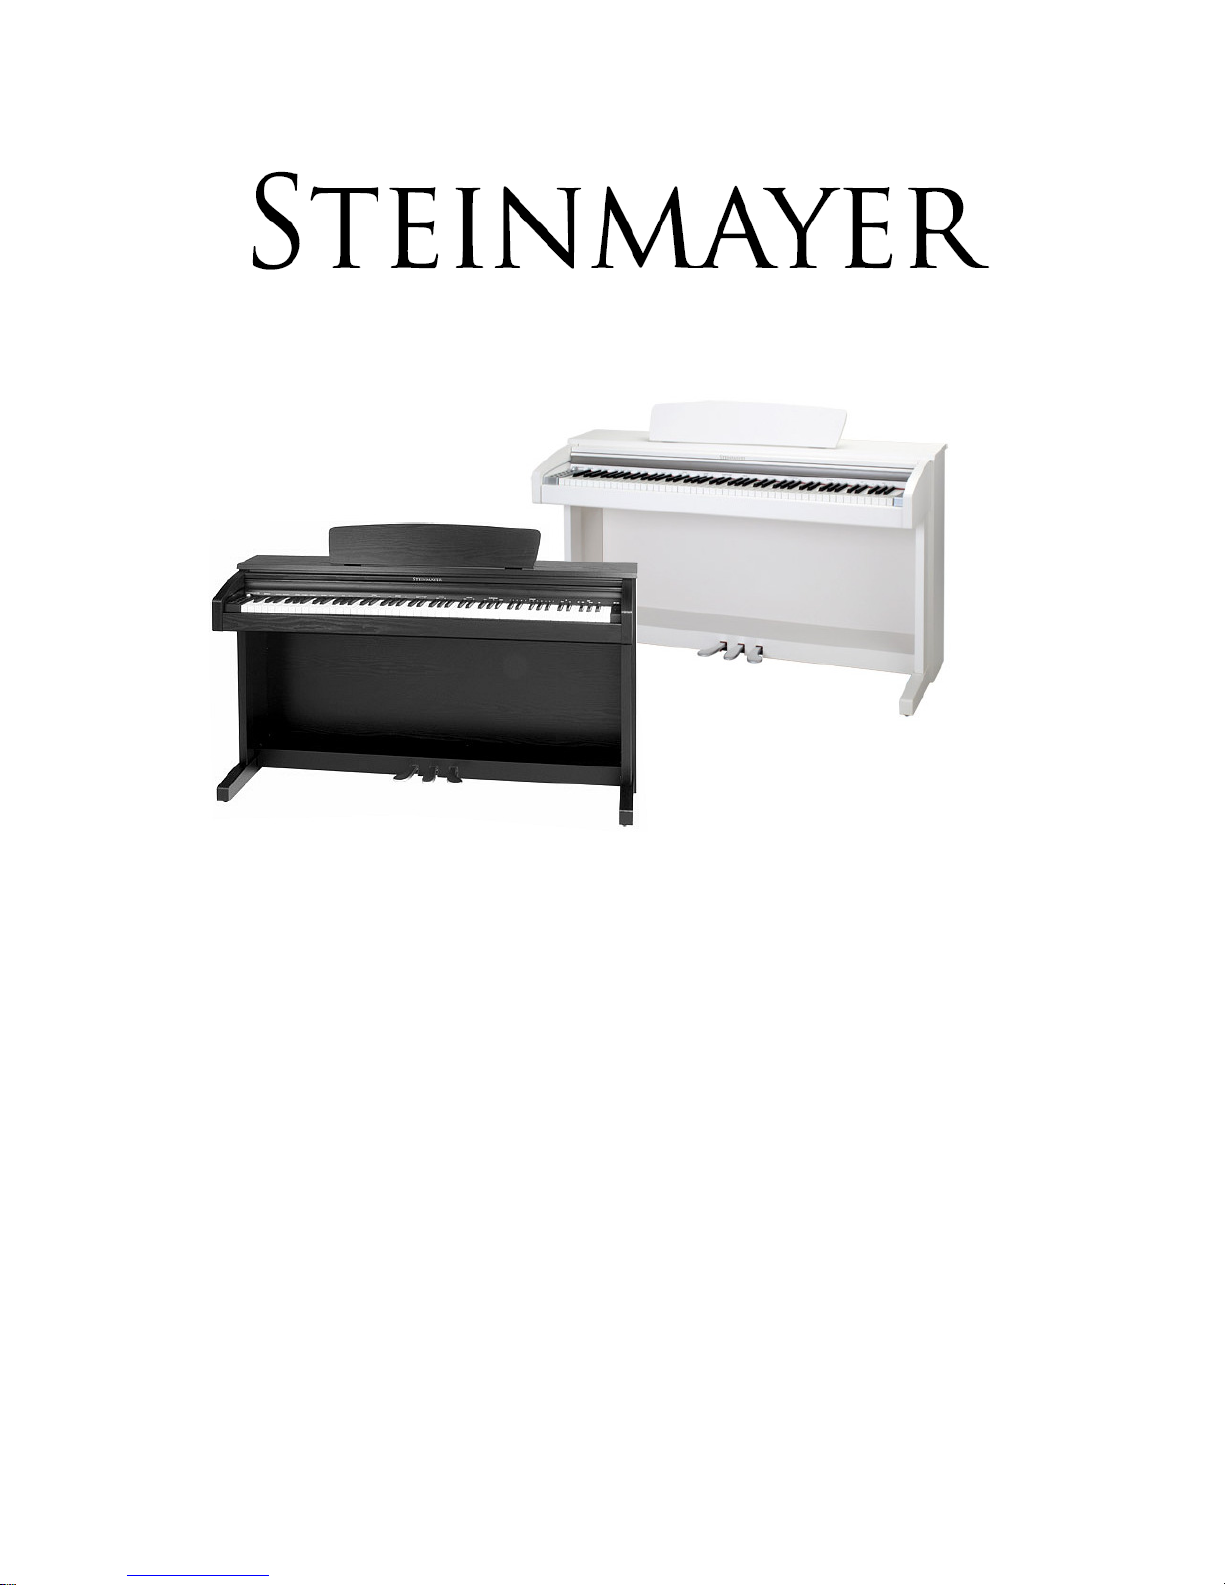
Users manual
DP-220
Digital Piano
00027530/00027531
Version 01/2012
Page 2
CAUTION
1
INSTRUCTIONS PERTAINING TO A RISK OF FIRE,
ELECTRIC SHOCK, OR INJURY TO PERSONS.
Precaution
WARNING : TO REDUCE THE RISK OF FIRE OR ELECTRIC SHOCK, DO NOT
EXPOSE THIS APPLIANCE TO RAIN OR MOISTURE.
RISK OF ELECTRIC
SHOCK
CAUTION TO REDUCE THE RISK OF
ELECTRIC SHOCK
DO NOT REMOVE COVER (OR BACK)
NO USER SERVICEABLE PARTS INSIDE
REFER SERVICING TO QUALIFIED SERVICE
PERSONNEL
This Symbol is intended to alert the user to the presence of
uninsulated dangerous voltage within the product’ s enclosure
that may be of sufficient magnitude to constitute a risk of fire
or electric shock.
This Symbol is intended to alert the user to the presence of
important in the literature accompanying this appliance.
All information should be read carefully to avoid misuse of
product.
WARNING :
DO NOT OPEN THE CABINET.
DANGEROUS HIGH VOLTAGE IS PRESENT, SERVICING SHOULD ONLY
BE PERFORMED BY QUALIFIED PERSONNEL.
CAUTION : TO PREVENT ELECTRIC SHOCK. MATCH WIDE BLADE OF PLUG
TO WIDE SLOT, FULLY INSERT.
ATTENTION :
POUR ÉVITER LES CHOC ÉLECTRIQUES, INTRODUIRE LA LAME LA PLUS
LARGE DE LA FICHE DANS LA BORNE CORRESPONDANTE DE LA PRISE ET
POUSSER JUSQUAU FOND.
Page 3

2
Precaution
IMPORTANT SAFETY INSTRUCTIONS
WARNING - When using electric products, basic precaution should always be followed,
including the following:
1. Read all the instructions before using the product.
2. To reduce the risk of injury, close supervision in necessary when a product is used near
children.
3. Do not use this product near water - for example, near a bathtub, washbowl, kitchen
sink, in a wet basement, or near a swimming by the manufacturer.
4. This product should be used only with a cart or stand that is recommended by the
manufacturer.
5. This product, either alone or in combination with an amplifier and headphones or
speakers, may be capable of producing hearing loss. Do not operate for a long period
of time at a high volume level or at a level that is uncomfortable. If you experience any
hearing loss or ringing in the ears, you should consult an audiologist.
6. The product should be located so that its location or position does not interfere with its
proper ventilation.
7. The product should be located away from heat sources such as radiators, heat registers,
or other products that produce heat.
8. The product should be connected to a power supply only of the type described in the
operating instructions or as marked on the product.
9. This product may be equipped with a polarized line plug (one blade wider than the
other). This is a safety feature. If you are unable to insert the plug into the outlet,
contact an electrician to replace your obsolete outlet. Do not defeat the safety purpose
of the plug.
10. The power-supply cord of the product should be unplugged from the outlet when left
unused for a long period of time.
11. Care should be taken so that objects do not fall and liquids are not spilled into the
enclosure through openings.
12. The product should be serviced by qualified service personnel when:
A. The power-supply cord or the plug has been damaged; or
B. Objects have fallen, or liquid has been spilled into the product; or
C. The product has been exposed to rain; or
D. The product does not appear to operate normally or exhibits a marked change
in performance; or
E. The product has been dropped, or the enclosure damaged.
Page 4

3
Precaution
13. Do not attempt to service the product beyond that described in the user maintenance
instruction. All other servicing should be referred to qualified service personnel.
14. To clean the exterior surfaces, wipe lightly with a clean, dry cloth. Never use solvents
such as benzine or paint thinners.
15. The product should be located away from a television, radio, or heavy equipment that can
generate electromagnetic fields.
16. The product should be located a flat, stable surface that can free of vibration.
17. Be careful to protect the product from knocks, particularly when carrying it.
18. During thunderstorms, turn the product off and disconnect the plug from the power outlet.
INFORMATION TO THE USER
This equipment has been tested and found to comply with the limits for a class B digital
device, pursuant to part 15 of the FCC Rules. These limits are designed to provide reasonable
protection against harmful interference in a residential installation. This equipment generates,
uses and can radiate radio frequency energy and, if not installed and used in accordance with
the instructions,may cause harmful interference will not occur in a particular installation. If this
equipment does cause harmful interference to radio or television reception, which can be
determined by turning the equipment off and on, the user is encouraged to try to correct the
interference by one more of the following measures :
- Reorient or relocate the receiving antenna.
- Increase the separation between the equipment and receiver.
- Connect the equipment into an outlet on a circuit different from that to which the receiver
is connected.
- Consult the dealer or an experienced radio/TV technician for help.
WARNING
Changes or modifications not expressly approved by the manufacturer could void the user ’ s
authority to operate the equipment
.
Page 5

4
Welcome
Thank you and congratulations on your purchase of the SLIM DIGITAL PIANO.
Your new SLIM DIGITAL PIANO is a state-of-the-art musical instrument which incorporates
the latest electronics technology to make its operation as easy as possible.
Your versatile DIGITAL PIANO is ideal for beginners or experienced musicians.
In order to enjoy the features and functions of this unit to their fullest, be sure to carefully
read this manual and follow the instructions contained herein.
Welcome
Page 6

Precaution
Welcome
Contents
Care of Your Digital Piano
Unpacking (SLP-100/SLP-200/SLP-300)
Setting Up Your Piano (SLP-100/SLP-200/SLP-300)
External Appearance
Panel Controls and Terminals
Adjusting the Volume
Using Pedals
Selecting Voice
Layer
Split
3D (Spatial Effect)
Twin Piano
Reverb
Effect
Tune
Transpose
Touch
Using Metronome
Recording
MIDI & USB MIDI
MIDI Implementation Chart
GM Voice & Drum Table
Troubleshooting
Specifications
5
Contents
목Contents
1
4
5
6
7/11/15
8/12/16
19
20
22
23
24
26
27
28
29
30
31
32
33
34
35
36
37
38
39
42
43
Page 7
●
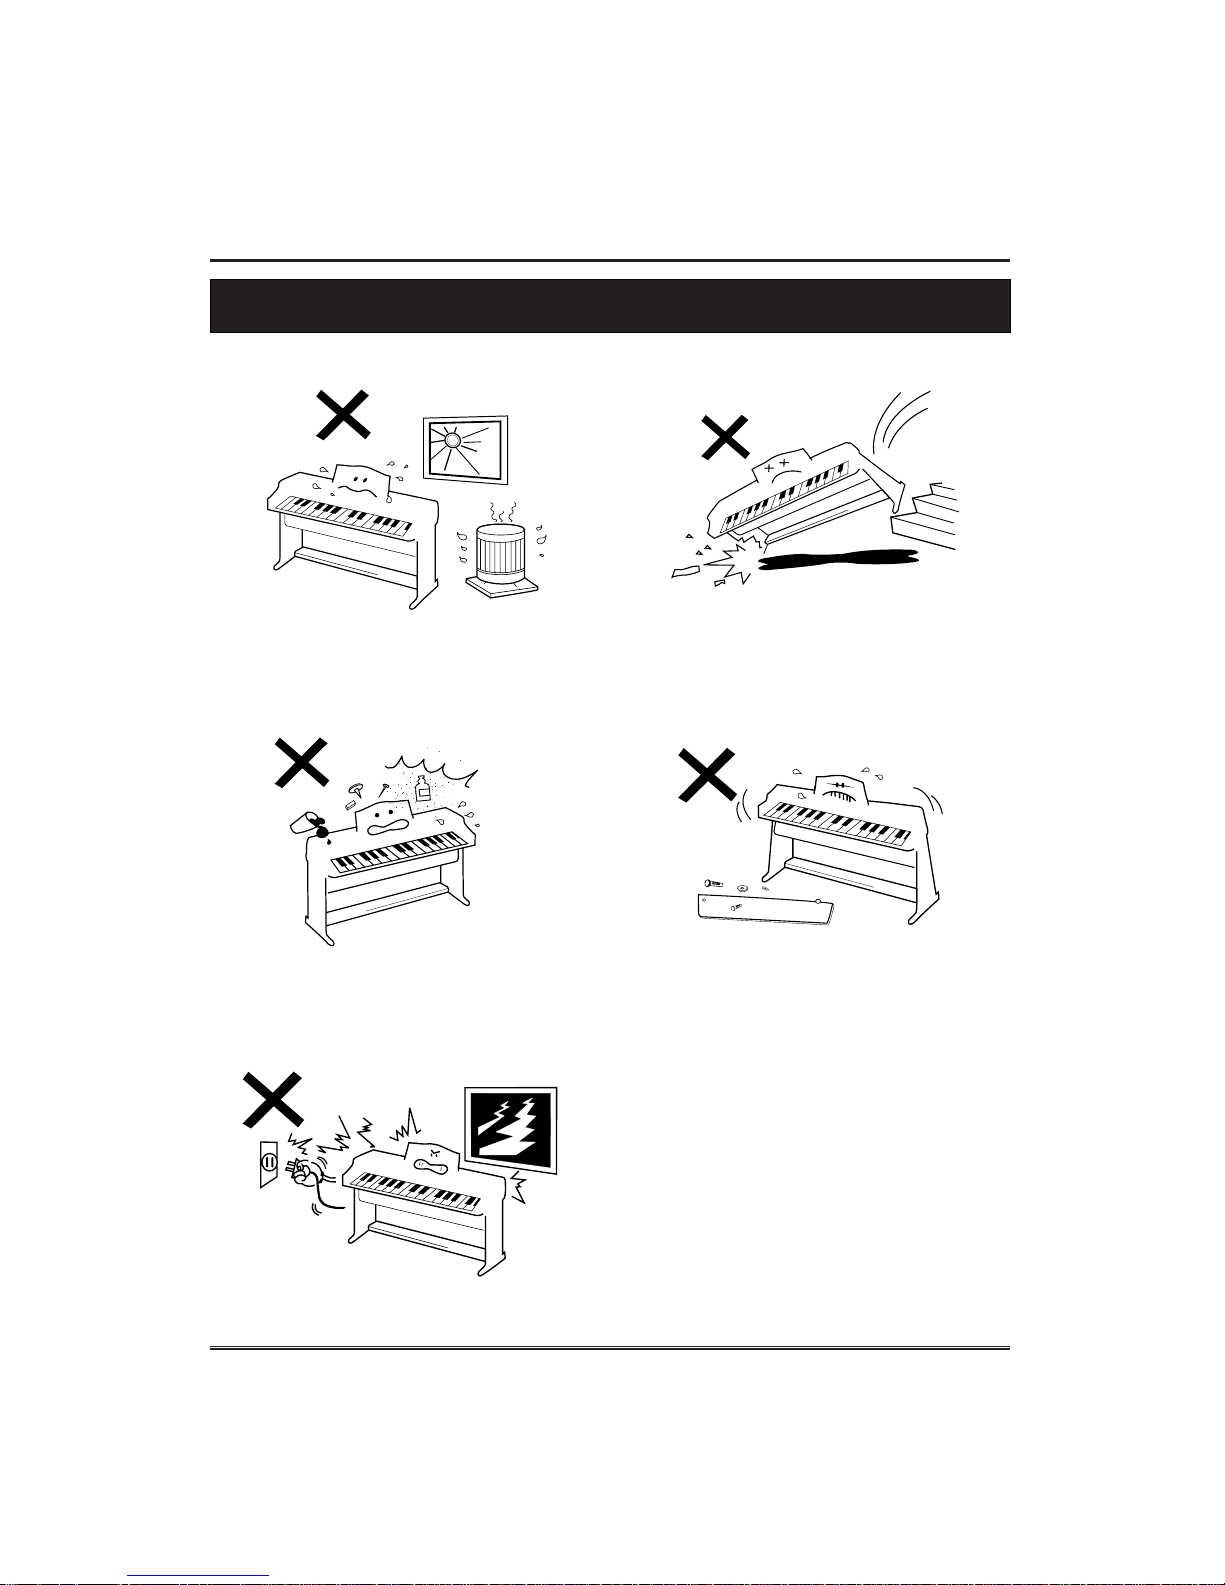
Avoid heat, humidity or direct sunlight.
●
Keep the unit free from liquids, dust, etc...
● During thunderstorms, turn the product off
and disconnect the plug from the power.
●
Take care not to drop the unit and avoid
strong impact.
●
Never attempt to modify any parts of the
unit.
6
Care of your Digital Piano
Care of your Digital Piano
Page 8
7
Unpacking (SLP-100)
Unpacking (SLP-100)
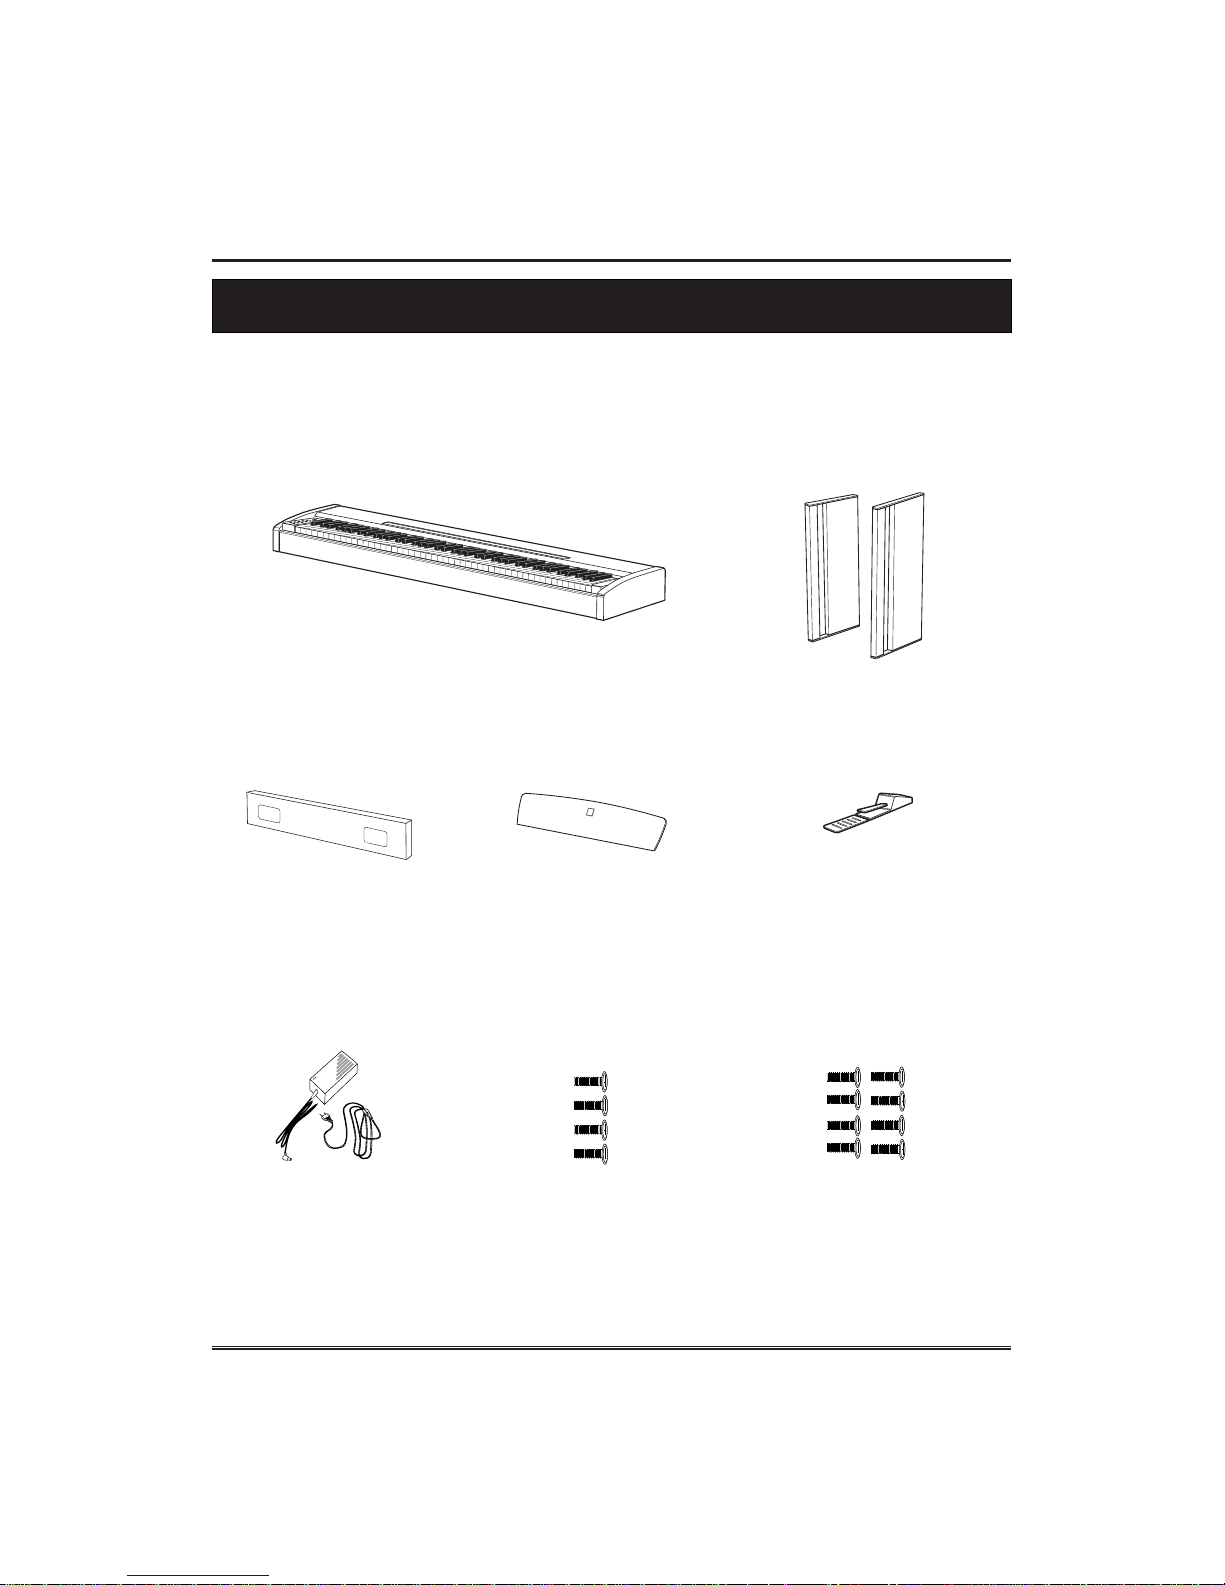
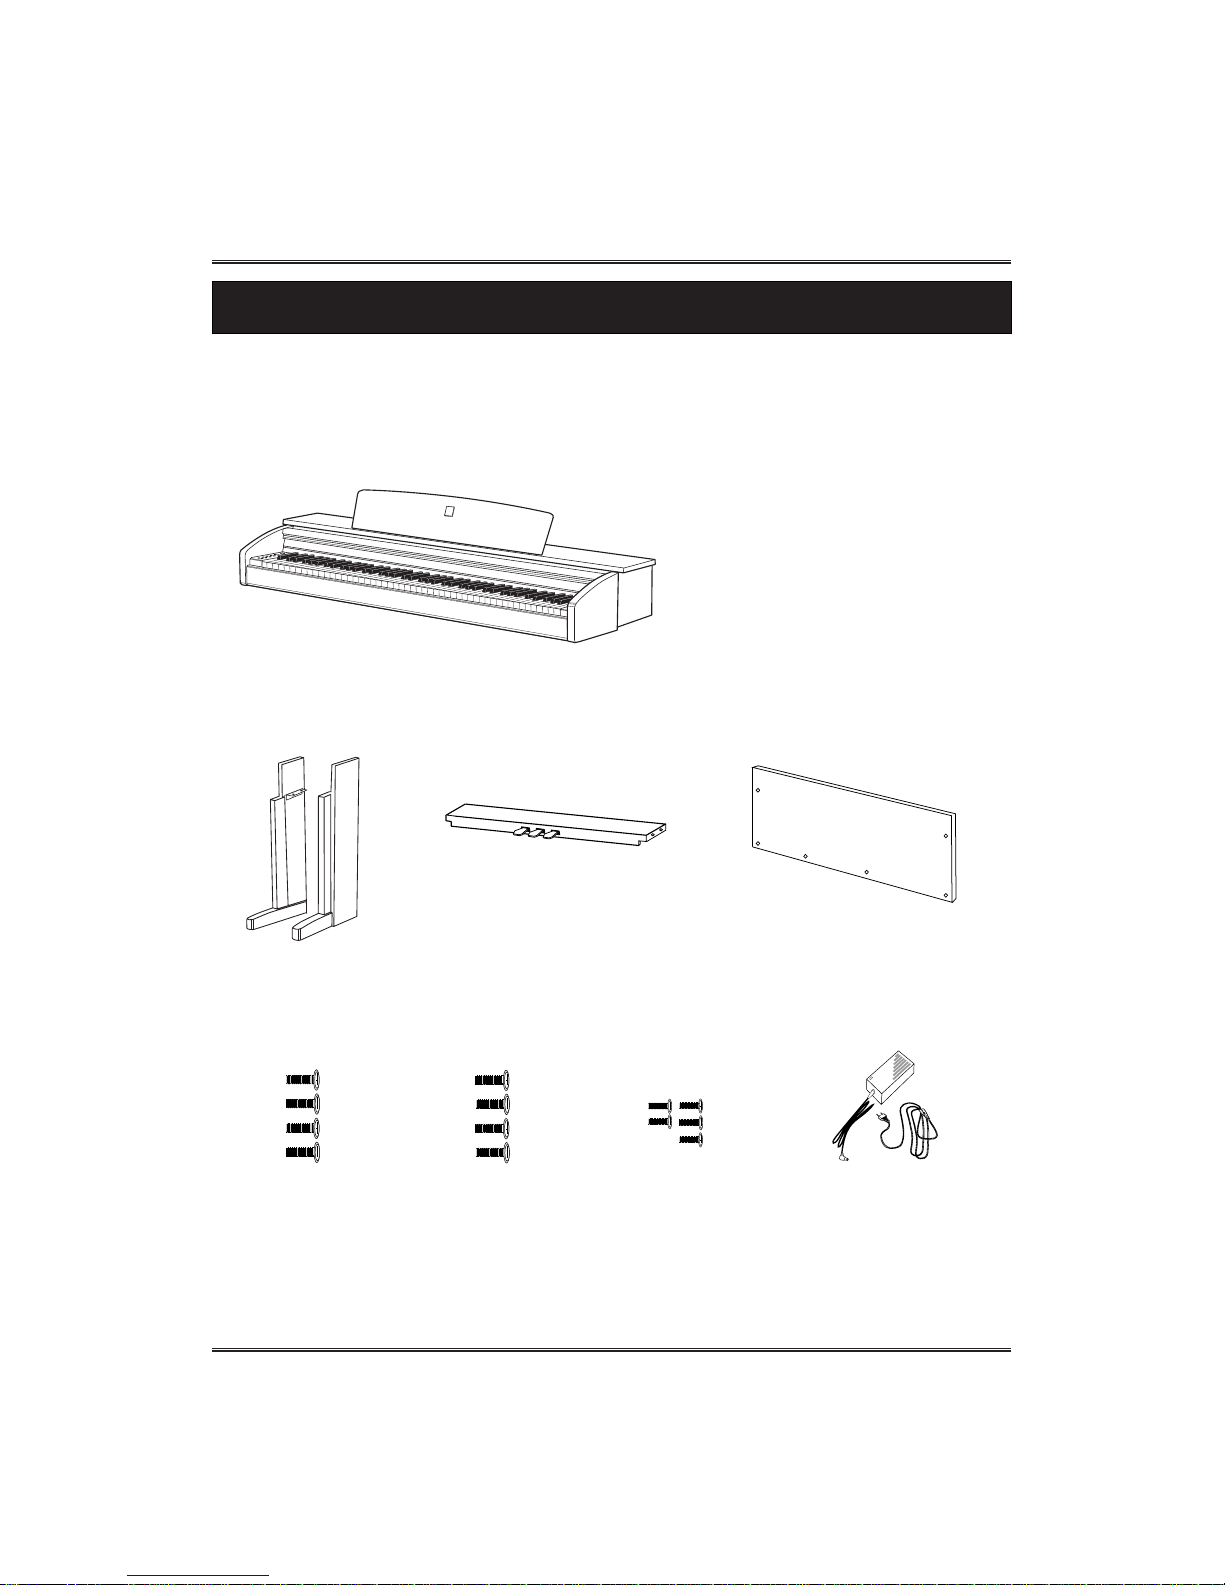
Carefully remove the Digital Piano and its accessories from the packing box. The Digital
Piano set consists of the following items.
Four Bolts
for Main Unit (g)
(M6x15)mm, Black
AC Power Adapter (f) Eight Bolts
for Speaker Box (h)
(M6x25)mm, Gold
Pedal(e)
Right, Left Legs (a, b)
Speaker Box (c)
☞
Inspect each item carefully to make sure that it is in good condition. If you find any item
missing or damaged, contact the place of purchase immediately for replacement.
Main Unit
Music Desk (d)
Page 9
8
Setting Up Your Piano (SLP-100)
Setting Up Your Piano (SLP-100)
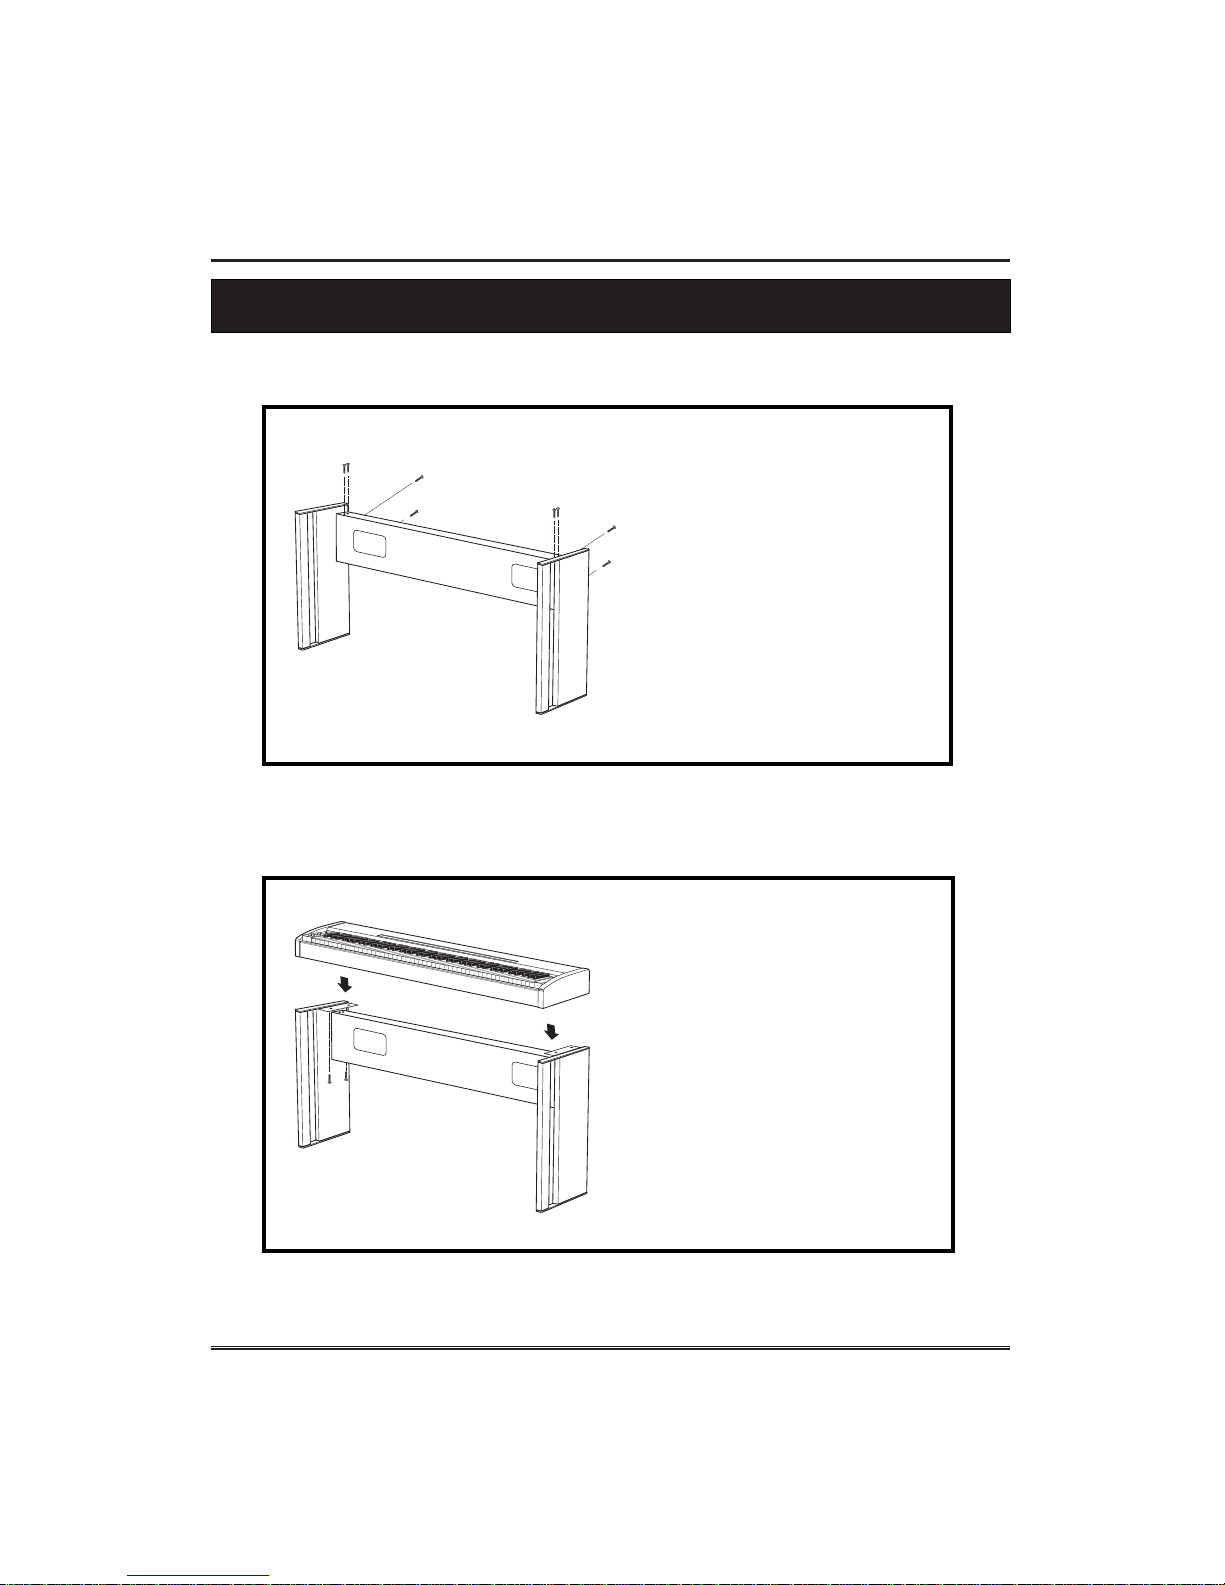
1. Attaching the both legs and speaker box assembly
2. Attaching the main unit and stand
Securely combine both
Legs(a,b) and Speaker Box(c)
assembly using Eight Bolts (h).
Set the stand upright and gently
lower the Main Unit on the stand,
then tighten the main unit with
four Bolts (g) for main unit as
shown in illustration.
Page 10
9
Setting Up Your Piano (SLP-100)
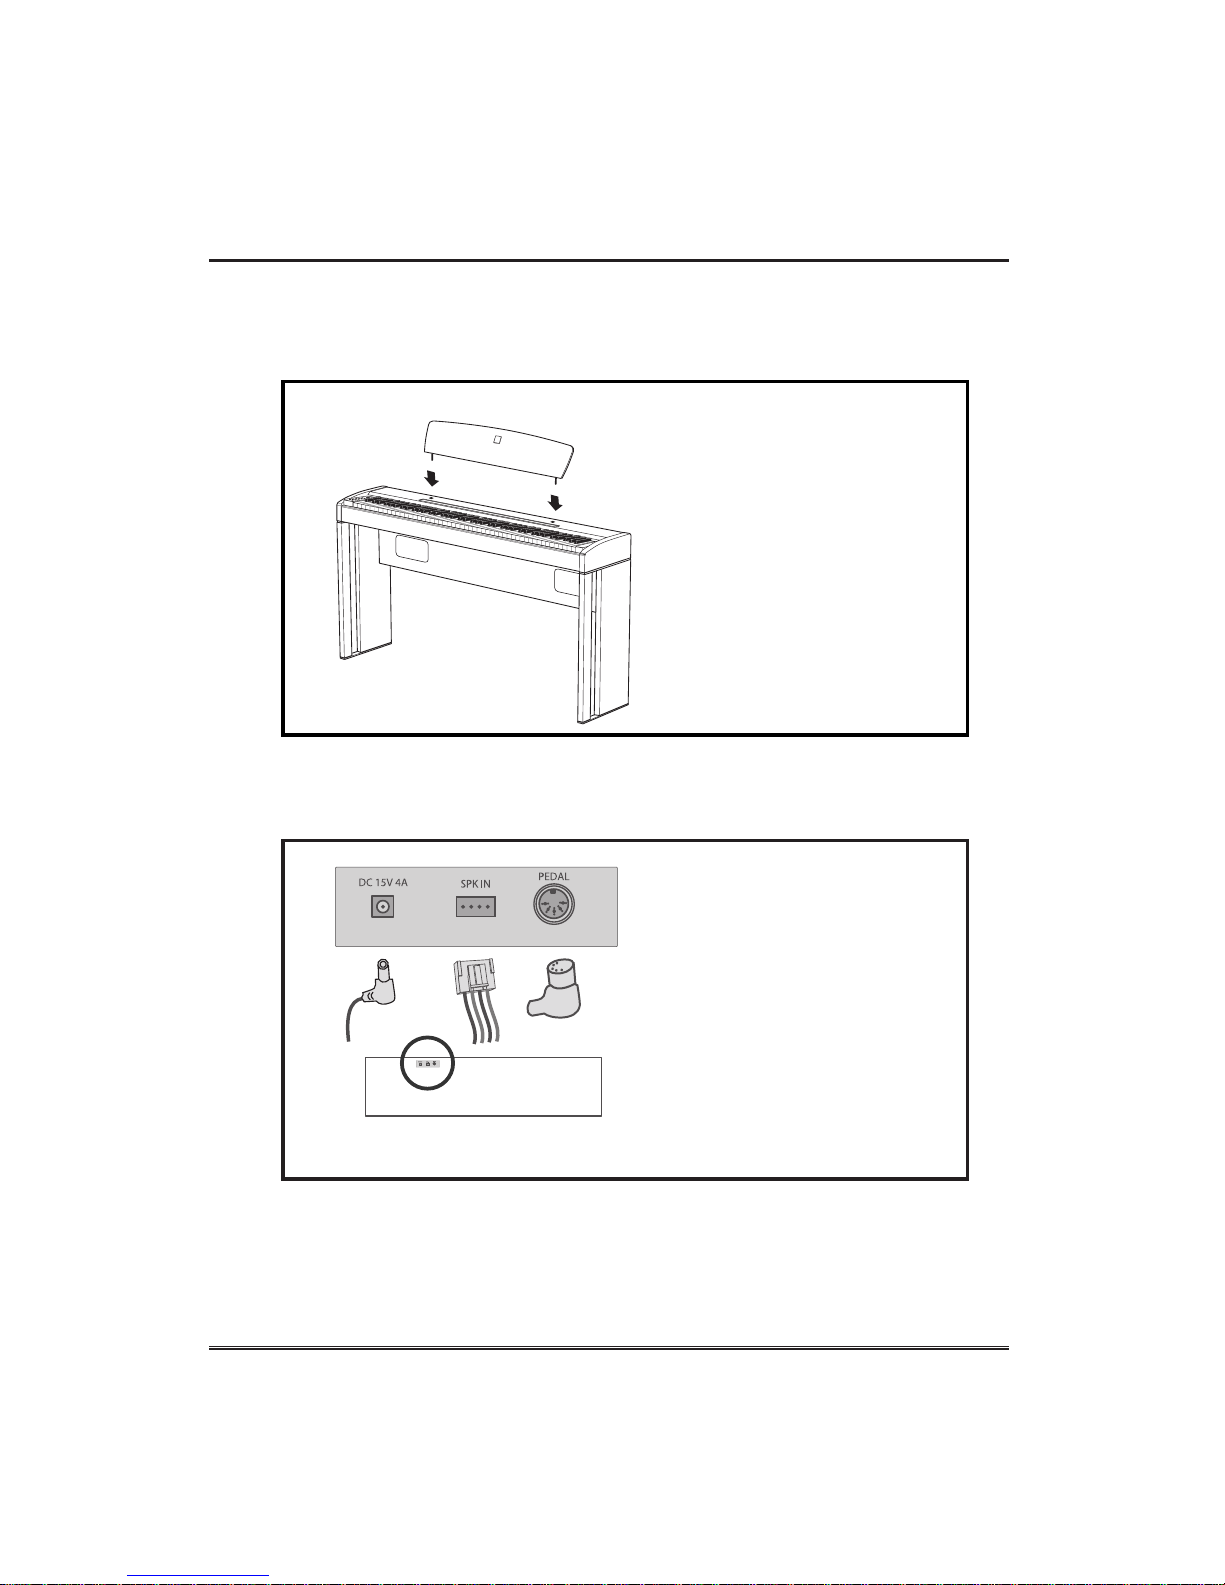
3. Attaching the music desk on the main unit
4. Connecting the pedal, speaker and AC adapter with main unit
Attach the Music Desk (d) on the
Main Unit as shown in illustration.
Plug Pedal Cord, AC AC adapter and
Speaker Cord into the corresponding
ports on the bottom of the main
unit as shown in illustration.
MAIN UNIT BOTTOM
Page 11
10
Setting Up Your Piano (SLP-100)
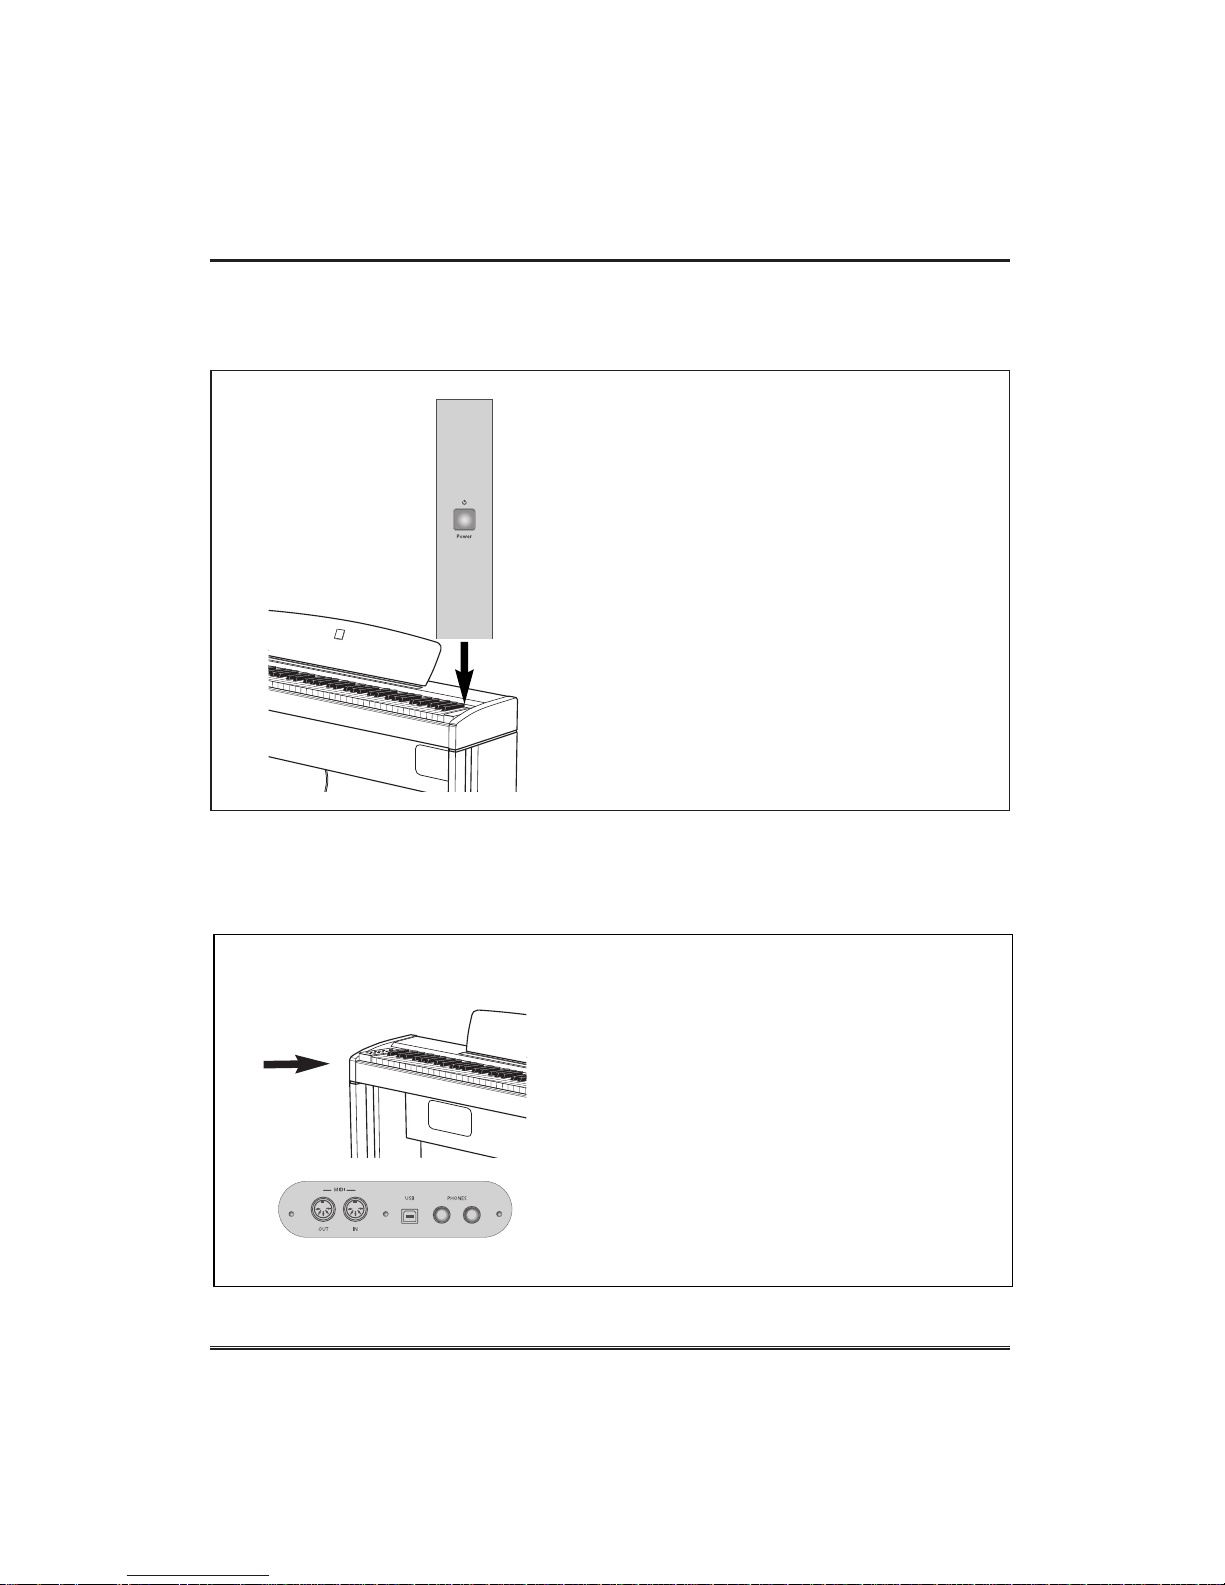
Turning on the Power
① Connect the AC POWER ADAPTER. Insert DC
plug at the end of DC cord of the AC adapter into
the piano and AC plug at end of AC cord of the
AC adapter into a standard AC outlet.
☞ See 'Connecting the pedal, speaker and AC adapter with
main unit' on page 9.
② Press POWER switch. The power is turned on
and the initial display appears in the Multi
Function Display. The voice of Grand Piano is
selected automatically at first.
☞ Adjust the volume by using MASTER VOLUME.
Press POWER switch again when turning off the
power. All lamps and LED display will turn off.
Headphones
Connect a set of stereo headphones(optional) to
PHONES jack.
Insert plug of the headphone into the PHONES
jack on the bottom panel of the piano.
When headphones are connected, the internal
speaker system is automatically shut off.
Since the piano has two PHONES jacks, two sets
of headphones can be used simultaneously, allow
two people to enjoy listening to the performance.
Page 12
11
Unpacking (SLP-200)
Unpacking (SLP-200)
Carefully remove the Digital Piano and its accessories from the packing box. The
Digital Piano set consists of the following items.
[BOX 1] BODY
Main Unit
[BOX2] STAND
Right, Left Legs (a, b) Pedal Box (c) Rear Plate (d)
☞
Inspect each item carefully to make sure that it is in good condition. If you find any item
missing or damaged, contact the place of purchase immediately for replacement.
Four Bolts for Main
Unit (g) (M6x15)mm,
Black
Four Bolts
for Pedal Box (f)
(PT6x25)mm, Gold
Five Bolts
for Rear Plate (h)
(4x22)mm
AC Power Adapter
Page 13
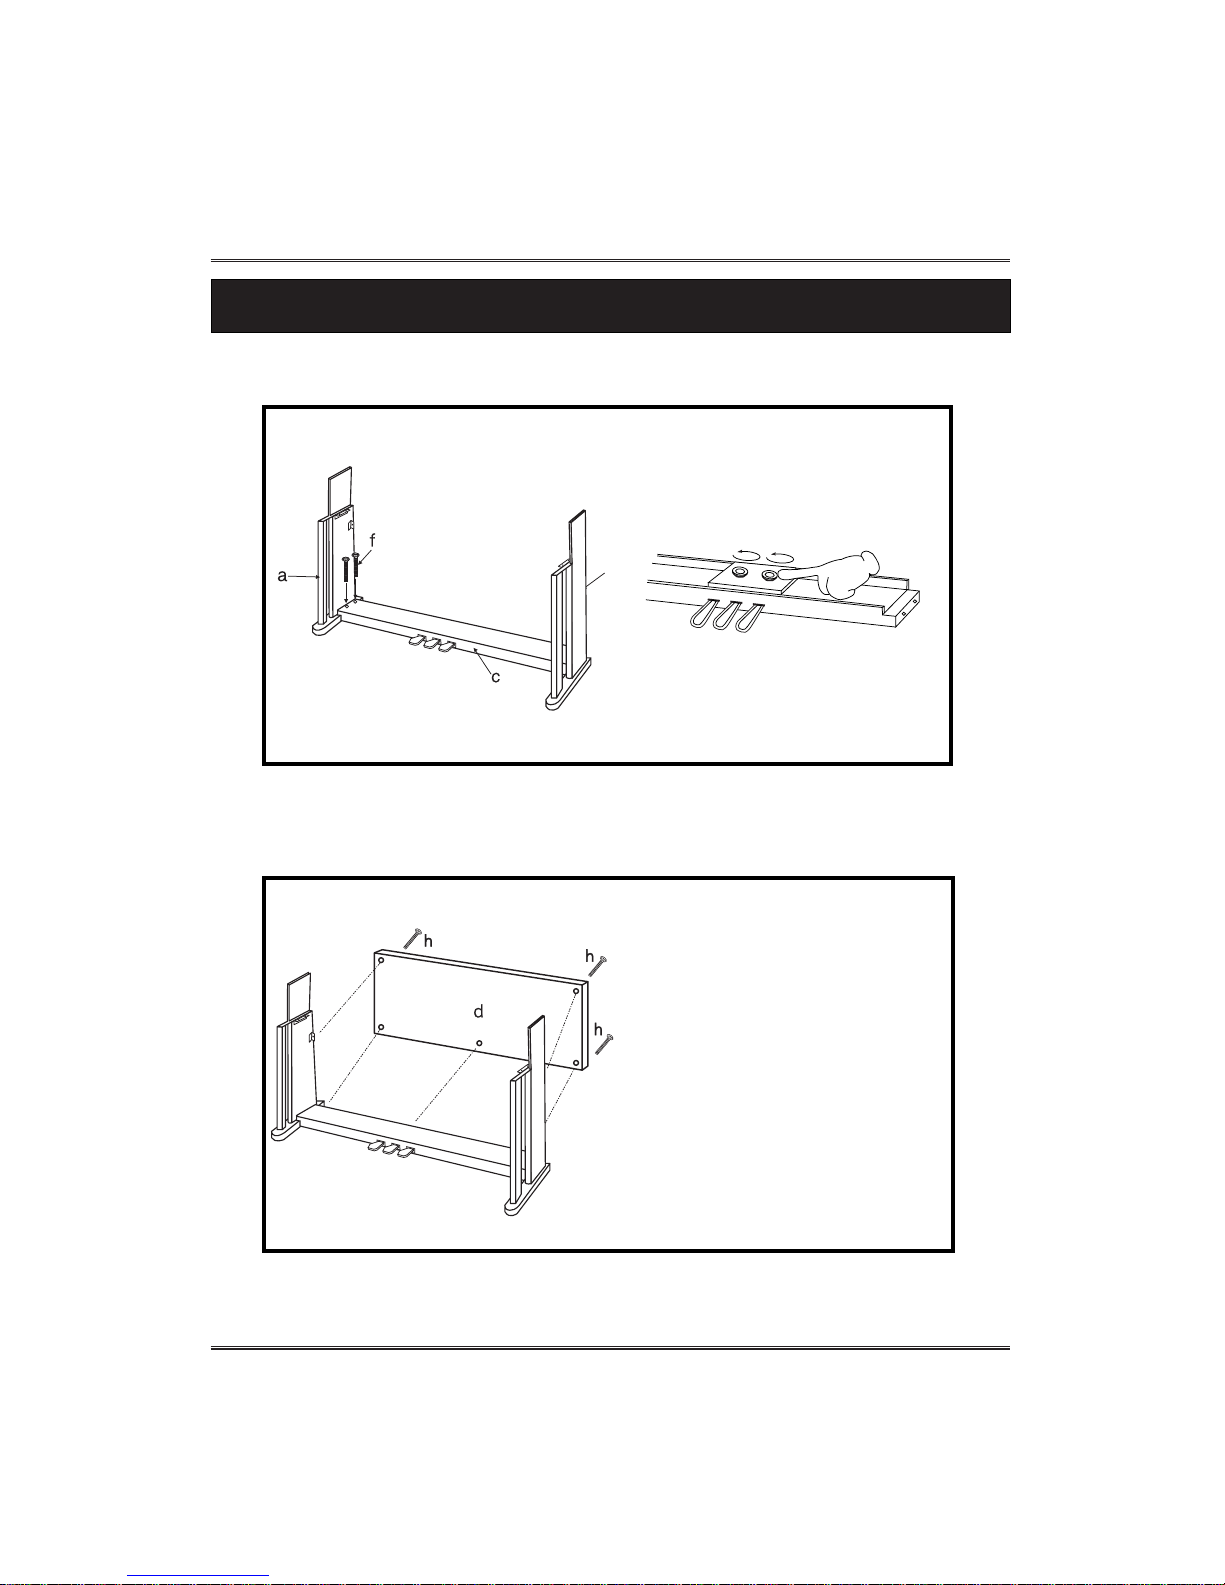
12
Setting Up Your Piano (SLP-200)
Setting Up Your Piano (SLP-200))
1. Attaching the both legs and pedal box assembly
2. Assembling the stand
① Securely combine both
Legs(a,b) Pedal Box(c) assembly
using four Bolts(f).
② For pedal stability, rotate the
adjusters on the bottom of the
pedal assembly unit they comes in
firm, contact with the floor surface.
① Attach the Rear Plate(d) to the
legs and pedal box using five Bolts (h)
for rear plate.
② After fixing the crossing plate
to the legs, set the stand upright
and make sure the stand is
parallel.
Page 14
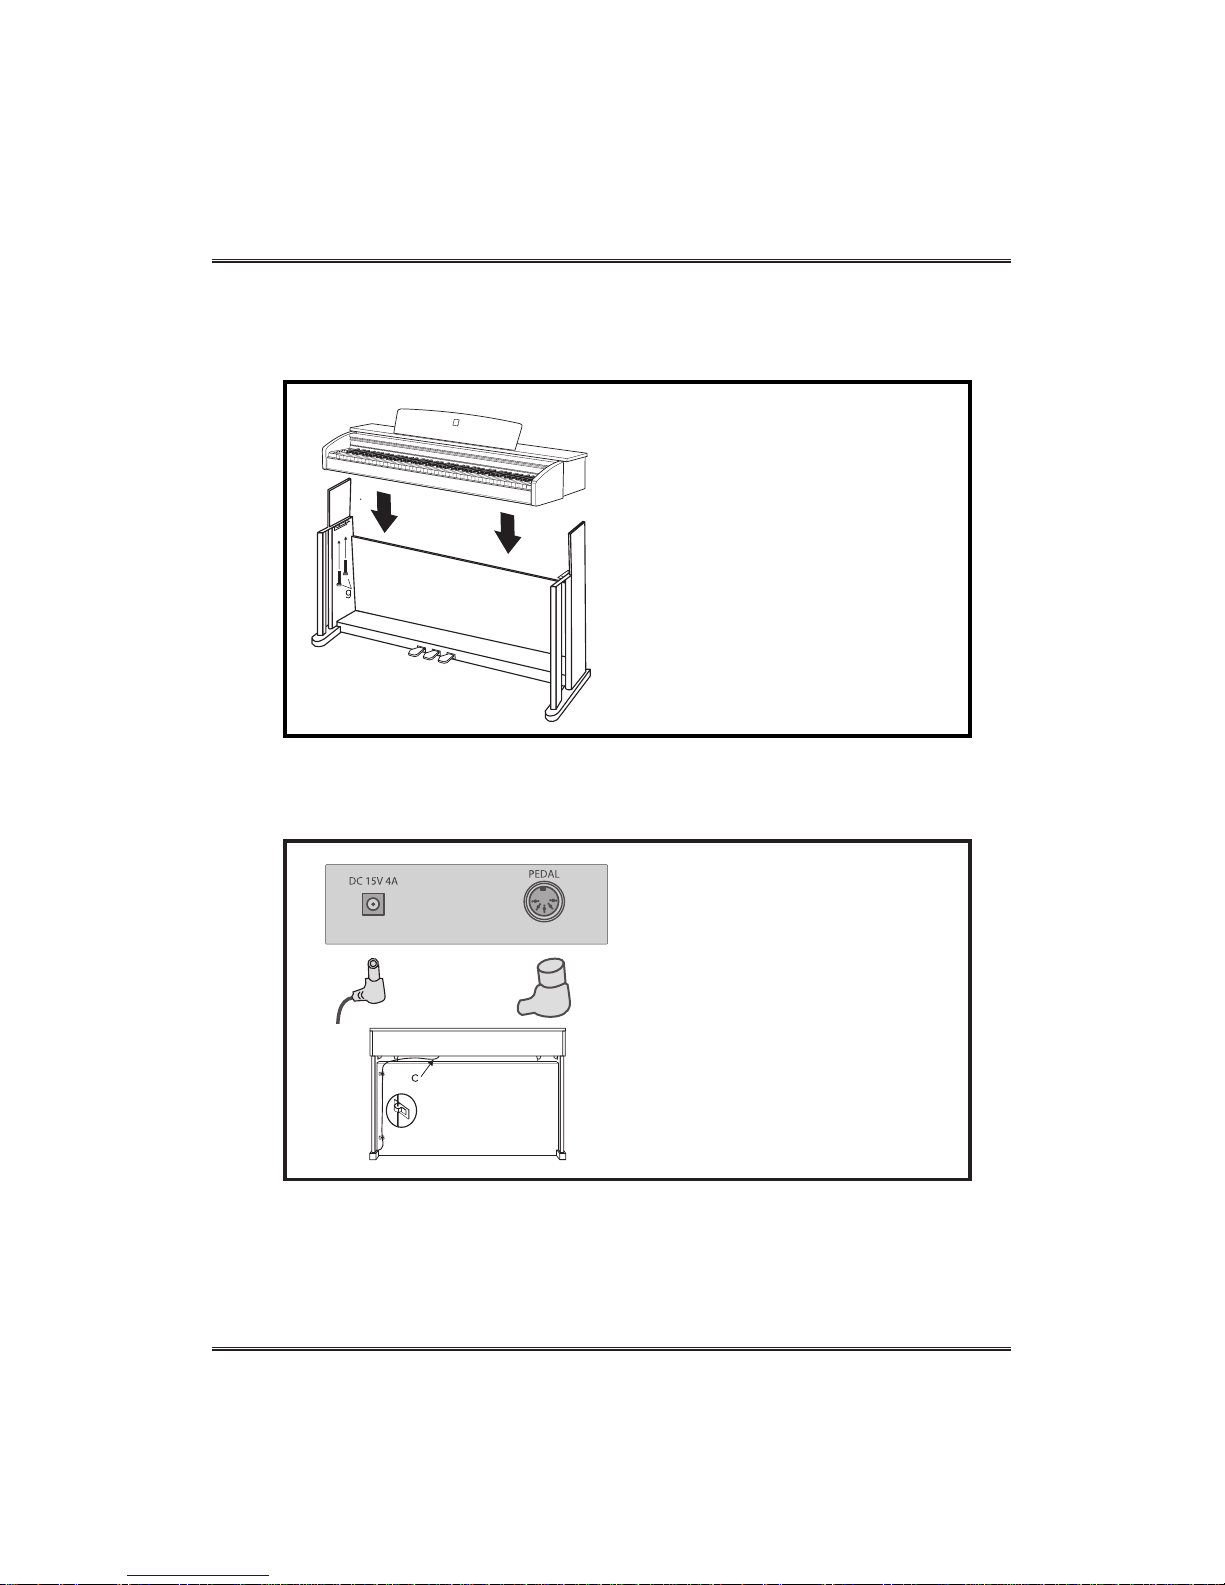
13
Setting Up Your Piano (SLP-200)
3. Attaching the main unit and stand
4. Connecting the pedal cord and AC adapter
Set the stand upright and gently
lower the main unit on the stand,
then tighten the main unit with four
Bolts (g) for main unit as shown in
illustration.
Plug pedal CORD(c) and AC adapter
plug into the corresponding ports on
the bottom of the main unit.
Page 15
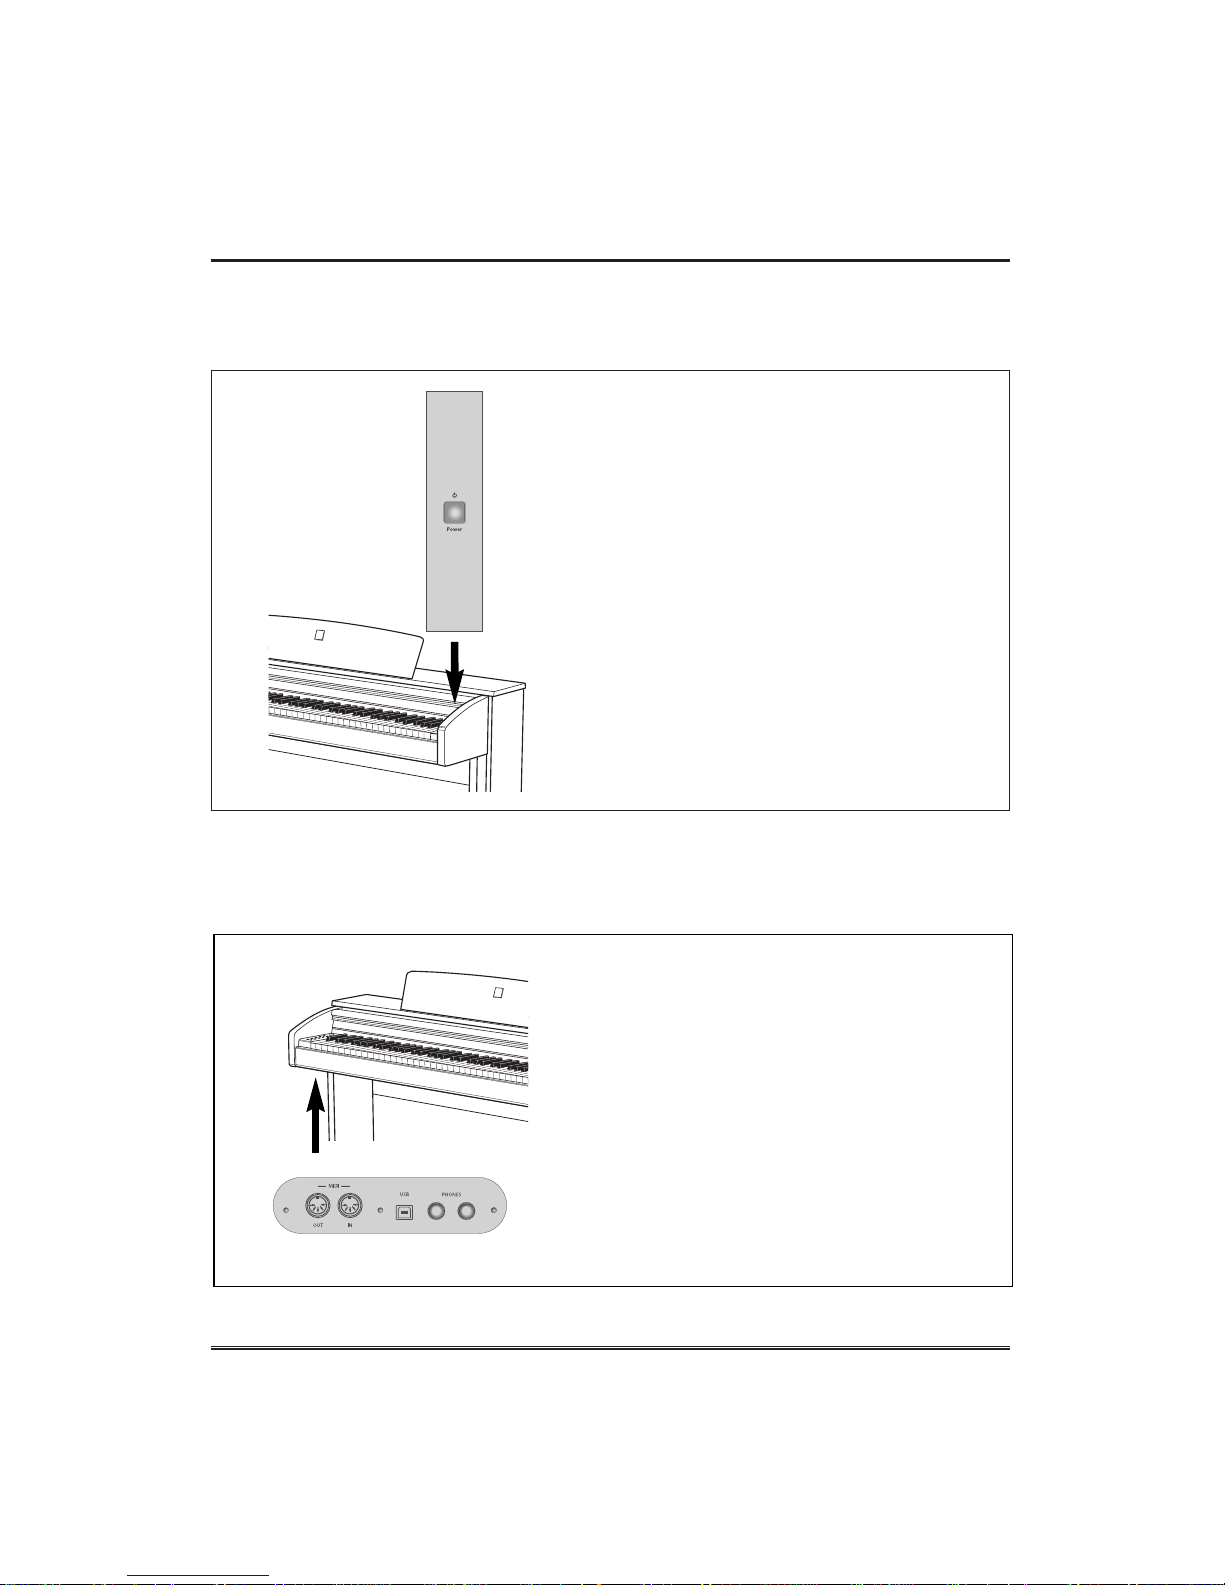
14
Setting Up Your Piano (SLP-200)
Turning on the Power
① Connect the AC POWER ADAPTER. Insert DC
plug at the end of DC cord of the AC adapter into
the piano and AC plug at end of AC cord of the
AC adapter into a standard AC outlet.
☞ See 'Connecting the pedal cord and AC adapter' on page
13.
② Press POWER switch. The power is turned on
and the initial display appears in the Multi
Function Display. The voice of Grand Piano is
selected automatically at first.
☞ Adjust the volume by using MASTER VOLUME.
Press POWER switch again when turning off the
power. All lamps and LED display will turn off.
Headphones
Connect a set of stereo headphones(optional) to
PHONES jack.
Insert plug of the headphone into the PHONES
jack on the bottom panel of the piano.
When headphones are connected, the internal
speaker system is automatically shut off.
Since the piano has two PHONES jacks, two sets
of headphones can be used simultaneously, allow
two people to enjoy listening to the performance.
Page 16
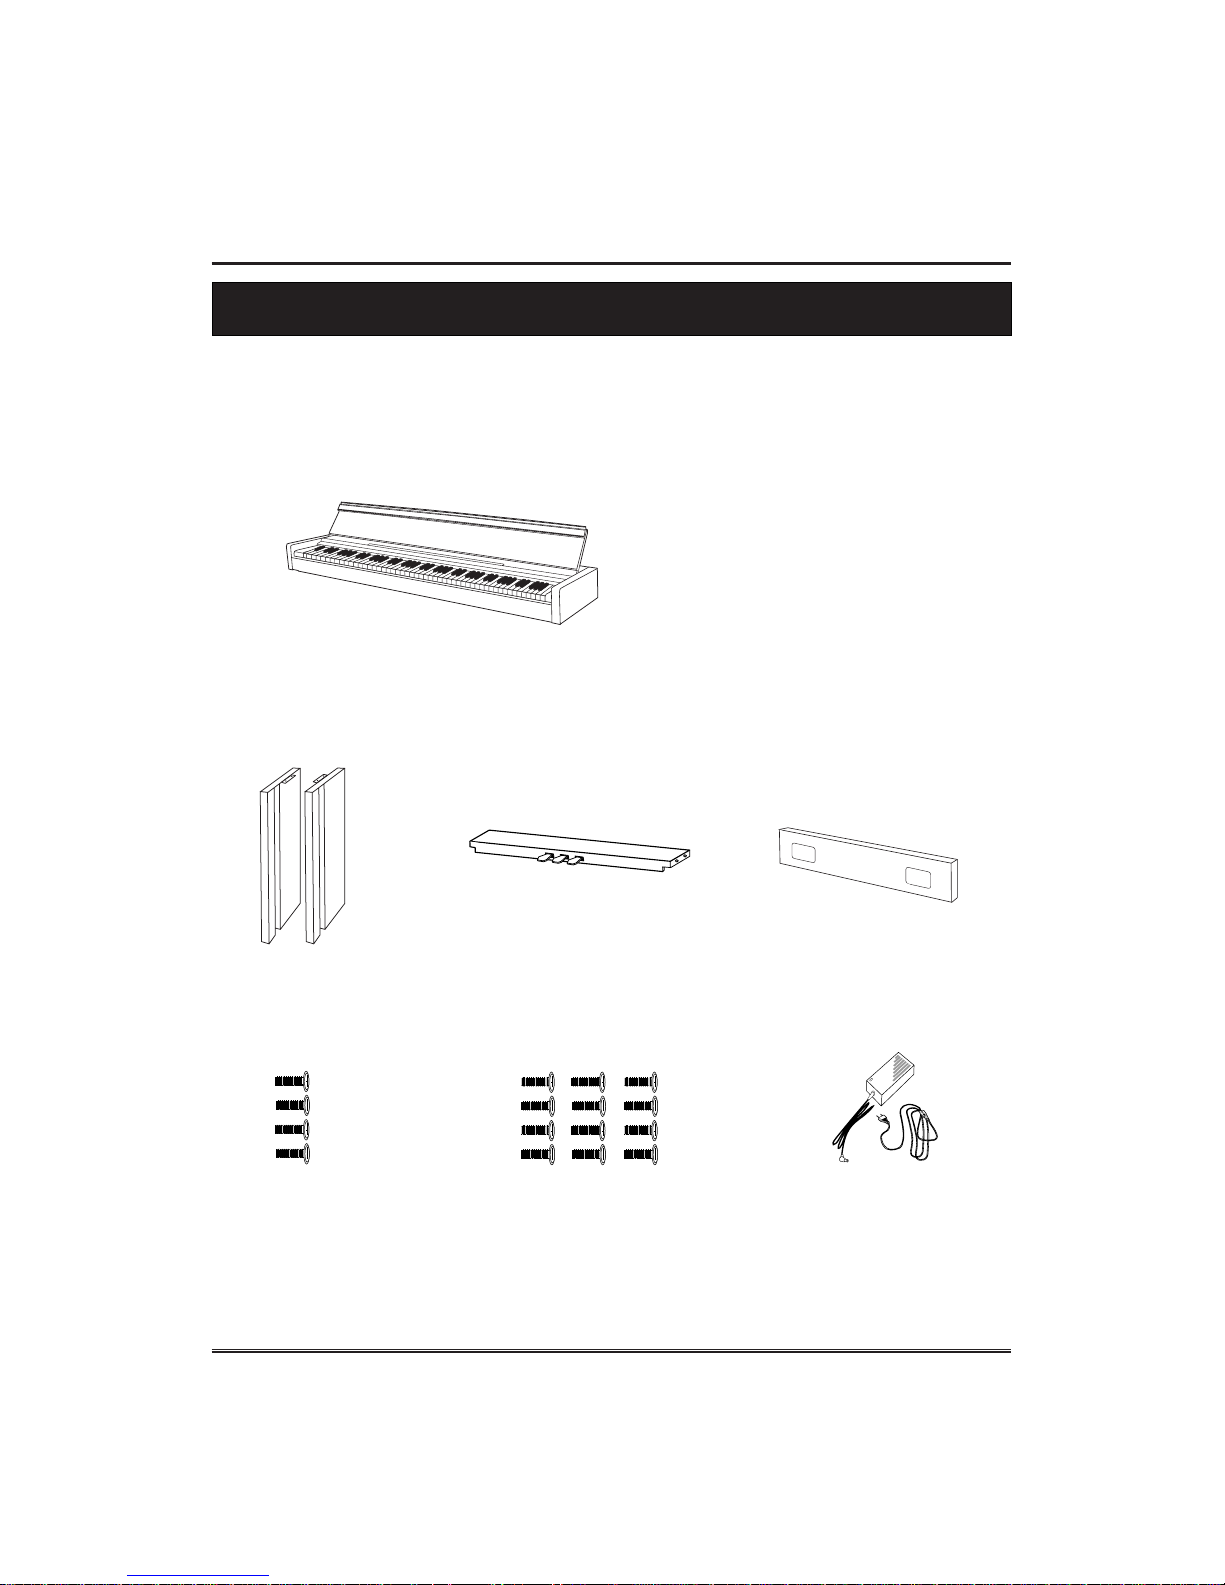
15
Unpacking (SLP-300)
Unpacking (SLP-300)
Carefully remove the Digital Piano and its accessories from the packing box. The
Digital Piano set consists of the following items.
[BOX 1] BODY
Main Unit
[BOX2] STAND
Right, Left Legs (a, b) Pedal Box (c) Speaker Box (d)
☞
Inspect each item carefully to make sure that it is in good condition. If you find any item
missing or damaged, contact the place of purchase immediately for replacement.
Four Bolts
for Main Unit (g)
(M6x15)mm, Black
Twelve Bolts
for Pedal Box and Speaker Box (f)
(PT6x25)mm, Gold
AC Power Adapter
Page 17
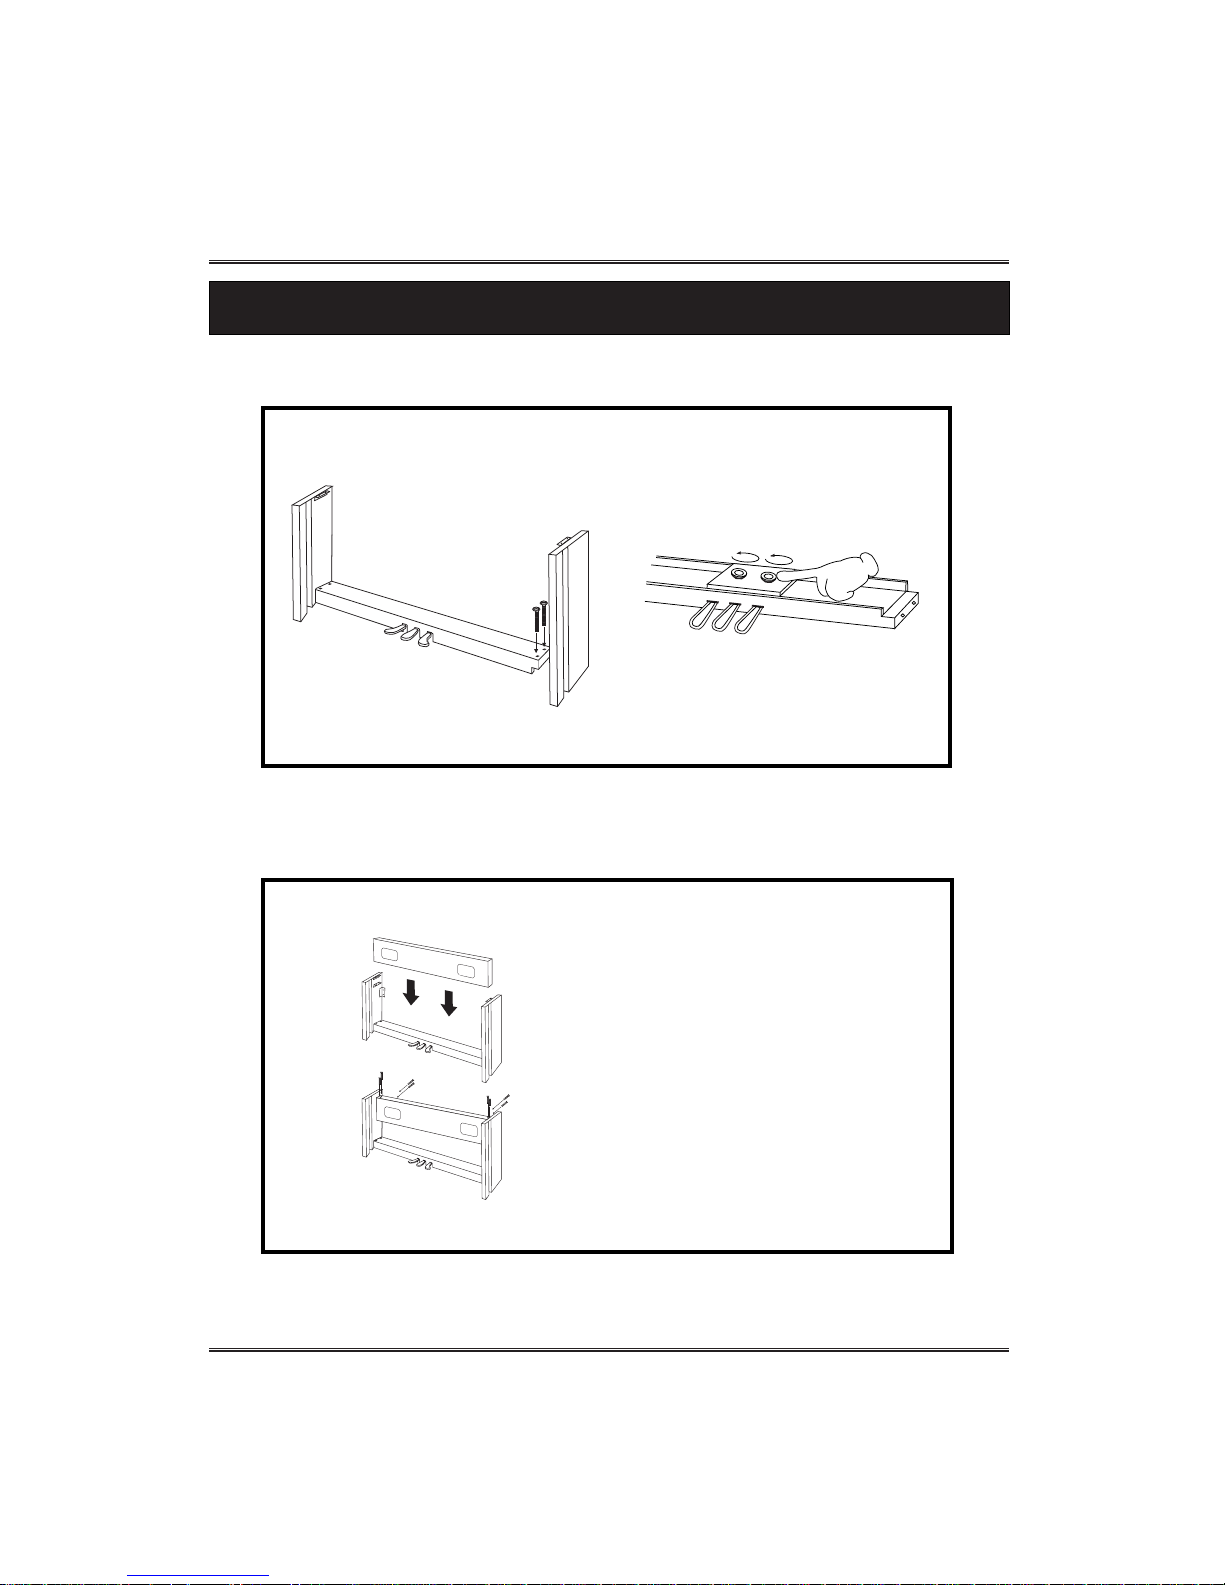
16
Setting Up Your Piano (SLP-300)
Setting Up Your Piano (SLP-300))
1. Attaching the both legs and pedal box assembly
2. Assembling the stand
① Securely combine both
Legs(a,b) Pedal Box(c) assembly
using four Bolts(f).
② For pedal stability, rotate the
adjusters on the bottom of the
pedal assembly unit they comes in
firm, contact with the floor surface.
① Attach the Speaker Box (d) to
the legs and pedal box using eight
Bolts (f) for speaker box.
② After fixing the speaker box to
the legs, set the stand upright and
make sure the stand is parallel.
Page 18
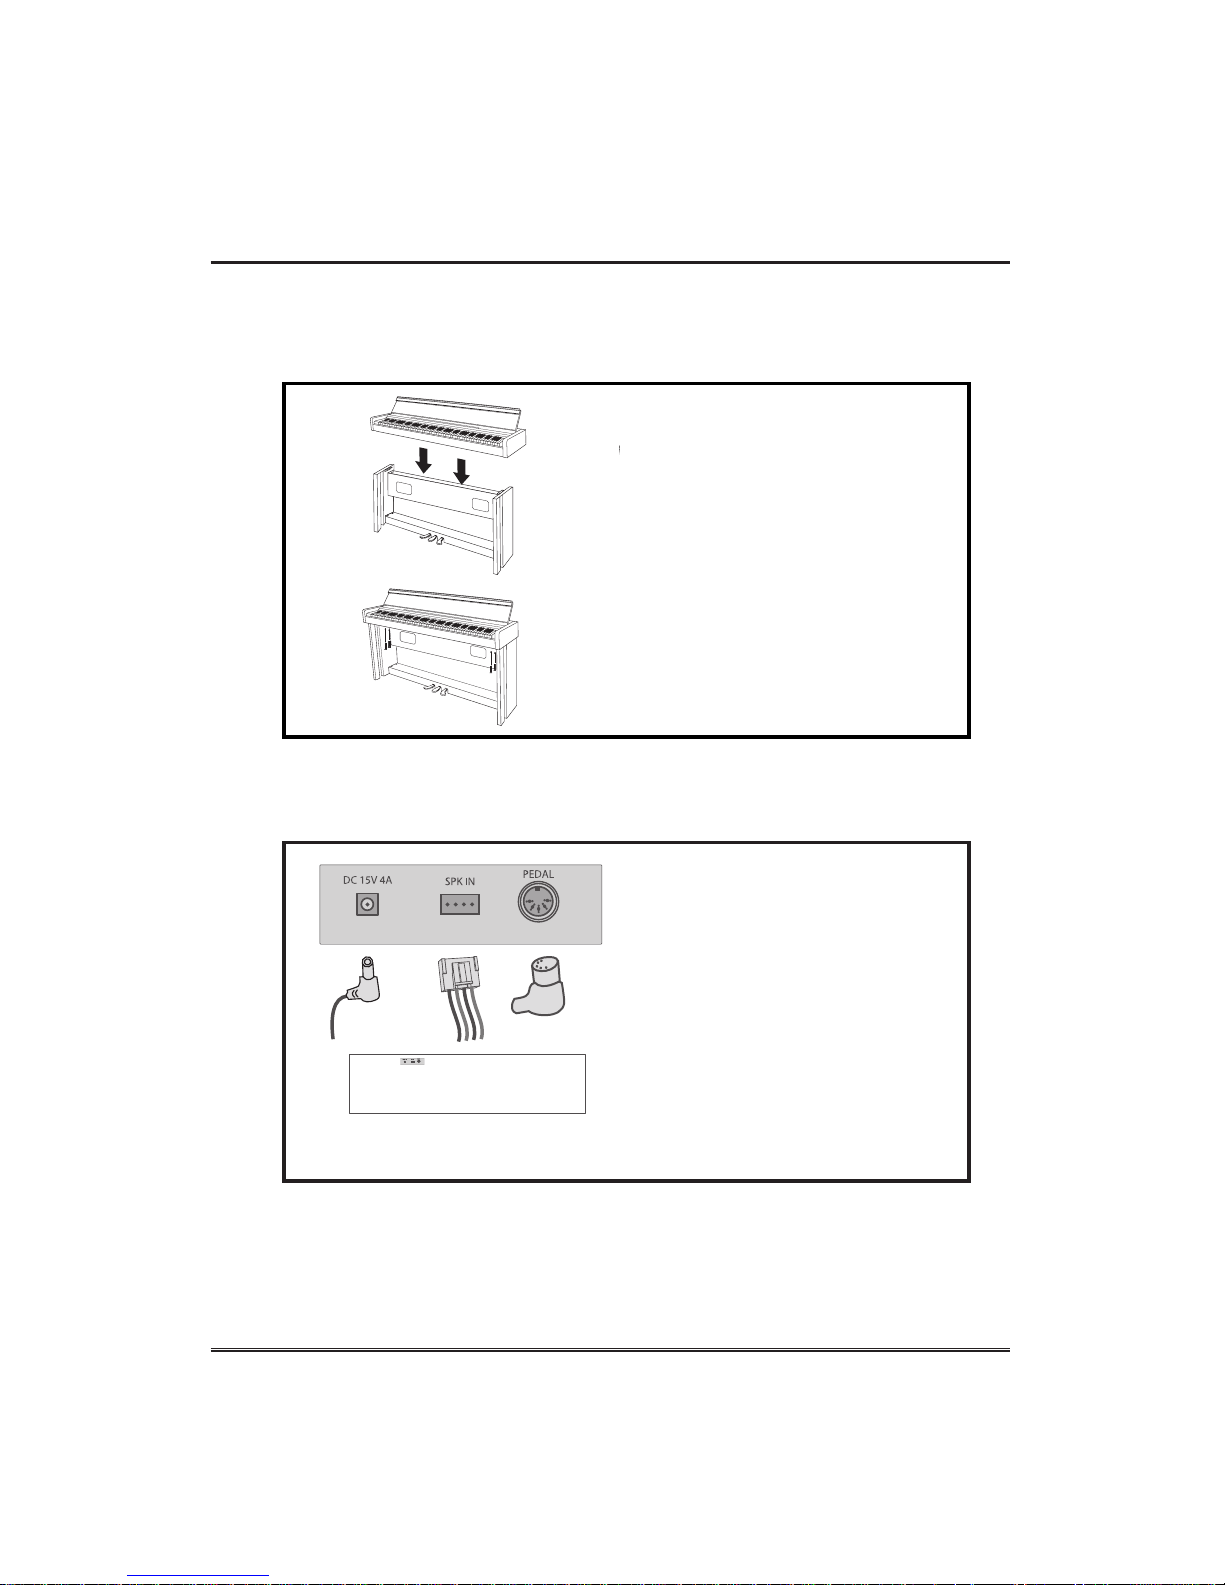
17
Setting Up Your Piano (SLP-300)
3. Attaching the main unit and stand
4. Connecting the pedal cord and AC adapter
Set the stand upright and gently
lower the main unit on the stand,
then tighten the main unit with four
Bolts (g) for main unit as shown in
illustration.
Plug Pedal Cord, AC AC adapter and
Speaker Cord into the corresponding
ports on the bottom of the main
unit as shown in illustration.
MAIN UNIT BOTTOM
Page 19
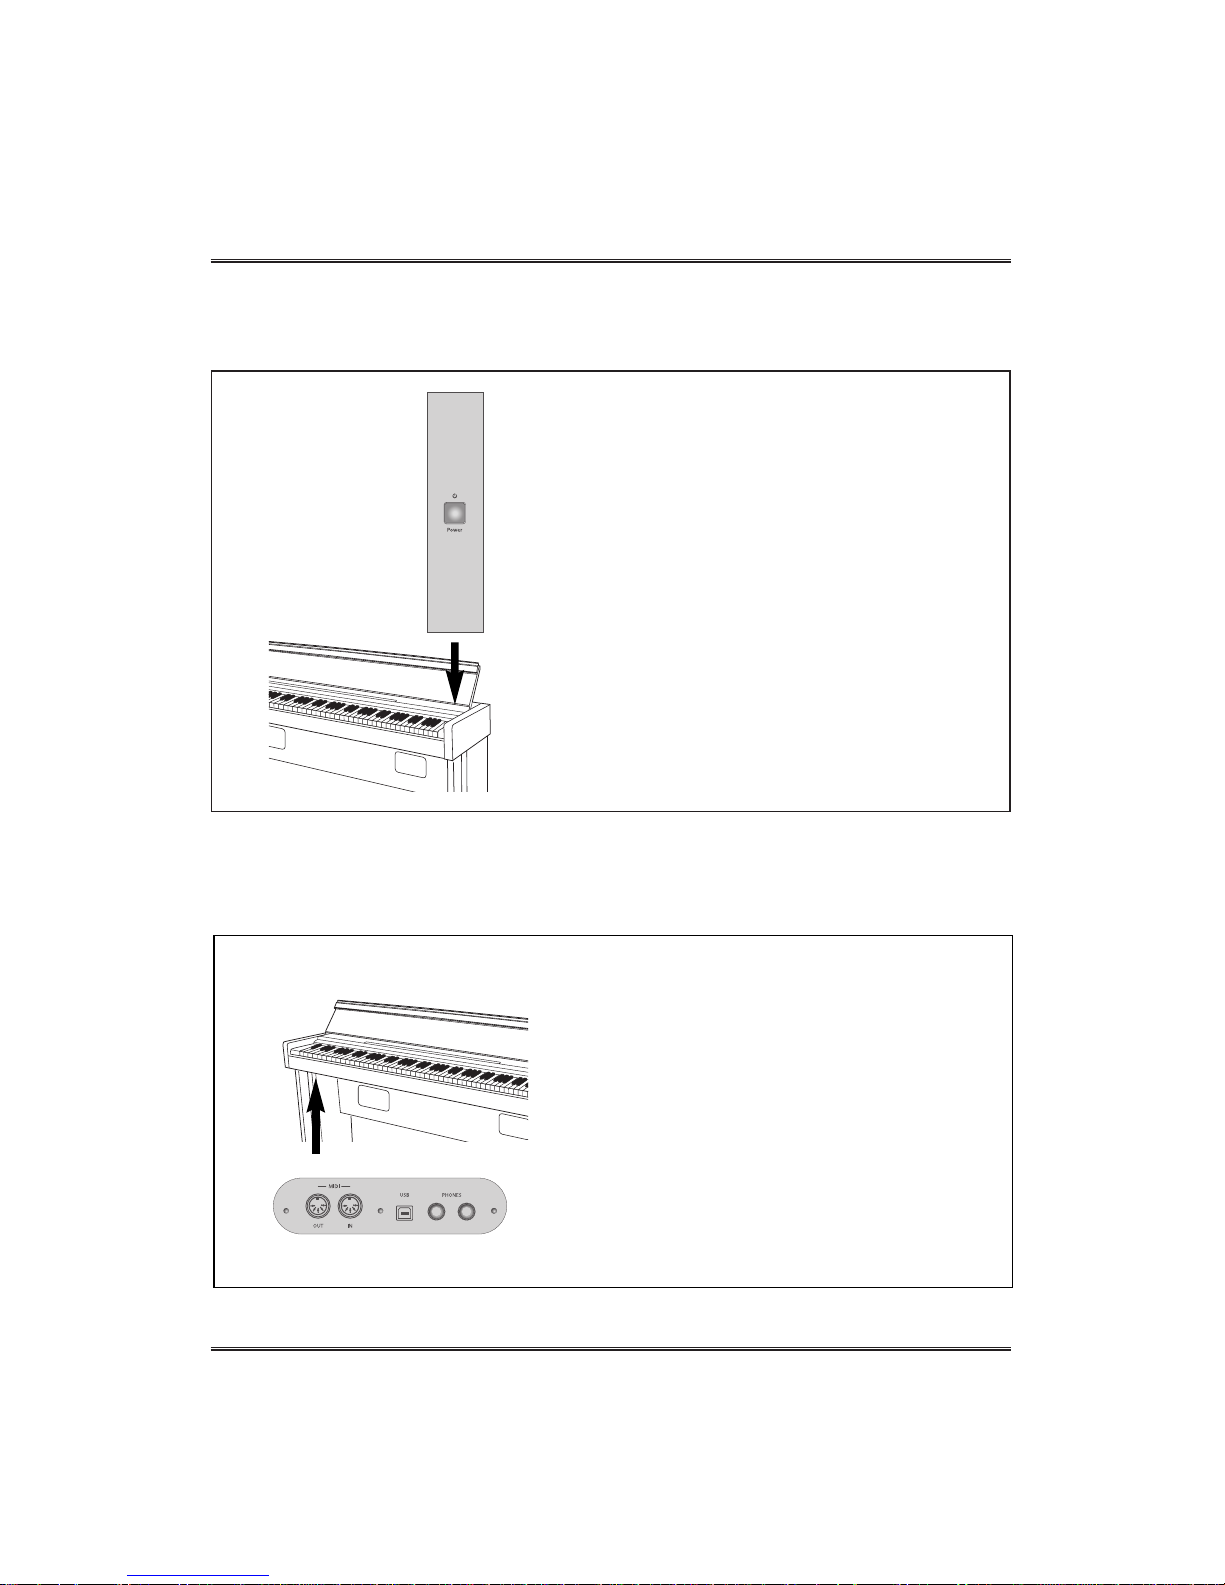
18
Setting Up Your Piano (SLP-300)
Turning on the Power
① Connect the AC POWER ADAPTER. Insert DC
plug at the end of DC cord of the AC adapter into
the piano and AC plug at end of AC cord of the
AC adapter into a standard AC outlet.
☞ See 'Connecting the pedal cord and AC adapter' on page
17.
② Press POWER switch. The power is turned on
and the initial display appears in the Multi
Function Display. The voice of Grand Piano is
selected automatically at first.
☞ Adjust the volume by using MASTER VOLUME.
Press POWER switch again when turning off the
power. All lamps and LED display will turn off.
Headphones
Connect a set of stereo headphones(optional) to
PHONES jack.
Insert plug of the headphone into the PHONES
jack on the bottom panel of the piano.
When headphones are connected, the internal
speaker system is automatically shut off.
Since the piano has two PHONES jacks, two sets
of headphones can be used simultaneously, allow
two people to enjoy listening to the performance.
Page 20
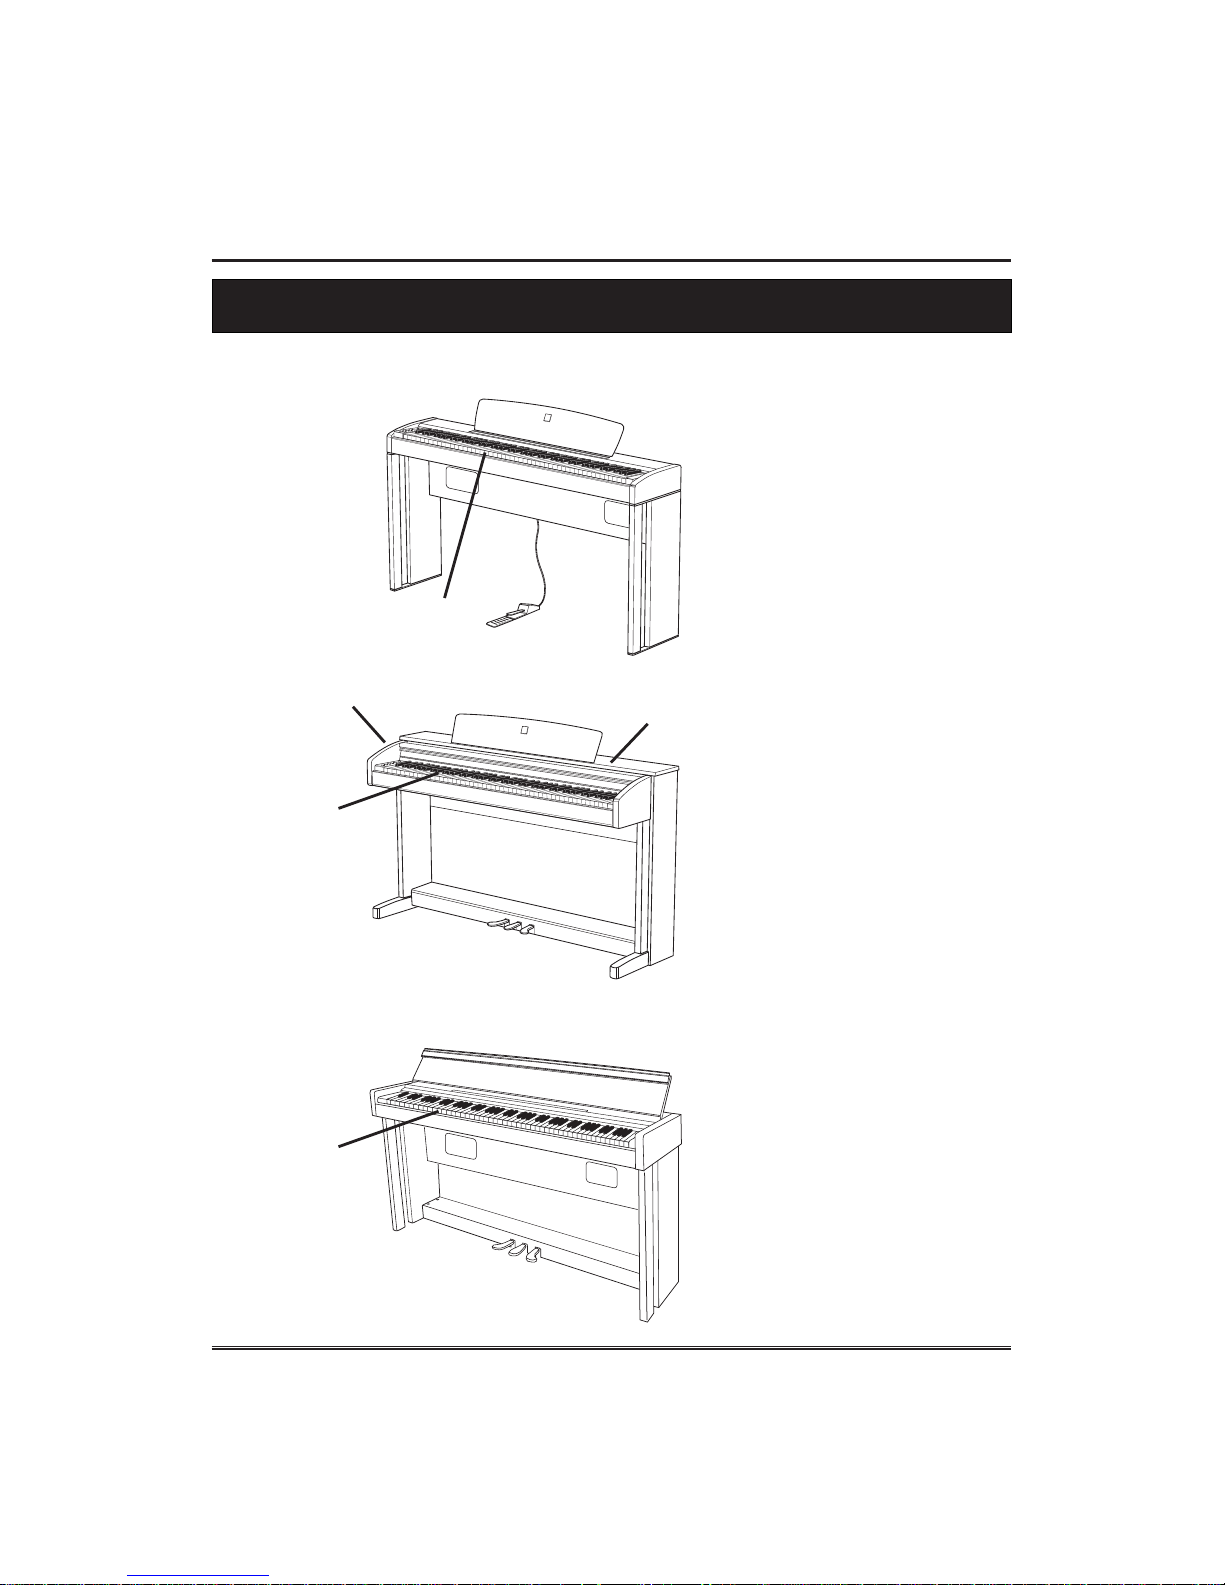
19
External Appearance
External Appearance
2
3
4
5
1
2
3
4
5
1
1. Music Desk
2. Control Panel
3. Keyboard
4. Pedal
5. Stand
1. Keyboard Cover
2. Control Panel
3. Keyboard
4. Pedal
5. Stand
SLP-100
SLP-200
2
3
4
5
1
1. Keyboard Cover
2. Control Panel
3. Keyboard
4. Pedal
5. Stand
SLP-300
Page 21
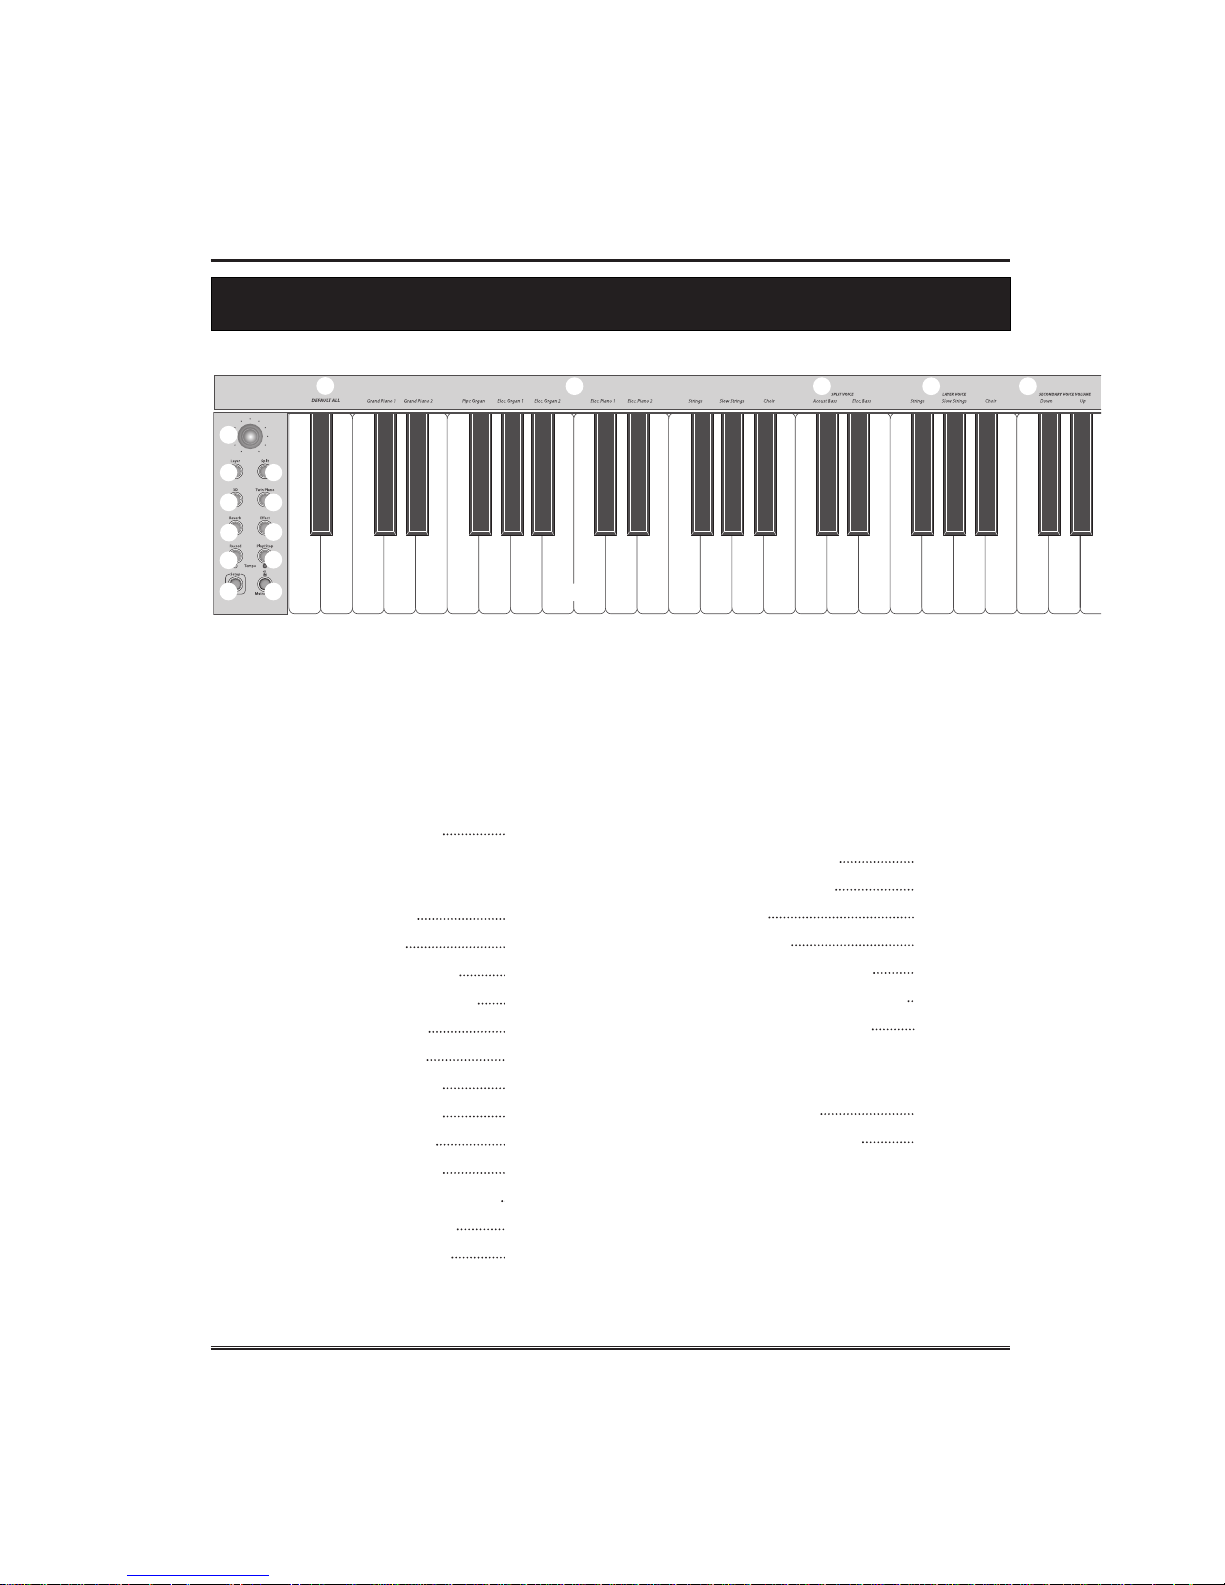
VOLUME SECTION
ⓐ MASTER VOLUME
VOICE SECTION
ⓑ LAYER BUTTON
ⓒ SPLIT BUTTON
ⓓ 3D EFFECT BUTTON
ⓔ TWIN PIANO BUTTON
ⓕ REVERB BUTTON
ⓖ EFFECT BUTTON
ⓗ MAIN VOICE KEYS
ⓘ EXTRA VOICE KEYS
ⓙ SPLIT VOICE KEYS
ⓚ LAYER VOICE KEYS
ⓛ SECONDARY VOICE VOL.
ⓜ REVERB LEVEL KEYS
ⓝ EFFECT LEVEL KEYS
FUNCTION SECTION
ⓞ SETUP Button
ⓟ DEFAULT ALL Key
ⓠ TRANSPOSE Keys
ⓡ TUNE Keys
ⓢ TOUCH Keys
ⓣ METRONOME Button
ⓤ METRONOME BEAT Keys
ⓥⓦ TEMPO UP/DOWN
RECORDING SECTION
ⓥ RECORD Button
ⓦ START/STOP Button
20
Panel Controls and Terminals
ⓕ
Panel Controls and Terminals
Page 22
Page 26
Page 27
Page 28
Page 29
Page 30
Page 31
Page 24
Page 25
Page 27
Page 26
Page 26
Page 30
Page 31
Page 29
Page 33
Page 32
Page 34
Page 35
Page 35
Page 35
Page 36
Page 36
ⓗ
ⓖ
ⓟ
ⓓ
ⓔ
ⓥ
ⓣ
ⓑ
ⓐ
ⓒ
ⓞ
ⓦ
ⓘ
ⓙ ⓚ ⓛ
Page 22
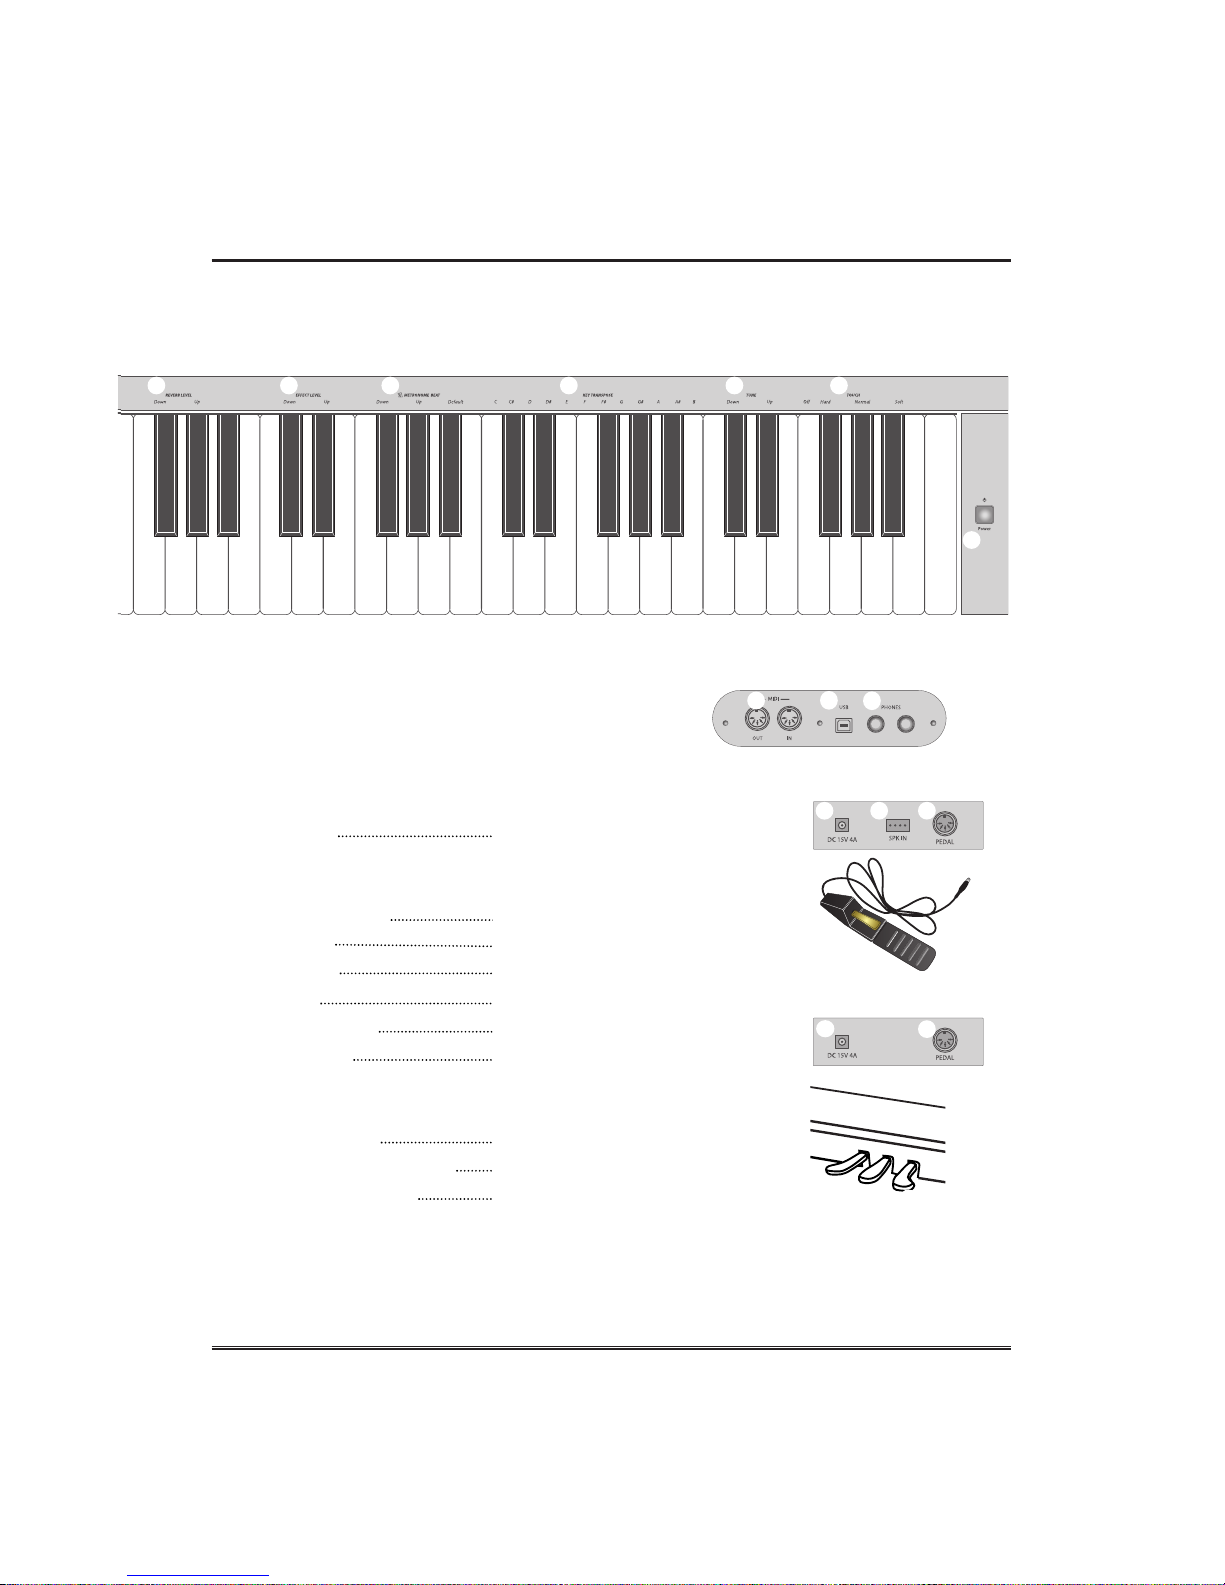
21
Panel Controls and Terminals
POWER
① POWER
TERMINAL SECTION
② MIDI IN/OUT
③ USB IN
④ PHONES
⑤ DC IN
⑥ SPEAKER IN
⑦ PEDAL IN
PEDAL SECTION
⑧ SOFT PEDAL
⑨ SOSTENUTO PEDAL
⑩ DAMPER PEDAL
Page 10,14,18
Page 37
Page 37
Page 10,14,18
Page 9,13,17
Page 9,17
Page 9,13,17
Page 23
Page 23
Page 23
②
④
③
⑧
⑨
⑩
⑩
⑤ ⑦⑥
⑤
⑦
ⓜ ⓝ ⓤ ⓠ ⓡ ⓢ
①
SLP-100/300
SLP-200
Page 23
22
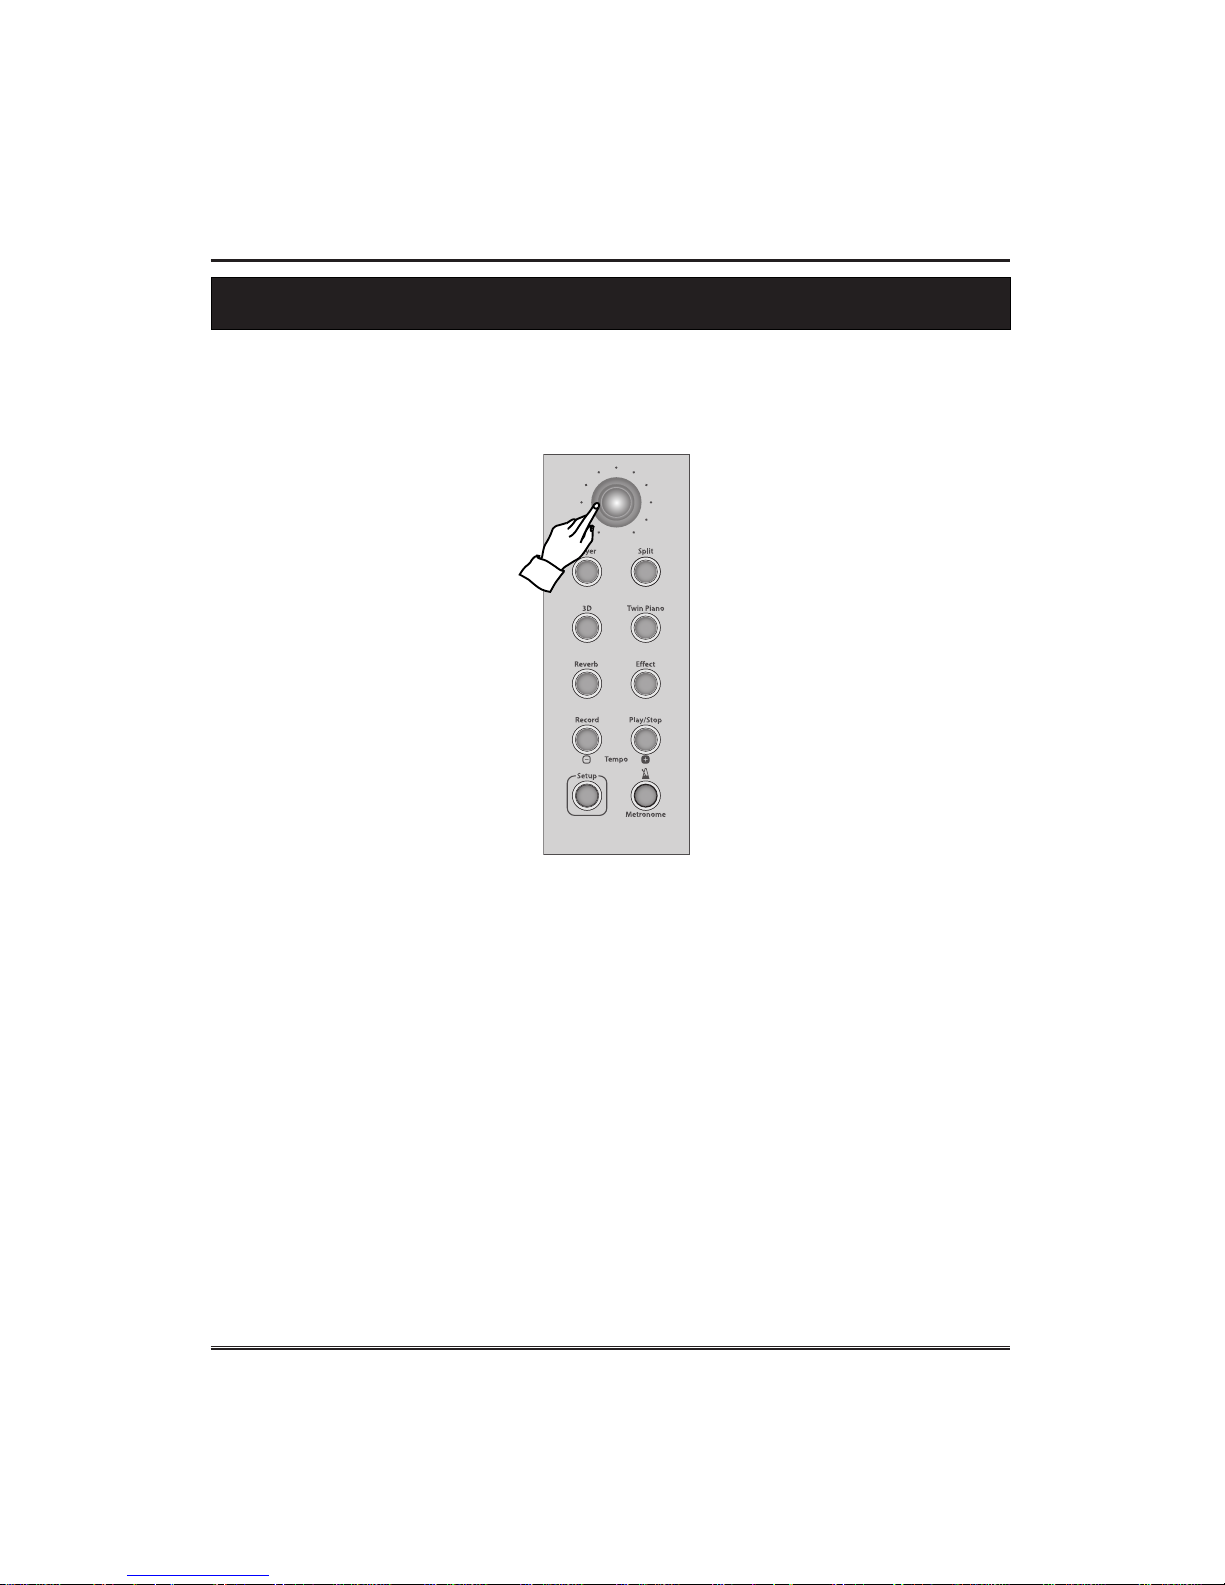
Adjusting the Volume
Adjusting the Volume
The piano has one volume on the panel for adjusting the volume.
MASTER VOLUME
This determines the entire volume of the piano.
☞ This also determines the output level of the signal at the PHONES.
Page 24
23
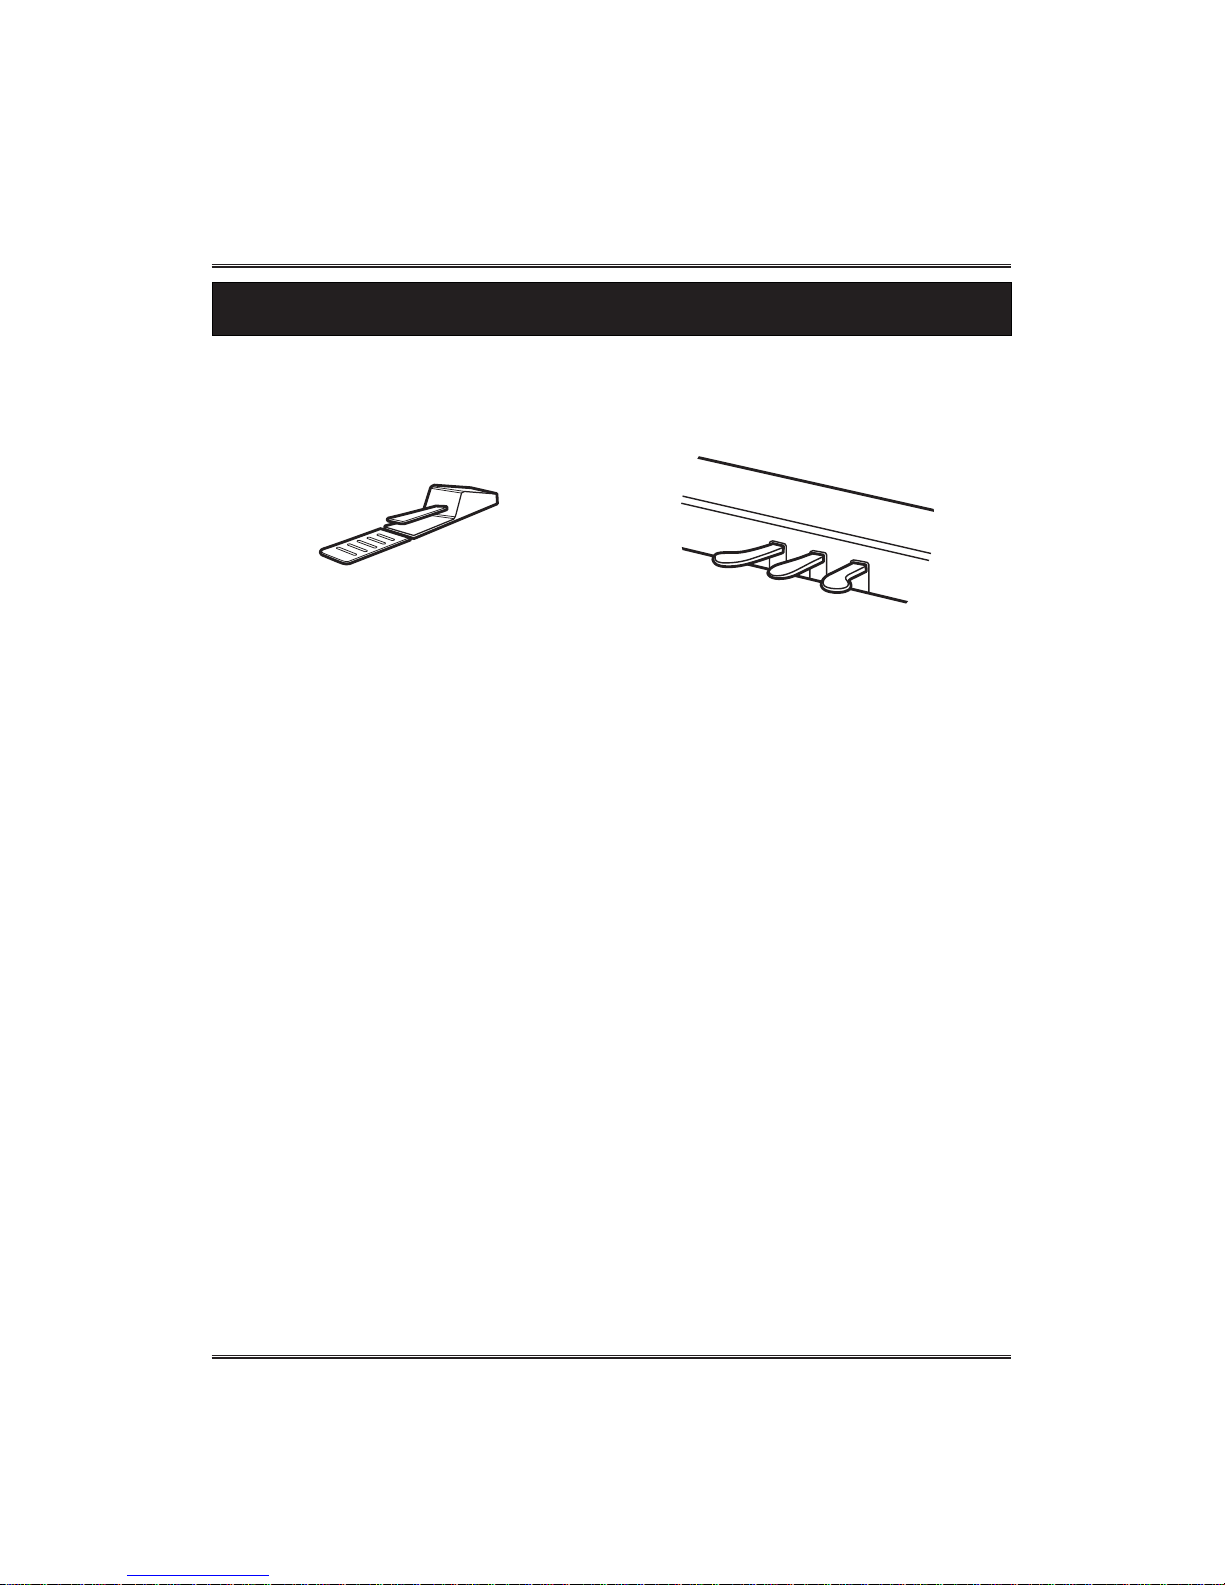
Using the Pedals
Using the Pedals
The piano has three pedals.
① Damper Pedal (Right)
The damper pedal performs the same function as the damper pedal on an actual
acoustic piano, letting you sustain the sound of the voices even after releasing your
fingers from the keys.
☞ SLP-100 has only one pedal, which is for damper.
☞ Certain voices in the PERCUSSION sounds may not be affected by use of the damper pedal.
☞ Some voices may sound continuously or have a long decay after the notes have been released
while the damper pedal is held.
☞ SLP-100 has only one pedal, which is for damper.
② Sostenuto Pedal (Center)
If you play a note or chord on the keyboard and press the sostenuto pedal while
the note(s) are held, those notes will be sustained as long as the pedal is held, but all
subsequently played notes will not be sustained. This makes it possible to sustain a
chord, for example, while other notes are played staccato.
③ Soft Pedal (Left)
Pressing this pedal reduces the volume and slightly changes the timbre of the
notes you play.
☞ Certain voices in the PERCUSSION group may not be affected by use of the sostenuto pedal.
☞ Certain voices such as STRINGS or BRASS sustain continuously when the sostenuto pedal is
pressed.
SLP-100 SLP-200/SLP-300
Page 25
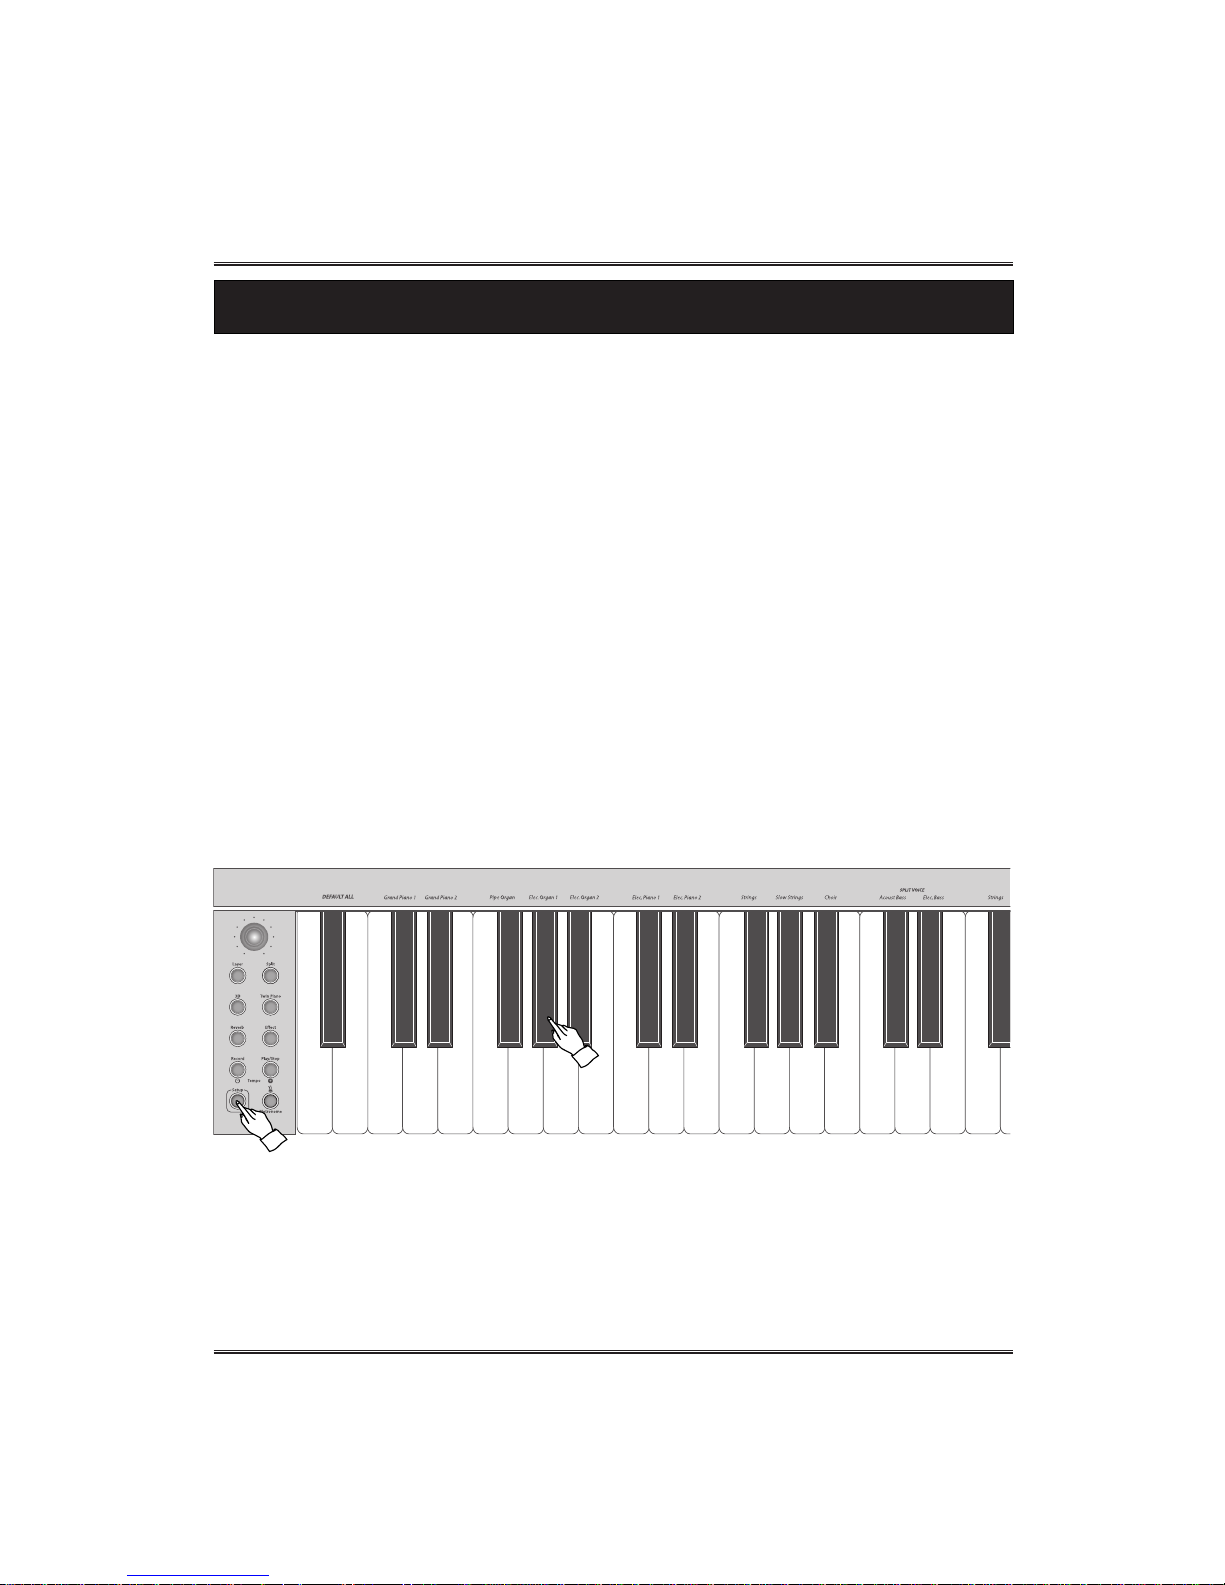
☞ Default voice is Grand piano 1.
☞ When a split voice or a layer voice is selected, layer or split function automatically will be on.
See the LAYER/SPLIT section on page 26~27.
24
Selecting Voice
Selecting Voice
The piano features a wealth of rich, authentic voices, including piano, strings and brass
instruments. It also features a keyboard percussion function that lets you play the
realistic drum and percussion sounds directly from keyboard.
There are 12 main voices, 2 split voices, 3 layered voices and 14 extra voices in this piano.
① Press and hold the SETUP button.
☞ The lamp is on.
② Select a desired voice.
☞ both the SETUP button and a voice key should be pressed.
☞ Main Voice
Grand Piano 1, 2, Pipe Organ, Elec. Organ 1, 2, Elec. Piano 1, 2, Strings, Slow Strings, Choir
☞ Split Voice
Acoustic Bass, Elec. Bass
☞ Layered Voice
Acoustic Bass, Fingered Bass, Elec. Bass
☞ Extra Voice
Grand Piano 3, Detuned Piano, Harpsichord, Vibraphone, Accordion, Elec. Organ 3,
Square Wave, Sawtooth Wave, Synth Piano, Flute, Saxophone, Guitar, Synth brass, Drum set
☞ 128 General MIDI Voice
When connecting with PC, it's available to use 128 GM voices.
(See the GM VOICE CHART/DRUM TABLE section on page 39~41.)
Page 26
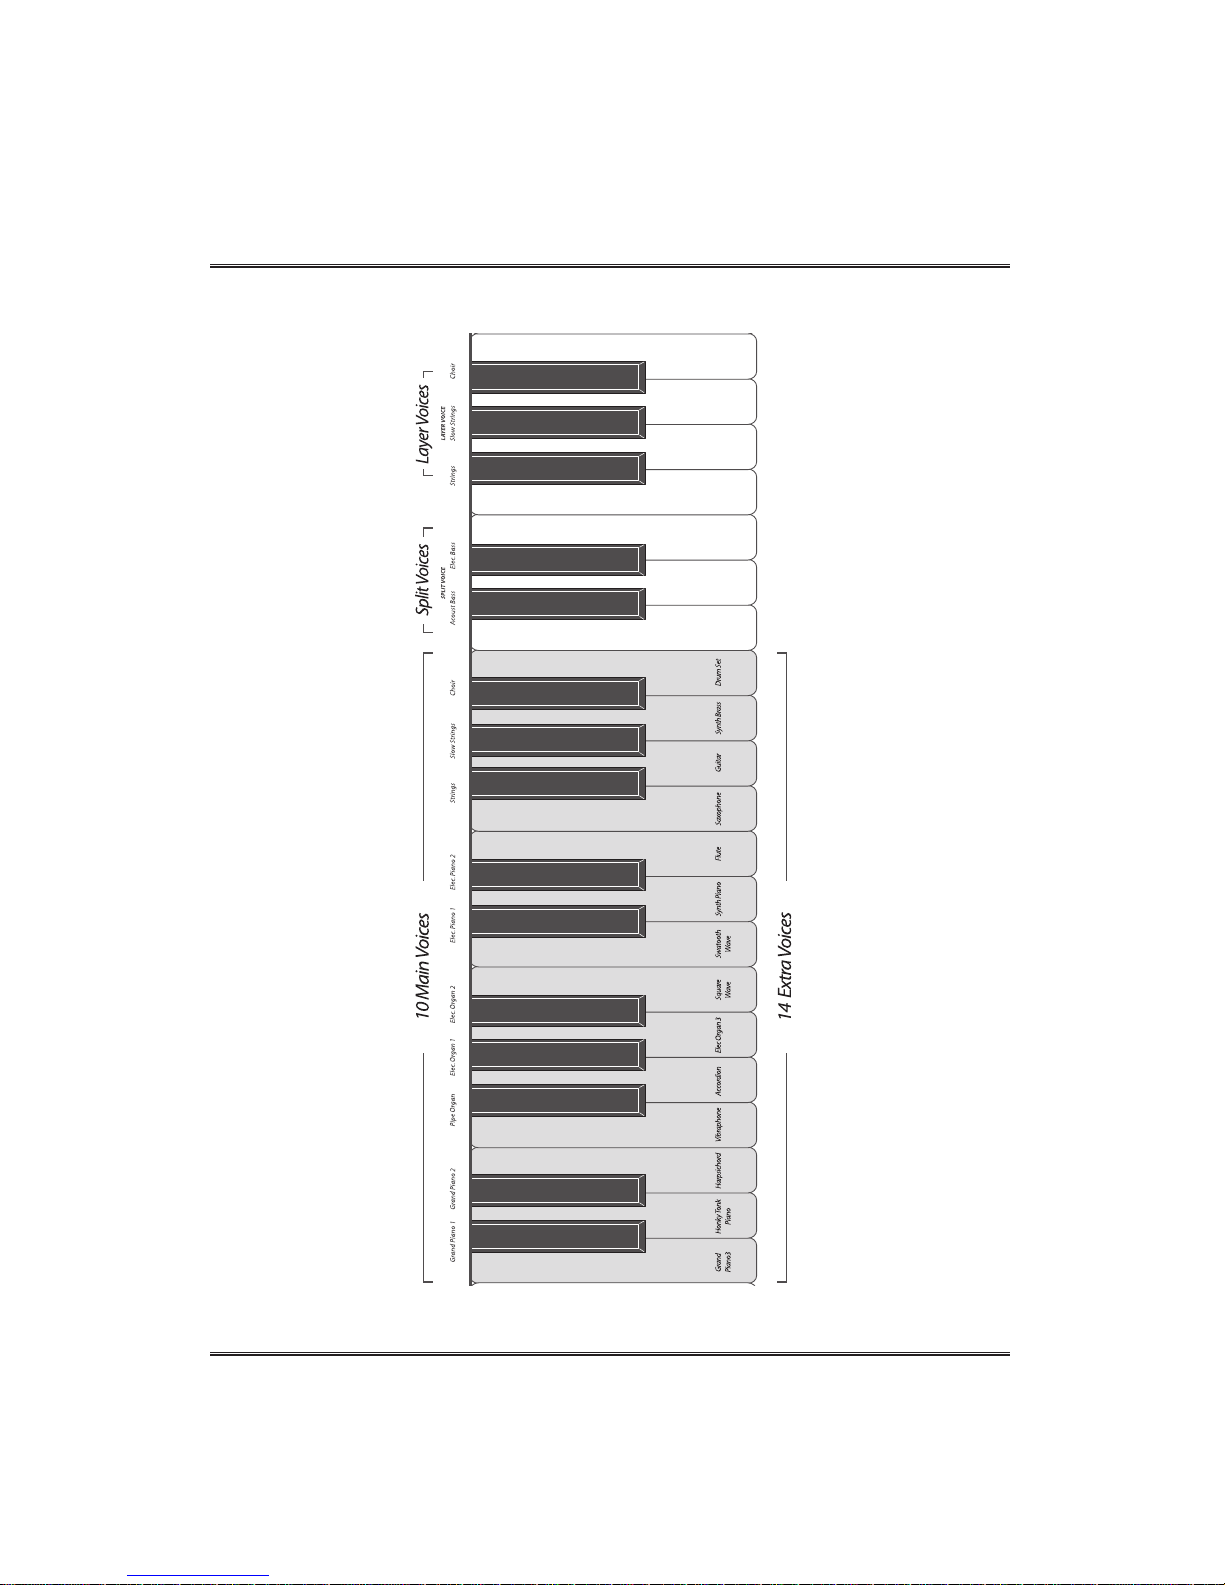
VOICE KEY MAP
25
Selecting Voice
Page 27
26
LAYER
Layer
The layer mode of the piano allows you to select and play two different voices
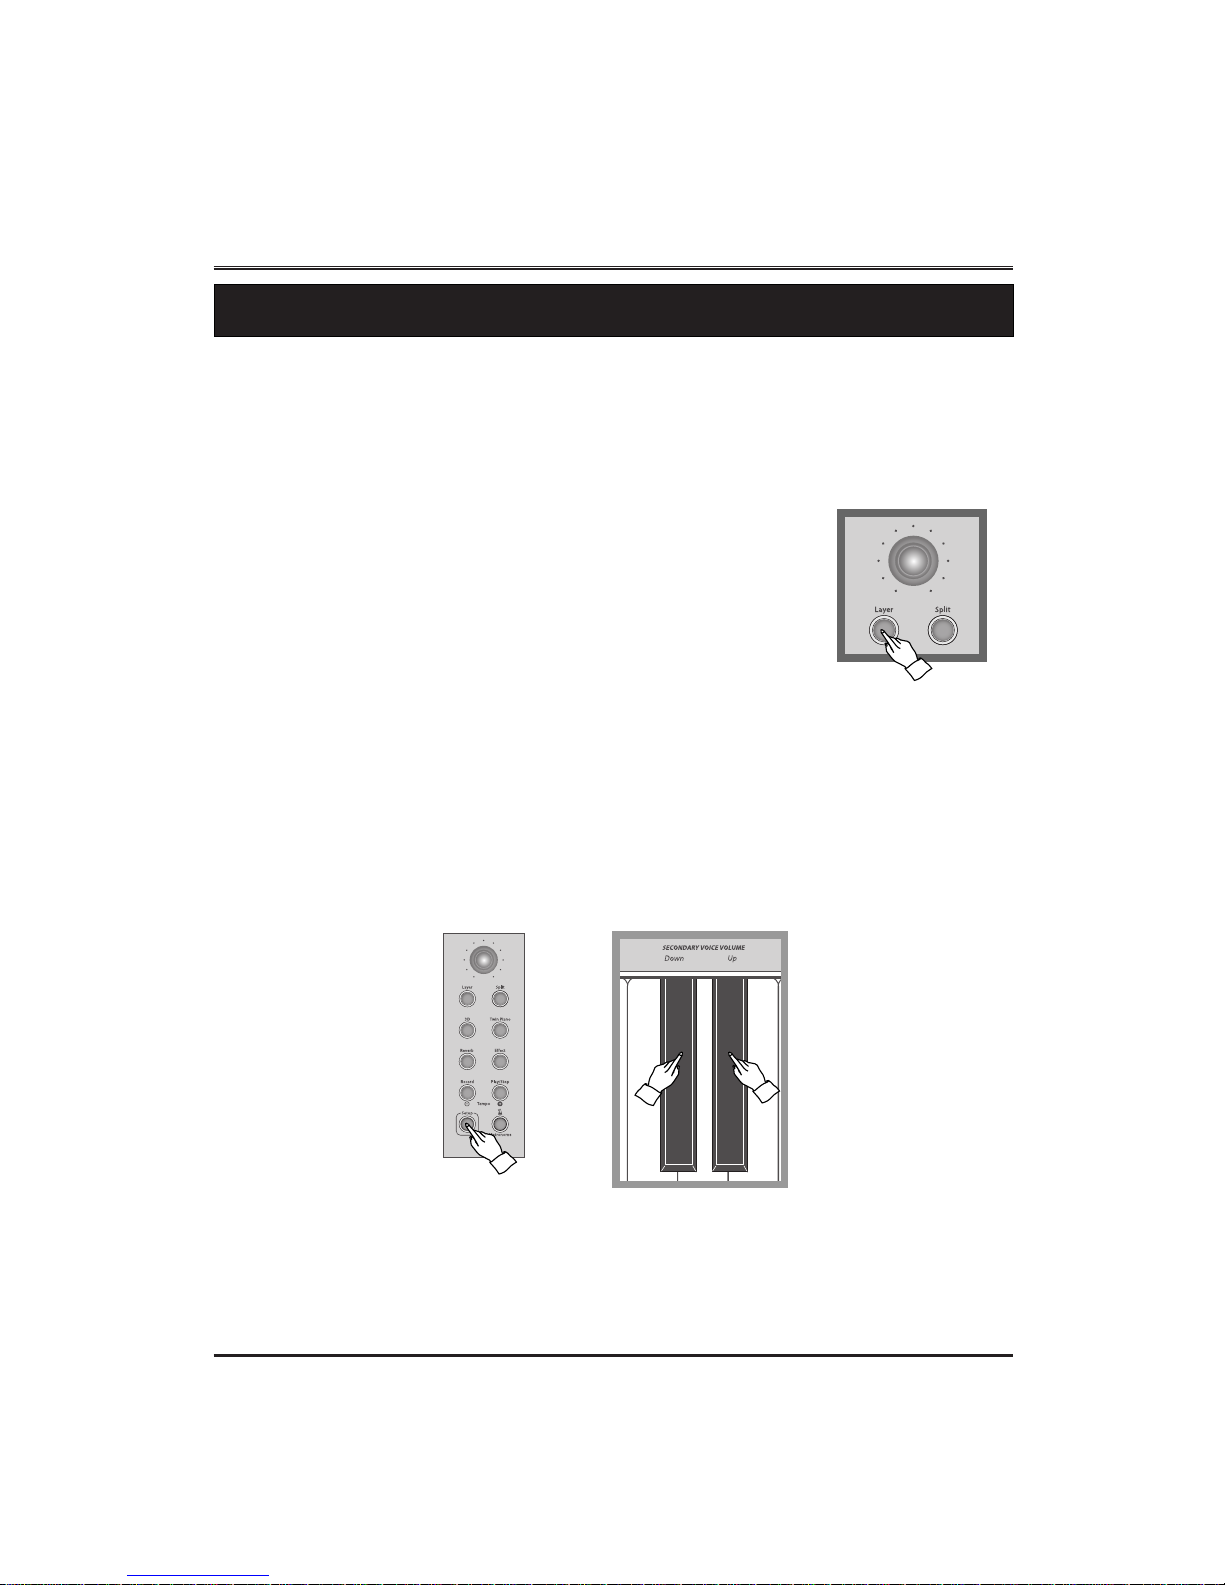
simultaneously in a layer. This makes it easy to create exceptionally rich and thick tonal
textures. The volume balance can be set for the two voices.
PLAYING WITH THE LAYER VOICE
① Select a main voice.
Select a voice in the normal way. (See the SELECTING VOICE section on page 24.)
② Call up the layer mode.
To call up the layer mode, press the LAYER button. Lamp lights and
the layer is set on.
③ Select the layered voice.
Select a voice in the normal way. (See the SELECTING VOICES section on page 24.)
ADJUSTING THE LAYER VOLUME
This determines the volume of the layered voice.
②
Adjust the layer volume by pressing secondary volume up and down keys.
☞ If you press both UP and DOWN keys at the same time, automatically return to the
default Layer Volume (11). The range of volume is 0 ~ 16.
☞ Hold the key for continuous decrementing or incrementing.
☞ Both split and layer volumes can be adjusted by using secondary volume keys.
① Press and hold the SETUP button.
☞ The lamp is on.
☞ If you select a layer voice, layer function automatically can be on without
pressing the LAYER button.
+
Page 28
27
Split
Split
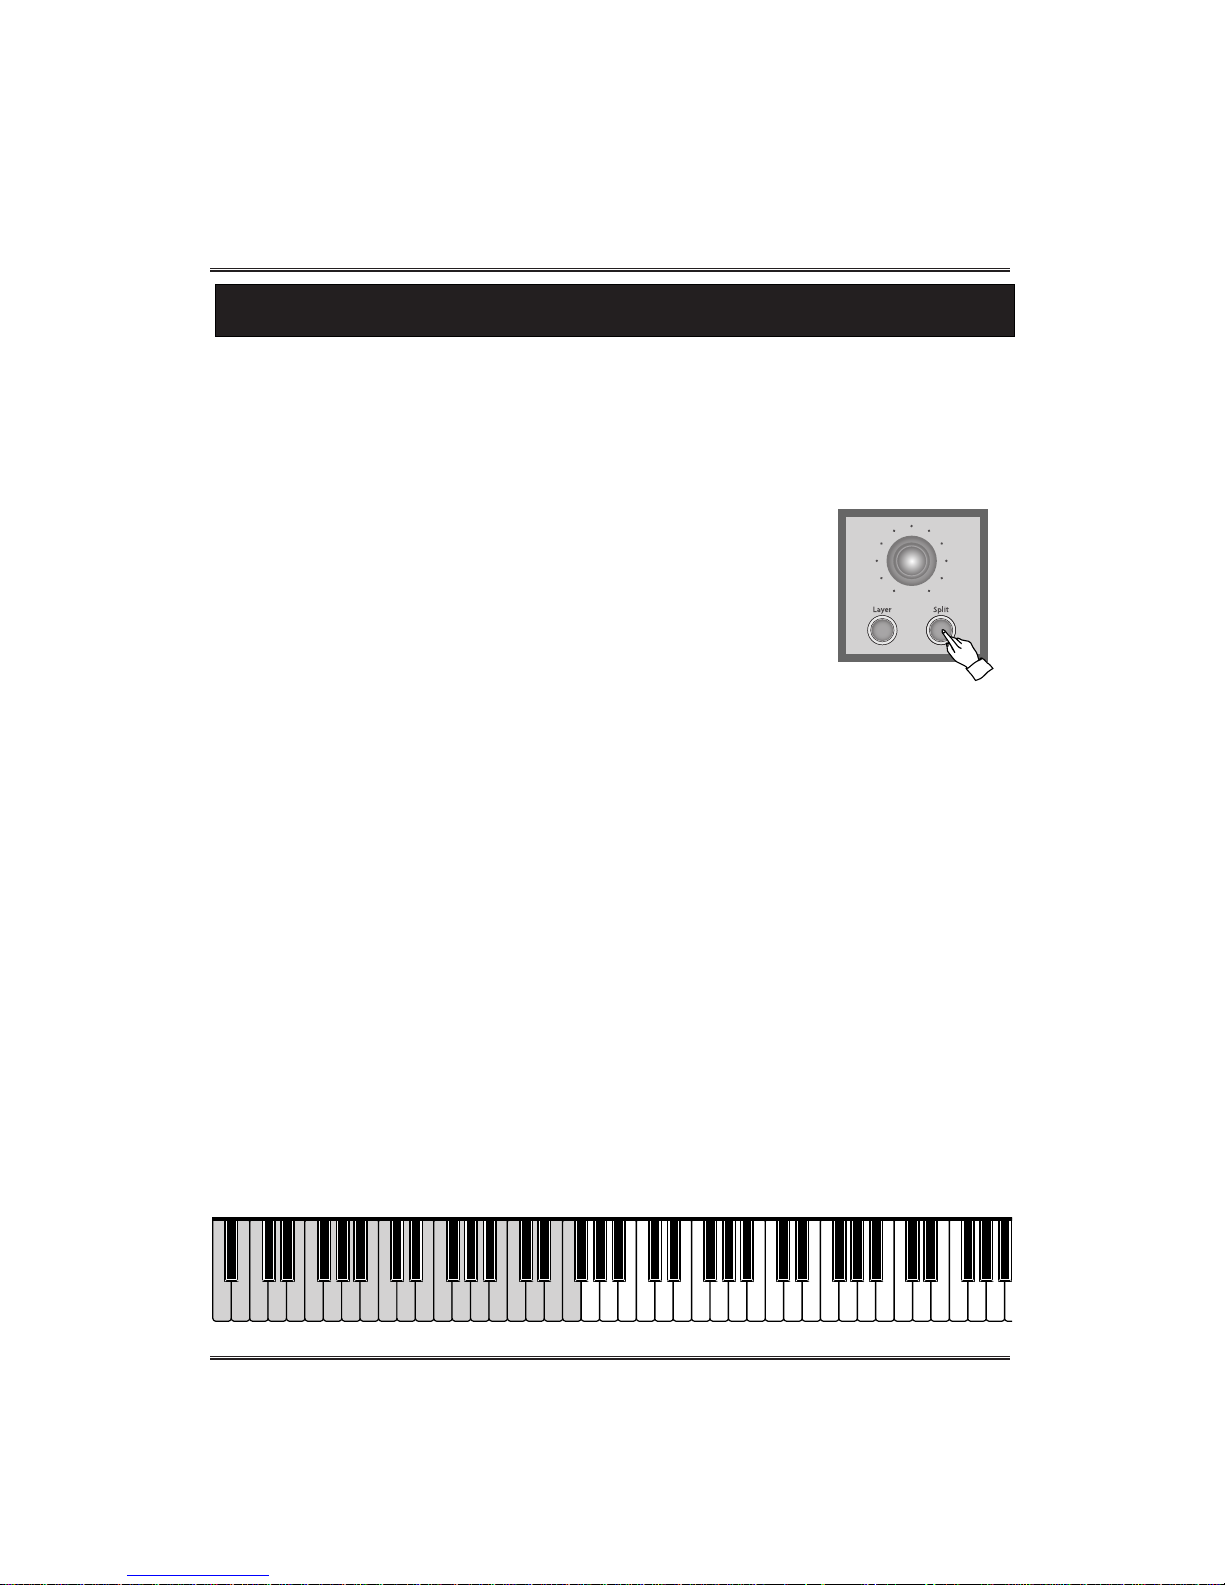
The split mode of the piano allows you to select and play two different voices with your left
and right hands - For example, play bass with the left and piano with the right .
PLAYING WITH THE SPLIT VOICE
① Select a main voice.
Select a voice in the normal way. (See the SELECTING VOICE section on page 24.)
② Call up the split mode.
To call up the layer mode, press the SPLIT button. Lamp lights and
the split is set on.
③ Select the split voice.
Select a voice in the normal way. (See the SELECTING VOICE section on page 24.)
ADJUSTING THE LAYER VOLUME
See the LAYER section on page 21.
☞ If you select a split voice, layer function automatically can be on without
pressing the SPLIT button.
CHANGING THE SPLIT POINT
You can set the point dividing the split voice and main voice ranges at any desired key position.
☞ Default value is F#4.
① Press and hold the SPLIT button.
② Press a desired key. The pressed key is assigned to new split point.
▼ Split point (F4#)
②
Adjust the layer volume by pressing secondary volume up and down keys.
① Press and hold the SETUP button.
☞ The lamp is on.
☞ If you press both UP and DOWN keys at the same time, automatically return to the
default Layer Volume (11). The range of volume is 0 ~ 16.
☞ Hold the key for continuous decrementing or incrementing.
☞ Both split and layer volumes can be adjusted by using secondary volume keys.
Page 29
28
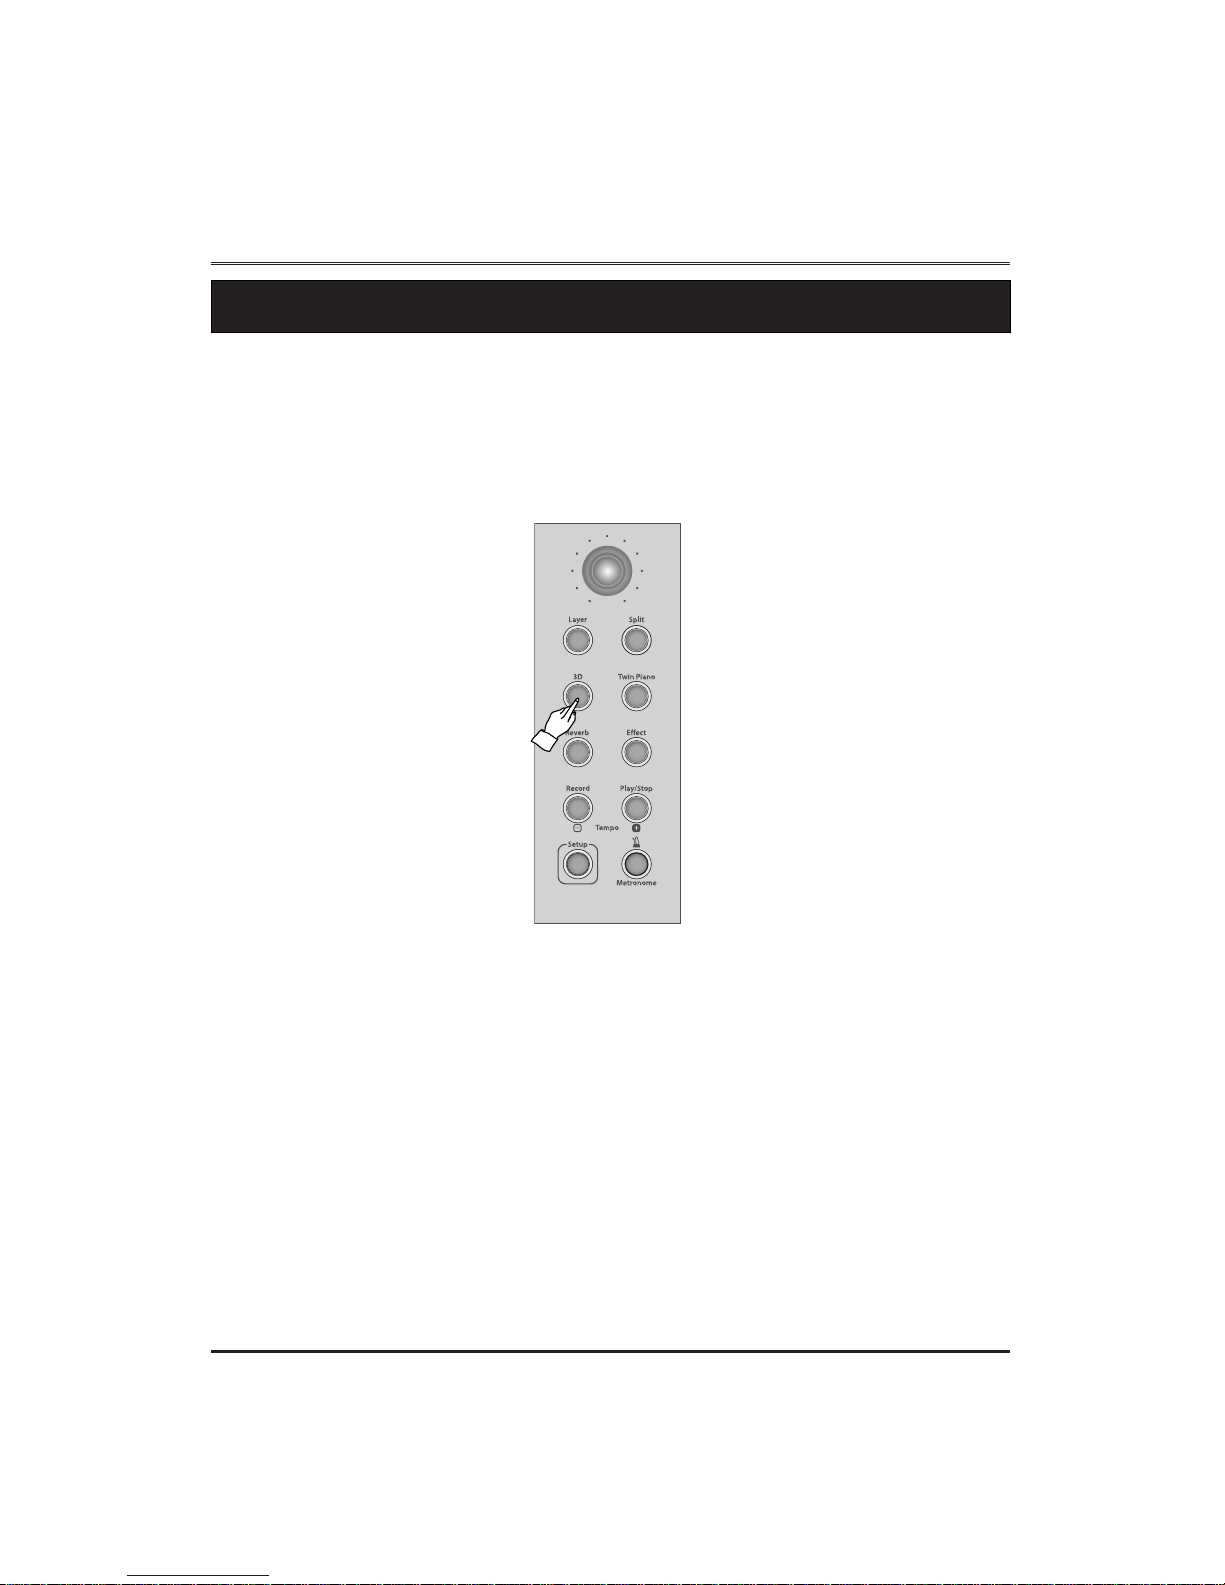
3D (Spatial Effect)
3D(Spatial Effect)
The 3D effects widen the stereo image and the listener through two speakers or stereo
headphones feels like placed in 3 dimensional spaces.
PLAYING WITH THE 3D EFFECT
① Press the 3D button.
The 3D effect turns on and the lamp lights.
② To turn off the 3D effects, press the 3D button again.
The 3D effect turns off and the lamp goes out.
Page 30
29
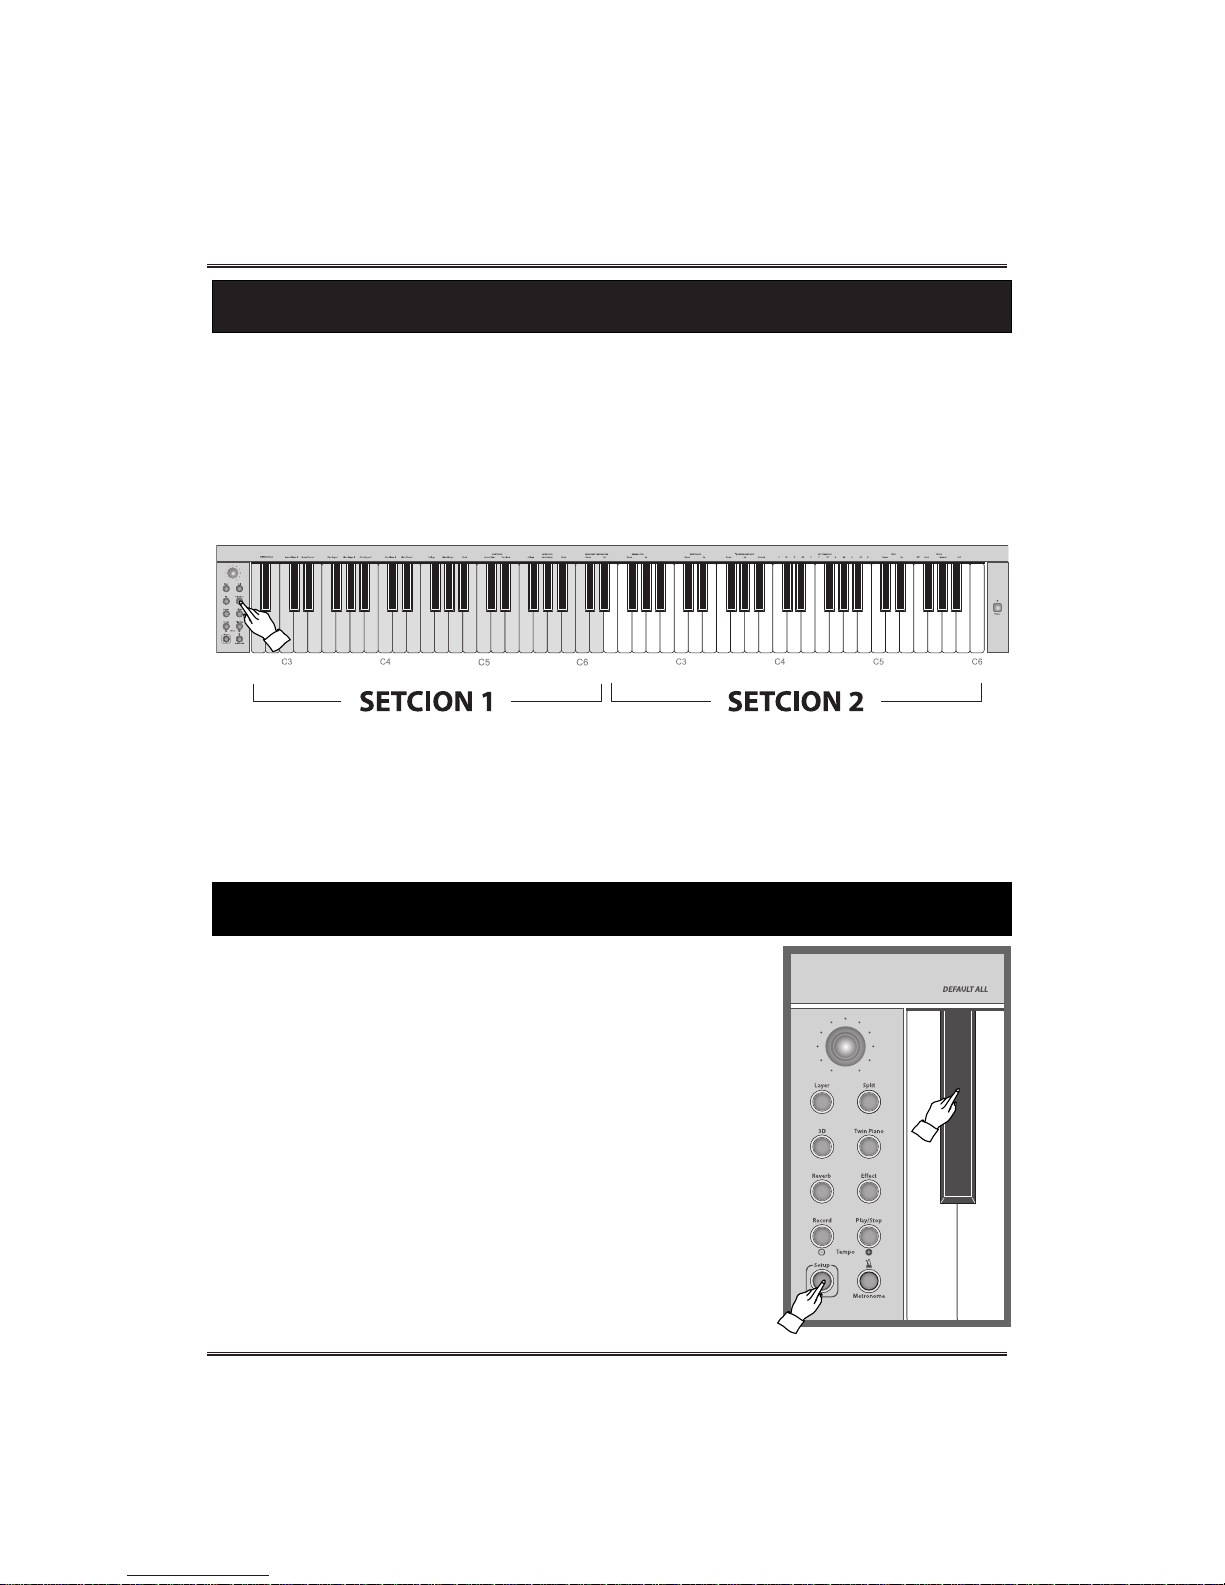
Twin Piano/Default All
Twin Piano
Default All
Splitting the Piano Keyboard into two sections for twin piano performance.
The keyboard can be divided into two separate sections, allowing for two people to
perform in the same octave.
It's possible to make following setting values to default values
with this function.
1) Secondary Voice volume (Default, 13 Range 0 ~ 16)
2) Reverb level (Default 11, Range 0 ~ 16)
3) Effect level (Default 11, Range 0 ~ 16)
4) Metronome beat (Default 4, Range 2 ~ 13)
5) Transpose (Default C, Range G~C~F#)
6) Tune (Default A3 440Hz, Range -50 ~ 0 ~ 50 cent)
7) Touch (Default Normal, Range Off, Hard, Normal, Soft)
PLAYING WITH THE TWIN PIANO
① Press the TWIN PIANO button.
The keyboard splits two sections, which have same octave.
② To turn off the twin piano performance, press the TWIN PIANO button again.
The twin piano performance turns off and the lamp goes out.
☞ This function can not be used with the layer and split functions.
Page 31
30
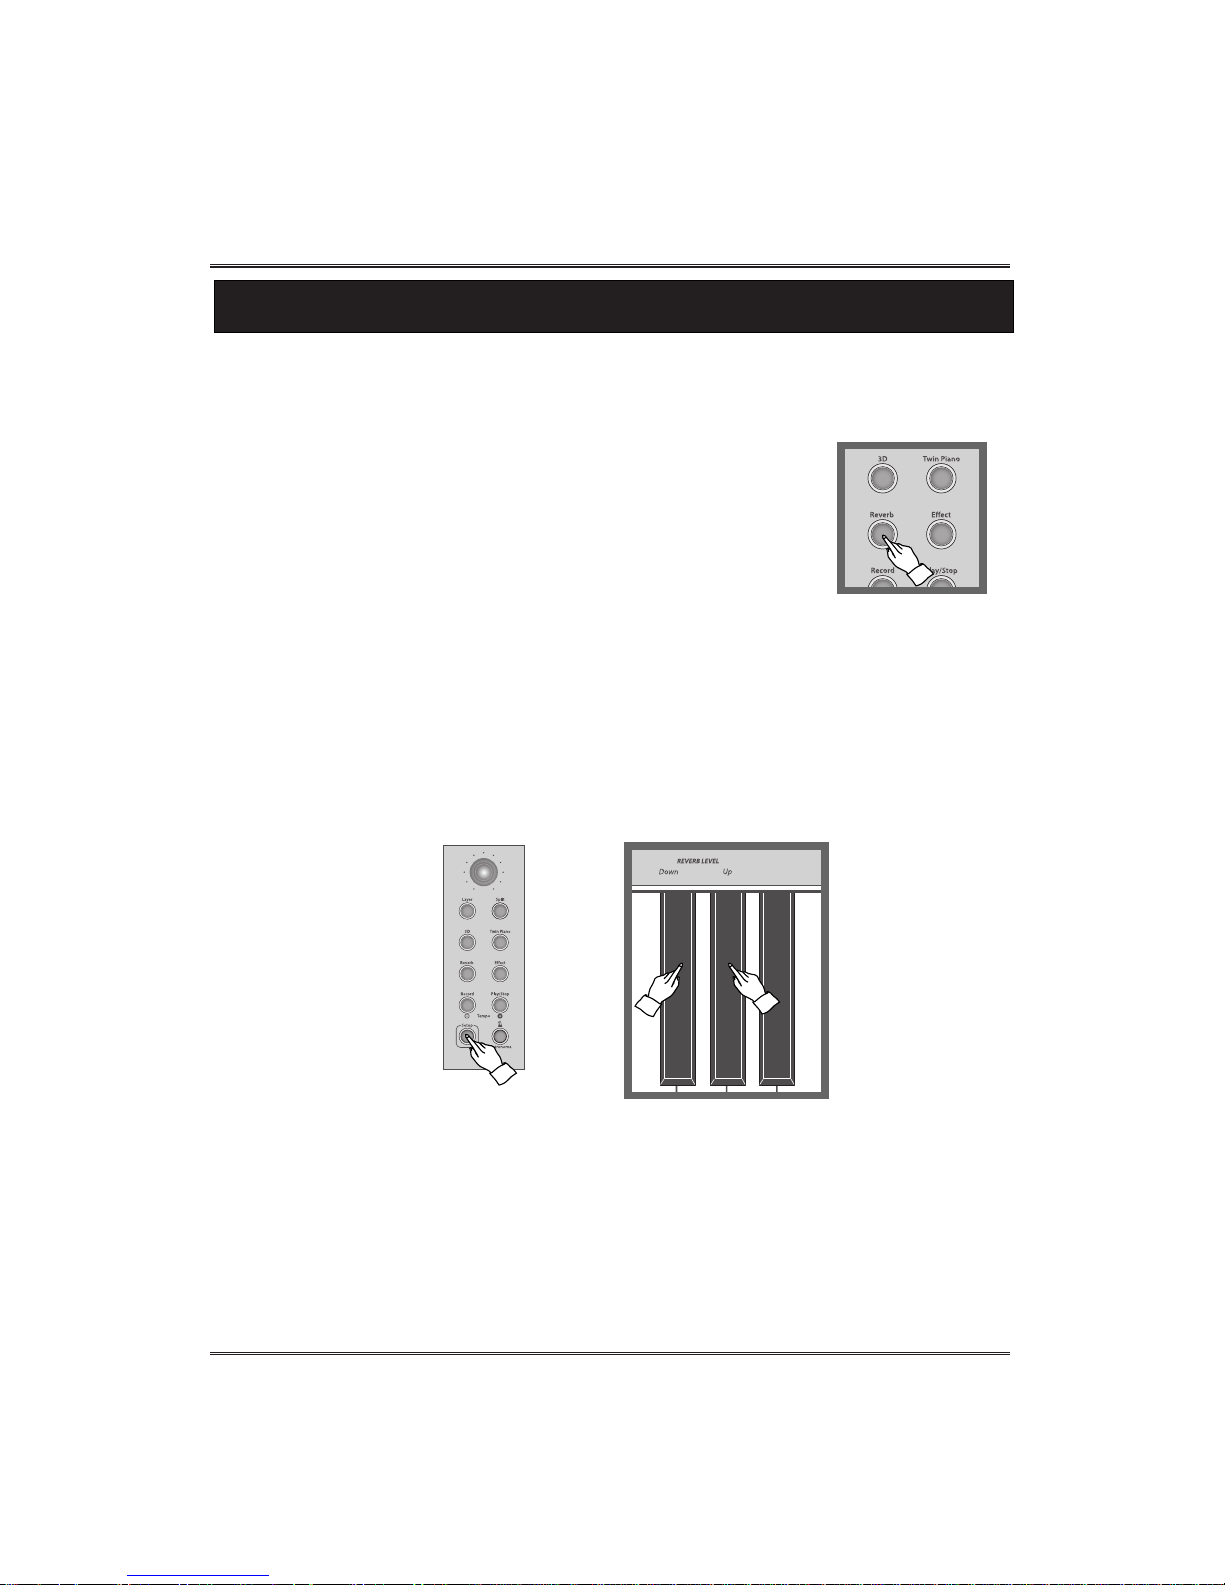
Reverb
Reverb
Reverb is an effect that recreates the decaying reflections of a sound in a performance
space, and reproduces the special ambience of a concert hall.
① Press the REVERB button.
② To turn off the reverb press the REVERB button again.
The reverb turns off and the lamp goes out.
☞ The reverb turns on and lamp lights.
☞ The reverb is engaged automatically when the power is turned on with
the lamp lighting.
ADJUSTING THE REVERB LEVEL
②
Adjust the reverb level by pressing reverb level up and down keys.
☞ The reverb level can be adjusted, when reverb is on.
☞ If you press both UP and DOWN keys at the same time, automatically return to the default reverb level (11).
The range is 0 ~ 16.
☞ Hold the key for continuous decrementing or incrementing.
① Press and hold the SETUP button.
☞ The lamp is on.
+
Page 32
31
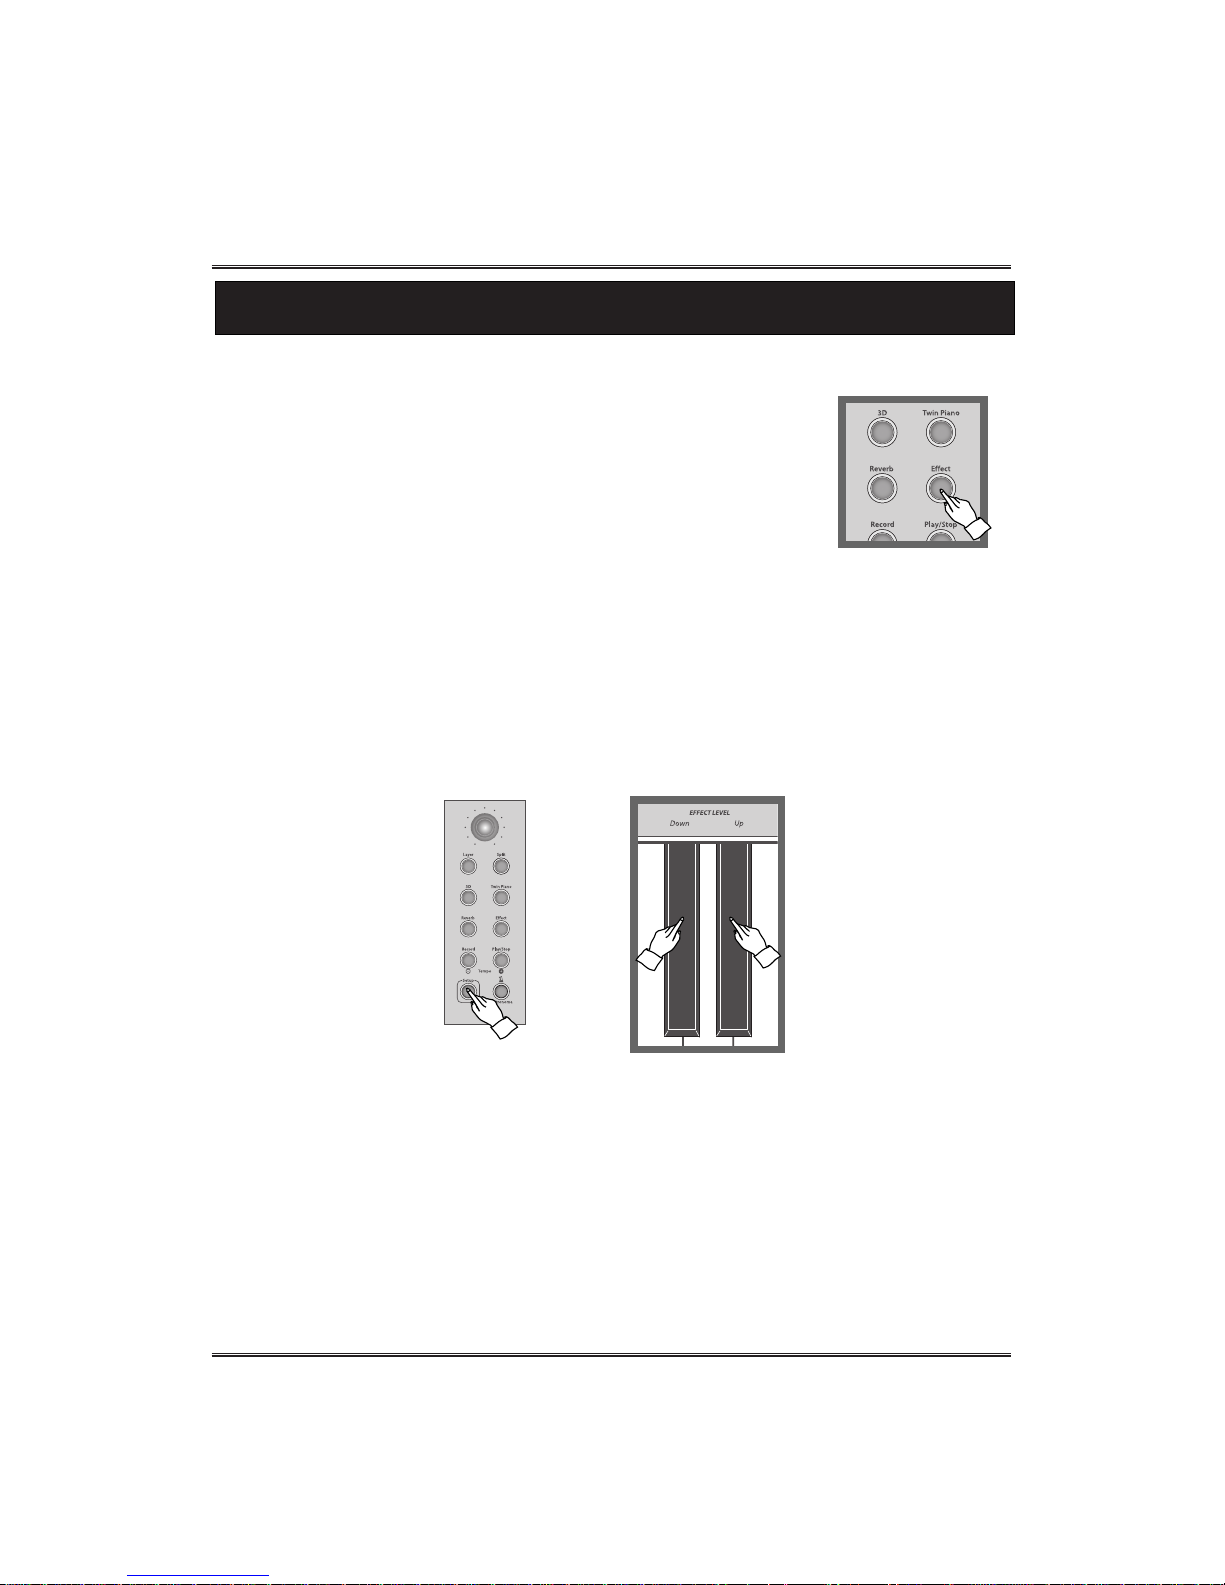
Effect
Effect
① Press the EFFECT button.
② To turn off the reverb press the EFFECT button again.
The effect turns off and the lamp goes out.
☞ The effect turns on and lamp lights.
☞ When turning on power, the effect is off. (Default is off.)
ADJUSTING THE EFFECT LEVEL
②
Adjust the effect level by pressing effect level up and down keys.
☞ The effect level can be adjusted, when effect is on.
☞ If you press both UP and DOWN keys at the same time, automatically return to the default effect level (11).
The range is 0 ~ 16.
☞ Hold the key for continuous decrementing or incrementing.
① Press and hold the SETUP button.
☞ The lamp is on.
+
The effect adds more breadth to the selected keyboard voice.
Page 33
32
Tune
Tune
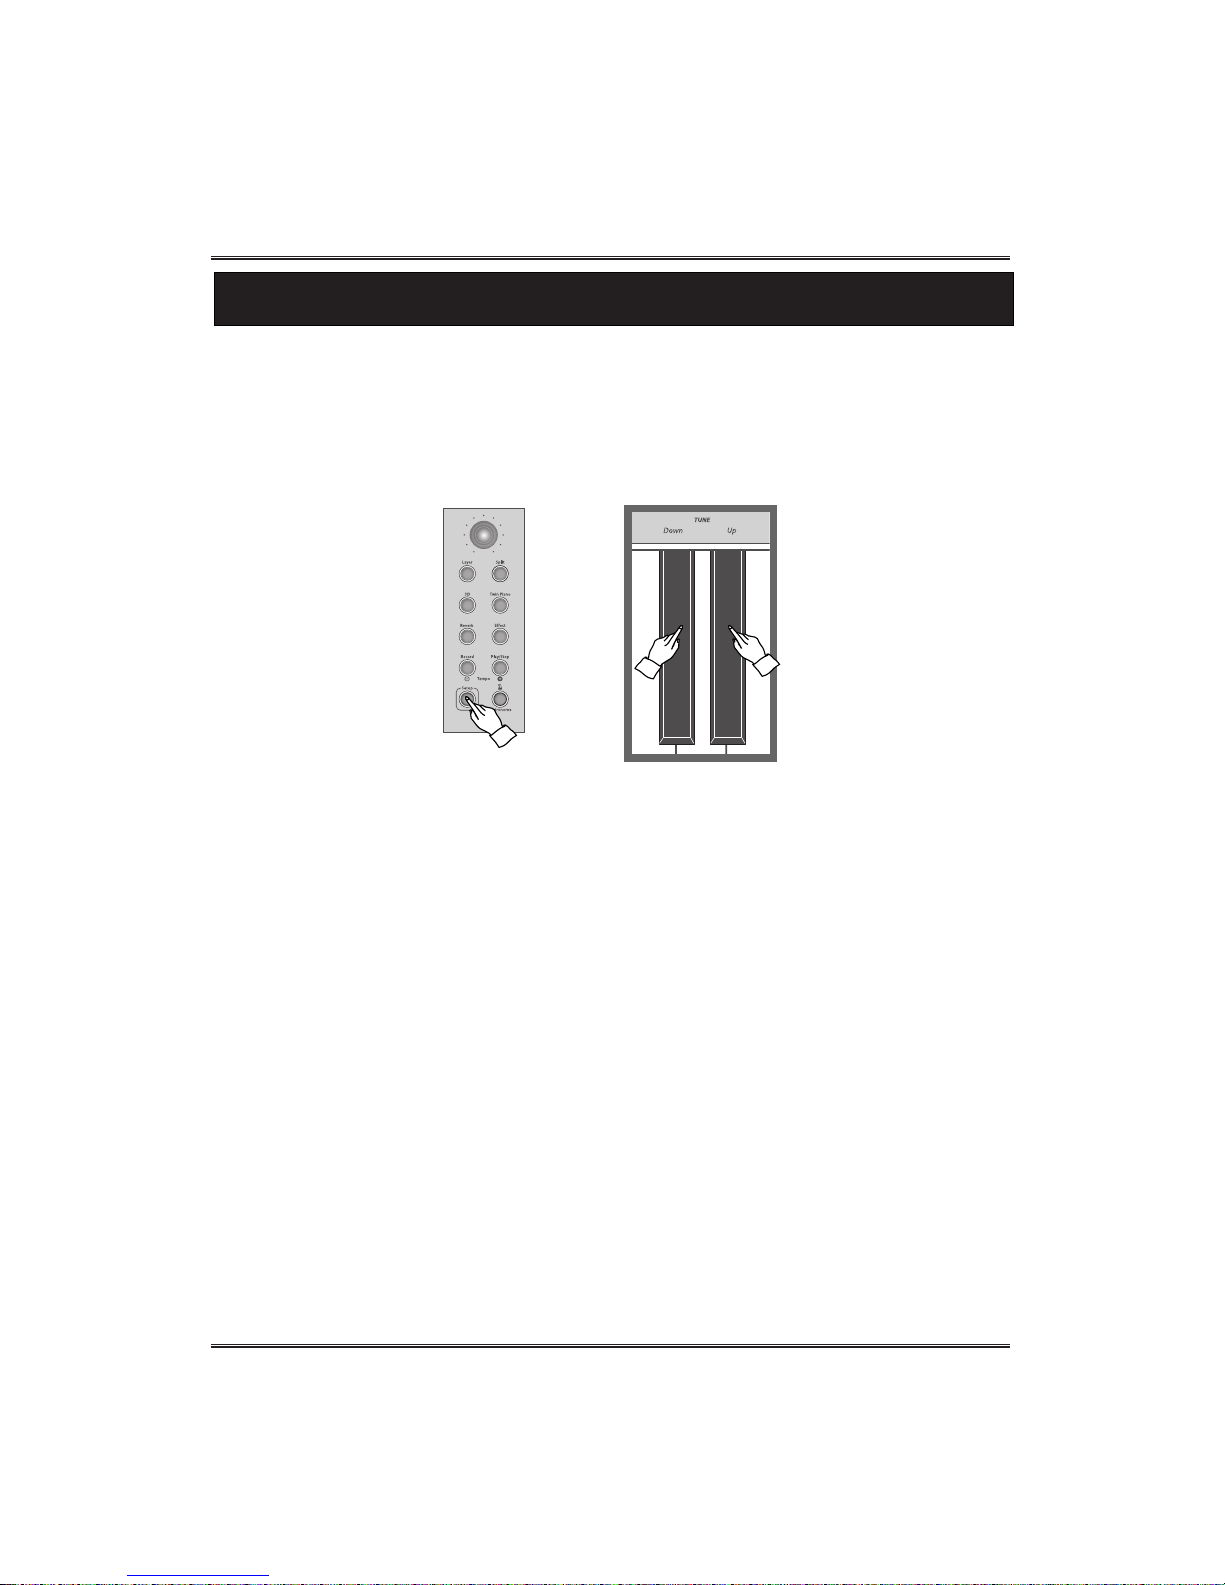
The Tune function lets you make fine adjustments to the pitch, allowing you to
accurately match the tuning with that of other instruments.
+
②
Adjust the pitch by pressing tune up and down keys.
☞
When pressing up or down key, piano makes 'C' sound and you can hear the adjusted pitch.
☞ If you press both UP and DOWN keys at the same time, automatically return to the default value.
☞ Range A3 440Hz ± 50cents (1step is 1 cent.)
☞ Hz(Hertz) The pitch is measured in units of Hertz (abbreviated Hz), which represents the number
of times the sound wave vibrates in a second.
☞ Cents Cent is unit of pitch, equal to 1/100 of a semitone.
☞ Hold the key for continuous decrementing or incrementing.
① Press and hold the SETUP button.
☞ The lamp is on.
Page 34
33
Transpose
Transpose
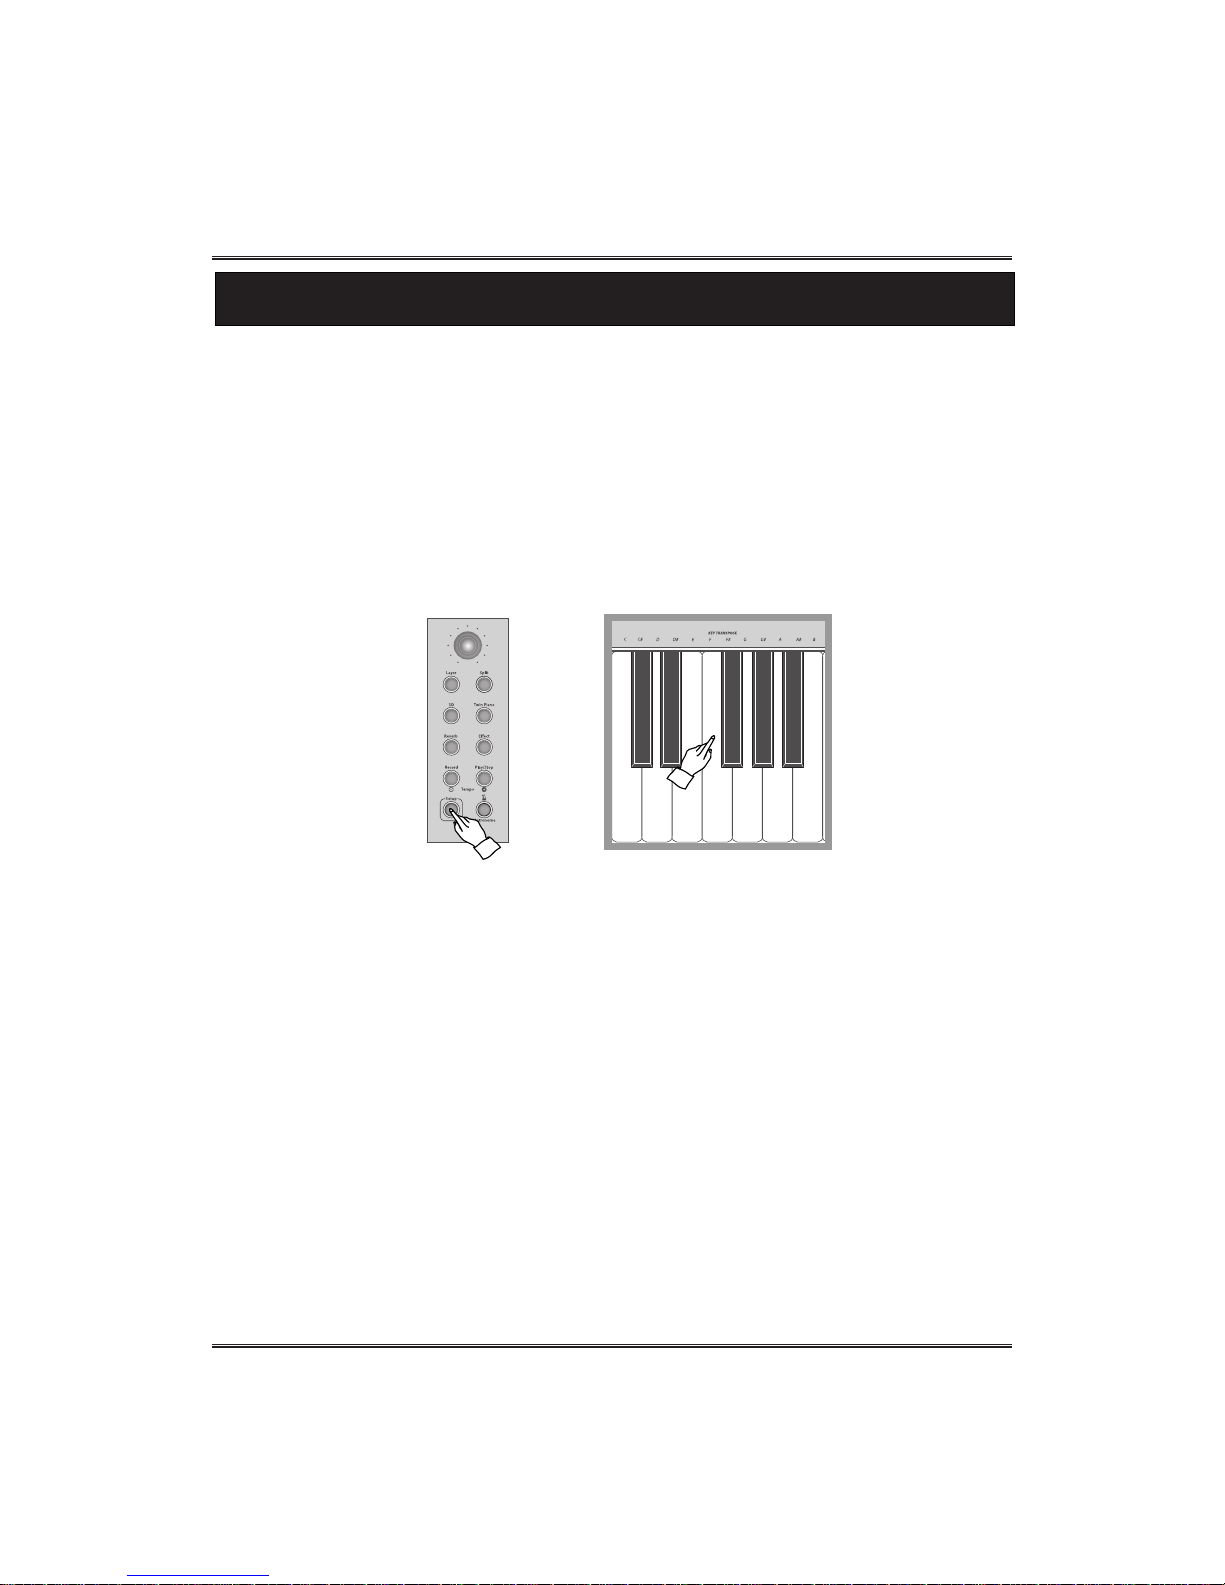
The Transpose function makes it possible to shift the pitch of the keyboard in
semitone units, allowing you to match the pitch of the keyboard to the range of other
instruments or singers, or letting you easily play in a different key without having to
change your fingering.
For example, if the Transpose is set F, playing C results in a pitch of F, or in other words,
you can play in the key of C major on the keyboard and automatically have the pitch
transposed to F major.
+
②
Set new key of transpose section.
☞ Default value: C key
☞ Range: 12 semitones (G ~ C ~ F#)
① Press and hold the SETUP button.
☞ The lamp is on.
Page 35
34
Touch
Touch
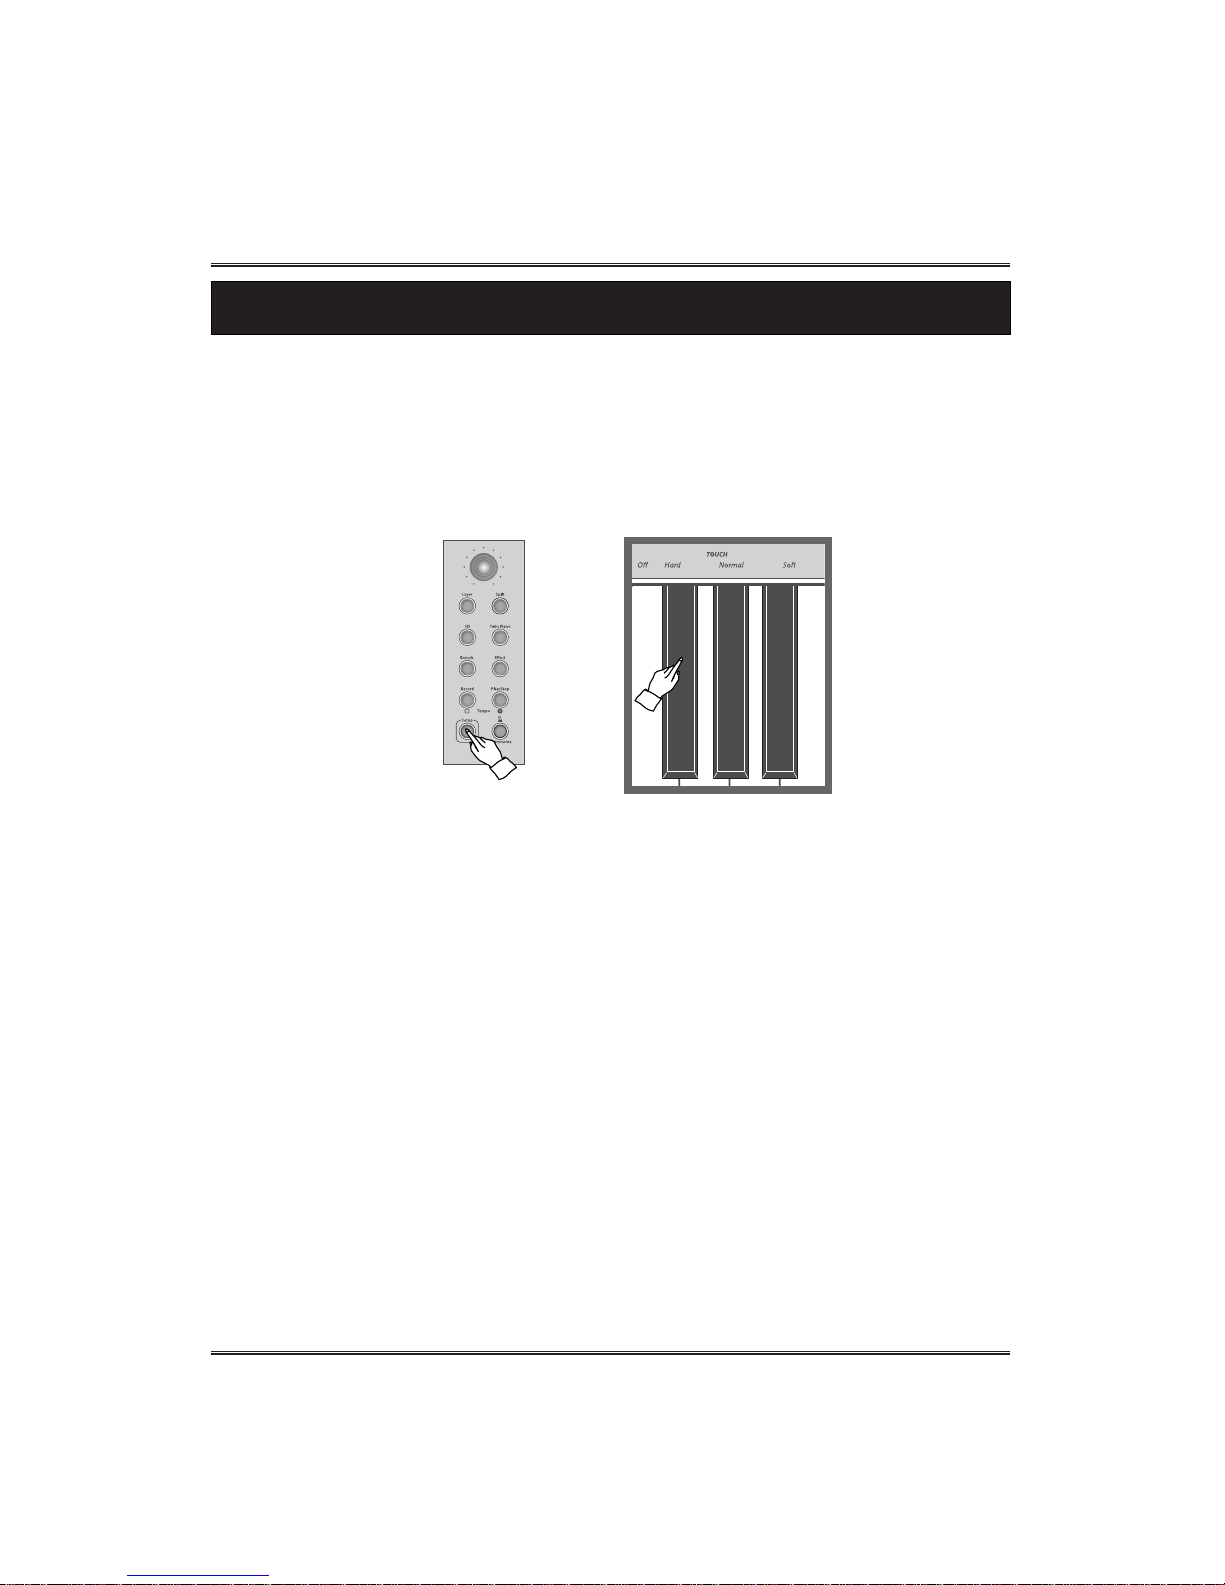
Touch determines how your playing strength (velocity) affects the volume of the voices.
Four(4) types are available for tailoring the keyboard response to the selected voice, type of
song, or your own playing preference.
☞ Default touch is Normal.
☞
There are 4 touch types in this piano - Off, Soft, Normal, Hard
Off
This setting produces the same degree of loudness, no matter how strongly of softly you play the keys.
Soft
These settings let you produce a relatively loud sound even when playing the key softly.
Normal
These settings are standard keyboard response. - Default setting
Hard
These settings require you to play the keys quit strongly to produce maximum loudness.
+
②
Set a desired touch by pressing one of touch keys.
① Press and hold the SETUP button.
☞ The lamp is on.
Page 36
35
Using Metronome
Using Metronome
① START/STOP of Metronome
To start the metronome, simply press the METRONOME button. The lamp
lights.
The piano features a convenient metronome that is ideal for practicing.
② Adjusting Tempo of Metronome
You can set the tempo over range 40 ~ 250 by using the TEMPO buttons.
☞ Hold the button for continuous decrementing or incrementing.
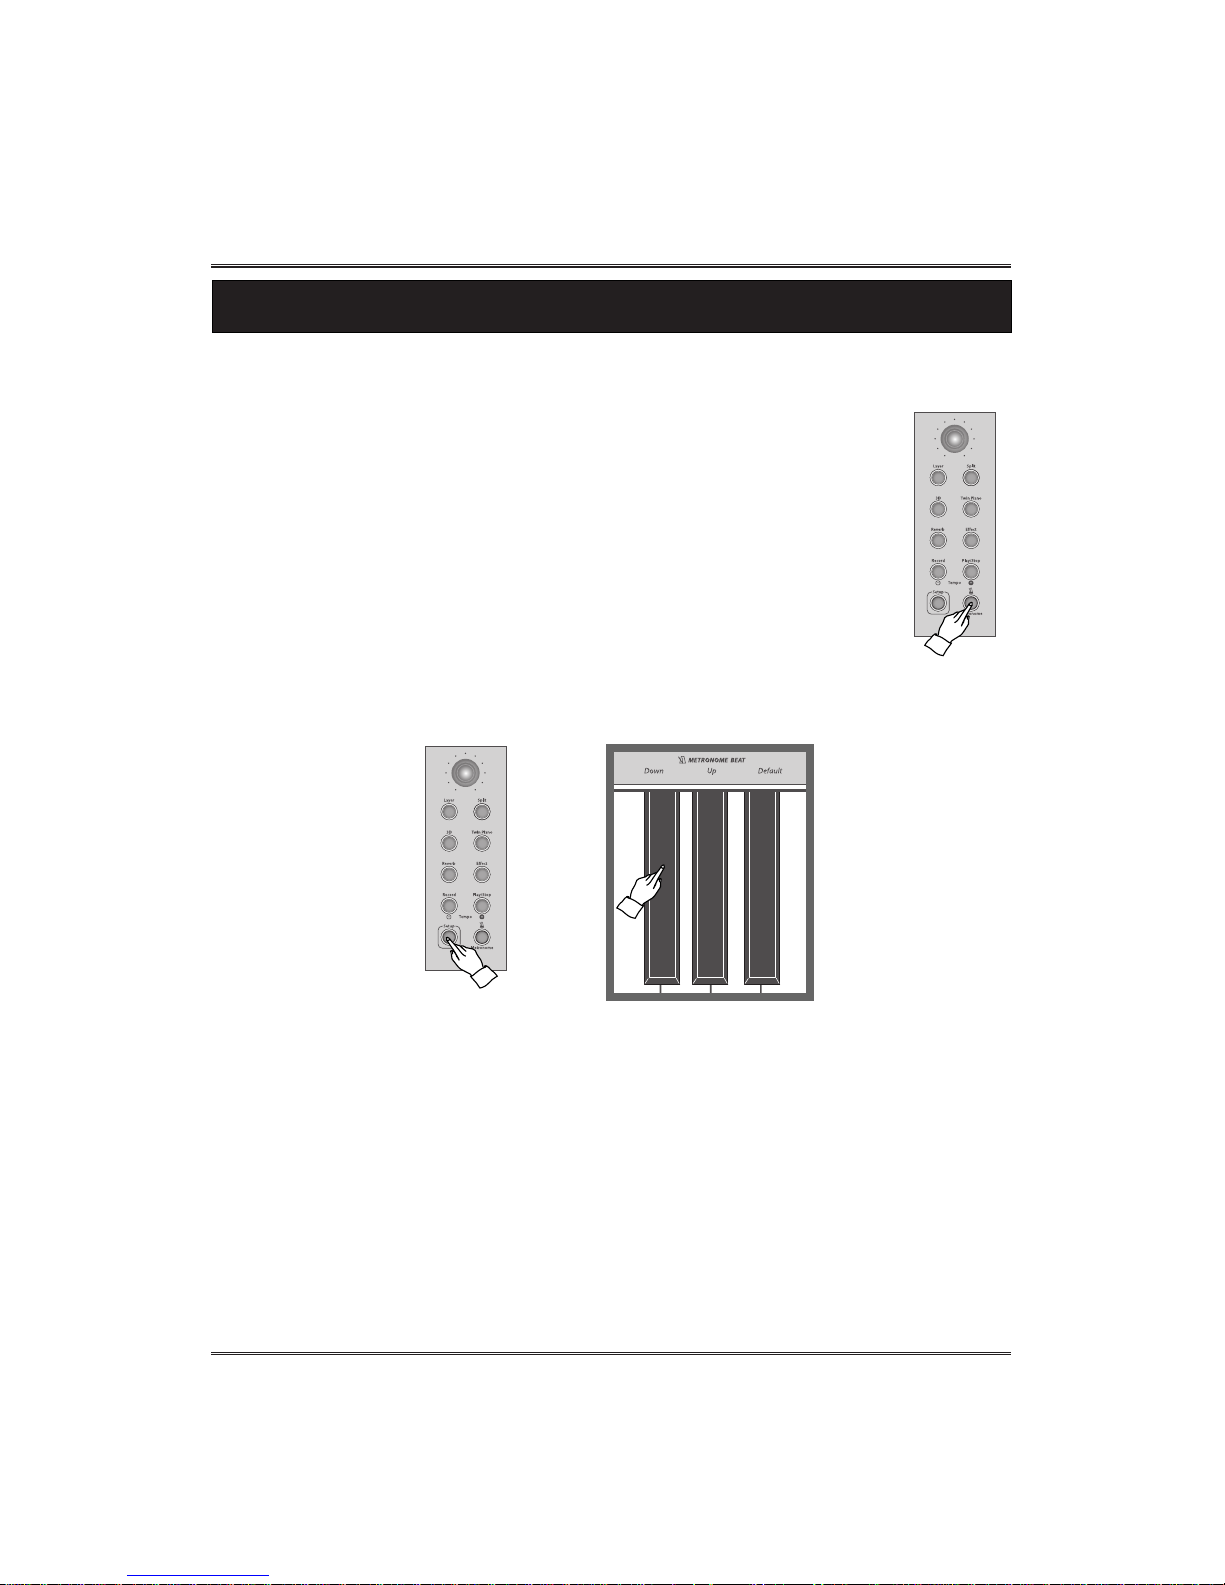
③ Changing the metronome Beat
Press and hold the SETUP button and press metronome beat up or down key.
☞ Beat Range 2, 3, 4, 5, 6, 7, 8, 9, 10, 11, 12, 13
☞ Default beat 4
☞ If you want to set default beat, press and hold the SETUP button and press default key of metronome
beat section.
Press the METRONOME button again to stop the metronome sound. The
lamp goes off.
+
Page 37
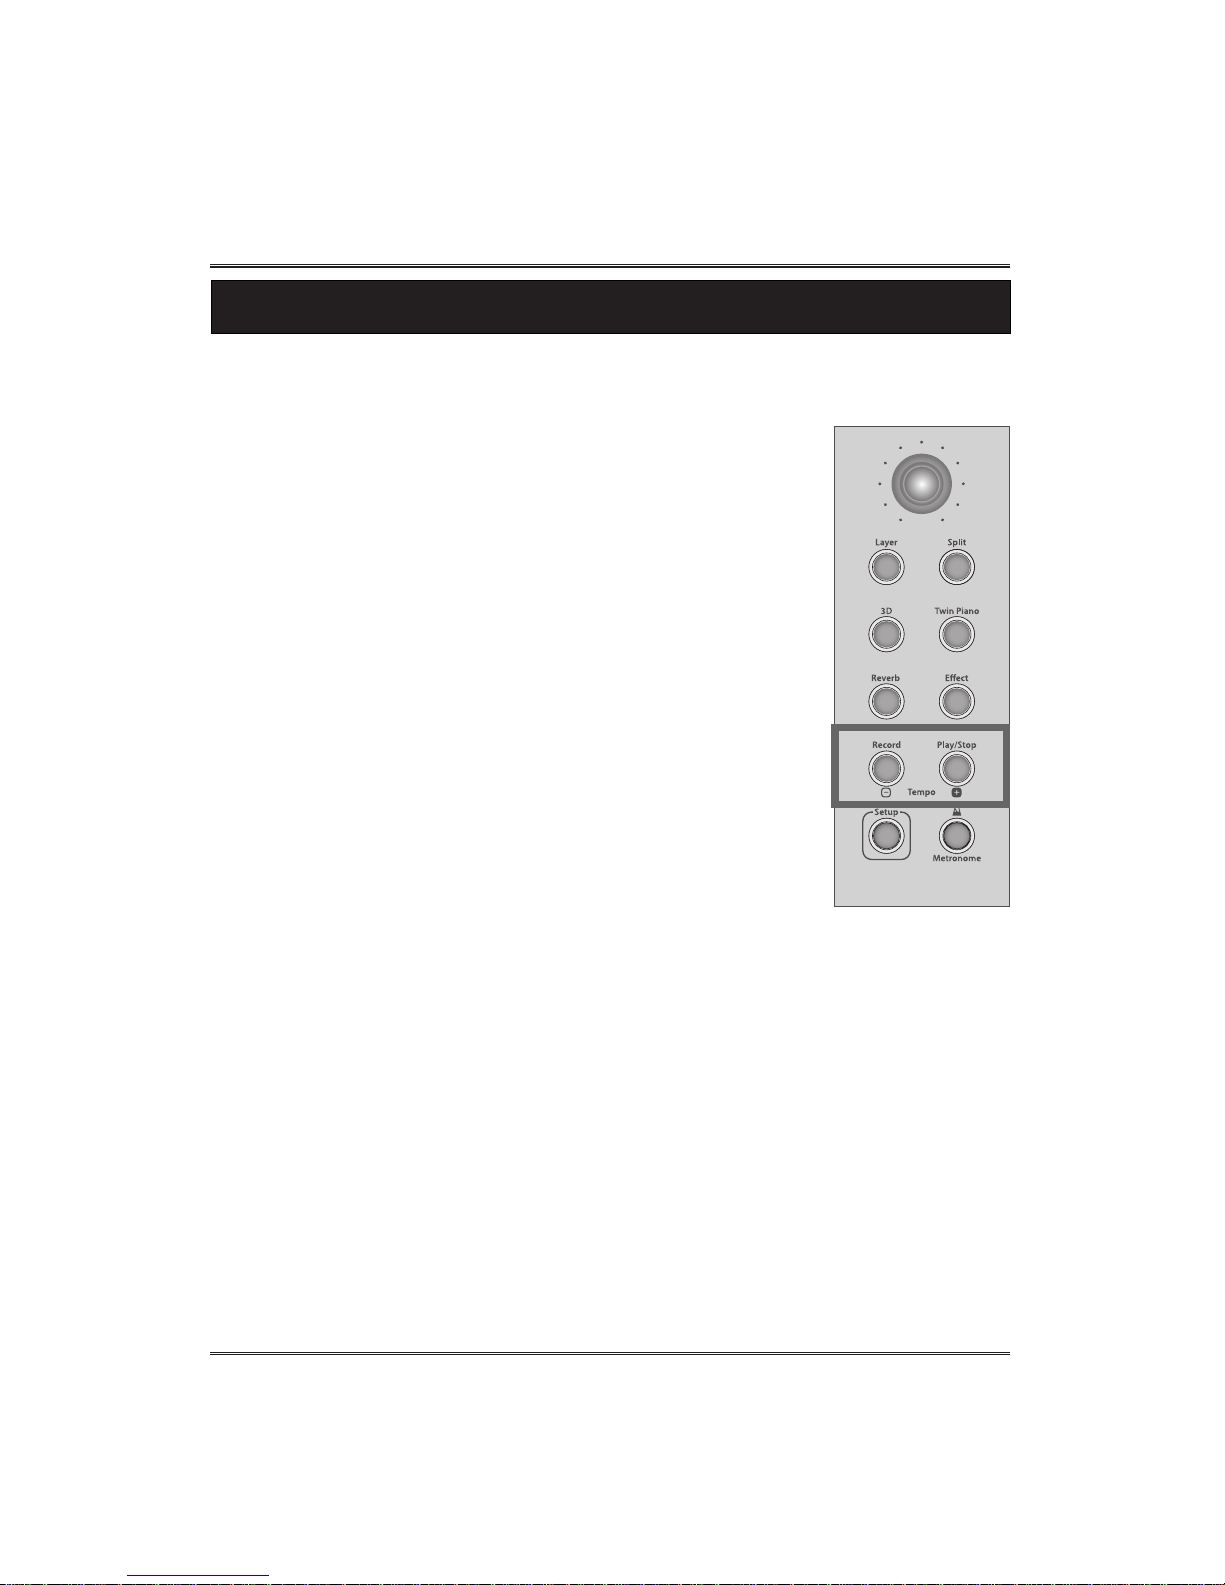
④ Playback the recorded song
Press the START/STOP button again in the record mode.
The recorded song is played.
The play/stop lamp flashes and the record lamp lights.
☞ To delete the recorded song, press and hold the RECORD button
during 2~3 seconds.
☞ If there is no recorded song in the memory, the record lamp lights
and the play/stop lamp is off.
☞ If there is a recorded song in the memory, both the record lamp and
the play/stop lamps light.
☞ The song memory is cleared, when the power is turned off.
⑤ Return to the normal mode
Press the RECORD button. The Record lamp is turned off.
36
Recording
① Select Record mode.
Press the RECORD button, the RECORD lamp lights.
Recording
The piano features comprehensive song recording functions that allow you to record
your own performance.
② Start recording
Start playing the keyboard or press the START/STOP button.
The record lamp flashes and the Play/stop lamp lights.
③ Stop recording
Stop playing the keyboard and press the START/STOP button.
Both record and play/stop lamps light.
Page 38
MIDI & USB MIDI
37
MIDI & USB MIDI
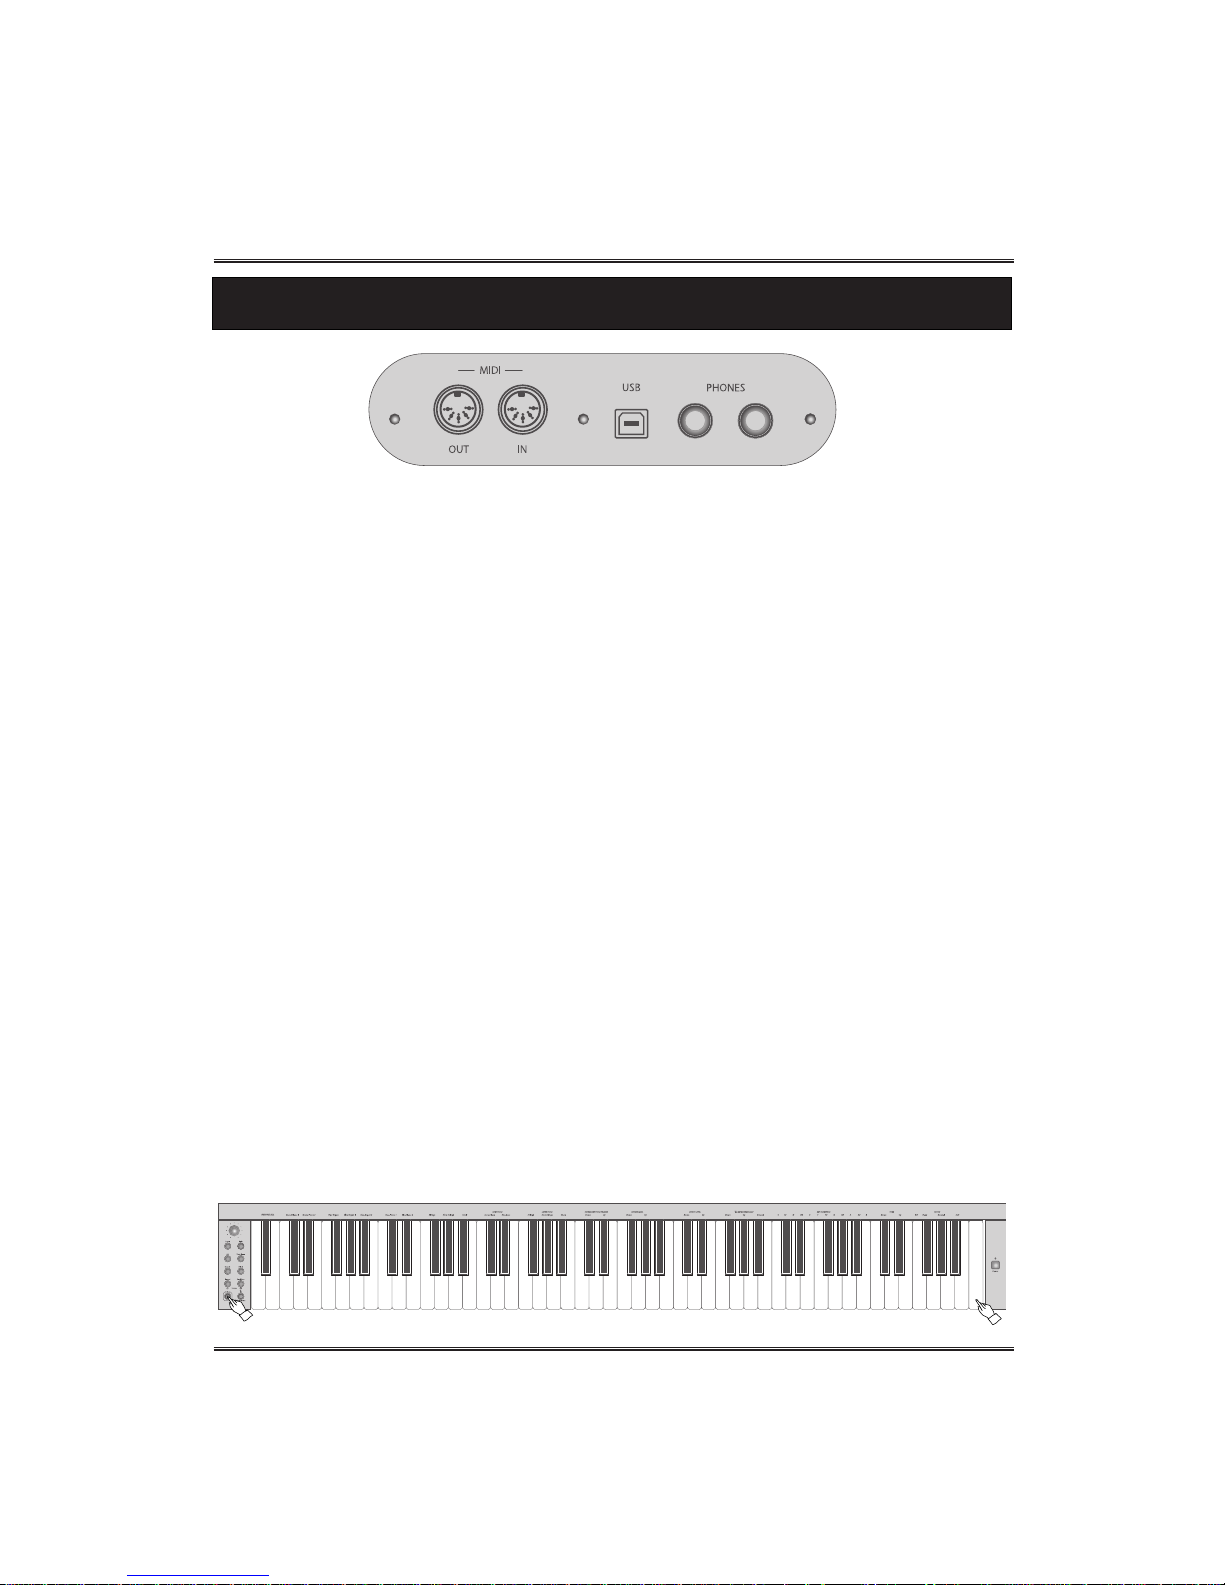
ⓐ Connecting the external MIDI devices (MIDI Terminals)
Use the built-in MIDI terminals and standard MIDI cables to connect external MIDI devices.
MIDI IN Receives MIDI messages from an external MIDI device.
MIDI OUT Transmits MIDI messages generated by the instrument.
☞ What's MIDI?
MIDI(Musical Instrument Digital Interface) is the international standard for digital communication of electronic
musical instrument data.
This means that any equipment that has a MIDI terminal (such as electronic musical instruments or personal computers
) can easily exchange digital data with other MIDI equipment without complicated conversions or connections.
ⓑ Connecting a computer (USB Terminal)
By connecting a computer to the USB, you can transfer data between the instrument and
the computer via MIDI, and take advantage of sophisticated computer music programs.
Keep in mind that you also need to install an appropriate USB MIDI driver.
The instructions below explain how to connect and use the terminals.
☞ CAUTION
This instrument cannot be connected with both USB terminal and MIDI Terminals.
☞ CAUTION - Precautions when using the USB terminal.
When connecting the computer to the USB terminal, make sure to observe the following points. Failing to do so
risks freezing the computer and corrupting or losing data. If the computer or the instrument freezes, turn the
power to the instrument off and restart the computer.
Before connecting the computer to the USB terminal, exit from any power-saving mode of the computer (such as
suspended, sleep, standby), and quit any open application software, also turns off the power to the instrument.
Execute the following before turning the power to the instrument off or unplugging the USB cable to/from the
instrument/computer.
- Quit any open application software on the computer.
- Make sure that data is not being transmitted from the instrument. (Data is transmitted only by playing notes on
the keyboard or playing back a song.)
- While a USB device is connected to the instrument, you should wait for six seconds or more between these
operations: When turning the power of the instrument off then on again, or when alternately
connecting/disconnecting the USB cable.
Local control On/Off (Hidden Function)
Press and hold down the SETUP button and press Right (C9) key.
☞ Under Local control off, the piano doesn't make any sound without PC connection(USB or MIDI).
☞ We recommend to turn off and on power, after using this function.
ⓐⓑ
Page 39
38
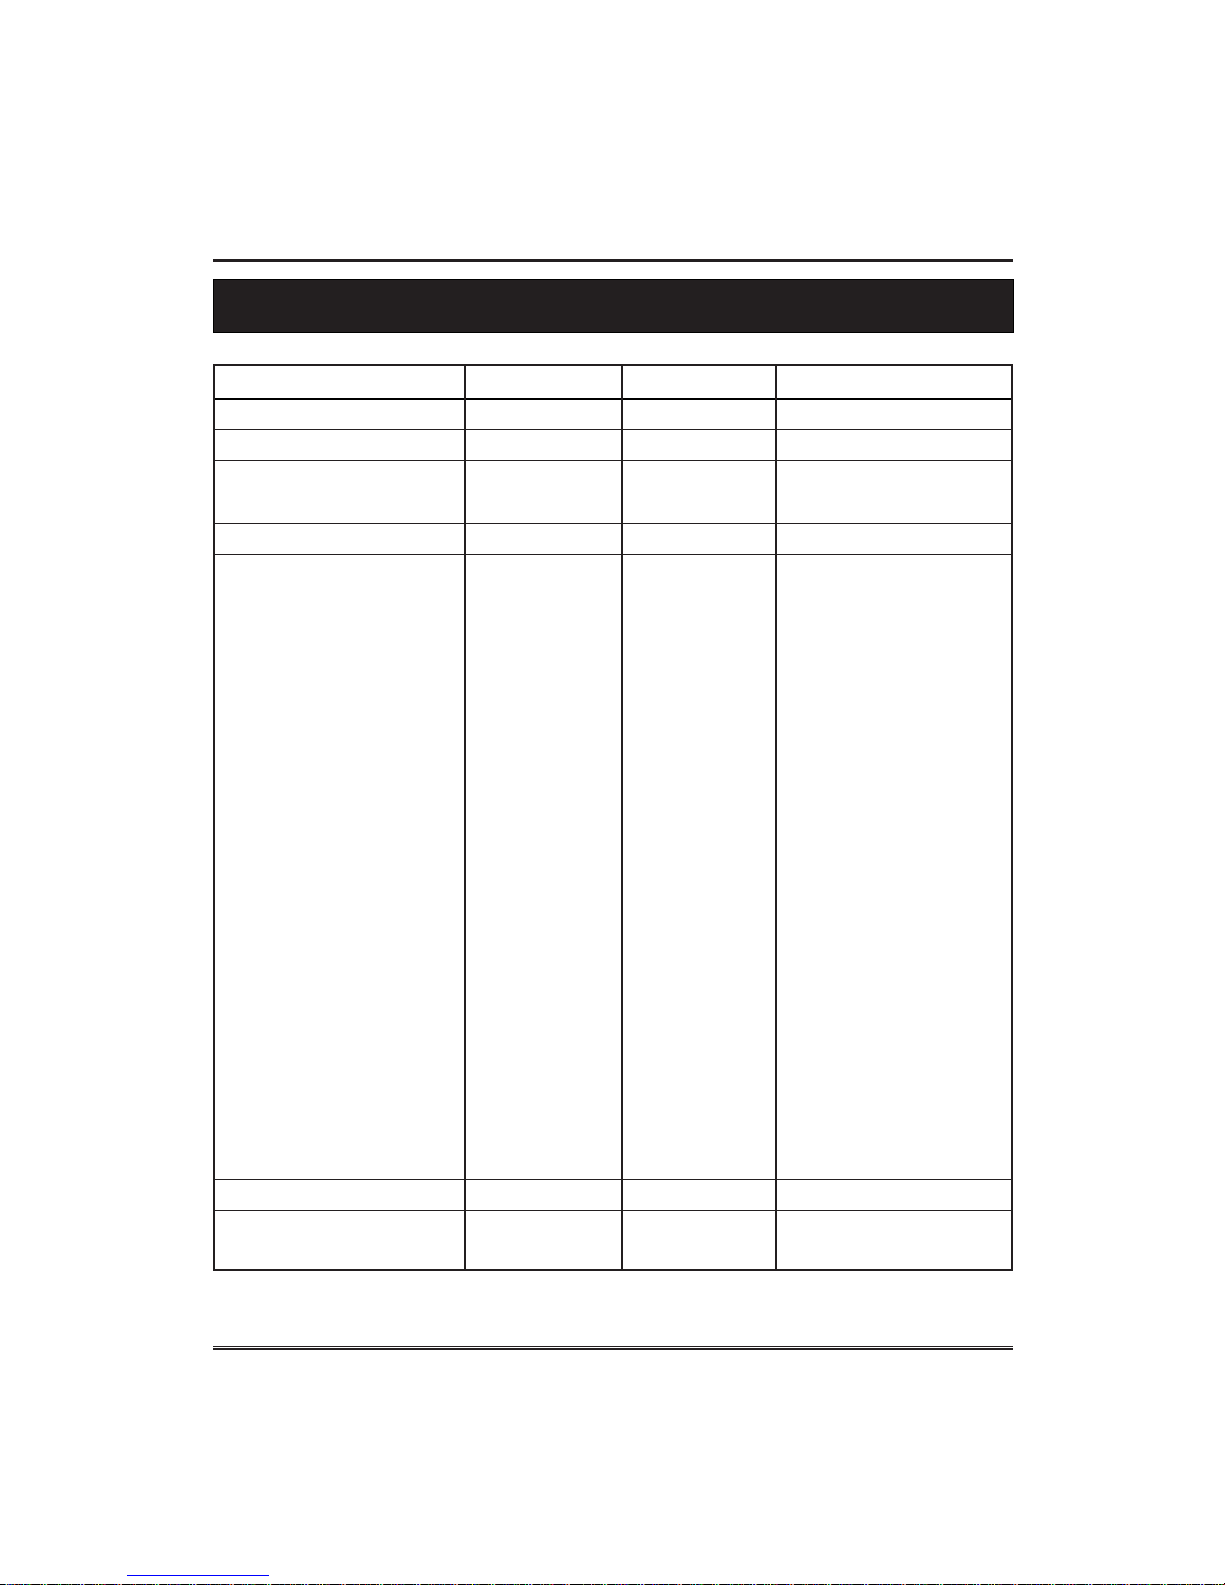
MIDI Implementation Chart
MIDI Implementation Chart
Function Recognized Transmitted Remark
Basic Channel Default ALL 1 - 3
Mode Default OMNI OFF, POLY OMNI OFF, POLY
Note ON/OFF 9nH kk vv O O #kk:note ON (0-127)
#vv:velocity (1-127)
Pitch Bender EnH bi bh O X Maximum swing +/- 1 tone
00 BnH 00H cc O X Bank Select
01 BnH 01H cc O X Modulation Wheel
05 BnH 05H cc O X Portamento Time
06 BnH 06H cc O X Data Entry
07 BnH 07H cc O X Volume
10 BnH 0AH cc O X Pan Out
11 BnH 0BH cc O X Expression
64 BnH 40H cc O O Sustain (Damper) Pedal
65 BnH 41H cc O X Portamento ON/OFF
66 BnH 42H cc O O Sostenuto Pedal
Control 67 BnH 43H cc O O Soft Pedal
Change 80 BnH 80H vv O X Reverb Prog.(vv=00H-70H)
81 BnH 51H vv O X Chorus Prog.
91 BnH 5BH vv O X Reverb Send Level
93 BnH 5DH vv O X Chorus Send Level
120 BnH 78H 00H O X All Sound Off
121 BnH 79H 00H O X Reset All Controller
123 BnH 7BH 00H O X All Notes Off
126 BnH 7EH 00H O X Mono On
127 BnH 7FH 00H O X Poly On
Program Change CnH PP O O Sounds/Drum Set List
System Exclusive General MIDI O X
Reset
O : Yes, X : No
Page 40

39
GM Voice & Drum
GM Voice & Drum Table
GM # Voice GM # Voice
081
082
083
084
085
086
087
088
089
090
091
092
093
094
095
096
097
098
099
100
101
102
103
104
001
002
003
004
005
006
007
008
009
010
011
012
013
014
015
016
017
018
019
020
021
022
023
024
025
026
027
028
029
030
031
032
033
034
035
036
037
038
039
040
041
042
043
044
045
046
047
048
049
050
051
052
053
054
055
056
057
058
059
060
061
062
063
064
065
066
067
068
069
070
071
072
073
074
075
076
077
078
079
080
105
106
107
108
109
110
111
112
113
114
115
116
117
118
119
120
121
122
123
124
125
126
127
128
Piano1
Piano2
Piano3
Honky Tonk
Electric Piano1
Electric Piano 2
Harpsichord
Clavinet
Celesta
Glockenspiel
Music Box
Vibraphone
Marimba
Xylophone
Tubular Bell
Dulcimer
Electric Organ
Jazz Organ
Rock Organ
Pipe Organ
Reed Organ
Accordion
Harmonica
Bandonion
Nylon Guitar
Steel Guitar
Jazz Guitar
Clean Guitar
Muted Guitar
Drive Guitar
Lead Guitar
Harmonic Guitar
Acoustic Bass
Finger Bass
Pick Bass
Fretless Bass
Slap Bass1
Slap Bass2
Synth Bass1
Synth Bass2
Violin
Viola
Cello
Contra Bass
Tremolo Strings
Pizzicato Strings
Harp
Timpani
Strings
Slow Strings
Synth Strings1
Synth Strings 2
Choir Aahs
Voice Oohs
Synth Voice
Orchestra Hit
Trumpet
Trombone
Tuba
Muted Trumpet
French Horn
Brass Section
Synth Brass1
Synth Brass2
Guitar Noise
Breath Noise
Sea Shore
Birds
Telephone
Helicopter
Applause
Gunshot
Soprano Saxophone
Alto Saxophone
Tenor Saxophone
Baritone Saxophone
Oboe
English Horn
Basson
Clarinet
Piccolo
Flute
Recorder
Pan Flute
Bottle Blow
Shakuhachi
Whistle
Ocarina
Square
Sawtooth
Calliope
Chiffer
Charang
Solo Vox
Fifths
Bass Lead
Fantasia
Warm Pad
Poly Synth
Space Vox
Bow Glass
Metal Pad
Halo Pad
Sweep Pad
Ice Rain
Sound Track
Crystal
Atmosphere
Brightness
Goblin
Echo Drop
Star Theme
Sitar
Banjo
Shamishen
Koto
Kalimba
Bagpipe
Fiddle
Shanai
Tinkle Bell
Agogo
Steel Drum
Wood Block
Taiko
Melody Tom
Synth Drum
Reversed Cymbal
☞ When connecting with PC or other MIDI device via MIDI or USB port, 128 GM voices and all drum sets on
the table can be used.
Page 41

40
GM Voice & Drum Table
Prog 1 Prog 9 Prog 17 Prog 25 Prog 26
Standard Drum Room Drum Power Drum Elec. Drum TR-808
27 - D#1 High Q
28 - E1 Slap
29 - F1 Scratch Push
30 - F#1 Scratch Pull
31 - G1 Sticks
32 - G#1 Square Click
33 - A1 Metronome Click
34 - A#1 Metronome Bell
35 - B1 Kick drum2/Jazz BD2
36 - C2 Kick drum1/Jazz BD1 Power Kick Elec BD 808 Bass Drum
37 - C#2 Side Stick 808 Rim shot
38 - D2 Snare Drum1 Gated Snare Elec SD 808 Snare Drum
39 - D#2 Hand Clap
40 - E2 Snare Drum 2
41 - F2 Low Floor Tom Room Low Tom2 Room Low Tom2 Elec Low Tom2 808 Low Tom2
42 - F#2 Closed Hi Hat [EXC1] 808 CHH[EXC1]
43 - G2 High Floor Tom Room Low Tom1 Room Low Tom1 Elec Low Tom1 808 Low Tom2
44 - G#2 Pedal Hi-Hat [EXC1] 808 CHH[EXC1]
45 - A2 Low Tom Room Mid Tom2 Room Mid Tom2 Elec Mid Tom2 808 Mid Tom2
46 - A#2 Open Hi-Hat [EXC1] 808 OHH[EXC1]
47 - B2 Low-Mid Tom Room Mid Tom1 Room Mid Tom1 Elec Mid Tom1 808 Mid Tom1
48 - C3 Hi Mid Tom Room Hi Tom2 Room Hi Tom2 Elec Hi Tom2 808 Hi Tom2
49 - C#3 Crash Cymbal 1 808 Cymbal
50 - D3 High Tom Room Hi Tom1 Room Hi Tom1 Elec Hi Tom1 808 Hi Tom1
51 - D#3 Ride Cymbal 1
52 - E3 Chinese Cymbal Reverse Cymbal
53 - F3 Ride Bell
54 - F#3 Tambourine
55 - G3 Splash Cymbal
56 - G#3 Cowbell 808 Cowbell
57 - A3 Crash Cymbal2
58 - A#3 Vibraslap
59 - B3 Ride Cymbal2
60 - C4 Hi Bongo
61 - C#4 Low Bongo
62 - D4 Mute Hi Conga 808 High Conga
63 - D#4 Open Hi Conga 808 Mid Conga
64 - E4 Low Conga 808 Low Conga
65 - F4 High Timbale
66 - F#4 Low Timbale
67 - G4 High Timbale
68 - G#4 Low Agogo
69 - A4 Cabasa
70 - A#4 Maracas
71 - B4 Short Whistle[EXC2] 808 Maracas
72 - C5 Long Whistle[EXC2]
73 - C#5 Short Guiro[EXC3]
74 - D5 Long Guiro[EXC3]
75 - D#5 Claves 808 Claves
76 - E5 Hi Wood Block
77 - F5 Low Wood Block
78 - F#5 Mute Cuica[EXC4]
79 - G5 Open Cuica[EXC4]
80 - G#5 Mute Triangle[EXC5]
81 - A5 Open Triangle[EXC5]
82 - A#5 Shaker
83 - B5 Jingle Bell
84 - C6 Belltree
85 - C#6 Castanets
86 - D6 Mute Surdo[EXC6]
87 - D#6 Open Surdo[EXC6]
88 - E6
Page 42

GM Voice & Drum Table
41
Prog 33 Prog 41 Prog 49 Remark
Jazz Drum (7-6) Brush Drum Orchestra
27 - D#1 Closed Hi Hat
28 - E1 Pedal Hi-Hat
29 - F1 Open Hi Hat
30 - F#1 Ride Cymbal
31 - G1
32 - G#1
33 - A1
34 - A#1
35 - B1 Jazz BD2 Jazz BD2 Concert BD 2
36 - C2 Jazz BD1 Jazz BD1 Concert BD1
37 - C#2
38 - D2 Brush Tap Concert SD
39 - D#2 Brush Slap Castanets
40 - E2 Brush Swirl Concert SD
41 - F2 Timpani F
42 - F#2 Timpani F#
43 - G2 Timpani G
44 - G#2 Timpani G#
45 - A2 Timpani A
46 - A#2 Timpani A#
47 - B2 Timpani B
48 - C3 Timpani c
49 - C#3 Timpani c#
50 - D3 Timpani d
51 - D#3 Timpani d#
52 - E3 Timpani e
53 - F3 Timpani f
54 - F#3
55 - G3
56 - G#3
57 - A3 Concert Cymbal2
58 - A#3
59 - B3 Concert Cymbal1
60 - C4
61 - C#4
62 - D4
63 - D#4
64 - E4
65 - F4
66 - F#4
67 - G4
68 - G#4
69 - A4
70 - A#4
71 - B4
72 - C5
73 - C#5
74 - D5
75 - D#5
76 - E5
77 - F5
78 - F#5
79 - G5
80 - G#5
81 - A5
82 - A#5
83 - B5
84 - C6
85 - C#6
86 - D6
87 - D#6
88 - E6
Page 43

Troubleshooting
Troubleshooting
42
※ Be sure to check to following table whenever you encounter problems with the DIGITAL
PIANO operation.
PROBLEM CAUSE SOLUTION
No sound
Occasional interference
No sound when connected
to external amplifier.
1. Power supply problem.
2. Volume setting is too low.
3. Headphone is plugged in.
1. Refrigerators, washing
machines and similar
electric appliances are
interfering.
1. Volume setting is too low.
2. Defective connection cord.
1. Check the power cord
whether it’ s properly in AC
outlet.
2. Adjust the volume.
3. Unplug the headphone.
1. Use outlet as far away as
possible from appliance
thought to be the cause.
1. Adjust the volume.
2. Replace connection cord.
Page 44

Specifications
Section Contents
PRODUCT SLIM DIGITAL PIANO
KEYBOARD 88 KEYS (STANDARD) - 7 1/4 OCTAVES
MAX. POLYPHONY 64 NOTES
SOUND 25 Voices and 1 DRUM KIT
FUNCTIONS LAYER
SPLIT
TWIN PIANO
TUNE
TRANSPOSE
TOUCH (Off, Hard, Normal, Soft)
DSP 3D EFFECT
REVERB with Adjustable Level Control
EFFECT with Adjustable Level Control
METRONOME YES
RECORD REAL-TIME-RECORDING
1 TRACK
MAX. 1,500NOTES
PEDAL SLP-100 1PEDAL (DAMPER)
SLP-200/300 3PEDALS(DAMPER, SOSTENUTO, SOFT)
VOLUME CONTROLS MAIN VOLUME
I/O TERMINALS MIDI IN/OUT
USB IN
2 HEADPHONE JACKS
SPEAKER 5:3 INCHES× 2, 2INCH x 2
POWER AC ADAPTER
POWER CONSUMPTION 10W
DIMENSIONS (W x D X H) SLP-100 1380 x 310 x 740 mm
SLP-200 1415 x 400 x 815 mm
SLP-300 1382 x 390 x 745 mm
WEIGHT SLP-100 40KGS
SLP-200 50KGS
SLP-300 50KGS
ACCESSORY OWNER’ S MANUAL, AC ADAPTER
43
Specifications
 Loading...