

Steinel Spot ONE Sensor, Spot ONE Sensor Connect, Spot DUO Sensor, Spot DUO Sensor Connect User guide [ml]
Page 1
RU CN BG LV LT EE HR SI RO PL S K CZ H U TR G R NO FI D K SE P T ES I T NL FR GB DE
STEINEL Vertrieb GmbH
Dieselstraße 80-84
33442 Herzebrock-Clarholz
Tel: +49/5245/448-188
www.steinel.de
DEGBCZSKPLROSIHREELTLVRUBGCN
Spot ONE Sensor
Spot ONE Sensor Connect
Contact
www.steinel.de/contact
Spot DUO Sensor
Spot DUO Sensor Connect
110070089 06/2019_A Technische Änderungen vorbehalten. / Subject to technical modification without notice.
Information
Spot ONE Sensor
Spot ONE Sensor Connect
Spot DUO Sensor
Spot DUO Sensor Connect
Page 2
3
3.1
3.4
3.6
...
DE .....8
GB ....16
CZ ....24
SK ....32
PL ....40
RO ....48
SI .....56
HR ....64
EE .....72
LT .....80
LV .....88
RU ....96
BG ...104
CN ...112
Textteil beachten!
Follow written instructions!
Dodržujte informace
v textové části!
Dodržiavajte informácie
v textovej časti!
Postępować zgodnie
z instrukcją!
Respectaţi instrucţiunile
scrise!
Upoštevajte del besedila!
Pridržavajte se pisanih
uputa!
Järgige tekstiosa!
Laikykitės rašytinių
instrukcijų!
Pievērsiet uzmanību
tekstam!
Обратите внимание
на текстовую часть!
Да се вземе предвид
текстовата част!
注意正文!
3.2
3.3
Ø 97 mm
3.5
175 mm
247 mm
98 mm
Ø 69 mm
45°
max 10 m
2,1 m
3.7
max 10 m
A
B
C
D
G
F
3.8 4
E
~ 2 m
175 mm
2 3
98 mm
Ø 69 mm
Page 3
4.1
5.1
5.4
5.7
I
NLL
6 mm
Ø 6
O
5
N
L N L N
L N
5.2
5.3
5.5
5.6
5.8
L
N
4 5
Page 4
5.9
6.1
7.1
7.4
I
90°
O
6
6.2 7
F
G
7.2
7.5
180°
7.3
7.6
6 7
Page 5
DE
!
1. Zu diesem Dokument
– Bitte sorgfältig lesen und aufbewahren!
– Urheberrechtlich geschützt.
Nachdruck, auch auszugsweise, nur mit unserer Genehmigung.
– Änderungen, die dem technischen Fortschritt dienen, vorbehalten.
Symbolerklärung
Warnung vor Gefahren!
!
Verweis auf Textstellen im Dokument.
...
2. Allgemeine Sicherheitshinweise
Vor allen Arbeiten am Gerät die Spannungszufuhr unterbrechen!
• Bei der Montage muss die anzuschließende elektrische Leitung spannungsfrei sein.
Daher als Erstes Strom abschalten und Spannungsfreiheit mit einem Spannungsprüfer überprüfen.
• Bei der Installation der Leuchte handelt es sich um eine Arbeit an der Netzspannung. Sie muss daher fachgerecht nach den landesüblichen Installationsvorschriften und Anschlussbedingungen durchgeführt werden.
• Nur Original-Ersatzteile verwenden.
• Reparaturen dürfen nur durch Fachwerkstätten durchgeführt werden.
• Nicht zur Verwendung mit Halogen-Leuchtmitteln geeignet.
3. Spot ONE Sensor/Spot DUO Sensor
Spot ONE Sensor Connect/Spot DUO Sensor Connect
Bestimmungsgemäßer Gebrauch
– LED-Leuchte zur Wandmontage im Innen- und Außenbereich
Spot ONE Sensor/Spot DUO Sensor
– Die Sensor-LED-Leuchte beinhaltet einen Infrarot-Bewegungsmelder.
Spot ONE Sensor Connect/Spot DUO Sensor Connect
– Die Sensor-LED-Leuchte beinhaltet einen Infrarot-Bewegungsmelder und ist nur
über Bluetooth einstellbar.
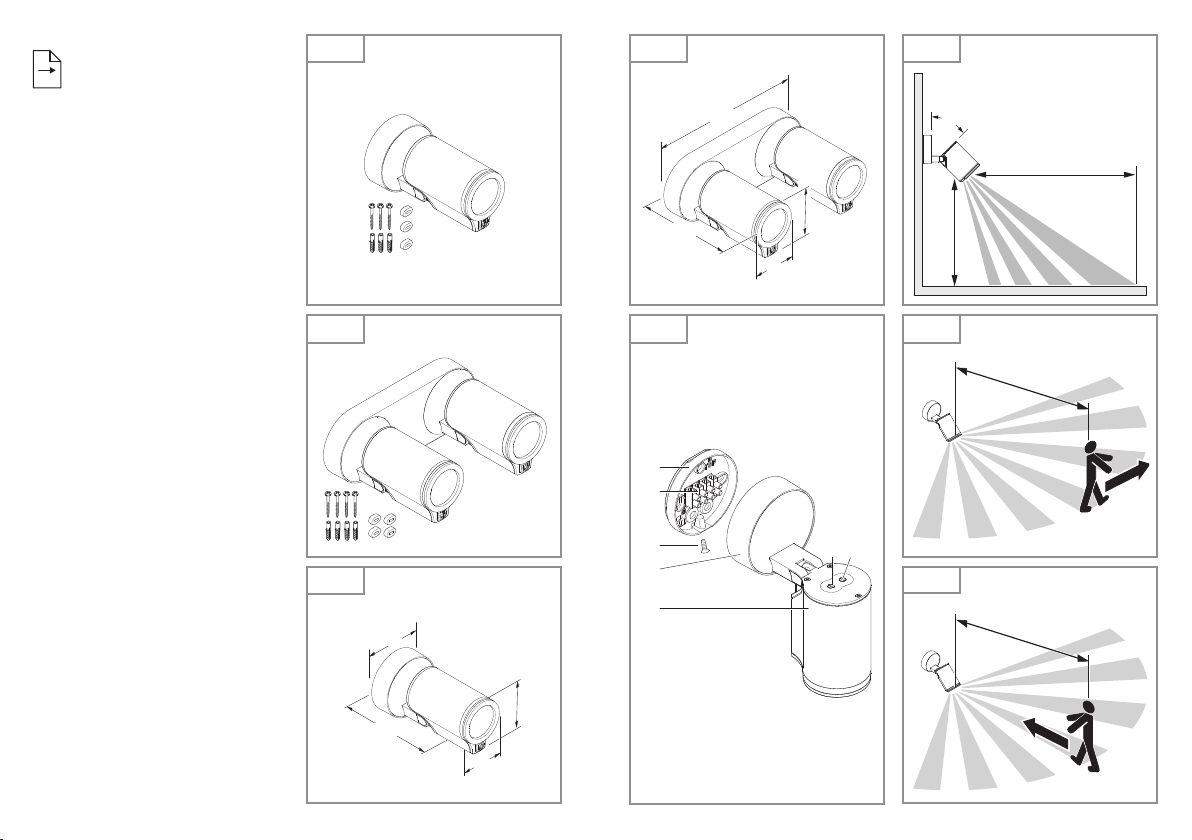
Lieferumfang Spot ONE (Abb. 3.1)
– Leuchte
– drei Schrauben
– drei Dübel
– drei Abstandshalter
8 9
Lieferumfang Spot DUO (Abb. 3.2)
– Leuchte
– vier Schrauben
– vier Dübel
– vier Abstandshalter
Produktmaße Spot ONE (Abb. 3.3)
Produktmaße Spot DUO (Abb. 3.4)
Produktübersicht (Abb. 3.5)
A Wandhalter
B Anschlussklemme
C Sicherungsschraube
D Leuchtenfuß
E Leuchtengehäuse
F Dämmerungseinstellung (nur Spot ONE/DUO Sensor)
G Zeiteinstellung (nur Spot ONE/DUO Sensor)
Erfassungsbereich Spot ONE/DUO Sensor (Abb. 3.6-3.8)
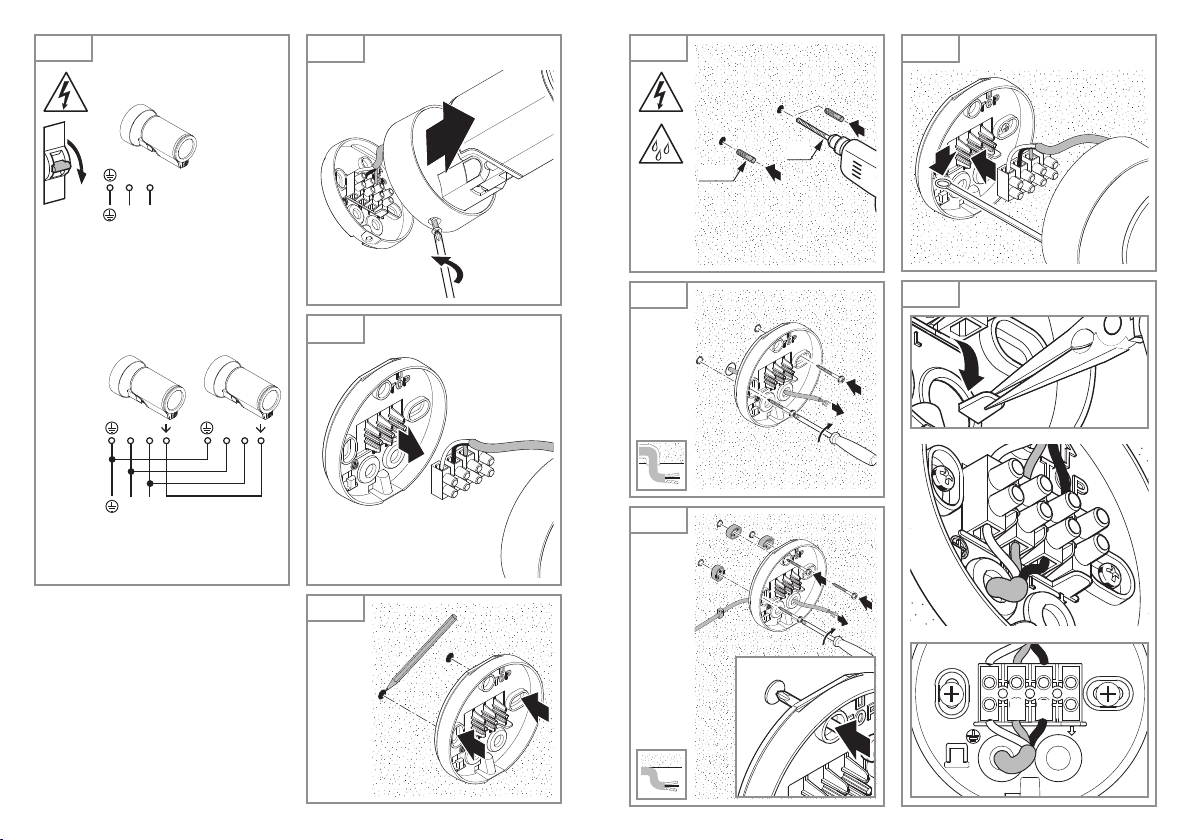
4. Elektrischer Anschluss
Schaltplan (Abb. 4.1)
Die Netzzuleitung besteht aus einem 3-adrigen Kabel:
L = Phase (meistens schwarz, braun oder grau)
N = Neutralleiter (meistens blau)
PE = Schutzleiter (grün/gelb)
Im Zweifel müssen Sie die Leitungen mit einem Spannungsprüfer identifizieren;
anschließend wieder spannungsfrei schalten. Phase (L), Neutralleiter (N) und Schutzleiter (PE) werden an der Anschlussklemme angeschlossen.
Wichtig:
Ein Vertauschen der Anschlüsse führt im Gerät oder Sicherungskasten später zum
Kurzschluss. In diesem Fall müssen nochmals die einzelnen Leitungen identifiziert und
neu verbunden werden. In die Netzzuleitung kann selbstverständlich ein Netzschalter
zum Ein- und Ausschalten installiert sein.
Vernetzung
" dient der Vernetzung der Leuchten. Es können bis zu 10 Leuchten von diesem
"
Typ parallelgeschaltet werden. (Abb. 4.1)
5. Montage
• Alle Bauteile auf Beschädigung prüfen.
• Bei Schäden das Produkt nicht in Betrieb nehmen.
DE
Page 6
• Bei der Montage der Leuchte ist darauf zu achten, dass sie erschütterungsfrei
befestigt wird.
• Geeigneten Montageort auswählen unter Berücksichtigung der Reichweite und
Bewegungserfassung.
Die sicherste Bewegungserfassung wird erreicht, wenn das Gerät seitlich zur
Gehrichtung montiert wird und keine Hindernisse (z. B. Bäume, Mauern etc.)
die Sicht des Sensors behindern.
Montageschritte
• Stromversorgung abschalten. (Abb. 4.1)
• Sicherungsschraube lösen und Leuchtengehäuse vom Wandhalter lösen. (Abb. 5.1)
• Steckklemme lösen und Leuchtengehäuse vom Wandhalter trennen. (Abb. 5.2)
• Bohrlöcher anzeichnen. (Abb. 5.3)
• Löcher bohren und Dübel einsetzen. (Abb. 5.4)
• Montage Unterputz (Abb. 5.5)
• Montage Aufputz mit Abstandhaltern (Abb. 5.6)
• Sicherungsband am Wandhalter befestigen und Steckklemme aufsetzen. (Abb. 5.7)
• Anschlusskabel anschließen. (Abb. 5.8)
• Bei Vernetzung mehrerer Leuchten Sicherungslasche herausbrechen. (Abb. 5.8)
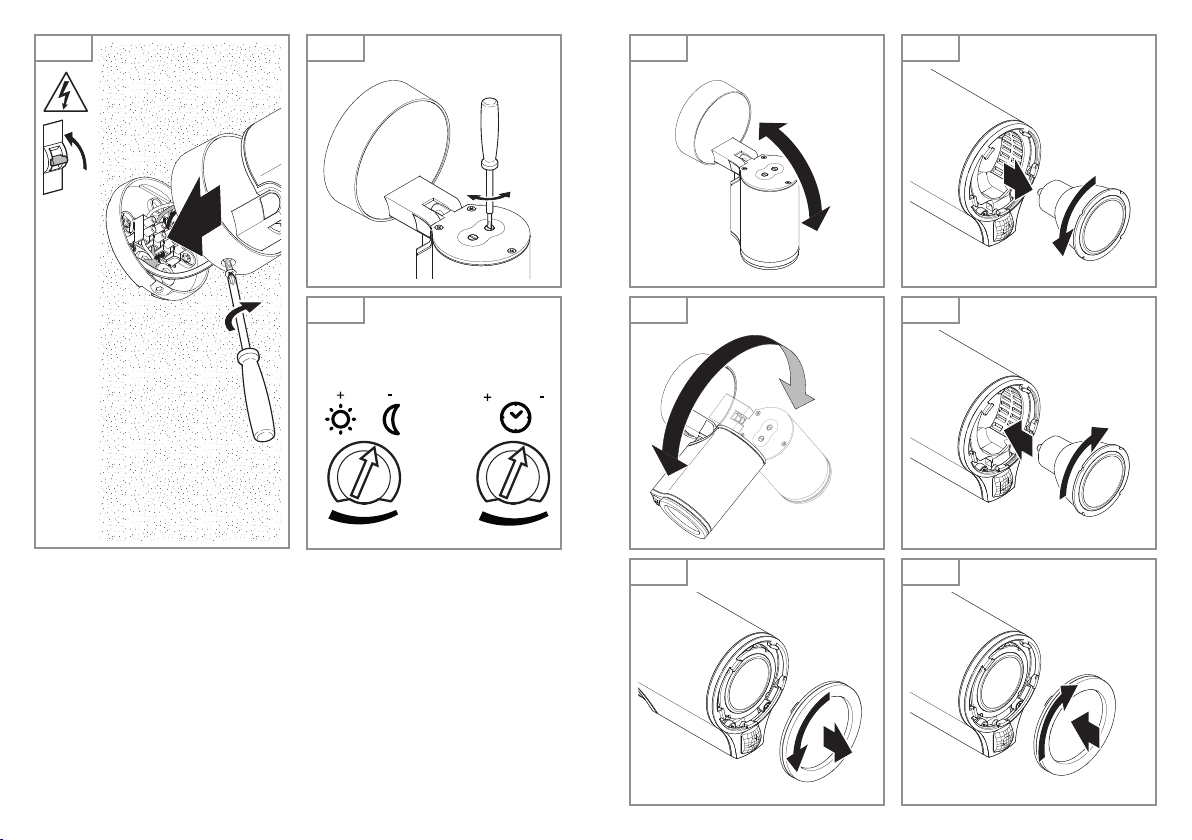
• Leuchtengehäuse auf Wandhalter aufstecken. (Abb. 5.9)
• Sicherungsschraube einschrauben. (Abb. 5.9)
• Stromversorgung einschalten. (Abb. 5.9)
• Einstellungen vornehmen ➜ "6. Funktion"
6. Funktion
Spot ONE Sensor/Spot DUO Sensor
Werkseinstellungen
– Dämmerungseinstellung: 1000Lux
– Zeiteinstellung: 8Sekunden
Dämmerungseinstellung (Abb. 6.2 F)
Die gewünschte Ansprechschwelle der Leuchte kann stufenlos von ca. 2 bis
1000Lux eingestellt werden.
– Einstellregler auf
– Einstellregler auf
Bei der Einstellung des Erfassungsbereiches und für den Funktionstest bei Tageslicht
muss der Einstellregler auf
Zeiteinstellung (Abb. 6.2 G)
Die gewünschte Leuchtdauer der Leuchte kann stufenlos von ca. 8Sekunden bis
max. 35 Minuten eingestellt werden. Durch jede erfasste Bewegung vor Ablauf dieser
Zeit wird die Zeituhr erneut gestartet.
– Einstellregler + = ca. 35 Minuten
– Einstellregler – = ca. 8Sekunden
gestellt = Tageslichtbetrieb (helligkeitsunabhängig)
gestellt = Dämmerungsbetrieb (ca. 2 Lux)
stehen.
10 11
Hinweis:
Nach jedem Abschaltvorgang der Leuchte ist eine erneute Bewegungserfassung für
ca. 1 Sekunde unterbrochen. Erst nach Ablauf dieser Zeit kann die Leuchte bei Bewegung wieder Licht schalten.
Spot DUO Sensor
Auslieferungszustand:
Beide Leuchtenköpfe sind vernetzt und schalten immer gleichzeitig ein und aus.
Für einen individuellen Betrieb der beiden Leuchtenköpfe muss die Verbindung
zwischen den Klemmen entfernt werden (
Spot ONE Sensor Connect/Spot DUO Sensor Connect
Werkseinstellungen
– Dämmerungseinstellung: 2000 Lux
– Zeiteinstellung: 5 Sekunden
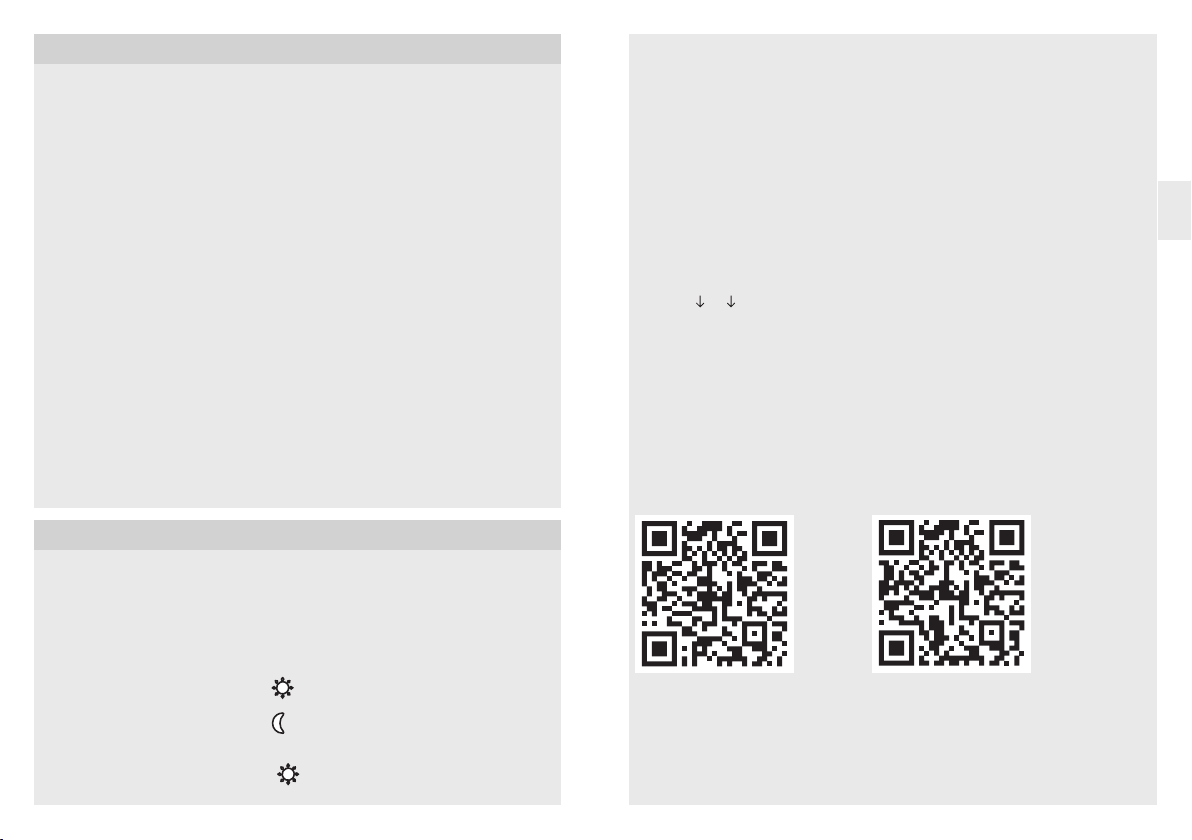
Smart Remote App
Für die Konfiguration der Leuchte mit Smartphone oder Tablet muss die STEINEL
Smart Remote App aus Ihrem AppStore heruntergeladen werden. Es ist ein Bluetoothfähiges Smartphone oder Tablet erforderlich.
Android iOS
Folgende Funktionen sind über die Smart Remote App einstellbar:
– Zeiteinstellung
– Dämmerungseinstellung
– Ein- und Ausschaltzeiten
– Situative Steuerung Automatik/Manuell
– Vernetzung
– Gruppenbildung
– Benennung der Gruppen und Leuchten
1 und 2).
DE
Page 7

Hinweis:
Nach jedem Abschaltvorgang der Leuchte ist eine erneute Bewegungserfassung
für ca. 1 Sekunde unterbrochen. Erst nach Ablauf dieser Zeit kann die Leuchte bei
Bewegung wieder Licht schalten.
Für zeitbasiertes ein- und ausschalten hat der Spot Connect eine interne Uhr. Diese
synchronisiert sich bei jeder Bluetooth Verbindung über die Smart Remote App
automatisch mit der Uhr des verbundenen Smartphones.
Um eine korrekte Funktion zu gewährleisten, muss nach einer Spannungsunterbrechung der Leuchte eine Verbindung über die Smart Remote App hergestellt
werden. Die interne Uhr wird erneut mit der Smartphone-Uhr synchronisiert.
7. Schwenkbereich der Leuchte / Leuchtmittelwechsel
Schwenkbereich der Leuchte. (Abb. 7.1/7.2)
Leuchtmittelwechsel
• Abdeckscheibe am Leuchtengehäuse lösen und herausziehen. (Abb. 7.3)
• Leuchtmittel lösen und herausziehen. (Abb. 7.4)
• Neues Leuchtmittel einsetzen und festdrehen. (Abb. 7.5)
• Abdeckscheibe aufsetzen und festdrehen. (Abb. 7.6)
Wichtig:
Nur GU10-LED-Leuchtmittel bis max. 9 W verwenden.
Hinweis:
• Stellen Sie bei einem Leuchtmittelwechsel sicher, dass die Dichtung und die
Dichtfläche nicht verschmutzt oder beschädigt sind.
8. Wartung
Das Produkt ist wartungsfrei.
Die Leuchte kann bei Verschmutzung mit einem feuchten Tuch
(ohneReinigungsmittel) gesäubert werden.
9. Entsorgung
Elektrogeräte, Zubehör und Verpackungen sollen einer umweltgerechten Wiederverwertung zugeführt werden.
Werfen Sie Elektrogeräte nicht in den Hausmüll!
Nur für EU-Länder:
Gemäß der geltenden Europäischen Richtlinie über Elektro- und Elektronik-Altgeräte
und ihrer Umsetzung in nationales Recht müssen nicht mehr gebrauchsfähige
Elektrogeräte getrennt gesammelt und einer umweltgerechten Wiederverwertung
zugeführt werden.
10. Konformitätserklärung
Hiermit erklärt STEINEL Vertrieb GmbH, dass der Funkanlagentyp Spot ONE Sensor
Connect/Spot DUO Sensor Connect der Richtlinie 2014/53/EU entspricht. Der vollständige Text der EU-Konformitätserklärung ist unter der folgenden Internetadresse
verfügbar: www.steinel.de
11. Herstellergarantie
Herstellergarantie der STEINEL Vertrieb GmbH, Dieselstraße 80-84,
33442 Herzebrock-Clarholz
Wir beglückwünschen Sie zum Kauf Ihres STEINEL-Produkts, das höchste Qualitätsansprüche erfüllt. Aus diesem Grund leisten wir als Hersteller Ihnen als Endkunde
gerne eine unentgeltliche Garantie gemäß den nachstehenden Bedingungen: Wir leisten Garantie durch kostenlose Behebung der Mängel (nach unserer Wahl: Reparatur,
Austausch ggf. durch ein Nachfolgemodell oder Rückerstattung des Kaufpreises),
die innerhalb der Garantiezeit auf einem Material- oder Herstellungsfehler beruhen.
Die Garantiezeit für Ihr erworbenes STEINEL-Produkt beträgt 3 Jahre und beginnt
mit dem Kaufdatum Ihres Produktes. Diese Herstellergarantie lässt gesetzliche Gewährleistungsansprüche, die Ihnen als Verbraucher gegenüber dem Verkäufer nach
geltendem Recht einschließlich besonderer Schutzbestimmungen für Verbraucher
zustehen können, unberührt. Die hier beschriebenen Leistungen gelten zusätzlich zu
den gesetzlichen Gewährleistungsansprüchen und beschränken oder ersetzen diese
nicht.
Ausdrücklich ausgenommen von dieser Garantie sind alle auswechselbaren Leuchtmittel. Darüber hinaus ist die Garantie ausgeschlossen:
• bei einem gebrauchsbedingten oder sonstigen natürlichen Verschleiß von Produktteilen oder Mängeln am STEINEL-Produkt, die auf gebrauchsbedingtem oder
sonstigem natürlichem Verschleiß zurückzuführen sind,
• bei nicht bestimmungs- oder unsachgemäßem Gebrauch des Produkts oder
Missachtung der Bedienungshinweise,
• wenn An- und Umbauten bzw. sonstige Modifikationen an dem Produkt eigenmächtig vorgenommen wurden oder Mängel auf die Verwendung von Zubehör-, Ergänzungs- oder Ersatzteilen zurückzuführen sind, die keine STEINEL-Originalteile sind,
• wenn Wartung und Pflege der Produkte nicht entsprechend der Bedienungsanleitung erfolgt sind,
• wenn Anbau und Installation nicht gemäß den Installationsvorschriften von
STEINEL ausgeführt wurden,
• bei Transportschäden oder -verlusten.
Die Garantie gilt für sämtliche STEINEL-Produkte, die in Deutschland gekauft und
verwendet werden. Es gilt deutsches Recht unter Ausschluss des Übereinkommens
der Vereinten Nationen über Verträge über den internationalen Warenkauf (CISG).
1312
DE
Page 8
Geltendmachung
3
5
HERSTELLER
GARANTIE
HERSTELLER
GARANTIE
Wenn Sie Ihr Produkt reklamieren wollen, senden Sie es bitte vollständig und frachtfrei
mit dem Original-Kaufbeleg, der die Angabe des Kaufdatums und der Produktbezeichnung enthalten muss, an Ihren Händler oder direkt an uns, die STEINEL Vertrieb
GmbH – Reklamationsabteilung –, Dieselstraße 80-84, 33442 Herzebrock-Clarholz.
Wir empfehlen Ihnen daher, Ihren Kaufbeleg bis zum Ablauf der Garantiezeit sorgfältig
aufzubewahren. Für Transportkosten und -risiken im Rahmen der Rücksendung
übernehmen wir keine Haftung.
12. Technische Daten
Abmessungen
(Ø×T)
(H×B×T)
Eingangsspannung 220-240 V, 50/60Hz
Leistung
• Stand by
• Betrieb
Leuchtmittel GU10-LED-Leuchtmittel (max. 9 W)
Sensortechnik Passiv Infrarot
Erfassungsbereich
• Erfassungswinkel
• Önungswinkel
Reichweite max. 10 m
Zeiteinstellung 8s - 35 min (nur Spot ONE/DUO Sensor)
Dämmerungseinstellung 2-1000Lux (nur Spot ONE/DUO Sensor)
Schutzart IP44
Schutzklasse I
Temperaturbereich -20 - +40 °C
Frequenz Bluetooth
Sendeleistung Bluetooth 5dBm/3 mW (nur Spot ONE/DUO Sensor Connect)
Spot ONE: Ø 97×175 mm
Spot DUO: 98×247×175 mm
ca. 0,5 W
ca. 0,5 W + LED-Leuchtmittel
90°
90°
5 s - 60min (nur Spot ONE/DUO Sensor Connect)
2-2000 Lux (nur Spot ONE/DUO Sensor Connect)
2,4 - 2,48GHz (nur Spot ONE/DUO Sensor Connect)
13. Betriebsstörungen
Störung Ursache Abhilfe
LED-Leuchte schaltet
nicht ein
Sensor-LED-Leuchte
schaltet nicht ein
Sensor-LED-Leuchte
schaltet nicht aus
Sensor-LED-Leuchte
schaltet immer EIN/AUS
Sensor-LED-Leuchte
schaltet unerwünscht ein
■ Sicherung hat ausgelöst,
nicht eingeschaltet,
Leitung unterbrochen
■ Kurzschluss
■ Leuchtmittel defekt
■ bei Tagesbetrieb, Däm-
merungseinstellung steht
auf Nachtbetrieb
■ Netzschalter AUS
■ Sicherung hat ausgelöst
■ Erfassungsbereich nicht
gezielt eingestellt
■ dauernde Bewegung im
Erfassungsbereich
■ Tiere bewegen sich im
Erfassungsbereich
■ Wind bewegt Bäume
und Sträucher im Erfassungsbereich
■ Erfassung von Autos
auf der Straße
■ plötzliche Temperatur-
veränderung durch Witterung (Wind, Regen,
Schnee) oder Abluft aus
Ventilatoren, offenen
Fenstern
■ Sensor-LED-Leuchte
schwankt (bewegt sich)
durch z. B. Windböen
oder starken Niederschlag
1514
■ Sicherung einschalten,
tauschen, Netzschalter
einschalten; Leitung
mit Spannungsprüfer
überprüfen
■ Anschlüsse überprüfen
■ Leuchtmittel wechseln
■ neu einstellen
■ Einschalten
■ Sicherung einschalten,
tauschen, evtl. Anschluss überprüfen
■ neu justieren
■ Bereich kontrollieren
und evtl. neu justieren
bzw. abdecken
■ Sensor höher
schwenken;
Bereich umstellen
■ Bereich umstellen
■ Bereich umstellen
■ Bereich verändern,
Montageort verlegen
■ Sensor-LED-Leuchte
auf einen festen Untergrund montieren
DE
Page 9
GB
!
1. About this document
– Please read carefully and keep in a safe place.
– Under copyright.
Reproduction either in whole or in part only with our consent.
– Subject to change in the interest of technical progress.
Symbols
Hazard warning!
!
Reference to other information in the document.
...
2. General safety precautions
Disconnect the power supply before attempting any work on the unit.
• During installation, the electric power cable to be connected must not be live.
Therefore, switch o the power first and use a voltage tester to make sure the
wiring is o-circuit.
• Installing the light involves work on the mains voltage supply. This work must therefore be carried out professionally in accordance with national wiring regulations and
electrical operating conditions.
• Only use genuine replacement parts.
• Repairs may only be made by specialist workshops.
• Not suitable for use with halogen lamps.
3. Spot ONE Sensor/Spot DUO Sensor
Spot ONE Sensor Connect/Spot DUO Sensor Connect
Proper use
– LED light with sensor for indoor and outdoor wall mounting
Spot ONE Sensor/Spot DUO Sensor
– The sensor-switched LED light contains an infrared motion detector.
Spot ONE Sensor Connect/Spot DUO Sensor Connect
– The sensor-switched LED light contains an infrared motion detector and can only
be adjusted via Bluetooth.
Spot ONE package contents (Fig. 3.1)
– Luminaire
– Three screws
– Three wall plugs
– Three spacers
Spot DUO package contents (Fig. 3.2)
– Luminaire
– Four screws
– Four wall plugs
– Four spacers
Spot ONE product dimensions (Fig. 3.3)
Spot DUO product dimensions (Fig. 3.4)
Product parts (Fig. 3.5)
A Wall mount
B Connecting terminal
C Locking screw
D Light base
E Light enclosure
F Twilight setting (Spot ONE/DUO Sensor only)
G Time setting (Spot ONE/DUO Sensor only)
Spot ONE/DUO Sensor detection zone (Fig. 3.6-3.8)
4. Electrical connection
Wiring diagram (Fig. 4.1)
The supply lead is a three-core cable:
L = phase conductor (usually black, brown or grey)
N = neutral conductor (usually blue)
PE = protective-earth conductor (green/yellow)
If you are in any doubt, identify the conductors using a voltage tester; then disconnect
from the power supply again. Connect phase (L), neutral (N) and protective-earth
conductor (PE) to the terminal.
Important:
Incorrectly wired connections will produce a short circuit later on in the product or
fuse box. In this case, you must identify the individual conductors once again and reconnect them. A mains power switch for turning the unit ON and OFF may of course
be installed in the mains supply lead.
GB
16 17
Page 10
Interconnection
" " used for interconnecting lights. As many as 10 lights of this type can be connected
in parallel. (Fig. 4.1)
5. Mounting
• Check all components for damage.
• Do not use the product if it is damaged.
• When installing the light, make sure the installation site is not subject to vibration.
• Select an appropriate mounting location, taking the reach and motion detection
into consideration.
The most reliable way to detect movement is given by mounting the light to point
across the direction in which people walk and by making sure no obstacles (e.g.
trees, walls etc.) interrupt the line of sensor vision.
Mounting procedure
• Switch OFF power supply. (Fig. 4.1)
• Undo locking screw and detach light enclosure from wall mount. (Fig5.1)
• Detach plug-in terminal and remove light enclosure from wall mount. (Fig.5.2)
• Mark drill holes. (Fig. 5.3)
• Drill holes and fit wall plugs. (Fig. 5.4)
• Concealed mounting (Fig. 5.5)
• Surface-mounted installation with spacers (Fig. 5.6)
• Attach retaining strap to the wall mount and fit plug-in terminal. (Fig.5.7)
• Connect conductors. (Fig. 5.8)
• When interconnecting several lights, break out safety tab. (Fig.5.8)
• Fit light enclosure onto wall mount. (Fig. 5.9)
• Screw in locking screw. (Fig. 5.9)
• Switch ON power supply. (Fig. 5.9)
• Make settings ➜ "6. Function"
6. Function
Spot ONE Sensor/Spot DUO Sensor
Factory settings
– Twilight level: 1000Lux
– Time setting: 8seconds
Twilight setting (Fig. 6.2 F)
The chosen response threshold can be infinitely varied from approx. 2 to 1000Lux.
– Control dial set to
– Control dial set to
= daylight mode (not depending on ambient brightness)
= night-time operation (approx. 2 lux)
18 19
The control dial must be turned to
forming the functional test in daylight.
Time setting (Fig. 6.2 G)
The light's stay ON time can be set to any period from approx. 8seconds to a
maximum of 35 minutes. Any movement detected before this time elapses will restart
the timer.
– Control dial set to + = approx. 35 minutes
– Control dial set to – = approx. 8seconds
Note:
After the light switches OFF, it takes approx. 1 second before it is able to start detecting movement again. The light will only switch ON in response to movement once this
period has elapsed.
Spot DUO Sensor
Factory configuration:
Both light heads are interconnected and always switch ON and OFF at the same time.
To operate the two light heads separately, the connection between the terminals must
be removed (
Spot ONE Sensor Connect/Spot DUO Sensor Connect
Factory settings
– Twilight level: 2000 lux
– Time setting: 5 seconds
Smart Remote app
To configure the light via smartphone or tablet, you must download the STEINEL
Smart Remote app from your app store. You will need a Bluetooth-capable smartphone or tablet.
Android iOS
1 and 2).
when adjusting the detection zone and per-
GB
Page 11

The following functions can be set via Smart Remote app:
3
5
MANUFACTURER'S
YEAR
WARRANTY
MANUFACTURER'S
YEAR
WARRANTY
– Time setting
– Twilight setting
– ON and OFF times
– Automatic/manual control, depending on situation
– Interconnection
– Grouping
– Naming groups and lights
Note:
After the light switches OFF, it takes approx. 1 second before it is able to start detecting
movement again. The light will only switch ON in response to movement once this
period has elapsed. The Spot Connect has an internal clock for time-based activation
and deactivation. This automatically synchronises with the clock of the connected
smartphone via the Smart Remote app each time a Bluetooth connection is established.
To ensure correct function following an interruption in the light's power supply, it must be
re-connected via the Smart Remote app. The internal clock is re-synchronised with the
smartphone clock.
7. Light tilting/swivelling range / Changing lamp
Light swivelling/tilting range (Fig. 7.1/7.2)
Changing lamp
• Undo glass cover and detach from light enclosure. (Fig.7.3)
• Disconnect and remove lamp. (Fig. 7.4)
• Insert new lamp and twist to engage. (Fig. 7.5)
• Fit glass cover and turn to engage. (Fig. 7.6)
Important:
Only use GU10 LED lamp with a wattage up to 9 W.
Note:
• On changing a lamp, make sure that the seal and sealing surface are not soiled or
damaged.
8. Maintenance
The product requires no maintenance.
The light can be cleaned with a damp cloth
(without detergents) if dirty.
9. Disposal
Electrical and electronic equipment, accessories and packaging must be recycled in
an environmentally compatible manner.
Do not dispose of electrical and electronic equipment as domestic waste.
EU countries only:
Under the current European Directive on Waste Electrical and Electronic Equipment
and its implementation in national law, electrical and electronic equipment no longer
suitable for use must be collected separately and recycled in an environmentally
compatible manner.
10. Declaration of Conformity
Hereby, STEINEL Vertrieb GmbH declares that the radio equipment type
Spot ONE Sensor Connect/Spot DUO Sensor Connect is in compliance with
Directive 2014/53/EU. The full text of the EU declaration of conformity is available
at the following internet address: www.steinel.de
11. Manufacturer's Warranty
This Steinel product has been manufactured with utmost care, tested for proper
operation and safety and then subjected to random sample inspection. Steinel guarantees that it is in perfect condition and proper working order. The warranty period
is 36months and starts on the date of sale to the consumer. We will remedy defects
caused by material flaws or manufacturing faults. The warranty will be met by repair
or replacement of defective parts at our own discretion. The warranty shall not cover
damage to wear parts, damage or defects caused by improper treatment or maintenance. Further consequential damage to other objects shall be excluded.
Claims under the warranty will only be accepted if the unit is sent fully assembled and
well-packed with a brief description of the fault, a receipt or invoice ( date of purchase
and dealer's stamp ) to the appropriate Service Centre.
Repair service:
If defects occur outside the warranty period or are not covered by the warranty, ask
your nearest service station for the possibility of repair.
GB
2120
Page 12

Dimensions
(Ø×D)
(W×H×D)
Input voltage 220-240 V, 50/60Hz
Output
• Stand by
• Operation
Lamp GU10-LED lamp (max. 9 W)
Sensor technology Passive infrared
Detection zone
• Angle of coverage
• Angle of aperture
Reach max. 10 m
Time setting 8s - 35 min (Spot ONE/DUO Sensor only)
Twilight setting 2-1000Lux (Spot ONE/DUO Sensor only)
IP rating IP44
Protection class I
Temperature range -20°C - +40°C
Bluetooth frequency 2.4-2.48GHz (Spot ONE/DUO Sensor Connect only)
Bluetooth transmitter power 5 dBm/3 mW (Spot ONE/DUO Sensor Connect only)
Spot ONE: Ø 97×175 mm
Spot DUO: 98×247×175 mm
approx. 0.5 W
approx. 0.5 W + LED lamp
90°
90°
5 s - 60min (Spot ONE/DUO Sensor Connect only)
2-2000 lux (Spot ONE/DUO Sensor Connect only)
13. Troubleshooting12. Technical specifications
Malfunction Cause Remedy
LED light does not switch ON ■ Fuse has tripped, not
Sensor-switched LED light
does not switch ON
Sensor-switched LED light
does not switch OFF
Sensor-switched LED light
keeps switching ON/OFF
Sensor-LED light switches
ON when it should not
switched ON, break in
wiring
■ Short circuit
■ Lamp faulty
■ Twilight setting in
night-time mode during
daytime operation
■ Mains switch OFF
■ Fuse has tripped
■ Detection zone not
correctly adjusted
■ Continued movement
within the detection zone
■ Animals moving in
detection zone
■ Wind is moving trees and
bushes in the detection
zone
■ Cars in the street are
detected
■ Sudden temperature
changes due to weather
(wind, rain, snow) or air
expelled from fans, open
windows
■ Sensor-switched LED
light is swaying (moving)
due to gusts of wind or
heavy rain
■ Activate, change fuse,
turn ON mains switch,
check wiring with
voltage tester
■ Check connections
■ Change lamp
■ Reset
■ Switch ON
■ Activate, change fuse,
check connection if
necessary
■ Readjust
■ Check zone and
readjust if necessary or
apply shroud
■ Tilt sensor higher; adjust
detection zone
■ Change detection zone
■ Change detection zone
■ Adjust detection zone or
install in a dierent place
■ Mount sensor-switched
LED light on a firm
surface
GB
2322
Page 13
CZ
!
1. Ktomuto dokumentu
– Pozorně si jej přečtěte auschovejte!
– Chráněno autorským právem.
Dotisk, ičástečný, jen snaším souhlasem.
– Změny, které slouží technickému pokroku, vyhrazeny.
Vysvětlení symbolů
Varování před nebezpečím!
!
Odkaz na text vdokumentu.
...
2. Všeobecné bezpečnostní pokyny
Před zahájením jakýchkoli prací na přístroji přerušit přívod napětí!
• Připojované elektrické vedení nesmí být během montáže pod napětím. Proto je
nejprve třeba vypnout proud apoté pomocí zkoušečky napětí zkontrolovat, zda je
vedení bez napětí.
• Při instalaci svítidla se jedná opráci na síťovém napětí. Musí proto být provedena
odborně podle obvyklých předpisů pro instalaci elektrických zařízení a podmínek
jejich připojení dle ČSN.
• Používejte jen originální náhradní díly.
• Opravy může provést jen odborný servis.
• Nevhodné kpoužívání shalogenovými žárovkami.
3. Spot ONE Sensor/Spot DUO Sensor
Spot ONE Sensor Connect/Spot DUO Sensor Connect
Používání vsouladu surčením
– Svítidlo LED pro montáž na stěnu ve vnitřní a venkovní oblasti
Spot ONE Sensor/Spot DUO Sensor
– Senzorové svítidlo LED obsahuje infračervený hlásič pohybu.
Spot ONE Sensor Connect/Spot DUO Sensor Connect
– Senzorové svítidlo LED obsahuje infračervený hlásič pohybu a lze jej nastavit jen
pomocí Bluetooth.
Rozsah dodávky Spot ONE (obr. 3.1)
– Svítidlo
– Tři šrouby
– Tři hmoždinky
– Tři rozpěrky
Rozsah dodávky Spot DUO (obr. 3.2)
– Svítidlo
– Čtyři šrouby
– Čtyři hmoždinky
– Čtyři rozpěrky
Rozměry Spot ONE (obr. 3.3)
Rozměry Spot DUO (obr. 3.4)
Přehled výrobků (obr. 3.5)
A Nástěnný držák
B Připojovací svorka
C Pojistný šroub
D Podstavec svítidla
E Kryt svítidla
F Soumrakové nastavení (jen Spot ONE/DUO Sensor)
G Časové nastavení (jen Spot ONE/DUO Sensor)
Oblast záchytu Spot ONE/DUO Sensor (obr. 3.6-3.8)
4. Elektrické připojení
Schéma zapojení (obr. 4.1)
Kpřipojení kelektrické síti použijte třípólový kabel:
L = fázový vodič (většinou černý, hnědý nebo šedý)
N = neutrální vodič (většinou modrý)
PE = ochranný vodič (zelenožlutý)
Vpřípadě pochybností je nutno identifikovat jednotlivé vodiče pomocí zkoušečky
napětí; zda jsou zase bez napětí. Fázový (L), neutrální (N) aochranný vodič (PE) se
připojí kpřipojovací svorce.
Důležité:
Případná záměna přívodů později způsobí zkrat vpřístroji nebo pojistkové krabici.
Vtomto případě je nutno jednotlivé vodiče opakovaně identifikovat apoté znovu
zapojit. V přívodním síťovém vedení může být samozřejmě instalován běžný síťový
vypínač.
CZ
24 25
Page 14
Propojení do sítě
" " slouží k propojení svítidel do sítě. Paralelně může být zapojeno až 10 svítidel
tohoto typu. (Obr. 4.1)
5. Montáž
• Zkontrolovat poškození uvšech konstrukčních dílů.
• Při poškození výrobek nepoužívat.
• Při montáži svítidla dbát, aby bylo upevněno bez otřesů.
• Vhodné montážní místo vybrat při zohlednění dosahu azachycení pohybu.
Nejbezpečnějšího zachycení pohybu se dosáhne tehdy, je-li přístroj namontován
napříč ke směru chůze asenzoru přitom nebrání ve výhledu žádné překážky (jako
např. stromy, zdi atp.).
Postup při montáži
• Vypnout napájení elektrickým proudem. (obr.4.1)
• Povolit pojistný šroub, z nástěnného držáku uvolnit kryt svítidla. (obr.5.1)
• Uvolnit zasouvací svorku a kryt svítidla odejmout z nástěnného držáku. (obr.5.2)
• Vyznačit otvory kvrtání. (obr.5.3)
• Vyvrtat otvory a vložit hmoždinky. (obr.5.4)
• Montáž pod omítku (obr. 5.5)
• Montáž na omítku s distančními držáky (obr. 5.6)
• Pojistný pásek upevnit na nástěnný držák a nasadit zasouvací svorku. (obr.5.7)
• Připojit připojovací kabel. (obr.5.8)
• U propojení několika svítidel do sítě vylomit pojistnou lamelu. (obr.5.8)
• Kryt svítidla nasunout na nástěnný držák. (obr.5.9)
• Zašroubovat pojistný šroub. (obr.5.9)
• Zapnout napájení elektrickým proudem. (obr.5.9)
• Provést nastavení ➜ „6. Funkce“
6. Funkce
Spot ONE Sensor/Spot DUO Sensor
Nastavení zvýroby
– Soumrakové nastavení: 1 000lx
– Časové nastavení: 8sekund
Soumrakové nastavení (obr. 6.2 F)
Požadovanou prahovou reakční hodnotu svítidla je možno plynule nastavit v rozmezí
od asi 2 do 1 000 lx.
– Otočný regulátor nastavený na
– Otočný regulátor nastavený na
= provoz za denního světla (nezávisle na jasu)
= soumrakový provoz (asi 2 lx)
26 27
Při nastavování oblasti záchytu a provádění funkční zkoušky za denního světla musí
být otočný regulátor nastaven na
Časové nastavení (obr. 6.2 G)
Požadovanou dobu, po kterou má být svítidlo zapnuto, je možno nastavit plynule
vrozmezí od asi 8sekund do max. 35 minut. Každým pohybem před uplynutím této
doby budou znovu spuštěny automatické hodiny.
– Otočný regulátor + = asi 35 minut
– Otočný regulátor – = asi 8sekund
Upozornění:
Po každém vypnutí svítidla je opětovné zachycování pohybu přerušeno asi na 1sekundu.
Teprve po uplynutí této doby může svítidlo při pohybu zase zapnout světlo.
Spot DUO Sensor
Stav při dodání:
Obě hlavy svítidla jsou propojeny do sítě a vždy se zapínají a vypínají současně. Pro
individuální provoz obou hlav svítidel musí být odstraněno spojení mezi svorkami
1 a 2).
(
Spot ONE Sensor Connect/Spot DUO Sensor Connect
Nastavení zvýroby
– Soumrakové nastavení: 2000lx
– Časové nastavení: 5 sekund
Aplikace Smart Remote
Pro konfiguraci svítidla pomocí smartphonu nebo tabletu si musíte z AppStore stáhnout aplikaci dálkového ovládání Smart Remote STEINEL. Je potřebný smartphone
nebo tablet s Bluetooth.
Android iOS
.
CZ
Page 15
Následující funkce lze nastavit aplikací Smart Remote:
3
5
ZÁRUKA
LETÁ
VÝROBCE
ZÁRUKA
LETÁ
VÝROBCE
– Časové nastavení
– Soumrakové nastavení
– Časy zapínání a vypínání
– Situační automatické/ruční řízení
– Propojení do sítě
– Tvoření skupin
– Názvy skupin a svítidel
Upozornění:
Po každém vypnutí svítidla je opětovné zachycování pohybu přerušeno asi na 1sekundu.
Teprve po uplynutí této doby může svítidlo při pohybu zase zapnout světlo.
Pro zapnutí a vypnutí podle času má Spot Connect interní hodiny. Hodiny se při
každém spojení Bluetooth synchronizují prostřednictvím aplikace Smart Remote
s hodinami spojeného smartphonu.
K zajištění správné funkce musí být po přerušení napětí svítidla vytvořeno spojení prostřednictvím aplikace Smart Remote. Interní hodiny se znovu synchronizují s hodinami
smartphonu.
9. Likvidace
Elektrická zařízení, příslušenství a obaly by měly být odvezeny k ekologickému
opětovnému zhodnocení.
Nevyhazujte elektrická zařízení do domovního odpadu!
CZ
Jen pro země EU:
V souladu splatnou evropskou směrnicí oodpadních elektrických a elektronických
zařízeních a jejím převedení do národního práva musí být nepoužitelná elektrická
zařízení separována a odevzdána kekologickému opětovnému zhodnocení.
10. Prohlášení oshodě
Tímto STEINEL Vertrieb GmbH prohlašuje, že typ rádiového zařízení Spot ONE Sensor
Connect/Spot DUO Sensor Connect je v souladu se směrnicí 2014/53/EU. Úplné
znění EU prohlášení o shodě je k dispozici na této internetové adrese: www.steinel.de
7. Rozsah natočení svítidla / výměna žárovky
Rozsah natočení svítidla (obr. 7.1/7.2)
Výměna žárovky
• Uvolnit a vytáhnout krycí sklo na krytu svítidla (obr.7.3)
• Povolit a vytáhnout žárovku. (obr.7.4)
• Vložit a utáhnout novou žárovku. (obr.7.5)
• Nasunout a utáhnout krycí sklo. (obr.7.6)
Důležité:
Používat jen žárovku GU10-LED do max. 9 W.
Upozornění:
• Při výměně žárovky se přesvědčit, zda nejsou těsnění a těsnicí plocha znečištěné
nebo poškozené.
8. Údržba
Výrobek je bezúdržbový.
Svítidlo lze v případě znečištění očistit vlhkým hadříkem (bez použití čisticích prostředků).
11. Záruka výrobce
Tento výrobek firmy Steinel je vyráběn s maximální pozorností věnovanou jeho funkčnosti a bezpečnosti, které byly vyzkoušeny podle platných předpisů, přičemž se výrobek rovněž podrobil namátkové výstupní kontrole. Firma Steinel přebírá záruku
za bezvadné provedení a funkčnost. Záruka se poskytuje vdélce 36měsíců azačíná dnem prodeje výrobku spotřebiteli. Odstraněny vám budou výrobní vady azávady zapříčiněné vadným materiálem, přičemž záruka spočívá vopravě nebo výměně
chybného dílu dle našeho výběru. Záruka se nevztahuje na škody na dílech podléhajících opotřebení, na škody avady zapříčiněné nesprávným zacházením nebo údržbou.
Uplatňování dalších nároků následných škod na cizích věcech je vyloučeno. Záruka
bude uznána jen tehdy, bude-li nedemontovaný přístroj dobře zabalen, přiložen krátký
popis závady, pokladní stvrzenka nebo faktura (datum prodeje arazítko prodejny),
poslán na adresu příslušného servisu.
Servisní opravny:
Po uplynutí záruční doby nebo v případě závad bez nároku na záruku se ve vašem
nejbližším servisu zeptejte na možnost opravy.
2928
Page 16
12. Technické parametry
Rozměry
(Ø×h)
(vך×h)
Vstupní napětí 220–240V, 50/60Hz
Výkon
• Stand by
• Provoz
Žárovka žárovka LED GU10 (max. 9W)
Senzorová
technologie
Oblast záchytu
• Úhel záchytu
• Úhel otevření
Dosah max. 10 m
Časové nastavení 8s – 35 min. ( jen Spot ONE/DUO Sensor)
Soumrakové nastavení 2–1000lx (jen Spot ONE/DUO Sensor)
Krytí IP44
Třída ochrany I
Teplotní rozmezí -20 – +40°C
Frekvence Bluetooth 2,4–2,48GHz
Vysílací výkon
Bluetooth
Spot ONE: Ø 97×175 mm
Spot DUO: 98×247×175 mm
asi 0,5 W
asi 0,5 W + žárovka LED
pasivní infračervená
90°
90°
5 s – 60min. (jen Spot ONE/DUO Sensor Connect)
2–2000lx (jen Spot ONE/DUO Sensor Connect)
(jen Spot ONE/DUO Sensor Connect)
5dBM/3mW
(jen Spot ONE/DUO Sensor Connect)
13. Provozní poruchy
Porucha Příčina Náprava
Svítidlo LED nezapíná ■ Pojistka zareagovala,
Senzorové svítidlo LED
nezapíná
Senzorové svítidlo LED
nevypíná
Senzorové svítidlo LED
střídavě zapíná a vypíná
Senzorové svítidlo LED
zapíná v nevhodnou dobu
svítidlo není zapnuté,
přerušené vedení
■ Zkrat
■ Poškozená žárovka
■ Při denním provozu je
zvoleno soumrakové
nastavení odpovídající
nočnímu provozu
■ Síťový vypínač v poloze
VYPNUTO
■ Pojistka zareagovala
■ Oblast záchytu není
přesně nastavena
■ Trvalý pohyb v oblasti
záchytu
■ Voblasti záchytu se
pohybují zvířata
■ Vítr pohybuje stromy
akeři v oblasti záchytu
■ Zaznamenávání pohybu
aut na ulici
■ Náhlá změna teploty díky
povětrnostním vlivům
(vítr, déšť, sníh) nebo
vzduchu z ventilátorů,
otevřených oken
■ Senzorové svítidlo LED
se kýve (pohybuje se),
např. při nárazech větru
nebo silné bouřce
■ Zapnout, vyměnit
pojistku, zapnout síťový
vypínač; zkontrolovat
vedení pomocí
zkoušečky napětí
■ Zkontrolovat připojení
■ Výměna žárovky
■ Znovu nastavit
■ Zapnout
■ Zapnout, vyměnit
pojistku, popř.
zkontrolovat připojení
■ Znovu seřídit
■ Zkontrolovat oblast
apřípadně znovu
seřídit nebo zakrýt
■ Natočit senzor výše,
popř. přestavit oblast
záchytu
■ Přestavit oblast záchytu
■ Přestavit oblast záchytu
■ Změnit oblast záchytu,
změnit místo montáže
■ Senzorové svítidlo LED
namontovat na pevný
podklad
CZ
3130
Page 17
SK
!
1. Otomto dokumente
– Pozorne si ho prečítajte a uschovajte!
– Chránené autorskými právami.
Dotlač, aj keď iba vskrátenej verzii, je povolená iba s naším súhlasom.
– Vyhradzujeme si právo na zmeny slúžiace technickému pokroku.
Vysvetlenie symbolov
Varovanie pred nebezpečenstvami!
!
Odkaz na textové pasáže v dokumente.
...
2. Všeobecné bezpečnostné pokyny
Pred všetkými prácami na prístroji prerušte prívod napätia!
• Pri montáži musí byť pripájané elektrické vedenie bez napätia. Preto je potrebné
najskôr vypnúť elektrický prúd a skontrolovať beznapäťovosť pomocou skúšačky
napätia.
• Pri inštalácii svietidla ide oprácu na sieťovom napätí. Inštalácia sa preto musí
vykonať odborne podľa inštalačných predpisov a podmienok pripojenia platných
vdanej krajine.
• Používajte iba originálne náhradné diely.
• Opravy smú vykonávať iba autorizované servisné dielne.
• Nevhodné na použitie shalogénovými svetelnými zdrojmi.
3. Spot ONE Sensor/Spot DUO Sensor
Spot ONE Sensor Connect/Spot DUO Sensor Connect
Správne používanie
– LED svietidlo je vhodné na nástennú montáž vinteriéri a exteriéri.
Spot ONE Sensor/Spot DUO Sensor
– Senzorové LED svietidlo obsahuje infračervený senzor pohybu.
Spot ONE Sensor Connect/Spot DUO Sensor Connect
– Senzorové LED svietidlo obsahuje infračervený senzor pohybu a dá sa nastaviť iba
pomocou Bluetooth.
32 33
Rozsah dodávky Spot ONE (obr. 3.1)
– svietidlo
– 3 skrutky
– 3 hmoždinky
– 3 dištančné držiaky
Rozsah dodávky Spot DUO (obr. 3.2)
– svietidlo
– 4 skrutky
– 4 hmoždinky
– 4 dištančné držiaky
Rozmery výrobku Spot ONE (obr. 3.3)
Rozmery výrobku Spot DUO (obr. 3.4)
Prehľad výrobku (obr. 3.5)
A nástenný držiak
B pripojovacia svorka
C poistná skrutka
D noha svietidla
E teleso svietidla
F nastavenie stmievania (iba Spot ONE/DUO Sensor)
G nastavenie času (iba Spot ONE/DUO Sensor)
Oblasť snímania Spot ONE/DUO Sensor (obr. 3.6 – 3.8)
4. Elektrické pripojenie
Schéma zapojenia (obr. 4.1)
Napájacie vedenie pozostáva z jedného 3-žilového kábla:
L = fáza (zvyčajne čierna, hnedá alebo sivá)
N = neutrálny vodič (zvyčajne modrý)
PE = ochranný vodič (zeleno-žltý)
Vprípade pochybností identifikujte vodiče pomocou skúšačky napätia; potom ich
znova odpojte od napätia. Fáza (L), neutrálny vodič (N) a ochranný vodič (PE) sa
pripoja na pripojovaciu svorku.
Dôležité:
Zámena vodičov neskôr vedie kskratu vprístroji alebo vskrinke spoistkami. Vtomto
prípade jednotlivé vodiče ešte raz identifikujte a nanovo zapojte. Na sieťový prívod sa
môže nainštalovať sieťový spínač na zapínanie a vypínanie.
Zosieťovanie
“ slúži na zosieťovanie svietidiel. Paralelne sa dá zapojiť až 10 svietidiel tohto typu.
„
(obr. 4.1)
SK
Page 18
5. Montáž
• Všetky diely skontrolujte vzhľadom na poškodenie.
• Pri poškodeniach výrobok neuvádzajte do prevádzky.
• Pri montáži svietidla dbajte na to, aby bolo upevnené na mieste bez otrasov.
• Vyberte vhodné miesto montáže, zohľadnite dosah a snímanie pohybu.
Najbezpečnejšie snímanie pohybu dosiahnete vtedy, keď prístroj namontujete bočne
ksmeru snímaného pohybu a keď senzoru nebudú pri snímaní zacláňať žiadne prekážky (napr. stromy, múry atď.).
Montážny postup
• Vypnite napájanie elektrickým prúdom. (obr. 4.1)
• Uvoľnite poistnú skrutku a odoberte kryt svietidla znástenného držiaka. (obr.5.1)
• Uvoľnite zásuvnú svorku a oddeľte kryt svietidla od nástenného držiaka. (obr.5.2)
• Naznačte diery na vŕtanie. (obr. 5.3)
• Vyvŕtajte diery a vložte hmoždinky. (obr. 5.4)
• Montáž podomietková (obr. 5.5)
• Montáž nadomietková s dištančnými držiakmi (obr. 5.6)
• Upevnite bezpečnostnú pásku na nástennom držiaku a nasaďte zásuvnú svorku.
(obr.5.7)
• Pripojte prípojný kábel. (obr. 5.8)
• Pri zosieťovaní viacerých svietidiel vylomte poistnú príložku. (obr.5.8)
• Teleso svietidla nastrčte na nástenný držiak. (obr. 5.9)
• Naskrutkujte poistnú skrutku. (obr. 5.9)
• Zapnite napájanie elektrickým prúdom. (obr. 5.9)
• Vykonajte nastavenia. ➜ „6. Funkcia“
6. Funkcia
Spot ONE Sensor/Spot DUO Sensor
Nastavenia z výroby
– Nastavenie stmievania: 1000 lx
– Nastavenie času: 8sekúnd
Nastavenie stmievania (obr. 6.2 F)
Požadovaný prah citlivosti svietidla sa môže plynulo nastaviť od cca 2lx do 1000lx.
– nastavovací regulátor nastavený na
od jasu)
– nastavovací regulátor nastavený na
Pri nastavovaní oblasti snímania a za účelom testu funkčnosti pri dennom svetle musí
byť nastavovací regulátor nastavený na
= prevádzka pri dennom svetle (nezávisle
= prevádzka pri stmievaní (cca 2 lx)
.
Nastavenie času (obr. 6.2 G)
Požadovaná doba svietenia svietidla sa môže plynulo nastaviť od cca 8s do max.
35min. Každým zaznamenaným pohybom pred uplynutím tohto času sa odpočítavanie doby svietenia začne odznovu.
– nastavovací regulátor + = cca 35 minút
– nastavovací regulátor – = cca 8sekúnd
Upozornenie:
Po každom vypnutí svietidla je opätovné snímanie pohybu prerušené na cca 1sekundu. Až po uplynutí tohto času môže svietidlo pri pohybe opäť zapnúť svetlo.
Spot DUO Sensor
Stav pri dodaní:
Obe hlavy svietidla sú zosieťované a vždy sa súčasne zapnú a vypnú.
Pre individuálnu prevádzku oboch hláv svietidla sa musí odstrániť spojenie medzi
svorkami (
Spot ONE Sensor Connect/Spot DUO Sensor Connect
Nastavenia z výroby
– Nastavenie stmievania: 2000 lx
– Nastavenie času: 5 sekúnd
Aplikácia diaľkového ovládania Smart Remote
Na konfiguráciu svietidla si musíte pomocou smartfónu alebo tabletu stiahnuť aplikáciu
STEINEL Smart Remote vo svojom AppStore. Na to je potrebný smartfón alebo tablet
sfunkciou Bluetooth.
Android iOS
1 a 2).
SK
34 35
Page 19

Nasledujúce funkcie sú nastaviteľné cez aplikáciu diaľkového ovládania SmartRemote:
3
5
ZÁRUKA
ROKY
VÝROBCU
ZÁRUKA
ROKOV
VÝROBCU
– nastavenie času
– nastavenie stmievania
– časy zapnutia a vypnutia
– situatívne ovládanie automaticky/manuálne
– zosieťovanie
– vytvorenie skupiny
– pomenovanie skupiny a svietidiel
Upozornenie:
Po každom vypnutí svietidla je opätovné snímanie pohybu prerušené na cca 1sekundu. Až po uplynutí tohto času môže svietidlo pri pohybe opäť zapnúť svetlo.
Na zapínanie a vypínanie na základe času disponuje svietidlo Spot Connect internými
hodinami. Hodiny sa automaticky synchronizujú pri každom pripojení Bluetooth cez
aplikáciu Smart Remote shodinami spárovaného smartfónu.
Na zabezpečenie správnej funkcie sa musí po prerušení prívodu napätia do svietidla
obnoviť spojenie cez aplikáciu Smart Remote. Interné hodiny sa opätovne synchronizujú s hodinami v smartfóne.
9. Likvidácia
Elektrické zariadenia, príslušenstvo a obaly odovzdajte na ekologickú recykláciu.
Elektrické zariadenia nevyhadzujte do komunálneho odpadu!
Iba pre krajiny EÚ:
Podľa platnej európskej smernice oodpade zelektrických a elektronických zariadení
ajej implementácie do národnej legislatívy sa musia nepoužívané elektrické a elektronické zariadenia zbierať separovane a odovzdať na ekologickú recykláciu.
10. Vyhlásenie o zhode
STEINEL Vertrieb GmbH týmto vyhlasuje, že rádiové zariadenie typu Spot ONE
Sensor Connect/Spot DUO Sensor Connect je v súlade so smernicou 2014/53/EÚ.
Úplné EÚ vyhlásenie o zhode je k dispozícii na tejto internetovej adrese: www.steinel.de
SK
7. Rozsah otáčania svietidla/výmena svetelného zdroja
Rozsah otáčania svietidla (obr. 7.1/7.2)
Výmena svetelného zdroja
• Uvoľnite krycie sklo na kryte svietidla a vytiahnite ho. (obr.7.3)
• Uvoľnite svetelný zdroj a vytiahnite ho. (obr. 7.4)
• Nasaďte nový svetelný zdroj a pevne utiahnite. (obr. 7.5)
• Nasaďte krycie sklo a pevne utiahnite. (obr. 7.6)
Dôležité: Používajte iba GU10 LED svetelný zdroj do max. 9 W.
Upozornenie:
Pri výmene svetelného zdroja sa ubezpečte, že tesnenie a tesniaca plocha nie sú
znečistené ani poškodené.
8. Údržba
Výrobok nevyžaduje údržbu.
Svietidlo môžete vprípade znečistenia očistiť vlhkou handrou (bez čistiaceho
prostriedku).
11. Záruka výrobcu
Tento výrobok spoločnosti Steinel bol vyrobený smaximálnou dôslednosťou, skontrolovaný zhľadiska funkčnosti abezpečnosti podľa platných predpisov a následne
podrobený náhodnej kontrole. Spoločnosť Steinel preberá záruku za bezchybný stav
a funkčnosť. Záručná doba je 36mesiacov azačína plynúť dňom predaja spotrebiteľovi. Odstránime nedostatky, ktoré vyplývajú z chyby materiálu alebo výrobnej chyby,
záručné plnenie sa uskutočňuje opravou alebo výmenou chybných dielov podľa nášho
uváženia. Záručné plnenie sa nevzťahuje na poškodenie opotrebovateľných dielov ani
na škody a nedostatky, ktoré vzniknú nesprávnym zaobchádzaním alebo údržbou.
Ďalšie následné škody na cudzích objektoch sú zo záruky vylúčené.
Záruka je platná len vtedy, ak sa nerozobraný prístroj skrátkym popisom chyby spolu
s pokladničným dokladom alebo faktúrou (dátum kúpy a pečiatka predajcu) zašle
riadne zabalený do príslušného servisu.
Servis pre opravy:
Po uplynutí záručnej doby alebo v prípade chýb, na ktoré sa nevzťahuje záruka, sa
omožnosti opravy informujte na najbližšej servisnej stanici.
3736
Page 20

12. Technické údaje
Rozmery
(Ø×h)
(vך×h)
Vstupné napätie 220 – 240 V, 50/60Hz
Výkon
• standby
• prevádzka
Svetelný zdroj GU10 LED svetelný zdroj (max. 9 W)
Senzorová technológia pasívna infračervená
Oblasť snímania
• uhol snímania
• uhol otvorenia
Dosah max. 10 m
Nastavenie času 8s – 35 min. (iba Spot ONE/DUO Sensor)
Nastavenie stmievania 2 – 1000 lx (iba Spot ONE/DUO Sensor)
Krytie IP44
Trieda ochrany I
Teplotný rozsah -20 – +40 °C
Frekvencia Bluetooth 2,4 – 2,48GHz (iba Spot ONE/DUO Sensor Connect)
Vysielací výkon Bluetooth 5 dBM/3 mW (iba Spot ONE/DUO Sensor Connect)
Spot ONE: Ø 97×175 mm
Spot DUO: 98×247×175 mm
cca 0,5 W
cca 0,5 W + LED svetelný zdroj
90°
90°
5 s – 60min. (iba Spot ONE/DUO Sensor Connect)
2 – 2000 lx (iba Spot ONE/DUO Sensor Connect)
13. Prevádzkové poruchy
Porucha Príčina Riešenie
LED svietidlo sa nezapína ■ aktivovala sa poistka,
Senzorové LED svietidlo sa
nezapína
Senzorové LED svietidlo sa
nevypína
Senzorové LED svietidlo
sa neustále zapína/vypína
Senzorové LED svietidlo
sa nežiaduco zapína
nezapnuté, vedenie
prerušené
■ skrat
■ chybný svetelný zdroj
■ pri dennej prevádzke,
nastavenie stmievania je
nastavené na nočnú
prevádzku
■ sieťový spínač je vypnutý
■ aktivovala sa poistka
■ oblasť snímania nie je
cielene nastavená
■ trvalý pohyb voblasti
snímania
■ zvieratá sa pohybujú v
oblasti snímania
■ vietor pohybuje konármi
stromov a kríkmi v oblasti
snímania
■ snímanie automobilov na
ulici
■ náhla zmena teploty v
dôsledku počasia (vietor,
dážď, sneh) alebo vzduch
prúdiaci zventilátorov,
otvorených okien
■ senzorové LED svietidlo
sa kýve (hýbe sa), napr.
zdôvodu vetra alebo
silných zrážok
■ zapnúť poistku, vymeniť,
zapnúť sieťový spínač,
skontrolovať vedenie
pomocou skúšačky
napätia
■ skontrolovať prípojky
■ vymeniť svetelný zdroj
■ nastaviť nanovo
■ zapnúť
■ zapnúť poistku,
vymeniť, príp.
skontrolovať pripojenie
■ nastaviť nanovo
■ skontrolovať oblasť
snímania a príp.
nanovo nastaviť, resp.
zakryť
■ senzor natočiť vyššie,
prestaviť oblasť
■ prestaviť oblasť
■ prestaviť oblasť
■ zmeniť oblasť snímania,
preložiť miesto montáže
■ senzorové LED svietidlo
namontovať na pevný
podklad
SK
3938
Page 21

PLTłumaczenie instrukcji oryginalnej
!
1. Informacje o tym dokumencie
– Zapoznać się dokładnie izostawić do przechowania!
– Dokument chroniony prawem autorskim.
Przedruk, także wczęściach, wyłącznie po uzyskaniu naszej zgody.
– Zmiany, wynikające zpostępu technicznego, zastrzeżone.
Objaśnienie symboli
Ostrzeżenie przed zagrożeniami!
!
Odsyłacz do tekstu wdokumencie.
...
2. Ogólne zasady bezpieczeństwa
Przed rozpoczęciem wszelkich prac przy urządzeniu należy odłączyć
napięcie zasilające!
• Przewód zasilający, który należy podłączyć podczas montażu, nie może być pod
napięciem. Dlatego najpierw należy wyłączyć prąd i sprawdzić brak napięcia za
pomocą próbnika.
• Podczas instalacji lampy wykonywana jest praca przy obecności napięcia sieciowego. Dlatego należy ją wykonać fachowo, zgodnie zobowiązującymi przepisami
dotyczącymi instalacji ipodłączania do zasilania elektrycznego.
• Stosować tylko oryginalne części zamienne.
• Naprawy mogą wykonywać jedynie autoryzowane punkty serwisowe.
• Nie nadaje się do stosowania wraz z lampami halogenowymi.
3. Spot ONE Sensor/Spot DUO Sensor
Spot ONE Sensor Connect/Spot DUO Sensor Connect
Zastosowanie zgodne zprzeznaczeniem
– Lampa LED do montażu na ścianie, na zewnątrz i wewnątrz budynku
Spot ONE Sensor/Spot DUO Sensor
– Lampa LED z czujnikiem ruchu jest wyposażona w detektor ruchu na podczerwień.
Spot ONE Sensor Connect/Spot DUO Sensor Connect
– Lampa LED z czujnikiem ruchu jest wyposażona w detektor ruchu na podczerwień
i może być ustawiana tylko za pośrednictwem Bluetooth.
40 41
Zakres dostawy Spot ONE (rys. 3.1)
– Lampa
– Trzy śruby
– Trzy kołki
– Trzy przekładki
Zakres dostawy Spot DUO (rys. 3.2)
– Lampa
– Cztery śruby
– Cztery kołki
– Cztery przekładki
Wymiary produktu Spot ONE (rys.3.3)
Wymiary produktu Spot DUO (rys.3.4)
Przegląd produktu (rys. 3.5)
A Uchwyt naścienny
B Zacisk przyłączeniowy
C śruba zabezpieczająca
D Stopa lampy
E Oprawa lampy
F Ustawianie progu czułości zmierzchowej (tylko Spot ONE/DUO Sensor)
G Ustawianie czasu (tylko Spot ONE/DUO Sensor)
Obszar wykrywania Spot ONE/DUO Sensor (rys. 3.6-3.8)
4. Przyłącze elektryczne
Schemat połączeń (rys. 4.1)
Przewód zasilający jest kablem 3-żyłowym:
L = przewód fazowy (najczęściej czarny, brązowy lub szary)
N = przewód neutralny (najczęściej niebieski)
PE = przewód ochronny (zielono-żółty)
Wrazie wątpliwości należy zidentyfikować przewody próbnikiem napięcia, anastępnie
ponownie wyłączyć napięcie. Fazę (L), przewód neutralny (N) i przewód ochronny
(PE) podłącza się do zacisku przyłączeniowego.
Ważne:
Pomylenie przewodów jest przyczyną późniejszego zwarcia wurządzeniu lub
wskrzynce bezpieczników. W takim przypadku należy jeszcze raz zidentyfikować
poszczególne przewody iponownie je podłączyć. Wprzewodzie zasilającym można
oczywiście zainstalować wyłącznik sieciowy do ręcznego włączania iwyłączania
oświetlenia.
PL
Page 22

Łączenie wsieć
" " służy do łączenia lamp w sieć. Połączenie może obejmować maksymalnie
10 lamp tego typu. (rys. 4.1)
5. Montaż
• Sprawdzić wszystkie elementy pod kątem uszkodzenia.
• Wprzypadku uszkodzeń nie uruchamiać produktu.
• Przy montażu lampy należy zwrócić na to uwagę, aby zamontować ją w miejscu
nie podlegającym wstrząsom i drganiom.
• Wybrać odpowiednie miejsce montażu zuwzględnieniem zasięgu iwykrywania ruchu.
Najpewniejsze wykrywanie poruszających się obiektów uzyskuje się przy zamontowaniu czujnika bokiem do kierunku ruchu i przy braku przeszkód (jak np.: drzewa, mury
itp.), zasłaniających czujnik.
Czynności montażowe
• Wyłączyć zasilanie. (rys. 4.1)
• Poluzować śrubę zabezpieczającą i oprawę lampy zdjąć zuchwytu naściennego.
(rys.5.1)
• Odłączyć zacisk wtykowy i zdjąć oprawę lampy z uchwytu naściennego. (rys.5.2)
• Zaznaczyć układ nawierceń. (rys. 5.3)
• Wywiercić otwory iwłożyć kołki. (rys. 5.4)
• Montaż podtynkowy (rys. 5.5)
• Montaż natynkowy z uchwytami dystansowymi (rys.5.6)
• Zamocować taśmę zabezpieczającą i zacisk przyłączeniowy na uchwycie ściennym.
(rys. 5.7)
• Podłączyć kabel przyłączeniowy. (rys. 5.8)
• W przypadku łączenia w sieć kilku lamp wyłamać łącznik zabezpieczający. (rys. 5.8)
• Założyć oprawę lampy na uchwycie ściennym. (rys. 5.9)
• Wkręcić śrubę zabezpieczającą. (rys. 5.9)
• Włączyć zasilanie. (rys. 5.9)
• Skonfigurować ustawienia ➜ "6. Działanie"
6. Działanie
Spot ONE Sensor/Spot DUO Sensor
Ustawienia fabryczne
– Ustawianie progu czułości zmierzchowej: 1000 luksów
– Ustawianie czasu załączenia: 8sekund
Ustawianie progu czułości zmierzchowej (rys.6.2 F)
Wymagany próg czułości zmierzchowej lampy zczujnikiem można ustawić bezstopniowo wzakresie od ok.2 do 1000luksów.
42 43
– Pokrętło regulacyjne ustawione wpozycji = praca przy świetle dziennym
(niezależnie od stopnia jasności)
– Pokrętło regulacyjne ustawione na
Podczas ustawiania zasięgu czujnika itestu działania przy świetle dziennym należy
obrócić pokrętło regulacyjne do pozycji
Ustawienie czasu (rys. 6.2 G)
Wymagany czas świecenia lampy można ustawić płynnie wzakresie od ok. 8sekund
do maks. 35minut. Każdy ruch wykryty przed upływem tego czasu powoduje ponowne uruchomienie zegara.
– Pokrętło regulacyjne + = ok.35minut
– Pokrętło regulacyjne – = ok. 8sekund
Wskazówka:
Po każdym wyłączeniu lampy ponowne wykrywanie ruchów zostaje przerwane na
czas ok.1sekundy. Dopiero po upływie tego czasu lampa może włączać światło po
wykryciu ruchu.
Spot DUO Sensor
Stan przy dostawie:
Obie głowice lamp są połączone w sieć i włączają się oraz wyłączają zawsze razem.
Aby eksploatować je indywidualnie należy usunąć połączenie pomiędzy zaciskami
1 i 2).
(
Spot ONE Sensor Connect/Spot DUO Sensor Connect
Ustawienia fabryczne
– Ustawianie progu czułości zmierzchowej: 2000 luksów
– Ustawianie czasu załączenia: 5 sekund
Aplikacja Smart Remote
Na potrzeby konfiguracji lampy za pomocą smartfonu lub tabletu należy ściągnąć
aplikację STEINEL Smart Remote z AppStore. Niezbędny jest smartfon lub tablet
zfunkcją Bluetooth.
Android iOS
= praca o zmierzchu (ok. 2 luksy)
.
PL
Page 23

Za pomocą aplikacji Smart Remote można ustawiać następujące funkcje:
– Ustawianie czasu
– Ustawianie progu czułości zmierzchowej
– Czasy włączania i wyłączania
– Sytuacyjne sterowanie tryb automatyczny/ręczny
– Łączenie wsieć
– Tworzenie grup
– Nazywanie grup i lamp
Wskazówka:
Po każdym wyłączeniu lampy ponowne wykrywanie ruchów zostaje przerwane na
czas ok.1sekundy. Dopiero po upływie tego czasu lampa może włączać światło po
wykryciu ruchu.
Na potrzeby włączania i wyłączania w oparciu o czas Spot Connect posiada wewnętrzny
zegar. Synchronizuje się on automatycznie przy każdym połączeniu Bluetooth poprzez
aplikację Smart Remote z zegarem podłączonego smartfonu.
Aby zapewnić prawidłowe działanie, po każdej przerwie w dostawie prądu należy
przywrócić połączenie lampy za pomocą aplikacji Smart Remote. Wewnętrzny zegar
zostanie zsynchronizowany ponownie z zegarem smartfonu.
8. Konserwacja
Produkt nie wymaga konserwacji.
Zabrudzoną powierzchnię lampy można oczyścić wilgotną szmatką (bez użycia
środków czyszczących).
9. Utylizacja
Urządzenia elektryczne, akcesoria i opakowania należy oddać do recyklingu przyjaznego środowisku.
Nie wyrzucać urządzeń elektrycznych wraz zodpadami zgospodarstw
domowych!
Tylko dla krajów UE:
Zgodnie z obowiązującymi dyrektywami europejskimi w sprawie zużytych urządzeń
elektrycznych i elektronicznych oraz ich wdrażaniu do prawa krajowego nienadające
się do użytkowania urządzenia elektryczne należy odbierać osobno i poddawać
recyklingowi w sposób przyjazny środowisku.
PL
7. Zakres obracania lampy/wymiana żarówki
Zakres obracania lampy (rys. 7.1/7.2)
Wymiana żarówki
• Odkręcić i wyjąć szkło osłaniające na oprawie lampy. (rys.7.3)
• Wyjąć żarówkę. (rys. 7.4)
• Włożyć nową żarówkę i dokręcić. (rys. 7.5)
• Nałożyć i dokręcić szkło osłaniające. (rys. 7.6)
Ważne:
Stosować tylko żarówki LED GU10 o mocy maks. 9 W.
Wskazówka:
• Podczas każdej wymiany źródła światła należy upewnić się, że uszczelka lub powierzchnia w miejscu uszczelnienia nie jest uszkodzona lub zabrudzona.
10. Deklaracja zgodności z normami
STEINEL Vertrieb GmbH niniejszym oświadcza, że typ urządzenia radiowego
Spot ONE Sensor Connect/Spot DUO Sensor Connect jest zgodny z dyrektywą
2014/53/UE. Pełny tekst deklaracji zgodności UE jest dostępny pod następującym
adresem internetowym: www.steinel.de
11. Gwarancja producenta
Niniejszy produkt firmy Steinel został wykonany zdużą starannością. Prawidłowe działanie i bezpieczeństwo użytkowania potwierdzają przeprowadzone losowo kontrole jakości oraz zgodność z obowiązującymi przepisami. Firma Steinel udziela gwarancji na
prawidłowe właściwości idziałanie. Okres gwarancji wynosi 36miesięcy irozpoczyna się zdniem sprzedaży użytkownikowi. Wramach gwarancji usuwane są braki wynikające z wad materiałowych lub produkcyjnych, świadczenia gwarancyjne obejmują naprawę lub wymianę wadliwych części, w zależności od potrzeb izgodnie znaszą
decyzją. Gwarancja nie obejmuje uszkodzenia części podlegających zużyciu eksploatacyjnemu, uszkodzeń iusterek spowodowanych przez nieprawidłową obsługę lub
konserwację. Gwarancja nie obejmuje odpowiedzialności za szkody wtórne powstałe
na przedmiotach trzecich.
4544
Page 24

Gwarancja jest udzielana tylko wtedy, gdy prawidłowo zapakowane urządzenie
3
5
GWARANCJI
LATA
PRODUCENTA
GWARANCJI
LAT
PRODUCENTA
(nierozłożone na części) zostanie odesłane do odpowiedniego punktu serwisowego
wraz zkrótkim opisem usterki, paragonem lub rachunkiem zakupu (opatrzonym datą
zakupu ipieczęcią sklepu).
Serwis naprawczy:
Po upływie okresu gwarancji lub wrazie usterek nieobjętych gwarancją informacji
omożliwości naprawy udziela najbliższy punkt serwisowy.
12. Dane techniczne
Wymiary
(Ø×gł.)
(wys.×szer.×gł.)
Napięcie wejściowe 220-240 V, 50/60Hz
Moc
• Stand-by
• Użytkowanie
Źródło światła Żarówka LED GU10 (maks. 9 W)
Technika czujników Pasywna podczerwień
Obszar wykrywania
• Kąt wykrywania
• Kąt rozwarcia
Zasięg maks. 10 m
Ustawianie czasu 8s - 35 min (tylko Spot ONE/DUO Sensor)
Ustawianie progu czułości
zmierzchowej
Stopień ochrony IP44
Klasa ochronności I
Zakres temperatury -20 – +40°C
Częstotliwość Bluetooth 2,4-2,48GHz (tylko Spot ONE/DUO Sensor Connect)
Moc nadawcza Bluetooth 5dBM/3 mW (tylko Spot ONE/DUO Sensor Connect)
Spot ONE: Ø 97×175 mm
Spot DUO: 98×247×175 mm
ok. 0,5 W
ok 0,5 W + żarówka LED
90°
90°
5 s - 60min (tylko Spot ONE/DUO Sensor Connect)
2-1000 Lux (tylko Spot ONE/DUO Sensor)
2-2000 Lux (tylko Spot ONE/DUO Sensor Connect)
13. Usterki
Usterka Przyczyna Usuwanie
lampa LED nie
włącza się
lampa LED zczujnikiem nie włącza się
lampa LED zczujnikiem nie wyłącza się
lampa LED z czujnikiem stale włącza się
iwyłącza
lampa LED zczujnikiem włącza się
wniepożądanym
momencie
■ zadziałał bezpiecznik,
niewłączony wyłącznik
sieciowy, przerwany
przewód
■ zwarcie
■ uszkodzona żarówka
■ przy dziennym trybie pracy
ustawiono próg czułości
zmierzchowej dla nocnego
trybu pracy
■ wyłączony wyłącznik
sieciowy
■ zadziałał bezpiecznik
■ niedokładnie ustawiony
obszar wykrywania czujnika
■ w obszarze wykrywania
czujnika ciągle coś się
porusza
■ wobszarze wykrywania
czujnika poruszają się
zwierzęta
■ wiatr porusza gałęziami
drzew ikrzewami wobszarze
wykrywania czujnika
■ czujnik rejestruje ruch
pojazdów na ulicy
■ gwałtowne zmiany tempera-
tury na skutek czynników
atmosferycznych (wiatr,
deszcz, śnieg) lub nadmuch
zwentylatorów, otwartych
okien
■ lampa LED z czujnikiem
kołysze się (porusza się), np.
na skutek porywistego wiatru
lub intensywnych opadów
■ włączyć, wymienić
bezpiecznik; włączyć
wyłącznik sieciowy;
sprawdzić przewód
próbnikiem napięcia
■ sprawdzić podłączenia
elektryczne
■ wymienić żarówkę
■ ustawić na nowo
■ włączyć
■ włączyć, wymienić
bezpiecznik, ewentualnie
sprawdzić podłączenie
■ wyregulować na nowo
■ skontrolować obszar
wykrywania czujnika,
ewent. ponownie wyregulować lub zasłonić
przesłonami
■ odchylić czujnik do góry;
zmienić obszar wykrywania
■ zmienić obszar
■ zmienić obszar
■ zmienić obszar wykrywania
czujnika, zmienić miejsce
montażu
■ zamontować lampę LED
zczujnikiem na stałym
podłożu
PL
4746
Page 25

RO
!
1. Despre acest document
– Vă rugăm să citiţi cu atenţie documentul și să-l păstraţi!
– Protejat prin Legea drepturilor de autor.
Reproducerea, inclusiv în extras, este permisă numai cu aprobarea noastră.
– Ne rezervăm dreptul de a face modificări care servesc progresului tehnic.
Explicaţia simbolurilor
Atenţie, pericole!
!
Trimitere la pasaje de text din document.
...
2. Instrucţiuni generale de securitate
Înainte de efectuarea oricăror lucrări la aparat, întrerupeţi alimentarea cu
energie electrică!
• La montare, cablul electric care urmează să fie conectat nu trebuie să fie sub tensiune. Opriţi așadar curentul și verificaţi cu un testor de tensiune să nu mai existe
curent pe cablu.
• Instalarea lămpii presupune o intervenţie la reţeaua electrică. Prin urmare, aceasta
trebuie efectuată corect, conform instrucţiunilor de instalare și condiţiilor de conectare uzuale în ţara respectivă.
• Folosiţi numai piese de schimb originale.
• Reparaţiile se vor executa numai în ateliere specializate.
• Nu este adecvat pentru utilizarea cu becuri cu halogen.
3. Spot ONE Sensor/Spot DUO Sensor
Spot ONE Sensor Connect/Spot DUO Sensor Connect
Utilizare conform destinaţiei
– Lampă cu LED, concepută pentru montarea pe perete, în interior și exterior
Spot ONE Sensor/Spot DUO Sensor
– Lampa cu LED și senzor conţine un detector de mișcare cu infraroșu.
Spot ONE Sensor Connect/Spot DUO Sensor Connect
– Lampa cu LED și senzor conţine un detector de mișcare cu infraroșu și se poate
regla numai prin Bluetooth.
Volumul livrării Spot ONE (fig. 3.1)
– lampă
– trei șuruburi
– trei dibluri
– trei distanţiere
Volumul livrării Spot DUO (fig. 3.2)
– lampă
– patru șuruburi
– patru dibluri
– patru distanţiere
Dimensiunile produsului Spot ONE (fig. 3.3)
Dimensiunile produsului Spot DUO (fig. 3.4)
Prezentarea sintetică a produsului (fig. 3.5)
A Suport de perete
B Bornă de conexiune
C Șurub de siguranţă
D Piciorul lămpii
E Carcasa lămpii
F Setarea luminozităţii de comutare (numai Spot ONE/DUO Sensor)
G Temporizare (numai Spot ONE/DUO Sensor)
Domeniu de detecţie Spot ONE/DUO Sensor (fig. 3.6-3.8)
4. Conexiune electrică
Schemă de conexiuni (fig. 4.1)
Circuitul de alimentare este format dintr-un cablu cu 3 fire:
L = conductor de fază (de obicei negru, maro sau gri)
N = conductor neutru (de obicei albastru)
PE = conductor de protecţie (verde/galben)
Dacă aveţi îndoieli, trebuie să identificaţi conductorii cu ajutorul unui creion de tensiune. După aceea ei trebuie scoşi din nou de sub tensiune. Faza (L), conductorul neutru
(N) şi conductorul de protecţie (PE) se conectează la blocul terminal.
Important:
Inversarea conexiunilor duce la scurtcircuit la aparat sau la tabloul de siguranţe.
În acest caz trebuie identificat din nou fiecare cablu și ulterior refăcute conexiunile
corecte. Pe cablul de alimentare se poate monta, bineînţeles, un întrerupător de reţea,
pentru activare și dezactivare.
RO
48 49
Page 26

Conectivitate în reţea
" " serveşte interconectării lămpilor. Se pot conecta în paralel până la 10 lămpi de
acest tip. (fig. 4.1)
5. Montaj
• Verificaţi toate componentele pentru a constata dacă prezintă deteriorări.
• Nu puneţi în funcţiune produsul dacă prezintă deteriorări.
• La montarea lămpii trebuie avut grijă să nu fie supusă trepidaiilor.
• Alegeţi un loc adecvat pentru montare, ţinând cont de raza de acţiune și de detectarea mișcării.
Cea mai sigură detectare a mișcării se obţine atunci când aparatul este montat lateral
faţă de direcţia de mers și nu există obstacole (de exemplu copaci, ziduri etc.) care să
împiedice vizibilitatea senzorului.
Etapele montării
• Opriţi alimentarea cu curent. (fig. 4.1)
• Desfaceţi șurubul de siguranţă și detașaţi carcasa lămpii din suportul de perete. (fig5.1)
• Decuplaţi clema de legătură și detașaţi carcasa lămpii din suportul de perete. (fig.5.2)
• Marcaţi locul unde vor fi găurile. (fig. 5.3)
• Faceţi găurile și introduceţi diblurile. (fig. 5.4)
• Montaj sub tencuială (fig.5.5)
• Montaj cablu pe tencuială cu distanţiere (fig.5.6)
• Fixaţi banda de siguranţă la suportul de perete și poziţionaţi borna de legătură.
(fig.5.7)
• Racordaţi cablul de conexiune. (fig. 5.8)
• În cazul interconectării mai multor lămpi, rupeţi eclisa de siguranţă. (fig.5.8)
• Introduceţi carcasa lămpii pe suportul de perete. (fig. 5.9)
• Înșurubaţi șurubul de siguranţă. (fig. 5.9)
• Porniţi alimentarea cu curent. (fig. 5.9)
• Realizaţi reglajele ➜ "6. Funcţionarea"
6. Funcţionarea
Spot ONE Sensor/Spot DUO Sensor
Reglaje din fabrică
– Luminozitate de comutare: 1000 lucşi
– Temporizare: 8secunde
Reglarea luminozităţii de comutare (fig. 6.2 F)
Pragul dorit de comutare a lămpii poate fi reglat continuu de la cca. 2 până la 1000 lucși.
– Buton poziţionat pe = regim de lumină naturală (independent de luminozitate)
– Buton de reglaj poziţionat pe
(cca. 2 lucși)
La reglarea ariei de detecţie și pentru verificarea funcţională la lumina zilei butonul de
reglare trebuie să fie poziionat pe
Temporizare (fig.6.2 G)
Durata de iluminare dorită pentru lampă poate fi reglată continuu de la cca. 8secunde
până la max. 35 minute. La fiecare mișcare detectată înaintea scurgerii acestei durate
de timp, temporizatorul repornește de la zero.
– Buton de reglare + = cca. 35 minute
– Buton de reglare – = cca. 8secunde
Indicaţie:
După fiecare stingere a lămpii, o nouă detectare de mișcare este posibilă doar după o
întrerupere de cca. 1 secundă. Numai după trecerea acestui interval de timp lampa se
poate aprinde din nou la detectarea mișcării.
Spot DUO Sensor
Stare la livrare:
Cele două capete de lampă sunt interconectate, aprinzându-se şi stingându-se
simultan.
Pentru funcţionarea individuală a celor două capete de lampă trebuie îndepărtată
conexiunea dintre cleme (
Spot ONE Sensor Connect/Spot DUO Sensor Connect
Reglaje din fabrică
– Luminozitate de comutare: 2000 lucşi
– Temporizare: 5 secunde
Smart Remote App
Pentru configurarea lămpii cu smartphone sau tabletă trebuie descărcată aplicaţia STEINEL
Smart Remote din AppStore. Este necesar un smartphone sau o tabletă cu Bluetooth.
Android iOS
= regim în funcţie de luminozitatea ambientală
.
1 şi 2).
RO
50 51
Page 27

Următoarele funcţii se pot regla prin Smart Remote App:
3
5
PRODUCĂTORULUI
ANI
GARANŢIA
PRODUCĂTORULUI
ANI
GARANŢIA
– Temporizare
– Setarea luminozităţii de comutare
– Timpi de pornire și oprire
– Comandă situativă Automată/Manuală
– Conectivitate în reţea
– Formarea grupurilor
– Denumirea grupurilor și lămpilor
Indicaţie:
După fiecare stingere a lămpii, o nouă detectare de mișcare este posibilă doar după o
întrerupere de cca. 1 secundă. Numai după trecerea acestui interval de timp lampa se
poate aprinde din nou la detectarea mișcării.
Pentru aprindere şi stingere în funcţie de timp, Spot Connect are un ceas intern. La
fiecare conexiune Bluetooth prin Smart Remote App, acesta se sincronizează automat
cu ceasul smartphone-urilor conectate.
Pentru a garanta funcţionarea corectă, după o întrerupere a tensiunii la lampă trebuie
realizată o conexiune prin Smart Remote App. Ceasul intern se sincronizează din nou
cu ceasul smartphone-ului.
7. Zona de pivotare a lămpii / schimbarea becului
Zona de pivotare a lămpii (fig. 7.1/7.2)
Schimbarea becului
• Desfaceţi geamul de protecţie de la carcasa lămpii și scoateţi-l. (fig.7.3)
• Desfaceţi becul și scoateţi-l. (fig. 7.4)
• Introduceţi noul bec și strângeţi-l. (fig. 7.5)
• Poziţionaţi geamul de protecţie și strângeţi-l. (fig. 7.6)
Important:
Nu utilizaţi decât becuri cu LED GU10 de până la max. 9 W.
Indicaţie:
• La schimbarea becului asiguraţi-vă că garnitura şi suprafaţa de etanşare nu sunt
murdare sau deteriorate.
8. Întreţinere
Produsul nu necesită lucrări de întreţinere.
În caz de murdărire, lampa poate fi curăţată cu o lavetă umedă (fără detergent).
9. Eliminarea ca deşeu
Aparatele electrice, accesoriile și ambalajele trebuie să facă obiectul unei reciclări
ecologice.
Nu aruncaţi aparatele electrice la gunoiul menajer!
Numai pentru ţările UE:
În conformitate cu directiva europeană privind eliminarea deșeurilor electrice și
electronice în vigoare și transpunerii ei în legislaţia naţională, aparatele electrice care
nu mai pot fi utilizate trebuie să fie colectate separat și să facă obiectul unei reciclări
ecologice.
10. Declaraţie de conformitate
Prin prezenta, STEINEL Vertrieb GmbH declară că tipul de echipamente radio
Spot ONE Sensor Connect/Spot DUO Sensor Connect este în conformitate cu
Directiva 2014/53/UE. Textul integral al declaraiei UE de conformitate este disponibil
la următoarea adresă internet: www.steinel.de
11. Garanţia de producător
Acest produs Steinel a fost fabricat cu maximă atenţie, verificat din punctul de vedere al funcţionării și al siguranţei și supus unor controale aleatorii. Steinel garantează
structura și funcţionarea ireproșabilă a acestui produs. Termenul de garanţie este de
36de luni și începe de la data vânzării produsului către consumator. Garanţia acoperă deficienţele bazate pe defecte de material și fabricaţie. Îndeplinirea garanţiei se realizează prin repararea sau înlocuirea pieselor defecte, conform opţiunii noastre. Garanţia nu se aplică pieselor de uzură și nici deteriorărilor sau deficienţelor cauzate de
utilizarea sau întreţinerea necorespunzătoare. Este exclusă compensarea daunelor
provocate altor obiecte. Garanţia este valabilă doar dacă aparatul nedezasamblat este trimis la centrul de service competent într-un ambalaj adecvat, împreună cu o scurtă descriere a defecţiunii, cu bonul de casă sau cu factura (cu data cumpărării și cu
ștampila distribuitorului).
Reparaţii şi post-garanţie:
După ieșirea din termenul de garanţie sau în cazul defecţiunilor pentru care nu beneficiaţi de reparaţii în garanţie, informaţi-vă cu privire la posibilitatea reparaţiei la centrul
de service cel mai apropiat.
RO
5352
Page 28

12. Date tehnice
Dimensiuni
(Ø×A)
(înălţime x lăţime x adâncime)
Tensiune de intrare 220-240 V, 50/60Hz
Putere
• Stand by
• Funcţionare
Sursă de lumină bec cu LED GU10 (max. 9 W)
Tehnologie senzori pasiv infraroșu
Domeniu de detecţie
• Unghi de detecţie
• Unghi de deschidere
Raza de acţiune max. 10 m
Temporizare 8s - 35 min (numai Spot ONE/DUO Sensor)
Setarea luminozităţii
de comutare
Grad de protecţie IP44
Clasă de protecţie I
Domeniu de temperatură -20 - +40 °C
Frecvenţă Bluetooth 2,4-2,48GHz (numai Spot ONE/DUO Sensor Connect)
Putere de emisie Bluetooth 5dBM/3 mW (numai Spot ONE/DUO Sensor Connect)
Spot ONE: Ø 97×175 mm
Spot DUO: 98×247×175 mm
cca. 0,5 W
cca. 0,5 W + bec cu LED
90°
90°
5 s - 60min (numai Spot ONE/DUO Sensor Connect)
2-1000 lucși (numai Spot ONE/DUO Sensor)
2-2000 lucși (numai Spot ONE/DUO Sensor Connect)
13. Defecţiuni în funcţionare
Defecţiune Cauză Remediu
Lampa cu LED nu se
aprinde
Lampa cu LED și senzor
nu se aprinde
Lampa cu LED și
senzor nu se stinge
Lampa cu LED și
senzor comută
permanent PORNIT/
STINS
Lampa cu LED și senzor
se aprinde necontrolat
■ Siguranţa a declanșat, aparat
neconectat, cablu întrerupt
■ Scurtcircuit
■ Becuri defecte
■ În regimul de zi, luminozitatea
la comutare este setată pe
regim de noapte
■ Întrerupător de reţea OPRIT
■ Siguranţa a declanșat
■ Domeniul de detecţie
nereglat corespunzător
■ Mișcare continuă în aria de
detecţie
■ În domeniul de detecţie se
mișcă animale
■ Vântul mișcă pomii și tufișurile
în domeniul de detecţie
■ Este detectat traficul auto de
pe șosea
■ Modificare bruscă a
temperaturii din cauza
intemperiilor (vânt, ploaie,
zăpadă) sau sesizarea aerului
evacuat de ventilatoare,
ferestre deschise
■ Lampa cu LED și senzor
oscilează (se mișcă) din
cauza rafalelor de vânt sau a
precipitaţiilor puternice
■ Cuplaţi siguranţa, înlocuiţi-o,
cuplaţi întrerupătorul de
reţea; verificaţi cablul cu
ajutorul unui creion de
tensiune
■ Verificaţi conexiunile
■ Schimbaţi becul
■ Reglaţi din nou
■ Porniţi întrerupătorul de
reţea
■ Cuplaţi siguranţa,
înlocuiţi-o, eventual verificaţi
legătura
■ Reglaţi din nou
■ Controlaţi zona și eventual
refaceţi reglajele, resp.
introduceţi diafragme de
obturare
■ Ridicaţi senzorul mai sus;
modificaţi zona
■ Schimbaţi domeniul de
detecţie
■ Schimbaţi domeniul de
detecţie
■ Schimbaţi domeniul,
schimbaţi locul de montaj
■ Montaţi lampa cu LED și
senzor pe un substrat solid
RO
5554
Page 29

SI
!
1. O tem dokumentu
– Natančno preberite in shranite!
– Zaščiteno z avtorskimi pravicami. Ponatis v celoti ali po delih je dovoljen le z našim
soglasjem.
– Spremembe zaradi tehničnega napredka so pridržane.
Razlaga simbolov
Opozorilo pred nevarnostmi!
!
Napotek na mesta besedila v dokumentu.
...
2. Splošna varnostna navodila
Pred izvajanjem dela na napravi prekinite dovod električne napetosti!
• Ob montaži mora biti električni vodnik, ki ga boste priključili na aparat, brez napetosti. Zato najprej odklopite tok in preverite s preizkuševalcem električne napetosti,
če res ni več napetosti.
• Pri inštalaciji svetilke imate opravka z delom pod električno napetostjo. Zato
mora biti strokovno izvedeno po veljavnih predpisih o instalaciji in pogojih izvedbe
priključkov.
• Uporabljajte samo originalne nadomestne dele.
• Popravila lahko izvajajo le v strokovnih delavnicah.
• Ni primerno za uporabo s halogenskimi svetili.
3. Spot ONE Sensor/Spot DUO Sensor
Spot ONE Sensor Connect/Spot DUO Sensor Connect
Namenska uporaba
– LED-svetilka za montažo na steno v stavbah in zunanjih področjih
Sijalka s senzorjem/sijalka z dvema senzorjema
– Senzorska LED-svetilka vsebuje infrardeči javljalnik gibanja.
Sijalka s senzorjem Connect/sijalka z dvema senzorjema
– Senzorska LED-svetilka vsebuje infrardeči javljalnik gibanja in je nastavljiva prek
Bluetooth.
Obseg dobave sijalke ONE (sl. 3.1)
– Svetilka
– Trije vijaki
– Trije vložki
– 3 distančniki
Obseg dobave sijalke DUO (sl. 3.2)
– Svetilka
– Štirje vijaki
– Štirje mozniki
– 4 distančniki
Mere izdelka sijalke ONE (sl. 3.3)
Mere izdelka sijalke DUO (sl. 3.4)
Pregled izdelkov (sl. 3.5)
A Zidno držalo
B Priključna sponka
C Varnostni vijak
D Noga svetilke
E Ohišje svetilke
F Nastavitev zatemnitve (samo sijalka ONE/DUO s senzorjem)
G Nastavitev časa (samo sijalka ONE/DUO s senzorjem)
Območje zaznavanja sijalke ONE/DUO s senzorjem (sl. 3.6-3.8)
4. Električni priključek
Vezalni načrt (sl. 4.1)
Električna napeljava je sestavljena iz 3-žilnega kabla:
L = fazni vodnik (običajno črn, rjav ali siv)
N = nevtralni vodnik (največkrat moder)
PE = varnostni vodnik (zeleno-rumen)
V primeru dvoma morate napeljave identificirati z indikatorjem napetosti; nato pa
ponovno preklopite na stanje brez napetosti. Fazo (L), nevtralnik vodnik (N) in zaščitni
vodnik (PE) priključite na priključno sponko.
Pomembno:
Pomešanje priključkov lahko privede kasneje v aparatu ali električni omarici do kratkega stika. V tem primeru morate vse napeljave znova identificirati in na novo povezati.
Na omrežni kabel lahko inštalirate omrežno stikalo za vklop in izklop.
SI
56 57
Page 30

Povezava v omrežje
" " je predviden za omrežno povezavo svetilk. Vzporedno je mogoče priklopiti največ
10 svetilk tega tipa. (sl. 4.1)
5. Montaža
• Preverite vse sklope, ali so poškodovani.
• Poškodovanega izdelka ne uporabljajte.
• Pri montaži svetilke je treba paziti, da je ta pritrjena brez tresljajev.
• Izberite primeren kraj montaže in upoštevajte doseg zaznavanja gibanja.
Najbolj varno zaznavanje gibanja dosežete, če napravo montirate stransko glede na
smer hoje in senzorja ne zastirajo ovire (npr. drevesa, stene itd.).
Navodila za montažo
• Izklopite oskrbo z energijo. (Sl. 4.1)
• Ločite varnostni vijaki ter ohišje svetilke od stenskega držala. (Sl.5.1)
• Vtično sponko in ohišje svetilke ločite od stenskega držala. (Sl.5.2)
• Zarišite luknje za vrtanje. (Sl. 5.3)
• Izvrtajte luknje in vstavite vložke. (Sl. 5.4)
• Podometna montaža (sl. 5.5)
• Nadometna montaža z distančniki (sl. 5.6)
• Priključite varnostni trak in nataknite vtično sponko na držalo. (sl.5.7)
• Priključite priključni kabel. (Sl. 5.8)
• Pri povezavi več svetilk odtrgajte varnostno zaplato. (sl.5.8)
• Ohišje svetilke nataknite na stensko držalo. (Sl. 5.9)
• Pritrdite varnostni vijak. (Sl. 5.9)
• Vklopite oskrbo z energijo. (Sl. 5.9)
• Izvedite nastavitve ➜ "6. Funkcija"
6. Delovanje
Sijalka s senzorjem/sijalka z dvema senzorjema
Tovarniške nastavitve
– Nastavitev zatemnitve: 1000 luksov
– Nastavitev časa: 8sekund
Nastavitev zatemnitve (sl. 6.2 F)
Želeno mejo vklopa senzorja svetilke lahko brezstopenjsko nastavite od približno
2luksa do 1000 luksov.
– Nastavni gumb na
– Gumb za reguliranje nastavljen na
= svetenje ob dnevni svetlobi (neodvisno od osvetljenosti)
= delovanje ob mraku (pribl. 2 luksa).
Pri nastavitvi območja zajemanja in za test delovanja pri dnevni svetlobi mora biti
gumb za reguliranje na
Nastavitev časa (sl. 6.2 G)
Želeni čas svetlenja luči lahko brezstopenjsko nastavite od približno 8sek. do najv.
35 min. Z vsakim zaznanim gibanjem pred iztekom nastavljenega časa se ura postavi
na začetek.
– Nastavitveni gumb na + = ca. 35 minut
– Nastavitveni gumb na – = pribl. 8sekund
Napotek:
Po vsakem postopku izklopa svetilke je ponovno zaznavanje gibanja za pribl. 1 sekundo prekinjeno. Šele potem ko je ta čas potekel, lahko svetilka ob zaznanem gibanju
zopet zasveti.
Svetilka DUO senzor
Dobavno stanje:
Obe svetilni glavi sta povezani in se vedno istočasno vklopita in izklopita.
Za individualno delovanje obeh svetilnih glav je povezavo med sponkama treba
odstraniti (
Sijalka s senzorjem Connect/sijalka z dvema senzorjema
Tovarniške nastavitve
– Nastavitev zatemnitve 2000 luksov
– Nastavitev časa: 5 sekund
Aplikacija Smart Remote
Za konfiguracijo svetilke s pametnim telefonom je treba iz AppStore sneti aplikacijo
STEINEL Smart Remote. Potreben je za Bluetooth primeren pametni telefon ali tablični
računalnik.
Android iOS
1 in 2).
.
SI
58 59
Page 31

Naslednje funkcije so nastavljite prek aplikacije Smart Remote:
3
5
PROIZVAJALCA
GARANCIJA
LETNA
PROIZVAJALCA
GARANCIJA
LETNA
– Nastavitev časa
– Nastavitev zatemnitve
– Časi vklopa in izklopa
– Situativno avtomatsko/ročno krmilje
– Povezava v omrežje
– Tvorjenje skupin
– Poimenovanje skupin in svetilk
Napotek:
Po vsakem postopku izklopa svetilke je ponovno zaznavanje gibanja za pribl. 1 sekundo prekinjeno. Šele potem ko je ta čas potekel, lahko svetilka ob zaznanem gibanju
zopet zasveti.
Za časovno nastavljen vklop ali izklop ima svetilka Spot Connect interno uro. Ta se pri
vsaki povezavi Bluetooth samodejno sinhronizira prek aplikacije Smart Remote z uro
povezanega pametnega telefona.
Za zagotovitev pravilnega delovanja je po prekinitvi napetosti svetilke treba prek
aplikacije Smart Remote vzpostaviti povezavo. Interna ura se znova sinhronizira z uro
pametnega telefona.
9. Odstranjevanje
Električne aparate, opremo in embalažo oddajte v okolju prijazno ponovno predelavo.
Električnih aparatov ne odstranjujte s hišnimi odpadki!
Samo za države članice EU:
V skladu z veljavno Evropsko direktivo o izrabljenih električnih in elektronskih aparatih
in njenim prenosom v nacionalno zakonodajo je električne aparate, ki niso več uporabni, treba zbirati ločeno in jih oddati v okolju prijazno ponovno predelavo.
10. Izjava o skladnosti
STEINEL Vertrieb GmbH potrjuje, da je tip radijske opreme Spot ONE Sensor Connect/
Spot DUO Sensor Connect skladen z Direktivo 2014/53/EU. Celotno besedilo izjave
EU o skladnosti je na voljo na naslednjem spletnem naslovu: www.steinel.de
7. Območje vrtenja svetilke / Menjava sijalke
Območje vrtenja svetilke (sl. 7.1/7.2)
Menjava svetila
• Sprostite pokrivno ploščico na ohišju svetilke in jo izvlecite ven. (sl.7.3)
• Sprostite sijalko in jo izvlecite ven. (Sl. 7.4)
• Vstavite novo sijalko in jo trdno privijte. (Sl. 7.5)
• Namestite pokrivno ploščico in jo trdno privijte. (Sl. 7.6)
Pomembno:
Uporabite samo GU10-LED-sijalko do največ 9 W.
Napotek:
• Pri menjavi sijalke zagotovite, da tesnilo in tesnilna površina ne bosta umazana ali
poškodovana.
8. Vzdrževanje
Izdelka ni treba vzdrževati.
Če je svetilka umazana, jo očistite z vlažno krpo (brez čistil).
11. Garancija proizvajalca
Ta proizvod podjetja je bil izdelan z veliko skrbnostjo, preverjen glede delovanja in varnosti po veljavnih predpisih ter končno podvržen naključni kontroli. Steinel daje garancijo
za brezhibno stanje in funkcionalnost proizvoda. Garancija velja 36mesecev od dneva
nakupa in se začne z dnem prodaje izdelka stranki. Odstranjujemo pomanjkljivosti, ki so
posledica napak v materialu ali izdelavi, obveznost garancije pa je izpolnjena ob popravilu ali menjavi delov z napakami po naši izbiri. Garancija ne velja pri poškodbah obrabnih delov in za škode in pomanjkljivosti, do katerih je prišlo zaradi nepravilne uporabe ali
vzdrževanja. Nadaljnje poškodbe na drugih predmetih so izključene.
Garancija bo odobrena v primeru, da pošljete nerazstavljeno napravo s kratkim opisom
napake ter potrdilom o nakupu oz. računom (datum nakupa in štampiljka trgovca),
dobro zapakirano na ustrezne servisne službe.
Servis za popravila:
Po poteku garancijske dobe ali pri napakah brez garancijske pravice se posvetujte
z našim servisnim obratom glede popravila.
6160
SI
Page 32

12. Tehnični podatki
Mete
(Ø×G)
(V׊×G)
Vhodna napetost 220-240 V, 50/60Hz
Zmogljivost
• Stanje pripravljenosti
• Delovanje
Sijalke GU10-LED-sijalka (največ 9 W)
Senzorska tehnika pasivno infrardeče
Območje zaznavanja
• Kot zaznavanja
• Odpiralni kot
Doseg največ 10 m
Nastavitev časa 8s - 35 min. (samo sijalka ONE/DUO s sensorjem)
Nastavitev zatemnitve 2-1000 luksov (samo sijalka ONE/DUO s sensorjem)
Vrsta zaščite IP44
Razred zaščite I
Temperaturno območje -20 – +40 °C
Frekvenca Bluetooth 2,4-2,48GHz (samo sijalka ONE/DUO s sensorjem
Oddajna moč Bluetooth 5dBM/3 mW (samo sijalka ONE/DUO s sensorjem
sijalka ONE: Ø 97×175 mm
sijalka DUO: 98×247×175 mm
pribl. 0,5 W
pribl. 0,5 W + LED-sijalka
90°
90°
5 s - 60min. (samo sijalka ONE/DUO s sensorjem
Connect)
2-2000 luksov (samo sijalka ONE/DUO s sensorjem
Connect)
Connect)
Connect)
13. Motnje delovanja
Motnja Vzrok Pomoč
LED-svetilka se ne vklopi ■ Varovalka se je sprožila,
Senzorska-LED-svetilka se
ne vklopi
Senzorska-LED-svetilka se
ne izklopi
Senzorska-LED-svetilka
stalno preklaplja VKLOP/
IZKLOP
Senzorska LED-svetilka
se nezaželeno vklopi
ni vklopljena, povezava je
prekinjena.
■ Kratki stik
■ Okvarjena sijalka
■ Pri dnevnem delovanju;
nastavitev zatemnitve se
nahaja na nočnem
delovanju
■ Omrežno stikalo je
IZKLOPLJENO
■ Varovalka se je sprožila
■ Območje zaznavanja ni
natančno nastavljeno
■ Stalno premikanje na
področju zajemanja,
■ V področju zaznavanja
se premikajo živali
■ Veter premika drevesa in
grmovje na območju
zaznavanja
■ Senzor zaznava
avtomobile na cesti
■ Nenadne spremembe
temperature zaradi
vremena (veter, dež,
sneg) ali zraka iz
ventilatorjev, odprtih oken
■ Senzorska-LED-svetilka
niha (se premika) npr.
zaradi vetra ali močnih
padavin
■ Vklopite, zamenjajte
varovalko, vklopite
omrežno stikalo;
preverite vod z
indikatorjem napetosti
■ Preverite priključke
■ Menjava sijalke
■ Ponovno nastavite
■ Vklapljanje
■ Vklopite, zamenjajte
varovalko, po potrebi
preverite priključek
■ Ponovno nastavite
■ Preverite področje in
po potrebi ponovno
nastavite oz. prekrijte
■ Senzor zasukajte
navzgor; prestavite
področje
■ Spremenite območje
■ Spremenite območje
■ Spremenite področje,
prestavite mesto
montaže
■ Montirajte senzorsko
LED-svetilko na trdno
podlago
SI
6362
Page 33

HR
!
1. Uz ovaj dokument
– Pažljivo pročitajte i sačuvajte!
– Zaštićeno autorskim pravima.
Pretisak, čak i djelomičan, dopušten je samo uz naše odobrenje.
– Zadržavamo pravo na promjene koje služe tehničkom napretku.
Tumačenje simbola
Upozorenje na opasnosti!
!
Uputa na tekst u dokumentu.
...
2. Opće sigurnosne napomene
Prije svih radova na uređaju prekinite naponsko napajanje!
• Prilikom montaže električni vod koji treba priključiti ne smije biti pod naponom.
Zbog toga kao prvo morate isključiti struju i pomoću ispitivača napona provjeriti je li
uspostavljeno beznaponsko stanje.
• Kod instalacije svjetiljke radi se o radovima na mrežnom naponu. Stoga se ona
mora provoditi stručno i u skladu s uobičajenim državnim propisima o instalacijama
i uvjetima priključivanja.
• Koristite samo originalne rezervne dijelove.
• Popravke smiju obavljati samo stručne radionice.
• Nije prikladan za korištenje s halogenim rasvjetnim tijelima.
3. Spot ONE Sensor/Spot DUO Sensor
Spot ONE Sensor Connect/Spot DUO Sensor Connect
Namjenska uporaba
– LED svjetiljka za zidnu motažu u unutarnjem i vanjskom prostoru
Spot ONE Sensor/Spot DUO Sensor
– Senzorska LED svjetiljka sadrži infracrveni dojavnik pokreta.
Spot ONE Sensor Connect/Spot DUO Sensor Connect
– Senzorska LED svjetiljka sadrži infracrveni dojavnik pokreta i može se podesiti
pomoću Bluetootha.
Sadržaj isporuke Spot ONE (sl. 3.1)
– svjetiljka
– tri vijka
– tri učvrsnice
– tri držača razmaka
Sadržaj isporuke Spot DUO (sl. 3.2)
– svjetiljka
– četiri vijka
– četiri učvrsnice
– četiri držača razmaka
Dimenzije proizvoda Spot ONE (sl. 3.3)
Dimenzije proizvoda Spot DUO (sl. 3.4)
Pregled proizvoda (sl. 3.5)
A zidni držač
B priključna stezaljka
C sigurnosni vijak
D postolje svjetiljke
E kućište svjetiljke
F podešavanje svjetlosnog praga (samo Spot ONE/DUO Sensor)
G podešavanje vremena (samo Spot ONE/DUO Sensor)
Područje detekcije senzora Spot ONE/DUO (sl. 3.6-3.8)
HR
4. Električni priključak
Shema priključivanja (sl. 4.1)
Mrežni vod sastoji se od trožilnog kabela:
L = faza (većinom crna, smeđa ili siva)
N = neutralni vodič (većinom plavi)
PE = zaštitni vodič (zeleno/žuti)
U slučaju dvojbe morate identificirati vodove pomoću ispitivača napona i zatim ponovno uspostaviti beznaponsko stanje. Faza (L), neutralni vodič (N) i zaštitni vodič (PE)
spajaju se na priključnu stezaljku.
Važno:
Slučajna zamjena priključaka u uređaju ili Vašem ormariću s osiguračima kasnije će
uzrokovati kratki spoj. U tom slučaju morate još jednom identificirati pojedinačne
vodove i ponovno ih spojiti. U vodu, naravno, može biti montirana mrežna sklopka za
uključivanje i isključivanje.
64 65
Page 34

Umreženje
" " služi za umreživanje svjetiljki. Može se paralelno spojiti do 10 svjetiljki tog tipa. (sl. 4.1)
5. Montaža
• Provjeriti sve sastavne dijelove na oštećenja.
• U slučaju oštećenja ne koristiti proizvod.
• Prilikom montaže svjetiljke treba paziti na to da se pričvrsti stabilno.
• Odabrati prikladno mjesto montaže uzimajući u obzir domet i detektiranje pokreta.
Najsigurnija detekcija pokreta postiže se kad se uređaj montira bočno na smjer kretanja i nikakve prepreke (npr. drveća, zidovi itd.) ne ometaju vidokrug senzora.
Koraci montaže
• Isključite strujno napajanje. (sl. 4.1)
• Otpustite sigurnosni vijak, skinite kućište svjetiljke sa zidnog držača. (sl.5.1)
• Odvojite utičnu stezaljku i kućište svjetiljke od zidnog držača. (sl.5.2)
• Označite rupe. (sl. 5.3)
• Izbušite rupe i umetnite učvrsnice. (sl. 5.4)
• Podžbukna montaža (sl.5.5)
• Nadžbukna montaža s distancama (sl. 5.6)
• Pričvrstite sigurnosnu traku na zidni držač i namjestite priključnu stezaljku. (sl. 5.7)
• Spojite priključni kabel. (sl. 5.8)
• Prilikom umreživanja više svjetiljki izbije se sigurnosna spojnica. (sl. 5.8)
• Nataknite kućište svjetiljke na zidni držač. (sl. 5.9)
• Uvrnite sigurnosni vijak. (sl. 5.9)
• Uključite strujno napajanje. (sl. 5.9)
• Izvršite podešavanje ➜ "6. Funkcija"
6. Funkcija
Spot ONE Sensor/Spot DUO Sensor
Tvorničke postavke
– Podešenost svjetlosnog praga: 1000 luksa
– Podešenost vremena: 8sekundi
Podešavanje svjetlosnog praga (sl. 6.2 F)
Željeni prag reagiranja svjetiljke može se kontinuirano podešavati od oko 2 do
1000 luksa.
– Regulator podešen na
– Regulator podešen na
= režim rada pri danjem svjetlu (neovisno o svjetlini)
= regulacija svjetlosti (oko 2 luksa)
66 67
Kod podešavanja područja detekcije i za testiranje funkcije kod danjeg svjetla regulator mora biti podešen na
Podešavanje vremena (sl.6.2 G)
Željeno trajanje svjetla može se podešavati kontinuirano od oko 8sekundi do maks.
35 minuta. Svakim detektiranim pokretom sat se prije isteka tog vremena ponovno
pokreće.
– Regulator + = oko 35 minuta
– Regulator – = oko 8sekundi
Napomena:
Nakon svakog postupka isključivanja svjetiljke prekida se ponovno detektiranje
pokreta na oko 1sekundu. Tek nakon isteka tog vremena svjetiljka može pri pokretu
ponovno uključiti svjetlo.
Spot DUO Sensor
Stanje pri isporuci:
Obje glave svjetiljki su umrežene i uvijek se istovremeno uključuju i isključuju.
Za pojedinačni rad obiju svjetiljki mora se prekinuti veza između stezaljki (
Spot ONE Sensor Connect/Spot DUO Sensor Connect
Tvorničke postavke
– Podešenost svjetlosnog praga: 2000 luksa
– Podešenost vremena: 5 sekundi
Aplikacija Smart Remote
Za konfiguraciju svjetiljke pomoću pametnog telefona ili tableta morate preuzeti aplikaciju STEINEL Smart Remote App iz Vašeg AppStorea. Za to je potreban pametan
telefon ili tablet s Bluetoothom.
Android iOS
Sljedeće funkcije mogu se podesiti putem aplikacije Smart Remote:
– Podešavanje vremena
– Podešavanje svjetlosnog praga
.
1 i 2).
HR
Page 35

– Vremena uključivanja i isključivanja
3
5
PROIZVOĐAČA
GODINE
JAMSTVA
PROIZVOĐAČA
GODINA
JAMSTVA
– Upravljanje ovisno prema situaciji automatsko/ručno
– Umreženje
– Stvaranje grupe
– Imenovanje grupa i svjetiljki
Napomena:
Nakon svakog postupka isključivanja svjetiljke prekida se ponovno detektiranje
pokreta na oko 1sekundu. Tek nakon isteka tog vremena svjetiljka može pri pokretu
ponovno uključiti svjetlo.
Spot Connect ima interni sat za vremenski bazirano uključivanje i isključivanje. On se
automatski sinkronizira prilikom svakog povezivanja Bluetoothom pomoću aplikacije
Smart Remote sa satom povezanog pametnog telefona.
Da bi se osiguralo ispravno funkcioniranje, nakon prekida napona svjetiljke mora se
uspostaviti veza pomoću aplikacije Smart Remote. Interni sat ponovno se sinkronizira
sa satom pametnog telefona.
7. Zakretno područje svjetiljke / Zamjena rasvjetnog tijela
Zakretno područje svjetiljke (sl. 7.1/7.2)
Zamjena rasvjetnog tijela
• Olabavite pokrivno staklo na kućištu svjetiljke i skinite. (sl. 7.3)
• Oslobodite i skinite rasvjetno tijelo. (sl. 7.4)
• Umetnite i učvrstite novo rasvjetno tijelo. (sl. 7.5)
• Namjesite i učvrstite pokrivno staklo. (sl. 7.6)
Važno:
Koristite samo rasvjetno tijelo GU10-LED do maks. 9 W.
Napomena:
• Prilikom zamjene rasvjetnog tijela provjerite nisu li brtva i brtvena površina zaprljane
ili oštećene.
8. Održavanje
Proizvod ne treba održavati.
U slučaju zaprljanosti svjetiljku možete obrisati vlažnom krpom (bez sredstva za
čišćenje).
9. Zbrinjavanje
Električne uređaje, pribor i ambalažu treba zbrinuti na ekološki način odvozom na
reciklažu.
Ne bacajte električne uređaje u kućni otpad!
Samo za zemlje EU:
Prema važećoj Europskoj direktivi za stare električne i elektroničke uređaje i njezinoj
implementaciji u nacionalno pravo, električni uređaji koji se više ne mogu koristiti
moraju se posebno sakupiti i zbrinuti na ekološki način odvozom na reciklažu.
10. Izjava o sukladnosti
STEINEL Vertrieb GmbH ovime izjavljuje da je radijska oprema tipa Spot ONE Sensor
Connect/Spot DUO Sensor Connect u skladu s Direktivom 2014/53/EU. Cjeloviti tekst
EU izjave o sukladnosti dostupan je na sljedećoj internetskoj adresi: www.steinel.de
11. Jamstvo proizvođača
Ovaj Steinel proizvod izrađen je s najvećom pažnjom, njegovo funkcioniranje i sigurnost ispitani su prema važećim propisima i na kraju je proizvod podvrgnut kontroli
uzorka. Steinel preuzima jamstvo za besprijekornu kakvoću i funkcionalnost. Jamstveni rok iznosi 36mjeseci i započinje s danom prodaje potrošaču. Uklanjamo nedostatke koji su posljedica grešaka na materijalu ili tvorničke greške, usluga jamstva izvršava
se popravkom ili zamjenom dijela s greškom po našem izboru. Jamstvo ne dajemo
u slučaju oštećenja na potrošnim dijelovima, kao ni šteta i nedostataka koji nastanu
zbog nestručnog rukovanja ili održavanja. Posljedične štete na drugim predmetima
su isključene.
Jamstvo se priznaje samo ako nerastavljeni, dobro zapakiran uređaj pošaljete zajedno
s kratkim opisom greške i računom (datum kupnje i pečat trgovine) nadležnoj servisnoj
službi.
Služba za popravke:
Nakon isteka jamstvenog roka ili kad se utvrdi nedostatak bez jamstva, raspitajte se
u najbližoj servisnoj službi o mogućnosti popravka.
HR
6968
Page 36

12. Tehnički podaci
Dimenzije
(Ø×D)
(V׊×D)
Ulazni napon 220-240 V, 50/60Hz
Snaga
• Stanje pripravnosti za rad
• Pogon
Rasvjetno tijelo GU10-LED rasvjetno tijelo (maks. 9 W)
Senzorska tehnika pasivna infracrvena
Područje detekcije
• kut detekcije
• kut otvora
Domet maks. 10 m
Podešavanje vremena 8s - 35 min (samo senzor Spot ONE/DUO Sensor)
Podešavanje svjetlosnog praga 2-1000 luksa (samo senzor Spot ONE/DUO Sensor)
Vrsta zaštite IP44
Klasa zaštite I
Temperaturno područje -20 - +40 °C
Frekvencija Bluetooth 2,4-2,48GHz (samo Spot ONE/DUO Sensor Connect)
Snaga odašiljanja Bluetoothom 5dBM/3 mW (samo Spot ONE/DUO Sensor Connect)
Spot ONE: Ø 97×175 mm
Spot DUO: 98×247×175 mm
oko 0,5 W
oko 0,5 W + LED rasvjetno tijelo
90°
90°
5 s - 60min (samo Spot ONE/DUO Sensor Connect)
2-2000 luksa (samo Spot ONE/DUO Sensor Connect)
13. Smetnje u pogonu
Smetnja Uzrok Pomoć
LED svjetiljka se ne uključuje
Senzorska LED svjetiljka se ne
uključuje.
Senzorska LED svjetiljka se ne
isključuje.
Senzorska LED svjetiljka
uvijek se UKLJUČUJE/ISKLJUČUJE
Senzorska LED svjetiljka
neželjeno se uključuje
■ reagirao je osigurač, nije
uključena, prekinut vod
■ kratki spoj
■ neispravno rasvjetno tijelo
■ po danu se podešavanje
svjetlosnog praga nalazi u
noćnom režimu rada
■ mrežna sklopka je
ISKLJUČENA
■ reagirao je osigurač
■ područje detekcije nije
ciljano podešeno
■ stalno kretanje u području
detekcije
■ životinje se kreću u
području detekcije
■ vjetar njiše drveća i grmlje
u području detekcije
■ detektiranje automobila
na ulici
■ iznenadna promjena
temperature zbog
nevremena (vjetar, kiša,
snijeg) ili zraka koji izlazi iz
ventilatora, otvorenih
prozora
■ Senzorska LED svjetiljka
koleba (miče se) npr.
zbog jakog vjetra ili
oborina
■ uključiti osigurač,
zamijeniti, uključiti
mrežnu sklopku,
provjeriti vod ispitivačem
napona
■ provjeriti priključke
■ zamijeniti rasvjetno tijelo
■ iznova podesiti
■ uključiti
■ uključiti osigurač,
zamijeniti, eventualno
provjeriti priključak
■ iznova podesiti
■ provjeriti područje i
eventualno ponovno
podesiti odnosno
prekriti
■ zakrenuti senzor naviše;
premjestiti područje
■ premjestiti područje
■ premjestiti područje
■ promijeniti područje,
premjestiti mjesto
montaže
■ montirajte senzorsku
LED svjetiljku na čvrstu
podlogu
HR
7170
Page 37

EE
!
1. Käesoleva dokumendi kohta
– Palun lugege hoolikalt läbi ja hoidke alles!
– Autoriõigusega kaitstud.
Järeltrükk, ka väljavõtteliselt, ainult meie nõusolekul.
– Õigus muudatusteks tehnilise täiustamise eesmärgil reserveeritud.
Sümbolite selgitus
Hoiatus ohtude eest!
!
Viide tekstikohtadele dokumendis.
...
2. Üldised ohutusjuhised
Katkestage enne igasuguseid töid seadme kallal pingetoide!
• Monteerimisel peab olema külgeühendatav elektrijuhe pingevaba. Selleks lülitage
esmalt elektrivool välja ja kontrollige pingetestri abil pingevabadust.
• Valgusti installeerimisel on tegemist tööga võrgupingel. Seda tuleb teostada seetõttu asjatundlikult vastavalt riigisisestele eeskirjadele.
• Kasutage ainult originaalvaruosi.
• Remonti tohivad teha üksnes oskustöökojad.
• Pole mõeldud halogeenvalgustitega kasutamiseks.
3. Spot ONE Sensor/Spot DUO Sensor
Spot ONE Sensor Connect/Spot DUO Sensor Connect
Nõuetekohane kasutus
– LED-valgusti on mõeldud paigaldamiseks sise- ja välisruumide seintele.
Spot ONE Sensor/Spot DUO Sensor
– Anduri LED-valgusti sisaldab infrapuna-liikumisandurit.
Spot ONE Sensor Connect / Spot DUO Sensor Connect
– Anduri LED-valgusti sisaldab infrapuna-liikumisandurit ning on vaid Bluetoothi
kaudu seadistatav.
Spot ONE tarnekomplekt (joon. 3.1)
– Valgusti
– 3 kruvi
– 3 tüüblit
– 3 distantshoidikut
72 73
Spot DUO tarnekomplekt (joon. 3.2)
– Valgusti
– Neli kruvi
– Neli tüüblit
– Neli distantshoidikut
Spot ONE tootemõõtmed (joon. 3.3)
Spot DUO tootemõõtmed (joon. 3.4)
Toote ülevaade (joon. 3.5)
A Seinahoidik
B Ühendusklemm
C Kinnituskruvi
D Valgusti jalg
E Valgusti korpus
F Hämaruse seadmine (ainult Spot ONE/DUO Sensor)
G Aja seadistamine (ainult Spot ONE/DUO Sensor)
Spot ONE/DUO Sensor tuvastuspiirkond (joon. 3.6-3.8)
4. Elektriline ühendus
Lülitite plaan (joon. 4.1)
Võrgutoitejuhe koosneb 3-soonelisest kaablist:
L = faas (enamasti must, pruun või hall)
N = neutraaljuht (enamasti sinine)
PE = kaitsejuht (roheline/kollane)
Kahtluse korral peate kaablid tuvastama pingetestriga ning lõpuks uuesti pinge alt
vabastama. Faas (L), neutraaljuht (N) ja kaitsejuht ühendatakse (PE) ühendusklemmide
külge.
Tähtis!
Ühenduste omavaheline äravahetamine põhjustab hiljem seadmes või kaitsmekarbis
lühise. Sellisel juhul tuleb üksikud kaablid uuesti tuvastada ning ühendada. Võrgutoitejuhtmesse võib olla iseenesestmõistetavalt installeeritud sisse ja välja lülitamiseks
võrgulüliti.
Võrgustamine
„ “ on mõeldud valgustite ühendamiseks. Paralleelselt saab ühendada kuni 10 seda
tüüpi valgustit. (joon. 4.1)
EE
Page 38

5. Montaaž
• Kontrollige kõiki koostedetaile kahjustuste suhtes.
• Ärge võtke toodet kahjustuste korral käiku.
• Valgusti paigaldamisel tuleb silmas pidada, et see kinnitataks raputuskindlalt.
• Valige tööraadiust ja liikumise tuvastamist arvesse võttes sobiv montaažikoht.
Liikumise usaldusväärseima tuvastamise saavutate, kui monteerite seadme kõndimise
suunas küljele ja takistused (nagu nt puud, müürid jms) ei tõkesta sensori vaatevälja.
Montaažisammud
• Lülitage voolutoide välja. (joon. 4.1)
• Vabastage kinnituskruvid ja eemaldage valgusti korpus seinahoidikust. (joon. 5.1)
• Vabastage pistikklemmid ja eemaldage valgusti korpus seinahoidikust. (joon. 5.2)
• Märgistage puurimisavad. (joon. 5.3)
• Puurige avad ja pange tüüblid sisse. (joon. 5.4)
• Süvispaigaldus (joon. 5.5)
• Pindpaigaldus koos distantsihoidikutega (joon. 5.6)
• Kinnitage kinnitusrihm seinahoidikusse ja paigaldage pistikklemm. (joon. 5.7)
• Ühendage ühenduskaabel külge. (joon. 5.8)
• Mitme valgusti ühendamisel murdke kinnituslapats välja. (joon. 5.8)
• Asetage valgusti korpus seinahoidikule. (joon. 5.9)
• Kinnitage lukustuskruvi (joon. 5.9)
• Lülitage voolutoide sisse. (joon. 5.9)
• Teostage seaded ➜ „6. Funktsioon“
6. Talitlus
Spot ONE Sensor/Spot DUO Sensor
Tehaseseadistused
– Hämaruse seadmine: 1000 lx
– Aja seadmine: 8sekundit
Hämaruse seadmine (joon. 6.2 F)
Valgustil soovitud rakendumisläve saab u 2–1000 lx vahemikus sujuvalt seadistada.
– Seadistusregulaatori asend
– Seaderegulaator
Tuvastuspiirkonna seadmisel ja päevavalguses talitlustesti läbiviimisel peab seaderegulaator
peal paiknema.
peale seatud = hämardusrežiim (u 2 lx.)
= päevavalgusrežiim (valgustusest sõltumatu)
74 75
Aja seadmine (joon. 6.2 G)
Valgusti soovitud valgustuskestust saab vahemikus u 8sekundist kuni 35 minutini sujuvalt muuta. Enne selle aja möödumist käivitatakse taimer iga tuvastatud liikumisega
uuesti.
– Reguleerseade + = u 35 min
– Reguleerseade – = u 8sek
Märkus
Uute liikumiste tuvastamine on pärast valgusti igakordset väljalülitustoimingut katkestatud u 1 sekundiks. Alles selle aja möödumisel saab valgusti liikumisega uuesti sisse
lülitada.
Spot DUO Sensor
Algne seadistus:
mõlemad valgustipead on omavahel seotud ja lülituvad alati samal ajal sisse ja välja.
Kahe valgustipea eraldiseisvaks kasutamiseks tuleb eemaldada klemmidevaheline
ühendus (
Spot ONE Sensor Connect / Spot DUO Sensor Connect
Tehaseseadistused
Rakendus Smart Remote
Valgusti seadistamiseks nutitelefoni või tahvelarvutiga tuleb rakenduste veebipoest
laadida alla STEINELi rakendus Smart Remote. Vajalik on Bluetoothi toetav nutitelefon
või tahvelarvuti.
Android iOS
Rakenduse Smart Remote kaudu saate seadistada järgmisi funktsioone.
1 ja 2).
– Hämaruse seadmine: 2000 lx
– Aja seadmine: 5 sekundit
– Aja seadmine
– Hämarusnivoo seadistamine
– Sisse- ja väljalülitamine
– Automaatne/manuaalne asukoha seadistamine
EE
Page 39

– Võrgustamine
3
5
TOOTJA
AASTAT
GARANTIID
TOOTJA
AASTAT
GARANTIID
– Rühmade loomine
– Valgustirühmade nimetamine
Märkus
Uute liikumiste tuvastamine on pärast valgusti igakordset väljalülitustoimingut katkestatud u 1 sekundiks. Alles selle aja möödumisel saab valgusti liikumisega uuesti sisse
lülitada.
Ajapõhiseks sisse- ja väljalülitamiseks on Spot Connectil süsteemisisene kell. See
sünkroniseerib end iga Bluetoothi ühenduse puhul Smart Remote Appi kaudu automaatselt ühendatud nutitelefoni kellaga.
Õige funktsionaalsuse tagamiseks peab valgusti toitepingekatkestuse puhul looma
ühenduse Smart Remote Appi kaudu. Süsteemisisene kell sünkroonitakse uuesti
nutitelefoni kellaga.
7. Valgusti pööramisala / valgusti vahetamine
Valgusti pööramisala (joon. 7.1/7.2)
Valgusti vahetamine
• Keerake lahti valgusti korpuse kate ja tõmmake välja. (joon. 7.3)
• Keerake valgusti lahti ja tõmmake välja. (joon. 7.4)
• Paigaldage uus valgusti ja keerake kinni. (joon. 7.5)
• Paigaldage kate ja keerake kinni. (joon. 7.6)
Tähtis!
Kasutage ainult GU10-LED valgustit kuni 9 W.
Märkus
• Veenduge valgusti vahetamisel, et tihend ja tihendi pind ei oleks määrdunud ega
kahjustatud.
8. Hooldus
Toode on hooldusvaba.
Valgusteid saab määrdumise korral puhastada niiske lapiga (ilma puhastusvahendita).
9. Utiliseerimine
Elektriseadmed, lisatarvikud ja pakendid tuleb suunata keskkonnateadlikku taaskasutusse.
Ärge visake elektriseadmeid olmejäätmete hulka!
Ainult ELi riikidele:
Vastavalt vanu elektri- ja elektroonikaseadmeid puudutavale kehtivale Euroopa
määrusele ja selle rakendamisele rahvusvahelises õiguses tuleb kasutuskõlbmatud
elektriseadmed koguda eraldi ning suunata keskkonnateadlikku taaskasutusse.
10. Vastavusdeklaratsioon
Käesolevaga deklareerib STEINEL Vertrieb GmbH, et käesolev raadioseadme tüüp
Spot ONE Sensor Connect/Spot DUO Sensor Connect vastab direktiivi 2014/53/EL
nõuetele. ELi vastavusdeklaratsiooni täielik tekst on kättesaadav järgmisel internetiaadressil: www.steinel.de
11. Tootja garantii
Steineli toode on valmistatud suurima hoolikusega, on talitluslikult ja ohutusalaselt
kehtivate eeskirjade alusel kontrollitud ning seejärel läbinud pistelise kontrolli. Steinel annab garantii toote laitmatu kvaliteedi ja töökorras oleku kohta. Garantiiaeg on
36kuud ja see algab tarbijale toote ostmise päevast. Meie remondime materjalist või
tootmisvigadest tulenevad puudused, garantiijuhtumi korral seade kas remonditakse
või puudulik osa asendatakse uuega, valiku üle otsustame meie. Garantii ei kehti kuluvate osade ning kahju ja puuduste kohta, mis on tekkinud oskamatu käsitsemise või
hoolduse tagajärjel. Edasised võõresemetele põhjustatud järgkahjud on välistatud.
Garantiinõuet aktsepteeritakse ainult siis, kui osandamata seade saadetakse koos vea
lühikirjelduse, kassatšeki või arvega (ostukuupäev ja müüja tempel) ja korralikult pakituna vastavasse teeninduspunkti.
Remonditeenus:
Pärast garantiiaja lõppu või puuduste korral, millele garantii ei kehti, küsige parandamisvõimaluste kohta lähimast teenindusjaamast järele.
EE
7776
Page 40

12. Tehnilised andmed
Mõõtmed (Ø × P)
(K×L×S) Spot ONE: Ø 97×175 mm
Sisendpinge 220–240 V, 50/60Hz
Võimsus
• Ooterežiim
• Kasutus
Lambipirn GU10 LED valgusti (max 9 W)
Sensortehnika Passiivne infrapuna
Jälgitav ala
• Tuvastusnurk
• Avanemisnurk
Tööraadius max 10 min
Aja seadmine 8s – 35 min (ainult Spot ONE/DUO Sensor)
Hämarusnivoo
seadistamine
Kaitseliik IP44
Kaitseklass I
Temperatuurivahemik -20 – +40 °C
Bluetoothi sagedus 2,4–2,48GHz (ainult Spot ONE/DUO Sensor)
Bluetoothi
saatmisvõimsus
Spot DUO: 98×247×175 mm
u 0,5 W
u 0,5 W + LED valgusallikas
90°
90°
5 s – 60min (ainult Spot ONE/DUO Sensor Connect)
2–1000 lux (ainult Spot ONE/DUO Sensor)
2–2000 lux (ainult Spot ONE/DUO Sensor Connect)
5 dBM / 3 mW (ainult Spot ONE/DUO Sensor)
13. Käitusrikked
Rike Põhjus Abi
LED-valgusti ei lülitu sisse ■ Kaitse on vallandunud,
LED-sensorvalgusti ei
lülitu sisse
LED-sensorvalgusti ei
lülitu välja
LED-sensorvalgusti ei lülitu
SISSE/VÄLJA
LED-sensorvalgusti lülitub
soovimatult sisse
pole sisse lülitatud, juhe
on katki
■ Lühis
■ Valgusallikas defektne
■ Päevarežiimi puhul
hämaruseseadistus
öörežiimil
■ Võrgulüliti VÄLJAS
■ Kaitse on vallandunud
■ Tuvastuspiirkond
suunatult seadmata
■ Pidev liikumine tuvastus-
piirkonnas
■ Loomad liiguvad
tuvastuspiirkonnas
■ Tuul liigutab tuvastuspiir-
konnas puid ja põõsaid
■ Tuvastatakse autosid
tänaval
■ Ilmastikust (tuul, vihm,
lumi), ventilaatorite
heitõhust või avatud
akendest põhjustatud
äkiline temperatuurimuutus
■ Anduri LED-valgusti
kõigub (liigub) nt
tuuleiilide või tugeva saju
tõttu
■ Lülitage kaitse sisse,
vahetage välja, lülitage
võrgulüliti sisse;
kontrollige juhet
pingetestriga
■ Kontrollige ühendusi
■ Valgusti vahetamine
■ Seadistage uuesti
■ Lülitage sisse
■ Lülitage kaitse sisse või
vahetage välja;
vajaduse korral
kontrollige ühendust
■ Häälestage uuesti
■ Kontrollige piirkonda ja
häälestage vajadusel
uuesti või katke kinni
■ Pöörake sensor kõr-
gemale; seadistage
piirkond ümber
■ Seadke piirkond ümber
■ Seadke piirkond ümber
■ Muutke piirkonda,
muutke montaažikohta
■ Paigaldage anduri
LED-valgusti kindlale
aluspinnale.
EE
7978
Page 41

LT
!
1. Apie šį dokumentą
– Prašom įdėmiai perskaityti ir išsaugoti!
– Autorių teisės saugomos.
Perspausdinti, taip pat ir atskiras ištraukas, leidžiama tik gavus mūsų sutikimą.
– Pasiliekama teisė daryti pakeitimus techninio tobulinimo tikslais.
Simbolių paaiškinimas
Įspėjimas apie pavojus!
!
Nuoroda į atskiras dokumento teksto dalis.
...
2. Bendrieji saugos nurodymai
Prieš pradėdami dirbti su prietaisu atjunkite elektros energijos tiekimą!
• Montuojant prijungiamajame elektros laide neturi būti įtampos. Todėl visų pirma
atjunkite elektros srovę ir įtampos rodytuvu patikrinkite, ar nėra įtampos.
• Šviestuvo įrengimas – tai darbas, susijęs su elektros maitinimo tinklo įtampa. Todėl
jį reikia prijungti tinkamai, vadovaujantis šalyje galiojančiomis instaliacijos normomis
ir jungimo taisyklėmis.
• Naudokite tik originalias atsargines dalis.
• Remonto darbus galima atlikti tik specializuotose remonto dirbtuvėse.
• Netinka naudoti su halogeninėmis lemputėmis.
3. „Spot ONE Sensor“ / „Spot DUO Sensor“
„Spot ONE Sensor Connect“ / „Spot DUO Sensor Connect“
Naudojimas pagal paskirtį
– LED šviestuvas, skirtas montuoti ant sienų patalpose ir lauke.
„Spot ONE Sensor“ / „Spot DUO Sensor“
– Sensoriniame LED šviestuve yra infraraudonųjų spindulių judesio sensorius.
„Spot ONE Sensor Connect“ / „Spot DUO Sensor Connect“
– Sensoriniame LED šviestuve yra infraraudonųjų spindulių judesio sensorius, kuris
gali būti nustatomas tik „Bluetooth“ ryšiu.
„Spot ONE“ tiekiamas komplektas (3.1 pav.)
– Šviestuvas
– 3 varžtai
– 3 mūrvinės
– 3 distanciniai laikikliai
„Spot DUO“ tiekiamas komplektas (3.2 pav.)
– Šviestuvas
– Keturi varžtai
– Keturios mūrvinės
– Keturi distanciniai laikikliai
„Spot ONE“ gaminio matmenys (3.3 pav.)
„Spot DUO“ gaminio matmenys (3.4 pav.)
Gaminio apžvalga (3.5 pav.)
A Sieninis laikiklis
B Gnybtai
C Apsauginis varžtas
D Šviestuvo kojelė
E Šviestuvo korpusas
F Prieblandos lygio nustatymas (tik „Spot ONE / DUO sensor“)
G Švietimo trukmės nustatymas (tik „Spot ONE / DUO sensor“)
„Spot ONE / DUO“ sensoriaus jautrumo zona (3.6–3.8 pav.)
4. Elektros jungtis
Sujungimo schema (4.1 pav.)
Įvadą sudaro trijų laidų kabelis:
L = fazė (dažniausiai juodas arba rudas laidas)
N = nulinis laidas (dažniausiai mėlynas)
PE = apsauginis laidas (žalias / geltonas)
Kilus dvejonių turite patikrinti laidus įtampos tikrikliu; po to įtampą reikia vėl išjungti.
Fazė (L), nulinis laidas (N) ir apsauginis laidas (PE) jungiami prie kištukinio gnybto.
Svarbu!
Sukeitus jungtis vėliau tai gali sukelti trumpąjį jungimą prietaise arba saugiklių dėžutėje. Tokiu atveju atskirus laidus reikia patikrinti ir iš naujo sujungti dar kartą. Tinklo įvade
galima įrengti įjungimo ir išjungimo jungiklius.
Sujungimas
“ skirtas šviestuvams sujungti. Lygiagrečiai galima sujungti iki 10 šio tipo šviestuvų.
„
(4.1 pav.)
LT
80 81
Page 42

5. Montavimas
• Patikrinkite visas dalis, ar nėra pažeidimų.
• Esant pažeidimams gaminio nenaudokite.
• Montuodami šviestuvą pasirinkite nuo vibracijos apsaugotą vietą.
• Pasirinkite tinkamą montavimo vietą atsižvelgdami į jautrumo zonos ilgį ir judėjimo
fiksavimą.
Judėjimas patikimiausiai fiksuojamas tuomet, kai prietaisas sumontuojamas šonu
judėjimo krypčiai ir sensoriaus matomumo neužstoja jokios kliūtys (pvz., medžiai,
sienos ir t. t.).
Montavimo eiga
• Išjunkite elektros energijos tiekimą (4.1 pav.).
• Atlaisvinkite apsauginius varžtus ir nuimkite šviestuvo korpusą nuo sieninio laikiklio
(5.1 pav.).
• Ištraukite kištuką ir nuimkite šviestuvo korpusą nuo sieninio laikiklio (5.2 pav.).
• Pasižymėkite gręžtinių skylių vietas (5.3 pav.).
• Išgręžkite skyles ir įkiškite kaiščius (5.4 pav.).
• Potinkinis montavimas (5.5 pav.).
• Virštinkinio įvado montavimas naudojantis distanciniais laikikliais (5.6 pav.).
• Pritvirtinkite apsauginę juostą prie sieninio laikiklio ir prijunkite kištuką (5.7 pav.).
• Prijunkite jungiamuosius laidus (5.8pav.).
• Kai sujungsite kelis šviestuvus, ištraukite fiksavimo liežuvėlį (5.8pav.).
• Uždėkite šviestuvo korpusą ant sieninio laikiklio (5.9 pav.).
• Įsukite varžtą (5.9 pav.).
• Įjunkite elektros energijos tiekimą (5.9 pav.).
• Atlikite nustatymus ➜ „6. Funkcija“
6. Veikimas
„Spot ONE Sensor“ / „Spot DUO Sensor“
Gamyklos nustatymas
– Prieblandos lygio nustatymas: 1000 liuksų
– Laiko nustatymas: 8sekundės
Prieblandos lygio nustatymas (6.2 F pav.)
Pageidaujamas šviestuvo suveikimo slenkstis nustatomas neribotai nuo maždaug
2 iki 1000 liuksų.
Nustatant jautrumo zoną ir atliekant funkcijų patikrinimą dienos metu nustatymo
reguliatorius turi būti nustatytas ties
Švietimo trukmės nustatymas (6.2 G pav.)
Pageidaujamą šviestuvo švietimo trukmę galima nustatyti tolygiai nuo maždaug 8sekundžių iki maks. 35 minučių. Kaskart užfiksavus judesį prieš pasibaigiant šiam laikui,
laikmatis įsijungia iš naujo.
– Nustatymo reguliatorius + = maždaug 35minučių
– Nustatymo reguliatorius – = maždaug 8sekundžių
Pastaba
Kaskart šviestuvui išsijungus naujas judesys gali būti užfiksuotas tik maždaug po
1sekundės. Tik pasibaigus šiam laikui šviestuvas užfiksavęs judesį vėl įjungs šviesą.
„Spot DUO“ sensorius
Tiekiamo komplekto būklė:
abi šviestuvų galvutės sujungtos ir visada įsijungia ir išsijungia kartu.
Norint individualiai naudoti abi šviestuvų galvutes, reikia atjungti jungtį tarp gnybtų
1 ir 2).
(
„Spot ONE Sensor Connect“ / „Spot DUO Sensor Connect“
Gamyklos nustatymas
– Prieblandos lygio nustatymas: 2000 liuksų
– Laiko nustatymas: 5 sekundės
Išmanioji nuotolinio valdymo programėlė „Smart Remote App“
Norint konfigūruoti šviestuvą naudojantis išmaniuoju telefonu arba planšetiniu kompiuteriu iš „AppStore“ reikia atsisiųsti STEINEL išmaniąją nuotolinio valdymo programėlę
„Smart Remote App“. Tam reikalingas išmanusis telefonas arba planšetė, kurioje
įdiegtas „Bluetooth“.
Android iOS
.
LT
– Nustatymo reguliatorius ties
apšvietimo).
– Nustatymo reguliatorius ties
= dienos šviesos režimas (nepriklauso nuo
= prieblandos režimas, apie 2 liuksai.
82 83
Page 43

Naudojant programėlę „Smart Remote“ galima nustatyti toliau išvardytas funkcijas.
3
5
GAMINTOJO
METŲ
GARANTIJA
GAMINTOJO
METŲ
GARANTIJA
– Švietimo trukmės nustatymas
– Prieblandos lygio nustatymas
– Įjungimo ir išjungimo laikas
– Automatinis / rankinis situacijos valdymas
– Sujungimas
– Grupavimas
– Grupių ir šviestuvų žymėjimas
Pastaba
Kaskart šviestuvui išsijungus naujas judesys gali būti užfiksuotas tik maždaug po
1sekundės. Tik pasibaigus šiam laikui šviestuvas užfiksavęs judesį vėl įjungs šviesą.
Kad „Spot Connect“ būtų galima įjungti ir išjungti priklausomai nuo laiko, jame yra
vidinis laikrodis. Jis kaskart „Bluetooth“ ryšiu jungiantis per „Smart Remote App“
automatiškai sinchronizuojamas su prijungto išmaniojo telefono laikrodžiu.
Siekiant užtikrinti tinkamą veikimą, kaskart nutrūkus elektros energijos teikimui į
šviestuvą, reikia atkurti ryšį naudojantis programėle „Smart Remote App“. Vidinis
laikrodis vėl bus sinchronizuojamas su išmaniojo telefono laikrodžiu.
9. Šalinimas
Elektros prietaisai, priedai ir pakuotės turi būti perdirbami aplinkai nekenksmingu būdu.
Neišmeskite elektros prietaisų kartu su buitinėmis atliekomis!
Tik ES šalims
Remiantis galiojančia Europos Sąjungos Direktyva dėl elektros ir elektronikos įrangos
atliekų ir jos perkėlimo į nacionalinę teisę, nebetinkami naudoti elektros prietaisai turi
būti renkami atskirai ir perdirbami aplinkai nekenksmingu būdu.
10. Atitikties deklaracija
Aš, STEINEL Vertrieb GmbH, patvirtinu, kad radijo įrenginių tipas Spot ONE Sensor
Connect/Spot DUO Sensor Connect atitinka Direktyvą 2014/53/ES. Visas ES atitikties
deklaracijos tekstas prieinamas šiuo interneto adresu: www.steinel.de
7. Šviestuvo sukimosi diapazonas / lemputės keitimas
Šviestuvo sukimosi zona (7.1 / 7.2 pav.)
Lemputės keitimas
• Atleiskite dangtelį ant šviestuvo korpuso ir ištraukite (7.3 pav.).
• Atsukite lemputę ir ją ištraukite (7.4 pav.).
• Įdėkite naują lemputę ir ją prisukite (7.5 pav.).
• Uždėkite ir priveržkite dangtelį (7.6 pav.).
Svarbu!
Naudoti tik GU10 LED lemputes maks. iki 9 W.
Pastaba
• Keisdami lemputę užtikrinkite, kad tarpinė ir sandarinamas paviršius būtų švarūs ir
nepažeisti.
8. Techninė priežiūra
Gaminiui techninė priežiūra nereikalinga.
Užsiteršusį šviestuvą galima valyti drėgnu skudurėliu (be valiklio).
11. Gamintojo garantija
Šis „Steinel“ produktas pagamintas itin kruopščiai, pagal galiojančias normas patikrintos jo funkcijos ir saugumas bei papildomai atlikta pasirinktų prietaisų patikra.
„Steinel“ suteikia prietaisui garantiją. Garantinis laikotarpis – 36mėnesiai. Jis skaičiuojamas nuo prietaiso pardavimo vartotojui dienos. Mes pašalinsime defektus, susijusius su medžiagų arba gamybos broku; garantiniu laikotarpiu, mūsų nuožiūra, prietaisas
nemokamai remontuojamas arba keičiamos sugedusios dalys. Garantija netaikoma
susidėvinčioms dalims, taip pat jei prietaisas sugenda dėl netinkamo naudojimo arba
netinkamos priežiūros. Kitiems daiktams padaryta žala neatlyginama.
Garantija taikoma tik tuo atveju, jei neišardytas prietaisas kartu su trumpu gedimo
aprašymu, kasos čekiu arba sąskaita (pirkimo data ir pardavėjo antspaudu), tinkamai
supakuotas atsiunčiamas į atitinkamą techninės priežiūros tarnybos vietą.
Remontas
Pasibaigus garantinio aptarnavimo laikotarpiui arba esant gedimams, kuriems garantinė priežiūra negalioja, dėl remonto galimybių teiraukitės artimiausiame aptarnavimo
centre.
8584
LT
Page 44

12. Techniniai duomenys
Matmenys
(Ø×G)
(A×P×G)
Įvado įtampa 220–240 V, 50/60Hz
Galingumas
• Budėjimo režimas
• Veikimas
Patarimas dėl lempučių GU10 LED lemputė (maks. 9 W)
Sensorinė technika Pasyvūs infraraudonieji spinduliai
Jautrumo zona
• Apimties kampas
• Apimties kampas
Jautrumo zonos ilgis maks. 10 m
Švietimo trukmės
nustatymas
Prieblandos lygio
nustatymas
Saugos klasė IP44
Apsaugos klasė I
Temperatūros diapazonas -20 – +40 °C
„Bluetooth“ dažnis 2,4–2,48GHz (tik „Spot ONE / DUO Sensor Connect“)
„Bluetooth“ siuntimo galia 5 dBM / 3 mW (tik „Spot ONE / DUO Sensor Connect“)
„Spot ONE“: Ø 97×175 mm
„Spot DUO“: 98×247×175 mm
apie 0,5 W
apie 0,5 W + LED lemputė
90°
90°
8s – 35 min. (tik „Spot ONE / DUO Sensor“)
5 s – 60min. (tik „Spot ONE / DUO Sensor Connect“)
2–1000 liuksų (tik „Spot ONE / DUO Sensor“)
2–2000 liuksų (tik „Spot ONE / DUO Sensor Connect“)
13. Veikimo sutrikimai
Sutrikimas Priežastis Ištaisymas
Šviesos diodų šviestuvas
neįsijungia
Sensorinis LED šviestuvas
neįsijungia
Sensorinis LED šviestuvas
neišsijungia
Sensorinis LED šviestuvas
visą laiką ĮSIJUNGIA /
IŠSIJUNGIA
Sensorinis LED šviestuvas
įsijungia tada, kai nereikia
■ Suveikė saugiklis,
neįjungta, nutrauktas
laidas
■ Trumpasis jungimas
■ Perdegė lemputė
■ Veikiant dienos šviesos
režimu prieblandos
nustatymai nustatyti ties
nakties režimu
■ Tinklo jungiklis
IŠJUNGTAS
■ Suveikė saugiklis
■ Fiksavimo diapazonas
nustatytas netikslingai
■ Jautrumo zonoje
fiksuojamas nuolatinis
judesys
■ Fiksavimo diapazone
juda gyvūnai
■ Jautrumo zonoje vėjas
linguoja medžius ir
krūmus
■ Užfiksuojami gatve
važiuojantys automobiliai
■ Staigus temperatūros
pokytis dėl oro sąlygų
(vėjo, lietaus, sniego)
arba oro srauto iš
ventiliatorių, atvirų langų
■ Sensorinis LED šviestu-
vas siūbuoja (juda), pvz.,
dėl vėjo gūsių arba
gausių kritulių
■ Įjunkite saugiklį,
pakeiskite, įjunkite tinklo
jungiklį; patikrinkite laidą
įtampos tikrintuvu
■ Patikrinkite jungtis
■ Pakeiskite lemputę
■ Nustatykite iš naujo
■ Įjunkite
■ Įjunkite, pakeiskite
saugiklį; jeigu reikia,
patikrinkite jungtį
■ Sureguliuokite iš naujo
■ Patikrinkite diapazoną
ir, jei reikia, iš naujo
sureguliuokite arba
nustatykite
■ Pakelkite sensorių;
pakeiskite zoną
■ Nustatykite jautrumo
zoną iš naujo
■ Nustatykite jautrumo
zoną iš naujo
■ Pakeiskite jautrumo
zoną, pakeiskite
montavimo vietą
■ Sensorinį LED šviestuvą
sumontuokite ant tvirto
pagrindo
LT
8786
Page 45

LV
!
1. Par šo dokumentu
– Lūdzu, izlasiet to uzmanīgi un saglabājiet!
– Autortiesības ir aizsargātas.
Pārpublicēšana, arī atsevišķu izvilkumu veidā, tikai ar mūsu atļauju.
– Paturam tiesības veikt izmaiņas, kas saistītas ar tehnikas attīstību.
Simbolu skaidrojums
Brīdinājums par bīstamību!
!
Norāde uz tekstu dokumentā.
...
2. Vispārēji drošības norādījumi
Pirms jebkādiem darbiem ar ierīci, pārtrauciet strāvas padevi tai!
• Montāžas laikā pievienojamais elektrības vads nedrīkst atrasties zem sprieguma.
Tādēļ vispirms jāatslēdz elektrība un ar sprieguma testeri jāpārbauda, vai sprieguma vairs nav.
• Uzstādot gaismekli, jāstrādā ar elektrotīkla spriegumu. Tādēļ tas jāveic lietpratīgi un
saskaņā ar vietējo instalēšanas un pieslēgšanas tehnisko priekšrakstu prasībām.
• Izmantojiet tikai oriģinālās detaļas.
• Remontdarbus drīkst veikt tikai profesionālas darbnīcas.
• Nav piemērots izmantošanai ar halogēnspuldzēm.
3. Spot ONE Sensor/Spot DUO Sensor
Spot ONE Sensor Connect/Spot DUO Sensor Connect
Pareiza lietošana
– LED gaismeklis motāžai pie sienas iekštelpās un ārā.
Spot ONE Sensor/Spot DUO Sensor
– LED sensorgaismeklis ietver aktīvu infrasarkano kustību ziņotāju.
Spot ONE Sensor Connect/Spot DUO Sensor Connect
– LED sensorgaismeklis ietver aktīvu infrasarkano kustību ziņotāju un ir iestatāms
tikai vaur Bloetooth.
Piegādes apjoms Spot ONE (3.1. att.)
– gaismeklis
– trīs skrūves
– trīs dībeļi
– trīs starplikas
Piegādes apjoms Spot DUO (3.2. att.)
– gaismeklis
– četras skrūves
– četri dībeļi
– četras starplikas
Produkta izmēri Spot ONE (3.3. att.)
Produkta izmēri Spot DUO (3.4. att.)
Informācija par preci (3.5. att.)
A Sienas stiprinājumsa
B Pieslēguma aizspiednis
C Drošības skrūve
D Gaismekļa kāja
E Gaismekļa korpuss
F Krēslas sliekšņa iestatījums (tikai Spot ONE/DUO sensoriem)
G Laika iestatīšana (tikai Spot ONE/DUO sensoriem)
Uztveres lauks Spot ONE/DUO sensoriem (3.6.-3.8. att.)
4. Elektriskais pieslēgums
Slēgumu plāns (4.1. att.)
Tīkla pievadvadu veido 3 dzīslu kabelis:
L = fāze (parasti melns, brūns vai pelēks)
N = nulles vads (parasti zils)
PE = zemējums (zaļš/dzeltens)
Šaubu gadījumā ar sprieguma mērītāju ir jānosaka kabeļa dzīslas; pēc tam kabelis
atkārtoti ir jāatslēdz no strāvas tīkla. Fāze (L), nulles vads (N), kā arī aizsargvads (PE)
tiek pieslēgti spieslēguma kopnei.
Svarīgi!
Pieslēgumu sajaukšana vēlāk var izraisīt īssavienojumu ierīcē vai Jūsu sadales skapī.
Šādā gadījumā ir atkārtoti jāveic atsevišķu kabeļu noteikšana un savienošana. Tīkla
pievadvadā var iemontēt tīkla slēdzi, kas paredzēts ieslēgšanai un izslēgšanai.
LV
88 89
Page 46

Saslēgums tīklā
" " kalpo gaismekļu saslēgšanai tīklā. Paralēli var pieslēgt līdz 10 šāda tipa gaismekļus.
(4.1 att.)
5. Montāža
• Pārbaudiet visas detaļas, vai tās nav bojātas.
• Bojājumu gadījumā nelietojiet produktu.
• Montējot gaismekli, jāpievērš uzmanība, lai tas tiktu piestiprināts stabili.
• Izvēlieties montāžai piemērotu vietu, ņemot vērā sniedzamību un kustības uztveršanu.
Sensors visefektīvāk uztvers kustību, ja uzstādīsiet ierīci kustības virzienā un ja sensora
redzamību neierobežos šķēršļi (piemēram, koki, sienas u. tml.).
Montāžas soļi
• Atslēdziet elektrības apgādi. (4.1. att.)
• Atskrūvējiet drošības skrūvi un atvienojiet gaismekļ korpusu no sienas turētāja.
(5.1. att.)
• Atvienojiet iespraužamās spailes un gaismekļa korpusu no sienas stiprinājuma.
(5.2. att.)
• Atzīmējiet urbuma vietas. (5.3. att.)
• Izurbiet caurumus un ievietojiet dībeļus (5.4. att.)
• Zemapmetuma montāža (5.5. att.)
• Virsapmetuma pievads ar starplikām (5.6. att.)
• Piestipriniet drošības lentu un uzlieciet iespraužamās spailes. (5.7. att.)
• Pievienojiet pieslēguma kabeli. (5.8. att.)
• Saslēdzot tīklā vairākus gaismekļus, izlauziet drošības mēlīti. (5.8. att.)
• Uzspraudiet gaismekļa korpusu uz sienas stiprinājuma. (5.9. att.)
• Ieskrūvējiet drošības skrūvi. (5.9. att.)
• Ieslēdziet elektrības apgādi. (5.9. att.)
• Veiciet iestatīšanu ➜ "6. Funkcijas"
6. Funkcijas
Spot ONE Sensor/Spot DUO Sensor
Rūpnīcas iestatījumi
– Krēslas iestatījums: 1000 luksi
– Laika iestatījums: 8sekundes
Krēslas sliekšņa iestatījums (6.2. F att.)
Vēlamo gaismekļa reakcijas slieksni iespējams iestatīt bez pakāpēm no apm. 2 līdz
1000 luksiem.
90 91
– Iestatīšanas slēdzis iestatīts uz = dienasgaismas režīms
(atkarībā no apgaismojuma)
– Iestatīšanas slēdzis iestatīts uz
Iestatot uztveres lauku un pārbaudot gaismekļa darbību dienasgaismā, iestatījumu
regulatoram jābūt pagrieztam pret
Laika iestatījums (6.12. G att.)
Vēlamo gaismekļa degšanas ilgumu iespējams iestatīt bez pakāpēm no apm. 8s līdz
maks. 35 min. Ar katru kustību, kas uztverta pirms šī laika beigām, pulkstenis tiek
startēts no jauna.
– Iestatījumu regulators + = apm. 35 minūtes
– Iestatījumu regulators – = apm. 8sekundes
Norāde:
Pēc katras gaismekļa izslēgšanās uz apm. 1 s ir pārtraukta jaunas kustības uztvere.
Tikai pēc šī laika paiešanas gaismeklis, uztverot kustību, atkal var ieslēgt gaismu.
Spot DUO Sensor
Piegādes stāvoklis:
Abas gaismekļu galvas ir saslēgtas tīklā un vienmēr ieslēdzas un izslēdzas vienlaicīgi.
Abu gaismekļu galvu atsevišķai darbībai ir jāpārtrauc savienojums starp spailēm
un 2. ).
(1.
Spot ONE Sensor Connect/Spot DUO Sensor Connect
Rūpnīcas iestatījumi
– Krēslas iestatījums: 2000 luksi
– Laika iestatījums: 5 sekundes
Smart Remote lietotne
Gaismekļa konfigurācijai ar viedtālruni vai planšetdatoru ir Jūsu AppStore jālejuplādē
STEINEL Smart Remote lietotne. Ir vajadzīgs viedtālrunis vai planšetdators ar Bluetooth.
Android iOS
= krēslas režīms (apm. 2 luksi)
.
LV
Page 47

Šādas funkcijas ir iestatāmas Smart Remote lietotnē:
3
5
RAŽOTĀJA
GADU
GARANTIJA
RAŽOTĀJA
GADU
GARANTIJA
– Laika iestatīšana
– Krēslas sliekšņa iestatījums
– Ieslēgšanas un izslēgšanas laiki
– Automātiska/manuāla situatīva vadība
– Saslēgums tīklā
– Grupu veidošana
– Grupu un gaismekļu nosaukšana
Norāde:
Pēc katras gaismekļa izslēgšanās uz apm. 1 s ir pārtraukta jaunas kustības uztvere.
Tikai pēc šī laika paiešanas gaismeklis, uztverot kustību, atkal var ieslēgt gaismu.
Lai nodrošinātu uz laiku balstītu ieslēgšanos un izslēgšanos, Spot Connect ir integrēts
pulkstenis. Tas automātiski sinhrozinējas ar pievienotā viedtrālruņa pulksteni pie katra
Bluetooth savienojama caur Smart Remote App.
Lai nodrošinātu korektu funkciju, pēc strāvas padeves pārtraukšanas gaismeklim
jāizveido savienojums caur Smart Remote lietotni. Integrētais pulkstenis atkal tiek
sinhronizēts ar viedtālruņa pulksteni.
9. Utilizācija
Elektroierīces, piederumi un iepakojumi jānodod dabai draudzīgai atkārtotai pārstrādei.
Nemetiet elektroierīces parastajos atkritumos!
Tikai ES valstīm:
Atbilstoši Eiropas vadlīnijām par vecām elektroierīcēm un elektroniskām ierīcēm, un to
lietojumam nacionālās tiesībās, nefunkcējošas elektroierīces jāsavāc atsevišķi un tās
jānodod dabai draudzīgai atkārtotai pārstrādei.
10. Atbilstības deklarācija
Ar šo STEINEL Vertrieb GmbH deklarē, ka radioiekārta Spot ONE Sensor Connect/
Spot DUO Sensor Connect atbilst Direktīvai 2014/53/ES. Pilns ES atbilstības deklarācijas teksts ir pieejams šādā interneta vietnē: www.steinel.de
7. Gaismekļa pagriešanas zona / Spuldzes maiņa
Gaismekļa pagriešanas zona (7.1./7.2. att.)
Spuldzes maiņa
• Atskrūvējiet nosegplāksni pie gaismekļa korpusa un izvelciet to. (7.3. att.)
• Izskrūvējiet un izvelciet spuldzi. (7.4. att.)
• Ielieciet un ieskrūvējiet jaunu spuldzi. (7.5. att.)
• Uzlieciet un pieskrūvējiet nosedzošo plāksni. (7.6. att.)
Svarīgi!
Izmantojiet tikai GU10 LED spuldzi līdz maks. 9 W.
Norāde:
• Mainot spuldzi pārliecinieties, ka blīve un blīvējamā virsma ir tīra un nav bojāta.
8. Apkope
Izstrādājumam apkope nav nepieciešama.
Ja gaismeklis ir netīrs, noslaukiet to ar mitru drānu (bez tīrīšanas līdzekļiem).
11. Ražotāja garantija
Šis Steinel produkts ir izgatavots ar vislielāko rūpību, tā darbība un drošība ir pārbaudīta saskaņā ar spēkā esošajiem priekšrakstiem, un noslēgumā tas pakļauts izlases veida pārbaudei. Steinel garantē nevainojamas produkta īpašības un darbību. Garantijas
laiks ir 36mēneši un tā stājas spēkā ar ierīces pārdošanas dienu lietotājam. Mēs novēršam trūkumus, kas radušies materiālu vai rūpnīcas kļūdu dēļ, garantijas serviss ietver
sevī bojāto daļu remontu vai apmaiņu pēc mūsu izvēles. Garantijas serviss neattiecas uz
nodilumam pakļauto daļu bojājumiem, kā arī uz bojājumiem un trūkumiem, kas radušies
nelietpratīgas lietošanas vai apkopes, kā arī kritiena rezultātā. Garantijas saistības neattiecas uz citiem objektiem, kas varētu tikt bojāti ierīces darbības rezultātā.
Garantija ir spēkā tikai tad, ja neizjaukta ierīce kopā ar īsu problēmas aprakstu, kases
čeku vai rēķinu (ar pirkšanas datumu un tirgotāja zīmogu), labi iepakota, tiek nosūtīta attiecīgajai servisa nodaļai.
Remonta serviss:
Pēc garantijas laika beigām vai tādu bojājumu gadījumā, uz kuriem neattiecas garantijas tiesības, vērsieties tuvākajā klientu apkalpošanas centrā, lai novērstu bojājumus.
9392
LV
Page 48

12. Tehniskie dati
Izmēri
(Ø×Dz)
(A×P×Dz)
Ieejas spriegums 220-240 V, 50/60Hz
Jauda
• Stand by
• Lietošana
Spuldzes GU10 LED gaismas avots (maks. 9 W)
Sensoru tehnoloģija Pasīvs-infrasarkans
Uztveres lauks
• Uztveres leņķis
• atveres leņķis
Sniedzamība maks. 10 m
Laika iestatīšana 8s - 35 min (tikai Spot ONE/DUO Sensor Connect)
Krēslas sliekšņa iestatījums 2-1000 luksi (tikai Spot ONE/DUO Sensor)
Aizsardzības veids IP44
Aizsargklase I
Temperatūras amplitūda -20 - +40 °C
Bluetooth frekvence 2,4-2,48GHz (tikai Spot ONE/DUO Sensor Connect)
Bluetooth raidjauda 5dBM/3 mW (tikai Spot ONE/DUO Sensor Connect)
Spot ONE: Ø 97×175 mm
Spot DUO: 98×247×175 mm
apm., 0,5 W
apm. 0,5 W + LED gaismas avots
90°
90°
5 s - 60min (tikai Spot ONE/DUO Sensor Connect)
2-2000 luksi (tikai Spot ONE/DUO Sensor Connect)
13. Darbības traucējumi
Traucējumi Cēlonis Risinājums
LED gaismeklis neieslēdzas ■ Drošinātājs ir izslēdzies,
LED sensorgaismeklis
neieslēdzas
LED sensorgaismeklis
neieslēdzas
LED sensorgaismeklis
pastāvīgi ieslēdzas un
izslēdzas.
LED sensorgaismeklis
nevajadzīgi ieslēdzas
nav ieslēgts, bojāts vads
■ Īssavienojums
■ Bojāts gaismas avots
■ Dienas gaismas režīmā,
krēslas slieksnis iestatīts
nakts režīmā
■ IZSLĒGTS tīkla slēdzis
■ Drošinātājs ir izslēdzies
■ Nav mērķtiecīgi iestatīts
uztveres lauks
■ Nepārtraukta kustība
uztveres laukā
■ Uztveres laukā pārvieto-
jas dzīvnieki
■ Vējš uztveres laukā
kustina kokus un krūmus
■ Uz ielas esošo automašī-
nu uztveršana
■ Laika apstākļu izraisītas
straujas temperatūras
izmaiņas (vējš, lietus,
sniegs), vai arī gaisa
plūsma no ventilatoriem,
atvērtiem logiem
■ LED sensorgaismeklis
šūpojas (kustas) stipra
vēja brāzmās vai stipros
nokrišņos.
■ Ieslēdziet drošinātāju,
nomainiet, ieslēdziet
tīkla slēdzi; pārbaudiet
vadu ar sprieguma
testeri
■ Pārbaudīt pieslēgumus
■ Nomainiet spuldzi
■ Iestatiet no jauna
■ Ieslēdziet
■ Ieslēdziet drošinātāju,
nomainiet, pēc
vajadzības pārbaudiet
pieslēgumu
■ Justējiet atkārtoti
■ Pārbaudiet lauku un
pēc nepieciešamības
atkārtoti justējiet, t. i.,
nosedziet
■ paceliet sensoru
augstāk; pārregulējiet
zonu
■ Izmainiet lauku
■ Izmainiet lauku
■ Izmainiet uztveres lauku,
mainiet uzstādīšanas
vietu
■ LED sensorgaismekli
piemontējiet pie stingras
pamatnes.
LV
9594
Page 49

RU
!
1. Об этом документе
– Просим тщательно прочесть и сохранить!
– Защищено авторскими правами.
Перепечатка, также выдержками, только с нашего согласия.
– Мы сохраняем за собой право на изменения, которые служат техническому
прогрессу.
Разъяснение символов
Предупреждение об опасностях!
!
Указание на текст в документе.
...
2. Общие указания по технике безопасности
Перед началом любых работ, проводимых на приборе, следует
отключить напряжение!
• При проведении монтажа подключаемый электропровод должен быть
обесточен. Поэтому в первую очередь следует отключить подачу тока и проверить отсутствие напряжения с помощью индикатора напряжения.
• Монтажные работы по подключению светильника относятся к категории
работ с сетевым напряжением. Поэтому при монтаже светильников следует
соблюдать указания и условия, приведенные в инструкции по подключению.
• Использовать только оригинальные запасные части.
• Ремонт разрешается выполнять только в специализированных мастерских.
• Не подходит для использования с галогенными осветительными средствами.
3. Spot ONE Sensor/Spot DUO Sensor
Spot ONE Sensor Connect/Spot DUO Sensor Connect
Применение по назначению
– Светодиодный светильник для настенного монтажа на улицах и в помещениях.
Spot ONE Sensor/Spot DUO Sensor
– Сенсорный светодиодный светильник содержит инфракрасный датчик
движения.
Spot ONE Sensor Connect/Spot DUO Sensor Connect
– Сенсорный светодиодный светильник содержит инфракрасный датчик дви-
жения и может регулироваться только посредством Bluetooth.
96 97
Комплект поставки Spot ONE (рис. 3.1)
– светильник
– три винта
– три дюбеля
– три распорки
Комплект поставки Spot DUO (рис. 3.2)
– светильник
– 4 винта
– 4 дюбеля
– четыре распорки
Размеры изделия Spot ONE (рис. 3.3)
Размеры изделия Spot DUO (рис. 3.4)
Обзор изделия (рис. 3.5)
A Угольник
B Клемма подключения
С Крепежный винт
D Ножка светильника
E Корпус светильника
F Установка сумеречного включения (только Spot ONE/DUO Sensor)
G Установка времени (только Spot ONE/DUO Sensor)
Зона регистрации Spot ONE/DUO Sensor (рис. 3.6-3.8)
4. Электрическое подключение
Схема соединений (рис. 4.1)
Сетевой провод состоит из 3 жил:
L = фаза (обычно черного, коричневого или серого цвета)
N = нулевой провод (чаще всего синий)
PE = провод заземления (зеленый/желтый)
В случае сомнения идентифицировать провода с помощью индикатора, затем
снова отключить напряжение. Присоединить фазный (L), нулевой провод (N) и
провод заземления (PE) к соответствующим клеммам светильника.
Важно:
Вследствие неправильного присоединения проводов в приборе или в распределительном ящике с предохранителями в дальнейшем может произойти
короткое замыкание. В таком случае рекомендуется еще раз проверить провода и заново подключить их. При необходимости в сетевой провод может быть
вмонтирован выключатель для включения и выключения сетевого тока.
RU
Page 50

Объединение в сеть
" " служит для объединения светильников в сеть. Можно включить
параллельно до 10 светильников этого типа. (рис. 4.1)
5. Монтаж
• Проверить все конструктивные детали на предмет повреждения.
• При повреждениях не включать продукт.
• При монтаже светодиодного светильника следить за тем, чтобы он крепился
без вибраций.
• Выбрать подходящее место для монтажа с учетом радиуса действия и регистрации движений.
Для обеспечения надежной работы сенсор следует монтировать так, чтобы
проводилась регистрация движущихся мимо объектов, а также исключать все
заграждающие объекты (например, деревья, стены и т.д.).
Порядок монтажа
• Отключить электропитание. (рис. 4.1)
• Отпустить крепежный винт и снять корпус светильника с кронштейна.
(рис. 5.1)
• Отсоединить контактный зажим и корпус светильника от кронштейна.
(рис. 5.2)
• Наметить отверстия для сверления. (рис. 5.3)
• Просверлить отверстия и вставить дюбели. (рис. 5.4)
• Монтаж скрытой проводкой (рис. 5.5)
• Подвод кабеля открытой проводкой с распорками (рис. 5.6)
• Закрепить ленту безопасности на кронштейне и подсоединить контактный
зажим. (рис. 5.7)
• Подключить соединительный кабель. (рис. 5.8)
• При объединении в сеть нескольких светильников и выломать предохранительную пластину. (рис. 5.8)
• Установить корпус светильника на кронштейн. (рис. 5.9)
• Вкрутить крепежный винт. (рис. 5.9)
• Включить электропитание. (рис. 5.9)
• Выполнить регулировки ➜ "6. Эксплуатация"
6. Эксплуатация
Spot ONE Sensor/Spot DUO Sensor
Заводские настройки
– Установка сумеречного порога: 1000 лк
– Время включения лампы: 8секунд
98 99
Установка сумеречного включения (рис. 6.2 F)
Необходимый порог срабатывания светильника может быть установлен плавно
в диапазоне от прим. 2 лк до 1000 лк.
– Регулятор, установленный на
от яркости)
– Регулятор, установленный на
При установке зоны обнаружения и при проведении эксплуатационного теста
при дневном свете регулятор должен быть установлен на
Регулировка времени (рис. 6.2 G)
Необходимое время освещения может быть установлено на светильнике плавно
в диапазоне от 8сек. до макс. 35 мин. Каждое зарегистрированное движение
до истечения этого времени заново начинает отсчет времени.
– Установочный регулятор на + = ок. 35 мин.
– Установочный регулятор – = ок. 8сек.
Указание:
После каждого процесса отключения светильника обнаружение нового движения прерывается прим. на 1 секунду. Только по истечении этого времени
светильник может снова включать свет при движении.
Spot DUO Sensor
Состояние при поставке:
Обе головки светильника соединены в сеть и всегда включаются и
выключаются одновременно.
Для индивидуальной работы обеих головок светильника необходимо удалить
соединение между клеммами (
Spot ONE Sensor Connect/Spot DUO Sensor Connect
Заводские настройки
– Установка сумеречного порога: 2000 лк
– Время включения лампы: 5 секунд
Приложение Smart Remote
Для конфигурации светильника с помощью смартфона или планшета необходимо скачать приложение STEINEL Smart Remote из AppStore. Необходим
смартфон или планшет с Bluetooth.
= режим дневного освещения (независимо
= режим сумеречного освещения (ок. 2 лк.)
.
1 и 2).
RU
Page 51

Android iOS
Следующие функции могут устанавливаться посредством приложения Smart
Remote:
– Время включения лампы
– Установка сумеречного включения
– Время включения и выключения
– Ситуативное управление автоматика/ручное
– Объединение в сеть
– Образование групп
– Присваивание названий группам и светильникам
Указание:
После каждого процесса отключения светильника обнаружение нового движения прерывается прим. на 1 секунду. Только по истечении этого времени
светильник может снова включать свет при движении.
Для включения и выключения по времени Spot Connect оснащен внутренними
часами. Они автоматически синхронизируются при каждом соединении по
Bluetooth посредством приложения Smart Remote с часами подключенного
смартфона.
Чтобы гарантировать корректную работу, после прерывания электропитания
светильника можно установить соединение посредством приложения Smart
Remote. Внутренние часы снова синхронизируются с часами смартфона.
7. Диапазон поворота светильника /
замена осветительных средств
Диапазон поворота светильника (рис. 7.1/7.2)
Замена осветительных средств
• Отсоединить плафон от корпуса светильника и вытащить. (рис.7.3)
• Открутить и вытащить осветительное средство. (рис. 7.4)
• Вставить и закрутить новое осветительное средство. (рис. 7.5)
• Надеть и прикрутить плафон. (рис. 7.6)
Важно:
Использовать только светодиодные осветительные средства GU10 макс. 9 Вт.
Указание:
• При замене осветительных средств обеспечить, что уплотнение и
уплотнительная поверхность не загрязнены или не повреждены.
8. Техническое обслуживание
Продукт не требует технического обслуживания.
Загрязнения на светильнике можно удалять влажным сукном (не используя
моющие средства).
9. Утилизация
Электроприборы, комплектующие и упаковку следует направлять на экологичную вторичную переработку.
Не выбрасывать электроприборы в бытовые отходы!
Только для стран ЕС:
Согласно действующей Европейской директиве по отработанному электрическому и электронному оборудованию и ее реализации в национальных законодательствах отработанные электроприборы должны собираться отдельно и
направляться на экологичную вторичную переработку.
10. Сертификат соответствия
Настоящим компания STEINEL Vertrieb GmbH заявляет, что радиоаппаратура
типа Spot ONE Sensor Connect/Spot DUO Sensor Connect отвечает требованиям
директивы 2014/53/EU. Полный текст сертификата соответствия ЕС доступен
по следующему адресу в Интернете: www.steinel.de.
11. Гарантия производителя
Данное изделие производства Steinel было с особым вниманием изготовлено и
испытано на работоспособность и безопасность эксплуатации соответственно
действующим инструкциям, а потом подвергнуто выборочному контролю качества. Фирма STEINEL гарантирует высокое качество и надежную работу изделия. Гарантийный срок эксплуатации составляет 36месяцев со дня продажи изделия. Фирма обязуется устранить недостатки, которые возникли вследствие
дефекта материала или конструкции. Дефекты устраняются путем ремонта изделия либо заменой неисправных деталей по усмотрению фирмы. Гарантийный
101100
RU
Page 52

срок эксплуатации не распространяется на повреждения и дефекты, возник-
3
5
ГАРАНТИИ
ПРОИЗВОДИТЕЛЯ
ГОДА
ГАРАНТИИ
ПРОИЗВОДИТЕЛЯ
ЛЕТ
шие в результате износа деталей, ненадлежащей эксплуатации и ухода. Фирма
не несет ответственности за материальный ущерб третьих лиц, нанесенный в
процессе эксплуатации изделия.
Гарантия предоставляется только в том случае, если изделие в собранном и
упакованном виде с кратким описанием неисправности было отправлено вместе с приложенным кассовым чеком или квитанцией (с датой продажи и печатью торгового предприятия) по адресу сервисной мастерской.
Ремонтный сервис:
По истечении гарантийного срока или при наличии неполадок, исключающих
гарантию, обратитесь в ближайшее сервисное предприятие, чтобы получить
информацию о возможности ремонта.
12. Технические данные
Габариты
(Ø×Г)
(В×Ш×Г)
Входное напряжение 220-240 В, 50/60Гц
Мощность
• Резервный режим
• Эксплуатация
Осветительное средство Светодиодное осветительное средство GU10
Сенсорная техника Пассивный ИК
Зона охвата
• Угол охвата
• Угол раствора
Радиус действия макс. 10 м
Время включения лампы 8сек. - 35 мин. (только Spot ONE/DUO Sensor)
Установка сумеречного
включения
Вид защиты IP 44
Класс защиты I
Температурный диапазон -20 - +40 °C
Частота Bluetooth 2,4-2,48ГГц (только Spot ONE/DUO Sensor Connect)
Мощность передатчика
Bluetooth
Spot ONE: Ø 97×175 мм
Spot DUO: 98×247×175 мм
ок. 0,5 Вт
ок. 0,5 Вт + светодиодное осветительное средство
(макс. 9 Вт)
90°
90°
5 сек. - 60мин. (только Spot ONE/DUO Sensor
Connect)
2-1000 лк (только Spot ONE/DUO Sensor)
2-2000 лк (только Spot ONE/DUO Sensor Connect)
5дБM/3 мВт (только Spot ONE/DUO Sensor Connect)
13. Неполадки при эксплуатации
Нарушение Причина Устранение
Светодиодный
светильник не
включается
Сенсорный светодиодный светильник не
включается
Сенсорный светодиодный светильник не
выключается
Сенсорный светодиодный светильник
постоянно
переключается
Нежелательное
включение сенсорного светодиодного
светильника
■ Предохранитель сработал,
не включен, неисправность
провода
■ Короткое замыкание
■ Лампа накаливания
неисправна
■ При дневном режиме,
установка сумеречного
порога установлена в ночной
режим
■ Выключен сетевой выключа-
тель
■ Сработал предохранитель
■ Неправильно установлена
зона обнаружения
■ Постоянное движение в
зоне обнаружения
■ В зоне обнаружения
находятся животные
■ В зоне движения происходит
движение деревьев и кустов
■ Включается в результате
движения автомашин на
дороге
■ В результате неожиданного
перепада температур при
изменении погоды (ветер,
дождь, снег) или потока
воздуха из вентиляционной
системы, открытых окон.
■ Сенсорный светодиодный
светильник колеблется
(движется), напр., за счет
порывов ветра или сильных
осадков
103102
■ Включить, заменить
предохранитель, включить
сетевой выключатель,
проверить провод
индикатором напряжения
■ Проверить подключения
■ Заменить осветительные
средства
■ Произвести новую
регулировку
■ Включить
■ Включить, заменить
предохранитель; при
необходимости проверить
соединение
■ Произвести новую
регулировку
■ Проверить зону и, при
необходимости, произвести новую регулировку или
установку заслонок
■ Повернуть сенсор выше,
оградить зону
■ Изменить зону
■ Изменить зону
■ Изменить зону обнаруже-
ния, произвести монтаж
светильника на новом
месте
■ Установить сенсорный
светодиодный светильник
на прочное основание
RU
Page 53

BG
!
1. За този документ
– Моля прочетете го внимателно и го пазете!
– Всички права запазени.
Препечатване, дори откъслечно, само с наше разрешение.
– Запазваме си правото за промени, които служат на техническото развитие.
Обяснение на символите
Предупреждение за опасности!
!
Препратка към части от текста в документа.
...
2. Общи указания за безопасност
Преди да предприемете каквито и да е работи по уреда, прекъснете
електрическото захранване!
• При монтаж електрическата система трябва да е без напрежение. Първо
спрете електрическия ток, след което проверете системата с уред за проверка на напрежението.
• Монтажът на лампата изисква работа с електричество. Затова трябва да
се извърши професионално, според съответните държавни предписания и
изисквания.
• Използвайте само оригинални резервни части!
• Ремонтите трябва да се извършват само от специализирани сервизи.
• Не е подходяща за използване с халогенни осветителни тела.
3. Spot ONE Sensor/Spot DUO Sensor
Spot ONE Sensor Connect/Spot DUO Sensor Connect
Употреба по предназначение
– LED-лампа за монтаж на стена на закрито или на открито
Spot ONE Sensor/Spot DUO Sensor
– Сензорната LED-лампа съдържа инфрачервен сензор за движение.
Spot ONE Sensor Connect/Spot DUO Sensor Connect
– Сензорната LED-лампа съдържа инфрачервен сензор за движение и може
да се настройва само през Bluetooth.
Съдържание на комплекта Spot ONE (рис. 3.1)
– Лампа
– Три винта
– Три дюбела
– Три подложки
Съдържание на комплекта Spot DUO (рис. 3.2)
– Лампа
– Четири винта
– Четири дюбела
– Четири подложки
Размери на продукта Spot ONE (рис. 3.3)
Размери на продукта Spot DUO (рис. 3.4)
Преглед на продукта (рис. 3.5)
A Стойка за стена
B Клема за свързване
C Обезопасителен винт
D Крак
E Корпус на лампата
F Настройка на светлочувствителността (само Spot ONE/DUO Sensor)
G Настройка на времето (само Spot ONE/DUO Sensor)
Диапазон на отчитане Spot ONE/DUO Sensor (рис. 3.6-3.8)
4. Електрическо свързване
Схема на свързване (рис. 4.1)
Кабелът съдържа 3 проводника:
L = фаза (обикновено черен, кафяв или сив)
N = нула (обикновено син)
PE = заземяващ проводник (зелен/жълт)
При съмнение, проводниците трябва да бъдат идентифицирани с уред за проверка на напрежението, след което отново да бъдат свързани, без напрежение.
Фазата (L), нулата (N) и заземяващият проводник (PE) се свързват към клемата.
Важно:
Размяна на проводниците води до късо съединение в уреда или таблото с
предпазители. При такъв случай всеки проводник трябва още веднъж да бъде
идентифициран и наново свързан. Към системата, разбира се, може да бъде
добавен прекъсвач, за включване и изключване.
BG
104 105
Page 54

Свързване в мрежа
" " служи за свързване на лампите в мрежа. Паралелно могат да бъдат
включени най-много до 10 лампи от този тип. (рис. 4.1)
5. Монтаж
• Всички части да се проверят за щети.
• При повреди продуктът да не се пуска в експлоатация.
• При монтаж на лампата да се следи за стабилното й закрепване.
• Да се избере подходящо място за монтаж, съобразявайки се с обхвата и
засичането на движение.
Най-сигурното засичане се получава, когато уредът се монтира странично
спрямо посоката на движение и нищо не пречи на видимостта на сензора (като
напр. дървета, стени и т.н.).
Последователност за монтаж
• Да се изключи електрозахранването. (рис. 4.1)
• Обезопасителният винт да се отвинти и корпусът на лампата да се отдели от
стойката за стена. (рис5.1)
• Клемата да се освободи и корпусът на лампата да се отдели от стойката за
стена. (рис.5.2)
• Да се маркират местата за пробиване. (рис. 5.3)
• Да се пробият дупките и да се поставят дюбелите. (рис. 5.4)
• Скрит монтаж (рис.5.5)
• Монтаж открити кабели с подложки (рис. 5.6)
• Обезопасителната лента да се закрепи на стойката за стена и да се постави
клемата. (рис. 5.7)
• Кабелите да се свържат. (рис. 5.8)
• При свързване на няколко лампи да се пречупи обезопасяващата клема.
(рис. 5.8)
• Корпусът на лампата да се постави на стойката за стена. (рис. 5.9)
• Обезопасителният винт да се завинти. (рис. 5.9)
• Електрозахранването да се включи. (рис. 5.9)
• Да се направят настройки ➜ "6. Функция"
6. Функция
Spot ONE Sensor/Spot DUO Sensor
Заводски настройки
– Настройка на светлочувствителността: 1000 лукса
– Настройка на времето: 8секунди
Настройка на светлочувствителността (рис. 6.2 F)
Желаният праг на задействане на лампата може да бъде регулиран безстепенно от около 2 до 1000 лукса.
– Регулатор в позиция
– Регулатор в позиция
При настройка на обхвата и при проверка на функциите на дневна светлина
регулаторът трябва да е на
Настройка на времето (рис. 6.2 G)
Желаната продължителност на светене на лампата може да се регулира безстепенно от около 8секунди до макс. 35 минути. Всяко засечено движение преди
изтичане на времето връща часовника в първоначална позиция.
– Регулатор + = около 35 минути
– Регулатор - = около 8секунди
Сведение:
След всяко изключване на лампата засичането на нови движения се прекъсва
за около 1 секунда. Едва след това лампата може да се включи при засечено
движение.
Spot DUO Sensor
Състояние при доставка:
двете лампи са свързани в мрежа и винаги едновременно се включват и
изключват.
За индивидуална употреба на двете лампи връзката между клемите трябва да
бъде отстранена (
Spot ONE Sensor Connect/Spot DUO Sensor Connect
Заводски настройки
– Настройка на светлочувствителността: 2000 лукса
– Настройка на времето: 5 секунди
Smart Remote App
За конфигуриране на лампата със смартфон или таблет трябва да свалите приложението STEINEL Smart Remote от Вашия магазин за приложения. Необходим
е смартфон или таблет с Bluetooth.
= дневен режим (независимо от осветеността)
= слаба светлина (около 2 лукса)
.
1 и 2).
BG
106 107
Page 55

Android iOS
Следните функции се регулират през Smart Remote App:
– Настройка на времето
– Настройка на светлочувствителността
– Времена на включване и изключване
– Ситуационно управление автоматично/ръчно
– Свързване в мрежа
– Създаване на групи
– Наименоване на групите и лампите
Сведение:
След всяко изключване на лампата засичането на нови движения се прекъсва
за около 1 секунда. Едва след това лампата може да се включи при засечено
движение.
За включване и изключване, базирано на часовото време, Spot Connect е снабден
с вътрешен часовник. Той автоматично се синхронизира при всяко свързване
през Bluetooth със Smart Remote App с часовника на закачения смартфон.
За да се гарантира правилната функция, след прекъсване на електрическото
напрежение на лампата трябва да се осъществи връзка през Smart Remote
App. Вътрешният часовник отново се синхронизира с часовника на смартфона.
7. Диапазон на изместване лампа /
смяна на осветителен елемент
Диапазон на изместване лампа (рис. 7.1/7.2)
Смяна на осветителен елемент
• Покриващата шайба на корпуса на лампата да се освободи и свали. (рис.7.3)
• Осветителният елемент да се освободи и свали. (рис. 7.4)
• Новото осветително тяло да се постави и завинти. (рис. 7.5)
• Покриващата шайба да се постави и завинти. (рис. 7.6)
Важно:
Да се използва само GU10-LED-осветителен елемент до макс. 9 W.
Сведение:
• При замяна на осветителното тяло се уверете, че уплътнението и
пространството около него не са замърсени или увредени.
8. Поддръжка
Продуктът не се нуждае от поддръжка.
При замърсяване, лампата може да бъде почистена с влажна кърпа
(без почистващ препарат).
9. Отстраняване
Електроуреди, принадлежности и опаковки трябва да бъдат рециклирани, с цел
опазване на околната среда.
Не изхвърляйте електроуреди с общите домашни отпадъци!
Само за страни от ЕС:
Според действащата Директива на ЕС за стари електронни и електроуреди и
транспонирането й в национално право, електроуреди, които повече не могат
да бъдат употребявани, трябва да бъдат разделно събирани и рециклирани, с
цел опазване на околната среда.
10. Декларация за съответствие
С настоящото STEINEL Vertrieb GmbH декларира, че този тип радиосъоръжение
Spot ONE Sensor Connect/Spot DUO Sensor Connect е в съответствие с Директива 2014/53/ЕС. Цялостният текст на ЕС декларацията за съответствие може
да се намери на следния интернет адрес: www.steinel.de
11. Гаранция от производителя
Този продукт на Steinel е произведен с найголямо старание, проверен е за
функционалност и безопасност, според действащите разпоредби, след което е подложен на качествен контрол, на принципа на случайния избор. STEINEL
гарантира перфектна изработка и функции. Гаранцията е с продължителност
36месеца и започва от деня на покупката. Ние отстраняваме дефекти, причинени от грешки в производството или качеството на материала, ремонтирай-
109108
BG
Page 56

ки или заменяйки дефектните части, по наш избор. Гаранцията не важи за щети
3
5
ГАРАНЦИЯ
ОТ ПРОИЗВОДИТЕЛ
ГОДИНИ
ГАРАНЦИЯ
ОТ ПРОИЗВОДИТЕЛ
ГОДИНИ
по износващи се части, както и за щети и дефекти, получени в резултат на неправилна употреба или поддръжка. Последващи щети на чужди предмети са изключени от гаранцията.
Гаранцията е валидна само, ако неразглобеният уред бъде изпратен на съответния сервиз, добре опакован и придружен от кратко описание на дефекта,
касова бележка или фактура (дата на покупка и печат на търговец).
Ремонтен сервиз:
След изтичане на гаранцията или при дефекти, непокрити от гаранцията,
попитайте в найблизкия заводски сервиз за възможностите за ремонт.
12. Технически данни
Размери
(Ø×Д)
(В×Ш×Д)
Входящо напрежение 220-240 V, 50/60Hz
Мощност
• Режим на готовност
• Експлоатация
Осветителен елемент GU10-LED-осветителен елемент (макс. 9 W)
Сензорна технология Пасивен инфрачервен сензор
Диапазон на обхват
• Ъгъл на отчитане
• ъгъл на разтвор
Обхват макс. 10 м
Настройка на времето 8с - 35 мин (само Spot ONE/DUO Sensor)
Настройка на светлочувствителността
Вид защита IP44
Клас защита I
Температурен диапазон -20 - +40 °C
Честота Bluetooth 2,4-2,48GHz (само Spot ONE/DUO Sensor Connect)
Излъчваща мощност
Bluetooth
Spot ONE: Ø 97×175 мм
Spot DUO: 98×247×175 мм
около 0,5 W
около 0,5 W + LED-осветителен елемент
90°
90°
5 с - 60мин (само Spot ONE/DUO Sensor Connect)
2-1000 лукса (само Spot ONE/DUO Sensor)
2-2000 лукса (само Spot ONE/DUO Sensor Connect)
5dBM/3 mW (само Spot ONE/DUO Sensor Connect)
13. Проблеми при експлоатация
Проблем Причина Решение
LED-лампата не се включва ■ Задействал се е
Сензорната LED-лампа
не се включва
Сензорната LED-лампа
не се изключва
Сензорната LED-лампа
постоянно се включва/
изключва
Сензорната LED-лампа
се включва произволно
предпазител, не е
включен, прекъснат
кабел
■ Kъсо съединение
■ Осветителното тяло е
дефектно
■ При дневен режим,
настройката на
светлочувствителността е на нощен
режим
■ Прекъсвачът е
изключен
■ Предпазителят се е
задействал
■ Обхватът не е настроен
целево
■ Продължително
движение в обхвата
■ Животни се движат в
обхвата
■ Вятър движи дървета и
храсти в обхвата
■ Засичане на автомоби-
ли на пътя
■ Внезапна промяна в
температурата заради
променени климатични
условия (вятър, дъжд,
сняг) или течение от
вентилатори, отворени
прозорци
■ Сензорната LED-лампа
се клати (движи се)
напр. заради силен
вятър или дъжд
111110
■ Предпазителят да се
включи или замени,
шалтерът да се
включи; проводниците
да се проверят с уред
за напрежение
■ Да се проверят
връзките
■ Осветителният
елемент да се замени
■ Настройката да се
направи наново
■ Включване
■ Предпазителят да се
включи, замени,
евентуално да се
провери връзката
■ Да се регулира
отново
■ Да се провери
обхвата и евентуално
да се регулира
отново, съответно да
се покрие
■ Сензорът да се насочи
по-нагоре; зоната да
се промени
■ Обхватът да се
промени
■ Обхватът да се
промени
■ Обхватът да се
промени, мястото на
монтаж да се измести
■ Сензорната LED-лам-
па да се монтира на
стабилна основа
BG
Page 57

CN
!
1. 关于本文件
– 请仔细阅读并妥善保管!
– 版权所有。未经我方批准禁止翻印或摘录。
– 保留技术更改的权利。
符号说明
危险警示!
!
文件中文本位置的指示说明。
...
2. 一般安全性提示
在设备上进行任何作业前均须断开电源!
• 安装时连接电线须断电。因此,首先切断电源,并使用试电笔检查是否存在电压。
• 在安装LED灯时涉及到对电源电压的操作。因此必须根据国内通用的安装规定和
连接条件执行专业工作。
• 只能使用原装备件。
• 维修作业只能由专业工厂进行。
• 不适合与卤素灯具一起使用。
3. Spot ONE Sensor/Spot DUO Sensor
Spot ONE Sensor Connect/Spot DUO Sensor Connect
按规定使用
– 用于在室内和室外壁式安装的 LED 灯。
Spot ONE Sensor/Spot DUO Sensor
– 传感器 LED 灯包含一个红外线运动检测器。
Spot ONE Sensor Connect/Spot DUO Sensor Connect
– 传感器 LED 灯包含一个红外线运动检测器,该检测器仅可通过蓝牙进行调整。
Spot ONE供货范围(图 3.1)
– 灯
– 3 个螺栓
– 3 个膨胀螺钉
– 3个调整垫片
Spot ONE供货范围(图 3.2)
– 灯
– 四个螺栓
– 四个膨胀螺钉
– 四个调整垫片
Spot ONE产品尺寸 (图 3.3)
Spot DUO产品尺寸 (图 3.4)
产品概览(图 3.5)
A 墙壁支架
B 连接端子
C 止动螺栓
D 灯底座
E 灯具外壳
F 亮度设置(仅 Spot ONE/DUO Sensor)
G 时间设置(仅 Spot ONE/DUO Sensor)
Spot ONE/DUO Sensor感应范围(图 3.6-3.8)
4. 电气连接
电路图(图 4.1)
电源线由 3 芯电缆组成:
L = 火线(通常为黑色、褐色或灰色)
N = 零线(通常为蓝色)
PE = 地线(绿色/黄色)
不确定时,必须使用试电笔识别导线;然后重新切断电源。火线(L)、零线(N)
和地线(PE)连接在接线端子上。
重要:
一旦混淆接头,将导致设备内或者保险丝盒内发生短路。这种情况下,必须再次识
112 113
别各条导线,并重新连接。在电源线上可以安装用于开关的电源开关。
CN
Page 58

联网
“ ” 用于灯的联网。最多可并联 10 盏这种类型的灯。(图 4.1)
5. 安装
• 检查所有构件是否受损。
• 损坏时禁止使用产品。
• 安装灯具时必须注意将其无振动地固定。
• 在考虑有效距离和探测到运动的情况下选择合适的装配地点。
将设备沿走动方向一侧安装且无障碍物(例如树木、墙等)遮挡感应视野时,移动
感应效果最佳。
安装步骤
• 切断供电。(图 4.1)
• 松开止动螺栓和墙壁支架上的灯具外壳。(图 5.1)
• 松开插接端子并拿下墙壁支架上的灯具外壳。(图 5.2)
• 标记钻孔。(图 5.3)
• 钻孔并插入销子。(图 5.4)
• 暗装(图 5.5)
• 带限位支架的明线安装(图 5.6)
• 固定墙壁支架上的保险胶带并装上插接端子。(图 5.7)
• 连接接线电缆。(图 5.8)
• 多盏灯联网时拆出固定接片。(图 5.8)
• 将灯具外壳插到墙壁支架上 (图 5.9)
• 旋入止动螺栓 (图 5.9)
• 接通电源。(图 5.9)
• 进行设置 ➜“6. 功能“
6. 功能
Spot ONE Sensor/Spot DUO Sensor
出厂设置
– 亮度设置: 1000 Lux
– 时间设置: 8秒钟
设置感应范围以及在日光下进行功能测试时调节器须处于 。
时间设置(图 6.2 G)
灯具的所需照明时长可在约 8 秒到 35 分钟之间进行无级调节。如果在该时间结束前
感应到任何移动,计时器均会重新启动。
– 调节器 + = 约 35 分钟
– 调节器 – = 约 8 秒
提示:
每次关闭灯后,新的移动感应会中断约 1 秒钟。该时间结束后,感应灯仅在感应到
移动时亮起。
Spot DUO Sensor Connect
交付状态:
两个灯头已联网,始终同时接通和关闭。
如需单独运行两个灯头,必须移除端子之间的连接(
Spot ONE Sensor Connect/Spot DUO Sensor Connect
出厂设置
– 亮度设置: 2000 Lux
– 时间设置: 5秒钟
Smart Remote App
智能手机和平板电脑必须从 AppStore 下载 STEINEL Smart Remote App 才能对灯具
进行配置。需要一个具备蓝牙功能的智能手机或平板电脑。
Android iOS
1 和 2)。
亮度设置 (图 6.2 F)
灯具所需的响应阈值可在2至1000 Lux之间进行无级调节。
– 设置调节器调到
– 设置调节器调到
= 日光运行(与亮度无关)
= 夜间运行(大约 2 Lux)
114 115
CN
Page 59

以下功能可通过 Smart Remote App 调整:
3
5
厂商
质保
年
厂商
质保
年
– 时间设置
– 亮度设置
– 接通和关闭时间
– 自动/手动情景控制
– 联网
– 分组图
– 组和灯的命名
提示:
每次关闭灯后,新的移动感应会中断约 1 秒钟。该时间结束后,感应灯仅在感应到
移动时亮起。
Spot Connect 有内置的时钟用于基于时间的开关。每次通过蓝牙连接到 Smart
Remote App 时会与智能手机的时钟进行自动同步。
为确保正确地运行,在灯具断电后必须与 Smart Remote App 建立连接。内置时钟
与智能手机的时钟进行同步更新。
7. 灯的转动范围/灯具更换
灯的转动范围(图 7.1/7.2)
灯具更换
• 松开并拉出灯具外壳上的防尘盖。(图 7.3)
• 松开并拔出灯具。(图 7.4)
• 装上新灯具并拧紧。(图 7.5)
• 装上防尘盖并拧紧。(图 7.6)
重要:
仅使用最大 9 W 的 GU10 LED 灯具。
提示:
• 更换灯泡时,请确保密封圈和密封表层没有脏污或损坏。
9. 废弃物处理
电子设备、附件和包装应根据环保要求寻求再次利用。
不得将电子设备投入生活垃圾!
仅针对欧盟国家:
根据适用的关于废旧电子设备和电子元件欧盟指令及其在国家法律中的实施规则,
必须将无法再使用的电子设备分开收集在一起并根据环保要求寻求再次利用。
10. 一致性声明
STEINEL Vertrieb GmbH 特此声明,Spot ONE Sensor Connect/Spot DUO Sensor
Connect 的无线电设备类型符合指令 2014/53/EU。在以下网址中提供欧盟一致性声
明的完整文本: www.steinel.de
11. 制造商担保
该产品系施特朗-精心研发制造,已根据有效规定通过了功能性及安全性审核,并进
行了抽样检查。施特朗保证其产品性能和功能完好。质保期为 36个月,自消费者购
买日起计算。材料或生产错误导致的产品缺陷由我方负责排除,质保服务 (通过维修
或是更换缺陷部件解决) 将由我方决定。耗材损失,未正确使用及保养造成的损失和
损坏未包含在质保范围内。外购物品上持续出现的发展性损坏亦不属于质保服务范
畴。 仅当将未拆卸的设备连同简要的故障说明,收款凭据或发票 (购买日期和零售商
盖章) 包装好并寄至相关维修点时,才能享受质保。
维修服务:
质保期已经到期或缺陷不在质保范围内的产品,可向就近服务站咨询维修事宜。
8. 维护
产品免维护。
照明灯脏污时,可使用一块湿布 (不含清洁剂)进行清洁。
117116
CN
Page 60

12. 技术参数
尺寸
(Ø × T)
(高 × 宽 × 深)
输入电压 220-240 V,50/60Hz
功率
• 待命
• 使用
灯具 GU10 LED 灯具(最大 9 W)
传感器技术 被动式红外线
感应范围
• 感应角度
• 视场角
有效距离 最大 10 m
时间设置 8 s - 35 min(仅 Spot ONE/DUO Sensor)
亮度设置 2-1000 Lux(仅 Spot ONE/DUO Sensor)
保护形式 IP44
防护等级 I
温度范围 -20 - +40 °C
蓝牙频率 2.4 - 2.48 GHz(仅Spot ONE/DUO Sensor Connect)
蓝牙发射功率 5dBM/3 mW(仅Spot ONE/DUO Sensor Connect)
Spot ONE:Ø 97 × 175 mm
Spot DUO:98 × 247 × 175 mm
约 0.5 W
约 0.5 W + LED-灯具
90°
90°
5 s - 60 min(仅 Spot ONE/DUO Sensor Connect)
2-2000 Lux(仅 Spot ONE/DUO Sensor Connect)
13. 运行故障
故障 原因 补救办法
LED灯未接通电源
LED感应灯无法打开
LED感应灯无法关闭
LED感应灯
始终打开/关闭
LED感应灯
意外打开
■ 保险丝已熔断,
未接通,断线
■ 短路
■ 灯具损坏
■ 在白天模式下,亮度设
置处于夜晚模式
■ 电源开关关闭
■ 保险丝已熔断
■ 感应范围未进行针对性
设置
■ 在感应范围内持续运行 ■ 检查范围,必要时重新
■ 动物在感应范围内移动 ■ 传感器向上转动;
■ 风吹动感应范围内的树
枝和灌木丛
■ 感应到街道上的汽车
■ 由于天气(风、雨、
雪)或通风设备排出的
废气、敞开的窗户引起
温度突然发生变化
■ 由于狂风或暴雨引起的
LED感应灯的晃动(摆动)
■ 接通、更换保险丝;
接通电源开关;通过电
压检测器检查电线
■ 检查接口
■ 更换灯具
■ 重新设置
■ 打开
■ 接通、更换保险丝,
必要时检查接头
■ 重新调节
调整或覆盖
更换区域
■ 调整范围
■ 调整范围
■ 改变范围,更改安装地
点
■ 将LED感应灯安装在牢
固的底座上。
119118
CN
 Loading...