

Page 1
STEINEL Vertrieb GmbH
RUS CN BG LV LT EST HR SLO RO PL SK CZ H TR GR N FIN DK S P E I NL F GB D
DE
Dieselstraße 80-84
33442 Herzebrock-Clarholz
Tel: +49/5245/448-188
www.steinel.de
AT
Steinel Austria GmbH
Hirschstettner Strasse 19/A/2/2
AT-1220 Wien
Tel.: +43/1/2023470
info@steinel.at
CH
PUAG AG
Oberebenestrasse 51
CH-5620 Bremgarten
Tel.: +41/56/6488888
info@puag.ch
GB
STEINEL U.K. LTD.
25, Manasty Road · Axis Park
Orton Southgate
GB-Peterborough Cambs PE2 6UP
Tel.: +44/1733/366-700
steinel@steinel.co.uk
IE
Socket Tool Company Ltd
Unit 714 Northwest Business Park
Kilshane Drive · Ballycoolin · Dublin 15
Tel.: 00353 1 8809120
info@sockettool.ie
FR
STEINEL FRANCE SAS
ACTICENTRE - CRT 2
Rue des Famards - Bât. M - Lot 3
FR-59818 Lesquin Cedex
Tél.: +33/3/20 30 34 00
info@steinelfrance.com
NL
Van Spijk B.V.
Postbus 2
5688 HP OIRSCHOT
De Scheper 402
5688 HP OIRSCHOT
Tel. +31 499 571810
info@vanspijk.nl
www.vanspijk.nl
BE
VSA Belgium
Hagelberg 29
BE-2440 Geel
Tel.: +32/14/256050
info@vsabelgium.be
www.vsabelgium.be
LU
Minusines S.A.
8, rue de Hogenberg
LU-1022 Luxembourg
Tél. : (00 352) 49 58 58 1
www.minusines.lu
ES
SAET-94 S.L.
C/ Trepadella, n° 10
Pol. Ind. Castellbisbal Sud
ES-08755 Castellbisbal (Barcelona)
Tel.: +34/93/772 28 49
saet94@saet94.com
IT
STEINEL Italia S.r.l.
Largo Donegani 2
IT-20121 Milano
Tel.: +39/02/96457231
info@steinel.it
www.steinel.it
F.Fonseca S.A.
PT
Rua Joao Francisco do Casal, 87/89
Esgueira, 3800-266 Aveiro - Portugal
Tel. +351 234 303 900
ffonseca@ffonseca.com
www.ffonseca.com
KARL H STRÖM AB
SE
Verktygsvägen 4
SE-553 02 Jönköping
Tel.: +46 36 550 33 00
info@khs.se
www.khs.se
Roliba A/S
DK
Hvidkærvej 52
DK-5250 Odense SV
Tel.: +45 6593 0357
www.roliba.dk
Oy Hedtec Ab
FI
Lauttasaarentie 50
FI-00200 Helsinki
Puh.: +358/207 638 000
valaistus@hedtec.fi
www.hedtec.fi/valaistus
Vilan AS
NO
Olaf Helsetsvei 8
NO-0694 Oslo
Tel.: +47/22725000
post@vilan.no
www.vilan.no
PANOS Lingonis + Sons O. E.
GR
Aristofanous 8 Str.
GR-10554 Athens
Tel.: +30/210/3212021
lygonis@otenet.gr
SAOS Teknoloji Elektrik Sanayi ve
TR
Ticaret Limited Şirketi
Halil Rıfat Paşa mahallesi
Yüzerhavuz Sokak
PERPA Ticaret Merkezi A Blok
Kat 5 No.313
Şişli / İSTANBUL
Tel.: +90 212 220 09 20
iletisim@saosteknoloji.com.tr
www.saosteknoloji.com.tr
NECO SK, A.S.
CZ
Ružová ul. 111 · SK-01901 Ilava
Tel.: +421/42/4 45 67 10
neco@neco.sk
www.neco.sk
„LŁ“ Spółka z ograniczoną
PL
odpowiedzialnością sp.k.
Byków, ul. Wrocławska 43
PL-55-095 Mirków
Tel.: +48 71 3980818
handlowy@langelukaszuk.pl
www.langelukaszuk.pl
DINOCOOP Kft
HU
Radvány u. 24
HU-1118 Budapest
Tel.: +36/1/3193064
dinocoop@dinocoop.hu
KVARCAS
LT
Neries krantine 32
LT-48463, Kaunas
Tel.: +370/37/408030
info@kvarcas.lt
Fortronic AS
EE
Tööstuse tee 10,
EE-61715, Tõrvandi,
Ülenurme vald, Tartumaa
Tel.: +372/7/475208
info@fortronic.ee
www.fortronic.ee
ELEKTRO – PROJEKT PLUS D.O.O.
SI
Suha pri Predosljah 12
SI-4000 Kranj
PE GRENC 2
4220 Škofja Loka
Tel.: 00386-4-2521645
GSM: 00386-40-856555
info@elektroprojektplus.si
www.priporocam.si
NECO SK, A.S.
SK
Ružová ul. 111
SK-01901 Ilava
Tel.: +421/42/4 45 67 10
neco@neco.sk
www.neco.sk
Steinel Distribution SRL
RO
505400 Rasnov, jud. Brasov
Str. Campului, nr.1
FSR Hala Scularie Birourile 4-7
Tel.: +40(0)268 53 00 00
www.steinel.ro
Daljinsko upravljanje d.o.o.
HR
Bedricha Smetane 10
HR-10000 Zagreb
t/ 00385 1 388 66 77
daljinsko-upravljanje@inet.hr
www.daljinsko-upravljanje.hr
Ambergs SIA
LV
Brīvības gatve 195-16
LV-1039 Rīga
Tel.: 00371 67550740
www.ambergs.lv
ТАШЕВ-ГАЛВИНГ ООД
BG
Бул. Климент Охридски № 68
1756 София, България
Тел.: +359 2 700 45 45 4
info@tashev-galving.com
www.tashev-galving.com
REAL.Electro
RU
109029, Москва
ул. Средняя
Калитниковская, д.26/27
Tel:+7(495) 230 31 32
info@steinel-russland.ru
www.steinel-russland.ru
STEINEL China
CN
Rm. 25A Huadu Mansion
No. 828-838 Zhangyang Road
200122 Shanghai, PR China
Tel: +86 21 5820 4486
Fax: +86 21 5820 4212
www.steinel.cn
info@steinel.cn
DEGBFRNLITESPTSEDKFINOGRTRHUCZSKPLROSIHREELTLVRUBGCN
XLED home 2 SL
XLED home 2 XL SL
Information
XLED home 2 SL
XLED home 2 XL SL
11005903105/2018_MTechnische Änderungen vorbehalten. / Subject to technical modification without notice.
Page 2
3
R 112
180°
3.5
148
161
3.6
A
C
B
3.7
Master Slave
L E EL`N L N
L
N
Slave
EL N
L
N
I
O
4
5.1
5.3
5.5
5.4
1.
2.
5.3
5.2
...
3.1
DE . . . . . 5
GB . . . . .8
FR . . . .10
NL . . . .12
IT . . . . .14
ES . . . .16
PT . . . .18
SE . . . .20
DK . . . .22
FI . . . . .24
NO . . . .26
GR . . . .28
TR . . . .30
HU . . . .32
CZ . . . . 34
SK . . . . 36
PL . . . .38
RO . . . .40
SI . . . . .42
HR . . . .44
EE . . . .46
LT . . . . 48
LV . . . .50
RU . . . .52
BG . . . .54
CN . . . .56
Textteil beachten!
Follow written instructions!
Suivre les instructions ci-après !
Instructies opvolgen!
Seguire attentamente le istruzioni!
¡Obsérvese la información textual!
Siga as instruções escritas
Följ den skriftliga montageinstruktionen.
Følg de skriftlige instruktioner!
Huomioi tekstiosa!
Se tekstdelen!
Τηρείτε γραπτές οδηγίες!
Yazılı talimatlara uyunuz!
A szöveges utasításokat tartsa meg!
Dodržujte písemné pokyny!
Dodržiavajte písomné informácie!
Postępować zgodnie zinstrukcją!
Respectai instruciunile următoare!
Upoštevajte besedilo!
Pridržavajte se uputa!
Järgige tekstiosa!
Atsižvelgti į rašytines instrukcijas!
Pievērsiet uzmanību teksta daļai!
Соблюдать текстовую инструкцию!
Прочетете инструкциите!
遵守文字说明要求!
3.2
3.3
3.4
R 112
R 116
R 134 (XL)
180
180°
180°
145 (XL)
127
199 (XL)
181
– 2 –
– 3 –
Page 3
DE
!
!
5.6
Ø 6
5.7
5.8
5.9
5.10
L
E
N
5.11
5.12
5.13
I
O
L`
DE
DE
1. Zu diesem Dokument
Bitte sorgfältig lesen und aufbewahren!
– Urheberrechtlich geschützt. Nachdruck, auch
auszugsweise, nur mit unserer Genehmigung.
– Änderungen, die dem technischen Fortschritt
dienen, vorbehalten.
Symbolerklärung
Warnung vor Gefahren!
Verweis auf Textstellen im Dokument.
...
2. Allgemeine Sicherheitshinweise
Vor allen Arbeiten am Gerät
die Spannungszufuhr unterbrechen!
• Bei der Installation dieser Geräte handelt es sich
um eine Arbeit an der Netzspannung; sie muss
daher fachgerecht nach den länderspezifischen
Installationsvorschriften und Anschlussbedingun-
gen durchgeführt werden (z.B DE-VDE 0100,
AT-ÖVE/ÖNORM E 8001-1, CH-SEV 1000).
• Die Leuchte ist so zu positionieren, dass längeres in die Leuchte starren in einem geringeren
Abstand als 0,3m nicht zu erwarten ist.
• Das Strahlergehäuse erwärmt sich während des
Betriebes. Die Ausrichtung des LED-Panels nur
durchführen, wenn dieses abgekühlt ist. Nicht
aus kurzer Distanz oder einen längeren Zeitraum
(> 5 min) in die LED-Leuchte blicken. Dies kann
zu einer Schädigung der Netzhaut führen.
• Montieren Sie das Gerät nicht auf leicht entflammbaren Oberflächen.
3. XLED home 2 SL /
einsetzen. Die höchst eziente LED-Technologie
sorgt in Verbindung mit der opalen Scheibe für
flächiges Licht.
Ausführungen
– XLED home 2 SL
– XLED home 2 XL SL
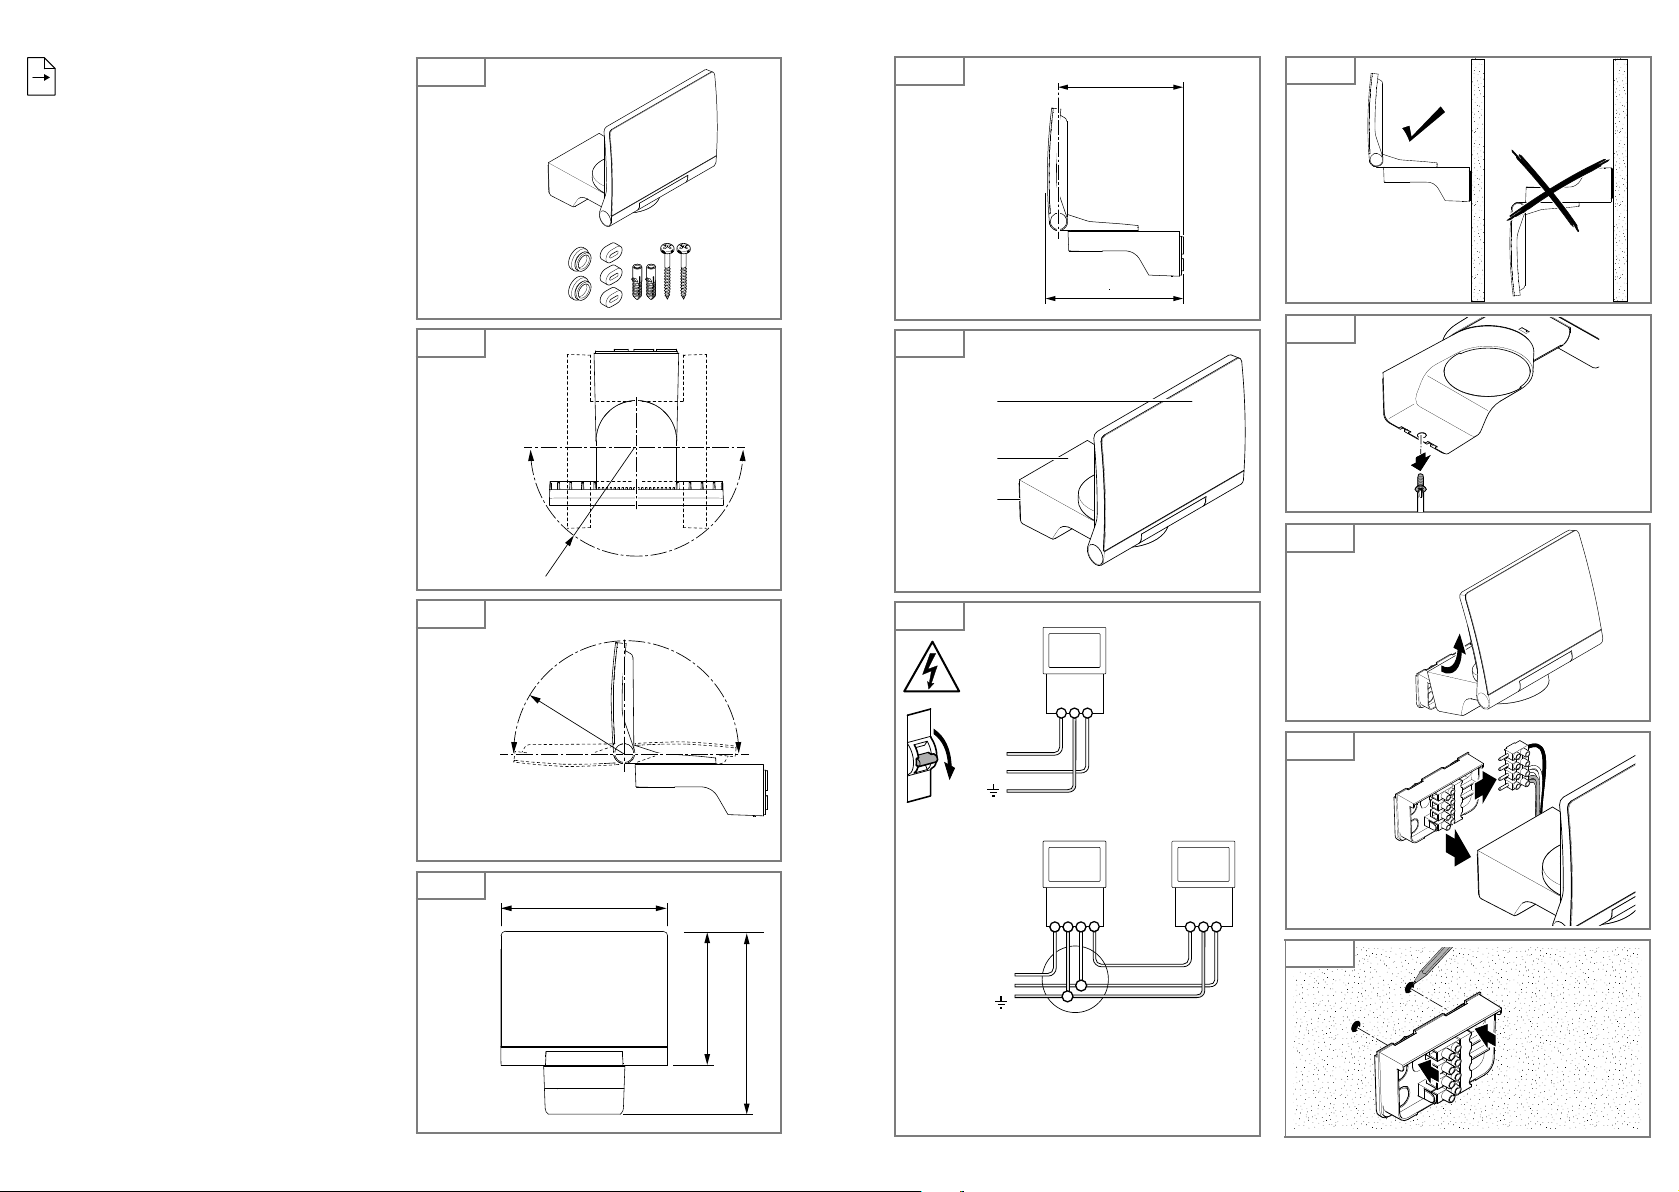
Lieferumfang (Abb. 3.1)
Schwenkbereich Strahlerkopf (Abb. 3.2/3.3)
Produktmaße (Abb. 3.4/3.5)
Geräteübersicht (Abb. 3.6)
A LED-Panel
B Gehäuse
C Wandhalter
4. Elektrische Installation
Anschluss Netzzuleitung
Die Netzzuleitung besteht aus einem 3-adrigen
Kabel:
L = Phase (meistens schwarz, braun oder grau)
N = Neutralleiter (meistens blau)
PE = Schutzleiter (grün/gelb)
Im Zweifel müssen Sie die Kabel mit einem Spannungsprüfer identifizieren; anschließend wieder
spannungsfrei schalten. Phase (L) und Neutralleiter
(N) werden an der Lüsterklemme angeschlossen.
Der Schutzleiter kann mit Hilfe der Klemme (E)
durchgeschleift werden.
Wichtig: Ein Vertauschen der Anschlüsse führt im
Gerät oder Ihrem Sicherungskasten später zum
Kurzschluss. In diesem Fall müssen nochmals die
einzelnen Kabel identifiziert und neu verbunden
werden.
Die Lichtquelle dieser Leuchte ist nicht ersetzbar;
falls die Lichtquelle ersetzt werden muss (z.B. am
Ende Ihrer Lebensdauer), ist die komplette Leuchte
zu ersetzen.
XLED home 2 XL SL
Bestimmungsgemäßer Gebrauch
– LED-Strahler zur Wandmontage im Außen-
bereich geeignet.
– Frei schwenkbares LED Panel.
– Als Einzelstrahler oder vernetzt mit der Master-
Version erhältlich.
Mit dem frei schwenkbaren Panel lässt sich der
Strahler im privaten Bereich zur Haus- und Grundstücksbeleuchtung oder im gewerblichen Bereich
z.B. zur Beleuchtung des Firmengeländes perfekt
5. Montage
• Alle Bauteile auf Beschädigungen prüfen.
• Bei Schäden das Produkt nicht in Betrieb
nehmen.
• Ausrichtung des Strahlers (Abb. 5.1)
– 4 –
– 5 –
Page 4
DE
5
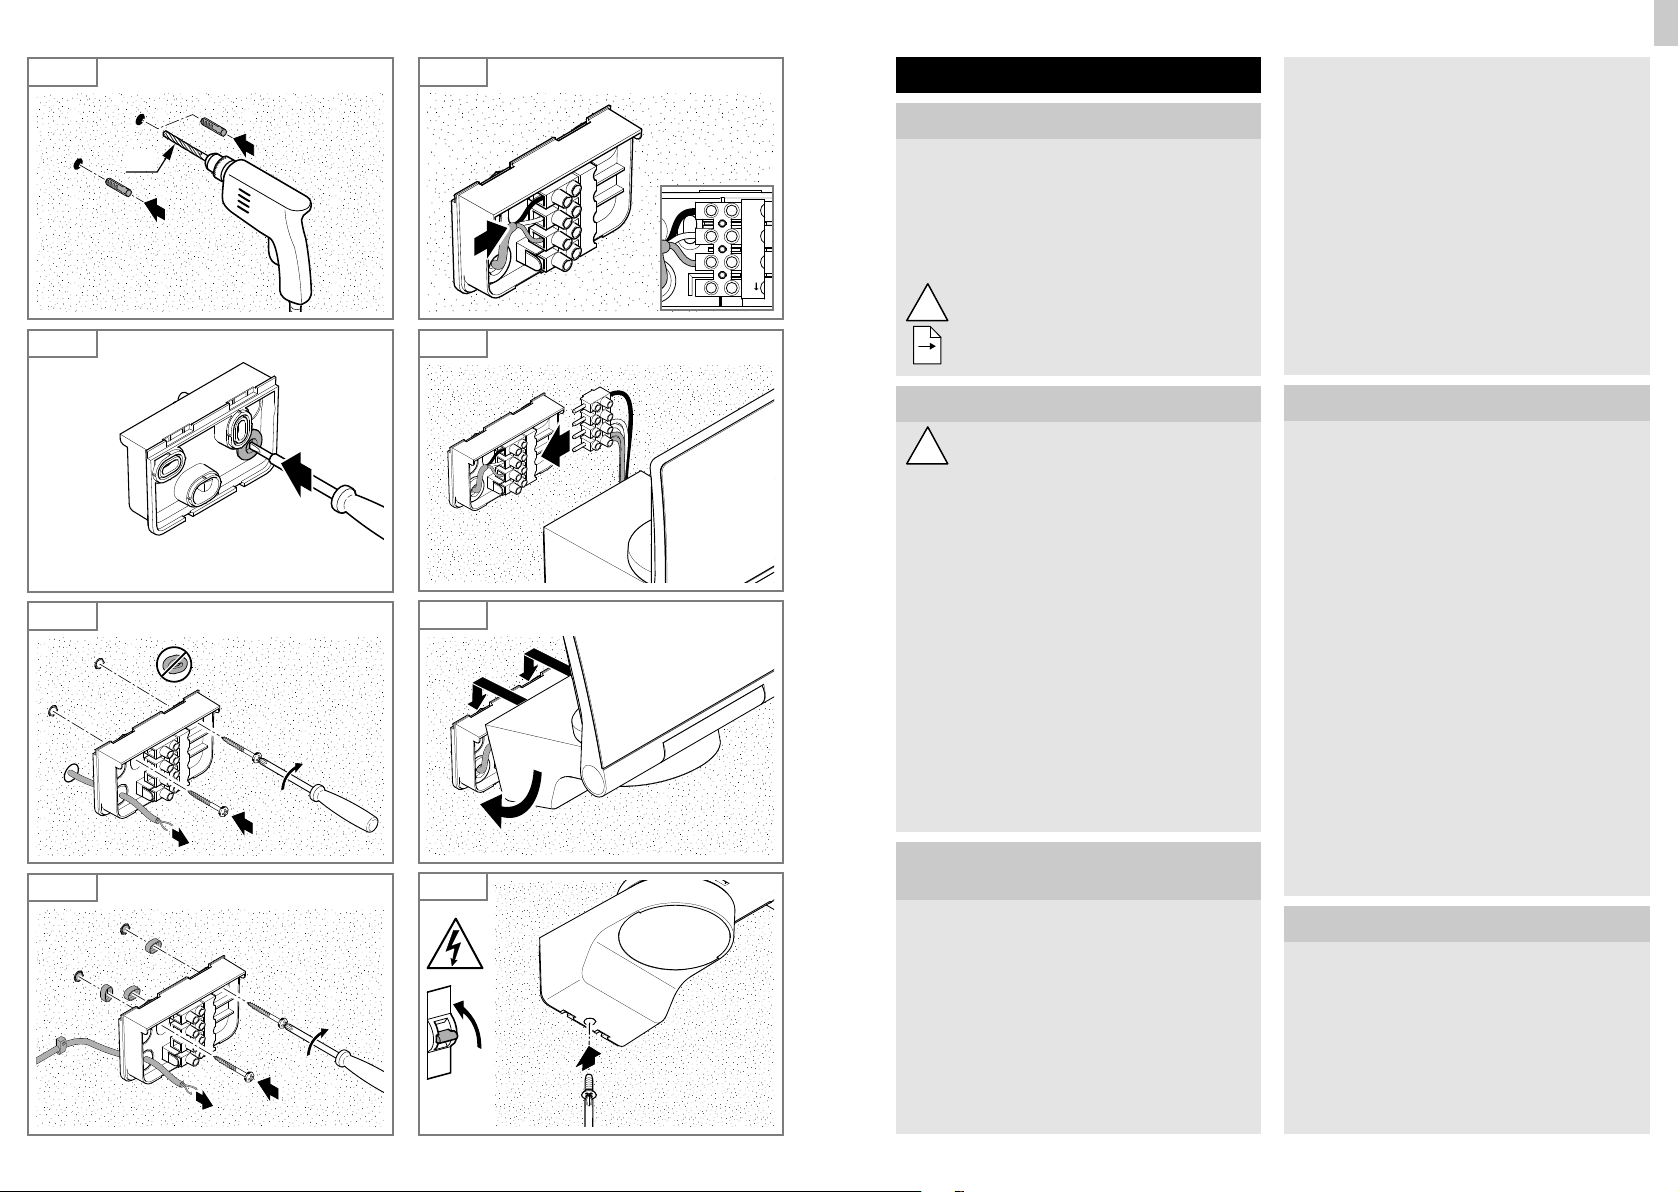
Montageschritte
• Stromversorgung abschalten. (Abb. 3.7)
• Sicherungsschrauben lösen. (Abb. 5.2)
• Gehäuse (B) vom Wandhalter (C) lösen.
(Abb. 5.3)
• Steckklemme (Male) vom Wandhalter trennen.
(Abb. 5.4)
• Bohrlöcher anzeichnen. (Abb. 5.5)
• Löcher bohren und Dübel einsetzen (Abb. 5.6)
• Dichtstopfen einsetzen. (Abb. 5.7)
– Zuleitung Unterputz (Abb. 5.8)
– Zuleitung Aufputz mit Abstandhaltern
(Abb. 5.9)
• Anschlusskabel anschließen. (Abb. 5.10)
• Steckklemme verbinden. (Abb. 5.11)
• Gehäuse auf Wandhalter aufstecken. (Abb. 5.12)
• Sicherungsschrauben einschrauben. (Abb. 5.13)
• Stromversorgung einschalten. (Abb. 5.13)
6. Herstellergarantie
Herstellergarantie der STEINEL Vertrieb GmbH,
Dieselstraße 80-84, 33442 Herzebrock-Clarholz
Wir beglückwünschen Sie zum Kauf Ihres
STEINEL-Produkts, das höchste Qualitätsansprüche erfüllt. Aus diesem Grund leisten wir als
Hersteller Ihnen als Endkunde gerne eine unentgeltliche Garantie gemäß den nachstehenden
Bedingungen: Wir leisten Garantie durch kostenlose Behebung der Mängel (nach unserer Wahl:
Reparatur, Austausch ggf. durch ein Nachfolgemodell oder Rückerstattung des Kaufpreises), die
innerhalb der Garantiezeit auf einem Material- oder
Herstellungsfehler beruhen. Die Garantiezeit für
Ihr erworbenes STEINEL-Produkt beträgt 3 Jahre
(bei Produkten der XLED home-Serie 5 Jahre)
und beginnt mit dem Kaufdatum Ihres Produktes.
Diese Herstellergarantie lässt gesetzliche Gewährleistungsansprüche, die Ihnen als Verbraucher
gegenüber dem Verkäufer nach geltendem Recht
einschließlich besonderer Schutzbestimmungen
für Verbraucher zustehen können, unberührt. Die
hier beschriebenen Leistungen gelten zusätzlich zu
den gesetzlichen Gewährleistungsansprüchen und
beschränken oder ersetzen diese nicht.
• bei einem gebrauchsbedingten oder sonstigen
natürlichen Verschleiß von Produktteilen oder
Mängeln am STEINEL-Produkt, die auf gebrauchsbedingtem oder sonstigem natürlichem
Verschleiß zurückzuführen sind,
• bei nicht bestimmungs- oder unsachgemäßem
Gebrauch des Produkts oder Missachtung der
Bedienungshinweise,
• wenn An- und Umbauten bzw. sonstige Modifikationen an dem Produkt eigenmächtig vorgenommen wurden oder Mängel auf die Verwendung
von Zubehör-, Ergänzungs- oder Ersatzteilen
zurückzuführen sind, die keine STEINELOriginalteile sind,
• wenn Wartung und Pflege der Produkte nicht entsprechend der Bedienungsanleitung erfolgt sind,
• wenn Anbau und Installation nicht gemäß den
Installationsvorschriften von STEINEL ausgeführt
wurden,
• bei Transportschäden oder -verlusten.
Die Garantie gilt für sämtliche STEINEL-Produkte,
die in Deutschland gekauft und verwendet werden.
Es gilt deutsches Recht unter Ausschluss des
Übereinkommens der Vereinten Nationen über Verträge über den internationalen Warenkauf (CISG).
Geltendmachung
Wenn Sie Ihr Produkt reklamieren wollen, senden
Sie es bitte vollständig und frachtfrei mit dem Original-Kaufbeleg, der die Angabe des Kauf datums
und der Produktbezeichnung enthalten muss, an
Ihren Händler oder direkt an uns, die STEINEL
Vertrieb GmbH –Reklamationsabteilung–,
Dieselstraße 80-84, 33442 Herzebrock-Clarholz.
Wir empfehlen Ihnen daher, Ihren Kaufbeleg bis
zum Ablauf der Garantiezeit sorgfältig aufzubewahren. Für Transportkosten und -risiken im Rahmen
der Rücksendung übernehmen wir keine Haftung.
HERSTELLER
GARANTIE
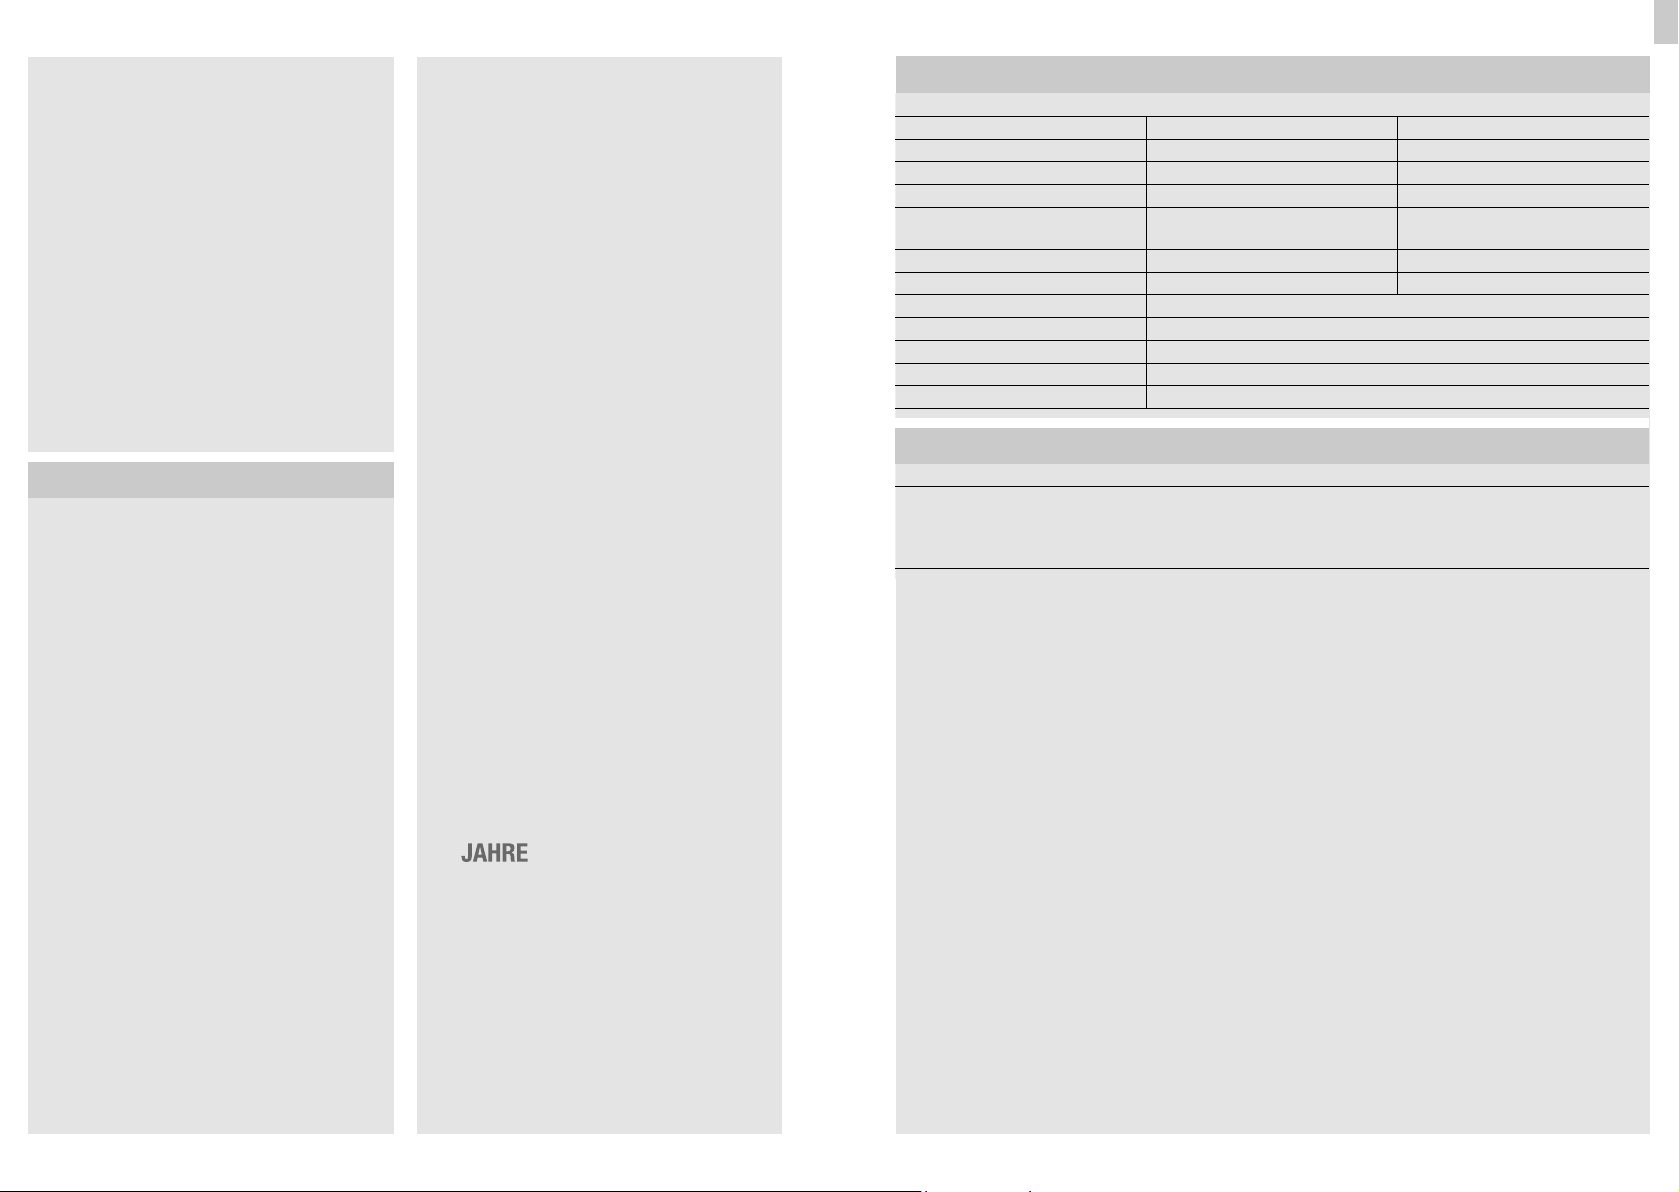
7. Technische Daten
XLEDHome 2 SL XLEDHome 2 XL SL
Abmessungen (H × B × T) 181 × 180 × 161 199 × 180 × 161
Leistung 14,8 W 20 W
Lichtstrom/Helligkeit 1184 lm 1608 lm
Gewicht 0,480 kg 0,525 kg
Projizierte Fläche Frontansicht 274,1 cm
Seitenansicht 86,3 cm
Netzstrom 75mA 97mA
Leistungsfaktor 0,84 0,86
Ezienz 80 lm/W
Lichtfarbe 4000 K (neutralweiß)
Farbwiedergabeindex Ra ≥ 80
Netzspannung 230-240 ~V / 50/60 Hz
IP/Schutzklasse IP44 / II
2
2
Frontansicht 307,2 cm
Seitenansicht 90,3 cm
8. Betriebsstörungen
Störung Ursache Abhilfe
LED-Strahler ohne Spannung
n Sicherung defekt, nicht
eingeschaltet, Leitung unterbrochen
n Kurzschluss
n neue Sicherung, Netzschalter
einschalten; Leitung mit
Spannungsprüfer überprüfen
n Anschlüsse überprüfen
2
2
Ausdrücklich ausgenommen von dieser Garantie
sind alle auswechselbaren Leuchtmittel. Darüber
hinaus ist die Garantie ausgeschlossen:
– 6 –
– 7 –
Page 5

GB
!
!
5
YEAR
1. About this document
Please read carefully and keep in a safe place.
– Under copyright. Reproduction either in whole or
in part only with our consent.
– Subject to change in the interest of technical
progress.
Symbols
Hazard warning!
Reference to other information in the
...
document.
2. General safety precautions
Disconnect the power supply before
attempting any work on the unit.
• Installing these units involves work on the mains
voltage supply; installation must therefore be
carried out professionally in accordance with
the applicable national wiring regulations and
electrical operating conditions (DE-VDE 0100,
AT-ÖVE/ÖNORM E 8001-1, CH-SEV 1000)
• The light must be positioned so that it is not
expected that anybody can stare into the light
for any prolonged period from a distance of less
than 0.3 m.
• The floodlight enclosure heats up when the light
is on. Only adjust the angle of the LED panel
once it has cooled down. Do not look into the
LED light at short range or for any prolonged
period (> 5 min). You could damage your retina.
• Do not install the light on normally flammable
surfaces.
3. XLED home 2 SL /
XLED home 2 XL SL
Proper use
– LED floodlight suitable for wall mounting
outdoors.
– Fully swivelling LED panel.
– Available as standalone floodlight or intercon-
nected with the master version.
With the fully swivelling panel, the floodlight can
be used at home to provide perfect illumination for
lighting up property, or commercially for lighting
up business premises. In conjunction with the opal
cover, this extremely ecient technology provides
wide-area lighting.
Models
– XLED home 2 SL
– XLED home 2 XL SL
Package contents (Fig. 3.1)
Floodlight adjustment range (Fig. 3.2 / 3.3)
Product dimensions (Fig. 3.4 / 3.5)
Product components (Fig. 3.6)
A LED panel
B Enclosure
C Wall mount
4. Electrical installation
Connecting the mains power supply lead
The supply lead consist of three wires:
L = phase conductor (usually black,
brown or grey)
N = neutral conductor (usually blue)
PE = protective-earth conductor (green/yellow)
If you are in any doubt, identify the conductors
using a voltage tester; then disconnect from the
power supply again. Connect the phase conductor
(L) and neutral conductor (N) to the terminal block.
The protective-earth conductor can be looped
through by means of terminal (E).
Important: Incorrectly wired connections will
produce a short circuit later on in the product or
your fuse box. In this case, you must identify the
individual conductors once again and reconnect
them. The light source of this luminaire cannot be
replaced. If the light source needs to be replaced
(e.g. at the end of its service life), the complete
luminaire must be replaced.
5. Mounting
• Check all components for damage.
• Do not use the product if it is damaged.
• Aiming the floodlight. (Fig. 5.1)
Mounting procedure
• Switch OFF power supply. (Fig. 3.7)
• Undo retaining screws. (Fig. 5.2)
• Detach enclosure (B) from wall mount (C).
(Fig. 5.3)
• Detach plug-in terminal (male) from wall mount.
(Fig. 5.4)
– 8 –
• Mark drill holes. (Fig. 5.5)
• Drill holes and insert wall plugs (Fig. 5.6)
• Fit sealing plug. (Fig. 5.7)
– Power supply lead, concealed (Fig. 5.8)
– Power supply lead, surface-mounted, with
spacers (Fig. 5.9)
• Connect conductors. (Fig. 5.10)
• Connect plug-in terminal. (Fig. 5.11)
• Fit enclosure onto wall mount. (Fig. 5.12)
• Screw in retaining screws. (Fig. 5.13)
• Switch ON power supply. (Fig. 5.13)
Further consequential damage to other objects
shall be excluded. Claims under the warranty will
only be accepted if the unit is sent fully assembled
and well-packed with a brief description of the fault,
a receipt or invoice (date of purchase and dealer's
stamp) to the appropriate Service Centre.
Service:
Our Customer Service Department will repair faults
not covered by warranty or after the warranty
period has expired. Please send the product
well-packed to your nearest Service Centre.
6. Manufacturer’s Warranty
This STEINEL product has been manufactured with
utmost care, tested for proper operation and safety
and then subjected to random sample inspection.
Steinel guarantees that it is in perfect condition
and proper working order. The warranty period is
5years and starts on the date of sale to the consumer. We will remedy defects caused by material
flaws or manufacturing faults. The warranty will be
met by repair or replacement of defective parts at
our own discretion. The warranty shall not cover
damage to wear parts, damage or defects caused
by improper treatment or maintenance.
MANUFACTURER'S
WARRANTY
7. Technical specifications
XLEDHome 2 SL XLEDHome 2 XL SL
Dimensions (H × W × D) 181 × 180 × 161 199 × 180 × 161
Output 14.8 W 20 W
Luminous flux / brightness 1184 lm 1608 lm
Weight 0.480 kg 0.525 kg
Area illuminated Front view 274.1 cm
Side view 86.3 cm
Mains current 75mA 97mA
Power factor 0.84 0.86
Eciency 80 lm/W
Colour temperature 4000 K (neutral white)
Colour rendering index Ra ≥ 80
Supply voltage 230-240 ~V / 50/60 Hz
IP / protection class IP44 / II
2
2
Front view 307.2 cm
Side view 90.3 cm
8. Troubleshooting
Malfunction Cause Remedy
Sensor-switched LED floodlight
without power
n Fuse faulty, not switched ON,
break in wiring
n Short circuit
– 9 –
n Replace fuse, turn ON mains
switch, check lead with
voltage tester
n Check connections
GB
2
2
Page 6

FR
!
!
5
ANS
1. À propos de ce document
Veuillez le lire attentivement et le conserver en
lieu sûr !
– Il est protégé par la loi sur les droits d'auteur.
Une réimpression même partielle n'est autorisée
qu'après notre accord préalable.
– Sous réserve de modifications techniques.
Explication des symboles
Attention danger !
Renvoi à des passages dans le
...
document.
2. Consignes de sécurité générales
Avant toute intervention sur l'appareil,
couper l'alimentation électrique !
• L'installation de ces appareils implique une
intervention sur le réseau électrique et doit donc
être eectuée correctement et conformément à
la norme NF C-15100. (DE-VDE 0100, AT-ÖVE/
ÖNORM E 8001-1, CH-SEV 1000)
• Positionner le projecteur de manière à ce que l'on
ne puisse pas s'attendre à ce que quelqu'un fixe
longtemps le luminaire à une distance de moins
de 0,3 m.
• Le boîtier chaue pendant le fonctionnement.
N'orienter le panneau LED que s'il a refroidi. Ne
pas regarder directement le luminaire LED allumé
d'une courte distance ou pendant un moment
prolongé (> 5 min). Cela pourrait endommager la
rétine.
• Ne pas monter l'appareil sur des surfaces inflammables.
3. XLED home 2 SL /
XLED home 2 XL SL
Utilisation conforme aux prescriptions
– Projecteur LED idéal pour le montage mural à
l'extérieur.
– Panneau LED complètement orientable.
– Disponible sous forme de projecteur isolé ou mis
en réseau avec la version maître.
Avec son panneau complètement orientable, il est
possible d'utiliser le projecteur dans une propriété
privée pour éclairer une maison ou un jardin ou dans
le domaine professionnel, par ex. pour éclairer le site
d'une entreprise. Combinée avec le diuseur opalescent, la technologie LED extrêmement ecace
garantit un éclairage des grands espaces extérieurs.
Modèles
– XLED home 2 SL
– XLED home 2 XL SL
Contenu de la livraison (fig. 3.1)
Orientabilité de la tête du projecteur (fig. 3.2/3.3)
Dimensions du produit (fig. 3.4/3.5)
Vue d'ensemble de l'appareil (fig. 3.6)
A Panneau LED
B Boîtier
C Support mural
4. Installation électrique
Branchement du câble d'alimentation secteur
Le câble secteur est composé d'un câble à 3
conducteurs :
L = phase (généralement noir, marron ou gris)
N = neutre (généralement bleu)
PE = conducteur de terre (vert/jaune)
En cas de doute, il faut identifier les câbles avec un
testeur de tension, puis les remettre hors tension. La
phase (L) et le neutre (N) sont branchés au domino.
Il est possible de boucler le conducteur de terre en
utilisant le domino (E).
Important : Une inversion des branchements
entraînera plus tard un court-circuit dans l'appareil
ou dans le boîtier à fusibles. Dans ce cas, il faut
à nouveau identifier les câbles et les raccorder en
conséquence.
Il n'est pas possible de remplacer la source lumineuse de ce luminaire. S'il fallait la remplacer (par
ex. si elle est brûlée), il faut remplacer le luminaire en
entier.
5. Montage
• Contrôler l'absence de dommages sur toutes les
pièces.
• Ne pas mettre le produit en service en cas de
dommage.
• Orientation du projecteur. (Fig. 5.1)
Étapes de montage
• Couper l'alimentation en courant. (Fig. 3.7)
• Desserrer les vis de blocage. (Fig. 5.2)
– 10 –
• Enlever le boîtier (B) du support mural (C).
(Fig. 5.3)
• Retirer le domino (mâle) du support mural.
(Fig. 5.4)
• Marquer l'emplacement des trous. (Fig. 5.5)
• Percer les trous, puis introduire les chevilles
(Fig. 5.6)
• Mettre le caoutchouc d'étanchéité. (Fig. 5.7)
– Câble d'alimentation encastré (Fig. 5.8)
– Câble d'alimentation en saillie avec pièces
d'écartement (Fig. 5.9)
• Brancher les câbles de raccordement. (Fig. 5.10)
• Raccorder le domino. (Fig. 5.11)
• Emboîter le boîtier sur le support mural.
(Fig. 5.12)
• Serrer les vis de blocage. (Fig. 5.13)
• Mettre l'appareil sous tension. (Fig. 5.13)
6. Garantie du fabricant
Ce produit STEINEL a été fabriqué avec le plus
grand soin. Son fonctionnement et sa sécurité ont
été contrôlés suivant des procédures fiables et il a
été soumis à un contrôle final par sondage. STEINEL
garantit un état et un fonctionnement irréprochables.
La durée de garantie est de 5 ans et débute au jour
de la vente au consommateur. Nous remédions
aux défauts provenant d'un vice de matière ou
de construction. La garantie sera assurée à notre
discrétion par réparation ou échange des pièces
défectueuses.
La garantie ne s'applique ni aux pièces d'usure, ni
aux dommages et défauts dus à une utilisation ou
maintenance incorrecte. Les dommages consécutifs
causés à d’autres objets sont exclus de la garantie. La garantie ne s'applique que si l’appareil non
démonté est retourné à la station de service aprèsvente la plus proche, dans un emballage adéquat,
accompagné d'une brève description du défaut et
d'un ticket de caisse ou d'une facture portant la
date d'achat et le cachet du vendeur.
Service après-vente :
Le service après-vente de notre usine eectue également les réparations non couvertes par la garantie
ou survenant après l'expiration de celle-ci. Veuillez
envoyer le produit correctement emballé à la station
de service après-vente la plus proche.
DE GARANTIE
FABRICANT
7. Caractéristiques techniques
XLEDHome 2 SL XLEDHome 2 XL SL
Dimensions (H × l × P) 181 × 180 × 161 199 × 180 × 161
Puissance 14,8 W 20 W
Flux lumineux/Luminosité 1184 lm 1608 lm
Poids 0,480 kg 0,525 kg
Surface éclairée Vue de face 274,1 cm
Vue latérale 86,3 cm
Courant du secteur 75 mA 97 mA
Facteur de puissance 0,84 0,86
Ecacité 80 lm/W
Couleur de la lumière 4000 K (blanc neutre)
Indice de rendu des couleurs IRC ≥ 80
Tension du réseau 230-240 ~V / 50/60 Hz
IP/Classe IP44 / II
2
2
Vue de face 307,2 cm
Vue latérale 90,3 cm
8. Dysfonctionnements
Problème Cause Solution
Projecteur LED sans tension
n Fusible défectueux, appareil
hors circuit, câble coupé
n Court-circuit
– 11 –
n Changer le fusible défectueux,
mettre l'interrupteur en circuit,
vérifier le câble à l'aide d'un
testeur de tension
n Vérifier le branchement
FR
2
2
Page 7
NL
!
!
5
1. Over deze handleiding
Zorgvuldig doorlezen en bewaren a.u.b.!
– Rechten uit het auteursrecht voorbehouden.
Vermenigvuldiging, ook van delen van deze
handleiding, is alleen met onze toestemming
geoorloofd.
– Wijzigingen in het kader van de technische voor-
uitgang voorbehouden.
Toelichting van de symbolen
Waarschuwing voor gevaar!
Verwijzing naar tekstpassages in het
...
document.
2. Algemene veiligheidsvoorschriften
Voor alle werkzaamheden aan het
apparaat dient de spanningstoevoer te
worden onderbroken!
• Bij het installeren van deze apparaten werkt u
met netspanning. De installatie moet daarom
vakkundig volgens de geldende installatievoorschriften en aansluitingsvoorwaarden worden
uitgevoerd (DE-VDE 0100,
AT-ÖVE/ÖNORM E 8001-1, CH-SEV 1000).
• De lamp moet zo worden afgesteld, dat het
langdurig in de lamp kijken op een afstand van
minder dan 0,3 m nagenoeg onmogelijk is.
• De behuizing van de lamp warmt op tijdens het
gebruik. Verander de positie van het led-paneel
alleen als die helemaal is afgekoeld. Niet van
dichtbij of gedurende langere tijd (> 5 min.) in de
led-lamp kijken. Dit kan tot beschadiging van het
netvlies leiden.
• Monteer de lamp niet op licht ontvlambare
oppervlakken.
3. XLED home 2 SL /
XLED home 2 XL SL
Gebruik volgens de voorschriften
– Led-spot geschikt voor wandmontage buiten.
– Vrij draaibaar led-paneel.
– Verkrijgbaar als losse spot of gekoppeld met de
master-versie.
Door het vrij draaibare paneel kan de spot worden
gebruikt voor de verlichting van huis en tuin van
particulieren en kan bij commercieel gebruik bijv.
het bedrijfsterrein perfect worden verlicht. De uiterst
eciënte led-technologie zorgt in combinatie met
de opale kap voor licht op een groot oppervlak.
Uitvoeringen
– XLED home 2 SL
– XLED home 2 XL SL
Bij de levering inbegrepen (afb. 3.1)
Draaibereik spotkop (afb. 3.2/3.3)
Productafmetingen (afb. 3.4/3.5)
Overzicht lamp (afb. 3.6)
A Led-paneel
B Behuizing
C Wandhouder
4. Elektrische installatie
Aansluiting stroomtoevoer
De stroomtoevoer bestaat uit een 3-polige kabel:
L = fase (meestal zwart, bruin of grijs)
N = nuldraad (meestal blauw)
PE = aarde (groen/geel)
In geval van twijfel moeten de draden met een
spanningstester worden geïdentificeerd; vervolgens
weer spanningsvrij maken. De fase (L) en nuldraad
(N) worden op het kroonsteentje aangesloten. De
aardedraad kan met behulp van de klem (E) worden door verbonden.
Belangrijk: Verwisseling van de aansluitingen
kan in het apparaat of in uw zekeringenkast tot
kortsluiting leiden. In dit geval moeten de afzonderlijke kabels nogmaals geïdentificeerd en opnieuw
verbonden worden.
De lichtbron van deze lamp kan niet worden vervangen. Mocht het noodzakelijk worden om die te
vervangen (bijv. aan het einde van zijn levensduur),
dan moet de complete lamp worden vervangen.
5. Montage
• Alle onderdelen controleren op beschadigingen.
• Neem het product bij beschadigingen niet in
gebruik.
• Afstelling van de sensorspot (afb. 5.1).
Montagestappen
• Stroomtoevoer uitschakelen (afb. 3.7).
• Borgschroeven losdraaien (afb. 5.2).
• Behuizing (B) van de wandhouder (C) nemen
(afb. 5.3).
• Steekklem (male) van de wandhouder scheiden
(afb. 5.4).
• Boorgaten aftekenen (afb. 5.5).
• Gaten boren en pluggen plaatsen (afb. 5.6).
• Afdichtstopje plaatsen (afb. 5.7).
– Kabels in de muur (afb. 5.8)
– Kabels op de muur met afstandhouders
(afb. 5.9)
• Aansluitkabel aansluiten (afb. 5.10).
• Steekklem verbinden (afb. 5.11).
• Behuizing op wandhouder steken (afb. 5.12).
• Borgschroeven inschroeven (afb. 5.13).
• Stroomtoevoer inschakelen (afb. 5.13).
6. Fabrieksgarantie
Dit STEINEL-product is met grote zorgvuldigheid
gefabriceerd, getest op goede werking en veiligheid
volgens de geldende voorschriften, en vervolgens
steekproefsgewijs gecontroleerd. Steinel verleent
garantie op de storingvrije werking. De garantieter-
mijn bedraagt 5 jaar en gaat in op de datum van
aanschaf door de klant. Wij verhelpen gebreken
die berusten op materiaal- of productiefouten. De
garantie bestaat uit reparatie of vernieuwen van
de defecte onderdelen, door ons te beoordelen.
Garantie vervalt bij schade aan onderdelen, die aan
slijtage onderhevig zijn en bij schade of gebreken, die door ondeskundig gebruik of onderhoud
ontstaan. Schade aan andere voorwerpen is
uitgesloten van garantie. De garantie wordt alleen
verleend wanneer het niet-gedemonteerde apparaat met korte storingsbeschrijving, kassabon of
rekening (koopdatum en winkelierstempel), goed
verpakt naar het desbetreende serviceadres wordt
gestuurd.
Service:
Na afloop van de garantietermijn of bij schade die
niet onder de garantie valt, kan er ook door ons
gerepareerd worden. Gelieve het product goed
verpakt naar het dichtstbijzijnde serviceadres te
sturen.
JAAR
FABRIEKS
GARANTIE
7. Technische gegevens
XLED Home 2 SL XLED Home 2 XL SL
Afmetingen (h/b/d) 181 × 180 × 161 199 × 180 × 161
Vermogen 14,8 W 20 W
Lichtstroom/lichtsterkte 1184 lm 1608 lm
Gewicht 0,480 kg 0,525 kg
Verlicht oppervlak voorkant 274,1 cm
zijaanzicht 86,3 cm
Netstroom 75mA 97mA
Vermogensfactor 0,84 0,86
Eciëntie 80 lm/W
Lichtkleur 4000 K (neutraal wit)
Index kleurweergave Ra ≥ 80
Netspanning 230-240 ~V / 50/60 Hz
IP/beschermingsklasse IP 44 / II
2
2
voorkant 307,2 cm
zijaanzicht 90,3 cm
8. Storingen
Storing Oorzaak Oplossing
Led-spot zonder netspanning
n Zekering defect, niet ingescha-
keld, kabel breuk
n Kortsluiting
n Nieuwe zekering, netschake-
laar inschakelen; kabel met
spanningzoeker controleren
n Aansluitingen controleren
NL
2
2
– 12 –
– 13 –
Page 8

IT
!
!
5
ANNI
1. Riguardo a questo documento
Si prega di leggerlo attentamente e di conservarlo!
– Tutelato dai diritti d'autore. La ristampa, anche
solo di estratti, è consentita solo previa nostra
approvazione.
– Con riserva di modifiche legate al progresso della
tecnica.
Spiegazione dei simboli
Avvertimento contro pericoli!
Rimando a passaggi nel documento.
...
2. Avvertenze generali relative alla
sicurezza
Prima di eettuare qualsiasi lavoro
sull'apparecchio, togliete sempre la
corrente!
• L'installazione di questi apparecchi richiede lavori
alla linea di alimentazione elettrica; per questo
motivo l'installazione deve essere eseguita
correttamente e in ottemperanza alle norme per
l'installazione vigenti nel relativo paese.
(DE-VDE 0100, AT-ÖVE/ÖNORM E 8001-1,
CH-SEV 1000)
• La lampada è da posizionare in modo tale che
le radiazioni della luce raggiungano una distanza
non inferiore a 3m.
• Durante il funzionamento l'involucro del proiettore diventa molto caldo: per cambiare l'orientamento del pannello LED aspettate sempre che si
sia rareddato. - Non guardate direttamente nella
lampada LED a breve distanza o per un periodo
prolungato (> 5 min). La retina si potrebbe danneggiare.
• Non montate l'apparecchio su superfici facilmente infiammabili.
3. XLED home 2 SL /
XLED home 2 XL SL
Utilizzo adeguato allo scopo
– Faro LED adatto per il montaggio in ambienti
esterni.
– Pannello LED orientabile.
– Disponibile come faro singolo o collegato in rete
con la versione Master.
Grazie al pannello orientabile il faro è perfetto sia
nel settore privato per illuminare casa e terreno
circostante, sia nel settore industriale, per es. per
l'illuminazione perimetrale della ditta. La tecnologia
LED altamente eciente unita al vetro opalino
assicurano l'illuminazione di tutta la superficie.
Varianti
– XLED home 2 SL
– XLED home 2 XL SL
Volume di fornitura (Fig. 3.1)
Area di rotazione testata del faro (Fig. 3.2/3.3)
Dimensioni dell'apparecchio (Fig. 3.4/3.5)
Panoramica degli apparecchi (Fig. 3.6)
A Pannello LED
B Involucro
C Supporto per il montaggio a muro
4. Installazione elettrica
Collegamento del cavo di alimentazione
Il cavo di collegamento alla rete ha 3 fili.
L = fase (di prevalenza nero, marrone o grigio)
N = filo neutro (nella maggior parte dei casi blu)
PE = conduttore di terra (verde/giallo)
In caso di dubbio occorre identificare il cavo con
un indicatore di tensione e poi disinserire nuovamente la tensione. Il filo di fase (L) e il filo neutro
(N) vengono collegati al morsetto isolante. Si può
eettuare una connessione passante del conduttore di terra con l'ausilio del morsetto (E).
Importante: Lo scambio di collegamenti causa un
corto circuito nell'apparecchio o nella sua valvoliera. In questo caso i singoli cavi devono essere
reidentificati e quindi collegati a nuovo.
La sorgente luminosa di questa lampada non è
sostituibile; in caso ciò fosse necessario, per es.
alla fine della sua durata utile, occorre cambiare
l'intera lampada.
5. Montaggio
• Controllare tutti i componenti per verificare se
presentano danneggiamenti.
• In caso di danni non mettere in funzione il
prodotto.
• Orientamento del faro a sensore. (Fig. 5.1)
Fasi di montaggio
• Staccare l'alimentazione di corrente (Fig. 3.7)
• Svitare le viti di sicurezza (Fig. 5.2)
• Staccare l'involucro (B) dal supporto per montaggio a muro (C). (Fig. 5.3)
• Staccare il morsetto a innesto (Male) dal supporto per montaggio a muro. (Fig. 5.4)
• Segnare i fori. (Fig. 5.5)
• Eettuare i fori e inserire i tasselli (Fig. 5.6)
• Inserire il tappo di tenuta. (Fig. 5.7)
– Conduttore sotto intonaco (Fig. 5.8)
– Conduttore sopra intonaco con distanziatori
(Fig. 5.9)
• Collegare il cavo di allacciamento. (Fig. 5.10)
• Collegare il morsetto a innesto. (Fig. 5.11)
• Infilare l'involucro sul supporto per montaggio a
muro. (Fig. 5.12)
• Inserire avvitando le viti di sicurezza. (Fig. 5.13)
• Attivare l'alimentazione di corrente. (Fig. 5.13)
6. Garanzia del produttore
Questo prodotto STEINEL è stato costruito con la
massima cura, con controlli di funzionamento e del
grado di sicurezza in conformità alle norme vigenti in
materia; vengono poi eettuati collaudi con prove a
campione. STEINEL si assume la garanzia di una fabbricazione ed un funzionamento perfetti. La garanzia
si estende a 5 anni ed inizia con il giorno di vendita
all'utente. Noi eliminiamo difetti riconducibili al materiale o alla fabbricazione; la prestazione della garanzia
consiste a nostra discrezione nella riparazione o nella
sostituzione dei pezzi difettosi.
Il diritto alla prestazione di garanzia viene a decadere
in caso di danni a pezzi soggetti ad usura nonché in
caso di danni o difetti che sono da ricondurre ad un
trattamento inadeguato o ad una cattiva manutenzione. Sono esclusi dal diritto di garanzia gli ulteriori danni conseguenti che si verificano su oggetti estranei.
La garanzia viene prestata solo se l'apparecchio viene
inviato non smontato, ben imballato e accompagnato
da una breve descrizione del difetto e dallo scontrino
o dalla fattura (in cui siano indicati la data dell'acquisto e il timbro del rivenditore), al centro di assistenza
competente.
Servizio di assistenza: Con periodo di garanzia
scaduto e nel caso di difetti che non danno diritto a
prestazioni di garanzia, il nostro centro di assistenza
può eseguire le relative riparazioni. Inviare il prodotto
ben imballato, al più vicino centro di assistenza.
DI GARANZIA
DEL PRODUTTORE
7. Dati tecnici
XLEDHome 2 SL XLEDHome 2 XL SL
Dimensioni (A × L × P) 181 × 180 × 161 199 × 180 × 161
Potenza 14,8 W 20 W
Flusso luminoso/luminosità 1184 lm 1608 lm
Peso 0,480 kg 0,525 kg
Superficie proiettata Vista frontale 274,1 cm
Vista laterale 86,3 cm
Corrente di rete 75 mA 97 mA
Fattore potenza 0,84 0,86
Ecienza 80 lm/W
Colore della luce 4000 K (bianco neutro)
Indice di resa cromatica Ra ≥ 80
Tensione di rete 230-240 ~V / 50/60 Hz
IP/Classe di protezione IP44 / II
2
2
Vista frontale 307,2 cm
Vista laterale 90,3 cm
8. Disturbi di funzionamento
Guasto Causa Rimedio
Faro LED senza tensione
n Fusibile guasto, interruttore
non acceso, cavo di alimentazione interrotto
n Corto circuito
n Sostituite il fusibile, accendete
l'interruttore, controllate la
linea di alimentazione con un
voltmetro
n Controllate gli allacciamenti
IT
2
2
– 14 –
– 15 –
Page 9

ES
!
!
5
1. Acerca de este documento
¡Leer detenidamente y conservar para futuras
consultas!
– Protegido por derechos de autor. Queda termi-
nantemente prohibida la reimpresión, ya sea total
o parcial, salvo con autorización expresa.
– Sujeto a modificaciones en función del progreso
técnico.
Explicación de los símbolos
¡Advertencia de peligros!
Referencia a partes de texto en el
documento.
...
2. Instrucciones generales de
seguridad
¡Antes de comenzar cualquier trabajo en
el aparato, interrúmpase la alimentación
de tensión!
• La instalación de estos aparatos supone un
trabajo en la red eléctrica; debe realizarse, por
tanto, profesionalmente, de acuerdo con las
normativas de instalación y condiciones de aco-
metida específicas de cada país. (DE-VDE 0100,
AT-ÖVE/ÖNORM E 8001-1, CH-SEV 1000)
• La lámpara se deberá posicionar de manera
que sea improbable que alguien dirija la mirada
durante mucho tiempo a una distancia de menos
de 0,3 m.
• La carcasa del foco se calienta durante el funcionamiento. Muévase el panel LED para orientarlo
solo una vez se haya enfriado. No dirija la mirada
a la lámpara LED ni de muy cerca ni durante un
periodo prolongado (> 5 min). Si lo hace, podrá
sufrir lesiones en la retina.
• No monte el aparato sobre superficies fácilmente
inflamables.
3. XLED home 2 SL /
XLED home 2 XL SL
Uso previsto
– Foco LED apto para el montaje en la pared en
zonas exteriores.
– Panel LED girable.
– Adquirible como foco suelto o interconectado
con la versión maestra.
Con su panel girable, el foco se puede emplear
perfectamente para alumbrar el ámbito privado de
la casa o la finca, o, en el ámbito industrial, p. ej.
para iluminar el recinto de una empresa. La ultraeficiente teconología LED garantiza, en combinación
con el cristal opalino, una luz radial.
Versiones
– XLED home 2 SL
– XLED home 2 XL SL
Volumen de suministro (fig. 3.1)
Rango de orientación cabezal de foco (fig. 3.2/3.3)
Dimensiones del producto (fig. 3.4/3.5)
Visión general del equipo (fig. 3.6)
A Panel LED
B Carcasa
C Soporte mural
4. Instalación eléctrica
Conexión del cable de alimentación de red
El cable de alimentación de red consta de un
conductor trifilar:
L = fase (generalmente negro, marrón o gris)
N = neutro (generalmente azul)
PE = toma de tierra (verde/amarillo)
En caso de dudas, hay que identificar los conductores con un comprobador de tensión; a continuación, volver a desconectar la tensión. La fase (L)
y el neutro (N) se conectan al borne. La toma de
tierra puede conectarse en paralelo mediante el
borne (E).
Importante: Si se efectúan mal las conexiones, se
producirá luego un cortocircuito en el aparato o en
la caja de fusibles. En tal caso, habrá que identificar una vez más cada uno de los conductores y
conectarlos de nuevo.
La bombilla de esta lámpara no se puede reemplazar, para reemplazar la bombilla (p. ej. al fin de su
vida útil), hay que cambiar toda la lámpara.
5. Montaje
• Comprobar que todos los componentes se
encuentran en perfecto estado.
• No se pongan en servicio en caso de estar
deteriorados.
• Orientación del foco. (fig. 5.1)
El montaje por pasos
• Desconectar la alimentación eléctrica. (fig. 3.7)
• Desenroscar los tornillos de fijación. (fig. 5.2)
• Separar la carcasa (B) del soporte mural (C).
(fig. 5.3)
• Separar el borne de enchufe (macho) del soporte
mural. (fig. 5.4)
• Marcar los orificios a taladrar. (fig. 5.5)
• Hacer los agujeros e introducir los tacos.
(fig. 5.6)
• Colocar el tapón obturador. (fig. 5.7)
– Cable empotrado. (fig. 5.8)
– Cable de superficie con distanciadores.
(fig. 5.9)
• Conectar los cables. (fig. 5.10)
• Conectar el borne. (fig. 5.11)
• Encajar la carcasa en el soporte mural. (fig. 5.12)
• Enroscar tornillos de retención. (fig. 5.13)
• Conectar la alimentación eléctrica. (fig. 5.13)
6. Garantía de fabricante
Este producto STEINEL ha sido elaborado con el
máximo esmero, habiendo pasado los controles de
funcionamiento y seguridad previstos por las dispo-
siciones vigentes, así como un control adicional de
muestreo al azar. Steinel garantiza el perfecto estado
y funcionamiento. El período de garantía es de 5
años, comenzando el día de la venta al consumidor.
Reparamos defectos de material o de fabricación,
la garantía se aplicará a base de la reparación o
el cambio de piezas defectuosas, según nuestro
criterio.
La prestación de garantía queda anulada para
daños producidos en piezas de desgaste y daños y
defectos originados por uso o mantenimiento inadecuados. Quedan excluidos de la garantía los daños
consecuenciales causados en objetos ajenos. La
garantía solo será efectiva enviando el aparato no
deshecho, con una breve descripción del fallo, tíquet
de caja o factura (con fecha de compra y sello del
comercio), bien empaquetado, al correspondiente
centro de servicio.
Servicio:
Una vez transcurrido el período de garantía o en
caso de defectos no cubiertos por la misma, las
reparaciones las lleva a cabo nuestro departamento
AÑOS
DE GARANTÍA
DE FABRICANTE
técnico. Rogamos envíen el producto bien empaquetado al centro
de servicio más próximo.
7. Datos técnicos
XLEDHome 2 SL XLEDHome 2 XL SL
Dimensiones (alt. × anch. × prof.) 181 × 180 × 161 199 × 180 × 161
Potencia 14,8 W 20 W
Flujo luminoso/luminosidad 1184 lm 1608 lm
Peso 0,480 kg 0,525 kg
Superficie proyectada Vista frontal 274,1 cm
Vista lateral 86,3 cm
Corriente eléctrica 75 mA 97 mA
Factor de potencia 0,84 0,86
Eficiencia 80 lm/W
Color de luz 4000 K (blanco neutro)
Índice de reproducción cromática Ra ≥ 80
Tensión de alimentación 230-240 ~V / 50/60 Hz
IP/Clase de protección IP 44 / II
2
2
Vista frontal 307,2 cm
Vista lateral 90,3 cm
8. Fallos de funcionamiento
Fallo Causa Remedio
Foco LED sin tensión
n Fusible defectuoso, interruptor
en OFF, línea interrumpida
n Cortocircuito
n Cambiar el fusible, poner el
interruptor en ON, comprobar
la línea de alimentación con un
comprobador de tensión
n Comprobar conexiones
ES
2
2
– 16 –
– 17 –
Page 10

PT
!
!
5
ANOS
1. Sobre este documento
Por favor, leia-o com atenção e guarde-o num
local seguro!
– Protegido pela lei sobre direitos de autor. Qual-
quer reimpressão, mesmo que apenas parcial,
só é permitida com o nosso consentimento.
– Reservado o direito a alterações que visem o
progresso técnico.
Explicação de símbolos
Aviso de perigo!
Remete para referências do texto no
...
documento.
2. Instruções de segurança gerais
Antes de executar qualquer trabalho no
aparelho, desligue-o da corrente de
alimentação!
• A instalação dos aparelhos consiste essencialmente em lidar com tensão de rede; por esse
motivo, terá de ser realizada de forma profissional segundo as respetivas prescrições de
instalação e condições de conexão habituais
nos diversos países (DE-VDE 0100,
AT-ÖVE/ÖNORM E 8001-1, CH-SEV 1000).
• O projetor deve ser posicionado de forma a que
não seja possível olhar diretamente para a luz a
uma distância inferior a 0,3 m.
• Em funcionamento, o corpo do projetor aquece.
Alinhe o painel de LEDs apenas quando este estiver frio. Não olhe diretamente para o candeeiro
LED a uma distância curta ou por um período
prolongado (> 5 minutos). O desrespeito a esta
indicação poderá causar lesões na retina.
• Não monte o aparelho em cima de superfícies
facilmente inflamáveis.
3. XLED home 2 SL /
XLED home 2 XL SL
Utilização prevista
– Projetores LED concebidos para montagem em
parede e no exterior.
– Painel de LEDs totalmente orientável.
– Disponível como projetor individual ou para
ligação em rede, com a versão Master.
O painel totalmente orientável permite iluminar na
perfeição quintais e terrenos, no âmbito doméstico,
ou a nível comercial/industrial, por ex. o terreno da
empresa. Em combinação com o vidro opalino, a
tecnologia de LEDs altamente eficiente proporciona
uma iluminação bastante ampla.
Versões
– XLED home 2 SL
– XLED home 2 XL SL
Itens fornecidos (fig. 3.1)
Margem de orientação da cabeça do projetor
(fig. 3.2/3.3)
Dimensões do produto (fig. 3.4/3.5)
Vista geral do aparelho (fig. 3.6)
A Painel de LEDs
B Corpo
C Suporte de fixação à parede
4. Instalação elétrica
Conexão do cabo proveniente da rede
O cabo proveniente da rede é formado por
3 condutores:
L = fase (geralmente preto, castanho ou cinzento)
N = neutro (geralmente azul)
PE = condutor terra (verde/amarelo)
Em caso de dúvida, procure identificar os cabos
com um busca-polos; a seguir, volte a desligar a
tensão. A fase (L) e o neutro (N) são conectados
na barra de junção. Por meio da barra de junção
(E), o condutor terra pode ser ligado em loop.
Importante: Se as ligações forem trocadas,
poderá ocorrer mais tarde um curto-circuito no
aparelho ou na caixa de fusíveis. Nesse caso, os
diversos fios terão de ser identificados e ligados de
novo. A fonte de luz deste candeeiro não pode ser
substituída, caso seja necessário substituí-la
(por ex. no fim da sua vida útil), terá de ser substituído todo o projetor.
5. Montagem
• Verifique todos os componentes para detetar
eventuais danos.
• Se detetar qualquer dano, não coloque o produto em funcionamento.
• Alinhamento do projetor (fig. 5.1)
Passos para montagem
• Desligue a fonte de alimentação elétrica.
(fig. 3.7)
• Desaperte os parafusos de fixação. (fig. 5.2)
– 18 –
• Liberte o corpo (B) do suporte de fixação à
parede (C). (fig. 5.3)
• Separe o terminal (macho) do suporte de fixação
à parede. (fig. 5.4)
• Marque os furos. (fig. 5.5)
• Faça os furos e coloque as buchas (fig. 5.6)
• Coloque o bujão vedante. (fig. 5.7)
– Cabo de alimentação para montagem
embutida (fig. 5.8)
– Cabo de alimentação para montagem de
superfície, com distanciadores (fig. 5.9)
• Ligue o cabo de conexão. (fig. 5.10)
• Ligue o terminal. (fig. 5.11)
• Encaixe a caixa no suporte de fixação à parede.
(fig. 5.12)
• Aparafuse os parafusos de fixação. (fig. 5.13)
• Ligue a fonte de alimentação elétrica. (fig. 5.13)
6. Garantia do fabricante
Este produto STEINEL foi fabricado com todo
o zelo e o seu funcionamento e segurança
verificados, de acordo com as normas em vigor,
e sujeito a um controlo por amostragem aleatória.
A STEINEL garante o bom estado e o bom funcio-
namento do aparelho. O prazo de garantia é de
cinco anos a contar da data de compra. Eliminamos falhas relacionadas com defeitos de material
ou de fabrico. A garantia inclui a reparação ou a
substituição das peças com defeito, de acordo
com o nosso critério, estando excluídas as peças
sujeitas a desgaste, os danos e as falhas originados por uma utilização ou manutenção incorreta.
Excluem-se igualmente os danos provocados
noutros objetos estranhos ao aparelho. Os serviços
previstos na garantia só serão prestados caso
o aparelho seja apresentado bem embalado no
respetivo serviço de assistência técnica, devidamente montado e acompanhado da fatura (data
da compra e carimbo do revendedor) e de uma
pequena descrição do problema.
Serviço de assistência:
Depois de expirado o prazo de garantia ou em
caso de falha não abrangida pela garantia, o nosso
serviço de assistência técnica encarregar-se-á da
reparação do seu aparelho. Basta enviar o produto
GARANTIA
DO FABRICANTE
bem acondicionado ao nosso
centro de assistência técnica mais
próximo de si.
7. Dados técnicos
XLEDHome 2 SL XLEDHome 2 XL SL
Dimensões (a × l × p) 181 × 180 × 161 199 × 180 × 161
Potência 14,8 W 20 W
Fluxo luminoso/luminosidade 1184 lm 1608 lm
Peso 0,480 kg 0,525 kg
Área iluminada Vista frontal 274,1 cm
Vista lateral 86,3 cm
Corrente elétrica 75mA 97mA
Fator de potência 0,84 0,86
Eficiência 80 lm/W
Cor da luz 4000 K (branco neutro)
Índice de reprodução de cores Ra ≥ 80
Tensão de rede 230-240 ~V / 50/60 Hz
IP/classe de proteção IP44 / II
2
2
Vista frontal 307,2 cm
Vista lateral 90,3 cm
8. Falhas de funcionamento
Falha Causa Solução
Projetor LED sem tensão
n Fusível queimado, não ligado,
ligação interrompida
n Curto-circuito
– 19 –
n Fusível novo, ligue o interrup-
tor de rede, verifique o
condutor com medidor de
tensão
n Verifique as conexões
PT
2
2
Page 11

SE
!
!
5
ÅRS
1. Om detta dokument
Läs noga igenom dokumentet och förvara det
väl!
– Upphovsrättsligt skyddat. Eftertryck, även delar
av texten, bara med vårt samtycke.
– Ändringar som görs pga den tekniska utveckling-
en, förbehålles.
Symbolförklaring
Varning för fara!
Hänvisning till textställen i dokumentet.
...
2. Allmänna säkerhetsanvisningar
Bryt spänningen före alla arbeten på
produkten!
• Vid installation av denna produkt handlar det om
arbeten på nätspänningen och därför måste arbetet genomföras professionellt enligt respektive
länders installationsföreskrifter och anslutnings-
krav. (DE-VDE 0100,
AT-ÖVE/ÖNORM E 8001-1, CH-SEV 1000)
• Strålkastaren bör placeras så, att det inte blir
möjligt att se in i strålkastaren under en längre tid
på ett kortare avstånd än 0,3 m.
• Strålkastarens huvud blir varmt under driften.
Rikta in LED-panelen sedan den svalnat. Utsätt
dig inte för LED-lampans sken på alltför nära håll
eller under en längre tid (> 5 min.). Det kan leda
till skador på näthinnan.
• Montera inte strålkastaren på lättantändliga
underlag.
3. XLED home 2 SL /
XLED home 2 XL SL
Användning
– LED-strålkastare avsedd för montage på vägg,
utomhus.
– Fritt svängbar LED-panel.
– Finns med eller utan rörelsevakt. Två eller fler
strålkastare kan kopplas samman.
Med den fritt vridbara panelen är strålkastaren
perfekt för såväl villor och privata fastigheter som
industri och andra oentliga byggnader. Den effektiva LED-teknologin ger i kombination med den
opala skivan ett bredstrålande ljus.
Utföranden
– XLED home 2 SL
– XLED home 2 XL SL
Innehåll (bild 3.1)
Lamphuvudets svängområde (bild 3.2/3.3)
Mått (bild 3.4/3.5)
Översikt produkt (bild 3.6)
A LED-strålkastarhuvud
B Armaturhus
C Väggfäste
4. Elektrisk installation
Nätanslutningens matarledning
Nätanslutningens matarledning består av en 3-ledarkabel:
L = Fas (oftast svart, brun eller grå)
N = Neutralledare (oftast blå)
PE = Skyddsledare (grön/gul)
Vid osäkerhet, måste kabeln identifieras med en
spänningskontroll; gör den därefter spänningsfri
igen. Fas (L) och neutralledare (N) ansluts till kopplingsplinten. Skyddsledaren kan vidarekopplas med
hjälp av plint (E).
Viktigt: En förväxling av anslutningarna leder till
kortslutning i armaturen eller i säkringsskåpet. I ett
sådant fall måste de enskilda kablarna identifieras
igen och anslutas på nytt.
Strålkastaren ljuskälla kan inte bytas ut; skulle det
bli tvunget att byta ut ljuskällan (t.ex. när den är
uttjänt), så måste hela strålkastaren bytas ut.
5. Montage
• Kontrollera samtliga delar med avseende på
skador.
• Är produkten skadad får den inte tas i bruk.
• Justering av strålkastaren. (bild 5.1)
Montage-ordning
• Bryt spänningen! (bild 3.7)
• Lossa skruvarna. (bild 5.2)
• Lossa armaturhuset (B) från vägghållaren (C).
(bild 5.3)
• Ta bort kopplingsplinten från vägghållaren.
(bild 5.4)
• Markera borrhålen. (bild 5.5)
• Borra hål och sätt i pluggar (bild 5.6)
• Sätt i gummitätningen. (bild 5.7)
– Kabel infällt montage (bild 5.8)
– Kabel utanpåliggande montage med
distanser (bild 5.9)
• Anslut nätkabeln. (bild 5.10)
• Anslut kopplingsplinten. (bild 5.11)
• Sätt fast armaturhuset på vägghållaren.
(bild 5.12)
• Skruva i låsskruven. (bild 5.13)
• Slå till spänningen. (bild 5.13)
6. Tillverkargaranti
Denna STEINEL-produkt är tillverkad med största
noggrannhet. Den är funktions- och säkerhetstestad enligt gällande föreskrifter och har därefter
genomgått en stickprovskontroll. Steinel garanterar
felfritt tillstånd och felfri funktion. Garantin gäller
5 år från inköpsdagen. Vi åtgärdar bristfälligheter
orsakade av material- eller tillverkningsfel. Garantin
uppfylls genom reparation eller utbyte av bristfälliga
delar efter vårt val. Garantin omfattar inte slitage
och skador orsakade av felaktigt hanterande eller
bristande underhåll och skötsel av produkten.
Följdskador på främmande föremål ersätts ej.
Garantin gäller endast då produkten, som inte får
vara demonterad, sändes väl förpackad med kort
beskrivning av felet och fakturakopia eller kvitto
(inköpsdatum och stämpel) till vår representant eller
lämnas till inköpsstället.
Service:
Efter garantins utgång eller vid fel som inte omfattas av garantin kan produkten repareras på vår
verkstad. Skicka produkten väl förpackad till nästa
serviceställe.
TILLVERKAR
GARANTI
7. Teknisk data
XLEDHome 2 SL XLEDHome 2 XL SL
Mått (H /B/ D) 181 × 180 × 161 199 × 180 × 161
Eekt 14,8 W 20 W
Ljusflöde 1184 lm 1608 lm
Vikt 0,480 kg 0,525 kg
Projekterad yta Framifrån 274,1 cm
Från sidan 86,3 cm
Strömförbrukning 75mA 97mA
Eektfaktor 0,84 0,86
Ljusutbyte 80 lm/W
Färgtemperatur 4000 K (neutral vit)
Färgåtergivningsindex Ra ≥ 80
Spänning 230-240 ~V / 50/60 Hz
Skyddsklass/isolationsklass IP44 / II
2
2
Framifrån 307,2 cm
Från sidan 90,3 cm
8. Driftstörningar
Störning Orsak Åtgärd
LED-strålkastare utan spänning
n Säkring defekt, inte påkopp-
lad, strömförsörjning avbruten
n Kortslutning
n Byt säkring, slå till spänningen;
testa med spänningsprovare
n Kontrollera anslutningarna
SE
2
2
– 20 –
– 21 –
Page 12

DK
!
!
5
ÅRS
GARANTI
1. Om dette dokument
Læs det omhyggeligt, og gem det!
– Ophavsretligt beskyttet. Eftertryk, også i uddrag,
kun med vores tilladelse.
– Vi forbeholder os ret til ændringer af hensyn til den
tekniske udvikling.
Symbolforklaring
Advarsel mod farer!
Henvisning til tekststeder i dokumentet.
...
2. Generelle sikkerhedsanvisninger
Afbryd spændingstilførslen, før der
arbejdes på enheden!
• Ved installationen af disse enheder arbejdes der
med netspænding. Dette arbejde skal udføres
fagligt korrekt efter de landespecifikke installationsforskrifter og tilslutningsbetingelser.
(DE-VDE 0100, AT-ÖVE/ÖNORM E 8001-1,
CH-SEV 1000)
• Lampen skal placeres således, at det ikke er
muligt at se direkte ind i lampen i længere tid på
en afstand, der er mindre end 0,3 m.
• Projektørens hus bliver varmt under brugen.
LED-panelet må først indstilles, når det er kølet
af. Se ikke ind i LED-lampen på kort afstand eller i
længere tid (> 5 min). Dette kan medføre beskadigelse af nethinden.
• Apparatet må ikke monteres på let brændbare
overflader.
3. XLED home 2 SL /
XLED home 2 XL SL
Korrekt anvendelse
– LED-projektør velegnet til udendørs vægmonte-
ring.
– Frit drejeligt LED-panel.
– Fås som enkeltprojektør eller i netværk med
master-version.
Med det frit drejelige panel er projektøren perfekt til
belysning både privat af hus og have og erhvervsmæssigt f.eks. af virksomhedens område. Den
yderst eektive LED-teknologi sørger med den
lysspredende skærm for dius belysning.
Udførelser
– XLED home 2 SL
– XLED home 2 XL SL
Leveringsomfang (fig. 3.1)
Svingområde for projektørens hoved (fig. 3.2/3.3)
Produktmål (fig. 3.4/3.5)
Oversigt over enheden (fig. 3.6)
A LED-panel
B Hus
C Vægholder
4. Elektrisk installation
Tilslutning af netledning
Nettilførslen består af en ledning med 3 ledere:
L = Fase (oftest sort, brun eller grå)
N = nulleder (oftest blå)
PE = jordledning (grøn/gul)
Hvis du er i tvivl, skal du identificere ledningerne med
en spændingstester og derefter afbryde spændingen
igen. Fase (L) og nulleder (N) tilsluttes kronemuen.
Jordledningen kan føres igennem vha. klemme (E).
Vigtigt: Ombytning af tilslutningerne fører senere til
kortslutning i enheden eller i sikringsboksen. Hvis
dette sker, skal de enkelte ledninger identificeres og
monteres igen.
Lyskilden i denne lampe kan ikke udskiftes. Hvis
lyskilden skal udskiftes (f.eks. når den ikke fungerer
længere), skal hele lampen udskiftes
5. Montering
• Kontrollér alle komponenter for beskadigelser.
• Er produktet beskadiget, må det ikke tages i brug.
• Justering af projektøren (fig. 5.1).
Monteringstrin
• Afbryd strømforsyningen (fig. 3.7)
• Løsn sikringsskruerne (fig. 5.2)
• Løsn huset (B) fra vægholderen (C) (fig. 5.3)
• Adskil stikklemmen (han) fra vægholderen
(fig. 5.4)
• Markér borehullerne (fig. 5.5)
• Bor huller, og sæt dyvler i (fig. 5.6)
• Sæt tætningspropper i (fig. 5.7)
– Skjult tilførselsledning (fig. 5.8)
– Synlig tilførselsledning med afstandsholdere
(fig. 5.9)
• Tilslut tilslutningskablet (fig. 5.10)
• Tilslut stikklemmen (fig. 5.11)
• Sæt huset på vægholderen (fig. 5.12)
• Skru sikringsskruerne i (fig. 5.13)
• Slå strømforsyningen til (fig. 5.13)
Service:
Når garantiperioden er udløbet, eller der opstår
mangler, der ikke er dækket af garantien, foretages
reparationer af vores fabriksservice. Send venligst
produktet velemballeret til nærmeste serviceafdeling.
6. Producentgaranti
Dette Steinel-produkt er fremstillet med største
omhu, funktions- og sikkerhedstestet iht. de gældende forskrifter samt gennemgået stikprøvekontrol.
Steinel garanterer for upåklagelig beskaenhed og
funktion. Garantien gælder 5 år fra den dag, apparatet er solgt til forbrugeren. Vi afhjælper mangler, der
skyldes materiale- eller fabrikationsfejl, og garantien
ydes i form af reparation eller udskiftning af defekte
dele efter vores valg. Der ydes ikke garanti ved
skader på sliddele, ej heller ved skader og mangler, der er opstået pga. ukorrekt behandling og
vedligeholdelse. Yderligere følgeskader på fremmede
genstande dækkes ikke. Garantien gælder kun, hvis
den ikke-adskilte enhed sammen med en beskrivelse af fejlen, kassebon eller faktura (købsdato
og forhandlerstempel) sendes velemballeret til den
pågældende serviceafdeling.
PRODUCENT
7. Tekniske data
XLEDHome 2 SL XLEDHome 2 XL SL
Mål (H/B/D) 181 × 180 × 161 199 × 180 × 161
Eekt 14,8 W 20 W
Lysstrøm/lysstyrke 1184 lm 1608 lm
Vægt 0,480 kg 0,525 kg
Projekteret areal Set forfra 274,1 cm
Set fra siden 86,3 cm
Netstrøm 75 mA 97 mA
Eektfaktor 0,84 0,86
Eektivitet 80 lm/W
Lysfarve 4000 K (neutral hvid)
Farvegengivelsesindeks Ra ≥ 80
Netspænding 230-240 ~V / 50/60 Hz
IP/beskyttelsesklasse IP44 / II
2
2
Set forfra 307,2 cm
Set fra siden 90,3 cm
8. Driftsforstyrrelser
Fejl Årsag Afhjælpning
LED-projektør får ingen
spænding
n Sikring defekt, ikke slået til,
ledning afbrudt
n Kortslutning
n Ny sikring, tænd netafbryder;
kontrollér ledning med
spændingstester
n Kontrollér tilslutninger
DK
2
2
– 22 –
– 23 –
Page 13

FI
!
!
5
VUODEN
1. Tämä asiakirja
Lue huolellisesti ja säilytä tulevaa tarvetta
varten!
– Tekijänoikeudellisesti suojattu. Jälkipainatus
(myös osittainen) sallittu vain, mikäli annamme
siihen luvan.
– Oikeudet teknistä kehitystä palveleviin muutoksiin
pidätetään.
Symbolit
Vaaroista ilmoittava varoitus!
Viite asiakirjan tekstin kohtiin.
...
2. Yleiset turvaohjeet
Katkaise virta, ennen kuin suoritat
laitteelle mitään toimenpiteitä!
• Laite liitetään verkkojännitteeseen. Asennus on
suoritettava asiantuntevasti. Voimassa olevia
sähköasennusmääräyksiä ja tuotteen asennusohjeita on noudatettava (SFS0100).
• Valaisin on sijoitettava siten, että sitä kohti ei
ole mahdollista katsoa pitkään alle 0,3metrin
etäisyydeltä.
• Valonheittimen runko lämpenee käytön aikana.
Kohdista LED-taulu vasta, kun se on jäähtynyt.
Älä katso LED-valoon liian läheltä tai liian kauan
(> 5 min). Verkkokalvo voi vaurioitua.
• Älä asenna laitetta herkästi syttyville pinnoille.
3. XLED home 2 SL /
XLED home 2 XL SL
Käyttötarkoituksen mukainen käyttö
– LED-valonheitin kiinnitetään seinään, ja se on
tarkoitettu käytettäväksi ulkona.
– Vapaasti kääntyvä LED-taulu.
– Voidaan käyttää yksittäisenä valonheittimenä tai
liittää master-valaisimeen.
Käännettävän taulun ansiosta valonheitintä voidaan
käyttää talon tai tontin tai yrityksissä esimerkiksi
yrityksen ympäristön valaisemiseen. Äärimmäisen
tehokas LED-teknologia opaaliin kupuun yhdistettynä mahdollistaa laaja-alaisen valaisun.
Mallit
– XLED home 2 SL
– XLED home 2 XL SL
Toimituslaajuus (kuva 3.1)
Taulun kääntyvyys (kuva 3.2/3.3)
Tuotteet mitat (kuva 3.4/3.5)
Laitteen yleiskuva (kuva 3.6)
A LED-taulu
B Runko
C Seinäkiinnike
4. Sähköasennus
Verkkojohdon liitäntä
Verkkojohtona käytetään 3-napaista kaapelia:
L = vaihe (useimmiten musta, ruskea tai harmaa)
N = nollajohdin (useimmiten sininen)
PE = suojamaajohdin (vihreä/keltainen)
Epäselvissä tapauksissa johtimet on tunnistettava
jännitteenkoettimella; katkaise sen jälkeen jälleen
virta. Vaihe (L) ja nollajohdin (N) liitetään kytkentäliittimeen. Suojamaajohdin voidaan liittää liittimen
(E) avulla.
Tärkeää: Liitäntöjen vaihtuminen keskenään johtaa
oikosulkuun laitteessa tai sulakekotelossa. Tässä
tapauksessa yksittäiset johtimet on tunnistettava ja
yhdistettävä uudelleen.
Tämän valaisimen valonlähdettä ei voi vaihtaa; koko
valaisin joudutaan vaihtamaan uuteen, jos valonlähde ei enää toimi (esim. sen käyttöiän päätyttyä).
5. Asennus
• Tarkista, että missään komponentissa ei ole
vaurioita.
• Älä ota tuotetta käyttöön, jos siinä on vikoja.
• Suuntaa valonheitin. (kuva 5.1)
Asennuksen vaiheet
• Katkaise virta. (kuva 3.7)
• Irrota kiinnitysruuvit. (kuva 5.2)
• Irrota runko (B) seinäkiinnitysosasta (C).
(kuva 5.3)
• Irrota jousiliitin seinäkiinnitysosasta. (kuva 5.4)
• Merkitse reiät. (kuva 5.5)
• Poraa reiät ja aseta tulpat (kuva 5.6)
• Aseta tiivistystulpat. (kuva 5.7)
• Johdon uppoasennus (kuva 5.8)
– Johdon pinta-asennus korotusholkeilla
(kuva 5.9)
• Liitä liitäntäkaapeli. (kuva 5.10)
• Yhdistä jousiliitin. (kuva 5.11)
• Liitä runko seinäkiinnitysosaan. (kuva 5.12)
• Kierrä kiinnitysruuvit kiinni. (kuva 5.13)
• Kytke virta päälle. (kuva 5.13)
6. Valmistajan takuu
Tämä STEINEL-tuote on valmistettu huolellisesti,
ja sen toiminta ja turvallisuus on testattu voimassa
olevien määräysten mukaisesti. Tuotantoa valvotaan
pistokokein. STEINEL myöntää takuun tuotteen
moitteettomalle toiminnalle ja rakenteelle. Takuuaika
on 5 vuotta ostopäivästä alkaen. Tänä aikana
STEINEL vastaa kaikista materiaali- ja valmistusvioista valintansa mukaan joko korjaamalla tai
vaihtamalla vialliset osat. Takuun piiriin eivät kuulu
kuluvat osat eivätkä vahingot, jotka ovat aiheutuneet väärästä huollosta tai käsittelystä tai laitteen
putoamisesta. Takuu ei koske laitteen muille esineille mahdollisesti aiheuttamia vahinkoja. Viallinen
laite toimitetaan yhdessä lyhyen virhekuvauksen ja
ostokuitin kanssa (ostopäivämäärä ja myyjäliikkeen
leima) hyvin pakattuna lähimpään huoltopisteeseen.
Takuu raukeaa, jos tuotetta on avattu enemmän
kuin tuotteen asentaminen vaatii.
Huolto:
Takuuajan jälkeen tai takuun piiriin kuulumattoman
vian ollessa kyseessä laite voidaan korjata huoltopalvelussamme. Huom! Ennen lähettämistä pyydä
korjauksesta hinta-arvio.
Pyydämme lähettämään tuotteen hyvin pakattuna
lähimpään huoltopisteeseen.
VALMISTAJAN
TAKUU
7. Tekniset tiedot
XLEDHome 2 SL XLEDHome 2 XL SL
Mitat (K×L×S) 181 × 180 × 161 199 × 180 × 161
Teho 14,8 W 20 W
Valovirta/kirkkaus 1184 lm 1608 lm
Paino 0,480 kg 0,525 kg
Projisoitu alue Kuva edestä 274,1 cm
Kuva sivulta 86,3 cm
Verkkovirta 75 mA 97 mA
Tehokerroin 0,84 0,86
Hyötysuhde 80 lm/W
Valon väri 4000 K (neutral white)
Värintoistoindeksi Ra ≥ 80
Verkkojännite 230-240 ~V / 50/60 Hz
IP/suojausluokka IP44 / II
2
2
Kuva edestä 307,2 cm
Kuva sivulta 90,3 cm
8. Käyttöhäiriöt
Häiriö Syy Häiriön poisto
LED-valonheitin ilman jännitettä
n viallinen sulake, ei kytketty
päälle, katkos johdossa
n oikosulku
n uusi sulake, kytke verkkokytkin
päälle, tarkista johto jännitteenkoettimella
n tarkasta liitännät
FI
2
2
– 24 –
– 25 –
Page 14

NO
!
!
5
ÅRS
1. Om dette dokumentet
Les dokumentet nøye og ta vare på det!
– Med opphavsrett. Ettertrykk, også i utdrag, kun
med vår tillatelse.
– Det tas forbehold om endringer som tjener
tekniske fremskritt.
Symbolforklaring
Advarsel om fare!
Henvisning til tekststeder i dokumentet.
...
2. Generelle sikkerhetsinstrukser
Koble fra strømtilførselen før du foretar
arbeider på apparatet!
• Under installasjon av dette apparatet kommer
man i kontakt med strømnettet, og arbeidet skal
derfor utføres av en fagkyndig iht. gjeldende nasjonale installasjonsforskrifter og tilkoblingskrav
(DE-VDE 0100, AT-ÖVE/ÖNORM E 8001-1,
CH-SEV 1000)
• Plasser lampen slik at det ikke er å forvente at
man vil stirre inn i lampen i en avstand på under
0,3m over lengre tid.
• Lyskasterboksen blir svært varm under drift. Vent
derfor med å vri på LED-panelet til etter at det er
avkjølt. Ikke se direkte på LED-lampen fra kort
avstand eller over lengre tid (> 5 min.). Dette kan
føre til skader på netthinnen.
• Apparatet må ikke monteres på lett antennelige
overflater.
3. XLED home 2 SL /
XLED home 2 XL SL
Forskriftsmessig bruk
– LED-lyskasteren er egnet til montering på vegg
utendørs.
– LED-panelet kan svinges fritt.
– Fås som enkelt lyskaster eller koblet sammen
med master-versjonen.
Med panelet som kan svinges fritt, er lyskasteren perfekt for belysning av private områder som
hus og hage, eller til industriell bruk som f.eks.
belysning av bedriftsområder. Sammen med den
opalhvite glassflaten sørger den ytterst eektive
LED-teknologien for lys over et stort område.
Modeller
– XLED home 2 SL
– XLED home 2 XL SL
Leveringsomfang (ill. 3.1)
Lyskasterhodets svingområde (ill. 3.2/3.3)
Produktmål (ill. 3.4/3.5)
Apparatoversikt (ill. 3.6)
A LED-panel
B Hus
C Veggbrakett
4. Elektrisk installasjon
Tilkobling av nettledningen
Nettledningen består av en 3-ledet kabel:
L = fase (som regel svart, brun eller grå)
N = fase (som regel blå)
PE = jordleder (grønn/gul)
I tvilstilfeller må kabelen kontrolleres med en spenningstester; deretter slås strømtilførselen av igjen.
Fase (L) og fase (N) kobles til kroneklemmen. Jordlederen kan viderekobles ved bruk av klemmen (E).
OBS: En forveksling av koblingene fører til kortslutning i apparatet eller i sikringsskapet. I så tilfelle
må de enkelte kablene identifiseres og kobles til på
nytt.
Lyskilden i denne lampen kan ikke skiftes ut. Dersom lyskilden skal erstattes (f.eks. mot slutten av
levetiden), må hele lampen skiftes ut.
5. Montering
• Kontroller alle komponenter for skader.
• Ikke ta produktet i bruk dersom det er skadet.
• Juster sensor-lyskasteren. (ill. 5.1)
Fremgangsmåte ved montering:
• Slå av strømtilførselen. (ill. 3.7)
• Løsne sikringsskruene. (ill. 5.2)
• Ta huset (B) av veggbraketten (C). (ill. 5.3)
• Ta innstikksklemmen (hann) ut av veggbraketten.
(ill. 5.4)
• Tegn borehull. (ill. 5.5)
• Bor hull og sett inn plugger. (ill. 5.6)
• Sett inn tetningsplugg. (ill. 5.7)
– Skjult ledningsføring.(ill. 5.8)
– Åpen ledningsføring med avstandsstykker.
(ill. 5.9)
• Koble til ledningen. (ill. 5.10)
• Sett inn innstikksklemmen. (ill. 5.11)
• Fest huset på veggholderen. (ill. 5.12)
• Skru inn sikringsskruene. (ill. 5.13)
• Slå på strømforsyningen. (ill. 5.13)
gjenstander) dekkes ikke av garantien. Garantien
ytes bare hvis hele apparatet pakkes godt inn og
sendes til importøren. Legg ved en kort beskrivelse
av feilen samt kvittering eller regning (kjøpsdato og
forhandlers stempel).
Service:
Etter garantitidens utløp, eller ved mangler som
ikke dekkes av garantien, kan vårt verksted foreta
reparasjoner. Pakk produktet godt inn og send det
til importøren.
6. Produsentgaranti
Dette STEINEL-produktet er fremstilt med største
nøyaktighet. Det er prøvet mht. funksjon og sikkerhet i henhold til gjeldende forskrifter, og deretter
underkastet en stikkprøvekontroll. Steinel gir full
garanti for feilfri kvalitet og funksjon. Garantifristen utgjør 5 år fra den dagen apparatet selges
til forbruker. Vi utbedrer mangler som kan føres
tilbake til fabrikasjonsfeil eller feil ved materialene.
Garantien ytes ved reparasjon eller ved at deler
med feil byttes ut. Garantien bortfaller ved skader
på slitasjedeler, eller ved skader eller mangler
som er oppstått som følge av ukyndig bruk eller
vedlikehold. Følgeskader ved bruk (skader på andre
PRODUSENT
GARANTI
7. Tekniske spesifikasjoner
XLEDHome 2 SL XLEDHome 2 XL SL
Mål (h/b/d) 181 × 180 × 161 199 × 180 × 161
Eekt 14,8 W 20 W
Lysstrøm/lysstyrke 1184 lm 1608 lm
Vekt 0,480 kg 0,525 kg
Projisert flate Sett forfra 274,1 cm
Sett fra siden 86,3 cm
Strømtilførsel 75 mA 97 mA
Eektfaktor 0,84 0,86
Eekt 80 lm/W
Lysfarge 4000 K (neutral white)
Fargegjengivelsesindeks Ra ≥ 80
Spenning 230-240 ~V / 50/60 Hz
IP/kapslingsklasse IP44 / II
2
2
Sett forfra 307,2 cm
Sett fra siden 90,3 cm
8. Driftsfeil
Feil Årsak Tiltak
LED-lyskasteren har ikke
spenning
n defekt sikring, ikke slått på,
ledningsbrudd
n kortslutning
n ny sikring, slå på
strømbryteren, kontroller
ledningen med
spenningstester
n kontroller koblingene
NO
2
2
– 26 –
– 27 –
Page 15

GR
!
!
5
ΕΤΗ
ΕΓΓΥΗΣΗ
1. Σχετικά ε αυτό το έγγραφο
Παρακαλούε διαβάζετε προσεκτικά και διαφυλάγετε!
– Κατοχυρωένη τεχνογνωσία. Ανατύπωση, ακόα
και αποσπασατικά, όνο κατόπιν δικής ας
έγκρισης.
– Με επιφύλαξη τροποποιήσεων, οι οποίες εξυπηρε-
τούν στην τεχνολογική πρόοδο.
Εξήγηση συβόλων
Προειδοποίηση ενώπιον κινδύνων!
Παραποπή σε σηεία κειένου στο
...
έγγραφο.
2. Γενικές υποδείξεις ασφάλειας
Πριν από την εκτέλεση κάθε εργασίας στη
συσκευή πρέπει να διακόπτετε την
τροφοδοσία ηλεκτρικής τάσης!
• Κατά την εγκατάσταση αυτών των συσκευών πρόκειται για εργασία στο δίκτυο ηλεκτρικής τάσης και
συνεπώς πρέπει να γίνει κατάλληλα και σύφωνα
ε τις εθνικές προδιαγραφές εγκατάστασης και
τους όρους σύνδεσης (DE-VDE 0100,
AT-ÖVE/ÖNORM E 8001-1, CH-SEV 1000).
• Ο λαπτήρας θα πρέπει να τοποθετηθεί έτσι, ώστε
να ην υπάρχει κίνδυνος άεσης οπτικής επαφής
εγάλης διάρκειας ε το λαπτήρα από απόσταση
ικρότερη από 0,3m.
• Το πλαίσιο του προβολέα θεραίνεται κατά τη
λειτουργία. Η ευθυγράιση του πάνελ LED
επιτρέπεται όνο εφόσον έχει κρυώσει η κεφαλή.
Μην κοιτάζετε από ικρή απόσταση ή για εγάλο
χρονικό διάστηα (> 5 λεπτά) στο λαπτήρα LED.
Κάτι τέτοιο ενδέχεται να προκαλέσει βλάβη στον
αφιβληστροειδή χιτώνα.
• Μη συναρολογείτε τη συσκευή πάνω σε εύφλεκτες επιφάνειες.
3. XLED home 2 SL /
XLED home 2 XL SL
Χρήση σύφωνα ε τους κανονισούς
– Ο προβολέας LED είναι κατάλληλος για εγκατάστα-
ση σε τοίχο σε εξωτερικούς χώρους.
– Πάνελ LED ελεύθερα περιστρεφόενο.
– ιαθέσιος ως εονωένος προβολέας ή δικτυω-
ένος ε την παραλλαγή Master.
Με το ελεύθερα περιστρεφόενο πάνελ είναι εφικτή
η άψογη χρήση του προβολέα στον ιδιωτικό τοέα για
το φωτισό οικιών και οικοπέδων ή στον επαγγελατικό τοέα π.χ. για το φωτισό εταιρικών εγκαταστάσεων. Η τεχνολογία LED ε έγιστη αποδοτικότητα
διασφαλίζει σε συνδυασό ε το γυαλί οπαλίνα
επιφανειακό φωτισό.
Μοντέλα
– XLED home 2 SL
– XLED home 2 XL SL
Περιεχόενο συσκευασίας (εικ.3.1)
Όρια περιστροφής κεφαλής προβολέα
(εικ. 3.2/3.3)
ιαστάσεις προϊόντος (εικ. 3.4/3.5)
Επισκόπηση συσκευής (εικ. 3.6)
A Πάνελ LED
B Πλαίσιο
C Στήριγα τοίχου
4. Ηλεκτρική εγκατάσταση
Σύνδεση αγωγού τροφοδοσίας
Ο αγωγός τροφοδοσίας αποτελείται από καλώδιο
3συράτων:
L = Φάση (συνήθως αύρο, καφέ ή γκρι)
N = Ουδέτερος αγωγός (συνήθως πλε)
PE = Αγωγός γείωσης (πράσινο/κίτρινο)
Σε περίπτωση αφιβολιών πρέπει να προβείτε σε αναγνώριση των καλωδίων ε δοκιαστικό τάσης. Κατόπιν
αποσυνδέετε πάλι από την ηλεκτρική τάση. Φάση (L)
και ουδέτερος αγωγός (N) συνδέονται στο ονωτικό
ακροδέκτη. Ο αγωγός γείωσης πορεί να τραβηχτεί ε
τη βοήθεια του ακροδέκτη (E).
Προσοχή: Το πέρδεα των συνδέσεων θα προκαλέσει στη συσκευή ή στον πίνακα ασφαλειών
βραχυκύκλωα. Στην περίπτωση αυτή πρέπει να γίνει
εκ νέου αναγνώριση των εονωένων καλωδίων και
επανασύνδεση.
Η πηγή φωτός αυτού του λαπτήρα δεν είναι αντικαταστάσιη, σε περίπτωση που πρέπει να αντικατασταθεί η πηγή φωτός (π.χ. ε τη λήξη της διάρκειας
ζωής της), πρέπει να αντικατασταθεί ολόκληρος ο
λαπτήρας.
5. Εγκατάσταση
• Ελέγχετε όλα τα εξαρτήατα σχετικά ε βλάβες.
• Σε περίπτωση βλαβών δεν επιτρέπεται η λειτουργία
του προϊόντος.
• Ευθυγράιση προβολέα. (εικ. 5.1)
Βήατα εγκατάστασης
• ιακόπτετε τροφοδοσία ρεύατος. (εικ. 3.7)
• Λύνετε ασφαλιστικές βίδες. (εικ. 5.2)
• Αποσπάτε πλαίσιο (Β) από στήριγα τοίχου (C).
(εικ. 5.3)
• Αποσπάτε κλέα εβυσάτωσης (αρσενικό) από το
στήριγα τοίχου. (εικ. 5.4)
• Σηαδεύετε τα σηεία για τρύπες. (εικ. 5.5)
• Ανοίγετε τρύπες και τοποθετείτε ούπατ. (εικ. 5.6)
• Τοποθετείτε στεγανοποιητική τάπα. (εικ. 5.7)
– Αγωγός τροφοδοσίας, ενδοτοίχια (εικ. 5.8)
– Αγωγός τροφοδοσίας, εξωτοίχια ε διαστάρια
(εικ. 5.9)
• Συνδέετε καλώδιο σύνδεσης. (εικ. 5.10)
• Συνδέετε κλέα εβυσάτωσης. (εικ. 5.11)
• Προσαρόζετε πλαίσιο στο στήριγα τοίχου.
(εικ. 5.12)
• Βιδώνετε ασφαλιστικές βίδες. (εικ. 5.13)
• Ενεργοποιείτε τροφοδοσία ρεύατος. (εικ. 5.13)
6. Εγγύηση κατασκευαστή
Αυτό το προϊόν STEINEL κατασκευάστηκε ε έγιστη
προσοχή, ελέγχθηκε σχετικά ε τη λειτουργία του και
την τεχνική του ασφάλεια σύφωνα ε τους ισχύοντες
κανονισούς και κατόπιν υποβλήθηκε σε δειγατοληπτικό έλεγχο. Η εταιρία STEINEL αναλαβάνει την
εγγύηση για απρόσκοπτη κατάσταση και λειτουργία.
Η προθεσία εγγύησης ανέρχεται σε 5 έτη και αρχίζει
ε την ηέρα πώλησης στον καταναλωτή. Επιδιορθώνουε ελαττώατα, τα οποία οφείλονται σε σφάλατα
υλικού ή εργοστασίου, η εγγυητική απαίτηση εκπληρώνεται ε επισκευή ή αντικατάσταση ελαττωατικών
εξαρτηάτων σύφωνα ε δική ας επιλογή.
Η εγγυητική απαίτηση εκπίπτει για βλάβες σε φθειρόενα εξαρτήατα όπως επίσης για βλάβες και
ελαττώατα που οφείλονται σε ακατάλληλο χειρισό
ή ακατάλληλη συντήρηση. Περαιτέρω επακόλουθες
βλάβες σε ξένα αντικείενα αποκλείονται. Η εγγύηση
παρέχεται όνο εφόσον η συσκευή αποσταλεί σε η
αποσυναρολογηένη ορφή ε σύντοη περιγραφή
βλάβης, απόδειξη ταείου ή τιολόγιο (ηεροηνία
αγοράς και σφραγίδα επόρου), καλά συσκευασένη
στην αρόδια υπηρεσία σέρβις.
Σέρβις: Επισκευές ετά την πάροδο του χρόνου εγγύησης ή επισκευές ελαττωάτων χωρίς εγγυητική απαίτηση εκτελούνται από το σέρβις του εργοστασίου ας.
ΚΑΤΑ ΣΚ ΕΥΑΣ ΤΗ
Σας παρακαλούε να αποστείλετε
το προϊόν καλά συσκευασένο στην
πλησιέστερη υπηρεσία σέρβις.
7. Tεχνικά δεδοένα
XLEDHome 2 SL XLEDHome 2 XL SL
ιαστάσεις (Υ/Π/Β) 181 × 180 × 161 199 × 180 × 161
Ισχύς 14,8 W 20 W
Φωτεινή ροή/φωτεινότητα 1184 lm 1608 lm
Βάρος 0,480 kg 0,525 kg
Προβαλλόενη επιφάνεια Πρόσθια όψη 274,1 cm
Πλευρική όψη 86,3 cm
Ρεύα δικτύου 75mA 97mA
Συντελεστής απόδοσης 0,84 0,86
Αποδοτικότητα 80 lm/W
Χρώα φωτός 4000 K (ουδέτερο λευκό)
είκτης χρωατικής απόδοσης Ra ≥ 80
Τάση δικτύου 230-240 ~V / 50/60 Hz
IP/κλάση προστασίας IP44 / II
2
2
Πρόσθια όψη 307,2 cm
Πλευρική όψη 90,3 cm
8. ιαταραχές λειτουργίας
Βλάβη Αιτία Βοήθεια
Προβολέας LED χωρίς τάση
n Ασφάλεια ελαττωατική, η
ενεργοποιηένη, διακοπή
κυκλώατος
n Βραχυκύκλωα
n Νέα ασφάλεια, ενεργοποίηση
διακόπτη δικτύου, έλεγχος
κυκλώατος ε δοκιαστικό
τάσης
n Έλεγχος συνδέσεων
GR
2
2
– 28 –
– 29 –
Page 16

TR
!
!
5
ÜRETİCİ
YIL
1. Bu doküman hakkında
Lütfen itinayla okuyun ve saklayın!
– Telif hakları korunmaktadır. Kısmen de olsa basıl-
ması, ancak onayımız alınarak mümkündür.
– Teknik gelişmelere hizmet eden değişiklikler
yapma hakkı saklıdır.
Sembol açıklaması
Tehlikelere karşı uyarı!
Dokümandaki metin kısımlarına
...
gönderme.
2. Genel güvenlik uyarıları
Cihaz üzerindeki tüm çalışmalardan
önce, elektrik beslemesini kesin!
• Bu cihazların kurulumu sırasında, elektrik şebekesinin üzerinde bir çalışma söz konusudur; bu yüzden, ülkeye özgü kurulum talimatları ve bağlantı
koşulları uyarınca, usulüne uygun bir çalışma
gerçekleştirilmelidir. (DE-VDE 0100,
AT-ÖVE/ÖNORM E 8001-1, CH-SEV 1000)
• Lamba, uzun bir süre boyunca 0,3 m'den daha
yakın bir mesafeden içine bakma olasılığının
olmayacağı şekilde konumlandırılmalıdır.
• Spotun gövdesi, işletim sırasında ısınır. LED
panelini çevirme işlemi, ancak soğuduktan sonra
yapılmalıdır. Yakın mesafeden veya uzun süre
boyunca (> 5 dak) LED lambanın içine doğru
bakmayın. Aksi halde, retina tabakası bundan
zarar görebilir.
• Cihazı, kolay tutuşabilen yüzeylerin üzerinde
monte etmeyin.
3. XLED home 2 SL /
XLED home 2 XL SL
Amacına uygun kullanım
– LED spot, dış mekanda duvara montaj için
uygundur.
– Serbestçe döndürülebilir LED paneli.
– Münferit sensör veya Master seçeneği ile ağ
yapısı içinde temin edilebilir.
Serbestçe dönebilen panel sayesinde spot, özel
sektörde ev veya arazi aydınlatması veya ticari
alanlarda örn. firma arazisinin aydınlatılması amacıyla mükemmel kullanılır. Olağanüstü verimli LED
teknolojisi, opal cam ile bağlantılı olarak yüzeysel
ışık sağlar.
Modeller
– XLED home 2 SL
– XLED home 2 XL SL
Teslimat kapsamı (Şek. 3.1)
Döndürülebilir spot başlığı (Şek. 3.2/3.3)
Ürünün boyutları (Şek. 3.4/3.5)
Cihazın genel görünümü (Şek. 3.6)
A LED paneli
B Gövde
C Duvar tutucusu
4. Elektrik kurulumu
Elektrik kablosu bağlantısı
Elektrik kablosu, 3 iletkenli bir kablodur:
L = Faz (genellikle siyah, kahverengi veya gri)
N = Nötr hattı (genellikle mavi)
PE = Topraklama hattı (yeşil/sarı)
Çelişkiye düşülmesi halinde, kabloları bir avometre
cihazıyla tanımlayın; ardından tekrar elektriksiz hale
getirin. Faz (L) ve nötr kablosu (N), avize terminaline
bağlanmalıdır. Topraklama hattı, terminal (E) kullanılarak geçirilebilir.
Önemli: Bağlantıların karıştırılması, daha sonra
cihazda veya sigorta kutunuzda kısa devreye neden
olur. Bu durumda, kabloların hepsini tekrar tanımlamak ve yeniden birleştirmek zorundasınız.
Bu lambanın ışık kaynağı değiştirilemez; ışık kaynağının değiştirilmesi gerektiğinde (örn. çalışma ömrü
sona erdiğinde), komple lambanın yenilenmesi
gerekir.
5. Montaj
• Bütün yapı parçalarında hasar kontrolü yapın.
• Hasarlar olduğunda, ürünü işletime almayın.
• Spotun hizalanması. (Şek. 5.1)
Montaj adımları
• Elektrik beslemesini kapatın. (Şek. 3.7)
• Emniyet vidalarını çıkartın. (Şek. 5.2)
• Gövdeyi (B) duvar tutucusundan (C) ayırın.
(Şek. 5.3)
• Geçme terminali (erkek) duvar tutucusundan
ayırın. (Şek. 5.4)
• Delik yerlerini işaretleyin. (Şek. 5.5)
• Delikleri delin ve dübelleri yerleştirin. (Şek. 5.6)
• Tapayı yerleştirin. (Şek. 5.7)
– Besleme kablosu, sıva altı (Şek. 5.8)
– Besleme kablosu, sıva üstü ara parçalarla
birlikte (Şek. 5.9)
• Bağlantı kablosunu bağlayın. (Şek. 5.10)
• Geçme terminali bağlayın. (Şek. 5.11)
• Gövdeyi duvar tutucusuna yerleştirin. (Şek. 5.12)
• Emniyet vidalarını vidalayın. (Şek. 5.13)
• Elektrik beslemesini açın. (Şek. 5.13)
dır. Garanti yükümlülüğü ancak, cihazın açılmamış
halde kısa hata açıklaması, kasa fişi veya faturasıyla
(satış tarihi ve satıcı kaşesi) birlikte, tam ambalajlanmış şekilde ilgili servis istasyonuna gönderilmesi
durumunda geçerlidir.
Servis:
Fabrika servisimiz, garanti süresi sona erdikten
sonra veya aksaklıklar halinde onarım yapar.
Lütfen ürünü iyi ambalajlanmış halde, en yakın
servis istasyonuna gönderin.
6. Üretici garantisi
Bu STEINEL ürünü, büyük bir itinayla üretilmiş,
fonksiyon ve güvenlik kontrolleri geçerli talimatlar
uyarınca yapılmış ve ardından bir numune kontrolüne tabi tutulmuştur. STEINEL, kusursuz nitelik
ve fonksiyon garantisi vermektedir. Garanti süresi
5 yıl olup, kullanıcıya satış tarihi itibariyle başlar.
Malzeme ve fabrikasyon hatalardan kaynaklanan
kusurlar tarafımızca giderilmektedir; garanti hizmeti,
tercihimize bağlı olarak kusurlu parçaların onarımı
veya değişimi şeklinde gerçekleşir. Garanti hizmeti,
aşınma parçalarındaki hasarları, usulüne aykırı
uygulama veya bakım sonucunda meydana gelen
hasar ve kusurları kapsamaz. Yabancı cisimlere
yansıyan dolaylı zararlar, garanti kapsamı dışında-
GARANTİSİ
7. Teknik özellikler
XLEDHome 2 SL XLEDHome 2 XL SL
Boyutlar (YxGxD) 181 × 180 × 161 199 × 180 × 161
Güç 14,8 W 20 W
Işık akımı/Parlaklık 1184 lm 1608 lm
Ağırlık 0,480 kg 0,525 kg
Öngörülen alan Ön görünüm 274,1 cm
Yan görünüm 86,3 cm
Elektrik gücü 75mA 97mA
Güç katsayısı 0,84 0,86
Verim 80 lm/W
Işık rengi 4000 K (nötr beyaz)
Renk yansıtma indeksi Ra ≥ 80
Şebeke gerilimi 230-240 ~V / 50/60 Hz
IP/Koruma sınıfı IP44 / II
2
2
Ön görünüm 307,2 cm
Yan görünüm 90,3 cm
8. İşletim arızaları
Arıza Nedeni Giderilmesi
LED spotta elektrik yok
n Sigorta arızalı, çalıştırılmamış,
kablo kopuk
n Kısa devre
n Yeni sigorta takın, elektrik
şalterini çalıştırın, kabloyu
voltmetre ile kontrol edin
n Bağlantıları gözden geçirin
TR
2
2
– 30 –
– 31 –
Page 17

HU
!
!
5
ÉV
GARANCIA
1. Tudnivaló a dokumentummal
kapcsolatban
Kérjük, olvassa el figyelmesen és őrizze meg!
– Szerzői jogvédelem alatt áll. Sokszorosítani,
kivonatosan is, csak az engedélyünkkel szabad.
– A műszaki fejlődést szolgáló változtatások jogát
fenntartjuk.
Jelmagyarázat
Figyelmeztetés veszélyekre!
A dokumentum szöveghelyeire utal.
...
2. Általános biztonsági útmutatások
Munkavégzés előtt szakítsa meg a
készülék tápfeszültségét!
• Ezeknek a készülékeknek a felszerelésekor hálózati feszültséggel lesz dolga; ezért a munkát a
saját országában hatályos szerelési előírások és
bekötési feltételek szem előtt tartásával, szakszerű módon kell végeznie. (DE-VDE 0100,
AT-ÖVE/ÖNORM E 8001-1, CH-SEV 1000)
• A lámpa helyét úgy kell megválasztani, hogy
0,3m-nél közelebbről ne lehessen belenézni
hosszabb ideig a lámpába.
• A fényszóró háza működés közben felmelegszik. A LED égős panelt csak lehűlt állapotában
szabad beirányítani. Ne nézzen bele közelről
vagy huzamosabb ideig (> 5 perc) a LED égős
lámpába. Ez a kötőhártya sérülését okozhatja.
• Ne szerelje a készüléket gyúlékony felületekre!
3. XLED home 2 SL /
XLED home 2 XL SL
Rendeltetésszerű használat
– A LED égős fényszórót kültéri falra is fel lehet
szerelni.
– A LED égős panelt tetszőleges helyzetbe lehet
fordítani.
– Önálló fényszóróként vagy hálózatba kötött,
Master módban üzemelő fényszóróként is
kapható.
A tetszőleges helyzetbe fordítható panelnek köszönhetően a fényszóró magán célú felhasználás
esetén a ház és a kert megvilágítására, vagy üzleti
célú felhasználás esetén pl. a cég telephelyének
megvilágítására tökéletesen megfelel. A befogott
terület terített fényű megvilágításáról a maximálisan
hatékony, opál színű üveggel kombinált LED égős
technológia gondoskodik.
Kivitelek
– XLED home 2 SL
– XLED home 2 XL SL
A csomag tartalma (3.1. ábra)
A fényszóró fej elfordítási tartománya
(3.2./3.3. ábra)
Termékméretek (3.4./3.5. ábra)
A készülék áttekintése (3.6. ábra)
A LED égős panel
B ház
C fali tartó
4. Elektromos bekötés
Hálózati betápvezeték csatlakoztatása
A hálózati betápvezeték 3-erű kábelből áll:
L = fázis (többnyire fekete, barna vagy szürke)
N = nulla vezető (többnyire kék)
PE = védővezető (zöld/sárga)
Kétség esetén a kábeleket feszültségjelző segítségével azonosítania kell; majd le kell róla kötnie
a feszültséget. A fázist (L) és a nulla vezetőt (N) a
sorkapocsra csatlakoztatjuk. A védővezetőt az (E)
kapocs segítségével át lehet hurkolni.
Fontos: A csatlakozások felcserélése később zárlathoz vezet a készülékben vagy az Ön biztosítékdobozában. Ebben az esetben ismét azonosítani
kell az egyes kábeleket, és újból össze kell kötni
őket.
A lámpa fényforrását nem lehet lecserélni; amennyiben a fényforrást le kell cserélni (pl. mert élettartamának végére ért), a teljes lámpát le kell cserélni.
5. Szerelés
• Minden alkatrészt ellenőrizzen sérülés szempontjából.
• Sérülések esetén ne vegye használatba a
terméket.
• Az érzékelő beirányítása. (5.1. ábra)
A szerelés lépései
• Az áramellátást kapcsolja le. (3.7. ábra)
• A rögzítő csavarokat lazítsa meg. (5.2. ábra)
• A (B) házat vegye le a (C) fali tartóról. (5.3. ábra)
• A bedugós (csapos) kapcsot válassza le a fali
tartóról. (5.4. ábra)
• A furat helyét jelölje be. (5.5. ábra)
• A furatokat fúrja ki, és rakjon beléjük tiplit.
(5.6. ábra)
• Helyezze fel a tömítést. (5.7. ábra)
– Falba süllyesztett betápvezeték (5.8. ábra)
– Vakolat feletti betápvezeték távtartókkal
(5.9. ábra)
• A csatlakozókábelt csatlakoztassa rá.
(5.10. ábra)
• A bedugós kapcsot kösse össze. (5.11. ábra)
• A házat húzza rá a fali tartóra. (5.12. ábra)
• A rögzítő csavarokat csavarja be. (5.13. ábra)
• Az áramellátást kapcsolja be. (5.13. ábra)
6. Gyári garancia
Ezt a terméket a STEINEL maximális gonddal
gyártotta le, működését és biztonságát az érvényes
előírások alapján vizsgálta be, majd szúrópróba
szerűen ellenőrizte. A Steinel garanciát vállal a kifogástalan minőségre és működésre. A garancia ideje
5 év, ami a vásárlás napján kezdődik. Minden olyan
hibát kijavítunk, ami anyag- vagy gyártási hibára vezethető vissza. A garancia teljesítésének módját mi
választjuk meg: ez lehet a hibás alkatrész megjavítása vagy kicserélése. A garancia nem vonatkozik a
kopóalkatrészeken bekövetkező károkra, valamint
az olyan károkra és hiányosságokra, amelyek a
szakszerűtlen kezelés vagy karbantartás miatt
következnek be. Idegen objektumokon keletkező
következményes károk ki vannak zárva a garancia köréből. Garanciát csak akkor vállalunk, ha a
készüléket szétszereletlen állapotban jól becsomagolják, mellékelik a hiba rövid leírását, a (vásárlás
időpontjával és a kereskedő pecsétjével ellátott)
pénztárblokkot vagy számlát, és ezeket elküldik az
illetékes szerviznek.
Szerviz:
A garanciaidő eltelte után vagy nem garanciális
hibák esetén gyári szervizünk végzi a javításokat.
Kérjük, hogy a jól becsomagolt terméket küldje el
az Önhöz legközelebb eső szerviznek.
GYÁRTÓI
7. Műszaki adatok
XLEDHome 2 SL XLEDHome 2 XL SL
Méretek (Ma/SZ/Mé) 181 × 180 × 161 199 × 180 × 161
Teljesítmény 14,8 W 20 W
Fényáram/fényerő 1184 lm 1608 lm
Súly 0,480 kg 0,525 kg
Besugárzott felület Elölnézet 274,1 cm
Oldalnézet 86,3 cm
Hálózati áram 75mA 97mA
Teljesítménytényező 0,84 0,86
Hatásfok 80 lm/W
Színhőmérséklet 4000 K (semleges fehér)
Színvisszaadási index Ra ≥ 80
Hálózati feszültség 230-240 ~V / 50/60 Hz
IP/védettségi osztály IP44 / II
2
2
Elölnézet 307,2 cm
Oldalnézet 90,3 cm
8. Üzemzavarok
Zavar Oka Elhárítása
A LED égős fényszóró nem kap
feszültséget
n biztosíték hibás, nincs bekap-
csolva, vezeték szakadt
n rövidzárlat
n új biztosíték, hálózati kapcso-
lót bekapcsolni; vezetéket
feszültségjelzővel ellenőrizni
n csatlakozókat átvizsgálni
HU
2
2
– 32 –
– 33 –
Page 18

CZ
!
!
5
LETÁ
1. Ktomuto dokumentu
Pozorně si jej přečtěte auschovejte!
– Chráněno autorským právem. Dotisk, ičástečný,
jen snaším souhlasem.
– Změny, které slouží technickému pokroku,
vyhrazeny.
Vysvětlení symbolů
Varování před nebezpečím!
Odkaz na text vdokumentu.
...
2. Všeobecné bezpečnostní pokyny
Před zahájením jakýchkoli prací na
přístroji přerušit přívod napětí!
• Při instalaci těchto přístrojů se jedná opráci na
síťovém napětí; musí proto být provedena odborně podle obvyklých předpisů pro instalaci apodmínek připojení dle norem ČSN (DE-VDE 0100,
AT-ÖVE/ÖNORM E 8001-1, CH-SEV 1000).
• Svítidlo musí být umístěno tak, aby nebylo možné po delší dobu hledět do světla ze vzdálenosti
menší než 0,3m.
• Těleso reflektoru se během provozu zahřívá.
Vyrovnání panelu LED lze provést až po jeho vychladnutí. Do kontrolky LED se nedívat z krátké
vzdálenosti nebo po delší dobu (>5 min.). Mohlo
by dojít kpoškození sítnice voku.
• K montáži přístroje vybírejte povrchy, které nepatří mezi snadno vznítitelné.
3. XLED home 2 SL /
XLED home 2 XL SL
Používání vsouladu surčením
– Reflektor LED vhodný pro montáž na stěnu ve
venkovní oblasti.
– Volně otočný panel LED.
– Kdostání jako samostatný reflektor nebo propo-
jený sverzí master.
Svolně otočným panelem lze reflektor dokonale
použít kosvětlení domu apozemku pro soukromé
účely, nebo kosvětlení např. firemního pozemku
pro komerční účely. Maximálně efektivní technologie LED ve spojení sopálovým kotoučem zajistí
plošné osvětlení.
Provedení
– XLED home 2 SL
– XLED home 2 XL SL
Rozsah dodávky (obr. 3.1)
Rozsah natočení hlavy reflektoru (obr. 3.2/3.3)
Rozměry výrobku (obr. 3.4/3.5)
Přehled zařízení (obr.3.6)
A LED panel
B Těleso
C Nástěnný držák
4. Elektrická instalace
Připojení kelektrické síti
Kpřipojení kelektrické síti použijte třípólový kabel:
L = fázový vodič (většinou černý,
hnědý nebo šedý)
N = neutrální vodič (většinou modrý)
PE = ochranný vodič (zelenožlutý)
Vpřípadě pochybností je nutno identifikovat
jednotlivé vodiče kabelu pomocí zkoušečky napětí;
zda jsou zase bez napětí. Fázový (L) aneutrální (N)
vodič se připojí ke svítidlové svorkovnici. Ochranný
vodič může být zapojen do smyčky pomocí svorky
(E).
Důležité: Případná záměna přívodů způsobí po
zapnutí zkrat vpřístroji nebo ve vaší pojistkové
krabici. Vtomto případě je nutno jednotlivé kabely
opakovaně identifikovat apoté znovu zapojit.
Světelný zdroj tohoto svítidla nelze vyměnit, jestliže
musí být světelný zdroj vyměněn (např. na konci
své životnosti), je třeba vyměnit celé svítidlo.
5. Montáž
• Zkontrolovat poškození uvšech konstrukčních
dílů.
• Při poškození výrobek nepoužívat.
• Vyrovnání reflektoru. (obr. 5.1)
Postup při montáži
• Vypnout napájení elektrickým proudem.
(obr.3.7)
• Uvolnit pojistné šrouby. (obr.5.2)
• Znástěnného držáku (C) uvolnit těleso (B).
(obr.5.3)
• Zasouvací svorku (zástrčku) sejmout z nástěnného držáku. (obr.5.4)
• Vyznačit otvory kvrtání. (obr.5.5)
• Vyvrtat otvory avložit hmoždinky (obr. 5.6)
• Zasuňte těsnicí zátky. (obr.5.7)
– Síťové přívodní vedení pod omítku (obr. 5.8)
– Síťové přívodní vedení na omítku s distančními
držáky (obr. 5.9)
• Připojit připojovací kabel. (obr.5.10)
• Spojit zasouvací svorku. (obr.5.11)
• Těleso nasunout na nástěnný držák. (obr.5.12)
• Našroubovat pojistné šrouby. (obr.5.13)
• Zapnout napájení elektrickým proudem.
(obr.5.13)
6. Záruka vrobce
Tento výrobek firmy STEINEL je vyráběn smaximální pozorností věnovanou jeho funkčnosti abezpečnosti, které byly vyzkoušeny podle platných předpisů, přičemž se výrobek rovněž podrobil namátkové
výstupní kontrole. Firma Steinel přebírá záruku za
bezvadné provedení a funkčnost. Záruka se poskytuje vdélce 5let azačíná dnem prodeje výrobku
spotřebiteli. Odstraněny vám budou výrobní vady
azávady zapříčiněné vadným materiálem, přičemž
záruka spočívá vopravě nebo výměně chybného
dílu dle našeho výběru. Záruka se nevztahuje na
škody na dílech podléhajících opotřebení, na škody
avady zapříčiněné nesprávným zacházením nebo
údržbou. Uplatňování dalších nároků následných
škod na cizích věcech je vyloučeno. Záruka bude
uznána jen tehdy, bude-li nedemontovaný přístroj
dobře zabalen, přiložen krátký popis závady,
pokladní stvrzenka nebo faktura (datum prodeje
arazítko prodejny), poslán na adresu příslušného
servisu.
Servis:
Naše servisní opravny provádějí rovněž opravy po
uplynutí záruční doby nebo opravy závad, na které
se záruka nevztahuje. Dobře zabalený výrobek
zašlete, prosím, ivtomto případě nejbližšímu
servisnímu středisku.
ZÁRUKA
VÝROBCE
7. Technické parametry
XLEDHome 2 SL XLEDHome 2 XL SL
Rozměry (v/š/h) 181 × 180 × 161 199 × 180 × 161
Výkon 14,8 W 20 W
Světelný tok/jas 1184 lm 1608 lm
Hmotnost 0,480 kg 0,525 kg
Projektovaná plocha Čelní pohled 274,1 cm
Boční pohled 86,3 cm
Síťový proud 75mA 97mA
Účiník 0,84 0,86
Efektivnost 80lm/W
Barva světla 4000K (neutrální bílá)
Index reprodukce barev Ra ≥80
Síťové napětí 230–240 ~V/50/60 Hz
IP/třída ochrany IP44/II
2
2
Čelní pohled 307,2 cm
Boční pohled 90,3 cm
8. Provozní poruchy
Porucha Příčina Náprava
Reflektor LED bez napětí
n Vadná pojistka, reflektor není
zapnutý, přerušené vedení
n Zkrat
n Nová pojistka, zapnout síťový
vypínač; zkontrolovat vedení
pomocí zkoušečky napětí
n Zkontrolovat připojení
CZ
2
2
– 34 –
– 35 –
Page 19

SK
!
!
5
ROKOV
1. O tomto dokumente
Pozorne si ho prečítajte a uschovajte!
– Chránené autorským právom. Dotlač, aj keď
iba v skrátenej verzii, je povolená iba s naším
súhlasom.
– Vyhradzujeme si právo na zmeny slúžiace tech-
nickému pokroku.
Vysvetlenie symbolov
Varovanie pred nebezpečenstvami!
Odkaz na textové pasáže v dokumente.
...
2. Všeobecné bezpečnostné pokyny
Pred všetkými prácami na prístroji
prerušte prívod napätia!
• Pri inštalácii týchto prístrojov ide o prácu na
sieťovom napätí, preto sa musí vykonať odborne
podľa národných predpisov pre inštaláciu a
podmienok pripojenia (DE-VDE 0100,
AT-ÖVE/ÖNORM E 8001-1, CH-SEV 1000).
• Svietidlo sa musí umiestniť tak, aby sa predišlo
dlhšiemu pozeraniu do svietidla zo vzdialenosti
menšej ako 0,3m.
• Kryt reflektora sa počas prevádzky zahrieva.
Nasmerovanie LED panela vykonávajte len vtedy,
ak už je vychladnutý. Nepozerajte sa do LED
svetla z krátkej vzdialenosti alebo dlhší čas
(> 5 min.). Môže to viesť k poškodeniu sietnice.
• Nemontujte svietidlo na ľahko horľavých
povrchoch.
3. XLED home 2 SL /
XLED home 2 XL SL
Správne používanie
– LED reflektor je vhodný na nástennú montáž
v exteriéri.
– Voľne otáčateľný LED panel
– Dostupný ako samostatný reflektor alebo zosie-
ťovaný s verziou Master.
Pomocou voľne otočného panela je možné reflektor
perfektne využiť v súkromnej oblasti na osvetlenie
domu alebo pozemku, alebo v komerčnej oblasti,
napr. na osvetlenie firemného areálu. Vysoko efektívna LED technológia sa v kombinácii s opálovým
sklom postará o ploché svetlo.
Modely
– XLED home 2 SL
– XLED home 2 XL SL
Rozsah dodávky (obr. 3.1)
Rozsah otáčania hlavy reflektora (obr. 3.2/3.3)
Rozmery výrobku (obr. 3.4/3.5)
Prehľad dielov výrobku (obr. 3.6)
A LED panel
B Kryt
C Nástenný držiak
4. Elektrická inštalácia
Pripojenie napájacieho vedenia
Napájacie vedenie pozostáva z jedného 3-žilového
kábla:
L = fáza (zvyčajne čierna, hnedá alebo sivá)
N = nulový vodič (väčšinou modrý)
PE = ochranný vodič (zeleno-žltý)
V prípade pochybností identifikujte káble pomocou
skúšačky napätia; potom ich znova odpojte od
napätia. Fáza (L) a neutrálny vodič (N) sa pripoja na
svietidlovú svorku. Ochranný vodič možno preslučkovať pomocou svorky (E).
Dôležité: Zámena vodičov neskôr vedie k skratu v
prístroji alebo v skrinke s poistkami. V tomto prípade jednotlivé káble ešte raz identifikujte a nanovo
zapojte.
Svetelný zdroj tohto svietidla sa nedá nahradiť.
V prípade nutnosti výmeny svetelného zdroja
(napr. na konci jeho životnosti) sa musí vymeniť
celé svietidlo.
5. Montáž
• Skontrolujte prípadné poškodenie všetkých
dielov.
• Pri poškodeniach výrobok neuvádzajte do
prevádzky.
• Vyrovnanie reflektora. (obr. 5.1)
Montážny postup
• Vypnite napájanie elektrickým prúdom. (obr. 3.7)
• Uvoľnite bezpečnostné skrutky. (obr. 5.2)
• Kryt (B) odpojte od nástenného držiaka (C).
(obr. 5.3)
• Zásuvnú svorku (Male) oddeľte od nástenného
držiaka. (obr. 5.4)
• Naznačte diery na vŕtanie. (obr. 5.5)
• Vyvŕtajte otvory a vložte hmoždinky. (obr. 5.6)
– 36 –
• Vložte tesniace zátky. (obr. 5.7)
– prípojné podomietkové vedenie (obr. 5.8)
– prípojné nadomietkové vedenie s dištančnými
držiakmi (obr. 5.9)
• Pripojte prípojný kábel. (obr. 5.10)
• Pripojte zásuvnú svorku. (obr. 5.11)
• Kryt nasaďte na nástenný držiak. (obr. 5.12)
• Naskrutkujte poistné skrutky. (obr. 5.13)
• Zapnite napájanie elektrickým prúdom.
(obr. 5.13)
6. Záruka vrobcu
Tento výrobok značky STEINEL bol vyrobený
s maximálnou dôslednosťou, skontrolovaný
z hľadiska funkčnosti a bezpečnosti podľa platných
predpisov a následne podrobený náhodnej kontrole. Spoločnosť Steinel preberá záruku za bezchybný stav a funkčnosť. Záručná doba predstavuje
5rokov a začína plynúť dňom predaja spotrebiteľovi. Odstránime nedostatky, ktoré vyplývajú z chyby
materiálu alebo výrobnej chyby, záručné plnenie
sa uskutočňuje opravou alebo výmenou chybných
dielov podľa nášho uváženia. Záručné plnenie
sa nevzťahuje na poškodenie opotrebovateľných
dielov ani na škody a nedostatky, ktoré vzniknú
nesprávnym zaobchádzaním alebo údržbou. Ďalšie
následné škody na cudzích objektoch sú zo záruky
vylúčené. Záruka je platná len vtedy, ak sa nerozobraný prístroj s krátkym popisom chyby spolu
s pokladničným dokladom alebo faktúrou (dátum
kúpy a pečiatka predajcu) zašle riadne zabalený do
príslušného servisu.
Servis:
Po uplynutí záručnej doby alebo v prípade chýb,
na ktoré sa nevzťahuje záruka, vykonáva opravy
náš dielenský servis. Dobre zabalený výrobok
zašlite na adresu najbližšieho servisu.
ZÁRUKA
VÝROBCU
7. Technické údaje
XLEDHome 2 SL XLEDHome 2 XL SL
Rozmery (V/Š/H) 181 × 180 × 161 199 × 180 × 161
Výkon 14,8 W 20 W
Svetelný tok/jas 1184 lm 1608 lm
Hmotnosť 0,480 kg 0,525 kg
Projektovaná plocha Čelný pohľad 274,1 cm
Bočný pohľad 86,3 cm
Sieťový prúd 75 mA 97 mA
Faktor výkonu 0,84 0,86
Efektívnosť 80 lm/W
Farba svetla 4000 K (neutrálna biela)
Index reprodukcie farieb Ra ≥ 80
Sieťové napätie 230 – 240 V, 50/60 Hz
IP/trieda ochrany IP44 / II
2
2
Čelný pohľad 307,2 cm
Bočný pohľad 90,3 cm
8. Prevádzkové poruchy
Porucha Príčina Riešenie
LED reflektor bez napätia
n chybná poistka, svietidlo nie je
zapnuté, prerušené vedenie
n skrat
– 37 –
n nová poistka, zapnúť sieťový
spínač, skontrolovať vedenie
pomocou skúšačky napätia
n skontrolovať pripojenia
SK
2
2
Page 20

PL Tłumaczenie instrukcji oryginalnej
!
!
5
LAT
PRODUCENTA
1. Informacje o tym dokumencie
Zapoznać się dokładnie izostawić do przechowania!
– Dokument chroniony prawem autorskim. Przedruk,
także wczęściach, wyłącznie po uzyskaniu naszej
zgody.
– Zmiany, wynikające zpostępu technicznego,
zastrzeżone.
Objaśnienie symboli
Ostrzeżenie przed zagrożeniami!
Odsyłacz do tekstu wdokumencie.
...
2. Ogólne zasady bezpieczeństwa
Przed rozpoczęciem wszelkich prac przy
urządzeniu należy odłączyć napięcie
zasilające!
• Podczas instalacji tych urządzeń wykonywana jest
praca przy obecności napięcia sieciowego; dlatego
należy wykonać ją fachowo, zgodnie zobowiązującymi wdanym kraju przepisami dotyczącymi
instalacji ipodłączania do zasilania elektrycznego
(DE-VDE 0100, AT-ÖVE/ÖNORM E 8001-1,
CH-SEV 1000).
• Lampę należy tak ustawić, aby nie dochodziło do
dłuższego patrzenia na lampę z odległości mniejszej niż 0,3 m.
• Obudowa włączonego reflektora nagrzewa się
podczas pracy. Regulację ustawienia panelu ledowego wolno wykonywać tylko po jego ostygnięciu.
Nie wolno patrzeć z bliskiej odległości lub przez
dłuższy czas (> 5 min) na lampę ledową. Może to
spowodować uszkodzenie siatkówki oka.
• Nie montować urządzenia na łatwopalnych powierzchniach.
3. XLED home 2 SL /
XLED home 2 XL SL
Zastosowanie zgodne zprzeznaczeniem
– Reflektor LED z czujnikiem jest odpowiedni do
montażu na ścianie, na zewnątrz budynku.
– Panel ledowy całkowicie odchylany.
– Dostępny jako reflektor pojedynczy lub do łączenia
w sieć w wersji Master.
Dzięki całkowicie odchylanemu panelowi reflektor
może być używany prywatnie do oświetlenia domu
lub posesji, czy też w firmie, np. do oświetlenia
terenu zakładu. Wysoce wydajna technologia LED
w połączeniu z mleczną szybą zapewnia uzyskanie
jednorodnego światła.
Wersje
– XLED home 2 SL
– XLED home 2 XL SL
Zakres dostawy (rys. 3.1)
Zakres obracania głowicy reflektora (rys. 3.2/3.3)
Wymiary produktu (rys. 3.4/3.5)
Przegląd urządzenia (rys. 3.6)
A Panel LED
B Obudowa
C Uchwyt naścienny
4. Instalacja elektryczna
Podłączenie przewodu zasilającego
Przewód zasilający jest kablem 3-żyłowym:
L = przewód fazowy (najczęściej czarny,
brązowy lub szary)
N = przewód zerowy (najczęściej niebieski)
PE = przewód ochronny (zielono-żółty)
Wrazie wątpliwości należy zidentyfikować kable
próbnikiem napięcia, anastępnie ponownie wyłączyć
napięcie. Fazę (L) iprzewód neutralny (N) podłącza
się do złączki elektrycznej typu kostka (gniazdo podłączeniowe). Przewód ochronny można zmostkować
za pomocą zacisku (E).
Ważne: Pomylenie przewodów jest przyczyną
późniejszego zwarcia w urządzeniu lub w skrzynce
bezpieczników. W takim przypadku należy jeszcze
raz zidentyfikować poszczególne żyły przewodów
iponownie je podłączyć.
Źródło światła tej lampy nie jest wymienne; jeżeli
zajdzie konieczność wymiany źródła światła (np. po
upłynięciu jego żywotności), należy wymienić całą
lampę.
5. Montaż
• Sprawdzić wszystkie elementy pod kątem uszkodzeń.
• Wprzypadku uszkodzeń nie uruchamiać
produktu.
• Regulacja reflektora. (rys. 5.1)
Czynności montażowe
• Wyłączyć zasilanie. (rys. 3.7)
• Odkręcić śruby zabezpieczające. (rys. 5.2)
• Zdjąć obudowę (B) z uchwytu naściennego (C).
(rys. 5.3)
• Odłączyć zacisk wtykowy (Male) od uchwytu
naściennego. (rys. 5.4)
• Zaznaczyć układ nawierceń. (rys. 5.5)
• Wywiercić otwory iwłożyć kołki (rys.5.6)
• Założyć zaślepki uszczelniające. (rys. 5.7)
– Przewód podtynkowy (rys. 5.8)
– Przewód natynkowy z uchwytami dystansowymi
(rys. 5.9)
• Podłączyć kabel przyłączeniowy. (rys. 5.10)
• Połączyć zacisk wtykowy. (rys. 5.11)
• Nałożyć obudowę na uchwyt naścienny.
(rys. 5.12)
• Wkręcić śruby zabezpieczające. (rys. 5.13)
• Włączyć zasilanie. (rys. 5.13)
6. Gwarancja producenta
Niniejszy produkt firmy STEINEL został wykonany z
dużą starannością. Prawidłowe działanie i bezpieczeństwo użytkowania potwierdzają przeprowadzone
losowo kontrole jakości oraz zgodność zobowiązującymi przepisami. Firma Steinel udziela gwarancji na
prawidłowe właściwości idziałanie. Okres gwarancji
wynosi 5lat irozpoczyna się zdniem sprzedaży użytkownikowi. W ramach gwarancji usuwane są braki
wynikające z wad materiałowych lub produkcyjnych,
świadczenia gwarancyjne obejmują naprawę lub
wymianę wadliwych części, w zależności od potrzeb
i zgodnie z naszą decyzją. Gwarancja nie obejmuje
uszkodzenia części podlegających zużyciu eksploatacyjnemu, uszkodzeń iusterek spowodowanych przez
nieprawidłową obsługę lub konserwację. Gwarancja
nie obejmuje odpowiedzialności za szkody wtórne
powstałe na przedmiotach trzecich. Gwarancja jest
udzielana tylko wtedy, gdy prawidłowo zapakowane
urządzenie (nierozłożone na części) zostanie odesłane
do odpowiedniego punktu serwisowego wraz
zkrótkim opisem usterki, paragonem lub rachunkiem
zakupu (opatrzonym datą zakupu ipieczęcią sklepu).
Serwis:
Po upływie okresu gwarancji lub w razie usterek nieobjętych gwarancją, naprawy wykonuje nasz serwis
GWARANCJI
firmowy. Prosimy o wysłanie dobrze
zapakowanego urządzenia do najbliższego punktu serwisowego.
7. Dane techniczne
XLEDHome 2 SL XLEDHome 2 XL SL
Wymiary (W/S/G) 181 × 180 × 161 199 × 180 × 161
Moc 14,8 W 20 W
Strumień świetlny/jasność 1184 lm 1608 lm
Masa 0,480 kg 0,525 kg
Powierzchnia halogenu LED widok z przodu 274,1 cm
widok z boku 86,3 cm
Prąd zasilający 75 mA 97 mA
Współczynnik mocy 0,84 0,86
Wydajność 80 lm/W
Barwa światła 4000 K (biały neutralny)
Indeks oddawania barw Ra ≥ 80
Napięcie sieciowe 230-240 ~V / 50/60 Hz
IP/klasa bezpieczeństwa IP44 / II
2
widok z przodu 307,2 cm
2
widok z boku 90,3 cm
8. Usterki
Usterka Przyczyna Usuwanie
brak napięcia zasilającego
reflektor diodowy
n przepalony bezpiecznik,
niewłączony wyłącznik
sieciowy, przerwany przewód
n zwarcie
n założyć nowy bezpiecznik,
włączyć wyłącznik sieciowy,
sprawdzić przewód próbnikiem napięcia
n sprawdzić przyłącza
2
PL
2
– 38 –
– 39 –
Page 21

RO
!
!
5
ANI
1. Despre acest document
Vă rugăm să citiţi cu atenţie documentul și să-l
păstraţi!
– Protejat prin Legea drepturilor de autor. Reprodu-
cerea, inclusiv în extras, este permisă numai cu
aprobarea noastră.
– Ne rezervăm dreptul de a face modificări care
servesc progresului tehnic.
Explicaţia simbolurilor
Atenţie, pericole!
Trimitere la texte din document.
...
2. Instrucţiuni generale de securitate
Înainte de efectuarea oricăror lucrări la
aparat, întrerupeţi alimentarea cu energie
electrică!
• Instalarea acestor aparate presupune o intervenţie
la reţeaua electrică; de aceea, lucrarea trebuie
executată corespunzător, conform normelor de
instalare și condiţiilor de conectare specifice ţării
respective. (DE-VDE 0100, AT-ÖVE/ÖNORM E
8001-1, CH-SEV 1000)
• Lampa trebuie poziţionată astfel încât să nu fie
posibil privitul în lampă de la o distanţă mai mică
de 0,3 m.
• Carcasa proiectorului se încălzește în timpul
funcţionării. Efectuaţi alinierea panoului cu LED-uri
numai după ce acesta s-a răcit. Nu priviţi de la
mică distanţă sau timp mai îndelungat (peste 5
min.) în lampa cu LED-uri. În caz contrar poate fi
afectată retina.
• Nu montaţi aparatul pe suprafeţe ușor inflamabile.
3. XLED home 2 SL /
XLED home 2 XL SL
Utilizare conform destinaţiei
– Proiector cu LED-uri, adecvat pentru montarea pe
perete, în exterior.
– Panou cu LED-uri liber pivotabil.
– Disponibil ca proiector individual sau interconectat
cu versiunea Master.
Cu panoul său liber pivotabil, proiectorul se poate
folosi perfect în domeniul privat, pentru iluminarea casei sau a terenului aferent, ori în domeniul
comercial, de exemplu pentru iluminarea terenului
unei firme. Tehnologia cu LED-uri extrem de eficientă
garantează, împreună cu sticla opalescentă, o iluminare precisă a suprafeţelor.
Modele
– XLED home 2 SL
– XLED home 2 XL SL
Volumul livrării (fig. 3.1)
Zona de pivotare a capului proiectorului
(fig. 3.2/3.3)
Dimensiunile produsului (fig. 3.4/3.5)
Prezentare generală a aparatului (fig. 3.6)
A Panou cu LED-uri
B Carcasă
C Suport de perete
4. Instalare electrică
Conectarea cablului de alimentare
Circuitul de alimentare este format dintr-un cablu cu
3 fire:
L = conductor de fază (de obicei negru,
maro sau gri)
N = conductor neutru (de obicei albastru)
PE = conductor de protecţie (verde/galben)
Dacă aveţi îndoieli, trebuie să identificaţi conductorii
cu ajutorul unui creion de tensiune. După aceea
ei trebuie scoși din nou de sub tensiune. Faza (L)
și conductorul neutru (N) se conectează la blocul
terminal. Conductorul de protecţie poate fi conectat
cu ajutorul clemei (E).
Important: Inversarea conexiunilor poate duce la
scurtcircuit la aparat sau la tabloul de siguranţe. În
acest caz trebuie identificat din nou fiecare cablu și
ulterior refăcute conexiunile corecte.
Sursa de lumină a acestei lămpi nu se poate înlocui;
în cazul în care sursa de lumină trebuie înlocuită
(de ex. la finalul duratei de viaţă), trebuie înlocuită
întreaga lampă.
5. Montaj
• Verificaţi toate componentele pentru a constata
dacă prezintă deteriorări.
• Nu puneţi în funcţiune produsul dacă prezintă
deteriorări.
• Orientarea proiectorului. (fig. 5.1)
Etapele montării
• Opriţi alimentarea cu curent. (fig. 3.7)
• Desfaceţi șuruburile de siguranţă. (fig. 5.2)
• Desprindeţi carcasa (B) din suportul de perete
(C). (fig. 5.3)
• Decuplaţi clema de legătură (tip "masculin") din
suportul de perete. (fig. 5.4)
• Marcaţi locul unde vor fi găurile. (fig. 5.5)
• Faceţi găurile și introduceţi diblurile (fig. 5.6)
• Introduceţi bușoanele de etanșare. (fig. 5.7)
– Cablu sub tencuială (fig. 5.8)
– Cablu pe tencuială cu distanţiere (fig. 5.9)
• Racordaţi cablul de conexiune. (fig. 5.10)
• Conectaţi clema de legătură. (fig. 5.11)
• Introduceţi carcasa pe suportul de perete.
(fig. 5.12)
• Strângeţi șuruburile de siguranţă. (fig. 5.13)
• Porniţi alimentarea cu curent. (fig. 5.13)
6. Garania de productor
Acest produs Steinel a fost fabricat cu maximă atenţie, verificat din punctul de vedere al funcţionării și al
siguranţei și supus unor verificări prin sondaj.
Steinel garantează structura și funcţionarea ireproșabilă a acestui produs. Termenul de garanţie este de
5 ani și începe de la data vânzării către consumator.
Garanţia acoperă deficienţele bazate pe defecte de
material și fabricaţie. Îndeplinirea garanţiei se realizează prin repararea sau înlocuirea pieselor defecte,
conform opţiunii noastre. Garanţia nu se aplică
pieselor de uzură și nici deteriorărilor sau deficienţelor cauzate de utilizarea sau întreţinerea necorespunzătoare. Este exclusă compensarea daunelor
provocate altor obiecte. Garanţia este valabilă doar
dacă aparatul nedezasamblat este trimis la centrul
de service competent într-un ambalaj adecvat,
împreună cu o scurtă descriere a defecţiunii, cu
bonul de casă sau cu factura (cu data cumpărării și
cu ștampila distribuitorului).
Service:
Service-urile noastre remediază și defecte, care
nu fac obiectul garanţiei sau pentru care aceasta
expirat. Vă rugăm să trimiteţi produsul bine ambalat
la cel mai apropiat service.
GARANŢIA
PRODUCĂTORULUI
7. Date tehnice
XLEDHome 2 SL XLEDHome 2 XL SL
Dimensiuni (înălţime/lăţime/adâncime) 181 × 180 × 161 199 × 180 × 161
Putere 14,8 W 20 W
Flux luminos/luminozitate 1184 lm 1608 lm
Greutate 0,480 kg 0,525 kg
Suprafaţa de proiecţie Vedere din faţă 274,1 cm
Vedere laterală 86,3 cm
Curent de la reţea 75mA 97mA
Factor de putere 0,84 0,86
Eficienţă 80 lm/W
Culoare lumină 4000 K (alb neutru)
Indice de redare a culorilor Ra ≥ 80
Tensiune de alimentare 230-240 ~V / 50/60 Hz
IP/clasă de protecţie IP44 / II
2
2
Vedere din faţă 307,2 cm
Vedere laterală 90,3 cm
8. Defecţiuni în funcţionare
Defecţiune Cauză Remediu
Proiector cu LED-uri fără
tensiune
n Siguranţă defectă, aparat
neconectat, cablu întrerupt
n Scurtcircuit
n Siguranţă nouă, cuplaţi
întrerupătorul de reţea;
verificaţi cablul cu ajutorul unui
creion de tensiune
n Verificaţi legăturile
2
2
RO
– 40 –
– 41 –
Page 22

SI
!
!
5
GARANCIJA
LETNA
1. O tem dokumentu
Natančno preberite in shranite!
– Zaščiteno z avtorskimi pravicami. Ponatis v celoti
ali po delih je dovoljen le z našim soglasjem.
– Spremembe zaradi tehničnega napredka so
pridržane.
Razlaga simbolov
Opozorilo pred nevarnostmi!
Napotek na mesta besedila v
...
dokumentu.
2. Splošna varnostna navodila
Pred izvajanjem dela na napravi prekinite
dovod električne napetosti!
• Inštalacija teh naprav vključuje delo na omrežni
napetosti, zato jo je treba izvesti strokovno v
skladu s krajevnimi predpisi in priključitvenimi pogoji. (DE-VDE 0100, AT-ÖVE/ÖNORM E 8001-1,
CH-SEV 1000)
• Svetilko namestite tako, da preprečite daljše
strmenje vanjo pri razdalji, manjši kot 0,3 m.
• Ohišje reflektorja se med obratovanjem segreje.
LED panel preusmerjajte le takrat, ko je povsem
ohlajen. V LED-svetilke nikoli ne glejte iz neposredne bližine ali dlje časa (> 5 min.).
S takšnim ravnanjem si lahko poškodujete
očesno mrežnico.
• Naprave ne montirajte na lahko vnetljive površine.
3. XLED home 2 SL /
XLED home 2 XL SL
Namenska uporaba
– LED-reflektor primeren za stensko montažo v
zunanjosti.
– Prosto gibljiv LED-panel.
– Na voljo kot posamični žaromet ali v omrežju z
različico master.
S prosto gibljivim panelom je žaromet primeren
tako za zasebno uporabo za osvetljevanje hiš in
dvorišč kot za komercialno uporabo za npr. osvetljevanje gospodarskih zemljišč. Visoko učinkovita
LED-tehnologija v povezavi z opalnim steklom
poskrbi za plosko svetlobo.
Izvedbe
– XLED home 2 SL
– XLED home 2 XL SL
Obseg dobave (sl. 3.1)
Območje obračanja glava reflektorja (sl. 3.2/3.3)
Mere izdelka (sl. 3.4/3.5)
Pregled naprav (sl. 3.6)
A LED-panel
B Ohišje
C Stensko držalo
4. Električna inštalacija
Priklop dovoda omrežja
Električna napeljava je sestavljena iz 3-žilnega
kabla:
L = faza (običajno črna, rjava ali siva)
N = nevtralni vodnik (praviloma moder)
PE = varnostni vodnik (zeleno-rumen)
V primeru dvoma morate kabel identificirati z indikatorjem napetosti; nato ga ponovno preklopite na
stanje brez napetosti. Fazo (L) in nevtralnik vodnik
(N) priključite na spončnico. Za zaščitni vodnik
lahko uporabite skoznjik s pomočjo sponke (E).
Pomembno: Zamenjava priključkov lahko povzroči
kratki stik v napravi ali v vaši električni omarici. V
tem primeru morajo vsi kabli biti znova identificirani
in na novo montirani.
Vira svetlobe te svetilke ne morete zamenjati, če je
treba vir svetlobe zamenjati (npr. ob koncu uporabne dobe), je treba zamenjati celo svetilko.
5. Montaža
• Preverite vse sklope, ali so poškodovani.
• Poškodovanega izdelka ne uporabljajte.
• Usmeritev senzorskega žarometa (sl. 5.1)
Navodila za montažo
• Izklopite oskrbo z energijo (Sl. 3.7)
• Odpustite varovalne vijake. (Sl. 5.2)
• Ločite ohišje (B) od stenskega držala (C).
(Sl. 5.3)
• Vtično sponko (moško) ločite od stenskega
držala. (Sl. 5.4)
• Zarišite luknje za vrtanje. (Sl. 5.5)
• Izvrtajte luknje in vstavite moznike. (Sl. 5.6)
• Vstavite tesnilne čepke. (Sl. 5.7)
– Podometna napeljava. (Sl. 5.8)
– Nadometna napeljava z distančniki. (Sl. 5.9)
• Priključite priključni kabel. (Sl. 5.10)
• Povežite vtično sponko. (Sl. 5.11)
• Ohišje nataknite na stensko držalo. (Sl. 5.12)
• Uvijačite varnostne vijake. (Sl. 5.13)
• Vklopite oskrbo z energijo. (Sl. 5.13)
6. Garancija proizvajalca
Ta izdelek podjetja STEINEL je bil izdelan z veliko
skrbnostjo, preverjen glede delovanja in varnosti po
veljavnih predpisih ter končno podvržen naključni
kontroli. Steinel daje garancijo za brezhibno stanje
in funkcionalnost proizvoda. Garancijski rok znaša
5 leta, garancija pa prične veljati na dan prodaje
uporabniku. Odstranjujemo pomanjkljivosti, ki so
posledica napak v materialu ali izdelavi, obveznost
garancije pa je izpolnjena ob popravilu ali menjavi delov z napakami po naši izbiri. Garancija ne
velja pri poškodbah obrabnih delov in za škode in
pomanjkljivosti, do katerih je prišlo zaradi nepravilne
uporabe ali vzdrževanja. Nadaljnje poškodbe na
drugih predmetih so izključene. Garancija bo odobrena v primeru, da pošljete nerazstavljeno napravo
s kratkim opisom napake ter potrdilom o nakupu
oz. računom (datum nakupa in štampiljka trgovca),
dobro zapakirano na ustrezne servisne službe.
Servis:
Po poteku garancijske dobe ali pri napakah brez
garancijske pravice izvaja popravila naš servisni
obrat. Prosimo, da izdelek pošljete dobro zapakiran
na naslov servisne službe.
PROIZVAJALCA
7. Tehhnični podatki
XLED home 2 SL XLEDHome 2 XL SL
Mere (Š × V × G) 181 × 180 × 161 199 × 180 × 161
Zmogljivost 14,8 W 20 W
Svetlobni tok/svetlost 1184 lm 1608 lm
Teža 0,480 kg 0,525 kg
Projicirana površina Pogled od spredaj 274,1 cm
Pogled od strani 86,3 cm
Omrežni tok 75 mA 97 mA
Faktor moči 0,84 0,86
Učinkovitost 80 lm/W
Barva svetlobe 4000 K (nevtralna bela)
Indeks barvne reprodukcije Ra ≥ 80
Omrežna napetost 230-240 ~V / 50/60 Hz
IP/razred zaščite IP44 / II
2
Pogled od spredaj 307,2 cm
2
Pogled od strani 90,3 cm
8. Motnje delovanja
Motnja Vzrok Pomoč
LED-reflektor je brez napetosti
n Okvarjena varovalka, ni
vključena, prekinjena povezava
n Kratek stik
n Nova varovalka, vklopite
omrežno stikalo; preverite
napeljavo z indikatorjem
napetosti
n Preverite kontakte
2
2
SI
– 42 –
– 43 –
Page 23

HR
!
!
5
GODINA
JAMSTVA
1. Uz ovaj dokument
Pažljivo pročitajte i sačuvajte!
– Zaštićeno autorskim pravima. Pretisak, čak i dje-
lomičan, dopušten je samo uz naše odobrenje.
– Zadržavamo pravo na izmjene koje služe tehnič-
kom napretku.
Tumačenje simbola
Upozorenje na opasnosti!
Uputa na tekst u dokumentu.
...
2. Opće sigurnosne napomene
Prije svih radova na uređaju prekinite
naponsko napajanje!
• Kod instalacije ovih uređaja radi se o radovima
na naponu mreže, stoga se ona mora izvesti
stručno i prema državnim propisima o instalacijama i uvjetima priključivanja. (DE-VDE 0100,
AT-ÖVE/ÖNORM E 8001-1, CH-SEV 1000)
• Svjetiljku namjestite tako da se ne može očekivati
dulje gledanje u svjetlo na razmaku manjem od
0,3 m.
• Kućište reflektora zagrijava se tijekom rada.
Poravnavanje LED panela provedite samo kad
se ohladi. Ne gledajte u LED svjetiljku s male
udaljenosti ili dulje vrijeme (> 5 min). To može
uzrokovati oštećenje mrežnice oka.
• Ne montirajte ređaj na lako zapaljivim
površinama.
3. XLED home 2 SL /
XLED home 2 XL SL
Namjenska uporaba
– LED reflektor prikladan je za zidnu montažu u
vanjskom području.
– Slobodno okretni LED panel.
– Može se koristiti kao individualni reflektor ili umre-
žen s master verzijom.
Slobodno okretnim panelom reflektor se može
savršeno podesiti za osvjetljavanje kuće ili zemljišta
u privatnom području ili za komercijalne svrhe
kao rasvjeta za teren tvrtke. Najučinkovitija LED
tehnologija daje u kombinaciji s opalnom pločom
jednolično svjetlo.
Izvedbe
– XLED home 2 SL
– XLED home 2 XL SL
Sadržaj isporuke (sl. 3.1)
Područje zakretanja glave reflektora (sl. 3.2/3.3)
Dimenzije proizvoda (sl. 3.4/3.5)
Pregled proizvoda (sl. 3.6)
A LED panel
B kućište
C zidni držač
4. Električna instalacija
Piključivanje mrežnog voda
Mrežni vod sastoji se od trožilnog kabela:
L = faza (većinom crna, smeđa ili siva)
N = neutralni vodič (većinom plavi)
PE = zaštitni vodič (zeleno/žuti)
U slučaju dvoumljenja morate identificirati kabel pomoću ispitivača napona; zatim ponovno uspostaviti
beznaponsko stanje. Faza (L) i neutralni vodič (N)
priključuju se na stezaljku svjetiljke. Zaštitni vodič
može se provući pomoću stezaljke (E).
Važno: Slučajna zamjena priključaka u uređaju
ili Vašem ormariću za osigurače kasnije uzrokuje
kratki spoj. U tom slučaju još jednom se moraju
identificirati pojedini kabeli i ponovno spojiti.
Izvor svjetlosti ove svjetiljke nije zamjenjiv; ako bi
se morao zamijeniti (npr. na kraju njegovog vijeka
trajanja), mora se zamijeniti cijela svjetiljka.
5. Montaža
• Provjeriti sve sastavne dijelove na oštećenja.
• U slučaju oštećenja ne koristiti proizvod.
• Poravnavanje reflektora. (sl. 5.1)
Montaža
• Isključite strujno napajanje. (sl. 3.7)
• Otpustite sigurnosne vijke. (sl. 5.2)
• Odvojite kućište (B) od zidnog držača (C).
(sl. 5.3)
• Odvojite utičnu stezaljku (male = muški) od
zidnog držača. (sl. 5.4)
• Označite rupe. (sl. 5.5)
• Izbušite rupe i stavite učvrsnice. (sl. 5.6)
• Umetnite brtveni čep. (sl. 5.7)
– Podžbukni kabel (sl. 5.8)
– Nadžbukni kabel s distancama (sl. 5.9)
• Spojite priključni kabel. (sl. 5.10)
• Spojite utičnu stezaljku. (sl. 5.11)
• Nataknite kućište na zidni držač. (sl. 5.12)
• Uvrnite sigurnosne vijke. (sl. 5.13)
• Uključite strujno napajanje. (sl. 5.13)
Servis:
Nakon isteka jamstvenog roka ili kad se utvrdi
nedostatak bez jamstva, popravak će se izvršiti u
tvornici. Molimo vas da dobro zapakiran proizvod
pošaljete najbližoj servisnoj službi.
6. Jamstvo proizvoaa
Ovaj STEINEL-ov proizvod izrađen je s najvećom
pažnjom, njegovo funkcioniranje i sigurnost ispitani
su prema važećim propisima i na kraju je proizvod podvrgnut kontroli uzorka. Steinel preuzima
jamstvo za besprijekornu kakvoću i funkcionalnost.
Jamstveni rok iznosi 5 godina a počinje s danom
prodaje potrošaču. Uklanjamo nedostatke koji su
posljedica grešaka na materijalu ili tvorničke greške,
usluga jamstva izvršava se popravkom ili zamjenom
dijela s greškom po našem izboru. Jamstvo ne
dajemo u slučaju oštećenja na potrošnim dijelovima, kao ni šteta i nedostataka koji nastanu zbog
nestručnog rukovanja ili održavanja. Posljedične
štete na drugim predmetima su isključene. Jamstvo
se priznaje samo ako nerastavljeni, dobro zapakiran
uređaj pošaljete zajedno s kratkim opisom greške i
računom (datum kupnje i pečat trgovine) nadležnoj
servisnoj službi.
PROIZVOĐAČA
7. Tehnički podaci
XLEDHome 2 SL XLEDHome 2 XL SL
Dimenzije (V × Š × D) 181 × 180 × 161 199 × 180 × 161
Snaga 14,8 W 20 W
Svjetlosni tok / svjetlina 1184 lm 1608 lm
Težina 0,480 kg 0,525 kg
Projicirana površina Frontalni pogled 274,1 cm
Bočni pogled 86,3 cm
Struja mreže 75mA 97mA
Koeficijent snage 0,84 0,86
Učinkovitost 80 lm/W
Boja svjetlosti 4000 K (neutralna bijela)
Indeks reprodukcije boje Ra ≥ 80
Napon mreže 230-240 ~V / 50/60 Hz
IP/Klasa zaštite IP44 / II
2
2
Frontalni pogled 307,2 cm
Bočni pogled 90,3 cm
8. Smetnje u radu
Smetnja Uzrok Pomoć
LED reflektor je bez napona
n neispravan osigurač, nije
uključen, prekinut vod
n kratki spoj
n staviti novi osigurač, uključiti
mrežnu sklopku; provjeriti vod
ispitivačem napona
n provjeriti priključke
2
2
HR
– 44 –
– 45 –
Page 24

EE
!
!
5
AASTAT
GARANTIID
1. Käesoleva dokumendi kohta
Palun lugege hoolikalt läbi ja hoidke alles!
– Autoriõigusega kaitstud. Järeltrükk, ka
väljavõtteliselt, ainult meie nõusolekul.
– Õigus muudatusteks tehnilise täiustamise
eesmärgil reserveeritud.
Sümbolite selgitus
Hoiatus ohtude eest!
Viide tekstikohtadele dokumendis.
...
2. Üldised ohutusjuhised
Katkestage enne igasuguseid töid
seadme kallal pingetoide!
• Nende seadmete paigaldamise puhul
on tegemist elektritööga, mida tuleb
teha asjatundlikult vastavalt riigis
kehtivatele paigalduseeskirjadele ning
ühendamistingimustele.(DE-VDE 0100, AT-ÖVE/
ÖNORM E 8001-1, CH-SEV 1000)
• Valgusti tuleb paigutada selliselt, et pikemaajaline
valgustisse vaatamine alla 0,3 m kauguselt oleks
ebatõenäoline.
• Prožektori korpus kuumeneb kasutamise ajal.
LED-paneeli tuleb suunata siis, kui see on
jahtunud. Ärge vaadake lähedalt või pikemat
aega (> 5 min) LED-lambi sisse. See võib
põhjustada silma võrkkestal kahjustusi.
• Ärge monteerige seadet kergesti süttivatele
pindadele.
3. XLED home 2 SL /
XLED home 2 XL SL
Nõuetekohane kasutus
– Seinale paigaldatav LED-prožektor on mõeldud
paigaldamiseks välistingimustesse.
– Vabalt pööratav LED-paneel.
– Saadaval nii üksikprožektorina kui ka võrku
ühendatuna Master-versiooniga.
Vabalt liigutatav paneel võimaldab prožektoril jätta
privaatse valgustatud ala maja või kinnistu juures
või äri territooriumil, näiteks et valgustada täielikult
ettevõtte ala. Tõeliselt efektiivne LED-tehnoloogia
võimaldab tänu opaalklaasile hajutada valguse
laiale alale.
Mudelid
– XLED home 2 SL
– XLED home 2 XL SL
Tarnekomplekt (joon. 3.1)
Prožektori pea pööramisulatus (joon. 3.2/3.3)
Toote mõõdud (joon. 3.4/3.5)
Seadme ülevaade (joon. 3.6)
A LED-paneel
B Korpus
C Seinakinnitus
4. Elektriinstallatsioon
Võrgutoitejuhtmete ühendus
Võrgutoitejuhe koosneb 3-soonelisest kaablist:
L = faas (enamasti must, pruun või hall)
N = neutraaljuht (enamasti sinine)
PE = kaitsejuht (roheline/kollane)
Kahtluse korral tuleb kaablid pingetestriga
identifitseerida; seejärel lülitage taas pingevabaks.
Faas (L) ja neutraaljuht (N) lülitatakse ridaklemmi
külge. Kaitsejuhi võib klemmi (E) abil ära lihvida.
Tähtis: Ühenduste omavaheline äravahetamine
põhjustab hiljem seadmes või kaitsmekarbis
lühise. Sel juhul tuleb üksikud kaablid veelkord
identifitseerida ning uuesti külge ühendada.
Selle valgusti valgusallikat ei saa vahetada; juhul
kui valgusallikas tuleb välja vahetada (nt selle eluea
lõppemisel), tuleb asendada kogu valgusti.
5. Montaaž
• Kontrollige kõiki koostedetaile kahjustuste
suhtes.
• Ärge võtke toodet kahjustuste korral käiku.
• Prožektorite suunamine. (joon. 5.1)
Montaažisammud
• Lülitage voolutoide välja. (joon. 3.7)
• Keerake lahti kinnituskruvid. (joon. 5.2)
• Keerake korpus (B) seinahoidiku (C) küljest lahti.
(joon. 5.3)
• Eemaldage (isasotsikuga) pistiku klemm
seinahoidiku küljest. (joon. 5.4)
• Märgistage puurimisavad. (joon. 5.5)
• Puurige avad ja pange tüüblid sisse (joon. 5.6)
• Paigaldage tihenduskorgid. (joon. 5.7)
– Toitejuhe süvispaigalduseks (joon. 5.8)
– Pindpaigalduse toitejuhe koos
distantsihoidikuga (joon. 5.9)
• Ühendage ühenduskaabel külge. (joon. 5.10)
– 46 –
• Ühendage pistiku klemmid. (joon. 5.11)
• Asetage korpus seinahoidikule. (joon. 5.12)
• Keerake lukustuskruvid sisse. (joon. 5.13)
• Lülitage voolutoide sisse. (joon. 5.13)
Teenus:
Pärast garantiiaja möödumist või defektide korral,
mille kohta garantii ei kehti, saab seadet remontida
meie tehase teeninduspunktis.
Palun saatke toode korralikult pakitult lähimasse
teeninduspunkti.
6. Tootja garantii
STEINELi toode on valmistatud suurima
hoolikusega, on talitluslikult ja ohutusalaselt
kehtivate eeskirjade alusel kontrollitud ning läbinud
seejärel pistelise kontrolli. Steinel annab garantii
toote laitmatu kvaliteedi ja töökorras oleku kohta.
Garantiitähtaeg on 5 aastat ja algab tarbijale toote
ostmise päevast. Meie remondime materjalist
või tootmisvigadest tulenevad puudused,
garantiijuhtumi korral seade kas remonditakse
või puudulik osa asendatakse uuega, valiku üle
otsustame meie. Garantii ei kehti kuluvate osade
ning kahju ja puuduste kohta, mis on tekkinud
oskamatu käsitsemise või hoolduse tagajärjel.
Edasised võõresemetele põhjustatud järgkahjud
on välistatud. Garantiinõuet aktsepteeritakse ainult
siis, kui osandamata seade saadetakse koos vea
lühikirjelduse, kassatšeki või arvega (ostukuupäev
ja müüja tempel) ja korralikult pakituna vastavasse
teeninduspunkti.
TOOTJA
7. Tehnilised andmed
XLEDHome 2 SL XLEDHome 2 XL SL
Mõõtmed (K/L/S) 181 × 180 × 161 199 × 180 × 161
Võimsus 14,8 W 20 W
Valguskiirgus/heledus 1184 lm 1608 lm
Kaal 0,480 kg 0,525 kg
Projitseeritav pindala Eestvaade 274,1 cm
Külgvaade 86,3 cm
Võrgupinge 75 mA 97 mA
Jõudlustegur 0,84 0,86
Tõhusus 80 lm/W
Valgusvärvus 4000 K (neutraalne valge)
Värvuse taasesitusindeks Ra ≥ 80
Võrgupinge 230-240 ~V / 50/60 Hz
IP/kaitseklass IP44 / II
2
2
Eestvaade 307,2 cm
Külgvaade 90,3 cm
8. Käitusrikked
Rike Põhjus Abi
LED-prožektoril puudub pinge
n Kaitse defektne, sisse lülita-
mata, juhe katkenud
n Lühis
– 47 –
n Uus kaitse, lülitage võrgulüliti
sisse, kontrollige juhet
pingetestriga
n Kontrollige ühendusi
2
2
EE
Page 25

LT
!
!
5
METŲ
GARANTIJA
1. Apie šį dokumentą
Prašom įdėmiai perskaityti ir išsaugoti!
– Autorių teisės saugomos. Perspausdinti, taip pat
ir atskiras ištraukas, leidžiama tik gavus mūsų
sutikimą.
– Pasiliekama teisė daryti pakeitimus techninio
tobulinimo tikslais.
Simbolių paaiškinimas
Įspėjimas apie pavojus!
Nuoroda į atskiras dokumento teksto
...
dalis.
2. Bendrieji saugos nurodymai
Prieš pradėdami dirbti su prietaisu
atjunkite elektros energijos tiekimą!
• Šie prietaisai jungiami prie elektros tinklo, todėl
juos reikia prijungti tinkamai, vado vaujantis šalyje
galiojančiomis instaliacijos normomis ir jungimo
taisyklėmis. (DE-VDE 0100, AT-ÖVE/ÖNORM E
8001-1, CH-SEV 1000)
• Šviestuvą reikia įrengti tokioje padėtyje, kad
mažesniu nei 0,3 m atstumu nebūtų galimybės
ilgiau žiūrėti į šviestuvą.
• Darbo metu prožektoriaus korpusas įkaista.
LED plokštelę reguliuokite tik kai ji yra atvėsusi.
Nežiūrėkite į LED šviestuvą iš arti arba ilgą laiką
(> 5 min.). Taip galite sužaloti akies tinklainę.
• Nemontuokite prietaiso ant lengvai užsiliepsnojančių paviršių.
3. XLED home 2 SL /
XLED home 2 XL SL
Naudojimas pagal paskirtį
– LED prožektorius skirtas montuoti ant sienos
lauke.
– Pilnai sukama LED plokštelė.
– Galima įsigyti kaip atskirą prožektorių arba jun-
giamą į tinklą su pagrindine versija.
Dėl laisvai sukamos plokštelės prožektorius idealiai
tinka naudoti tiek privačioje erdvėje namo ar sklypo
apšvietimui, tiek pramoninėje zonoje, pvz., įmonės
sklypui apšviesti. Itin veiksminga LED technologija kartu su matiniu stiklu užtikrina didelio ploto
apšvietimą.
Konstrukciniai variantai
– XLED home 2 SL
– XLED home 2 XL SL
Tiekiama įranga (3.1 pav.)
Prožektoriaus galvutės sukimosi zona (3.2/3.3 pav.)
Gaminio matmenys (3.4/3.5 pav.)
Prietaiso apžvalga (3.6 pav.)
A Šviesos diodų skydas
B Korpusas
C Sieninis laikiklis
4. Elektros įrengimas
Tinklo įvado prijungimas
Įvadą sudaro trijų laidų kabelis:
L = fazė (dažniausiai juodas arba rudas laidas)
N = nulinis laidas (dažniausiai mėlynas)
PE = apsauginis laidas (žalias / geltonas)
Jei kyla abejonių, laidus patikrinkite įtampos indikatoriumi; po to atjunkite srovę. Fazė (L) ir nulinis laidas (N) jungiami prie šviestuvo gnybtų. Naudojantis
gnybtu (E) galima prijungti apsauginį laidą.
Svarbu! Neteisingai sujungti laidai sukelia trumpąjį
jungimą prietaise arba paskirstymo dėžutėje. Tokiu
atveju reikia dar kartą identifikuoti atskirus kabelius
ir prijungti iš naujo.
Šio šviestuvo šviesos elementas yra nekeičiamas,
todėl prireikus jį pakeisti (pvz., pasibaigus tarnavimo
laikui), reikia keisti visą šviestuvą.
5. Montavimas
• Visas dalis patikrinkite dėl pažeidimų.
• Esant pažeidimams gaminio nenaudokite.
• Prožektoriaus padėties nustatymas. (5.1 pav.)
Montavimo eiga
• Išjunkite elektros energijos tiekimą. (3.7 pav.)
• Atlaisvinkite varžtus. (5.2 pav.)
• Nuimkite korpusą (B) nuo sieninio laikiklio. (C).
(5.3 pav.)
• Atskirkite kištukinį gnybtą (kaištį) nuo sieninio
laikiklio. (5.4 pav.)
• Pasižymėkite gręžtinių skylių vietas. (5.5 pav.)
• Išgręžkite skyles ir įkiškite kaiščius. (5.6 pav.)
• Įstatykite sandarinimo kaištį. (5.7 pav.)
– Potinkinis įvadas (5.8 pav.)
– Virštinkinis įvadas su distanciniais laikikliais
(5.9 pav.)
• Prijunkite jungiamuosius laidus. (5.10 pav.)
• Sujunkite kištukinius gnybtus. (5.11 pav.)
• Korpusą uždėkite ant sieninio laikiklio. (5.12 pav.)
• Įsukite apsauginius varžtus. (5.13 pav.)
• Įjunkite elektros energijos tiekimą. (5.13 pav.)
6. Gamintojo garantija
Šis „Steinel“ produktas pagamintas itin kruopščiai,
pagal galiojančias normas patikrintos jo funkcijos
ir saugumas bei papildomai atlikta pasirinktų prietaisų patikra. „Steinel“ suteikia prietaisui garantiją.
Garantinis laikotarpis – 5 metai. Jis skaičiuojamas
nuo prietaiso pardavimo vartotojui dienos. Mes
pašalinsime defektus, susijusius su medžiagų
arba gamybos broku; garantiniu laikotarpiu, mūsų
nuožiūra, prietaisas nemokamai remontuojamas arba keičiamos sugedusios dalys. Garantija
netaikoma susidėvinčioms dalims, taip pat jei
prietaisas sugenda dėl netinkamo naudojimo arba
netinkamos priežiūros. Kitiems daiktams padaryta
žala neatlyginama. Garantija taikoma tik tuo atveju,
jei neišardytas prietaisas kartu su trumpu gedimo
aprašymu, kasos čekiu arba sąskaita (pirkimo
data ir pardavėjo antspaudu), tinkamai supakuotas atsiunčiamas į atitinkamą techninės priežiūros
tarnybos vietą.
Aptarnavimas
Pasibaigus garantinio aptarnavimo laikotarpiui
arba jei yra gedimų, kuriems garantija netaikoma,
prietaisą taiso mūsų gamyklos servisas. Prašom
tinkamai supakuotą produktą atsiųsti į artimiausią
servisą.
GAMINTOJO
7. Techniniai duomenys
XLEDHome 2 SL XLEDHome 2 XL SL
Matmenys (A/P/G) 181 × 180 × 161 199 × 180 × 161
Galingumas 14,8 W 20 W
Šviesos srautas / šviesumas 1184 lm 1608 lm
Svoris 0,480 kg 0,525 kg
Projektuojamas plotas Vaizdas iš priekio 274,1 cm
Vaizdas iš šono 86,3 cm
Tinklo srovė 75 mA 97 mA
Galios koeficientas 0,84 0,86
Efektyvumas 80 lm
Šviesos spalva 4000 K (neutrali balta)
Spalvos atkūrimo indeksas Ra ≥ 80
Tinklo įtampa 230–240 ~V / 50/60 Hz
IP apsaugos klasė IP44 / II
2
Vaizdas iš priekio 307,2 cm
2
Vaizdas iš šono 90,3 cm
8. Veikimo sutrikimai
Sutrikimas Priežastis Ištaisymas
Šviesos diodų prožektoriuje nėra
įtampos
n Sugedęs, neįjungtas saugiklis,
nutrūkusi elektros srovė
n Trumpasis jungimas
n Pakeiskite saugiklį, įjunkite
tinklo jungiklį, įtampos indikatoriumi patikrinkite elektros
laidus
n Patikrinkite įvadą
2
2
LT
– 48 –
– 49 –
Page 26

LV
!
!
5
GADU
1. Par šo dokumentu
Lūdzu, izlasiet to uzmanīgi un saglabājiet!
– Autortiesības ir aizsargātas. Pārpublicēšana, arī
atsevišķu izvilkumu veidā, tikai ar mūsu atļauju.
– Paturam tiesības veikt izmaiņas, kas saistītas ar
tehnikas attīstību.
Simbolu skaidrojums
Brīdinājums par bīstamību!
Norāde uz tekstu dokumentā.
...
2. Vispārēji drošības norādījumi
Pirms jebkādiem darbiem ar ierīci,
pārtraukt strāvas padevi tai!
• Šo ierīču instalēšana nozīmē darbu ar elektrotīkla
spriegumu; tā jāizpilda profesionāli, saskaņā
konkrētās valsts instalācijas priekšrakstiem un
pieslēgšanas noteikumiem. (DE-VDE 0100,
AT-ÖVE/ÖNORM E 8001-1, CH-SEV 1000)
• Gaismeklis ir novietojams tā, lai nebūtu sagaidāma ilgstoša skatīšanās gaismeklī no tuvāka
attāluma par 0,3 m.
• Starmeša korpuss sasilst darbības laikā. LED
paneļa iestatīšanu veiciet tikai tad, kad tas ir
atdzisis. Neskatieties LED gaismeklī no tuva attāluma, kā arī ilgāku laiku (> 5 min). Tas var izraisīt
tīklenes bojājumus.
• Nemontējiet ierīci pie viegli uzliesmojošām
virsmām.
3. XLED home 2 SL /
XLED home 2 XL SL
Pareiza lietošana
– LED sensorstarmetis ir piemērots motāžai pie
sienas ārā.
– Brīvi pagriežams LED panelis un kustīgs sensors.
– Pieejams kā atsevišķs starmetis vai tīklā ar
vadošo versiju.
Ar brīvi pagriežamo paneli iespējams izgaismot gan
privāto zonu - mājā un tās teritorijā, gan industriālo
zonu, piemēram, uzņēmuma teritoriju. Ļoti efektīvā
LED tehnoloģija savienojumā ar opālstiklu nodrošina virsmu noklājošu apgaismojumu.
Modeļi
– XLED home 2 SL
– XLED home 2 XL SL
Piegādes apjoms (3.1. att.)
Strmeša galvas pagriešanas zona (3.2./3.3. att.)
Produkta izmēri (3.4./3.5. att.)
Ierīces komplektācija (3.6. att.)
A LED panelis
B Korpuss
C Sienas stiprinājums
4. Elektriskā instalācija
Elektrotīkla pievadvada pieslēgums
Tīkla pievadvadu veido 3 dzīslu kabelis:
L = fāze (parasti melns, brūns vai pelēks)
N = nulles vads (parasti zils)
PE = zemējums (zaļš/dzeltens)
Šaubu gadījumā ar sprieguma mērītāju ir jānosaka
kabeļa dzīslas; pēc tam kabelis atkārtoti ir jāatslēdz
no strāvas tīkla. Fāze (L) un nulles vads (N) tiek
pieslēgti savienotājkopnei. Zemējumu var saslēgt ar
spailes (E) palīdzību.
Svarīgi! Pieslēgumu sajaukšana vēlāk var izraisīt
īssavienojumu ierīcē vai Jūsu sadales skapī. Šādā
gadījumā ir atkārtoti jāveic atsevišķu kabeļu noteikšana un savienošana.
Šī gaismekļa gaismas avots nav nomaināms, ja
gaismas avotu ir jānomaina (piem., tā darba mūža
beigās), ir jānomaina viss gaismeklis.
5. Montāža
• Pārbaudiet visas detaļas, vai tās nav bojātas.
• Bojājumu gadījumā nelietojiet produktu.
• Starmeša virziena iestatījums. (5.1. att.)
Montāžas soļi
• Atslēdziet elektrības apgādi. (3.7. att.)
• Atskrūvējiet drošības skrūves. (5.2. att.)
• Atvienojiet korpusu (B) no sienas turētāja (C).
(5.3. att.)
• Atvienojiet sienas stiprinājumu no iespraužamās
spailes. (5.4. att.)
• Atzīmējiet urbuma vietas. (Abb. 5.5)
• Izurbiet caurumus un ievietojiet dībeļus (5.6. att.)
• Ievietojiet blīvaizbāzni. (5.7. att.)
– Zemapmetuma pievads (5.8. att.)
– Virsapmetuma pievads ar starplikām (5.9. att.)
• Pievienojiet pieslēguma kabeli. (5.10. att.)
• Savienojiet kontaktspaili. (5.11. att.)
• Uzspraudiet korpusu uz sienas stiprinājuma.
(5.12. att.)
• Ieskrūvējiet drošības skrūves. (5.13. att.)
• Ieslēdziet elektrības apgādi. (5.13. att.)
6. Raotja garantija
Šis STEINEL ražojums ir izgatavots ar vislielāko
rūpību, tā darbība un drošība pārbaudīta atbilstoši
spēkā esošajiem normatīviem, un noslēgumā veikta
izlases veida kvalitātes kontrole. Steinel garantē nevainojamas produkta īpašības un darbību.
Garantijas laiks ir 5 gadi un tā stājas spēkā ar
ierīces pārdošanas dienu lietotājam. Mēs novēršam trūkumus, kas radušies materiālu vai rūpnīcas
kļūdu dēļ, garantijas serviss ietver sevī bojāto daļu
remontu vai apmaiņu pēc mūsu izvēles. Garantijas
serviss neattiecas uz nodilumam pakļauto daļu bojājumiem, kā arī uz bojājumiem un trūkumiem, kas
radušies nelietpratīgas lietošanas vai apkopes, kā
arī kritiena rezultātā. Garantijas saistības neattiecas
uz citiem objektiem, kas varētu tikt bojāti ierīces
darbības rezultātā. Garantija ir spēkā tikai tad, ja
neizjaukta ierīce kopā ar īsu kļūdas aprakstu, kases
čeku vai rēķinu (ar pirkšanas datumu un tirgotāja
zīmogu), labi iepakota, tiek nosūtīta attiecīgajai
servisa nodaļai.
Serviss:
Pēc garantijas laika beigām vai gadījumos, kad
garantija nav spēkā, nepieciešamo remontu veic
rūpnīcas servisa dienests. Lūdzu, nosūtiet labi
iesaiņotu izstrādājumu uz tuvāko servisa darbnīcu.
RAŽOTĀJA
GARANTIJA
7. Tehniskie dati
XLEDHome 2 SL XLEDHome 2 XL SL
Izmēri (A/P/Dz) 181 × 180 × 161 199 × 180 × 161
Jauda 14,8 W 20 W
Gaismas plūsma/Gaišums 1184 lm 1608 lm
Svars 0,480 kg 0,525 kg
Projicētais laukums Frontāli: 274,1 cm
No sāna: 86,3 cm
Elektroenerģija 75mA 97mA
Jaudas faktors 0,84 0,86
Efektivitāte 80 lm/W
Gaismas krāsa 4000 K (neitrāli balta)
Krāsas attēlošanas indekss Ra ≥ 80
Elektrotīkla spriegums 230-240 ~V / 50/60 Hz
IP/Aizsargklase IP44 / II
2
2
Frontāli: 307,2 cm
No sāna: 90,3 cm
8. Darbības traucējumi
Traucējumi Cēlonis Risinājums
LED starmetis ir bez sprieguma
n Bojāts drošinātājs, nav
ieslēgts, bojāts vads
n Īssavienojums
n Jauns drošinātājs, ieslēdziet
tīkla slēdzi; pārbaudiet vadu ar
sprieguma mērītāju
n Pārbaudiet pieslēgumus
2
2
LV
– 50 –
– 51 –
Page 27

RU
!
!
5
ЛЕТ
1. Об этом документе
Просим тщательно прочесть и сохранить!
– Защищено авторскими правами. Перепечатка,
также выдержками, только с нашего согласия.
– Мы сохраняем за собой право на изменения,
которые служат техническому прогрессу.
Разъяснение символов
Предупреждение об опасностях!
Указание на текст в документе.
...
2. Общие указания по технике
безопасности
Перед началом любых работ, проводимых на приборе, следует отключить
напряжение!
• Монтажные работы по подключению этих при-
боров относятся к категории работ с сетевым
напряжением; поэтому они должны проводиться согласно инструкциям по монтажу и при со-
блюдении условий подключения электрических
изделий, действующих в стране. (DE-VDE 0100,
AT-ÖVE/ÖNORM E 8001-1, CH-SEV 1000)
• Светильник следует отпозиционировать так,
чтобы не было опасности длительно смотреть
на светильник с расстояния менее 0,3 м.
• Во время работы корпус прожектора нагре-
вается, поэтому регулировку светодиодной
панели следует производить только после
ее остывания. Не смотреть на светодиодный
светильник с короткой дистанции или в течение
длительного времени (> 5 мин.). Это может
привести к повреждениям сетчатки.
• Запрещается монтировать светильник на легко
возгораемых поверхностях.
3. XLED home 2 SL /
XLED home 2 XL SL
Применение по назначению
– Светодиодный прожектор подходит для настен-
ного монтажа на улицах.
– Произвольно поворачиваемая светодиодная
панель.
– Предлагается в качестве отдельного прожекто-
ра или в версии "мастер".
Этот прожектор с произвольно поворачиваемой
панелью прекрасно подходит для использования
в частных владениях для освещения дома или
прилегающего пространства, также в промышленной сфере, например, для освещения зданий
и территорий. Эффективнейшая светодиодная
технология обеспечивает в комбинации с опаловым стеклом поверхностный свет.
Исполнения
– XLED home 2 SL
– XLED home 2 XL SL
Объем поставки (рис. 3.1)
Зона поворота головки прожектора
(рис. 3.2/3.3)
Размеры изделия (рис. 3.4/3.5)
Обзор приборов (рис. 3.6)
А Светодиодная панель
B Корпус
C Кронштейн
4. Электромонтаж
Присоединение сетевого провода
Сетевой провод состоит из 3 жил:
L = фаза (обычно черного, коричневого или
серого цвета)
N = нулевой провод (чаще всего синий)
PE = провод заземления (зеленый/желтый)
В случае сомнения идентифицировать кабель с
помощью индикатора, затем снова отключить
напряжение. Присоединить фазный (L) и нулевой
провод (N) к соответствующим клеммам светильника. Шлейфование провода заземления можно
выполнить с помощью клеммы (Е).
Важно: Неправильное присоединение проводов
в устройстве или в распределительном ящике с
предохранителями может привести к короткому
замыканию. В таком случае рекомендуется еще
раз проверить провода и заново подключить их.
Источник света этого прожектора не подлежит
замене. При необходимости замены источника
света (например, в конце его срока службы),
необходимо заменить весь прожектор.
5. Монтаж
• Проверить все конструктивные детали на предмет повреждения.
• При повреждениях не включать продукт.
• Выравнивание прожектора. (рис. 5.1)
– 52 –
Порядок монтажа
• Отключить электропитание. (рис. 3.7)
• Отпустить стопорные винты. (рис. 5.2)
• Отсоединить корпус (В) от кронштейна (С).
(рис. 5.3)
• Отсоединить контактный зажим (Male) от кронштейна. (рис. 5.4)
• Наметить отверстия для сверления. (рис. 5.5)
• Просверлить отверстия и вставить дюбели.
(рис. 5.6)
• Вставьте уплотнители. (рис. 5.7)
– Подвод кабеля скрытой проводкой. (рис. 5.8)
– Подвод кабеля открытой проводкой с рас-
порками. (рис. 5.9)
• Подключить соединительный кабель.
(рис. 5.10)
• Соединить контактный зажим. (рис. 5.11)
• Надеть корпус на кронштейн. (рис. 5.12)
• Вкрутить стопорные винты. (рис. 5.13)
• Включить электропитание. (рис. 5.13)
6. Гарантия производителя
Данное изделие производства STEINEL было с
особым вниманием изготовлено и испытано на
работоспособность и безопасность эксплуата-
ции соответственно действующим инструкциям,
а потом подвергнуто выборочному контролю
качества. Фирма STEINEL гарантирует высокое
качество и надежную работу изделия. Гаран-
тийный срок эксплуатации составляет 5 лет со
дня продажи изделия. Фирма обязуется устра-
нить недостатки, которые возникли вследствие
дефекта материала или конструкции. Дефекты
устраняются путем ремонта изделия либо заме-
ной неисправных деталей по усмотрению фирмы.
Гарантийный срок эксплуатации не распростра-
няется на повреждения и дефекты, возникшие
в результате износа деталей, ненадлежащей
эксплуатации и ухода. Фирма не несет ответ-
ственности за материальный ущерб третьих лиц,
нанесенный в процессе эксплуатации изделия.
Гарантия предоставляется только в том случае,
если изделие в собранном и упакованном виде с
кратким описанием неисправности было отправлено вместе с приложенным кассовым чеком или
квитанцией (с датой продажи и печатью торгового
предприятия) по адресу сервисной мастерской.
Сервисное обслуживание:
По истечении гарантийного срока или при наличии неполадок, исключающих гарантию, наше
сервисное предприятие предлагает свои услуги.
ГАРАНТИИ
ПРОИЗВОДИТЕЛЯ
В таких случаях просим отправлять изделие в упакованном
виде в ближайшую сервисную
мастерскую.
7. Технические данные
Габаритные размеры (Ш × В × Г) 181 × 180 × 161 199 × 180 × 161
Мощность 14,8 Вт 20 Вт
Световой поток/яркость 1184 лм 1608 лм
Вес 0,480 кг 0,525 кг
Проецированная поверхность Вид спереди 274,1 см
Сетевой ток 75мА 97мА
Коэффициент мощности 0,84 0,86
Эффективность 80 лм/Вт
Свет цвета 4000 K (нейтральный белый)
Коэффициент цветопередачи Ra ≥ 80
Сетевое напряжение 230-240 ~В / 50/60 Гц
IP/Класс защиты IP44 / II
XLEDHome 2 SL XLEDHome 2 XL SL
Вид сбоку 86,3 см
2
2
Вид спереди 307,2 см
Вид сбоку 90,3 см
8. Неполадки при эксплуатации
Нарушение Причина Устранение
Светодиодный сенсорный
прожектор без напряжения
n Дефект предохранителя, не
включен, неисправность
провода
n Короткое замыкание
– 53 –
n Заменить предохранитель,
включить сетевой выключатель, проверить провод
индикатором напряжения
n Проверить соединения
2
2
RU
Page 28

BG
!
!
5
1. За този документ
Моля прочетете го внимателно и го пазете!
– Всички права запазени. Препечатване, дори
откъслечно, само с наше разрешение.
– Запазваме си правото за промени, които слу-
жат на техническото развитие.
Обяснение на символите
Предупреждение за опасности!
Препратка към части от текста в
...
документа.
2. Общи указания за безопасност
Преди да предприемете каквито и да е
работи по уреда, прекъснете електрическото захранване!
• При монтаж на тези уреди се изисква работа с
електричество. По тази причина той трябва да
се извърши професионално, според съответните държавни предписания и изисквания.
(DE-VDE 0100, AT-ÖVE/ÖNORM E 8001-1,
CH-SEV 1000)
• Лампата трябва да се позиционира така, че да
не може да се очаква дълготрайно взиране в
лампата от разстояние по-малко от 0,3 м.
• Корпусът на лампата се нагрява по време
на работа. Моля насочвайте LED-прожекто-
ра, само когато е изстинал. Да не се гледа в
LED-лампата отблизо или продължително време (> 5 мин.). Това може да доведе до уврежда-
не на ретината.
• Не монтирайте уреда върху леснозапалими
повърхности.
3. XLED home 2 SL /
XLED home 2 XL SL
Употреба по предназначение
– LED-прожектор, подходящ за монтаж на външ-
на стена.
– Свободно движещ се LED-панел.
– Наличен като самостоятелен прожектор или
като основна единица за връзка в мрежа.
Благодарение на свободно регулируемия си панел
прожекторът може да се използва многостранно,
независимо дали за лична употреба за осветява-
не на къща и двор или за бизнес цели, напр. за
осветяване на фирмена сграда. Високо ефективната LED-технология дава светлина върху цялата
площ, благодарение на опалния абажур.
Изпълнения
– XLED home 2 SL
– XLED home 2 XL SL
Съдържание на комплекта (рис. 3.1)
Диапазон на изместване на главата на прожекто-
ра (рис. 3.2/3.3)
Размери (рис. 3.4/3.5)
Преглед на уреда (рис. 3.6)
A LED-панел
B Корпус
C Стойка за стена
4. Ел. инсталация
Свързване към мрежата
Кабелът съдържа 3 проводника:
L = фаза (обикновено черен, кафяв или сив)
N = нула (обикновено син)
PE = заземяващ проводник (зелен/жълт)
При съмнение, проводниците трябва да бъдат
идентифицирани с уред за проверка на напрежението, след което отново да бъдат свързани, без
напрежение. Фазата (L) и нулата (N) се свързват
към лустер клемата. Заземителният проводник
може да се свърже с помощта на клемата (E).
Важно: Размяна на проводниците води до късо
съединение в уреда или таблото с предпазители. При такъв случай всеки проводник трябва
още веднъж да бъде идентифициран и наново
свързан.
Светлинният източник на тази лампа е незаменяем; ако се наложи замяната му (напр. след края
на живота му), цялата лампа трябва да се замени.
5. Монтаж
• Всички части да се проверят за щети.
• При повреди продуктът да не се пуска в експлоатация.
• Насочване на прожектора. (рис. 5.1)
Последователност за монтаж
• Да се изключи електрозахранването. (рис. 3.7)
• Да се отвинтят обезопасителните винтове.
(рис. 5.2)
• Корпусът (B) да се отдели от стойката за стена
(C). (рис. 5.3)
– 54 –
• Клемата (мъжка) да се отдели от стойката за
стена. (рис. 5.4)
• Да се маркират местата за пробиване.
(рис. 5.5)
• Да се пробият дупките и да се поставят дюбелите (рис. 5.6)
• Да се поставят уплътнителите. (рис. 5.7)
– Монтаж скрити кабели (рис. 5.8)
– Монтаж открити кабели с подложки
(рис. 5.9)
• Кабелите да се свържат. (рис. 5.10)
• Клемата да се свърже. (рис. 5.11)
• Корпусът да се постави на стойката за стена.
(рис. 5.12)
• Да се завинтят осигурителните винтове.
(рис. 5.13)
• Електрозахранването да се включи. (рис. 5.13)
6. Гаранция от производителя
Този продукт на STEINEL е произведен с найголямо старание, проверен е за функционалност и безопасност, според действащите разпоредби, след което е подложен на качествен
контрол, на принципа на случайния избор.
STEINEL гарантира перфектна изработка и
функции. Гаранцията е с продължителност 5
години и започва от деня на покупката. Ние
отстраняваме дефекти, причинени от грешки
в производството или качеството на материала, ремонтирайки или заменяйки дефектните
части, по наш избор. Гаранцията не важи за
щети по износващи се части, както и за щети
и дефекти, получени в резултат на неправилна
употреба или поддръжка. Последващи щети на
чужди предмети са изключени от гаранцията.
Гаранцията е валидна само, ако неразглобени-
ят уред бъде изпратен на съответния сервиз,
добре опакован и придружен от кратко описание на дефекта, касова бележка или фактура
(дата на покупка и печат на търговец).
Ремонтен сервиз:
След изтичане на гаранцията или при дефекти,
непокрити от гаранцията, се обръщайте към нашите заводски сервизи. Моля изпратете добре
опакования продукт до най-близкия сервиз.
ГОДИНИ
ГАРАНЦИЯ
ОТ ПРОИЗВОДИТЕЛ
7. Технически данни
XLEDHome 2 SL XLEDHome 2 XL SL
Размери (В/Ш/Д) 181 × 180 × 161 199 × 180 × 161
Мощност 14,8 W 20 W
Светлинен поток/осветеност 1184 lm 1608 lm
Тегло 0,480 кг 0,525 кг
Обхваната площ Челен изглед 274,1 см
Страничен изглед 86,3 см
Мрежов ток 75mA 97mA
Мощностен фактор 0,84 0,86
Ефективност 80 lm/W
Цвят на светлината 4000 K (неутрално бяло)
Индекс на цветовото отражение Ra ≥ 80
Захранване 230-240 ~V / 50/60 Hz
IP/Клас защита IP44 / II
2
Челен изглед 307,2 см
2
Страничен изглед 90,3 см
8. Проблеми при експлоатация
Проблем Причина Решение
LED-прожекторът е без
напрежение
n Дефектен предпазител, не е
включен, прекъснат кабел
n Kъсо съединение
– 55 –
n Нов предпазител, да се
включи; проводниците да се
проверят с уред за напрежение
n Да се проверят връзките
2
2
BG
Page 29

CN
!
!
5
1. 关于本文件
请仔细阅读并妥善保管!
–– 版权所有。未经我方批准禁止翻印或摘录。
–– 保留技术更改的权利。–
符号说明
危险警告!
指示文件中的文本位置。
...
2. 一般安全性提示
在设备上进行任何工作前均须断开电源!
• 安装该设备时涉及到电源电压的相关工作;因
此必须根据国家特定的安全规定和连接条件执
行工作 (DE-VDE 0100,
AT-ÖVE/ÖNORM E 8001-1, CH-SEV 1000)。
• –这样来定位灯具,在间距小于 .3 m时,聚光的
时间更长。
• 泛光灯外壳在使用期间会自动升温。仅当外壳
冷却后,才能调整 LED 灯盘。不得近距离或长
时间(> 5 分钟)直视 LED 灯。否则可能造成
视网膜损伤。
• 请勿把设备安装在易燃表面上。
3. XLED home 2 SL /
XLED home 2 XL SL
按规定使用
–– 壁装式 LED 泛光灯适用于外部区域。
–– 可自由摆动的 LED 灯盘。
–– 可作为单个泛光灯或者与主机联网的泛光–
灯出售。
无论是用于私人住宅的室内或室外照明,还是用于
商业建筑的办公室照明,辐射灯利用可自由旋转的
灯盘可以完美地照明。高效的LED技术用乳白色的
圆盘适用于平面照明。
规格
– XLED home 2 SL
– XLED home 2 XL SL
供货范围–(图–3.1)
泛光灯灯头摆动范围–(图 3.2/3.3)
产品尺寸–(图 3.4/3.5)
设备概况 (图–3.6)
A LED-板
B 壳体
C 墙壁支架
4. 电气安装
连接电源线
电源线由 3 芯电缆组成:
L = 火线(通常为黑色、棕色或灰色)
N = 零线(通常为蓝色)
PE = 保护线(绿色/黄色)
不确定时,必须使用试电笔鉴定电缆,然后重新切
断电源。火线(L)和零线(N)连接到接线端子
上。可借助端子–(E)–磨穿地线。
重要:混淆接头将导致设备内或者保险丝盒内发生
短路。此种情况下须辨别每一根电缆并重新连接。–
该灯的光源不能更换;如须更换光源(如在其使用
寿命结束时),更换整个灯。
5. 安装
• 检查所有部件是否损坏。
• 损坏时禁止使用产品
• 校准发射极.–(图 5.1)
安装步骤
• 切断供电. (图 3.7)
• 松开固定螺栓。(图5.2)
• 将壳体(B)同墙壁支架(C)分离。(图 5.3)
• 将插入端子(公)从墙壁支架分离。(图 5.4)
• 标记钻孔。(图 4.4)
• 钻孔,然后装入楔子。(图 5.6)
• 插入密封塞。(图 5.7)
– 暗装馈电线 (图 5.8)
– 带有间隔固定件的明装馈电线 (图 5.9)
• 连接接线电缆。(图 5.10)
• 连接插入端子。(图 5.11)
• 将壳体插装到墙壁支架上。(图 5.12)
• 拧入固定螺栓。(图5.13)
• 接通电源。(图 5.13)
6. 制造商担保
该产品系STEINEL(司登利)精心研发制造,已根
据有效规定通过了功能性及安全性审核,并进行了
抽样检查。施特朗保证其产品性能和功能完好。保
修期限为 5 年,自销售给消费者之日起计算。材料
或生产错误导致的产品缺陷由我方负责排除,质保
服务(通过维修或是更换缺陷部件解决)将由我方
决定。耗材损失、未正确使用及保养造成的损失和
损坏未包含在质保范围内。外购物品上持续出现的
发展性损坏亦不属于质保服务范畴。仅当将未拆卸
的设备连同简要的故障说明、收款凭据或发票–
(购买日期和零售商盖章)包装好并寄至相关维修
点时,才能享受质保。
服务:质保期已经到期或缺陷不在质保范围内的产
品,可由我方工厂服务部门进行维修。请将产品妥
善包装并寄至就近维修点。
年
厂商
7. 技术参数
XLEDHome 2 SL XLEDHome 2 XL SL
尺寸(高/长/宽)
功率
光流/亮度
重量
照射面积 正面 274.1 cm
电源电流
功率系数
效率
光色 4000 K (零线,白色)
显色指数:
电源电压
IP/防护等级
181 × 180 × 161 199 × 180 × 161
14.8 W 20 W
1184 lm 1608 lm
.480 kg .525 kg
2
侧面 86.3 cm
75mA 97mA
.84 .86
80 lm/W
Ra ≥ 80
230-240 ~V / 50/60 Hz
IP44 / II
2
8. 运行故障
故障 原因
LED 泛光灯没有电 n –保险丝损坏,未接通,断线
n 短路
质保
正面 307.2 cm
侧面 90.3 cm
补救办法
n –新保险丝,开启电源开关;用
试电笔检查导线
n 检查接头
2
2
– 56 –
– 57 –
CN
 Loading...