

Page 1
®
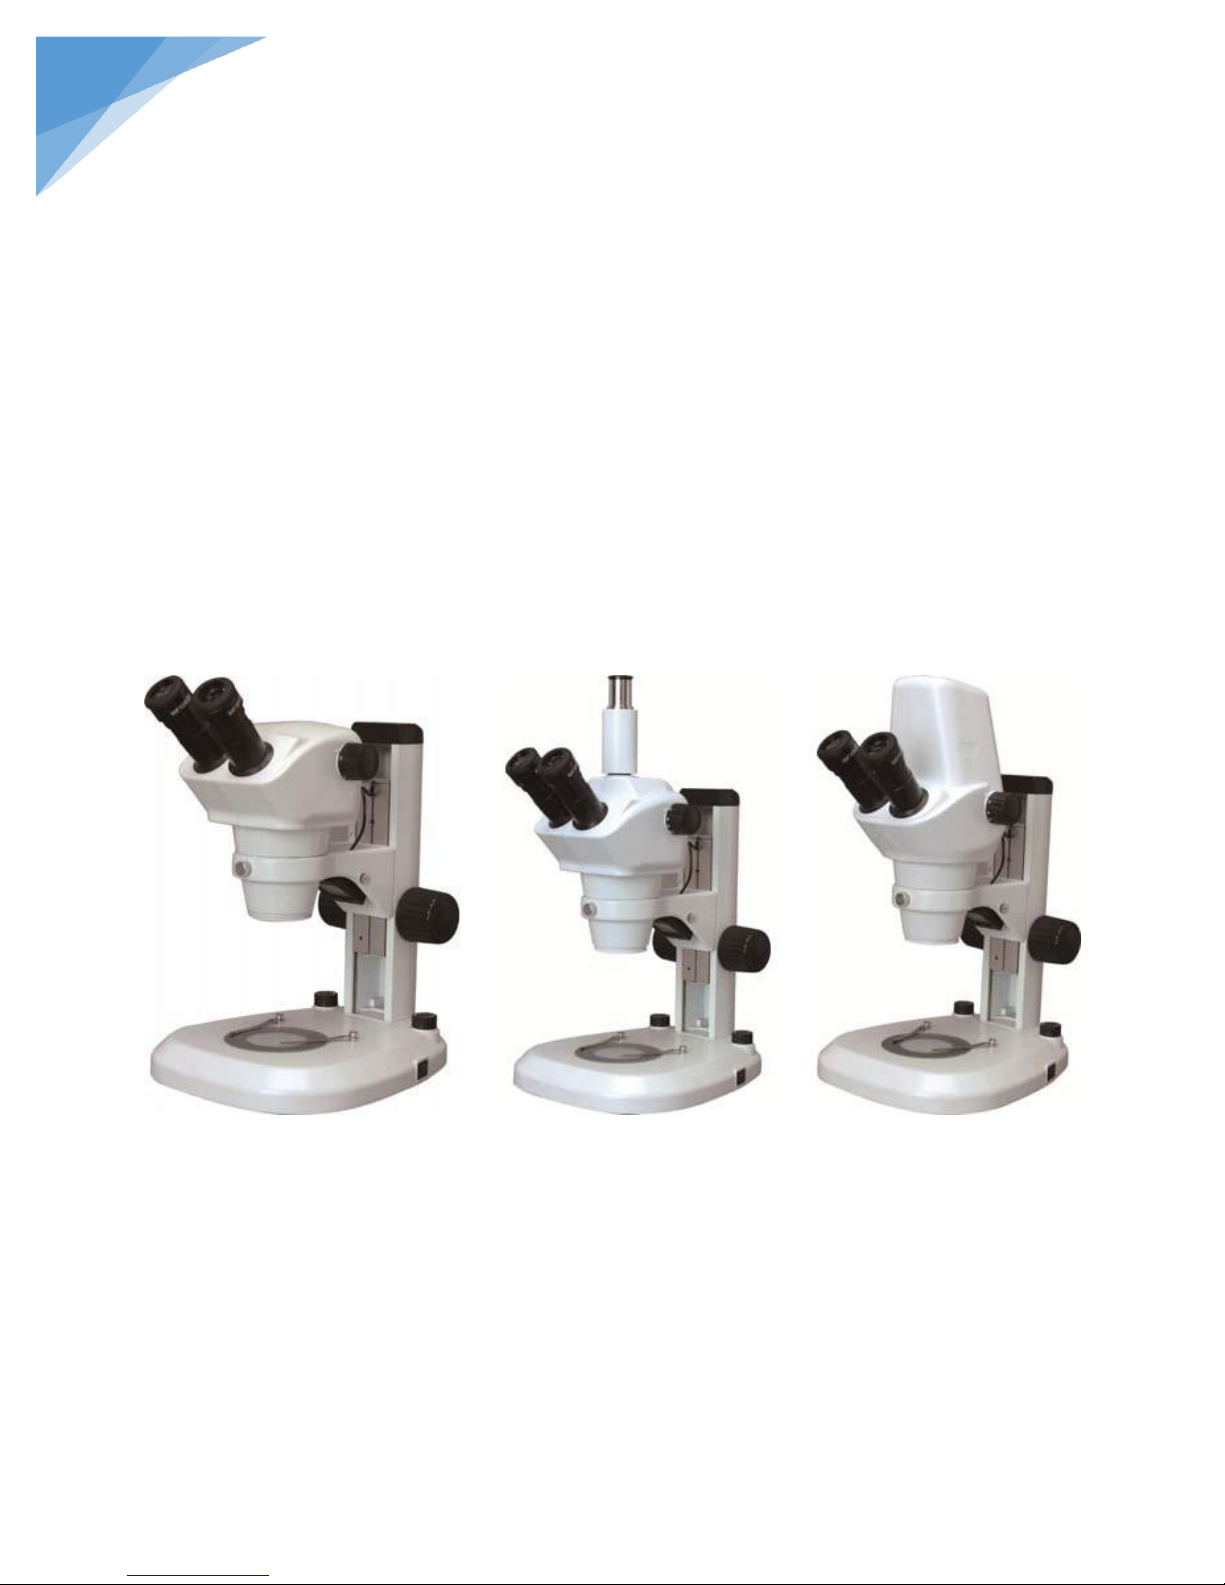
S-340
S-341
S-344
STEINDORFF
Zoom Stereo
Microscope
S-340 / S-341 / S-344
Instruction
Manual
This instruction manual is for the Zoom stereo microscope S-340/341/344. To insure safety and obtain
optimum performance and familiarize yourself fully with the use of this microscope .We recommend that
you read the manual thoroughly before operating the microscope, Attain this manual instruction in an easily
accessible place near the microscope for the further reference.
Page 2

1
®
Use Notices ………………………………………………………………………………………
2
1. Name of Components ……………………………………………………………………….
3
2. Assembly …………………………………………………………………………………….
4
2.1. Figure …………………………………………………………………………………..
4
2.2. Process …………………………………………………………………………………
5
3. Adjustment ………………………………………………………………………………….
7
3.1. Trinocular Head ……………………………………………………………………….
7
3.2. Stand …………………………………………………………………………………...
8
4. Technical parameter ………………………………………………………………………..
9
5. Troubleshooting …………………………………………………………………………….
9
6. Outfit …………………………………………………………………………………...........
10
CONTENTS
STEINDORFF
Page 3

2
®
USE NOTICES
STEINDORFF
Notice
1. The microscope is composed of precision components, Handle with care to prevent abrupt.
2. Check the input voltage: be sure the input voltage which signed in the back of the microscope is
consistent with the power supply voltage, or it will bring a serious damage to the instrument.
3. Microscope should be place dry and clean place. Do not expose the microscope in the sun
directly, avoiding high temperature and violent vibration.
4. Handle stand with one hand and the base with another hand when moving microscope.
5. If the bacterium solution or the water splash to the stage, objective or viewing tube, pull out the
cord at once, and wipe up the microscope. Otherwise, the instrument will be damaged.
6. The microscope illumination house will get hot when operating. Make sure enough room to
disperse heat.
7. Connect with land to prevent lighting strike.
8. Professional people to take the electronic components to prevent electricity strike.
9. Use the factory supplied power cord please.
Maintenance
1. All lenses had been precisely adjusted and do not take the microscope apart.
2. Do not take the Binocular head and focusing system apart.
3. The instrument should be kept clean, and prevent pollution while cleaning.
4. Wipe glass components softly, fingerprints and oil marked on it should be wipe off with a tissue
moistened with a small amount of xylene or a 3:7 mixture of alcohol and ether.
5. Never use the organic solution to clean the other surface, if necessary, pleased choose neutral
detergent.
6. Turn off electricity if microscope is moisture when operating .then wipe it off.
7. Do not take any parts of microscope apart, or else effecting microscope function.
8. The instrument should be kept in dry place, cover the microscope with the dust cover after the
illumination house temperature come down.
Page 4
3
®
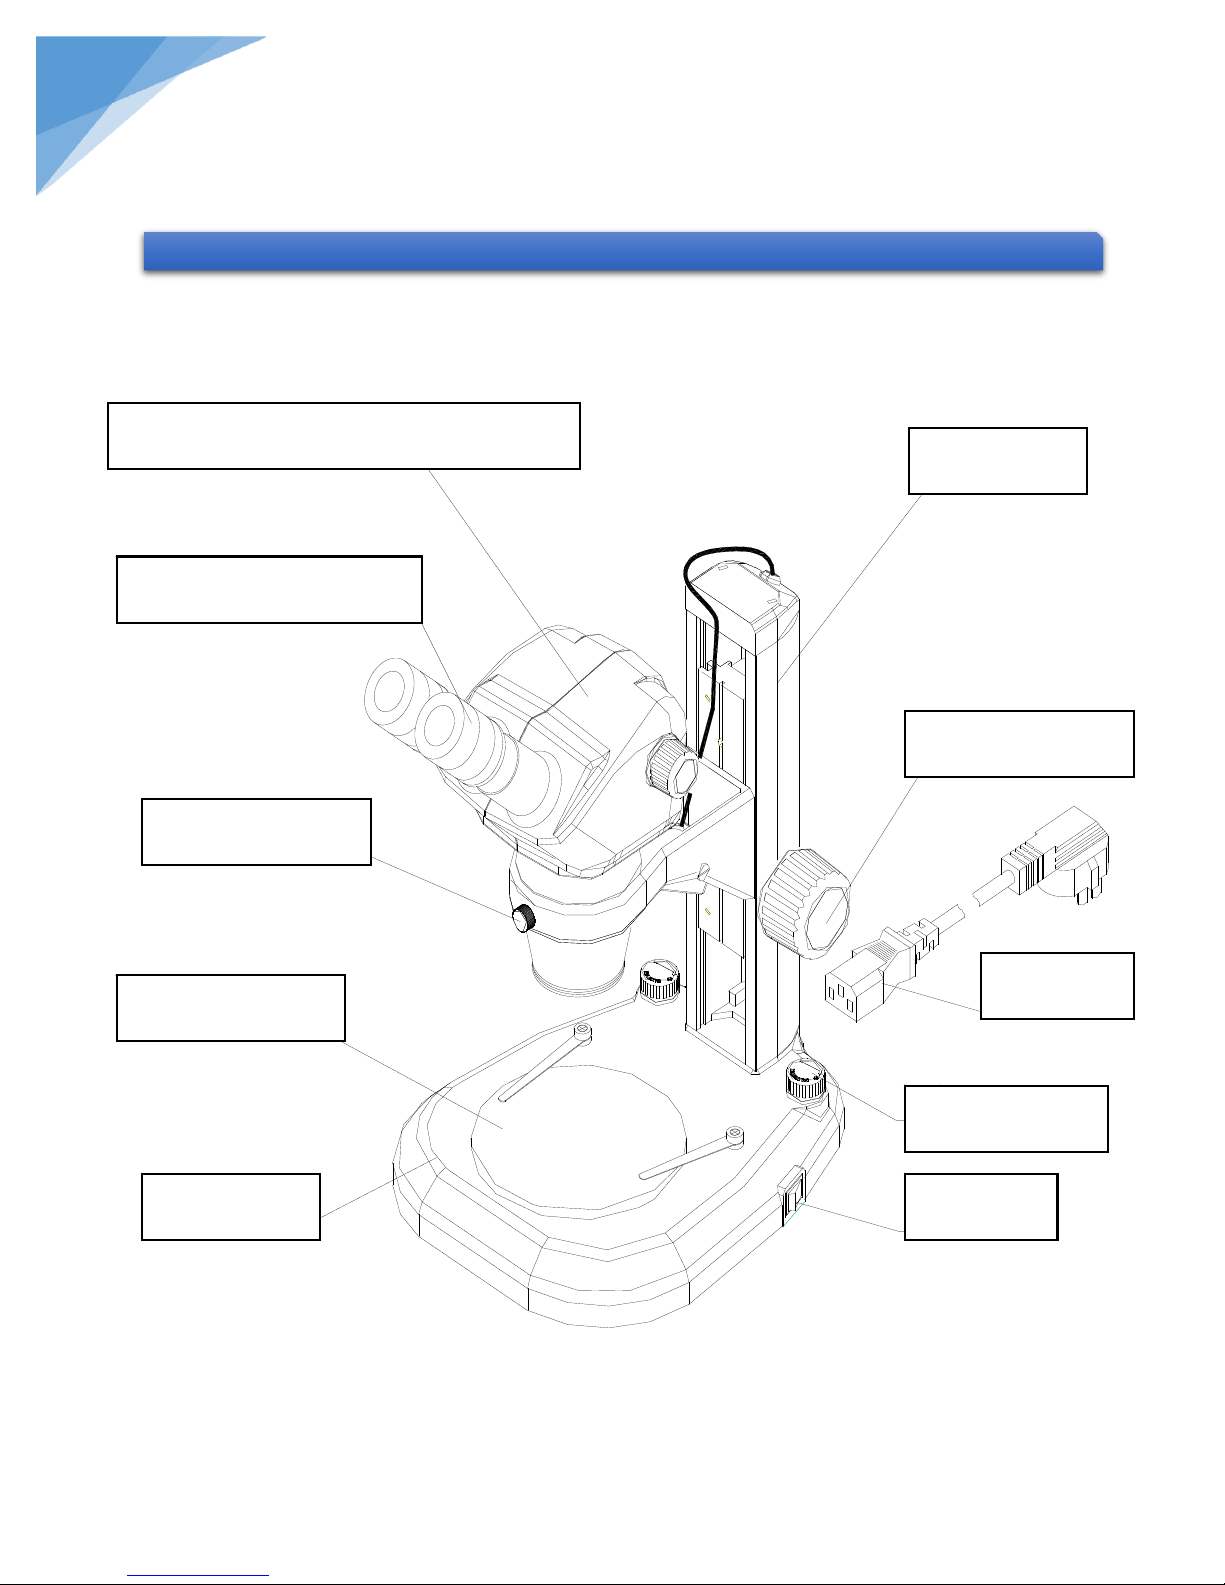
1. NAME OF COMPONENTS
STEINDORFF
Binocular/Trinocular/Digital head
EW 10[ eyepiece
Stand
Focusing knob
Lock-screw
Glass plate
Base
3RZHUFRUG
Shift knob
6with
Page 5
4
®
2. ASSEMBLY
STEINDORFF
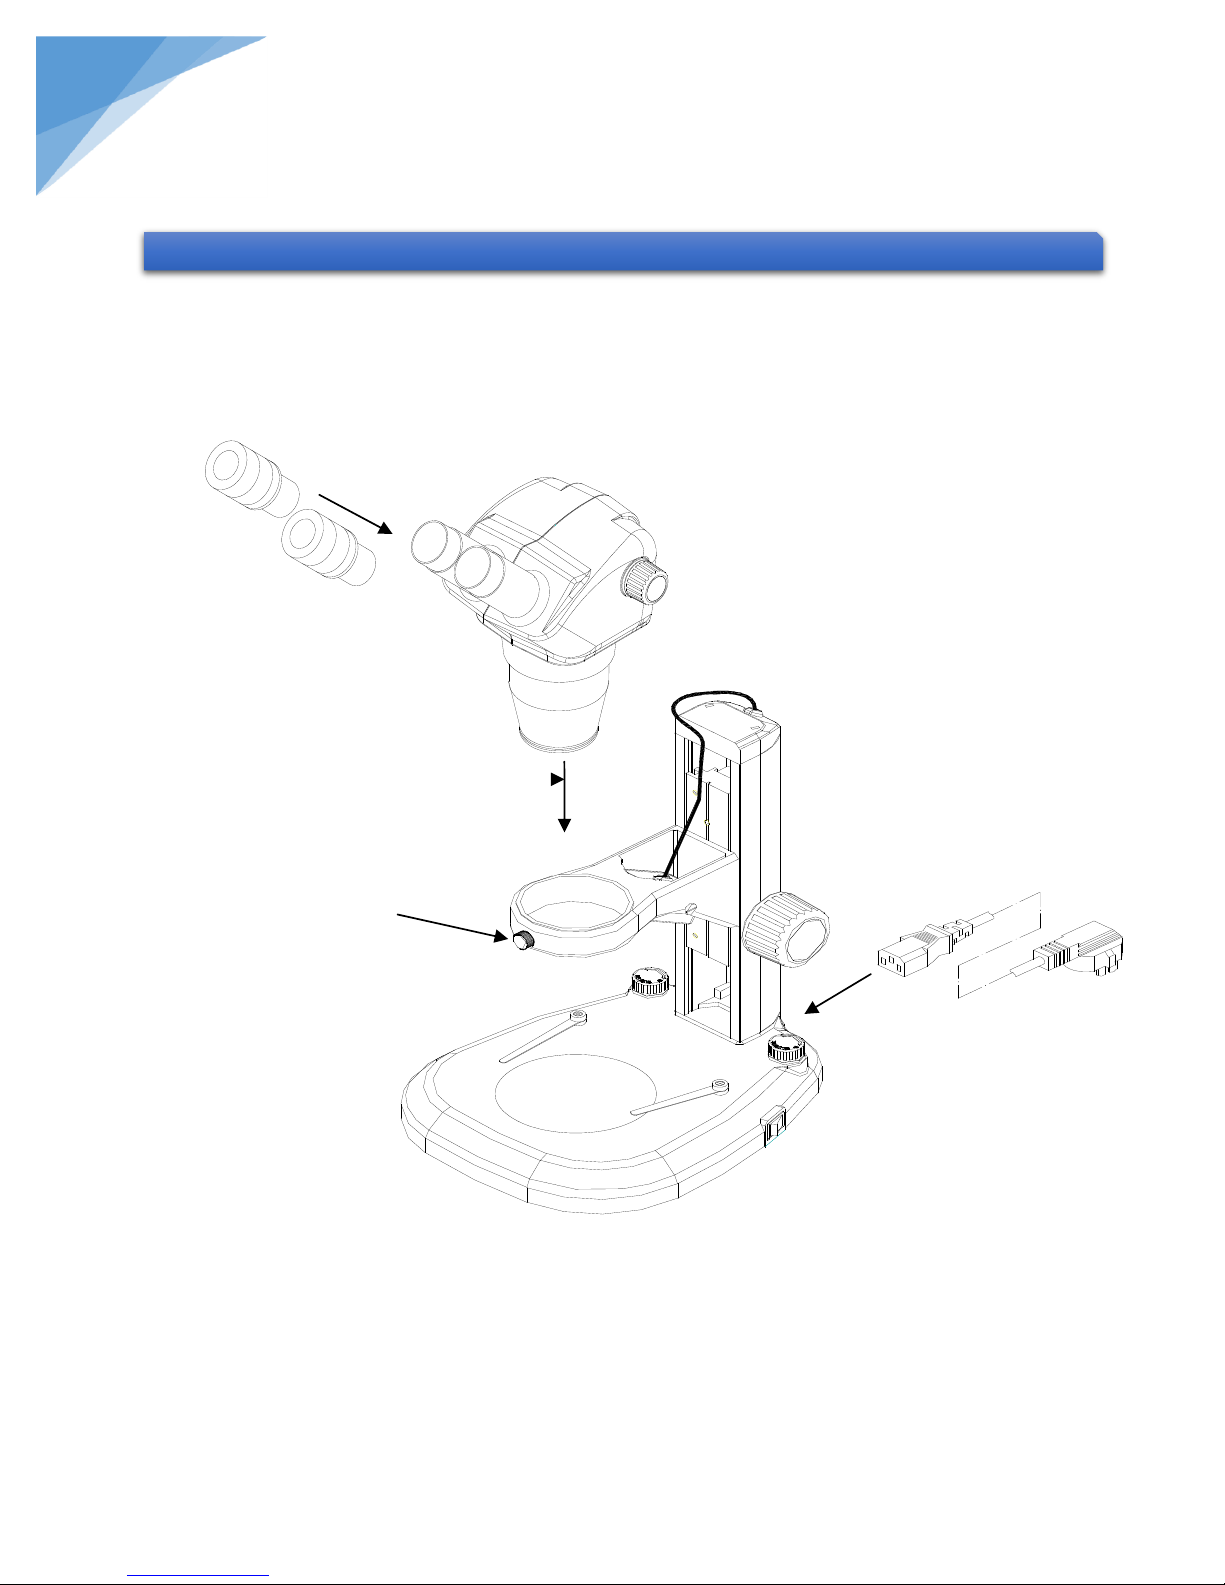
2.1. Assembly Graph
Graph below indicate the assembly process
Check it is clean before assembling. Do not scratch any components and the surface of glass.
EW10[ Eyepiece
③
Binocular head
②
①
Stand
④
3RZHUFRUG
Page 6
5
®
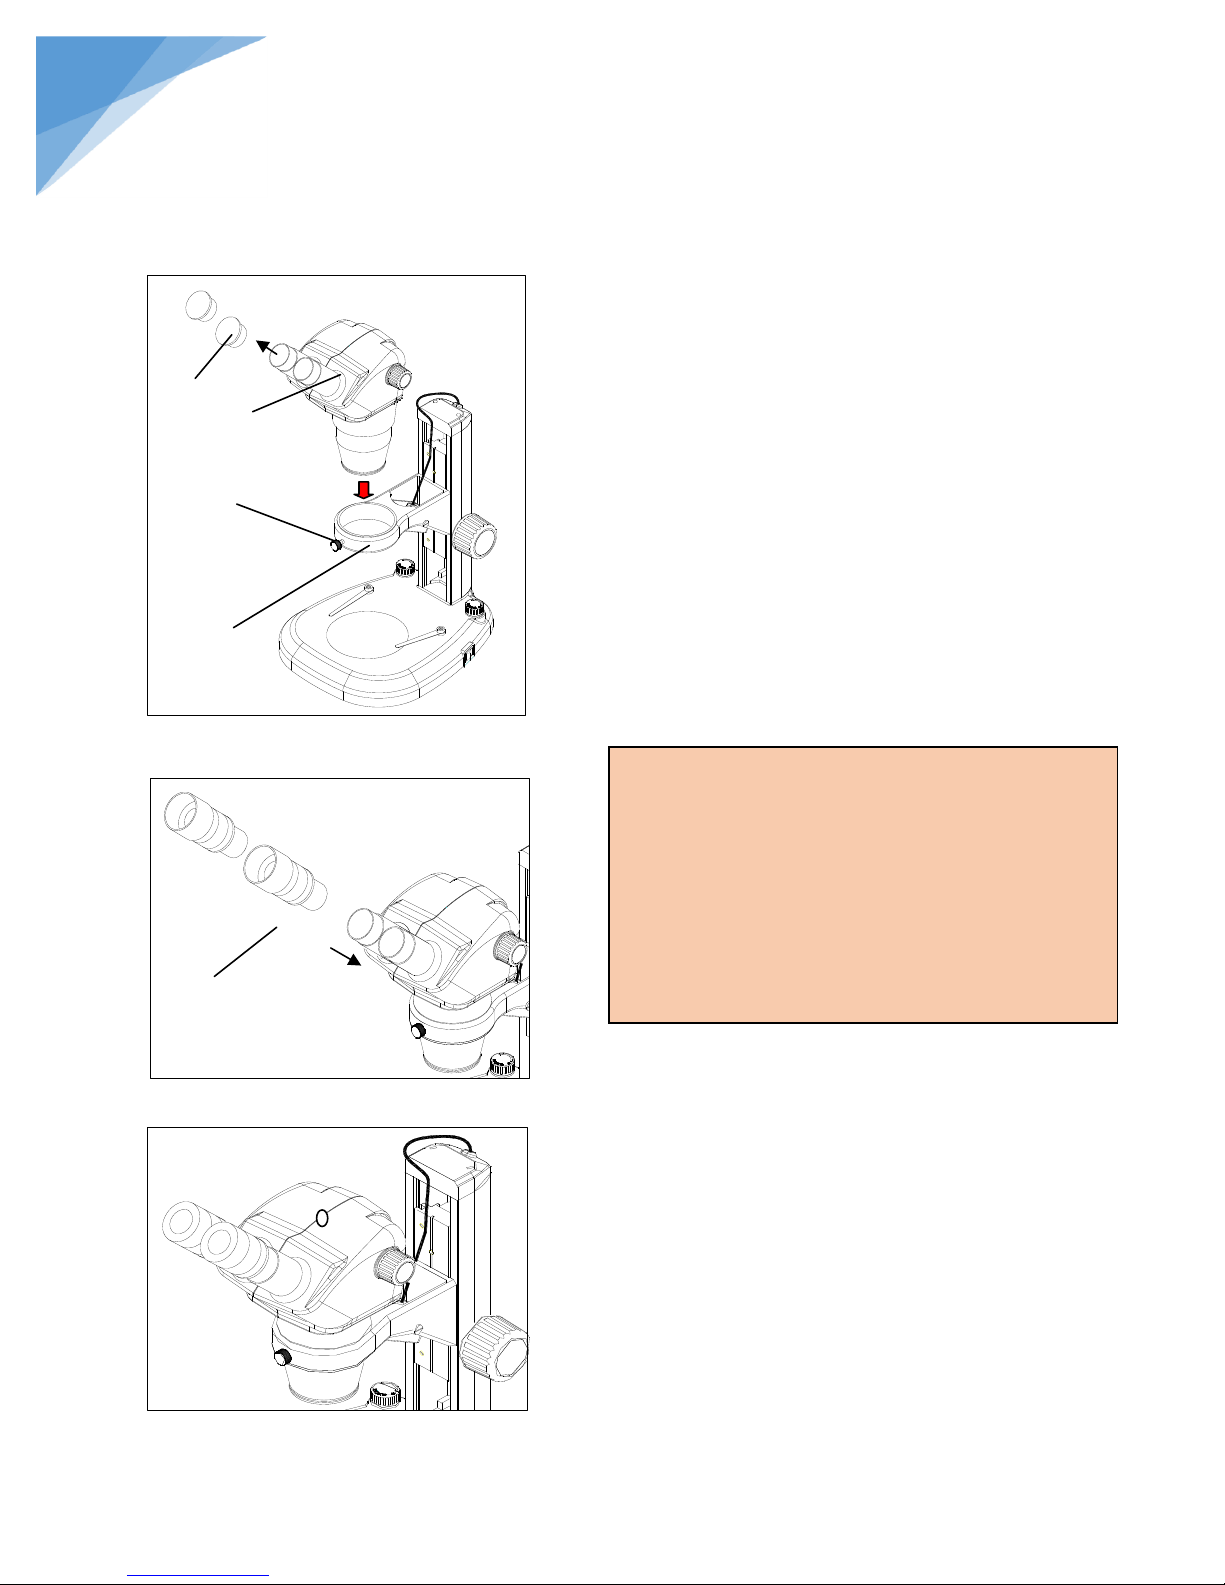
2.2.1. Assembly Binocular/Trinocular Head (Figure 1)
Loosen the lock-screw ③ of stand ④, put the
binocular/trinocular head ② into the hole of stand,
tight the lock-screw.
2.2.2. Eyepiece Assembly (Figure 2, Figure 3)
Take the dust cover ① apart of binocular/trinocular
head ②. Insert the 2pcs WF10X eyepiece into tube.
The rubber on the eyepiece prevents extra light.
Take away the rubber when observing with glasses.
Working
Condition:
1. Temperature: 0℃~40℃
.
2. Hot or moisture will damage the instrument.
3. Place the instrument in a clear condition.
Cover it the instrument when no using.
4. The microscope should be placed without
vibration.
Figure 1
Figure 2
Figure 3
STEINDORFF
2.2. Assembly Process
①
⑤
③
④
②
Page 7
6
®
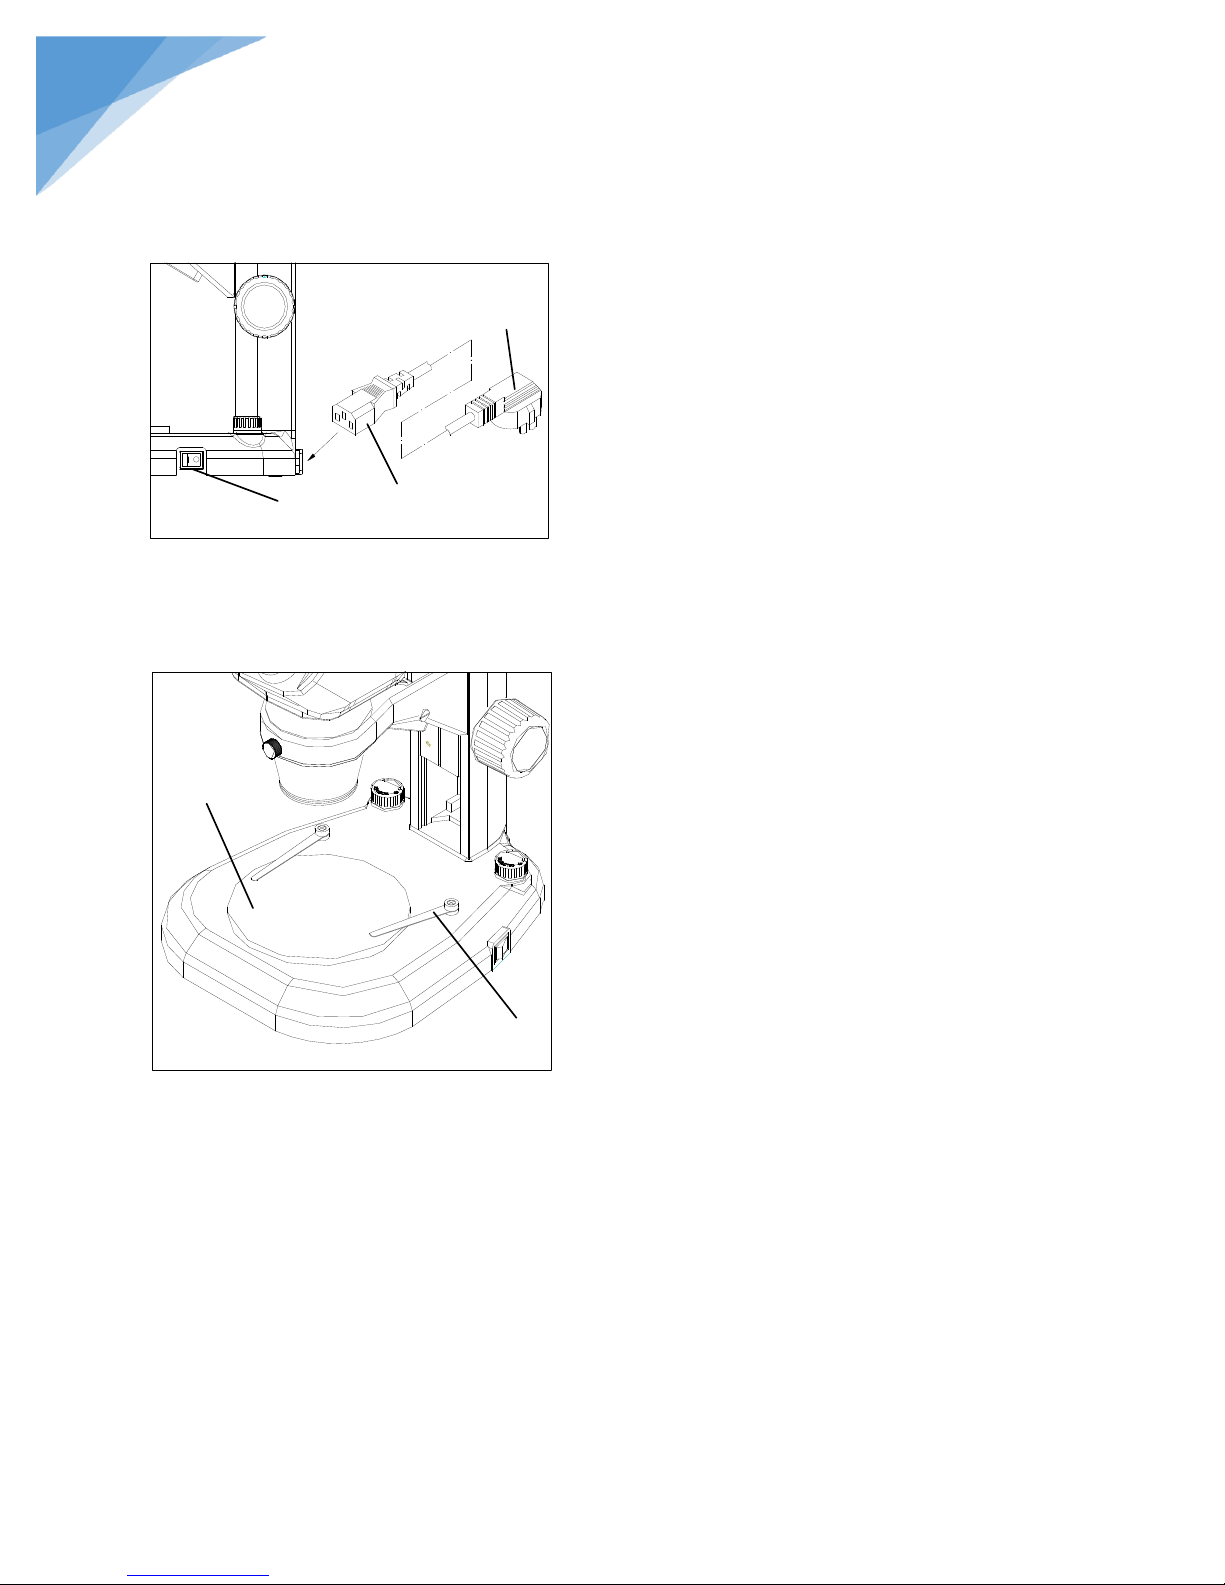
Figure 4
Figure 5
2.2.3. Cable connecting (Figure 4)
1. Turn to “O” position ⑥ before connecting ⑧
power ⑦.
2. Insert the pin ⑦ into microscope plug safely.
3. Insert the pin ⑧ into the power plug.
2.2.4. Use the glass stage (Figure 5)
Set the glass stage plate ⑨ on the center of base,
clamp the slide with two clips ⑩ when using the
plate.
Using LED light illumination
Input: 100V~240V
STEINDORFF
⑨
⑥
⑦
⑧
⑩
Page 8
7
®
Figure 6
Figure 7
3. ADJUSTMENT
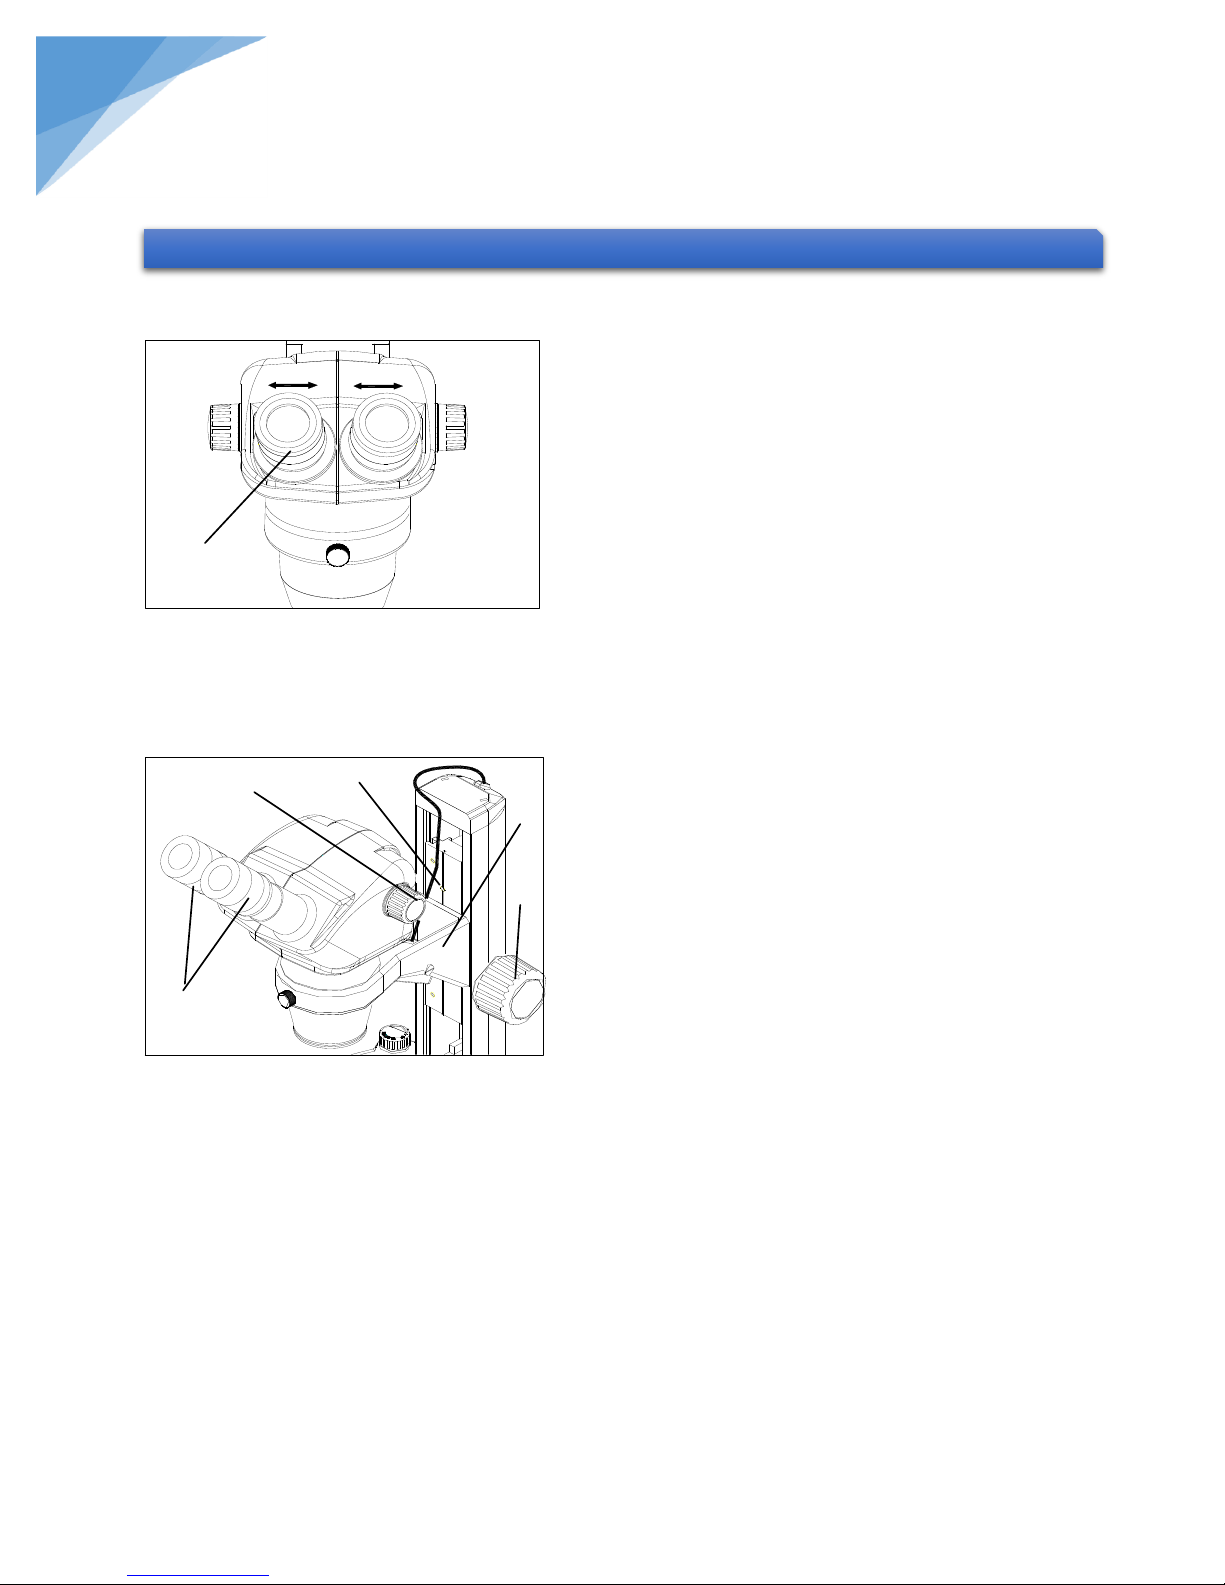
3.1.1. Interpupillary Adjustment (Figure 6)
Adjusting Interpupillary after observation for
another one using. Hold the two tubes, ① adjust
interpupillary to obtain a clear image.
3.1.2. Diopter Adjustment (Figure 7)
1. Turn the diopter adjusting rings ② to the zero.
2. Set the sample on the stage.
3. Turn the zoom adjusting knob ③ to the 5X
position, focusing the sample.
4. Turn the zoom knob ③ to 0.8X position. Observe
though the left side eyepiece. Adjusting the
diopter ring ② to focus sample. Then look
though the right eyepiece, adjusting the diopter
ring ② to focus sample.
5. Repeat process3 and process 4 until the image
was located on focus, the image also the clear
when change the magnification.
Working distance: 115mm, set up the tray if
necessary.
Operating: take the lock-screw down by screw
driver. Driver up the tray ⑤ to a higher lock-
screw hole. Tighten it.
Screw
STEINDORFF
3.1. Binocular/ Trinocular head
②
①
③
⑤
④
Page 9
8
®
Figure 8
Figure 10
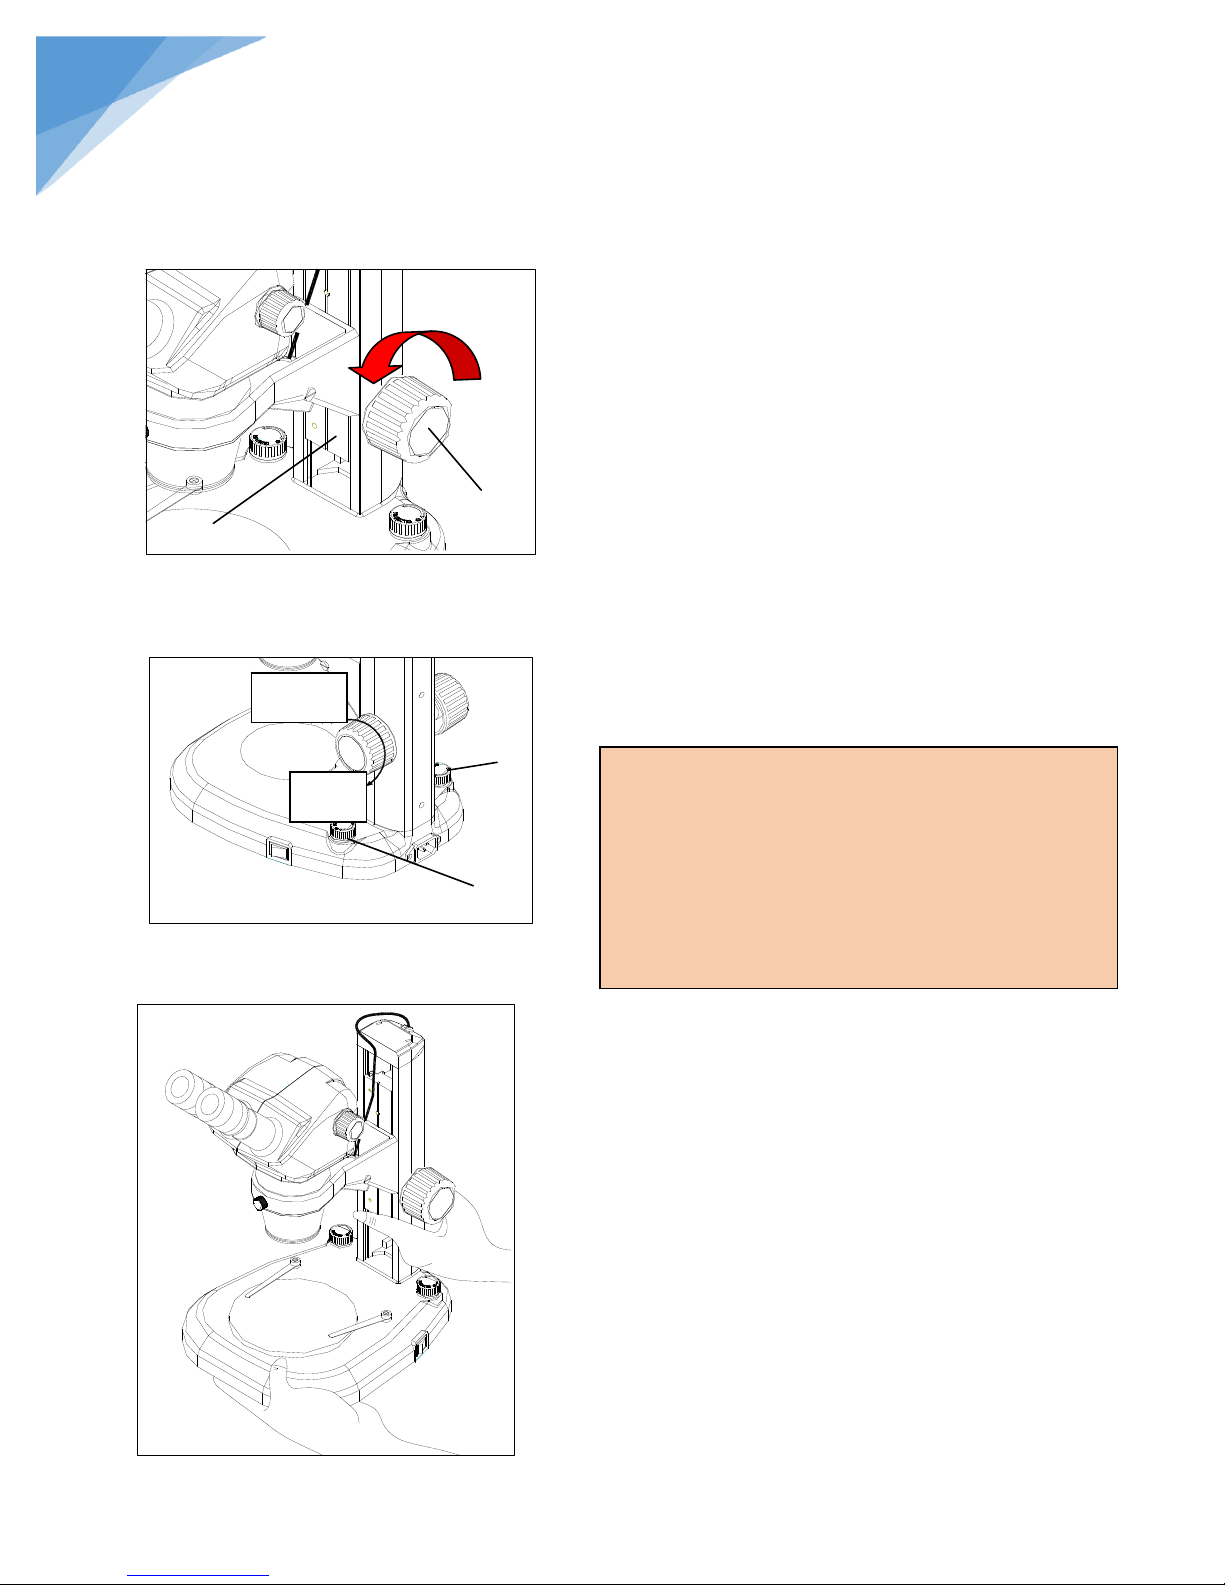
3.2.1. Focusing Knob Adjustment (Figure 8, Figure 9)
1. Pull down the skateboard ② by focusing knob
① in a low position to prevent the microscope
head drop because of focusing knob loosen.
2. Hold two side focusing knob ①. Left focusing
knob keep still, turn the right focusing knob.
Move up or down according to the strength of
right focusing knob.
3. Light adjustment: adjust base illumination with
right side knob ③. Adjust Top illumination by
left side knob ④.
Attention:
1. Clean the touch-area after observing
contagious sample.
2. Take away sample before move microscope.
3. Hold the stand and the base to prevent incline
during move microscope.
Loose
Tight
Figure 9
Loose
Tight
STEINDORFF
3.2. Stand
②
①
④
③
Page 10

9
®
Zoom Ratio
6.1:1
Zoom Range
0.8x~5x
Eyepiece
Wide field 10x/Φ22, interpupillary adjustable
Viewing Head
Incline 45°, interpupillary range: 52~75mm
Working Distance
115mm
Range of Movement
105mm
Illumination
LED lamp illumination
Input
100-240V, 0.15A, 50/60HZ
Trouble
Cause
Remedy
Double images
Interpupillary distance is not
correct
Readjust it
Diopter adjustment is not correct
Readjust it
Dirt appears in the view field
Dirt on the specimen
Clean specimen
Dirt on the surfaces of eyepieces
Clean eyepieces
Image is not clear
Dirt on the surface of objectives
Clear objectives
Image is not clear while
focusing change
Diopter adjustment is not correct
Readjust diopter
Focusing is not correct
Readjust it
The focusing knob is not smooth
The focusing knob is too tight
Loosen it to a suitable position
The image is obscure because of
the head slipping down during
observation
The focusing knob is too loosen
Tighten it to a suitable position
4. TECHNICAL PARAMETER
5. TECHNICAL PARAMETER
STEINDORFF
Page 11
10
®
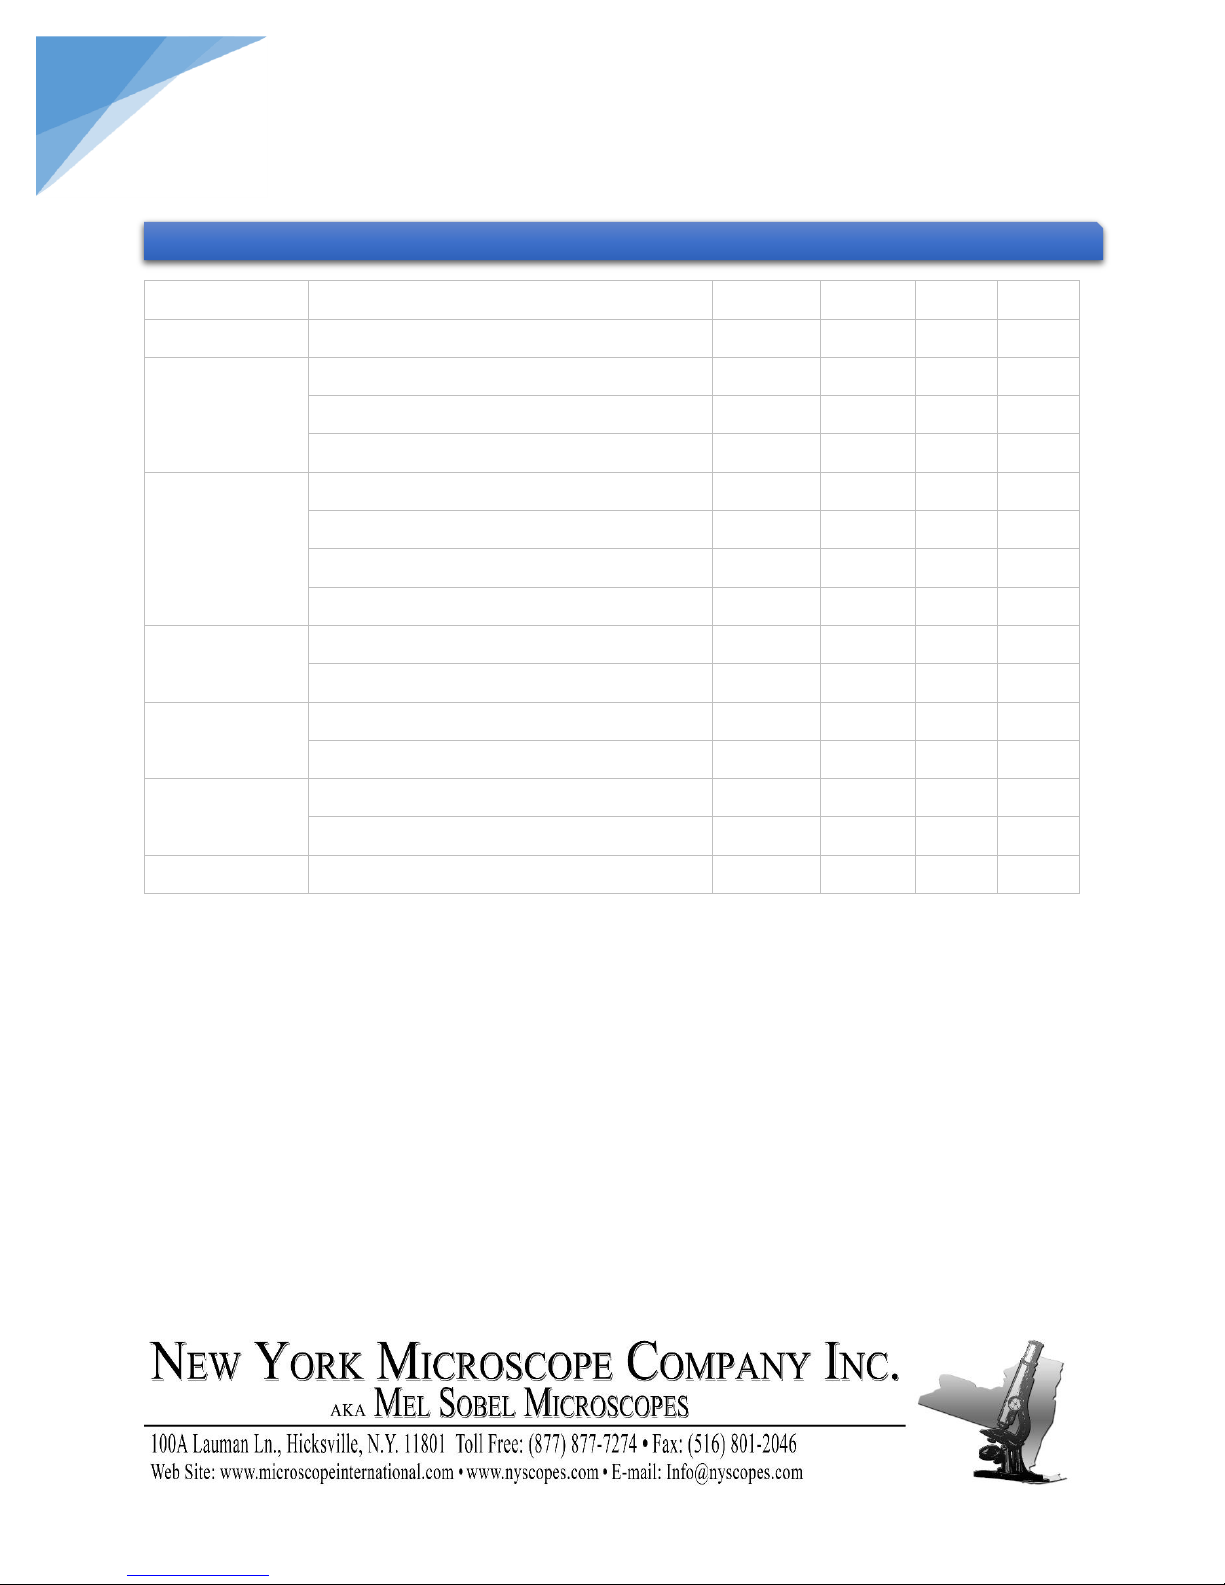
Components
Specification
Quantity
S-340
S-341
S-344
Body
Main body stand
1 ● ●
●
Head
Binocular zoom head
1 ● ○
○
Trinocular zoom head
1 ○ ●
○
Digital Binocular zoom head
1 ○ ○
●
Illumination
Transmitted (LED)
1 ● ●
●
Reflected (LED)
1 ● ●
●
Ring fluorescence lamp
○ ○
○
LED Ring Light
○ ○
○
Eyepiece
10x Eyepiece
2 ● ●
●
20x Eyepiece
○ ○
○
Objective
0.5x Auxiliary objective
○ ○
○
2x Auxiliary objective
○ ○
○
Observe plate
Black and white plate
1 ● ●
●
Glass plate
1 ● ●
●
Power Cord
Power cord
1 ● ●
●
6. OUTFIT
STEINDORFF
●: Standard, ○: Optional
 Loading...