

Page 1

®
STEINDORFF
Metallurgical Microscope
Model Number
NYMCS-603
User Manual
This manual is written for Metallurgical Microscope of NYMCS-603. For safety and for exerting
the best performance, making you familiar with the instrument entirely, it is strongly
recommended that you read this manual carefully before using the microscope.
Page 2

1
®
STEINDORFF
Contents NYMCS-603
User Notices
1 Components Name ………………………………………………………….. 3
2 Installation …………………………………………………………………... 4
2.1 Installing Diagram …………………………………………………………………….. 4
2.2 Installing steps …………………………………………………………………………. 5
3 Adjustment & Operation ………………………………………………….... 9
3.1 Adjustment System Installing Illustration ………………………………………….. 9
3.2 Operation ………………………………………………………………………………. 11
4 Technical Specifications …………………………………………………….. 14
5 Troubleshooting …………………………………………………………….... 15
…………………………………………………………………… 2
Page 3

2
®
STEINDORFF
Use Notices NYMCS-603
I. Safety note
1. Carefully open the box, avoid the accessories, like lens, dropping to ground and being damaged.
6. Make sure the instrument is earthed, to avoid lighting strike.
9. Use the factory supplied power cord, please.
II. Maintenance
1. All the lenses have been well checked and adjusted. It is forbidden to disassemble them yourself.
2. Do keep the instrument out of direct sunlight, high temperature or humidity, dusty and easy
shaking environment. Make sure the stage is smooth, horizontal and firm enough.
3. When moving the instrument, please use two hands to grip with the two sides of the microscope
body.
4. If the bacterium solution or the water splash to the stage, objective or viewing tube, pull out the
power cord at once, and wipe up the microscope. Otherwise, the instrument will be damaged.
5. When running, the lamp house and nearby parts will be very hot. Please ensure there is enough
cooling room for them.
7. For safety, be sure the main switch is in “O” (off) state before replace the halogen lamp or the fuse,
then cut off the power, and do the operation after the lamp bulb and the lamp house completely cool.
8. Check the input voltage: be sure the input voltage which signed in the back of the microscope is
consistent with the power supply voltage, or it will bring a serious damage to the instrument.
2. The nosepiece and coarse/fine focus unit have a compact and precise frame, please don’t
disassemble them as possible as you can.
3. Keep the instrument clean, wipe dust regularly, and be attention to avoid contaminating the
optical elements especially.
4. The contaminations on the prism, as finger mark and oil, could be gently wiped with a piece of soft
cloth or tissue paper, gauze which has been immersed in pure alcohol or xylene. (Note that the alcohol
and the xylene are all burned easily, do not let them near the fire, and use them in a drafty room as
possible as you can.)
5. Don’t use organic solvent to wipe the non-optical elements, when you need to clean, use the soft
detergent, please.
6. When using, if the microscope is splash by liquid, cut off the power at once, and wipe up the
moisture.
7. Do not disassemble any parts of the microscope. That will affect the function or decline the
performance of the microscope.
8. Place the instrument in a cool, dry position. After using the microscope, remember to cover it
with dust helmet. Do wait for the lamp house cooling completely before cover.
Page 4
3
®
STEINDORFF
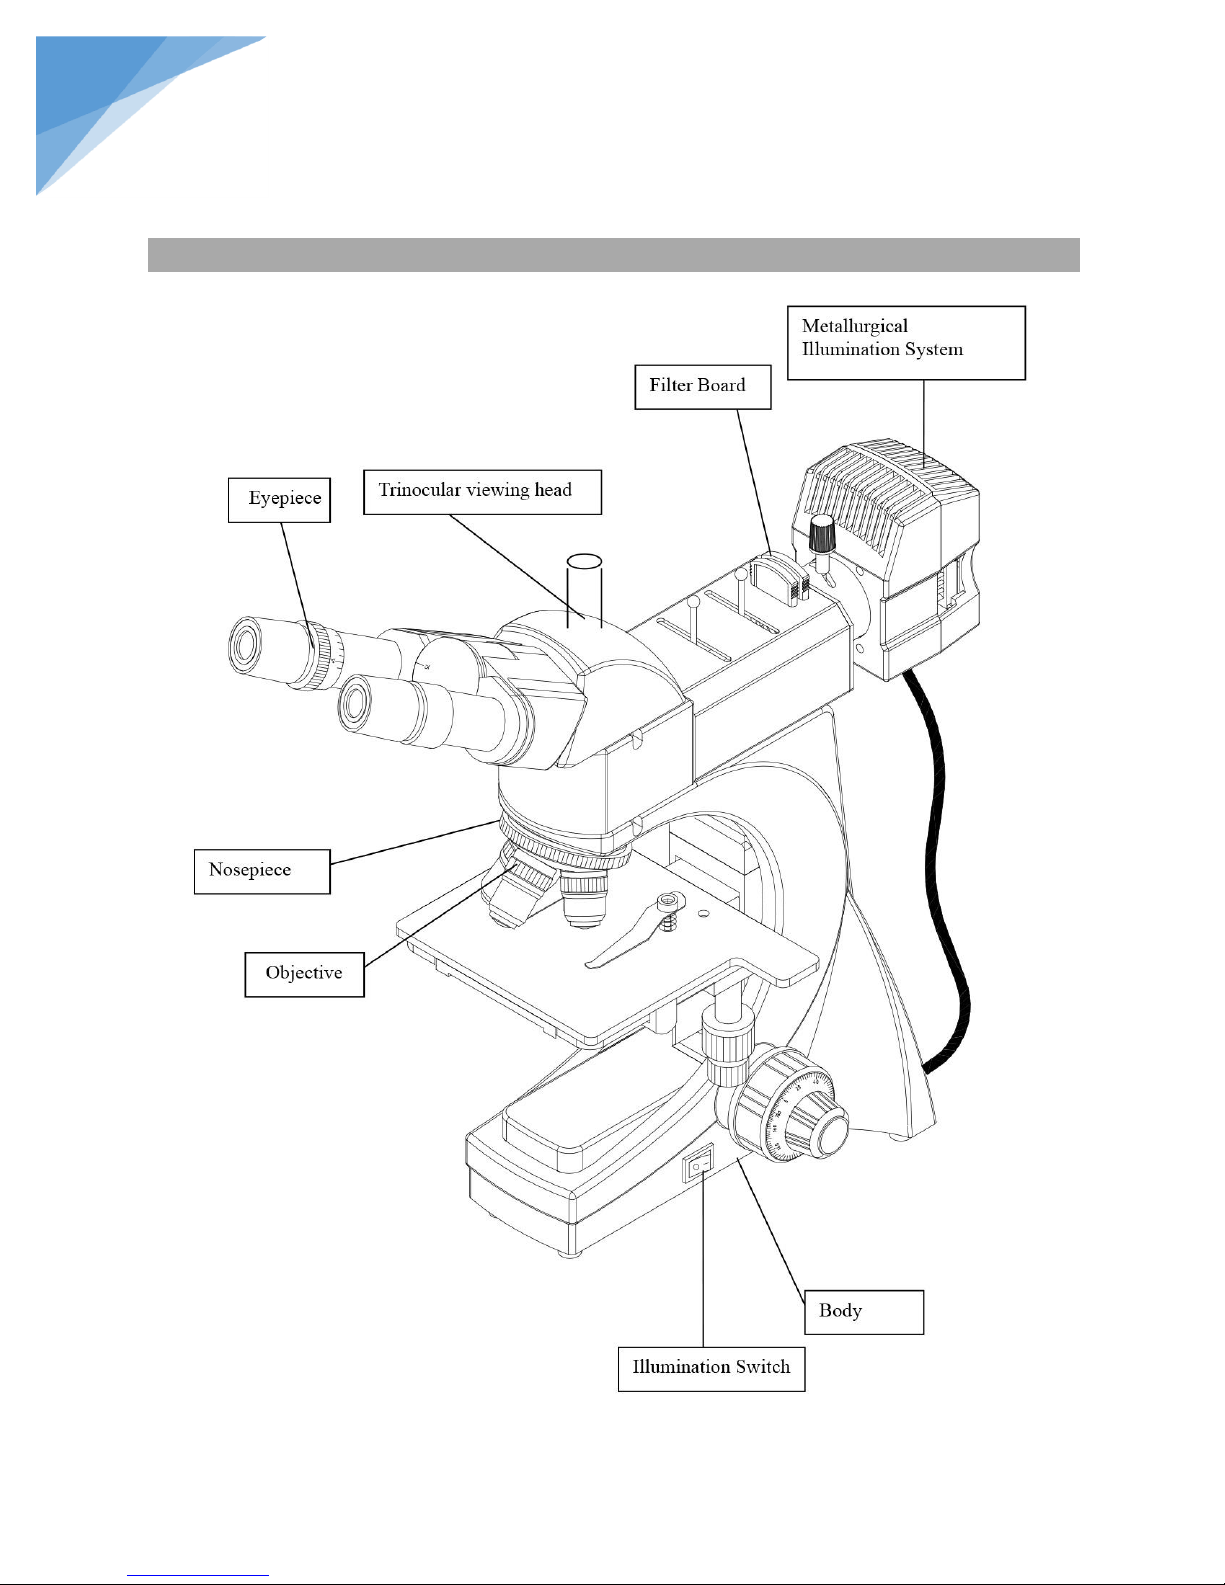
1. Name of Components NYMCS-603
Page 5
4
®
STEINDORFF
2.Installation NYMCS-603
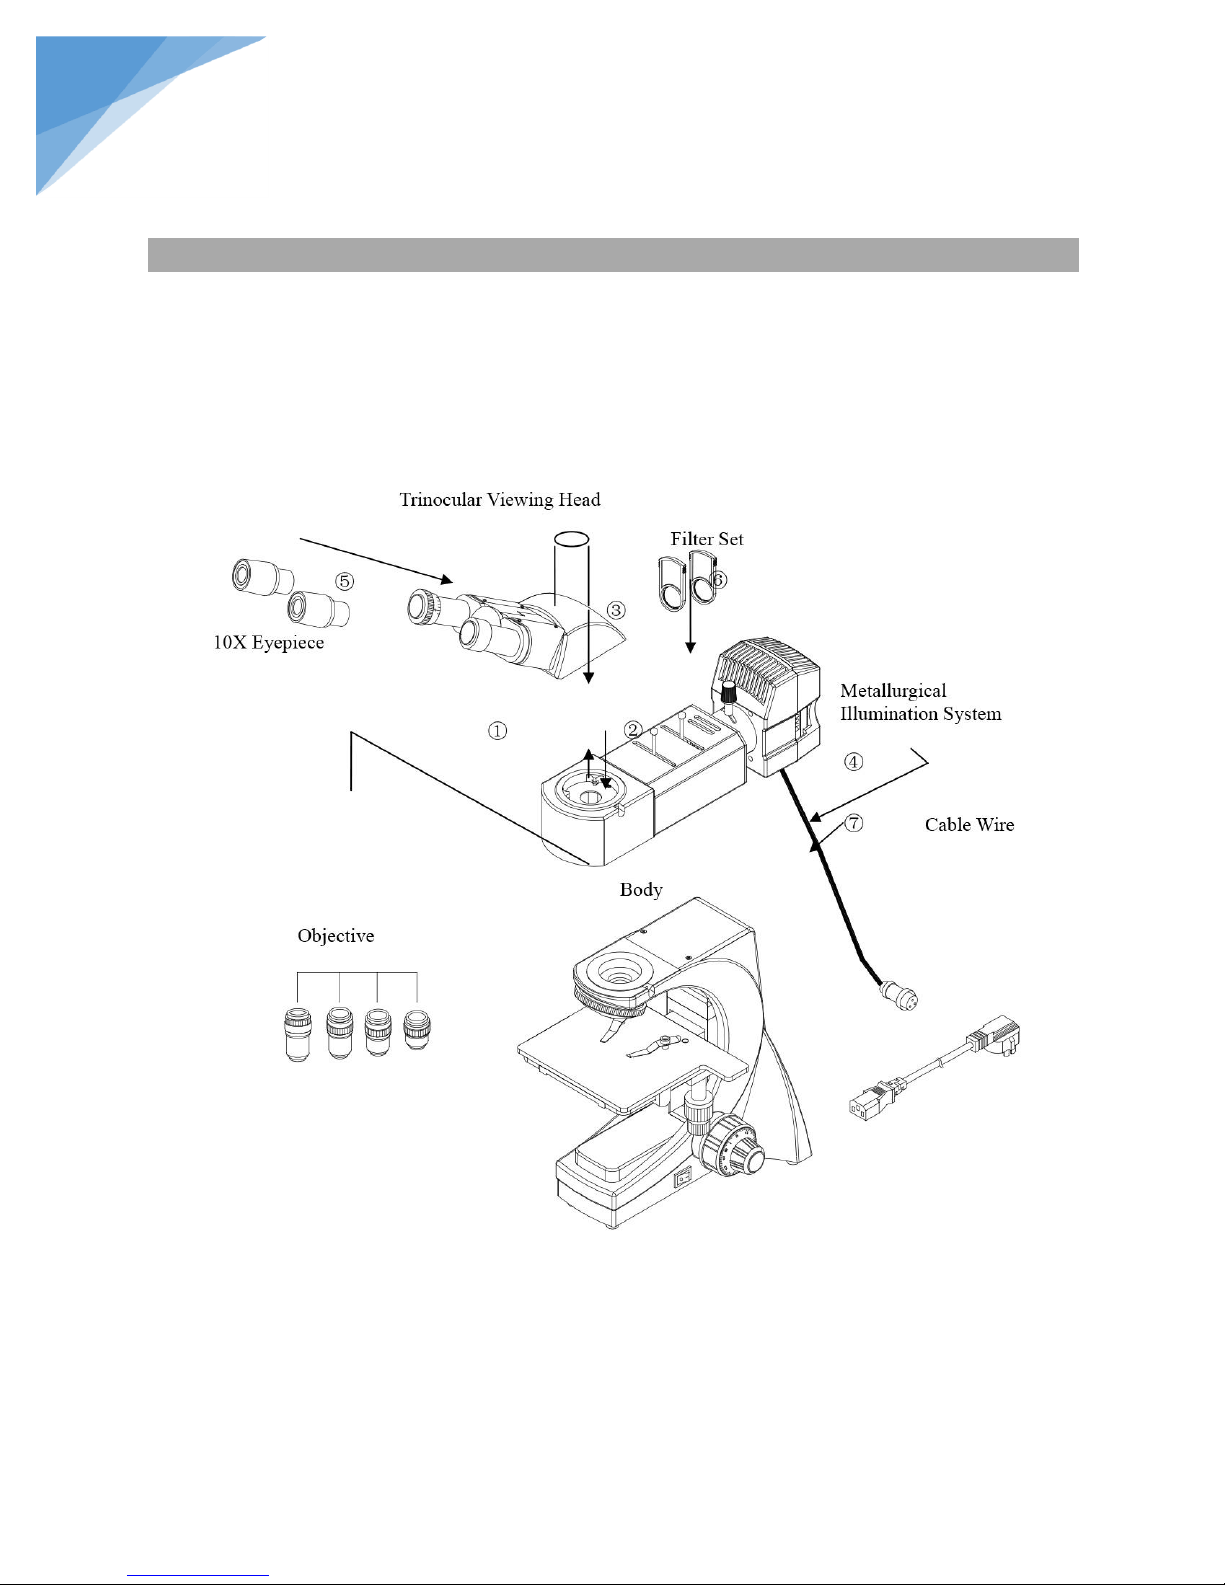
2.1 Installing Illustration
The following shows the installing order of the spare parts. The number expresses the installing process.
Before the installing, make sure there is no dust and stain on the spare parts. No marks by outside
force on the surface of the spare parts or glass.
Keeping the hexagon- spanner well, when change the spare parts, you will use it.
Page 6
5
®
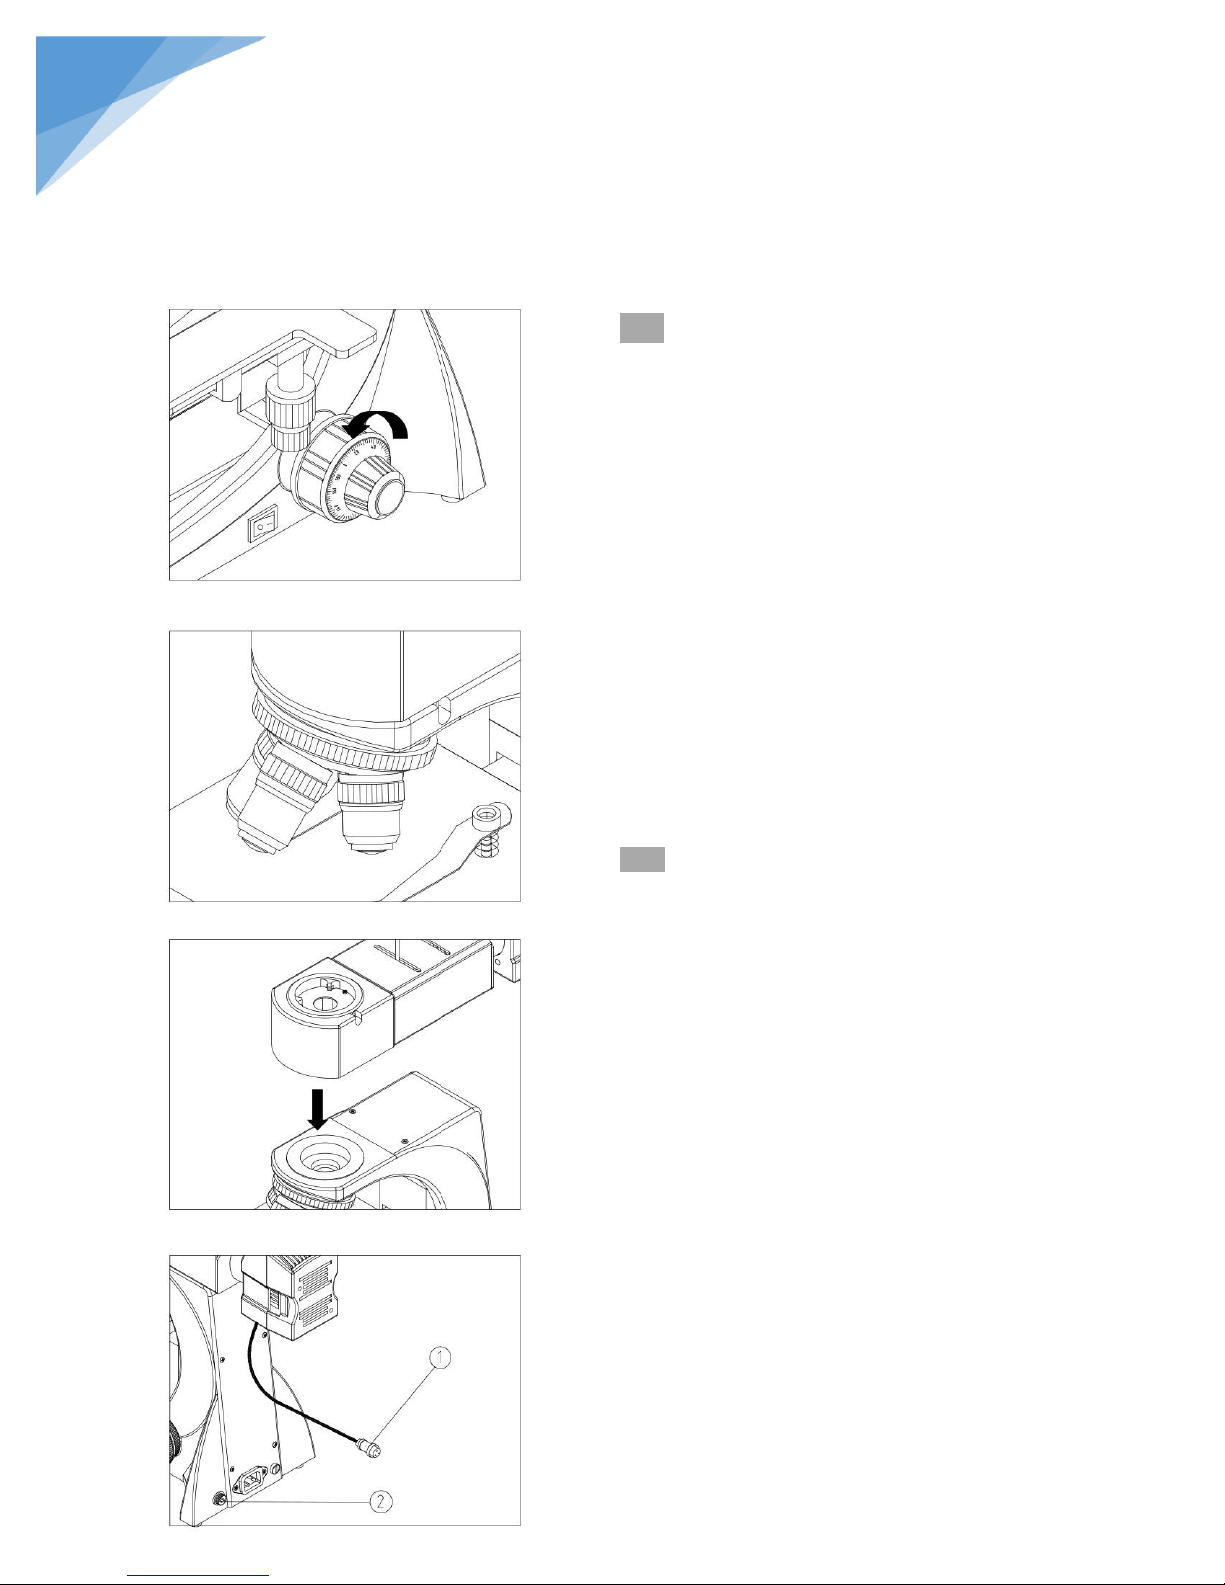
2.2.1 Installing the Objective (Fig. 1-2)
1. Adjust the coarse &fine focus knob, till the
mechanical stage to the low limited place.
2. Screw down the objective to nosepiece from left or
right side, low magnification objective first.
Install all the objective form low to high
magnification following the clock hand.
According to this way to install the objective will
make it easier to change magnification in operation.
Clean the objective frequently.
At first, use the 10X objective to looking for
image, then change another one.
Turn the objective till hear the “Kai. Kai”
sound, make sure the objective enter the
objective center.
2.2.2 Installing the Metallurgical
Illumination Set (Fig. 3-4)
1. Insert the Metallurgical Illumination Set with
Lamp House installed into the Microscope
Body. Align the position and screw down the
bolt with hexagon wrench.
2. Plug the power cord ① of the Metallurgical
Illumination Set into the socket ②. Then
screw the bolt firmly on the socket.
Fig. 1
Fig. 2
Fig. 3
Fig. 4
STEINDORFF
2.2 Installing Steps
Page 7
6
®
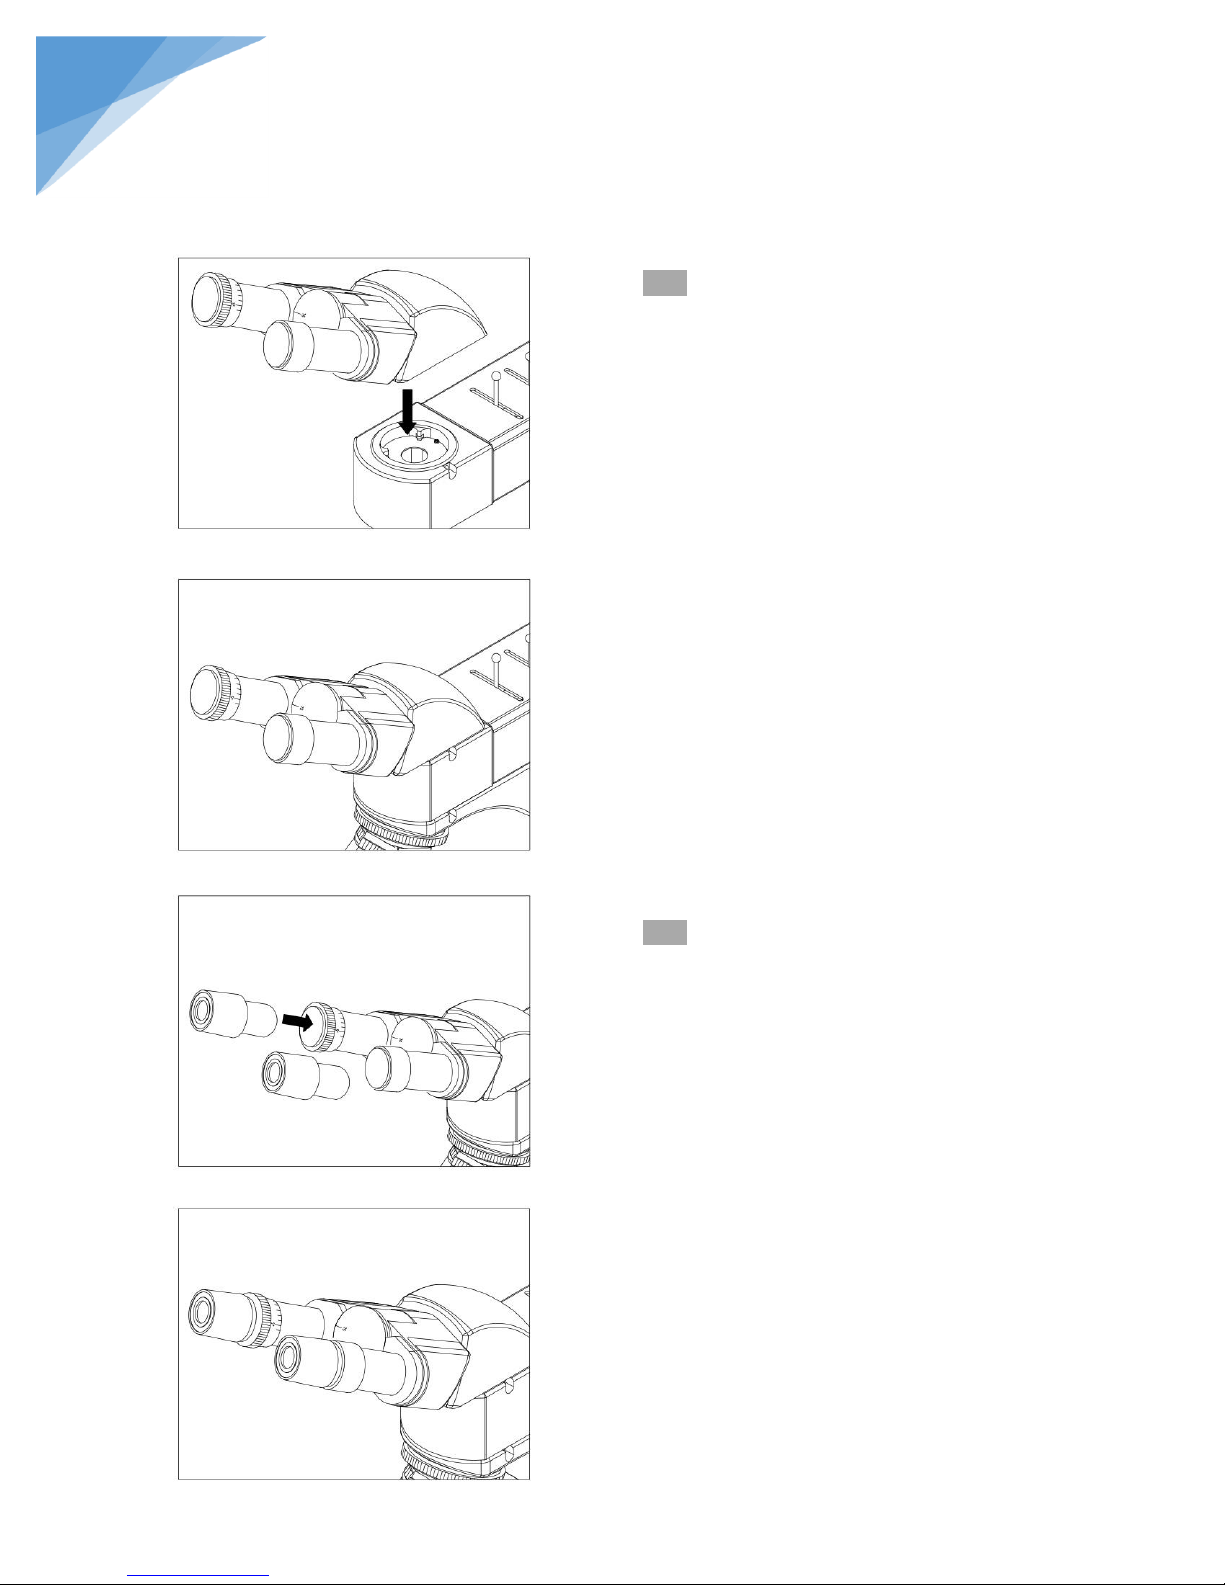
2.2.3 Install the binocular viewing head
(Fig. 5-6)
Insert the binocular viewing head in the head of
the body, turn to the right place, then fix up it
by bolts.
2.2.4 Install the eyepiece (Fig. 7-8)
Insert the eyepiece in the eyepiece tube till end.
Fig. 8 picture shows the station after the installing.
Fig. 5
Fig. 6
Fig. 7
Fig. 8
STEINDORFF
Page 8
7
®
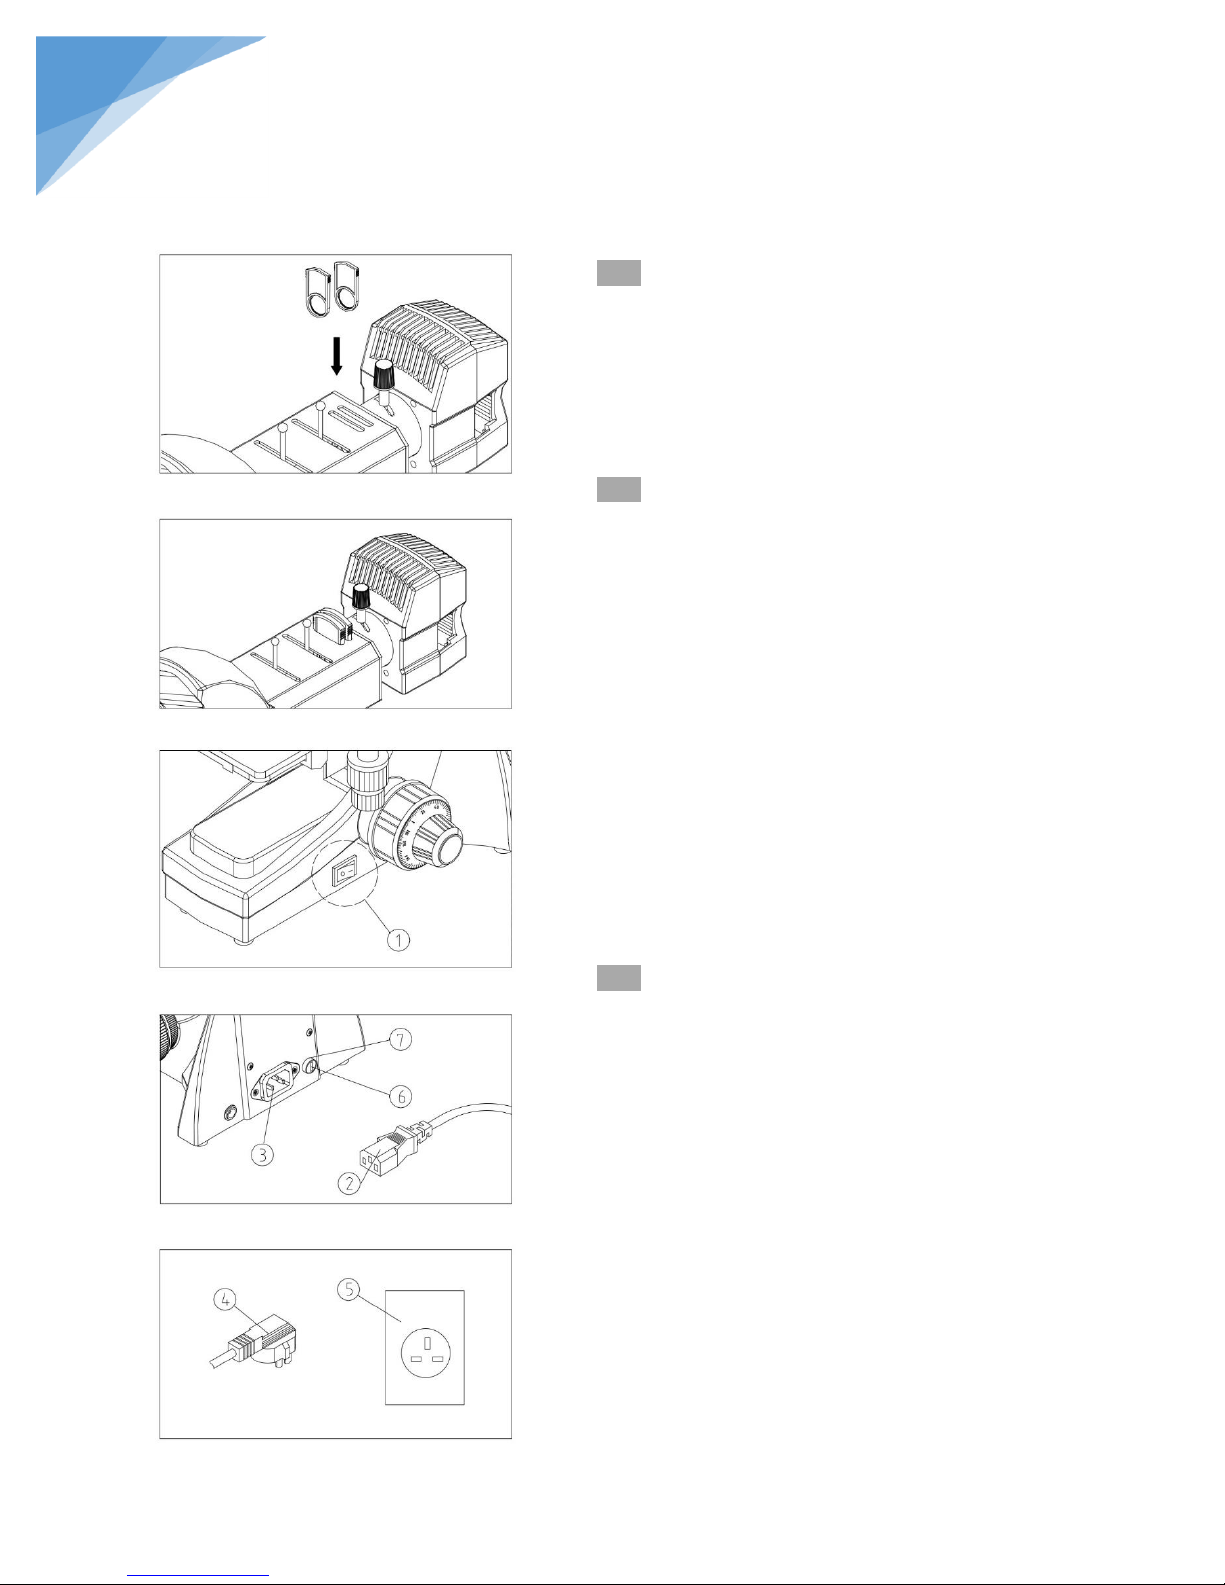
2.2.5 Install the color filter (Fig. 9-10)
Put the filter into the jack of the illumination system.
★ There is three type of color filter. The color is
blue, yellow and green.
2.2.6 Connecting the Power Cord (Fig. 11-13)
★ Do not force on the Power Cord. The cable and
wire
are easier to be damaged when bended or wrapped.
1. Before connecting the power cord, switch the main
On-Off ① to “O” (off).
2. Plug the power cord ② into the socket ③ on
microscope safely. Make sure be connected.
3. Plug the power cord ④ into the power source
Socket ⑤ safely. Make sure be connected.
★ Do use the supplied power cord all the time. If
lost or damaged, select the same standard cord,
please.
★ This machine has High-Band voltage. It can
adapt any voltage between 100V and 240V.
2.2.7 Replacing the fuse (Fig. 11-12)
Do remember to turn the main switch ① on the
state of “O” (off) before replacing the fuse, and
unplug the power cord. Rotate the fuse ⑥ kits out
of the holder ⑦ by the “--”type screwdriver,
replace a new fuse, then rotate back to the holder
again
Fig. 9
Fig. 10
Fig. 11
Fig. 12
Fig. 13
STEINDORFF
Page 9
8
®
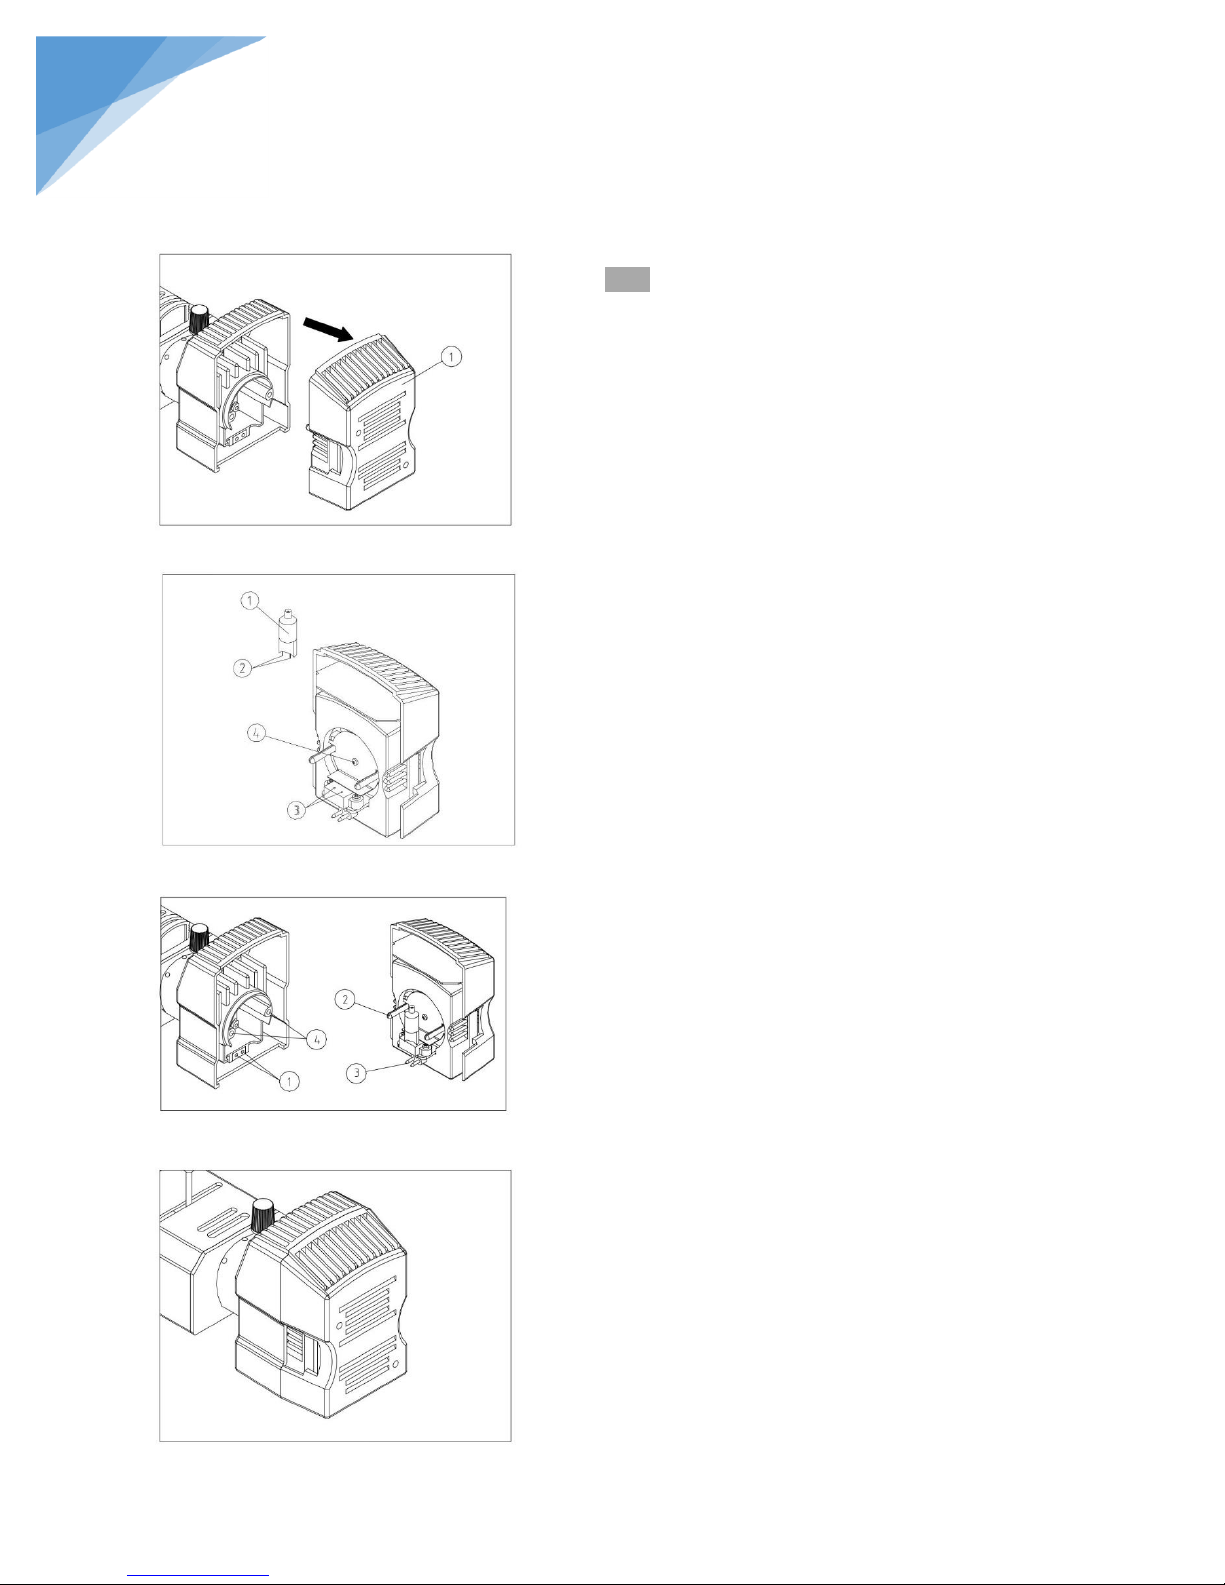
2.2.8 Installing and replacing the lamp (Fig. 14-17)
Please use the specified halogen Lamp 6V30W.
1. Pull out the lamp-house ① as the picture show
(Fig. 14)
2. Hold to the bulb ① after you wrap it with gauze or other
protection materials, then depress the plugs into the jack
on the lamp house, ensure the filament and the bolt
are in a same level. (Fig. 15)
3. Replacing the lamp when using or soon after
When using, or soon after it is turned off, the lamp, the
lamp house and nearby parts will be very hot and will
cause serious burns. Please turn the main switch on “O”
(off), pull up power plug, and make sure the bulb, the
lamp house and periphery are all cool. Then, you can do
your replacing.
Please insert the lamp gently, or it will be damaged
by excessive extrusion.
Do not touch the Halogen bulb with your hands. It will
shorten the service life or cause it to burst. If you leave
fingerprints on the surface carelessly, clean it with a dry
soft cloth.
4. Align the socket ① and pins ② and align the bolt ③ and
the jack ④. Then push the lamp-house into the
Metallurgical Illumination Set until covered. (Fig. 15-16)
Fig. 14
Fig. 15
Fig. 16
Fig. 17
STEINDORFF
Page 10
9
®
Fig. 18
STEINDORFF
3. Adjustment & Operation NYMCS-603
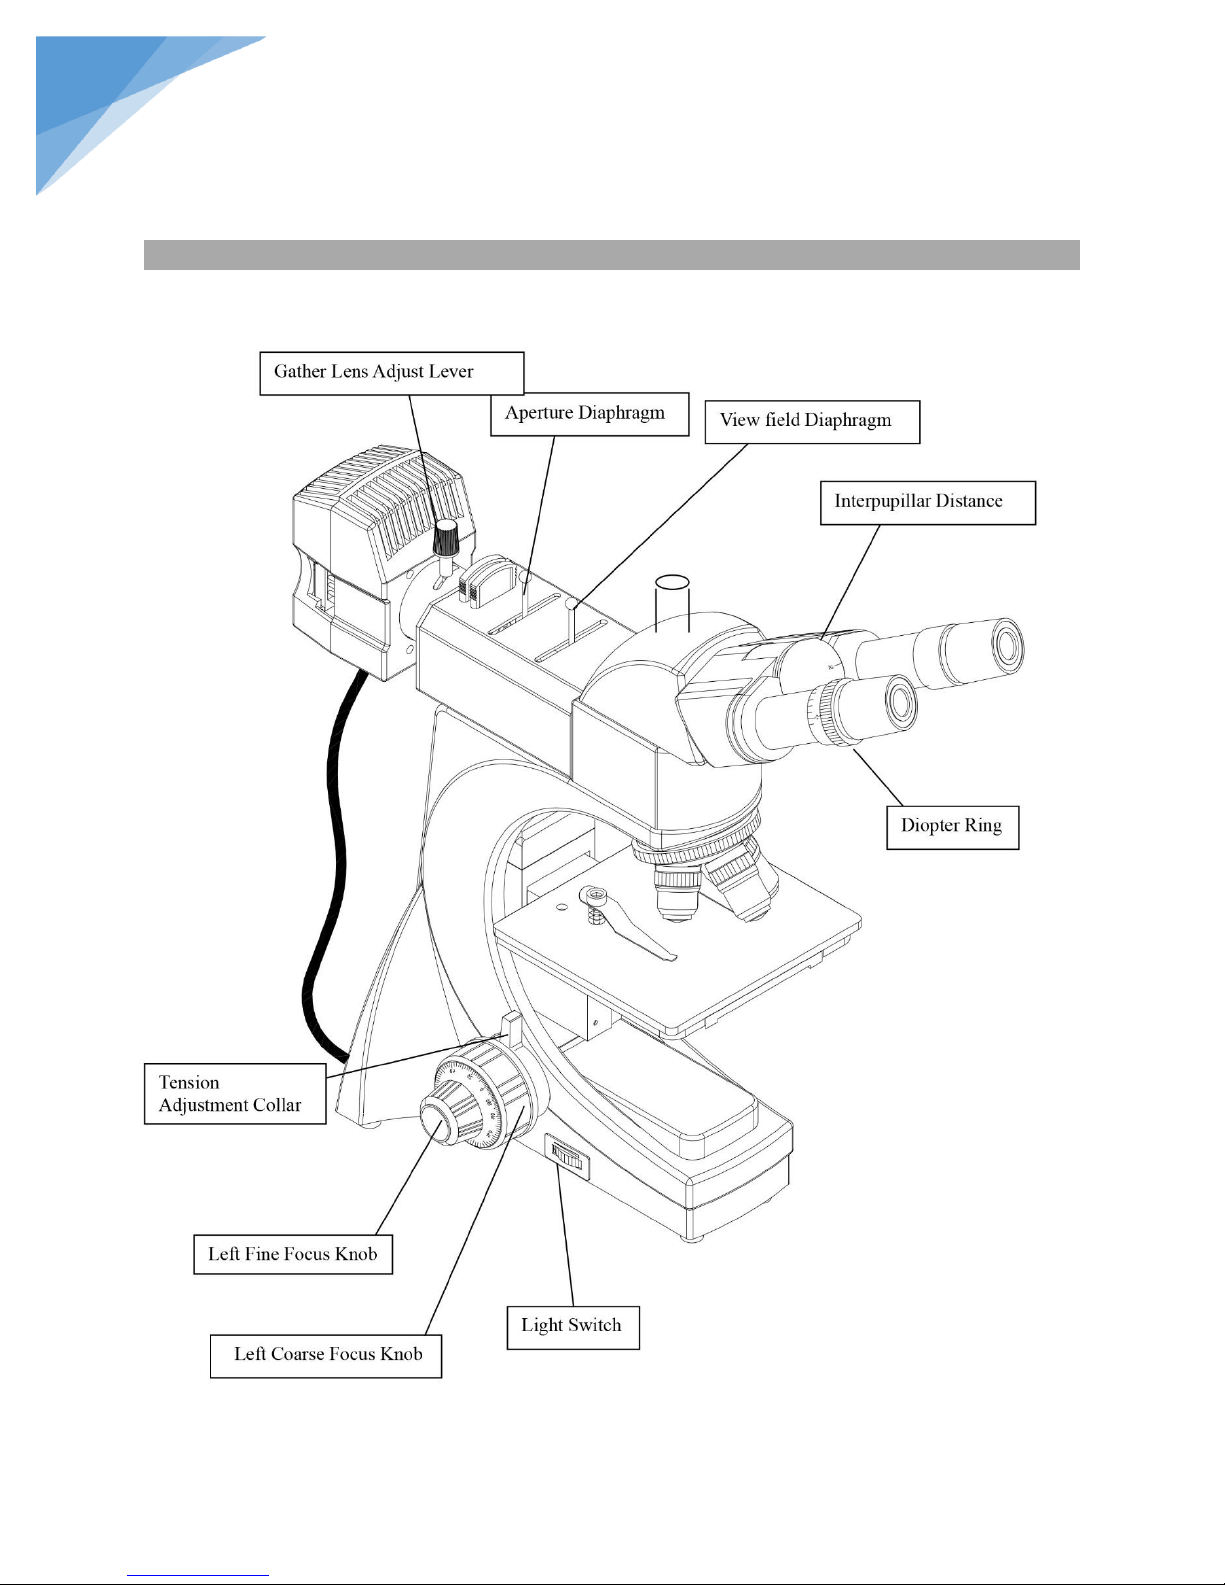
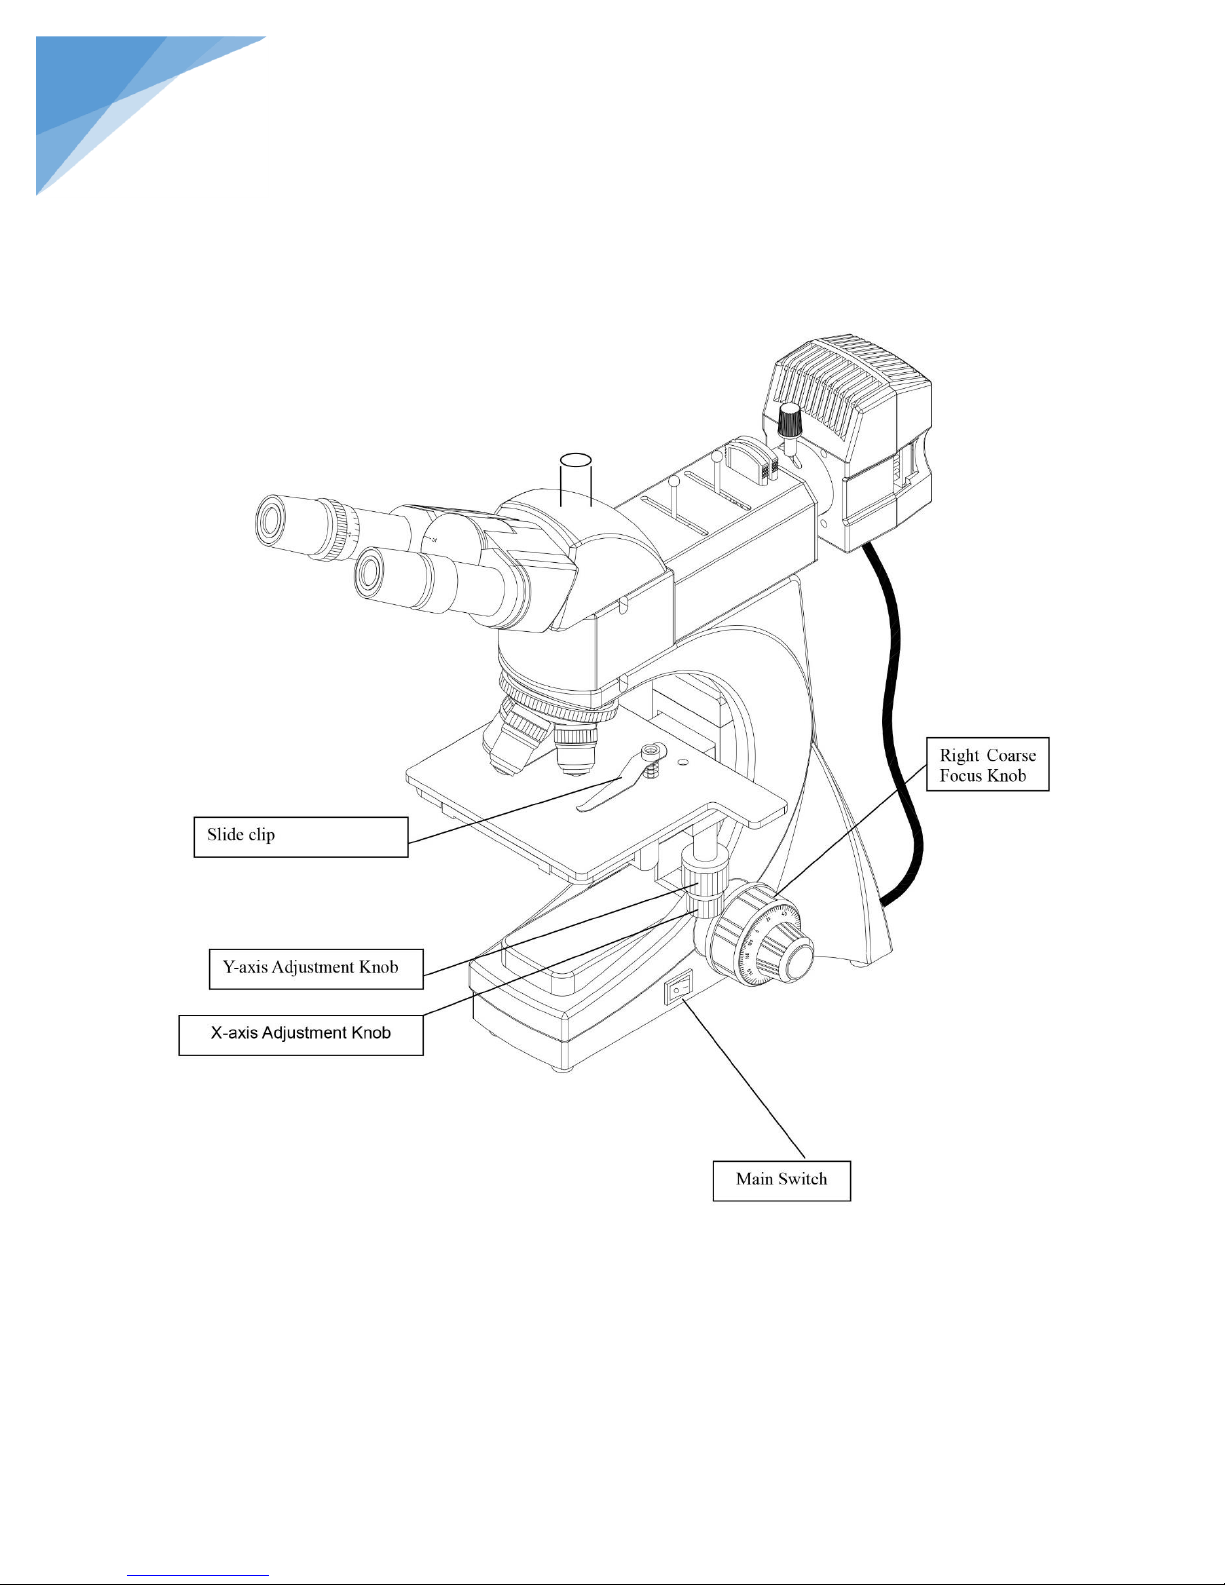
3.1 Adjustment Set Diagram (Fig. 18-19)
Page 11
10
®
Fig. 19
STEINDORFF
Page 12
11
®
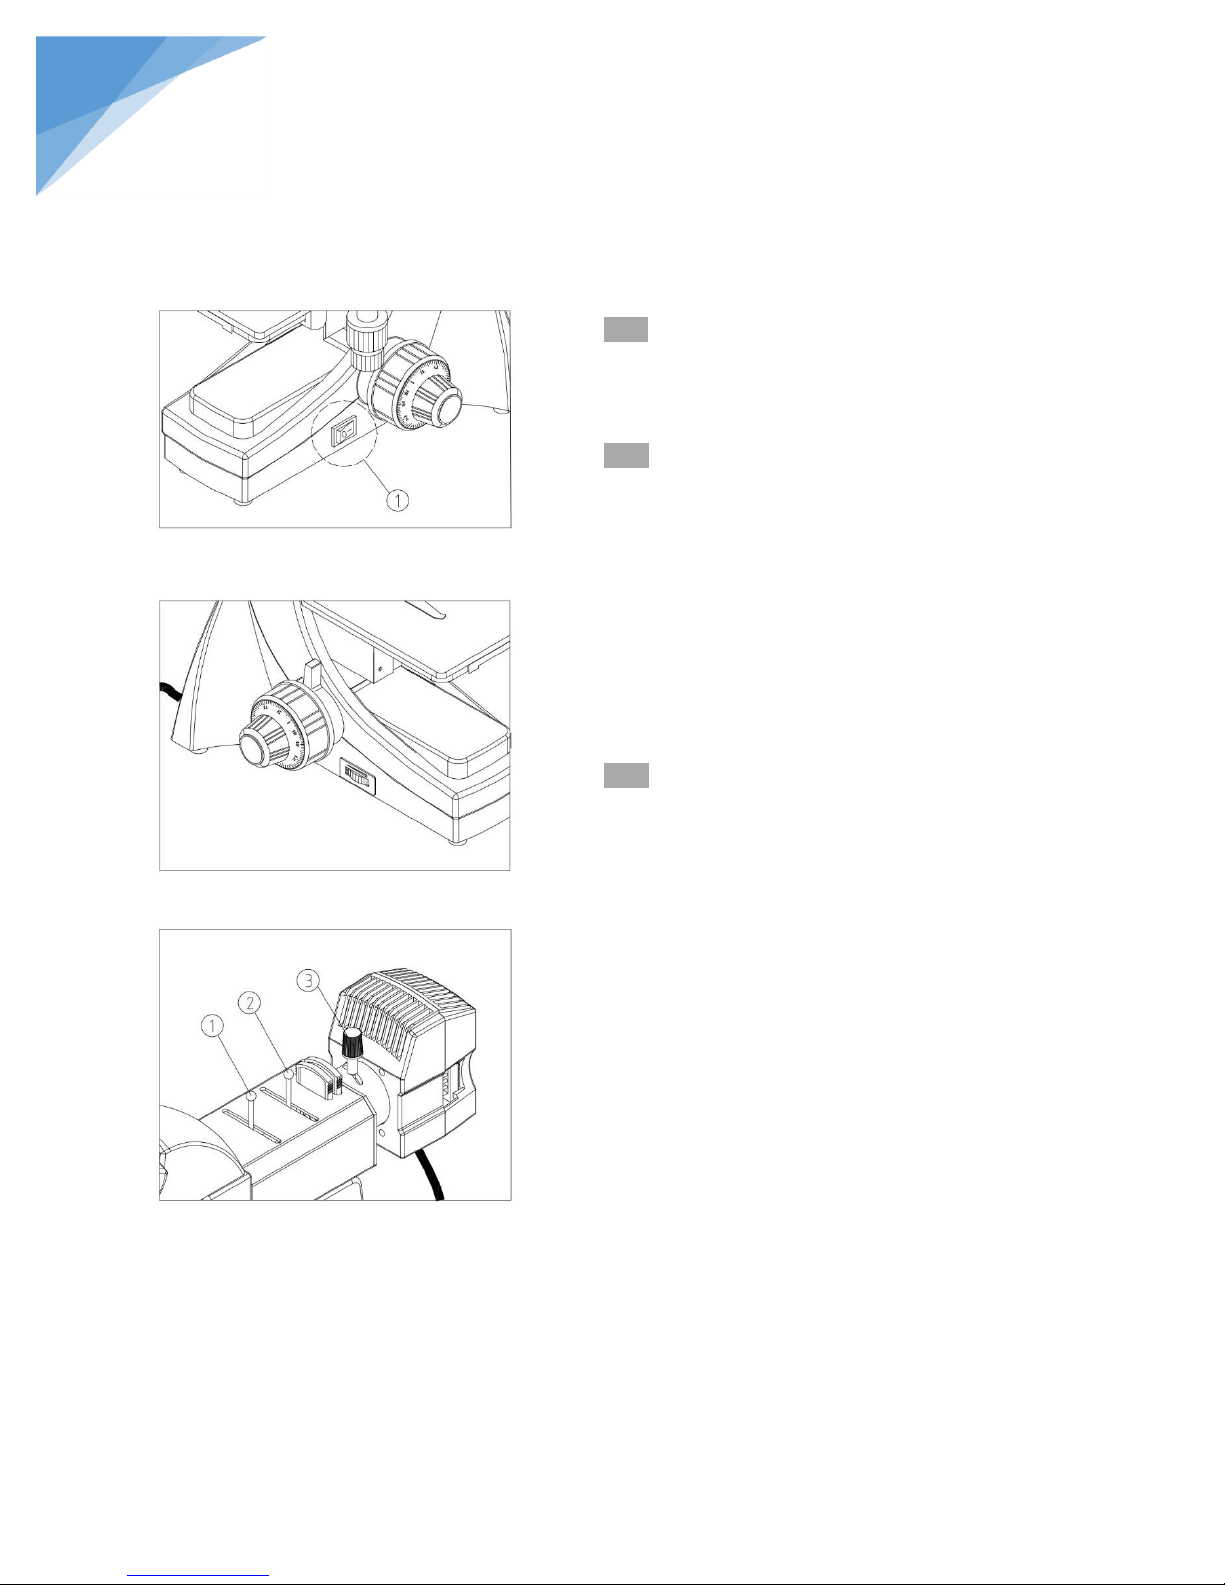
3.2.1 Open Lamp-House (Fig. 20)
Connect the power, turn on the main switch (Fig. 15)
to “-” (on).
3.2.2 Adjusting the brightness (Fig. 21)
Turning the brightness adjustment knob
anti-clockwise, the voltage raise, and the brightness
strengthen; turning it clockwise, the voltage decline,
and the brightness weaken.
Using the lamp in a low voltage condition, will
prolong the use life.
3.3.3 Adjusting the Illumination Set (Fig. 22)
1. Make sure the ray brightness in view field is even,
have no filament shadow. If there is filament shadow,
please adjust the Condenser Knob ③ to proper
position
2. Adjust the View field Diaphragm ① and Aperture
Diaphragm until the two Diaphragm open size is
properly. Then you can get clear image. When in using,
you need to adjust simultaneously, part observe
until to the high-point.
★ Aperture Diaphragm: The aperture diaphragm
(iris diaphragm) is designed for matching the
objective's numerical aperture, not use for
adjusting brightness. When the objective is
adjusted full of light, the Aperture Diaphragm
is in best state and the image is clear. What to
be notice is that when switch objective, the
Aperture Diaphragm size should change along
with the adjusting.
★ View field
Diaphragm:
Used to control view field
size, to reduce Anti-cast light and Dizzled light.
When the objective is adjusted full of light, the
image is clear and in high-point state.
Fig. 20
Fig. 21
Fig. 22
STEINDORFF
3.2 Operation
Page 13
12
®
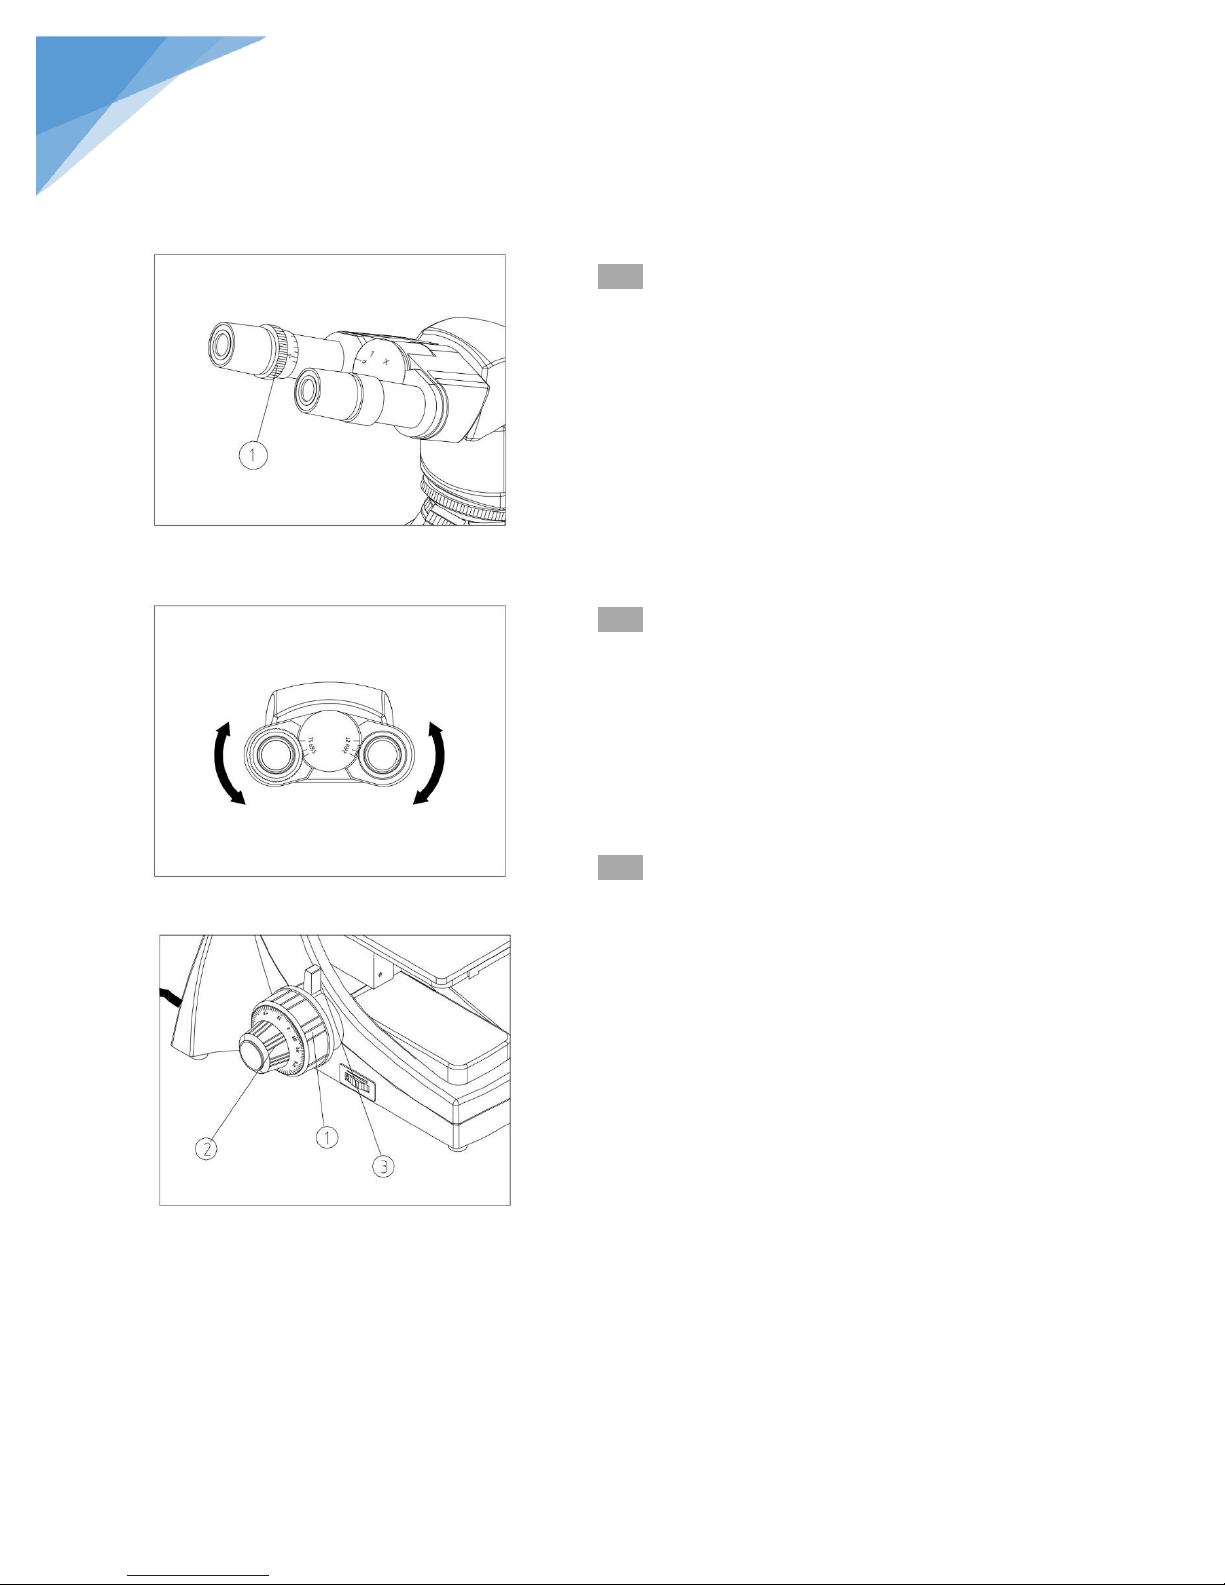
3.3.4 Adjusting the Diopter (Fig. 23)
1. Observe the right ocular tube with your right eye. Turn the
Coarse & Fine Focus Knob to focus the specimen.
2. Observe the left ocular tube with your left eye. If not in
focus just adjust the Diopter Ring ① to make it in focus.
★ The range of Diopter Ring is ±5, as the value align the
reticle ② of the ring.
3.3.5 Adjusting the Interpupillar Distance (Fig. 24)
The interpupillar distance range: 55mm~75mm. When
observing with two eyes, hold on the left and right prism
holder, turn around the axis, and adjust the interpupillar
distance until the left and right fields of view coincide
completely.
3.3.6 Focusing (Fig. 25)
1. Use the 10×objective focus, to avoid the objective
touch with the specimen, you should raise the mechanical
stage at first, let the specimen close to the objective, then
slowly separating them to focus. The operator can
converse turn the coarse focus knob ① to get the
specimen down ,and search images in the 10×ocular
simultaneously, then use the fine
knob ② to focus.
At this moment, you can replace
other magnification
objectives safely, and focus without the risk of destroying
the specimen.
★ If you need to fix the stage on a vertical position to
make the observation become more convenience, take
use of the locking set.
Fig. 23
Fig. 24
Fig. 25
STEINDORFF
Page 14
13
®
Fig. 26
Fig. 27
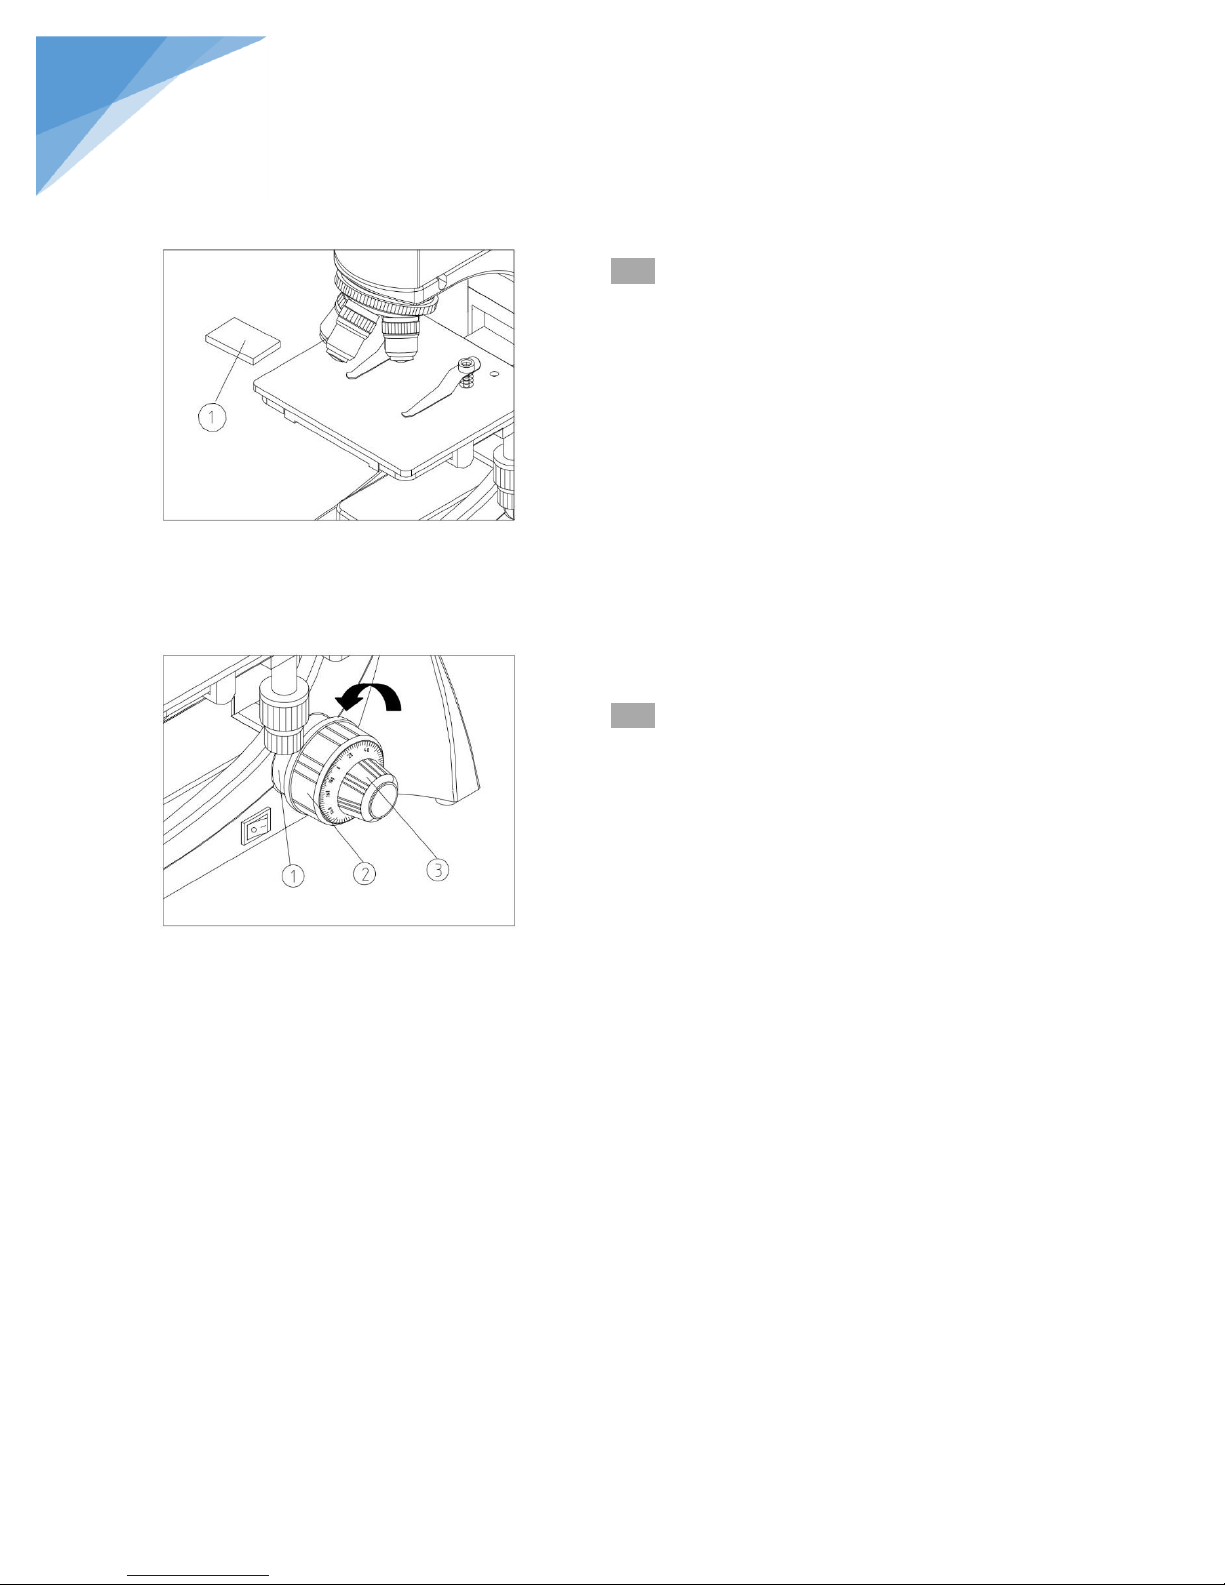
3.3.7 Placing Specimen (Fig. 26)
1. Place the slide on the mechanical stage. Use the stage
clips to clamp the slide gently.
2. Turn the portrait and lateral adjustment knob of the
mechanical ruler, move the specimen onto the required
position.
★ Be careful when changing the objective. If you finish
the observation with the short working distance
objective, and want to change another one, be careful
of not letting the objective touch the specimen.
3.3.8 Adjusting the Tension Adjustment Collar
(Fig. 27)
The tightness of the tension adjustment collar has
adjusted before leaving factory, if finding it’s loosing
(the mechanical stage drop itself because of deadweight),
please turning the tension adjustment
collar ① until
the tightness is in order. Turn it along the
direction show
in the picture, the Coarse Focus Knob ② will become
tighter. Turn anti-direction will become loosen.
If the mechanical stage drop itself, or even lose focus
just after adjusting the fine focus knob ③. Mean the
tightness of the Coarse Focus Knob ② is too low. You
should turn the tension adjustment collar along the
direction show in the picture to make it tighter.
STEINDORFF
Page 15

14
®
Optical System
Infinite Optical System
Viewing Head
Compensation Free Trinocular Head, Inclined at 30, Interpupillar distance:
48-75mm
Eyepiece (Ocular)
View field line 18mm
Nosepiece
Forward Quadruple Nosepiece
Objective
Infinite plan Achromatic: 4×, 10×, 20×(choose and buy), 40×
Focus System
Coaxial Coarse and Fine Focusing System, Sensitivity and Graduation of Fine
Focus: 0.002mm.
Stage
Double layer mechanical stage, area: 150×140mm, movement range: 75×50mm
Lamp-House
halogen lamp 6V20W
Magnification
Numerical Value
Aperture
Diaphragm(N.A)
Working Distance
(mm)
Conjugate Distance
(mm)
4X
0.10
25.4
∞
10X
0.25
11
∞
20X(choose and buy)
0.40
6.06
∞
40X
0.60
3.7
∞
STEINDORFF
4.Technical Specifications
1. Main specifications
NYMCS-603
2. Objective
Page 16

15
®
PROBLEMS
REASON FOR PROBLEMS
SOLUTION
I. Optical Part:
1. Illumination is on,
but the field of view is
dark.
The poor contact exists in the lamp house and
the illumination system.
Ensure the contact pin and the lamp holder pin work well
The lamp bulb spoils
change a new bulb
The brightness adjustment knob is set too
dark
Adjust the knob in a proper position
No use the appointed lamp bulb
use the specified halogen Lamp 6V20W
2. The edge of the
field of view has
shadow or the
brightness is
asymmetry
The nosepiece is not in the located position
Adjust it into the located position
The surface of the lamp become black
Change a new lamp bulb
The filament shadow not clean up
Move in condenser adjust knob front and back to change
the focus position to clean up the filament shadow.
The surface of the lens is moldy or has
contaminant
Clean the lens
3.
Find dust and stain in
the field of view
There are stains on the specimen
Change the specimen
There are stains on the eyepiece
Clean the eyepiece
4. The image is
defocus,
low-resolution
The objective damage
Mend and correct the objective (send to
factory for overhauling)
The lens of the objective and eyepiece is
moldy or have contaminant
Do cleaning
The opening of Aperture diaphragm and field
diaphragm is not proper, and too much
astigmatism.
Change the opening of the aperture diaphragm
and field diaphragm
Fine focus system is broken
Examine and repair the fine focus system(send to
factory for overhauling)
The objective is not in the center of the light
path
Turn the nosepiece to the located position
5. The image focus
surface incline(one
side is clear and the
other side is faint)
The illumination light incline serious
Adjust the filament position ,let the light
distributing of the field of view become symmetrical
and bright
The specimen don’t correctly place
Put the specimen on the right position
The nosepiece is not in the located position
Turn the nosepiece in the required position
6. The eyes are
uncomfortable, the
left and right fields
of view is not
coincided.
The interpupillar distance is not correct
Adjust the interpupillar distance correctly
The diopter is not right
Adjust the diopter according your sight
Can’t adapt to binocular observation
When look into the objective, do not stare at the specimen
but at the whole field of view, or move the eyes away to
see other things, then back into the objective
STEINDORFF
5.Troubleshooting NYMCS-603
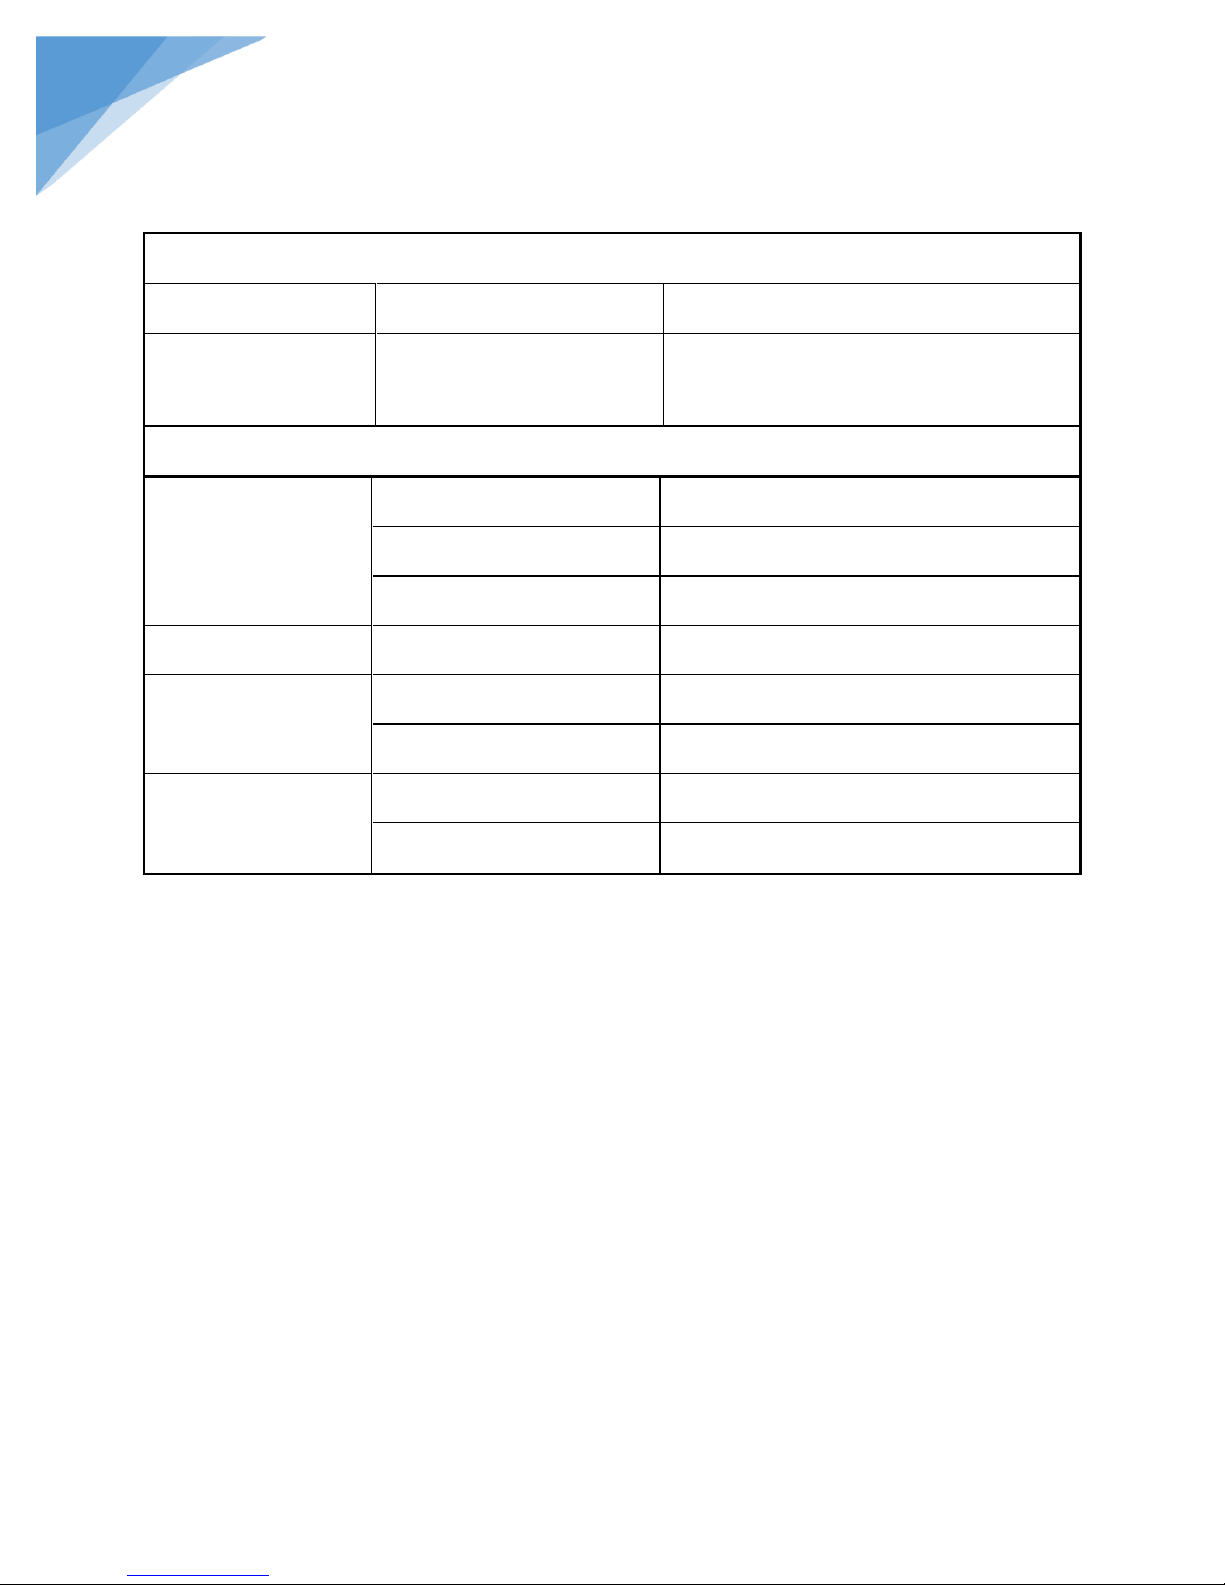
Some problems will happen in the using of the microscope, you could solve them according the following list.
Page 17
16
®
II. Mechanical Part:
1. The coarse focus knob is
hard to run
The tension adjustment collar is
too tight
Loose properly
2. The image can’t stay on
the focal plane in the
process of the observation
The tension adjustment collar is
too loose
Tighten properly
III. Electric Part:
1. The lamp can’t light
No power supply
Check the power cord, and connect them
exactly
the installation of the bulb is
wrong
Install the bulb correctly
The bulb burn out
Change a new bulb
2. The bulb burn out in a
high frequency
Not use the specified lamp
Use the required lamp
3. The height of the
brightness is not enough
Not use a appointed lamp
use a appointed lamp
The brightness adjustment knob
is used wrong
Adjust the brightness adjustment knob in a
correct way
4. The light glimpse
The bulb is going to sp oil
Change the bulb
The power cord have a poor
contact
Check the power cord, and connect them
exactly
STEINDORFF
 Loading...