

Page 1

Addendum: Podcast
Page 2

English
The information in this document is subject to change without notice and does not represent a commitment on the part
of Steinberg Media Technologies GmbH. The software described by this document is subject to a License Agreement
and may not be copied to other media except as specifically allowed in the License Agreement. No part of this publication may be copied, reproduced or otherwise transmitted or recorded, for any purpose, without prior written permission
by Steinberg Media Technologies GmbH.
All product and company names are ™ or ® trademarks of their respective owners. Windows XP is a trademark of
Microsoft Corporation. The Mac logo is a trademark used under license. Macintosh and Power Macintosh are registered
trademarks.
© Steinberg Media Technologies GmbH, 2007.
All rights reserved.
Deutsch
Die in diesem Dokument enthaltenen Informationen können ohne Vorankündigung geändert werden und stellen keine
Verpflichtung seitens der Steinberg Media Technologies GmbH dar. Die Software, die in diesem Dokument beschrieben
ist, wird unter einer Lizenzvereinbarung zur Verfügung gestellt und darf ausschließlich nach Maßgabe der Bedingungen
der Vereinbarung (Sicherheitskopie) kopiert werden. Ohne ausdrückliche schriftliche Erlaubnis durch die Steinberg Media Technologies GmbH darf kein Teil dieses Handbuchs für irgendwelche Zwecke oder in irgendeiner Form mit irgendwelchen Mitteln reproduziert oder übertragen werden.
Alle Produkt- und Firmennamen sind ™ oder ® Warenzeichen oder Kennzeichnungen der entsprechenden Firmen.
Windows XP ist ein Warenzeichen der Microsoft Corporation. Das Mac-Logo ist eine Marke, die in Lizenz verwendet wird.
Macintosh ist ein eingetragenes Warenzeichen. Power Macintosh ist eine eingetragene Marke.
© Steinberg Media Technologies GmbH, 2007.
Alle Rechte vorbehalten.
Français
Les informations contenues dans ce document sont sujettes à modification sans préavis et n’engagent aucunement la
responsabilité de Steinberg Media Technologies GmbH. Le logiciel décrit dans ce document fait l’objet d’une Licence
d’Agrément et ne peut être copié sur un autre support sauf si cela est autorisé spécifiquement par la Licence d’Agrément. Aucune partie de cette publication ne peut en aucun cas être copiée, reproduite ni même transmise ou enregistrée, sans la permission écrite préalable de Steinberg Media Technologies GmbH.
Tous les noms de produits et de sociétés sont des marques déposées ™ ou ® de leurs propriétaires respectifs. Windows XP est une marque déposée de Microsoft Corporation.
© Steinberg Media Technologies GmbH, 2007.
Tous droits réservés.
Page 3

Podcasting
Page 4

Introduction
Podcasting is a method of distributing multimedia files
over the Internet, e.g. for playback on mobile devices and
personal computers. A Podcast can be downloaded automatically, using software capable of reading "RSS feeds".
RSS ("Really Simple Syndication") is a standard for distributing news and other information via the Internet.
An RSS news feed sends short messages on a certain
topic (e.g. sports, music, etc.), made available from a web
site. In order to read the messages, the user employs a
program (e.g. a special feed reader or an Internet
browser) that has the ability to monitor multiple feeds and
automatically download new messages on a regular basis.
Technically speaking, a Podcast is an RSS feed including
data content, such as audio or video files. Like a kind of
"show" with new episodes released regularly, for an audience that wants to listen when, where and how they want.
As such, this is a great way to make information available
to anyone.
As you know, WaveLab Essential is capable of editing and
producing audio material, but it also has the ability to create and publish Podcast episodes at will. And all this without ever quitting the program!
All you need, except for WaveLab Essential itself, is some
webspace with an FTP account for it in order to upload
the Podcast data.
Creating a new Podcast
Given that a wave window is the currently active document:
• Pull down the Edit menu and select "Create Podcast
from Wave...".
This will create a new Podcast window, with the audio file already being
selected for episode 1.
• Pull down the File menu and select "Add to Podcast..."
from the Special submenu.
A dialog appears from which you can either select a Podcast currently
open in WaveLab (if any), or browse and open an existing Podcast from
your harddisk. In both cases, a new episode will be added to the Podcast, with the audio file selected for this episode. Alternatively, you can
also choose to create a new Podcast from this dialog, with the audio file
already being selected for episode 1.
Given that an existing Podcast window is currently open:
• Select "Clone this Podcast..." from the Podcast window’s Options menu.
An untitled copy of the existing Podcast is created, containing all information of the original Podcast. Alternatively, you can drag the Podcast
window’s Document icon onto the WaveLab Essential desktop to
achieve the same.
Podcast templates
WaveLab Essential allows to store Podcast templates
from open Podacst windows:
• Pull down the File menu and select "Save as template..."
This will store the currently active Podcast window’s information in a
template. Next time when you create a new podcast by using any of the
methods described above, you can choose this template, so that the information is already filled in the new Podcast window.
In order to create a new Podcast from scratch, pull down
the File menu, and select "Podcast..." from the New submenu.
This will bring up a new Podcast window where you can
enter all information required for the Podcast (usually this
will be paths to mp3 audio files along with some textual information).
Alternative ways to create a Podcast
There are other ways to create a Podcast, which can be
shortcuts, depending on what kind of documents you already have opened in WaveLab Essential.
Podcasting
4
Page 5
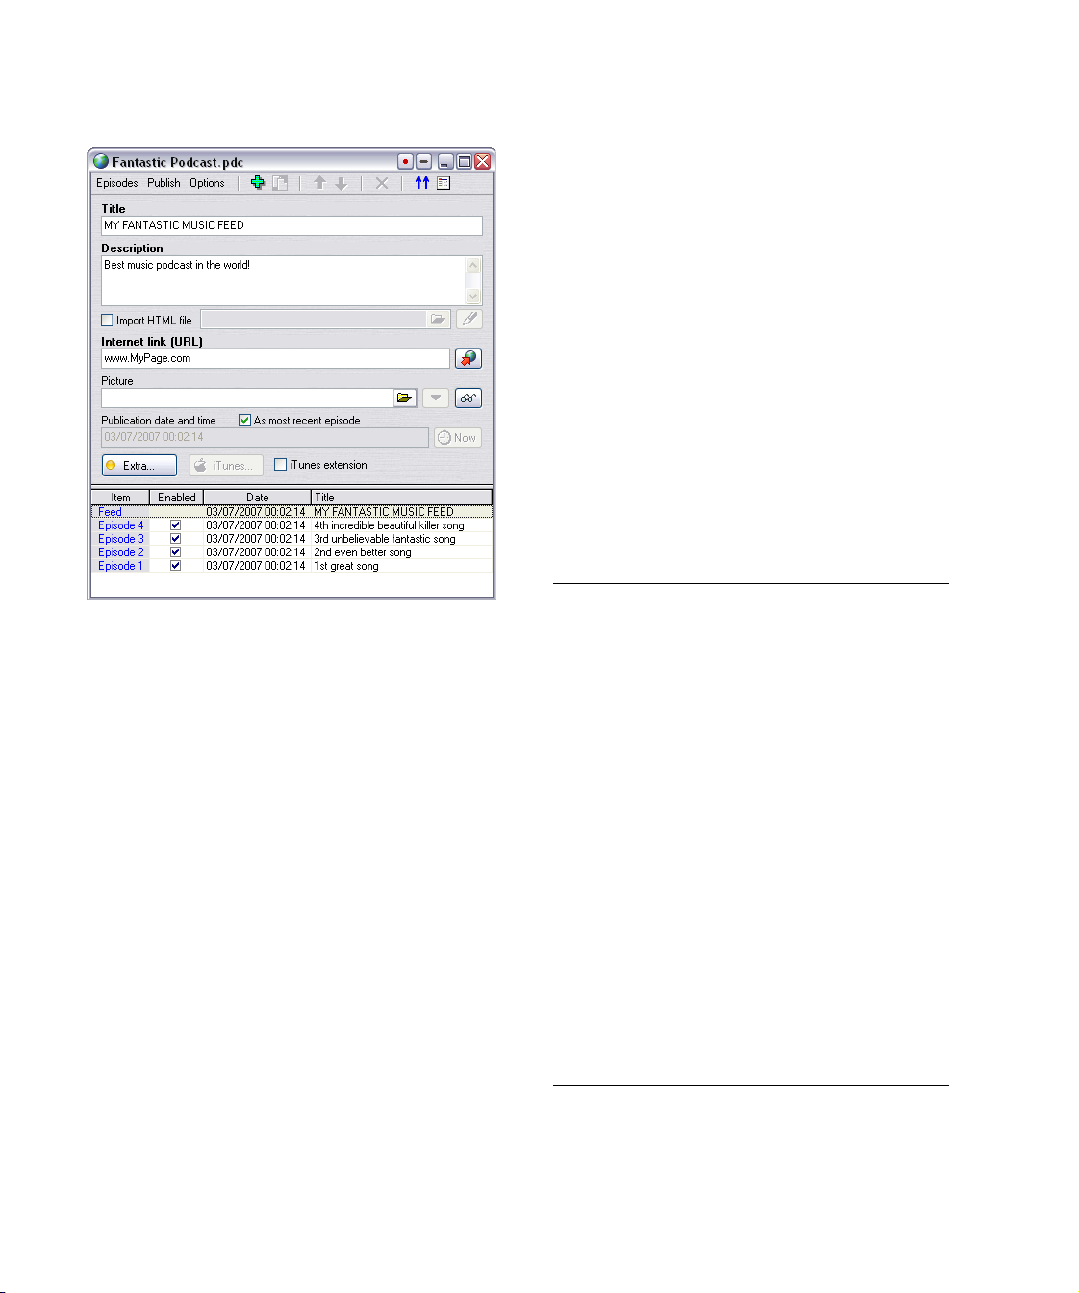
The Podcast window
A Podcast window including four episodes.
The Podcast window is divided into two panes. The lower
pane shows an item list of the basic feed and all episodes
included in the Podcast.
The upper pane shows the information for the feed or an
episode, depending on the item selected in the list below.
This is where you will be adding files, Internet links or textual information to the Podcast feed and its episodes.
Adding, moving and deleting episodes
There are two ways to add an episode to a Podcast:
• Select "New" from the Podcast window’s Episodes
menu.
This will add a new untitled episode without any information being
present.
• Select an existing episode in the Podcast window’s
item list, then select "Duplicate" from the Episodes menu.
This will add a new episode, copying all information from the existing episode to the new one.
Episodes can be moved by using the "Move up/down"
functions in the Podcast window’s Episodes menu. Alternatively, you can also re-order episodes by using dragand-drop in the item list.
In order to delete an episode, select it in the item list and
use the "Delete" function in the Episodes menu.
Ö There must be at least one episode present in the
Podcast.
Adding information to the Podcast
The upper pane of the Podcast window shows various
fields and settings that are related to the basic feed or an
episode, depending on what you have selected in the
lower pane’s item list (the fields are slightly different for
the feed and episodes).
Ö Field labels in bold letters point at a field that is mandatory to fill. For quick publishing of your Podcast it is sufficient to fill these fields only.
Following settings are available for the feed:
Setting Description
Title Sets the title of the feed (e.g. the topic of your pod-
Description Further description of the feed content (HTML tags
Import
HTML file
Internet link
(URL)
Picture You may add a picture to your feed. This picture can-
Publication
date and
time
cast). This is a mandatory field.
are also allowed). This is a mandatory field.
Allows to browse for an HTML document, replacing
the description above. Clicking the "Pen" button
launches your HTML editor (see “Global Podcast
options” on page 6), which allows for more complex
designs.
Your feed’s main link presented to the user. Use this
to direct people to a certain website that is related to
your feed. This is a mandatory field.
Clicking the "Link" button will open the specified
URL in your system’s default Internet browser, to
make sure that the link is correct.
not be larger than 144 x 400 pixels according to the
RSS standard, but it is possible to automatically resize the picture, if required (see “Global Podcast op-
tions” on page 6).
Clicking the "Glasses" button will open the specified
picture in your system’s default image viewer.
Allows to set the feed’s publication date and time. If
"As most recent episode" is checked, this will automatically be set accordingly. Clicking the "Now" button will set your system’s current date and time.
5
Podcasting
Page 6
These settings are available for episodes:
Setting Description
Title Sets the episode’s title. This is a mandatory field.
Description Further description of the episode content (HTML
Import
HTML file
Internet link
(URL)
Audio file Sets the path to the audio file you want to add to the
Publication
date and
time
tags are also allowed). This is a mandatory field.
Allows to browse for an HTML document, replacing
the description above. Clicking the "Pen" button
launches your HTML editor (see “Global Podcast
options” on page 6), which allows for more complex
designs.
An additional link related to the episode.
Clicking the "Link" button will open the specified
URL in your system’s default Internet browser, to
make sure that the link is correct.
episode. This could be any file type that is supported
by WaveLab Essential, but should be an mp3 file for
best possible compatibility.
Clicking the "Arrow" button allows to directly add any
file that is currently open. Alternatively, it is also possible to drag an opened audio file’s Document icon
onto the Podcast window’s upper pane.
Clicking the "Play" button will open the specified file
in your system’s default media player.
Allows to set the episode’s publication date and
time. Clicking the "Now" button will set your system’s
current date and time.
Please note the following:
• When using HTML files and publishing the Podcast, any
picture files that may be referenced by the HTML file will
automatically be uploaded without any intervention (for
this to work, HTML files should be in unicode "utf-8" or
"Windows Latin code 1252" format).
• All fields support WaveLab Essential's "Default text variables" from the Options menu (more information on user
variables can be found in the Operation Manual).
• It is possible to add an open Podcast to a Data CD/
DVD project, using "Add to Data CD/DVD" from the Special submenu of the File menu. This way you can easily
backup the complete Podcast including all accompanying
media files to a CD for example.
may or may not take advantage of these settings, and this
is why they are gathered in an extra dialog (your Podcast
will play perfectly without specifying anything here, but
you may go ahead, if you so desire).
If any optional information is set in this dialog, the small
"light" within the "Extra..." button will turn from orange to
green.
iTunes extension
If your Podcast should be received using Apple’s iTunes
application, you may want to activate the "iTunes extension" checkbox in the feed settings. This enables the
"iTunes..." button to specify additional feed and episode
information.
Again, the information here is not mandatory, and your Podcast will play fine in iTunes, even without the iTunes extension activated. But making proper settings here (e.g. in the
Categories and Keywords sections) may help your Podcast
getting distributed more easily among iTunes users.
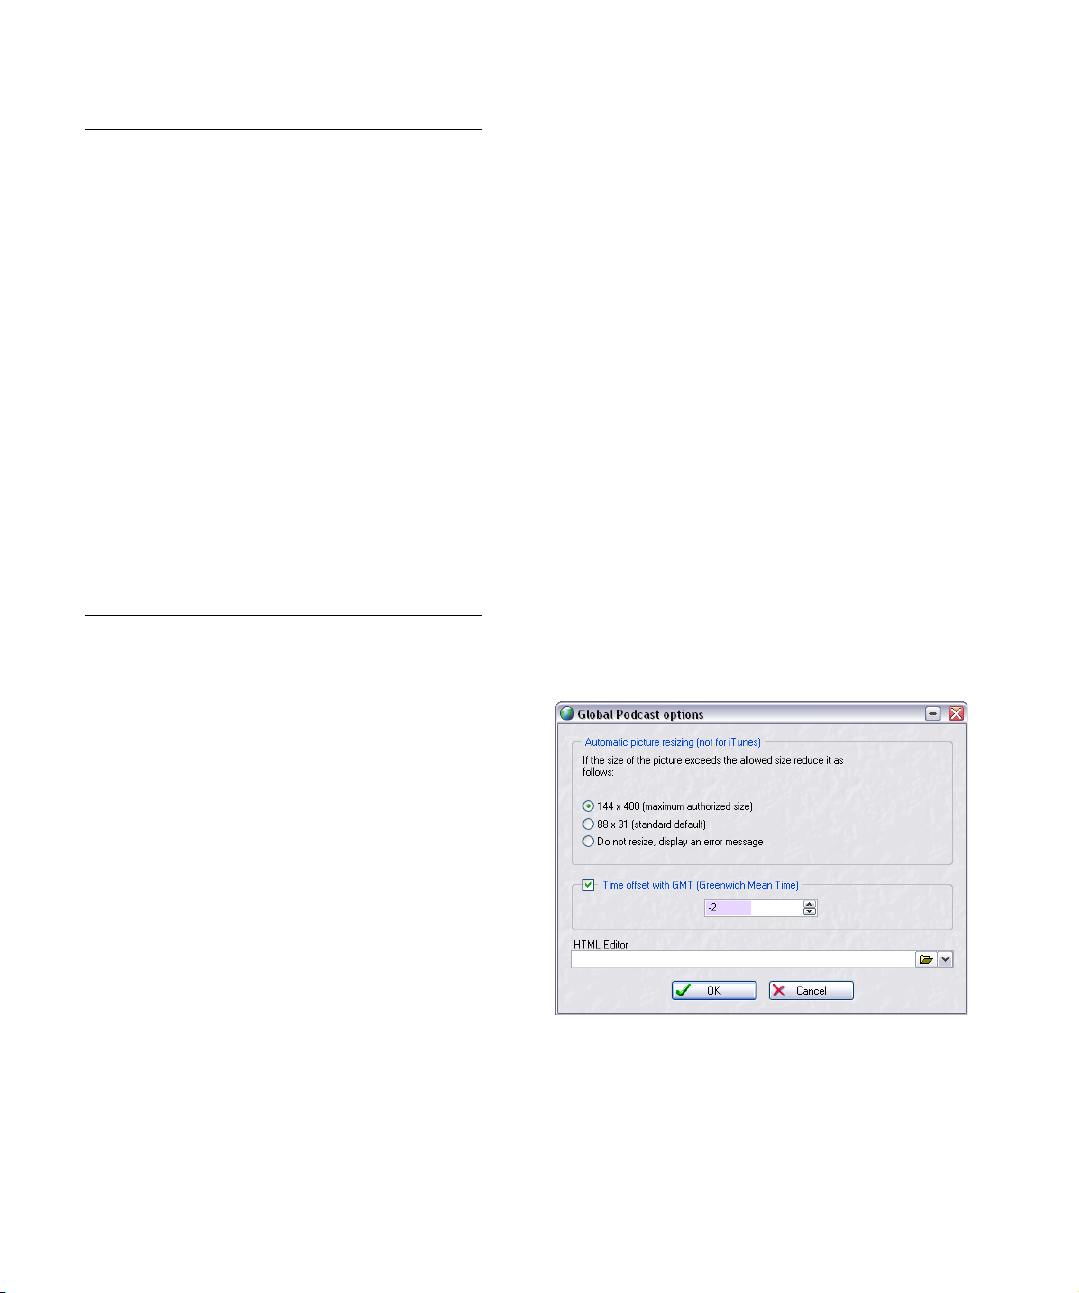
Global Podcast options
There are some additional options you can set, which are
valid for all Podcast windows. Selecting "Global options..." from the Podcast window’s Options menu brings
up this dialog:
Optional information
Clicking the "Extra..." button in the Podcast window’s upper pane allows to specify optional information for the
feed and the individual episodes. The information here is
not mandatory and rarely used. Feed receiving programs
The Global Podcast options dialog.
6
Podcasting
Page 7

The following options are available:
Option Description
Automatic
picture
resizing
Time offset
with GMT
HTML
Editor
Defines what to do, if specified pictures exceed the
maximum size allowed by the RSS standard. If pictures need resizing, the original images on your harddisk will not be modified.
The displayed dates and times are "local". If your system is properly set, WaveLab Essential will automatically adjust the time offset in relation to GMT
correctly. However, if you want to have time and date
relative to a different time zone, adjust the value here.
Sets the path to the external HTML editor, which will
be launched when clicking the "Pen" button in the
feed or episode "Import HTML file" setting.
Publishing the Podcast
Following settings are available and must be specified:
Setting Description
Host Your own FTP address.
User name Your login user name to your own FTP address.
Password The password to your user name.
Use Passive
Mode
Feed file
name (with
path)
Associated
web site
(URL)
This should be left activated and only changed if you
experience problems with the FTP connection.
The Podcast file name, as you want it to end up on
your FTP site (extension .xml), including the relative
path to it.
Both, file name and path, are part of the Podcast’s final public Internet address, so you may want to avoid
long names.
Your own web site address, including the path to the
feed (see above).
When you are finished with adding files and information to
your feed and episodes, you can directly publish the Podcast to the Internet from within WaveLab Essential, using
the built-in FTP client.
The requirement for this to work of course is, that you
must have some webspace with an FTP account for it in
order to upload data, so that you can make your Podcast
available at a publicly accessible Internet address.
FTP site manager
WaveLab Essential’s FTP site manager stores all information required for the Podcast upload process. Selecting
"FTP site..." from the Podcast window’s Publish menu
brings up the FTP site dialog:
FTP site dialog.
Here’s an example:
• Your FTP host address is "ftp.MyPage.com", your public
web site address is "www.MyPage.com".
• The Feed file name setting is "podcasts/fantasticcast.xml", the Associated web site setting is
"www.MyPage.com/podcasts".
• The Podcast’s media files will then be uploaded onto
the FTP at "ftp.MyPage.com/podcasts".
• The Podcast file itself (and as such the Internet address
to be distributed) will be found at
"www.MyPage.com/podcasts/fantastic-cast.xml".
Each Podcast stores its own complete FTP site information. It’s also possible to save and recall FTP site presets
using the Preset functions at the bottom left of the dialog.
Uploading the Podcast
Once you have specified the FTP site settings, uploading
the Podcast is rather simple by using the functions in the
Podcast window’s Publish menu.
7
Podcasting
Page 8

Following upload functions are available:
Function Description
Update all
items on
FTP
Upload/Replace all
items on FTP
Update selected item on
FTP
Upload/Replace selected item on
FTP
Uploads/updates the XML Podcast file on the FTP;
also uploads all items’ media files, but only if they are
not already present on the FTP.
This is the most common function to upload and update your Podcast.
Same as above, but always uploads/replaces all
items’ media files; useful if you have changed the audio data, for example.
Uploads/updates the XML Podcast file on the FTP;
also uploads the media file of the currently selected
item in the list, but only if it is not already present on
the FTP.
Same as above, but always uploads/replaces the
media file of the currently selected item in the list;
useful if you have changed the audio data, for example.
Ö Please note that when we say "all items", we in fact
mean all items which have their "Enabled" checkbox activated in the item list. If not enabled, these episodes are
simply omitted from the Podcast.
Ö Uploading happens in a separate background process, so that you can continue working in WaveLab Essential, in case uploading takes time.
Checking the Podcast
Selecting "View XML source document..." from the Podcast window’s Publish menu launches your system’s default XML editor, in order to visualize the contents of the
feed XML file produced by WaveLab Essential.
And as a final check, select "View published Podcast..."
from the Podcast window’s Publish menu, to open your
system’s default Internet browser and receive the Podcast
you have just published from the Internet.
8
Podcasting
Page 9

Podcasting
Page 10

Einführung
Podcasting ist eine Methode für die Verteilung von Multimedia-Dateien über das Internet, die z. B. für die Wiedergabe auf mobilen Geräten und PCs verwendet werden
können. Ein Podcast kann mit Hilfe einer Software, die
sog. «RSS-Feeds» lesen kann, automatisch heruntergeladen werden. RSS ist eine Abkürzung für "Really Simple
Syndication" und ist Standard für die Distribution von
Nachrichten und anderen Informationen via Internet.
Ein RSS Nachrichten-Feed sendet dabei kurze Mitteilungen über ein bestimmtes Thema (wie z. B. Sport, Musik
usw.), die über eine Webseite verfügbar gemacht werden.
Damit diese Mitteilungen gelesen werden können, wird
vom Anwender ein Programm (z. B. ein spezielles Tool
zum Lesen von Feeds oder ein Internet-Browser) eingesetzt, das in der Lage ist, mehrere Feeds gleichzeitig zu
überwachen sowie automatisch und regelmäßig neue Mitteilungen herunterzuladen.
Technisch gesehen handelt es sich bei einem Podcast um
einen RSS-Feed mit Dateninhalt, wie z. B. Audio- oder Videodateien. Ein Podcast ist dabei ähnlich wie eine "Radiosendung" aufgebaut, mit immer neuen Episoden, die
regelmäßig für eine Zuhörerschaft publiziert werden, die
selbst entscheiden will, wann immer, wo immer und wie
immer sie eine Podcast-Sendung anhören möchte. Aus
dieser Sicht ist ein Podcast ohne Zweifel eine großartige
Sache, wenn es darum geht, Informationen jedermann
und jederzeit zugänglich zu machen.
WaveLab Essential ist nicht nur in der Lage, Audiomaterial
zu bearbeiten und zu produzieren, sondern verfügt ebenfalls über die Fähigkeit, Podcast-Episoden nach Belieben
zu erzeugen und zu publizieren, wobei es noch nicht einmal notwendig ist, das Programm selbst zu verlassen!
Alles, was Sie außer WaveLab Essential noch benötigen,
ist ein wenig Webspeicher mit einem entsprechenden
FTP-Account zum Hochladen Ihrer Podcast-Daten.
Einen neuen Podcast erstellen
Um einen neuen Podcast zu erstellen, wählen Sie im
«Neu-Untermenü» des Datei-Menüs den Eintrag «Podcast...».
Das Podcast-Fenster wird auf dem Bildschirm gerufen
und Sie können alle für Ihren Podcast benötigten Informationen eingeben (dies sind in der Regel die Pfade zu den
mp3-Audiodateien mit einigen Textinformationen).
Alternative Möglichkeiten der Podcast-Erstellung
In Abhängigkeit davon, welche Art von Dokumenten Sie
bereits in WaveLab Essential geöffnet haben, gibt es noch
andere und eventuell schnellere Möglichkeiten der Podcast-Erstellung.
Angenommen, das aktuell aktive Dokument ist ein WaveFenster:
• Wählen Sie aus dem Bearbeiten-Menü den Eintrag
«Podcast aus Wavedatei erstellen...».
Es wird ein neues Podcast-Fenster erstellt, wobei die Audiodatei bereits
für Episode 1 ausgewählt ist.
• Wählen Sie im «Spezial-Untermenü» des Datei-Menüs
den Eintrag «Zum Podcast hinzufügen...» .
In dem eingeblendeten Dialog können Sie entweder einen aktuell in
WaveLab Essential (falls vorhanden) geöffneten Podcast auswählen
oder Ihre Festplatte nach einem vorhandenen Podcast durchsuchen und
öffnen. In beiden Fällen wird eine neue Episode mit der dafür ausgewählten Audiodatei zum Podcast hinzugefügt. Alternativ besitzen Sie zudem
die Option, über diesen Dialog mit der bereits für Episode 1 ausgewählten Audiodatei einen neuen Podcast zu erstellen.
Angenommen, das bestehende Podcast-Fenster ist aktuell geöffnet:
• Wählen Sie aus dem Optionen-Menü des PodcastFensters den Eintrag «Podcast klonen...».
Sie erstellen damit eine unbenannte Kopie des bestehenden Podcasts,
die alle Informationen des Original-Podcasts enthält. Alternativ dazu können Sie mit derselben Wirkung das Ziehen-Symbol des Podcast-Fensters auf den WaveLab Essential-Desktop ziehen.
Podcast-Vorlagen
WaveLab Essential ermöglicht Ihnen das Speichern von
Podcast-Vorlagen aus geöffneten Podcast-Fenstern:
• Wählen Sie aus dem Datei-Menü die Option «Als Vorlage speichern...»
Sie speichern damit die Informationen des aktuell aktiven PodcastFensters ein eine Vorlage. Beim nächsten Mal, wenn Sie unter Verwendung einer der oben beschriebenen Methoden einen neuen Podcast erstellen, können Sie bei Bedarf auf diese Vorlage zurückgreifen. Die
Informationen sind dann bereits in dem neuen Podcast-Fenster enthalten.
10
Podcasting
Page 11

Das Podcast-Fenster
Episoden können mit Hilfe der Funktionen «Nach oben/
Nach unten» aus dem Episoden-Menü des Podcast-Fensters verschoben werden. Alternativ dazu können Sie durch
Ziehen & Ablegen die Reihenfolge der in der Objektliste
enthaltenen Einträge nach Belieben verändern.
Möchten Sie eine Episode löschen, wählen Sie den betreffenden Eintrag in der Objektliste aus und aktivieren Sie
im Episoden-Menü die Funktion «Löschen».
Ö In einem Podcast muss wenigstens eine Episode vorhanden sein.
Informationen für einen Podcast einfügen
Die obere Fläche des Podcast-Fensters enthält eine
Reihe von Feldern und Einstellungen, die sich - in Abhängigkeit von der aktuellen Auswahl in der Objektliste der
unteren Fensterfläche - auf einen Basis- Feed bzw. eine
Episode beziehen. Die Felder für Feeds und Episoden
weichen dabei ein wenig voneinander ab.
Podcast-Fenster mit vier Episoden.
Das Podcast-Fenster ist in zwei Flächen unterteilt, wobei
der untere Teil eine Objektliste des Basis-Feeds mit allen
Podcast-Episoden anzeigt.
In der oberen Fensterfläche finden Sie die für den Feed
relevanten Informationen, die von dem in der Liste unten
ausgewählten Objekt abhängen. Hier fügen Sie Dateien,
Internet-Links oder Textinfos zu Ihren Podcast-Feeds und
den damit verknüpften Episoden hinzu.
Episoden hinzufügen, verschieben und
löschen
Wenn Sie eine Episode zu einem Podcast hinzufügen
möchten, besitzen Sie die beiden folgenden Möglichkeiten:
• Wählen Sie aus dem Episoden-Menü des PodcastFensters den Eintrag «Neu».
Sie fügen damit eine neue und unbenannte Episode ohne jegliche Informationen ein.
• Wählen Sie aus der Objektliste des Podcast-Fensters
eine vorhandene Episode aus und aktivieren Sie dann aus
dem Episoden-Menü die Option «Duplizieren».
Sie fügen damit eine neue Episode ein, wobei alle Informationen aus der
bestehenden Episode in die neue Episode kopiert werden.
Ö Sind die Feldüberschriften fett, bedeutet dies, dass
das betreffende Feld ausgefüllt werden muss. Wenn Sie
einen Podcast schnell publizieren möchten, reicht es aus,
nur die Felder mit den fetten Überschriften auszufüllen.
Für die Feeds stehen Ihnen die folgenden Einstellungen
zur Verfügung:
Einstellung Beschreibung
Titel Hier vergeben Sie den Titel für einen Feed (wie z. B.
BeschreibungNähere Beschreibung des Feed-Inhaltes (HTML-
Importiere
HTML Datei
Internet Link
(URL)
das Thema Ihres Podcasts). Das Feld muss ausgefüllt werden.
Tags sind ebenfalls erlaubt). Das Feld muss ausgefüllt werden.
Hier können Sie nach einem HTML-Dokument suchen, mit dem Sie die Beschreibung oben ersetzen
möchten. Wenn Sie auf den Schalter «Stift» klicken,
wird ein HTML-Editor aufgerufen (siehe “Allgemeine
Podcast-Optionen” auf Seite 13), womit Sie über
größere Gestaltungsmöglichkeiten verfügen.
Ihr wichtigster Feed-Link für den Anwender. Verwenden Sie diese Option, um Ihre Zuhörer zu einer
Webseite zu führen, die mit Ihrem Feed verknüpft ist.
Auch dieses Feld muss ausgefüllt werden.
Ein Klick auf den «Link»-Schalter öffnet den von Ihrem System als Standard festgelegten InternetBrowser. Damit wird sichergestellt, dass der Link
auch korrekt ist und funktioniert.
11
Podcasting
Page 12

Einstellung Beschreibung
Bild Bei Bedarf können Sie zu Ihrem Feed ein Bild hinzu-
Datum und
Zeit der Veröffentlichung
fügen. Dieses Bild darf - der RSS-Norm entsprechend - nicht größer sein als 144 x 400 Pixel. Falls
erforderlich ist es jedoch auch möglich, das Bild automatisch in der Größe zu verändern (siehe hierzu
“Allgemeine Podcast-Optionen” auf Seite 13).
Wenn Sie auf den «Brillen»-Schalter klicken, wird
das betreffende Bild in dem von Ihrem System als
Standard festgelegten Tool für die Bildbetrachtung
geöffnet.
Geben Sie hier Datum und Zeit für die Feed-Publikation ein. Mit Aktivierung der Option «Als aktuellste
Episode» werden die dafür notwendigen Werte automatisch gesetzt. Mit Klick auf den «Jetzt»-Schalter,
werden die aktuellen Datums- und Zeitwerte von Ihrem System übernommen.
Für Episoden stehen Ihnen die folgenden Einstellungen
zur Verfügung:
Einstellung Beschreibung
Titel Hier vergeben Sie den Titel für eine Episode.
BeschreibungNähere Beschreibung des Episoden-Inhaltes
Importiere
HTML-Datei
Internet-Link
(URL)
Audiodatei Setzt den Pfad zu der Audiodatei, den Sie Ihrer Epi-
Datum und
Zeit der Veröffentlichung
Das Feld muss ausgefüllt werden.
(HTML-Tags sind ebenfalls erlaubt). Das Feld muss
ausgefüllt werden.
Hier können Sie nach einem HTML-Dokument suchen, mit dem Sie die Beschreibung oben ersetzen
möchten. Wenn Sie auf den Schalter «Stift» klicken,
wird ein HTML-Editor aufgerufen (siehe “Allgemeine
Podcast-Optionen” auf Seite 13), womit Sie über
größere Gestaltungsmöglichkeiten verfügen.
Zusätzlicher Link mit Bezug auf die Episode.
Ein Klick auf den «Link»-Schalter öffnet den von Ihrem System als Standard festgelegten InternetBrowser. Damit wird sichergestellt, dass der Link
auch korrekt ist und funktioniert.
sode hinzufügen möchten. Es kann sich dabei um
jede Art von Datei handeln, die von WaveLab Essential unterstützt wird, doch sollte es aus Gründen der
bestmöglichen Kompatibilität eine mp3-Datei sein.
Das Klicken des «Pfeil»-Schalters ermöglicht Ihnen
das direkte Hinzufügen von jeder gerade geöffneten
Datei, die gerade geöffnet ist. Alternativ können Sie
auch das Ziehen-Symbol einer geöffneten Audiodatei auf die obere Fensterfläche des Podcast-Fensters ziehen.
Wenn Sie auf den «Wiedergabe»-Schalter klicken,
wird die betreffende Datei in dem von Ihrem System
als Standard festgelegten Media Player geöffnet.
Ermöglicht die Angabe von Datum und Zeit für die
Episoden-Publikation. Mit Klick auf den «Jetzt»Schalter, werden die aktuellen Datums- und Zeitwerte von Ihrem System übernommen.
Bitte beachten Sie die folgenden Punkte:
• Wenn Sie bei der Publikation Ihres Podcasts HTMLDateien verwenden, wird jede Bilddatei, auf die von der
HTML-Datei aus referenziert wird, automatisch und ohne
Ankündigung hochgeladen (damit dies funktioniert, sollten
die verwendeten HTML-Dateien entweder im Unicode
"utf-8" oder im "Windows Latin Code 1252" vorliegen).
• Alle Felder unterstützen die «Standard-Textvariablen»
von WaveLab Essential aus dem Optionen-Menü (weitere
Informationen zu Variablen finden Sie im Benutzerhandbuch).
• Mit Hilfe der Option «Zu Daten-CD/DVD hinzufügen»
aus dem «Spezial-Untermenü» des Datei-Menüs ist es
auch möglich, einen geöffneten Podcast zu einem DatenCD/DVD-Projekt hinzuzufügen. So können Sie einfach und
komfortabel den gesamten Podcast mit all seinen Mediendateien als Backup zum Beispiel auf eine CD brennen.
Optionale Informationen
Wenn Sie in der oberen Fläche Ihres Podcast-Fensters
den "Extra..."-Schalter aktivieren, können Sie optionale Informationen für Ihren Feed und die einzelnen Episoden
hinterlegen. Diese Informationen sind nicht obligatorisch
und werden in der Regel auch nicht sehr häufig verwendet. Da diese Einstellungen von Programmen, die Feeds
empfangen, zwar ausgewertet werden können, aber nicht
müssen, haben wir sie in einem separaten Dialog untergebracht (Ihr Podcast wird auch dann perfekt funktionieren,
wenn Sie hier nichts angeben, doch lassen Sie sich nicht
davon zurückhalen, diese Option auszuprobieren).
Sobald Sie eine optionale Information in diesem Dialog
ablegen, wechselt der kleine "Leuchtpunkt" innerhalb des
"Extra..."-Schalters seine Farbe von orange nach grün.
iTunes-Erweiterung
Sollte Ihr Podcast auch mit Hilfe der iTunes-Applikation
von Apple empfangen werden, besitzen Sie die Möglichkeit, die Option «iTunes Extension» in den Feed-Einstellungen zu aktivieren. Über den «iTunes...»-Schalter können
Sie danach zusätzliche Feed- und Episoden-Informationen festlegen.
Die Eingabe von Informationen ist jedoch nicht obligatorisch. Ihr Podcast wird auch in Kombination mit iTunes
hervorragend funktionieren und zwar selbst dann, wenn
die iTunes-Erweiterung nicht aktiviert wurde. Es ist jedoch
12
Podcasting
Page 13

so, dass klare Angaben und Einstellungen (z. B. in den
Sektionen «Kategorie» und «Schlagworte») Ihrem Podcast
vielleicht dazu verhelfen können, unter iTunes-Anwendern
noch leichter Verbreitung zu finden.
Allgemeine Podcast-Optionen
Es gibt ein paar zusätzliche Optionen, die Sie einstellen
können und die für alle Podcast-Fenster Gültigkeit besitzen. Wählen Sie «Allgemeine Podcast Optionen...» aus
dem Optionen-Menü des Podcast-Fensters. Das folgende Dialogfenster wird aufgerufen:
Einen Podcast veröffentlichen
Nachdem Sie zu Ihrem Feed und den darin enthaltenen
Episoden die gewünschten Dateien und Informationen
hinzugefügt haben, können Sie den Podcast mit Hilfe des
in WaveLab Essential implementierten FTP-Clients direkt
im Internet veröffentlichen.
Voraussetzung hierfür ist, dass Sie zum Hochladen der
Dateien über ein wenig Webspeicher mit entsprechendem FTP-Account verfügen, um Ihren Podcast einer öffentlich zugänglichen Internet-Adresse zugänglich
machen zu können.
FTP Site-Manager
Der FTP Site-Manager von WaveLab Essential speichert
alle für den Upload Ihres Podcasts benötigten Informationen. Wählen Sie aus dem Veröffentlichen-Menü des Podcast-Fensters den Eintrag «FTP Site...», wonach der
gleichnamige Dialog auf den Bildschirm gerufen wird:
Der Allgemeine Podcast Optionen-Dialog.
Es stehen Ihnen die folgenden Optionen zur Verfügung:
Optionen Beschreibung
Automatische Bildgrössenanpassung
Zeitversatz zu
GMT (Greenwich Mean
Time)
HTML
Editor
Hier wird festgelegt, was zu tun ist, wenn Bilder die
von dem RSS-Standard zugelassene Maximalgröße
überschreiten. Auch wenn Bilder in ihrer Größe verändert werden müssen, werden die auf Ihrer Festplatte enthaltenen Bildoriginale nicht verändert.
Bei den angezeigten Datums- und Zeitangaben handelt es sich um "lokale" Werte. Sind diese Werte
korrekt auf Ihrem System eingestellt, wird WaveLab
Essential den Zeitversatz zur Greenwhich-Zeit automatisch richtig berechnen. Sollten Sie jedoch Datums- und Zeitwerte vorziehen, die sich auf eine
andere Zeitzone beziehen, können Sie die betreffenden Werte hier einstellen.
Hier können Sie den Pfad zu einem externen HTMLEditor festlegen, der aufgerufen werden soll, wenn
Sie im Kontrollbereich «Importiere HTML Datei» Ihrer
Feed- oder Episoden-Einstellungen das «Stift»-Symbol anklicken.
FTP Site-Dialog.
Es stehen Ihnen die folgenden obligatorischen Einstellungen zur Verfügung:
Einstellungen
Host Ihre eigene FTP-Adresse.
Benutzername
Passwort Das Passwort zu Ihrem Benutzernamen.
Passiv Modus benutzen
13
Podcasting
Beschreibung
Ihr Login-Benutzername für Ihre eigene FTPAdresse.
Diese Option sollte aktiviert bleiben und nur dann
geändert werden, wenn Sie mit Ihrer FTP-Verbindung Probleme haben sollten.
Page 14

Einstellungen
Dateiname
des Feed (mit
Pfad)
Zugehörige
Webseite
(URL)
Beschreibung
Dateiname Ihres Podcasts wie er auf Ihrer FTP-Seite
(mit der Erweiterung .xml) erscheinen soll mit relativem Pfad zur Podcast-Datei.
Da sowohl der Name als auch der Pfad Bestandteil
der endgültigen öffentlichen Internetadresse Ihres
Podcasts sind, werden Sie lange Namen u. U. vermeiden wollen.
Ihre eigene Webseiten-Adresse mit aktuellem Pfad
zu Ihrem Feed (siehe oben).
Ein Beispiel:
• Ihre FTP Host-Adresse lautet "ftp.MeineSeite.de" und
Ihre öffentlich zugängliche Webseiten-Adresse
"www.MeineSeite.de".
• Die Einstellung für den Feed-Namen lautet "podcasts/
fantastic-cast.xml"; die damit verknüpfte Webseiten-Einstellung lautet "www.MeineSeite.de/podcasts".
• Die zum Podcast gehörenen Mediendateien werden
dann unter der Adresse "ftp.MeineSeite.de/podcasts" auf
Ihre FTP-Seite hochgeladen.
• Sie finden die eigentliche Podcast-Datei (und damit
auch die für die Verteilung benötigte Internet-Adresse)
unter
"www.MeineSeite.de/podcasts/fantastic-cast.xml".
Jeder Podcast speichert seine eigene vollständige FTPSite-Information. Mit Hilfe der Speichern als-Option und
der Funktionen «Presets auswählen» im Dialogfenster unten links ist es auch möglich, entsprechende Presets von
FTP-Seiten zu speichern und wieder abzurufen.
Es stehen Ihnen die folgenden Upload-Funktionen zur
Verfügung:
Funktion Beschreibung
Alle Objekte
auf dem FTP
aktualisieren
Laden/Ersetzen aller Objekte auf dem
FTP
Ausgewähltes Objekt auf
FTP aktualsieren
Laden/Ersetzen des ausgewählten
Objekts auf
dem FTP
Lädt/aktualisiert die auf der FTP-Seite enthaltene
XML Podcast-Datei; ebenfalls hochgeladen werden
die zu den einzelnen Objekten gehörenden Mediendateien. Dies gilt allerdings nur für den Fall, dass sie
nicht bereits schon auf der FTP-Seite vorhanden
sind.
Zum Hochladen und Aktualisieren Ihrer Podcasts ist
dies die gängigste Funktion.
Hier gilt das Gleiche wie oben, mit der Ausnahme,
dass stets die Mediendateien aller Objekte hochgeladen/ersetzt werden. Dies ist z. B. dann sinnvoll,
wenn Sie Ihre Audiodaten verändert haben.
Lädt/aktualisiert die XML Podcast-Datei auf die FTPSeite; ebenfalls hochgeladen werden die zu den aktuell in der Liste ausgewählten Objekten gehörenden
Mediendateien. Dies gilt allerdings nur für den Fall,
dass sie nicht bereits schon auf der FTP-Seite vorhanden sind.
Hier gilt das Gleiche wie oben, mit der Ausnahme,
dass nur die zu den aktuell in der Liste ausgewählten
Objekten gehörenden Mediendateien hochgeladen/
ersetzt werden. Dies ist z. B. dann sinnvoll, wenn Sie
die Audiodaten verändert haben.
Ö Wichtig: Mit «allen Objekten» meinen wir all diejenigen
Objekte, bei denen in der Objektliste das «Aktiv»-Kontrollkästchen auch wirklich mit einem Häkchen versehen und
damit aktiviert ist. Alle deaktivierten Episoden-Objekte werden dagegen einfach aus dem Podcast ausgeschlossen.
Ö Der eigentliche Vorgang des Hochladens wird im Hintergrund abgewickelt, so dass Sie - für den Fall, dass das
Uploaden längere Zeit in Anspruch nehmen sollte - mit
WaveLab Essential weiterarbeiten können.
Einen Podcast hochladen
Nachdem Sie die Einstellungen für Ihre FTP-Seite vorgenommen haben, können Sie Ihren Podcast nun einfach mit
Hilfe der unter dem Veröffentlichen-Menü des PodcastFensters aufgeführten Optionen hochladen.
Podcasting
Den Podcast überprüfen
Wenn Sie im Veröffentlichen-Menü Ihres Podcast-Fensters die Option «Zeige XML Quelldokument...» wählen,
wird der von Ihrem System als Standard definierte XMLEditor aufgerufen, um die Inhalte der von WaveLab Essential erstellten Feed XML-Datei anzuzeigen.
Wählen Sie für die abschließende Überprüfung Ihres Podcasts im Veröffentlichen-Menü des Podcast-Fensters die
Option «Zeige veröffentliche Podcasts...» und öffnen Sie
damit den von Ihrem System als Standard definierten Internet-Browser, um genau den Podcast zu empfangen,
den Sie gerade über das Internet veröffentlicht haben.
14
Page 15

Podcasting (diffusion pour baladeur)
Page 16

Introduction
Le Podcasting est une méthode de diffusion des fichiers
multimédia par Internet, permettant par exemple la lecture
sur appareils portatifs et sur ordinateurs personnels. Le
téléchargement d’un Podcast peut avoir lieu de manière
automatique, au moyen d’un logiciel capable de lire le format "RSS feeds". Le RSS, pour "Really Simple Syndication", est un standard de diffusion d’actualités et autres
informations par Internet.
Un flux RSS (RSS feed) envoie de courts messages sur
un thème donné (sports, musique, etc.), disponibles depuis un site web. Pour lire les messages, l’utilisateur dispose d’un programme (tel qu’un lecteur spécial de flux ou
un navigateur Internet) capable de lire de nombreux flux et
de télécharger automatiquement les nouveaux messages
à intervalles réguliers.
Sur le plan technique, un Podcast est un flux RSS comprenant des données sous forme de fichiers audio ou vidéo. Ces fichiers sont diffusés régulièrement, à la manière
des épisodes d’une émission, à l’attention d’un auditoire
désireux de les recevoir au moment, au lieu et de la manière voulus. Il s’agit donc d’un moyen astucieux de rendre
l’information disponible à tous.
Vous le savez, WaveLab Essential est en mesure d’éditer
et de produire des données audio, mais aussi de créer et
de publier des épisodes Podcast à volonté. Tout ceci
sans jamais quitter le programme !
Tout ce dont vous aurez besoin, en plus du matériel requis
pour faire fonctionner le logiciel WaveLab Essential luimême, est d’un peu d’espace Internet et d’un compte FTP
pour télécharger les données Podcast.
Création d’un nouveau Podcast
Pour créer un nouveau Podcast, faites défiler le menu Fichier et sélectionnez "Podcast..." dans le sous-menu Nouveau.
Vous verrez alors apparaître une nouvelle fenêtre Podcast
dans laquelle vous pouvez saisir toutes les informations
requises pour le Podcast (il s’agit en général des chemins
d’accès des fichiers audio mp3 avec quelques informations textuelles).
Autres moyens de créer un Podcast
Il existe d’autres façons de créer un Podcast, en utilisant
des raccourcis par exemple, en fonction des documents
que vous avez déjà ouverts dans WaveLab Essential.
Dans l’exemple suivant, le document actif est une fenêtre
Wave :
• Faites défiler le menu Edition et sélectionnez "Créer un
Podcast à partir du fichier audio...".
Cette fonction permet de générer une fenêtre Podcast, avec le fichier
audio déjà sélectionné pour l’épisode 1.
• Faites défiler le menu Fichier et sélectionnez "Ajouter au
Podcast..." depuis le sous-menu Spécial.
Une fenêtre de dialogue s’affiche, vous permettant soit de sélectionner
un Podcast déjà ouvert dans WaveLab (le cas échéant), soit de rechercher et d’ouvrir un Podcast existant sur votre disque dur. Dans les deux
cas, un nouvel épisode sera ajouté au Podcast, avec le fichier audio sélectionné pour cet épisode. Ou bien, vous pouvez également choisir de
créer un Podcast à partir de cette fenêtre de dialogue, avec le fichier
audio déjà sélectionné pour l’épisode 1.
Dans l’exemple suivant, une fenêtre Podcast existante est
ouverte :
• Sélectionnez "Cloner ce Podcast..." depuis le menu
Options de la fenêtre Podcast.
Une copie sans titre du Podcast existant est créée, qui contient toutes
les informations du Podcast d’origine. En alternative, vous pouvez amener l’icône Document de la fenêtre Podcast sur le bureau WaveLab Essential pour effectuer cette même opération.
Modèles (gabarits) Podcast
WaveLab Essential permet la sauvegarde des modèles
(gabarits) Podcast des fenêtres Podacst ouvertes :
• Faites défiler le menu Fichier et sélectionnez "Sauver
comme modèle..."
Cette fonction permet de sauvegarder sous forme de modèle l’information de la fenêtre Podcast active. La prochaine fois que vous créez un
podcast en utilisant une des méthodes décrites ci-dessus, vous pourrez
choisir ce modèle, de sorte que les informations sont déjà présentes
dans la nouvelle fenêtre Podcast.
16
Podcasting (diffusion pour baladeur)
Page 17

La fenêtre Podcast
Fenêtre Podcast comportant quatre épisodes.
La fenêtre Podcast est divisée en deux volets. Le volet inférieur affiche une liste des articles du flux de base et tous
les épisodes contenus dans le Podcast.
Le volet supérieur affiche les informations relatives au flux
ou à un épisode, selon l’article sélectionné dans la liste de
dessous. C’est là que vous pourrez ajouter des fichiers,
des liens Internet ou des informations textuelles relatives
au flux Podcast et à ses épisodes.
Ajout, déplacement et suppression d’épisodes
Il y a deux moyens d’ajouter un épisode à un Podcast :
• Sélectionnez "Nouveau" dans le menu Épisodes de la
fenêtre Podcast.
Cette fonction permet d’ajouter un nouvel épisode sans titre, sans informations présentes.
• Sélectionnez un épisode existant dans la liste des articles de la fenêtre Podcast, puis sélectionnez "Dupliquer"
dans le menu Épisodes.
Cette fonction permet d’ajouter un nouvel épisode, en copiant toutes les
informations de l’épisode existant au nouveau.
Les épisodes peuvent être déplacés au moyen des fonctions "Déplacer vers le haut/vers le bas" dans le menu Épisodes de la fenêtre Podcast. Ou bien, vous pouvez
également réorganiser des épisodes par "glisser-déposer" dans la liste des articles.
Pour supprimer un épisode, sélectionnez-le dans la liste
des articles et utilisez la fonction "Supprimer" du menu
Épisodes.
Ö Au moins un épisode doit être présent dans le Podcast.
Ajouter une information au Podcast
Le volet supérieur de la fenêtre Podcast affiche plusieurs
champs et réglages relatifs au flux de base ou à un épisode, selon ce que vous avez sélectionné dans la liste des
articles du volet inférieur (les champs sont légèrement différents pour le flux et pour les épisodes).
Ö Les cases dont les intitulés sont en caractères gras
doivent être remplies obligatoirement. Pour une publication rapide de votre Podcast, il suffit de remplir ces cases.
Les réglages suivants sont disponibles pour le flux :
Réglage Description
Titre Définit le titre du flux (par exemple thème de votre
Description Description détaillée du contenu du flux (les balises
Importer fichier
HTML
Lien Internet
(URL)
podcast). Cette case doit être remplie obligatoirement.
HTML sont également autorisées). Cette case doit
être remplie obligatoirement.
Permet de rechercher un document HTML, en remplaçant la description ci-dessus. Cliquez sur le bouton "Crayon" pour lancer votre éditeur HTML (voir
“Options globales Podcast” à la page 19), pour des
designs plus complexes.
Le lien principal de votre flux, présenté à l’utilisateur.
Utillisez-le pour diriger les utilisateurs vers un site Internet défini, lié à votre flux. Cette case doit être remplie obligatoirement.
Cliquez sur le bouton "Lien" pour ouvrir l’URL spécifiée dans votre navigateur Internet par défaut, afin de
vous assurer que le lien est correct.
17
Podcasting (diffusion pour baladeur)
Page 18

Réglage Description
Image Vous pouvez ajouter une image à votre flux. Cette
Date et heure
de publication
image ne peut pas dépasser 144 x 400 pixels conformément au standard RSS, mais il est possible de
redimensionner automatiquement l’image si nécessaire (voir “Options globales Podcast” à la page 19).
Cliquez sur le bouton "Lunettes" pour ouvrir l’image
spécifiée dans le visionneur d’images par défaut de
votre système.
Permet de régler la date et l’heure de la publication
du flux. Si la case "Comme l’épisode le plus récent"
est cochée, ceci sera réglé automatiquement en
conséquence. Cliquez sur le bouton "Maintenant"
pour régler la date et l’heure de votre système.
Les réglages suivants sont disponibles pour les
épisodes :
Réglage Description
Titre Définit le titre de l’épisode. Cette case doit être rem-
Description Description détaillée du contenu de l’épisode (les
Importer fichier
HTML
Lien Internet
(URL)
Fichier audio Définit le chemin du fichier audio que vous désirez
Date et heure
de publication
plie obligatoirement.
balises HTML sont également autorisées). Cette
case doit être remplie obligatoirement.
Permet de rechercher un document HTML, en remplaçant la description ci-dessus. Cliquez sur le bouton "Crayon" pour lancer votre éditeur HTML (voir
“Options globales Podcast” à la page 19), pour des
designs plus complexes.
Un lien supplémentaire relatif à l’épisode.
Cliquez sur le bouton "Lien" pour ouvrir l’URL spécifié dans votre navigateur Internet par défaut, afin de
vous assurer que le lien est correct.
ajouter à l’épisode. Il peut s’agir de tout type de fichier compatible avec WaveLab Essential, mais le
format mp3 est préconisé pour une compatibilité optimale.
Cliquez sur le bouton "Flèche" pour ajouter directement tout fichier ouvert. Ou bien, il est également
possible d’amener l’icône Document d’un fichier
audio ouvert sur le volet supérieur de la fenêtre Podcast.
Cliquez sur le bouton "Lecture" pour ouvrir le fichier
spécifié dans le lecteur multimédia par défaut de votre système.
Permet de régler la date et l’heure de la publication
de l’épisode. Cliquez sur le bouton "Maintenant"
pour régler la date et l’heure de votre système.
Veuillez tenir compte des points suivants :
• Lorsque vous utilisez des fichiers HTML et que vous diffusez le Podcast, les fichiers images auxquels le fichier
HTML peut faire référence seront téléchargés automatiquement, sans aucune intervention (pour exécuter cette
fonction, les fichiers HTML devraient être au format unicode "utf-8" ou "Windows Latin code 1252").
• Tous les champs supportent les "Variables textes par
défaut" WaveLab Essential dans le menu Options (pour
plus d’informations sur les variables utilisateur, reportezvous au Mode d’Emploi.
• Il est possible d’ajouter un Podcast ouvert à un projet
de CD/DVD de données, en utilisant la fonction "Ajouter à
un CD/DVD de données" dans le sous-menu Spécial du
menu Fichier. Cette fonction vous permet d’archiver facilement le Podcast complet avec tous les fichiers multimédia l’accompagnant, pour un CD par exemple.
Information optionnelle
Cliquez sur le bouton "Extra..." sur le volet supérieur de la
fenêtre Podcast pour spécifier une information optionnelle
concernant le flux et les épisodes individuels. L’information n’est pas obligatoire et n’est utilisée que rarement.
Les programmes de réception de flux peuvant utiliser ou
non ces réglages, ceux-ci sont regroupés dans un dialogue séparé (votre Podcast sera lu sans aucun problème
même en l’absence de spécifications particulières ici,
mais vous pouvez définir des spécifications si vous le désirez).
Si des informations optionnelles sont spécifiées dans ce
dialogue, la petite "lampe" intégrée au bouton "Extra..."
passera de l’orange au vert.
Extension iTunes
Si votre Podcast doit être reçu au moyen de l’application
iTunes d’Apple, vous pouvez cocher la case "Extension
iTunes" dans les réglages du flux. Cela permet au bouton
"iTunes..." de définir des informations supplémentaires relatives au flux et à l’épisode.
Là encore, cette information n’est pas obligatoire, et votre
Podcast fonctionnera parfaitement en iTunes, même sans
activation de l’extension iTunes. Mais le fait de définir ici
des réglages (dans les sections Catégories et Mots-clés)
peut cependant faciliter la diffusion de votre Podcast
parmi les utilisateurs de iTunes.
18
Podcasting (diffusion pour baladeur)
Page 19

Options globales Podcast
Certaines options complémentaires valables pour toutes
les fenêtres Podcast peuvent être définies. Sélectionnez
"Options globales..." dans le menu Options de la fenêtre
Podcast pour afficher le dialogue suivant :
Dialogue des options globales Podcast.
Les options suivantes sont disponibles :
Option Description
Redimensionnement automatique des
images
Décalage horaire par rapport au GMT
(temps
moyen de
Greenwich)
Editeur HTML Définit le chemin vers l’éditeur HTML externe qui dé-
Définit la marche à suivre si les images spécifiées
dépassent la taille maximum autorisée par le standard RSS. Le redimensionnement d’images n’affecte
pas les images originales sur votre disque dur.
Les dates et heures affichées correspondent aux
données locales. Si votre système est réglé correctement, WaveLab Essential ajustera automatiquement l’heure en fonction de GMT. Cependant, si
vous désirez régler votre système sur la date et
l’heure d’un fueau horaire différent, vous pouvez effectuer la modification ici.
marre lorsque vous cliquez sur le bouton "Crayon"
dans le réglage "Importer fichier HTML" du flux ou de
l’épisode.
Publication du Podcast
Lorsque vous avez terminé d’ajouter des fichiers et des informations à votre flux et à vos épisodes, vous pouvez passer à la publication directe du Podcast sur Internet à partir
de WaveLab Essential, en utilisant le FTP client intégré.
Bien entendu, cette fonction nécessite que vous disposiez
d’un peu d’espace Internet et d’un compte FTP pour télécharger des données, de sorte que vous puissiez mettre à
disposition votre Podcast sur une adresse Internet accessible à tous.
Gestionnaire de site FTP
Le gestionnaire de site FTP de WaveLab Essential mémorise toutes les informations requises pour le téléchargement du Podcast. Sélectionnez "Site FTP..." dans le menu
Publier de la fenêtre Podcast pour accéder au dialogue du
site FTP :
Dialogue du site FTP.
Les réglages suivants sont disponibles et doivent être
définis :
Réglage Description
Hôte Votre adresse FTP.
Nom utilisateur
Mot de passe Le mot de passe pour votre nom d’utilisateur.
Utiliser le
mode passif
Nom de fichier du flux
(avec le chemin)
Site web associé (URL)
Exemple :
• Votre adresse hôte FTP est "ftp.MyPage.com", votre
adresse publique de site Internet est "www.MyPage.com".
Votre nom d’utilisateur pour ouvrir une session à votre adresse FTP.
Cette fonction devrait être laissée activée, et modifiée uniquement dans le cas où la connexion FTP
pose des problèmes.
Le nom du fichier Podcast, avec l’extension que vous
souhaitez lui attribuer sur votre site FTP (extension
.xml), avec son chemin d’accès.
Tous deux, le nom du fichier et le chemin d’accès,
faisant partie de l’adresse Internet finale du Podcast,
il est préférable d’éviter les noms trop longs.
Votre propre adresse de site Internet, avec le chemin
d’accès au flux (voir ci-dessus).
19
Podcasting (diffusion pour baladeur)
Page 20

• Le nom du fichier du flux est "podcasts/fantasticcast.xml", le site Internet associé est
"www.MyPage.com/podcasts".
• Les fichiers multimédia du Podcast seront ensuite téléchargés sur le FTP, à l’adresse
"ftp.MyPage.com/podcasts".
• Le fichier Podcast lui-même (et par conséquent,
l’adresse Internet de diffusion) se trouve sous
"www.MyPage.com/podcasts/fantastic-cast.xml".
Chaque Podcast mémorise l’information complète relative
à son site FTP. Il est également possible de sauvegarder
et de rappeler les préréglages relatifs au site FTP en utilisant les fonctions "Sauver (sous)..". et "Explorer les Présélections..." en bas à gauche du dialogue.
Téléchargement du Podcast
Une fois que vous avez spécifié les réglages du site FTP,
le téléchargement du Podcast se fait facilement, en utilisant les fonctions du menu Publier de la fenêtre Podcast.
Les fonctions de téléchargement suivantes sont disponibles :
Fonction Description
Mettre à jour
tous les articles sur
le FTP
Envoyer/
Remplacer
tous les articles sur le
FTP
Mettre à jour
‘l’article sélectionné sur
le FTP
Envoyer/
Remplacer
l’article sélectionné sur le
FTP
Assure le téléchargement/la mise à jour du fichier
XML Podcast sur le FTP ; assure également le téléchargement des fichiers multimédia de tous les articles, à condition que ceux-ci soient déjà présents sur
le FTP.
C’est la fonction principale pour effectuer le téléchargement et la mise à jour de votre Podcast.
Même fonction que ci-dessus, mais assure toujours
le téléchargement/le remplacement des fichiers multimédia de tous les articles ; utile si vous avez modifié
les données audio par exemple.
Asure le téléchargement/la mise à jour du fichier
XML Podcast sur le FTP ; assure également le téléchargement du fichier multimédia de l’article actuellement sélectionné dans la liste, à condition que
celui-ci ne soit pas encore présent sur le FTP.
Même fonction que ci-dessus, mais assure toujours
le téléchargement/le remplacement du fichier multimédia de l’article actuellement sélectionné dans la
liste ; cette fonction est utile si vous avez modifié les
données audio par exemple.
Ö Le téléchargement a lieu dans un processus séparé
en arrière-plan, ce qui vous permet de continuer de travailler dans WaveLab Essential, sans être gêné si le téléchargement prend du temps.
Contrôle du Podcast
Sélectionnez "Visualiser le document XML source..." dans
le menu Publier de la fenêtre Podcast pour démarrer l’éditeur XML par défaut de votre système, et visualiser le contenu du fichier XML de flux produit par WaveLab
Essential.
Et, en dernière vérification, sélectionnez "Voir le Podcast
publié..." dans le menu Publier de la fenêtre Podcast, pour
ouvrir le navigateur Internet par défaut de votre système et
recevoir sur Internet le Podcast que vous venez de publier.
Ö Veuillez noter que nous entendons par "tous les articles" en fait tous les articles dont la case "validé" est activée dans la liste des articles. Sinon, ces épisodes sont
simplement omis du Podcast.
Podcasting (diffusion pour baladeur)
20
 Loading...