

Page 1
Page 2

The information in this document is subject to change without notice and does not represent a commitment on the part of Steinberg Media Technologies GmbH. The software described by this document is subject to a License Agreement and may not be
copied to other media except as specifically allowed in the License Agreement. No part
of this publication may be copied, reproduced or otherwise transmitted or recorded, for
any purpose, without prior written permission by Steinberg Media Technologies GmbH.
All product and company names are ™ or ® trademarks of their respective owners.
Windows XP is a trademark of Microsoft Corporation. The Mac logo is a trademark
used under license. Macintosh and Power Macintosh are registered trademarks.
© Steinberg Media Technologies GmbH, 2005.
All rights reserved.
Page 3

ENGLISH
Table of Contents
Page 4

7 Introduction
8 About this manual
9 What are VST instruments?
9 About the instruments
included in Studio Case
11 Optimizing the hard disk
before installation
12 Minimum system require-
ments (PC version)
12 Minimum system require-
ments (Mac version)
13 About the Steinberg Key
16 Installation
18 Register your software!
19 Activating VST instruments
in Cubase SE
21 Virtual Guitarist
Electric Edition SE
22 About Virtual Guitarist
Electric Edition SE
23 How do I use Virtual
Guitarist?
23 What is Virtual Guitarist
Electric Edition SE?
24 How does Virtual Guitarist
work?
24 What you can and can’t do
with Virtual Guitarist Electric
Edition SE
25 First test
26 How to play Virtual Guitarist
Electric Edition SE
27 Players
28 Parts
29 Chord recognition
31 Latch mode
31 Expression and timing
variations
35 Sound variations
36 MIDI controller assignments
37 Reference
43 Virtual Bassist SE
44 About Virtual Bassist SE
45 What is Virtual Bassist SE?
45 How does Virtual Bassist
SE work?
46 What you can and can’t do
with Virtual Bassist
47 The first test
48 Playing Virtual Bassist SE
48 Using a MIDI keyboard
50 Virtual Bassist SE
terminology
52 Loading and saving Styles
53 Auditioning styles
54 Virtual Bassist SE controls
60 Guitar controls
62 MIDI Controller assignments
63 Assigning MIDI controllers
in Virtual Bassist SE
64 Chord recognition
67 Groove Agent SE
68 What is Groove Agent SE?
68 First test
69 Groove Agent SE
terminology
70 Using Groove Agent SE
71 The LCD window
71 Range
72 Sliders and buttons
78 Mute, grouping and
instrument selection
79 Stop/Run
VST Instruments
4Table of Contents
Page 5

ENGLISH
81 Using the automation in Cu-
base SE
81 Controlling Groove Agent
SE from a MIDI keyboard
83 The Grand SE
84 Introduction
85 Playing The Grand SE
86 Opening the Edit window
86 Sound Character
87 Global
89 D’cota SE
90 Introduction
90 Overview
93 The synthesis section
94 Creating a synth sound with
PWM – a brief tutorial
96 Analog parameters
106 The modulation and output
section
107 The Controller strip
113 Using external MIDI
controllers
113 LFO section
115 The Envelope section
117 Volume and Pan dials
118 The Effect section
120 The keyboard
121 Tips and tricks
123 HALion SE
124 Introduction
125 HALion SE overview
125 How HALion SE plays
samples
125 About program banks and
programs
132 Tweaking programs
132 The Filter section
135 DCA and Envelope
136 The LFO
137 The Tune Section
137 Glide
137 The Options pop-up menu
139 Importing samples and
soundbanks into HALion SE
141 Automation and MIDI
controllers
141 Recording dynamic control
settings
142 Using MIDI controllers
143 Optimizing system
performance
145 Composer Set
Documentation
151 Index
Table of Contents 5
VST Instruments
Page 6

VST Instruments
6Table of Contents
Page 7

ENGLISH
1
Introduction
Page 8

About this manual
Steinberg Studio Case consists of two main parts:
• Cubase SE software – the recording studio
•A set of 6 software instruments – the band
This manual describes the instruments included in Studio Case. They
complement Cubase SE with a backing band that offers you sounds
and instruments for a vast range of musical styles.
Key command conventions
Many of the key commands in Cubase SE use modifier keys, some of
which are different depending on the operating system, Windows or
Mac. When key commands with modifier keys are described in this
manual, they are shown with the Windows modifier key first, in the following form:
[Win modifier key]/[Mac modifier key]-[key] or action
For example, [Ctrl]/[Command]-click means “press [Ctrl] under
Windows or [Command] under Mac OS, and mouse click”.
VST Instruments
1 – 8 Introduction
Page 9

What are VST instruments?
With computers becoming more powerful and a more integral part of
home and professional studios all over the world, instruments that
used to be hardware move into the computer.
VST instruments (short: VSTis) are software instruments which run under any VST compatible host, such as Cubase SE. They are plugged
into the host software, which means that you set up and play them
from within the host. This offers many advantages to external/hardware
instruments:
• First off, since VST instruments use your computer system and don’t need their
own hardware, they’re a much better value and more portable. Even more, when
you own one VST instrument, you can use multiple instances of it in one song
without having to buy multiple copies of the instrument. Two acoustic Grand
Pianos would be a significant investment in terms of money, space and maintenance – in Studio Case, a second Grand Piano is a matter of two mouse clicks.
• VST instruments are part of the song. When you load up your song, the instruments used in it and their settings are automatically restored – “Total Recall“.
• VST instruments offer a much better integration into your musical environment
than external instruments can. They can be fully automated (you can record
and play back knob or fader movements within the VSTi).
• Software instruments do not have to deal with hardware limitations such as
RAM, small graphic displays or missing hard disks. Their performance depends
only on your computer system, and these instruments can make full use of the
CPU power, RAM, hard disk or monitor your computer has to offer.
ENGLISH
About the instruments included in Studio Case
Steinberg has gained a world-wide reputation for software instruments.
You’ll hardly find a music studio without Steinberg software instruments.
Award-winning products like The Grand, Virtual Guitarist or D’cota are
used by high-profile artists world-wide and can be heard in countless
chartbreaking music productions and film scores.
Studio Case incorporates essential versions of six of these great instruments. SE versions are easier to use and less demanding on computer
performance than their professional counterparts. At the same time,
they offer the same sound quality the originals are well known for.
VST Instruments
Introduction 1 – 9
Page 10

The six instruments complement each other perfectly, representing a
comprehensive collection of sounds for any musical style:
• HALion SE is a powerful software sampler. A composer set from Wizoo is already included, providing you with important sounds like basses, guitars,
strings or even drumloops. It imports all HALion-compatible libraries (separately available) and even imports AIF/WAV and Soundfont files, so it can produce a vast range of instruments, sounds and grooves.
• The Grand SE is an emulation of the grandest instrument of all times – the
acoustic concert grand piano. Apart from four characteristics to choose from,
it offers you exactly the controls you’re used to from the real thing: Keys, pedals and nothing else.
• Groove Agent SE relieves you of the time-consuming task of programming
your own grooves. Just hit a key and let him do his magic. You are in full control of playing style, complexity, dynamics and fills. And if you like, you can of
course create your own grooves using Groove Agent SE’s built-in drumkits.
• Virtual Guitarist Electric Edition SE is a professional electric guitarist with a
perfect sound, perfect timing and perfect playing technique. Tell him what
style to play and he’ll beef up your tracks with juicy funk/wah licks or crunchy
rock riffs – it’s all up to you.
• Virtual Bassist SE is a professional bass player with a perfect sound, perfect
timing and the ability to flexibly adapt the playing to suit most musical needs.
With Virtual Bassist SE, you can easily add professional-sounding bass guitar
tracks to your projects.
• D’cota SE is a powerful analog synthesizer. It complements your backing band
with a vast range of synth basses, leads, pads and other typical analog sounds.
You can either choose from the 128 patches supplied or make your own ones.
Although SE instruments are great tools that can last a lifetime, we’ve
taken into account that maybe sooner or later you feel like you’ve made
a lot of progress and your demand gets higher. In such a case, you can
conveniently upgrade to the original versions of each of the instruments.
For feature comparisons and upgrading options, check the Steinberg
website.
VST Instruments
1 – 10 Introduction
Page 11

Optimizing the hard disk before installation
The VSTi installer installs about 1 GB of data on your hard disk, and if
your drive is quite full, or has not been defragmented recently, it’s possible that the install data will get split (fragmented) into many parts over
the disk. This can affect the performance of some VSTis, and it can
lead to longer loading times of library files.
Therefore we recommend that you defragment the target hard disk
before you start the installation. This can be done with the defragmentation system software on Windows, or with Norton Utilities (or another
defragmentation program) on the Macintosh.
Latency
Although VST instruments are practically latency-free, high latency
times (which result in delays between pressing keys on your MIDI keyboard and hearing a sound) can occur when you play VSTis via your
MIDI keyboard in real time.
This is often caused by the audio card or the MIDI interface, although
it won’t be an issue when playing back a song with a VSTi MIDI track.
To get rid of annoying real time latency, we recommend that you replace your current soundcard with a professional audio card for which
an ASIO driver is available. Most soundcards built into off-the-shelf
computers don’t use an ASIO driver and usually produce latencies of
up to several hundred milliseconds.
ENGLISH
VST Instruments
Introduction 1 – 11
Page 12

Minimum system requirements (PC version)
•A PC with an 800 MHz Pentium or Athlon processor (2.8 GHz or faster
recommended).
• 384 MB of RAM (512 MB recommended).
• 1.1 GB of hard disk space.
• Windows® XP Home or Professional.
• Windows MME compatible audio hardware (an ASIO compatible audio card
is recommended).
• The Steinberg Key and an available USB port.
• Monitor and graphics card supporting 1024 x 768 resolution (dual monitor
setup and 1152 x 864 resolution recommended).
•A DVD ROM drive is required for installation.
• When you are upgrading from a previous version of Cubase SE/LE, a working
internet connection is required for the licence activation.
Note that The Grand SE requires 85 MB of RAM!
Minimum system requirements (Mac version)
•A Power Mac G4 867 MHz computer (Power Mac G5 Dual and 1.8 GHz or
faster recommended).
• 384 MB of RAM (512 MB recommended).
• 1.1 GB of hard disk space.
• Mac OS X version 10.3 or 10.4.
• CoreAudio compatible audio hardware.
• The Steinberg Key and an available USB port.
•A DVD ROM drive.
• Monitor and graphics card supporting 1024 x 768 resolution (dual monitor
setup and 1152 x 864 resolution recommended).
• When you are upgrading from a previous version of Cubase SE/LE, a working
internet connection is required for the licence activation.
Note that The Grand SE requires 85 MB of RAM!
VST Instruments
1 – 12 Introduction
Page 13

ENGLISH
About the Steinberg Key
Please read the following section before installing the instruments
included with Studio Case.
New users
Included with the Studio Case package you will find a hardware key
(sometimes referred to as “dongle”) that is part of the Cubase SE and
the Virtual Bassist SE copy protection scheme. The licenses for both
the program and the instrument are stored on that key. Cubase SE
and Virtual Bassist SE will not run if this key isn’t installed properly.
•
You should first install the program (and any necessary hardware, see
below), then insert the protection key and finally launch the program.
This is because the necessary drivers for the key are installed when you install the
program.
If you’re upgrading from a previous version of Cubase SE/LE
Included with the Studio Case package, you will find a Virtual Bassist
SE activation code for the Steinberg Key, a hardware copy protection
device that is part of the Virtual Bassist SE copy protection scheme.
Virtual Bassist SE will not run if there is no Steinberg Key present or if
this key has not been properly activated.
•
If you already own a copy protection key, you need to activate that key
for use with Virtual Bassist SE. This is done by means of the activation
code included in the upgrade package, after the installation procedure,
see page 15.
•
If your previous version of Cubase SE/LE was not hardware-protected
by a Steinberg Key, you need to purchase this key separately. The key
then needs to be activated for use with Virtual Bassist SE. This is done
by means of the activation code included in the upgrade package, after
the installation procedure, see page 15.
Both licenses can be stored on the same Steinberg key. If you have
already downloaded the Cubase SE license to your Steinberg key,
proceed the same way for Virtual Bassist SE. If you have not installed
Cubase SE yet, please read the following sections and follow the instructions carefully.
VST Instruments
Introduction 1 – 13
Page 14
The Steinberg Key
The Steinberg Key is, in fact, a little computer on which your Steinberg
software licenses are stored. All hardware-protected Steinberg products use the same type of key and you can store more than one license
on a key. Licenses can also (within certain limits) be transferred between keys – which is helpful, e.g. if you want to sell a piece of software.
•
If you have a Windows PC and have never used a dongle on your
computer before, the installation routine will initiate a restart of Windows after installation of the key drivers. After the restart, the key must
be plugged into the USB port for the installation routine to continue.
When the key is plugged into the USB port, Windows will automatically recognize it as
a new hardware device and will attempt to find drivers for it – these necessary drivers
won’t be present until Virtual Bassist SE has been installed and the computer restarted.
•
If you have an Apple Macintosh computer, there will be no automatic
restart. Be sure to read the information regarding the Steinberg Key
that is displayed during the installation process.
•
If you already own copy-protected Steinberg software, you should remove any existing Steinberg Keys from the computer’s USB port during the installation routine.
You can load your Virtual Bassist SE license and the Cubase SE license
onto the same Steinberg key.
The Steinberg Key must not be plugged in before or during the installation of Virtual Bassist SE if this is the first time you use such a key.
Otherwise the operating system of your computer will register it as new
USB hardware and try to find drivers that won’t be present before Virtual
Bassist SE installation.
VST Instruments
1 – 14 Introduction
Page 15

ENGLISH
Activating the Steinberg Key (only if you’re upgrading from a
previous version of Cubase SE/LE)
• For the activation of the copy protection key, you need a working internet
connection, as this is performed online. In case you have no connection
to the internet on the computer on which you wish to use Studio Case,
you can always use a different computer for activation.
Simply install the License Control Center separately on the internet computer, without
installing the complete product.
Windows: To do this, the product installation DVD contains a dedicated installer called
“SyncrosoftLicenseControlSetup”.
Mac: Double-click the installer file, and select the “Custom” installation type. Deactivate
the installation of the VST instruments and only install the License Control Center.
You can also find up-to-date versions of this installer (for Mac and for PC) on the internet at www.syncrosoft.com/downloads/index.html.
Your Steinberg Key does not yet contain a valid license for Virtual
Bassist SE. You must download a license to it before you can launch
Virtual Bassist SE! Use the activation code supplied with the program
in order to download a valid Virtual Bassist SE license to your Steinberg Key. Proceed as follows:
1.
After installation of the dongle drivers and the software (and, on a
Windows PC, after restarting your computer), plug the Steinberg Key
into the USB port.
If you are unsure of which port this is, consult the computer’s documentation.
2.
If this is the first time a copy protection device is plugged in, it will be
registered as a new hardware device. On a Mac, drivers are found
automatically, without further user interaction. Windows will display a
dialog asking you whether you would like to find drivers for the device
manually or automatically. Under Windows, choose to find drivers automatically.
The dialog closes and you may have to reboot your computer.
3.
Make sure that your computer has a working internet connection.
4.
Launch the “License Control Center” application (found in the Windows Start menu under “Syncrosoft” or in the Macintosh Applications
folder).
This application allows you to view your Steinberg Keys and to load or transfer licenses.
VST Instruments
Introduction 1 – 15
Page 16

5.
Use the License Control Center “Wizard” function along with the activation code supplied with Virtual Bassist SE to download the license
to your Key.
Simply follow the on-screen instructions. If you are uncertain about how to proceed,
consult the help for LCC.
Installation
To install the VST instruments included in Studio Case, proceed as
follows:
Windows
1.
Start your computer and launch Windows.
2.
Make sure that no Steinberg Key is connected to the USB port.
3.
Insert the plug-in installation DVD into your DVD-ROM drive.
4.
A pop-up installation dialog appears automatically.
If this dialog does not appear, open the DVD on the desktop and double click the
installer file.
5.
Follow the instructions on the screen.
6.
During the installation process, you will be asked to select the instruments to be installed and to select the target folders for the audio
content (for all instruments except D’cota SE).
The audio content folders contain specifically designed samples for the different instruments. Please note that the audio content takes up about 1 GB of hard disk space.
Make sure to check the DVD for “read first” or “late changes” files. Please
read all such files before launching any of the instruments, since they may
contain late information not included in this manual.
Please note that the installation routine will take some time to install all
plug-ins and the content files.
VST Instruments
1 – 16 Introduction
Page 17

Removing the instruments
To remove the VST instruments from your computer:
1.
Open the “Add or Remove programs” control panel.
2.
Select “Steinberg VSTi Collection” and click “Add/Remove”.
3.
Follow the instructions on the screen.
•
The instruments and the respective audio content are removed from
your computer.
Macintosh
1.
Disable any anti-virus software. Then insert the plug-in DVD into the
computer’s DVD drive.
2.
Double click on the icon for the plug-in DVD.
A window opens.
3.
Double click on the VSTi installer (the .mpkg) file.
The installation procedure starts.
ENGLISH
4.
Follow the instructions on screen.
•
At some stage, you will be asked to read and confirm the license
agreement (shown on screen – this is required for the installation to
proceed) and to select a destination for the software installation.
• When the actual software installation starts, a second window will open.
Note that this must not be closed during the installation process, otherwise installation will not be successful.
Finally, a dialog box informs you that the installation was successful.
Please note that the installation routine will take some time to install all
plug-ins and the content files.
•
For each of the available instruments (except D’cota SE), there are audio content folders with specifically designed samples available. Please
note that the audio content takes up about 1 GB of hard disk space.
VST Instruments
Introduction 1 – 17
Page 18

Make sure that you have enough free hard disk space on your system
partition for the installation procedure.
Make sure to check the DVD for “read first” or “late changes” files.
Please read all such files before launching any of the instruments, since
they may contain late information not included in this manual.
Removing the instruments
To remove the instruments from your computer, delete the respective
files in the vstplugins folder in your system folder.
Things to note
•
The first time you launch HALion SE, Groove Agent SE, Virtual Guitarist
Electric Edition SE, Virtual Bassist SE and The Grand SE, you might
have to specify the path to its content folder on your hard disk (e.g. if
you chose the custom installation). A dialog will be opened where you
can navigate to the desired folder.
•
When you are launching Virtual Guitarist Electric Edition SE for the
first time, the player content may not be localized automatically and
you will get the message “Content not found”. In this case:
1.
Click OK.
The dialog “Please locate the content folder” appears.
2.
Locate and select the folder “Virtual Guitarist EE SE” and click OK.
Under Mac OS X, the path is /Library/Audio/Plug-Ins/VST/VSTi Collection.
3.
In the VST Instrument rack, it now reads “Please reload the plug-in”.
4.
To “re-load” the plug-in, deselect it in the instrument slot (select “No VST
instrument”) and re-select it from the pop-up menu.
Register your software!
Before getting carried away with the software, which we’re sure you will
do, please take a moment to complete and return the registration card
enclosed with the Studio Case package. This will entitle you to technical support, and we’ll also keep you up to date with the latest news and
updates.
VST Instruments
1 – 18 Introduction
Page 19
Activating VST instruments in Cubase SE
This section describes how to set up any of the VSTis in Cubase SE.
Make sure Cubase SE has been correctly installed and set up to work
with your MIDI and audio hardware (e.g. a MIDI keyboard and a sound
card).
We’ll show the process of setting up a VSTi instrument using HALion
SE as an example.
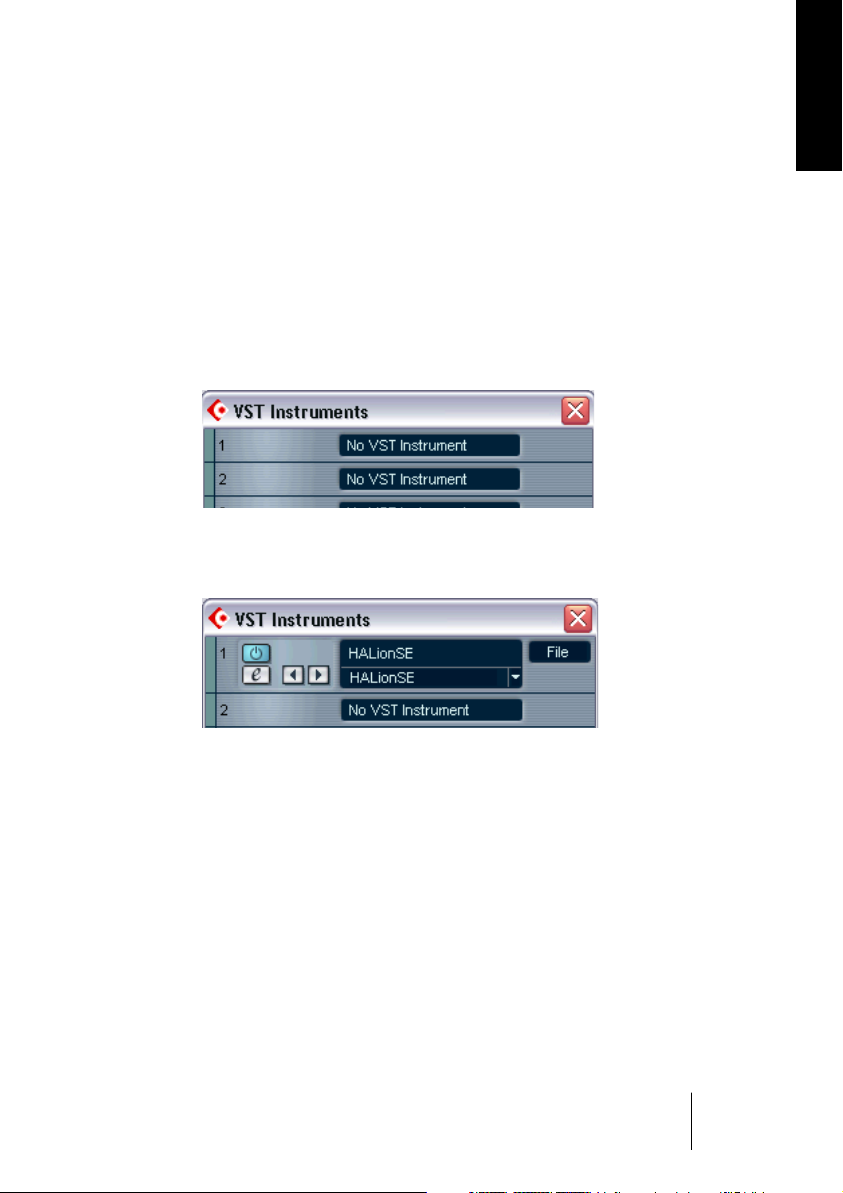
1.
In Cubase SE, open the VST Instruments window.
2.
Click the “No VST Instrument” label. In the pop-up menu choose
HALion SE.
ENGLISH
3.
Open the HALion SE window by clicking the Edit button (e) in the
VST Instruments window.
4.
In Cubase SE, select HALion SE as the output for a MIDI track, and
make sure this track is set up to receive MIDI data from your MIDI keyboard and to transmit on channel 1.
5.
HALion SE is now set up properly.
• Please note that for some instruments, you have to choose the content
folder when you launch the instrument for the first time (see page 18).
VST Instruments
Introduction 1 – 19
Page 20

VST Instruments
1 – 20 Introduction
Page 21

ENGLISH
2
Virtual Guitarist Electric
Edition SE
Page 22
About Virtual Guitarist Electric Edition SE
Virtual Guitarist Electric Edition SE is your own personal rhythm guitarist, letting you choose between 6 guitar players, each of which is a
perfectionist: perfect sound, perfect timing, and the ability to flexibly
adapt to suit most musical styles.
Using Virtual Guitarist Electric Edition SE you can easily add professional-sounding rhythm guitar tracks to your songs, without the need
for a real player, and get a perfect take every time. Even if you use real
guitarists in your music as well, Virtual Guitarist Electric Edition SE
has the big advantage of enabling you to experiment with rhythm guitar parts at any time, and in any place, without the need for special recording equipment. You could even be laying down tracks on your
laptop computer while flying to Mongolia.
VST Instruments
2 – 22 Virtual Guitarist Electric Edition SE
Page 23

How do I use Virtual Guitarist?
Using Virtual Guitarist Electric Edition SE is simple, especially if you
think of the plug-in as a real rhythm guitar player – tell them what to
play and they will play it. The playing is precise and the guitarist won’t
complain, which, aside from the clever programming, is a worldwide
first in itself!
Virtual Guitarist Electric Edition SE is used exactly like any other VST
Instrument:
• Prepare a track and load Virtual Guitarist Electric Edition SE.
• Select a player from the menu.
• Use a MIDI keyboard to trigger Virtual Guitarist Electric Edition SE or, alternatively, manually add the chords to a MIDI track via the sequencer’s editor.
• Swap guitars, throw in fills or long chords, and improve your guitar track until
you’re happy with it. You can change any parameter at a later time, and, in
contrast to recording “real” guitars, you can change the key of the song at any
time without having to repeat the whole recording session!
What is Virtual Guitarist Electric Edition SE?
ENGLISH
Technically speaking, Virtual Guitarist Electric Edition SE is a VST instrument containing a variety of rhythm guitar styles. Each style is represented by a player, and is ready-to-go with the correct guitar, microphone or amp.
Musically speaking, Virtual Guitarist Electric Edition SE plays itself,
and all you have to do is play the chord and key progressions via a
MIDI keyboard. You can control the phrasing, sound, and play parameters, using either the mouse, or by triggering them in real time by
using a MIDI controller. This enables you to adapt the rhythm guitar to
seamlessly work within your song, and in any given musical style.
VST Instruments
Virtual Guitarist Electric Edition SE 2 – 23
Page 24

How does Virtual Guitarist work?
To clear up a common misconception, Virtual Guitarist Electric Edition
SE doesn’t use common single-note samples or synthesis to imitate
guitars. The result would be extremely artificial, and if you’ve ever tried
to simulate guitar playing on a MIDI keyboard, you’ll know exactly what
we’re talking about.
Perhaps surprisingly, the Virtual Guitarist Electric Edition SE concept is
actually much simpler and is based on a huge library of audio tracks recorded by real living and breathing guitar players. This means the result
really is a genuine guitar recording – and not an artificial approximation.
Virtual Guitarist Electric Edition SE’s ground-breaking approach
makes it possible to select from these recordings in real time when
you change a chord or any other parameter. Tempo changes are no
problem as the guitar recordings have been processed in a way that
enables all the beats to be triggered individually.
What you can and can’t do with Virtual Guitarist Electric Edition SE
Virtual Guitarist Electric Edition SE has many advantages when compared with a real guitar player:
• The virtual guitar players are convenient and available at any time.
• Using a virtual guitarist is cheap and easy, especially since you won’t need a
studio to record in.
• You can save time because there’s no setup, tuning, preparation, microphone
positioning, or audio recording.
•Virtual guitarists don’t play wrong notes and there aren’t going to be any timing
problems.
• You can work with several guitar players simultaneously.
• You have complete control over the sound and phrasing of the guitar.
• Virtual Guitarist Electric Edition SE supports your creativity, allowing you to
experiment as much as you want, and giving you the possibility of creating
tracks that couldn’t be played on a “real” guitar.
• It’s possible to make alterations at any stage, even after recording or during
the mixing process. You can change the instrument, phrasing, and sound
without having to recreate the chord data from scratch.
VST Instruments
2 – 24 Virtual Guitarist Electric Edition SE
Page 25

Despite all of these advantages, it’s important to remember that Virtual
Guitarist Electric Edition SE is a computer program and will inevitably
have some disadvantages when compared to a real player. It would be
impossible for Virtual Guitarist Electric Edition SE to provide everything
a real guitarist might theoretically be able to offer, although the included
virtual players do cover a broad range of musical styles capable of suiting most needs.
First test
At this point, you’re probably itching to get your hands on Virtual Guitarist Electric Edition SE, so:
1. Activate Virtual Guitarist Electric Edition SE (as described in the section “Activating VST instruments in Cubase SE” on page 19) and load
a player. In the Virtual Guitarist Electric Edition SE window, click the
“Latch On/Off” button to activate this parameter.
2. Play a chord or note on your MIDI keyboard, and Virtual Guitarist Electric Edition SE will start to play. Because we activated the “Latch On/
Off” button, playback will continue when you release the key(s).
ENGLISH
3. If you have a sustain pedal connected to your MIDI keyboard, press it
to stop Virtual Guitarist Electric Edition SE.
If you don’t have a sustain pedal, you can assign the “stop” function to
a note on your MIDI keyboard. For more information about this, check
out the section “Remote keys” on page 32.
The MIDI LED in the Virtual Guitarist Electric Edition SE window lights
up when the instrument receives MIDI events.
VST Instruments
Virtual Guitarist Electric Edition SE 2 – 25
Page 26

How to play Virtual Guitarist Electric Edition SE
There are several ways of playing Virtual Guitarist Electric Edition SE:
• You can play chords and vary the expression using keyboard velocity, MIDI
controllers, the sustain pedal, and program changes.
• If you’re not familiar with a keyboard, you can enter chords and other MIDI
events using one of the editors provided by your software sequencer.
• You can use Virtual Guitarist Electric Edition SE to dub the chord tracks of existing songs and MIDI files to improve the way they sound. Many commercial
MIDI files include special chord tracks, although duplicating a typical “Pad
sound” track (such as strings) with Virtual Guitarist will usually produce good
results.
Multiple Virtual Guitarists
You can use as many versions of Virtual Guitarist Electric Edition SE
simultaneously as your host application and computer allow. There’s
nothing wrong in using two rock guitar tracks at the same time with
different phrasing, and then throwing in an additional riff from a third
Virtual Guitarist instance here and there.
VST Instruments
2 – 26 Virtual Guitarist Electric Edition SE
Page 27
Players
In Virtual Guitarist terminology, a player is a guitarist with a unique style.
However, more than just a style or rhythm, each Virtual Guitarist player
refers to particular guitar, sound (amp, speaker, etc.), and dedicated
playing style.
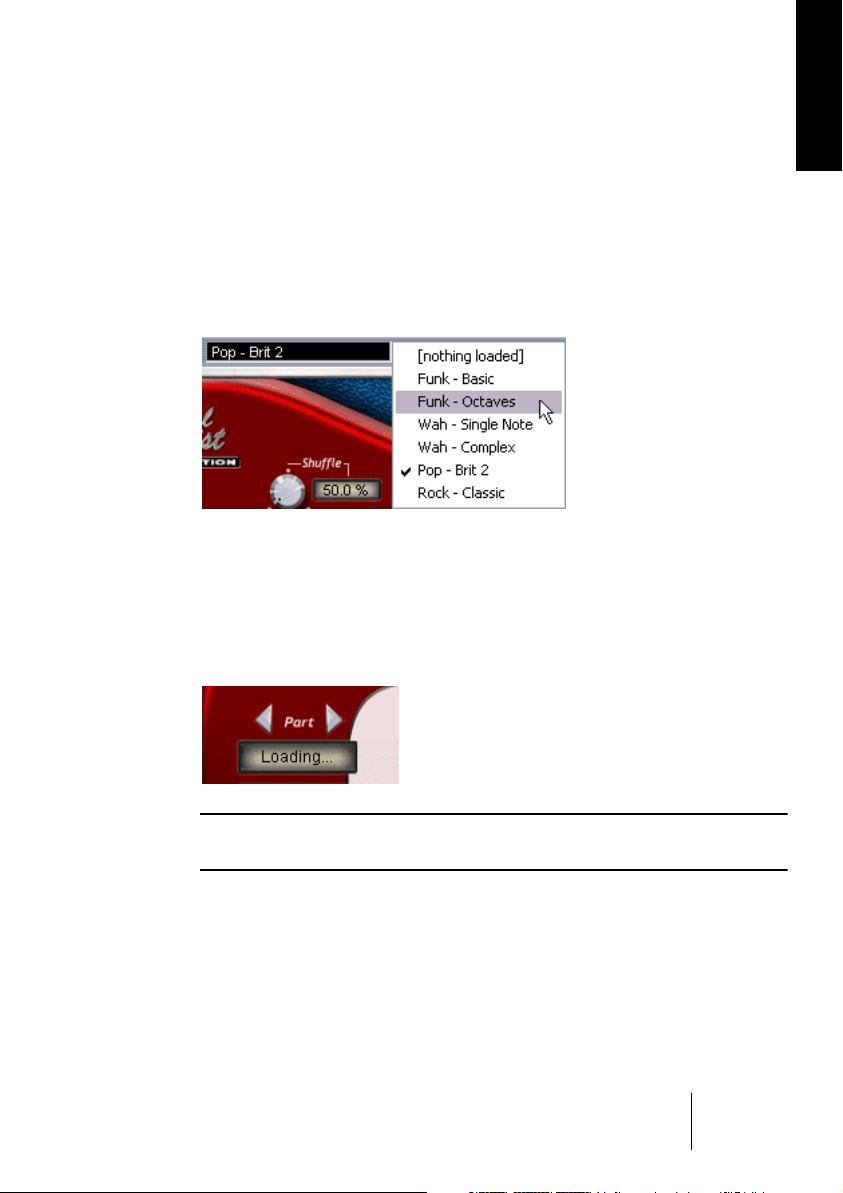
Selecting a player
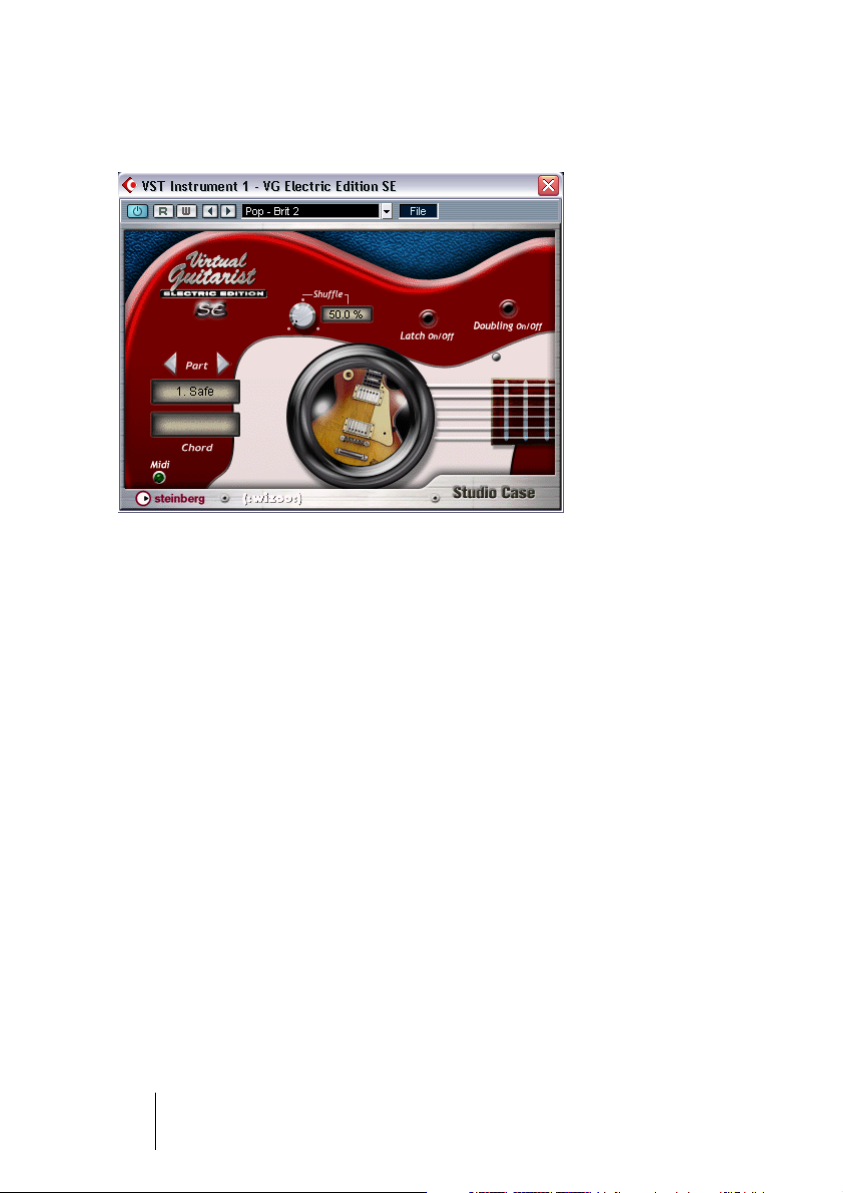
• To select a player, click the small downward-pointing arrow on the
Virtual Guitarist’s plug-in window, and choose from the pop-up menu.
The loading status is indicated in the control panel, see below.
ENGLISH
• You can also use the left and right arrows window to switch between
players, but this isn’t recommended because of the long loading times.
After loading, a picture of the original guitar used for the recording is
visible in the “sound hole”.
VST Instruments
Virtual Guitarist Electric Edition SE 2 – 27
Page 28

Parts
Each player offers up to four different parts. A part is variation – varying
in rhythmic phrasing, note structure (e.g. single notes, chords, octaves)
and effect setting. You can either play the same part all the time, or
switch parts while playing to add variation to a track.
Selecting parts
You can select a part by clicking one of the two part selection arrows
in the Virtual Guitarist Electric Edition SE window.
Switching parts in real time
You can switch between parts while you play without any glitches, and
one way of doing this is to send a MIDI program change message (from
one to four) from a MIDI keyboard. The program change number corresponds to the part number.
Alternatively, you can switch between parts using certain notes on your
MIDI keyboard.
VST Instruments
2 – 28 Virtual Guitarist Electric Edition SE
Page 29

Chord recognition
Virtual Guitarist Electric Edition SE contains an intelligent chord recognition system, which always plays the correct chord based on the MIDI
input from a sequencer or MIDI keyboard in real time. The MIDI input
can consist of a complete chord or simple one-finger notes – you don’t
need to make any special settings because Virtual Guitarist Electric
Edition SE will always know what to do.
The chord set
The chords provided in Virtual Guitarist Electric Edition SE are the six
most common chords in most musical styles:
• Major, 7, maj7, minor, sus4, sus2.
If you play a chord that’s not included in this set, Virtual Guitarist Electric Edition SE will automatically select the most appropriate replacement chord.
Playing chords
ENGLISH
If you play a complete chord (for example, the notes C, F, and G for a
Csus chord), Virtual Guitarist Electric Edition SE will automatically
recognize it.
• For the best possible chord recognition, all the notes of a chord must be
played. Playing three notes is sufficient for major, minor or sus4 chords,
but for the other supported chord types (maj7, 7 and sus2) you need to
play all four notes.
Chord inversions
In most cases, it doesn’t matter what inversion of a chord you play.
However, there is one exception where the bass note has to be the
root or tonic note:
• +5 chords (A+5 uses the same notes as C#+5 and F+5).
VST Instruments
Virtual Guitarist Electric Edition SE 2 – 29
Page 30
One-finger chords
For the chord types major, 7 and minor, you don’t actually need to play
all the notes in the chord. Although playing a single note always indicates a major chord, you can indicate a different chord type by playing
an additional key.
Additional key Chord
None major
Next left white key 7
Next left black key minor
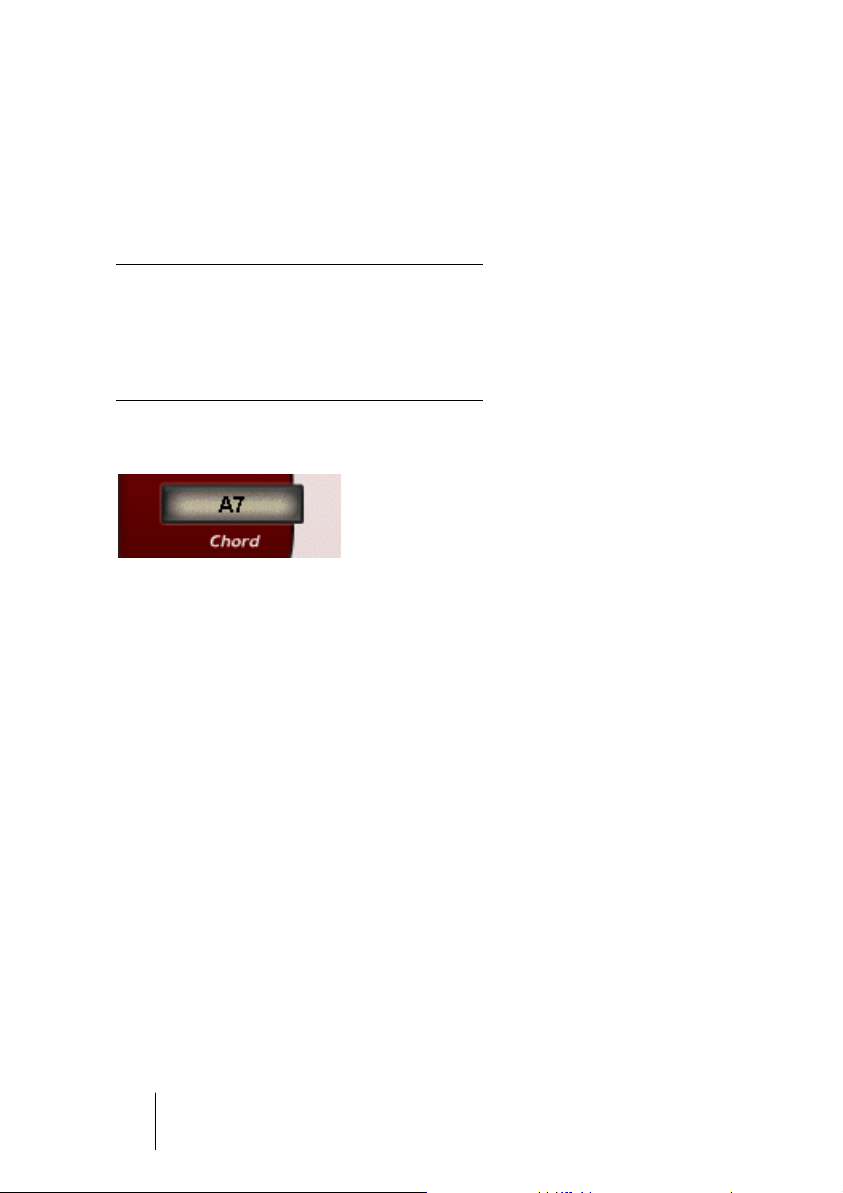
Chord display
The chord display shows the currently playing or pre-selected chord. If
the chord you play can’t be found or is missing in the chord set, Virtual
Guitarist Electric Edition SE will automatically choose the most appropriate replacement chord (indicated in the chord display).
Players and chords
You’ll soon discover that the selection of available chords depends on
which player you have selected. Some players only offer neutral
chords. But it’s no problem to control this type of player from a MIDI
track containing more complex chords – Virtual Guitarist Electric Edition SE automatically selects the most appropriate chords from the
available selection.
VST Instruments
2 – 30 Virtual Guitarist Electric Edition SE
Page 31

Latch mode
Latch mode sets whether Virtual Guitarist Electric Edition SE continues
to play when you release the keys on your MIDI keyboard. With latch
mode on, Virtual Guitarist Electric Edition SE plays continuously from
the moment you play the first key, until you manually force a stop by using the stop button of your sequencer, the sustain pedal, or by playing
the B remote key.
If you only want to play a lick here and there, set latch mode to off and
Virtual Guitarist Electric Edition SE will only play while the keys are
held down on your MIDI keyboard.
You can find more information about using remote keys and the sustain
pedal on page 32 and page 33.
ENGLISH
Expression and timing variations
Virtual Guitarist Electric Edition SE offers a number of functions for
adjusting the playing style and creating variations.
Accents and syncopation
If you play the notes on your MIDI keyboard quite forcefully (which will
result in a high MIDI note velocity value), Virtual Guitarist Electric Edition SE will play the chord in a syncopated style. This means that the
chord will only be played on the weak beats, with the chord on the
strong beats being omitted.
To make Virtual Guitarist Electric Edition SE revert back to a normal
(unsyncopated) playing style, simply play another note or chord with a
lighter touch.
VST Instruments
Virtual Guitarist Electric Edition SE 2 – 31
Page 32

Long chords
You can also use Virtual Guitarist Electric Edition SE to play long
(sustained) chords.
• To play long chords, press the sustain pedal and play the chords as
normal on your MIDI keyboard.
There are two types of long chords, triggered by different MIDI note
velocities:
•A light key stroke produces a slowly strummed chord (not available in all
players).
•A stronger key stroke produces a heavy chord.
If you don’t have a sustain pedal, you can assign this function to the
B-key of your MIDI keyboard’s remote octave. For more information
about how to do this, look at the “Remote keys” section below.
Fills
While Virtual Guitarist is playing, you can trigger a fill (a little variation of
the current part) by using the modulation wheel on your MIDI keyboard.
Simply turn the modulation wheel forwards and back, and Virtual Guitarist Electric Edition SE will play a fill before carrying on with the normal groove.
You can also trigger a fill by pressing the A# key on the remote octave
of your MIDI keyboard, see below.
Remote keys
With Virtual Guitarist’s remote keys, you can use the remote octave
(the octave starting with C1) of your MIDI keyboard as a remote control
for the most important playback variations. The remote keys are especially useful if your MIDI keyboard doesn’t have program change buttons or a sustain pedal, although it’s important to remember that Virtual
Guitarist’s remote keys and controllers can be active simultaneously.
VST Instruments
2 – 32 Virtual Guitarist Electric Edition SE
Page 33

The keys for the remote octave are mapped out with the following
functions:
Key Function Description
C to F Parts one to four Selects a Part
C# Fret noise Adds fret noise (very noticeable effect in the
Player “Rock:Classic”)
D# Stop noise Triggers a stop noise (very noticeable effect in
the Player “Rock:Classic”)
F# Sustain pedal Same effect as using the sustain pedal
• If you want to experiment with this function, you should load the Player
“Rock:Classic”, since the Fret and Stop noises are most noticeable in
this Player.
Sustain pedal
The sustain pedal has an important function in Virtual Guitarist Electric
Edition SE, and it works differently depending on whether latch mode
is activated or not.
ENGLISH
If you don’t have a sustain pedal, you can simulate it by using the B-key
in the remote octave instead (as described in the previous section).
Try experimenting with the functions described in the table below to
get an understanding of how you can use the sustain pedal.
Latch Mode On Stop function Virtual Guitarist will stop playing if you press
the sustain pedal during playback.
Latch Mode Off Sustain pedal Virtual Guitarist will stop playing as soon as
you release the keys played on the MIDI keyboard, unless you release the keys while the
pedal is down. (This is similar to how the sustain pedal works when playing a piano instrument on a keyboard, for example.)
If Virtual Guitarist Electric Edition SE is not playing and you hold down
the sustain pedal, notes played on the keyboard will result in single long
chords, instead of starting Virtual Guitarist’s rhythm playing as usual.
(See the section “Long chords” on page 32 for more information.)
VST Instruments
Virtual Guitarist Electric Edition SE 2 – 33
Page 34

Tempo
Virtual Guitarist Electric Edition SE automatically adapts itself to the
tempo of the current song, which is set up in the host application
(such as Cubase). Virtual Guitarist Electric Edition SE will also automatically follow tempo changes during playback, like an accelerando,
for example.
However, the slowest song tempo that Virtual Guitarist Electric Edition
SE plays correctly at is 70 bpm (beats per minute). With high shuffle
values (see below), the minimum tempo played back correctly is slightly
higher. The slowest tempo for perfect triplets (Shuffle 66.7%) is 85
bpm. However, there are no upper limits to Virtual Guitarist’s tempo –
except for taste!
Shuffle
The shuffle dial allows you to add a swing factor to the virtual guitarist’s playback, enabling you to fit the rhythmic feel more closely to your
song. Technically speaking, the shuffle dial sets how far the off-beats
are placed behind the eighth note positions – you can get Virtual Guitarist to play exact triplets by setting shuffle to 66.7%.
If your music has a mostly triplet-based rhythmic feel, Virtual Guitarist
Electric Edition SE will sound better if you set shuffle to a slightly lower
value than 66.7% – between 58% and 63% is usually a good starting point.
VST Instruments
2 – 34 Virtual Guitarist Electric Edition SE
Page 35

Sound variations
Track Doubling
In a recording studio, guitar tracks are often doubled as another way
to enhance the stereo image, and to produce a richer sound. To do
this, the guitar player must record the same track twice onto two separate tracks, which are panned left and right.
Virtual Guitarist Electric Edition SE doesn’t need two recordings to
achieve this. Simply activate the Doubling switch and, as if by magic,
two guitar players will play in unison.
The doubling feature literally plays back two different tracks. This means
that Virtual Guitarist Electric Edition SE’s doubling sounds exactly the
same as the conventional, but more cumbersome, doubling method.
ENGLISH
VST Instruments
Virtual Guitarist Electric Edition SE 2 – 35
Page 36

MIDI controller assignments
In addition to VST automation, many of Virtual Guitarist Electric Edition
SE’s parameters can be controlled by MIDI controllers. The following
table shows the assignment of Virtual Guitarist Electric Edition SE
parameters to MIDI controller numbers.
Cc# Name Virtual Guitarist Parameter
1 Modwheel
7 Volume Volume
11 Expression Volume
64 Sustain Pedal Sustain Pedal
67 Soft Pedal Desync (deactivates tempo sync to host)
70 Fill (if assigned in setup)
71 Reso Doubling on/off
72 Release Latch on/off
76 Vibrato Rate Shuffle
RPN 0 Pitch Bend Range 0 to 24 semitones
In Cubase SE (and other Steinberg hosts), you can automate the dials
and switches in Virtual Guitarist Electric Edition SE using the automation
features of the host application instead of MIDI Controller numbers.
VST Instruments
2 – 36 Virtual Guitarist Electric Edition SE
Page 37

Reference
Chord reference
The chord reference table below lists all the chord types (based on
the key of C) as an overview. It includes the notes and the one-finger
scheme.
One Finger Scheme
Chord Notes
C C-E-G Root note
Cmaj7 C-E-G-B
C7 C-E-G-Bb + next lower white key
Cm C-Eb-G + next lower black key
Csus4 C-F-G
Csus2 C-D-(E)*-G
C-D-(Eb)*-G
ENGLISH
*Csus2: You need to press E or Eb for the chord recognition although
this note is not sounding in the chord.
Guitars
The following sections introduce the guitars and amps used in the
production of Virtual Guitarist Electric Edition SE.
•When loading a player, the guitar used for this player is shown in the
stylized “bull’s eye” in Virtual Guitarist Electric Edition SE’s control panel.
VST Instruments
Virtual Guitarist Electric Edition SE 2 – 37
Page 38

Fender Stratocaster
Model 1956
In Player … Funk: Basic/Octaves, Wah: Single Note//Complex
The perfect maple neck Stratocaster with a pickup offering unrivalled
transparency.
Fender Esquire
Model 1953
In Player … Pop: Brit2
This guitar is almost identical to a Telecaster, except for the fact that
the Tele has a second neck pickup (which the Esquire has just been
prepared for). The character of this “cowboy” guitar has a lot of twang
and is perfect for vocal accompaniment. The sound of the neck pickup
embraces the voice with shimmering treble and piano-like basses, just
like an acoustic guitar.
VST Instruments
2 – 38 Virtual Guitarist Electric Edition SE
Page 39

Gibson ES 335
Model 1963
In Player … Rock: Classic
This is a semi-resonance guitar with humbuckers which sounds a bit
lighter compared to a Gibson Les Paul. Therefore it’s predestined for
slightly overdriven, fat, wooden but also jazzy sounds. The instrument
of artists like Chuck Berry or BB King.
Amps
ENGLISH
Fender Twin Reverb
Model 1966
In Player … All Funk Players, All Wah Players
The king of clean guitar amps. Its 100W 6L6-equipped power amp
develops a mighty and punchy, yet transparent and warm sound without any unwanted distortion.
VST Instruments
Virtual Guitarist Electric Edition SE 2 – 39
Page 40

Marshall Plexi 50
Model 1968
In Player … Rock: Classic
AC/DC 101. This amp creates a smoky, fat distortion with a lot of beef.
Vox AC30 Top Boost
Model 1963
In Player … Pop: Brit2
This british combo was originally developed for organ amplification.
But the pop and rock stars from the island pretty quickly got hooked
by its uniquely brilliant and warm timbre. The Beatles finally helped it
to world fame.
VST Instruments
2 – 40 Virtual Guitarist Electric Edition SE
Page 41

Player reference
This table provides detailed info on players, chords and bpm.
ENGLISH
Rhythm
Name Description
Funk: Basic Funky, clean pop rhythm guitar 8 full set >70
Funk: Octaves Octave riffs complementing chord
versions
Wah: Single Note Collection of funky single-note wah
phrases
Wah: Complex More complex variants of Wah: Soul 16 neutral
Pop: Brit 2 Pop-oriented guitars 16 full set >70
Rock: Classic Smokey classic rock grooves 8 neutral 80—150
Base Chords
16 neutral >70
16 neutral >70
(plays chords and
lines)
bpm
Range
>70
VST Instruments
Virtual Guitarist Electric Edition SE 2 – 41
Page 42

VST Instruments
2 – 42 Virtual Guitarist Electric Edition SE
Page 43

ENGLISH
3
Virtual Bassist SE
Page 44

About Virtual Bassist SE
Virtual Bassist SE is your own personal bass player, allowing you to
choose between 5 fulfilling styles with perfect sound, perfect timing,
and the ability to flexibly adapt the playing to suit most musical needs.
Virtual Bassist SE will easily add professional-sounding bass guitar
tracks to your projects, without the need for a real bass player, and
you get a perfect take every time. Even if you use real bassists in your
music as well, Virtual Bassist SE has the big advantage of enabling
you to experiment with and alter your bass parts at any time, in any
place, without the need for special recording equipment. You can
even lay down tracks on your laptop computer while sitting in the park.
VST Instruments
3 – 44 Virtual Bassist SE
Page 45

What is Virtual Bassist SE?
Technically speaking, Virtual Bassist SE is a software instrument that
comes with a variety of electric bass guitar Styles, each fitting a certain
musical style, and that is ready-to-go with the correct sound and
phrases as well as a selection of Fills and controls.
Musically speaking, Virtual Bassist SE plays itself, all you have to do is
select the chords or root notes via a MIDI keyboard. You can control
the phrasing and many other play parameters in real time, using either
the mouse or a MIDI controller.
Please note that you have to download a separate license for Virtual
Bassist SE to your Steinberg Key to be able to use the instrument. This
is described in detail in the Introduction chapter (see page 13).
How does Virtual Bassist SE work?
Virtual Bassist SE doesn’t use single-note samples or synthesis to imitate reality. The result would be extremely artificial, if you’ve ever tried
to simulate bass playing on a MIDI keyboard you’ll know exactly what
we’re talking about.
ENGLISH
Perhaps surprisingly, the Virtual Bassist SE concept is much simpler.
It is based on a huge library of audio tracks recorded by real living
bass players. This means the results are genuine bass recordings –
and not some MIDI trickery.
Virtual Bassist SE’s approach makes it possible to choose from these
recordings in real-time when you change a chord or any other parameter. Tempo changes are no problem as the bass recordings have been
processed in such a way that they can be played at any tempo. The 13
Parts and 6 Fills available in each Style are all examples of what’s possible, we’ll take a closer look later.
VST Instruments
Virtual Bassist SE 3 – 45
Page 46

What you can and can’t do with Virtual Bassist
Virtual Bassist SE has many advantages when compared with a real
player:
• Virtual Bassist SE is convenient and available at any time.
• Virtual Bassist SE is cheap and easy and you won’t need a studio to record in.
• You can save time because there’s no setup, tuning, preparation, microphone
positioning, or audio recording.
• Virtual Bassist SE doesn’t play wrong notes and there aren’t any timing problems.
• You can work with several bass players simultaneously.
• You can control the sound and phrasing of the bass.
• Virtual Bassist SE supports your creativity, allowing you to experiment as
much as you want, and gives you the possibility to create tracks that couldn’t
be played on a real bass guitar.
• It’s possible to make alterations at any stage, even after recording or during
the mixing process. You can change the instrument, phrasing and sound without having to recreate a recording from scratch.
Despite all of these advantages, it’s important to remember that Virtual
Bassist SE is a computer program and will inevitably have some disadvantages when compared to a real player. It would be impossible for
Virtual Bassist SE to provide everything a real musician might theoretically be able to offer, although the included Styles cover a broad range
and will be capable of suiting most needs.
VST Instruments
3 – 46 Virtual Bassist SE
Page 47

The first test
At this point, you’re probably itching to get your hands on Virtual
Bassist SE, so let’s get started:
1. Activate Virtual Bassist SE (as described on page 19). Virtual Bassist
SE automatically loads a showcase Style. The “Latch” button will be
activated.
2. Press the D1 key on your MIDI keyboard (to select a Part) and play a
chord or note in the two octaves between C3 and B4 (the Pitch
Range). Virtual Bassist SE will play a basic groove. Because the “Latch”
button is activated, playback will continue when you release the key(s).
3. Pressing white keys between D1 and B2 (the Remote Range) on your
MIDI keyboard will select Parts, increasing in complexity from left to
right.
4. Pressing black keys (F#, G#, Bb) in the Remote Range will trigger
Fills.
After playing a Fill, Virtual Bassist SE will return to playing the last Part
chosen.
ENGLISH
5. To stop Virtual Bassist SE immediately press C#1 or press D#1 to
end playback with a sustained note, lasting one bar.
The MIDI LED in the Virtual Bassist SE window lights up when Virtual
Bassist SE receives MIDI information.
VST Instruments
Virtual Bassist SE 3 – 47
Page 48

Playing Virtual Bassist SE
There are several ways to play Virtual Bassist SE:
• You can play chords and notes and vary the expression using keyboard velocity, MIDI controllers and sustain pedal.
• If you don’t have a MIDI keyboard you can enter notes and other MIDI events
using a MIDI editor provided by your host application.
• If you haven’t got a MIDI keyboard connected to your host application or if you
just want a quick impression, you can make Virtual Bassist SE play by clicking
on the frets of the bass on the instrument panel. The Chord Display will show
you the pitch chosen.
• Virtual Bassist SE can be used to replace tracks of existing projects and MIDI
files to improve the way they sound.
• You can use several instances of Virtual Bassist SE. You can use as many instances simultaneously as your host application and computer allow. There’s
nothing wrong with using one Virtual Bassist SE to play the basic groove and
at the same time using another to add additional licks or Fills.
Using a MIDI keyboard
When using a MIDI keyboard to play Virtual Bassist SE there are two
ranges (or zones) used for different purposes.
VST Instruments
3 – 48 Virtual Bassist SE
Page 49

The Pitch Range
The key range between C3 and B4 on your MIDI keyboard is called
the Pitch Range and controls the pitch of the played Parts, Fills or Single Notes. In this range you can play notes or chords and Virtual Bassist SE will intelligently follow your playing. Playing any note in the Pitch
Range with a high velocity (>125) produces an eighth or a quarter
bass note, depending on the Style. This Accent is handy for varying
your bass lines in real-time.
The Remote Range
The key range between C1 and B2 is called the Remote Range and
triggers Parts, Fills, Single Note mode, Stop and End as well as a few
other useful features. The functions of each key can be freely assigned
in the Parts Browser which is explained below. By default the Remote
Range is assigned as follows:
Key Function Description
C1 Single Note Mode When active, any MIDI notes or chords played in the
Pitch Range will produce a single sustained bass note.
C#1 Stop Virtual Bassist SE immediately stops playing.
F#, G#, Bb Fill Triggers a Fill.
D#1 Short End (1bar) Plays an ending note with a length of one bar.
D#1 Held End Holding the D#3 key will allow you to control the
length of the final End note. When you release the key
the End note stops playing.
C#2 4 or 5 strings Toggles between bass guitars with either four or five
strings.
D#2 Chord/Note Determines whether a Part will play melodic bass
lines or whether it will play the rhythmic pattern of the
Part using only the root keys of the note or chord chosen in the Pitch Range. Sometimes octave notes are
also played when appropriate for the Style.
ENGLISH
VST Instruments
Virtual Bassist SE 3 – 49
Page 50

Virtual Bassist SE terminology
Styles
A Style is a set of grooves and phrases (called Parts and Fills) and includes bass selection, FX and Groove Match settings suitable for a
particular musical genre. Each Style consists of 13 Parts triggered by
the white keys between D1 and B2 and 6 Fills triggered by the black
keys F#, G#, Bb in the same key range.You can load a Style by doubleclicking it in the Style Browser. Virtual Bassist SE loads a showcase
Style when started.
Parts
A Part is a bass groove or phrase varying in rhythmic and melodic
structure triggered by the white keys (D1 to B2) in the Remote Range
of your MIDI keyboard. The Parts from D1 to B1, named Basic 1 to
Basic 6, tend to be simpler in their rhythmic and melodic nature. The
Parts from C2 to B2, called Complex 1 to Complex 7, are more complex and more Style specific. When playing Parts, Virtual Bassist SE
will quantize the changes to the nearest 16th note by default.
Fills
A Fill is a special kind of Part that plays for a predefined time (for example 1 bar). After that, Virtual Bassist SE will return to playing the
Part that was playing prior to the Fill. Fill Parts are found on the F#,
G#, Bb keys of the Remote Range (D1 to B2).
If you want Virtual Bassist SE to play a different Part after it has completed a Fill just hit the appropriate white key for that Part after the Fill
key has been played.
A Fill will repeat as many times as the Fill key has been played. So if
you want a Fill to play three times, hit the Fill key three times.
If a Fill key is the first key played after Virtual Bassist SE has been
stopped, the Fill will play repeatedly until another Fill or Part is played.
VST Instruments
3 – 50 Virtual Bassist SE
Page 51

Remote Keys
Remote Keys are special functions assigned in the Remote Range that
influence the performance of Virtual Bassist SE. These keys include:
Single Note Mode (C1), Stop (C#1), End (D#1), 4/5 String Mode
(C#2) and Chord/Note Mode (D#2).
Single Note Mode
Single Note Mode is activated by pressing C1 on your MIDI keyboard.
Once Single Note Mode is activated all MIDI keys played in the Pitch
Range will trigger single bass notes allowing you to play your own
bass lines with Virtual Bassist SE.
Accents
Playing a MIDI note in the Pitch Range with a high velocity (125 and
above) will start the Part with (depending on the Style) either an
eighth or a quarter bass note called Accent. This Accent is handy for
varying your bass lines in real time.
ENGLISH
Aftertouch Vibrato
Applying aftertouch will automatically produce vibrato in Virtual Bassist
SE.
Virtual Bassist SE 3 – 51
VST Instruments
Page 52

Loading and saving Styles
On the right side of the Virtual Bassist SE panel is a Browser listing
the available Styles.
Load
To load a Style you can either:
• Double-click its name in the list or …
• Click the Load button on the bottom right of the Browser and use the
standard load dialog to locate and open the Style.
Save
To save a Style click Save (the left button at the bottom of the
Browser section) and use the standard Save dialog to enter a name
and location for the saved Style.
If the Styles listing is not displayed, click the Styles button at the top of
the Browser.
Depending on the speed of your computer a Style may take a few seconds to Load. The chord display will show a message saying “Loading”.
VST Instruments
3 – 52 Virtual Bassist SE
Page 53

Auditioning styles
Each Factory Style comes with an audio preview. The previews were
made using Virtual Bassist SE with Steinberg’s Virtual Guitarist and
Groove Agent to give you an example of how the Style might sound
with guitar and drums.
There are two ways of previewing:
Listen
In the Style Browser, click on a style (it becomes highlighted). Click
Listen and Virtual Bassist SE will play a preview for as long as you
hold the mouse button.
Auto
Clicking Auto activates the automatic preview mode. With Auto active
a Style preview will play any time you click a Style in the Browser. The
preview will play for as long as you hold the mouse button.
ENGLISH
The Parts Browser
Clicking on a Part in the Browser displays the key assignments of all
of the Parts, Fills and Remote Keys used in the selected Style. All features in the Remote Range can be renamed and their key assignments
changed. When a Part, Fill or Remote Key is played it will become
highlighted in the Parts Browser.
Virtual Bassist SE 3 – 53
VST Instruments
Page 54

Virtual Bassist SE controls
Four or five string
Use this switch to choose between a standard four string or five string
bass (which has an additional low B string). In 5 string mode Virtual
Bassist SE will play licks including notes on the low B string, whenever
possible.
• You can switch between 4-string or 5-string mode using the MIDI
remote key C#2.
MIDI In
The MIDI In LED lights up red to indicate that Virtual Bassist SE receives MIDI data from your host application or MIDI keyboard. When
you play notes on your keyboard but the LED does not light up, this
means Virtual Bassist SE is not receiving any MIDI data.
Chords/Note
You can switch between Chords or Note mode during a performance
by playing MIDI note D#2 on your MIDI keyboard or in your host application. The Chords/Note mode selector determines whether a Part will
play melodic bass lines or the rhythmic pattern of the Part using only the
root keys and octaves of the note or chord chosen in the Pitch Range.
Changing this setting will not affect every Part of a Style.
VST Instruments
3 – 54 Virtual Bassist SE
Page 55

Latch mode
With latch mode On, Virtual Bassist SE will play Parts continuously
from the moment you play the first key until you press the stop button
of your sequencer or play the C#1 Stop or D#1 End remote keys.
If you only want to play a lick here and there, set latch mode to Off and
Virtual Bassist SE will only play while the keys on your MIDI keyboard
are held.
Using the sustain pedal in Latch mode
Latch mode is turned On or Off for the duration that your sustain pedal
is pressed.
Using a combination of Latch settings and sustain pedal with Virtual
Bassist SE will give you a lot of flexibility when arranging and
performing.
ENGLISH
Try experimenting with the possibilities described below to get an
understanding of how useful the sustain pedal can be.
Latch Mode On Sustain pedal
pressed
Latch Mode Off Sustain pedal
pressed
Latch mode is disabled for as long as you press
the sustain pedal. While the sustain pedal is
held any notes played in the Pitch Range will
produce single notes. Virtual Bassist SE will return to playing normal Parts when the sustain
pedal is released.
Latch mode is enabled for as long as you press
the sustain pedal. Any Parts played while the
pedal is held will play until you release the sustain pedal.
VST Instruments
Virtual Bassist SE 3 – 55
Page 56

If you don’t have a sustain pedal you can assign Latch to a different MIDI
controller. To do this right-click (Win) or [Ctrl]-click (Mac) on the Latch
parameter and assign a MIDI controller from the drop-down list or rightclick (Win) or [Ctrl]-click (Mac) and choose MIDI Learn, move the MIDI
controller of your choice and this controller will be detected and used by
Virtual Bassist SE.
Retrigger mode
With Retrigger mode activated, every time a Part key is played the Part
will begin to play again from the beginning, regardless of the current
bar position.
When Retrigger Mode is Off, Part changes will be performed playing
the appropriate melodic and rhythmic phrasing of the Part for the current position in the bar.
Activating Retrigger mode does only make sense for showcases or a
quick overview of the Parts of a Style. When performing or arranging with
Virtual Bassist SE, it is strongly recommended to turn Retrigger mode off.
VST Instruments
3 – 56 Virtual Bassist SE
Page 57

Speed
Virtual Bassist SE automatically follows the tempo of your project, including all tempo changes. The Speed parameter in Virtual Bassist
SE allows you to change the playback speed to half, normal or double
the speed of your project tempo. This can be useful for example if you
happen to be working on a track that is 80 BPM but are running your
host application at 160 BPM. It might also be quite interesting creatively to have your bass playing at double or half speed.
Half = 1/2 Virtual Bassist SE plays at half the tempo of your project.
Normal = 1 Virtual Bassist SE plays at the same tempo as your project.
Double = 2 Virtual Bassist SE plays at double the tempo of your project.
ENGLISH
The red LEDs under the Speed control indicate the current position in
the bar.
Swing
Swing allows you to adjust the feel of Virtual Bassist SE’s performance.
Technically speaking, Swing allows you to move the offbeats of a bar to
an earlier or later position. Turning Swing to the left moves the offbeats
back, turning it to the right moves them forward. Virtual Bassist SE will
play exact triplets when setting Swing to -100% or +100%.
VST Instruments
Virtual Bassist SE 3 – 57
Page 58

Variance
The timing and feel of Virtual Bassist SE are always perfect and reliable.
However, given that these two words are rarely used to describe the
timing of a musician, Virtual Bassist SE also allows you to adjust how
accurately the player will play. Variance adds timing and sound variations so every note sounds slightly different.
A setting of 0% produces a very accurate performance, while at a value
of 100% the performance is loose and uneven.
Early/Late
This control is used to adjust the overall timing of Virtual Bassist SE in
relation to the rest of the instruments in your project. Turning to the left
(Early) will give you an aggressive groove, playing slightly ahead of the
beat, turning to the right (Late) produces a more laid back groove.
The maximum timing deviation is very modest and will hardly be audible
if only Virtual Bassist SE is playing. However, in conjunction with other
tracks, especially those that have been quantized it will become clearly
noticeable.
VST Instruments
3 – 58 Virtual Bassist SE
Page 59

Bass Selector
This seamless selector allows you to change the basic sound of the
bass guitar being played. You can choose between the sound of a
modern bass guitar with active pickups, a classic model as used in
70’s rock and pop or a vintage bass with flatwound strings for that
legendary Motown sound. Just move the silver sphere on the circle to
the sound of your choice, or experiment with in-between positions.
Fret Buzz
ENGLISH
Depending on the setup of the bass and the playing style, the strings
might touch the frets causing a buzzing or rattling sound. In Virtual
Bassist SE you can adjust the amount of buzz in your bass. The right
dose of Buzz will enhance the natural feel of your bass tracks.
Fret Noise
When a bassist moves from one hand position to another the hand
slides over the strings and frets creating a squeaking sound. This fret
noise is an important part of a natural bass sound – a fact often ignored
in bass emulations. Virtual Bassist SE gives you control over the amount
of fret noise in your bass track. Select Mid for a little, Full for a lot or Off
to completely remove fret noises from the track.
Virtual Bassist SE 3 – 59
VST Instruments
Page 60

Compression, Drive, Master
The Compression control varies the Amount of Virtual Bassist SE’s
compressor. Drive raises the gain of the preamp and Master the master volume of the amplifier’s output.
The bass sound lock
Activating the bass sound lock (by clicking on the lock symbol at the
bottom right of the bass) will lock all settings that influence your bass
sound, e.g. the knobs on the bass guitar and the bass selector. It will
keep these settings even when you change the Style.
Guitar controls
You will notice that the bass guitar graphic on the left of the instrument
panel has four knobs and a slider for varying your bass sound.
Volume
The Volume knob controls the output level of the Bass to the amp, just
like the volume knob on a real bass guitar. Turning this up will help to
overdrive your sound.
VST Instruments
3 – 60 Virtual Bassist SE
Page 61

Tone
The Tone knob is also just like the tone control on a bass guitar. Turning
the Tone knob to the left will cut high frequencies and soften the sound.
Attack
Bass players can change the sound of their playing by choosing to
play with their fingers or a pick. Playing with the fingers produces a
softer sound while playing with a pick produces more of an attacking
sound. The Attack knob in Virtual Bassist SE adjusts the strength of
the attack allowing you to seamlessly produce the kind of attack sound
you want, from fingered to picked or in between.
ENGLISH
Damp
Bass players can subtly vary their sound by damping the strings with
their hands, to make the sound duller and decay faster. The Damp
knob emulates this behavior, turning it to the left makes the sound
softer and more percussive.
At the maximum left position Virtual Bassist SE will play deadnotes.
To emulate the sound of old bass strings try a setting between 10 and 2
o’clock.
VST Instruments
Virtual Bassist SE 3 – 61
Page 62

Pickup position
The sound spectrum a bass guitar produces depends on the position
of the pick-up. A cool thing about Virtual Bassist SE is that it allows
you to adjust the position of the pick-up. Moving the slider downwards
from the neutral mid position increases the bite, while moving it up produces a warmer sound with more bass.
MIDI Controller assignments
To help you get the most out of Virtual Bassist SE in a recording or
performance situation we have made many parameters available for
use with MIDI controllers. The following table shows the factory default assignment of Virtual Bassist SE parameters to MIDI controller
numbers.
CC# Name Virtual Bassist SE parameter
1 Mod Wheel Wah Pedal
7 Volume Master Volume
11 Expression Bass Volume
64 Sustain Pedal Latch On/Off
71 Resonance Damp
73 Attack Attack
74 Cutoff Tone
76 Vibrato Rate Vibrato Rate
77 Vibrato Rate Vibrato Depth
78 Vibrato Rate Vibrato Delay
VST Instruments
3 – 62 Virtual Bassist SE
Page 63

In Cubase SE (and other Steinberg hosts), you can automate the dials
and switches in Virtual Bassist SE using the automation features of the
host application instead of MIDI controller numbers.
Assigning MIDI controllers in Virtual Bassist SE
As well as the preassigned MIDI controllers listed above, you can assign many of the features of Virtual Bassist SE to MIDI controllers for
automation or real-time control, e.g. via the knobs of your MIDI keyboard.
There are two ways to assign a Virtual Bassist SE knob or parameter
to a MIDI controller:
ENGLISH
1. Right-click (Win) or [Ctrl]-click (Mac) on the parameter and choose a
controller number from the drop-down list.
2. Right-click (Win) or [Ctrl]-click (Mac) on the parameter, select Learn
and move the desired knob or controller on your MIDI keyboard or
sequencer host. Virtual Bassist SE will set this MIDI controller to the
parameter you have chosen.
• When you have assigned a parameter and decide that you want to
remove it, right-click (Win) or [Ctrl]-click (Mac) on the parameter and
select “Forget”.
VST Instruments
Virtual Bassist SE 3 – 63
Page 64

Chord recognition
Virtual Bassist SE contains an intelligent chord recognition system, it
always plays the correct bass line for the chords it receives from the
MIDI input of your sequencer or keyboard, although for some chord
types the bass line may not significantly change. The MIDI input can
consist of a complete chord or simple one-finger notes – you don’t
need to make any special settings because Virtual Bassist SE will always know what to do.
Playing chords
If you play a complete chord in the Pitch Range (for example, the
notes C, F, and G for a Csus chord), Virtual Bassist SE will automatically recognize it.
For the best possible chord recognition, all the notes of a chord must
be played. Playing three notes is sufficient for major, minor or sus4
chords, but for other chord types (maj7, 7, 6, dim, mmaj7, m7, m6,
m7-5, sus2 and 7sus4) you need to play all four notes.
Chord inversions
In most cases, it doesn’t matter what inversion of a chord you play.
However, there are some exceptions where the bass note has to be
the root or tonic note:
• m7: For example, in Am7 the A must be the bass note because Virtual Bassist
SE would otherwise interpret the chord as a sixth (C6, in this case) – although
the chord uses the same notes on the keyboard, it should have a different root
note when played on a bass guitar.
• dim chords (for example, Adim uses the same notes as Cdim, Eb-dim and
Gb-dim).
• +5 chords (A+5 uses the same notes as C#+5 and F+5).
• m6 chords (Am6 uses the same notes as F#m7-5).
VST Instruments
3 – 64 Virtual Bassist SE
Page 65

One-finger chords
For the chord types major, 7, minor, and m7, you don’t actually need
to play all the notes in the chord. Although playing a single note always indicates a major chord, you can indicate a different chord type
by playing an additional key.
Additional key Chord
None major
Next left white key 7
Next left black key minor
Next left white and black keys minor7
Chord display
ENGLISH
The chord display at the top of the instrument panel shows the currently playing chord. Virtual Bassist SE will always play a fitting bass
line to any chord although for some chord types the bass line may not
significantly change.
VST Instruments
Virtual Bassist SE 3 – 65
Page 66

VST Instruments
3 – 66 Virtual Bassist SE
Page 67

ENGLISH
4
Groove Agent SE
Page 68

What is Groove Agent SE?
Technically speaking, Groove Agent SE uses thousands of custom
designed MIDI patterns. These patterns trigger samples especially
recorded for this instrument. That's basically it!
• The Timeline slider allows you to choose a musical style and its associated
drum kit. Some of the kits are acoustic, others are electronic.
• The Complexity slider provides you with increasing degrees of advanced play.
For each level there's an associated fill, half tempo feel pattern and sidestick
version.
• On top of that, there's an Edit section where you can tweak the sounds and
even change your instruments.
First test
Let's make sure Groove Agent SE is properly set up and ready to play:
1. Load Groove Agent SE as a VST instrument. Make sure Groove
Agent SE is selected as the output for a MIDI track and that the MIDI
channel chosen is any other than channel 10. If required, make sure
your MIDI controller is routed to this track.
2. Open the Groove Agent SE panel. Move the Style slider to a style of
your choice. Be prepared to wait for a second or two while Groove
Agent SE loads its samples for this style. The yellow window is helpful
here with its Loading and Ready messages.
3. Adjust the tempo of Cubase SE to suit each style's favorite tempo
range as stated in the “range” field in the yellow LCD window.
4. Click Run in the Groove Agent SE window. By now you should see
the beat light indicate 1-2-3-4 and you should hear rhythms streaming from your speakers!
VST Instruments
4 – 68 Groove Agent SE
Page 69

Groove Agent SE terminology
LCD window – The big, yellow window tells you, at all times, what's going on inside Groove Agent SE. This is your main source of information.
Style – A certain musical style, normally linked to a unique drum and
percussion kit.
Complexity – The level of advancement in a style. In Groove Agent SE
the complexity levels go from left (simple) to right (advanced). Music
in general benefits from variations in a song, and in Groove Agent SE
they're easy to reach.
Fill – A live drummer usually plays a fill every eight bars or so, emphasizing the song's structure and movement. A fill may be regarded as “an
improvised exclamation mark”. Going from the verse into the chorus?
Time for a fill!
Half tempo feel – Typically, slowing down the kick and snare pattern to
half speed, while keeping the rest of the pattern going in the other instruments, creates a dramatic effect. This is very typical live drummer
behavior.
ENGLISH
Accent – Before drum machines became popular, an accent was a
marked hit, typically played on the crash cymbal and kick drum. When
played off beat, like e.g. on the 8th note preceding a bar line, it becomes
a syncope.
Ambience – Groove Agent SE comes with a complete set of ambience recordings for all drums and percussion instruments. The acoustic sounds have been recorded with distant microphones and the
electronic sounds have been processed through various reverb and
effects units.
Dry/Wet – While “dry” represents the uneffected signal, “Wet” is the
pure effect signal. A Dry/Wet slider typically adjust the amount of room
ambience.
VST Instruments
Groove Agent SE 4 – 69
Page 70

Using Groove Agent SE
Choose what style you want to use with the upper slider. Make sure
the lower slider is somewhere in the middle third of its total range and
that the tempo is inside the tempo range of the chosen style. Start
your sequencer, and when you want the drums to start playing, hit
Run in Groove Agent SE.
For really easy living, activate Auto Fill. Move the Complexity slider to
the left for easier/gentler playing and to the right for a more advanced/
noisy/wild drummer. Stop Groove Agent SE with its own Stop button
or by stopping your sequencer.
VST Instruments
4 – 70 Groove Agent SE
Page 71

The LCD window
The information given in this window is
mostly self explanatory, but let us give
you a useful tip:
When navigating the Style and Complexity sliders, the big LCD window always tells you where the sliders are.
There are 13 styles available for the
top slider, and some users may find
the style names difficult to read. Please, have a look in the LCD window. It makes it much easier for you to place the sliders exactly where
you want them.
Range
Each style has its own favorite tempo range. If you play a hectic
House style at 40 BPM, it probably won't sound very impressive.
Groove Agent SE won't stop you from trying any style in any tempo
though – the Range is just a friendly recommendation.
ENGLISH
VST Instruments
Groove Agent SE 4 – 71
Page 72

Sliders and buttons
The style slider/timeline
The top slider is perhaps the most important gadget in the entire instrument. It is a timeline with various musical styles written above it. When
dragging the slider along this timeline, you select what style to use.
Every style has its own typical drum kit assigned to it.
When first selecting a style, the VSTi will take a few seconds to load
the samples.
When you move to another style, there are a few seconds of loading
time again. But if you go back to the first style again, loading time will be
much shorter, because the samples are still in your computer's cache.
VST Instruments
4 – 72 Groove Agent SE
Page 73

Styles in Groove Agent SE
Here's a short description of each style:
1952 Jazz Trio
Brush Kit groove inspired by brush greats such as Buddy Rich, Louie
Bellson, Jo Jones.
1956 Rumba
Afro-Cuban version of the Rumba, not to be confused with the Rhumba
(with an “h”) that can often be heard in older drum machines.
1966 Pop
High energy pop drumming, fave tempo is 146 BPM.
1971 Cajun
“Deep down in Louisiana close to New Orleans” kind of Cajun style.
1973 Dark Side
ENGLISH
Fair amount of inspiration from Pink Floyd's “Dark Side of the Moon”,
well suited for slow songs.
1977 Hard Rock
Steady and heavy drums for anyone with Angus-ambitions.
1983 Breakbeat
Dirty, groovy, kind of playing-too-much à la Chemical Brothers.
1988 House
A quite laidback electronic style that lives on its own groove.
1993 Modern Soul
Straight and very well suited for slow pop and soul ballads. Modern
Soul contains a hybrid of analog, processed sounds and electronic
sounds.
VST Instruments
Groove Agent SE 4 – 73
Page 74

1996 Drum’n’Bass
Combination of high speed beats with a natural half tempo feel, resulting in a playful rhythmic ballet.
2002 Nu RnB
Modern RnB/Hiphop style with a compressed sound.
The Complexity slider
Getting acquainted with this slider shouldn't be too problematic, since
its behavior is very predictable.
If you move this slider to the left, you'll reach the simpler levels of complexity. As a matter of fact, the first levels are usually not even complete patterns. Something is missing here, be it a kick drum or a few
beats. You might find these patterns suitable for song intros or when
producing very sparse music. Maybe only the first verse of your song
needs this gentle touch?
By moving the slider to the right, you move into the more busy territory.
Here you'll find variations of the chosen style and the further you move
to the right, the busier it gets.
For convenience's and predictability's sake, level changes occur only
at bar lines. This means that if you want to change from level 8 to 11
and move the slider on the second beat of a bar, you'll have to wait until the next bar to hear the new level. This behavior gives you time to
trigger fills (and click other buttons if you need to) a bit in advance.
Snare/Sidestick
The sidestick playing technique generally sounds more natural at lower
complexity levels. It is not available in all variations.
VST Instruments
4 – 74 Groove Agent SE
One common practice in traditional drumming is to
make the sound “lighter” by playing with the stick
lying down on the snare drum hitting the metal rim.
This is called sidestick and here's the button for it.
You may switch between regular snare and sidestick
at any time.
Page 75

Accent
This button triggers a kick + crash cymbal hit. You
may use it as an accent in your song. When hit at an
off-beat, the accent hit becomes a syncope. The current drum pattern stops for as long as you keep the
button pressed. Holding down the Accent button for
approximately one quarter note after you hit it on an
off-beat creates a very realistic syncope.
Fill
Hit the button when you feel it's time for a fill. If you hit
the button early in a bar, you'll hear more of the fill bar
than if you hit the button late in a bar. Armed with this
knowledge, you can turn even the wilder fills into more
discrete ones.
Please note that in most styles the fills end with a
crash cymbal on the downbeat of the next bar, just like a live drummer.
You can turn this effect off by muting the Crash group.
ENGLISH
Speaking of arming, you can actually start a pattern with a fill. When
Groove Agent SE is stopped, hitting the fill button will arm it, so that
clicking the Run button makes Groove Agent SE start playing with a fill.
Some musical styles have a definite 2 or 4-bar pattern feel to them. While
an irregular (like 7 or 9) bar period in your music may cause such a pattern to sound wrong (a bit like “one bar late”), it's reassuring to know that
after a fill the music always restarts at “bar 1" in such a pattern.
Fills can also be used for endings. Hit the Fill button in the last bar of
your song and then the Stop button on the last beat.
VST Instruments
Groove Agent SE 4 – 75
Page 76

Half Tempo Feel
One trick many live drummers use, is to change their
playing to “half tempo feel”. It usually involves slowing
down the kick and snare pattern to half tempo while
keeping the hihat/ride pattern going.
In practice, the Half Tempo Feel function doubles the
amount of available styles! You can think of the half
tempo feel as the basic rhythm of your song. And
then, near the end, perhaps disengage the button for an uptempo,
gospel style ending!
Try activating the Half Tempo Feel button at the bridge section of a song
and then go back to normal play for the end choruses. Or at any other
part where you feel the urge to increase the excitement or coolness with
this function.
Random
If you want some automatic pattern variation, the Random button is very handy. This function automatically
changes patterns for you. The general idea is to make
the drumming sound less rigid, less predictable. The
LCD window shows you what level is currently playing.
The random button only moves within a range of ±2 levels from the
slider's original position.
Auto Fill
If an auto save function is active in your sequencer, it may cause Groove
Agent SE to trigger a fill. The medicine is to turn Auto Save off.
VST Instruments
4 – 76 Groove Agent SE
Here's a handy little button. It can automate the way fills
are triggered. When you move from one complexity level
to another with Auto Fill activated, Groove Agent SE automatically plays a fill before the next level.
Page 77

Random Fill
This is another little tool to make life easier. If you stay
within one complexity level and trigger a fill every now
and then, this button will make sure that every time
there's a fill, it'll be a slightly different one.
As with the Random button, the randomly chosen fill always lies within
±2 steps from the slider's current location.
Ambience
This knob is one of the highlights of Groove Agent
SE! All the acoustic drums and percussion instruments were recorded using a mix of four techniques:
• Every instrument close miked, giving a very dry sound.
• Every instrument recorded through the overhead microphones, giving a rather
dry sound but with a sweet stereo image.
• Every instrument recorded through the ambience microphones, positioned
approximately 2 meters from the source. This gave us a warm, roomy sound
with a controlled amount of “air”.
• Every instrument recorded through a pair of distant mikes, placed over 7 metres
away. These recordings give a definite hall atmosphere.
ENGLISH
The type of ambience used for a specific style matches the way it was
recorded in its original era.
We've preset a lot of different kits to go with the different musical
styles, but if you want to change the preset version, use this dial.
The normal position for this knob is 12 o'clock. Turning it all the way to
the left produces an all dry sound, while all the way to the right gives
you the ambient (wet) sounds only.
VST Instruments
Groove Agent SE 4 – 77
Page 78

Mute, grouping and instrument selection
The sounds in Groove Agent SE are organized in 8 logical groups:
1. Kick (bass) drum
2. Snare drum
3. Toms or effects
4. Hihat
5. Ride and Chinese cymbals
6. Crash and splash cymbals
7. Percussion group 1 (usually “high and
quick” instruments)
8. Percussion group 2 (usually “low and
slow” instruments)
You can use the corresponding Mute button at any time to kill the
sound output from any of these groups. Mute activated = no sound.
Mute disabled (un-lit) = sound on.
While listening to the preset styles and their related kits, you may want
to experiment with exchanging individual instruments or instrument
groups. Click the sound name field to open a pop-up menu from which
you can choose a different instrument. Change that tight 80s studio
kick to a dull 50s jazz kick in one easy go and hear the results instantly!
VST Instruments
4 – 78 Groove Agent SE
Page 79

Stop/Run
These buttons start and stop Groove Agent SE. While
this instrument can be used with your host sequencer
stopped, it always plays at the BPM rate (tempo) of your
host program. When your sequencer is running, Groove
Agent SE follows the tempo and synchronizes to the
beat position of the host.
You can make Groove Agent SE start simultaneously
with your sequencer by using this method:
1. Start Cubase SE.
2. Start Groove Agent SE.
3. Click the sequencer stop button.
Now, the next time you start your sequencer, Groove Agent SE will
start, too! The waiting status of the Run button is indicated by a green
light.
This is good for those situations where you want the drums to play
from the very start of a song or a section.
ENGLISH
VST Instruments
Groove Agent SE 4 – 79
Page 80

Groove Agent SE keyboard mapping
Here’s an image that describes how the Groove Agent SE sounds are
laid out on a MIDI keyboard.
VST Instruments
4 – 80 Groove Agent SE
Page 81

Using the automation in Cubase SE
1. Open Groove Agent SE in your VST instruments rack. From Groove
Agent SE's panel, activate the Write button (W). Look in the Cubase
project window, and you'll notice that a new track called VST Instrument Automation, plus another track below it, have been created. For
most situations, the auto quantize function in your sequencer should
be turned OFF. You're now ready to start recording your drum track.
2. Start Cubase SE. When it's time for the drums to start playing, hit the
Run button (with or without a fill being armed, remember?). Drag the
sliders, push the buttons and turn the knobs until your drum track
sounds right. When the song or section of the song is over, hit Groove
Agent SE's Stop button and then Cubase's Stop button.
3. After recording, right click on the VST Instrument Automation track
and select “Show used automation for all tracks”. All the automation
classes (Run/Stop, Fill, Pattern Select etc.) will have a separate track.
4. Click the Read button (R) in Groove Agent SE or in one of the newly
created automation sub-tracks. Now you'll see the actual data in all
the tracks. This data can be freely edited.
ENGLISH
5. To prevent unintentional over-writing of data, make sure the Write
button is only lit when you deliberately want to over-write the automation data.
Controlling Groove Agent SE from a MIDI keyboard
There are situations where you want to control Groove Agent SE via a
remote MIDI device such as a keyboard. We have prepared a scheme,
so that almost everything you can do directly on screen can also be
carried out remotely. Here's a complete description.
• MIDI notes B0-A3 (35-69) play the internal sounds according to the
keyboard map shown on page 80. These drum sounds are available at
all times.
• If you control Groove Agent SE on MIDI channel 10, the keyboard
becomes compatible with standard General MIDI (GM) mapping.
VST Instruments
Groove Agent SE 4 – 81
Page 82

• MIDI note A#3 (70) doubles as the Accent button. It also kills drumming for as long as it's held; play a syncope and hold this key for one
quarter note for very realistic behavior. Please note that this key has
better timing than the Accent button on screen.
• MIDI note B3 (71) stops Groove Agent SE when it's running.
• Moving the modulation wheel or using CC 66 triggers a fill.
• When controlling Groove Agent SE on an odd number channel, MIDI
notes C4-C5 (72-84) serve dual purposes. Pressing any of these
keys starts Groove Agent SE. If you hit a key harder than velocity 90,
you will trigger a fill.
• When controlling Groove Agent SE on an even number channel the
white MIDI keys C4-B4 (72-83) are used to mute and un-mute the 8
individual instrument groups.
If you have an extra modulation wheel or dedicated controller/s on
your keyboard, you can use these CC's to control Groove Agent SE:
MIDI CC Destination
CC Destination
2 and 65 Snare/Sidestick selection
3 and 64 Half Tempo Feel
7 Overall volume
76 Host BPM (60 + value) if your host does not support tempo sync
91 Ambience
Please note that the controllers mentioned here may also be handy
when editing Groove Agent SE drum parts in your sequencer.
VST Instruments
4 – 82 Groove Agent SE
Page 83

ENGLISH
5
The Grand SE
Page 84

Introduction
The Grand SE is just what it looks like – an acoustic grand piano in a
lean, easy software instrument. It is derived from its famous brother
The Grand, which has become a music industry standard and is used
world-wide by pianists, composers and bands, but is based on a
scaled-down sample model that uses only 85 MB RAM and does not
involve disk-streaming.
You’ll love its authentic sound and great playing feel.
Survey of key features:
• based on a top-drawer grand concert piano
• superior sound quality
• four master timbres: Natural, Soft, Bright, Hard
VST Instruments
5 – 84 The Grand SE
Page 85

Playing The Grand SE
We take it that you want to play a piano in the conventional manner
rather than program it as you would a synthesizer.
In this case, no further adjustments are necessary once you’ve opened
the lid – that is, launched the VSTi. A genuine grand piano stands before you waiting to be played.
That you can do by striking the 88 keys in a sequence and with an intensity of your choosing. For reasons beyond the scope of this manual,
we won’t venture to discuss how to go about doing that. We’re just the
piano makers – what you play and how you play is entirely up to you.
Pedals
The following pedals are available (from right to left):
Sustain Pedal
Aside from the keys, a piano’s most important means of expression is
the hold or sustain pedal, which with a sharpness of wit rarely matched
among musical instrument vendors, we call Sustain.
ENGLISH
Plug a pedal into your MIDI keyboard’s Sustain or Hold port or control
sustain via MIDI Control Change #64.
Sostenuto Pedal
If you bear down on this pedal while holding a chord, that chord will
continue sounding. Even when you release the keys, the chord will
continue sustaining, but any new notes that you play will sound in the
usual way.
This lets you lay down a cozy “carpet” of chords to solo over.
To this end, plug a pedal into your MIDI keyboard’s Sostenuto pedal
port or control sostenuto via MIDI Control Change #66.
Soft Pedal
The left pedal lets you dampen the overall volume and tone of the
instrument. To do this, plug a pedal into your MIDI keyboard’s Soft
pedal port or control the pedal via MIDI Control Change #67.
VST Instruments
The Grand SE 5 – 85
Page 86

Opening the Edit window
Some basic settings for The Grand SE are hidden away in a separate
Edit window. If you want to edit settings, simply open the Edit window
by clicking the Edit button.
Sound Character
The Sound Character section’s four sophisticated presets let you adjust the piano to suit your musical style or technique in terms of both
volume and tone.
Natural
• As the name suggest, here no adjustment to sonic properties is made –
it plays and sounds just like a genuine acoustic grand.
Good for classical and jazz styles as well as other musical scenarios calling for natural,
realistic sound and authentic response.
Soft
• Full volume range, dampened tonal response. Pounding and caressing the keys elicits the same vast variations in volume, but the tone will
not vary as wildly as on the original instrument.
Good for soft songs, ballads and mood music.
VST Instruments
5 – 86 The Grand SE
Page 87

Bright
• Full volume range, brighter tonal response. As is the case with the
Soft variant, the dynamic range remains unchanged in terms of volume, but the tone is brighter, with added punch. You’ll hear the difference even when you play with a light touch.
Good for solo/melody lines and for playing along with electric/electronic instruments.
Hard
• Compressed volume range; brighter tone. The dynamic response of
the instrument is limited to the extent that it sounds altogether louder
and with added punch. Its tone is also somewhat brighter.
Good for the kind of in-your-face, punchy grand piano sounds typical of modern music
styles.
Global
Quality
This setting lets you improve the performance of your system’s CPU,
albeit at the expense of sound quality.
ENGLISH
Your best bet is to forget about this parameter, only remembering to
make use of it when the system performance display of your computer
tells you that its CPU reserves are depleted.
• Setting this option to Low Quality lightens the load on your system’s CPU.
The downside is that frequency response and tonal transparency suffer. High
Quality delivers the highest fidelity, but it also puts the greatest load on the
CPU. However, unless you have a reason not to, we recommend to leave the
setting at High Quality.
Master Tune
This knob lets you vary the fundamental or reference tuning of The
Grand SE in the range of 415.3 to 466.2 Hertz.
VST Instruments
The Grand SE 5 – 87
Page 88

VST Instruments
5 – 88 The Grand SE
Page 89

ENGLISH
6
D’cota SE
Page 90

Introduction
D’cota SE is a powerful advanced analog synthesizer. It features a vast
range of synth basses, leads, pads and other typical analog sounds, as
well as basic FM sounds.
Each instance of D’cota SE that you load adds a high-quality synthesizer with up to 16 voices to your host application.
These are D’cota SE’s most prominent features:
• Advanced analog synthesis.
• Aliasing-free synthesizers provide superb sound quality.
• Stereo output.
• Advanced, yet simple to use controller – modulation routing.
• Complete automation from within Cubase or Nuendo.
Overview
About the default program bank
Like all VST instruments, D’cota SE can save and load programs
(“.fxp” files) and program banks (complete sets of programs, “.fxb”)
from disk. Note that you will also find additional program banks in the
D’cota SE folder. The saving and loading procedure is described in
the documentation of your VST host application. However, D’cota SE
has a special feature:
When you open a new instance of the instrument, a default program
bank is automatically loaded – you can immediately choose between
a number of programs in the instrument, without having to manually
load a program bank from disk. You can have any program bank of
your own choice be the default bank, giving you immediate access to
your own favorite sounds:
1. Open the folder in which the D’cota SE plug-in file resides.
You will find the “D’cota SE.dll” (PC) or “Dcota SE” (Mac) item in the VSTplugins folder
of your VST host application, a shared, common VSTplugins folder or a subfolder to any
of these.
2. Locate the file “DcotaSEdef.fxb” and rename it to something else.
This is just to keep the original default bank, should you wish to use it in the future.
VST Instruments
6 – 90 D’cota SE
Page 91

3. Save the desired D’cota SE program bank in that folder, under the
name “DcotaSEdef.fxb”.
The next time you launch D’cota SE, your saved bank will open as default.
The window overview
ENGLISH
D’cota SE is an analog synth that uses classic subtractive synthesis,
the most common synthesis method. See page 93 for details.
VST Instruments
D’cota SE 6 – 91
Page 92

The parameters in the lower section of the window
In the lower section of the window, you find parameters for modulation
and output. See page 106 for details.
Editing methods
Changing parameters in the D’cota SE control panel is very straightforward – click and drag to turn dials or move graphic elements (envelope segments, etc.), click buttons to turn them on or off and click
pop-up menu boxes to select waveforms and other options. A few
things to note:
• Holding [Shift] and changing a parameter will adjust its value in finer
steps.
• [Ctrl]/[Command]-clicking on a parameter will set it to its default value
(or remove modulation for the parameter, see page 107).
• If you click a parameter, its current value is shown numerically.
• When a parameter is “selected” this way (value is shown), you can
use the up/down arrow keys on the computer keyboard to make fine
adjustments.
Similarly, the [Page Up]/[Page Down] keys will make coarse adjustments. Pressing the
[Home] or [End] keys will set the parameter to its minimum or maximum value, respectively. Note that the option “Plug-ins receive key commands” has to be activated in the
host application for this.
VST Instruments
6 – 92 D’cota SE
Page 93

The synthesis section
D’cota SE is modelled on subtractive synthesis, the method used in
classic analog synthesizers.
The synthesis section in the upper part of the window has the following basic features:
• Multimode filter
Two lowpass and a highpass filter type – see page 103.
• Two oscillators, each with 4 standard waveforms plus an assortment
of specialized waveforms.
See page 96.
ENGLISH
• Frequency Modulation (FM).
See page 101.
• Arpeggiator.
See page 105.
• Ring Modulation.
See page 102.
VST Instruments
D’cota SE 6 – 93
Page 94

Creating a synth sound with PWM – a brief tutorial
Here’s how you create a basic synth Program that uses PWM (Pulse
Width Modulation) in the synthesis section:
1. Select a default empty Program.
If you play a few notes you should hear a very basic static sound, that
uses one oscillator producing a Sawtooth waveform.
2. Turn up the Osc 2 parameter clockwise in the Mixer section all the way.
Now two oscillators are used. The sound is still basically the same,
just a little louder.
3. Set the oscillator Tune parameter for Osc 2 to a value of about + 2.00
cent, and play a few notes.
As you can hear, the oscillators now “beat” slightly against each other,
producing a more animated sound.
4. In the Envelope section (the two window displays above the keyboard),
try adjusting the Attack parameter for Envelope 1 (the left envelope
display) by moving the “A” parameter dial below the display.
If you play a few notes, you can now hear that the start of the sound
now is faded in rather than starting abruptly. By default, Envelope 1
controls the amplitude envelope for the oscillators. The amplitude envelope determines how the volume changes from the moment you
press a key to the moment you release it. The Attack parameter sets
the time it takes for the volume to reach full level.
5. Set the Attack parameter back to about 4 ms, or adjust it to your liking.
6. Try adjusting the Filter Cutoff parameter.
The filter changes the basic timbre of the sound. Set the Cutoff parameter to about 6 kHz.
7. Click the “WM” button for Osc 1.
VST Instruments
6 – 94 D’cota SE
Page 95

A new dial appears named “WM”. Wave modulation works by adding a
phase-shifted copy of the oscillator output to itself, which produces
waveform variations. In this case, two Sawtooth waveforms are used,
which produces a Pulse waveform. Still the sound is fairly static. Applying modulation to the WM parameter will make things more interesting.
8. Click the “C” button to bring up the Controller strip.
This is where you assign controller modulation to parameters.
9. Click the button named “LFO 1” on the Controller strip.
ENGLISH
A LFO (low frequency oscillator) can be used to apply cyclic modulation, which for classic PWM is what we want.
10.Click and hold inside the WM parameter dial, and move the mouse
pointer upwards until the dial is fully colored orange, and release the
mouse button.
When the mouse is moved upward, the dial is gradually colored orange.
In general, the more the dial is colored orange the more modulation is
applied to a parameter by the controller. In this case, however, the modulation amount is also controlled by another parameter (LFO1 Level), so
nothing is heard at this moment. Read on.
VST Instruments
D’cota SE 6 – 95
Page 96

11.Click the “C” button again to close the Controller strip.
12.Locate the LFO 1 section in the lower left section of the D’cota SE
window, and turn the LFO 1 “Level” parameter clockwise to about a 12
o’clock position.
Now if you play, you can hear the typical sound of PWM! By adjusting
the WM dial for Osc 1 the timbre is changed. Setting the WM dial
somewhere around 12 o’clock produces smooth modulation, turning
it hard left or right produces a more “pulsating” type of modulation.
Adjusting the LFO 1 “Rate” parameter changes the speed of the
modulation cycle.
This brief tutorial hopefully illustrated some of the basic operations and
features of D’cota SE’s analog synth. Read on for a full description of
all available parameters and functions.
Analog parameters
In this section we will describe the parameters found in the oval area
of the synthesis section in the upper part of the D’cota SE window.
The oscillator section
Oscillators are the main sound generators in subtractive synthesis, the
other features are typically used to shape the sound of the oscillators.
Oscillators generate two properties, waveform and pitch (frequency).
The oscillator waveform determines the harmonic content which affects the basic tone quality of the sound (also known as “timbre”).
VST Instruments
6 – 96 D’cota SE
Page 97

Selecting a waveform
1. To select a waveform, click in the name field under the corresponding
“Osc 1 or Osc 2” label, and select a waveform from the pop-up menu
that appears.
The method used is identical for both oscillators, as are the available waveforms.
ENGLISH
2. To hear the signal generated by the oscillator(s), the corresponding
“Osc” dial in the Mixer section must be turned clockwise to a suitable
value (normally between 0.50 - 1.00).
VST Instruments
D’cota SE 6 – 97
Page 98

About the waveforms
Each oscillator has 13 waveforms to choose from. These can be
divided into two groups:
• The classic waveforms (Sawtooth, Square, Triangle and Sine). These are the
fundamentals of the substractive synthesis and have been used in many synthesizers since the beginning of the “analog” era.
• The more complex waveforms (Parabolic, Formant 1 and 10, Vocal A, Add 3,
Octave, Prime, ResoPulse and slope). These additional waveforms include
e.g. “rounded” sawtooth waveforms, Formant waveforms (which emphasize
certain frequency bands), Partials (also called harmonics or overtones) and
much more.
VST Instruments
6 – 98 D’cota SE
Page 99

Oscillator 1
Oscillator 1 acts as a “master” oscillator. It determines the base pitch
for both oscillators, and acts as the modulator source when using frequency modulation (FM). Oscillator 1 features the following parameters:
Parameter Value Description
Pitch +/- 48 semitones This determines the base pitch used by both oscil-
lators.
Fine +/- 50 cent Fine tunes the oscillator pitch in cent increments
(100ths of a semitone). This also affects both oscillators.
WM (Wave
modulation)
Phase button On/Off When Phase synchronization is activated, both os-
Track button On/Off When Track is activated, the oscillator pitch will
WM button On/Off Switches Wave modulation on or off.
Osc 1 Waveform pop-up
0-100 This parameter dial is only visible if the WM button
is activated. Wave modulation works by adding a
phase-shifted copy of the oscillator output to itself,
which produces waveform variations. For example
if a sawtooth waveform is used, activating WM will
produce a pulse waveform. By modulating the WM
parameter with for example a LFO, classic PWM
(pulse width modulation) is produced. Wave modulation can, however, be applied to any waveform.
cillators will restart their waveform cycles with every note played. With Phase deactivated, the
oscillators generate a waveform cycle continuously, which produces slight variations when playing as each note will start from a random phase in
the cycle, adding “warmth” to the sound.
But when synthesizing bass sounds or drum
sounds, it is usually desired that the attack of every
note played sounds the same, so for these purposes you should activate Phase sync. Phase sync
also affects the noise generator (see page 103).
track the notes played on the keyboard. If Track is
deactivated the oscillator pitch remains constant,
regardless of what note is played.
See page 98. Sets the waveform for oscillator 1, see page 98.
ENGLISH
VST Instruments
D’cota SE 6 – 99
Page 100

Oscillator 2
Oscillator 2 features the following parameters:
Parameter Value Description
Coarse +/- 48 semitones This determines the pitch used by oscillator 2 rela-
tive to the tuning of oscillator 1.
Tune +/- 50 cent Fine tunes the oscillator 2 pitch relative to oscilla-
tor 1 in cent increments (100ths of a semi tone).
WM (Wave
modulation)
Index (FM) 0-16 This parameter dial (which is only visible if the FM
WM button On/Off Switches wave modulation on or off.
Sync button On/Off When Sync is activated, Osc 2 is “slaved” to Osc 1.
Track button On/Off When Track is activated, the oscillator pitch will
FM button On/Off This switches frequency modulation (FM) on or off,
Osc 2 Waveform pop-up
0-100 This parameter dial is only visible if the WM button
is activated. Wave modulation works by adding a
phase-shifted copy of the oscillator output to itself,
which produces waveform variations. For example
if a sawtooth waveform is used, WM will produce a
pulse waveform. By modulating the WM parameter
with for example a LFO, classic PWM (pulse width
modulation) is produced. Wave modulation can,
however, be applied to any waveform.
button is activated) adjusts the amount of frequency modulation (FM) applied to oscillator 2. FM
is explained on page 101.
This means that every time Osc 1 completes it's cycle, Osc 2 is forced to reset (start it's cycle from the
beginning). This produces a characteristic sound,
suitable for lead playing. Osc 1 determines the
pitch, and varying the pitch of Osc 2 produces
changes in timbre. For classic sync sounds, try
modulating the pitch of Osc 2 with an envelope or a
LFO. The Osc 2 pitch should also be set higher
than the pitch of Osc 1.
track the notes played on the keyboard. If Track is
deactivated the oscillator pitch remains constant,
regardless of what note is played.
see page 101.
See page 98. Sets the waveform for oscillator 2, see page 98.
VST Instruments
6 – 100 D’cota SE
 Loading...