

Page 1

MIDEX-3
MIDI Interface
Operation Manual
Page 2

Declaration of Conformity
We, Steinberg Media Technologies AG
Neuer Hoeltigbaum 22 - 32,
D-22143 Hamburg
herewith confirm that the product:
Type: USB/MIDI interface
Model: MIDEX-3
meets the requirements of the council of
the European communities as specified
by the following norms (or normative
documents)
CENLEC EN 55 024
CENLEC EN 55 022
DIN EN 60 950
relating to electromagnetic compatibility
(Council Directives 73/23/EEC and 89/
336/EEC)
The CE symbol is awarded to high-quality appliances which comply with the European Directive 89/336/EEC or the EMVG (law relating
to electromagnetic compatibility of appliances) and which offer the following significant benefits:
• Simultaneous and interference-free operation
of adjoining appliances
• No unpermitted interference signals
• High resistance to electro-smog
Page 3

Table of Contents
2 Declaration of Conformity
3 Table of Contents
4 Introduction
5 Contents of the Package
6 System Requirements – PC
6 System Requirements – Apple Computer
7 The MIDEX-3 Features
8 MIDEX-3 – Controls and Sockets
9 Connecting and Setting Up
11 Software Installation – PC
12 Software Installation – Macintosh
22 The Linear Time Base Method
23 The Buttons
24 Windows Problems with the USB Reset
25 Practical Hints
28 Questions and Answers
Page 4

Introduction
Congratulations on your purchase of
MIDEX-3!
MIDEX-3 is a multi port MIDI interface. It
can be used to transfer MIDI data between your computer and external MIDI
equipment. Each MIDEX-3 has one MIDI
input and three independent MIDI outputs (MIDI ports).
Each of the three MIDI outputs lets you
use 16 MIDI channels. Therefore, one
MIDEX-3 interface can simultaneously receive MIDI data on 16 separate MIDI
channels and send MIDI data on up to 48
independent MIDI channels.
To connect your computer and the
MIDEX-3, you must use the USB ports on
both devices. USB is a powerful technology, that simultaneously lets you connect
up to 127 peripheral devices to your computer, if it is USB-compatible. With USB,
there is no need to configurate jumpers,
i/o addresses, DMA channels etc.
Two important factors make sure that
MIDEX-3 offers an extremely reliable and
accurately timed MIDI data transfer:
• The communication takes place via the Universal Serial Bus (USB).
• The MIDEX-3 uses Steinberg´s LTB- technology. LTB is the abbreviation for Linear Time
Base, a MIDI Time Stamping method, which
transfers MIDI data to your sound modules
with utmost timing accuracy.
MIDEX-3 and LTB have been developed in
close co-operation with Access Music, the
company that has acquired an excellent
name with its Virus synthesizer products.
This operation manual contains important information on how to install and
use the MIDEX-3. Please read it so that
you can quickly and successfully use your
new interface.
Have fun using the MIDEX-3!
The Steinberg Team
Page 5

Contents of the Package
The MIDEX-3 package should contain
these items:
• MIDEX-3 interface.
• This operation manual.
• A Registration card. Please take the time to fill
it in and send it back to us.
• A USB A/B standard cable for connection to a
Macintosh or PC.
• CD-ROM with driver software for all supported computer operating systems. As
newer driver software might be available
when you read this, we recommend that you
visit the Steinberg web site ( http://
www.steinberg.net) and download the latest
versions.
➢
Please take the time to read any ReadMe
files that you might get with this product
or when downloading driver software!
These files contain important late-breaking information.
Page 6

System Requirements – PC
To be able to use MIDEX-3, you need:
• A PC with a main board (motherboard) that is
equipped with USB connectors or a PC that is
equipped with a PCI USB host adapter.
➢
Some older main boards support USB, but
don’t offer the physical USB ports on the
rear of the computer. You can easily
change this by buying a port extension and
installing it in your PC. Please find all corresponding information in the manual of
your computer. If necessary, consult an experienced technician.
• To use MIDEX-3 in connection with a PC,
please make sure that your computer runs a
Windows 98SE, Windows Me, Windows 2000
or Windows XP operating system.
➢
Windows 98 Gold or earlier Windows versions are not supported.
System Requirements –
Apple Computer
To be able to use MIDEX-3, you need:
• An Apple Computer that is equipped with
USB connectors, e.g. the iMacs, G3/G4 Power
Books or G3/G4 desktop computers. Furthermore you need Mac OS 8.6 (or higher).
• When this was written, Mac OS X compatible
drivers were not yet available. If you use Mac
OS X, please check out www.steinberg.net,
from where you can download the driver software as soon as it becomes available.
• OMS version 2.3.8 or a newer version.
• If you use a PCI card that provides the USB
ports, you will also need a Mac OS, that supports your USB PCI card.
➢
Not all USB cards available for retrofitting
do function well in all Macintosh computers. We have experienced no problems
with cards manufactured by Sonnet.
Page 7

The MIDEX-3 Features
The MIDEX-3 USB MIDI interface has the
following features:
• Full speed connector for USB-compatible PCs
or Apple Computers. (12Mbit/sec)
• MIDI interface with one input and three separate outputs (each connected MIDEX-3 interface can address up to 48 MIDI output
channels).
• MIDI activity indicators for the input and the
outputs.
• The MIDEX-3 doesn’t need any external power
supply. As an external device, it is connected
to the USB bus of your computer and therefore receives the necessary power from here.
Opening the computer is not necessary.
• MIDEX-3 provides an automatic “MIDI Thru”
function for MIDI In/Out 1. This is automatically enabled, when no application (like e.g.
your sequencer) accesses the MIDEX-3 or
when USB is disconnected. You can then directly address the instrument connected to
output 1 from an instrument connected to the
MIDEX-3 input, without the need to change
the MIDI cable connection.
• Compatible with Mac OS 8.6 (or higher) (OMS
2.3.8 or higher required) and all known software products for Macintosh that support
OMS.
• Compatible with Windows 98 SE (Second Edition), Windows Me (Millenium Edition), Windows 2000 and Windows XP and MME
compatible software. Plug & Play installation
without the need to set IRQs, I/O addresses or
DMA Channels.
Page 8
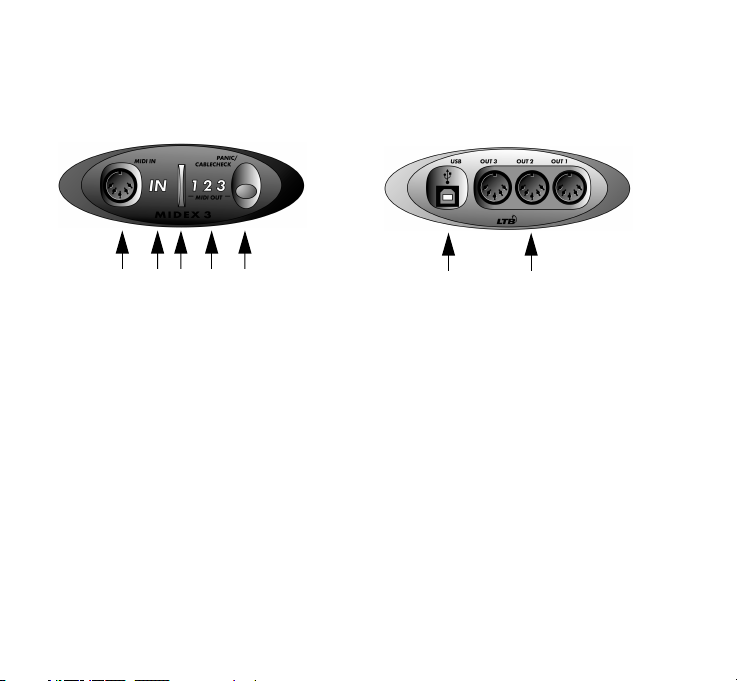
MIDEX-3 – Controls and Sockets
Front Rear
➀➂➃➄➁
MIDI In socket – Using a MIDI cable, connect this e.g.
➀
to your MIDI Master keyboard.
MIDI In Activity LED – This LED indicates MIDI activity
➁
on the MIDI input.
Power LED – This LED indicates that the MIDEX-3 is
➂
ready for use. It lights up shortly after the MIDEX-3
has been connected to the USB bus of your
computer.
MIDI Out Activity LEDs – These LEDs indicate MIDI
➃
activity on the MIDI outputs.
Panic/Cablecheck button – pressing this button
➄
briefly starts a MIDI cable check, pressing it longer
(for ca. 3 seconds) sends a MIDI Reset (All Notes Off
and Controller Reset on all channels) and thus
removes “hanging notes”.
➀➁
USB socket – This MIDEX-3 socket and the host
➀
computer’s USB port must be connected to each
other using a USB cable.
MIDI Out sockets 1 to 3 – Using MIDI cables, you can
➁
e.g. connect these three independent outputs to
different sound modules, samplers, drum machines
etc.
Page 9

Connecting and Setting Up
➢
Please install all necessary drivers and
other software,
MIDEX-3 to your computer! Especially if
you install it on a Macintosh computer, it is
important to maintain a certain installation order to prevent installation errors.
Please do carefully read the corresponding
sections in this manual.
Positioning the MIDEX-3
• Position the MIDEX-3 interface in a convenient spot near your computer.
If the distance between the MIDEX-3 and
the computer is too big, you might need
to buy a USB extension cable. This is available in computer shops. The cable should
support the “USB Full Speed Mode”.
before you connect the
Connecting MIDEX-3 and Computer
When you have installed all necessary
software, proceed as follows to connect
the MIDEX-3 to the computer:
1. Switch off the computer.
2. Use the USB standard cable that came with
your MIDEX-3 to connect the USB port on
the rear of your computer to MIDEX-3’s
USB.
Your computer’s USB port is a small (1/8 inch x
3/8 inch) rectangular socket. Desktop computers often have two, Laptop computers
mostly have one such socket. The USB socket
on your MIDEX-3 can easily be identified by its
lable.
3. If you are sure that all necessary software
has been installed, you can now switch on
your computer.
➢
We assume that you have properly connected the MIDEX-3 to your computer’s USB
bus, so that it gets the necessary power, and
that the computer is switched On.
Page 10

Making the MIDI Connections
Use standard MIDI cables to connect the
MIDEX-3 to other external devices instruments and sound modules.
A typical MIDI system would e.g. include
your MIDEX-3 interface, a computer, MIDI
Sequencer software, a MIDI Master keyboard and a few MIDI compatible sound
modules. Such a system could be connected as follows:
• MIDEX-3 interface and computer are connected using the USB standard cable that came
with the MIDEX-3.
• The MIDI output on your Master keyboard is
connected to the MIDI input on the MIDEX-3.
• The first MIDI output (Out 1) on your MIDEX-3
interface is connected to the MIDI input of a
sound module (this can also be your Master
keyboard, if it can generate sound).
• The second MIDI output (Out-2) on the MIDEX3 is connected to another sound module.
• You can connect an additional sound module/
MIDI instrument to the remaining MIDI output.
In the MIDI system setup illustration
shown below, the MIDEX-3 interface is
used to transfer MIDI data between Master keyboard, computer with application
software and sound modules.
In
USB
In 1
Out 2 Out 3
Out 1
In
USB
Out In
Page 11

Software Installation – PC
When you have connected the MIDEX-3
to your computer, Windows recognizes,
that a new USB device has been connected and automatically starts the “Add
New Hardware Wizard”.
1. Click on the “Next” button.
You can now determine the method that the
Wizard should use to find the drivers.
2. Activate “Find the best driver for the device” and click on the “Next” button
You can now determine, where the Wizard
should search for the drivers.
3. Click on “CD-ROM drive” so that it is ticked.
If your computer has more than one CDROM drive, please specify the path of the
drive that you use. Now insert the MIDEX-3
CD-ROM into the corresponding drive and
click the “Next” button.
Windows indicates when it has found the drivers.
4. Click the “Next” button to install the drivers.
When that has successfully happened, Windows displays a corresponding message.
The firmware driver is now automatically
transferred into the MIDEX-3 and Windows
might ask you to insert the Windows CD, if it
needs any additional Windows drivers, that
were previously not installed.
5. If necessary, insert the Windows CD and
click “Browse”.
Windows will then find and install the needed
drivers.
6. Restart your computer when the installation has successfully been completed.
➢
Under certain conditions, several versions
of the Windows operating system do not
properly recognize USB devices. You
should therefore avoid to plug in your
MIDEX-3 or remove it during operation.
Please find more information about this issue in the section “Windows Problems with
the USB Reset” on page 24.
Page 12

Software Installation – Macintosh
Installing on the Mac – Important
Information
Please definitely do read the following information before you start to install the
MIDEX-3 drvers on your Macintosh:
➢
Your Macintosh computer must be equipped
with the necessary USB port(s). It must run
Mac OS version 8.6 or higher and provide sufficient empty space on its hard disk (min.10
MegaBytes).
➢
Your Cubase or Nuendo version must be compatible with the LTB technology. When this
was written, this was true for the Cubase VST
Mac version 5.0.2. and Nuendo Mac version
1.5.2. If necessary, please turn to the support
department of the Steinberg distribution in
your country.
➢
Do not connect the MIDEX-3 itself before
OMS and the MIDEX-3 drivers have completely been installed! The system would otherwise not recognize it correctly.
➢
OMS 2.3.8 or a newer version must correctly
be installed on your computer,
tivate the MIDEX-3 Installer program, otherwise certain drivers will not automatically be
copied to the correct destinations in the System or OMS folders. An OMS Installation programcan be found on the MIDEX-3 Driver CD.
➢
If you are not familiar with OMS, please do
definitely read the following sections.
➢
If OMS 2.3.8 or higher is installed on your
computer and if you are familiar with OMS,
then you can immediately start to install the
MIDEX-3 drivers, as described in the section
“Installing the MIDEX-3 Driver Software” on
page 14.
before you ac-
Page 13

What is OMS ?
The Open MIDI System (OMS) has been
co-developed by Opcode Systems Inc.
and Steinberg. This System Extension
closes the gap between MIDI applications
and MIDI hardware on the Mac. In addition, OMS lets several MIDI applications
communicate with each other and share
resources (like Patch names and Timing
information).
OMS Version
➢
To be able to use MIDEX-3, you must have
installed and activated OMS version 2.3.8
or higher on your computer. Older OMS
versions do not sufficiently support USB
interfaces.
Please proceed as follows to find out
whether OMS has been installed on your
computer:
1. Open the System Extensions folder in your
System folder. If OMS has been installed on
your computer, then the »OMS« System Extension must be present in this folder.
The OMS System Extension icon
2. To find out which version it is, click once on
the »OMS« System Extension so that the icon
is inverted. Then select »Information« on the
Apple Desktop File menu. A dialog appears. It
contains the desired information.
➢
If the current OMS version is installed on
your computer, then you can skip the section »Installing or Updating OMS« and proceed with installing the driver software as
described in the section »Installing the
MIDEX-3 drivers«.
Installing or Updating OMS
1. Open the folder “OMS 2.3.8” on the MIDEX3 CD-ROM and start the program “Install
OMS 2.3.8”.
This loads the OMS Installer program. In the
first dialog that appears, click “Continue”. This
will open the Installer dialog.
2. Use the »Install Location« pop-up menu to
define where on your hard disk the Installer should install the “Opcode” folder.
Among other things, this will later contain the
OMS Setup program.
3. Click on the “Install” switch.
OMS 2.3.8 will now be installed on your computer.
➢
If an older OMS version was installed on
your computer, it will automatically be updated.
Page 14

4. Please do now restart your computer!
Same as all other System Extensions, OMS will
only be started upon system start, i.e. when
you restart your computer. If you do not restart, OMS will not be available and therefore
errors might occur during driver installation.
• The OMS Installer program has created an
“Opcode” folder on your hard disk. This con-
tains the “OMS Setup” program, that you can
later use to make the necessary settings.
• The OMS Installer program has also created an
“OMS Folder” folder in your System folder.
Please do not move or delete this folder.
Installing the MIDEX-3 Driver
Software
1. Insert the MIDEX-3 Driver CD into the corresponding drive on your computer.
If you have access to the Internet, then you
can find out prior to installation whether a
newer version of the driver software is available. To do this, proceed as described in the
section “Downloading a new driver” below.
2. Start the driver software installation by
double clicking the Installer icon “MIDEX-3
Install V 1.xx”.
If you double click this icon…
…this dialog will appear:
Page 15

3. Use the “Install Location” pop-up menu to
tell the Installer on which hard disk your
System folder resides. The click the “Install”
switch to start the installation process.
The Installer program will now install a
number of files in your System folder and in
the “OMS Folder”.
4. When the installation has been completed,
close the dialog by clicking “Quit”.
You do not have to restart the computer at
this point.
5. You can now finally connect your MIDEX-3
to the USB socket on your computer, as described on page 9 and using the USB cable
that came with the unit.
6. If your MIDEX-3 has already been connected, then momentarily remove the USB
cable and connect it again to force a device
reset.
The MIDEX-3 should now automatically be
recognized and receive its drivers in the background. The blue operation LED should now
light up.
Downloading a new MIDEX-3 Driver
from the Internet
If you have access to the Internet, you can
surf to the Steinberg web site to find out
whether a newer version of the MIDEX-3
driver software is available. This must
have a higher version number than the
driver on the MIDEX-3 CD-ROM. If a newer
driver software is available, then you
download it and install it as described
should
above.
Please point your Internet Browser to:
• http://www.steinberg.net/support/hardwaredriver
Page 16

Setting up OMS
You must now make the necessary settings in the “OMS Setup” program to
make sure that OMS properly recognizes
MIDEX-3 and that its MIDI ports can be
made available to the system.
The “OMS Setup” program is located in
the “OMS Applications” folder which can
be found in the “Opcode” folder on your
hard disk.
1. Start the “OMS Setup” program by double
clicking its icon.
If AppleTalk is active, you will now be asked
whether you wish to turn it off. If your computer is not connected to a local area network
anyway, then you should definitely click the
»Turn it off« switch. But even if you are connected to a network, you should still disconnect it, as a running network connection will
always consume computer power which you
could better use for your sequencer, especially if you work with many audio tracks.
2. In the File menu, select “New Studio Setup”
to let OMS search for all connected MIDI interfaces.
This dialog appears.
3. Confirm by clicking “OK” in this and
“Search” in the following dialog.
The program will now automatically search
for usable MIDI drivers and the corresponding
devices that are connected to your computer.
One of these – maybe the only one currently –
is the MIDEX-3 interface. If the search result resembles the one depicted below and if the
MIDEX-3 has been recognized, then you can
confirm the successful search by clicking “OK”.
Page 17

4. If your MIDEX-3 has not been recognized,
do again check whether the MIDEX-3 has
really been properly connected to the computer and that it is operational.
• When you click “OK”, OMS will initialize all
available inputs and outputs of your
MIDEX-3. The corresponding MIDEX-3 output ports should now light up in succession
and OMS should now display a message
that resembles the one displayed below.
The installed MIDEX-3 ports are listed below
the MIDEX-3 symbol and therefore possibily
not immediately visible. Use the scrollbar to
see the hidden part of the dialog.
5. Now you can activate the individual MIDI
ports.
There is a check box to the left of each listed
port. If you click on it, a cross will appear in it
to indicate that the corresponding MIDEX-3
port is activated.
Page 18

We recommend that you you activate all
MIDEX-3 ports, even if you do not wish to
use all at first.
6. Confirm your settings by clicking “OK”.
OMS will now ask you to save the results of
your search as well as your settings as a file
named “My Studio Setup”. You can of course
also use another name.
If you intend to work with different settings, then you should of course save the
different setups under different names.
Hints on using OMS
If you´re not yet familiar with OMS, we
recommend that you read its manuals.
These can be found in the “OMS Tech
Pubs” folder. This is located in the “OMS
Applications” folder on your hard disk.
The manuals are available in Adobe Acrobat format and can be read and printed
out by using the Adobe Acrobat Reader
utility. You can download the Adobe Acrobat Reader free of charge from the
Adobe web site (http://www.adobe.com).
• Upon each (new) selection of “New Studio
Setup” in the OMS File menu, OMS creates internal MIDI ports for the IAC bus as well as for
the Quicktime Musical instruments. If you do
not intend to use these, then you should delete them from your OMS
otherwise unnecessarily consume processor
power.
setup. They would
Page 19

• OMS also offers possibilities to exactly define
your MIDI instruments or other MIDi devices
and include them into the OMS setup. Using
Cubase or Nuendo becomes especially comfortable this way.
• You can name all MIDI devices that you assign
like this or – if available – select them from a library. This will later facilitate your work as you
can stop memorizing the MIDI port or even
channel numbers of the devices that are connected. Instead, you can select the devices by
name (e.g. "JV 1080-3").
• Please note the small arrows that are visible in
the OMS setup next to the listed ports. These
indicate the available transfer directions for
MIDI data to and from the MIDEX-3. By simply
clicking on an arrow, you can activate or deactivate the corresponding MIDI transfer direction, if that is available on the interface.
• If you intend to use the physical Thru function
on some devices to connect several devices to
the same MIDEX-3 MIDI port, then the corresponding MIDI channels must be assigned to
each device in the “MIDI Device Info” dialog’s
“Receive Channels” section. This is done by
clicking on the corresponding channel. The
“MIDI Device Info” dialog can be opened by
double clicking the keyboard symbol with the
question mark in the OMS Setup window.
• By cleverly limiting the MIDI input channels of
your MIDI instruments, you can connect many
more than just 3 sound devices to the MIDEX-
3.
• it would e.g. be possible to connect an old
DX7 exclusively to – say – MIDI channel 9
while the MIDI channels 1 to 8 of the same
MIDi output port are used for a multi-timbral
instrument like the ROLAND JV2080. To do
this, you would have to deactivate the option
“Is multitimbral” in the “MIDI Device Info” dialog and select the corresponding channels
(do not forget to activate the receiving channel in each synthesizer!).
• You can improve the graphics and transparency by double clicking the Keyboard icon
next to the corresponding entry in the “OMS
Setup” window and by clicking the same symbol once in the “MIDI Device Info” dialog that
appears. A dialog opens where you can select
an icon which represents the actually connected device. Your Studio Setup will become
very clear this way.
• You can also directly change your Studio
setup from Cubase VST. Open the Studio
setup window by selecting Option->MIDI
Setup->OMS->OMS Studio Setup and make
the necessary changes. You can immediately
activate the changes by selecting “Save and
make current”.
Page 20

Using OMS and Cubase VST
or Nuendo
➢
If you have previously used OMS and Cubase or if you already are Nuendo user,
then you can skip this section.
1. If OMS was not installed before, start Cubase VST and set “OMS compatibility” in
Cubase VST’s “MIDI Setup/System” dialog
from “No OMS” to “IN & OUT”. Wait until
the program has finished loading and quit
it when you have changed the setting, as
the MIDEX-3 can only recognize the change
when you start the program next time.
This is not necessarry if you work with Nuendo, as here OMS is always active if it has
been installed.
2. If you then (re)start Cubase VST or Nuendo,
the MIDEX-3 interface is available as a MIDI
input and output device. From now on, you
can select your MIDEX-3 outputs directly in
the output column of your program.
➢
If you use another sequencer program, you
will probably have to configurate its OMS
support. Please read the documentation
provided by its manufacturer.
3. You should now check whether the program receives MIDI data from the connected Recording Keyboard or MIDI
Controller. To do this, simply press a few
keys on the MIDI keyboard or move a few
controls. While you do this, the corresponding Input LED on your MIDEX-3
should light up. The same goes for the MIDI
Input indicator in your program on the
screen.
• If it doesn’t, please re-check all MIDI cable
connections. Furthermore, look up the
“MIDI System Setup” dialog) in Cubase VST
or the ”Device Setup” dialog in Nuendo to
make sure, that the corresponding devices
are selected and activated for the MIDI inputs of your system.
More information about setting up the
MIDI inputs and outputs of your program
can be found in the corresponding sections of its documentation.
Page 21

Setting up your MIDI Program
When you have installed the MIDEX-3 interface driver, you must configurate your
MIDI application program, so that it actually uses the MIDEX-3 interface.
What you actually must do to select the
MIDEX-3 within the program, depends on
the program you use. We will therefore
only describe the basics here. Please find
more details in the manual of your MIDI
application program.
• Most MIDI application programs on the PC
and on the Macintosh offer possibilities to set
up the MIDI ports, often via a dialog called
“MIDI Devices” or “MIDI Setup”.
• This where you select your MIDI input and
output devices or activate them.
• The output port that you select for a MIDI
track in your sequencer, sends the MIDI data
to the keyboard or sound module that is connected to this port.
If the MIDEX-3 interface driver has correctly been installed, then you can e.g. select the MIDEX-3 input in the Cubase
“Inputs” column and select the outputs
Out 1 to 3 in the “Outputs” column.
In Nuendo’s Track List, you can select the
input in the “Input” pop-up and an output in the pop-up above it.
• The input and the outputs correspond to the
physical input and outputs 1 to 3 of the
MIDEX-3 interface.
• Make sure, that these items are actually activated (ticked or highlighted) in the corresponding dialog of your MIDI application
program. Some programs do limit the
number of simultaneously usable input
and output ports.
Page 22

The Linear Time Base Method
To achieve the best possible Timing, the
MIDEX-3 uses the Linear Time Base
method. This new approach to optimize
time-critical MIDI data transfer is the result of a close co-operation between
Steinberg and Access Music.
The Problem
The generally used new multitasking operating systems are often not capable to
really accurately transfer MIDI data, even
on very fast computers. The problem is
caused by the sequential method that
these systems use to share the system resources between all running applications.
The intention of the method is to allow
for a virtually simultaneous processing of
different tasks. But when time-critical
processes are involved, this method often
results in slight timing problems. This
might not be of great importance for
many other applications, but a timing difference of 5 milliseconds during a MIDI
data transfer is clearly recognizable.
The Solution
The solution is called LTB – Linear Time
Base. This method adds an additional
time information to each MIDI Event and
sends the event to the MIDEX-3 early.
• For this reason, the MIDEX-3 “knows” very
early, which MIDI information/note it should
soon output.
• Monitoring the current time position, the
MIDEX-3 assigns the individual MIDI Events to
the current position of your Song and exactly
sends the MIDI Event at the musically correct
time.
Page 23

The Buttons
Cablecheck/Panic
Depending on how long you press this
button, you can activate one of the two
functions.
If this button is pressed for less than ca. 2
to 3 seconds, a MIDI cable test is executed. Please proceed as follows:
1. Connect the cable to be tested to the MIDI
input and any of the MIDI outputs 1 to 3 on
your MIDEX-3.
2. Press the “Panic/Cablecheck” button for
less than ca. 2 seconds.
3. If your MIDI cable is okay, the LEDs of the
input and output that the cable is connected to will light up for a ca. three seconds. If the cable is defective, the input
LED and the blue Power LED will momentarily go out.
If this button is pressed for more than ca.
2 to 3 seconds, all connected MIDI devices are reset. This is e.g. helpful if hanging notes have occurred. Please proceed
as follows:
• Press the “Panic/Cablecheck” button for
more than 2 to 3 seconds.
The MIDEX-3 now sends out a series of “All
Notes Off” and “Controller Reset” messages
via all MIDI outputs. This lets the output LEDs
flash up momentarily.
➢
The “Panic” and “Cablecheck” functions
are only supported, if the MIDEX-3 is connected to a computer via a USB cable and if
the operating system and the drivers have
already been booted.
MIDI Thru Mode
The MIDEX-3 provides a built-in automatic MIDI Thru mode for its Port 1. This
lets you play the Master keyboard, even
when no software program is active. The
MIDEX-3 output ports 2 and 3 are not addressed in this mode.
➢
This mode can also be used if the MIDEX-3
is not connected to the computer via the
USB cable. MIDI Thru is automatically
switched off, if an application program
starts to use one the MIDI input or any of
the outputs.
Page 24

Windows Problems with the USB Reset
Contrary to the capabilities originally intended for the USB bus, none of the USB
supporting Windows versions, available
at the time of release of this manual, tolerates unplugging the USB cable while
the application program is still running. In
the worst case, the corresponding Windows version simply crashes.
➢
Until these problems are fixed by a newer
operating system version, you should thus
definitely avoid to interrupt the USB connection during operation by unplugging
the USB cable.
• Always first terminate the running application, before you reset the USB bus.
• If you use Windows 2000, then you first
need to run the “Unplug or Eject
Hardware” function on the right side of the
Task Bar,
before you terminate the USB
connection.
Page 25

Practical Hints
MIDI – Brief Introduction for the
Novice
The MIDEX-3 is used to transfer MIDI data.
The term “MIDI” is the abbreviation for
“Musical Instrument Digital Interface”.
This is a procedure used to exchange data
between musical instruments, sound
modules and other MIDI compatible devices or programs. All devices must be
equipped with a MIDI port.
The data that is transferred does not contain the sounds themselves. Instead, it is a
series of different control commands.
These do e.g. tell a receiving device to
play a certain note, modulate a sound in a
certain manner or switch to another
sound of its sound library (e.g. from violin
to piano). But MIDI can also be used to
control other devices, e.g. stage lighting
systems, tape recorders, effect devices
etc.
Using the MIDEX-3, you can connect your
computer – and therefore a sequencer
program that runs on it – with external
MIDI capable devices.
• Data on up to 16 separate channels can be
transferred into one direction via one single
MIDI socket.
• For sending, receiving and forwarding MIDI
data, separate sockets are available on a MIDi
device:
MIDI data is being received via the MIDI In
socket, sent out via the MIDI Out socket and
forwarded to another device unchanged via
the MIDI Thru socket.
• For a bi-directional connection between any
two MIDI devices you thus need two MIDI cables and each device must have one MIDI input and one MIDI output.
• To enable you to address many different devices separately on 16 channels each and to
also receive data from a device, the MIDEX-3
provides one MIDI input and three separate
MIDI outputs.
More detailed information about MIDI for
the novice and the advanced user can e.g.
be found on the Steinberg product
“MIDI Xplained”, a Multimedia CD-ROM.
What can I do if my Multi Mode
Instruments cause Timing Problems?
Many MIDI sound modules – especially
Multi Mode instruments (i.e. instruments
that simultaneously receive data on up to
16 MIDI channels) do have problems with
their processing speed when they receive
large amounts of data. As a result, delays
occur between the arrival of a MIDI command and its execution, which can cause
noticeable timing problems.
Page 26

In spite of its LTB processing, the MIDEX-3
can of course not compensate for this
kind of delay, which is caused by the technical shortcomings of the corresponding
sound module.
So, what solutions are available, if you encounter this problem?
• If possible, route MIDI tracks, that should play
back simultaneously, onto many different
sound modules.
• Create a thinner stream of data. Besides note
commands, MIDI data also contains a lot of
“continuous” data, which is created and sent
by controllers like the modulation wheel, the
pitch controller etc. This type of data puts a
heavy burden on the receiving device, but
much of it can be filtered out without a negative impact on the sound. Cubase does e.g. offer the “Reduce Controller Data” function for
this purpose.
• Avoid the transfer of system-exclusive data.
• If you use a sequencer that can also record au-
dio, then you can separately play back individual MIDI Tracks and record each as an audio file.
Using USB Hubs
USB devices sometimes offer facilities to
pass on the USB signal. Because of its real
time tasks, the MIDEX-3 has been designed as a USB end device. If you wish to
simultaneously operate several MIDEX-3
on one USB port, then you do therefore
need a USB Hub.
A USB Hub is an additional device, which
at least offers one USB input and two USB
outputs. A Hub “distributes” the incoming data onto the connected devices.
Two different types of device are available on the market: “Self-powered USB
Hubs” (i.e. Hubs with their own power
supply) and “Bus-powered USB Hubs” (i.e.
Hubs that get their power from the USB
Bus of the computer).
➢
If you wish to connect one or several
MIDEX-3 to a Hub, then this must be selfpowered.
Page 27

Using several MIDEX-3
simultaneously
If the MIDI input and the three MIDI outputs of one MIDEX-3 are not enough, you
can combine several MIDEX-3 and thus
adapt the number of inputs and outputs
to your needs.
Theoretically (i.e. according to the specification) each USB port lets you address up
to 127 USB devices. In practise, this can
not be reached with devices, that have
such a high data output like the MIDEX-3,
as the USB bus reaches its limits much
earlier.
Generally and with the necessary Hubs, it
should be possible to operate up to seven
MIDEX-3 devices on one USB controller
bus.
The maximum number of simultaneously
usable MIDEX-3 can additionally vary depending on the operating system/driver
version that is used.
You can obtain information about the latest driver versions in the world wide web
under http://www.steinberg.net or from
your national Steinberg distributor.
Page 28

Questions and Answers
This section can be used to find solutions and answers to problems and questions that can originate in the combination of system components that you might use.
Problem/Question Solution/Answer
Windows 95 and the first Windows 98 version (Windows
98 Gold) do not recognize the MIDEX-3 driver.
If you disconnect the MIDEX-3 from the USB-bus while
Windows 98 SE is active, the error message “The
specified MIDI device is already in use. Wait until it is
free, and then try again.” might appear. It depends on
the host application that you use, if this happens or not.
If you do e.g. use Cubase VST, the problem occurs in a
different form, i.e., the MIDEX-3 MIDI ports can not be
selected within Cubase.
You wish to use more than one MIDEX-3. The devices must be installed separately and one after
Note: The MIDEX-3 driver has been developed based upon Microsoft’s latest driver model. This has the advantage
that the MIDEX-3 driver can both be used under Windows 9x and under Windows 2000. Normally, Windows 98 SE
and Windows 2000 do not support more than 10 MIDI ports, which are provided by WDM- drivers (Windows Driver
Model). The Steinberg programmers have found ways to prevent these limitations for Cubase VST 5.0 or later and
Nuendo. Other applications, however, are limited to the number of MIDI ports supplied by the operating system.
In the successor to Win98 SE, called Windows Millennium Edition, Microsoft have solved this problem. A future
Service Pack for Windows 2000 might solve the problem on this system. Service-Pack 1 for Windows 2000 from
Microsoft though, did not yet contain a solution. Windows XP, the Windows 2000 successor, will provide 32 MIDI
ports.
Windows versions older than Windows 98 SE can not
recognize the driver. To be able to use MIDEX-3, please
install Windows 98 SE or a newer system on your
computer.
This problems originated in a faulty implementation of
USB within Windows 98 SE. It can be solved by activating
a Windows 98 SE repair program (USB-Fix). The repair
program is called 242937usa8.exe. You can find it on the
MIDEX-3 driver CD-ROM and you can start and
automatically run it, by double clicking on it.
another. We recommend, that you restart Windows after
each installation.
Page 29

Problem/Question Solution/Answer
How many MIDEX-3 can be connected to the USB-bus, if
the devices receive their power from the USB bus itself
(are thus “Bus powered”?
Resetting the MIDEX-3 software and hardware. If you restart Windows, then this only causes a software
Note: The MIDEX-3 should never
cause a Windows system crash.
How is MIDEX-3 supported by Cubase VST? Starting with version 5.0, Cubase VST supports all
You have installed the MIDEX-3 drivers before you
installed Cubase VST Version 5, and now the MIDI
outputs do not work. Reason: The Cubase VST 5.0
releases 0 and 1 contain several components that are
replaced when you install MIDEX-3.
You have set small audio latency values (smaller than 12
ms) and when you stop the sequencer, drop outs occur.
Note: To ensure a stable MIDI output even in times of a very high system load (many audio tracks are played back),
you should set Cubase VST’s “System Preroll” parameter to at least 100 ms. To find this parameter, select
“Synchronization” in the Options menu. In the lower right corner of the dialog that opens you can find the “System
Preroll” option.
be separated from the USB bus if you still use it in an application, as this would
If the devices receive their power only from the USB bus,
then you should not connect more than four MIDEX-3.
Reason: The MIDEX-3 registers on the bus with a power
consumption of 250 mA and the USB-host (i.e., the USB
bus of your computer) does not supply more than 1 A.
reset within the MIDEX-3. To reset the hardware, you
must disconnect the MIDEX-3 from the USB bus. This is
done by disconnecting the USB cable.
MIDEX-3 capabilities.
Earlier versions use the MIDEX-3 as a »normal« MIDI
interface (i.e., they don’t use the advantages of the
Linear Time Base technology).
Insert the MIDEX-3 driver CD-ROM into your CD-ROM
drive and double click on the program UPDMROS.EXE.
Cubase VST versions from 5.0 release 2 as well as the
demo version that you can find on the driver CD-ROM do
not have this problem anymore.
Open the MIDI Preferences dialog via the Edit menu item
“Preferences” and its sub-menu item “MIDI…”. Select the
“Reset” tab and deactivate the function “Reset on Stop”.
To do this, please click on the corresponding tick in the
status/value- column. If no tick is visible for “Reset on
Stop”, then this functions has already been deactivated.
Page 30

Warranty Terms
Based on the following terms, Steinberg
grants a warranty for the technical components used in this device:
1. The warranty period is a one year, beginning with the date of purchase from an authorized dealer. If local law demands a
mandatory warranty period exceeding one
year, then this period is valid.
2. The warranty includes the removal of defects of production and material as well as
the exchange of parts by Steinberg. It does
not include damage caused by poor means
of transport, external force or damage
caused by non-observance of the instructions in the operation manual.
3. The warranty includes the removal of discovered production or material defects by
repair or exchange of the defective parts.
Claims beyond those described here, especially compensation claims, can not be asserted within the framework of this
warranty.
4. A warranty claim can only be accepted, if
the warranty card and a proof for the purchase of the device are in your possession
and if the device bears the original model
identification plate and the correct serial
number.
5. The device may only be opened or repaired
by an authorized Steinberg representation, otherwise the warranty becomes
void.
6. This warranty does not restrict your other
legal rights.
Please read this before you send in a
device for repair
• Please find the address of the Steinberg distributor responsible for product service on
your Product Registration Pass.
• You must obtain an RMA number from the responsible Steinberg distributor prior to sending in a faulty device.
• For logistical reasons, we can not accept devices that you send in without an RMA
number. These are returned to you at your expense.
• When sending in a device, please make sure
that you also send in its Warranty Card, fully
filled in, a description of the malfunction and
a copy of the invoice.
• Devices that arrive without a description of
the malfunction need more extensive testing.
This results in additional costs for which must
charge you.
• We are sorry, but if you send in a device for repair and it turns out that it is fault-free, then
we do still have to charge you with a service
flat rate.
 Loading...