

Page 1
Steffy
Wood Products, Inc.
Multi-Section Storage
Item #VL1210/7172
701 West Mill Street
Angola, Indiana 46703
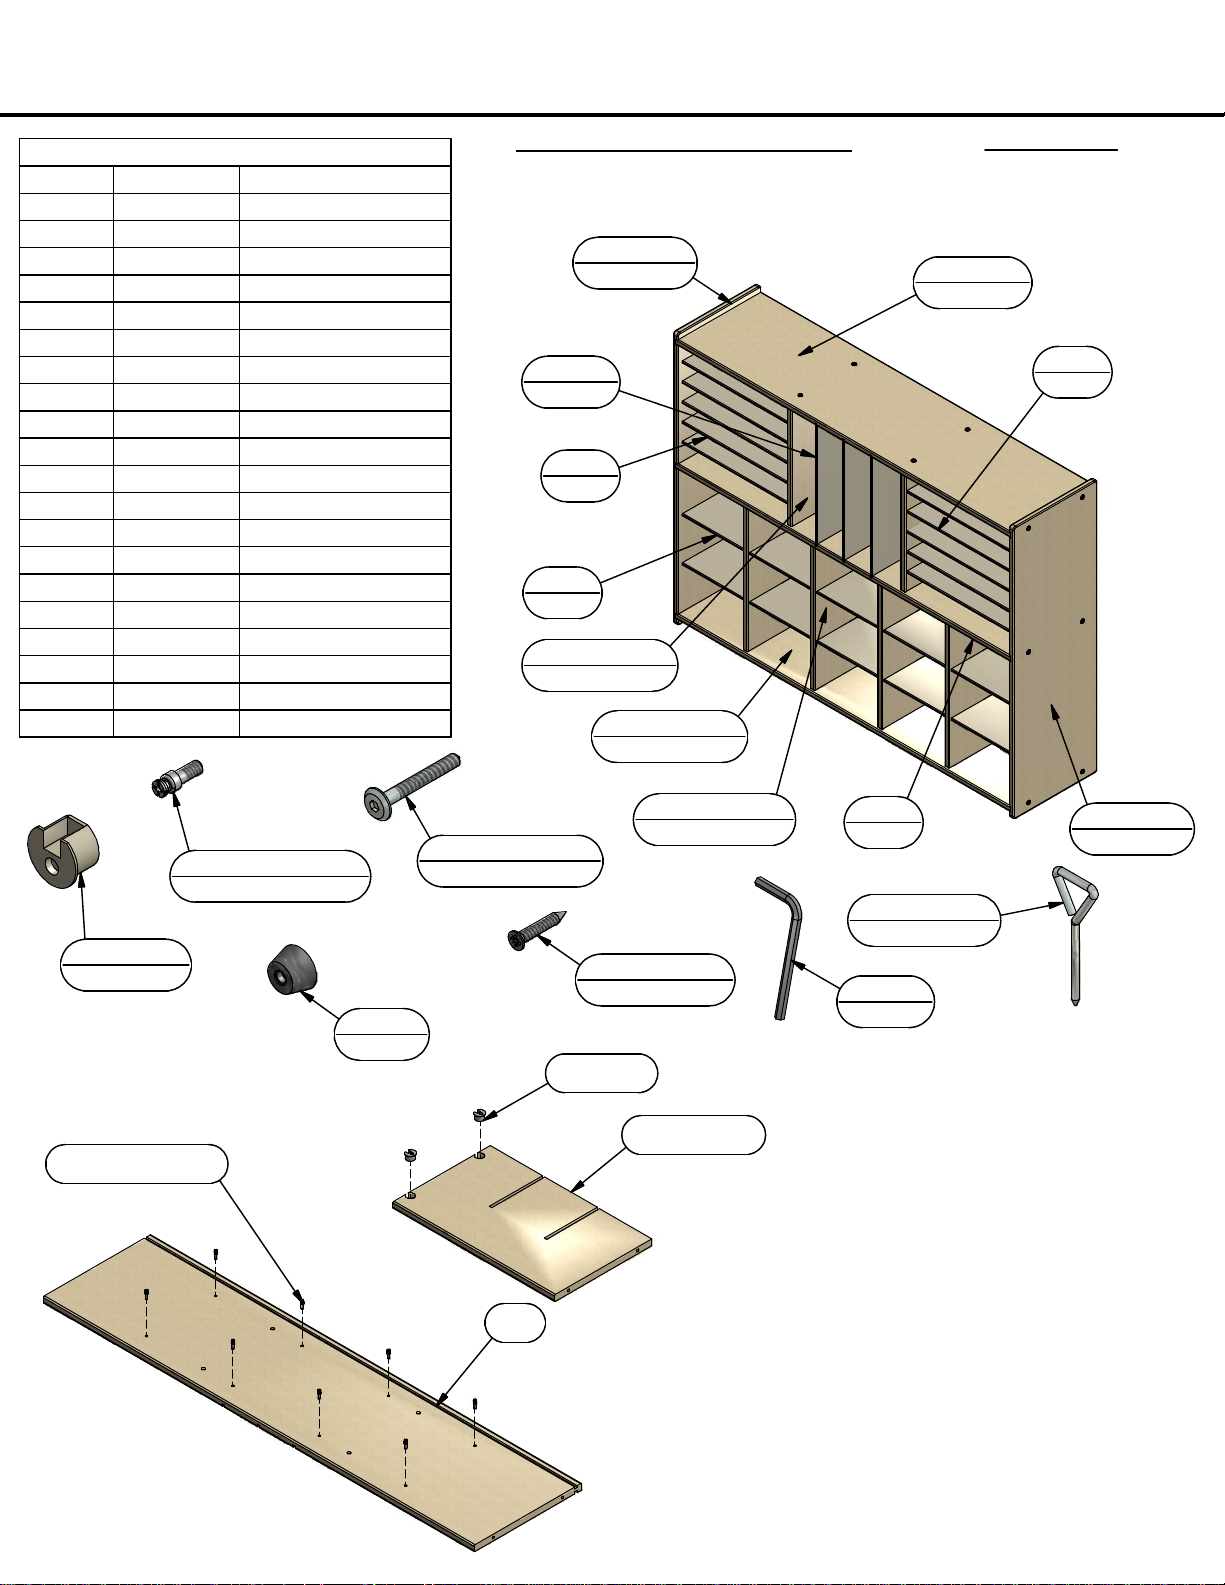
PARTS LIST
DESCRIPTIONPART NUMBERQTY
1
7165
8
1
1
1
80149
801522
801553
5
5
ANTI-TIP HARDWARE
Hex Key72011
CONNECTOR7205
CONNECTING SCREW72068
CONNECTING BOLT721328
BUMPER7217-011
1" LONG SCREW7242
SCREW DRIVER7271
TOP PANEL801481
SHELF
BOTTOM PANEL801501
SIDE PANEL80151L1
SIDE PANEL80151R1
UPPER DIVIDER
LOWER DIVIDER801534
SHELF8015410
DIVIDER
SHELF801562
BACK PANEL (SHORT)80157
BACK PANEL (LONG)80158
CAUTION: CHOKING HAZARD
Adult assembly required due to the
presence of small parts and sharp edges.
SIDE PANEL
80151L
DIVIDER
80155
SHELF
80154
SHELF
80156
UPPER DIVIDER
80152
BOTTOM PANEL
80150
Phone: 1-800-656-8586
Email: [email protected]
Questions?
TOP PANEL
80148
SHELF
80154
CONNECTING SCREW
CONNECTOR
7205
CONNECTING SCREW
7206
BUMPER
7217
CONNECTING BOLT
7213
CONNECTOR
SHELF
LOWER DIVIDER
80153
1" LONG SCREW
7242
LOWER DIVIDER
SHELF
80149
SCREW DRIVER
7271
HEX KEY
7201
SIDE PANEL
80151R
1
Using a screwdriver, attach the connecting screws to
the shelf as shown.
DO NOT USE A POWER TOOL TO ATTACH THESE
CONNECTING SCREWS!!
Insert the plastic connectors into the large holes in the
dividers. Be sure the flat edge of the connector aligns
with the flat edge of the panels.
Page 2
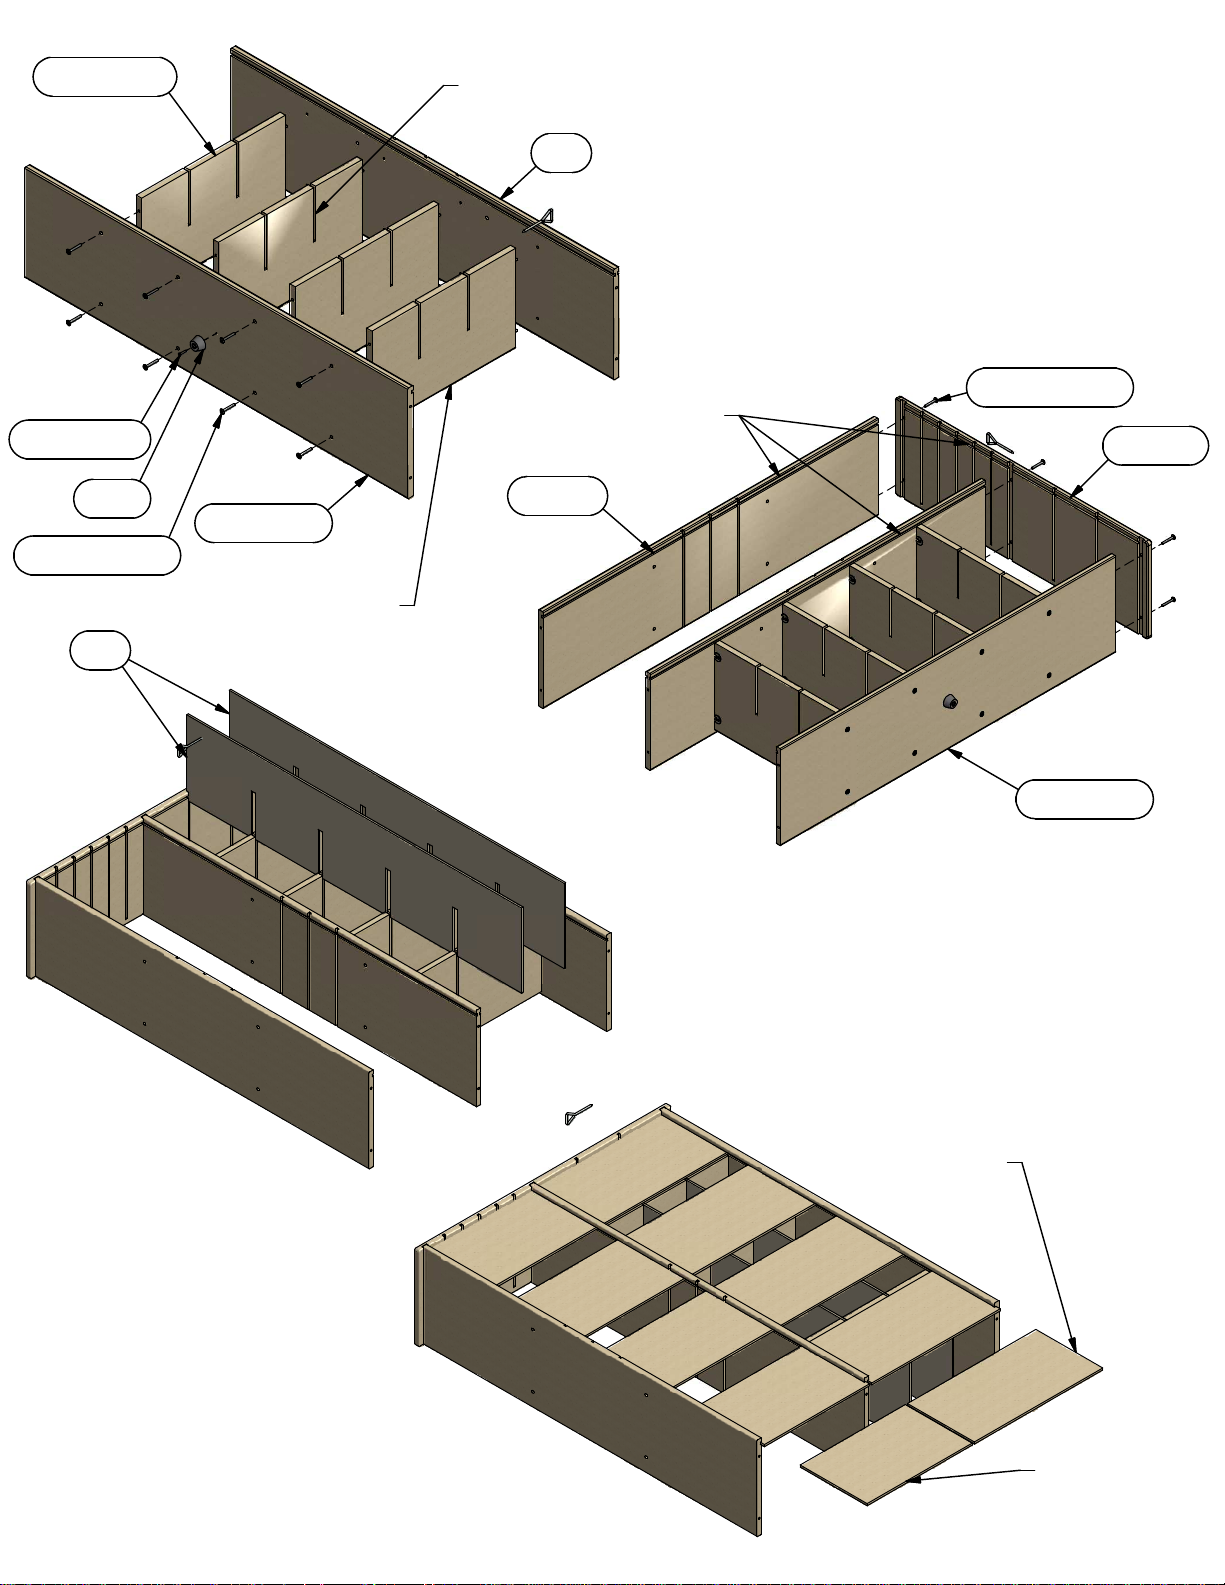
LOWER DIVIDER
1" LONG SCREW
SLOTS FOR SHELVES
SHELF
SLOTS FOR BACK
2
Attach the lower dividers to the shelf and bottom panels. Insert
the plastic connectors in the dividers to the connecting screws
on the shelf. Be sure the rounded edge of the divider is facing
down and the slots for the shelves are facing up. Using an
appropriate size screwdriver, turn the screw located in the
plastic connector clockwise until tight.
Attach the bottom panel to the dividers using the connecting
bolts and hex key. Be sure the slot for the back panel is facing
up.
Attach the bumper to the bottom panel using the 1" long screw.
CONNECTING BOLT
SIDE PANEL
BUMPER
CONNECTING BOLT
ROUNDED EDGE FACING DOWN
SHELF
TOP PANEL
BOTTOM PANEL
BOTTOM PANEL
3
Refer to sketch above. Attach a side panel to the bottom and
shelf using the connecting bolts and hex key. Be sure the slot
for the back panel is aligned with the slots in the shelf and
bottom panel. Attach the top panel to the side making sure the
slot for the back panel is aligned with the slot in the side panel.
Refer to sketch at left. Slide the shelves into the slots in the
dividers and side panel.
4
Refer to sketch at right. Slide the long back
panels into the slots in the shelf and top
and the short backs into the slots in the
bottom and shelf. Be sure the panel next to
the side is completely in the slot in the side
panel.
Long back panel
Short back panel
Page 3
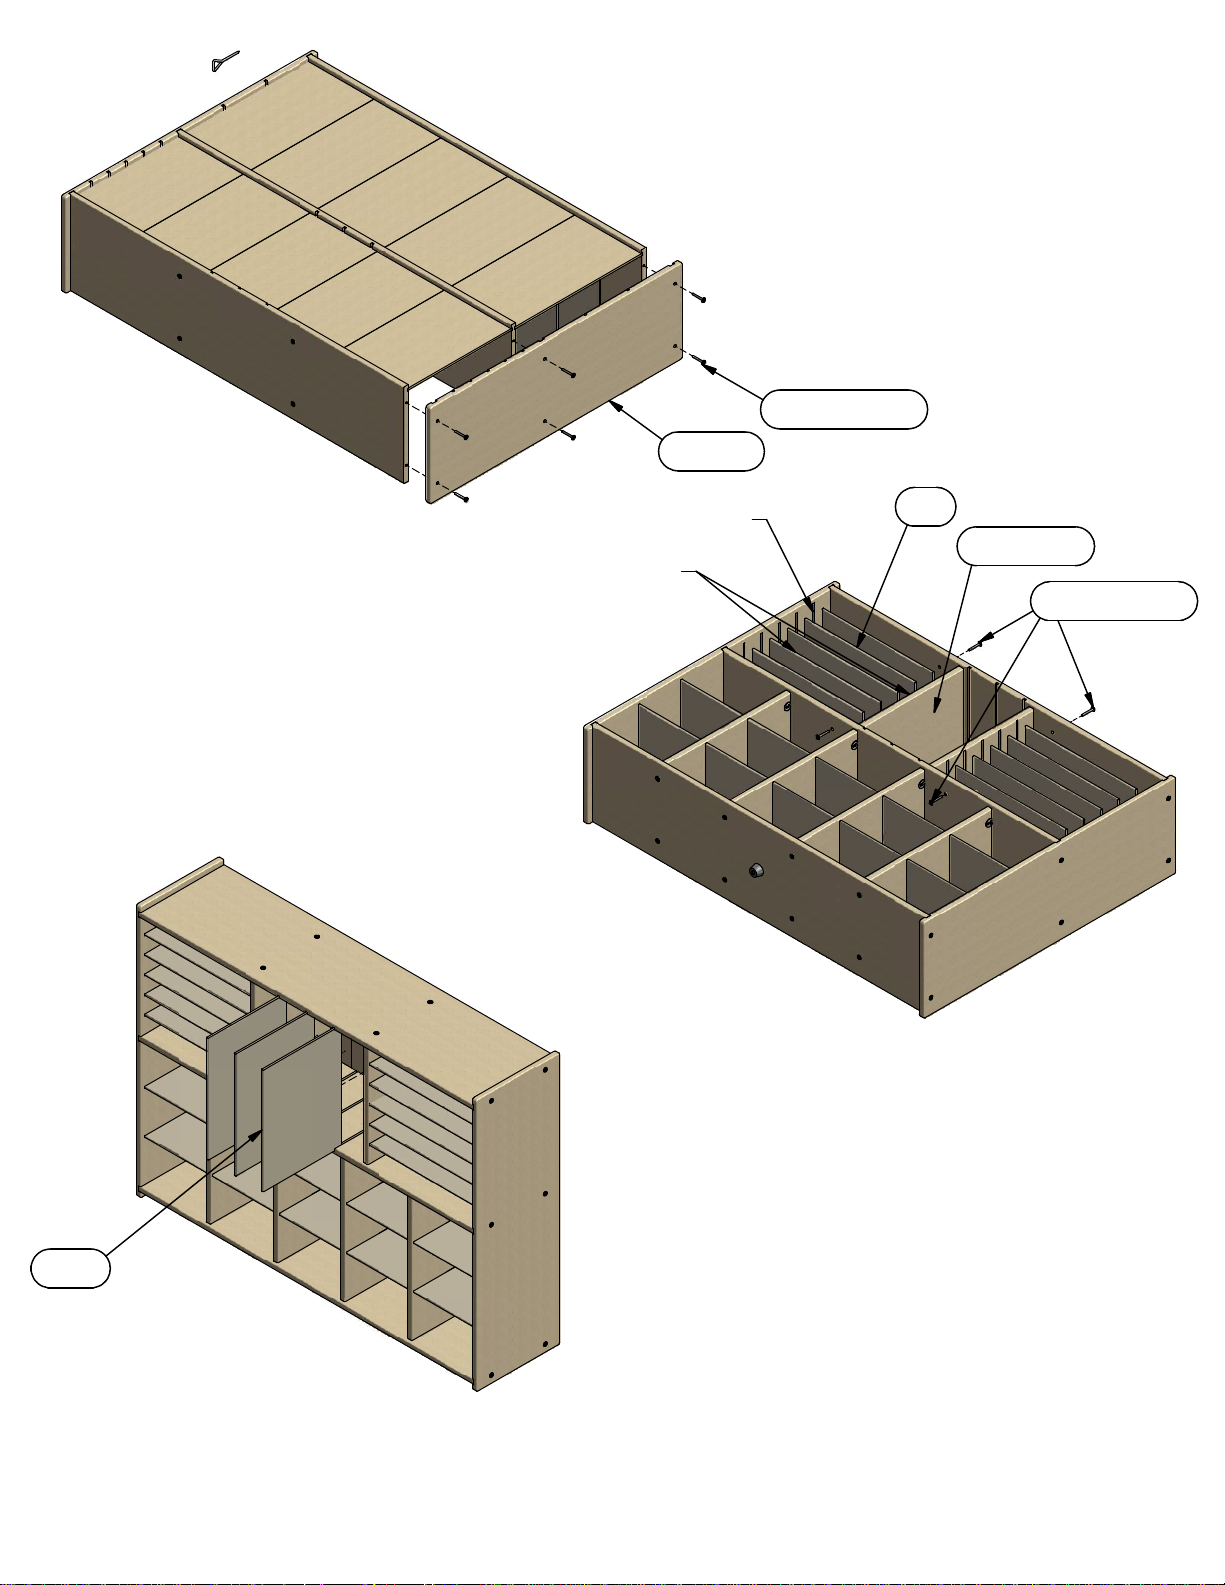
5
Attach the remaining side panel to the top, shelf and
bottom panels using the connecting bolts and hex key.
Be sure the top, shelf, bottom and back panels are
completely in the slots in the side panel.
SIDE PANEL
CONNECTING BOLT
6
Turn the unit over onto the back. Place the shelves
into the slots in the side panels making sure the
rounded edge on each shelf is faacing up.
Slide the upper divider into place making sure each
shelf is in the appropriate slot. Attach the dividers
to the top panel and shelf using the connecting bolts
and hex key.
SLOTS IN SIDE PANEL
ROUNDED EDGE UP ON
SHELVES AND DIVIDERS
7
Slide the dividers into the slots in the top and shelf
making sure the rounded edge is facing front.
SHELF
UPPER DIVIDER
CONNECTING BOLT
DIVIDER
CHECK ALL BOLTS AND SCREWS
PERIODICALLY TO MAKE SURE
THEY ARE TIGHT!!
Go back and check to make sure all bolts are tight.
8
Furniture tipping restraint hardware is included in with the
hardware package for this unit. Follow the installation
instructions printed on the restraint hardware bag.
WARNING !!
Serious or fatal crushing injuries can occur from
furniture tip-over. To help prevent tip-over:
Place heaviest items on bottom of cabinet.
Never allow children to climb or hang on doors or shelves.
Use of tip-over restraints may only reduce, but not
eliminate, the risk of tip-over.
 Loading...