

Page 1
TAKE CONTROL
2.4GHz RTR STEERIX FUSION RC CATAMARAN SAILBOAT
Model No: 18009
Ahoy there Skipper! You’ve just made your first steps into the exciting world of RC sailing. Please
take a few minutes to read this manual to find out how to assemble your boat, gain an
understanding of nautical terminology and learn the basics of sailing techniques.
Please take the time to read and understand these instructions completely before attempting to sail
for your first time. This manual includes everything you need to know about assembly, operations
and maintenance. A small amount of time reading this manual will save you big headaches in the
future. Please also note that this model is not a toy. Assembly and operation of this catamaran
requires adult supervision.
TAKE CONTROL
TAKE CONTROL
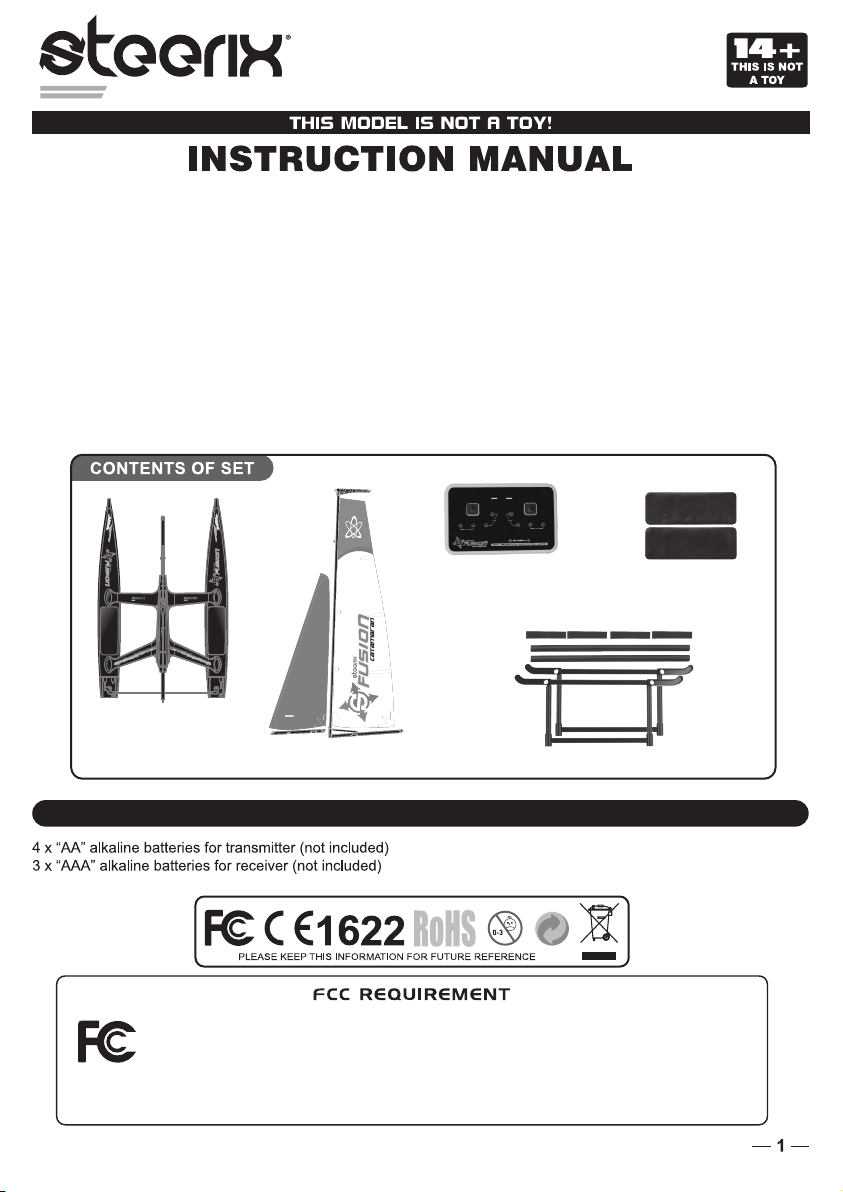
Fusion Catamaran Hull
(Servos, Receiver &
Battery Box Pre-Installed)
27
TAKE CONTROL
Sails, Mast & Boom Set
2.4GHz 2CH Transmitter
(The control sticks are included
in the battery compartment)
Two PVC Hatch Covers
Boat Stand
ITEMS REQUIRED FOR OPERATION
This device complies with Part 15 of the FCC Rules. Operation is subject to the following two
conditions: (1) This device may not cause harmful interference, and (2) This device must accept
any interference received, including interference that may cause undesired operation.
CAUTION: Changes or modifications to this product not expressly approved by the party responsible
for compliance may void the user’s authority to operate the equipment.
Page 2
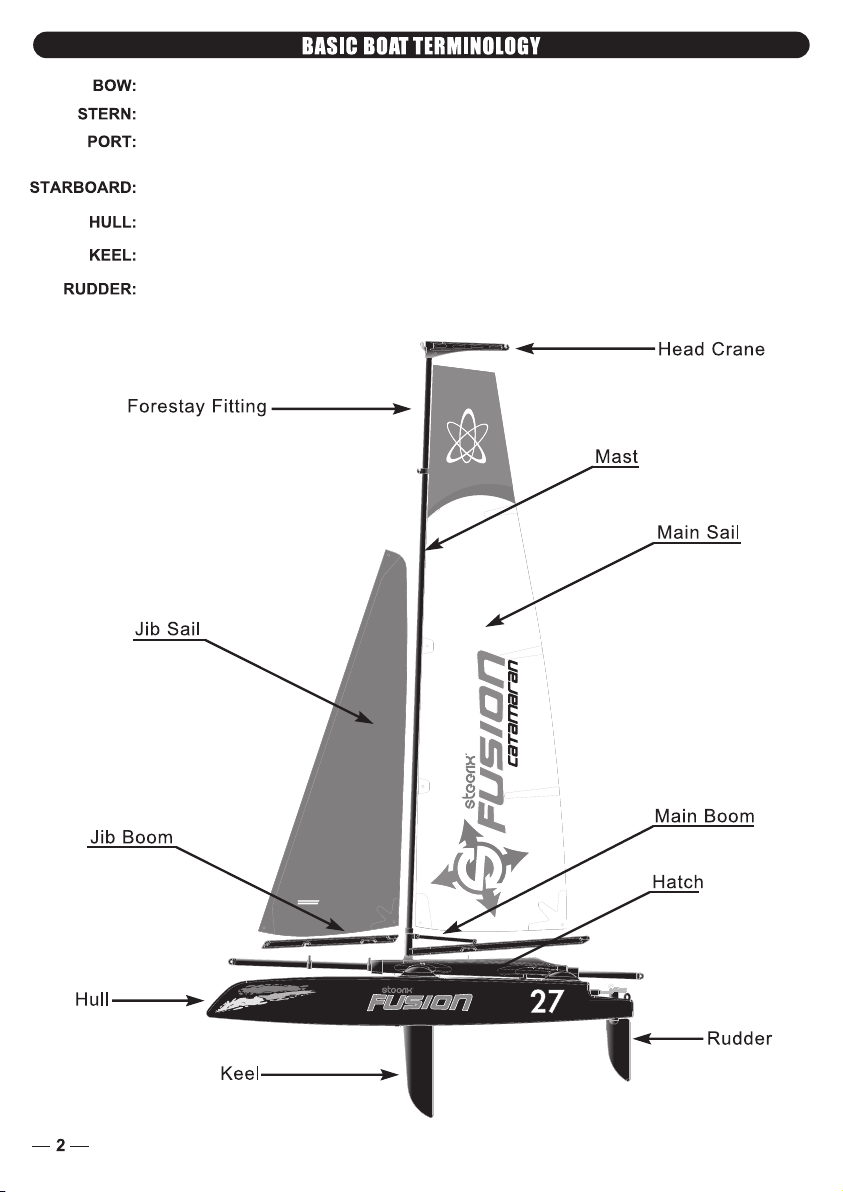
The front of the boat.
The back of the boat.
This is the left side of the boat when viewing the boat from the stern. An easy way to remember
this is that port and left both contain 4 letters.
This is the right side of the boat when viewing the boat from stern.
The body of the boat.
A weighted blade that protrudes from the bottom of the hull as a means of providing lateral stability.
The hinged vertical plate mounted at the stern that controls steering.
27
TAKE CONTROL
CATAMARAN
Page 3
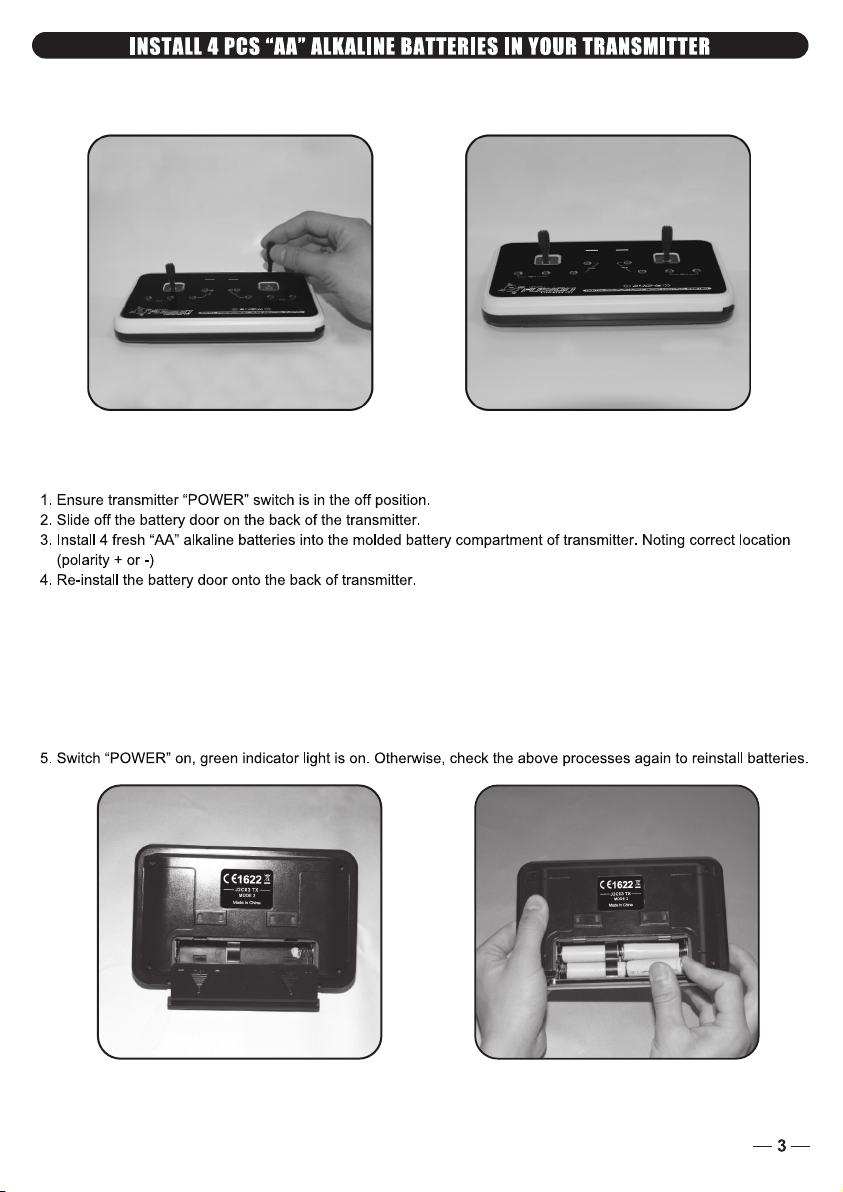
Open the battery compartment of your transmitter. There will be two control sticks located there that
will need to be installed on the front face of the transmitter.
Always use fresh AA batteries in your transmitter. Old or mixed (new and old)
batteries can affect the range of your transmitter leaving your boat stranded.
Important note: It is critical that the throttle stick (left side) is at its lowest position before switching on
the transmitter. Should the stick not be at it’s lowest position the receiver in the boat will not properly arm
and there will be no response when trying to adjust your sails or rudder. If the green light on the transmitter
is flashing please move the stick to its lowest position. This should correct the problem. When the green
light is solid, the transmitter and receiver are working properly.
Page 4
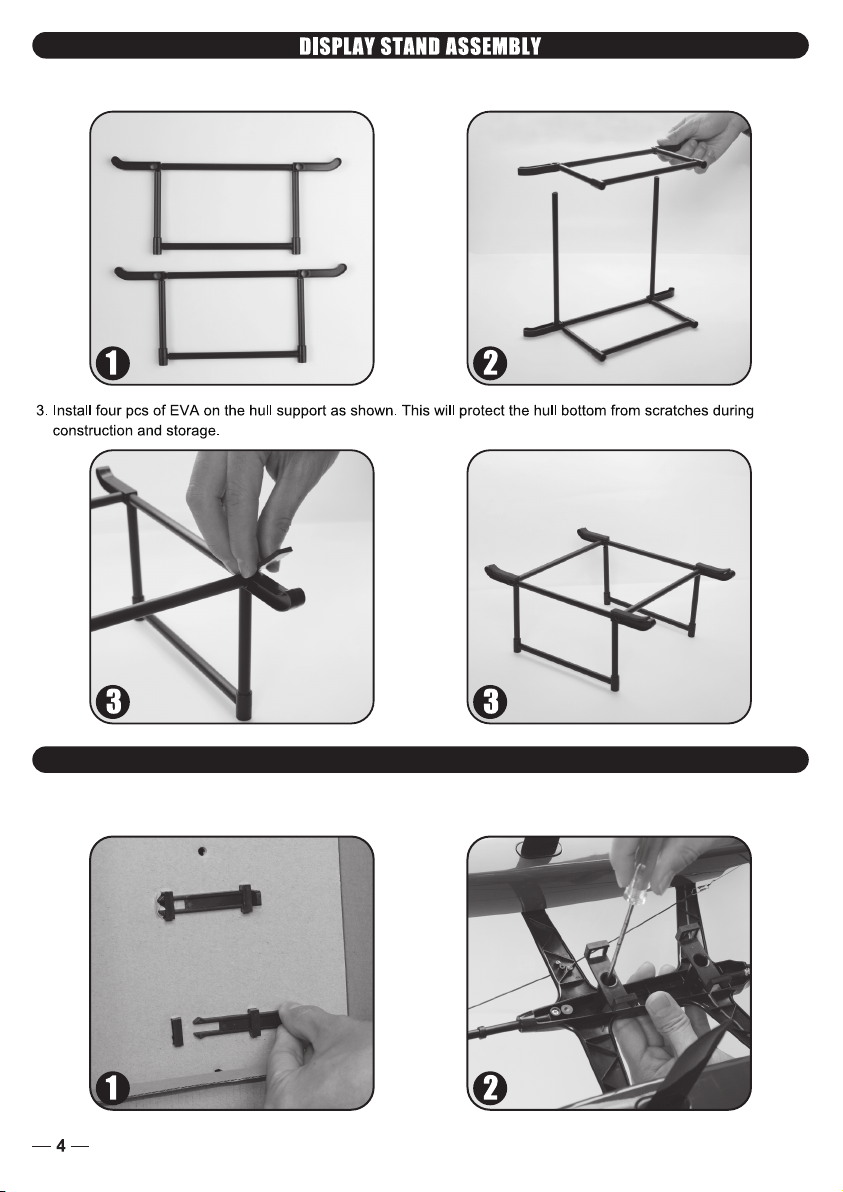
1. Assemble two pieces of the side stand as shown in photo.
2. Install two pieces of the long tubes between two side stands as shown in photo.
BOAT ASSEMBLY
1. Take inner cardboard box out, disassemble two pieces of pinch plates as shown in photo.
2. Use a cross-head screwdriver to remove the two screws underneath the boats central spar as shown in photo.
Page 5
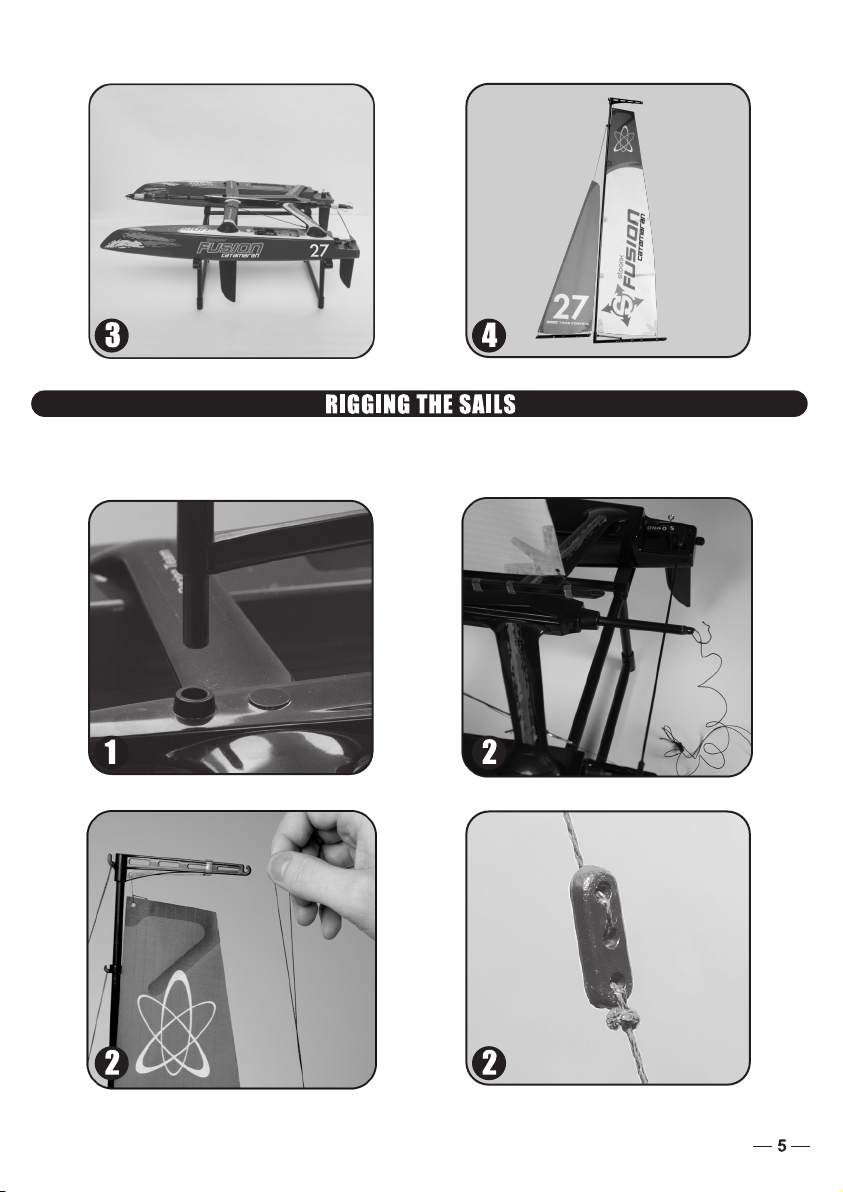
3. Place the boat on the display stand for the next step of assembly.
4. Take Sails, Mast, and Boom sets (pre-installed) out of box.
1. Insert the mast into the mast mount located on the central spar as shown in photo.
2. Use cord on rear end of central spar and attach to hook on backstay crane as shown in photo. Adjust
cord bowsie to pull the backstay cord tight and straight.
Page 6
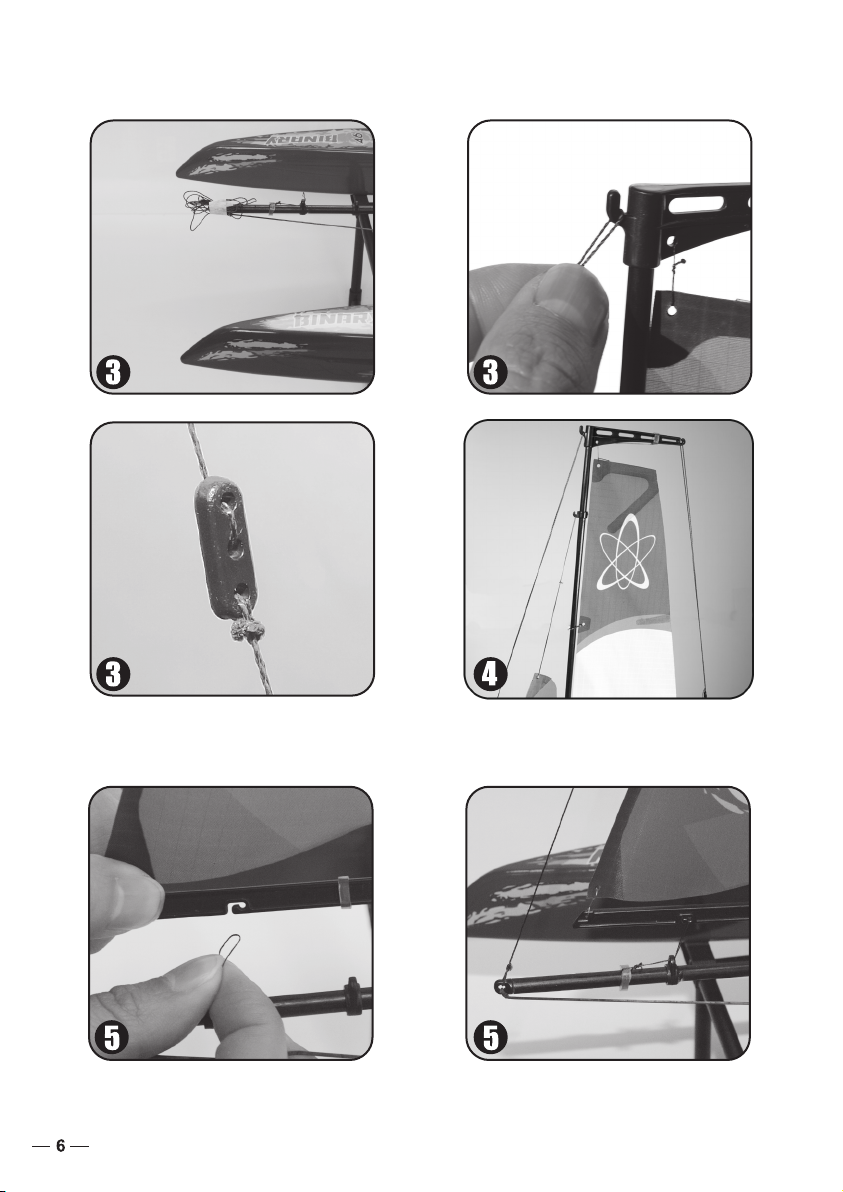
3. Use cord on front end of central spar and attach on hook of backstay crane as shown in photo. Adjust cord
bowsie to pull the forstay cord tight and straight.
4. Use forestay cord on jib sail tip and attach to hook on forestay fitting as shown in photo.
5. Attach the looped cord found on the central spar to the bottom of the jib boom. Adjust the silicon ring to
pull the cord tight as shown in the photo below.
Page 7
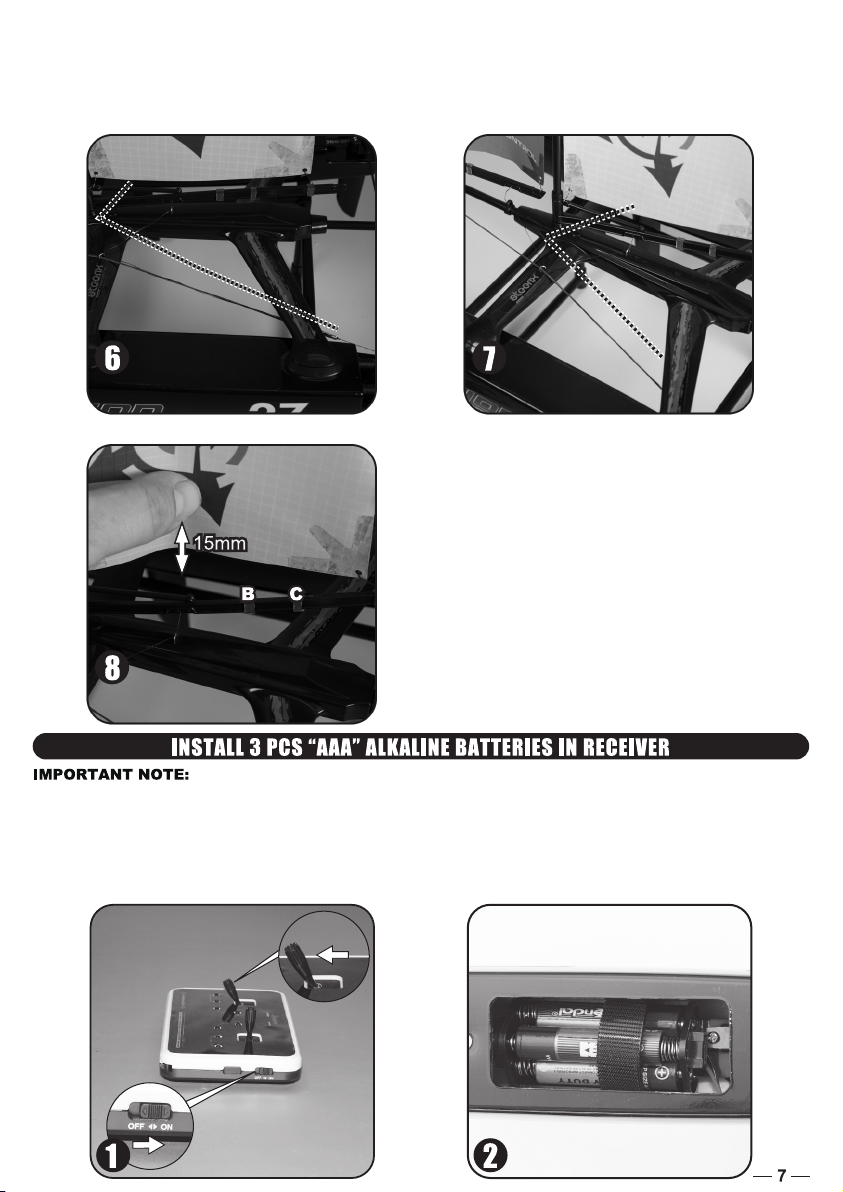
6. Take the jib boom cord and thread it through the plastic boom bend eyelet (located on the center spar
directly below the three adjustment holes for the jib boom pivot) then down through the eyelet on the forward
crossbeam. Attach the jib boom cord to the metal clasp suspended by the rubber cord.
7. Take the main boom cord and thread it through the metal deck eyelet on the center cross beam, then through
the metal eyelet on the forward cross beam and attach to the metal clasp as done with the jib boom cord.
8. Adjust the B & C silicone ring on main boom to adjust the main sail radian as shown on photo.
Always switch on the transmitter before switching on the receiver, and always
switch off the receiver before switching off the transmitter.
1. Push down the throttle stick (left stick) to the lowest position as shown, then switch on the
transmitter.
2. Install 3 “AAA” Alkaline batteries into the receiver box (ensuring correct polarity) and then secure
batteries with included Velcro strap.
Page 8
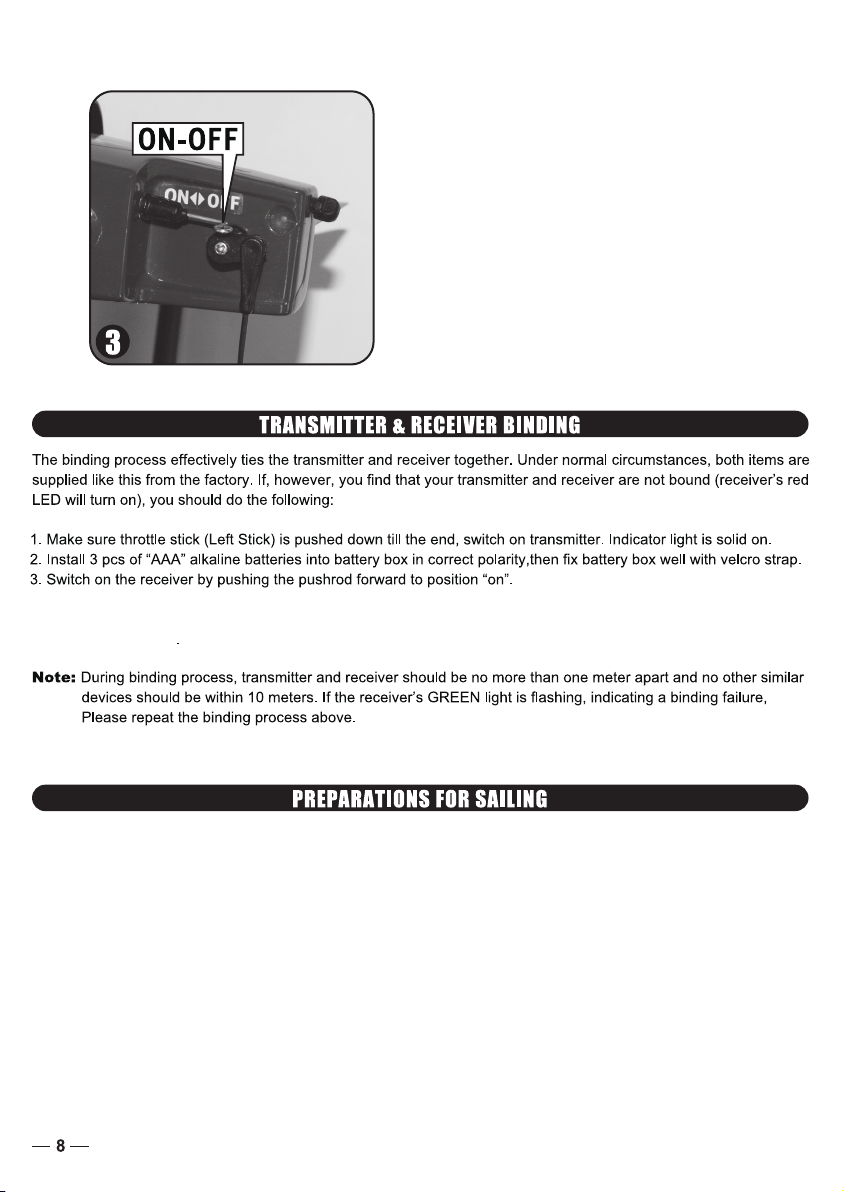
3. Switch on the receiver by pushing the pushrod forward to position “on”. This moment the receiver green light
will be on, and steering servo and sailing servo in boat are under control corresponding of the radio control.
4. Press down the “BIND” button on the receiver, then release. The receivers green light will flash
then turn to a solid green. This indicates that the bind process has been completed successfully
and the receiver will now accept commands from the transmitter.
When you go sailing, always switch the transmitter on first before turning on the receiver in the catamaran. When
finished for the day, be sure to turn the catamaran off first, before turning off the transmitter.
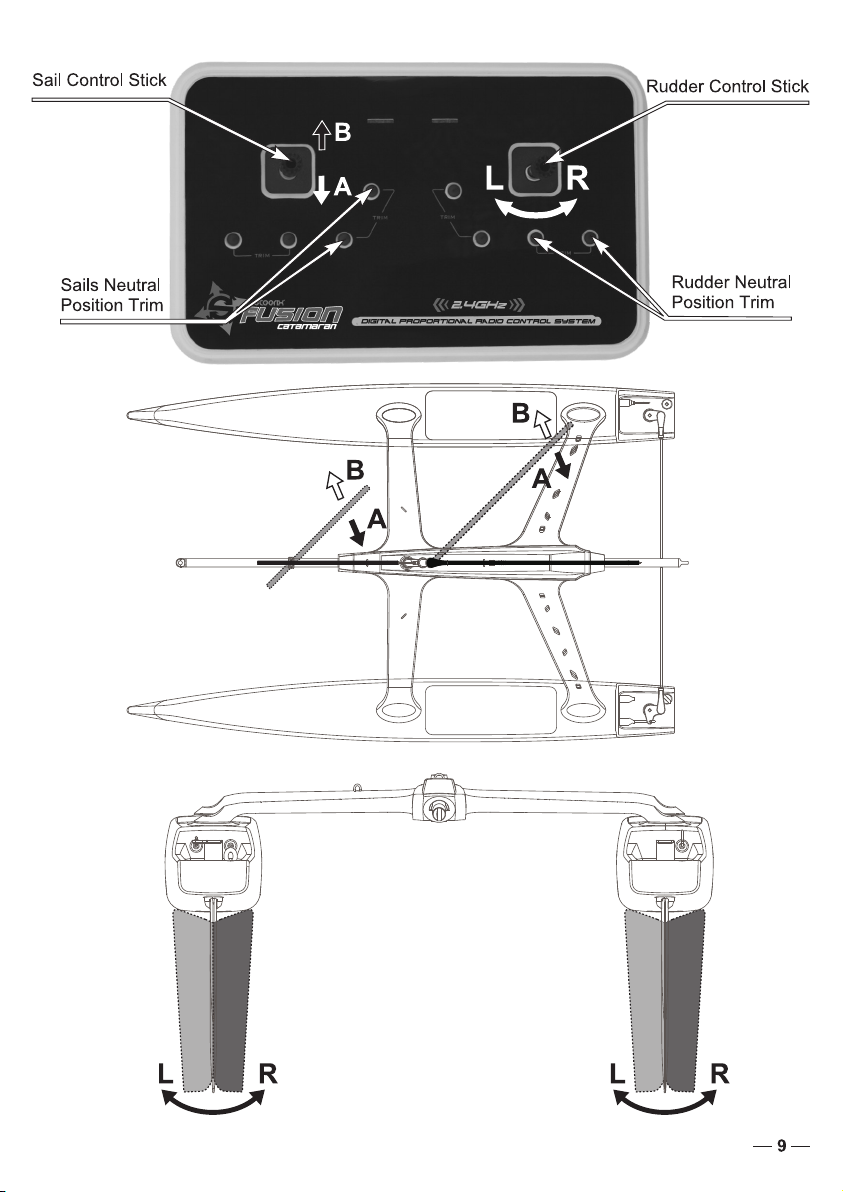
Please refer to the graphic on the opposite page for position referencing when checking your sailboats function.
1. For these examples, your sail control stick (left control stick) will have two positions. Know that to sail properly you
may position your sail anyplace between point A and point B.
2. When your throttle (left) control stick is in position “A”, the sails should be in relative line with the central spar. This
is called the “sails neutral” position. When the stick is at position “B” the sails should be at roughly a 45-degree angle
from the center spar. If you have no wind to push the sails, you may need to either blow on the sails to check position
or gently check them by pushing the main boom and jib boom with your finger.
3. Should you find the sail is not inline with the central spar use the sail trim buttons to straighten the Jib and Main
booms.
4. For your rudder control (right stick) when the control stick is pushed left, both rudders should move left. When the
stick is pressed right, both rudders should move to the right.
5. Should the rudders not rest at center, use the rudder trim buttons to return them to center.
Page 9
Page 10
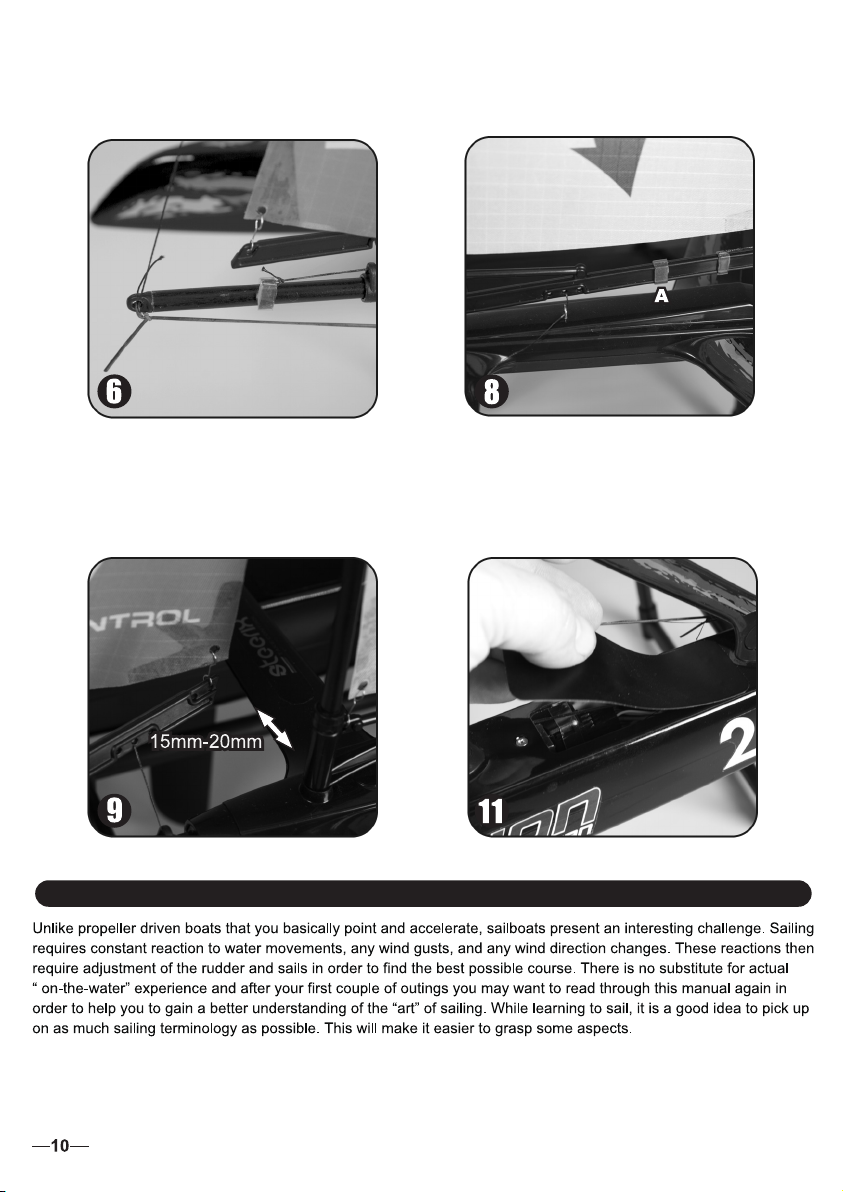
6. Adjust the silicone ring on central spar to pull jib boom tight.
7. Push down transmitter throttle stick (left stick) to its lowest position. This will make the winch servo pull the jib
boom cord and main cord tight.
8. Adjust silicone ring (labeled “A” in picture 8 on this page) position on the main boom so that the main boom is
on the centered over the hull of the boat when the cord is pulled tight.
9. Adjust the silicone ring’s position on the jib boom so that the jib boom is moved away from the mast
15mm-20mm when the winch servo pulls the jib boom cord tight.
10. Push up throttle stick till its top position, to check whether main sail and jib sail can be freely opened or not.
11. For the final step, locate the 2 PVC hatch stickers. Place them on the top of both hulls, sealing the electronics
and battery access holes. Press firmly around all edges of the sticker to ensure a good seal.
SAILING THE STEERIX FUSION
Page 11
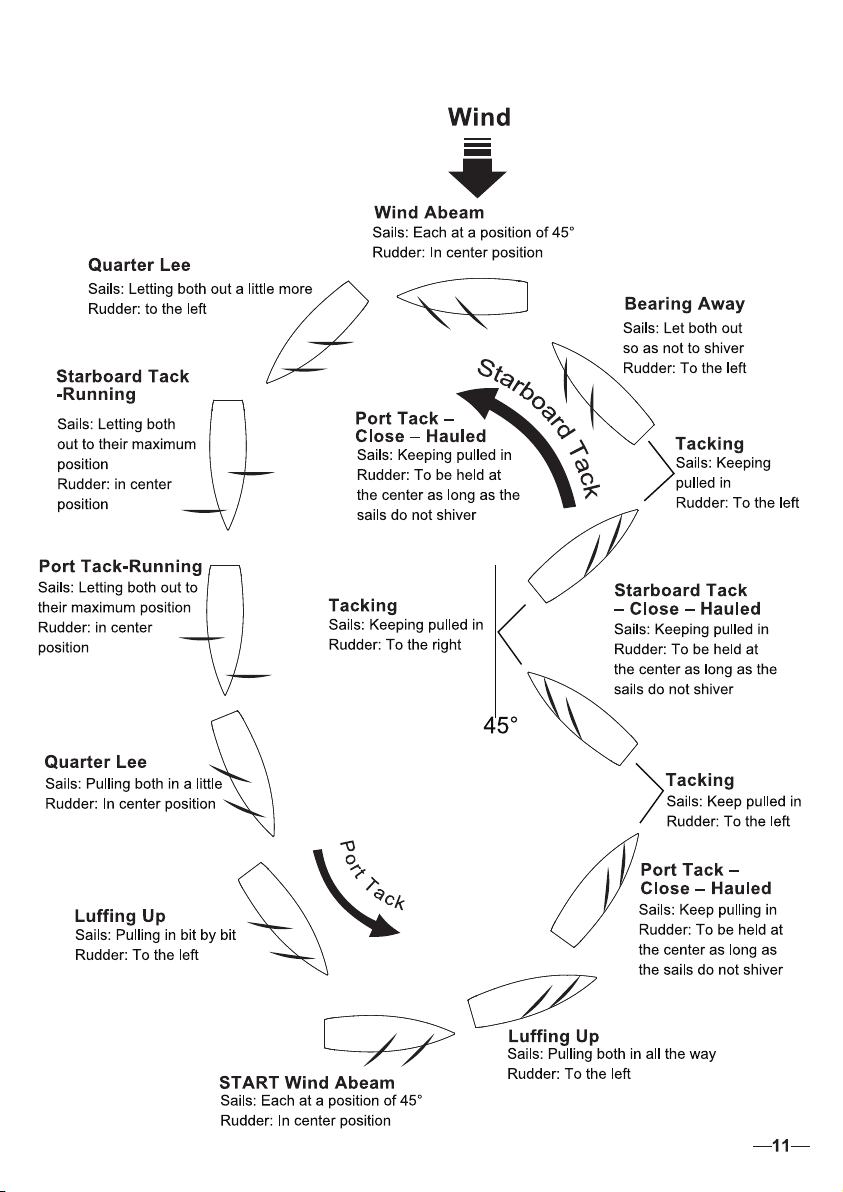
HOW TO SAIL THE STEERIX FUSION
Page 12

1. Only sail your boat in still bodies of water. Never sail your boat in running water such as streams or rivers,
as it is easy to lose control of your boat.
2. Do not sail in heavy winds.
3. Never attempt to swim after a stalled or stuck boat! Wait patiently for the wind currents to return the boat to
shore.
4. After running, remove the deck and allow the interior of the boat to dry out completely. If you neglect to do
this, it may result in corrosion of the electronic components.
To order STEERIX FUSION spare parts, use the part numbers in the spare
parts list that follows.
PART NO. DESCRIPTION
18100
Deck Cover (4pcs) - Fusion
18101
18102
18103
18104
18105
18106
Main and Jib Sail Set - Fusion
Mast Boom and Fitting Set - Fusion
Beam Set - Fusion
Central Spar and Fitting Set - Fusion
ABS Keel (2pcs) - Fusion
ABS Rudder and Linkage Set - Fusion
TAKE CONTROL
14028 N. Ohio Street Rathdrum, Idaho 83858 USA
800.705.0620
Outside North America: 208.762.0620
CUSTOMER SERVICE
For Customer Service issues & the quickest
warranty service please visit www.atomikrc.com
and click the support tab.
 Loading...