

Copyright © 2009 – 2013.
Steenbeck is a trademark.
No part of this manual may be reproduced without the prior written permission of Steenbeck.
Specifications, colours etc. are subject to change without notice. Images are an example.
USER MANUAL
ST3512 - ST3514 - ST3516

V4E-2013 35mm New Line
1
FILM AND SOUND CONTROLLING AND VIEWING TABLES.
STEENBECK ST3512 (35mm – 1 screen – 2 plate)
ST3514 (35mm – 1 screen – 4 plate)
ST3516 (35mm – 1 screen – 6 plate)
USER MANUAL
Table of contents
Section page
1.0 Introduction 2
2.0 General data 2-3
3.0 Technical data 4-5
4.0 Important safety instructions 6
4.1 Warranty information 7
5.0 ST3512 / 14 / 16: general description 8-9
Figures: 1 – 12 10-15
6.0 Operation manual / instructions 16
6.1 General overview 16-17
6.2 Working with the New Line Steenbeck 18-19
Film- and sound threading 20-21
Projection lamp adjustment and replacement 22
6.3 Touch screen: Home 23
Work light 23
Calculator 24
Cue / cueing 25-26
Count 1 / 2 26-27
Sound 27-28
Sensor 29
6.4 Universal counter 29
Figures 15 – 27 30-36
Pictures ST3516 - top SEPMAG threading 37
- below wind threading 37
7.0 Foot control 38

V4E-2013 35mm New Line
2
1.0 INTRODUCTION
The ‘ NEW LINE ’ 35mm Steenbeck film table is a complete New Generation of
Film and Sound controlling an viewing tables.
This New Generation has been specially developed for the film archives and
film labs.
With this new series Steenbeck reached a very high standard with maximum
of secure film handling and transport. Changing the sprockets for shrunken
film material is now possible within a few minutes.
2.0 GENERAL DATA:
- The following types of the New Line 35mm Steenbeck are available:
ST3512: 1 screen - 2 plates, COMOPT stereo sound (mono switchable)
ST3514: 1 screen - 4 plates, COMOPT stereo sound (mono switchable)
SEPMAG stereo 1 track (mono switchable)
SEPOPT (optional) mono
ST3516: 1 screen - 6 plates, COMOPT stereo sound (mono switchable)
SEPMAG stereo 2 tracks (mono switchable)
SEPOPT (optional) only on track 1, mono.
- Complete new film and sound track design with safe and scratch free
COMOPT sound reader.
- COMOPT with white light or optional red light sound reader.
(interchangeable by user)
- Maximum for 600 m./2000ft. picture film or PE sound film.
- Switchable for 3 image formats (optional) like standard, cinemascope,
and S35.
- Film plates MAG. 1 (on ST3514) and MAG.2 can be switched off.
- Interchangeable projection lamp condenser system with heat filter.
Lamp: halogen 12Volt / 100 Watt.
- Sync sound speeds: 24 / 25 frames per sec. (f.p.s.)
- Variable (vario) speed from 14 to 32 f.p.s.
- Maximum wind through sprockets: approx. 130 f.p.s.
- Maximum wind in wind mode: approx. 3 meters / 10 feet per second.
- Automatic stop at end of film or when film breaks.
- MAG. 1 SEPMAG has a picture-sound shift system, selectable for exactly one
frame or continuously.

V4E-2013 35mm New Line
3
- New counter display:
count of film or MAG. 1
running speed of film or PE sound film
warning signal for Vario speed.
- Touch screen (TS) with users friendly menu structure:
digital sound faders for pre and main sound amplifiers: level – treble – bass.
sound mute (each pre-amp) - head phone level - mono/stereo switch
external input.
counter selectable: frames- time – meters/decimetres/frames – feet/frames.
zero return and five cue points
film format calculator and elapsed time counter.
- Sound system: 2 way loudspeaker, nominal 2 x 40 Watt.
input with RCA connector – 10dB.
XLR balanced output +4dB.
- Bi phase 50 Hz - master output for external synchronising.
- Power requirements: 100 – 240 Volt 50 or 60 Hz.
- Power consumption: approx. 1000 watt.

V4E-2013 35mm New Line
4
3.0 TECHNICAL DATA:
PICTURE
The rear screen projection method via an optical compensation system with
18-face revolving prism gives a very brilliant, bright and sharp picture.
The standard dimensions of the projection are 212 x 288 mm.
Accurate film transport is achieved by revolving sprockets on the left and right
side of the polygon.
The left sprocket is spring driven, guaranteeing a smooth and careful film
transport and a very good picture steadiness.
With the ‘New Line’ Series it is possible to change sprockets within a minute
for shrunken film (optional).
There are two shrunken sprocket systems available.
There is a possibility that the picture steadiness with shrunken film sprockets
is poorer.
Framing is possible in running mode.
Moreover, with the ‘New Line’ it is now possible to have three picture/image
formats:
Standard (academy) and (optional) Cinemascope, S35 or Widescreen.
The projection lamp can be easily replaced and adjusted.
In stand-still mode the light is automatically dimmed to prevent heat damages
to the film. The very easy threading saves time and protects the film from being
damaged.
SOUND
High quality sound reproduction is possible with specially designed digital pre
amps and main amp of 2 x 40 W output.
The “New Line’ series Steenbeck have the following standard set up:
ST3512: COMOPT Stereo optical sound, mono switchable.
ST3514: COMOPT Stereo optical sound, mono switchable.
SEPMAG: MAG 1 stereo / 2 channels / 17,5mm, mono switchable.
Optional: SEPOPT mono.
SEPMAG 35mm, 2, 3 or 4 channels.
ST3516: COMOPT Stereo optical sound, mono switchable.
SEPMAG: MAG 1 stereo / 2 channels / 17,5mm, mono switchable.
Optional: SEPOPT mono (on MAG 1 track only)
SEPMAG 35mm, 2, 3 or 4 channels.
For all types is standard available:
- head phone output with ¼”jack.
- XLR balanced audio output + 4dB.
- line-input with RCA / cinch connector – 10dB.
- loudspeakers 2-way, 2 x 40 W.

V4E-2013 35mm New Line
5
All audio adjustments can be made via the Touch Screen (TS) (see section 6.3).
In the TS all kinds of audio mixes can be made.
Each pre-amp has:
level – treble – bass - balance (L-R) adjustment – mono switch.
The so called synchronize points for film and PE sound film are only available
on request as an option
GENERAL
Power: 1- phase 100 – 240 Volts - 50 / 60 Hz.
Power consumption: approx. 1000 W.
Switch on current: 10 Amps.
The fuses can be found on the back side of the machine (see section 6.5).
IMPORTANT: all fuses in the Steenbeck machines are T (slow blown) and
should never be replaced by F (fast blown) fuses.
Always replace the fuses by the exact prescribed type.
Dimensions of a full erected machine, including monitor and loudspeakers are:
Height: 124,5 cm.
Width: 143,5 cm.
Depth: 119,0 cm.
Weight ST3512 250 kg.
ST3514 265 kg.
ST3516 275 kg.
All dimensions and weights are approximately.
IMPORTANT:
The installation of the Steenbeck machine should be done by the Steenbeck
factory or appointed and/or certified dealer / agent.
Moving the machine to another room:
When the doors etc. are too small to move the machine in another room, the
machine has to be partly taken apart.
(This explanation is under construction)

V4E-2013 35mm New Line
6
4.0 IMPORTANT SAFETY INSTRUCTIONS:
The installation and maintenance should always be done by Steenbeck factory
engineers or appointed / certified Steenbeck agent / dealer.
Absolutely important is a well-connected and safe power ground system.
This is important for:
- the safety of the user of the Steenbeck machine.
- all printed circuit boards, motor and mechanical parts to need a proper
ground system.
- discharge of static electricity.
The Steenbeck machine should always be placed in a dry room and free of
dust.
The temperature should be between approx. between 10ºC and 30º
( 50ºF and 90ºF)
Humidity should be approx. between 40% and 70%.
A higher humidity can also cause corrosion on electronic contacts.
IMPORTANT:
Never put drinks/liquids on the Steenbeck machine.
Liquid spill, when leaking into the machine, can cause great damage and can
be dangerous for its user.
Regularly clean the machine with the brush and special cloth delivered with
machine. NEVER use steel cleaning tools.
Never open the machine.
If there is any mechanical of electronically alignment needed, these should be
done by a Steenbeck engineer or by Steenbeck trained staff.
It’s advised to use good trained personnel to work at the Steenbeck machine.
It’s important that this personnel has read and studied the users manual.
IMPORTANT:
There is always a personal danger because of the revolving sprockets.
Be aware of this danger when having long hair, necklaces, bracelets, long
sleeves etc..

V4E-2013 35mm New Line
7
4.1 WARRANTY INFORMATION:
Steenbeck film machines are made with the best possible accuracy and
precision possible. After extensive runs and tests the machine is ready for
shipment.
Steenbeck film machines are made for “quality, reliability and long life” with a
minimum of maintenance. Only use the machine for the purpose it was
constructed for.
There is always a slight possibility that within the warranty period of 1 (one)
year after purchasing the Steenbeck, a part is not working properly.
In such case, please contact the Steenbeck factory or your local Steenbeck
agent/dealer at once.
Defective parts will be repaired or replaced by Steenbeck.
Before replacing the part Steenbeck has the right to check the part before
replacing it.
No warranty in case of:
- when the machine is used for different purpose then what is
was made for.
- deliberate damage.
- an untrained technician worked at the machine.
- defective projection or optical sound lamp, wire breakage.
- damage to lacquer by use, bumping or cleaning with not advised
solvents.
Defective parts should be send to the Steenbeck factory in Holland or local
dealer/agent at cost and risk of the owner/user of the Steenbeck machine.
The costs for repair or replacement of parts is in principle always at the cost of
Steenbeck. Steenbeck factory always returns parts free of charge.
The replaced parts are property of Steenbeck factory.
If a Steenbeck engineer is required to take care for warranty repairs or
replacements, all travelling and staying costs are for the owner/user of the
Steenbeck machine.

V4E-2013 35mm New Line
8
5.0 OPERATION MANUAL
GENERAL DESCRIPTION
1. Driving deck picture track fig. 1
2. Driving deck sound (ST3516 only) fig. 1
3. Friction left picture track fig. 1
4. Friction right picture track fig. 1
5. Friction left sound track 1 (MAG 1 – ST3514 – ST3516 only)
6. Friction right sound track 1 (MAG 1 – ST3514 – ST3516 only)
7. Friction left sound track 2 (MAG 2 – ST3514 – ST3516 only)
8. Friction right sound track 2 (MAG 2 – ST3514 – ST3516 only)
9. Guide film roller for rewinding fig. 1 – 2
10. Operation panel fig. 1 – 2 – 4
11. Speed switch / paddle fig. 2
12. Ground glass fig. 2
13. Film ruler fig. 2
14. Touch screen (TS) fig. 2 (70)
15. Emergency stop push button fig. 1 / fig. 4a
16. Main power on / off switch fig. 1 / fig. 4a
17. Headphone ¼” socket fig. 1 (at the left side of frame)
18. Projection lamp fig. 18
19. ------
20. Universal film counter fig. 2 - 12
21. Shutter for several images fig. 3
22. Back connection panel fig. 11

V4E-2013 35mm New Line
9
OPERATION PANEL fig. 5 – 6 – 7 – 8 – 9 – 10
23. Standby: switch from standby (red) to operation (On – green)
24. Synchronous speed switch for 24 / 25 frames per second (f.p.s)
25. Clutch / brake switch picture track (ST3514 - ST3516 only)
26. Framing
27. Lamp: on / off projection lamp
28. Clutch / brake switch sound track 1 / MAG 1 (ST3514 - ST3516 only)
29. Sound shift <<: picture – sound shift retard MAG 1 only.
30. Sound shift >>: picture – sound shift advance MAG 1 only.
31. MAG 2: clutch / brake switch (ST3516 only)
32. Exciter lamp COMOPT power on / off
33. Exciter lamp SEPOPT power on / off MAG 1 only.
34. Ground glass: power on / off. Backlited LED source 7.000ºK
35. Wind: switch for wind operation
36. Remove Film: Warning signal for wind mode
The film should be removed from the picture track before
winding
37. Tension COMOPT: push button tension for playback COMOPT sound
38. Variable speed: switch on / off variable synchronous speed
39. Potentiometer for variable sync speed control from 14 to 30 f.p.s.
40. Fuses
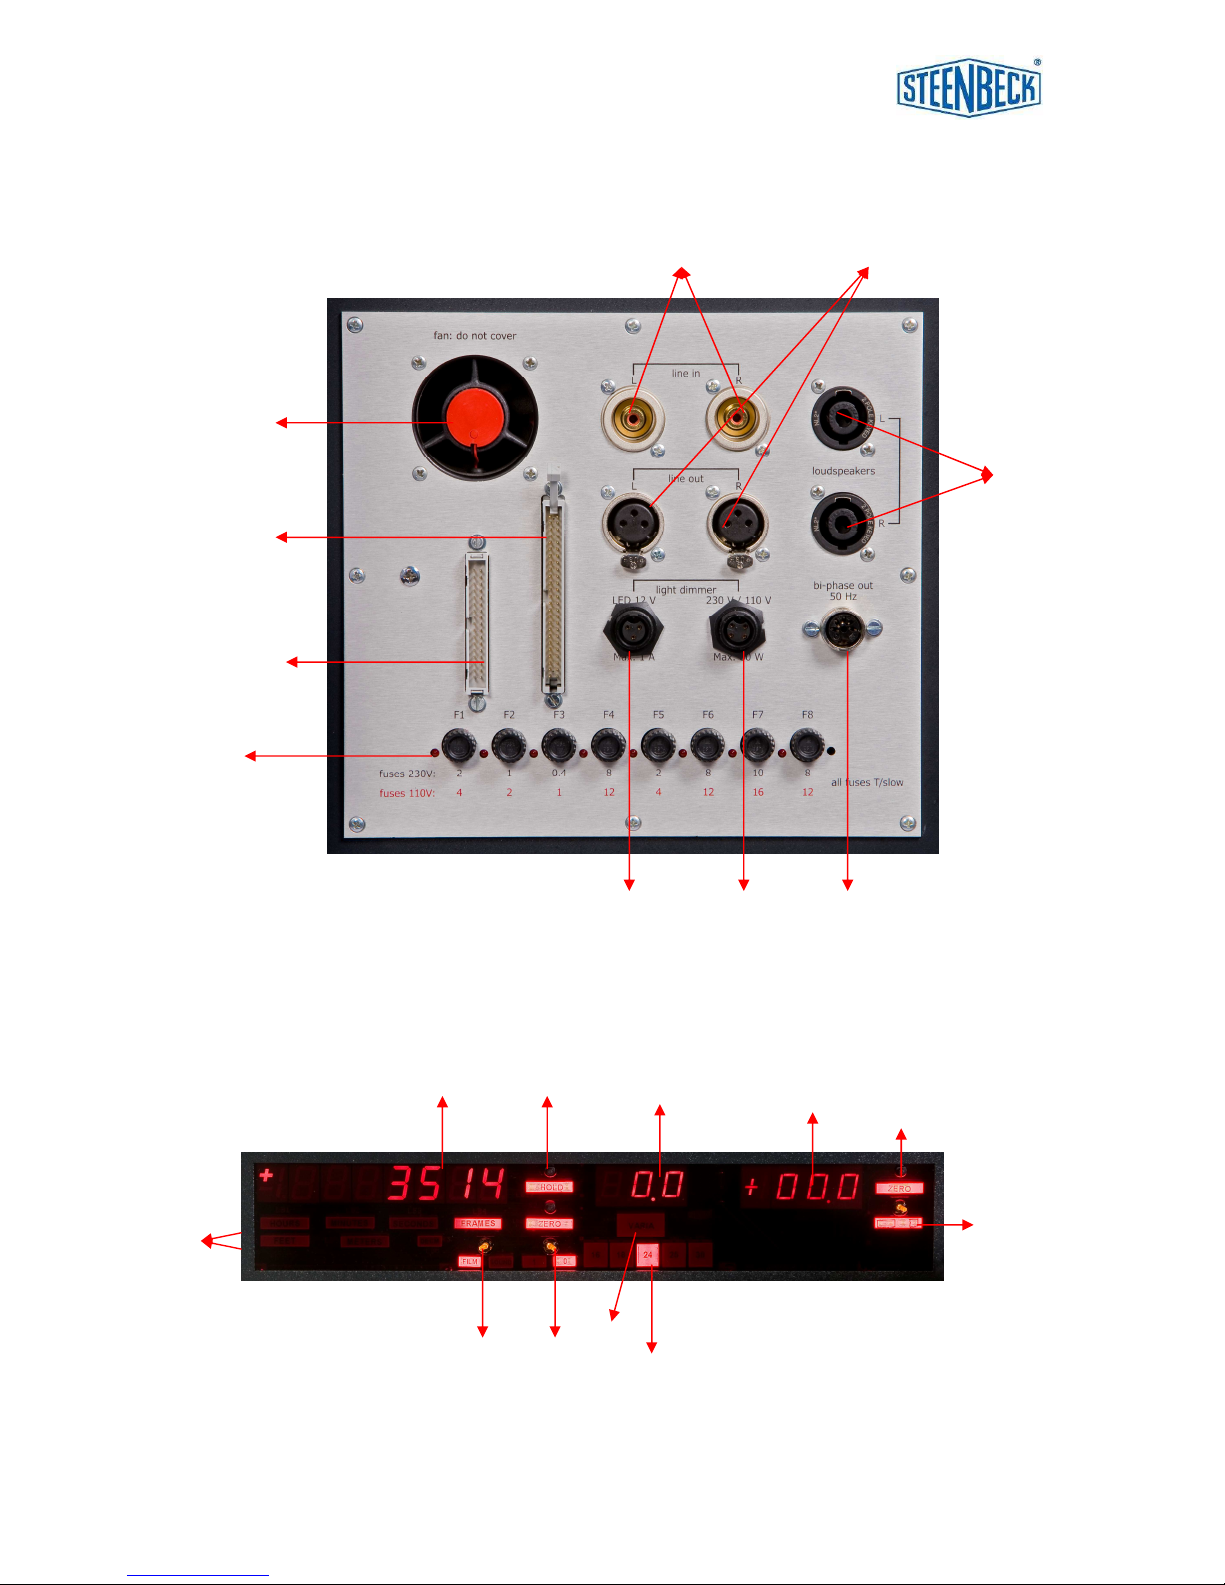
CONNECTION PANEL ( back side) fig. 11
41. Picture – sound – shift display connector
42. Universal counter connector
43. Fan (do not cover)
44. LED working light connector. 12 volt - 1 amp. Max.
45. 230 volt working lamp connector - 60 Watt max.
46. Bi-phase 50Hz connect. (output – master only)
47. Loudspeaker connectors
48. Audio Line out: balanced XLR output
49. Audio Line in: - 10dB RCA / Cinch audio input

V4E-2013 35mm New Line
10
Fig. 1
1
3
5
7
17
9
10
15/16
4
9
6
2
8
17

V4E-2013 35mm New Line
11
57
9
13
14 12
10
11
20
54
58
56
55
Fig 2.
Fig. 3
21

V4E-2013 35mm New Line
12
Fig. 4
10
Fig. 4a
16
15

V4E-2013 35mm New Line
13
Fig. 5
10
Fig. 6
23 24 25 26 27
Fig. 7
28 29 30 31

V4E-2013 35mm New Line
14
Fig. 8
32 33 34
Fig. 9
35
36
Fig. 10
37 38 39
V4E-2013 35mm New Line
15
Fig. 11
44 45 46
47
48 49
43
42
41
40
Fig. 12
83 85
82
84
90
89
88
80
87
81
81

V4E-2013 35mm New Line
16
6.0 OPERATION MANUAL STEENBECK ST3512 – ST3514 – ST3516
6.1 GENERAL OVERVIEW
The ‘NEW LINE’ STEENBECK is a high quality film viewing and controlling
table for motion picture and perforated magnetic sound film and specifically
designed for film archives and film laboratories.
The most important goal of this new design is to view and transport fragile film
and sound material in the best possible way with a minimal amount of physical
wear.
With these tables films can be checked for any kind of degree of scratches,
fading of colour and optical or magnetic sound.
The drive and sound system
is processor controlled.
These processors can be aligned for users’ specification.
When the film breaks or at the end of the film the table will stop automatically
as it’s detected by sensors.
The film plates of the disengaged MAG tracks (ST3514-ST3516 only) will also
stop turning.
Standard Bi-phase 50 Hz output for synchronising (master only)
An optional foot pedal is available.
Picture reproduction
is done via an optical compensation system with an
highly rated 18 face revolving prism.
Two revolving sprockets ensure of an accurate transport, a smooth and careful
film transport and an excellent picture steadiness.
A third sprocket is for the COMOPT sound reproduction.
All three sprockets can be replaced by special sprockets for shrunken film
within a minute. There are two kits available.
The lighting system
is equipped with a 12V – 100W halogen lamp.
The projection lamp and the condenser system with heat filter are fitted in a
quickly removable system enabling very easy replacement of broken lamps.
Light is automatically reduced when the film transport is stopped, which allows
viewing of the film frame for an unlimited time without causing any damage.
The projection system
is fitted with highly polished front surface coated
mirrors. A hard over coating ensures long life with constant picture quality.
The special close grained screen is of a special plastic to ensure maximum
view quality within a viewing angle of approximately 70º.

V4E-2013 35mm New Line
17
Sound system
can be controlled by the touch screen (TS).
Every pre-amplifier for optical and / of magnetic sound can be selected by the
touch screen menu. Faders for volume, treble, bass and balance are available.
Each pre amplifier has two channels / stereo, can be set in mono and mute.
The mix of the pre-amplifiers is available on the balanced XLR +4dB outputs.
An extra RCA -10dB input is available for mixing or monitoring an external
analogue audio source.
The summing amplifier is fitted with the master volume control for audio
including treble, bass and balance of this signal.
A high quality power amplifier with 40 W output and 2 way compact
loudspeakers guarantees an excellent sound reproduction.
Reproduction of 4-channel COMMAG films and separate (SEPOPT) 35mm
sound film or sound negatives is also possible as an option.
Audio playback is automatically muted when the table runs more than 30 f.p.s..
The Steenbeck Universal counter
is standard equipment.
This counter for all formats measures all film length, elapsed time and frames
and is able to convert every count immediately into another count.
Within the universal counter display is also monitored:
- the exacts running speed of the film.
- measurement of the MAG 1 sound track, by switching.
- Vario speed is active.
- the selected synchronous speed.
- the picture-sound shift advance / retard frames
( for ST3514-ST3516 only).
The universal counter system is operated mainly from the touch screen menu
which also has a film format calculator and transfer counts to a cueing system.
The advance and retard system
for sound tape (only on MAG 1 of ST3514 and
ST3516) can be operated at all speeds by a differential gear.
By using the advance and retard switch the sync mode can be matched to
within one teeth of a frame or after switching over in single frame in either
direction to the picture. This enables in a short time exact perforation
synchronisation.
The touch screen
is the operation centre of the ‘New Line’ Steenbeck.
This touch screen gives the operator of the table some interesting tools:
- light menu for levelling working lamp for standard light as well as LED light.
- calculator menu to calculate and transfer counts, operation of universal
counter.
- cue menu: return zero system and 5 cue point are available.
- count 1 and 2 menu.
- sound menu.
- sensor menu.
- elapsed time counter for maintenance.
All preceding items are explained in section 6.3 and 6.4.

V4E-2013 35mm New Line
18
6.2 WORKING WITH THE NEW LINE STEENBECK
Connect the Steenbeck to power as described in section 3.0 and 4.0.
Please take care that the power connector at the table is secured with the
safety clamping devise at the frame.
Always
check if the power is according to the given voltage and frequency,
which can be found on the type and serial number plate at the back of the
frame.
Always
check that the grounding of the power socket is correct.
Without a proper grounding, the operator might be at danger.
Use a free power group of at least 16 Amps.
Switch the power ON with the main power switch (16).
A part of the electronics of the table will go in standby and the fan will start
moving.
The push button 23 (standby) will show a RED light.
When the standby button (23) is pushed the light will turn to GREEN and the
table will start up in several stages in a short time.
Before switching OFF, it’s advised to always switch off the sub functions (2732-33-34-35) off first and then the Standby button 23. Finally the main power
switch 15 can be switched off.
After switching ON the processor the touch screen (TS) is activated too.
After a short time you will hear a ‘peep’ and the home page menu can be seen.
Now the table is ready for use and all the needed sub-functions can be chosen
now.
It’s advised to switch on only sub-functions which are needed.
The sound is also activated after switching on.
If you don’t need sound, then please always MUTE the master sound control.
( see section 6.3 ) If you intend to use one sound source, please take care that
other pre-amps are muted.
FILM THREADING.
Threading of the film is done as explained in fig. 29 – 30 - 31 .
The left hand sprocket has a spring, enabling the film ton be set with the
correct tension in combination with the right hand sprocket.
Always
check the tension before running the table!! The film can get damaged!
When a film with optical sound has to be viewed threat the film as shown in
fig.29 .
Now push button 37 ( tension COMPOPT) and the tension roller 58 can be
disengaged.
Align the film now by pulling the film to the right giving a margin of at least
one perforation at the tension roller.
Keep the film at that spot and engage again with button 37.

V4E-2013 35mm New Line
19
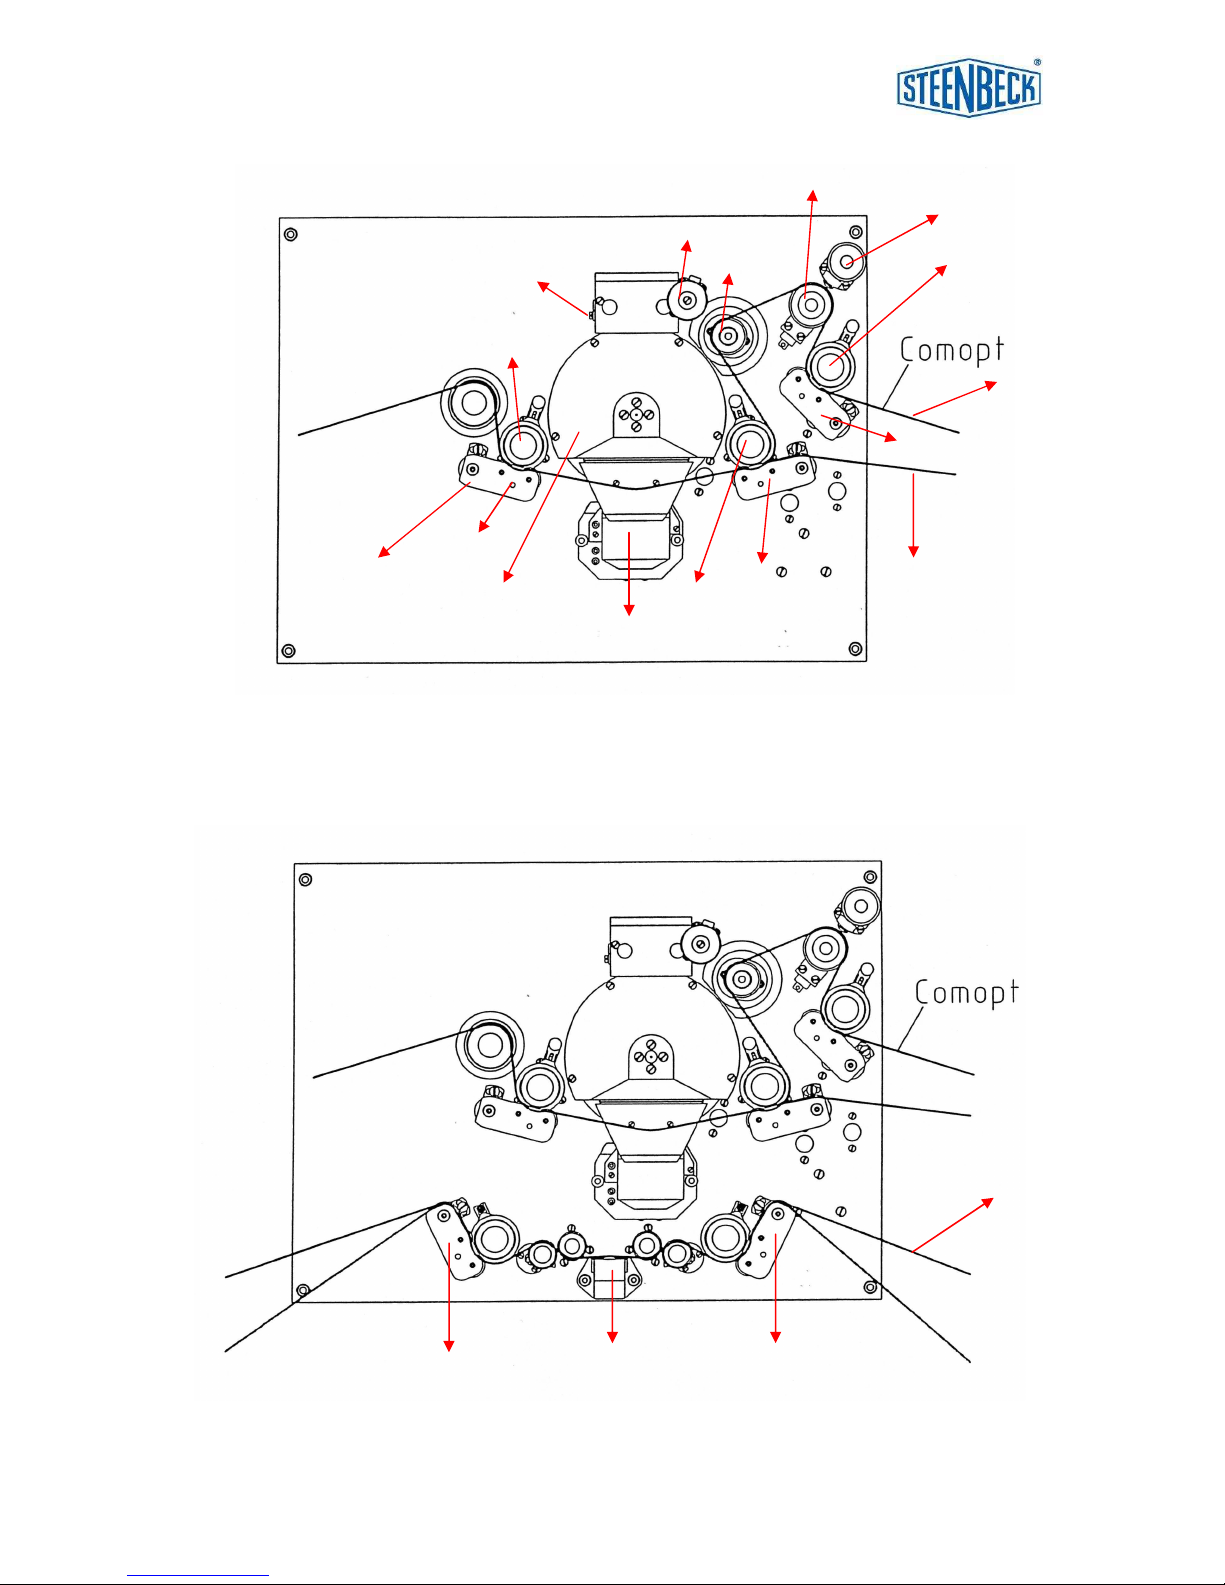
SOUND THREADING. (see fig. 30 - 31 ) (for ST3514 – ST3516 only)
In the standard configuration the sound tracks MAG 1 and MAG 2 of the New
Line series are set up for 17,5mm perforated magnetic sound film for 2
channels/tracks and/or stereo.
Only sound track MAG 1 has the following possibilities:
-optional SEPOPT reader ST68, mono, incl. picture rollers and pressure arms.
-optional SEPMAG, 4 channels replay incl. guide rollers and pressure arms.
Threading the sound film as shown in fig. 30 -31 .
Switch on track by pushing buttons 28 and / or 31.
We do advise to use 100mm film cores only.
50. threading film. (fig. 29)
51. threading film with optical sound. (fig. 29)
52. threading perforated magnetic sound film MAG 1. (fig. 30)
53. threading perforated magnetic sound film MAG 2. (fig. 31)
54. film sprocket left hand side. (with spring) (fig. 29)
55. film sprocket right hand side. (fig. 29)
56. film sprocket COMOPT (optical sound). (fig. 29)
57. polygon. (fig.29)
58. tension arm with roller COMOPT / optical sound. (fig. 29)
59. picture pressure arms. (fig.29)
60. push button to lock and unlock picture pressure arm. (fig. 29)
61. interchangeable condenser system projection lamp. (fig. 29)
62. focus alignment. (fig.29)
63. turning knob for projection formats (optional). (fig.29)
64. housing optical lamp. (fig.29)
65. optical sound reader. (fig.29)
66. sound pressure arm. (fig.29)
67. magnetic sound replay head MAG 1. (fig. 30)
(or optional SEPOPT reader)
68. magnetic sound replay head MAG 2. (fig. 31)
69. sound pressure arm MAG 1 / 2 . ( fig. 30/31)
V4E-2013 35mm New Line
20
ST3512
Fig. 29
50
51
54
59
59
66
60
61
55
56
57
58
62
63
65
64
ST3514
Fig. 30
52
69
69
67

V4E-2013 35mm New Line
21
ST3516
Fig. 31
53
68
69

V4E-2013 35mm New Line
22
Fig. 18
Projection lamp and condenser / lamp adjustment / lamp replacement
Replacing lamp:
- remove left/right screw.
- lift condenser carefully.
- remove lamp.
- replace lamp (12V 100W).
- don’t touch the lamp
- put condenser back
and fix.

V4E-2013 35mm New Line
23
6.3 TOUCH SCREEN (TS)
70. Home Menu
71. Light Menu
72. Calculator Menu
73. Cue Menu
74. Count 1 Menu
75. Count 2 Menu
76. Sound Menu
77. Sensor Menu
Fig. 15 - 27 (page 30 – 36)
70. HOME MENU. fig. 15
In this menu you will find the basic menu structure for the TS operation.
When the table is switched on, the TS always starts up with this page.
On the right you see 8 push buttons for the other menus.
71. LIGHT MENU. fig. 16
Here you see three possibilities:
71a: contrast and brightness of the TS.
71b: display 1 / display 2:
Alignment of the light intensity of the counter display.
For one screen tables display 1 is in use.
For two screen tables display 2 is also in use.
71c: work light 1 / work light 2:
Work light 1:
Here you can control the voltage to the 230 V working lamp of max. 60 W.
This 230 V working lamp can be connected at the back of the table at
connection 45 (fig. 11), which is a special connector.
Work light 2:
Here you can control the low voltage of maximum 12 V to a LED working lamp /
light of maximum 1 Amp.
The LED lamp / light can be connected at the back of the table at connection 44
(fig. 11), which is a special connector.
IMPORTANT: both special connectors can’t be rearranged because of the
pinning.

V4E-2013 35mm New Line
24
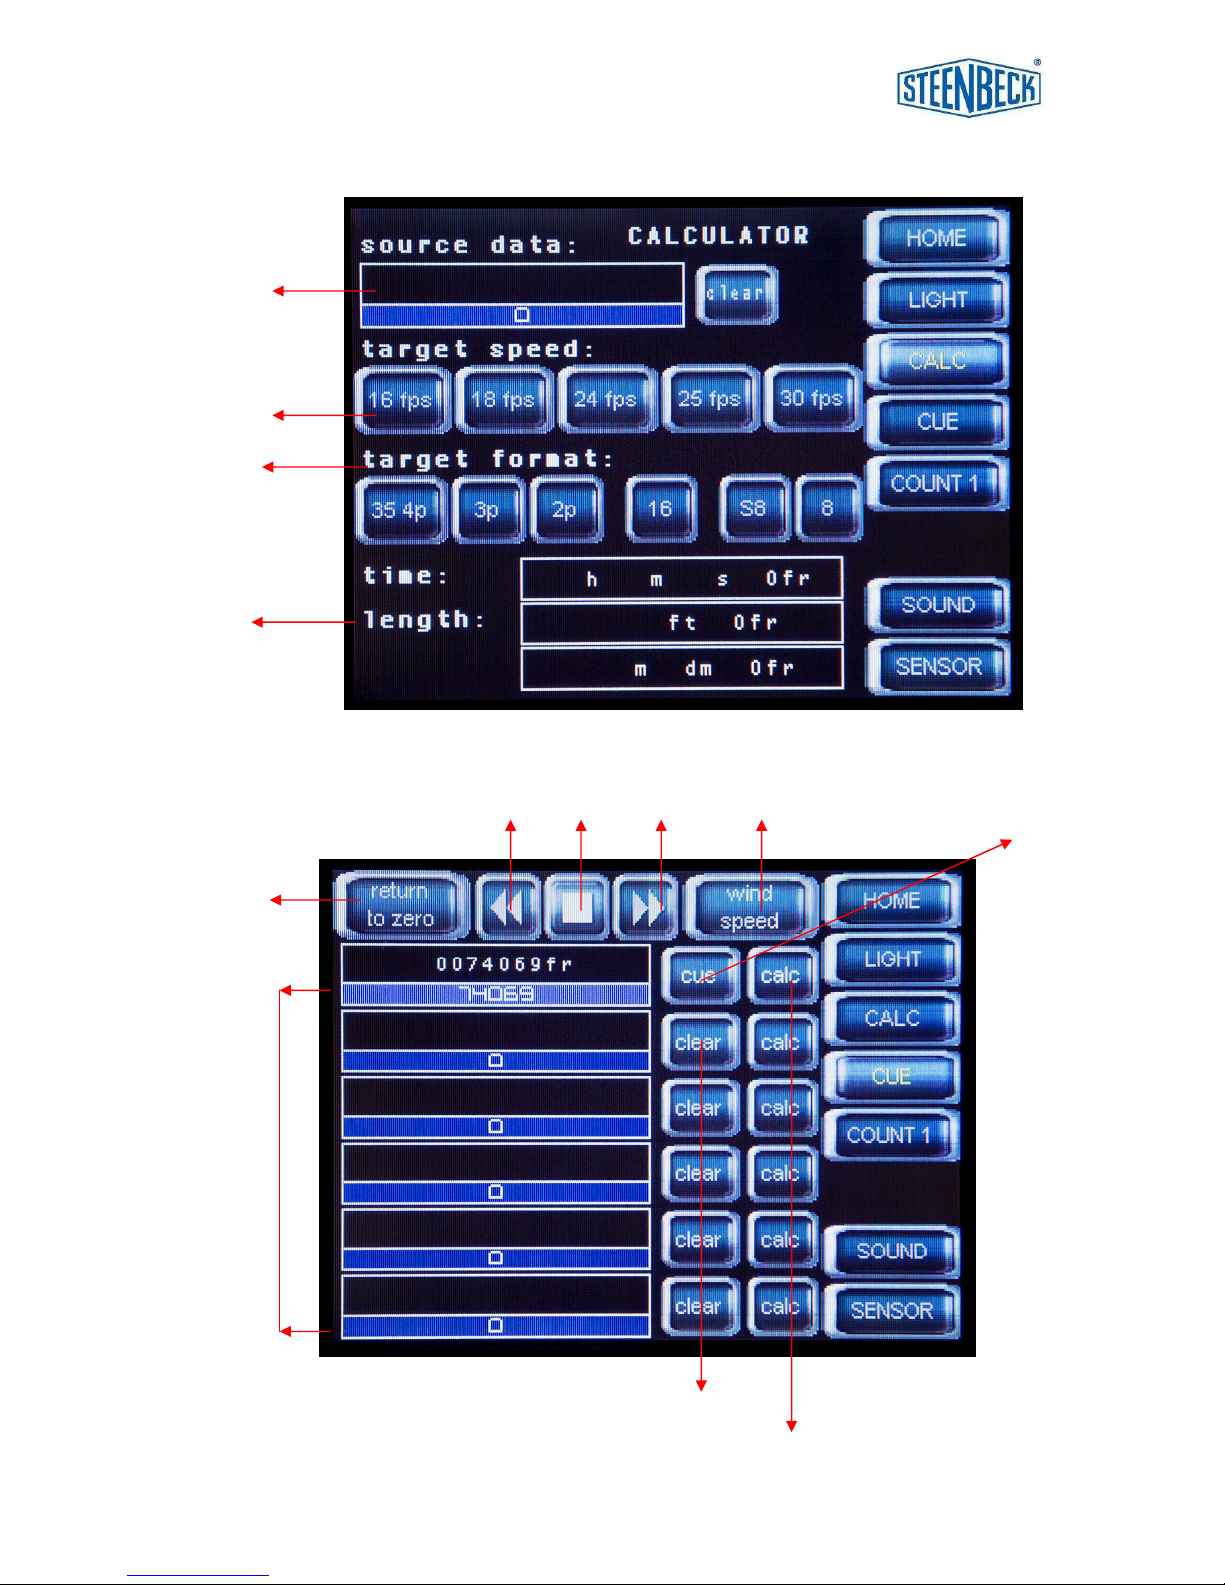
72. CALCULATOR MENU fig. 17 (page 31)
Here you find the possibility to convert between film formats.
For example: if you have a 35mm film on the table and you want to make a
16mm copy of this film: how long will the 16mm copy be?
72a: source data: the displayed count on the counter.
72b: target speed: what film speed should the new film format have?
72c: target format: what film format should the new format have?
72d: time – length: here you can read: - time of the new format
- length in feet / frames
- length in meter / Dm./ frames
Example: you want to copy a 16mm film of 360 meter to a 35mm copy at 24
frames per second. (f.p.s.)
- push on field source data
- source format: 16mm
- push on field: M (meter)
- enter: 360 meter
- confirm with: < (above right)
- now you are back into the ‘calculator’ menu
- you see in ‘source data’ : 360 mtr. - 47246 frames
- target speed: set to 24 f.p.s.
- target format: 35 4 p. (35mm / 1 frame / 4 perforations)
- now you can read: time: 32 min. - 48 sec. - 14 frames
length: 899 meter - 9 decimetre - 4 frames
Of course you can convert from meters to feet and visa versa in the three film
formats (S)8 - 16 - 35mm.

V4E-2013 35mm New Line
25
73. CUE MENU fig. 18 (page 31)
With this menu you have to the following possibilities:
- return zero (73a): automatic wind back (or forward) to the set ‘0’
position.
- cue points (73b) for checking film copies.
IMPORTANT: always switch (with 85) the counter display to count 1 (fig. 12).
73a: return zero (RZ): by pushing this field (73a) the table will run back or
forward to the set ‘ 0 ‘ position.
By pushing on ‘wind speed’ (73c) you have the choice for three wind speeds.
Wind speed 3 is the highest wind speed.
The wind speed in this mode is the same as done by the manual speed paddle.
Wind speed 1: synchronous speed.
Wind speed 2: speed approx. 90 f.p.s.
Wind speed 3: maximum speed.
If you want to change the wind speed during winding, just push ‘wind speed’ to
select the wanted speed.
IMPORTANT: if you want to stop just push button 73g.
If you want to proceed, push return to zero (73a) again.
IMPORTANT: during cueing or returning to zero do not use the speed paddle.
CUEING
With this facility you have the possibility to store five cue points during the
checking of a film.
By pushing knob ‘cue’ (73h) you enter the actual count.
This can be done during any running speed of the table.
73b:
Field 1 (F1): is showing the actual count in frames.
Field 2 – 5 (F2-5) by pushing ‘cue’ you enter the actual count from that
moment into F2 (F2). By pushing ‘cue’ again the next cue point is F3 , F4 till
F5.
After you have checked the film copy the table can run automatically to the set
cue points by:
<< (73d): pushing ones: winding to the proceeding cue point.
pushing twice: winding to penultimate cue point etcetera.
>> (73f): pushing ones: winding to the next cue point.
pushing twice: winding to the next following cue point etc.
>> (73g): stop winding during return to zero or cueing mode.
Whatever button (73d-f-g) you have pushed, you always can restart RZ and
cueing.
Clear (73i): with this button you can clear the cue point to ‘0’.

V4E-2013 35mm New Line
26
Calc (73j): with this button you can store the count from the cue into the
calculator menu for converting.
In case you want to convert the actual count (F1) push
‘calc’ or F1 which brings the actual count into the calculator
menu.
Up to 5 cue points can be stored into the cueing system in case film copies
with fixed check points have to be verified:
- to enter data, push one of the fields (F1, 2, 3, 4 or 5)
- the “enter data” menu will appear
- push “length and film format” button
- enter the number of feet / frames or meters / decimetre / frames in field m
- confirm with < (above right side)
- menu returns to Cue Menu.
- the inputs are now stored into the selected cue point.
Wind speeds during cueing:
At 0 - 400 frames difference *): speed 1
At 400 - 1500 frames difference*): speed 2
At 1500 - 3000 frames difference*): speed 3
74. COUNT 1 MENU fig. 19 ( page 32)
This menu is for setting the counter for 1 screen tables.
74a: - actual count
- cue:
- calc: entering calculator – cue menu 73.
74b: setting counter for: - frames
- time: hours – minutes – seconds
- length in feet – frames
- length in meter – decimetre – frames
74c: count source: reading the setting of the counter for film or MAG 1
sound track. (done by switch 83 fig. 12)
film format: for standard 35mm: 35mm 4 perforations.
sync speed: reading the setting of the synchronous speed.
(set by 24 on fig. 6)

V4E-2013 35mm New Line
27
75. COUNT 2 MENU.
This menu is only used for setting the counter for 2 screen tables.
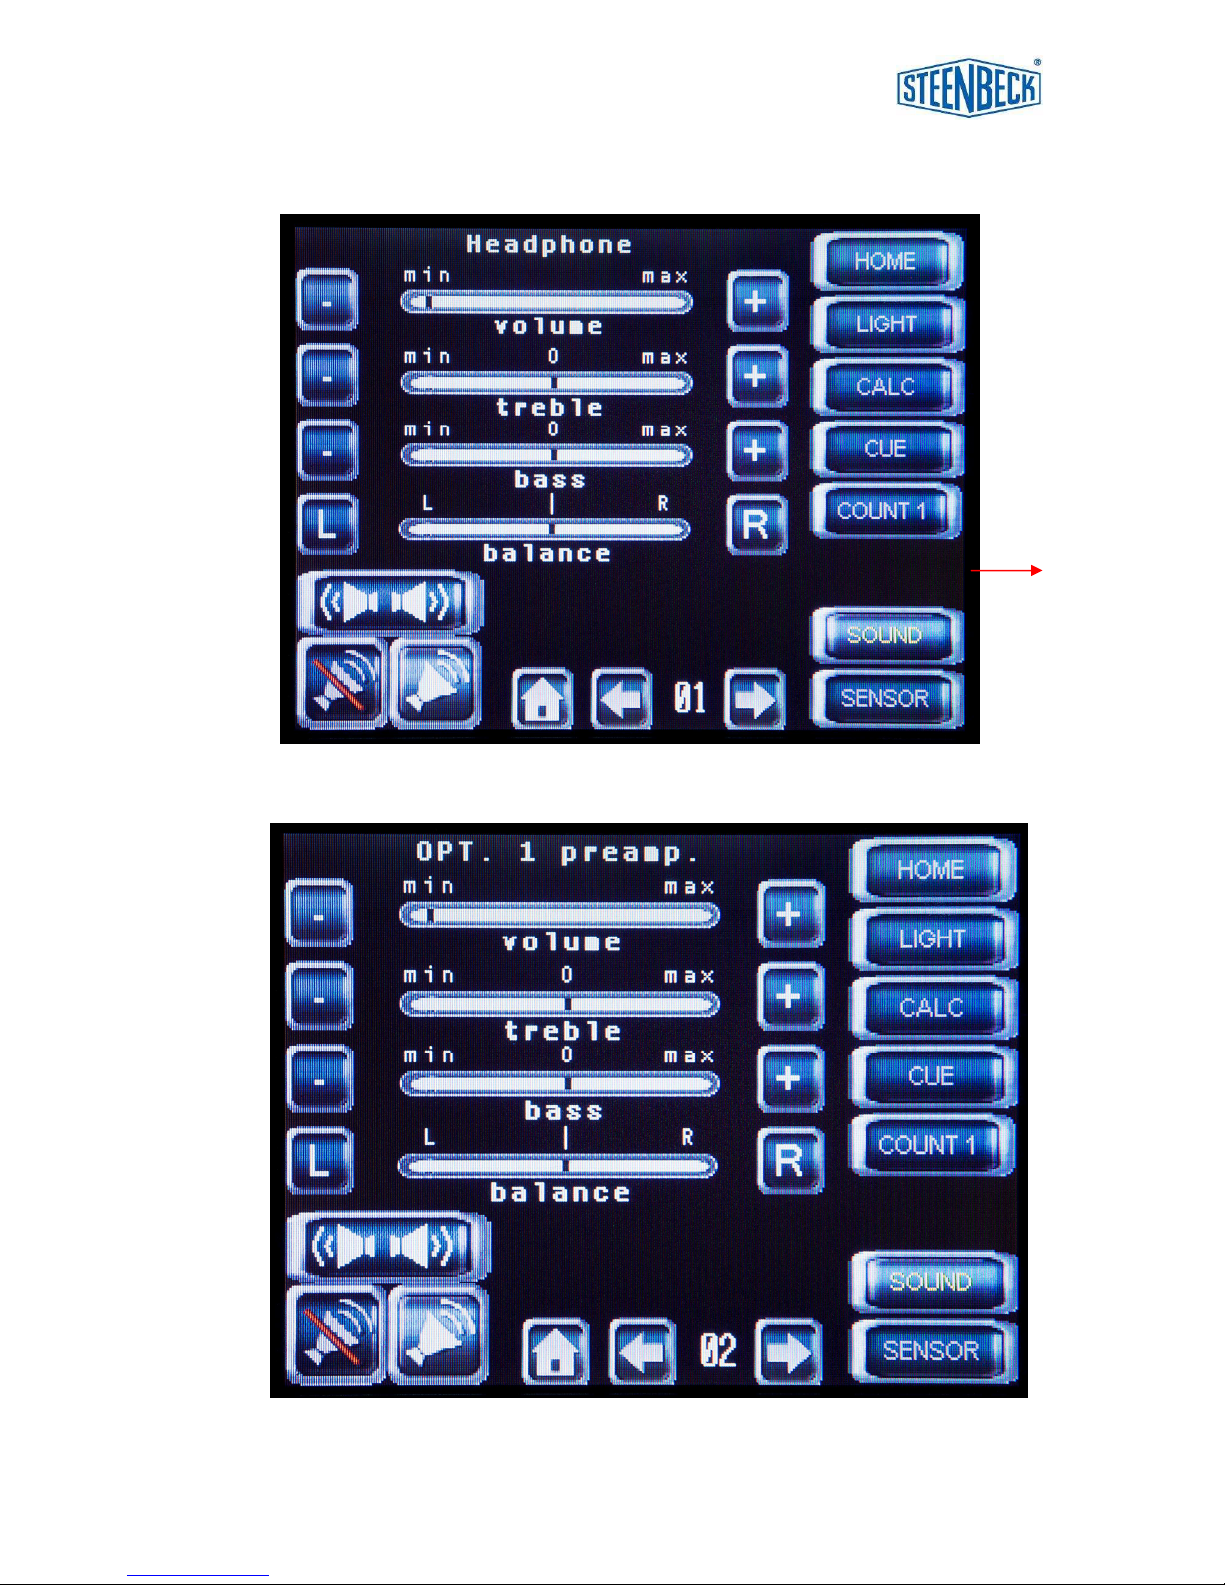
76. SOUND MENU fig. 20 ( page 32)
This menu is for levelling, mixing and muting all sound sources.
All sound sources / pre amplifiers are stereo / 2-channel and are mono
selectable in case of 1-channel sources.
With each pre-amplifier every sound adjustment can be made.
It’s advised to mute all sound sources which are not used.
By pushing every ‘sound‘ button on each menu you always get back into the
‘Master Sound Control’ (summing amp)
Standard all ‘New Line’ Steenbeck have the same sound board and contain the
following pre-amplifiers:
1. master sound pre-amplifier / summing amp
2. headphone output amplifier
3. optical 1 pre-amp
4. optical 2 pre-amp
5. optical 3 pre-amp
6. mag. 1 pre-amp
7. mag. 2 pre-amp
8. line-in pre-amp
Basic adjustments are (see fig. 20):
76a: master sound control with : level / treble / bass / balance.
76b: switching stereo / mono.
When the audio is set to both loudspeakers (LS): STEREO.
LS left selected: channel left is reproduced as mono on two channels.
LS right selected: channel right is reproduced as mono on two channels.
76c: Mute button left: push this button to mute the audio (red stripe).
Mute button right: push this button to clear the audio mute (green).
When the table runs over 30 f.p.s. a mute will be automatically made
This can be seen at the mute button left.
76d: With these buttons you can go forward or backwards into the sound pre
amp. menu.
76f: Headphone level and sound adjustment (fig. 21)
Connector for ¼” jack at the left side of frame (16)

V4E-2013 35mm New Line
28
76g: Line in:
With this input you have the possibility to connect to an external audio
source like a CD player. This sound can be monitored on the table LS
and/or mixed with the other audio sources.
76h: Opt 1 – 2 – 3: Optical Sound (fig. 22-23-24)
Level and sound adjustment for: Opt. 1: COMOPT
Opt. 2: SEPOPT
Opt. 3: extra back up
All optical pre amps are stereo, mono switchable.
Each pre-amp has it own level, treble, bass and balance adjustment.
76i: Mag 1 – 2: Magnetic sound (fig. 25-26)
Level and sound adjustment for: Mag. 1: SEPMAG 1
Mag. 2: SEPMAG 2
Mag 1 and 2 can also be used for COMMAG.
All magnetic pre-amps are stereo, mono selectable, which is useful in
case you have a 1-channel source enabling to monitor on both
loudspeakers.
Each pre-amp has it own level, treble, bass and balance adjustment.
NOTE:
If you have a 2- or 4-plate table it’s advised to have some spare pre-amps
available.

V4E-2013 35mm New Line
29
77. SENSOR MENU. fig. 27 (page 36)
77a: Automatic stop ON / OFF:
ON: the table stops at film end or when film brakes.
This facility is ONLY available on the film track.
77b: Film detected: monitoring the sensors during film transport.
As long as the sensors detect movement the transport will be continued.
As soon as one of the sensors detect that one of the frictions are in
stand still, the transport will stop.
IMPORTANT:
- When the table is started and there is NO film in the film track, the
table will stop after some seconds.
- If it’s required to wind or playback a magnetic sound film (track 2) the setting
of the sensor should be at OFF.
- In case the film is started with the speed switch/paddle for example
synchronous mode and the table stops, give a little turn at the left or right
friction / film plate and the table will run again.
When this doesn’t help one sensor could be out of alignment.
6.4 UNIVERSAL COUNTER fig. 12 (page 15)
The New Line Steenbeck film tables also have a new generation counter board
and display.
Comparing this counter and display with the famous ‘hello’ series counter, the
new type has some interesting advantages:
- it displays the actual running speed of film (80)
- counting in: frames (81)
length in meter-decimetre-frames
or length in feet-frames
time in hours-minutes-seconds-frames
- variable speed ON (82)
- it has a switch for count film track or sound track Mag. 1 (83)
- the synchronous speed of the table: 24 or 25 f.p.s. (84)
- it has a switch for count 1 or count 2. Standard always on 1 (85)
- it has a push button ‘hold’ (86)
- it has a push button ‘reset’ (87)
- it has a picture-sound-shift (BT) (88) only for ST3514 – ST3516

V4E-2013 35mm New Line
30
Fig. 15
Fig. 16
71a
71b
71c
V4E-2013 35mm New Line
31
Fig. 17
72d
72c
72b
72a
Fig. 18
73b
73d
73g 73f 73c
73h
F1
F2
F3
F4
F5
F6
73i
73j

V4E-2013 35mm New Line
32
Fig. 20
76b
76c
76d
76a
Fig. 19
74A
74B
74C
V4E-2013 35mm New Line
33
Fig. 21
76f
Fig. 22

V4E-2013 35mm New Line
34
Fig. 23
Fig. 24

V4E-2013 35mm New Line
35
Fig.25
Fig. 26

V4E-2013 35mm New Line
36
Fig. 27
77A
77B

V4E-2013 35mm New Line
37
V4E-2013 35mm New Line
38
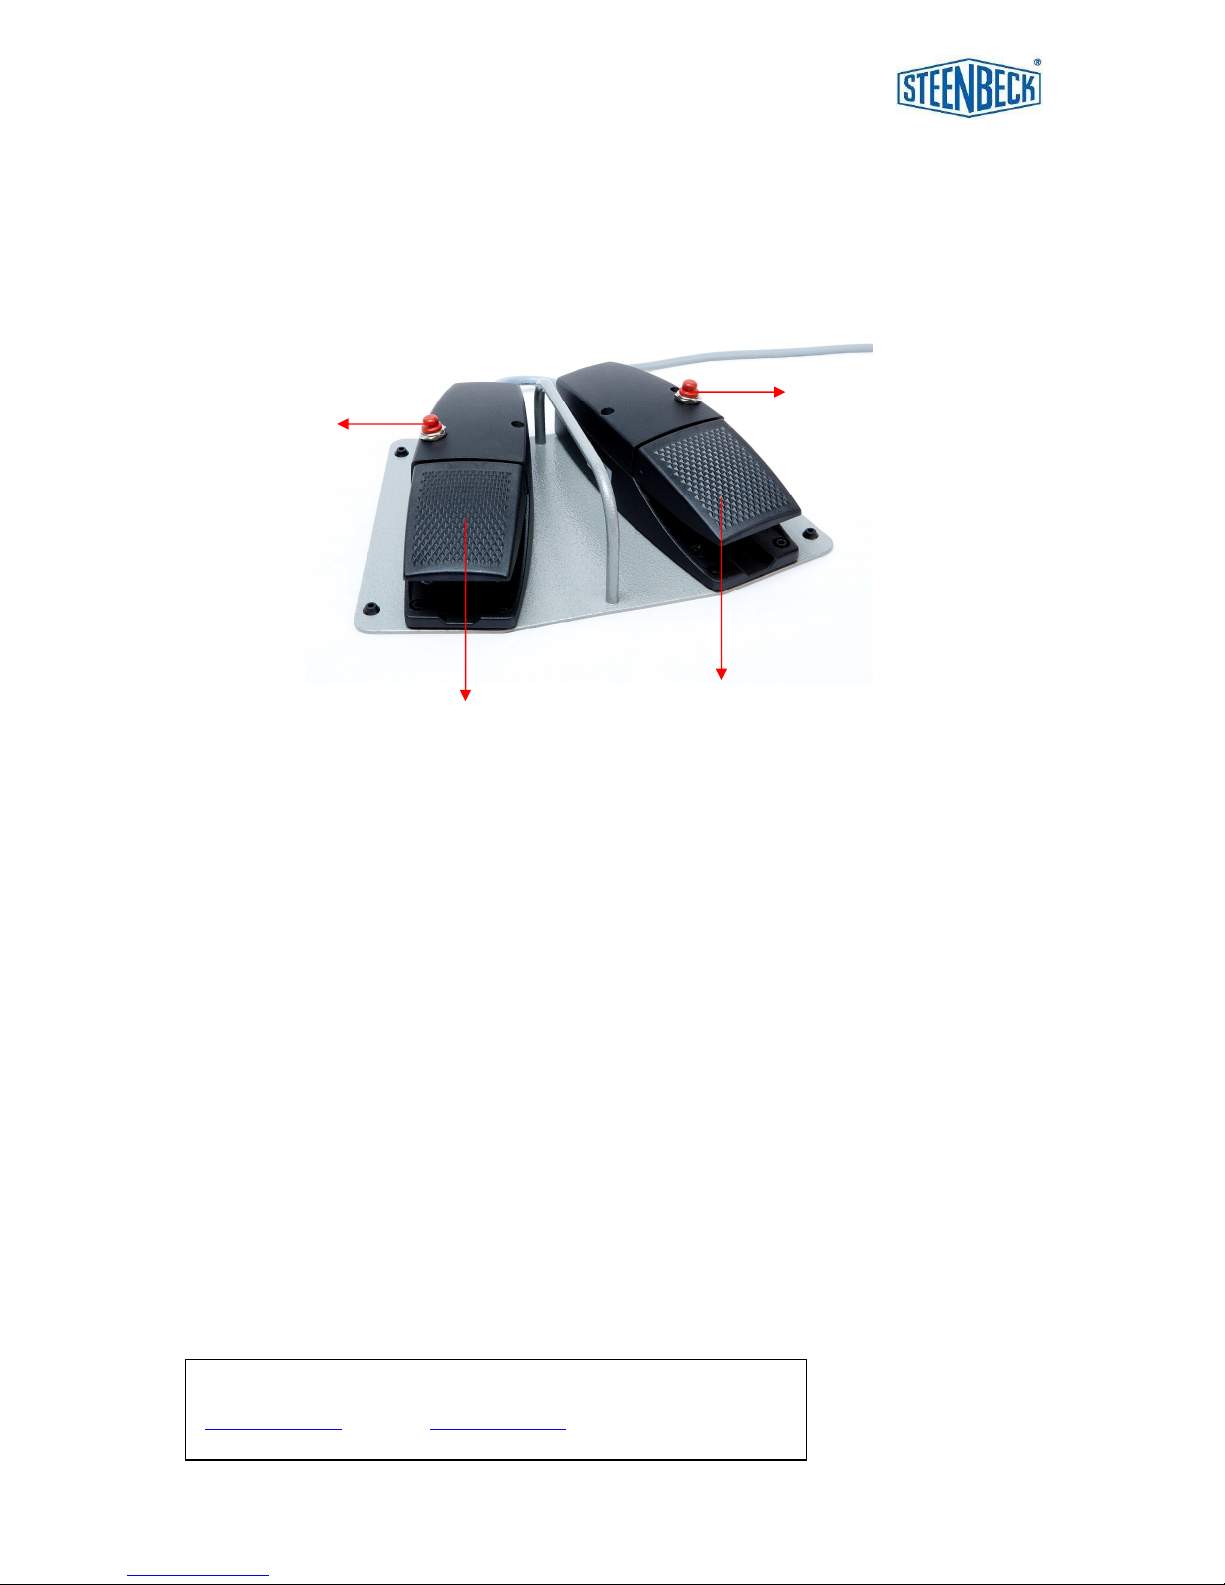
Fig.28
stop / sync
reverse
stop / sync
forward
variable speed
forward pedal
variable speed
reverse pedal
STEENBECK B.V.
(Ltd.)
Keizersveld 31, 5803 AM VENRAY. The Netherlands
Tel: +31 (0)478 63 03 00 Fax: +31 (0)478 69 00 07
info@steenbeck.com www.steenbeck.com
7.0 FOOT CONTROL (optional)
The “New Line” series foot control is a useful tool when you need your hands
for checking / guiding the film.
All drive commands can be given with this foot control .
Push buttons ( red ) are for start running in sync speed and the next push
is STOP.
You also can go directly from sync forward to sync reverse without pushing
for stop
When the table is in STOP you can use the foot pedal for variable speed
between 0 and 125 frames per second.
When the table is in sync speed you can push the foot pedal to increase
the speed.
However when you take the foot of the pedal, it will go back to sync speed.
Pushing both pedals, the table will stop.
IN WIND MODE ( page 14 fig. 9 ):
In this mode the foot control is NOT active.
 Loading...