

Page 1
ARCTIS NOVA 5
WIRELESS
PRODUCT INFORMATION GUIDE
Page 2
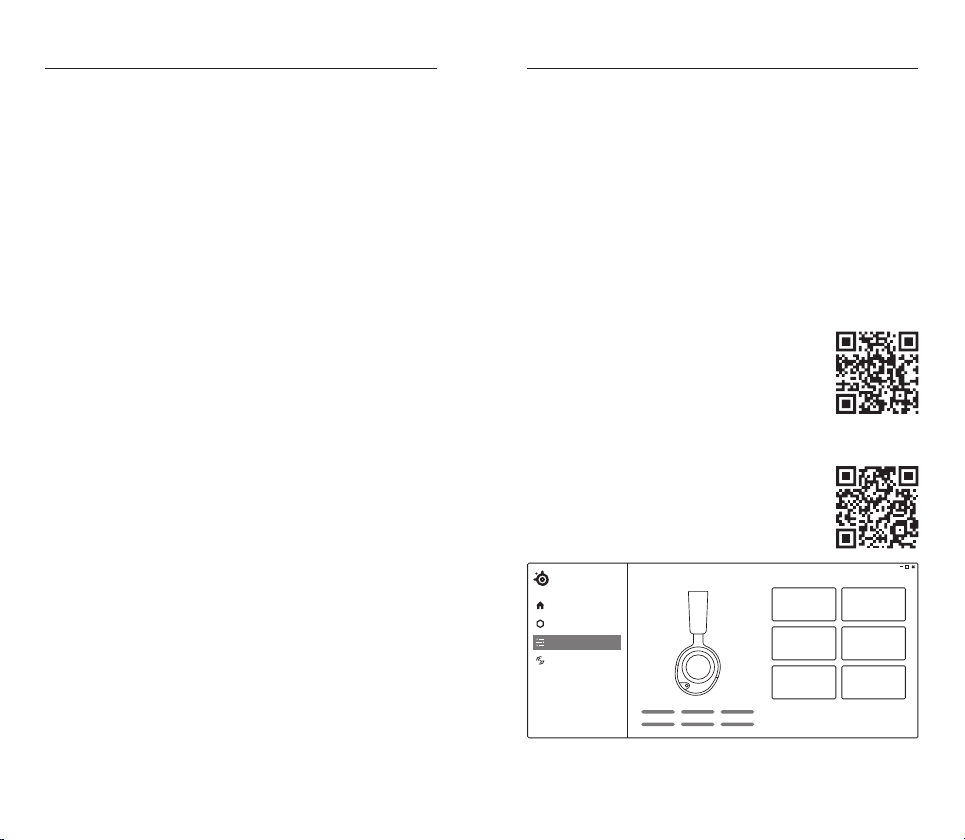
TABLE OF CONTENTS
GENERAL
General ..................................................... 3
Product Overview ............................................ 5
Quick Start Guide ............................................ 6
Setup ....................................................... 7
Power ...................................................... 8
Dongle Pairing ............................................... 9
Bluetooth ................................................... 10
Multimedia Controls .......................................... 10
QuickSwitch Button Controls ................................... 11
Microphone .................................................. 12
Perfect Fit ................................................... 13
Translations .................................................. 14
Deutsch ................................................... 14
Español .................................................... 16
Français ................................................... 19
Italiano .................................................... 21
Polski ..................................................... 24
Português .................................................. 27
日本語 .................................................... 29
简体中文.. 32
繁體中文 .................................................. 34
..................................................... 36
Regulatory . . . . . . . . . . . . . . . . . . . . . . . . . . . . . . . . . . . . . . . . . . . . . . . . . . . 40
PACKAGE CONTENTS
Arctis Nova 5 Wireless Headset
USB-C Wireless Dongle
USB-C to USB-A Adapter Cable
(5 ft / 1.5 m)
Charging Cable (5 ft / 1.5 m)
Product Information Guide
SYSTEM COMPATIBILITY
PC
PlayStation 5
PlayStation 4
Mobile
Nintendo Switch
Mac
NOVA 5 COMPANION APP
Complete your setup with fast access to custom
sound settings from your smartphone with the Nova 5
Companion App. Enjoy over 100+ game audio presets
in-game or on the go.
STEELSERIES GG
Use Engine inside SteelSeries GG to set custom
equalizer settings and control your mic.
GG also has other amazing apps like Sonar, a
breakthrough in gaming sound, that allows you to hear
what matters most, through cutting-edge audio tools.
GG
Home
Moments
Engine
Sonar
ARCTIS NOVA 5X
3
Page 3
PRODUCT OVERVIEW
13
11
*Find accessories and replacement parts at
steelseries.com/gaming-accessories
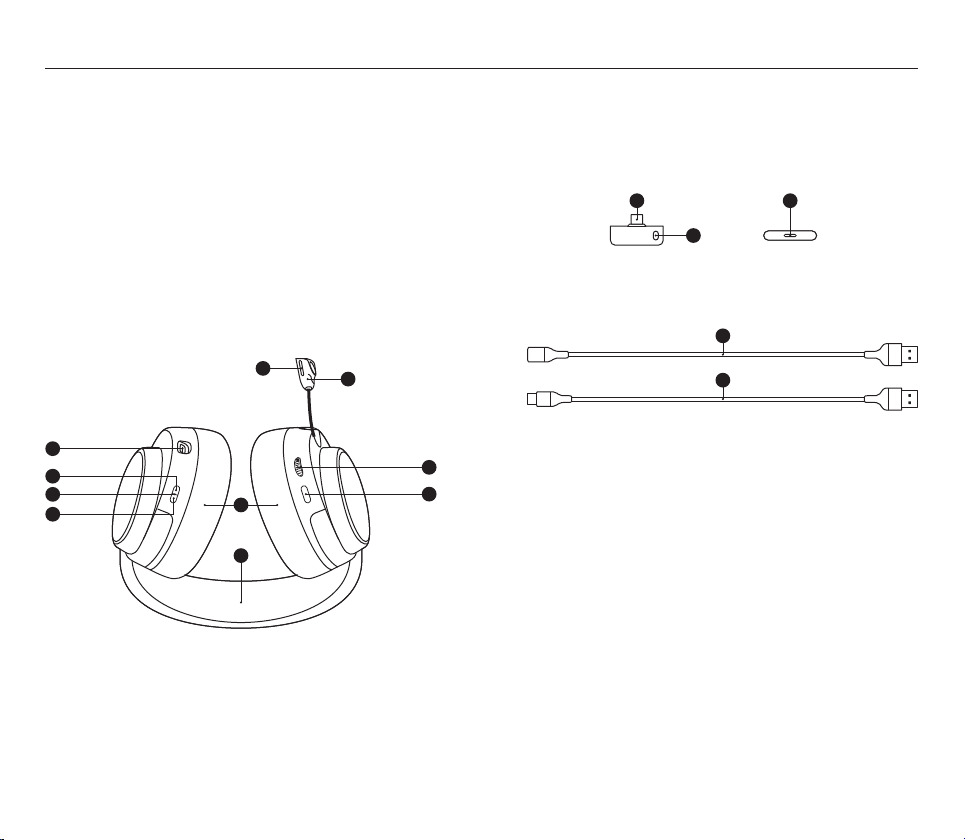
HEADSET
1 Elastic Headband*
2 Airweave Ear Cushions*
3 Retractable ClearCast Microphone
4 Microphone Mute LED
5 Volume Wheel
6 Microphone Mute Button
7 USB-C Charging Jack
8 Power Button
9 Power Indicator LED
10 QuickSwitch Button
7
8
9
10
DONGLE
11 USB-C Wireless Dongle*
12 Pairing Button
13 Status LED
12
ACCESSORIES*
14 USB-C to USB-A Adapter Cable*
15 Charging Cable*
14
4
2
1
3
5
6
15
54
Page 4
QUICK START GUIDE
PS5 / PS4
Device
Device
SETUP
Arctis Nova 5 Wireless can easily switch between a dongle and Bluetooth
connection for seamless usability. Need to take a call while you’re gaming?
Want to switch from your phone to your PC? Get started here.
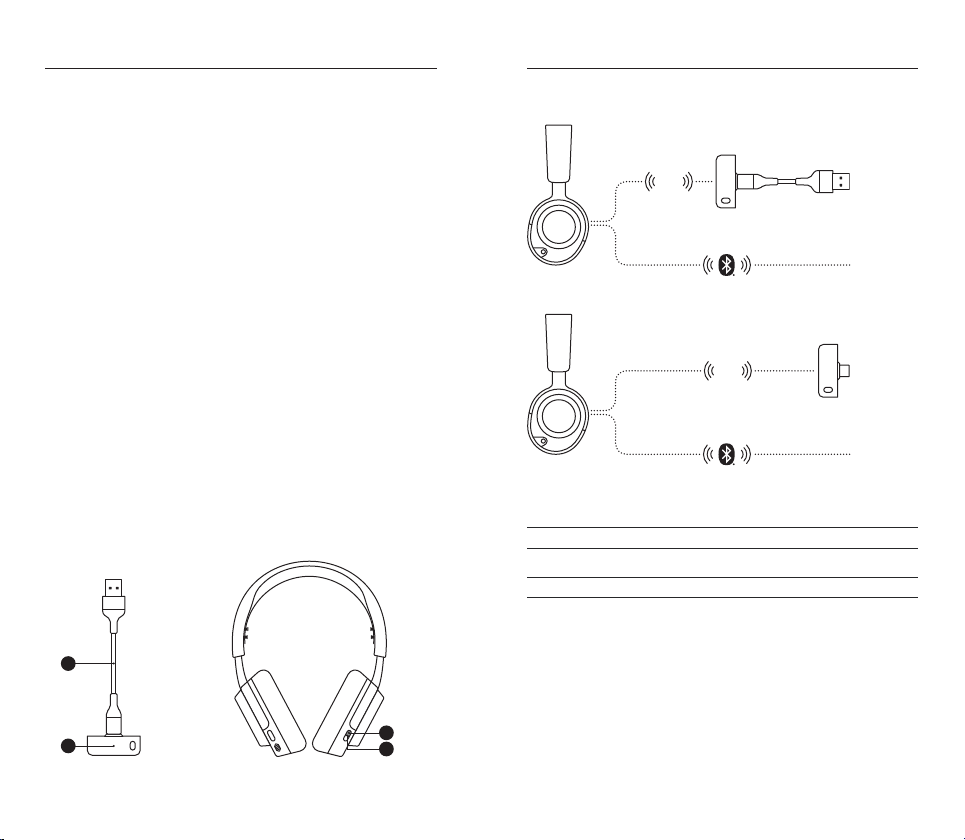
2.4 MODE
1 Connect the USB-C Wireless Dongle (11) into the USB-C to USB-A
Adapter Cable (14)
2 Plug the USB-C to USB-A Adapter Cable (14) into your computer or
PlayStation directly
3 Once the headset is turned on you will hear the connected sound
eect and the Power Indicator LED (9) on the headset will blink
slowly
BLUETOOTH MODE
1 To switch to BT mode, press the QuickSwitch Button (10) on the
headset and you will enter pairing mode
2 Go to your main device’s Bluetooth settings and pair to the “Nova 5”
device. Once successfully paired the blue Power Indicator LED (9)
will go from fast blinking to blinking slowly
3 Now that you’re setup you can switch between 2.4 GHz mode and
Bluetooth mode seamlessly with the press of the QuickSwitch
Button (10)
PC / PlayStation
14
CONNECTION TO USBA
2.4
GHz
PC
Any BT
CONNECTION TO USBC
PC
GHz
2.4
Android
Switch
Mac
Any BT
PLAYSTATION 5 AUDIO SETTINGS
PS5 SETTING > AUDIO OUTPUT
Output to Headphones All Audio
PS5 SETTING > AUDIO OUTPUT > VOLUME
Headphones Set to Max
11
10
9
76
Page 5
POWER
DONGLE PAIRING
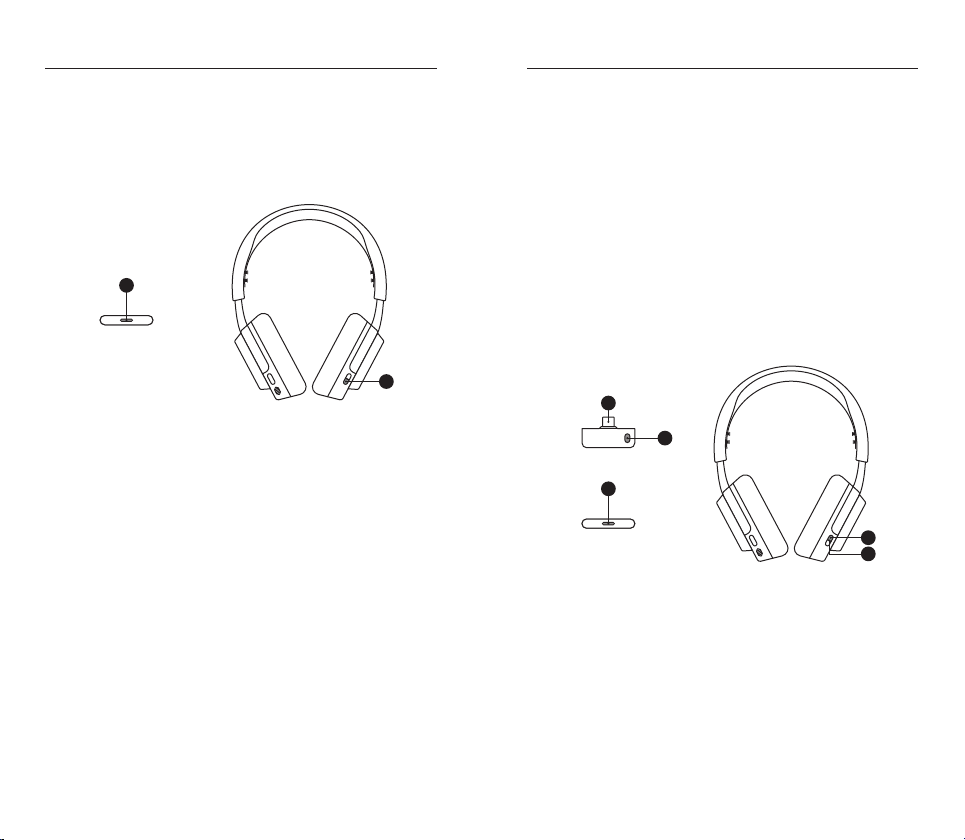
POWER ON/OFF
Press and hold the Power Button (8) for 1 second to power the headset
on/o.
When the Headset is powered on and connected, the Dongle’s Status LED
(13) increases brightness.
13
8
CHARGING
To charge the headset, connect the Charging Cable (15) from the
Headset’s USB-C Charging Jack (7) to any USB power source.
The color of the power LED indicates the battery level.
Green 100–50 %
Yellow 49–15 %
Orange 14–5 %
Red 4–1 %
Note: The headset and dongle come paired.
If you need to re-pair:
1 Connect the USB-C Wireless Dongle (11) to your gaming device
2 Press and hold the Dongle’s Pairing Button (12) for 4s until the
Dongle’s Status LED (13) blinks rapidly
3 Headset On – Press and hold the QuickSwitch Button (10) for 2
seconds until you hear “Dongle Pairing Mode” and the Headset’s
Power Indicator LED (9) blinks rapidly
Headset O – Press and hold the power button for 2s until the
Headset’s Power Indicator LED (9) blinks rapidly
4 When pairing is successful you will hear “Dongle Connected”, and the
Dongle’s Status LED (13) will turn solid
11
12
13
10
9
98
Page 6

BLUETOOTH
QUICKSWITCH BUTTON CONTROLS
Bluetooth can be used independently from 2.4 GHz Wireless by pressing
the QuickSwitch Button (10) and hearing “Bluetooth Mode”.
PAIRING
Headset on – Press & hold the QuickSwitch Button (10) for 2 seconds
until you enter pairing mode and the Headset’s Power Indicator LED (9)
blinks rapidly blue. To switch between dongle and BT pairing mode, press
the QuickSwitch Button (10).
Headset o – Press and hold the Power Button (8) for 2s until the
Headset’s Power Indicator LED (9) blinks rapidly. If the headset is in
dongle pairing mode, press the QuickSwitch Button (10) to switch to
Bluetooth pairing mode.
MULTIMEDIA CONTROLS
Play / Pause Music
Single · press the Power Button (8)
Skip Track
Double · · press the Power Button (8)
Previous Track
Triple · · · press the Power Button (8)
Answer / End Voice Call
Single · press the QuickSwitch Button (10)
(If call is answered in 2.4 GHz mode, you will return back to 2.4 GHz
mode after the Bluetooth call is over.)
Ignore Call
Double · · press the QuickSwitch Button (10)
Increase Call Volume
Single · press the Power Button (8)
MODE SWITCH
Switch between dongle & bluetooth mode by pressing the QuickSwitch
Button (10).
PAIRING MODE
Hold QuickSwitch Button (10) for 2 seconds.
Decrease Call Volume
Double · · press the Power Button (8)
1110
Page 7
MICROPHONE
PERFECT FIT
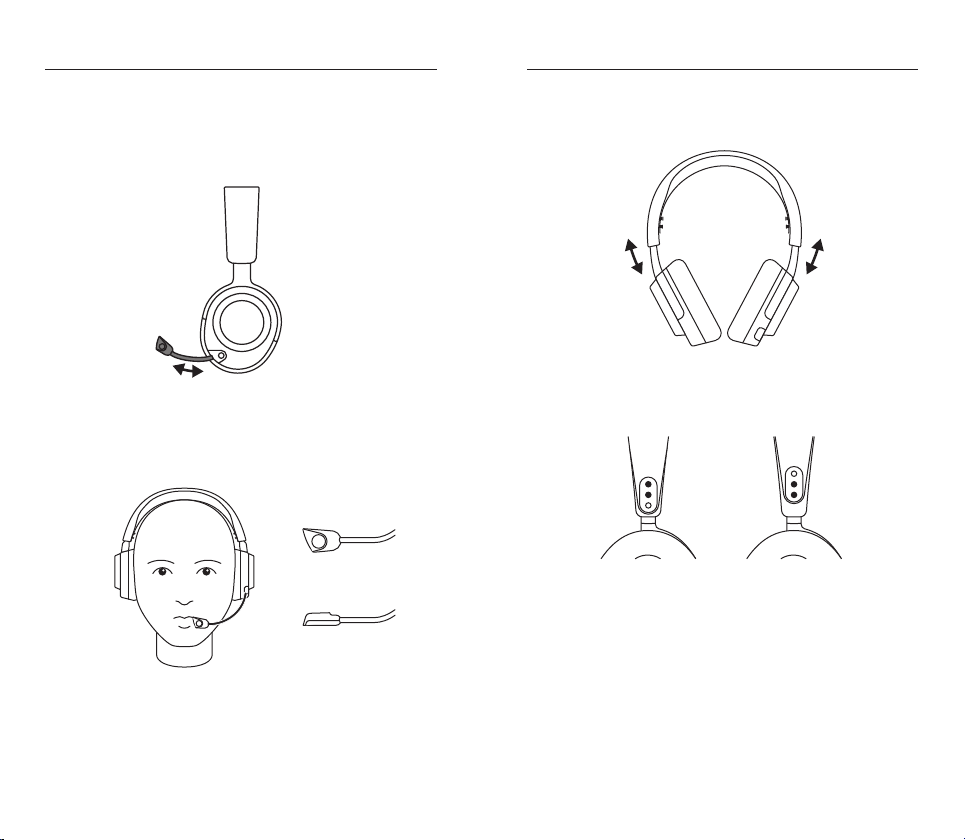
RETRACTABLE MICROPHONE
Out of the box, the Retractable ClearCast Microphone (3) is retracted.
To use the microphone, slide it away from the headset until it reaches full
extension.
POSITIONING
Position the Retractable ClearCast Microphone (3) close to the corner
of your mouth with the front surface facing you.
Note: The microphone should not be used when retracted.
There are two ways to adjust the t of your headset.
Slide the Earcups up or down to change the overall height.
Change the position of the Elastic Headband (1) on one or both sides to
achieve the desired tension and ex.
1312
Page 8

TRANSLATIONS
DEUTSCH
ALLGEMEIN
LIEFERUMFANG
Arctis Nova 5 Wireless Headset
USB-C Wireless-Dongle
USB-C- auf USB-A-Adapterkabel (1,5m)
KOMPATIBILITÄT
PC, PlayStation 5, PlayStation 4, Mobilgeräte, Nintendo Switch, Mac
NOVA 5 COMPANION APP
Runde dein Setup bequem mit benutzerdenierten Audio-Einstellungen über die auf
deinem Smartphone ab. Nutze über 100Audio-Presets für deine Games oder unterwegs.
STEELSERIES GG
Mit Engine in SteelSeries GG kannst du die Equalizer- und
Mikrofon-Einstellungen an deine Vorlieben anpassen.
In GG ndest du auch weitere spannende Anwendungen wie Sonar, eine
innovative App im Bereich Gaming-Audio, mit der du dank modernster
Audiotools genau die Sounds hören kannst, die am wichtigsten sind.
PRODUKTÜBERSICHT
HEADSET
1 Flexibler Kopfbügel*
2 AirWeave-Ohrpolster*
3 Einziehbares ClearCast-Mikrofon
4 Mikrofon-Stummschalt-LED
5 Lautstärkeregler
DONGLE
11 USB-C-Wireless-Dongle*
12 Taste zum Koppeln
ZUBEHÖR*
14 USB-C- auf USB-A-Adapterkabel* 15 Ladekabel*
*Zubehör und Ersatzteile gibt es unter steelseries.com/gaming-accessories
KURZANLEITUNG
Das Arctis Nova 5 Wireless kann bequem zwischen einer Verbindung über
einen Dongle und Bluetooth wechseln, damit du jederzeit kabellose Freiheit
genießen kannst. Du musst zwischen den Runden einen Anruf tätigen? Du
möchtest vom Handy zum PC wechseln? Dann bist du hier richtig.
2,4GHZMODUS
1 Verbinde das USB-C-Wireless-Dongle (11) mit dem
USB-C- auf USB-A-Adapterkabel (14)
2 Stecke das USB-C- auf USB-A-Adapterkabel (14) in
deinen Computer oder deine PlayStation
3 Sobald das Headset eingeschaltet ist, hörst du einen Signalton
und die Power-LED (9) auf dem Headset blinkt langsam
BLUETOOTHMODUS
1 Um in den Bluetooth-Modus zu wechseln, drückst du die QuickSwitch-
Taste (10) am Headset, um in den Kopplungsmodus zu gelangen
2 Wechsel zu den Bluetooth-Einstellungen deines Endgeräts und
kopple es mit dem Nova 5. Nach erfolgreicher Kopplung blinkt die
blaue Power-LED (9) nicht mehr schnell, sondern langsam
Ladekabel (1,5m)
Produkt-Informationshandbuch
6 Mikrofon-Stummschalttaste
7 USB-C-Ladeanschluss
8 Power-Taste
9 Power-LED
10 QuickSwitch-Taste
13 Status-LED
3 Nach der Einrichtung kannst du nahtlos zwischen dem 2,4-GHz-Modus und dem
Bluetooth-Modus umschalten, indem du auf die QuickSwitch-Taste (10) drückst
EINRICHTUNG
VERBINDUNG ÜBER USBA
PC, PS5 / PS4, Beliebiges Bluetooth-Gerät
VERBINDUNG ÜBER USBC
PC, Android, Switch, Mac, Beliebiges Bluetooth-Gerät
PLAYSTATION 5 AUDIOEINSTELLUNGEN
PS5-Einstellungen > Audioausgabe
Ausgabe über Kopfhörer Gesamtes Audio
PS5-Einstellungen > Audioausgabe > Lautstärke
Kopfhörer Höchste Einstellung
VERWENDUNG
EIN UND AUSSCHALTEN
Um das Headset ein- und auszuschalten, halte die Power-Taste (8) 1Sekunde gedrückt.
Wenn das Headset eingeschaltet und verbunden ist, leuchtet
die Status-LED (13) des Dongles heller.
LADEVORGANG
Um das Headset aufzuladen, verbinde das Ladekabel (15) mit dem USB-CLadeanschluss (7) und schließe es an eine beliebige USB-Stromquelle an.
Die Farbe des Power-LEDs zeigt den Akkustand an.
Grün 100–50%
Gelb 49–15%
Orange 14–5%
Rot 4–1%
KOPPELN PER DONGLE
Hinweis: Das Headset und der Dongle sind standardmäßig gekoppelt.
Um die Verbindung zum Dongle erneut herzustellen:
1 Verbinde das USB-C-Wireless-Dongle (11) mit deinem Endgerät
2 Halte die Taste zum Koppeln (12) des Dongle 4Sekunden lang
gedrückt, bis die Status-LED (13) des Dongle schnell blinkt
3 Headset ein– Halte die QuickSwitch-Taste (10) 2Sekunden lang gedrückt, bis du
„Dongle Pairing Mode“ hörst und die Power-LED (9) des Headset schnell blinkt
Headset aus– Halte die Power-Taste 2Sekunden lang gedrückt,
bis die Power-LED (9) des Headsets schnell blinkt
4 Wenn die Kopplung erfolgreich war, hörst du „Dongle Connected“
und die Status-LED (13) des Dongles leuchtet durchgängig
BLUETOOTH
Bluetooth kann unabhängig von 2,4 GHz Wireless verwendet werden, indem
du die QuickSwitch-Taste (10) drückst und „Bluetooth-Modus“ hörst.
KOPPELN
Headset ein– Halte die QuickSwitch-Taste (10) 2Sekunden lang
gedrückt, bis du im Kopplungsmodus bist und die Power-LED (9) des
Headsets schnell blau blinkt. Um zwischen dem Dongle- und dem BluetoothKopplungsmodus zu wechseln, drücke die QuickSwitch-Taste (10).
Headset aus– Halte die Power-Taste (8) 2Sekunden lang gedrückt,
bis die Power-LED (9) des Headsets schnell blinkt. Wenn sich das
Headset im Dongle-Kopplungsmodus bendet, drücke die QuickSwitch-
Taste (10), um in den Bluetooth-Kopplungsmodus zu wechseln.
1514
Page 9

MULTIMEDIASTEUERUNG
Musik abspielen/pausieren – Power-Taste (8) einmal drücken
Nächster Titel – Power-Taste (8) zweimal drücken
Vorheriger Titel – Power-Taste (8) dreimal drücken
Anruf entgegennehmen/beenden – QuickSwitch-Taste (10) einmal drücken
(Wenn der Anruf im 2,4-GHz-Modus angenommen wird, kehrst du nach
Beendigung des Bluetooth-Anrufs wieder in den 2,4-GHz-Modus zurück)
Anruf ignorieren – QuickSwitch-Taste (10) zweimal drücken
Anruautstärke erhöhen – Power-Taste (8) einmal drücken
Anruautstärke verringern – Power-Taste (8) zweimal drücken
QUICKSWITCHTASTE
MODUS WECHSELN
Wechsle mit der QuickSwitch-Taste (10) zwischen
Dongle-Verbindung und Bluetooth-Modus.
KOPPLUNGSMODUS
Halte die QuickSwitch-Taste (10) 2Sekunden lang gedrückt.
MIKROFON
EINZIEHBARES MIKROFON
Wenn du das Headset zum ersten Mal aus der Verpackung nimmst, ist das
Einziehbares ClearCast-Mikrofon (3) eingezogen. Wenn du das Mikrofon
aktivieren willst, musst du es vollständig aus dem Headset herausziehen.
POSITIONIERUNG
Positioniere das Einziehbares ClearCast-Mikrofon (3) nahe an
deinem Mundwinkel, mit der Vorderseite Richtung Gesicht.
Hinweis: Das Mikrofon sollte nicht verwendet werden, wenn es eingefahren ist.
PERFEKTE PASSFORM
Es gibt zwei Möglichkeiten, den Sitz deines Headsets anzupassen:
Schiebe die Ohrmuscheln nach oben oder unten, bis die gewünschte Höhe erreicht ist.
Ändere die Position des Flexibler Kopfbügel (1) auf einer oder beiden Seiten,
um den gewünschten Druck und die bevorzugte Flexibilität zu einzustellen.
ESPAÑOL
GENERAL
CONTENIDO DEL PAQUETE
Auriculares Arctis Nova 5 Wireless
Dongle inalámbrico USB-C
Cable adaptador USB-C a
USB-A (5 ft / 1,5 m)
COMPATIBILIDAD DEL SISTEMA
PC, PlayStation 5, PlayStation 4, Móviles, Nintendo Switch, Mac
NOVA 5 COMPANION APP
Finaliza tu conguración con acceso a ajustes de sonido personalizado
desde tu teléfono móvil con la Nova 5 Companion App. Disfruta de
más de 100 preajustes de sonido como y cuando los quieras.
STEELSERIE ENGINE
Utiliza Engine dentro de Steelseries GG para congurar los ajustes
personalizados del ecualizador y controlar tu micro.
GG también tiene otras aplicaciones asombrosas como Sonar,
pionera en sonido gaming, que te permite escuchar lo que más
importa, gracias a herramientas vanguardistas de audio.
Cable de carga (5 ft / 1,5 m)
Guía informativa sobre el producto
RESUMEN DEL PRODUCTO
AURICULARES
1 Diadema elástica*
2 Almohadillas de cuero* AirWeave
3 Micrófono retráctil ClearCast
4 Led de silenciamiento del micrófono
5 Perilla de volumen
DONGLE
11 Dongle inalámbrico USB-C*
12 Botón de emparejamiento
ACCESORIOS*
14 Cable adaptador USB-C a USB-A* 15 Cable de carga*
*Los accesorios y piezas de sustitución se encuentran en
steelseries.com/gaming-accessories
GUÍA DE INICIO RÁPIDO
Arctis Nova 5 Wireless puede cambiar rápidamente entre conexión por dongle y
Bluetooth para una usabilidad impecable. ¿Tienes que responder a una llamada
durante el juego? ¿Quieres cambiar entre tu teléfono y tu PC? Empieza por aquí.
MODO 2.4
1 Conecta Dongle inalámbrico USB-C (11) a Cable adaptador USB-C a USB-A (14)
2 Enchufa directamente Cable adaptador USB-C a
USB-A (14) a tu ordenador o Playstation
3 Una vez se hayan encendido los auriculares escucharás el efecto de
sonido que indica que están conectados y en los auriculares LED
indicador de alimentación (9) parpadeará lentamente
MODO BLUETOOTH
1 Cambia a modo BT, pulsa Botón QuickSwitch (10) en los
auriculares y accederás así al modo emparejamiento
2 Ve a los ajustes generales de Bluetooth de tu dispositivo y emparéjalo a
«Nova 5». Una vez que se empareje correctamente, el LED indicador
de alimentación (9) azul pasará de un parpadeo rápido a uno lento
3 Ahora que ya está congurado, puedes cambiar inmediatamente entre los
modos de 2,4 GHz y Bluetooth pulsando Botón QuickSwitch (10)
6 Botón para silenciar el micrófono
7 Conector de carga USB-C
8 Botón de encendido
9 LED indicador de alimentación
10 Botón QuickSwitch
13 LED de estado
CONFIGURACIÓN
CONEXIÓN A USBA
PC, PS5/PS4, Cualquier dispositivo Bluetooth
CONEXIÓN A USBC
PC, Android, Switch, Mac, Cualquier dispositivo Bluetooth
CONFIGURACIÓN AUDIO PLAYSTATION 5
Conguración PS5 > Salida de audio
Salida a auriculares Todo el audio
Conguración PS5 > Salida de audio > Volumen
Auriculares Establecer en máximo
ALIMENTACIÓN
ENCENDER/APAGAR
Mantén pulsado el Botón de encendido (8) durante 1
segundo para encender/apagar los auriculares.
Cuando los auriculares están encendidos y conectados,
aumenta el brillo de LED de estado (13) del dongle.
1716
Page 10

CARGAR
Para cargar los auriculares, conecta el Cable de carga (15) del Conector de
carga USB-C (7) de los auriculares a cualquier fuente de alimentación USB.
El color del led de alimentación indica el nivel de la batería.
Verde 100–50 %
amarillo 49–15 %
naranja 14–5 %
rojo 4–1%
EMPAREJAMIENTO DE DONGLE
Aviso: Los auriculares y el dongle vienen emparejados.
Si tienes que volver a emparejar:
1 Conecta el Dongle inalámbrico USB-C (11) a tu dispositivo de juego
2 Mantén pulsado el Botón de emparejamiento (12) del dongle durante 4
segundos hasta que el LED de estado (13) del dongle parpadee rápidamente
3 Encender auriculares – Mantener pulsado Botón QuickSwitch (10) 2 segundos
hasta que oigas «Modo de emparejamiento de dongle» y los LED indicador de
alimentación (9) de los auriculares parpadeen rápidamente
Apagar auriculares – Mantener pulsado el botón de encendido durante 2s hasta
que el LED indicador de alimentación (9) del auricular parpadee rápidamente
4 Cuando emparejamiento se haya realizado correctamente, escucharás «Dongle
conectado» el LED de estado (13) del dongle se iluminará de forma ja
BLUETOOTH
Bluetooth se puede utilizar independientemente del 2,4 GHz Wireless al
pulsar Botón QuickSwitch (10) y escuchar «Modo Bluetooth».
EMPAREJAMIENTO
Encender auriculares – Mantener pulsado Botón QuickSwitch (10) durante
2 segundos hasta que estés en modo emparejamiento y el LED indicador de
alimentación (9) del auricular parpadee rápidamente en azul. Para cambiar entre
modo dongle y modo emparejamiento Bluetooth, pulsa Botón QuickSwitch (10).
Apagar auriculares - Mantén pulsado el Botón de encendido (8) durante
2s hasta que el LED indicador de alimentación (9) parpadee rápidamente.
Si los auriculares están en modo emparejamiento dongle, pulsa Botón
QuickSwitch (10) para cambiar a modo de emparejamiento Bluetooth.
CONTROLES MULTIMEDIA
Reproducir/Pausar música – Pulsar una vez ·Botón de encendido (8)
Saltar pista – pulsar dos veces · · Botón de encendido (8)
Pista anterior – Pulsar tres veces · · · Botón de encendido (8)
Responder / acabar llamada de voz – Pulsar una vez · Botón QuickSwitch (10)
(Si respondes a una llamada en modo 2,4 GHz, volverás al modo
2,4 GHz cuando haya acabado la llamada Bluetooth.)
Ignorar llamada – Pulsar dos veces · · Botón QuickSwitch (10)
Subir volumen de llamada – Pulsar una vez · Botón de encendido (8)
Bajar volumen de llamada – Pulsar dos veces · · Botón de encendido (8)
CONTROLES DE BOTÓN QUICKSWITCH
CAMBIO DE MODO
Cambia entre los modos dongle y bluetooth pulsando Botón QuickSwitch (10).
MODO EMPAREJAMIENTO
Mantén pulsando Botón QuickSwitch (10) 2 segundos.
MICRÓFONO
MICRÓFONO RETRÁCTIL
El Micrófono retráctil ClearCast (3) se suministra replegado. Para utilizar
el micrófono, extiéndelo hasta que alcance la longitud máxima.
COLOCACIÓN
Coloca el Micrófono retráctil ClearCast (3) cerca de la comisura
de los labios con la supercie frontal apuntando hacia ti.
Aviso: El micrófono no se debe utilizar cuando está replegado.
AJUSTE PERFECTO
Existen dos formas de ajustar tus auriculares.
Sube o baja los auriculares para cambiar su altura en conjunto.
Cambia la posición de la Diadema elástica (1) en uno o en ambos
lados para que logres la tensión y exibilidad que buscas.
FRANÇAIS
GÉNÉRAL
CONTENU DE L’EMBALLAGE
Casque audio sans l Arctis
Nova 5 Wireless
Dongle sans l USB-C
Câble adaptateur USB-C
COMPATIBILITÉ SYSTÈME
PC, PlayStation 5, PlayStation 4, Mobile, Nintendo Switch, Mac
NOVA 5 COMPANION APP
Complétez votre installation avec un accès rapide aux réglages sonores
personnalisés depuis votre smartphone grâce à la Nova 5 Companion App.
Protez de plus de 100 préréglages audio en jeu ou en déplacement.
STEELSERIES GG
Utilisez Engine dans SteelSeries GG pour dénir des paramètres
d’égaliseur personnalisés et contrôler votre micro.
GG dispose aussi d’autres applications exceptionnelles comme Sonar,
une révolution en termes de son gaming, qui vous permet d’entendre
ce qui compte le plus, par le biais d’outils audio de pointe.
PRÉSENTATION DU PRODUIT
CASQUE AUDIO
1 Bandeau élastique*
2 Coussinets Airweave pour les oreilles*
3 Microphone ClearCast rétractable
4 LED de sourdine du microphone
5 Molette de volume
DONGLE
11 Dongle sans l USB-C*
12 Bouton d’appairage
ACCESSOIRES*
14 Câble adaptateur USB-C vers USB-A* 15 Câble de recharge*
*Trouvez des accessoires et des pièces de rechange sur steelseries.com/gaming-accessories
GUIDE DE DÉMARRAGE RAPIDE
L’Arctis Nova 5 Wireless peut facilement passer d’un dongle à une connexion
Bluetooth pour une utilisation continue. Vous avez besoin de prendre un appel en
pleine partie? Vous voulez passer de votre téléphone à votre PC? Commencez ici.
MODE 2,4
1 Connectez le Dongle sans l USB-C (11) au Câble
adaptateur USB-C vers USB-A (14)
vers USB-A (1,5 m)
Câble de recharge (1,5 m)
Guide d’information sur le produit
6 Bouton de sourdine du microphone
7 Prise de recharge USB-C
8 Bouton d’alimentation
9 Voyant d’alimentation LED
10 Bouton QuickSwitch
13 LED d’état
1918
Page 11

2 Branchez le Câble adaptateur USB-C vers USB-A (14)
directement sur votre ordinateur ou votre PlayStation.
3 Une fois le casque allumé, vous entendrez l’eet sonore de connexion et le
symbole Voyant d’alimentation LED (9) sur le casque clignotera lentement.
MODE BLUETOOTH
1 Pour passer en mode Bluetooth, appuyez sur le Bouton QuickSwitch
(10) du casque et vous entrerez dans le mode d’appairage.
2 Allez dans les paramètres Bluetooth de votre appareil principal et appairez avec
l’appareil «Nova 5». Une fois l’appairage réussi, le Voyant d’alimentation
LED (9) bleu passera d’un clignotement rapide à un clignotement lent.
3 Maintenant que la conguration est eectuée, vous pouvez
basculer entre le mode 2,4 GHz et le mode Bluetooth de manière
continue en appuyant sur le Bouton QuickSwitch (10).
CONFIGURATION
CONNEXION À L’USBA
PC, PS5 / PS4, Tout appareil Bluetooth
CONNEXION À L’USBC
PC, Android, Switch, Mac, Tout appareil Bluetooth
PARAMÈTRES AUDIO DE LA PLAYSTATION 5
Paramètres PS5 > Sortie audio
Sortie vers les écouteurs Tout l’audio
Paramètres PS5 > Sortie audio > Volume
Écouteurs Régler sur Max
ALIMENTATION
ALLUMER/ÉTEINDRE
Appuyez sur le Bouton d’alimentation (8) et maintenez-le enfoncé
pendant 1 seconde pour allumer ou éteindre le casque.
Lorsque le casque est allumé et connecté, la luminosité
du LED d’état (13) du dongle augmente.
RECHARGE
Pour recharger le casque, connectez le Câble de recharge (15) de la Prise
de recharge USB-C (7) du casque à une source d’alimentation USB.
La couleur de la LED d’alimentation indique le niveau de la batterie.
Vert 100–50%
Jaune 49–15%
Orange 14–5%
Rouge 4–1%
APPAIRAGE DU DONGLE
Remarque: Le casque et le dongle sont appairés par défaut.
Si vous avez besoin de réappairer:
1 Connectez le Dongle sans l USB-C (11) à votre appareil de jeu.
2 Appuyez sur le Bouton d’appairage (12) du dongle et maintenez-le enfoncé pendant
4 secondes jusqu’à ce que le LED d’état (13) du dongle clignote rapidement.
3 Casque activé – Appuyez et maintenez le Bouton QuickSwitch (10) pendant
2 secondes jusqu’à ce que vous entendiez «Mode d’appairage du dongle» et
que le Voyant d’alimentation LED (9) du casque clignote rapidement Casque
désactivé – Appuyez et maintenez le bouton d’alimentation pendant 2 secondes
jusqu’à ce que le Voyant d’alimentation LED (9) du casque clignote rapidement.
4 Lorsque l’appairage est réussi, vous entendrez «Dongle connecté»
et le LED d’état (13) du dongle deviendra xe.
BLUETOOTH
Le Bluetooth peut être utilisé indépendamment du sans-l 2,4 GHz en appuyant
sur le Bouton QuickSwitch (10) et en entendant «Mode Bluetooth».
APPAIRAGE
Casque activé – Appuyez et maintenez la touche Bouton QuickSwitch (10) pendant
2 secondes jusqu’à ce que vous entriez dans le mode d’appairage et que le Voyant
d’alimentation LED (9) du casque clignote rapidement en bleu. Pour passer du mode
dongle au mode d’appairage Bluetooth, appuyez sur la touche Bouton QuickSwitch (10).
Casque désactivé – Appuyez et maintenez la touche Bouton d’alimentation (8)
pendant 2 secondes jusqu’à ce que le Voyant d’alimentation LED (9) du casque
clignote rapidement. Si le casque est en mode d’appairage dongle, appuyez sur
le Bouton QuickSwitch (10) pour passer en mode d’appairage Bluetooth.
COMMANDES MULTIMÉDIA
Lecture/pause d’un titre musical – Appuyez une · fois sur le Bouton d’alimentation (8)
Sauter une piste – Appuyez deux ·· fois sur le Bouton d’alimentation (8)
Piste précédente – Appuyez trois ··· fois sur le Bouton d’alimentation (8)
Répondre / Mettre n à un appel vocal – Appuyez une · fois sur le Bouton QuickSwitch (10)
(Si vous répondez à un appel en mode 2,4 GHz, vous reviendrez
en mode 2,4 GHz une fois l’appel Bluetooth terminé).
Ignorer l’appel Double – Appuyez deux ·· fois sur le Bouton QuickSwitch (10)
Augmenter le volume de l’appel – Appuyez une · fois sur le Bouton d’alimentation (8)
Diminuer le volume de l’appel – Appuyez deux ·· fois sur le Bouton d’alimentation (8)
COMMANDES DES BOUTONS QUICKSWITCH
MODE SWITCH
Passez du mode dongle au mode Bluetooth en appuyant sur le Bouton QuickSwitch (10).
MODE D’APPAIRAGE
Maintenez Bouton QuickSwitch (10) enfoncé pendant 2 secondes.
MICROPHONE
MICROPHONE RÉTRACTABLE
À la sortie de l’emballage, le Microphone ClearCast rétractable (3)
est rétracté. Pour utiliser le microphone, faites-le glisser en l’éloignant
du casque jusqu’à ce qu’il atteigne sa pleine extension.
POSITIONNEMENT
Positionnez le Microphone ClearCast rétractable (3) près du
coin de votre bouche, la surface avant vous faisant face.
Remarque: Le microphone ne doit pas être utilisé lorsqu’il est rétracté.
AJUSTEMENT PARFAIT
Il existe deux façons de régler l’ajustement de votre casque
Faites glisser les écouteurs vers le haut ou vers le bas pour modier la hauteur totale.
Modiez la position du Bandeau élastique (1) d’un ou des deux
côtés pour obtenir la tension et la souplesse souhaitées.
ITALIANO
GENERALITÀ
CONTENUTO DELLA CONFEZIONE
Cue Arctis Nova 5 Wireless
Dongle wireless USB-C
Cavo adattatore da USB-C
a USB-A (1,5 m / 5’)
Cavo di ricarica (1,5 m / 5’)
Guida alle informazioni sul prodotto
2120
Page 12

COMPATIBILITÀ DEL SISTEMA
PC, PlayStation 5, PlayStation 4, MOBILE, Nintendo Switch, Mac
NOVA 5 COMPANION APP
Completa la tua congurazione con un accesso rapido alle impostazioni audio
personalizzate dal tuo smartphone con la Nova 5 Companion App. Sfrutta
gli oltre 100 preset audio per giochi specici mentre giochi o sei in giro.
STEELSERIES GG
Usa Engine all’interno di SteelSeries GG per impostare le impostazioni
dell’equalizzatore personalizzato e controllare il tuo microfono.
GG ore anche altre applicazioni sorprendenti quali Sonar, una
vera svolta nel suono per i giochi, che ti permette di sentire ciò che
conta di più, attraverso strumenti audio all’avanguardia.
PANORAMICA SUL PRODOTTO
CUFFIE
1 Archetto elastico*
2 Cuscinetti Airweave*
3 Microfono ClearCast retrattile
4 LED di microfono spento
5 Rotella del volume
DONGLE
11 Dongle wireless USB-C*
12 Pulsante di associazione
ACCESSORI*
14 Cavo adattatore da USB-C a USB-A* 15 Cavo di ricarica USB-C*
*Trovi accessori e parti di ricambio su steelseries.com/gaming-accessories
GUIDA RAPIDA
Arctis Nova 5 Wireless può passare facilmente da un dongle a una
connessione Bluetooth per un utilizzo senza interruzioni. Devi rispondere a
una chiamata mentre giochi? Vuoi passare dal telefono al PC? Inizia qui.
MODALITÀ 2.4
1 Collega il Dongle wireless USB-C (11) nell’Cavo adattatore da USB-C a USB-A (14)
2 Collega l’Cavo adattatore da USB-C a USB-A (14)
direttamente al computer o alla PlayStation
3 Una volta accese le cue, sentirai l’eetto sonoro della connessione e l’LED
indicatore di accensione (9) sulle cue lampeggerà lentamente.
MODALITÀ BLUETOOTH
1 Per passare alla modalità BT, premi il Pulsante QuickSwitch (10)
sulle cue e accederai alla modalità di associazione.
2 Vai alle impostazioni Bluetooth del tuo dispositivo principale e associalo al dispositivo
“Nova 5”. Una volta eettuata l’associazione, l’LED indicatore di accensione
(9) blu passerà da un lampeggiamento veloce a un lampeggiamento lento.
3 Ora sei pronto puoi passare agevolmente dalla modalità 2,4 GHz alla
modalità Bluetooth premendo il Pulsante QuickSwitch (10).
6 Pulsante di mute sul microfono
7 Jack di ricarica USB-C
8 Pulsante di accensione
9 LED indicatore di accensione
10 Pulsante QuickSwitch
13 LED di stato
IMPOSTAZIONI
CONNESSIONE A USBA
PC, PS5 / PS4, Qualsiasi dispositivo Bluetooth
CONNESSIONE A USBC
PC, Android, Switch, Mac, Qualsiasi dispositivo Bluetooth
IMPOSTAZIONI AUDIO PLAYSTATION 5
Impostazioni PS5 > Uscita audio
Riproduci l'audio tramite cue Tutto l'audio
Impostazioni PS5 > Uscita Audio > Volume
Cue Imposta al massimo
ALIMENTAZIONE
ACCENSIONE/SPEGNIMENTO
Tenere premuto il Pulsante di accensione (8) per 1
secondo per accendere/spegnere le cue.
Quando le Cue sono accese e collegate, il LED di stato
(13) del Dongle aumenta la luminosità.
RICARICA
Per ricaricare le cue, collegare il Cavo di ricarica USB-C (15) proveniente dal
Jack di ricarica USB-C (7) delle cue a qualsiasi fonte di alimentazione USB.
Il colore del pulsante di accensione a LED indica il livello della batteria.
Verde 100–50 %
Giallo 49–15 %
Arancione 14–5 %
Rosso 4–1 %
ASSOCIAZIONE DONGLE
Nota: Le cue e il dongle sono accoppiati.
Se c’è bisogno di una nuova associazione:
1 Collegare il Dongle wireless USB-C (11) al proprio dispositivo di gioco
2 Tenere premuto il Pulsante di associazione (12) del dongle per 4 secondi
no a quando il LED di stato (13) del dongle lampeggia rapidamente.
3 Cue accese – Tenere premuto il Pulsante QuickSwitch (10) per 2 secondi no a
quando non sentirai “Modalità associazione dongle” e il LED indicatore di accensione
(9) delle cue inizia a lampeggiare velocemente
Cue spente – Tenere premuto il pulsante di alimentazione
per 2 secondi no a quando il LED indicatore di accensione
(9) delle cue inizia a lampeggiare velocemente.
4 Quando l’associazione è riuscita, sentirai “Dongle connesso” e
il LED di stato (13) del Dongle passerà a luce ssa.
BLUETOOTH
Il Bluetooth può essere utilizzato indipendentemente dal Wireless a 2,4 GHz
premendo il Pulsante QuickSwitch (10) e ascoltando “Modalità Bluetooth”.
ASSOCIAZIONE
Cue accese – Tenere premuto il Pulsante QuickSwitch (10) per 2 secondi no
a quando non entrano in modalità associazione e il LED indicatore di accensione
(9) delle cue lampeggia velocemente in blu. Per passare dalla modalità
dongle a quella di accoppiamento BT, premi Pulsante QuickSwitch (10).
Cue spente -Tenere premuto il Pulsante di accensione (8) per 2 secondi no
a quando il LED indicatore di accensione (9) delle cue lampeggia rapidamente.
Se le cue sono in modalità di associazione con il dongle, premi il Pulsante
QuickSwitch (10) per passare alla modalità di associazione Bluetooth.
CONTROLLI MULTIMEDIALI
Riproduzione/messa in pausa della musica – Premere ·
una volta il Pulsante di accensione (8)
Traccia successiva – Premere · · due volte il Pulsante di accensione (8)
Traccia precedente – Premere · · · tre volte il Pulsante di accensione (8)
Rispondere / Terminare chiamata vocale – Premere · una volta il Pulsante QuickSwitch (10)
(se la risposta alla chiamata avviene quando sei in modalità 2,4 GHz,
tornerai in modalità 2,4 GHz al termine della chiamata Bluetooth)
Ignora la chiamata – Premi due volte · · il Pulsante QuickSwitch (10)
Aumentare il volume della chiamata – Premere una volta · il Pulsante di accensione (8)
Diminuire il volume della chiamata – Premere due volte · · il Pulsante di accensione (8)
2322
Page 13

CONTROLLI DEL PULSANTE QUICKSWITCH
SCAMBIO DELLE MODALITÀ
Passa dalla modalità dongle a quella bluetooth premendo il Pulsante QuickSwitch (10).
MODALITÀ DI ASSOCIAZIONE
Teni premuto Pulsante QuickSwitch (10) per 2 secondi
MICROFONO
MICROFONO RETRAIBILE
Quando lo tiri fuori dalla scatola, il Microfono ClearCast retrattile
(3) è retratto. Per usare il microfono, fallo scorrere fuori dalle
cue nché non raggiunge la massima estensione.
POSIZIONAMENTO
Posiziona il Microfono ClearCast retrattile (3) vicino all’angolo
della tua bocca con la supercie frontale rivolta verso di te.
Nota: Il microfono non deve essere usato quando è retratto.
ADATTABILITÀ PERFETTA
Ci sono due modi per regolare le tue cue.
Fai scorrere i padiglioni verso l’alto o verso il basso per cambiare l’altezza delle cue.
Cambia la posizione dell’Archetto elastico (1) su uno o entrambi
i lati per ottenere la tensione e la essione desiderate.
POLSKI
INFORMACJE OGÓLNE
ZAWARTOŚĆ OPAKOWANIA
Zestaw słuchawkowy Arctis
Nova 5 Wireless
Bezprzewodowy odbiornik USB-C
Przewód-adapter USB-C do
KOMPATYBILNOŚĆ SYSTEMOWA
PC, PlayStation 5, PlayStation 4, Smartfon, Nintendo Switch, Mac
NOVA 5 COMPANION APP
Uzupełnij swoją kongurację o szybki dostęp do niestandardowych
ustawień dźwięku ze smartfona za pomocą Nova 5 Companion App. Ciesz
się 100+ ustawieniami wstępnymi dźwięku w grze lub w podróży.
STEELSERIES GG
Użyj aplikacji Engine w Steelseries GG, aby ustawić domyślne
ustawienia korekcji dźwięku i kontrolować swój mikrofon.
GG ma również inne niesamowite aplikacje, jak Sonar, przełom
w dziedzinie dźwięku w grach, która pozwala usłyszeć to, co
najważniejsze, dzięki najnowocześniejszym narzędziom audio.
OPIS PRODUKTU
ZESTAW SŁUCHAWKOWY
1 Elastyczny pał ąk*
2 Poduszki nauszne Airweave*
3 Wysuwany mikrofon ClearCast
4 Wskaźnik LED wyciszenia mikrofonu
5 Pokrętło regulacji głośności
ODBIORNIK
11 Bezprzewodowy odbiornik USB-C*
12 Przycisk parowania
USB-A (5 ft / 1,5 m)
Przewód ładujący (5 ft / 1,5 m)
Przewodnik informacyjny dla produktu
6 Przycisk wyciszenia mikrofonu
7 Złącze ładowania USB-C
8 Przycisk zasilania
9 Wskaźnik LED zasilania
10 Przycisk QuickSwitch
13 Dioda LED statusu
AKCESORIA*
14 Przewód-adapter USB-C do USB-A 15 Przewód ładujący*
*Akcesoria i części zamienne dostępne są na stronie steelseries.com/gaming-accessories
SKRÓCONA INSTRUKCJA OBSŁUGI
Arctis Nova 5 Wireless można łatwo przełączać między odbiornikiem a połączeniem
Bluetooth, zapewniając bezproblemową obsł ugę. Musisz odebrać telefon w
trakcie gry? Chcesz przełączyć się z telefonu na komputer? Zacznij tutaj.
TRYB 2,4
1 Podł ącz Bezprzewodowy odbiornik USB-C (11) do
Przewód-adapter USB-C do USB-A (14)
2 Podł ącz Przewód-adapter USB-C do USB-A (14)
bezpośrednio do komputera lub konsoli PlayStation
3 Po wł ączeniu zestawu słuchawkowego usł yszysz efekt
dźwiękowy podłączenia, a wskaźnik Wskaźnik LED zasilania
(9) na zestawie słuchawkowym zacznie powoli migać
TRYB BLUETOOTH
1 Aby przejść do trybu BT, naciśnij Przycisk QuickSwitch (10) na zestawie
słuchawkowym, co spowoduje przejście do trybu parowania
2 Przejdź do ustawień Bluetooth swojego głównego urządzenia i sparuj je z
urządzeniem „Nova 5”. Po pomyślnym sparowaniu niebieska dioda Wskaźnik
LED zasilania (9) przestanie szybko migać a zacznie migać powoli
3 Po zakończeniu konguracji możesz płynnie przeł ączać się między trybem
2,4 GHz a trybem Bluetooth, naciskając przycisk Przycisk QuickSwitch (10)
KONFIGURACJA
PODŁĄCZENIE DO USBA
PC, PS5 / PS4, Dowolne urządzenie Bluetooth
PODŁĄCZENIE DO USBC
PC, Android, Switch, Mac, Dowolne urządzenie Bluetooth
USTAWIENIA AUDIO PLAYSTATION 5
Ustawienia PS5 > Wyjście audio
Wyjście do podłączenia słuchawek Wszystkie wejścia i wyjścia audio
Ustawienia PS5 > Wyjście audio > Głośność
Słuchawki Ustaw maksymalną wartość
ZASILANIE
WŁĄCZANIE/WYŁĄCZANIE ZASILANIA
Wciśnij i przytrzymaj Przycisk zasilania (8) przez 1 sekundę,
aby włączyć/wyłączyć zestaw słuchawkowy.
Gdy zestaw słuchawkowy jest włączony i połączony, Dioda
LED statusu (13) odbiornika zwiększa jasność
ŁADOWANIE
Aby naładować zestaw słuchawkowy, podłącz Przewód ładujący (15) z Złącze
ładowania USB-C (7) zestawu słuchawkowego do dowolnego źródła zasilania USB.
Kolor diody zasilania LED wskazuje poziom naładowania baterii.
Zielony 100-50%
Żółty 49-15%
Pomarańczowy 14-5%
Czerwony 4-1%
PAROWANIE Z ODBIORNIKIEM
Uwaga: Zestaw słuchawkowy i odbiornik są fabrycznie sparowane
W przypadku gdy wymagane jest ponowne parowanie:
2524
Page 14

1 Po łącz Bezprzewodowy odbiornik USB-C (11) ze swoją platformą do gier
2 Wciśnij i przytrzymaj Przycisk parowania (12) odbiornika przez 4 s
aż Dioda LED statusu (13) odbiornika zacznie szybko migać.
3 Zestaw sł uchawkowy włączony – Naciśnij i przytrzymaj Przycisk QuickSwitch
(10) przez 2 sekundy, aż usłyszysz dźwięk „Dongle Pairing Mode”, a Wskaźnik LED
zasilania (9) zestawu słuchawkowego zacznie szybko migać.
Zestaw słuchawkowy wyłączony – Naciśnij i przytrzymaj
przycisk zasilania przez 2 sekundy, aż Wskaźnik LED zasilania
(9) zestawu słuchawkowego zacznie szybko migać
4 Po pomyślnym sparowaniu usł yszysz „Dongle Connected”, a Dioda
LED statusu (13) odbiornika zacznie świecić światłem ciągłym
BLUETOOTH
Bluetooth może być używany niezależnie od łączności bezprzewodowej 2,4 GHz po
naciśnięciu Przycisk QuickSwitch (10) i usłyszeniu dźwięku „Bluetooth Mode”.
PAROWANIE
Zestaw słuchawkowy włączony – naciśnij i przytrzymaj Przycisk QuickSwitch (10)
przez 2 sekundy, aż przejdziesz w tryb parowania, a Wskaźnik LED zasilania (9)
zestawu słuchawkowego zacznie szybko migać na niebiesko. Aby przełączyć się między
trybem parowania odbiornika i BT, naciśnij przycisk Przycisk QuickSwitch (10).
Zestaw słuchawkowy wyłączony – Naciśnij i przytrzymaj Przycisk zasilania (8)
przez 2 sekundy, aż Wskaźnik LED zasilania (9) zestawu słuchawkowego zacznie
szybko migać. Jeśli zestaw słuchawkowy znajduje się w trybie parowania odbiornika,
naciśnij Przycisk QuickSwitch (10), aby przełączyć się w tryb parowania Bluetooth.
STEROWANIE MULTIMEDIAMI
Odtwórz/zatrzymaj muzykę – Pojedyncze · naciśnięcie Przycisk zasilania (8)
Pomiń utwór – Dwa · · naciśnięcia Przycisk zasilania (8)
Poprzedni utwór – Trzy · · · naciśnięcia Przycisk zasilania (8)
Odbierz / Zakończ połączenie gł osowe – Pojedyncze · naciśnięcie Przycisk QuickSwitch (10)
(Jeśli połączenie zostanie odebrane w trybie 2,4 GHz, po zakończeniu
połączenia Bluetooth powrócisz do trybu 2,4 GHz.)
Ignoruj połączenie – Podwójne · · naciśnięcie Przycisk QuickSwitch (10)
Zwiększ głośność połączenia – Pojedyncze · naciśnięcie Przycisk zasilania (8)
Zmniejsz głośność połączenia – Podwójne · · naciśnięcie Przycisk zasilania (8)
STEROWANIE PRZYCISKIEM QUICKSWITCH
PRZEŁĄCZNIK TRYBU
Przełączaj się między trybem odbiornika a trybem bluetooth,
naciskając przycisk Przycisk QuickSwitch (10).
TRYB PAROWANIA
Przytrzymaj Przycisk QuickSwitch (10) przez 2 sekundy.
MIKROFON
WYSUWANY MIKROFON
Po wyjęciu z pudełka Wysuwany mikrofon ClearCast (3) jest wsunięty.
Aby użyć mikrofonu, wysuń go na maksymalną długość z zestawu.
POZYCJONOWANIE
Ustaw Wysuwany mikrofon ClearCast (3) blisko kącika ust,
z przednią powierzchnią skierowaną do Ciebie.
Uwaga: Mikrofonu nie należy używać, gdy jest wsunięty.
IDEALNE DOPASOWANIE
Istnieją dwie metody dopasowania zestawu słuchawkowego.
Przesuwaj nauszniki w górę lub w dół, aby regulować ogólną wysokość.
Zmień położenie Elastyczny pałąk (1) z jednej lub z obu
stron, by ustawić żądany naciąg i elastyczność.
PORTUGUÊS
GERAL
CONTEÚDO DA EMBALAGEM
Auscultadores Arctis Nova 5 Wireless
Dongle sem os USB-C
Cabo adaptador USB-C para
USB-A* (5 ft / 1,5 m)
COMPATIBILIDADE DO SISTEMA
PC, PlayStation 5, PlayStation 4, Dispositivos móveis, Nintendo Switch, Mac
NOVA 5 COMPANION APP
Complete a sua conguração com acesso rápido a denições de som personalizadas
a partir do seu smartphone com a Nova 5 Companion App. Desfrute de mais
de 100 predenições de áudio de jogos no jogo ou em movimento.
STEELSERIES GG
Utiliza o Engine dentro do SteelSeries GG para denir as denições
do equalizador personalizadas e controlar o teu microfone.
A GG também tem outras aplicações fantásticas, como a Sonar, uma
inovação em termos de som de jogo que permite ouvir o que mais
importa através de ferramentas de áudio de última geração.
DESCRIÇÃO GERAL DO PRODUTO
AUSCULTADORES
1 Arco de suporte elástico*
2 Almofadas Airweave*
3 Microfone ClearCast retrátil
4 LED de silêncio do microfone
5 Roda de volume
DONGLE
11 Dongle sem os USB-C*
12 Botão de emparelhamento
ACESSÓRIOS*
14 Cabo adaptador USB-C para USB-A* 15 Cabo de carregamento
*Encontra acessórios e peças de substituição em steelseries.com/gaming-accessories
GUIA DE INICIAÇÃO RÁPIDA
O Arctis Nova 5 Wireless pode alternar facilmente entre um dongle e uma
ligação Bluetooth para uma utilização fácil. Precisas de atender uma chamada
enquanto jogas? Queres mudar do telemóvel para o PC? Começa aqui.
MODO 2.4
1 Conecta o Dongle sem os USB-C (11) a Cabo adaptador USB-C para USB-A (14)
2 Liga o Cabo adaptador USB-C para USB-A (14)
diretamente ao teu computador ou PlayStation
3 Quando os auscultadores estiverem ligados vais ouvir o som de conexão e o
LED indicador de energia (9) nos auscultadores vai piscar lentamente
MODO BLUETOOTH
1 Para mudar para o modo BT, pressiona o Botão QuickSwitch (10)
nos auscultadores e entrarás no modo de emparelhamento
2 Acede às congurações de Bluetooth do aparelho principal e emparelha ao
dispositivo “Nova 5”. Quando o emparelhamento for bem-sucedido o LED
indicador de energia (9) passará a piscar lentamente invés de rapidamente
3 Agora que está congurado, podes facilmente alternar entre o modo 2.4
GHz e o modo Bluetooth premindo o botão Botão QuickSwitch (10)
Cabo de carregamento (5 ft / 1,5 m)
Guia de informação sobre o produto
6 Botão de silêncio do microfone
7 Conector de carregamento USB-C
8 Botão de energia
9 LED indicador de energia
10 Botão QuickSwitch
13 LED de estado
2726
Page 15
CONFIGURAÇÃO
LIGAÇÃO A USBA
PC, PS5 / PS4, Qualquer dispositivo Bluetooth
LIGAÇÃO A USBC
PC, Android, Switch, Mac, Qualquer dispositivo Bluetooth
DEFINIÇÕES DE ÁUDIO PLAYSTATION 5
Denições PS5 > Saída de áudio
Saída para auscultadores Todo o áudio
Conguração PS5 > Saída de áudio > Volume
Auscultadores Denir para o máximo
ENERGIA
LIGAR/DESLIGAR
Prime e mantém premido o Botão de energia (8) durante
1 segundo para ligar/desligar os auscultadores.
Quando os auscultadores estiverem ligados e conectados, o
LED de estado (13) do Dongle aumenta o seu brilho.
A CARREGAR
Para carregar os auscultadores, liga o Cabo de carregamento (15) do Conector de
carregamento USB-C (7) dos auscultadores a qualquer fonte de energia USB.
A cor do LED de energia indica o nível da bateria.
Verde 100–50%
Amarelo 49–15%
Laranja 14–5%
Vermelho 4–1%
EMPARELHAR O DONGLE
Nota: Os auscultadores e os dongle vêm emparelhados.
Caso necessites de voltar a emparelhar:
1 Liga o Dongle sem os USB-C (11) ao teu dispositivo de gaming
2 Prime e mantém premido o Botão de emparelhamento (12) do dongle durante
4 segundos até que o LED de estado (13) do dongle pisque rapidamente.
3 Auscultadores ligados – Mantém premido o Botão QuickSwitch (10) durante 2
segundos até ouvires “Modo de emparelhamento do dongle” e o LED indicador de
energia (9) dos auscultadores piscar rapidamente
Auscultadores desligados – Mantém premido o botão de energia durante 2 segundos
até o LED indicador de energia (9) dos auscultadores piscar rapidamente
4 Quando o emparelhamento for bem-sucedido, ouvirás “dongle
conectado” e o LED de estado (13) do dongle cará sólido
BLUETOOTH
O Bluetooth pode ser usado de forma independente do 2.4 GHz sem os
premindo o Botão QuickSwitch (10) e ouvindo o “Modo Bluetooth”
EMPARELHAMENTO
Auscultadores ligados – Mantém premido o Botão QuickSwitch (10) durante
2 segundos até entrares em modo de emparelhamento e o LED indicador de
energia (9) dos auscultadores piscar rapidamente a azul. Para alternar entre o
modo de emparelhamento do dongle e BT prime o Botão QuickSwitch (10).
Auscultadores desligados – Mantém premido o Botão de energia (8) durante 2
segundos até o LED indicador de energia (9) dos auscultadores piscar rapidamente.
Se os auscultadores estiverem em modo de emparelhamento do dongle, prime o Botão
QuickSwitch (10) para mudar para o modo de emparelhamento do Bluetooth.
CONTROLOS MULTIMÉDIA
Reproduzir/Pausar Música – Carrega uma vez no Botão de energia (8)
Avançar Faixa – Carrega duas vezes no Botão de energia (8)
Faixa Anterior – Carrega três vezes no Botão de energia (8)
Atender/Terminar chamada de voz – Carrega uma vez no Botão QuickSwitch (10)
(Se a chamada for atendida em modo 2.4 GHz, voltarás ao modo
2.4 GHz depois de a chamada Bluetooth terminar.)
Ignorar chamada – Carrega duas vezes no Botão QuickSwitch (10)
Aumentar volume de chamada – Carrega uma vez no Botão de energia (8)
Baixar volume de chamada – Carrega duas vezes no Botão de energia (8)
CONTROLOS DE BOTÃO QUICKSWITCH
MODO SWITCH
Alterna entre o modo dongle e bluetooth carregando no Botão QuickSwitch (10).
MODO DE EMPARELHAMENTO
Mantém premido Botão QuickSwitch (10) durante 2 segundos.
MICROFONE
MICROFONE RETRÁTIL
O Microfone ClearCast retrátil (3) vem retraído de fábrica. Para
utilizar o microfone, estica-o até atingir a sua extensão total.
POSICIONAMENTO
Posiciona o Microfone ClearCast retrátil (3) perto do canto
da boca com a superfície frontal voltada para ti.
Nota: o microfone não deve ser utilizado quando retraído.
AJUSTE PERFEITO
Existem duas formas de ajustar os teus auscultadores.
Desliza as almofadas para cima ou para baixo para alterar a altura total.
Altera a posição do Arco de suporte elástico (1) num ou em ambos
os lados para alcançar a tensão e exibilidade pretendidas.
日本語
概要
パッケージ 内容
ArctisNova5ワイヤレスヘッドセット
USB-Cワイヤレスドングル
USB-C&USB-Aアダプター
ケーブル(5ft/1.5m)
システム互換性
PC,PlayStation5,PlayStation4,モバイル,NintendoSwitch,Mac
NOVA 5 COMPANION APP
Nova5CompanionAppを使えば、スマートフォンからカスタムサウンド
設定に素早くアクセスして設定を完了できます。100種類以上のゲーム
オーディオ・プリセットをゲーム中や外出先でお楽しみください。
STEELSERIES GG
SteelSeriesGG内でEngineを使用すると、カスタムのイコラ
イザーを設 定してマイクをコントロールできます。
GGには、ゲームサウンドに革命をもたらしたSonarなどの優れたアプリがあり、
最先端のオーディオツールにより最も重要なサウンドを聞くことができます。
製品概要
ヘッド セット
1 伸縮性のあるヘッドバンド*
2 Airweaveイヤークッション*
充電ケーブル(5ft/1.5m)
製品情報ガイド
3 格納式ClearCastマイク
4 マイクミュートLED
2928
Page 16

5 音 量ホ イール
6 マイクミュートボタン
7 USB-C充電ジャック
ドングル
11 USB-Cワイヤレスドングル*
12 ペア リング ボ タン
アクセサリ *
14 USB-C&USB-Aアダプターケーブル* 15 充 電ケーブル*
*steelseriescom/gaming-accessoriesでアクセサリーと交換用パーツをお求めいただけます
クイッ クスタ ートガ イド
ArctisNova5ワイヤレスは、ドングルとBluetooth接続を簡単に切り替えることがで
き、シームレスな使い心地を実現します。ゲーム中にかかってきた電話をとりたい場
合や、携帯電話からPCに切り替えたい場合など、便利な機能をご活用ください。
2.4モード
1 USB-Cワ イヤレスドン グル (11) をUSB-C & USB-A
アダプ ターケーブ ル (14)に 接続します
2 USB-C & USB-Aア ダプターケ ーブル (14)をPCまたはPlayStationに直接繋げます
3 ヘッドセットがオンになると、接続されたことを意味するサウンドエフェク
ト が 鳴 り 、ヘ ッ ド セ ッ ト の 電源表示LED (9) が ゆ っくり 点 滅 します 。
BLUETOOTHモード
1 BTモードに切り替えるには、ヘッドセットのQuickSwitch
ボタン (10) を押してペアリングモ ードにします
2 メインデバイスのBluetooth設定で、“Nova5”デバイスにペアリングしますペアリングが
成 功 す る と 、青 い 電源表示LED (9)が高速点滅からゆっくりとした点滅に変わります
3 こ れ で セ ット ア ップ が 完 了 し 、QuickSwitchボ タン (10)を押すと2.4GHzモ
ードとBluetoothモードをシームレスに切り替えられるようになります
8 電 源 ボ タン
9 電源表示LED
10 QuickSwitchボタン
13 ステータスLED
設定
USB-Aへの接続
PC、PS5/PS4,任意のBluetoothデバイス
USB-Cへの接続
PC,Android,Switch,Mac,任意のBluetoothデバイス
PLAYSTATION 5オーディオ設定
PS5設定>オーディオ出力
ヘッド ホ ン 出 力 全 ての オ ー ディオ
PS5設定>オーディオ出力>音量
ヘッド ホ ン 最大に設定
電源
電源オン/オフ
ヘ ッド セ ット の 電 源 を オ ン / オフ に す る に は 、電源ボ タン (8)を1秒間押し続けます。
ヘッドセットの電源がオンになって接続されると、ドングル
のステータス LED (13)の 明 るさが 増し ます。
充電
ヘ ッド セ ット を 充 電 す る に は 、ヘッ ド セット の USB-C充 電ジ ャッ
ク (7)の充電 ケーブル (15)をUSB電源に接続します。
電源LEDの色がバッテリーレベルを表示します。
緑 100〜50%
黄 49〜15%
オレンジ 14〜5%
赤 4〜1%
ドングルのペアリング
注:ヘッドセットとドングルは最初からペアリングされています。
再ペアリングが必要な場合の手順:
1 USB-Cワ イヤレスドン グル (11) をゲーミングデバイスに接続します
2 ドン グル の ス テータス LED (13)が高速点滅するまでドング
ルのペア リングボ タン (12)を4秒間押し続けます
3 ヘッドセットがオンの状態–「ドングルペアリングモード」という音が鳴り、ヘッドセットの電
源表示LED (9)が高速点滅するまでQuickSwitchボタン (10)を2秒間押し続けます。
ヘッドセットがオフの状態–ヘッドセットの電源表示LED (9)が
高速点滅するまで電源ボタンを2秒間押し続けます。
4 ペ アリングが成功すると、「ドングルが接 続されました」という音が
鳴ってドン グ ル の ステー タスLED (13) が点 灯 します。
BLUETOOTH
QuickSwitchボタン (10)を押して「Bluetoothモード」という音が鳴る
と、Bluetoothを2.4GHzワイヤレスとは別に使用することができます。
ペアリン グ
ヘッドセットがオンの状態–ヘッドセットがペアリングモードになり、電源表示LED (9)
が青で高速点滅するまでQuickSwitchボタン (10)を2秒間押し続けます。ドングル
とBTペアリングモードを切り替えるには、QuickSwitchボタン (10)を押 します。
ヘッドセットがオフの状態–ヘッドセットの電源表示LED (9)が高速点滅するまで電源
ボタン (8)を2秒間押し続けます。ヘッドセットがドングルペアリングモードになっている
場合、QuickSwitchボ タン (10)を押してBluetoothペアリングモードに切り替えます。
マ ルチ メディア コント ロ ール
音楽の再生/停止–電源 ボタン (8)を1度押す
曲のスキップ–電 源ボタン (8)を2度押す
前の曲へ移動–電源 ボタン (8)を3度押す
音声電話の応答/終了–QuickSwitchボタン (10)を1度押す
(2.4GHzモードで通話に応答した場合、Bluetooth通
話終了後に2.4GHzモードに戻ります。)
電話を無視–QuickSwitchボタン (10)を2度押す
電話の音量を上げる–電源 ボタン (8)を1度押す
電話の音量を下げる–電源 ボタン (8)を2度押す
QUICKSWITCHボタンの操作
モ ードス イッチ
QuickSwitchボタン (10)を押して、ドングルとBluetoothモードを切り替えます。
ペアリン グモー ド
QuickSwitchボタン (10)を2秒押し続けます。
マイク
格納式マイク
開封時、格納式ClearCastマイク (3)のケーブルはヘッドセットに格納されています。
マイクを使 用するに は 、ヘッドセットからスライドさせて完全 に出してください 。
配置
格納式ClearCastマイク (3)を全 面がご自身 の方を向く
ようにして、口 元 の 近くに配 置 してください 。
注:マイクが格納されている時は使用できません。
完璧なフィット感
ヘッドセットのフィット感は、以下の2つの方法で調整できます。
イヤーカップを上下 にスライドさせて高さを調 節します。
伸縮性のあるヘッドバンド* (1)の片方または両方の位
置を、ご希望のきつさと角度に調節します。
3130
Page 17

简体中文
概述
包装内容
ArctisNova5Wireless耳机
USB-C无线收发器
USB-C转USB-A线(5英尺/1.5m)
系统兼容性
PC,PlayStation5,PlayStation4,手机,NintendoSwitch,Mac
NOVA 5 COMPANION APP
在智能手机上,使用Nova5CompanionApp,快速访问自定义音色设
置,完成设置。在游戏中或随时轻松享受100+种游戏音频预设。
STEELSERIES GG
利用SteelSeriesGG内置的Engine,定制均衡器设置和控制麦克风。
GG还有其他令人惊叹的应用,例如,Sonar,这是游戏音效的一个
突破,通过尖端的音频工具,为您呈现精彩的声音效果。
产品概览
耳机
1 弹性头带*
2 Airweave耳垫*
3 伸缩式ClearCast麦克风
4 麦克风静音LED
5 音量轮
收发器
11 USB-C无线收发器*
12 配对按钮
配件*
14 USB-C转USB-A线* 15 充电线*
*在.steelseriescom/gaming-accessories.查找配件和替换件
快速入门指南
ArctisNova5Wireless可以在收发器和Bluetooth连接之间轻松切换,实现
无缝使用。玩游戏时需要接听电话?想从手机切换到电脑?从这里开始。
2.4 模式
1 将USB-C 无线收发器 (11)连接至USB-C 转 USB-A 适配器电缆 (14)
2 将USB-C 转 USB-A 线 (14)直接插入电脑或PlayStation
3 一旦耳机开启,您将听到连接音效,且耳机上的电源指示灯 LED (9)将缓慢闪烁
BLUETOOTH 模式
1 若要切换到BT模式,请按下耳机上的快速开关按钮 (10),将进入配对模式
2 转到主设备的Bluetooth设置,并与“Nova5”设备配对。配对成功
后,蓝色电源指示灯 LED (9)将从快速闪烁变为缓慢闪烁
3 设置完毕后,只需按下快速开关按钮 (10),即可在2.4
GHz模式和Bluetooth模式之间无缝切换
设置
连接至 USB-A
PC,PS5/PS4,任何Bluetooth设备
连接至 USB-C
PC,Android,Switch,Mac,任何Bluetooth设备
PLAYSTATION 5 音频设置
PS5设置>音频输出
输出至耳机 所有音频
充电线(5英尺/1.5m)
产品信息指南
6 麦克风静音按钮
7 USB-C充电孔
8 电源按钮
9 电源指示灯LED
10 快速开关按钮
13 状态LED
PS5设置>音频输出>音量
耳机 设置为最大值
电源
电源开/关
按住电源按钮 (8)1秒,开启/关闭耳机。
在耳机通电并连接时,收发器的状态 LED (13)亮度增加。
充电
若要为耳机充电,请将充电线 (15)从耳机的USB-C 充电孔 (7)连接到任何USB电源。
电源LED的颜色表示电池电量。
绿色 100–50%
黄色 49–15%
橙色 14–5%
红色 4–1%
收发器配对
注意:在您收到时,耳机和收发器已配对。
如果需要重新配对:
1 将USB-C 无线收发器 (11)连接至游戏设备
2 按住收发器的配对按钮 (12)4秒,直至状态 LED (13)快速闪烁
3 开启耳机–按住快速开关按钮 (10)2秒,直至听到“收发器配对模式”,且耳机的电源
指示灯 LED (9)快速闪烁
关闭耳机–按住电源按钮2秒,直至耳机的电源指示灯 LED (9)快速闪烁
4 配对成功后,您会听到“收发器已连接”,且收发器的状态 LED (13)稳定亮起
BLUETOOTH
按下快速开关按钮 (10)并听到“BluetoothMode”,即可
独立于2.4GHz无线模式使用Bluetooth。
配对
开启耳机–按住快速开关按钮 (10)2秒,直至进入配对模式,且耳机的电源指示灯 LED
(9)快速闪烁蓝光。若要在收发器和BT配对模式之间切换,请按快速开关按钮 (10)。
关闭耳机–按住电源按钮 (8)2秒,直至耳机的电源指示灯 LED (9)快速闪烁。如果耳
机处于收发器配对模式,按下快速开关按钮 (10),可以切换到Bluetooth配对模式。
多媒体控制
播放/暂停音乐–按一次・电源按钮 (8)
跳过曲目–按两次・・电源按钮 (8)
上一首曲目–按三次・・・电源按钮 (8)
接听/结束语音通话–按一次・快速开关按钮 (10)
(若在2.4GHz模式下接听通话,Bluetooth通话结束后,将返回2.4GHz模式。)
忽略来电–按两次・・快速开关按钮 (10)
增加通话音量–按一次・电源按钮 (8)
降低通话音量–按两次・・电源按钮 (8)
快速开关按钮控制
模式开关
按下快速开关按钮 (10),在收发器和bluetooth模式之间切换。
配对模式
按住快速开关按钮 (10)2秒。
麦克风
可伸缩麦克风
在开箱时,伸缩式 ClearCast 麦克风 (3)处于收起状态。若要
使用麦克风,请将其从耳机上滑开,直至完全展开。
3332
Page 18

定位
将伸缩式 ClearCast 麦克风 (3)靠近嘴角,正面朝向您。
注意:麦克风在收起时,不能使用。
完美贴合
调整耳机的贴合度有两种方法。
向上或向下滑动听筒,改变整体高度。
更改一侧或两侧的弹性头带 (1)位置,获得所需的张力和弯曲度。
繁體中文
概述
包裝內容
ArctisNova5Wireless耳機
USB-C無線收發器
USB-C轉USB-A線(5英呎/1.5m)
系統相容性
PC,PlayStation5,PlayStation4,手機,NintendoSwitch,Mac
NOVA 5 COMPANION APP
在智慧型手機上,使用Nova5CompanionApp,快速存取自訂音色設
定,完成設定。在遊戲中或隨時輕鬆享受100+種遊戲音訊預設。
STEELSERIES GG
利用SteelSeriesGG內建的Engine,定制等化器設定和控制麥克風。
GG還有其他令人驚歎的應用,例如,Sonar,這是遊戲音效的一個突
破,透過尖端的音訊工具,為您呈現無比震撼的聲音效果。
產品概覽
耳機
1 彈性頭帶*
2 Airweave耳罩*
3 伸縮式ClearCast麥克風
4 麥克風靜音LED
5 音量輪
收發器
11 USB-C無線收發器*
12 配對按鈕
配件*
14 USB-C轉USB-A線* 15 充電線*
*在.steelseriescom/gaming-accessories.查找配件和替換件
快速入門指南
ArctisNova5Wireless可以在收發器和Bluetooth連接之間輕鬆切換,實現
無縫使用。玩遊戲時需要接聽電話?想從手機切換到電腦?從這裡開始。
2.4 模式
1 將USB-C 無線收發器 (11)連接至USB-C 轉 USB-A 線 (14)
2 將USB-C 轉 USB-A 線 (14)直接插入電腦或PlayStation
3 一旦耳機開啟,您將聽到連接音效,且耳機上的電源指示燈 LED (9)將緩慢閃爍
BLUETOOTH 模式
1 若要切換到BT模式,請按下耳機上的快速開關按鈕 (10),將進入配對模式
2 轉到主設備的Bluetooth設定,並與「Nova5」設備配對。配對成功
後,藍色電源指示燈 LED (9)將從快速閃爍變為緩慢閃爍
3 設定完畢後,只需按下快速開關按鈕 (10),即可在2.4
GHz模式和Bluetooth模式之間無縫切換
充電線(5英呎/1.5m)
產品資訊指南
6 麥克風靜音按鈕
7 USB-C充電孔
8 電源按鈕
9 電源指示燈LED
10 快速開關按鈕
13 狀態LED
設定
連接至 USB-A
PC,PS5/PS4,任何Bluetooth設備
連接至 USB-C
PC,Android,Switch,Mac,任何Bluetooth設備
PLAYSTATION 5 音訊設定
PS5設定>音訊輸出
輸出至耳機 所有音訊
PS5設定>音訊輸出>音量
耳機 設定為最大值
電源
電源開/關
按住電源按鈕 (8)1秒,開啟/關閉耳機。
在耳機通電並連接時,收發器的狀態 LED (13)亮度增加。
充電
若要為耳機充電,請將充電線 (15)從耳機的USB-C 充電孔 (7)連接至任何USB電源。
電源LED的顏色表示電池電量。
綠色 100–50%
黃色 49–15%
橙色 14–5%
紅色 4–1%
收發器配對
注意:在您收到時,耳機和收發器已配對。
如果需要重新配對:
1 將USB-C 無線收發器 (11)連接至遊戲裝置
2 按住收發器的配對按鈕 (12)4秒,直至狀態 LED (13)快速閃爍
3 開啟耳機–按住快速開關按鈕 (10)2秒,直至聽到「收發器配對模式」,且耳機的電源
指示燈 LED (9)快速閃爍
關閉耳機–按住電源按鈕2秒,直至耳機的電源指示燈 LED (9)快速閃爍
4 配對成功後,您會聽到「收發器已連接」,且收發器的狀態 LED (13)穩定亮起
BLUETOOTH
按下快速開關按鈕 (10)並聽到「BluetoothMode」,即可
獨立於2.4GHz無線模式使用Bluetooth。
配對
開啟耳機–按住快速開關按鈕 (10)2秒,直至進入配對模式,且耳機的電源指示燈 LED
(9)快速閃爍藍光。若要在收發器和BT配對模式之間切換,請按快速開關按鈕 (10)。
關閉耳機–按住電源按鈕 (8)2秒,直至耳機的電源指示燈 LED (9)快速閃爍。如果耳
機處於收發器配對模式,按下快速開關按鈕 (10),可以切換到Bluetooth配對模式。
多媒體控制
播放/暫停音樂–按一次・電源按鈕 (8)
跳過曲目–按兩次・・電源按鈕 (8)
上一首曲目–按三次・・・電源按鈕 (8)
接聽/結束語音通話–按一次・快速開關按鈕 (10)
(若在2.4GHz模式下接聽通話,Bluetooth通話結束後,將返回2.4GHz模式。)
忽略來電–按兩次・・快速開關按鈕 (10)
增加通話音量–按一次・電源按鈕 (8)
降低通話音量–按兩次・・電源按鈕 (8)
3534
Page 19

快速開關按鈕控制
模式開關
按下快速開關按鈕 (10),在收發器和bluetooth模式之間切換。
配對模式
按住快速開關按鈕 (10)2秒。
麥克風
可伸縮麥克風
在開箱時,伸縮式 ClearCast 麥克風 (3)處於收起狀態。若要
使用麥克風,請將其從耳機上滑開,直至完全展開。
定位
將伸縮式 ClearCast 麥克風 (3)靠近嘴角,正面朝向您。
注意:麥克風在收起時,不能使用。
完美貼合
調整耳機的貼合度有兩種方法。
向上或向下滑動聽筒,改變整體高度。
更改一側或兩側的彈性頭帶 (1)位置,獲得所需的張力和彎曲度。
1
2
3
4
5
11
12
14 15
6
7
8
9
10
13
1
2
3
1
2
3
1
2
3
4
3736
Page 20

3938
Page 21
REGULATORY
Europe – EU Declaration of Conformity
Hereby, SteelSeries ApS. declares that the equipment which is compliance with directive RoHS
2.0 (2015/863/EU), R.E.D (2014/53/EU), EMC Directive (2014/30/EU), and LVD (2014/35/
EU) which are issued by the Commission of the European Community.
The full text of the EU declaration of conformity is available at the following internet address:
https://support.steelseries.com/hc/en-us/categories/360001256111-Other-Stu
SteelSeries ApS. hereby conrms, to date, based on the feedback from our suppliers indicates
that our products shipping to the EU territory comply with REACH (Registration, Evaluation,
Authorization, and Restriction of Chemicals - (EC) 1907/2006) compliance program. We are
fully committed to oering REACH compliance on the products and posting accurate REACH
compliance status for the all of products.
Frequency bands and Powers (Headset and Transceiver)
a. Frequency band(s) in which the radio equipment operates: 2.400 - 2.4835 GHz
b.
Maximum radio-frequency power transmitted in the frequency band(s) in which the
radio equipment operates:
• EIRP: GFSK: 9.81 dBm (Headset/ SRD)
• EIRP: GFSK: 12.72 dBm (Headset/ BT)
• EIRP: л/4-DQPSK: 10.22 dBm (Headset/ BT)
• EIRP: GFSK: 10.16 dBm (Transceiver/ SRD)
c. Firmware Version: V23
UK Declaration of Conformity
Hereby, SteelSeries ApS. declares that the following equipment which is compliance with
Electromagnetic Compatibility Regulations 2016, Electrical Equipment (Safety) Regulations
2016, Radio Equipment Regulations 2017 and The Restriction of the Use of Certain Hazardous
Substances in Electrical and Electronic Equipment Regulations 2012 issued by the Department
for Business, Energy& Industrial Strategy.
The full text of the UK declaration of conformity is available at the following internet address:
https://support.steelseries.com/hc/en-us/categories/360001256111-Other-Stu
WEEE
This product must not be disposed of with your other household waste or treat them in compliance
with the local regulations or contact your local city oce, your household waste disposal service
or the shop where you purchased the product.
Turkey RoHS Compliance
Republic of Turkey: In conformity with the EEE Regulation
Türkiye Cumhuriyeti: EEE Yönetmeliğine Uygundur
Federal Communication Commission Interference Statement
Supplier’s Declaration of Conformity: 47 CFR § 2.1077 Compliance Information
This device complies with Part 15 of the FCC Rules. Operation is subject to the following two
conditions:
1. This device may not cause harmful interference, and
2.
this device must accept any interference received, including interference that may cause
undesired operation.
This equipment has been tested and found to comply with the limits for a Class B digital
device, pursuant to Part 15 of the FCC Rules. These limits are designed to provide reasonable
protection against harmful interference in a residential installation. This equipment generates,
uses and can radiate radio frequency energy and, if not installed and used in accordance with
the instructions, may cause harmful interference to radio communications. However, there is
no guarantee that interference will not occur in a particular installation. If this equipment does
cause harmful interference to radio or television reception, which can be determined by turning
the equipment o and on, the user is encouraged to try to correct the interference by one of
the following measures:
• Reorient or relocate the receiving antenna.
• Increase the separation between the equipment and receiver.
•
Connect the equipment into an outlet on a circuit dierent from that to which the
receiver is connected.
• Consult the dealer or an experienced radio/TV technician for help.
FCC Caution:
Any changes or modications not expressly approved by the party responsible for compliance
could void the user’s authority to operate this equipment.
This transmitter must not be co-located or operating in conjunction with any other antenna
or transmitter.
Radiation Exposure Statement:
The device has been evaluated to meet general RF exposure requirement; the device can be
used in portable exposure condition without restriction.
The portable device is designed to meet the requirements for exposure to radio waves established
by the FCC. These requirements set a SAR limit of 0.11 w/kg (FHSS_Headset), 0.09 w/kg
(DTS_Headset) and 0.25 w/kg (Dongle) averaged over one gram of tissue. The highest SAR value
reported under this standard during product certication for use when properly worn on the body.
FCC ID: ZHK-HS42 (Wireless Headset)
FCC ID: ZHK-HS42TX (Transceiver)
Industry Canada Statement
This device complies with Industry Canada license-exempt RSS standard(s). Operation is subject
to the following two conditions:
1. this device may not cause interference, and
2.
this device must accept any interference, including interference that may cause undesired
operation of the device.
Le présent appareil est conforme aux CNR d’Industrie Canada
applicables aux appareils radio exempts de licence. L’exploitation est autorisée aux deux
conditions suivantes:
1. l’appareil ne doit pas produire de brouillage, et
2.
l’utilisateur de l’appareil doit accepter tout brouillage radioélectrique subi, même si le
brouillage est susceptible d’en compromettre le fonctionnement.
4140
Page 22

This Class B digital apparatus complies with Canadian ICES-003.
Cet appareil numérique de la classe B est conforme à la norme NMB-003 du Canada.
This device and its antenna(s) must not be co-located or operating in conjunction with any other
antenna or transmitter, except tested built-in radios.
Cet appareil et son antenne ne doivent pas être situés ou fonctionner en conjonction avec une
autre antenne ou un autre émetteur, exception faites des radios intégrées qui ont été testées.
The County Code Selection feature is disabled for products marketed in the US/ Canada.
La fonction de sélection de l’indicatif du pays est désactivée pour les produits commercialisés
aux États-Unis et au Canada.
The appliance must not be exposed to splashes or drops of water and it should not be used as
a support for any object lled with liquid, such as a vase.
L’appareil ne doit pas être exposé à des éclaboussures ou à des gouttes d’eau et il ne doit pas
servir de support à un quelconque objet rempli de liquide, tel qu’un vase.
The portable device is designed to meet the requirements for exposure to radio waves established
by the ISED. These requirements set a SAR limit of 0.11 w/kg (FHSS_Headset), 0.09 w/kg
(DTS_Headset) and 0.25 w/kg (Dongle) averaged over one gram of tissue. The highest SAR value
reported under this standard during product certication for use when properly worn on the body.
Cet équipement est conforme aux limites d’exposition aux rayonnements ISED établies pour
un environnement non contrôlé. L’utilisateur nal doit suivre les instructions spéciques pour
satisfaire les normes. Cet émetteur ne doit pas être co-implanté ou fonctionner en co njonction
avec toute autre antenne ou transmetteur.
Result for highest Simultaneous Transmission SAR value is 0.11 w/kg (FHSS_Headset), 0.09 w/
kg (DTS_Headset) and 0.25 w/kg (Dongle).
Radiation Exposure Statement:
The device has been evaluated to meet general RF exposure requirement, The device can be
used in portable exposure condition without restriction.
Déclaration d’exposition aux radiations:
L’appareil a ete evalue pour repondre aux exigencies generals d’ exposition aux radio frequencies .
L’appareil peut etre utilise en condition d’ exposition portable sans restriction
Headset IC: 9638A-HS42
Transceiver IC: 9638A-HS42TX
Ukraine RoHS:
Обладнання відповідає вимогам Технічного регламенту щодо обмеження використання
деяких небезпечних речовин в електричному та електронному обладнанні, затвердженого
постановою Кабінету Міністрів України від 3 грудня 2008 № 1057
Restriction on Hazardous Substances statement (India)
This product complies with the “India E-waste Rule 2011” and prohibits use of lead, mercury,
hexavalent chromium, polybrominated biphenyls or polybrominated diphenyl ethers in concentrations
exceeding 0.1 weight % and 0.01 weight % for cadmium, except for the exemptions set in
Schedule 2 of the Rule.
低功率電波輻射性電機管理辦法
取得審驗證明之低功率射頻器材,非經核准,公司、商號或使用者均不得擅自變更頻率、加大
功率或變更原設計之特性及功能。低功率射頻器材之使用不得影響飛航安全及干擾合法通
信;經發現有干擾現象時,應立即停用,並改善至無干擾時方得繼續使用。前述合法通信,指
依電信管理法規定作業之無線電通信。低功率射頻器材須忍受合法通信或工業、科學及醫療
用電波輻射性電機設備之干擾。
この装置は、クラスB機器です。この装置は、住宅環境で使用することを目的とし.ていますが 、
この装置がラジオやテレビジョン受信機に近接して使用されると、受.信障害を引き起こすこ
とが あります。.取扱説明書に従って正しい取り扱いをして下さい。.VCCI-B.
この機器の使用周波数帯では、電子レンジ等の産業・科学・医療用機器のほか工場の製造
ライン等で使用されている移動体識別用の構内無線局(免許を要する無線局)及び特定小
電力無線局(免許を要しない無線局)並びにアマチュア無線局(免許を要する無線局)が運
用さ れて います。
1 この機器を使用する前に、近くで移動体識別用の構内無線局及び特定小電力無線局並び
にアマチュア無線局が運用されていないことを確認して下さい。
2 万一、この機器から移動体識別用の構内無線局に対して有害な電波干渉の事例が発生
した場合には、速やかに使用周波数を変更するか又は電波の発射を停止した上、下記連
絡先にご連絡頂き、混信回避のための処置等(例えば、パーティションの設置など)につい
てご 相 談して 下 さい 。
3 その他、この機器から移動体識別用の特定小電力無線局あるいはアマチュア無線局に対
して有害な電波干渉の事例が発生した場合など何かお困りのことが起きたときは、次の
連絡先へお問い合わせ下さい。
.
1.
2.
3.
4.
5.
该电子电气产品含有某些有害物质,在环保使用期限内可以放心使用,超过环保使用期限之
后则应该进入回收循环系统。
《废弃电器电子产品回收处理管理条例》提示性说明
为了更好地关爱及保护地球,当用户不再需要此产品或产品寿命终止时,请遵守国家废弃电器电子
产品回收处理相关法律法规,将其交给当地具有国家认可的回收处理资质的厂商进行回收处理。
微功率设备产品使用说明:
本产品符合”.微功率短距离无线电发射设备目录和技术要求.“.的通用微功率设备F类设
备要求,使用频率∶2400-24835MHz;发射功率限值:10mW(.eirp),频率容限:75kHz。
(一)符合“微功率短距离无线电发射设备目录和技术要求”的具体条款和使用场景,天线
..................类型为PCB板载天线,设备开机后通过拨动开关选择.,进入微功率模式;若要退
..................出微功率模式,则相应通过拨动开关操作,进入其它模式;
(二)不得擅自改变使用场景或使用条件、扩大发射频率范围、加大发射功率(包括额外加
4342
Page 23
..................装射频功率放大器),不得擅自更改发射天线;
(三)不得对其他合法的无线电台(站)产生有害干扰,也不得提出免受有害干扰保护;
(四)应当承受辐射射频能量的工业、科学及医疗(ISM)应用设备的干扰或其他合法的
...................无线电台(站)干扰;
(五)如对其他合法的无线电台(站)产生有害干扰时,应立即停止使用,并采取措施消
...................除干扰后方可继续使用;
(六)在航空器内和依据法律法规、国家有关规定、标准划设的射电天文台、气象雷达站、
..................卫星地球站(含测控、测距、接收、导航站)等军民用无线电台(.站)、机场等的电磁
...................环境保护区域内使用微功率设备,应当遵守电磁环境保护及相关行业主管部门的规
..................定;
(七)禁止在以机场跑道中心点为圆心、半径5000米的区域内使用各类模型遥控器;
(八)微功率设备使用时温度..(摄氏度:.0.℃~.+40℃.)和电压.(DC.5V).的环境条件。
*報廢電池請按照廢棄物管理辦法回收處理
警語: 本产品仅适用于海拔2000m及以下地区安全使用
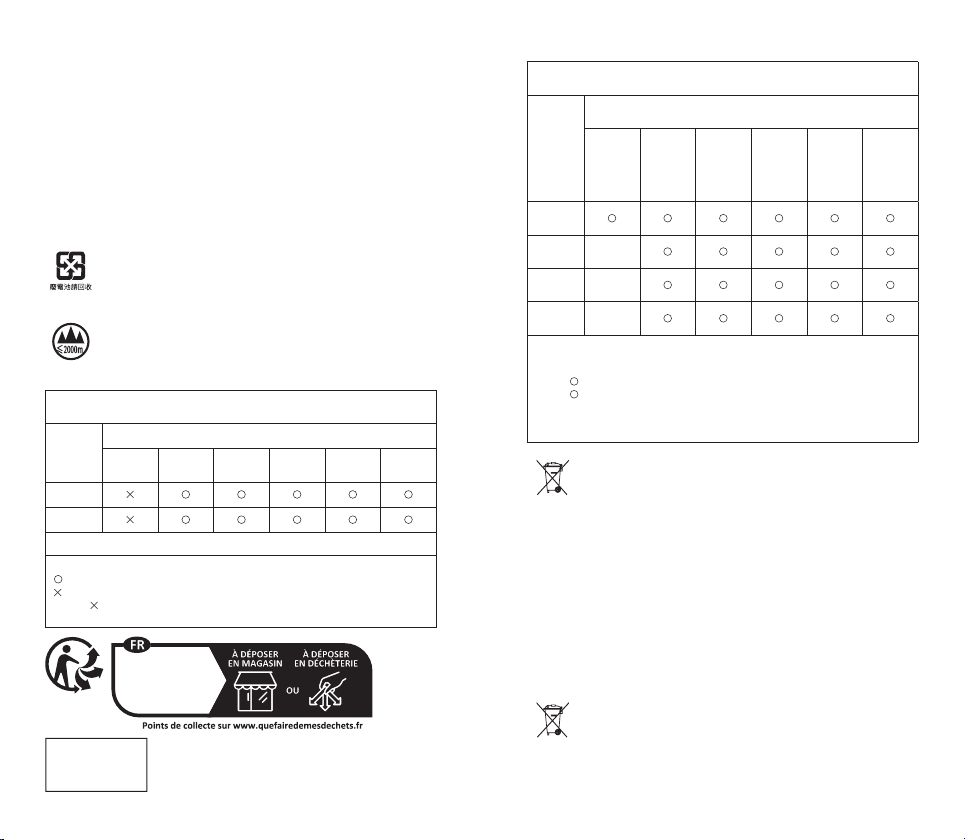
根据中国大陆《电子电气产品有害物质限制使用标识要求》,.
以下部分列出了产品中可能包含的有害物质的名称和含量:
零部件名称
电路板组件
其他线材
*电路板组件包括印刷电路板及其构成的零部件,如电阻、电容、集成电路、连接器等。
本表格依据SJ/T 11364的规定编制。
:.表示该有害物质在该部件所有均质材料中的含量均在.GB/T 26572规定的限量要求以下。
:.表示该有害物质至少在该部件的某一均质材料中的含量超出GB/T 26572规定的限量要求;
上表中打“ ”的部件,应功能需要,部分有害物质含量超出GB/T 26572规定的限量要求,但是符合欧盟RoHS
法规要求(属于豁免部分)。
铅
(Pb)
Cet appareil
et sa baerie
se recyclent
汞
(Hg)镉 (Cd)
有害物质
六价铬
(Cr(VI))
多溴联苯
(PBB)
多溴二苯醚
(PBDE)
The RoHS test method is based on the standards JIS C 0950 and CNS 15663.
設備名稱:.無線耳機 型號(型式):.HS42
Equipment name: Wireless Headset Type designation: HS42
限用物質及其化學符號.
Restricted substances and its chemical symbols
單元.
Unit
塑膠部件.
Plastic
電路板及元件.
PCBA
線材.
Cables
金屬部件.
Metal
備考1 “超出0.1 wt %”及“超出0.01 wt %”係指限用物質之百分比含量超出百分比含量基準值。
Note 1 “Exceeding 0.1 wt %” and “exceeding 0.01 wt %” indicate that the percentage content of the
備考2
Note 2
備考3 -.係指該項限用物質為排除項目。
Note 3 - indicates that the restricted substance corresponds to the exemption
歐盟
電池,電池組及蓄電池不可當作未分類的家庭廢棄物棄置。 請依據當地法規使用公共回收
系統退回、回收或處理電池。
鋰電安全使用指南
注意: 電池若未正確更換,可能會爆炸。請用原廠建議之同款或同等級的電池來更換。請依原
廠指示處理廢棄電池。請詳閱本安全指示。須留意裝置及使用手冊上的注意事項及警告標
示。本裝置須遠離濕氣與高溫。
鉛
Lead.
restricted substance exceeds the reference percentage value of presence condition.
係指該項限用物質之百分比含量未超出百分比含量基準值。
indicates that the percentage content of the restricted substance does not exceed the percentage
of reference value of presence.
•
切勿將裝置放置於攝氏 60 度/華氏140 度以上或攝氏 0 度/華氏 32 度以下等沒有.
.空調的環境下,以免裝置損壞。
• 使用本機時,周圍環境最高溫度請勿超過攝氏 35度( 華 氏 95度 )。
• 為避免因更換不當電池導致爆炸,請務必使用由原廠建議之同款或同等級的電池。
• 務必將電池放在安全場所。
汞
Mercury.
(Pb)
-
-
-
Cadmium.
(Hg)
六價鉻
鎘
Hexavalent.
chromium.
(Cd)
+6
(Cr
)
多溴聯苯
Poly-.
brominated.
biphenyls.
(PBB)
多溴二苯醚
Poly-.
brominated.
diphenyl.
ethers.
(PBDE)
Complies with
IMDA Standards
DA 106032
Singapore approval (IMDA)
欧盟
电池、电池组及蓄电池不可当作未分类的家庭废弃物弃置。请依据当地法规使用公共回收系
统退回、回收或处理电池。
4544
Page 24

锂电安全使用指南
注意: 电池若未正确更换,可能会爆炸。请用原厂建议之同款或同等级的电池来更换。请依原
厂指示处理废弃电池。请详阅本安全指示。须留意装置及使用手册上的注意事项及警告标
示。本装置须离湿气与高温。
•
切勿将装置放置于摄氏60度(华氏140度)以上或摄氏0度(华氏32度)以下等没有空.
.调的环境下,以免装置损坏。
• 使用本机时,周围环境最高温度请勿超过摄氏35度(华氏95度)。
• 该产品的预期使用的环境由配备的电源适配器决定。
• 为避免因更换不当电池导致爆炸,请务必使用由原厂建议之同款或同等级的电池。
• 务必将电池放在安全场所。
European Union
Batteries, battery packs, and accumulators should not be disposed of as unsorted household
waste. Please use the public collection system to return, recycle, or treat them in compliance
with the local regulations.
Safety Guideline for Using Lithium Battery
Danger of explosion if battery is incorrectly replaced. Replace only with the same or
equivalent type recommended by the equipment manufacturer. Discard used batteries
according to manufacturer’s instructions.
Read the safety instructions carefully and thoroughly. All cautions and warnings on the
equipment or user’s manual should be noted.Keep this equipment away from humidity and
high temperature.
•
Do not leave the equipment in an unconditioned environment with a storage temperature
above 60ºC (140ºF) or below 0ºC (32ºF), which may damage the equipment.
• This unit should be operated under maximum ambient temperature of 35ºC (95ºF).
•
To prevent explosion caused by improper battery replacement, use the same or equivalent
type of battery recommended by the manufacturer only.
• Always keep the battery in a safe place.
Union européenne
Les piles, batteries et accumulateurs ne doivent pas être jetés comme des déchets
domestiques non triés. Veuillez faire appel au système de collecte public pour faire recycler ou
détruire votre batterie en conformité avec les réglementations locales.
Directives de sécurité concernant l’utilisation d’une batterie lithium-ion
Le remplacement incorrect de la batterie peut provoquer un risque d’explosion. Si vous devez
remplacer votre batterie, choisissez seulement une batterie de même type ou d’un type
équivalent recommandé par le fabricant. Pour vous débarrasser de votre batterie usagée,
veuillez suivre les instructions du fabricant. Veuillez lire attentivement les instructions de
sécurité et prendre en compte tous les avertissements et toutes les précautions d’usage se
trouvant sur l’appareil ou sur le mode d’emploi. Conservez cet appareil à l’abri de l’humidité et
des températures élevées. Posez l’appareil sur une surface stable avant de l’utiliser.
•
des températures dépassant les 60ºC (140ºF) ou inférieures à 0ºC (32ºF) car cela
pourrait endommager l’appareil.
• En marche, l’appareil supporte une température ambiante maximum de 35ºC (95ºF).
•
Pour éviter une explosion provoquée par un mauvais remplacement des piles, utilisez
systématiquement des piles identiques ou de type équivalent, en suivant les recommandations
du fabricant.
• Conservez toujours la batterie dans un endroit sûr.
Die Europäische Union
Batterien, Akkus und Akkumulatoren dürfen nicht als unsortierter Hausmüll entsorgt werden.
Bitte benutzen Sie die öentliche Sammlung, um sie zurückzukehren, zu recyclen oder in
Übereinstimmung mit den örtlichen Vorschriften zu behandeln.
Sicherheitshinweise zu Lithium-Akkus
Falls Batterien oder Akkus vom falschen Typ eingesetzt werden, besteht Explosionsgefahr.
Ersatz nur durch denselben oder einen vom Hersteller empfohlenen gleich-wertigen
Typ. Entsorgung gebrauchter Batterien nach Angaben des Herstellers. Lesen Sie die
Sicherheitshinweise aufmerksam und gründlich durch. Halten Sie sich an sämtliche Hinweise
in der Bedienungsanleitung oder am Produkt selbst. Halten Sie das Gerät von Feuchtigkeit
und hohen Temperaturen fern.
•
Lagern und benutzen Sie das Gerät nicht an Stellen, an denen Temperaturen über 60°C
(140°F) oder unter 0°C (32°F) herrschen - dadurch kann das Gerät beschädigt werden.
•
Dieses Gerät sollte unter maximaler Umgebungstemperatur von 35°C (95°F) betrieben
werden.
•
Damit es nicht zu Explosionen durch ungeeignete Ersatz-Akkus kommt, verwenden Sie
ausschließlich vom Hersteller empfohlene Akkus vom selben Typ.
• Lagern Sie Akkus grundsätzlich an einem sicheren Ort.
Unione europea
Le batterie e gli accumulatori non devono essere smaltiti come riuti domestici indierenziati.
Si prega di utilizzare il sistema pubblico di raccolta per restituire, riciclare o trattare questi
materiali in conformità con le normative locali.
Istruzioni di sicurezza per l’uso delle batterie al Litio
C’è pericolo di esplosioni se la batteria è sostituita in modo scorretto. Sostituire solamente con
lo stesso tipo di batteria o con tipo equivalente raccomandato dal produttore dell’attrezzatura.
Smaltire le batterie usate osservando le istruzioni del produttore.
Leggere attentamente e completamente le istruzioni di sicurezza. Deve essere presa nota di
tutti gli avvisi e le avvertenze riportate nel manuale d’uso. Tenere questa attrezzatura lontana
dall’umidità e dalle alte temperature.
Non lasciare l’attrezzatura in ambienti non condizionati con temperature di immagazzinamento
•
superiori ai 60°C (140°F) o inferiori ai 0°C (32°F), perché si può danneggiare l’attrezzatura.
•
L’unità deve essere fatta funzionare ad una temperatura d’ambiente massima di 35ºC (95ºF).
•
Per prevenire l’esplosione provocata dalla scorretta sostituzione delle batterie, usare
solo batterie dello stesso tipo o equivalenti a quelle raccomandate dal produttore.
• Conservare sempre le batterie in un luogo sicuro.
Unión Europea
las pilas, baterías y acumuladores no deberían mezclarse con la basura normal doméstica. Utilice
el sistema de recogida público para devolver, reciclar o tratarlos según las regulaciones locales.
4746
Page 25

Indicaciones de seguridad para el uso de baterías de litio
Existe peligro de explosión si la batería se sustituye de forma incorrecta. Sustituya la batería
únicamente por otra similar o de tipo equivalente recomendado por el fabricante. Descarte usar
baterías usadas de acuerdo con las instrucciones del fabricante.
Lea las instrucciones de seguridad detenida e íntegramente. Tenga en cuenta todas las precauciones
y advertencias que guran sobre el equipo y en el manual del usuario. Mantenga este equipo
alejado de lugares húmedos y sometidos a altas temperaturas.
• No deje el equipo en un entorno no acondicionado con una temperatura de almacenamiento
superior a 60ºC (140ºF) o inferior a 0ºC (32ºF), pues el equipo podría dañarse.
• La unidad se debe utilizar en lugares donde la temperatura ambiente no supere los 35ºC
(95ºF).
• Para evitar que la batería explote debido a un reemplazo incorrecto, utilice únicamente el
mismo tipo de batería o uno equivalente recomendado por el fabricante.
• Conserve la batería en un lugar seguro.
0.25–2.5
W
The power delivered by the charger must be between min 0.25 Watts required by the radio
equipment, and max 2.5 Watts in order to achieve the maximum charging speed.
European Union RED Compliance Statement
English
Hereby, Steelseries ApS. declares that all CE Marked Steelseries products incorporating Radio
and Telecom Terminal Equipment functionality are in compliance with the essential requirements
and other relevant provisions of Directive 2014/53/EU.
Български
С настоящата, Steelseries ApS. декларира, че всички изделия на Steelseries, маркирани със
знака СЕ, включващи функционалност за терминално оборудване за радио и телекомуникации,
съответстват на основните изисквания и на други съответни условия на Директива 2014/53/EC.
Ceština
Společnost Steelseries ApS. tímto prohlašuje, že všechny produkty společnosti Steelseries se
značkou CE, které obsahují rádiová zařízení a telekomunikační koncová zařízení, vyhovují základním
požadavkům i ostatním příslušným předpisům směrnice 2014/53/EU.
Dansk
Steelseries ApS. erklærer hermed, at alle CE-mærkede Steelseries-produkter, som har indbygget
tilslutningsfunktionalitet til radio- og telekommunikation, overholder de obligatoriske krav og andre
relevante forudsætninger i Direktiv 2014/53/EU
Nederlands
Steelseries ApS. verklaart bij deze dat alle Steelseries-producten die van een CE-markering zijn
voorzien en waar functionaliteit voor radio- en telecommunicatie-terminalapparatuur is ingebouwd,
voldoet aan de essentiële vereisten en andere relevante bepalingen van Richtlijn 2014/53/EU.
Eesti keel
Käesolevaga teatab Steelseries ApS., et kõik CE-tähistusega tooted, mis hõlmavad raadio- ja
telekommunikatsioonikeskuse seadmete funktsioone, vastavad direktiivi 2014/53/EL põhinõuetele
ja teistele asjaomastele sätetele.
Suomi
Täten Steelseries ApS. ilmoittaa, että kaikki CE-merkityt radio- ja telealan laitteistojen toiminnallisuuksia
sisältävät Steelseries-tuotteet ovat direktiivin 2014/53/EU välttämättömien vaatimusten ja muiden
relevanttien säännösten mukaisia.
Français
Par la présente, Steelseries ApS. déclare que tous les produits Steelseries incorporant la fonctionnalité
d’Équipement terminal Radio et télécommunications et marqués du symbôle CE sont conformes
aux exigences essentielles et autres dispositions pertinentes de la Directive 2014/53/UE.
Deutsch
Hiermit versichert Steelseries ApS., dass alle mit einem CE-Zeichen versehenen SteelseriesProdukte, die Funktionalität von Radio und Telecoms Terminal-Geräten einbeziehen, die notwendigen
Voraussetzungen und andere wichtige Bereitstellungen der Richtlinien 2014/53/EU erfüllen.
Ελληνικά
Δια του παρόντος η Steelseries ApS. δηλώνει ότι όλα τα προϊόντα της Steelseries με τη σήμανση CE
συμπερ. ραδιοεξοπλισμού και τηλεπικοινωνιακού τερματικού εξοπλισμού συμμορφώνεται με τις
απαραίτητες απαιτήσεις και τις λοιπές σχετικές διατάξεις της Οδηγίας 2014/53/EE.
Magyar
Ezennel a Steelseries ApS. kijelenti, hogy az összes rádió és telekommunikációs egységeket
tartalmazó CE jelzésű Steelseries termék megfelel az 2014/53/EU szabvány és más vonatkozó
előírás követelményeinek.
Português
Por meio deste, a Steelseries ApS. declara que todos os produtos Steelseries com a marca CE que
incorporar a funcionalidade de equipamentos terminais de rádio e telecomunicações cumprem os
requisitos essenciais e outras provisões relevantes da directiva 2014/53/UE.
Italiano
Con la presente, Steelseries ApS. dichiara che tutti i prodotti Steelseries con marchio CE che
incorporano la funzionalità delle apparecchiature radio e delle apparecchiature terminali di
telecomunicazione (R&TTE, Radio and Telecoms Terminal Equipment), sono conformi ai requisiti
essenziali e ad altre importanti disposizioni della Direttiva 2014/53/UE.
Latviešu Valoda
Ar šo Steelseries ApS. apliecina, ka visi Steelseries produkti, kam ir CE marķējums, ieskaitot radio
iekārtu un telekomunikāciju gala iekārtu darbību, atbilst Direktīvas 2014/53/ES pamatprasībām
un citiem ar to saistītiem nosacījumiem.
Lietuvių kalba
„Steelseries ApS.“ pareiđkia, kad visi „CE“ paţymëti „Steelseries“ produktai su „Radio and
Telecoms Terminal Equipment“ funkcijomis atitinka svarbiausius ir kitus susijusius 2014/53/ES
Direktyvos reikalavimus.
Malti
Hawnhekk, Steelseries ApS. tiddikjara li l-prodotti kollha Steelseries Immarkati b’CE li jinkorporaw
il-funzjonalità tat-Tagħmir Terminali tar-Radju u tat-Telekomunikazzjonijiet, huma konformi malħtiġijiet essenzjali u provvedimenti rilevanti oħrajn ta’ Direttiva 2014/53/UE.
Polski
Niniejszym Steelseries ApS. oświadcza, że wszystkie produkty oznaczone znakiem CE, zawierające
radiowe i telekomunikacyjne urządzenia końcowe są zgodne z zasadniczymi wymogami oraz
pozostałymi stosownymi postanowieniami Dyrektywy 2014/53/UE.
4948
Page 26
Română
Steelseries ApS. declară, prin prezenta, că toate produsele Steelseries marcate CE, care au
integrată funcţionalitatea de echipament terminal radio şi de telecomunicaţii sunt conforme cu
cerinţele principale şi cu alte dispoziţii relevante ale Directivei 2014/53/UE.
Slovenčina
Spol. Steelseries ApS. týmto vyhlasuje, že všetky produkty Steelseries so značkou CE, ktoré
obsahujú funkčnosť rádiových a telekomunikačných koncových zariadení, sú v súlade s hlavnými
požiadavkami a inými príslušnými ustanoveniami smernice 2014/53/EU.
Slovenščina
S tem družba Steelseries ApS. izjavlja, da so vsi izdelki Steelseries z oznako CE, ki vsebujejo
funkcionalnost radijske in telekomunikacijske terminalne opreme, v skladu z bistvenimi zahtevami
in drugimi primernimi odločbami Direktive 2014/53/EU.
Español
Por la presente, Steelseries ApS. declara que todos los productos Steelseries con la marca CE
que incluyen la funcionalidad Equipos radioeléctricos y equipos terminales de telecomunicación
cumplen con los requisitos esenciales y otras provisiones relevantes de la Directiva 2014/53/UE.
Svenska
Härmed försäkrar Steelseries ApS. att alla CE-märkta produkter från Steelseries som innehåller
radio- och teleterminalsfunktionalitet är i överensstämmelse med erforderliga föreskrifter och
andra relevanta bestämmelser i direktiv 2014/53/EU.
Türkçe
Sonuç olarak, Steelseries ApS., CE ile Damgalı Steelseries ürünlerin bünyesine dahil edilen Radyo
ve Telekomların Terminal Araç fonksiyonelliklerin, 2014/53/EU direktierinin esas koşulları ve
hükümlerine uygun olduğunu beyan eder.
“CAUTION!”
Risk of explosion if battery pack is not replace by same
type as specied by the manufacturer.
Please keep follow all listed important warnings and cautions below while using this battery
pack to avoid any damage or hazard.
1.
The battery polarity (+) and (–) shall not be connected and charged reversely. Risk of
explosion if the battery polarity (+) and (–) is reversed.
2.
Please keep this battery pack away from re and high heat sources due to explosion might
happen. Do not place your battery pack close to any heater or hot location.
3.
This battery pack shall not be hit or impacted. This battery pack shall not be dealt with
any sharp or keen objects either.
4. This battery pack shall not be exposed to moisture, dripping or splashing.
5.
If any electrolyte ow out of this battery pack when touch the user’s eyes and skin, please
seek medical advice immediately.
“MISE EN GARDE!”
RISQUE D’EXPLOSION SI LE BLOC-PILES N’EST PAS REMPLACÉ PAR LE MÊME
TYPE QUE SPÉCIFIÉ PAR LE FABRICANT.
Veuillez suivre tous les avertissements et mises en garde ci-dessous lors de
l’utilisation de cette batterie pour éviter tout dommage ou danger.
1.
La polarité (+) et (-) de la batterie ne doit pas être connectée et chargée à l’envers. Risque
d’explosion si la polarité (+) et (-) de la batterie est inversée.
2.
Gardez cette batterie à l’écart du feu et des sources de chaleur élevées en raison(Audessus de 60 ℃ ou 140 ℉) de l’explosion qui pourrait se produire. Ne placez pas votre
batterie près d’un radiateur ou d’un endroit chaud.
3.
Cette batterie ne doit pas être heurtée ni impactée. Ce bloc-batterie ne doit pas non plus
être traité avec des objets tranchants ou vifs.
4. Cette batterie ne doit pas être exposée à l’humidité, aux gouttes ou aux éclaboussures.
5.
Si un électrolyte s’écoule de cette batterie lorsque vous touchez les yeux et la peau de
l’utilisateur, consultez immédiatement un médecin.
6. Ne continuez pas à utiliser la batterie si elle est gonée.
Region Address Telephone
Asia
亞洲
Europe Havneholmen 8, 1
USA 656 W Randolph St., Suite 3E,
More information and support from steelseries.com
HIDF16000265
4F.-4, No. 186, Jian 1st Rd., Zhonghe Dist.,
New Taipei City, Taiwan
新北市中和區建一路186號4樓及4樓之4
st
2450 Copenhagen SV, Denmark
Floor,
Chicago, IL 60661, USA
+886 2 8227 1999
+45 702 500 75
+1 312 258 9467
Malaysia Approval (SIRIM)
Custom Union Compliance.
(Russia / Belarus / Kazakhstan / Armenia / Kyrgyzstan)
ACMA Compliance
(Australia/ New Zealand)
Direct Current
Product Name (產品名稱/产品名称): Wireless Headset (無線耳機/无线耳机)
Model No. (型號/型号): HS42
Rated (規格/规格): 5V
Accessories information (配件資訊/配件信息)
Product Name (產品名稱/产品名称): (收發器/收发器)
Model No. (型號/型号): HS42TX
Rated (規格/规格): 5V 50mA
Made in China (中國製造/中国制造)
Operating Temperature: 0 to + 40
產品使用環境溫度: 0 - 40度
°
500mA
C
5150
Page 27

learn more at steelseries.com
 Loading...