


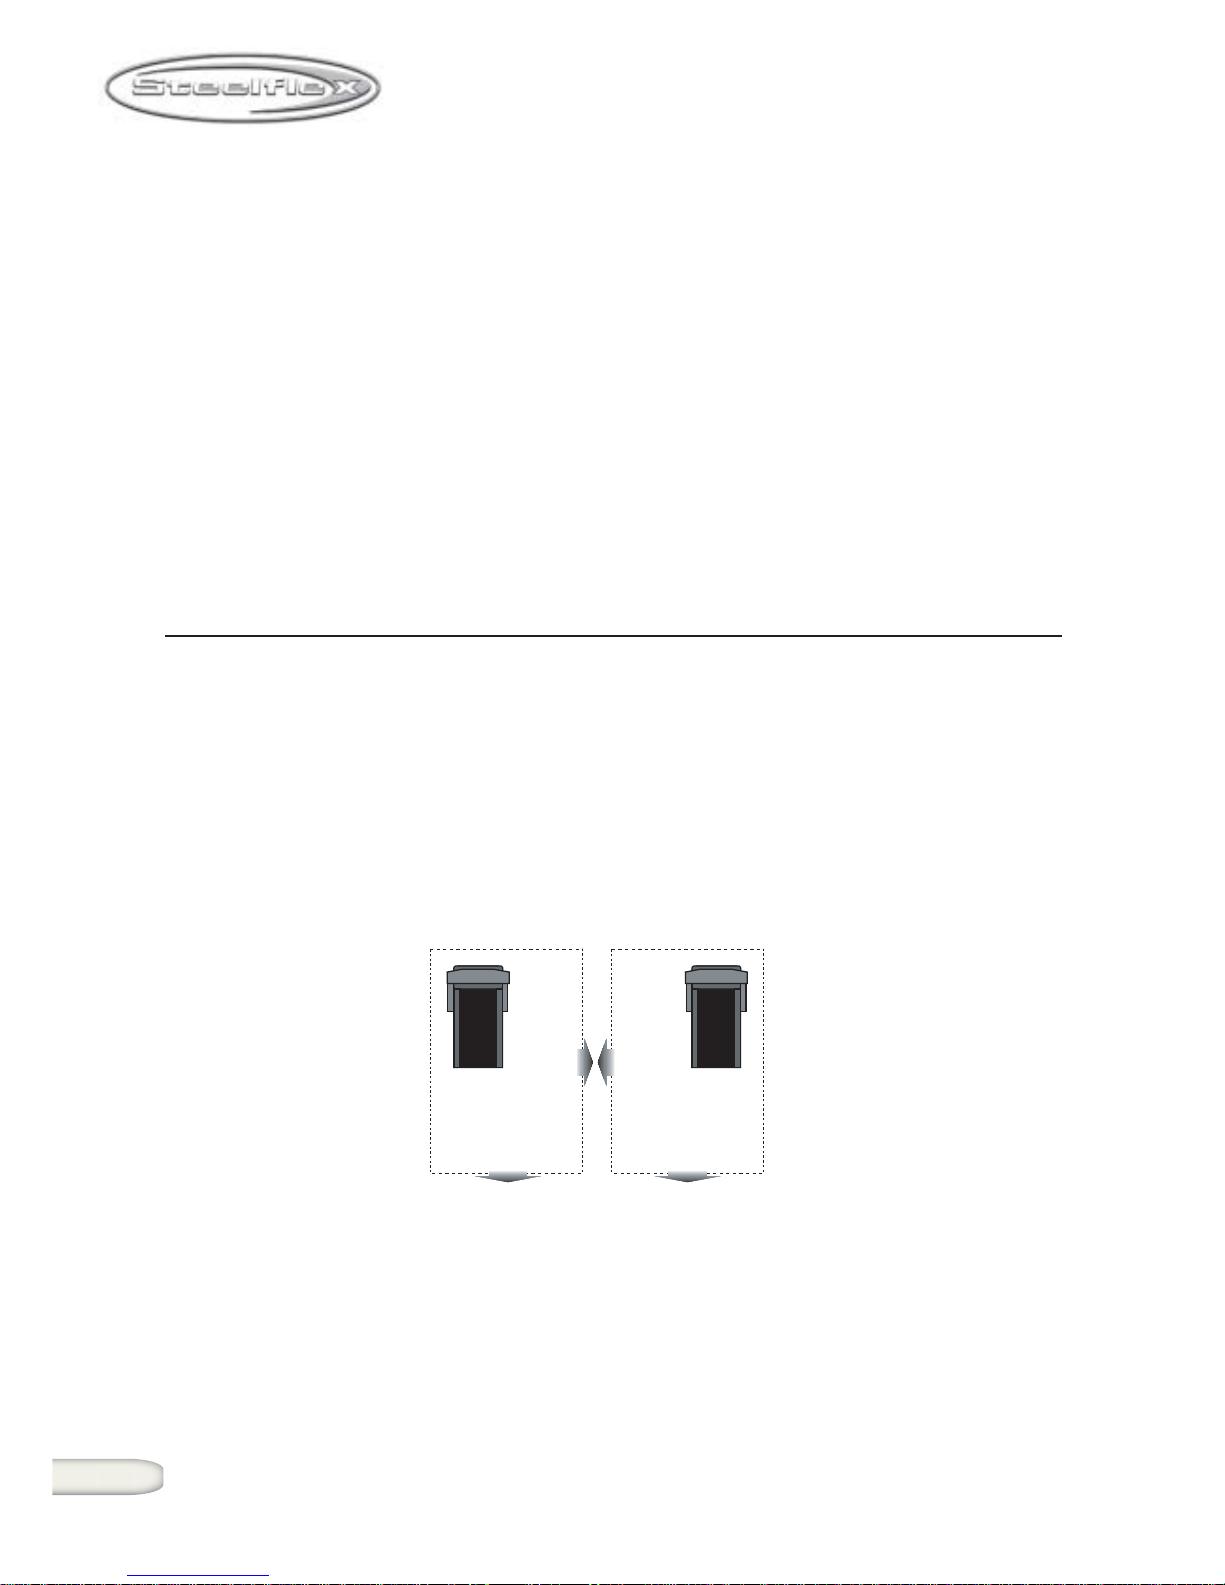
This product must be grounded. A temporary adapter such as the one
illustrated below may be used to connect this plug to a 2-pole receptacle
as shown, if a properly grounded outlet is not available. If it should
malfunction or breakdown, grounding provides a path of least resistance
for electric current to reduce the risk of electric shock. This product is
equipped with a cord having an equipment-grounding conductor and
grounding plug. The plug must be plugged into an appropriate outlet that
is properly installed and grounded in accordance with all local codes
and ordinances.
DANGER- Improper connection of the equipment-grounding conductor
can result in a risk of electric shock. Check with qualified electrician or
serviceman if you are in doubt as to whether the product is properly
grounded. Do not modify the plug provided with the product - if it will not
fit the outlet, have a proper outlet installed by a qualified electrician.
This product is for use on a nominal 120-volt circuit and has a grounding
plug that looks like the plug illustrated in the figure. Make sure that the
product is connected to an outlet having the same configuration as the
plug. No adapter should be used with this product.
. The appliance must be positioned so that the plug is accessible
. If the power cord is damaged, it must be replaced by the manufacture or
its service agent or a similarly qualified person in order to avoid a hazard
GROUNDING INSTRCTION'S
3-POLE
GROUNDED
OUTLET
GROUNDED
TRE AD MILL
PRO W ER CORD
AD APTOR
METAL
GROUND ING
SC RE W
2-POLE
OUTLET
GROUNDED BOX

FCC WARNING - POSSIBLE RADIO/TEVEVISION INTERFERENCE
NOTE: This equipment has been tested and found to comply with
Part 15 of the FCC rules. These limits are designed to provide
reasonable protection against harmful interference in a residential
installation. Any changes or modifications not expressly approved
by the party responsible for the compliance could void the user's
authority to operate the equipment. This equipment generates, uses
and can radiate radio frequency energy and, if not installed and
used in accordance with the instructions, may cause harmful
interference to radio communications. However, there is no
guarantee that the interference will not occur in a particular
installation. If this equipment does cause harmful radio interference
to radio or television reception, which can be determined by turning
the equipment off and on, you are encouraged to try to correct the
interference by one or more of the following measures:
Class R (Residential): Private or non-commercial use
• Reorient or relocate the receiving antenna
• Increase space between the equipment
• Plug the equipment into two electrical outlet
located on separate circuits
• Consult an exercise equipment dealer or an
experienced radio/TV technician for help
XT-3200/3300/3600/4600
4800/5600/5700 Treadmill
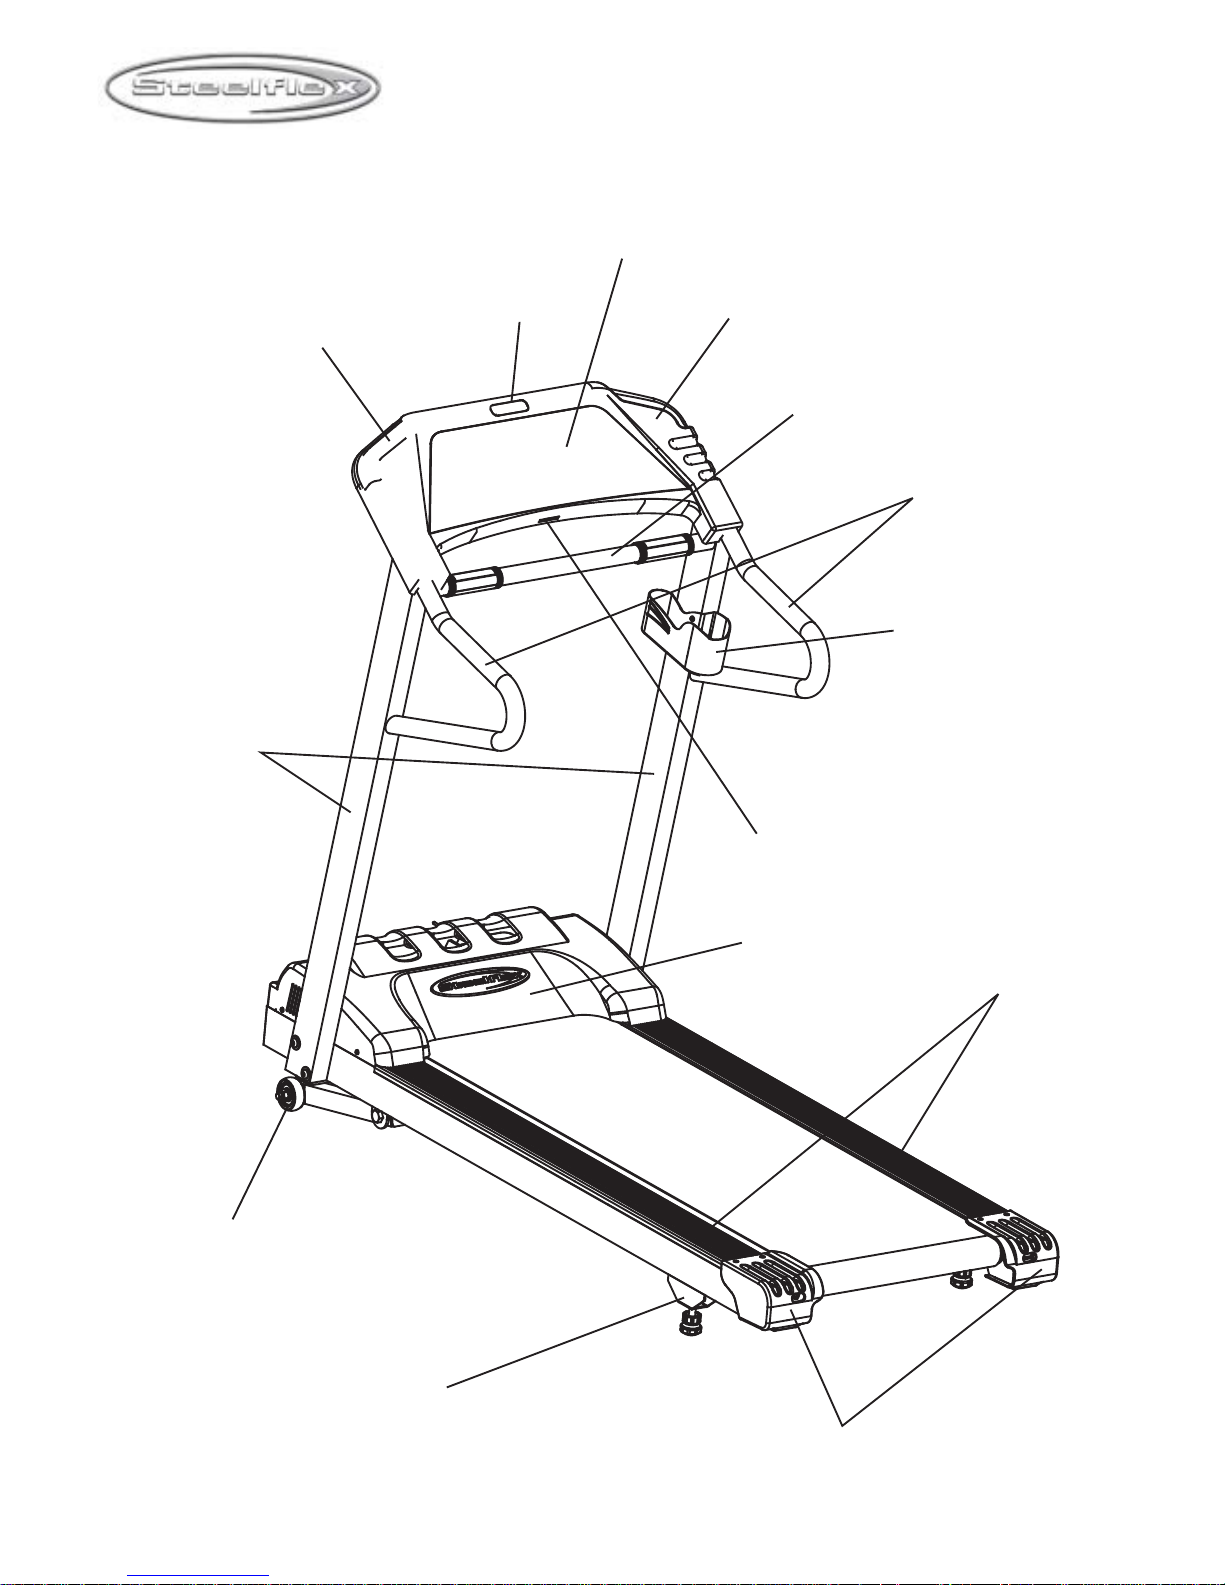
panel
console bottom
console
console dispaly
handle bars
beverage holder
safety key
front handle holder
uprights
front transport wheel
end cap
side railing
motor cover
rear adjustable foot
XT-3200/3300/3600/4600
4800/5600/5700 Treadmill

T
ABLE
OF C
ONTENTS
F
OR XT-3200/3300/3600/4600
4800/5600/5700 UNLESS INDICATED OTHERWISE
Introduction .................................................................................
Using This Manual .....................................................................
Important Safety Instructions ....................................................
Power Sources ...........................................................................
Ventilation ...................................................................................
Location ......................................................................................
Proper Use .................................................................................
Installation ...................................................................................
Electrical Requirement ...............................................................
Location ....................................................................................
Grounding Instructions ...............................................................
Leveler Legs ...............................................................................
Belt Tension Instructions.............................................................
Treadmill Overview......................................................................
Power Switch .............................................................................
Circuit Breaker Reset .................................................................
Powercord ..................................................................................
The Display Console & The Information Windows
XT-3200/3300.........................................
. XT-3600..................................................
XT-4600..................................................
XT-4800..................................................
XT-5600/5700.........................................
Information Window.....................................................................
LED Matrix Window ....................................................................
Incline Window ...........................................................................
Feedback Window ......................................................................
Speed Window ...........................................................................
The Speed And Incline Arrows Buttons ....................................
The Speed Arrow Buttons ..........................................................
The Incline Arrow Buttons ...........................................................
The Start Button .........................................................................
The Enter Button ........................................................................
The Stop Button ..........................................................................
The Cool Down Button................................................................
The Stop Key ..............................................................................
Belt & Running Surface ..............................................................
Belt Condition .............................................................................
The Basics Of Operation ............................................................
Getting Started ...........................................................................
Set Weight XT-4600/4800/5700 only..........................................
Starting A Workout ......................................................................
Changing The Running Belt Speed ............................................
Changing The Incline .................................................................
Pausing The Workout .................................................................
Cool Down .................................................................................
.
1
1
3
4
4
4
5
5
5
5
6
6
7
9
9
9
9
10
11
12
13
14
15
15
15
16
16
16
17
18
18
18
18
19
19
20
20
21
21
21
21
22
23
23
23
XT-3200/3300/3600/4600
4800/5600/5700 Treadmill

T
ABLE
OF C
ONTENTS
F
OR XT-3200/3300/3600/4600
4800/5600/5700
UNLESS INDICATED OTHERWISE
Storing Instructions XT-3300/5700.............................................
Using Instructions XT-3300/5700...............................................
The Workouts ..............................................................................
Manual .......................................................................................
Set Time (Manual Workout With Time Goal) .............................
Weight Loss ....................................................................................
Running Courses ...........................................................................
Endurance XT-3200/3300/5700........................................................
Fat Burn XT-3200/3300/5700............................................................
Cardio XT-3200/3300/4600/4800/5600/5700 only............................
Interval ..........................................................................................
Hand Pulse ....................................................................................
Maintenance ....................................................................................
Cleaning ..........................................................................................
Customer Service ...........................................................................
Technical Information ......................................................................
Specifications .................................................................................
Warranty ...........................................................................................
Developing a Fitness Program........................................................
Warmup .....................................................................................
Flexibility ....................................................................................
Exercise Guidlines .....................................................................
Achieving Your Fitness Goals ....................................................
Sample Goals ............................................................................
Keeping an Exercise Diary ........................................................
Heart Rate Conversion Chart......................................................
Treadmill Breakdown Check List...............................................
24
24
25
25
26
27
29
30
32
34
36
38
39
39
39
41
41
43
44
44
45
50
51
50
53
54
55
XT-3200/3300/3600/4600
4800/5600/5700 Treadmill

XT-3200/3300/3600/4600
4800/5600/5700 Treadmill
I
NTRODUCTION
Thank you for purchasing the STEELFEX XT treadmill.
With proper use and maintenance this product will last for years of great
workouts!
Using this Manual
Please read this entire manual to become familiar with your
treadmill. This will ensure proper and comfortable use of the
product.
Throughout the manual you will find items of importance
highlighted. These items range from helpful tips to dangerous
situations to be avoided.
The following is a list of the notes you will encounter and what they
represent.
TIP: Helpful information, not mandatory.
A helpful shortcut.
NOTE: Informational, not mandatory.
CAUTION: May cause possible personal injury or
damage to product or property, possible
problem with usability of product or product
warranty.
WARNING: May cause personal severe or
fatal injury or damage to product or property.
DANGER: Will cause personal severe or fatal injury or
severe damage to product or property.

• Introduction - A quick overview of this manual.
• Important Safety Instructions - Important
information you MUST read.
• Installation - How to install treadmill properly.
• Treadmill Overview - A quick description of the
treadmill.
• Information Window - Displays graphics.
• The Speed and Incline Arrows Buttons -Controll
speed incline.
• The Basics Of Operation - How to operate the
treadmill.
• The Workouts - A description and step-by-step
explanation of the preprogrammed work.
• Maintenance - How to care for the treadmill.
• Technical Information - Product information.
• Glossary - Explanations of the vocabulary used in
this manual.
• Warranty - An explanation of how the warranty
works.
• Keeping An Exercise Diary - How to keep a diary.
The manual is divded into thirteen section:
XT-3200/3300/3600/4600
4800/5600/5700 Treadmill
I
MPORTANT SAFETY INSTRUCTIONS
NOTE: Before attempting to use this product, it is
essential that you read this ENTIRE Manual
and any accompanying material.
THE USE OF THIS PRODUCT IN ANY WAY NOT DESCRIBED IN
THIS MANUAL IS NOT RECOMMENDED, MAY CAUSE SERIOUS
OR FATAL INJURY AND MAY VOID YOUR WARRANTY.
CAUTION: Any changes or modifications to this
equipment could void your product warranty!
CAUTION: Any service, other than basic cleaning or
user maintenance, must be performed by an
authorized service agent. There are no user
serviceable parts.
CAUTION: SteelFlex firmly recommends that you have a
complete medical exam by a qualified physician
before beginning any exercise program, particularly
if you have a family history of high blood pressure
or heart disease, are over the age of 45, or if you
smoke, have high cholesterol, are obese or have
not exercised regularly in the past year.
CAUTION: If, at any time while exercising, you feel faint,
dizzy, pain or a shortness of breath, stop exercising
immediately.
WARNING! To reduce the risk of burns, fire, electrical shock
or injury, this product MUST be plugged into a
properly grounded electrical outlet.
WARNING! To reduce the risk of electrical shock,
UNPLUG THIS PRODUCT'S POWERCORD
3
XT-3200/3300/3600/4600
4800/5600/5700 Treadmill

To disconnect this product, first depress the power switch to the
OFF position. Next unplug the powercord from the electrical outlet
by grasping the plug. DO NOT pull the power cord from the outlet
by grasping the cord.
• DO NOT pull the power cord to move this product.
• Keep the power cord away from heated surfaces.
• Supervision of children, invalid or disabled persons is
mandatory when they are using or are near this product.
• Connect this product only to a properly grounded
electrical outlet.
• Always keep the ventilation slots located on this product
clear of obstruction.
• DO NOT insert objects into any slot or orifice on this product.
• If an object falls into the product, unplug this product
immediately and call Customer Support for assistance.
• DO NOT operate this product if it has a damaged power
cord/plug, if it has been dropped, damaged or even partially
immersed in water or other liquid. Contact Customer
Support for further assistance.
• DO NOT use this product in areas of high humidity
(e.g. saunas or swimming pools) nor outdoors.
• DO NOT locate or use this product in areas where
aerosol spray products are being used or where oxygen
is being administered. Due to electrical components a risk
of combustion may be present.
• DO NOT place the obstructions near this product.
• DO NOT operate this product unless it is located on
a level, flat surface and NEVER operate this product
while it is tipped on its side.
Power Sources
Ventilation
Location
XT-3200/3300/3600/4600
4800/5600/5700 Treadmill
Proper Use
• DO NOT use this product unless proper attire is worn.
Rubber-soled training, running, or tennis shoes must
be worn to provide proper traction and protection while
using this product.
• DO NOT use cleats, spikes or any other non-athletic
style shoes.
• DO NOT use this product while barefoot or wearing
only socks.
I
NSTALLATION
E
LECTRICAL
R
EQUIREMENT
Your SteelFlex™ treadmill is intended for use in the country to which it
was shipped. Electrical supplies outside of this country may differ
and may not be compatible with the product. Please consult
Customer Support before using the treadmill in a different country.
L
ocation
When choosing a location for the treadmill, pick a location that is
unobstructed. The treadmill must have the following clearance.
These spacing requirements are mandatory for the safe use of the
treadmill. If an accident should occur, you must have sufficient space
to move awa
y
from the treadmill
.
• Non-entry side of treadmill - Minimum of 8 inches (20cm)
• Entry side of treadmill - Minimum of 36" (90cm)
• Front of the treadmill - Minimum of 12 inches (30cm)
• Behind treadmill - Minimum of 6 feet (180cm)
5
XT-3200/3300/3600/4600
4800/5600/5700 Treadmill
Grounding Instructions
The treadmill must be properly grounded prior to use. Proper
grounding reduces the risk of shock or damage to the treadmill.
The powercord's plug is equipped with a grounding conductor
that must be used with an electrical outlet installed in accordance to
all local codes and ordinances.
DO NOT use a temporary adapter that bypasses this function.
This will stop the safety equipment from functioning properly and
may void your warranty.
DANGER! A risk of electrical shock may result from
improper connection of the equipment grounding conductor. Check with a qualified
electrician if you are in doubt as to proper
grounding technique.
DO NOT MODIFY the plug provided with this product. If it will not fit an
electrical outlet, have a proper outlet installed by a qualified electrician.
Leveler Legs
After finding a location that is suitable for the
treadmill, the rear legs must be adjusted to
provide stable support. Located on the side of
each leg is a thumb-wheel that will allow you to
lower or raise the leg until it is properly seated
on the floor.
WARNING: DO NOT adjust legs while the treadmill is
on. Turn the power switch to the OFF position.
While kneeling behind the treadmill, place the heal of your hands on
each side of the treadmill directly above the running-belt adjustment
bolts. Attempt to rock the treadmill by alternately pressing downward
on each side. If you feel even a slight movement on one side adjust
that side until the movement has stopped.
For example, if you feel a slight rocking on the right side, start by
turning the thumb-wheel on the right leg counter-clockwise to lower
the leg until the movement stops.
XT-3200/3300/3600/4600
4800/5600/5700 Treadmill
XT-3200/3300/3600/4600
4800/5600/5700 Treadmill
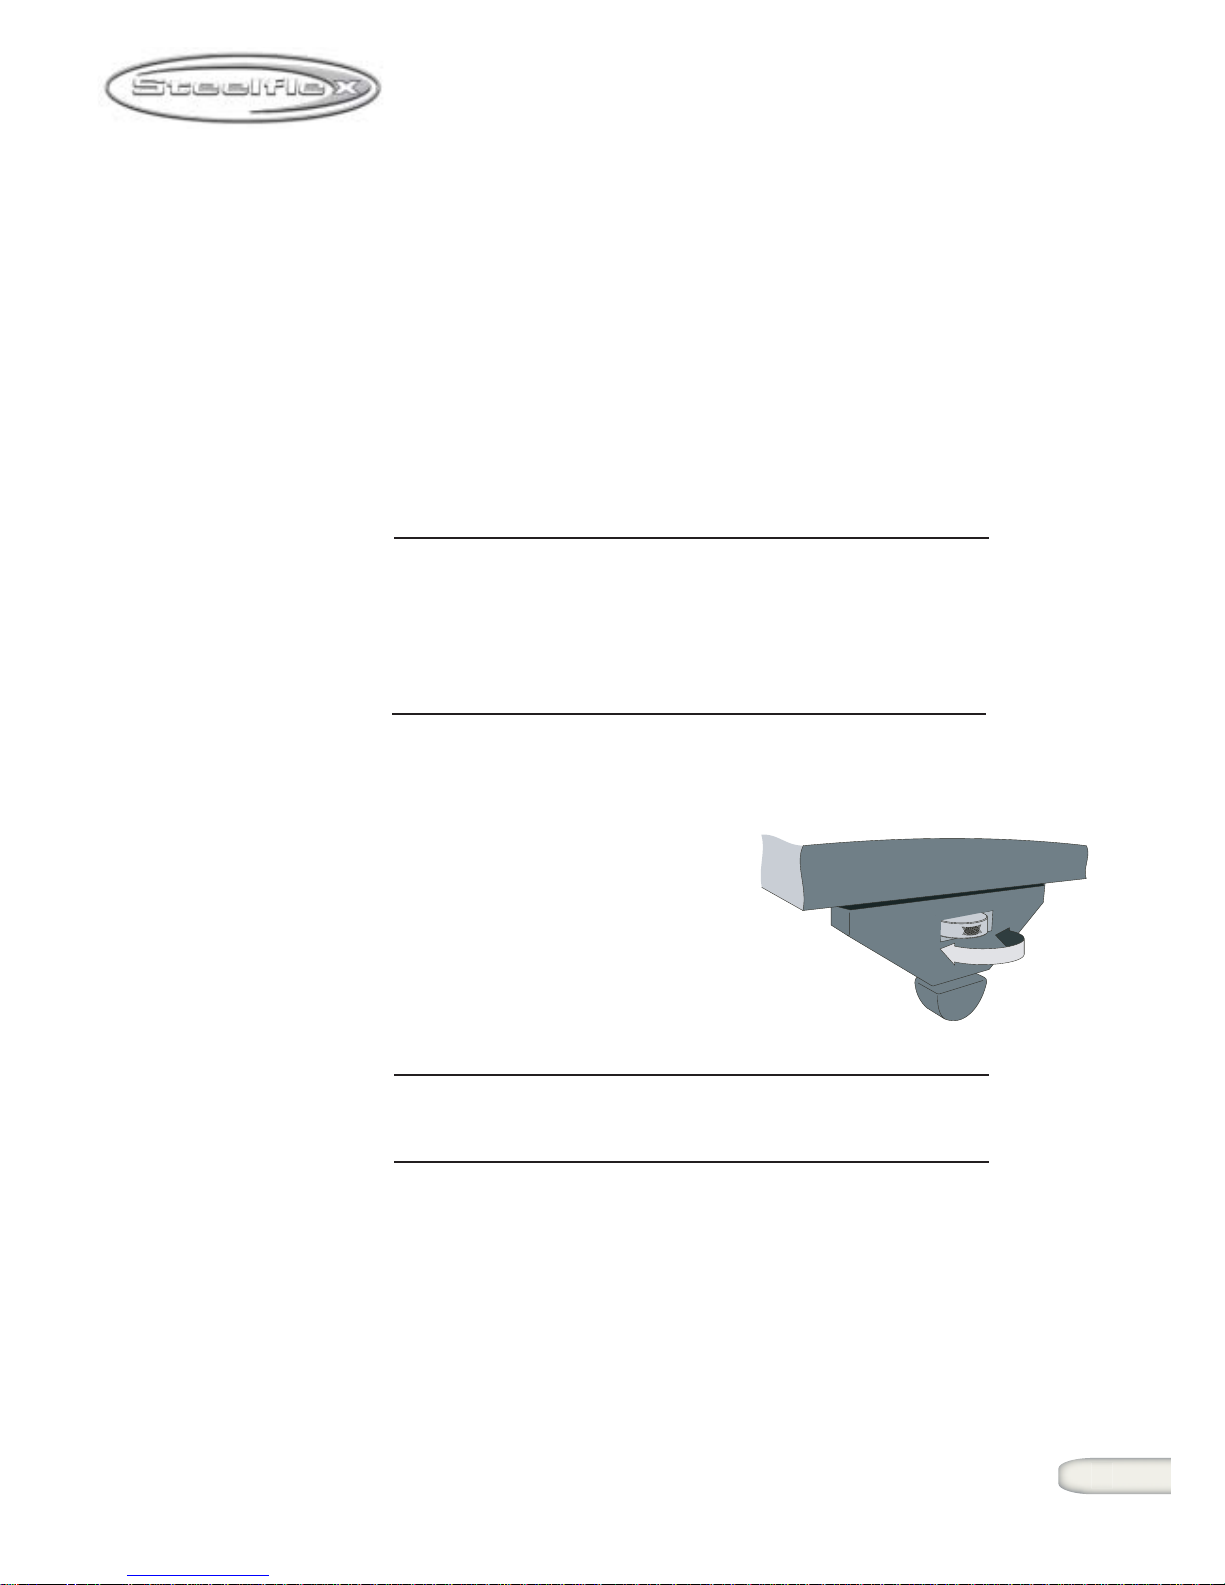
BELT TENSION INSTRUCTIONS
make 3 turns
After assembly and before turning
power on position the rear roller
using the " T " wrench (refer to the
drawing if needed). make 3 turns.
Clockwise to avoid the belt from
slipping.
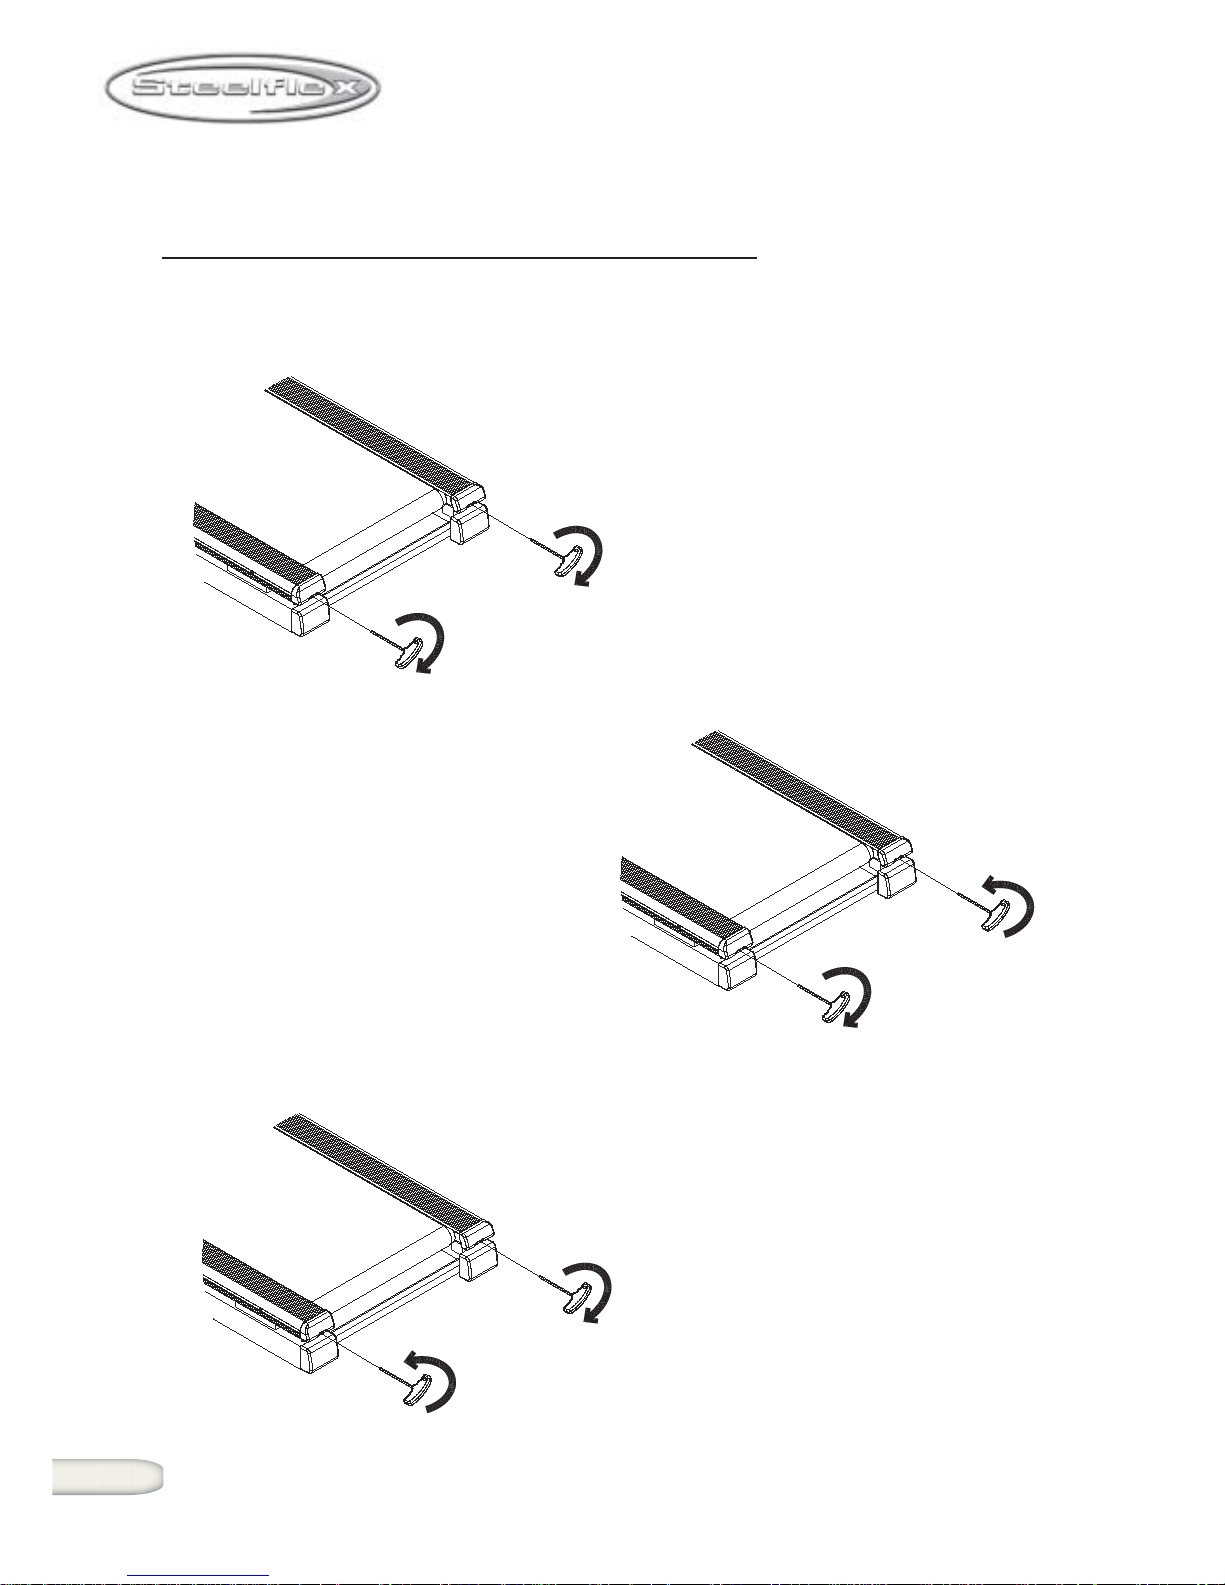
If belt is too far to the left side
1) turn the left roller bolt 1/4 turn
clockwise(tighten)
2) turn the right roller 1/4 turn
counterclockwise(loosen)
If belt is too far to the right side
1) turn the right roller bolt 1/4 turn
clockwise(tighten)
2) turn the left roller bolt 1/4 turn
counterclockwise(loosen)
XT-3200/3300/3600/4600
4800/5600/5700 Treadmill
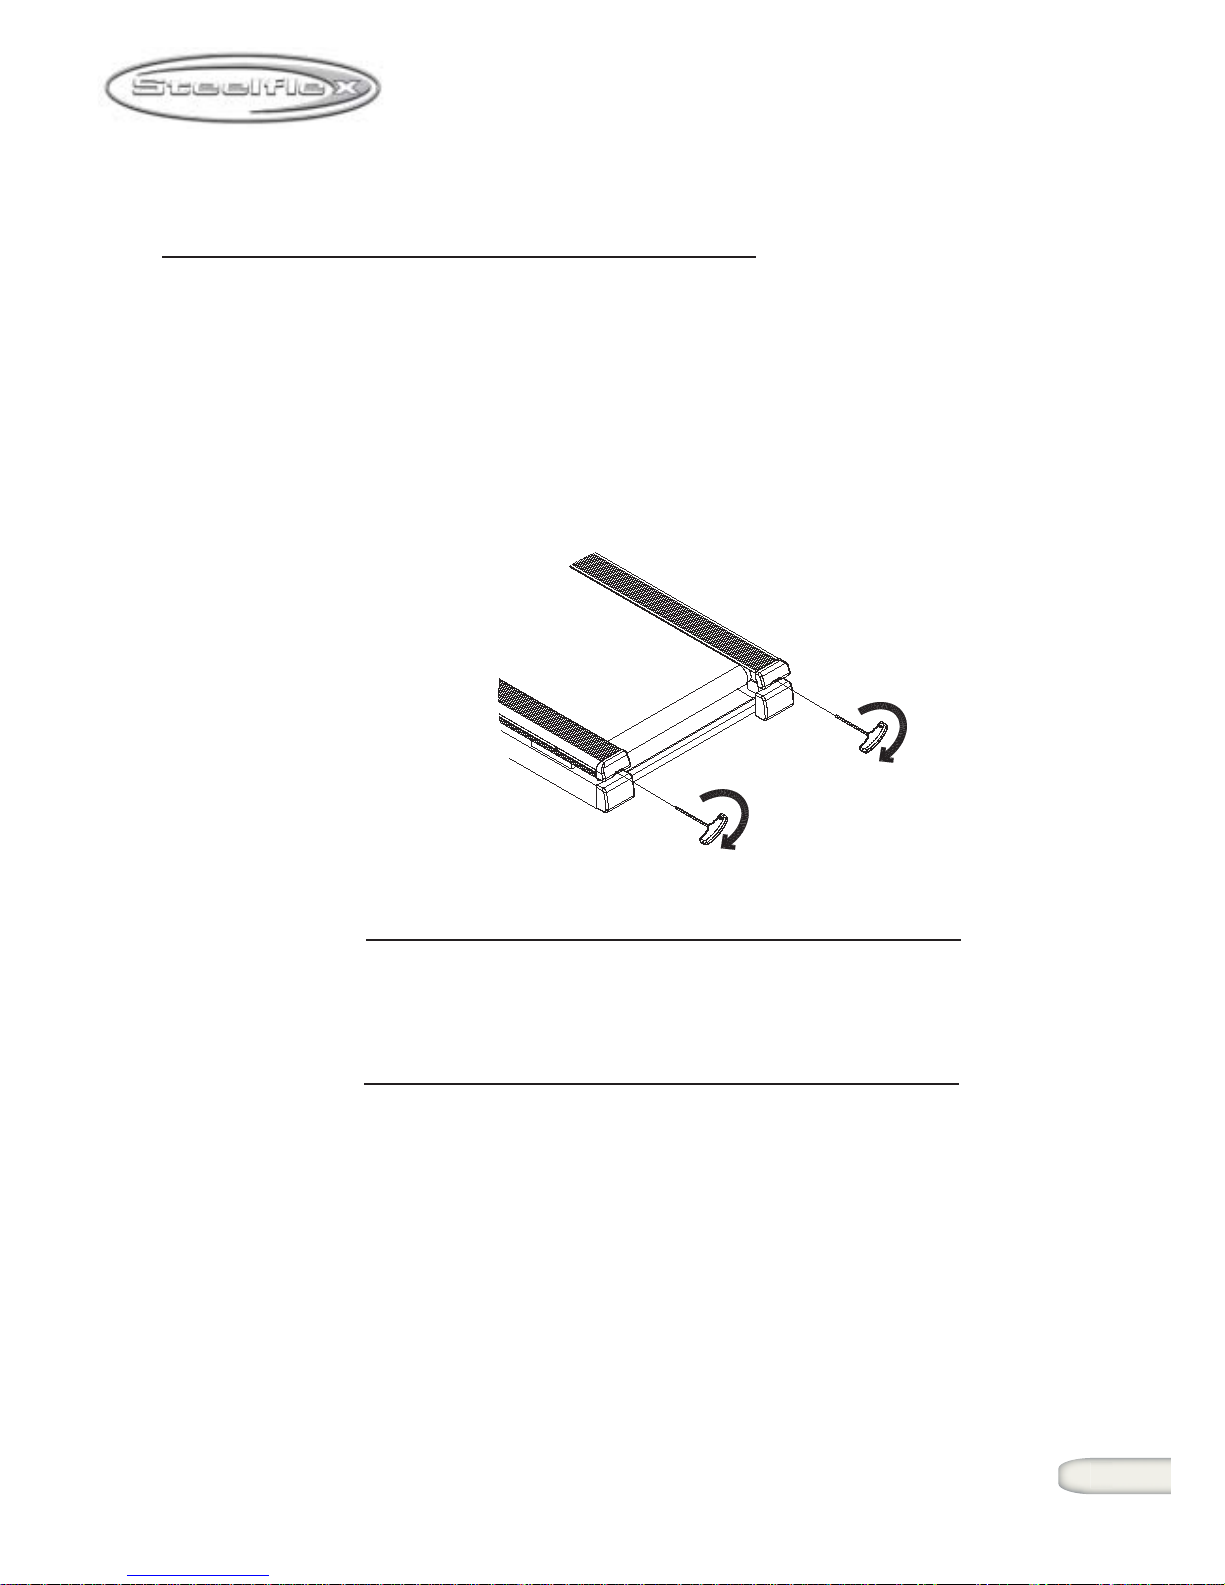
TENSIONING THE BELT
RUNNING BELT
If when you plant your foot on the belt, you can feel a sliping sensation then
the belt has been stretched and is slipping over the roller. This is normal
and common adjustment on a new treadmill. To eliminate this slipping,
tighten both sides of the rear roller by wing a Allen wrench turn 1/4 of a
TURN as shown above. Try the treadmill again to check
for slipping. Repeat if necessary, but
NEVER TURN the roller bolt more
than 1/4 turn at a time.
CAUTION: OVER TIGHTENING OF THE ROLLER WILL
SEVERELY SHORTEN THE LIFE OF THE BELT
AND MAY CAUSE FURTHER DAMAGE TO
OTHER COMPONENTS.
DRIVE BELT
If you have tightened the running belt and are still experiencing a slipping
sensation, call your STEELFLEX dealer. Tightening of the drive belt should
only be performed by an authorized dealer.
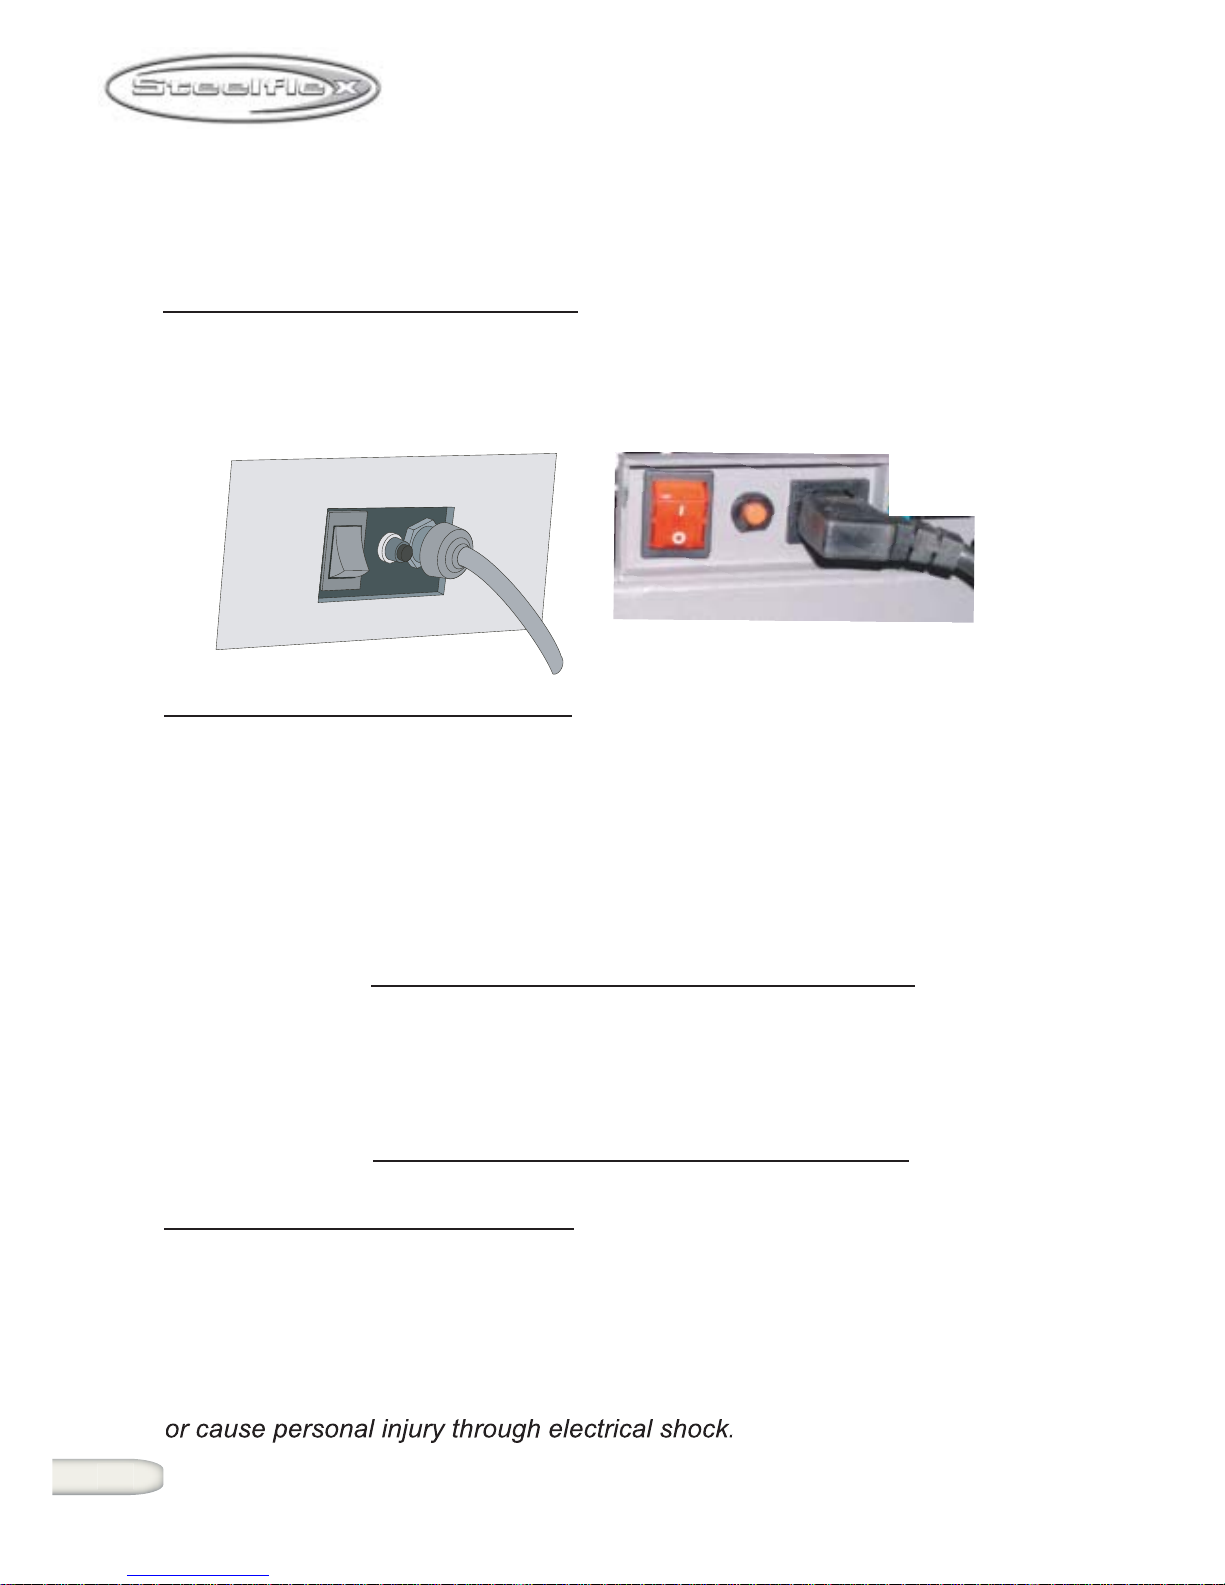
TREADMILL OVERVIEW
POWER SWITCH
The power switch is located in the front of the treadmill near the powercord.
The power switch has two positions -ON and OFF. The display console will
beep when the treadmill is plugged in and the power switch is pressed ON.
CIRCUIT BREAKER RESET
The circuit breaker is located next to the power switch. If there should be an
electrical overload due to a surge in electricity or other situation, the circuit
breaker will disconnect and attempt to prevent any damage from occurring
to the treadmill.
If the treadmill suddenly stops with no lights visible nor beep heard, the
circuit breaker may need to be reset. To reset the circuit breaker press the
button firmly. The display console should restart and a beep should be heard.
CAUTION: Feel the powercord with your hands. If the
powercord is warm to the touch a problem
may exist with the electrical outlet in which
the treadmill is plugged. It may be necessary
to plug the treadmill into a different outlet.
POWERCORD
The powercord, located in the front of the treadmill must be plugged into a
properly grounded electrical outlet.
Locate the powercord so it will not come in contact with the wheels of the
treadmill during operation. This may cause the powercord to become
pinched or damaged. Damage to the powercord could result in a fire hazard
9
XT-3200/3300/3600/4600
4800/5600/5700 Treadmill

XT-3200/3300 Treadmill Dimentions
P4
P2
P5
P3
A Information Windows
B Safety Key
C Elevation Arrow Buttons
D Mode Button
E Enter/Start Button
F Time Arrow Buttons
G Speed Arrow Buttons
H Stop Button
A
B
C
D
F
G
E
H
HEART RATE TRAININGZONE
BEATS
PER
MINUTE
A G E 20 30 40 50 60 70
MAX
85%
70%
60%
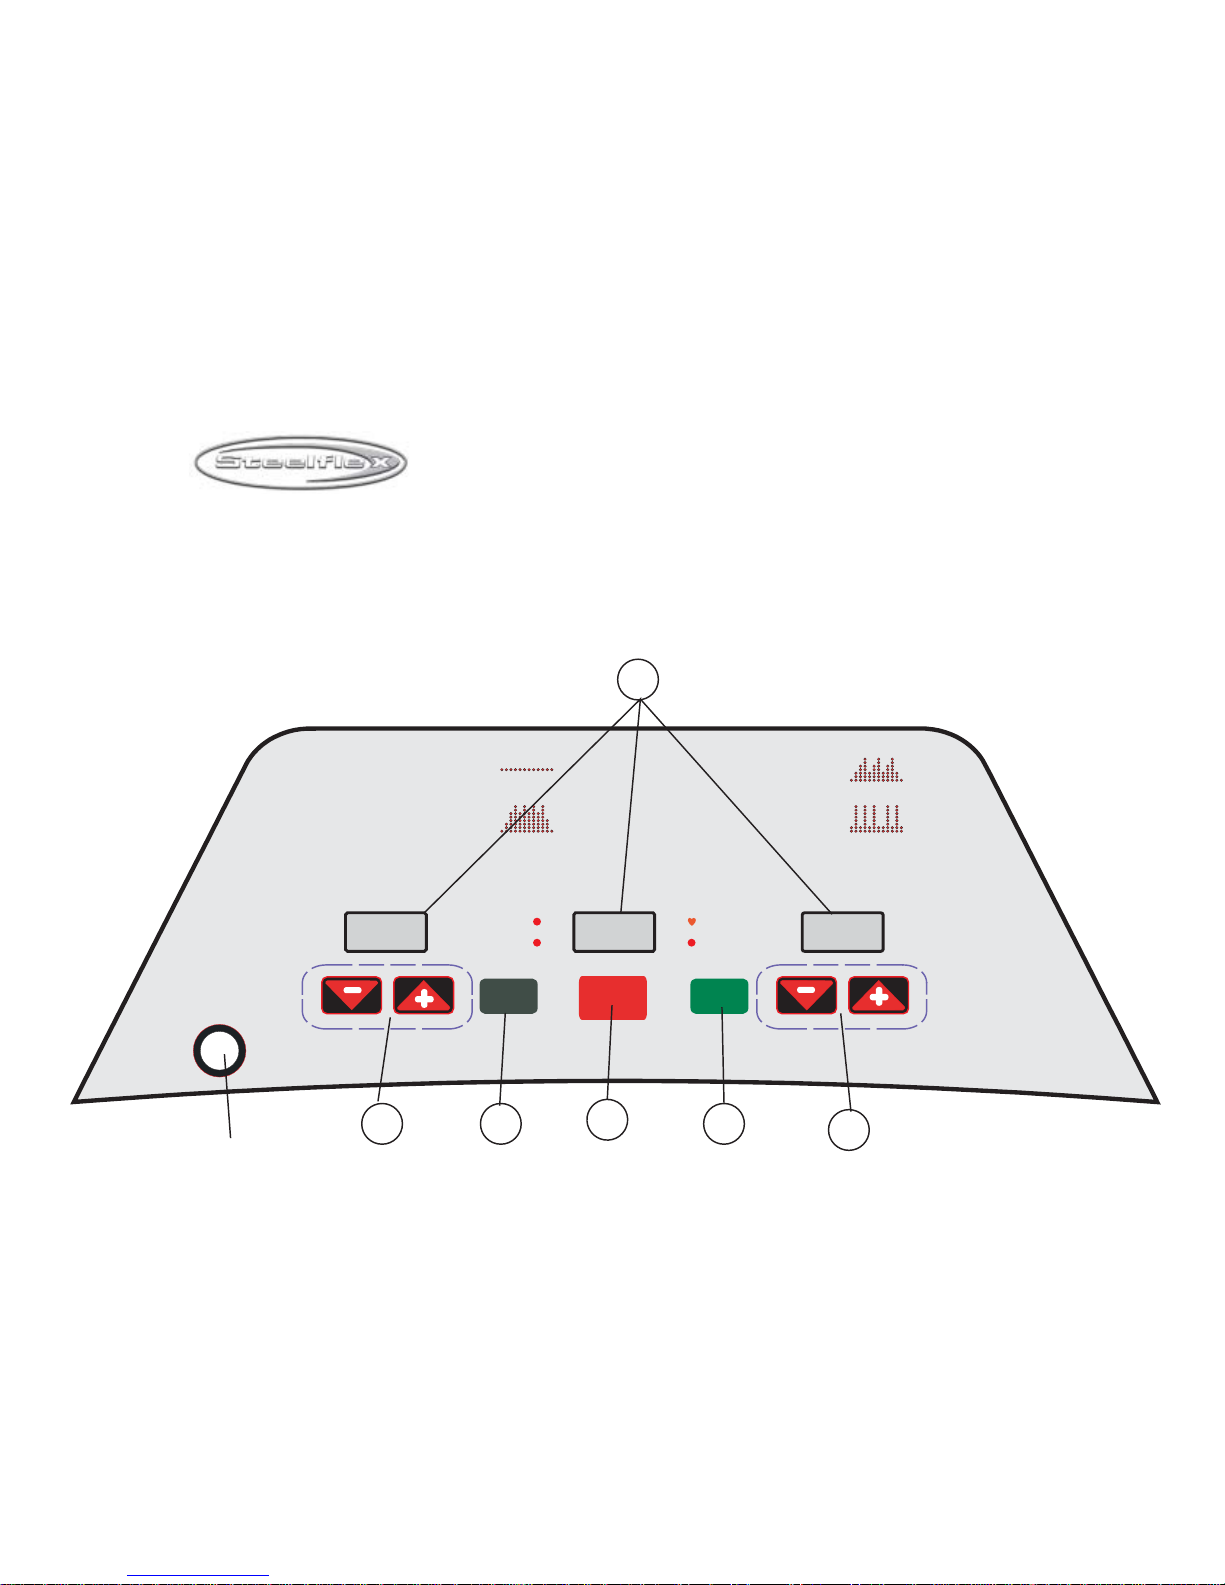
XT-3600 Treadmill Dimentions
A Information Windows
B Incline Arrow Buttons
C Speed Arrow Buttons
D Enter Button
E Stop Button
F Start Button
Safety key
TIME
CALORIES DISTANCE
P1:MANUAL
P2:WEIGHT LOSS
P3:RUNNING
P4:INTERVAL
INSTRUCTION
1:PUT SAFETY KEY.
2:IN PUT PRO GRAM U SING " + . - " , PR ESS EN TER
3:INPUT LEVEL USING " + . - ", PRESS ENTER
4:INPUT TIME USING " + . - ",PRESS START
PULSE
ENTER START
STOP
INCLINE SPEED
SAFE KEY
HOLD TO RESET
A
B
C
D
E
F
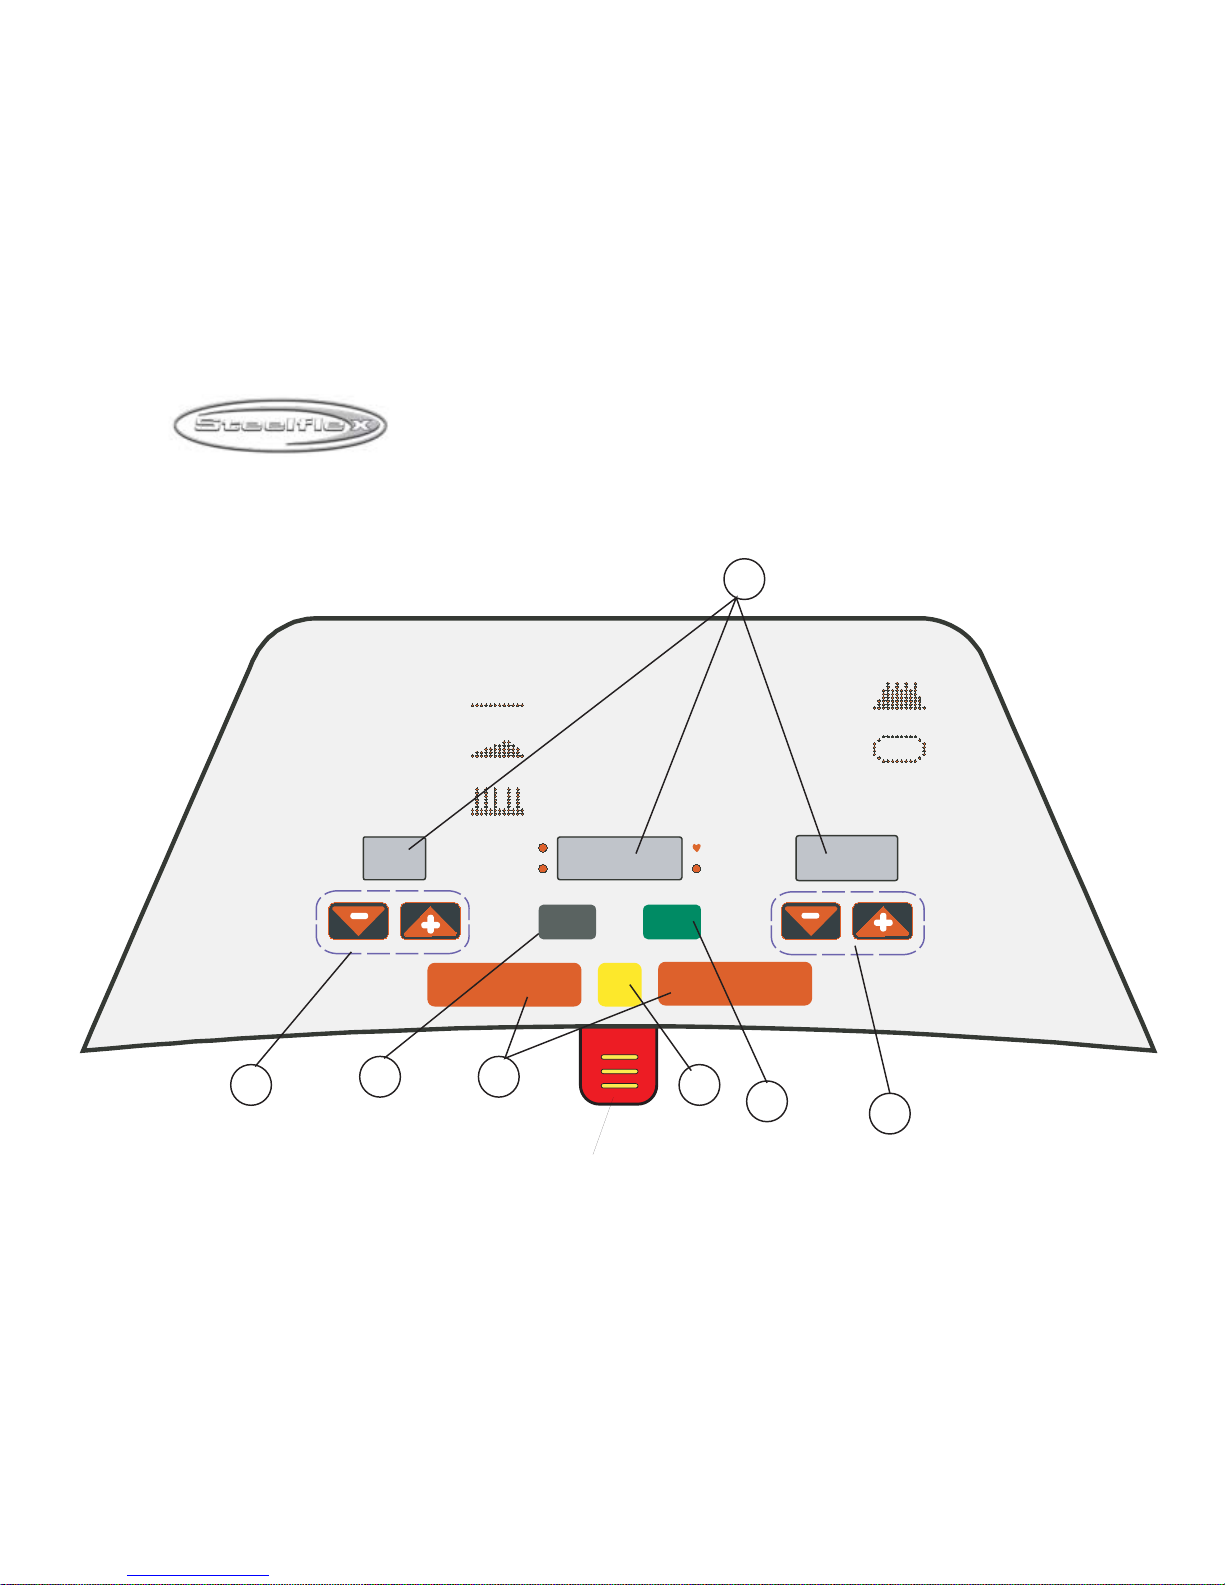
XT-4600 Treadmill Dimentions
A Information Windows
Stop Button
B Incline Arrow Buttons F Cool Down Button
C Speed Arrow Buttons G Start Button
D Enter Button
Safety key
TIME
CALO RIES
PULSE
DIS TA N C E
ENTER
START
STO P STO P
COO L
DOW N
IN C LIN E
SPEED
P1:M A NU AL
P2:CARDIO
P 3 :IN T E R VA L S
P4:W EIGHT LO SS
P5¡GRUNNING
INSTRUCTION
1:PU T SAFETY KEY.
2:EN T ER PROG R AM USING AR RO W S , PRESS SELECT
3:EN T ER LEVEL USING ARROW S, PRESS SELECT
4:EN T ER TIME USING ARROW S,PRESS START
A
B
D
E
F
G
C
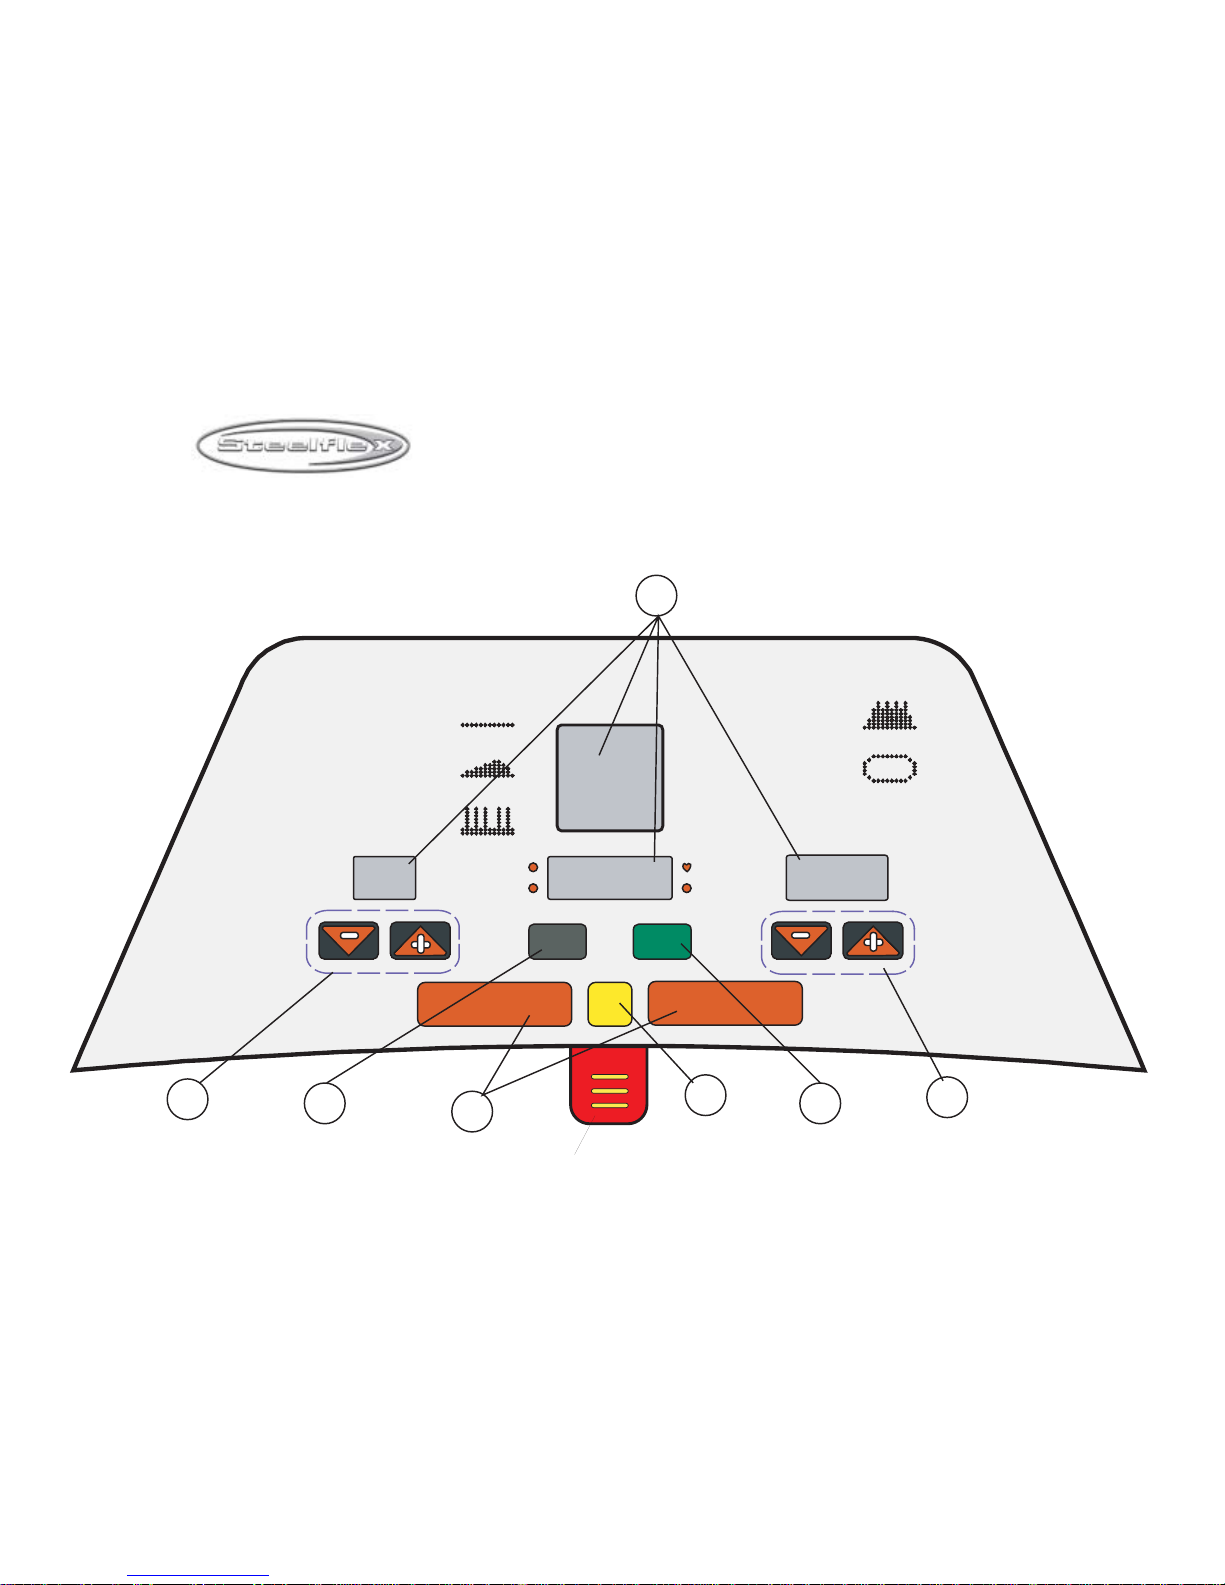
XT-4800 Treadmill Dimentions
A Information Windows E Stop Button
B Incline Arrow Buttons F Cool Down Button
C Speed Arrow Buttons
D Enter Button
Safety key
TIME
TIME
C A LO R I E
R I E
S
P U LS E
D I S
D I S
TA N C E
ENTER
ENTER
STA R T
S T O P
C O O L
DO W N
INCLINE
INCLINE
S P E E D
P 1: M
: M
A N U A L
P 2: C
: C
A R D I O
I O
P 3: I N
: I N
T E R V A L S
P 4: W E I G
: W E I G
H T L O S S
P 5: R
: R
U N N I N
N N I N
G
I N
I N
S TR U C T I O
T I O
N
1: P
: P
U T S AF E T Y KE Y .
2: E
: E
N T ER PR O G R A M U S IN G A R R O W S , PR E S S SE L E C T
3: E
: E
N T ER LE V E L US IN G A R R O W S , PR E S S S E L E C T
4: E
: E
N T ER TIM E U S IN G A R R O W S ,P R ES S STA R T
A
C
B
E
F
G
D
S T O P
G Start Button

XT-5600/5700 Treadmill Dimentions
Information Window
s
B Safety Key
C Elevation Arrow Buttons
D Enter/Start Button
E Speed/Weight Arrow Buttons
F Cool Down Button
G Time Arrow Buttons
H Stop Button
B
C
A
D
F
G
E
H
HEART RATE TRAININGZONE
BEATS
PER
MINUTE
A G E 20 30 40 50 60 70
MAX
85%
70%
60%

I
NFORMATION
W
INDOWS
LED Matrix Window
The LED Matrix window (or LED window) is located at the top of the Display Console.
This window displays graphical information such as the Virtual Track to chart
your progress and prompt and display information such as your weight, age and
Maximum Heart Rate.
Incline Window
The Incline window displays the current incline rate in "Percentage of Grade."
This is the same system used to measure hills and roads. A 100% grade is equal
to 45%. The following chart shows the conversion between percentage of
grade and degrees.
Grade equals the tangent of the angle (dy / dx). Thus a 100% grade would
% of Grade
Degrees
1
0.45
2
0.9
31.35
4
1.8
5
2.25
6
2.7
7
3.15
83.6
94.05
10
4.5
11
4.95
12
5.4
1
5
XT-3200/3300/3600/4600
4800/5600/5700 Treadmill

FEEDBACK WINDOW
The Feedback window displays the time, calories, heart rate and distance
during a workout. The information continually cycles, alternating between
time, calories, heart rate and distance. A red LED next to the Feedback
window lights signaling which information is presently being displayed.
SPEED WINDOW
The Speed window displays the current belt-speed setting. Except for
the slow change in belt-speed when increasing or decreasing the setting,
this is the actual speed at which the running belt is traveling in miles
per hour.
SPEED AND INCLINE ARROW BUTTONS
The Speed + and Speed - Arrow buttons are located below the Speed
window and are used to increase or decrease the belt-speed during
a workout.
The Incline + and Incline - Arrow buttons are located below the Incline
window and are used to increase or decrease the grade or tilt of the
running belt during a workout.
Use either the Incline or Speed arrow buttons to increase or decrease
values you are prompted to enter such as your weight, age, maximum
heart rate and goals for your workouts - Time, Calories, Distance and
Percentage of Maximum Heart Rate. After the value has been adjusted,
press the Enter button.
1
6
XT-3200/3300/3600/4600
4800/5600/5700 Treadmill

SPEED ARROW BUTTONS
Press the Speed + Arrow button to increase the running belt speed and
the Speed - Arrow button to decrease the running belt speed to the desired
setting. As the buttons are pressed the Speed window will display the value
in miles per hour (MPH). Increase the running belt speed value in
the Speed window to a known comfortable speed and let the running
belt reach that speed before increasing it.
TIP: The speed may be increased or decreased
at any time during the workout.
Note: Typically, the preprogrammed workout is
chosen and starts at 0.5 MPH and is then
increased to the desired speed.
CAUTION: DO NOT OVER-INCREASE SPEED!
As the button is pressed, the Belt-speed
value shown in the Speed window will increase
immediately. The running belt will increase to
this speed gradually. If a speed value is entered
that is too high for the user's capabilities,
personal injury may occur.
DO NOT continually press the Speed + Arrow button to increase the belt.
Enter a known, comfortable value and wait for the running belt to reach
that speed. Use care when further increasing the speed.
Use either the Speed or Incline Arrow buttons to increase or decrease
the weight setting shown in the Feedback window.
After the weight value has been adjusted press the Enter button.
XT-3200/3300/3600/4600
4800/5600/5700 Treadmill

INCLINE ARROW BUTTONS
Press Incline + Arrow button to increase the grade of the running belt and
the Incline - Arrow button to decrease the grade of the running belt to
the desired setting. As the buttons are pressed the Incline window will
display the value in percentage of grade.
The range of the percentage of grade is 0% to 12%.
TIP: The Incline may be increased or decreased
at any time during the workout.
For more information on percentage of grade please see Incline Window.
START BUTTON
Located in the center of the Display Console it is used to begin a workout
after all of the prompted information has been entered or immediately
to start a simple, manual program.
ENTER BUTTON
Located in the center of the Display Console it is used to accept information
you are prompted for and to finalize your selection of a preprogrammed
workout or effort level.
STOP BUTTON
The Stop buttons are located at the bottom of the Display Console and
perform the same task.
Press the Stop button once and it pauses the workout, holding your
current workout information such as the time elapsed, calories burned
and distance traveled. It does not change any aspect of your workout - it
stops it until you decide to continue. Press the Start button to continue
your workout in progress.
1
8
XT-3200/3300/3600/4600
4800/5600/5700 Treadmill

Press the Stop button twice and it will end your current workout immediately.
TIP: You may choose a different goal while in
goal-oriented workout.
COOL DOWN BUTTON FOR XT-4600/4800/5600/5700 MODELS ONLY
Press the Cool Down button at any time during a workout to gradually stop
a workout.
When pressed, the treadmill's incline will return to 0%. The running-belt
speed will decrease 0.1MPH each second until the speed reaches 2.0MPH.
The running belt will quickly slow to a stop.
TIP: If you decide you would like to continue your
workout after pressing the Cool Down button,
simply press the MPH Bar and return to any
speed of your choice.
STOP KEY FOR XT-4600/4800 MODELS ONLY
The Stop key is designed to stop the treadmill immediately.
The Stop key, when used correctly, will pull out of the Display Console
and stop the treadmill quickly if the user has fallen or is out of the safe
operating area.
Proper Use: Attach the clip at the end of the lanyard to
the waistband and insert the Stop key into
the Display Console
1
9
XT-3200/3300/3600/4600
4800/5600/5700 Treadmill

NOTE: The Stop key is also used to reset the treadmill
if an "EI" or programming error should occur
(if "EI" should appear in your LED Matrix window).
Simply pull the Stop key out momentarily and
re-insert it into the Display Console.
BELT & RUNNING SURFACE
Belt Condition
Inspect the Running belt monthly to check it's condition. Look for loose
pieces, tears or extremely worn areas. If these conditions occur, replace
the running belt immediately.
Please call STEELFEX Customer Support to purchase a replacement
running belt.
For XT4600/4800 models only
For XT-3200/3300/3600/5600/5700
models only
SAFE KEY
2
0
XT-3200/3300/3600/4600
4800/5600/5700 Treadmill

THE BASICS OF OPERATION
GETTING STARTED
After the treadmill is correctly installed and plugged in, it's time to start
our workout.
Begin by depressing the power switch, located in the front of the treadmill
near the powercord, to the ON position.
SET WEIGHT FOR XT-4600/4800/5600/5700 MODELS ONLY.
After the power switch is depressed to the ON position, the Set Weight LED
will light and the display console will read the last weight entered from
the previous workout. If no weight was previously entered or the system
was reset (refer to the Stop button information), the Main window will
display 150 (factory default).
NOTE: If the Enter button is not pressed within 6
seconds, the system will accept the displayed
weight and begin a Manual workout program.
STARTING A WORKOUT
When you are ready to begin a workout, check that there are no
obstructions near the treadmill. Also confirm there is nothing located under
the treadmill especially if there are children or pets present. Carefully reach
down and press the power switch to the ON position. You will hear an
audible beep and the Display console will prompt you to enter your weight.
Use the Speed or Incline Arrow keys to raise or lower the weight value
displayed in the LED Matrix window. Once the desired weight is displayed,
press the Enter button to continue.
XT-3200/3300/3600/4600
4800/5600/5700 Treadmill

If no key is pressed within six (6) second, the default setting of 150 pounds
or the last weight previously entered will be automatically accepted.
NOTE: It is important to enter the correct weight. The
treadmill uses this value to compute the number
of calories burned during a workout.
You are now ready to select a Workout!
TIP: When in a workout, press the Select button to
immediately end the current program and select
a different program. Your current workout
information will be discarded.
CHANGING THE RUNNING BELT SPEED
After pressing the Enter button the Lap Counter will appear on the display.
For information on this see "The Lap Counter" later in this section.
Press the Incline + Arrow button to increase the belt speed and the
Incline - Arrow button to decrease the belt speed of the treadmill to the
desired setting. As the buttons are pressed the speed window will display
the current speed.
TIP: The speed may be increased or decreased at
any time during a workout.
XT-3200/3300/3600/4600
4800/5600/5700 Treadmill

CHANGING THE INCLINE
Press the Incline + Arrow button to increase the incline and the
Incline - Arrow button to decrease the incline of the treadmill to the desired
setting. As the buttons are pressed the Incline window will display the value
in "percentage of grade" comparable to the measurement of the grade
of a hill.
TIP: The incline may be increased or decreased at
any time during a workout.
PAUSING THE WORKOUT
Press the Stop button to pause your workout temporarily. Pressing the
Stop button once will stop the running belt immediately and retain all of
the current workout information.
When you are ready to continue the workout, straddle the running belt by
holding on to the handrails and placing one foot on each side of the treadmill.
Press the Start button and the belt will slowly begin to travel. When ready
and while holding on to the handrails, carefully step onto the belt and
continue your workout.
COOL DOWN FOR XT-4600/4800/5600/5700 MODELS ONLY
The Cool Down function allows a workout to end with a gradual
slowing down.
Press the Cool Down button and the treadmill slow down 0.1 MPH per
second until it reaches 2.0 MPH. At this point it will slow from 2.0 MPH to
0 MPH in six (6) seconds.
While the treadmill is in the process of a "Cool Down", you may press
the Speed + Arrow button, Speed - Arrow button or any of the MPH Bar
buttons to stop the Cool Down process and continue the workout at the
present-chosen speed setting.
2
3
XT-3200/3300/3600/4600
4800/5600/5700 Treadmill

STORING INSTRUCTIONS FOR XT-3300/5700 MODELS ONLY
The XT-3300/5700 treadmills are specially designed for those who don't have
a lot of space but still want to enjoy the benefits of having a treadmill. These
two models are easily stored using STEELFLEX 's new folding design.
In order to use this system properly please follow the proceeding instructions:
• Stand directly behind the treadmill with feet at shoulder width apart.
• Bend down in a proper manner (bend at your knees not your back.)
• Place your hands on either side and on the outer side of the end caps
and lift upward until the safety pin clicks into place. (Remember to keep
your back straight and lift with your legs.)
USING INSTRUCTIONS FOR XT-3300/5700 MODELS ONLY
To use the XT-3300/5700 treadmills follow the proceeding instructions:
• Stand directly behind the treadmill with feet at shoulder width apart.
• Holding the treadmill with your left hand release the safety pin in place
with your right hand.
• Then place your hands on either side and on the outer side of the end
caps and pull downward until the treadmill is sitting flat on the ground
(Remember to always keep your back straight and bend at the knees
not your back.)
XT-3200/3300/3600/4600
4800/5600/5700 Treadmill

WORKOUTS
MANUAL (INCLUDES SET-TIME)
The Manual workout let's you control the effort. Change your effort level
and speed to challenge yourself. Press the MPH Bar and Start button
and you're working out instantly.
After entering your weight, the LED next to MANUAL will be lighted.
Press the Enter button to begin a basic, manual workout. This will allow
you to control the speed and incline of your workout and to continue until
you decide to stop.
Press the Start button to begin the workout.
Press the Arrow buttons and MPH Bar to tailor your workout to suit you.
CAUTION: DO NOT OVER-INCREASE SPEED! As
the Arrow button is pressed, the Belt-speed
value shown in the Speed window will increase
immediately. The running belt will increase to
this speed gradually. If a speed value is entered
that is too high for the user's capabilities,
personal injury may occur.
DO NOT continually press the Speed + Arrow
button to increase the belt. Enter a known,
comfortable value and wait for the running
belt to reach that speed. Use care when further
increasing the speed.
2
5
XT-3200/3300/3600/4600
4800/5600/5700 Treadmill

SET TIME (MANUAL WORKOUT WITH TIME GOAL)
Set the duration of your workout and get to it! The count down of the time
goal is displayed in the Main window and keeps you motivated.
After entering your weight the Manual workout will be selected.
Press the Select button until the LED next to SET TIME is lighted.
Press the Enter button to accept this workout.
Press the Speed or Incline Arrow buttons to display the desired amount
of time to workout and press the Enter button.
NOTE: The time ranges from 1 - 99 minutes.
The default is 1 minutes.
Press the MPH Bar to choose a desired speed.
Press the Incline Arrow buttons to display the desired Incline.
Press the Start button to begin the workout.
Press the Start button. The screen will display "3", "2", "1" and will
then beep. At this time the running belt will begin traveling at 0.5 MPH.
TIP: You may change the running-belt speed or
incline with the arrow buttons at any time
during the workout.
As you work out the console displays the time remaining in
the Main window.
Increase the running belt speed by pressing the Speed + Arrow button.
2
6
XT-3200/3300/3600/4600
4800/5600/5700 Treadmill

WEIGHT LOSS FOR XT-3600/4600/4800 MODELS ONLY
Really get into the zone! Raise your heart rate to the proper level and use
the duration to burn away! Twenty-five minutes to really feel the progress.
The weight loss workout has eight sessions. The first session is the
Warm-Up and the eighth session is the Cool-Down. They are
preprogrammed and you cannot change them. The second through
seventh sessions are preprogrammed but each segment can be changed
(four LEDs) temporarily.
TIP: You can change an individual segment's speed
and incline until the next segment begins.
The temporary changes made to a segment,
however, are not memorized for future workouts.
After entering your weight, the Manual workout will be selected.
Press the + button until the LED is lighten.
Press the Enter button to accept this workout.
Press the Arrow buttons to choose an effort level - Beginner, Novice or
Expert. The higher the LED profile, the more challenging the workout.
Press the Start button to immediately begin the workout or press the
Enter button to accept the effort level and choose a goal for the
workout - Time, Calories or Distance.
If you press the Enter button, choose a goal using the Arrow buttons to
display the goal you desire. Once the goal is displayed, press the Enter
button to accept the choice.
TIP: If you select one goal and change your mind,
press the Stop button to go back to the
goal choices.
XT-3200/3300/3600/4600
4800/5600/5700 Treadmill

Each session is controled by you the user. Use the Speed + - and
Incline + - Arrows to contol your speed and elevation.
TIP: You can press the Cool Down button at any time
to end the workout slowly.
TIP: Press the Stop button once to pause the workout
and twice to end the workout completely, allowing
you to choose a different effort level profile.
TIP: Press the Select button at any time to end
the current workout and select a different one.
2
8
XT-3200/3300/3600/4600
4800/5600/5700 Treadmill

RUNNING COURSES FOR XT-3600/4600/4800/5600/5700 MODELS ONLY
Let the Steelflex XT treadmill create a challenging workout for you!
After entering your weight, the Manual workout will be selected.
Press the + button until the LED is lighten.
Press the Enter button to accept this workout.
Press the Arrow buttons to choose an effort level - Beginner, Novice or
Expert. The higher the LED profile, the more challenging the workout.
Press the Start button to immediately begin the workout or press
the Enter button to accept the effort level and choose a goal for the
workout - Time, Calories or Distance.
If you press the Enter button, choose a goal using the Arrow buttons to
display the goal you desire. Once the goal is displayed, press the Enter
button to accept the choice.
TIP: If you select one goal and change your mind,
press the Stop button to go back to the goal
choices.
Next, use the Arrow buttons to enter a value for the goal and press
the Enter button to accept it.
The Running Courses' workout profile consist of one session of 10
segments. Each segment is four (4) LEDs each - each LED represents
15 seconds.
After the 10-minute session is completed, it automatically begins again
(for workouts over 10 minutes in duration).
XT-3200/3300/3600/4600
4800/5600/5700 Treadmill
2
9

ENDURANCE FOR XT-3200/3300/5700 MODELS ONLY
The ULTIMATE workout! Build your endurance and feel the burn!
The Endurance 30 Minute workout has thirteen sessions. The
firstsession is the Warm-Up and the thirteenth sessions is the CoolDown. They are preprogrammed and you cannot change them.
The second through twelfth sessions are preprogrammed but each
segment(four LEDs) can be changed temporarily.
TIP: You can change an individual segment's
speed and incline until the next segment
begins. The temporary changes made to a
segment, however,are not memorized for
future workouts.
After entering your weight, the Manual workout will be selected.
Press the Select button until the LED next to ENDURANCE 30
MIN is lighted.
Press the Enter button to accept this workout.
Press the Arrow buttons to choose an effort level - Beginner,
Novice or Expert. The higher the LED profile, the more challenging
the workout.
Press the Start button to immediately begin the workout or press
the Enter button to accept the effort level and choose a goal for the
workout - Time, Calories or Distance.
If you press the Enter button,choose a goal using the Arrow buttons
to display the goal you desire. Once the goal is displayed, press
the Enter button to accept the choice.
TIP: If you select one goal and change your
mind, press the Stop button to go back to
the goal choices.
Next, use the Arrow buttons to enter a value for the goal and press
the Enter button to accept it.
XT-3200/3300/3600/4600
4800/5600/5700 Treadmill

1
FOR XT-3200/3300 MODELS ONLY
The first session consists of three segments (12 LEDs) or three
minutes at 0% incline. The first segment's running-belt speed is
at 2 MPH, the second segment is at 2.5 MPH, third segment is
at 3 MPH. The second through the twelfth sessions use the
preprogrammed speed and the thirteenth session is the Cool
Down session.
TIP: You can press the Cool Down button at any
time to end the workout slowly.
TIP: Press the Stop button once to pause the
workout and twice to end the workout
completely, allowing you to choose a
different effort level profile.
TIP: Press the Select button at any time to end
the current workout and select a different
one.
XT-3200/3300/3600/4600
4800/5600/5700 Treadmill

FAT BURN FOR XT-3200/3300/5700 MODELS ONLY)
Really get into the zone! Raise your heart rate to the proper level
and use the duration to burn away! Twenty-five minutes to really
feel the progress.
The Minute workout has thirteen sessions. The first session is the
Warm-Up and the thirteenth session is the Cool-Down. They are
preprogrammed and you cannot change them. The second through
twelfth sessions are preprogrammed but each segment (four LEDs)
can be changed temporarily.
TIP: You can change an individual segment's
speed and incline until the next segment
begins. The temporary changes made to a
segment, however, are not memorized for
future workouts.
After entering your weight, the Manual workout will be selected.
Press the Select button until the LED next to is lighted.
Press the Enter button to accept this workout.
Press the Arrow buttons to choose an effort level - Beginner,
Novice or Expert. The higher the LED profile, the more challenging
the workout.
Press the Start button to immediately begin the workout or press
the Enter button to accept the effort level and choose a goal for the
Workout - Time, Calories or Distance.
If you press the Enter button,choose a goal using the Arrow buttons
to display the goal you desire. Once the goal is displayed, press
the Enter button to accept the choice.
TIP: If you select one goal and change your
mind, press the Stop button to go back to
the goal choices.
XT-3200/3300/3600/4600
4800/5600/5700 Treadmill

FOR XT-3200/3300 MODELS ONLY
Next, use the Arrow buttons to enter a value for the goal and press
the Enter button to accept it.
The first session consists of three segments (12 LEDs or three
minutes) at 0% incline. The first segment's running-belt speed is
at 2 MPH, the second segment is at 2.5 MPH, third segment is
at 3 MPH. The second through the twelfth sessions use the
preprogrammed speed and the thirteenth session is the Cool Down
session.
TIP: You can press the Cool Down button at any
time to end the workout slowly.
TIP: Press the Stop button once to pause the
workout and twice to end the workout
completely, allowing you to choose a
different effort level profile.
TIP: Press the Select button at any time to end
the current workout and select a different
one.
XT-3200/3300/3600/4600
4800/5600/5700 Treadmill

CARDIO FOR XT-3200/3300/4600/4800/5600/5700 MODELS ONLY
The first step to a healthier heart! A workout profile to raise your heart rate
to a higher level effectively helping your heart become stronger.
The Cardio workout has eight sessions. The first session is the Warm-Up
and the eighth session is the Cool-Down. They are preprogrammed and
you cannot change them.
The second through seventh sessions are preprogrammed but each
segment can be changed temporarily.
TIP: You can change an individual segment's speed
and incline until the next segment begins.
The temporary changes made to a segment,
however, are not memorized for future workouts.
After entering your weight, the Manual workout will be selected.
Press the + button until the LED is lighten.
Press the Enter button to accept this workout.
Press the Arrow buttons to choose an effort level - Beginner, Novice or
Expert. The higher the LED profile, the more challenging the workout.
Press the Start button to immediately begin the workout or press the Enter
button to accept the effort level and choose a goal for the workout and time.
If you press the Enter button, choose a goal using the Arrow buttons to
display the goal you desire. Once the goal is displayed, press the Enter
button to accept the choice.
TIP: If you select one goal and change your mind,
press the Stop button to go back to the goal
choices.
XT-3200/3300/3600/4600
4800/5600/5700 Treadmill

Next, use the Arrow buttons to enter a value for the goal and press the
Enter button to accept it.
The first session consists of three segments ( 8 LEDs or three minutes)
at 0% incline. The first segment's running-belt speed is at 1 MPH, the
second segment is at 1.2 MPH, third segment is at 1.6 MPH.
The second through the seventh sessions use the preprogrammed speed
and the eighth session is the Cool Down session.
TIP: You can press the Cool Down button at any
time to end the workout slowly.
TIP: Press the Stop button once to pause the
workout and twice to end the workout completely,
allowing you to choose a different effort level
profile.
TIP: Press the Select button at any time to end the
current workout and select a different one.
XT-3200/3300/3600/4600
4800/5600/5700 Treadmill

INTERVAL
Want a slightly greater challenge? Tone-up and continue your exercise
regiment with the Interval workout.
The Interval workout has eight sessions. The first session is the Warm-Up
and the eighth session is the Cool-Down. They are preprogrammed and
you cannot change them. The second through seventh sessions are
preprogrammed but each segment can be changed temporarily.
TIP: You can change an individual segment's speed
and incline until the next segment begins. The
temporary changes made to a segment, however,
are not memorized for future workouts.
After entering your weight, the Manual workout will be selected.
Press the Select button until the LED P2 is lighten.
Press the Enter button to accept this workout.
Press the Arrow buttons to choose an effort level - Beginner, Novice or
Expert. The higher the LED profile, the more challenging the workout.
Press the Start button to immediately begin the workout or press the Enter
button to accept the effort level and choose a goal for the workout and time.
If you press the Enter button, choose a goal using the Arrow buttons to
display the goal you desire. Once the goal is displayed, press the Enter
button to accept the choice.
TIP: If you select one goal and change your mind,
press the Stop button to go back to the goal
choices.
Next, use the Arrow buttons to enter a value for the goal and press the
Enter button to accept it.
XT-3200/3300/3600/4600
4800/5600/5700 Treadmill

The first session consists of three segments ( 8 LEDs or three minutes)
at 0% incline. The first segment's running-belt speed is at 1.2 MPH, the
second segment is at 4.3 MPH, third segment is at 1.2 MPH.
The second through the seventh sessions use the preprogrammed speed
and the eighth session is the Cool Down session.
TIP: You can press the Cool Down button at any
time to end the workout slowly.
TIP: Press the Stop button once to pause the
workout and twice to end the workout
completely, allowing you to choose a different
effort level profile.
TIP: Press the Select button at any time to end
the current workout and select a different one.
XT-3200/3300/3600/4600
4800/5600/5700 Treadmill

HAND PULSE CONTROL
FOR XT-3600/4600/4800/5600/5700 MODELS ONLY
Choose your Maximum Heart Rate (MHR) for proper control of your workout!
SteelFlex firmly recommends that you have a complete medical exam by
a qualified physician before beginning any exercise program, particularly
if you have a family history of high blood pressure or heart disease, are
over the age of 45, or if you smoke, have high cholesterol, are obese or
have not exercised regularly in the past year.
If, at any time while exercising, you feel faint, dizzy, pain or a shortness of
breath, stop exercising immediately.
After entering your weight, the Manual workout will be selected.
Press the Select button until the LED next to HAND PULSE CONTROL
is lighten.
Press the Enter button to accept this workout.
Hold the HAND PULSE firmly.
When the Heart Rate Control workout is chosen, the heart will display in
the LED Matrix window.
Change the display to your age using the Arrow buttons and press the
Enter button.
Caution: If you have a family history of heart disease,
a diagnosed heart ailment or have not
undertaken an exercise program recently,
an incorrect percentage of MHR could set
your targeted rate too high and may cause
injury or death. If you are unsure of what
your maximum heart rate should
be, please consult your physician before
attempting any exercise program.
If the Display Console does not detect a heart rate signal within 20 seconds,
the running belt will stop.
Press the Stop button once to pause the workout or twice to end the
workout immediately.
Press the Cool Down button to end the workout slowly.
Press the Select button to immediately stop the current workout and
choose a different one.
XT-3200/3300/3600/4600
4800/5600/5700 Treadmill

MAINTENANCE
Here are some preventative maintenance tips that will keep your treadmill
operating at its best.
Cleaning
NOTE: When cleaning the exterior of the unit, a
non-abrasive cleanser and soft cotton cloth
are strongly recommended. At no time should
cleanser be applied directly to any part of the
equipment. Instead, place the non-abrasive
cleaning solution on a soft cloth and wipe
down the unit.
Customer Service
Contact the Customer Service group at:
• Clean the Display Console and all exterior
surfaces regularly.
• Vacuum running belt regularly to keep debris from
accumulating.
• Inspect exterior parts regularly for wear and tear,
especially the running belt and deck.
• Inspect area under treadmill and vacuum regularly.
SteelFlex
No. 35, Tun Hi Rd.
Chin Chan Li
Sa Lu Taichung Hsien,
Taiwan
Phone: 8862-2720-9980
FAX: 8862-2722-9750
E-mil:joong@ms13.hinet.net
http://www.joong,com.tw
XT-3200/3300/3600/4600
4800/5600/5700 Treadmill

XT Treadmill Cleaning
Schedule Chart
4
0

TECHNICAL INFORMATION
Specifications
Range of Speed - 0.5 - 10.0 MPH
- 0.7 - 10.0 MPH
Range of Elevation - 0% - 10% Grade
- 0% - 12% Grade
Motor Size - 2.2 HP
- 2.0 HP
- 2.4 HP
Power Requirements - 120V/230V 60Hz/50Hz
Roller Diameter - 2.5"
Belt Size - XT-3200 = 52" x 18" x 1.6t
- XT-3300 = 52" x 18" x 1.6t
- XT-3600 = 54" x 19.5" x 1.8t
- XT-4600 = 54" x 19.5" x 1.8t
- XT-4800 = 60" x 19.5” x 2.1t
- XT-5600 = 54" x 20" x 1.8t
- XT-5700 = 54" x 20" x 1.8t
Manual
Weight Loss
Running Courses
Cardio
Interval
Endurance
Fat Buren
Hand Pulse
Dimensions
Height - 65"
- 67"
- 73"
Width - 30"
- 32"
Length - 63"
- 66"
- 67"
- 69"
- 73"
Weight - 275 lbs - XT-3200/3300
- 2
50
lbs - XT-2
600/2700
-
300
lbs - XT-
3600/4600/4800/5600/5700
XT-3200/3300/3600/4600
4800/5600/5700 Treadmill
-
XT-3200/3300/3600/4600/4800/5600/5700
- XT-4600/4800/5600/5700
- XT-4600/4800/5600/5700
- XT-3200/3300/3600/4600/4800/5600/5700
- XT-3200/3300/3600/4600/4800/5600/5700
- XT-3200/3300/5600/5700
- XT-3200/3300/5600/5700
- XT-3600/4600/4800/5600/5700
- XT-3200/3300/5600/5700
- XT-3600/4600/4800
- XT-3600/4600/4800
- XT-3200/3300/5600/5700
- XT-3200/3300
- XT2600/2700
- XT-3600/4600/4800/5600/5700
- XT-3200/3300
- XT-3600/4600/5600/5700
- XT-4800
- XT-3200/3600/4600/4800
- XT-3300/5600/5700
- XT-3200
- XT-3300
- XT-3600/4600/5700
- XT-5600
- XT-4800

GLOSSARY
Here are some more commonly used words.
Belt (Running Belt) Running surface of the treadmill
BPM Beats Per Minute
Deck Cushioned running surface that supports the Belt
Display
Console The dashboard of the treadmill. Contains the buttons and
windows to control the workouts.
Information
windows The Incline, Main and Speed windows. Used to display
information continuously and textually.
LED (Light Emitting Diode) The red or multi-colored lights found
above the information windows. These LEDs are used to
graphically represent periods of time, distance or other
information.
LED Matrix
Window The LEDs are located on eitherside of the Main window.
Used to graphically display effort levels and other
information.
MHR Maximum Heart Rate
Safety Key The red, plastic key located at the bottom of the Display
Console (when inserted in place) tethred to a clip to be
attached to your waistband.
Segment A one-minute period of time represented by a series of four
(4) LEDs. Each LED represents 15 seconds. A collection
of Segments create a Session.
Session One part of a workout. Typically, this includes the Warm-up
session and Cool-Down session and various sessions
in-between. A Session is made up of Segments.
Workout A preset exercise program adjusted by certain goals such
as Time, Calories and Distance. A Workout is a collection
of Sessions that create a group of challenges for you.
XT-3200/3300/3600/4600
4800/5600/5700 Treadmill

LIMITED HOME USE WARRANTY
STEELFLEX is proud to offer you the following warranty, wich applies to
home use, residential, noncommercial purposes only. Any other use of
this device will void this warranty.
STEELFLEX hereby extends the following limited warranties for the
following components of the device, for the period indicated:
FRAME - LIFETIME STEELFLEX warrants the frame against defects in
workmanship and materials for the life of the product, so long as it remains
in the possession of the original owner.
Electronics & Parts STEELFLEX warrants the Electronic components and
all original Parts against defects in workmanship and materials for a period
of three years from the date of original purchase, so long as the device
remains in the possession of the original owner.
Labor - STEELFLEX shall cover the Labor cost for the repair of the device
for a period of 1 year from the date of original purchase, so long as the
device remains in the possession of the original owner.
LIMITED HOME USE WARRANTY (continued)
The warranty does not apply to damage or failure due to accident, abuse,
corrosion, dicoloration of paint or plastic, or neglect. STEELFLEX shall
not be responsible for incidental or consequntial damages. Parts and
Electronic components reconditioned to As New Condition by STEELFLEX
or its vendors may sometimes be supplied as warranty replacement parts
and constitute fulfillment of warranty terms. Any warranty replacement
parts shall be warranted for the remainder of the original warranty term.
STEELFLEX expressly disclaims all other warranties, express or implied,
including but not limited to all warranties of fitness for a particular prupose
or of merchantability. This warranty gives you specific legal rights and your
rights may vary from state to state.
WARRANTY REGISTRATION
Your warranty card must be completed and sent to STEEL FLEX BEFORE
A WARRANTY CLAIM CAN BE PROCESSED.
You may also register via our website at http://www.joong.com.tw
Inside the enclosed warranty card you will find a customer survey. Your care
in completing the survey will be of value to us in serving you in the future.
Comments and suggestions are always welcome. We are certain you will
enjoy your new STEELFLEX XT Treadmill. Thank you for selecting a
S
TEELFLEX product.
4
3
XT-3200/3300/3600/4600
4800/5600/5700 Treadmill

Developing a Fitness Program
Warm Up:
Warming up is an extremely important phase, but unfortunately, it’s often an
activity that is ignored and painful, frustrating muscle pulls or strains may
be the result. There are two goals for warm - up: warming up the muscles
of the back and the extremities ( so that you can stretch them without injury),
and slight acceleration of the heart rate so the body can move gradually
into the target heart rate.
Warm - ups should consist of 5-10 minutes of exercises that are not very
demanding: marching in place, stepping sided to side and swinging your
arms walking at a pace of about 3.5mph, ect. ( your heart rate should be
between 90 - 120.
A gradual warm - up will do the following:
Produce faster more forceful muscle contractions.
Increase your metabolic rate so oxygen is delivered to the working muscles
more quickly.
Leads to efficient calorie burning by increasing your core body temperature
Prevent injuries by improving the elasticity of your muscles.
Allow you to work out comfortable longer because your energy systems are
able to exercise, preventing the buildup of lactic acid in the blood.
Improves joint range of motion.
Psychologically prepares you for highter intensities by increasing your
arousal and focus on exercise.
Warm - up: Warm - up 5 to 10 minutes before aerobic activity.
Duration: Maintain your exercise intensity for 20 to 60 minutes.
Cool Down: Gradually decrease the intensity of your workout,
then stretch to cool down during the last 5 to
10 minutes.
NOTE: If weight loss is your major goal, a minimum of 30
minutes of aerobic activity five or more times per
week is recommended.
XT-2600/2700/3200/3300/3600
4600/4800/5600/5700 Treadmill

Flexibility
Adequate flexibility is the ability to move your limbs and joints easily
(through a complete range of motion) the way you need to in order to meet
the callenges of daily life. Fortunately there’s a positive reinforcing cycle
between flexibility and activity. Adequate flexibility enables you to maintain
an active lifestyle, and an active lifestyle makes an important contribution
to maintaining adequate flexibility. These relationships grow stronger the
older we become.
When should I stretch?
Any time is a good time to Stretch. In the morining it can work out the kinks
in your back, at work, you can relax your neck and shoulders, and after
work stretch out your lower back. However, your should never do your
stretches before you have had a chance to warm your body up.
How should I stretch?
Perform the following stretches slowly and smoothly until you feel a slight
“tugging” sensation on the muscles involved. Don’t stretch to the point you
feel pain, and don’t bounce you could pull a muscle. Hold each stretch for
10 to 20 seconds. Exhale through the stretch, and breathe slowly. This will
keep you from bouncing.
1. Calf ( back of lover leg)
a. Straight knee start with the leg to be stretched approximately
three feet from the wall and the opposite leg on step forward.
Lean toward the wall, keeping your heels down and feet turned
in slightly.
b. Bent knee start same as above, but move approximately one
foot closer to the wall and bend the knee of the back leg to be
stretched.
c. Repeat using the other leg.
4
5
XT-3200/3300/3600/4600
4800/5600/5700 Treadmill

2. Iliotibial Band ( outside of hip)
3. Lower Back, Hips, Groin, and Hamstrings
a. Start with the leg to be stretched one step back and behind the
opposite foot. Move your hips sideways toward the side of your
body being stretched. Keep the upper body away from the wall
and do not bend forward.
b. Repeat using the other leg.
a. Stand with the feet about shoulder- width apart and pointed
straight ahaead. If you are pretty flexible and need more of a
stretch, cross one leg in front of the other for a few stretches,
then switch legs.
b. Slowly bend forward from the hips, always keeping your knees
slightly bent.
c. Stretch only to the point where you feel a tugging in the back of
your legs.
4
6
XT-3200/3300/3600/4600
4800/5600/5700 Treadmill

4. Side Bends
5. Quadriceps (front of thigh)
a. Stand with your feet about shoulder - width apart and toes pointed
straight ahead. Keep your knees slightly bent, one hand on
your hip; extend your other arm up and over your head. Slowly
bend at your waist to one side, toward the hand on your hip
b. Extend both arms overhead.
Hold your right hand with your
left hand and bend slowly to
the left, using your left arm
to pull the right arm gently
over the head and down
toward the ground.
c. Repeat with other side.
a. Lying on our stomach, pull the heel toward your buttocks with
the opposite hand. Keep the thigh of the leg being stretched
close to the leg on the floor.
b. The same stretch can be
done standing. Do not allow
the thigh to come in front of
you and so not bend forward
at the waist.
c. Do this exercise twice - once
on each leg.
XT-3200/3300/3600/4600
4800/5600/5700 Treadmill

6. Groin (inside of thigh)
7. Hamstrings (back side of upper leg)
8.Gluteus (back of hip)
a. Sit on the floor with the soles of your feet together. Gently push
knees down toward the floor with your elbows.
b. Stand with your feet three to four
feet apart and turned out slightly.
Keep the knee of the leg to be
stretched straight, and bend
the opposite knee as you
move your body toward the
bent leg. Keep your toes
pointed forward.
c. Repeat using the other leg
a. Sit with one knee bent and the leg to be stretched out straight.
Reach for the toes of the straight
leg with the right hand and
then the left hand.
b. Repeat with the other leg.
a. Lie on your back. Pull one knee up to your chest while keeping
the opposite leg down on the
floor with the knee straight.
b. The same may be done
standing.
c. Repeat with the other leg.
4
8
XT-3200/3300/3600/4600
4800/5600/5700 Treadmill

9. Anterior Tibialis (front of shin)
10. Iliopsoas (lower back)
a. Stand with all of your weight on one leg. Extend the opposite
leg forward and flex and point at the ankle.
b. Repeat with the other leg.
a. If you have a neck problem, be very careful with this stretch. In a
sitting position (on a mat or rug hold your knees with your hands
and pull them to your chest.
b. Gently roll up and down your spine, keeping your chin down
toward your chest. This will further stretch the muscles along
the spine.
c. Try to roll evenly and with control. Roll back and forth 4 to 8
times or until you feel your back loosen.
4
9
XT-3200/3300/3600/4600
4800/5600/5700 Treadmill

Zone intensity Goal
(% MHR)
1 50-60% Improve health and
well-being, dec rease
stress, reduc e risk fac tors,
2 60-70% Weight m anagem ent and
optim al fat burning
3 70-80% Aerobic fitness,
4 80-85% Aerobic/ Anaerobic fitness
5 85-100% Anaerobic fitness for peak
performance and competition
Training Zones
M ode
Very easy, conver sational
pace.
Easy pace, longer
duration to bulid
endurance.
Faster pace,
improve stam ina.
Increase speed and
improve stride.
Interval runs to increase
VO 2 MAX, speed, econom y,
and form.
Exercise Guidelines:
The American Council of Sports Medicine (ACSM) recommends the following
exercise guidelines, for healthy aerobic activity:
Warm - up: Warm - up 5 to 10 minutes before aerobic activity.
Duration: Maintain your exercise intensity for 20 to 60 minutes.
Cool Down: Gradually decrease the intensity of your workout, then
stretch to cool down during the last 5 to 10 minutes.
NOTE: If weight loss is your major goal, a minimum of 30 minutes
of aerobic activity five or more times per week is recommended.
Determining your target heart rate (Kavvonen Heart Rate Formula)
Example: 40 year old with a resting rate pulse of 60 BPM
220 -40 (age) = 180
180-60 (resting pulse) = 120
120 x .5 (50% intensity) = 60
60 + 60 (resting pulse) = 120 (target heart rate)
The following chart explains how to determine your target heart rate for varing levels
of intensity. The different levels of intensity will help you achieve different objectives.
XT-3200/3300/3600/4600
4800/5600/5700 Treadmill

Achieving your Fitness Goals
Each of us are individuals with possibly different fitness goals. It is critical to
determine what your goals are when deleloping a long term fitness program.
STEELFLEX fitness products are pleased with your decision in using our
quality products to help reach your fitness goals. Below are some benefits
of exercising. We have listed these to help in reaching your fitness goals:
¡E Strengthens heart and lungs
¡E Increases energy
¡E Lowers blood pressure
¡E Increases metabolism
¡E Prevents diabetes
¡E Strengthens bones
¡E Strengthens and tones muscles
¡E Maintains weight loss
¡E Improves productivity
¡E Improves sleep
¡E Reduces stess
¡E Improves posture and appearance
¡E Reduces feelings of depression
¡E Improves sense of well -being
XT-3200/3300/3600/4600
4800/5600/5700 Treadmill

Its important that your goals are well defined and reachable. Put your goals
in writing. The more specific you are the easier it will be to keep track of
your progress. Setting long terms are best reached if one incorportates
short term goals in order to reach the overall long term goal.
The STEELFLEX product console provides you with several readouts that
can be used to record your progress. You can track Distance, Calories or
Time. Time is the most important and useful of the test functions.
SAMPLE GOALS:
Goal setting is a popular motivational technique. It’s important to set goals
and reward yourself when initiating a new exercise program because
you’re attempting to break current patterns and form a new habit. Whether
you use this technique or another, make fitness a priority in your life. You
can achieve the ultimate reward to yourself: you can establish the exercise
habit!
Some sample goals may be:
KEEPING AN EXERCISE DIARY
Feel free to photocopy the following weekly and annual log sheets.
By doing so you can pridefully check and return to look at the progress
you have made.
To strengthen my heart by exercising 30 minutes three days a week.
(Goal Measurement: Exercise Time 90 minutes a week.)
To improve my bodies ability to utilize and burn fat at a higher rate
by exercising at a low intensity for 45 minutes per session, 5 days
per week.
(Goal Measurement: Exercise Time = 225 per week).
To decrease work other daily stress by exercising for 20 minutes a
day on work days.
(Goal Mesurement: Exercise Time = 100 minutes per week).
XT-3200/3300/3600/4600
4800/5600/5700 Treadmill

Week #
Date:___________________
Number hours of sleep:__________________
Weekly Goals:_______________
Sheduled work out time:_______________
Reward:_______________
Level of intensity by % of your predicted maximal heart rate:
__________________
Rating of your percieved exertion (R.P.E., Borg Scale)
6 13 Some What Hard
7 Very, Very Light 14
8 15 Hard
9 Very Light 16
10 17 Very Hard
11 Fairly Light 18
12 19 Very, Very Hard
Diary
T
XT-3200/3300/3600/4600
4800/5600/5700 Treadmill

Heart Rate Conversion for 10 Seconds (Use as reference)
11 = 66 19 = 114 27 = 162
12 = 72 20 = 120 28 = 168
13 = 78 21 = 126 29 = 174
14 = 84 22 = 132 30 = 180
15 = 90 23 = 139 31 = 186
16 = 96 24 = 144 32 = 192
17 = 102 25 = 150 33 = 198
18 = 108 26 = 156 34 = 204
XT-3200/3300/3600/4600
4800/5600/5700 Treadmill

 Loading...