

Page 1

Page 2
1
SAFETY INSTRUCTIONS....................................................
MOVING...............................................................................
SEAT ADJUSTMENT.............................................................
CONSOLE ADJUSTMENT....................................................
LEVELER ADJUSTMENT.......................................................
OPERATING INSTRUCTIONS FOR CB/CR/CE/CF.............
OPERATING INSTRUCTIONS FOR ENTERTAINMENT....
OPERATING INSTRUCTIONS FOR PST.............................
OPERATING INSTRUCTIONS FOR PB/PR.........................
MAINTENANCE...................................................................
WARRANTY CONDITIONS.................................................
2-3
4
5
6
7
8-22
23-27
28-39
40-48
49
50
Page 3
2
STEELFLEX
STEELFLEX
STEELFLEX
When the STEELFLEX product is in use, young children and
pets should be kept at least 10 feet away.
Bike / Elliptical / Stepper
Page 4
3
STEELFLEX
Page 5
4
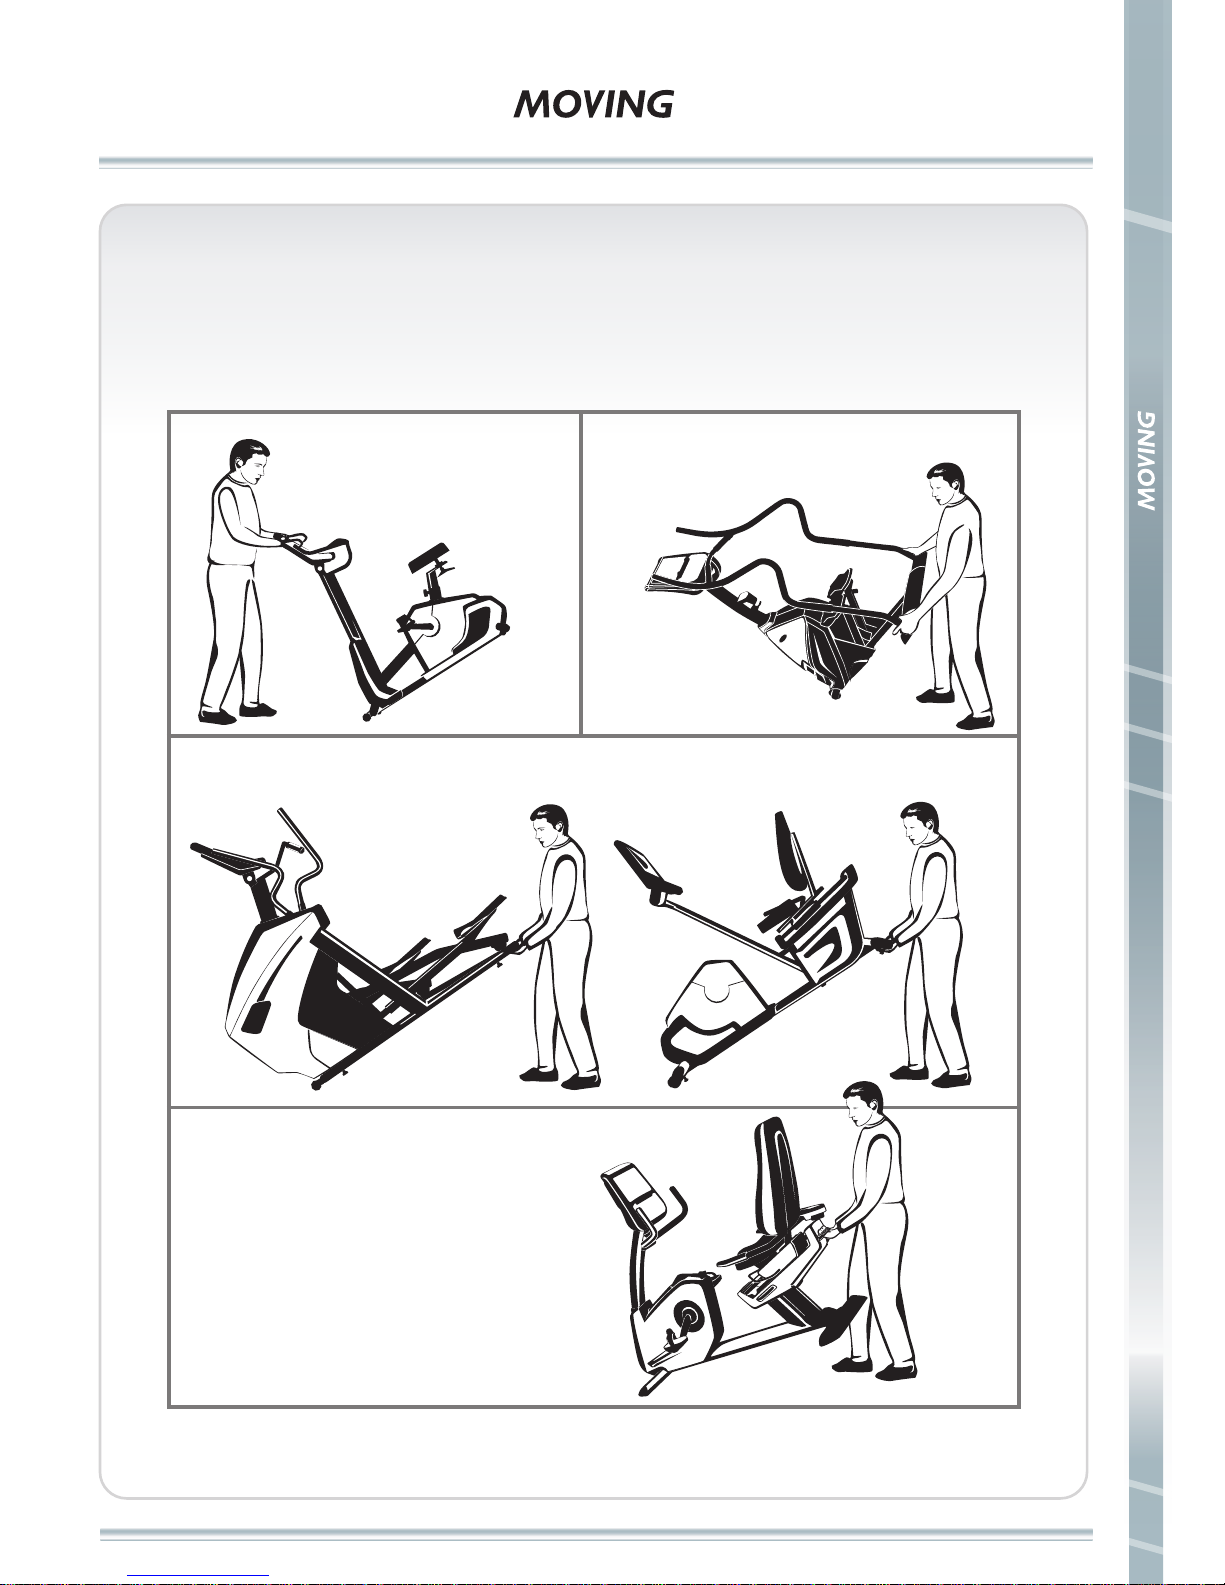
Each STEELFLEX product equips with a pair of transport wheels
built into the front leg. Follow instructions below to move your
STEELFLEX product.
Caution:
The product is heavy. Take caution and use additional help if necessary.
To move CB and PB, firmly
grasp the handlebars, carefully
tip toward you and roll on the
transport wheels.
To move CE, CF and CR, firmly grasp assembled rear foot, carefully lift and
roll on transport wheels.
To move PST, firmly grasp bottom areas
of handlebars, carefully lift and
roll on the transport wheels.
To move PR, firmly grasp rear
handlebar, carefully lift and roll
on transport wheels.
Page 6
5
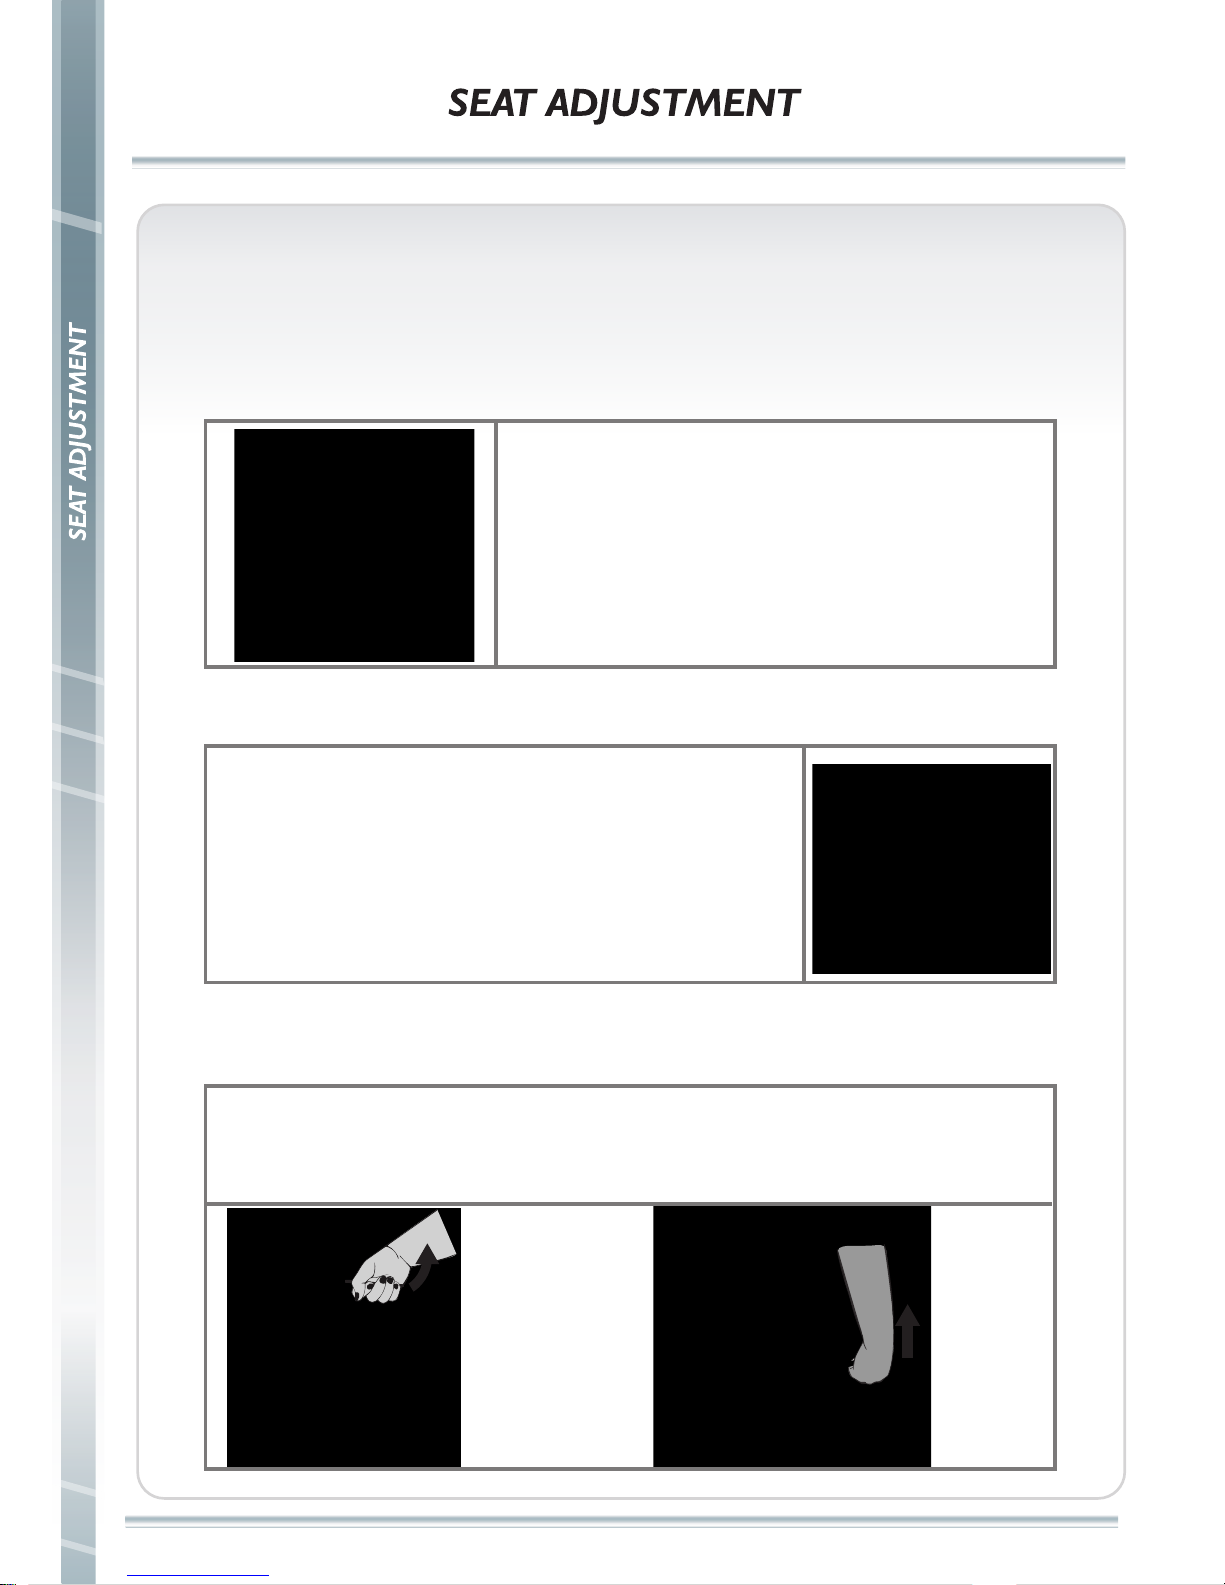
The seat is at the proper position when your knee is slightly bent
when the pedal is in the furthest position.
Item : All CR series
Item : All CB series
Item: PB and PR
To adjust PB and PR seat position, all you need to do is pull the adjusted handle up and
move forward or backward to the position you feel comfortable. When the seat position
is set, let your hand off the adjusted handle.
To adjust CR seat position, all you need to do is pull the
adjusted bar and move forward or back to the position
you feel comfortable. Then press the adjusted bar down
to lock.
To adjust CB seat position, two different places yor can adjust.
1. If the seat is too short or too high, you can use round adjust
pin. Loosen the adjust pin and then pull it to adjust the height
of seat to a comfortable position, then tighten it.
2. If the seat is too far or too close, you can use the bar pin.
Loosen the pin and adjust to a comfortable position.
Page 7
6
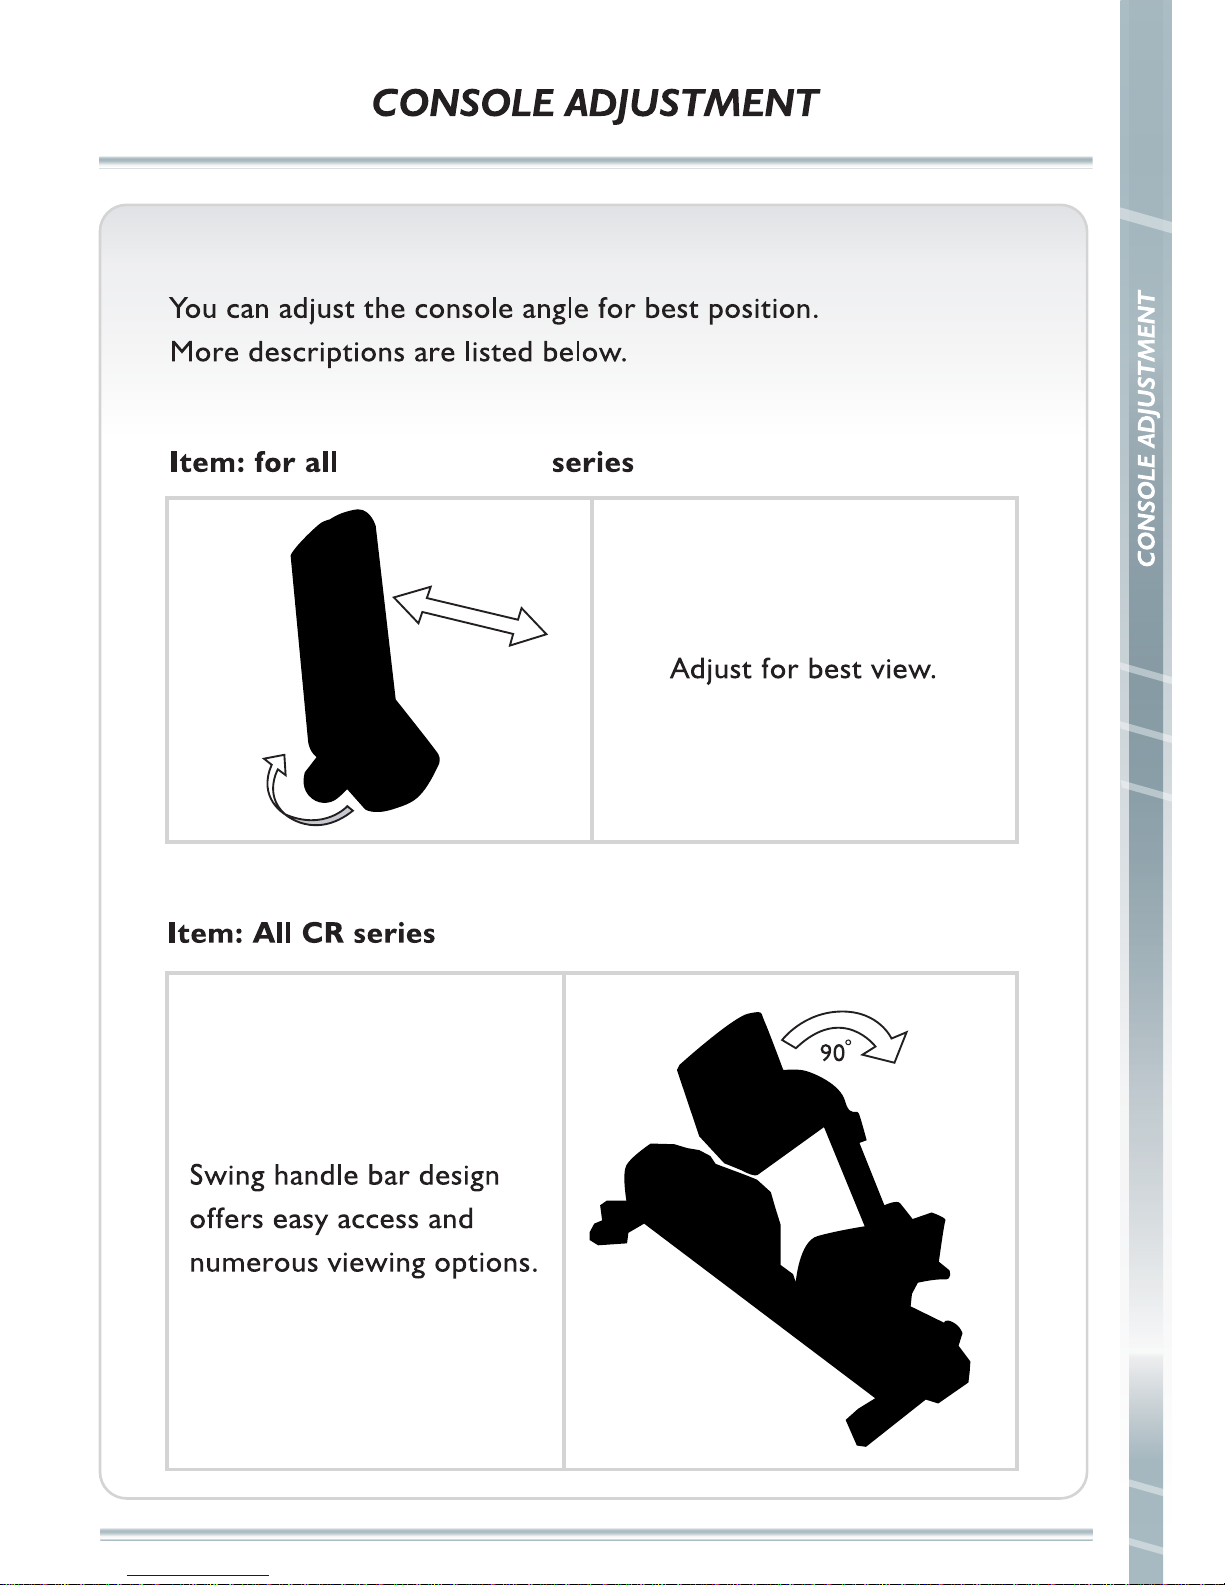
CB/CR/CE/CF
Page 8
7
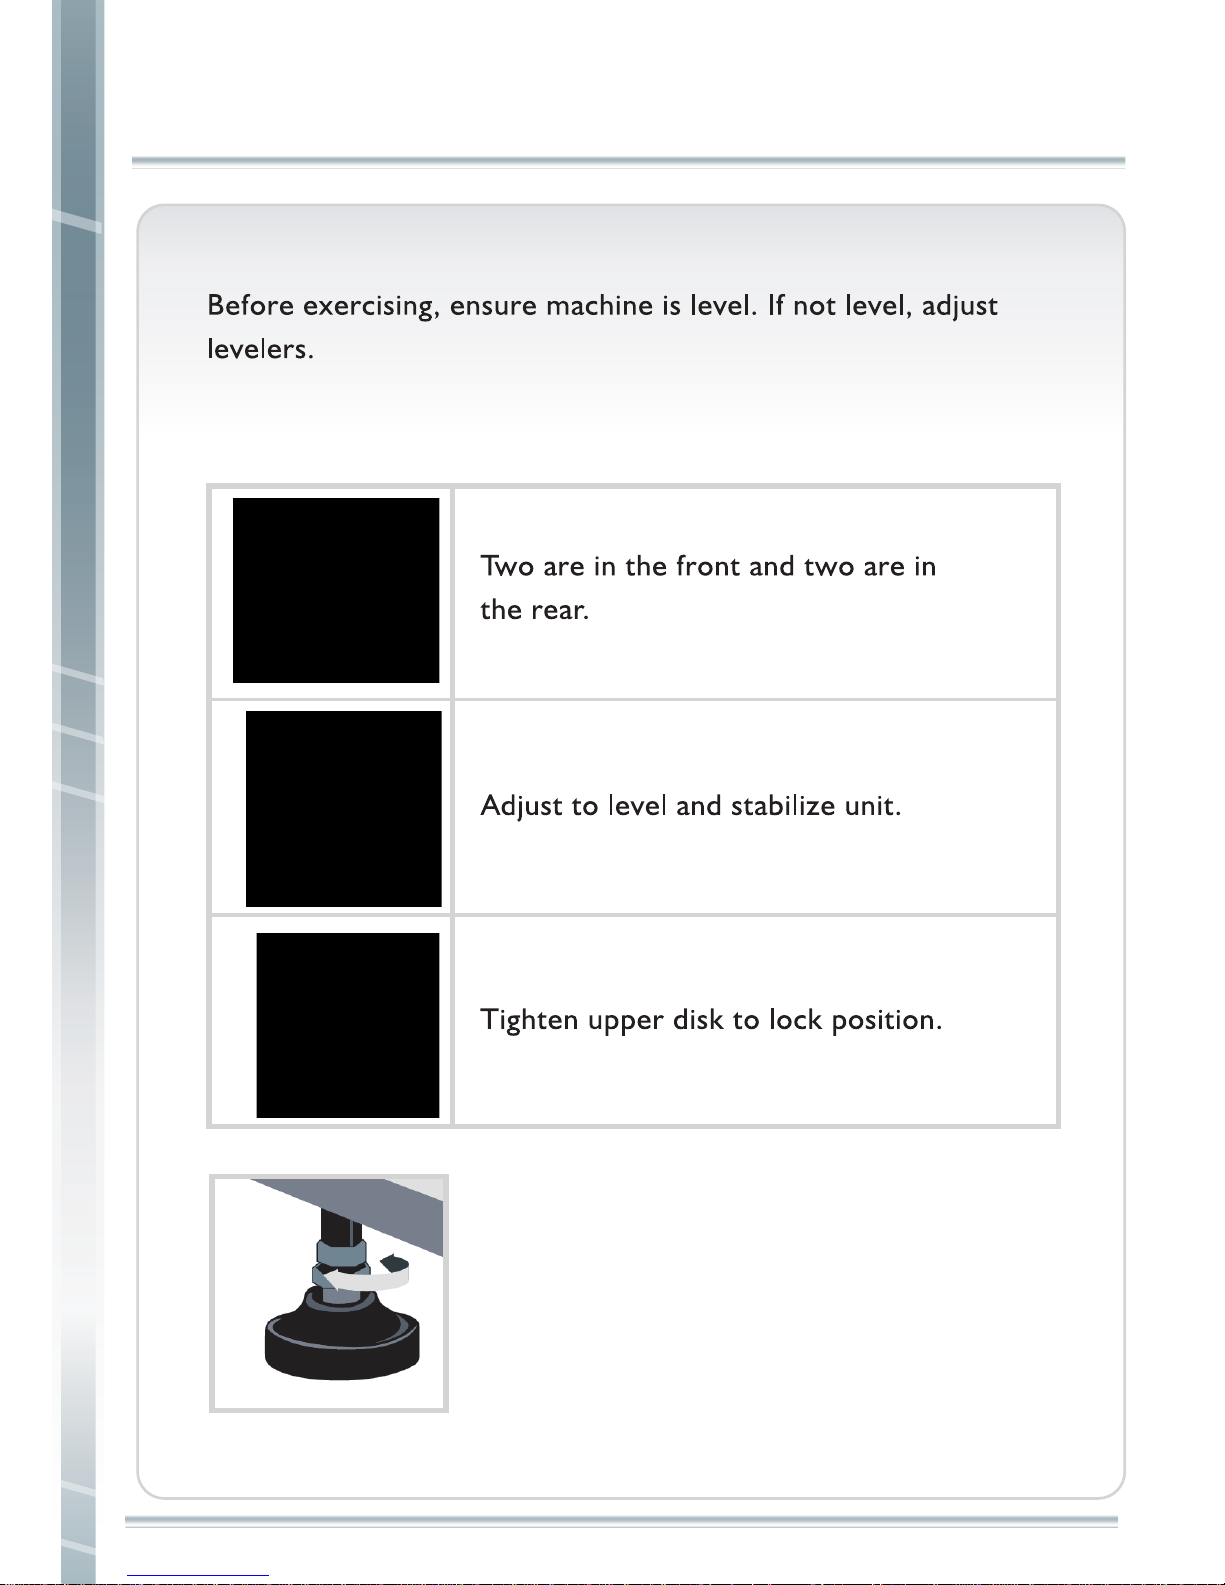
Item : for all CE and CF series
After finding a location that is suitable for the
elliptical, you can adjust four levelers which
allow you to adjust until it is properly seated
on the floor.
DO NOT adjust levelers while the elliptical is
used.
Item : for all CB/CR , PST , PB and PR
LEVELER ADJUSTMENT
LEVELER ADJUSTMENT
Page 9
CBSG/CRSG/CESG/CFSG or CB1/CR1/CE1/CF1
is used
Page 10
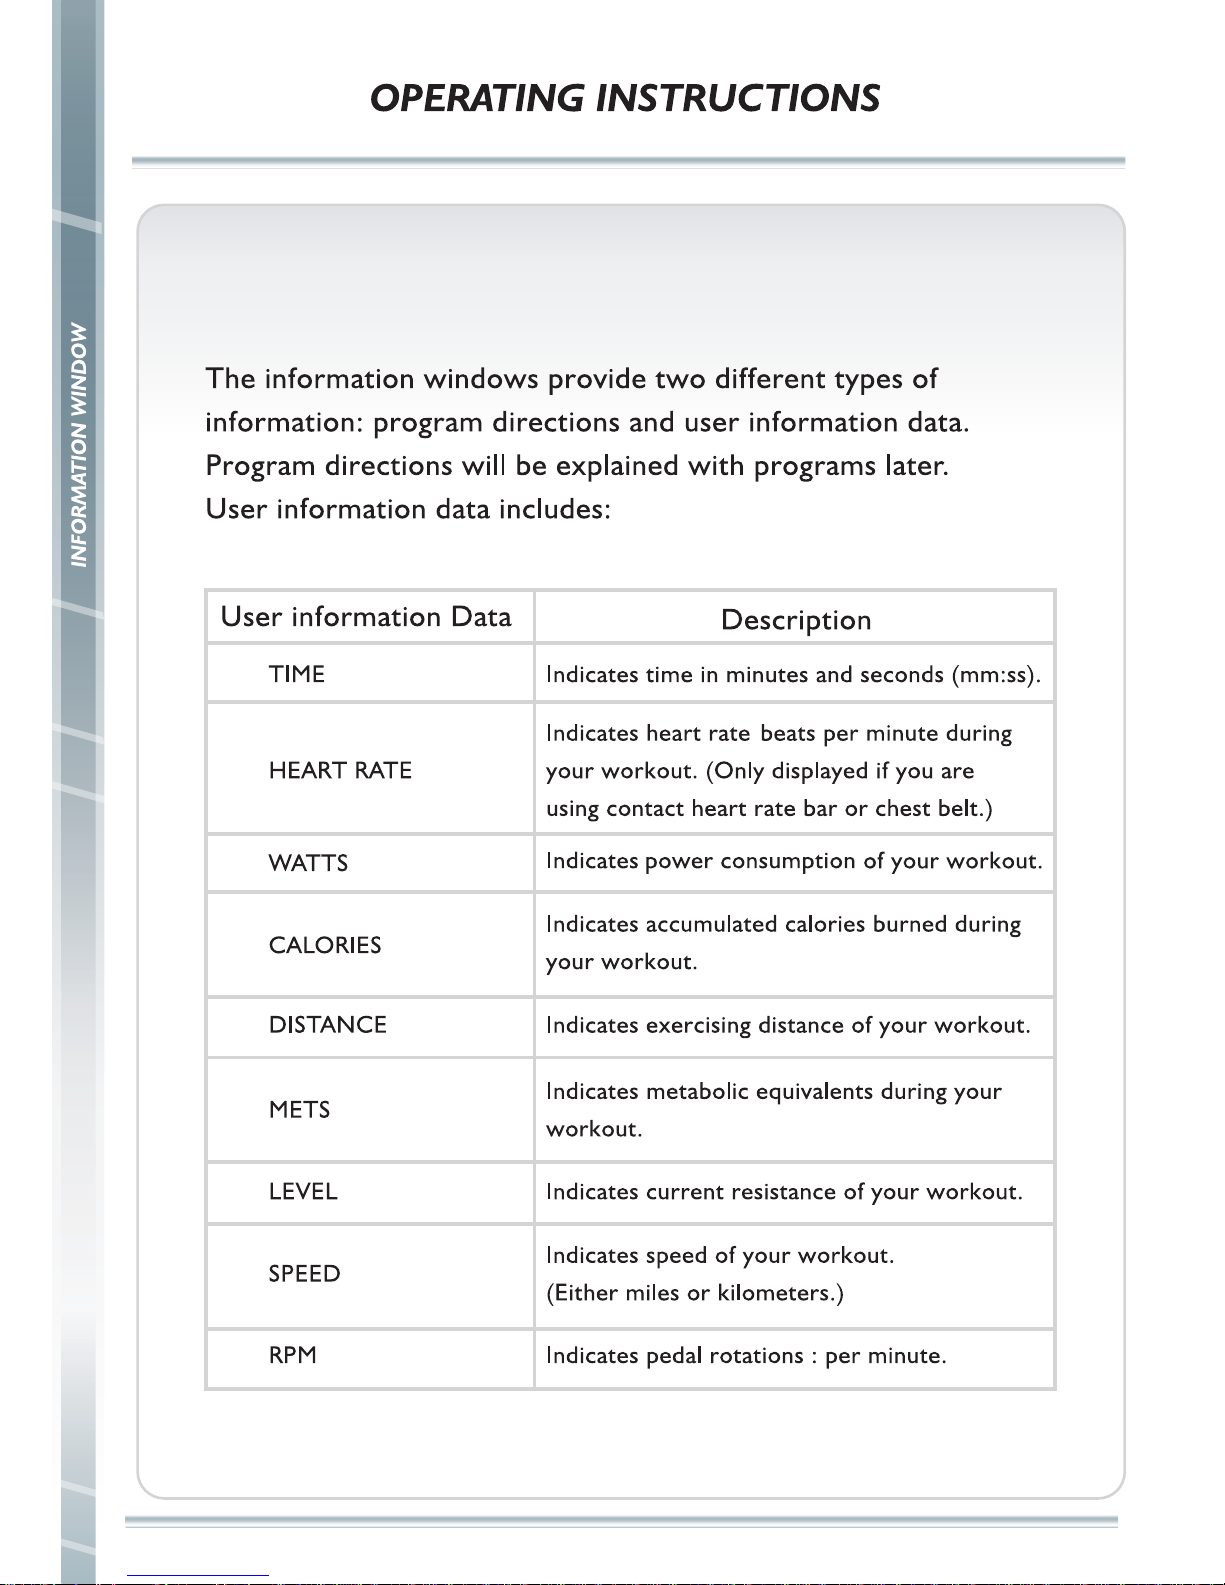
For CBSG/CRSG/CESG/CFSG & CB1/CR1/CE1/CF1
Information window
9
Page 11
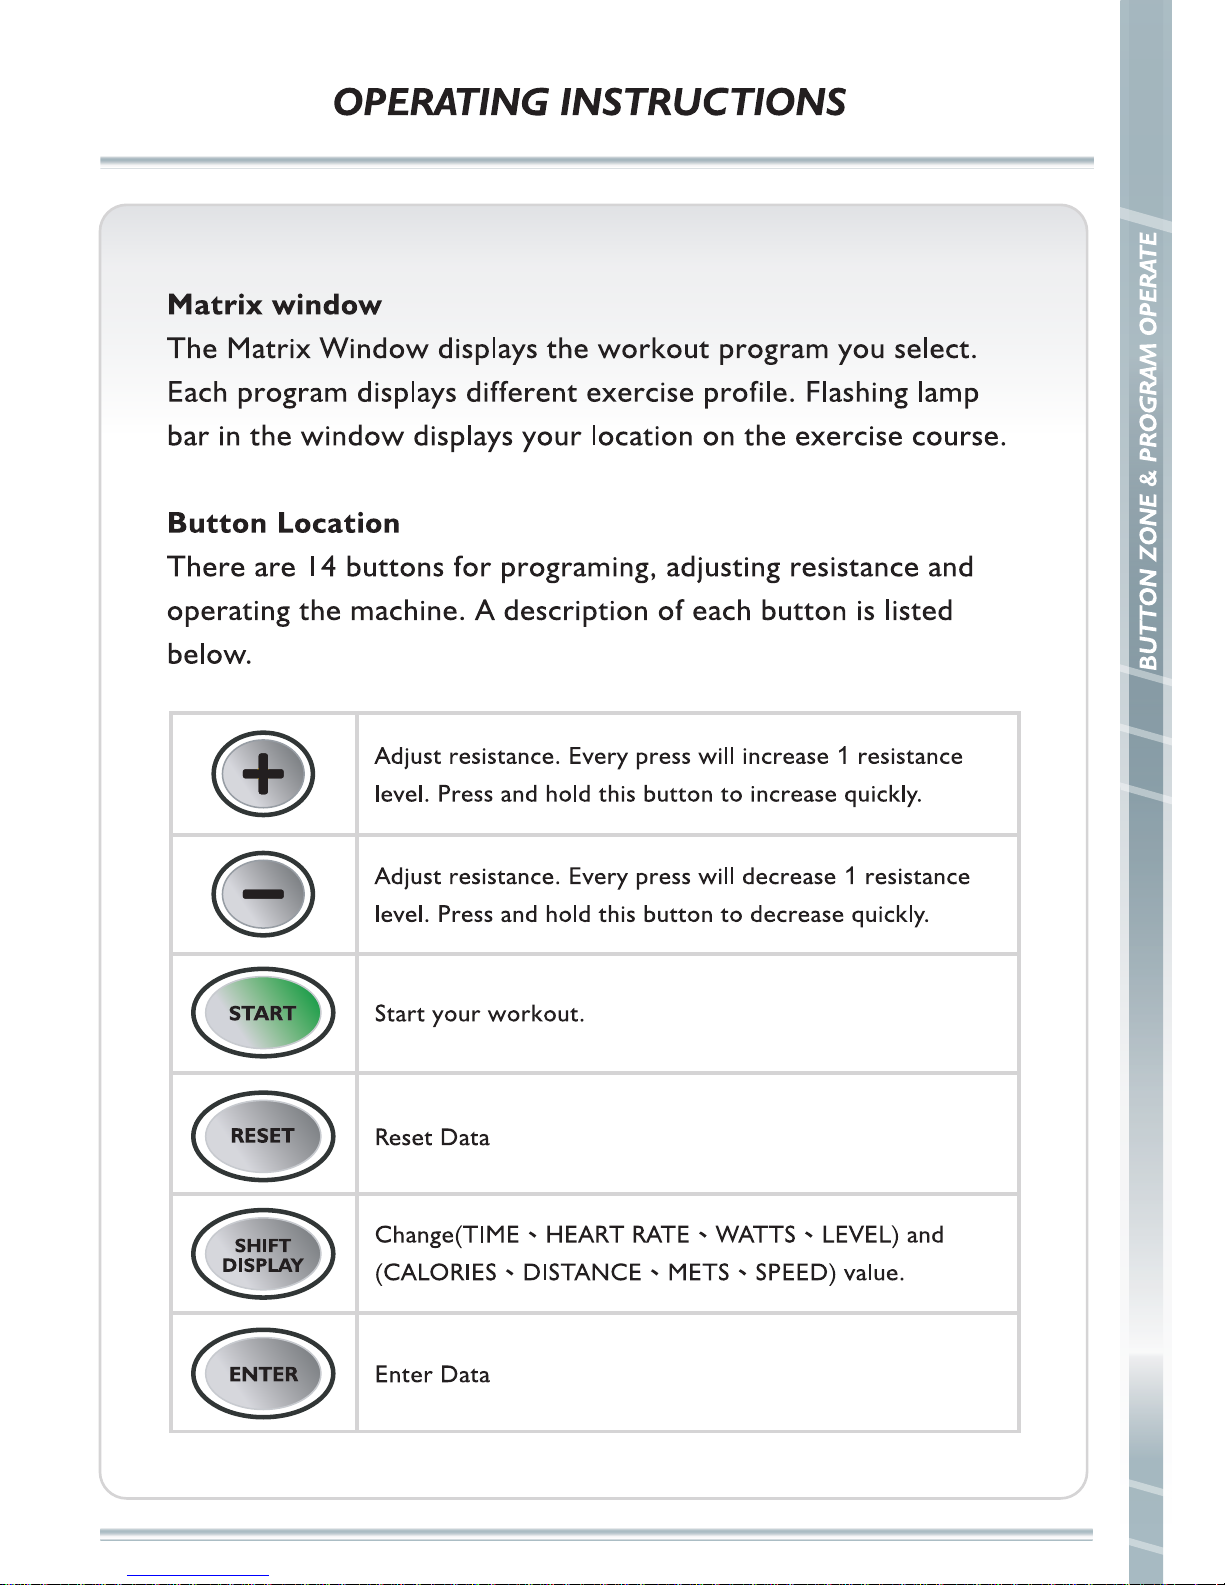
10
Page 12
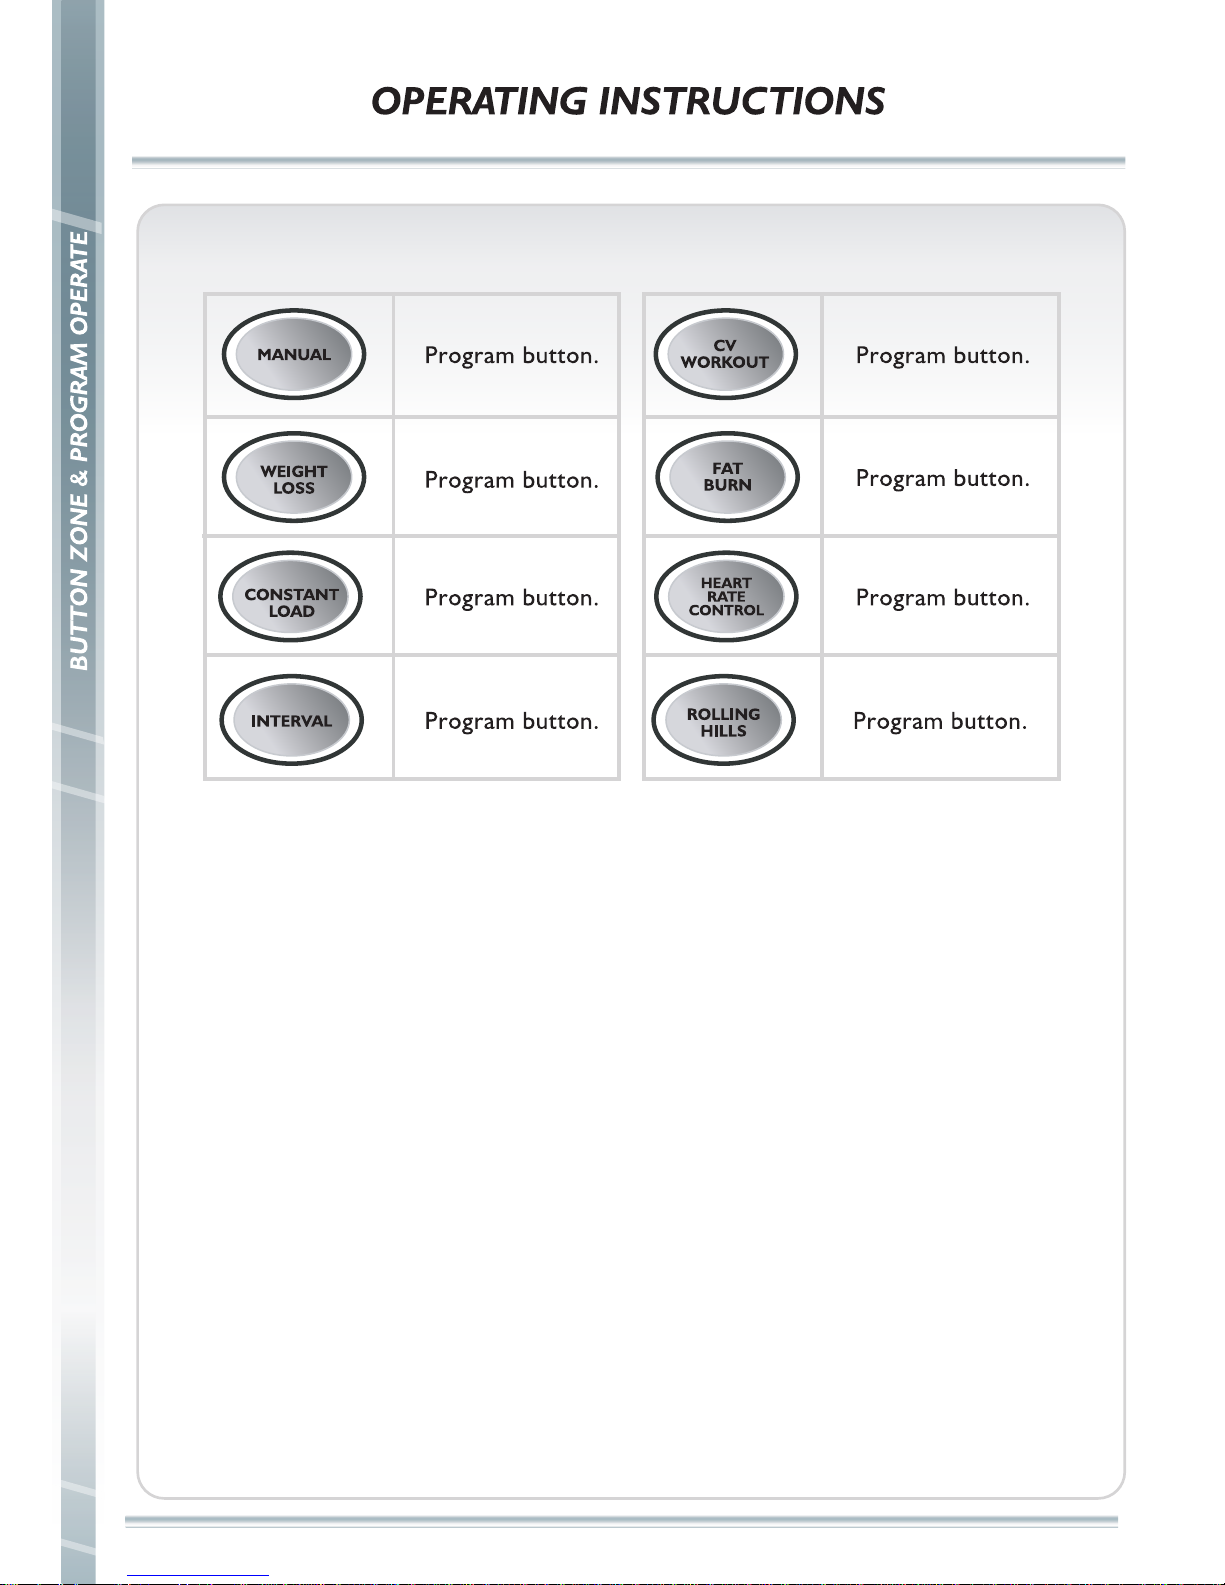
11
Page 13
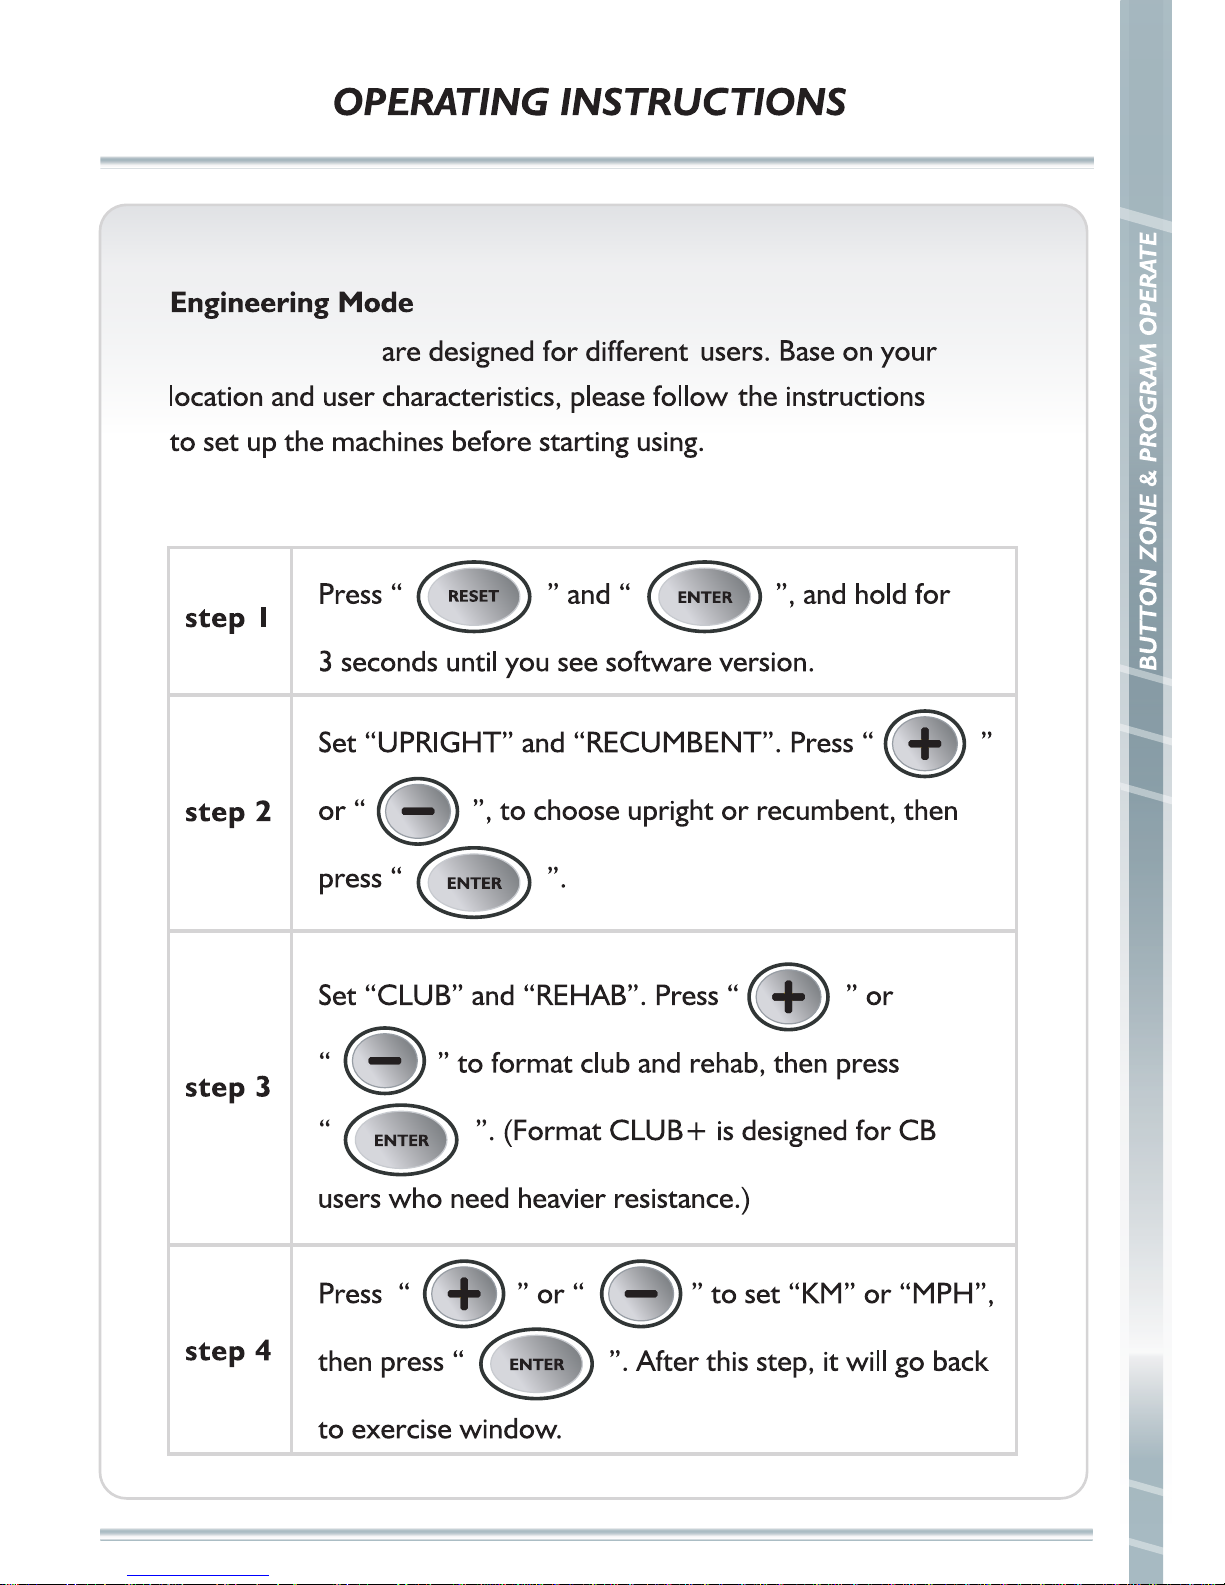
For CBSG/CRSG/CESG/CFSG & CB1/CR1/CE1/CF1
(Only for CB /CR).
Steelflex series
12
Page 14
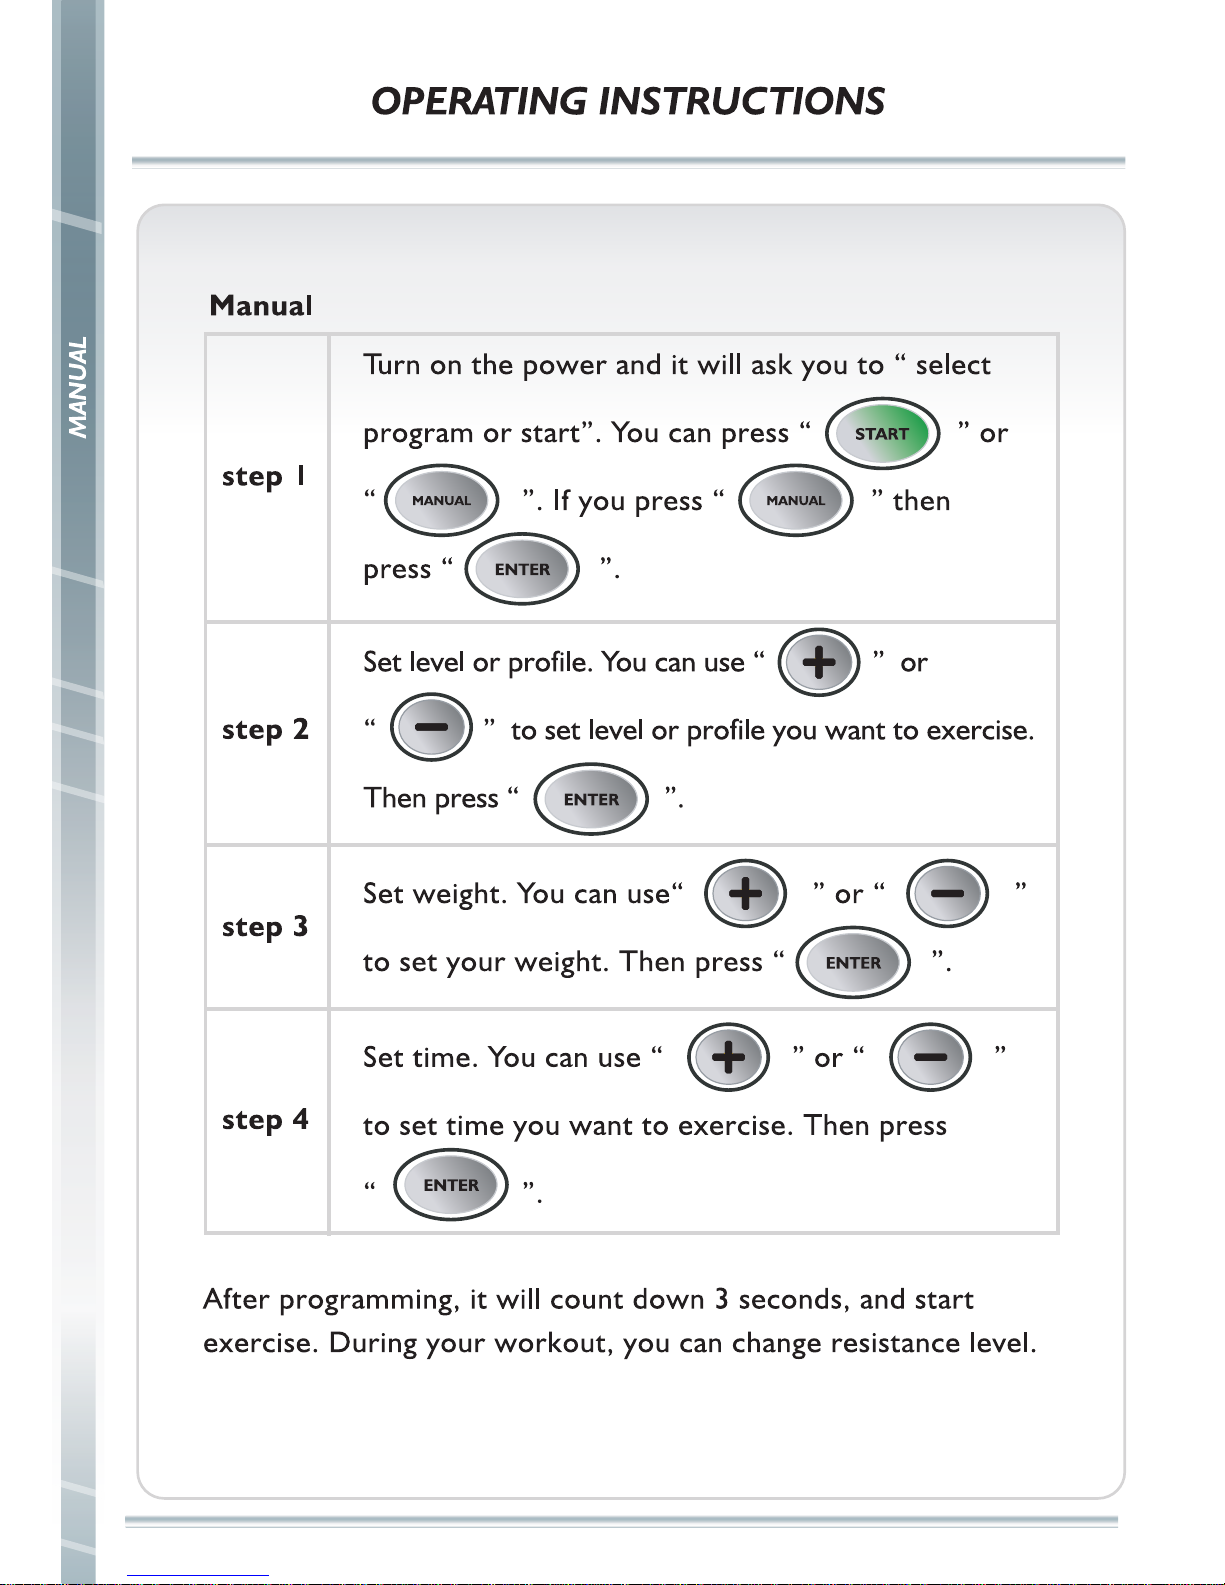
13
Page 15
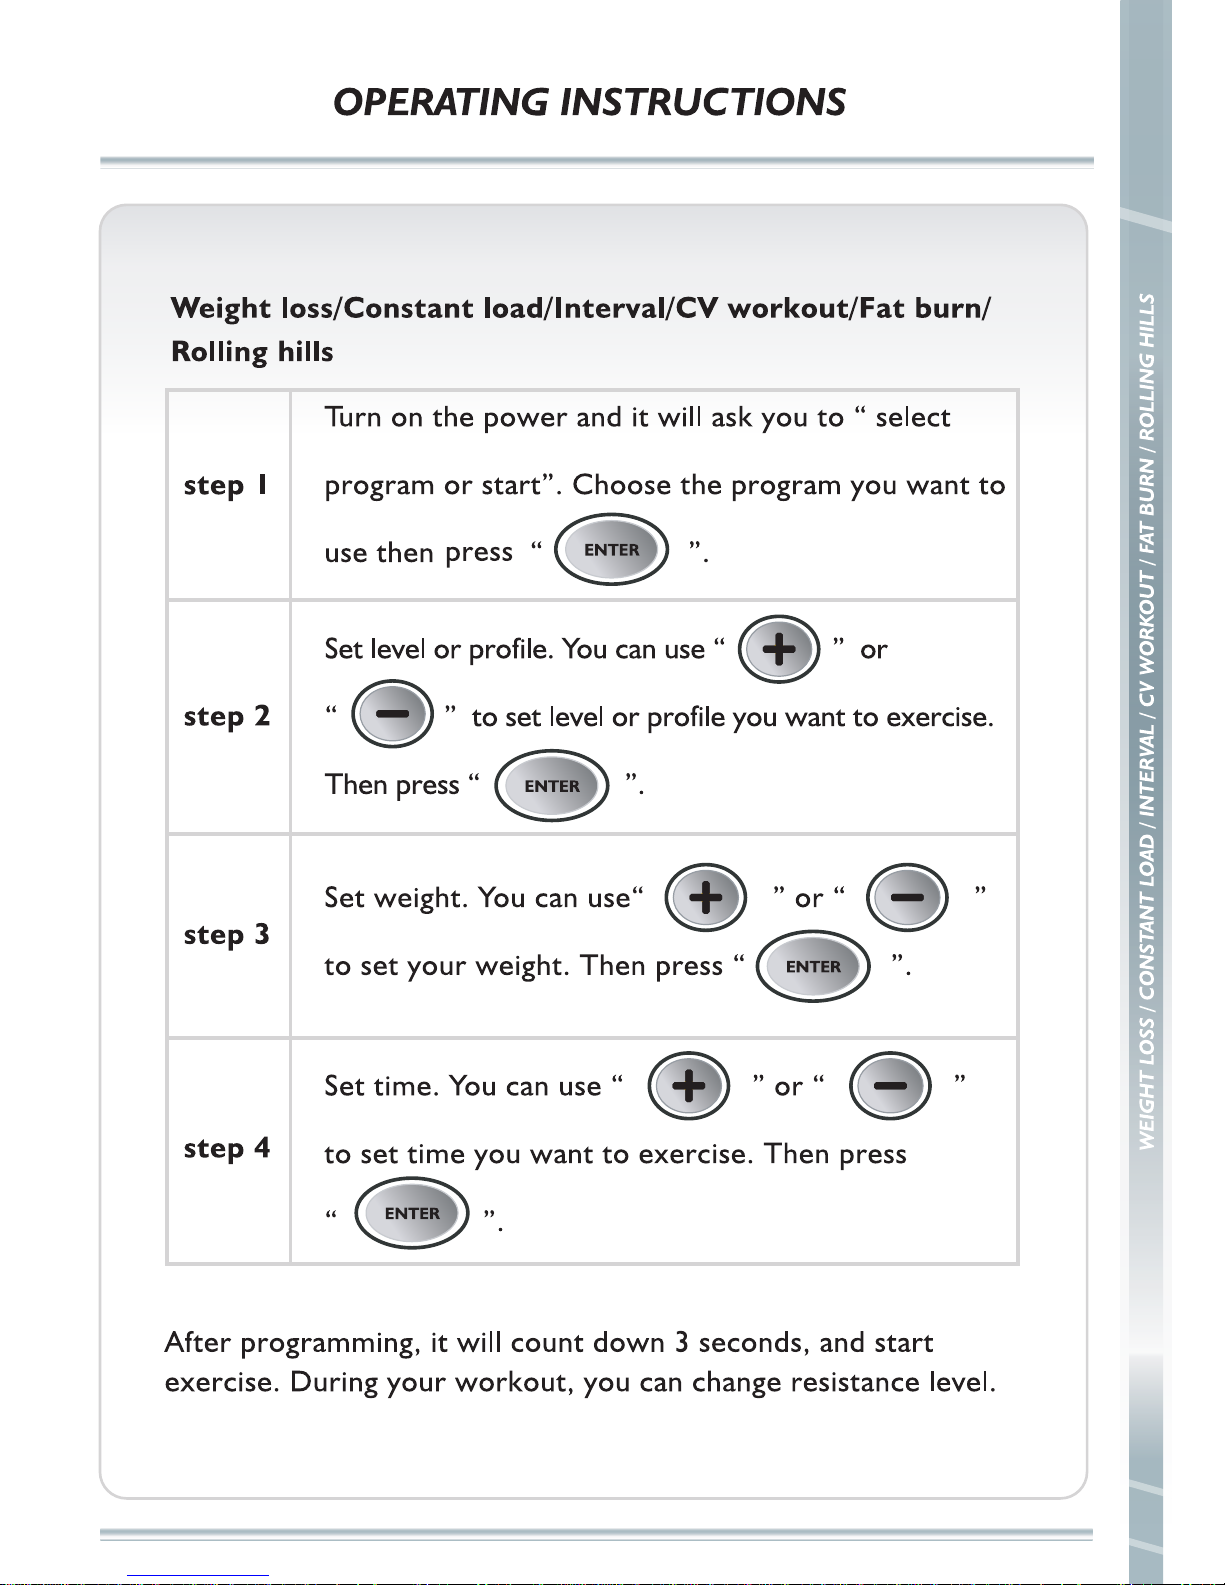
14
Page 16
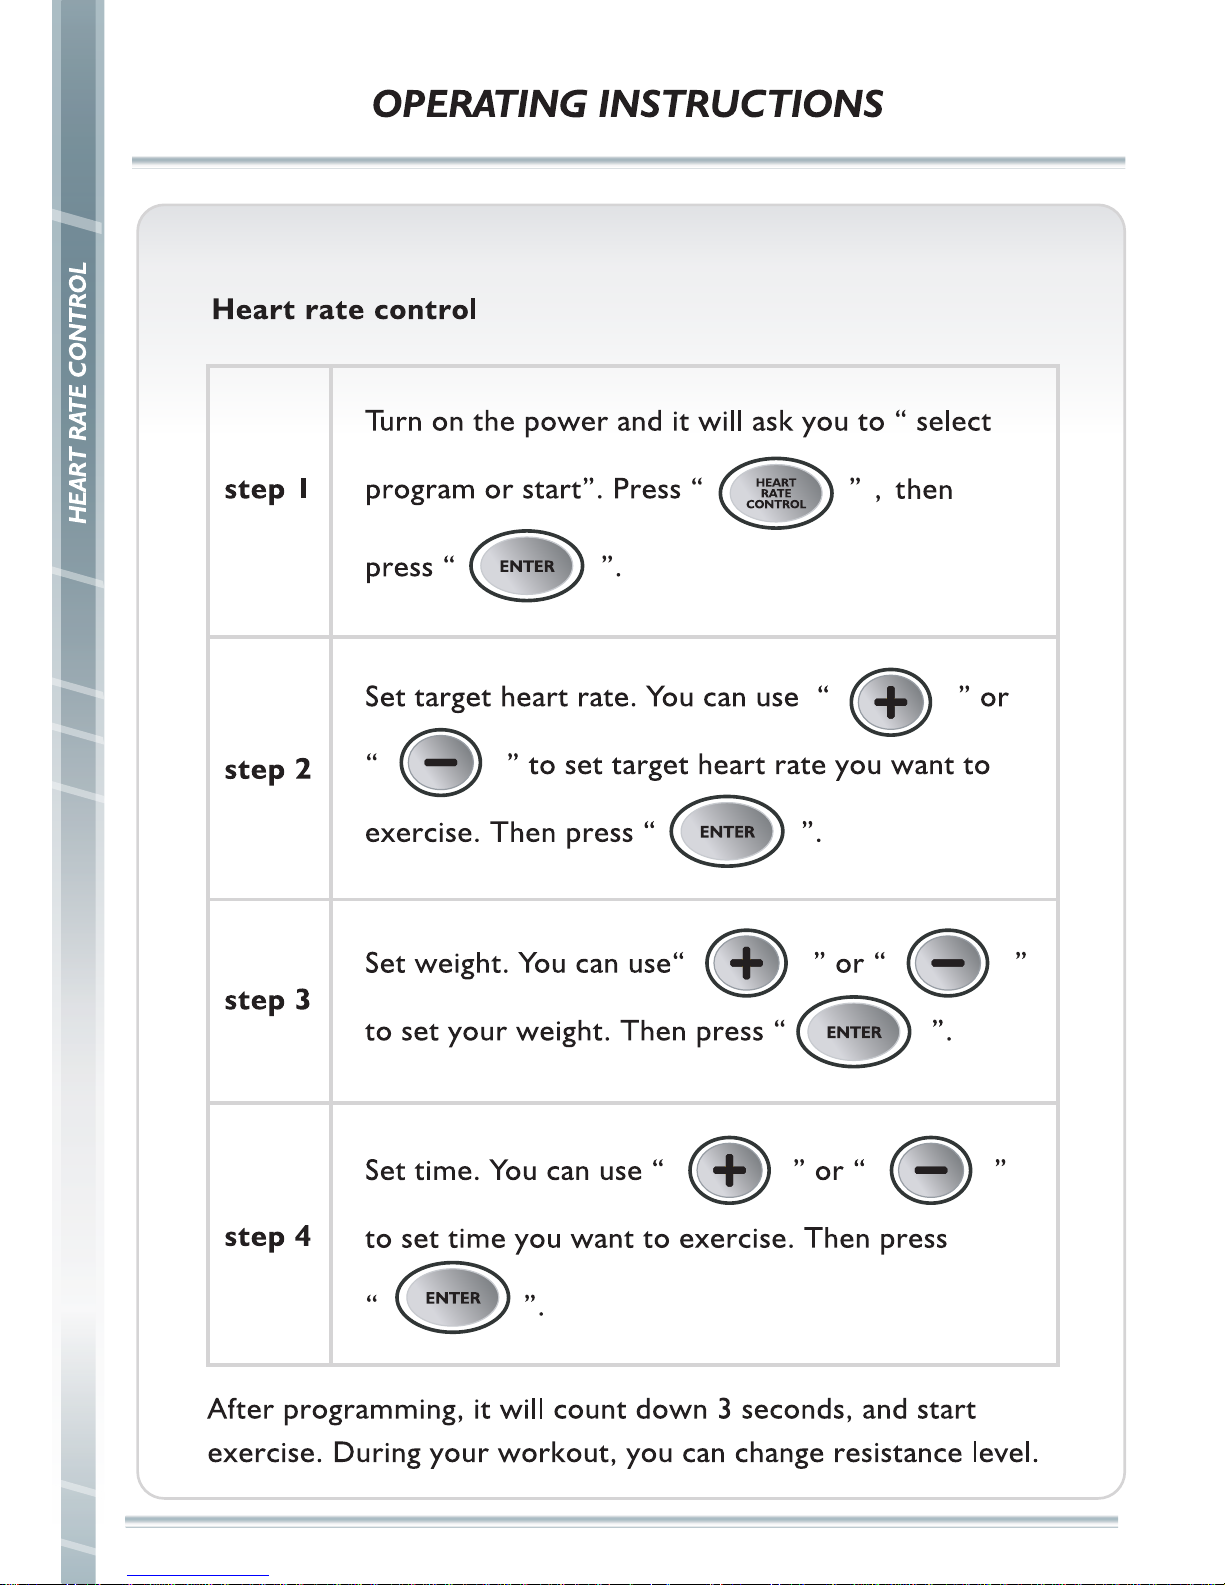
15
Page 17
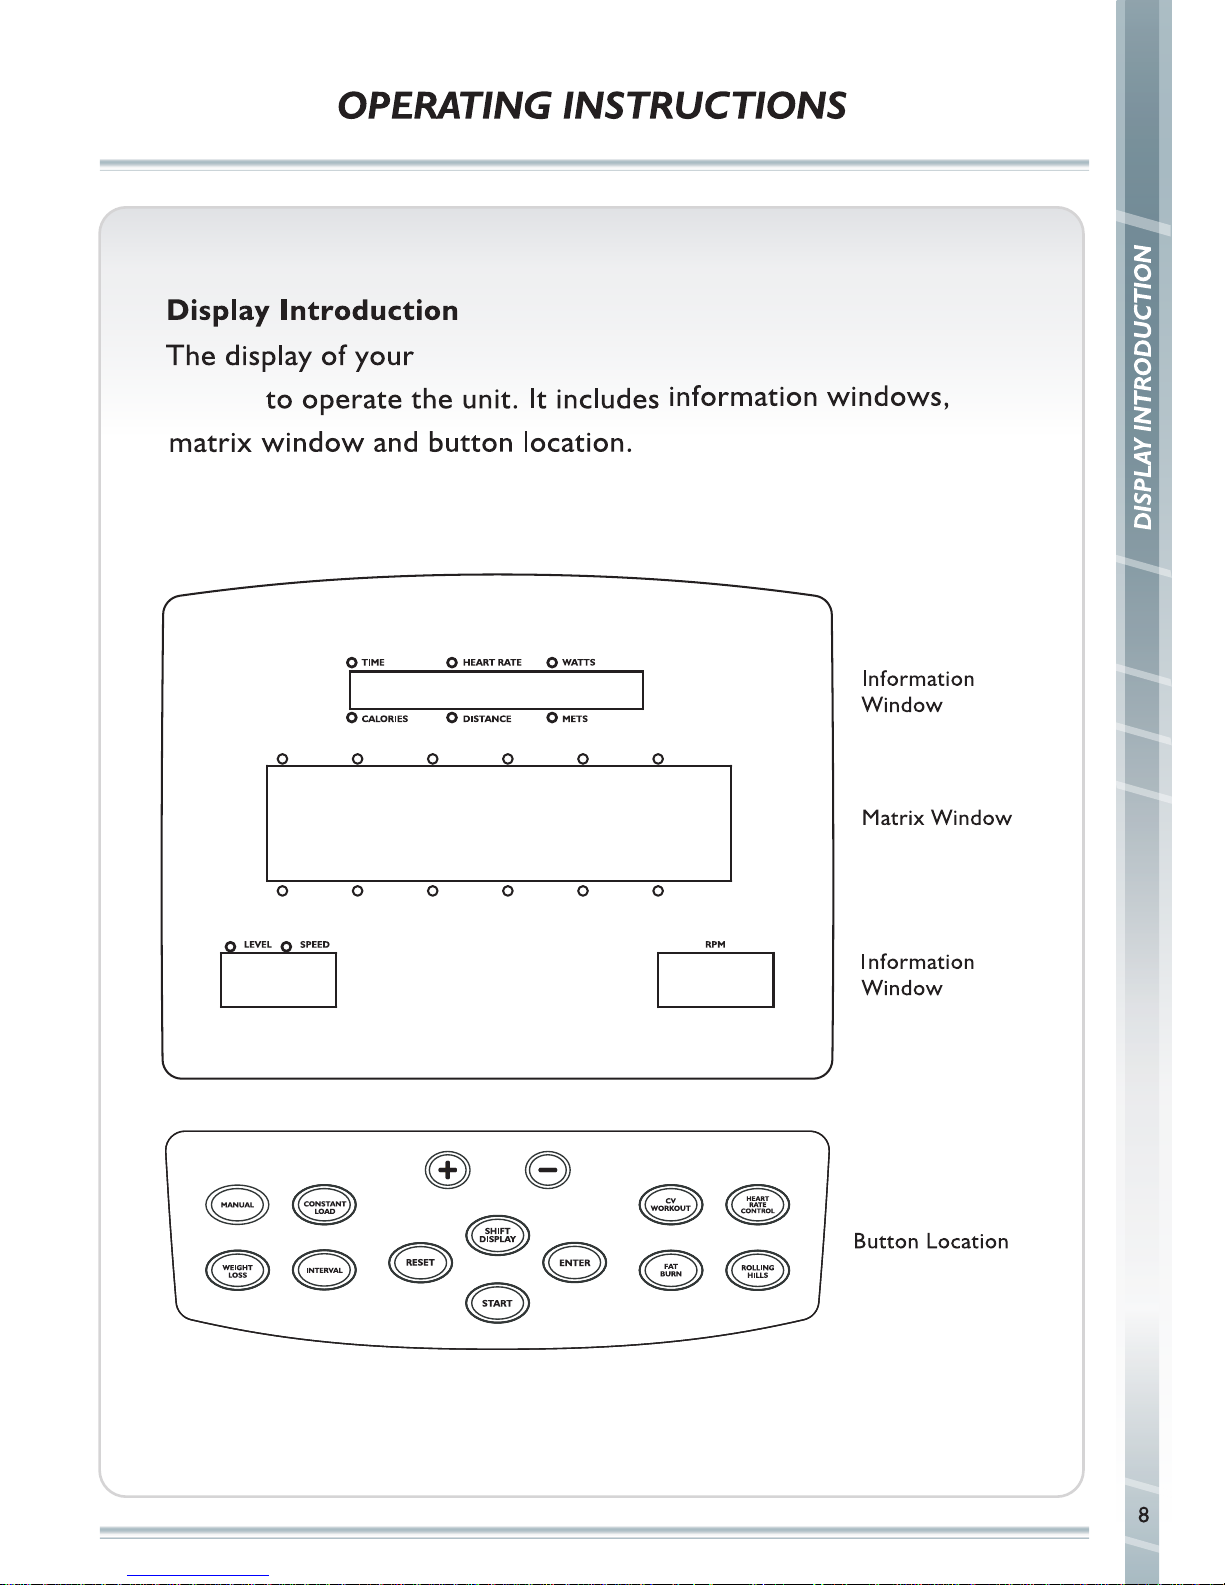
OPERATING INSTRUCTIONS
OPERATING INSTRUCTIONS
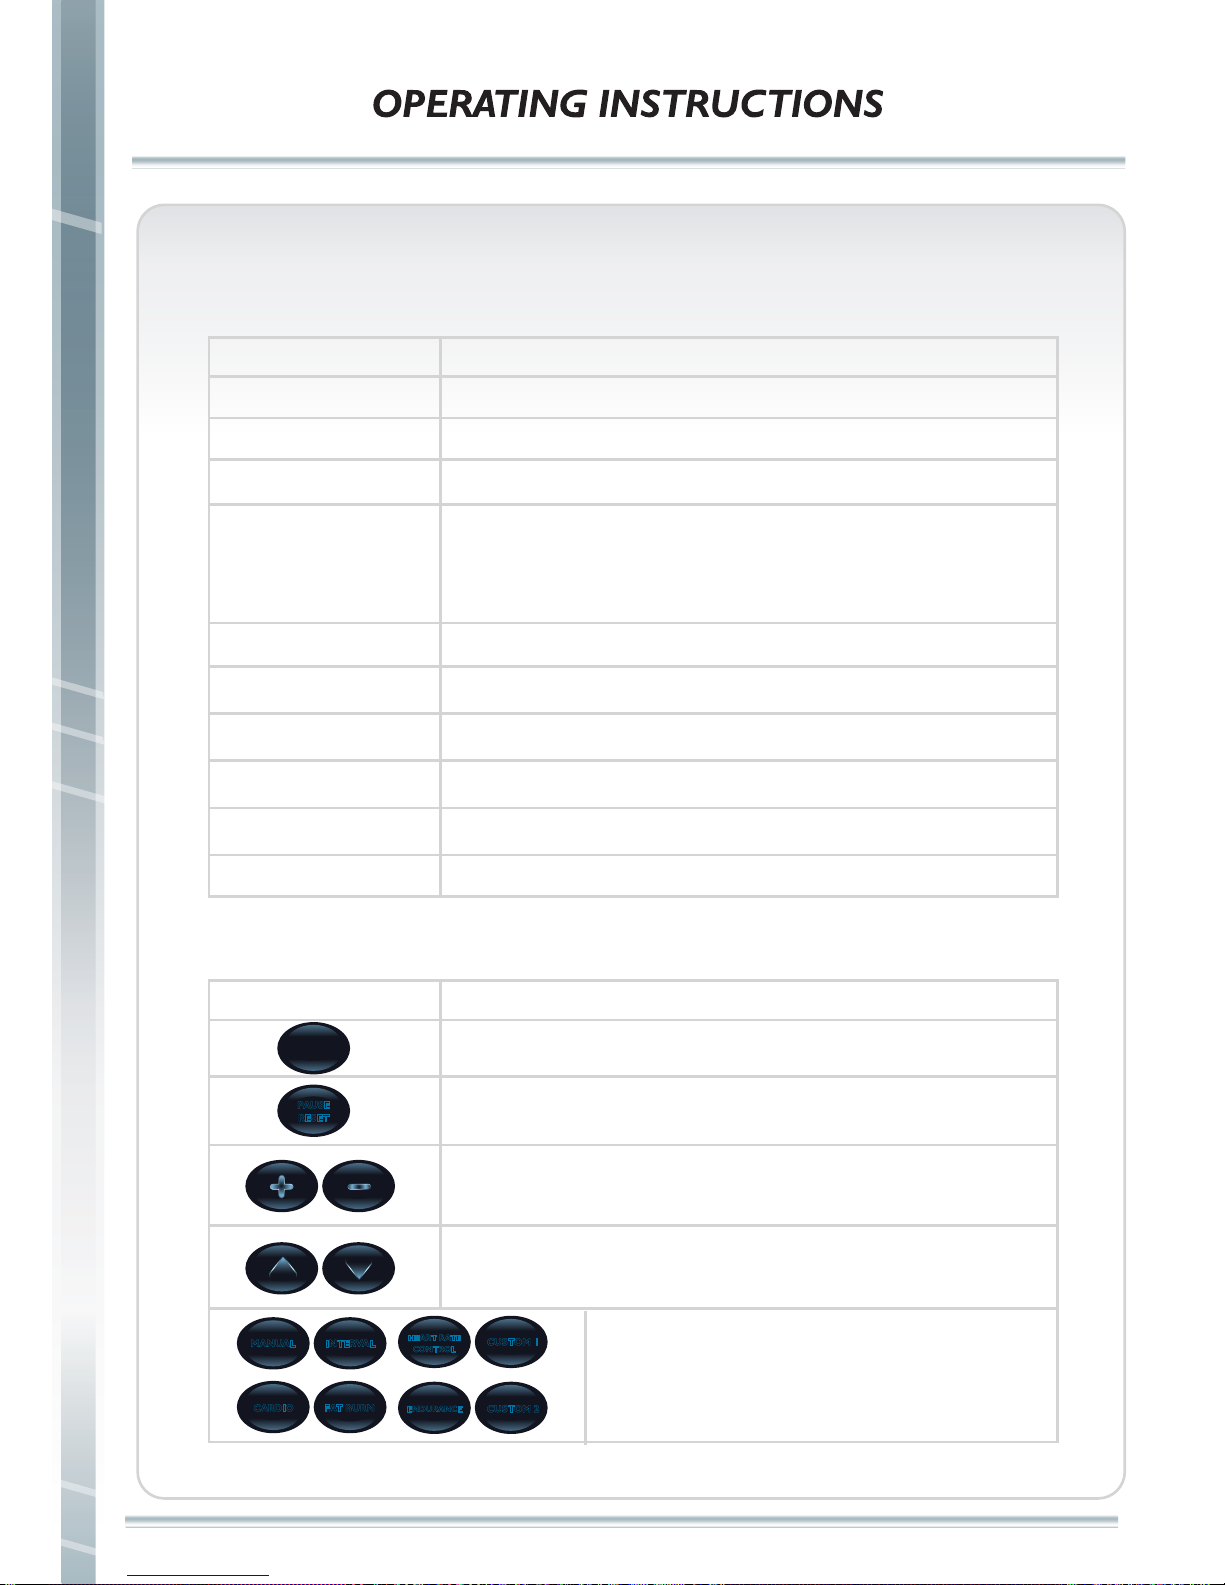
Display Introduction
The display of your CB2/CR2/CE2/CF2 is used to operate the unit.
It includes touch panel screen and button location.
Touch panel screen
Button location
16
Page 18
17
OPERATING INSTRUCTIONS
PULSE
LEVEL
Indicates current resistance of your workout.
SPEED
Indicates speed of your workout.(Either miles or kilometers.)
WATT
Indicates power consumption of your workout.
RPM
Indicates pedal rotations : per minute.
Indicates heart rate beats per minute during your workout.
(Only displayed if you are using contact heart rate bar or
chest belt.)
WEIGHT
Set user weight. Default value is 180Lbs(80kg).
AGE
Set user w
eight. Default value is 30.
User information Description
Button location
Start your workout.
Pause or reset data.
Adjust resistance level. Every press will increase 1 level.
Press and hold this button to increase quickly.
Adjust profile level. (No function when you are under
MANUAL, HRC and CUSTOM program.)
START
PAUSE
RESET
User information
User information Description
TIME Indicates time in minutes and seconds(mm:ss).
DISTANCE
Indicates exercising distance of your workout.
CALORIES Indicates accumulated calories burned during your workout.
Choose workout program.
Note: When workout, both touch panel screen and buttons can be used to operate.
MANUAL
CARDIO
INTERVAL
CUSTOM 1
CUSTOM 2
ENDURANCE
HEART RATE
CONTROL
FAT BURN
Page 19
OPERATING INSTRUCTIONS
OPERATING INSTRUCTIONS
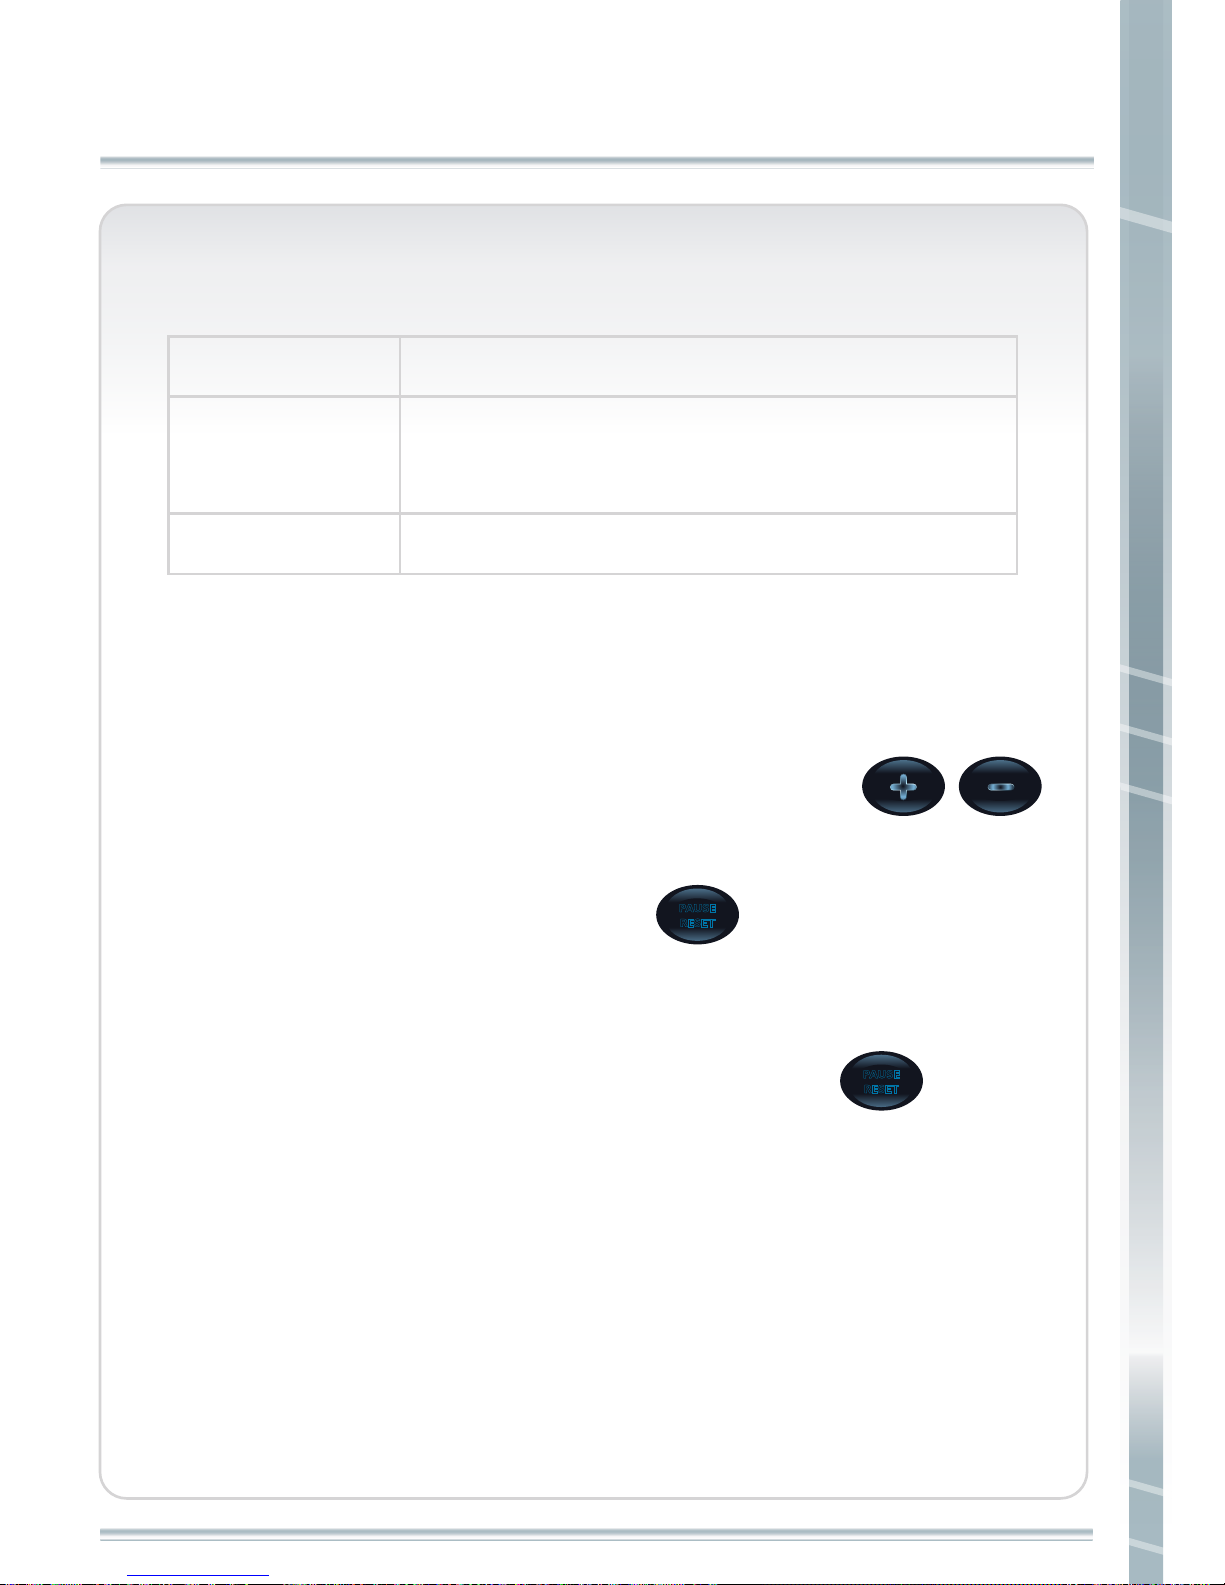
Manual
Choose program MANUAL by touch panel.
Set workout goal(time, calories or distance) and
weight.
(When setting, please use touch panel only.)
step 1
step 2
step 3
Press START to start your workout.
Note
1. You can also press start to start your workout directly.
2. When operating, you can use either buttons or touch panel.
3. While workout, you can adjust resistance level either through
or touch panel.
4. During exercise, after 5 minutes or press , program stops. Workout
summary will be displayed on the console.
PAUSE
RESET
5.When workout summary is displayed on the console, press or wait
for 5 minutes, it will back to standby mode.
PAUSE
RESET
18
Page 20
19
OPERATING INSTRUCTIONS
Note
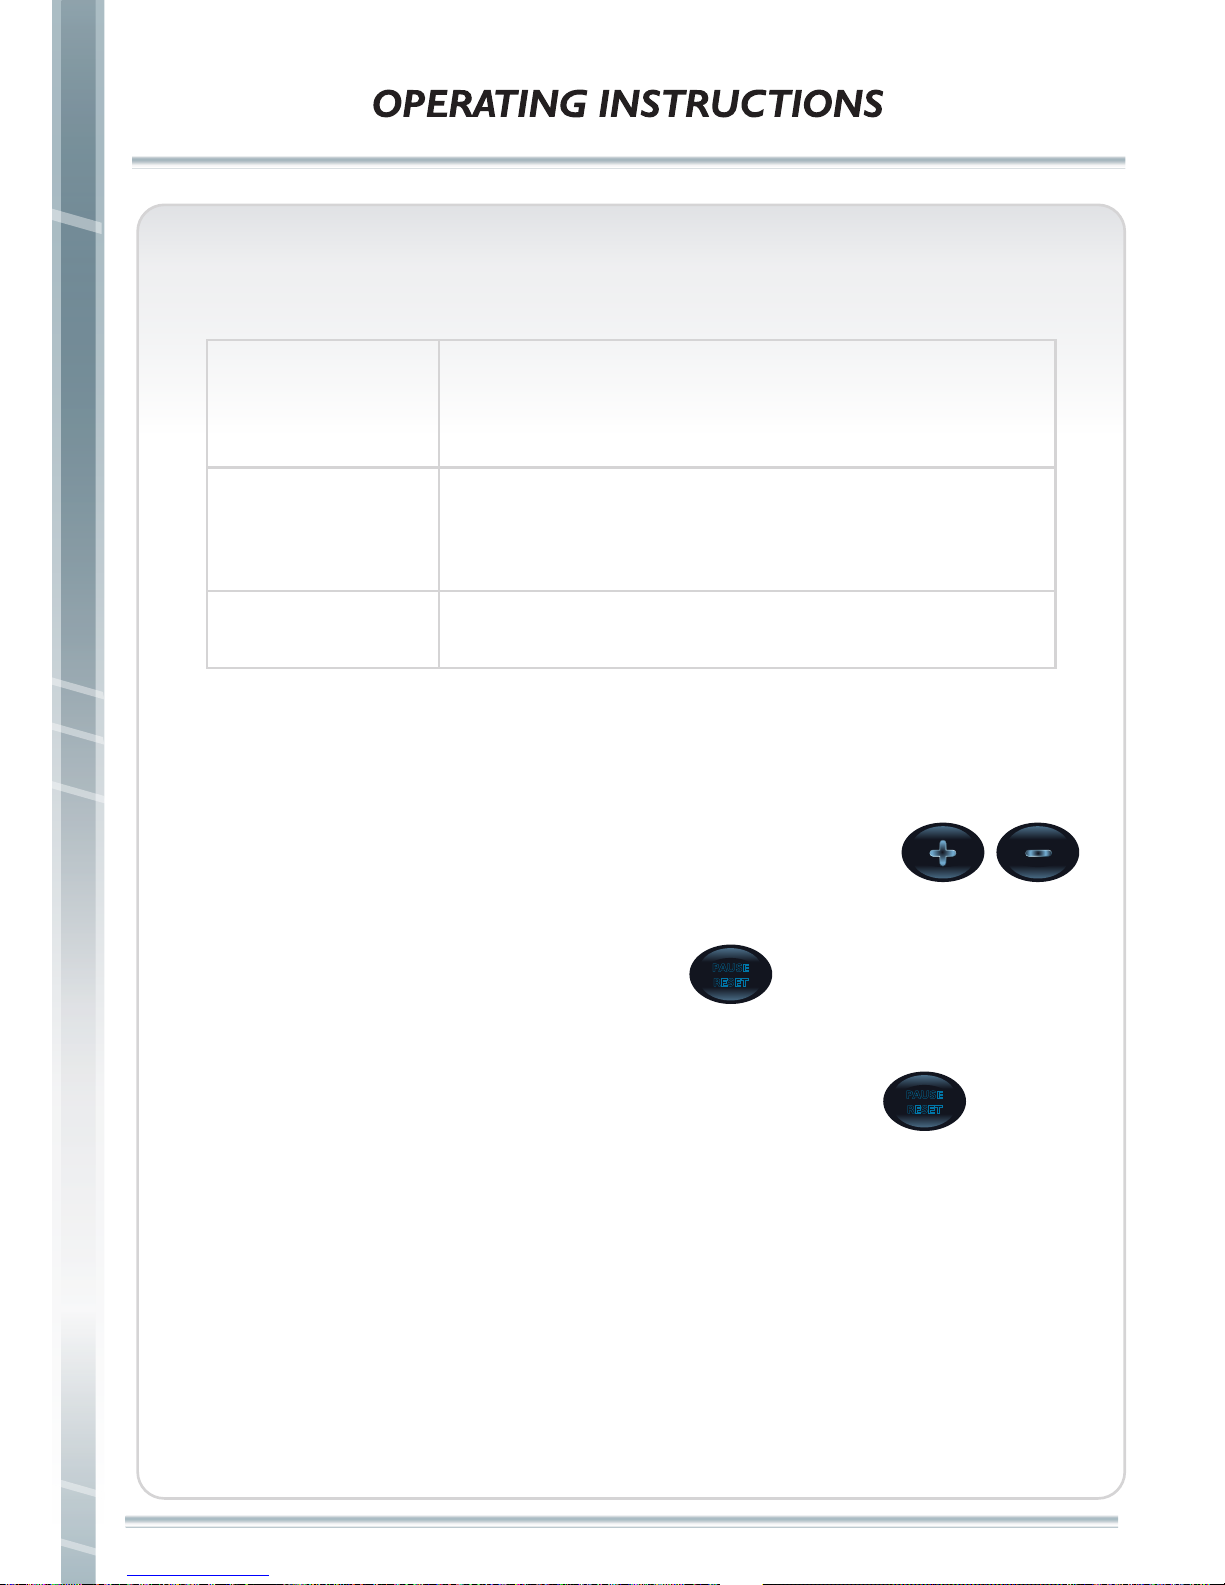
1.When operating, you can use either buttons or touch panel.
2.While workout, you can adjust resistance level either through
or touch panel.
3.During exercise, after 5 minutes or press , program stops. Workout
summary will be displayed on the console.
4.When workout summary is displayed on the console, press or wait
for 5 minutes, it will back to standby mode.
PAUSE
RESET
PAUSE
RESET
Interval / Cardio / Fat Burn / Endurance
Turn on power and choose one program of
Interval / Cardio / Fat burn / Endurance from
touch panel.
Set workout goal(time, calories or distance)
and weight.(When setting, please use touch
panel only.)
step 1
step 2
step 3
Press START to start your workout.
Page 21
OPERATING INSTRUCTIONS
OPERATING INSTRUCTIONS
Note
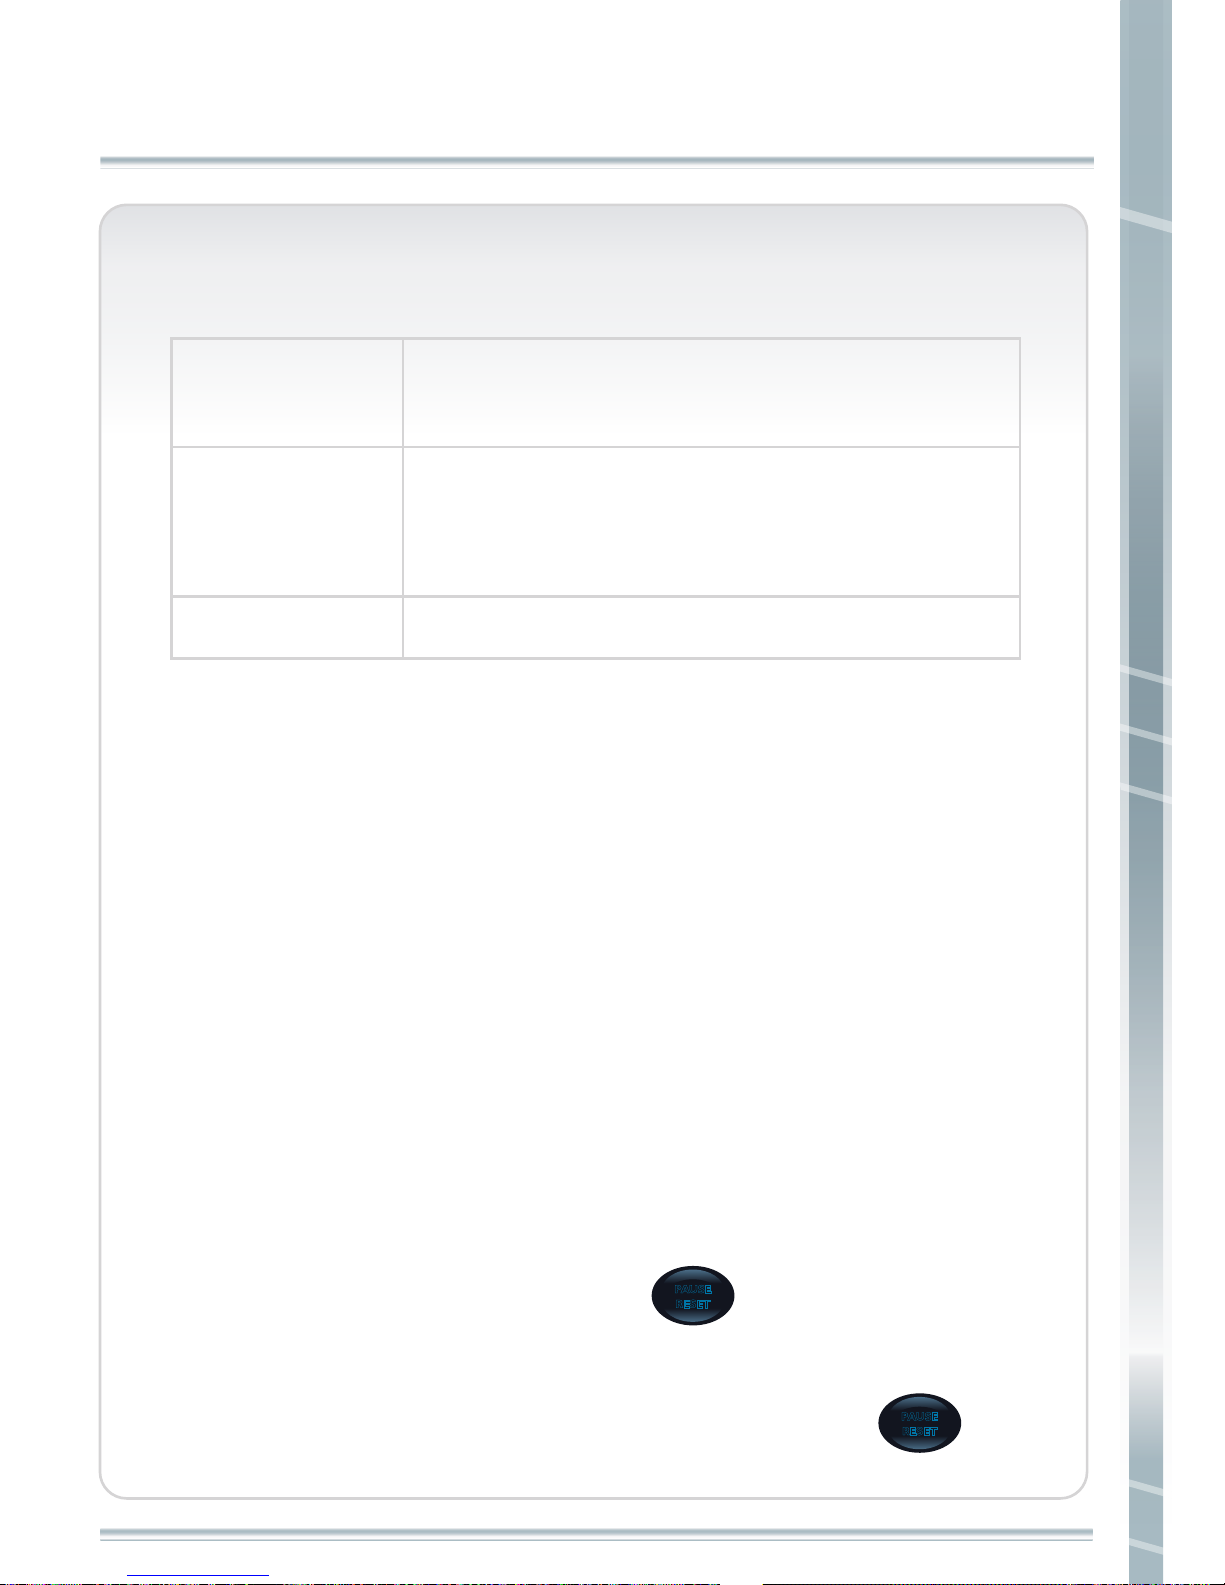
1. Heart rate checks are made every 30 seconds.
If detected HR is more than 20 beats below target HR, resistance will increase
2 levels.
If detected HR is more than 10 beats below target HR, resistance will increase
1 level.
If detected HR is more than 10 beats above target HR, resistance will decrease
1 level.
If detected HR is more than 20 beats above target HR, resistance will decrease
2 levels.
If HR can not be detected, 〝No Heartbeat Signal〞is showed on the screen.
Resistance level keeps the same.
If HR can not be detected over 60 seconds, resistance decreases 4 levels every
30 seconds.
Heart rate control
Turn on power and choose Heart rate control
program from touch panel.
Set workout goal(time, calories or distance),
target HR, age and weight. (When setting,
please use touch panel only.)
step 1
step 2
step 3
Press START to start your workout.
2.During exercise, after 5 minutes or press , program stops. Workout
summary will be displayed on the console.
3.When workout summary is displayed on the console, press or
wait for 5 minutes, it will back to standby mode.
PAUSE
RESET
PAUSE
RESET
20
Page 22
21
OPERATING INSTRUCTIONS
2.During exercise, after 5 minutes or press , program stops. Workout
summary will be displayed on the console.
PAUSE
RESET
USER1/USER2
Turn on power and choose USER1/USER2
program from touch panel.
Set workout goal(time, calories or distance)
and weight. (When setting, please use touch
panel only.)
step 1
step 2
step 3
step 4
Set each segment’s resistance level.
(When setting, please use touch panel only.)
Press START to start your workout.
1.While workout, you can adjust resistance level either through
or touch panel.
Note
3.When workout summary is displayed on the console, press or
wait for 5 minutes, it will back to standby mode.
PAUSE
RESET
Page 23
OPERATING INSTRUCTIONS
OPERATING INSTRUCTIONS
This is for CB2/CR2/CE2/CF2. When under standby mode,
press and together and hold for 3 seconds
to enter into test mode to test each button. When pressing the
button, button name will be displayed.
PAUSE
RESET
TEST MODE
START
PAUSE
RESET
This is for CB2/CR2/CE2/CF2. When under standby mode,
press and together and hold for 3 seconds to
enter into engineer mode. Below information will be displayed
at the same time.
ENGINEER MODE
A.Software version of console.
B.Accumulated hours of the machine.
C.Set KM or MPH from touch panel.
D.Set CB2, CR2,CE2 or CF2 from touch panel.
E.Set REHAB, CLUB or CLUB+ from touch panel.
(For CB2/CR2, REHAB, CLUB or CLUB+ modes can be set.
For CE2/CF2, only CLUB mode.)
22
Page 24
23
OPERATION INSTRUCTIONS OF ENTERTAINMENT FOR
CB2/CR2/CE2/CF2
OPERATING INSTRUCTIONS OF ENTERTAINMENT
OPERATING INSTRUCTIONS FOR ENTERTAINMENT
Page 25
24
OPERATING INSTRUCTIONS FOR ENTERTAINMENT
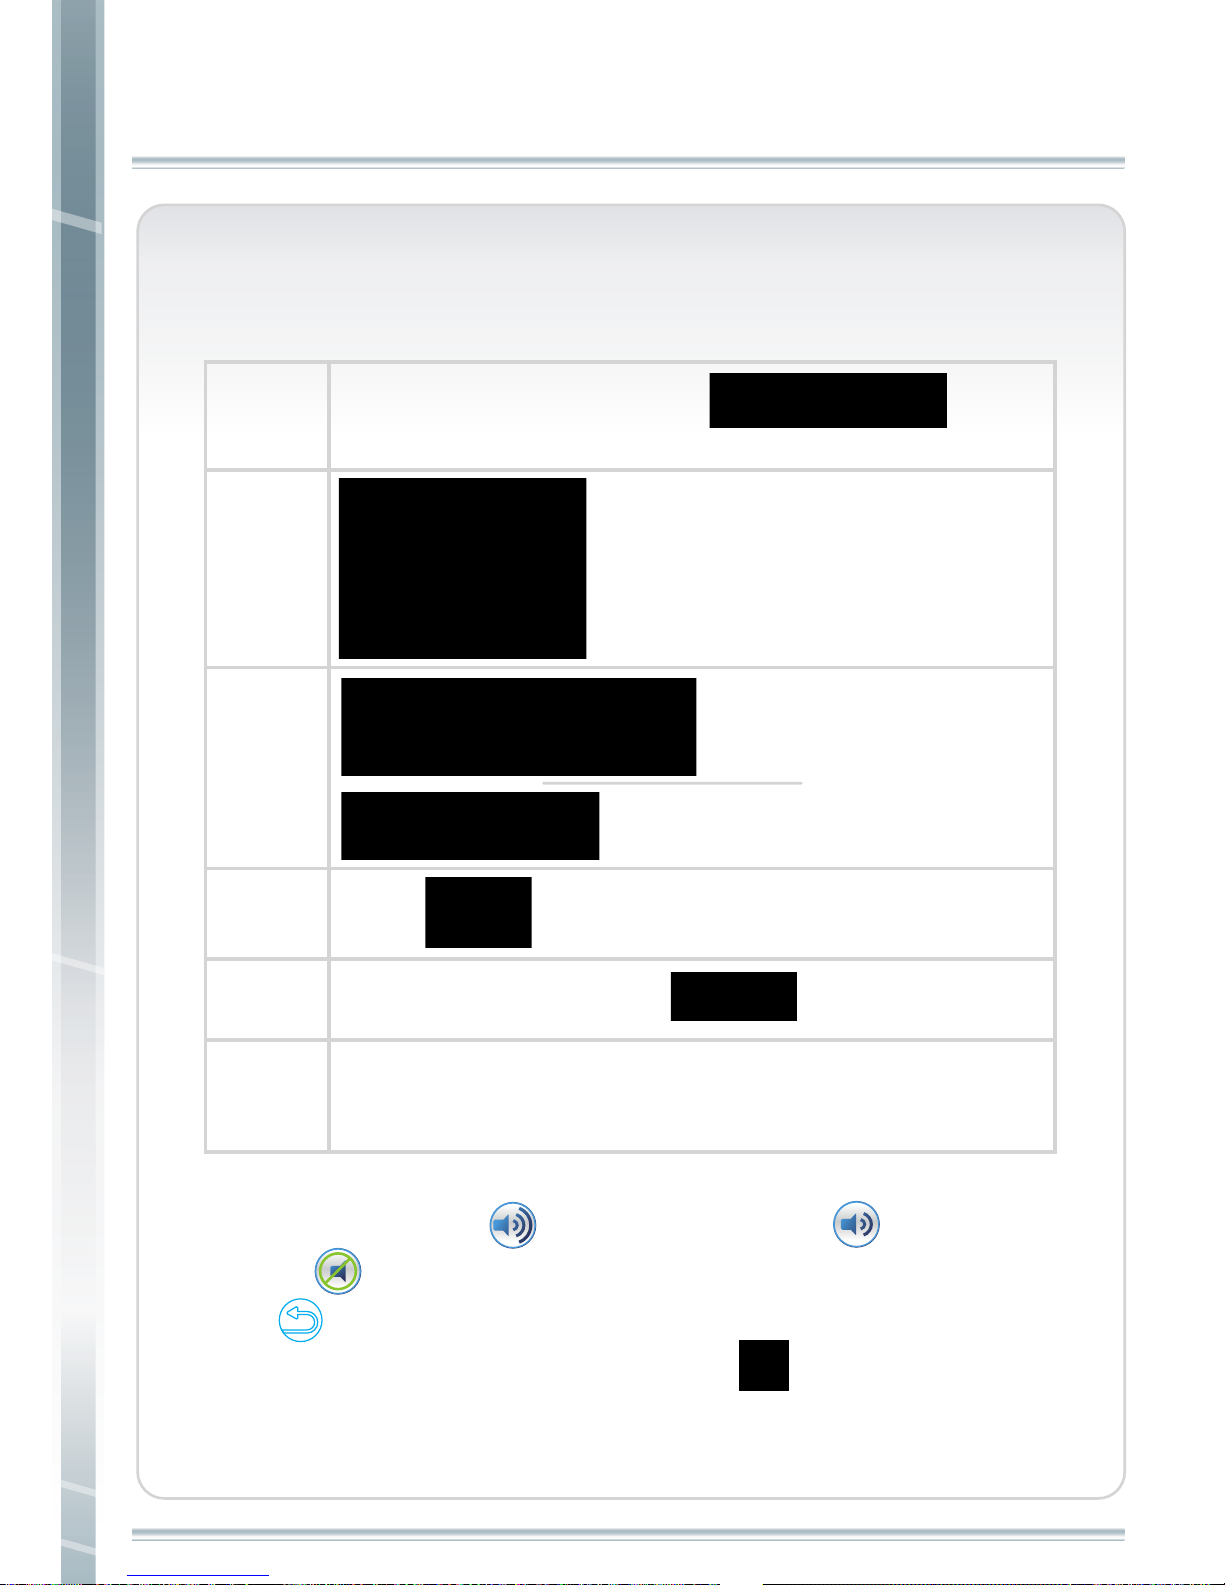
VIDEO
step 1
step 2
step 3
Choose by pressing touch panel during
workout.
Scroll film list from touch
panel to choose the video
you want to watch.
step 4
Press “Play” to start the
video.
Plug USB storage with films on. The type
of the films must be MP4.
(“video not found” will be shown when
film can not be detected.)
Note:
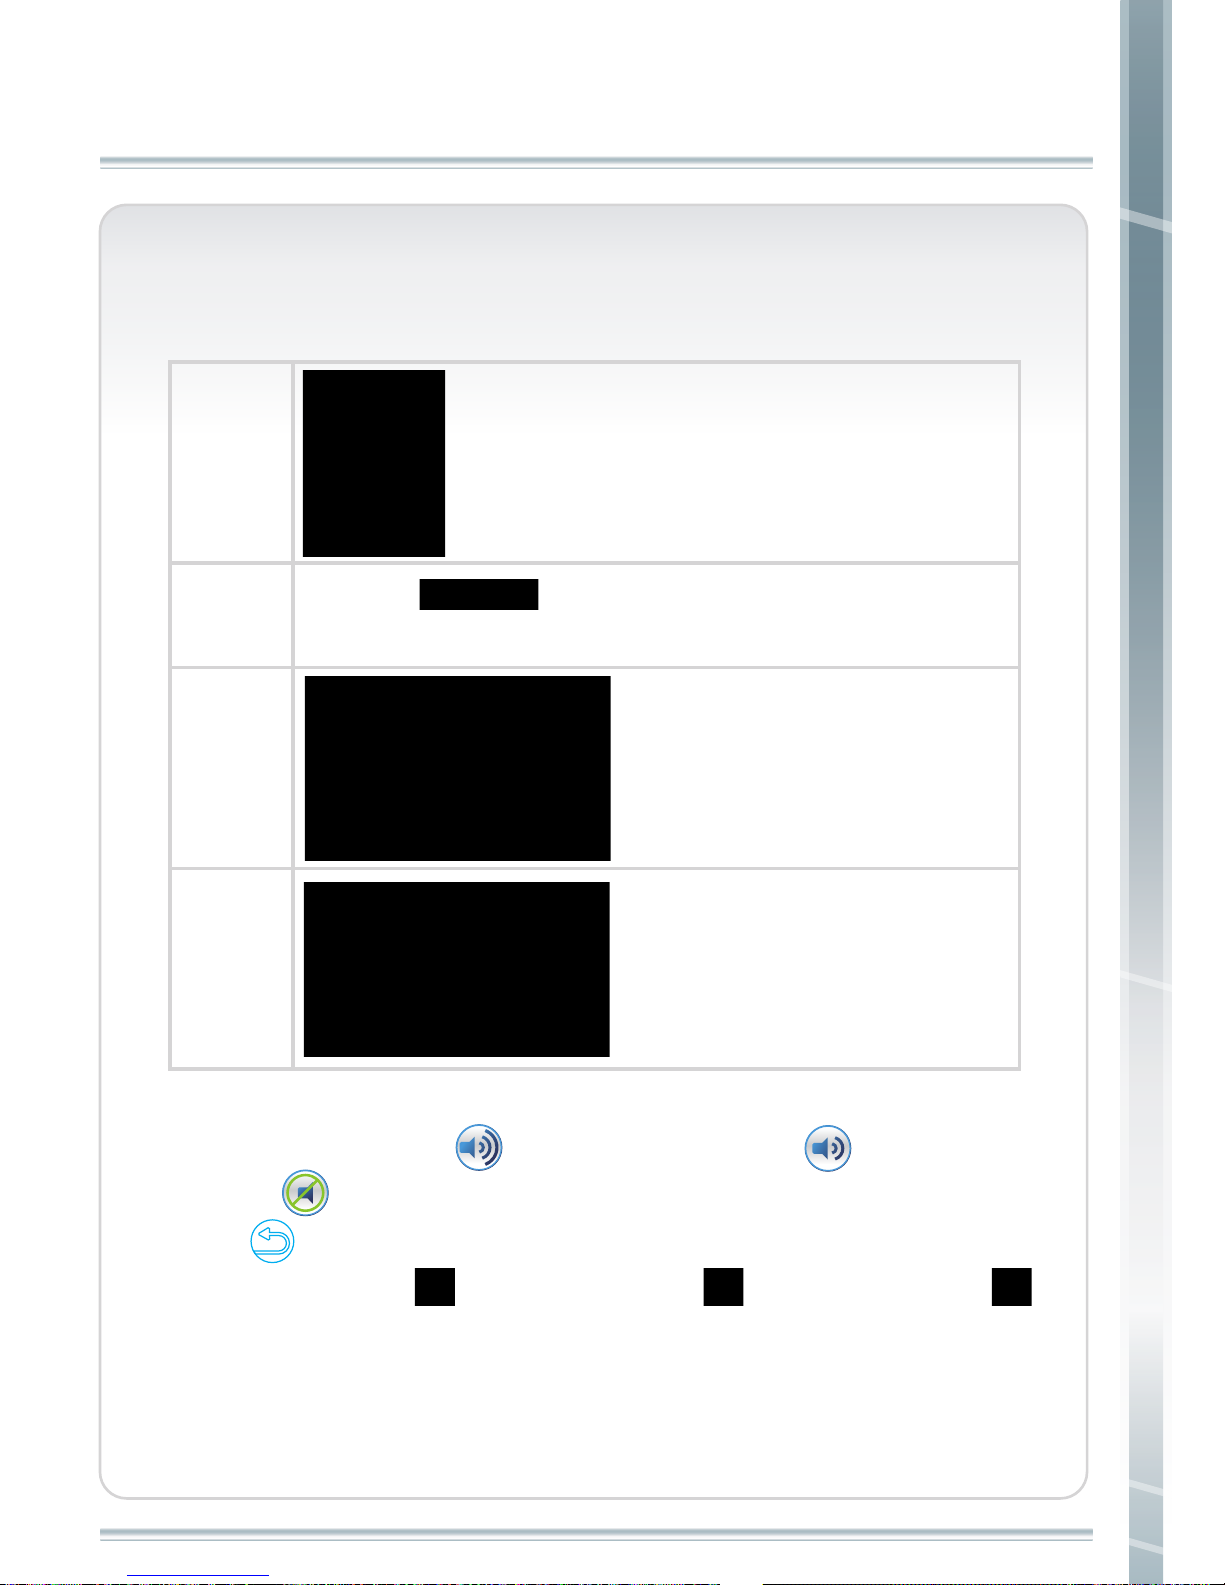
1.Voice increase by pressing . Voice decrease by pressing . Mute by
pressing .
2.Press to back to sport window.
3.Play video by pressing . Pause video by pressing . Stop video by pressing .
4.Press center screen and hold for a while to have full screen. Under full screen, press
center screen and hold for a while to back to the window with exercise information.
SPORT
Page 26
25
OPERATING INSTRUCTIONS FOR ENTERTAINMENT
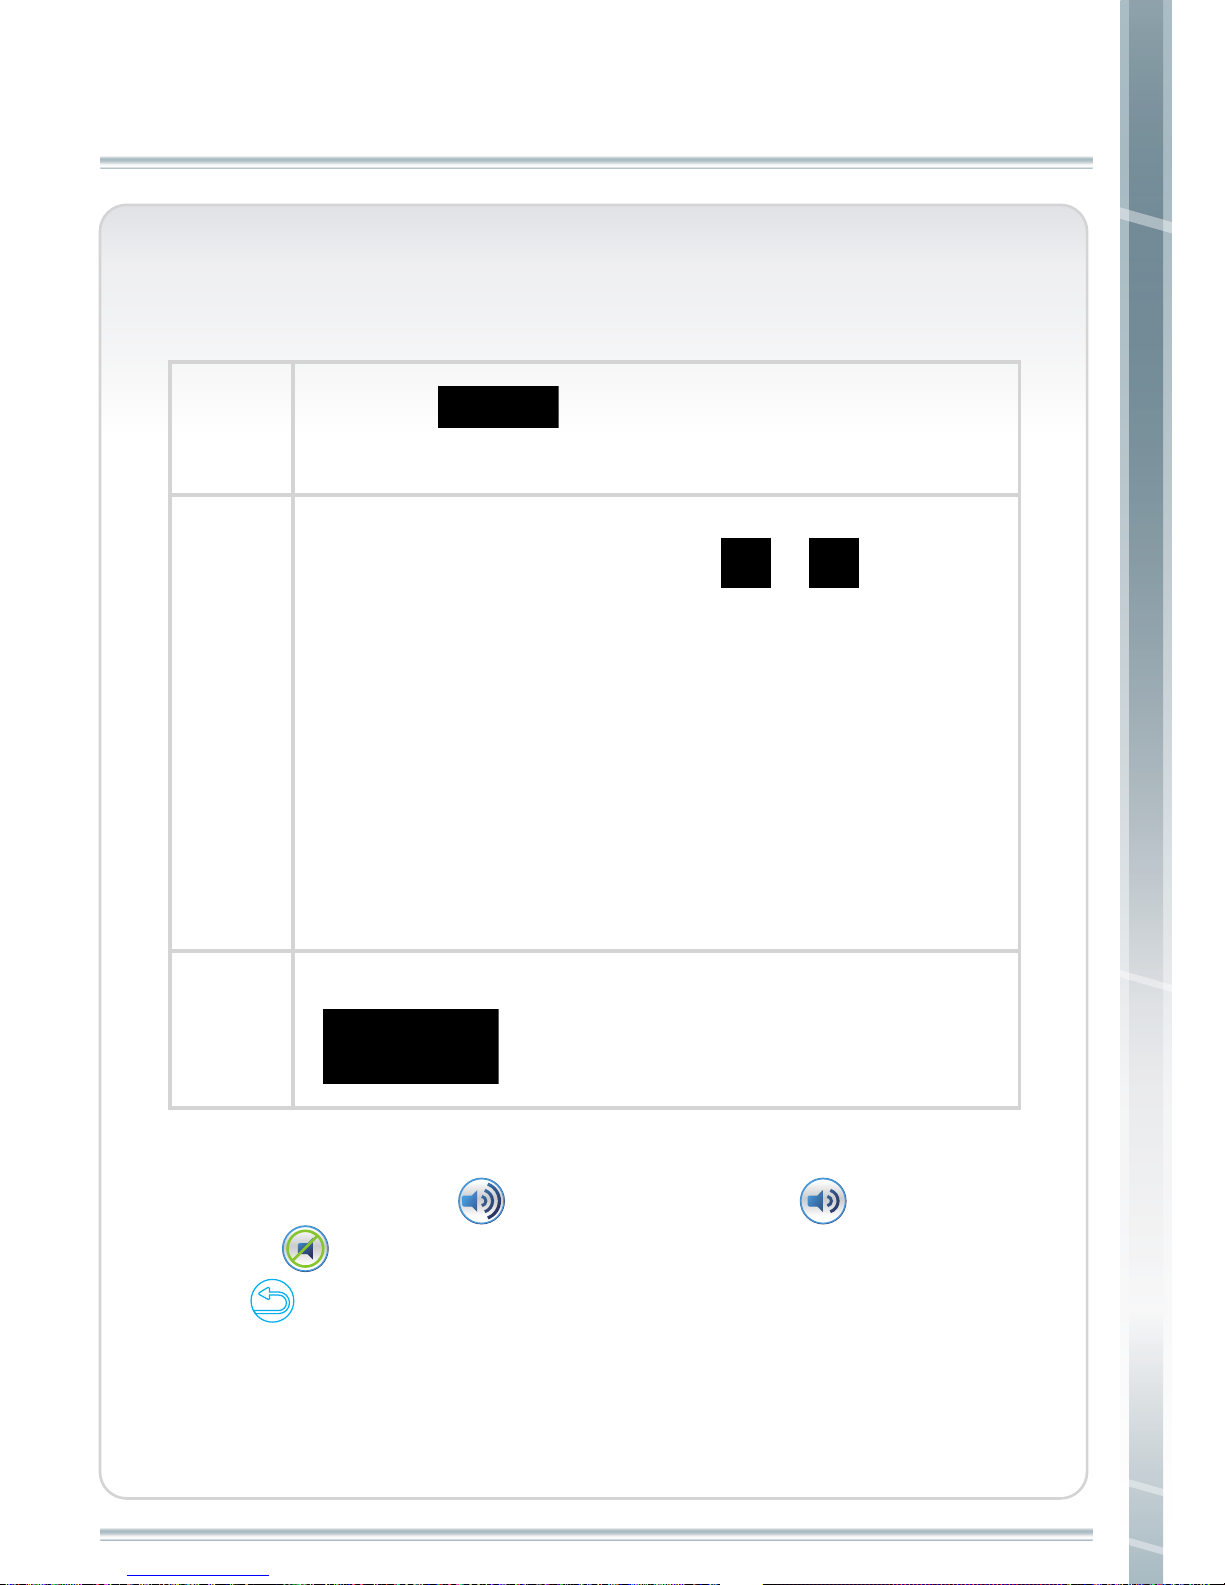
INTERNET
step 1
step 2
step 3
Under standby mode, press by
touch panel.
Detected WIFI list will be shown
on the screen. Choose the one
you will use.
step 4
step 5
step 6
Press to back to sport window.
SPORT
Enter WIFI password, then
press “OK” by touch panel.
“No WIFI connected” will be shown
if WIFI connection doesn’t work.
Start workout, then press .
Google, Google+, Youtube, Facebook, Twitter, Weibo,
Yahoo, CNN, or Steelflex can be connected.
Note:
1.Voice increase by pressing . Voice decrease by pressing . Mute by
pressing .
2.Press to back to sport window.
3.If you want to back to previous internet page, press .
4.Press center screen and hold for a while to have full screen. Under full screen, press
center screen and hold for a while to back to the window with exercise information.
Page 27
26
OPERATING INSTRUCTIONS FOR ENTERTAINMENT
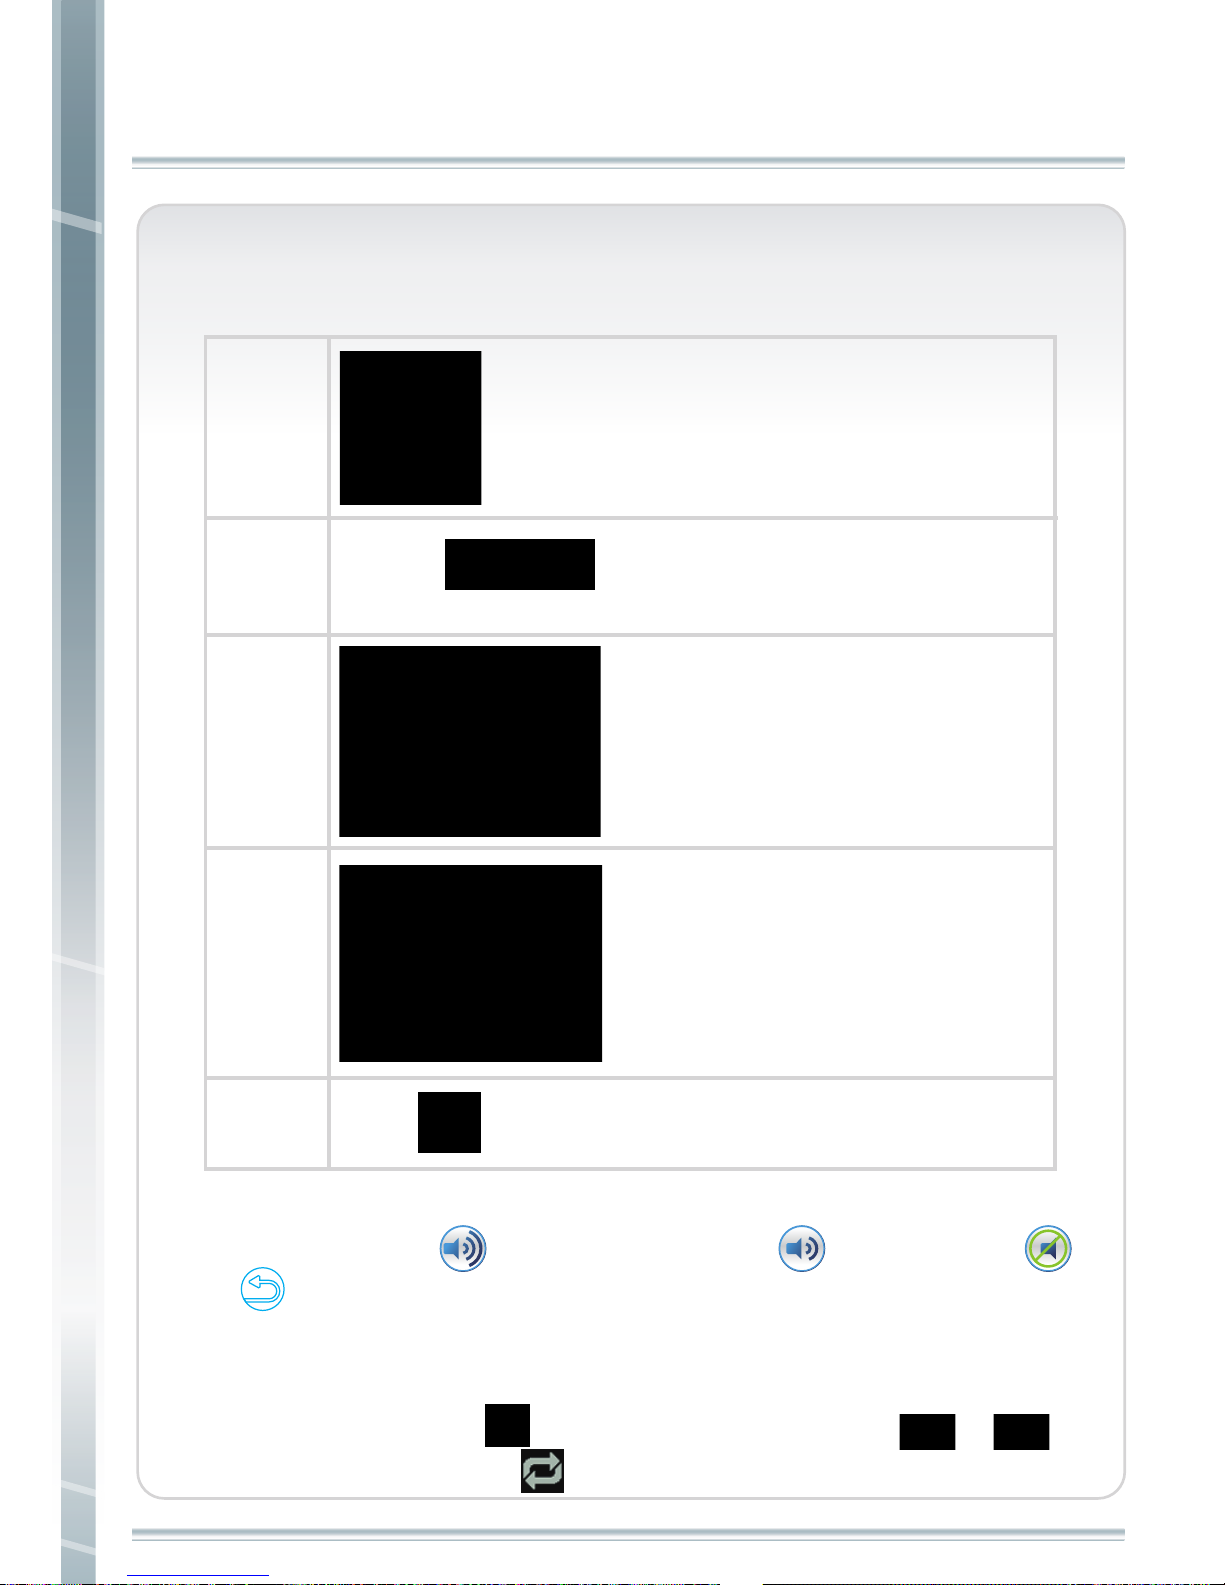
TV
step 1
step 2
step 3
Choose TV or AV by pressing / of touch
panel.(DTV is digital TV which is not equipped on
this display.)
Notice:
When choosing TV, coaxial cable must be connected
with the machine.
When choosing AV, AV signal cables must be
connected with the machine.
Choose by pressing touch panel during
workout.
Note:
1.Voice increase by pressing . Voice decrease by pressing . Mute by
pressing .
2.Press to back to sport window.
3.Press center screen and hold for a while to have full screen. Under full screen, press
center screen and hold for a while to back to the window with exercise information.
SPORT
Choose channel by pressing up and down of
.
Page 28
27
OPERATING INSTRUCTIONS FOR ENTERTAINMENT
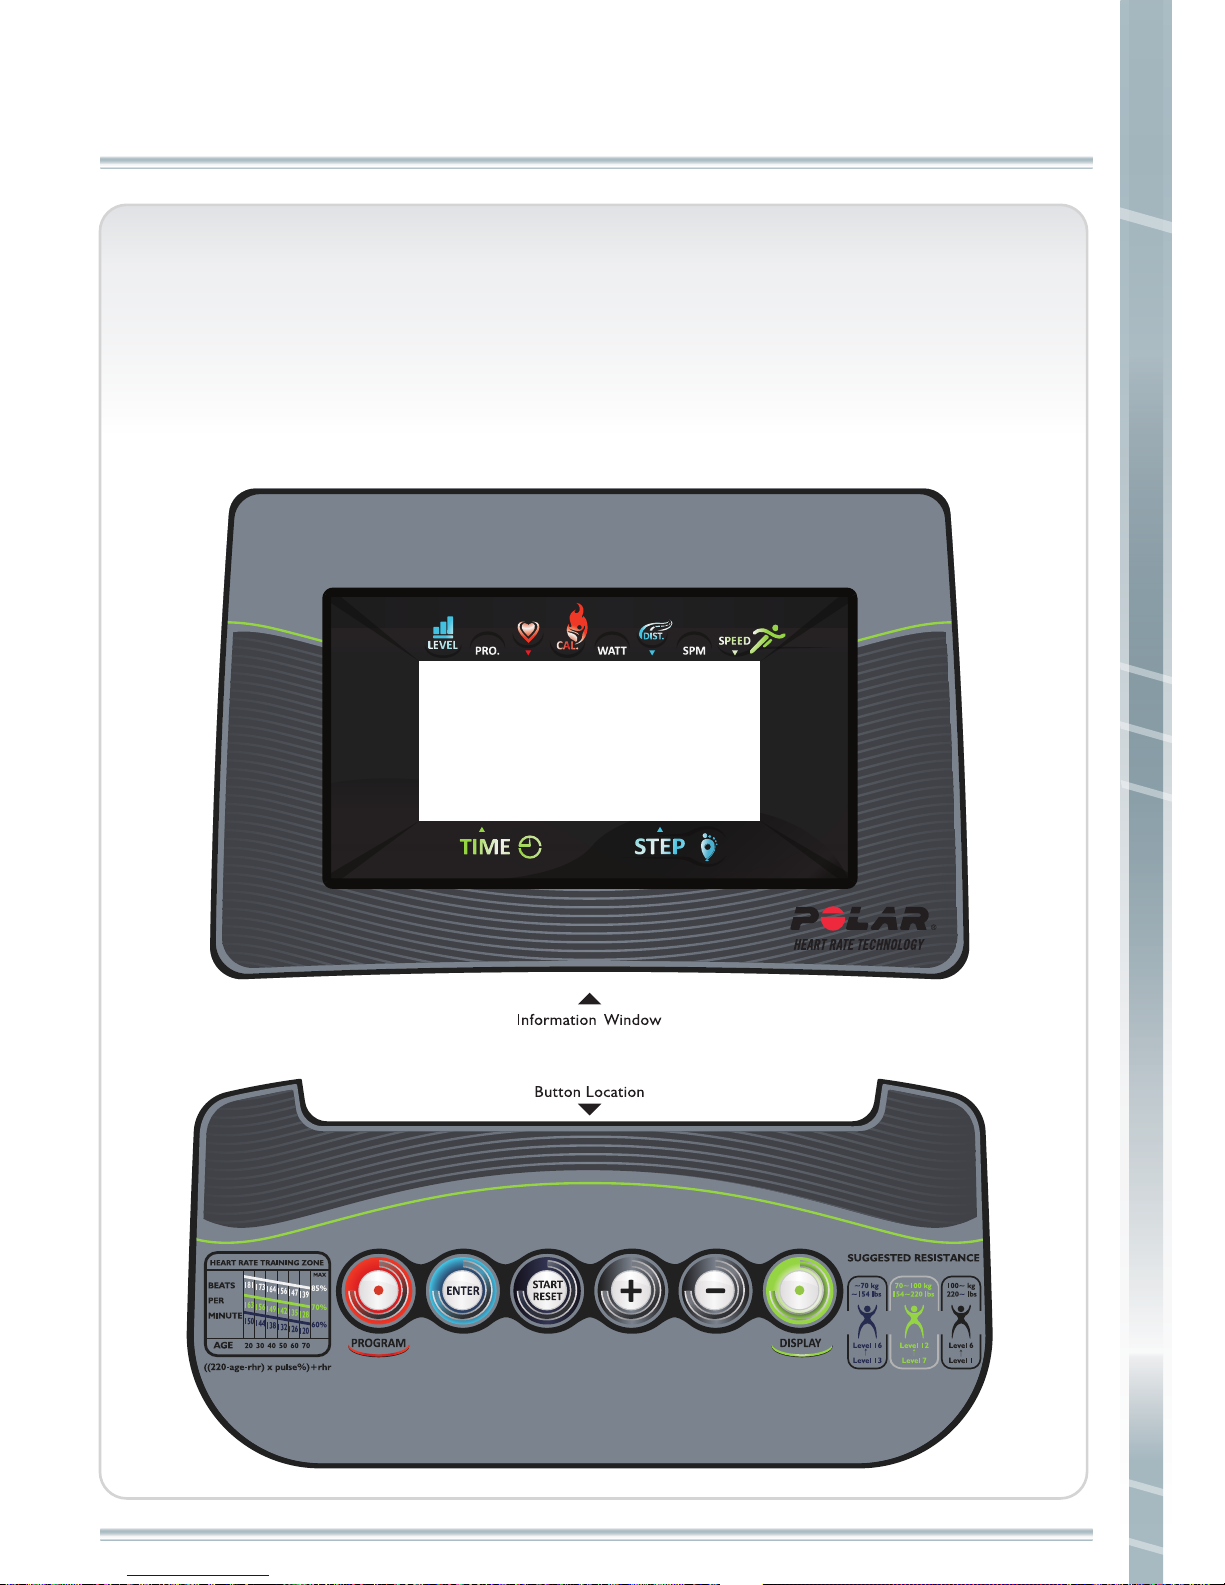
MUSIC
step 1
step 2
step 3
step 4
step 5
Choose by pressing touch panel during
workout.
SPORT
Scroll audio list from touch panel
to choose the music you want to
play.
When you choose a song, press
“select”. The song will be listed
in play list. You can also press
“select all”, and all songs of audio
list will be listed under play list.
Plug USB storage with songs on. The
type of the songs must be MP3.
Press to play music.
Note:
1.Voice increase by pressing . Voice decrease by pressing . Mute by pressing .
2.Press to back to sport window.
3.Press center screen and hold for a while to have full screen. Under full screen, press center
screen and hold for a while to back to the window with exercise information.
4.Stop playing music by pressing . Last song or next song by pressing or .
Songs play continuous by pressing .
Page 29
28
OPERATING INSTRUCTIONS
OPERATING INSTRUCTIONS
Display Introduction
The display of your PST10 is used to operate the unit. It includes
information window and button location.
Page 30
29
Information window
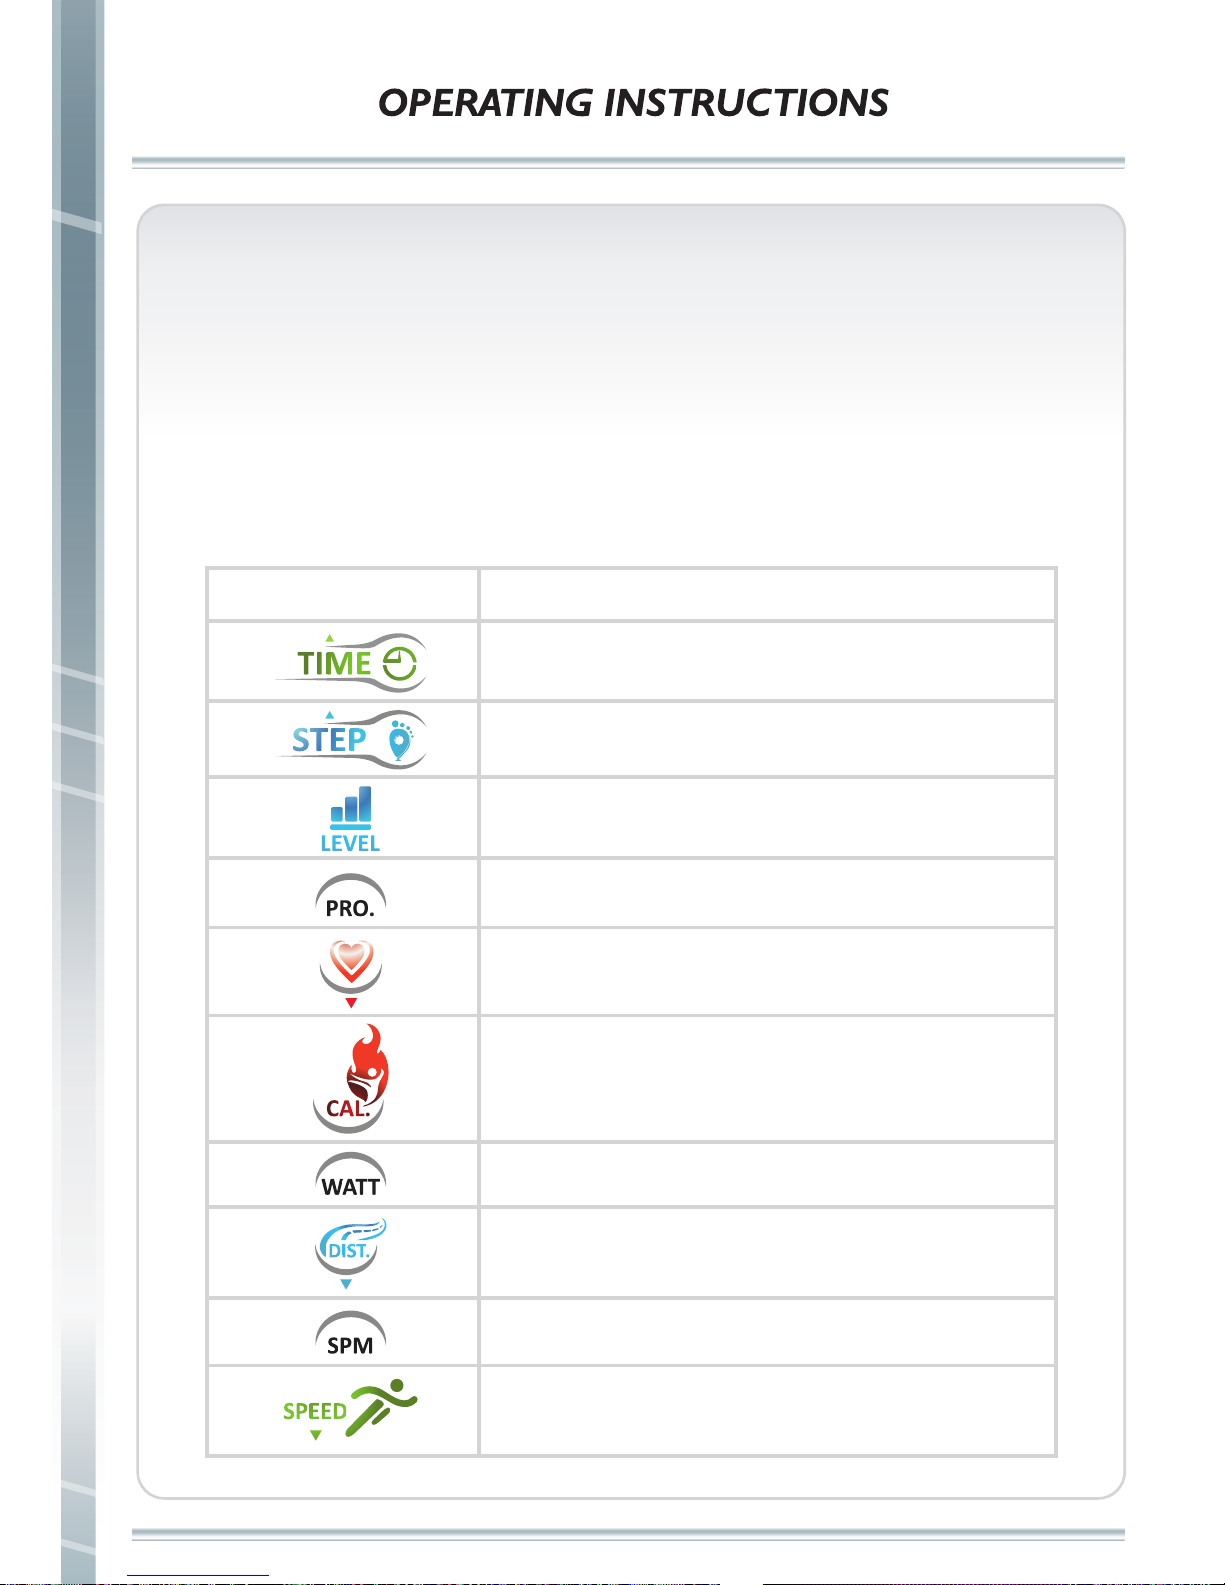
The information window provides two different types of
information: programs directions and user workout data.
Program direction will be explained with programs later. User
workout data includes:
User workout data
Description
Indicates time in minutes and seconds (mm:ss).
Indicates step counts during workout.
Indicates current resistance of user’s workout.
Indicates workout program user chooses.
Indicates user’s heart rate during workout.
Indicates accumulated calories burned during
workout.
Indicates power consumption of workout.
Indicates exercising distance of your workout.
Indicates user’s workout steps per minute.
Indicates speed of workout.
Page 31
30
OPERATING INSTRUCTIONS
OPERATING INSTRUCTIONS
Button location
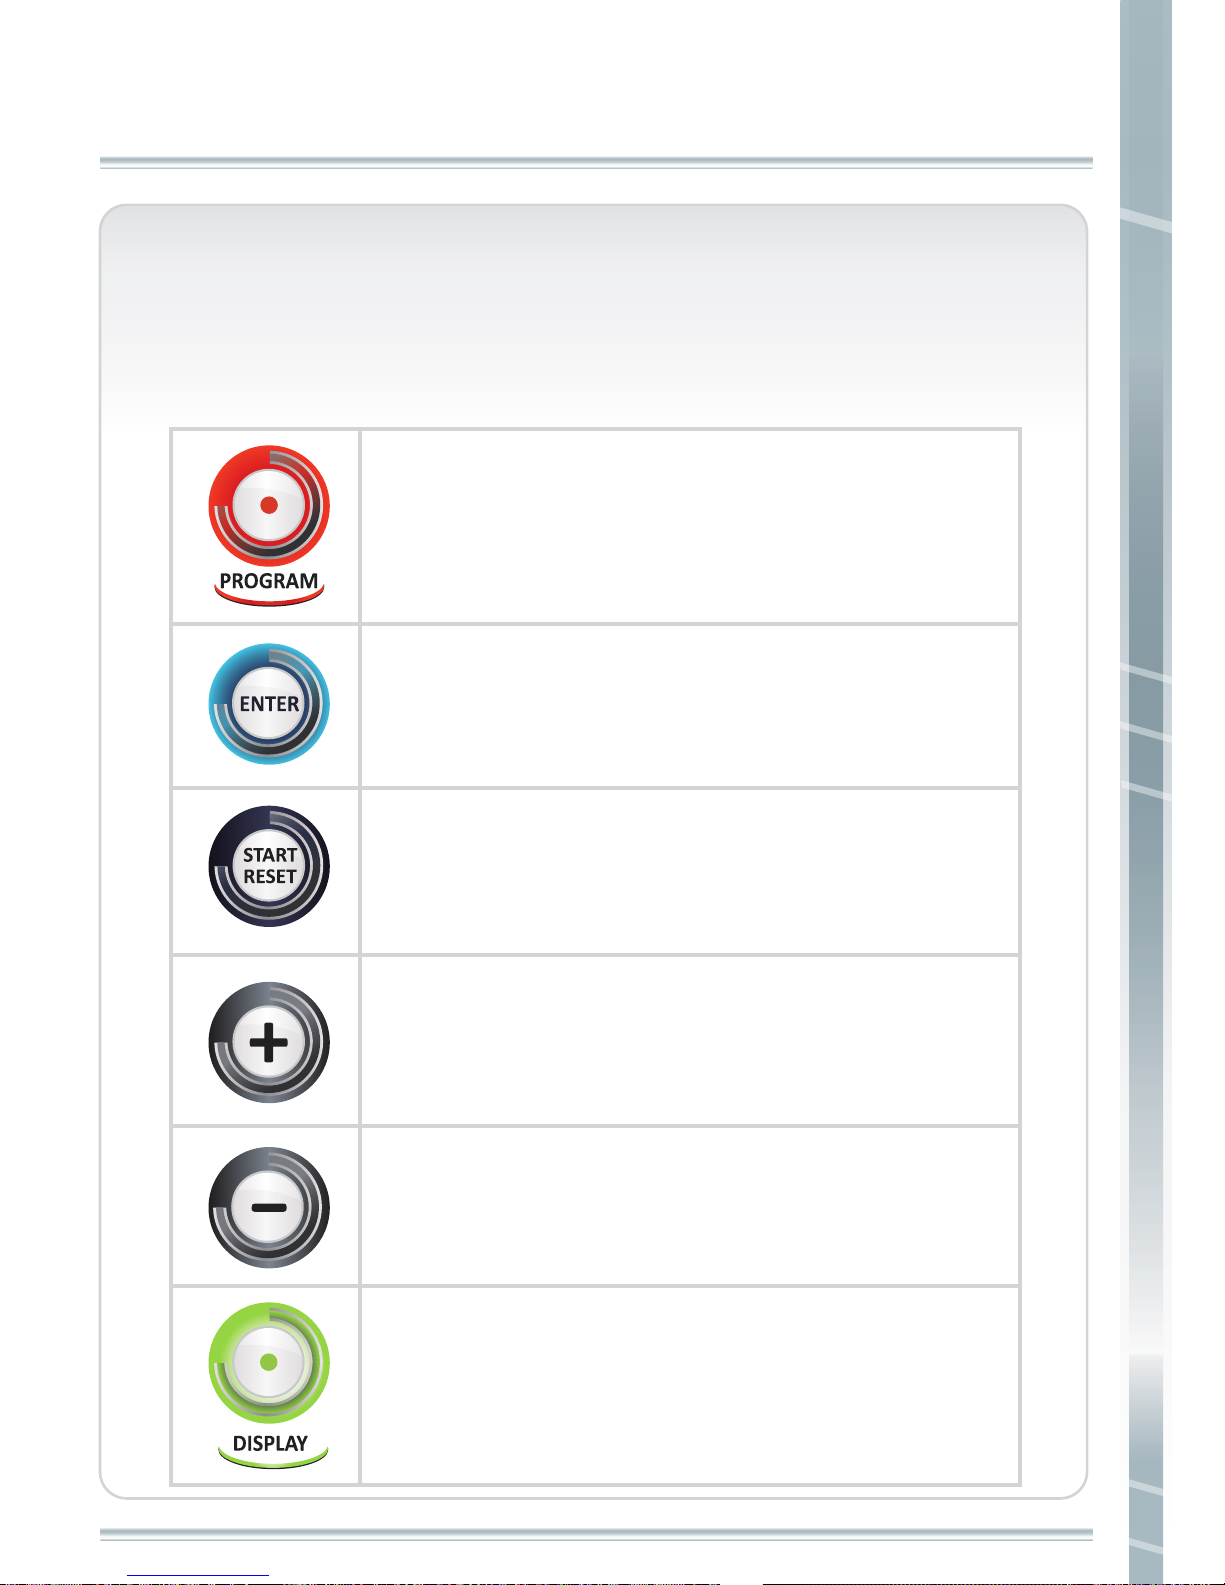
Description of each button is listed below.
Enter data.
Choose workout program.
Under START condition, press another time will be RESET.
Under RESET condition, press another time will be START.
Increasing setting values.
Decreasing setting values.
Workout data display changes.
Page 32
31
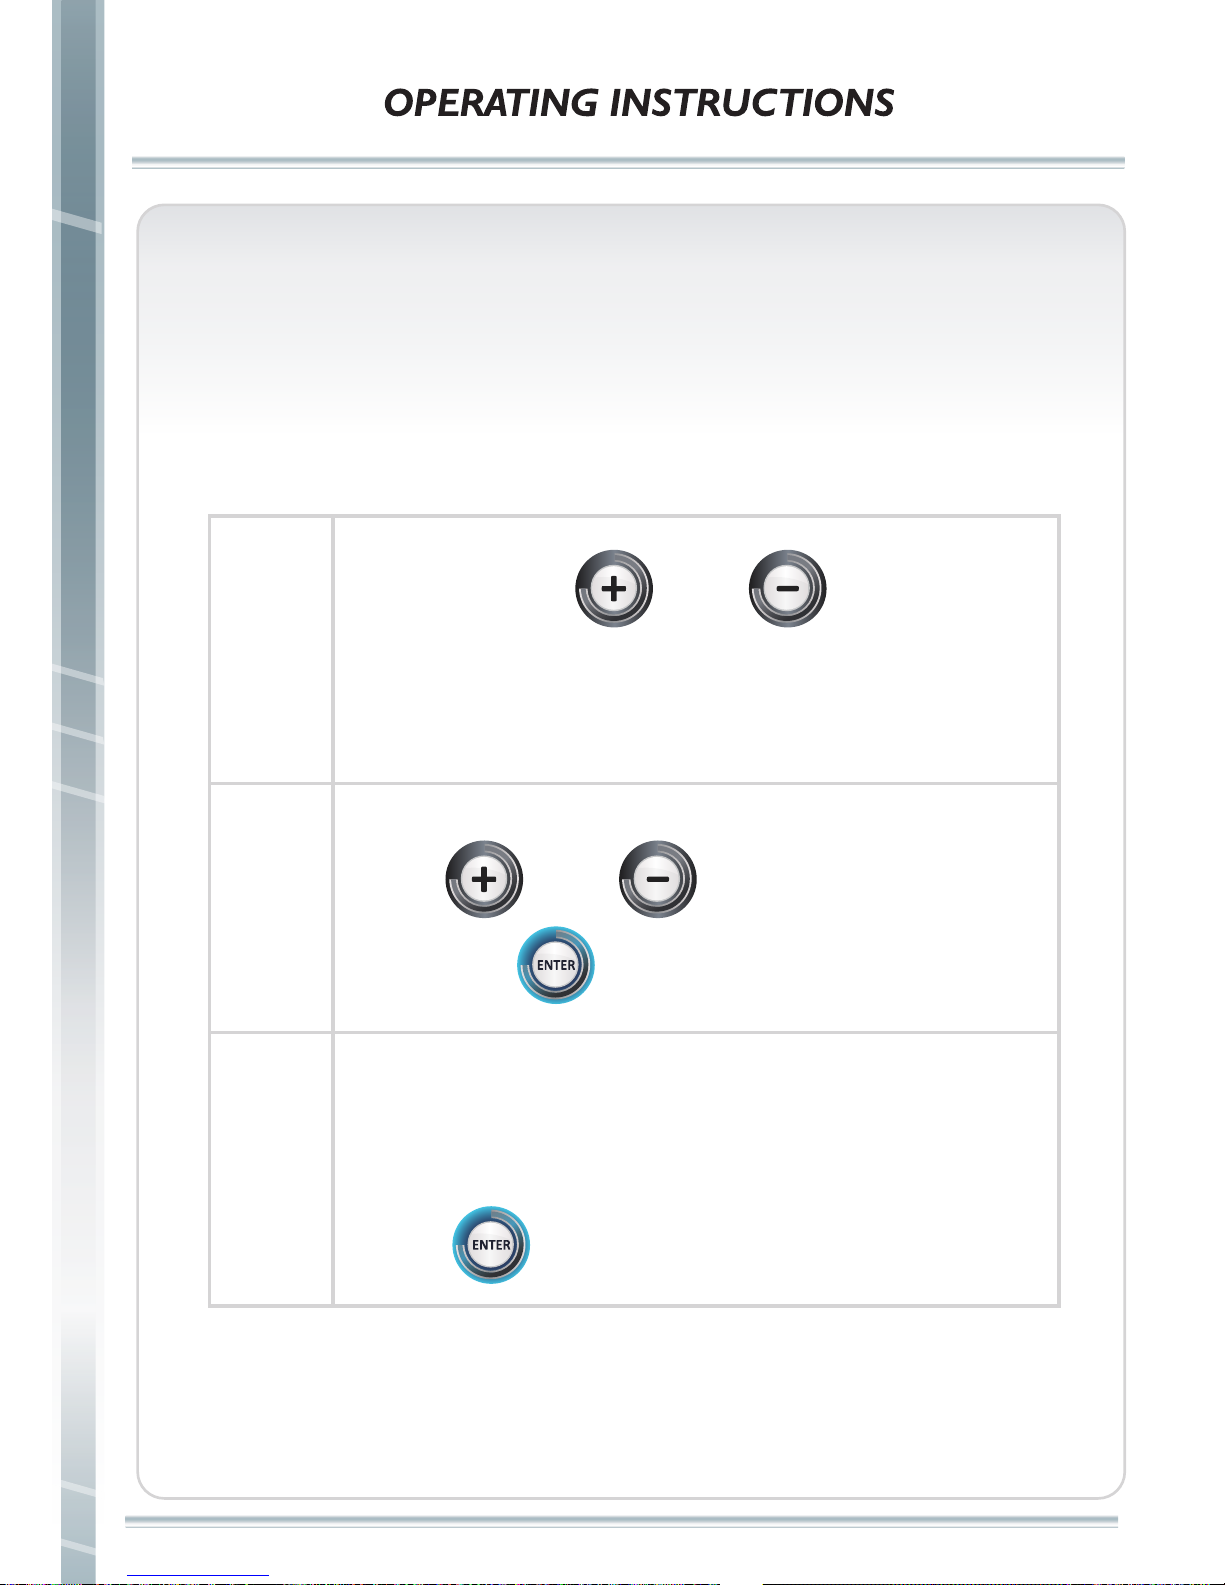
Engineer Mode
Steelflex stepper is designed for different users. Base on your
location and user characteristics; please follow the instructions
to set up the machines before starting using.
step 1
step 2
step 3
Press and hold and together for
3 seconds. Software version will be shown for 3
seconds, then enter metric/imperial setting.
Press or to set metric/imperial,
then press .
“TOTAL TIME” which means accumulated total
workout time of the machine will be shown.
Press to leave engineer mode.
Page 33
32
OPERATING INSTRUCTIONS
OPERATING INSTRUCTIONS
Programs
There are 9 different exercising programs which includes manual,
cardio, fat burn, interval, goal-time, goal-distance, goal-calories,
goal-step and HRC. Operations are explained as following.
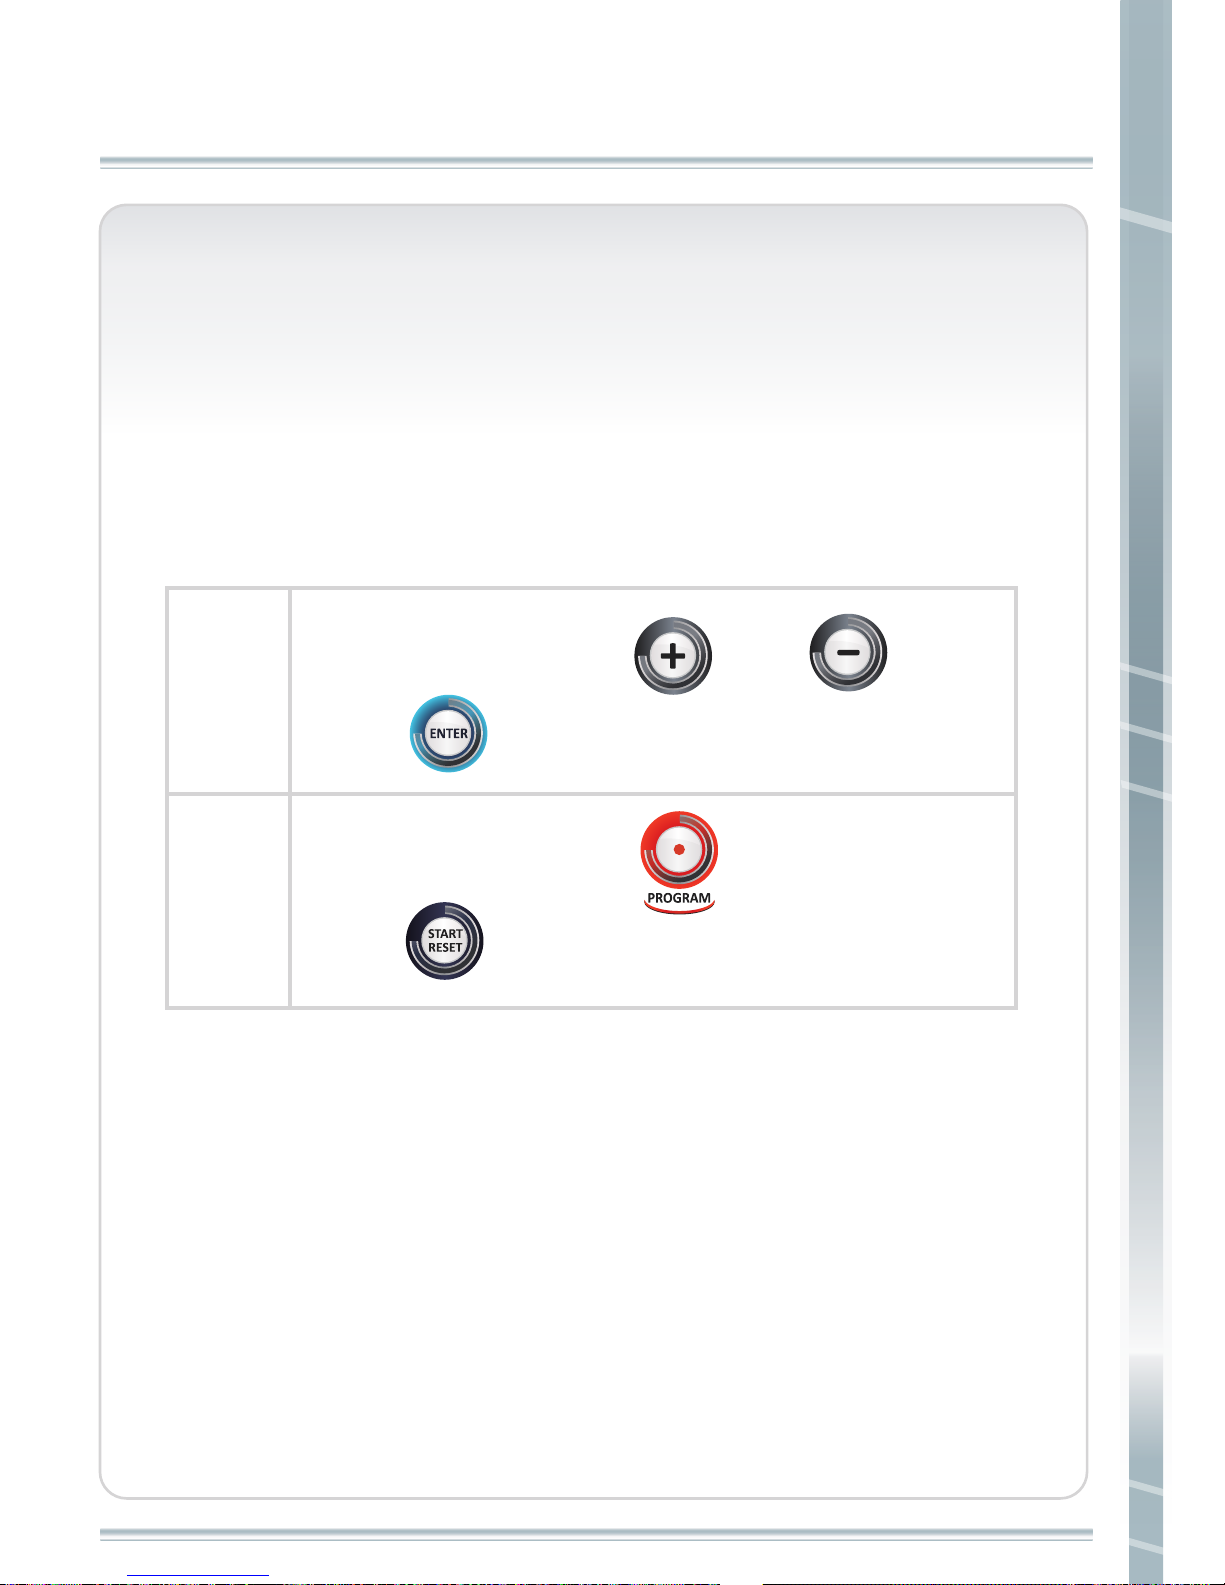
Manual(P1)
step 1
step 2
Set weight by pressing and , then
press . Default value is 70 KGS/150LBS.
Choose P1 by pressing , then
press to start your workout.
1. Time, distance, calories and step will be counted up from 0.
Page 34
OPERATING INSTRUCTIONS
33
OPERATING INSTRUCTIONS
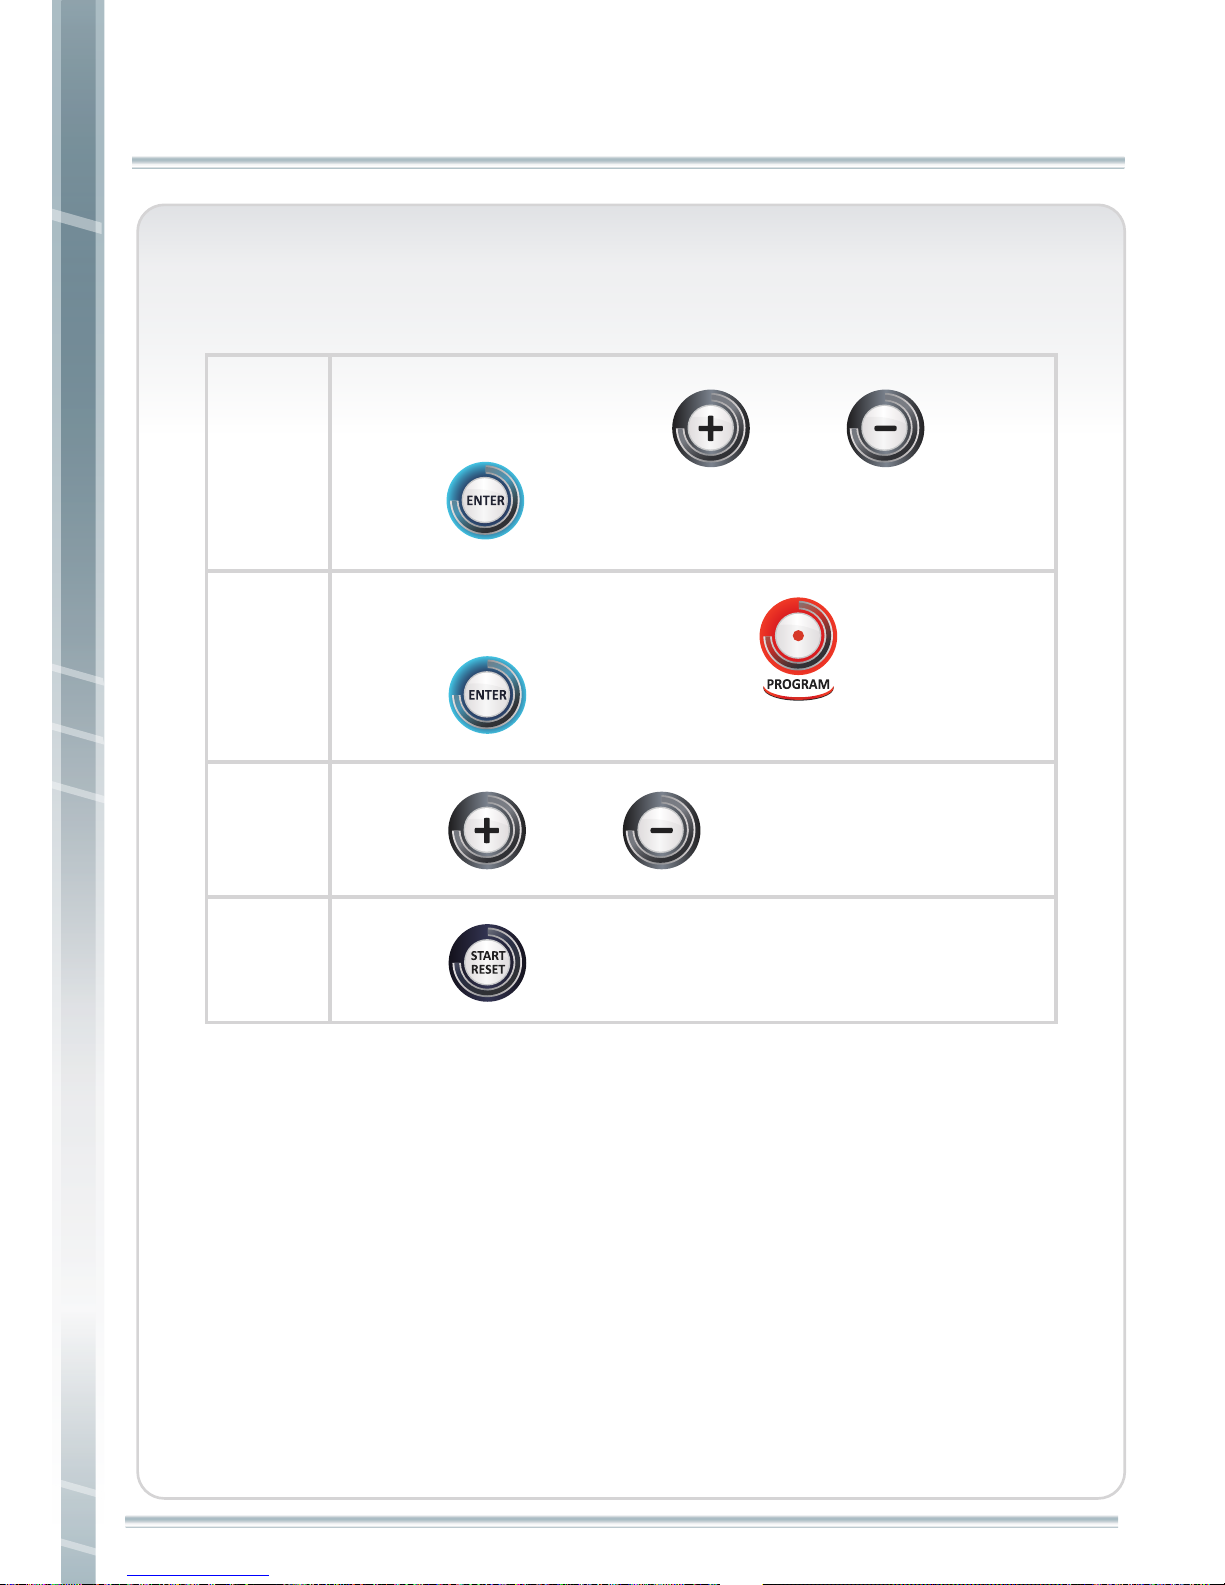
Cardio(P2)/Fat Burn(P3)/Interval(P4)
step 1
step 2
step 3
step 4
Set weight by pressing and , then
press . Default value is 70 KGS/150LBS.
Press and to set workout time.
Press to start your workout.
Choose P2/P3/P4 by pressing , then
press .
1.Time will be count down from default value or setting value.
Distance, calories and step will be counted from 0.
Page 35
34
OPERATING INSTRUCTIONS
OPERATING INSTRUCTIONS
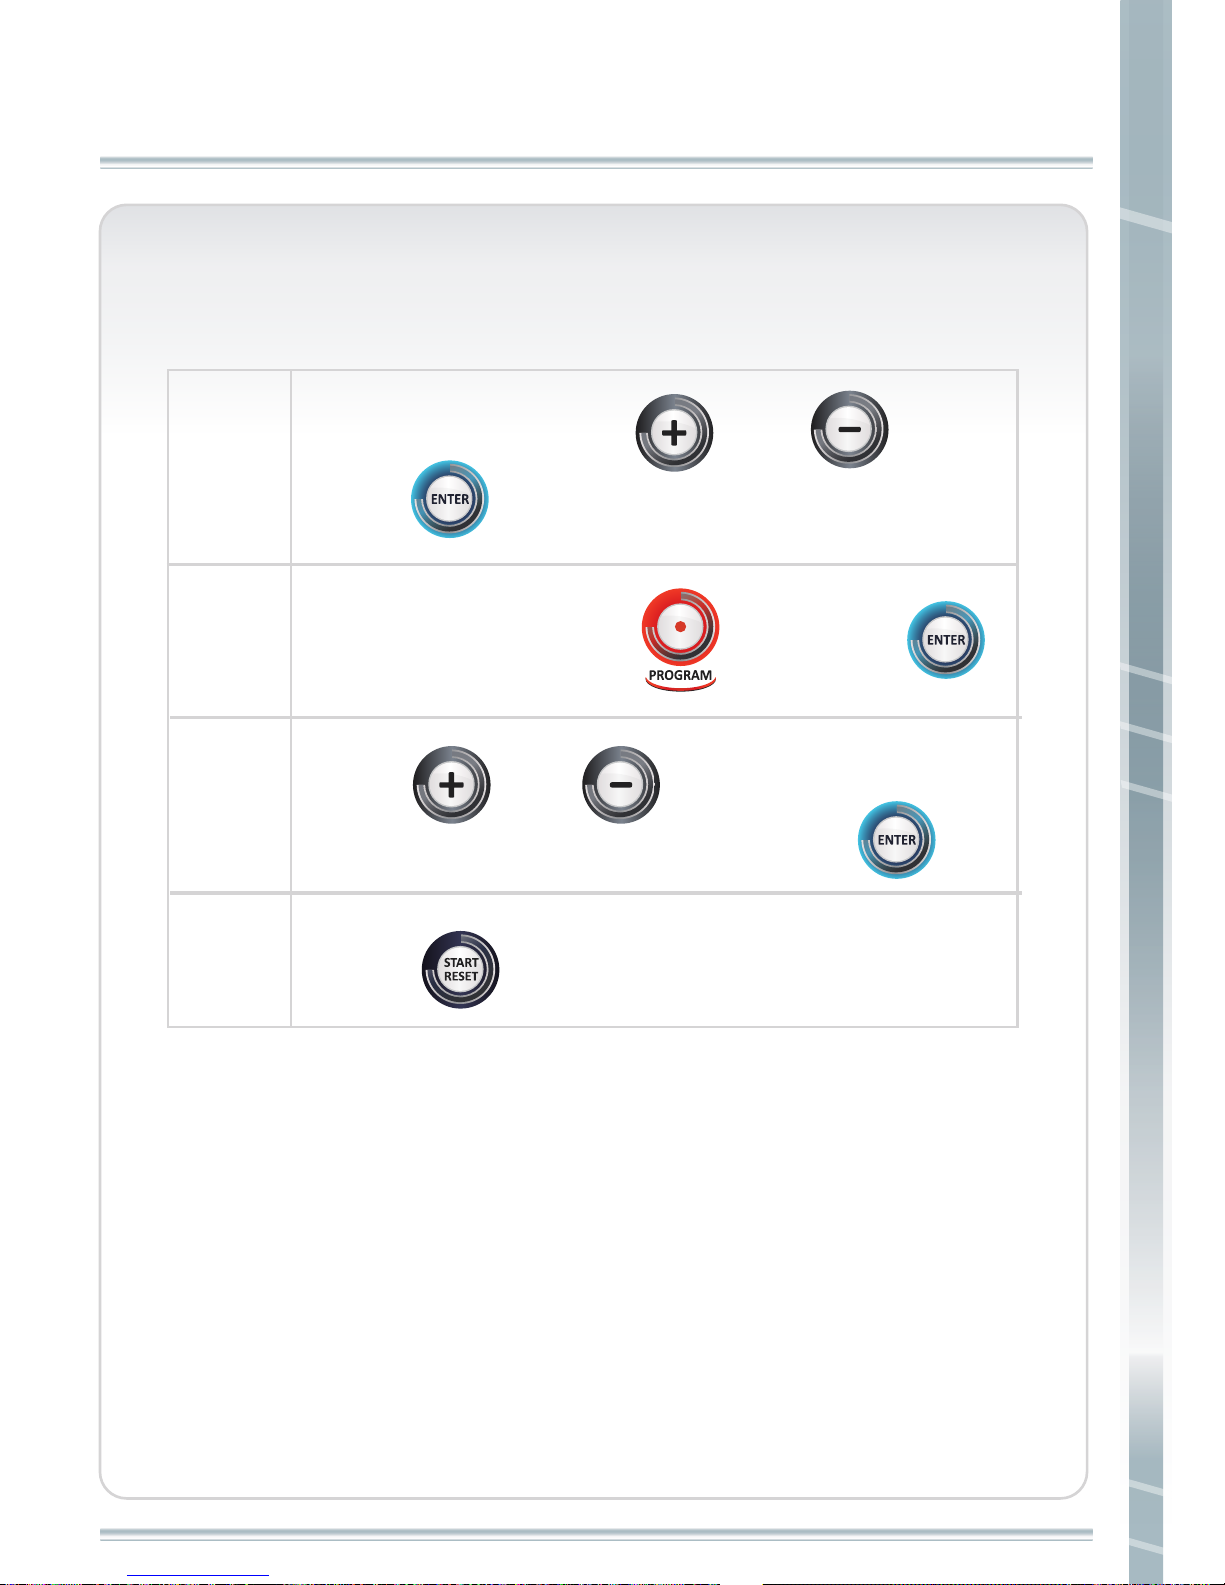
step 3
step 4
Press or to set workout time.
Default value is 30 minutes. Then press .
Press to start your workout.
1.Time will be count down from default value or setting value.
Distance, calories and step will be counted up from 0.
Goal-time(P5)
step 1
step 2
Set weight by pressing and , then
press . Default value is 70 KGS/150LBS.
Choose P5 by pressing , then press .
Page 36
OPERATING INSTRUCTIONS
35
OPERATING INSTRUCTIONS
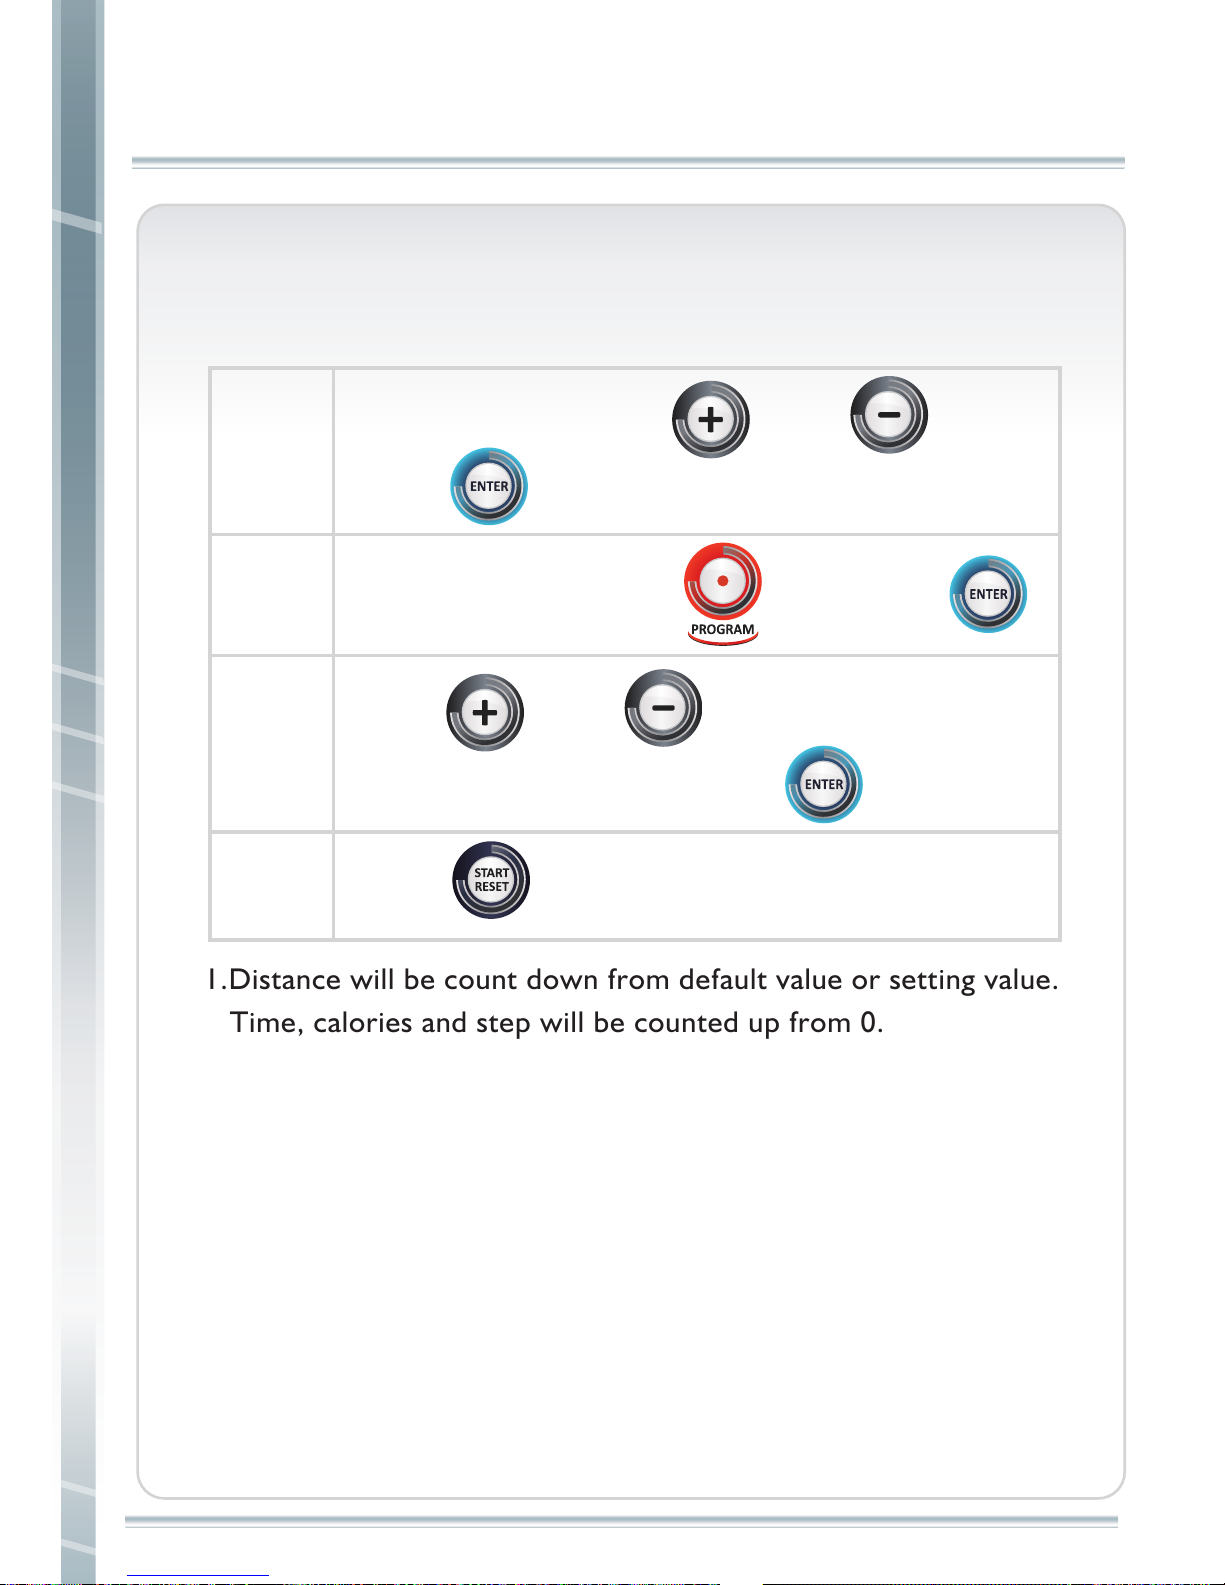
Goal-distance(P6)
step 1
step 2
step 3
Set weight by pressing and , then
press . Default value is 70 KGS/150LBS.
step 4 Press to start your workout.
1.Distance will be count down from default value or setting value.
Time, calories and step will be counted up from 0.
Choose P6 by pressing , then press .
Press or to set distance.
Default value is 0.5. Then press .
Page 37
36
OPERATING INSTRUCTIONS
OPERATING INSTRUCTIONS
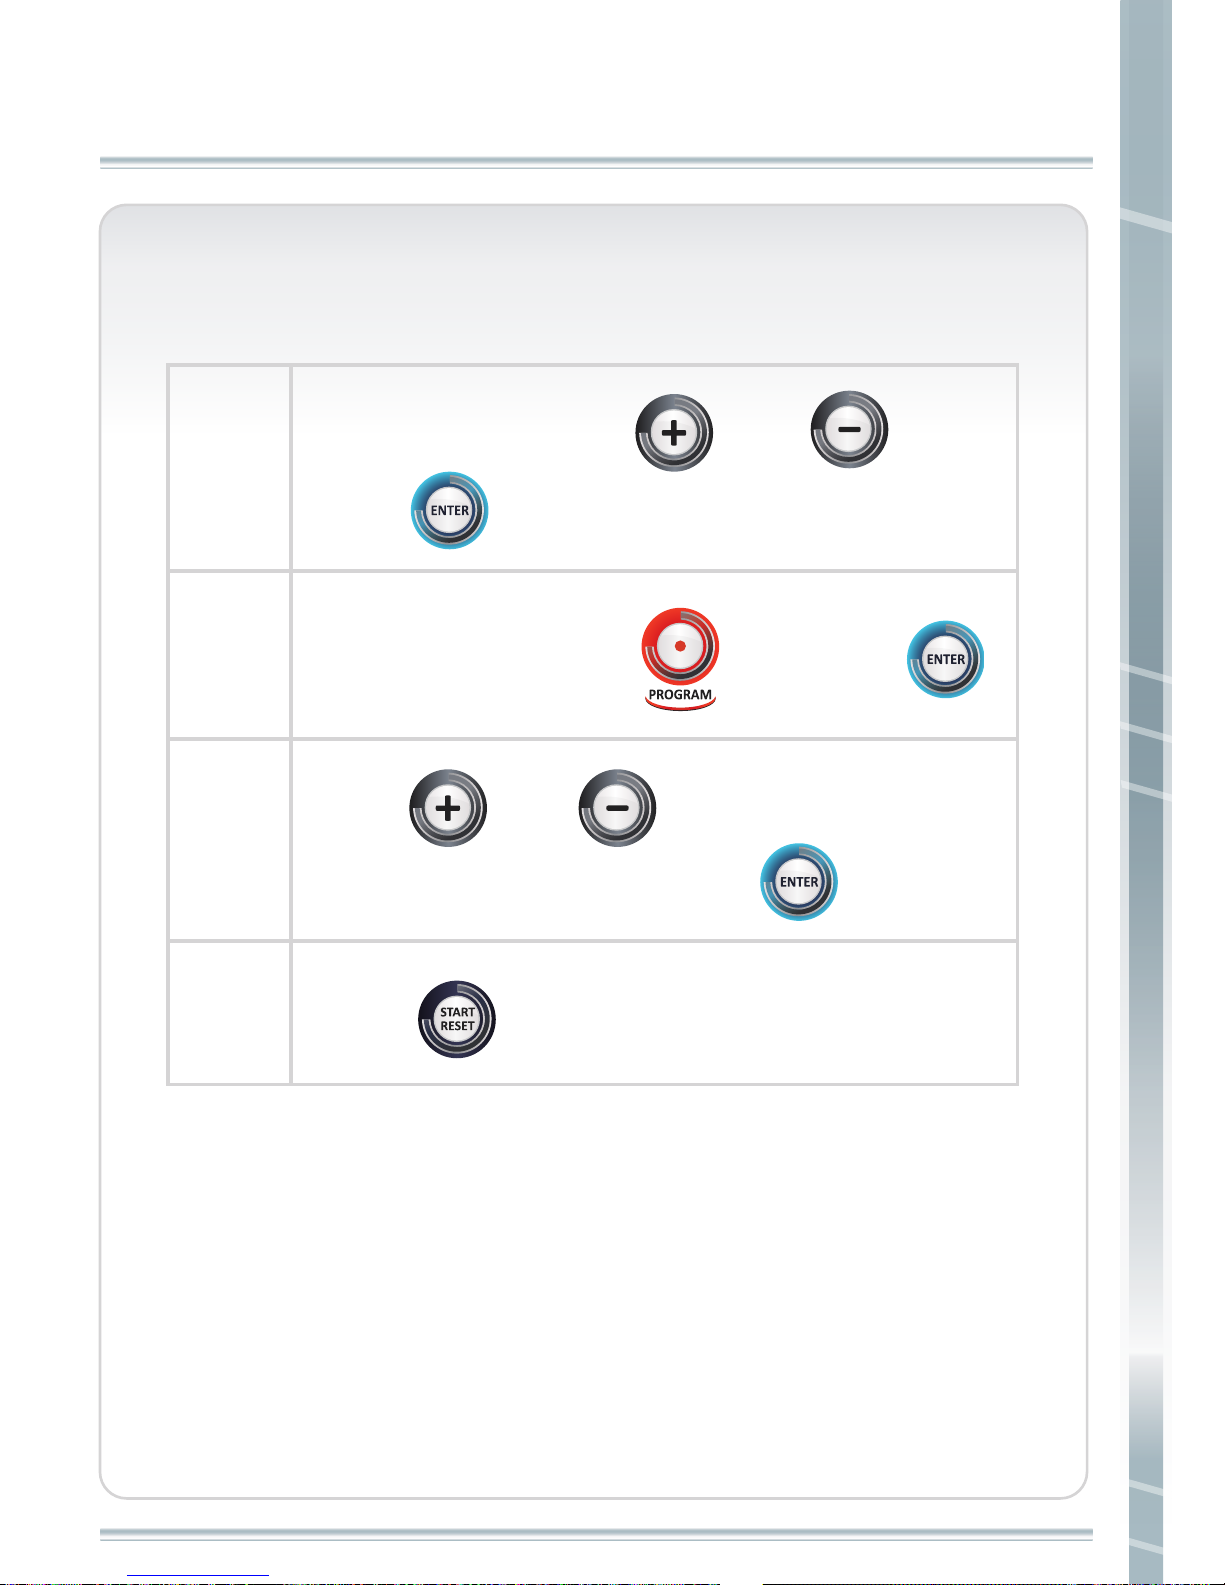
Goal-calories(P7)
step 1
step 2
step 3
step 4
Set weight by pressing and , then
press . Default value is 70 KGS/150LBS.
Choose P7 by pressing , then press .
Press or to set calories.
Default value is 200. Then press .
Press to start your workout.
1.Calories will be count down from default value or setting value.
Time, distance and step will be counted up from 0.
Page 38
OPERATING INSTRUCTIONS
37
OPERATING INSTRUCTIONS
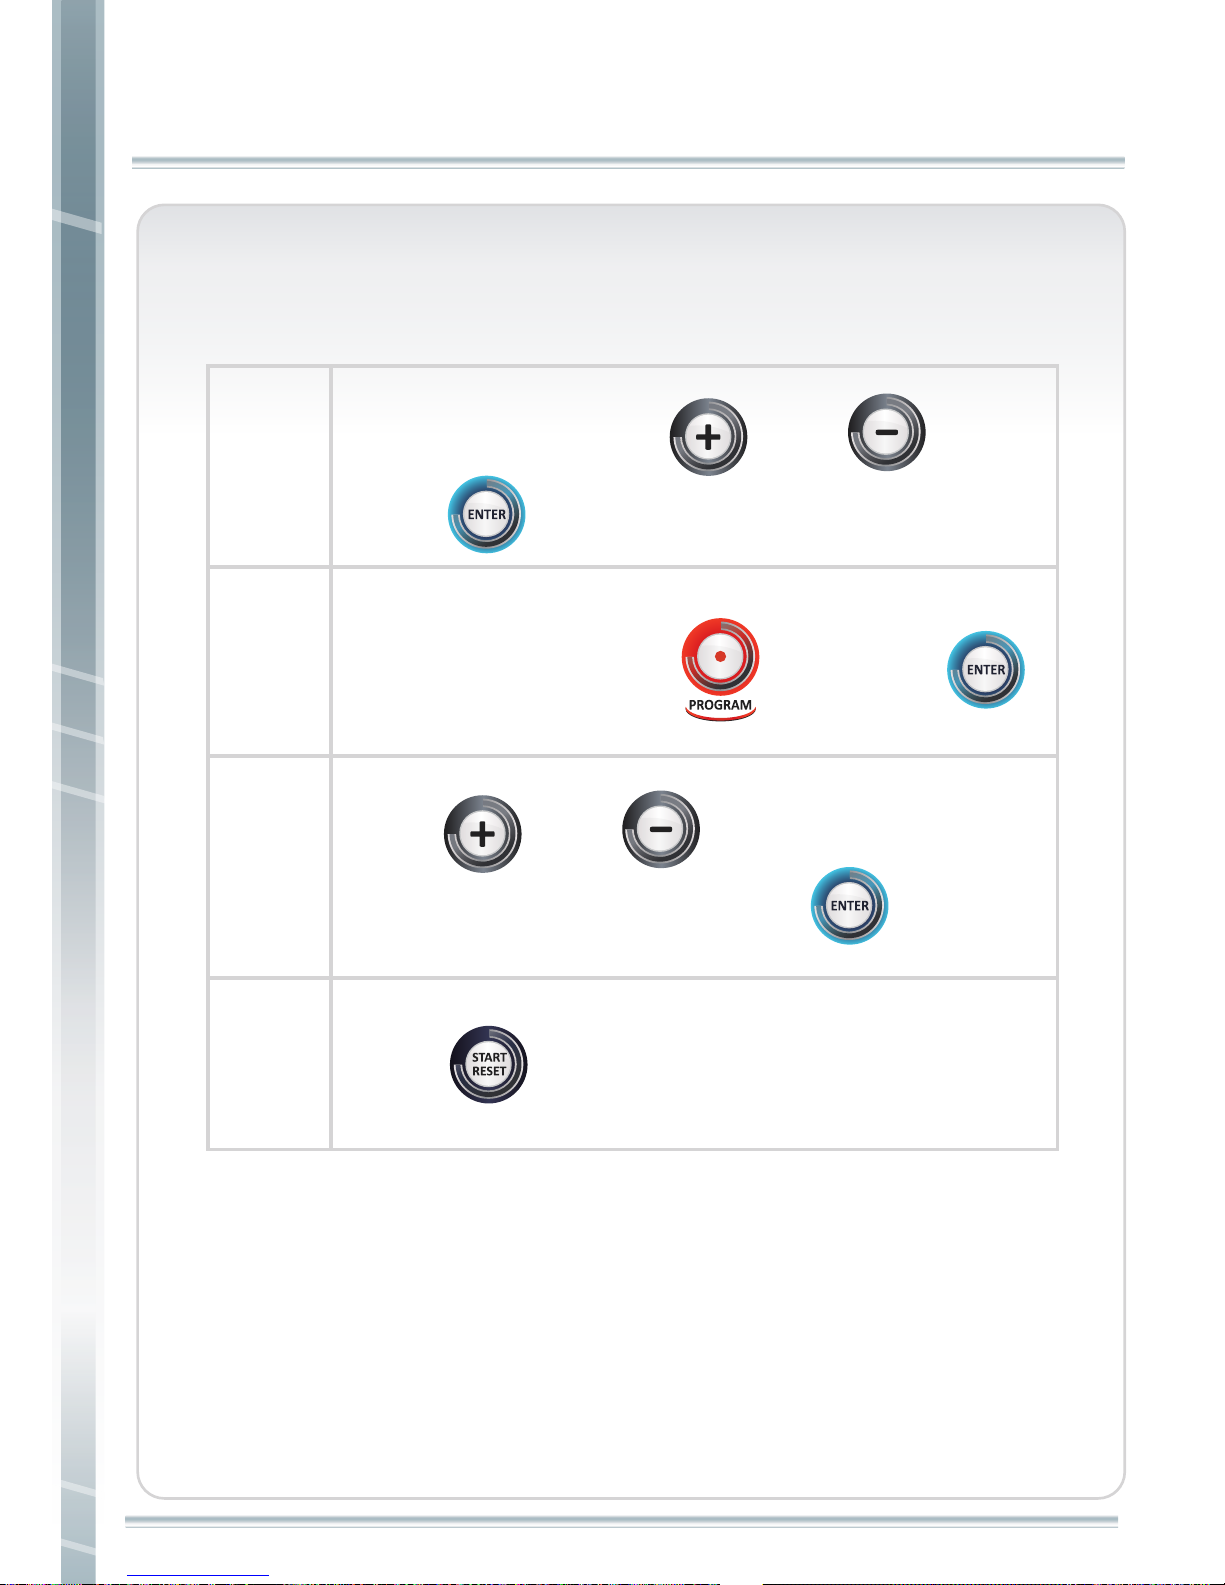
Goal-step(P8)
step 1
step 2
step 3
Set weight by pressing and , then
press . Default value is 70 KGS/150LBS.
step 4 Press to start your workout.
1.Step will be count down from default value or setting value.
Time, distance and calories will be counted up from 0.
Choose P8 by pressing , then press .
Press or to set distance.
Default value is 1000. Then press .
Page 39
38
OPERATING INSTRUCTIONS
OPERATING INSTRUCTIONS
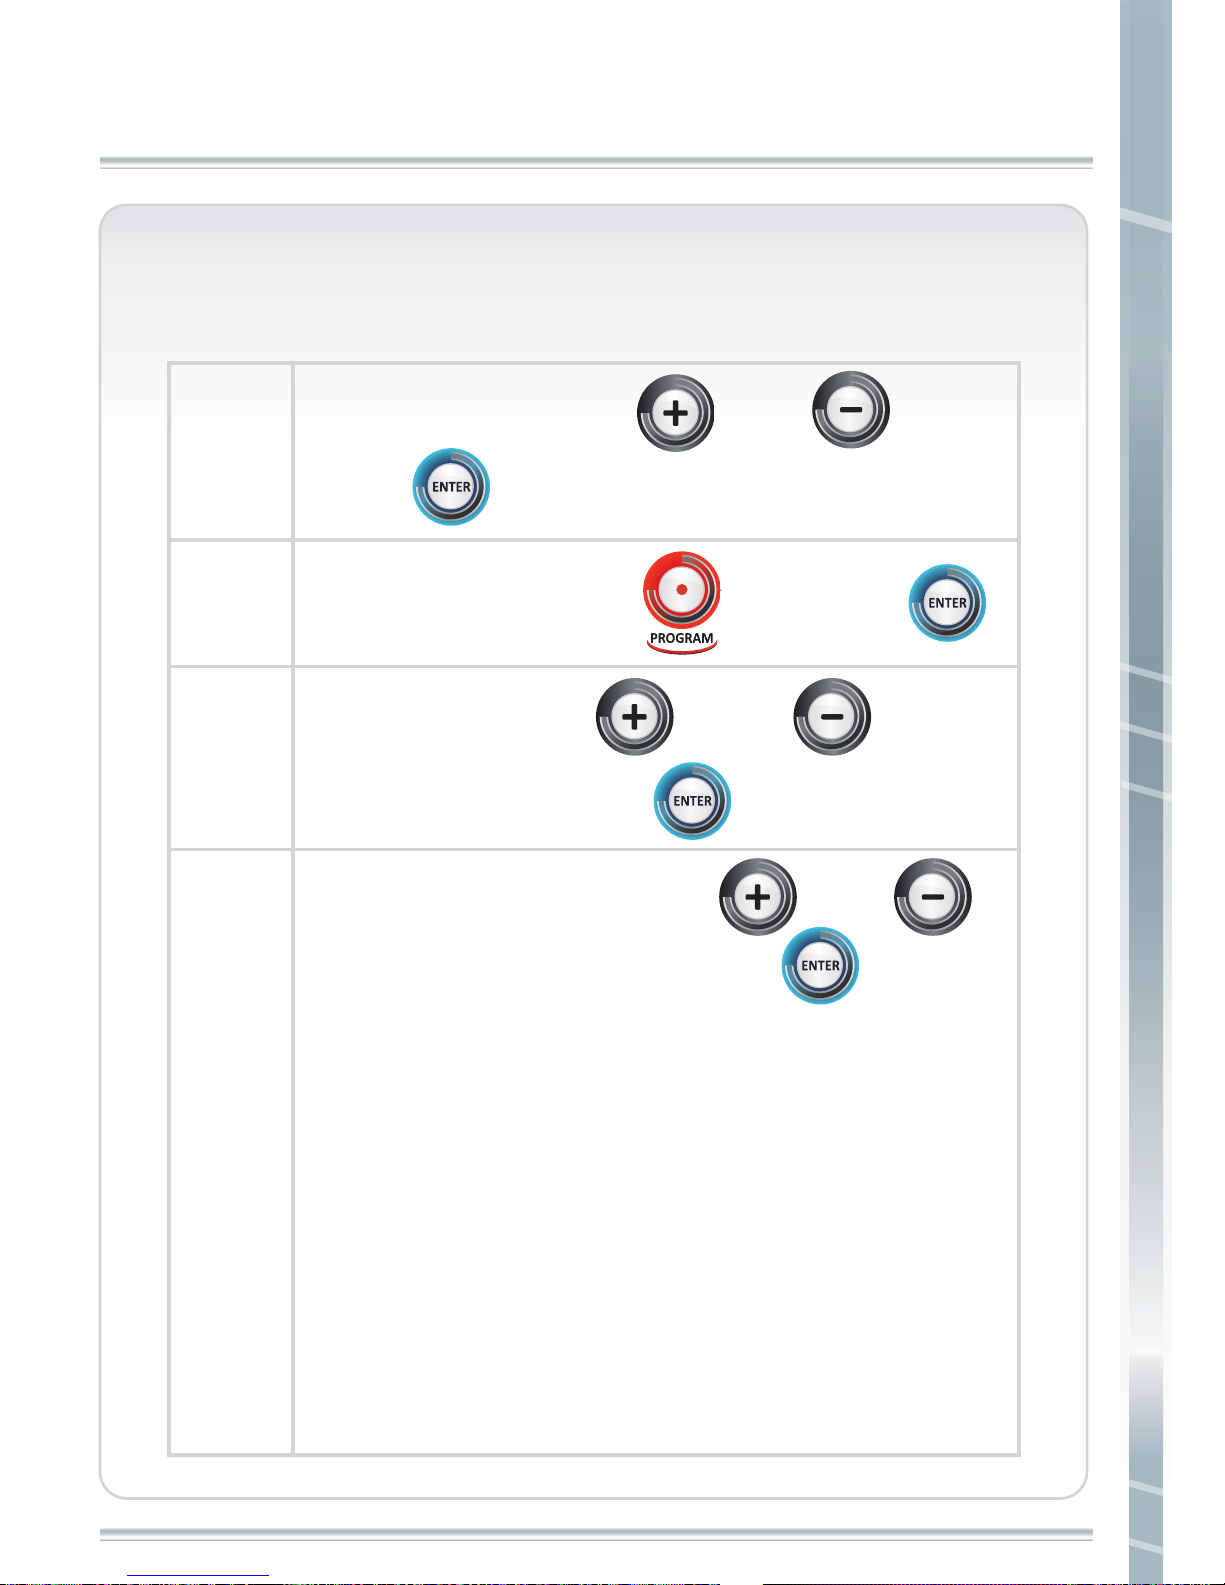
HRC(P9)
step 1
step 2
step 3
step 4
Set weight by pressing and , then
press . Default value is 70 KGS/150LBS.
Choose P9 by pressing , then press .
Set age by pressing and . Default
value is 30. Then press .
Set max. pulse % by pressing and .
Default value is 70%. Then press .
If heart rate is more than 20 bpm below target, level
will increase 2 every 30 seconds.
If heart rate is more than 10 bpm below target, level
will increase 1 every 30 seconds.
If heart rate is more than 20 bpm above target, level
will decrease 2 every 30 seconds.
If heart rate is more than 10 bpm above target, level
will decrease 1 every 30 seconds.
If heart rate can not be detected, PULSE will be shown
on the display every 0.5 second, and level doesn’t change.
Page 40
OPERATING INSTRUCTIONS
39
OPERATING INSTRUCTIONS
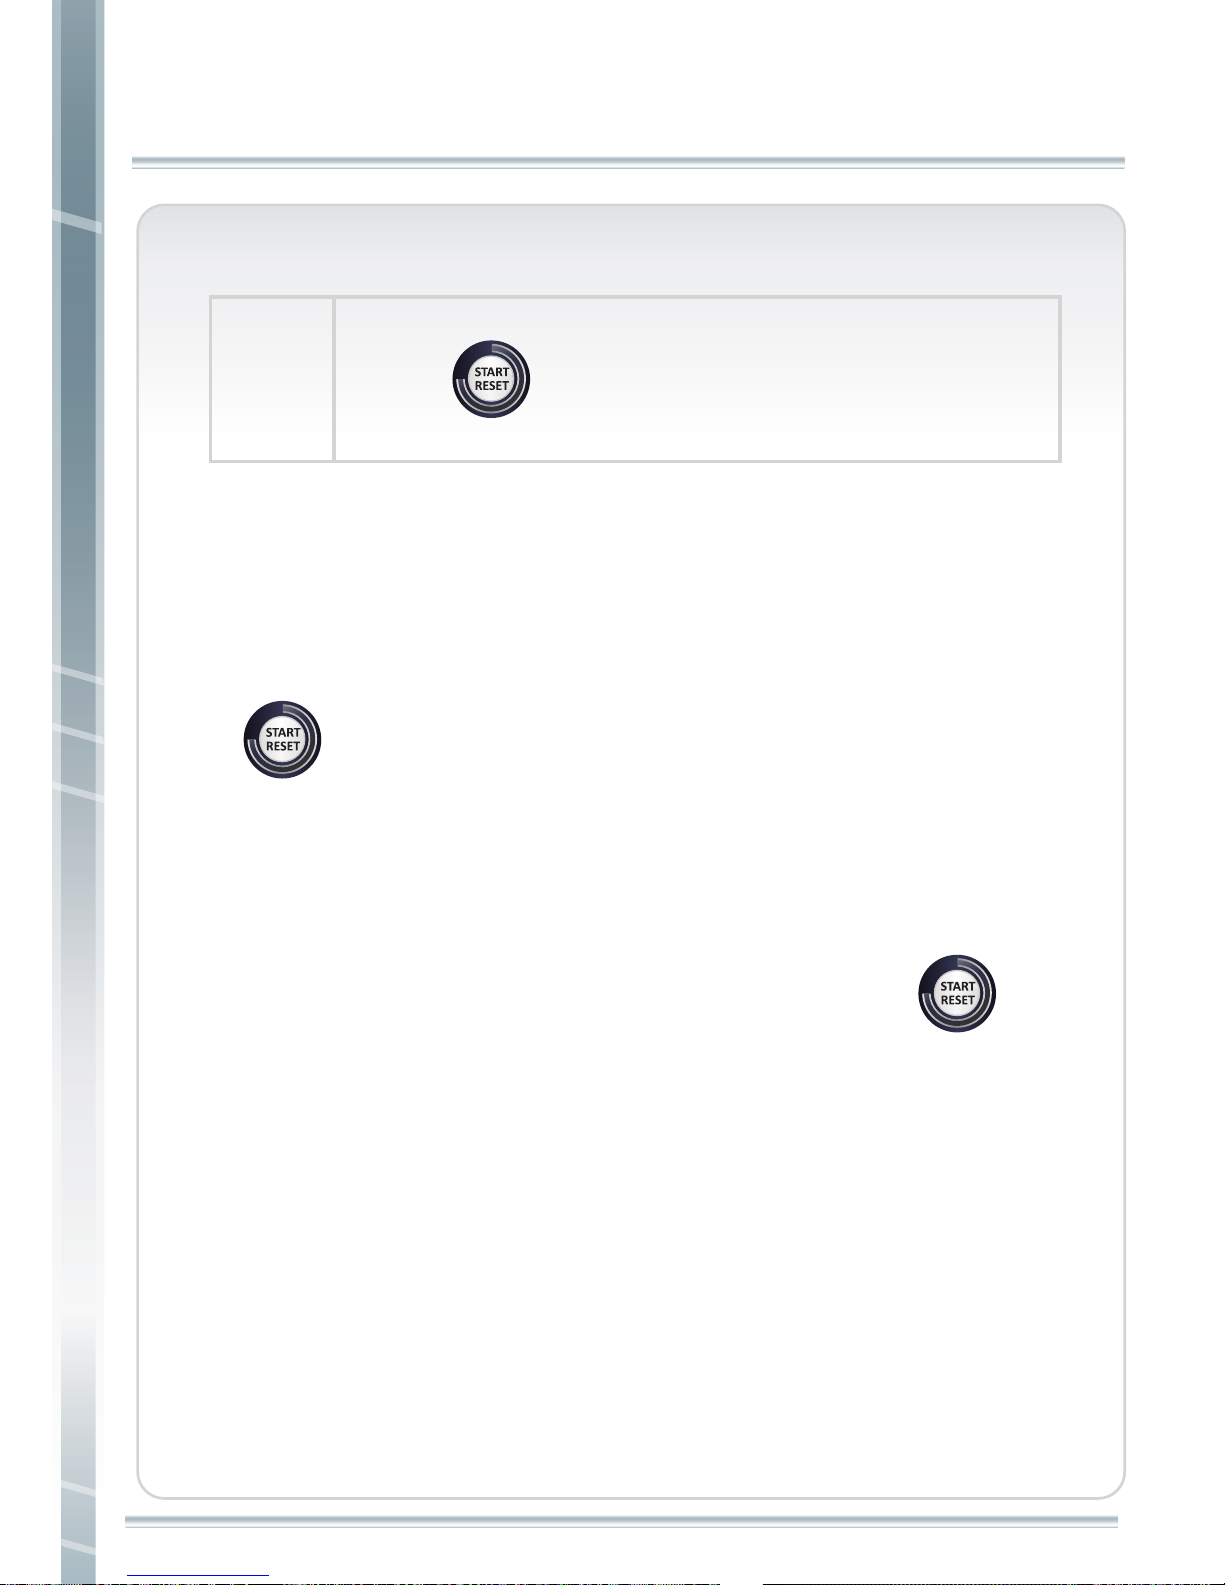
step 5 Press to start your workout.
1.Time, distance, calories and step will be counted up from 0.
Note
1.During workout, if user wants to reset, please press and hold
for 3 seconds.
2.If no signal is detected in 30 seconds, it will enter sleep mode.
Once it wakes up, it will back to weight setting.
3.When END is shown on the display, user can press to
back to start condition or it will go back to program setting
condition after 3 minutes.
Page 41
40
DISPLAY INSTRUCTION
DISPLAY INSTRUCTION
The display of your PB10 and PR10 is used to operate the unit.
It includes information window and button location.
INFORMATION WINDOW
BUTTON LOCATION
Page 42
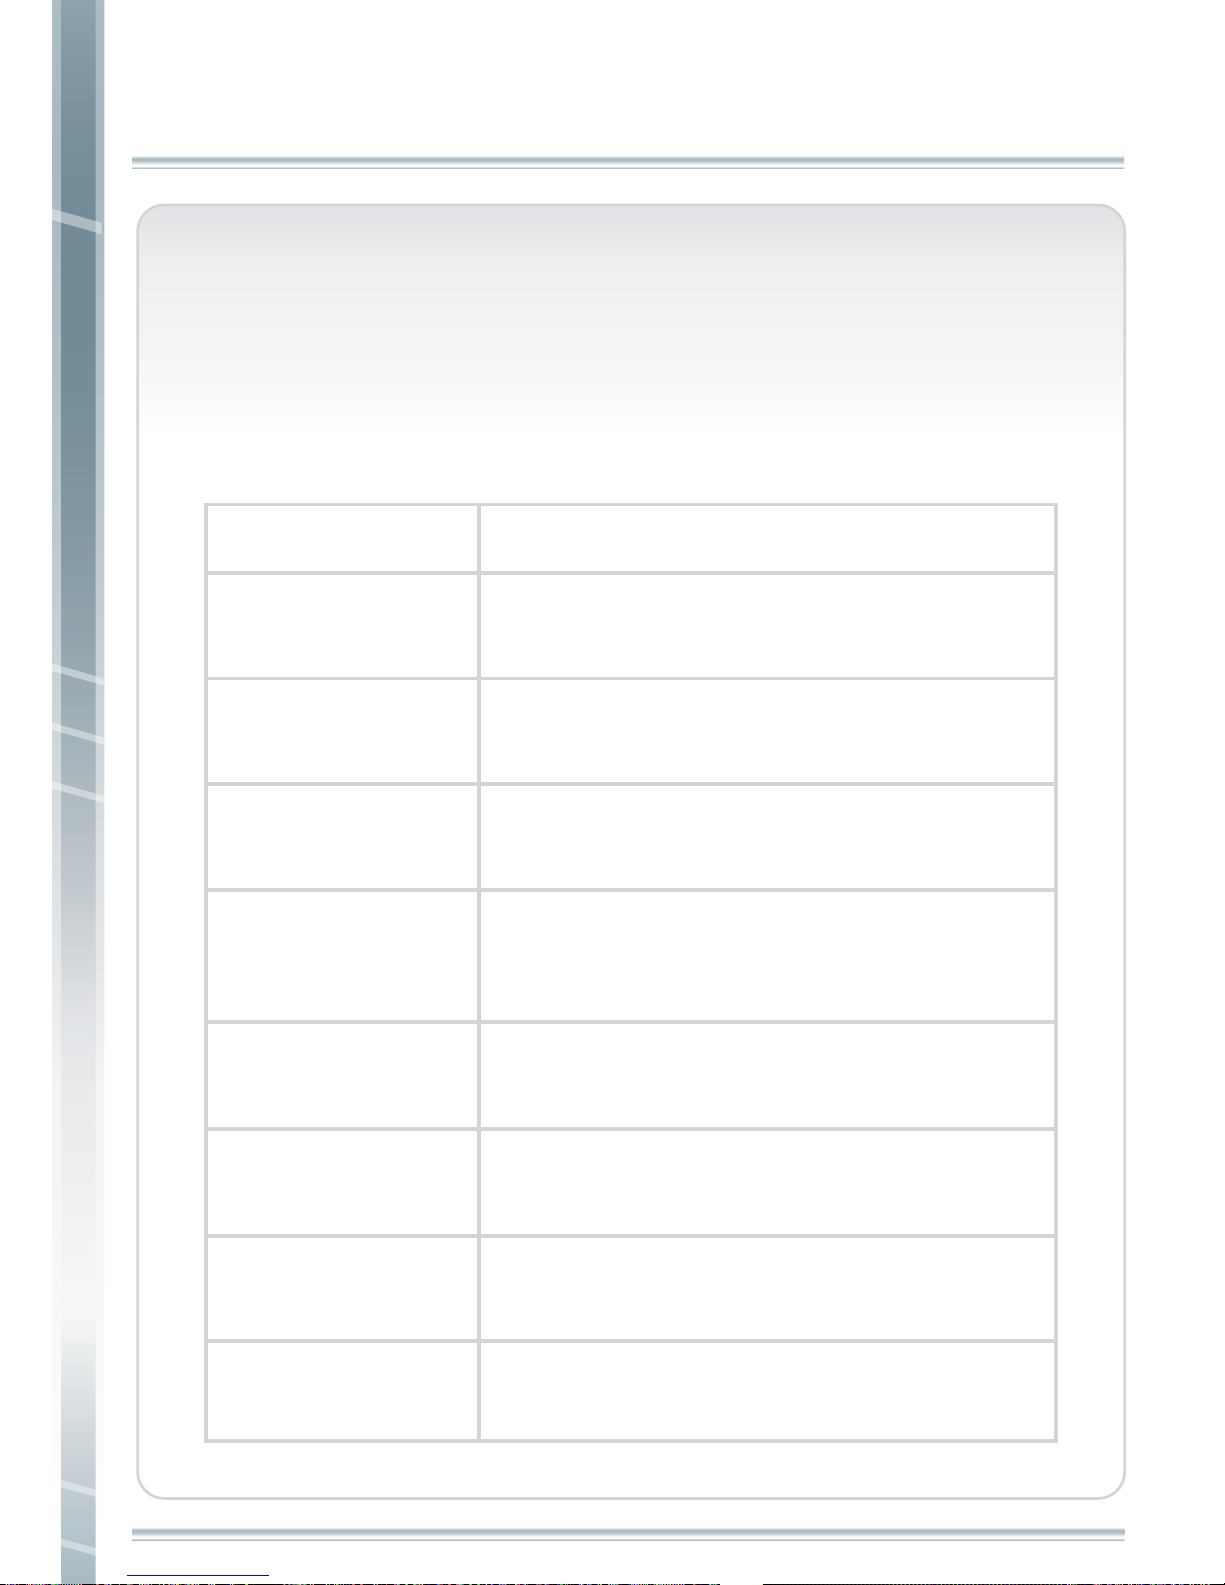
INFORMATION WINDOW
INFORMATION WINDOW
PULSE
41
Information window
The information window provides two different types of
information: program directions and user information data.
Program directions will be explained with programs later. User
information data includes:
User information Description
Indicates time in minutes and seconds(mm:ss).
Indicates exercising distance during your workout.
Indicated accumulated calories burned
during your workout.
Indicates current resistance of your workout.
Indicates heart rate beats per minute during
your workout. (Only displayed if you are using
contact heart rate bar or chest belt.)
TIME
DISTANCE
CALORIES
LEVEL
SPEED
WATT
RPM
Indicates speed of your workout.
(Either miles or kilometers)
Indicates power consumption of your workout.
Indicates pedal rotations : per minute.
Page 43
42
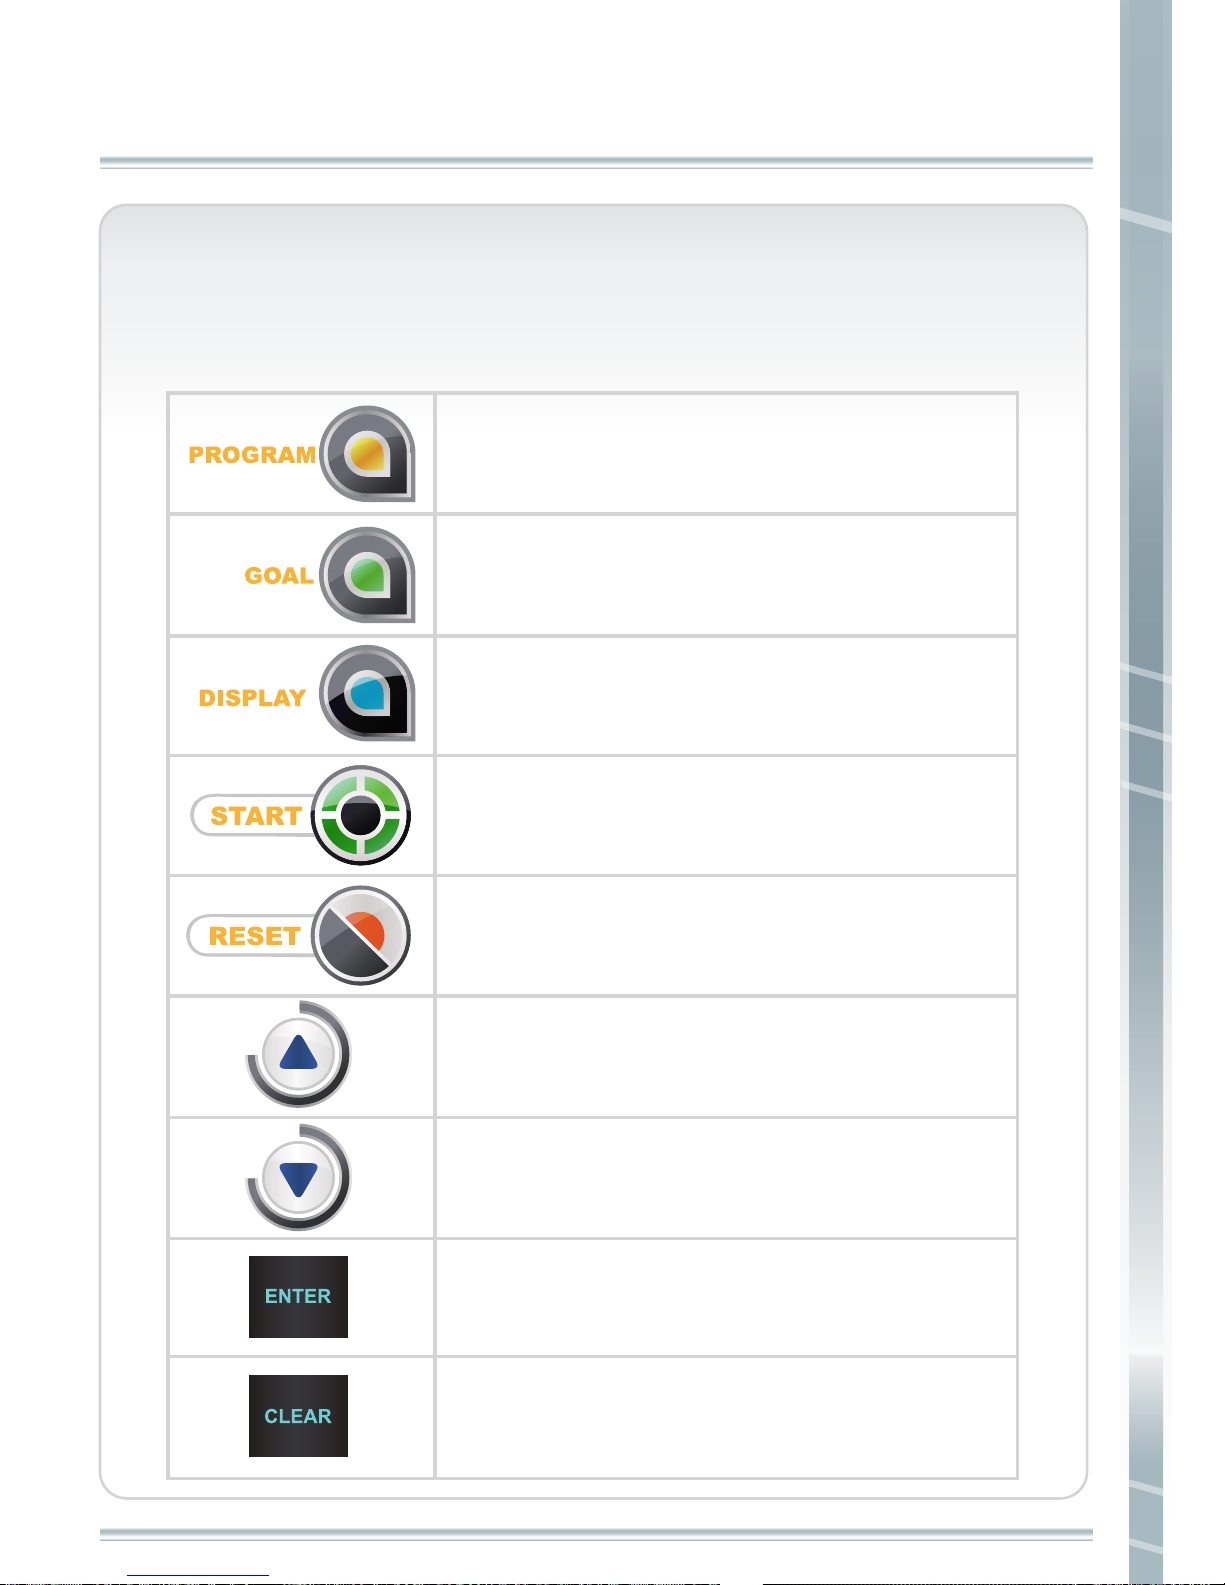
BUTTON LOCATION
BUTTON LOCATION
BUTTON LOCATION
Description of each button is listed below.
Choose workout program.
Set workout goal which can be time,
distance or calories.
Workout data display changes.
Start your workout.
Reset data.
Setting number increases. Press and hold this
button to increase quickly.
Setting number decreases. Press and hold this
button to decrease quickly.
Enter data.
Clear numerical settings when setting time,
distance or calories.
Page 44
OPERATION INSTRUCTION
OPERATION INSTRUCTION
43
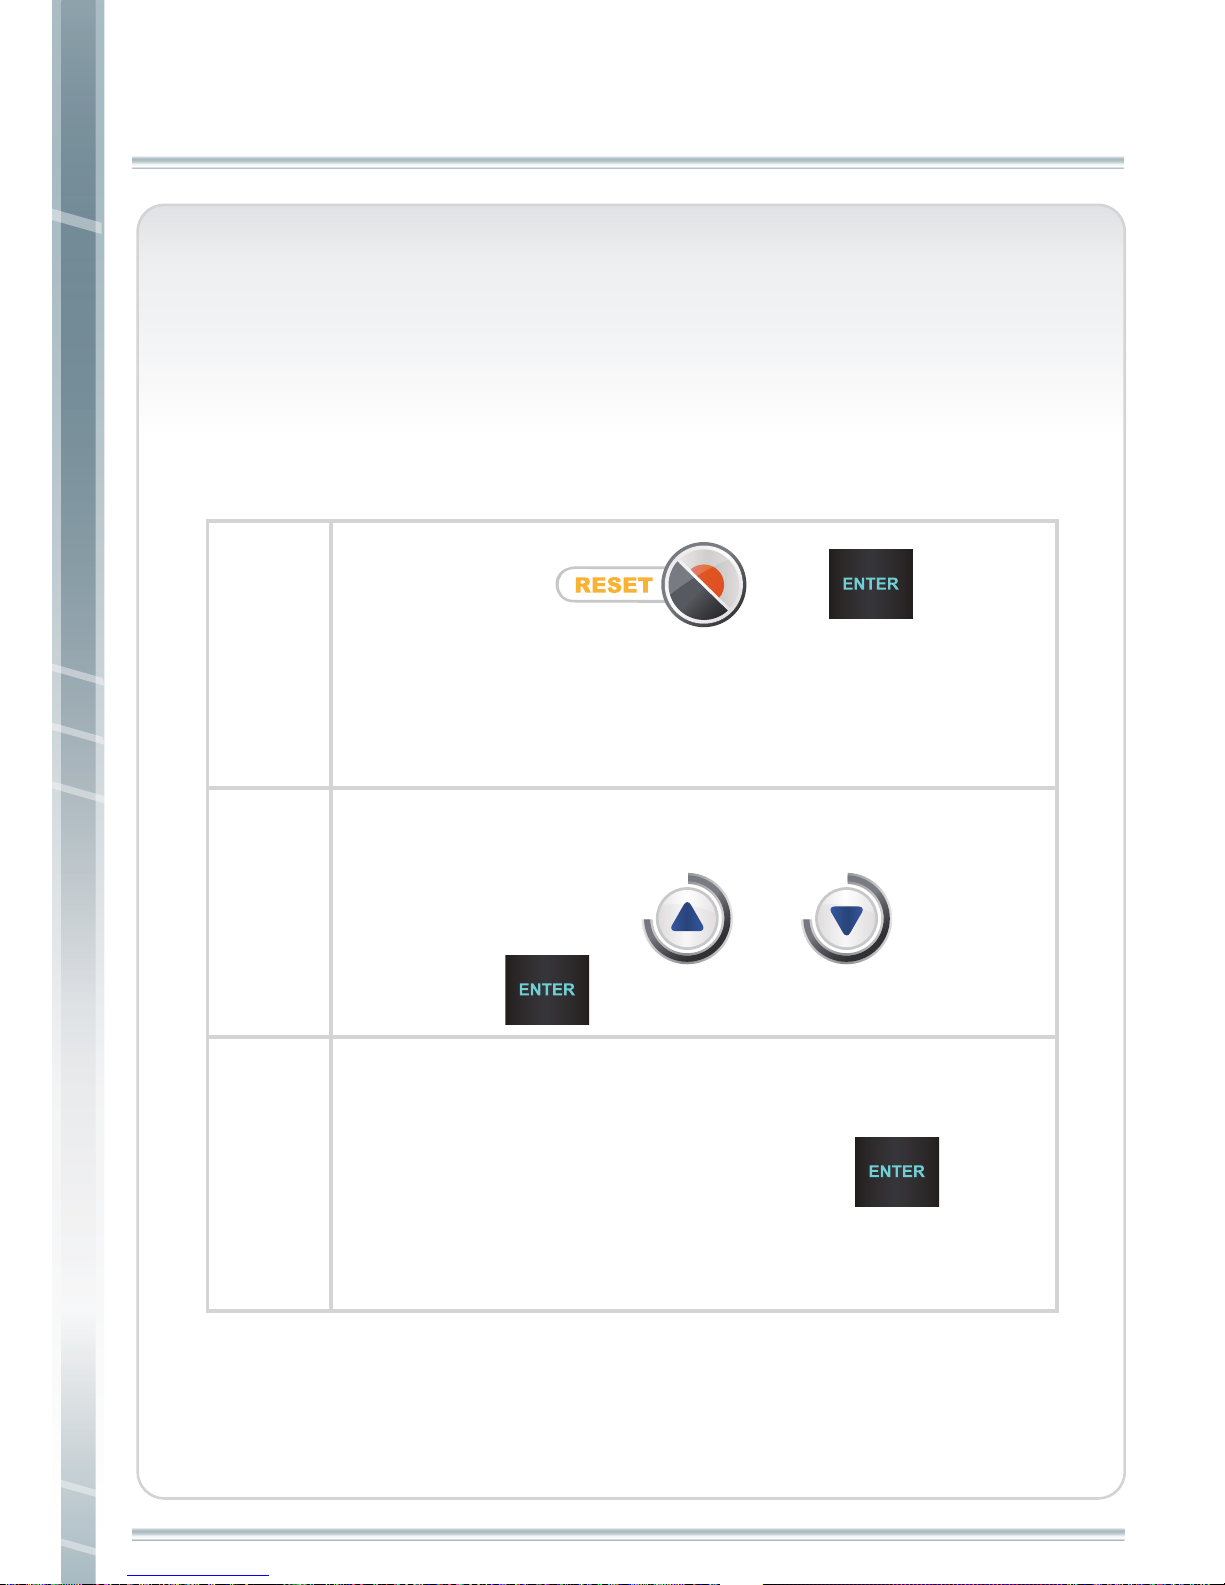
Engineer Mode
Steelflex bikes are designed for different users. Base on your
location and user characteristic; please follow the instructions to
set up the machines before starting using.
step 1
step 2
step 3
Press and hold and together
for a while. Software version will be shown on
WATT/RPM window.
KG/LBS will be shown on the Matrix window.
It can be adjusted by or ,
then press .
TOTAL TIME(accumulated workout hours) is
shown on PULSE window, then press
to leave engineer mode.
Page 45
44
OPERATION INSTRUCTION
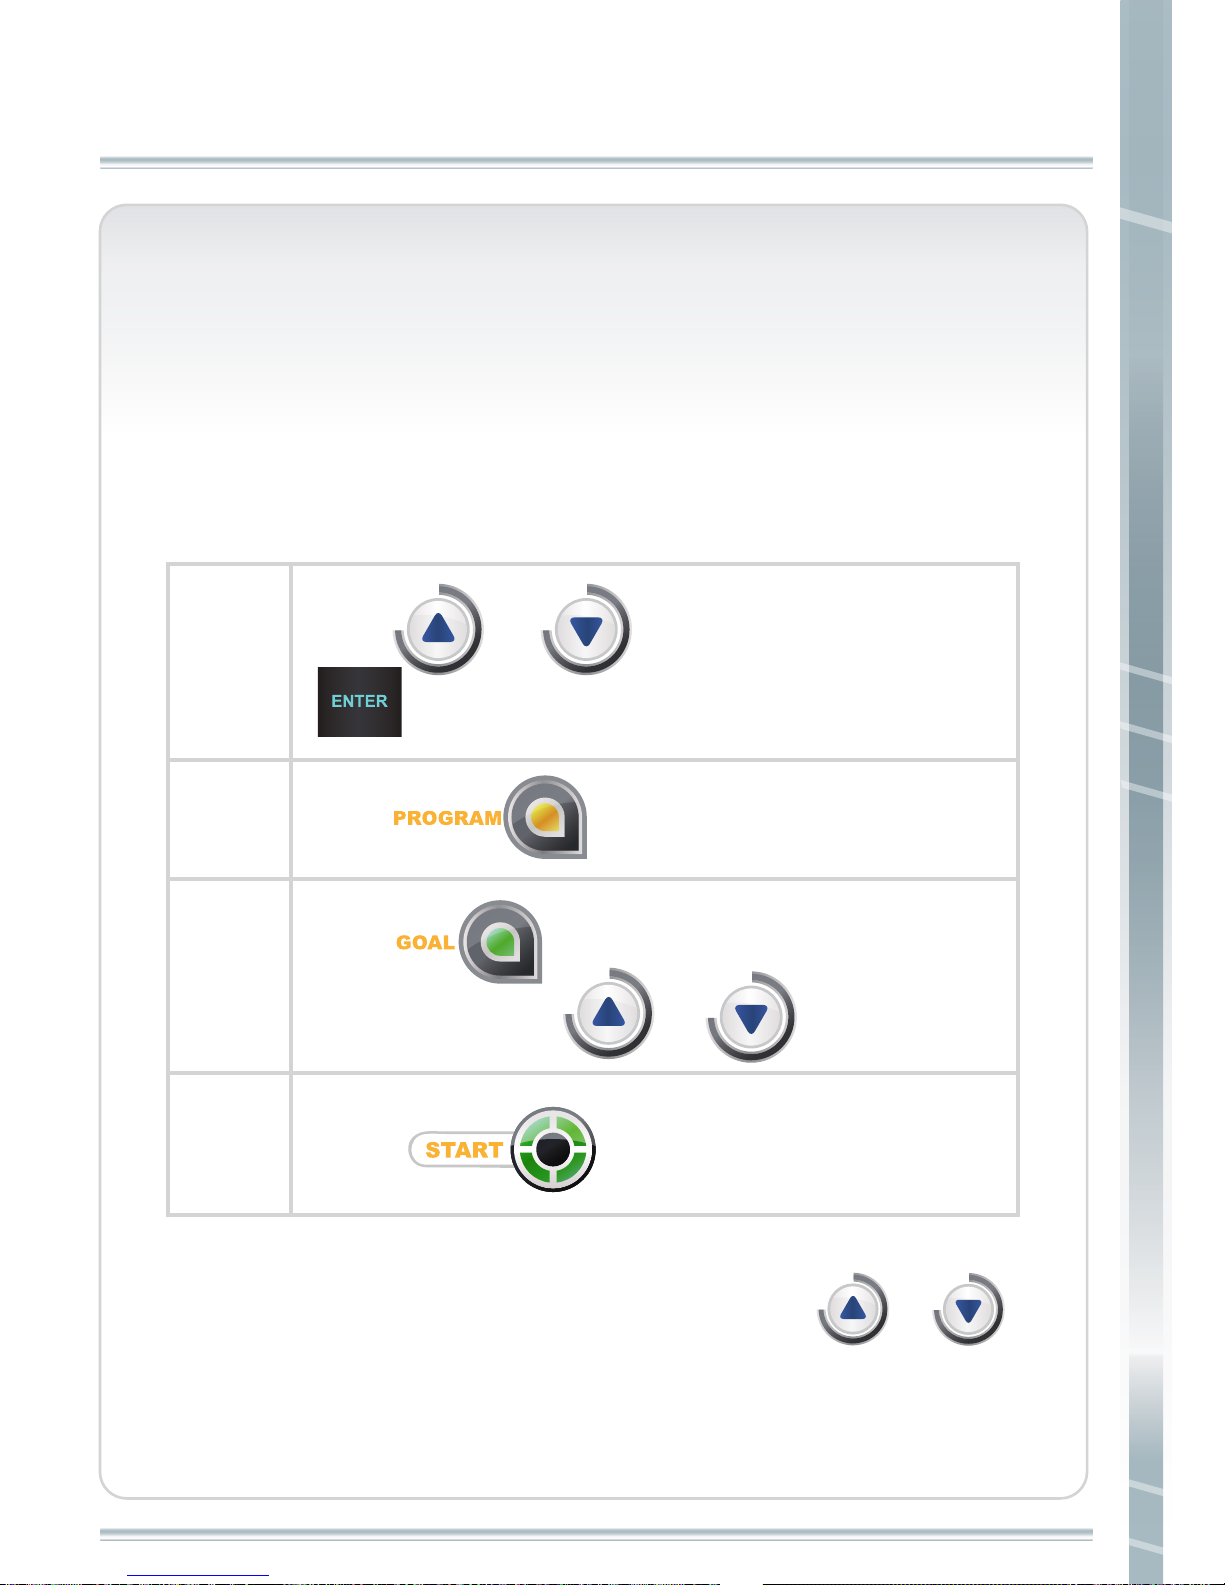
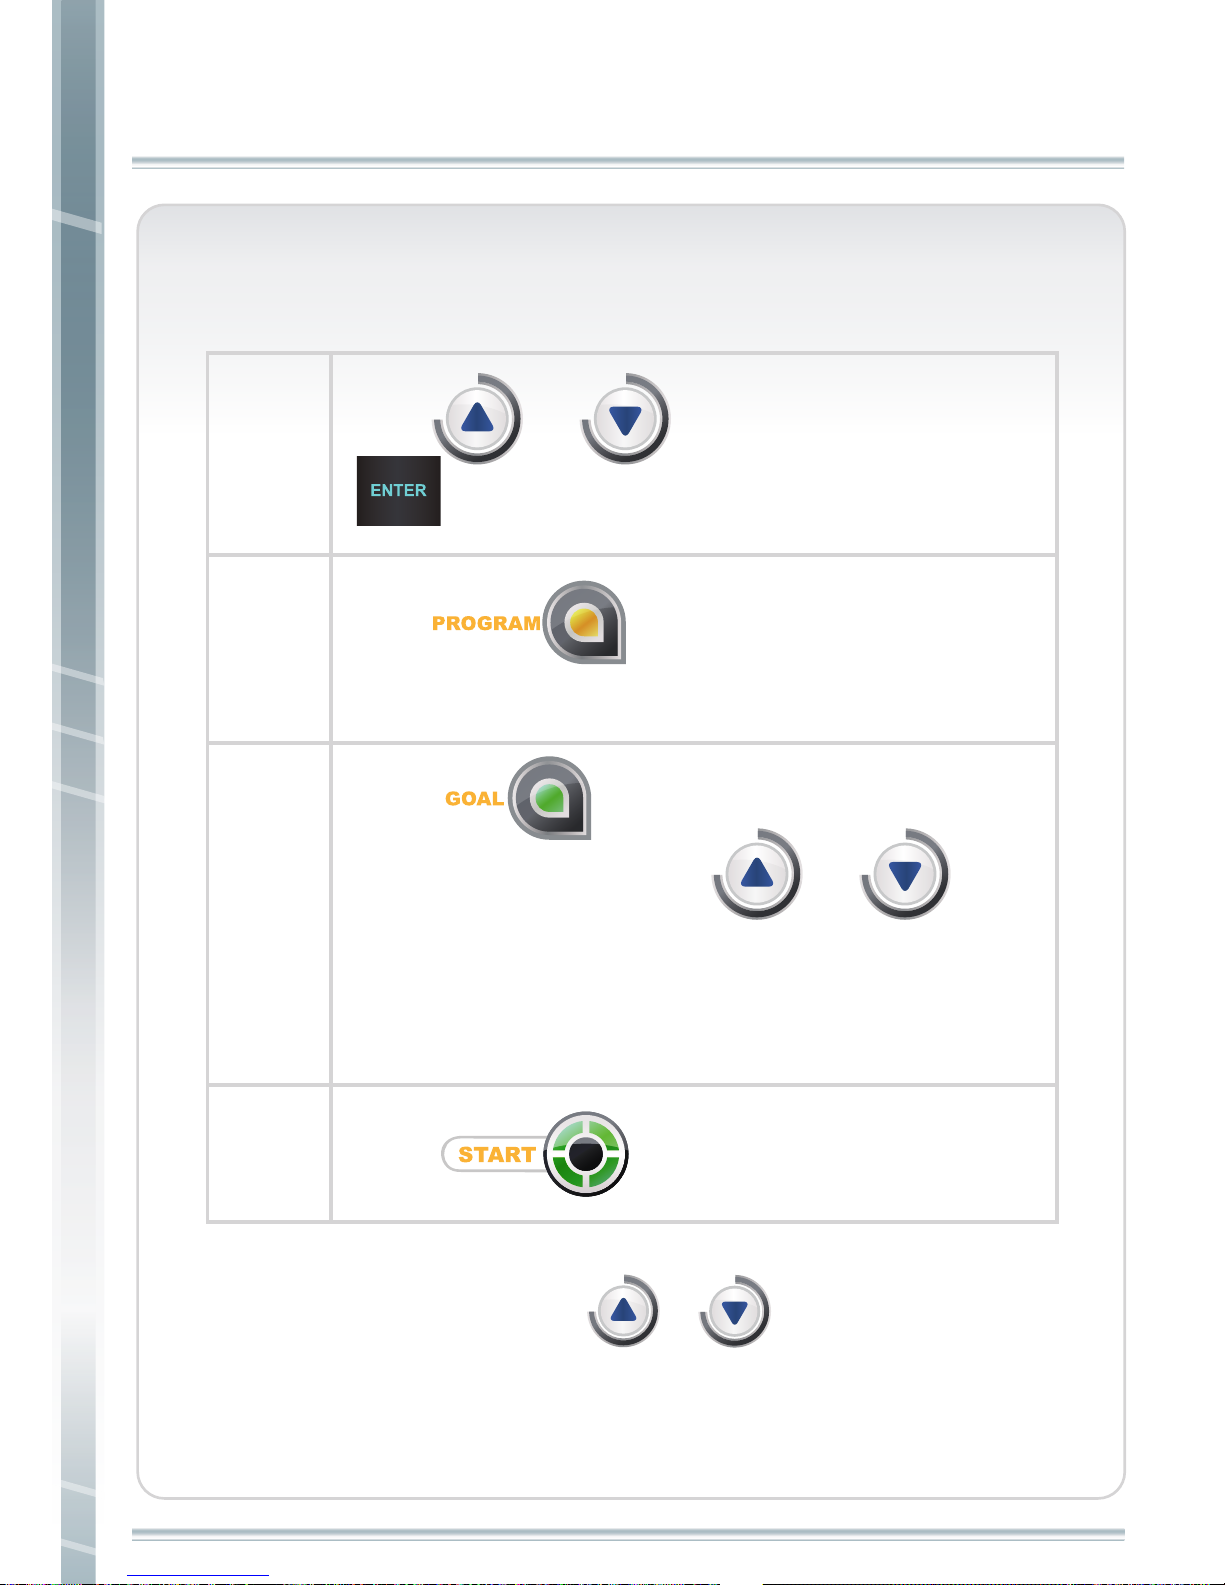
Programs
There are 8 different exercise programs which include manual,
cardio, fat burn, interval, training, H.R.C., custom 1 and custom 2.
Operations are explained as following.
step 1
step 2
step 3
step 4
Press to choose MANUAL.
Press to set workout goal (time, distance
or calories). Press or to adjust value.
Press or to set weight, then press
.
OPERATION INSTRUCTION
Note:
1.During workout, you can adjust resistance by pressing or .
When resistance level is adjusted, from present workout segment to
final workout segment, resistance levels will be changed together.
Press to start your workout.
Manual
Page 46
OPERATION INSTRUCTION
OPERATION INSTRUCTION
45
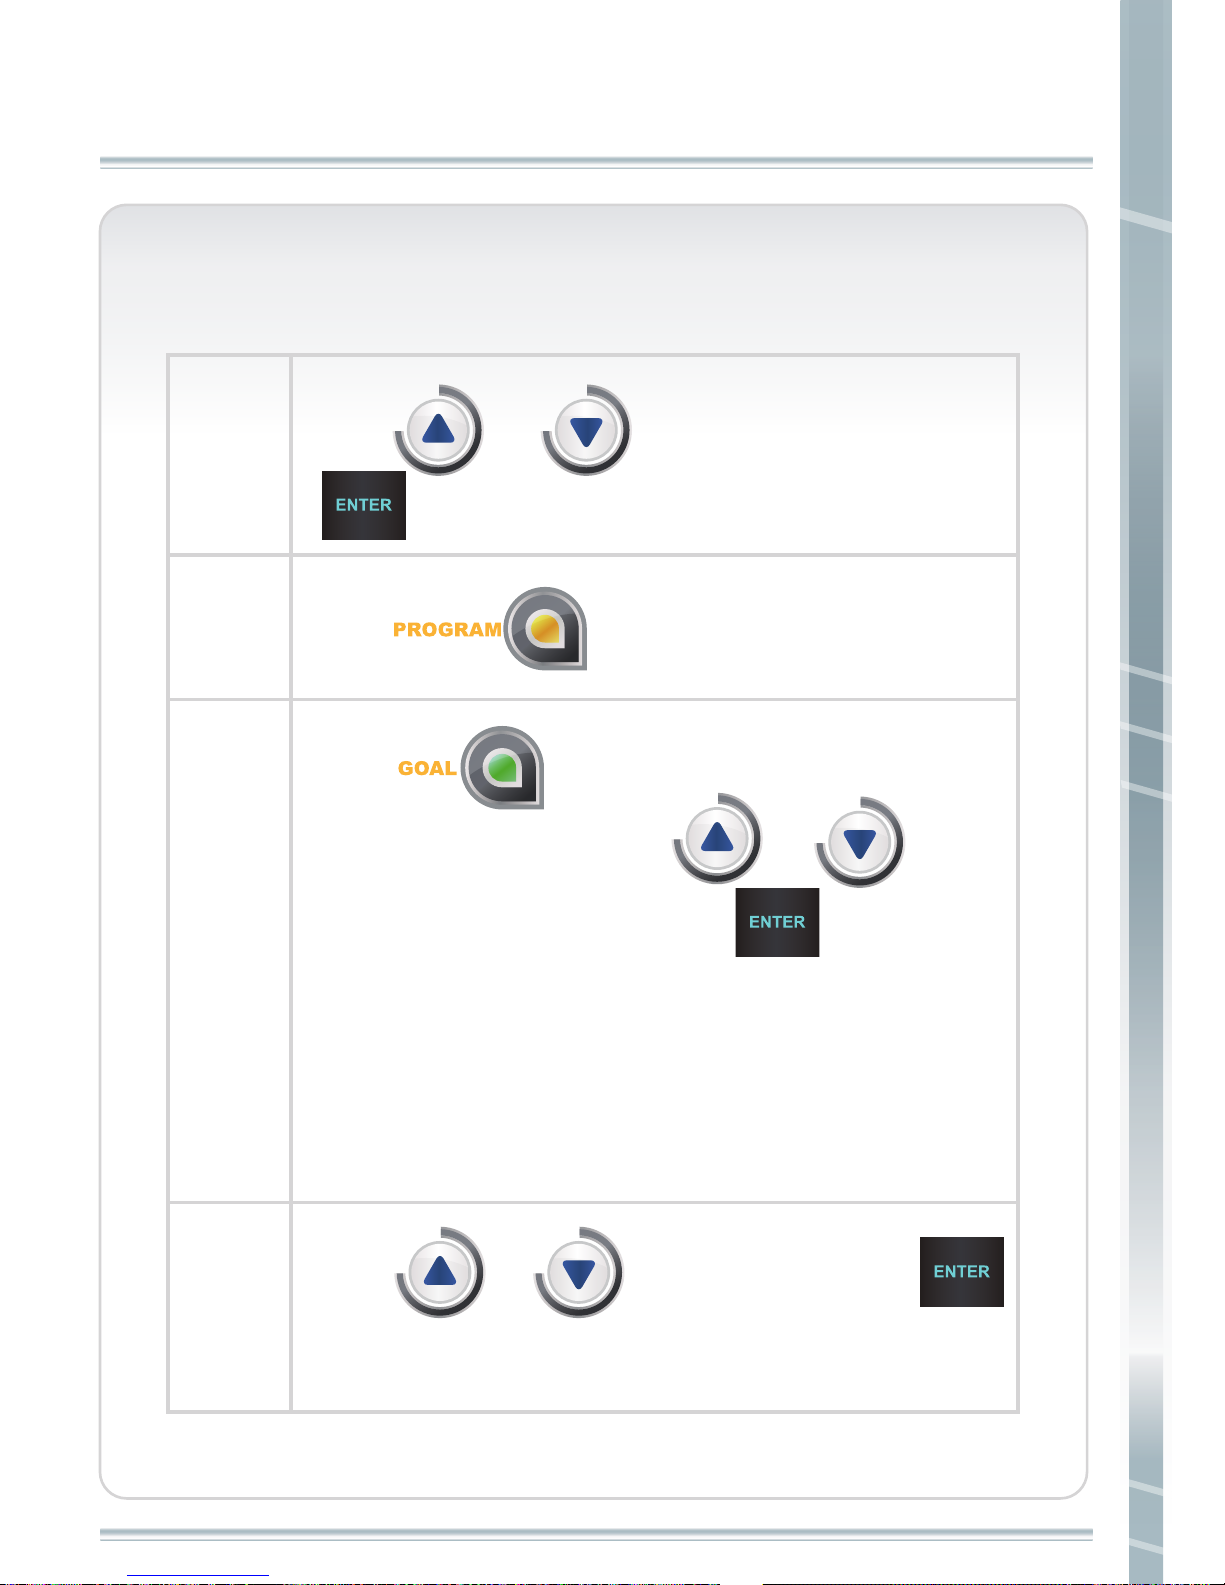
CARDIO/FAT BURN/INTERVAL/TRAINING
step 1
step 2
step 3
step 4
Press or to set weight, then press
.
Press to set workout goal (time,
distance or calories). Press or to
adjust setting value.
Default value of time is 30:00.
Default value of distance is 5.0.
Default value of calories is 150.
Press to choose CARDIO/
FAT BURN/ INTERVAL.
Press to start your workout.
Note:
1.During workout, you can press or change profile.
Page 47
46
OPERATION INSTRUCTION
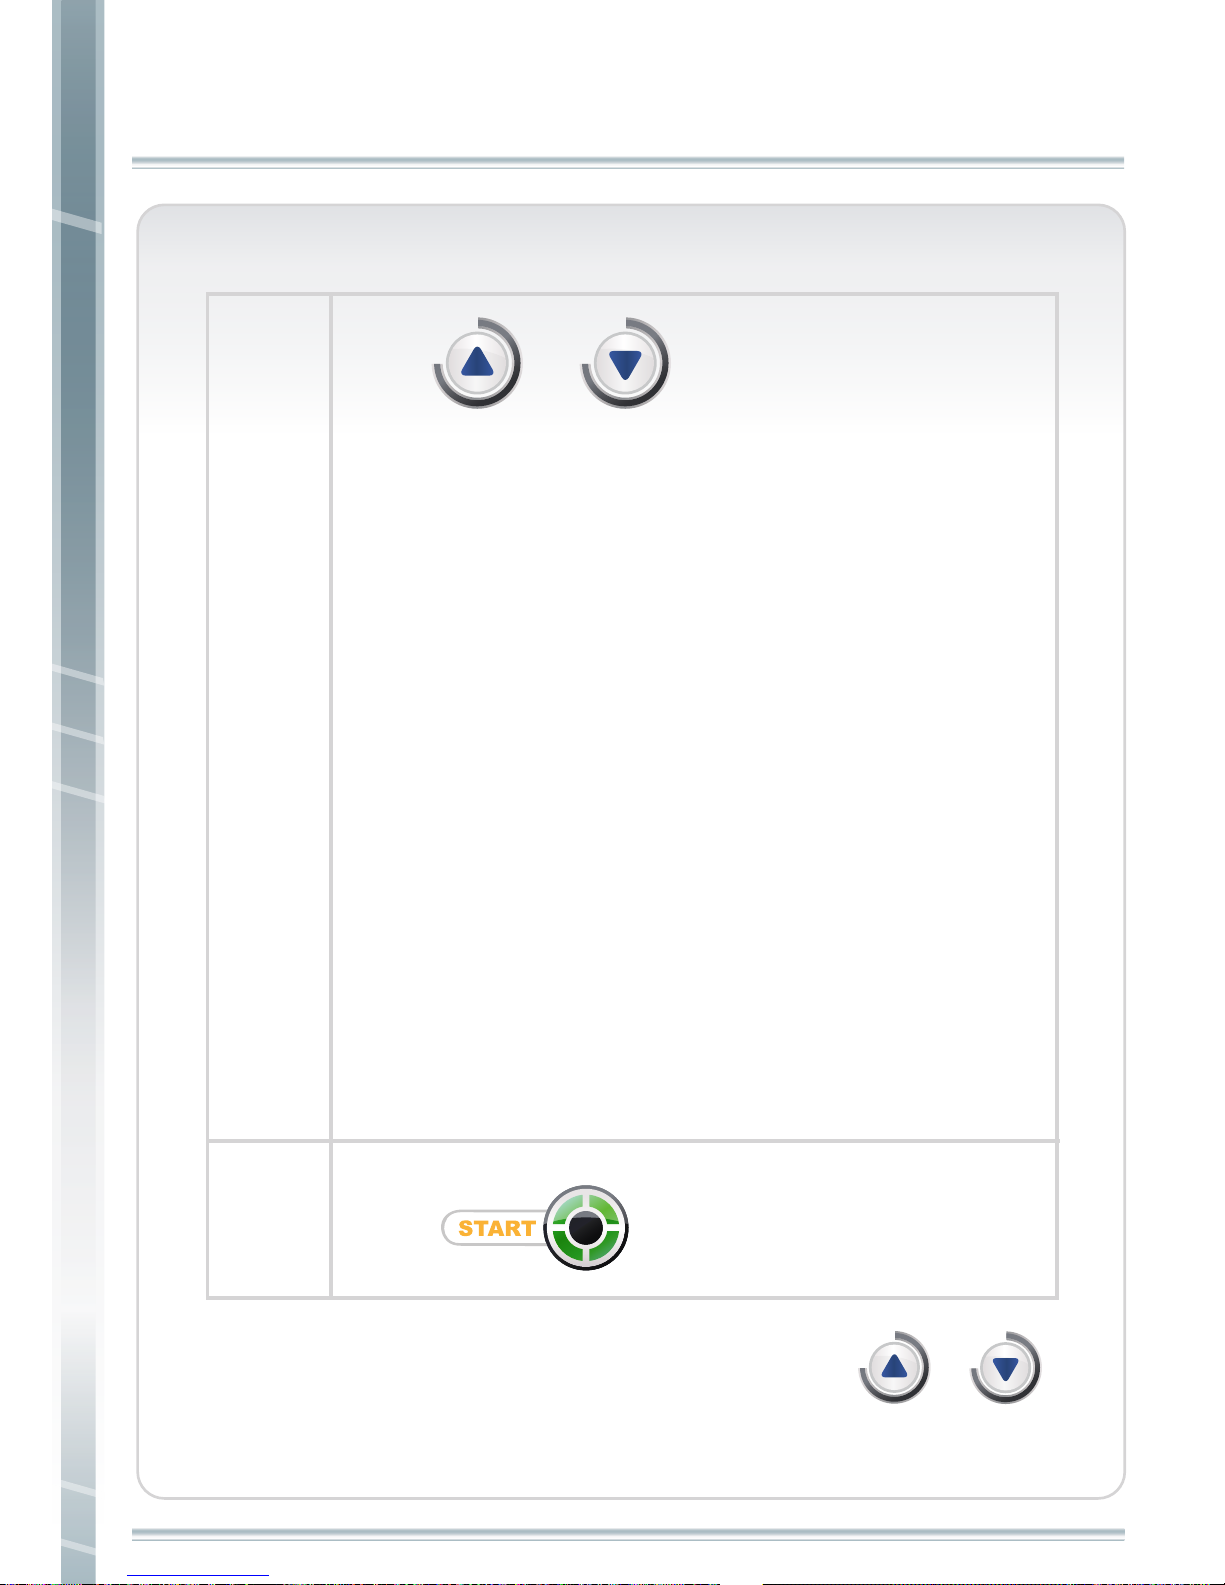
H.R.C.
step 1
step 2
step 3
step 4
Press to choose H.R.C..
Press to set workout goal (time,
distance or calories). Press or to
adjust setting value, then press .
Default value of time is 30:00.
Default value of distance is 5.0.
Default value of calories is 150.
Press or to set weight, then press
.
OPERATION INSTRUCTION
Press or to set age, then press .
Default value is 30.
Page 48
OPERATION INSTRUCTION
OPERATION INSTRUCTION
47
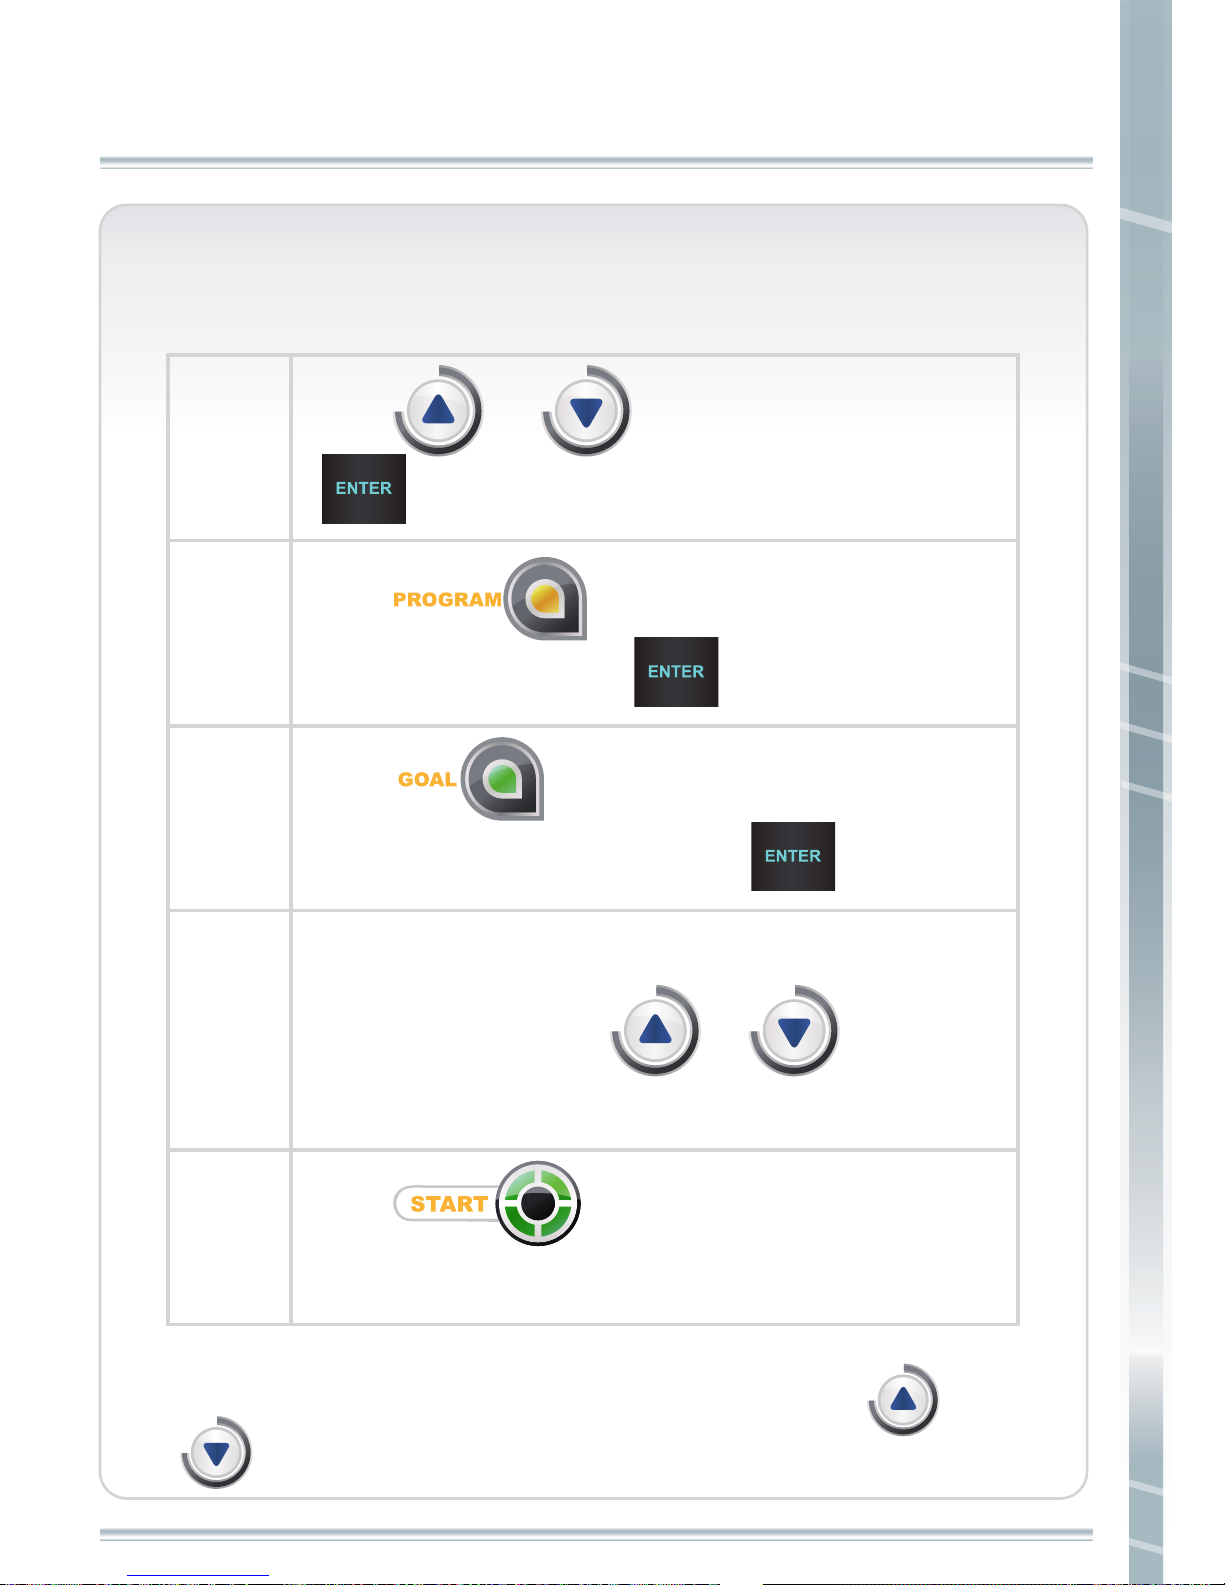
step 5
step 6
Press or to set pulse %. Default
value is 70%.
If heart rate is more than 20 bpm below target,
level will increase 2 every 30 seconds.
If heart rate is more than 10 bpm below target,
level will increase 1 every 30 seconds.
If heart rate is more than 20 bpm above target,
level will decrease 2 every 30 seconds.
If heart rate is more than 10 bpm above target,
level will decrease 1 every 30 seconds.
If heart rate can not be detected, PULSE will be
showed on the display every 0.5 second, and level
doesn’t change.
If no signal is detected in 60 seconds, level decreases
4 every 30 seconds.
Press to start your workout.
Note:
1.During workout, you can adjust resistance by pressing or .
When resistance level is adjusted, from present workout segment to final
workout segment, resistance levels will be changed together.
Page 49
48
OPERATION INSTRUCTION
CUSTOM 1/CUSTOM 2
step 1
step 2
step 3
step 4
step 5
Press to choose CUSTOM 1 or
CUSTOM 2, then press .
Press to set workout goal (time,
distance or calories) , then press .
Press or to set weight, then press
.
OPERATION INSTRUCTION
Press numeric buttons to set each segment’s
resistance level. Press or to set last
or next segment resistance level.
Press to save your settings and
start your workout.
Note:
1.During workout, you can adjust resistance level by pressing or
. Only the segment you workout can be adjusted.
Page 50
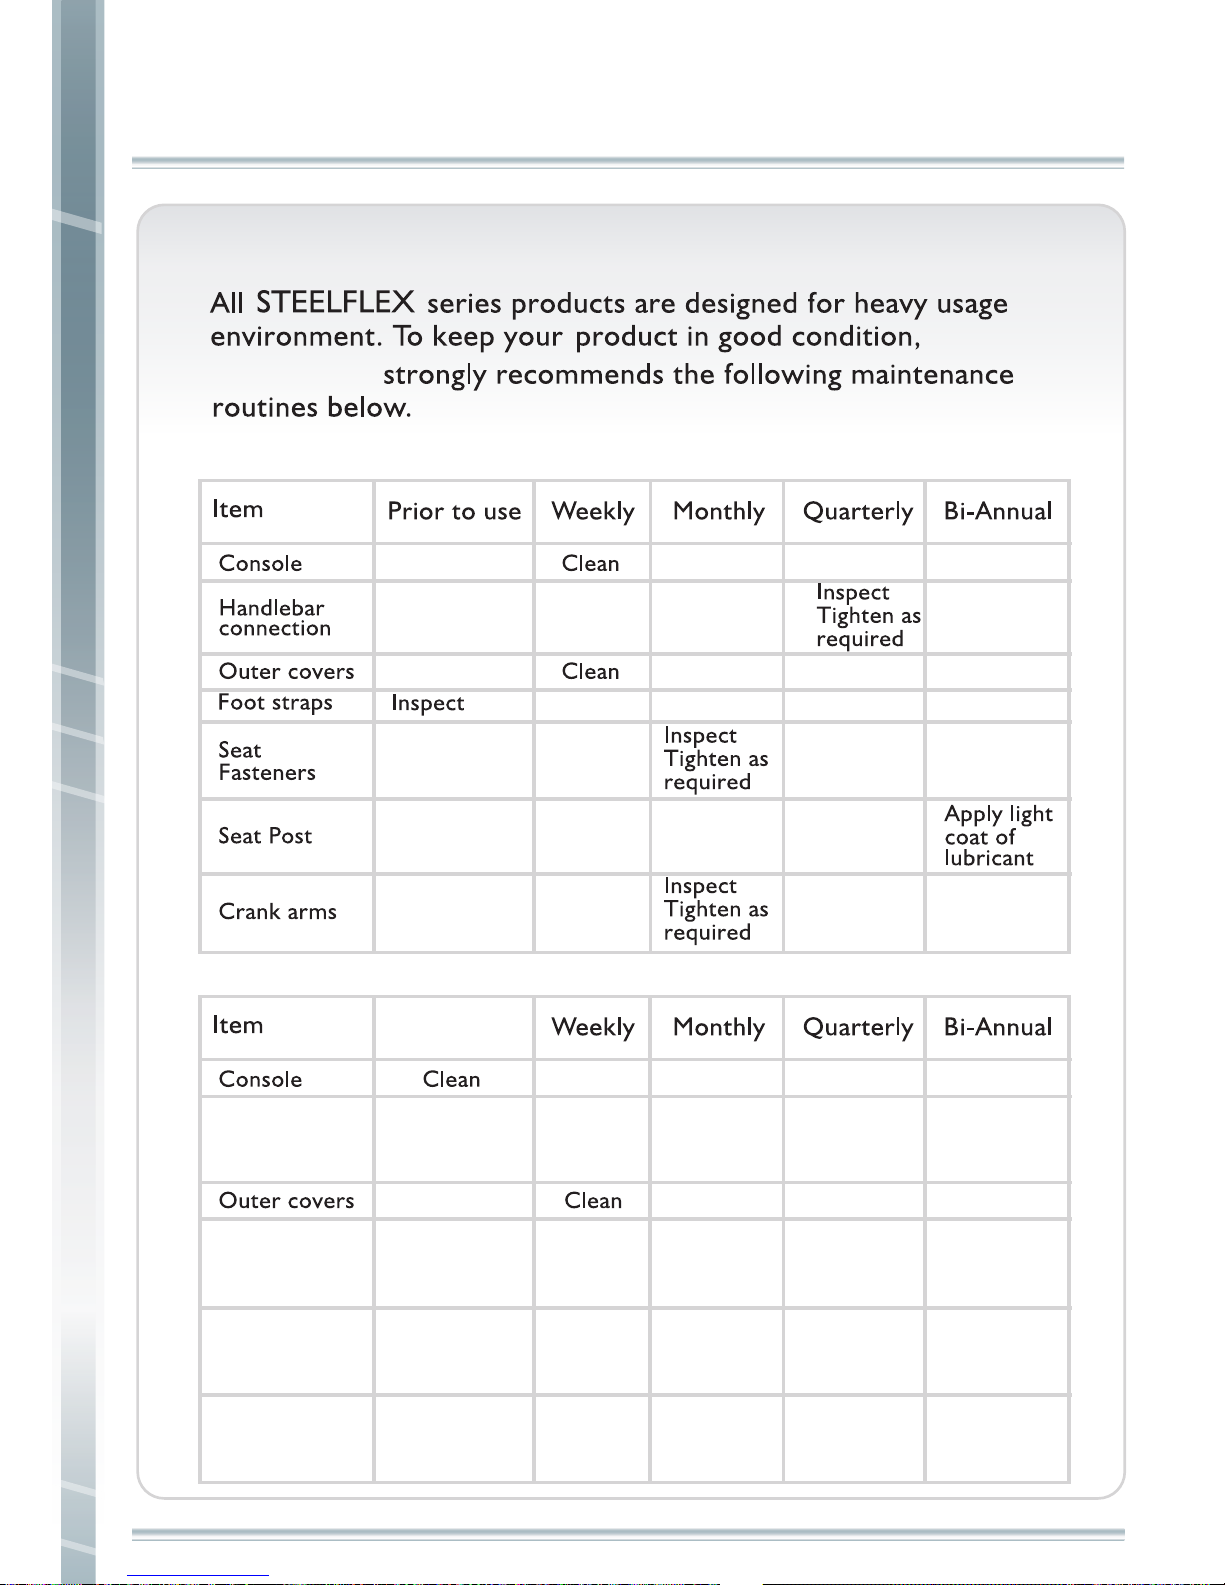
MAINTENANCE
MAINTENANCE
49
STEELFLEX
FOR ALL UPRIGHT AND RECUMBENT BIKES
FOR ALL ELLIPTICAL AND STEPPER
Console
Mounting
Bolts
After Use
Fasteners
Bearings
Footpads
Inspect
Inspect
and
tighten
Inspect
and
tighten
Inspect
and
tighten
Inspect
and
tighten
Page 51
50
WARRANTY CONDITIONS
WARRANTY CONDITIONS
1. Ask your dealer about product warranty conditions.
2. The warranty applies only to the original owner, and covers the cost
of parts repair or replacement and does not include freight charges.
Proof of purchase must be demonstrated.
3.The warranty applies only to the original owner and is non transferable.
If you are in US., the warranty card must completed and sent back to
FMI to complete registration. If you are out of US., please contact your
dealer about your warranty situation.
4.Labor coverage is provided only by authorized STEELFLEX dealer or
if the STEELFLEX factory does the work.
5. Any reimbursement for travel outside of the dealers' normal service
or coverage area will be the responsibility of the customer.
6.Warranty does not cover failure due to improper assembly, installation
or use.
7.This warranty does not cover customer instruction, installation, set up
or adjustment. User is responsible for necessary maintenance.
8.The warranty will not be extended to any product whose serial number
has been removed, altered, or defaced.
9.This warranty does not cover damage or equipment failure caused by,
or resulting from accident, misuse, abuse, improper assembly or
installation, un-authorized modification, or failure to provide reasonable
and necessary care as outlined in the owner's manual.
Page 52

 Loading...