

Steelcraft Automotive 32250 User Manual

TAILLIGHT GUARD
Qty
Description
Qty
Description
1
Driver/Left Taillight Guard
2
6mm Nylock Nuts
1
Passenger/Right Taillight Guard
2
4-.70mm x 15mm Phillips Screws
2
Support Brackets
2
4mm Internal Locking Star Washers
2
6mm x 20mm Button Head Screws
2
4mm x 8.9mm OD x .8mm Flat Washers
2
6mm x 30mm OD x 2mm Flat
Washers
09-10 DODGE RAM 1500
PARTS LIST:
PROCEDURE:
1. REMOVE CONTENTS FROM BOX. VERIFY ALL PARTS ARE PRESENT. READ INSTRUCTIONS
CAREFULLY BEFORE STARTING INSTALLATION.
2. IMPORTANT! Cover the bed edge around the taillight housing with masking tape to protect the finish of
the vehicle when removing the taillight housing and installing the Taillight Guard.
3. Open the tailgate and remove the (2) screws holding the driver’s side taillight, (Figure 1).
4. Grasp the taillight assembly with both hands and pull gently straight back, (Figure 2). NOTE: Be sure
to pull straight towards the rear of the vehicle to avoid possible damage. This is the same procedure
required to change a taillight bulb in the assembly. For more info, see owner’s manual on replacing
taillight bulbs.
5. With the taillight assembly removed, gently let it hang from the wiring. NOTE: You do not need to
disconnect the wire harness but take precautions to prevent damage to the wiring and insulation.
6. Select (1) Support Bracket and bolt it to the hole in the body using (1) 6mm x 20mm Button Head
Screw, (1) 6mm Flat Washer and (1) 6mm Nylock Nut, (Figure 3). IMPORTANT: Tighten the 6mm x
20mm Button Head Screw but do not over-tighten or the Support Bracket may be damaged.
7. Line-up the taillight assembly with the plastic clips on the inner body panel and firmly push it back into
position. Position the Taillight Guard over the taillight and attach it to vehicle using the (2) factory
screws, (Figure 4). Do not tighten at this time. NOTE: If the Mounting Tabs or Support Brackets don’t fit
properly, they can be adjusted to fit using a pair of pliers. Before adjusting, make sure to cover the
Taillight Guard mounting brackets with masking tape to protect the finish.
8. Attach Taillight Guard to the Support Bracket using the included (1) 4-.70mm x 15mm Phillips Screw,
(1) 4mm Lock Washers, and (1) 4mm Flat Washers, (Figure 5).
9. Align the Taillight Guard and tighten all hardware. IMPORTANT! Carefully close the tailgate to make
sure that the Taillight Guard does not interfere with the tailgate. If so, remove the Taillight Guard and
adjust the Mounting Brackets to fit properly.
10. Repeat steps 2-9 for the passenger side Taillight Guard installation.
11. Do periodic inspections to the installation to make sure that all hardware is secure and tight.
To protect your investment, wax this product after installing. Regular waxing is recommended to
add a protective layer over the finish. Do not use any type of polish or wax that may contain abrasives
that could damage the finish.
For stainless steel: Aluminum polish may be used to polish small scratches and scuffs on the finish.
Mild soap may be used also to clean the Taillight Guard.
For gloss black finishes: Mild soap may be used to clean the Taillight Guard.
Page 1 of 2
11/20/08(DP)
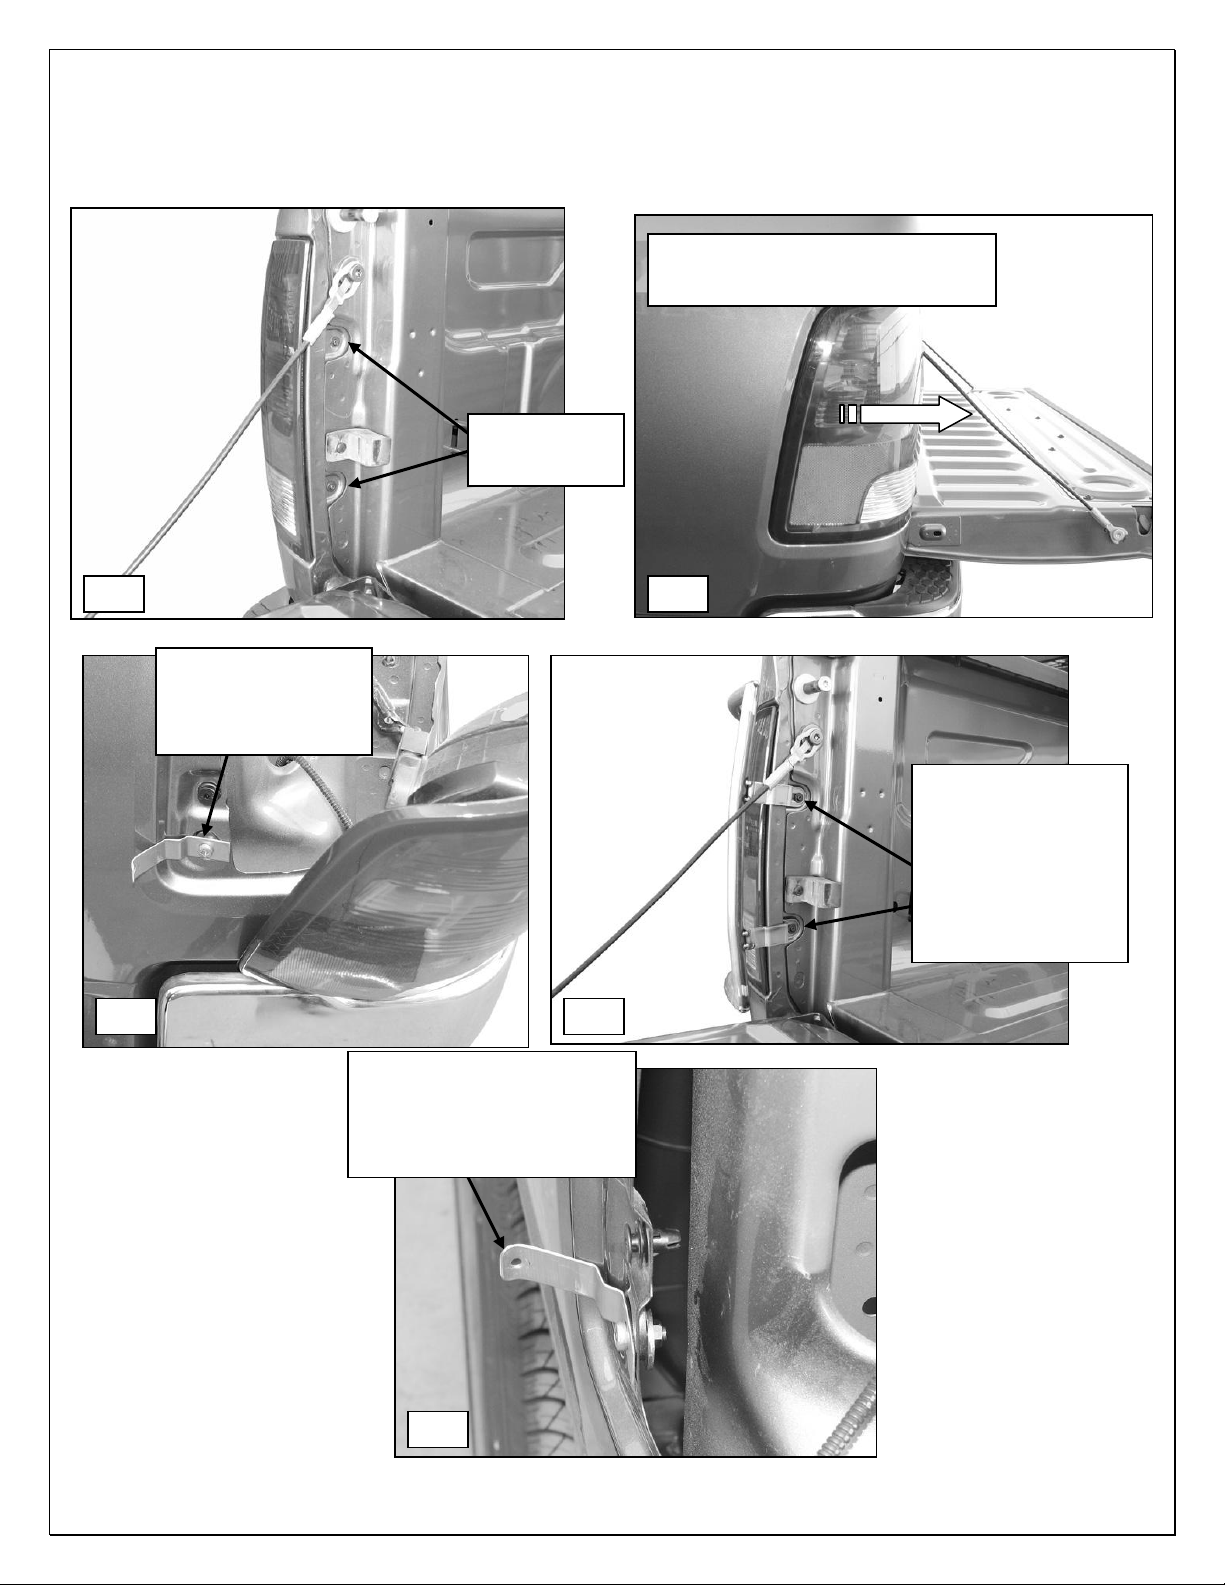
Remove these
factory screws
Gently but firmly slide taillight
housing straight back from fender
6mm x 20mm Button
Head Screws
6mm Flat Washers
6mm Nylock Nut
Fig 1
Fig 2
Fig 3
Fig 4
Secure the Taillight Guard to
the Support Bracket with:
4mm x 15mm Phillips Screw
4mm Lock Washer
4mm Flat Washer
Fig 5
Carefully close the
tailgate to check for
clearance and adjust
the brackets as
necessary. Use the
factory screws to
fasten the Taillight
Guard to the vehicle
11/20/08 (DP)
TAILLIGHT GUARD
09-10 DODGE RAM 1500
DRIVER SIDE INSTALLATION PICTURED
Page 2 of 2
 Loading...