

Page 1

Temperature differential controller
5 inputs, 2 outputs
742.114 | Z03 | 14.50 | Subject to change due to technical improvements!
EN
Installation and operating instructions
Page 2

2
742.114 | 14.50
EN
1 General safety instructions ....................................................................3
2 Proper usage .........................................................................................4
3 About these instructions .......................................................................4
3.1 Contents ........................................................................................................ 4
3.2 Target audience ............................................................................................. 4
3.3 Danger levels in warning notices
Évaluation du niveau de risque dans les avertissements....................................4
4 Installation .............................................................................................5
4.1 Opening / Closing the casing ......................................................................... 5
4.2 Mounting the casing .....................................................................................6
4.3 Establishing the electrical connections...........................................................7
4.4 Terminal pin assignments ............................................................................. 10
5 Commissioning the device for the first time .......................................13
6 Structure ..............................................................................................17
6.1 Casing ..........................................................................................................17
6.2 Display ......................................................................................................... 17
7 Operation .............................................................................................20
7.1 Operating buttons ....................................................................................... 20
7.2 Display when operating ............................................................................... 20
8 Modes of operation .............................................................................20
8.1 Changing the mode of operation ................................................................20
8.2 "Off" mode ...................................................................................................21
8.3 “Manual” mode ........................................................................................... 21
8.4 "Automatic" mode ........................................................................................22
9 Settings menu ......................................................................................23
9.1 Overview ......................................................................................................23
9.2 Calling up the settings menu and selecting a menu entry ..............................26
9.3 Setting the time ........................................................................................... 26
9.4 Setting the system ....................................................................................... 26
9.5 Setting the functions .................................................................................. 26
9.6 Setting the parameters ............................................................................... 26
9.7 Setting the priority ......................................................................................27
9.8 Resetting to factory defaults ........................................................................27
10 Functions ..............................................................................................28
10.1 Operation ....................................................................................................28
10.2 Characteristics .............................................................................................29
10.3 Functional description .................................................................................31
11 Parameters ...........................................................................................45
12 Dismantling and disposal ....................................................................48
13 Info messages ......................................................................................48
Contents
Page 3

3
742.114 | 14.50
EN
1 General safety instructions
• This document is part of the product.
• Install and use the device only after reading and understanding this document.
• Keep this document in a safe place for the entire service life of the device. Pass the
document on to subsequent owners and operators of the device.
• Adhere to all safety instructions. Consult (further) professional personnel in the
event of any ambiguities.
• The measures described in this document may only be performed by qualified
technical professionals. Exception: End-customers may operate the device when they
have previously been trained by a technical professional.
• The solar energy system can be damaged by improper operation of the device.
• The device must not be connected to the mains power supply when:
– the casing is open or damaged.
– cables are damaged.
• Factory labels and markings must never be altered, removed or rendered unreadable.
• The prescribed conditions of use must be adhered to; more information is provided
in 15, p. 53.
• This device is not intended for:
– children.
– persons with physical, sensory or mental impairment.
– persons without sufficient experience or knowledge, unless they are instructed
in the use of the device, and initially supervised, by a person responsible for their
safety.
This product is CSA certified and complies with the requirements of the applicable UL
and CSA standards in terms of design and operating behaviour. Please contact your
dealer should you require further information on this.
14 Troubleshooting ...................................................................................49
14.1 General faults ..............................................................................................49
14.2 Error messages ............................................................................................50
14.3 Checking the Pt1000 temperature sensor ....................................................52
15 Technical data ......................................................................................53
15.1 Controller ....................................................................................................53
15.2 Cable specifications .....................................................................................54
16 Exclusion of liability .............................................................................54
17 Legal guarantee ...................................................................................54
18 Notes ...................................................................................................55
Page 4

4
742.114 | 14.50
EN
2 Proper usage
The temperature differential controller, subsequently referred to as the controller, is an
independently installed electronic temperature controller for on-surface installation.
Integration into a pump assembly is possible when the technical specifications of the
controller are adhered to.
The maintenance-free controller is exclusively intended for controlling solar energy and
heating systems.
3 About these instructions
3.1 Contents
This manual contains all information required by a technical professional for setting up
and operating the temperature differential controller.
3.2 Target audience
The target audience of this manual are technical professionals who:
• have the knowledge of terminology and the skills necessary for setting up and operating solar energy systems.
• have the necessary training, knowledge and experience, and knowledge of the applicable regulations in order to evaluate and recognise the dangers inherent in the
following work:
– Installation of electrical equipment
– Production and connection of data communication cables
– Production and connection of mains grid power supply cables
3.3 Danger levels in warning notices
Évaluation du niveau de risque dans les avertissements
Danger level
Niveau de risque
Likelihood of occurrence
Éventualité de l’intervention
Consequences resulting from non-compliance
Conséquences en cas de non-respect
Danger
Danger
Imminent threat of danger
Danger imminent
Death, serious bodily injury
Mort, lésions corporelles graves
Warning
Avertissement
Possible threat of danger
Danger éventuel
Death, serious bodily injury
Mort, lésions corporelles graves
Caution
Attention
Possible threat of danger
Danger éventuel
Minor bodily injury
Lésions corporelles simples
Notice
Avis
Possible threat of danger
Danger éventuel
Property damage
Dommages matériels
Page 5

5
742.114 | 14.50
EN
4 Installation
The following section describes only the installation of the
4.1 Opening / Closing the casing
4.1.1 Removing the front panel
by the grooves at the sides
and pull forwards
(Fig.
4.1.2 Mounting the front panel
and then press it onto the casing until it latches
4.1.3 Removing the terminal cover
(Fig. 1).
4.1.4 Mount the terminal cover.
Tighten the screw
to a torque of 0.5
Page 6

6
742.114 | 14.50
EN
4.2 Mounting the casing
√ The mounting location must satisfy the prescribed conditions of use; more informa-
tion on this is provided in section 15, p. 53.
√ The mounting surface is vertical and allows good access for installation.
Danger
Risk of death by electrocution!
• Disconnect the controller from the power supply before opening the casing.
• Make sure that the power supply cannot be unintentionally switched on when the
casing is open.
• Do not use the casing as a drilling template.
1. If necessary, remove the terminal cover.
2. Screw in the screw for the upper mounting hole (Fig. 2) until the screw head has
a clearance of 5 ... 7 mm (0.20 ... 0.28 inch) from the mounting surface.
3. Hang the controller on the screw by the upper mounting hole and align it vertically.
4. Mark the position of the lower mounting hole through the casing.
5. Remove the controller and prepare the mounting hole for the lower screw.
6. Hang the controller by the upper mounting hole and then fasten the screw in the
lower mounting hole .
7. Mount the terminal cover.
ø5 (0.20 inch)
ø5 (0.20 inch)
8.5 (0.33 inch)
140 (5.51 inch)
105 (4.13 inch)
156 (6.14 inch)
Fig. 2: Rear side of the controller with the upper and lower mounting holes.
Page 7

7
742.114 | 14.50
EN
4.3 Establishing the electrical connections
Danger
Risk of death by electrocution! Make sure that the following conditions are satisfied
when performing the work described in this section:
• All cables leading to the controller must be disconnected from the power supply and
it must be ensured that they cannot be unintentionally reconnected during installation.
• Each terminal must only be connected to a single conductor.
• The protective earth conductors (PE) from the mains cable and pump and valve
cables must be connected to the protective earth conductor terminal block.
• All cables must be laid so that persons cannot stand on them or trip over them.
• The cables must satisfy the requirements listed in Section 15, p. 53.
• The local power supply must match the specifications on the type plate of the con-
troller.
• The power supply cable is to be connected to the mains power as follows:
– using a plug connected to a wall mains socket or
– via an isolating mechanism allowing complete isolation in the case of permanent
wiring.
• The power supply cable must be laid in conformance to all applicable legal guide-
lines and regulations of the local electricity supplier.
Notice
Danger of damage and malfunction.
• Connect only components that do not overload the controller inputs and outputs;
more information is provided on the type plate and in Section 15, p. 53.
• For outputs R1 and R2, the following applies:
– Speed control must be deactivated when an external relay is connected.
– The correct pump type must be set (standard/high-efficiency pump).
More information on this is provided in Sections 5, p. 13 and 11, p. 45 (P18, P19).
Notes
• Any connection polarity may be used for the 1 – 5 and RS signal inputs and outputs.
• Only type Pt1000 temperature sensors may be used.
• Lay the sensor cables at least 100 mm (4 inch) away from any power supply cables.
• Use shielded sensor cables when inductive sources are present, e.g. high-voltage
lines, radio transmitters, microwave devices.
Page 8

8
742.114 | 14.50
EN
4.3.1 Position of the terminals
11
2
13
14
6
7
18
L R1
L
const.
X
NN
PE PEPEPE
N
R1 R2
R
S54321
N
R2
L
const.
11
13
R
S
0-10
15
Fig. 3: Terminals in the lower part of the controller (terminal cover removed)
Power connection terminal block:
L
1x phase conductor (mains input)
R1, R2 2x output (TRIAC, for pumps or valves)
X
not used
L
const.
2x phase conductor (outputs, permanent voltage)
N
4x neutral conductor (common neutral conductors for mains power
input and outputs)
Note
Outputs R1 and R2 are protected by an electronic fuse.
Protective conductor terminal block:
PE
4x protective earth (common protective earth for power connection
terminal block)
Signals terminal block:
1 – 4 4x sensor input (Pt1000 temperature sensor)
5
1x sensor input (Pt1000 temperature sensor or pulse water meter input)
R
S
1x signal output (potential-free relay contact for safety extra-low voltage)
0–10 R1
0–10 R2
2x control output (for 0–10 V-controlled high-efficiency pumps)
7x mass connection (common mass for sensor inputs and control outputs)
Pin strip, for internal use only.
Cable openings on the rear side of the casing
Upper strain relief clamps (2 identical plastic links, each with 2 strain relief clamps,
supplied in the scope of delivery)
Lower strain relief clamps
Cable openings at the bottom of the casing
Page 9

9
742.114 | 14.50
EN
4.3.2 Preparing the cable openings
The cables can be fed through openings in the rear wall of the casing or at the bottom
of the casing. The openings are pre-punched and must be prepared as required before
installation.
Prepare the cable openings in the rear wall of the casing as follows:
1. Break out the cable openings (Fig. 3) using a suitable tool.
2. Deburr the edges.
Prepare the cable openings at the bottom of the casing as follows:
1. Cut the required cable openings (Fig. 3) at the left and right using a suitable knife
and break them out.
2. Deburr the edges.
4.3.3 Connecting the cables
√ All cables are voltage-free.
√ The cable openings have been prepared.
X Observe the following points when connecting the cables:
• Connect the cable conductors to the correct terminals as described in Section
4.4, p. 10.
• Mains input and outputs: First connect PE, then N and L.
• Strain relief:
– First clamp the lower strain relief clamps and then the upper strain relief clamps.
– When using the upper strain relief clamps, use the plastic links as described
below.
– If the opening in the strain relief clamp is too large, e.g. in the case of thin ca-
bles, turn over the strain relief clamping bar (with the bend facing down).
– Only use the strain relief clamps for cables entering the bottom of the casing.
Use external strain relief clamps when feeding cables through the rear of the
casing.
4.3.4 Inserting / Removing plastic links
Insert the plastic links as follows:
1. Insert the right plastic link with the latching protrusion first (Fig. 4).
2. Press the other side of the plastic link down , until the spring clamp latches into
place.
3. Insert the left plastic link the other way around (latching protrusion to the left,
spring clamp to the right).
Fig. 4: Inserting the right plastic link
Remove the plastic links as follows:
1. Insert a flat-blade screwdriver under the right plastic link between the casing and
the spring clamp , (Fig. 5).
Page 10

10
742.114 | 14.50
EN
2. Carefully push the flat-blade screwdriver to the left . Lever the spring clamp to
the right until the plastic link is free.
3. Pull out the plastic link upwards by hand .
4. Remove the left plastic link accordingly.
Fig. 5: Removing the right plastic link
4.4 Terminal pin assignments
For each solar energy system that can be selected at the controller, the external components (pumps, valves, temperature sensors) must be connected to particular terminals.
The following table provides information on
• the graphic and number of the solar energy system on the controller display (the
graphic is only intended to provide an overview and is not a technical drawing) and
• the terminal pin assignments of the connected components.
Display Legend Terminal layout
No system
Note
No system is used when only the functions are used. When No
system is selected, then all inputs and outputs are freely available
for use by the functions. More information on this is provided in
Section 10, p. 28.
1 storage tank, 1 collector array
T1
T2
R1
T1: collector array sensor
T2: lower storage tank sensor
R1: solar circuit pump
1,
2,
R1, N, PE (0–10 R1,
1)
)
Page 11

11
742.114 | 14.50
EN
Display Legend Terminal layout
1 storage tank with heating return increase, 1 collector array
R1
R2
T1
T2
T3
T4
T1: collector array sensor
T2: lower storage tank sensor
T3: upper storage tank sensor
T4: heating return increase sensor
R1: solar circuit pump
R2: heating return switching valve
3)
1,
2,
3,
4,
R1, N, PE (0–10 R1,
1)
)
R2, N, PE
1 storage tank with external heat exchanger, 1 collector array
R2 R1
T1
T2
T3
T1: collector array sensor
T2: lower storage tank sensor
T3: external heat exchanger sensor
R1: storage tank loading circuit pump
R2: solar circuit pump
1,
2,
3,
R1, N, PE (0–10 R1,
1)
)
R2, N, PE (0–10 R2,
2)
)
1 storage tank with zone loading, 1 collector array
R1
R2
T1
T2
T3
T1: collector array sensor
T2: lower storage tank sensor
T3: upper storage tank sensor
R1: solar circuit pump
R2: zone loading switching valve
4)
1,
2,
3,
R1, N, PE (0–10 R1,
1)
)
R2, N, PE
1 storage tank, 2 collector arrays
R1
R2
T1
T3
T2
T1: collector array 1 sensor
T2: collector array 2 sensor
T3: lower storage tank sensor
R1: solar circuit pump, collector array 1
R2: solar circuit pump, collector array 2
1,
2,
3,
R1, N, PE (0–10 R1,
1)
)
R2, N, PE (0–10 R2,
2)
)
2 storage tanks, 1 collector array (pump-controlled)
T1
T2
T3
R1
R2
T1: collector array sensor
T2: lower storage tank 1 sensor
T3: lower storage tank 2 sensor
R1: solar circuit pump, storage tank 1
R2: solar circuit pump, storage tank 2
1,
2,
3,
R1, N, PE (0–10 R1,
1)
)
R2, N, PE (0–10 R2,
2)
)
2 storage tanks, 1 collector array (pump-/valve-controlled)
T1
T2
T3
R1
R2
T1: collector array sensor
T2: lower storage tank 1 sensor
T3: lower storage tank 2 sensor
R1: solar circuit pump
R2: storage tank switching valve
5)
1,
2,
3,
R1, N, PE (0–10 R1,
1)
)
R2, N, PE
Page 12

12
742.114 | 14.50
EN
Display Legend Terminal layout
1 swimming pool, 1 collector array
R2
T1
T2
T1: collector array sensor
T2: swimming pool sensor
R2: solar circuit pump
1,
2,
R2, N, PE (0–10 R2,
2)
)
1 swimming pool with external heat exchanger, 1 collector array
R1
R2
T1
T2
T3
T1: collector array sensor
T2: swimming pool sensor
T3: external heat exchanger sensor
R1: solar circuit pump
R2: swimming pool loading circuit
pump
1,
2,
3,
R1, N, PE (0–10 R1,
1)
)
R2, N, PE (0–10 R2,
2)
)
1 storage tank, 1 swimming pool, 1 collector array (pump-controlled)
T1
T2
T3
R1
R2
T1: collector array sensor
T2: lower storage tank sensor
T3: swimming pool sensor
R1: storage tank solar circuit pump
R2: swimming pool solar circuit pump
1,
2,
3,
R1, N, PE (0–10 R1,
1)
)
R2, N, PE (0–10 R2,
2)
)
1 storage tank, 1 swimming pool, 1 collector array (pump-/valve-controlled)
R1
R2
T1
T2
T3
T1: collector array sensor
T2: lower storage tank sensor
T3: swimming pool sensor
R1: solar circuit pump
R2: storage tank switching valve
6)
1,
2,
3,
R1, N, PE (0–10 R1,
1)
)
R2, N, PE
Tab. 1: Terminal pin assignments
1)
Terminal pin assignments for 0–10 V-controlled high-efficiency pumps: The power supply must
be connected to output R1 (N, PE); the control cable for the pump electronics must be connected to 0–10 R1 and
2)
Terminal pin assignments for 0–10 V-controlled high-efficiency pumps: The power supply must
be connected to output R2 (N, PE); the control cable for the pump electronics must be connected to 0–10 R2 and .
3)
Installation regulation: When no power is supplied to the switching valve, then no flow occurs
through the storage tank.
4)
Installation regulation: When no power is supplied to the switching valve, then the lower part
of the storage tank (T2) is loaded.
5)
Installation regulation: When no power is supplied to the switching valve, then the first priority
storage tank (T2) is loaded.
6)
Installation regulation: When no power is supplied to the switching valve, then the storage
tank (T2) is loaded.
Page 13

13
742.114 | 14.50
EN
5 Commissioning the device for the first time
Danger
Risk of death by electrocution! Be sure to perform all the measures listed in Section 4
before starting the first commissioning.
Notes
• After commissioning the controller for the first time, it is configured in such a man-
ner that it can be used in most applications without changes.
• After completing the first commissioning, later recommissioning is not necessary.
• The following steps must also be performed after the device has been reset to the
factory defaults.
Overview
Operation mode Off is
switched on.
ESC /
OK
SET
Time
System
Pump R1 (R2)
Type / minimum speed
Functions
ESC /
ESC /
ESC /
The first time the controller is switched on, the following
main settings are made blockwise via a guided configuration process (Fig. left):
• Time
• System (hydraulic variant)
• Type (Standard/high-efficiency pump) and minimum
speed of the connected pumps (not System 0.1)
• Functions
Values can be subsequently changed during the guided
configuration process. The following applies:
• /ESC/ blockwise navigation forwards and back
(Fig. left: = forwards; ESC/ = back).
• Navigation (with /ESC/) is always possible after
completing a block.
• Subsequent modification of a block is started with
SET.
Commission the controller for the first time as follows:
Setting the time
1. Apply power to the controller.
– The time 12:00 is displayed.
– 12 flashes (Fig. left)
– The backlighting is red.
2. Press to set the hours.
3. Press SET. The minutes flash.
4. Press to set the minutes.
5. Press SET. The time is displayed.
Page 14

14
742.114 | 14.50
EN
Selecting a system
6. Press . System 1.1 is displayed, 1.1 flashes
(Fig. left).
7. Press to select another system.
8. Press SET.
If System 0.1 was selected in step 7, proceed with
step 20.
Setting pump 1 (output R1)
9. Press . AC and (pump 1) flash (example in fig.
left).
10.
Notice
Standard pump: Select AC!
High-efficiency pump: Select HE!
Press to select the type for pump 1.
11. Press SET.
12.
Notice
When selecting HE (high-efficiency pump) pay attention to the pump characteristics.
Only if HE was selected in step 10:
Press to set the characteristic of the high-efficiency pump; see Tab. 2 and Fig. 6, p. 16.
13. Press SET.
– If bA or bb was selected in step 12 then SC is
displayed; off, and (pump 1) flash (example in Fig. left; SC = Speed Control).
– If C was selected in step 12, proceed with
step 18 (for 2 pumps) or step 20 (for 1 pump).
14. If required, press to switch on the speed control (on flashes).
15. Press SET.
If off was selected in step 14, proceed with step 18
(for 2 pumps) or step 20 (for 1 pump).
16. min, Value %,
and (pump 1) flash.
Press to set the minimum speed of pump 1
in %.
17. Press SET.
Page 15

15
742.114 | 14.50
EN
Set pump 2 (output R2; only if a system with 2 pumps was selected in step 7; otherwise
continue with step 20)
18. Press . AC and (pump 2) flash (example in fig.
left).
19. Perform steps 10 to 17 accordingly for pump 2.
20. Press . F: is displayed.
Set the functions (necessary for System 0.1, or as required for other systems; The functions can also be set at a later date.)
21. Press SET to set the functions. F:01 (function num-
ber) flashes (example in Fig. left).
or
Press to skip the setting of the functions; Ok
flashes. Continue with step 30.
22. Press to select a different function. (Function
description in Section 10.3)
23. Press SET. oFF is displayed.
24. Press SET. oFF flashes.
25. Press . on flashes.
26. Press SET. The function is activated.
27. Set the characteristics (see Section 10.1).
28. Press ESC.
29. Press . Ok flashes.
Finishing initial commissioning
30. Press SET to finish initial commissioning. The
controller switches to the operating mode Off
(Example in Fig. left).
or
Press /ESC to display the previous settings and
correct them if necessary.
Set the operating mode (off, manual, automatic)
31. Remove the front panel (Fig. left and Section 4.1.1).
Page 16

16
742.114 | 14.50
EN
32.
Notice
Danger of pump damage if run dry. Only switch the
system to manual or automatic mode when the
system is filled.
Press and hold the mode button (arrow
in Fig. left) for 2 seconds to change the operating
mode; more information on this is provided in Section 8.
33. Mount the front panel. The controller is now ready
for operation.
Characteristics of high-efficiency pumps
Display Pump type Characteristic curve
bA
High-efficiency pump with a 0–10 V
profile for a rising characteristic curve
(Fig. 6)
0 V: Pump off
10 V: Max. pump speed
bb
High-efficiency pump with a 0–10 V
profile for a falling characteristic curve
(Fig. 6)
0 V: Max. pump speed
10 V: Pump off
C
Pressure regulated high-efficiency pump –
(no control cable, switching on/off
via the supply voltage)
Tab. 2: Characteristics of high-efficiency pumps
U/V
RPM
U/V
RPM
Fig. 6: Characteristics of high-efficiency pumps with 0–10 V profiles for a rising characteristic curve
(bA, left) and a falling characteristic curve (bb, right)
Page 17

17
742.114 | 14.50
EN
6 Structure
6.1 Casing
11
13
2
16
15
14
ESC
SET
No. Element
See
Section
Mode button (under
front panel)
7.1
8
Operating buttons , SET,
ESC,
7.1
Display 6.2
Front panel 4.1
Terminal cover 4.3.1
1)
Terminal cover fastening
screw
–
1)
Section 4.3.1 describes the terminals under the
terminal cover.
Fig. 7: Front view of the controller
6.2 Display
6.2.1 Overview
B
l
g
p
Fig. 8: Overview of the display areas (all elements visible)
System graphics
Settings menu
Pictograms for functions
Operational and setting values
The display areas are described below.
Page 18

18
742.114 | 14.50
EN
6.2.2 System graphics symbols
The following tables describe the symbols used in the system graphics ( in Fig. 8).
General
Symbol Description Symbol Description
Pipework Pump, switched on
Collector (array) Pump, switched off
Maximum collector temperature reached
3-way valve with flow direction
Storage tank Domestic water outlet
Swimming pool Cooler for active cooling
External heat exchanger Back-up heating
Temperature sensor Solid fuel boiler
Sufficient solar irradiation
available for loading
Drainback
Symbols Description
1
2
3
4
5
Drainback tank
Booster pump
Symbol Short startup for drainage assistance
Symbol Draining
Symbol Filling
+ Symbol Stabilising
6.2.3 Settings menu
The settings menu ( in Fig. 8) contains the following entries:
Time System
Functions Parameter
Priority Reset to factory defaults
Page 19

19
742.114 | 14.50
EN
6.2.4 Pictograms for functions
The following table describes the pictograms used for functions ( in Fig. 8).
Symbol Description Symbol Description
Manual operation Holiday – recooling
2)
Pump is speed controlled
1)
Alarm output
1)
Interval
2)
Stagnation reduction
2)
Freeze recirculation
2)
1)
Symbol is visible while the function/parameter is being edited in the settings menu.
2)
Symbol flashes: The function is activated and is actively intervening in the control process.
Symbol does not flash: The function is activated and is not actively intervening in the control
process or the function is currently being edited in the setting menu.
6.2.5 Operational and setting values
The display of the operational and setting values ( in Fig. 8) consists of the following
elements:
B
l
g
p
1
2
3
5
6
4
Symbol for time control of functions. This symbol is displayed when:
• a time restriction / control has been set,
• the status of time restriction/control is displayed,
• the time restriction blocks a temperature control (symbol flashes).
Number of the time window that is currently being set/displayed or within which
the current time lies.
The time control of a function consists of 1 to 3 configurable time windows. Example:
Time window 1: 06:00 – 08:00
Time window 2: 11:00 – 12:30
Time window 3: 17:00 – 19:00
Additional information:
on, off: switching state/condition on, off
max, min: maximum value, minimum value
Σ: summed operational value since first commissioning, cannot be reset
Δ: summed operational value since last reset to 0
Symbol is displayed when a temperature sensor is selected when setting a function.
Display of:
• Measurements
• Settings
• Error codes
• Additional information, e.g. software version
Physical unit of the value displayed in : °F, F, psi, gal/min, MBtu, MBtu/h, MMBtu,
%, tn sh CO2
Note
The physical units are only displayed as appropriate.
Page 20

20
742.114 | 14.50
EN
7 Operation
This section contains general information on operating the controller.
7.1 Operating buttons
The device is operated using the , , SET, ESC and buttons as follows:
• Scrolls up through the menu/initial commissioning
• Increases the setting value by 1 step
• Scrolls down through the menu/initial commissioning
• Decreases the setting value by 1 step
SET
• Selects a setting to be changed (setting value flashes)
• Confirms a setting value or jumps one level down in the menu
structure
• Calls up the settings menu (not in manual mode)
ESC
• Discards an entered setting
• Jumps up by one operating level
• Scrolls up through the initial commissioning
Sets the operating mode
Note
We recommend that you write down all settings that you have changed, e.g. in Section 18, p. 55.
7.2 Display when operating
• A flashing component in the system graphic means: the displayed operational or
setting value applies to the flashing component.
Exception: always flashes in manual mode.
• A flashing symbol is indicated in the figures by
.
• Displays that are automatically alternately displayed are shown overlapping in the
figures. Example: Figure in Section 8.2.
8 Modes of operation
8.1 Changing the mode of operation
Notice
Danger of pump damage if run dry. Only switch the system to manual or automatic
mode when the system is filled.
1. Remove the front panel.
2. Press the button for 2 seconds to change the mode of operation.
3. Repeat step 2 if necessary.
4. Mount the front panel.
Off
Manual operation
Automatic
T
2 s 2 s 2 s
Page 21

21
742.114 | 14.50
EN
8.2 "Off" mode
Functionality
• All outputs are switched off (outputs/control outputs without power, relays open).
• OFF and the software version are displayed alternately.
See example in Fig. below: software version St 1.3.
• Backlighting is red.
• Settings menu can be called up.
• The Off mode is preset when the device is delivered.
Operation
X Press and hold the SET button for 2 seconds to call up the settings menu ( ).
8.3 “Manual” mode
Functionality
• Backlighting is red, spanner symbol flashes.
• The controller outputs (pumps, valves) can be manually switched. Possible switching
states:
0: off
1: on
A: automatic operation as per the settings in the settings menu
• Current temperatures and operating hours can be displayed (status display).
• When changing to manual mode all outputs are switched to A; R1 is displayed.
Exception: initial commissioning (all outputs at 0).
• Typical application: functional test (maintenance), fault-finding.
Operation
You switch the outputs on and off as follows:
1. If necessary, press to select a different output.
2. Press SET. The switching state flashes.
3. Press to change the switching state.
4. Press SET to adopt the change.
See
in the following Figure (system 1.1 and output R1 are shown as an example).
You display the current temperatures and operating hours as follows:
1. Press ESC. The temperature/operating hours are displayed and the associated component flashes ( , display is not illustrated).
2. Press to select a different component.
3. Press SET to leave the temperature/operating hours display.
Page 22

22
742.114 | 14.50
EN
SET
SET
SET
SET
SET
ESC
33
2
8.4 "Automatic" mode
Functionality
Automatic is the normal mode of operation and the system is automatically controlled.
The following actions are possible:
• Display status (status display): display the status of external components (temperatures, switching states, run times).
• Display stored min./max. values (temperature sensors) or sum/difference values (operating hours1) of the pumps and valves.
Summed values (symbol ∑): operating hours since initial commissioning. Summed
values cannot be reset.
Difference values (symbol Δ): operating hours since the last reset to 0.
• Reset the stored min./max./difference values.
• Call up the settings menu.
1)
Summed switch-on times of the outputs
Page 23

23
742.114 | 14.50
EN
Operation
√ The controller shows the status display.
You can display the status of external components as follows:
X Press to display the status of other components ( , shown using system 1.1 as
an example).
You can display and reset the stored min./max./difference values as follows:
1. Press as required, in order to display other components (
, component
flashes).
2. Press SET. The min./max./difference values are displayed alternately
.
3. If desired, press and hold the SET button for 2 seconds to reset the currently (!)
displayed value .
4. Press ESC. The status display is shown.
5. Repeat steps 1 to 4 if necessary.
You access the settings menu as follows:
X Press and hold SET for 2 seconds . The settings menu appears.
SET
SET
7
2 s
SET
SET
7
2 s
SET
SET
7
2 s
SET
6
2 s
SET
6
2 s
SET
6
2 s
4
5
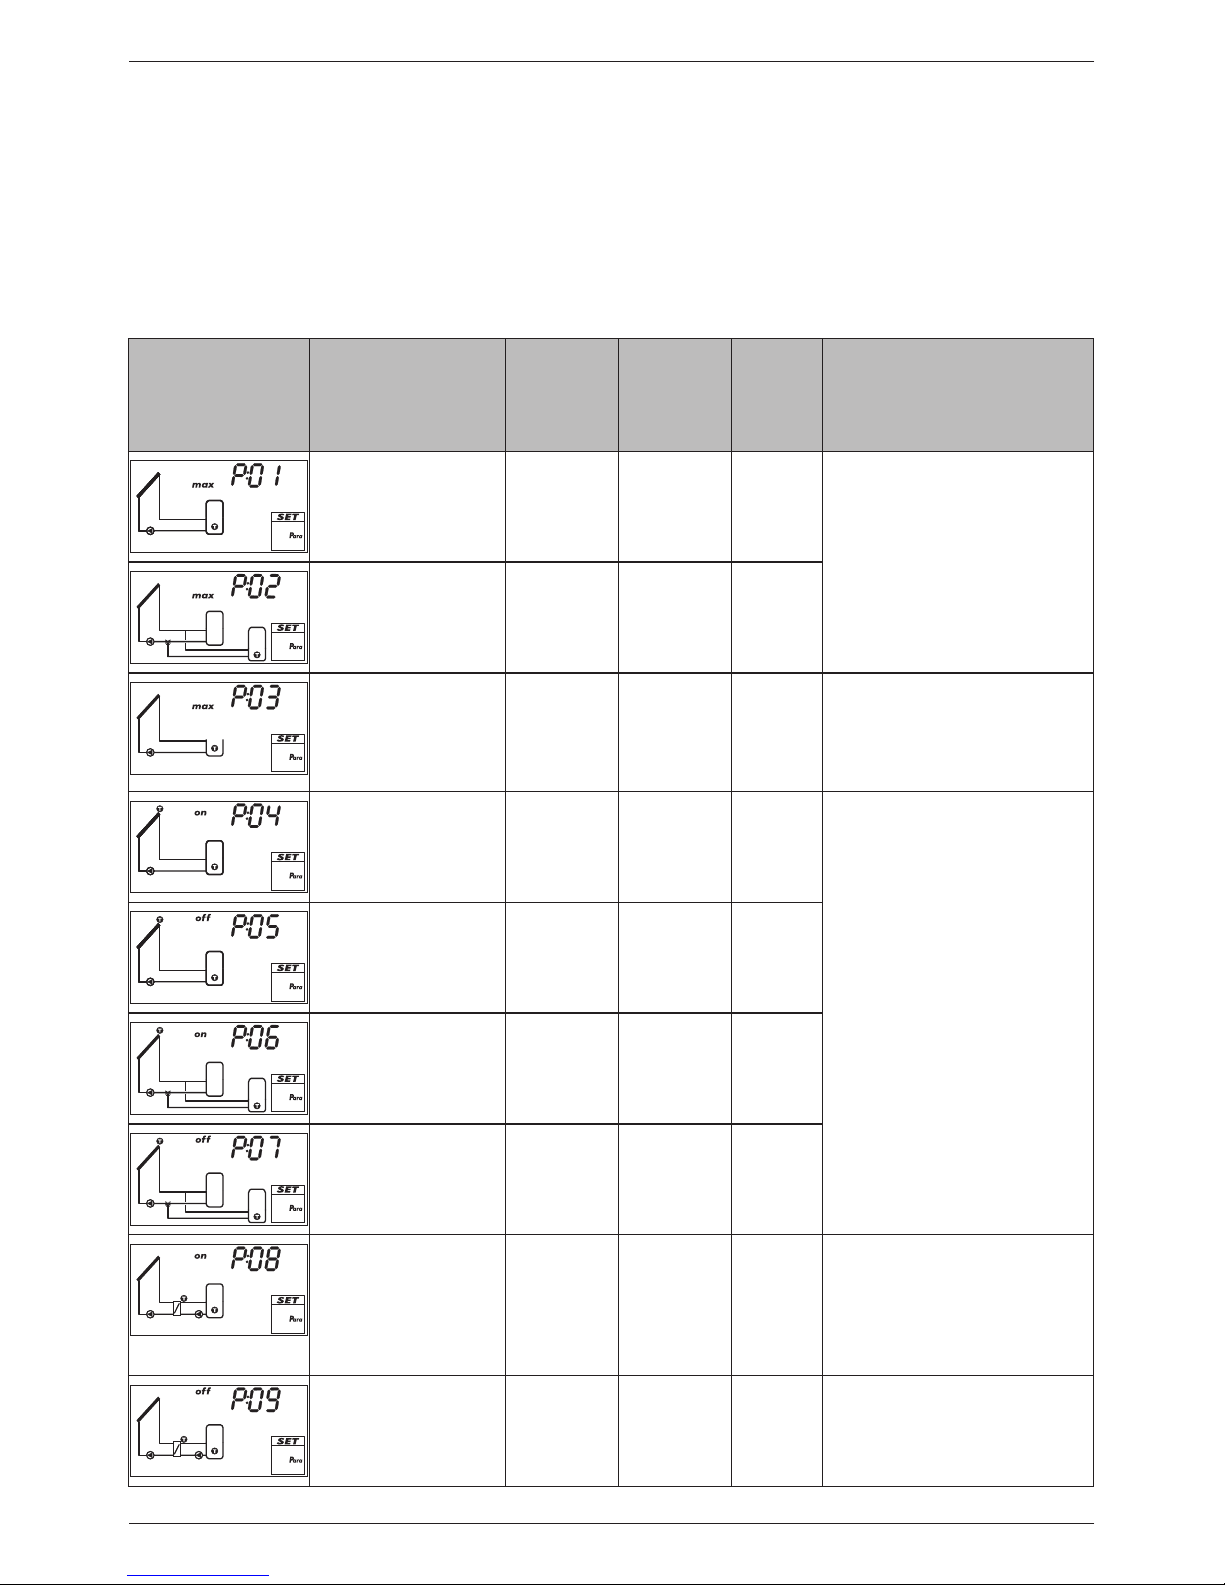
9 Settings menu
9.1 Overview
The following graphic provides an overview of the structure of the settings menu.
Page 24

24
742.114 | 14.50
EN
SET SET
SET for 5 seconds
Control of return increase – P22
Loading strategy storage tank 1 – P16
Loading strategy storage tank 2 – P17
Pump characteristic and speed control R1 – P18
Pump characteristic and speed control R2 – P19
Control of storage tank loading valve – P20
Control of zone loading valve – P21
Maximum temperature storage tank 1 – P01
Parameters
1)
Factory settingPriority
Storage tank 1 before
storage tank 2
Maximum temperature storage tank 2 – P02
Storage tank 2 before
storage tank 1
Only storage tank 1
Only storage tank 2
Reset to factory
settings
Switch-off temperature difference solar circuit 2
– P07
Switch-on temperature difference external
heat exchanger – P08
Switch-off temperature difference external
heat exchanger – P09
Maximum temperature loading circuit – P14
Maximum collector temperature – P10
Minimum collector temperature – P11
Switch-on temperature difference
heating return increase – P12
Switch-off temperature difference
heating return increase – P13
Maximum temperature swimming pool – P03
Switch-on temperature difference solar circuit 1
– P04
Switch-off temperature difference solar circuit 1
– P05
Switch-on temperature difference solar circuit 2
– P06
1)
Only specific functions and parameters may be
called up depending on the selected system.
Minimum temperature loading circuit – P15
SET SET SET
Time System
Circulation – F02
Functions
1)
Drainback – F01 No system – 0.1
Quick charge – F05
Heat quantity – F06
Set time
1 storage tank with external heat exchanger,
1 collector array – 1.3
1 storage tank with zone loading,
1 collector array – 1.4
1 storage tank,
2 collector arrays – 1.5
Back-up heating – F03
Solid fuel boiler – F04
2 storage tanks,
1 collector array (pump/valve-controlled) – 2.2
1 swimming pool,
1 collector array – 3.1
1 storage tank,
1 collector array – 1.1
1 storage tank with heating return increase,
1 collector array – 1.2
2 storage tanks,
1 collector array (pump-controlled) – 2.1
Thermostat – F07
Differential thermostat – F08
Interval – F09
Stagnation reduction – F10
Holiday – recooling – F11
1 swimming pool with external heat exchanger,
1 collector array – 3.2
1 storage tank, 1 swimming pool,
1 collector array (pump-controlled) – 4.1
1 storage tank, 1 swimming pool,
1 collector array (pump/valve-controlled) – 4.2
Active cooling – F12
Freeze recirculation – F13
Upper storage tank display – F14
Alarm output – F15
Page 25

25
742.114 | 14.50
EN
SET SET
SET for 5 seconds
Control of return increase – P22
Loading strategy storage tank 1 – P16
Loading strategy storage tank 2 – P17
Pump characteristic and speed control R1 – P18
Pump characteristic and speed control R2 – P19
Control of storage tank loading valve – P20
Control of zone loading valve – P21
Maximum temperature storage tank 1 – P01
Parameters
1)
Factory settingPriority
Storage tank 1 before
storage tank 2
Maximum temperature storage tank 2 – P02
Storage tank 2 before
storage tank 1
Only storage tank 1
Only storage tank 2
Reset to factory
settings
Switch-off temperature difference solar circuit 2
– P07
Switch-on temperature difference external
heat exchanger – P08
Switch-off temperature difference external
heat exchanger – P09
Maximum temperature loading circuit – P14
Maximum collector temperature – P10
Minimum collector temperature – P11
Switch-on temperature difference
heating return increase – P12
Switch-off temperature difference
heating return increase – P13
Maximum temperature swimming pool – P03
Switch-on temperature difference solar circuit 1
– P04
Switch-off temperature difference solar circuit 1
– P05
Switch-on temperature difference solar circuit 2
– P06
1)
Only specific functions and parameters may be
called up depending on the selected system.
Minimum temperature loading circuit – P15
Page 26

26
742.114 | 14.50
EN
9.2 Calling up the settings menu and selecting a menu entry
√ Automatic or Off mode is selected.
1. Press and hold SET for two seconds. The settings menu is displayed, menu entry
flashes.
2. Press to select a different menu entry.
3. Change the settings as described in the following sections.
9.3 Setting the time
Note
The time must be once more set to the correct values if power is removed for a longer
period of time. After this, the same operating mode is displayed as was active previous
to the removal of power.
√ flashes.
1. Press SET. The hours display flashes.
2. Press to change the hour.
3. Press SET. The minutes flash.
4. Press to change the minute.
5. Press SET. The change is adopted.
9.4 Setting the system
Note
A system overview is provided in Section 4.4, p. 10.
√
S
yst
flashes.
1. Press SET. The number of the current system flashes.
2. Press to select another system.
3. Press SET. The change is adopted.
9.5 Setting the functions
√
F
unc
flashes.
X Continue as described in Section 10, p. 28.
9.6 Setting the parameters
Note
Details on the parameters are provided in Section 11, p. 45.
√
P
ara
flashes.
1. Press SET. P:01 (parameter number) flashes.
2. Press to display a different parameter.
3. Press SET. The value of the parameter is displayed, associated components flash in
the system graphics.
4. Press SET. The parameter value flashes.
5. Press to change the value.
6. Press SET to adopt the change.
7. Press ESC. The parameter number is displayed (flashing).
8. If necessary, repeat steps 2 – 7.
Page 27

27
742.114 | 14.50
EN
9.7 Setting the priority
Functionality
The priority determines the sequence in which the storage tanks are loaded (only for
systems with more than 1 storage tank). If the higher priority storage tank (first-priority
storage tank) cannot be loaded because the collector temperature is too low, then the
lower priority storage tank (second-priority storage tank) is loaded
1)
. The following
values can be selected:
-1-: only storage tank 1 is loaded.
-2-: only storage tank 2 is loaded.
1-2: storage tank 1 is the first-priority storage tank.
2-1: storage tank 2 is the first-priority storage tank.
1)
Every 30 minutes, the controller checks to see if the first-priority storage tank can be loaded.
Due to the warming of the collector array, this check can take several minutes. On the basis of
the heating process, the controller predicts whether it is possible to load the first-priority storage
tank in a foreseeable period of time.
Operation
√
P
rio
flashes.
1. Press SET. The current value flashes.
2. Press to change the priority. The system graphics change accordingly.
3. Press SET. The change is adopted.
9.8 Resetting to factory defaults
√ flashes; RESEt is displayed (RE and SEt alternately).
1. Press and hold SET for 5 seconds.
2. A progress display is shown for a few seconds. After this the reset is finished.
3. Continue as described in Section 5, p. 13.
Page 28

28
742.114 | 14.50
EN
10 Functions
10.1 Operation
Displaying the functions
The following information is visible when the functions are
displayed:
• Function number, e.g. F:02 (Fig. left)
• Switching state:
on: function is activated
off: function is deactivated (Fig. left)
Note
If neither on nor off are displayed, then the function cannot be
used. Possible causes:
• The set system does not allow the use of this function.
• All outputs are used.
You display the functions as follows:
√
F
unc
flashes.
1. Press SET. F:01 flashes.
2. Press to display the next function.
Activating the function
A function must be activated (activation = on; Fig. left) and all
the associated characteristics must be correctly set before it can
be used.
If a function is activated and then exited before the characteristics are set, then oFF flashes briefly. After this, the function
is displayed with a switching state of off (function is deactivated).
You activate a function as follows:
√ Function number flashes.
1. Press SET. The function is selected.
2. Press SET. oFF flashes.
3. Press . on flashes.
4. Press SET. The function is activated.
5. Set the characteristics as described below.
Page 29

29
742.114 | 14.50
EN
Setting the characteristics
The functions have different numbers of characteristics. The
characteristic values are always set via the same sequence of
operating steps.
You set the values of characteristics as follows:
√ The function has been activated as described previously.
1. Press to select a characteristic.
2. Press SET. The value of the characteristic and the associated
components in the system graphics flash.
3. Press to change the value.
4. Press SET to adopt the change.
5. Repeat steps 1 to 4 for the other characteristics.
6. Press ESC when all characteristics of the function have been
set. The function number flashes.
10.2 Characteristics
The main characteristics for the functions are described below. The figures show examples.
Output
When a function should control an output, instead of the factory setting R- (= no output; Fig. left), one of the outputs R1,
R2 or RS must be selected. Only free outputs are displayed for
selection.
Temperature control
When a function is to be temperature controlled, the temperature control must be switched on (tc = temperature control). In
the figure, the temperature control is switched off (off).
Input
When a function requires a temperature sensor, a sensor input
must be selected instead of the factory setting. The factory setting is " –" (no input; Fig. left).
All sensor inputs are displayed for selection. A single sensor
input can be simultaneously used by several functions.
Page 30

30
742.114 | 14.50
EN
Switch-on temperature difference
If a function contains a differential thermostat, then the switchon temperature difference can be set. The relevant sensor
symbols flash.
Switch-off temperature difference
If a function contains a differential thermostat, then the switchoff temperature difference can be set. The relevant sensor
symbols flash.
Switch-on temperature
If a function contains a thermostat, then the switch-on temperature can be set. The relevant sensor symbol flashes.
Switch-off temperature
If a function contains a thermostat, then the switch-off temperature can be set. The relevant sensor symbol flashes.
Time control
If a function is to be time controlled, then the time control must
be activated and the time windows must be set (cc = clock
control). In the Fig. at the left, the time control is switched off
(off).
Page 31

31
742.114 | 14.50
EN
Starting time of a time window
When setting the start time of a time window, the following is
displayed to the left of the start time (see Fig. left):
•
• Number of time window 1 ... 3, whose end time is to be set
(in this case: 1)
• on
End time of a time window
When setting the end time of a time window, the following is
displayed to the left of the end time (see Fig. left):
•
• Number of time window 1 ... 3, whose end time is to be set
(in this case: 1)
• off
Note
The start time always lies before the end time! When an attempt is made to set a start time that is later than the end time,
the end time is automatically adjusted.
10.3 Functional description
The tables in this section describe the function characteristics as follows:
• The rows contain the characteristics in the same sequence as they appear on the
display.
• The columns contain the following information, from left to right:
Column Description
Display Sample display when setting the characteristics.
Characteristic Designation of the characteristics and their interdependence.
Dependent characteristics can only be selected and set when
the higher level characteristic has the value on. This is shown as
follows:
• Higher-level characteristic: bold text
• Dependent characteristics: indented to the right below the
higher level characteristic
Example: In the table for the circulation function (p. 33), the
sensor input, switch-on temperature and switch-off temperature characteristics are only displayed when the temperature
control is set to on.
Min., max.,
factory default
setting
Lower (min.) and upper limit (max.) of a characteristic range
and the factory setting. When a value range only contains a few
values, then these are individually listed. Example: on, oFF.
Page 32

32
742.114 | 14.50
EN
10.3.1 Drainback
Notice
Danger of malfunction in drainback systems
• In drainback systems, the drainback function must be activated.
• In drainback systems with speed-controlled solar circuit pumps (sys-
tems 1.1 to 4.2), note the following:
– Activation of the drainback function switches off the speed
control of the solar circuit pump, but this can be subsequently
switched on again if desired (P:18/P:19 in Section 11).
– Adjust the minimum speed high enough so that the heat trans-
fer fluid is reliably pumped into the collector.
The following drainback function characteristics can be set:
Filling time: When switched on, the solar circuit pump runs for the
duration of the filling time in order to pump the heat transfer fluid into
the collector.
Stabilising time: After the filling time has expired, the solar circuit
pump continues to run for the duration of the stabilising time. The following applies:
• The solar circuit pump also continues to run for this time even when the
switch-off conditions are satisfied.
• When the speed control is activated and the solar irradiation is too
low (no sun symbol on the display) the pump runs at minimum
speed.
• After expiry of the stabilising time, the controller checks to see if the
solar irradiation is sufficient to continue loading the storage tanks.
Draining time: The solar circuit pump is switched off during the draining time. This allows the heat transfer fluid to flow back into the drainback tank and the solar circuit is automatically drained.
Short startup time: After the draining time has expired, the solar circuit
pump runs for the duration of the short startup time (a few seconds). In
most cases, this supports the draining process and sucks the remaining
heat transfer fluid out of the solar circuit.
Booster pump: The booster pump supports the solar circuit pump during the filling time and short startup time. The booster pump can only
be connected when a free output is available.
Notes
• The drainback function cannot be active simultaneously with the
following functions:
– Interval
– Reduction of stagnation phases
– Holiday – recooling
– Active cooling
– Freeze recirculation
• The drainback function can only be activated in systems with a
single solar circuit.
Page 33

33
742.114 | 14.50
EN
Display Characteristic min. max.
Factory
setting
Activation on, oFF
oFF
Filling time 1 ... 10 minutes 3 minutes
Stabilising time 1 ... 15 minutes 2 minutes
Draining time: 1 ... 30 minutes 5 minutes
Short startup time 0 ... 60 seconds 0 seconds
Booster pump on, oFF
oFF
Output (booster pump) free output R1/R2/R
S
–
Pump type (R1, R2 only) AC, HE
1)
AC
Pump characteristic (HE only) bA, bb, C (see p. 16) –
1)
Notice
Standard pump: Set AC!
High-efficiency pump: Set HE!
External relay: Set AC pump type!
10.3.2 Circulation
Switches a circulation pump on and off on a temperature and/or time
controlled basis.
Temperature control: If the temperature in the circulation return falls
below the Ton value, then the circulation pump is switched on until the
T
off
temperature is reached.
Time control: The circulation pump is switched on when the current
time lies within one of 3 configurable time windows.
Temperature and time control: The circulation pump is switched on when
the switch-on conditions for the temperature and time control are satisfied.
Note
Install the circulation sensor at least 1.5 m (60 inch) away from the storage
tank to avoid false measurements due to heat conduction of the pipes.
Page 34

34
742.114 | 14.50
EN
Display Characteristic min. max.
Factory
setting
Activation on, oFF
oFF
Output (circulation pump) free output R1/R2/R
S
–
Pump type (R1, R2 only) AC, HE
1)
AC
Pump characteristic (HE only) bA, bb, C (see p. 16) –
Temperature control on, oFF
oFF
Sensor input for circulation
return temperature sensor
1 ... 5 –
Switch-on temperature T
on
32 °F T
off
– 4 F 85 °F
Switch-off temperature T
off
Ton + 4 F 200 °F 95 °F
Time control on, off
off
Time window 1 start/end 0:00 23:59 6:00/8:00
Time window 2 start/end 0:00 23:59 12:00/13:30
Time window 3 start/end 0:00 23:59 18:00/20:00
1)
Notice
Standard pump: Set AC!
High-efficiency pump: Set HE!
External relay: Set AC pump type!
10.3.3 Back-up heating
Performs temperature-dependent switching of an output for heating a storage tank using an oil or gas burner. The function can be time restricted.
Temperature control: If the temperature in the storage tank falls below
the Ton value, then the external heating is switched on until the T
off
tem-
perature is reached.
Time restriction: The function is executed when the current time lies
within one of 3 configurable time windows.
Display Characteristic min. max.
Factory
setting
Activation on, oFF
oFF
Output (external heating) free output R1/R2/R
S
–
Pump type (R1, R2 only) AC, HE
1)
AC
Pump characteristic (HE only) bA, bb, C (see p. 16) –
Sensor input for readiness part of
the storage tank
1 ... 5 –
Switch-on temperature T
on
32 °F T
off
– 4 F 130 °F
Switch-off temperature T
off
Ton + 4 F 200 °F 140 °F
Time restriction on, oFF
oFF
Time window 1 start/end
Time window 2 start/end
Time window 3 start/end
0:00
0:00
0:00
23:59
23:59
23:59
6:00/8:00
12:00/13:30
18:00/20:00
1)
Notice
Standard pump: Set AC!
High-efficiency pump: Set HE!
External consumer (e.g. 115 V relay): Set AC pump type.
Page 35

35
742.114 | 14.50
EN
10.3.4 Solid fuel boiler
Controls a pump in order to heat a storage tank using a solid fuel boiler.
The pump is switched on when all of the following conditions are satisfied at the same time:
• The temperature difference between the solid fuel boiler and the
storage tank exceeds T
diff on
.
• The solid fuel boiler temperature lies above the min. solid fuel boiler
temperature.
• The storage tank temperature lies below the max. storage tank
temperature.
The pump is switched off when one of the following conditions is satisfied:
• The temperature difference between the solid fuel boiler and the
storage tank drops below T
diff off
.
• The solid fuel boiler temperature drops below the min. solid fuel
boiler temperature.
• The storage tank temperature reaches the max. storage tank tem-
perature.
Speed control of the pump can be activated as required. The loading
strategy of the speed control system attempts to regulate the temperature of the solid fuel boiler to match the control target that has been set.
The control target should be at least 20 F above the minimum temperature of the solid fuel boiler.
Display Characteristic min. max.
Factory
setting
Activation on, oFF
oFF
Output (pump) free output R1/R2/R
S
–
Pump type (R1, R2 only) AC, HE
1) 2)
AC
Pump characteristic (HE only) bA, bb, C (see p. 16) –
Speed control (R1, R2 only) on, oFF
2)
oFF
Minimum speed (AC only) 30% 100% 50%
Minimum speed (HE + bA only) 0% 100% 25%
Minimum speed (HE + bb only) 0% 100% 75%
Sensor input for storage tank
temperature
1 ... 5 –
Sensor input for solid fuel boiler
temperature
1 ... 5 –
Switch-on temperature difference
T
diff on
T
diff off
+ 4 F 40 F 12 F
Switch-off temperature difference
T
diff off
0 F T
diff on
– 4 F 6 F
Max. storage tank temperature 32 °F 300 °F 140 °F
Page 36

36
742.114 | 14.50
EN
Min. solid fuel boiler temperature 85 °F 200 °F 125 °F
Control target for solid fuel boiler
temperature (Speed control = on)
32 °F 200 °F 140 °F
1)
Notice
Standard pump: Set AC!
High-efficiency pump: Set HE!
2)
Notice
External consumer (e.g. 115 V relay): Set AC pump type and set the speed control to oFF!
10.3.5 Quick charge
Uses a higher loading temperature to load the upper region of the storage
tank more quickly in order to provide early prevention of back-up heating
by the conventional heating system. To do this, the loading strategy of the
first-priority storage tank is changed from differential loading to absolute
temperature loading as soon as the temperature in the upper tank region
drops below T
on
*)
. At the same time, an attempt is made to achieve a
higher temperature in the storage tank by using the speed control.
*)
To retain the proven quick charge functionality, when Ton is changed, the value
of T
off
is changed in parallel.
Note
To use the quick charge function, the speed control must be switched on;
more information on this is provided in Section 11, p. 45 (P18, P19).
Display Characteristic min. max.
Factory
setting
Activation on, oFF
oFF
Sensor input for upper storage tank
temperature
1 ... 5 –
Switch-on temperature T
on
32 °F 185 °F 125 °F
Switch-off temperature T
off
Ton + 4 F Ton + 20 F 130 °F
Page 37

37
742.114 | 14.50
EN
10.3.6 Heat quantity
B
Calculates the acquired heat volume based on the following information:
• Supply temperature
• Return temperature
• Flow rate determined using the following methods:
– Calculated via pump speed
– Measured using a pulse water meter (terminal 5)
Notes
– Calculation based on the pump speed cannot be performed
when No system (system 0.1) has been selected.
– In drainback systems, the correct flow rate value can only be
read when the system is filled.
• Glycol proportion and accounting for the temperature dependent
thermophysical properties of the heat transfer fluid
Additional possibility: display of the amount of CO2 saved by using the
system. The amount of CO2 is calculated from the acquired heat volume.
To do this, the controller requires the conversion factor lbs
CO2
/kWh
therm
to be entered.
Display Characteristic min. max.
Factory
setting
Activation on, oFF
oFF
Type of flow rate acquisition tyP 1, tyP 2
1)
–
l
g
Type 1: flow rate value at max.
speed F
max.
(pump 1).
When the Fig. at the left is displayed (value flashes), then enter
the value read from the flow rate
display.
F
min.
999.9
gal/min
0.0 gal/min
l
g
Type 1: flow rate value at min.
speed F
min.
(pump 1).
When the Fig. at the left is displayed (value flashes), then enter
the value read from the flow rate
display.
0.0 gal/min F
max.
0.0 gal/min
Type 1: flow rate value at max.
speed F
max.
(pump 2)
2)
F
min.
999.9
gal/min
0.0 gal/min
Type 1: flow rate value at min.
speed F
min.
(pump 2)
2)
0.0 gal/min F
max.
0.0 gal/min
l
g
Type 2: flow rate of the pulse
water meter in litres/pulse; see
the pulse water meter data
sheet.
1.0 gal...10.0 gal,
1 l, 10 l, 25 l
– gal
(no flow
rate value
selected)
Glycol proportion 0% 60% 40%
Supply sensor input (warm) 1 ... 5 –
Return sensor input (cold) 1 ... 5 –
Page 38

38
742.114 | 14.50
EN
CO2 display on, oFF
oFF
T
T
F
unc
SET
lbs
CO2
/kWh
therm
0.100 2.500 1.918
3)
1)
tyP 1: calculation of the flow rate from the pump speed. To do this, the displayed flow rate values are entered
at two measuring points (pump speed min. and max.).
tyP 2: determining the flow rate using a pulse water meter. The flow rate of the pulse water meter is entered in litres/pulse.
2)
Only for systems with 2 pumps. Enter the displayed flow rate values at F
max./Fmin.
in the same manner as with
type 1, pump 1.
3)
Source: Hawaiian Electric Co., Inc. HECO Residential Rebate Program, Solar water heating system information
sheet (2007): 1.918 Ibs
CO2
/kWh
therm
.
Page 39

39
742.114 | 14.50
EN
10.3.7 Thermostat
Switches an output on and off, depending on the temperature range
of any desired sensor. The function can be time restricted and is set for
heating or cooling as follows:
Heating: The Ton value is set lower than T
off
.
When the sensor temperature drops below Ton, the output is switched on
until the temperature exceeds T
off
.
Cooling: The Ton value is set higher than T
off
.
When the sensor temperature exceeds Ton, the output is switched on
until the temperature drops below T
off
.
Time restriction: The function is executed when the current time lies
within one of 3 configurable time windows.
Note
The Ton value can be set to the same value as T
off
. However, this setting
has no practical application.
Display Characteristic min. max.
Factory
setting
Activation on, oFF
oFF
Output free output R1/R2/R
S
–
Pump type (R1, R2 only) AC, HE
1)
AC
Pump characteristic (HE only) bA, bb, C (see p. 16) –
Sensor input 1 5 –
Switch-on temperature T
on
32 °F 350 °F 70 °F
Switch-off temperature T
off
32 °F 350 °F 70 °F
Time restriction on, oFF
oFF
Time window 1 start/end
Time window 2 start/end
Time window 3 start/end
0:00
0:00
0:00
23:59
23:59
23:59
00:00/00:00
00:00/00:00
00:00/00:00
1)
Notice
Standard pump: Set AC!
High-efficiency pump: Set HE!
External consumer (e.g. 115 V relay): Set AC pump type!
10.3.8 Differential thermostat
Switches an output on and off as follows – time restricted and depending on the set temperature difference between 2 selectable sensors:
When the temperature difference exceeds T
diff on
, the output is switched
on until the temperature difference drops below T
diff off
. In addition to
this, the discharging of the heating source can be limited to a particular
temperature range (T
src min./Tsrc max.
) and the loading of the heating target
can be limited to a maximum value (T
sink max.
).
Time restriction: The function is executed when the current time lies
within one of 3 configurable time windows.
Speed control of the pump can be activated as required. The loading
strategy of the speed control system attempts to regulate the temperature
difference to match the switch-on temperature difference that has been set.
Page 40

40
742.114 | 14.50
EN
Display Characteristic min. max.
Factory
setting
Activation on, oFF
oFF
Output free output R1/R2/R
S
–
Pump type (R1, R2 only) AC, HE
1) 2)
AC
Pump characteristic (HE only) bA, bb, C (see p. 16) –
Speed control (R1, R2 only) on, oFF
2)
oFF
Minimum speed (AC only) 30% 100% 50%
Minimum speed (HE + bA only) 0% 100% 25%
Minimum speed (HE + bb only) 0% 100% 75%
Heat source sensor input 1 ... 5 –
Heat sink sensor input 1 ... 5 –
Switch-on temperature difference
T
diff on
T
diff off
+ 4 F 160 F 12 F
Switch-off temperature difference
T
diff off
0 F T
diff on
– 4 F 6 F
Heat source max. temperature
T
src max.
T
src min.
+ 4 F 350 °F 212 °F
Heat source min. temperature
T
src min.
32 °F T
src max.
– 4 F 32 °F
Heat sink max. temperature T
sink max.
32 °F 200 °F 140 °F
Time restriction on, oFF
oFF
Time window 1 start/end
Time window 2 start/end
Time window 3 start/end
0:00
0:00
0:00
23:59
23:59
23:59
00:00/00:00
00:00/00:00
00:00/00:00
1)
Notice
Standard pump: Set AC!
High-efficiency pump: Set HE!
2)
Notice
External consumer (e.g. 115 V relay): Set AC pump type and set the speed control to oFF!
Page 41
41
742.114 | 14.50
EN
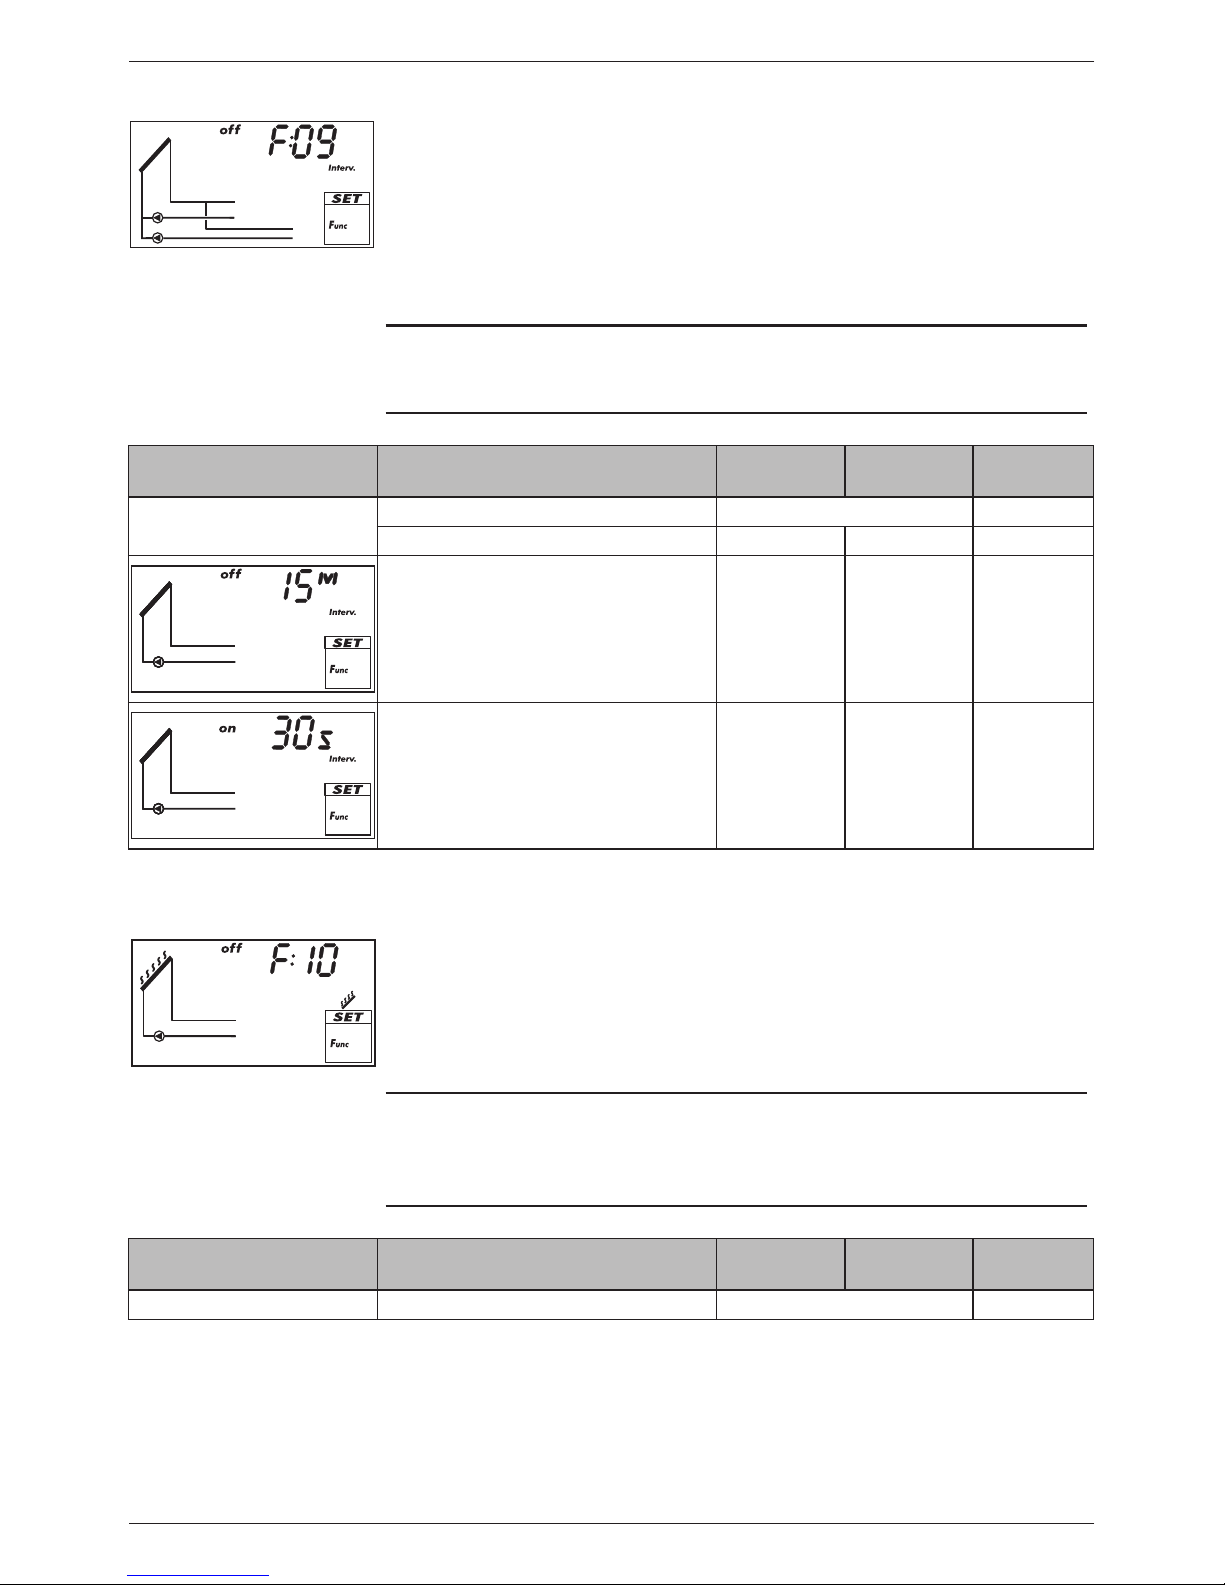
10.3.9 Interval
Periodically switches the solar circuit pump on and off in order to measure the actual collector temperature. The delay between 2 switch-on
operations and the switch-on duration can be set. Applications:
• Collector types where the mechanical construction prevents the
temperature from being measured at a suitable place
• Unsuitable position of the temperature sensor on the collector
The function can be time restricted to prevent unnecessary periodic
operation at night.
Note
This function cannot be active at the same time as the drainback function.
Display Characteristic min. max.
Factory
setting
Activation on, oFF
oFF
Time window start/end 0:00 23:59 08:00/19:00
Wait time 1 min 999 min 15 min
Switch-on duration 3 s 999 s 5 s
10.3.10 Reduction of stagnation phases
Delays the end of the storage tank's loading phase in order to reduce, or
even to avoid, the system standstill (stagnation) times at high temperatures. To do this, the pump is stopped repeatedly, and only briefly
switched on again at high collector temperatures. Since the efficiency
drops heavily at high collector temperatures, the loading takes longer
and possible stagnation occurs later.
Note
This function cannot be activated
• in systems with swimming pools,
• when the drainback function is activated.
Display Characteristic min. max.
Factory
setting
Activation on, oFF
oFF
Page 42

42
742.114 | 14.50
EN
10.3.11 Holiday – recooling
Attempts to reduce, or even to avoid, the system standstill (stagnation)
times at high temperatures. To do this, at night the storage tank – or the
second-priority storage tank if 2 storage tanks are present – is charged
as far as possible to the set minimum temperature, if the storage tank
temperature during the day was 20 F below the set maximum temperature.
Stagnation occurs when not enough hot water is removed from the
system during an absence (holiday).
Notes
The following applies to this function:
• Only activate if you intend to be absent for an extended period.
• Deactivate this after returning from a holiday in order to avoid an
unnecessary waste of energy via the collector circuit.
• This function cannot be activated in systems with swimming pools.
• This function cannot be active at the same time as the drainback
function.
Display Characteristic min. max.
Factory
setting
Activation on, oFF
oFF
Minimum storage tank temperature:
32 °F 200 °F 95 °F
10.3.12 Active cooling
Switches an additional cooler into the solar circuit when one of the following conditions is satisfied:
• The temperature of the storage tank – or of the second-priority
storage tank in the case of 2 storage tanks – lies 20 F below the set
maximum temperature.
• Holiday recooling is performed at night.
Application examples: areas with strong solar irradiation, avoidance of
stagnation.
Note
This function cannot be active at the same time as the drainback function.
Display Characteristic min. max.
Factory
setting
Activation on, oFF
oFF
Output (switching-in of additional
cooler)
free output R1/R2/R
S
–
Page 43

43
742.114 | 14.50
EN
10.3.13 Freeze recirculation
Attempts to prevent freezing of the collectors by pumping heat from the
first-priority storage tank into the collectors:
• The collector temperature is below 40 °F: solar circuit pump is switched on.
• The collector temperature is above 45 °F: solar circuit pump is switched off.
The freeze recirculation function is only useful when the heat transfer
fluid contains insufficient or no anti-freeze. It is recommended to generally use heat transfer fluid with anti-freeze!
Notice
Despite the freeze recirculation function being activated, the solar energy system can freeze under the following conditions:
• The first-priority storage tank is unloaded and a back-up heating
system is not present.
• Heat transfer fluid contains insufficient or no anti-freeze.
• Power outage.
• Unsuitable position of the temperature sensor on the collector.
• Collector sensor or cable is broken or has a short circuit.
• The collectors are installed in a position exposed to the wind.
• Solar circuit pump is faulty.
Note
This function cannot be active at the same time as the drainback function.
Display Characteristic min. max.
Factory
setting
Activation on, oFF
oFF
10.3.14 Display storage tank top
Shows the temperature in the upper region of 1 or 2 storage tanks. For
this, an appropriate sensor must be connected to each tank. The measured temperatures are not used for control purposes.
Display Characteristic min. max.
Factory
setting
Activation on, oFF
oFF
Storage tank 1 upper sensor input 1 ... 5 –
Storage tank 2 upper sensor input
1)
1 ... 5 –
1)
Only for systems with 2 storage tanks
10.3.15 Alarm output
Activates the set output in the case of the following faults:
• Sensor fault due to short-circuit or interruption.
• Clock loses the current time due to an extended power outage.
• Volume flow fault: Er: 1
1)
.
• The electronic overload switch or fuse has triggered: Er: 3 ... Er: 6
1)
.
Page 44

44
742.114 | 14.50
EN
Display Characteristic min. max.
Factory
setting
Activation on, oFF
oFF
Output free output R1/R2/Rs –
Control norm, InV
2)
norm
1)
More information is provided in Section 14.2, p. 50.
2)
norm = normal: contact closes when a fault occurs.
InV = inverted: contact opens when a fault occurs.
Page 45
45
742.114 | 14.50
EN
11 Parameters
Note the following when setting parameters:
• Observe the operating data of the solar components used.
• The individual parameters are only displayed and can be changed when this is per-
mitted by the type of solar energy system that has been set.
Special case: system 0.1 has no parameters; no P is displayed.
• In most applications, the controller can be used without modifying any parameters.
More information is provided in the Functionality column.
The figures in this section show examples.
Display Parameter min. max.
Factory
setting
Functionality
Maximum temperature storage tank 1
32 °F 200 °F 140 °F When the maximum tem-
perature is exceeded, no more
loading occurs until the temperature drops to 6 F below
the set value.
Maximum temperature storage tank 2
32 °F 200 °F 140 °F
Maximum temperature swimming pool
50 °F 115 °F 85 °F When the maximum tem-
perature is exceeded, no more
loading occurs until the tem-
perature drops to 1 F below
the set value.
Switch-on tempera-
ture difference solar
circuit 1
T
P05
+ 4 F 100 F 16 F When the switch-on tem-
perature difference between
collector and storage tank is
reached, the storage tank is
loaded.
Loading ends when the
switch-off temperature differ-
ence is reached.
Switch-off temperature difference solar
circuit 1
0 F T
P04
– 4 F 8 F
Switch-on temperature difference solar
circuit 2
T
P07
+ 4 F 100 F 16 F
Switch-off temperature difference solar
circuit 2
0 F T
P06
– 4 F 8 F
Switch-on temperature difference external heat exchanger
T
P09
+4 F 100 F 12 F When the switch-on tempera-
ture difference between the
secondary side of the external
heat exchanger and the
storage tank is reached, the
storage tank is loaded.
Switch-off tempera-
ture difference external heat exchanger
0 F T
P08
– 4 F 6 F Loading ends when the
switch-off temperature differ-
ence is reached.
Page 46

46
742.114 | 14.50
EN
Display Parameter min. max.
Factory
setting
Functionality
Maximum collector
temperature
T
P11
+ 40 F 350 °F 270 °F When the maximum collector
temperature is exceeded, no
more loading occurs until
the temperature drops to 6 F
below the set value.
Minimum collector
temperature
32 °F T
P10
– 40 F 32 °F Load only starts when the
minimum collector temperature is exceeded.
Switch-on temperature difference heating return increase
T
P13
+ 4 F 100 F 12 F The heating return increase is
switched on (switching valve
on) when the switch-on temperature difference between
the storage tank and heating
return temperature is reached.
Switch-off temperature difference heating return increase
0 F T
P12
– 4 F 6 F When the switch-off tem-
perature difference is reached,
the heating return increase is
switched off.
Maximum temperature loading circuit
T
P15
+ 40 F 270 °F 212 °F The difference between P14
and the temperature of the
secondary side of the heat
exchanger controls the solar
circuit pump and the storage
tank loading pump.
1)
Minimum temperature loading circuit
32 °F T
P14
– 40 F 32 °F The storage tank loading
pump is only switched on
when the secondary side of
the heat exchanger is greater
than or equal to P15.
Loading strategy
storage tank 1
dIFF2), AbS
3)
The loading strategy depends
on the storage tank system
used and the usage of the
system.
diff: highest efficiency. The
control target is the temperature difference between
the collector and the storage
tank.
4)
AbS: Useful when the system
requires particular temperatures, e.g. to avoid switching
on the external back-up heating system.
The control target is the temperature of the collector.
4)
Control target of
differential temperature loading
(dIFF)
4 F 100 F 16 F
Control target of
absolute temperature loading (AbS)
32 °F 200 °F 140 °F
Loading strategy
storage tank 2
dIFF2), AbS
3)
Control target of
differential temperature loading
(dIFF)
4 F 100 F 16 F
Control target of
absolute temperature loading (AbS)
32 °F 200 °F 140 °F
Page 47

47
742.114 | 14.50
EN
Display Parameter min. max.
Factory
setting
Functionality
Pump type R1 AC, HE
AC
Notice
Danger of malfunctions in the
controller or damage to the
components.
HE must be set when using
a high-efficiency pump and
AC must be set when using a
standard pump!
Set speed control to oFF
when an external relay is con-
nected or speed control is not
wanted.
Pump characteristic (HE only)
bA, bb, C (see p. 16) –
Speed control
(R1, R2 only)
on, oFF
oFF
Minimum speed
(AC only)
30% 100% 50%
Minimum speed
(HE + bA only)
0% 100% 25%
Minimum speed
(HE + bb only)
0% 100% 75%
Pump type R2 AC, HE
AC
Pump characteristic (HE only)
bA, bb, C (see p. 16) –
Speed control
(R1, R2 only)
on, oFF
oFF
Minimum speed
(AC only)
30% 100% 50%
Minimum speed
(HE + bA only)
0% 100% 25%
Minimum speed
(HE + bb only)
0% 100% 75%
Control of the storage tank loading
valve
norm, InV
norm
norm (normal) must be set
when the valve has been
installed according to the
installation instructions in Sec-
tion 4.4, p. 10.
InV (inverted) must be set
when the valve has been
installed in a different way
compared to the installation
instructions.
Control of the zone
loading valve
norm, InV
norm
Control of the return
increase
norm, InV
norm
Tab. 3: Parameters
1)
When the secondary side of the heat exchanger reaches 6 F below P14, the solar circuit pump is
switched off. At 20 F below P14, the solar circuit pump is switched on again.
When the secondary side of the heat exchanger reaches P14, the storage tank loading pump is
switched off. Below P14, the storage tank loading pump is switched on again.
2)
diFF is a fixed value for swimming pools.
3)
The factory setting depends on the system that has been set.
4)
The pump speed is adjusted accordingly to achieve the control target.
Page 48

48
742.114 | 14.50
EN
12 Dismantling and disposal
Danger
Risk of death by electrocution!
• Disconnect the device from the power supply before opening the casing.
• All work on an open device must be performed by professional personnel.
1. To dismantle the controller, follow the installation instructions in the reverse order;
see Section 4.
2. Dispose of the device in accordance with the local regulations.
13 Info messages
Display Description
The maximum collector temperature has been reached; the
solar circuit pump in the respective solar circuit has been
switched off.
The symbols in the status display flash when the temperature
of the respective collector is selected.
The maximum collector temperature has been reached; the
solar circuit pump in the respective solar circuit has been
switched off.
is shown in the status display when the temperature of
the respective collector is not selected.
The maximum storage tank temperature has been reached.
The symbols in the status display flash when the temperature
of the respective storage tank is selected.
Tab. 4: Info messages
Page 49

49
742.114 | 14.50
EN
14 Troubleshooting
Danger
Risk of death by electrocution!
• Immediately disconnect the device from the mains supply when it can no longer be
operated safely, e.g. in the case of visible damage.
• Disconnect the device from the mains power before opening the casing.
• All work on an open device must be performed by professional personnel.
Note
The controller is a quality product, conceived for years of continuous trouble-free operation. Observe the following points:
• Faults are often caused by connected components and not by the controller.
• The following notes on fault identification indicate the most common causes of
faults.
• Only return the controller when you are absolutely sure that none of the problems
listed below is responsible for the fault.
14.1 General faults
Display Possible cause Remedy
Controller not functioning at all
Display empty/
dark
Controller power supply is interrupted. • Check the controller power cable.
• Check the fuse for the power
supply.
Controller constantly displays 12:00
12 flashes. Controller power supply was interrupted
for longer than 15 minutes.
Set the time.
Solar circuit pump not operating + switch-on condition is fulfilled
Pump power supply is interrupted. Check the pump power cable.
Pump has seized up. Get the pump working again,
replace if necessary.
• The maximum storage tank temperature has been reached.
• The maximum collector temperature
has been reached.
• In multi storage tank systems: the system has stopped due to a priority test.
• The minimum collector temperature
has not been reached.
• The maximum loading temperature
has been reached.
• Stagnation reduction is activated and is
actively intervening in the control process.
• The storage tank has been deactivated
in the priority settings.
No fault.
flashes
Pump has been switched off in manual
mode (off).
• No fault.
• Switch to automatic mode if
necessary.
Page 50

50
742.114 | 14.50
EN
Display Possible cause Remedy
Solar circuit pump is operating + switch-on condition not fulfilled
• The following functions are activated
and are actively intervening in the
control process:
– Interval function
– Holiday function
– Freeze recirculation function
• Blockage protection for the pumps is
being performed.
• No fault.
• Deactivate the relevant func-
tion, if necessary.
flashes
Pump has been switched on in manual
mode (on).
• No fault.
• Switch to automatic mode if
necessary.
Solar circuit pump is operating + switch-on condition is fulfilled + no heat transport in the
solar circuit (no heat transfer fluid circulation)
Air is in the solar circuit. Check the solar circuit for air.
The isolating valve is closed. Check the isolating valve.
Limescale or contamination in solar circuit. Clean the solar circuit (flush).
Solar circuit pump shows cycle behaviour
Temperature difference too small. Adjust temperature difference in
the Parameters settings menu.
Collector sensor incorrectly positioned. Check the position of the collector
sensor and correct if necessary.
Tab. 5: General faults
14.2 Error messages
When an error message is displayed and no button has been pressed for 5 minutes, the
backlighting turns red and starts flashing.
The figures in this section show example systems.
Error message Description Remedy
An interruption was detected at the
displayed sensor input (in this case:
sensor input 2).
Check the cable and
sensor connected to
the sensor input.
A short-circuit was detected at the
displayed sensor input (in this case:
sensor input 2).
Check the cable and
sensor connected to
the sensor input.
Page 51

51
742.114 | 14.50
EN
The controller has detected a flow
rate fault in the primary or secondary
circuit. A permanently high temperature difference exists between
the heat source and loading target.
Primary and secondary circuit pumps
are flashing. Possible causes:
• Air in system.
• The isolating valve is closed.
• The pump is faulty.
• Bleed air from the
system.
• Check the isolating valve.
• Check the pump.
The controller has detected faulty
operation of the system. This is probably caused by swapped collector
connections.
Check the collector
connections.
A short-circuit exists at output R1; the
pump connected to output R1 flashes.
Possible causes:
• The pump is faulty.
• Wiring fault.
• Check the pump.
• Check the wiring
from R1.
Output R1 is overloaded; the pump
connected to output R1 flashes.
Cause: The permissible values for R1
specified on the type plate have been
permanently exceeded; the output has
been switched off.
Check the electrical
data of the pump;
replace pump if
necessary. R1 is automatically switched on
again.
A short-circuit exists at output R2; the
pump connected to output R2 flashes.
Possible causes:
• The pump is faulty.
• Wiring fault.
• Check the pump.
• Check the wiring
from R2.
Output R2 is overloaded; the pump
connected to output R2 flashes.
Cause: The permissible values for R2
specified on the type plate have been
permanently exceeded; the output has
been switched off.
Check the electrical
data of the pump;
replace pump if
necessary. R2 is automatically switched on
again.
Tab. 6: Error messages
Page 52

52
742.114 | 14.50
EN
14.3 Checking the Pt1000 temperature sensor
Danger
Risk of death by electrocution! Before opening the device, make sure that all cables
leading to the device have been disconnected from the mains power and cannot be
unintentionally reconnected to the mains power.
1. Remove the terminal cover.
2. Disconnect the temperature sensor.
3. Measure the resistance of the temperature sensor with an ohmmeter and compare
with the following table. Small deviations are acceptable.
4. Mount the terminal cover.
Temperature-resistance assignments
Temperature [°F] –22 –4 14 32 50 68 86 104 122 140 158
Temperature [°C] –30 –20 –10 0 10 20 30 40 50 60 70
Resistance[Ω] 882 922 961 1000 1039 1078 1117 1155 1194 1232 1271
Temperature [°F] 176 194 212 230 248 266 284 302 320 338 356
Temperature [°C] 80 90 100 110 120 130 140 150 160 170 180
Resistance[Ω] 1309 1347 1385 1423 1461 1498 1536 1573 1611 1648 1685
Tab. 7: Temperature-resistance assignment with Pt1000 temperature sensors
Page 53

53
742.114 | 14.50
EN
15 Technical data
15.1 Controller
Inputs/outputs
Rated voltage (system voltage) 115 ... 230 V~, 50/60 Hz
Own consumption ≤0.8W,twoPt1000temperaturesensorsconnected
Outputs R1, R2
Quantity
Type
Switching current
Voltage
2
TRIAC
1.1 (1.1) A each
115 ... 230 V~, 50/60 Hz
Signal inputs/outputs
Signal inputs 1 ... 5
Quantity
Type of signal inputs 1 ... 4
Type of signal input 5
5
Pt1000 (temperature acquisition)
Pt1000 (temperature acquisition) or
pulse water meter using 1 gal/pulse, 2 gal/pulse,
5 gal/pulse, 10 gal/pulse, 1 l/pulse, 10 l/pulse, 25 l/pulse
(flow rate acquisition)
Signal output R
S
Type
Max. contact load
potential-free NO contact
1 (0) A, 24 V
Signal outputs 0–10 R1, 0–10 R2
Type
Min. working resistance
0 – 10 V
10kΩ
Interfaces
TTL interface
Type
Application
6-pin strip
connection of a TTL/USB interface cable; further information can be obtained from your dealer
Hydraulic schemes (systems)
Quantity 11
Display
Type LCD display with backlighting
Application conditions
Degree of protection IP22, DIN 40050 (without front panel: IP20)
Protection class I
Ambient temperature 32 ... 122 °F, when wall-mounted
Physical specifications
Dimensions L x W x H 110 x 160 x 51 mm (4.33 x 6.30 x 2.01 inch)
Weight 370 g (0.82 lbs)
Software class A
Type of action type 1.Y
Type of fastening for permanently
connected cables
type X
Degree of pollution 2
Ball pressure test temperature Casing pan: 257 °F
Other casing parts: 167 °F
Overvoltage category class II (2500 V)
Tab. 8: Technical controller data
Page 54

54
742.114 | 14.50
EN
15.2 Cable specifications
Mains cable
Mains cable type
External diameter of mantle
Conductor cross-section
Single strand (solid)
Fine strand (with core end sleeves)
H05 VV-... (NYM…)
6.5 to 10 mm (0.25 to 0.4 inch)
≤2.5mm
2
(#AWG 14)
≤1.5mm2 (#AWG 16)
Diameter of the internal strain relief 6.5 to 10 mm (0.25 to 0.4 inch)
Signal cable
Sensor cable length ≤100m(330ft.),includingextension
Sensor extension cable
Design
Cross-section of each conductor
twisted-pair conductors for lengths > 10 m (33 ft.)
0.75 mm
2
(#AWG 18) for lengths < 50 m (165 ft.)
1.50 mm
2
(#AWG 16) for lengths > 50 m (165 ft.)
Tab. 9: Technical data of the cables connected to the controller
16 Exclusion of liability
The manufacturer can neither monitor the compliance with this manual nor the conditions and methods during the installation, operation, usage and maintenance of the
controller. Improper installation of the system may result in damage to property and, as
a result, to bodily injury.
Therefore, the manufacturer assumes no responsibility and liability for loss, damage or
costs which result from or are in any way related to incorrect installation, improper operation, incorrect execution of installation work and incorrect usage and maintenance.
Similarly, we assume no responsibility for patent right or other right infringements of
third parties caused by usage of this controller.
The manufacturer reserves the right to make changes to the product, technical data or
installation and operating instructions without prior notice.
17 Legal guarantee
In accordance with German statutory regulations, there is a 2-year legal guarantee on
this product for the customer.
The seller will remove all manufacturing and material faults that occur in the product
during the guarantee period and affect the correct functioning of the product. Natural
wear and tear does not constitute a malfunction. No legal guarantee can be offered if
the fault can be attributed to third parties, unprofessional installation or commissioning,
incorrect or negligent handling, improper transport, excessive loading, use of improper
equipment, faulty construction work, unsuitable construction location or improper operation or use. Legal guarantee claims shall only be accepted if notification of the fault
is provided immediately after it is discovered. Guarantee claims are to be directed to the
seller.
The seller must be informed before guarantee claims are processed. For processing
a guarantee claim, an exact fault description and the invoice / delivery note must
be provided.
The seller can choose to fulfil the legal guarantee either by repair or replacement. If the
product can neither be repaired nor replaced, or if this does not occur within a suitable
period in spite of the specification of an extension period in writing by the customer, the
reduction in value caused by the fault shall be replaced, or, if this is not sufficient taking
the interests of the end customer into consideration, the contract is cancelled.
Any further claims against the seller based on this legal guarantee obligation, in particular claims for damages due to lost profit, loss-of-use or indirect damages are excluded,
unless liability is obligatory by law.
Page 55

55
742.114 | 14.50
EN
18 Notes
...........................................................................................................................................
...........................................................................................................................................
...........................................................................................................................................
...........................................................................................................................................
...........................................................................................................................................
...........................................................................................................................................
...........................................................................................................................................
...........................................................................................................................................
...........................................................................................................................................
...........................................................................................................................................
...........................................................................................................................................
...........................................................................................................................................
...........................................................................................................................................
...........................................................................................................................................
...........................................................................................................................................
...........................................................................................................................................
...........................................................................................................................................
...........................................................................................................................................
...........................................................................................................................................
...........................................................................................................................................
...........................................................................................................................................
...........................................................................................................................................
Page 56

742114
 Loading...