

Page 1
Pikkolo Basic Pikkolo 60 T 3
- I - TERMOVENTILATORE
- GB - FAN HEATER
- NL - VENTILATORKACHEL
- D - HEIZLÜFTER
- F - RADIATEUR SOUFFLANT
- E - CALEFACTOR
- Conservare il presente libretto di istruzioni p er ulteriori cons ultazioni future.
- Please retain this instructions in a safe place for future reference.
- Bewahren Si e diese Gebrauchs anweisung für eine spätere Benutzung
sorgfältig au f.
- Bewaar deze gebruiksaanwijzing voor een later gebru ik.
- Conserver cette notice pour une utilisation ulterieure.
- Conservar las instruc cione de uso.
Gebrauchsanweisung
Instructions for use
Istruzioni per l’uso
Mode d´emploi
Gebruiksaanwijzing
Page 2
2
3
1 2
3
4
min
15cm
min. 50cm
min
15cm
min. 15cm
min. 15cm
105mm
175mm
5
Page 3
4
5
-- D -- GEBRAUCHSANWEISUNG
3. Safe positioning
Only ever use the appliance in an upright position;
When portable, always maintain a distance of at least 1m between the product and any inflammable
object/surface.
When the product is wall mounted, make sure that the minimum distances reported in pictures 1 and
2 are respected. Do not place the heater so that the air flow blows directly towards the wall.
As the heater is a class 2 product, earth connection is not required.
The heater has an IPX1 protection level against water and, if wall mounted may be installed in
bathrooms. In any case you have to respect the national installation standard and safety requirements
valid in your State.
Never install/use this appliance in the Zones 0, 1 or 2 illustrated in picture 3:
On no account must any switch / button be accessible by people in the shower or in the bathtub.
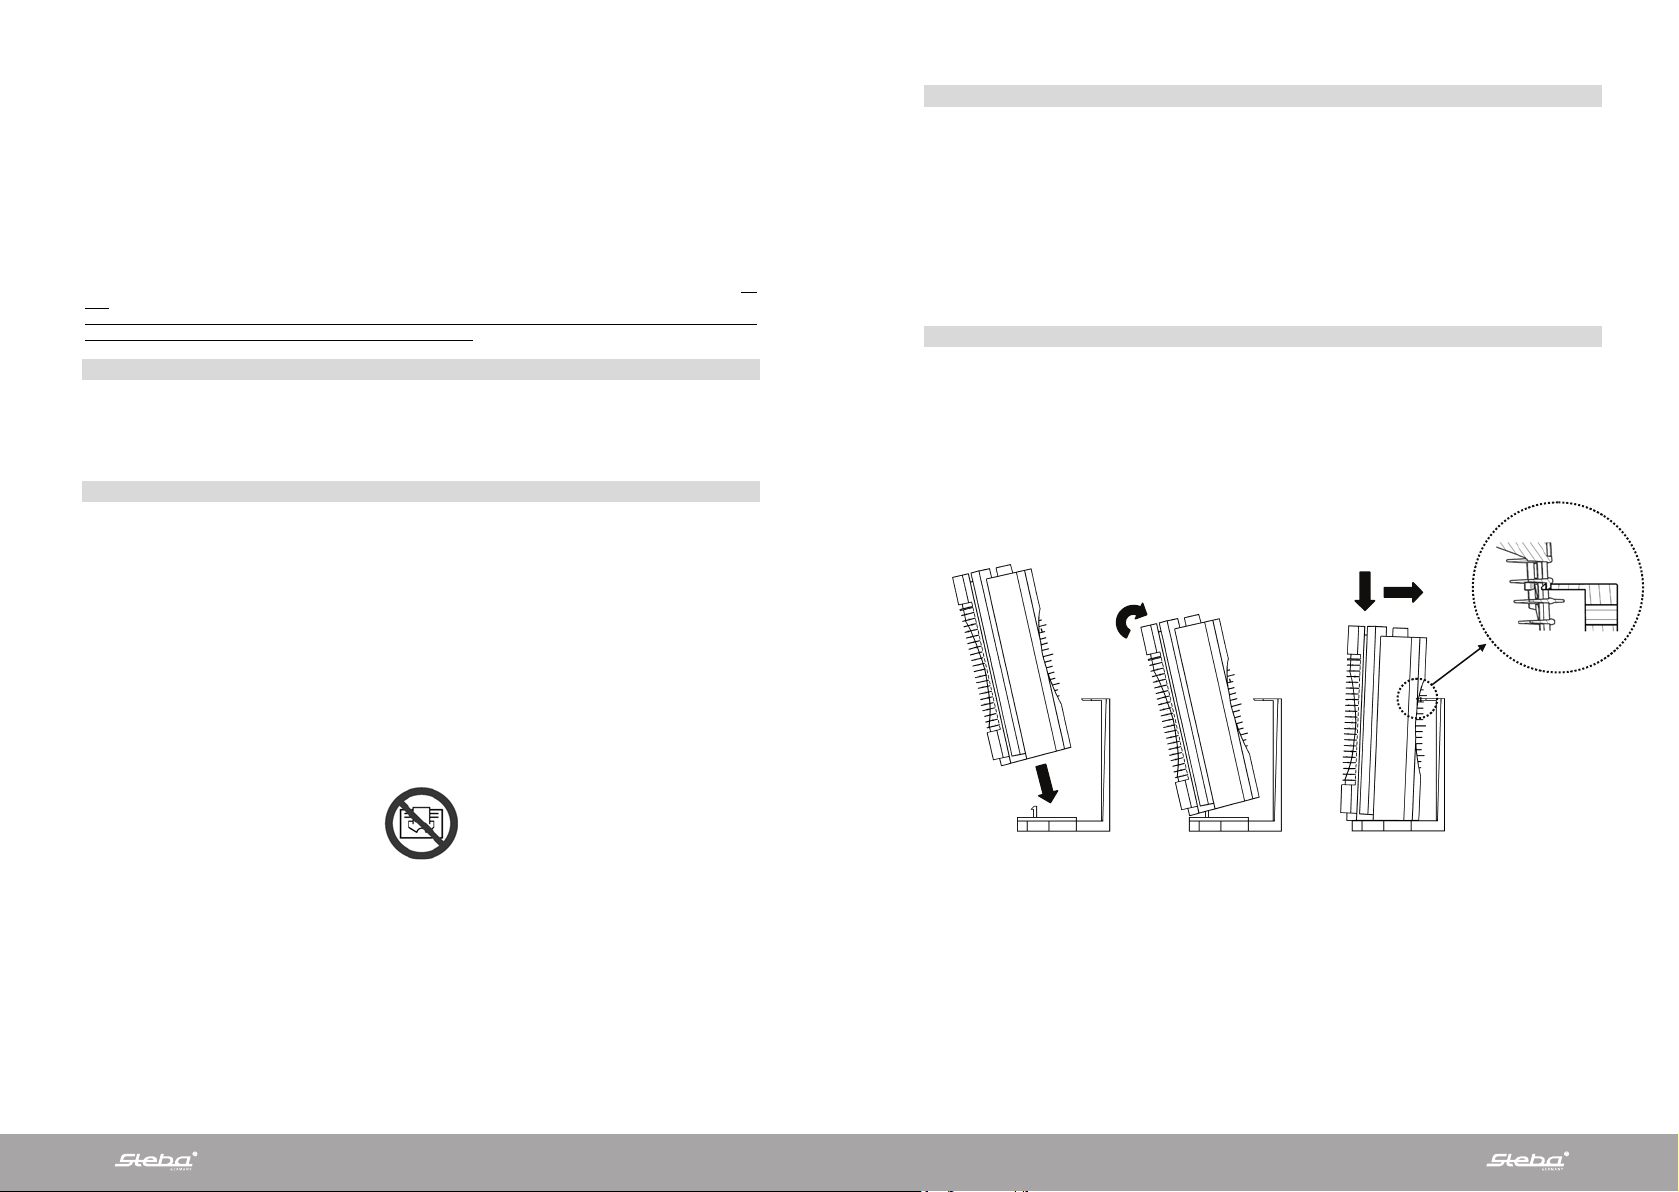
4. Wall mounting
After carefully reading section 3, proceed with installation following the sequence shown in picture 4.
To hang on the product proceed as follows:
- Lay the base of the product on the base of the wall bracket coupling the plastic ribs created to
make the lodging easier;
- Push a little bit the product downwards and move the upper side of the product near the bracket;
- Check that the upper holed rib of the bracket fits the dedicated pivot created on the back grid of
the heater. Moderately shake the heater after installation to be sure it is correctly fixed.
1
2
3
4
click!
termoventilatore ad un centro di riparazioni qualificato perché è richiesto l’intervento di personale
specializzato al fine di evitare qualunque rischio di danneggiamento.
altre sostanze;
con superfici taglienti.
raggiungibile.
infiammabile;
prodotto in modo tale che il flusso d'aria colpisca direttamente il muro.
collegamento di terra.
fissaggio a muro e, in tale caso, è installabile anche nei bagni. In ogni caso l’installazione deve essere
eseguita in accordo alla normativa nazionale valida nel vostro paese.
all’interno della vasca da bagno o della doccia.
le istruzioni indicate in figura 4.
- Appoggiate il prodotto alla base del supporto facendo accoppiare le nervature plastiche create
per semplificare il posizionamento;
- Premere leggermente il prodotto verso il basso e avvicinarne la parte superiore alla staffa di
fissaggio;
- Controllare che la linguetta forata del supporto murale si sia correttamente agganciata alla
nervatura presente sulla griglia posteriore del prodotto. Dopo ogni installazione scuotere
lievemente il prodotto per assicurarsi che sia ben agganciato.
1
2
3
4
click!
Diese Anweisungen lesen Sie bitte sorgfältig vor dem Gebrauch des Heizlüfters, um Schaden
und gefährliche Situationen zu vermeiden. Jeglicher andere Gebrauch des Heizlüfters als der hier
in dieser Anleitung vorgeschriebene, kann Brände, elektrische Schläge oder Verletzungen herbeiführen, und führt zum Erlöschen jeglicher Garantieansprüche.
Garantie wird nicht übernommen für jeglichen Defekt, Mangel, Verlust, Beschädigung oder Schaden, welche
durch den falschen Gebrauch oder Missbrauch des Heizlüfters verursacht oder herbeigeführt wurden. Nationale Gesetze werden nicht beeinträchtigt. Keine der Bedingungen dieser Garantie schließt Bedingungen
oder Gewährleistungen aus, die in nationalen Gesetzen geregelt sind und nicht ausgeschlossen oder verändert werden dürfen.
Vor dem Gebrauch die Verpackung entfernen und die Intaktheit des Produkts prüfen. Im Falle von Defekten
oder Schäden nicht versuchen, das Gerät selbst zu reparieren; wenden Sie sich stattdessen an Ihren Händler.
Verhindern Sie, dass Kinder mit der Verpackung spielen und schützen Sie die Umwelt durch Entsorgung der
Verpackung gemäß den nationalen Bestimmungen der Müllverwertung.
1. Ihr Produkt
Das Produkt wird ohne Zubehör verkauft.
Abhängig vom Gerätetyp kann eine Halterung für die Wandmontage auf der Rückseite des Produkts
vorhanden sein. Um es an der Wand zu befestigen, sollten Sie die beigefügten Nylondübel und Kreuzschlitzschrauben verwenden.
Kontaktieren Sie sofort Ihren Händler, falls das Produkt beschädigt ist oder die Halterung fehlt.
2. Zu Ihrer eigenen Sicherheit
Der Heizlüfter ist eine zusätzliche Heizquelle und darf allein zu diesem Zweck verwendet werden
Die Bemessungsspannung des Stroms muss den Daten auf dem Typenschild entsprechen, z.B. 230 V AC, 50
Hz.
Verlassen Sie nicht das Haus während das Gerät in Betrieb ist: der Schalter oder der Timer müssen hierbei
immer auf Position „0“ sein, und das Thermostat auf das Minimum „*“ gesetzt.
Schalten Sie das Gerät aus und ziehen Sie den Stecker, wenn Sie es für längere Zeit nicht verwenden.
Während des Betriebs, den Heizlüfter in eine sichere Position stellen:
- wenigstens 1,0 m entfernt von brennbaren Gegenständen oder Möbeln;
- bei Wandinstallation: nicht auf Kunststoffoberflächen anbringen
- die Abluftschlitze freilassen: 1,0 m freier Raum vor dem Gerät und 0,5 m freier Raum dahinter
- nie direkt unterhalb einer Steckdose anbringen
Lassen Sie niemals Tiere oder Kinder das Gerät anfassen oder mit ihm spielen. Vorsicht: das Lüftungsgitter
wird während des Betriebs sehr heiß (mehr als 80°C/176°F).
Warnung: um eine Überhitzung zu vermeiden niemals den Heizlüfter abdecken. Hängen Sie
nichts über das Gerät und bedecken Sie es nicht, während es ein ist. Sie können dies deutlich der Produktaufschrift entnehmen oder dem Symbol
Dieses Produkt darf nicht verwendet werden von Menschen (einschließlich Kindern) mit eingeschränk-
ten körperlichen, sensorischen und geistigen Fähigkeiten, oder von Menschen mit unangemessener
Erfahrung und Kenntnissen, sofern diese nicht von einer zuständigen Person überwacht werden oder von
dieser Person angemessen über Sicherheit unterrichtet wurden. Kinder müssen beaufsichtigt werden,
damit sichergestellt ist, dass diese nicht mit dem Produkt spielen.
Den Heizlüfter keinesfalls benutzen, wenn sich explosive Gase, Lösungsmittel- oder Lackdämpfe oder
allgemein brennbare Dämpfe und Gase in der Luft befinden.
Niemals beschädigte Kabel selbst ersetzen! Um Schaden abzuwenden, lassen Sie besser die Reparatur bei
einem zugelassenen Reparaturdienst von einem Fachmann durchführen.
Verwenden Sie den Heizlüfter nicht in der Nähe von Duschen, Bädern, Wasserbecken oder Pools.
Reinigen Sie niemals das Gerät, während dieses eingesteckt ist; tauchen Sie es nie in Wasser.
Wickeln Sie niemals das Kabel um das eingeschaltete Gerät und ziehen sie es nicht über scharfe Kanten.
Das Gerät muss so aufgestellt werden, dass der Netzstecker immer zugänglich ist.
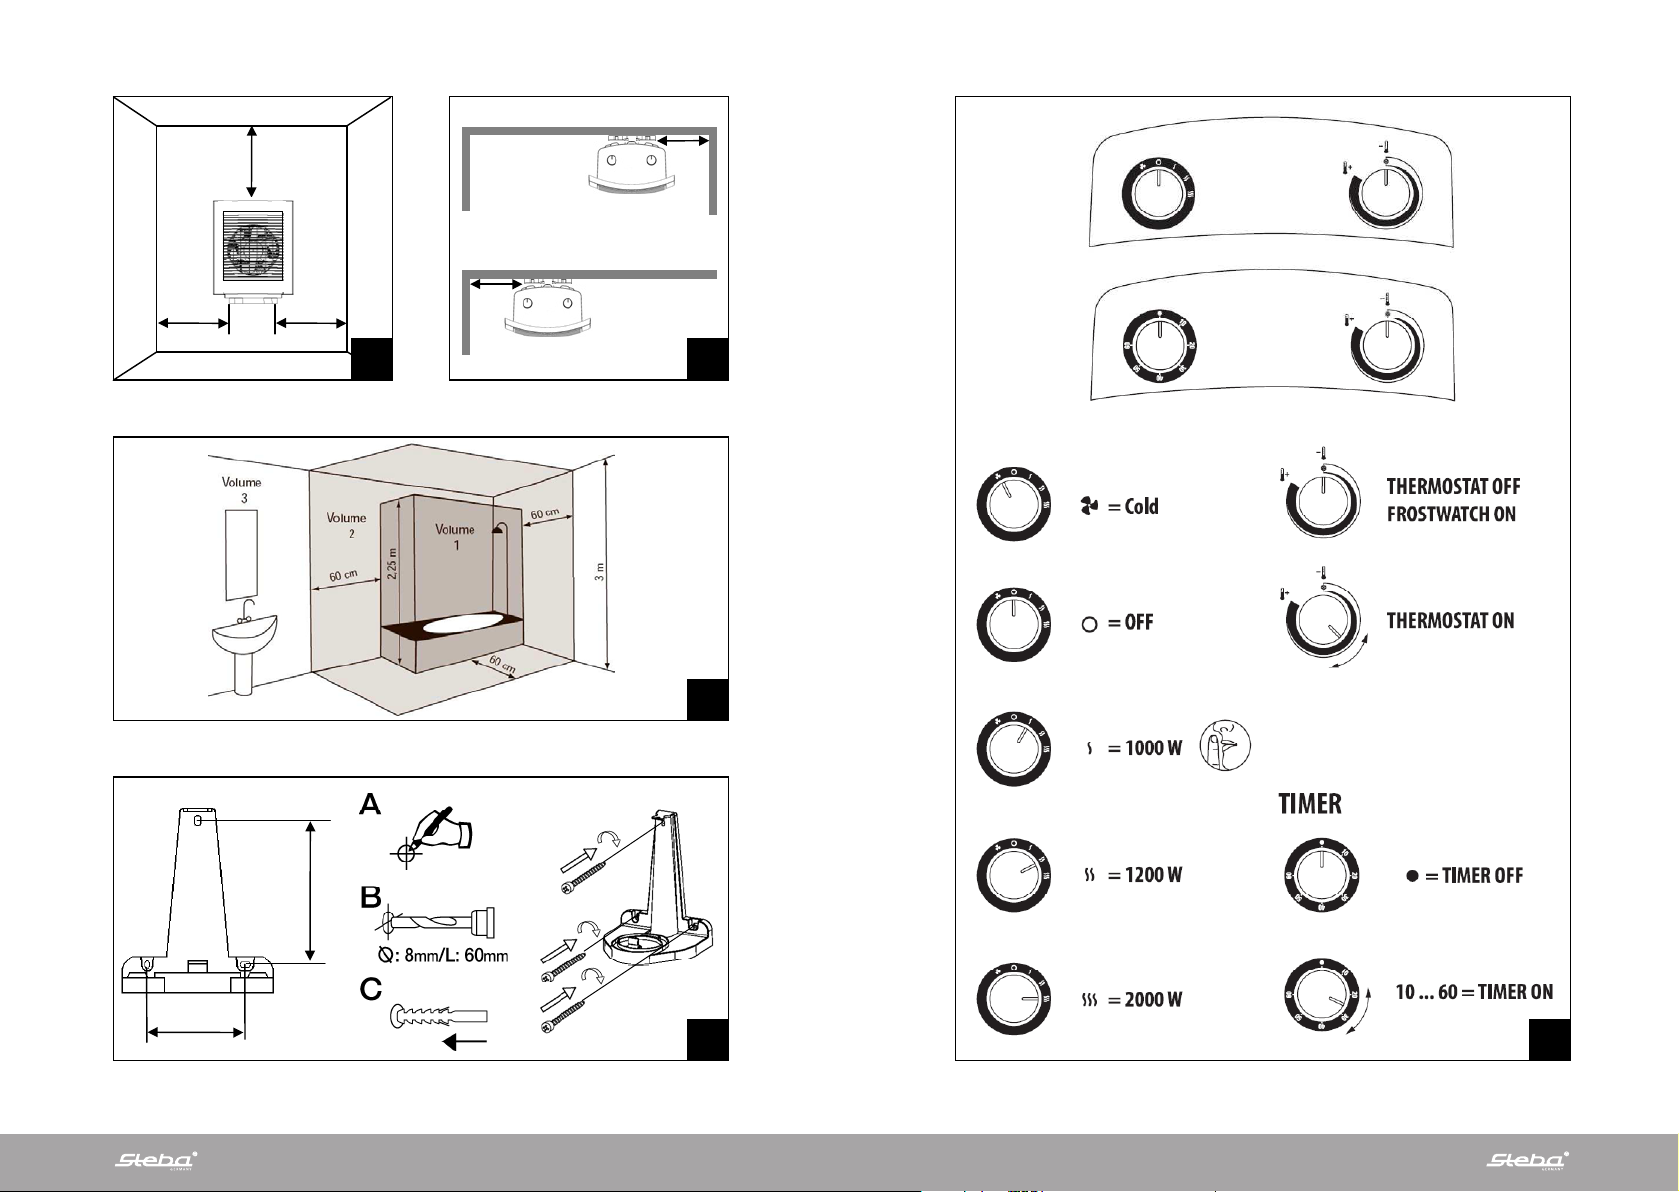
3. Sicheres Aufstellen
Das Gerät darf nur senkrecht aufgestellt werden.
Bei tragbaren Geräten immer einen Mindestabstand von 1,0 m zwischen dem Produkt und allen brennba-
ren Gegenständen/ Oberflächen einhalten.
Bei Wandbefestigung ist für die Mindestabstände (siehe Bild 1 und 2) zu sorgen. Den Heizlüfter nicht so
platzieren, dass der Luftstrom direkt gegen die Wand geht.
Da dieser Heizlüf ter ein Produkt der Klasse 2 ist, ist kein Erdanschluss erforderlich.
Das Gerät hat einen IPX1-Schutz gegen Wasser und darf bei Wandinstallation in Nasszellen eingesetzt
werden. Sie müssen immer die nationalen Installationsvorschriften und Sicherheitsbestimmungen einhalten.
Das Gerät darf nie in den Zonen 0, 1 oder 2 installiert/ verwendet werden (siehe Bild 3).
Keinesfalls dürfen Schalter oder Knöpfe von der Dusche oder von der Badewanne aus erreichbar sein.
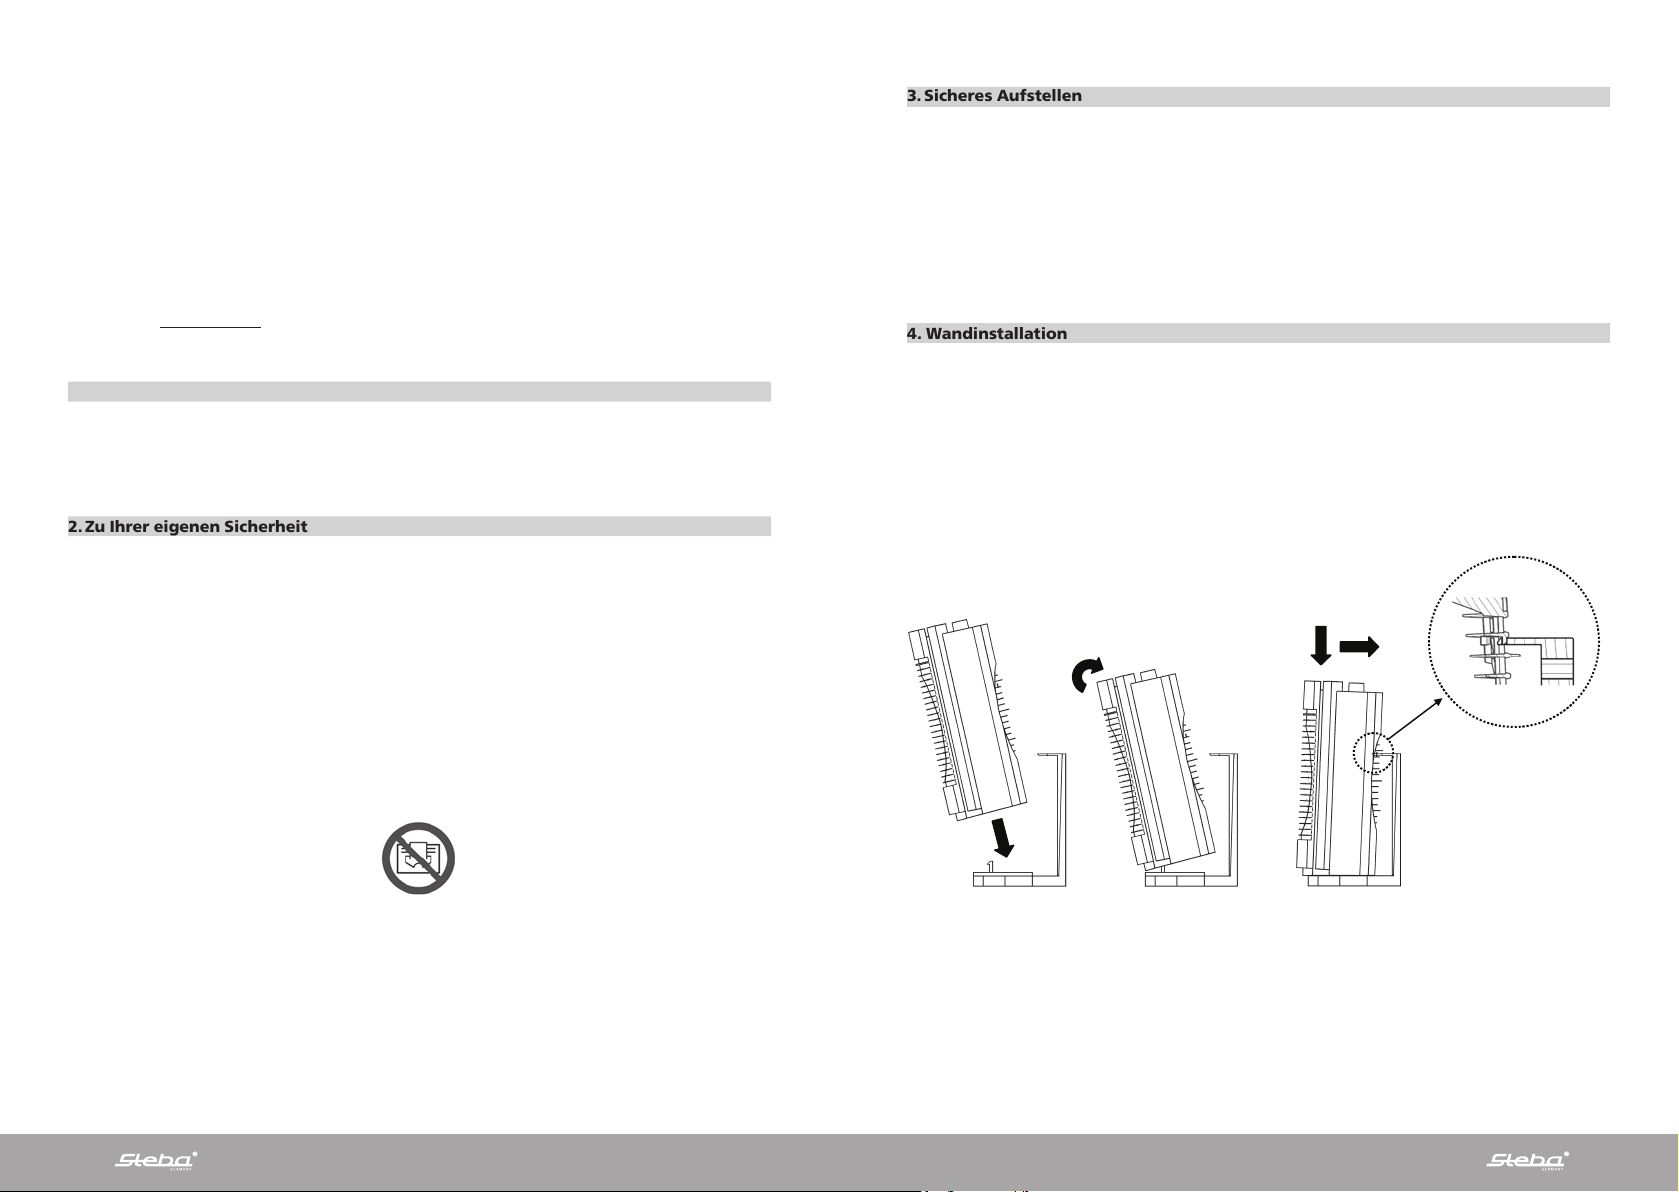
4. Wandinstallation
Nachdem Sie Abschnitt 3. sorgfältig gelesen haben, können Sie mit der Installation gemäß Anleitung in
Bild 4 for tfahren.
Um das Gerät aufzuhängen, verfahren Sie bitte wie folgt:
- Stellen Sie den Fuß des Gerätes auf die Wandhalterung und verbinden Sie die Kunststoff-rippen, die die
Positionierung vereinfachen.
- Schieben Sie das Gerät ein bisschen nach unten und bewegen Sie die Oberseite zur Halterung.
- Prüfen Sie, dass die obere gelochte Rippe der Halterung in den vorgesehenen Stift am rückseitigen
Gitter des Heizlüfters passt.
- Schütteln Sie nach der Installation den Heizlüfter leicht, um zu gewährleisten, dass er richtig befestigt
ist.
Page 4
6
7
Um das Gerät aus der Halterung zu lösen, gehen Sie wie folgt vor: # Schieben Sie mit der Hand die obere
7. Safety in the event of the product not functioning normally
In the event of overheating, the safety system will automatically turn off the heating elements and the
motor. If this happens:
- switch off the fan heater using the main switch;
- remove the cause of overheating (i.e. obstacles in front of the air inlet or air outlet grilles, unusual
accumulations of dirt, etc);
- let the heater cool down for 15/20 minutes;
L
N
Electrical
Phase = brown
Neutral = blue
Product’s
Rippe der Halterung kräftig genug nach unten, um das Gerät zu lösen und ziehen sie dieses nach oben.
Wenn das Gerät oben heraußen ist, ziehen Sie es nach oben um es von der Wandhalterung zu entfernen.
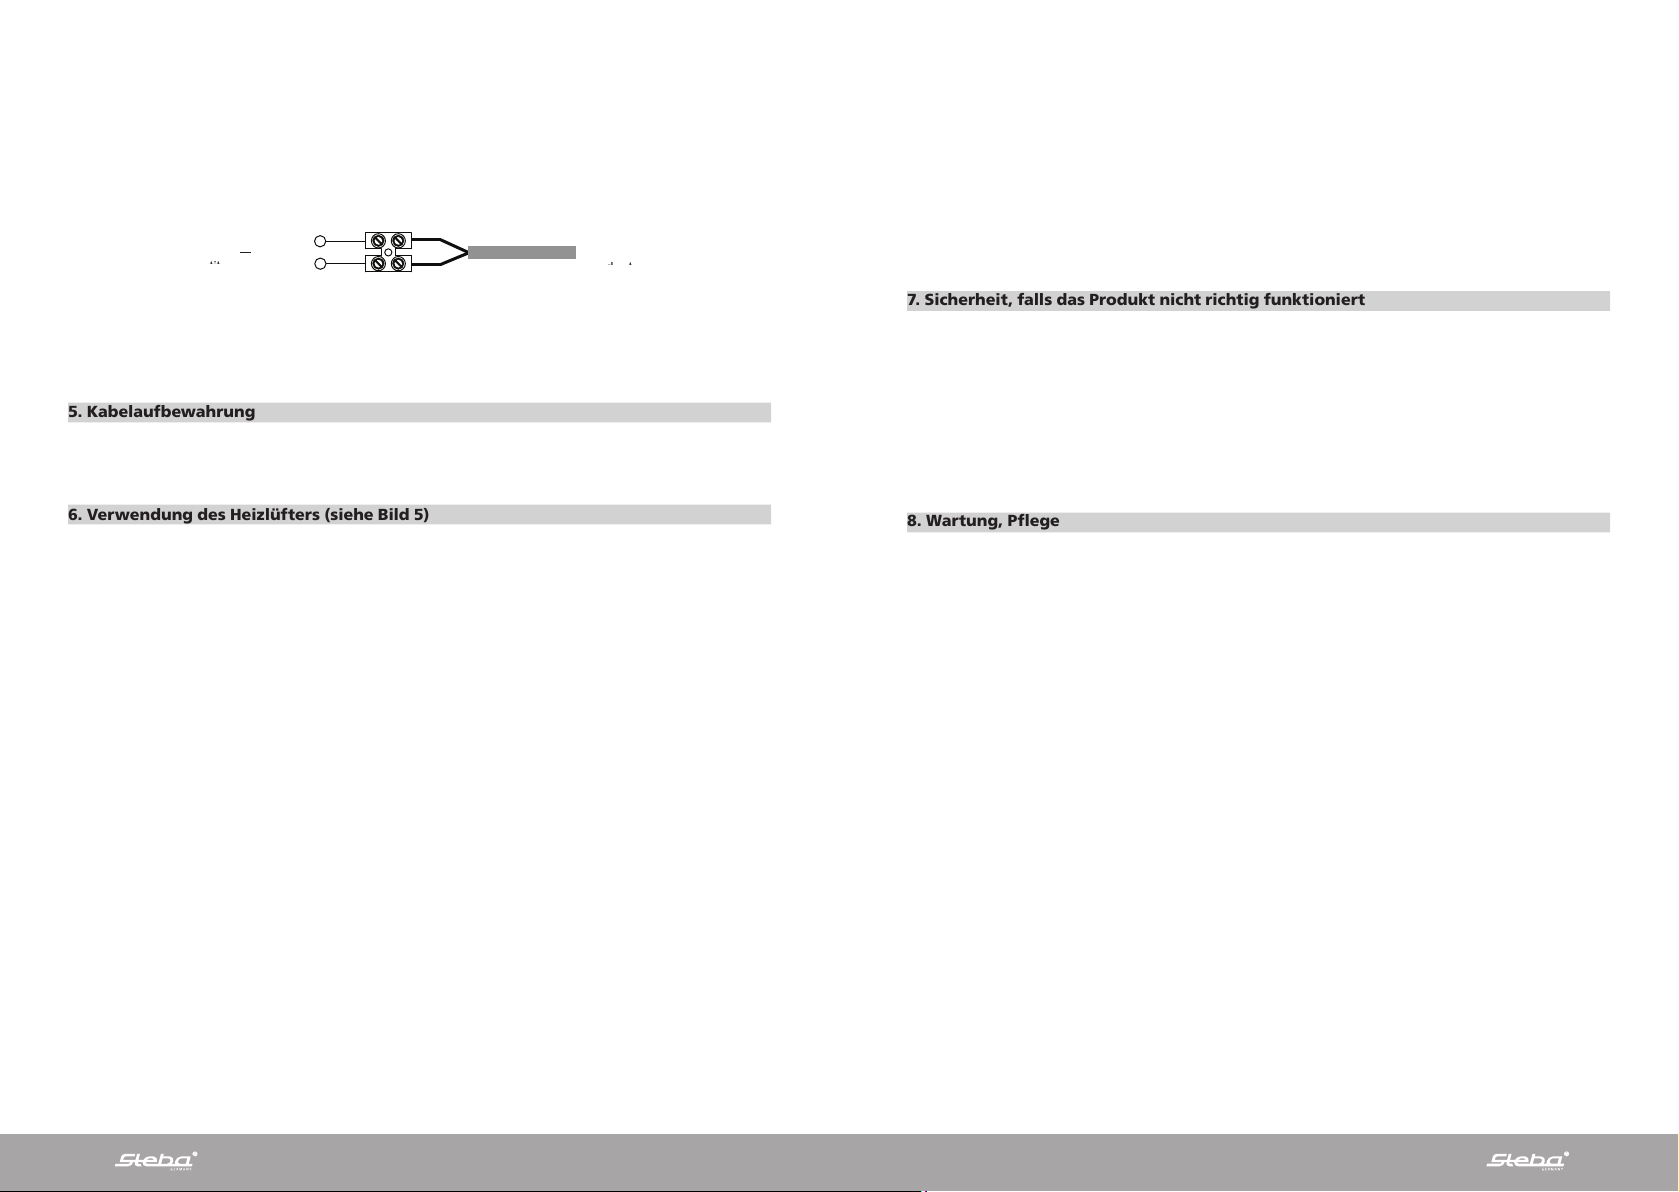
Wichtig für Frankreich: Wenn das Gerät an der Wand montiert ist, muss die elektrische Verbindung
gemäß beigefügtem Bild erstellt werden: das Kabel muss eingeschnitten werden und ein Anschlussblock
zwischen dem Gerätekabel und der Stromquelle geschalten werden
In Feuchträumen, Badezimmern oder Küchen muss dieser Anschlussblock wenigstens 0,25 m vom Boden
entfernt installiert werden. Der elektrische Anschluss muss auch die Verwendung eines 2-poligen Schalters beinhalten; hierbei ist ein Kontaktöffnungsabstand von mindestens 3mm erforderlich,
5. Kabelaufbewahrung
Wenn das Gerät außer Betrieb ist, können Sie das Kabel in den Fuß des Gerätes schieben.
Bitte beachten Sie, dass das Kabel bei Betrieb immer komplett ausgerollt sein muss.
6. Verwendung des Heizlüfters (siehe Bild 5)
6.1 Type mit Schalter und Thermostat
Das Gerät hat 2 Knöpfe, die den Schalter und das Thermostat kontrollieren.
Der Schalterknopf hat 5 Positionen, mit denen man die gewünschte Geräteleistung einstellen kann.
Drehen Sie den Thermostatknopf ausgehend von der Position „*“ im Uhrzeiger-sinn bis sie ein Klicken
hören: das Gerät schaltet sich mit der gewünschten Leistung ein.
Das Thermostat schafft die gewünschte Raumtemperatur und schaltet das Gerät automatisch ein und aus.
Je weiter der Knopf im Uhrzeigersinn gedreht ist, desto höher wird die eingestellte Raumtemperatur. Die
Maximalleistung des Thermostats liegt bei etwa 30°C; die Position „*“ entspricht etwa 5°C.
Für die korrekte Bedienung des Thermostats siehe Abschnitt 6.3: „Bedienung des Thermostats“.
6.3 Bedienung des Thermostats
In einem Raum mit zu hoher Temperatur (höher als 30°C) ist es normal, dass das Thermostat nicht den
Heizlüfter einschaltet.
In einem Raum mit zu niedriger Temperatur (5°C oder gar weniger) ist es auch normal, dass das Thermos-
tat das Gerät dauernd laufen lässt bis sich die Raumtemperatur erhöht.
Um die richtige Thermostatposition zu wählen sollten Sie:
- das Thermostat auf Maximalposition stellen (im Uhrzeigersinn),
- das Gerät laufen lassen bis eine angenehme Raumtemperatur erreicht ist,
- den Knopf gegen den Uhrzeigersinn drehen bis Sie ein Klicken hören und das Gerät stoppt,
- den Knopf wieder ein bisschen im Uhrzeigersinn drehen: in dieser Position behält das Thermostat die
angenehme Raumtemperatur bei, die Sie eingestellt haben.
7. Sicherheit, falls das Produkt nicht richtig funktioniert
Im Falle einer Überhitzung schaltet das Sicherheitssystem automatisch die Heizelemente und den Motor
aus. Falls dies geschieht:
- Schalten Sie den Heizlüfter am Hauptschalter aus,
- entfernen Sie die Ursache der Überhitzung (z.B. Hindernisse vor den Lufteintritts- und –austrittsgittern,
übermäßigen Schmutz, etc.),
- lassen Sie den Heizlüfter 15 bis 20 Minuten abkühlen,
- schalten Sie das Gerät wieder an und prüfen Sie seine Funktionstüchtigkeit genau.
Falls Sie ein unregelmäßiges Laufen sowie Schaden am Heizelement oder der Gerätestruktur bemerken,
ziehen Sie den Hauptstecker und setzen Sie sich mit dem technischen Kundendienst oder dem Händler in
Verbindung.
8. Wartung, Pflege
Dieser Heizlüfter muss nicht besonders gewartet werden.
Wir empfehlen Ihnen, die Lufteintritts- und –austrittsgitter wenigstens zweimal pro Jahr mit einem
Staubsauger zu reinigen. Entfernen Sie den Staub vom Motor und von den Heizelementen.
Falls das Gerät repariert werden muss, wenden Sie sich bitte an einen Kundendienst.
Falls das Kabel gewechselt werden muss: denken Sie daran, dass ein 2x1 m² H05VV-F <HAR> - Kabel ver-
wendet werden muss.
6.2 Modell mit Thermostat und 60-Minuten-Zeitschalter
Der Heizlüfter hat 2 Knöpfe.
Drehen Sie den Zeitschaltknopf im Uhrzeigersinn um die bevorzugte Laufzeit von 5 bis 60 Minuten einzu-
stellen. Der Heizlüfter läuft bei voller Leistung (2000W), und die Einstellung des Thermostats beeinflusst
nicht das Funktionieren.
Nach dem ausgewählten Zeitraum schaltet der Heizlüfter automatisch auf mittlere Leistung (100 0W);
vom Thermostat kontrolliert durch die Thermostateinstellung. Zur Bedienung des Thermostats siehe
Abschnitt 6.3.
Wenn das Gerät unter Zeitschaltkontrolle bei voller Leistung arbeitet, regelt das Thermostat nicht die
Raumtemperatur. Verwenden Sie unter dieser Bedingung nicht den Heizlüfter in kleinen Räumen, wenn
in diesen Personen sind, die nicht eigenständig den Raum verlassen können, es sei denn eine ununterbrochene Beaufsichtigung dieser Personen ist gewährleistet.
Page 5
8
9
-- GB -- DIRECTIONS FOR USE
Before operating the heater, please read these instructions thoroughly to avoid damage and
hazardous situations. Any use of this heater other than that stipulated in this instruction manual
may cause fire, electric shock or injury, and voids all warranties.
Warranty does not apply to any defect, deterioration, loss, injury or damage caused by, or as a result of, the
misuse or abuse of this heater. The rights dictated by State law are not prejudiced. None of the terms of this
warranty are to be taken as excluding any conditions or warranties implied by State law, which cannot be
excluded or modified.
Before any operation remove the packaging and check product integrity. In case of defects or damages do
not try to repair it yourself but contact your dealer.
Do not let children play with the packaging and protect the environment by disposing of the packaging in
accordance with the national regulations for waste processing.
1. Your product
The product is sold without accessories.
Depending on the version, a bracket for wall mounting may be present on the back of the product. To
fix it to the wall we suggest you use nylon rawplugs and cross head screws included.
Contact your dealer immediately if the product is damaged or the bracket missing.
2. For your own safety
This heater provides an additional source of heating, and must solely be used for this purpose.
Make sure that your supply rating corresponds to what is specified on the rating plate, e.g. 230V AC,
50Hz.
Don't leave your home while the appliance is in operation: always ensure that the switch or the timer
is on the “O” position and the thermostat set to minimum “¿”.
Switch off the product and unplug it if you are not going to use it for long periods;
While in operation, place the heater in a safe position:
- at least 1.0m away from inflammable objects or furniture;
- if wall mounted, not fixed to synthetic or plastic surfaces;
- leaving the air outlets free: 1m free space in front of the heater and 50cm free space behind it;
- never placed immediately under a socket.
Do not let animals or children touch or play with the appliance. Careful! The air outlet grille becomes
very hot during operation (over 80°C/176°F).
WARNING: in order to avoid overheating, never cover the heater. Do not hang anything on the
heater and do not cover it while it’s working. This is clearly written on the product or shown by the
symbol
This product may not be used by people (children included) with reduced physical, sensorial or mental
capacities, or with inadequate experience and knowledge, unless they are under the supervision of a
person responsible for their safety or have been suitably instructed by the latter. Children must be
supervised to ensure they do not play with the product.
Do not use the heater in the presence of explosive gases, solvent or varnish vapors or, in any case,
inflammable vapors/gases.
If the cable is damaged and you have to change it, do not do the job yourself! Take the product to an
authorized repair center as the repair must be carried out by a specialist, in order to avoid any risk of
damage.
Do not use this heater close to showers, baths, water basins or swimming pools.
Do not clean the product while plugged in, and never immerse it in water.
Do not wind the cable around the device when it is in operation, or pull it across sharp edges.
The appliance must be positioned so that the plug is always accessible.
3. Safe positioning
Only ever use the appliance in an upright position;
When portable, always maintain a distance of at least 1m between the product and any inflammable
object/surface.
When the product is wall mounted, make sure that the minimum distances reported in pictures 1 and
2 are respected. Do not place the heater so that the air flow blows directly towards the wall.
As the heater is a class 2 product, earth connection is not required.
The heater has an IPX1 protection level against water and, if wall mounted may be installed in
bathrooms. In any case you have to respect the national installation standard and safety requirements
valid in your State.
Never install/use this appliance in the Zones 0, 1 or 2 illustrated in picture 3:
On no account must any switch / button be accessible by people in the shower or in the bathtub.
4. Wall mounting
After carefully reading section 3, proceed with installation following the sequence shown in picture 4.
To hang on the product proceed as follows:
- Lay the base of the product on the base of the wall bracket coupling the plastic ribs created to
make the lodging easier;
- Push a little bit the product downwards and move the upper side of the product near the bracket;
- Check that the upper holed rib of the bracket fits the dedicated pivot created on the back grid of
the heater. Moderately shake the heater after installation to be sure it is correctly fixed.
To release the product from the bracket proceed as follows:
- Use your hand to push downwards the upper rib of the bracket as much as necessary to release the
product by pulling it on the top.
- Once the product has been unlocked on the upper side just pull it upwards to release it from its base.
1
2
3
4
click!
Page 6

10
11
IMPORTANT FOR FRANCE:
If the product is wall mounted, the electrical connection must be made according to the enclosed
drawing, cutting the cable and using a connection block between the product cable and the electricity
supply.
In humid rooms, bathrooms or kitchens, this connection block must be installed at least 25 cm from
the floor. The electrical connection must also include the use of a 2-pole switch with a contact opening
distance of at least 3 mm.
5. Cable storage
While the product is not in use, you can store the cable pushing it into the base of the product.
Note that while the product is in operation, the cable must always be completely pulled out.
6. Use of the heater
See picture 5
6.1 Version with switch and thermostat
The heater has 2 knobs controlling the switch and the thermostat.
The switch knob has 5 positions, allowing to select the desired power setting.
Starting from the “¿” position, turn the thermostat knob clockwise until you hear a "click”: the
appliance starts working at the desired power setting.
The thermostat maintains the desired room temperature switching on and off automatically the
appliance. The more the knob is turned clockwise, the higher is the maintained temperature.
Maximum thermostat setting corresponds at about 30°C; “¿” position corresponds to approximately
5°C.
For correct use of the thermostat , see section “ USE OF THE THERMOSTAT”
6.2 Model with thermostat and 60' timer
The heater has 2 knobs.
Turn the timer knob clockwise to select the working time you prefer from 5 to 60'. The heater starts
working at full power (2000W) and thermostat setting doesn’t influence the functioning;
After the selected period the heater will automatically turn to mid power (1000W), thermostatically
controlled according to the thermostat setting. For the use of the thermostat see section 6.3.
When the heater is working under timer control at full power, the thermostat doesn't control the room
temperature. In this condition, do not use the heater in small rooms when they are occupied by
persons not capable of leaving the room on their own, unless constant supervision is provided.
6.3 Use of the thermostat
In a room where the temperature is too high (more than 30°C), it is normal that the thermostat will not
switch on the heater.
In a room where the temperature is too low (around 5°C or even less) it is also normal that the
thermostat will keep the appliance working until the temperature gets higher.
To select the right thermostat position we suggest you to
- turn the thermostat in maximum position (clockwise);
- leave the appliance working until the comfortable temperature is reached;
- turn the knob anti clockwise until you hear a "click" and the appliance stops;
- turn clockwise again the knob (just a little): in this position the thermostat will maintain the
comfortable temperature you have selected.
7. Safety in the event of the product not functioning normally
In the event of overheating, the safety system will automatically turn off the heating elements and the
motor. If this happens:
- switch off the fan heater using the main switch;
- remove the cause of overheating (i.e. obstacles in front of the air inlet or air outlet grilles, unusual
accumulations of dirt, etc);
- let the heater cool down for 15/20 minutes;
- switch on the fan heater and check it is functioning properly.
L If you notice irregular operation, damage to the heating element or to the structure of the appliance,
disconnect the product from the mains power supply and contact your technical assistance center or dealer.
8. Maintenance
This heater does not require any particular maintenance.
We recommend you clean the air inlet and air outlet grilles at least twice a year with a vacuum
cleaner, to remove dust from the motor and the heating elements.
If the heater needs to be repaired, please contact an authorized center.
If the cable is to be changed, please remember that a 2x1m
2
H05VV-F <HAR> cable must be used.
L
N
Electrical
Phase = brown
Neutral = blue
Product’s
Page 7

12
13
-- I -- ISTRUZIONI D’USO
Si prega di leggere attentamente queste istruzioni prima di utilizzare il prodotto in modo da evitare
danneggiamenti o comunque il verificarsi di situazioni di pericolo. Qualsiasi utilizzo del prodotto
diverso da quanto indicato nel presente manuale può causare incendi, pericoli elettrici o ferite e
rende nulla qualsiasi garanzia.
La garanzia non si applica ad alcun difetto, deterioramento, perdita, ferimento o danneggiamento
riconducibili ad un uso non corretto del prodotto. Rimangono garantiti tutti i diritti di legge in materia.
Nessuna condizione di garanzia può escludere o modificare le condizioni di garanzia regolamentate da
leggi dello Stato che non possono essere a nessun titolo escluse o modificate.
Prima di ogni operazione, rimuovere con cura l’imballo e controllare la perfetta integrità del prodotto. Nel
caso si evidenziassero dei difetti o danni, non
installare né cercare di riparare l’apparecchiatura, ma
rivolgersi al rivenditore.
Non lasciare l’imballo alla portata dei bambini e smaltirne le parti in conformità con le disposizioni vigenti.
1. Il vostro prodotto
Il prodotto viene fornito senza accessori.
In funzione della versione acquistata, può essere presente una staffa per l’aggancio a muro del
termoventilatore. Per fissarla vi suggeriamo di utilizzare i tasselli e le viti fornite.
Qualora il prodotto sia danneggiato o la staffa mancante contattate immediatamente il vostro
rivenditore.
2. Per la vostra sicurezza
Questo termoventilatore è una fonte di riscaldamento ausiliario e deve essere utilizzato
esclusivamente per questo scopo.
Assicuratevi che l’alimentazione di rete corrisponda ai dati di targa: esempio 230V AC, 50Hz.
Non abbandonate mai la vostra abitazione lasciando il termoventilatore in funzionamento; in tali casi
assicuratevi sempre che l’interruttore o il timer siano in posizione “0” e il termostato al minimo “¿”;
Spegnete il prodotto con l’interruttore e scollegatelo dalla rete se prevedete di non utilizzarlo per
lunghi periodi;
Durante il funzionamento collocate il termoventilatore in una posizione sicura ovvero:
- ad almeno 1m da oggetti infiammabili o mobili;
- se installato a muro, non fissato a pareti di materiale plastico o sintetico;
- lasciando libere le griglie di ingresso e di uscita dell’aria: nessun oggetto deve essere presente nel
raggio di 1m dalla griglia anteriore e di 50cm dalla griglia posteriore;
- mai posizionato immediatamente sotto ad una presa di corrente.
Non lasciate che animali o bambini giochino o tocchino il termoventilatore. Attenzione! Durante il
funzionamento la griglia di uscita dell’aria può diventare molto calda ( oltre 80°C = 176°F);
IMPORTANTE: per evitare surriscaldamenti non ricoprite mai il prodotto. Non appoggiate mai
alcun oggetto o coperta sull’apparecchio mentre è in funzione. Questo è chiaramente scritto
sull’apparecchio o illustrato dal simbolo
Questo prodotto non deve essere utilizzato da persone (bambini inclusi) con capacità fisiche,
sensoriali o mentali ridotte, o con inadeguata esperienza e conoscenze, che non siano sotto la
supervisione di una persona responsabile per la loro sicurezza o che non siano da essa stati
adeguatamente istruiti. I bambini devono essere sorvegliati per assicurarsi che non giochino con il
prodotto.
Non utilizzate il termoventilatore in stanze sature di gas esplosivi, di vapori generati da solventi e
vernici o comunque di vapori/gas infiammabili.
Se il cavo è danneggiato e dovete sostituirlo non eseguite questa operazione da soli, riportate il
termoventilatore ad un centro di riparazioni qualificato perché è richiesto l’intervento di personale
specializzato al fine di evitare qualunque rischio di danneggiamento.
Non utilizzate questo termoventilatore nelle vicinanze di docce, vasche da bagno, piscine o lavandini.
Non pulite mai il prodotto quando è collegato alla rete elettrica e non immergetelo mai in acqua o in
altre sostanze;
Non arrotolate mai il cavo attorno al prodotto quando è in funzione e non portate il cavo a contatto
con superfici taglienti.
Il termoventilatore deve essere posizionato in modo tale che la presa di alimentazione sia sempre
raggiungibile.
3. Posizionamento sicuro
Utilizzate il termoventilatore solo in posizione verticale;
Nell’uso portatile rispettate sempre la distanza di almeno 1m da qualsiasi oggetto/superficie
infiammabile;
Se installato a muro rispettate le distanze minime indicate in figura 1 e 2. Non posizionate mai il
prodotto in modo tale che il flusso d'aria colpisca direttamente il muro.
Il termoventilatore è costruito in doppio isolamento elettrico (classe II) e, pertanto, non richiede il
collegamento di terra.
Il termoventilatore ha un grado IPX1 di protezione all’acqua, può essere fornito con una staffa per il
fissaggio a muro e, in tale caso, è installabile anche nei bagni. In ogni caso l’installazione deve essere
eseguita in accordo alla normativa nazionale valida nel vostro paese.
Non installare mai l’apparecchio all’interno delle zone 0, 1 o 2 illustrate in figura 3.
I pulsanti di regolazione non devono in nessun caso essere accessibili da parte di persone che siano
all’interno della vasca da bagno o della doccia.
4. Installazione a muro
Dopo aver letto attentamente quanto riportato al paragrafo 3 procedete con l'installazione seguendo
le istruzioni indicate in figura 4.
Per fissare il prodotto al supporto procedere nel seguente modo:
- Appoggiate il prodotto alla base del supporto facendo accoppiare le nervature plastiche create
per semplificare il posizionamento;
- Premere leggermente il prodotto verso il basso e avvicinarne la parte superiore alla staffa di
fissaggio;
- Controllare che la linguetta forata del supporto murale si sia correttamente agganciata alla
nervatura presente sulla griglia posteriore del prodotto. Dopo ogni installazione scuotere
lievemente il prodotto per assicurarsi che sia ben agganciato.
1
2
3
4
click!
Page 8

14
15
Per sganciare il prodotto dal supporto procedere nel seguente modo:
- Premere verso il basso la linguetta del supporto murale fino a quando non è possibile
sganciarla dal prodotto;
- Dopo aver sganciato la parte superiore tirare il prodotto verso l'alto per rimuoverlo dalla sua
base.
IMPORTANTE PER LA FRANCIA:
Nel caso in cui il prodotto venga installato a muro, il collegamento elettrico con la rete di
alimentazione deve essere eseguito tagliando la spina in dotazione e utilizzando un apposito
morsetto secondo lo schema di seguito illustrato:
In locali umidi, nei bagni o nelle cucine, il morsetto di collegamento deve essere installato ad almeno
25cm dal pavimento. Il collegamento elettrico con la rete deve inoltre prevedere l’utilizzo di un
interruttore bipolare con una distanza minima di apertura fra i contatti di almeno 3mm.
5. Avvolgicavo
Quando non utilizzate il prodotto il cavo può essere inserito nella base premendolo verso l’interno.
Ricordatevi che durante l’uso del prodotto il cavo deve essere sempre completamente estratto.
6. Uso del termoventilatore
Vedere la figura 5
6.1 Versione con termostato e interruttore
Il termoventilatore è dotato di due manopole, una per l’interruttore ed una per il termostato.
L’interruttore ha 5 posizioni e permette di regolare le diverse modalità di funzionamento;
Iniziando dalla posizione antigelo, contrassegnata dal simbolo “¿”, ruotate la manopola del
termostato in senso orario fino a quando non si sente un “click”: il prodotto inizia così a funzionare
alla potenza desiderata.
Il termostato mantiene la temperatura ambiente desiderata accendendo e spegnendo
automaticamente il termoventilatore. Più la manopola è ruotata in senso orario più la temperatura
assicurata sarà elevata. La posizione massima del termostato corrisponde a circa 30°C, quella
minima (¿) a circa 5°C.
Uso del termostato, vedere il paragrafo 6.3.
6.2 Versione con termostato e timer 60’
Il termoventilatore è dotato di due manopole, una per il timer ed una per il termostato.
Ruotare la manopola del timer per selezionare il tempo desiderato di funzionamento fra 5min e 60min.
Il prodotto funziona così a piena potenza (2000W) e il termostato non influisce sul funzionamento.
Quando il timer si azzera il prodotto torna a funzionare alla potenza intermedia (1000W) e sotto il
controllo del termostato. Per l’uso del termostato, vedere il paragrafo 6.3.
Quando il prodotto funziona a piena potenza, durante il tempo di attivazione del timer, il termostato
non controlla la temperatura della stanza. In questa condizione non utilizzate mai il termoventilatore in
piccole stanze qualora siano occupate da persone incapaci di lasciare la stanza autonomamente a
meno che non siano sotto la supervisione di una persona responsabile per la loro sicurezza.
6.3 Uso del termostato
In una stanza ove la temperatura supera i 30°C è normale che il termostato, anche se posizionato al
massimo, non accenda il termoventilatore.
Viceversa, in una stanza con una temperatura troppo bassa (sotto i 5°C) è normale che il termostato
mantenga l’apparecchio continuamente acceso, anche se posizionato al minimo.
Per regolare al meglio il termostato consigliamo questa procedura:
- posizionate il termostato al massimo e fate funzionare l’apparecchio sino al raggiungimento di una
temperatura confortevole;
- girate poi la manopola termostato in senso antiorario sino a che sentirete un “ click” e l’apparecchio
si spegnerà;
- girate poi ancora leggermente (solo un pochino) la manopola del termostato in senso orario;
- in questa posizione il termostato manterrà la temperatura ambiente che avete prescelto.
7. Sicurezza in caso di funzionamento anormale
In caso di surriscaldamento il sistema di protezione dell’apparecchio disattiva automaticamente gli
elementi riscaldanti ed il motore, facendo così interrompere il funzionamento del termoventilatore
In questo caso:
- Spegnere il termoventilatore con l’interruttore principale;
- Rimuovere le cause di surriscaldamento (per es. ostacoli di fronte alla griglia di ingresso e/o uscita
dell’aria, anomalo accumulo di sporco ecc);
- Lasciare raffreddare il prodotto per 15/20 minuti;
- Accendere nuovamente il termoventilatore e verificarne il corretto funzionamento.
L Se notate anomalie nel funzionamento del termoventilatore, danneggiamenti dell’elemento riscaldante o
dell’involucro scollegate il prodotto dall’alimentazione e contattate il rivenditore o il centro di assistenza di
riferimento.
8. Manutenzione
Questo termoventilatore non richiede particolare manutenzione;
Vi raccomandiamo di pulire il prodotto ogni 6 mesi ed in particolare modo le griglie di ingresso e di
uscita dell’aria. Utilizzando un aspirapolvere rimuovere lo sporco accumulatosi sul motore e
sull’elemento riscaldante.
Qualora sia necessario riparare il termoventilatore contattate un centro di assistenza qualificato.
Se deve essere sostituito il cavo di alimentazione ricordatevi che deve obbligatoriamente essere
utilizzato un cavo tipo 2 x 1 mm
2
H05VV-F <HAR>.
L
N
Rete
Fase = marrone
Neutro = blu
Cavo del prodotto
Page 9

16
17
-- FR -- MODE D’EMPLOI
Avant d’utiliser le radiateur, lisez attentivement les instructions afin d’éviter tout danger ou
d’utilisation inappropriée de l’appareil. Toutes utilisations autres que celles décrites dans cette
notice seront considérées comme dangereuses et risquent de causer des incendies, des chocs
électriques ou des blessures et ne seront pas couverts par la garantie.
La garantie ne s’applique pas en cas de défaut, détérioration, dommages causés en raison d’un usage
impropre ou d’un abus dans l’utilisation du radiateur. Vous pouvez disposer de droits reconnus par la loi de
votre pays. Aucune disposition de la présente garantie ne peut avoir pour effet d’exclure quelque garantie
ou droit reconnu d’ordre public par la législation de votre pays.
Avant toute opération, otez l’emballage du produit et vérifiez si l’appareil n’est pas endommagé. En cas de
défaut, de choc ou de dommage, n’essayez pas de réparer l’appareil vous-même et contactez votre
revendeur.
Ne laissez pas les enfants jouer avec les emballages et protegez l’environnement en jetant les cartons et
les calages dans les endroits appropriés pour le recyclage.
1. Votre appareil
Ce produit est vendu sans accessoire.
Consultez votre revendeur si quelque chose vous manque ou est cassé.
2. Pour votre sécurité
Cet appareil n'est pas prévu pour être utilisé par des personnes ( y compris enfants) dont les
capacités physiques, sensorielles ou mentales sont réduites, ou des personnes dénuées d'expérience
ou de connaissance, sauf si elles ont pu bénéficier, par l'intermédiaire d'une personne responsable de
leur sécurité, d'une surveillance ou d'instruction préalable concernant l'utilisation de l'appareil
Les enfants doivent être surveillés pour être sûrs qu’ils ne jouent pas avec l’appareil.
Cet appareil est une source de chaleur auxiliaire qui ne doit servir que dans ce but.
Assurez-vous que l’alimentation du secteur soit conforme à la plaque signalétique : 230 V CA, 50 Hz.
Ne sortez jamais de chez vous sans éteindre l’appareil ; assurez-vous que la minuterie (si elle est
présente) soit en position Eteint (0) et que le thermostat soit sur le minimum (*).
Pendant le fonctionnement, installez l’appareil dans un endroit sûr, c’est-à-dire :
- à 1 mètre au moins des objets inflammables ou des meubles ;
- en laissant libre la grille de sortie de l’air ; en ne plaçant aucun objet dans un rayon d’un mètre de la
grille de sortie;
- en ne le plaçant jamais juste au-dessous d’une prise de courant.
Ne laissez jamais les enfants et les animaux jouer ou toucher l’appareil. Attention ! Pendant le
fonctionnement, la grille de sortie de l’air peut atteindre une température très élevée (plus de 80°C =
175°F) ;
IMPORTANT : pour éviter tout risque de surchauffe ne couvrez jamais l’appareil. Ne posez
jamais ni objet, ni couverture, sur l’appareil lorsqu’il est en marche. Cette interdiction est écrite
clairement sur l’appareil et illustrée par ce symbole.
N’utilisez pas l’appareil dans des pièces saturées de gaz explosifs, de vapeurs générées par des
solvants ou des vernis ou de vapeurs/gaz inflammables.
Si le câble d'alimentation est endommagé, il doit être remplacé par le fabricant, son service après
vente ou une personne de qualification similaire afin d'éviter un danger
N’utilisez pas cet appareil près d’une douche, d’une baignoire, d’un lavabo ou un piscine.
Placez l’appareil de façon à ce que la prise d’alimentation soit toujours accessible.
N’enroulez pas le câble autour de l’appareil et ne le laissez pas en contact avec un matériau
tranchant; n’allumez pas l’appareil quand le câble est enroulé
Pour débrancher l’appareil, ne tirez ni sur le câble d’alimentation , ni sur l’appareil
3. Emplacement sûr
Utilisez l’appareil seulement en position verticale;
En utilisation mobile, maintenez toujours une distance d’au moins 1 mètre entre l’appareil et tout objet
inflammable.
Si l’appareil est utilisé fixé au mur, respectez les distances minimales mentionnées dans les
immages 1 et 2. Ne placez jamais l’appareil avec le débit d’aire orienté directement contre un mur ou
une surface proche à l’appareil
L’appareil étant classe II, il ne nécessite pas de connexion à la terre.
Le radiateur a un degré de protection IPX1 contre l’eau et, avec l’installation de la fixation murale, il
peut être installé dans une salle de bain. Dans tous les cas, le montage doit être effectué
conformément aux normes en vigueur du pays.
N’installez et n’utilisez jamais cet appareil en Zone 0, 1 or 2 dans l’immage nr. 3:
Les boutons de commandes de l’appareil ne doivent pas être accessibles par toute personne à partir
de la baignoire ou de la douche.
4. Installation murale
Apres avoir respecté la notice du paragraphe 3, suivez avec attention la sequence des operations
visible dans l’immage nr. 4 dessous
Pour fixer l’appareil sur son support mural suivez la procedure suivante :
- Logez l’appareil sur la base du support mural en faisant attention qu’il soit dans la siège correcte
- Vérifiez que la partie haute du support mural ( languette avec le trou) va correspondre au point de
fixation créé sur la partie arrière du soufflant.
- Basculez l’appareil vers le support mural de façon que la languette du support mural va se clipper
à l’arrière de l’appareil avec un CLICK. Vérifiez que l’appareil est bien fixé et il est aussi bien en
place sur la base du support.
Pour détacher le soufflant de son support mural suivez la procedure suivante :
.Avec votre doigt poussez la languette superieure du support mural vers le bas et tirez l’appareil vers
vous en le prennant par la partie superieure. La languette se dégagerà de l’appareil.
1
2
3
4
click!
Page 10

18
19
Apres ça, tirez l’appareil vers vous et il se détacherà de la base.
IMPORTANT POUR LA FRANCE:
Dans le cas de la fixation murale, les connections électriques doivent être faites conformément au
schéma ci dessous en utilisant un bloc de connexion encastrable sécurisé (non fourni) pour raccorder
le cordon à l’alimentation générale.
Dans les pièces humides, salles de bains ou cuisines, le bloc de connexion doit être au moins à 25cm
du sol. Les deux bornes du raccordement électrique du bloc doivent être séparées par au moins
3mm.
5. Rangement du cordon
Lorsque vous n’utilisez pas le radiateur, vous pouvez ranger le câble à l’intérieur du compartiment
prévu à cet effet en le poussant dans le trou situé à l’arrière de l’appareil.
Rappelez-vous que pendant le fonctionnement de l’appareil, le cordon doit être intégralement
sorti de son compartiment et déroulé.
6. Utilisation du radiateur
Voir immage 5
6.1 Vérsion avec commutateur et thermostat
Le soufflant est muni de deux poignées : une pour l’interrupteur et une pour le thermostat.
L’interrupteur, qui a 5 positions, permet de régler le fonctionnement de l’appareil; posizionnez le
bouton dans le mode de fonctionnement que vous désirez.
Faites tourner la poignée du thermostat de la position antigel, indiqué par le symbole * en sens
horaire jusqu’à ce que vous entendiez un clic. l’appareil commence alors à fonctionner à la puissance
voulue.
Le thermostat maintient la température ambiante voulue en allumant et en éteignant automatiquement
le thermoventilateur. Plus vous faites tourner la poignée en sens horaire, vers une position ayant un
chiffre plus élevé, plus la température garantie est élevée. La position maximale du thermostat
correspond à environ 30°C, la minimale (*) à environ 5°C.
Pour l’utilisation correcte du thermostat, regardez svp la section 6.3
6.2 Modèle avec thermostat et timer 60’
Le radiateur soufflant est muni de deux poignées, une pour le timer 60’ et une pour le thermostat.
Le produit vous permet de régler 2 différents modes de fonctionnement:
Réchauffement de l’environnement avec maintient de la température:
En partant de la position antigel, marquée avec le symbole “*”, tournez la poignée du thermostat dans
le sens des aiguilles de la montre jusqu’à entendre un “clic”: le produit commence alors à fonctionner
à 1000W de puissance. Le thermostat maintient la température ambiante requise en allumant et
éteignant automatiquement le radiateur soufflant. Le plus la poignée est tournée dans le sens des
aiguilles de la montre, dans la position avec le chiffre le plus haut, plus la température garantie sera
élevée. La position maximale du thermostat correspond à environ 30°C, la minimale (*) à environ 5°C.
Pour le réglage du thermostat, voir chapitre 6.3
Réchauffement rapide de l’environnement:
Ayant réglé le thermostat ambiant selon la température ambiante requise, tournez ensuite la poignée
du timer en sélectionnant le temps de fonctionnement requis. Le produit fonctionne à 2000W de
puissance pour le temps réglé, en produisant un réchauffement rapide de la pièce et ensuite
garantira à une puissance de 1000W le maintient de la température ambiante réglée par le
thermostat,
Quand le radiateur soufflant fonctionne sous le contrôle du timer à 2000W, le thermostat ne contrôle
pas la température de la pièce. A cette condition, n’utilisez pas le radiateur soufflant dans une petite
pièce quand elle est occupée par des personnes qui ne sont pas capable d’en sortir leur mêmes, à
l’exception d’une supervision constante faite par une personne qui soit responsable pour leur
sécurité.
6.3 Emploi du thermostat
Dans un local ou la température dépasse les 30°C il est normal que le thermostat, même si placé à
son maximum, n'active point l'appareil.
Par contre, dans un local où la température est très basse (au-dessous des 5°C), il est normal que le
thermostat maintienne l'appareil constamment allumé, même lorsque celui-ci est réglé au minimum.
Pour régler au mieux le thermostat, nous conseillons la procédure suivante :
- placer le thermostat au maximum et faire fonctionner l'appareil jusqu'à atteindre une température de
tout confort;
- tourner ensuite le bouton du thermostat dans le sens contraire aux aiguilles d'une montre jusqu'à
entendre un “click” et l'appareil s'éteindra;
- ensuite, tourner encore légèrement (seulement un petit peu) le bouton du thermostat dans le sens
des aiguilles d'une montre;
- lorsque dans cette position, le thermostat conservera la température ambiante que vous avez
choisie.
7. Sécurité en cas de fonctionnement anormal
o Dans le cas d’échauffement anormale de l’appareil, le système de protection contre la surchauffe
interviendrà. Si ça arrive :
Arretez le fonctionnement de l’appareil en positionnant l’interrupteur en position 0
Eliminez les causes de surchauffe : obstacle devant ou dérrière l’appareil qui empechent le correcte
débit d’aire , accumulation de poussière , position de l’appareil trop proche à des surfaces dérrière la
prise d’aire ou devant la sortie.
Laissez l’appareil réfroidir pendant 15 minutes
Remettez l’appareil en marche.
L Si vous notez apres ça un fonctionnement encore irregulier de l’appareil ou des dommages à la
structure ou au corp de l’appareil , déconnectez l’appareil et appelez un service apres vente qualifié ou
votre revendeur pour assistance.
8. Entretien
Cet appareil n’a besoin d’aucun entretien particulier.
Nous vous recommandons de nettoyer l'appareil tous les 6 mois, en particulier le panneau chauffant,
à l'aide d'un chiffon sec.
Si l'appareil doit être réparé, adressez-vous à un service après-vente.
Si vous devez remplacer le câble d’alimentation n’oubliez que vous devez obligatoirement utiliser un câble
de, 2x1m
2
H05VV-F <HAR>. Si le câble d’alimentation est endommagé, il doit être changé par le fabricant,
son service de maintenance ou une personne de qualification similaire afin d’éviter un danger.
L
N
Alimentation
secteur
Phase = marron
Neutre = bleu
Cordon
Page 11

20
21
NEDERLANDS
INSTRUCTIES VOOR HET GEBRUIK
1. Voor uw veiligheid
Deze warmeluchtventilator is een bijkomende verwarmingsbron en dient uitsluitend voor dit doel
gebruikt te worden.
Kijkt u na of de netvoeding overeenkomt met de gegevens op het plaatje: 230V AC, 50Hz.
Verlaat u uw woning nooit terwijl de warmeluchtventilator in werking is. Controleer in dat geval
altijd of de schakelaar op OFF (0) staat en of de thermostaat op de minimumst
and staat (*).
Tijdens de werking zet u de warmeluchtventilator op een veilige plaats, dus:
- op minstens 1 m van ontvlambare of mobiele objecten;
- de luchtinlaat- en luchtuitlaatroosters moeten vrijgelaten worden: er mogen zich in geen
geval objecten binnen een straal van 1 m. van het luchtuitlaatrooster bevinden en binnen
een straal van 50 cm. Van het rooster aan de achterkant;
- nooit onmiddelli
jk onder een stopcontact.
Laat dieren of kinderen niet met de warmeluchtventilator spelen of deze aanraken. Let op!
Tijdens de werking kan het luchtuitlaatrooster erg warm worden (meer dan 80°C = 175°F);
BELANGRIJK: Om oververhitting te voorkomen dient u het apparaat nooit te bedekken.
Plaats nooit voorwerpen of dekens op het apparaat terwijl dit in werking is. Dit wordt
duidelijk schriftelijk op
het apparaat vermeldt, of aangegeven door het symbool
OF
Gebruik de warmeluchtventilator niet in ruimtes die verzadigd zijn met explosieve gassen, of met
dampen die gegenereerd worden door oplosmiddelen of verf, of hoe dan ook bij de aanwezigheid
van ontvlambare dampen/gassen.
Is de kabel beschadigd en moet deze vervangen worden, dan dient u dit niet zelf te doen. Breng
de warmeluchtventilator naar een bevoegd reparatiecentrum omdat de tussenkomst van
ge
specialiseerd personeel vereist is. Zo wordt het risico op beschadiging voorkomen.
Gebruik deze warmeluchtventilator niet in de nabijheid van douches, badkuipen of wastafels.
De warmeluchtventilator moet zo geplaatst worden dat het stopcontact altijd bereikbaar is.
Het apparaat mag niet direct onder een contactdoos gemonteerd of geplast worden
2. Veilige plaatsing
Gebruik de warmeluchtventilator alleen in de verticale stand;
De thermoventialtor heeft een dubbele elektrische isolatie (klasse II) en heeft daarom geen
aardeverbinding nodig.
De thermoventilator heeft een beschermingsgraad IPX1 tegen water. In ieder geval nooit
installeren of utilisieren zoals aangeduid in de figuur
termoventilatore ad un centro di riparazioni qualificato perché è richiesto l’intervento di personale
specializzato al fine di evitare qualunque rischio di danneggiamento.
altre sostanze;
con superfici taglienti.
raggiungibile.
infiammabile;
prodotto in modo tale che il flusso d'aria colpisca direttamente il muro.
collegamento di terra.
fissaggio a muro e, in tale caso, è installabile anche nei bagni. In ogni caso l’installazione deve essere
eseguita in accordo alla normativa nazionale valida nel vostro paese.
all’interno della vasca da bagno o della doccia.
le istruzioni indicate in figura 4.
- Appoggiate il prodotto alla base del supporto facendo accoppiare le nervature plastiche create
per semplificare il posizionamento;
- Premere leggermente il prodotto verso il basso e avvicinarne la parte superiore alla staffa di
fissaggio;
- Controllare che la linguetta forata del supporto murale si sia correttamente agganciata alla
nervatura presente sulla griglia posteriore del prodotto. Dopo ogni installazione scuotere
lievemente il prodotto per assicurarsi che sia ben agganciato.
1
2
3
4
click!
3. Veilige positionering
Gelieve het apparaat altijd uitsluitend in een staande positie te gebruiken.
Indien draagbaar: gelieve altijd een afstand van minstens 1 m tussen het product en ieder ontvlambaar
object/oppervlak in acht te nemen.
Als het product aan de wand gemonteerd is, zorgt u ervoor dat de in de afbeeldingen 1 en 2 vermelde
minimumafstanden in acht genomen worden. Plaats het verwarmingstoestel zodanig, dat de luchtstroom
rechtstreeks in de richting van de wand blaast.
Omdat het verwarmingstoestel een product uit de klasse 2 is, is een aardverbinding niet noodzakelijk.
Het verwarmingstoestel heeft een IPX1 beschermingsniveau tegen water en, indien het aan een wand
gemonteerd is, kan het in badkamers geïnstalleerd worden. In elk geval dient u de nationale installatiestandaard en de in uw land geldende veiligheidsinstructies na te leven.
Gelieve dit apparaat nooit in de in afbeelding 3 geïllustreerde zones 0, 1 of 2 te installeren of te gebrui-
ken:
In geen geval mag een schakelaar / knop voor iemand, die zich in de douche of in bad bevindt, toegankeli-
jk zijn.
4. Wandmontage
Nadat u paragraaf 3 zorgvuldig gelezen hebt, gaat u door met de installatie doordat u zich aan de in
afbeelding 4 getoonde volgorde houdt.
Om het product op te hangen, gaat u als volgt te werk (zie afbeelding 6):
- Leg de basis van het product op de basis van het wandarmatuur door de voor een vereenvoudiging van
de plaatsing gemaakte, plastic ribben te koppelen.
- Duw het product een beetje naar beneden en breng de bovenzijde van het product tot aan het armatuur.
- Ga na, of de bovenste geperforeerde rib van het armatuur past op de daarvoor dienende spil, die aan de
achterste rooster van het verwarmingstoestel voorzien is. Schud het verwarmingstoestel na de installatie
lichtjes heen en weer om er zeker van te zijn dat het correct bevestigd is.
Page 12

22
23
Om het product van het armatuur te lossen, gaat u als volgt te werk:
7. Safety in the event of the product not functioning normally
In the event of overheating, the safety system will automatically turn off the heating elements and the
motor. If this happens:
- switch off the fan heater using the main switch;
- remove the cause of overheating (i.e. obstacles in front of the air inlet or air outlet grilles, unusual
accumulations of dirt, etc);
- let the heater cool down for 15/20 minutes;
L
N
Electrical
Phase = brown
Neutral = blue
Product’s
- Gebruik uw hand om de bovenste rib van het armatuur zoveel mogelijk baar beneden te duwen om het
product te lossen en dit doordat u aan de bovenzijde trekt.
- Zodra het product aan de bovenzijde werd losgemaakt, trekt u het gewoon naar boven om het van de
basis te lossen.
BELANGRIJK VOOR FRANKRIJK:
Als het product aan een wand gemonteerd is, moet de elektrische aansluiting in overeenstemming met
de bijgevoegde tekening doorgevoerd worden doordat u de kabel doorsnijdt en een aansluitingsblok
tussen de productkabel en de stroomtoevoer gebruikt (zie afbeelding 6).
In vochtige kamers, badkamers of keukens moet dit aansluitingsblok op een afstand van minstens 25 cm
tot de vloer geïnstalleerd worden. De elektrische aansluiting moet eveneens het gebruik van een 2-polige
schakelaar met een afstand tot de contactopening van minstens 3 mm impliceren.
5. Kabelopslag
Wanneer het product niet in gebruik is, kunt u de kabel bewaren doordat u hem in de basis van het pro-
duct duwt.
Gelieve te noteren dat, wanneer het product in werking is, de kabel altijd helemaal uitgetrokken moet
zijn.
6. Gebruik van het verwarmingstoestel (Zie afbeelding 5)
6.1 Uitvoering met schakelaar en thermostaat
Het verwarmingstoestel heeft 2 knoppen, die de schakelaar en de thermostaat besturen.
De schakelaarknop heeft 5 standen, die het mogelijk maakt om het gewenste vermogen in te stellen.
Uitgaande van de stand “_” draait u de thermostaatknop in de richting van de wijzers van de klok totdat
u een "klik” hoort: het apparaat begint te functioneren bij het gewenste, ingestelde vermogen.
De thermostaat handhaaft de gewenste kamertemperatuur door het apparaat automatisch in en uit te
schakelen. Hoe meer de knop in de richting van de wijzers van de klok gedraaid is, hoe hoger de gehandhaafde temperatuur is. Een maximale instelling van de thermostaat komt overeen met ongeveer 30°C;
stand “_” stemt ongeveer met 5°C overeen.
Voor een correct gebruik van de thermostaat, verwijzen wij naar paragraaf “GEBRUIK VAN DE THERMO-
STA AT”
6.3 Gebruik van de thermostaat
In een kamer, waar de temperatuur te hoog is (meer dan 30°C), is het normaal dat de thermostaat het
verwarmingstoestel niet zal inschakelen.
In een kamer, waar de temperatuur te laag is (ongeveer 5°C of zelf minder) is het ook normaal dat de
thermostaat het apparaat in werking zal houden totdat de temperatuur stijgt.
Om de rechtse stand van de thermostaat te selecteren, stellen wij voor
- de thermostaat (in de richting van de wijzers van de klok) in de maximumstand te draaien;
- het apparaat te laten functioneren totdat een comfortabele temperatuur bereikt is;
- de knop tegen de richting van de wijzers van de klok in te draaien totdat u een "klik" hoort en het
apparaat stopt;
- de knop (alleen maar een beetje) terug in de richting van de wijzers van de klok te draaien: in deze stand
zal de thermostaat de door u geselecteerde, comfortabele temperatuur handhaven.
7. Veiligheid indien het product niet normaal functioneert
Ingevalvanoververhittingzalhetveiligheidssysteemdeverwarmingselementenendemotorautoma-
tisch uitschakelen. Als dit gebeurt:
- schakelt u de warmeluchtventilator uit door de hoofdschakelaar te gebruiken;
- verhelpt u de oorzaak van de oververhitting (d.w.z. hindernissen vooraan de luchtinlaat- of luchtuitlaatroosters, ongewone ophopingen van vuil etc.);
- laat u het verwarmingstoestel 15 tot minuten lang afkoelen;
- schakelt u de warmeluchtventilator in en gaat u na, of deze naar behoren functioneert.
Indien u een onregelmatige werking, schade aan het verwarmingselement of aan de structuur van het
apparaat waarneemt, verbreekt u het product van de netvoeding en neemt u met uw technisch supportcenter of speciaalzaak contact op.
8. Onderhoud
Dit verwarmingstoestel vereist geen specifiek onderhoud.
Wij raden u aan, de luchtinlaat- en luchtuitlaatroosters minstens twee keer per jaar met een stofzuiger te
reinigen om stof van de motor en van de verwarmingselementen te ver wijderen.
Indien het verwarmingstoestel gerepareerd dient te worden, verzoeken wij u, een geautoriseerde klan-
tenservice te contacteren.
Indien de kabel vervangen dient te worden, let er dan op dat een 2x1m² H05 VV-F <HAR> kabel gebruik t
moet worden.
6.2 Model met thermostaat en 60' timer
Het verwarmingstoestel heeft 2 knoppen.
Draai de timerknop in de richting van de wijzers van de klok om de door u geprefereerde duur van de
werking van 5 tot 60 minuten te selecteren. Het verwarmingstoestel begint te functioneren bij een maximaal vermogen (2000 W) en een instelling van de thermostaat oefent geen invloed op de werking uit.
Na de geselecteerde periode zal het verwarmingstoestel, bestuurd door de thermostaat in overeenstem-
ming met de instelling van de thermostaat, automatisch naar het gemiddelde vermogen (1000 W) overgaan. Voor het gebruik van de thermostaat verwijzen wij naar paragraaf 6.3.
Wanneer het verwarmingstoestel met timerbesturing bij maximaal vermogen functioneert, bestuurt de
thermostaat de kamertemperatuur niet. Gelieve in dit geval het verwarmingstoestel niet in kleine kamers
te gebruiken wanneer deze betrokken worden door personen, die niet in staat zijn om de kamer zonder
hulp te verlaten, tenzij permanent toezicht voorzien is.
Page 13

24
25
- GB Environment and recycling
Please help us to protect the environment by disposing of the packaging in accordance with the
national
regulations for waste processing.
Recycling of obsolete appliances
Appliances with this label must not be disposed off with the general waste. They must be
collected separately and disposed off according to local regulations.
- I Tutela dell'ambiente e riciclaggio
Affinché il vostro apparecchio non subisca danni durante il trasporto, esso è stato imballato con
cura. Per contribuire alla tutela del nostro ambiente, vi chiediamo di smaltire in modo
appropriato il materiale utilizzato per l'imballaggio dell'apparecchio.
Smaltimento degli apparecchi usati
Gli apparecchi che recano il contrassegno riportato a fianco non devono essere smaltiti insieme
ai rifiuti urbani, ma vanno raccolti e smaltiti separatamente. Lo smaltimento degli apparecchi usati va
eseguito a regola d'arte, in conformità con le prescrizioni e leggi vigenti localmente in materia.
- NL Milieu en recycling
Wij verzoeken u ons bij de bescherming van het milieu behulpzaam te zijn. Verwijder de
verpakking daarom overeenkomstig de voor de afvalverwerking geldende nationale
voorschriften.
Recycling van oude toestellen
Toestellen met dit kenmerk horen niet thuis in de vuilnisbak en zijn apart in te zamelen en te
recyclen. De recycling van oude toestellen moet steeds vakkundig en volgens de ter plaatse
geldende voorschriften en wetgeving plaats vinden.
- F Environnement et recyclage
Nous vous demandons de nous aider à préserver l'environnement. Pour ce faire, merci de vous
débarrasser de l'emballage conformément aux règles nationales relatives au traitement des
déchets.
Collecte et recyclage des produits en fin de vie
Les appareils munis de ce symbole ne doivent pas être mis avec les ordures ménagères, mais
doivent être collectés séparément et recyclés. La collecte et le recyclage des produits en fin de vie doivent
être effectués selon les dispositions et les décrets locaux.
- D Entsorgung von Altgeräten in Deutschland
Geräte mit dieser Kennzeichnung gehören nicht in die Restmülltonne und sind getrennt zu
sammeln und zu entsorgen.
Die Hersteller sorgen im Rahmen der Produktverantwortung für eine umweltgerechte
Behandlung und Verwertung der Altgeräte.
Im Rahmen des Elektro- und Elektronikgerätegesetzes (ElektroG) und zum Schutz unserer
Umwelt ist eine kostenlose Rückgabe bei Ihrer kommunalen Sammelstelle möglich.
- E Medio ambiente y reciclaje
Ayúdenos a proteger el medio ambiente eliminando el embalaje con arreglo a la legislación
nacional sobre tratamiento de residuos.
Eliminación de aparatos viejos
No tirar los aparatos que lleven esta identificación junto con la basura no clasificada. Se deben
recoger y eliminar de forma especial. La eliminación de aparatos viejos se debe realizar de
forma adecuada y competente, de acuerdo con las normas y leyes locales vigentes.
Pikkolo_STD/
19052010/R2
Please retain these instructions in a safe place for future reference.
Si prega di conservare con cura questo libretto di istruzioni per future
consultazioni.
Bewaar deze gebruiksaanwijzing zorgvuldig voor toekomstig gebruik.
Conserver cette notice pour toute consultation ultérieure.
Es wird gebeten, diese Gebrauchsanleitung für ein zukünftiges Nachschlagen
sorgfältig aufzubewahren.
Conservar las instruccione de uso.
Kundenservice:
Sollte Ihr Gerät wider Erwarten einmal den Kundendienst benötigen, wenden Sie
sich bitte an nachfolgende Anschrift. Wir werden dann im Garantiefall die Abholung
veranlassen. Das Gerät muss transportfähig verpackt sein.
Unfreie Pakete können nicht angenommen werden!
STEBA Elektrogeräte GmbH & Co KG
Pointstr. 2, 96129 Strullendorf / Germany
Vertrieb-Tel.: 09543 / 449-17 / -18, Service-Tel.: 09543 / 449-44, Fax: 09543 / 449-19
e-Mail: elektro@steba.com Internet: http://www.steba.com
Achtung! Elektrogeräte dürfen nur durch Elektro-Fachkräfte repariert werden, da
durch unsachgemäße Reparaturen erhebliche Folgeschäden entstehen können.
Page 14

Garantie-Bedingungen
Dieses Gerät ist nur für den Gebrauch im Haushalt bestimmt. Schäden am Gerät, die
bei bestimmungsgemäßem Gebrauch auf Werksfehler zurückzuführen sind und uns
unverzüglich nach Feststellung und innerhalb der gesetzlichen Garantiezeit nach
Lieferung an den Endabnehmer mitgeteilt wurden, beheben wir nach Maßgabe der
folgenden Bedingungen:
Eine Garantiepflicht wird nicht ausgelöst durch geringfügige Abweichungen von der
Soll-Beschaffenheit, die für Wert- und Gebrauchstauglichkeit des Gerätes unerheblich
sind sowie für Schäden aus nicht normalen Umweltbedingungen. Gebrauchsschäden
an Oberflächenbeschichtungen oder Lackierung sowie Glasbruch fallen nicht unter
Garantie. Die Behebung von uns als garantiepflichtig anerkannter Mängel erfolgt
dadurch, dass die mangelhaften Teile durch einwandfreie Teile ersetzt werden.
Geräte, für die unter Bezugnahme auf diese Garantie eine Mangelbeseitigung beansprucht wird, sind an uns sachgemäß verpackt, gereinigt, mit Fehlerangabe und einschließlich Kaufbeleg einzusenden. Ersetzte Teile gehen in unser Eigentum über. Der
Garantieanspruch ist nicht übertragbar und erlischt bei unsachgemäßem Gebrauch
oder Zweckentfremdung, wenn Reparaturen oder Eingriffe von dritter Seite vorgenommen wurden; und zwar unabhängig davon, ob die Beanstandung hierauf beruht.
Garantieleistungen bewirken weder eine Verlängerung der Garantiefrist noch setzen
sie eine neue Garantiefrist in Lauf. Die Garantiefrist für eingebaute Ersatzteile endet
zum gleichen Zeitpunkt wie die Garantiefrist für das ganze Gerät.
Kann der Mangel nicht beseitigt werden oder wird die Nachbesserung von uns abgelehnt oder unzumutbar verzögert, wird auf Wunsch des Endabnehmers innerhalb der
gesetzlichen Garantiezeit ab Kauf- bzw. Lieferdatum entweder kostenfreier Ersatz
geliefert oder der Minderwert vergütet oder das Gerät gegen Erstattung des Kaufpreises zurückgenommen.
Weitergehende Ansprüche, insbesondere solche auf Ersatz außerhalb des Gerätes
entstandener Schäden sind ausgeschlossen.
Steba Elektrogeräte GmbH & Co. KG
Pointstraße 2, D-96129 Strullendorf Zentrale: Tel.: 09543- 449- 0
Elektro@steba.com Fax: 09543-449-19
Vertrieb: Tel.: 09543-449-17
www.steba.com
Tel.: 09543-449-18
Art. Nr. 480-13171 05/ 2010 Irrtümer und technische Änderungen vorbehalten
 Loading...