

Steamfast SF-210 Owner's Manual
MODEL SF-210
MODELO SF-210
MODÉLE SF-210
Everyday Steam Cleaner
Limpiador de Vapor de Uso Diario
Nettoyeur à vapeur d’usage quotidien
Owner’s Guide
Guía del Propietario
Mode d’emploi
ENGLISH p. 2
ESPAÑOL p. 16
FRANÇAIS p. 30
KEEP YOUR RECEIPT FOR WARRANTY PURPOSES.
Please read all instructions before use.
CONSERVE SU RECIBO PARA LA GARANTÍA.
Lea todas las instrucciones antes de utilizar el vaporizador.
GARDEZ VOTRE REÇU AUX FINS DE LA GARANTIE.
Veuillez lire toutes les instructions avant l’utilisation.
IMPORTANT SAFETY INSTRUCTIONS
WARNING: To reduce risk of re, electrical shock or injury, the following
basic safety precautions should always be followed when using an
electrical appliance.
WARNING: To reduce the risk of electrical shock, this appliance uses a
grounded (three-pronged) plug. This plug will t in a grounded wall outlet
only one way. If the plug does not correctly t in the outlet, contact a licensed
electrician to install a proper outlet. DO NOT attempt to modify the plug or
defeat this safety feature.
READ ALL INSTRUCTIONS BEFORE USE
DANGER
Any appliance is electrically live even when switched off. To reduce risk of electrical shock:
1. Always unplug power cord immediately after using.
2. Do not place or store unit where it can fall or be pulled into a sink or tub.
3. Do not place in, or drop into water or other liquid.
4. If unit falls into water, immediately unplug power cord. Do not reach into the water.
WARNING
To reduce risk of burns, electrocution, re, or injury to persons:
1. Use Everyday Steam Cleaner only for its intended purpose as indicated in this manual.
2. If an extension cord is necessary, use a properly rated cord (15 ampere, 14 gauge). Use care
to position extension cord where it is least likely to be damaged or tripped over during use.
3. Before plugging power cord into electrical outlet, be sure that all electrical information on rating
label agrees with your power supply.
4. To reduce likelihood of circuit overload, DO NOT operate another high wattage appliance on
the same circuit as this unit.
5. To protect against risk of electrical shock, do not immerse unit in water or other liquids. Do not
use power cord as handle, let it hang over edges of counters, or be crimped or closed in doors.
6. Never yank power cord to disconnect from outlet; instead, grasp plug and pull smoothly to
disconnect.
7. Do not operate unit with a damaged power cord or if the unit has been dropped or damaged.
To avoid risk of electrical shock, do not disassemble unit; contact Steamfast Consumer Service
for examination and repair. Incorrect reassembly can cause a risk of electrical shock when unit
is used.
8. Close supervision is required for any appliance being used near children, pets and plants. Do
not leave unit unattended while plugged in.
9. This unit is not intended for use by persons (including children) with reduced physical, sensory
or mental capabilities, or lack of experience and knowledge, unless they have been given
supervision or instruction concerning use of the unit by a person responsible for their safety.
2 | ENGLISH

10. Do not use unit where aerosol-based products are being used, or where oxygen is being
administered.
11. Unit is only meant to be used with recommended Everyday Steam Cleaner (model SF-210)
accessories. Using other types of attachments may cause damage to unit or injury.
12. If Heating Indicator Light does not illuminate when unit is plugged in, unit is not operating
normally. Immediately disconnect cord from power supply, then refer to troubleshooting guide
on Page 12 of this manual for assistance.
13. Do not attempt to use unit without properly lling Boiler with water.
14. When lling unit, only water should be used – other cleaning agents could damage unit or
cause injury. Distilled or de-mineralized water is highly recommended, in order to minimize
potential build-up of mineral deposits.
15. To reduce risk of contact with hot water emitting from Steam Nozzle, check appliance before
each use by positioning it away from body and turning it on. Do not operate unit if Steam
Nozzle is blocked.
16. Burns can occur from touching hot plastic parts, hot water, or steam. Do not touch Steam
Nozzle or attempt to connect any accessories while unit is in use. Use caution when you turn
unit upside-down – there may be hot water inside.
17. When steaming any surface for the rst time, it is recommended that you consult the
manufacturer’s guidelines for the material being steamed. For items in question, test on an
inconspicuous area before proceeding.
18. Do not allow power cord to touch hot surfaces during use. Loosely bundle cord when storing.
19. Always allow Everyday Steam Cleaner to cool (at least 30 minutes for complete cooling) and
empty Boiler before storing.
SAVE THESE INSTRUCTIONS!
FOR HOUSEHOLD USE ONLY
Questions or comments?
www.steamfast.com
•
consumerservice@steamfast.com
•
1-800-711-6617
•
Speak your mind! We invite you to review this product online:
www.steamfast.com/reviews
ENGLISH | 3
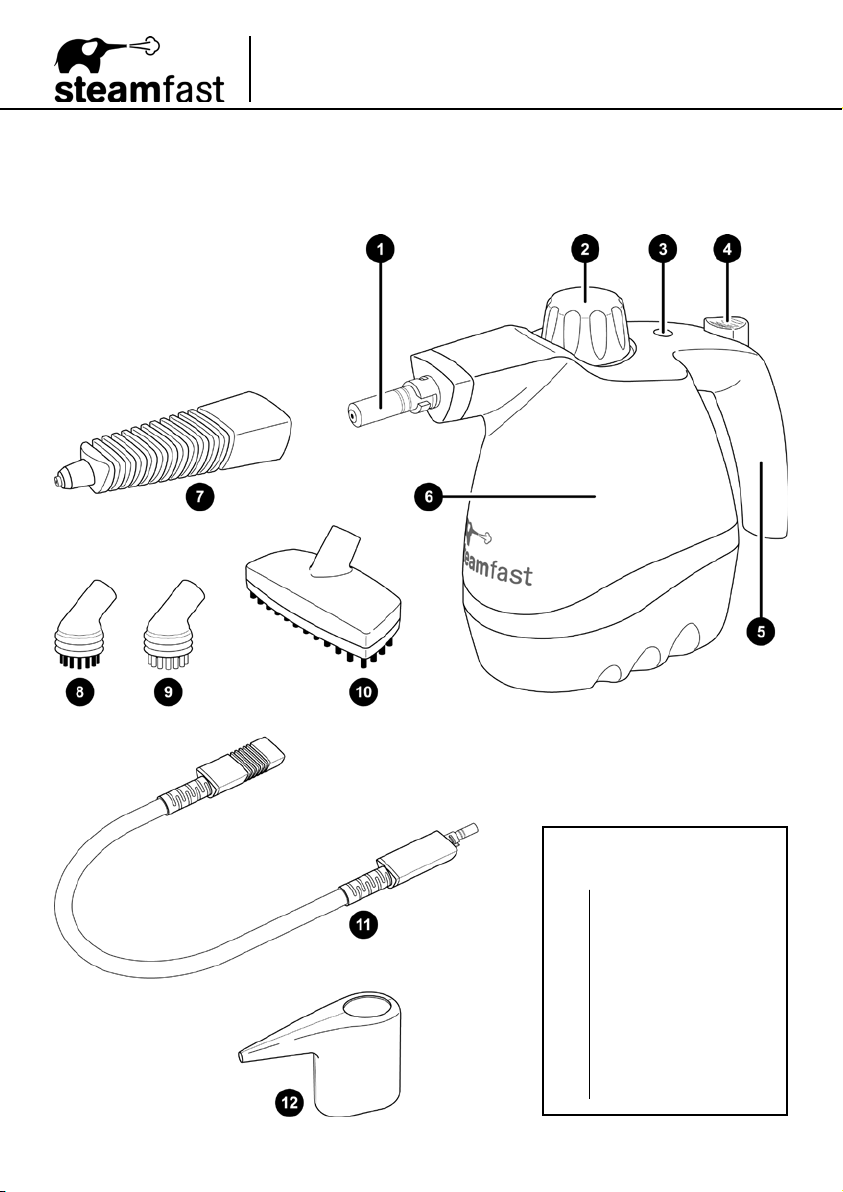
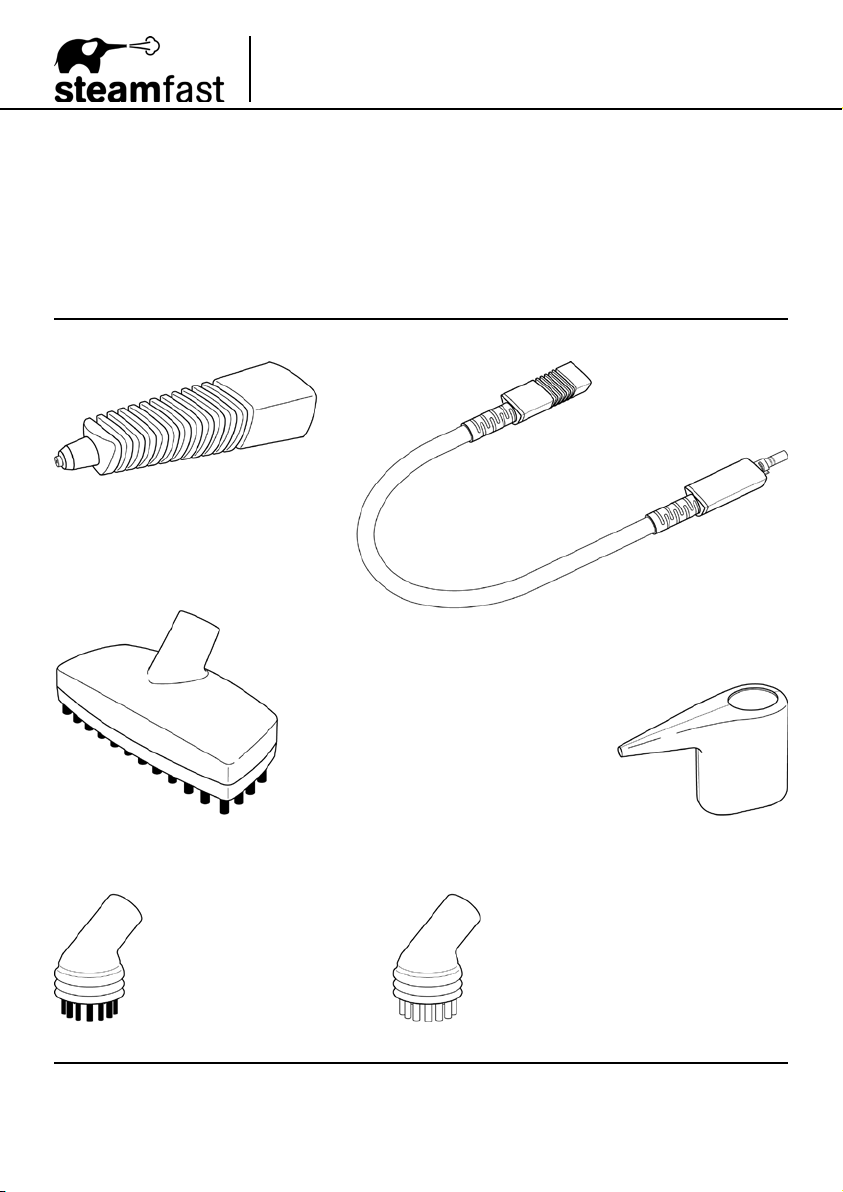
Product Information
The following features and accessories are included with your Everyday Steam Cleaner. Carefully
inspect the packing material for all parts listed below. To obtain possible missing parts, refer to
Product Support on Page 14 of this manual for Consumer Service contact information.
4 | ENGLISH
UNIT FEATURES
& ACCESSORIES
1
Steam Nozzle
2
Boiler Cap
3
Heating Indicator Light
4
Steam Trigger
5
Handle
6
Boiler (Internal)
7
Jet Nozzle
8
Nylon Utility Brush
9
Brass Utility Brush
10
Large Brush
11
Extension Hose
12
Measuring Cup

The Steam Nozzle (1) emits a ow of hot, penetrating steam whenever the Steam Trigger is
•
pressed and held. The Jet Nozzle or Extension Hose should always be connected to the
Steam Nozzle when the unit is in use.
The Boiler Cap (2) is designed to safely contain steam inside the Boiler. The Boiler Cap must
•
be unscrewed and removed in order to ll the Boiler with water.
The Heating Indicator Light (3) illuminates when the power cord is plugged in and the Boiler has
•
begun heating. The Heating Indicator Light will turn off when the Boiler is fully heated and the
unit is ready to begin producing steam.
The Steam Trigger (4) is pressed and held in order to start the ow of steam from the Steam
•
Nozzle, then released when you wish to stop.
The Handle (5) is engineered to stay cool while providing maximum grip and comfort.
•
The Boiler (6) is the internal reservoir where water is held and heated into steam. For optimal
•
steam production, the Boiler should be lled with no more than 6 oz (180 ml) of water.
The Jet Nozzle (7) connects to the Steam Nozzle and is designed to focus the ow of steam
•
for concentrated cleaning. The Nylon Utility Brush, Brass Utility Brush and Large Brush all
connect to the Jet Nozzle. Alternatively, the Jet Nozzle may be connected to the end of the
Extension Hose.
The Nylon Utility Brush (8) connects to the Jet Nozzle and is designed for scrubbing especially
•
tough stains. The Nylon Utility Brush is ideal for use on many surfaces around the home,
including carpet, ceramic tile, grouting, and more.
The Brass Utility Brush (9) connects to the Jet Nozzle and is designed for scrubbing especially
•
tough stains. The Brass Utility Brush is perfect for use on BBQ grills, oven racks, automobile
engines, shop tools and other hard metal surfaces.
The Large Brush (10) connects to the Jet Nozzle and is designed for scrubbing especially
•
tough stains. The Large Brush functions similar to the Nylon Utility Brush, only designed to
more efciently scrub larger surface areas.
NOTE: Some delicate surfaces, such as painted wood or stainless steel, may be scratched
or damaged by the bristles of the Brushes – especially the Brass Utility Brush. Use
careful judgement when deciding what surface to clean with any of the Brushes. If you are
unsure if a surface will be damaged, it is recommended that you test a small inconspicuous
spot before proceeding.
The Extension Hose (11) connects to the Steam Nozzle and is designed
•
freedom to easily reach a variety of spaces. The Jet Nozzle should be connected to the male
end of the Extension Hose in order to safely focus the ow of steam.
The Measuring Cup (12) provides an easy and convenient way to consistently ll the Boiler with
•
the optimum amount of water (6 oz / 180 ml).
to provide additional
ENGLISH | 5
Assembling Your
Everyday Steam Cleaner
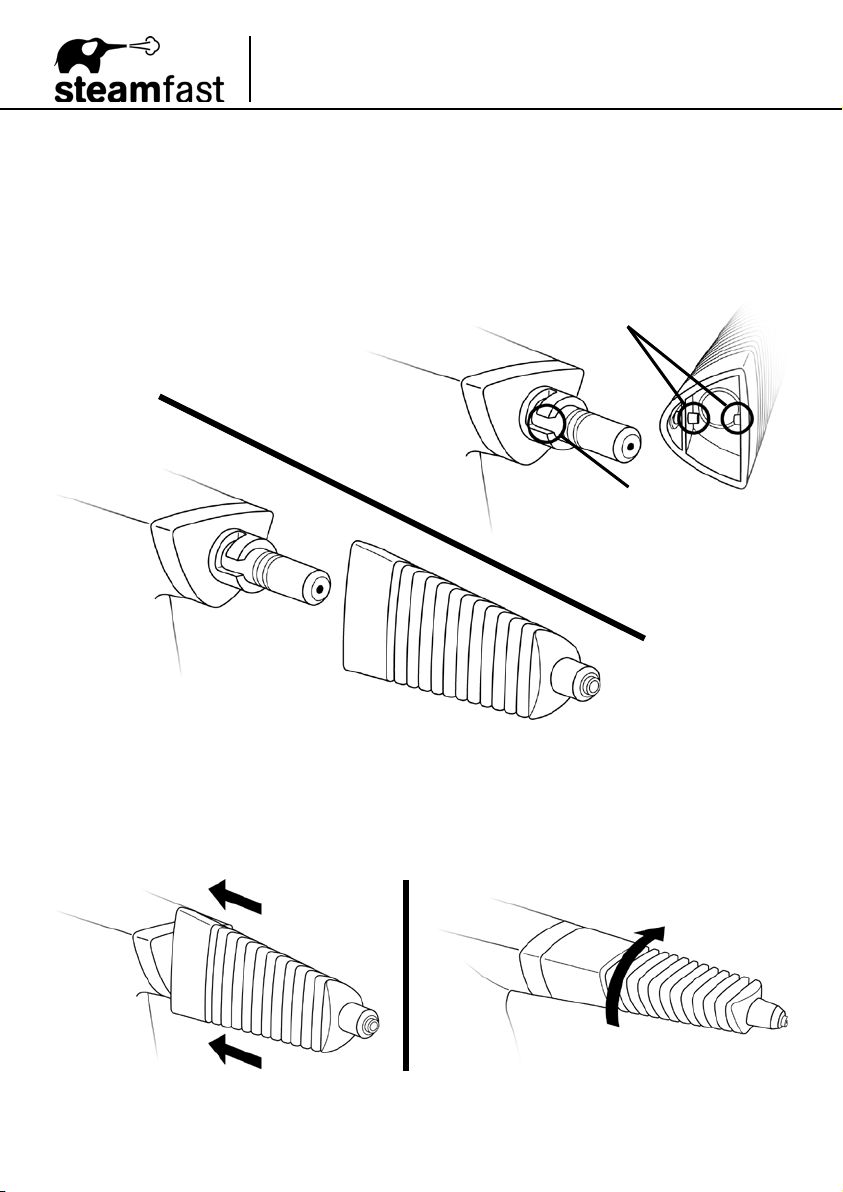
CONNECTING JET NOZZLE
WARNING: DO NOT attempt to connect any accessories while unit is emitting steam.
Doing so could result in burns or other injury.
1. Align Jet Nozzle with Steam Nozzle as shown (FIGURE 1-A). Jet Nozzle should be sideways
90º counter-clockwise from it’s nal position. Guide keys on Jet Nozzle should line up with key
slots on base of Steam Nozzle (FIGURE 1-B).
GUIDE KEYS
1-A
KEY SLOTS
1-B
FIGURE 1
2. Slide Jet Nozzle onto Steam Nozzle - guide keys should t into key slots. Push Jet Nozzle on
as far as it will go (FIGURE 2-A). Rotate Jet Nozzle 90ºclockwise, turning it until it will move
no further (FIGURE 2-B).
2-A
2-B
FIGURE 2
6 | ENGLISH
CONNECTING BRUSHES
NOTE: The Nylon Utility Brush, Brass Utility Brush and Large Brush are all attached in the
same manner. The Nylon Utility Brush is illustrated in FIGURE 3 as an example.
1. Align Brush with Jet Nozzle as shown. Guide key on back of Brush should line up with key
slot on side of Jet Nozzle tip (FIGURE 3-A).
2. Firmly press Brush onto Jet Nozzle (FIGURE 3-B).
CAUTION: Make sure Brush is pushed as far as possible onto tip to ensure that it is
seated securely. This will prevent steam leaks and ensure that Brush is not forced off of
Jet Nozzle by steam pressure.
GUIDE KEY
KEY SLOT
3-A
3-B
FIGURE 3
ENGLISH | 7
Assembling Your
Everyday Steam Cleaner
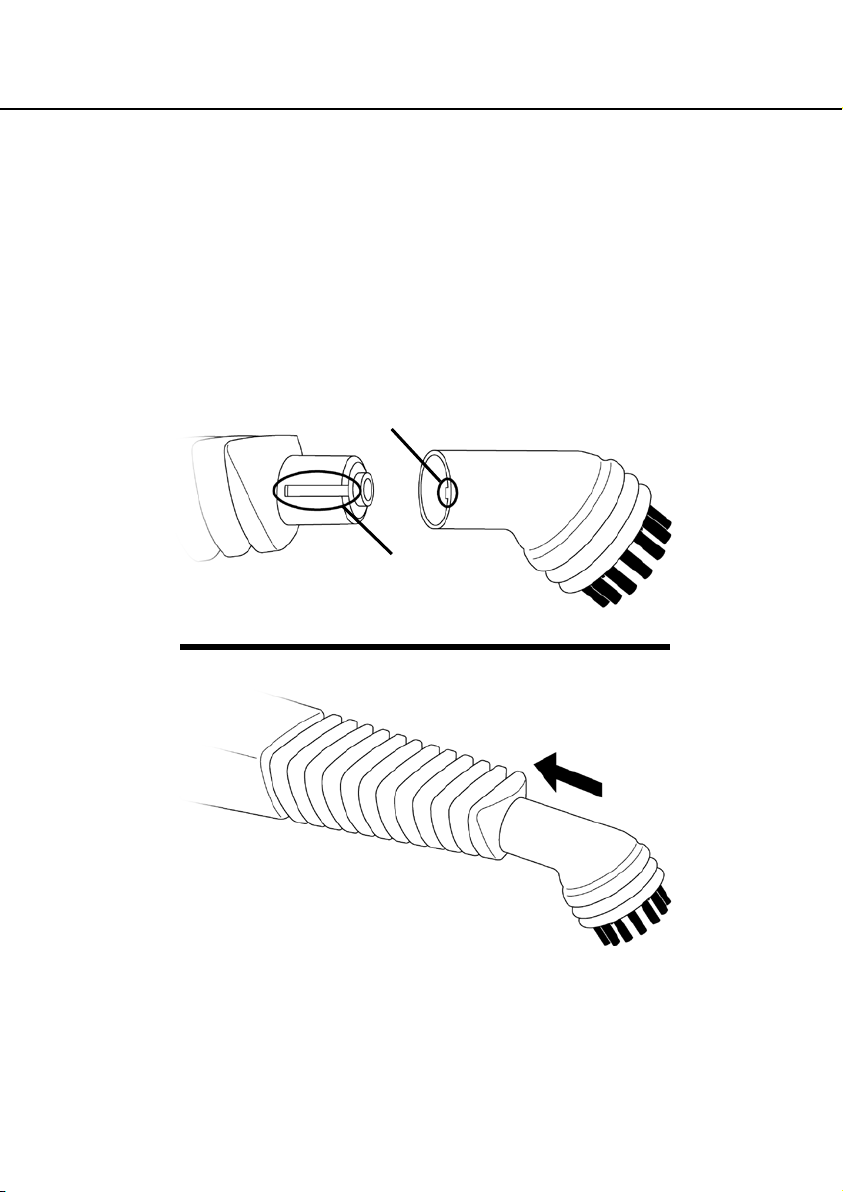
CONNECTING EXTENSION HOSE
1. Align female end of Extension Hose with Steam Nozzle (FIGURE 4-A). Guide keys on
Extension Hose should line up with key slots on base of Steam Nozzle (FIGURE 4-B).
2. Slide Extension Hose onto Steam Nozzle, being sure to push it on as far as it will go. Rotate
Extension Hose clockwise, turning it until you feel it “lock” into place and it will move no further.
GUIDE KEYS
4-A
KEY SLOTS
4-B
FIGURE 4
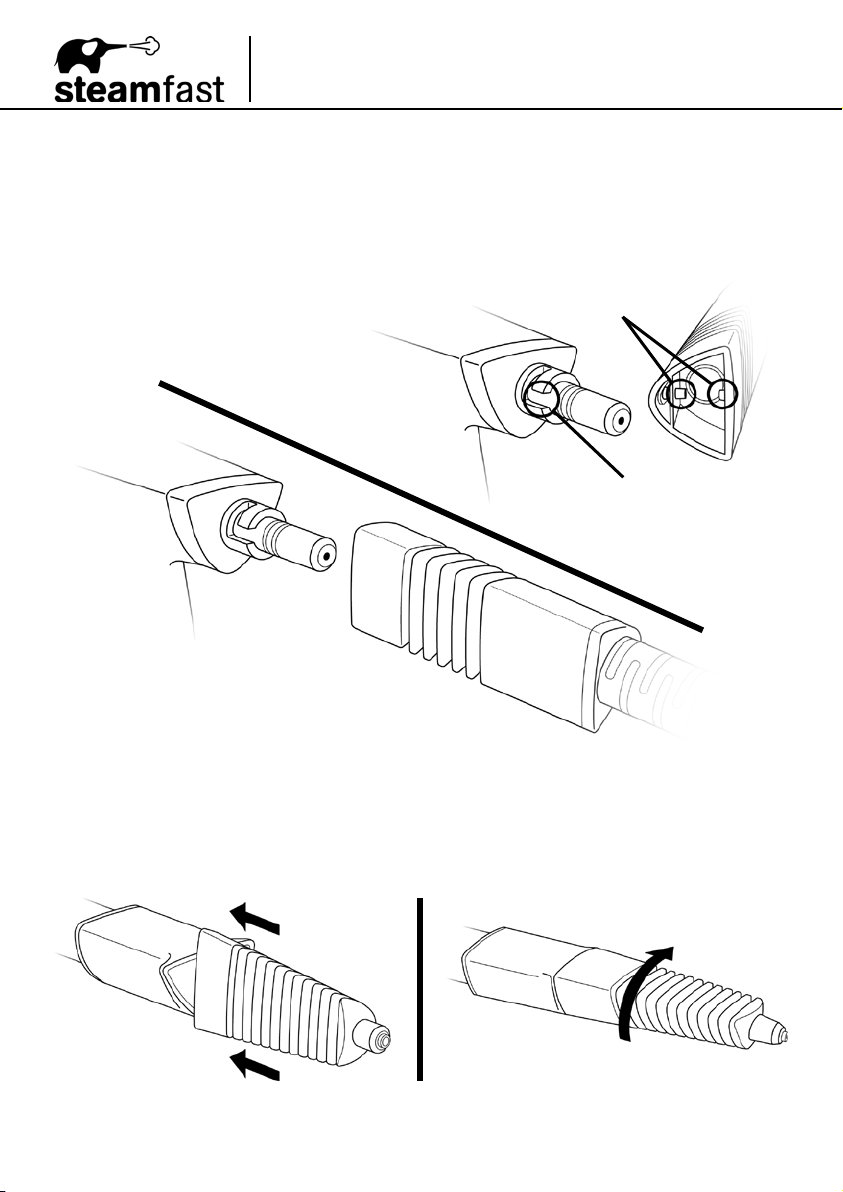
3. Align Jet Nozzle with male end of Extension Hose. Guide keys on Jet Nozzle should line up
with key slots on base of Extension Hose nozzle.
4. Slide Jet Nozzle onto Extension Hose, being sure to push it on as far as it will go (FIGURE 5-A).
Rotate Jet Nozzle clockwise, turning it until you feel it “lock” into place and it will move no
further (FIGURE 5-B).
5-A
5-B
FIGURE 5
8 | ENGLISH
Using Your
Everyday Steam Cleaner
FILLING BOILER
1. Place Everyday Steam Cleaner on a at, level surface.
2. Make sure power cord is unplugged from electrical outlet.
3. Cautiously remove Boiler Cap by unscrewing it in a counter-clockwise direction, and lift it off.
CAUTION: Refer to relling procedure below for additional safety precautions that must
be taken when relling the unit after it has been in use.
4. Boiler should always be emptied after each use. If it was not emptied after the previous use,
empty it now – this will make it easier to ll with the correct amount of water.
5. Fill included Measuring Cup with 6 oz (180 ml) of water.
NOTE: In order to extend the life of your Everyday Steam Cleaner and keep it functioning
at it’s maximum potential, it is highly recommended that distilled or de-mineralized
water be used in Boiler.
6. Carefully pour water from Measuring Cup into Boiler through ll hole.
NOTE: Do not exceed the Boiler’s maximum capacity of 6 oz (180 ml). This will ensure
a better ow of steam with minimal dripping water.
7. Replace Boiler Cap, screwing it in a clockwise direction to tighten. Make sure it is screwed on
securely to prevent hot water or steam from escaping.
REFILLING BOILER
If unit has been in use, always use the following safety precautions before removing
the Boiler Cap to add water:
Allow unit to cool for 5-10 minutes.
•
Press and hold Steam Trigger to release all remaining steam. Steam can remain pressurized
•
inside Boiler for up to an hour after use.
WARNING: Failure to follow these precautions may result in burns from escaping steam
when the Boiler Cap is removed.
ENGLISH | 9

Using Your
Everyday Steam Cleaner
STEAM CLEANING
NOTE: Before operating, make sure all desired accessories are connected and Boiler is
lled with the correct amount of water (refer to Pages 6-9 for details).
1. For rst-time use, remove protective plastic cover that is shipped on electrical plug. Plug
power cord into a convenient 3-prong electrical outlet. Heating Indicator Light will illuminate to
show that unit is receiving power and Boiler has begun to heat.
CAUTION: This unit uses a grounded (3-prong) electrical plug. Use only in properly
installed 3-prong electrical outlets. Do not attempt to alter plug or circumvent this
safety feature in any way.
2. After approximately 3 minutes, Heating Indicator Light will turn off. This indicates that Boiler is
fully heated, and unit is ready to begin steaming.
NOTE: Heating Indicator Light may cycle off and on during use, accompanied by a slight
temporary drop in steam pressure – this is a normal part of operation, as the Boiler
works to maintain a steady optimal temperature.
3. Point Jet Nozzle (and any connected accessories) towards surface you wish to steam, and
press Steam Trigger. Hold Trigger down for a continuous ow of steam.
CAUTION: Always be sure that Jet Nozzle and other accessories are pointed in a safe
direction (away from yourself, other people, pets, and plants) before pressing Steam
Trigger.
NOTE: When steaming any surface for the rst time, it is recommended that you consult
the manufacturer’s guidelines for material being steamed. For items in question, test
steam on an inconspicuous area before proceeding.
4. Using a slight back-and-forth motion over the area you are steaming will enhance the cleaning
process, as will scrubbing the area (if a Brush is connected). Wipe steamed areas with a
clean cloth to remove loosened dirt and grime.
CAUTION: Wiping an area while it is still wet is recommended, but use care when wiping
surfaces such as metal that may still be hot.
5. To effectively kill bacteria and other microorganisms, hold Jet Nozzle (and any connected
accessories) approximately 1/2 inch from surface and press Steam Trigger. Keep Trigger held
and concentrate steam on the same spot for at least 5 seconds.
6. At its maximum capacity (6 oz / 180 ml), the Boiler will provide approximately 8 minutes of
continuous steam. If you wish to continue steaming, refer to Filling Boiler procedure on
Page 9 – be sure to note Relling Boiler section at bottom of page.
7. Once you are nished using your Everyday Steam Cleaner, immediately unplug power cord
from electrical outlet. Refer to Storage & Care guidelines on Page 11 for proper cleaning and
storage procedures.
10 | ENGLISH

Storage & Care
PROPER STORAGE
Preparing your Everyday Steam Cleaner for storage is quick and simple. When you have nished
your steaming tasks, follow the steps listed below.
1. Unplug power cord from electrical outlet.
2. Allow unit to cool (30 minutes for complete cooling).
3. Press and hold Steam Trigger to release all remaining steam pressure.
4. Unscrew and remove Boiler Cap. Drain all remaining water from Boiler into a sink or tub, then
loosely replace Boiler Cap.
NOTE: Do not overtighten Boiler Cap when storing, as this may make it difcult to remove
during next use.
5. Loosely bundle power cord, and store Everyday Steam Cleaner in a cool dry location.
CARE & MAINTENANCE
A common maintenance need for steam appliances is the removal of build-up caused by high
mineral content in many municipal water supplies. This mineral build-up may limit the
effectiveness and reduce the life of your Everyday Steam Cleaner.
The best way to minimize mineral build-up is to use distilled or de-mineralized water when
using your Everyday Steam Cleaner. If you are unable to use distilled water, it is recommended that
the following procedure be followed monthly to help remove any mineral build-up:
To remove mineral build-up:
1. Unplug power cord from electrical outlet.
2. Allow unit to cool (30 minutes for complete cooling).
3. Press and hold Steam Trigger to release all remaining steam pressure.
4. Unscrew and remove Boiler Cap, and drain any remaining water from Boiler into a sink or tub.
5. Fill Measuring Cup with 6 oz (180 ml) distilled vinegar. Carefully pour vinegar into Boiler.
6. Slowly shake or move unit around to agitate vinegar.
7. Allow to stand for at least 40 minutes, or more if possible.
8. Drain vinegar from Boiler.
9. Rinse Boiler with fresh water, drain and repeat until vinegar odor dissipates.
10. Loosely replace Boiler Cap and continue with normal storage procedure, as outlined in
Proper Storage section above.
ENGLISH | 11
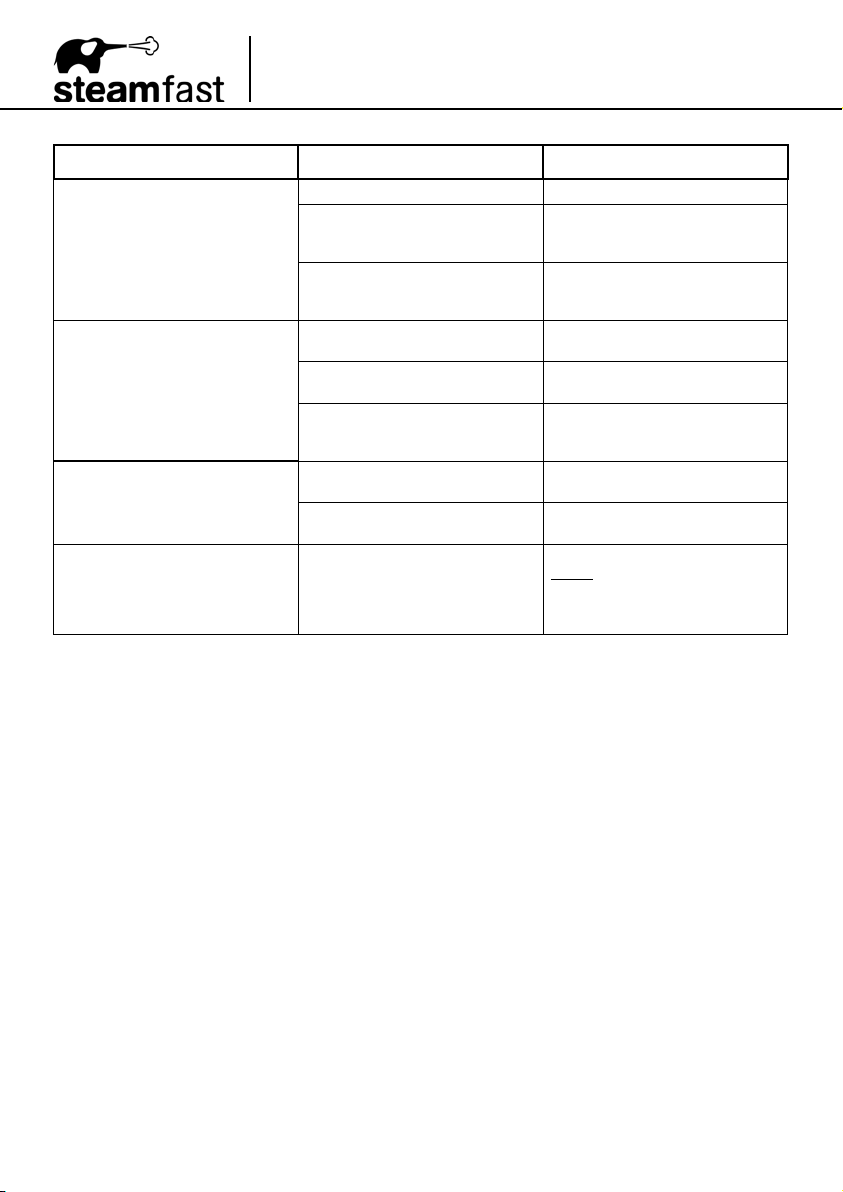
PROBLEM POSSIBLE CAUSE SOLUTION
Unit fails to heat up. Heating
Indicator Light DOES NOT illuminate.
Unit fails to heat up. Heating
Indicator Light DOES illuminate.
NOTE: Always allow sufcient
time for unit to heat up before
pressing Steam Trigger.
Steam output is weak or intermittent.
Boiler Cap cannot be unscrewed.
Troubleshooting
Unit is not plugged in.
Household circuit breaker / ground
fault interrupter has tripped or blown
a fuse.
Unit is damaged or otherwise in
need of repair.
No water in Boiler.
Mineral build-up in unit.
Unit is damaged or otherwise in
need of repair.
Water level in Boiler is running low.
Mineral build-up in unit.
Boiler Cap has been overtightened
after previous use.
Plug power cord into electrical outlet.
Reset circuit breaker / ground fault
interrupter, or replace fuse. For
assistance, contact a licensed electrician.
Immediately cease usage and unplug.
Contact Consumer Service for
assistance (see Page 13 for details).
Refer to Filling Boiler procedure on
Page 9 to ll unit with water.
Refer to Care & Maintenance
section on Page 11 for details.
Immediately cease usage and unplug.
Contact Consumer Service for
assistance (see Page 13 for details).
Refer to Relling Boiler procedure
on Page 9 to rell unit with water.
Refer to Care & Maintenance
section on Page 11 for details.
Boiler Cap should always be replaced
loosely when storing. For assistance
with a Cap that has become stuck,
contact Consumer Service (see Page
13 for details).
12 | ENGLISH
Product Support
CONSUMER SERVICE
For problems with your Everyday Steam Cleaner, please refer to the troubleshooting guide located
on Page 12 of this manual. Additional inquiries should be directed to our consumer support services
through our Web site, www.steamfast.com.
If you do not have internet access, you may also contact our Consumer Service Department by
telephone, at 1-800-711-6617.
NOTE: In order for our Consumer Service representatives to help you as quickly and
efciently as possible, please have the following information ready before calling:
• Purchase information (where and when you purchased this product)
• Copy of purchase receipt / proof of purchase
• Product serial number (located on electrical specication label on bottom of unit)
• Date code (4-digit number located on electrical specication label)
For information regarding your 1 year limited warranty, refer to Page 15 of this manual.
PRODUCT SPECIFICATIONS
MODEL
SF-210
VOLTAGE
WATTAGE
AMPERAGE
WATER CAPACITY
HEATING TIME
CONTINUOUS STEAM TIME
UNIT WEIGHT
UNIT DIMENSIONS
POWER CORD LENGTH
120VAC 60Hz
900W
7.5A
6 OZ (180 ML)
3 MIN (APPROXIMATE)
8 MIN (APPROXIMATE)
2.6 LBS (1.2 KG)
13.3” (33.8 CM) x 5.7” (14.4 CM) x 8.3” (21.1 CM)
12.5’ (380.0 CM)
ENGLISH | 13
Product Support
ACCESSORIES & PARTS
When ordering accessories and parts for your Everyday Steam Cleaner, you may refer to the part
numbers below. Accessories and parts may be ordered through our Web site:
www.steamfast.com
You may also contact Consumer Service directly:
consumerservice@steamfast.com or 1-800-711-6617
JET NOZZLE
A210-100R-
EXTENSION HOSE
A210-016R-
LARGE BRUSH
A210-001R-
NYLON UTILITY BRUSH
A210-003R-
BRASS UTILITY BRUSH
A210-004R-
MEASURING CUP
A142-P002R-
NOTE: Due to continuing improvements, part numbers listed above may change.
For assistance ordering parts, please contact Consumer Service directly.
14 | ENGLISH
 Loading...