

Page 1
Please read all instructions before use.
KEEP YOUR RECEIPT FOR WARRANTY PURPOSES.
Clean Mist Steam Mop
MODEL SF-145 F
User’s Guide
Page 2

GARANTÍA LIMITADA DE 1 AÑO
Steamfast, una división de Vornado Air LLC, (“Steamfast”) garantiza al comprador o consumidor original que este
Steamfast Trapeador a Vapor Niebla Limpia (“Producto”) contra defectos de material o mano de obra durante un período
de un (1) año a partir de la fecha de compra. Si se descubriera cualquiera de estos defectos dentro del período de
garantía, Vornado reparará o reemplazará el Producto, a su discreción, sin costo alguno, en tanto el Producto se
remita a Steamfast con los gastos de envío pagos. Las reparaciones no cubiertas por la garantía o fuera del período
de garantía requerirán de un pago cubriendo el costo de materiales, manipuleo y envío.
Esta garantía no se aplica a defectos producidos por el abuso del Producto, por su modicación, alteración, reparación
o mantenimiento por personas ajenas a Steamfast, por mal manejo del mismo, mantenimiento inadecuado, uso
comercial o daños producidos durante el envío o atribuibles a fuerza mayor.
LA REPARACIÓN O REEMPLAZO QUE SE OFRECE BAJO ESTA GARANTÍA ES LA ÚNICA SOLUCIÓN PROPORCIONADA
PARA EL CLIENTE. STEAMFAST NO SERÁ RESPONSABLE POR NINGÚN DAÑO INCIDENTAL O INDIRECTO POR
EL INCUMPLIMIENTO DE CUALQUIER GARANTÍA EXPRESA O IMPLÍCITA DE ESTE PRODUCTO. EXCEPTO HASTA
EL ALCANCE PROHIBIDO POR LAS LEYES VIGENTES, TODA GARANTÍA IMPLÍCITA DE APTITUD O IDONEIDAD
PARA UN USO EN PARTICULAR DE ESTE PRODUCTO QUEDA LIMITADA A LA DURACIÓN DE ESTA GARANTÍA.
Algunos estados no permiten limitaciones con respecto a cuánto dura una garantía implícita o la exclusión o limitación
de daños imprevistos o consiguientes, por lo tanto las exclusiones o limitaciones anteriores pueden no aplicarse en su
caso. Esta garantía le otorga derechos legales especícos; usted puede también tener otros derechos, los que varían
de estado a estado.
Por garantía o servicio de reparaciones, llame al 1-800-711-6617 o mande un correo electrónico a
consumerservice@steamfast.com para obtener el formulario de Autorización de Retorno (“RA”). Por favor, cuando
contacte a Steamfast por la garantía, tenga a mano o incluya en el envío los números de modelo, código de fecha
y de serie de su Producto, así como su nombre, dirección, ciudad, estado, código postal y número de teléfono. Es
posible que se le requiera proporcionar el recibo original de venta. Para sus registros: Abroche o adjunte su recibo
original de compra a esta ‘Guía del Usuario’. Por favor, también escriba aquí abajo el número de serie de su Producto
(ubicado en la calcomanía de especicaciones de su producto).
Numero de Serie: _______________________________________________________________________________
Después de recibir el formulario RA, despache su Producto con gastos de envío pagos a:
Steamfast
Attn: Warranty & Repair
6655 Troost Avenue
Kansas City, MO 64131
Para asegurar el manejo adecuado, los embalajes deben estar claramente marcados con el número de RA. Los
paquetes que no estén marcados claramente con dicho número de RA podrían ser rechazados en la dársena de
recepción.
Por favor espere entre 1 y 2 semanas después de la recepción del Producto para dar tiempo a la reparación y
devolución del mismo.
Registre su producto en línea en www.steamfast.com
© 2009 Vornado Air LLC • Andover, KS 67002
Especicaciones del producto sujetas a cambio sin previo aviso.
Steamfast® son marcas registradas de Vornado Air LLC.
Fabricado en China.
Servicios al Consumidor de Steamfast
W: www.steamfast.com • T: 1-800-711-6617 • C: consumerservice@steamfast.com
IMPORTANT SAFETY INSTRUCTIONS
ENGLISH
2
READ ALL INSTRUCTIONS BEFORE USE
DANGER
Any appliance is electrically live even when switched off. To reduce risk of electrical shock:
1. Always unplug power cord immediately after using.
2. Do not place or store unit where it can fall or be pulled into a sink or tub.
3. Do not place in, or drop into water or other liquid.
4. If unit falls into water, immediately unplug power cord. Do not reach into the water.
WARNING
To reduce risk of burns, electrocution, re, or injury to persons:
1. Use Clean Mist Steam Mop only for its intended purpose as indicated in this manual.
2. If an extension cord is necessary, use a properly rated cord (15 ampere, 14 gauge). Use care
to position extension cord where it is least likely to be damaged or tripped over during use.
3. Before plugging power cord into electrical outlet, be sure that all electrical information on rating
label agrees with your power supply.
4. To reduce likelihood of circuit overload, DO NOT operate another high wattage appliance on
the same circuit as this unit.
5. To protect against risk of electrical shock, do not immerse unit in water or other liquids. Do not
use power cord as handle, let it hang over edges of counters, or be crimped or closed in doors.
6. Never yank power cord to disconnect from outlet; instead, grasp plug and pull to disconnect.
7. Do not operate unit with a damaged power cord or if the unit has been dropped or damaged.
To avoid risk of electrical shock, do not disassemble unit; contact Steamfast Consumer Service
for examination and repair. Incorrect reassembly can cause a risk of electrical shock when unit
is used.
8. Close supervision is required for any appliance being used near children, pets and plants. Do
not leave unit unattended while plugged in.
9. This unit is not intended for use by persons (including children) with reduced physical, sensory
or mental capabilities, or lack of experience and knowledge, unless they have been given
supervision or instruction concerning use of the unit by a person responsible for their safety.
WARNING: To reduce risk of re, electrical shock or injury, the following basic
safety precautions should always be followed when using an electrical
appliance.
WARNING: To reduce the risk of electrical shock, this appliance uses a
polarized electrical plug with one prong that is larger than the other. This plug
will t into a wall outlet only one way. If the plug does not correctly t in the
outlet, contact a licensed electrician to install a proper outlet. DO NOT attempt
to modify the plug or defeat this safety feature.
Page 3

3
10. Do not use unit where aerosol-based products are being used, or where oxygen is being
administered.
11. Unit is only meant to be used with recommended SF-145 F accessories. Using other types of
attachments may cause damage to unit or injury.
12. If red Power Indicator Light does not illuminate when unit is plugged in and On/Off Switch is
pressed, unit is not operating normally. Immediately disconnect cord from power supply, then
refer to troubleshooting guide on Page 12 of this manual for assistance.
13. Always turn unit off and unplug power cord before lling Boiler with water. Do not attempt to
use unit without properly lling Boiler.
14. When lling Boiler, only water should be used in unit – other cleaning agents could damage
unit or cause injury. Distilled or de-mineralized water is highly recommended, in order to
minimize potential build-up of mineral deposits. Do not overll unit.
15. Cleanfast HARD FLOOR Solution should only be used in Solution Tank. Pouring Solution
into Boiler could result in reduced effectiveness, damage to unit or possible injury.
16. To reduce risk of contact with hot water emitting from Steam Nozzle, check appliance before
each use by positioning it away from body and turning it on. Do not operate unit if Steam
Nozzles are blocked.
17. Burns can occur from touching hot metal parts, hot water, or steam. Do not touch bottom of
Mop Head or attempt to attach a Microber Pad by hand while unit is in use. Use caution
when you turn unit upside-down – there may be hot water in Boiler.
18. Use caution when using unit on uneven surfaces, such as stairs.
19. When steaming any surface for the rst time, it is recommended that you consult the
manufacturer’s guidelines for material being steamed. For items in question, test on an
inconspicuous area before proceeding.
20. Steaming unsealed hardwood or unglazed ceramic surfaces is not recommended, and may
result in warping or damage to the surface. Steam may remove the sheen from surfaces
treated with wax.
21. When steam mopping, never leave unit resting in one spot on any surface for any period of
time – prolonged exposure to heat and moisture may damage oor surfaces.
22. Do not allow power cord to touch hot surfaces during use. Wrap cord loosely around Cord
Brackets when storing.
23. Always allow Clean Mist Steam Mop to cool completely (at least 30 minutes) and empty Boiler
before storing. Do not store unit with a damp Microber Pad still attached.
SAVE THESE INSTRUCTIONS!
FOR HOUSEHOLD USE ONLY
Questions or comments?
•
www.steamfast.com
•
consumerservice@steamfast.com
•
1-800-711-6617
Page 4

Product Information Soporte del Producto
SERVICIO AL CLIENTE
Si tiene problemas con su Trapeador a Vapor Niebla Limpia, vea la guía de solución de problemas en
la página 12 de este manual. Las preguntas adicionales se deben hacer a nuestro servicio soporte al
cliente a través de nuestro sitio Web, www.steamfast.com.
Si no tiene acceso a Internet, puede contactar a nuestro Departamento de Servicio al Cliente por
teléfono, al 1-800-711-6617.
NOTA: Para que nuestros representantes de servicio al cliente le ayuden rápida y
ecientemente, tenga la siguiente información a mano antes de llamar:
• Información de compra (dónde y cuándo compró este producto)
• Copia del recibo de compra / prueba de compra
• Número de serie del producto (ubicado cerca del sello de especicación eléctrica, detrás de la
unidad)
• Código de fecha (número de 4 dígitos ubicado en el sello de especicación eléctrica, detrás de
la unidad)
Para información en cuanto a su 1 año limitó la garantía, referirse a la página 15 de este manual.
ESPECIFICACIONES DEL PRODUCTO
TIEMPO VAPOR CONSTANTE
ENGLISH
4
The following features and accessories are included with your Clean Mist Steam Mop. Carefully
inspect the packing material for all parts listed below. To obtain possible missing parts, refer to
Product Support on Pages 13 & 14 of this manual.
UNIT FEATURES & ACCESSORIES
Handle
Telescopic Pole
Extension Lock
Cord Brackets
Solution Tank (internal)
Solution Tank Plug
Mop Head
Solution Nozzle
Floor Lights
Floor Light Switch
On/Off Switch
Boiler (internal)
Boiler Cap
Solution Spray Button
Power Indicator Light (red)
Heating Indicator Light (green)
Steam Nozzles
Cloth Grips
Microber Pads (2)
Carpet Glider
Resting Pad
Measuring Cup
Funnel
Cleanfast HARD FLOOR Solution
1.
2.
2
a.
3.
4.
4
a.
5.
6.
7.
8.
9.
10.
10
a.
11.
12.
13.
14.
15.
16.
17.
18.
19.
20.
21.
Page 5

5
•
The Handle (1) connects to the top of the Telescopic Pole, and is designed for maximum grip and comfort.
•
The Telescopic Pole (2) connects the Mop Head to the Handle, and can be extended and retracted for
comfortable use and convenient storage.
•
The Extension Lock (2A) is used to adjust the length of the Telescopic Pole.
•
The Cord Brackets (3) provide a convenient way to neatly wrap the power cord for storage.
•
The Solution Tank (4) is the internal reservoir where Cleanfast HARD FLOOR Solution can be added
for use during mopping.
•
The Solution Tank Plug (4A) is the rubber plug which must be removed in order to access the Solution Tank’s
ll hole.
•
The Mop Head (5) is the unit’s main body, housing the Boiler and producing steam through the Steam Nozzles.
•
The Solution Nozzle (6) is the front-mounted nozzle that sprays a burst of solution from the Solution Tank
outwards in front of the unit whenever the Solution Spray Button is pressed.
•
The Floor Lights (7) are four front-mounted LED lights, designed for illuminating dark or difcult-to-see areas to
ensure more thorough cleaning, as well as attractive accent lighting. The Floor Lights will only function if the
On/Off Switch has been pressed to activate the unit’s main power.
•
The Floor Light Switch (8), located on the back-right side of the Mop Head, is the foot operated button that
activates and deactivates the Floor Lights.
•
The On/Off Switch (9), located on the back side of the Mop Head, is the foot-operated button that activates and
deactivates the unit. The On/Off Switch is pressed to turn the unit on (the red Power Indicator Light will illuminate),
then pressed again to turn the unit off (the red Power Indicator Light will turn off).
•
The Boiler (10) is the internal reservoir where water is held and converted into steam. For optimal steam
production, the Boiler should be lled with no more than 10 oz. (300 ml.) of water.
•
The Boiler Cap (10A) is designed to safely contain steam inside the Boiler, while providing easy access to the
Boiler’s ll hole. The Cap must be unscrewed and removed in order to ll the Boiler with water.
•
The Solution Spray Button (11), located on the back-left side of the Mop Head, is the foot-operated button that
controls the unit’s solution spray function. When pressed, a burst of solution contained in the Solution Tank will
be sprayed from the Solution Nozzle.
•
The red Power Indicator Light (12) illuminates whenever the power cord is plugged into an electrical outlet and
the On/Off Switch is pressed, to indicate that unit is receiving power.
•
The green Heating Indicator Light (13) illuminates while the Boiler is actively heating water. When the Boiler is
empty, the Light will turn off.
•
The Steam Nozzles (14), located on the bottom of the Mop Head, evenly disperse the ow of steam produced
by the Boiler.
•
The Pad Grips (15), located on the bottom of the Mop Head, are designed to adhere to fastener strips on the
Microber Pads.
•
The Microber Pads (16) each attach to the Pad Grips on the bottom of the Mop Head. The Pads are designed
to clean scuffs and stains from hard oors. The Microber Pads are reusable and machine washable. Two
Pads are included.
•
The Carpet Glider (17) ts around the Mop Head / Microber Pad, and is designed to allow the unit to effortlessly
move over carpeted surfaces.
•
The Resting Pad (18) serves as a base for the unit, providing a convenient place for it to rest as the Boiler
heats and cools without risk of damage to delicate oor surfaces. The Resting Pad has a smooth side and a
textured side – the textured side is designed to capture excess moisture and should face upward, so that Mop
Head rests on top of it.
•
The Measuring Cup (19) provides an easy and convenient way to consistently ll the Boiler with the optimum
amount of water (10 oz. / 300 ml.).
•
The Funnel (20) provides an easy and convenient way to ll the Solution Tank with Cleanfast HARD FLOOR
Solution.
•
The 32 oz. Cleanfast HARD FLOOR Solution (21) is a specially formulated, non-toxic and biodegradable
solution that is designed to enhance steam cleaning to eliminate the toughest scuffs and stains. When used on
most any hard oor surface during steam mopping, overall cleaning effectiveness is increased beyond what
either steam or the Solution is capable of alone. For best results, pour Cleanfast HARD FLOOR Solution into
the unit’s Solution Tank, where it can be conveniently sprayed from the Solution Nozzle.
CAUTION: Before using Cleanfast HARD FLOOR Solution, carefully read all instructions and
precautions on the bottle label.
Page 6
ALMACENAMIENTO ADECUADO
Preparar su Trapeador a Vapor Niebla Limpia para guardarlo es fácil y simple. Cuando haya terminado
sus labores de limpieza, siga los pasos indicados.
1. Presione suavemente el Interruptor de Encendido hasta que haga clic. Desconecte el cable de la
toma eléctrica.
2. Ponga el Cabezal del Trapeador sobre la Almohadilla de Descanso y espere a que se enfríe
totalmente (30 minutos).
3. Para mayor conveniencia, se recomienda desconectar el Tubo Telescópico, y si está adherido, retire el
Cojín de Microbra del Cabezal. Si está sucio puede lavarlo a mano o en máquina. Deje secar al aire.
4. Desenrosque y retire la Tapa del Tanque. Bote el agua restante del Tanque en el lavamanos o en la
tina para minimizar potenciales acumulaciones de minerales y evitar llenar demasiado en el próximo
uso. Ponga la Tapa nuevamente (no apretar completamente).
NOTA: No es necesario vaciar la Solución Cleanfast SUELO DURO que queda en el Tanque
de Solución.
5. Reconecte el Tubo Telescópico. Para efectos de almacenarlo, es bueno encoger el Tubo Telescópico
hasta el mínimo. Ver página 6 para más detalles.
6. Envuelva el cable de poder en los Ganchos.
7. Guarde el Trapeador a Vapor Niebla Limpia en un sitio fresco y seco, junto con todos los accesorios
incluidos.
ACUMULACIÓN DE MINERALES
Un mantenimiento común para los dispositivos de vapor es retirar la acumulación causada por el alto
contenido de minerales en muchas de las aguas municipales. Esta acumulación de minerales puede
limitar la eciencia y reducir la vida útil de su Trapeador a Vapor Niebla Limpia.
La mejor forma de minimizar la acumulación de minerales es usar agua destilada o
desmineralizada cuando utilice su Trapeador a Vapor Niebla Limpia. También se recomienda
seguir el procedimiento de limpieza por lo menos una vez al mes a n de retirar los depósitos que se
forman. Esto ayudará a extender la vida útil de su Trapeador a Vapor Niebla Limpia y lo tendrá
funcionando perfectamente.
Para retirar la acumulación de minerales:
1. Presione suavemente el Interruptor de Encendido hasta que haga clic. Desconecte el cable de la
toma eléctrica.
IMPORTANTE: La unidad debe permanecer apagada y desconectada durante el proceso de
limpieza.
2. Ponga el Cabezal del Trapeador sobre la Almohadilla de Descanso y espere a que se enfríe
totalmente (30 minutos).
3. Para mayor conveniencia, se recomienda desconectar el Tubo Telescópico, y si está adherido, retire
el Cojín de Microbra, si está instalado. Si los retira para la limpieza, será más fácil.
4. Retire la Tapa del Tanque de agua y bote el agua restante del Tanque en el lavamanos o en la tina.
5. Use la Taza de Medidas para hacer una mezcla de aproximadamente 3.4 oz. (100 ml.) de agua
destilada y 3.4 oz. (100 ml.) de vinagre.
6. Vierta la solución de agua/vinagre en el Tanque.
7. Deje reposar la solución de agua/vinagre por 30-40 minutos.
8. Bote la solución de agua/vinagre del Tanque en el lavamanos o en la tina. Llene el Tanque con agua
fresca, vacíelo y repita hasta que desaparezca el olor a vinagre.
9. Ponga nuevamente la Tapa del Tanque (no apretar completamente), conecte nuevamente el Tubo y
guarde su Trapeador a Vapor Niebla Limpia en la forma usual.
1-A 1-B 1-C 1-D 1-E
FIGURE 1
6
ENGLISH
Assembling Your
Clean Mist Steam Mop
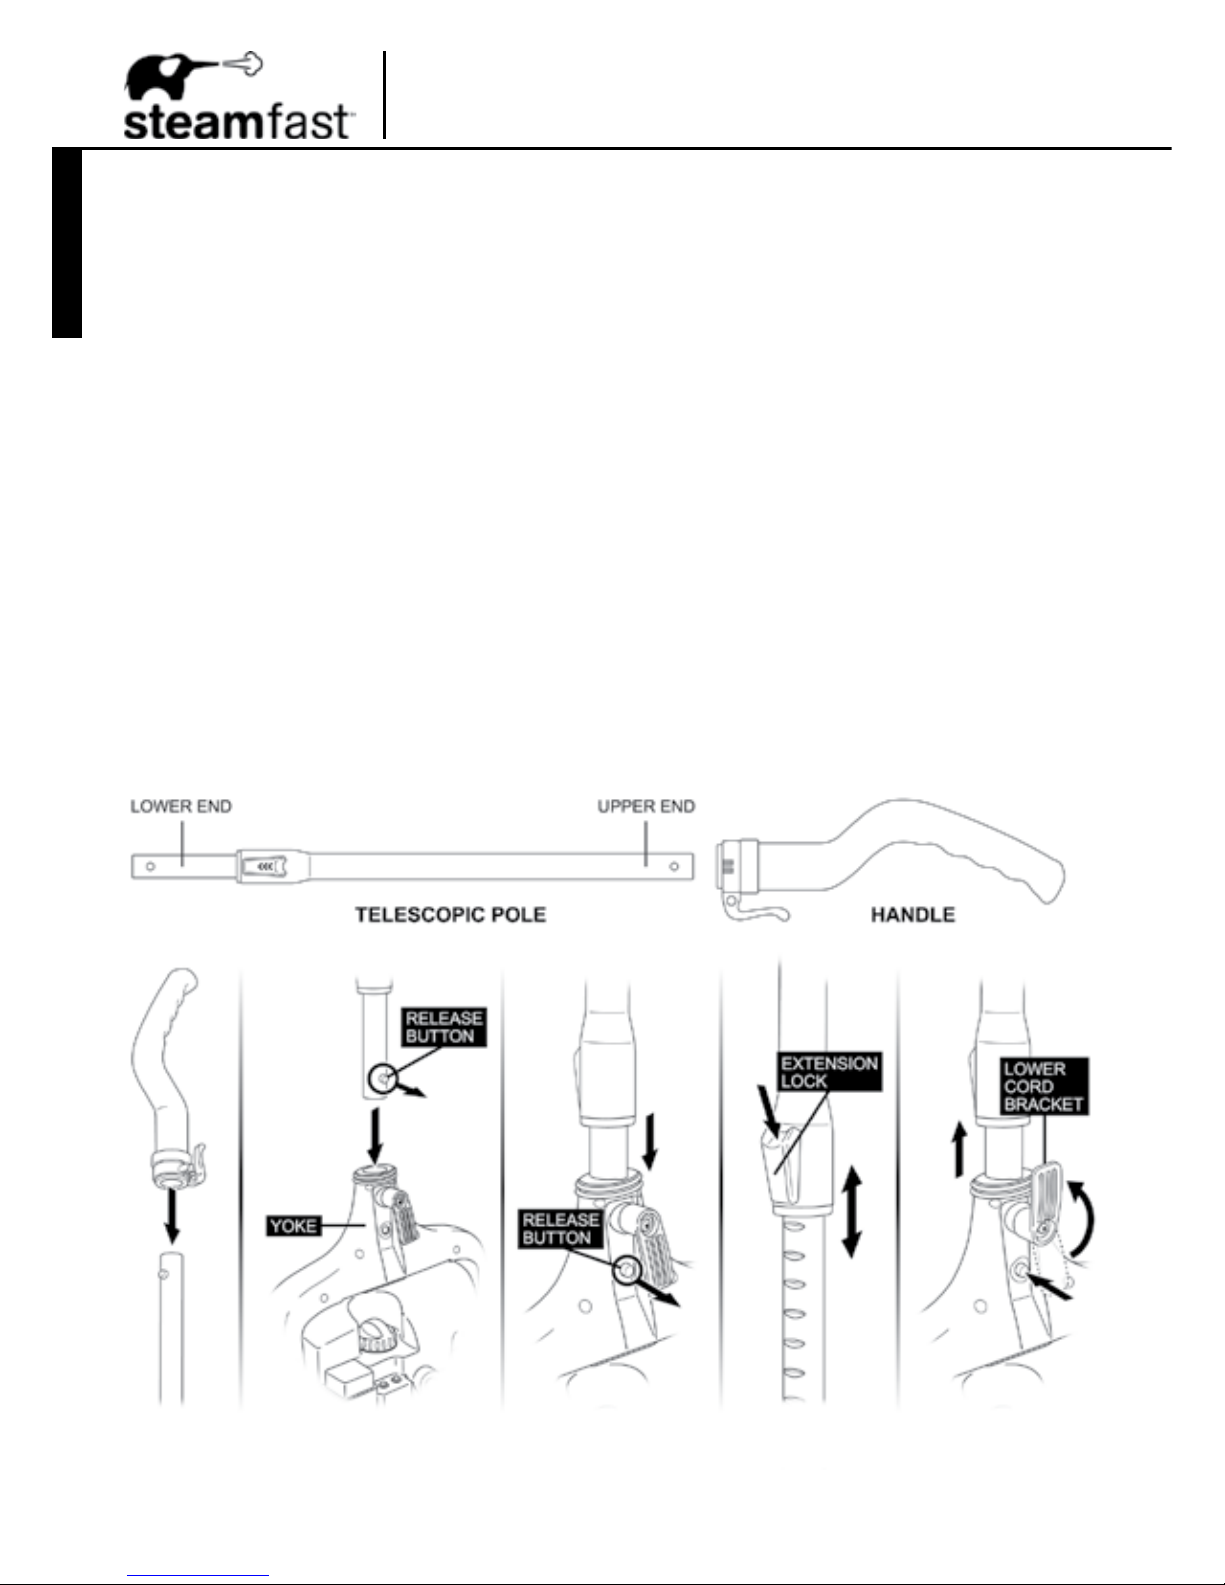
TELESCOPIC POLE
1. Connect Handle to upper (thicker) end of Telescopic Pole. To do this, simply slide Handle onto
Pole until it snaps in place (FIGURE 1-A).
NOTE: Once connected, the Handle is not designed to be removed from the Telescopic Pole.
If it becomes necessary to remove it, contact Consumer Service for assistance (Page 13).
2. Insert lower (thinner) end of Telescopic Pole into yoke on top side of Mop Head. When inserting,
make sure release button located on Pole faces towards back side of yoke as illustrated
(FIGURE 1-B).
3. Press Telescopic Pole into yoke until release button snaps through small hole on back side of
bracket (FIGURE 1-C). Pole should now be secured to Mop Head.
NOTE: In order to coax the release button through the hole, it may be necessary to
rotate and adjust the Telescopic Pole until button aligns properly with hole.
4. To adjust length of Telescopic Pole, press Extension Lock downward. While holding Lock
down, move the upper section of Pole until it is at the desired length (FIGURE 1-D). Release
Lock, then adjust upper section of Pole again until it “clicks” securely into place.
5. To disconnect Telescopic Pole, swivel lower Cord Bracket 180º upward, then press rmly on
release button while simultaneously pulling Pole away from Mop Head yoke (FIGURE 1-E).
Page 7
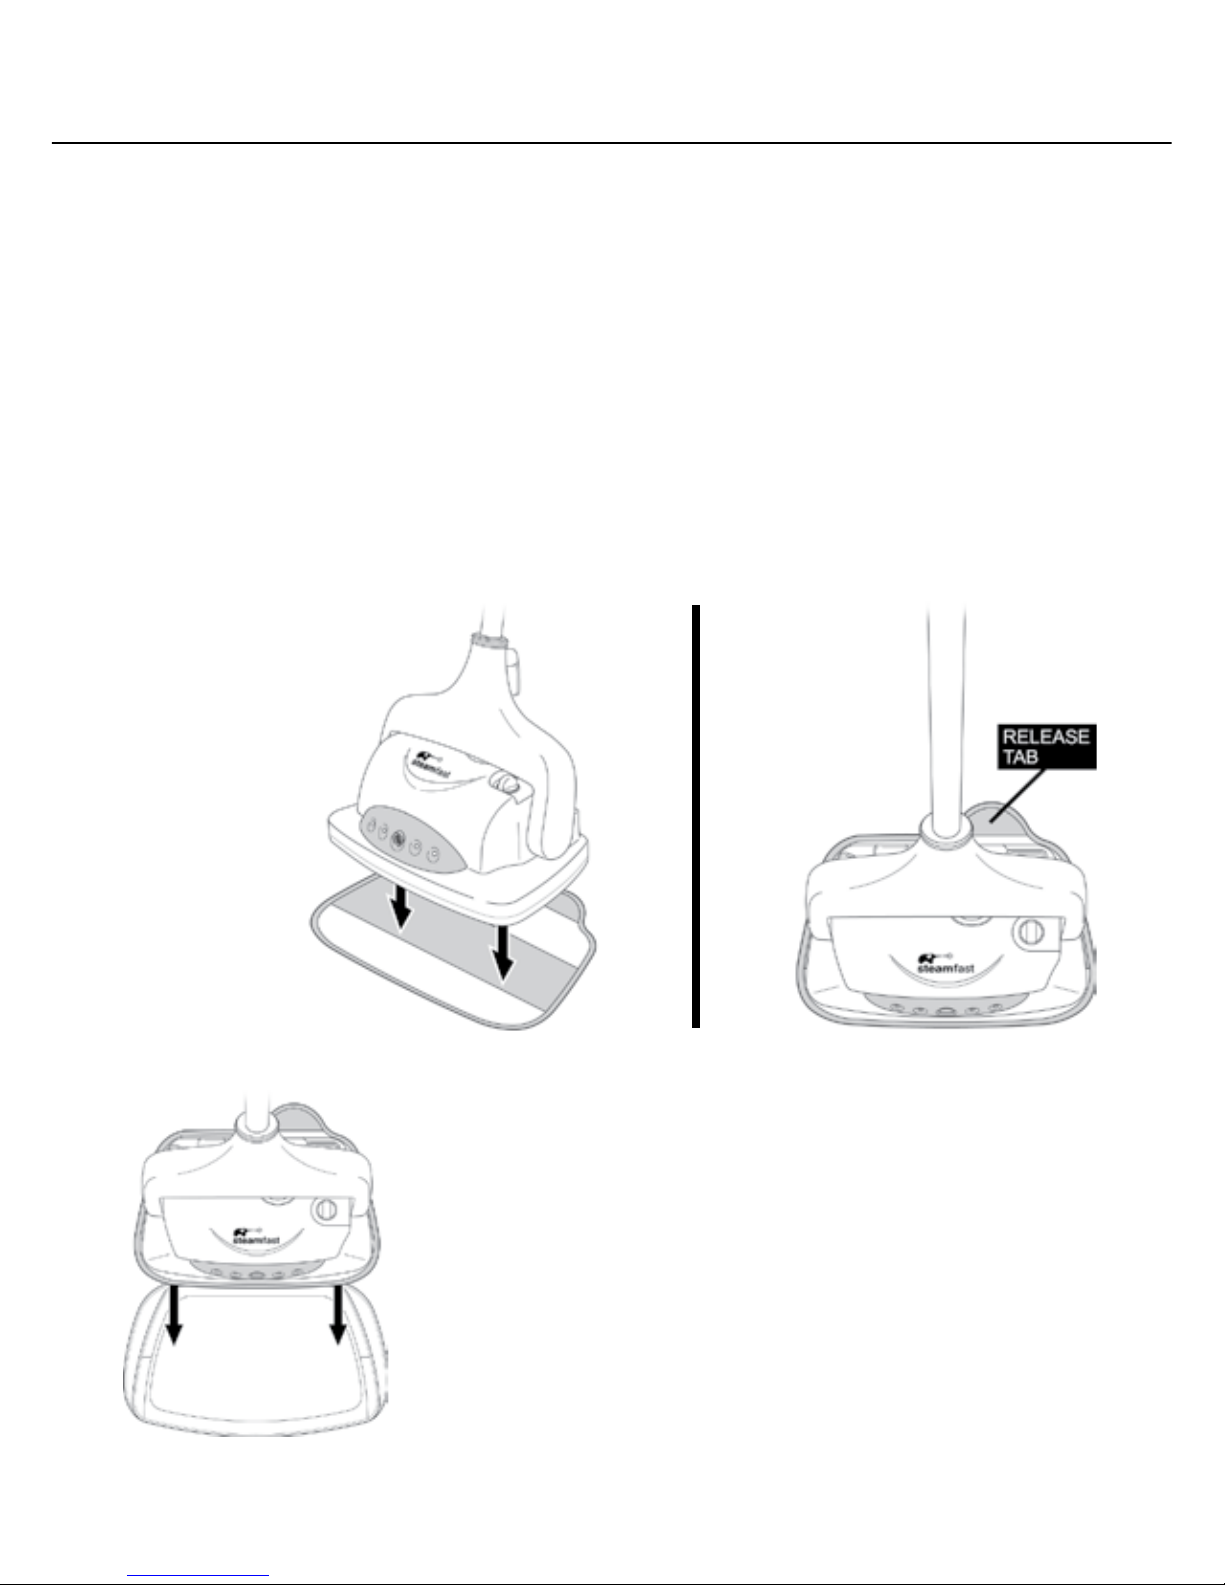
MICROFIBER PADS
1. Lay one Microber Pad on at surface, with fastener strips facing upward.
2. Align Mop Head above Microber Pad. Make sure Mop is oriented with Pad as shown, and
centered as best as possible (FIGURE 2-A).
3. Press Mop Head rmly down onto Microber Pad. Fastener strips will adhere to Pad Grips on
underside of Mop. Pad should now be attached and ready for use (FIGURE 2-B).
4. To remove, use your foot to press down on Microber Pad release tab while simultaneously
pulling Mop Head up off of Pad.
CAUTION: Use care when handling a recently used Microber Pad, as it may still be hot.
NOTE: Microber Pads are machine washable. To avoid picking up lint, washing
separately from other fabrics is recommended. Only use liquid detergent. Avoid using
any fabric softeners or bleach. Air drying is recommended; machine drying on a low
setting is acceptable as well.
CARPET GLIDER
NOTE: Microber Cloth should already be connected to
Mop Head before using Carpet Glider.
1. Lay Carpet Glider on at surface.
2. Align Mop Head above Carpet Glider. Make sure Mop Head
is oriented with Carpet Glider as shown (FIGURE 3).
3. Set Mop Head down in Carpet Glider.
NOTE: Carpet Glider does not connect to Mop Head.
The Mop Head/Microber Cloth simply rest inside the
Carpet Glider as it is pushed along carpet, until they are
lifted out.
7
FIGURE 3
FIGURE 2
2-B2-A
Page 8
ENGLISH
Using Your
Clean Mist Steam Mop
ADDING WATER
1. Make sure On/Off Switch is set to “off” position (red
Power Indicator Light will not be illuminated) and
power cord is unplugged.
REFILLING: If unit has been in use, allow a
minimum of 5 minutes cooling time.
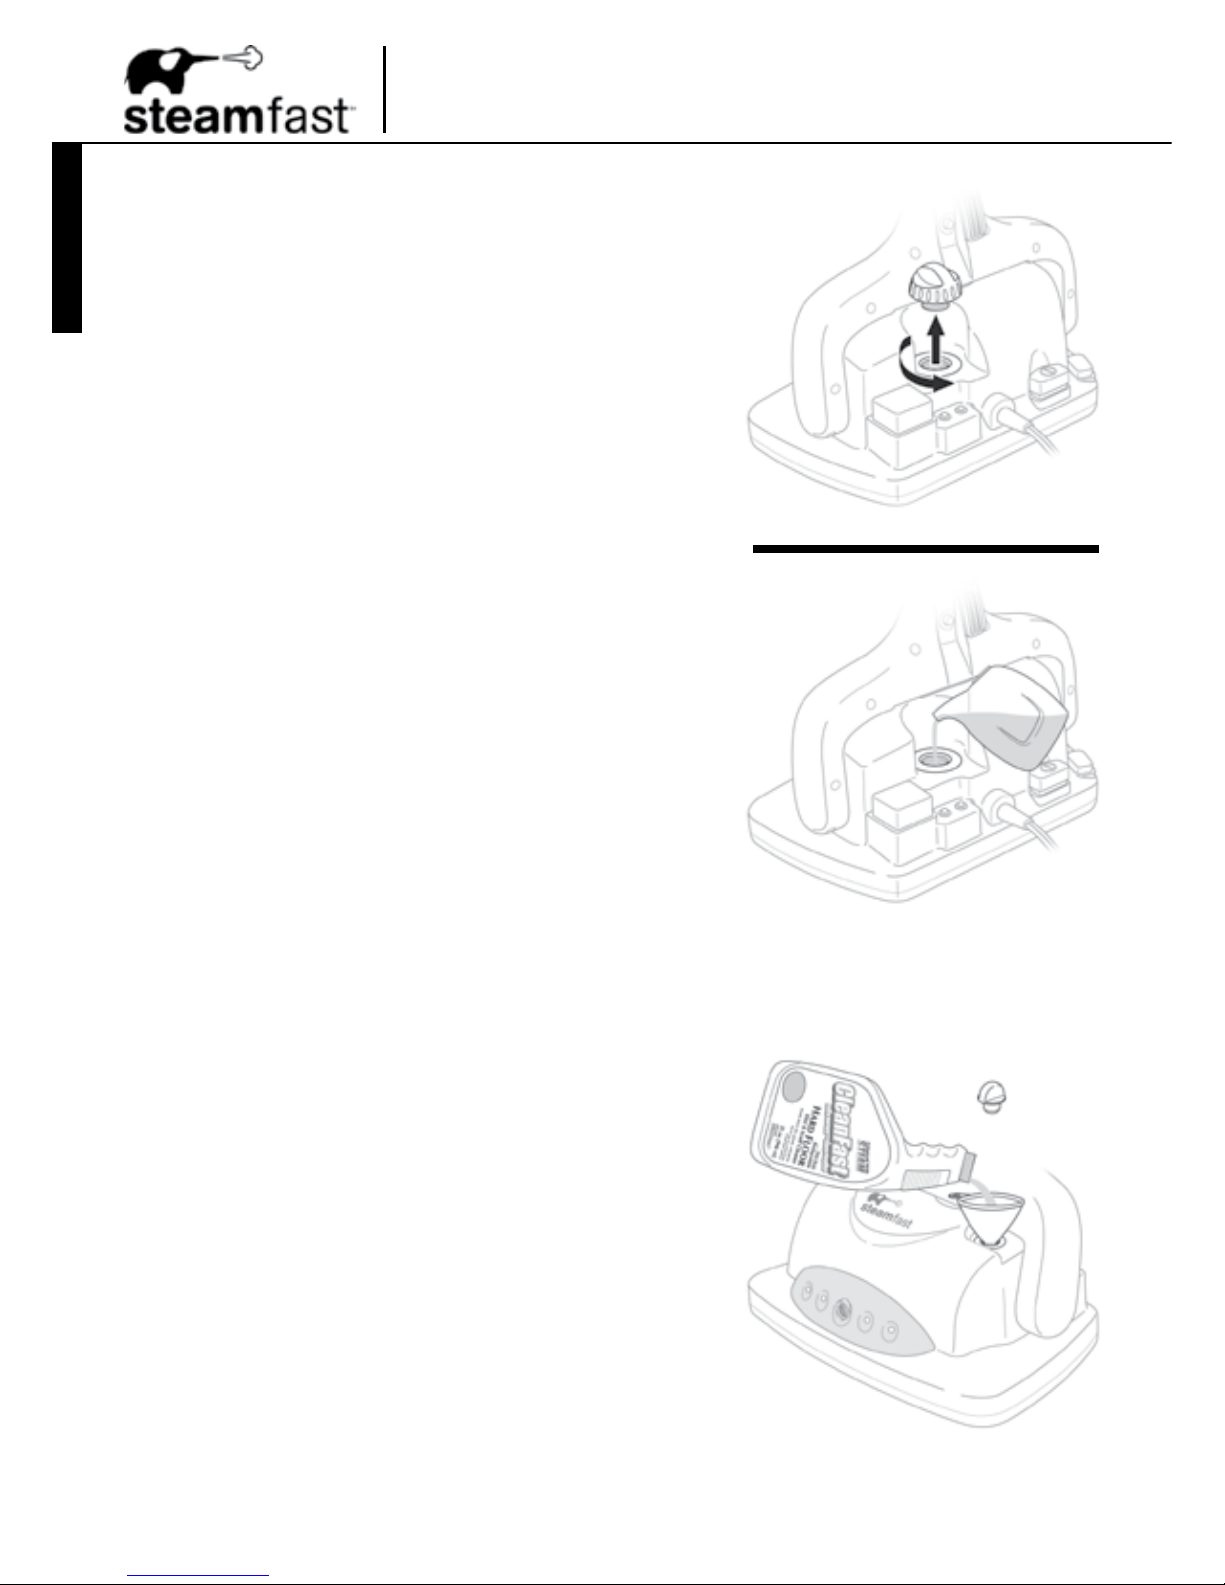
2. Carefully remove Boiler Cap by unscrewing it in a
counter-clockwise direction (FIGURE 4-A).
REFILLING: If unit has been in use, be sure Boiler
is completely empty to prevent overlling.
3. Fill included Measuring Cup with 8.5 oz. (250 ml.)
water, and pour into Boiler through Boiler Fill Hole
(FIGURE 4-B).
NOTE: In order to minimize potential mineral
build-up and prolong the life of your Clean Mist
Steam Mop, it is recommended that distilled or
de-mineralized water be used in the Boiler.
If distilled water is not available, then Boiler
should be cleaned frequently in order to remove
mineral build-up. Refer to Page 11 for details.
4. For maximum usable water (10 oz. / 300 ml.), ll
Measuring Cup with another 1.5 oz. (50 ml.) of water,
and add into Boiler.
5. Replace Boiler Cap by screwing it into Boiler Fill Hole
in a clockwise direction until tight. Unit is now ready
to begin steaming – refer to Page 9 for operating
instructions.
ADDING CLEANFAST
HARD FLOOR SOLUTION
1. Remove Solution Tank Plug to expose Solution Tank
ll hole.
NOTE: Solution Tank Plug does not need to be
unscrewed or otherwise unlocked – simply grasp
it and pull it out.
2. Insert Funnel into Solution Tank ll hole.
3. Pour Cleanfast HARD FLOOR Solution into the
Solution Tank, up to a maximum of 6.75 oz. (200 ml.).
4. Remove Funnel and reinsert Solution Tank Plug.
CAUTION: Cleanfast HARD FLOOR Solution
should only be used in Solution Tank. Pouring
Solution into Boiler could result in reduced
effectiveness, damage to unit or possible injury.
FIGURE 5
FIGURE 4
4-A
4-B
LUCES DEL SUELO
Una característica sin igual de su Trapeador a Vapor Niebla Limpia son cuatro Luces de Suelo indicadoras frontales,
que iluminan de forma atractiva y conveniente las áreas oscuras o difíciles de ver. Simplemente presione el Interruptor
de Luz de Suelo en cualquier momento mientras la unidad esté encendida para activar las luces de suelo.
NOTA: Las Luces de Suelo sólo funcionarán si la unidad principal está encendida (se ha presionado el
Interruptor de Encendido y la Luz roja Indicadora de Poder está encendida).
TRAPEAR CON VAPOR
Antes de usar la unidad, asegúrese que el Cojín de Microbra esté debidamente conectado (página 7), el
Tanque esté lleno de agua (página 8), y, si así desea, el Tanque de Solución esté lleno de Solución Cleanfast
SUELO DURO (página 8).
1. Para el primer uso, retire la cubierta plástica sobre el enchufe. Conéctelo a una toma de corriente adecuada.
2. Ponga la Almohadilla de Descanso en el suelo, con el lado texturizado hacia arriba. Descanse el Cabezal del
Trapeador sobre la Almohadilla para ayudar a proteger el suelo del calor y humedad excesivos durante el período
de calentamiento.
3. Presione suavemente el Interruptor de Encendido hasta que escuche un clic. La Luz Indicadora de Calentamiento
se encenderá indicando que el Tanque está calentando.
4. Aproximadamente tras 3 minutos de calentamiento, la unidad empezará a emitir vapor.
5. Retire la unidad de la Almohadilla, y comience a trapear.
Ver página 10 para un listado de las supercies recomendadas para limpiar con el Trapeador a Vapor Spray
Limpio.
6. Para mejores resultados un movimiento constante adelante y atrás sobre el suelo, empujando y halando el
trapeador. Trabaje hacia atrás, a n de no pararse sobre el área recién trapeada.
IMPORTANTE: Para evitar deformación o daño por calor o humedad, no use en suelos no sellados o en
cerámica no recubierta. El vapor puede quitar el brillo de algunos suelos que han sido encerados.
Nunca permita que el Trapeador a Vapor Niebla Limpia descanse sin ser utilizado sobre el suelo mientras
aún esté encendido – la exposición prolongada al vapor en una sola área puede decolorar o dañar algunos
suelos. Si es necesario dejar de trapear durante algún tiempo, siempre apague la unidad y ubíquela
nuevamente sobre la Almohadilla de Descanso.
7. Para limpiar mugre, manchas y marcas muy rebeldes, se recomienda tratarlas previamente con la Solución
Cleanfast SUELO DURO. Para usar la solución, primero asegúrese que el Tanque de Solución esté lleno (ver el
procedimiento de Cómo Agregar Solución Cleanfast SUELO DURO en la página 8). Luego, con el pie, presione
suavemente el Botón de Rociado de Solución – se liberará una ráfaga de la Solución desde la Boquilla de Solución
al frente de la unidad. Repita si es necesario para cubrir bien el área sucia, luego siga trapeando normalmente.
NOTA: Para marcas y manchas muy rebeldes, permita que la Solución Cleanfast SUELO DURO remoje el
área durante 1-2 minutos después del rociado, luego siga trapeando normalmente.
8. Cuando se acabe el agua, la Luz verde Indicadora de Calentamiento se apagará para demostrar que el Tanque
está vacío. Si desea seguir trapeando, primero apague la unidad presionando suavemente el Interruptor de
Encendido hasta que haga clic, luego desconecte el cable. Ver procedimiento de Cómo Agregar Agua en la
página 8 para rellenar el Tanque/Caldera.
9. El Cojín de Microbra absorberá la humedad durante el trapeado. Sin embargo, dependiendo de la supercie y de
la intensidad del vapor, puede quedar alguna humedad residual. En este caso, se recomienda permitir el secado
naturalmente. Puede orientarse un ventilador hacia el área trapeada para mejorar el secado.
10. Al terminar de trapear, apague la unidad presionando el Interruptor de Encendido hasta que haga clic, luego
desconecte el cable de la corriente. Ponga la unidad sobre la Almohadilla de descanso, luego vea los
procedimientos de la página 11 para un adecuado almacenamiento y cuidado de su Trapeador a Vapor Spray
Limpio.
Page 9

9
FLOOR LIGHTS
A unique feature of your Clean Mist Steam Mop are the front-mounted LED Floor Lights, which attrac-
tively and conveniently illuminate dark or difcult-to-see oor areas. Simply press down on the Floor
Light Switch at any time while unit is powered on to activate the Floor Lights.
NOTE: Floor Lights will only function when the unit’s main power is on (On/Off Switch has been
pressed and red Power Indicator Light is illuminated).
STEAM MOPPING
Before operating, make sure Microber Pad is properly attached (Page 7), Boiler is lled with
water (Page 8), and if desired, Solution Tank is lled with Cleanfast Hard Floor Solution (Page 8).
1. For rst-time use, remove protective plastic cover that is shipped on electrical plug. Plug power cord
into a convenient electrical outlet.
2. Place Resting Pad on oor, so that textured side faces upward. Rest Mop Head on top of Pad, in
order to help protect oor surface from excess heat and moisture during heat-up period.
3. Using your foot, gently press down on On/Off Switch until it clicks. Red Power Indicator Light will
illuminate to show that unit is receiving power. At the same time, green Heating Indicator Light will
illuminate to show that Boiler is heating.
4. After approximately 3 minutes of heating time, unit will begin emitting steam.
5. Remove unit from Resting Pad, and begin mopping.
Refer to Page 10 for a listing of oor surfaces that are recommended for cleaning with your
Clean Mist Steam Mop.
6. For best results, mop using a steady back-and-forth motion over the oor, working your way
backwards in order to avoid walking over the freshly mopped area.
IMPORTANT: To avoid warping or damage caused by heat and moisture, do not use on unsealed
hardwood or unglazed ceramic surfaces. Steam may remove the sheen from some oors that
have been treated with wax.
Never allow Clean Mist Steam Mop to rest idle on oor surfaces while still on – prolonged
exposure to steam in a single area may discolor or damage some oors. If it becomes
necessary to stop mopping at any time, always turn unit off and place back on Resting Pad.
7. To clean exceptionally tough dirt, stains and scuffs, pretreating with Cleanfast HARD FLOOR Solution is
recommended. To use Solution, rst be sure that Solution Tank is lled (refer to Adding Cleanfast
Hard Floor Solution procedure on Page 8). Then, using your foot, gently press down on Solution
Spray Button – a burst of Solution will be sprayed from Solution Nozzle onto oor in front of unit.
Repeat as necessary to thoroughly cover dirty area, then continue mopping as normal.
NOTE: For very stubborn scuffs and stains, allow Cleanfast HARD FLOOR Solution to soak
for 1-2 minutes after spraying, then continue mopping as normal.
8. Once all water has been used, green Heating Indicator Light will turn off to show that Boiler is empty.
If you wish to continue mopping, rst turn unit off by pressing down gently on On/Off Switch until it
clicks, then unplug power cord from outlet. Refer to Adding Water procedure on Page 8 to rell Boiler.
9. The Microber Cloth will absorb dirt and moisture during mopping. However, when you are nished
you may nd some residual moisture has been left behind. In this case, it is recommended to allow
oor time to air-dry. A fan may be directed towards mopped area to facilitate drying.
10. Once your mopping tasks are completed, place unit back on Resting Pad and turn it off by pressing
down gently on On/Off Switch until it clicks. Unplug power cord from outlet, then refer to procedures
on Page 11 for proper storage and care of your Clean Mist Steam Mop.
Page 10

ENGLISH
RECOMMENDED FLOOR SURFACES
Below is a listing of some of the most common oor surfaces that the Clean Mist Steam Mop
is ideal for cleaning. If you have a question about a oor surface that isn’t listed below, please
contact our Consumer Service Department:
consumerservice@steamfast.com or 1-800-711-6617.
The Clean Mist Steam Mop is perfect for these oor surfaces:
•
Sealed Hardwood
•
Stained Concrete
•
Sealed Laminate
•
Linoleum
•
Ceramic
•
Granite
•
Marble
•
Slate
•
Tile
•
Carpeting / Rugs (using Carpet Glider accessory)
IMPORTANT: Do not use on unsealed hardwood or unglazed ceramic surfaces. Surfaces
that are not properly sealed may be warped or damaged by exposure to heat and moisture.
Care should also be taken when steaming sealed hardwood oors, as prolonged exposure
to steam in a single spot may cause damage and discoloration. To avoid this, keep the
Clean Mist Steam Mop in constant motion on these surfaces, and place it back on Resting
Pad when idle.
Steam may remove the sheen from some oors that have been treated with wax.
Extremely rough textured oors may tear or damage Microber Pads.
Before steaming any carpeting, it is recommended to consult the manufacturer’s guidelines.
For carpets in question, always test on a small inconspicuous area before proceeding.
ABOUT CLEANFAST HARD FLOOR SOLUTION
Cleanfast HARD FLOOR Solution is an advanced, steam-enhanced cleaner. Not to be confused
with typical harsh household chemicals, HARD FLOOR Solution contains only harmless proprietary
surfactants and water. Surfactants, or surface acting agents, break down dirt’s bond with your
hard oors and makes even the toughest scuffs and stains a snap to wipe away. Because of
it’s unique properties, HARD FLOOR Solution is actually enhanced by steam. Use it to on your
oors while steam mopping, and marvel at results that are even faster and more effective than
what either steam or solution alone are capable of. Non-toxic and biodegradable, with no harmful
bleach or other additives.
Using Your
Clean Mist Steam Mop
COJINES DE MICROFIBRA
1. Ponga un Cojín de Microbra sobre una supercie plana, con las dos tiras de sujetador mirando hacia arriba.
2. Alinee el Cabezal del Trapeador sobre el Cojín de Microbra. Asegúrese que el Trapeador esté
orientado con el Cojín como se muestra, y lo más centrado posible (FIGURA 2-A).
3. Presione rmemente el Cabezal del Trapeador sobre el Cojín de Microbra. Las tiras de sujetador se
adherirán a las Abrazaderas debajo del Trapeador. Ahora el Cojín debe estar adherido y listo para
ser usado (FIGURA 2-B).
4. Para removerlo, use su pie para presionar hacia abajo la pestaña de liberación del Cojín al tiempo
que hala hacia arriba el Cabezal del Trapeador.
ATENCIÓN: Tenga cuidado al manipular un Cojín de Microbra recién usado, puede estar
caliente aún.
NOTA: Los Cojines de Microbra pueden lavarse en máquina. Para que no tengan motas, lave
separado de otras telas. Sólo use detergente líquido. Evite los suavizantes de ropa o la lejía.
Se recomienda dejar secar al aire; también puede hacerlo con la secadora a baja temperatura
Page 11

Storage & Care
11
PROPER STORAGE
Preparing your Clean Mist Steam Mop for storage is quick and simple. When you have nished
your mopping tasks, follow the steps listed below.
1. Gently press down on On/Off Switch until it clicks – red Power Indicator Light will turn off.
Unplug power cord from electrical outlet.
2. Place Mop Head on top of Resting Pad, and allow unit to fully cool (30 minutes).
3. For convenience it is recommended to disconnect Telescopic Pole, and if attached, remove
Microber Pad from Mop Head. If Pad is dirty you may wash it, either by hand or in a washing
machine. Allow to air-dry.
4. Unscrew and remove Boiler Cap. Drain any water remaining in Boiler into a sink or tub, to
minimize potential mineral build-up and prevent overlling during next use. Replace Cap (do
not fully tighten).
NOTE: It is not necessary to drain any Cleanfast HARD FLOOR Solution remaining
inside Solution Tank.
5. Reconnect Telescopic Pole. For storage purposes, you may wish to collapse Telescopic Pole
to its shortest length. Refer to Page 6 for details.
6. Wrap power cord around Cord Brackets.
7. Store Clean Mist Steam Mop in a cool, dry location, along with all included accessories.
MINERAL BUILD-UP
A common maintenance need for steam appliances is the removal of build-up caused by high
mineral content in many municipal water supplies. This mineral build-up may limit the
effectiveness and reduce the life of your Clean Mist Steam Mop.
The best way to minimize mineral build-up is to use distilled or de-mineralized water when
using your Clean Mist Steam Mop. In addition, it is recommended that the Boiler be cleaned at
least once a month in order to remove any deposits that form. This will help to extend the life of
your Clean Mist Steam Mop and keep it functioning at its maximum potential.
To remove mineral build-up:
1. Gently press down on On/Off Switch until it clicks – red Power Indicator Light will turn off.
Unplug power cord from electrical outlet.
IMPORTANT: Unit should remain off and unplugged during cleaning procedure.
2. Place Mop Head on top of Resting Pad, and allow unit to fully cool (30 minutes).
3. For convenience it is recommended to disconnect Telescopic Pole, and if attached, remove
Microber Pad from Mop Head. Leaving them off during cleaning will make the process easier.
4. Remove Boiler Cap and drain any water remaining in Boiler into a sink or tub.
5. Using Measuring Cup, make a mixture of 3.4 oz. (100 ml.) water and 3.4 oz. (100 ml.) vinegar.
6. Pour water/vinegar solution into Boiler.
7. Allow water/vinegar solution to soak in boiler for 30-40 minutes.
8. Drain water/vinegar solution from Boiler into a sink or tub. Rell Boiler with fresh water, drain
and repeat until vinegar odor dissipates.
9. Replace Boiler Cap (do not fully tighten), reconnect Telescopic Pole and store your Clean Mist
Steam Mop as usual.
Page 12

Troubleshooting
12
ENGLISH
Unit fails to heat up. Red Power
Indicator Light DOES NOT
illuminate.
Unit fails to heat up. Red Power
Indicator Light DOES illuminate;
green Heating Indicator Light DOES
NOT illuminate.
Steam output is weak or intermittent.
Unit heats up, but fails to steam. Both
red Power Indicator Light and
green Heating Indicator Light DO
illuminate.
NOTE: Always allow sufcient
time for unit to heat up and begin
producing steam.
Excessive moisture left on oor
during mopping.
NOTE: It is normal for some
amount of moisture to be left
behind. Allow oor some time to
air-dry once mopping is complete.
Unit is not plugged in.
No water in Boiler.
Mineral build-up in unit.
Mineral build-up in unit.
Household circuit breaker / ground
fault interrupter has tripped or blown
a fuse.
Unit is damaged or otherwise in
need of repair.
Unit is damaged or otherwise in
need of repair.
Unit’s main power is not on.
Water level in Boiler is running low.
Microber Pad has become
saturated with moisture.
Boiler has been overlled.
Plug power cord into electrical outlet.
Refer to Adding Water procedure
on Page 8 to ll Boiler.
Refer to Mineral Build-up section on
Page 11 for cleaning procedure.
Refer to Mineral Build-up section on
Page 11 for cleaning procedure.
Reset circuit breaker / ground fault
interrupter, or replace fuse. For
assistance, contact a licensed electrician.
Immediately cease usage and unplug.
Contact Consumer Service for
assistance (see Page 13 for details).
Immediately cease usage and unplug.
Contact Consumer Service for
assistance (see Page 13 for details).
Press On/Off Switch until it clicks.
Refer to Adding Water procedure
on Page 8 to rell Boiler.
Remove Pad and replace with a
fresh dry one. To purchase
additional Pads, contact Consumer
Service (see Page 14 for details).
Filling Boiler with more than 10 oz.
(300 ml.) of water interferes with
steam production, resulting in water
condensation in steam.
Drain some water out of Boiler.
Always use included Measuring Cup
to ll Boiler with correct amount of
water (see Page 8 for details).
PROBLEM POSSIBLE CAUSE SOLUTION
Floor surfaces appear cloudy or
streaky after steaming.
Floor Lights do not illuminate when
Floor Light Switch is pressed.
No solution is sprayed when Solution
Spray Button is pressed.
Microber Pad is dirty.
Unit’s main power is not on.
Solution Tank is empty.
Lights are burnt out or
malfunctioning.
Spray mechanism is clogged or
malfunctioning.
Hard water residue on oor.
Replace Microber Pad with a clean one.
Press On/Off Switch until it clicks.
Refer to Adding Cleanfast Hard
Floor Solution procedure on Page
8 to rell Solution Tank.
Contact Consumer Service for
assistance (see Page 13 for details).
Contact Consumer Service for
assistance (see Page 13 for details).
Switch to distilled water.
•
La Manija (1) se conecta a la parte superior del Tubo Telescópico, y está diseñada para un máximo agarre y comodidad.
•
El Tubo Telescópico (2) conecta el Cabezal del Trapeador a la Manija, y puede ser alargado o acortado para un uso
cómodo y almacenaje adecuado.
•
El Seguro de Extensión (2A) se usa para ajustar el largo del Tubo Telescópico.
•
Los Ganchos para el Cable (3) ofrecen una forma conveniente para enrollar el cable de poder para su almacenamiento.
•
El Tanque de Solución (4) es el recipiente interior donde se puede agregar la Solución Cleanfast SUELO DURO
durante el trapeado.
•
El Tapón del Tanque de Solución (4A) es el tapón de caucho que debe ser retirado para tener acceso al agujero de
llenado del Tanque de Solución.
•
El Cabezal del Trapeador (5) es el cuerpo principal de la unidad, que contiene el Tanque y produce vapor a través de
las Boquillas de Vapor.
•
La Boquilla de Solución (6) es la boquilla frontal que rocía la solución desde el Tanque de Solución hacia fuera cuando
se presiona el Botón de Rociado de Solución.
•
Las Luces del Suelo (7) son cuatro luces indicadoras frontales, diseñadas para iluminar áreas oscuras o difíciles de ver
para asegurar una mejor limpieza, así como una agradable iluminación. Las Luces del Suelo sólo funcionarán si el
Interruptor de Encendido ha sido presionado para activar la potencia de la unidad principal.
•
El Interruptor de Luces del Suelo (8), ubicado atrás a la derecha del Cabezal del Trapeador, es un botón de pedal que
activa y desactiva las Luces del Suelo.
•
El Interruptor de Encendido (9), ubicado atrás del Cabezal del Trapeador, es un botón de pedal que activa y desactiva
la unidad. Éste se presiona para encender la unidad (la Luz Indicadora de Poder roja se encenderá), se presiona
nuevamente para apagar la unidad (la Luz Indicadora de Poder roja se apagará).
•
El Tanque/Caldera (10) es el recipiente interno donde se almacena el agua y se convierte en vapor. Para una óptima
producción de vapor, éste debe llenarse con no más de 10 oz. (300 ml.) de agua.
•
La Tapa del Tanque (10A) está diseñada para retener en forma segura el vapor dentro del Tanque, y para un fácil
acceso a la abertura de llenado. Para llenar el Tanque con agua se debe desenroscar y retirar la Tapa.
•
El Botón de Rociado de Solución (11), ubicado atrás a la izquierda del Cabezal del Trapeador, es un botón de pedal
que controla la función de rociado de solución de la unidad. Cuando se presiona, libera una ráfaga de solución
contenida en el Tanque de Solución a través de la Boquilla de Solución.
•
La Luz Indicadora de Poder roja (12) ilumina cuando el cable de potencia está conectado a un toma corriente y el
Interruptor de Encendido es presionado, para indicar que la unidad tiene energía.
•
La Luz Indicadora de Calentamiento verde (13) ilumina cuando el Tanque está calentando el agua. Cuando éste está
vacío, la Luz se apagará.
•
Las Boquillas de Vapor (14), ubicadas en la parte inferior del Cabezal del Trapeador, despiden uniformemente el ujo
de vapor caliente producido por el Tanque.
•
Las Abrazaderas del Cojín (15) ubicados en la parte inferior del Cabezal del Trapeador, están diseñados para
adherirse a las tiras de ajuste de los Cojines de Microbra.
•
Los Cojines de Microbra (16) se adhieren a las Abrazaderas al nal del Cabezal del Trapeador. Éstos están
diseñados especícamente para limpiar mugre y manchas de los suelos duros. Éstos son reutilizables y se pueden
lavar en lavadora. Se incluyen dos Cojines.
•
El Deslizador de Alfombra (17) encaja alrededor del Cabezal del Trapeador / Cojín de Microbra, y está diseñado ara
permitir que la unidad se deslice sobre áreas alfombradas fácilmente.
•
La Almohadilla de Descanso (18) sirve como base para la unidad, brindando un lugar conveniente para que ésta
descanse mientras el Tanque se calienta y enfría, sin el riesgo de dañar supercies delicadas. La Almohadilla tiene
un lado suave y uno con textura – el lado de la textura está diseñado para atrapar el exceso de humedad y debe estar
mirando hacia abajo, de forma que el Cabezal del Trapeador descanse sobre él.
•
La Taza para Medidas (19) ofrece una forma fácil y conveniente para llenar el Tanque en forma consistente con la
cantidad óptima de agua (10 oz. / 300 ml.)
•
El Embudo (20) ofrece una forma fácil y conveniente para llenar el Tanque de Solución con la Solución Cleanfast
SUELO DURO.
•
La Solución Cleanfast SUELO DURO de 32 oz (21) es una solución especialmente formulada, no tóxica y
biodegradable, diseñada para mejorar la limpieza a vapor, para eliminar la mugre y manchas más rebeldes. Cuando
se usa sobre la mayoría de supercies duras durante el trapeado a vapor, se aumenta la eciencia general de la
limpieza por encima de lo que pueden hacer el vapor o la Solución por sí solos. Para mejores resultados, vierta la
Solución Cleanfast SUELO DURO en el Tanque de Solución de la unidad, donde pueda ser rociada desde la Boquilla
de Solución.
ADVERTENCIA: Antes de usar la Solución Cleanfast SUELO DURO, lea cuidadosamente todas las instrucciones
y precauciones del sello de la botella.
Page 13

Product Support
13
CONSUMER SERVICES
For problems with your Clean Mist Steam Mop, please refer to the troubleshooting guide located
on Page 12 of this manual. Additional inquiries should be directed to our consumer support services through our Web site, www.steamfast.com.
If you do not have internet access, you may also contact our Consumer Service Department by
telephone, at 1-800-711-6617.
NOTE: In order for our Consumer Service representatives to help you as quickly and
efciently as possible, please have the following information ready before calling:
• Purchase information (where and when you purchased this product)
• Copy of purchase receipt / proof of purchase
• Product serial number (located near electrical specication label on back of unit)
• Date code (4-digit number located on electrical specication label on back of unit)
For information regarding your 1 year limited warranty, refer to Page 15 of this manual.
PRODUCT SPECIFICATIONS
SF-145 F
120V
1000W
8.3A
10 OZ. (300 ML.)
3 MIN. (APPROXIMATE)
12 MIN. (APPROXIMATE)
4.6 LBS. (2.1 KG.)
11.5” (29.2 CM.) x 7.1” (18.0 CM.) x 50.4” (128.0 CM.)
18.7’ (570.0 CM.)
MODEL
VOLTAGE
WATTAGE
AMPERAGE
WATER CAPACITY
HEATING TIME
CONTINUOUS STEAM TIME
UNIT WEIGHT
UNIT DIMENSIONS
POWER CORD LENGTH
Page 14

Product Support
10. No use la unidad donde se utilicen productos en aerosol o cerca de una fuente de oxígeno.
11. La unidad solo debe usarse con los accesorios SF-145 F recomendados. El uso de otro tipo de
elementos puede dañar la unidad o causar lesiones.
12. Si la Luz Indicadora de Poder no enciende cuando está conectado y se presiona el Interruptor de
Encendido, la unidad no está funcionando normalmente. Desconecte el cable de la corriente
inmediatamente y vaya a la guía de solución de problemas en la página 12 de este manual para
mayor asistencia.
13. Siempre apague la unidad y desconecte el cable antes de llenar la Caldera con agua. No intente
usar la unidad sin haber llenado el Tanque adecuadamente.
14. Al llenar el Tanque sólo use agua – otros limpiadores pueden dañar la unidad o causar lesiones.
Se recomienda usar agua destilada o desmineralizada para minimizar la potencial acumulación de
minerales. No llene de más.
15. La Solución Cleanfast SUELO DURO solo debe usarse en el Tanque de Solución. Si vierte la
solución en la Caldera podrá tener menor efectividad, dañar la unidad o tener una posible herida.
16. Para reducir el riesgo de contacto con el agua caliente que sale de las Boquillas de Vapor, revise el
dispositivo antes de cada uso poniéndolo lejos del cuerpo y encendiéndolo. No opere la unidad si
las Boquillas de Vapor está bloqueada.
17. Puede quemarse si toca partes metálicas calientes, agua caliente o vapor. No toque la parte inferior
del Cabezal del Trapeador, ni trate de instalar un Conjín de Microbra con las manos cuando la
unidad esté en uso. Tenga cuidado cuando voltee la unidad – aún puede haber agua caliente en el
Tanque.
18. Tenga cuidado al usar la unidad en supercies desiguales, como escaleras.
19. Cuando vaporice cualquier supercie por primera vez, se recomienda que consulte las guías del
fabricante para el material que está vaporizando. Para los elementos con que haya dudas, haga
una prueba en una parte oculta antes de proceder.
20. No es recomendable vaporizar suelos de Madera no sellada o supercies de cerámica no recubierta,
ya que puede deformar o dañar la supercie. El vapor puede remover el brillo a las supercies
enceradas.
21. Al trapear con vapor, nunca deje la unidad en un solo sitio por largo tiempo – la exposición prolongada
al calor y humedad puede dañar los suelos.
22. No permita que el cable de poder toque supercies calientes durante el uso. Envuelva el cable
alrededor de los Ganchos al almacenar.
23. Siempre deje que el Trapeador a Vapor Niebla Limpia se enfríe totalmente (por lo menos 30 minutos)
y vacíe el Tanque de agua antes de almacenar. No almacene la unidad con el Cojín de Microbra
húmedo aún instalado.
¿Preguntas o comentarios?
•
www.steamfast.com
•
consumerservice@steamfast.com
•
1-800-711-6617
14
ENGLISH
ACCESSORIES & PARTS
When ordering replacement accessories and parts for your Clean Mist Steam Mop, you may refer
to the part numbers below. Replacement parts may be ordered through our Web site:
www.steamfast.com
You may also contact Consumer Service directly:
consumerservice@steamfast.com or 1-800-711-6617
CLEANFAST HARD FLOOR SOLUTION (32oz)
CF-014R-
MEASURING CUP
A142-P002R-
FUNNEL
A275-014R-
MICROFIBER PADS (2)
A140-000R-
RESTING PAD
A142-003R-
CARPET GLIDER
A142-P003R-
NOTE: Due to continuing improvements, part numbers listed above may change.
For assistance ordering parts, please contact Consumer Service directly.
Page 15

15
Warranty Information
1 YEAR LIMITED WARRANTY
Steamfast, a division of Vornado Air LLC, (“Steamfast”) warrants to the original consumer or purchaser
this Steamfast Multi-Purpose Steam Cleaner SF-370 (“Product”) is free from defects in material or
workmanship for a period of one (1) year from the date of purchase. If any such defect is discovered
within the warranty period, Vornado, at its discretion, will repair or replace the Product at no cost if the
Product is returned to Steamfast postage-paid. Repairs not covered by the warranty or outside the
warranty period will require a fee to cover the cost of materials, handling and shipping.
This warranty does not apply to defects resulting from abuse of the Product, modication, alteration,
repair or service of the Product by anyone other than Steamfast, mishandling, improper maintenance,
commercial use of the Product, damages which occur in shipment or are attributed to acts of God.
REPAIR OR REPLACEMENT AS PROVIDED UNDER THIS WARRANTY IS THE EXCLUSIVE
REMEDY OF THE CONSUMER. STEAMFAST SHALL NOT BE LIABLE FOR ANY INCIDENTAL OR
CONSEQUENTIAL DAMAGES FOR BREACH OF ANY EXPRESS OR IMPLIED WARRANTY ON THIS
PRODUCT. EXCEPT TO THE EXTENT PROHIBITED BY APPLICABLE LAW, ANY IMPLIED WARRANTY
OF MERCHANTABILITY OR FITNESS FOR A PARTICULAR PURPOSE ON THIS PRODUCT IS
LIMITED IN DURATION TO THE DURATION OF THIS WARRANTY.
Some states do not allow the exclusion or limitation of incidental or consequential damages, or allow
limitations on how long an implied warranty lasts, so the above limitations or exclusions may not apply to you.
This warranty gives you specic legal rights, and you may have other rights that vary from state to state.
For warranty or repair service, call 1-800-711-6617 or email consumerservice@steamfast.com to obtain
a Return Authorization (“RA”) form. Please have or include your Product’s model number, date code and
serial number, as well as your name, address, city, state, zip code and phone number when contacting
Steamfast for warranty service. You may be required to provide the original sales receipt. For your
records: Staple or attach your original sales receipt to this Owner’s Guide. Please also write your
Product’s serial number below (located on product specs decal).
Serial No. __________________________________________________________________________
After receiving the RA form, ship your Product to:
Steamfast
Attn: Warranty & Repair
415 East 13th
Andover, KS 67002
To assure proper handling, packages must be clearly marked with the RA number. Packages not
clearly marked with the RA number may be refused at the receiving dock.
Please allow 1-2 weeks for repair and return of your Product after the Product is received.
Product registration available online at www.steamfast.com
© 2011 Vornado Air LLC • Andover, KS 67002
Specications subject to change without notice.
Steamfast® is a trademark owned by Vornado Air LLC.
Manufactured in China.
Steamfast Consumer Service
W: www.steamfast.com | P: 1-800-711-6617 | E: consumerservice@steamfast.com
Page 16

2 15
ESPAÑOL
INSTRUCCIONES IMPORTANTES
DE SEGURIDAD
LEA TODAS LAS INSTRUCCIONES ANTES DE USARLO
PELIGRO
Todo dispositivo está eléctricamente activo aún si se encuentra apagado. Para reducir el riesgo de
choque eléctrico:
1. Siempre desconecte el cable de poder inmediatamente después de su uso.
2. No ubique ni almacene la unidad donde pueda caerse o ser halada hacia un lavamanos o una tina.
3. No la ponga en, ni la deje caer en agua u otro líquido.
4. Si la unidad cae en el agua, desconecte inmediatamente el cable de poder. No meta las manos en el agua.
ADVERTENCIA
Para reducir el riesgo de quemaduras, choques eléctricos, incendios o lesiones en personas:
1. Use el Trapeador a Vapor Niebla Limpia únicamente para lo que está diseñado, según se indica en este manual.
2. Si se necesita un cable de extensión, use uno que tenga las especicaciones adecuadas
(15 amperios, calibre 14). Tenga cuidado al ubicar la extensión donde tenga menor riesgo de daño o
de tropezarse con ella durante su uso.
3. Antes de conectar el cable de poder en la toma, asegúrese que toda la información en el rótulo esté
conforme con su toma de corriente.
4. Para reducir la posibilidad de sobrecarga de circuito, NO opere ningún otro aparato de alto vataje en
el mismo circuito que esta unidad.
5. Para protegerse frente a un choque eléctrico, no sumerja la unidad en agua u otros líquidos. No
use el cable de poder como manija, déjelo colgar en los extremos de los mesones, ni permita que se
enrosque ni se atrape en las puertas.
6. Nunca tire del cable de poder para desconectarlo de una toma, más bien, agarre el enchufe y hálelo
para desconectarlo.
7. No opere la unidad con un cable de poder dañado o si la unidad se ha caído o está dañada. Para
evitar el riesgo de choque eléctrico no desarme la unidad, contacte al servicio al cliente de
Steamfast para que hagan un examen y reparación. Un reensamblaje incorrecto puede causar un
riesgo de choque eléctrico cuando se use la unidad.
8. Se requiere una buena supervisión cuando se utilicen aparatos cerca de niños, mascotas y plantas.
Siempre mantenga la atención en la unidad cuando esté conectada.
9. La unidad no está hecha para ser usada por personas (incluso niños) con limitaciones físicas,
sensoriales o mentales, o sin experiencia y conocimiento, a menos que hayan recibido supervisión o
instrucción sobre el uso de la unidad por parte de una persona responsable por su seguridad.
ADVERTENCIA: Para reducir el riesgo de incendio, choque eléctrico o
accidente, se deben seguir las siguientes precauciones al usar equipos
eléctricos.
ADVERTENCIA: Para reducir el riesgo de choque eléctrico, este dispositivo usa un
enchufe eléctrico polarizado, con una punta más grande que la otra. Este enchufe encajará en una toma de corriente en sólo una dirección. Si éste no encaja correctamente
en la toma de corriente, contacte a un electricista licenciado para que instale una toma
adecuada. NO intente modicar el enchufe ni vencer esta característica de seguridad.
1 YEAR LIMITED WARRANTY
Steamfast, a division of Vornado Air LLC, (“Steamfast”) warrants to the original consumer or purchaser
this Steamfast Clean Mist Steam Mop (“Product”) is free from defects in material or workmanship for a
period of one (1) year from the date of purchase. If any such defect is discovered within the warranty
period, Vornado, at its discretion, will repair or replace the Product at no cost if the Product is returned
to Steamfast postage-paid. Repairs not covered by the warranty or outside the warranty period will
require a fee to cover the cost of materials, handling and shipping.
This warranty does not apply to defects resulting from abuse of the Product, modication, alteration,
repair or service of the Product by anyone other than Steamfast, mishandling, improper maintenance,
commercial use of the Product, damages which occur in shipment or are attributed to acts of God.
REPAIR OR REPLACEMENT AS PROVIDED UNDER THIS WARRANTY IS THE EXCLUSIVE
REMEDY OF THE CONSUMER. STEAMFAST SHALL NOT BE LIABLE FOR ANY INCIDENTAL OR
CONSEQUENTIAL DAMAGES FOR BREACH OF ANY EXPRESS OR IMPLIED WARRANTY ON THIS
PRODUCT. EXCEPT TO THE EXTENT PROHIBITED BY APPLICABLE LAW, ANY IMPLIED WARRANTY
OF MERCHANTABILITY OR FITNESS FOR A PARTICULAR PURPOSE ON THIS PRODUCT IS
LIMITED IN DURATION TO THE DURATION OF THIS WARRANTY.
Some states do not allow the exclusion or limitation of incidental or consequential damages, or allow
limitations on how long an implied warranty lasts, so the above limitations or exclusions may not apply to you.
This warranty gives you specic legal rights, and you may have other rights that vary from state to state.
For warranty or repair service, call 1-800-711-6617 or email consumerservice@steamfast.com to obtain
a Return Authorization (“RA”) form. Please have or include your Product’s model number, date code and
serial number, as well as your name, address, city, state, zip code and phone number when contacting
Steamfast for warranty service. You may be required to provide the original sales receipt. For your
records: Staple or attach your original sales receipt to this Owner’s Guide. Please also write your
Product’s serial number below (located on product specs decal).
Serial No. __________________________________________________________________________
After receiving the RA form, ship your Product to:
Steamfast
Attn: Warranty & Repair
6655 Troost Avenue
Kansas City, MO 64131
To assure proper handling, packages must be clearly marked with the RA number. Packages not
clearly marked with the RA number may be refused at the receiving dock.
Please allow 1-2 weeks for repair and return of your Product after the Product is received.
Product registration available online at www.steamfast.com
© 2009 Vornado Air LLC • Andover, KS 67002
Specications subject to change without notice.
Steamfast® is a trademark owned by Vornado Air LLC.
Manufactured in China.
Steamfast Consumer Service
W: www.steamfast.com • P: 1-800-711-6617 • E: consumerservice@steamfast.com
Page 17

3
10. No use la unidad donde se utilicen productos en aerosol o cerca de una fuente de oxígeno.
11. La unidad solo debe usarse con los accesorios SF-145 F recomendados. El uso de otro tipo de
elementos puede dañar la unidad o causar lesiones.
12. Si la Luz Indicadora de Poder no enciende cuando está conectado y se presiona el Interruptor de
Encendido, la unidad no está funcionando normalmente. Desconecte el cable de la corriente
inmediatamente y vaya a la guía de solución de problemas en la página 12 de este manual para
mayor asistencia.
13. Siempre apague la unidad y desconecte el cable antes de llenar la Caldera con agua. No intente
usar la unidad sin haber llenado el Tanque adecuadamente.
14. Al llenar el Tanque sólo use agua – otros limpiadores pueden dañar la unidad o causar lesiones.
Se recomienda usar agua destilada o desmineralizada para minimizar la potencial acumulación de
minerales. No llene de más.
15. La Solución Cleanfast SUELO DURO solo debe usarse en el Tanque de Solución. Si vierte la
solución en la Caldera podrá tener menor efectividad, dañar la unidad o tener una posible herida.
16. Para reducir el riesgo de contacto con el agua caliente que sale de las Boquillas de Vapor, revise el
dispositivo antes de cada uso poniéndolo lejos del cuerpo y encendiéndolo. No opere la unidad si
las Boquillas de Vapor está bloqueada.
17. Puede quemarse si toca partes metálicas calientes, agua caliente o vapor. No toque la parte inferior
del Cabezal del Trapeador, ni trate de instalar un Conjín de Microbra con las manos cuando la
unidad esté en uso. Tenga cuidado cuando voltee la unidad – aún puede haber agua caliente en el
Tanque.
18. Tenga cuidado al usar la unidad en supercies desiguales, como escaleras.
19. Cuando vaporice cualquier supercie por primera vez, se recomienda que consulte las guías del
fabricante para el material que está vaporizando. Para los elementos con que haya dudas, haga
una prueba en una parte oculta antes de proceder.
20. No es recomendable vaporizar suelos de Madera no sellada o supercies de cerámica no recubierta,
ya que puede deformar o dañar la supercie. El vapor puede remover el brillo a las supercies
enceradas.
21. Al trapear con vapor, nunca deje la unidad en un solo sitio por largo tiempo – la exposición prolongada
al calor y humedad puede dañar los suelos.
22. No permita que el cable de poder toque supercies calientes durante el uso. Envuelva el cable
alrededor de los Ganchos al almacenar.
23. Siempre deje que el Trapeador a Vapor Niebla Limpia se enfríe totalmente (por lo menos 30 minutos)
y vacíe el Tanque de agua antes de almacenar. No almacene la unidad con el Cojín de Microbra
húmedo aún instalado.
¡CONSERVE ESTAS INSTRUCCIONES!
SÓLO PARA USO DOMÉSTICO
¿Preguntas o comentarios?
•
www.steamfast.com
•
consumerservice@steamfast.com
•
1-800-711-6617
Page 18

ESPAÑOL
Las siguientes características y accesorios están incluidos con su Trapeador a Vapor Niebla Limpia.
Revise el paquete para ver que todas las partes estén incluidas. Para obtener posibles piezas
faltantes, ver Soporte del Producto en las páginas 13-14 de este manual.
Información del Producto
CONSUMER SERVICES
For problems with your Clean Mist Steam Mop, please refer to the troubleshooting guide located
on Page 12 of this manual. Additional inquiries should be directed to our consumer support ser-
vices through our Web site, www.steamfast.com.
If you do not have internet access, you may also contact our Consumer Service Department by
telephone, at 1-800-711-6617.
NOTE: In order for our Consumer Service representatives to help you as quickly and
efciently as possible, please have the following information ready before calling:
• Purchase information (where and when you purchased this product)
• Copy of purchase receipt / proof of purchase
• Product serial number (located near electrical specication label on back of unit)
• Date code (4-digit number located on electrical specication label on back of unit)
For information regarding your 1 year limited warranty, refer to Page 15 of this manual.
PRODUCT SPECIFICATIONS
CONTINUOUS STEAM TIME
4
CARACTERÍSTICAS Y ACCESORIOS
Manija
Tubo Telescópico
Seguro de Extensión
Ganchos para el Cable
Tanque de Solución (interno)
Tapón del Tanque de Solución
Cabezal del Trapeador
Boquilla de Solución
Luces del Suelo
Interruptor de Luces del Suelo
Interruptor de Encendido
Tanque/Caldera (interno)
Tapa del Tanque
Botón de Rociado de Solución
Luz Indicadora de Poder (roja)
Luz Indicadora de Calentamiento (verde)
Boquillas de Vapor
Abrazaderas del Cojín
Cojines de Microbra (2)
Deslizador de Alfombras
Almohadilla de Descanso
Taza para Medidas
Embudo
Solución Cleanfast SUELO DURO
1.
2.
2
a.
3.
4.
4
a.
5.
6.
7.
8.
9.
10.
10
a.
11.
12.
13.
14.
15.
16.
17.
18.
19.
20.
21.
Page 19

5
•
La Manija (1) se conecta a la parte superior del Tubo Telescópico, y está diseñada para un máximo agarre y comodidad.
•
El Tubo Telescópico (2) conecta el Cabezal del Trapeador a la Manija, y puede ser alargado o acortado para un uso
cómodo y almacenaje adecuado.
•
El Seguro de Extensión (2A) se usa para ajustar el largo del Tubo Telescópico.
•
Los Ganchos para el Cable (3) ofrecen una forma conveniente para enrollar el cable de poder para su almacenamiento.
•
El Tanque de Solución (4) es el recipiente interior donde se puede agregar la Solución Cleanfast SUELO DURO
durante el trapeado.
•
El Tapón del Tanque de Solución (4A) es el tapón de caucho que debe ser retirado para tener acceso al agujero de
llenado del Tanque de Solución.
•
El Cabezal del Trapeador (5) es el cuerpo principal de la unidad, que contiene el Tanque y produce vapor a través de
las Boquillas de Vapor.
•
La Boquilla de Solución (6) es la boquilla frontal que rocía la solución desde el Tanque de Solución hacia fuera cuando
se presiona el Botón de Rociado de Solución.
•
Las Luces del Suelo (7) son cuatro luces indicadoras frontales, diseñadas para iluminar áreas oscuras o difíciles de ver
para asegurar una mejor limpieza, así como una agradable iluminación. Las Luces del Suelo sólo funcionarán si el
Interruptor de Encendido ha sido presionado para activar la potencia de la unidad principal.
•
El Interruptor de Luces del Suelo (8), ubicado atrás a la derecha del Cabezal del Trapeador, es un botón de pedal que
activa y desactiva las Luces del Suelo.
•
El Interruptor de Encendido (9), ubicado atrás del Cabezal del Trapeador, es un botón de pedal que activa y desactiva
la unidad. Éste se presiona para encender la unidad (la Luz Indicadora de Poder roja se encenderá), se presiona
nuevamente para apagar la unidad (la Luz Indicadora de Poder roja se apagará).
•
El Tanque/Caldera (10) es el recipiente interno donde se almacena el agua y se convierte en vapor. Para una óptima
producción de vapor, éste debe llenarse con no más de 10 oz. (300 ml.) de agua.
•
La Tapa del Tanque (10A) está diseñada para retener en forma segura el vapor dentro del Tanque, y para un fácil
acceso a la abertura de llenado. Para llenar el Tanque con agua se debe desenroscar y retirar la Tapa.
•
El Botón de Rociado de Solución (11), ubicado atrás a la izquierda del Cabezal del Trapeador, es un botón de pedal
que controla la función de rociado de solución de la unidad. Cuando se presiona, libera una ráfaga de solución
contenida en el Tanque de Solución a través de la Boquilla de Solución.
•
La Luz Indicadora de Poder roja (12) ilumina cuando el cable de potencia está conectado a un toma corriente y el
Interruptor de Encendido es presionado, para indicar que la unidad tiene energía.
•
La Luz Indicadora de Calentamiento verde (13) ilumina cuando el Tanque está calentando el agua. Cuando éste está
vacío, la Luz se apagará.
•
Las Boquillas de Vapor (14), ubicadas en la parte inferior del Cabezal del Trapeador, despiden uniformemente el ujo
de vapor caliente producido por el Tanque.
•
Las Abrazaderas del Cojín (15) ubicados en la parte inferior del Cabezal del Trapeador, están diseñados para
adherirse a las tiras de ajuste de los Cojines de Microbra.
•
Los Cojines de Microbra (16) se adhieren a las Abrazaderas al nal del Cabezal del Trapeador. Éstos están
diseñados especícamente para limpiar mugre y manchas de los suelos duros. Éstos son reutilizables y se pueden
lavar en lavadora. Se incluyen dos Cojines.
•
El Deslizador de Alfombra (17) encaja alrededor del Cabezal del Trapeador / Cojín de Microbra, y está diseñado ara
permitir que la unidad se deslice sobre áreas alfombradas fácilmente.
•
La Almohadilla de Descanso (18) sirve como base para la unidad, brindando un lugar conveniente para que ésta
descanse mientras el Tanque se calienta y enfría, sin el riesgo de dañar supercies delicadas. La Almohadilla tiene
un lado suave y uno con textura – el lado de la textura está diseñado para atrapar el exceso de humedad y debe estar
mirando hacia abajo, de forma que el Cabezal del Trapeador descanse sobre él.
•
La Taza para Medidas (19) ofrece una forma fácil y conveniente para llenar el Tanque en forma consistente con la
cantidad óptima de agua (10 oz. / 300 ml.)
•
El Embudo (20) ofrece una forma fácil y conveniente para llenar el Tanque de Solución con la Solución Cleanfast
SUELO DURO.
•
La Solución Cleanfast SUELO DURO de 32 oz (21) es una solución especialmente formulada, no tóxica y
biodegradable, diseñada para mejorar la limpieza a vapor, para eliminar la mugre y manchas más rebeldes. Cuando
se usa sobre la mayoría de supercies duras durante el trapeado a vapor, se aumenta la eciencia general de la
limpieza por encima de lo que pueden hacer el vapor o la Solución por sí solos. Para mejores resultados, vierta la
Solución Cleanfast SUELO DURO en el Tanque de Solución de la unidad, donde pueda ser rociada desde la Boquilla
de Solución.
ADVERTENCIA: Antes de usar la Solución Cleanfast SUELO DURO, lea cuidadosamente todas las instrucciones
y precauciones del sello de la botella.
Page 20

ESPAÑOL
Cómo Ensamblar Su
Trapeador a Vapor Niebla Limpia
PROPER STORAGE
Preparing your Clean Mist Steam Mop for storage is quick and simple. When you have nished
your mopping tasks, follow the steps listed below.
1. Gently press down on On/Off Switch until it clicks – red Power Indicator Light will turn off.
Unplug power cord from electrical outlet.
2. Place Mop Head on top of Resting Pad, and allow unit to fully cool (30 minutes).
3. For convenience it is recommended to disconnect Telescopic Pole, and if attached, remove
Microber Pad from Mop Head. If Pad is dirty you may wash it, either by hand or in a washing
machine. Allow to air-dry.
4. Unscrew and remove Boiler Cap. Drain any water remaining in Boiler into a sink or tub, to
minimize potential mineral build-up and prevent overlling during next use. Replace Cap (do
not fully tighten).
NOTE: It is not necessary to drain any Cleanfast HARD FLOOR Solution remaining
inside Solution Tank.
5. Reconnect Telescopic Pole. For storage purposes, you may wish to collapse Telescopic Pole
to its shortest length. Refer to Page 6 for details.
6. Wrap power cord around Cord Brackets.
7. Store Clean Mist Steam Mop in a cool, dry location, along with all included accessories.
MINERAL BUILD-UP
A common maintenance need for steam appliances is the removal of build-up caused by high
mineral content in many municipal water supplies. This mineral build-up may limit the
effectiveness and reduce the life of your Clean Mist Steam Mop.
The best way to minimize mineral build-up is to use distilled or de-mineralized water when
using your Clean Mist Steam Mop. In addition, it is recommended that the Boiler be cleaned at
least once a month in order to remove any deposits that form. This will help to extend the life of
your Clean Mist Steam Mop and keep it functioning at its maximum potential.
To remove mineral build-up:
1. Gently press down on On/Off Switch until it clicks – red Power Indicator Light will turn off.
Unplug power cord from electrical outlet.
IMPORTANT: Unit should remain off and unplugged during cleaning procedure.
2. Place Mop Head on top of Resting Pad, and allow unit to fully cool (30 minutes).
3. For convenience it is recommended to disconnect Telescopic Pole, and if attached, remove
Microber Pad from Mop Head. Leaving them off during cleaning will make the process easier.
4. Remove Boiler Cap and drain any water remaining in Boiler into a sink or tub.
5. Using Measuring Cup, make a mixture of 3.4 oz. (100 ml.) water and 3.4 oz. (100 ml.) vinegar.
6. Pour water/vinegar solution into Boiler.
7. Allow water/vinegar solution to soak in boiler for 30-40 minutes.
8. Drain water/vinegar solution from Boiler into a sink or tub. Rell Boiler with fresh water, drain
and repeat until vinegar odor dissipates.
9. Replace Boiler Cap (do not fully tighten), reconnect Telescopic Pole and store your Clean Mist
Steam Mop as usual.
1-A 1-B 1-C 1-D 1-E
FIGURA 1
6
TUBO TELESCÓPICO
1. Conecte la Manija al extremo superior (más ancho) del Tubo Telescópico. Para esto, simplemente
deslice la Manija en el Tubo hasta que quede ja en su lugar (FIGURA 1-A).
NOTA: Una vez conectada, la Manija está diseñada para no ser retirada del Tubo Telescópico.
Si se requiere retirarla, contacte a Servicio al Cliente para asistencia (página 13).
2. Introduzca el extremo inferior (más angosto) del Tubo Telescópico en la yunta encima del Cabezal
del Trapeador. Cuando lo introduzca, asegúrese de que el botón de liberación del Tubo quede en la
parte trasera de la yunta, como se ilustra (FIGURA 1-B).
3. Presione el Tubo Telescópico en la yunta hasta que el botón de liberación quede jo dentro del
pequeño agujero detrás de la abrazadera (FIGURA 1-C). Ahora el Tubo debe estar asegurado dentro
del Cabezal del Trapeador.
NOTA: A n de lograr pasar el botón de liberación por el agujero, puede ser necesario rotar y
ajustar el Tubo Telescópico hasta que el botón esté alineado con el agujero.
4. Para ajustar el largo del Tubo Telescópico, presione el seguro de extensión hacia abajo. Mientras
tanto, mueva la sección superior del Tubo hasta el largo deseado (FIGURA 1-D). Suelte el seguro,
luego ajuste la sección superior del Tubo nuevamente hasta que haga clic y esté asegurada en su
lugar.
5. Para desconectar el Tubo Telescópico, gire 180º el Gancho del Cable inferior hacia arriba y presione
rmemente el botón mientras hala el Tubo fuera de la yunta del Cabezal del Trapeador (FIGURA 1-E).
Page 21

710
COJINES DE MICROFIBRA
1. Ponga un Cojín de Microbra sobre una supercie plana, con las dos tiras de sujetador mirando hacia arriba.
2. Alinee el Cabezal del Trapeador sobre el Cojín de Microbra. Asegúrese que el Trapeador esté
orientado con el Cojín como se muestra, y lo más centrado posible (FIGURA 2-A).
3. Presione rmemente el Cabezal del Trapeador sobre el Cojín de Microbra. Las tiras de sujetador se
adherirán a las Abrazaderas debajo del Trapeador. Ahora el Cojín debe estar adherido y listo para
ser usado (FIGURA 2-B).
4. Para removerlo, use su pie para presionar hacia abajo la pestaña de liberación del Cojín al tiempo
que hala hacia arriba el Cabezal del Trapeador.
ATENCIÓN: Tenga cuidado al manipular un Cojín de Microbra recién usado, puede estar
caliente aún.
NOTA: Los Cojines de Microbra pueden lavarse en máquina. Para que no tengan motas, lave
separado de otras telas. Sólo use detergente líquido. Evite los suavizantes de ropa o la lejía.
Se recomienda dejar secar al aire; también puede hacerlo con la secadora a baja temperatura
.
DESLIZADOR DE ALFOMBRAS
NOTA: El paño microbra ya debe estar conectado al cabezal
del trapeador antes de usar el deslizador de alfombras.
1. Ponga el Deslizador sobre una supercie plana.
2. Alinee el Cabezal del Trapeador sobre el Deslizador. Asegúrese
que el Cabezal esté en la misma orientación del Deslizador
(FIGURA 3).
3. Ajuste el Cabezal del Trapeador en el Deslizador.
NOTA: El Deslizador de Alfombras no se conecta al Cabezal
del Trapeador. El Cabezal del Trapeador / Cojín de Microbra
simplemente descansan dentro del Deslizador mientras se
empuja sobre la alfombra, hasta que se levantan.
FIGURA 3
FIGURA 2
2-B2-A
Page 22

8
ESPAÑOL
Uso de Su
Trapeador a Vapor Niebla Limpia
FLOOR LIGHTS
A unique feature of your Clean Mist Steam Mop are the front-mounted LED Floor Lights, which attrac-
tively and conveniently illuminate dark or difcult-to-see oor areas. Simply press down on the Floor
Light Switch at any time while unit is powered on to activate the Floor Lights.
NOTE: Floor Lights will only function when the unit’s main power is on (On/Off Switch has been
pressed and red Power Indicator Light is illuminated).
STEAM MOPPING
Before operating, make sure Microber Pad is properly attached (Page 7), Boiler is lled with
water (Page 8), and if desired, Solution Tank is lled with Cleanfast Hard Floor Solution (Page 8).
1. For rst-time use, remove protective plastic cover that is shipped on electrical plug. Plug power cord
into a convenient electrical outlet.
2. Place Resting Pad on oor, so that textured side faces upward. Rest Mop Head on top of Pad, in
order to help protect oor surface from excess heat and moisture during heat-up period.
3. Using your foot, gently press down on On/Off Switch until it clicks. Red Power Indicator Light will
illuminate to show that unit is receiving power. At the same time, green Heating Indicator Light will
illuminate to show that Boiler is heating.
4. After approximately 3 minutes of heating time, unit will begin emitting steam.
5. Remove unit from Resting Pad, and begin mopping.
Refer to Page 10 for a listing of oor surfaces that are recommended for cleaning with your
Clean Mist Steam Mop.
6. For best results, mop using a steady back-and-forth motion over the oor, working your way
backwards in order to avoid walking over the freshly mopped area.
IMPORTANT: To avoid warping or damage caused by heat and moisture, do not use on unsealed
hardwood or unglazed ceramic surfaces. Steam may remove the sheen from some oors that
have been treated with wax.
Never allow Clean Mist Steam Mop to rest idle on oor surfaces while still on – prolonged
exposure to steam in a single area may discolor or damage some oors. If it becomes
necessary to stop mopping at any time, always turn unit off and place back on Resting Pad.
7. To clean exceptionally tough dirt, stains and scuffs, pretreating with Cleanfast HARD FLOOR Solution is
recommended. To use Solution, rst be sure that Solution Tank is lled (refer to Adding Cleanfast
Hard Floor Solution procedure on Page 8). Then, using your foot, gently press down on Solution
Spray Button – a burst of Solution will be sprayed from Solution Nozzle onto oor in front of unit.
Repeat as necessary to thoroughly cover dirty area, then continue mopping as normal.
NOTE: For very stubborn scuffs and stains, allow Cleanfast HARD FLOOR Solution to soak
for 1-2 minutes after spraying, then continue mopping as normal.
8. Once all water has been used, green Heating Indicator Light will turn off to show that Boiler is empty.
If you wish to continue mopping, rst turn unit off by pressing down gently on On/Off Switch until it
clicks, then unplug power cord from outlet. Refer to Adding Water procedure on Page 8 to rell Boiler.
9. The Microber Cloth will absorb dirt and moisture during mopping. However, when you are nished
you may nd some residual moisture has been left behind. In this case, it is recommended to allow
oor time to air-dry. A fan may be directed towards mopped area to facilitate drying.
10. Once your mopping tasks are completed, place unit back on Resting Pad and turn it off by pressing
down gently on On/Off Switch until it clicks. Unplug power cord from outlet, then refer to procedures
on Page 11 for proper storage and care of your Clean Mist Steam Mop.
CÓMO AGREGAR AGUA
1. Asegúrese de que el Interruptor de Encendido esté apagado (la
Luz roja Indicadora de Poder no estará encendida) y el cable
desconectado.
RELLENADO: Si la unidad estaba en uso, espere 5 minutos
para que se enfríe.
2. Retire cuidadosamente la Tapa del Tanque desenroscándola en
dirección contraria a las manecillas del reloj (FIGURA 4-A).
RELLENADO: Si la unidad estaba en uso, asegúrese que el
Tanque esté totalmente vacío para no llenarlo en exceso.
3. Llene la Taza de Medidas que se incluye con 8.5 oz. (250 ml.)
de agua, y viértala en el Tanque a través de la abertura para
llenado (FIGURA 4-B).
NOTA: Para minimizar la potencial acumulación de minerales
y prolongar la vida de su Trapeador a Vapor Niebla Limpia,
se recomienda usar aguadestilada o desmineralizada en el
tanque.
Si no hay agua destilada disponible, el tanque debe limpiarse
frecuentemente para retirar la acumulación de minerales.
Ver página 11 para más detalles.
4. Para la máxima cantidad de agua utilizable (10 oz. / 300 ml.),
llene la Taza de Medidas con 1.5 oz (50 ml) de agua adicionales
y vierta en el Tanque.
5. Ponga la Tapa del Tanque atornillándola sobre la abertura en
dirección de las manecillas del reloj, hasta que esté apretada.
La unidad ya está lista para empezar a producir vapor – ver
página 9 para instrucciones sobre cómo trapear con vapor.
CÓMO AGREGAR LA SOLUCIÓN
CLEANFAST SUELO DURO
1. Retire el Tapón del Tanque de Solución para liberar el agujero
de llenado.
NOTA: El tapón del tanque de solución no debe ser
desatornillado ni liberado – simplemente hálelo.
2. Inserte el Embudo en el agujero de llenado del Tanque de
Solución.
3. Vierta la Solución Cleanfast SUELO DURO en el Tanque hasta
un máximo de 6.75 oz. (200 ml.).
4. Retire el Embudo y ponga el Tapón del Tanque de Solución
nuevamente.
ADVERTENCIA: La Solución Cleanfast SUELO DURO
únicamente debe usarse en el Tanque de Solución. Si se
pone en el Tanque/Caldera puede reducir la efectividad,
dañar la unidad o causar heridas.
FIGURA 5
FIGURA 4
4-A
4-B
Page 23

98
LUCES DEL SUELO
Una característica sin igual de su Trapeador a Vapor Niebla Limpia son cuatro Luces de Suelo indicadoras frontales,
que iluminan de forma atractiva y conveniente las áreas oscuras o difíciles de ver. Simplemente presione el Interruptor
de Luz de Suelo en cualquier momento mientras la unidad esté encendida para activar las luces de suelo.
NOTA: Las Luces de Suelo sólo funcionarán si la unidad principal está encendida (se ha presionado el
Interruptor de Encendido y la Luz roja Indicadora de Poder está encendida).
TRAPEAR CON VAPOR
Antes de usar la unidad, asegúrese que el Cojín de Microbra esté debidamente conectado (página 7), el
Tanque esté lleno de agua (página 8), y, si así desea, el Tanque de Solución esté lleno de Solución Cleanfast
SUELO DURO (página 8).
1. Para el primer uso, retire la cubierta plástica sobre el enchufe. Conéctelo a una toma de corriente adecuada.
2. Ponga la Almohadilla de Descanso en el suelo, con el lado texturizado hacia arriba. Descanse el Cabezal del
Trapeador sobre la Almohadilla para ayudar a proteger el suelo del calor y humedad excesivos durante el período
de calentamiento.
3. Presione suavemente el Interruptor de Encendido hasta que escuche un clic. La Luz Indicadora de Calentamiento
se encenderá indicando que el Tanque está calentando.
4. Aproximadamente tras 3 minutos de calentamiento, la unidad empezará a emitir vapor.
5. Retire la unidad de la Almohadilla, y comience a trapear.
Ver página 10 para un listado de las supercies recomendadas para limpiar con el Trapeador a Vapor Spray
Limpio.
6. Para mejores resultados un movimiento constante adelante y atrás sobre el suelo, empujando y halando el
trapeador. Trabaje hacia atrás, a n de no pararse sobre el área recién trapeada.
IMPORTANTE: Para evitar deformación o daño por calor o humedad, no use en suelos no sellados o en
cerámica no recubierta. El vapor puede quitar el brillo de algunos suelos que han sido encerados.
Nunca permita que el Trapeador a Vapor Niebla Limpia descanse sin ser utilizado sobre el suelo mientras
aún esté encendido – la exposición prolongada al vapor en una sola área puede decolorar o dañar algunos
suelos. Si es necesario dejar de trapear durante algún tiempo, siempre apague la unidad y ubíquela
nuevamente sobre la Almohadilla de Descanso.
7. Para limpiar mugre, manchas y marcas muy rebeldes, se recomienda tratarlas previamente con la Solución
Cleanfast SUELO DURO. Para usar la solución, primero asegúrese que el Tanque de Solución esté lleno (ver el
procedimiento de Cómo Agregar Solución Cleanfast SUELO DURO en la página 8). Luego, con el pie, presione
suavemente el Botón de Rociado de Solución – se liberará una ráfaga de la Solución desde la Boquilla de Solución
al frente de la unidad. Repita si es necesario para cubrir bien el área sucia, luego siga trapeando normalmente.
NOTA: Para marcas y manchas muy rebeldes, permita que la Solución Cleanfast SUELO DURO remoje el
área durante 1-2 minutos después del rociado, luego siga trapeando normalmente.
8. Cuando se acabe el agua, la Luz verde Indicadora de Calentamiento se apagará para demostrar que el Tanque
está vacío. Si desea seguir trapeando, primero apague la unidad presionando suavemente el Interruptor de
Encendido hasta que haga clic, luego desconecte el cable. Ver procedimiento de Cómo Agregar Agua en la
página 8 para rellenar el Tanque/Caldera.
9. El Cojín de Microbra absorberá la humedad durante el trapeado. Sin embargo, dependiendo de la supercie y de
la intensidad del vapor, puede quedar alguna humedad residual. En este caso, se recomienda permitir el secado
naturalmente. Puede orientarse un ventilador hacia el área trapeada para mejorar el secado.
10. Al terminar de trapear, apague la unidad presionando el Interruptor de Encendido hasta que haga clic, luego
desconecte el cable de la corriente. Ponga la unidad sobre la Almohadilla de descanso, luego vea los
procedimientos de la página 11 para un adecuado almacenamiento y cuidado de su Trapeador a Vapor Spray
Limpio.
Page 24

10
ESPAÑOL
Uso de Su
Trapeador a Vapor
MICROFIBER PADS
1. Lay one Microber Pad on at surface, with fastener strips facing upward.
2. Align Mop Head above Microber Pad. Make sure Mop is oriented with Pad as shown, and
centered as best as possible (FIGURE 2-A).
3. Press Mop Head rmly down onto Microber Pad. Fastener strips will adhere to Pad Grips on
underside of Mop. Pad should now be attached and ready for use (FIGURE 2-B).
4. To remove, use your foot to press down on Microber Pad release tab while simultaneously
pulling Mop Head up off of Pad.
CAUTION: Use care when handling a recently used Microber Pad, as it may still be hot.
NOTE: Microber Pads are machine washable. To avoid picking up lint, washing
separately from other fabrics is recommended. Only use liquid detergent. Avoid using
any fabric softeners or bleach. Air drying is recommended; machine drying on a low
setting is acceptable as well.
SUPERFICIES DE SUELOS RECOMENDADAS
A continuación hay un listado de algunas de las supercies más comunes que se pueden limpiar en
forma ideal con el Trapeador a Vapor. Si tiene preguntas sobre alguna supercie que no esté listada,
por favor contacte a nuestro departamento de servicio al cliente:
consumerservice@steamfast.com o 1-800-711-6617.
El Trapeador a Vapor es perfecto para las siguientes supercies:
•
Madera Sellada
•
Concreto Tinturado
•
Laminados Sellados
•
Linóleo
•
Cerámica
•
Granito
•
Mármol
•
Pizarra
•
Baldosa
•
Alfombras (con el accesorio Deslizador de Alfombras)
IMPORTANTE: No use la unidad sobre supercies de madera no sellada o cerámica no
recubierta. Las supercies que no estén selladas pueden pandearse o dañarse con la
exposición al calor y humedad.
También debe tener cuidado cuando vaporice suelos de madera sellada, ya que la exposición
prolongada al vapor en un solo sitio puede causar daños y decoloración. Para evitar esto,
mantenga el Trapeador a Vapor en constante movimiento sobre estas supercies, y póngalo en
la Almohadilla de Descanso cuando no lo use.
El vapor puede quitar el brillo de algunos suelos que hayan sido encerados.
Los suelos extremadamente ásperos pueden dañar o romper los Cojines de Microbra.
Antes de vaporizar cualquier alfombra, se recomienda consultar las guías del fabricante. Para
las alfombras donde haya dudas, siempre pruebe en un área pequeña y escondida antes de
proceder.
ACERCA DE LA SOLUCIÓN CLEANFAST SUELO DURO
La Solución Cleanfast SUELO DURO es un avanzado limpiador que mejora el vapor. No se debe
confundir con los típicos químicos domésticos duros; esta solución contiene únicamente agentes de
acción supercial patentados y agua. Estos agentes rompen la unión entre la mugre con sus suelos du-
ros y hace que la mugre y manchas más rebeldes desaparezcan en un abrir y cerrar de ojos. Por sus
inigualables propiedades, la solución SUELO DURO es potencializada por el vapor. Úsela sobre sus
suelos cuando trapee con vapor y maravíllese con los resultados, que son más rápidos y efectivos que
aquellos del vapor o solución por sí solos. Al ser no tóxica y biodegradable, sin lejías u otros aditivos
dañinos.
Page 25

11
ALMACENAMIENTO ADECUADO
Preparar su Trapeador a Vapor Niebla Limpia para guardarlo es fácil y simple. Cuando haya terminado
sus labores de limpieza, siga los pasos indicados.
1. Presione suavemente el Interruptor de Encendido hasta que haga clic. Desconecte el cable de la
toma eléctrica.
2. Ponga el Cabezal del Trapeador sobre la Almohadilla de Descanso y espere a que se enfríe
totalmente (30 minutos).
3. Para mayor conveniencia, se recomienda desconectar el Tubo Telescópico, y si está adherido, retire el
Cojín de Microbra del Cabezal. Si está sucio puede lavarlo a mano o en máquina. Deje secar al aire.
4. Desenrosque y retire la Tapa del Tanque. Bote el agua restante del Tanque en el lavamanos o en la
tina para minimizar potenciales acumulaciones de minerales y evitar llenar demasiado en el próximo
uso. Ponga la Tapa nuevamente (no apretar completamente).
NOTA: No es necesario vaciar la Solución Cleanfast SUELO DURO que queda en el Tanque
de Solución.
5. Reconecte el Tubo Telescópico. Para efectos de almacenarlo, es bueno encoger el Tubo Telescópico
hasta el mínimo. Ver página 6 para más detalles.
6. Envuelva el cable de poder en los Ganchos.
7. Guarde el Trapeador a Vapor Niebla Limpia en un sitio fresco y seco, junto con todos los accesorios
incluidos.
ACUMULACIÓN DE MINERALES
Un mantenimiento común para los dispositivos de vapor es retirar la acumulación causada por el alto
contenido de minerales en muchas de las aguas municipales. Esta acumulación de minerales puede
limitar la eciencia y reducir la vida útil de su Trapeador a Vapor Niebla Limpia.
La mejor forma de minimizar la acumulación de minerales es usar agua destilada o
desmineralizada cuando utilice su Trapeador a Vapor Niebla Limpia. También se recomienda
seguir el procedimiento de limpieza por lo menos una vez al mes a n de retirar los depósitos que se
forman. Esto ayudará a extender la vida útil de su Trapeador a Vapor Niebla Limpia y lo tendrá
funcionando perfectamente.
Para retirar la acumulación de minerales:
1. Presione suavemente el Interruptor de Encendido hasta que haga clic. Desconecte el cable de la
toma eléctrica.
IMPORTANTE: La unidad debe permanecer apagada y desconectada durante el proceso de
limpieza.
2. Ponga el Cabezal del Trapeador sobre la Almohadilla de Descanso y espere a que se enfríe
totalmente (30 minutos).
3. Para mayor conveniencia, se recomienda desconectar el Tubo Telescópico, y si está adherido, retire
el Cojín de Microbra, si está instalado. Si los retira para la limpieza, será más fácil.
4. Retire la Tapa del Tanque de agua y bote el agua restante del Tanque en el lavamanos o en la tina.
5. Use la Taza de Medidas para hacer una mezcla de aproximadamente 3.4 oz. (100 ml.) de agua
destilada y 3.4 oz. (100 ml.) de vinagre.
6. Vierta la solución de agua/vinagre en el Tanque.
7. Deje reposar la solución de agua/vinagre por 30-40 minutos.
8. Bote la solución de agua/vinagre del Tanque en el lavamanos o en la tina. Llene el Tanque con agua
fresca, vacíelo y repita hasta que desaparezca el olor a vinagre.
9. Ponga nuevamente la Tapa del Tanque (no apretar completamente), conecte nuevamente el Tubo y
guarde su Trapeador a Vapor Niebla Limpia en la forma usual.
Almacenamiento y Cuidado
Page 26

ESPAÑOL
La salida de vapor es débil o intermitente.
Acumulación de minerales en la unidad.
El nivel de agua del Tanque se está
agotando.
Ver la sección de Acumulación de
Minerales en la página 11 para el
procedimiento de limpieza.
Siga el procedimiento de Cómo Agregar
Agua en la página 8.
Cómo Solucionar Problemas
•
The Handle (1) connects to the top of the Telescopic Pole, and is designed for maximum grip and comfort.
•
The Telescopic Pole (2) connects the Mop Head to the Handle, and can be extended and retracted for
comfortable use and convenient storage.
•
The Extension Lock (2A) is used to adjust the length of the Telescopic Pole.
•
The Cord Brackets (3) provide a convenient way to neatly wrap the power cord for storage.
•
The Solution Tank (4) is the internal reservoir where Cleanfast HARD FLOOR Solution can be added
for use during mopping.
•
The Solution Tank Plug (4A) is the rubber plug which must be removed in order to access the Solution Tank’s
ll hole.
•
The Mop Head (5) is the unit’s main body, housing the Boiler and producing steam through the Steam Nozzles.
•
The Solution Nozzle (6) is the front-mounted nozzle that sprays a burst of solution from the Solution Tank
outwards in front of the unit whenever the Solution Spray Button is pressed.
•
The Floor Lights (7) are four front-mounted LED lights, designed for illuminating dark or difcult-to-see areas to
ensure more thorough cleaning, as well as attractive accent lighting. The Floor Lights will only function if the
On/Off Switch has been pressed to activate the unit’s main power.
•
The Floor Light Switch (8), located on the back-right side of the Mop Head, is the foot operated button that
activates and deactivates the Floor Lights.
•
The On/Off Switch (9), located on the back side of the Mop Head, is the foot-operated button that activates and
deactivates the unit. The On/Off Switch is pressed to turn the unit on (the red Power Indicator Light will illuminate),
then pressed again to turn the unit off (the red Power Indicator Light will turn off).
•
The Boiler (10) is the internal reservoir where water is held and converted into steam. For optimal steam
production, the Boiler should be lled with no more than 10 oz. (300 ml.) of water.
•
The Boiler Cap (10A) is designed to safely contain steam inside the Boiler, while providing easy access to the
Boiler’s ll hole. The Cap must be unscrewed and removed in order to ll the Boiler with water.
•
The Solution Spray Button (11), located on the back-left side of the Mop Head, is the foot-operated button that
controls the unit’s solution spray function. When pressed, a burst of solution contained in the Solution Tank will
be sprayed from the Solution Nozzle.
•
The red Power Indicator Light (12) illuminates whenever the power cord is plugged into an electrical outlet and
the On/Off Switch is pressed, to indicate that unit is receiving power.
•
The green Heating Indicator Light (13) illuminates while the Boiler is actively heating water. When the Boiler is
empty, the Light will turn off.
•
The Steam Nozzles (14), located on the bottom of the Mop Head, evenly disperse the ow of steam produced
by the Boiler.
•
The Pad Grips (15), located on the bottom of the Mop Head, are designed to adhere to fastener strips on the
Microber Pads.
•
The Microber Pads (16) each attach to the Pad Grips on the bottom of the Mop Head. The Pads are designed
to clean scuffs and stains from hard oors. The Microber Pads are reusable and machine washable. Two
Pads are included.
•
The Carpet Glider (17) ts around the Mop Head / Microber Pad, and is designed to allow the unit to effortlessly
move over carpeted surfaces.
•
The Resting Pad (18) serves as a base for the unit, providing a convenient place for it to rest as the Boiler
heats and cools without risk of damage to delicate oor surfaces. The Resting Pad has a smooth side and a
textured side – the textured side is designed to capture excess moisture and should face upward, so that Mop
Head rests on top of it.
•
The Measuring Cup (19) provides an easy and convenient way to consistently ll the Boiler with the optimum
amount of water (10 oz. / 300 ml.).
•
The Funnel (20) provides an easy and convenient way to ll the Solution Tank with Cleanfast HARD FLOOR
Solution.
•
The 32 oz. Cleanfast HARD FLOOR Solution (21) is a specially formulated, non-toxic and biodegradable
solution that is designed to enhance steam cleaning to eliminate the toughest scuffs and stains. When used on
most any hard oor surface during steam mopping, overall cleaning effectiveness is increased beyond what
either steam or the Solution is capable of alone. For best results, pour Cleanfast HARD FLOOR Solution into
the unit’s Solution Tank, where it can be conveniently sprayed from the Solution Nozzle.
CAUTION: Before using Cleanfast HARD FLOOR Solution, carefully read all instructions and
precautions on the bottle label.
12
La unidad no calienta. La Luz roja
Indicadora de Poder NO enciende.
La unidad no calienta. La Luz rojaIndicadora
de Poder SÍ enciende, la Luz verde
Indicadora de Calentamiento NO enciende.
La unidad calienta pero no produce vapor.
La Luz roja Indicadora de Poder y la Luz
verde Indicadora de Calentamiento SÍ
enciende.
(NOTA: Siempre deje que la unidad se
caliente un rato y empiece a producir
vapor.)
Queda un exceso de humedad en el suelo
al trapear.
NOTA: es normal que quede un poco
de humedad. Espere un poco para un
secado al aire al terminar de trapear.
La unidad no está conectada.
No hay agua en el Tanque.
Acumulación de minerales en la unidad.
El breaker de circuito doméstico /
interruptor de tierra se saltó o quemó un
fusible.
La unidad está dañada o necesita
mantenimiento.
La unidad está dañada o necesita
mantenimiento.
La unidad no está encendida.
El Cojín de Microbra se ha saturado de
humedad.
El Tanque está demasiado lleno.
Conecte el cable de poder a la toma de
corriente.
Siga el procedimiento de Cómo Agregar
Agua en la página 8.
Ver la sección de Acumulación de
Minerales en la página 11 para el
procedimiento de limpieza.
Reinicie el breaker / interruptor de tierra o
reemplace el fusible. Si necesita ayuda,
llame a un electricista licenciado.
Detenga inmediatamente su uso y desconecte.
Contacte a Servicio al Cliente para mayor
asistencia (ver página 13 para más detalles).
Detenga inmediatamente su uso y desconecte.
Contacte a Servicio al Cliente para mayor
asistencia (ver página 13 para más detalles).
Presione el Interruptor de Encendido hasta
que haga clic.
Presione el Interruptor de Encendido hasta
que haga clic.
Retire el Cojín y reemplácelo por uno
seco. Para comprar más paños, contacte
a Servicio al Cliente (ver página 14 para
más detalles).
Llenar el Tanque con más de 10 oz. (300
ml) de agua interere con la producción
de vapor, creando condensación de agua
en el vapor.
Saque un poco de agua del Tanque.
Siempre use la Taza de Medidas que
se incluye, para llenar el Tanque con la
cantidad adecuada de agua (ver página 8
para más detalles).
PROBLEMA CAUSA POSIBLE SOLUCIÓN
Las supercies del suelo se ven opacas o
con residuos después de la vaporización.
Las Luces del Suelo no encienden cuando
se presiona el Interruptor de Luces de
Suelo.
No hay aspersión de Solución al presionar
el Botón de Rociado de Solución.
El Cojín de Microbra está sucio.
La unidad no está encendida.
El Tanque de Solución está vacío.
Las Luces están quemadas o no funcionan
bien.
El mecanismo de rociado está tapado o no
funciona bien.
Hay residuos de aguas duras en el suelo.
Instale un Cojín limpio.
Siga el procedimiento de Cómo Agregar
Solución Cleanfast SUELO DURO en la
página 8.
Contacte a Servicio al Cliente para
asistencia (ver página 13 para más detalles).
Contacte a Servicio al Cliente para
asistencia (ver página 13 para más detalles).
Cambie a agua destilada.
Page 27

13
SERVICIO AL CLIENTE
Si tiene problemas con su Trapeador a Vapor Niebla Limpia, vea la guía de solución de problemas en
la página 12 de este manual. Las preguntas adicionales se deben hacer a nuestro servicio soporte al
cliente a través de nuestro sitio Web, www.steamfast.com.
Si no tiene acceso a Internet, puede contactar a nuestro Departamento de Servicio al Cliente por
teléfono, al 1-800-711-6617.
NOTA: Para que nuestros representantes de servicio al cliente le ayuden rápida y
ecientemente, tenga la siguiente información a mano antes de llamar:
• Información de compra (dónde y cuándo compró este producto)
• Copia del recibo de compra / prueba de compra
• Número de serie del producto (ubicado cerca del sello de especicación eléctrica, detrás de la
unidad)
• Código de fecha (número de 4 dígitos ubicado en el sello de especicación eléctrica, detrás de
la unidad)
Para información en cuanto a su 1 año limitó la garantía, referirse a la página 15 de este manual.
ESPECIFICACIONES DEL PRODUCTO
SF-145 F
120V
1000W
8.3A
10 OZ. (300 ML.)
3 MIN. (APROXIMADO)
12 MIN. (APROXIMADO)
4.6 LBS. (2.1 KG.)
11.5” (29.2 CM.) x 7.1” (18.0 CM.) x 50.4” (128.0 CM.)
18.7’ (570.0 CM.)
MODELO
VOLTAJE
VATIAJE
AMPERAJE
CAPACIDAD DE AGUA
TIEMPO CALENT
TIEMPO VAPOR CONSTANTE
PESO DE UNIDAD
DIMENSIONES DE UNIDAD
LARGO DEL CABLE
Page 28

14
ESPAÑOL
Soporte del Producto
REPUESTOS & ACCESSORIOS
Cuando ordene repuestos y accesorios para su Trapeador a Vapor Niebla Limpia, puede referirse a los
siguientes números de repuesto. Los repuestos se pueden ordenar a través de nuestro sitio Web:
www.steamfast.com
También puede contactar directamente a Servicio al Cliente:
consumerservice@steamfast.com o 1-800-711-6617
10. Do not use unit where aerosol-based products are being used, or where oxygen is being
administered.
11. Unit is only meant to be used with recommended SF-145 F accessories. Using other types of
attachments may cause damage to unit or injury.
12. If red Power Indicator Light does not illuminate when unit is plugged in and On/Off Switch is
pressed, unit is not operating normally. Immediately disconnect cord from power supply, then
refer to troubleshooting guide on Page 12 of this manual for assistance.
13. Always turn unit off and unplug power cord before lling Boiler with water. Do not attempt to
use unit without properly lling Boiler.
14. When lling Boiler, only water should be used in unit – other cleaning agents could damage
unit or cause injury. Distilled or de-mineralized water is highly recommended, in order to
minimize potential build-up of mineral deposits. Do not overll unit.
15. Cleanfast HARD FLOOR Solution should only be used in Solution Tank. Pouring Solution
into Boiler could result in reduced effectiveness, damage to unit or possible injury.
16. To reduce risk of contact with hot water emitting from Steam Nozzle, check appliance before
each use by positioning it away from body and turning it on. Do not operate unit if Steam
Nozzles are blocked.
17. Burns can occur from touching hot metal parts, hot water, or steam. Do not touch bottom of
Mop Head or attempt to attach a Microber Pad by hand while unit is in use. Use caution
when you turn unit upside-down – there may be hot water in Boiler.
18. Use caution when using unit on uneven surfaces, such as stairs.
19. When steaming any surface for the rst time, it is recommended that you consult the
manufacturer’s guidelines for material being steamed. For items in question, test on an
inconspicuous area before proceeding.
20. Steaming unsealed hardwood or unglazed ceramic surfaces is not recommended, and may
result in warping or damage to the surface. Steam may remove the sheen from surfaces
treated with wax.
21. When steam mopping, never leave unit resting in one spot on any surface for any period of
time – prolonged exposure to heat and moisture may damage oor surfaces.
22. Do not allow power cord to touch hot surfaces during use. Wrap cord loosely around Cord
Brackets when storing.
23. Always allow Clean Mist Steam Mop to cool completely (at least 30 minutes) and empty Boiler
before storing. Do not store unit with a damp Microber Pad still attached.
Questions or comments?
•
www.steamfast.com
•
consumerservice@steamfast.com
•
1-800-711-6617
SOLUCIÓN CLEANFAST SUELO DURO (32oz)
CF-014R-
TAZA DE MEDIDAS
A142-P002R-
EMBUDO
A275-014R-
COJINES DE MICROFIBRA (2)
A140-000R-
ALMOHADILLA DE DESCANSO
A142-003R-
DESLIZADOR DE ALFOMBRAS
A142-P003R-
NOTA: Debido a mejoras persistentes, los números de repuestos en una lista encima pueden
cambiarse. Para la ayuda que pide a partes, por favor póngase en contacto con el Servicio al
Cliente directamente.
Page 29

15
Información Sobre la Garantía
GARANTÍA LIMITADA DE 1 AÑO
Steamfast, una división de Vornado Air LLC, (“Steamfast”) garantiza al comprador o consumidor original que este
Steamfast Trapeador a Vapor Niebla Limpia (“Producto”) contra defectos de material o mano de obra durante un
período de un (1) año a partir de la fecha de compra. Si se descubriera cualquiera de estos defectos dentro
del período de garantía, Vornado reparará o reemplazará el Producto, a su discreción, sin costo alguno, en tanto el
Producto se remita a Steamfast con los gastos de envío pagos. Las reparaciones no cubiertas por la garantía o
fuera del período de garantía requerirán de un pago cubriendo el costo de materiales, manipuleo y envío.
Esta garantía no se aplica a defectos producidos por el abuso del Producto, por su modicación, alteración, reparación
o mantenimiento por personas ajenas a Steamfast, por mal manejo del mismo, mantenimiento inadecuado, uso
comercial o daños producidos durante el envío o atribuibles a fuerza mayor.
LA REPARACIÓN O REEMPLAZO QUE SE OFRECE BAJO ESTA GARANTÍA ES LA ÚNICA SOLUCIÓN PROPORCIONADA
PARA EL CLIENTE. STEAMFAST NO SERÁ RESPONSABLE POR NINGÚN DAÑO INCIDENTAL O INDIRECTO POR
EL INCUMPLIMIENTO DE CUALQUIER GARANTÍA EXPRESA O IMPLÍCITA DE ESTE PRODUCTO. EXCEPTO HASTA
EL ALCANCE PROHIBIDO POR LAS LEYES VIGENTES, TODA GARANTÍA IMPLÍCITA DE APTITUD O IDONEIDAD
PARA UN USO EN PARTICULAR DE ESTE PRODUCTO QUEDA LIMITADA A LA DURACIÓN DE ESTA GARANTÍA.
Algunos estados no permiten limitaciones con respecto a cuánto dura una garantía implícita o la exclusión o limitación
de daños imprevistos o consiguientes, por lo tanto las exclusiones o limitaciones anteriores pueden no aplicarse en su
caso. Esta garantía le otorga derechos legales especícos; usted puede también tener otros derechos, los que varían
de estado a estado.
Por garantía o servicio de reparaciones, llame al 1-800-711-6617 o mande un correo electrónico a
consumerservice@steamfast.com para obtener el formulario de Autorización de Retorno (“RA”). Por favor, cuando
contacte a Steamfast por la garantía, tenga a mano o incluya en el envío los números de modelo, código de fecha
y de serie de su Producto, así como su nombre, dirección, ciudad, estado, código postal y número de teléfono. Es
posible que se le requiera proporcionar el recibo original de venta. Para sus registros: Abroche o adjunte su recibo
original de compra a esta ‘Guía del Usuario’. Por favor, también escriba aquí abajo el número de serie de su Producto
(ubicado en la calcomanía de especicaciones de su producto).
Numero de Serie: _______________________________________________________________________________
Después de recibir el formulario RA, despache su Producto con gastos de envío pagos a:
Steamfast
Attn: Warranty & Repair
415 East 13th
Andover, KS 67002
Para asegurar el manejo adecuado, los embalajes deben estar claramente marcados con el número de RA. Los
paquetes que no estén marcados claramente con dicho número de RA podrían ser rechazados en la dársena de
recepción.
Por favor espere entre 1 y 2 semanas después de la recepción del Producto para dar tiempo a la reparación y
devolución del mismo.
Registre su producto en línea en www.steamfast.com
© 2011 Vornado Air LLC • Andover, KS 67002
Especicaciones del producto sujetas a cambio sin previo aviso.
Steamfast® son marcas registradas de Vornado Air LLC.
Fabricado en China.
Servicios al Consumidor de Steamfast
W: www.steamfast.com | T: 1-800-711-6617 | C: consumerservice@steamfast.com
Page 30

Steamfast
415 East 13th, Andover, KS 67002
1-800-711-6617 www.steamfast.com consumerservice@steamfast.com
review this product online
evalúe este producto en línea
www.steamfast.com/reviews
 Loading...