

St. Bernard iPrism Installation And Configuration Manual

Installation and Conguration Guide
Version 6.2
800•782•3762
www.stbernard.com

©2001 – 2009 St. Bernard Software Inc. All rights reserved. The St. Bernard
Software logo, iPrism and iGuard are trademarks of St. Bernard Software Inc. All
other trademarks and registered trademarks are hereby acknowledged.
Microsoft and Windows are either registered trademarks or trademarks of
Microsoft Corporation in the United States and/or other countries.
Other product and company names mentioned herein may be the trademarks of
their respective owners.
The iPrism software and its documentation are copyrighted materials. Law
prohibits making unauthorized copies. No part of this software or documentation
may be reproduced, transmitted, transcribed, stored in a retrieval system, or
translated into another language without prior permission of St. Bernard
Software, Inc.
INS0001.6.2.0003

i
CHAPTER 1 iPrism Overview ....................................................................... 1
CHAPTER 2 iPrism Installation..................................................................... 5
Installation Instructions.......................................................... 6
CHAPTER 3 iPrism Testing ........................................................................... 26
Test #1: Accessing the iPrism Main Menu ............................ 27
Test #2: Using the iPrism as a Proxy Server......................... 29
CHAPTER 4 Familiarizing Yourself with iPrism .......................................... 31
CHAPTER 5 Deploying iPrism in Production.............................................. 32
Bridge (Transparent) Mode ................................................... 32
Proxy Mode ........................................................................... 36
APPENDIX A: Windows XP/SP2 Firewall Configuration ..................................................... 38
Turning Off the Firewall ......................................................... 39
Configuring the Firewall ........................................................ 40
APPENDIX B: Configuring Your Browser for Proxy Mode ................................................. 43
APPENDIX C: Support Information....................................................................................... 48
APPENDIX D: Information Sheet........................................................................................... 50
APPENDIX E: Upgrading your iPrism................................................................................... 51
Upgrade Process Overview........................................................ 52
Upgrade Process Example ................................................... 53
What do I do if ... ? ................................................................ 56
How to Upgrade iPrisms in a
Central Management Configuration ...................................... 59
Index........................................................................................................................................ 62
Contents

1
CHAPTER 1 iPrism
Overview
iPrism is the award-winning Internet filtering appliance that secures your
organization from Internet-based threats such as malware, spyware, IM/P2P,
and inappropriate content at the perimeter, while it helps enforce your
acceptable use and security policies.
This guide will help you understand the basic functions of your iPrism as
well as get you started using it. Let’s begin with the basic functionality of
your iPrism.

iPrism Overview
2
The iPrism is designed to operate in either proxy mode or bridge
(transparent) mode:
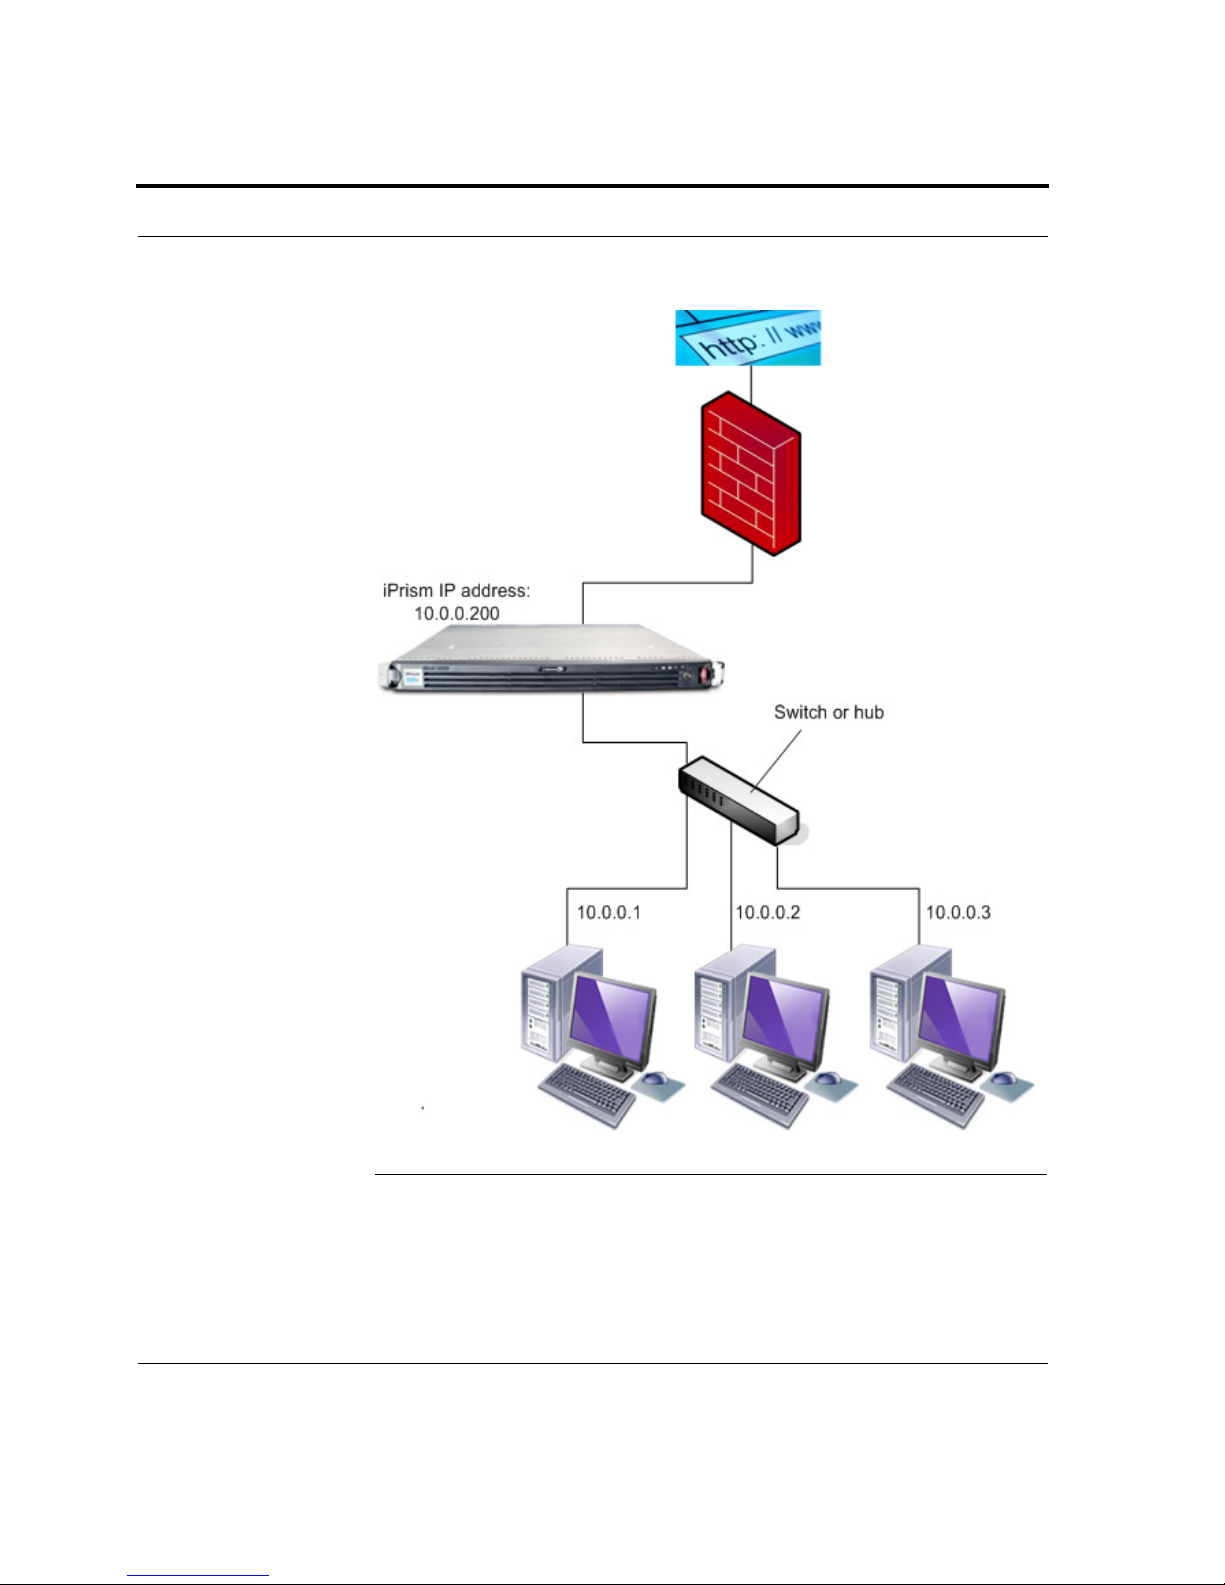
In proxy mode, iPrism uses a single internal interface to connect to the
Internet. Proxy mode uses 1 network (NIC) connection, as only the internal
interface is connected to the local network. The iPrism acts as a filtering
web proxy; web and IM network traffic explicitly directed to the iPrism is
filtered. This is the preferred mode in which to operate an iPrism when
testing (see Figure 1).
FIGURE 1. Proxy Mode

3
Bridge (transparent) mode is an “in-line installation” which has 2 network
(NIC) connections. All network traffic destined for the Internet (e.g., email
and web) flows through the iPrism, and a single IP address is used by both
interfaces. iPrism filters web and IM/P2P traffic only. It is best to position
iPrism between the outbound Internet connection and an internal switch to
limit traffic handling to outbound Internet traffic. This is the preferred mode
in which to deploy and operate an iPrism (see Figure 2).
Note: The iPrism can also act as a filtering web proxy when in bridge
(transparent) mode. Users can configure their browsers to point at the
iPrism, just as they do in proxy mode, although the iPrism is configured in
bridge (transparent) mode. Web and IM/P2P traffic will be filtered for these
users.
iPrism Overview
4
FIGURE 2. Bridge (Transparent) Mode

5
CHAPTER 2 iPrism
Installation
The following steps must be completed to successfully install your iPrism.
All will be covered in greater detail in this guide.
1. Install the iPrism in proxy mode for testing, evaluation, and initial
configuration.
2. Configure the iPrism for use with your system. Define the web, IM/P2P
filtering rules (Profiles) you wish to use and ensure the iPrism works
with your authentication system. During this time, your user community
can test the iPrism’s ability to filter web traffic by configuring their
browser to use the iPrism as a proxy (see Appendix B: “Configuring
Your Browser for Proxy Mode” on page 43).
3. After the iPrism is up and running, it can be deployed in one of the
following modes:
Bridge (Transparent) Mode (the preferred operating mode): Connect
the iPrism between your internal network and the Internet, inside the
firewall if you have one. Enable the external interface in bridge
(transparent) mode.

iPrism Installation
6
Proxy Mode: Inform your user community that they must use the iPrism
as a proxy or create a domain policy that makes the iPrism the proxy for
everyone. Change the firewall rules to block any http traffic that does not
come from the iPrism.
2.1 Installation Instructions
This section provides detailed step-by-step instructions for installing your
iPrism. After completing the installation, your iPrism will be ready for
configuration and testing. When testing is complete and you are satisfied
with the configuration, you can deploy your iPrism into a production
environment.
To quickly set up your iPrism in proxy mode, refer to the Quick Setup
Guide at www.stbernard.com/docs/guide/iPrism_quickSetup_6-0.pdf
2.1.1 Gathering Information
The first step in the installation process is ensuring you have all of the
necessary information.
2.1.1.1 Completing the Information Sheet
Begin by photocopying the information sheet on page 50, and completing it.
Follow the instructions below to help you locate the information you need.
2.1.1.1.1 iPrism Information
You will need certain information to install and configure your iPrism. The
following information is lettered to correspond with the information sheet.
Note: If you already know this information and can complete the
information sheet, you can skip to Hardware Setup on page 8.
(A) iPrism Serial Number: Your iPrism serial number can be found on
your iPrism appliance.
(B) Registration Key and (C) Expiration Date: Your registration key is
emailed to you as well as included on a separate sheet with your iPrism
appliance. This key will expire with the termination of your license
agreement or subscription.

7
The email you are sent with your registration key also has an attachment
containing this registration key. It is recommended that you save this file in
a secure location.
(D) IP Address and (E) Netmask: The iPrism appliance requires a unique
IP address on the subnet to which it is installed. Locate the available IP
address and its netmask on your network and enter it in the blanks for (D)
and (E) on your information sheet. The computer you are using for
configuration and the iPrism must be connected to the same hub or switch,
and must be on the same subnet. In addition, when configuring the iPrism,
you must choose network settings matching the network on which your
computer is located.
To locate your current IP address, do the following from your computer:
1. Open a command prompt (from the Start Menu, select Run, then type
cmd (Windows
®
NT4, 2000, XP, and 2003) or command (Windows 9x,
ME)).
2. At the c:> prompt, type ipconfig /all
3. Look for the Ethernet adapter Local Area Connection, e.g.:
Ethernet adapter Local Area Connection:
Connection-specific DNS Suffix . : .example.com
IP Address........................ : 192.168.1.10
Subnet Mask....................... : 255.255.255.0
Default Gateway................... : 192.168.1.1
Select an IP address for the iPrism on the same IP network. Using the
example above, you can choose any available IP address in the
192.168.1.1 – 192.168.1.254 range.
Important: Verify that the IP address you choose is not in use by
another system.
(F) iPrism Host Name: During the setup procedures, you will be asked to
assign a host name to the iPrism appliance. The name you choose should
reflect your DNS domain, such as iprism.example.com. You can then create
an entry for iPrism in your domain DNS configuration (some email filters
will not deliver email from a system with no DNS entry.)
(G) Default Route (Gateway) Address: The default route refers to the IP
address of the device, usually a firewall’s internal interface, that lies

iPrism Installation
8
between the local network (subnet) and the Internet. This address should be
on the same physical network as the iPrism.
(H) Name Server (DNS): Since the iPrism and its clients tend to look up
many of the same host names, you can improve efficiency and your cache
hit rate by using the same DNS server for the iPrism and the computers that
use it. Enter the IP address of this DNS server here.
2.1.2 Hardware Setup
This section describes the iPrism’s LED lights and connectors, as well as
how to physically install and connect the iPrism appliance to your network
in proxy mode (for a description of proxy mode, see page 2). This is done
in the least obtrusive way possible, allowing your network to operate
normally until you are ready to make the final connection.
2.1.2.1 Mounting the Hardware Appliance
If you have not already done so, now is a good time to unpack the iPrism
appliance and physically mount it in its final location (e.g., a 19” rack). If
you need help installing the iPrism in a rack or installing rails, see the
following Knowledgebase article:
http://www.stbernard.com/products/support/iprism/help/iprism.htm
Note: On the model 3000, make sure the power isolation switch on the back
of the unit is turned off (0).
Connect the power cord to the back of the iPrism and plug it in.
2.1.2.2 Overview of LED Lights and Connectors
The following section describes the LEDs and lights on the iPrism control
panels, and the console and internal/external Ethernet interfaces (ports) on
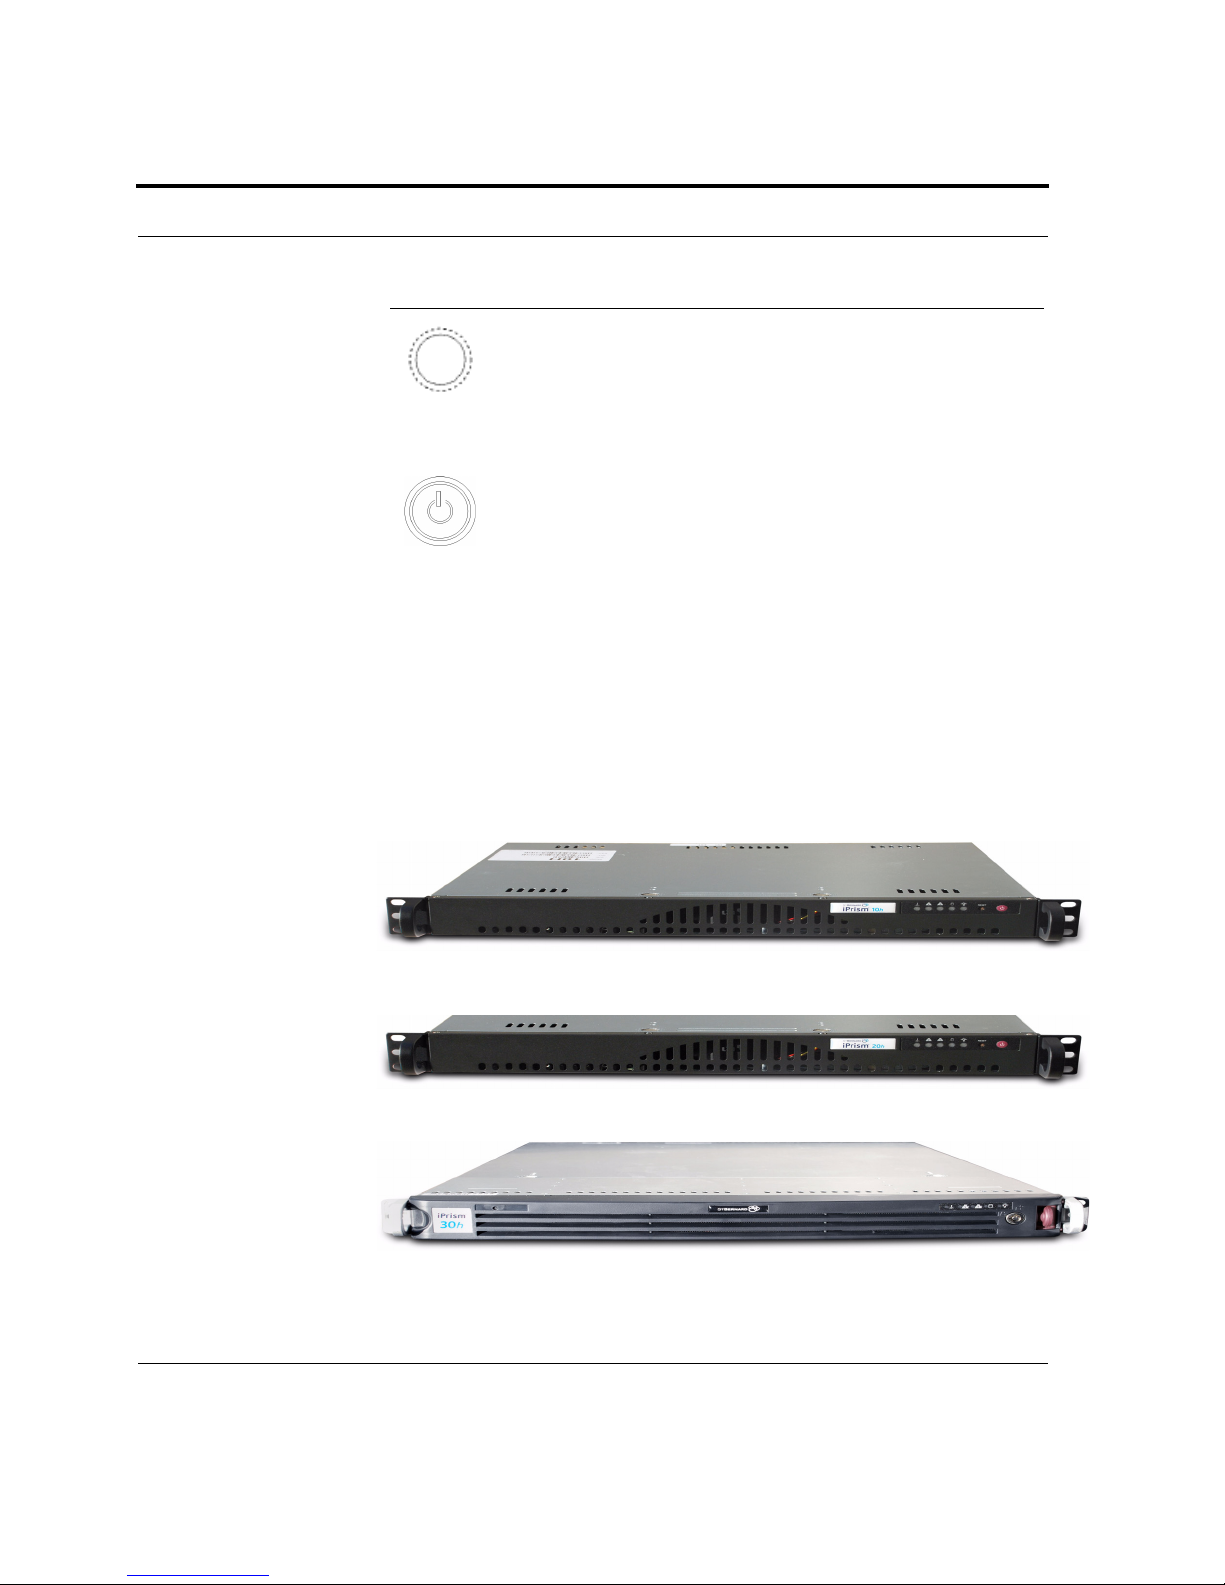
the back panels. Note the following:
• iPrism models 10h and 20h have the same front panel, but different back
panels.
• iPrism models 30h, 50h, and 100h have the same front and back panels.
Refer to the iPrism h-Series Appliance Specifications at
www.stbernard.com/products/support/iprism/help/iprism.htm for detailed
information about each model’s hardware configuration.

9
LEDs and Lights
The LEDs and lights on the iPrism control panel keep you informed of the
system status. The following LEDs and lights are available on the h-Series:
UID: Unit identifier. Depressing the UID button
illuminates an LED on both the front and rear of the
appliance to allow you to easily locate the appliance in
large stack configurations. The LED will remain on until
the button is pushed a second time. Another UID button
on the rear of the appliance serves the same function.
NIC2: Indicates network activity on LAN2 when
flashing.
NIC1: Indicates network activity on LAN1 when
flashing.
HDD: Indicates IDE channel activity or SATA and/or
DVD-ROM drive activity when flashing.
Power: Indicates power is being supplied to the system’s
power supply units. This LED should normally be
illuminated when the systen is operating.
iPrism Installation
10
Front Panels
10h
20h
30h
Reset: Reboots the system. Important: Do not press this
button until you have shut down the iPrism from the Exit
> Shutdown menu option. This cleanly terminates the
current iPrism services and network connections and
prepares iPrism to be powered down using this button.
Power Button: Used to apply or remove power from the
power supply to the server system. Turning off system
power with this button removes the main power but
keeps standby power supplied to the system.
Important: Do not press this button until you have shut
down the iPrism from the Exit > Shutdown menu
option. This cleanly terminates the current iPrism
services and network connections and prepares iPrism to
be powered down using this button.

11
50h
100h
iPrism Installation
12
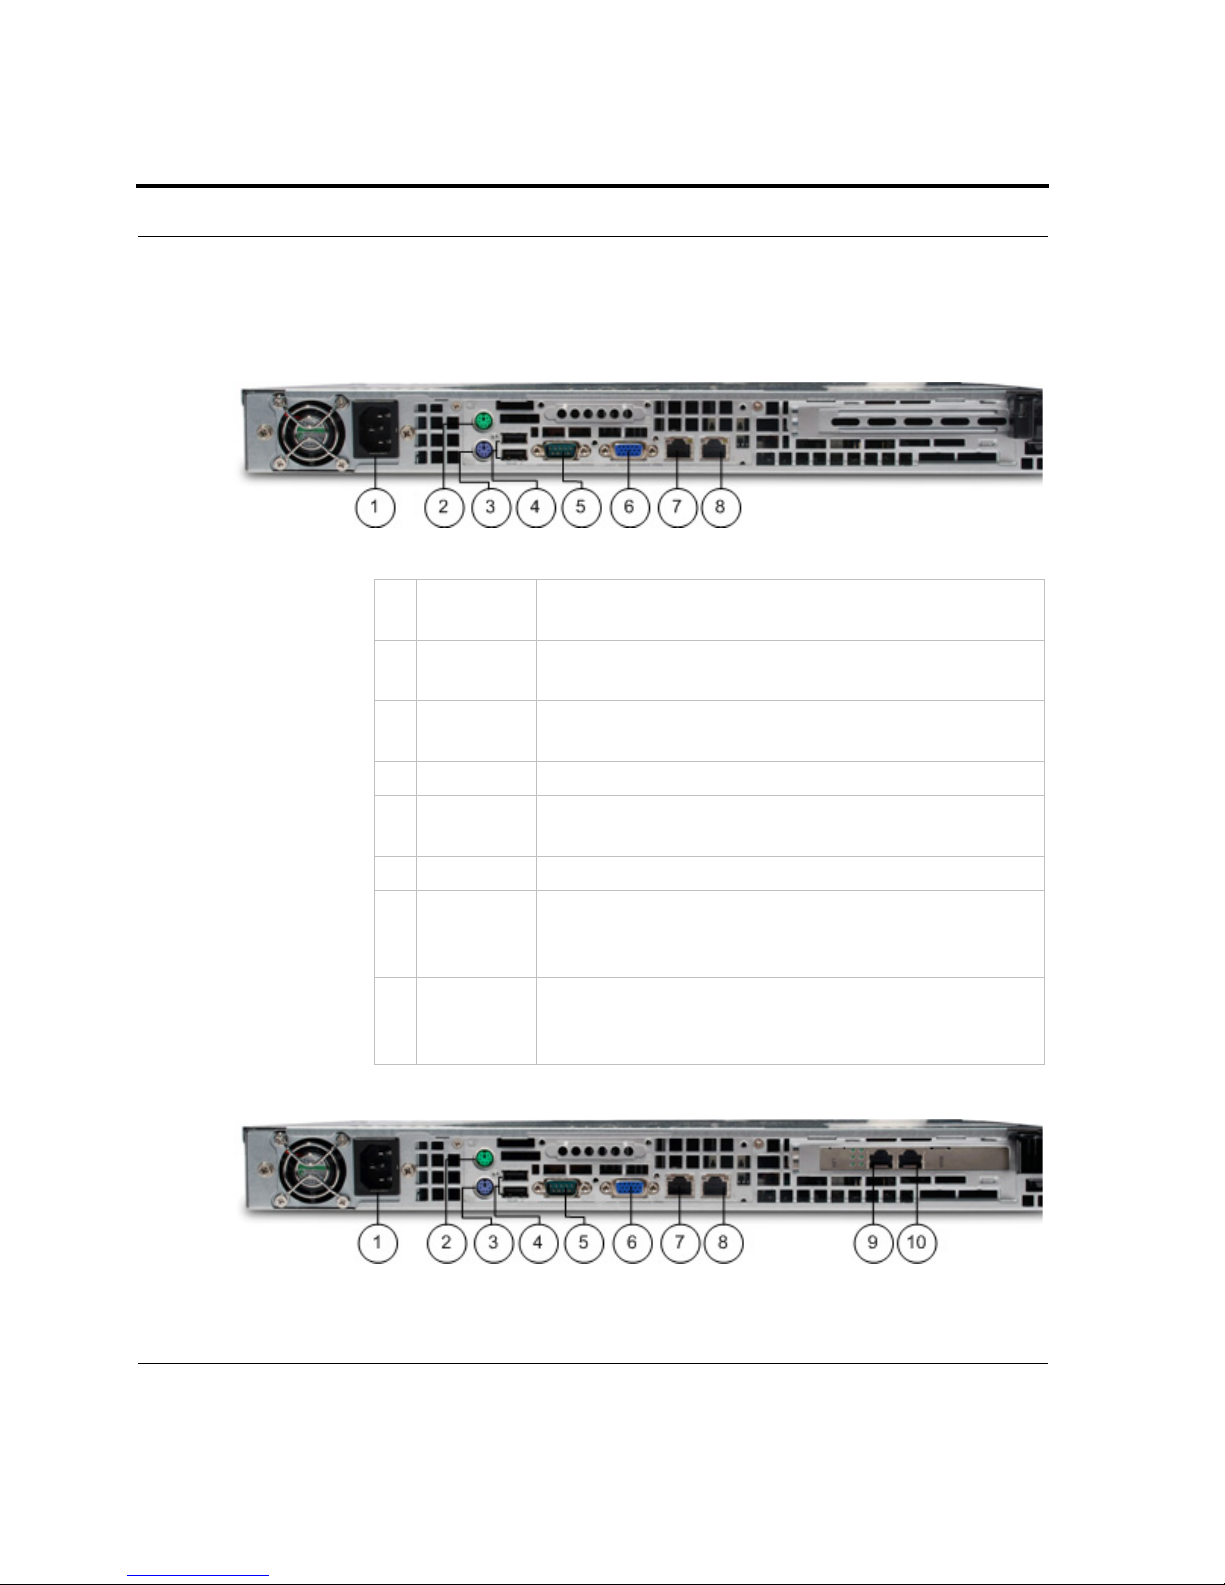
Rear Panels
10h
20h
1 Power
connector
This connects power to iPrism (115 – 230 VAC autosensing).
2 Mouse
port
Unused
3 Keyboard
port
Unused
4 USB ports Unused
5 Console
port
Access to this port is only under the direction of St.
Bernard Technical Support for a specific reason.
6 Video port Unused
7 Internal
interface
(LAN1)
This port provides auto-sensing Ethernet connectivity
to your internal network (the network to which iPrism
will apply filtering).
8 External
interface
(LAN2)
This port provides auto-sensing Ethernet connectivity
to the external network (Internet).

13
1 Power
connector
This connects power to iPrism (115 – 230 VAC
auto-sensing).
2 Mouse port Unused
3 Keyboard port Unused
4 USB ports Unused
5 Console port Access to this port is only under the direction of
St. Bernard Technical Support for a specific
reason.
6 Video port Unused
7 Management
interface
(LAN1)
This port provides a third auto-sensing 10/100/
1000 Mbps Ethernet port that can be used for outof-band management of the iPrism.
Note: This is used for advanced configurations
only. See the iPrism Administration Guide for
more information.
8 Interface Unused
9 External
interface
This port provides auto-sensing Ethernet
connectivity to the external network (Internet).
10 Internal
interface
This port provides auto-sensing Ethernet
connectivity to your internal network (the network
to which iPrism will apply filtering).
iPrism Installation
14
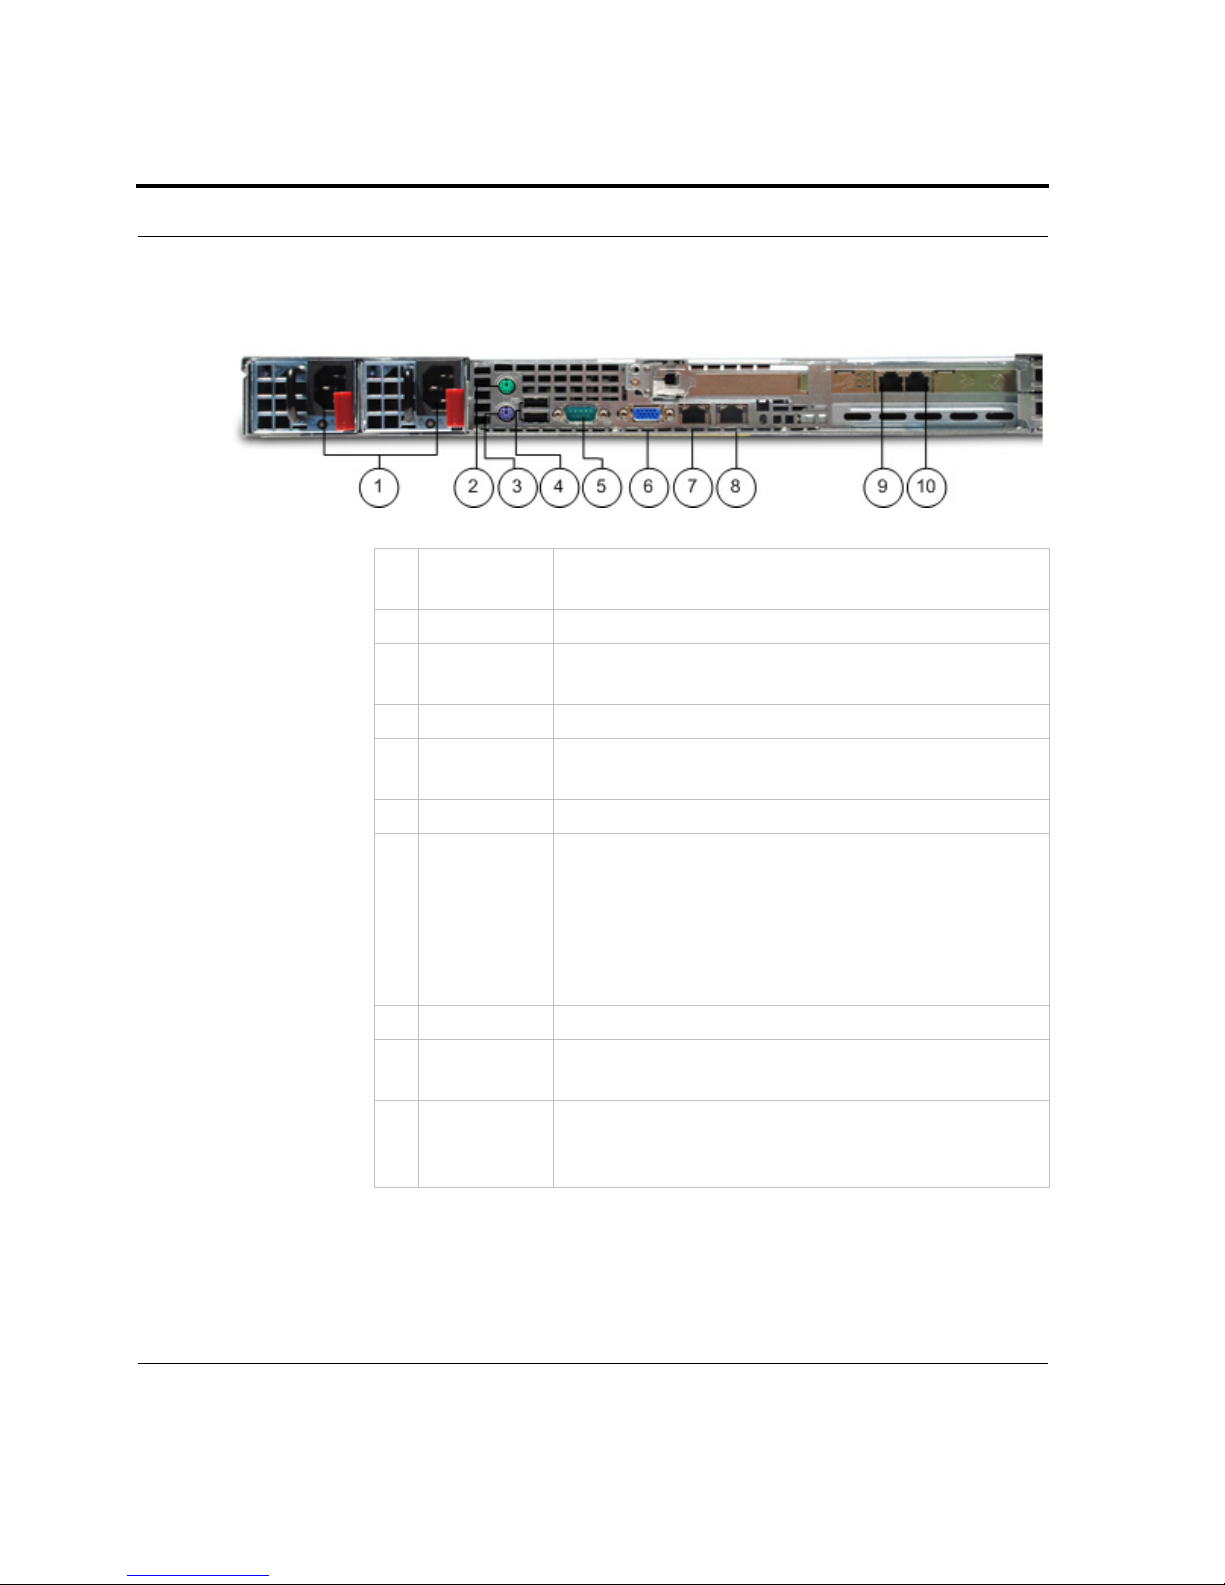
30h, 50h and 100h
1 Power
connectors
These connect power to iPrism (100 – 240 VAC autosensing).
2 Mouse port Unused
3 Keyboard
port
Unused
4 USB ports Unused
5 Console
port
Access to this port is only under the direction of St.
Bernard Technical Support for a specific reason.
6 Video port Unused
7 Managemen
t interface
(LAN1)
This port provides a third auto-sensing 10/100/1000
Mbps Ethernet port that can be used for out-of-band
management of the iPrism.
Note: This is used for advanced configurations only.
See the iPrism Administration Guide for more
information.
8 Interface Unused
9 External
interface
This port provides auto-sensing Ethernet connectivity
to the external network (Internet).
10 Internal
interface
This port provides auto-sensing Ethernet connectivity
to your internal network (the network to which
iPrism will apply filtering).

15
2.1.2.3 Connecting iPrism to the Internal LAN
In proxy mode, the iPrism is connected only to your internal LAN. This
allows you to configure the iPrism using any of the computers on that
network.
1. Take the standard blue Ethernet cable (provided) from the box and
connect one end to the iPrism’s Internal interface.
2. Connect the other end of the cable into the hub/switch that serves the
local subnet.
Important: Do not connect the external side of the iPrism at this point. This
configuration is used for initial setup and testing so as not to interrupt
network traffic. The configuration may be changed later, during the actual
deployment of the iPrism in bridge (transparent) mode (see “Deploying
iPrism in Production” on page 32).
2.1.2.3.1 Cable Identification
The cables shipped with your iPrism can be distinguished by holding one of
the cables at each end so the connectors are oriented the same way. Now,
look at the color-coding of the wires in each connector. If the colors are in
the exact same order, it is a standard Ethernet patch cable. If the colors are
in a different order, it is a crossover cable.
The crossover cable’s package will be marked with “crossover”.
2.1.2.4 Powering Up
Unlock the front panel of the iPrism. Press and hold the power button
( ) to turn on the appliance.
2.1.3 The Appliance Manager
The iPrism Appliance Manager software is used to configure and manage
the iPrism. The Appliance Manager software uses a Java-based interface;
thus, any computer that supports Java (version 1.4 or later) can be used. You
can install the software from your web browser by following the
instructions in the Knowledgebase article “Web-based iPrism
Administration” at
www.stbernard.com/products/support/iprism/help/iprism.htm.

iPrism Installation
16
If you are running a non-Windows operating system, contact St. Bernard
Software technical support for assistance.
2.1.3.1 Installing and Starting the Appliance Manager
Before you begin, ensure that the iPrism is properly connected to your
network and powered on. Any firewall software running on your computer,
such as the Microsoft Windows XP Firewall or Norton Internet Security™,
must be disabled before continuing. (See Appendix B on page 38 for details
on how to disable the Windows XP Firewall.)
1. Browse to
http://199.245.188.19/pub/iprism/Appliance_Manager_2_3.exe
2. Select Save File to save the executable file to your computer.
3. Once the file has downloaded, double-click it to execute it:
4. Click Run.
5. Click Next (Figure 3).
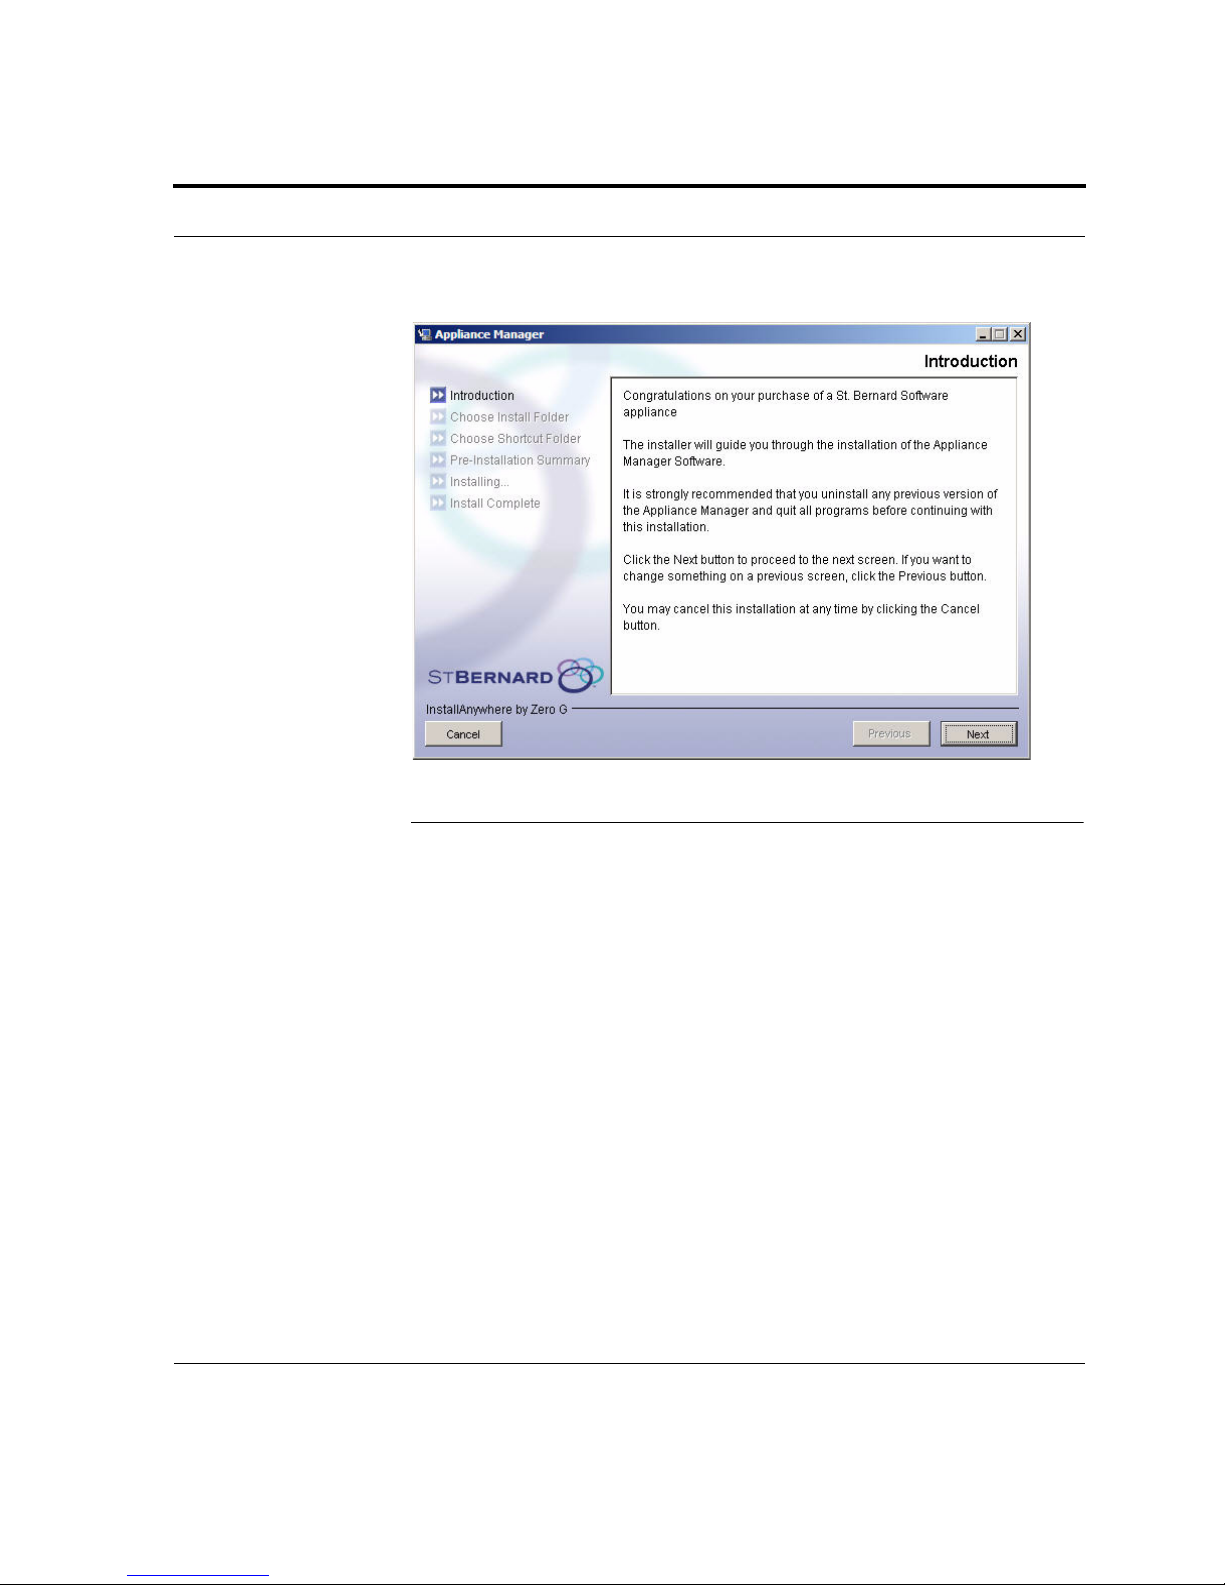
17
FIGURE 3. Appliance Manager Introduction
iPrism Installation
18
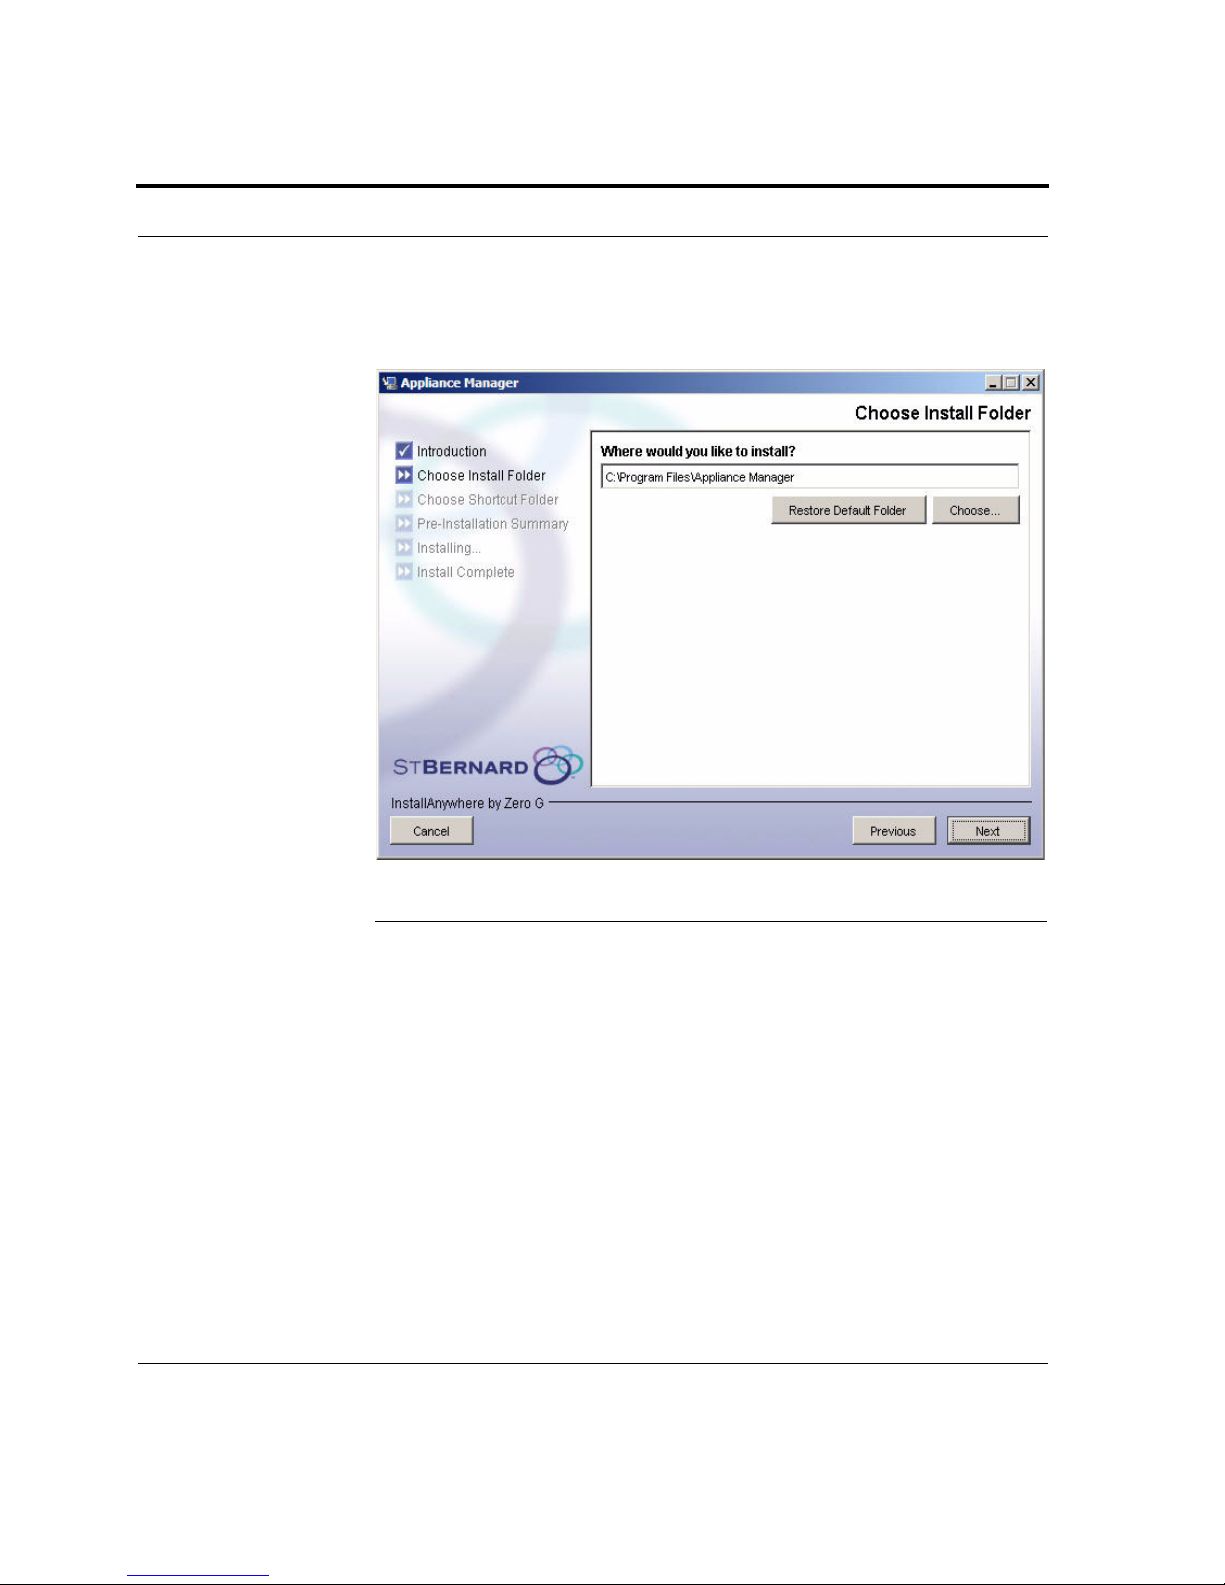
6. Select the folder where you want the Appliance Manager installed
(Figure 4), and click Next.
FIGURE 4. Installation Folder
 Loading...