

Page 1

Installation Manual
EA-MINI-2D-35 EA-MINI-3D-35
35 Watts per Channel Digital Mini-Amplier
Page 2
EA-MINI-XD-35 Installation Manual
1. Important Safety Instructions
Warning: To reduce the risk of re or electric shock, do not expose this apparatus to rain or moisture. Do not
remove cover. No user serviceable parts inside. Refer servicing to qualied service personnel.
1. Read and follow all instructions and warnings in this manual. Keep for future reference.
2. Do not use this apparatus near water.
3. Clean only with a dry cloth.
4. Do not block any ventilation openings. Install according to manufacturer’s instructions.
5. Do not install near any heat sources such as radiators, heat registers, stoves or other apparatus (including
ampliers) that produce heat.
6. Do not override the safety purpose of the polarized or grounding-type plug. A polarized plug has two
blades - one wider than the other. A grounding type plug has two blades and a third grounding prong. The
wide blade or the third prong is provided for your safety. If the provided plug does not t into your outlet,
consult an electrician for replacement of the obsolete outlet.
7. Protect the power cord from being walked on or pinched particularly at plug, convenience receptacles,
and the point where it exits from the apparatus.
8. Only use attachments/accessories specied by the manufacturer.
9. Refer all servicing to qualied service personnel. Servicing is required when the apparatus has been
damaged in any way, such as when the power-supply cord or plug is damaged, liquid has been spilled
or objects have fallen into the apparatus, the apparatus has been exposed to rain or moisture, does not
operate normally, or has been dropped.
10. DO NOT EXPOSE THIS EQUIPMENT TO DRIPPING OR SPLASHING AND ENSURE THAT NO
OBJECTS FILLED WITH LIQUIDS, SUCH AS VASES, ARE PLACED ON THE EQUIPMENT.
11. TO COMPLETELY DISCONNECT THIS EQUIPMENT FROM THE AC MAINS, DISCONNECT THE
POWER SUPPLY CORD PLUG FROM THE AC RECEPTACLE.
12. THE MAINS PLUG OF THE POWER SUPPLY CORD SHALL REMAIN READILY OPERABLE.
CAUTION
CAUTION: TO REDUCE THE RISK OF
ELECTRICAL SHOCK.
DO NOT REMOVE COVER. NO USER
SERVICEABLE PARTS INSI DE.
REFER SERVICING TO QUALI FIED
SERVICE PERSONNEL.
Pg. 2
The lightning ash with arrowhead symbol, within an
equilateral triangle, is intended to alert the user to the
presence of un-insulated dangerous voltage within the
product’s enclosure that may be of sufcient magnitude
to constitute a risk of electric shock to persons.
The exclamation point within an equivalent triangle is
intended to alert the user to the presence of important
operating and maintenance (servicing) instructions in
the literature accompanying the appliance.
© 2013 Episode
®
Page 3

EA-MINI-XD-35 Installation Manual
Table of Contents
1. Important Safety Instructions 2
2. Welcome to Episode® 4
3. Features 4
4. Package Contents 4
5. Installation Recommendations 5
5.1. Tools 5
5.2. Cables and Wiring 5
5.3. Speakers 5
5.4. Subwoofer 5
5.5. IR Control 5
6. Device Layout 6
6.1. EA-MINI-2D-35 6
6.2. EA-MINI-3D-35 6
6.3. Layout Description 7
7. Installation 8
8. Positioning the Amplifier 9
8.1.1. Vertical Mounting (Walls or Enclosures) 9
8.1.2. Horizontal Placement 9
9. Speaker Connections and Setup 10
9.1.1. Stereo/Mono Dip Switch (Switch 3) 10
9.1.2. Analog RCA Subwoofer Output 10
9.1.3. Speaker Wire Terminiation 10
10. Input Connections and Setup 11
10.1.1. RCA Input 1 (Left and Right Stereo) 11
10.1.2. Toslink Input 2 11
10.1.3. Input Priority Switch 11
11. IR Connections and Setup 12
11.1. IR Connections and Controls 12
11.2. IR Control Options 12
11.2.1. Optional Accessory Remote (EA-MINI-RC) 12
11.2.2. IR Control with Programmed Commands 13
11.2.3. IR Learning 13
11.3. IR Application Diagrams 14
11.3.1. Using In-Room IR Receiver and Remote 14
11.3.2. Programmed Control System 14
12. Sound Calibration 15
12.1. HIGH PASS 60Hz / FULL Dip Switch 15
12.2. Audio Settings 15
13. Troubleshooting 16
14. Specifications 17
15. Dimensions 18
16. Warranty 19
17. Contacting Technical Support 19
www.snapav.com Support: 866.838.5052
Pg. 3
Page 4

EA-MINI-XD-35 Installation Manual
2. Welcome to Episode
Episode® is one of the most highly-regarded brands of audio products available today. We appreciate your
business, and we stand committed to providing our customers with the highest degree of quality and service
in the industry.
Episode Mini ampliers are built on the latest digital technology and were designed to deliver efcient, clean
power to a soundbar or stereo speaker zone from either of two source inputs. A wide range of control options
and congurability make it ideal for almost any small speaker zone application.
®
3. Features
Durable Audiophile Design
These ampliers use the latest digital technology to deliver cool-running performance from a compact,
reliable package. Plus, they feature superior-quality components for outstanding sound quality and short
circuit protection for all inputs and outputs.
Compact Size and Layout
The Episode Mini Amplier is designed to be tucked away for great looking and sounding installations.
With compact controls, efciently placed connections, and an integrated 5V DC power output for a wireless
subwoofer adapter (the Episode ES-SUB-WIRELESS), this amp is ready to perform without having to be
seen.
IR Pass-Through with Command Capture
IR pass-through eliminates the need for extra ashers and wires, while still allowing control of the amplier.
Built-In Digital Sound Processing
DSP modes, including Music / Movies / Voice / Night Mode / Special Enhancement, can all be changed by IR
remote command for on-the-y changes to suit music, movies, or vocal audio.
Customizable Control with Optional IR Learning
Auto-input priority allows for hassle-free input selection while allowing inputs to be toggled manually at any
time. Power can be toggled on and off or controlled using auto-sense to detect input signals. A full IR
protocol is available for custom programmed control, or IR learning may be set up to enable control from
source remotes.
An optional accessory remote (EA-MINI-RC) is available from www.SnapAV.com.
4. Package Contents
(1) EA-MINI-XD-35
(4) Rubber Adhesive-Back Feet
(4) Module Mounting Pins
Pg. 4
(1) Installation Manual
(1) IR Learning Guide
(1) Detachable 6ft IEC Power Cable
© 2013 Episode
®
Page 5

EA-MINI-XD-35 Installation Manual
5. Installation Recommendations
5.1. Tools
• #2 Philips Screwdriver
5.2. Cables and Wiring
• Speaker Wire
Use high-quality, 2 or 4-conductor, 14-18 gauge (AWG) speaker wire. The higher the strand count, the
better the sound quality will be.
• RCA Input and Subwoofer Output Cables
Use high-quality pre- or eld-terminated RCA cables and connectors rated at 75 Ohms impedance.
Binary™ cables and connectors are recommended.
• Toslink Input Cables
Use high-quality Toslink cables with standard connectors. Binary™ cables are recommended. (Set
sources to output only 2-channel PCM stereo audio)
5.3. Speakers
• The minimum load for EA-MINI-XD-35 is 4-ohm per channel.
• Output power is 35 watts per channel with a 4- or 6-ohm load, and 26 watts with an 8-ohm load.
• Use matched speakers for all channels to achieve the best audio quality during use.
5.4. Subwoofer
• The optional subwoofer SUB OUT port can be connected to a powered subwoofer or subwoofer amplier.
• The 5 volt output on the amplier can provide power for the wireless subwoofer kit without using up
valuable space where the amplier gets installed.
• If a subwoofer system will be installed, be sure to provide an RCA cable or purchase an Episode
ES-SUB-WIRELESS kit to provide signal for the sub.
• Wire Strippers
5.5. IR Control
• Be sure that a control system with IR output can be set up to control the amplier if local IR remotes
will not be used.
• No IR receiver is included. Even if it won’t be used after installation, it is suggested to have an IR
receiver on hand for use during setup.
• Be sure to supply an IR receiver for installation if an in-room IR remote is used for control.
www.snapav.com Support: 866.838.5052
Pg. 5
Page 6
EA-MINI-XD-35 Installation Manual
R+ R- L+ L-
DIGITAL IN
SUB OUTANALOG IN
RIGHT
1 2 3 4 5
IR IN
IR OUT
+5V GND
RESET
SPEAKER OUTPUTS
STATUS
1
2
LEFT
SWITCHES
100-240V~50/60Hz 1.6A
UP
1 2
3
4
5
CONTROL
DOWN
IR
RECEIVER
RUN
LEARN
MONO
STEREO
FULL
HP 60Hz
IN 1
IN 2
SWITCH POSITION
AL
IR OUT
5
R+ R- C+ C- L+ L-
DIGIT IN
SUB OUTANALOG IN
RIGHT
1 2 3 4 5
IR IN
+5V GND
RESET
4
HIGH PASS 60Hz/FULL
INPUT PRIORITY 1/2
SPEAKER OUTPUTS
STATUS
1
2
LEFT
SWITCHES
100-240V~50/60Hz 1.6A
UP
1 2
3
4
5
CONTROL
DOWN
IR
RECEIVER
RUN
LEARN
MONO
STEREO
FULL
HP 60Hz
IN 1
IN 2
SWITCH POSITION
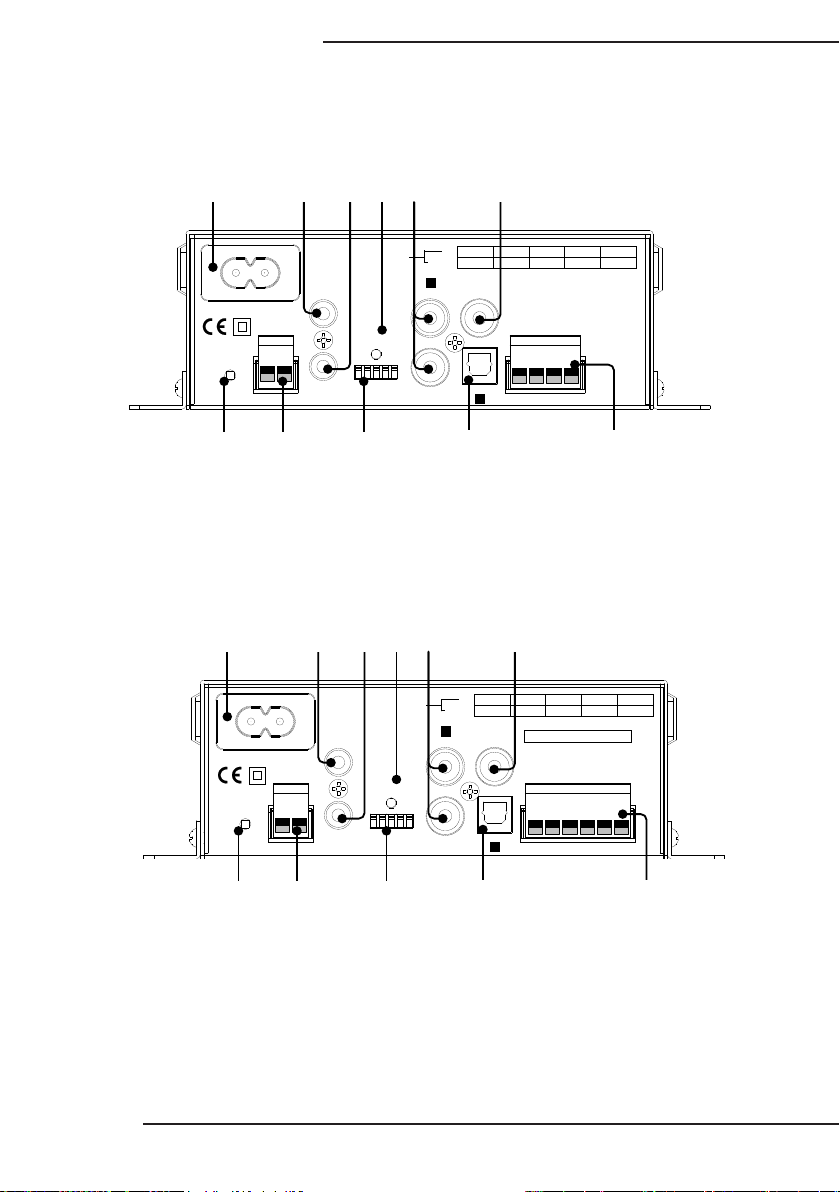
6. Device Layout
6.1. EA-MINI-2D-35
1 2 3 4 5
7 8
6.2. EA-MINI-3D-35
1 2 3 4 5
6
9
10 11
6
Pg. 6
7 8
9
10 11
© 2013 Episode
®
Page 7

EA-MINI-XD-35 Installation Manual
6.3. Layout Description
1. Power Connector
Attach the included IEC cable to this port for power.
2. IR Out
3.5mm mono mini port to send IR commands from IR IN to other equipment.
3. IR In
3.5mm stereo mini connection for attaching an IR receiver or an IR asher output from other equipment.
Commands for the amplier are captured via this input. All IR signals pass through to the IR OUT port.
4. Status LED
Bi-color LED indicator for amplier status in IR RUN mode:
Blue (Solid) On
Blue (Blinking) IR communication is occurring.
Red (Solid) Standby
Pink (Blinking) Mute
5. Analog Input 1
RCA stereo input with left and right connections.
6. Sub Out (RCA)
RCA line level output to feed powered subwoofer or amplier.
7. Reset Button
Reset the unit to factory default settings.
8. 5V DC Output
Power an Episode ES-SUB-WIRELESS kit without adding another power supply.
9. DIP Switches
1. IR RECEIVE/CONTROL IR receiver port power.
2. RUN/LEARN IR command learning.
3. STEREO/MONO Speaker output mode.
4. HIGH PASS 60Hz/FULL Frequency range for speaker outputs.
5. INPUT PRIORITY 1/2 Select the primary input.
10. Toslink Optical Input 2
Digital optical input. No surround sound formats can be converted. Set source to output only
2-channel PCM stereo.
11. Speaker Wire Connectors
Set-screw connectors to attach speaker wires for left, center, and right channels (left and right only on
EA-MINI-2D-35).
www.snapav.com Support: 866.838.5052
Pg. 7
Page 8

EA-MINI-XD-35 Installation Manual
AL
IR OUT
5
R+ R- C+ C- L+ L-
DIGIT IN
SUBOUTANALOGIN
RIGHT
1 2 3 4 5
IR IN
+5VGND
RESET
4
HIGHPASS 60Hz/FULL
INPUTPRIORITY 1/2
SPEAKEROUTPUTS
STATUS
1
2
LEFT
SWITCHES
100-240V~50/60Hz1.6A
UP
1 234
5
CONTROL
DOWN
IR
RECEIVER
RUN
LEARN
MONO
STEREO
FULL
HP60Hz
IN1
IN2
SWITCHPOSITION
256
7. Installation
RCA Left/Right In
Toslink In
Secondary Source
ES-SUB-WIRELESS
Transmitter
Wireless Sub
Receiver
+5V DC
Subwoofer
RCA Sub Out
or
Display
Soundbar
Note: To avoid confusion, IR connections have been omitted in this diagram. See pages 12-14 for complete
details and instructions for IR connections and setup.
Important: DO NOT plug in or power the EA-MINI-XD-35 until it is indicated to do so.
1. Plan and prepare the amplier location. (Page 9)
2. Install and set up the speakers and powered subwoofer (optional). (Page 10)
3. Connect the sources to the inputs. (Page 11)
4. Install and set up the IR receiver or cabling to the amplier and other equipment. (Page 12)
5. Set up the amplier control method. (Pages 11-14, Control Protocol)
6. Plug in all equipment and power on the system. Set up sources and audio equalization as needed.
(Page 15)
7. Mount the amplier in its nal location after testing the system. Installation is complete!
Troubleshoot any issues using the Troubleshooting section if needed. (Page 16)
Pg. 8
© 2013 Episode
®
Page 9

EA-MINI-XD-35 Installation Manual
8. Positioning the Amplifier
8.1.1. Vertical Mounting (Walls or Enclosures)
• The amplifier may be mounted on any surface using fasteners suited for the surface material (not included).
• The included module mounting pins may be used to secure the amplifier inside structured wiring enclosures.
• The included rubber feet can be attached to dampen vibrations if needed.
8.1.2. Horizontal Placement
The included rubber adhesive-back feet can be used for shelf placement of the amplifier. Using these will
prevent vibration and movement of the amplifier. Attach one of the four feet to each corner of the unit.
Warning! Do not stack anything on top of the amplifier to prevent instability.
www.snapav.com Support: 866.838.5052
Pg. 9
Page 10

EA-MINI-XD-35 Installation Manual
5
INPUT PRIORITY 1/2
R+ R- L+ L-
1
2
3
4
IR RECEIVE/CONTROL
RUN/LEARN
STEREO/MONO
HIGH PASS 60Hz/FULL
SPEAKER OUTPUTS
1 2 3 4 5
SWITCHES
9. Speaker Connections and Setup
9.1.1. Stereo/Mono Dip Switch (Switch 3)
Position Output Mode Descrpition
Up Mono All speakers play the same mixed audio
Down Stereo Each speaker plays its own audio channel
Set the output from the speakers to be mono or stereo format. Use mono for applications where left and right
can’t be balanced. Use stereo to provide the most accurate recreation of audio for movies and television.
9.1.2. Analog RCA Subwoofer Output
Connect an RCA cable between the amplifier’s SUB OUT port and a powered subwoofer or subwoofer
amplifier. Use the crossover cutoff in the subwoofer amplifier to set the frequency range.
Note: The subwoofer output volume may be controlled independently by using the EA-MINI-RC accessory
remote, or by using commands from the IR protocol. Visit the product page for the EA-MINI-XD-35 at
www.snapav.com for these items.
9.1.3. Speaker Wire Terminiation
1. Strip the outer jacket (if applicable) of the speaker cable back about 2”, and then strip the insulation of
each wire back ¼“.
2. Loosen the set screws on the connector using a 1/8” flat blade screwdriver.
3. Twist the wires clockwise, insert them into the correct holes per the diagram on the amplifier, and tighten
the screws. Do not allow any strands of copper to touch between the terminals to avoid short circuits.
Pg. 10
EA-MINI-2D-35 EA-MINI-3D-35
L+ L-
R+ R-
Right
Speaker
Left
Speaker
R+ R-
Right
Speaker
C+ C-
Center
Speaker
L+ L-
Speaker
Left
© 2013 Episode
®
Page 11

EA-MINI-XD-35 Installation Manual
1 2 3 4 5
SWITCHES
10. Input Connections and Setup
10.1.1. RCA Input 1 (Left and Right Stereo)
Connect a source using left and right analog RCA cables.
10.1.2. Toslink Input 2
Connect a source using a Toslink optical audio cable. No surround sound formats can be converted by
the amplifier. Set source to output only 2-channel PCM stereo.
Note: The EA-MINI-3D-35 will mix the signal from left and right channel inputs together to output to center
channel.
10.1.3. Input Priority Switch
Position Priority Input
Up 1 (Toslink)
Down 2 (RCA Left/RIght)
The EA-MINI-XD-35 amplifier is always set to show priority for one of the two inputs. Set the priority input to
the one that will be used most.
Operation Limitations and Notes
• If the amplifier is switched away from the priority input via IR command, auto input priority will be disabled
until the system is powered off and back on.
• If the priority source is turned off but the amplifier is left on, the secondary input will begin to play if signal
is present until the priority source signal returns.
• If the amplifier senses no signal on either input for 20 minutes, it will automatically shut off.
• If a control system is controlling the amplifier, it is recommended to use discrete input or toggle commands
to change the source as needed.
• If input commands are included, send a discrete input command ahead of power-on commands for
sources. This will disable priority switching automatically, eliminating the possibility of the secondary
source playing unexpectedly (recommended).
www.snapav.com Support: 866.838.5052
Pg. 11
Page 12

EA-MINI-XD-35 Installation Manual
1 2 3 4 5
SWITCHES
1 2 3 4 5
SWITCHES
11. IR Connections and Setup
11.1. IR Connections and Controls
IR In Port
Connect an IR Receiver or a 3.5mm mono mini cable to this port to input IR commands for amplifier control.
Be sure to set the IR Receive/Control dip switch correctly to configure the port for the desired pinout.
IR Receive/Control Dip Switch
Controls the pinout of the IR In port to provide power for an IR Receiver if needed. The pinout of each setting
is described below:
IR Receiver
Switch1 Down
IR Signal (Tip)
GND (Ring)
12V DC (Sleeve)
IR Out Port
The IR Out port repeats all commands received from the IR In port. Connect IR
flashers to this port for control of other equipment.
If more flashers are required, connect the port to an IR distribution block to power
additional flashers.
Switch1 Up
Control
11.2. IR Control Options
11.2.1. Optional Accessory Remote (EA-MINI-RC)
The optional accessory remote (EA-MINI-RC) is designed to include
most functions necessary for setup. It may also be used for regular
control.
For more information please visit the EA-MINI-RC product page at
www.SnapAV.com.
IR Signal (Tip)
GND (Ring)
IR Signal (Tip)
GND (Ring)
Pg. 12
© 2013 Episode
®
Page 13

EA-MINI-XD-35 Installation Manual
R+ R- L+ L-
DIGITALIN
SUB OUTANALOG IN
RIGHT
1 2 3 4 5
IR IN
IR OUT
+5V GND
RESET
SPEAKER OUTPUTS
STATUS
1
2
LEFT
SWITCHES
100-240V~50/60Hz 1.6A
UP
1 2
3
4
5
CONTROL
DOWN
IR
RECEIVER
RUN
LEARN
MONO
STEREO
FULL
HP 60Hz
IN 1
IN 2
SWITCH POSITION
11.2.2. IR Control with Programmed Commands
For IR codes to be programmed into a control system or remote, visit the product page for the EA-MINIXD-35 at www.SnapAV.com to download. Follow the control system manufacturer instructions to configure
commands for use.
11.2.3. IR Learning
IR Learning allows control of the amplifier using the re mote for a display or any other remote on a job. After
completing the learning procedure, the same but tons for power toggle, volume up, volume down, mute toggle,
and input toggle on the selected remote will also control these settings for the amplifier.
See the full color IR Learning Guide in the box for setup instructions. Basic instructions are below if the guide
has been misplaced. Download a new copy from the EA-MINI product product page at www.SnapAV.com.
Watch the Status LED for feedback
IR RECEIVER (Not
Included) Plugged into
IR IN Port
IR Receiver
Switch 2 DOWN to enable IR Learning mode
Switch 1 DOWN for IR Receiver power
Basic Instructions
When learning commands, the order of commands programmed will always be the same:
Command Description
1. Power Toggle Turn amplifier power on and off.
2. Volume Up Turn volume up (louder).
3. Volume Down Turn volume down (quieter).
4. Mute Toggle Toggle mute mode (no volume) on and off.
5. Input Toggle Switch between inputs 1 and 2.
1. Set amplifier dip switch 2 (RUN/LEARN) to the LEARN (DOWN) position. The Status LED will turn from
solid BLUE (RUN mode) to PINK for about 1 second, and then the LED will flash blue. This indicates
that the amplifier is in Learning Mode.
2. Press and release the desired command button to be learned until the Status LED flashes BLUE twice
as fast the command is received, and then returns to normal flashing.
3. Press the same command button for a second time to confirm it. The LED should flash BLUE twice as
fast, then PINK for 1 second, and then return normal flashing.
4. Repeat steps 2 and 3 for each command. If a RED LED flashes there is an error. Try pressing the same
button again. If RED is followed by PINK, the current command needs to re-learned.
5. After the last command is learned, or if none are received for 20 seconds, the amplifier will revert to
regular operation. Return dip switch 2 to the RUN (UP) position and test the learned commands.
See the IR Learning Guide for more information about error codes and troubleshooting.
www.snapav.com Support: 866.838.5052
Pg. 13
Page 14

EA-MINI-XD-35 Installation Manual
R+ R- L+ L-
DIGITALIN
SUBOUTANALOGIN
RIGHT
1 2 3 4 5
IR IN
IR OUT
+5VGND
RESET
SPEAKEROUTPUTS
STATUS
1
2
LEFT
SWITCHES
100-240V~50/60Hz1.6A
UP
1 234
5
CONTROL
DOWN
IR
RECEIVER
RUN
LEARN
MONO
STEREO
FULL
HP60Hz
IN1
IN2
SWITCHPOSITION
256
R+ R- L+ L-
DIGITALIN
SUBOUTANALOGIN
RIGHT
1 2 3 4 5
IR IN
IR OUT
+5VGND
RESET
SPEAKEROUTPUTS
STATUS
1
2
LEFT
SWITCHES
100-240V~50/60Hz1.6A
UP
1 234
5
CONTROL
DOWN
IR
RECEIVER
RUN
LEARN
MONO
STEREO
FULL
HP60Hz
IN1
IN2
SWITCHPOSITION
256
IR Outputs
RS232
IR Inputs
11.3. IR Application Diagrams
11.3.1. Using In-Room IR Receiver and Remote
To control the amplifier with an in-room IR remote (commands
transmit directly from the remote):
1. Set dip switch 1 to the DOWN position.
2. Connect the IR Receiver to the IR In port.
3. Position the receiver so that commands are received
reliably.
4. Control additional equipment by attaching an IR flasher
to the IR Out port.
11.3.2. Programmed Control System
To control the amplifier with a control system:
1. Set dip switch 1 to the UP position.
2. Connect a 3.5mm mono mini cable from the flasher
output of the controller to the IR In port on the amplifier.
3. Program the control system using the IR control protocol.
4. Control additional equipment by attaching an IR flasher
to the IR Out port.
All IR commands may be found in the EA-MINI-XD-35
Control Protocol which may be downloaded from the
amplifier product page at www.snapav.com.
IR Receiver
3.5mm Mono Cable
Automation Controller
IR Flasher
Switch 1 DOWN
IR Flasher
Switch 1 UP
Pg. 14
© 2013 Episode
®
Page 15

EA-MINI-XD-35 Installation Manual
1 2 3 4 5
SWITCHES
12. Sound Calibration
The EA-MINI-XD-35 features built-in digital sound processing to allow for the dealer or end user to fine-tune
settings such as balance, subwoofer volume, and treble and bass equalization. Additionally, there are three
preset options optimized for movie, music, and vocal audio.
To change DSP settings, use the accessory remote or a programmed universal remote. The commands for
DSP cannot be set up via IR learning.
12.1. HIGH PASS 60Hz / FULL Dip Switch
Position Frequency Mode
Up Full frequency audio to speakers
Down Frequencies < 60Hz not routed through speakers
This switch controls the output frequency of the speaker level outputs. Set the high pass filter switch to the
down position to protect both the amplifier and the speakers it is powering if smaller speakers are used or if
a subwoofer is used.
12.2. Audio Settings
1. Music Mode
2. Movie Mode
3. Voice Mode
4. Space Enhancement Preset levels optimized for use in large or noisy spaces.
5. Treble
6. Bass
Preset bass and treble levels, optimized for playing music, movies,
or vocal audio.
Bass and treble levels can be set discretely to flat or customized as
needed.
7. Balance
8. Subwoofer
www.snapav.com Support: 866.838.5052
Left and right channel balance can be changed as much as needed,
or be set discretely to center.
Subwoofer volume can be adjusted as needed. (Set crossover levels
using the powered subwoofer amplifier.)
Pg. 15
Page 16

EA-MINI-XD-35 Installation Manual
13. Troubleshooting
No audio
• Power cable to the amplifier is incorrectly connected or plugged into
an outlet that does not have power. Check connections and verify
power on the outlet.
• Audio cable to the source component is not connected properly, is
connected to the incorrect input, or the cable is defective.
• Set the input volume level higher.
• Check audio output of source for correct setup.
• Check the speaker connections and wiring for proper setup.
Hum or buzzing sound is
heard
Amplifier will not turn on
Amplifier will not turn on or
switch inputs automatically.
Low frequencies are not
playing properly through the
speakers.
• Check RCA input cables by removing them one at time (powering
down the amplifier before disconnecting) and checking to see if a
connection or cable is to blame.
• The amplifier must be plugged into a live outlet.
• The power switch on the back panel must be on.
• Auto-On is automatically disabled when discrete or toggle power
commands are used. Power cycle the amplifier to reset Auto-On
and set the amplifier up to use only Auto-On or only IR power
commands.
• Auto-On can be disabled by switching it off using a custom IR
command. Toggle the setting back to On.
• Auto-Input is disabled when inputs are changed manually until the
system is shut down and powered back on.
• Auto-Input can be disabled by switching it off using a custom IR
command. Toggle the setting back to On.
• Set dip switch 4 UP to FULL to allow full frequency audio through
the normal speakers.
Pg. 16
© 2013 Episode
®
Page 17

14. Specifications
26 watts RMS at 8 ohms
Continuous Power Output
(Both channels driven)
Input Sensitivity
Input Impedance RCA Analog input: 20K ohms
35 watts RMS at 6 ohms
35 watts RMS at 4 ohms
Analog
(Gain: 29dB)
Digital
(Gain: 40dB) (Vrms/FS)
EA-MINI-XD-35 Installation Manual
4 ohms: 420mV
6 ohms: 500mV
8 ohms: 500mV
4 ohms: -20dBFS
6 ohms: -18dBFS
8 ohms: -18dBFS
Auto On (Audio Sense)
Sensitivity (RCA input)
S/N ratio
Frequency Response (Speaker) 20 Hz to 20 kHz
Frequency Response (Sub) 20 Hz to 500 Hz
Distortion Less than 1% THD+N 20 Hz- 20 kHz, 22KHz BW
IR Input Jack / Operation Voltage 1/8” 3.5mm / 12 VDC
IR Output Jack / Operation Voltage 1/8” 3.5mm / 12 VDC
AC Main Inputs 100-240V ~ 50/60Hz 1.6A
Power Consumption Typical Power: 60 watts
Dimensions
Weight 2.5 lbs.
Certication EMC, FCC, UL
2.5 mV
Analog 77dB
Digital Optical 90dB
5.40”W x 6.90”H x 2.00”D (without mounting ears)
6.50”W x 6.90”H x 2.00”D (with mounting ears)
www.snapav.com Support: 866.838.5052
Pg. 17
Page 18

EA-MINI-XD-35 Installation Manual
EA-MINI- 3D-35
15. Dimensions
5.40in.
(Without mounting ears)
2.00in.
6.50in.
(With mounting ears)
6.90in.
Pg. 18
© 2013 Episode
®
Page 19

16. Warranty
2 Year Limited Warranty
Episode® Amplier Products have a 2-Year Limited Warranty. This warranty
2
year
includes parts and labor repairs on all components found to be defective in material
or workmanship under normal conditions of use. This warranty shall not apply
to products which have been abused, modied or disassembled. Products to be
repaired under this warranty must be returned to SnapAV or a designated service
center with prior notication and an assigned return authorization number (RA).
17. Contacting Technical Support
Phone: (866) 838-5052
Email: Techsupport@snapav.com
EA-MINI-XD-35 Installation Manual
www.snapav.com Support: 866.838.5052
Pg. 19
Page 20

130829-0950
© 2013 Episode
®
 Loading...