

Page 1

AVS300
SEL. VOL
SRC
BAND
REL
CAR DV D/VCD /CD/M P3/MP 4 PLAYE R
IR
INT RPT RDM
M2
M1
M3
L/R
M4
AUX
AVS30 0
N/P
PLAY
M6
M5
USB
Page 2
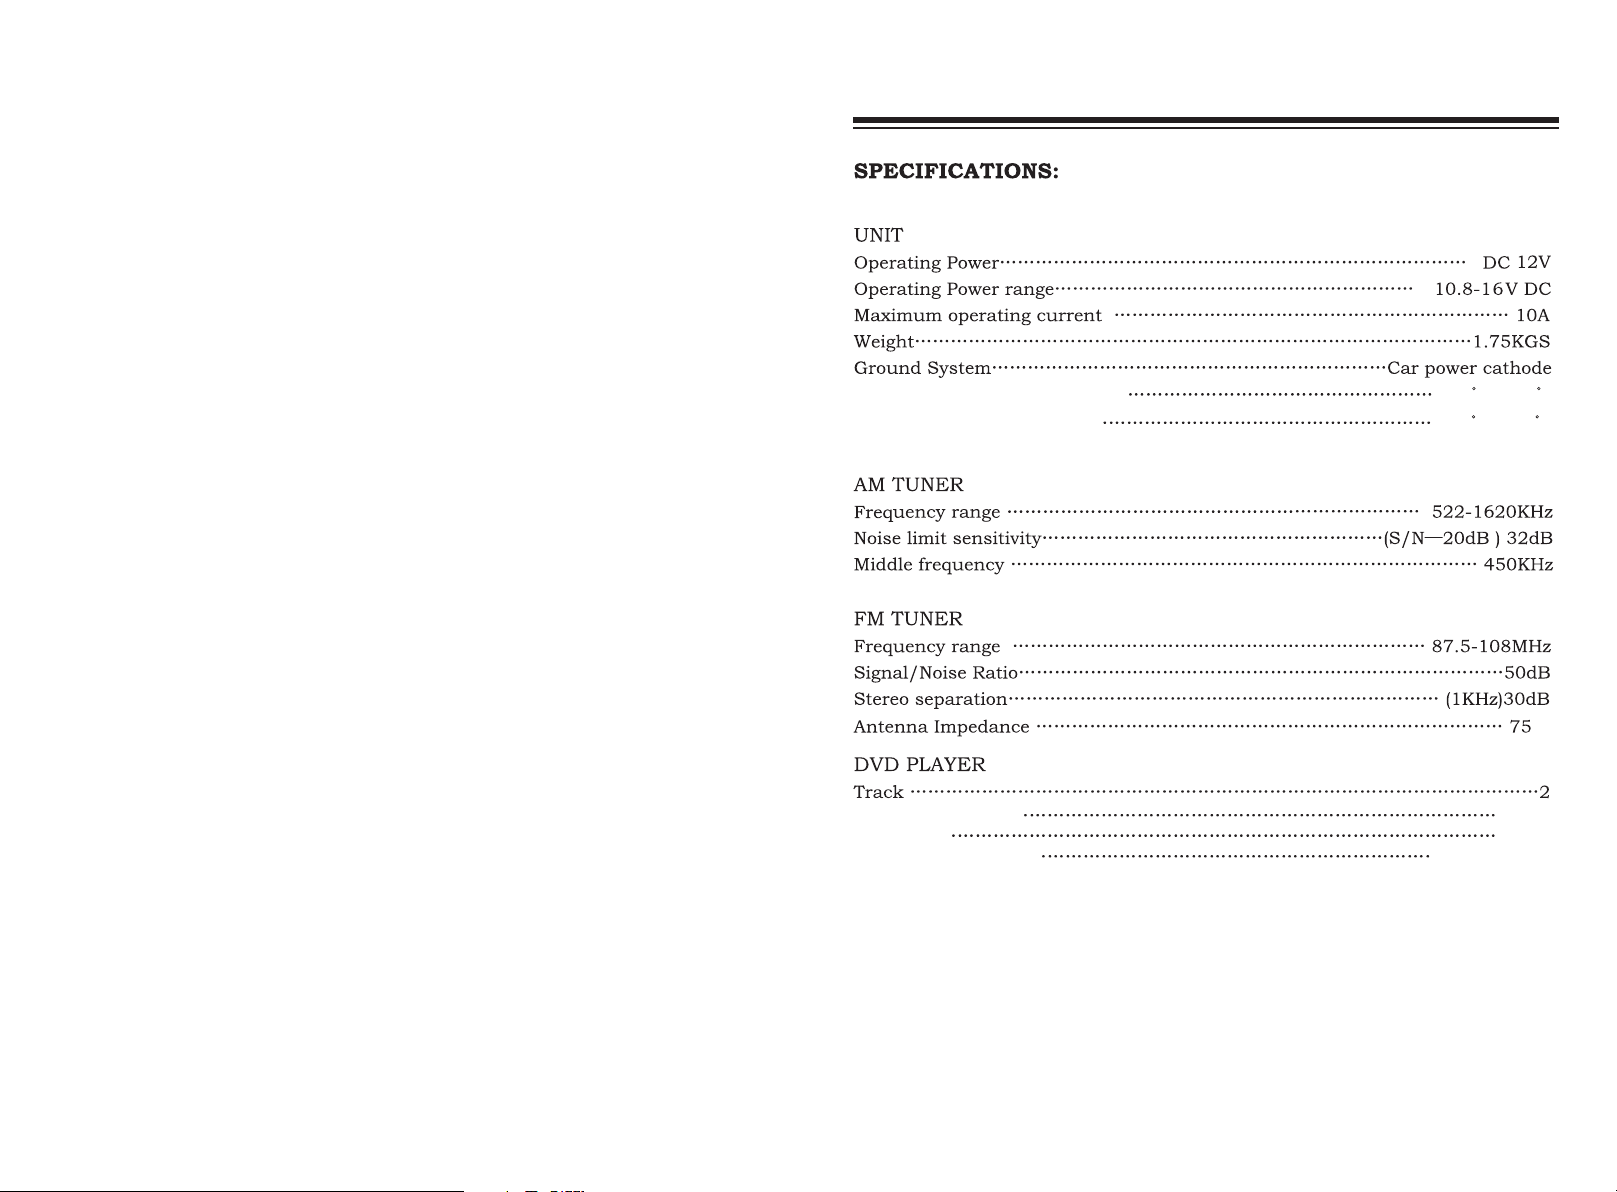
AVS300
Operating temperature
Storage
Signal/Noise Ratio
Separation
Frequency Response
temperature
range
range
- 20 C ~ +60C
- 30 C~ +70 C
20HZ-20KHZ
Ω
55DB
50DB
17
Page 3

AVS300
dealer.Do not repair the unit by yourself. That is danger.
AVS300
professional installer or
Marking system reset
When the system is running abnormally, you can reset the machine.Reset hole
in the base of the machine, as shown below:
RESET
RESET
Please use the touch pen tip tool, click the reset hole, after rebooting, the device
will return to normal state.
16
2 CHANNEL VIDEO OUT
6、USB and Memory Card slot.
1
Page 4

AVS300
Please refer to the actual unit for standard
AVS300
2
1
SRC
REL
3
6
SEL. VOL
BAND
4
5
7
CAR DV D/VCD /CD/M P3/MP 4 PLAYE R AVS3 00
IR
INT RPT RDM L/R N/P PLAY
M2
M1
9
8
10
M4
11
12
M5
13
M3
M6
15
14
AUX
USB
16
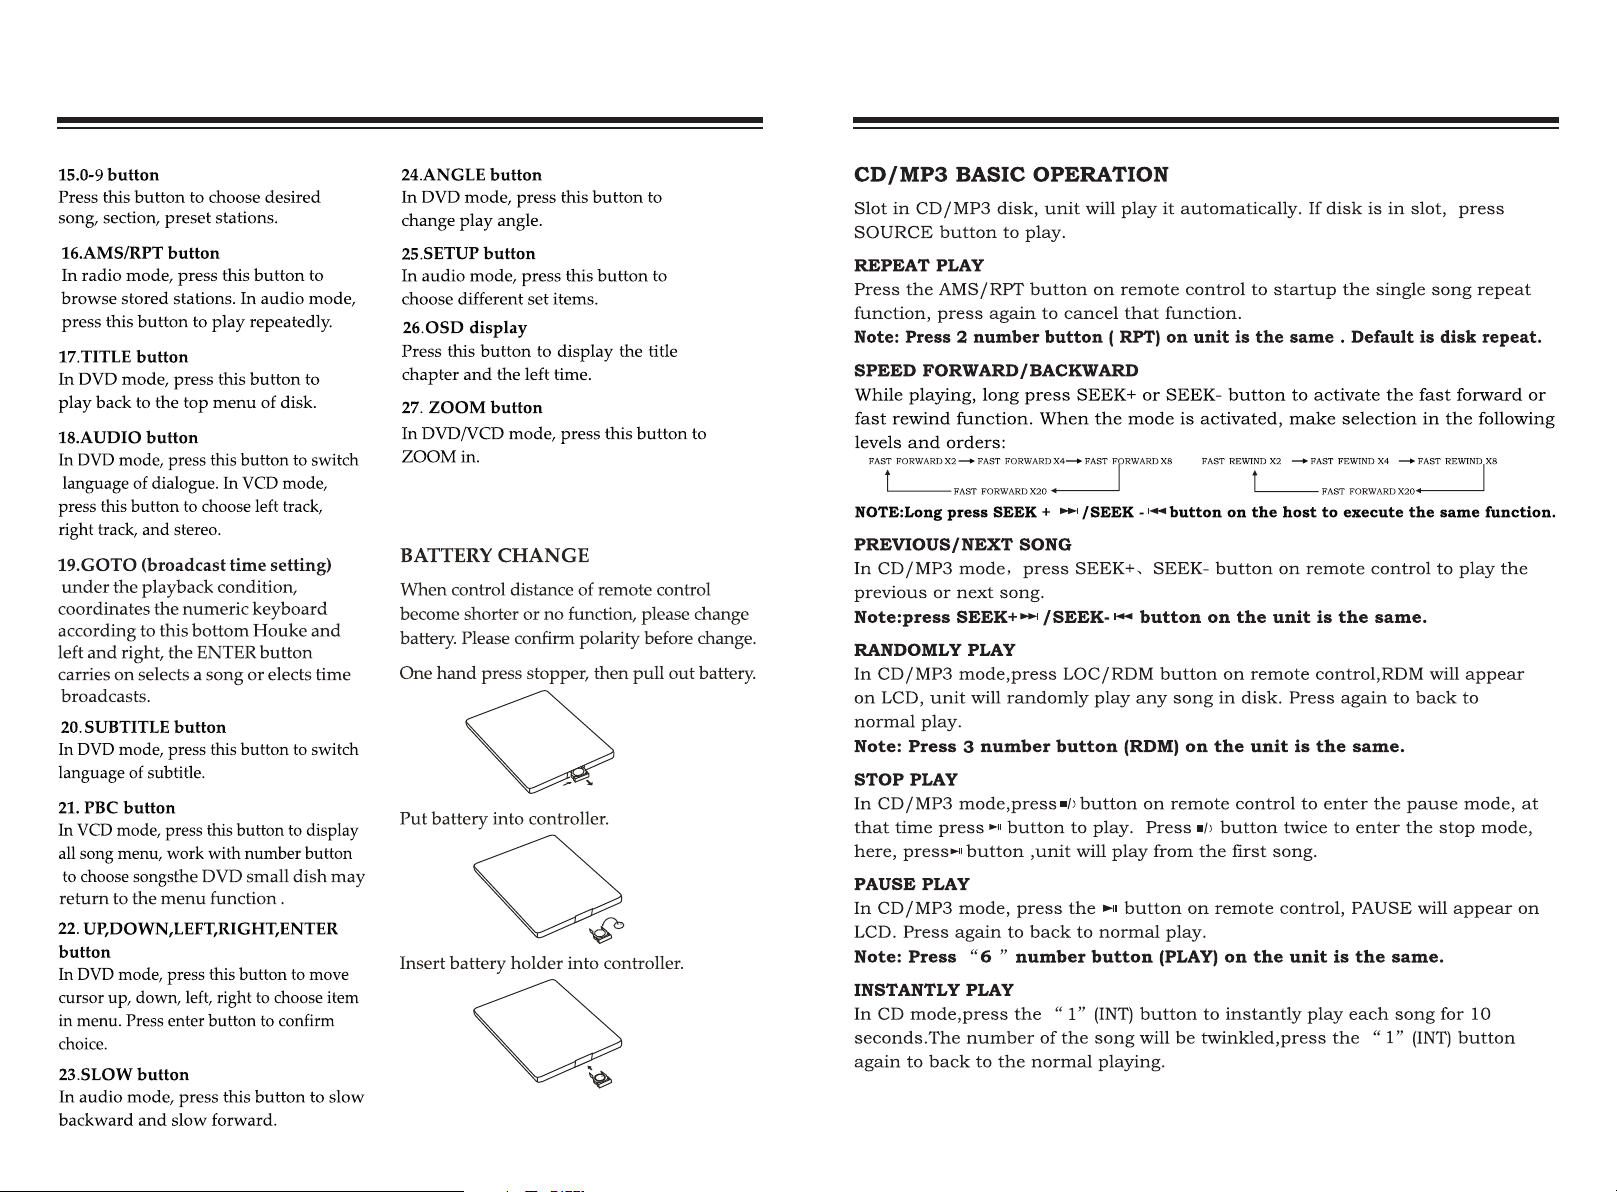
1. SRC (Power button / Audio mode switching button)
Press this button to power on. Press it shortly to switch audio source mode.
At Aux in mode, press it longer to power off.
2. Disc eject button
Press to eject the disc.
3. REL(Panel release button)
Press this button to release the panel.
4. SEEK - (Select Radio channels & Music)
At radio state, short press this button to manually decrease modulation
frequency;
At disc playing state, short press this button to skip to the last music for
playing and long press this button to execute fast rewind function.
5. SEEK + (Select Radio channels & Music)
At Radio state, short press this button to manually increase modulation
frequency;
At disc playing state, short press this button to skip to the next music for
playing and long press this button to execute fast forward function.
2
15
Page 5

AVS300
AVS300
6. BAND/BND (Band selection)
[When the host has “AMS/AS/PS” function button, the functions of “BAND/BND”
button are as following:]
Under radio mode, repeatedly press this button for band selection:
Fm1→Fm2→Fm3→Am1→Am2
[When the host does not have “AMS/AS/PS” function button, the functions of
“BAND/BND” button are as following:]
Under radio mode, repeatedly press this button for band selection:
Fm1→Fm2→Fm3→Am1→Am2
Long press this button to search and save radio stations automatically.
Under playback mode, short press for ID3 information browsing; long press this
button for TRL SCH (Track selection), FILE SCH(Song name selection) , DIR SCH
(File selection).
Operation method of TRK SCH (Track selection)
When TRK SCH appears, use VOL+/- to adjust, and press SEL to confirm. If
there is no operation for three seconds, it shall automatically jump to tens' digit/
hundreds' digit from single digit; when adjusting at tens' digit or hundreds' digit,
short press this button to move back one digit.
Operation method of FILE SCH
When FILE SCH appears, use VOL+/- to adjust, and press SEL to confirm. If
there is no operation for three seconds, it shall automatically jump from first
digit to second digit. Short press this button during adjusting so as to move
back one digit.
Operation method of DIR SCH
When DIR SCH appears, press SEEK+/- button to select files. Press SEL for
confirmation, use VOL+/- to select song names in the files, and then press SEL
to confirm.
Remark: The disk should support track selection/song name selection/file
selection function.
Long press this button to display information of the current playback state.
14
7. Volume adjusting, pattern translation
Button type (1): VOL/SEL knob (Volume button/ function choose button)
Short click can choose:
VOL-BAS-TRE-BAL-FAD-DBAS-DX-BEEP ON (BEEP voice open and close)AREA EUR
Ps:1) After choosing the mode you need, you can adjust the current condition
with VOA button.
2) After you choose the model for 5 seconds and don't adjust the VOL button,
the mode will come back to the condition which is before adjusting.
Button type (2): SEL button with VOL+ button or VOL- button.
Click SEL button to choose:
VOL-BAS-TRE-BAL-FAD
Ps:1) After choosing the mode you need, you can adjust the current condition
with VOA button.
2) After you choose the model for 5 seconds and don't adjust the VOL button,
the mode will come back to the condition which is before adjusting.
3
Page 6

8. M1/INT(Number button M1/Scanning & Playing at disc playing state)
At Radio state, press this button to select pre-saved frequency radio channels;
At disc playing state, press this button to execute scanning & playing.
When in the Bluetooth there appears 1.
9. M2/RPT(Number button M2/Repeat playing button)
At Radio state, press this button to select pre-saved frequency radio channels;
At disc playing state, press this button to select repeat playing.
When in the Bluetooth there appears 2.
10. M3/RDM(Number button M3/Random playing button)
At Radio state, press this button to select pre-saved frequency radio channels;
At disc playing state, press this button to select random playing.
When in the Bluetooth there appears 3.
11. M4/L.R(Number button M4/Left&Right track switching)
At Radio state, press this button to select pre-saved frequency radio channels;
At disc playing state, press this button to select left or right track switching.
When in the Bluetooth there appears 4.
12. M5/N/P(Number button M5/Video system switching)
At Radio state, press this button to select pre-saved frequency radio channels;
At disc playing state, press this button to switch video system.
When in the Bluetooth there appears 5.
13. M6/Play(Number button M6/Playing button)
At Radio state, press this button to select pre-saved frequency radio channels;
At disc playing state, press this button to play/pause playing.
When in the Bluetooth there appears 6.
14. AUX-IN (AUX Input)
AUX Input jack.
15. APS/OSD(browse/automatic search memory radio channels/screen
display)
In radio mode, press it shortly to instantly play stored radio stations, each 5
seconds. Press it longer to star up auto scan and store function.
In the disc playing state, press this button on the host to display the location
and playing time of the current music.
When inset the USB or Memory Card, press this button shortly to the current
song position and the playing time, longer press this button to enter the
recording mode.
16. USB(MP3/USB SLOT)
Use the high speed degree delivers to connect eloquent, can read big capacity
MP3/MP4 formats.
AVS300AVS300
4
13
Page 7

AVS300AVS300
9
12
10+
5
Page 8
28.10+(Forward plus 10)
Forward when in playback plus 10 songs
AVS300AVS300
6
11
Page 9

MEMORY CARD OPERATION
In radio or audio mode, insert Memory Card, unit will read Memory Card and play
automatically. If there is a card in the slot,please press SOURCE button to play.(Note:In
power off mode, insert Memory Card,power will be turn on and read the
card.)
REPEATEDLY PLAY
When playing Memory Card.press AMS/RPT button on remote control.unit will play
repeatedly the current song,press it again to cancel the repeated play function.
Note:press 2(RPT) button on the unit is the same.
SPEED FORWARD/BACKWARD
Press longer the SEEK+/SEEK-button on remote control to speed forward or
backword play.
Note:press longer theSEEK+/SEEK-button on the unit is the same.
SELECT SONG TO PLAY DIRECTLY
Press the number button on remote control to select the song to play directly.
PREVIOUS SONG/NEXT SONG
When playing Memory Card,press SEEK+、SEEK- button on remote control to play
Previous song or next song.
Note:press button on unit is the same.
RANDOMLY PLAY
When playing the Memory Card,press LOC/RDM button on remote control,unit will
play the current song randomly,press LOC/RDM button again to stop the function.
Note:Press 4(RDM) button on the unit is the same.
STOP PLAY
When playing Memory Card,p
AVS300AVS300
When playing Memory Card,
Memory Card is same as above.
Memory Card
10
unit will read USB and
7
Page 10

CLEAR
AVS300AVS300
8
9
 Loading...