

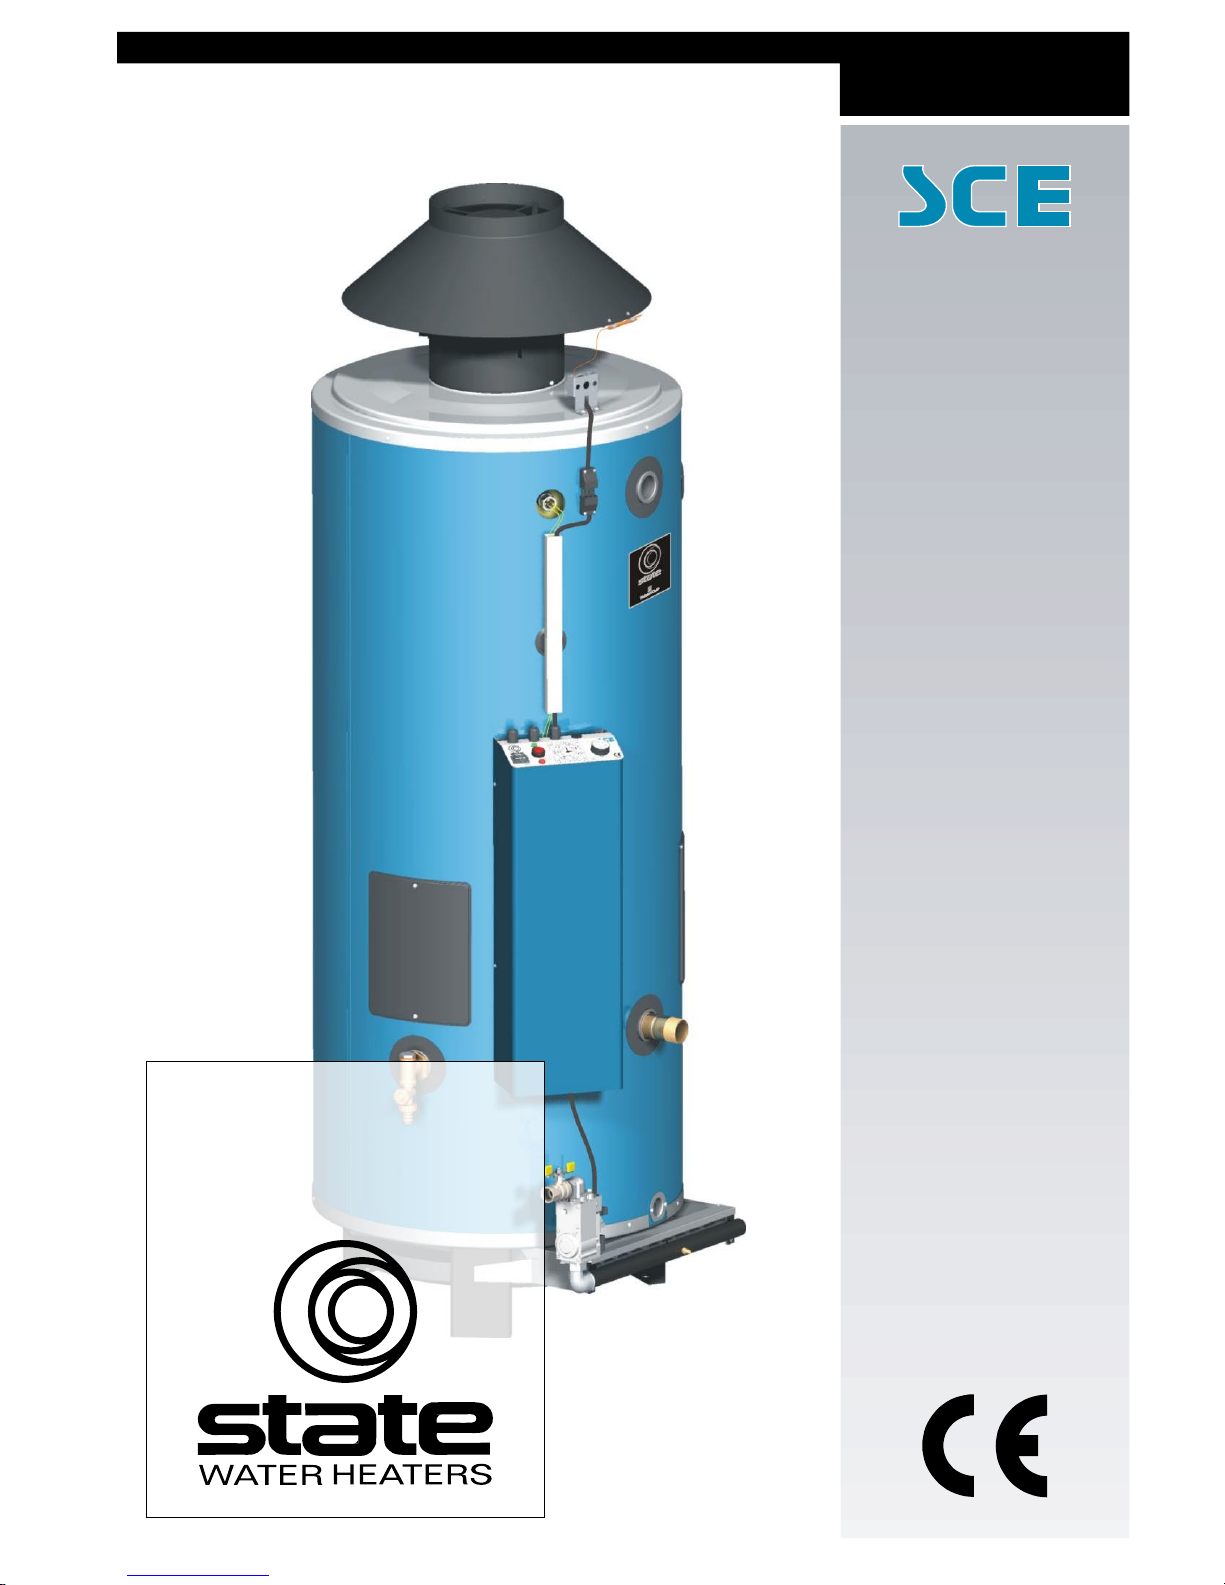
State Water Heaters SCE 80-115, SCE 80-140, SCE 80-180, SCE 95-199, SCE 95-260 Installation, User And Service Manual
...Page 1
Installation
User and
Service Manual
80-115
80-140
80-180
95-199
95-260
70-360
65-400
65-500
Release R.2.0 Uk
Page 2

your installer
www.state-waterheaters.co.uk
Page 3

Release R.2.0 Uk 3
Warning
Read this manual carefully before first using the water heater. Failure to read
this manual and to follow the instructions in this manual may lead to
accidents, personal injury, and damage to the appliance.
Copyright
Copyright 2004 State Water Heaters
All rights reserved.
Nothing from this publication may be copied, reproduced and/or published by
means of printing, photocopying or by whatsoever means, without the prior
written approval of State Water Heaters.
State Water Heaters reserves the right to modify specifications stated in this
manual.
Trademarks
Any brand names mentioned in this manual are registered trademarks of their
respective owners.
Liability
State Water Heaters accepts no liability for claims from third parties arising from
improper use other than that stated in this manual and in accordance with the
General Conditions registered at the Eindhoven Chamber of Commerce.
Refer further to the General Conditions. These are available on request, and
without charge.
Although considerable care has been taken to ensure a correct and suitably
comprehensive description of all relevant components, the manual may
nonetheless contain errors and inaccuracies.
Should you detect any errors or inaccuracies in the manual, we would be
grateful to receive notification. This helps us to further improve our
documentation.
More information
If you have any comments or queries concerning any aspect related to the
appliance, then please do not hesitate to contact State Water Heaters.
Aquaheat State Sales
Orchard House, 61-67 Commercial Road
Southampton SO15 1GG
Tel.: 023 8057 1107
Fax: 023 8057 7965
E-mail: [email protected]
In the event of problems with connecting to the gas, electricity or water supply,
please contact your installation’s supplier/installer.
Page 4

4 Instruction Manual SCE
Page 5

Release R.2.0 Uk 5
gis
Table of contents
1 Introduction - - - - - - - - - - - - - - - - - - - - - - - - - - - 9
1.1 About the appliance - - - - - - - - - - - - - - - - - - - - - - - - - - - - 9
1.2 What to do if you smell gas- - - - - - - - - - - - - - - - - - - - - - - - - 9
1.3 Regulations - - - - - - - - - - - - - - - - - - - - - - - - - - - - - - - - 9
1.4 Target groups - - - - - - - - - - - - - - - - - - - - - - - - - - - - - - 10
1.5 Maintenance - - - - - - - - - - - - - - - - - - - - - - - - - - - - - - - 10
1.6 Forms of notation - - - - - - - - - - - - - - - - - - - - - - - - - - - - 11
1.7 Overview of this document - - - - - - - - - - - - - - - - - - - - - - - - 11
2 Functioning of the appliance - - - - - - - - - - - - - - - - - - 13
2.1 Introduction - - - - - - - - - - - - - - - - - - - - - - - - - - - - - - - 13
2.2 Functional description of the appliance - - - - - - - - - - - - - - - - - - 14
2.3 The appliance’s heating cycle - - - - - - - - - - - - - - - - - - - - - - 15
2.4 Protection for the appliance - - - - - - - - - - - - - - - - - - - - - - - 15
2.4.1 Water temperature protection - - - - - - - - - - - - - - - - - 16
2.4.2 Flue gas backflow safeguard - - - - - - - - - - - - - - - - - 16
2.4.3 Ionisation rod - - - - - - - - - - - - - - - - - - - - - - - - - 16
2.5 Safety of the installation - - - - - - - - - - - - - - - - - - - - - - - - - 16
2.5.1 Unvented installation - - - - - - - - - - - - - - - - - - - - - 16
2.5.2 Vented installation- - - - - - - - - - - - - - - - - - - - - - - 17
2.5.3 T&P valve - - - - - - - - - - - - - - - - - - - - - - - - - - - 17
3 Installation - - - - - - - - - - - - - - - - - - - - - - - - - - - 19
3.1 Introduction - - - - - - - - - - - - - - - - - - - - - - - - - - - - - - - 19
3.2 Packaging - - - - - - - - - - - - - - - - - - - - - - - - - - - - - - - - 21
3.3 Environmental conditions- - - - - - - - - - - - - - - - - - - - - - - - - 21
3.3.1 Working clearances - - - - - - - - - - - - - - - - - - - - - - 21
3.3.2 Humidity and ambient temperature- - - - - - - - - - - - - - - 21
3.3.3 Maximum floor loading - - - - - - - - - - - - - - - - - - - - 22
3.3.4 Water composition - - - - - - - - - - - - - - - - - - - - - - 22
3.4 Technical specifications - - - - - - - - - - - - - - - - - - - - - - - - - 22
3.5 Installation diagram - - - - - - - - - - - - - - - - - - - - - - - - - - - 24
3.6 Water connections, Unvented - - - - - - - - - - - - - - - - - - - - - - 26
3.6.1 Cold water side - - - - - - - - - - - - - - - - - - - - - - - - 26
3.6.2 Shunt pipe - - - - - - - - - - - - - - - - - - - - - - - - - - 26
3.6.3 Hot water side- - - - - - - - - - - - - - - - - - - - - - - - - 26
3.6.4 Drain valve - - - - - - - - - - - - - - - - - - - - - - - - - - 26
3.6.5 Circulation pipe - - - - - - - - - - - - - - - - - - - - - - - - 27
3.7 Water connections, Vented- - - - - - - - - - - - - - - - - - - - - - - - 27
3.7.1 Cold water side - - - - - - - - - - - - - - - - - - - - - - - - 27
3.7.2 Shunt pipe - - - - - - - - - - - - - - - - - - - - - - - - - - 27
3.7.3 Hot water side- - - - - - - - - - - - - - - - - - - - - - - - - 27
3.7.4 Circulation pipe - - - - - - - - - - - - - - - - - - - - - - - - 27
3.8 Gas connection - - - - - - - - - - - - - - - - - - - - - - - - - - - - - 28
3.9 Flue gas discharge- - - - - - - - - - - - - - - - - - - - - - - - - - - - 28
3.9.1 Introduction - - - - - - - - - - - - - - - - - - - - - - - - - - 29
3.9.2 Fitting the draught diverter - - - - - - - - - - - - - - - - - - - 29
3.9.3 Flue gas thermostat assembly - - - - - - - - - - - - - - - - - 30
gis
Page 6

6 Instruction Manual SCE
gis
3.10 Electrical connection - - - - - - - - - - - - - - - - - - - - - - - - - - - 31
3.10.1 Introduction - - - - - - - - - - - - - - - - - - - - - - - - - - 31
3.10.2 Preparation- - - - - - - - - - - - - - - - - - - - - - - - - - - 31
3.10.3 Mains voltage - - - - - - - - - - - - - - - - - - - - - - - - - 32
3.10.4 Week timer circuit - - - - - - - - - - - - - - - - - - - - - - - 33
3.10.5 Connecting extra error signal (’Alarm OUT’) - - - - - - - - - - - 33
3.11 Checking the supply pressure and burner pressure - - - - - - - - - - - - 33
3.12 Conversion to a different gas category - - - - - - - - - - - - - - - - - - - 36
3.12.1 Introduction - - - - - - - - - - - - - - - - - - - - - - - - - - 36
3.12.2 Conversion to a different gas SCE 80-115 through 65-400 - - - - 37
3.12.3 Conversion to a different gas category SCE 65-500 - - - - - - - 39
4 Filling and draining - - - - - - - - - - - - - - - - - - - - - - - 43
4.1 Introduction - - - - - - - - - - - - - - - - - - - - - - - - - - - - - - - - 43
4.2 Filling the appliance - - - - - - - - - - - - - - - - - - - - - - - - - - - - 44
4.2.1 Filling unvented installations - - - - - - - - - - - - - - - - - - 44
4.2.2 Filling vented installations- - - - - - - - - - - - - - - - - - - - 44
4.3 Draining the appliance - - - - - - - - - - - - - - - - - - - - - - - - - - 44
4.3.1 Draining unvented installations - - - - - - - - - - - - - - - - - 44
4.3.2 Draining vented installations - - - - - - - - - - - - - - - - - - 45
5 Operating - - - - - - - - - - - - - - - - - - - - - - - - - - - - 47
5.1 Introduction - - - - - - - - - - - - - - - - - - - - - - - - - - - - - - - - 47
5.2 Control panel - - - - - - - - - - - - - - - - - - - - - - - - - - - - - - - 47
5.3 Explanation of the icons - - - - - - - - - - - - - - - - - - - - - - - - - - 48
5.4 I/0/II switch - - - - - - - - - - - - - - - - - - - - - - - - - - - - - - - - 48
5.5 Control thermostat - - - - - - - - - - - - - - - - - - - - - - - - - - - - 48
5.6 Burner control reset button - - - - - - - - - - - - - - - - - - - - - - - - 49
5.7 Week timer circuit - - - - - - - - - - - - - - - - - - - - - - - - - - - - - 49
5.8 Flue gas backflow safeguard reset button - - - - - - - - - - - - - - - - - 50
6 Status of the appliance - - - - - - - - - - - - - - - - - - - - - 51
6.1 Introduction - - - - - - - - - - - - - - - - - - - - - - - - - - - - - - - - 51
6.2 Operating modes - - - - - - - - - - - - - - - - - - - - - - - - - - - - - 51
6.3 Power Anode Status - - - - - - - - - - - - - - - - - - - - - - - - - - - 51
6.4 Error conditions - - - - - - - - - - - - - - - - - - - - - - - - - - - - - - 52
7 Starting up and shutting down - - - - - - - - - - - - - - - - - 53
7.1 Introduction - - - - - - - - - - - - - - - - - - - - - - - - - - - - - - - - 53
7.2 Starting up - - - - - - - - - - - - - - - - - - - - - - - - - - - - - - - - 53
7.3 Shutting down- - - - - - - - - - - - - - - - - - - - - - - - - - - - - - - 53
7.3.1 Shut the appliance down for a brief period (’OFF mode’)- - - - - 53
7.3.2 Disconnect the appliance from the mains - - - - - - - - - - - - 53
7.3.3 Shut the appliance down for a longer period - - - - - - - - - - - 53
7.4 The appliance’s heating cycle - - - - - - - - - - - - - - - - - - - - - - - 54
8 Troubleshooting - - - - - - - - - - - - - - - - - - - - - - - - 55
8.1 Introduction - - - - - - - - - - - - - - - - - - - - - - - - - - - - - - - - 55
8.2 Troubleshooting table for general errors - - - - - - - - - - - - - - - - - - 56
8.3 Troubleshooting table ’no hot water’ - - - - - - - - - - - - - - - - - - - - 57
8.4 Troubleshooting table ’insufficient hot water’ - - - - - - - - - - - - - - - - 60
9 Maintenance - - - - - - - - - - - - - - - - - - - - - - - - - - 61
9.1 Introduction - - - - - - - - - - - - - - - - - - - - - - - - - - - - - - - - 61
Page 7

Release R.2.0 Uk 7
gis
9.2 Preparation for maintenance - - - - - - - - - - - - - - - - - - - - - - - 61
9.3 Water-side maintenance - - - - - - - - - - - - - - - - - - - - - - - - - 62
9.3.1 Introduction - - - - - - - - - - - - - - - - - - - - - - - - - - 62
9.3.2 Checking the anodes - - - - - - - - - - - - - - - - - - - - - 62
9.3.3 Descaling and cleaning the tank - - - - - - - - - - - - - - - - 62
9.4 Gas-side maintenance - - - - - - - - - - - - - - - - - - - - - - - - - - 63
9.4.1 Introduction - - - - - - - - - - - - - - - - - - - - - - - - - - 63
9.4.2 Cleaning the burners - - - - - - - - - - - - - - - - - - - - - 63
9.4.3 Cleaning the orifices - - - - - - - - - - - - - - - - - - - - - - 63
9.4.4 Checking the flue baffles - - - - - - - - - - - - - - - - - - - 63
9.5 Finalising maintenance- - - - - - - - - - - - - - - - - - - - - - - - - - 63
10 Warranty (Certificate)- - - - - - - - - - - - - - - - - - - - - - 65
10.1 General warranty - - - - - - - - - - - - - - - - - - - - - - - - - - - - 65
10.2 Tank warranty - - - - - - - - - - - - - - - - - - - - - - - - - - - - - - 65
10.3 Installation and conditions of use - - - - - - - - - - - - - - - - - - - - - 65
10.4 Exclusions - - - - - - - - - - - - - - - - - - - - - - - - - - - - - - - - 66
10.5 Scope of the warranty - - - - - - - - - - - - - - - - - - - - - - - - - - 66
10.6 Claims - - - - - - - - - - - - - - - - - - - - - - - - - - - - - - - - - - 66
10.7 Limitation of liability State - - - - - - - - - - - - - - - - - - - - - - - - 66
A Appendices - - - - - - - - - - - - - - - - - - - - - - - - - - - 67
A.1 Introduction - - - - - - - - - - - - - - - - - - - - - - - - - - - - - - - 67
A.2 Electrical diagram SCE- - - - - - - - - - - - - - - - - - - - - - - - - - 68
A.2.1 Electrical diagram SCE 65-500 LP - - - - - - - - - - - - - - - 68
A.2.2 Electrical diagram SCE - - - - - - - - - - - - - - - - - - - - 69
IX Index - - - - - - - - - - - - - - - - - - - - - - - - - - - - - - 71
Page 8

8 Instruction Manual SCE
gis
Page 9
About the appliance
Release R.2.0 Uk 9
gis
1 Introduction
1.1 About the appliance This manual describes how to install, service and use the SCE appliance. The
SCE appliance is a gas-fired open water heater without a fan. The SCE
appliance is fitted with a flue gas backflow safeguard and falls into the appliance
category B11BS. This information is located on the appliance’s identification
plate. The information in this manual is applicable to types SCE: 80-115,
80-140, 80-180, 95-199, 95-260, 70-360, 65-400, 65-500.
The manner of construction and features of the appliance are in conformance
with the European standard for gas-fired storage water heaters for the
production of domestic hot water (ES 89). The appliances are therefore
compliant with the European Directive for Gas Appliances, and have the right to
bear the CE mark.
Warning
Read this manual carefully before starting up the water heater. Failure to
read the manual and to follow the printed instructions may lead to personal
injury and damage to the appliance.
1.2 What to do if you
smell gas
Warning
Whenever there is a smell of gas:
No naked flames! No smoking!
Avoid causing sparks! Do not use any electrical equipment or switch, i.e. no
telephones, plugs or bells!
Shut off the mains gas supply!
Open windows and doors!
Warn occupants and leave the building!
After leaving the building, alert the gas distribution company or installer.
1.3 Regulations As the (end) user, installer or service and maintenance engineer, you must
ensure that the entire installation complies, as a minimum, with the official local:
• building regulations;
• energy supplier’s directives for existing gas installations;
• directives and technical guidelines for natural gas installations;
• safety requirements for low-voltage installations;
• regulations governing the supply of drinking water;
• regulations governing ventilation in buildings;
• regulations governing the supply of air for combustion;
• regulations governing the discharge of products of combustion;
• requirements for installations that consume gas;
• regulations governing indoor waste water disposal;
• regulations imposed by fire service, power companies and municipality;
0063
gis
Page 10
Introduction
10 Instruction Manual SCE
1
gis
Furthermore, the installation must comply with the manufacturer’s instructions.
n Note
Later amendments and/or additions to all regulations, requirements and
guidelines published on or prior to the moment of installing, will apply to the
installation.
1.4 Target groups The three target groups for this manual are:
• (end) users;
•installers;
• service and maintenance engineers.
Symbols on each page indicate the target groups for whom the information is
intended. See Table 1.1.
1.5 Maintenance A service should be carried out at least once a year, both on the water side and
on the gas side. Maintenance frequency depends, among other things, on the
water quality, the average burning time per day and the set water temperature.
n Note
To determine the correct maintenance frequency, it is recommended to
arrange for the service and maintenance engineer to check the appliance on
both the water and gas side, three months after installation. Based on this
check, the best maintenance frequency can be determined.
n Note
Regular maintenance extends the service life of the appliance.
Both the end user and the service and maintenance engineer are responsible
for regular maintenance. They will need to establish clear agreements on this.
n Note
If the appliance is not regularly maintained, the warranty will become void.
Tabl e 1.1 Target group symbols
Symbol Target group
g
(End) user
i
installer
s
Service and maintenance engineer
Page 11
Forms of notation
Release R.2.0 Uk 11
gis
1.6 Forms of notation The following notation is used in this manual:
n Note
Important information
cCaution
Ignoring this information can lead to the appliance being damaged.
Warning
Failure to carefully read this information may lead to danger of personal
injury, and serious damage to the appliance.
1.7 Overview of this
document
Ta bl e 1 .2 provides an overview of the contents of this document.
Tab le 1. 2 Contents of document
Chapter Target groups Description
2 Functioning of the
appliance
gis
This chapter describes how the appliance functions.
3 Installation
is
This chapter describes the installation activity to be completed
before you actually start up the appliance. Instructions are
also provided for the installation and/or service and
maintenance engineer on converting the appliance to other
types of gas.
4 Filling and draining
gis
This chapter describes how to fill and drain the appliance.
5 Operating
gis
This chapter describes the appliance’s control panel, and how
to use it.
6 Status of the appliance
gis
This chapter describes the status (mode or condition) that the
appliance may have, and possible actions to take.
7 Starting up and shutting
down
gis
This chapter describes how to start up the appliance, and how
to shut it down for a brief or long period of time. The general
heating cycle of the appliance is also described.
8 Troubleshooting
gis
This chapter is mainly intended for the installer and the service
and maintenance engineer. It describes appliance errors.
These errors are indicated on the display. A troubleshooting
table of possible causes and solutions is provided. End users
may also refer to this chapter for additional information about
the appliance.
9 Maintenance
s
This chapter sets out the maintenance tasks to be carried out
during a service.
10 Warranty (Certificate)
gis
This chapter states the warranty terms and conditions.
Page 12

Introduction
12 Instruction Manual SCE
1
gis
Page 13

Introduction
Release R.2.0 Uk 13
gis
2 Functioning of the
appliance
2.1 Introduction Topics covered in this chapter:
• Functional description of the appliance;
• The appliance’s heating cycle;
• Protection for the appliance;
• Safety of the installation.
gis
Page 14
Functioning of the appliance
14 Instruction Manual SCE
2
gis
2.2 Functional
description of the
appliance
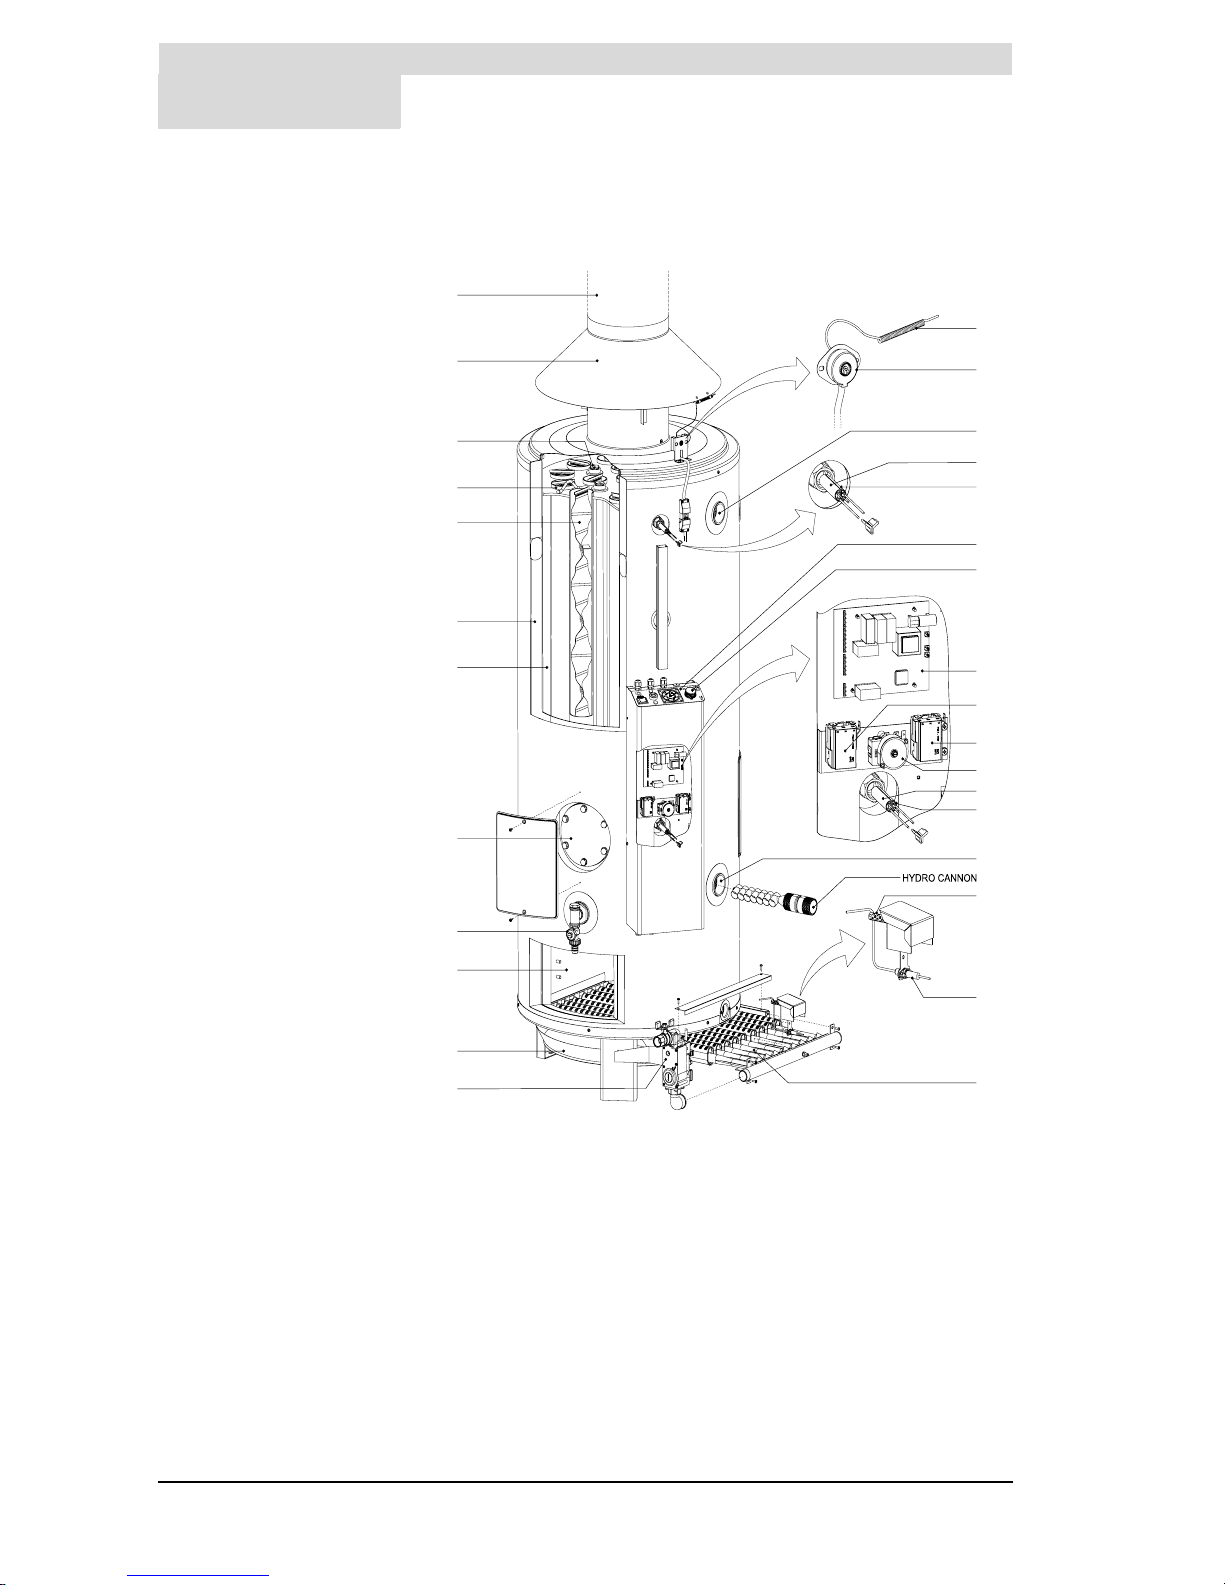
Figure 2.1 shows a cut-away view of the appliance.
In this appliance, the cold water enters the bottom of the tank via the cold water
inlet z. The heat of combustion is transferred to the water through the
combustion chamber j and flue tubes d. The heated tap water leaves the tank
via the hot water outlet o. Once the appliance is completely filled with water, it
remains constantly under water supply pressure. As hot water from the
appliance is consumed, it is continuously replenished with cold water.
Legend
a flue gas discharge
b draught diverter
c anodes
d flue tubes
e flue baffles
f PU-isolation
g tank
h cleaning opening
i drain valve
j combustion chamber
k radiation shield/condensation
tray
l gas control
m flue gas thermostat sensor
n flue gas thermostat
o hot water outlet
p safety thermostat sensor
q high-limit thermostat sensor
r control panel
s control thermostat
t burner control
u high-limit thermostat
v frost thermostat
w safety thermostat
x control thermostat sensor
y frost thermostat sensor
z cold water inlet
A glow igniter
B ionisation rod
C bar burner/ burner tray
Figure 2.1 Cross-section of the appliance
IMD-0143
m
n
o
p
u
x
z
A
C
q
t
w
r
s
v
y
B
a
c
d
e
f
h
i
j
k
g
b
l
Page 15

The appliance’s heating cycle
Release R.2.0 Uk 15
gis
The gas required for combustion flows into the manifold via the gas control l.
Orifices are located within the manifold. Via these orifices, the gas enters the
bar burners C. The bar burners together form the burner tray. As the gas is
injected into the bar burners, the primary air required for combustion is also
drawn in
(1)
. Additional air is drawn through the openings in the burner tray. The
glow igniter A ensures the ignition of the gas/air mixture. The flue gases
generated by this combustion are led through the flue tubes d. There are flue
baffles e fitted inside the flue tubes. These slow down the flue gas exhaust,
improving the heat transfer efficiency. The flue gases leave the appliance via the
draught diverter b. A radiation shield/condensation tray k is mounted below
the burner tray. This prevents overheating of the floor surface under the
appliance and serves as a collection tray for condensation water.
The PU-isolation f prevents heat loss. The inside of the tank is enamelled to
protect against corrosion. The anodes c provide additional protection. The
Hydro Cannon also protects the bottom of the tank from scale and lime buildup.
2.3 The appliance’s
heating cycle
The entire appliance is controlled by the burner control t and the control
thermostat s or frost thermostat v. The control thermostat and frost thermostat
both independently measure the water temperature (T
water
). The appliance’s
heating cycle is activated as soon as T
water
falls below the specified threshold
value (T
set
). The value for T
set
depends on the status chosen for the appliance,
see paragraph ’6.2 Operating modes’. If the appliance is in the ’OFF mode’
(frost protection), then this value is determined by the frost thermostat
(threshold value = 20°C). If the appliance is in the ’ON mode’, then the threshold
value is selectable via the control thermostat (±40°C - ±70°C).
As soon as T
water
falls below T
set
, the relevant thermostat (control or frost) will
close, and the burner control will register a heat demand. The gas control l will
open, and the gas will mix with the air it draws in. This mixture is ignited by the
glow igniter A and the water becomes heated. A soon as T
water
exceeds T
set
,
the thermostat will open once more. The heat demand will cease, and the
burner control will stop the heating cycle.
The thermostats have a certain margin both when closing and opening. We refer
to this margin as the hysteresis. The hysteresis cannot be adjusted.
2.4 Protection for the
appliance
The burner control monitors the water temperature by means of thermostats,
and ensures a safe combustion. This is achieved by:
•the Water temperature protection;
•the Flue gas backflow safeguard;
•the Ionisation rod.
1. The narrow opening in the orifices accelerates the gas flow. This causes a partial vacuum. The
effect of this partial vacuum is to draw the air into the flow (the Venturi effect).
Page 16
Functioning of the appliance
16 Instruction Manual SCE
2
gis
2.4.1 Water temperature protection
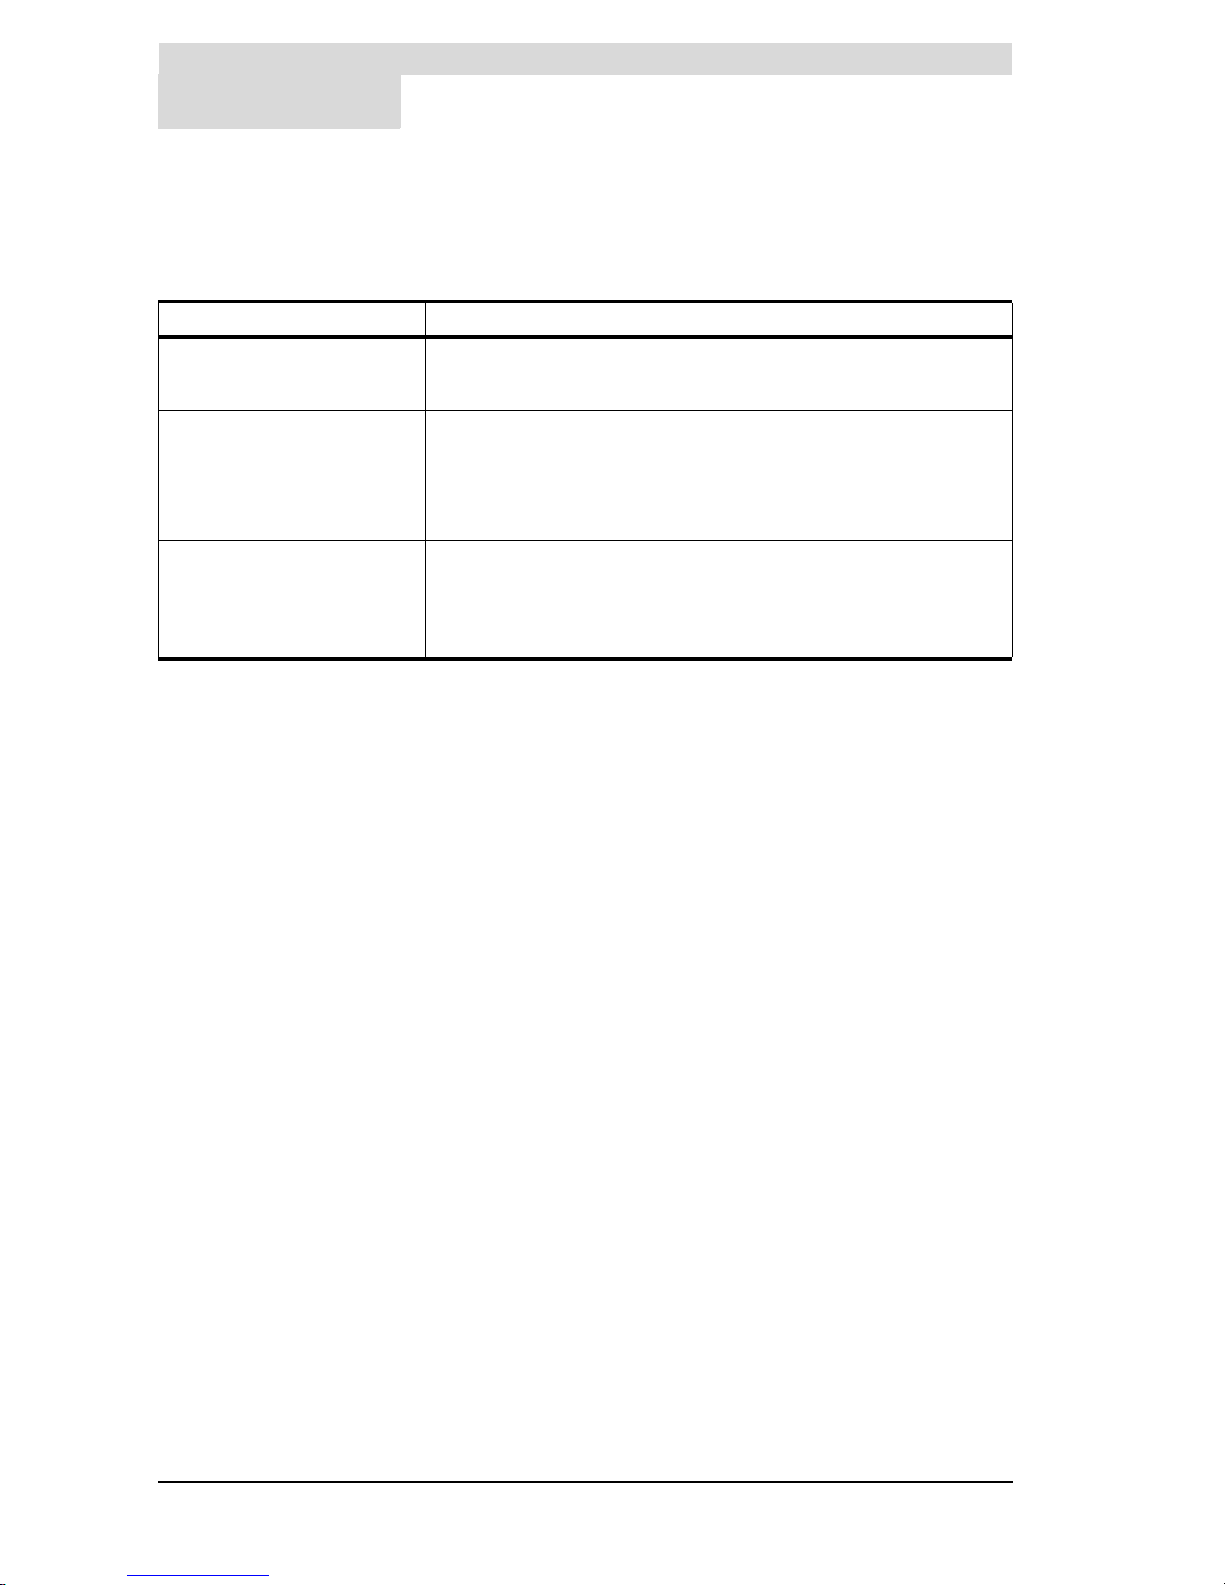
By means of the frost, high-limit and safety thermostats, the burner control
monitors three temperatures related to safety. See Tab l e 2 .1 .
2.4.2 Flue gas backflow safeguard
The flue gasses are directed to the outside via the draught diverter b and the
flue gas discharge a. To prevent the flue gases from flowing back into the boiler
room, the discharge ducting is monitored by a feature called the Thermal Reflux
Safeguard (T.R.S.). This uses a flue gas thermostat sensor m with flue gas
thermostat n which are located in the draught diverter. Under normal
circumstances this sensor will register the ambient temperature. However, if the
chimney is not drawing sufficiently (for example, due to a blockage in the
chimney), the flue gases will ’reflux’ and flow back past the flue gas thermostat
sensor. The sensor will then detect an excessive temperature and the flue gas
thermostat will open. The heat demand will be ended, and the burner control
immediately stops the heating cycle. The flue gas thermostat will also lock out.
This must be manually reset, before the appliance can be put back into
operation.
2.4.3 Ionisation rod
To prevent gas flowing when there is no combustion, an ionisation rod B is
fitted. The burner control uses this rod for flame detection, by means of
ionisation detection. The burner control acts immediately, as soon as it detects
that gas is flowing, but there is no flame.
2.5 Safety of the
installation
In addition to the standard safety monitoring of the appliance, the appliance
must also be protected by an expansion vessel, pressure overflow valve, nonreturn valve and a T&P valve.
Use of an expansion vessel, a pressure relief valve and/or a pressure reducing
valve depends on the type of installation: unvented or vented.
2.5.1 Unvented installation
With an unvented installation, a pressure relief valve and expansion vessel
prevent excessive pressure in the tank. This prevents damage being caused to
the enamelled coating (in the appliance) or to the tank. A non-return valve
prevents excessive pressure in the water supply system. This valve also
Tab le 2.1 Temperature protection
Protection Description
Frost thermostat If the frost thermostat sensor y detects a temperature of 20°C or lower, the
appliance’s heating cycle will start. See paragraph ’2.3 The appliance’s
heating cycle’.
High-limit thermostat If the high-limit thermostat sensor q detects a temperature greater than 84°C,
the high-limit thermostat will open. The heat demand will be stopped, and the
burner control will stop the heating cycle until the high-limit thermostat closes
again. At that moment, the burner control resets the appliance, and the heating
cycle resumes. The high-limit safeguard serves to prevent overheating and/or
excessive formation of scale in the appliance.
Safety thermostat If the safety thermostat sensor p detects a temperature greater than 93°C, the
safety thermostat will open. The heat demand will be ended, and the burner
control immediately stops the heating cycle. A lockout error will occur in the
burner control. This must be manually reset, before the appliance can be put
back into operation.
Page 17

Safety of the installation
Release R.2.0 Uk 17
gis
prevents water from flowing backwards from the tank into the cold water supply
system. The pressure reducing valve protects the installation against an
excessively high water supply pressure (> 8 bar). These components are fitted
to the cold water pipe. See paragraph ’3.6.1 Cold water side’.
2.5.2 Vented installation
With a vented installation, excess pressure is taken up by the open water
reservoir. The level of the water reservoir determines the maximum working
pressure in the tank, which may not exceed 8 bar. The installation must also be
fitted with an overflow from the hot water pipe, which discharges into the water
reservoir. See paragraph ’3.6.3 Hot water side’.
2.5.3 T&P valve
A T&P valve is only mandatory in an ’unvented’ installation. However, State also
recommends the use of a T&P valve in ’vented’ installations.
A T&P valve monitors the pressure in the tank, and the water temperature at the
top of the tank. If the pressure in the tank becomes excessive (>10 bar) or the
water temperature is too high (>97°C), the valve will open. The hot water will
immediately flow out of the tank. Because the appliance is under water supply
pressure, cold water will automatically flow into the tank. The valve remains
open until the unsafe situation has been averted. A connecting point for a T&P
valve is standard on the appliance. See paragraph ’3.6.3 Hot water side’.
Page 18

Functioning of the appliance
18 Instruction Manual SCE
2
gis
Page 19
Introduction
Release R.2.0 Uk 19
is
3 Installation
Warning
The installation should be carried out by an approved installer in compliance
with the general and local regulations imposed by the gas, water and power
supply companies and the fire service.
The appliance may only be installed in a room which complies with the
requirements stated in national and local ventilation regulations.
Refer also to paragraph ’1.3 Regulations’.
3.1 Introduction This chapter describes the installation activities to be carried out before the
appliance may be started up, namely:
• Packaging;
• Environmental conditions;
• Technical specifications;
• Water connections, Unvented;
• Water connections, Vented;
• Gas connection;
• Flue gas discharge;
• Electrical connection;
• Checking the supply pressure and burner pressure;
• Conversion to a different gas category;
n Note
Starting up the appliance is described in chapter ’7 Starting up and shutting
down’.
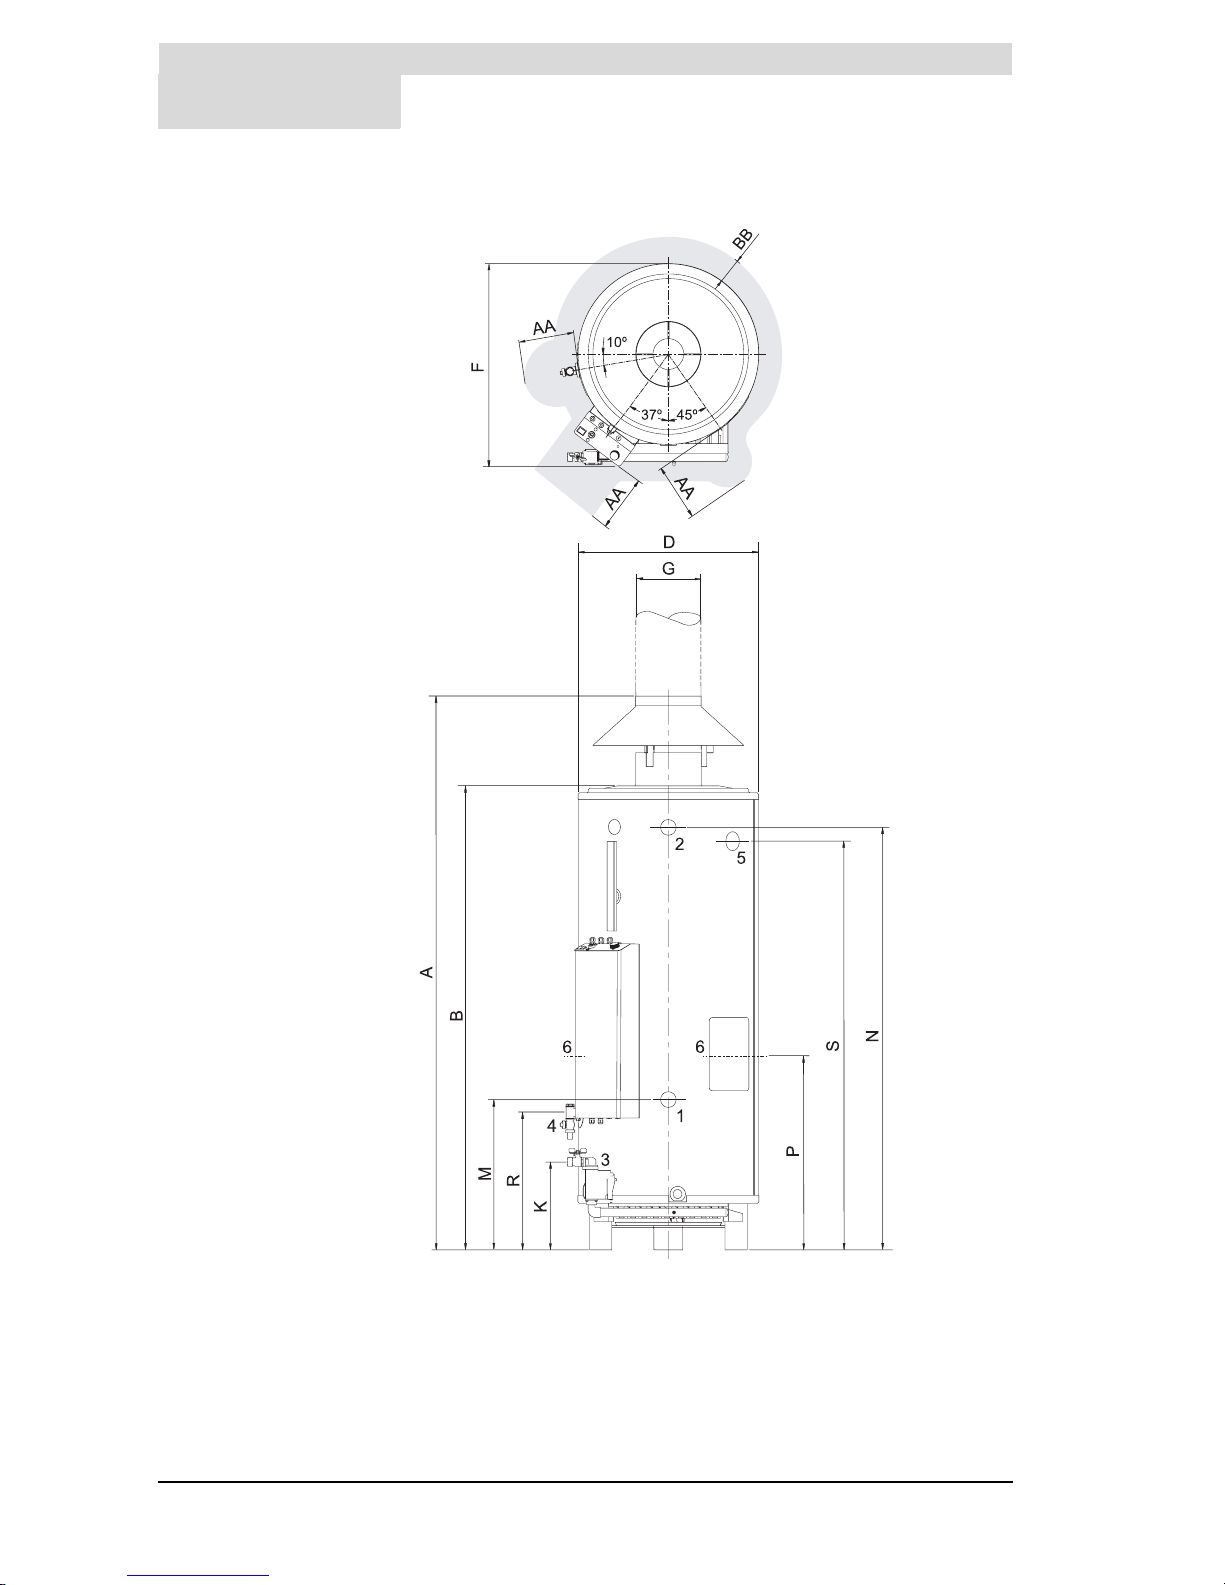
Figure 3.1 shows a front view of the appliance.
is
Page 20
Installation
20 Instruction Manual SCE
3
is
Figure 3.1 Plan and elevation of the appliance
IMD-0145
Page 21
Packaging
Release R.2.0 Uk 21
is
3.2 Packaging To avoid damaging the appliance, remove the packaging carefully.
We recommend unpacking the appliance at or near its intended location.
cCaution
The appliance may only be manoeuvred in an upright position. Take care
that the appliance is not damaged after unpacking.
3.3 Environmental
conditions
cCaution
The appliance may not be used in rooms where chemical substances are
stored or used due to the risk of explosion, and corrosion to the appliance.
Some propellants, bleaching agents, degreasing agents and so on, disperse
vapours which are explosive and/or which cause accelerated corrosion. If
the appliance is used in a room in which such substances are present, the
warranty will be void.
SCE-appliances are open appliances, and may only be placed in an open boiler
room. They fall under category B11BS.
3.3.1 Working clearances
For access to the appliance it is recommended that the following clearances
are observed (see Figure 3.1):
• AA: around the appliance’s control column and cleaning openings: 100 cm.
• BB: around the appliance itself: 50 cm.
• Above the appliance (room to replace the anodes):
- 100 cm if using fixed anodes, or
- 50 cm if using flexible anodes.
If the available clearance is less than 100 cm, flexible magnesium anodes
may be ordered from State Water Heaters.
n Note
When installing the appliance, be aware that any leakage from the tank and/
or connections can cause damage to the immediate environment or floors
below the level of the boiler room. If this is the case, then the appliance
should be installed above a wastewater drain or in a suitable metal leak tray.
The leak tray must have an appropriate wastewater drain and must be at
least 5 cm deep with a length and width at least 5 cm greater than the
diameter of the appliance.
3.3.2 Humidity and ambient temperature
The boiler room must be frost-free, or be protected against frost. Ta bl e 3 .1
shows the environmental conditions that must be adhered to, for correct
functioning of the electronics present in the appliance to be guaranteed.
Tab le 3. 1 Humidity and ambient temperature specifications
Humidity and ambient temperature
Humidity max. 93% RH at +25°C
Ambient temperature Functional: 0 ≤ t ≤ 60°C
Page 22
Installation
22 Instruction Manual SCE
3
is
3.3.3 Maximum floor loading
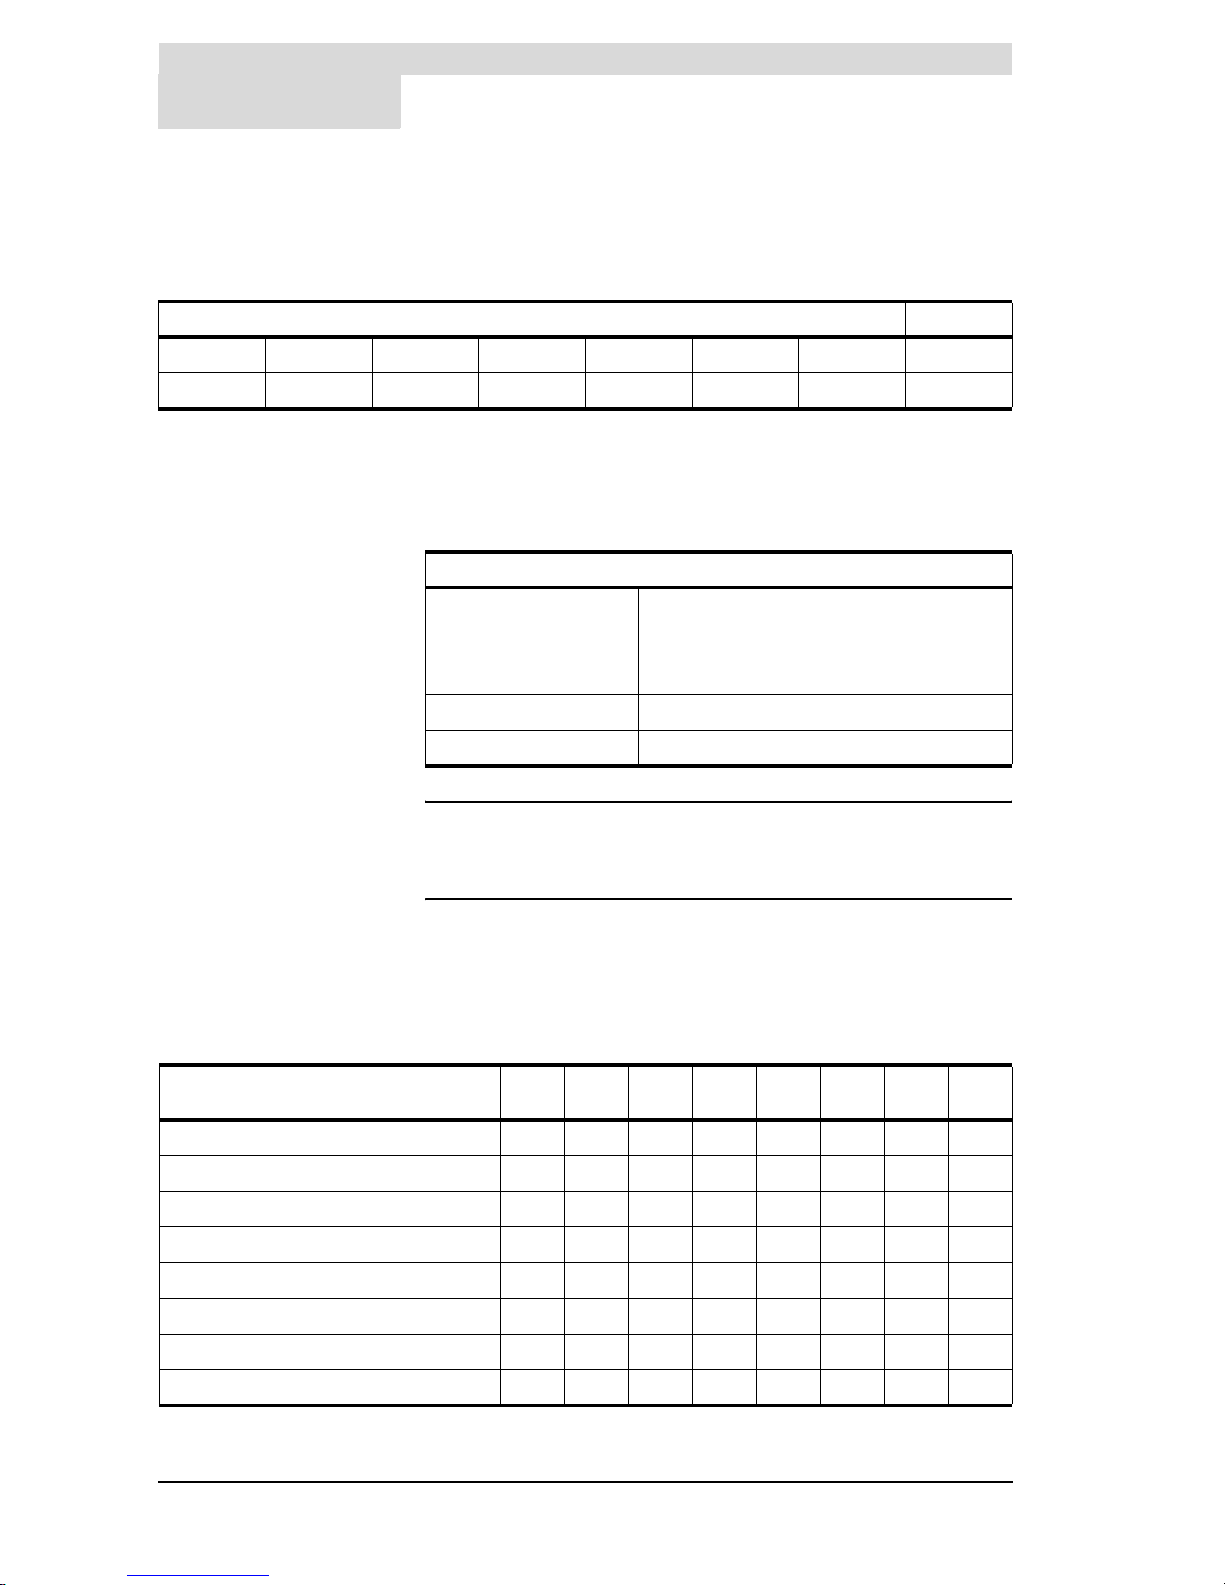
In connection with the appliance’s weight, take account of the maximum floor
loading, see Tab le 3 .2 .
3.3.4 Water composition
The appliance is intended for heating drinking water. The drinking water must
comply with the regulations governing drinking water for human consumption.
Table 3.3 shows these requirements.
n Note
If the water specifications deviate from those stated in Ta bl e 3 .3 , then the
tank protection cannot be guaranteed.
See also chapter ’10 Warranty (Certificate)’.
3.4 Technical
specifications
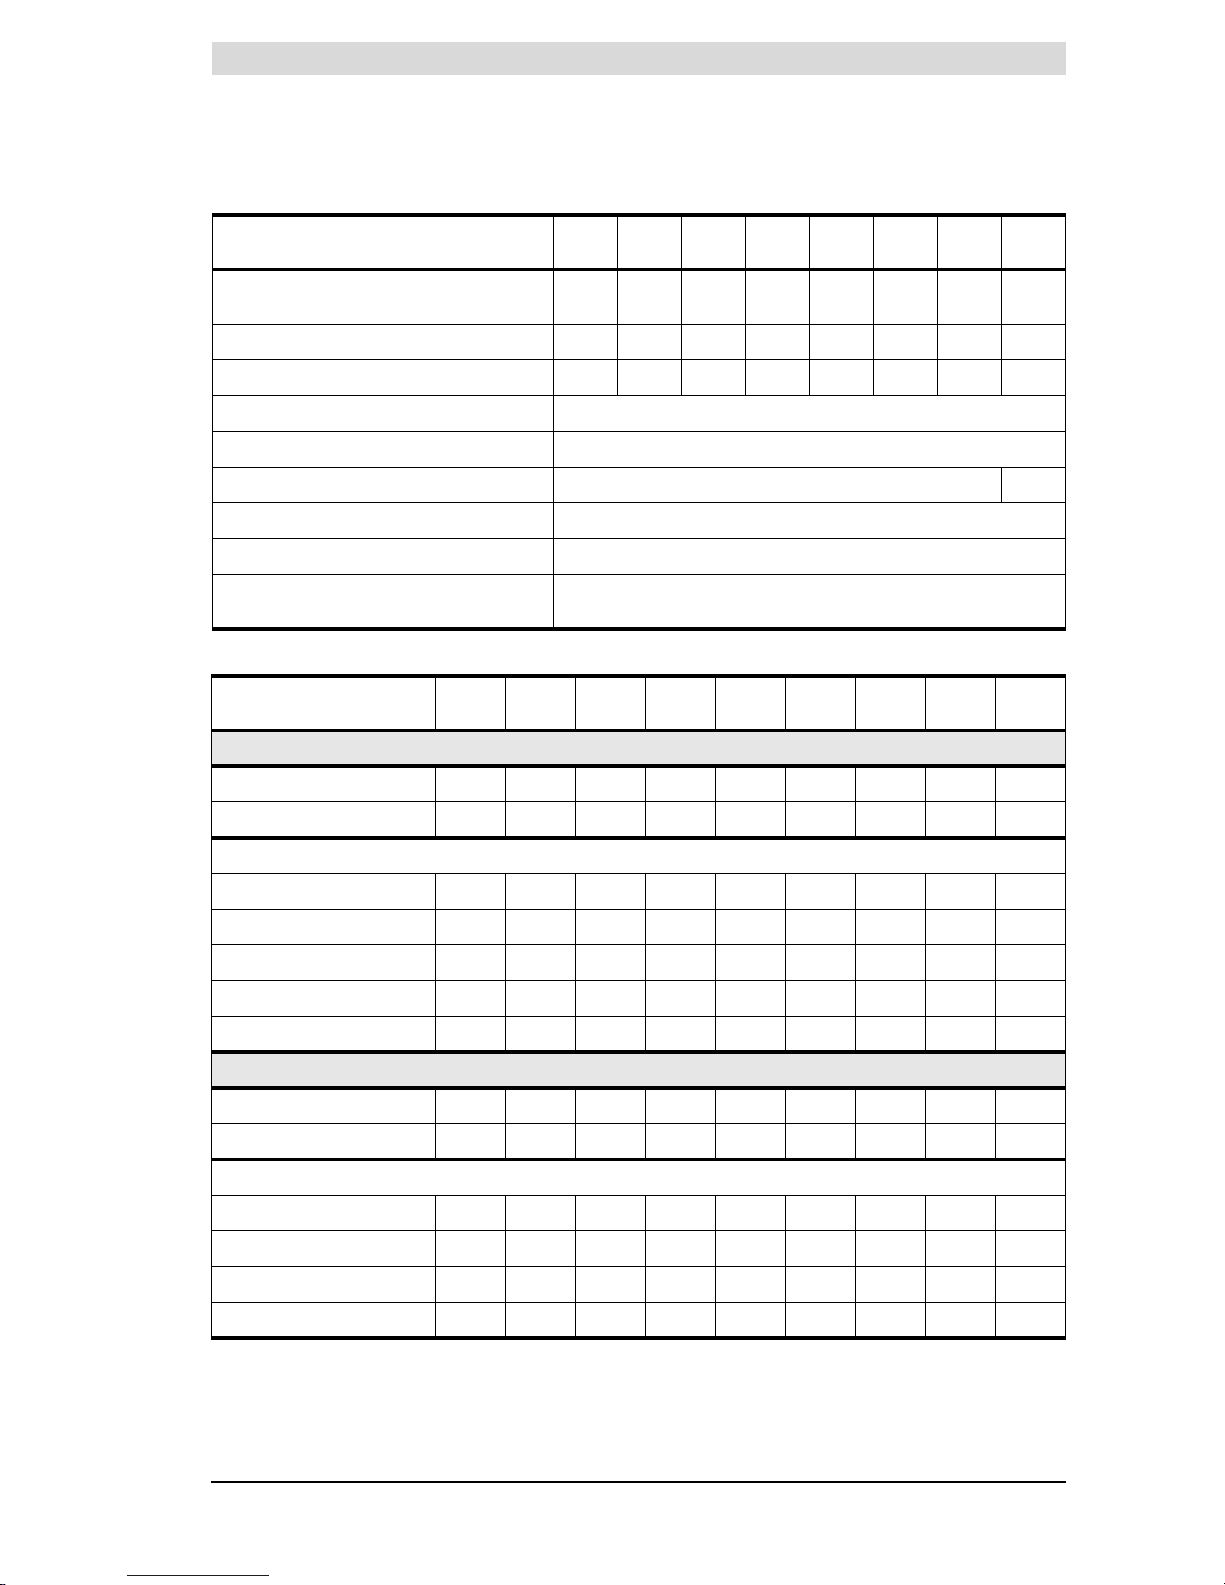
The appliance is supplied without accessories. Check the dimensions and other
specifications for the accessories to be used, based on Figure 3.1 and tables
Table 3.4 through Ta bl e 3 .7 .
Tab le 3.2 Weight specifications related to maximum floor loading
Weight of the appliance filled with water
SCE 80-115 SCE 80-140 SCE 80-180 SCE 95-199 SCE 95-260 SCE 70-360 SCE 65-400 SCE 65-500
523 kg 523 kg 525 kg 594 kg 597 kg 540 kg 531 kg 582
Tabl e 3.3 Water specifications
Water composition
Hardness
(alkaline earth ions)
> 1.00 mmol/l:
• German hardness > 5.6° dH
• French hardness > 10.0° fH
• British hardness > 7.0° eH
Conductivity > 125 µS/cm
Acidity (pH value) 7.0 < pH value < 9.5
Tab le 3.4 Dimensions SCE
Dimension Description SCE
80-115
SCE
80-140
SCE
80-180
SCE
95-199
SCE
95-260
SCE
70-360
SCE
65-400
SCE
65-500
A. Height including draught diverter (mm)
1910 1910 1890 2155 2155 1950 2145 2145
B. Height excluding draught diverter (mm)
1690 1690 1690 1900 1900 1735 1810 1810
D. Diameter of the appliance (mm)
710 710 710 710 710 710 710 710
F. Width including control column (mm)
800 800 800 800 800 800 800 800
G. Flue gas outlet diameter (mm)?
130 130 150 180 180 200 250 250
K. Height of gas supply (mm)
145 145 145 145 145 145 145 145
M. Height of cold water supply (mm)
505 505 505 505 505 515 590 590
N. Height of hot water outlet (mm)
1545 1545 1545 1750 1750 1580 1655 1655
Page 23
Technical specifications
Release R.2.0 Uk 23
is
P. Height of the cleaning opening centre
(mm)
710 710 710 710 710 720 795 795
R. Height of the drain valve centre (mm)
440 440 440 440 440 480 535 535
S. Height of the T&P plug centre (mm)
1490 1490 1490 1695 1695 1525 1525 1525
1. Cold water supply (external)
R 1½
2. Hot water outlet connection (internal)
Rp 1½
3. Gas control connection (internal)
Rp ¾ Rp 1
4. Tank drain valve connection (internal)
Rp 1½
5. T&P valve connection (internal)
1 -14 NPT
6. Dimensions of the cleaning and inspection
opening (mm)
Ø 100
Tab le 3. 5 Data on gas categories, appliance category II2H3+
Description Unit SCE
80-115
SCE
80-140
SCE
80-180
SCE
95-199
SCE
95-260
SCE
70-360
SCE
65-400
SCE
65-500
Data natural gas, gas category 2H
Diameter of orifice mm 2.90 3.20 3.20 3.30 2.95 3.20 3.30 3.90
Burner pressure control - Yes Yes Yes Yes Yes Yes Yes Yes
G20
Nominal load (Upper Value) kW 33.9 42.1 53.4 59.9 83.2 102.6 128.8 142.4
Pre-pressure mbar 20 20 20 20 20 20 20 20
Burner pressure
(1)
mbar8.58.67.88.58.59.27.811.5
Gas consumption
(2)
m³/h 3.2 4.0 5.1 5.7 7.9 9.8 12.3 13.6
Warm-up time dT = 44 Kmin.3830232517118 7
Data on LP gas, gas category 3+
Diameter of orifice mm 1.60 1.70 1.60 1.75 1.50 1.70 1.75 2.25
Heating up time min. 38 30 23 25 17 11 8 7
G30 (butane)
Nominal load kW 33.9 42.2 53.4 59.2 80.8 100.1 127.5 140.3
Supply pressure mbar 30 30 30 30 30 30 30 30
Burner pressure
(1)
mbar--------
Gas consumption
(2)
kg/h2.53.13.94.35.97.39.310.2
Tab le 3. 4 Dimensions SCE
Dimension Description SCE
80-115
SCE
80-140
SCE
80-180
SCE
95-199
SCE
95-260
SCE
70-360
SCE
65-400
SCE
65-500
Page 24
Installation
24 Instruction Manual SCE
3
is
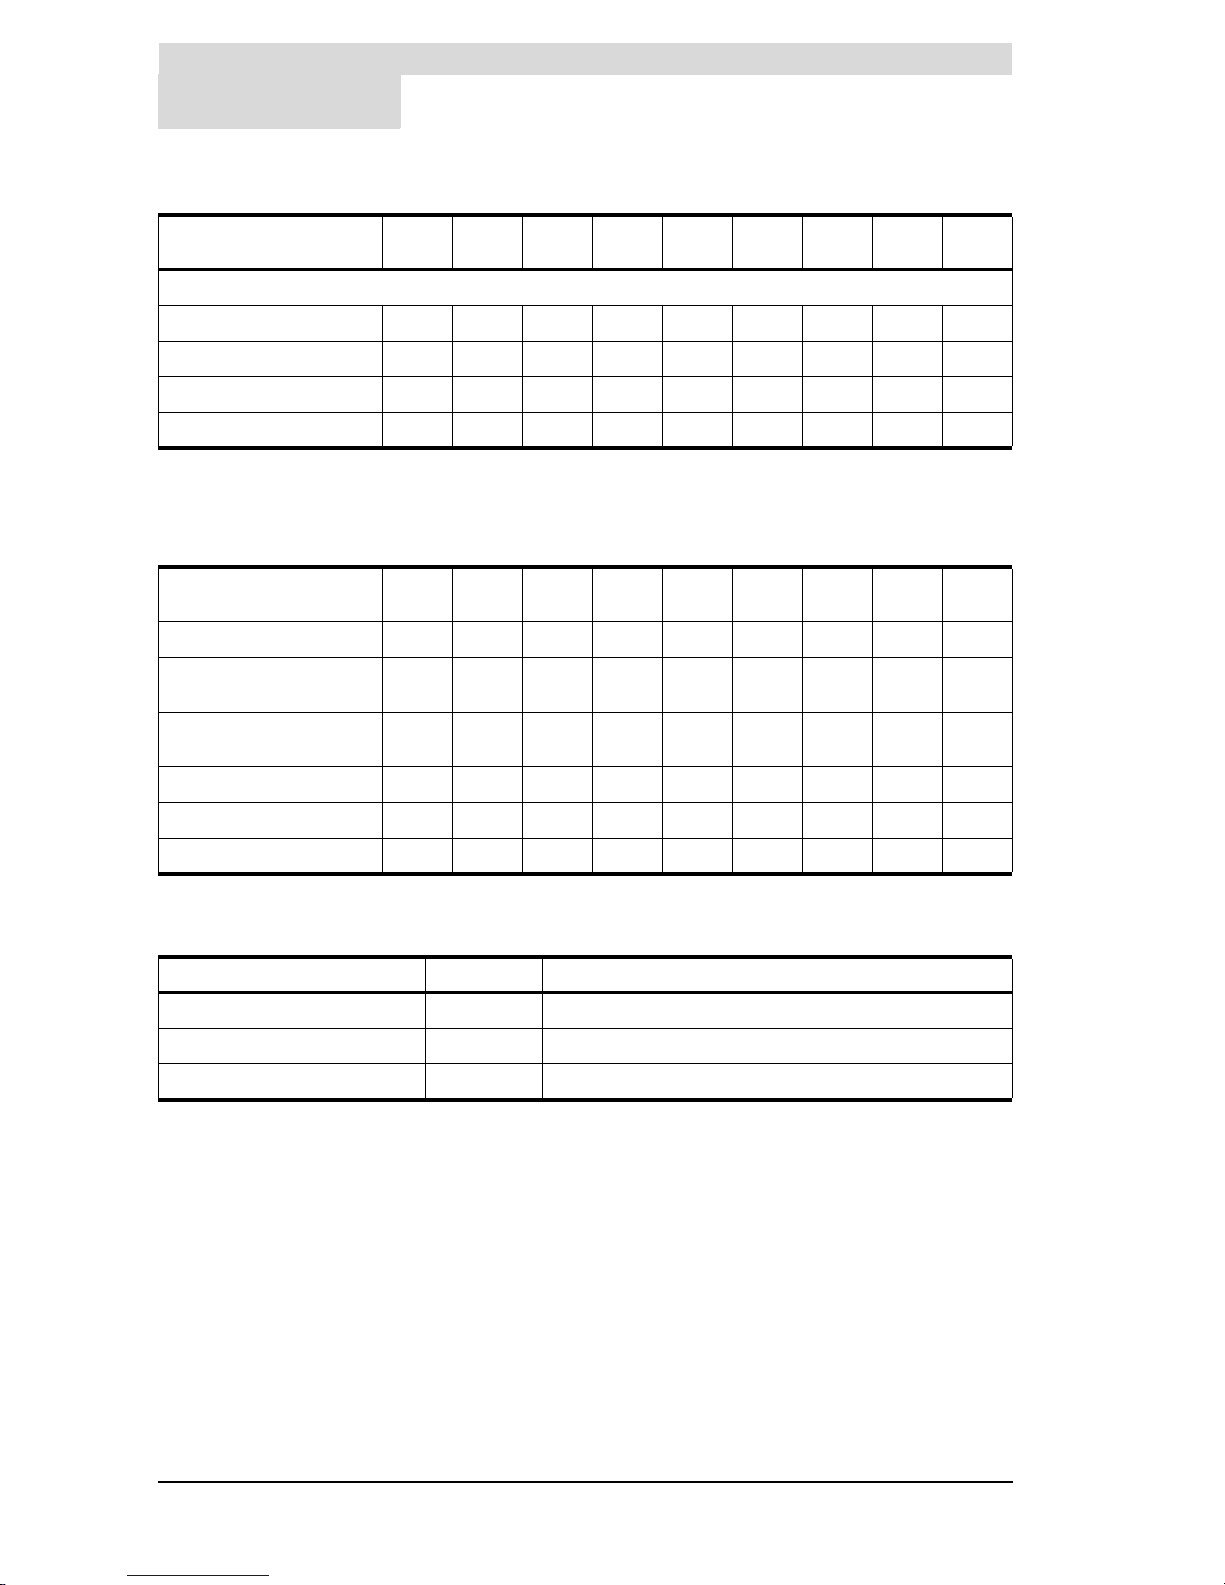
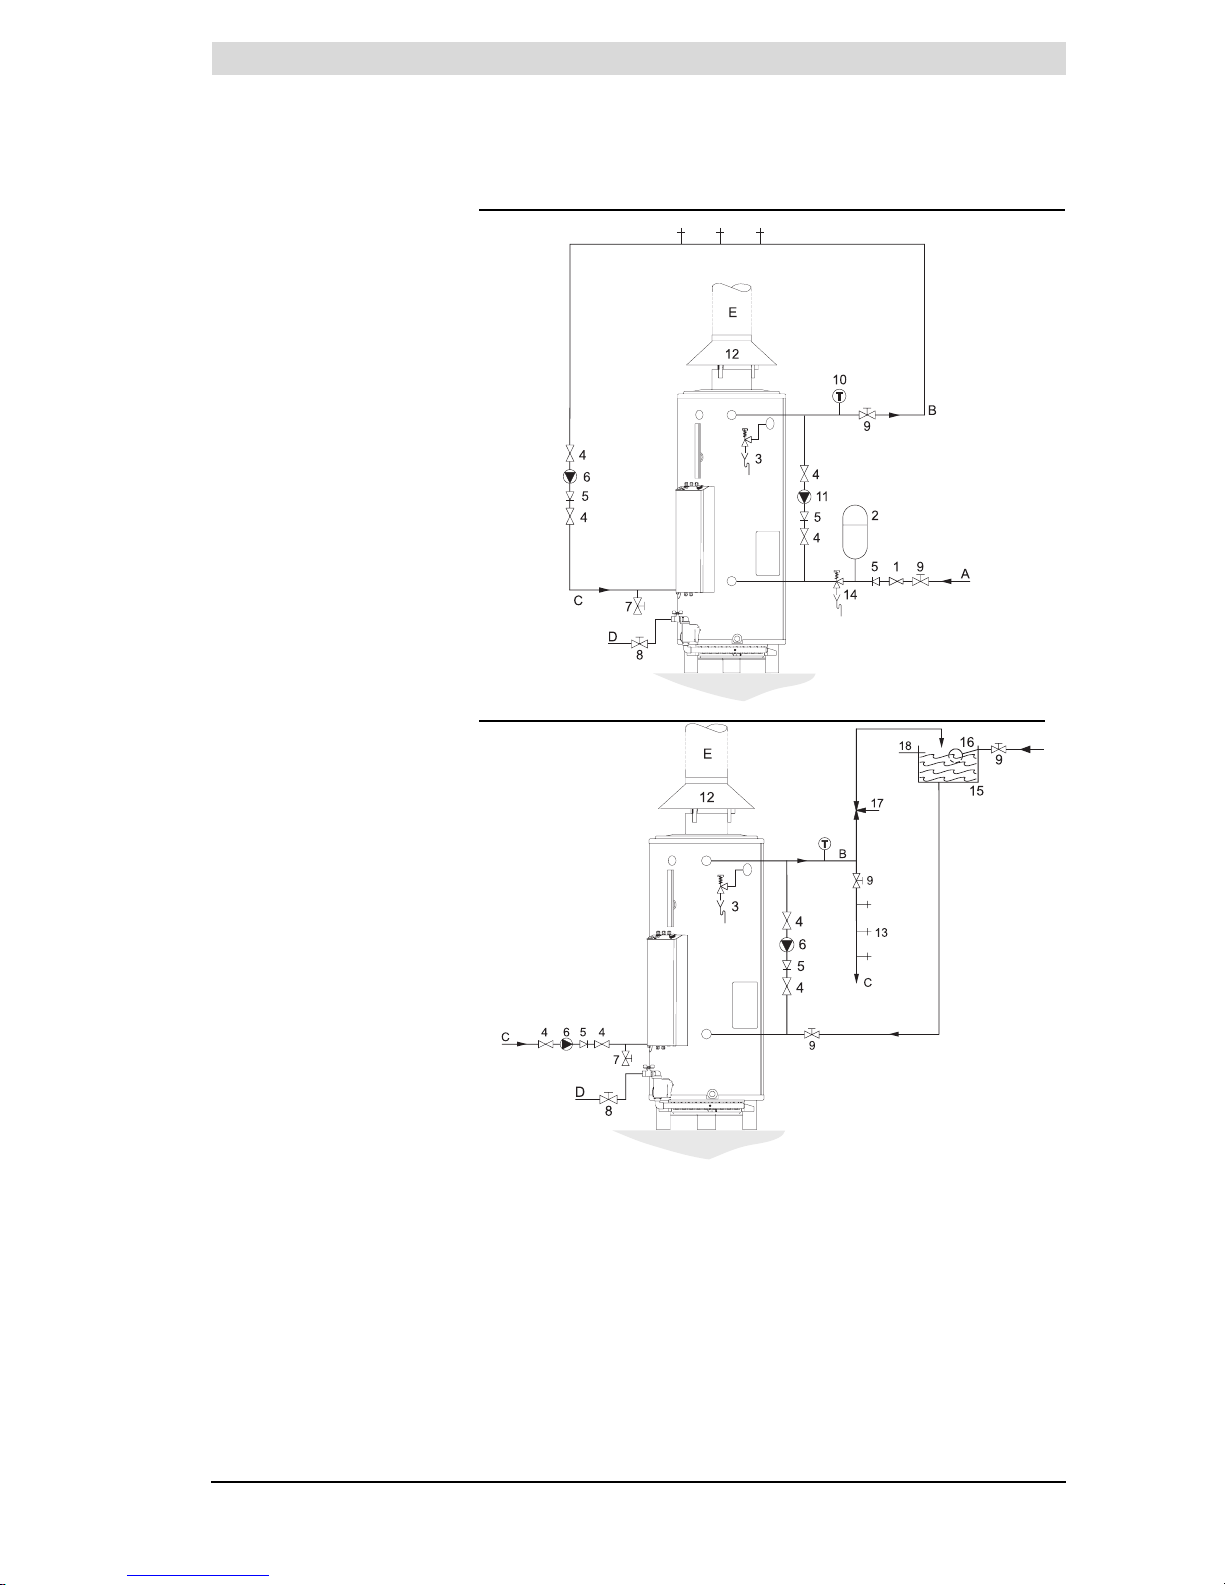
3.5 Installation diagram Figure 3.2 shows the water and gas connection diagrams for unvented and
vented installations. The following paragraphs, describing the connections in
detail, make reference to these diagrams
G31 (propane)
Nominal load (Upper Value). kW 33.1 41.4 52.8 58.2 78.4 98.3 125.5 136.2
Supply pressure mbar 37 37 37 37 37 37 37 37
Burner pressure
(1
mbar--------
Gas consumption
(2)
kg/h 2.4 3.0 3.8 4.2 5.6 7.0 9.0 9.7
1. If using a flat sealing plate or high-low control program, instead of a burner pressure control, it is assumed that the burner pressure is
equal to the pre-pressure. In practice however the burner pressure will be lower,
2. Based on 1013.25 mbar and 15°C
Tab le 3.6 Data general
Description Unit SCE
80-115
SCE
80-140
SCE
80-180
SCE
95-199
SCE
95-260
SCE
70-360
SCE
65-400
SCE
65-500
Capacity litres 309 309 298 357 335 278 253 252
Number of bar burners/
orifices
- 33447796
Number of flue tubes/flue
baffles
- 55769121617
Empty weight kg 214 214 227 237 262 262 278 330
Number of anodes - 22223344
Maximum working pressurebar88888888
Tab le 3.5 Data on gas categories, appliance category II2H3+ (Continued)
Description Unit SCE
80-115
SCE
80-140
SCE
80-180
SCE
95-199
SCE
95-260
SCE
70-360
SCE
65-400
SCE
65-500
Tab le 3.7 Data electrical
DESCRIPTION Unit All models
Electrical power consumption W 30
Supply voltage VAC 230 (-15% +10%)
Mains frequency Hz 50 (±1 Hz)
Page 25
Installation diagram
Release R.2.0 Uk 25
is
Legend
a pressure-reducing valve
(obligatory)
b expansion vessel
(obligatory)
c T&P valve
(obligatory)
d stop valve
(recommended)
e non-return valve
(obligatory)
f circulation pump
(optional)
g drain valve
h gas valve
(obligatory)
i stop valve
(obligatory)
j temperature gauge
(recommended)
k shunt pump
(optional)
l draught diverter
m hot water draw-off points
n pressure relief valve
(obligatory)
o water cistern
p float valve
q 3-way aeration valve
(recommended)
r overflow pipe
a cold water supply
b hot water outlet
c circulation pipe
d gas supply
e flue gas outlet
Figure 3.2 Installation diagrams
13
UNVENTED
IMD-0146
A
VENTED
IMD-0147
Page 26

Installation
26 Instruction Manual SCE
3
is
3.6 Water connections,
Unvented
3.6.1 Cold water side
See a in Figure 3.2.
1. Fit an approved stop valve i on the cold water side as required by
regulations.
Refer also to paragraph ’1.3 Regulations’.
2. The maximum working pressure of the appliance is 8 bar. Because the
pressure in the water pipe at times can exceed 8 bar, you must fit an
approved pressure-reducing valve a.
3. Fit a non-return valve e and an expansion vessel b.
4. Fit a pressure relief valve n and connect the overflow side to an open
wastewater pipe.
3.6.2 Shunt pipe
You can connect a shunt pump to prevent stacking of the water in the water
heater.
1. Optional: Depending on the consumption pattern, fit a shunt pipe (Ø 22 mm),
stop valve i and a shunt pump k.
2. Fit a non-return valve e.
3. Fit a stop valve i.
3.6.3 Hot water side
See b in Figure 3.2.
n Note
Insulating long hot water pipes prevents unnecessary energy loss.
1. Fit the T&P valve c.
2. Optional: fit a temperature gauge j to be able to check the temperature of
the tap water.
3. Fit a stop valve i in the hot water outlet pipe, for use when servicing.
3.6.4 Drain valve
1. Fit the standard supplied drain valve g.
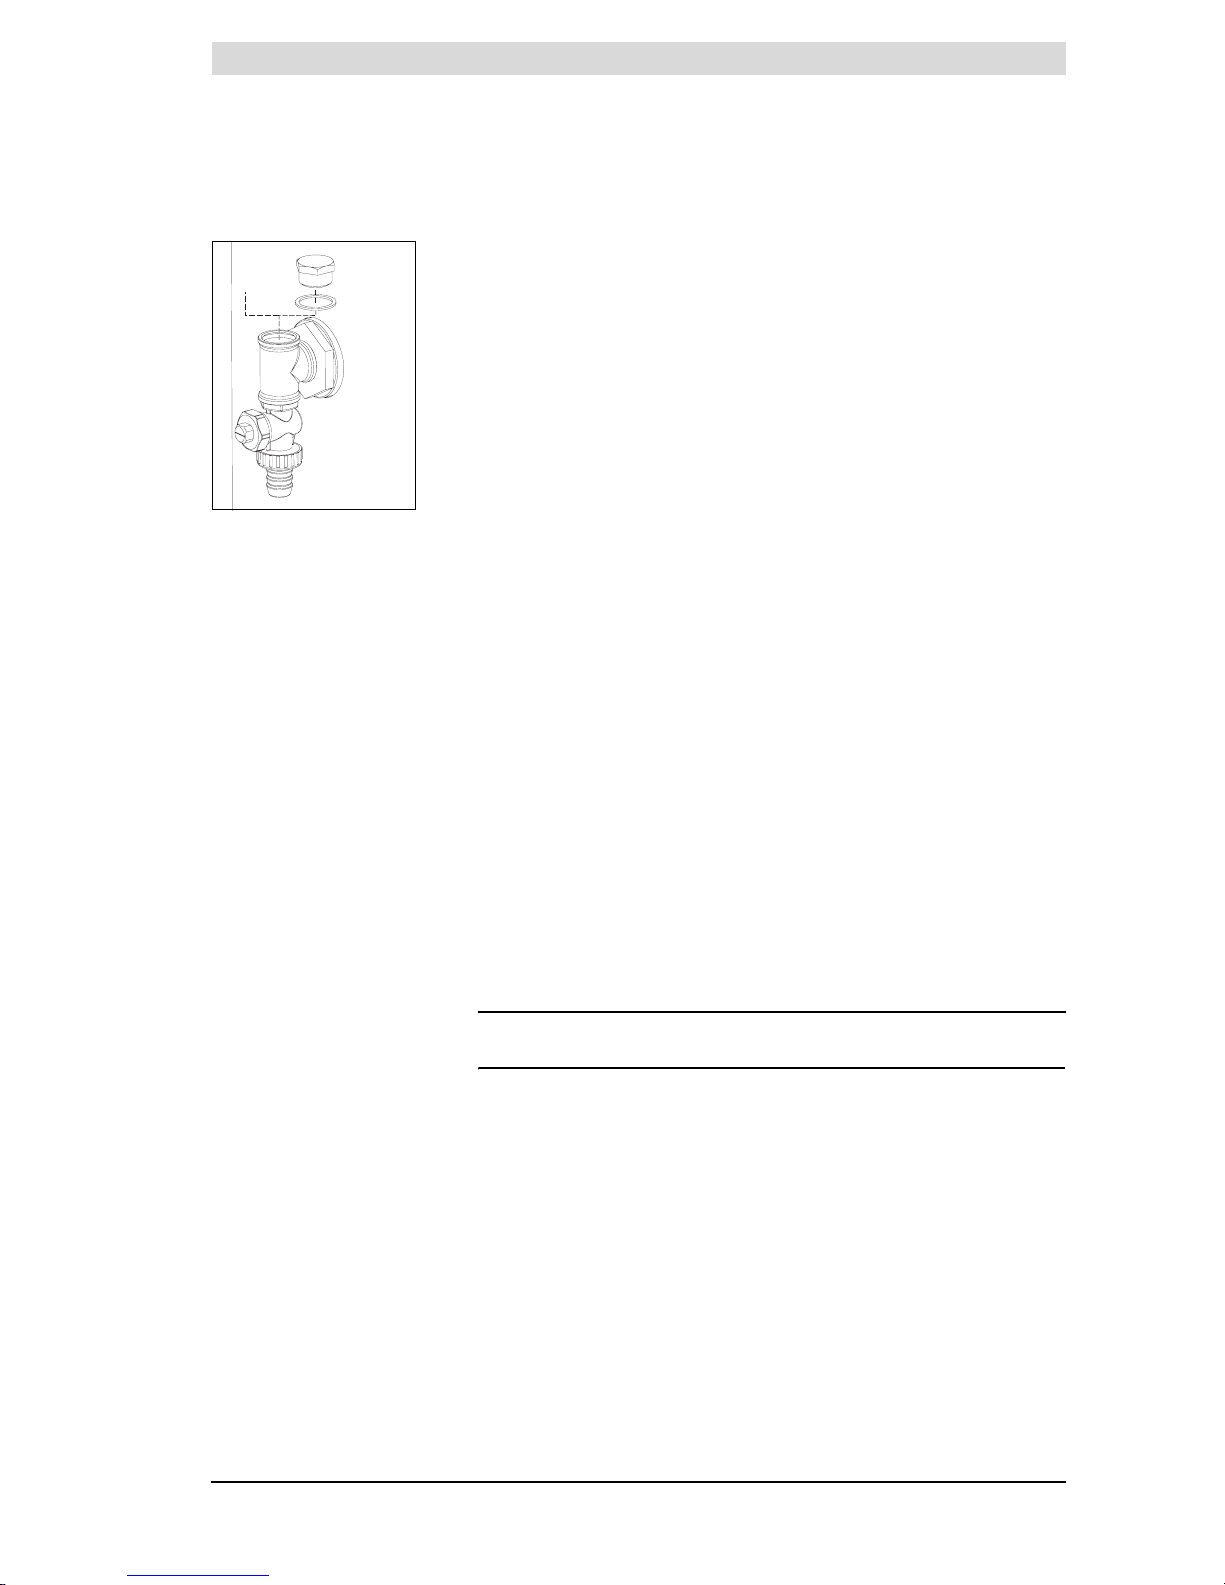
2. If a circulation pipe is to be fitted, then refer to paragraph 3.6.5. Otherwise,
fit the sealing nut and gasket supplied with the drain valve. See Figure 3.3.
Page 27
Water connections, Vented
Release R.2.0 Uk 27
is
3.6.5 Circulation pipe
See c in Figure 3.2 and Figure 3.3.
If an immediate flow of hot water is required at draw-off points, a circulation
pump can be installed. This improves comfort and reduces water wastage.
1. Fit a circulation pump f of the correct capacity for the length and resistance
of the circulation system.
2. Fit a non-return valve e behind the circulation pump to guarantee the
direction of circulation.
3. Fit two stop valves d for service purposes.
4. Connect the circulation pipe to the T-piece on the drain valve g. See
Figure 3.3.
3.7 Water connections,
Vented
3.7.1 Cold water side
See a in Figure 3.2.
• Fit an approved stop valve i on the cold water side between the water
cistern o and the appliance, as required by regulations. Refer also to
paragraph ’1.3 Regulations’.
3.7.2 Shunt pipe
You can connect a shunt pump to prevent stacking of the water in the water
heater.
1. Optional: Depending on the consumption pattern, fit a shunt pipe (Ø 22 mm),
stop valve i and a shunt pump k.
2. Fit a non-return valve e.
3. Fit a stop valve i.
3.7.3 Hot water side
See b in Figure 3.2.
n Note
Insulating long hot water pipes prevents unnecessary energy loss.
1. Fit the T&P valve c.
2. Optional: fit a temperature gauge j to be able to check the temperature of
the tap water.
3. Fit a stop valve i in the hot water outlet for servicing.
4. If a circulation pipe is to be fitted, then refer to paragraph 3.7.4.
3.7.4 Circulation pipe
See c in Figure 3.2.
If an immediate flow of hot water is required at draw-off points, a circulation
pump can be installed. This improves comfort and reduces water wastage.
1. Fit a circulation pump f of the correct capacity for the length and resistance
of the circulation system.
2. Fit a non-return valve e behind the circulation pump to guarantee the
direction of circulation.
Figure 3.3 Drain valve
IMD-0122
c
Page 28
Installation
28 Instruction Manual SCE
3
is
3. Fit two stop valves d for service purposes.
4. Connect the circulation pipe to the cold water supply pipe.
3.8 Gas connection
Warning
Gas installation may only be carried out by an authorised installer in
compliance with the general regulations imposed by the gas company.
Refer also to paragraph ’1.3 Regulations’.
cCaution
Make sure that the diameter and length of the gas supply pipe are large
enough to supply sufficient capacity to the appliance.
See d in Figure 3.2.
1. Fit a gas valve h in the gas supply pipe.
2. Blow the gas pipe through before use, to be sure it is clean.
3. Close the gas valve.
4. Fit the gas supply pipe to the gas control.
Warning
Check for leaks after fitting.
3.9 Flue gas discharge
Warning
The installation should be carried out by an authorised installer, in
compliance with the general and local regulations imposed by gas, water
supply and power supply companies and the fire service.
Refer also to paragraph ’1.3 Regulations’.
Page 29
Flue gas discharge
Release R.2.0 Uk 29
is
3.9.1 Introduction
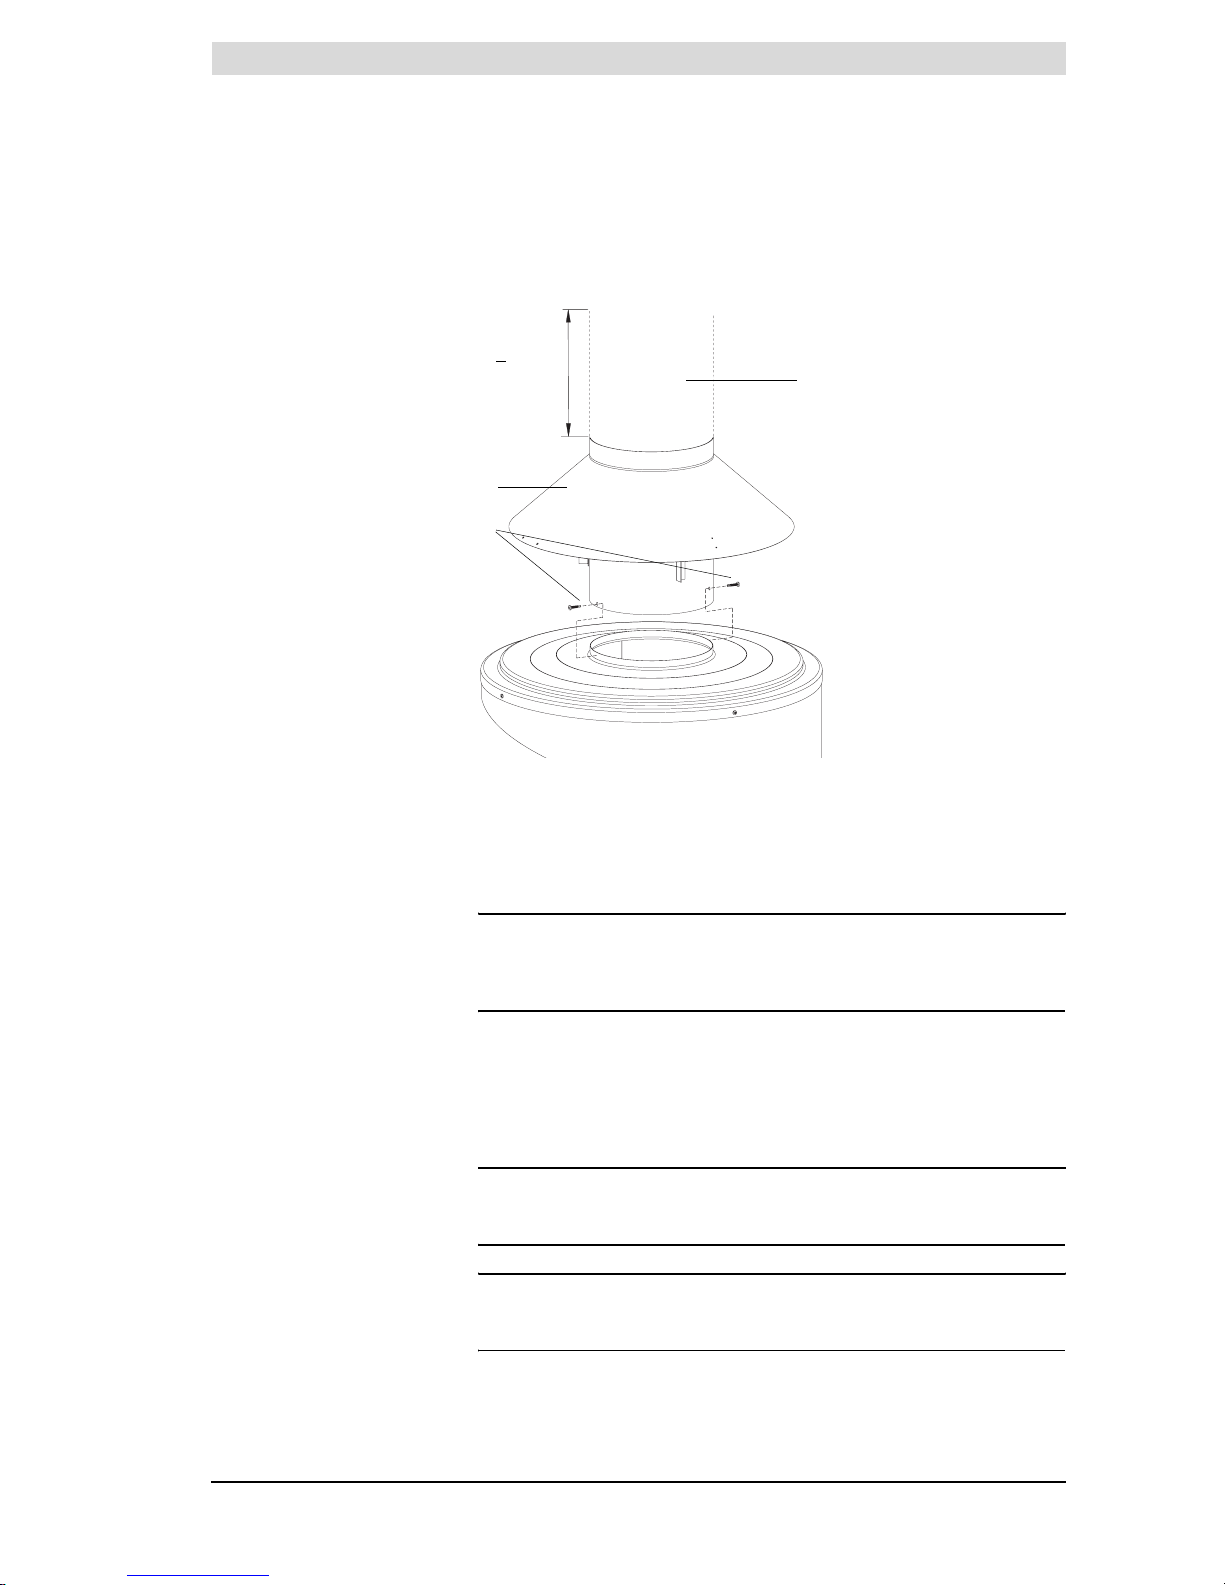
When connecting the appliance to the chimney, the draught diverter a
supplied with the appliance must be used. The standard flue gas thermostat
and sensor that are supplied must be fitted in the draught diverter.
3.9.2 Fitting the draught diverter
De draught diverter a is fitted with two fastening screws b. The assembly
procedure is as follows:
1. Place the draught diverter on the appliance and mark the drill holes.
Again remove the draught diverter from the appliance.
n Note
The position of the holes already made for the flue gas backflow safeguard
sensor must be taken into account. The holes should be roughly in line with
the flue gas thermostat bracket.
2. Now drill two holes into the top of the appliance (3.2 mm drill bit).
3. Using the fastening screws, fix the draft diverter to the appliance.
4. Fit a chimney pipe c of at least 0.5 metres length to the opening of the draft
diverter, before fitting the rest of the chimney materials according to current
regulations. See paragraph ’1.3 Regulations’.
n Note
Use flue gas discharge materials that comply with the regulations. See
paragraph ’1.3 Regulations’.
n Note
Make sure that the chimney discharges into an area where this is permitted
for this category of appliance.
Legend
a draught diverter
b fastening screws
c chimney pipe
b
c
IMD-0148
> 0.5 m
a
Page 30
Installation
30 Instruction Manual SCE
3
is
3.9.3 Flue gas thermostat assembly
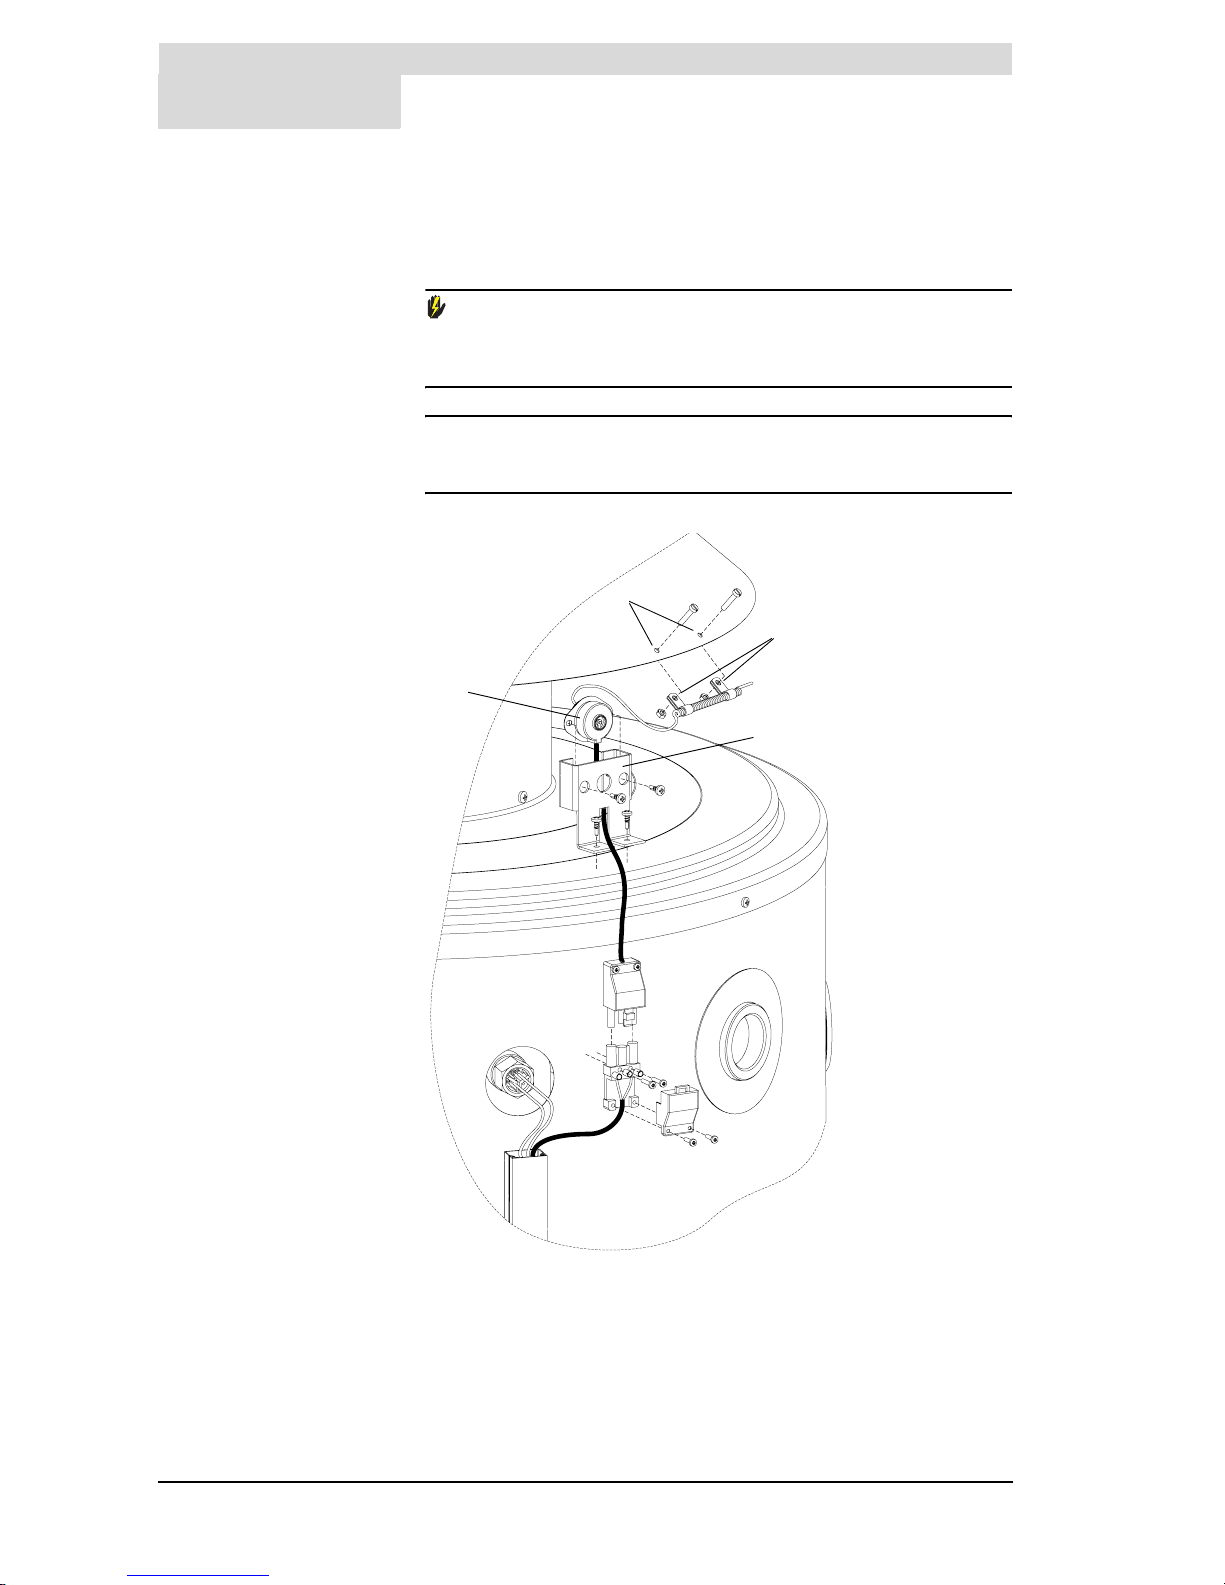
The flue gas thermostat sensor is already mounted in the draught diverter. The
bracket with thermostat needs to be mounted on the top of the unit and the cable
from the thermostat needs to be connected with the connector on the unit.
Warning
If the flue gas thermostat is not (or is incorrectly) fitted/connected, the flue
gas discharge will not be protected. An incorrectly fitted chimney can cause
flue gases to backflow into the boiler room.
n Note
Figure 3.4 shows an example. For each type of unit the position of the
sensor can slightly differ.
Fit the flue gas thermostat as follows:
1. Remove the flue gas thermostat assembly a a from the packet.
2. Mount the bracket b with the thermostat on the top of the unit.
Figure 3.4 Flue gas backflow detection
3
1
2
4
5
6
7
IMD-0187
Page 31
Electrical connection
Release R.2.0 Uk 31
is
3. Connect the connector from the flue gas thermostat f to the connector on
the appliance g.
3.10 Electrical
connection
Warning
The installation should be carried out by an approved installer in compliance
with the general and local regulations imposed by the gas, water and power
supply companies and the fire service.
Refer also to paragraph ’1.3 Regulations’.
3.10.1 Introduction
Topics covered in this paragraph:
• 3.10.2 Preparation;
• 3.10.3 Mains voltage;
• 3.10.4 Week timer circuit
• 3.10.5 Connecting extra error signal (’Alarm OUT’)
3.10.2 Preparation
cCaution
The appliance is phase-sensitive. It is absolutely essential to connect the
phase (L) from the mains to the phase of the appliance, and the neutral (N)
of the mains to the neutral of the appliance.
There should also be no potential difference present between neutral (N)
and earth (
A). If this is the case, then an isolating transformer must be
applied in the supply circuit. For more information, or to order this isolating
transformer, please contact State.
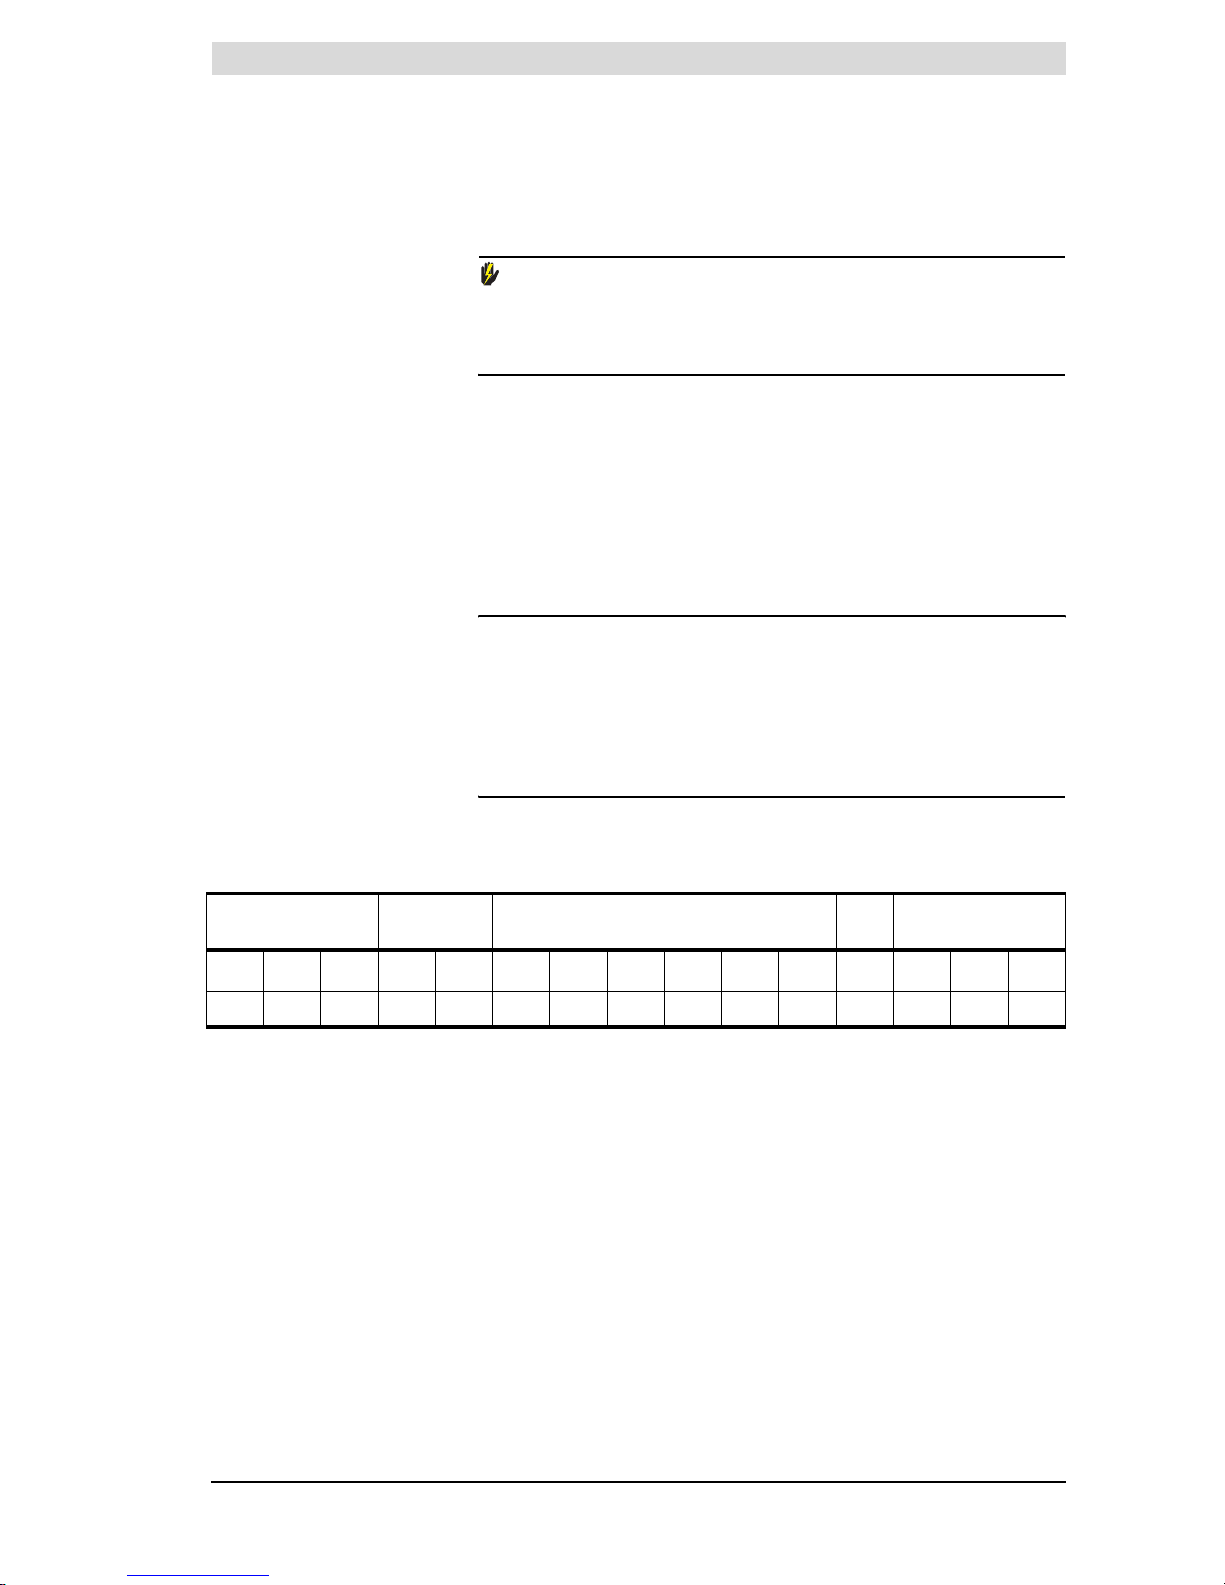
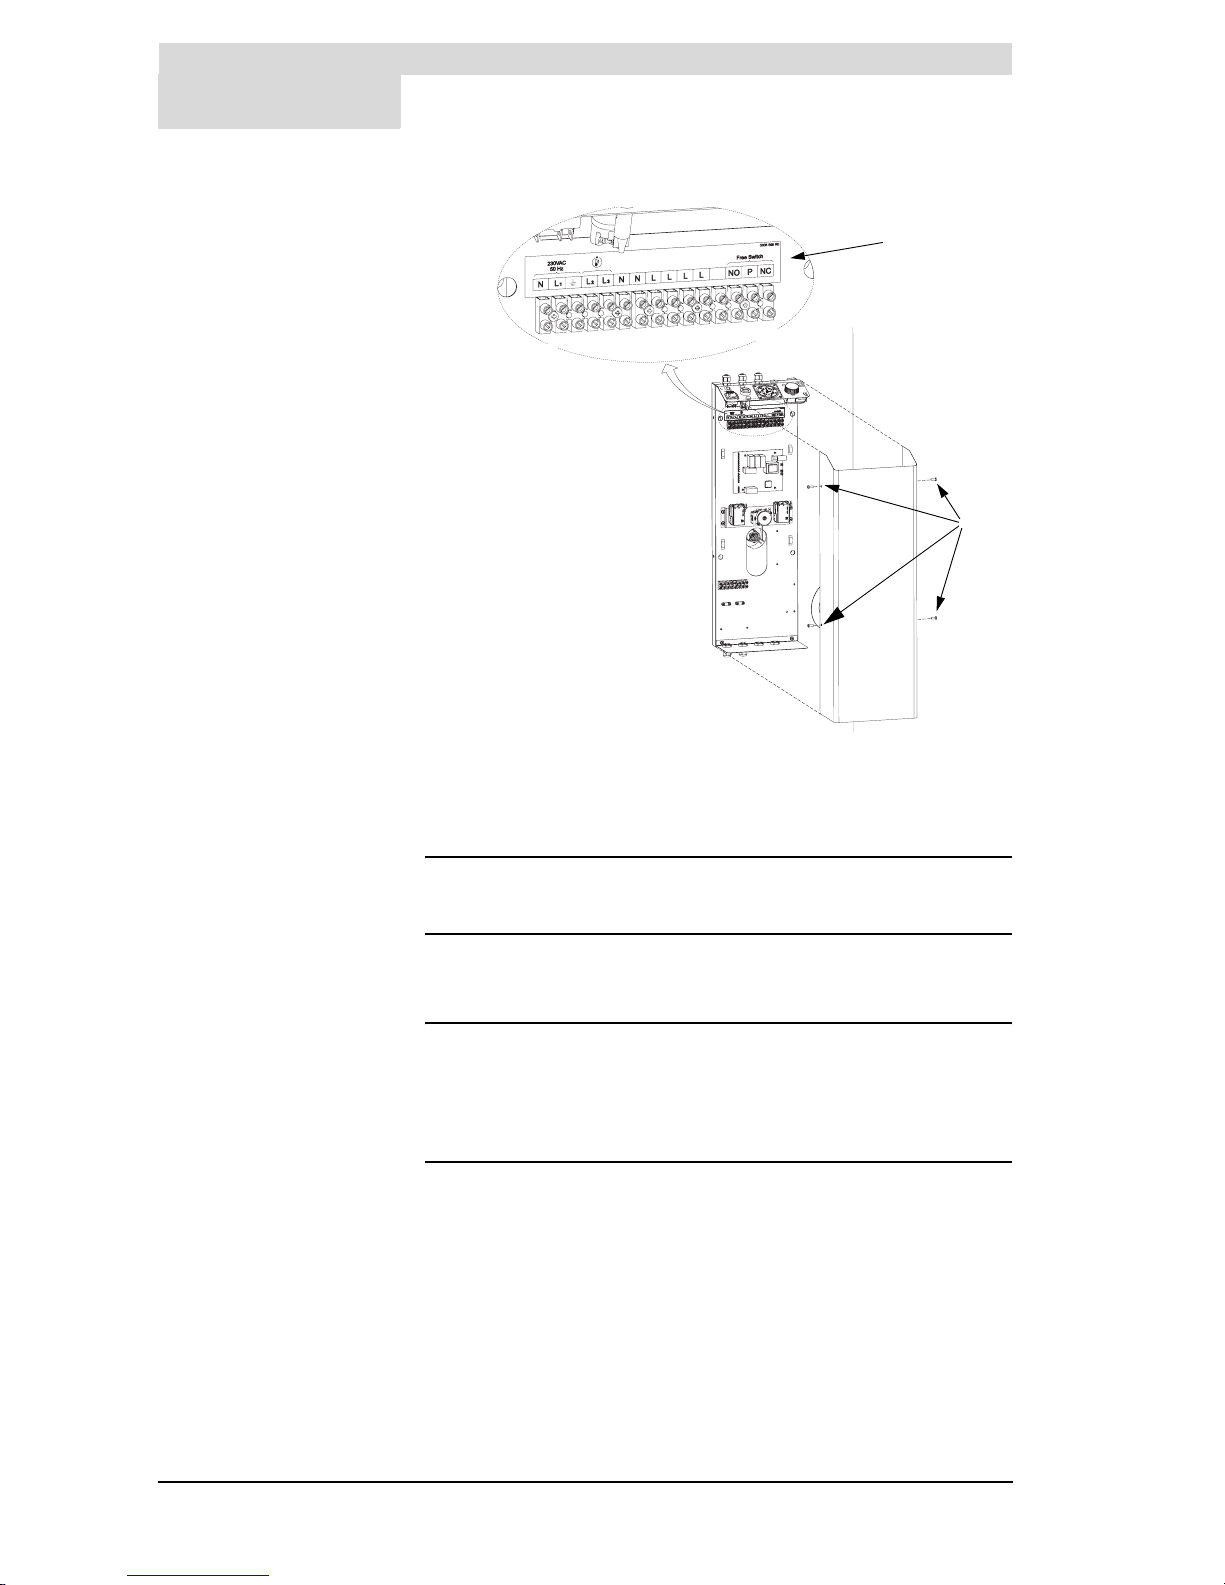
Figure 3.5 shows a front view of the electrical connection block. Ta b le 3 . 8
shows the associated connections.
Tab le 3. 8 Electrical connection block SCE
Mains voltage Flue gas
protection
Week timer circuit Un-
used
Potential free
contact
A
L
1
NL2L
3
NNLLLL-NOPNC
123456789101112131415
Page 32
Installation
32 Instruction Manual SCE
3
is
In preparation, first remove the protective cover from the control column:
• Undo the 4 screws a and remove the protective cover 2 from the electrical
section. The connection block 3 is now visible.
n Note
Refer to ’A.2 Electrical diagram SCE’ for the connection of electrical
components.
3.10.3 Mains voltage
The appliance is supplied without a power cord and main switch.
n Note
In order to receive electrical power, the appliance has to be connected to the
mains voltage by means of a permanent electrical connection. A twoterminal main switch with a contact gap of at least 3 mm must be fitted
between this fixed connection and the appliance. The power cord must have
cores of at least 3 x 1.0 mm2.
1. Lead the power cord through the metric pull relief on the top of the control
column.
2. Connect earth (
A), phase (L
1
) and neutral (N) of the power cord to terminals
1 through 3 of the connection block as indicated in Ta b le 3 . 8 .
3. Tighten the pull relief so that the cable is clamped.
4. If you do not need to make any more connections, then fit the protective
cover back on the control column.
Figure 3.5 Connection block (connections 1 through 15 explained in Ta bl e 3 . 8)
IMD-0134
1
15
b
c
a
Page 33

Checking the supply pressure and burner pressure
Release R.2.0 Uk 33
is
5. Connect the power cord to the main switch.
Warning
Leave the appliance disconnected until you are ready to start it up.
3.10.4 Week timer circuit
1. Cut out the week timer image from the control panel.
2. Fit the week timer in the hole.
3. Connect the week timer by connecting the wires with core bush to 7 (N), 9(L)
and 11 (L).
4. Connect the cable with sliding bush to position B4 of the I/0/II switch.
5. If you do not need to make any more connections, then fit the protective
cover back on the control column
3.10.5 Connecting extra error signal (’Alarm OUT’)
Alarm OUT is a potential free terminal that is switched when an error is
detected. You can connect various objects to it. For example, a signalling
lamp (max. 250V, 10A) to indicate malfunctioning of the appliance .
The objects can be connected to normally open contacts (lamp ON on error)
or to normally closed contacts (lamp OFF on error).
1. Feed the power cord through the metric pull relief on the top of the control
column.
2. Connect the extra indicator at points 13 (NO) and 14 (P), and/or 14 (P) and
15 (NC) according to Ta bl e 3 .8 .
3. Tighten the pull relief so that the cable is clamped.
4. If you do not need to make any more connections, then fit the protective
cover back on the control column.
3.11 Checking the supply
pressure and burner
pressure
n Note
Before you start up the appliance and/or begin to check the supply pressure
and burner pressure, you must first fill the appliance. Please refer to
paragraph ’4.2 Filling the appliance’ for filling instructions.
cCaution
Before starting-up for the first time, and following conversion, you must
always check the supply pressure and burner pressure. If necessary, adjust
these to be certain of optimum performance of the appliance.
n Note
The easiest way to check the gas pressures is by using two pressure
gauges. This procedure assumes that these two gauges are available.
Page 34
Installation
34 Instruction Manual SCE
3
is
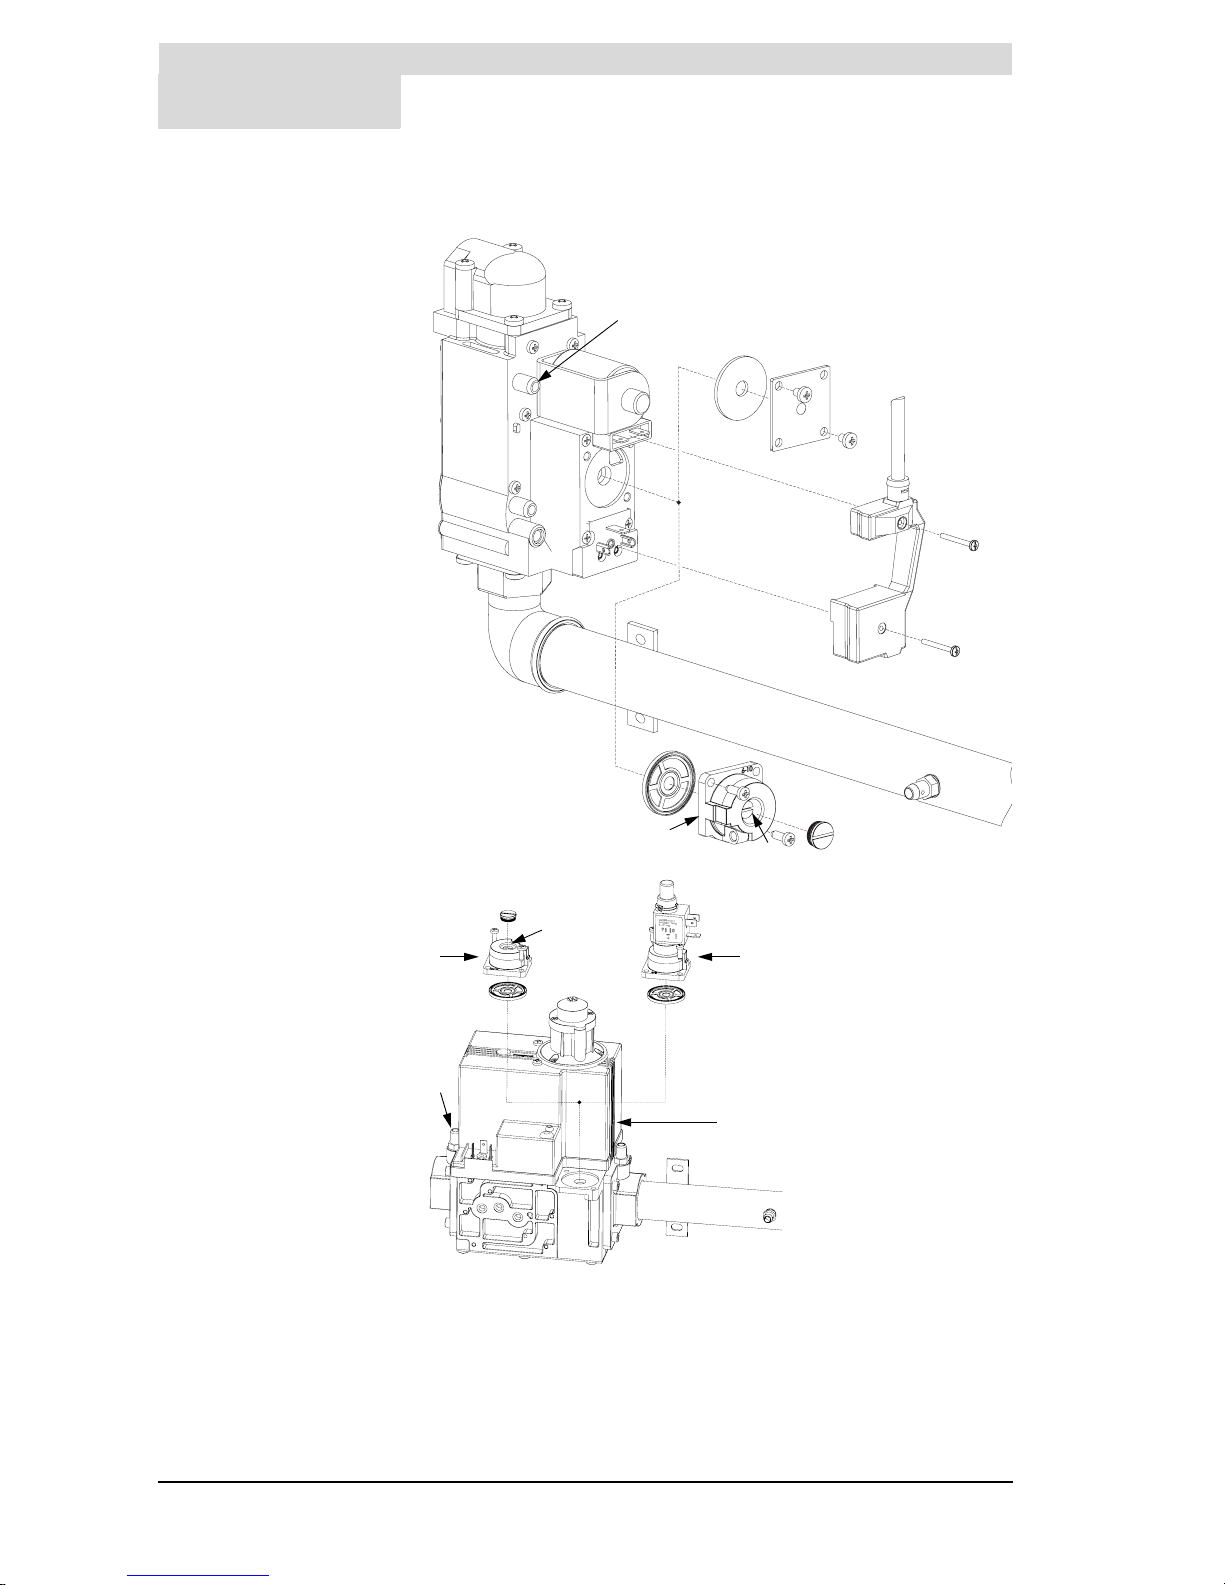
Legend
a burner pressure regulator
b burner pressure regulator cap
c burner pressure regulator
adjusting screw
d gas control connector
e flat sealing plate
f supply pressure nipple
g gas control
h manifold nipple
i high-low control
Block for SCE 80-115, 80-140, 80-180, 95-199, 95-260, 70-360, 65-400
Figure 3.6 Gas blocks for the two designs
e
d
f
g
b
IMD-0127
a
c
h
IMD-0129
a i
g
f
b
c
h
Block for SCE 65-500
Page 35
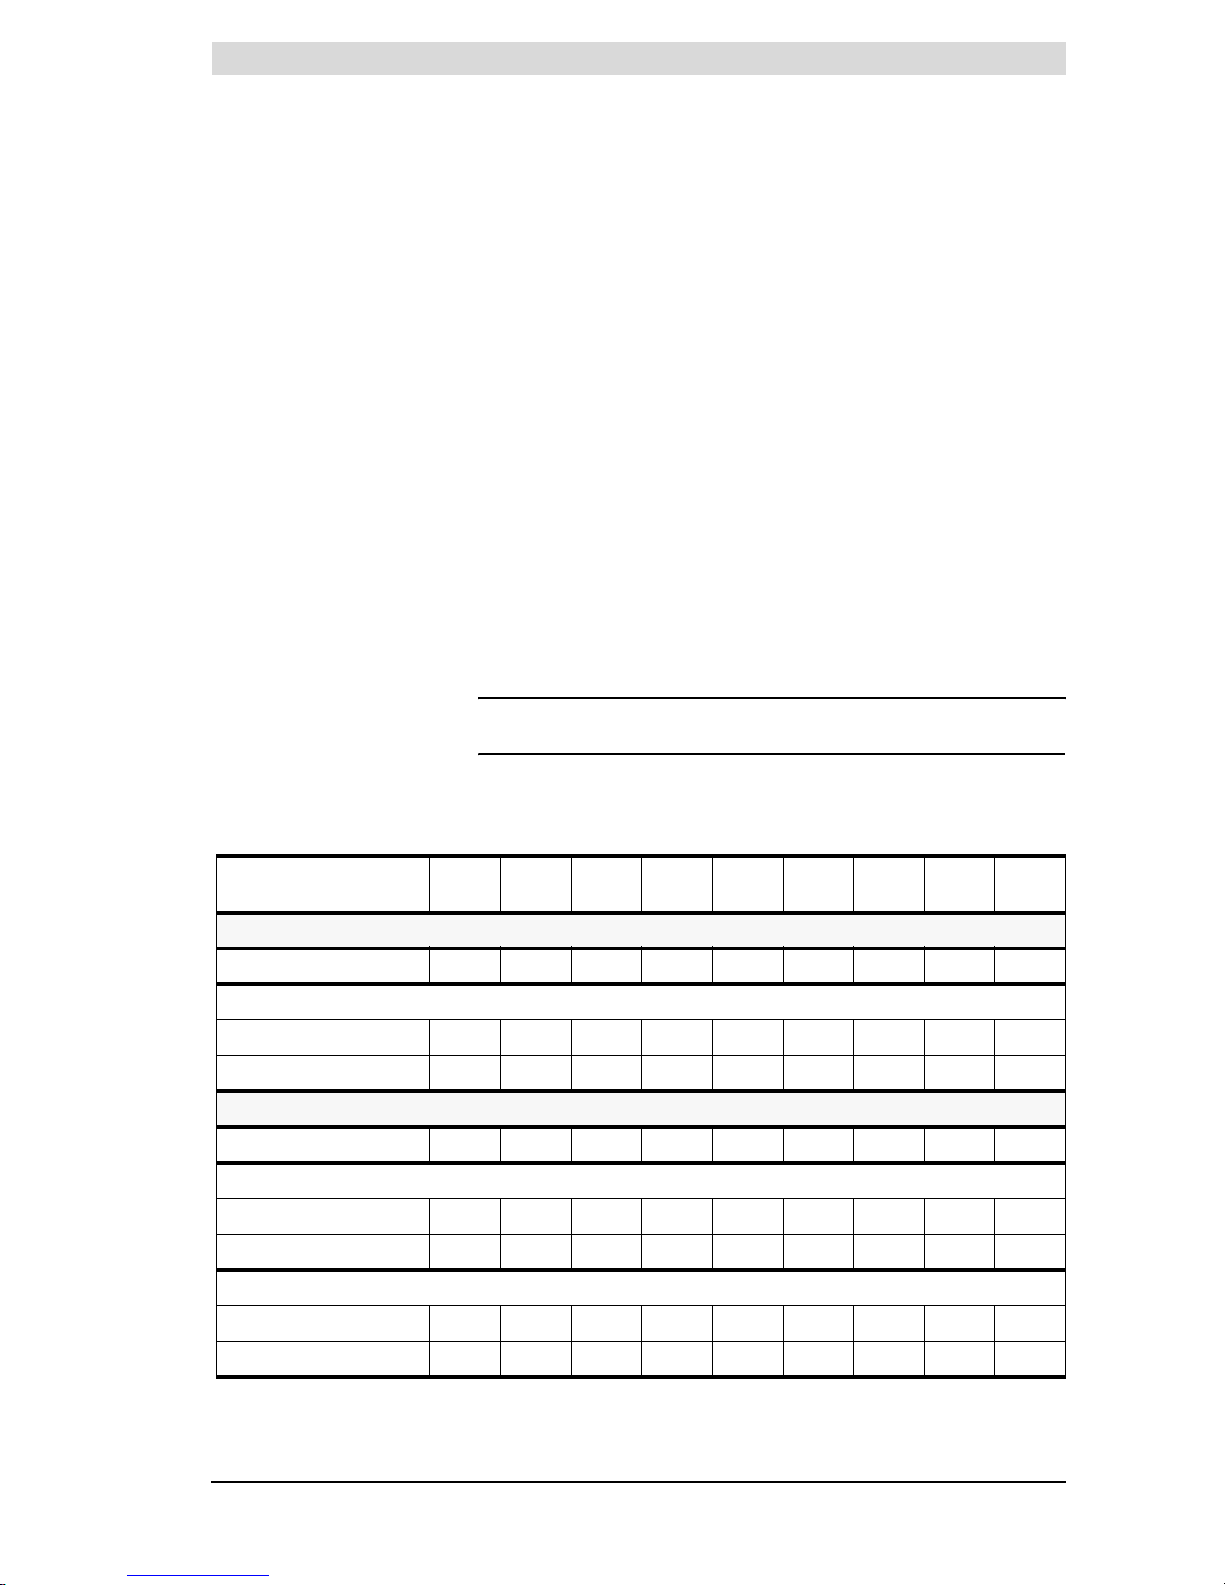
Checking the supply pressure and burner pressure
Release R.2.0 Uk 35
is
To check the supply pressure and burner pressure, proceed as follows:
1. Disconnect the appliance from the mains. See paragraph ’7.3.2 Disconnect
the appliance from the mains’.
2. On the gas control (Figure 3.6) there are two nipples. To check the supply
pressure, nipple f is used. The other nipple on the gas control is not used.
The manifold nipple h is used for measuring the burner pressure.
Sealing screws are located inside the nipples. Loosen both sealing screws
by a few turns. Do not loosen them completely; this makes them difficult to
tighten again.
3. Connect a pressure gauge to the manifold nipple h.
4. Open the gas supply and vent the gas supply line via nipple f.
5. Connect a pressure gauge to nipple f as soon as gas starts to flow from this
nipple.
6. Switch on the power to the appliance using the mains switch.
7. Set the control thermostat to the highest position and start the appliance
running by putting the I/0/II switch to I position.
8. The heating cycle will start and the burner tray will ignite after a short time.
9. After the burner tray has ignited, wait for approximately 1 minute before you
start reading the dynamic pressures.
10. Use the pressure gauge to read the supply pressure at nipple f. See Table 3.9.
n Note
Consult the mains gas supply company if the supply pressure is not correct.
11. Use the pressure gauge to read the burner pressure at the burner pressure
nipple h. Refer to Ta bl e 3 .9 .
Tab le 3. 9 Conversion data for appliance category II
2H3+
DESCRIPTION Unit SCE
80-115
SCE
80-140
SCE
80-180
SCE
95-199
SCE
95-260
SCE
70-360
SCE
65-400
SCE
65-500
Data for natural gas, gas category 2H
Diameter of orifices mm 2.90 3.20 3.20 3.30 2.95 3.20 3.30 3.90
G20
Supply pressure mbar 20 20 20 20 20 20 20 20
Burner pressure mbar 8.5 8.6 7.8 8.5 8.5 9.2 7.8 11.5
Data for LP gas, gas category 3+
Diameter of orifices mm 1.60 1.70 1.60 1.75 1.50 1.70 1.75 2.25
G30 (butane)
Supply pressure mbar 30 30 30 30 30 30 30 30
Burner pressure
(1)
mbar--------
G31 (propane)
Supply pressure mbar 37 37 37 37 37 37 37 37
Burner pressure
(1)
mbar--------
1. If using a flat sealing plate or high-low control program, instead of a burner pressure regulator, it is assumed that the burner pressure
is equal to the supply pressure. In practice however, the burner pressure will be lower.
Page 36

Installation
36 Instruction Manual SCE
3
is
n Note
If the burner pressure is not correct and the appliance is fitted with a flat
sealing plate or high-low control, you will not be able to adjust the pressure.
In this case, consult your installer or supplier.
If the appliance is fitted with a burner pressure regulator, then the pressure
can be adjusted by following steps 12 through 17.
12. Remove the cap b from the burner pressure regulator a.
13. Adjust the burner pressure by turning the adjusting screw c, depending on
the correction required:
- Adjusting screw anticlockwise: burner pressure decreases.
- Adjusting screw clockwise: burner pressure increases.
14. Cover the opening of the adjusting screw and check the burner pressure
against the target value from Ta bl e 3 . 9.
15. If the pressure reading is not correct, repeat steps 13 and 14 until the correct
pressure is attained.
16. Fit the cap b on the burner pressure regulator.
17. Shut down the appliance by putting the I/0/II switch to 0 position.
18. Shut off the gas supply.
19. Disconnect the two pressure gauges and re-tighten the sealing screws in the
nipples.
n Note
Before starting-up the appliance, take time to fill in the warranty card
supplied with the appliance. This enables us to guarantee the quality of our
systems, and to further enhance our warranty procedure.
Please return this card as soon as possible. Your customer will then receive
a warranty certificate with our warranty conditions.
3.12 Conversion to a
different gas
category
cCaution
The conversion may only by carried out by an authorised installer.
3.12.1 Introduction
If the appliance must operate on a family of gas (LP gas or natural gas) other
than the category of gas for which the appliance has been set up at the
factory, the appliance will have be adapted using a special conversion kit.
cCaution
Check the supply pressure and burner pressure after conversion.
Page 37
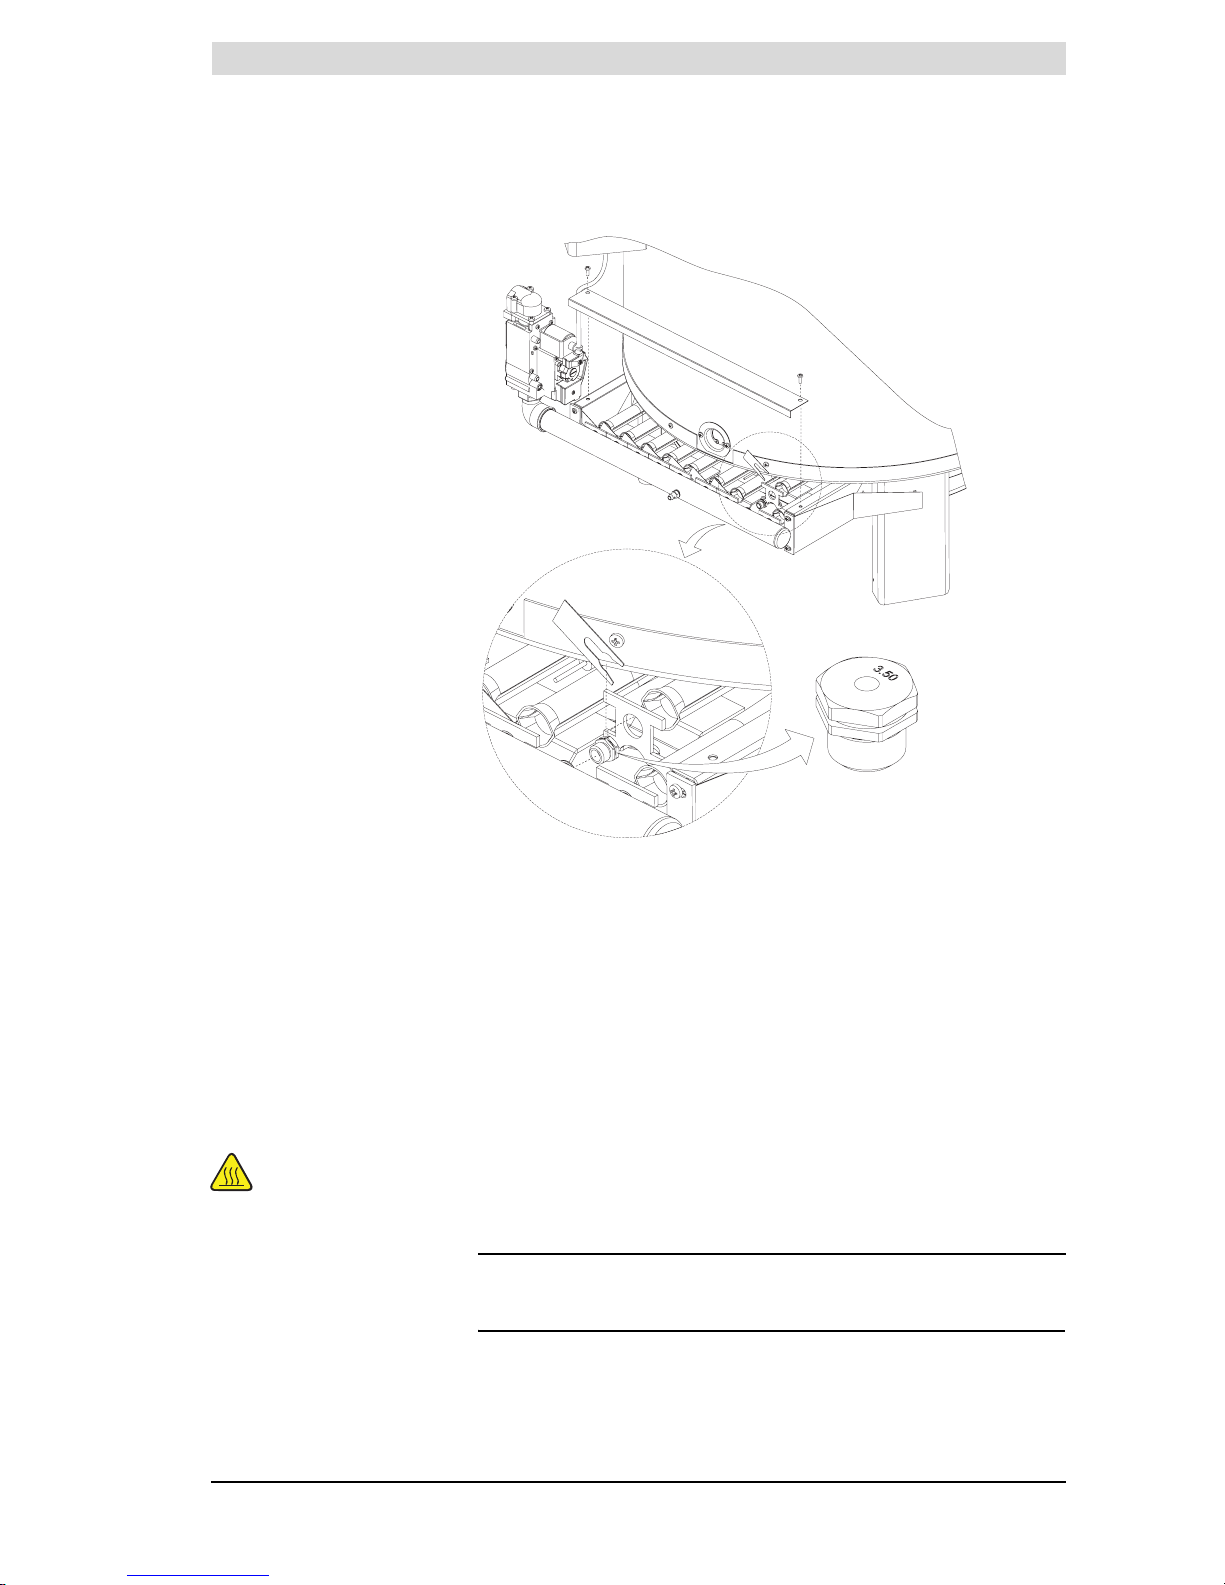
Conversion to a different gas category
Release R.2.0 Uk 37
is
The conversion of the SCE 65-500 differs from the other SCE-appliances. The
conversion procedures are described in paragraphs:
• ’3.12.2 Conversion to a different gas SCE 80-115 through 65-400’
• ’3.12.3 Conversion to a different gas category SCE 65-500’.
3.12.2 Conversion to a different gas SCE 80-115 through 65-400
(80-115, 80-140, 80-180, 95-199, 95-260, 70-360, 65-400)
1. Disconnect the appliance from the mains. See paragraph ’7.3.2 Disconnect
the appliance from the mains’.
2. Shut off the gas supply.
Take care
The burner may be
hot.
3. Unscrew the cover plate a from the burner support.
4. Use a suitable tool to remove the locking strips b. Note: the locking strips
have very sharp edges.
Withdraw the locking strips straight upwards.
n Note
The radiation shield / condensation tray can be temporarily loosened to
simplify assembly of the burner.
5. Remove the burners one by one from their brackets at the front. To do this,
you first move them away from you and then downwards. The orifices will
now be accessible.
Legend
a cover plate
b locking strip
c orifice with stamped figure
Figure 3.7 Exchanging orifices
1
2
3
IMD-
Page 38
Installation
38 Instruction Manual SCE
3
is
6. Remove the orifices.
7. Select and fit the correct orifices from the conversion kit, based on Ta b le 3 . 9.
The orifice diameter is stamped into each orifice c.
8. Refit the burners back in their original position.
9. Re-fit the locking strips.
n Note
If the radiation shield /condensation tray was loosened, re-tighten it.
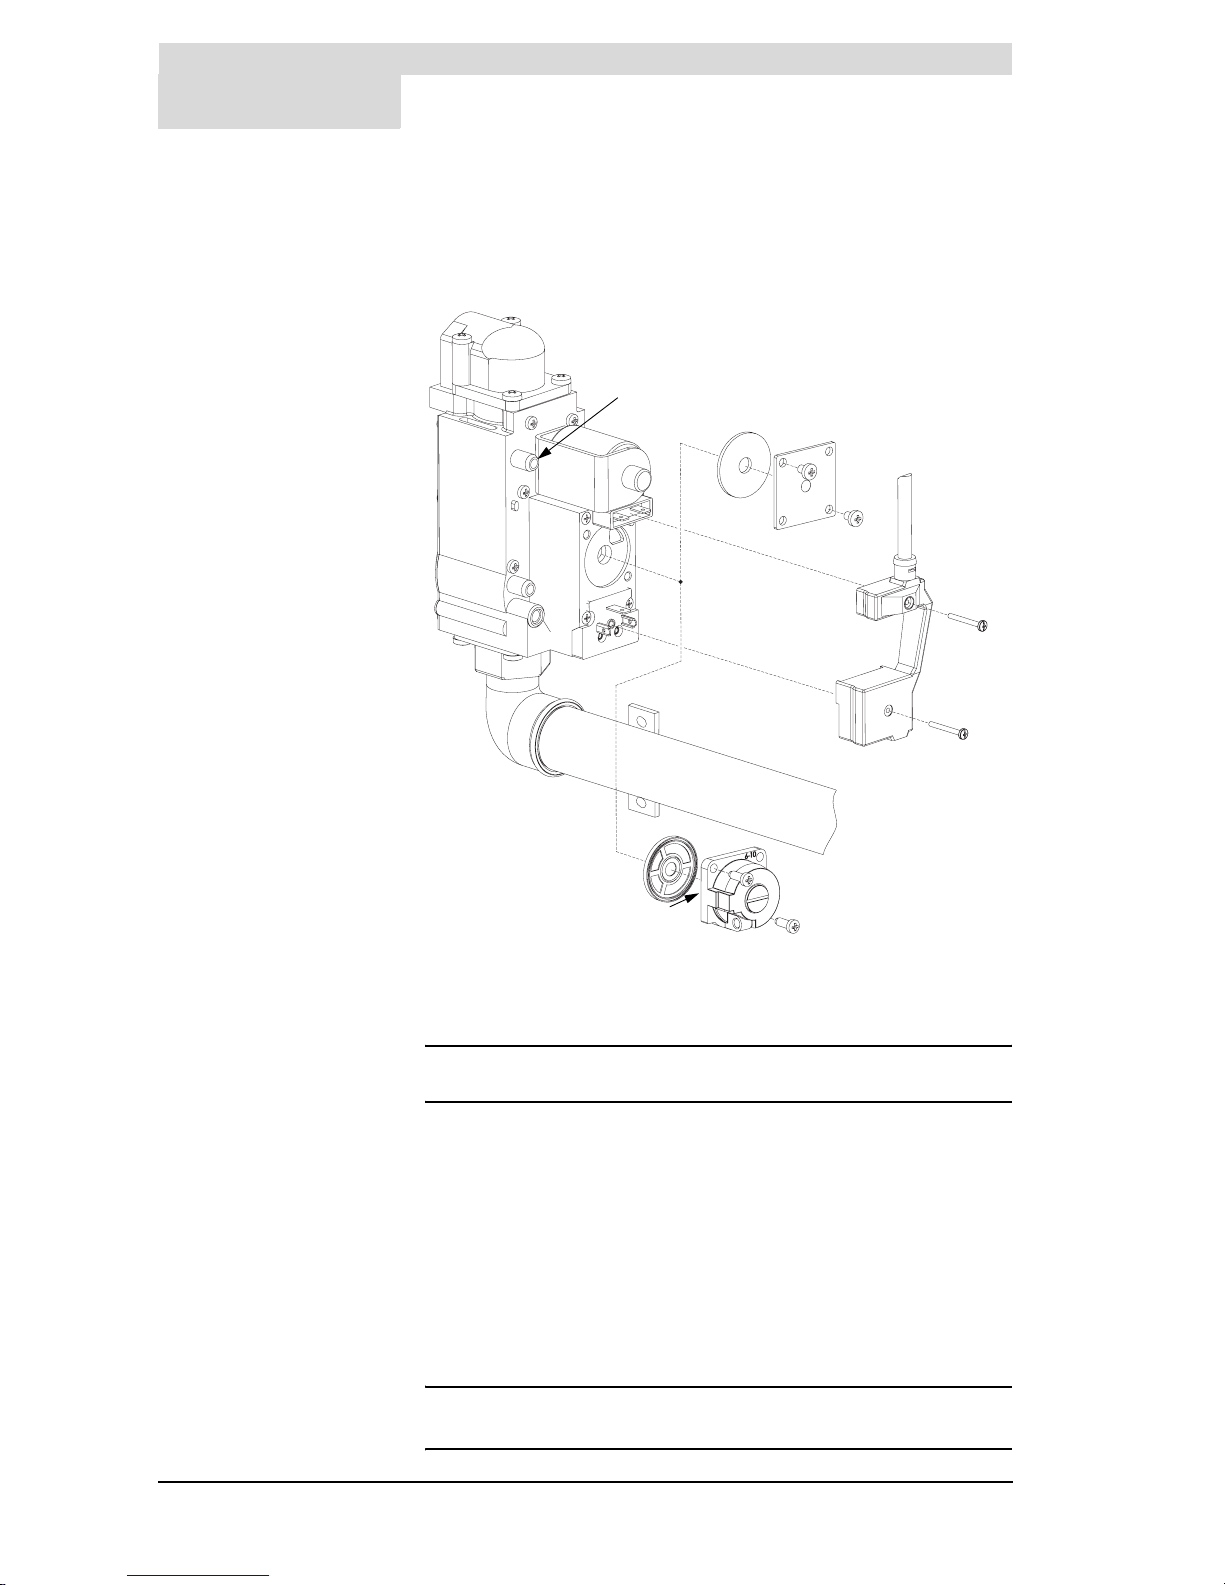
10. Check whether the block is equipped with a burner pressure regulator d or
a flat sealing plate f.
11. Check with Tab le 3 . 5 whether a burner pressure regulator is required for the
new gas category.
12. If the flat sealing plate or burner pressure regulator need to be replaced:
- Undo the gas control connector e.
- Disassemble the flat sealing plate f or burner pressure regulator d.
- Fit the flat sealing plate or burner pressure regulator supplied with the
conversion kit.
- Fit the gas control connector e.
cCaution
13. Check the burner and supply pressure (see paragraph 3.11).
Legend
See Figure 3.7 for 1 through 3.
d burner pressure regulator
e gas control connector
f flat sealing plate
g supply pressure nipple
h gas control
Figure 3.8 Conversion of gas control
f
e
g
h
IMD-0131
d
Page 39
Conversion to a different gas category
Release R.2.0 Uk 39
is
14. Remove the sticker showing the new gas category from the conversion kit,
and attach it below the appliance’s rating plate. This clearly indicates that the
appliance may no longer be run on the gas for which it was originally
supplied.
15. Start the appliance (see paragraph 7.2).
3.12.3 Conversion to a different gas category SCE 65-500
Introduction
This paragraph describes the:
• Conversion from LP gas to natural gas.
• Conversion from natural gas to LP gas.
Conversion from LP gas to natural gas
1. Perform steps 1 through 9 of paragraph ’3.12.2 Conversion to a different gas
SCE 80-115 through 65-400’.
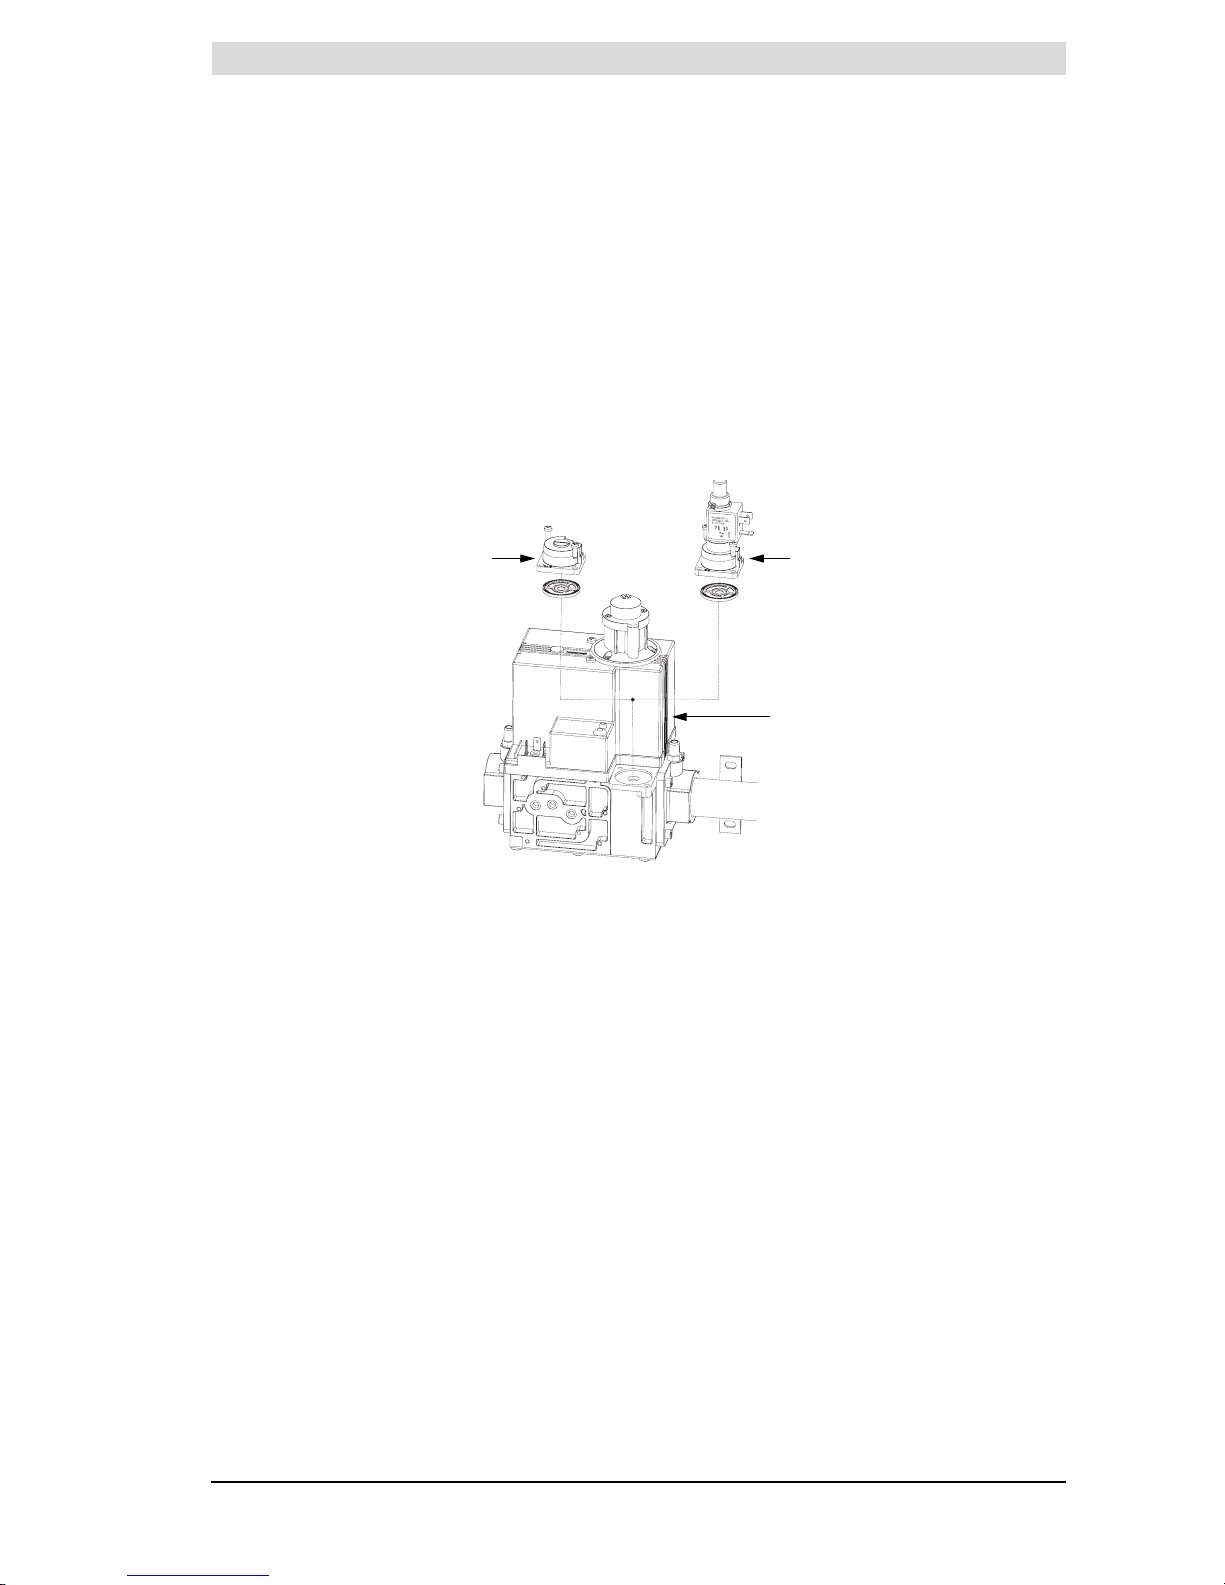
2. Detach the high-low control b.
3. Fit the burner pressure regulator a including the sealing gasket from the
conversion kit. Attach the burner pressure regulator to the gas control c
using the two small screws supplied.
Legend
a burner pressure regulator
b high-low control
c gas control
Figure 3.9 Conversion of gas control SCE 65-500
IMD-0132
1 2
3
Page 40
Installation
40 Instruction Manual SCE
3
is
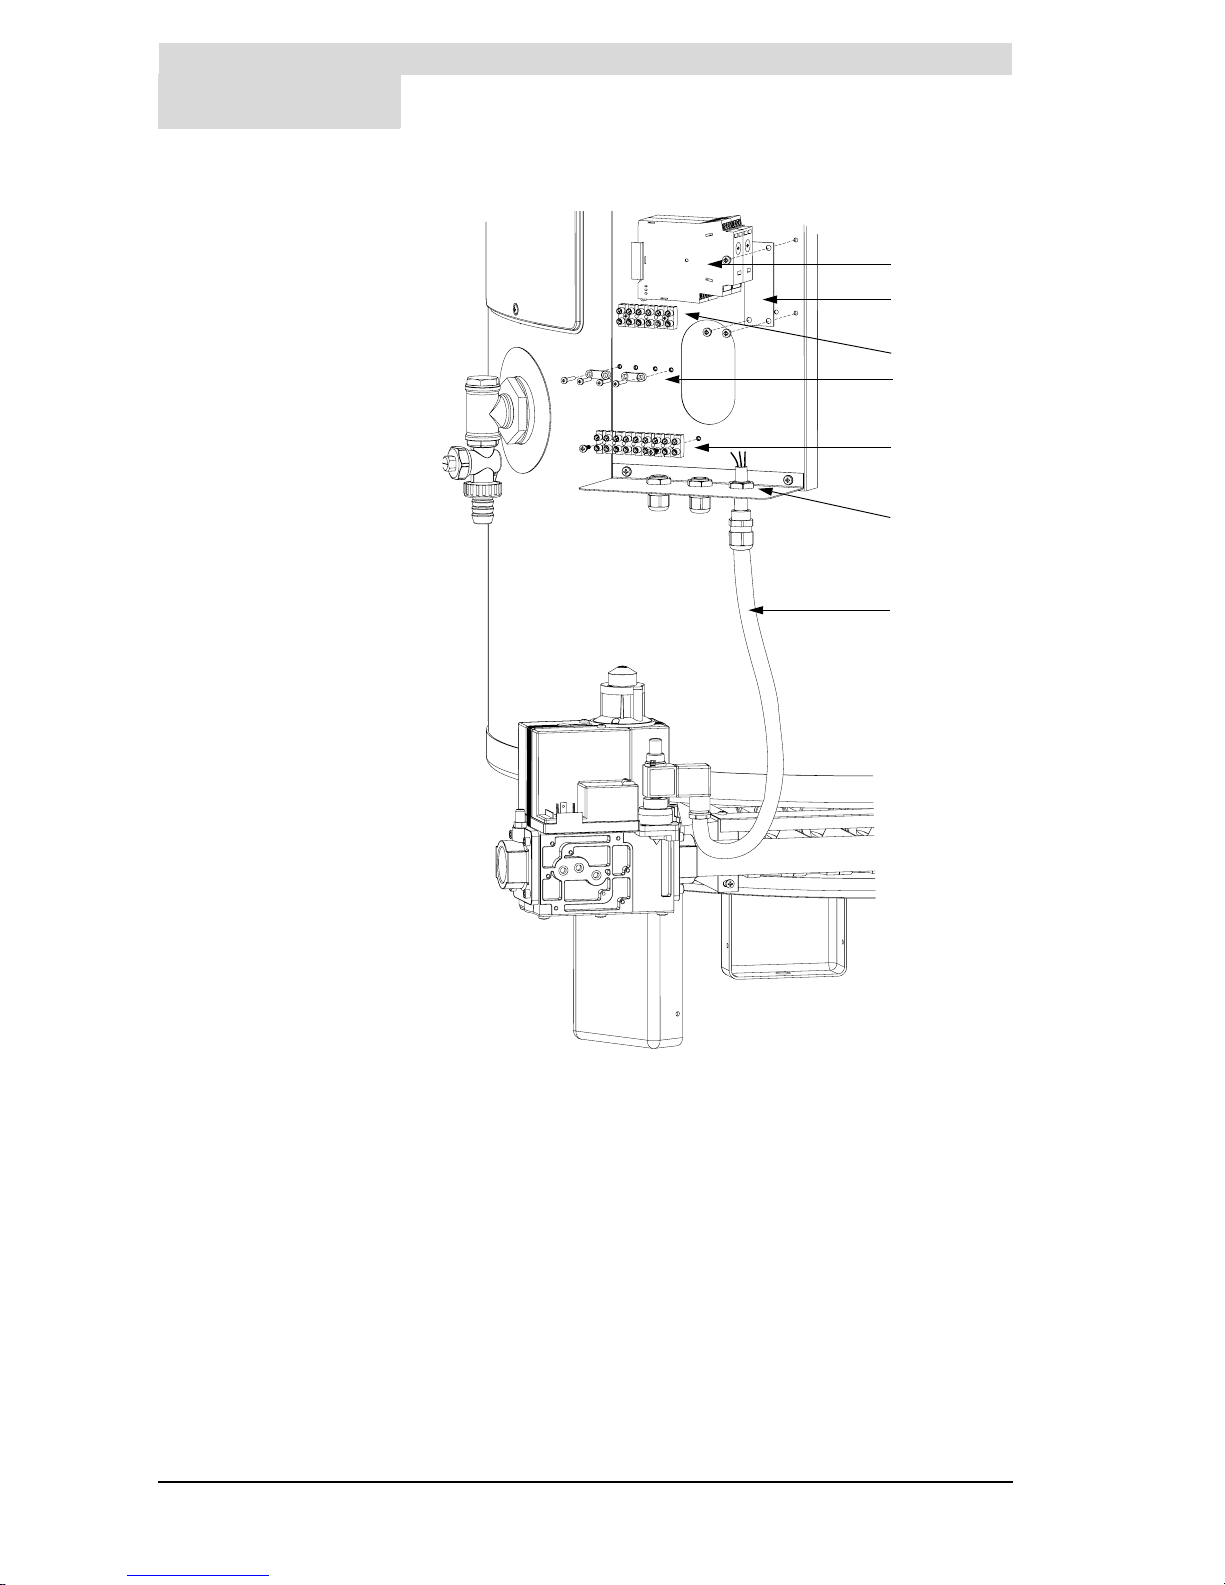
4. Detach the cables between the 6-terminal connector strip f and 9-terminal
connector strip h. These are the cables for the timers, high-low control, gas
control, glow igniter and ionisation rod.
5. Undo timers d, bracket e, cable-harness (not shown) and the 9-terminal
connector strip h.
6. Undo the metrical pull relief i with high-low control cable j. Remove this
cable.
7. Fit the stop plug from the conversion set in the place of the metric pull relief.
8. Connect the cables of the gas control, the glow igniter, and ionisation rod to
the 6-terminal connector strip as shown in the electrical diagram. See
appendices ’A.2.1 Electrical diagram SCE 65-500 LP’ and ’A.2.2 Electrical
diagram SCE’.
9. Clamp the gas control cable in one of the pull reliefs supplied g. Do the
same for the cables from the glow igniter and ionisation rod.
Legend
See Figure 3.9 for the
numbers a to c.
d timers
e bracket
f 6-terminal connector strip
g pull relief
h 9-terminal connector strip
i metrical pull relief
j high-low control cable
Figure 3.10 Fitting and removal of conversion components
IMD-0130
4
5
6
7
8
9
0
Page 41

Conversion to a different gas category
Release R.2.0 Uk 41
is
cCaution
10. Check the burner and supply pressure (see paragraph 3.11).
11. Remove the sticker showing the new gas category from the conversion kit,
and attach it below the appliance’s rating plate. This clearly indicates that the
appliance may no longer be run on the gas for which it was originally
supplied.
12. Start the appliance (see paragraph 7.2).
Conversion from natural gas to LP gas
1. Perform steps 1 through 9 of paragraph ’3.12.2 Conversion to a different gas
SCE 80-115 through 65-400’.
2. Detach the burner pressure regulator a.
3. Fit the high-low control b including the sealing gasket from the conversion
kit. Attach the high-low control to the gas control using two small screws.
4. Detach the cables from the gas control, the glow igniter, and the ionisation
rod from the 6-terminal connector strip f and pull relief g.
5. Fit the timers d including cable harness plus 9-terminal connector strip h
from the conversion kit, to the control column.
6. Remove the stop plug (not shown) from the underside of the control column
and replace this with metrical pull relief i from the conversion kit.
7. Lead the high-low control cable j through the pull relief and tighten the pull
relief by turning it until the cable is clamped.
8. Connect the high-low control cable j with connector to the high-low
control b.
9. Connect the cables from the timers, high-low control, gas control and the
glow igniter as shown in the electrical diagram. See appendix ’A.2 Electrical
diagram SCE’.
cCaution
10. Check the burner and supply pressure (see paragraph 3.11).
11. Remove the sticker showing the new gas category from the conversion kit,
and attach it below the appliance’s rating plate. This clearly indicates that the
appliance may no longer be run on the gas for which it was originally
supplied.
12. Start the appliance (see paragraph 7.2).
Page 42

Installation
42 Instruction Manual SCE
3
is
Page 43
Introduction
Release R.2.0 Uk 43
gis
4 Filling and draining
4.1 Introduction Topics covered in this chapter:
• Filling the appliance.
• Draining the appliance.
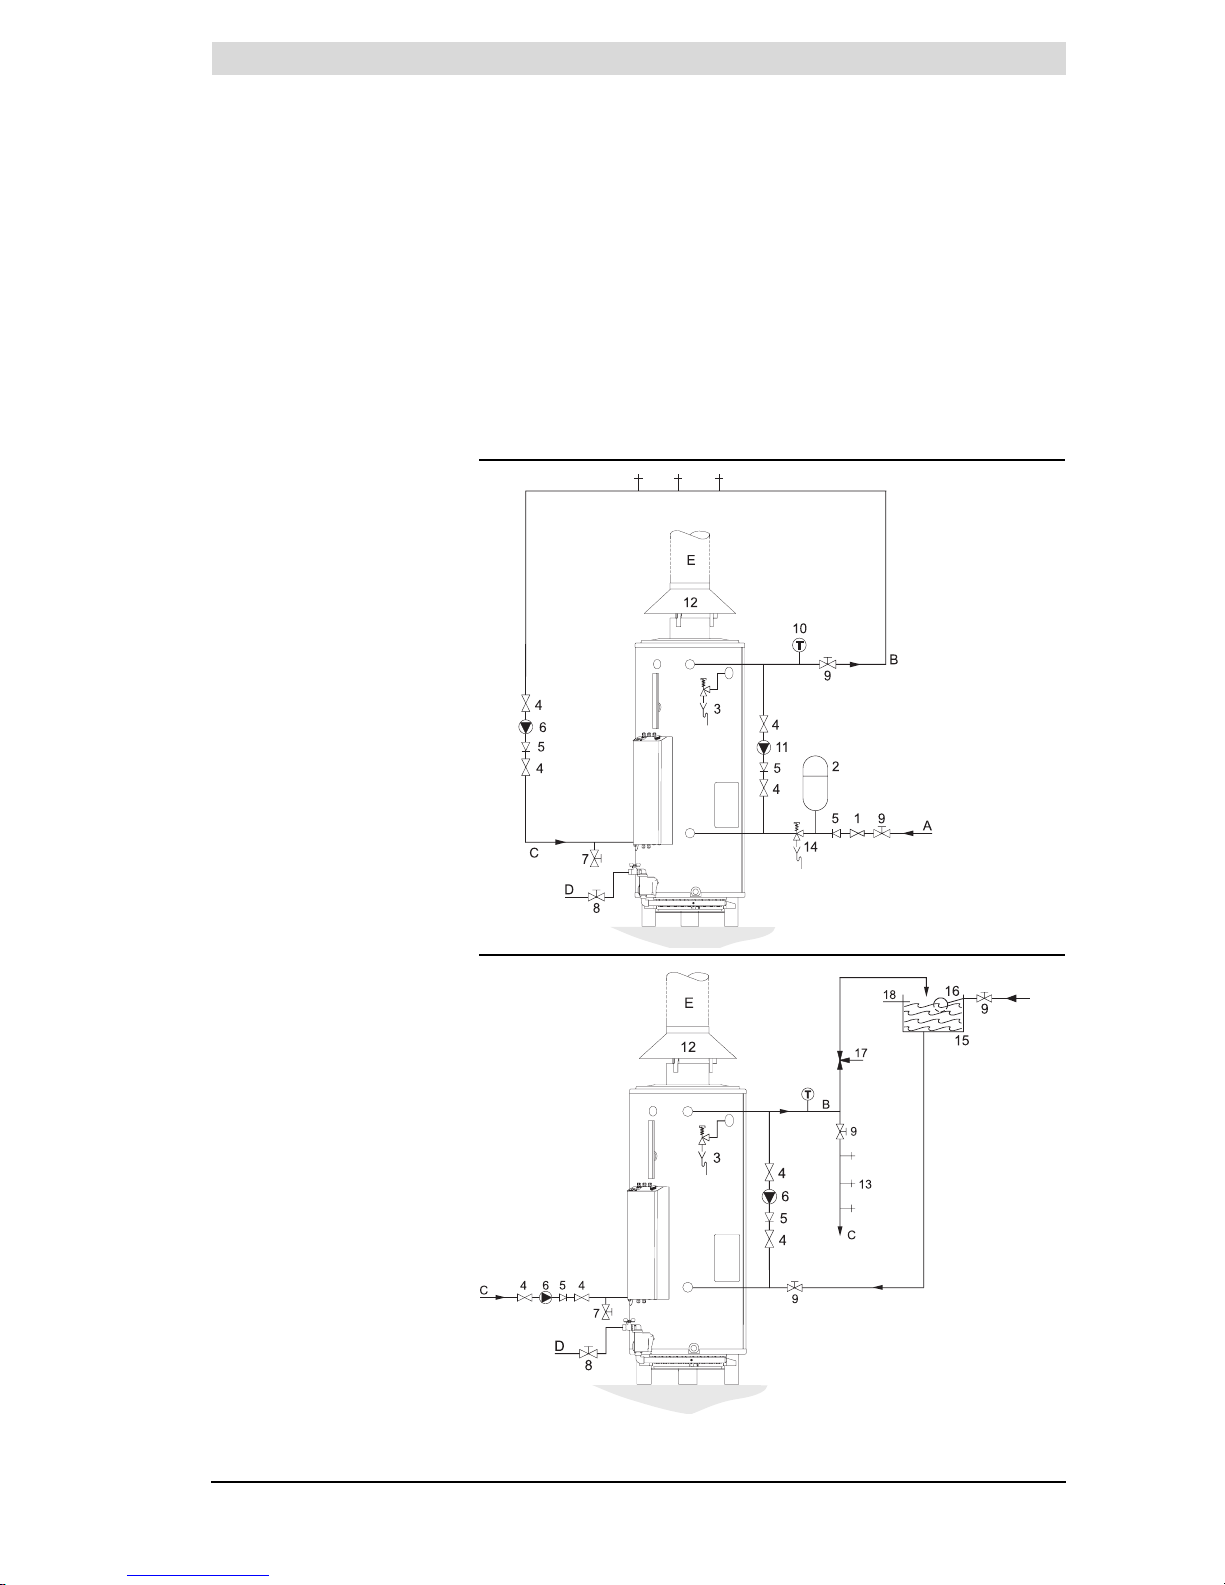
The components referred to in these paragraphs are illustrated in Figure 4.1.
Legend
a pressure-reducing valve
(obligatory)
b expansion vessel
(obligatory)
c T&P valve
(obligatory)
d stop valve
(recommended)
e non-return valve
(obligatory)
f circulation pump
(optional)
g drain valve
h gas valve
(obligatory)
i stop valve
(obligatory)
j temperature gauge
(recommended)
k shunt pump
(optional)
l draught diverter
m hot water draw-off points
n pressure relief valve
(obligatory)
o water cistern
p float valve
q 3-way aeration valve
(recommended)
r overflow pipe
a cold water supply
b hot water outlet
c circulation pipe
d gas supply
e flue gas discharge
Figure 4.1 Installation diagrams
13
UNVENTED
IMD-0146
A
VENTED
IMD-0147
gis
Page 44

Filling and draining
44 Instruction Manual SCE
4
gis
4.2 Filling the appliance
4.2.1 Filling unvented installations
To fill the appliance, proceed as follows.
1. Open the valve i in the hot water pipe and, if present, the valve d for the
circulation pump.
2. Close drain valve g
3. Open the nearest hot water draw-off points m.
4. Open the valve i on the cold water side a so that cold water flows into the
appliance.
5. Completely fill the appliance (when cold water flows at normal pressure from
the nearest hot water draw-off point, the appliance is full).
6. Bleed the entire installation of air, for example by opening all hot water drawoff points.
7. The appliance is now under water supply pressure. There should be no
water coming out of the T&P valve. If this does happen, the cause might be:
- The water supply pressure is greater than the specified 8 bar.
Do place a pressure-reducing valve a after all.
- The overflow valve in the protected cold supply setup is defective or
incorrectly fitted.
4.2.2 Filling vented installations
To fill the appliance, proceed as follows.
1. Open the valve i in the hot water pipe and, if present, the stop valves d for
the circulation pump.
2. Close the drain valve g.
3. Open the nearest hot water draw-off point m.
4. Open the valve i on the cold water side a so that cold water flows into the
appliance.
5. Completely fill the appliance (when cold water flows at normal pressure from
the nearest hot water draw-off point, the appliance is full).
6. Bleed the entire installation of air, for example by opening all hot water drawoff points.
7. The appliance is now under water supply pressure. There should be no
water coming out of the T&P valve c. If this does happen, the T&P valve
might be defective or incorrectly fitted.
4.3 Draining the
appliance
4.3.1 Draining unvented installations
Some service activities require the appliance to be drained. Proceed as follows:
1. Shut the appliance down by putting the I/0/II switch to 0 position.
2. Disconnect the appliance by putting the mains switch between the appliance
and the mains power supply to 0 position.
3. Shut off the gas supply h.
4. Close the valve i in the hot water pipe b.
5. Close the valve i in the cold water supply a.
6. Open the drain valve g.
7. Bleed the appliance (or installation) so that it drains completely empty.
Page 45

Draining the appliance
Release R.2.0 Uk 45
gis
4.3.2 Draining vented installations
Some service activities require the appliance to be drained. Proceed as follows:
1. Shut the appliance down by putting the I/0/II switch to 0 position.
2. Disconnect the appliance by putting the mains switch between the appliance
and the mains power supply to 0 position.
3. Shut off the gas supply h.
4. Close the stop valve valve i in the hot water pipe b.
5. Close the supply valve in the cold water supply.
6. Open the drain valve g.
7. Bleed the appliance (or installation) so that it drains completely empty.
Page 46

Filling and draining
46 Instruction Manual SCE
4
gis
Page 47
Introduction
Release R.2.0 Uk 47
gis
5Operating
5.1 Introduction Topics covered in this chapter:
• 5.2 Control panel;
• 5.3 Explanation of the icons;
• 5.4 I/0/II switch;
• 5.5 Control thermostat;
• 5.6 Burner control reset button;
• 5.7 Week timer circuit;
• 5.8 Flue gas backflow safeguard reset button.
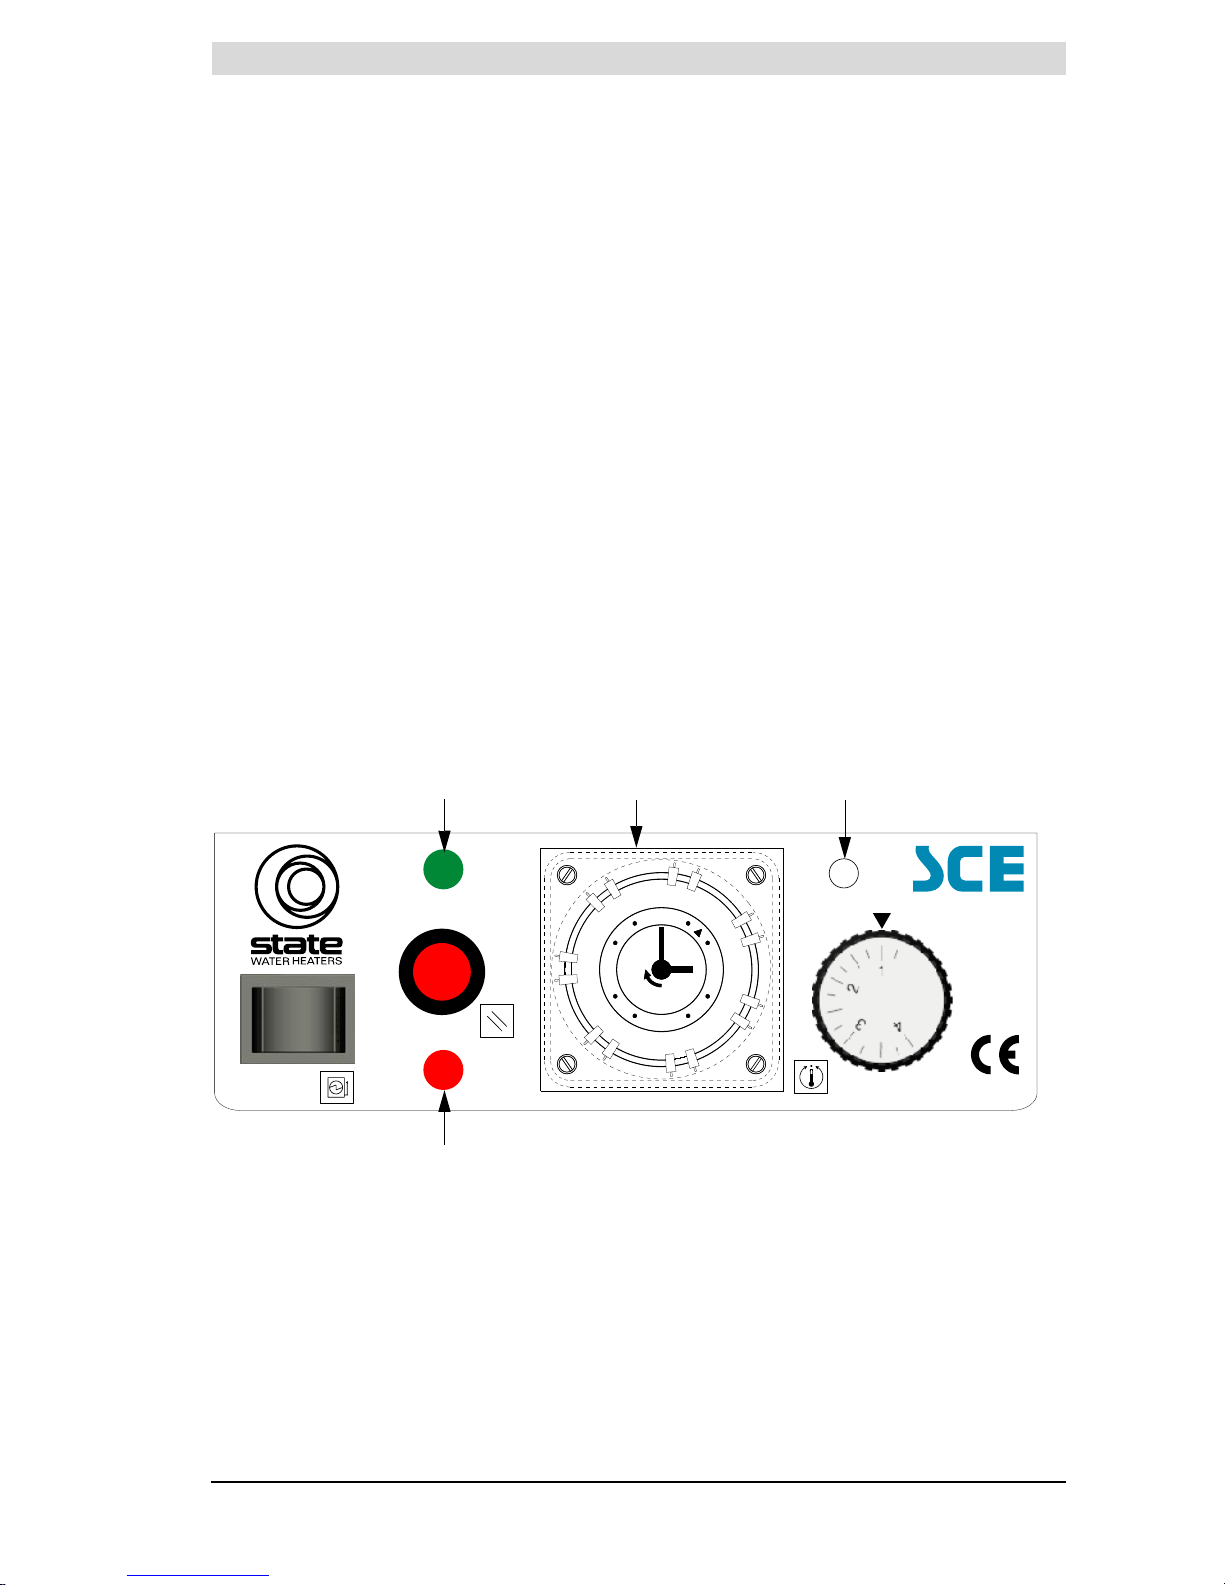
5.2 Control panel Figure 5.1 shows the control panel The panel consists of:
•a I/0/II switch;
• a reset button;
• a control thermostat with rotary knob;
• two status LEDs;
• a week timer (optional);
• a Power Anode indicator light (optional).
Figure 5.1 The control panel
0063
12
12
6
3
9
1
0
0
1
0
1
0
1
0
1
0
1
0
1
Mon
Mon
Sun
Sun
Sat
Sat
Fri
Fri
Thu
Thu
Wed
Wed
Tue
Tue
O
II
I
RESET
da b
c
gis
Page 48
Operating
48 Instruction Manual SCE
5
gis
5.3 Explanation of the
icons
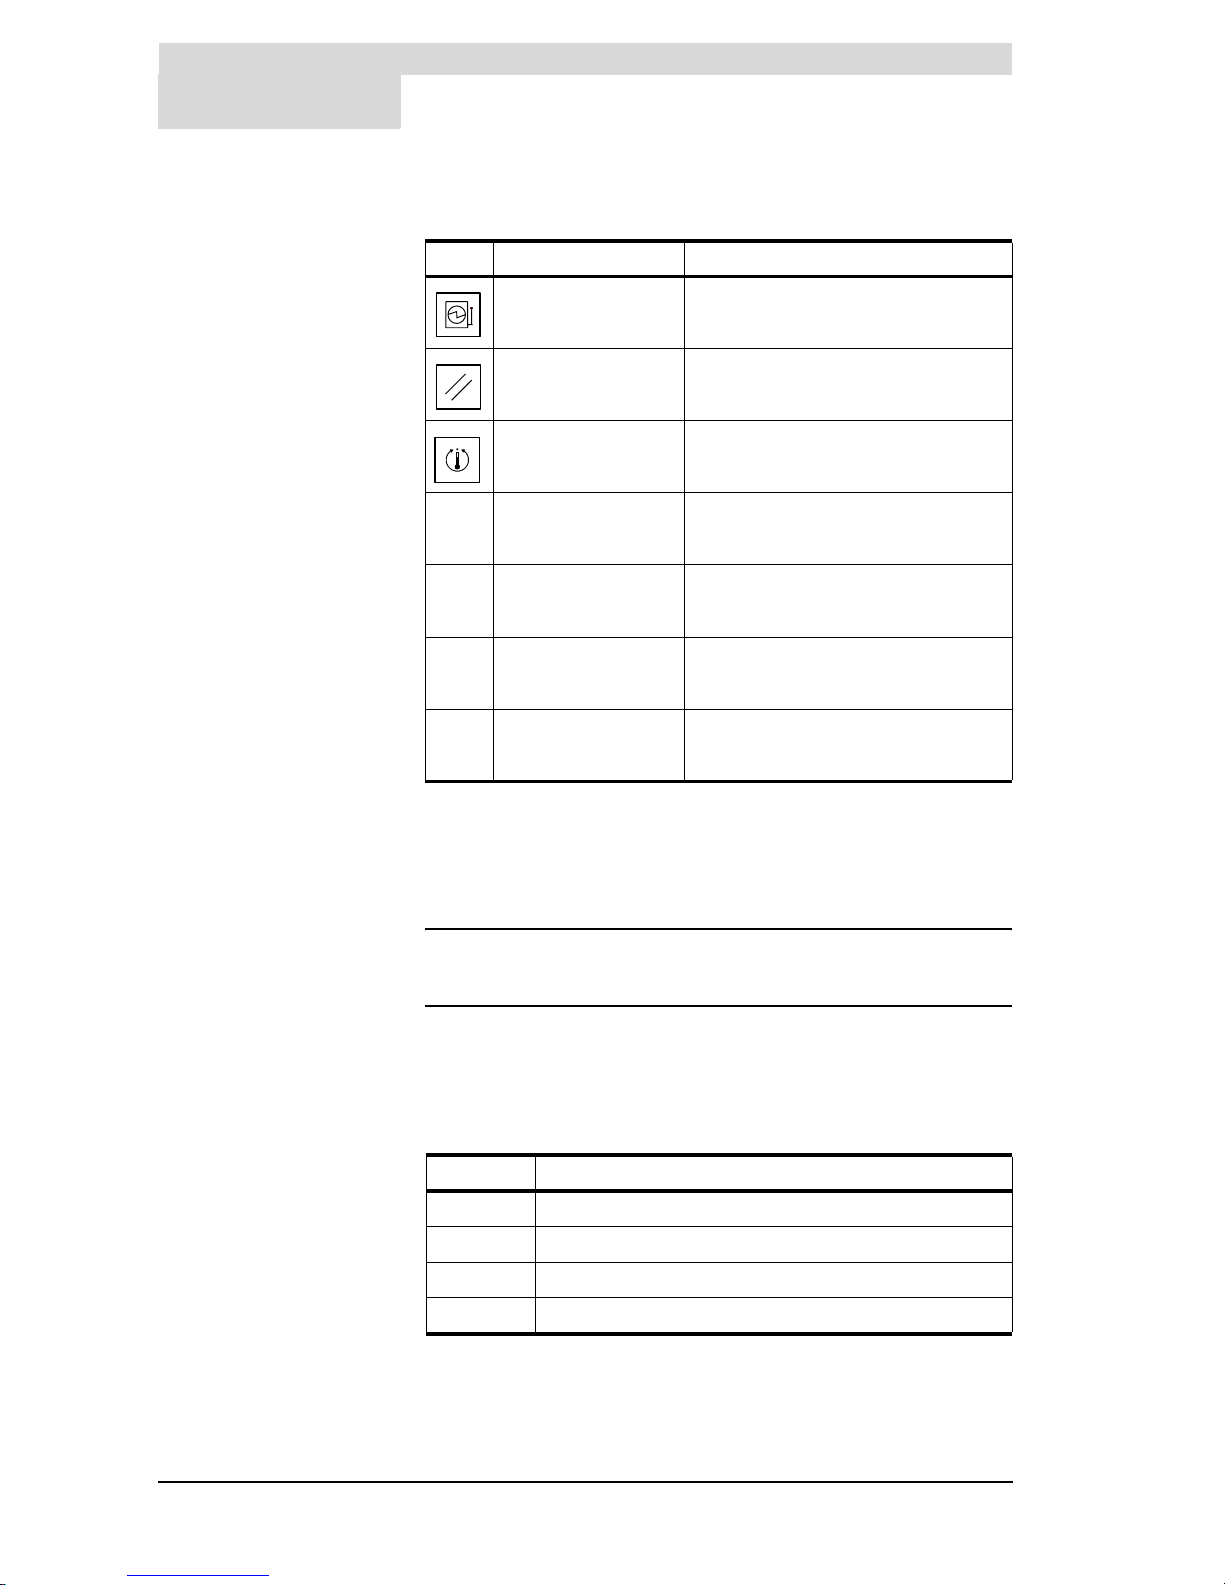
Table 5.1 shows the meanings of the icons on the control panel.
5.4 I/0/II switch With the I/0/II switch, the appliance is set in ON mode (I position), OFF mode
(0 position), or the week timer mode (II position). See paragraph
’6.2 Operating modes’.
The appliance remains live, even when in the OFF mode. This ensures the frost
protection remains activated.
n Note
To electrically disconnect the appliance, you must use the main switch
between the appliance and the mains power supply.
5.5 Control thermostat Use the rotary knob on the control thermostat to set the desired water
temperature to between ± 40°C and ± 70°C. The rotary knob is continuous, over
a scale of 1 to 4. Table 5.2 shows the temperatures corresponding to each
position.
Tabl e 5.1 Icons and their meaning
Icon Name Explanation
I/0/II switch ’ON mode’ / ’OFF mode’
Reset button Reset burner control
Temperature control To set water temperature (T
set
)
Week timer Sets the weekly water heating program
Power Anode indicator
lamp
Shows Power Anode status
Error light Burner control lockout
Power light Burner control on power
a
b
c
d
Tabl e 5.2 Temperature setting
Position Temperature
1 ± 40°C
2 ± 50°C
3 ± 60°C
4 ± 70°C
Page 49
Burner control reset button
Release R.2.0 Uk 49
gis
5.6 Burner control reset
button
An error can cause the burner control to lock out. When this happens, the red
light on the control panel will illuminate. After eliminating the cause of the error,
you can reset the appliance using the reset button.
n Note
Before resetting, always eliminate the cause of the error.
To identify the various errors, refer to chapter ’6 Status of the appliance’.
Chapter ’8 Troubleshooting’ describes how to troubleshoot errors and
problems.
5.7 Week timer circuit Optionally, you can use the week timer to program when the appliance must
supply the heat demand. Set the I/0/II switch to the II position to activate the
week timer circuit.
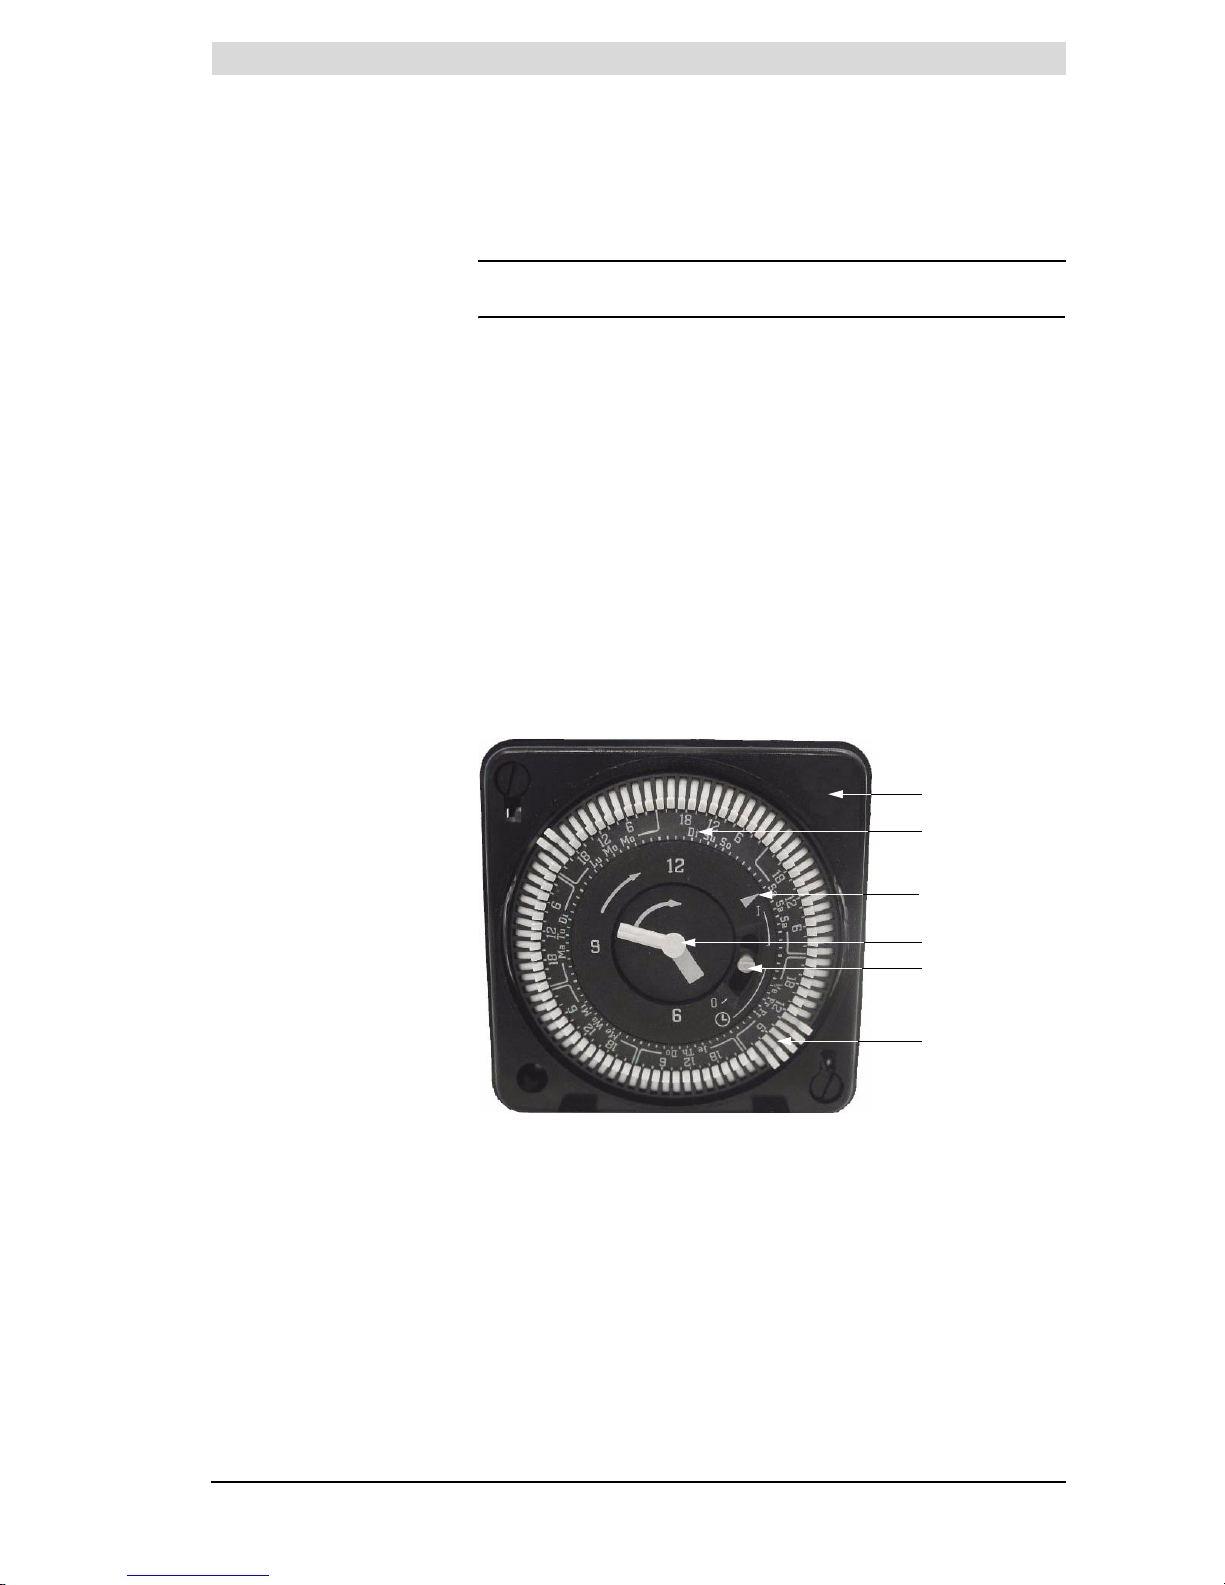
On the week disc b of the timer switch a seven day segments are indicated
’Monday’ through ’Sunday’. Each day is divided by 12 tabs f (2 hours per tab).
To set a two-hour period during which the appliance must respond to a heat
demand, press the tab for that period outwards.
The current time can be read from the hands d (12 hour clock).
Set the day and time as follows: to set the time roughly, rotate the week disc b
in the direction of the arrow, until the correct weekday lies beside the arrow
marker c. To finely set the time, rotate the minute hand clockwise until the
correct time is set. The manual switch e must always be in the central position
(this activates the timer program).
Legend:
a timer switch
b week disc
c arrow marker
d hands
e manual switch
f tabs
Figure 5.2 Week timer
a
b
d
e
f
c
Page 50
Operating
50 Instruction Manual SCE
5
gis
5.8 Flue gas backflow
safeguard reset
button
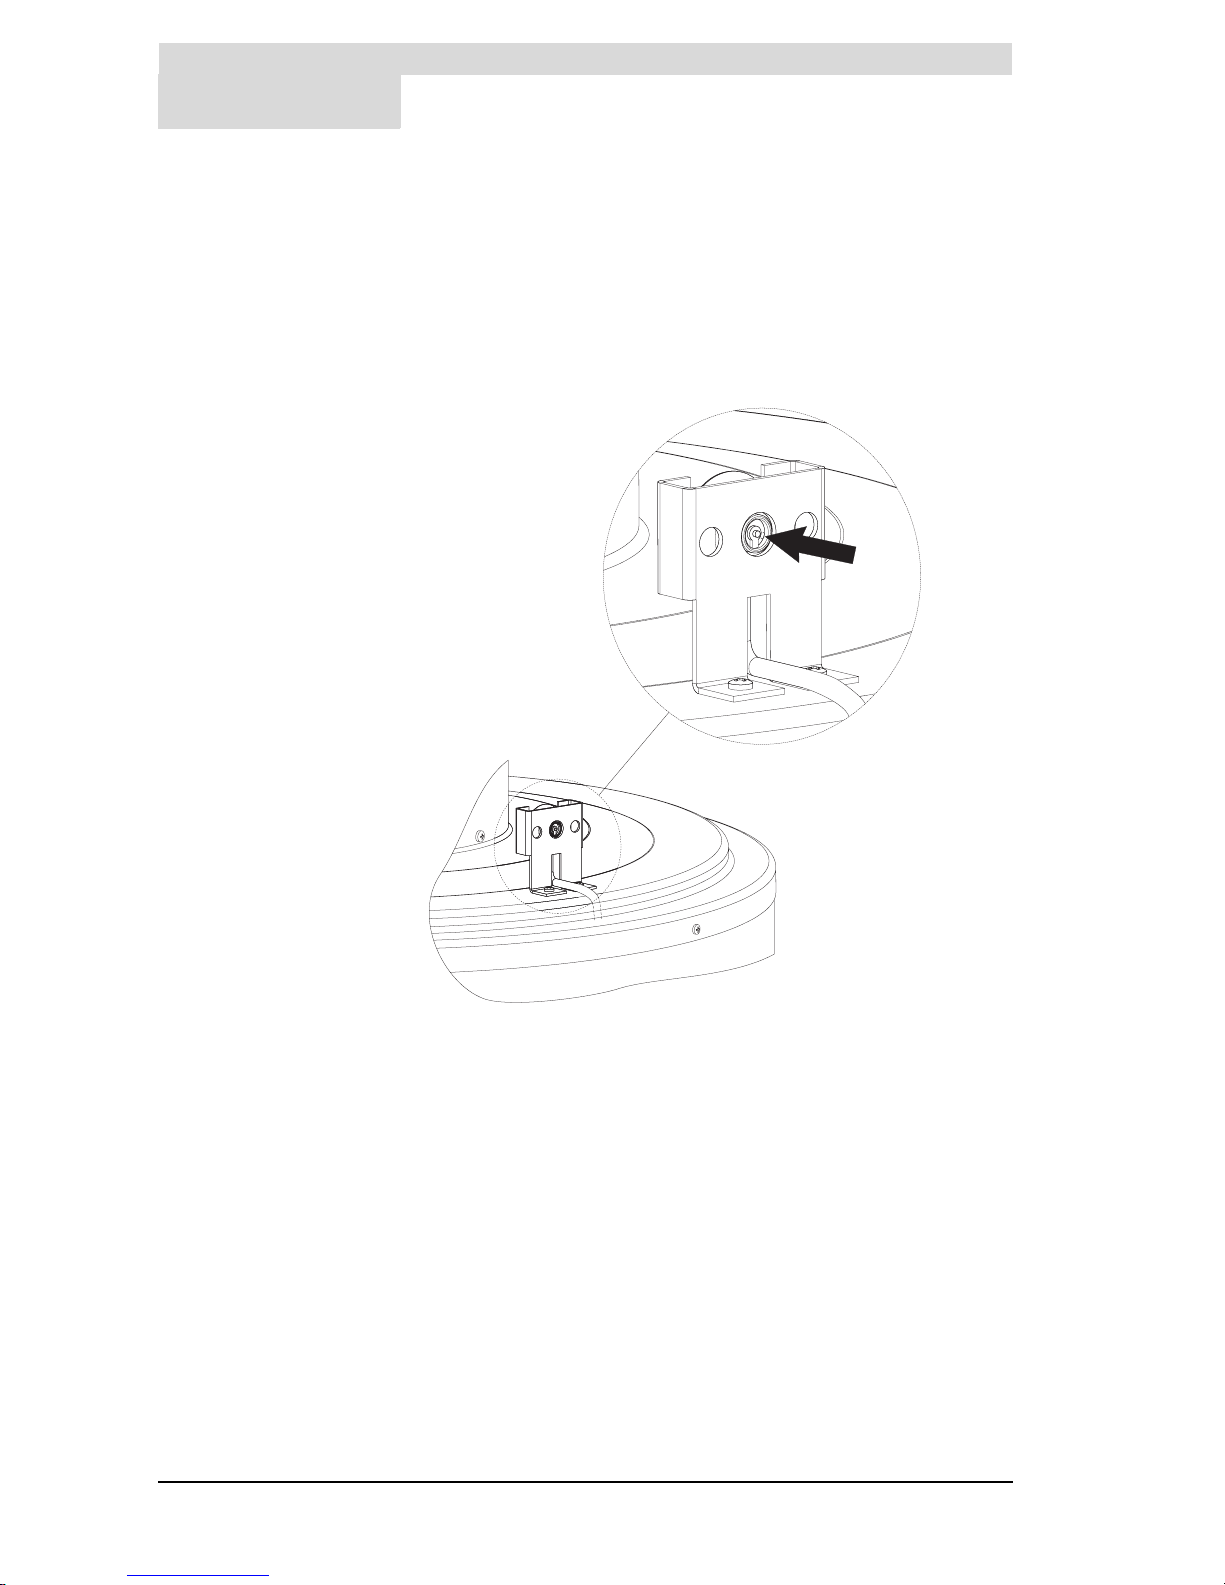
A malfunction in the flue gas discharge, like a blockage in the chimney, can lead
to the flue gas thermostat locking out. This state is evident when the push button
on the flue gas thermostat is activated, see Figure 5.3. Once the cause has
been removed, and the sensor has cooled down sufficiently, press this push
button to reset (if the sensor is not sufficiently cooled down, the flue gas
thermostat will immediately lock out again). The appliance will then
automatically start up again, if there is a current heat demand. If this does not
happen, refer to chapter ’8 Troubleshooting’ for a complete troubleshooting
guide.
Figure 5.3 Flue gas backflow safeguard reset button
IMD-0151
Page 51

Introduction
Release R.2.0 Uk 51
gis
6 Status of the
appliance
6.1 Introduction Topics covered in this chapter:
• 6.2 Operating modes;
• 6.3 Power Anode Status;
• 6.4 Error conditions.
6.2 Operating modes When running, the appliance has three basic operating modes, namely:
• DISCONNECTED
In this mode the appliance is off and all components are electrically dead.
The main switch (switch between the appliance and the power supply) is
turned off. On the control panel:
- the I/0/II switch is set tot the 0 position;
- the green light is off.
• WEEK PROGRAM (optional)
In this position the appliance only meets the heat demand during the periods
set by the timer. Outside these periods, only frost protection is active.
On the control panel:
-The I/0/II switch is set to the II position.
- The water temperature can be set by turning the rotary knob on the
control thermostat, see paragraph 5.5 Control thermostat.
- The period during which the heat demand must be fulfilled can be
programmed using the week timer, see paragraph 5.7 Week timer
circuit.
- the green light is illuminated.
n Note
If no week timer is installed, the ’II’ mode is the same as the ’0’ mode.
• OFF
In this mode, the frost protection is activated. The main switch is set to
Iposition. On the control panel:
-The I/0/II switch is set to the 0 position;
- the green light is illuminated.
• ON
In this mode the appliance continuously fulfils the demand for heat. On the
control panel:
-The I/0/II switch is set to the I position;
- The water temperature can be set by turning the rotary knob on the
control thermostat, see paragraph ’5.5 Control thermostat’;
- the green light is illuminated.
6.3 Power Anode Status If the appliance is fitted with a Power Anode, there is an extra indicator lamp on
the operating panel. Depending on the status of the appliance, this lamp will be
lit either Green or Red, or it will be Off:
gis
Page 52

Status of the appliance
52 Instruction Manual SCE
6
gis
• Green
This state indicates that the Power Anode is working correctly.
• Red
This state indicated that the Power Anode is not working properly due to an
error.
• Off
This state indicates that the Power Anode is not working.
n Note
If there is an error with the Power Anode (Red), or if the Power Anode is not
working (Off), this will have no effect on the hot water supply.
6.4 Error conditions If the appliance has an error, heat demand will be (temporarily) ignored. The
frost protection will also be out of operation. There are various types of errors:
• Lockout error due to the flue gas backflow safeguard
The lockout (push button) of the flue gas thermostat in de draught diverter
has been activated. After removing the cause, the push button must be
pressed to re-start the appliance (see ’5.8 Flue gas backflow safeguard
reset button’).
• Lockout errors of the burner control
In this event, the red error light on the control panel will be illuminated. The
burner control is locked out.
After eliminating the cause, the appliance must be returned to service by
pressing the reset button (see ’5.6 Burner control reset button’).
• Blocking errors
You can recognise this status by the fact that the appliance will not start
operation, despite the water temperature being lower than you have set with
the control thermostat (see ’5.5 Control thermostat’).
These errors disappear automatically once the cause of the error has been
removed, after which the appliance resumes by itself.
The cause of the error cannot be seen on the control panel. For a detailed
overview of error conditions, please refer to chapter ’8 Troubleshooting’.
If, as end-user, you find the appliance in an error condition, you may attempt to
re-start the appliance by pressing the reset button once. However, should the
error return or become persistent, you should contact your service and
maintenance engineer.
Page 53

Introduction
Release R.2.0 Uk 53
gis
7 Starting up and
shutting down
7.1 Introduction Topics covered in this chapter:
• Starting up;
• Shutting down;
• The appliance’s heating cycle.
7.2 Starting up Start-up the appliance as follows:
1. Fill the appliance. See chapter ’4 Filling and draining’.
2. Open the gas valve (see ’Figure 4.1 Installation diagrams’).
3. Switch on the power to the appliance using the mains switch between the
appliance and the power supply.
4. Set the appliance, using the I/0/II switch on the control panel, to the ON
mode (I position) or in the weekly program mode (II position). See '6.2
operating states'.
5. Set the desired water temperature using the control thermostat. See
paragraph ’5.5 Control thermostat’
If there is a heat demand, the appliance will run through a heating cycle. See
paragraph ’7.4 The appliance’s heating cycle’.
7.3 Shutting down You can:
• Shut the appliance down for a brief period (’OFF mode’).
• Disconnect the appliance from the mains.
• Shut the appliance down for a longer period.
7.3.1 Shut the appliance down for a brief period (’OFF mode’)
To shut the appliance down for a brief period, you must activate the frost
protection. Refer also to paragraph ’2.3 The appliance’s heating cycle’
With the frost protection you can prevent water freezing in the appliance.
Activate frost protection by switching the I/0/II switch on the control panel to the
0 position.
7.3.2 Disconnect the appliance from the mains
The appliance should only be disconnected from mains power in the correct
way. The correct procedure is as follows:
1. Shut the appliance down by putting the I/0/II switch to 0 position.
2. Disconnect the appliance by putting the mains switch between the appliance
and the mains power supply to 0 position.
7.3.3 Shut the appliance down for a longer period
Drain the appliance, if you are shutting it down for a longer period of time.
Proceed as described in paragraph ’4.3 Draining the appliance’.
gis
Page 54

Starting up and shutting down
54 Instruction Manual SCE
7
gis
7.4 The appliance’s
heating cycle
The appliance’s heating cycle is activated as soon as the measured water
temperature (T
water
) falls below the threshold value (T
set
). This threshold value
depends on the currently selected appliance operating mode. For example, if
the appliance is in the ’OFF mode’ (frost protection), then this value is 20°C. If
the appliance is in the ’ON mode’, then this threshold value is selectable, for
example, position 3 (±60°C).
The heating cycle runs in turn through the following states:
1. HEAT DEMAND;
2. WAITING TIME;
3. PRE-GLOW;
4. IGNITION;
5. RUNNING;
6. WAITING TIME.
The complete cycle is explained in the example set out below.
n Note
The appliance runs through an identical cycle when frost protection is
activated.
1. The control thermostat sensor measures the water temperature. The water
temperature falls below the set temperature, e.g. 60°C, causing the control
thermostat to close. The burner control now detects a heat demand and
starts the heating cycle.
2. Following the heat demand, the waiting time begins. This waiting time
ensures the ignition takes place safely. The waiting time lasts about 15
seconds.
3. Once the waiting time is over (audible ’clicking’ of the relay in the burner
control) the pre-glowing of the glow igniter is started.
4. After about 12 seconds (pre-)glowing, the gas control is opened and ignition
can take place.
5. After ignition, the flame is detected and the appliance will be running. This
means that actual heating has started.
6. When the water is up to temperature, the heat demand cuts out. The gas
control closes, and the burner tray is extinguished. A new waiting time
begins, of about 10 seconds.
7. After this waiting time, the appliance enters an idle state, and waits until the
water temperature again falls below the set temperature.
With any subsequent heat demand, the heating cycle will resume from step 1.
Page 55

Release R.2.0 Uk 55
8 Troubleshooting
8.1 Introduction This chapter covers the following errors:
• General errors:
- Gas smell;
- Water leakage;
- Explosive ignition;
- Poor flame profile;
- Power Anode (optional).
• No hot water;
• Insufficient hot water.
General errors cannot be displayed on the control panel, but these errors
usually do not cause the hot water supply to fail, neither fully nor partially.
If the hot water supply should fail, this is termed an error condition. See
paragraph ’6.4 Error conditions’’.
If the hot water supplied is insufficient, this is usually caused by an incorrect
setting, or some temporary problem.
The following pages provide troubleshooting tables for each type of error.
gis
Page 56
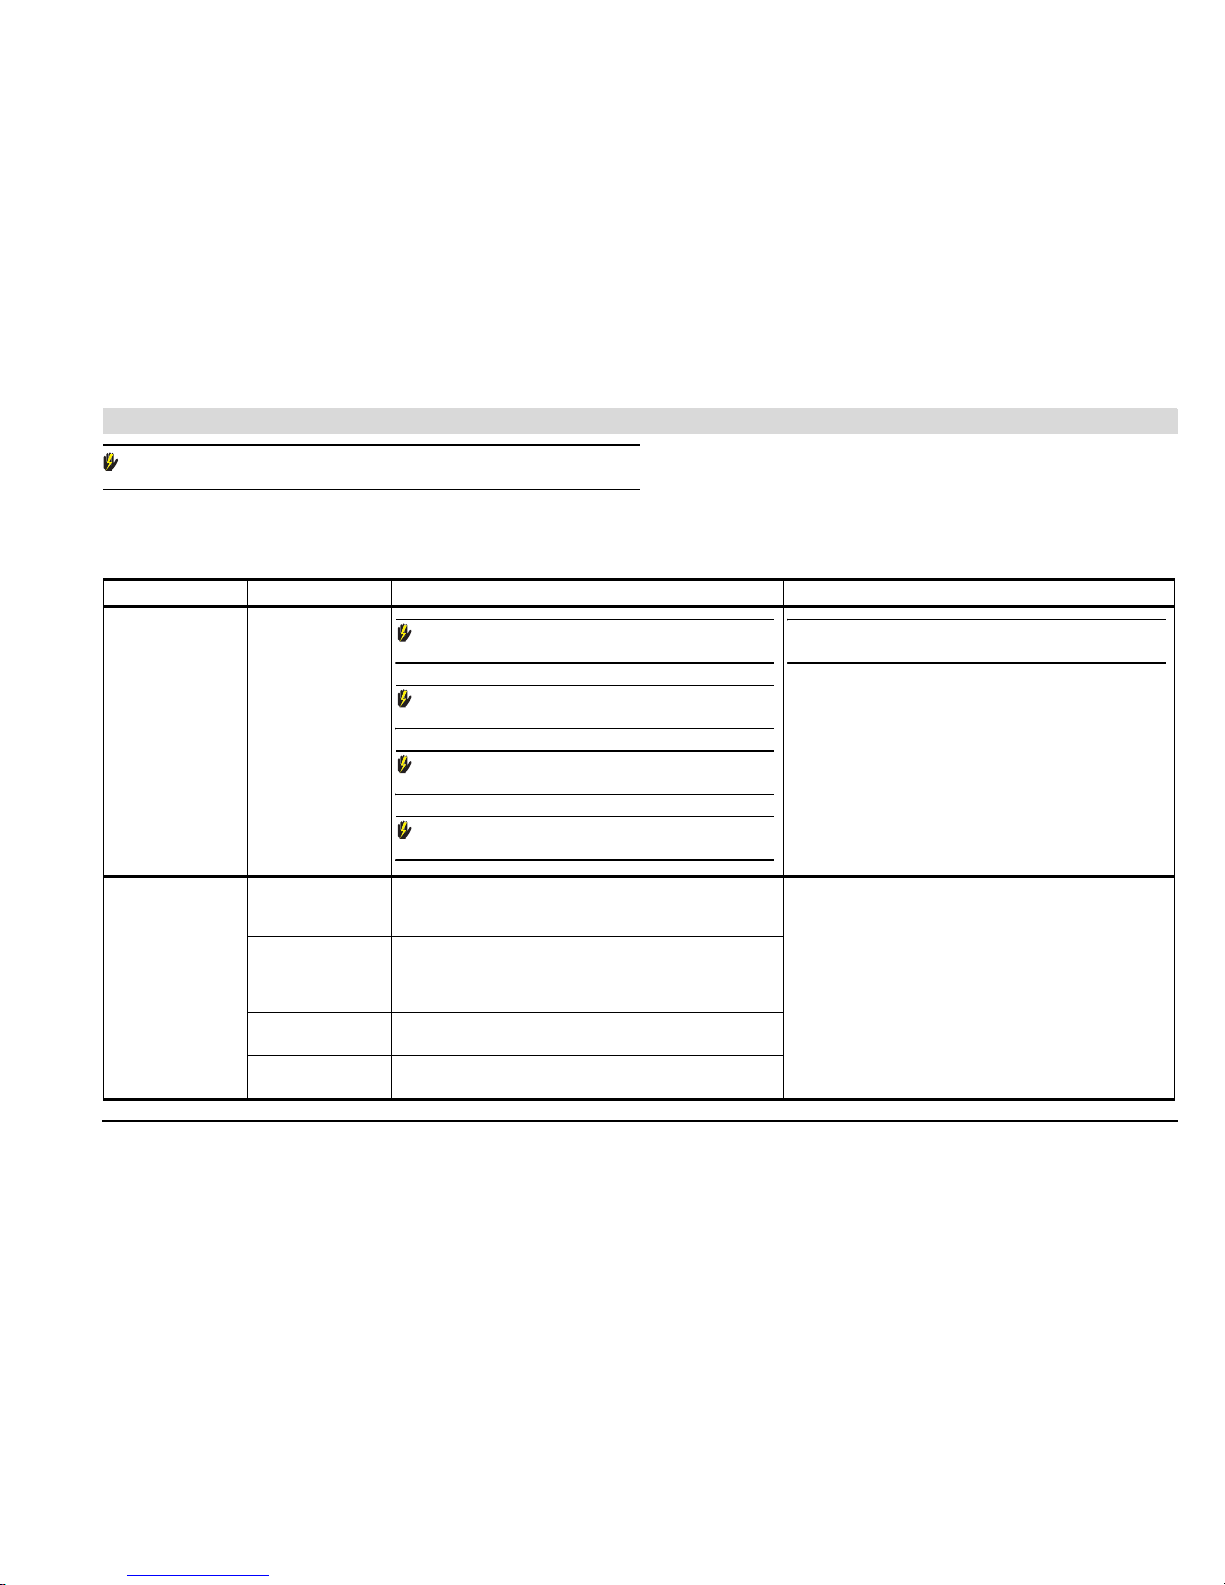
is
Release R.2.0 Uk 56
Warn ing
Onderhoud mag alleen worden uitgevoerd door een service- en onderhoudsmonteur.
8.2 Troubleshooting table for general errors
Tab le 8.1 General errors (page 1 of 2)
Symptom Cause Solution Remark
Gas smell Gas leak
Warning
Immediately close the main gas valve.
Warning
Do not operate any switches.
Warning
No naked flames.
Warning
Ventilate the boiler room.
n Note
Immediately contact your installer or local gas company.
Water leakage Leakage from one of
the water connections
(threaded).
Tighten the threaded connection. If the leak persists, consult your installer.
Leakage from another
nearby water
appliance or pipe
segment.
Trace the leak.
Leakage from the
appliance’s tank.
Consult the supplier and/or manufacturer.
Condensation Before drawing off (too much) hot tap water, wait until the water in
the heater has reached the set temperature.
Page 57
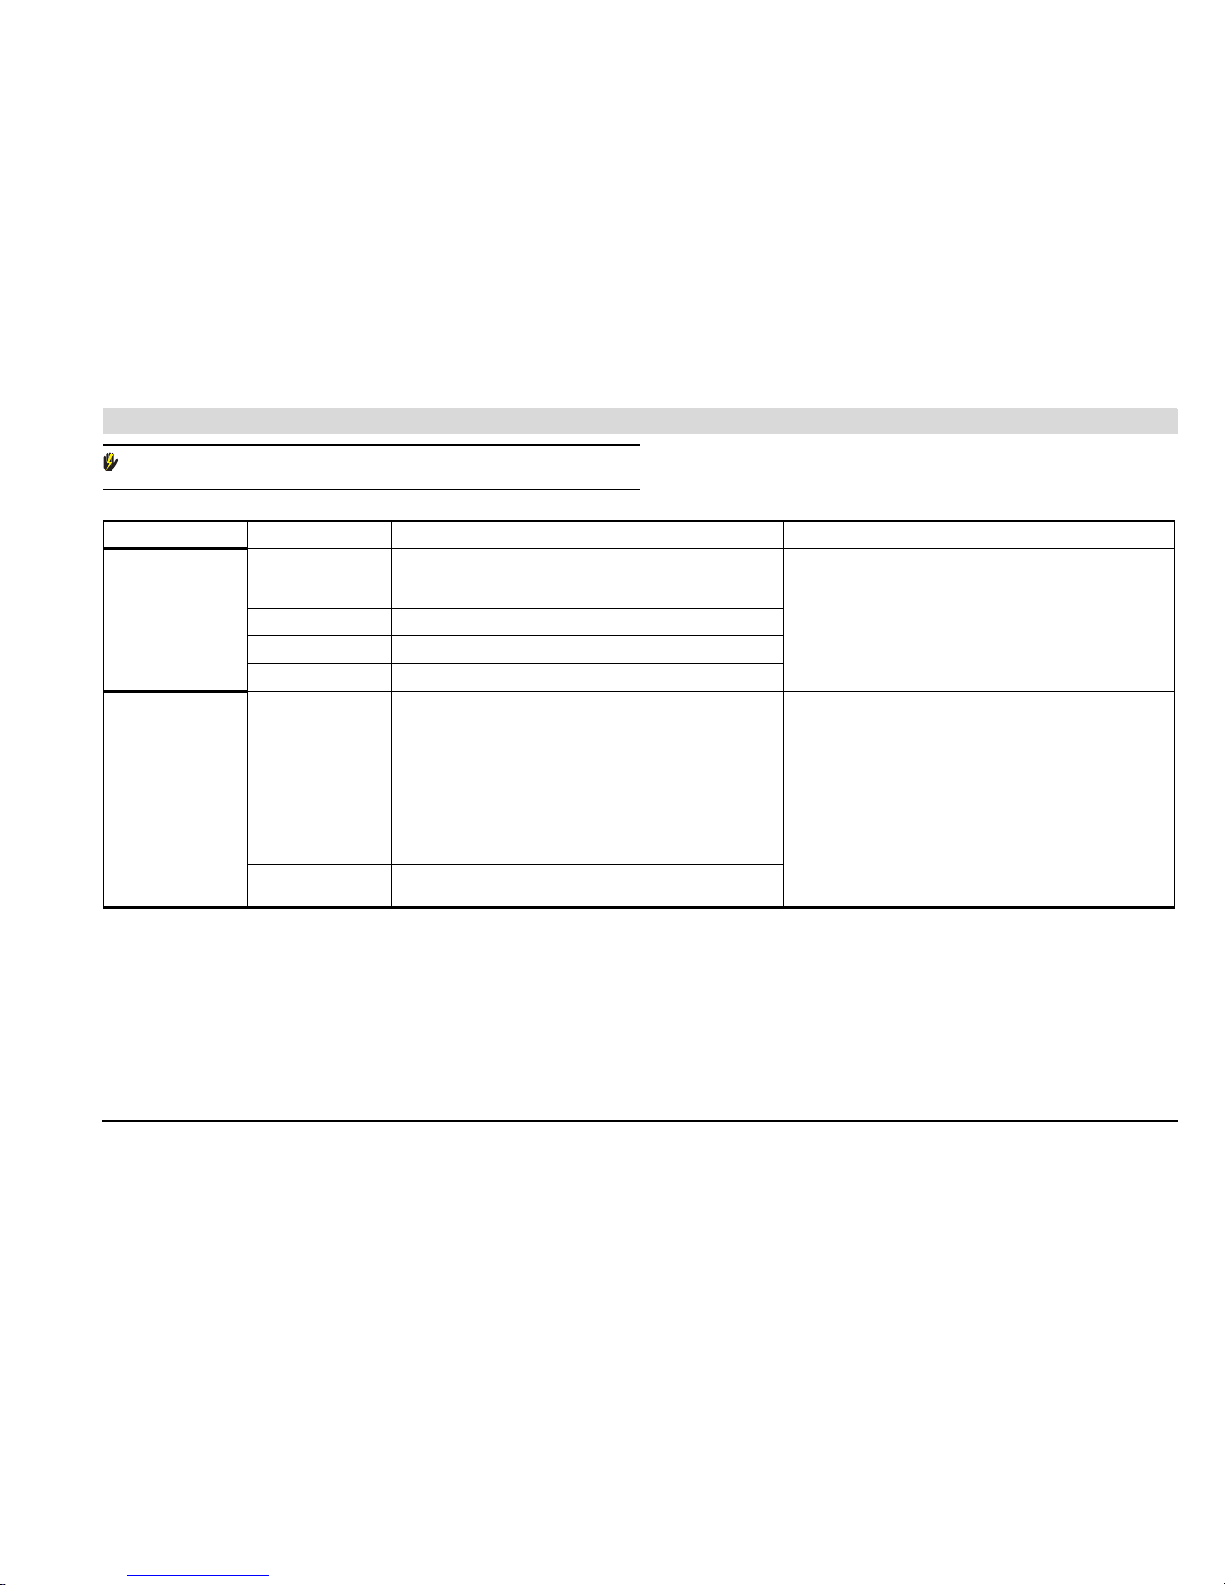
is
Release R.2.0 Uk 57
Warn ing
Onderhoud mag alleen worden uitgevoerd door een service- en onderhoudsmonteur.
8.3 Troubleshooting table ’no hot water’
If the appliance fails to supply any hot water, there are several possible causes.
Refer to table ’Table 8.2 No hot water’.
Explosive ignition
Poor flame profile
Incorrect supply
pressure and/or burner
pressure.
Set the correct supply pressure and/or burner pressure, see
’3.11 Checking the supply pressure and burner pressure’.
If ignition is not improved, consult your installer.
Contaminated burner Clean the burner. See ’9.4.2 Cleaning the burners’
Contaminated orifice. Clean the orifice. See ’9.4.3 Cleaning the orifices’
Inadequate air supply Improve the air supply by better ventilating the boiler room.
Power Anode
(optional)
If the malfunction cannot be solved, consult your installer.
• Indicator lamp is
red
• Anodes not making
contact with the
water;
• Break in one of the
cables;
• Anode poorly
earthed;
1. Check that the water heater is full of water;
2. Check that the Power Anode is properly connected,
see appendix ’A Electrical scheme SCE';
3. Check to see that all connections are properly made;
4. Check all cables for breaks and replace if any are found.
• Indicator lamp is
off
No power supply to the
potentiostat;
Check the power supply
Tab le 8.1 General errors (page 2 of 2)
Symptom Cause Solution Remark
Page 58
is
Release R.2.0 Uk 58
Warn ing
Onderhoud mag alleen worden uitgevoerd door een service- en onderhoudsmonteur.
Table 8.2 No hot water (page 1 of 2)
Symptom Cause Solution Remark
Green light OFF
and
Red light OFF
No mains power
present
1. Check that the mains switch is ON.
2. Check the voltage across the main switch.
3. Check the voltage on the electrical connector block.
4. Check the voltage on the burner control.
5. Check the fuse in the burner control.
The measured voltage must be 230V AC +15% -10%.
See appendix ’A.2 Electrical diagram SCE’. If you cannot resolve
the error, contact your installer.
Green light ON
and
Red light OFF.
Blockage in the flue
gas discharge (the flue
gas backflow
safeguard has cut out)
1. Trace the blockage.
2. Remove the blockage.
3. Reset flue gas backflow safeguard. See paragraph ’5.8 Flue
gas backflow safeguard reset button’.
When heat demand is detected, the appliance will re-start.
Page 59
is
Release R.2.0 Uk 59
Warn ing
Onderhoud mag alleen worden uitgevoerd door een service- en onderhoudsmonteur.
Green light ON
and
Red light ON.
There are three possible causes for this error. To determine the cause, the error must be
made to recur:
1. Reset the appliance by pressing the reset button 1x.
2. Should nothing happen, then the reset button has already been pressed too often
(maximum 5x in a single heating cycle) and you will have to first electrically disconnect
the appliance, then start it again. See paragraph ’7.3.2 Disconnect the appliance from
the mains’ and steps 3 through 5 of paragraph ’7.2 Starting up’.
3. Decide which type of cause (a) or (b) describes the situation.
(a) three unsuccessful
start attempts in a row
1. No gas:
• Check that the gas valve is open.
• Check that gas control opens (clicking of the gas control).
• Check the gas control wiring.
2. No ignition:
• Check whether the glow igniter lights up.
• Check the power supply to the glow igniter.
• Check the wiring of the glow igniter.
3. No flame detection:
• Check that the Phase (L) and Neutral (N) are correctly
connected (from the mains) to the appliance
• Check that the ionisation rod is not defective.
• Check that the wiring to the ionisation rod is correctly
connected.
If the error cannot be resolved or is persistent, contact your
installer.
(b) The safety
thermostat has cut out
1. The safety thermostat has cut out correctly:
• Reset the appliance.
• Check whether the control thermostat is working.
• Check whether the high-limit thermostat is working.
• Check that the circulation pump (if present) is working.
2. The safety thermostat has cut out without apparent reason:
• Check whether the thermostat may be broken.
• Check whether the thermostat sensor may be broken.
If the error cannot be resolved or is persistent, contact your
installer.
Table 8.2 No hot water (page 2 of 2)
Symptom Cause Solution Remark
Page 60
is
Release R.2.0 Uk 60
Warn ing
Onderhoud mag alleen worden uitgevoerd door een service- en onderhoudsmonteur.
8.4 Troubleshooting table ’insufficient hot water’
If the appliance fails to supply any hot water, there are several possible causes.
Refer to ’Table 8.3 Insufficient hot water’
Table 8.3 Insufficient hot water
Symptom Cause Solution Remark
Insufficient hot water The water temperature
setting (T
set
) is too low
Set the control thermostat to a higher setting. See paragraph
’5.5 Control thermostat’.
Hot water supply used
up.
1. Reduce the rate of hot water consumption. Allow the appliance
enough time to heat up the water.
2. If this error occurs regularly, check whether the high-limit
thermostat is cutting in/out. If so, check that the circulationand/or shunt pump are working properly.
If the error has not been rectified, and no other cause can be
found, disconnect the appliance from the mains, shut off the gas
valve and alert your installer.
Page 61

Introduction
Release R.2.0 Uk 61
s
9 Maintenance
9.1 Introduction
cCaution
Maintenance may only by carried out by an approved service and
maintenance engineer.
At each service, the appliance undergoes maintenance both on the water side
and on the gas side. The maintenance should be carried out in the following
order.
1. Preparation for maintenance;
2. Water-side maintenance;
3. Gas-side maintenance;
4. Finalising maintenance.
n Note
Before ordering spare parts, take a moment to write down the appliance type
and model, and the full serial number of the appliance. Only by ordering with
this information can you be sure to receive the correct spare parts. These
details can be found on the rating plate.
9.2 Preparation for
maintenance
To test whether all components are still working properly, you should complete
the following steps:
1. Put the I/0/II switch on the control panel to 0 position.
2. Set the control thermostat to the highest position (take note of the original
setting) and put the I/0/II switch back to I position.
3. If there is no heat demand, draw some hot water off to initiate a heat
demand.
4. Check whether the heating cycle runs correctly. See paragraph ’7.4 The
appliance’s heating cycle’.
5. Set the control thermostat back to the original setting, and put the I/0/II
switch back to I position.
6. Check the supply and burner pressures and adjust these, where necessary.
See paragraph ’3.11 Checking the supply pressure and burner pressure’.
7. Check that all components of the flue gas system are properly attached.
8. Test the operation of the overflow valve of the cold supply setup. The water
should spurt out.
9. Test the overflow operation of the T&P valve. The water should spurt out.
10. Check the wastewater pipes of the overflow valves and remove any lime
buildup that may be present.
11. Drain the appliance. See paragraph ’4.3 Draining the appliance’.
s
Page 62
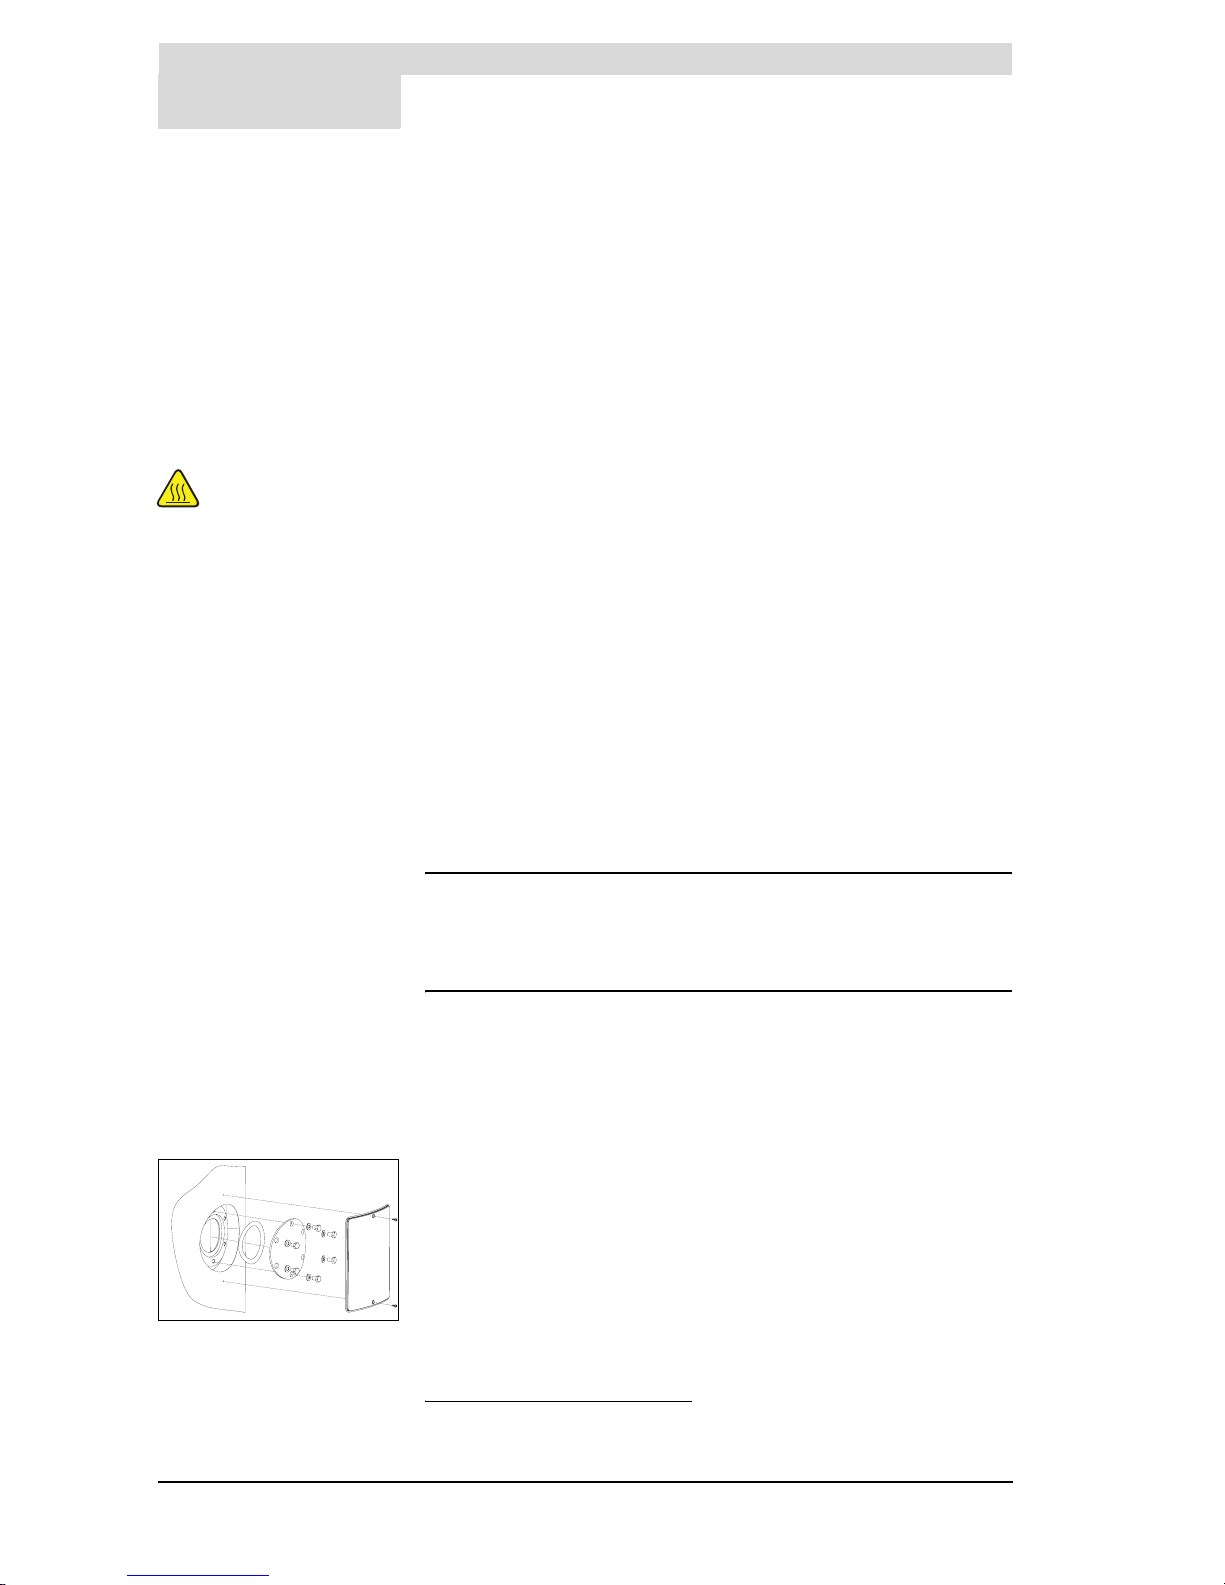
Maintenance
62 Instruction Manual SCE
9
s
9.3 Water-side maintenance
9.3.1 Introduction
The following steps should be carried out on the water side:
1. Checking the anodes.
2. Descaling and cleaning the tank.
9.3.2 Checking the anodes
Timely replacement of the anodes extends the service life of the appliance. The
appliance’s anodes must be replaced as soon as they are 60% or more used up
(take this into consideration when determining the maintenance frequency).
Take care
The draught diverter
and the cover may be
hot.
1. Disassemble the protective cap on the control column by loosening the 4
screws on the cap.
2. Disconnect the draught diverter from the flue gas discharge.
3. Undo the screws on the draught diverter.
4. Remove the draught diverter from the appliance.
5. Undo the screws on the draught diverter.
6. Remove the cover from the appliance.
7. Remove the sealing ring from the tank.
8. Loosen the anodes using suitable tools.
9. Check the anodes, and if necessary, replace them.
10. Now also check the flue baffles. Replace them, if necessary. See paragraph
’9.4.4 Checking the flue baffles’.
11. Fit a new sealing ring around the edge of the tank and replace the cover.
12. Reconnect the wiring for the flue gas thermostat to the connector of the
appliance.
n Note
For this appliance Power Anodes might be used as well. These anodes
require less to no maintenance. The anodes are deliverable as an option
and can be ordered separately. See the instructions coming with these
anodes or contact your installer.
9.3.3 Descaling and cleaning the tank
Scale and lime buildup prevent effective conduction of the heat to the water.
Periodic descaling prevents buildup of these deposits. This increases the
service life of the appliance, and also improves the heating process. Take the
rate of scale formation into account when deciding on maintenance frequency.
1. Remove the cover plate 1 on the outer jacket. See Figure 9.1.
2. Undo the bolts.
3. Remove the cover and the rubber O-ring.
4. Inspect the tank and remove any contamination.
5. Remove the scale using Borcoil
(1)
.
6. Close the cleaning opening.
Use a new rubber O-ring for this.
Figure 9.1 Cleaning opening
1. State recommends the use of Borcoil, as the composition of this material is known to us. Borcoil
can be ordered from State.
Page 63

Gas-side maintenance
Release R.2.0 Uk 63
s
9.4 Gas-side maintenance
9.4.1 Introduction
The following steps should be carried out on the gas side:
Take care
The burners may be
hot.
1. Cleaning the burners.
2. Cleaning the orifices.
3. Checking the flue baffles.
9.4.2 Cleaning the burners
1. Detach the burners.
2. Carefully remove any contamination present on the burners.
3. Re-attach the burners.
9.4.3 Cleaning the orifices
1. Remove the orifices.
2. Remove any contamination present in the orifices.
3. Re-attach the orifices.
9.4.4 Checking the flue baffles
Take care
The flue baffles may
be hot.
1. Complete steps 1 through 9 of paragraph ’9.3.2 Checking the anodes’.
2. Remove the flue baffles from the appliance.
3. Check the flue baffles for rust, and remove any which is present.
4. Check the flue baffles for wear, and replace any worn flue baffles.
5. Complete steps 11 and 12 of paragraph ’9.3.2 Checking the anodes’
9.5 Finalising
maintenance
To finalise the maintenance carry out the following steps:
1. Fill the appliance. See paragraph ’4.2 Filling the appliance’.
2. Start-up the appliance. See ’7.2 Starting up’.
Page 64

Maintenance
64 Instruction Manual SCE
9
s
Page 65

General warranty
Release R.2.0 Uk 65
gis
10 Warranty (Certificate)
To register your warranty, you should complete and return the enclosed
warranty card after which a warranty certificate will be sent to you. This
certificate gives the owner of a water heater supplied by State Water Heaters
B.V. of Veldhoven, The Netherlands (hereinafter “State”) the right to the
warranty set out below, defining commitments of State to the owner.
10.1 General warranty If within one year of the original installation date of a water heater supplied by
State, following verification, and at the sole option of State, a part or component,
(with exclusion of the tank) proves to be defective or does not function correctly
due to manufacturing and/or material defects, State shall replace or repair this
part or component.
10.2 Tank warranty If within 3 years of the original installation date of a water heater supplied by
State, following inspection, and at the sole option of State, the glass-lined steel
tank proves to be leaking due to rust or corrosion occurring on the water side,
State shall provide an entirely new water heater of equivalent size and quality.
The warranty period given on the replacement water heater shall be equal to the
remaining warranty period of the original water heater that was supplied.
Notwithstanding that stated earlier in this article, in the event that unfiltered or
softened water is used, or allowed to stand in the water heater, the warranty
shall be reduced to one year from the original installation date.
10.3 Installation and
conditions of use
The warranty set out in article 1 and 2 will apply solely under the following
conditions:
a. The water heater is installed under strict adherence to the installation
instructions of State applying to the specific model, and the relevant local
authority installation and building codes, rules and regulations in force.
b. The water heater remains installed at the original site of installation.
c. The appliance is exclusively used with drinking water, which at all times can
freely circulate (a separately installed heat exchanger is mandatory for
heating salt water or corrosive water).
d. The tank is safeguarded against harmful scaling and lime buildup by means
of periodic maintenance.
e. The water temperatures in the heater do not exceed the maximum setting of
the thermostats, which form a part of the water heater.
f. The water pressure and/or heat load do not exceed the maximum values
stated on the water heater rating plate.
g. The water heater is installed in a non-corrosive atmosphere or environment.
h. The water heater is connected to a cold water supply arrangement, which is:
approved by the relevant authority; with sufficient capacity for this purpose;
supplying a pressure no greater than the working pressure stated on the
water heater; and where applicable, fitted with a temperature and pressure
relief valve compliant with the installation instructions of State pertaining to
the specific model of water heater, and under adherence to the relevant local
authority installation and building codes, rules and regulations in force.
i. At all times the appliance must be equipped with a protection in the form of
anodes. If sacrificial anodes are used they must be replaced when and if
they are used for 60% or more. If electrical anodes are used they should be
operational at all times.
gis
Page 66

Warranty (Certificate)
66 Instruction Manual SCE
10
gis
10.4 Exclusions The warranty set out in article 1 and 2 will not apply, in the event of:
a. damage to the water heater caused by an external factor;
b. misuse, neglect (including frost damage), modification, incorrect and/or
unauthorised use of the water heater and any attempt to repair leaks;
c. contaminants or other substances having been allowed to enter the tank;
d. the conductivity of the water being less than 125 µS/cm and/or the hardness
(alkaline-earth ions) of the water being less than 1.00 mmol/lit
(see Ta bl e 3 .3 );
e. unfiltered, recirculated water flowing through or being stored in the water
heater;
f. any attempts at repair to a defective water heater other than by an approved
service engineer.
10.5 Scope of the
warranty
The obligations of State pursuant to the specified warranty do not extend
beyond free delivery from the Veldhoven warehouse of the replacement parts or
components or water heater. Shipping, labour, installation and any other costs
associated with the replacement will not be accepted by State.
10.6 Claims A claim on grounds of the specified warranty must be submitted to the dealer
from whom the water heater was purchased, or to another authorised dealer for
the products of State Water Heaters. Inspection of the water heater as referred
to in articles 1 and 2 shall take place in one of the laboratories of State.
10.7 Limitation of liability
State
State grants no other warranty or guarantee over its water heaters nor the (parts
or components of) water heaters supplied for replacement, other than the
warranty expressly set out in this Certificate.
State is not liable for damage to persons or property caused by (parts or
components, or the glass-lined steel tank of) a (replacement) water heater that
it has supplied under the terms of this warranty, nor on any other grounds.
Page 67

Release R.2.0 Uk 67
A Appendices
A.1 Introduction This appendix contains:
•The Electrical diagram SCE.
is
Page 68
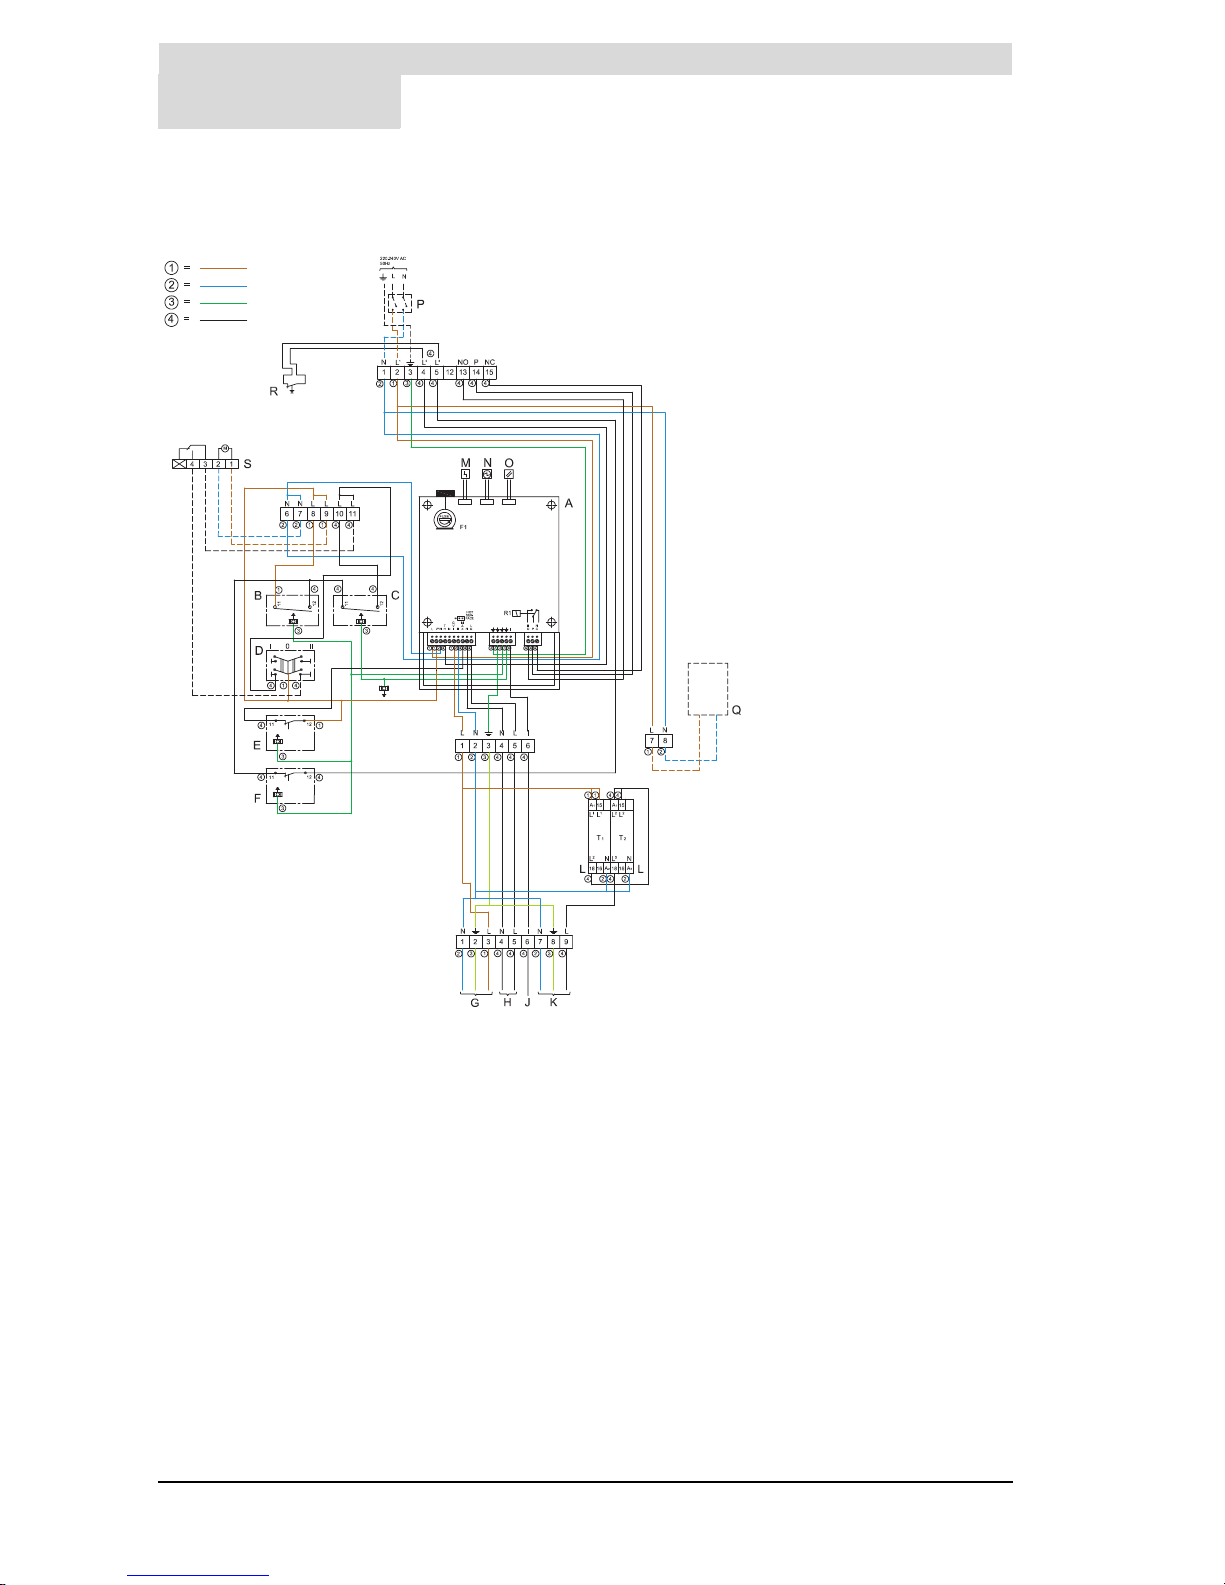
Appendices
68 Instruction Manual SCE
A
is
A.2 Electrical diagram SCE
A.2.1 Electrical diagram SCE 65-500 LP
TERMINAL STRIP CONNECTIONS:
A Earth
N Neutral
LPhase
L1Phase input to controller
L2Phase input to flue gas backflow safeguard
L
3
Phase input safety circuit for enabling temperate control
NO Normally open
P PVC supply
NC Normally closed
COMPONENTS:
A burner control Double-pole main switch
- N Neutral
-
A Earth
- LI Phase input to controller
- LIIPhase output
- TH Phase input of thermostat circuit
- GV1 Phase output to gas control
- MAX Phase input of safety thermostat
- LG Phase output to glow igniter
- I Ionisation detection = output
- NO Normally open
- P Phase input alarm
- NC Normally closed
- F1 Fuse (T5A)
- R1 Relay max 250V-10A
B Frost thermostat
C Control thermostat
D
I/0/II-switch
E Safety thermostat
F Max. thermostat
G Gas block
H Glow igniter
J Ionisation pin
K High-low control
LTimer
M Error signalling
N Signalling In operation
O Reset button
OPTIONAL COMPONENTS:
P Main switch
Q Potentiostat (for power anodes)
R Thermal Reflux Safeguard (TRS)
S Week timer control
Figure A.1 Electrical scheme SCE 65-500 LP
brown
blue
yellow/green
black
Page 69
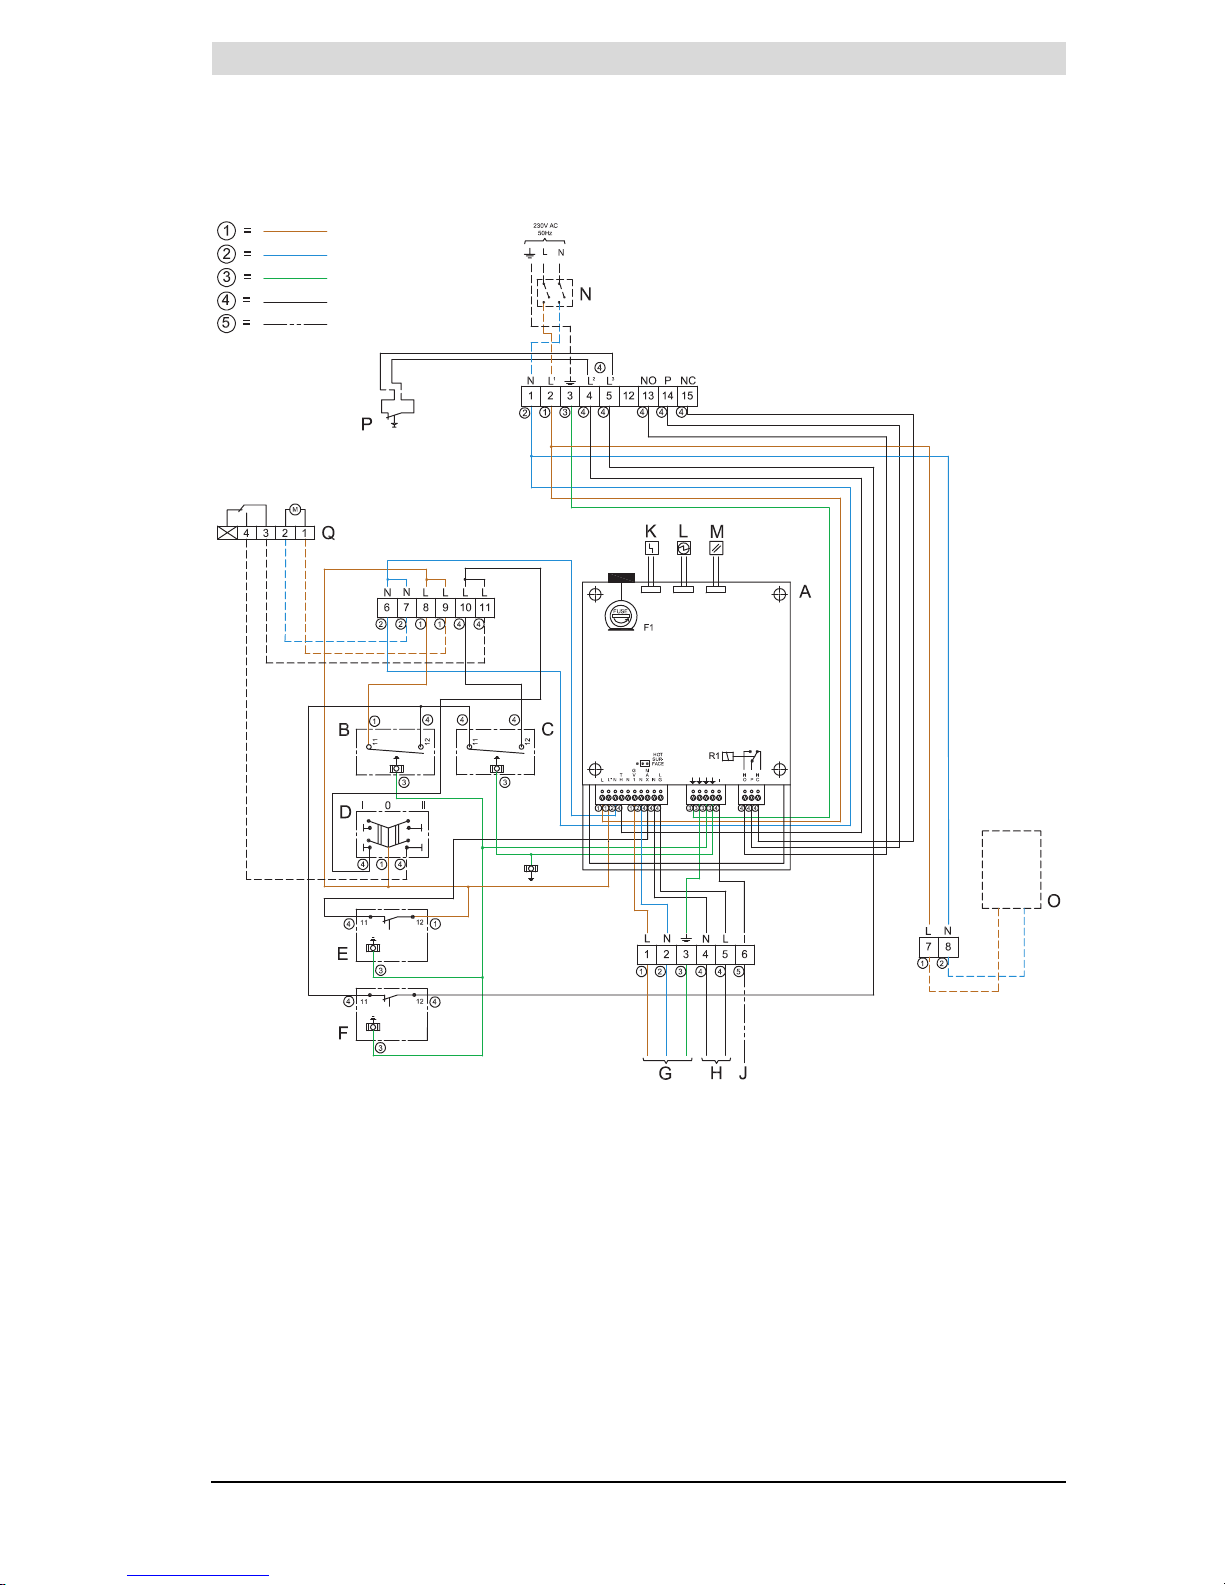
Electrical diagram SCE
Release R.2.0 Uk 69
is
A.2.2 Electrical diagram SCE
TERMINAL STRIP CONNECTIONS:
A Earth
NNeutral
L Phase
L
1
Phase input to controll er
L2Phase input to flue gas backflow safeguard
L3Phase input safety circuit for e nabling temperate control
NO Normally open
P PVC Supply
NC Normally closed
COMPONENTS:
A Double-pole main switch
- N Ne utral
- A Earth
- LIPhase input to controller
- L
II
Phase out
- TH Phase input of thermostat circuit
- GV1 Phase output to gas control
- MAXPhase input of safety thermostat
- LG Phase output to glow igniter
- I Ionisation-detection = output
- NO Normally open
- P Phase in: alarm
- NC Normally closed
- F1 Fuse (T5A)
- R1 Relay max 250V-10A
B Frost protection thermostat
C C ontrol thermostat
D
I/0/II-switch
E Safety thermostat
F High-limit thermostat
G Gas valve
H Glo w plug
J Ionisation rod
M Error signalling
L Signalling In operation
M Reset button
OPTIONAL COMPONENTS:
N Mains switch control
O Potentiostat (for power anodes)
P Thermal Reflux Safeguard (TRS)
Q Week timer control
Figure A.2 Electrical diagram SCE
white
brown
blue
yellow/green
black
Page 70

Appendices
70 Instruction Manual SCE
A
is
Page 71

Index
Release R.2.0 Uk 71
gis
IX Index
A
ambient temperature - - - - - - - - - - - - - - 21
appliance
functional description - - - - - - - - - - - - 14
heating cycle - - - - - - - - - - - - - - - - 15
installation types - - - - - - - - - - - - - - 9
protection- - - - - - - - - - - - - - - - - - 15
B
burner pressure- - - - - - - - - - - - - - - - - 33
C
check
supply pressure, burner pressure - - - - - - 33
circulation pipe - - - - - - - - - - - - - - - - - 27
claims - - - - - - - - - - - - - - - - - - - - - 66
cold water side - - - - - - - - - - - - - - - 26
, 27
condensation drainage
connect- - - - - - - - - - - - - - - - - - - 27
connect
circulation pipe - - - - - - - - - - - - - - - 27
cold water side - - - - - - - - - - - - -26
, 27
condensation drainage - - - - - - - - - - - 27
electrical - - - - - - - - - - - - - - - - - - 31
gas - - - - - - - - - - - - - - - - - - - - - 28
hot water side- - - - - - - - - - - - - - - - 26
control thermostat- - - - - - - - - - - - - - - - 48
conversion to different gas - - - - - - - - - - - 36
D
descaling - - - - - - - - - - - - - - - - - - - - 62
dimensions - - - - - - - - - - - - - - - - - - - 22
document contents - - - - - - - - - - - - - - - 11
draining- - - - - - - - - - - - - - - - - - - - - 44
E
electrical connection - - - - - - - - - - - - - - 31
electrical connection block - - - - - - - - - - - 31
electrical data- - - - - - - - - - - - - - - - - - 24
electrical diagram - - - - - - - - - - - - - - - - 68
environmental conditions - - - - - - - - - - - - 21
F
filling - - - - - - - - - - - - - - - - - - - - - - 44
floor loading - - - - - - - - - - - - - - - - - - 22
forms of notation - - - - - - - - - - - - - - - - 11
frost protection - - - - - - - - - - - - - - - - - 48
activation - - - - - - - - - - - - - - - - - - 53
functional description - - - - - - - - - - - - - - 14
G
gas connection - - - - - - - - - - - - - - - - - 28
gas conversion - - - - - - - - - - - - - - - - - 36
H
heat demand - - - - - - - - - - - - - - - - - - 54
heating cycle - - - - - - - - - - - - - - - -15, 54
hot water side - - - - - - - - - - - - - - - - - - 26
humidity - - - - - - - - - - - - - - - - - - - - 21
I
icons - - - - - - - - - - - - - - - - - - - - - -48
ignition - - - - - - - - - - - - - - - - - - - - -54
installation diagram - - - - - - - - - - - - - - - 24
installer - - - - - - - - - - - - - - - - - - - - - 10
ionisation rod - - - - - - - - - - - - - - - - - - 16
L
liability - - - - - - - - - - - - - - - - - - - - - 3
lime- - - - - - - - - - - - - - - - - - - - - - - 62
M
mains power - - - - - - - - - - - - - - - - - - 32
mains switch - - - - - - - - - - - - - - - - - - 32
maintenance
anode- - - - - - - - - - - - - - - - - - - - 62
burner - - - - - - - - - - - - - - - - - - - 63
carrying out - - - - - - - - - - - - - - - - - 61
descaling - - - - - - - - - - - - - - - - - - 62
finalising - - - - - - - - - - - - - - - - - - 63
gas-side - - - - - - - - - - - - - - - - - - 63
lime buildup - - - - - - - - - - - - - - - - - 62
orifice - - - - - - - - - - - - - - - - - - - - 63
preparation - - - - - - - - - - - - - - - - - 61
water-side - - - - - - - - - - - - - - - - - 62
mode
OFF - - - - - - - - - - - - - - - - - - - - 51
ON - - - - - - - - - - - - - - - - - - - - - 51
O
operating modes - - - - - - - - - - - - - - - - 51
P
packaging- - - - - - - - - - - - - - - - - - - - 21
power cord - - - - - - - - - - - - - - - - - - - 32
pre-glow - - - - - - - - - - - - - - - - - - - -54
protection - - - - - - - - - - - - - - - - - - - -15
R
reset button - - - - - - - - - - - - - - - - - - -49
running - - - - - - - - - - - - - - - - - - - - - 54
S
safety - - - - - - - - - - - - - - - - - - - - - - 16
scale - - - - - - - - - - - - - - - - - - - - - - 62
service check - - - - - - - - - - - - - - - - - - 10
service engineer - - - - - - - - - - - - - - - - 10
shunt pump - - - - - - - - - - - - - - - - -26
, 27
gis
Page 72

Index
0305 899
IX
gis
Instruction Manual SCE
shutting down
brief period - - - - - - - - - - - - - - - - - 53
disconnecting - - - - - - - - - - - - - - - - 53
longer period - - - - - - - - - - - - - - - - 53
specifications - - - - - - - - - - - - - - - - - - 22
stacking - - - - - - - - - - - - - - - - - - 26
, 27
starting up - - - - - - - - - - - - - - - - - - - 53
state
electrically disconnected - - - - - - - - - - 51
HEAT DEMAND - - - - - - - - - - - - - - 54
IGNITION- - - - - - - - - - - - - - - - - - 54
PRE-GLOW - - - - - - - - - - - - - - - - 54
RUNNING - - - - - - - - - - - - - - - - - 54
WAITING TIME - - - - - - - - - - - - - - - 54
supply pressure- - - - - - - - - - - - - - - - - 33
symbol
installer - - - - - - - - - - - - - - - - - - - 10
service engineer - - - - - - - - - - - - - - 10
user - - - - - - - - - - - - - - - - - - - - 10
T
target groups - - - - - - - - - - - - - - - - - - 10
trademarks - - - - - - - - - - - - - - - - - - - 3
U
user - - - - - - - - - - - - - - - - - - - - - - 10
W
waiting time - - - - - - - - - - - - - - - - - - - 54
warranty - - - - - - - - - - - - - - - - - - - - 65
exclusions - - - - - - - - - - - - - - - - - 66
general - - - - - - - - - - - - - - - - - - - 65
installation and conditions of use - - - - - - 65
scope - - - - - - - - - - - - - - - - - - - - 66
tank- - - - - - - - - - - - - - - - - - - - - 65
water
composition - - - - - - - - - - - - - - - - - 22
stacking- - - - - - - - - - - - - - - - - 26
, 27
 Loading...