


Please read these instructions carefully before use and retain for future reference.
Before switching on your appliance – Always check for any damage that may have been caused in transit.
Instruction Manual
XR510W 5KG 1000RPM WASHING MACHINE
XR612W 6KG 1200RPM WASHING MACHINE
Serial number:

2
CONTENTS
Important Safety Instructions ........................................ 3
Specication .............................................................. 4-5
Appliance Overview .......................................................6
Installation ................................................................. 6-8
Operating Instructions ............................................. 8-12
Cleaning and Maintenance .................................... 13-14
Fuse Replacement ......................................................14
Trouble Shooting Guide ......................................... 15-17
Disposal Information ...................................................18

3
IMPORTANT SAFETY INSTRUCTIONS
Read and follow all of the instructions even if you feel you are familiar with the product, and nd a
place to keep this manual handy for future reference.
Important: This product is intended for domestic indoor use only.
When using electrical appliances, basic safety precautions should always be followed:
1. All electrical repairs must be carried out by a qualied electrician. Inadequate repairs may result
in a major source of danger for the user and invalidate the warranty.
2. Do not operate the appliance with a damaged cord or plug, after it malfunctions or has been
dropped or damaged in any way.
3. Check the voltage of the appliance matches the household voltage, which is located on the
rating label.
4. Use of an extension cord is not recommended with this product.
5. This appliance is not intended for use by persons (including children) with reduced physical,
sensory or mental capabilities, or lack of experience and knowledge.
6. Cleaning and user maintenance shall not be made by children
7. Keep the appliance and its cord out of reach of children.
8. Children shall not play with the appliance.
9. The product must only be used for washing and rinsing of laundry that are marked accordingly.
10. Always unplug the appliance before attempting to move. When disconnecting from the electricity
supply, pull the plug and not the cord.
11. When installing the appliance to the water supply ensure that the new supplied hose is used.
12. The door may become extremely hot during operation; ensure that children and animals are kept
away from the appliance.
13. Do not lean or put any weight on the open door of the appliance.
14. Ensure that the ventilation openings found at the base of the appliance are not obstructed
i.e. carpets and rugs.
15. Before using the appliance ensure that all packaging materials and transit bolts are removed,
keep the transit bolts in a safe place in case you move in the future.
16. Before each use ensure that all foreign objects are removed from the garments being washed
as these may damage the appliance and garments.
17. Do not install the appliance in bath rooms, wet rooms or similar rooms.
18. Do not store explosive substances such as aerosol cans with a ammable propellant near
the appliance.
19. Ensure that the appliance is only used for its intended purpose i.e. washing laundry etc.
20. Keep detergents out of reach of children.
21. Before each use, check that the drum of the appliance is empty.
22. This appliance is designed to operate in ambient temperatures between 0°C and 40°C with
humidity below 95% when the temperature is 25°C.
23. The machine is equipped with a connecting cable and earthed plug for connection to 220-240V
at 50Hz. Check the voltage of the appliance matches the household voltage on the rating label
and specication for further details.
24. This appliance must be earthed
WARNING: The appliance is heavy and care is needed when unpacking and moving it. Get
extra help and only hold the appliance by the casing – never hold by the door or detergent
drawer.

4
TECHNICAL SPECIFICATION - XR510W
Trade Mark Statesman
Model Number XR510W
Rated Capacity (kg) 5kg
Category Type Front loading washing machine
Programs to which the information relates to Cotton 60°C and 40°C
Energy Eciency Class / Scale from A+++(Highest
Eciency) to D (Lowest Eciency) A++
Annual Energy Consumption (kWh/yr) 152
Energy Consumption of the Standard 60°C
Cotton Programme at Full Load (kWh) 0.79
Energy Consumption of the Standard 60°C
Cotton Programme at Partial Load (kWh) 0.58
Energy Consumption of Standard 40°C
Cotton Programme at Partial Load (kWh) 0.55
Weighted power o-mode (P_o) (W) 0.49
Weighted Power left-on mode (P_I) (W) 0.48
Annual Water Consumption (l) (L/yr) 8500
Spin Eciency Class
A (most ecient) to G (least ecient) C
Maximum Spin Speed (rpm) 1000
Program duration of the standard program
Cotton 60°C at full load 252min
Cotton 60°C at partial load 249min
Cotton 40°C with partial load 248min
Weighted time in left-on mode 10min
Other
Water Supply cold
Water Supply Pressure Minimum (kPa) 50
Maximum (kPa) 800
Noise Emission (dB) Wash (dB) 62
Spin (dB) 75
Remaining Moisture Content (%) 58
Capacity (kg) 5
Dimensions (h*w*d) (mm) 850*595*470
Net Weight (kg) 51
Gross Weight (kg) 54
Package Weight (kg) 3
Total Power (W) 1950
Voltage (V) 220~240
Frequency (Hz) 50
Built-In No

5
TECHNICAL SPECIFICATION - XR612W
Trade Mark Statesman
Model Number XR612W
Rated Capacity (kg) 6kg
Category Type Front loading washing machine
Programs to which the information relates to Cotton 60°C and 40°C
Energy Eciency Class / Scale from A+++(Highest
Eciency) to D (Lowest Eciency) A+++
Annual Energy Consumption (kWh/yr) 152
Energy Consumption of the Standard 60°C
Cotton Programme at Full Load (kWh) 0.79
Energy Consumption of the Standard 60°C
Cotton Programme at Partial Load (kWh) 0.55
Energy Consumption of Standard 40°C
Cotton Programme at Partial Load (kWh) 0.58
Weighted power o-mode (P_o) (W) 0.49
Weighted Power left-on mode (P_I) (W) 0.48
Annual Water Consumption (l) (L/yr) 9500
Spin Eciency Class
A (most ecient) to G (least ecient) B
Maximum Spin Speed (rpm) 1200
Program duration of the standard program
Cotton 60°C at full load 252min
Cotton 60°C at partial load 249min
Cotton 40°C with partial load 248min
Weighted time in left-on mode 10min
Other
Water Supply cold
Water Supply Pressure Minimum (kPa) 50
Maximum (kPa) 800
Noise Emission (dB) Wash (dB) 62
Spin (dB) 75
Remaining Moisture Content (%) 52
Capacity (kg) 6
Dimensions (h*w*d) (mm) 850*595*470
Net Weight (kg) 54
Gross Weight (kg) 57
Package Weight (kg) 3
Total Power (W) 1950
Voltage (V) 220~240
Frequency (Hz) 50
Built-In No

6
APPLIANCE OVERVIEW
Display
Door
Filter Door
Detergent
Drawer
INSTALLATION
It is recommended that the appliance be installed by a qualied plumber. Before installing the
appliance ensure that the area that you have selected is suitable, water tap close by, enough
ventilation and allowing the appliance door to fully open for loading and unloading. Ensure the
appliance is installed on a at even surface but not on carpet and is not placed in direct sunlight.
WARNING: Transit bolts must be removed before installation.
7
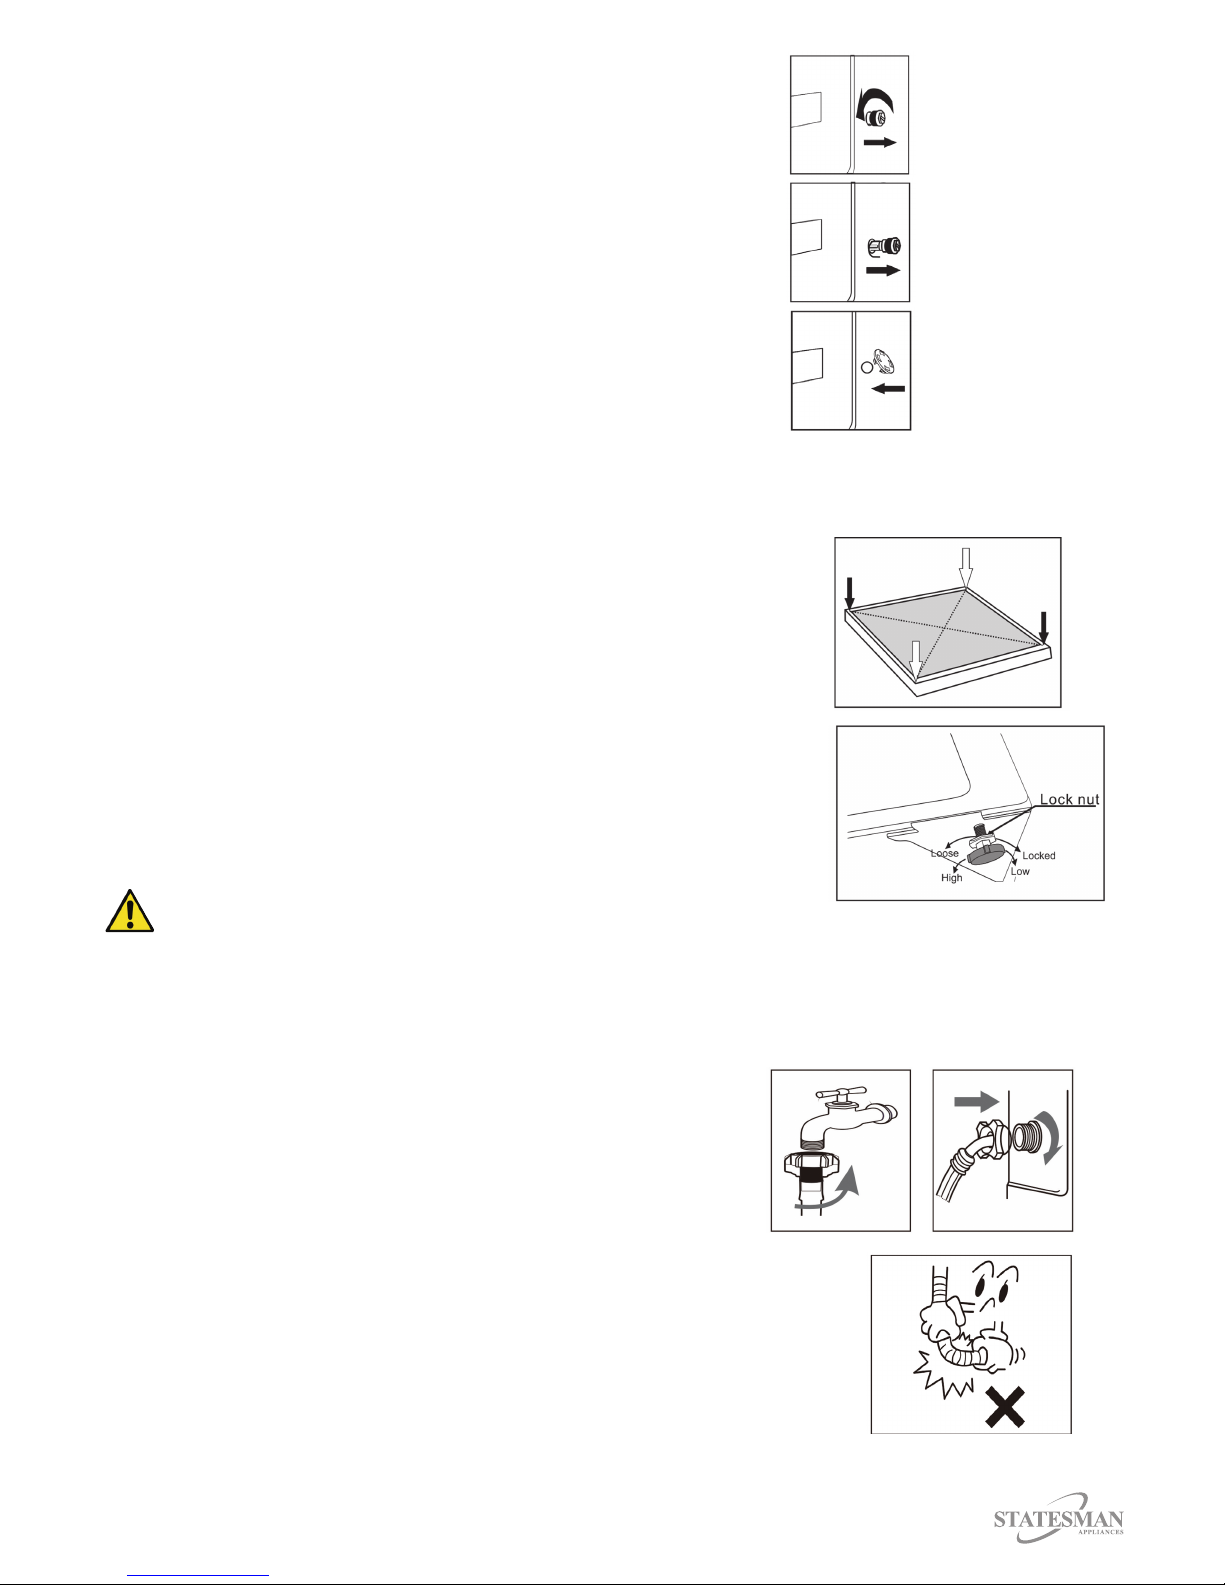
Removing Transit Bolts
• Loosen the four transit bolts by turning in an anti-clockwise
direction using a spanner.
• Remove each transit bolt by pulling out of the hole.
• Once all transit bolts have been removed, t the supplied
hole covers in the empty holes.
Levelling the appliance
• Check that the adjustable feet of the appliance are at against the appliance, to do this turn in
a clockwise direction.
Important: Do not replace the adjustable feet with castors.
• Once the appliance is in the correct position, push down on each
corner to see if there is any movement. If movement is found,
it means that the appliance is not level and the adjustable feet
will need readjusting.
• To loosen the adjustable feet turn in an anti-clockwise direction
• Push down again on each corner to see if there is any movement,
if movement is found repeat the above sequences again.
WARNING: The drum of the appliance spins at a very high
speed, if the appliance is not level and on a solid oor it may
cause loud noise, vibration and unwanted movement in the appliance.
Connecting the Inlet hose
• Connect the inlet hose to the water tap and fasten in an
anticlockwise direction.
• Connect the other end of the inlet hose to the inlet valve
found on the back of the appliance and fasten tightly in a
clockwise direction.
• If there are any leakages repeat the above sequences
ensuring that all connections are tightly fastened.
• The appliance must be connected to a cold water supply.
Important: Do not bend or kink when installing the hose
8
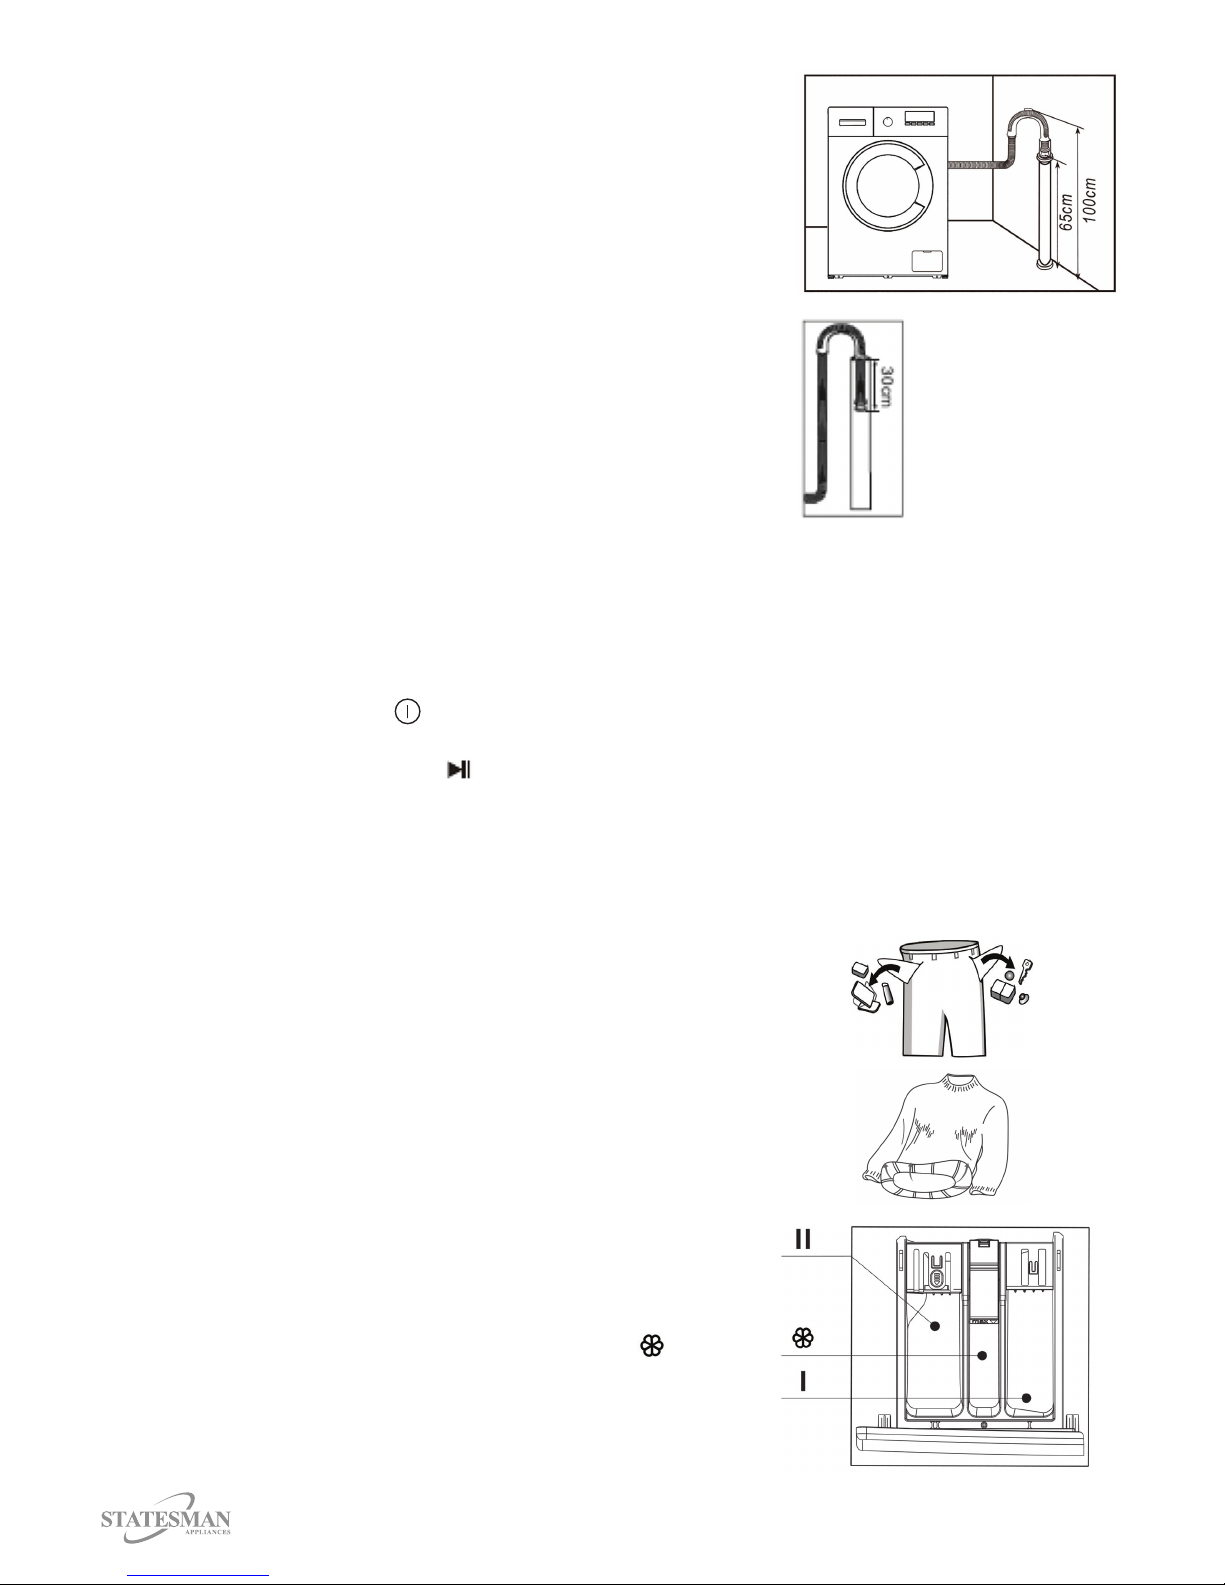
Connecting the drain hose
• Fit the drain hose ensuring that it is 65 – 100cm above the oor;
otherwise it could cause poor drainage.
• Connect the drain hose support bracket to the drain hose and
place drain hose into the drainage pipe.
Important: Do not put the drain hose more than 30cm into the
drain pipe and the drain hose cannot be immersed in water
otherwise the appliance will not operate correctly.
OPERATING INSTRUCTIONS
Before using the appliance for the rst time you must run a complete cycle without clothes, this will
remove any water which was left from the manufacturers test runs; follow below steps;
• Put a small amount of detergent into the drawer and close.
• Press the On/O button .
• Turn the control dial to the “Cotton” setting.
• Press the Start/Pause button .
Sorting Clothes
• Do not overll the appliance above the load capacity.
• Garments should be sorted by colour and care label, most garments have a textile care label in
the collar of side seam. Do not wash dark colours with whites or light colours as this may
stain the garments.
• Make sure that all garments have no foreign
objects left in pockets.
• Close any zips, fasten hooks etc. before washing.
• Soiled and stained garments should be pre-treated with
stain removers etc. before washing.
• For garments that have a woollen surface or are prone to
pilling, turn inside out to help protect.
Detergent
• Pull out the detergent drawer.
• If doing a pre-wash add detergent into compartment (I).
• For a main wash add detergent into compartment (II).
• If required add fabric softener into compartment .
Important: Care labels should be checked before adding
softener to wash.
• Do not add detergent above the maximum suggested levels.

9
Functions
• Temperature Button: This button is used to select the water temperature; temperatures will vary
depending on the programme selected. The temperature will ash on the panel during the
selection process. You cannot select a higher temperature than the preset temperature for the
programme.
• Spin Button: Use this button to select spin speed; speeds will vary depending on the programme
selected. The spin setting will ash on the panel during selection process. You cannot select a
higher spin speed than the preset maximum for the programme.
XR510W: 0 – 1000RPM
XR612W: 0 – 1200RPM
• Time Delay Button: Time delay can be set between 3 to 24 hours, press the button repeatedly
to set desired time.
• Start/Pause Button: Press the button once to start a cycle, press again and the cycle will pause.
During a pause, settings can be modied. Press again and the cycle will continue on the last set
programme.
• On/O Button: Press this button once to turn appliance on and press again to turn appliance o,
if no programmes have been selected after 10 minutes then the appliance will automatically
switch o.
Indicators
: When this indicator appears it means that the “Time Delay” function has been selected.
: When this indicator appears it means that the “Sound O” function has been selected.
: When this indicator appears it means that the “Child Lock” function has been selected.
: The lock indicator will appear during a cycle and after for a short time until the appliance has
emptied all water out.

10
Programmes
• Quick Wash: This cycle is suitable for washing a small amount of lightly soiled garments.
• Intensive: This cycle can be selected to wash particularly dirty garments and help boost stain
removal.
• Spin: This cycle is to be used to extract excess water from garments.
• Rinse: The cycle is to be used to rinse remaining detergent and excess water from garments.
• Self-Clean: This cycle is to clean the drum and pipes of the appliance and has a pre-set
temperature of 60/90°c to sterilize the appliance.
• Allergy Care: The increased rinse cycle helps to reduce pollen and dust mites.
• Bedding: This cycle is suitable for washing large heavy items such as bed sheets.
• Sportswear: A tailored cycle suitable for washing your sportswear.
• Cotton: This cycle is to be used to wash hard-wearing and heat resistant fabrics made of cotton
or linen.
• Pre-wash: Use this cycle to give an extra wash before the main wash.
• Dark Colour: This cycle is for dark cotton or easy care garments (see Care Label).
• Mixed: This cycle can be used for garments made of dierent materials not colours.
• Wool / Hand Wash: This cycle can be used for woollen garments, for those only approved for
machine wash, on the care label. Check the care label for the recommended temperature.
• Synthetics: This cycle can be used to wash shirts made of cotton, linen, synthetic bres or
blended fabrics.
• Delicate: This cycle can be used for washing delicate garments. such as satin, synthetic bres
and mixed blends.
• Silk / Lingerie: This cycle is to be used for washing delicate garments such as machine washable
silk, synthetic bres, mixed bres, rayon and easy care cottons.
Features
• Power-O Memory: If a power cut occurs during the cycle, the settings will be saved and
operation will resume when the power is restored.
• Child Lock: Press the “Temperature” and “Spin” buttons simultaneously for 3 seconds to
activate or deactivate the child lock. When the child lock is activated all buttons will be locked
until deactivated or the cycle is nished.
• Sound O: Press the “Spin” and “Time Delay” button simultaneously for 3 seconds to activate or
deactivate.
• Unbalance Protection: During spin-drying, if clothes are distributed unevenly, the washing
machine will attempt to untangle and re-distribute the load. The spin-drying speed will lower
automatically for the purpose of avoiding the strenuous vibration of the washing machine.
• Reload: If you need to add garments to the wash after the cycle has started press and hold
the “Start/Pause” button for 3 seconds, the appliance will beep twice; this means that the reload
feature has been activated. Wait for the indicator to disappear, the door can now be opened.
Once garments have been added press the “Start/Pause” button to resume the wash.
11
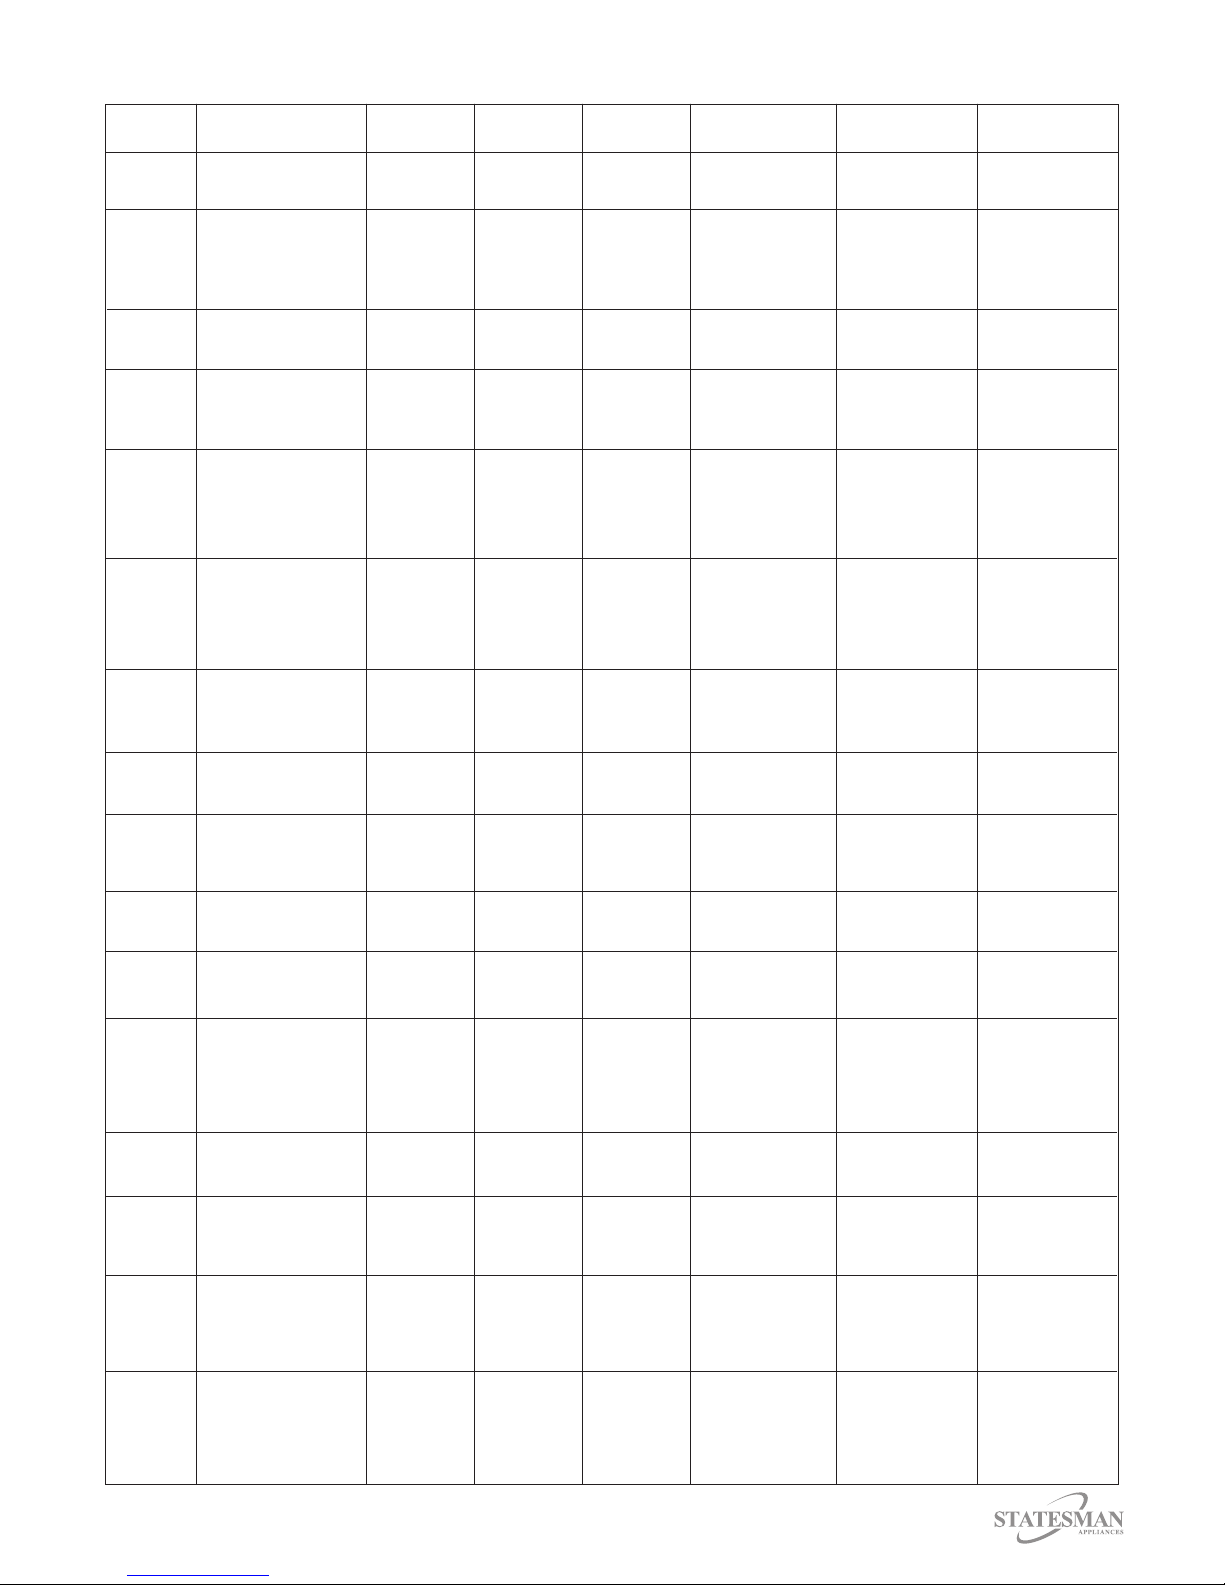
Programme Chart - XR510W
Programme Function Max Load (kg) Water Energy Max. Speed Cycle length Temperature
Consumption
Consumpsion (kWh)
(minutes)
Quick Wash This cycle is suitable for
washing a small amount
of lightly soiled garments.
Intensive This cycle can be
selected to wash
particularly dirty
garments and help boost
stain removal.
Spin This cycle is to be used
to extract excess water
from garments.
Rinse The cycle is to be used to
rinse remaining detergent
and excess water from
garments.
Self Clean This cycle is to clean
the drum and pipes of
the appliance and has a
pre-set temperature of
60/90°c to sterilize the
appliance.
Allergy Care
The increased rinse cycle
helps to reduce pollen and
dust mites.
Bedding This cycle is suitable
for washing large heavy
items such as bed
sheets.
Sportswear A tailored cycle suitable
for washing your
sportswear.
Cotton This cycle is to be used
to wash hard-wearing
and heat resistant fabrics
made of cotton or linen.
Prewash Use this cycle to give an
extra wash before the
main wash.
Dark Colour
This cycle is for dark cotton
or easy care garments (see
Care Label).
Mixed This cycle can be used
for garments made of
dierent materials not
colours. Colours and
whites should still be
washed separately.
Wool / Hand
Wash
This cycle can be used
for woollen garments, for
those only approved for
Synthetics This cycle can be used
to wash shirts made of
cotton, linen, synthetic
bres or blended fabrics.
Delicate This cycle can be used
for washing delicate
garments. such as satin,
synthetic bres and
mixed blends.
Silk /
Lingerie
This cycle is to be used for
washing delicate garments
such as machine washable
silk, synthetic bres, mixed
bres, rayon and easy
care cottons.
1.5 19.6 0.051 0/400/500/600/800/1000 0:20/0:25/0:30 (--)/20/30
5 43.2 0.418 0/400/500/600/800/1000 1:22/1:25/1:37/1:47/2:12 (--)/20/30/40/60
5 0 0.032 0/400/500/600/800/1000 0:13 (--)
5 19 0.038 0/400/500/600/800/1000 0:19 (--)
0 22.2 1.18 800 1:26/1:48(1:48) 60/90(90)
3 57.1 0.644 0/400/500/600/800/1000 1:05/1:08/1:13/1:23/1:43 (--)/20/30/40/60
4 44.7 1.089 0/400/500/600/800/1000 1:15/1:18/1:23/1:33/1:58 (--)/20/30/40/60
2 39 1.092 0/400/500/600/800 0:43/0:46/0:51/1:01 (--)/20/30/40
5 50.2 0.345 0/400/500/600/800/1000 1:07/1:10/1:17/1:27 (--)/20/30/40/60/90
4 59.9 0.331 0/400/500/600/800/1000 1:31/1:34/1:41/1:51 (--)/20/30/40/60/90
3 38.3 0.3 0/400/500/600/800/1000 1:04/1:07/1:14/1:20 (--)/20/30/40
3 42.3 0.261 0/400/500/600/800/1000 0:45/0:48/0:53/1:03 (--)/20/30/40
1.5 34.2 0.596 0/400/500/600 0:39/0:47/0:52/1:02 (--)/20/30/40
2 34.3 0.078 0/400/500/600/800/1000 0:46/0:49/0:56/1:02/1:24 (--)/20/30/40/60
3 30.5 0.086 0/400/500/600/800 0:45/0:48/0:53/1:03/1:28 (--)/20/30/40/60
3 N/A N/A 0/400/500/600/800 0:47/0:52/0:57/1:07 (--)/20/30/40
/1:57/2:23
/2:21/2:47

12
Programme Chart - XR612W
Programme Function Max Load (kg) Water Energy Max. Speed Cycle length Temperature
Consumption
Consumpsion (kWh)
(minutes)
Quick Wash This cycle is suitable for
washing a small amount
of lightly soiled garments.
Intensive This cycle can be
selected to wash
particularly dirty
garments and help boost
stain removal.
Spin This cycle is to be used
to extract excess water
from garments.
Rinse The cycle is to be used to
rinse remaining detergent
and excess water from
garments.
Self Clean This cycle is to clean
the drum and pipes of
the appliance and has a
pre-set temperature of
60/90°c to sterilize the
appliance.
Allergy Care
The increased rinse cycle
helps to reduce pollen and
dust mites.
Bedding This cycle is suitable
for washing large heavy
items such as bed
sheets.
Sportswear A tailored cycle suitable
for washing your
sportswear.
Cotton This cycle is to be used
to wash hard-wearing
and heat resistant fabrics
made of cotton or linen.
Prewash Use this cycle to give an
extra wash before the
main wash.
Dark Colour
This cycle is for dark cotton
or easy care garments (see
Care Label).
Mixed This cycle can be used
for garments made of
dierent materials not
colours. Colours and
whites should still be
washed separately.
Wool / Hand
Wash
This cycle can be used
for woollen garments, for
those only approved for
Synthetics This cycle can be used
to wash shirts made of
cotton, linen, synthetic
bres or blended fabrics.
Delicate This cycle can be used
for washing delicate
garments. such as satin,
synthetic bres and
mixed blends.
Silk /
Lingerie
This cycle is to be used for
washing delicate garments
such as machine washable
silk, synthetic bres, mixed
bres, rayon and easy
care cottons.
1.5 19.6 0.051 0/400/600/800/1000 0:20/0:25/0:30 (--)/20/30
6 43.2 0.418 0/400/600/800/1000/1200 1:22/1:25/1:37/1:47/2:12 (--)/20/30/40/60
6 0 0.032 0/400/600/800/1000/1200 00:13 (--)
6 19 0.038 0/400/600/800/1000/1200 0:19 (--)
0 22.2 1.18 800 1:26/1:48(1:48) 60/90(90)
3 57.1 0.644 0/400/600/800/1000/1200 1:05/1:08/1:13/1:23/1:43 (--)/20/30/40/60
4 44.7 1.089 0/400/600/800/1000/1200 1:15/1:18/1:23/1:33/1:58 (--)/20/30/40/60
2 39 1.092 0/400/600/800 0:43/0:46/0:51/1:01 (--)/20/30/40
6 50.2 0.345 0/400/600/800/1000/1200 1:07/1:10/1:17 (--)/20/30/40/60/90
4 59.9 0.331 0/400/600/800/1000/1200 1:31/1:34/1:41/1:51 (--)/20/30/40/60/90
3 38.3 0.3 0/400/600/800/1000 1:04/1:07/1:14/1:20 (--)/20/30/40
3 42.3 0.261 0/400/600/800/1000 0:45/0:48/0:53/1:03 (--)/20/30/40
1.5 34.2 0.596 0/400/600 0:39/0:47/0:52/1:02 (--)/20/30/40
2 34.3 0.078 0/400/600/800/1000 0:46/0:49/0:56/1:02/1:24 (--)/20/30/40/60
3 30.5 0.086 0/400/600/800 0:45/0:48/0:53/1:03/1:28 (--)/20/30/40/60
3 N/A N/A 0/400/600/800 0:47/0:52/0:57/1:07 (--)/20/30/40
/1:27/1:57/2:23
/2:21/2:47

CLEANING AND MAINTENANCE
13
Switch o the electrical supply and remove the plug from the mains socket before cleaning.
Drain Pump
• Remove the drain pump cover by using a coin or
something similar in the slot and turning in a clockwise direction.
• Place a small container below the drain pump to catch any excess water.
• Unscrew the lter, allowing any excess water to drain into the container.
• Remove any foreign objects from the drain pump.
• Replace the lter, ensuring that it is locked in place.
• The drain pump cover can now be replaced.
Detergent Drawer
• Open drawer and press down catch (1) detergent drawer can now
be removed.
• To remove the softener cover, lift the clip and remove.
• Clean the drawer and softener cover thoroughly, ensuring that
all detergent and softener are removed.
• Replace the softener cover; the detergent drawer can now
be replaced.
Detergent Drawer Recess
• Detergent and softener can accumulate inside the detergent drawer recess, so this should
be regularly cleaned, with either a damp cloth or an old toothbrush.
• Once clean the detergent drawer can be replaced and it is recommended to run a rinse cycle
without any garments.

14
Internal
• Overtime rust deposits can occur in the drum of the appliance, it is recommended to regularly
wipe the inside of the drum and clean the exible gasket, removing any foreign objects at the
same time. Use chlorine-free detergents to remove these deposits.
Important: Steel wool should not be used.
• It is recommended to regularly wipe the door glass and door seal dry.
Exterior
• The cabinet of the appliance should be regularly cleaned using a clean cloth and warm water
Important: Do not use abrasive cloths, powders, household cleaners, bleach or wax polish to clean
the appliance.
Water Inlet Filter
• Turn o the water tap.
• Unscrew the water inlet hose
• Clean the water inlet lter with water
and a non-abrasive cloth or brush.
• Reconnect the water inlet hose to the water tap.
Winter Guard
If the appliance is situated in areas where it is likely to be exposed to temperatures below 0°C then it
is recommended that the following precautions be taken;
• Turn o the water tap.
• Unscrew the water inlet hose.
• Unhook the drain hose and place in a bowl or bucket.
• Run a spin programme, this will remove any excess water from the appliance.
• The water inlet hose and drain hose can now be replaced.
Important: The appliance is recommended to be used in rooms where the temperature is above
0°C, if your appliance does become frozen then contact a qualied plumber.
FUSE AND MAINS PLUG REPLACEMENT
Fuse Replacement (Class I)
This appliance must be earthed. There are 3 screws on the plug,
remove them and open the shell. Take out fuse and replace with
a new fuse of the same Amp. Install the shell again and tighten
the screws.
15
TROUBLESHOOTING
If you are having problems with your appliance, please use our troubleshooting guide below. If you
are unable to resolve the issue using this guide please ring our Customer Service Department on
0844 848 5861. Please have the model code and purchase information available.
Appliance does
not work.
Mains plug is not plugged in
or is loose.
Fuse has blown or is defective.
Check fuse, replace if necessary.
Socket is defective. Mains malfunctions are to be
corrected by an electrician.
Water inlet tap closed.
Power button has not been pressed. Press the Power button.
Start/Pause button has been
pressed.
Check that the appliance hasn’t
been paused.
Delay feature has been activated. Check to see if the delay
feature has been activated.
Insert mains plug.
Fault Possible cause Solution
Open water inlet tap.
Factory tests. This is completely normal and is
the result of tests performed at the
factory.
There is water in the
new appliance.
Inlet hose leaking. Clean and tighten the inlet hose.
Water leakage
Drain hose leaking. Check that the drain hose is not
blocked. Contact qualied plumber.
Check that the transit bolts
have been removed.
Remove transit bolts.
Abnormal noise
and vibration.
Appliance is not level. Adjust the adjustable feet to level
the appliance.
Foreign objects in the drum of the
appliance.
Clean the drum of the appliance.
Drum has been overloaded. Remove some of the garments,
always check pockets etc. before
washing.
Appliance is not
washing properly.
Incorrect programme has
been selected.
Check that the correct programme
has been selected.
Detergent is left on garments. Too much detergent was added
or drum was overloaded with
garments.

16
TROUBLESHOOTING - Continued
Buttons on the
appliance not
working.
Child lock has been activated.
This may have been caused by
too much detergent or rinse cycle
taking longer of loaded with too
many garments above the maximum
capacity.
Next time reduce the amount
of detergent or reduce to load
capacity.
Deactivate child lock (see page 10).
Fault Possible cause Solution
Wash time cycle
delay.
Check the drain hose height.
Ensure drain hose is between
65cm – 100cm from the oor (see
page 8).
The appliance lls
with water whilst
draining.
Drain hose blocked and immersed
in water.
Check that the hose isn’t blocked.
ERROR DISPLAY CODES
E1
The washer lls over the time
Water drainage over time. Check if the drain pump is blocked.
Contact Statesman Customer Service
Check if the tap is open
Check if the water pressure is too low.
Check if the inlet hose is blocked.
Display Fault Solution
E2
Door lock is broken.
Try closing the door rmly again.
Check if any garments are caught
between the door and seal.
Contact Statesman Customer Service
E3
E4
Water has overowed. Let the appliance drain out water
automatically until the water level is
suitable for wash procedure.
E5
The appliances motor is faulty.
Contact Statesman Customer Service
E6
The appliance is not heating up.
Contact Statesman Customer Service
E7
Temperature sensor fault.
E9
Communication failures
E10
Inverter failures.
EP
The cycle running does not match
the control dial.
Turn the control dial to the
corresponding cycle.
Contact Statesman Customer Service
Contact Statesman Customer Service
Contact Statesman Customer Service

17
FABRIC CARE LABELS

18
DISPOSAL
The European Directive 2012/19/EU on Waste Electrical and Electronic Equipment
(WEEE), requires that old household electrical appliances must not be disposed of in
normal unsorted municipal waste.
Old appliances must be collected separately in order to optimise the recovery and
recycling of the materials they contain and reduce the impact on human health and the
environment.
The crossed out “wheeled bin” symbol on the product reminds you of your obligation,
that when you dispose of the appliance it must be separately collected. Consumers
should contact their local authority or retailer for information concerning the correct
disposal of their old appliance.

19

0844 848 5861
38 Bluestem Road,
Ransomes Europark
Ipswich, IP3 9RR
Disclaimer: Statesman operate a policy of continual improvement and development.
We therefore reserve the right to change/alter the specication and appearance of our appliances without prior notice.
All diagrams and images shown in this manual are for illustration purposes only.
 Loading...