

Page 1

1
STUDIO2, STUDIO2B
& STUDIO2S
Please read these instructions carefully before use and retain for future reference
Instruction Manual
50cm SINGLE BLACK CAVITY GAS COOKER
Page 2

2
Contents
Page
Introduction......................................................... 3
Safety (General) ............................................ 4 & 5
Using the Oven………………………………......... 6
Using the Hotplate…………………………........... 7
Using the Grill……………………………………… 7
Cleaning……………………………………………. 8
Installation ................................................... 9 & 10
LPG Conversion………………………………..... 11
Technical Data .................................................. 11
Specication ..................................................... 14
Page 3

3
Introduction
Thank you for choosing a STATESMAN appliance.
Important: Before using your appliance, please read this manual carefully to assist
safe and successful operation.
Installation ( See Page 8)
This cooker must be installed by qualied personnel, according to the manufacturers
instructions and to the relevant British Standards.
This cooker is heavy and care shoild be taken when moving it.
Remove all packaging before using the cooker.
Ensure that the electrical supply is compatible with type stated on the rating plate.
Do not attempt to modify the cooker in any way as this may be dangerous and will
invalidate the guarantee.
Service
Should you have any diculty using your appliance and you have checked the
possible causes with the help of information provided, you may contact our
National Service Line: 0844 848 5861
Spare Parts Line: 0844 848 5862
Page 4

4
Safety
It is important to read this manual and take all safety measures recommended.
• This appliance has been designed for domestic, non-professional use.
• Check for any damage once unpacked. If there are any defects or damage,
do not use the appliance. Report the defect/damage to your supplier or
Statesman Service. Remove and dispose of all packaging immediately to prevent
any risk of harm to children.
• This appliance must be installed and commissioned by a qualied person as
Statesman will not take any responsibility for damage caused by incorrect installation.
• Before installing this appliance, make sure that the gas and electricity supplies are
compatible with the specication on the rating plate and the packaging.
• The supply cable must never be changed by the customer. If it becomes damaged,
contact a qualied person to replace it.
• Always switch the power supply o before any cleaning or maintenance is carried out.
• After use, some parts of this appliance may remain hot for a long time.
Take care to avoid touching parts until the appliance has cooled.
• Keep ammable materials away from the appliance.
• Ensure that no cables of other appliances come into contact with this appliance,
especially hot parts.
• Turn any control knobs to the o position when not being used.
• When heating fats or oils, do not leave pans unattended as there is risk of re.
• Keep children away from this appliance.
• When using the grill, the oven door should be kept open.
• Never use steam cleaners for cleaning the appliance.
• Before opening the lid which covers the hotplate, check that there are no liquids on it.
• Do not close the lid after use until the appliance has cooled down.
• Make sure that the lid is open when using the appliance.
Page 5

5
Safety
• IF A REPAIR IS REQUIRED, ONLY GENUINE PARTS SHOULD BE USED AND ANY
WORK MUST BE CARRIED OUT BY A QUALIFIED ENGINEER.
• The installer of this appliance should read the installation instructions and should be
a suitably qualied person.
• Please be aware of the risk of leaving the oven door or drawer open. Any downwards
pressure could tilt the cooker forward and tip any pans being used from the hotplate.
Excess weight or pressure on the open door or drawer may also result in damage
which will not be covered by the guarantee.
• Do not place any ammable items in the lower drawer (nylon, plastic, paper, cloth etc).
• Switch the power supply switch (cooker switch) o at the wall when not in use.
• Always protect the appliance from the eects of damp or wet weather conditions.
(continued)
Page 6

6
Using the Oven
OPERATION
Open the door fully, push in and turn the oven control knob to max. Hold the control knob
in and press the ignition button. Keep the oven control knob pressed in for a further 5 - 10
seconds before slowly releasing and turning to the desired temperature.
If the burner fails to light, do not attempt to re-light it for 1 min.
PREHEATING
Allow the oven to preheat for approximately 15 minutes before cooking food.
The cooking times will be reduced when preheating the oven. If cooking without
preheating, you may wish to increase the cooking time by 15 minutes.
WARMING
When keeping food warm, the minimum setting may be too hot for some food.
Heat the empty oven for at least 15 minutes and turn the oven control knob to the o
position. The food can then be kept warm for up to 30 minutes.
POSITIONING
The temperature at the centre of the oven corresponds with the selected temperature
and will vary according to the shelf position being used.
CONDENSATION AND STEAM
When moist food is heated it produces steam in the same way as boiling a kettle.
If this steam comes into contact with a cool surface on the outside of the cooker,
it will condense and produce water droplets. This is quite normal and is not a fault
with the oven.
COOKWARE
Use any oven proof cookware which will withstand temperatures of 2500C.
Do not use baking trays larger than 30cm x 35cm, as they will restrict the circulation
of heat and may aect the performance.
Page 7

7
Using the Hotplate
Using the Grill
IGNITION
Push in and turn the selected control knob anticlockwise to the ‘full on’ position (as
indicated by the ame symbols), whilst pressing the ignition button until the burner lights.
If you have the FULL FFD model (LEGACY 50GSLF), YOU WILL NEED TO HOLD THE
CONTROL KNOB IN FOR 5-10 SECONDS.
If the burner fails to light, do not attempt to re-light it for 1 minute.
SIMMERING
To achieve a simmer ame, light the burner on the full position and then slowly turn the
control knob anticlockwise to the small ame symbol. When trying to achieve a small
simmer ame, ensure burner remains lit before placing a pan over it.
PANS
For optimum safety and performance, please ensure pans are placed centrally over the
burner ame.
FOLD DOWN LID (if tted)
The lid is not intended to be used as a work surface as it becomes hot when the cooker is
in use and the surface will become damaged if rough or sharp items are put or used on it.
IMPORTANT - When grilling, the door must be open and the grill deector plate in
place. The deector plate will t beneath the control panel by locating it onto the
2 metal lugs.
IGNITING AND USING THE GRILL
Open the door fully, push in and turn the oven / grill control knob to the grill position
(as per symbol). Hold the control knob in and press the ignition button.
Keep the control knob pressed in for a further 5–10 seconds before slowly releasing.
If the burner fails to light, keep the oven door open and do not attempt to re-light it for
1 minute.
Allow 5 minutes for the grill burner ame to stabilize and reach the required temperature.
Adjust the grill pan on the runner positions to allow for dierent types of food.
Page 8

8
Cleaning
IMPORTANT - Before any maintenance or cleaning can be carried out, the cooker
must be un-plugged from the electricity supply.
HOTPLATE
The hotplate is best cleaned when it is still warm as it is easier to remove spillages before
it has cooled. Regularly wipe over the hob top using a soft cloth well wrung out in warm
water to which a little washing up liquid has been added.
Avoid the use of the following:
• Household detergents and bleaches;
• Impregnated pads unsuitable for non-stick saucepans;
• Steel wool pads;
• Bath / sink stain removers.
CONTROL PANEL AND LID
Before cleaning the control fascia and lid, ensure that the fascia surface is cool.
For best results use a soft dampened cloth, if marks should remain use a very mild
detergent using a light rubbing action being particularly careful around graphics.
THE OVEN
The oven should be kept clean at all times. A build up of fats or other foodstus
could result in a re.
The oven cavity is a smooth enamel nish and can be scrubbed with a soft cloth
soaked in warm soapy water, however from time to time it may require a more
thorough clean using an oven cleaner. Ensure that the oven cleaner used is suitable
for smooth enamel.
Page 9
9
Installation
IMPORTANT - Installation of this cooker must be carried out by qualied personnel.
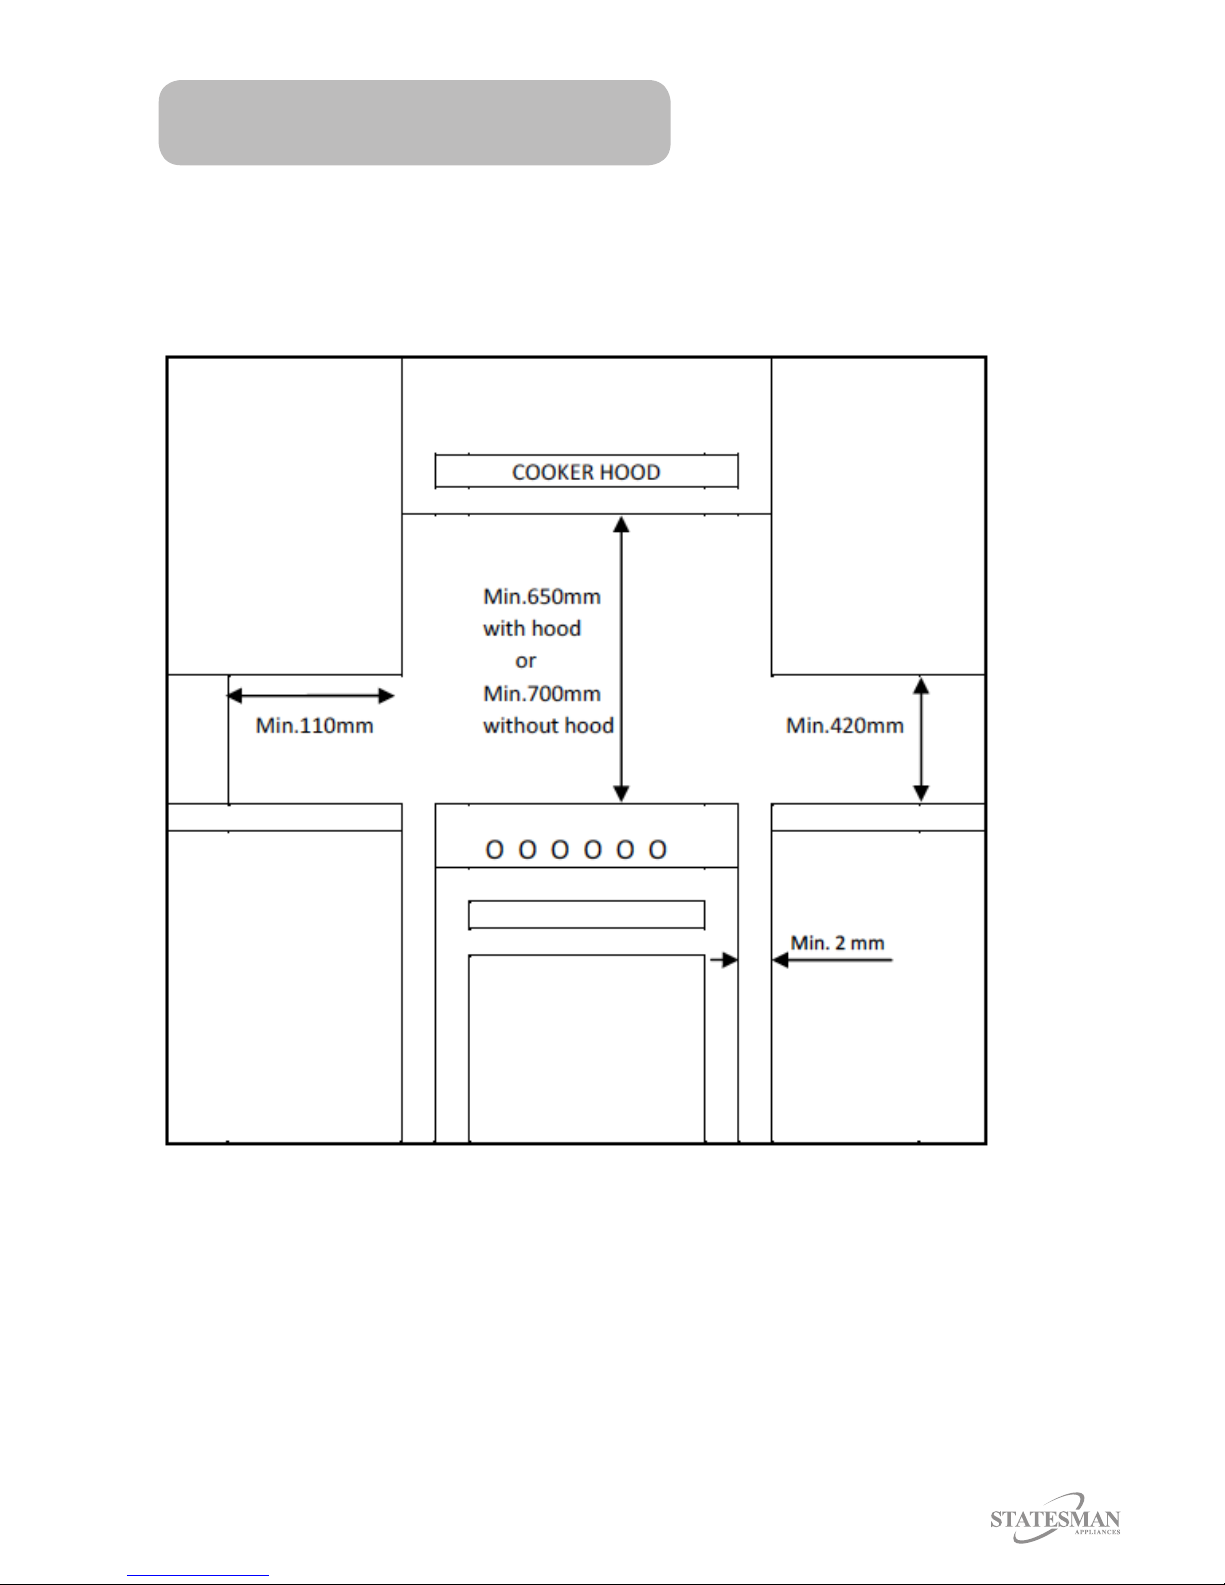
This cooker may be tted ush to the base units.
Leave a gap of approximately 2mm minimum from any adjacent cupboard or appliance.
Any adjacent surface must be heat resistant to 50°C and if it is higher than the appliance
it must be a minimum of 110mm away from the appliance.
Any such adjacent cupboard less than 110mm away horizontally, must be at least 420mm
higher than the hotplate level.
No cupboard over the appliance should be closer than 700mm or cooker hood
closer than 650mm above hotplate.
CLEARANCES
Page 10

10
Installation
VENTILATION REQUIREMENTS
This appliance needs 2m3/h of air per kw input.
This appliance must not be installed in a bed sitting room of less than 20m3 or in
a bathroom or shower room.
If there are other fuel burning appliances in the same room, BS5440; Part2; 1989
should be consulted to determine the air vent requirements.
For room volumes between 5m3 and 10m3, an air vent of 50cm2 is required.
If the room has a door that opens directly to outside, or the room exceeds 10m3,
no air vent is required.
For room volumes of up to 5m3, an air vent of 100cm2 is required.
All rooms require an openable window or equivalent and some rooms will require a
permanent vent as well.
NOTE: The use of a gas cooker results in the product ion of heat and
moisture in the room in which it is installed.
Always ensure that the kitchen is well ventilated. Keep natural ventilation holes open or
install a mechanical ventilation device. In particular, when using the grill or more than one
burner, open a window if a mechanical ventilation device is not in operation.
(continued)
Page 11

11
Installation
ANTI-TILT DEVICE
The cooker must be tted with an anti-tilt /restraint device to prevent it tipping forward
when in use. To use the oor mounted bracket supplied, see the instructions provided.
LEVELLING
Place a spirit level on an oven pan or shelf and adjust the feet accordingly.
Make sure that the appliance is stable and does not rock.
GAS CONNECTION
• Always grip the appliance inlet tting rmly when tting the hose to prevent any
damage occurring.
• Never check for gas leaks with a naked ame.
The cooker is tted with a ½’’ BSP internal thread situated at the rear right corner.
A exible hose of correct rating in size and temperature should be used.
For Natural Gas it will be a black hose with a yellow band or label and should comply
with BS 669.
LPG hoses should be suitable for LP gases up to 50 mbar pressure and 70°C
temperature rise. It will be a black hose with a red band or label.
Hoses should not exceed 1.5m in length.
Pressure setting – G20 Natural Gas @ 20 mbar
G30 Butane @ 28.3 mbar
G31 Propane @ 37 mbar
NOTE: The gas hose and electrical cables of your cooker must not come into direct
contact with any hot or sharp surfaces or objects.
Do not move the appl iance after the gas connect ion has been made.
Make sure that the hose is not kinked, damaged or trapped.
ELECTRICAL CONNECTION
• Make sure that the electricity supply is compatible with the type stated on the
data plate of the appliance.
• This appliance must be earthed.
• The cable should not touch any hot surface or sharp objects.
• The electrical switch should be within 1.5m of the appliance and an extension lead
should not be used.
The instructions must be followed, otherwise the guarantee is invalid.
(continued)
Page 12

12
LPG Conversion
This cooker has been pre-set for use on Natural Gas. A conversion kit is included for
converting the appliance for use on LP Gas. This should only be carried out by a suitably
qualied engineer.
CHANGING THE INJECTORS
Refer to the table of injector sizes to select the correct injectors. The hotplate injectors
are situated underneath the hotplate caps. To access the oven and grill injectors,
proceed as follows:
1. Remove the outer back panel. Unscrew the gas supply tube nut from the injector block.
2. Remove the oven base panel inside the oven.
3. Remove the 2 screws at the rear, either side of the oven burner to release the
oven injector block behind.
4. Replace the injector with the relevant LPG one and re-t the injector block.
5. Remove the grill burner by undoing the screw at the front of the burner.
6. Exchange the injector without removing the injector block and re-t the grill burner.
Page 13

13
LPG Conversion
SETTING THE SIMMER RATES
Hotplates.
a) Models without hotplate FSD
Each hotplate tap can be adjusted through the hole in the centre of the tap
spindle. Set the lighted burner to the simmer position and remove the control
knob. Adjust the ame size, ensuring that the ame will not be extinguished by
a slight draught or by turning the tap down to simmer, quickly.
b) Models with hotplate FSD (Access procedure is the same for the oven)
Switch o the electricity supply and access the hotplate by-pass screws as
follows;
1. Remove the hotplate tray by undoing the rear xings and the 2 small screws
beneath each hotplate burner head. Now slide the hotplate forwards to unhook it
from the front locators.
2. Unscrew and remove the control panel, taking care with the ignition switch wires.
3. The by-pass adjustment screw can now be accessed and adjusted to as necessary.
4. Carry out the oven adjustment before re-assembling.
Oven
The by-pass / simmer rate needs to be adjusted to ensure a sucient
maintenance rate to the burner once the oven temperature has been reached.
Proceed as follows:
1. Light the oven and select 1800C. After a few minutes the oven will have reached
temperature and the ame size will have decreased.
2. Turn the oven control knob to minimum.
3. Switch o the electricity supply and access the thermostat by-pass screw as follows;
• Remove the hotplate tray by undoing the rear xings and the 2 small screws beneath
each hotplate burner head. Now slide the hotplate forwards to unhook it from the
front locators.
• Unscrew and remove the control panel, taking care with the ignition switch wires.
4. Adjust the ame size small enough to enable lowest temperature settings to be
maintained and large enough to maintain ame stability. If the ame is too small,
the thermocouple may cool down and shut o the gas supply to the burner.
5. If this model has FSD hotplates, ensure that these have been adjusted before
reassembling.
Grill.
The grill does not have any adjustment as it is always in the full-on position when in use.
Page 14

14
Technical Data
GAS TYPE Nat Gas @ 20 mbar
LPG - Propane @37 mbar
LPG - Butane @ 28.3 mbar
GAS CATEGORY Natural Gas - I 2H
LPG - I3 + I3H
AERATION Preset
ELECTRICAL 220 - 240V 50Hz
FUSE 3 Amp
OVEN CAPACITY 50.5 Litres
KW RATING Max. Total = 12.5 kW
OVEN 2.8 kW
GRILL 2.2 kW
BURNER Large 3.0 kW
BURNER Med 1.75 kW
BURNER Small 1.0 kW
This appliance is designed and made in accordance with the European standards
listed below:
EN 30 - 1 - 1, EN 30 - 2 - 1, & EN 437 + subsequent amendments ( gas )
EN 60335 - 1 & EN 60335 - 2 - 6 ( electric ) + relative amendments.
The appliance complies with the prescriptions of the European Directives as below:
73 / 23 + 93 / 68 EC concerning electrical safety ( BT ).
89 / 336 + 92 / 31 + 93 / 68 EC concerning electromagnetic
compatibility ( EMC ) 90 / 396 + 93 / 68 EC concerning gas safety.
Oven accessories that could come into contact with food stus are materials that
comply with the provisions of the 89 / 109 EC directive dated 21 / 12 / 88.
Page 15
15
Specification
Gas Type Small Medium Large Oven Grill
Burner Burner Burner Burner Burner
G20 20mbar 0.72 0.97 1.15 1.2 1.1
G25 25mbar 0.72 0.94 1.25 1.2 1.1
G30 30mbar 0.5 0.65 0.85 0.70 0.68
G31 37mbar 0.5 0.65 0.85 0.70 0.68
G30 50mbar 0.43 0.58 0.75 0.68 0.62
Natural Gas 1 1.75 3 2.8 2.2
FIXED SPECIFICATION Studio 50GS
Legacy 50GSLF
Product Dimensions (H x W x D mm) 900 x 500 x 500
Packaged Dimensions (H x W x D mm) 967 x 545 x 586
Product Weight ( KG ) 36
Packaged Weight ( KG ) 39
This appliance complies with European regulations on low
voltages, EEC Directive 73 / 23 on electrical safety and with the
following European regulations : EEC Directive 89 / 336 on
electromagnetic compatibility and EEC Directive 93 / 68 on EC
marking.
Page 16

16
0844 848 5861
38 Bluestem Road,
Ransomes Europark
Ipswich, IP3 9RR
 Loading...